josh leckman physics senior - 30demosin60minutes.com list of demos 2010.pdfthe copper pipe remix...
TRANSCRIPT

Polarizer Tank
Josh Leckman Physics Senior MATERIALS: Aquarium (One that can hold water) 3d glasses that utilize polarizers A 3rd polarizer Wooden Dowel (2 pieces) Hot Glue Water Coffee Creamer Green Laser (Red should work too) Cardboard/Something to attach the dowels to SETUP:
Any polarizer will work for this setup, but it is more fun to go see a 3d movie and get the polarizer’s as a bonus. Cut the 3d glasses (utilizing proper safety practices) at the bridge remove the folding arms as well.
Being careful to align the polarizer’s so they are at opposing angles, glue/attach them to the ends of your dowel rod. (I used the arms of the glasses themselves to make the other end of the dowel look fancy) When doing this, make sure that they will be at the same level in the tank. If you have enough helpers, you can just have somebody hold the two polarizer’s, otherwise a piece of cardboard with slits cut in it will help you hold them up while you talk and use the laser. I drilled a hole through the arms big enough to stick another piece of dowel through to keep them from falling in.
Fill the tank with enough water to cover the polarizer’s and position them far enough apart that you can stick in the third polarizer in between them. Now add just a dash of coffee creamer to better enable beam visibility. PROCEDURE:
Show the students the nifty tank of water that you can see a beam of light in. Now show them that each polarizer can diminish the beam’s intensity by half. By passing the light through both polarizer’s, the beam all but disappears after the second polarizer.
Now, ask the students what would happen if a third polarizer was placed between them. After gathering ideas, show that by putting a third polarizer in, the light can actually pass through the last polarizer. TIPS:
Go easy on the coffee creamer, not much is needed to cloud the water. Also, make sure that the two original polarizer’s are actually in opposition with each other. And DO NOT leave the polarizer assembly soaking in water. The glue will weaken and it will fall apart. EXPLANATION:
Light travels in waves. When light passes through a polarizer, the polarizer has “slats” much like a fence. Waves that are travelling in the direction of the slats (think up and down) will continue through while the others are blocked. When these waves than crash into a horizontal (left to right) polarizer, the waves can’t go through.
Now when a third polarizer is put in between them at a 45 degree angle, the waves that travel through the first polarizer are reduced, but the ones that make it through are manipulated into a new orientation, allowing them to pass through the last polarizer.

The Copper Pipe Remix
Josh Leckman Physics Senior MATERIALS: Copper pipe Powerful magnet Wooden Dowel Stem Tube (Think floral department) Hot Glue/ Masking Tape PROCEDURE:
In an original version of this demo, you show the class a copper pipe and a magnet. Demonstrating that the pipe itself is not magnetic (by touching the pipe to the copper), you then have a volunteer hold the pipe and watch as a magnet is dropped down the inside. The magnet will fall very slowly and the only person who really gets to see it fall is the teacher and the student.
Now, this demo involves dropping a long stick with a magnet on the end down the copper pipe. This demo rehash allows for the demo to be shown to multiple people at once (as opposed to one person at a time) and also allows for students to pull the magnet through the tube and feel the opposing force (great for students who have vision problems or students who learn better through touch.)
TIPS
Make your assembly smaller than the diameter of your tube, but make sure your magnet is big/powerful enough to create resistance. Also, marking the dowel makes its speed easier to see. (Like marks, or swirls)
EXPLANATION:
Lenz’s Law explains (in general) how a magnet passing by a conductive material can induce a current, which will generate a magnetic field. When the magnet passes through the tube, current is generated and an opposing magnetic field slows the descent of the magnet.
Cloud in a Bottle
Kaleo Chung MATERIALS: glass bottle, rubbing alcohol, pump, rubber stopper, chalk dust. PROCEDURE:
The principles behind cloud formation can be shown with a clear glass bottle, a bike pump, and a rubber stopper. Drill out the rubber stopper so that it fits snug over the bike pump nozzle. Add chalk dust to the interior of the bottle and this will act as dust particles for the evaporated molecules to cling too. Attach the rubber stopper to the glass jar and begin pumping. This increases the pressure in the bottle and forms heat. Some of the water will evaporate due to this pressure. Quickly remove the rubber stopper from the glass bottle, in doing so the pressure will be reduced, which will cool the air and condense the evaporated molecules onto the dust particles creating a cloud in a bottle. CONCEPTS:
Pumping the bottle forces the molecules to squeeze together or compress. Releasing the pressure allows the air to expand, and in doing so, the temperature of the air becomes cooler. This cooling process allows the molecules to stick together ‐ or condense ‐ more easily, forming tiny droplets. Clouds are nothing more than groups of tiny water droplets!
The reason the rubbing alcohol forms a more visible cloud is because alcohol evaporates more quickly than water. Alcohol molecules have weaker bonds than water molecules, so they let go of each other more easily. Since there are more evaporated alcohol molecules in the bottle, there are also more molecules able to condense. This is why you can see the alcohol cloud more clearly than the water cloud.

Blue Bottle Reductionoxidation reaction
Kaleo Chung MATERIALS‐ clear bottle, methylene blue, dextrose, potassium hydroxide, oxygen in the bottle. PROCEDURE:
Use a clear plastic bottle and combine the dextrose solution and potassium hydroxide in a 50/50 concentration. Add 3‐4 drops of methylene blue as a indicator. Methylene blue is widely used as a redox indicator. Put a cap on the bottle and shake. Upon shaking the bottle, oxygen oxidizes methylene blue, and the solution turns blue. The dextrose will gradually reduce the methylene blue to its colorless, reduced form. So, when the dissolved oxygen is entirely consumed, the solution will turn colorless. CONCEPTS:
On the molecular level, the blue bottle experiment is a complex system composed of ethanol, the simple sugar glucose, the dye methylene blue, the hydroxide ion, and oxygen from the atmosphere. The color change occurs do to a pair of competing reduction‐oxidation reactions. Hence, the blue bottle experiment is a wonderful tool for introducing the key concepts of reduction and oxidation.
In first stage of the blue bottle experiment, the methylene blue dye acts as an oxidizing agent and the glucose acts as a reducing agent. The methylene blue oxidizes the glucose to gluconic acid and the glucose reduces the methylene blue to its colorless form. The result is a bottle of colorless solution.
When the bottle is shaken, the surface are of the liquid temporarily increases, causing more oxygen to dissolve in the ethanol. The additional oxygen acts as an oxidizing agent and changes methylene blue to its blue, oxidized form. The result is a dramatic color change from colorless to blue.
When the shaking is stopped, the oxygen levels in solution begin to drop. With less oxygen present, the methylene blue once again is reduced to its colorless form by the glucose, and observers will see the color fade and disappear. The color change can be repeated many times simply by shaking the bottle to induce the blue color and then allowing it to sit still in order to make it disappear.

Floating Water
Alex Bajorek Senior Earth Science Major MATERIALS ‐ Mason Jar with lid (Pint sized), Fine mesh screen, Water and an Index Card PROCEDURE ‐
Put the mesh net over the mason jar and put on the lid without the top part. Fill the jar with water and cover with the index card. Invert the jar and remove the index card. The water should be suspended in the jar. The index card should also be suspended as well without having to hold it. EXPLANATION –
This demo is possible due to the surface tension of water. Because of the cohesion between water molecules is so great, it is able to span each gap in the mesh, causing the water to create a membrane at the lid of the jar. Due to this the water will not flow out of the jar unless the surface tension is broken. Also the index card will remain suspended at the lid of the jar due to atmospheric pressure pushing up on the card being greater than the pressure above it.
Inseparable Phone Books
Alex Bajorek Senior Earth Science Major
MATERIALS ‐ 2 Phone books (any size works) PROCEDURE –
Page by page, interweave the phone books so they are effectively "shuffled" together. EXPLANATION –
The frictional force acting on each page of recycled paper is fairly small. However multiplying this force by ~600 pages makes the force resisting trying to pull the phonebooks apart very great.

SNELL’S BENDY LASER
Damien Gapinski – Senior – Physics Major MATERIALS:
An obstacle a target a glass prism a plane mirror a piece of plastic A laser
PROCEDURE:
Create the setup by placing the laser, the obstacle, and the target in a straight line (so that the laser cannot hit the target). Now place the prism between the laser and the obstacle so that the light refracts/reflects beyond one side of the obstacle. Place the plane mirror in the path of the laser so that the light bends towards the target area. Lastly, place the piece of plastic in the path of the laser and rotate until it’s oriented so that the laser hits your target. TIPS:
It’s easier to make quick adjustments when the laser and the target are equidistant from the obstacle and the mirror is place perpendicular to the laser/obstacle/target line. You can add more obstacles and more light manipulatives (mirrors, prisms, etc.) to make the demo more flashy. You can also outline different objectives for students to try and achieve by moving around the target and limiting the regions where the manipulatives can be placed. EXPLANATION:
Snell’s Law is used to determine the direction of light rays when refractive media have varying indices of refraction. The law is most commonly written as n1sinθ = n2sinθ where n is the refractive index of the material and theta is the angle of incidence with respect to the perpendicular of the medium interface. When light travels from air to water, the refractive index (n) changes from 1 to 1.3 and requires a change in theta, the refraction of light. This is why fish are not where they appear to be when trying to catch them. There is also the case of the critical angle which results in reflection. In the case of the plane mirror, all angles can be considered critical angles and light will be reflected.

Laser Radiation Tester
Damien Gapinski – Senior – Physics Major MATERIALS: 2 water pouring jugs water a laser PROCEDURE:
Fill one jug up about halfway with water, preferably the one that pours more easily. Place the other jug, empty, next to filled jug. Tell your audience that you have discovered a way to tell if water is radioactive. Explain that by shooting a laser through the flowing water, it should pass through if it was clean. However, if the water is radioactive, the radioactive particles will absorb the energy from the laser and emits a glow. (Of course this is just the background story to engage the students and later you will explain the real reason for the glow.) Now fire your laser at a high angle of incidence into constant flow of water being poured from the filled jug to the empty jug. Depending on the angle, the stream of water should give off a glow. TIPS:
You may want an extra jug of water to help demonstrate the difference of how the angle you fire the laser matters. If you fire perpendicular to the flow of the pour, the laser should pass through with some refraction. If you fire the laser near parallel, it is easier to get the desired glow effect. A constant flow is important, so it may be easier to have a volunteer/helper pour the water for you. EXPLANATION:
The flow of water acts as fiber optic tube when the flow is near constant. This means that when a laser is fired into the tube at the appropriate range of angles, the light goes through total internal reflection all the way down the stream. This is mostly due to Snell’s Law (n1sinθ = n2sinθ) and finding the critical angle. The critical angle is the minimum angle at which total internal reflection occurs and light fails to leave its medium and enter another one (for example, trapped in a flow of water). Fiber optics allows us to transmit information around the world at nearly the speed of light, which is pretty darn fast and cool.

“Cartesian Diver”
Scott Beckley – Post Graduate – Chemistry
DESCRIPTION: The Cartesian diver experiment is set up by placing a "diver"—a small, rigid tube, open at one end, such as an eyedropper – in a much larger container with some flexible component; for example, a 2‐L soft drink bottle. The "diving" occurs when the flexible part of the larger container is pressed inward, causing the "diver" to sink to the bottom until the pressure is released, when it rises back to the surface.
MATERIALS: Large plastic container with lid, e.g., a 2‐L soft drink bottle, and an eyedropper RATIONALE: This is a demonstration that takes about two minutes to prepare and really helps students visualize the concepts of buoyancy and how pressure can change an objects density. PROCEDURE: The large container is filled with water and must be airtight when closed. The “diver”, eyedropper, is partially filled with water (the exact amount of water to be added will be determined experimentally as it depends on the size of the eyedropper). Stand the bottle on its base, and drop the “diver” into the bottle. Have the “diver” float on the top of the water, but still being almost completely submerged, by finding the balance of air to water to become buoyant. Once this is accomplished, place the lid on the bottle. To make the “diver” sink, squeeze the plastic container. The “diver” will sink when the container is squeezed and will rise back to the surface when the container is no longer squeezed. EXPLANATION: There is just enough air in the diver to make it positively buoyant and the diver floats on the water's surface. In accordance with Pascal’s Law, when the pressure is increased by squeezing the container, the pressure on the water also increases and this compresses the diver, allowing more water to enter. The diver becomes less buoyant due to its increased weight so becomes negatively buoyant and sinks. When the pressure on the container is released, the air expands, reducing the weight of the diver, which becomes positively buoyant and floats.

“Carbon Dioxide: Ocean Acidity”
Scott Beckley – Post Graduate – Chemistry
DESCRIPTION: The carbon dioxide produced through respiration and the burning of fossil fuels increases the acidity of the atmosphere and the oceans as the CO2 reacts with water molecules. When CO2 is passed through a straw, from the lungs and into a pH‐colorimetric aqueous solution, the change in pH that occurs is observed through a color change of the solution, from red to yellow. After about a 24 hour period the pH‐colorimetric aqueous solution will change back to the red color, after the CO2 gas has escaped. The pH‐colorimetric aqueous solution can be reused again and again.
MATERIALS: pH‐colorimetric aqueous solution, straw, glass flask RATIONALE: This is a demonstration that takes about 15 seconds to demonstrate and about 10 minutes to prepare. The demonstration helps students to understand the reaction of CO2 with H2O as supported by a color change when CO2 from the lungs is added into the H2O solution that has color changing pH indicators present. PROCEDURE: Prepare the pH‐colorimetric aqueous solution: Add 26.2 mL of 0.01 M sodium hydroxide to 200 mL of DI water. Dissolve 0.1 g of cresol red in this solution, dilute to 250 mL. Blow through a straw into the pH‐colorimetric aqueous solution and observe the solution changing color. SAFETY: Do not drink or inhale the solution while blowing air into the straw. EXPLANATION: Carbon dioxide changes the pH of water by the following acid forming reaction: CO2 + H2O H2CO3. The neutral water, with a pH around 7, will become acidic, with a pH of approximately 5.5, when it has been exposed to the CO2 present in human lungs. As the CO2 from the lungs is passed into the aqueous solution, the acidity of the solution increases and a color change is observed as a result of the pH‐colorimetric indicator, cresol red.

Are You Left or Right Sighted?
Krista Van Allen MATERIALS: 1. Two blank sheets of white paper.
2. A pencil
PROCEDURE:
1. Make a hole in the center of one sheet of paper with a pencil.
2. Draw a black dot in the center of the other sheet of paper the size of a penny, and place this about 40 cm in front of you on the table.
3. With both eyes open, hold the sheet with the hole between your face and the sheet with the dot, and move the sheet about until the black dot can be seen through the hole.
4. While holding this sheet steady (while seeing the dot), close first your left eye and then your right. When does the dot disappear?
EXPLANATION:
For most people, the dot will disappear when closing the right eye. This indicates that most people are right sighted. It means that most people prefer to use their right eye over the left, if they are confronted with the option of using only one. In this case it means that those people can see the dot with both eyes open or with only the right eye open, but not with only the left eye. In other words, when both eyes are open, the left eye does no work. There is probably a connection between this phenomenon and the right handedness of most people, although it would be hard to say which is the cause is and which is the effect.

Balloon Piercing
Krista Van Allen
MATERIALS:
1) A 10 or 12 inch balloon.
2) A bamboo skewer (or metal rod)10 ‐12 inches long.
3) Cooking oil.
PROCEDURE:
1) Hold up balloon and ask the audience what they predict will happen if the skewer is inserted into the balloon after it is inflated.
2) Dip the skewer into the oil and gently twist and push the skewer through the thick nipple end of the balloon. Continue to gently twist and push the skewer until it penetrates the surface of the balloon.
3) Continue to gently twist and push the skewer through the balloon until it starts to poke out through the area around the knot. Continue to gently twist and push until the skewer penetrates the knot end of the balloon.
4) Ask the audience if they predicted this result. Then explain the concept behind the demo.
EXPLANATION:
Balloons are made out of thin sheets of rubber latex which in turn are made from many long intertwined strands of polymer molecules. The rubber is stretchy because of the elasticity of the polymer chains. When the balloon is blown up, the polymer strands are stretched. The middle area of the balloon stretches more than the tied end and the nipple end (opposite the tie). A sharp, lubricated point can be pushed through the strands at the tie and nipple ends because the polymer strands will stretch around it. !! A sharp, lubricated point pushed through the strands at the side of the balloon will (usually) pop the balloon because the strands are already stretched and will break. Once a tear begins, it enlarges as the air rushes out of the balloon." (1994, American Chemical Society, Operation Chemistry, Polymers Unit p.4)

Energy Demonstration
Marquelle Sanchez LESSON OBJECTIVES:
1. Students will learn that energy is not lost just changed into usable and unusable forms. 2. Students will apply Newton’s laws in real examples
MATERIALS: Empty Aluminum pop can Bucket with water String/ fishing line Nail ¼” METHOD: Place four holes in the aluminum can equally spaced apart with a nail, near the bottom of the can. Make an angle of the hole with the nail by pushing the nail threw and turning it sideways. Tie a string to the pop tab and submerge the can into the bucket of water. As the can is lifted out of the water, the potential energy is turned into kinetic energy and causes the can to spin until the water is drained out. The water streaming out creates a force. Students can use the scientific method to make a hypothesis (what will happen as the experimental can is raised out of the water?) They will change one variable at a time to determine the maximum amount of energy released. Variables include changing the size of the holes, increasing the number of holes, placing the holes at different heights on the pop can. They will determine the energy by counting the number of spins the pop can creates.

Lung Demonstration
Marquelle Sanchez MATERIALS: Gatorade bottle (32oz or larger), 4 rubber bands, 3 balloons, tube tee nylon 3/8”X 3/8” X 3/8”, vinyl tubing ½”, scissors, drill METHODS: (Teacher assembly): Drill a hole at the center of the cap of the Gatorade bottle (1/2” diameter). Cut the bottom of the Gatorade bottle with scissors. (Student assembly): Cut tubing approximately ½ foot length. Take one rubber band; wrap it around the tubing at the top ¾ of the tubing length from the bottom, to serve as a seal and placeholder for the lungs. At the long end, push the center of the tubing tee in to the vinyl tube. Place balloons on the remaining ends of the tee tube. Tie rubber bands around the balloons to seal them to the tee ends. Put the nylon tubing through the Gatorade bottle with the cap on (try to keep the rubber band under the cap as a sealant when twisting on the cap). Cut the last balloon in half, just above the largest part of the balloon’s diameter. This balloon will go on the bottom of the Gatorade bottle. Once the balloon is on, put the last rubber band on the diaphragm to keep it in place. The lung is now ready to use. To inhale: Pull the balloon on the bottom of the Gatorade out and watch the lung fill with air. To exhale: Push the balloon on the bottom of the Gatorade back in and watch the lung exhale. This demonstration is a great visualization of the respiratory system; it demonstrates how the diaphragm works and how as we breathe we inhale and exhale air through our lungs. The air fills and empties our lungs by changes in the diaphragm. The can be incorporated into an anatomy class or an introduction to pressure differences.

Gelatin Volcano Demonstration
Arnold, Tamara SeniorBiology TOPIC: Magma Flow‐ This demonstration shows how and why magma flows through volcanoes. MATERIALS: Volcano:
Four unflavored/uncolored gelatin packets 2 cups cold water 6 cups hot water Large mixing bowl Small containers (Tupperware works well) Refrigerator Magma: Syringe Red food coloring 1 cup of water Plastic straw or tubing
Other: Peg board or a base with small holes punched in it Draining pan 2 blocks or stable objects to keep peg board elevated PROCEDURE: To create the gelatin volcanoes, mix the four packets of gelatin with 2 cups of cold water in a large mixing bowl. Stir for approximately 2 minutes. Add the 6 cups of hot water and stir until gelatin is dissolved. Distribute the gelatin into the Tupperware containers. Place in the refrigerator for at least 3 hours. Once gelatin molds are set, mix the red food coloring and remaining water to create the “magma”. Dip a Tupperware container in hot water to loosen the gelatin. Place the peg board or other base material on top of the Tupperware and flip the container so that the base is on the bottom. The gelatin mold should easily slide down to rest on the base. If it does not, gently shake the materials until the gelatin is released. Place base material on top of blocks to elevate it and place draining pan underneath. Attach a straw or plastic tubing to one of the holes in the base. Inject “magma” into the tubing using the syringe, refilling syringe as necessary until “magma” emerges through volcano. EXPLANATION: A volcano is a place on the Earth's surface (or any other planet's or moon's surface) where molten rock, gases and pyroclastic debris erupt through the earth's crust. Volcanoes vary quite a bit in their structure ‐ some are cracks in the earth's crust where lava erupts, and some are domes, shields, or mountain‐like structures with a crater at the summit. Volcanic vents are openings in Earth's crust where molten lava and volcanic gases escape onto the land surface or into the atmosphere. Most volcanoes have a circular central vent near their summit crater that serves as a conduit for ongoing volcanic construction. The central vent system is often plugged between large eruptions. Lava may fill fissures on the flanks of the mountain creating radial dikes. Gases and fluids also escape from secondary vents, creating fumaroles and hot springs on the slopes of a stratovolcano. SAFETY: Be careful when handling the hot water and food coloring as not to burn or stain skin/other objects.
Lava Lamp Density Demonstration
Arnold, Tamara SeniorBiology TOPIC: Density‐ This demonstration shows how the density properties of different materials affect a system. MATERIALS:
• Clear container • Water • Vegetable oil • Table salt
PROCEDURE: To create the system, fill container with water to desired level. Carefully add vegetable oil into container. Wait for oil and water to separate. (Brief discussion of oil and water densities/properties could be inserted here.) After the two layers separate, sprinkle table salt on top of oil. Watch as oil and salt move to the due to change in density. EXPLANATION: Oil floats on water because a drop of oil is lighter than a drop of water the same size. Another way of saying this is to say that water is denser than oil. Density is a measurement of how much a given volume of something weighs. Things that are less dense than water will float in water. Things that are more dense than water will sink. Salt is heavier than water, so when you pour salt on the oil, it sinks to the bottom of the mixture, carrying a blob of oil with it. In the water, the salt starts to dissolve. As it dissolves, the salt releases the oil, which floats back up to the top of the water. SAFETY: Be mindful of liquid materials as they might spill.

Homopolar Motor
Travis Steele MATERIALS: 1.5v battery (AAA‐D) Copper Wire (shielding/insulation removed for alternate setup) Cylindrical Conductive Magnet (Neodymium works well) Nail or Screw PROCEDURE: 1. Place magnet on nail head 2. Use magnetic field to stick nail to one battery terminal 3. Touch one end of wire to open terminal of magnet 4. Touch other end of wire to side of cylindrical magnet PROCEDURE (ALTERNATE): 1. Attach magnet to hard surface 2. Place battery on magnet 3. Make an “M” shaped frame of wire with center point touching upper terminal 4. Bend wire so that “legs” each touch (wrap) the sides of the magnet EXPLANATION: A magnetic field is produced by the electrical current moving through the circuit (this is why the magnet must be conductive). Another magnetic field is produced by the magnet. Since the magnetic flow from the current is also passing through the magnet, which has its own magnetic field, the magnetic fields want to repel from each other, causing torque to turn the magnet (standard setup) or wire (alternate).

Bernoulli’s Ping Pong Ball
Travis Steele MATERIALS: Ping Pong Ball String or Fishing Line Any ONE of the Following: Super glue/ Hot glue/ Epoxy/ Scotch or Duct Tape Source of Running Water Basin Ring Stand (optional) PROCEDURE:
1. Attach ping pong ball to end of string in whatever fashion works best (keep in mind the ball will get wet). 2. Start current of running water (must be run a fairly high rate) 3. Holding opposite end of string from ball (or have it tied to ring stand), swing ball back and forth towards stream
of water. 4. When ball enters stream and sticks keep the string taught without pulling the ball from the stream.
EXPLANATION: Bernoulli’s principle states that pressure of a fluid is inversely proportional to the speed at which it is moving. In this demonstration, the fluids in question are the air and the water. Since the water is moving at a high rate, the pressure within the water stream is lower than that of the atmosphere. When the ping pong ball enters the flow of water, it is entering a low pressure region that keeps it suspended within the stream.

Nut Osmosis
Cynthia Krull Junior Biology Major MATERIALS: ‐Jar of salted nuts (or pretzels), any dry salty food will work PROCEDURE:
Students love food, and anything revolving food, so why not incorporate food into your demo to spark their interest and attention.
Have students eat a handful of salted nuts. As they are sitting there eating as the question, "What happens after
eating salty foods?" Help the students explore the answer that the nuts have a high concentration of salt and a low concentration of water. This causes water to leave the cells of the mouth, making you thirsty. Use a follow up question of "How do you remedy the condition?"

Mouse Muscle Contraction
Cynthia Krull Junior Biology Major MATERIALS:
Mouse Trap Pen or pencil
PROCEDURE:
Use a mousetrap to show the idea of the all‐or‐none principle of muscle contraction. It takes a certain amount of force to trip the trap just as it takes a certain stimulus to trigger the muscle. The trap will snap completely, not partially or excessively as does a muscle contraction.
Diffusion Demonstration
Corey Johnson DESCRIPTION: This easy demonstration is useful to illustrate how diffusion works. Materials are easy to acquire and students gain concept comprehension. MATERIALS: Balloon Vanilla Extract Pipette PROCEDURE: Place 1‐2 drops of vanilla extract into an empty balloon. Blow up the balloon and tie it off like you normally would. Shake the balloon back and forth for a few seconds and then sniff the balloon. Pass the balloon around and have students do the same. For added showmanship, place the vanilla into the balloon without the students seeing it. Then, blow the balloon up and ask a volunteer student to come up and smell the balloon. They are most likely to say that it smells like vanilla. Then prompt the class with “How could this be?” Have them think about why it smells like vanilla and how they could smell something that is inside the balloon. EXPLANATION: The balloon itself acts just like a cell wall; it allows certain materials through (vanilla molecules), but also keeps things in (the air).

Gravity Defying Marble
Corey Johnson DESCRIPTION: This demonstration is used to illustrate centripetal force MATERIALS: Glass jar Marble PROCEDURE: Place a normal sized marble on a flat tabletop. Turn an empty glass jar upside down over the marble. Announce that the marble can be moved to another part of the room without tipping the jar right side up. Make fast circular movements with the jar, which causes the marble to make revolution inside the jar. Continue making this movement to transfer the marble to a new location. EXPLANATION: Centripetal force moves the marble against the inner wall of the jar. Also, the narrowing of the glass jar at its mouth prevents the marble from dropping out as you lift it from the table.

Cleaning up an Oil Spill
Genevieve Froid PostBaccalaureate Student The purpose of this experiment is to demonstrate some of the ways that scientists and others use to clean up oil spills especially in regards to the resent oil spill in the Gulf of Mexico. Scientists have been collecting and using hair to create booms to soak up a lot of the oil out of the ocean. MATERIALS:
Motor Oil Water Spoon Clear Plastic Cup Hair (Human or animal) Paper towels Bags for trash
PROCESS FOR THE OIL SPILL SCIENCE EXPERIMENT: 1) Pour water into the cleat plastic cup until its about 1/2 way full. 2) Begin adding the motor oil until you have a nice oil slick on top of the water. 4) Take some hair and start sprinkling some onto the top of the oil slick 5) Wait a few minutes and watch what happens to the oil. 6) Take a large spoon and scoop out the oil now that is attached to the hair and is easy to scoop out in a ball. THE SCIENCE BEHIND THE OIL SPILL EXPERIMENt
Hair is a great resource to clean oil because it is an organic, natural, renewable material that exists in plentiful quantities and is usually considered a waste material and thrown in the trash. Hair doesn't exactly soak up the oil; the oil clings to thousands of tiny scales on hair shafts. The oil clings to the outer layer of the hair, the cuticle. The cuticle consists of several layers of flat, thin cells laid out overlapping each other like roof shingles.
A public charity called Matter of Trust has asked salons and retailers around the country to send all the hair and nylons they can as an effort to make ultra‐effective booms, or floating barriers that soak up the oil. Even Petco and other pet groomers are donating hair to help clean up the Gulf, too. Booms are traditionally filled with air or Styrofoam, but hair is great at retaining oil too. So far, Matter of Trust has collected 400,000 pounds of hair. Once the hair is soaked with oil, oyster mushrooms are placed on them to absorb the oil, converting it to compost in about 12 weeks. Mushrooms have been used in the bioremediation of many types of toxic substances for years.

The Metal inside of you
Genevieve Froid PostBaccalaureate Student
If you sit there and ponder the foods that you eat for a bit, you’ll realize that you eat plants and animals just like other fuzzy creatures in the forest. But did it ever occur to you that you eat metal too? You chew through metal everyday in your food without even really thinking about it. Even more eye opening is the fact that metal in your diet is required to survive.
MATERIALS:
• Breakfast cereal high in iron • Bowl with water • Spoon • Magnet
PROCEDURE:
1. Take a breakfast cereal that is high in iron and crumble it to powder 2. Mix water with the cereal powder to make a very watery solution 3. Take a magnet and stir the cereal powder mixture around for a while 4. Examine the magnet. You will see particles of iron clinging to the magnet.
Iron is a part of everyone’s healthy diet and it’s the exact same iron that’s used to make metal nails. Oxygen is transported through your body in your blood and iron is required in the blood for the oxygen to cling too. The oxygen piggybacks on the iron and is carried throughout your bodies to all of the individual cells. If you do not consume enough iron, your body will be short on oxygen and you will feel tired. Minerals such as iron are very important to your health.
Strangely enough, having too much iron in your body can lead to a condition called hemochromatosis. Some people even supplement their diet with vitamins and minerals including iron. Taking in too much iron can overload the body with iron and can leave you feeling tired and weak.

Exploring the Properties of Water
Juliana Coalson PURPOSE: To study to surface tension characteristics of water and the influence that a base substance (when introduced to the water) has on the molecular bonds formed between the water molecules. MATERIALS: Notebook A glass dish (or cup) A small straight pin Water Household detergent (Ivory soap) PROCEDURE:
Fill a glass dish with water. Very carefully, lay a small, straight pin on the surface of the water. What do you observe and why do you think this has occurred?
Now, place one drop of household detergent (Ivory dish soap) onto the side of your bowl allowing it to drain down into the water, while the needle is still afloat. What do you observe and why do you think this has occurred?
What affect might the detergent have, on the chemical bonds of the water, causing the result that you have observed?
Water has high surface tension. Hydrogen bonds form between water molecules making them "stick" together.
When water molecules meet the air this is surface tension is particularly noticeable as water forms an invisible, smooth, connective surface. This layer of water molecules can be surprisingly strong. This allows some insects to "walk on water". This is also why water can make things wet and why it climbs through narrow tubes, called capillary tubes. This "capillary" action helps water move through the soil, up through vessels in plants' stems and through the tiny blood vessels (capillaries) in animals.
Pure water has a neutral pH of 7. When a base, such as Ivory soap is added, the ratio of hydrogen ions to hydroxide ions is no longer neutral but rather has become more basic, due to the increased presence of hydroxide ions (introduced by the addition of a base). One of the unique characteristics of water, as observed through water tension, is disrupted as this base, (hydroxide ions), removes hydrogen ions from the solution ‐ disrupting the beauty of the intermolecular hydrogen bonds…and the surface tension is lost causing the pin to sink!
Exploring the Properties of Strawberry DNA
Juliana Coalson PURPOSE: To determine how the physical properties of strawberry DNA relate to the structure of DNA molecules ‐ what does DNA look like in a test tube and what properties can be observed by the naked eye? This lesson plan is for the extraction of DNA from strawberries. Strawberries are an exceptional fruit to use for this lesson because each individual student is able to complete the process by themselves and strawberries yield more DNA than any other fruit (i.e. banana, kiwi, etc.). Strawberries are soft and easy to pulverize. Strawberries have large genomes; they are octoploid, which means they have eight of each type of chromosome in each cell. Thus, strawberries are an exceptional fruit to use in DNA extraction labs. The long, thick fibers of DNA store the information for the functioning of thechemistry of life. DNA is present in every cell of plants and animals. The DNA found in strawberry cells can be extracted using common, everyday materials. We will use an extraction buffer containing salt, to break up protein chains that bind around the nucleic acids, and dish soap to dissolve the lipid (fat) part of the strawberry cell ‐ the phospholipid bilayers of the cell membrane and organelles. This extraction buffer will help provide us access to the DNA inside the cells. DNA is not soluble in ethanol. The colder the ethanol, the less soluble the DNA will be in it. Thus make sure to keep the ethanol in the freezer or on ice. http://gemsclub.org/yahoo_site_admin/assets/docs/StrawberryDNA... Materials: zip‐lock (sandwich size) freezer bags 1‐2 strawberries ‐ fresh or frozen 10 mil DNA extraction buffer (shampoo, salt and water) Filtration Apparatus ‐ cheesecloth or gauze, funnel and small beaker Ice‐cold ethanol (90% concentration or higher) in a dropper bottle Large size test tube Glass rod for stirring Safety goggles Scissors Microcentrifuge tube (if students want to take home a sample of their DNA)


Density demo
Jennifer O’Patchen A. WILL NEED
a. 3 beakers b. 3 bic pen caps c. Water d. Alcohol
B. SET UP/ STEPS a. Put one pen cap in a beaker filled with water, it will float b. Put one pen cap in a beaker filled with alcohol, it will sink c. Put one pen cap in a water/alcohol mixture, it will be suspended in the middle d. Then have the students figure out the density of the pen cap if they are given the density of water and
alcohol OR give the students the density of the pen cap, water and alcohol and have them figure out the density of the mixture
C. CONCEPT‐DENSITY OF MIXTURES
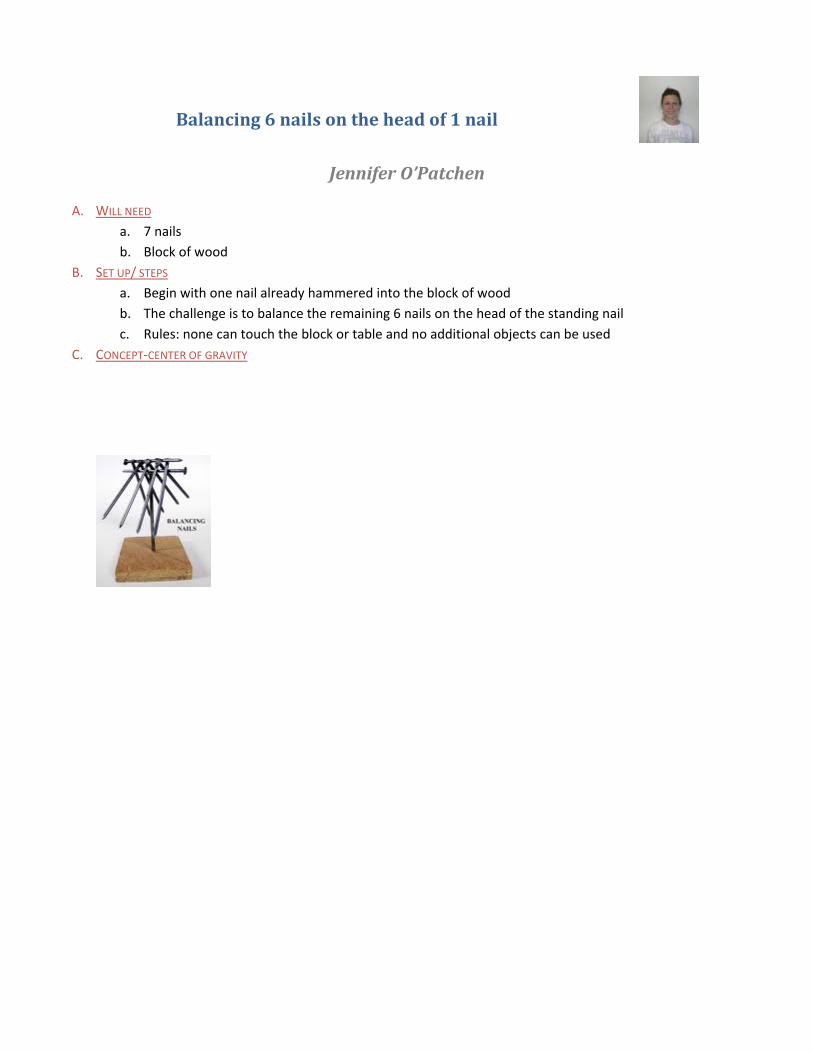
Balancing 6 nails on the head of 1 nail
Jennifer O’Patchen A. WILL NEED
a. 7 nails b. Block of wood
B. SET UP/ STEPS a. Begin with one nail already hammered into the block of wood b. The challenge is to balance the remaining 6 nails on the head of the standing nail c. Rules: none can touch the block or table and no additional objects can be used
C. CONCEPT‐CENTER OF GRAVITY

The Mirrored Flask
Lindsey Nelson MATERIALS:
Glass bottle Prepare these solution as follows:
A. Dissolve 25.0 grams of sucrose in 250 mL of distilled water and then add 3.0g of tartaric acid. Boil the solution for 10 minutes, cool, and then add 50 mL of ethanol. Dilute to 500 mL. (0.15M sucrose, 0.040M tartaric acid, and 1.70M ethanol)
B. Dissolve 20.0 g of AgNO3 and 3.00 g of NH4NO3 in distilled water and dilute to 500 ml. (2.4 M silver nitrate and 0.75M ammonium nitrate)
C. Dissolve 50.0g of NaOH in distilled water and dilute to 500 mL. (2.5M sodium hydroxide.
DIRECTIONS 1. Clean the glass bottle very well 2. Place warm water in the glass bottle and let sit until the bottle is warm. 3. Pour 10 mL of A into the glass bottle. Then pour 10 mL of B into the bottle. Finally add 10 mL of C. 4. Put a stopper in the bottle 5. Swirl the bottle around 6. When the precipitate begins to form shake the bottle to the precipitate coats the inside of the bottle. 7. Open the bottle and pour the left over solution down the drain with lots of water. 8. Rinse the bottle out with warm water
REACTION TAKING PLACE: CH2OH(CHOH)4CHO + 2[Ag(NH3)2]
‐+ 3OH‐ →2Ags + CH2OH(CHOH)4COO‐ + 4NH3 + 2H2O
This reaction is commonly used in qualitative organic analysis to identify aldehydes. The reaction is classed as a Tollens’ test and is performed by mixing aqueous silver nitrate with aqueous ammonia to produce a solution called Tollens’ reagent. The reagent contains silver diammine ion. It is an oxidizing agent that will oxidize an aldehyde functional group (‐CHO) of the dextrose to a carboxylate ion (‐COO‐). As this oxidation takes place the silver is reduced form Ag1‐ to metallic silver. This demo works for an AP chemistry class learning about organic chemistry because of the functional groups involved in this reaction. This is also a good demo for a general chemistry class because of the redox reaction process taking place.

Liquid Nitrogen Ice Cream
Lindsey Nelson MATERIALS:
• Large plastic bowl
• Wooden spoon
• 5 or more liters of liquid nitrogen
• gloves and goggles
• 4 cups heavy cream (whipping cream)
• 1‐1/2 cups half‐and‐half
• 1‐3/4 cups sugar
• 1 quart mashed fresh strawberries or thawed frozen berries
DIRECTIONS:
1. First, mix the cream, half‐and‐half, and sugar in the bowl. Mix until the sugar is completely dissolved.
2. Put on gloves and goggles.
3. Slowly start pouring the liquid nitrogen directly into the bowl containing your other ingredients.
4. Stir the mixture constantly while continuing to add the liquid nitrogen.
5. As soon as the ice cream starts to thicken, add the mashed strawberries. Stir vigorously.
6. Keep adding liquid nitrogen to the ice cream until it becomes too solid to stir. Let any excess liquid nitrogen boil away before serving.
DISCUSSION:
Liquid nitrogen has an extremely low boiling point, ‐196 degrees Celsius. It is a cryogenic fluid and it will freeze most anything it comes in contact with very fast. Normally the cream base used to make ice cream slowly freezes but when using liquid nitrogen it happens in minutes. As the liquid nitrogen is released from its container, it starts to turn to a gas. This demo is good for showing different types of phase changes. The liquid base of the ice cream turns from a liquid to a solid in the freezing process while the liquid nitrogen turns from a liquid to a gas in the boiling process. This shows how different elements have different properties such as boiling and freezing temperatures.

Water Density Demonstration: Temperature
Sarah LePage PURPOSE: To show how temperature affects the density of water CONCEPTS: When the temperature is high, molecules in water disperse and move around more rapidly than they usually do in order to spread the heat energy. When the temperature is low, water molecules move less and lose energy, and because of this, the space that they move in becomes smaller. Since there is less space and yet the same number of molecules, the density increases. MATERIALS: Glass Baking Pan Cardboard 800 ml Hot Water Flash Light 800 ml Cold Water Food Coloring (two colors) PROCEDURE: 1: Place a couple drops of food coloring in 800 ml of cold water 2: Place a couple drops of a second color in 800 ml of hot water 3: Cut a piece of cardboard to fit snugly in the middle of the glass baking pan
4: With help, hold the cardboard separator in place and then pour each sample of colored water on either side of the cardboard 5: Remove the cardboard separator and observe the density differences Note: You may find it helpful to shine a flashlight on either side of the baking dish

Water Density Demonstration: Salinity
Sarah LePage PURPOSE: To show how salinity affects the density of water CONCEPTS: When you add salt to water, the salt dissolves into ions. The volume increases a small factor, but the mass increases by an even greater factor. This is because the salt ions are attracted to the water and bind closely to the water molecules themselves. Since the mass increases faster than the volume increases when you add salt, the density increases. Salt Water is more dense than regular water because for a certain volume, there is more mass (or stuff) in the salt water than there is in the normal water. MATERIALS: 2‐ 1 Liter beakers Cardboard spoon 700 ml tap water in each beaker 2 golf balls Food coloring 150 grams of non‐iodized salt PROCEDURE: 1: Dissolve the salt into one of the beakers of water 2: Place a golf ball into each beaker, and observe the difference in each golf ball 3: Remove golf balls and add a few drops of food coloring to the beaker of fresh water 4: Using the spoon to cushion the fall, pour some of the colored freshwater into the beaker containing the salty water, and observe the difference in each sample of water 5: Gently place a golf ball into the beaker near the boundary created by the layers of salt/fresh water, and observe the location of the golf ball

Characteristics of Life
Shannon Swanson Senior Biology Major MATERIALS
1. A clear container (glass, bowl, ect.) 2. Mountain Dew (or a very carbonated soda) 3. Raisins
PROCEDURE 1. Fill a glass with Mountain Dew or other carbonated beverage. 2. Add raisins to the glass and observe them “swim” up in down in the glass. 3. Explain how movement is not a characteristic of life.
EXPLANATION The raisins sink to the bottom of the glass. As the carbon dioxide is released from the soda the bubbles accumulate on the raisins and allow it to float back to the top. The bubbles break at the top and allow the raisins to sink back to the bottom and the process is repeated until there is not enough carbonation left. Although the raisins are able to “swim” in the class of soda, they are not living organisms and can help students to understand how movement does not make something alive.

Candle and Air Pressure Demonstration
Shannon Swanson Senior Biology Major MATERIALS
1. Tea candle 2. A clear glass container 3. Shallow dish 4. Water
PROCEDURE 1. Pour water into a shallow plastic dish with lit tea candle in the middle. 2. Place the glass container over the candle. 3. Allow the candle to burn until it uses up the oxygen and burns out. 4. Observe the water level rise.
EXPLANATION The water level in the glass changes due to a pressure difference between the inside of the glass and the outside of the glass. This is due to the heating of the air in the glass as the candle burns (this could also be done using a source other than a candle that also heats the glass.) After the glass is heated and the candle burns out the glass begins to cool. This creates a high to low pressure gradient that causes the water to move from the dish into the glass and cause a change in water levels. The water will rise until the pressure inside the glass and outside the glass are equal. You can also use ice to cool the glass down further and cause the water to rise even higher. This can be used to explain convection in the atmosphere. As air is heated near the surface of the earth due to solar radiation it begins to rise, and the cooler air of the upper atmosphere is more dense and sinks back to the surface where it can be heated and the cycle repeats. This vertical exchange of heat in the atmosphere is known as convection.

Supercool Water
Brent Hoeppner INTRODUCTION Temperature is a measure of the average speed of the molecules that make up the matter. The higher the temperature the faster the molecules are moving and the lower the temperature the slower the molecules are moving. This motion controls the phase that different matter is in. Water freezes at 0°C or 32° F. Water is able to stay a liquid below its freezing point, called supercooling. When the temperature of water lowers ice crystals form around impurities in the water so in order to supercool water the water must be pure. After the water is in the supercooled state, any disturbance will suddenly freeze the entire container of water into ice. MATERIALS
• Bucket
• Ice
• Salt
• DI water
• Cup
PROCEDURE 1. Pour some of the DI water into the cup 2. Place cup in the center of the bucket 3. Pour ice cubes into bucket, do not get any ice into the cup 4. Sprinkle about 2tbsp of salt onto ice, do not get any salt into the cup 5. Should take around 10‐20 min to supercool 6. Take out of ice and supercooled water is ready
CONCLUSION Supercooled water becomes colder than its freezing point and stays a liquid when most water would turn into a solid. This can only happen because the water is pure. Supercooled water occurs in nature in some clouds and can pose problems for airplanes when they fly through and the supercooled water in the clouds suddenly freezes onto the plane. Some plants use this method and supercool their fluid to survive extremely low temperatures.
The Bernoulli Effect
Tony Grabau The Bernoulli effect is showing that when air moves faster pressure drops. This is how planes are able to fly. MATERIALS
• 2 ping pong balls • string • tape or glue • drinking straw
METHOD Place the two ping pong balls about 2cm apart using string. Take the straw and blow in between the two balls. The fast air will drop the pressure between the two balls causing them to swing together. This demo shows how pressure drops when air moves faster between two objects. PURPOSE This is a good demo when talking about pressure systems and showing how when air move faster than the surrounding air, it causes a lower pressure. This can be tied into describing how planes fly using jet engines and the pressure of the surrounding air.

Steady Flow
Tony Grabau PURPOSE The purpose is to demonstrate how different air pressures work together. The hair dryer represents high air flow with low pressure to the surrounding air. MATERIALS
• Hair Dryer • Ping pong ball
METHOD Turn hair dryer on and place ping pong ball in the center. The ping pong ball will float in the middle of the air stream because that is where the air pressure is the lowest. When the ball moves to the side of the air flow it will quickly move back to the center because that is where the air pressure is at its lowest. This is another demo of the Bernoulli Effect.

Fire Extinguisher
Tyler Zitek Chemistry MATERIALS: Stair step apparatus or vapor ramp Matches Tea Candles Vinegar Baking Soda Pitcher PROCEDURE: Set up the stair step apparatus or the vapor ramp and light the candles. In a pitcher mix baking soda and vinegar and close the lid (experiment with the amount of each to avoid overflow or the lid popping off). Next, pour the liquid out into a separate container after it stops fizzing. The pitcher should be left with carbon dioxide. Make sure to get all the liquid out so that it is clear that the gas is putting out the fire, and not any liquid that may have been in the pitcher. EXPLANATION: Carbon dioxide is denser than air. The stair step or vapor ramp allows the carbon dioxide to settle. Since combustion needs oxygen to take place, the carbon dioxide settles and forces out all of the excess oxygen, and thereby extinguishing the candles. TIPS: Mix the baking soda and vinegar up to 15 minutes before pouring it. This allows more carbon dioxide to build up and accumulate in the pitcher. Make sure all liquid is out of the pitcher before dumping the gas on into the ramp.

Leaky Bag
Tyler Zitek Chemistry MATERIALS: Ziploc bag (any size, gallon size is easiest to see) Water Sharpened pencils PROCEDURE: Fill the bag about two thirds full of water. Hold the bag so everyone can see. Then stick the pencils through the bag, making sure to go in so that both ends of the pencil end up under the water line. You can do this as many times as you want. EXPLANATION: Plastic bags are made up of long strands of molecules called monomers. One of the properties of polymers is elasticity, which is illustrated here. When the pencil is pushed through the bag, the monomers stretch, allowing the pencil through, and then retract, resealing the hole around the pencil.

Sugar Cube Rock Cycle
Kaylyn JamesSenior Earth Science Major MATERIALS: ‐box of sugar cubes ‐tea candle/jar candle ‐lighter/matches ‐aluminum foil ‐hammer/book ‐two pieces of scratch paper PROCEDURE:
1. Examine compacted sugar cube (sedimentary rock), place in between two sheets of scratch paper 2. Use hammer/book to smash sugar cube (weathering) 3. Fold a boat out of foil (Note: thin, flat bottom necessary for quick melting and make a handle to hold boat with) 4. Transport crushed sugar into foil boat (erosion) 5. Light candle and place foil boat over the candle’s flame 6. Allow enough melting time for sugar to become transparent (melting/magma) 7. Take boat off of the flame, allow cooling time 8. Once cool to touch, break the sugar in the boat and examine the results(weathering; process begins again)
This demonstration is great for scaffolding student’s approach to understanding the rock cycle on a smaller scale, while using inexpensive materials. Sugar cubes show the best changes due to the ability to be compacted, representing sedimentary rock, to be crushed as weathering and transporting sugar sediments to the foil boat as erosion. Then students represent melting of sediments using a candle flame then cooling the melted sugar to be crushed again, to represent weathering. The sugar cubes demonstrate the continuous stages of the rock cycle and how the cycle never ends. Typically, students will ask for a sugar cube at the end of this, I suggest, have extra boxes of sugar cubes for this reason.

Volume vs. Temperature Using Balloons
Kaylyn JamesSenior Earth Science Major MATERIALS: ‐two different colored balloons ‐plastic bin ‐liquid nitrogen with storage container ‐forceps ‐gloves PROCEDURE:
1. Set plastic bin on a flat, sturdy surface 2. Uncap container with liquid nitrogen 3. Pour liquid nitrogen in plastic container 4. Blow up balloons 5. Place balloons in container with liquid nitrogen 6. Present result and allow balloons to expand, again
This demonstration is based on the Gas Laws and will be presented using inflated balloons and liquid nitrogen. When the balloons are inflated, the gas particles in there are moving are moving at a reasonably fast pace due to the warm temperature, as temperature increases the particles move faster and continue to expand the balloons. When the balloons are placed in the bin of liquid nitrogen, immediately the balloons will contract, resulting in no loss of gas particles but the gas particles are moving slower causing the balloon to shrink. Once the balloons are removed from the liquid nitrogen, the gas particles begin to move faster and inflate the balloon to the original state. There is no loss or gain of the gas particles, the compaction or expansion of the balloon is based on the temperatures effect on the movement of gas particles.