juan martin-guitar method
DESCRIPTION
Juan Martin-Guitar MethodTRANSCRIPT

The secrets of Flamenco, that 'wonder of natural art' as Manuel de Falla called it, have hithertobeen hard to learn without personal lessons from an expert teacher, and such teachers are rareindeed outside Andalucia or Madrid. Yet nearly everyone who plays or wants to play the Spanishguitar would like to learn at least something about how those exciting sounds of Flamenco arecreated. Here now is a book combined with a cassette tape-recording in which a top-rankingflamenco soloist and recording artist reveals the very essence of the flamenco art of the guitar.
Juan Martin's playing of his music on the cassette, along with the many photographs anddetails in the text, vividly demonstrates the essential techniques, rhythms and toques of Flamenco,His Method also contains longer solos, daily exercises for developing technique and invaluableinformation about the flamenco guitar and its music.
The Method has been designed for the player of any standard. You may be an absolute beginnerwith no previous knowledge of music or the guitar, or you may already play the guitar quite well.Your ambitions may be just to be able to enjoy yourself playing some Flamenco, or they mayreach much further, perhaps even so far as pursuing a professional career with the guitar. Whateverthe case, the Method will provide the basis for you to advance greatly your skill and understanding,so that you find in the joys and sorrows of Flamenco something more of that capacity for express-ing oneself through the guitar which Juan Martin so excitingly demonstrates.
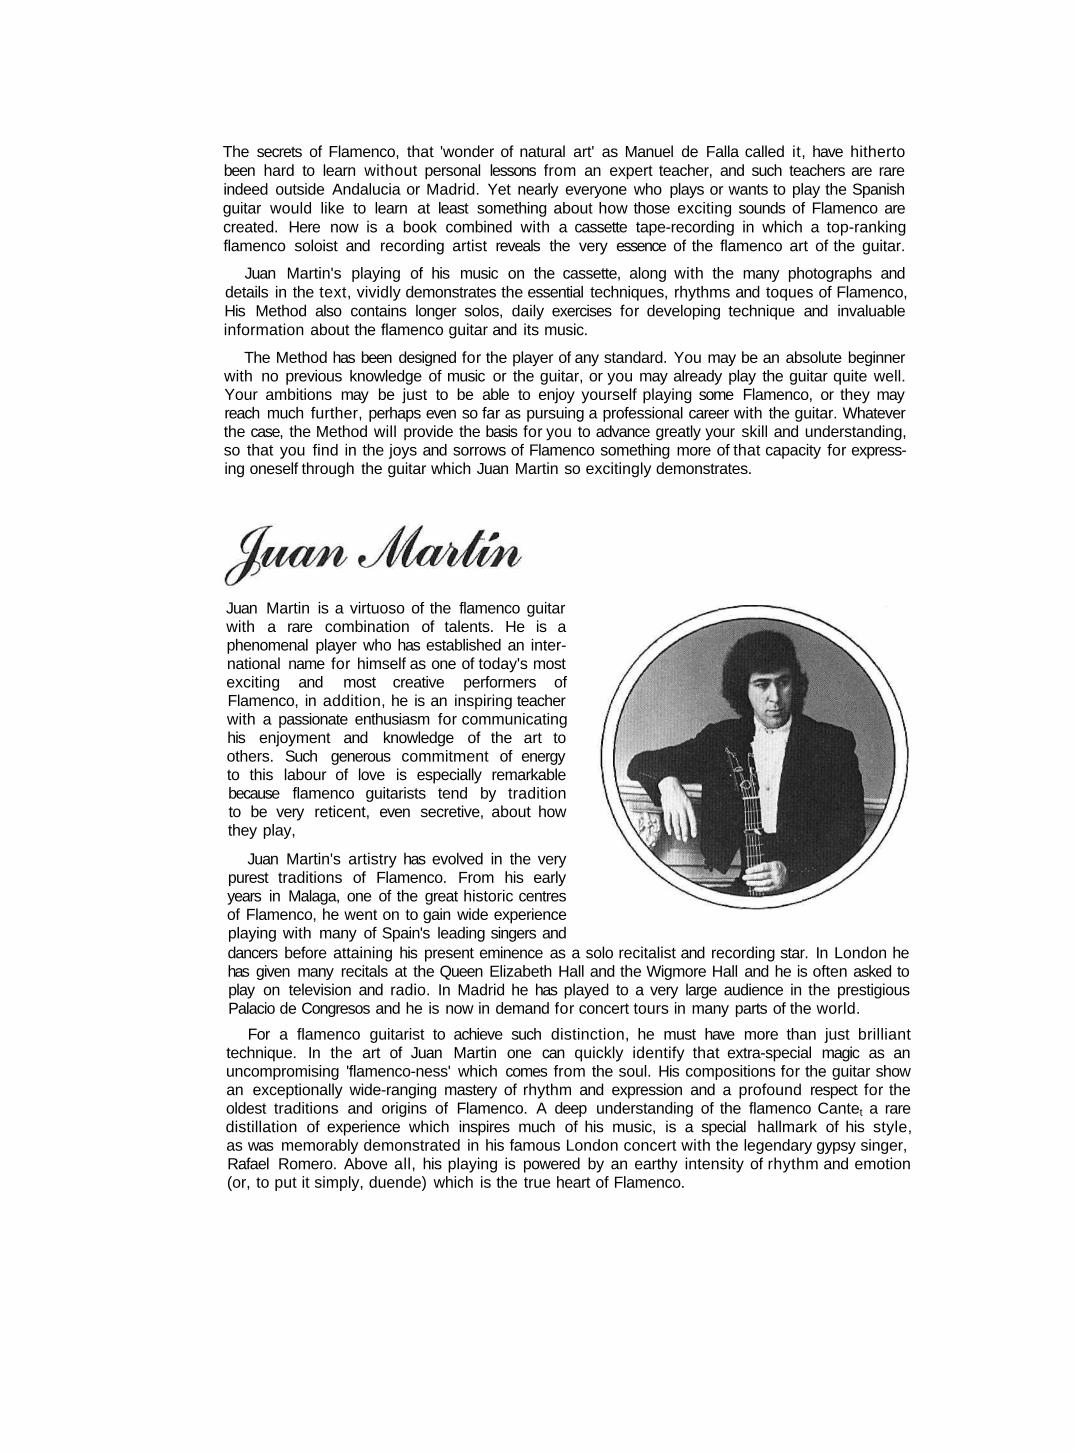
Juan Martin is a virtuoso of the flamenco guitarwith a rare combination of talents. He is aphenomenal player who has established an inter-national name for himself as one of today's mostexciting and most creative performers ofFlamenco, in addition, he is an inspiring teacherwith a passionate enthusiasm for communicatinghis enjoyment and knowledge of the art toothers. Such generous commitment of energyto this labour of love is especially remarkablebecause flamenco guitarists tend by traditionto be very reticent, even secretive, about howthey play,
Juan Martin's artistry has evolved in the verypurest traditions of Flamenco. From his earlyyears in Malaga, one of the great historic centresof Flamenco, he went on to gain wide experienceplaying with many of Spain's leading singers anddancers before attaining his present eminence as a solo recitalist and recording star. In London hehas given many recitals at the Queen Elizabeth Hall and the Wigmore Hall and he is often asked toplay on television and radio. In Madrid he has played to a very large audience in the prestigiousPalacio de Congresos and he is now in demand for concert tours in many parts of the world.
For a flamenco guitarist to achieve such distinction, he must have more than just brillianttechnique. In the art of Juan Martin one can quickly identify that extra-special magic as anuncompromising 'flamenco-ness' which comes from the soul. His compositions for the guitar showan exceptionally wide-ranging mastery of rhythm and expression and a profound respect for theoldest traditions and origins of Flamenco. A deep understanding of the flamenco Cantet a raredistillation of experience which inspires much of his music, is a special hallmark of his style,as was memorably demonstrated in his famous London concert with the legendary gypsy singer,Rafael Romero. Above all, his playing is powered by an earthy intensity of rhythm and emotion(or, to put it simply, duende) which is the true heart of Flamenco.
Introduction by Juan Martin
This is a book for those genuinely interested in learning the marvellous art of theflamenco guitar. I have tried to convey in my method the exact way traditionaltechnique is built and the purest playing style achieved. The rhythms and melodicvariations (falsetas) are the very basis upon which all good professional flamencosbase their style. I have taken particular care to show in the music the correct finger-ing for both hands for this is often the problem for players learning by ear fromrecordings. (The book starts at the very beginning and assumes no knowledge ofFlamenco or music on the part of the beginner). The music contained is also writtenin cifra which is explained at the start for those who do not know or wish to learnmusic. The transcription of the music, together with the preparation of the text andof the photos showing the way I play, has been undertaken by my good friendand guitarist Patrick Campbell; an exhausting task completed with great love.
The great and ancient tradition of Flamenco is a broad and deep current formedfrom many sources, I would like to dedicate this book not only to all those newaficionados I hope it will encourage but also to all those many unsung players of theflamenco guitar whose playing continually enriches and extends the tradition ofFlamenco. There are so many working guitarists in Spain and elsewhere whoseaccomplishments may never gain wide recognition, yet it is they who make up thebasis of the living art that is Flamenco today.
j Viva el Artel
Juan Martin.
V

THE CASSETTE Music composed and played by JUAN M A R T I N
SIDE ONE
Tuning Note A for the 5th String
The Open Strings of the Guitar
Exercise 1
Exercise 2
Exercise 3
Exercise 4
Exercise 5
A First-Day Solo: Malaguena
Malaguena: First Slower Version
Malaguena: Second Slower Version
Lessons 2, 3 and 4 First Soleares (complete)
Lesson 2 The First Two Compases (slowly)
Lesson 3 Rhythm, Llamada and First Falseta
Second Falseta
Ligado Exercise (slow)
Ligado Exercise (faster)
Lesson 4 Third Falseta
Three More Rhythm Compases
Picado Exercise
Lesson 5 Seguiriyas
Lesson 6 Alegrias
Lesson 7 Second Soleares
Lesson 8 Exercise for Double Arpegio and Barre
Lesson 9 Fandangos de Huelva
Fandangos: Introduction and First Falseta (slowly)
Lesson 10 Three Sevillanas
First Sevillana (slowly)
Lesson 11 Tremolo Falseta for Soleares
Lesson 12 First Bulerias
Lesson 13 Second Bulerias
Third Bulerias
Final Compas of Third Bulerias (slowly)
Compas of Soleares with Triplet Rasgueo
Lesson 14 Farruca
SIDE TWO
Lesson 15
Lesson 16
Lesson 17 Tientos: The Basic Compas
The Solo Tientos
Alternative Basic Compas
Lesson 18 Zapateado
Lesson 19 Solea por medio
Lesson 20 Malaguenas
Lesson 21 Tarantos
Lesson 22 Solea
Lesson 23 Alegrias en mi
Lesson 24 Seguiriyas
Lesson 25 Bulerias
Lesson 26 Daily Exercise B
WRITING DOWN FLAMENCOFlamenco is an art-form which traditionally does not use written notation.Many readers must, therefore, wonder about the authenticity and accuracyof the transcriptions of Juan Martin's music into staff notation andtablature (cifra). The approach adopted here was designed to preserve asmuch as possible the vital spontaneity of Juan's playing and to avoidsimplification or distortion in showing how Flamenco is actually played.
After the main outlines of the Method had been decided upon, heplayed and tape-recorded the pieces impromptu, most of them in just onevery inspired session. In this way he linked together many melodic falsetasand rhythmic passages of rasgueo into pieces suitable for a progressiveintroduction to guitar techniques as well as for solo performance. Next,the music was transcribed from the tape-recording into notation and cifra.Some further sections were recorded and transcribed separately in orderto complete the coverage of basic techniques and essential toques. Workingnow from the basis of the transcriptions and the recordings, Juanmemorised the pieces as he had originally played them and re-recordedthem for the cassette to go with the book. Both during and after thisre-recording at EMI's studios the transcriptions were checked through againnote by note to ensure that they correspond as exactly as possible to thefinal recording you will hear. P.C.
'ELEMENTS OF FLAMENCO'The pupil who learns with Juan Martin receives much more than just apersonal initiation into flamenco music and guitar-playing. He is also intro-duced to a whole world of Flamenco as Juan emphasises and demonstratesthe essential musical values which give the music its unique strength andappeal. In order to convey these more theoretical aspects of his teachingthe book includes, among the sections called 'Elements of Flamenco',discussions of key terms used in Flamenco and a brief outline of thehistory of the art, along with other, more practical details about the guitar,These sections, listed below, are presented separately at the end of theearlier Lessons in the book.
Fourth Bulerias
Granadinas
Elements of Flamenco 1
2
3
4
5
6
7
8
9
10
11
12
Compas. The Guitar
Toques
Fingernails
Aire
Duende
Choosing a guitar
Guitarreros
History (1)
History (2) -- The guitar
The role of the guitar
Palmas
Improvisation
Page 12
23
30
37
43
5O
55
59
65
71
85
105
vi

THE BOOK Contents
VII
LESSON
Introduction by Juan Martin Page v
1 Getting Started 1
2 Part One: Introducing Soleares 15
Part Two: A Technical Exercise 19
3 Soleares (continued) 24
4 Part One: Soleares (concluded) 32
Part Two: The Technique of Picado 34
5 Seguiriyas 38
6 Alegrias 44
7 More Soleares 52
8 Double Arpegio and Barre 56
9 Fandangos de Huelva 60
10 Sevillanas 66
11 Tremolo 72
12 Bulerias (i) 74
13 Bulerias (ii) 80
14 Farruca 86
15 Bulerias (iii) 94
16 Granadinas 99
17 Tientos 106
18 Zapateado 111
19 Solea por medio 115
20 Malaguenas 120
21 Tarantos 124
22 Solei 129
23 Alegrias en mi 134
24 Seguiriyas 140
25 Bulerias 146
26 Daily Exercises , 153
Appendix A Understanding Musical Notation 161
Appendix B Flamenco Scales and the Phrygian Mode 167
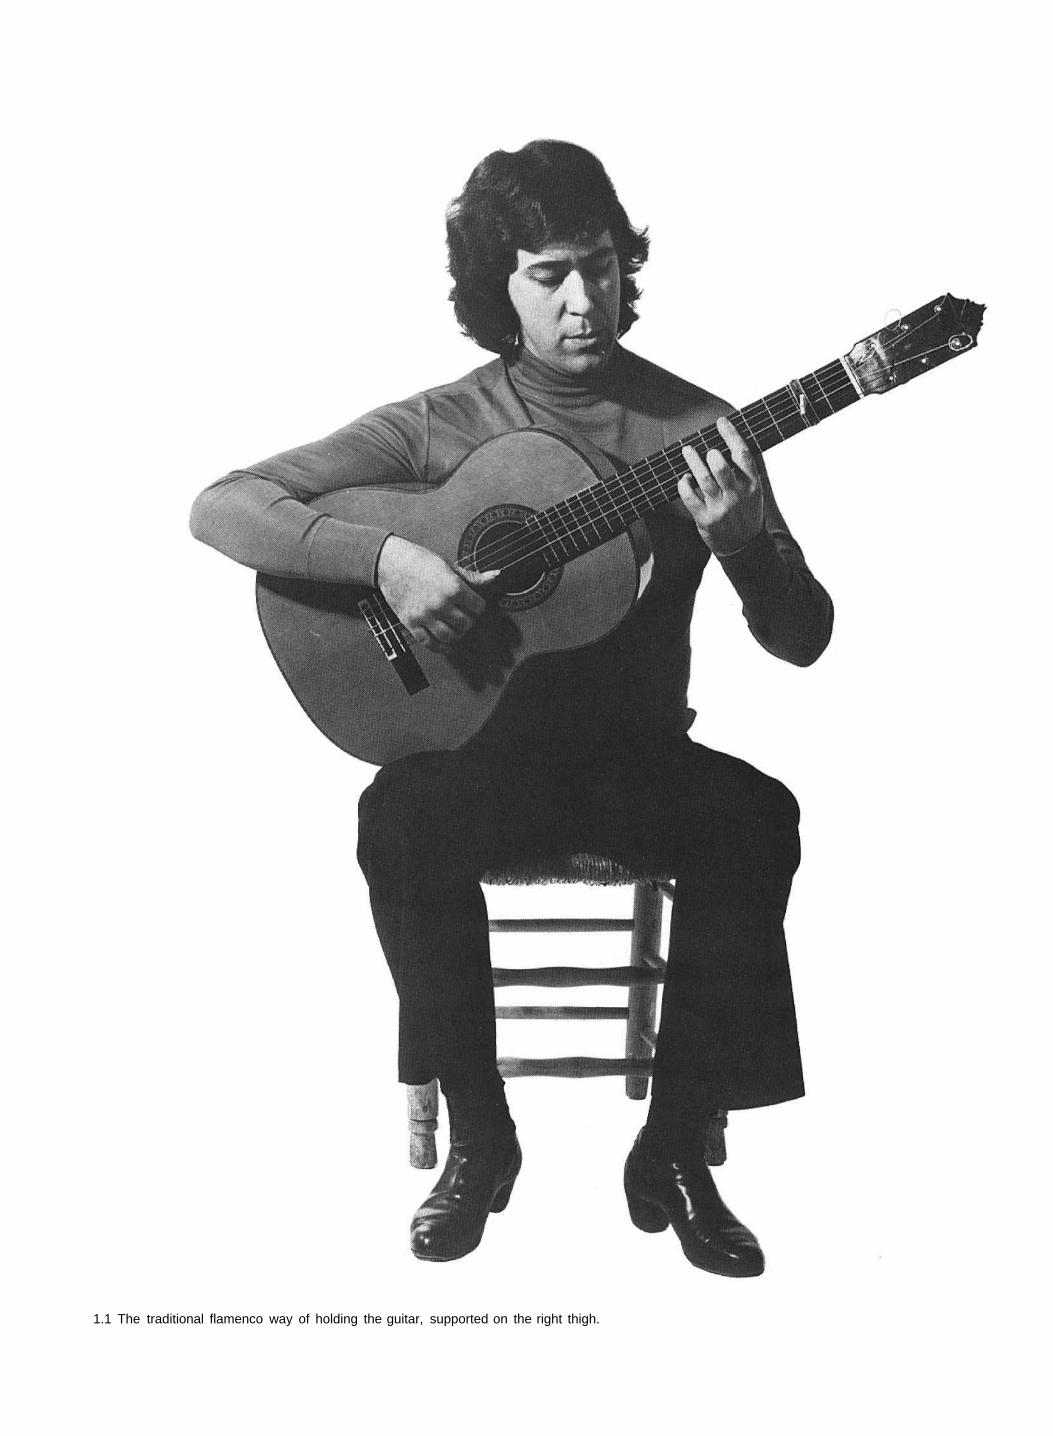
1.1 The traditional flamenco way of holding the guitar, supported on the right thigh.

LESSON 1 Getting Started
Tuning the guitar
The flamenco position
Introduction to rasgueo
A first-day solo
The musical illustrations recorded on thecassette follow the sequence of the printedtext. The symbol indicates points in thetext at which it is appropriate to switch onyour recorder to hear the next item on thetape. Each item is introduced by a briefannouncement on the recording and is alsonamed in the text.
In this first lesson we start by learning to tune the guitar. We then look at how to sit and hold the instrumentin the proper flamenco position, and from there you can quickly progress to playing flamenco rasgueos and ashort sequence of a Malaguena.
The only assumption at this point is that you have a Spanish type of guitar with nylon strings.
You do not need a special flamenco instrument to begin with, so the question of how to choose the right sortof guitar is left until further on in the book (p. 50 ). Buying an expensive guitar before you know what to look forand what sort suits you best can turn out to be a costly mistake. Better, therefore, to make a start with even avery modest instrument before you commit yourself to major expense.
If your guitar is not already fitted with golpeadores (tapping-plates) you will need to buy some self-adhesiveones from a guitar shop, but they are not necessary for the first lesson. Once fitted, they may not be removedeasily without risk of damage to the surface of the guitar.
Flamenco guitarists traditionally do not read music but learn by imitation and by ear. You, too, will not needto understand musical notation to learn the music in this book. Other simpler methods of representing the musicrecorded on the cassette will show you what to play. If you do want to learn notation, however, Appendix Acontains a brief introduction to the subject.
We begin by tuning the 5th string, which is the middle one of the three bass strings wound with a covering of wire,to the note A. This note is heard as a continuous tone at the very start of the cassette.
Adjust the machine-head or tuning-peg (see photo 1.2) tobring the 5th string to the right degree of tension, so that whenthe string is plucked it sounds exactly the same note as the Anote on the cassette. Once you have achieved this, you can usethe 5th string as the basis for tuning all the other strings, as isdescribed in detail on page 2.
At first you may find it difficult to be sure when two notes(initially the note on the cassette and the note of the 5th stringand, later, notes on different strings) are exactly the same.Practice, however, will make you more confident about doingthis accurately. If it sounds right then it probably is right.
The quickest method for tuning any string is to tighten itprogressively so that you always tune upwards in pitch towardsthe correct pitch, rather than downwards by slackening thestring. If you overtighten so that the string sounds sharp, thatis higher in pitch than the exact note you are aiming for, loosenit off just enough to let you approach the right note from alower (flat) pitch by tightening the string again.
7.2 Adjusting a tuning-peg. Right hand braces the neck of theguitar.
1
Tuning the guitar
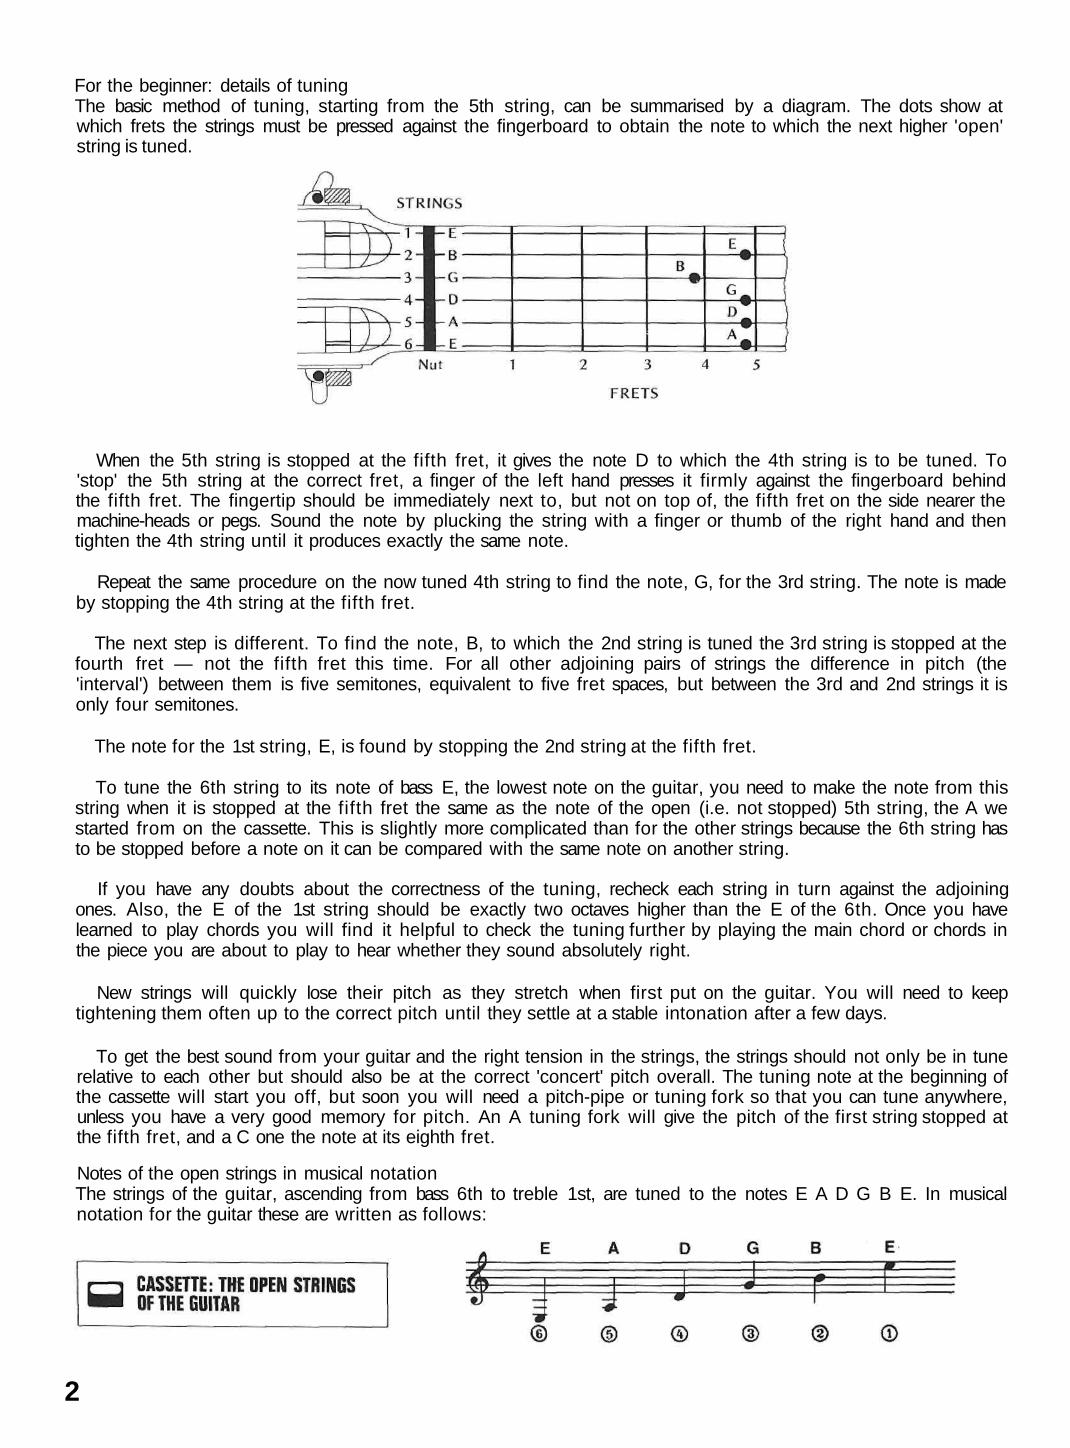
For the beginner: details of tuningThe basic method of tuning, starting from the 5th string, can be summarised by a diagram. The dots show atwhich frets the strings must be pressed against the fingerboard to obtain the note to which the next higher 'open'string is tuned.
When the 5th string is stopped at the fifth fret, it gives the note D to which the 4th string is to be tuned. To'stop' the 5th string at the correct fret, a finger of the left hand presses it firmly against the fingerboard behindthe fifth fret. The fingertip should be immediately next to, but not on top of, the fifth fret on the side nearer themachine-heads or pegs. Sound the note by plucking the string with a finger or thumb of the right hand and thentighten the 4th string until it produces exactly the same note.
Repeat the same procedure on the now tuned 4th string to find the note, G, for the 3rd string. The note is madeby stopping the 4th string at the fifth fret.
The next step is different. To find the note, B, to which the 2nd string is tuned the 3rd string is stopped at thefourth fret — not the fifth fret this time. For all other adjoining pairs of strings the difference in pitch (the'interval') between them is five semitones, equivalent to five fret spaces, but between the 3rd and 2nd strings it isonly four semitones.
The note for the 1st string, E, is found by stopping the 2nd string at the fifth fret.
To tune the 6th string to its note of bass E, the lowest note on the guitar, you need to make the note from thisstring when it is stopped at the fifth fret the same as the note of the open (i.e. not stopped) 5th string, the A westarted from on the cassette. This is slightly more complicated than for the other strings because the 6th string hasto be stopped before a note on it can be compared with the same note on another string.
If you have any doubts about the correctness of the tuning, recheck each string in turn against the adjoiningones. Also, the E of the 1st string should be exactly two octaves higher than the E of the 6th. Once you havelearned to play chords you will find it helpful to check the tuning further by playing the main chord or chords inthe piece you are about to play to hear whether they sound absolutely right.
New strings will quickly lose their pitch as they stretch when first put on the guitar. You will need to keeptightening them often up to the correct pitch until they settle at a stable intonation after a few days.
To get the best sound from your guitar and the right tension in the strings, the strings should not only be in tunerelative to each other but should also be at the correct 'concert' pitch overall. The tuning note at the beginning ofthe cassette will start you off, but soon you will need a pitch-pipe or tuning fork so that you can tune anywhere,unless you have a very good memory for pitch. An A tuning fork will give the pitch of the first string stopped atthe fifth fret, and a C one the note at its eighth fret.
Notes of the open strings in musical notationThe strings of the guitar, ascending from bass 6th to treble 1st, are tuned to the notes E A D G B E. In musicalnotation for the guitar these are written as follows:
2
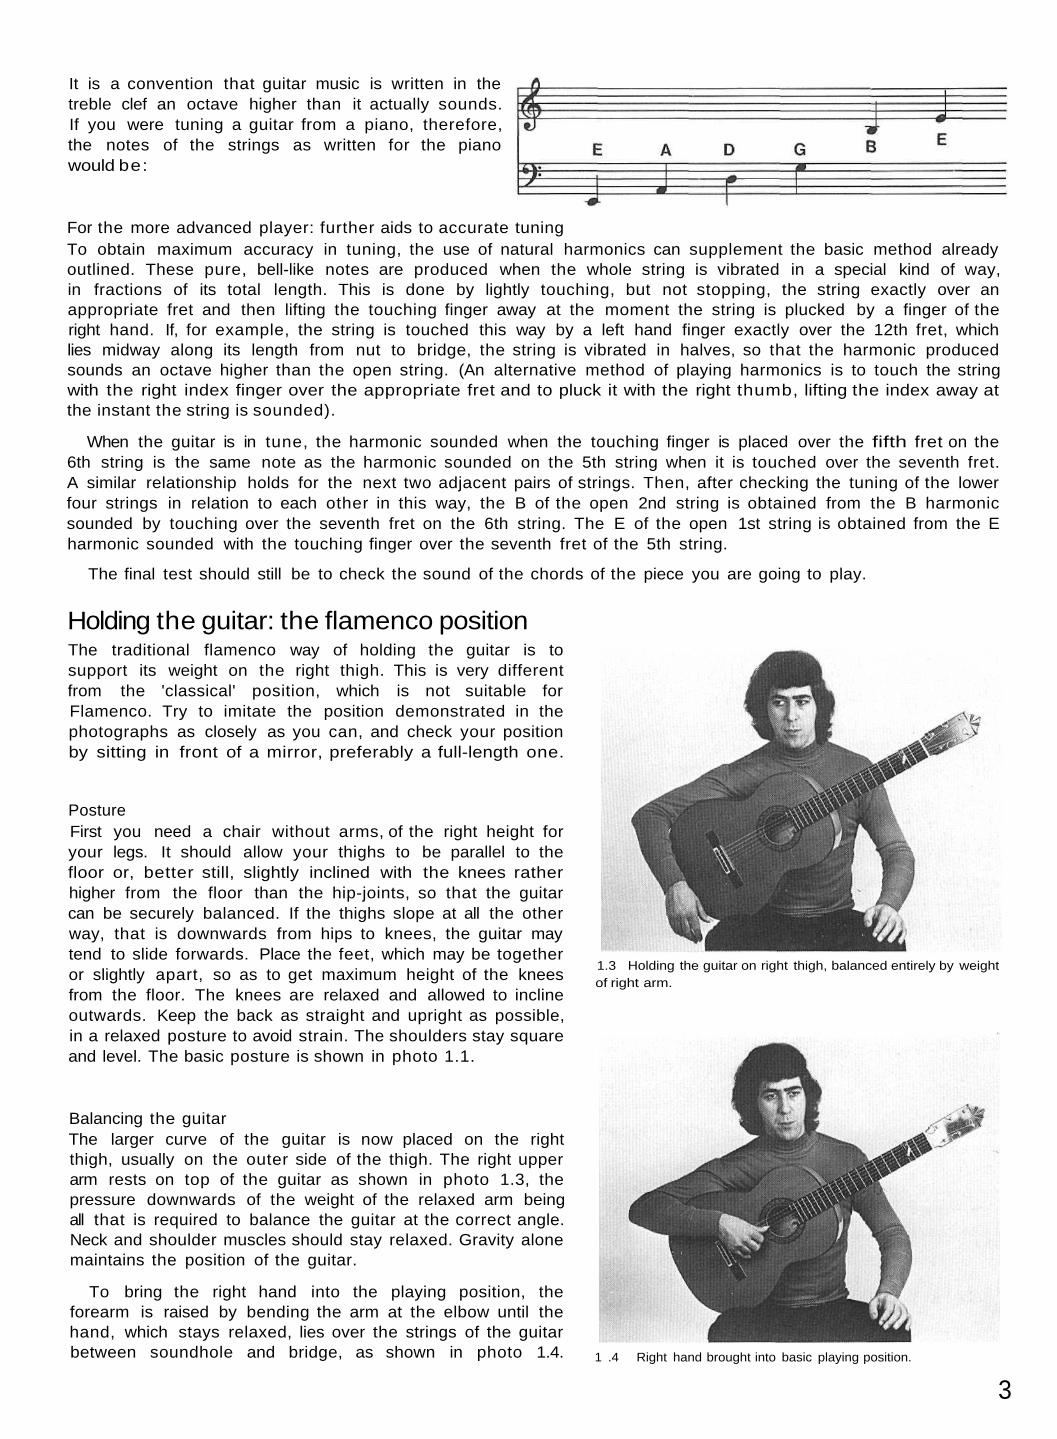
It is a convention that guitar music is written in thetreble clef an octave higher than it actually sounds.If you were tuning a guitar from a piano, therefore,the notes of the strings as written for the pianowould be:
For the more advanced player: further aids to accurate tuningTo obtain maximum accuracy in tuning, the use of natural harmonics can supplement the basic method alreadyoutlined. These pure, bell-like notes are produced when the whole string is vibrated in a special kind of way,in fractions of its total length. This is done by lightly touching, but not stopping, the string exactly over anappropriate fret and then lifting the touching finger away at the moment the string is plucked by a finger of theright hand. If, for example, the string is touched this way by a left hand finger exactly over the 12th fret, whichlies midway along its length from nut to bridge, the string is vibrated in halves, so that the harmonic producedsounds an octave higher than the open string. (An alternative method of playing harmonics is to touch the stringwith the right index finger over the appropriate fret and to pluck it with the right thumb, lifting the index away atthe instant the string is sounded).
When the guitar is in tune, the harmonic sounded when the touching finger is placed over the fifth fret on the6th string is the same note as the harmonic sounded on the 5th string when it is touched over the seventh fret.A similar relationship holds for the next two adjacent pairs of strings. Then, after checking the tuning of the lowerfour strings in relation to each other in this way, the B of the open 2nd string is obtained from the B harmonicsounded by touching over the seventh fret on the 6th string. The E of the open 1st string is obtained from the Eharmonic sounded with the touching finger over the seventh fret of the 5th string.
The final test should still be to check the sound of the chords of the piece you are going to play.
Holding the guitar: the flamenco positionThe traditional flamenco way of holding the guitar is tosupport its weight on the right thigh. This is very differentfrom the 'classical' position, which is not suitable forFlamenco. Try to imitate the position demonstrated in thephotographs as closely as you can, and check your positionby sitting in front of a mirror, preferably a full-length one.
PostureFirst you need a chair without arms, of the right height foryour legs. It should allow your thighs to be parallel to thefloor or, better still, slightly inclined with the knees ratherhigher from the floor than the hip-joints, so that the guitarcan be securely balanced. If the thighs slope at all the otherway, that is downwards from hips to knees, the guitar maytend to slide forwards. Place the feet, which may be togetheror slightly apart, so as to get maximum height of the kneesfrom the floor. The knees are relaxed and allowed to inclineoutwards. Keep the back as straight and upright as possible,in a relaxed posture to avoid strain. The shoulders stay squareand level. The basic posture is shown in photo 1.1.
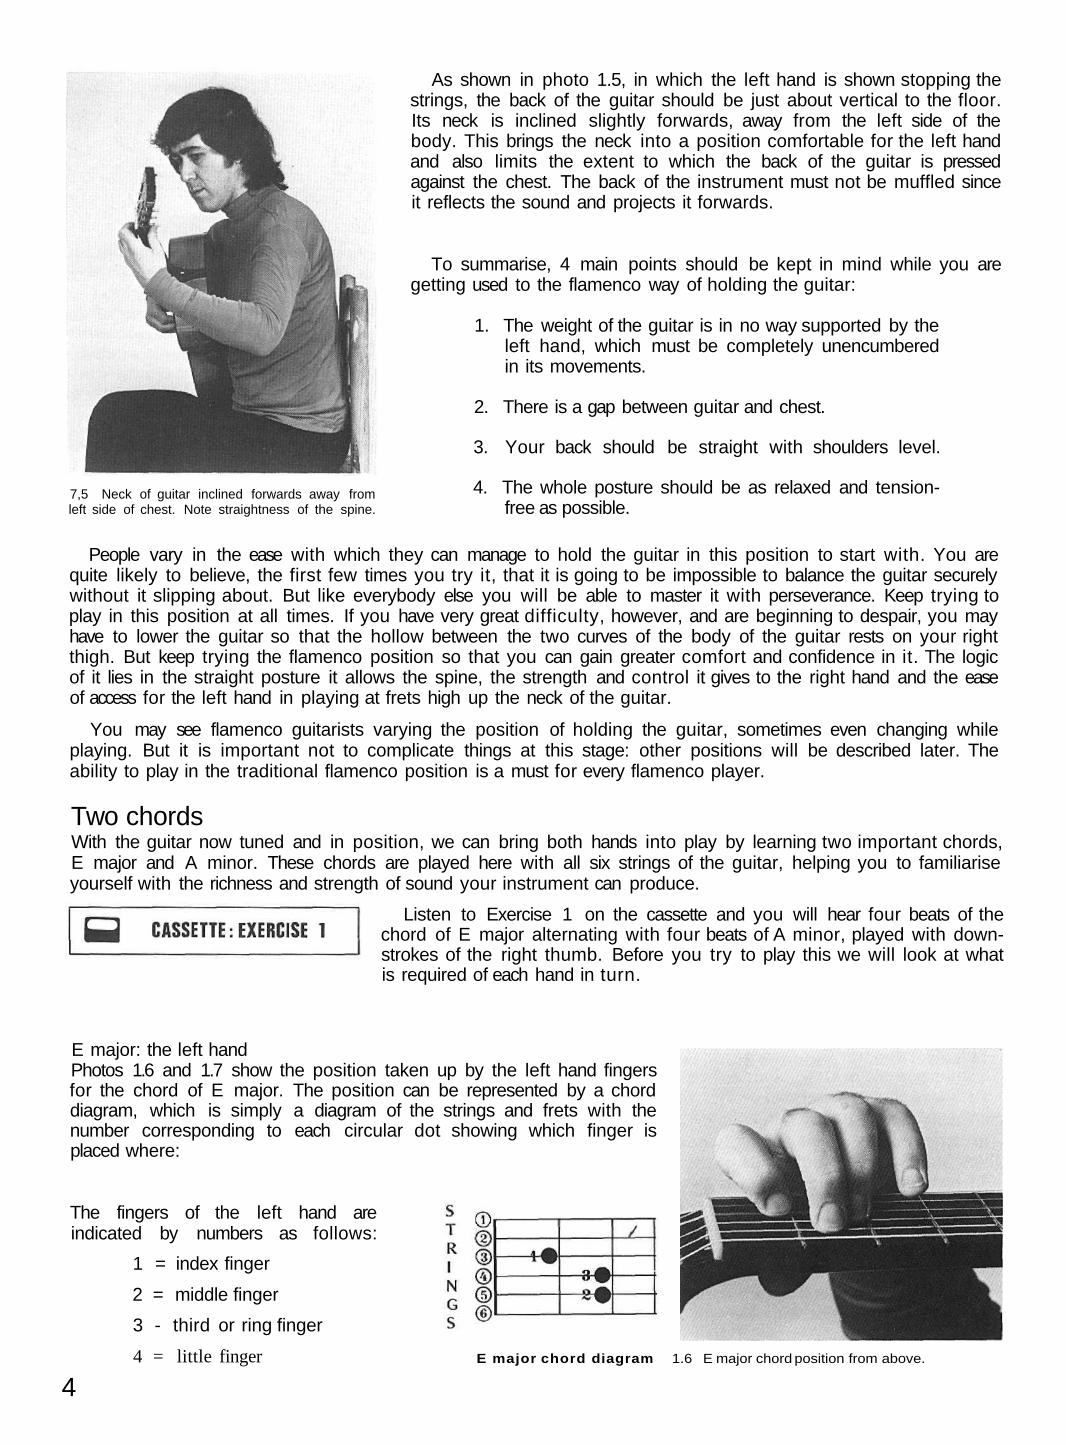
Balancing the guitarThe larger curve of the guitar is now placed on the rightthigh, usually on the outer side of the thigh. The right upperarm rests on top of the guitar as shown in photo 1.3, thepressure downwards of the weight of the relaxed arm beingall that is required to balance the guitar at the correct angle.Neck and shoulder muscles should stay relaxed. Gravity alonemaintains the position of the guitar.
To bring the right hand into the playing position, theforearm is raised by bending the arm at the elbow until thehand, which stays relaxed, lies over the strings of the guitarbetween soundhole and bridge, as shown in photo 1.4.
1.3 Holding the guitar on right thigh, balanced entirely by weightof right arm.
1 .4 Right hand brought into basic playing position.
3
7,5 Neck of guitar inclined forwards away fromleft side of chest. Note straightness of the spine.
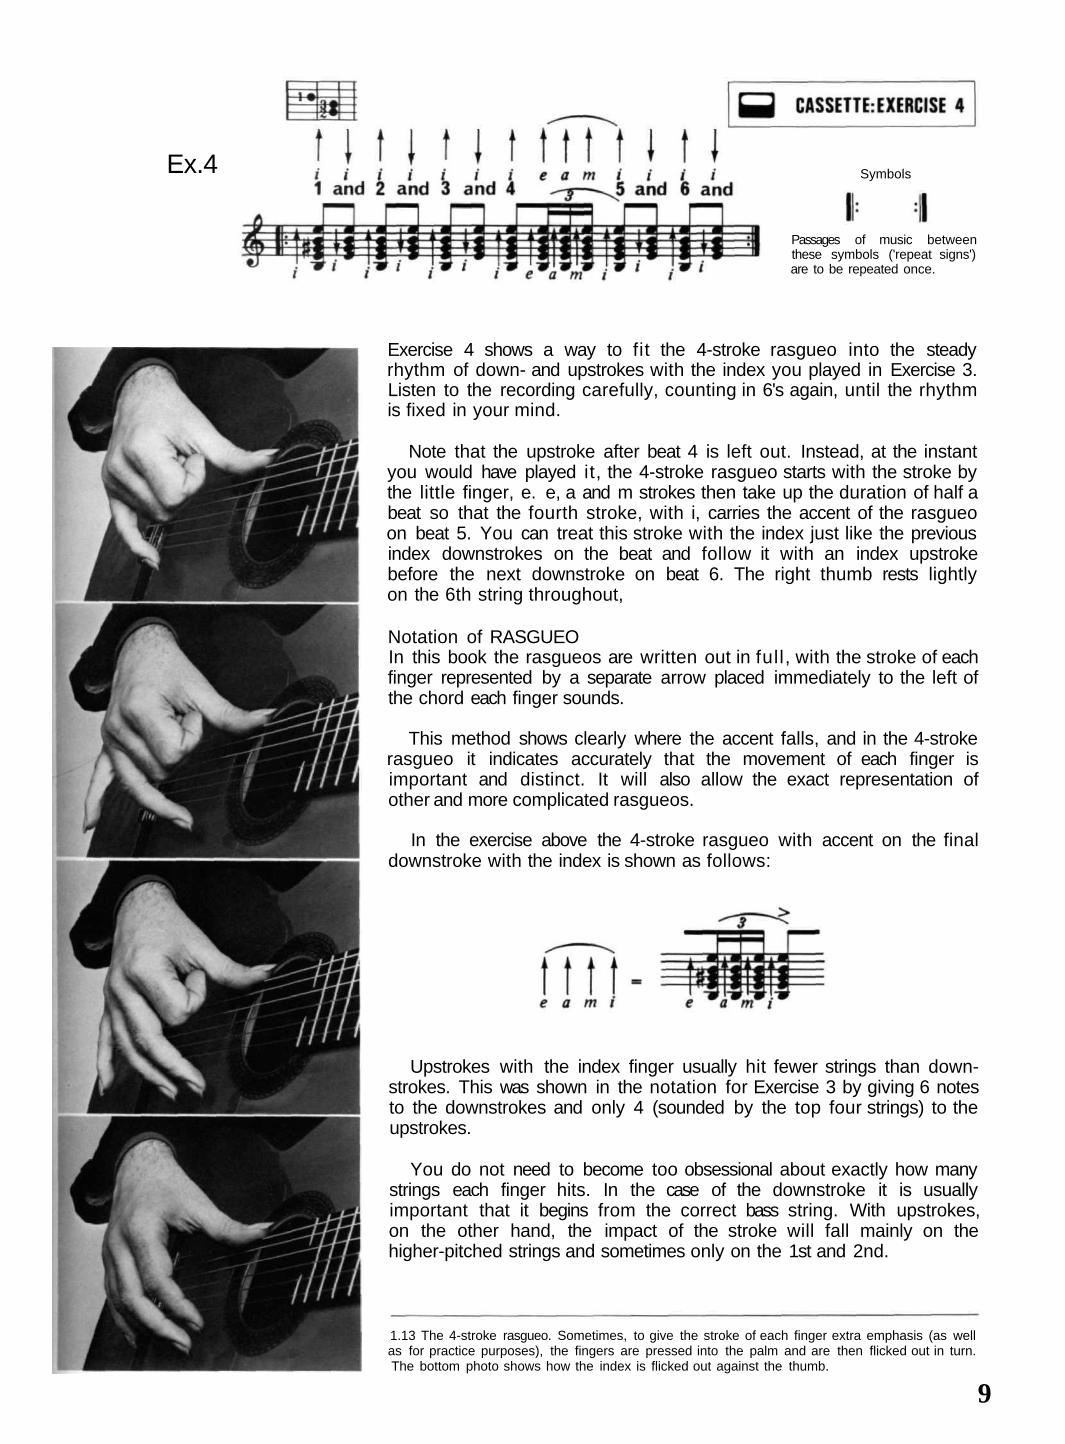
As shown in photo 1.5, in which the left hand is shown stopping thestrings, the back of the guitar should be just about vertical to the floor.Its neck is inclined slightly forwards, away from the left side of thebody. This brings the neck into a position comfortable for the left handand also limits the extent to which the back of the guitar is pressedagainst the chest. The back of the instrument must not be muffled sinceit reflects the sound and projects it forwards.
To summarise, 4 main points should be kept in mind while you aregetting used to the flamenco way of holding the guitar:
1. The weight of the guitar is in no way supported by theleft hand, which must be completely unencumberedin its movements.
2. There is a gap between guitar and chest.
3. Your back should be straight with shoulders level.
4. The whole posture should be as relaxed and tension-free as possible.
People vary in the ease with which they can manage to hold the guitar in this position to start with. You arequite likely to believe, the first few times you try it, that it is going to be impossible to balance the guitar securelywithout it slipping about. But like everybody else you will be able to master it with perseverance. Keep trying toplay in this position at all times. If you have very great difficulty, however, and are beginning to despair, you mayhave to lower the guitar so that the hollow between the two curves of the body of the guitar rests on your rightthigh. But keep trying the flamenco position so that you can gain greater comfort and confidence in it. The logicof it lies in the straight posture it allows the spine, the strength and control it gives to the right hand and the easeof access for the left hand in playing at frets high up the neck of the guitar.
You may see flamenco guitarists varying the position of holding the guitar, sometimes even changing whileplaying. But it is important not to complicate things at this stage: other positions will be described later. Theability to play in the traditional flamenco position is a must for every flamenco player.
Two chordsWith the guitar now tuned and in position, we can bring both hands into play by learning two important chords,E major and A minor. These chords are played here with all six strings of the guitar, helping you to familiariseyourself with the richness and strength of sound your instrument can produce.
Listen to Exercise 1 on the cassette and you will hear four beats of thechord of E major alternating with four beats of A minor, played with down-strokes of the right thumb. Before you try to play this we will look at whatis required of each hand in turn.
E major: the left handPhotos 1.6 and 1.7 show the position taken up by the left hand fingersfor the chord of E major. The position can be represented by a chorddiagram, which is simply a diagram of the strings and frets with thenumber corresponding to each circular dot showing which finger isplaced where:
The fingers of the left hand areindicated by numbers as follows:
1 = index finger
2 = middle finger
3 - third or ring finger
4 = little finger E major chord diagram 1.6 E major chord position from above.
4

The E major chord can be represented in musical notation as follows:Numbers alongside the dots of the notes again show whichfinger of the left hand stops a string to make the corre-sponding note. The O's indicate that the notes which they areadjacent to are made on open strings.
Try to copy the way the fingers are placed in the photos,noting, if you can, the points mentioned in the caption.
Watching the left hand fingersTo place the fingers of the left hand behind the correct frets when you havethe guitar in position you will need to look at them over the top of theguitar. There will be a temptation to pull the left hand nearer your body inorder to get a better view, but you should resist this, since it will bring theback of the guitar against the chest. The plane of the front surface of theguitar stays upright or nearly so. See photo 1.5.
The right handTo sound the chord, strike firmly downwards towards the floor across thestrings with a deliberate sweep of the right thumb. The fleshy edge of thetip of the thumb contacts all six strings in rapid succession. The movementof the thumb is shown in photos 1.8 (a) and (b).
Repeat the movement to produce a slow steady rhythm.
1.8 (left) Downwards sweep of the thumb acrossall six strings.
(a) start of stroke.(b) end of stroke.
A minorPhoto 1.9 shows the position of the left hand fingers for the chord of Aminor, shown in chord-diagram form as:
and in notation as:
A minor chord diagram
You will see that the fingers are in exactly the same formation relative toeach other as in the preceding chord of E major. The only difference is thatthey stop strings 4, 3 and 2 instead of 5, 4 and 3.
Sound the chord with downstrokes of the thumb, repeating them inrhythm as before. 1.9 Chord position of A minor.
7.7 (above) Left hand position for E major chord.Fingers 1, 3, 2 stop the strings. The fingertips areclose to the frets without pressing down on lop ofthem and are nearly at right angles to the fret board.The knuckles of the left hand are parallel to theedge of the fretboard. The wrist is in a relaxedposture.
5

Changing chordsHaving learned to play the chords of E major and A minor, your next step is to be able to change smoothly fromone to the other.
Start by playing repeated thumbstrokes on the E major chord in a slow and regular rhythm. Beating time withyour left foot will help to keep the rhythm even. When you have got the rhythm going steadily, move all three lefthand fingers holding down the chord across together to take up the position of the A minor chord. The fingersmove as one since, as already noted, the two chords use the fingers in identical formation. You will need to playvery slowly at first so that there is no detectable delay in the rhythm as you change chords.
Having changed to A minor, keep the rhythm going as before with the thumbstrokes and then, when you feelready for it, change back to E major, again without holding up the pulse of the rhythm. Keep doing this again andagain until you can change chords easily.
You can now proceed to play Exercise 1, which is simply four beats of E major alternating with four of A minor.Counting aloud will help you make the change-over at the right moments. Written out in chord diagrams andnotation, Exercise 1 looks like this:
Some symbolsTo Indicate the kind of thumbstroke just described, the exercise above uses the symbol
A stroke by thumb or finger of the right, hand moving from bass to treble downwards towards the floor is calleda 'downstroke' and is shown by an arrow, . In notation the arrow refers to the chord which immediately followsit. An arrow in the opposite direction, , is a stroke from treble to bass, an 'upstroke'.
At first sight, you might think that these arrows look thewrong way round, but you will easily avoid any confusion byrelating them to the guitar, as shown in the diagram (right).
The arrows are drawn the way they are because of the order inwhich the strings are struck: in notation the higher notes arenearer the top of the page than the lower.
A wavy arrow, , means that the chord is played in a spread-out way, with the individual strings heard in quick succession.The straight arrow is used where the stroke is made so rapidlythat the sound is a single beat.
1.10 Symbols for the fingers of right and left hands.
The letter beneath each arrow shows whichfinger of the right hand makes the stroke. Hereit is p for pa/gar (thumb).
Other letters used in the book are:
a for anular (ring or 3rd finger)
m for medio (middle or 2nd finger)
i for indice (index or 1st finger)
e for menique (little or 4th finger)
p, a, m and i are standard symbols widely usedin guitar music. Use of the 4th finger (inrasgueos) is special to Flamenco and there is nostandard symbol.
DOWNSTROKE
6

Introducing RASGUEOSwitch on the cassette to listen to Exercises 2, 3 and 4. Thesedemonstrate your next objective, which is to play the E major chordusing flamenco 'rasgueo', the exciting sound most characteristic ofthe flamenco guitar. The exercises will be discussed step by step.
The word 'rasgueo', which embraces all strumming techniques using one or more fingers of the right hand, ispronounced 'rachayo' in the language of Flamenco, with the 'ch' guttural as in the Scottish 'loch'. 'Rasgueado'(from the verb rasguear) is an alternative term.
Here we meet two of the commonest kinds of rasgueo, the single stroke with the index finger and the longerroll of the 4-stroke rasgueo.
Index finger RASGUEO(i) Downstrokes. Place the right hand in the position shown in photo 1.11 (a), with the thumb resting lightly besidethe sound-hole of the guitar on the rosette. This stabilises the hand, which stays relaxed. Flex the index finger fromthe knuckle so that its nail nearly touches the base of the thumb. From this position flick it forwards, strikingdownwards across all six strings to reach the position shown in photo 1.11(b). The movement is as if you wereflicking a small object lying on the 6th string across the strings to just beyond the 1st. Do it quite gently to startwith. The line of movement of the stroke is straight across the strings, at right angles to them.
Do it again and again in a slow steady rhythm, beating time with your foot. With practice you will achieve ashorter, crisper sound. Exercise 2 can now be written as follows; count the rhythm aloud in 6's this time ratherthan 4's.
Ex.2
etc.
(ii) Upstrokes. Once you have started the rhythm going steadily with downstrokes of the index finger you canbegin to introduce upstrokes after each downstroke. On each upstroke the index flicks back towards its positionat the start of the downstroke [shown in 1.11 (a)], hitting the higher-pitched strings so that only the first four(strings 1, 2, 3 and 4) are sounded. You should try to get a 'spring' in the movement in order to give crispnessand an elastic sort of 'bounce' to the rhythm of alternate down- and upstrokes heard in Exercise 3 and written as:
E major
Ex.3
etc.
1.11 Index finger downstroke — thumb rest-ing on rosette of guitar (for index strokeacross all six strings).
(a) start of stroke,(b) end of stroke.
7

The 4-stroke RASGUEOThis very important technique (shown in sequence in photos 1.12 and 1.13) consists of a rapid succession of down-strokes by the four fingers of the right hand, in the order e, a, m, i. The hand position is the same basic positionshown in 1.11, except that the thumb now rests on the sixth string without touching the front surface of theguitar, instead of resting on the rosette. The thumb adopts this position to stabilise the hand in playing rasgueowhen, as here, only the top five strings are to be sounded.
The fingers are first flexed so that they nearly, but not quite, touch the palm. Each finger in turn is uncurled sothat it hits the strings, brushing downwards across them with the same sort of movement just described for theindex downstroke. You can start by doing this slowly and gently. Try to get an even succession of strokes by thefour fingers so that each is heard distinctly. Each finger moves independently of the others and you should try togive each equal force, although this will be hard initially with e and a. Resist any temptation to push downwardswith the whole hand so that the fingers arc dragged across the strings. Hand and wrist are stationary and veryrelaxed.
1.12 The 4-stroke rasgueo. Thumb resting on6th string.Upper row (from left to right)
- starting position- after stroke with e- after stroke with a
Lower row- after stroke with m- after stroke with i.
Practising the 4-stroke RASGUEO without a guitarYou can build up facility and strength by practising this rasgueo at any time, at home, at work, on the bus. To dothis, flex the fingers so that their nails do actually press into the palm of the right hand, then flick each outseparately in the order e a m i against the resistance provided by the ball and base of the thumb. Alternatively youcan balance the thumb on the top or edge of a table, the side of your thigh, your seat on the bus, and then use thesurface or edge as the resistance against which you flick the fingers.
The important thing is to learn to control each finger at a time, making the separate stroke of each equallypowerful. With continued practice you should be able to repeat the sequence e a m i e a m i etc. in a smooth un-broken rhythm without pause between the i of one rasgueo and the e of the next. Once you can do this you havethe basis for longer or continuous rolls on the guitar.
8
Ex.4 Symbols
Passages of music betweenthese symbols ('repeat signs')are to be repeated once.
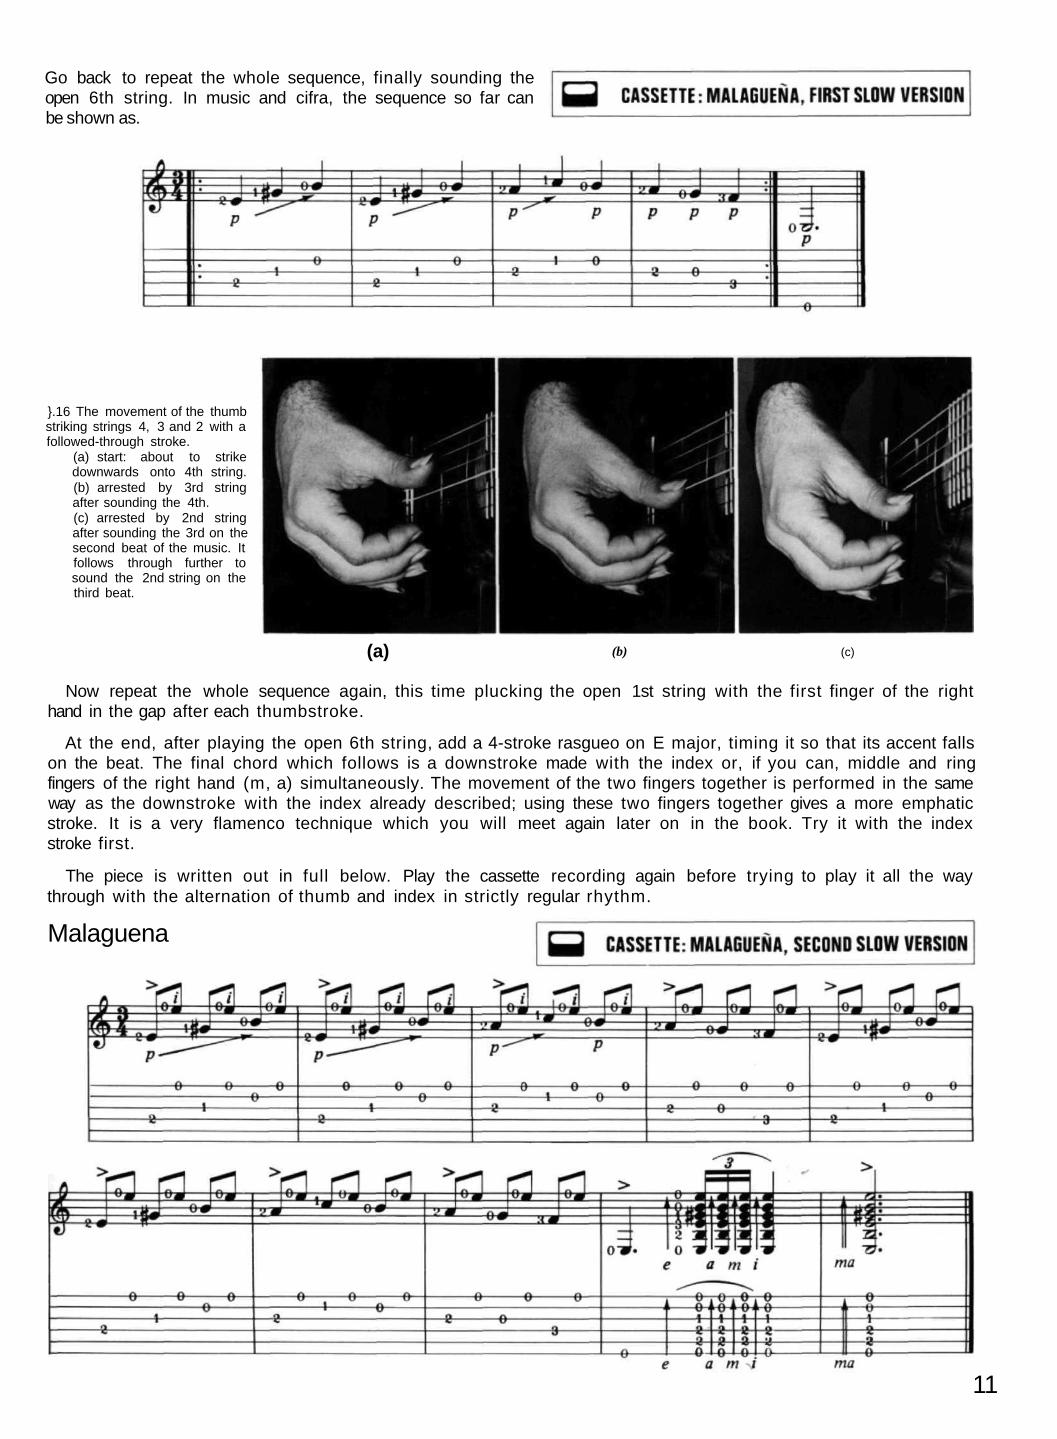
Exercise 4 shows a way to fit the 4-stroke rasgueo into the steadyrhythm of down- and upstrokes with the index you played in Exercise 3.Listen to the recording carefully, counting in 6's again, until the rhythmis fixed in your mind.
Note that the upstroke after beat 4 is left out. Instead, at the instantyou would have played it, the 4-stroke rasgueo starts with the stroke bythe little finger, e. e, a and m strokes then take up the duration of half abeat so that the fourth stroke, with i, carries the accent of the rasgueoon beat 5. You can treat this stroke with the index just like the previousindex downstrokes on the beat and follow it with an index upstrokebefore the next downstroke on beat 6. The right thumb rests lightlyon the 6th string throughout,
Notation of RASGUEOIn this book the rasgueos are written out in full, with the stroke of eachfinger represented by a separate arrow placed immediately to the left ofthe chord each finger sounds.
This method shows clearly where the accent falls, and in the 4-strokerasgueo it indicates accurately that the movement of each finger isimportant and distinct. It will also allow the exact representation ofother and more complicated rasgueos.
In the exercise above the 4-stroke rasgueo with accent on the finaldownstroke with the index is shown as follows:
Upstrokes with the index finger usually hit fewer strings than down-strokes. This was shown in the notation for Exercise 3 by giving 6 notesto the downstrokes and only 4 (sounded by the top four strings) to theupstrokes.
You do not need to become too obsessional about exactly how manystrings each finger hits. In the case of the downstroke it is usuallyimportant that it begins from the correct bass string. With upstrokes,on the other hand, the impact of the stroke will fall mainly on thehigher-pitched strings and sometimes only on the 1st and 2nd.
1.13 The 4-stroke rasgueo. Sometimes, to give the stroke of each finger extra emphasis (as wellas for practice purposes), the fingers are pressed into the palm and are then flicked out in turn.The bottom photo shows how the index is flicked out against the thumb.
9

Exercise 5 uses exactly the same right hand movements as the preceding exercise,but combines it with the left hand chord change of Exercise 1, 6 beats of E majoralternate with 6 of A minor. Again, there should be no interruption in the rhythmas you change chords from one to the other.
C I F R A : Besides being written in notation, Exercise 5 is shown in cifra (Spanish for 'cipher'). This method oftablature will be used throughout the book as an alternative to conventional musical notation for those who do notread music and as a supplement for those who do.
The six horizontal lines represent the six strings of the guitar, as shown by the numbers at their left hand ends.The numbers on the lines are those of the frets (not the fingers) behind which the strings are to be stopped byfingers of the left hand. In order to find which finger is used you can refer to the numbers alongside the notes inthe notation above, but they can, in any case, be worked out from the way the frets required fall most naturallyunder the fingers. A nought, 0, indicates that the string is played open.
The value of the cifra system will become clearer in the next piece.
The notation of time-valuesThe duration of individual notes in the music can be heard from the cassette. Time-values are indicated in themusical notation but they have not been duplicated in the cifra in order not to clutter the page. The right handfingering for strokes of rasgueos, however, is indicated in both the notation and the cifra.
A first-day solo: MalaguenaWith the chords of E major and A minor as the basis, it is easy to play a theme from the traditional flamencosong of Malaga, the Malaguena. Play the piece first on the cassette before we examine it step by step.
The recording is of the whole piece played at fullspeed first, followed by two much slower renderingsto help you learn its structure.
The first step is to play the basic melody with the thumb on 4th, 3rd and 2nd strings.Start by placing the first and second fingers of the left hand in position on just 3rdand 4th strings for a chord of E major, as shown on the right:The right thumb now sounds the 4th, 3rd and 2nd strings insequence. Its movement is a single downward stroke whichsounds the 4th string, pauses momentarily after coming to restagainst the 3rd string, then follows through to sound the 3rdstring and then the 2nd string after a similar pause. Repeatthese three notes once, as follows: E major
1.14 Left hand position for E majorchord using top 4 strings only.
The inclined arrow pdenotes a folio wed-throughstroke by the thumb, hittingin turn an ascending sequenceof strings.
Next, move the left hand fingers to an A minor position onstrings 2 and 3.
Strike these two strings with a single stroke and follow-through of the thumb as before. Then with the thumb strikeeach of the following notes in turn: open 2nd string (afterlifting the 1st finger), 3rd string stopped by 2 at the secondfret, open 3rd string {after lifting the second finger), then4th string stopped by 3 at the 3rd fret.
A minor 1.15 A minor on top 3 strings.
10
Ex.5
Go back to repeat the whole sequence, finally sounding theopen 6th string. In music and cifra, the sequence so far canbe shown as.
}.16 The movement of the thumbstriking strings 4, 3 and 2 with afollowed-through stroke.
(a) start: about to strikedownwards onto 4th string.(b) arrested by 3rd stringafter sounding the 4th.(c) arrested by 2nd stringafter sounding the 3rd on thesecond beat of the music. Itfollows through further tosound the 2nd string on thethird beat.
(a) (b) (c)
Now repeat the whole sequence again, this time plucking the open 1st string with the first finger of the righthand in the gap after each thumbstroke.
At the end, after playing the open 6th string, add a 4-stroke rasgueo on E major, timing it so that its accent fallson the beat. The final chord which follows is a downstroke made with the index or, if you can, middle and ringfingers of the right hand (m, a) simultaneously. The movement of the two fingers together is performed in the sameway as the downstroke with the index already described; using these two fingers together gives a more emphaticstroke. It is a very flamenco technique which you will meet again later on in the book. Try it with the indexstroke first.
The piece is written out in full below. Play the cassette recording again before trying to play it all the waythrough with the alternation of thumb and index in strictly regular rhythm.
Malaguena
11

The basic element of rhythm in Flamenco is called the compass word which literally means 'compass' and hencea 'measure' of music. Each compas is a recurring pattern of accented beats which gives the regular pulse of therhythm its impetus and metrical form. Different kinds of compas have different patterns.
Repeated again and again, the patterns create that vital pulsation in the rhythms of Flamenco which is like aheart-beat, bringing to life their expressiveness and excitement. If you can learn, even from your very first stepswith the guitar, to aim for a profound understanding of the various types of compas, then you can soon begin togenerate the rhythmic impetus on which so much of Flamenco depends. Establish a sense of the compas deepwithin you and the guitar will come alive in your hands: ignore it or lose the pulse of it and the music dies at once.Without a real understanding of the compas a guitarist can learn to do many clever and even very difficult thingson the guitar, but his playing will never come to life as Flamenco. He may 'understand' the compas in the sensethat he knows the theory about the ways the beats of the rhythm are structured and accented in different kindsof pattern, but a feeling for the compas ultimately demands something much more than an intellectual awarenessif one is to communicate its physical energy and momentum. It has to become a part of one's whole being, aninner bodily sense that is translated into musical expression through the movements of the hands and the fingers.This kind of physical identification with the rhythms of Flamenco comes fairly readily to some people. Moreoften, however, it has to be worked for with patient persistence by continual self-awareness as one plays and byabsorbing as much Flamenco as one can, in all its forms.
The ability to play the compas strictly and unerringly is the main yardstick by which all a guitarist's efforts willbe appraised by the expert. You may be sure that the aficionado (devotee) of Flamenco will quickly dismiss yourplaying as being of little interest if you play fuera de compas, (out of compas), no matter how elaborate and speedyyour technique.
To play a compas (in compas}, then, has two inseparable components. The rhythm must generate a compellinglyregular pulse to it, the kind of impetus that makes the listener want to move in time to the music. Also, theaccentuation of beats and the number of beats in each musical phrase must at all times fit the characteristic patternof the particular rhythmic form being played. These different forms are called toques and we shall meet the mostcentral of them, the Soleares, in Lesson 2. The compas is strictly adhered to not only in the passages of rhythmicstrumming (rasqueo) but also in the passages of melody which are called falsetas.
Elements of Flamenco 1 Compas The GuitarCOMPAS
12
The flamenco guitar shares many points of similarity in construction with the 'classical' Spanish guitar, but thereare important differences. The sides and back are of light-coloured Spanish cypress rather than the dark pah santo(Brazilian rosewood) of the finest classical models. This, combined with slightly different wood thicknesses,internal strutting and dimensions, gives the flamenco guitar its characteristic tone, a more penetrating brilliance andvibrancy of response compared to the mellower resonance of the classical guitar.
Instead of machine-heads for tightening the strings, the flamenco guitar traditionally has pegs of ebony or,sadly more common now, rosewood or other more easily worked hardwoods. Many flamenco guitars today havemachine-heads, both because of their ease of fitt ing and because of their simplicity for tuning, but some playersstill prefer pegs: they are lighter in weight and more durable, and some claim that they impart a more flamencotone.
The tapa or soundboard of the guitar, as in the classical instrument, is made of close-grained German spruce(pinabete) or nowadays often Canadian cedar. The neck is of cedar or hardwood and the fingerboard of ebony.The bridge is palo santo. Nut and bridge-saddle are of bone and in Spanish are called the huesos (bones).
The flamenco guitar is fitted with golpeadores or tapping-plates which protect the delicate surface of the tapafrom the fingernails and thumb of the right hand. Today these are of transparent plastic but opaque white plasticor mother of pear! were formerly the rule. Polyurethane lacquers, often tinted deep orange in colour, are widelyused to give a strong and brilliant gloss finish to the body and neck, but some makers still prefer the older andless robust spirit varnishes which often give the guitar a much paler colouring.
The 'action' and response of the flamenco guitar are faster than on the classical guitar, and these are furtherfactors which contribute to its special capacity for a ringing brilliance of tone and attack. The strings lie closer tothe fingerboard both because the bridge is shallower and because the fingerboard is inclined in the portion ofoverlying the tapa.
A recent innovation is the 'guitarra negra', an instrument with sides and back of palo santo which is otherwiseconstructed to flamenco specifications. Though popular with flamenco soloists because of its big tone and carryingpower, it lacks the brightness and earthy intensity of the traditional instrument.
The flamenco guitar
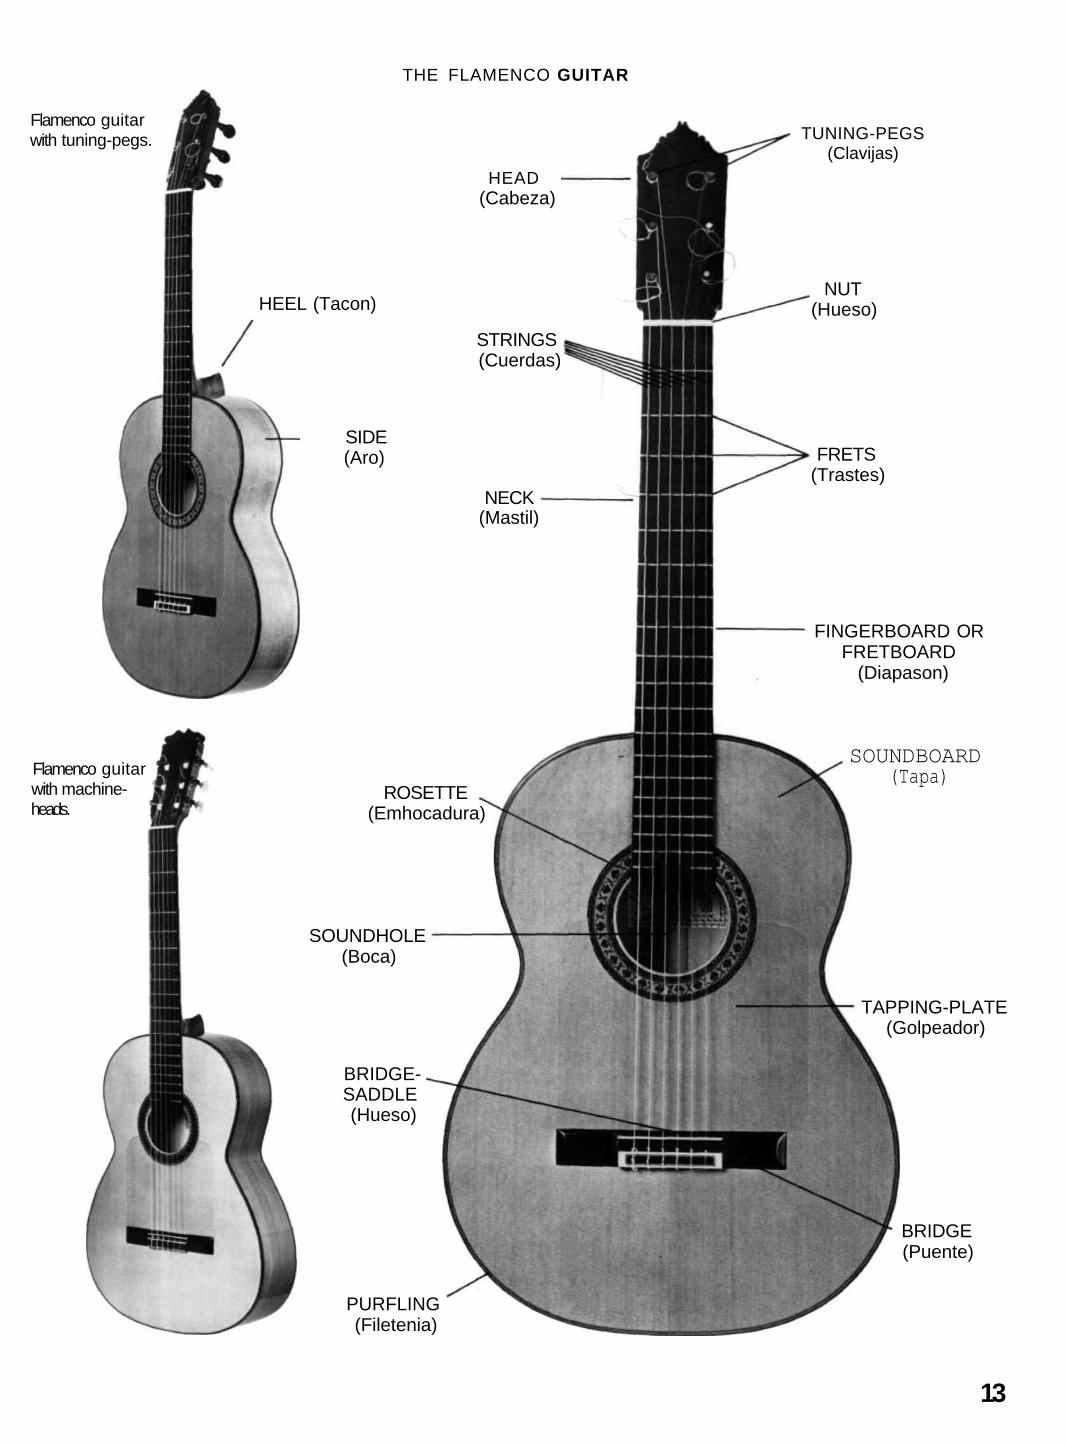
THE FLAMENCO GUITAR
Flamenco guitarwith tuning-pegs.
Flamenco guitarwith machine-heads.
HEAD(Cabeza)
HEEL (Tacon)
STRINGS(Cuerdas)
SIDE(Aro)
NECK(Mastil)
ROSETTE(Emhocadura)
SOUNDHOLE(Boca)
BRIDGE-SADDLE(Hueso)
TUNING-PEGS(Clavijas)
NUT(Hueso)
FRETS(Trastes)
PURFLING(Filetenia)
FINGERBOARD ORFRETBOARD
(Diapason)
SOUNDBOARD(Tapa)
TAPPING-PLATE(Golpeador)
BRIDGE(Puente)
13

StringsThe three lower strings of the flamenco guitar, the 'basses', i.e. 6th, 5th and 4th, are made of nylon floss woundwith fine metal wire. The third (G) string is of plain nylon filament or may be nylon floss wound with nylonfilament; the latter type is thicker and its sound tends to have longer 'sustain', but it wears out more quickly thanthe plain filament. The second string may be similarly covered with a winding of nylon, though it is usually plain.The first string is nearly always of plain nylon filament but one or two brandsprovide a covered first. Some makes of plain nylon strings have a smooth surface.Others are slightly opaque and rougher to the touch from being milled to providea perfectly round cross-section and more even intonation.
Normal and high tension strings are suitable for the flamenco guitar and indi-vidual tastes differ. Sometimes you may find it best to combine trebles of onetension with basses of a different tension in order to obtain the best balance ofsound and action from your guitar. There are excellent strings by Savarez, Darco,La Bella and D'Addario to choose from. After extensive experiment and withthe collaboration of John D'Addario a special set of flamenco strings has beenproduced, called 'JUAN MARTIN FLAMENCO DE CONCIERTO'. These stringscan definitely give a flamenco quality to even a dull-sounding guitar.
Care of the guitarWhen not in use the guitar should be protected by a rigid, well-fitting case. It is a good idea to leave the guitar outof its case a little at times to let it 'breathe'. Extremes of temperature and humidity must be avoided. Central-heating can be very damaging to guitars and if the guitar has to be kept in a centrally heated room, humidificationof the air is strongly advisable to avoid the risk of cracking and warping. This is especially likely to occur if theguitar is made of inadequately seasoned wood. The great guitarreros use wood that is many years old to ensure thatit is fully dried out, but cheaper instruments are often made of much more recently felled timber.
After use, a duster or soft cloth should be used to wipe the strings and can be used with care on the woodensurfaces. Do not use polishes or other potions, otherwise the delicate finish of the guitar may suffer and the woodmay absorb them. A very slightly moistened cloth should be capable of removing grease spots and other marks.
Small cracks in the face or sides of the wood may be of little consequence. They are not uncommon in fineguitars which have been much played. Before they attain considerable size, however, the attention of a skilledrepairer should be sought. Any warping of the fingerboard is of much more serious import and will demand expertand costly repair.
Care of the stringsCleaning the strings by wiping with a cloth after playing prevents early deterioration from perspiration. Coveredstrings may be given prolonged life if they are reversed end to end when their brilliance begins to fade. One canwash strings to give them a still longer life but their recovery is so short-lived after this procedure as to be hardlyworthwhile.
When the strings are changed it is essential to do this one at a time so that the tension of the soundboard is notleft slackened off for long periods. It is a useful idea, however, occasionally to slacken off all the covered strings(but not the plain trebles) for brief periods of perhaps up to five minutes and then to tighten them again afterwiping the strings with a cloth; this procedure gives the tone renewed brilliance.
The left-handed playerIt might seem logical for the left-handed player to reverse the hand positions and order of stringing of the guitarso that he strikes the strings with the left hand. This has to be an individual decision, but it must be rememberedthat if a high quality guitar is going to be wanted one day, it may need to be made specially. This is because theinternal construction of the tapa is not fully symmetrical and interchanging the treble and bass strings on a normalright-handed instrument will spoil the tone.
The CEJILLAThe cejilla is a device which is fixed across the, strings to raise their pitch. It effectively acts as a movable nutwhich stops the strings when tightly fixed immediately behind a fret. Originally used to allow the guitar tuning tobe adjusted easily to the key of the singer's voice in the Cante, it is now used for almost all performances ofFlamenco to give added brightness to the guitar by pitching it in a higher key.
For solo playing the cejilla is usually placed at a fret between 1 and 4, commonly at the 2nd fret. Fret-positionsfor the cejilla higher than 4 should generally only be used for accompaniment.
In order to develop strength and technical facility in the left hand it is advisable to practise exercises withoutthe cejilla in place; the hand has to work harder, especially in the stretch, in the first position than in the higherpositions.
14

Two main types of cejilla are available. The traditional form is made of hardwood, often finely carved anddecorated. It is tied down by means of a nylon string which is wound round a wooden peg inserted in a hole inthe wooden cross-piece. The neck of the guitar is protected from the pressure of the string by a leather thongattached to the cross-piece. A more modern form of cejilla is made of metal with a rubber lining and with a plasticcross-bar and nylon strap. This variety is especially quick to apply and adjust, though uglier than the traditionalkind, some of which are very beautifully made.
1.18 Cejilla - traditional type. 1.19 Cejilla - Jim Dun/op model.
All the excerpts of music in this book beyond this page are played on the cassette with the cejilla at the fretindicated at the top of the written music. The notation and cifra are written as if the cejilla was not being used.Open strings are still represented as EBGDAE from 1st to 6th rather than their actual pitch (which, for example,will be F C A E B F if the cejilla is at the 2nd fret). Similarly, chord positions for the left hand and individualnotes are named in the text according to their positions relative to the cejilla, as if it was the nut. This allows openstrings, chord positions and fingering to be easily recognised, irrespective of the fret-position at which the cejillais placed.
Tuning with CEJILLA in placeWhen using the cejilla it will be necessary to check the tuning with the cejilla fixed in place. Its pressure on thestrings limits the direct transmission of changes in tension of the string produced by adjustments of the machine-heads or pegs. When the pitch of the string you are tuning is too low, pulling firmly with a left hand finger on thestring between nut and cejilla may raise the pitch to the required degree. Conversely, if the string is too high inpitch, firm pressure downwards on the string with the right hand thumb will lower it. Alternatively you can pushthe string outwards away from the fingerboard with your right thumb in the playing position.
The rhythm of Soleares takes you deep into the heart of Flamenco, for it is a toque which embodies many ofFlamenco's most vital elements of rhythm and harmony and from which many other toques are derived. InAndalucla, every student of the flamenco guitar will start with it.
The rhythmic structure ('compas') of Soleares plays so central a role that when you can truly dominate it withthe completeness of your feeling for its emphatic pulse, you will already be far on the road to becoming a flamencoguitarist. You have to absorb its powerful momentum into your very bones by playing it over and over again, somany times that your friends and family are driven almost mad with it.
As so often in Flamenco, the exact historical origins of Soleares are uncertain and controversial. Probably themost important centre of its development was the Triana district of Sevilla in the early nineteenth century butother localities, too, have strongly influenced it and given it their own distinctive style. The Canas and Polos areoften said to be older forms but some flamenco historians have suggested that Soleares is earlier still, possiblyderived from less serious toques used as dance accompaniments. As it is performed today, whether as guitar soloor in accompaniment to song and dance the Toque por Soleares is a solemn and majestic rhythm, rich in passionatesentiment and melancholy grandeur.
The word 'sofea' is probably a corruption of 'soledad' which means solitude or loneliness; soleares, the pluralform, would be soledades in Castillian Spanish. The coplas (song-verses) of the cante are sometimes ironicallyphilosophical but more usually the themes are of romantic tragedy, desolation and death.
15
LESSON 2 Part One Introducing Soleares

The cassette recording of SolearesFirst listen to the Soleares on the cassette called 'First Soleares'. This forms the basis for study in Lessons 2, 3and 4. The whole solo is first heard at a speed which is correct for Soleares and which you can aim to achievewhen you have become thoroughly familiar with the piece. You will next hear it recorded as a series of shortsequences played separately at a slow speed, so that you can hear their structure clearly. In the text, each sequencewill be discussed in turn and new techniques for the right and left hand will be described as they are introducedin the music.
When you study each sequence, your first aim should be to play it in anabsolutely even rhythm, at the kind of slow speed heard on the cassette. Itwill greatly help you to develop your feeling for the rhythm if you try toplay along with the cassette, repeating each sequence again and again untilyou have really mastered it before going on to study the next.
In Lesson 2 we will study the basic rhythm of Soleares and the first sequence of the music.
The COMPAS of SolearesThe rhythm of Soleares is based on a repeated pattern of 12 equally spaced beats, with accents on the3rd, 6th, 8th and 10th beats and with a more variable accent also on the 12th. Each sequence of 12 beats makes upone compas.
Try to get the feeling of this compos first by counting aloud repeatedly at a steady, even pace the numbers 1 to12, emphasising the numbers shown below in bold print by saying them more loudly:
First Soleares (Introduction: first two com pases) CEJILLA at 2nd fret
16
Note: In the chord diagrams, O opposite a string indicates that itis played open, indicates that the string is not sounded.
Keep the rhythm regular by beating time with your left foot (keeping the heel on the ground and moving theinstep up and down so that you count the beats each time it contacts the floor). Now play back the whole 'FirstSoleares' recording on the cassette again and try to count this rhythm aloud in time with the music you hear,starting from the count of 'one' on the first beat of the music. The accented numbers will coincide with accentedbeats heard in the music on the tape. Beats 11 and 12 of the first compas are heard as taps on the guitar.
You will now be ready to learn to play the first of the sequences played at a slow speed on the recording:
2.1 E major position for beginning Soleares. Cejillashown at second fret.
The first sequenceThe first sequence of Soleares consists of two composes, each of which has 12 beats in the pattern of the composjust described. The first 12-beat compos introduces the use of the 4th finger of the left hand and the techniques ofligado and golpe. These techniques will now be described.
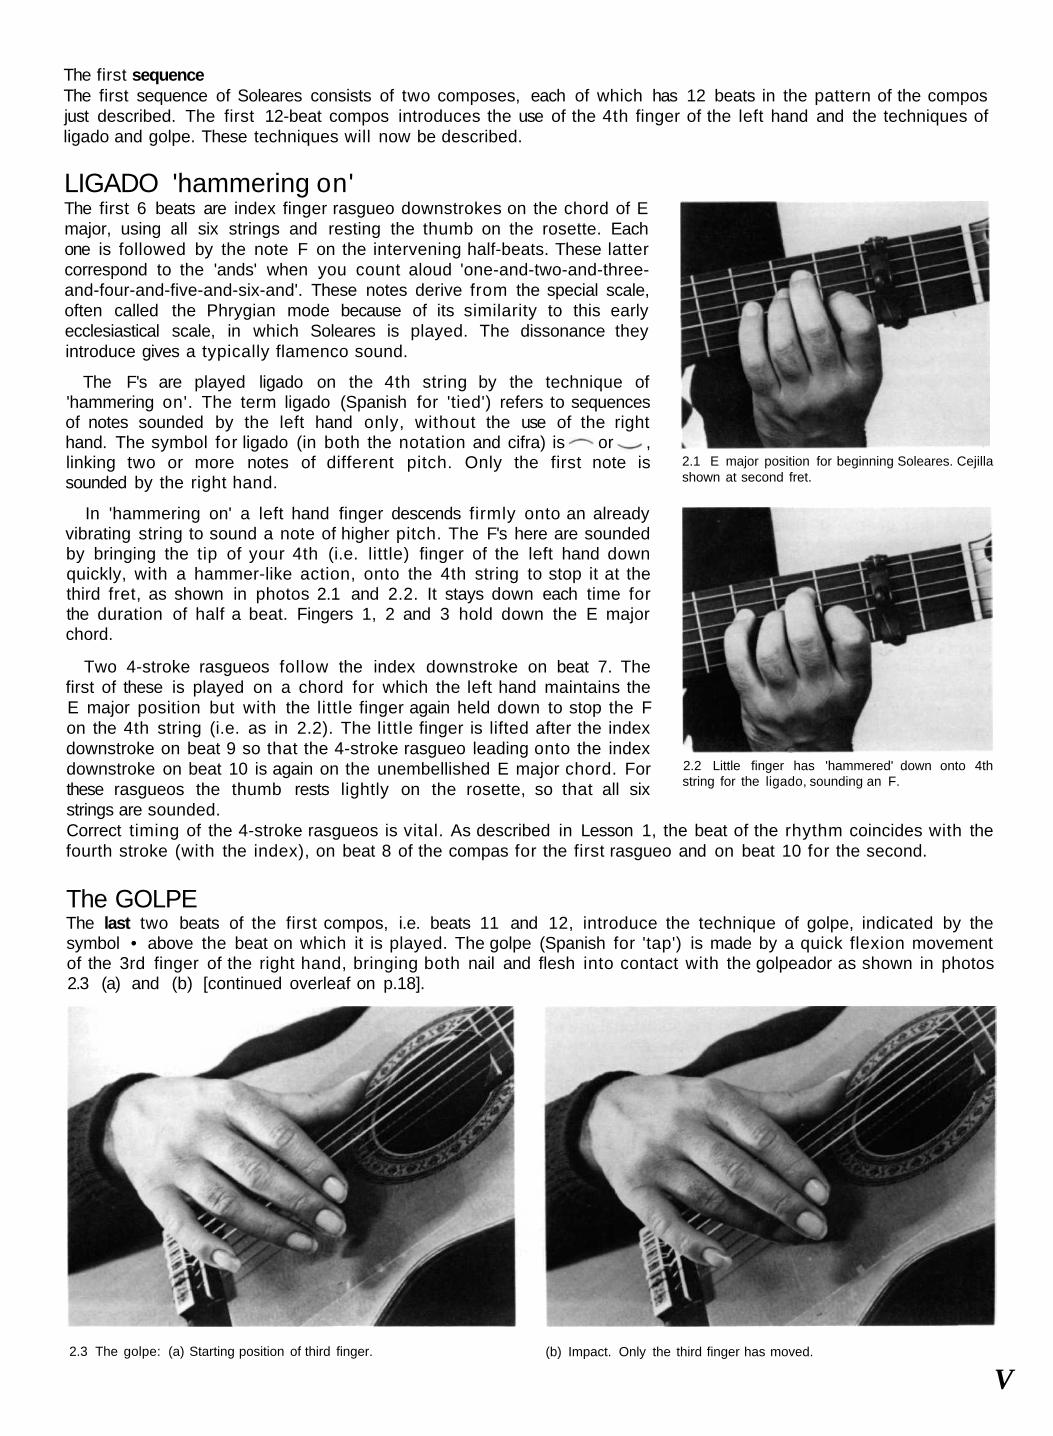
LIGADO 'hammering on'The first 6 beats are index finger rasgueo downstrokes on the chord of Emajor, using all six strings and resting the thumb on the rosette. Eachone is followed by the note F on the intervening half-beats. These lattercorrespond to the 'ands' when you count aloud 'one-and-two-and-three-and-four-and-five-and-six-and'. These notes derive from the special scale,often called the Phrygian mode because of its similarity to this earlyecclesiastical scale, in which Soleares is played. The dissonance theyintroduce gives a typically flamenco sound.
The F's are played ligado on the 4th string by the technique of'hammering on'. The term ligado (Spanish for 'tied') refers to sequencesof notes sounded by the left hand only, without the use of the righthand. The symbol for ligado (in both the notation and cifra) is or ,linking two or more notes of different pitch. Only the first note issounded by the right hand.
In 'hammering on' a left hand finger descends firmly onto an alreadyvibrating string to sound a note of higher pitch. The F's here are soundedby bringing the tip of your 4th (i.e. little) finger of the left hand downquickly, with a hammer-like action, onto the 4th string to stop it at thethird fret, as shown in photos 2.1 and 2.2. It stays down each time forthe duration of half a beat. Fingers 1, 2 and 3 hold down the E majorchord.
Two 4-stroke rasgueos follow the index downstroke on beat 7. Thefirst of these is played on a chord for which the left hand maintains theE major position but with the little finger again held down to stop the Fon the 4th string (i.e. as in 2.2). The little finger is lifted after the indexdownstroke on beat 9 so that the 4-stroke rasgueo leading onto the indexdownstroke on beat 10 is again on the unembellished E major chord. Forthese rasgueos the thumb rests lightly on the rosette, so that all sixstrings are sounded.Correct timing of the 4-stroke rasgueos is vital. As described in Lesson 1, the beat of the rhythm coincides with thefourth stroke (with the index), on beat 8 of the compas for the first rasgueo and on beat 10 for the second.
The GOLPEThe last two beats of the first compos, i.e. beats 11 and 12, introduce the technique of golpe, indicated by thesymbol • above the beat on which it is played. The golpe (Spanish for 'tap') is made by a quick flexion movementof the 3rd finger of the right hand, bringing both nail and flesh into contact with the golpeador as shown in photos2.3 (a) and (b) [continued overleaf on p.18].
2.2 Little finger has 'hammered' down onto 4thstring for the ligado, sounding an F.
2.3 The golpe: (a) Starting position of third finger. (b) Impact. Only the third finger has moved.
V
The GOLPE (continued)
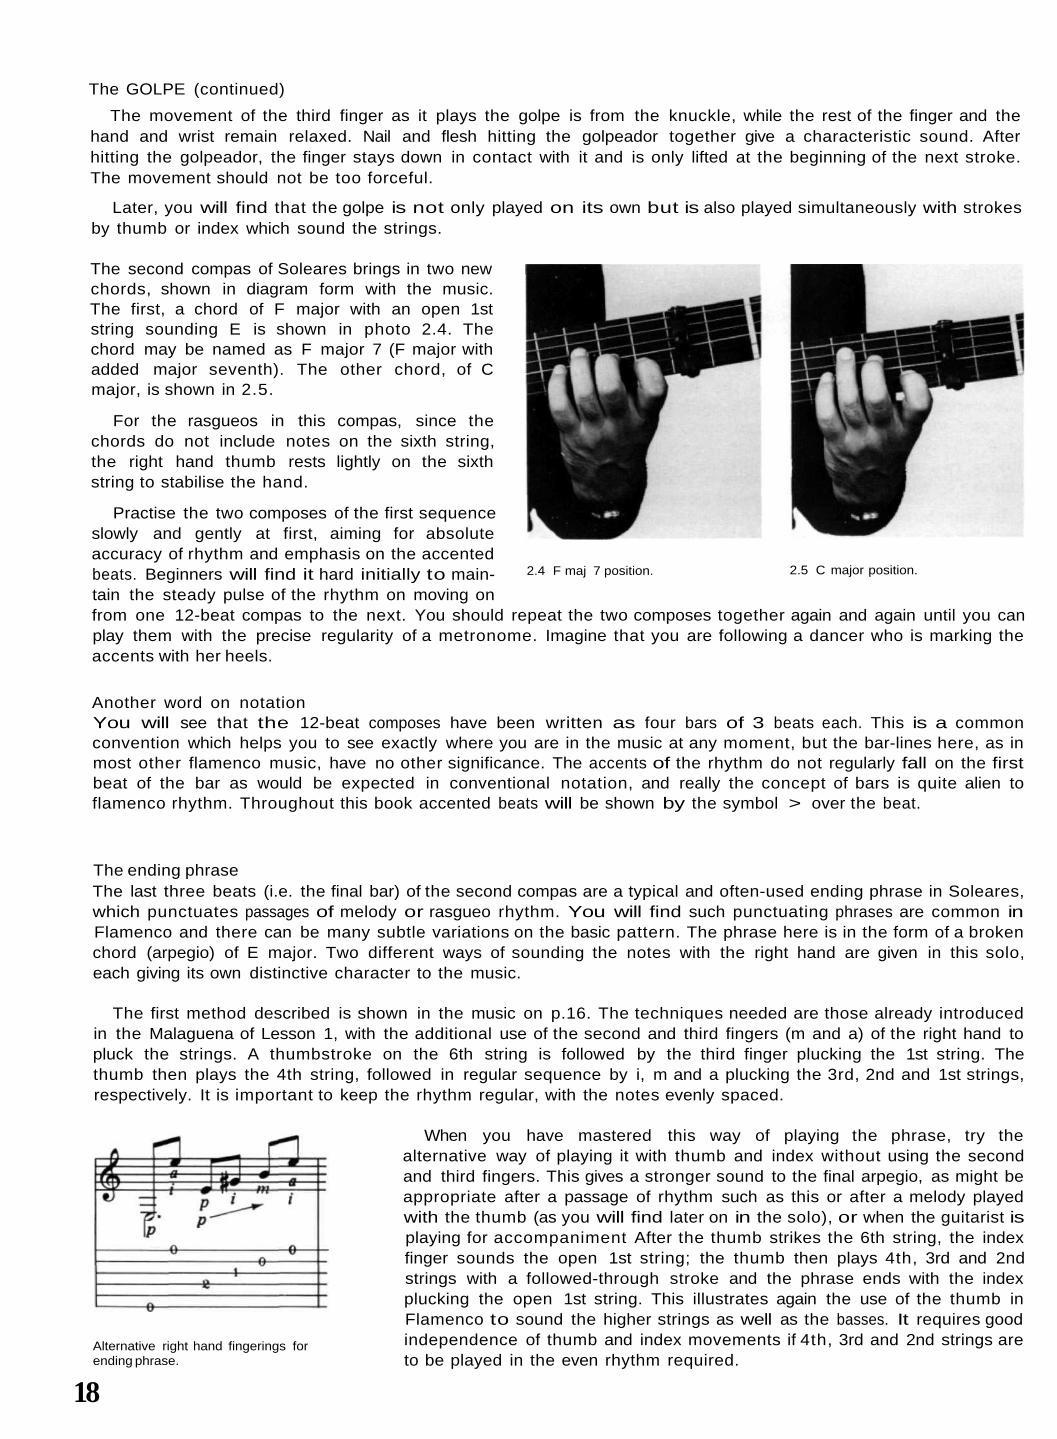
The movement of the third finger as it plays the golpe is from the knuckle, while the rest of the finger and thehand and wrist remain relaxed. Nail and flesh hitting the golpeador together give a characteristic sound. Afterhitting the golpeador, the finger stays down in contact with it and is only lifted at the beginning of the next stroke.The movement should not be too forceful.
Later, you will find that the golpe is not only played on its own but is also played simultaneously with strokesby thumb or index which sound the strings.
The second compas of Soleares brings in two newchords, shown in diagram form with the music.The first, a chord of F major with an open 1ststring sounding E is shown in photo 2.4. Thechord may be named as F major 7 (F major withadded major seventh). The other chord, of Cmajor, is shown in 2.5.
For the rasgueos in this compas, since thechords do not include notes on the sixth string,the right hand thumb rests lightly on the sixthstring to stabilise the hand.
Practise the two composes of the first sequenceslowly and gently at first, aiming for absoluteaccuracy of rhythm and emphasis on the accentedbeats. Beginners will find it hard initially to main-tain the steady pulse of the rhythm on moving onfrom one 12-beat compas to the next. You should repeat the two composes together again and again until you canplay them with the precise regularity of a metronome. Imagine that you are following a dancer who is marking theaccents with her heels.
2.4 F maj 7 position. 2.5 C major position.
Another word on notationYou will see that the 12-beat composes have been written as four bars of 3 beats each. This is a commonconvention which helps you to see exactly where you are in the music at any moment, but the bar-lines here, as inmost other flamenco music, have no other significance. The accents of the rhythm do not regularly fall on the firstbeat of the bar as would be expected in conventional notation, and really the concept of bars is quite alien toflamenco rhythm. Throughout this book accented beats will be shown by the symbol > over the beat.
The ending phraseThe last three beats (i.e. the final bar) of the second compas are a typical and often-used ending phrase in Soleares,which punctuates passages of melody or rasgueo rhythm. You will find such punctuating phrases are common inFlamenco and there can be many subtle variations on the basic pattern. The phrase here is in the form of a brokenchord (arpegio) of E major. Two different ways of sounding the notes with the right hand are given in this solo,each giving its own distinctive character to the music.
The first method described is shown in the music on p.16. The techniques needed are those already introducedin the Malaguena of Lesson 1, with the additional use of the second and third fingers (m and a) of the right hand topluck the strings. A thumbstroke on the 6th string is followed by the third finger plucking the 1st string. Thethumb then plays the 4th string, followed in regular sequence by i, m and a plucking the 3rd, 2nd and 1st strings,respectively. It is important to keep the rhythm regular, with the notes evenly spaced.
When you have mastered this way of playing the phrase, try thealternative way of playing it with thumb and index without using the secondand third fingers. This gives a stronger sound to the final arpegio, as might beappropriate after a passage of rhythm such as this or after a melody playedwith the thumb (as you will find later on in the solo), or when the guitarist isplaying for accompaniment After the thumb strikes the 6th string, the indexfinger sounds the open 1st string; the thumb then plays 4th, 3rd and 2ndstrings with a followed-through stroke and the phrase ends with the indexplucking the open 1st string. This illustrates again the use of the thumb inFlamenco to sound the higher strings as well as the basses. It requires goodindependence of thumb and index movements if 4th, 3rd and 2nd strings areto be played in the even rhythm required.
Alternative right hand fingerings forending phrase.
18
for the right thumb and the four fingers of the left handThis exercise (Ex, 6) is a very good way of developing strength and independent control in the right thumb and allfour fingers of the left hand. The techniques introduced in it are of such fundamental importance to Flamenco thatthey are discussed in detail on this and the next 3 pages. The exercise has not been recorded on the cassette-
There are not many purely technical exercises in the book, since the aim has been to relate all techniques asmuch as possible to the actual music of Flamenco. Those that are now going to be included are meant forcontinuing daily practice however advanced you are. You should keep coming back to them, because as youprogress you will recognise more and more how vital it is to get the basic hand and finger movements right if youare to get a really good sound from the guitar. It is very easy to fall into bad habits of hand-positioning andtechnique early on which turn out to be hard to unlearn. Sooner or later they become a big obstacle to furtherprogress and a major source of frustration. A little more time spent now on the basic essentials will be very amplyrewarded.
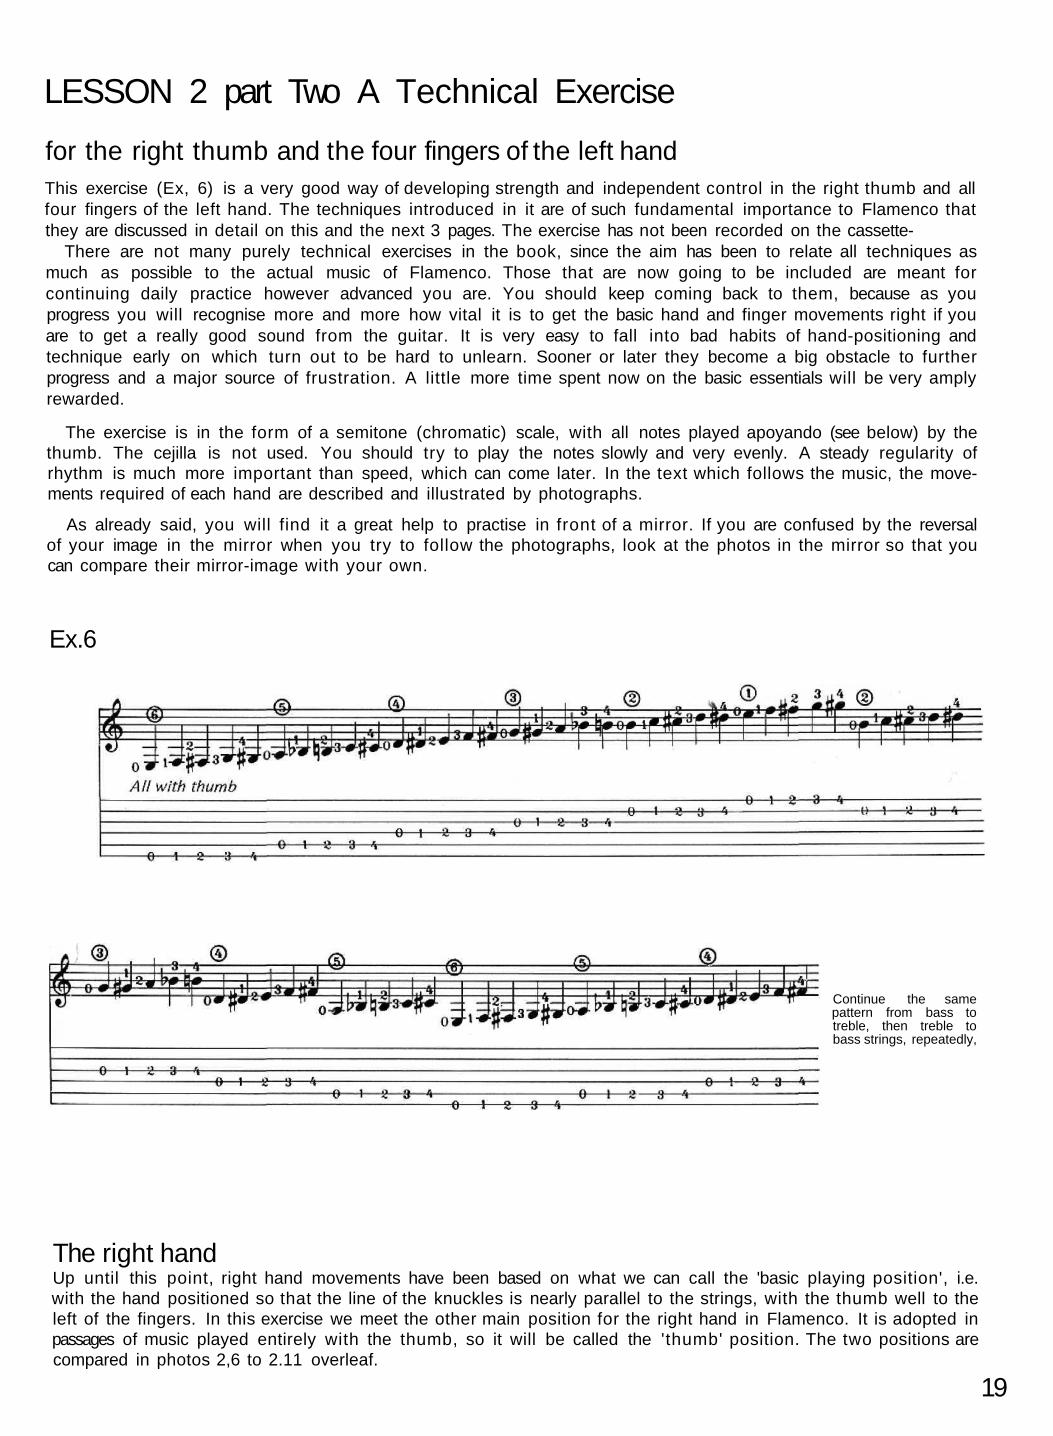
The exercise is in the form of a semitone (chromatic) scale, with all notes played apoyando (see below) by thethumb. The cejilla is not used. You should try to play the notes slowly and very evenly. A steady regularity ofrhythm is much more important than speed, which can come later. In the text which follows the music, the move-ments required of each hand are described and illustrated by photographs.
As already said, you will find it a great help to practise in front of a mirror. If you are confused by the reversalof your image in the mirror when you try to follow the photographs, look at the photos in the mirror so that youcan compare their mirror-image with your own.
Ex.6
Continue the samepattern from bass totreble, then treble tobass strings, repeatedly,
The right handUp until this point, right hand movements have been based on what we can call the 'basic playing position', i.e.with the hand positioned so that the line of the knuckles is nearly parallel to the strings, with the thumb well to theleft of the fingers. In this exercise we meet the other main position for the right hand in Flamenco. It is adopted inpassages of music played entirely with the thumb, so it will be called the 'thumb' position. The two positions arecompared in photos 2,6 to 2.11 overleaf.
19
LESSON 2 part Two A Technical Exercise

BASIC playing position THUMB position
2.6 Right hand in the basic position, 2. 7 Right hand in the thumb position.
2.8 Basic position, with plane of back of hand parallel to soundboard. 2.9 Thumb position. Higher arch to wrist.
2.10 Basic position from player's viewpoint. 2.11 Thumb position. Thumb strikes at a steeper angle nearer the bridge.
20
The 'thumb' positionYou will see from the photographs opposite that for the 'thumb' position the forearm has moved forwards slightly,so that the thumb descends on the strings at a steeper and less acute angle than in the 'basic' playing position. Thearch of the wrist is higher, so that the palm of the hand now faces the right shoulder and the line of the knucklesis at more of an angle across the strings. Index and middle fingers, slightly flexed, rest with their tips on thegolpeador just under the first string and close to the bridge. Ring and little fingers extend forwards to counter-balance the hand. Try to make sure you get a similar 'balanced' look to your hand in the mirror.
The hand is now stabilised and only the thumb moves. The wrist stays very relaxed.
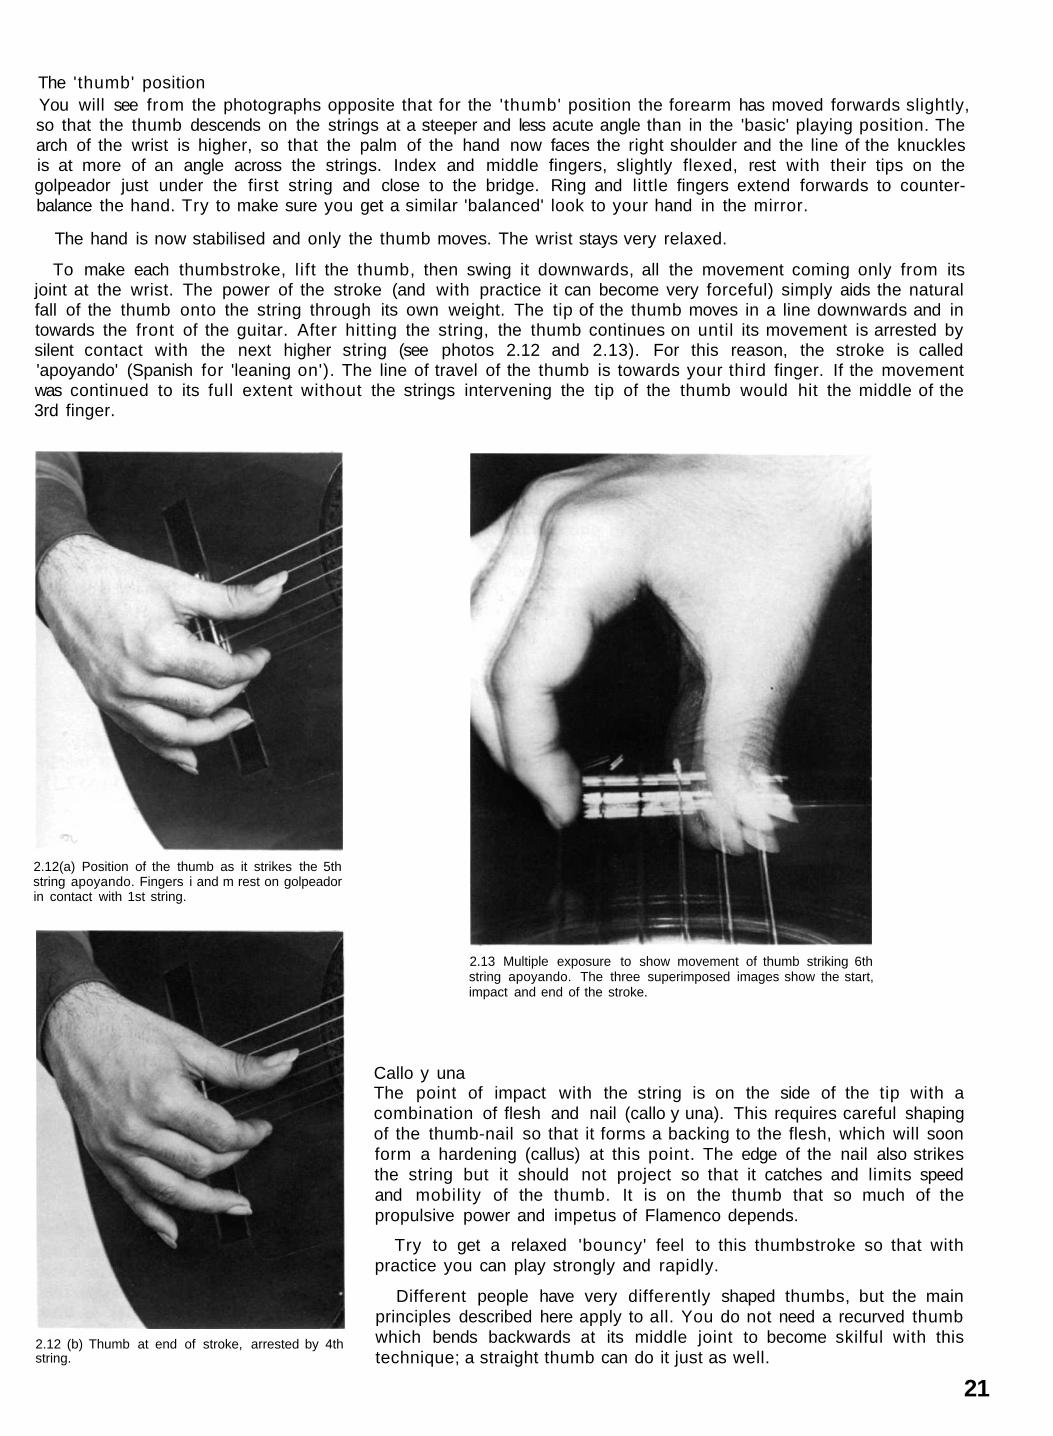
To make each thumbstroke, lift the thumb, then swing it downwards, all the movement coming only from itsjoint at the wrist. The power of the stroke (and with practice it can become very forceful) simply aids the naturalfall of the thumb onto the string through its own weight. The tip of the thumb moves in a line downwards and intowards the front of the guitar. After hitting the string, the thumb continues on until its movement is arrested bysilent contact with the next higher string (see photos 2.12 and 2.13). For this reason, the stroke is called'apoyando' (Spanish for 'leaning on'). The line of travel of the thumb is towards your third finger. If the movementwas continued to its full extent without the strings intervening the tip of the thumb would hit the middle of the3rd finger.
2.12(a) Position of the thumb as it strikes the 5thstring apoyando. Fingers i and m rest on golpeadorin contact with 1st string.
2.12 (b) Thumb at end of stroke, arrested by 4thstring.
2.13 Multiple exposure to show movement of thumb striking 6thstring apoyando. The three superimposed images show the start,impact and end of the stroke.
Callo y unaThe point of impact with the string is on the side of the tip with acombination of flesh and nail (callo y una). This requires careful shapingof the thumb-nail so that it forms a backing to the flesh, which will soonform a hardening (callus) at this point. The edge of the nail also strikesthe string but it should not project so that it catches and limits speedand mobility of the thumb. It is on the thumb that so much of thepropulsive power and impetus of Flamenco depends.
Try to get a relaxed 'bouncy' feel to this thumbstroke so that withpractice you can play strongly and rapidly.
Different people have very differently shaped thumbs, but the mainprinciples described here apply to all. You do not need a recurved thumbwhich bends backwards at its middle joint to become skilful with thistechnique; a straight thumb can do it just as well.
21

2.14 The left hand. One finger to each of four fretson the 6th string.
2.15 One finger to a fret on the 1st string. Line ofknuckles parallel to fretboard. Fingertips verticalto strings.
2.16 Position of left thumb at back of neck. Thefingers are stopping the chord of E major.
The left hand
Exercise 6 is a good basis for learning important principles of left handaction. Points to bear in mind include the following:
* Fingertips vertical to strings
Stop the strings as close to the frets as you can without damping thesound, so that there is no buzz from the fret. Bring your fingers down onthe string as nearly as possible at rightangles to the plane of the finger-board. The pressure of their tips on the strings is balanced by the thumb,without undue tension or any pull by the arm.
* Thumb straight, stationary and opposite fingers
Keep the left hand thumb positioned opposite the fingers and in contactwith the neck on or near to a line, down the middle of the neck, as shownin photo 2.16. As you ascend from 6th to 1st string, the thumb movesonly very slightly round the neck from the middle towards the side ofthe fingerboard away from you (see 2.17). The thumb does not bend andit does not stick out to the left. Remember the left hand does notsupport any of the weight of the guitar.
Finger flexion on changing strings
Since the thumb moves only enough to maintain the tips of the fingersvertical to the fretboard the fingers must bend more at their middlejoints as you ascend from 6th to 1st string, Compare photos 2.14 and 2.15.
* Knuckles parallel to strings
Make very sure that the line of the knuckles stays parallel to the edge ofthe fingerboard. A good way of working on this is to imagine you aretrying to keep the palm at the base of the little finger nearer to the edgeof the fingerboard than the palm at the base of the 1st finger. You willnot actually achieve this but keeping this aim in mind will help youovercome a very common and disabling fault in the left hand. This is tolet the fingers come down at an angle to the strings rather than squareacross them; 3rd and 4th fingers will then have much further to travelto stop the strings and you will not be able to develop the necessarystrength, speed or accuracy in their use.
* Relaxed wrist
In any fret-position on the guitar, whether here, in what is called the firstposition, or later on in higher positions, you need to keep the basicposture of the hand in relation to the fingerboard constant. The wristmust stay relaxed. You will find that the book contains a considerablenumber of photographs of left hand chord positions or 'shapes' as theyare often called. The main purpose of these is to illustrate the basicposture of the hand and fingers.
22

* One finger per fret
If the knuckles are parallel to the edge of the fingerboard, each fingernaturally overlies a different fret-space and in this exercise is broughtdown in sequence 1 to 4 without the hand as a whole moving. Photo2.18 shows how each of the fingers descends onto the string.
* Economy of movement
It is an important principle of left hand action that there should be aminimum of unnecessary movements of the fingers. Otherwise, facilityand speed are hindered and the movements of the fingers will wasteeffort and look untidy. The fingertips should stay close to the finger-board, so that they move only a short distance to stop strings. This isshown, for example, in the photographs of left hand chord shapes: youwill see that the non-stopping fingers stay poised close to the finger-board. It can even be difficult to tell from the photographs alone whichfingers are actually pressed down onto the strings (hence the need forchord diagrams in addition to the photos).
* Checking the indentations
Because each finger should descend on the strings at a constant point onits tip, you will find the flesh of the tip becomes indented and then formsa hardened callus at a constant point. Notice carefully where the indent-ations fall and the angles made by the strings on each finger. As a generalrule the indentations on the middle finger should lie parallel to thefingerboard.
2.17 Position of thumb when fingers stop only the1st string, it has moved slightly nearer the edge ofthe fingerboard.
2.18 Angles of fingers relative to each other as theydescend onto 6th string.
Elements of Flamenco 2 ToquesAt the beginning of this lesson Soleares was introduced as an example of a flamenco toque. The word toque (fromthe Spanish verb tocar: 'to touch' or 'hit' and hence 'to play an instrument') is actually used in three senses.El Toque embraces the whole art of flamenco guitar-playing, just as El Cante denotes flamenco singing andEl Baile, flamenco dance. We may also speak of the toque of a particular guitarist (tocaor) when we refer to hisrepertoire and style of playing. It is, however, in a third sense that the word is most commonly used here when werefer to the different rhythmic forms of Flamenco as toques, of which Soleares is a very important one. Othertoques of central importance in Flamenco include Seguiriyas, Alegrias, Bulerias, Tangos and Fandangos.
Each toque, commonly named in the plural as, for example, Soleares or toque por (for) Soleares, is a form ortype of Flamenco. There is no exact English equivalent for 'toque' used in this sense, but as you become morefamiliar with Flamenco you will soon find that the different toques are easily distinguished. Each has a charac-teristic and recurring pattern of beats and accents (i.e. its compas) and it also has its own kinds of key andharmonic structure. As a result it has not only a particular rhythmic form but also a characteristic sound and rangeof expression. Historically the toques have different regional origins, and their name often reflects this. The dance(baile) and song-verses (coplas) of the styles of singing (cante) associated with each toque are also distinct.
Some toques do not have a consistently regular rhythm so that they are said to be en toque libre ('in free time').They include many forms of Fandangos and their regional variants. The majority of toques, however, have botha regular beat and a very definite pattern of accented beats which together make up the compas. As was saidearlier, this metrical emphasis is adhered to very strictly by the guitarist both in passages of rasgueo and in hisfalsetas.
Two examples of falsetas will be introduced in the next lesson.
23
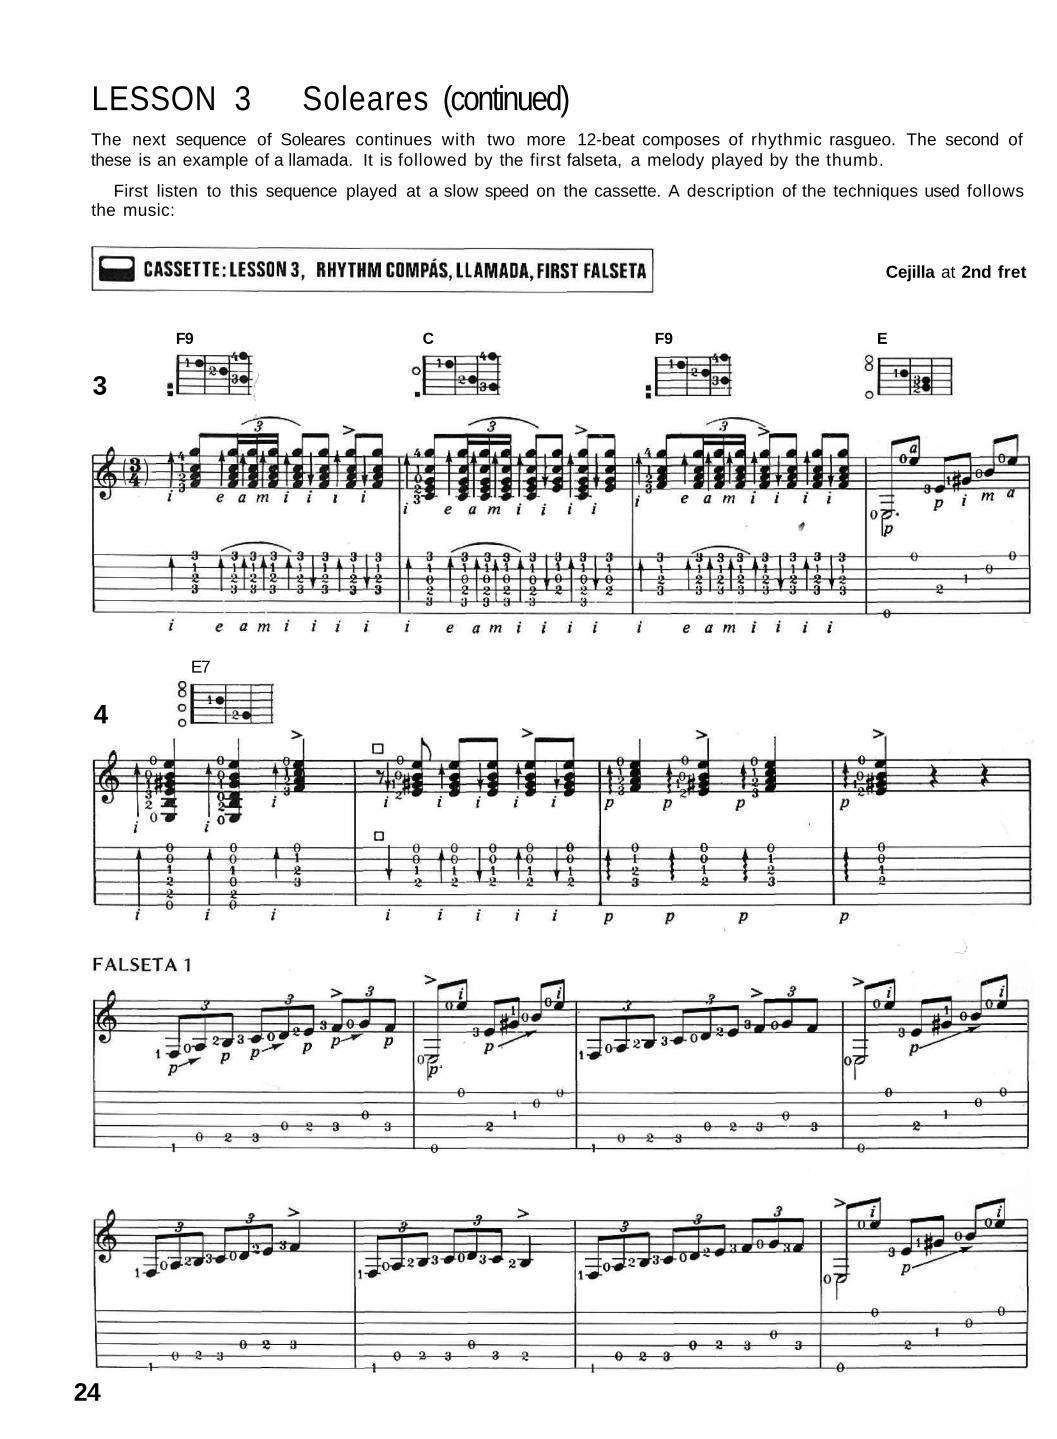
LESSON 3 Soleares (continued)The next sequence of Soleares continues with two more 12-beat composes of rhythmic rasgueo. The second ofthese is an example of a llamada. It is followed by the first falseta, a melody played by the thumb.
First listen to this sequence played at a slow speed on the cassette. A description of the techniques used followsthe music:
Cejilla at 2nd fret
E7
24
4
3
F9 C F9 E
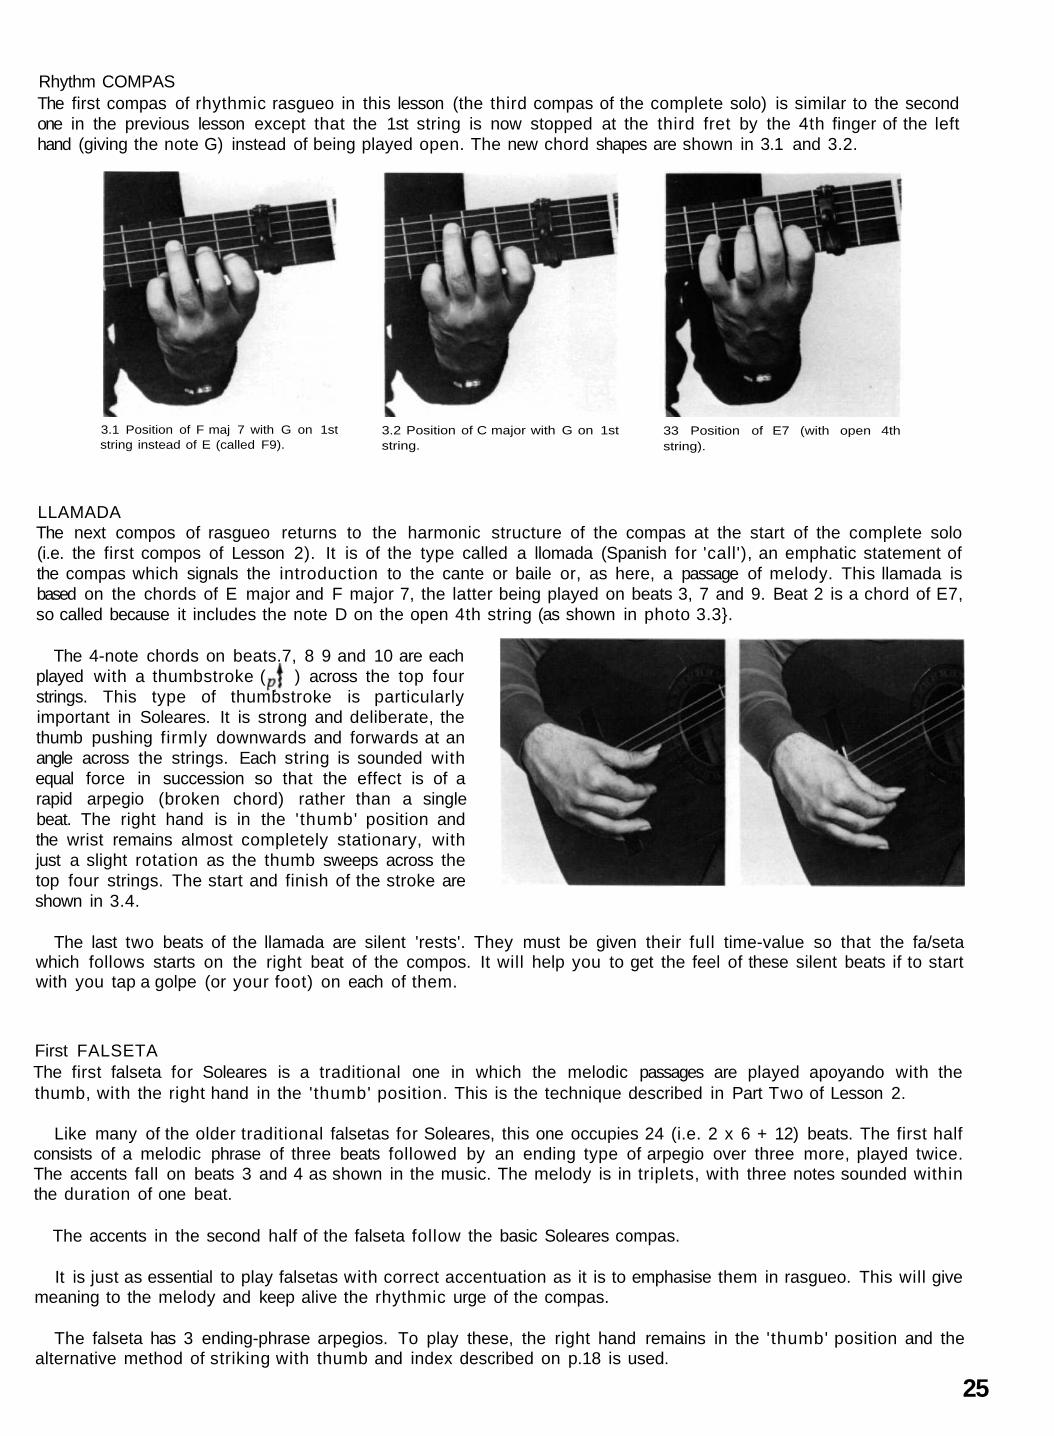
Rhythm COMPASThe first compas of rhythmic rasgueo in this lesson (the third compas of the complete solo) is similar to the secondone in the previous lesson except that the 1st string is now stopped at the third fret by the 4th finger of the lefthand (giving the note G) instead of being played open. The new chord shapes are shown in 3.1 and 3.2.
3.1 Position of F maj 7 with G on 1ststring instead of E (called F9).
3.2 Position of C major with G on 1ststring.
33 Position of E7 (with open 4thstring).
LLAMADAThe next compos of rasgueo returns to the harmonic structure of the compas at the start of the complete solo(i.e. the first compos of Lesson 2). It is of the type called a llomada (Spanish for 'call'), an emphatic statement ofthe compas which signals the introduction to the cante or baile or, as here, a passage of melody. This llamada isbased on the chords of E major and F major 7, the latter being played on beats 3, 7 and 9. Beat 2 is a chord of E7,so called because it includes the note D on the open 4th string (as shown in photo 3.3}.
The 4-note chords on beats.7, 8 9 and 10 are eachplayed with a thumbstroke ( ) across the top fourstrings. This type of thumbstroke is particularlyimportant in Soleares. It is strong and deliberate, thethumb pushing firmly downwards and forwards at anangle across the strings. Each string is sounded withequal force in succession so that the effect is of arapid arpegio (broken chord) rather than a singlebeat. The right hand is in the 'thumb' position andthe wrist remains almost completely stationary, withjust a slight rotation as the thumb sweeps across thetop four strings. The start and finish of the stroke areshown in 3.4.
The last two beats of the llamada are silent 'rests'. They must be given their full time-value so that the fa/setawhich follows starts on the right beat of the compos. It will help you to get the feel of these silent beats if to startwith you tap a golpe (or your foot) on each of them.
First FALSETAThe first falseta for Soleares is a traditional one in which the melodic passages are played apoyando with thethumb, with the right hand in the 'thumb' position. This is the technique described in Part Two of Lesson 2.
Like many of the older traditional falsetas for Soleares, this one occupies 24 (i.e. 2 x 6 + 12) beats. The first halfconsists of a melodic phrase of three beats followed by an ending type of arpegio over three more, played twice.The accents fall on beats 3 and 4 as shown in the music. The melody is in triplets, with three notes sounded withinthe duration of one beat.
The accents in the second half of the falseta follow the basic Soleares compas.
It is just as essential to play falsetas with correct accentuation as it is to emphasise them in rasgueo. This will givemeaning to the melody and keep alive the rhythmic urge of the compas.
The falseta has 3 ending-phrase arpegios. To play these, the right hand remains in the 'thumb' position and thealternative method of striking with thumb and index described on p.18 is used.
25
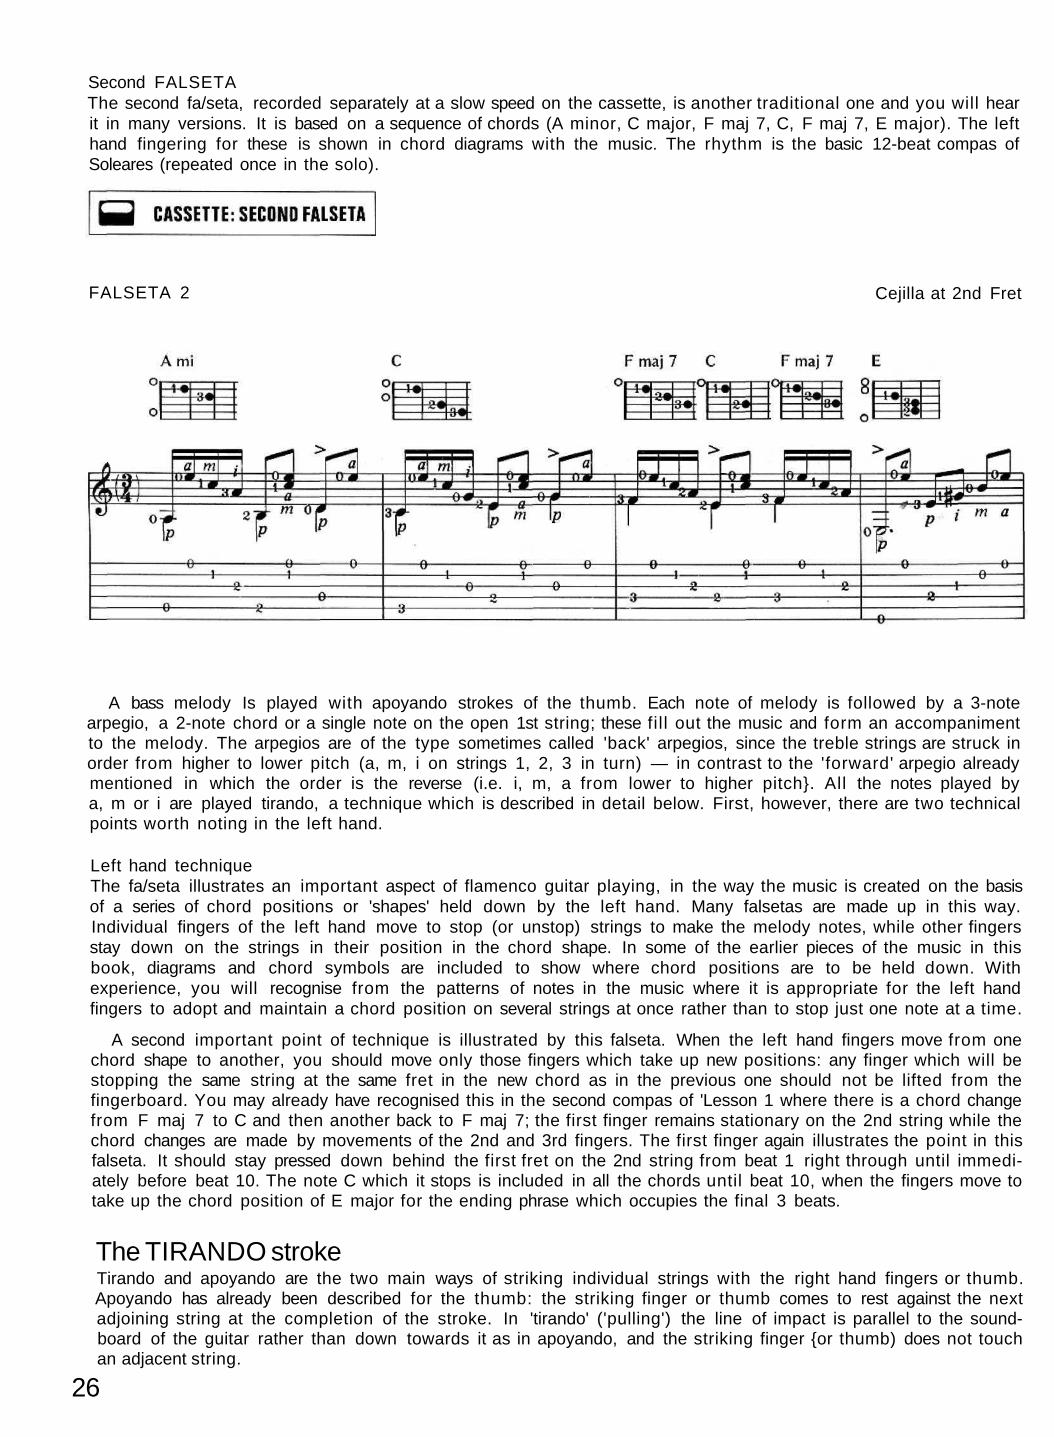
Second FALSETAThe second fa/seta, recorded separately at a slow speed on the cassette, is another traditional one and you will hearit in many versions. It is based on a sequence of chords (A minor, C major, F maj 7, C, F maj 7, E major). The lefthand fingering for these is shown in chord diagrams with the music. The rhythm is the basic 12-beat compas ofSoleares (repeated once in the solo).
FALSETA 2 Cejilla at 2nd Fret
A bass melody Is played with apoyando strokes of the thumb. Each note of melody is followed by a 3-notearpegio, a 2-note chord or a single note on the open 1st string; these fil l out the music and form an accompanimentto the melody. The arpegios are of the type sometimes called 'back' arpegios, since the treble strings are struck inorder from higher to lower pitch (a, m, i on strings 1, 2, 3 in turn) — in contrast to the 'forward' arpegio alreadymentioned in which the order is the reverse (i.e. i, m, a from lower to higher pitch}. All the notes played bya, m or i are played tirando, a technique which is described in detail below. First, however, there are two technicalpoints worth noting in the left hand.
Left hand techniqueThe fa/seta illustrates an important aspect of flamenco guitar playing, in the way the music is created on the basisof a series of chord positions or 'shapes' held down by the left hand. Many falsetas are made up in this way.Individual fingers of the left hand move to stop (or unstop) strings to make the melody notes, while other fingersstay down on the strings in their position in the chord shape. In some of the earlier pieces of the music in thisbook, diagrams and chord symbols are included to show where chord positions are to be held down. Withexperience, you will recognise from the patterns of notes in the music where it is appropriate for the left handfingers to adopt and maintain a chord position on several strings at once rather than to stop just one note at a time.
A second important point of technique is illustrated by this falseta. When the left hand fingers move from onechord shape to another, you should move only those fingers which take up new positions: any finger which will bestopping the same string at the same fret in the new chord as in the previous one should not be lifted from thefingerboard. You may already have recognised this in the second compas of 'Lesson 1 where there is a chord changefrom F maj 7 to C and then another back to F maj 7; the first finger remains stationary on the 2nd string while thechord changes are made by movements of the 2nd and 3rd fingers. The first finger again illustrates the point in thisfalseta. It should stay pressed down behind the first fret on the 2nd string from beat 1 right through until immedi-ately before beat 10. The note C which it stops is included in all the chords until beat 10, when the fingers move totake up the chord position of E major for the ending phrase which occupies the final 3 beats.
The TIRANDO strokeTirando and apoyando are the two main ways of striking individual strings with the right hand fingers or thumb.Apoyando has already been described for the thumb: the striking finger or thumb comes to rest against the nextadjoining string at the completion of the stroke. In 'tirando' ('pulling') the line of impact is parallel to the sound-board of the guitar rather than down towards it as in apoyando, and the striking finger {or thumb) does not touchan adjacent string.
26
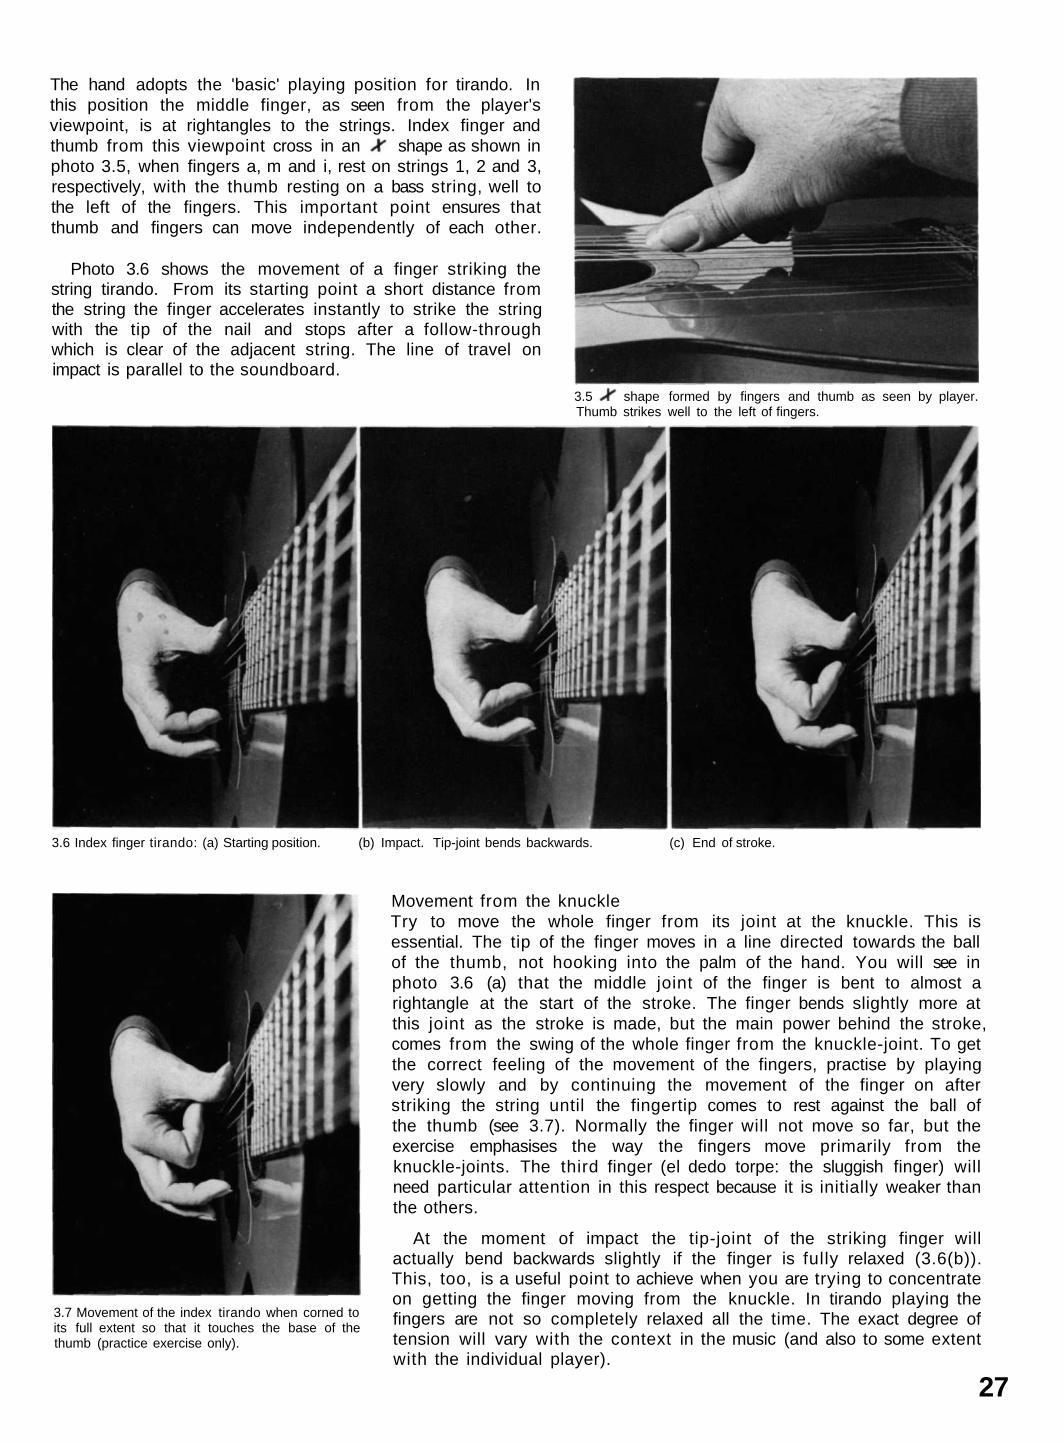
The hand adopts the 'basic' playing position for tirando. Inthis position the middle finger, as seen from the player'sviewpoint, is at rightangles to the strings. Index finger andthumb from this viewpoint cross in an shape as shown inphoto 3.5, when fingers a, m and i, rest on strings 1, 2 and 3,respectively, with the thumb resting on a bass string, well tothe left of the fingers. This important point ensures thatthumb and fingers can move independently of each other.
Photo 3.6 shows the movement of a finger striking thestring tirando. From its starting point a short distance fromthe string the finger accelerates instantly to strike the stringwith the tip of the nail and stops after a follow-throughwhich is clear of the adjacent string. The line of travel onimpact is parallel to the soundboard.
3.5 shape formed by fingers and thumb as seen by player.Thumb strikes well to the left of fingers.
3.6 Index finger tirando: (a) Starting position. (b) Impact. Tip-joint bends backwards. (c) End of stroke.
3.7 Movement of the index tirando when corned toits full extent so that it touches the base of thethumb (practice exercise only).
Movement from the knuckleTry to move the whole finger from its joint at the knuckle. This isessential. The tip of the finger moves in a line directed towards the ballof the thumb, not hooking into the palm of the hand. You will see inphoto 3.6 (a) that the middle joint of the finger is bent to almost arightangle at the start of the stroke. The finger bends slightly more atthis joint as the stroke is made, but the main power behind the stroke,comes from the swing of the whole finger from the knuckle-joint. To getthe correct feeling of the movement of the fingers, practise by playingvery slowly and by continuing the movement of the finger on afterstriking the string until the fingertip comes to rest against the ball ofthe thumb (see 3.7). Normally the finger will not move so far, but theexercise emphasises the way the fingers move primarily from theknuckle-joints. The third finger (el dedo torpe: the sluggish finger) willneed particular attention in this respect because it is initially weaker thanthe others.
At the moment of impact the tip-joint of the striking finger willactually bend backwards slightly if the finger is fully relaxed (3.6(b)).This, too, is a useful point to achieve when you are trying to concentrateon getting the finger moving from the knuckle. In tirando playing thefingers are not so completely relaxed all the time. The exact degree oftension will vary with the context in the music (and also to some extentwith the individual player).
27
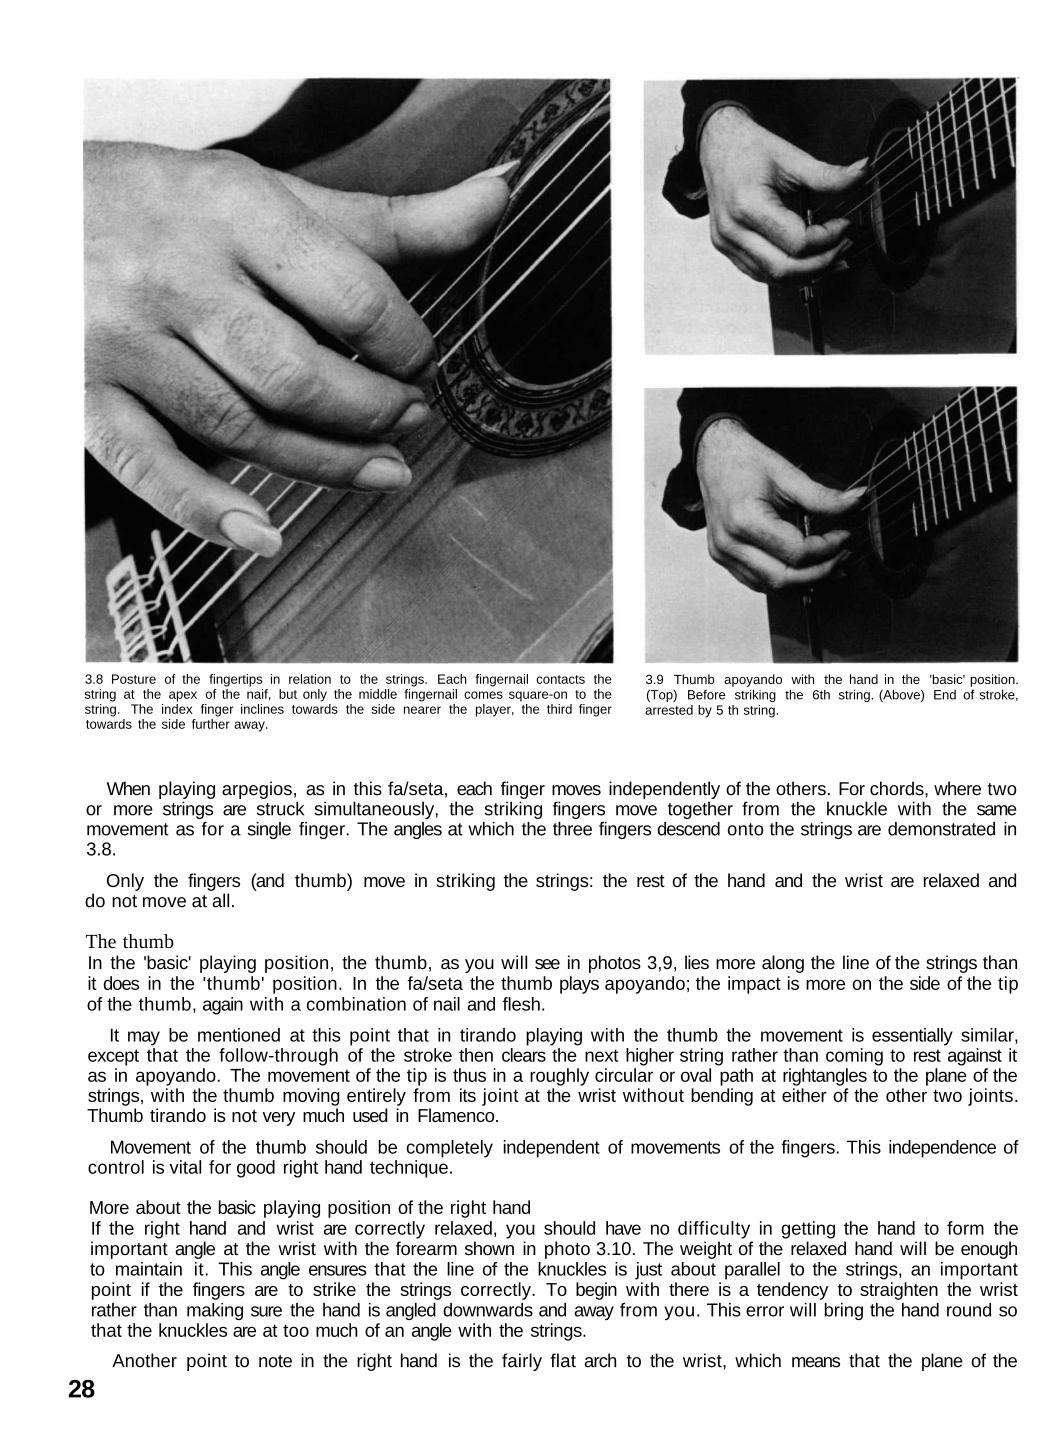
3.8 Posture of the fingertips in relation to the strings. Each fingernail contacts thestring at the apex of the naif, but only the middle fingernail comes square-on to thestring. The index finger inclines towards the side nearer the player, the third fingertowards the side further away.
3.9 Thumb apoyando with the hand in the 'basic' position.(Top) Before striking the 6th string. (Above) End of stroke,arrested by 5 th string.
When playing arpegios, as in this fa/seta, each finger moves independently of the others. For chords, where twoor more strings are struck simultaneously, the striking fingers move together from the knuckle with the samemovement as for a single finger. The angles at which the three fingers descend onto the strings are demonstrated in3.8.
Only the fingers (and thumb) move in striking the strings: the rest of the hand and the wrist are relaxed anddo not move at all.
The thumbIn the 'basic' playing position, the thumb, as you will see in photos 3,9, lies more along the line of the strings thanit does in the 'thumb' position. In the fa/seta the thumb plays apoyando; the impact is more on the side of the tipof the thumb, again with a combination of nail and flesh.
It may be mentioned at this point that in tirando playing with the thumb the movement is essentially similar,except that the follow-through of the stroke then clears the next higher string rather than coming to rest against itas in apoyando. The movement of the tip is thus in a roughly circular or oval path at rightangles to the plane of thestrings, with the thumb moving entirely from its joint at the wrist without bending at either of the other two joints.Thumb tirando is not very much used in Flamenco.
Movement of the thumb should be completely independent of movements of the fingers. This independence ofcontrol is vital for good right hand technique.
More about the basic playing position of the right handIf the right hand and wrist are correctly relaxed, you should have no difficulty in getting the hand to form theimportant angle at the wrist with the forearm shown in photo 3.10. The weight of the relaxed hand will be enoughto maintain it. This angle ensures that the line of the knuckles is just about parallel to the strings, an importantpoint if the fingers are to strike the strings correctly. To begin with there is a tendency to straighten the wristrather than making sure the hand is angled downwards and away from you. This error will bring the hand round sothat the knuckles are at too much of an angle with the strings.
28Another point to note in the right hand is the fairly flat arch to the wrist, which means that the plane of the

3.10 In the 'basic' position the right hand is angled downwards at thewrist, away from the line of the forearm. Photo 1.1 also shows thisclearly.
.back of the hand lies roughly parallel to the front-surfaceof the guitar. Too high an arch will limit the power thefingers can exert. (You can prove this to yourself byseeing what happens when you support your full weightoff the ground by hanging by your fingertips; the wristnaturally straightens and even bends backwards if you areto exert the necessary force).
The right hand side of the palm should be broughtdown fairly close to the front of the guitar and shouldnot be further from it than the left side (as seen when thehand is in the playing position). This is a characteristicfeature of the right hand in Flamenco: it brings the 3rdfinger strongly onto the strings.
The positioning of the knuckles in relation to thestrings serves as a useful reference point in studying thedetails of right hand technique. The degree to which theirline approaches a line parallel to the strings, their distancefrom the strings, which strings they overlie and their normal distance from the bridge — all these points are likely tovary slightly for best results according to the shape of your hands and the kind of tone you want from the guitar.As your technique advances you will be able to explore the effect of altering these to suit best the action of yourhand. To start with, however, you would be well advised to copy the photos in these respects as closely andprecisely as you can.
The aim of this book is to describe major principles of technique and also to provide a model (by means of thephotographs) which will help you lay down a really sound basis for developing musical facility and good tone.These major principles mostly stress the points of similarity you will notice if you watch different professionalflamenco players. You will, of course, also notice minor differences between them in the way their hands andfingers move. These small differences result from individual preference and convenience and it would be foolish toattempt any definitive statement as to which is generally superior. What suits one player best may not suit anotherquite so well.
An exercise for LIGADOTo conclude Lesson 3 we have another technical exercise, this time written in the same rhythm as the first fa/setaplayed with the thumb. Besides illustrating the techniques already described, it takes the ligado technique of'hammering on' a stage further by using fingers 1, 2 and 3 of the left hand. The fa/seta structure will help you toget the timing right.
In the ligado passages, an open string is struck apoyando by the thumband then 1st, 2nd and 3rd fingers are 'hammered on' in sequence to sound achromatic phrase occupying the duration of one beat.
Ex.7 Cejilla at 2nd fret
29

3.1 i The right hand fingernaiils. 3.12 Fingernails of the right hand seen by translucentlight with the fingertips at eye level.
Elements of Flamenco 3 FingernailsYour fingernails of the right hand are going to be very important to you in playing the flamenco guitar. It is theimpact of the nail which makes the string vibrate, so each must be long enough to produce a clean, incisively clearnote. The nails must not be so long, however, that they hinder the mobility of the fingers.
If the nails are the right length, then in apoyando and tirando playing the fleshy extremity of the fingertip willjust touch the string before the latter is hit by the projecting end of the nail. This light brush with the flesh helpsguide the nail onto the string but it makes no significant contribution to the sound. In rasgueo, too, the nails areessential in producing the brilliant 'attack' so characteristic of the exciting sound of Flamenco. With the thumb, asalready mentioned, sound production is by a combination of nail and flesh.
There are some guitarists who become nail-neurotics: they talk fingernails, think fingernails — perhaps evendream fingernails. But this does not mean that the proper care of your nails has to be a daunting and difficultbusiness. They need careful shaping and strengthening to meet Flamenco's demands on them, but you will find thattime devoted to their preparation and protection is amply rewarded by your greater enjoyment and progress. Youshould soon be able to find a routine that suits you.
ShapingShaping of the ends of the right hand nails (and the smoothing of any projecting irregularities on their playingsurface) is best done with fine-surfaced emery-boards. The nails can then be further smoothed with the very finestgrade of emery paper. Coarser abrasives such as metal files should be avoided. One can give the tips a final polish by
3.13 The right thumbnail. 3.14 Nails of right and left hands compared.
30
rubbing them against a piece of leather or, to follow a practice among some professionals, against the back (not thesides) of a match-box.
Note the length and shaping of the right hand nails in the photographs. With the palm of the hand facing youand the tips of the fingers level with your eyes, the nails should project about 1/16 inch {1 -1.5 mm) beyond thefingertips. Hold them up to the light and you will get a good view of the translucent tips of the nails (see photo3.12). Different players may prefer slightly different lengths of nail but you are strongly advised to start with therelative length illustrated before you consider making any slight modifications to suit your own playing style as itdevelops.
The little finger-nail can be longer than the others. It is used only for rasgueos, where its extra length canpartially compensate for the shortness of the little finger compared to the other fingers.
Correct shaping of the right hand thumb-nail (3.13) is critical, particularly on the side where it contacts thestring, so that flesh and nail can strike together. People often remark with surprise on the length of the rest of thethumb-nail; this helps the thumb to produce a good sound, particularly in upstrokes as you will later find used inthe technique of alzapua.
The fingernails of the left hand are kept smoothly rounded and fairly short (Photo 3.14). They must not be tooshort, since they are required to give a firm backing to the flesh: this will allow you to produce a strong sound inligado 'pulling-off (see Lesson 5).
Protection and strengtheningEven the thickest fingernails will need some protection if they are not to be abraded and damaged by impact withthe strings. If your nails are thin, they will need additional support and strengthening for good tone-production.
Several methods are used. A good method is first to apply a base-coat of a clear nail-lacquer, Cutex 'Strongnail'.Once this is dry, one or more thin coats of cellulose glue can be applied evenly over it and can be built up in layersto the required thickness. In Spain, 'Pegamento Imedio' is the flamencos' favourite. In the U.K. 'Durafix' byRawlplug has fairly similar properties. The glue should not be applied directly to the nail but only to the base-coatof Cutex, It is best spread thinly and evenly to prevent bubbles forming as it dries. Place a small blob from the tubeonto the surface of the lacquered nail and quickly spread it out with a finger of the left hand, using a different (andcorresponding) left hand finger for each nail so that you have a clean fingertip for smoothing the glue on each righthand nail. Some players like to provide added strength by applying the glue together with one or more layers ofthin tissue, 'Micropore' adhesive tape or teased out cottonwool, but glue alone is usually adequate.
To prevent the nails drying out from these applications it is advisable to remove the protection every day. Some-times it peels off easily. Otherwise, use nail-polish remover which contains added oil.
All sorts of things, to be applied or consumed, have been advocated at one time or another as indispensable forstrong nails, but many seem based more on superstition than science. Eating gelatin every day (most easily in theform of jelly-cubes) really does seem to help.
Various commercial preparations claim to strengthen nails. 'Tuff Nail' can be helpful if used sparingly as amoisturiser. One should be careful of preparations containing formic acid since they seem capable of softening thenails unduly if used for long. An occasional application of Mavala may help harden the nail and may reduce the riskof flaking and splitting.
PrecautionsYou will soon develop a heightened awareness of the many hazards to nails you are likely to meet in everyday lifeand will learn to take the necessary avoiding action. Handles, switches and clock-winders are just a few of them.
It is vitally important not to expose nails to the drying action of detergents and soaps. Washing-up is out of thequestion. Even the use of rubber gloves can cause trouble.
Carry an emery-board with you at all times to provide first-aid and to prevent small cracks becoming bigger.Larger cracks, tears or flaking may require careful repairs with glue and possibly paper. New cyanoacrylateadhesives which 'bond instantly to skin tissue' (as the makers warn) may perhaps be useful in emergencies if usedwith proper caution.
Don't blame your nails!Students of Flamenco often worry about the shape or strength of their nails and feel they are going to present aninsuperable obstacle to playing in a really flamenco way. This is always an unnecessary fear.
Experience has shown again and again that a little care and attention will ensure that the nails can be brought toa satisfactory condition. Nino Ricardo had nails, as he said, 'como papeles' (as thin as paper) yet, with the help ofPegamento, he could produce an incomparably strong sound from the guitar.
31
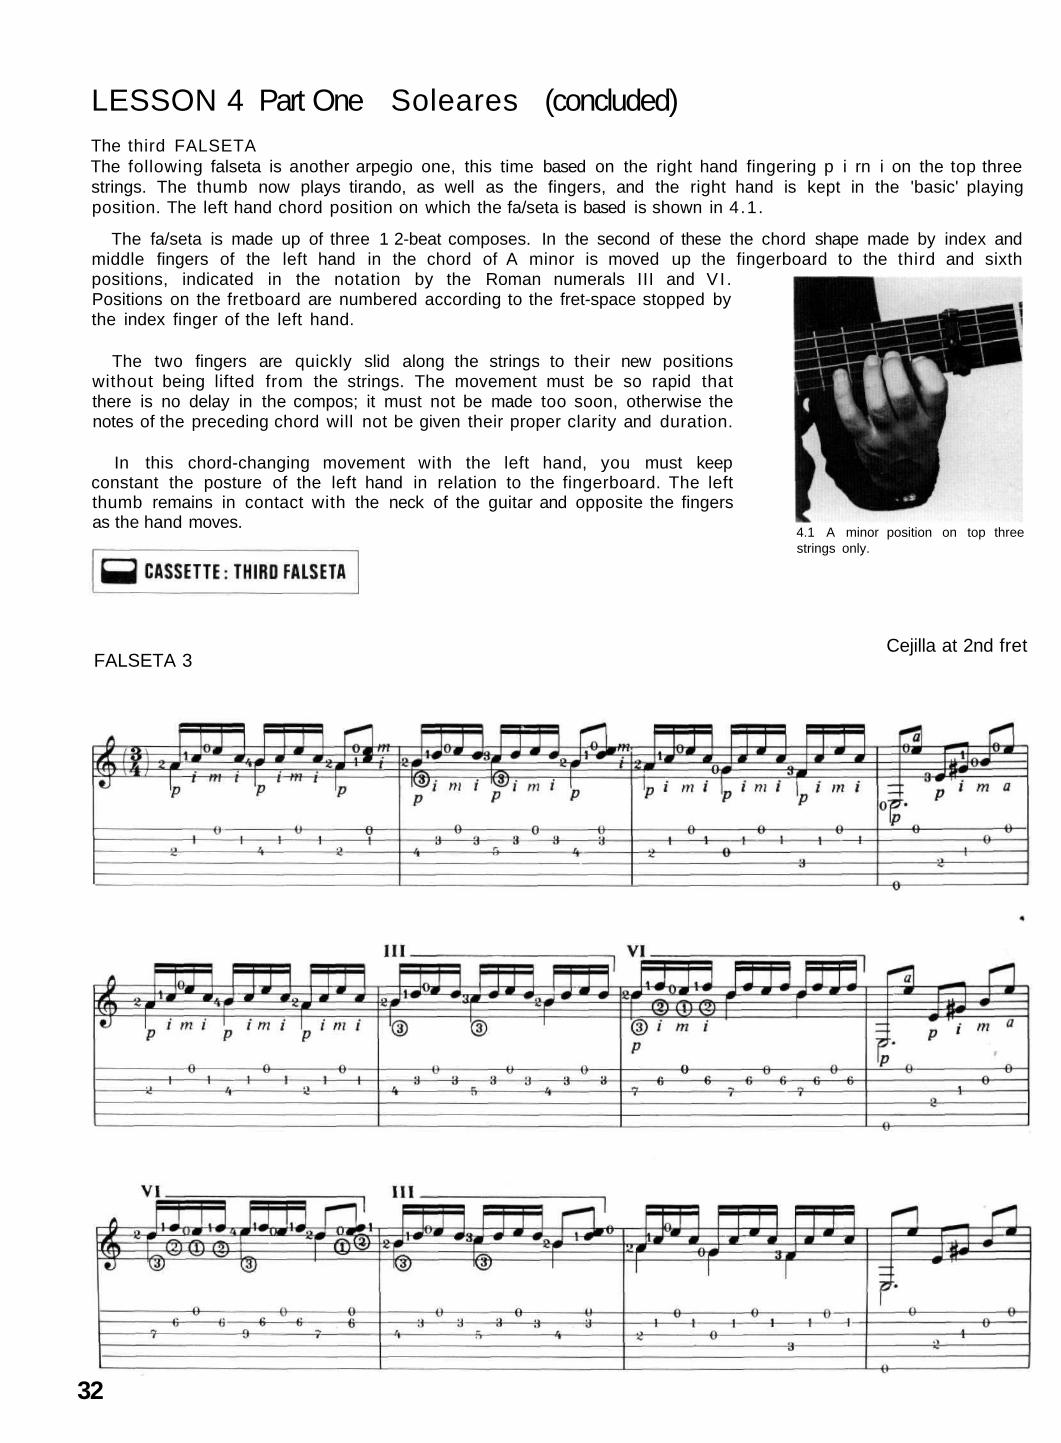
LESSON 4 Part One Soleares (concluded)The third FALSETAThe following falseta is another arpegio one, this time based on the right hand fingering p i rn i on the top threestrings. The thumb now plays tirando, as well as the fingers, and the right hand is kept in the 'basic' playingposition. The left hand chord position on which the fa/seta is based is shown in 4.1.
The fa/seta is made up of three 1 2-beat composes. In the second of these the chord shape made by index andmiddle fingers of the left hand in the chord of A minor is moved up the fingerboard to the third and sixthpositions, indicated in the notation by the Roman numerals III and VI .Positions on the fretboard are numbered according to the fret-space stopped bythe index finger of the left hand.
The two fingers are quickly slid along the strings to their new positionswithout being lifted from the strings. The movement must be so rapid thatthere is no delay in the compos; it must not be made too soon, otherwise thenotes of the preceding chord will not be given their proper clarity and duration.
In this chord-changing movement with the left hand, you must keepconstant the posture of the left hand in relation to the fingerboard. The leftthumb remains in contact with the neck of the guitar and opposite the fingersas the hand moves.
FALSETA 3Cejilla at 2nd fret
4.1 A minor position on top threestrings only.
32
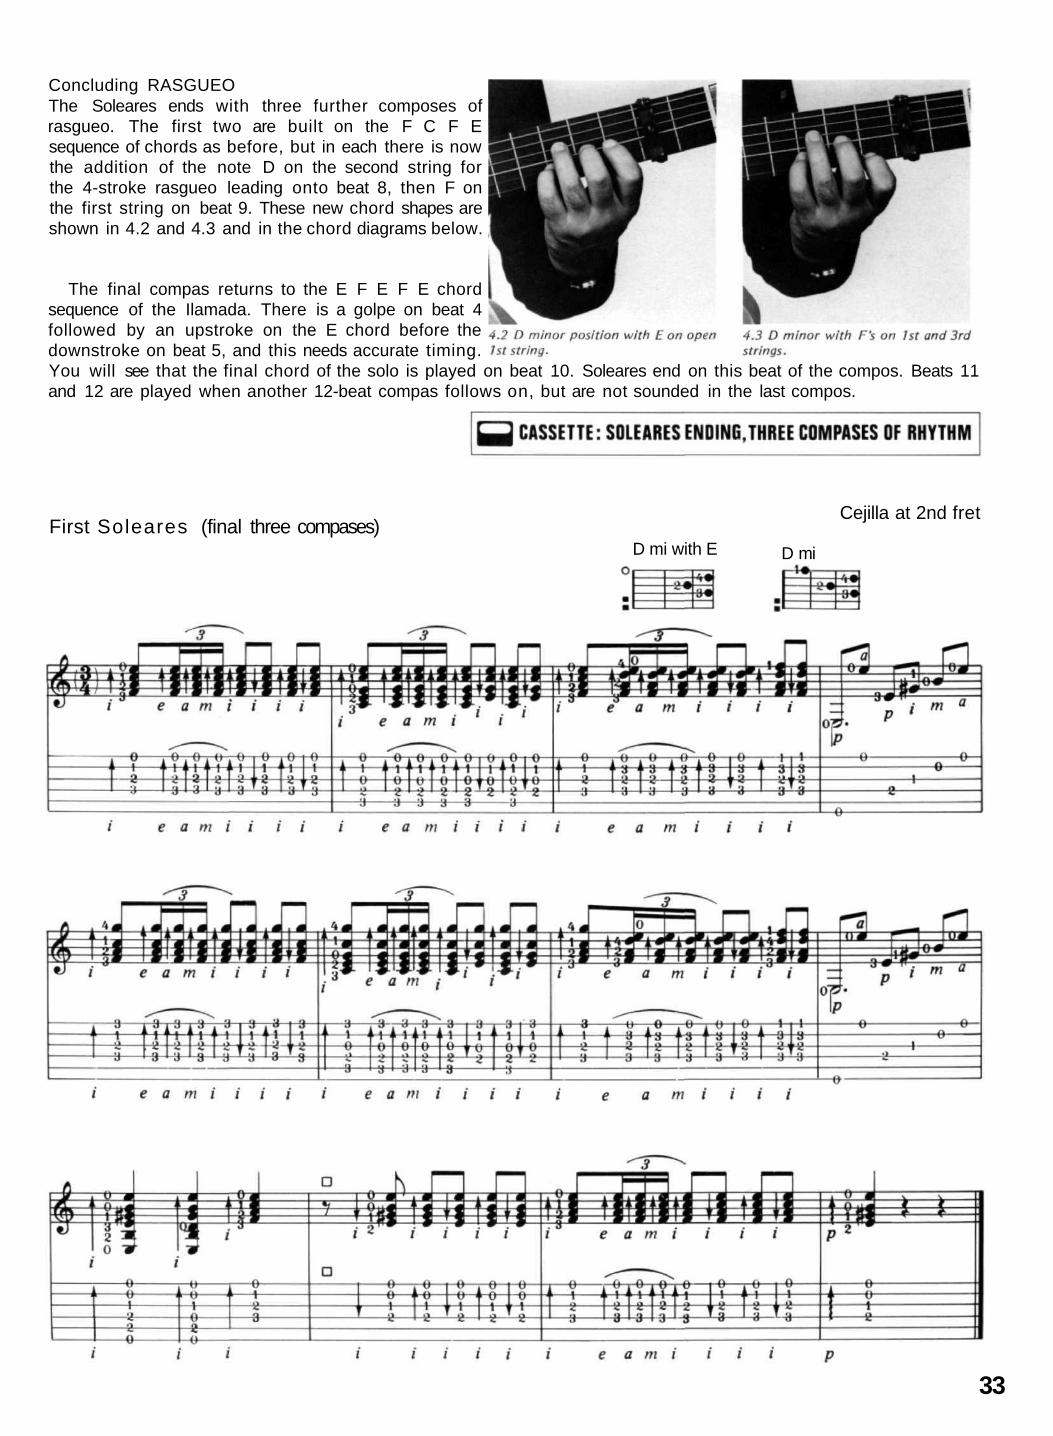
Concluding RASGUEOThe Soleares ends with three further composes ofrasgueo. The first two are built on the F C F Esequence of chords as before, but in each there is nowthe addition of the note D on the second string forthe 4-stroke rasgueo leading onto beat 8, then F onthe first string on beat 9. These new chord shapes areshown in 4.2 and 4.3 and in the chord diagrams below.
The final compas returns to the E F E F E chordsequence of the Ilamada. There is a golpe on beat 4followed by an upstroke on the E chord before thedownstroke on beat 5, and this needs accurate timing.You will see that the final chord of the solo is played on beat 10. Soleares end on this beat of the compos. Beats 11and 12 are played when another 12-beat compas follows on, but are not sounded in the last compos.
First Soleares (final three compases)Cejilla at 2nd fret
D mi with E D mi
33

LESSON 4 Part Two The Technique of PicadoIn picado (literally 'picked') playing, passages of single notes are played with apoyando strokes of alternating righthand fingers. The commonest method is to use alternate strokes with the index and middle finger. With practice the
• technique can be developed to achieve brilliant speed and attack in playing runs of single notes, but It is also usedfor slower passages of melody. In Flamenco, single melody notes are always played apoyando rather than tirando.Sometimes passages of picado on higher strings are played with an accompaniment of bass notes played with thethumb tirando.
In the following exercise repeated notes are played picado on each open string in turn from 1st to 6th and backagain to 1st, repeatedly. It provides an excellent basis for a good understanding of the movements involved. Adetailed discussion of the technique follows the music. The exercise has not been recorded on the cassette.
Right hand position for PICADOThe hand position is the same 'basic' position already described for tirando, except that the knuckles may lieslightly more over the bass strings as shown in 4.4(a). The knuckles are parallel to the strings and the back of thehand is roughly parallel to the plane of the front of the guitar. The wrist remains relaxed and there is no movementat the wrist joint.
The thumbThe thumb rests lightly on the 6th string to stabilise the hand while notes are played on any of the three treblestrings. In a descending run it moves onto the golpeador on the near side of the strings when notes are played onthe 4th string or on lower bass strings. It moves back again to the 6th string when an ascending run passes from 4thto 3rd and higher treble strings.
The finger movementsIn fairly slow passages of picado (and you should start by playing the exercise extremely slowly and evenly) thefingers are relaxed. The power of the stroke can be thought of as coming entirely from movement at the knuckles,the two other joints of the finger being somewhat flexed. The alternating movement is as if you were 'walking'the fingers, each taking a swing of equal extent and striking with equal force. Each finger begins its stroke from ashort distance (perhaps half an inch or less) from the string. The finger swings in a direction across the strings andalso towards the soundboard (i.e. in towards your chest). The tip of the nail hits the string firmly and cleanly andthe finger follows through until its tip is brought to rest against the adjacent lower-pitched string. As the nail hitsthe string the tip-joint is bent backwards by the impact.
When picado is played faster or with greater emphasis, the fingers are more rigid and straighter, the movementstill coming from the knuckle. Because of the greater rigidity of the fingers, however, the tip-joint does not bendbackwards at the moment of impact. For extremely short bursts at maximum speed (which is not appropriate inthis exercise) the alternation of the fingers becomes a kind of nervous movement, as one feels for instance if onedrums the tips of the straightened fingers as fast as possible on a table top.
Ring and little fingers stay relaxed or the little finger may be extended as shown in photo 4.5. The ring fingerwill normally move in sympathy with the middle (because of the way the extensor tendons of the fingers areattached).
Practising the exercisePlay the exercise first with alternating index and middle fingers, i-m, i-m. Then repeat it m-i,m-i. Next play itwith the alternation of index and third finger, i-a, i-a and a-i, a-i. Hardest of all, but valuable for the developmentof the weak third finger, is the alternation m-a, m-a, then a-m, a-m. Movement of the ring finger should be exactlythe same as for the other fingers from the knuckle. The hand should be able to change from one pattern to anotherwithout moving as a whole.
34
Ex.8

4.4 Picado with alternate i and m on the 1st string.(a) Index ready to strike 1st string.
(c) After striking 1st string index comes to rest against the 2nd
(b) impact of index (shown here with no bending back of the tip-joint).
(d) Middle finger arrested by 2nd string after its stroke. Index ready tostrike again.
35
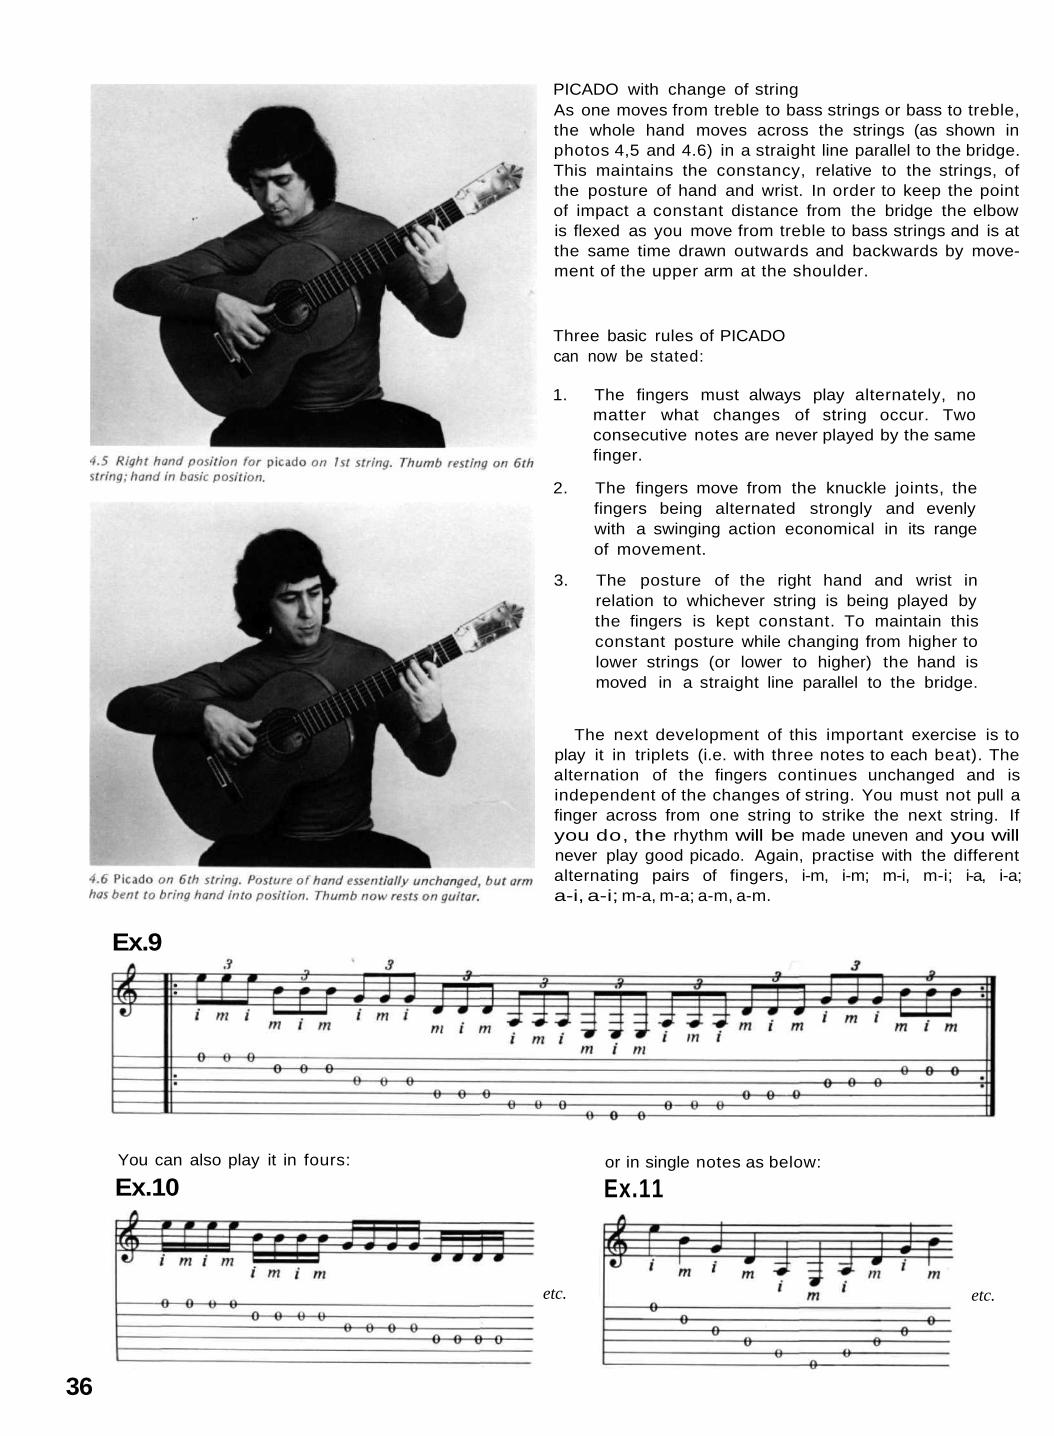
PICADO with change of stringAs one moves from treble to bass strings or bass to treble,the whole hand moves across the strings (as shown inphotos 4,5 and 4.6) in a straight line parallel to the bridge.This maintains the constancy, relative to the strings, ofthe posture of hand and wrist. In order to keep the pointof impact a constant distance from the bridge the elbowis flexed as you move from treble to bass strings and is atthe same time drawn outwards and backwards by move-ment of the upper arm at the shoulder.
Three basic rules of PICADOcan now be stated:
1. The fingers must always play alternately, nomatter what changes of string occur. Twoconsecutive notes are never played by the samefinger.
2. The fingers move from the knuckle joints, thefingers being alternated strongly and evenlywith a swinging action economical in its rangeof movement.
3. The posture of the right hand and wrist inrelation to whichever string is being played bythe fingers is kept constant. To maintain thisconstant posture while changing from higher tolower strings (or lower to higher) the hand ismoved in a straight line parallel to the bridge.
You can also play it in fours:
Ex.10
36
etc.
or in single notes as below:
Ex.11
etc.
The next development of this important exercise is toplay it in triplets (i.e. with three notes to each beat). Thealternation of the fingers continues unchanged and isindependent of the changes of string. You must not pull afinger across from one string to strike the next string. Ifyou do, the rhythm will be made uneven and you willnever play good picado. Again, practise with the differentalternating pairs of fingers, i-m, i-m; m-i, m-i; i-a, i-a;a-i, a-i; m-a, m-a; a-m, a-m.
Ex.9
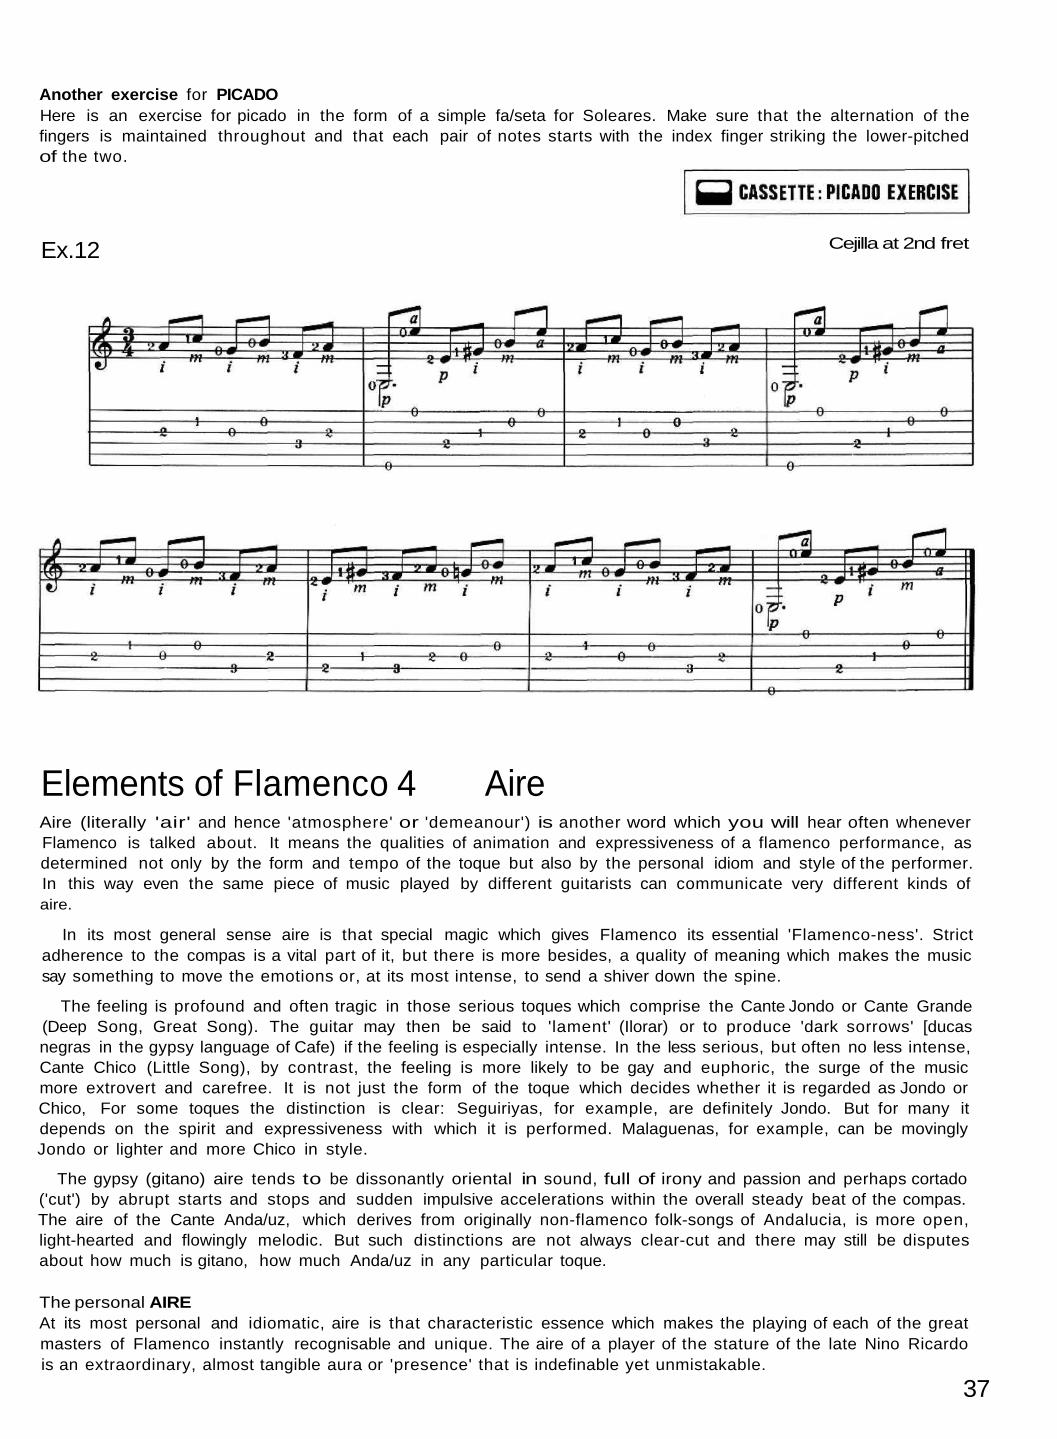
Another exercise for PICADOHere is an exercise for picado in the form of a simple fa/seta for Soleares. Make sure that the alternation of thefingers is maintained throughout and that each pair of notes starts with the index finger striking the lower-pitchedof the two.
Ex.12 Cejilla at 2nd fret
Elements of Flamenco 4 AireAire (literally 'air' and hence 'atmosphere' or 'demeanour') is another word which you will hear often wheneverFlamenco is talked about. It means the qualities of animation and expressiveness of a flamenco performance, asdetermined not only by the form and tempo of the toque but also by the personal idiom and style of the performer.In this way even the same piece of music played by different guitarists can communicate very different kinds ofaire.
In its most general sense aire is that special magic which gives Flamenco its essential 'Flamenco-ness'. Strictadherence to the compas is a vital part of it, but there is more besides, a quality of meaning which makes the musicsay something to move the emotions or, at its most intense, to send a shiver down the spine.
The feeling is profound and often tragic in those serious toques which comprise the Cante Jondo or Cante Grande(Deep Song, Great Song). The guitar may then be said to 'lament' (Ilorar) or to produce 'dark sorrows' [ducasnegras in the gypsy language of Cafe) if the feeling is especially intense. In the less serious, but often no less intense,Cante Chico (Little Song), by contrast, the feeling is more likely to be gay and euphoric, the surge of the musicmore extrovert and carefree. It is not just the form of the toque which decides whether it is regarded as Jondo orChico, For some toques the distinction is clear: Seguiriyas, for example, are definitely Jondo. But for many itdepends on the spirit and expressiveness with which it is performed. Malaguenas, for example, can be movinglyJondo or lighter and more Chico in style.
The gypsy (gitano) aire tends to be dissonantly oriental in sound, full of irony and passion and perhaps cortado('cut') by abrupt starts and stops and sudden impulsive accelerations within the overall steady beat of the compas.The aire of the Cante Anda/uz, which derives from originally non-flamenco folk-songs of Andalucia, is more open,light-hearted and flowingly melodic. But such distinctions are not always clear-cut and there may still be disputesabout how much is gitano, how much Anda/uz in any particular toque.
The personal AIREAt its most personal and idiomatic, aire is that characteristic essence which makes the playing of each of the greatmasters of Flamenco instantly recognisable and unique. The aire of a player of the stature of the late Nino Ricardois an extraordinary, almost tangible aura or 'presence' that is indefinable yet unmistakable.
37
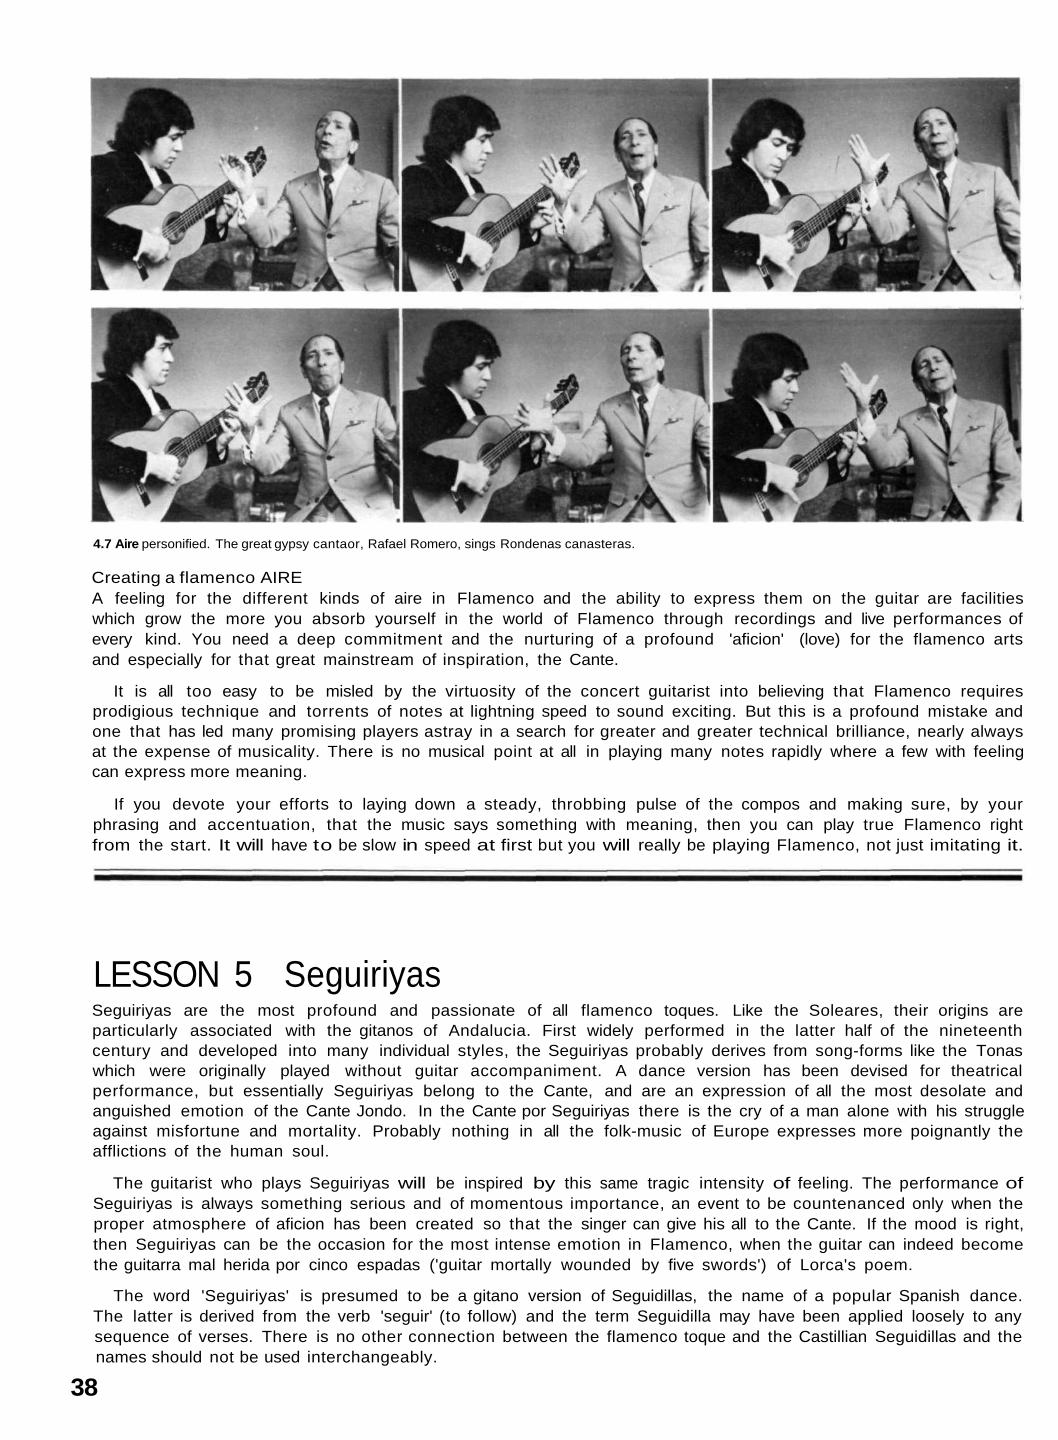
Creating a flamenco AIREA feeling for the different kinds of aire in Flamenco and the ability to express them on the guitar are facilitieswhich grow the more you absorb yourself in the world of Flamenco through recordings and live performances ofevery kind. You need a deep commitment and the nurturing of a profound 'aficion' (love) for the flamenco artsand especially for that great mainstream of inspiration, the Cante.
It is all too easy to be misled by the virtuosity of the concert guitarist into believing that Flamenco requiresprodigious technique and torrents of notes at lightning speed to sound exciting. But this is a profound mistake andone that has led many promising players astray in a search for greater and greater technical brilliance, nearly alwaysat the expense of musicality. There is no musical point at all in playing many notes rapidly where a few with feelingcan express more meaning.
If you devote your efforts to laying down a steady, throbbing pulse of the compos and making sure, by yourphrasing and accentuation, that the music says something with meaning, then you can play true Flamenco rightfrom the start. It will have to be slow in speed at first but you will really be playing Flamenco, not just imitating it.
LESSON 5 SeguiriyasSeguiriyas are the most profound and passionate of all flamenco toques. Like the Soleares, their origins areparticularly associated with the gitanos of Andalucia. First widely performed in the latter half of the nineteenthcentury and developed into many individual styles, the Seguiriyas probably derives from song-forms like the Tonaswhich were originally played without guitar accompaniment. A dance version has been devised for theatricalperformance, but essentially Seguiriyas belong to the Cante, and are an expression of all the most desolate andanguished emotion of the Cante Jondo. In the Cante por Seguiriyas there is the cry of a man alone with his struggleagainst misfortune and mortality. Probably nothing in all the folk-music of Europe expresses more poignantly theafflictions of the human soul.
The guitarist who plays Seguiriyas will be inspired by this same tragic intensity of feeling. The performance ofSeguiriyas is always something serious and of momentous importance, an event to be countenanced only when theproper atmosphere of aficion has been created so that the singer can give his all to the Cante. If the mood is right,then Seguiriyas can be the occasion for the most intense emotion in Flamenco, when the guitar can indeed becomethe guitarra mal herida por cinco espadas ('guitar mortally wounded by five swords') of Lorca's poem.
The word 'Seguiriyas' is presumed to be a gitano version of Seguidillas, the name of a popular Spanish dance.The latter is derived from the verb 'seguir' (to follow) and the term Seguidilla may have been applied loosely to anysequence of verses. There is no other connection between the flamenco toque and the Castillian Seguidillas and thenames should not be used interchangeably.
38
4.7 Aire personified. The great gypsy cantaor, Rafael Romero, sings Rondenas canasteras.

The COMPAS of SeguiriyasThe compas of Seguiriyas on the guitar follows a simple and strongly emphasised pattern which is repeatedunvaryingly. The way to count it can be shown as follows:
The duration of each of the 12 syllables should be the same, with the accents of the rhythm falling on the numbers.The pattern is repeated again and again.
Play through the cassette recording of the first solo Seguiriyas so thatyou can start to get the feeling of this powerful rhythm. Count thecompas aloud as shown above and beat time to the music with yourfoot, if you can, bringing your foot down to coincide with each of thenumbered beats.
It is conventional to represent the compas of Seguiriyas in musical notation in alternating bars of 3/4 and 6/8time. In the notation below you will see that the compas starts on the second beat of a bar in 3/4 time and ends onthe first beat of the next bar of 3/4 time.
At first sight this may look complicated, but the complexity lies less in the rhythm than in the way it has to bewritten in notation. Each note above lasts the same length of time.
There are many passages in Seguiriyas where it may be more appropriate to count the same compas slightlydifferently as:
1 2 3 and 4 and 5
Here the duration of each number is twice as long as the time taken up in saying the 'and's.
Combining the two methods and showing the basic compas repeated once we have:
Chords for SeguiriyasSeguiriyas is played on the guitar in the key position called by flamencos 'por medio'. The starting chord is in theposition of A major and the scale, as in Soleares, is in the Phrygian mode. The left hand position for the A majorchord is shown in photo 5.1.
Note the way the first finger stops two strings, the third and fourth. If your previous experience with the guitarhas made you accustomed to playing this chord with fingers 1, 2 and 3, you should gradually try to make thechange-over to the flamenco way described here. This is essential if your 3rd finger is to be free in order to stopother frets during passages where the A major chord is held down (for example the ligado 'hammer on' to B flat atthe start of the solo, shown in 5.2).
A major A major with B flat
5.7 Chord position of A major. 5.2 3rd finger 'hammers on' for theligado.
39

5.3 B flat chord for Seguiriyas. 5,4 Starting chord for Falseta 1. 5.5 Next, C stopped on 5th string.
The other chord most used in Seguiriyas is a version of B flat major which is shown in 5.3 and in the chorddiagram under the photo. Many passages in Seguiriyas are based on this chord. Fingers 3 and 4 hold down theirpositions while melody notes are played on the 4th and 5th strings using 1st and 2nd fingers together with ligadotechniques of 'hammering-on' and 'pulling off1.
Two more chords derived from B which occur in the solo and which precede the previous chord in sequence tocreate a characteristic cadence of Seguiriyas are shown in 5.4 and 5.5 and in the chord diagrams beneath.
LIGADO 'pulling off'This technique is a second way of sounding notes using only the left hand. We have already met 'hammering on'which produces a higher note than the note first sounded by the right hand. 'Pulling off produces a lower note. Aleft hand finger stopping the string plucks it by pulling firmly in a direction across it towards the palm and down-wards towards the fingerboard.
In the simplest example the second note is that of an open string: e.g. the notation(left) indicates that the middle finger of the left hand stops the 4th string at the 2ndfret; the first note, E, is sounded by the right hand and the second by pulling off withthe left middle finger to sound the note, D, of the open string. The symbol for theligado is again a tie,
In other instances the note sounded by 'pulling off maybe stopped by another finger of the left hand, which maythen itself be 'pulled off to sound another, lower note.
An example of two consecutive notes being sounded by 'pulling off, as occurs in thesolo to follow, is shown in the notation on the right. The F stopped by the third fingerat the 3rd fret on the 4th string is first sounded by the right thumb, with the secondfinger of the left hand already placed in position to stop the string at the 2nd fret. Thethird finger pulls off to sound the E and then the second finger pulls off to sound theopen string, D. Three notes have been played in sequence but only the first has beensounded by the right hand.
When more than one 'pulling off occurs consecutively like this, the pulling finger andthe stopping finger(s) must be in place at the start when the right hand first plucks thestring. A clear note depends not only on the correct movement of the pulling finger butequally on the stopping finger which must brace the string firmly. In the example above,for instance, fingers 3 and 2 must start down together on the frets. This is shown inphotos 5.6 (a), (b) and (c).
Sometimes the finger which hammers on then sounds the starting note again bypulling off, as in the following example from the solo (right). Ligado passages using bothhammering on and pulling off to sound a consecutive series of notes are very widelyused in Flamenco. It is very important to keep the rhythm of each sequence of noteseven and regular otherwise a whole falseta could be put out of compas.
40
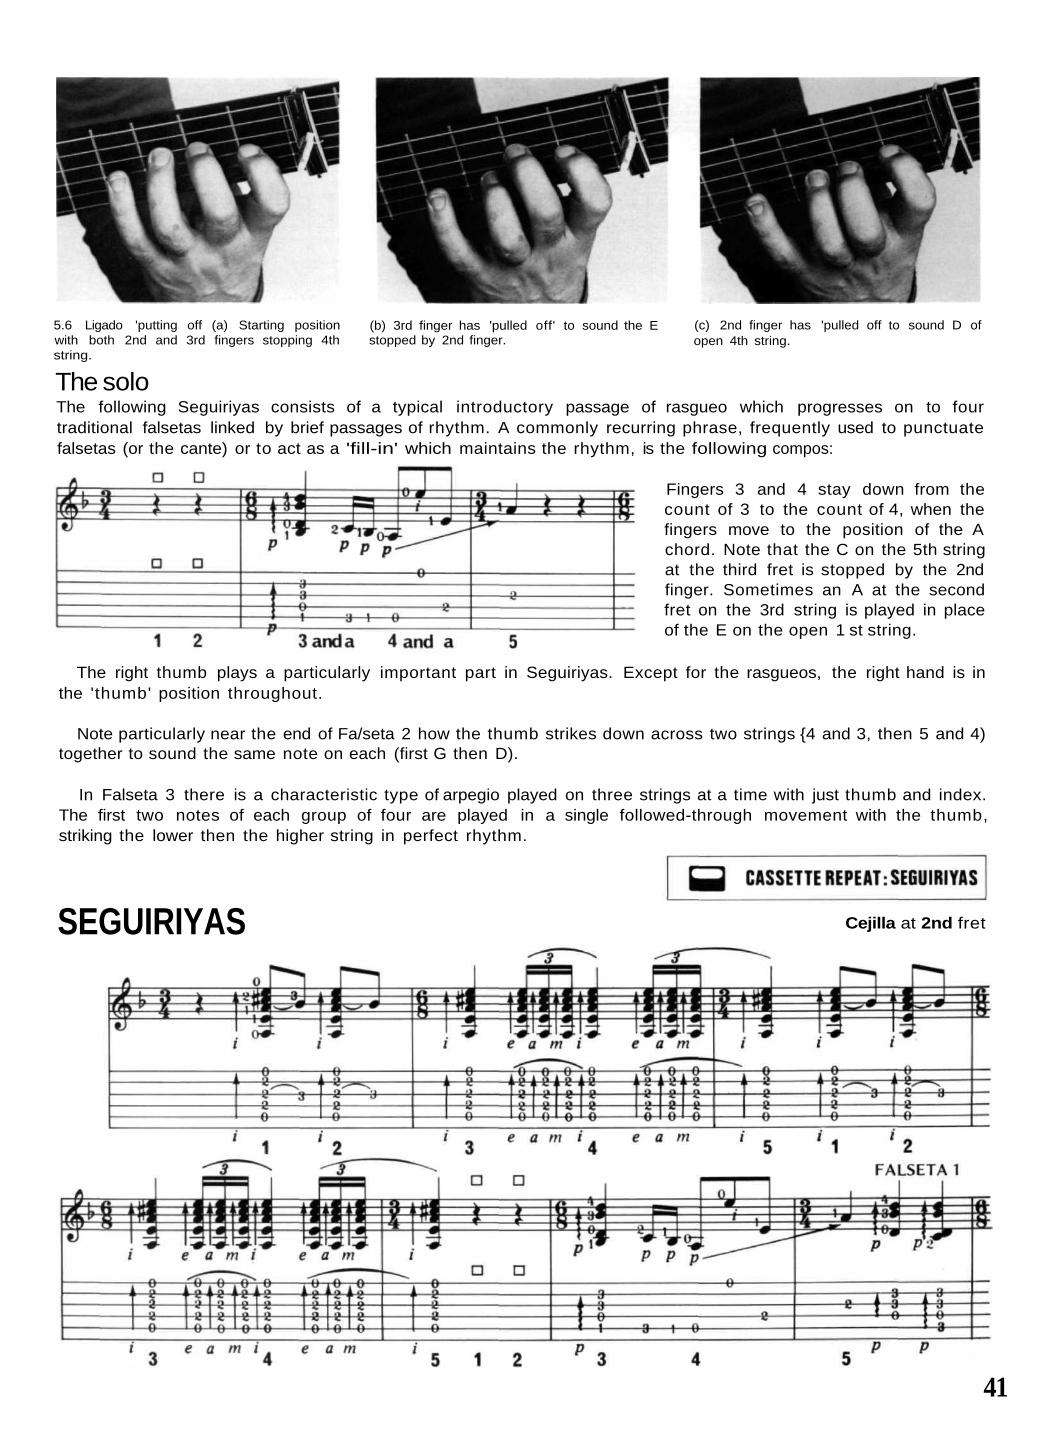
(b) 3rd finger has 'pulled off' to sound the Estopped by 2nd finger.
(c) 2nd finger has 'pulled off to sound D ofopen 4th string.
The soloThe following Seguiriyas consists of a typical introductory passage of rasgueo which progresses on to fourtraditional falsetas linked by brief passages of rhythm. A commonly recurring phrase, frequently used to punctuatefalsetas (or the cante) or to act as a 'fill-in' which maintains the rhythm, is the following compos:
Fingers 3 and 4 stay down from thecount of 3 to the count of 4, when thefingers move to the position of the Achord. Note that the C on the 5th stringat the third fret is stopped by the 2ndfinger. Sometimes an A at the secondfret on the 3rd string is played in placeof the E on the open 1 st string.
The right thumb plays a particularly important part in Seguiriyas. Except for the rasgueos, the right hand is inthe 'thumb' position throughout.
Note particularly near the end of Fa/seta 2 how the thumb strikes down across two strings {4 and 3, then 5 and 4)together to sound the same note on each (first G then D).
In Falseta 3 there is a characteristic type of arpegio played on three strings at a time with just thumb and index.The first two notes of each group of four are played in a single followed-through movement with the thumb,striking the lower then the higher string in perfect rhythm.
SEGUIRIYAS Cejilla at 2nd fret
41
5.6 Ligado 'putting off (a) Starting positionwith both 2nd and 3rd fingers stopping 4thstring.
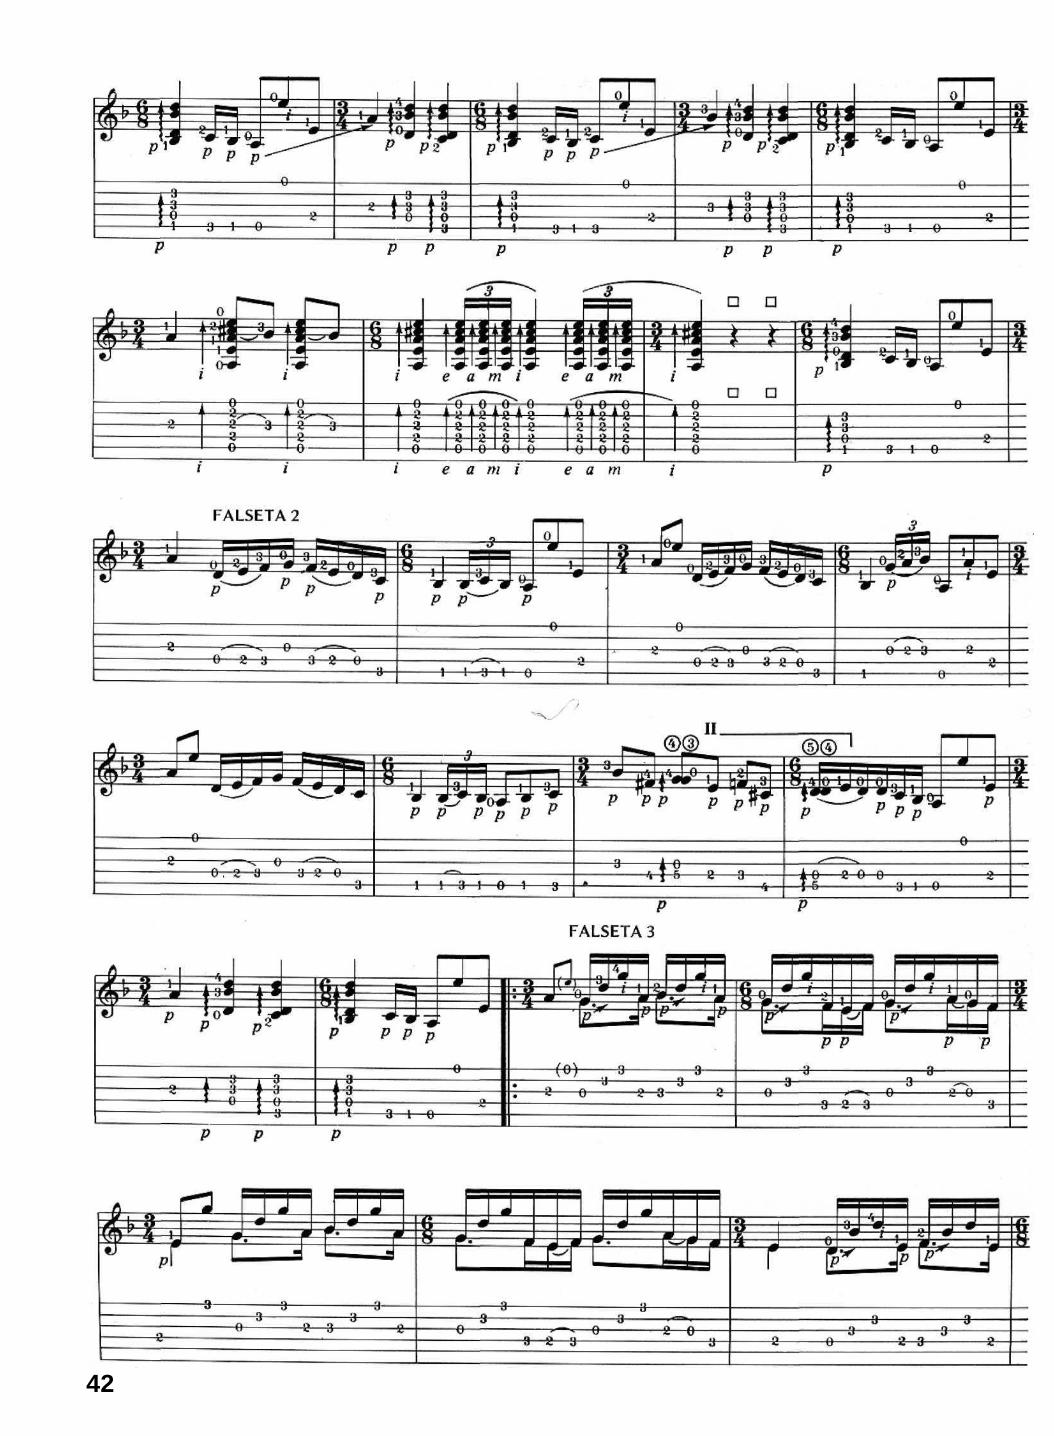
42
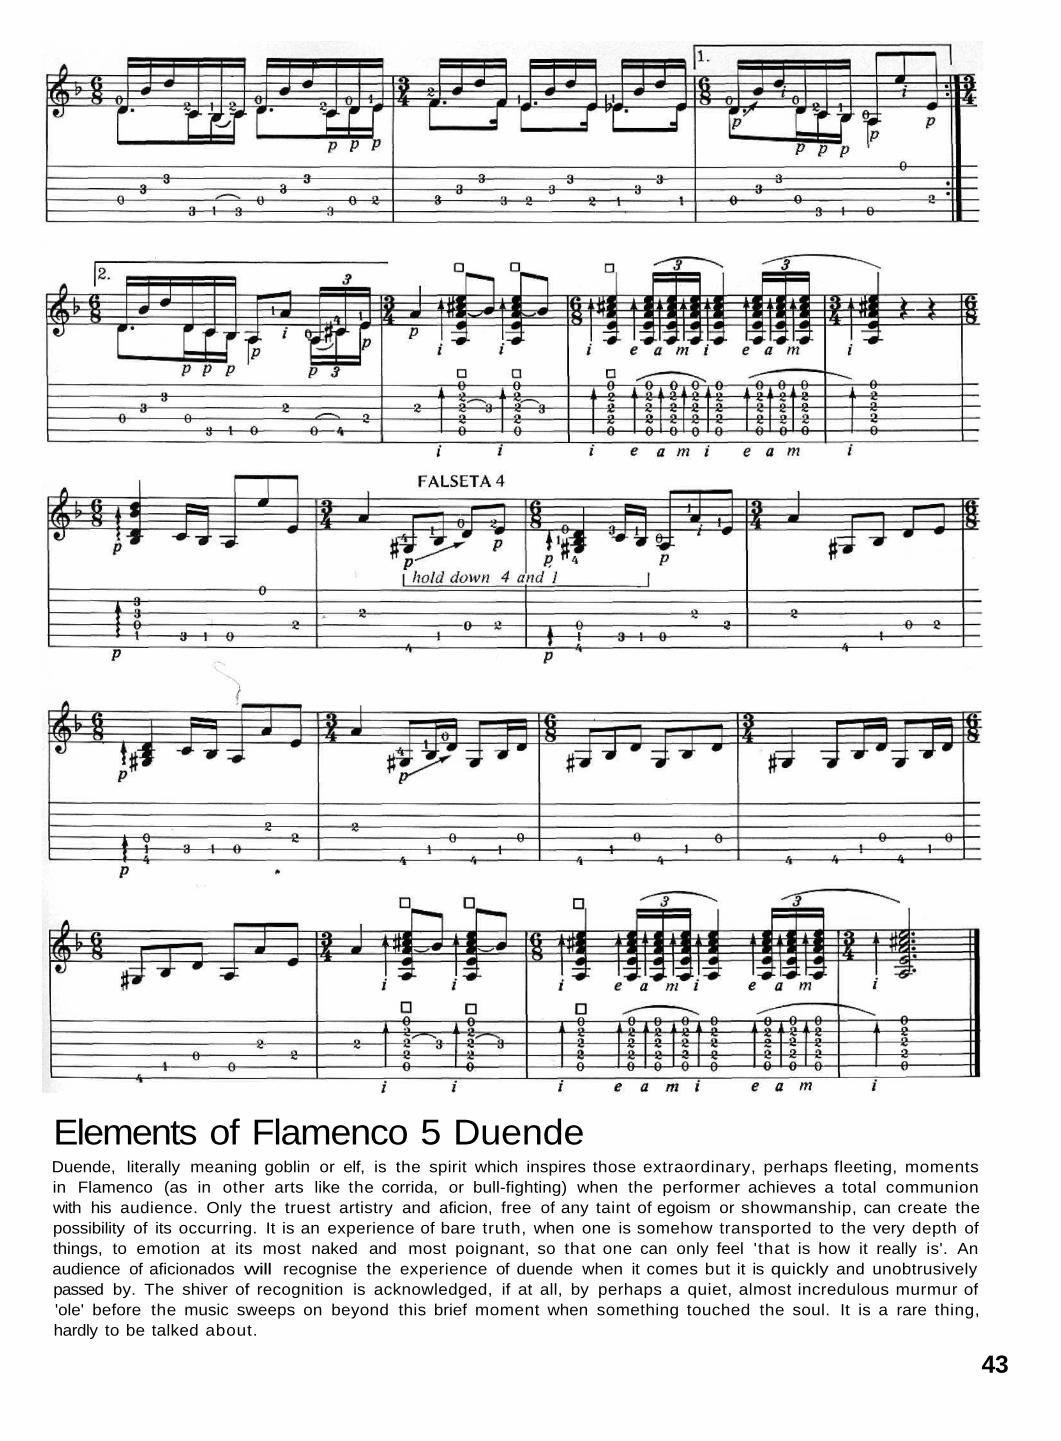
Elements of Flamenco 5 DuendeDuende, literally meaning goblin or elf, is the spirit which inspires those extraordinary, perhaps fleeting, momentsin Flamenco (as in other arts like the corrida, or bull-fighting) when the performer achieves a total communionwith his audience. Only the truest artistry and aficion, free of any taint of egoism or showmanship, can create thepossibility of its occurring. It is an experience of bare truth, when one is somehow transported to the very depth ofthings, to emotion at its most naked and most poignant, so that one can only feel 'that is how it really is'. Anaudience of aficionados will recognise the experience of duende when it comes but it is quickly and unobtrusivelypassed by. The shiver of recognition is acknowledged, if at all, by perhaps a quiet, almost incredulous murmur of'ole' before the music sweeps on beyond this brief moment when something touched the soul. It is a rare thing,hardly to be talked about.
43
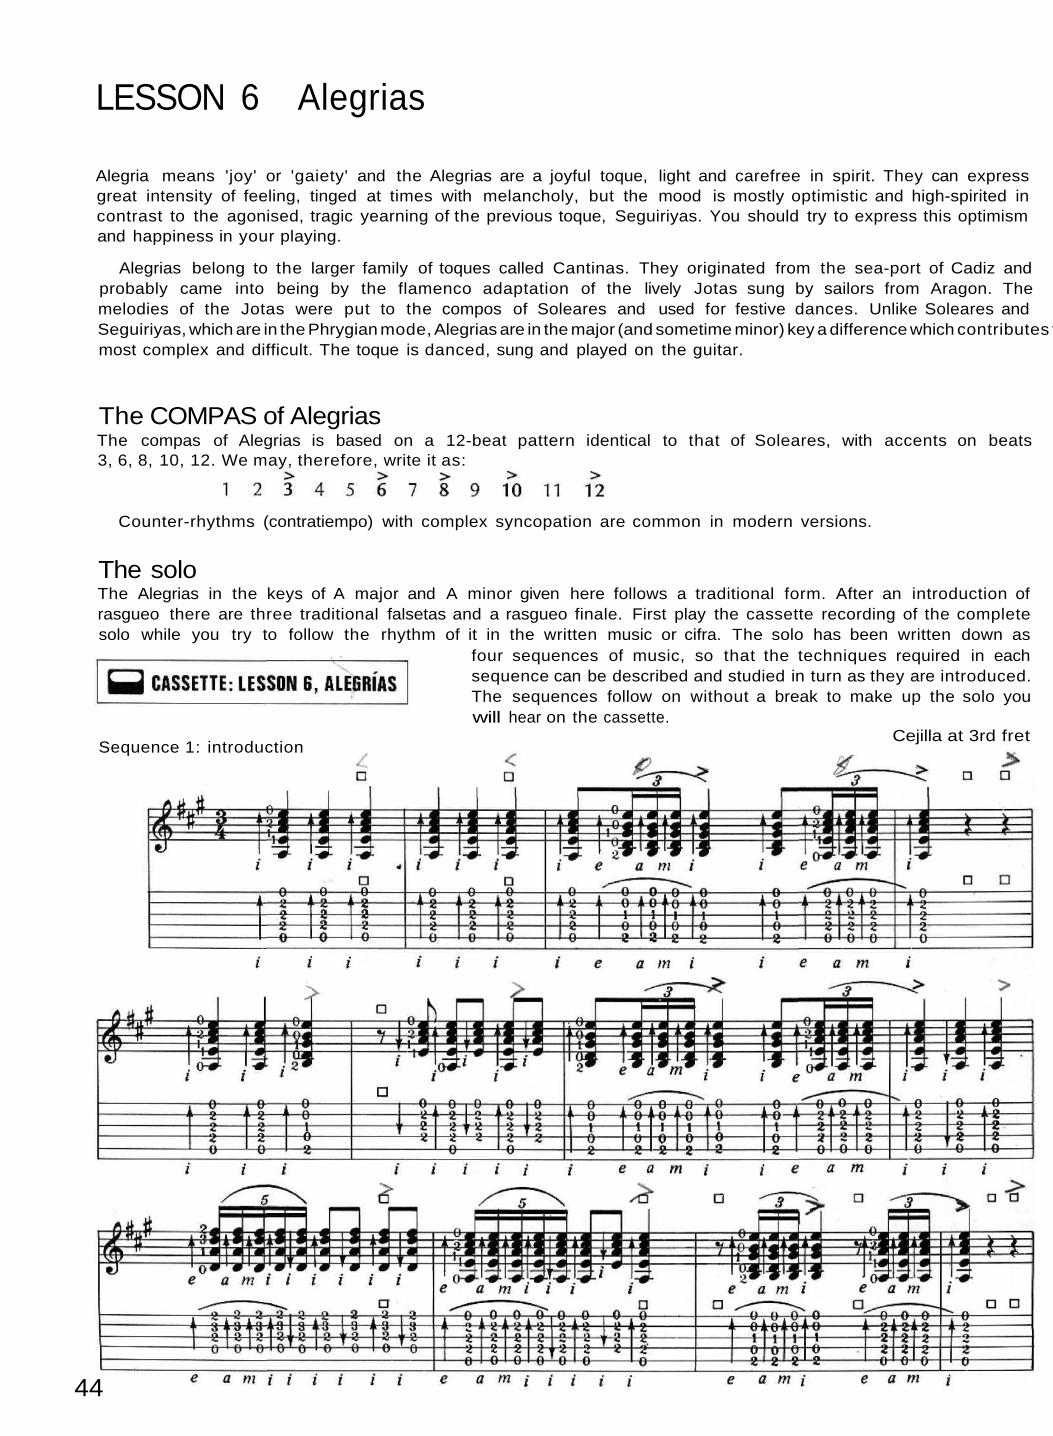
LESSON 6 Alegrias
The soloThe Alegrias in the keys of A major and A minor given here follows a traditional form. After an introduction ofrasgueo there are three traditional falsetas and a rasgueo finale. First play the cassette recording of the completesolo while you try to follow the rhythm of it in the written music or cifra. The solo has been written down as
four sequences of music, so that the techniques required in eachsequence can be described and studied in turn as they are introduced.The sequences follow on without a break to make up the solo youwill hear on the cassette.
Alegria means 'joy' or 'gaiety' and the Alegrias are a joyful toque, light and carefree in spirit. They can expressgreat intensity of feeling, tinged at times with melancholy, but the mood is mostly optimistic and high-spirited incontrast to the agonised, tragic yearning of the previous toque, Seguiriyas. You should try to express this optimismand happiness in your playing.
Alegrias belong to the larger family of toques called Cantinas. They originated from the sea-port of Cadiz andprobably came into being by the flamenco adaptation of the lively Jotas sung by sailors from Aragon. Themelodies of the Jotas were put to the compos of Soleares and used for festive dances. Unlike Soleares andSeguiriyas, which are in the Phrygian mode, Alegrias are in the major (and sometime minor) key a difference which contributes to their happier and more obviously tuneful aire. The baile por Flamenco'smost complex and difficult. The toque is danced, sung and played on the guitar.
Cejilla at 3rd fret
The COMPAS of AlegriasThe compas of Alegrias is based on a 12-beat pattern identical to that of Soleares, with accents on beats3, 6, 8, 10, 12. We may, therefore, write it as:
Counter-rhythms (contratiempo) with complex syncopation are common in modern versions.
Sequence 1: introduction
44
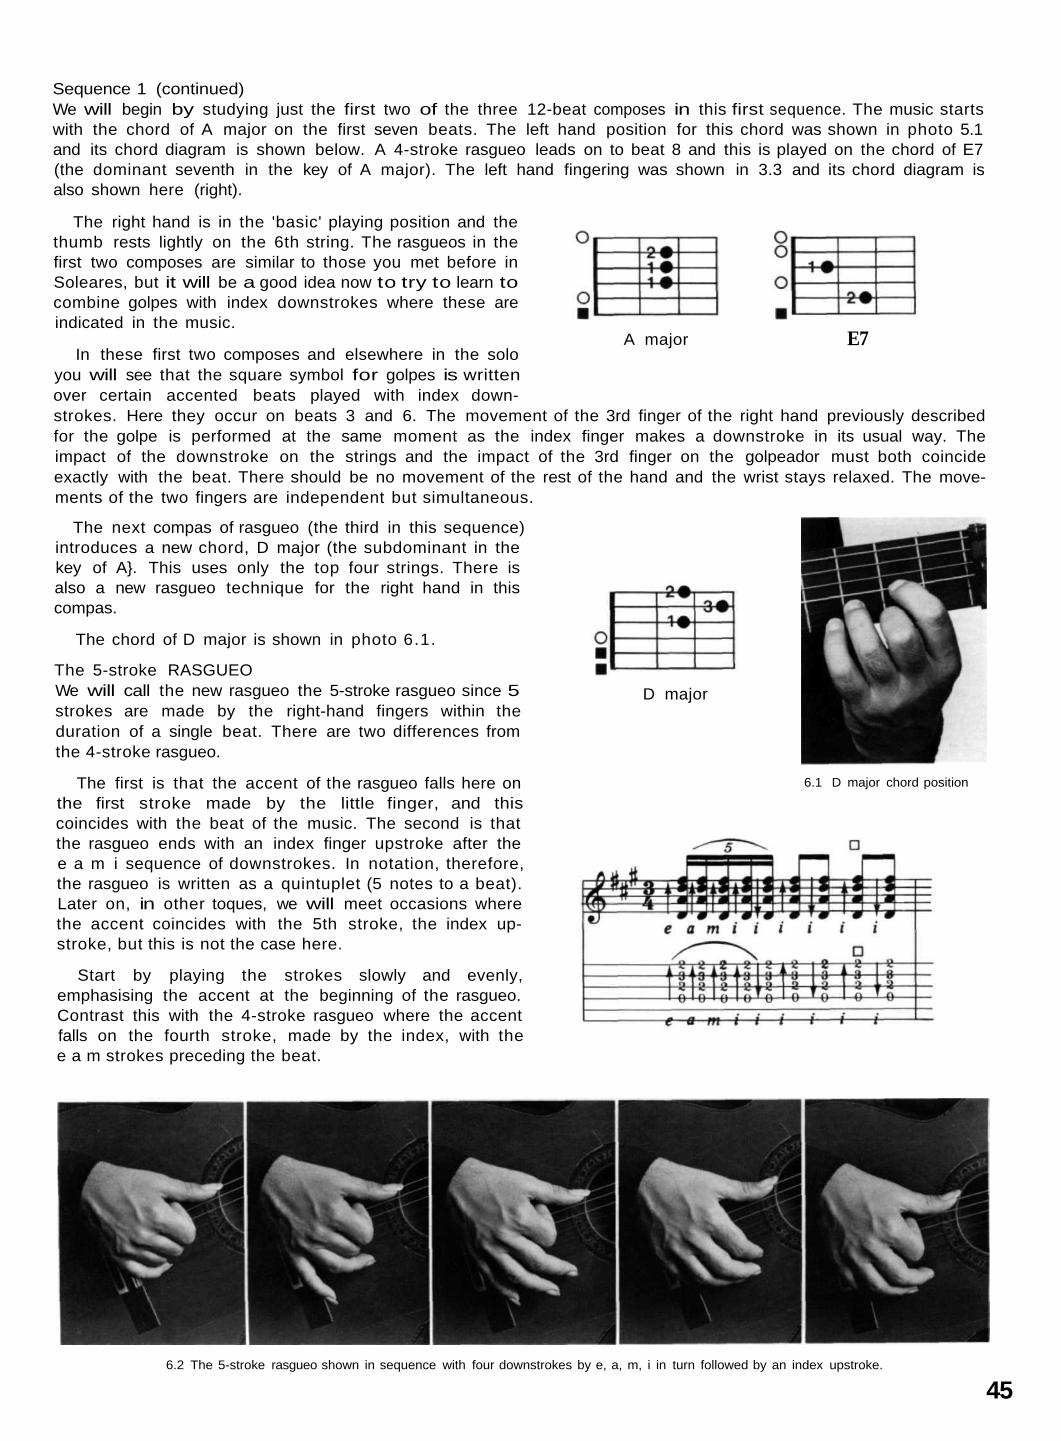
Sequence 1 (continued)We will begin by studying just the first two of the three 12-beat composes in this first sequence. The music startswith the chord of A major on the first seven beats. The left hand position for this chord was shown in photo 5.1and its chord diagram is shown below. A 4-stroke rasgueo leads on to beat 8 and this is played on the chord of E7(the dominant seventh in the key of A major). The left hand fingering was shown in 3.3 and its chord diagram isalso shown here (right).
The right hand is in the 'basic' playing position and thethumb rests lightly on the 6th string. The rasgueos in thefirst two composes are similar to those you met before inSoleares, but it will be a good idea now to try to learn tocombine golpes with index downstrokes where these areindicated in the music.
A major E7
D major
In these first two composes and elsewhere in the soloyou will see that the square symbol for golpes is writtenover certain accented beats played with index down-strokes. Here they occur on beats 3 and 6. The movement of the 3rd finger of the right hand previously describedfor the golpe is performed at the same moment as the index finger makes a downstroke in its usual way. Theimpact of the downstroke on the strings and the impact of the 3rd finger on the golpeador must both coincideexactly with the beat. There should be no movement of the rest of the hand and the wrist stays relaxed. The move-ments of the two fingers are independent but simultaneous.
The next compas of rasgueo (the third in this sequence)introduces a new chord, D major (the subdominant in thekey of A}. This uses only the top four strings. There isalso a new rasgueo technique for the right hand in thiscompas.
The chord of D major is shown in photo 6.1.
The 5-stroke RASGUEOWe will call the new rasgueo the 5-stroke rasgueo since 5strokes are made by the right-hand fingers within theduration of a single beat. There are two differences fromthe 4-stroke rasgueo.
The first is that the accent of the rasgueo falls here onthe first stroke made by the little finger, and thiscoincides with the beat of the music. The second is thatthe rasgueo ends with an index finger upstroke after thee a m i sequence of downstrokes. In notation, therefore,the rasgueo is written as a quintuplet (5 notes to a beat).Later on, in other toques, we will meet occasions wherethe accent coincides with the 5th stroke, the index up-stroke, but this is not the case here.
Start by playing the strokes slowly and evenly,emphasising the accent at the beginning of the rasgueo.Contrast this with the 4-stroke rasgueo where the accentfalls on the fourth stroke, made by the index, with thee a m strokes preceding the beat.
6.1 D major chord position
6.2 The 5-stroke rasgueo shown in sequence with four downstrokes by e, a, m, i in turn followed by an index upstroke.
45

Sequence 2: first FALSETA and rhythm COMPASThe fa/seta is played mainly with thumb and index in triplets and is based on the chords of E7 and A major. Notethat the compos is again the 12-beat pattern with accents on beats 3, 6, 8, 10 and 12. The first fa/seta is followedby another rasgueo compas based on the chords D, A, E7,A, with 5-stroke rasgueos played on the chords of D and A.On beat 9 in this compas we meet another version ofthe chord of E7, this time played on just the bottom fourstrings. The fingering is shown in 6.3 alongside the chorddiagram,
This beat and the final chord of A major in thiscompas are both played by downstrokes of the thumb atthe same time as golpes are played with the third finger.As was described earlier for the index downstroke com-bined with golpe, the movements of thumb and thirdfinger must be independent but exactly simultaneous.
E7
6.3 E7 on lower four strings.
FALSETA 1
46
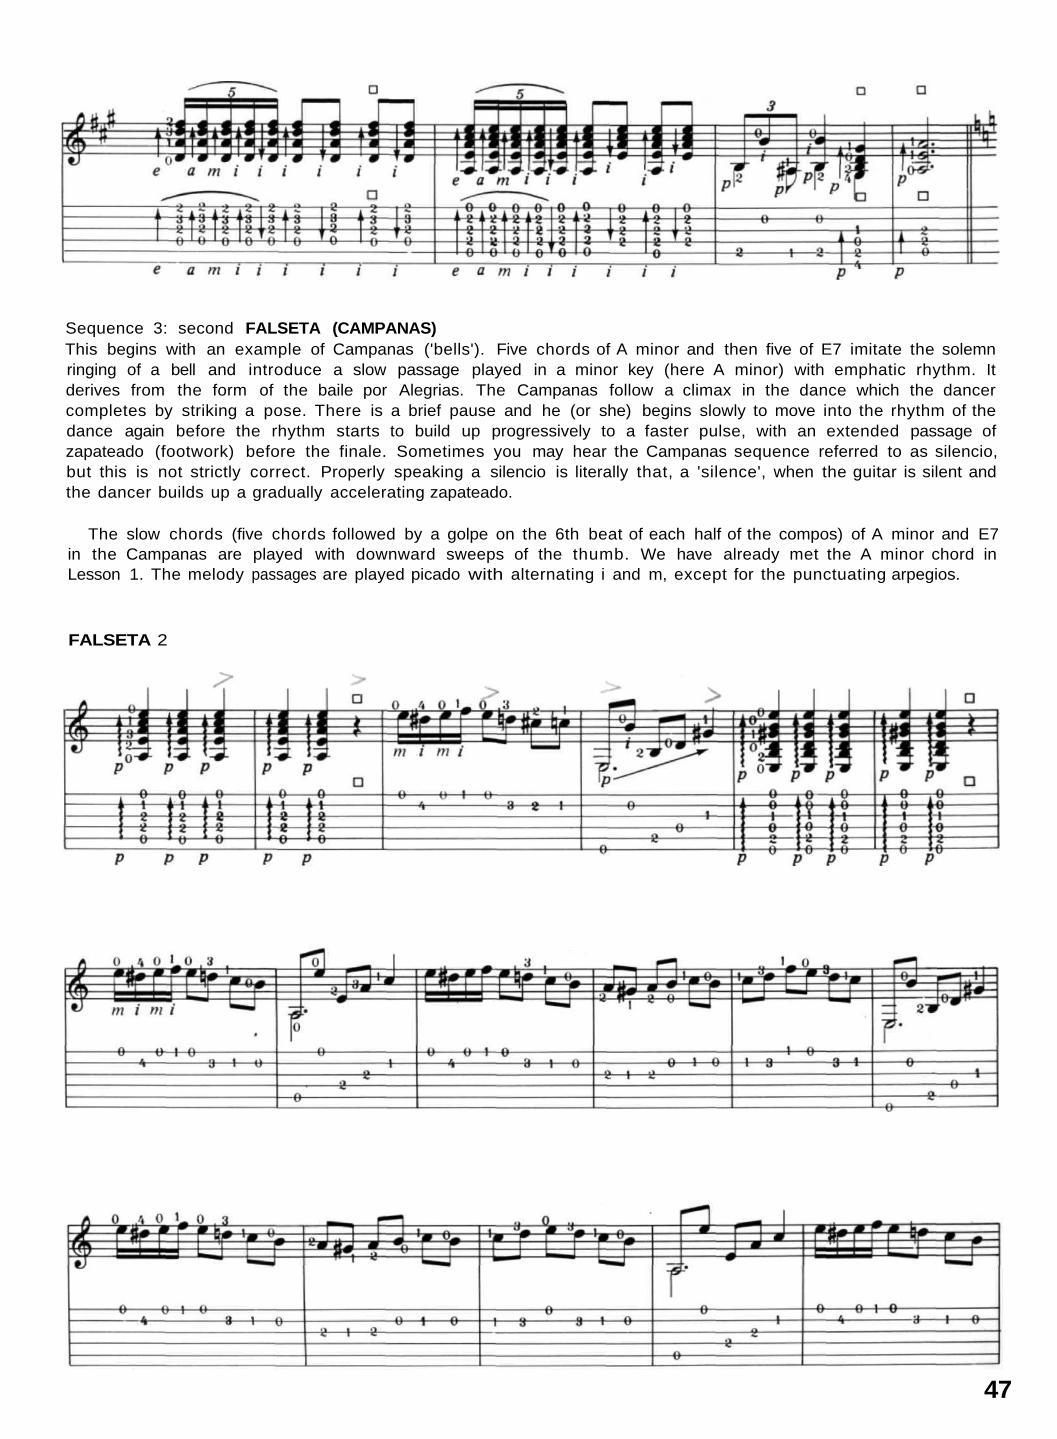
Sequence 3: second FALSETA (CAMPANAS)This begins with an example of Campanas ('bells'). Five chords of A minor and then five of E7 imitate the solemnringing of a bell and introduce a slow passage played in a minor key (here A minor) with emphatic rhythm. Itderives from the form of the baile por Alegrias. The Campanas follow a climax in the dance which the dancercompletes by striking a pose. There is a brief pause and he (or she) begins slowly to move into the rhythm of thedance again before the rhythm starts to build up progressively to a faster pulse, with an extended passage ofzapateado (footwork) before the finale. Sometimes you may hear the Campanas sequence referred to as silencio,but this is not strictly correct. Properly speaking a silencio is literally that, a 'silence', when the guitar is silent andthe dancer builds up a gradually accelerating zapateado.
The slow chords (five chords followed by a golpe on the 6th beat of each half of the compos) of A minor and E7in the Campanas are played with downward sweeps of the thumb. We have already met the A minor chord inLesson 1. The melody passages are played picado with alternating i and m, except for the punctuating arpegios.
FALSETA 2
47
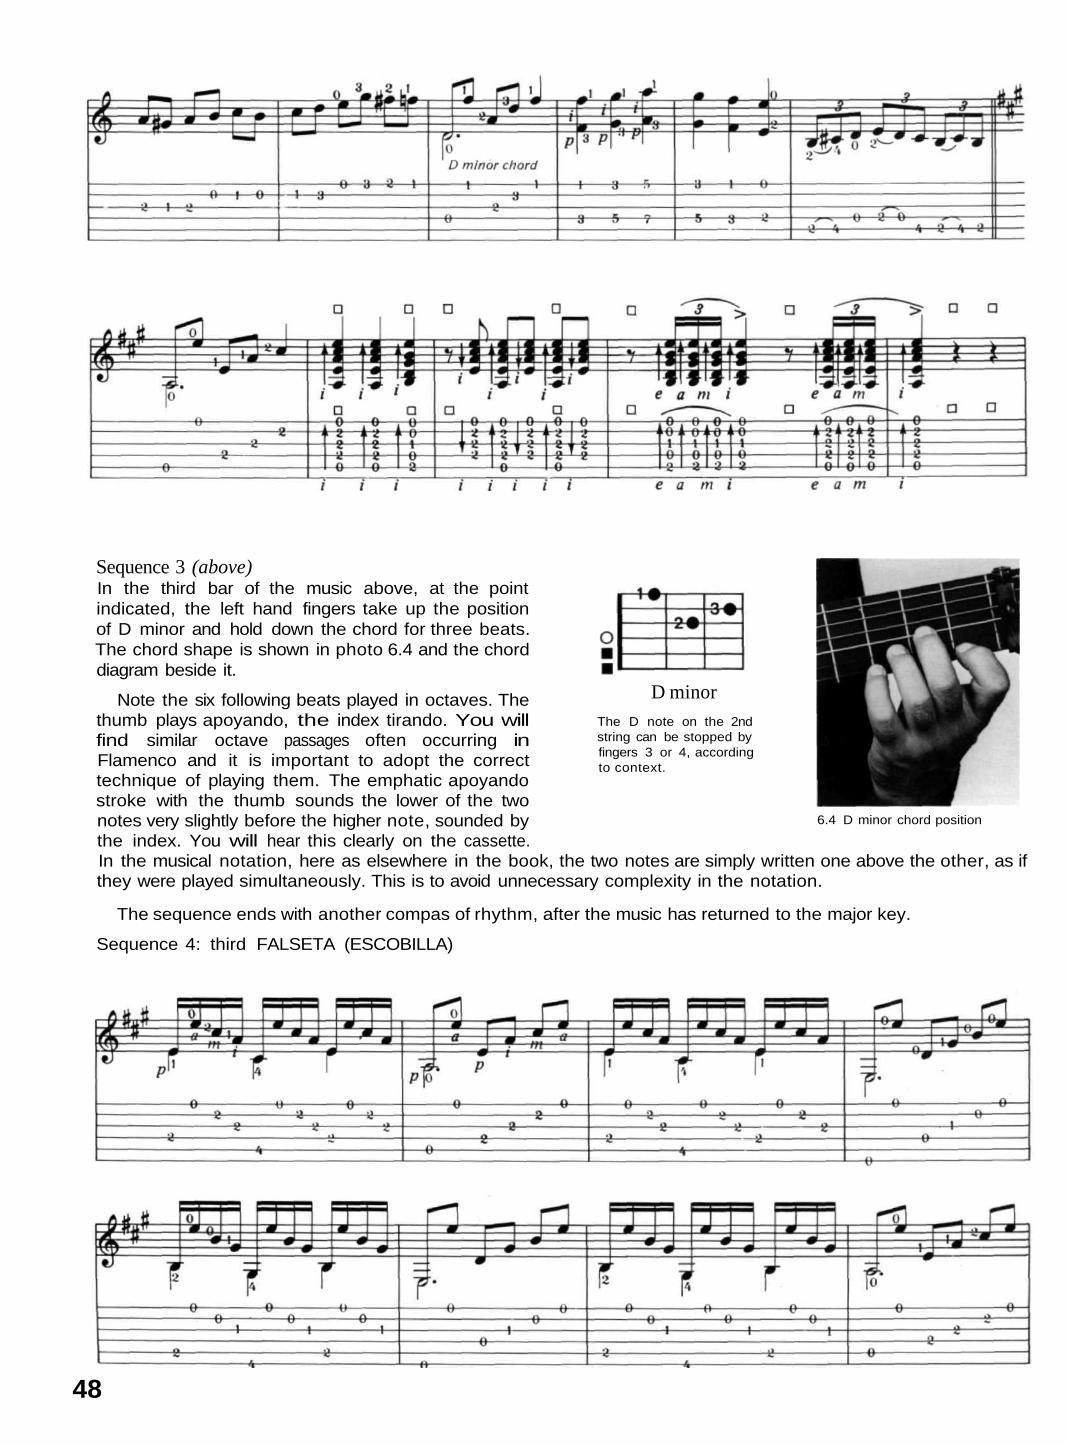
Sequence 3 (above)In the third bar of the music above, at the pointindicated, the left hand fingers take up the positionof D minor and hold down the chord for three beats.The chord shape is shown in photo 6.4 and the chorddiagram beside it.
Note the six following beats played in octaves. Thethumb plays apoyando, the index tirando. You willfind similar octave passages often occurring inFlamenco and it is important to adopt the correcttechnique of playing them. The emphatic apoyandostroke with the thumb sounds the lower of the twonotes very slightly before the higher note, sounded bythe index. You will hear this clearly on the cassette.In the musical notation, here as elsewhere in the book, the two notes are simply written one above the other, as ifthey were played simultaneously. This is to avoid unnecessary complexity in the notation.
The sequence ends with another compas of rhythm, after the music has returned to the major key.
D minorThe D note on the 2ndstring can be stopped byfingers 3 or 4, accordingto context.
6.4 D minor chord position
48
Sequence 4: third FALSETA (ESCOBILLA)
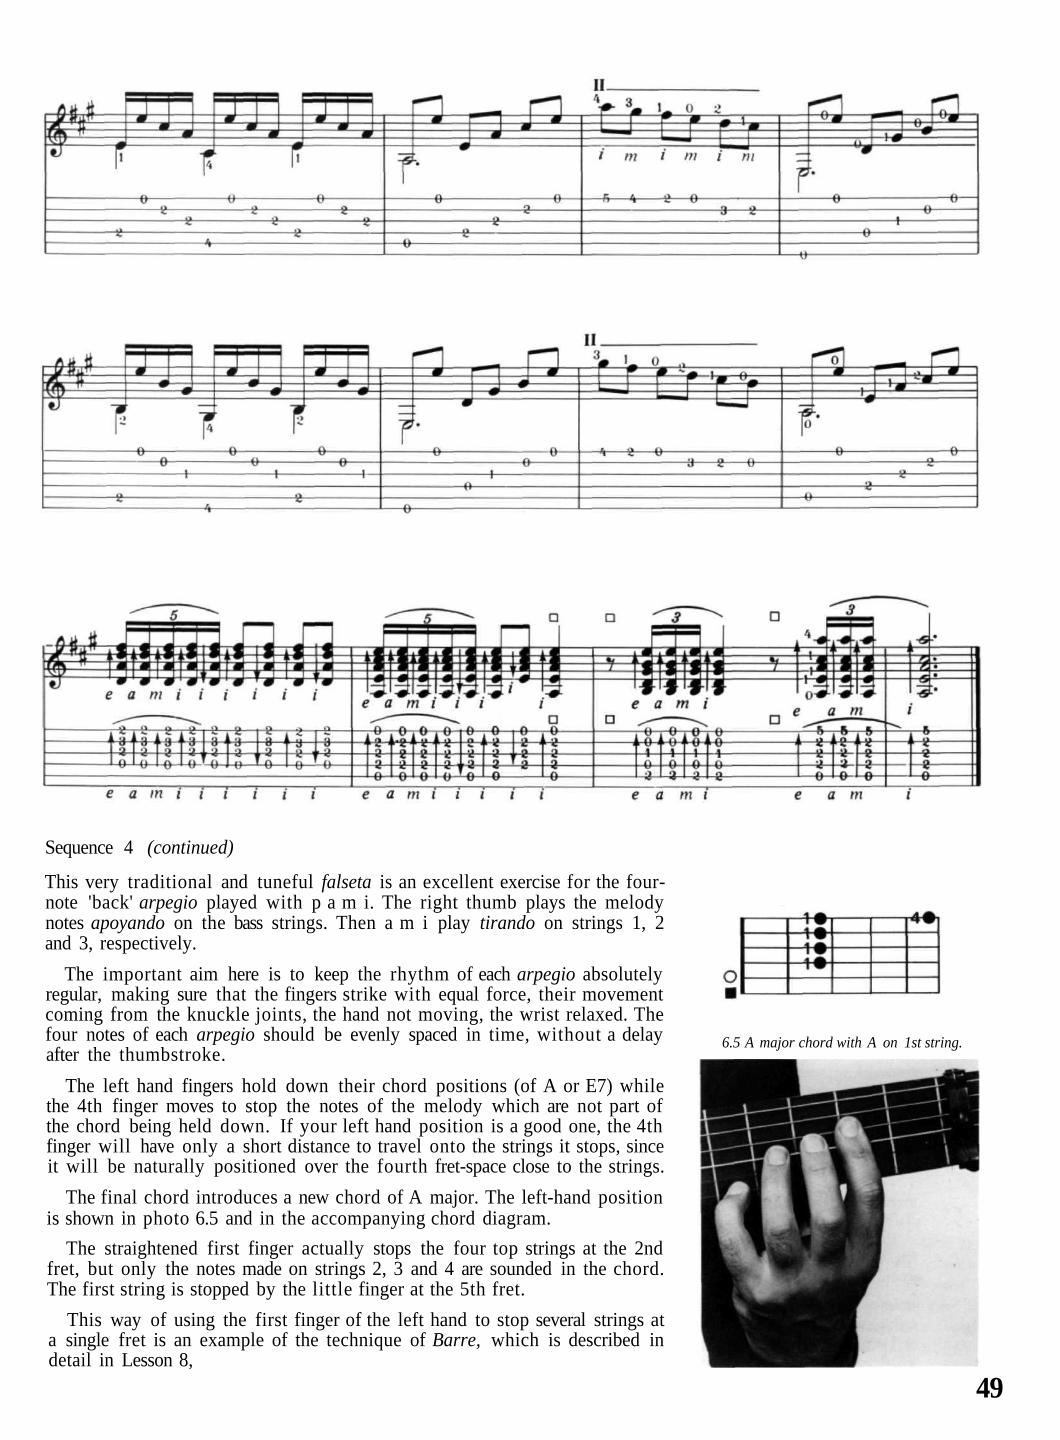
Sequence 4 (continued)
This very traditional and tuneful falseta is an excellent exercise for the four-note 'back' arpegio played with p a m i. The right thumb plays the melodynotes apoyando on the bass strings. Then a m i play tirando on strings 1, 2and 3, respectively.
The important aim here is to keep the rhythm of each arpegio absolutelyregular, making sure that the fingers strike with equal force, their movementcoming from the knuckle joints, the hand not moving, the wrist relaxed. Thefour notes of each arpegio should be evenly spaced in time, without a delayafter the thumbstroke.
The left hand fingers hold down their chord positions (of A or E7) whilethe 4th finger moves to stop the notes of the melody which are not part ofthe chord being held down. If your left hand position is a good one, the 4thfinger will have only a short distance to travel onto the strings it stops, sinceit will be naturally positioned over the fourth fret-space close to the strings.
The final chord introduces a new chord of A major. The left-hand positionis shown in photo 6.5 and in the accompanying chord diagram.
The straightened first finger actually stops the four top strings at the 2ndfret, but only the notes made on strings 2, 3 and 4 are sounded in the chord.The first string is stopped by the little finger at the 5th fret.
This way of using the first finger of the left hand to stop several strings ata single fret is an example of the technique of Barre, which is described indetail in Lesson 8,
6.5 A major chord with A on 1st string.
49
Elements of Flamenco 6 Choosing a guitarThe experienced guitarist will look for many points when assessing a guitar, whatever its price. But two featuresstand out above all others, namely the facility for right and left hands the instrument allows him and its sound.
It is well worth going to some trouble to find a more expert player or a teacher whose advice you can trust aboutany guitar you are thinking of buying. He will know more about weighing up the strengths and weaknesses of aguitar, but only you can make the final decision about whether it suits you. If you are going to buy new from adealer, find one who has a special interest in Flamenco.
The major details of workmanship which require attention include the following:
First appearances. Guitar manufacturers know how susceptible buyers are to beautiful decoration and a glossy finishwhen they come to choose a guitar. Just as with a car, however, it is what is under the bonnet that counts, and anattractive finish gives little or no clue about how well the guitar is going to play and sound.
The instrument should show careful and accurate workmanship and the use of appropriate and well-seasonedwoods. Even in the cheapest guitars one must demand proper timbers and internal strutting. Veneered laminatesmust be absolutely avoided. The better tapas are made of close-grained German spruce or Canadian cedar and bothhalves should match closely. An even grain should be evident in other woods. Major defects like a sunken tapa, abridge-saddle that is about to come off or a warped neck should be obvious.
The neck should be absolutely straight. Its rounded curvature must be smoothly finished, with a breadth andcurvature that feel comfortable all the way along the fingerboard. Check for any sign of warping. Do not buy awarped guitar. The wood used may have been too young or the guitar may have suffered from central-heating orother extremes of temperature or humidity.
The fingerboard, a separate piece of hardwood applied to the neck, must be perfectly flat. Ebony is best. The fretsshould be well-fitted into slots, with bevelled edges and no jagged projections which snag the left hand fingers. Testby sliding the left hand along both edges of the fingerboard. The note at each fret on every string must be played todetect any-excessive buzzes resulting from uneven height of frets. A scale-length longer than the normal 66 cms(from nut to bridge) is likely to feel uncomfortable for those with smaller hands.
The intonation must be true at all frets. You can test this by playing octave harmonics at the 12th fret on each stringto ensure that the note coincides with the pitch of the note when the string is firmly stopped against the 12th fret.Check notes at all frets and play octaves (e.g. E's at 2nd fret on fourth string and open first string; D's on 10th fretof first string and 12th of fourth string etc.). The open strings must, of course, be very accurately tuned for thesetests.
Responsiveness is a difficult quality to define in words, but it refers to the immediacy of sound production by thetapa. In good guitars there is a definite resonance to be heard when the sides and back are gently knocked with theback of a finger. A good flamenco guitar has a feeling about it of being imbued with a kind of nervous energyand tension that makes it respond instantly to the slightest touch on the strings. The timbers are thin, hard andimmediately alive with sound and there is no sense of slackness or heaviness in the wood-
Flamenco guitars, especially those with peg heads, may feel very fight in weight but this is not a good guide toquality. A very light guitar can be bad and a rather heavy one could be magnificent.
Many of the finest guitars need considerable time to warm up before they can produce their true brilliance andvibrant intensity of sound. The wood resonates less well when it is cold. Nearly all guitars improve for a time withage, but the process has limits and a flamenco guitar may pass its best by 10 or 20 years of age. For a guitar to bewell and truly played in, so that its initial coarseness and 'woodiness' have gone, it requires lots of strong playing ofall its notes over a period of months or even a year or two. A guitar that has been long unplayed or has beenaccustomed to being only gently tickled cannot give of its best.
The action of the guitar should be examined and the range of modification possible by altering the height of thehuesos ('bones', i.e, the nut and bridge-saddle). The 'action' of the guitar, which determines its ease of playing, ismade up of several factors, including the responsiveness of the soundboard, the tension of the strings and theirheight from the fingerboard and soundboard. Too low or soft an action will cause excessive buzz at all but minimalvolume. Too high or hard an action will make the guitar sound more 'classical' and will make it more of an effort toplay. Paradoxically there are some guitars which buzz less if the action is lowered. Some degree of buzz is needed toget the right sort of ringing attack in the sound of the rasgueo, but the individual notes of the guitar, particularly onthe higher strings, must give a clear and unfuzzy sound.
The beginner may be attracted by the very low or soft action of a guitar since it offers greater ease of playing, butthere are reasons which may make a harder action a better choice. Such an action may favour greater projection andclarity of tone, besides helping to develop the necessary strength in the fingers.
It is, of course, essential to ensure that the guitar is fitted with strings of the highest quality and most appropriatetension. These must be tuned exactly to concert pitch and be in good condition, otherwise valid assessment of thesound quality and action is not possible.
Balance of sound quality and loudness should be distributed as equally as possible between bass, mid-range andtreble, not only with the open strings but all over the fingerboard, with all notes having adequate projection, volumeand sustain. A good bass is more commonly found than a clear singing treble, and if you are not careful, you mayallow yourself to be over-impressed by the potency of the bass notes, particularly if the strings are brand new. The
50

treble is very important in Flamenco. It is particularly in regard to the balance of sound quality that the reallyexceptional guitar can be differentiated from the merely very good.
Play chromatic scales all the way up every string to hear the sound of every note. If you are choosing a guitarfrom several of the same make in a shop, try every one of them because differences in sound quality and action maybe marked.
When you are testing a guitar for sound you have to be very careful not to be misled by resonance from thesurroundings. Uncarpetted rooms with a very resonant acoustic can give you the Impression you are getting muchmore sound from the guitar than you really are. To test the guitar itself, unaided by the surroundings, you need avery 'dry', unresonant acoustic such as you would get in a well-furnished sitting-room.
Loudness is not at all the same thing as quality or projection. A guitar with real quality, even if it seems quieter,can project further and more clearly. A new guitar with new strings can sound tremendously loud and powerful atfirst only to reveal its poor quality of tone once you have listened to it more critically, particularly when the stringsare a little older and its brashness has faded. A good flamenco guitar retains most of Its brilliance even with ancientstrings.
Pegs or machine-heads must be well-fitting and easily adjusted. The best pegs arc made of ebony. An application ofan extremely small amount of dry soap or French chalk may prevent a tendency to stick in older pegs. Excessivewear in the cogs of machine-heads indicates poor quality materials; the winding action must be positive andimmediate. For most players, other qualities of the guitar will be more important in determining choice than thequestion of whether it has pegs or machines.
Nut and bridge-saddle should be of bone and not plastic. The slots at the nut must be accurately cut to allow thestrings to lie in a single plane. No wear should be visible at the bridge-saddle. The height of the huesos can be raisedif necessary, by thin strips of plastic or card.
The innards. Much of the most important construction of the guitar is out of sight. If you are really obsessionalabout It, you can Inspect the system of fan-strutting used by means of a dentist's mirror. At least there should not beany excessive glue visible through the sound-hole.
The label. Although you may well have looked at the label first, this may sometimes be the last thing you should beinfluenced by. One occasionally hears stories of people buying guitars which have had false labels, cannibalised frombroken instruments, stuck in them. A very much commoner, and entirely legitimate, practice is for guitars bearingthe name of a famous maker to be made by apprentices or a factory. The famous name may then be simply a brandname of the marketing firm. If you want to be sure you have a guitar hand-made by the individual maker himself,the only way is to make yourself thoroughly acquainted with that maker's own system of labelling the guitarsof different grades sold under his name. Almost always it will only be the most expensive model which is madepersonally by him or by an apprentice under his direct supervision. Slightly cheaper models may be the work ofapprentices or may be, like the cheapest, the product of a separate workshop, or factory using semi-mass-productlonmethods.
Going for the bestThe best flamenco guitars are as individual as beautiful women, and as difficult to choose between. One's relation-ship with the instrument is a very personal and individual thing that has to feel right. In a word, the player must beable to dominate a guitar.
Constructional differences between guitars include variations of scale-length (some players prefer a scale shorterthan 66 cms), width of fingerboard and overall action. Professional players commonly ask for guitars to be built totheir own requirements.
Some would-be purchasers have been disappointed to find that even a visit to the guitarrero (guitar-maker) doeslittle to reduce the months or years of waiting that may be necessary if one is to obtain a new guitar by the makerof one's choice. Certainly if the guitarrero has any for offer for over-the-counter sale to a stranger they are unlikelyto be of the very best.
The cheaper guitarSo-called 'Flamenco' guitars are available at a wide range of prices, but the cheapest guitars sold under that title areoften not worth the money. To obtain anything like the real flamenco tone and action you usually have to go atleast to the middle price bracket or above. Even paying a lot for a flamenco guitar that is less than the very best isno guarantee of obtaining those elusive tonal qualities so vital to Flamenco. In general, therefore, it may be best tobuy a guitar with reasonable playing facility to start on, even if it is a cheap classical model from Valencia or Japanwhich has to be fitted with golpeadores, and then to wait until you can afford a really good new or second-handinstrument.
51
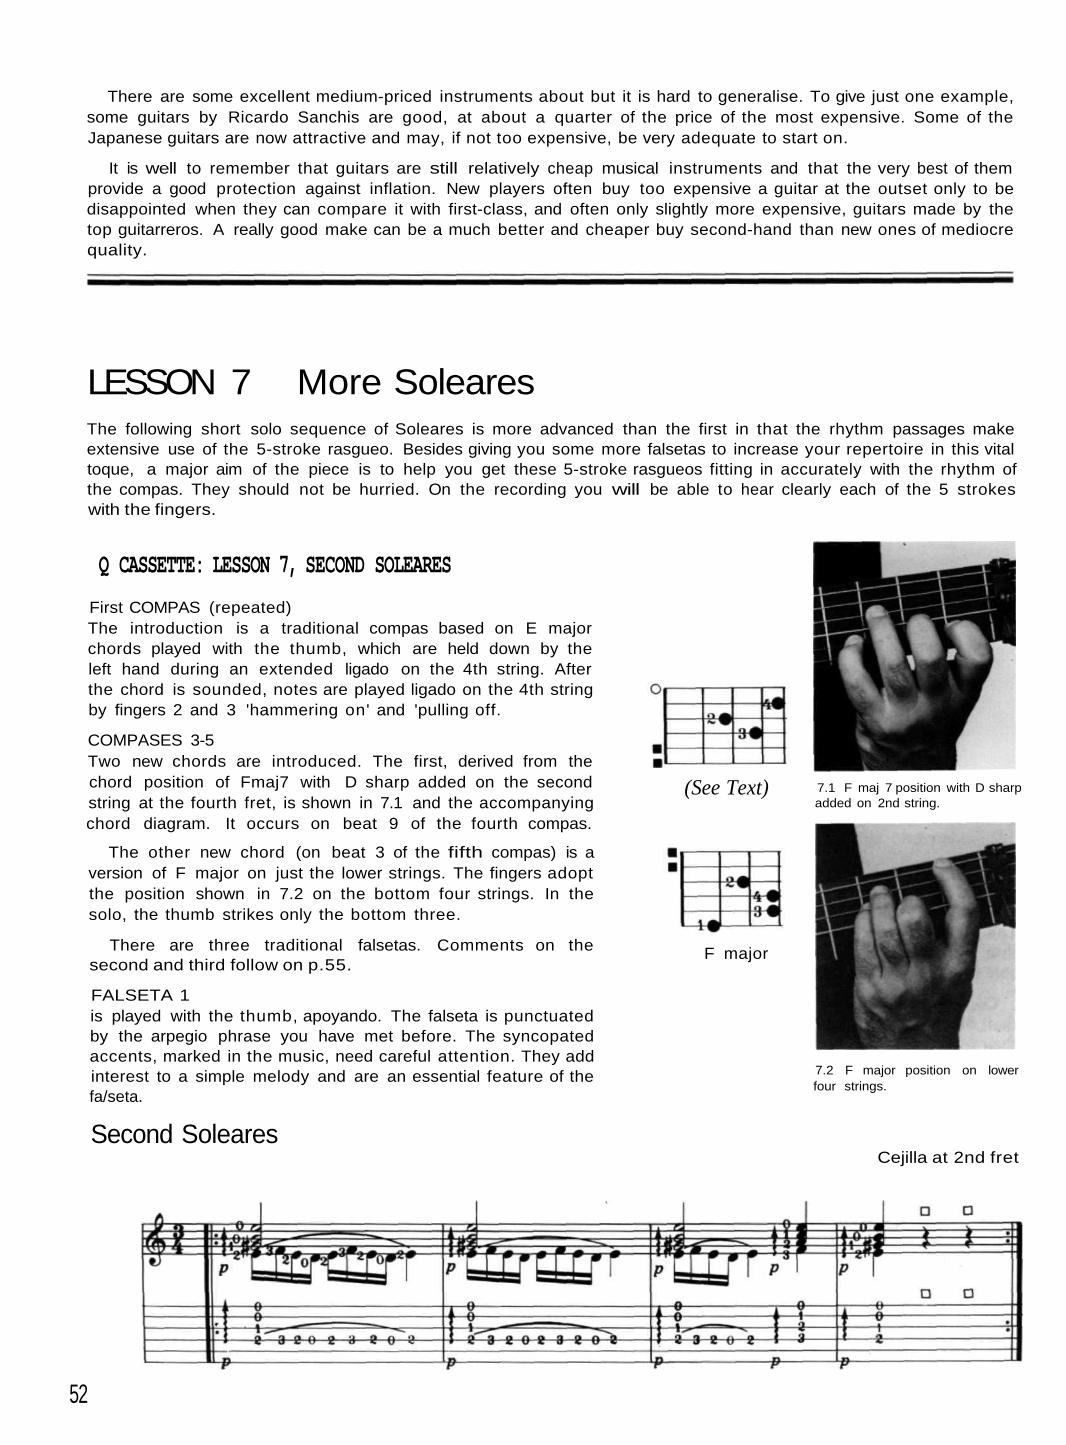
There are some excellent medium-priced instruments about but it is hard to generalise. To give just one example,some guitars by Ricardo Sanchis are good, at about a quarter of the price of the most expensive. Some of theJapanese guitars are now attractive and may, if not too expensive, be very adequate to start on.
It is well to remember that guitars are still relatively cheap musical instruments and that the very best of themprovide a good protection against inflation. New players often buy too expensive a guitar at the outset only to bedisappointed when they can compare it with first-class, and often only slightly more expensive, guitars made by thetop guitarreros. A really good make can be a much better and cheaper buy second-hand than new ones of mediocrequality.
LESSON 7 More SolearesThe following short solo sequence of Soleares is more advanced than the first in that the rhythm passages makeextensive use of the 5-stroke rasgueo. Besides giving you some more falsetas to increase your repertoire in this vitaltoque, a major aim of the piece is to help you get these 5-stroke rasgueos fitting in accurately with the rhythm ofthe compas. They should not be hurried. On the recording you will be able to hear clearly each of the 5 strokeswith the fingers.
First COMPAS (repeated)The introduction is a traditional compas based on E majorchords played with the thumb, which are held down by theleft hand during an extended ligado on the 4th string. Afterthe chord is sounded, notes are played ligado on the 4th stringby fingers 2 and 3 'hammering on' and 'pulling off.
COMPASES 3-5Two new chords are introduced. The first, derived from thechord position of Fmaj7 with D sharp added on the secondstring at the fourth fret, is shown in 7.1 and the accompanyingchord diagram. It occurs on beat 9 of the fourth compas.
The other new chord (on beat 3 of the fifth compas) is aversion of F major on just the lower strings. The fingers adoptthe position shown in 7.2 on the bottom four strings. In thesolo, the thumb strikes only the bottom three.
There are three traditional falsetas. Comments on thesecond and third follow on p.55.
FALSETA 1is played with the thumb, apoyando. The falseta is punctuatedby the arpegio phrase you have met before. The syncopatedaccents, marked in the music, need careful attention. They addinterest to a simple melody and are an essential feature of thefa/seta.
(See Text) 7.1 F maj 7 position with D sharpadded on 2nd string.
F major
7.2 F major position on lowerfour strings.
Cejilla at 2nd fret
52
Second Soleares
Q CASSETTE: LESSON 7, SECOND SOLEARES
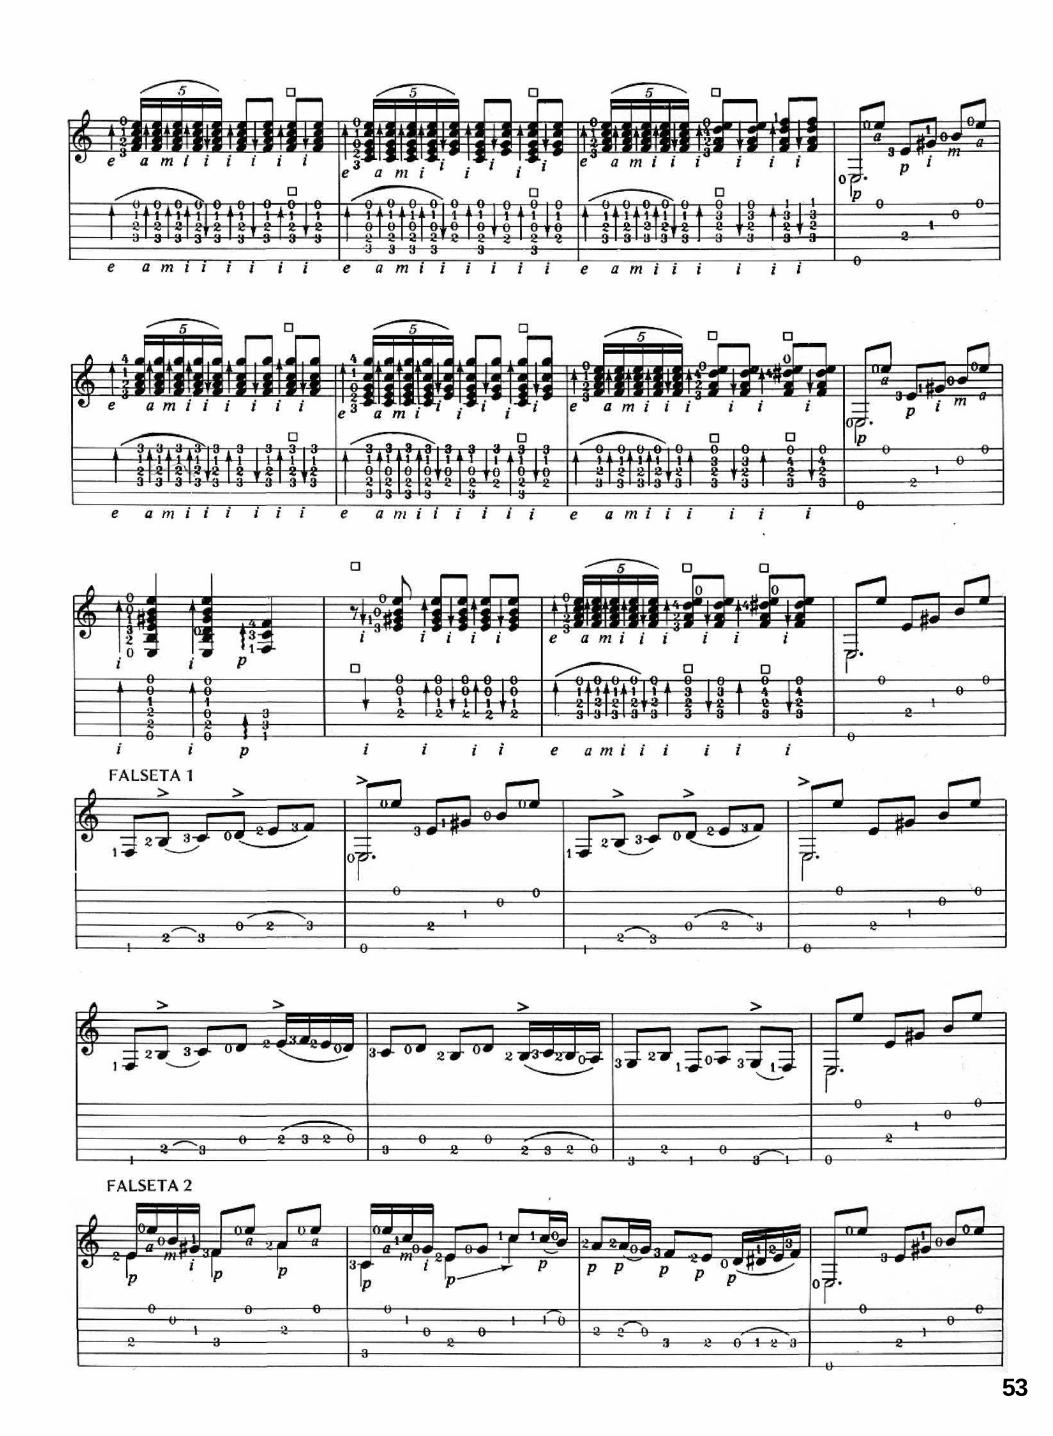
53
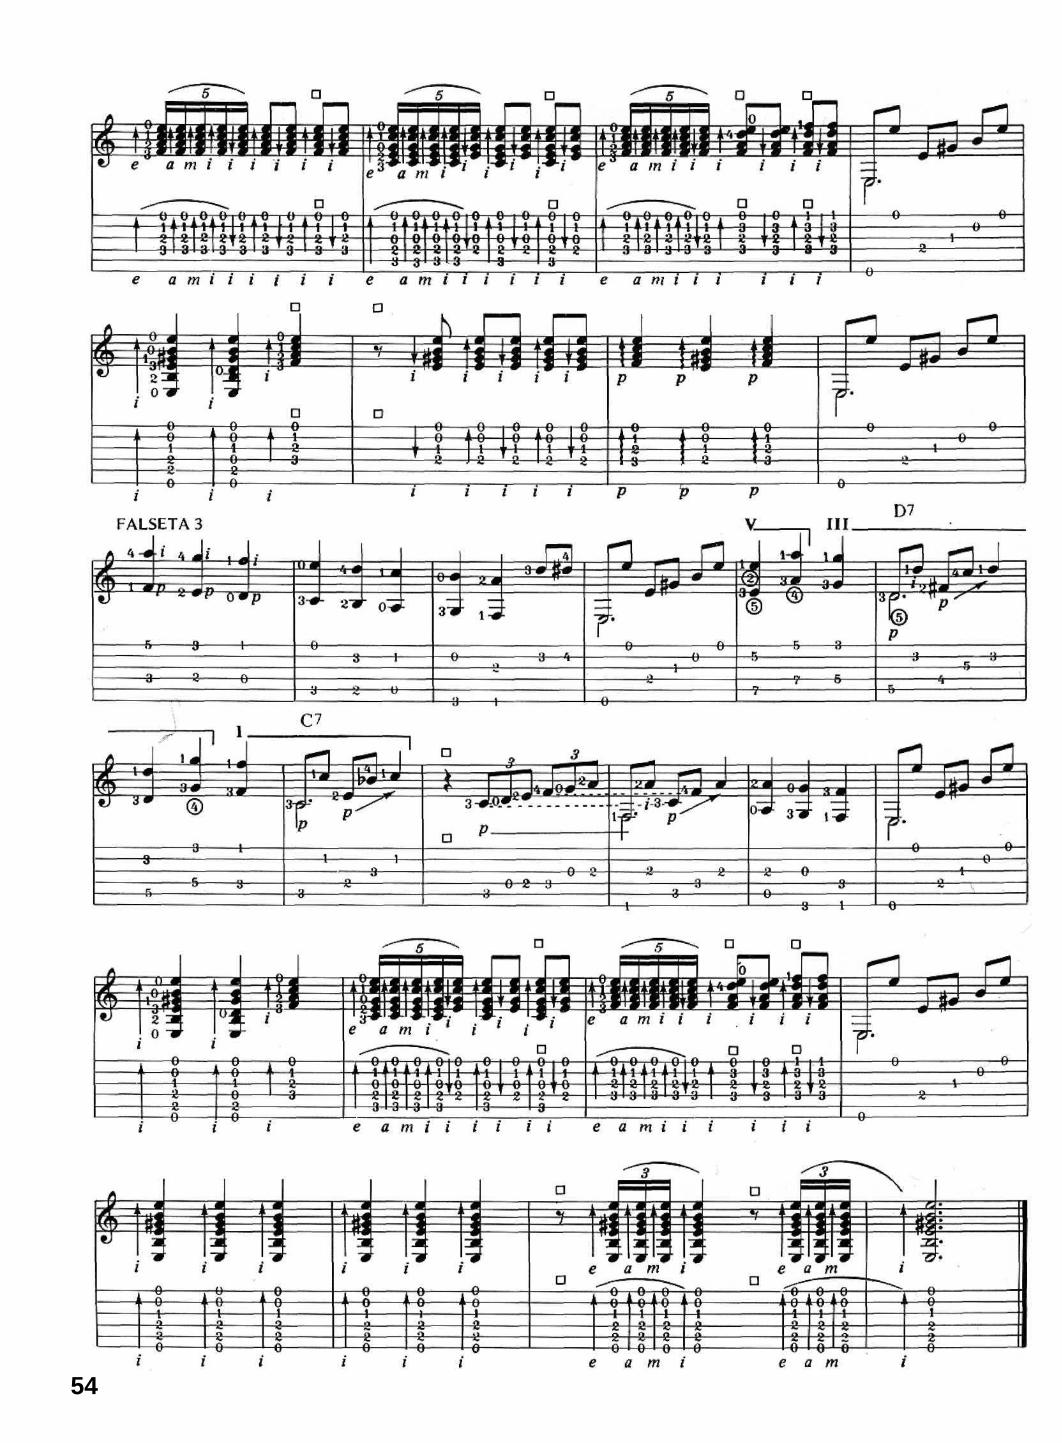
54

FALSETA 2starts with arpegios and the ending is played with thumb andligados.
FALSETA 3is played largely in tenths and octaves with thumb apoyandoand index tirando, as already described. The left hand has tomove to higher fret-positions. Two new chords are introduced,D7 and C7, indicated in the music. The same chord shape isused for both chords, at the third and first fret-positionsrespectively. The chord shape is shown in photo 7,3 alongsidethe chord diagrams for D7 and C7.
D77.3 C7 position.
The design of the flamenco guitar, in both the form and materials by which it is known today, takes origin fromthe innovations of the great Antonio Torres of Almeria (d.1892). Before Torres the guitars of the day, calledguitarras de tablao, were smaller, shallower and much less powerful in sound. Torres introduced larger bodydimensions (the plantilla Torres) and a deeper body, together with other improvements in construction andmaterials and a clear differentiation between flamenco and classical instruments. His influence and that ofsucceeding great guitarreros who introduced further innovations and refinements can be traced through successivegenerations of master and apprentice.
Manuel Ramirez of Madrid (d.1916), brother of Jose Ramirez I who was a famous maker of the older-styleinstrument, adopted and extended Torres' techniques and passed them on to his apprentices, Santos Hernandez,Domingo Esteso and Modesto Borreguero.
Santos Hernandez (d.1942) achieved prestigious status as Spain's most sought-after guitarrero and hisinstruments today are prized collectors' items. He was, it is said, totally secretive about his working methods andrefused to have an apprentice. After his death, however, his widow maintained his shop, employing Marcel Barbero(d.1956), who thereby had access to Santos Hernandez' plans and tools.
Jose Ramirez II, nephew of Manuel and son of Jose I, had earlier taught Marcelo Barbero and his own son JoseRamirez III. The line of succession from Barbero passed on to Arcangel Fernandez, who is still one of Madrid'sfinest makers of flamenco guitars, and through him to the young Marcelo Barbero Hijo,
Jose Ramirez 111 has achieved international fame (and many imitators) for his classical guitars, especially admiredfor their fine qualities of tone and finish and for their remarkable consistency. He has also made some fineflamenco instruments, particularly in the new style of the guitarra negro with rosewood sides and back. Several oftoday's leading makers have developed their craft in his Madrid workshop and then have gone on to establish them-selves independently, notably Manuel Contreras, Feliz Manzanero and Paulino Bernabe. Best known for theirclassical guitars, these guitarreros have also made some excellent flamenco instruments.
Domingo Esteso, (d.l937) hardly less prestigious a maker of flamenco guitars than Santos Hernandez and amuch more prolific one, made the guitars played in the '30's by many professional players, including Nino Ricardo.His tradition has been maintained and developed by his three nephews, Faustino, Mariano and Julio under thename Sobrinos de Domingo Esteso {or more recently Hermanos Conde). For years now their guitars have been thepreferred choice of many professional players. Their highly distinctive qualities of warmth and sweetness of tonecombined with a superb ringing vibrancy make them the aristocrats of the flamenco guitar, easily recognised onmany recordings.
Two outstanding makers of flamenco guitar in Cordoba are Manuel Reyes, largely self-taught but powerfullyinfluenced by Barbero's ideas, and Miguel Rodriguez,
Today there are several very talented guitarreros among the younger generation. Especially worthy of mention isGerundino Fernandez of Almeria whose flamenco guitars possess an extraordinarily potent and distinctive'flamenconess', combining a singing purity of tone with amazing immediacy of response. A young man, totallydedicated to the guitar and Flamenco, he expresses in his guitars all that is purest and most 'earthy' in Flamenco, aquality almost too fiercely lamenting to appeal to concert audiences used to the gently mellow sounds of theclassical guitar. Their projection and brilliance are quite remarkable.
Others among today's makers in Spain who have made good flamenco instruments include Francisco Barba{Sevilla}, Antonio Marin Montero (Granada), Jeronimo Pena Fernandez and the brothers Alvarez (Madrid).
The guitars shown in the photographs in this book are, as can be recognised from their distinctive carving on thehead, by Gerundino Fernandez (the guitar with pegs) and by Sobrinos de Domingo Esteso. Guitars by both thesemakers are heard on the cassette-recording.
55
Elements of Flamenco 7 Guitarreros

This lesson introduces two important techniques. The first, for the left hand, is the index finger barre, then for theright hand, the double arpegio. The two will be combined in an attractive exercise taught by Maestro Esquembre, arenowned guitar-teacher in Madrid. The exercise, which is recorded on the cassette, also illustrates left hand actionin changing chords in higher fret-positions.
The BARRETo make a barre, the left index finger is placed straight across all six strings, stopping them behind the same fret. Inthis way it acts like a movable cejilla to provide a basis for chords and melodies in higher fret-positions than wehave so far been using. It allows the other fingers to adopt similar chord shapes to ones already described, with thedifference that notes previously played on open strings are now stopped by the first finger and the pitch of thewhole chord is raised.
We start with the chord of F major, shown in photos 8.1 and8.2. The chord diagram shows that it is the same chord shape asthe E major chord, only moved up one fret higher on all sixstrings. The index finger barre means that fingers 2, 3 and 4 nowstop the positions taken by 1, 2 and 3 in the E major chord youhave previously learned.
F major
The chord diagram for the F major chord is:
Notation of the BARREIn notation, the letter C (for 'cejilla') above the chord is theconventional way of indicating an index finger barre across all sixstrings. The Roman numeral which follows indicates the numberof the fret behind which the first finger is placed. Thus, F majorwill be written as shown on the right.
Often it is not necessary for the index finger to stop all six strings. In the last chord ofthe Alegrias in Lesson 6 for instance, only the top four strings need to be stopped bythe index, which therefore only extends far enough across the fingerboard to stop thenumber required {as shown in photo 6.5). This is often rather ambiguously called ahalf-barre and may be indicated by the symbol 1/2C, even though, strictly, this shouldmean that only three strings are stopped by the barre. A more accurate method, usedhere, is to indicate the exact number of strings stopped by the index in the form of afraction to base 6. Thus the symbol 4/6 C means that the barre extends over the fourtop strings only.
F major
8.1 F major chord position.
A major
Same chordshape withindex barreat 5th fret.
Economy of effortBeginners often find the barre painfully difficult because theyapproach it in the wrong way and exert a lot of unnecessaryeffort which quickly causes spasm of the fingers. In fact, notmuch pressure is needed to stop all six strings firmly so that eachcan give a clear note.
Start by laying the straightened index finger across the stringsimmediately behind the first fret as lightly as you can. For this tobe easily done, the left hand must be in a good position, with thewrist relaxed and held forward at the sort of angle with the fore-arm shown in photo 8.2. Bend the other fingers into theirpositions on the strings behind the appropriate frets and thenapply just enough pressure between thumb and fingers to bringall six strings firmly against the frets, so that they are securelystopped. Sound all six strings with a slow downward sweep of theright thumb to give you a good note from each string in turnfrom 6th to 1st.
If you find yourself getting discouraged by an initial inabilityto obtain clean-sounding notes from the strings, you will find iteasier if you move the same chord shape up to a higher fret-position where the frets are closer together. With the barre at the5th fret, for instance, you will be playing a chord of A major(photo 8.3). 8.2 Posture of left hand and wrist for barre.
56
LESSON 8 Barre and Double Arpegio

• the pressure of the barre must not be exerted by pullingthe left hand towards you with the arm. The arm staysrelaxed.
• the position of the thumb (shown opposite the index inphoto 8.2) is important because the pressure neededcomes primarily from a squeezing action between thumband index.
• Note where the tip of the index finger lies in relation tothe fingerboard (see photo 8.1). Do not push it over toofar towards you.
• You will feel discomfort in the thumb muscles lyingbetween thumb and index finger when you first maintaina barre for more than a brief spell of time. With practice,however, you will soon be able to hold the barre downcomfortably even for long periods.
• Once you have got used to the feel of the barre, you willfind it possible to change fret-positions and chord shapesquickly up and down the fingerboard. Our slow motionapproach here is just designed to get the left hand intothe way of adopting a good basic position.
8.4 Thumb stays in middle of neck with barre in higherposition.
Double ARPEGIOThis right hand technique, developed to a level of great virtuosity by Don Ramon Montoya, is extensively used inFlamenco to give an intricate, beautifully rounded sound to arpegios.
Each arpegio has 6 notes, a thumb apoyando on a bass note being followed by i m a m i tirando on turn on 3adjacent higher strings. This is shown in the simple example below, using the chord of E major. Each group ofnotes is written as a sextuplet, with the figure 6 indicating that the 6 notes of each arpegio occupy the durationof one beat.
The art of double arpegio depends on playing the notes sounded by p i m a m i in sequence at perfectly regularintervals, with each note equally loud. The thumb plays a melody line in the bass.
Try the exercise extremely slowly at first, concentrating on ensuring absolute evenness of timing and volumebefore you try to increase the speed.
When the 4-note arpegio was introduced earlier it was suggested you should (though only as a practice exercise)flex the fingers until their tips contact the ball of the thumb. The same technique here will help you to get the feelof the finger movements needed.
57
8.3 A major chord position with barre,(Cejilla at 2nd fret).
Ex.13
There are a few more points to note about the barre:

An example of Double Arpegio in SolearesWhen you can play the preceding exercise evenly and in regular timing, you can aim to introduce the doublearpegio in place of the 4-note arpegio to give a richer texture of sound in the second fa/seta of the Soleares ofLesson 7, as follows:
58
The example (which has not been separately recorded on the cassette) demonstrates the kind of way that thearpegio may be used in Flamenco and the speed needed for its execution. You will find many further examples inlater solo pieces. Your playing will need to become fluent and quite fast if you are to fit the arpegio into thecompas, while retaining the smooth redondo ('rounded') quality which is so essential to good arpegio-playing. Theexercise which follows employs the right hand fingering of the double arpegio at a much slower pace than would berequired for Soleares. It will help you develop the control and fluency necessary if you are to play the arpegio wellat the faster speeds.
Esquembre's exerciseThe exercise below is an excellent illustration of the kind of study material, derived from classical guitar technique,which flamenco guitarists have used in developing the technical virtuosity needed for solo concert playing. Thedemands it makes on left and right hands and the importance of obtaining a good tone from the guitar make it agood exercise to practise every day. For each double arpegio phrase the left hand holds down a chord position. Thesixth note of each arpegio preceding a change of chord position by the left hand must be given its full time-value.
Do not cut the note short by moving the left hand too soon, or youwill interrupt the smooth flow of the music. The left hand changes ofchord will have to be performed rapidly in order to keep the rhythmeven throughout.
No cejillaEx.14

The only way to become adept at moving the left hand from one chord shape to another at the same or a differentfret-position is to practise the change repeatedly, keeping the rhythm slow enough so that you do not disrupt it atall when the chord change occurs.
The fingers should stay flexed over the frets, being lifted as short a distance as possible from the fingerboard asthe move is made in order to maintain maximum economy of movement. Quite often you will find that one ormore fingers can retain contact with the string during the move if they are to stop the same string in the new chord.
If you adopt this energy-saving and time-saving approach from the start, practising each move carefully inadvance so that the fingers move the shortest possible distance between one position and the next and the thumbalways stays in contact with the neck, you will soon develop good habits and a neat-looking left hand.
To start with you will not find it easy to move all the fingers at the same time into their new positions. It may benecessary, therefore, to place the fingers on the frets in rapid succession so that the strings are stopped in the orderthey are to be sounded. With practice, however, all the fingers will move into place simultaneously.
Give these all-important principles of efficient left hand action enough thought and practice early on andeconomical movements will become so natural and quick as to look and feel effortless. Your fingers will simplyknow by themselves where to go, without your needing even to look at them.
In spite of extensive research into the origins of the flamenco arts there is still no general agreement about exactlyhow Flamenco came into being. The intermingling of Moorish and Christian, gypsy and non-gypsy strands in theevolution over centuries of the Flamenco that we know in Andalucla today cannot be unravelled so that one canconfidently assess the contribution of each. Legends abound but indisputable facts are few.
The word 'Flamenco'Even the origins of the word 'Flamenco' are controversial. Probably of Arabic derivation, it is found in popularusage at the beginning of the 19th century as a slang term for an arrogant or affected person. Later it came todesignate the gypsies (gitanos) of Andalucla, and only later still was it applied to their songs and dances. The use ofthe general term Cante Flamenco to denote a type of Andalusian song derived from both gypsy and non-gypsyorigins seems to have become well established only in the second half of the 19th century.
The early rootsAny theory about Flamenco must explain why it is a uniquely Andaluz (Andalusian) phenomenon. It began as amusic of the poorer people, so that its emergence is poorly documented. There is little detailed information beforethe latter half of the 19th century. You will have often heard it said that the gitanos first gave voice to the Cante.Certainly they have been particularly identified with the performance of such essential cantes as Soleares,Seguiriyas, Tangos and Bulerias. But the argument as to how much they actually created still goes on, at timesheatedly.
These itinerant people had arrived in Spain in the 15th century at the end of their long migration from northernIndia. After centuries of persecution, the gitanos of Andalucla had become settled in communities which were tobecome particularly associated with the genesis of Flamenco, especially the Triana in Sevilla and gypsy quarters inCadiz, Jerez de la Frontera, Granada, Malaga, Ronda and other towns and villages of Andalucla. In their daily livesthey lived close to the Mozarabic descendants of the Moors expelled en masse from Spain in 1492, and with thepoorer classes of the older indigenous communities. They were renowned for their talents as singers and dancers,and one may presume that they brought musical elements from their own Indian heritage, as well as contributingtheir style of voice production, poetically attributed to el dolor en la garganta ('the grief in the throat'), so charac-teristic of the voz rajada (cracked voice) of the cantaor (singer). The gitano influence is evident, too, in thelanguage of the coplas, with its many references to the personal tragedies and oppression of their lives and theiroccupations in the fields and as silversmiths and blacksmiths.
But what music was there in Andalucla already, derived from Moorish and even earlier Christian, Judaic andNorth African sources? There were, after all, gypsies in many other parts of Spain, so that we must look to othersources for the particularly Andaluz flavour of Flamenco, and the origins of its characteristic modal scale. It ispossible that the role of the gypsies has been somewhat romanticised and that too little has been made of othercultures to the south and east of the Mediterranean, revealed in close affinities of form and phrasing betweenFlamenco and the music of Islam. Certainly there were pre-gypsy Arabic songs such as the Fandango, and otherstoo which were adapted and popularised by Andaluces besides the gitanos.
59
Changing chords with the left hand
Elements of Flamenco 8 History (1)

The main birth-place of Flamenco was within an area of Andalucla centred on Jerez de la Frontera and extendingto include Sevilla, Cadiz, Granada, Malaga and Ronda. It is bordered to the north by the ancient limits of theMoorish conquest of Spain. In this extraordinary crucible of musical alchemy were fused the elements, includingMoorish, Mozarabic, Islamic, Hebraic, Hindu, Persian, Byzantine and Greek liturgical, which together made auniquely Andaluz amalgam of musical culture. Somehow it became transmuted into the pure gold of Flamenco.
Further evolution of FlamencoThe processes of absorption and intermingling, by which Flamenco incorporated many forms of Andaluz folk-music as well as, later on, some South American songs and rhythms have been continuing ones. In turn Flamencohas influenced the wider sphere of Spanish song and dance. While the trend has lately been to look north and west-ward, towards jazz and European popular music for newer sources of inspiration, it is probably much truer to theearly traditions of Flamenco and to its special capacities for musical expression to took south and eastward, to theworld of Islam in North Africa and Asia Minor.
LESSON 9 Fandangos de HuelvaThe Fandango has Arabic roots which reach back in time to the early beginnings of Flamenco during the Moors'occupation of southern Spain. From its birthplace in Andalucla this ancient form of song and dance spreadthroughout Spain, and over centuries it has evolved in different ways according to the influence of differentregions, localities and individual performers. In the north it was the basis for the Jota, while in the south it gaveorigin to the Rondena, the Malaguena, the Granadina, the Taranta, Minera and Cartagenera.
Fandangos and fandanguillos are sung all over Andalucla and are traditionally known by local names. Theperformances of much-promoted 'fandangueros' became so popular during the earlier decades of this century thatfor a time the Fandango nearly eclipsed all other styles of Flamenco.
Today, from the viewpoint of the guitarist, we can distinguish two main types of Fandango. On the one hand arethose highly expressive Fandangos, like the Fandangos Grandes, which belong primarily to the Cante: these allowconsiderable individual freedom within the compos. On the other hand are the strongly rhythmic Fandangos whichcan be both danced and sung. These are particularly associated with the province and town of Huelva.
In the Cante por Fandangos, the themes of the coplas are extremely varied, ranging from tragedies of disillusionand betrayal in the more serious styles all the way to ironic humour and absurdity in the most light-hearted. Often,especially in the Fandangos Grandes, the lines (letras') of each cop/a lead up to a telling point, a dramatic climaxor a humorous punch-line at the end. The audience responds with a chorus of 'Ole's, while the guitarist begins aninterlude of rasgueo and fa/setas which ushers in the new drama of the next cop/a. The communication betweensinger, guitarist and audience can be incredibly intense, a very moving experience.
60
The compas of Fandangos de Huelva is lively, emphatic and unvarying. Its rhythmic structure, compellingly simplewhen one hears the music, is essentially straightforward. Yet many students find it one of the harder toques tounderstand. There is only one aspect which needs special clarification, and that is the relationship of the falsetas tothe intervening passages of rhythm rasgueo.
Basically the rhythm is made up of 1 2-beat composes with a recurring pattern of accented beats which you willhear clearly when you listen to the music. In the case of Soleares we were able to state which numbered beats carrythe accents of the rhythm, but the compos of Fandangos is different and does not lend itself so well to this simpleapproach. It can be confusing to try to assign the accents to particular numbered beats because, as is described indetail below, passages of rhythmic rasgueo and falsetas are best counted in different ways. Many falsetas have 14beats in their final resolution (ending phrase) and they start two beats earlier than might be expected. Thosefalsetas which derive directly from cop/as of the cante, on the other hand, fit more simply into the recurringpattern of 12 beats, without the need for a longer ending or early beginning.
The method of counting the compas is described here in detail so that you can study it at leisure. It will beimportant for you to understand the underlying principles, but they are unlikely to mean much until you havegained some familiarity with the music. You may well prefer, therefore, to skip the following section on thetwo types of falseta and to go straight on to studying the recorded solo and the written music. You can then returnlater to the theory of the compas. Once you have started to play Fandangos it will all seem much clearer.
The COMPAS of Fandangos de Huelva
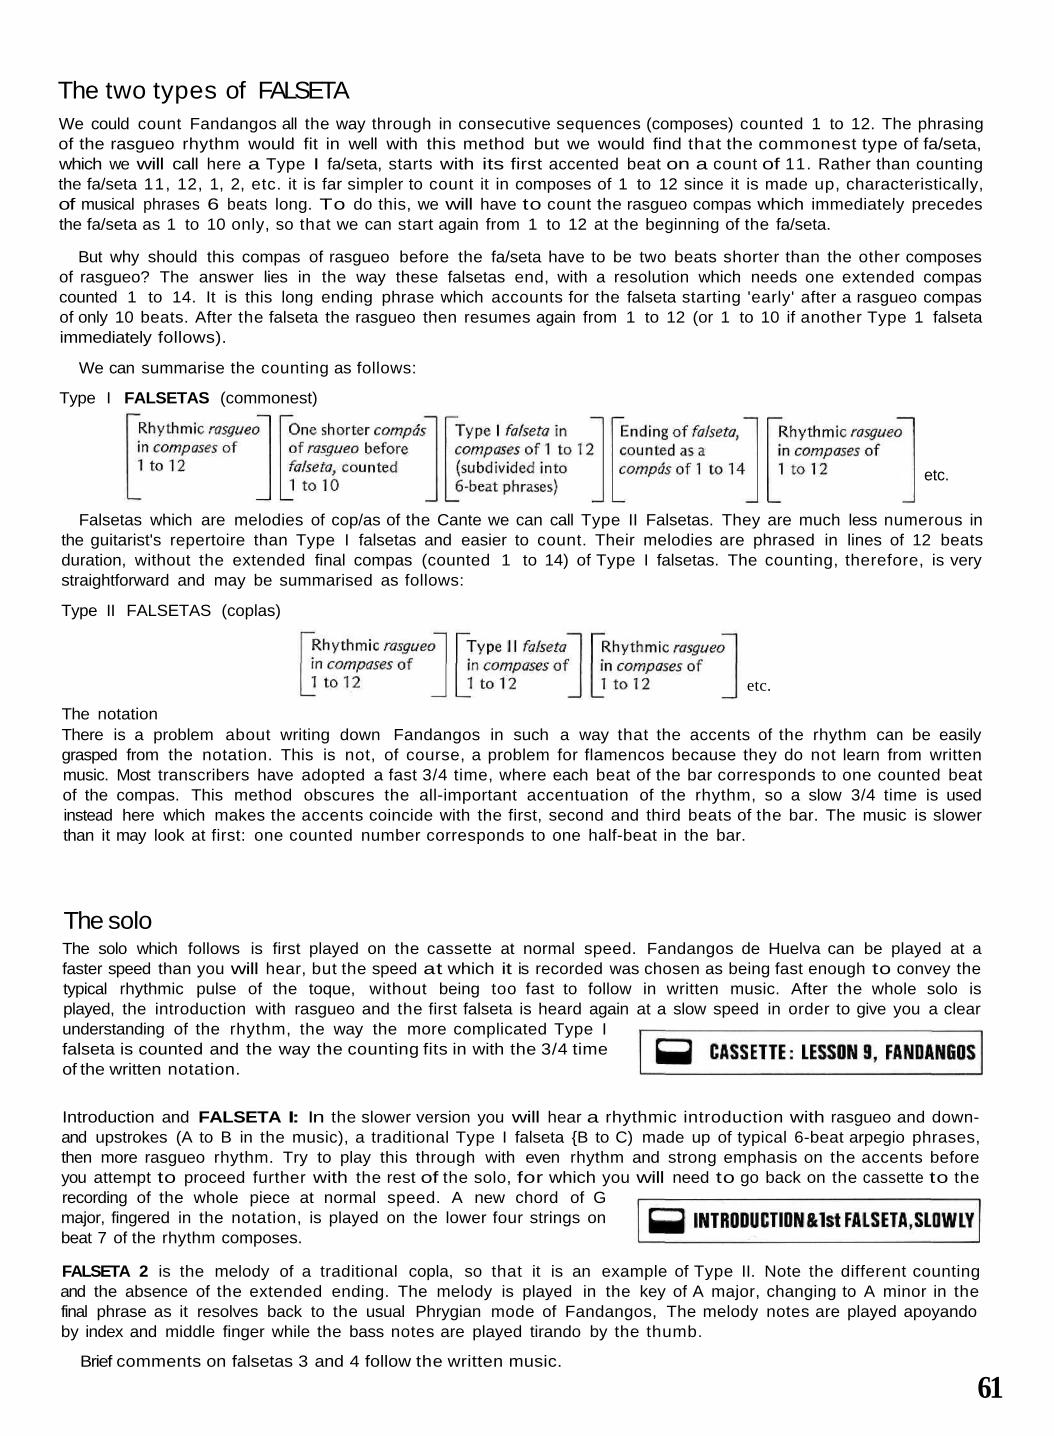
The two types of FALSETAWe could count Fandangos all the way through in consecutive sequences (composes) counted 1 to 12. The phrasingof the rasgueo rhythm would fit in well with this method but we would find that the commonest type of fa/seta,which we will call here a Type I fa/seta, starts with its first accented beat on a count of 11. Rather than countingthe fa/seta 11, 12, 1, 2, etc. it is far simpler to count it in composes of 1 to 12 since it is made up, characteristically,of musical phrases 6 beats long. To do this, we will have to count the rasgueo compas which immediately precedesthe fa/seta as 1 to 10 only, so that we can start again from 1 to 12 at the beginning of the fa/seta.
But why should this compas of rasgueo before the fa/seta have to be two beats shorter than the other composesof rasgueo? The answer lies in the way these falsetas end, with a resolution which needs one extended compascounted 1 to 14. It is this long ending phrase which accounts for the falseta starting 'early' after a rasgueo compasof only 10 beats. After the falseta the rasgueo then resumes again from 1 to 12 (or 1 to 10 if another Type 1 falsetaimmediately follows).
We can summarise the counting as follows:
Type I FALSETAS (commonest)
etc.
Falsetas which are melodies of cop/as of the Cante we can call Type II Falsetas. They are much less numerous inthe guitarist's repertoire than Type I falsetas and easier to count. Their melodies are phrased in lines of 12 beatsduration, without the extended final compas (counted 1 to 14) of Type I falsetas. The counting, therefore, is verystraightforward and may be summarised as follows:
Type II FALSETAS (coplas)
etc.
The notationThere is a problem about writing down Fandangos in such a way that the accents of the rhythm can be easilygrasped from the notation. This is not, of course, a problem for flamencos because they do not learn from writtenmusic. Most transcribers have adopted a fast 3/4 time, where each beat of the bar corresponds to one counted beatof the compas. This method obscures the all-important accentuation of the rhythm, so a slow 3/4 time is usedinstead here which makes the accents coincide with the first, second and third beats of the bar. The music is slowerthan it may look at first: one counted number corresponds to one half-beat in the bar.
The soloThe solo which follows is first played on the cassette at normal speed. Fandangos de Huelva can be played at afaster speed than you will hear, but the speed at which it is recorded was chosen as being fast enough to convey thetypical rhythmic pulse of the toque, without being too fast to follow in written music. After the whole solo isplayed, the introduction with rasgueo and the first falseta is heard again at a slow speed in order to give you a clearunderstanding of the rhythm, the way the more complicated Type Ifalseta is counted and the way the counting fits in with the 3/4 timeof the written notation.
Introduction and FALSETA I: In the slower version you will hear a rhythmic introduction with rasgueo and down-and upstrokes (A to B in the music), a traditional Type I falseta {B to C) made up of typical 6-beat arpegio phrases,then more rasgueo rhythm. Try to play this through with even rhythm and strong emphasis on the accents beforeyou attempt to proceed further with the rest of the solo, for which you will need to go back on the cassette to therecording of the whole piece at normal speed. A new chord of Gmajor, fingered in the notation, is played on the lower four strings onbeat 7 of the rhythm composes.
FALSETA 2 is the melody of a traditional copla, so that it is an example of Type II. Note the different countingand the absence of the extended ending. The melody is played in the key of A major, changing to A minor in thefinal phrase as it resolves back to the usual Phrygian mode of Fandangos, The melody notes are played apoyandoby index and middle finger while the bass notes are played tirando by the thumb.
Brief comments on falsetas 3 and 4 follow the written music.
61

FANDANGOS DE HUELVA Cejilla at 3rd fret
62
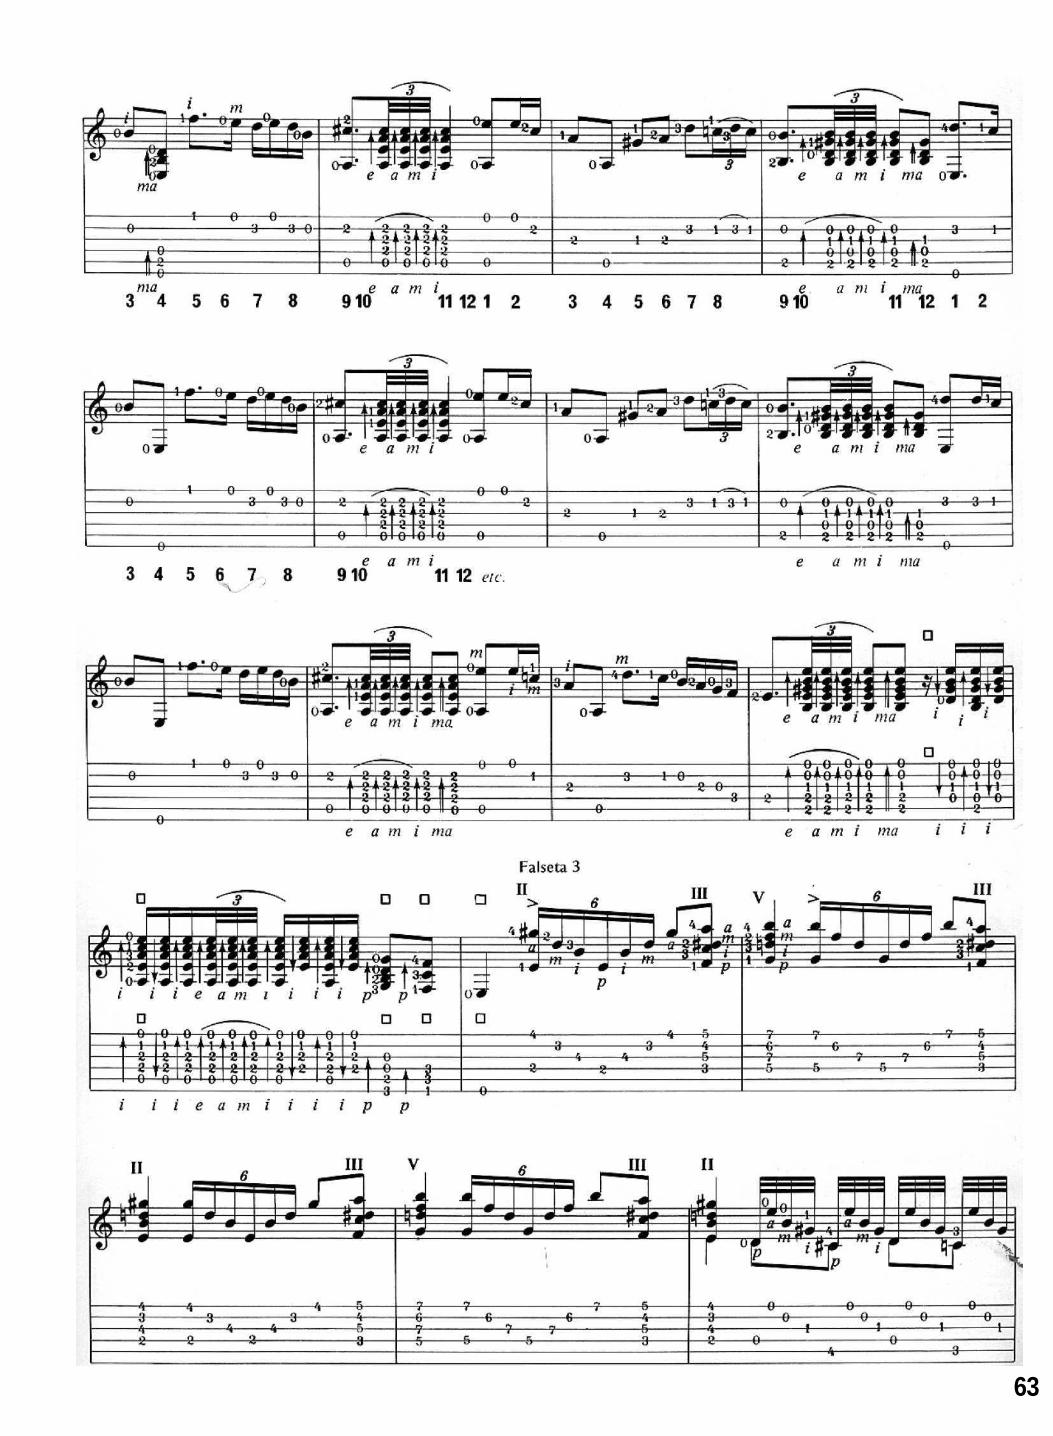
63
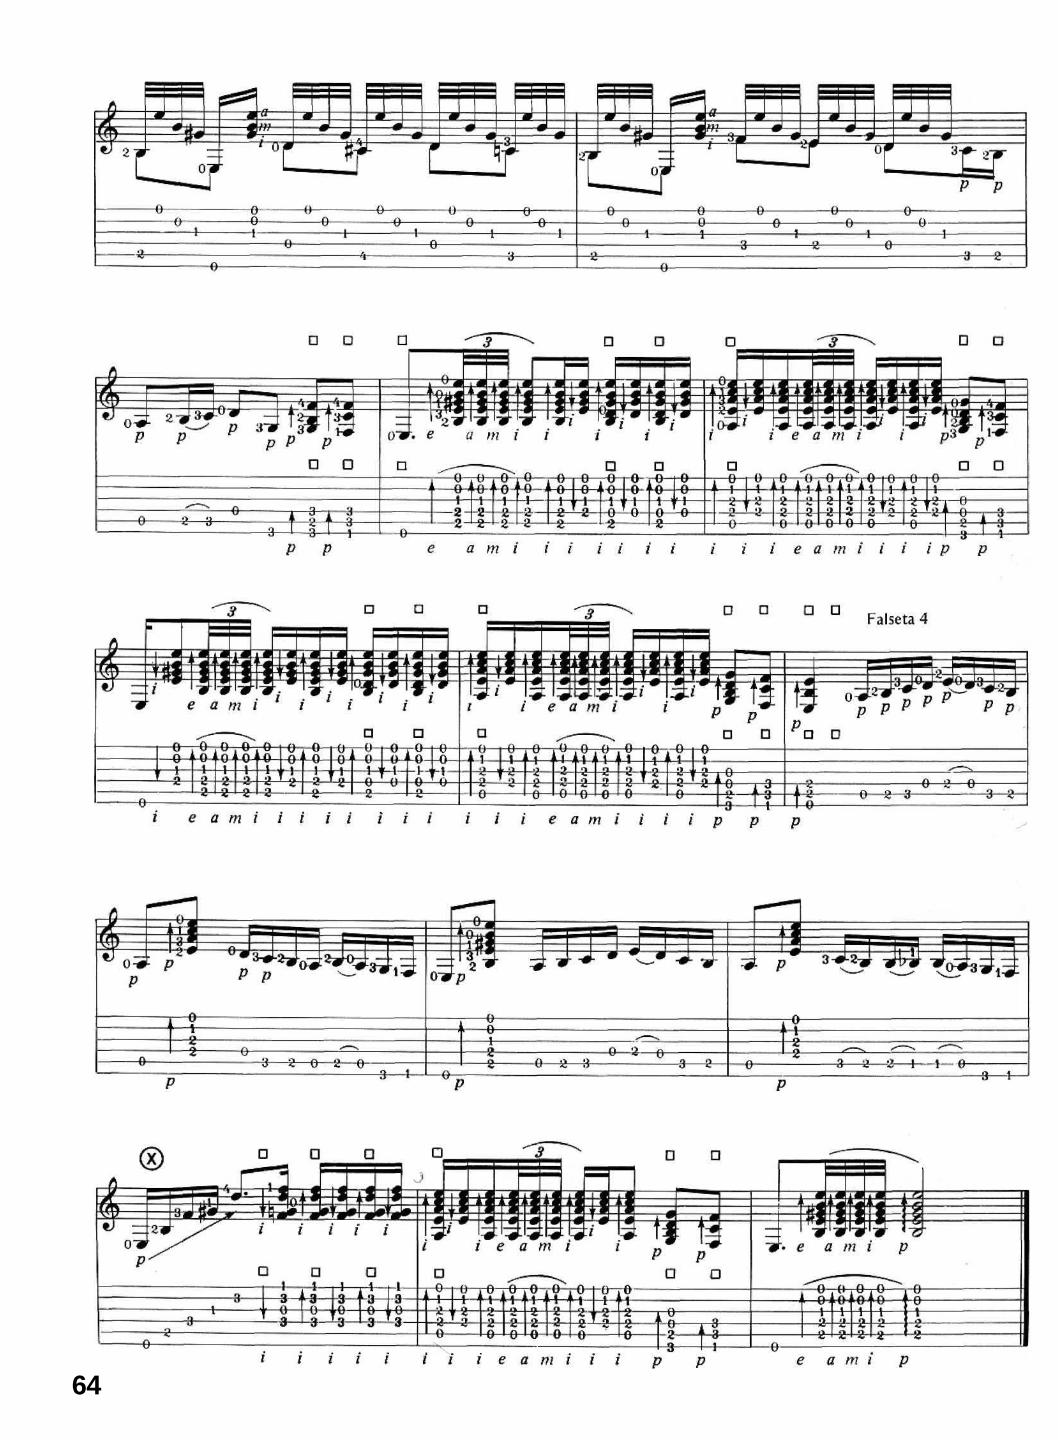
64

FALSETA 3. Here the left hand adopts a chord shape (E7) on the top four strings which ismaintained when the hand is moved to higher fret-positions (F7 then G7) and back again.There is a new right hand arpegio pattern: the fingering is shown in the music. 4-stringchords also occur in which four strings are sounded simultaneously. Thumb and threefingers play tirando, the fingers moving from the knuckle joints without movement of thehand as a whole. The hand is not pulled away from the strings but stays relaxed whilefingers and thumb do the work. The tips of the fingers move in lines directed towards theball of the thumb.
FALSETA 4. Another traditional falseta, this is played apoyando by the thumb with thehand in the 'thumb' position. It is punctuated by thumb downstrokes, and in the left handthere is much use of ligado 'pulling-off. Follow strictly the accents in the phrasing. Thefalseta ends with an ascending arpegio by the thumb (from the point marked X in themusic) on a 'diminished' chord. The left hand fingers first take up the position shown indiagram (i) (top right); the 1st finger then moves across from the 3rd to the 1st string asshown in the diagram (ii).
The final rasgueo which ends the solo introduces another pattern of right hand fingering.A rapid 4-stroke rasgueo is followed without a pause by a strong downward sweep of thethumb. The thumbstroke carries the accent of the beat. The rasgueo is made in onecombined movement involving the fingers, thumb and wrist.
O
The early history of the guitar in Flamenco is hardly less obscure than that of the Cante, but its elevation to solostatus is far more recent and more easily charted.
Flamenco was born of necessity, as an essential expression of the joys and sorrows of everyday life in the fields,at work and in the home. It was a music of ordinary people who shared their art among their small communitiesand sang together as they worked or at their leisure, accompanying themselves with the tools of their work (such asthe blacksmith's hammer in the Martinete) or by hand-clapping and other simple forms of percussion like the beatof a stick on the ground. To begin with, these songs of everyday life and the dances that went with them on festiveoccasions were part of day-to-day survival or celebration, not highly polished performances to instrumentalaccompaniment. The guitar, therefore, was not an essential or even an important part of this early Flamenco.
A story often repeated is that the flamenco guitar came about by the gypsies' adaptation of 'classical' guitartechniques to suit the accompaniment of the flamenco Cante, its use growing in popularity and sophistication alongwith the wealth and status of flamenco performers. But this simple tale seems likely to be all too simple andperhaps gravely mistaken. The most distinctive features of older-style flamenco guitar-playing are worlds apart from'classical' guitar techniques. The percussive rasgueos and accented phrasing seem, instead, to have close similaritiesto techniques heard in Arabic music for the 'ud and other stringed instruments whose origins date back to the timeof the Moors. Rather than being an offshoot of classical guitar development, flamenco techniques seem likely to bederived far more directly from early Mozarabic and other ancient Andaluz instrumental music. Once again, thegitanos' role may have been over-emphasised.
GuitaristsIt was during the Cafe Cantante period of Flamenco at the end of the last century that guitarists began to achievefame as performers in their own right, both as accompanists and soloists. Falsetas, initially developed as melodicinterludes in the accompaniment of the Cante, became more elaborate and longer in the hands of individualcreators. More recently, the advancing status of the solo instrument can be largely attributed to a few individualplayers whose virtuosity brought them recognition as concert performers and recording artists. In modern timesgramophone records have played a very important role in disseminating Flamenco to a world-wide audience and inextending the fund of music available to the student of the guitar, both in Andalucla and elsewhere.
Don Ramon Montoya (1880—1949) is revered as Flamenco's first concert recitalist and is credited withintroducing technical advances such as the five-note tremolo and extended use of 'double' arpegio, together with agreater development of picado and other innovations. But it must not be forgotten that Don Ramon's eminence asa colossus among guitarists rested primarily on his outstanding abilities as an accompanist. Although, too, he wasone of Flamenco's great creators of new falsetas and rasgueos, his playing was built onto the basis of inventions ofother and earlier masters of the guitar such as Patino and Javier Molina, whose music has passed into the guitarrepertoire of Flamenco and whose innovations have been widely imitated. All have excelled in the art ofaccompaniment and all have grafted their toque firmly onto a basis of tradition.
65
Elements of Flamenco 9 History (2) -the guitar
Since Don Ramon's time two figures stand out particularly as important influences on today's youngergeneration of guitarists. Nino Ricardo (Manuel Serrapi) of Sevilla, who died in 1972, and Sabicas (AugustinCastellon), long resident in America, have both been especially gifted as creators, and many of their falsetas havebeen played by other guitarists or become the basis for further adaptation and development.
But it would be wrong for any history of the flamenco guitar, even the briefest, to single out only thoseguitarists who have been widely acclaimed. The tradition of Flamenco is like a great river formed from manytributaries. The sources of the music we now call 'traditional' cannot be attributed and there have been very manyguitarists, some who have gained recognition and many more who have done so on a very small scale if at all, whohave contributed something to that great current of Flamenco which inspires the guitarist of today.
LESSON 10 SevillanasSevillanas are a lively and tuneful form of Andaluz folk-music, strongly influenced by Flamenco and now a part ofit. They are said to have originated two or three centuries ago from the seguidillas manchegas (no connection withthe flamenco Seguiriyas) of old Castile. Today a great variety of Sevillanas, to be sung, danced to and played on theguitar, have become popular throughout Andalucia, and new melodies and verses are continually being created. Thestrongly rhythmic compas is common to all.
The spirit or aire of Sevillanas is usually exuberant and full of alegria and poetic gratia, but some of the melodiesand verses are in more serious vein. Those in the Phrygian mode have a typically flamenco character but most oftenthe melodies are in major or minor keys so that they sound more akin to other kinds of Spanish folk-music. Thepace is usually brisk, but may be slower and more deliberate in some of the serious cop/as.
The best time to hear the most joyful Sevillanas sung and danced in all their rich variety is at Sevilla's annualFeria or Spring Fair, when crowds in traditional costume throng the streets and gather round the casetas. Manykinds of Sevillanas, including the more solemn ones, are sung along with Fandangos de Huelva by the pilgrims whojoin the Romeria del Rocio on its annual progress from Sanlucar de Barameda to Sevilla. Such expert performersas the Hermanos Toronjo and the Hermanos Reyes demonstrate the wide scope of Sevillanas on their records.
First, the guitar plays a rhythmic introduction counted in 6's. This is usually of rasgueos and down- and up-strokesbut may sometimes consist of plucked chords and arpegios. Next comes the Salida (literally, 'departure'), a briefintroductory passage of the melody. You will find that this is the same or very nearly the same as the last line ofthe melody. After a further short passage of rhythm {which is also interposed between repeats of the melody) thefull melody (the Cop/a) is played three times. Variations are often introduced into it the third time it is played. Atthe end, the music stops abruptly. There is a brief pause, then the guitarist begins the next Sevillana, often in adifferent and perhaps contrasting key. Commonly, four different Sevillanas are played in succession.
Further comments on the compas and the solo follow the music on the next three pages.
66
The compas follows a strict pattern. If you bring the pulse of it alive,you will make your listeners want to get upand dance to it. You must aim to get a real bounce in your playing, even if to start with you have to play Sevillanasvery slowly. The compas quickly becomes absorbed as part of you when you hear it often, so you would do well tolisten to the recordings on the cassette many, many times, supplemented by all the records you can lay hands on.
The rhythm is harder to grasp from words or notation and, as with Fandangos de Huelva, which it closelyresembles, it has often been poorly translated into written music. Again, a slow 3/4 time has been adopted here asthe clearest possible way of showing accurately in notation how the rhythm is accentuated. But as with allflamenco composes it is important not to become preoccupied by bar-lines: it's that vital pulse of the rhythm thatmatters.
On the cassette, three traditional Sevillanas are first played at normal speed. These are followed by a recording ofthe first Sevillana of the three, played at a slow speed so that you can understand how the rhythm goes, how it canbe counted and how the music has been transcribed into written notation and cifra. Each Sevillana has a charac-teristic structure which can be summarised as follows:
The COMPAS of Sevillanas
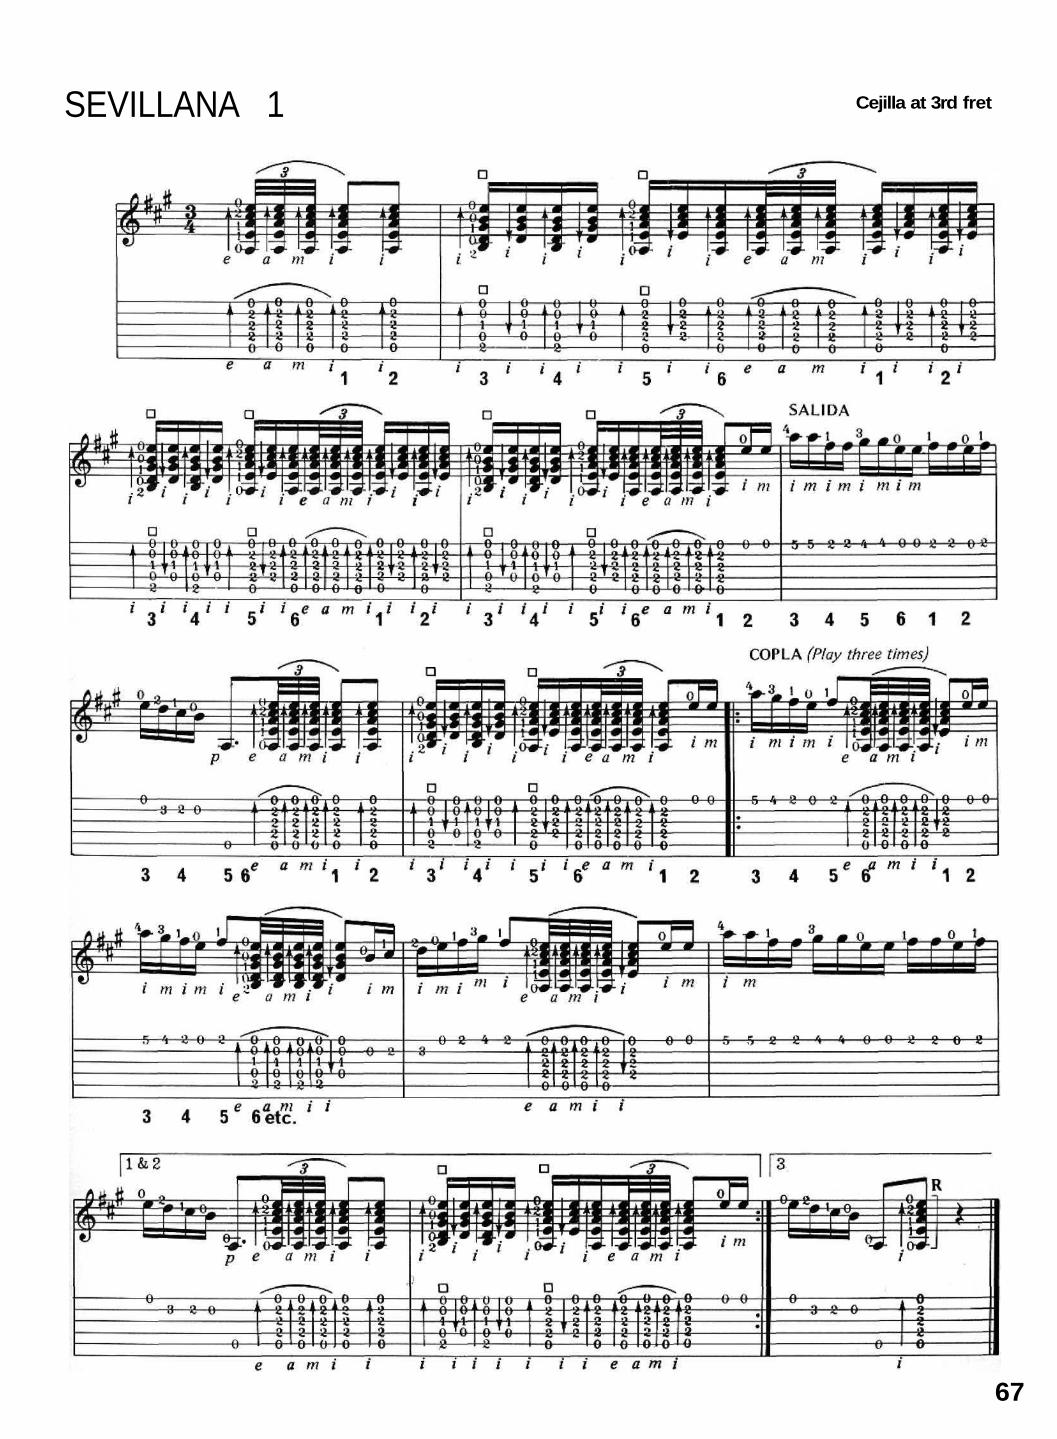
SEVILLANA 1 Cejilla at 3rd fret
67

SEVILLANA 2 Cejilla at 3rd fret
68

SEVILLANA 3 Cejilla at 3rd fret
69

Counting the COMPASThe compas of Sevillanas can be counted all the way through in 6's. You need to understand how the melody fitsin with the rhythm passages. It works out like this:
The technique of APAGADO
To stop the sound of a chord abruptly, as is heard, for instance,at the end of a Sevillana, the flamenco guitarist uses a techniquecalled apagado, which means 'quenched' or 'silenced'. This canbe performed by either the right hand or the little finger of theleft hand, as follows:
Right hand APAGADO. Here, the right hand is brought downsharply onto the strings after striking them, in such a way thatthe base of the little finger and the edge of the palm instantlystop the vibration of the strings. To do this, the wrist is pushedsmartly in towards the front surface of the guitar so that at thecompletion of the movement the hand is in the position shownin photo 10.1. The symbol used in this book to represent righthand apagado is a vertical bracket across the stave after thechord, with the letter R above it to indicate the right hand:
Left hand APAGADO. An alternative method of instantly stop-ping the vibration of the strings is to damp them with the littlefinger of the left hand, which is brought down straight across thestrings at right-angles to them the instant after a chord has beensounded by the right hand. The position of the little finger at theend of the movement is shown in photo 10.2. The little fingerneeds to rest only momentarily across the strings to quench thesound. It does not press the strings against the fingerboard butjust descends very quickly and lightly onto them. The symbol is avertical bracket across the stave following the chord, with thefigure 4 above it to indicate the little finger, i.e:
Right-hand apagado is the more powerful method of the two.
The little finger apagado can be repeated quickly, to produce asuccession of abrupt ('staccato') chords.
10.1 Right hand apagado.
10.2 Left hand apagado with little finger.
70
Beginning with count 1 on the first beat (which coincides with the index stroke of the first 4-stroke rasgueo) theintroductory rasgueo passage can be counted in 6's, usually three times over. The Salida, and later the full melody,both begin on a count of 2 or 3, with the preceding count of 1 or 1 and 2 taken up by rasgueo. The ending of theSalida or of the full melody coincides with a count of 5. The following rhythm passage of rasgueo then begins fromthe count of 6 before starting through the 1 to 6 sequence again. After the third and final version of the melodythere is usually an accented chord (here played with an index downstroke) on the count 6 to bring the music to asudden stop. After a pause, the first beat of the next Sevillana starts again from the count of 1.
The soloThe three Sevillanas are in different keys.
Sevillana 1Key: A major. The melody is played picado with alternating index and middle fingers of the right hand. It starts onthe count of 2. Strongly played 5-stroke rasgueos punctuate the melody; the accent of each rasgueo falls on thefinal stroke with the index and coincides with the beat of the music. Contrast this with the 5-stroke rasgueosdescribed in earlier lessons, which had the accent falling on the initial stroke with the little finger.
Sevillana 2Key: A minor. The melody is again picado, but this time on the lower strings. Note that it starts on the count of 3when you count the rhythm in 6's.
Sevillana 3Here is an example of a Sevillana in the Phrygian mode based on E (or, as the Flamencos call it, 'por arriba'). Themelody is played with apoyando thumb-strokes on lower strings.

There are some people who regret the new status of the flamenco guitar as a solo concert instrument, fearing that itmight have thereby lost touch with its earlier origins as an integral part of the Cante, It is true that the enormousinterest today in the classical guitar has led many people to a serious appreciation of the flamenco instrument whomay have only a very limited awareness of the musical context in which it developed. But one can take anoptimistic view of this new popularity. It will encourage people outside Andalucia to look further than the guitarinto the musical heritage, embodied especially in the Cante, from which the flamenco guitar draws so much of itsstrengths.
Flamenco is an improvised music deeply rooted in ancient traditions, which can give expression to the mostpersonal and universal themes of hope and suffering. As a solo instrument, the flamenco guitar can do much morethan just conjure up evocations of the Cante and Baile. It is ready to find a new validity on its own, able to givevoice to all the most powerful emotions of Flamenco while retaining, and yet being partly distinct from, theinspiration of the Cante.
Today the art of solo playing can begin to acquire a new self-sufficiency and musicality, if only guitarists canstart to advance beyond the sterile displays of speed and technical virtuosity into which so many good players havebeen led astray. Largely because of gramophone recording, standards of technique are far higher than ever before,but it is essential that these skills are seen as a means to an end rather than as an end in themselves.
The future possibilities reach out in many directions. The lure of pop music draws some players; yet one can besure that it is only in so far as the flamenco guitar reaches deeper into the inspiration of the Cante and its earlyorigins in Andalucia and cultures further south and eastward that its living tradition will grow further as a seriousinternational presence in contemporary music.
The guitar in accompaniment'Accompaniment' is not strong enough a term to describe the creative role of the guitarist in his collaboration withan accomplished singer. It is an equal partnership, a dialogue in which the performance of each artist complementsthe other so that the sum is greater than its parts. The ability to improvise and to be flexible in one's toque areamong the special skills required if the guitarist is to complement his partner's performance to the full withoutappearing to compete or to intrude. For the Cante, the guitarist must have an extensive knowledge of the cop/asand a deep identification with their aire, as well as a good ear for their harmonies, if he is to anticipate what thesinger is going to do. The accompaniment of the Baile makes other demands as well, requiring an especially firmcommand of the compas and an instant responsiveness to the dancer's changes of tempo. To be able to accompanywell is an essential aim if one is to become a flamenco guitarist in the fullest and truest sense.
Unfortunately for the student, the subtle arts of accompaniment for the Cante and Baile are more difficult toexplore than the art of solo playing. To the concert-going public outside Spain they are still almost completelyunknown and unappreciated.
Modern trendsToday there are signs that a second Golden Age of Flamenco is dawning, for there is rekindled interest in Flamencoin Spain and outside it. After a period of decline after the Civil War and until the 1960's, when the popularisationof showy, watered-down Flamenco in the theatre, in the tourist-traps of holiday resorts and on records becamewidespread, pure Flamenco is once again resurgent.
Today, Flamenco seems ready to resume its continuing process of evolution now that it has at last begun torecover in part from the disruption brought about by technological advance. Over the space of only a few decadesthis uniquely expressive and personal folk-music became subjected to an overwhelming onslaught of commercialpressures to sell its special magic to the enormous audience that could now be introduced to it. Inevitably thecreative process came almost to a standstill and its deepest inspiration was all but lost sight of while only its moresuperficial and immediately attractive flamboyance could be marketed to a non-flamenco audience. Thosecommercial pressures will not abate, but at least there are now a growing number of people aware of what hadnearly been destroyed, who seek to revive the creative force in Flamenco which was always part of its essence. Theworld outside Spain, awakening slowly to a recognition of the largely unfamiliar musical riches of the ancientcultures of southern Spain and North Africa, is readier now than ever before to be initiated into the authentic artsof Flamenco and to contribute to its future development.
In the guitar world in recent years there have been trends towards more complex syncopations and more'modern' harmonies as well as numerous attempts, on record, to combine the flamenco guitar with otherinstruments. Nonetheless, compas and aire, those two indispensable ingredients, remain pre-eminent. Indeed therehas been in the modern style a re-emphasis of the regular driving force of the compas, which had becomediminished in importance in the days when the Fandango was almost all that survived of the flamenco Cante in
Elements of Flamenco 10 The role of the guitar
71

public performance. Much earlier, there had been a rage for the Malaguenas of Juan Breva. Since the '60's, theRumba has replaced the Fandango as the cante most popular with the non-f!amenco audience. But there areencouraging signs that the audience for the more deeply flamenco Cante is growing rapidly. There is generally, asindeed there ought to be, a rediscovery of the Cante as the oldest and deepest expression of Flamenco.
LESSON 11 TremoloTremolo is a technique for the solo guitar which gives the illusion of two instruments playing together. One, thetreble voice, carries a flowing melodic line in which the impression of sustained sounds is created by very rapidlyrepeated notes, as on the mandolin. The other, the bass voice, plays a rhythmic accompaniment or counter-melody.
Development of right hand techniqueTremolo is introduced at this fairly early stage because it provides an excellent means of developing good righthand technique. It demands complete independence of movement of thumb and fingers and good control of eachfinger separately. You will need to practise it a great deal before you can begin to play it at anything near the sortof speed at which it sounds most effective, but if you can start to play it now, very slowly, in regular rhythm andwith good independent control of the thumb and fingers you can be confident that your right hand is developingwell.
The flamenco TREMOLOThe flamenco tremolo has five notes to a beat, with an initial thumbstroke on a bass note followed by four tirandostrokes with the fingers on the treble: it is therefore written p i a m i. This has one more stroke than the tremolofor classical guitar which is p a m i, the technique used in Tarrega's famous tremolo study 'Recuerdos del Alhambra'.
The music which follows takes the form of a fa/seta for Soleares. It isplayed on the cassette at a slow speed so that you can hear each note ofthe tremolo clearly.
A Tremolo Falseta Cejilla at 2nd fret
72

The left handFor the first three bars of the fa/seta, the little finger of the lefthand holds down A on the 1st string by stopping the string at thefifth fret, while fingers 1 and 2 move to stop notes on 5th, 4thand 3rd strings. In the fourth bar the left hand adopts a positionof E major on the top four strings with the little finger stopping aG sharp at the fourth fret on the 1st string. The fifth bar intro-duces the new chord shape of G major, shown in diagram formand photo 11.1 on the right. The same chord shape may befingered in different ways.
For the final three bars of the fa/seta, the left hand adopts inturn the chord positions of C major, F major and E major.
The importance of the rhythmAbsolutely even rhythm is all-important in creating the illusion of an unbroken melody in the treble. The fingersmust each strike distinctly, each with equal force and tone, and the spacing of the strokes with thumb and eachfinger must be regular.
Tremolo has been well called 'an arpeggio on a single string'. This way of viewing it will help you to concentrateon the even timing and spacing of the notes. Start very slowly, making sure that the intervals between p i a m i areall the same. The hand is relaxed and the fingers move primarily from the knuckles. The movements of the fingersare shown in 11.2 (a) to (f).
You may be tempted to rush things in your eagerness to obtain the beautiful effect of the tremolo playedrapidly. If you do, you are certain to develop bad habits which will cause unevenness of the rhythm. You will thenfind it much harder to make your tremolo smooth and flowing, but if you start right the speed will come naturallywith practice.
The thumb in TREMOLOThe thumb plays apoyando or tirando, according to the effect desired. Where the bass notes are sounded in anascending sequence of strings (e.g. 6th, 5th, 4th) the thumb, if playing apoyando, follows through to sound eachone in turn without being lifted and swung back after each string has been sounded.
11,2 The flamenco tremolo, a) Thumb strikes b) Thumb apoyando stroke arrested by 5th c) End of stroke with index.6th string. string.
d) Third finger. e) Middle finger. f) Index again.
73
G major The chord diagramshows fingers 2 and3 stopping the 5lh4nd 6th strings andthe photo shows aneasier position usingFingers 1 and 2 ontheir strings. Sometimes with the litterfingering, the 3rdfinger stops the 1ststring. The choke offingering will dependon the musical con-'text and the toque.
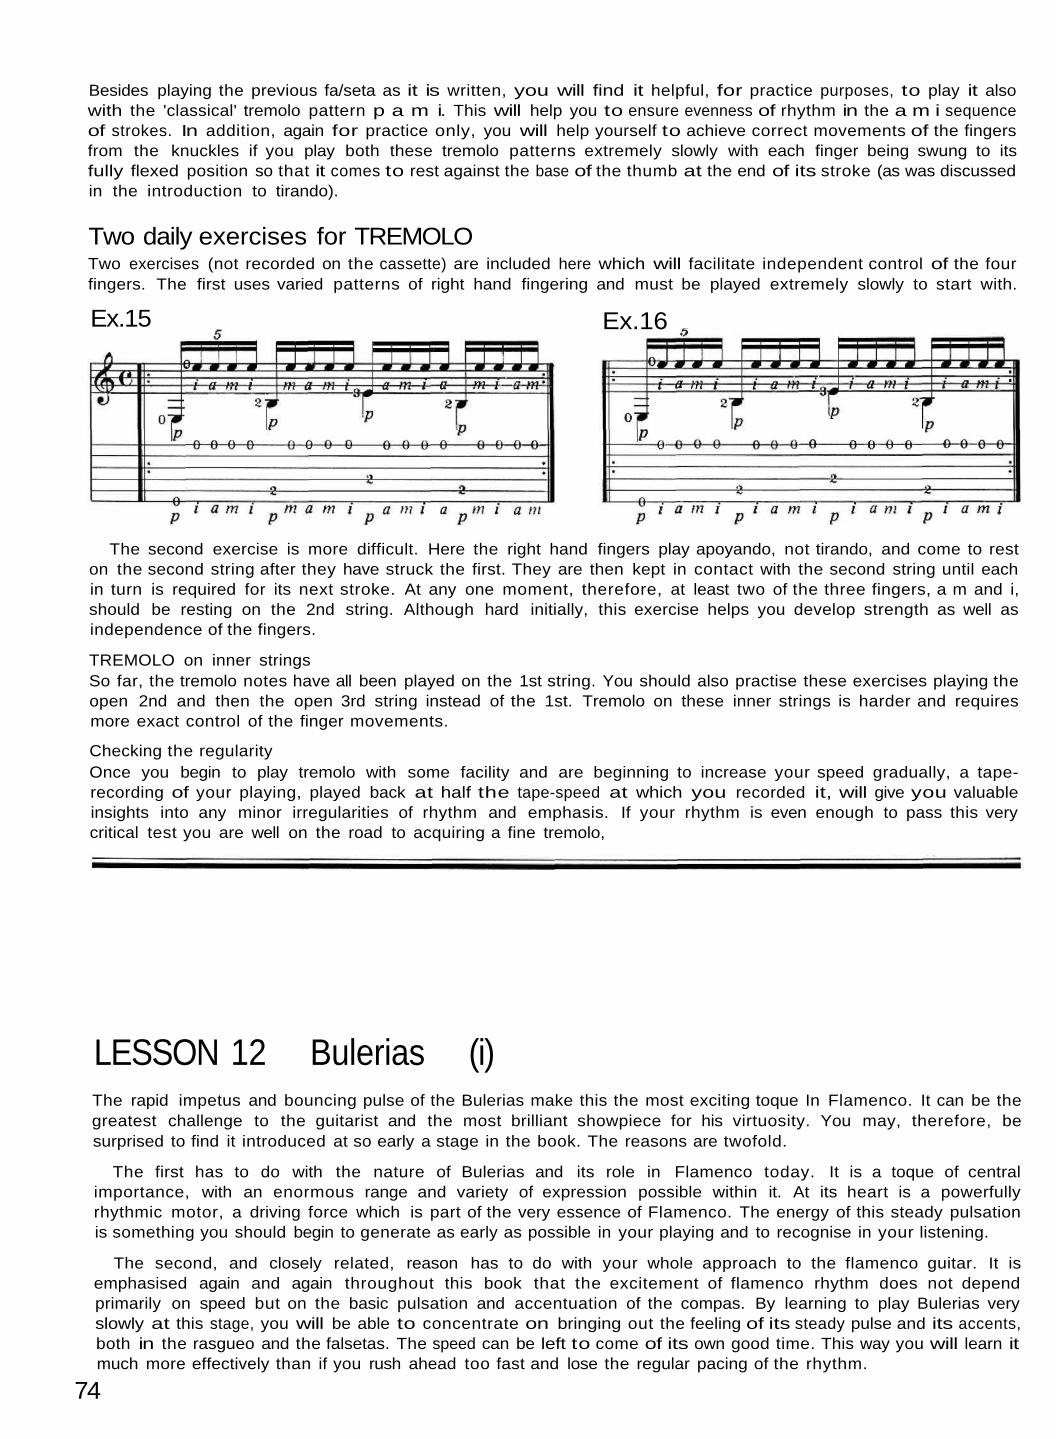
Besides playing the previous fa/seta as it is written, you will find it helpful, for practice purposes, to play it alsowith the 'classical' tremolo pattern p a m i. This will help you to ensure evenness of rhythm in the a m i sequenceof strokes. In addition, again for practice only, you will help yourself to achieve correct movements of the fingersfrom the knuckles if you play both these tremolo patterns extremely slowly with each finger being swung to itsfully flexed position so that it comes to rest against the base of the thumb at the end of its stroke (as was discussedin the introduction to tirando).
Ex.15 Ex.16
LESSON 12 Bulerias (i)The rapid impetus and bouncing pulse of the Bulerias make this the most exciting toque In Flamenco. It can be thegreatest challenge to the guitarist and the most brilliant showpiece for his virtuosity. You may, therefore, besurprised to find it introduced at so early a stage in the book. The reasons are twofold.
The first has to do with the nature of Bulerias and its role in Flamenco today. It is a toque of centralimportance, with an enormous range and variety of expression possible within it. At its heart is a powerfullyrhythmic motor, a driving force which is part of the very essence of Flamenco. The energy of this steady pulsationis something you should begin to generate as early as possible in your playing and to recognise in your listening.
The second, and closely related, reason has to do with your whole approach to the flamenco guitar. It isemphasised again and again throughout this book that the excitement of flamenco rhythm does not dependprimarily on speed but on the basic pulsation and accentuation of the compas. By learning to play Bulerias veryslowly at this stage, you will be able to concentrate on bringing out the feeling of its steady pulse and its accents,both in the rasgueo and the falsetas. The speed can be left to come of its own good time. This way you will learn itmuch more effectively than if you rush ahead too fast and lose the regular pacing of the rhythm.
74
Two exercises (not recorded on the cassette) are included here which will facilitate independent control of the fourfingers. The first uses varied patterns of right hand fingering and must be played extremely slowly to start with.
Two daily exercises for TREMOLO
The second exercise is more difficult. Here the right hand fingers play apoyando, not tirando, and come to reston the second string after they have struck the first. They are then kept in contact with the second string until eachin turn is required for its next stroke. At any one moment, therefore, at least two of the three fingers, a m and i,should be resting on the 2nd string. Although hard initially, this exercise helps you develop strength as well asindependence of the fingers.
TREMOLO on inner stringsSo far, the tremolo notes have all been played on the 1st string. You should also practise these exercises playing theopen 2nd and then the open 3rd string instead of the 1st. Tremolo on these inner strings is harder and requiresmore exact control of the finger movements.
Checking the regularityOnce you begin to play tremolo with some facility and are beginning to increase your speed gradually, a tape-recording of your playing, played back at half the tape-speed at which you recorded it, will give you valuableinsights into any minor irregularities of rhythm and emphasis. If your rhythm is even enough to pass this verycritical test you are well on the road to acquiring a fine tremolo,
Besides its faster pace, other components of the rhythm give the Bulerias its own special character. These will bestated briefly now, but the principles described can only begin to make much sense when you have studied themusical illustrations in this lesson and Lessons 13 and 15.
Much of the apparent complexity of Bulen'as stems from the fact that within the overall compos in 12's there areother inner-rhythms best counted in 6's, as well as subtle syncopations and variations of accentuation. The correcttiming of falsetas is especially important.
The beginnings of FALSETASMany falsetas for Bulerias start (like those in Soleares) on the count of 1. But there are many others that begin onthe earlier count of 12, after a rasgueo passage with its final accent on 10. Some falsetas start earlier still on thecount of 11 or even occasionally on 10.
The duration and endings of FALSETASFalsetas vary in length. The melodic phrases of which they are composed can be counted within multiples of 6beats. The melody may span an odd or even number of sequences of 6 beats, but the overall framework of the 12-beat compos has to be preserved. How is this done?
The answer lies in the number of beats played with rasgueo at the end of the fa/seta. If we are counting insequences of 1 to 6, the last note of the falseta usually falls on the count of 4. Where the fa/seta has an unevennumber of 6's, there will be 8 beats to be completed before the next 12-beat compos begins. These are taken up bya passage of rasgueo. Where the fa/seta has, on the other hand, an even number of 6's, the final note falls on thebeat equivalent to 10 when we count in 12's. There are then only 2 beats to be completed before the next 12-beatcompos.
So, if the falseta has an uneven multiple of 6's, it will require the longer type of rasgueo ending.
Quite often the falseta is composed of short phrases (sometimes repeated) followed by a longer phrase. Similarprinciples apply. If any of the phrases fall within an uneven multiple of 6's — as, for example when the falsetabegins with a phrase starting on 12 and ending on the first count of 6 — then the longer type of rasgueo 'fill-in'passage is needed before the next phrase starts on 12. In this way the 12-beat compas is preserved.
Historical developmentThe word 'Buleria' seems likely to be a gitano derivation from buleria which means torn-foolery or ridicule. Thereare various theories about how the toque evolved. It appears to be a fairly recent development of the Cante Gitano,perhaps hardly more than a century old. Styles have changed and are continuing to do so.
Bulerias now constitute a toque, still particularly associated with the gitanos, which has great flexibility. It haswell been called 'omnivorous', since such a wide variety of themes, including pop songs and even, in regrettabletaste, some non-Spanish tunes, have been set to its compas. Many dances, especially Soleares and Alegrias butsometimes even other toques, are commonly brought to a dramatic final climax by finishing with Bulerias.
The compas shows it to be very closely related to Soleares. Possibly it started with the faster music (remates)with which gitano singers liked to end Soleares. El Loco Mateo ('Mad Matthew') of Jerez is known to have donethis about 1870.
The earlier styles of Bulen'as are quite slow in pace and are called Bulerias al Golpe, because of their markedrhythm with strongly emphasised accents. Diego del Gastor (d.1973) was a magnificent player for these oldercantes, which deserve to be far more widely known and performed. They are closer in aire to such intermediateforms as the Solea por Bulen'as than to the much faster styles of recent times. The aire can be passionate andserious or even tragic, in contrast to the festive gaiety or uproarious frivolity and ecstatic abandon which prevail inthe faster Bulen'as.
The faster Bulen'as, known as Bulerias Ligadas because of their more flowing and less abrupt rhythm, havebecome very popular as cheerful and often humorous songs, as the accompaniment for festive dances and as guitarsolos of thrilling virtuosity.
Already the guitar style in Bulerias has moved on a long way, even in comparison with styles of, say, ten yearsago. Within the same overall compas, the aire has altered with the introduction of new rasgueos, more complexsyncopation and contratiempo and new harmonies derived from jazz-influenced popular music.
75
The COMPAS of BuleriasThe basic compas of Bulerias follows the same pattern as a Soleares. It is made up of sequences of 12 beats withaccents on beats 3, 6, 8, 10 and 12. i.e.:

Palmas
Count in 12's
Count in 6's
*
1
1
*
2
2
3
3
*
4
4
5
5
6
6
*
7
1
8
2
9
3
*
10
4
*
11
5
12
6
The first solo BuleriasThe first example of Bulerias (opposite) is played fairly slowly on the cassette recording so that you can hear thecompos clearly. When you play the solo you will find it best to study the music in sections of one or two composes
at a time. Master the rhythm of each of them before you moveon to the next. The solo begins with five composes of rasgueorhythm. These are separately numbered in the music.
COMPAS 1Compas 1 consists entirely of index finger downstrokes on the chord of A major with a ligado 'hammer-on' fromA to B on the 3rd string added on the half-beats. The compas demonstrates the accents on beats 3, 6, 8, 10 and 12and you should bring these out clearly by giving extra emphasis to the downstrokes on these beats. In addition, ifyou can, play a golpe to coincide with each accented downstroke. The timing must be very exact if the golpe is tosound simultaneously with a crisp impact from the index downstroke. If you are not yet confident aboutcombining a golpe with the downstroke, leave it out to start with so that you can concentrate on getting the feel ofthe rhythm with the index strokes,
COMPAS 2The 3, 6, 8, 10, 12 accentuation continues here but we now have index upstrokes on the half-beats after 7 and 8and then a 5-stroke rasgueo starting on beat 9 with its accent on beat 10. The count of 10 coincides with the finalindex upstroke of the rasgueo.
76
The rhythm of the PALMASThe hand-clapping (palmas) in Bulerias provides the essential clue to understanding how the 12-beat compas withaccents on beats 3, 6, 8, 10, 12 can also be counted as two identical 6-beat sequences. When we count In 6's, thehandclaps occur on beats 1, 2 and 4, 5 like this:
The same rhythm is heard at times in golpes on the guitar and may be emphasised also in some types of rasgueoand fafsetas.
You can get the feeling of this by practising the hand-claps (see p. 85 for details of the correct flamencotechnique) while you count aloud in 6's. Clap your hands twice over towards your left side on counts 1 and 2 andtwice over towards your right on counts 4 and 5. This way you will quickly feel the 'swing' of the rhythm.
Putting the two kinds of rhythm, in 12's and 6's, together and adding the bar-lines from the musical notation, wenow have:
Ending BuleriasAs in Soleares and Alegrias, Bulerias ends with its final chord being played on a count of 10.
CONTRATIEMPOThe compas in 12's and the inner-rhythm in 6's together provide the rhythmic basis for Bulerias. When you firsthear a cuadro (flamenco troupe) performing Bulerias it may sound much more complicated than this becausefurther syncopations can be introduced by the guitarist in rasgueos and falsetos, and by the hand-clapping and thedancer's taconeo (heel-work). We have shown only the beats above, but other accents can be added on the inter-vening half-beats. Once you have understood the essential form of the compas, however, you will hear it emergeclearly, with all these possible additional elements fitting within its basic pattern.
Musical notation and tonalityThe Bulerias in this book are written in a fast 3/4 time. 3/8 would be more appropriate to the speed, but 3/4 allowsgreater clarity of symbols.
The music of the Bulerias in Lessons 12, 13 and 15 is played in the 'por medio' position, that is in the Phrygian,mode based on A. For the most part the chords are similar to those you have already met in Seguiriyas.
Bulerias may also be played in other keys, both major and minor, as well as in the Phrygian mode based on E oreven (a recent innovation) on F as in Tarantas.
1 2 3 4 5 6 1 2 3 4 5 6

Together, Compases 1 and 2 provide a typical introduction to a Bulen'as. They illustrate very clearly how muchof the exciting pulse of the music can be generated just by good right hand control and a feeling for the bounce ofthe rhythm, using only a single chord and single strokes. Once you have got this motor drive inside you and intoyour right hand, the rest of Bulerias can follow naturally and logically for you.
COMPAS 3Here a chord change to a B chord (with E on the open 1st string) coincides with the marked accent on beat 3 andthe chord change back to A coincides with the beat on 7. 2 beats of golpe on 4 and 5 must be exactly timed. Theending of the compas is similar to the previous one. (In the musical notation, the B chord on beat 3 is written asa crotchet tied to a minim in the second bar. The minim is not played separately but is written in to indicate thatthe sound of the chord is allowed to sustain from beat 3 until just before beat 6. The cifra also shows the actualright hand strokes.) This compas can be used a lot in Bulen'as as a rasgueo passage which maintains the continuityof the rhythm. Compases 5 and 12 are the same one again. You could start Bulen'as with it, either from the countof } (as In Bulen'as No. 3, to follow) or from the upstroke on the previous count of 1 2.
COMPAS 4This is another variant of the basic 3, 6, 8, 10, 12 pattern, with upstrokes on the half-beats after beats 3 and 4.There are two new chords, both fingered in the musical notation. The first is a version of B with F on the 1ststring, and the second is derived from C7 with an added D on the 2nd string.
First Bulerias Cejilla at 3rd fret
77
1

78

The FALSETA (opposite page)This traditional falseta is typical of many in Bulerias which start on a count of 12. Two melodic phrases, each inturn repeated once, make up the first part of the falseta. They are played picado with i and m. Remember toobserve the rule about always alternating the fingers in picado.
After the first beat of the melody on the count 12, each picado phrase occupies another 6 beats. The followingrasgueo sequence therefore has to last 5 more beats to complete the compos before the next phrase starts, again onthe count of 12. In this way the recurring pattern of 12-beat composes is preserved throughout the first part of thefalseta.
Like many falsetas, this one has two parts, allowing the performer a choice of second part to follow the first.One could think of it as two falsetas, except that the first part (the picado phrases) all relate to just one chord (A7with G on the open 3rd string) and would sound incomplete if played on their own. The second part played here(which could also be used as a brief falseta on its own or as an ending to another falseta) also starts on the count of12. It then occupies only 1 1/2 compases (i.e. 3 x 6's), so that the concluding rasgueo again has to be of the longerkind for this part of the falseta (and the falseta as a whole) to conform to the pattern of 12-beat composes.
The melody section of the second part of the falseta introduces the use of thumb upstrokes, an alzapuatechnique which will be described below.
The left hand also deserves comment. Fingers 4 and 3 are held down on the 2nd and 3rd strings, respectively,throughout the second part of the falseta. Fingers 2 and 1 move to stop notes on the 5th string. Notice how the2nd finger is used to stop the C at the fourth fret on the 5th string, as shown in 12.1 overleaf.
ALZAPUAThe name alzapua (from alzar = 'lift' or 'raise' and pua = 'point' or 'plectrum') comes from the use of upstrokeswith the thumb in this very flamenco technique, which imparts a strongly rhythmic and syncopated pulsation tomelodic passages.
In its most typical form today, alzapua consists of a rapidly repeated pattern of three types of stroke with theright hand thumb. The thumb-strokes are played in the following order:
1. First, the thumb plays a downstroke chord across the strings, starting from a well-definednote as the lowest note of the chord that is sounded. This note belongs to the melody and isthe most important part of the chord, whose exact extent onto higher strings is thereforenot crucial. A golpe is often played to coincide with the thumb-stroke. For example:
2. Next, the thumb plays a strong upstroke on the same chord, hitting across the strings withthe edge of the nail. It is the emphasis on this upstroke which gives the rhythm its charac-teristic syncopation and urgency. The exact extent of the upstroke does not have to be veryclearly defined because it is essentially part of the rhythm, not the melody.
3. Thirdly, the thumb plays a single melody note with a firm apoyando stroke on a bass string.This string is either the same string as the one the next downstroke of the thumb starts fromor, commonly, it is the next one lower. In the latter case the thumb swings on to sound thenext downstroke chord on its follow-through after striking the single note.
The right hand is in the 'thumb' position as shown in Lesson 2. The thumb swings from its joint at the wrist.The left hand finger movements are based on chord positions; these are held down by some fingers while otherfingers are kept on the move stopping the melody notes. continued overleaf
79
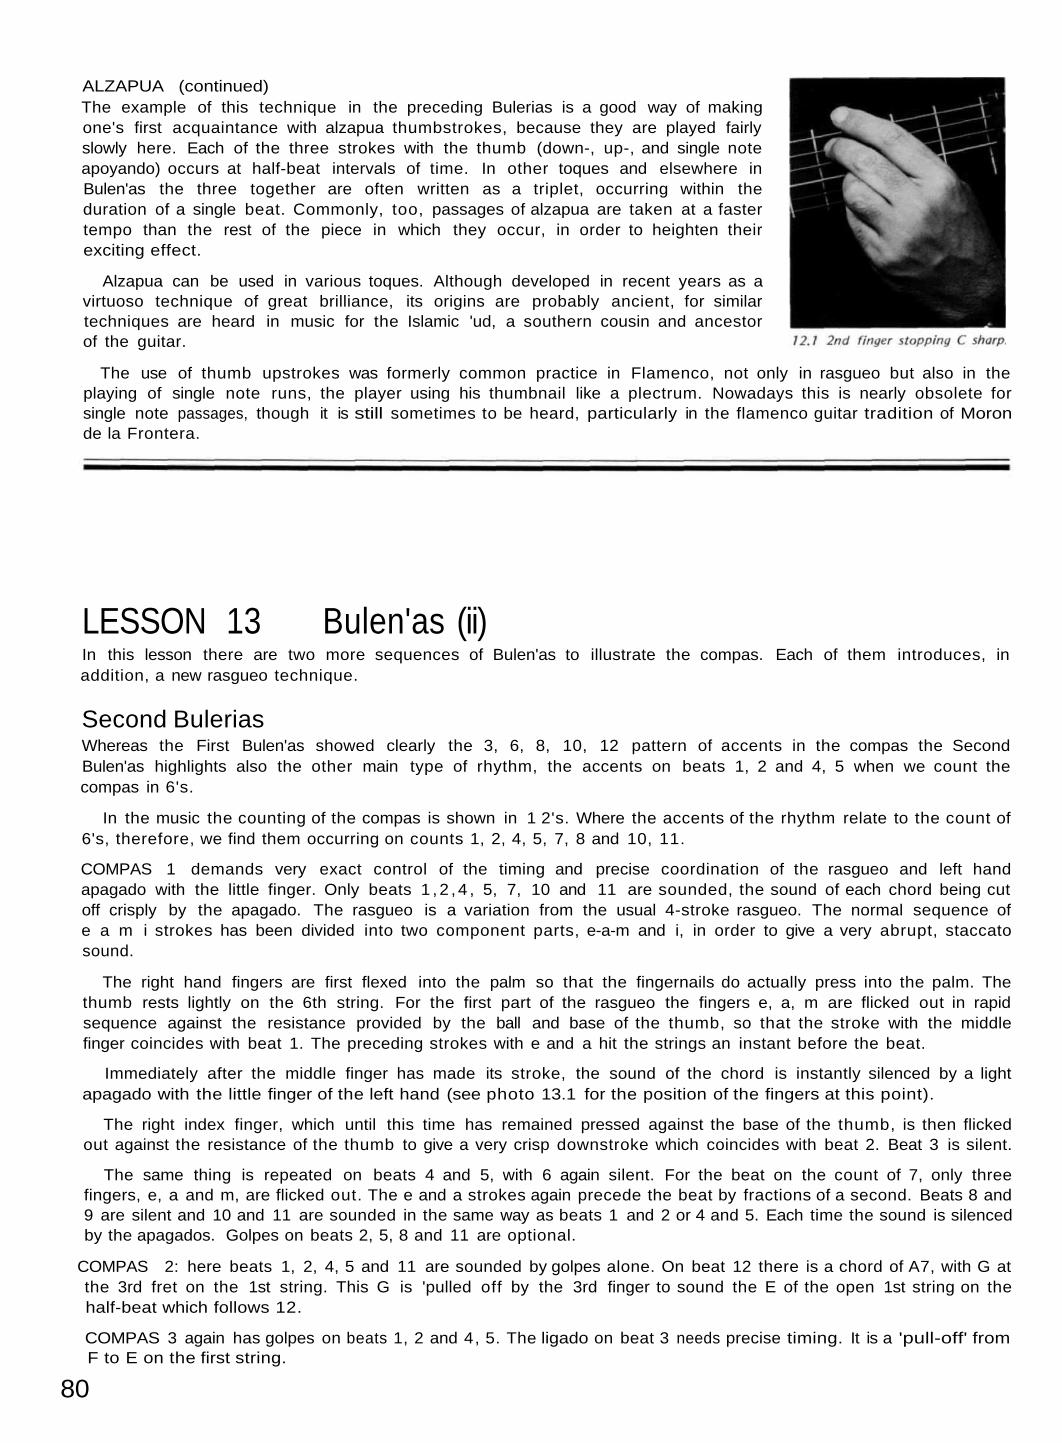
ALZAPUA (continued)The example of this technique in the preceding Bulerias is a good way of makingone's first acquaintance with alzapua thumbstrokes, because they are played fairlyslowly here. Each of the three strokes with the thumb (down-, up-, and single noteapoyando) occurs at half-beat intervals of time. In other toques and elsewhere inBulen'as the three together are often written as a triplet, occurring within theduration of a single beat. Commonly, too, passages of alzapua are taken at a fastertempo than the rest of the piece in which they occur, in order to heighten theirexciting effect.
Alzapua can be used in various toques. Although developed in recent years as avirtuoso technique of great brilliance, its origins are probably ancient, for similartechniques are heard in music for the Islamic 'ud, a southern cousin and ancestorof the guitar.
The use of thumb upstrokes was formerly common practice in Flamenco, not only in rasgueo but also in theplaying of single note runs, the player using his thumbnail like a plectrum. Nowadays this is nearly obsolete forsingle note passages, though it is still sometimes to be heard, particularly in the flamenco guitar tradition of Moronde la Frontera.
LESSON 13 Bulen'as (ii)In this lesson there are two more sequences of Bulen'as to illustrate the compas. Each of them introduces, inaddition, a new rasgueo technique.
Second BuleriasWhereas the First Bulen'as showed clearly the 3, 6, 8, 10, 12 pattern of accents in the compas the SecondBulen'as highlights also the other main type of rhythm, the accents on beats 1, 2 and 4, 5 when we count thecompas in 6's.
In the music the counting of the compas is shown in 1 2's. Where the accents of the rhythm relate to the count of6's, therefore, we find them occurring on counts 1, 2, 4, 5, 7, 8 and 10, 11.
COMPAS 1 demands very exact control of the timing and precise coordination of the rasgueo and left handapagado with the little finger. Only beats 1 ,2 ,4 , 5, 7, 10 and 11 are sounded, the sound of each chord being cutoff crisply by the apagado. The rasgueo is a variation from the usual 4-stroke rasgueo. The normal sequence ofe a m i strokes has been divided into two component parts, e-a-m and i, in order to give a very abrupt, staccatosound.
The right hand fingers are first flexed into the palm so that the fingernails do actually press into the palm. Thethumb rests lightly on the 6th string. For the first part of the rasgueo the fingers e, a, m are flicked out in rapidsequence against the resistance provided by the ball and base of the thumb, so that the stroke with the middlefinger coincides with beat 1. The preceding strokes with e and a hit the strings an instant before the beat.
Immediately after the middle finger has made its stroke, the sound of the chord is instantly silenced by a lightapagado with the little finger of the left hand (see photo 13.1 for the position of the fingers at this point).
The right index finger, which until this time has remained pressed against the base of the thumb, is then flickedout against the resistance of the thumb to give a very crisp downstroke which coincides with beat 2. Beat 3 is silent.
The same thing is repeated on beats 4 and 5, with 6 again silent. For the beat on the count of 7, only threefingers, e, a and m, are flicked out. The e and a strokes again precede the beat by fractions of a second. Beats 8 and9 are silent and 10 and 11 are sounded in the same way as beats 1 and 2 or 4 and 5. Each time the sound is silencedby the apagados. Golpes on beats 2, 5, 8 and 11 are optional.
COMPAS 2: here beats 1, 2, 4, 5 and 11 are sounded by golpes alone. On beat 12 there is a chord of A7, with G atthe 3rd fret on the 1st string. This G is 'pulled off by the 3rd finger to sound the E of the open 1st string on thehalf-beat which follows 12.
COMPAS 3 again has golpes on beats 1, 2 and 4, 5. The ligado on beat 3 needs precise timing. It is a 'pull-off' fromF to E on the first string.
80
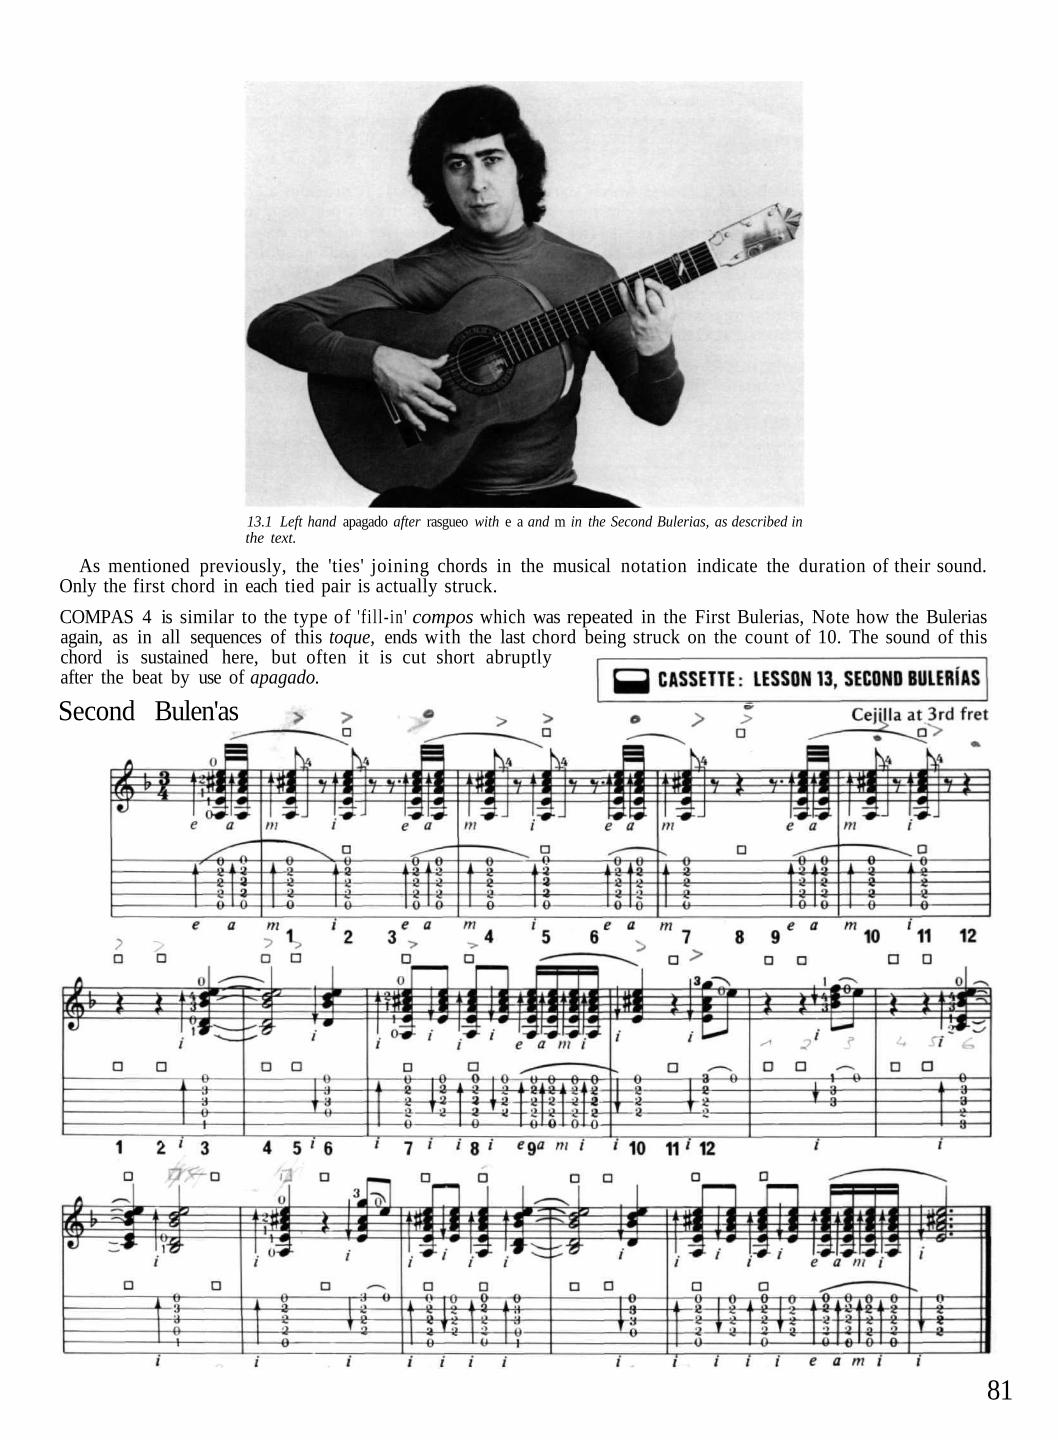
As mentioned previously, the 'ties' joining chords in the musical notation indicate the duration of their sound.Only the first chord in each tied pair is actually struck.
COMPAS 4 is similar to the type of ' f i l l- in ' compos which was repeated in the First Bulerias, Note how the Buleriasagain, as in all sequences of this toque, ends with the last chord being struck on the count of 10. The sound of thischord is sustained here, but often it is cut short abruptlyafter the beat by use of apagado.
Second Bulen'as
81
13.1 Left hand apagado after rasgueo with e a and m in the Second Bulerias, as described inthe text.
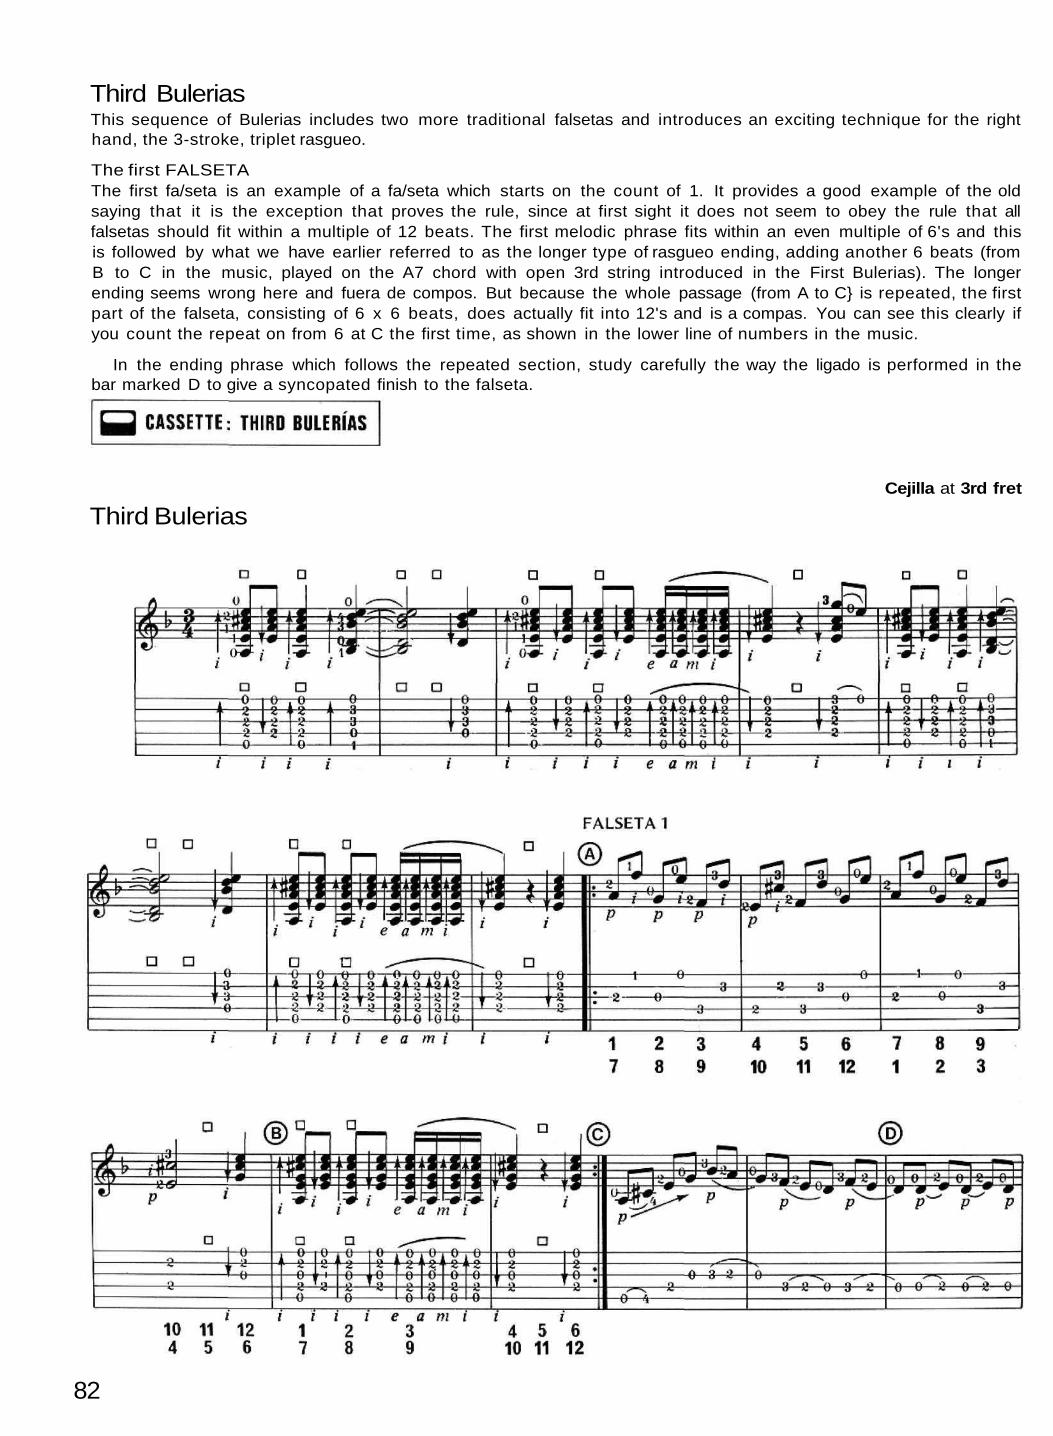
Third BuleriasThis sequence of Bulerias includes two more traditional falsetas and introduces an exciting technique for the righthand, the 3-stroke, triplet rasgueo.
The first FALSETAThe first fa/seta is an example of a fa/seta which starts on the count of 1. It provides a good example of the oldsaying that it is the exception that proves the rule, since at first sight it does not seem to obey the rule that allfalsetas should fit within a multiple of 12 beats. The first melodic phrase fits within an even multiple of 6's and thisis followed by what we have earlier referred to as the longer type of rasgueo ending, adding another 6 beats (fromB to C in the music, played on the A7 chord with open 3rd string introduced in the First Bulerias). The longerending seems wrong here and fuera de compos. But because the whole passage (from A to C} is repeated, the firstpart of the falseta, consisting of 6 x 6 beats, does actually fit into 12's and is a compas. You can see this clearly ifyou count the repeat on from 6 at C the first time, as shown in the lower line of numbers in the music.
In the ending phrase which follows the repeated section, study carefully the way the ligado is performed in thebar marked D to give a syncopated finish to the falseta.
Third BuleriasCejilla at 3rd fret
82
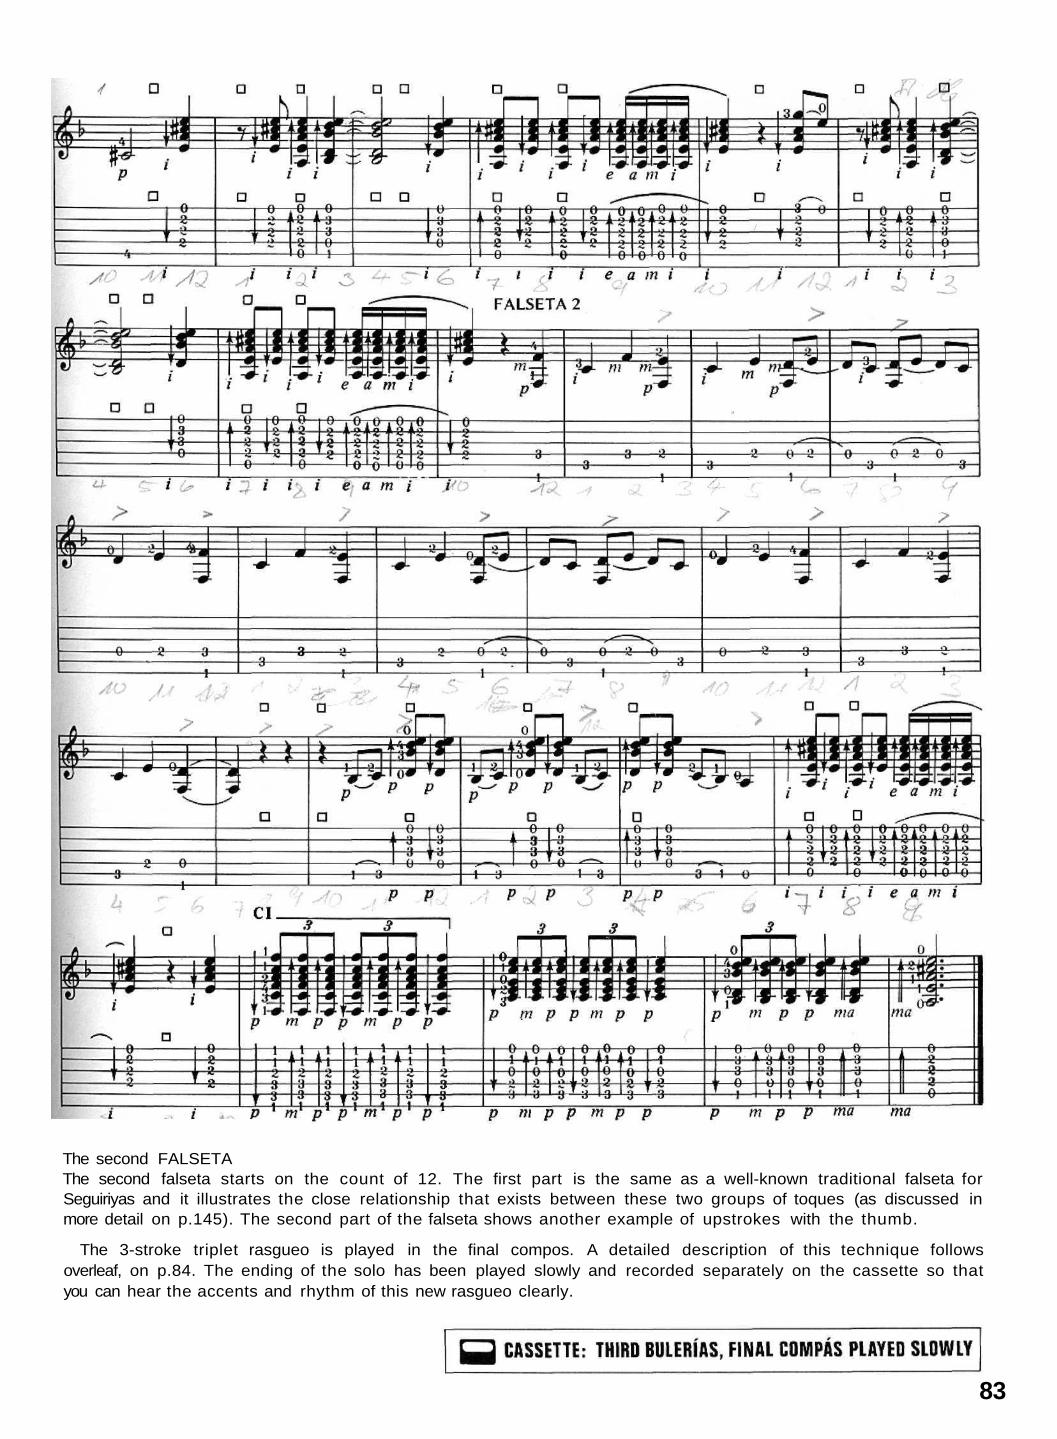
The second FALSETAThe second falseta starts on the count of 12. The first part is the same as a well-known traditional falseta forSeguiriyas and it illustrates the close relationship that exists between these two groups of toques (as discussed inmore detail on p.145). The second part of the falseta shows another example of upstrokes with the thumb.
The 3-stroke triplet rasgueo is played in the final compos. A detailed description of this technique followsoverleaf, on p.84. The ending of the solo has been played slowly and recorded separately on the cassette so thatyou can hear the accents and rhythm of this new rasgueo clearly.
83
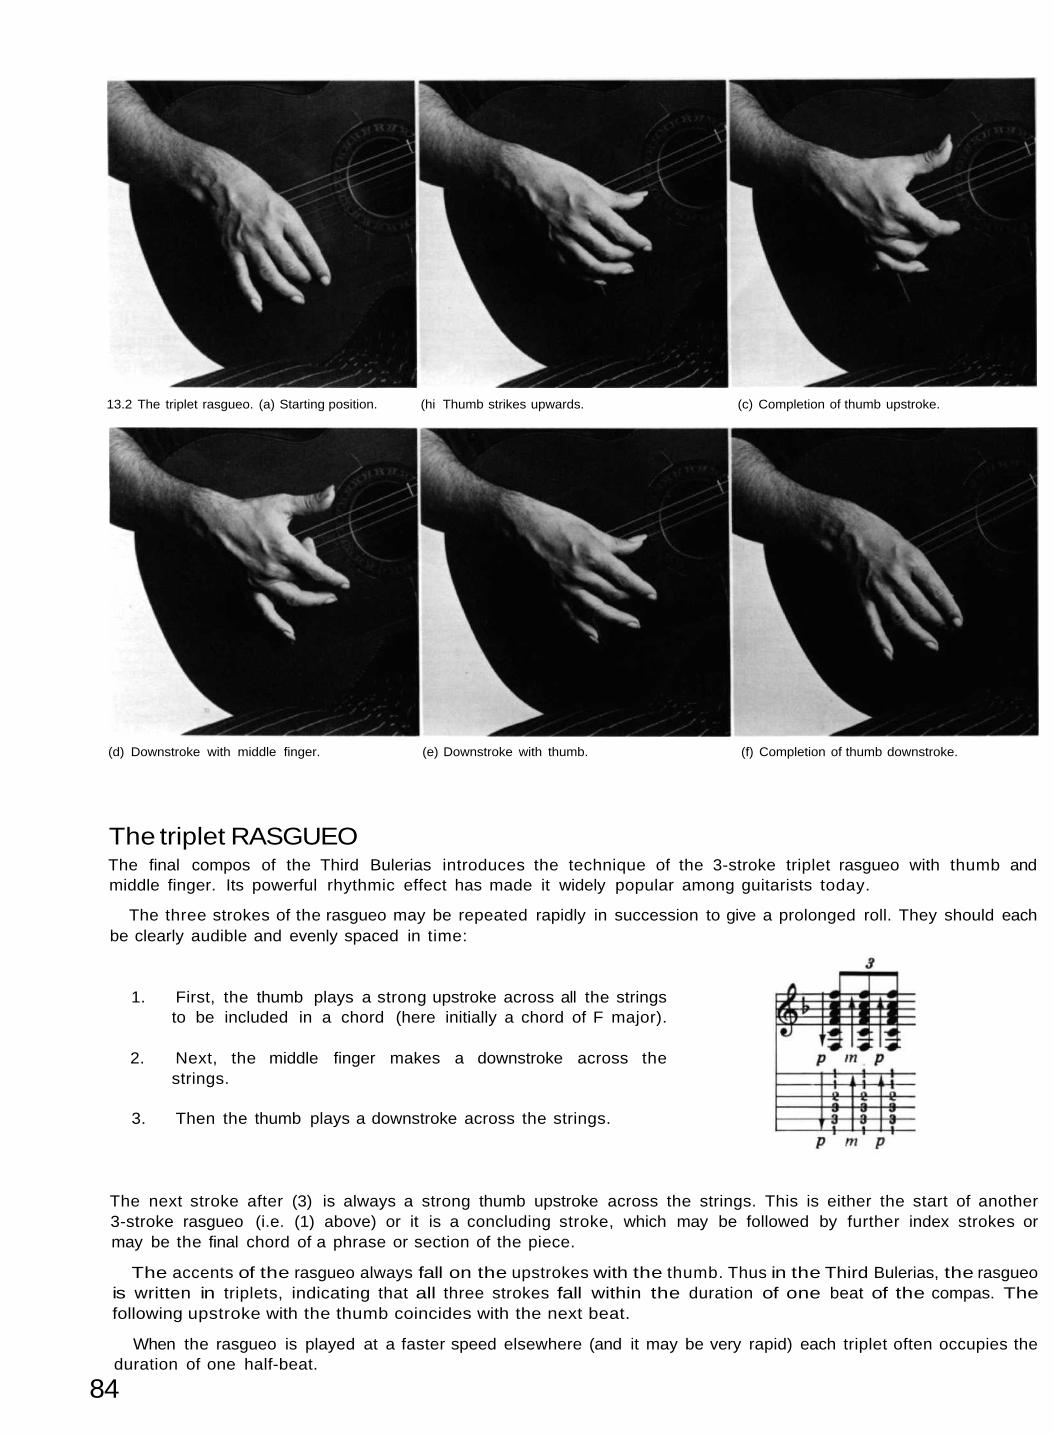
13.2 The triplet rasgueo. (a) Starting position. (hi Thumb strikes upwards. (c) Completion of thumb upstroke.
(d) Downstroke with middle finger. (e) Downstroke with thumb. (f) Completion of thumb downstroke.
The triplet RASGUEOThe final compos of the Third Bulerias introduces the technique of the 3-stroke triplet rasgueo with thumb andmiddle finger. Its powerful rhythmic effect has made it widely popular among guitarists today.
The three strokes of the rasgueo may be repeated rapidly in succession to give a prolonged roll. They should eachbe clearly audible and evenly spaced in time:
1. First, the thumb plays a strong upstroke across all the stringsto be included in a chord (here initially a chord of F major).
2. Next, the middle finger makes a downstroke across thestrings.
3. Then the thumb plays a downstroke across the strings.
The next stroke after (3) is always a strong thumb upstroke across the strings. This is either the start of another3-stroke rasgueo (i.e. (1) above) or it is a concluding stroke, which may be followed by further index strokes ormay be the final chord of a phrase or section of the piece.
The accents of the rasgueo always fall on the upstrokes with the thumb. Thus in the Third Bulerias, the rasgueois written in triplets, indicating that all three strokes fall within the duration of one beat of the compas. Thefollowing upstroke with the thumb coincides with the next beat.
When the rasgueo is played at a faster speed elsewhere (and it may be very rapid) each triplet often occupies theduration of one half-beat.
84

The power of the rasgueo comes from a combination of movement of thumb and middle finger together withmovement of the whole hand from the wrist. The hand starts from a position similar to the 'thumb' position. It isimportant that the wrist should be arched enough to bring the line of the thumb upstroke towards a line at right-angles across the strings. The downstroke with the middle finger is a flick-like uncurling of the finger (as in the usualdownstroke with the index). It does not quite touch the palm at its starting position. The downstroke with thethumb is a firm sweep across the strings.
To bring thumb and middle finger into correct positions for their strokes the hand is swung freely from a veryrelaxed wrist. There is a to-and-fro movement of the wrist as well as a very slight amount of clockwise rotation(as seen from your viewpoint as you play).
Here is another example of the many uses ofthe three-stroke rasgueo, this time to thecompos of Soleares. Play it again and againuntil you have the rhythm exactly right:
Elements of Flamenco 11 PalmasThe playing of palmas (handclaps) in Flamenco demands very considerable skill and knowledge of compas if it is tobe performed well. The newcomer to Flamenco often believes, mistakenly, that palmas (or the vocal encourage-ment of the jaleo) demand only indiscriminate enthusiasm, but this is very far from being the case.
The photos below show the two basic techniques, pa/mas sordas and palmas fuertes, described overleaf.
13.3 PALMAS SORDAS 13.4 PALMAS FUERTES
85
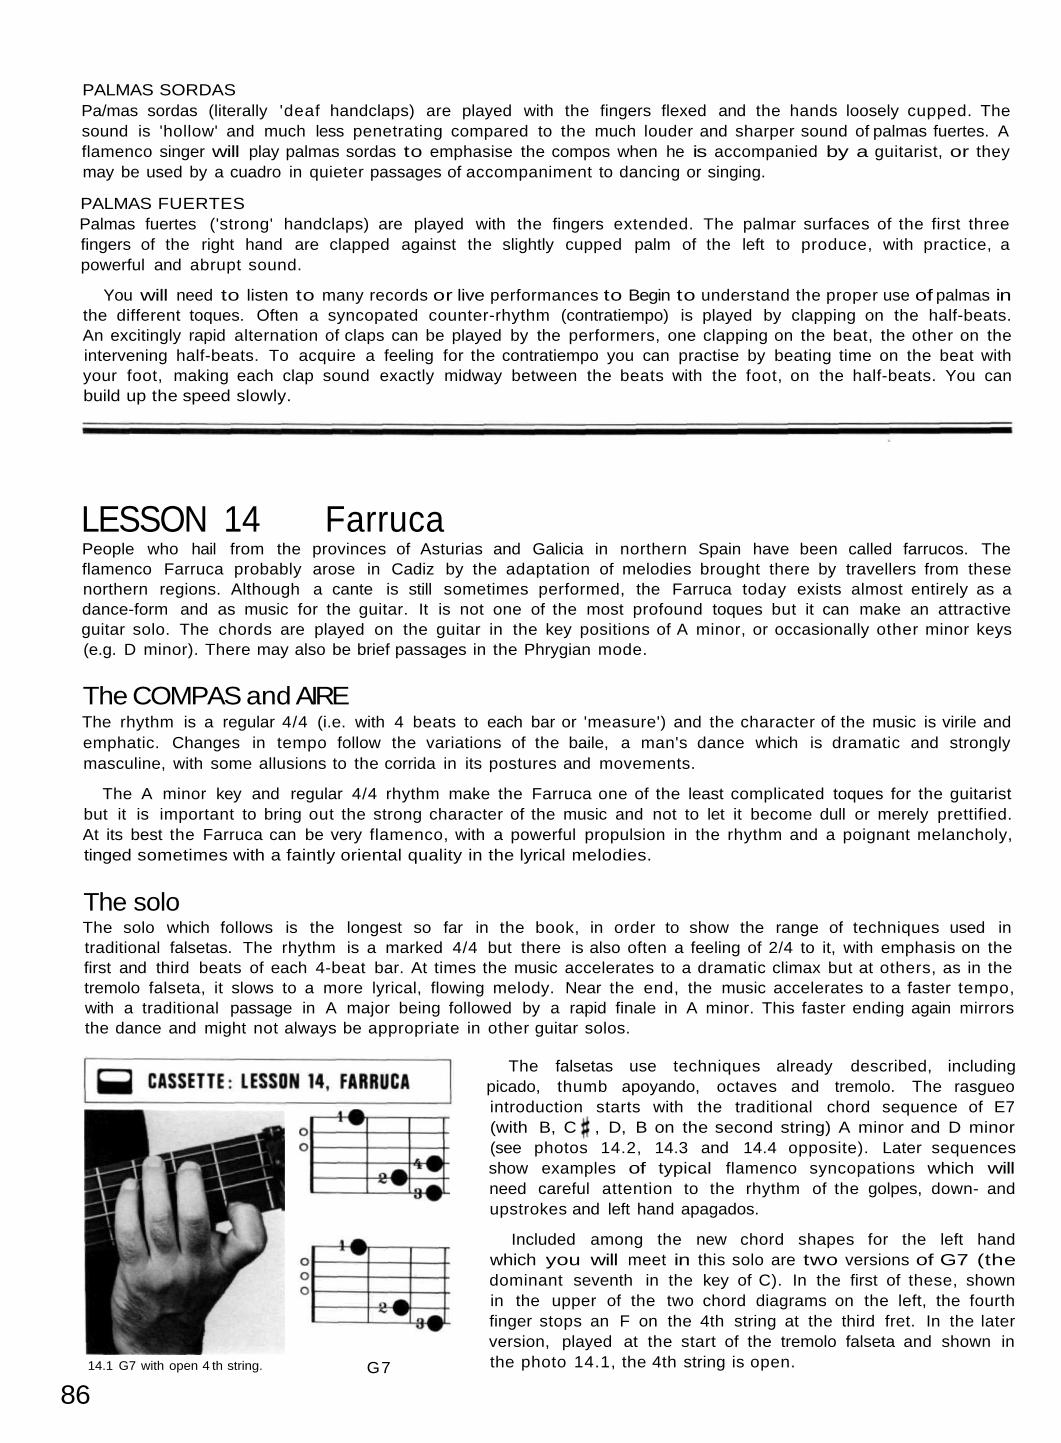
PALMAS SORDASPa/mas sordas (literally 'deaf handclaps) are played with the fingers flexed and the hands loosely cupped. Thesound is 'hollow' and much less penetrating compared to the much louder and sharper sound of palmas fuertes. Aflamenco singer will play palmas sordas to emphasise the compos when he is accompanied by a guitarist, or theymay be used by a cuadro in quieter passages of accompaniment to dancing or singing.
PALMAS FUERTESPalmas fuertes ('strong' handclaps) are played with the fingers extended. The palmar surfaces of the first threefingers of the right hand are clapped against the slightly cupped palm of the left to produce, with practice, apowerful and abrupt sound.
You will need to listen to many records or live performances to Begin to understand the proper use of palmas inthe different toques. Often a syncopated counter-rhythm (contratiempo) is played by clapping on the half-beats.An excitingly rapid alternation of claps can be played by the performers, one clapping on the beat, the other on theintervening half-beats. To acquire a feeling for the contratiempo you can practise by beating time on the beat withyour foot, making each clap sound exactly midway between the beats with the foot, on the half-beats. You canbuild up the speed slowly.
LESSON 14 FarrucaPeople who hail from the provinces of Asturias and Galicia in northern Spain have been called farrucos. Theflamenco Farruca probably arose in Cadiz by the adaptation of melodies brought there by travellers from thesenorthern regions. Although a cante is still sometimes performed, the Farruca today exists almost entirely as adance-form and as music for the guitar. It is not one of the most profound toques but it can make an attractiveguitar solo. The chords are played on the guitar in the key positions of A minor, or occasionally other minor keys(e.g. D minor). There may also be brief passages in the Phrygian mode.
The COMPAS and AIREThe rhythm is a regular 4/4 (i.e. with 4 beats to each bar or 'measure') and the character of the music is virile andemphatic. Changes in tempo follow the variations of the baile, a man's dance which is dramatic and stronglymasculine, with some allusions to the corrida in its postures and movements.
The A minor key and regular 4/4 rhythm make the Farruca one of the least complicated toques for the guitaristbut it is important to bring out the strong character of the music and not to let it become dull or merely prettified.At its best the Farruca can be very flamenco, with a powerful propulsion in the rhythm and a poignant melancholy,tinged sometimes with a faintly oriental quality in the lyrical melodies.
The soloThe solo which follows is the longest so far in the book, in order to show the range of techniques used intraditional falsetas. The rhythm is a marked 4/4 but there is also often a feeling of 2/4 to it, with emphasis on thefirst and third beats of each 4-beat bar. At times the music accelerates to a dramatic climax but at others, as in thetremolo falseta, it slows to a more lyrical, flowing melody. Near the end, the music accelerates to a faster tempo,with a traditional passage in A major being followed by a rapid finale in A minor. This faster ending again mirrorsthe dance and might not always be appropriate in other guitar solos.
14.1 G7 with open 4 th string. G7
The falsetas use techniques already described, includingpicado, thumb apoyando, octaves and tremolo. The rasgueointroduction starts with the traditional chord sequence of E7(with B, C , D, B on the second string) A minor and D minor(see photos 14.2, 14.3 and 14.4 opposite). Later sequencesshow examples of typical flamenco syncopations which willneed careful attention to the rhythm of the golpes, down- andupstrokes and left hand apagados.
Included among the new chord shapes for the left handwhich you will meet in this solo are two versions of G7 (thedominant seventh in the key of C). In the first of these, shownin the upper of the two chord diagrams on the left, the fourthfinger stops an F on the 4th string at the third fret. In the laterversion, played at the start of the tremolo falseta and shown inthe photo 14.1, the 4th string is open.
86
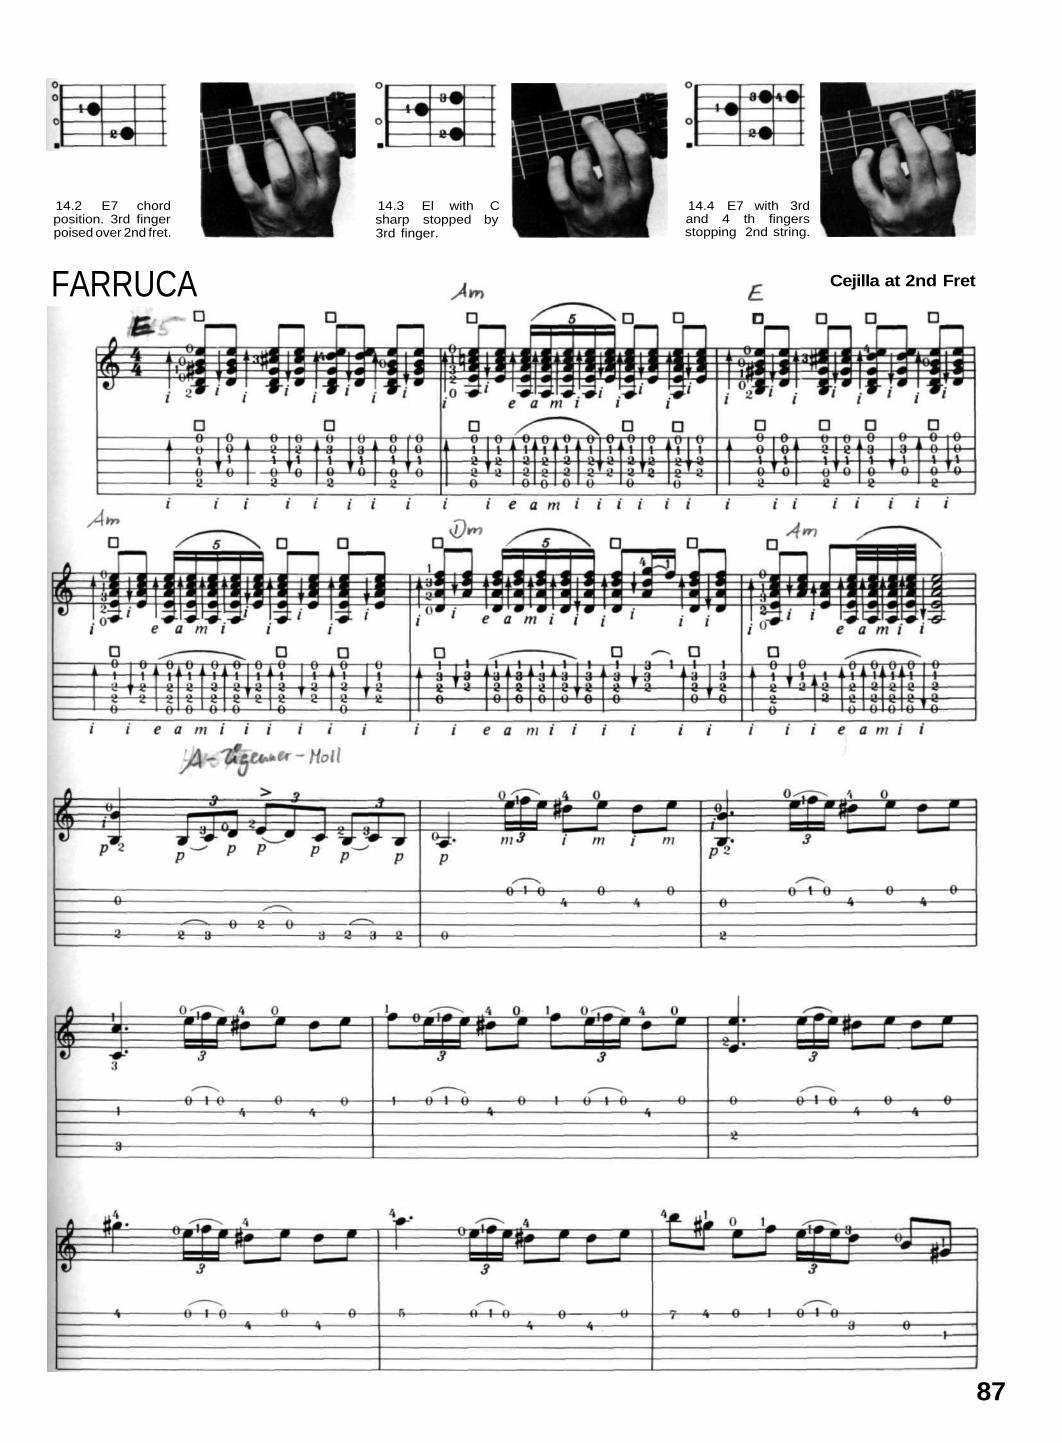
14.2 E7 chordposition. 3rd fingerpoised over 2nd fret.
14.3 El with Csharp stopped by3rd finger.
14.4 E7 with 3rdand 4 th fingersstopping 2nd string.
87
FARRUCA Cejilla at 2nd Fret
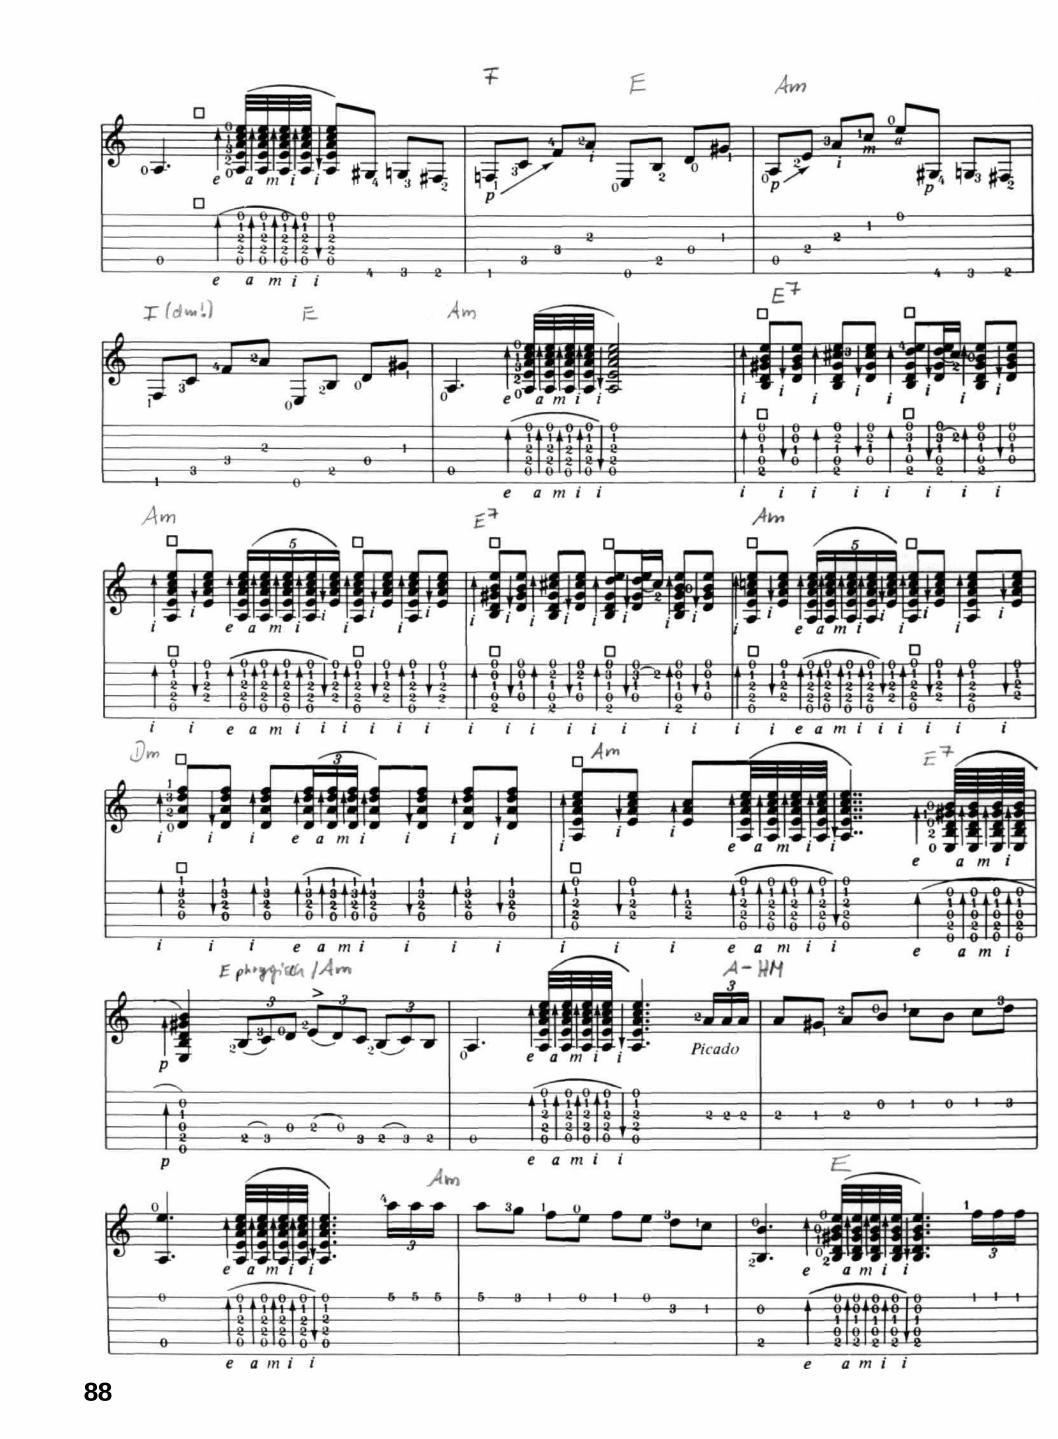
88

89
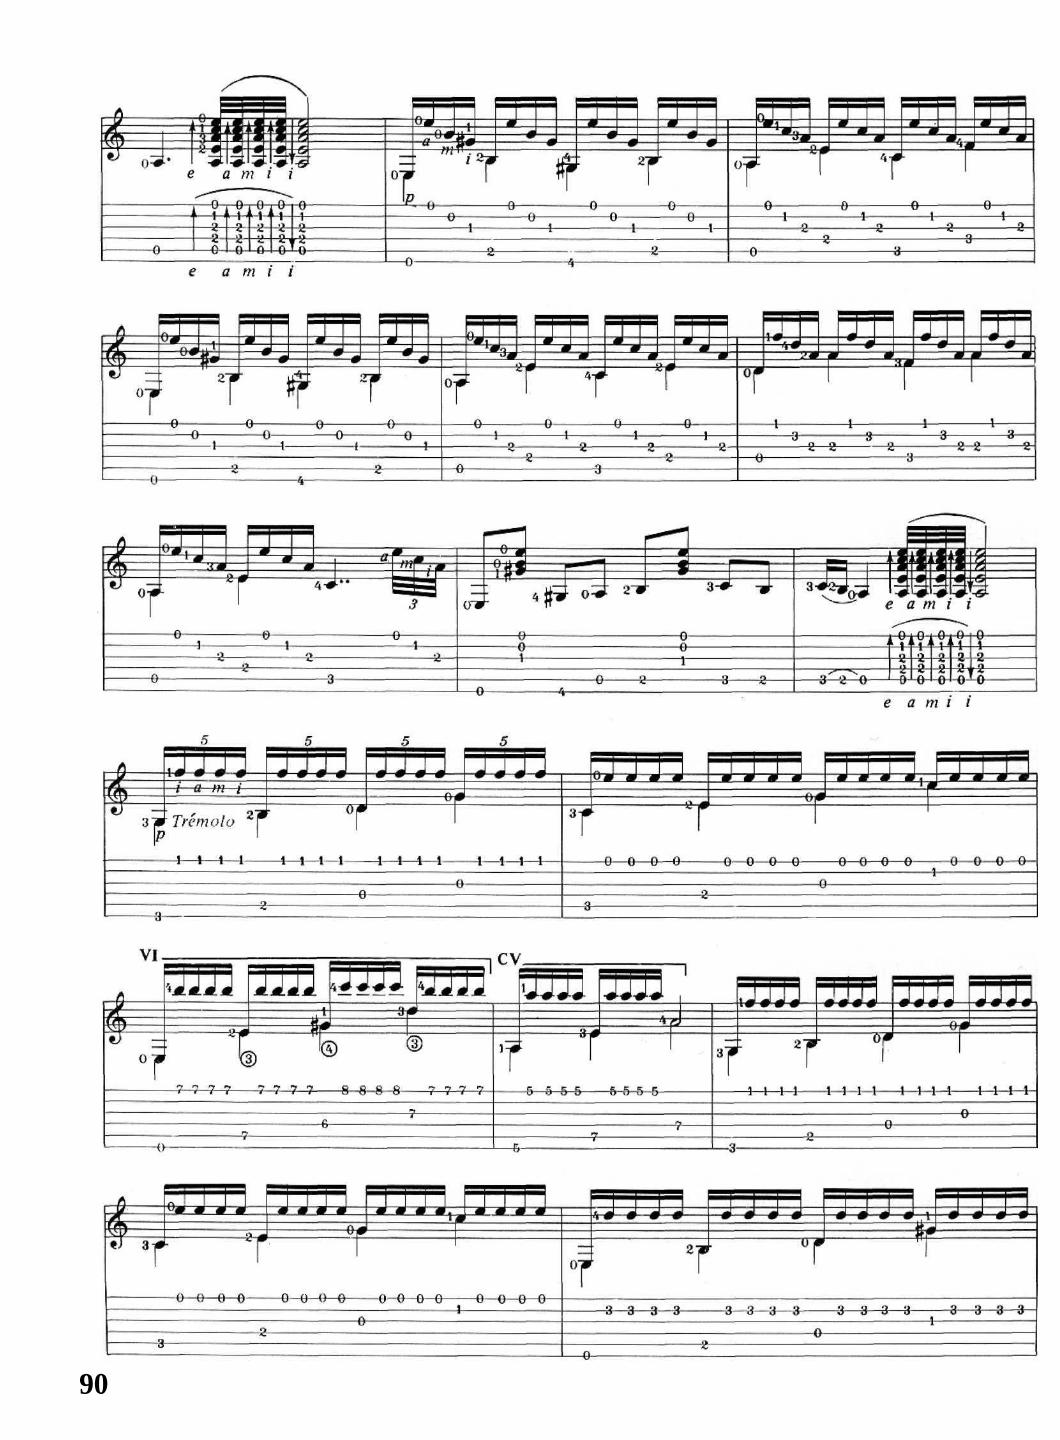
90
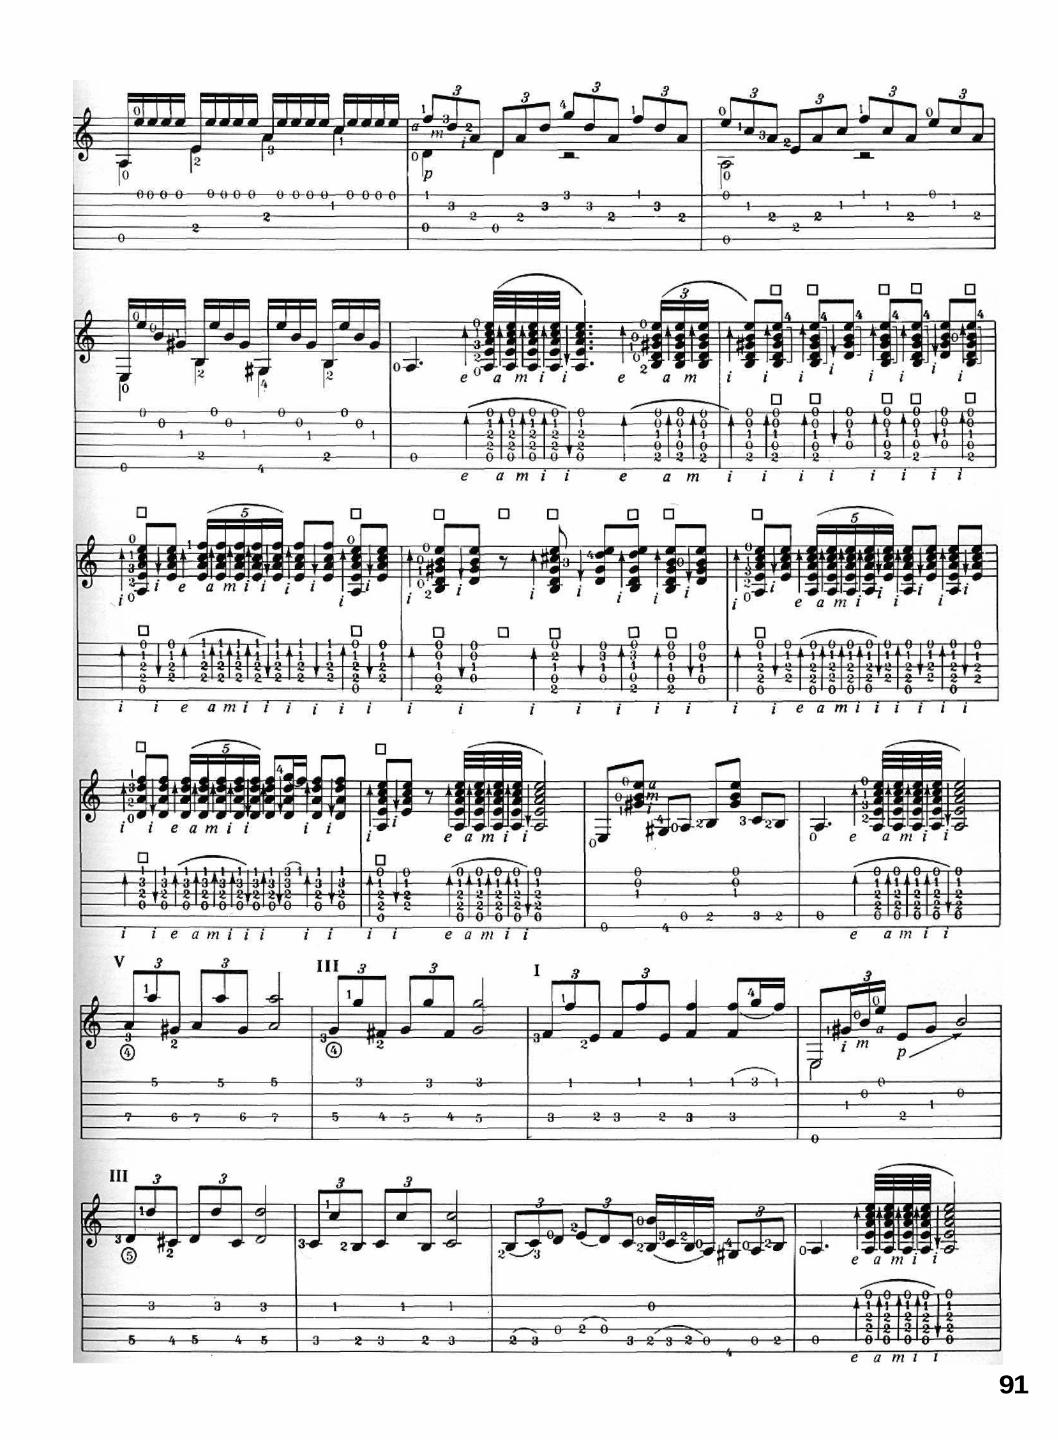
91
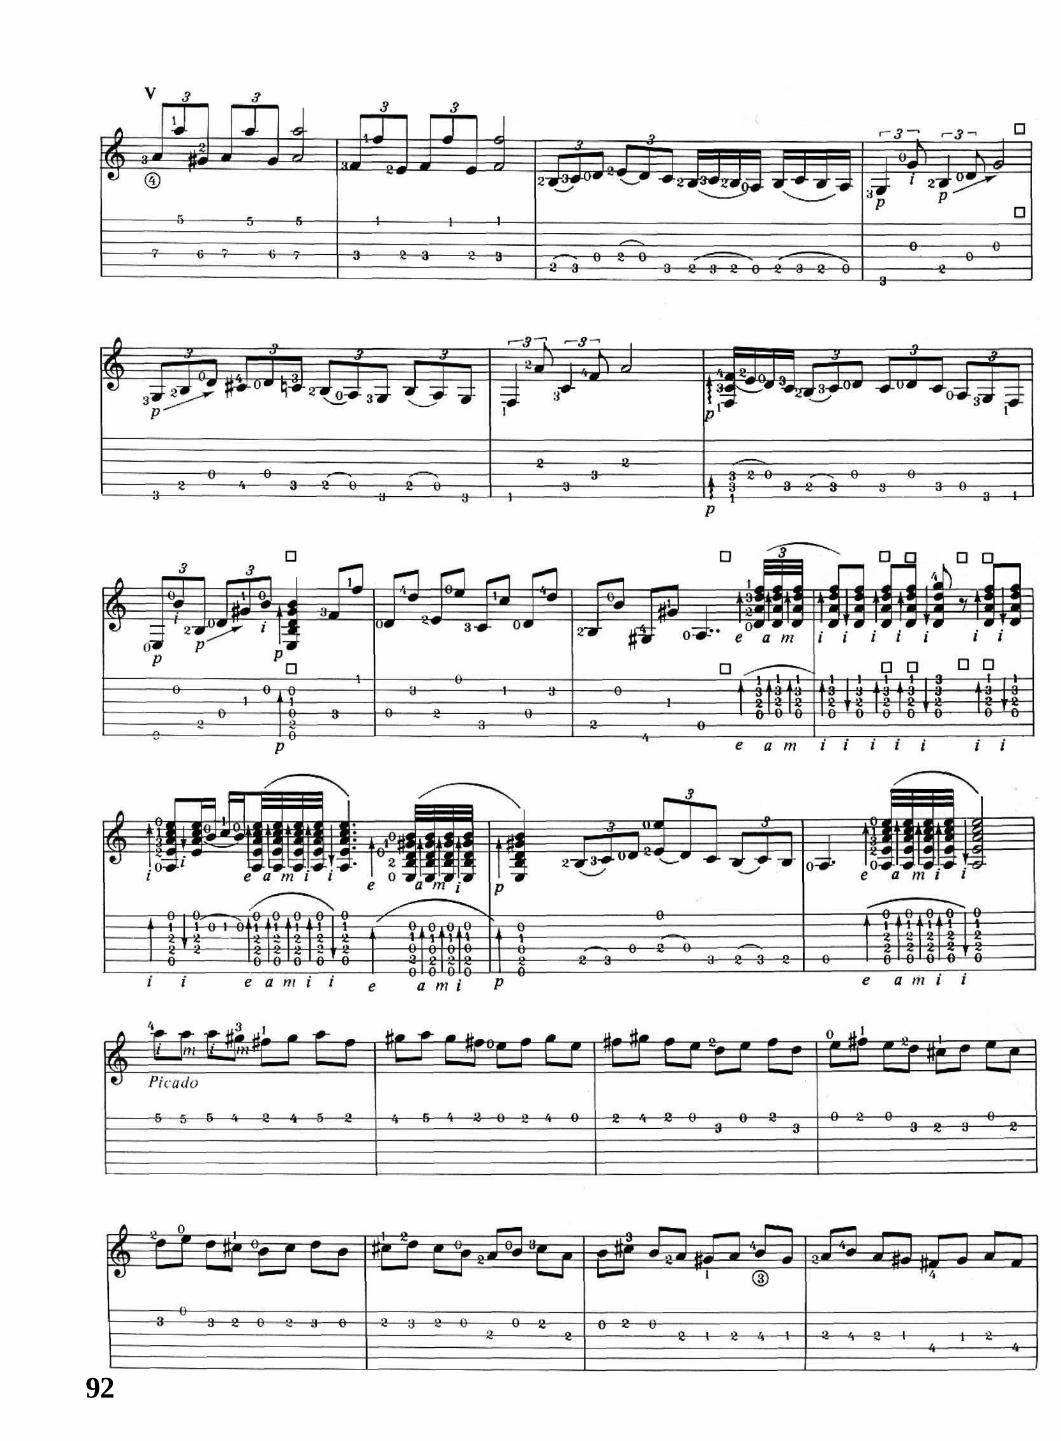
92
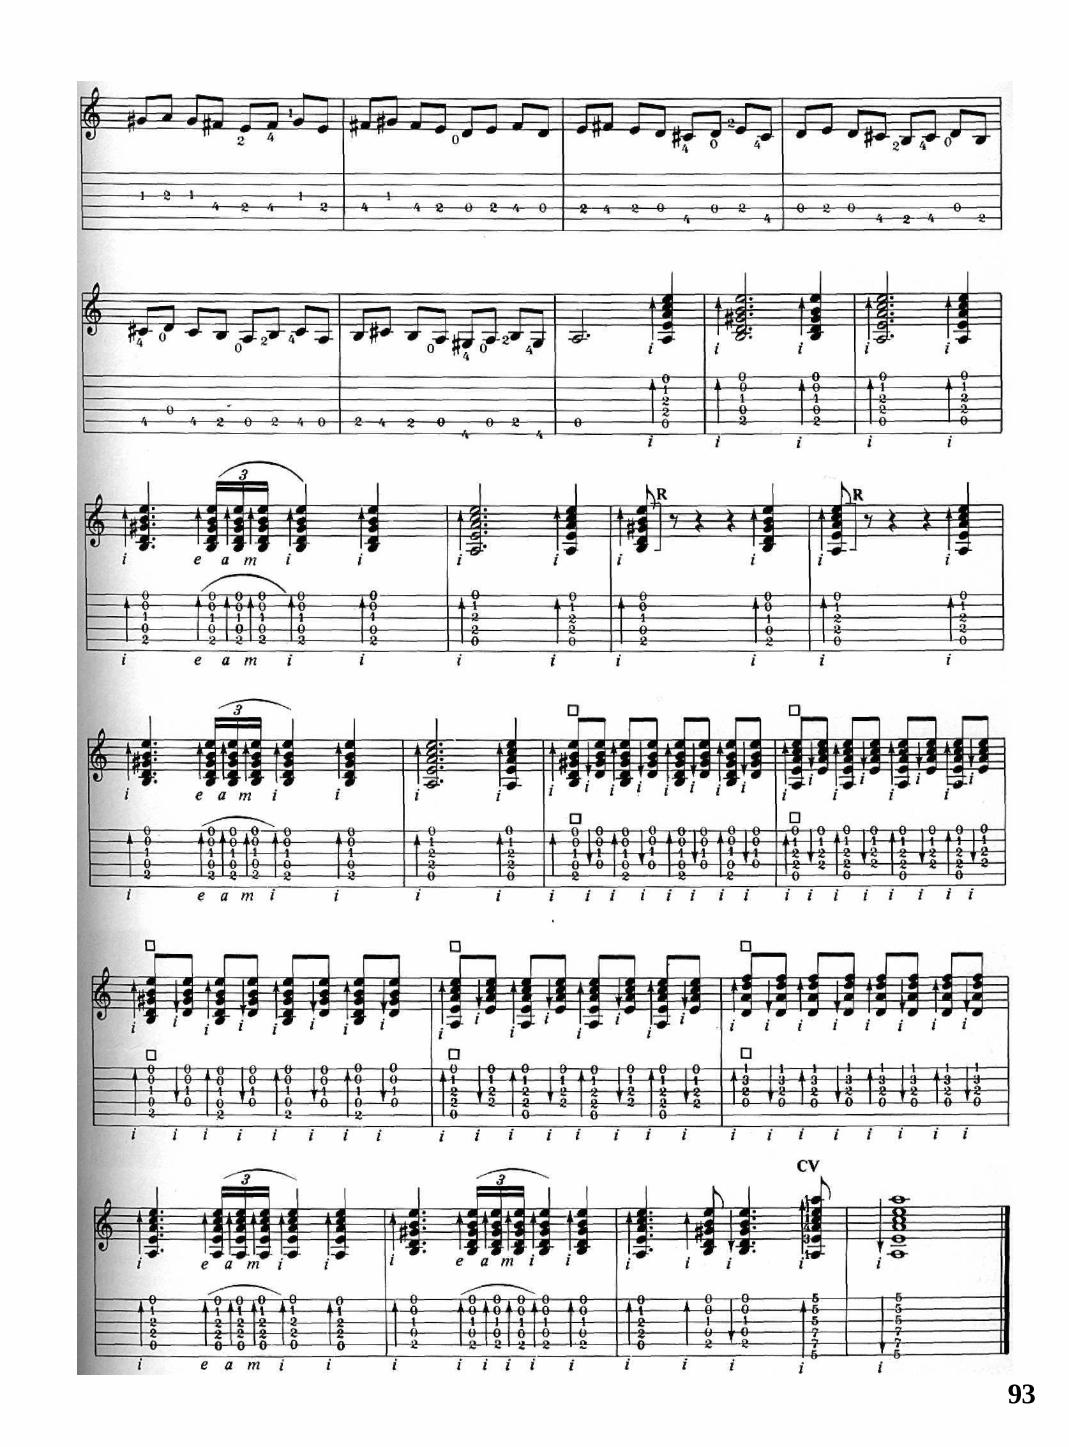
93

LESSON 15 Bulerias(iii)The longer solo Bulerias which follows contains four more traditional falsetas together with further types ofrasgueo compas. These show the 3, 6, 8, 10, 12 pattern as well as, in some places, the 1, 2, 4, 5 pattern of accentsor golpes relating to the count in 6's. The first two falsetas are played with the thumb (including thumb upstrokes
in the first) and the third and fourth are mainlypicado. They start either on the count of 12 (falsetas1, 3 and 4) or on the count of 1 (falseta 2). Thetechniques used have been described earlier, but two
The two introductory composes (from A to B in the notation) have the same rhythmic form as the introductionto the First Bulerias. The right hand strokes, however, are not the same since two different kinds of downstrokereplace the simpler index downstrokes of the First Bulen'as. They illustrate techniques widely used in present-dayFlamenco.
(i) Downstrokes made by middle and ring fingers simultaneously (represented by the symbol ) are played onbeats 1, 2, 4, 5, 7 , 9 , 1 1 in the first compas and beats 1, 2, 4, 5 in the second. Both fingers move together as a unitfrom the knuckles, as shown in photo 15.1. The extra weight behind the stroke gives it a powerful, decisive sound.
(ii) Flicked-out index downstrokes (combined withgolpes) occur on other beats (3, 6, 8, 10, 12 in the firstcompas and 3, 6, 7 and 8 in the second). In previousdownstrokes with the index, the finger has not actuallytouched the flesh at the base of the thumb. Here,however, the index stroke starts from the positionshown in photo 15.2 so that it is flicked strongly againstthe resistance provided by the thumb to give a morepowerful, faster stroke.
You will find that this emphatic index downstrokeflicked out against the thumb is widely used in othertoques to give extra crispness and attack to the rhythm.You could, for example, introduce it on some of theaccented beats in the toques you have already learned.
15.1 Downstroke with m and a together, (a) Starting position. (b) End of stroke.
15.2 Flicking out the index against the thumb for extra emphasis.
A longer rasgueo roll is played in the third rhythm compas between falsetas 2 and 3 (in bar C in the music).Three 4-stroke rasgueos are played in succession without a break in the rhythm of the strokes of the fingers. Therasgueo starts on the count of 1 with a stroke by the little finger and the final index finger downstroke brings it toan end exactly on beat 3.
In the notation the figures 1 1/2 are written over the rasgueo to show that the first 11 strokes (e a m i e a m i e a m)take up the duration of two beats. This needs precise timing.
94
passages of rasgueo need further explanation, as follows:
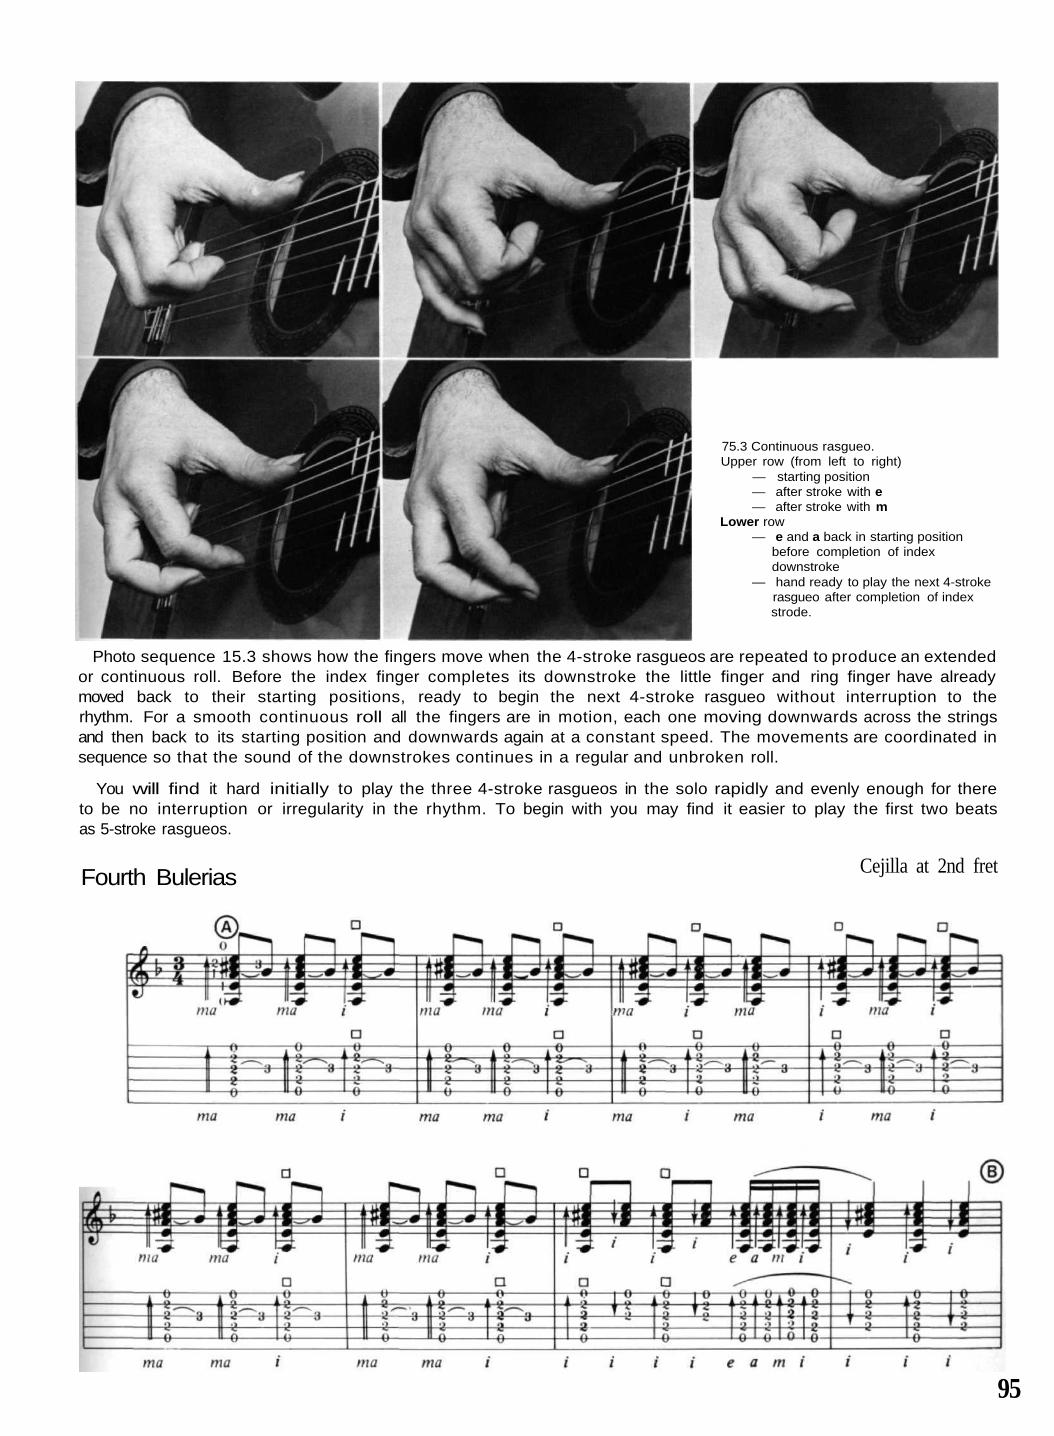
Photo sequence 15.3 shows how the fingers move when the 4-stroke rasgueos are repeated to produce an extendedor continuous roll. Before the index finger completes its downstroke the little finger and ring finger have alreadymoved back to their starting positions, ready to begin the next 4-stroke rasgueo without interruption to therhythm. For a smooth continuous roll all the fingers are in motion, each one moving downwards across the stringsand then back to its starting position and downwards again at a constant speed. The movements are coordinated insequence so that the sound of the downstrokes continues in a regular and unbroken roll.
You will find it hard initially to play the three 4-stroke rasgueos in the solo rapidly and evenly enough for thereto be no interruption or irregularity in the rhythm. To begin with you may find it easier to play the first two beatsas 5-stroke rasgueos.
Fourth Bulerias Cejilla at 2nd fret
95
75.3 Continuous rasgueo.Upper row (from left to right)
— starting position— after stroke with e— after stroke with m
Lower row— e and a back in starting position
before completion of indexdownstroke
— hand ready to play the next 4-strokerasgueo after completion of indexstrode.
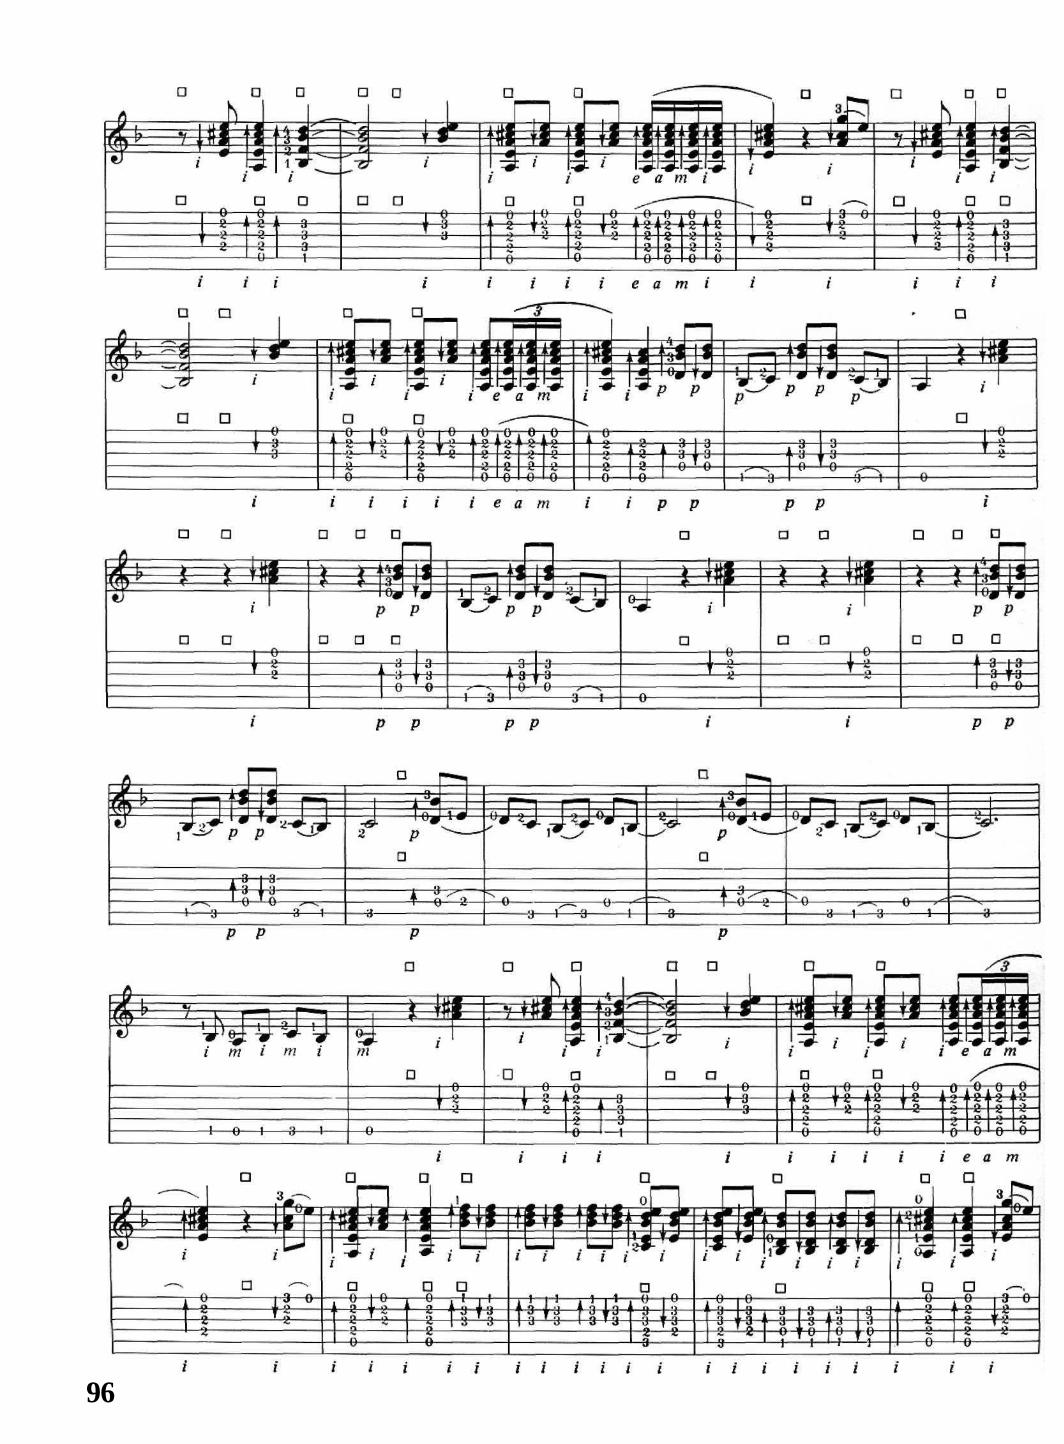
96
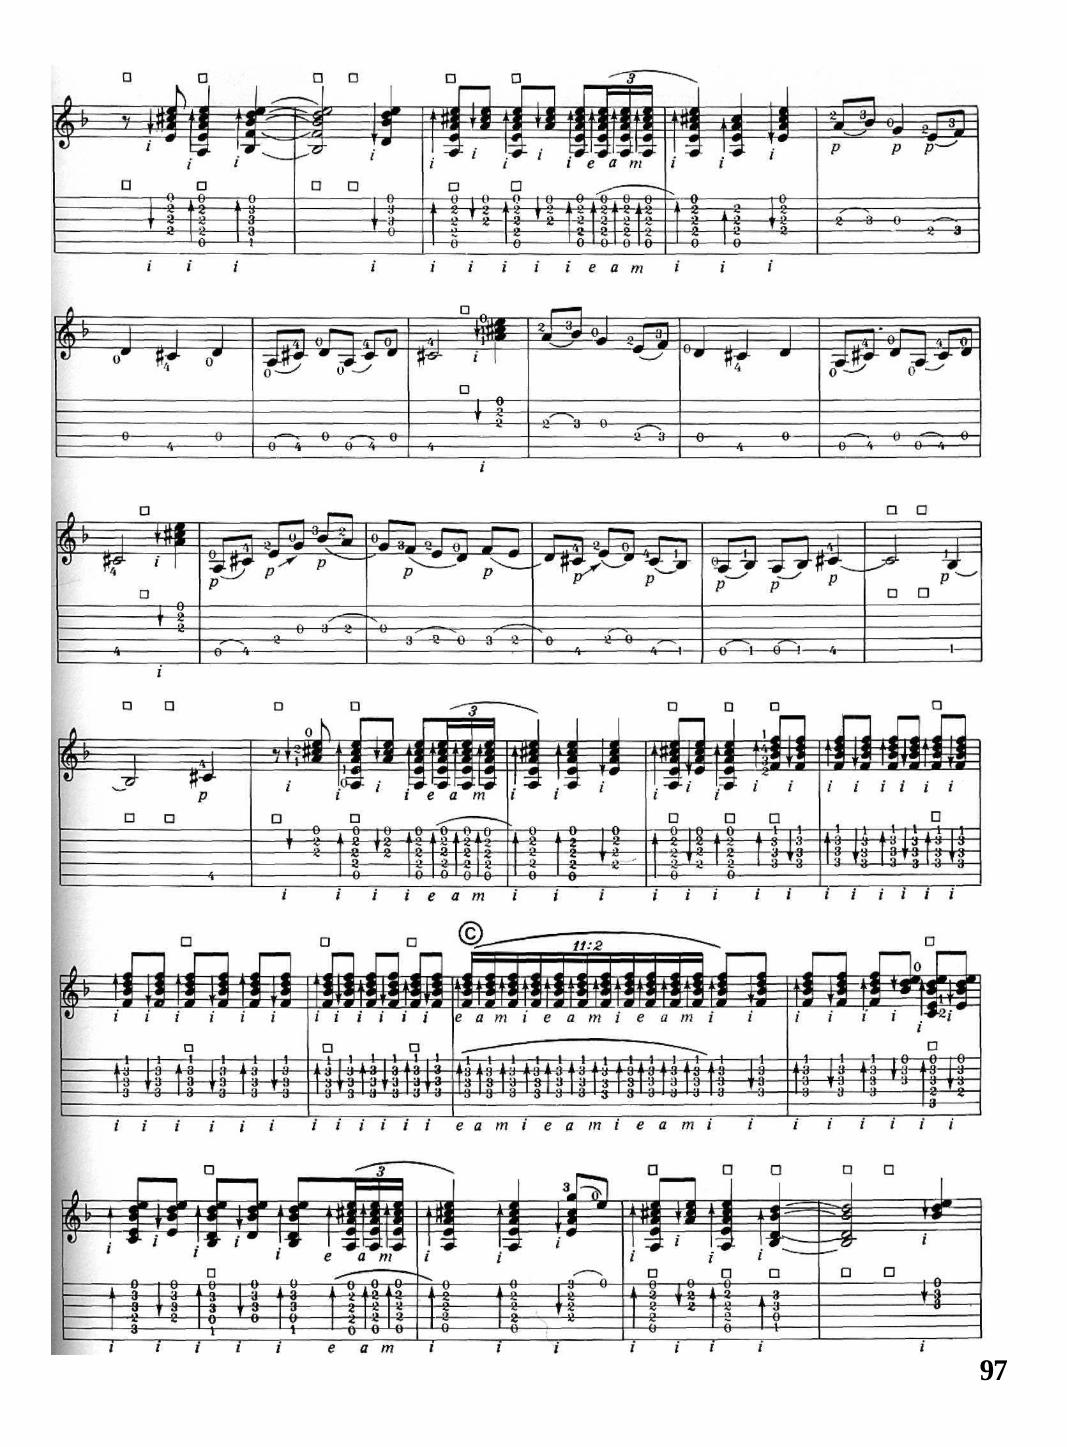
97

98

Observing the silencesThroughout the Bulen'as it is absolutely essential that the duration of the silences, no less than of the sounds,should be very exactly timed, otherwise that crucial pulse of the compas will be lost. A particular illustration ofthis is the sequence D to E in the music. Here, a chord sequence of D minor, C and B is played, the sound ofeach chord being abruptly quenched by apagado with the right hand. The chords must be played very strictlya compas.
Once you have mastered all the falsetas and rhythm passages in the Bulerias solos 1—4, you can try to fit themtogether to make a single solo piece. You will need to choose just one of the introductory rasgueos to start it off,and you can arrange the order of the falsetas in any way that seems most appropriate.
LESSON 16 GranadinasGranadinas, or as the flamencos say grana'inas, are a form of Fandangos Grandes from the ancient city of Granada.In both their cante and toque they have a richly embellished and oriental quality which reflects early Moorishinfluences on the music from which they take root, for Granada was under the domination of the Moors from711 A.D. to 1492.
Lyrical and intricately ornamented, the music of the Toque por Granadinas makes a beautiful guitar solo, full ofsentiment and yearning nostalgia. If you have seen Granada, you will recognise how vividly Granadinas evoke theimages and sounds of that magical city — the filligree-like decorations of its great Moorish fortress and palace theAlhambra, the snow-covered peaks of the surrounding Sierra Nevada and the tinkling music of the many streamsbringing snow-water from the mountains. Here is music that is animated and inspired by the oriental aire of old
Andalucia. The COMPAS
Much of the music for Granadinas is played en toque fibre (in free time) without a regular compas and allowing theperformer great freedom of personal expression and tempo. As in Fandangos Grandes, however, there are parts ofthe music in regular rhythm. These are written in 3/4 time. As in Fandangos, also, many of the melodic phrases inthese rhythmic passages are 6 beats long (here represented by two bars of music).
99

The Phrygian mode used in Granadinas is unique in Flamencoin being based on the note B. The flamenco cadence of chords istherefore E minor (or E7), D major (or D7), C major (or C7)B major (or B with added E) or B7. The position of the left handfor the chord of B major with E on the open 1st string is shownin 16.1, The chord diagrams show this chord and E minor and B7.
The solo GranadinasThe music which follows is in typical Granadinas solo form. Itincludes a variety of traditional falsetas. These are mostly basedon techniques already familiar to you, including arpegio, picado,ligado, alternating thumb and index, thumb apoyando, 3-notechords and tremolo.
Three new techniques are introduced in the solo.
1. The TREMOLO thumbstroke (i a m i )The introduction to the solo, as is typical of many Granadinas, starts with chords of B (with E) and C major playedwith a downward sweep of the right thumb. Each of these chords is preceded by a very rapid succession of tirandostrokes, played with i a m i as in the tremolo, on the highest note of the chord. The hand is in the 'basic' positionand the i a m i strokes (here written as grace notes to indicate that they precede the main emphasis on the chord)must be even and very rapid, leading into the chord without any irregularity or delay in the timing. You will needto practise them very slowly at first in order to get the timing right.
2. The long GLISSANDOA left hand technique very characteristic of Granadinas is a long accelerating slide (glissando) up the 6th stringfrom F at the second fret to B at the seventh fret. The 2nd finger stops the string. After the string has been struckjust once (with the right thumb) to sound the F , the pressure of the finger is maintained as it is slid up the stringto the seventh fret. The slide from F# to B is notated as shown above. The glissando comes at the end of the finalphrase of falsetas in Granadinas (which has similarities to a slow ending to Fandangos, though of course in adifferent key). Sometimes (but not in this solo) it is more appropriate for the 1st finger to be used.
3. ARRASTREThe technique of arrastre (literally 'dragging'), is commonly used not only in Granadinas but in some other toqueslike the Tarantas. It is shown at the point marked A in the music. With the right hand in the 'basic' position, thehand is drawn upwards by slight bending of the forearm so that the fingernail of the flexed third finger is pulledback across the strings towards you, striking them apoyando in even succession from 1st to 6th. This sounds a rapidarpegio chord from treble to bass.
GRANADINAS Cejilla at 2nd fret
100
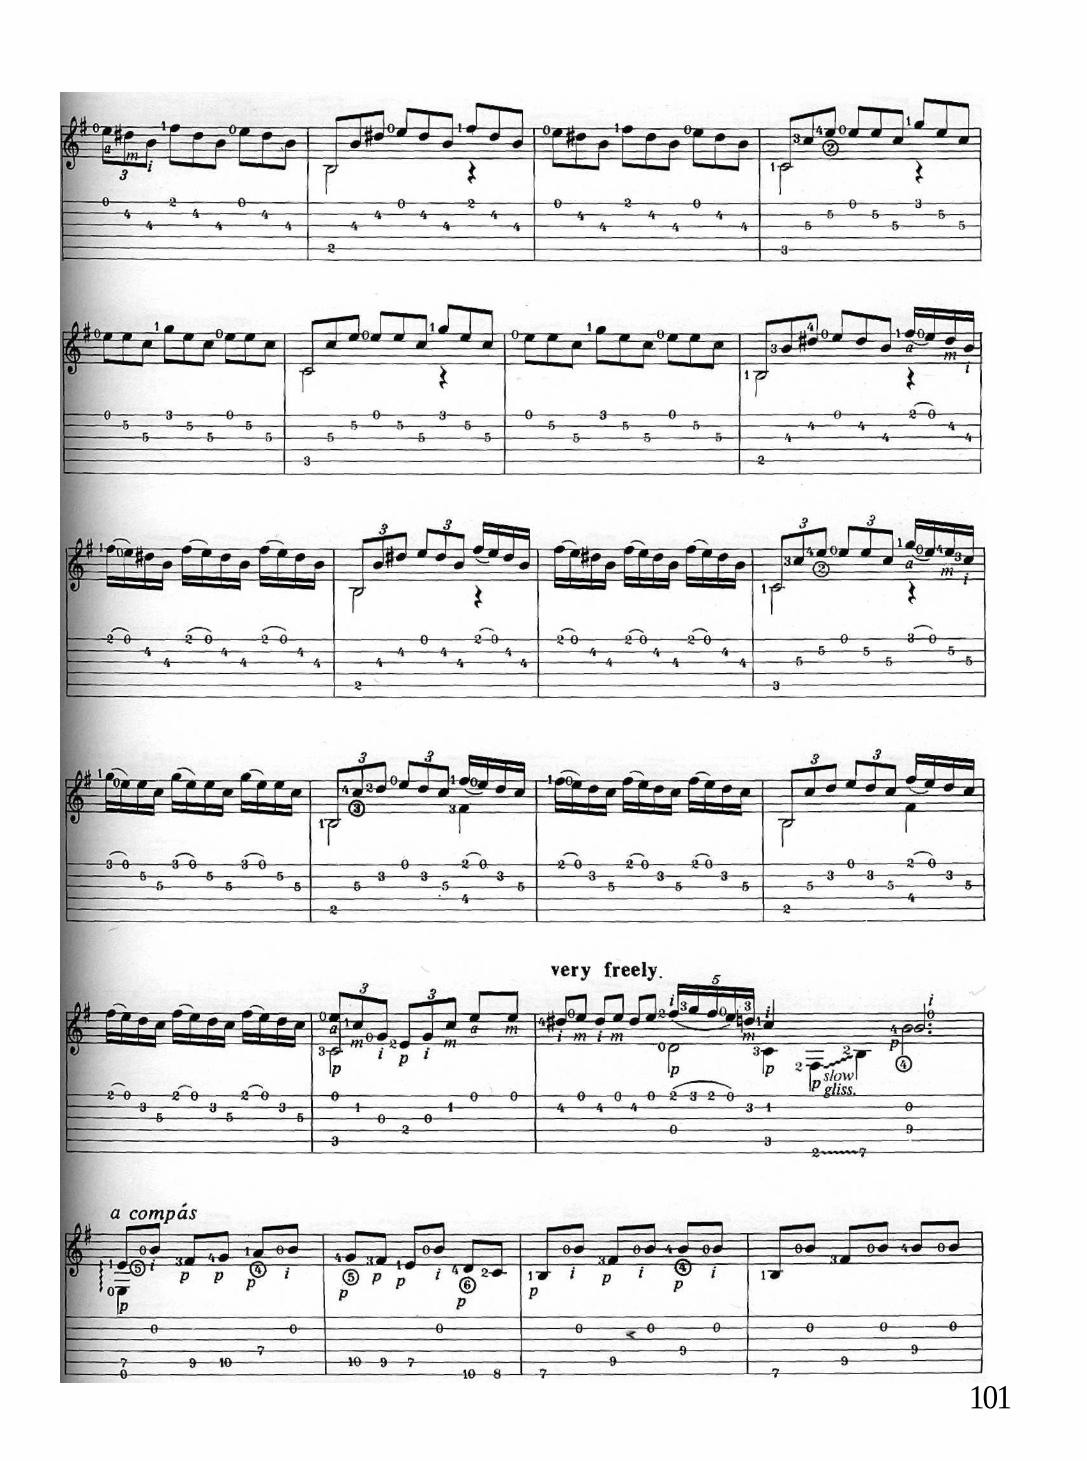
101

102
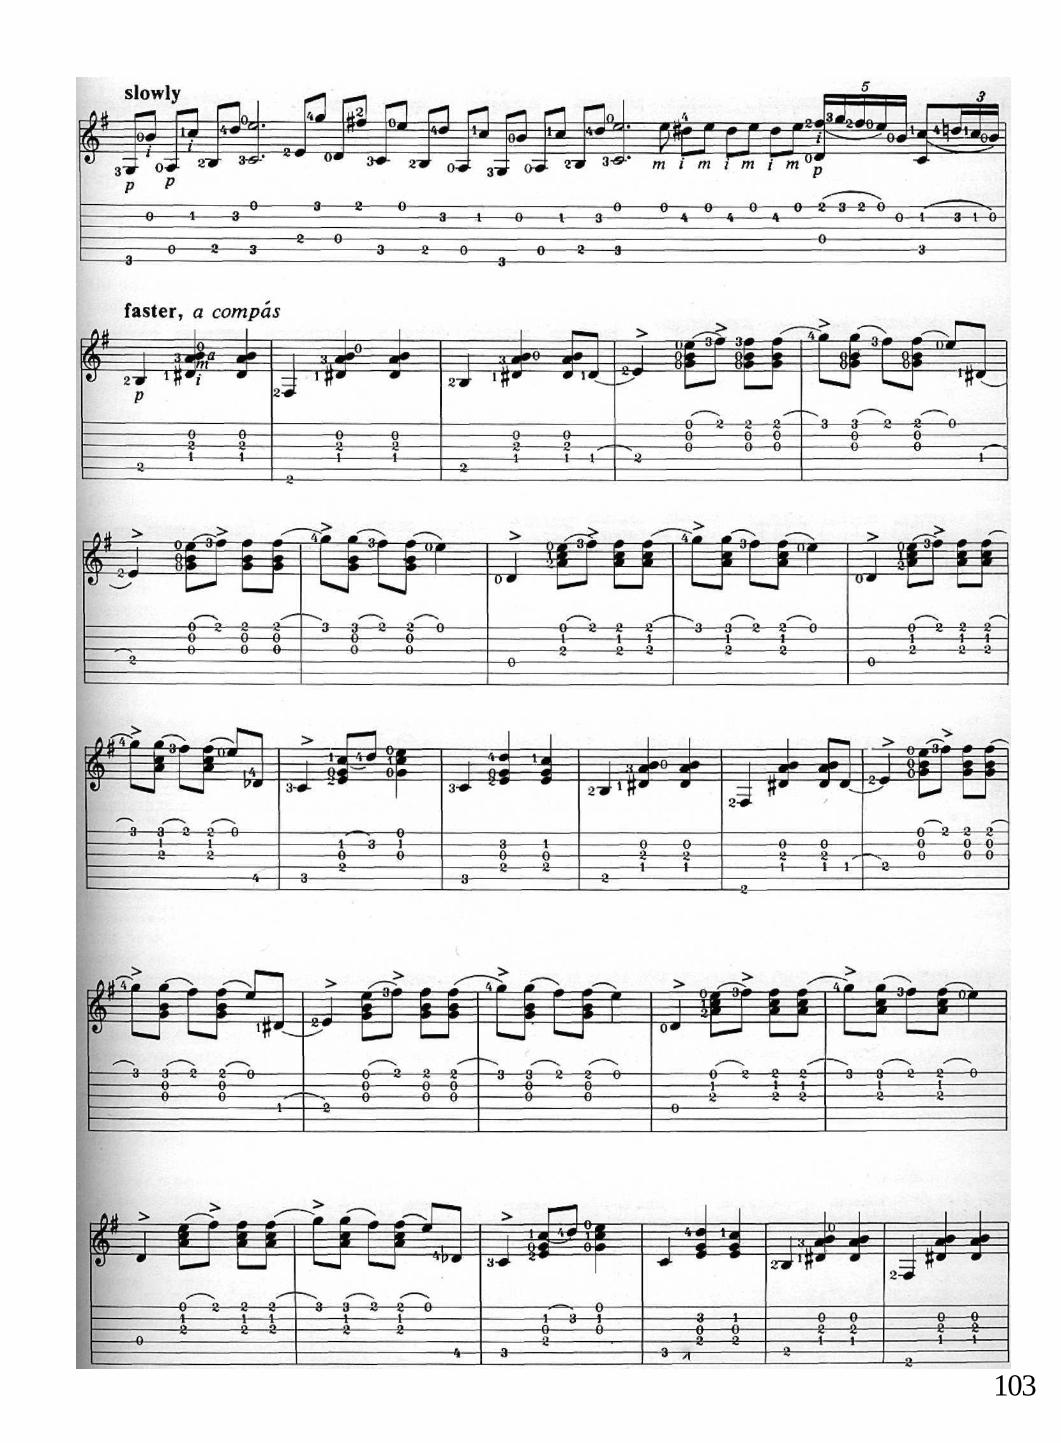
103

Further examples of the TREMOLO thumbstrokeThis flamenco technique, illustrated in the introduction to the Granadinas, will be encountered again in Tientos,Malaguenas, Soleares and Alegrias en Mi. You might also like to introduce it at this stage as an alternative way ofplaying the introductory chords in the Campanas of the Alegrias in Lesson 6. The five A minor and five E7 chordsat the beginning were initially played with sweeps of the thumb, You could now play them with the rapid i a m itremolo on the top string preceding each chord, as follows:
104
Parts of the Granadinas solo are en toque fibre and you will have read in the music the direction that these are to beplayed 'very freely'. The freedom referred to is freedom from a strictly regular beat to the rhythm so that theplayer can interpret the music with the timing and phrasing he prefers. This is just one example of the several kindsof freedom the guitarist has opportunity for in his playing. It gives us an appropriate moment to look more widelyat other kinds of freedom in the performance of the flamenco guitar.
The difference between improvisation and innovationFlamenco music on the guitar is said to be 'improvised' because the guitarist is not limited by having to play to apredetermined routine or to a written score. He is free to play what he likes, but this does not mean, as is some-times supposed, that he invents the music as he goes along. He makes it up by a process of choice rather than byinstant innovation, by choosing falsetas, rasgueos and other linking passages from his pre-existing repertoire of well-practised items.
The experienced performer will know many different versions and variants of the falsetas and rasgueos he plays.He can piece these bits together in different ways to suit the aire of the toque and according to the mood andcontext of the moment. As a result, he may seldom repeat the performance of any toque in quite the same way. Onsome occasions he may rehearse carefully in advance exactly what he is going to do but on other occasions,particularly the more informal, he will play as the feeling takes him. In either case he is free to vary the selectionand sequence of items from his repertoire, provided always that he sticks to the compas of the toque he isperforming and, if he is playing for accompaniment, that he responds to the needs of the singer or dancer.
Individual players will obviously vary a lot in their creativeness and in the range and flexibility of their toque.Early on in his career, a guitarist will collect together the material for his repertoire by imitating and adaptingmusic he has heard performed by other guitarists, Later, if he has some gifts as a composer, he wilt add variationswhich he has invented himself. Eventually, after he has had long experience, the working repertoire from which hedraws the music he performs may become largely (and for some pieces, entirely) made up of his own originalinventions.
By 'innovation' or 'invention' we mean here the art of creating new music for the guitar. It is not somethingwhich usually takes place while the guitarist is actually performing before an audience. Sometimes, it is true, hemay be exceptionally inspired, perhaps by a particular occasion such as a juerga (flamenco celebration) or anespecially moving performance by a singer, to bring off some new variation in his playing. But these moments ofsudden intuition are likely to be rare in public. Innovation is a private thing, which can occur when the guitaristexplores new ideas and possibilities while he is alone with his instrument.
Learning to improviseThe keen student of Flamenco must have a good grasp of basic techniques for the guitar and a repertoire of well-rehearsed material before he can go very far towards improvising his own solos. He does not have to have a veryextensive repertoire of falsetas and rasgueos to choose from, but he must have a real feeling for the aire of thosethat he does know if he is to arrange them in a musical and flamenco way. To play just a random miscellany offalsetas and rasgueos in a toque is not enough to make a worthwhile solo. They should lead on from one another tomake an emotionally meaningful sequence, so that there is some overall sense of form and development in theperformance.
It is, of course, difficult to formulate rules about how to do this. One can state definitely that too much tremolowill sap any toque of its flamenconess, making it insipid and too far removed from the essential inspiration of theCante and Baile. It is, by contrast, far harder to state how much rhythmic rasgueo one should include in solos.Some players intersperse their falsetas with quite a lot of rasgueo in order to generate a driving pulsation and dramain the music and to stay close to the form and spirit of flamenco singing and dancing, but other soloists includelittle or hardly any. The choice is up to you.
There is probably little or nothing to be said briefly about how one goes about creating new falsetas and rasgueoswhich are to have any lasting interest or appeal, for it is a process which is only possible on the basis of a longfamiliarity and deep understanding of Flamenco. If your ultimate ambitions lie in this direction, however, you canmake a start by trying to learn as much material as you can from available sources so that you can acquire a wideknowledge of the musical components and techniques from which Flamenco has been created. The technicalaspects are more easily learned than the musical, but the latter are much the most important. Your left hand mustknow the fingerboard well (so that you can, for example, play chords in many inversions up and down the neck)and your right hand must know the many ways the strings can be struck in different rhythmic patterns. Above all,though, you should look to the inspiration of the Cante in your search for the ingredients from which one day, ifyou pursue your interest in Flamenco far enough, you can hope to make new inventions.
Elements of Flamenco 12 Improvisation

LESSON 17 TientosTangos are a basic form of flamenco rhythm in 4/4 (or 2/4) time, probably originating from Cadiz and Sevilla butheard now throughout Andalucia. Tientos are the most solemn and profound cante and toque of the group andthey are distinguished from the faster styles of Tangos by their characteristic compas and by their serious themes.The word tiento literally means a 'touch'.
The flamenco Tangos have nothing in common with the Latin-American tango apart from the name. The mostlightweight and least intense of the flamenco family of Tangos are the Tanguillos, which are tuneful folk-songs anddances in 6/8 time, particularly associated with Cadiz. The many kinds of Tangos may be known by a ratherconfusing variety of names such as tangos flamencos, tangos gitanos and tangos (or tientos) canasteros. Some styleshave much in common with the Zambras. Some of the Zambras del Sacromonte, for instance, played by the gitanosof Granada are in the rhythm of slow Tangos.
The music of Tientos is played on the guitar in the por medio position (the Phrygian mode based on A). Inaddition to the familiar flamenco progression of chords (D minor or F, C(7), B , A), there are some falsetas wherethe chords follow coplas of the cante. Often a singer will end his performance of Tientos with a faster Tangos.
The COMPASThe strict compas of Tientos is distinguished by its characteristic pattern of emphasis and syncopation. Thisimparts a strongly 'lamenting' quality, full of sadness and pathos, yet dignified by strength and grandeur. Thefeeling can be deeply moving and jondo.
The first sequence of Tientos played on the cassette-recording demonstrates the basic compas in its simplestform. The method of counting the compas is shown with the musical notation, below. The rhythm is played withdown and upstrokes of the index on the chords of A major, B (with E on the open 1st string) D minor and Cmajor. You should start by listening to the recording carefully until you have the sound of the rhythm firmly fixedin your mind. You will then be able to study the notation so that you can play it with the correct timing, accent-uation and aire.
Tientos: the basic COMPAS Cejilla at 3rd fret
106
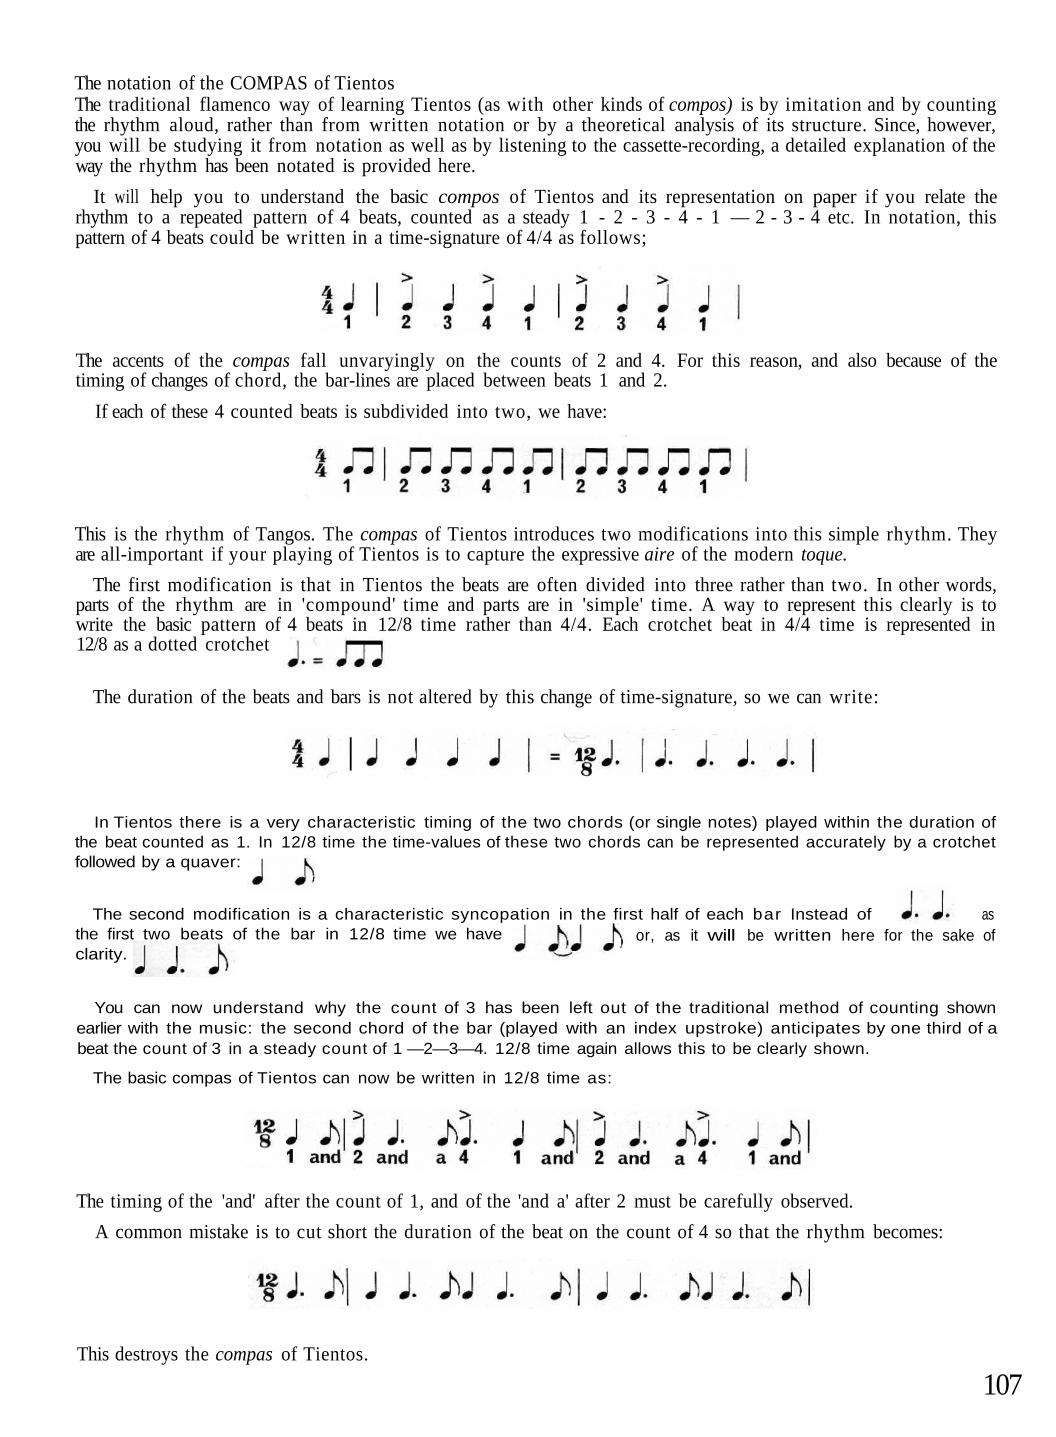
The notation of the COMPAS of TientosThe traditional flamenco way of learning Tientos (as with other kinds of compos) is by imitation and by countingthe rhythm aloud, rather than from written notation or by a theoretical analysis of its structure. Since, however,you will be studying it from notation as well as by listening to the cassette-recording, a detailed explanation of theway the rhythm has been notated is provided here.
It will help you to understand the basic compos of Tientos and its representation on paper if you relate therhythm to a repeated pattern of 4 beats, counted as a steady 1 - 2 - 3 - 4 - 1 — 2 - 3 - 4 etc. In notation, thispattern of 4 beats could be written in a time-signature of 4/4 as follows;
The accents of the compas fall unvaryingly on the counts of 2 and 4. For this reason, and also because of thetiming of changes of chord, the bar-lines are placed between beats 1 and 2.
If each of these 4 counted beats is subdivided into two, we have:
This is the rhythm of Tangos. The compas of Tientos introduces two modifications into this simple rhythm. Theyare all-important if your playing of Tientos is to capture the expressive aire of the modern toque.
The first modification is that in Tientos the beats are often divided into three rather than two. In other words,parts of the rhythm are in 'compound' time and parts are in 'simple' time. A way to represent this clearly is towrite the basic pattern of 4 beats in 12/8 time rather than 4/4. Each crotchet beat in 4/4 time is represented in12/8 as a dotted crotchet
The duration of the beats and bars is not altered by this change of time-signature, so we can write:
You can now understand why the count of 3 has been left out of the traditional method of counting shownearlier with the music: the second chord of the bar (played with an index upstroke) anticipates by one third of abeat the count of 3 in a steady count of 1 —2—3—4. 12/8 time again allows this to be clearly shown.
The basic compas of Tientos can now be written in 12/8 time as:
The timing of the 'and' after the count of 1, and of the 'and a' after 2 must be carefully observed.
A common mistake is to cut short the duration of the beat on the count of 4 so that the rhythm becomes:
This destroys the compas of Tientos.
107
In Tientos there is a very characteristic timing of the two chords (or single notes) played within the duration ofthe beat counted as 1. In 12/8 time the time-values of these two chords can be represented accurately by a crotchetfollowed by a quaver:
The second modification is a characteristic syncopation in the first half of each bar Instead of asthe first two beats of the bar in 12/8 time we have or, as it will be written here for the sake ofclarity.
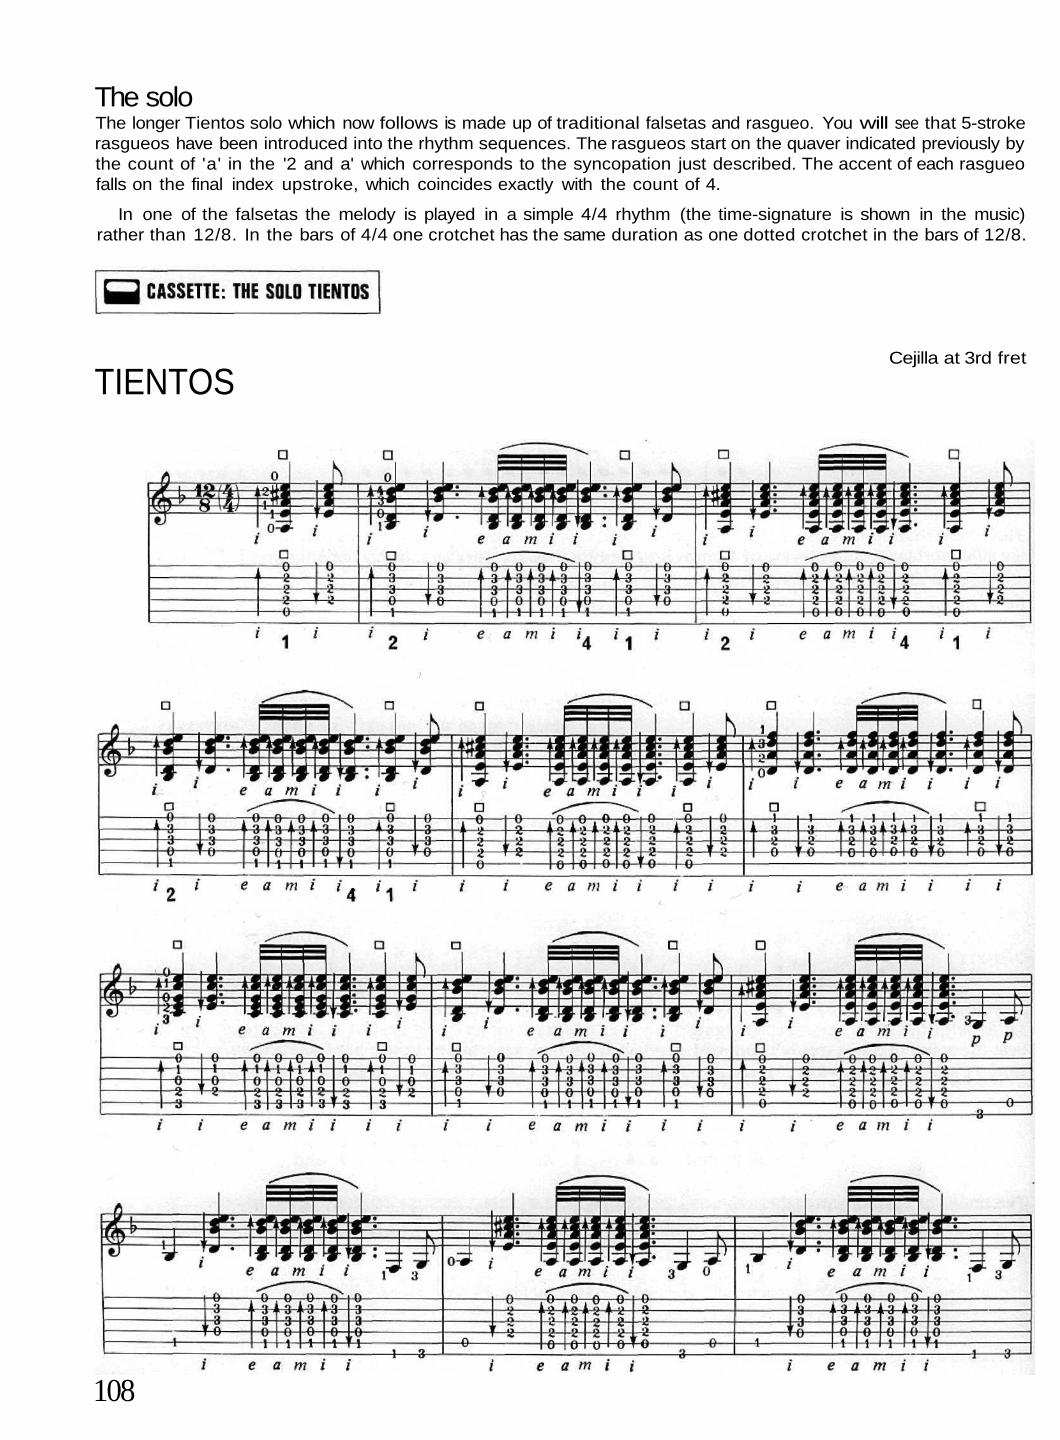
The soloThe longer Tientos solo which now follows is made up of traditional falsetas and rasgueo. You will see that 5-strokerasgueos have been introduced into the rhythm sequences. The rasgueos start on the quaver indicated previously bythe count of 'a' in the '2 and a' which corresponds to the syncopation just described. The accent of each rasgueofalls on the final index upstroke, which coincides exactly with the count of 4.
In one of the falsetas the melody is played in a simple 4/4 rhythm (the time-signature is shown in the music)rather than 12/8. In the bars of 4/4 one crotchet has the same duration as one dotted crotchet in the bars of 12/8.
TIENTOSCejilla at 3rd fret
108

109

A third brief sequence of Tientos played on the cassette-recording shows an alternative way of playing the basiccompos of Tientos, as heard in the solo. You will see from the notation that strokes with middle and third fingertogether are used to give added emphasis in the downstrokes. The downstroke on the count of 2 in the first barmay be played with either the thumb or with m and a together.
The section between the repeat signs may be repeated as many times as appropriate: the pattern ofright hand strokes can be played with the left hand chord changes illustrated in the first version of thebasic compas. The final chord will fall on the beat of 4 marked with an asterisk,*.
Cejilla at 3rd fret
110

LESSON 18 ZapateadoZapateado, literally meaning 'tapped with the shoe', is a general term for the footwork with punta y tacon ('pointand heel') in the flamenco Baile. It is also the name of a specific dance, a virtuoso solo for a man which provides adisplay of his speed and control in the taconeo. The music for this dance is played to the rhythm of the Tanguilloin 6/8 time (alternatively notated as triplets in 2/4 time) and the toque is usually in the chord positions of the keyof C major. The basic chords, therefore, are C major, F major and G7. Other major keys (e.g. E major) are some-times used. Although not a profound toque, the Zapateado can be a delightfully tuneful and rhythmic guitar solowhich can show off guitar techniques such as picado particularly well.
The COMPAS is strictly regular, with a characteristic pulse in the rhythm, notated here as 2/4 time for the linkingpassages of rasgueo and 6/8 for the falsetas. There are also changes in tempo which reflect the different variationsof the dance. Accelerations to a climax are followed by passages at a slower speed and then a building up again ofthe tempo. In some versions there may be passages in the more sombre minor key (the tonic minor) and modu-lations to other keys. The solo is made up of rasgueos and falsetas which follow a traditional pattern on a basis of C major, F major and
G7 chords. All the techniques used have been described previously. It
is entitled Zapateado para bailar ('for dancing') because it typifies the traditional accompaniment to the dance.
ZAPATEADO para bailar Cejilla at 2nd Fret
111

112
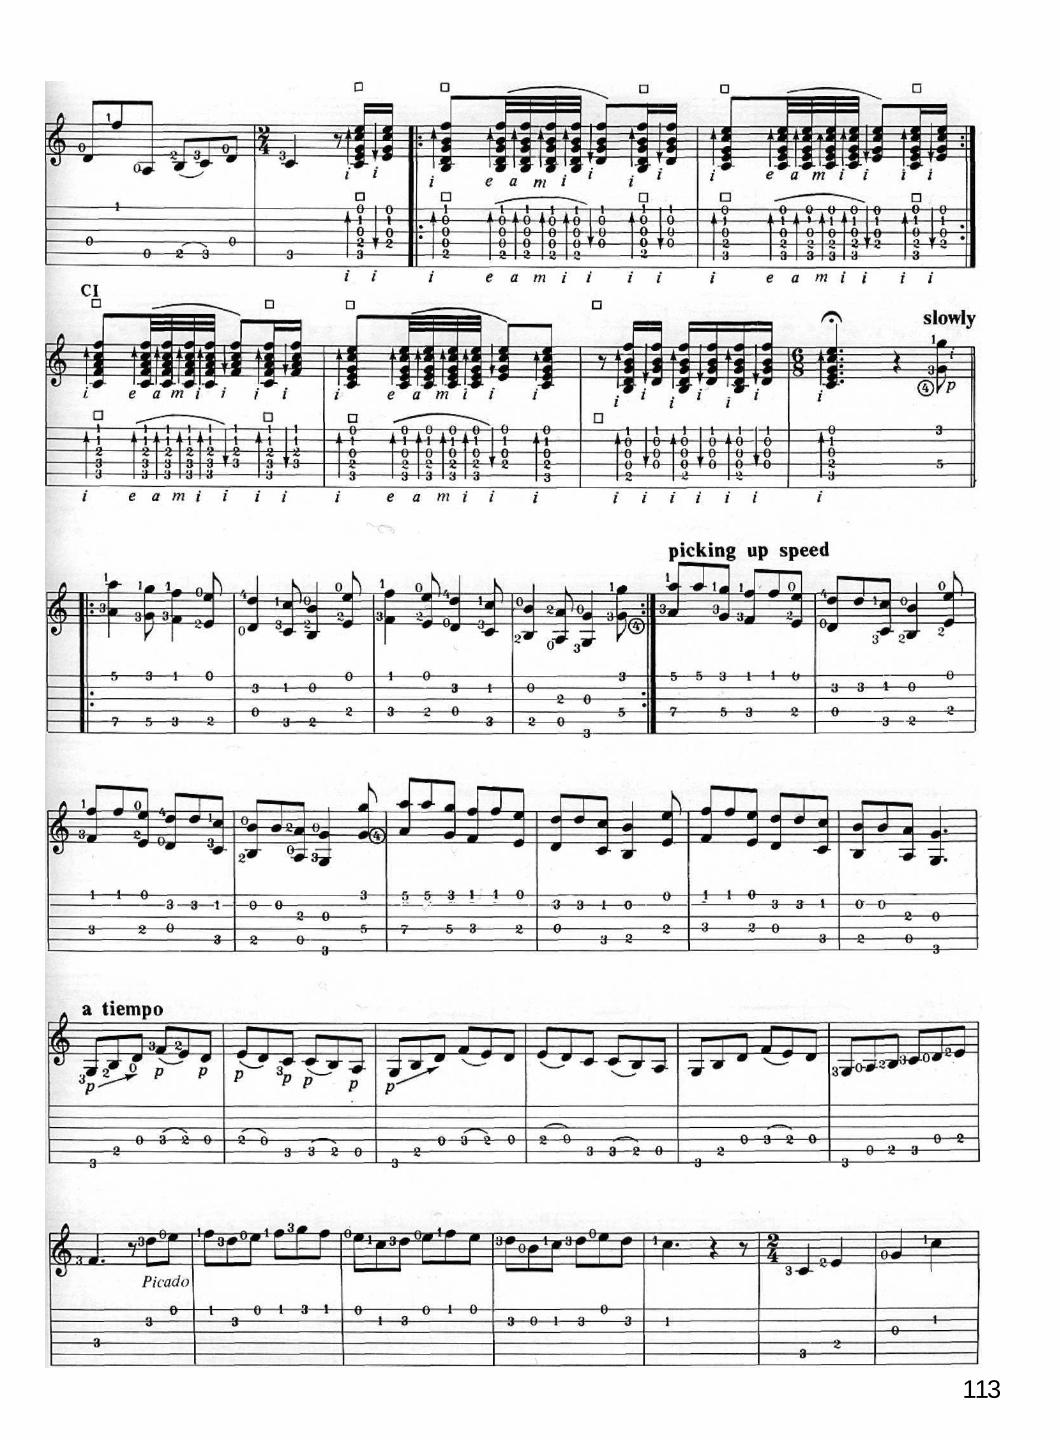
113
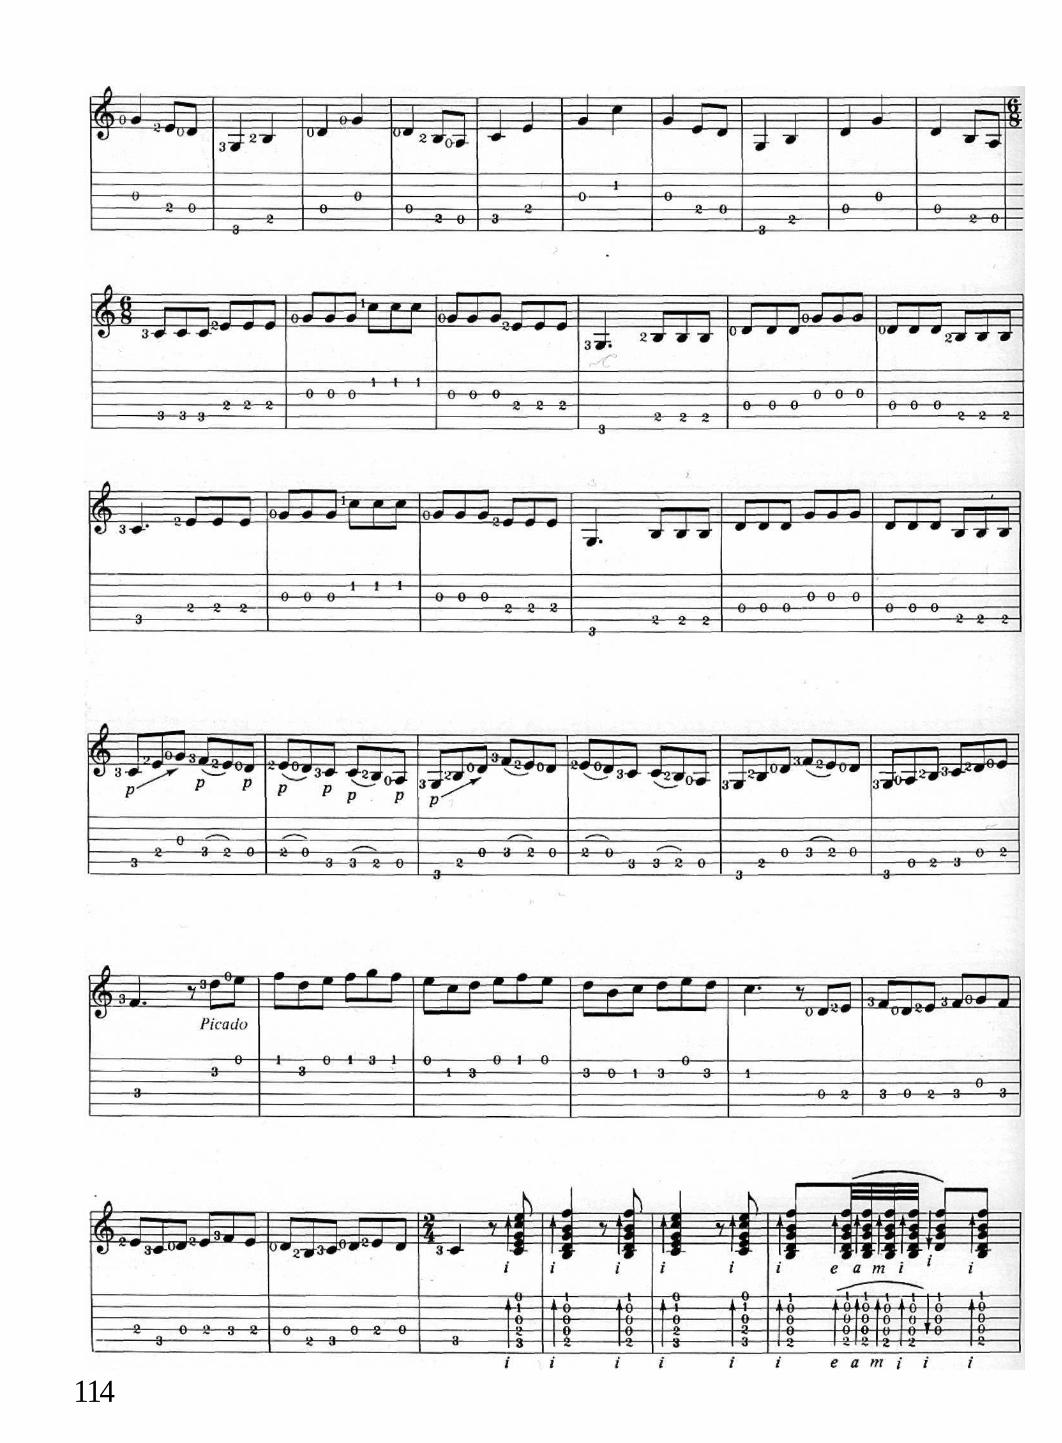
114
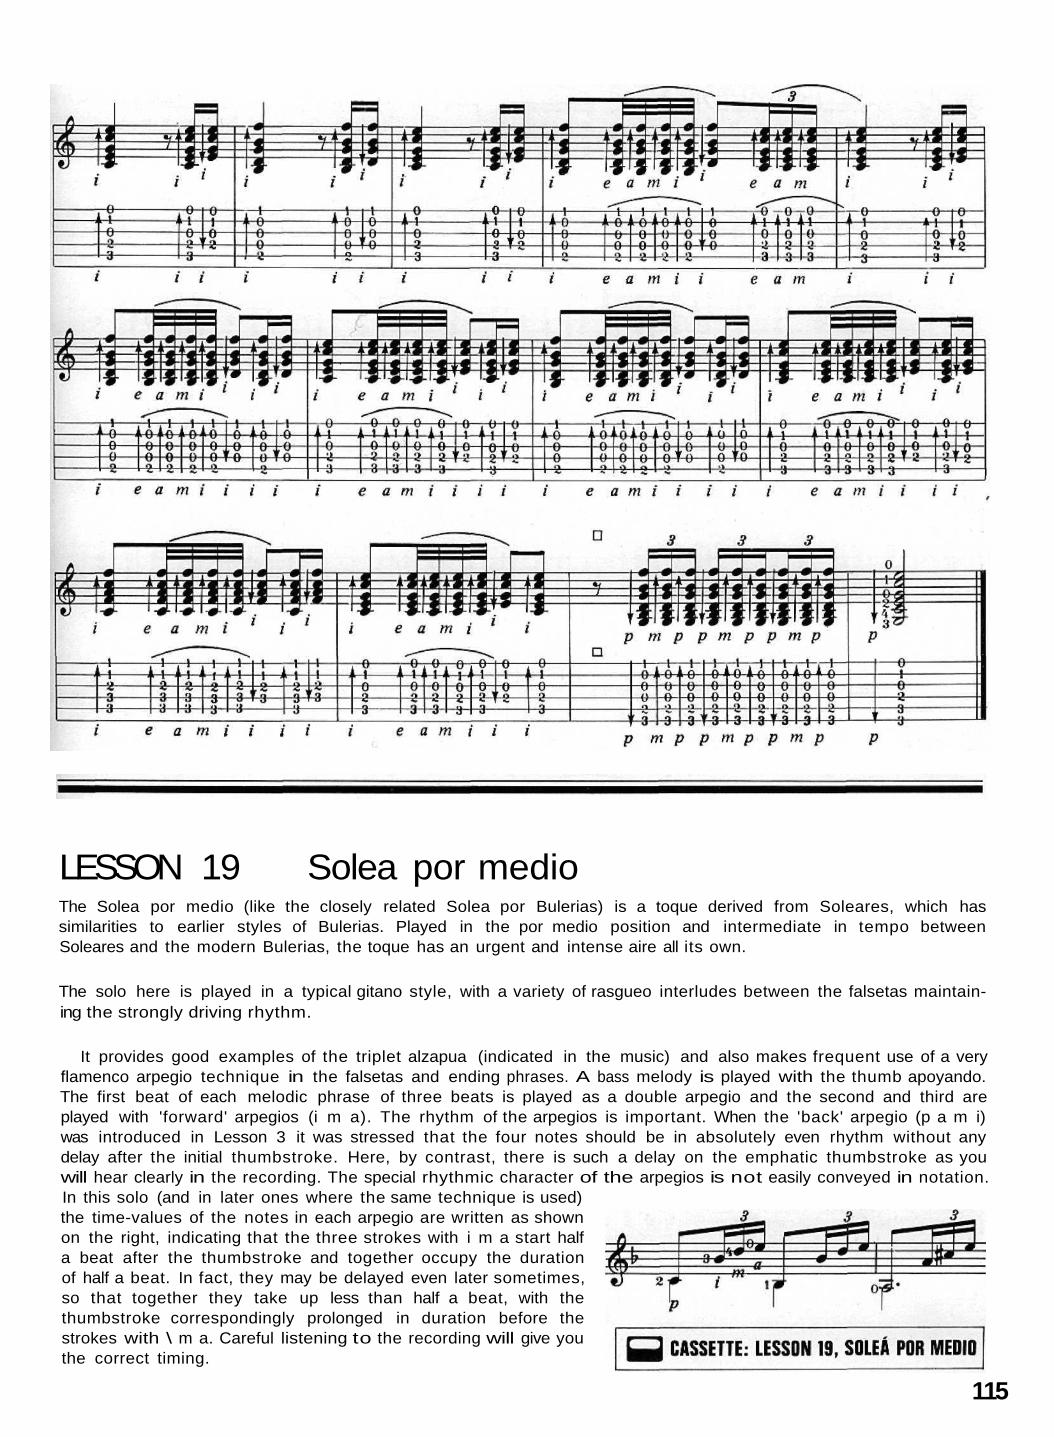
LESSON 19 Solea por medioThe Solea por medio (like the closely related Solea por Bulerias) is a toque derived from Soleares, which hassimilarities to earlier styles of Bulerias. Played in the por medio position and intermediate in tempo betweenSoleares and the modern Bulerias, the toque has an urgent and intense aire all its own.
It provides good examples of the triplet alzapua (indicated in the music) and also makes frequent use of a veryflamenco arpegio technique in the falsetas and ending phrases. A bass melody is played with the thumb apoyando.The first beat of each melodic phrase of three beats is played as a double arpegio and the second and third areplayed with 'forward' arpegios (i m a). The rhythm of the arpegios is important. When the 'back' arpegio (p a m i)was introduced in Lesson 3 it was stressed that the four notes should be in absolutely even rhythm without anydelay after the initial thumbstroke. Here, by contrast, there is such a delay on the emphatic thumbstroke as youwill hear clearly in the recording. The special rhythmic character of the arpegios is not easily conveyed in notation.In this solo (and in later ones where the same technique is used)the time-values of the notes in each arpegio are written as shownon the right, indicating that the three strokes with i m a start halfa beat after the thumbstroke and together occupy the durationof half a beat. In fact, they may be delayed even later sometimes,so that together they take up less than half a beat, with thethumbstroke correspondingly prolonged in duration before thestrokes with \ m a. Careful listening to the recording will give youthe correct timing.
115
The solo here is played in a typical gitano style, with a variety of rasgueo interludes between the falsetas maintain-ing the strongly driving rhythm.
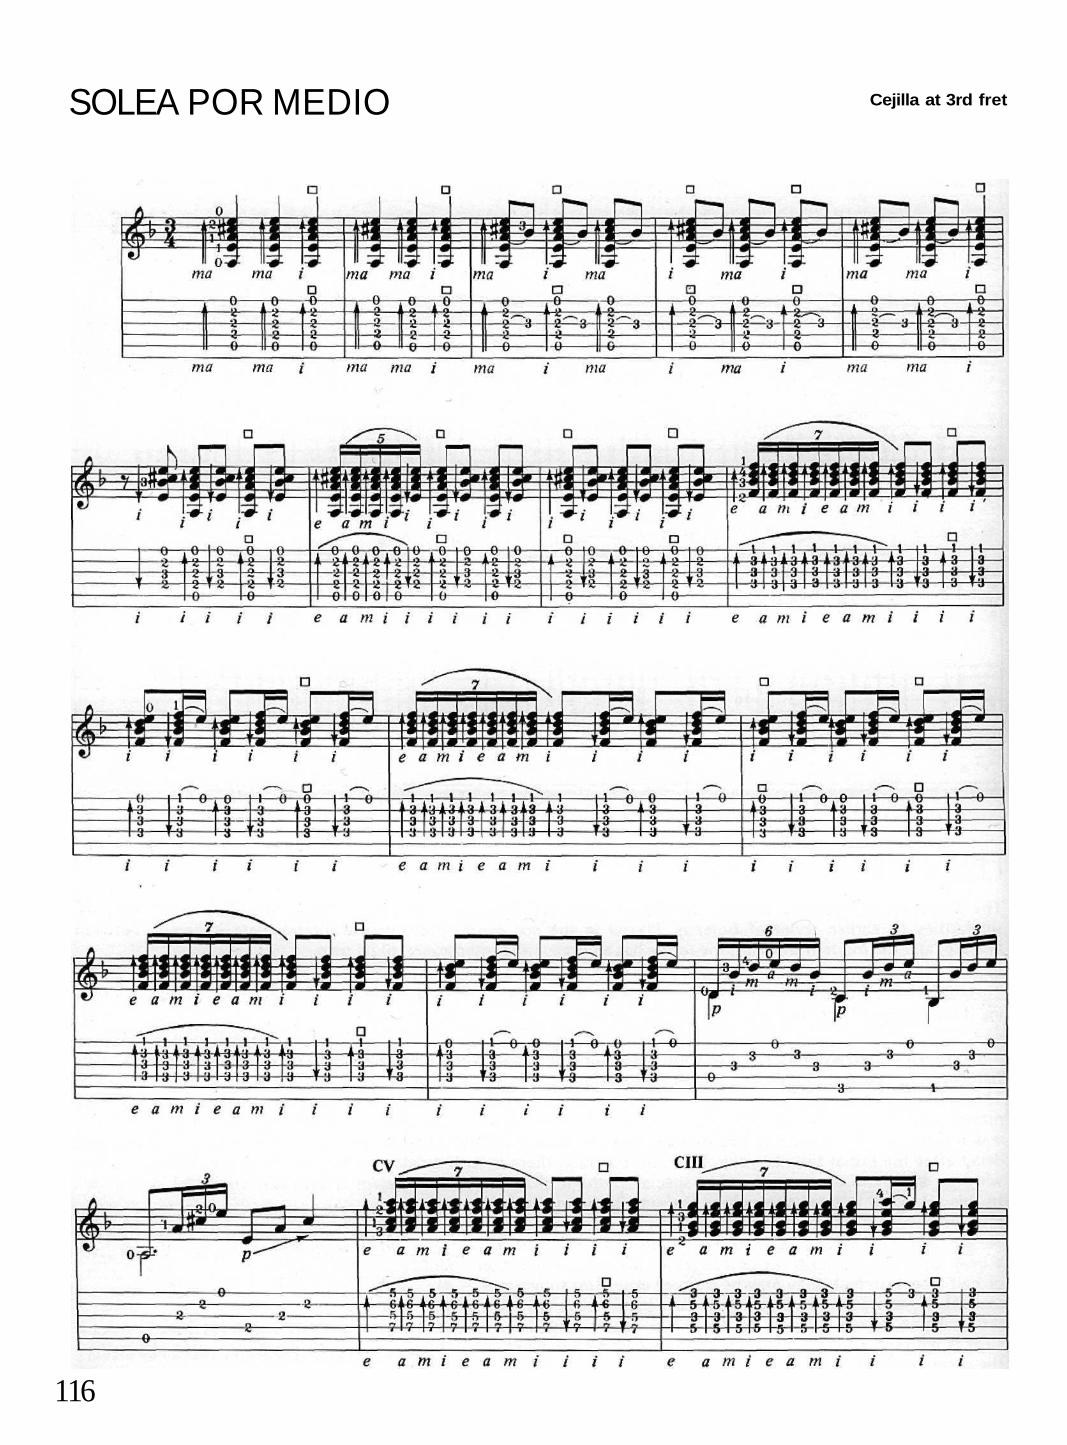
SOLEA POR MEDIO Cejilla at 3rd fret
116

117
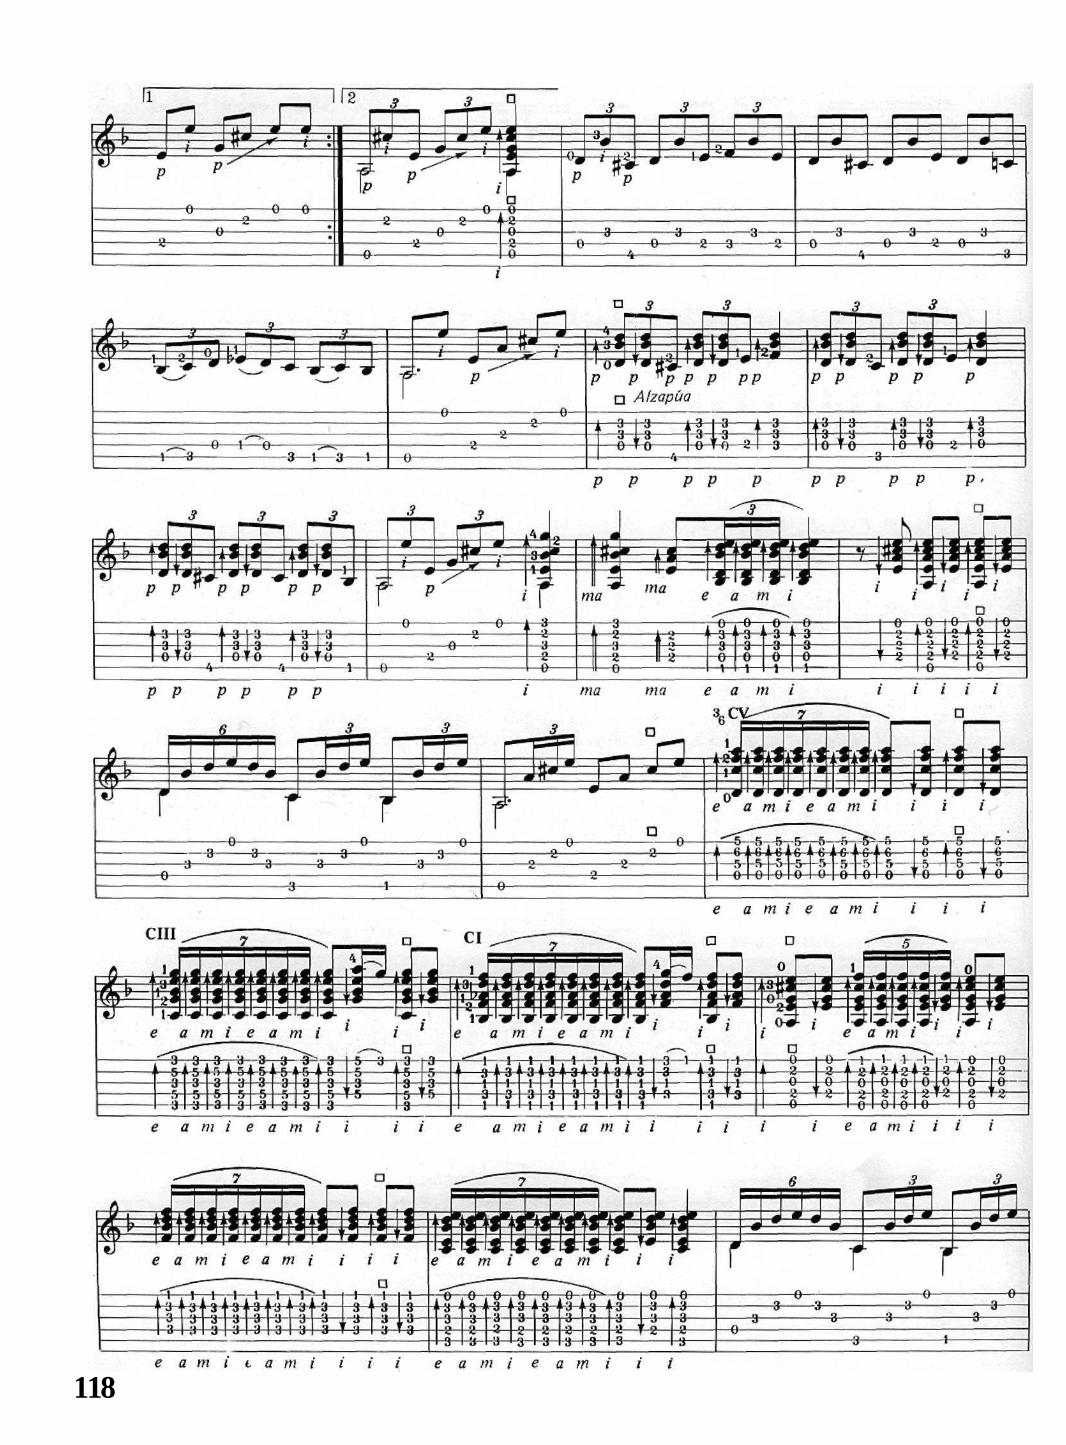
118

119

LESSON 20 MalaguenasIn Malaga the Fandango has evolved into many styles of Malaguenas, whose coplas range in feeling from deepesttragedy to carefree good humour. The Malaguena, therefore, has been called a Cante Intermedio, a cante that isintermediate between the Jondo and the Chico. The really gifted singer can perform Malaguenas in a movinglyJondo way, with an aire that approaches the intensity of Soleares, but there are also much lighter styles whichcelebrate the joys of life and the beauties of the countryside.
The flamenco cantes heard today date back to the end of the last century. Their development from the simplecountry melodies of Malaga such as the rhythmic songs and dances called Verdiales can be attributed to the innova-tions of several outstanding malagueneros. Three creators of Malaguenas became particularly famous, AntonioOrtega (who called himself 'Juan El Breva'), Enrique Jimenez ('El Mellizo') and Don Antonio Chacon. Each in histurn brought increasing complexity and sophistication to his cante, gaining widespread renown and a host ofimitators. Their styles of Malaguenas are known today by their names.
The COMPASAs Malaguenas developed, the rhythm became freer, the melodies more elaborately ornamented. In the forms ofMalaguenas played today the rhythm is partly en toque libre and partly in a regular 3/4 time, with many echoes of
120

the Fandango. The music is in the Phrygian mode based on E.
The soloThe solo Malaguenas played here illustrates a very freely improvised style of toque, with an introduction and finalein free time together with falsetas in regular rhythm. The first fa/seta has a melody in chords and ligado and thesecond is an extended passage of rapid alternating thumb and index strokes. Note carefully, in the first fa/seta, theway the melody is syncopated. In the second, you will see that in the earlier bars thumb and index are played simul-taneously on the third beat of the bar, whereas they alternate throughout the later parts of the melody.
The introduction en toque libre (with a first part here in an alternating 3/4:6/8 rhythm) begins on a chord of E7.The music will look daunting at first, but it has been notated to show in detail three long rolls played with repeated4-stroke rasgueos, interspersed with fast index down- and upstrokes. The first two long rolls are played with thee a m i sequence of strokes repeated to a total of five times, and the third, during which the left hand changes thechord to F major, contains ten 4-stroke rasgueos in continuoussequence. It is important in these continued rasgueos that the fingersshould strike the strings in even rhythm so that there is nointerruption between one 4-stroke sequence and the next.
MALAGUENAS Cejilla at 3rd fret
121
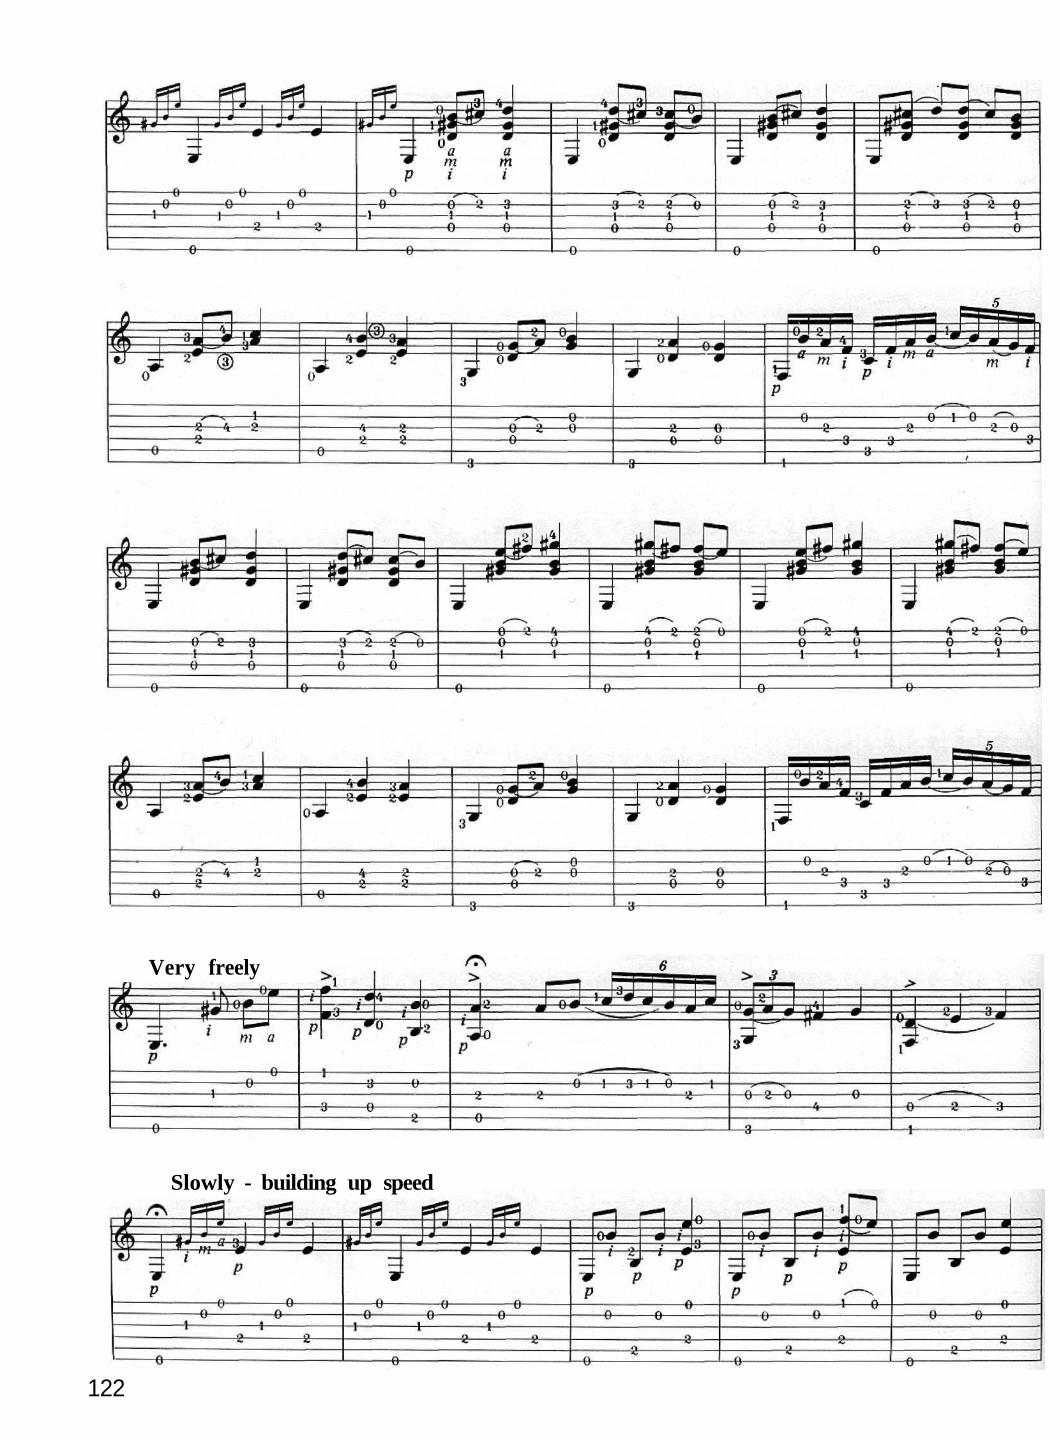
122
Very freely
Slowly - building up speed
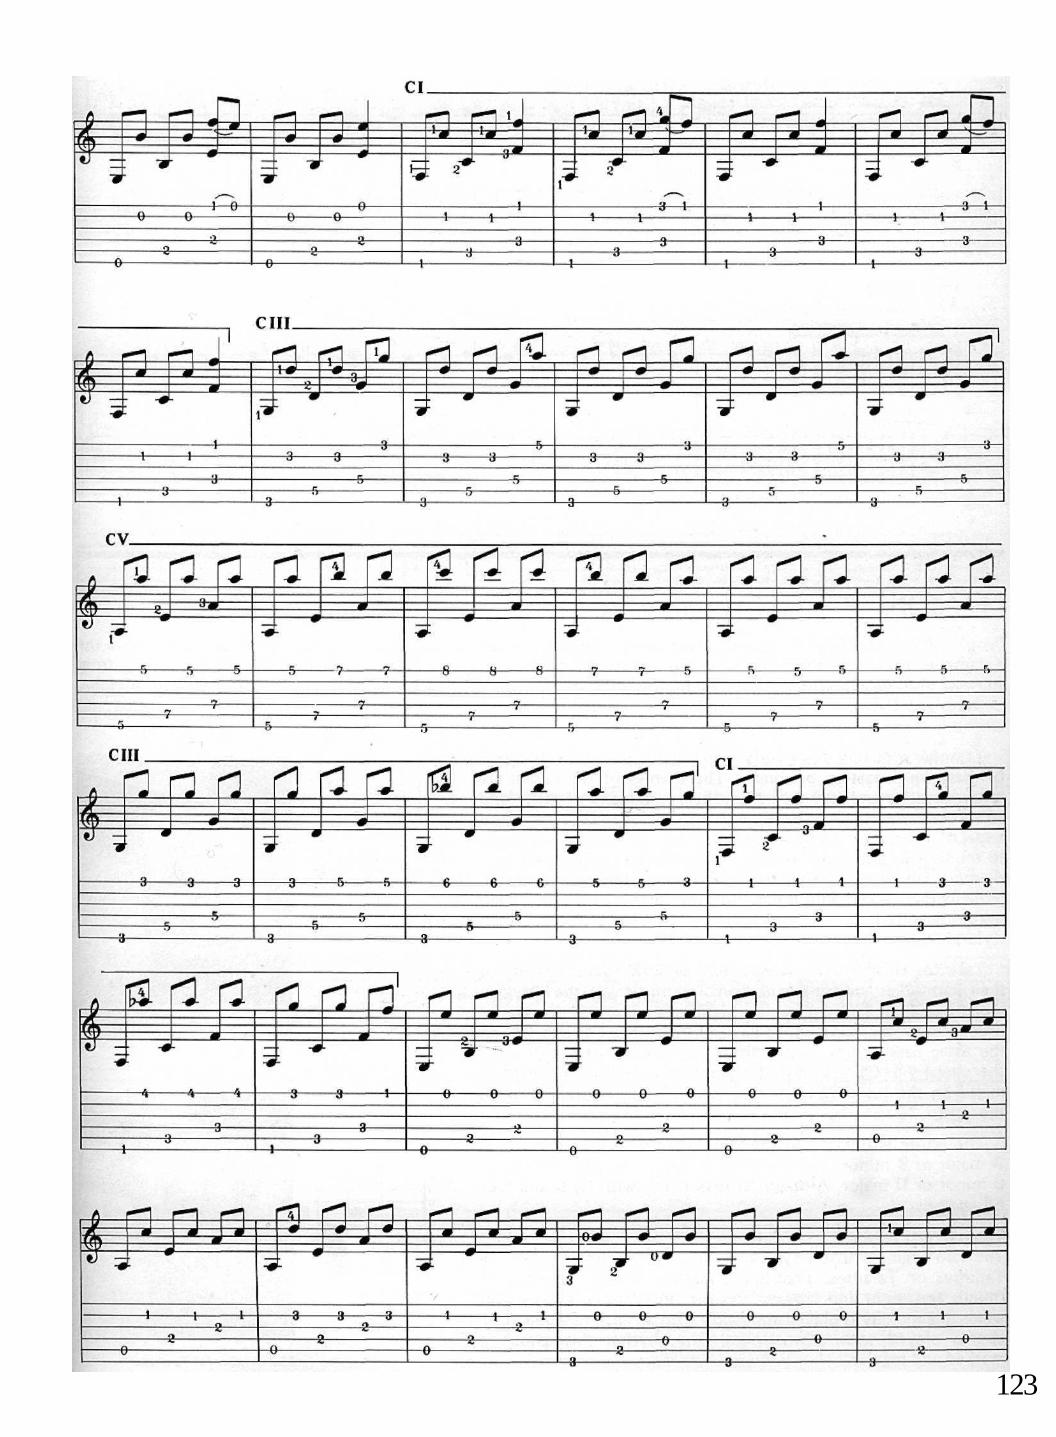
123
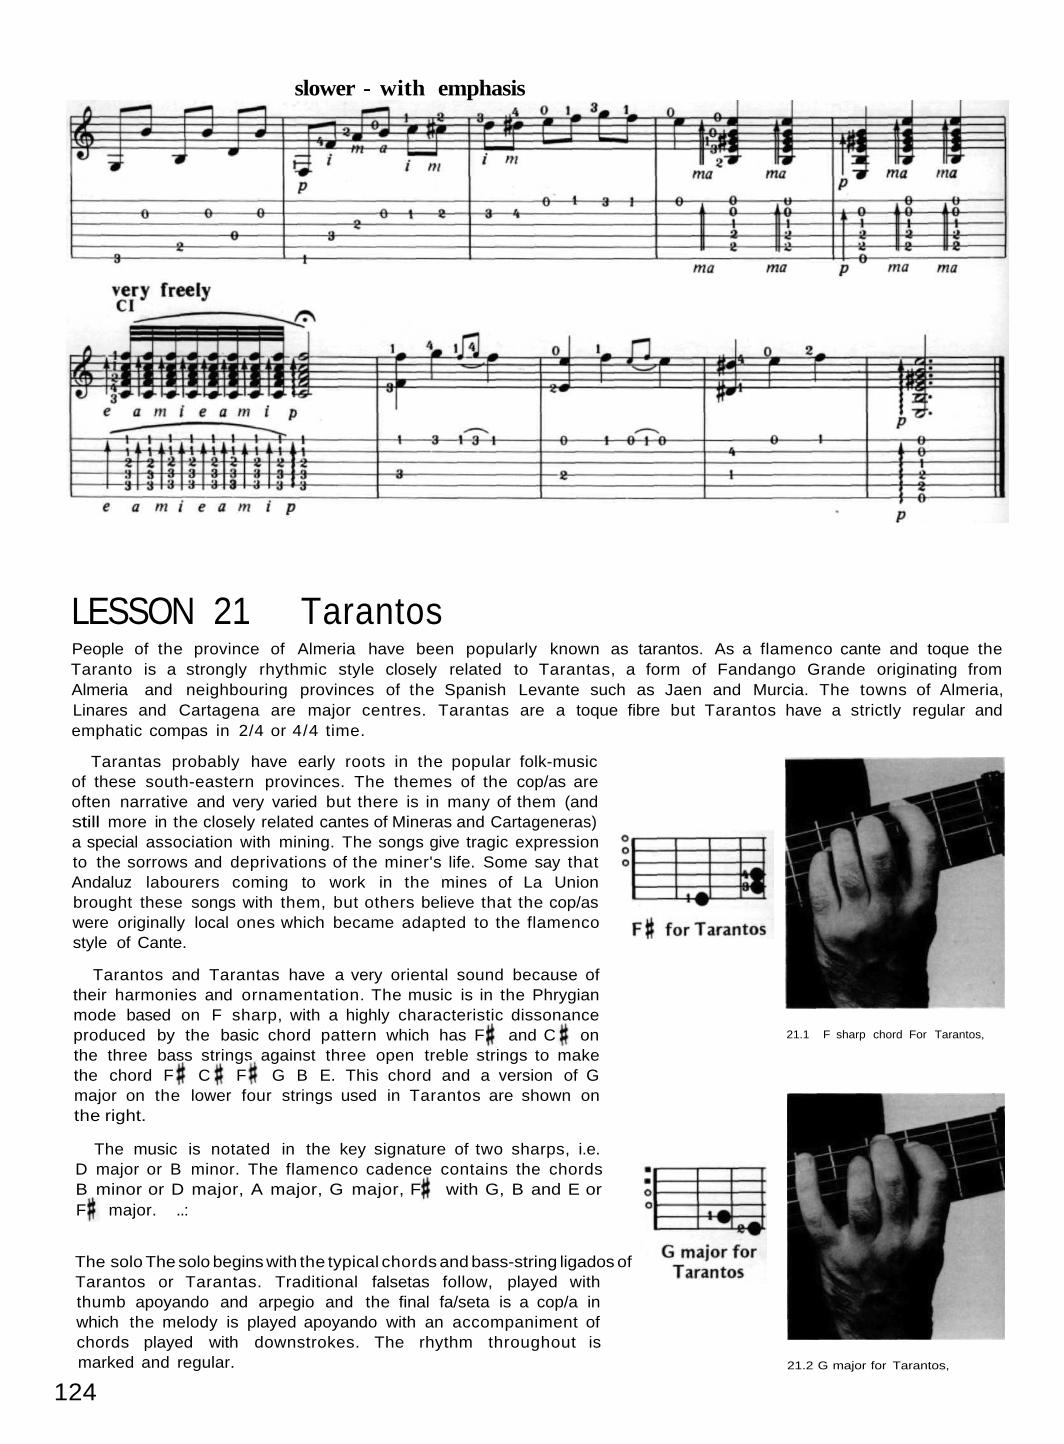
LESSON 21 TarantosPeople of the province of Almeria have been popularly known as tarantos. As a flamenco cante and toque theTaranto is a strongly rhythmic style closely related to Tarantas, a form of Fandango Grande originating fromAlmeria and neighbouring provinces of the Spanish Levante such as Jaen and Murcia. The towns of Almeria,Linares and Cartagena are major centres. Tarantas are a toque fibre but Tarantos have a strictly regular andemphatic compas in 2/4 or 4/4 time.
Tarantas probably have early roots in the popular folk-musicof these south-eastern provinces. The themes of the cop/as areoften narrative and very varied but there is in many of them (andstill more in the closely related cantes of Mineras and Cartageneras)a special association with mining. The songs give tragic expressionto the sorrows and deprivations of the miner's life. Some say thatAndaluz labourers coming to work in the mines of La Unionbrought these songs with them, but others believe that the cop/aswere originally local ones which became adapted to the flamencostyle of Cante.
Tarantos and Tarantas have a very oriental sound because oftheir harmonies and ornamentation. The music is in the Phrygianmode based on F sharp, with a highly characteristic dissonanceproduced by the basic chord pattern which has F and C onthe three bass strings against three open treble strings to makethe chord F C F G B E. This chord and a version of Gmajor on the lower four strings used in Tarantos are shown onthe right.
The music is notated in the key signature of two sharps, i.e.D major or B minor. The flamenco cadence contains the chordsB minor or D major, A major, G major, F with G, B and E orF major. ..:
The solo The solo begins with the typical chords and bass-string ligados ofTarantos or Tarantas. Traditional falsetas follow, played withthumb apoyando and arpegio and the final fa/seta is a cop/a inwhich the melody is played apoyando with an accompaniment ofchords played with downstrokes. The rhythm throughout ismarked and regular.
21.1 F sharp chord For Tarantos,
slower - with emphasis
21.2 G major for Tarantos,
124

TARANTOS Cejilla at 3rd fret
125
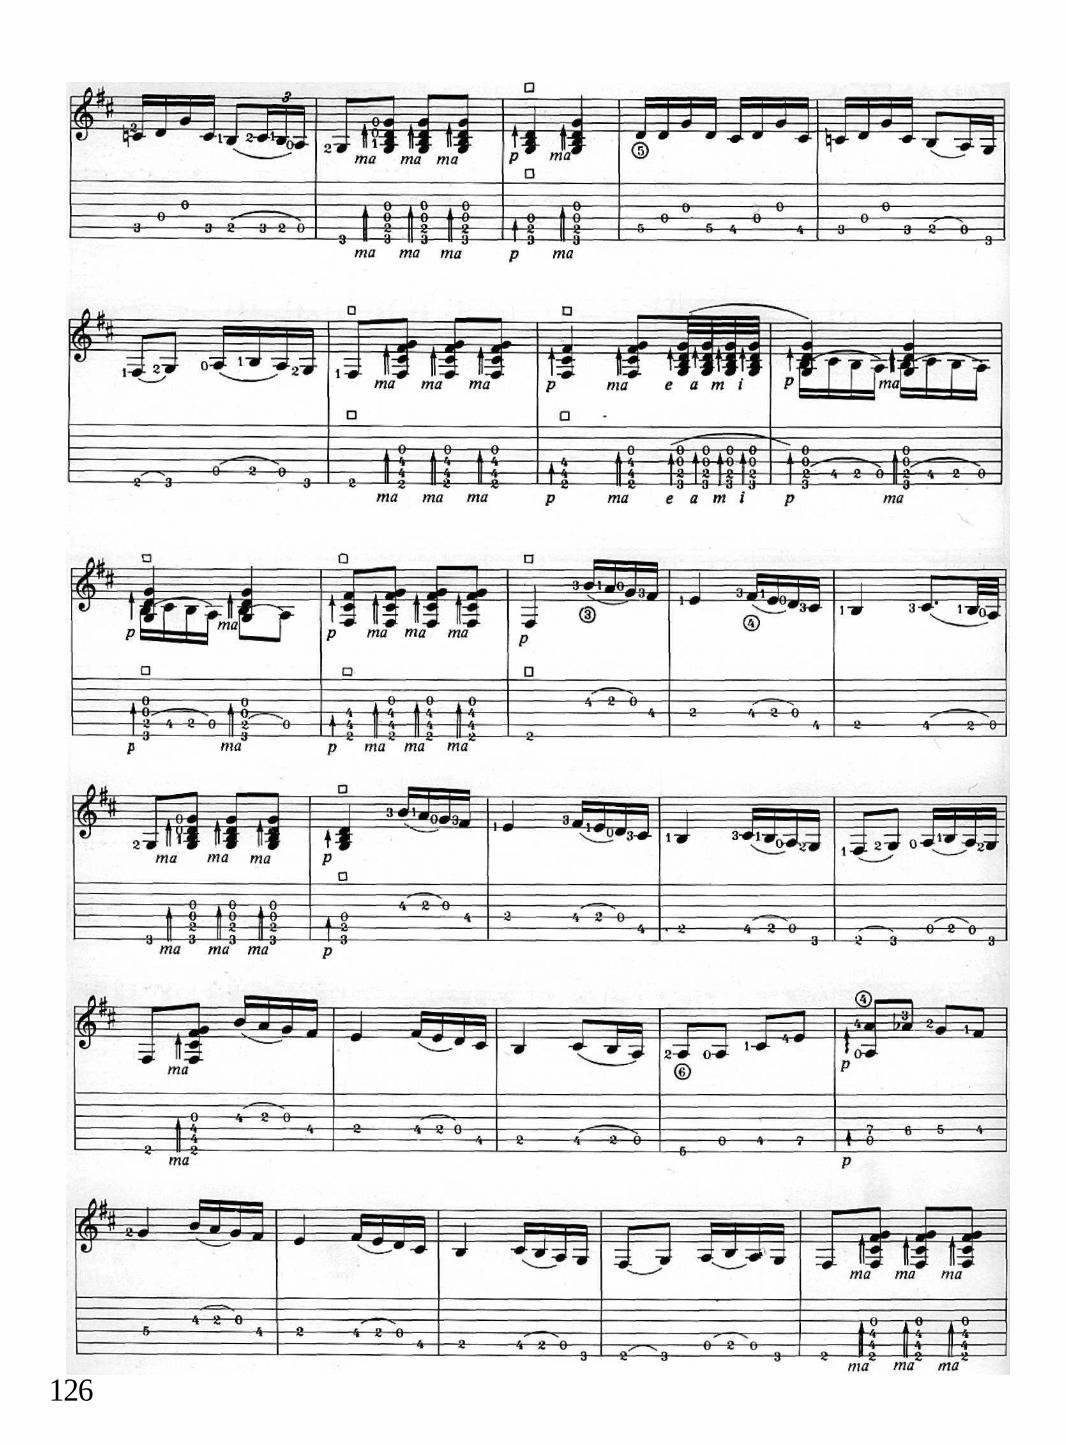
126

127

128
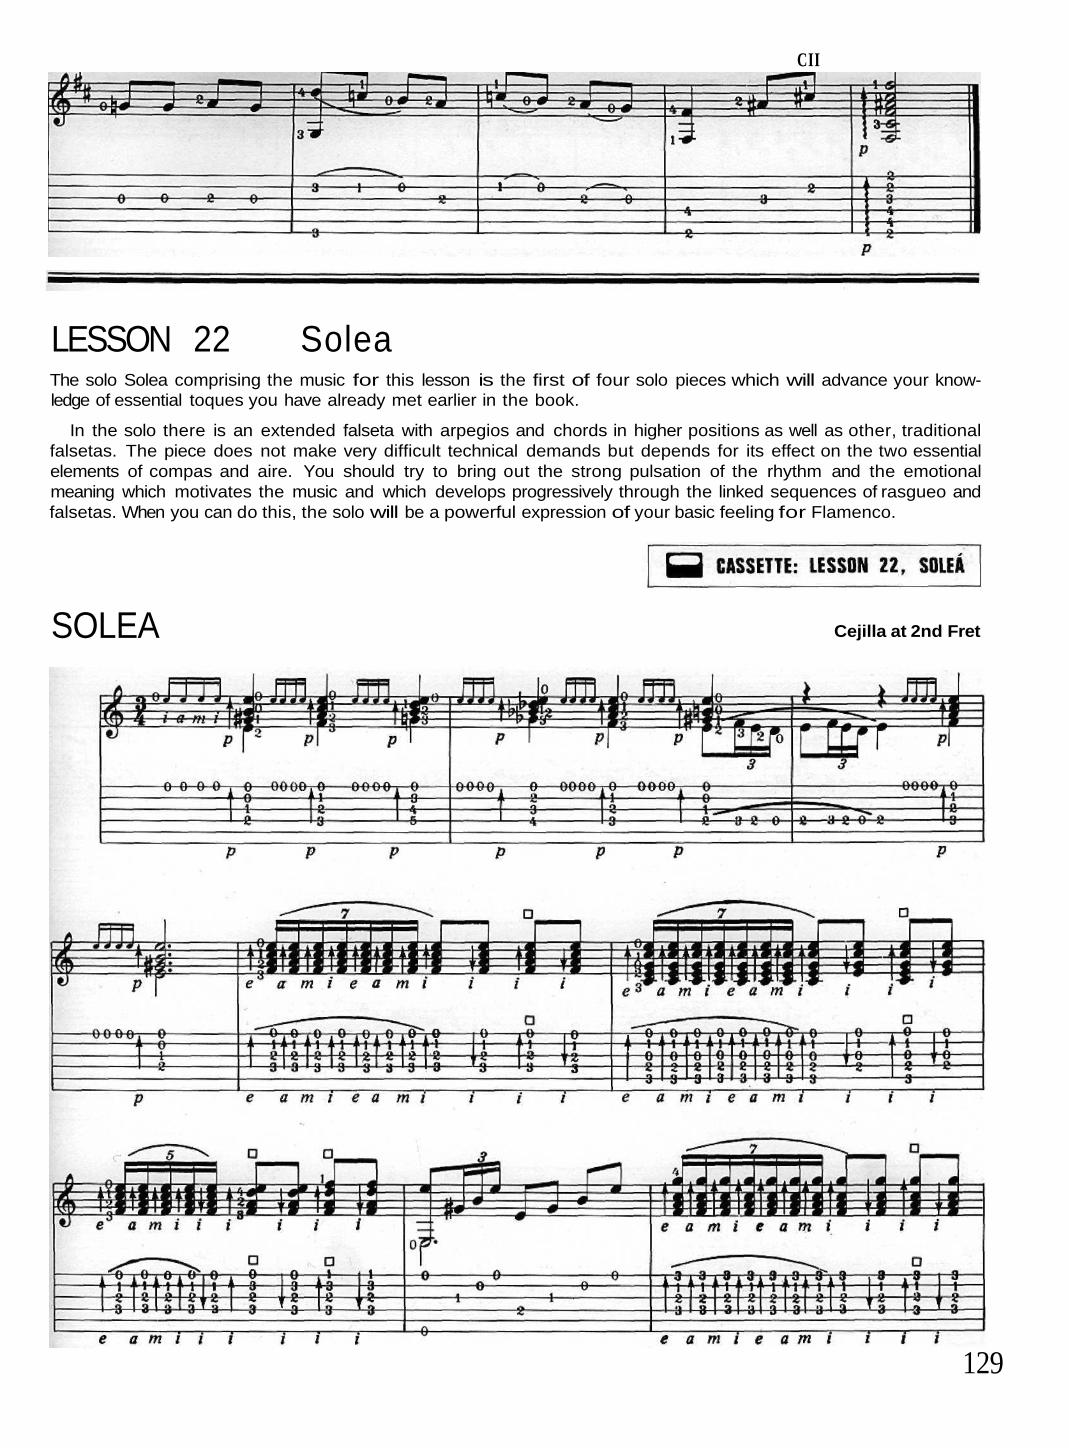
CII
LESSON 22 SoleaThe solo Solea comprising the music for this lesson is the first of four solo pieces which will advance your know-ledge of essential toques you have already met earlier in the book.
In the solo there is an extended falseta with arpegios and chords in higher positions as well as other, traditionalfalsetas. The piece does not make very difficult technical demands but depends for its effect on the two essentialelements of compas and aire. You should try to bring out the strong pulsation of the rhythm and the emotionalmeaning which motivates the music and which develops progressively through the linked sequences of rasgueo andfalsetas. When you can do this, the solo will be a powerful expression of your basic feeling for Flamenco.
SOLEA Cejilla at 2nd Fret
129

BO
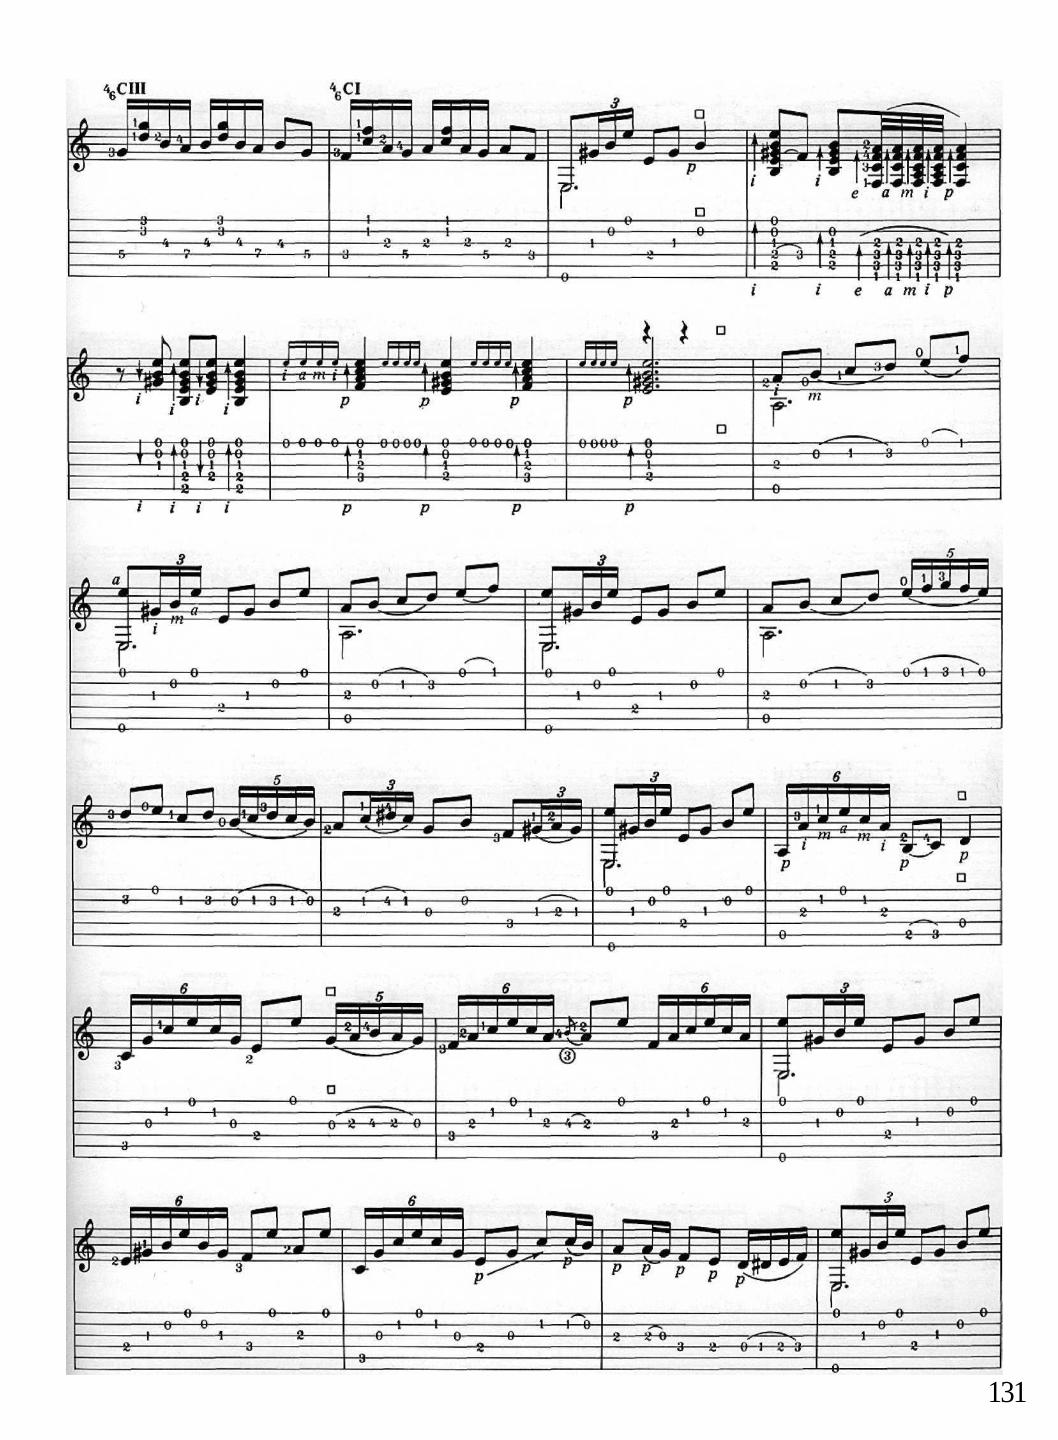
131

132

Flamenco VIBRATOIn the flamenco technique of vibrato a left hand finger stopping a string pulls the string (after it has been soundedby the right hand) across the fingerboard towards the palm, in a direction parallel to the frets. The movement ofthe finger is a very rapid alternation of flexion and relaxation which is repeated several times to produce an up-and-down vibration of pitch in the note sounded, giving it a plaintive 'lamenting' quality. When the stopping finger pullsthe string, the pitch of the note is sharpened; when it relaxes, the note returns to its natural pitch. The technique isparticularly used for single melody notes on strings 5, 4 and 3 in such expressive toques as Soleares (e.g. on theaccented bass notes of arpegio falsetas) or Malaguenas.
133
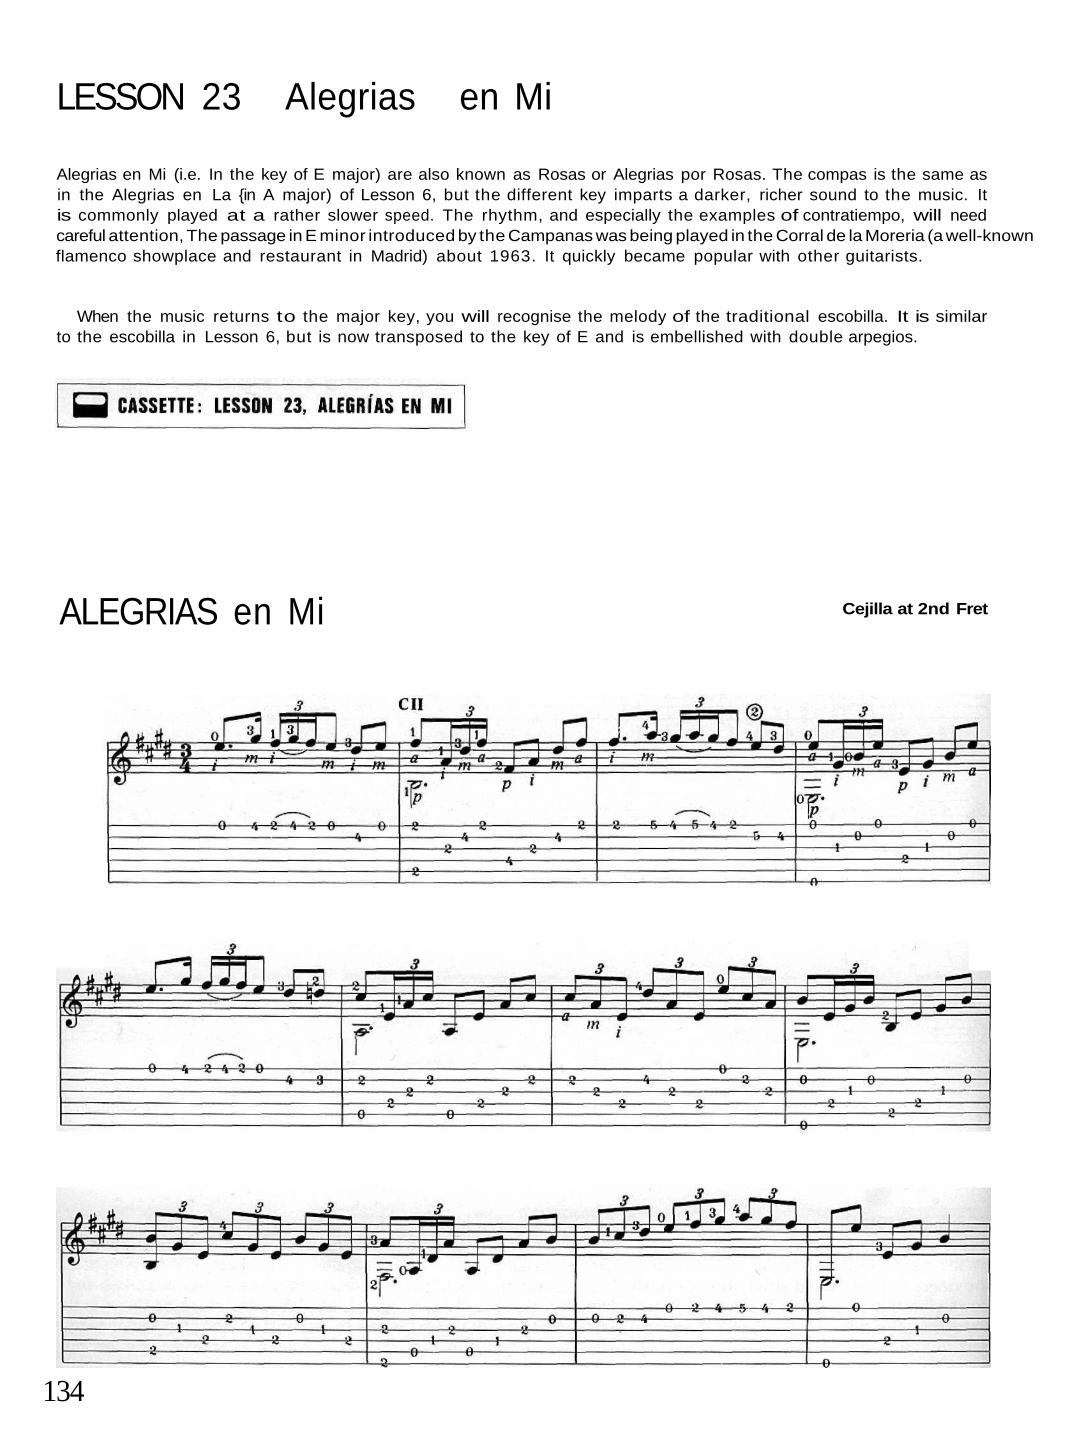
LESSON 23 Alegrias en Mi
Alegrias en Mi (i.e. In the key of E major) are also known as Rosas or Alegrias por Rosas. The compas is the same asin the Alegrias en La {in A major) of Lesson 6, but the different key imparts a darker, richer sound to the music. Itis commonly played at a rather slower speed. The rhythm, and especially the examples of contratiempo, will needcareful attention, The passage in E minor introduced by the Campanas was being played in the Corral de la Moreria (a well-knownflamenco showplace and restaurant in Madrid) about 1963. It quickly became popular with other guitarists.
When the music returns to the major key, you will recognise the melody of the traditional escobilla. It is similarto the escobilla in Lesson 6, but is now transposed to the key of E and is embellished with double arpegios.
ALEGRIAS en Mi Cejilla at 2nd Fret
134

135
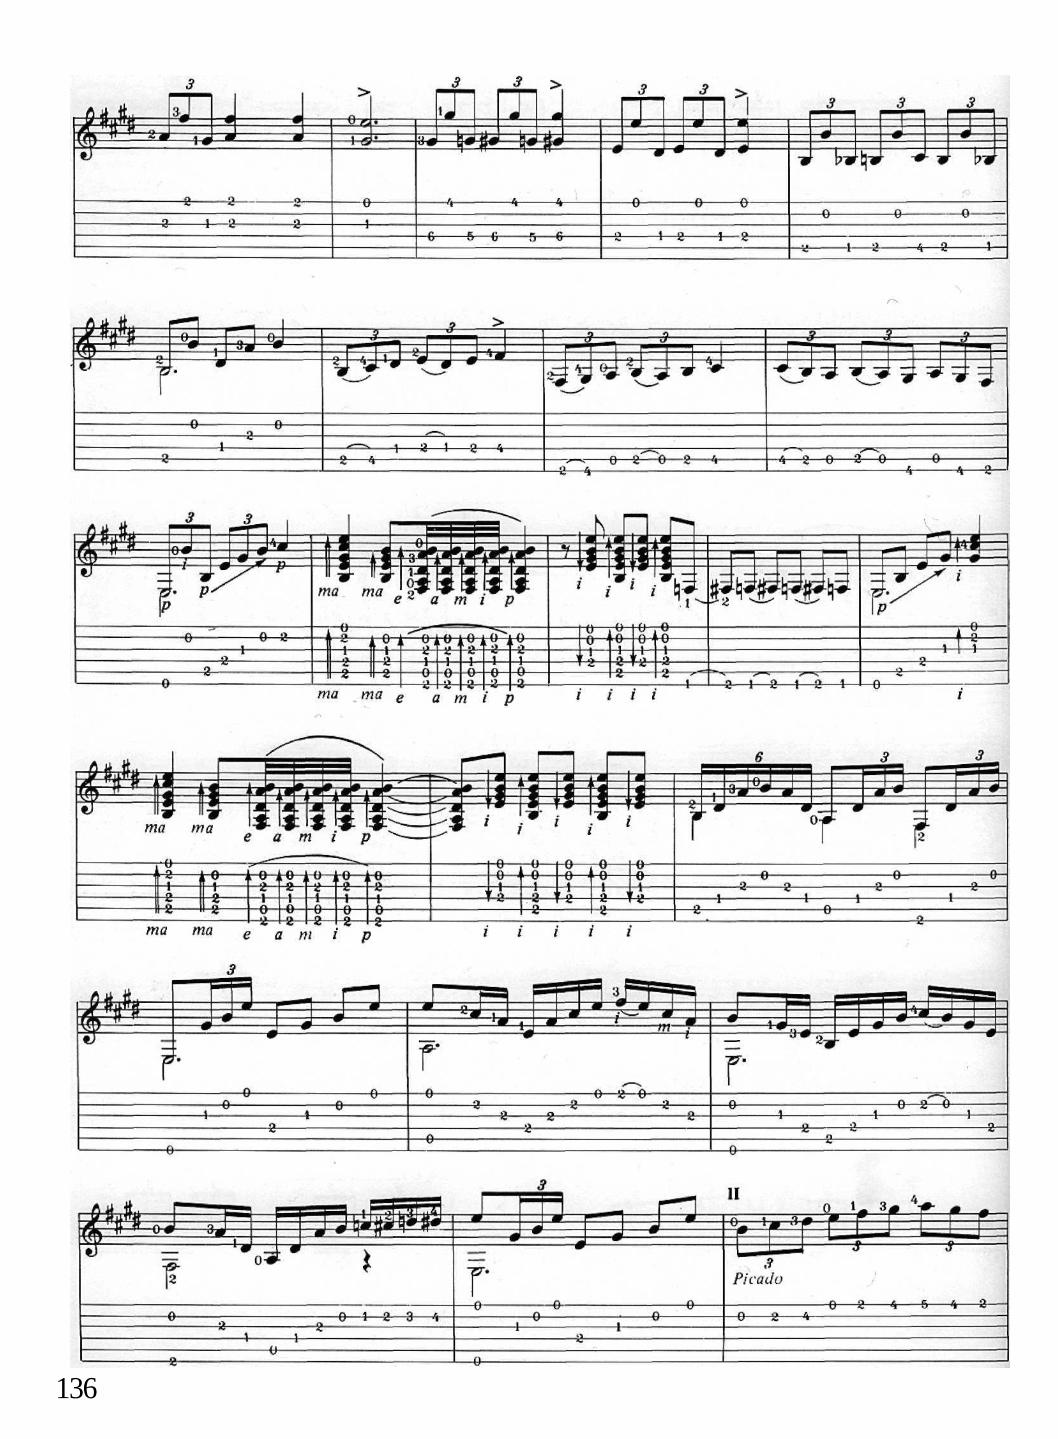
136
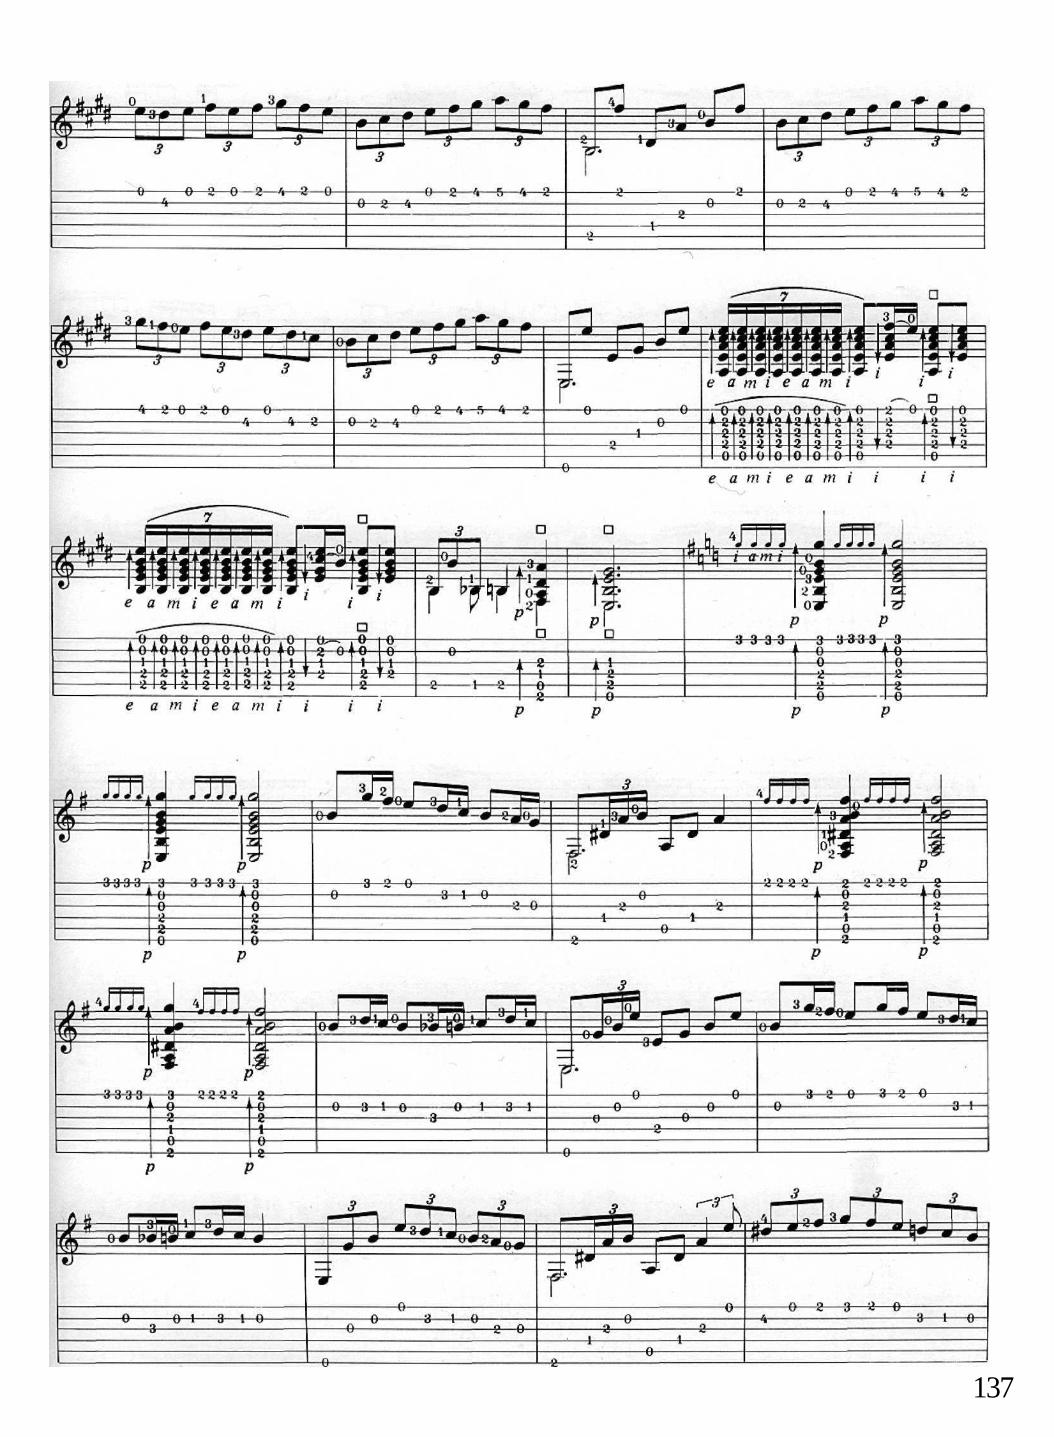
137
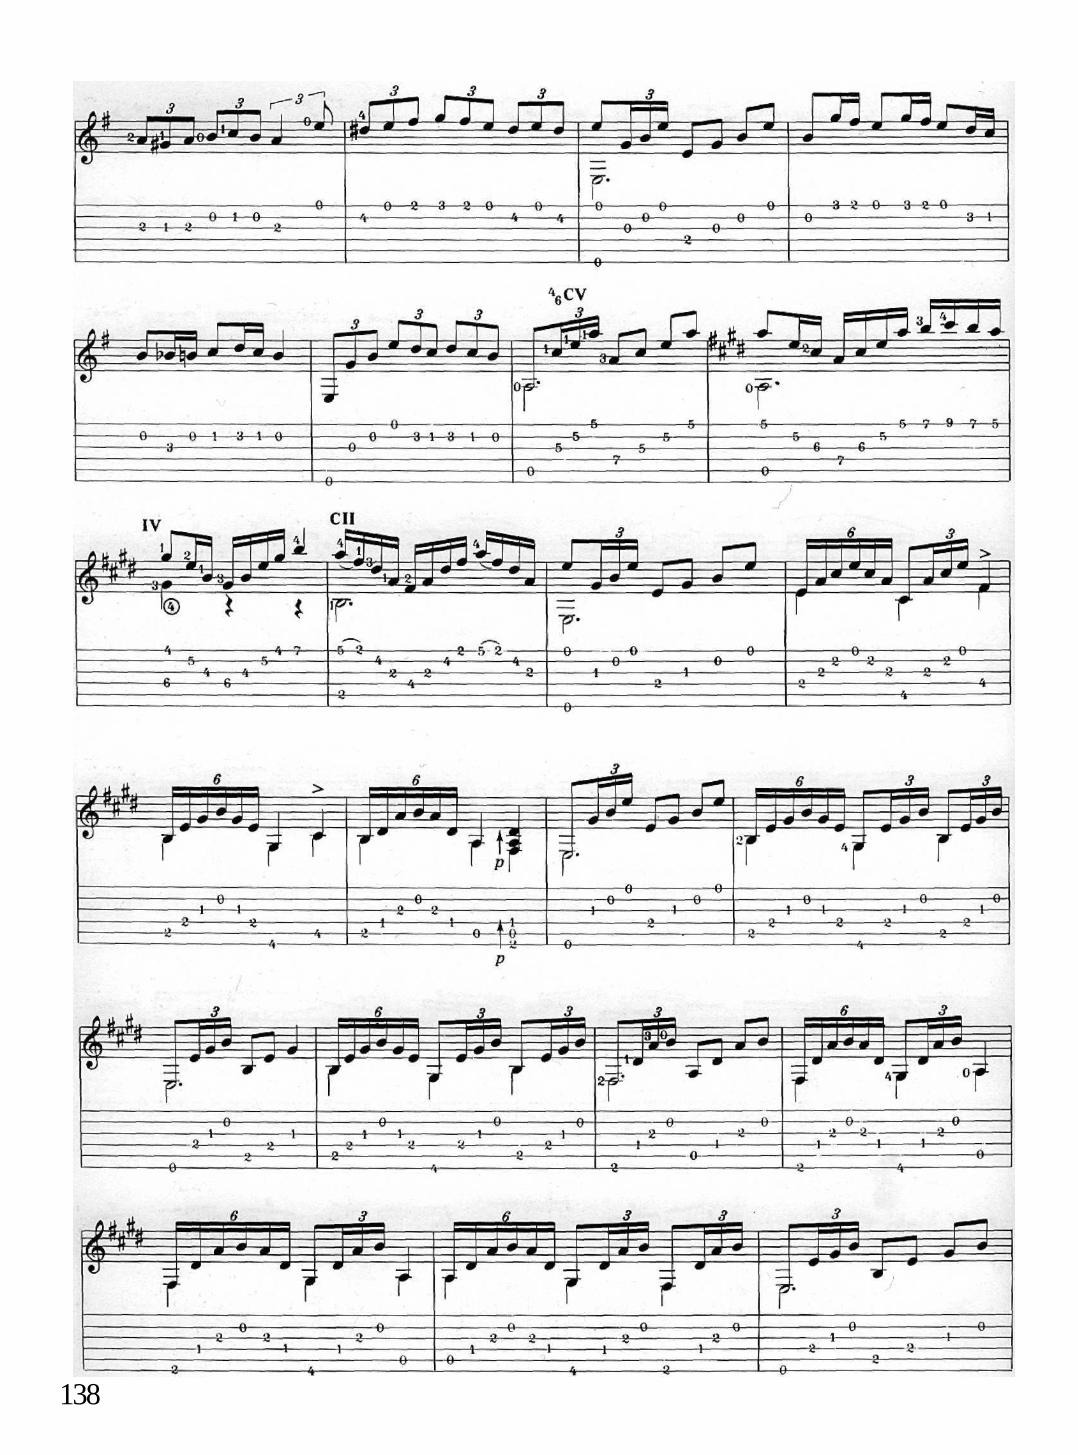
138

139

LESSON 24 Seguiriyas
The beautiful traditional falsetas of this solo powerfully communicate the tragic inspiration of Seguiriyas.
The introductory rasgueo and three later interludes of rasgueo demonstrate a characteristic pattern in Seguiriyas,with double 4-stroke rasgueos leading onto beats 4 and 5 of the compos described in Lesson 5, The first time therasgueos are played all 5 upper strings are sounded. The next three times, only the lower strings are struck. Thethumb resting on the 6th string prevents it from sounding a note, but the fingers hit across this string in therasgueo, each making a distinct sound from the deadened string, rather like the beat of a snare-drum. This adds acharacteristic sound to the staccato roll of the rasgueo.
SEGUIRIYAS Cejilla at 3rd fret
140
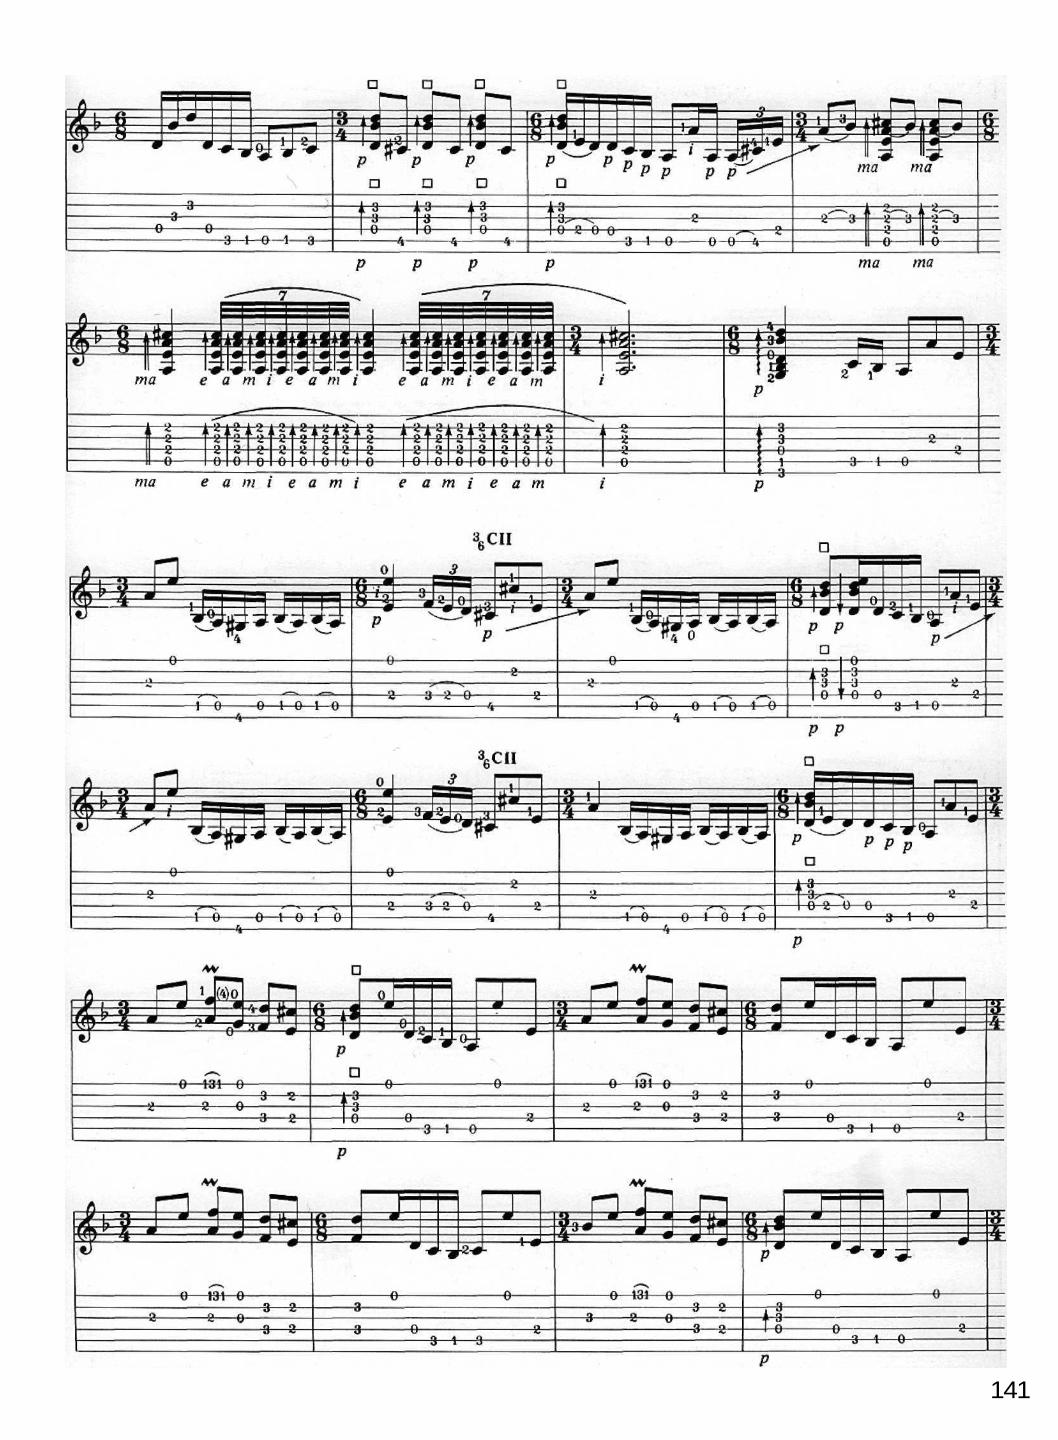
141
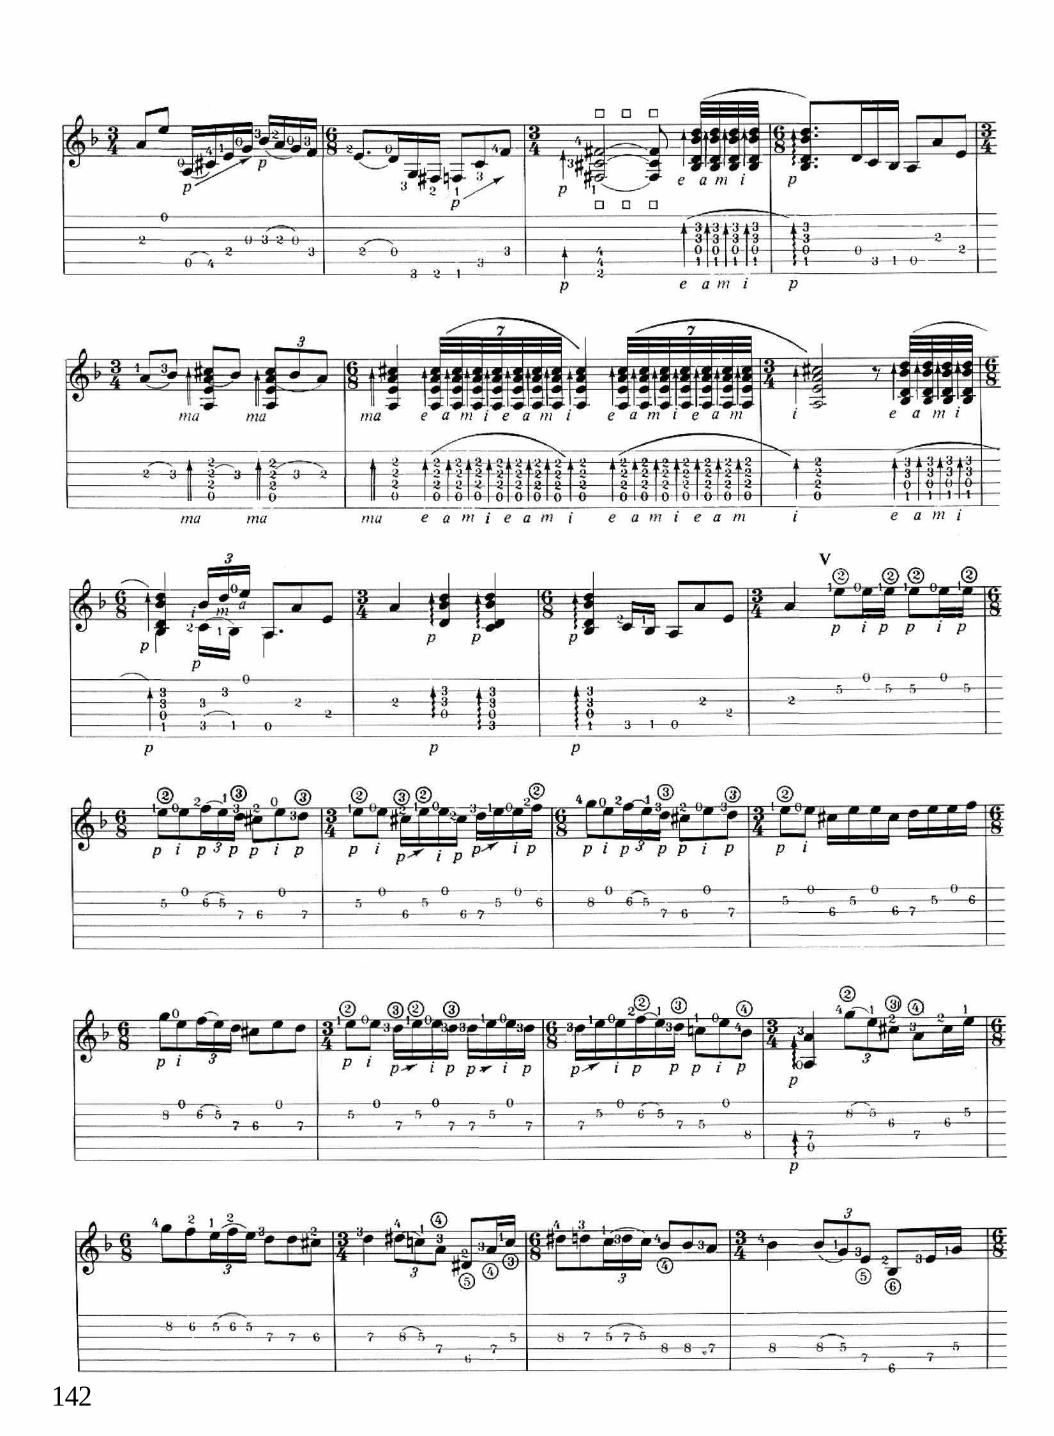
142
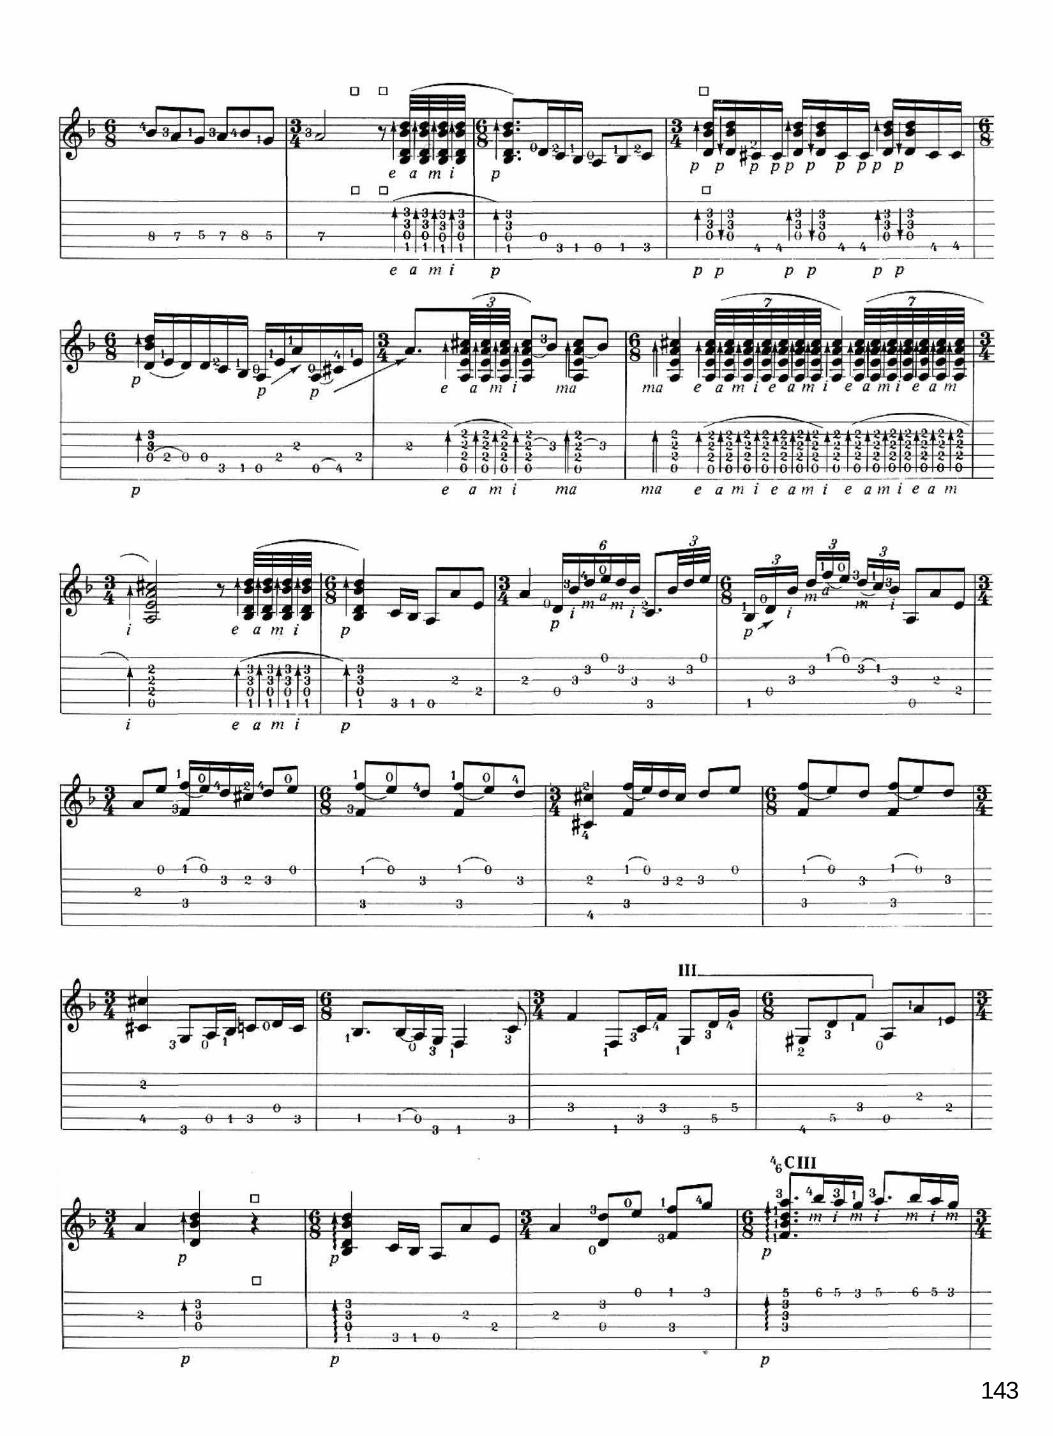
143

144

24. 1 Rafael Romero sings por Seguiriyas.
The relationship between Seguiriyas and SolearesThere is an important relationship between the compos of Seguiriyas and that of Soleares. Possibly it accounts forthe historical derivation of the Seguiriyas.
If you examine the compas of Seguiriyas carefully, you will find that the pattern of accentuation imposed on the12 half-beats in the compas is the same as the pattern in the basic 12-beat compas of Soleares. The difference isthat there has in effect been a shifting along of the accents so that beat 1 of Seguiriyas corresponds to beat 8 ofSoleares. Starting from the 'and' after the count 3 in Seguiriyas and repeating the whole compas again we see thatthe compas of Soleares emerges as follows;
Seguiriyas COMPAS
145
Soleares COMPAS

LESSON 25 Bulerias
The following solo for Bulerias begins in the Phrygian mode in por medio, modulates (i.e. changes key) to A minorand finishes in A major. Included among the falsetas and rasgueo sequences in these three keys are some newpatterns of syncopation. All of them still fit within the basic framework of the repeating 12-beat compos. Theyprovide further illustration of the many rhythmic variations which may be performed in this exciting toque. Thistime, the solo starts with a fa/seta, on the count of 1 in the compas.
BULERIAS Cejilla at 2nd Fret
146

147

148

149
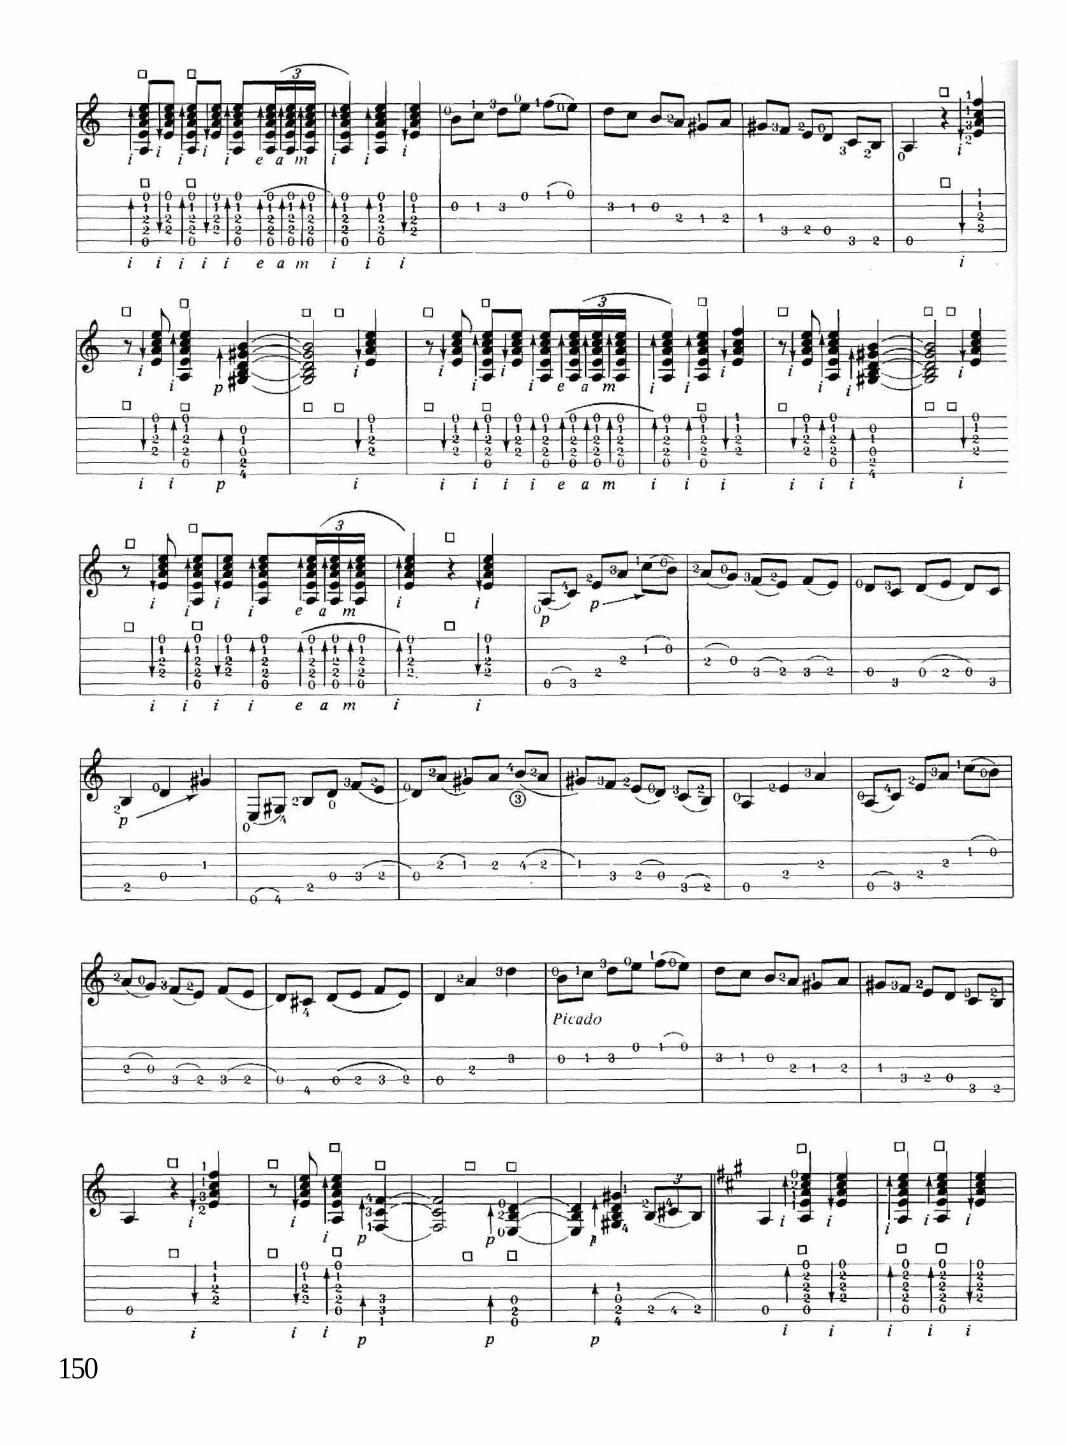
150

151

152

LESSON 26 Daily Exercises
Several exercises in the book have already been recommended as good for practising every day, however advancedyou are. Some more are included here to help develop good basic techniques and also as a 'warm-up' for thehands when you first pick up your guitar.
Since your time for practice is likely to be limited, it is worth outlining first some general principles about howto make the most effective and rewarding use of whatever time you have. However high you have set your sights,whether you just want a modest degree of skill or are aiming for an advanced or even professional standard,your progress will be faster and further in the time available if your practice is purposeful and organised, withsome definite aims in mind each time you play.
Principles of effective practice1. StartingYour hands need time to warm up, so it is important not to try to play at full speed and strength straight away.Build up slowly. Too sudden an exertion can strain muscles and tendons.
2. Directed energy: learning to relaxWhen you first try to achieve the muscular strength and coordination needed for Flamenco, it is natural to beinclined to apply your efforts in a general and rather undirected way. As a result, tension is likely to build up,perhaps without your being aware of it, in muscles in neighbouring and more distant parts of the body whichshould not be involved in the movement required. This misdirection of effort can be a bar to progress.
Effective practice actually involves learning which muscles to relax, no less importantly than which musclesto contract.
One learns to apply energy in an increasingly selective way, bringing the focus of effort into the hands and theexactly appropriate and most economical movement of the fingers. Less and less energy is wasted in irrelevantmovements and muscles which should be relaxed if the focussed energy is to have most effect.
After hard practice, the muscles involved in the techniques you have been working on may ache from theexertion, particularly in the left hand fingers and the forearm muscles. Such discomfort is good evidence thatyou have been extending their power, but discomfort elsewhere in the body or a general feeling of tiredness andstrain should warn you that energy is being misdirected, A good posture of the back and shoulders is especiallyimportant.
If you direct your energies accurately to where they are needed, practice becomes a fascinating exercise incoordinating thought and action. It should never be a dreary chore of laborious and mindless repetition. Timespent in purposeful practice will be generously repaid by progress, in very fair proportion to the amount of timeyou can devote to it.
3. Getting the basic techniques rightYou may well feel by now that the importance of strictly keeping the compas has already been stressed enoughin this book. The same, perhaps, goes for the emphasis on establishing the basic techniques correctly and workingon them slowly and deliberately. Putting these principles into practice, however, demands a lot more than justgrasping them in theory, so you will need to keep coming back to them again and again when you practise.
4. Identifying difficultiesEach exercise or solo will present you with points of special difficulty. Once you have identified them clearly,it is these rather than the easier parts which require the greater part of your time. There is a temptation to rushthrough them and just hope that they will somehow become easier with time. But if you give in to the temptation,you will just be spending time practising your mistakes again and again. Analyse the difficulties carefully and givethem special attention. Stick to a speed at which you can play them through correctly without any hesitation atall in the rhythm.
5. FeedbackThere are several ways of getting feedback information about how your efforts are progressing.
(a) A mirror helps with checking correct posture and the positioning of right and left hands.
(b) A tape-recorder is a stern but helpful critic, especially if you can replay recordings of yourself at both normaland half speed. Wish-fulfilling day-dreams are quickly dispelled by the recorder's hypercritical ear identifyingthe fluffed note and missed beat one had overlooked while playing.
(c) Playing along with the cassette or a metronome, the beat of your foot, a tape-recording of palmas or a recordwill be a great help in pacing the rhythm and in identifying any irregularities in your compas.
153
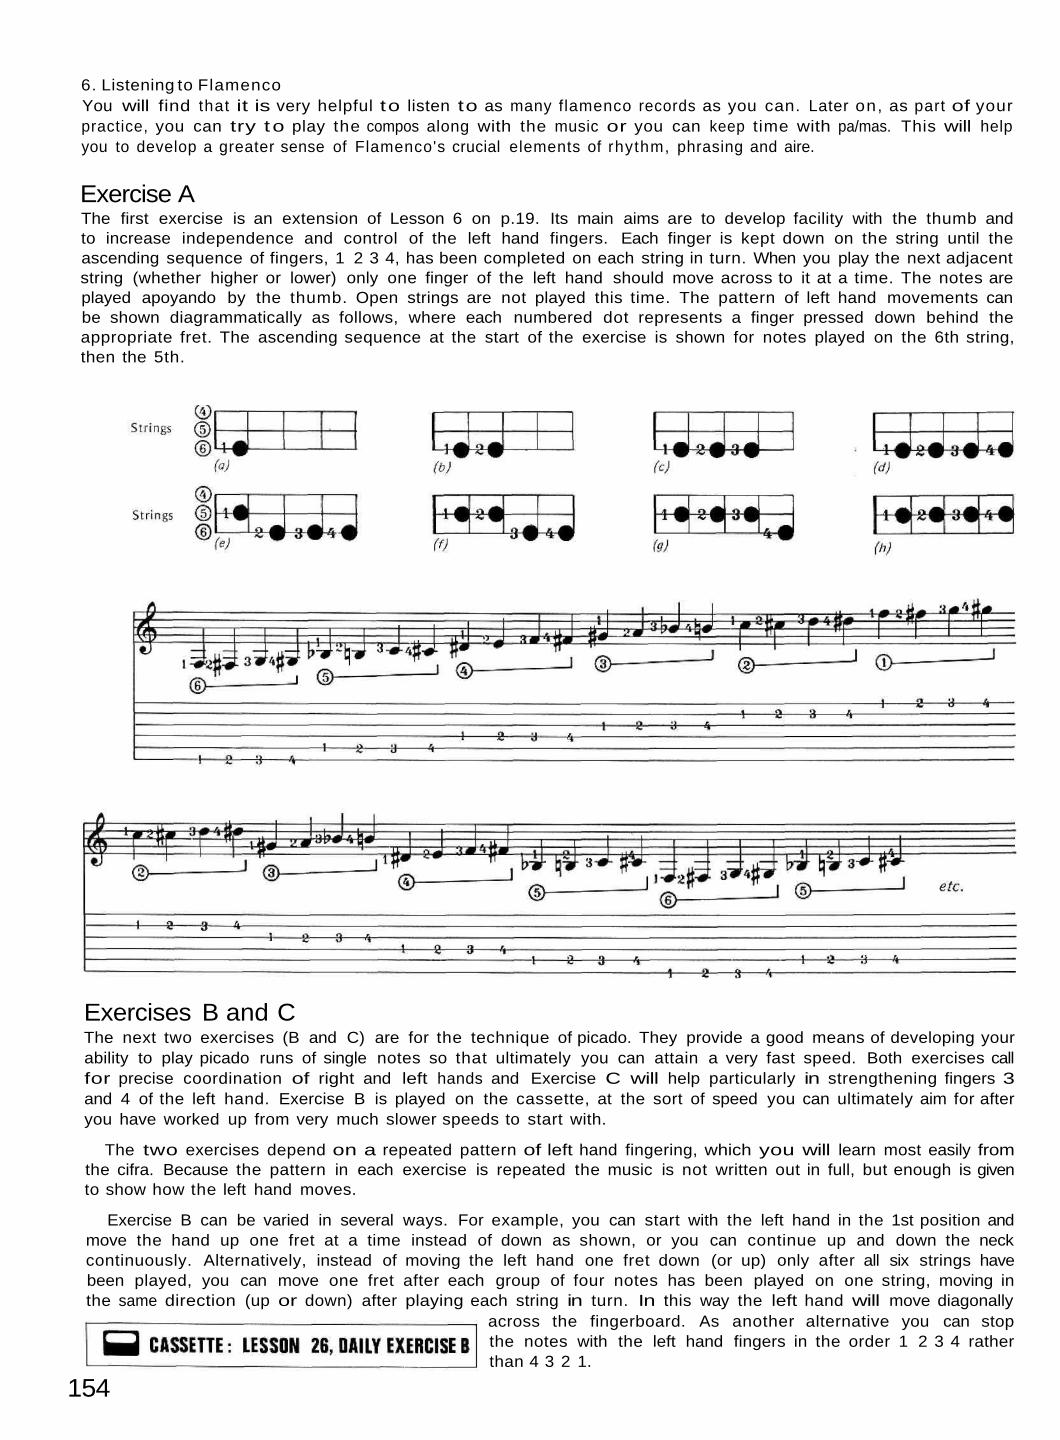
6. Listening to FlamencoYou will find that it is very helpful to listen to as many flamenco records as you can. Later on, as part of yourpractice, you can try to play the compos along with the music or you can keep time with pa/mas. This will helpyou to develop a greater sense of Flamenco's crucial elements of rhythm, phrasing and aire.
Exercise AThe first exercise is an extension of Lesson 6 on p.19. Its main aims are to develop facility with the thumb andto increase independence and control of the left hand fingers. Each finger is kept down on the string until theascending sequence of fingers, 1 2 3 4, has been completed on each string in turn. When you play the next adjacentstring (whether higher or lower) only one finger of the left hand should move across to it at a time. The notes areplayed apoyando by the thumb. Open strings are not played this time. The pattern of left hand movements canbe shown diagrammatically as follows, where each numbered dot represents a finger pressed down behind theappropriate fret. The ascending sequence at the start of the exercise is shown for notes played on the 6th string,then the 5th.
Exercises B and CThe next two exercises (B and C) are for the technique of picado. They provide a good means of developing yourability to play picado runs of single notes so that ultimately you can attain a very fast speed. Both exercises callfor precise coordination of right and left hands and Exercise C will help particularly in strengthening fingers 3and 4 of the left hand. Exercise B is played on the cassette, at the sort of speed you can ultimately aim for afteryou have worked up from very much slower speeds to start with.
The two exercises depend on a repeated pattern of left hand fingering, which you will learn most easily fromthe cifra. Because the pattern in each exercise is repeated the music is not written out in full, but enough is givento show how the left hand moves.
Exercise B can be varied in several ways. For example, you can start with the left hand in the 1st position andmove the hand up one fret at a time instead of down as shown, or you can continue up and down the neckcontinuously. Alternatively, instead of moving the left hand one fret down (or up) only after all six strings havebeen played, you can move one fret after each group of four notes has been played on one string, moving inthe same direction (up or down) after playing each string in turn. In this way the left hand will move diagonally
across the fingerboard. As another alternative you can stopthe notes with the left hand fingers in the order 1 2 3 4 ratherthan 4 3 2 1.
154
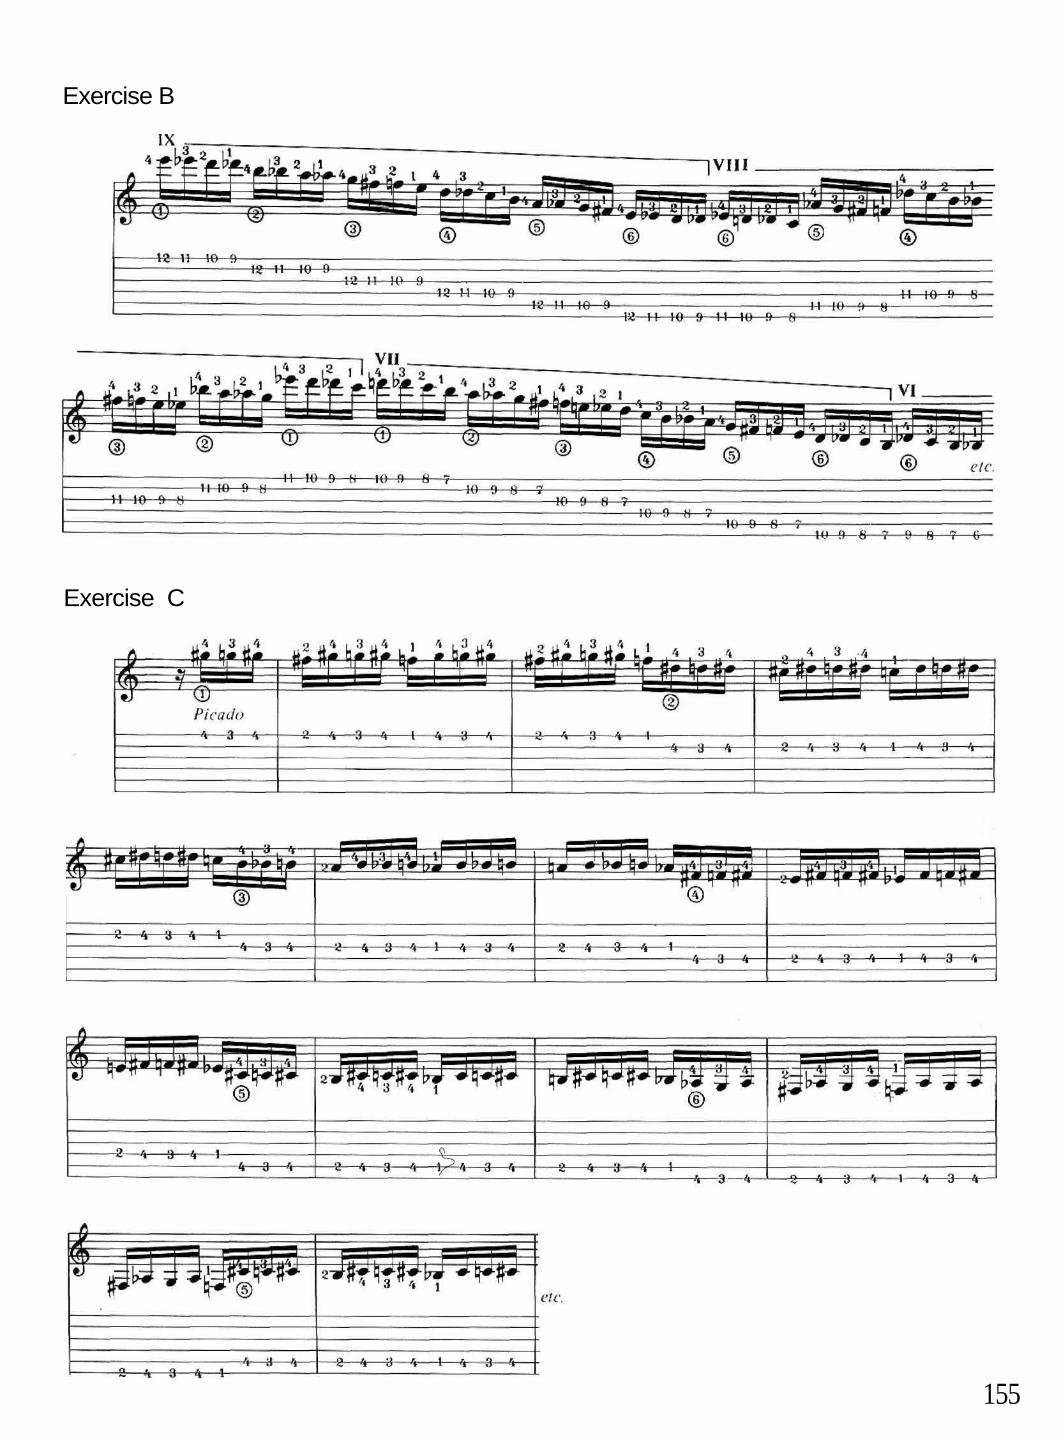
Exercise B
Exercise C
155
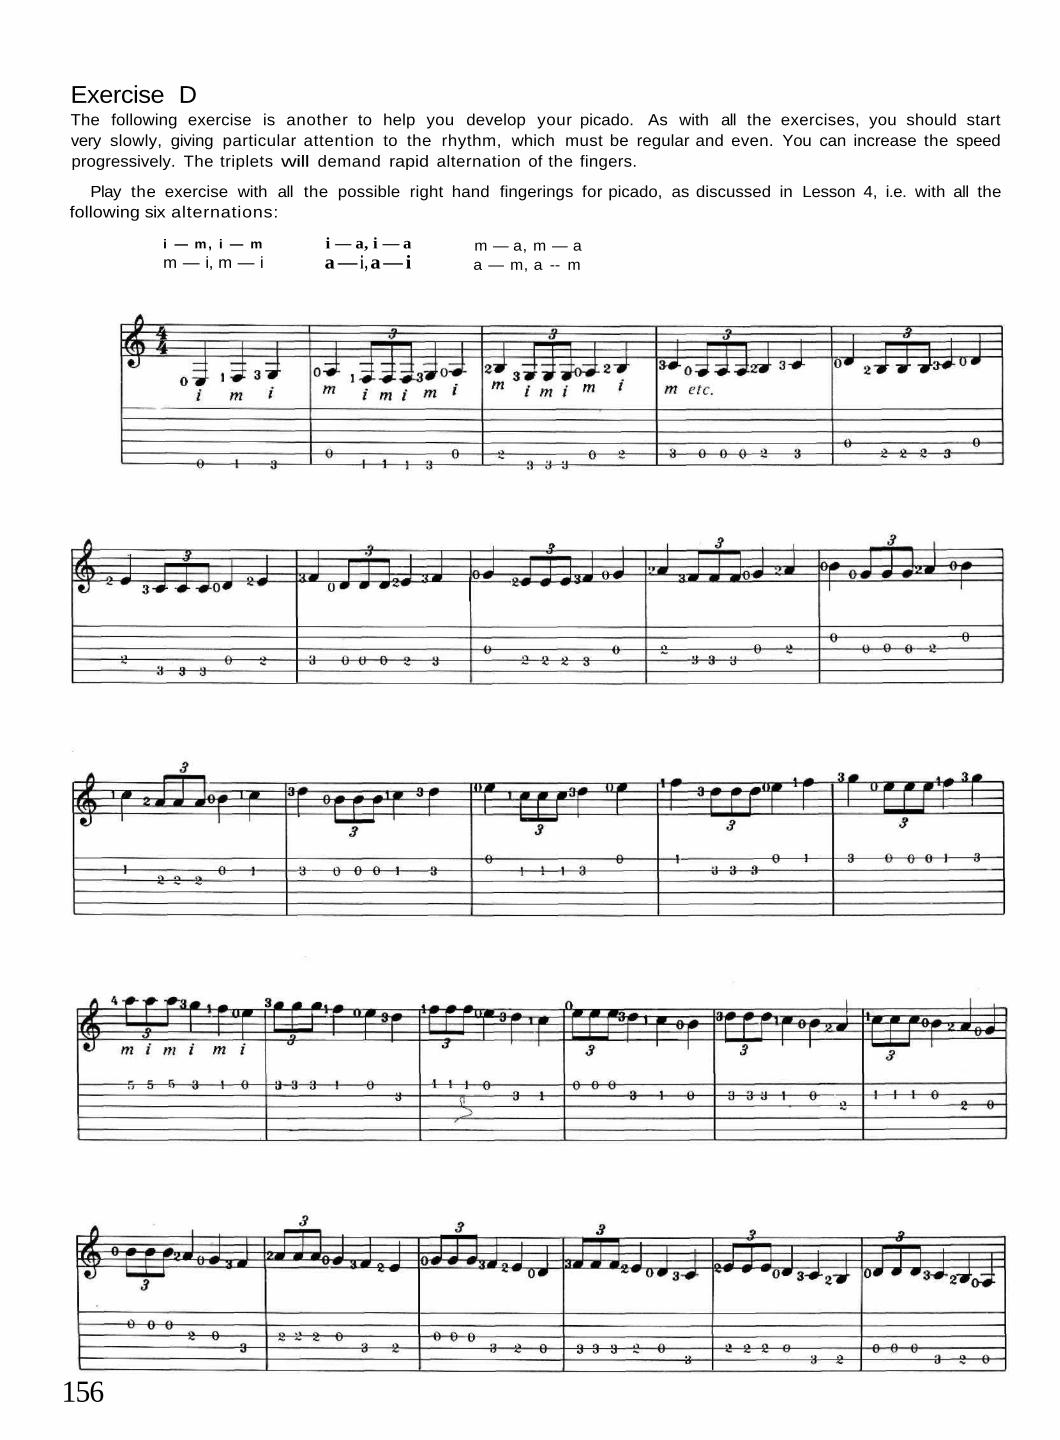
Exercise DThe following exercise is another to help you develop your picado. As with all the exercises, you should startvery slowly, giving particular attention to the rhythm, which must be regular and even. You can increase the speedprogressively. The triplets will demand rapid alternation of the fingers.
Play the exercise with all the possible right hand fingerings for picado, as discussed in Lesson 4, i.e. with all thefollowing six alternations:
i — m, i — m
m — i, m — ii — a, i — aa — i , a — i
m — a, m — aa — m, a -- m
156
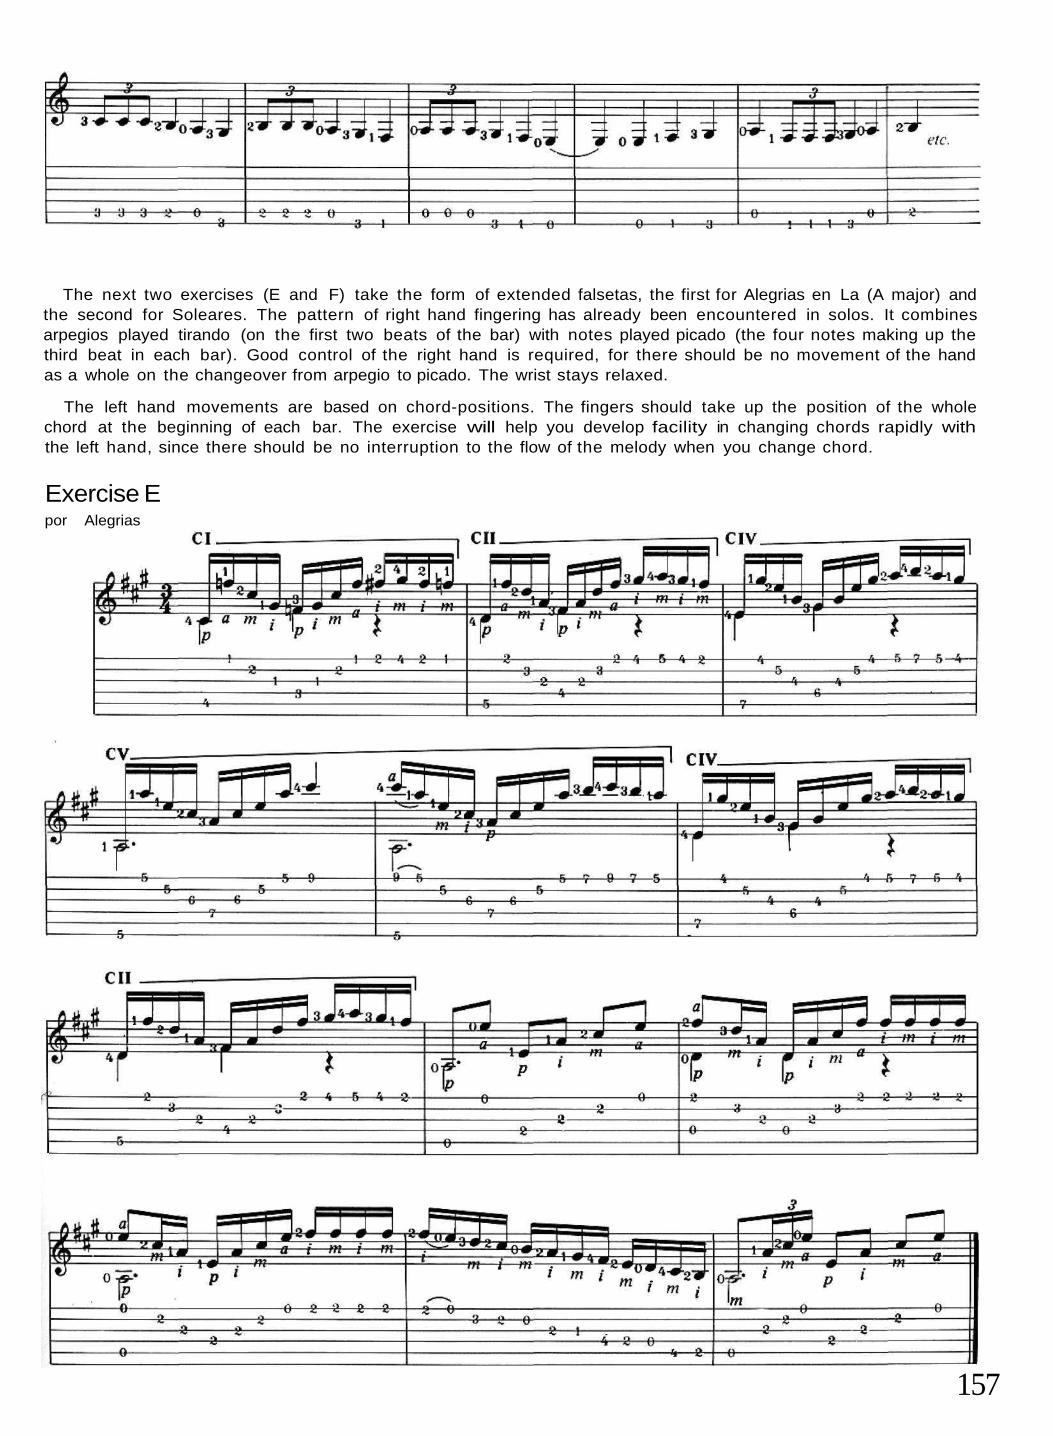
The next two exercises (E and F) take the form of extended falsetas, the first for Alegrias en La (A major) andthe second for Soleares. The pattern of right hand fingering has already been encountered in solos. It combinesarpegios played tirando (on the first two beats of the bar) with notes played picado (the four notes making up thethird beat in each bar). Good control of the right hand is required, for there should be no movement of the handas a whole on the changeover from arpegio to picado. The wrist stays relaxed.
The left hand movements are based on chord-positions. The fingers should take up the position of the wholechord at the beginning of each bar. The exercise will help you develop facility in changing chords rapidly withthe left hand, since there should be no interruption to the flow of the melody when you change chord.
Exercise Epor Alegrias
157
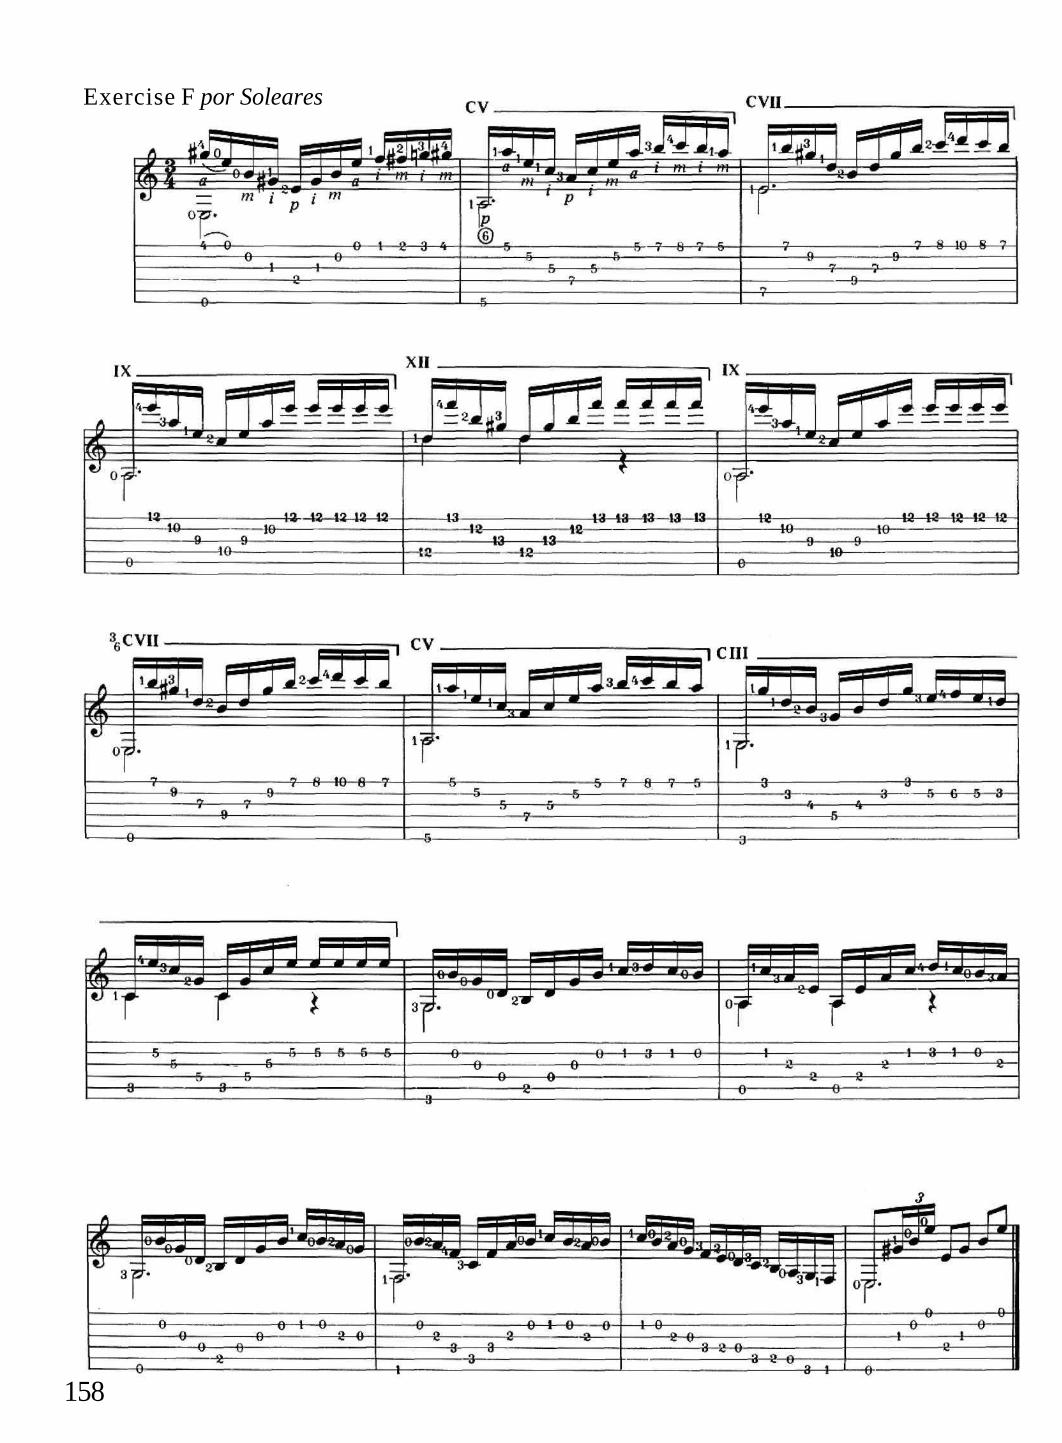
Exercise F por Soleares
158

Exercise GTwo exercises for the daily practice of tremolo were given in Lesson 11. Here is another tremolo falseta, thistime for the Alegrias en La. The lyrical melody must flow very smoothly.
por Alegrias
159
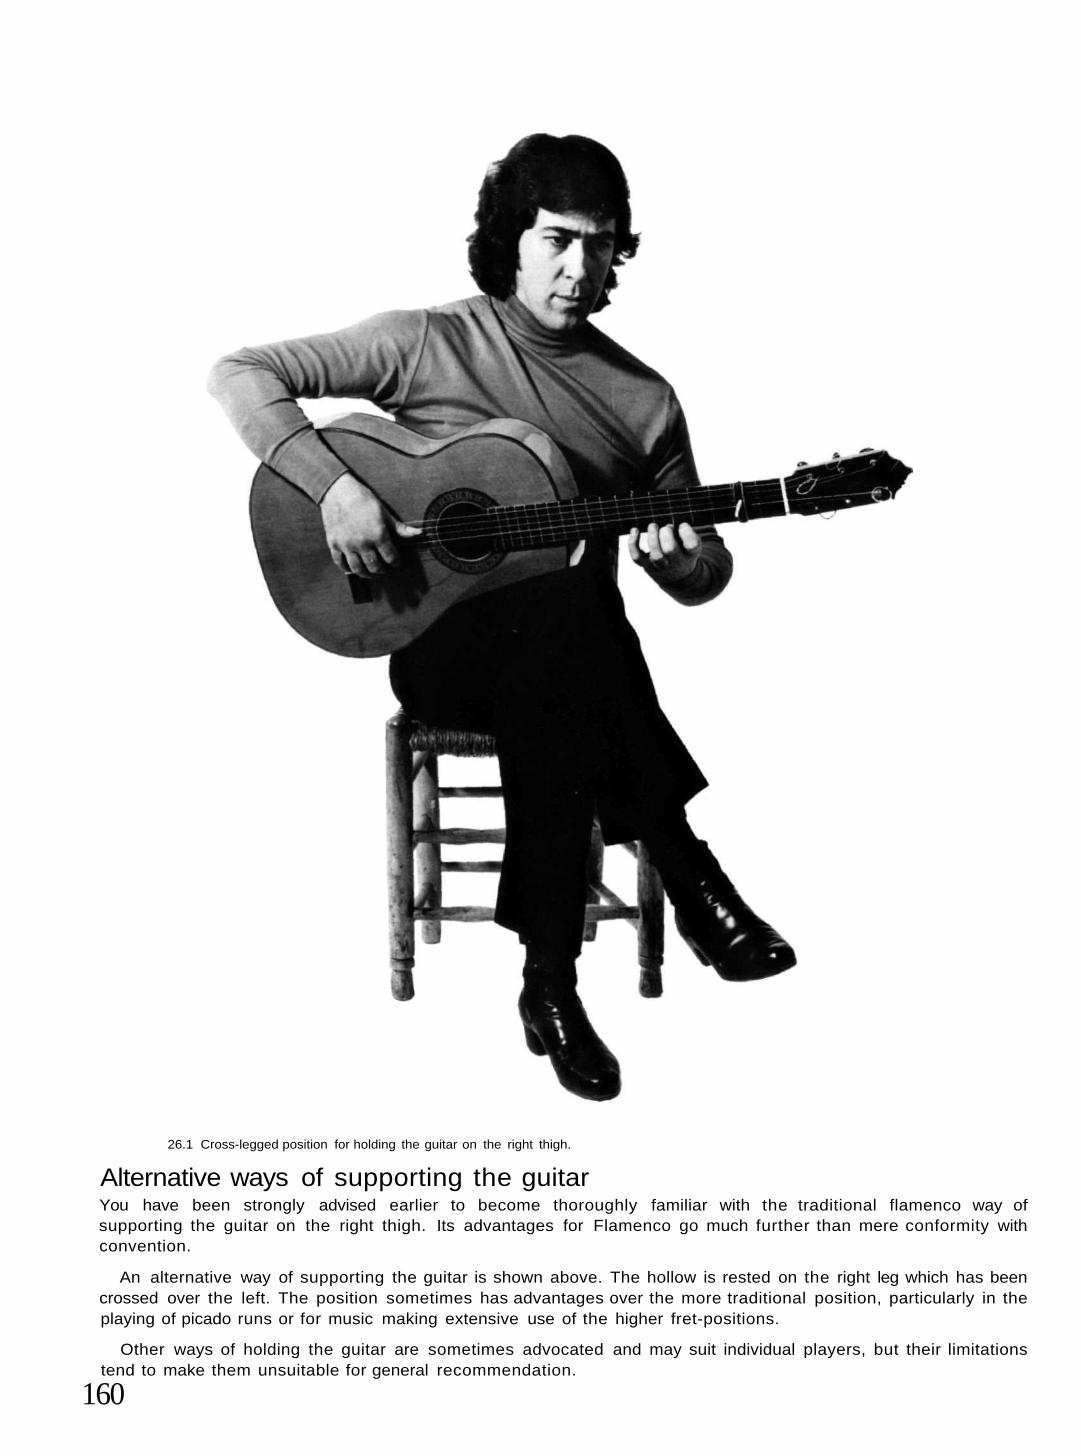
Alternative ways of supporting the guitarYou have been strongly advised earlier to become thoroughly familiar with the traditional flamenco way ofsupporting the guitar on the right thigh. Its advantages for Flamenco go much further than mere conformity withconvention.
An alternative way of supporting the guitar is shown above. The hollow is rested on the right leg which has beencrossed over the left. The position sometimes has advantages over the more traditional position, particularly in theplaying of picado runs or for music making extensive use of the higher fret-positions.
Other ways of holding the guitar are sometimes advocated and may suit individual players, but their limitationstend to make them unsuitable for general recommendation.
26.1 Cross-legged position for holding the guitar on the right thigh.
160
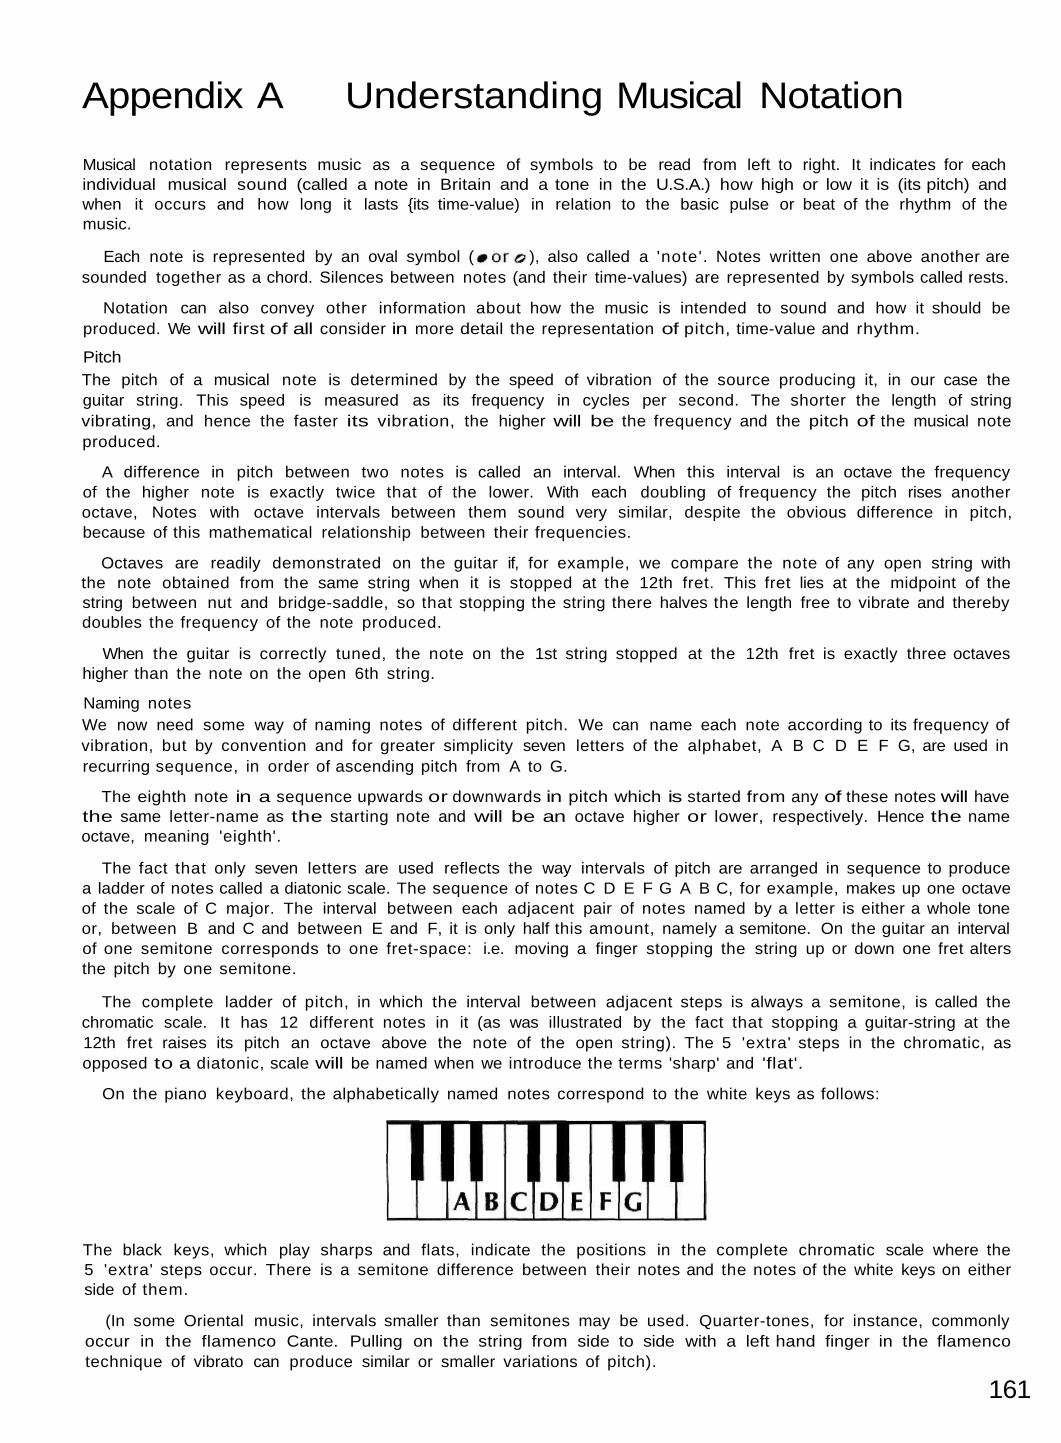
Appendix A Understanding Musical Notation
Musical notation represents music as a sequence of symbols to be read from left to right. It indicates for eachindividual musical sound (called a note in Britain and a tone in the U.S.A.) how high or low it is (its pitch) andwhen it occurs and how long it lasts {its time-value) in relation to the basic pulse or beat of the rhythm of themusic.
Each note is represented by an oval symbol ( ), also called a 'note'. Notes written one above another aresounded together as a chord. Silences between notes (and their time-values) are represented by symbols called rests.
Notation can also convey other information about how the music is intended to sound and how it should beproduced. We will first of all consider in more detail the representation of pitch, time-value and rhythm.
PitchThe pitch of a musical note is determined by the speed of vibration of the source producing it, in our case theguitar string. This speed is measured as its frequency in cycles per second. The shorter the length of stringvibrating, and hence the faster its vibration, the higher will be the frequency and the pitch of the musical noteproduced.
A difference in pitch between two notes is called an interval. When this interval is an octave the frequencyof the higher note is exactly twice that of the lower. With each doubling of frequency the pitch rises anotheroctave, Notes with octave intervals between them sound very similar, despite the obvious difference in pitch,because of this mathematical relationship between their frequencies.
Octaves are readily demonstrated on the guitar if, for example, we compare the note of any open string withthe note obtained from the same string when it is stopped at the 12th fret. This fret lies at the midpoint of thestring between nut and bridge-saddle, so that stopping the string there halves the length free to vibrate and therebydoubles the frequency of the note produced.
When the guitar is correctly tuned, the note on the 1st string stopped at the 12th fret is exactly three octaveshigher than the note on the open 6th string.
Naming notesWe now need some way of naming notes of different pitch. We can name each note according to its frequency ofvibration, but by convention and for greater simplicity seven letters of the alphabet, A B C D E F G, are used inrecurring sequence, in order of ascending pitch from A to G.
The eighth note in a sequence upwards or downwards in pitch which is started from any of these notes will havethe same letter-name as the starting note and will be an octave higher or lower, respectively. Hence the nameoctave, meaning 'eighth'.
The fact that only seven letters are used reflects the way intervals of pitch are arranged in sequence to producea ladder of notes called a diatonic scale. The sequence of notes C D E F G A B C, for example, makes up one octaveof the scale of C major. The interval between each adjacent pair of notes named by a letter is either a whole toneor, between B and C and between E and F, it is only half this amount, namely a semitone. On the guitar an intervalof one semitone corresponds to one fret-space: i.e. moving a finger stopping the string up or down one fret altersthe pitch by one semitone.
The complete ladder of pitch, in which the interval between adjacent steps is always a semitone, is called thechromatic scale. It has 12 different notes in it (as was illustrated by the fact that stopping a guitar-string at the12th fret raises its pitch an octave above the note of the open string). The 5 'extra' steps in the chromatic, asopposed to a diatonic, scale will be named when we introduce the terms 'sharp' and 'flat'.
On the piano keyboard, the alphabetically named notes correspond to the white keys as follows:
The black keys, which play sharps and flats, indicate the positions in the complete chromatic scale where the5 'extra' steps occur. There is a semitone difference between their notes and the notes of the white keys on eitherside of them.
(In some Oriental music, intervals smaller than semitones may be used. Quarter-tones, for instance, commonlyoccur in the flamenco Cante. Pulling on the string from side to side with a left hand finger in the flamencotechnique of vibrato can produce similar or smaller variations of pitch).
161
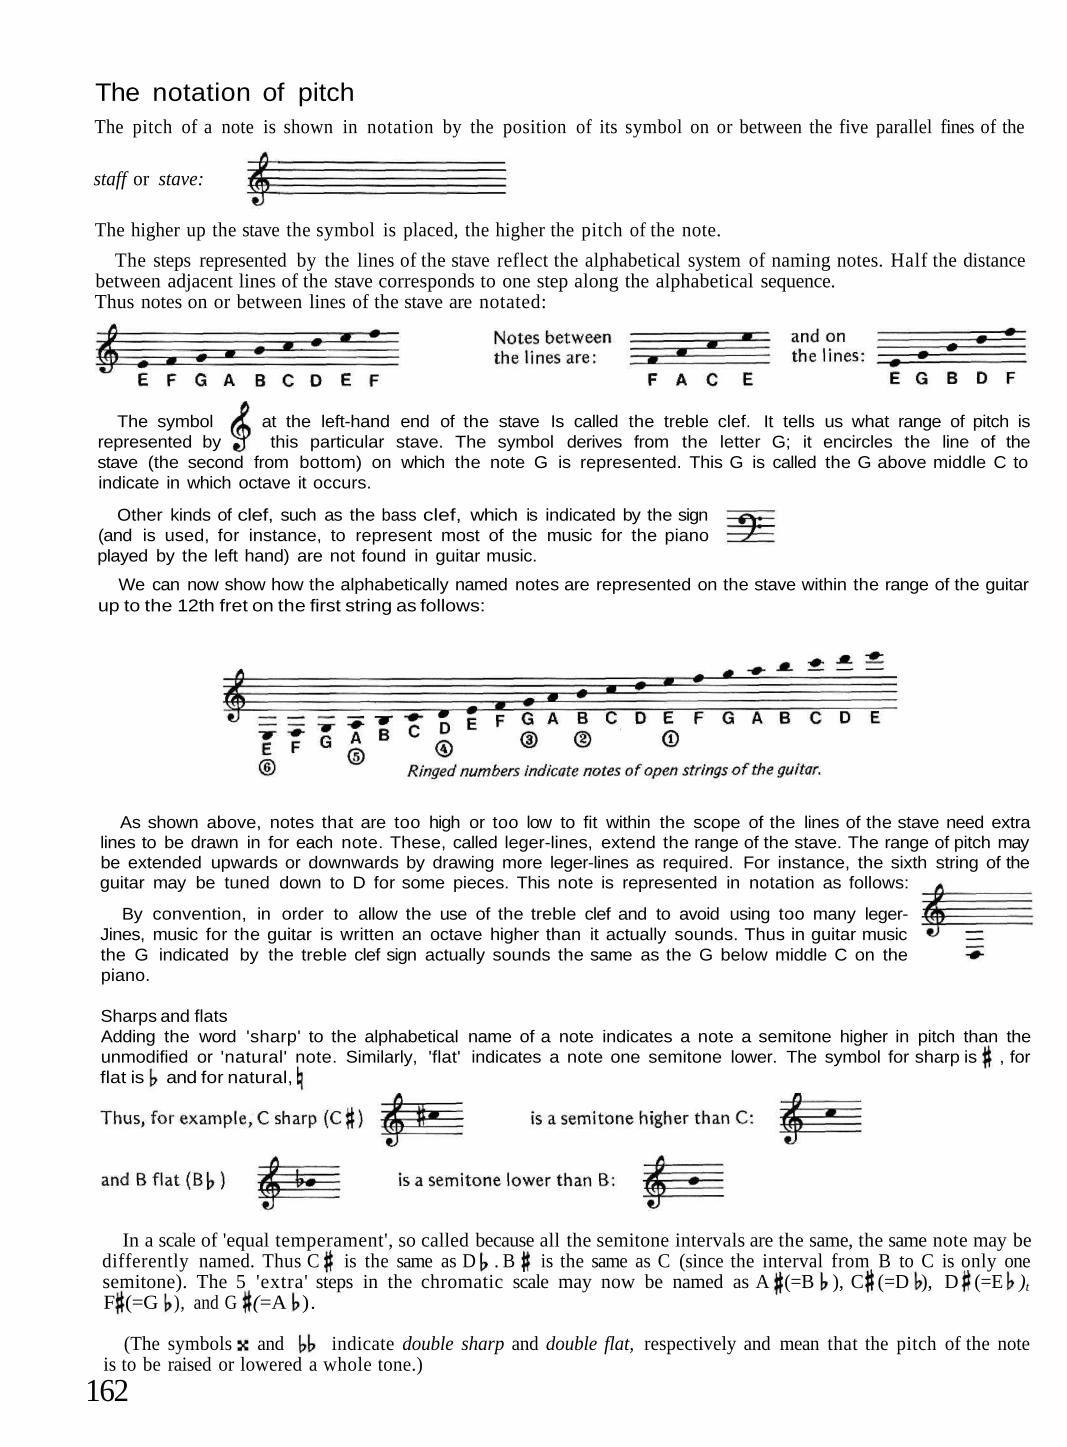
The notation of pitchThe pitch of a note is shown in notation by the position of its symbol on or between the five parallel fines of the
staff or stave:
The higher up the stave the symbol is placed, the higher the pitch of the note.
The steps represented by the lines of the stave reflect the alphabetical system of naming notes. Half the distancebetween adjacent lines of the stave corresponds to one step along the alphabetical sequence.Thus notes on or between lines of the stave are notated:
The symbol at the left-hand end of the stave Is called the treble clef. It tells us what range of pitch isrepresented by this particular stave. The symbol derives from the letter G; it encircles the line of thestave (the second from bottom) on which the note G is represented. This G is called the G above middle C toindicate in which octave it occurs.
Other kinds of clef, such as the bass clef, which is indicated by the sign(and is used, for instance, to represent most of the music for the pianoplayed by the left hand) are not found in guitar music.
We can now show how the alphabetically named notes are represented on the stave within the range of the guitarup to the 12th fret on the first string as follows:
As shown above, notes that are too high or too low to fit within the scope of the lines of the stave need extralines to be drawn in for each note. These, called leger-lines, extend the range of the stave. The range of pitch maybe extended upwards or downwards by drawing more leger-lines as required. For instance, the sixth string of theguitar may be tuned down to D for some pieces. This note is represented in notation as follows:
By convention, in order to allow the use of the treble clef and to avoid using too many leger-Jines, music for the guitar is written an octave higher than it actually sounds. Thus in guitar musicthe G indicated by the treble clef sign actually sounds the same as the G below middle C on thepiano.
Sharps and flatsAdding the word 'sharp' to the alphabetical name of a note indicates a note a semitone higher in pitch than theunmodified or 'natural' note. Similarly, 'flat' indicates a note one semitone lower. The symbol for sharp is , forflat is and for natural,
In a scale of 'equal temperament', so called because all the semitone intervals are the same, the same note may bedifferently named. Thus C is the same as D . B is the same as C (since the interval from B to C is only onesemitone). The 5 'extra' steps in the chromatic scale may now be named as A (=B ), C (=D ), D (=E )t
F (=G ), and G (=A ).
(The symbols and indicate double sharp and double flat, respectively and mean that the pitch of the noteis to be raised or lowered a whole tone.)
162

Systematic rules govern the way symbols for sharp ( ), flat ( ) and natural ( ) are used in notation:
Placed at the left-hand end of each stave, they indicate that all notes in any octave, which are named the same asnotes falling on the line or space they occupy, arc to be played sharp or flat according to the sign used.
For example
and
means that all B's in any octave are to be played as B flat.
means that all F's, C's and G's in any octave are to be played sharp.
C in Bar 1 is sharpenedby an accidental.
B's occur in two octaves in Bars, 2, 3 and 4. The key signature dictates that all areplayed flat. The first two A's and the first two E's in Bar 2 arc played natural; thesecond two of each are flat, In Bar 3, the key signature reasserts itself and A, Cand E are natural.
C (this time ina higher octave)is again sharpened.
Notes available on the guitar fingerboard are shown in notation and named below. The 6 parallel lines beneaththe stave represent in cifra the six strings of the guitar. The numbers on them show the alternative fret-positions ondifferent strings at which the corresponding note may be sounded:
The particular pattern of sharps or flats, which are placed in a standard order on the stave, determines the keysignature of the music and reflects the particular scale on which it is based. (The natural sign may occasionally beplaced within the key signature to draw attention to a change of key.)
Placed immediately to the left of a note in the body of the notation, they are called accidentals. They apply to thatnote and to any other succeeding ones of the same pitch occurring up to but not beyond the next bar-line (avertical line through the stave). They do not apply to similarly named notes in other octaves, which require theirown symbol if they are to be modified in the same way.
The key signature may be over-ridden by a , , or placed to the left of any note in the notation. This iseffective only in the same way already described for other accidentals. The key signature becomes operative againat the start of the next bar and may be re-emphasised by the appropriate symbol to avoid risk of confusion. Anexample illustrates the use of the symbols and :
163
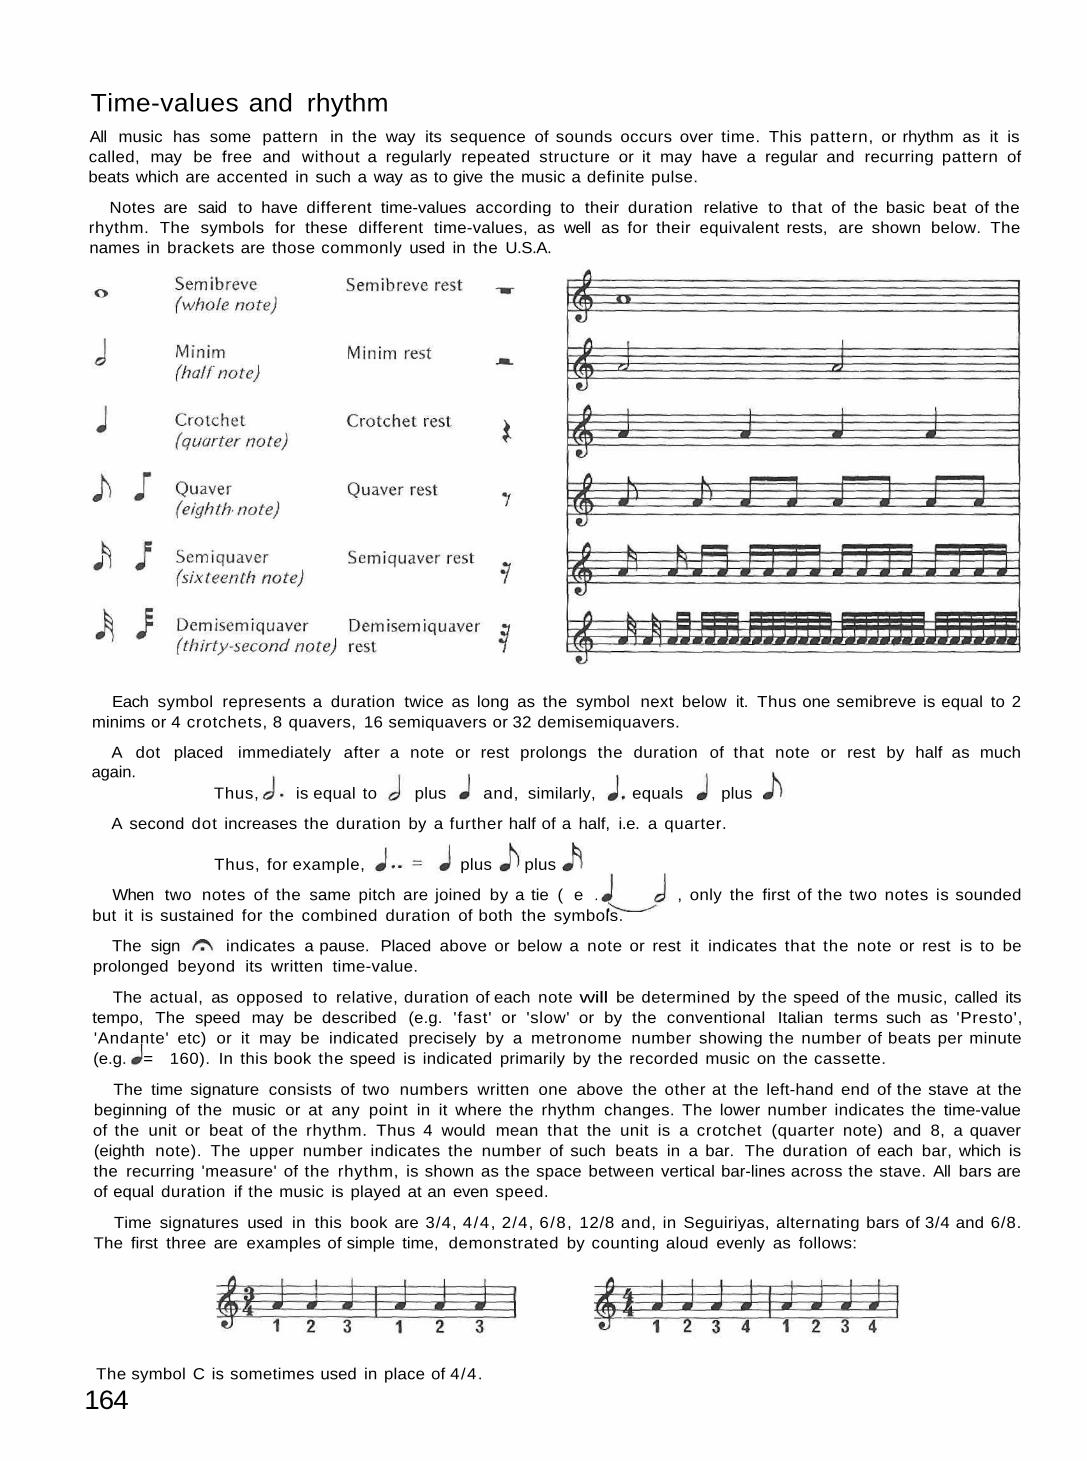
Time-values and rhythmAll music has some pattern in the way its sequence of sounds occurs over time. This pattern, or rhythm as it iscalled, may be free and without a regularly repeated structure or it may have a regular and recurring pattern ofbeats which are accented in such a way as to give the music a definite pulse.
Notes are said to have different time-values according to their duration relative to that of the basic beat of therhythm. The symbols for these different time-values, as well as for their equivalent rests, are shown below. Thenames in brackets are those commonly used in the U.S.A.
Each symbol represents a duration twice as long as the symbol next below it. Thus one semibreve is equal to 2minims or 4 crotchets, 8 quavers, 16 semiquavers or 32 demisemiquavers.
A dot placed immediately after a note or rest prolongs the duration of that note or rest by half as muchagain.
Thus, is equal to plus and, similarly, equals plus
A second dot increases the duration by a further half of a half, i.e. a quarter.
Thus, for example, plus plus
When two notes of the same pitch are joined by a tie ( e . g . : ) , only the first of the two notes is soundedbut it is sustained for the combined duration of both the symbols.
The sign indicates a pause. Placed above or below a note or rest it indicates that the note or rest is to beprolonged beyond its written time-value.
The actual, as opposed to relative, duration of each note will be determined by the speed of the music, called itstempo, The speed may be described (e.g. 'fast' or 'slow' or by the conventional Italian terms such as 'Presto','Andante' etc) or it may be indicated precisely by a metronome number showing the number of beats per minute(e.g. = 160). In this book the speed is indicated primarily by the recorded music on the cassette.
The time signature consists of two numbers written one above the other at the left-hand end of the stave at thebeginning of the music or at any point in it where the rhythm changes. The lower number indicates the time-valueof the unit or beat of the rhythm. Thus 4 would mean that the unit is a crotchet (quarter note) and 8, a quaver(eighth note). The upper number indicates the number of such beats in a bar. The duration of each bar, which isthe recurring 'measure' of the rhythm, is shown as the space between vertical bar-lines across the stave. All bars areof equal duration if the music is played at an even speed.
Time signatures used in this book are 3/4, 4/4, 2/4, 6/8, 12/8 and, in Seguiriyas, alternating bars of 3/4 and 6/8.The first three are examples of simple time, demonstrated by counting aloud evenly as follows:
The symbol C is sometimes used in place of 4/4.
164

The strongest beat, and therefore the main pulse of the rhythm, is normally the first beat of the bar, but this rulevery often does not apply in the written notation of Flamenco.
6/8 is an example of compound time, so called because the bar is divided into two beats (each equivalent to adotted crotchet ) which are further divided into three quavers. The counting is shown as follows (below left):
A bar of quavers in 3/4, although of the same relative duration, has a different pulse (above right). The twodifferent rhythms of 3/4 and 6/8 alternate in the flamenco toque, Seguiriyas.
The compound time of I 2/8 is discussed in the introduction to Tientos in Lesson 17.
Time-values of beats may be combined or subdivided in any way which maintains constant the overall durationof the bar. The notes are grouped together in their notation in ways which preserve as far as possible the organisa-tion of beats in a bar. Thus all the following bars conform to 3/4:
A triplet is shown in the second last bar by the figure 3 above the three notes grouped together. This indicatesthat three notes are played within the duration normally occupied by two of the time-value shown. Other sub-divisions such as quintuplets, sextuplets, and septupfets, in which 5, 6 and 7 notes, respectively, occupy theduration of time normally taken by four of the same time-value are described in the text.
In the notation of Flamenco, the simple time signatures used do not adequately represent the more complexpatterns of accents which occur in the various types of compas described in the text. Accent symbols (> ) may,therefore, be needed to indicate which notes are emphasised. Time signatures, time-values and bars do, however,correctly indicate the duration and grouping of the notes relative to the basic beat of the rhythm.
Music in which the pattern of accentuation differs from the normal is said to be syncopated. In one senseflamenco music may be said to be syncopated to the extent that the basic compas displaces accents from theirnormal positions relative to the bar (but it must be remembered that the imposition of a conventional bar-structureon flamenco music is entirely alien to the essentially aural tradition of Flamenco). A further element of synco-pation may be added when the accents are displaced from their normal positions within the compas. This is calledcontratiempo.
Double bar-lines indicate the end of the music or of a particular sequence of it. In the latter role they may notcoincide with the end of a bar.
Repeats: Passages of music enclosed within repeat signs (above), represented by double bar-lines with two dotsfacing inwards towards the music to be repeated, are played twice.When the ending of the repeated section is played differently on thetwo occasions, this is indicated by the signs shown on the right:The second time through, the music under the bracket numbered 1is omitted and it carries on from 2.
The stems of notes are by convention directed upwards ( ) when the note lies above themiddle of the stave and downwards ( ) when it lies below the middle, in Flamenco,however, the sequence of the melody may be emphasised by writing all the stems upwards.Where the music has two 'voices' with, for instance, a melody on the treble strings and anaccompaniment on the bass strings} each voice may be represented with its own time-valuesfor notes and rests. Where the melody and bass notes coincide, as in the initial bass E of thefollowing ending-phrase from Soleares, both time-values may be shown simultaneously:The upward stems and grouping of the tails of the first four notes indicate that the triplet (occupying half a beat)starts one quaver's duration after the initial E. The lower voice shows the E as a dotted minim, the only note in thebass voice in the bar. This indicates that the sound is allowed to sustain throughout the bar. In guitar music it isoften difficult to show simply how long each note is sustained.
165

In Flamenco, only parts of the music are clearly audible as consisting of two voices. If one or the other voice isabsent throughout a whole bar rests are not written for that bar. Throughout the music in the book complicatedways of representing voicing in the music have been largely avoided since the cassette will help you hear clearlyhow the notes should sound. You will also find it helpful to try to think in terms of left hand chord positions,which in Flamenco are very often held down by the left hand fingers while a melody is built up around the chord.
More symbols: grace-notes and ornamentsIn some of the pieces of music in this book you will sec occasional notes or groups ofnotes written much smaller than the others. These are grace-notes which here indicatean embellishment played very rapidly. You will be able to hear the correct timing fromthe cassette. They must not hold up the compas and as a general rule in this book theyare played before the main beat of the rhythm.
An example of the use of grace-notes is found in the introduction to the Solea inLesson 22 (top right).
There is only one other ornament indicated by a special symbol in this book and thisis the upper mordent. The symbol above a note means that the note is to bealternated once very rapidly with the note next above it in the scale by means of'hammering on' and 'pulling off.
An example of the mordent (right) is seen in Lesson 24.
Flamenco players traditionally name keys according to the tonic sol-fa system, which names the notes of theC major scale as; C D E F G A B C
The key signature of D major is written:
of E major: and of F major:
Not only the first degree (the ionic) but all the other degrees of a scale also have special names. Those ofparticular importance in the chords most commonly used are the 4th degree (the subdominant), the 5th (thedominant) and the 7th (the leading note).
The three sharp notes are indicated by the key signature, which is written as:
Any key which uses the left hand fingering and chord shapes pertaining to C major when the guitar is playedwithout a cejilla is called 'do' by flamencos, even when the cejilla alters the pitch from an actual C.
Any of the 12 different notes in the chromatic scale may be taken as a keynote, the intervals between thedegrees remaining constant for all major scales. Thus a scale of A major contains the notes:
Music based on this scale is said to be in the key of C major. The key signature has no sharps or flats:
ScalesThe starting note of a diatonic scale is called the tonic or keynote. The 8 ascending steps of the scale are numberedfrom it as degrees of the scale as far as the 8th degree which is the octave of the starting note. The number of semi-tones in the intervals between the tonic and each degree defines the character of the scale.
In a major scale, the intervals between degrees of the scale are shown as follows, taking the scale of C major as anexample:
166
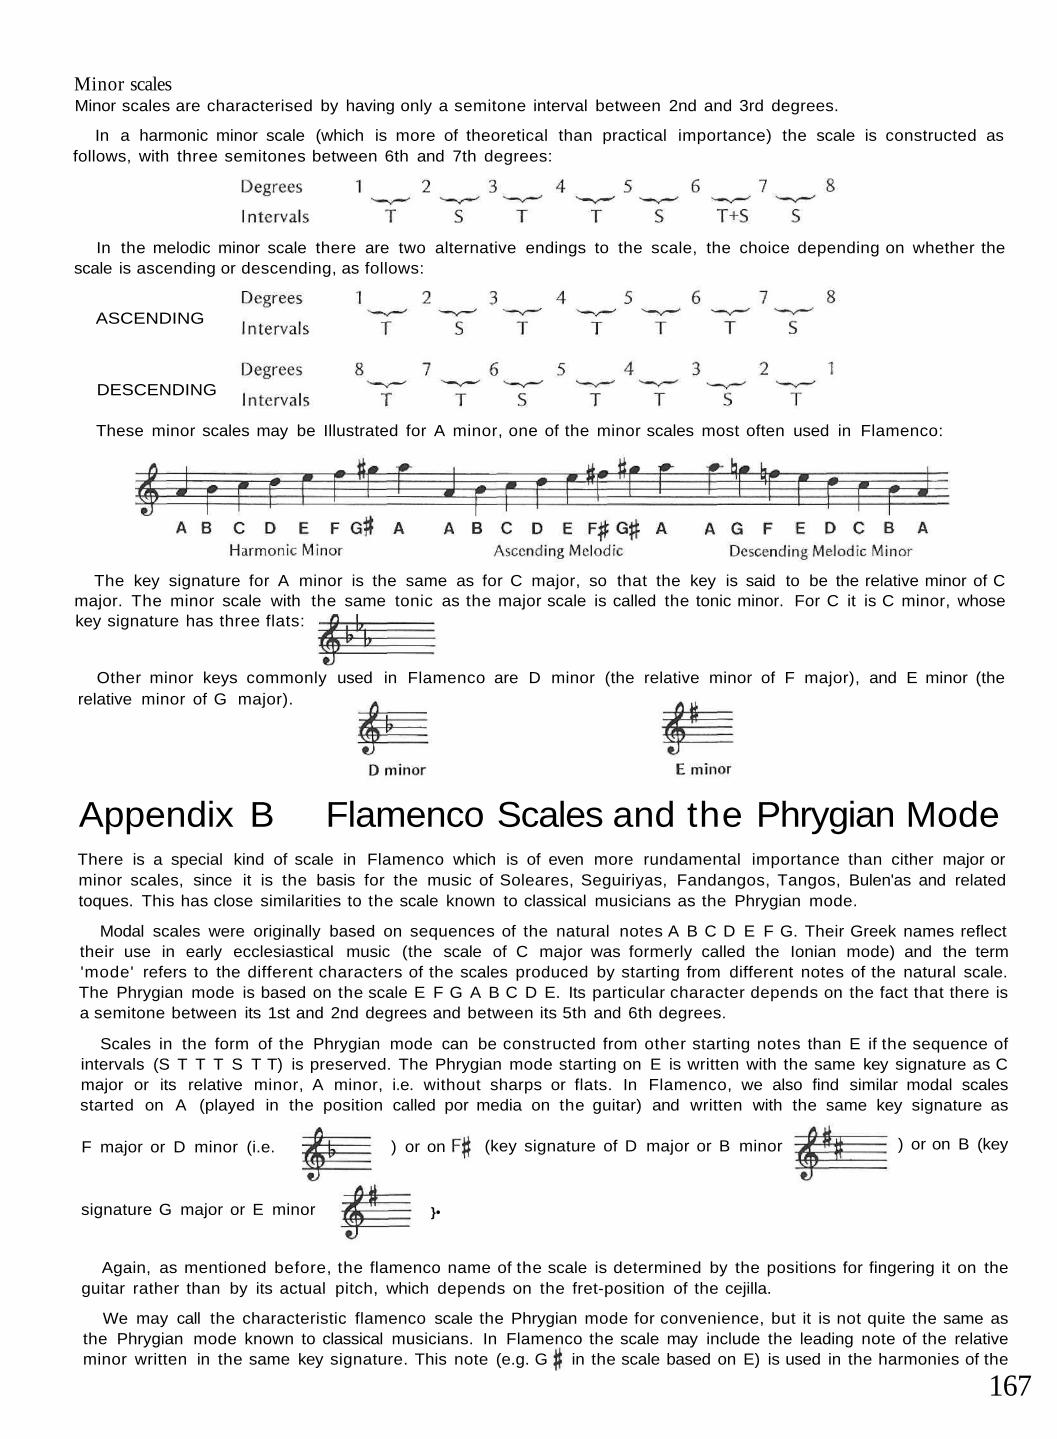
DESCENDING
Appendix B Flamenco Scales and the Phrygian ModeThere is a special kind of scale in Flamenco which is of even more rundamental importance than cither major orminor scales, since it is the basis for the music of Soleares, Seguiriyas, Fandangos, Tangos, Bulen'as and relatedtoques. This has close similarities to the scale known to classical musicians as the Phrygian mode.
Modal scales were originally based on sequences of the natural notes A B C D E F G. Their Greek names reflecttheir use in early ecclesiastical music (the scale of C major was formerly called the Ionian mode) and the term'mode' refers to the different characters of the scales produced by starting from different notes of the natural scale.The Phrygian mode is based on the scale E F G A B C D E. Its particular character depends on the fact that there isa semitone between its 1st and 2nd degrees and between its 5th and 6th degrees.
Scales in the form of the Phrygian mode can be constructed from other starting notes than E if the sequence ofintervals (S T T T S T T) is preserved. The Phrygian mode starting on E is written with the same key signature as Cmajor or its relative minor, A minor, i.e. without sharps or flats. In Flamenco, we also find similar modal scalesstarted on A (played in the position called por media on the guitar) and written with the same key signature as
F major or D minor (i.e.
signature G major or E minor }•
Again, as mentioned before, the flamenco name of the scale is determined by the positions for fingering it on theguitar rather than by its actual pitch, which depends on the fret-position of the cejilla.
We may call the characteristic flamenco scale the Phrygian mode for convenience, but it is not quite the same asthe Phrygian mode known to classical musicians. In Flamenco the scale may include the leading note of the relativeminor written in the same key signature. This note (e.g. G in the scale based on E) is used in the harmonies of the
167
Minor scalesMinor scales are characterised by having only a semitone interval between 2nd and 3rd degrees.
In a harmonic minor scale (which is more of theoretical than practical importance) the scale is constructed asfollows, with three semitones between 6th and 7th degrees:
In the melodic minor scale there are two alternative endings to the scale, the choice depending on whether thescale is ascending or descending, as follows:
These minor scales may be Illustrated for A minor, one of the minor scales most often used in Flamenco:
Other minor keys commonly used in Flamenco are D minor (the relative minor of F major), and E minor (therelative minor of G major).
The key signature for A minor is the same as for C major, so that the key is said to be the relative minor of Cmajor. The minor scale with the same tonic as the major scale is called the tonic minor. For C it is C minor, whosekey signature has three flats:
ASCENDING
) or on (key signature of D major or B minor ) or on B (key

music, which keep returning to the major chord of the starting note. Also, when G is substituted for G in melodicpassages based on the scale from E (i.e. when the 3rd degree is sharpened) the music has a characteristically orientalquality. This is especially pronounced when melodic phrases arc based on the pentatonic scale of 5 notes (e.g.E F G A B). Accidentals are required in the notation to indicate when this note is sharpened or when its equiva-lent in other keys is played (e.g. C in par medio).
Throughout this book the modal type of scale used in many flamenco toques is referred to as the Phrygianmode, although it must be said that the historical reasons for its role in Flamenco are still obscure. The adoption bythe early Church in Spain of Byzantine music may be, as de Falla argued in his writings on Cante Jondo, thedecisive historical event. Early ecclesiastical influences on the development of folk-music may well have beenimportant but the unique characteristics of the scales used in Flamenco suggest that other influences, some gitano,some Islamic, are also likely to have contributed to the evolution of the typical structure of flamenco scales andharmonies. The subject is clearly a large and complex one, beyond the scope of this volume.
Chords and harmonySome simple principles about the use of chords and harmony in flamenco music will now be briefly outlined.
Naming intervalsAs we have seen from the name octave, intervals are named numerically according to the total number of fettersencompassed. Thus A to C (three letters) is a third, A to E (five letters) is a fifth and A to G (seven letters) is aseventh. The numbering is not affected by sharps or flats, depending only on the letter-names of the notes inquestion. The numerical name is, however, qualified according to the number of semitones in the interval. Thusthere arc 4 semitones in a major third (e.g. C to E), 3 In a minor third (e.g. A to C), 7 in a perfect fifth (e.g. C to G),10 in a minor seventh (e.g. G to F), 11 in a major seventh (e.g. C to B). Augmented and diminished are otherqualifying terms used in specific contexts.
Building simple chordsThe simplest three-note chords are called triads. Major triads are built up from a starting note (the roof) togetherwith a major third and a major fifth. Thus the chord of C major contains the notes C E and G. Minor triads aresimilar except that the third is minor, not major. Thus the chord A minor contains A C and E. Notes of the chordmay be doubled or tripled in different octaves. They may also be arranged in alternative orders of pitch to givedifferent inversions of the chord. The most solid and restful sounding of these will be the one where the root is thelowest note.
Chord sequencesIn any major key, whether in Flamenco or elsewhere, the major chord of the tonic is the most important, togetherwith those of the subdominant and the dominant. A fourth note is added to the dominant to make a dominantseventh, so called because the extra note is a minor seventh above the dominant.
In the key of C major, for example, the main chords are C major (the tonic), F major (subdominant) and G7(as the dominant seventh is written). The dominant seventh has a feeling of tension in it, resolved by a return to thetonic, In the key of A minor, the corresponding chords arc A minor, D minor and E7. A minor seventh iscommonly added to the tonic in the progression to the subdominant major chord, as in the sequence C C7 F.
In flamenco music based on the Phrygian type of modal scale the chord to which the music tends repeatedly toreturn at the end of passages of melody or rhythm is the major chord of the starting note of the scale. There isa very characteristic descending sequence or cadence which provides a basis for both melodic and rhythmicpassages. In the Phrygian mode based on E the cadence is A minor, G major, F major, E major. The minor chord atthe beginning may be replaced by the major chord to which it is the relative minor and this and the other threechords may, in some sequences, have the addition of minor sevenths to give, for example, the sequence C (or C7),G7, F7, E7. Other variants on this basic pattern are common. In the por medio key, corresponding chords are Dminor (or F major), C major (or C7), B (or sometimes B 7) and A (or sometimes A7). In Bulerias, for example,you will find that some composes end on A7 rather than A.
Other passages of the music in the same piece or toque may use alternative progressions derived from the threemain chords of the major key or its relative minor key with the same key signature (e.g. G7, C and F in musicbased on the Phrygian mode starting on E). Such progressions are very common in the accompaniment of theCante or in solo guitar passages based on it.
In recent years more complex chromatic harmonics and jazz-influenced chord substitutions, augmented anddiminished chords and chords with added major 7th, 6th or 9th have been introduced into Flamenco. Someembellished chords of this type belong to the earliest traditions of Flamenco. A discussion of their use is beyondthe scope of the present volume, but any such chords in the music included here are mentioned in the text (e.g.the chord of F major 7 with FACE played in the First Soleares).
168

Basic chord positions of the left handAn essential part of the f lamenco guitar ist 's knowledge of his ins t rument is the ability to play chords in theirdifferent inversions up and down the f ingerboard. The chord diagrams below show some basic pa t te rns of left handfingering. On the left of the page, each basic pat tern is shown in the nut posi t ion. The line of diagrams to the rightof each basic shape shows examples of how the same chord shape can be played in higher fret-posit ions or withslight modif icat ion to provide a variety of o ther chords . There are, of course , many more chords and harmonies inFlamenco than can be shown here, but those given il lustrate some of the commones t shapes adopted by the lefthand.
MAJOR CHORDS
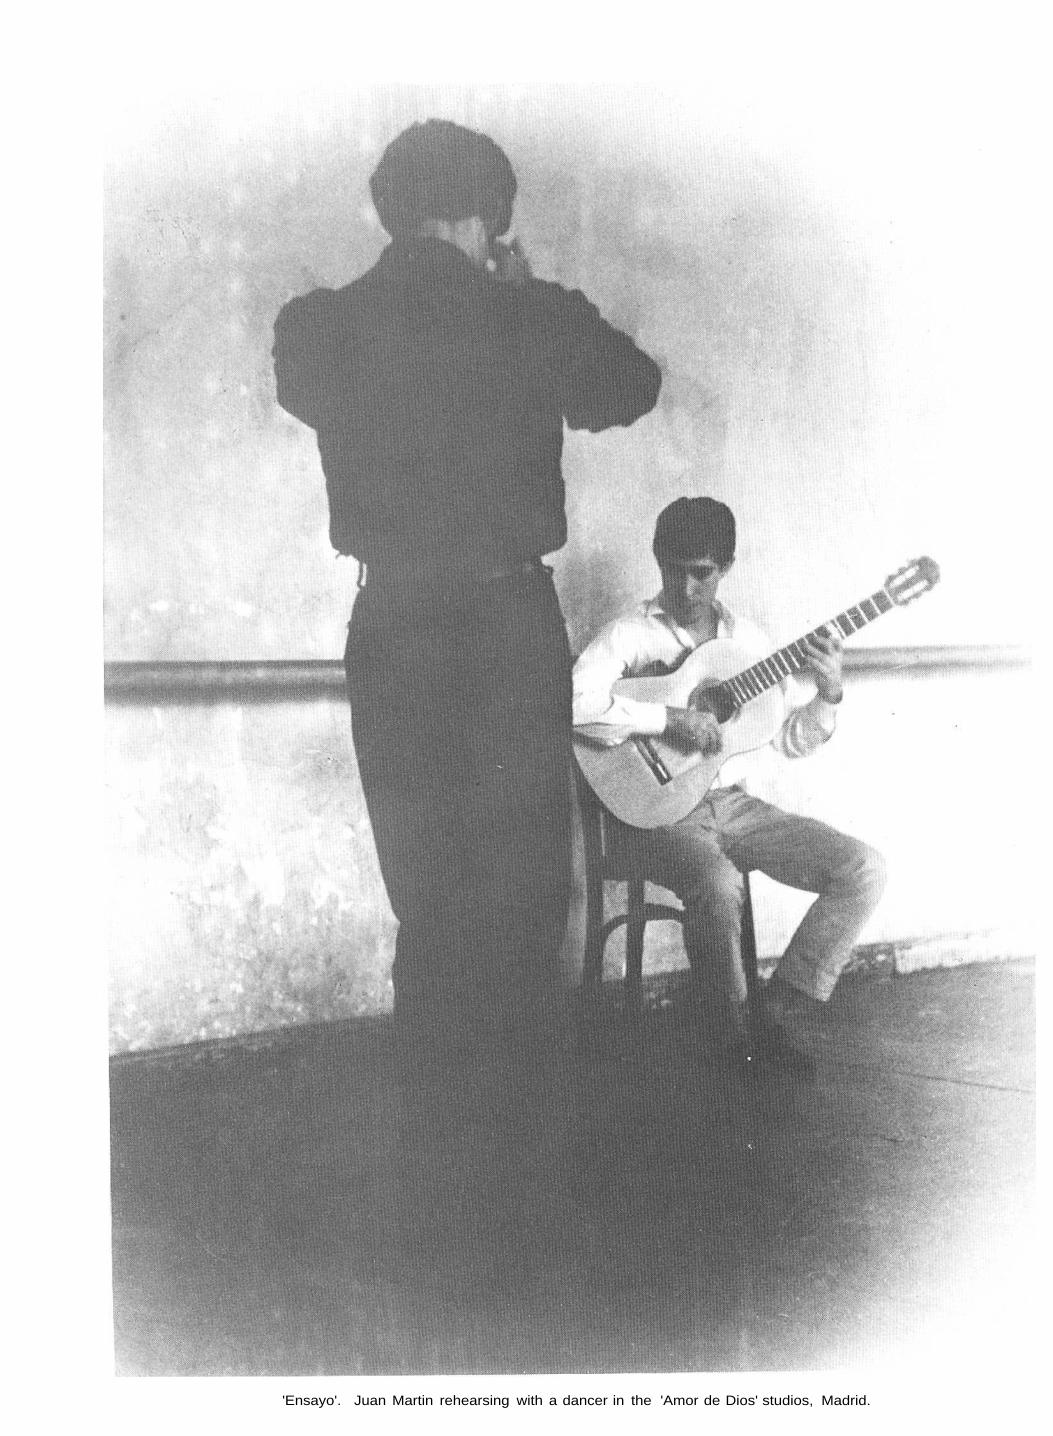
'Ensayo'. Juan Martin rehearsing with a dancer in the 'Amor de Dios' studios, Madrid.