kaiser p6 r8 basic navigation user guide v1.1.doc.pdf
TRANSCRIPT

NFS Kaiser
P6 r8: User Guide
Version 1.1
June 19, 2011
NOTE: P6 r8 is the “browser‐based” version of Oracle/Primavera P6 scheduling and resource
management product. This provides the basic navigation and schedule management overview to
facilitate the transition from the P6 “Client” application user interface to this latest release of the
product. It includes Dashboard and Project Schedule Management. (Resources, Portfolios, and Reports
are excluded from this guide.) Note that this guide can only cover some of the basic features and
functionality. P6 r8 offers much more than what is covered in this guide which is only intended to get
users familiar with this new interface.

P6 r8 User Guide NFS Kaiser
1
Contents
1 Login and Basic Navigation .......................................................................................... 3
1.1 Launch P6 Web ...................................................................................................... 3
1.2 Login ...................................................................................................................... 3
1.3 Dashboards, Projects, and Resources .................................................................... 5
1.4 Setup User Preferences ......................................................................................... 7
2 Manage Dashboards ................................................................................................. 10
2.1 Assign/Remove Dashboards from View............................................................... 10
2.2 Dashboard Portlets .............................................................................................. 12
2.3 Dashboard Features ............................................................................................ 14
2.4 Create a New Dashboard ..................................................................................... 15
3 Schedule Development ............................................................................................. 18
3.1 Create Project Schedule ...................................................................................... 18
3.2 View/Edit Project Data ........................................................................................ 20
3.2.1 General Tab ................................................................................................... 20
3.2.2 Check Project Preferences ............................................................................. 21
3.2.3 Enter Project Notebook Topics ...................................................................... 21
3.2.4 Enter Project Codes ....................................................................................... 23
3.3 Add/Update Activities ......................................................................................... 24
3.3.1 Update Toolbars ............................................................................................ 24
3.3.2 Add WBS and Activities ................................................................................. 25
3.3.3 Update Activity Duration ............................................................................... 26
3.3.4 Add/Modify Relationships ............................................................................. 26
3.3.5 Add Activity Constraints ................................................................................ 28

P6 r8 User Guide NFS Kaiser
2
3.3.6 Additional Project Data ................................................................................. 29
3.3.7 Calculate the Schedule .................................................................................. 29
4 Project Workspace .................................................................................................... 31
4.1 Customize Project Workspace ............................................................................. 31
5 Project Baseline ......................................................................................................... 34
5.1 Create Baseline .................................................................................................... 34
5.2 Assign Baseline .................................................................................................... 35
6 Project Progress Updates .......................................................................................... 36
6.1 Enter Actuals ........................................................................................................ 36
7 Activity Views ............................................................................................................ 37

P6 r8 User Guide NFS Kaiser
3
1 Login and Basic Navigation
1.1 Launch P6 Web Using Internet Explorer 7.0 or 8.0, access the LoadSpring web site.
Java 6, Update 20+ (check for appropriate version) is required to run Primavera P6
release 8. The Java Runtime Environment (JRE) will install the first time you launch
P6 Web. P6 r8 is not supported with older versions of Java.
Allow Pop‐ups for P6 Web site. (Tools, Pop‐up Blocker, Turn‐off Pop‐up Blocker).
If you installed non‐standard toolbars (Yahoo, Google, etc.) , check these
too.
1.2 Login 1. Enter Username and Password. Click “Login”. (u/n and p/w should match the
LoadSpring login credentials).

P6 r8 User Guide NFS Kaiser
4
P6 r8 User Guide NFS Kaiser
5
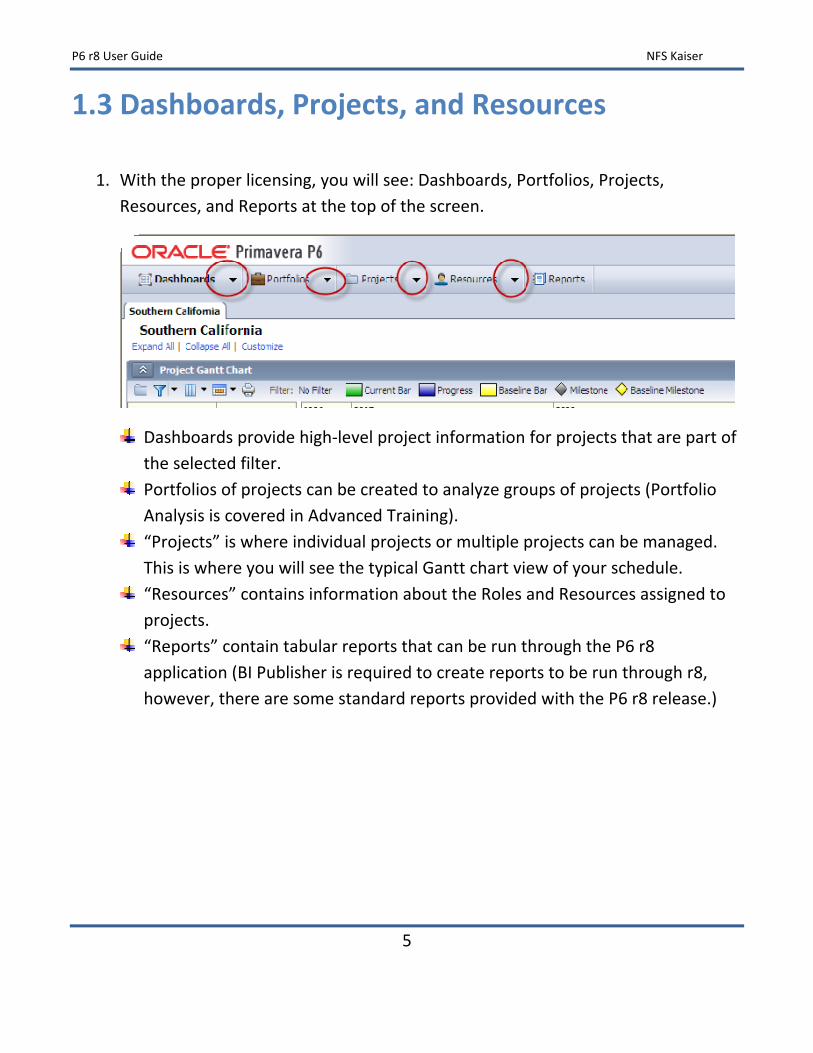
1.3 Dashboards, Projects, and Resources
1. With the proper licensing, you will see: Dashboards, Portfolios, Projects,
Resources, and Reports at the top of the screen.
Dashboards provide high‐level project information for projects that are part of
the selected filter.
Portfolios of projects can be created to analyze groups of projects (Portfolio
Analysis is covered in Advanced Training).
“Projects” is where individual projects or multiple projects can be managed.
This is where you will see the typical Gantt chart view of your schedule.
“Resources” contains information about the Roles and Resources assigned to
projects.
“Reports” contain tabular reports that can be run through the P6 r8
application (BI Publisher is required to create reports to be run through r8,
however, there are some standard reports provided with the P6 r8 release.)
P6 r8 User Guide NFS Kaiser
6
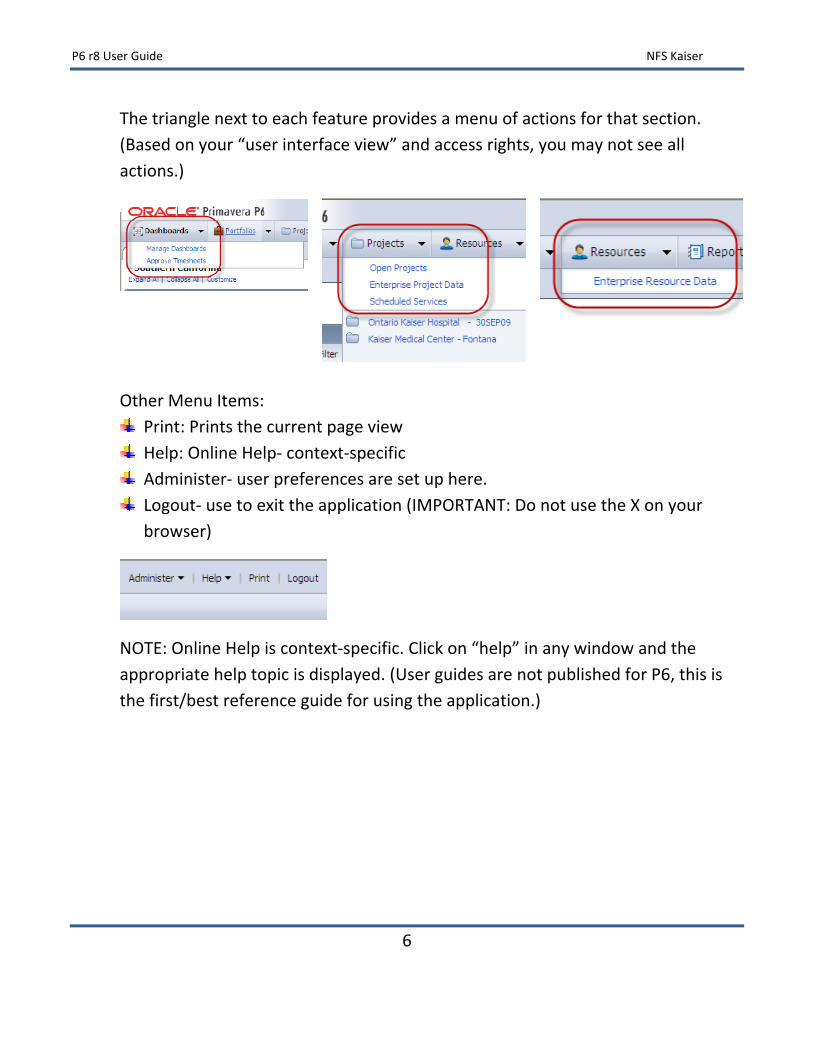
The triangle next to each feature provides a menu of actions for that section.
(Based on your “user interface view” and access rights, you may not see all
actions.)
Other Menu Items:
Print: Prints the current page view
Help: Online Help‐ context‐specific
Administer‐ user preferences are set up here.
Logout‐ use to exit the application (IMPORTANT: Do not use the X on your
browser)
NOTE: Online Help is context‐specific. Click on “help” in any window and the
appropriate help topic is displayed. (User guides are not published for P6, this is
the first/best reference guide for using the application.)

P6 r8 User Guide NFS Kaiser
7
1.4 Setup User Preferences 1. Setup User Preferences‐ Select “Administer, My Preferences”.
You will see three tabs‐ Global, View, and Password.

P6 r8 User Guide NFS Kaiser
8
2. You will need to “save” most changes made in the P6 Web application. In most
cases you will be prompted to save your changes, but make it a practice to Save
or Save and Close before exiting a screen.
This is the recommended user default setting for the Date Format.

P6 r8 User Guide NFS Kaiser
9
These are the recommended settings for displaying Time Units and Currency. These are all “user” preferences which can modified if the project requirements change.
Time Units are associated with resource assignments. Planned and/or Actual hours worked on an activity.
Durations are activity durations,
generally displayed in days. Units/Time is checked for
units/duration, for example 4 hours/day or 8 hours/day.
Show Unit or Duration label helps
to know the units used. For example, 8h or 5d would mean (8 hours or 5 days).
Uncheck “Show decimal places” to
allow dollar values to fit in some of the reports.
3. Click “Save and Close” to save your changes.

P6 r8 User Guide NFS Kaiser
10
2 Manage Dashboards
2.1 Assign/Remove Dashboards from View Each user should be setup with at least 1 dashboard prior to logging in. If you do not
have any dashboards displayed, you will see this message.
Click on “Manage Dashboards” where listed above, or use the Dashboards menu
and click “Manage Dashboards”.

P6 r8 User Guide NFS Kaiser
11
Click the triangle to expand “Available Dashboards” and check the box for the
Dashboard(s) you would like to see.
Click on “Dashboards” to view the selected (Displayed) dashboard(s).

P6 r8 User Guide NFS Kaiser
12
2.2 Dashboard Portlets The Dashboards Home page displays “portlets” of information about the portfolios,
projects, resources, and activities specific to you. The information you can view is
controlled by licensing and security settings, administrator configuration and user
interface view settings, your assignments to activities, your filtering criteria, and the
customized content and layout you select.
A “portlet” is a distinct web portal “window” that displays specific project
information.
The Southern California dashboard contains the following “portlets” of
information:
1. Project Gantt Chart: Use the Project Gantt Chart portlet to quickly view the status
of projects and review each project's milestones.

P6 r8 User Guide NFS Kaiser
13
2. Project Statistics: Use this portlet to view high‐level project
information
The Dashboard Filter controls which projects are displayed in the Dashboard.
Click the “select” icon to choose Project Code to display projects with the
selected Project Code.

P6 r8 User Guide NFS Kaiser
14
2.3 Dashboard Features All Dashboards feature the same Commands.
Expand or Collapse portlets. Portlets can be expanded or collapsed individually or
all at once.
Other Dashboard functions:
Print the contents of the portlet (not available for all portlets)‐ Gantt Chart and Portfolio view only.
Help‐ context‐specific help for the portlet.
Refresh‐ to refresh the data in the portlet.
Minimize/Maximize the portlet.

P6 r8 User Guide NFS Kaiser
15
2.4 Create a New Dashboard Each user will have the ability to create a dashboard for their own use. It can also be
made available to other users, but not to “all users” (this is a global dashboard).
1. Select the Dashboard Menu and click “Manage Dashboards”.
2. Click “Create Dashboard”.
3. You will use an existing dashboard for your new dashboard. The existing
dashboard is copied and then you will customize it to meet your needs. Select the
existing dashboard and click “OK”.

P6 r8 User Guide NFS Kaiser
16
4. There are 3 tabs of information to create the dashboard. “Content” is the portlets
of information, Layout is how the portlets are ordered and “Access” is which users
can access this dashboard. (A dashboard only formats the information presented,
the projects that are included are based on the dashboard filter selected and
which projects a user can access.)
a. Content‐ Select which portlets of information by checking the boxes. Each
portlet is described in the “Help”.
Enter a Dashboard Title and assign a Dashboard Filter (by Project or Project
Code). When other users are granted access, you will need to indicate if other
users can change the Dashboard Filter. If other users can change the filter, it
will only change for that user, not for others. (This option only appears if other
users are granted access to the Dashboard through the “Access” tab.)

P6 r8 User Guide NFS Kaiser
17
b. Layout consists of “Narrow” or “Wide” and location in the layout. Location
can be changed using the arrows on the right.
c. The Access tab allows a user to make the dashboard available to other
users. (As noted above, only certain users can create “Global”
dashboards”.)
5. Be sure to “Save” your changes.

P6 r8 User Guide NFS Kaiser
18
3 Schedule Development
This provides direction on creating a project. Steps are included for adding and deleting
Work Breakdown Structure (WBS) levels and activities, and adding constraints, as well as
adding/modifying activity relationships.
3.1 Create Project Schedule 1. Click on “Projects” and you will see the “Enterprise Project Structure” which
includes the EPS for all elements/projects for which you have been granted access.
2. Click on “Actions”, “Add”, and “Add Project”.

P6 r8 User Guide NFS Kaiser
19
3. Enter the Required information and select “Create” to create the project.
Project ID: 20‐character “unique”
project identifier
Project Name= Project Title
EPS= Enterprise Project Structure
element
Responsible Manager= OBS‐ drives
security to the project
Planned Start Date‐ defaults to today’s
date
Must Finish by‐ not required, but can be
added later
(*) Indicates a “required” field

P6 r8 User Guide NFS Kaiser
20
3.2 View/Edit Project Data 1. The new project is created. Select the project and click on the “Project Details” tab‐
“General” at the bottom of the screen. These tabs contains the project‐level
information for that project.
3.2.1 General Tab 1. The General Tab is the first tab available. The information entered in the Create
Project process is displayed and can be updated, as needed.

P6 r8 User Guide NFS Kaiser
21
3.2.2 Check Project Preferences 1. Click on the “Set Project Preferences” icon to review and update the “Calculations”,
Defaults” , and other preferences. for the project. Click “Save” or “Save and Close” to
apply any changes.
3.2.3 Enter Project Notebook Topics 1. Select the Notebook tab. Click “Assign Notebook Topic”.

P6 r8 User Guide NFS Kaiser
22
2. Click on the “Description” button. Enter the topic description and click “OK” to
save.
P6 r8 User Guide NFS Kaiser
23
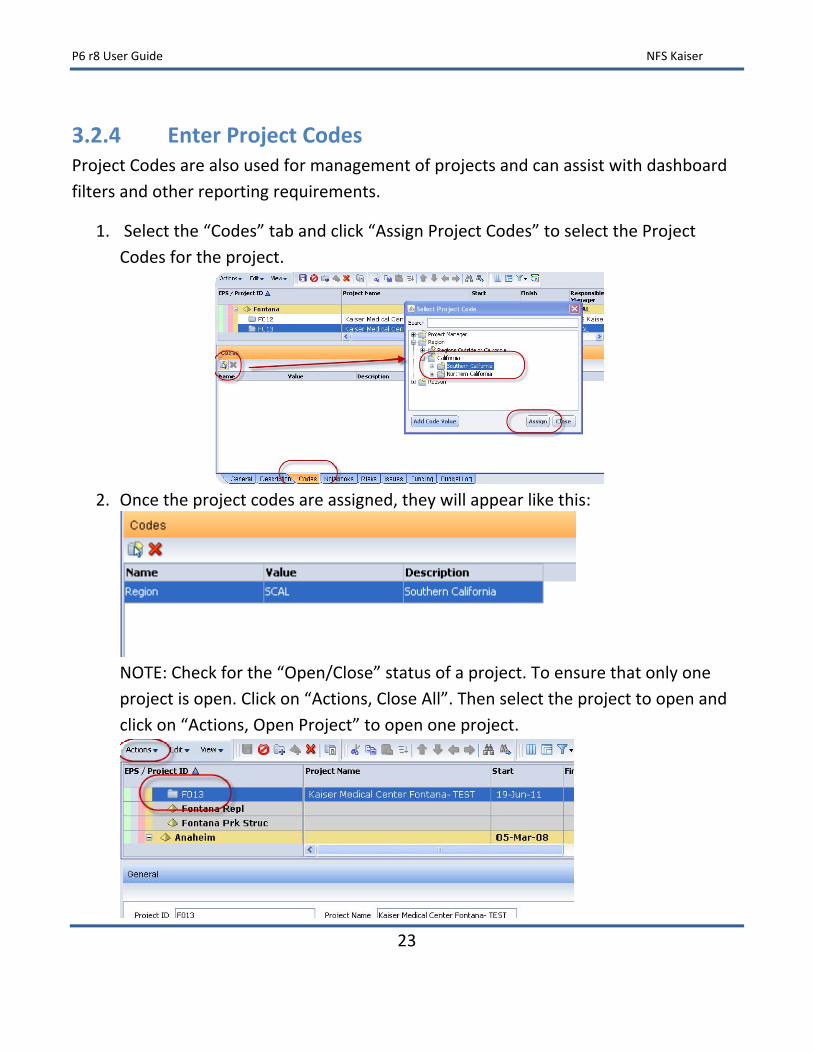
3.2.4 Enter Project Codes Project Codes are also used for management of projects and can assist with dashboard
filters and other reporting requirements.
1. Select the “Codes” tab and click “Assign Project Codes” to select the Project
Codes for the project.
2. Once the project codes are assigned, they will appear like this:
NOTE: Check for the “Open/Close” status of a project. To ensure that only one
project is open. Click on “Actions, Close All”. Then select the project to open and
click on “Actions, Open Project” to open one project.
P6 r8 User Guide NFS Kaiser
24
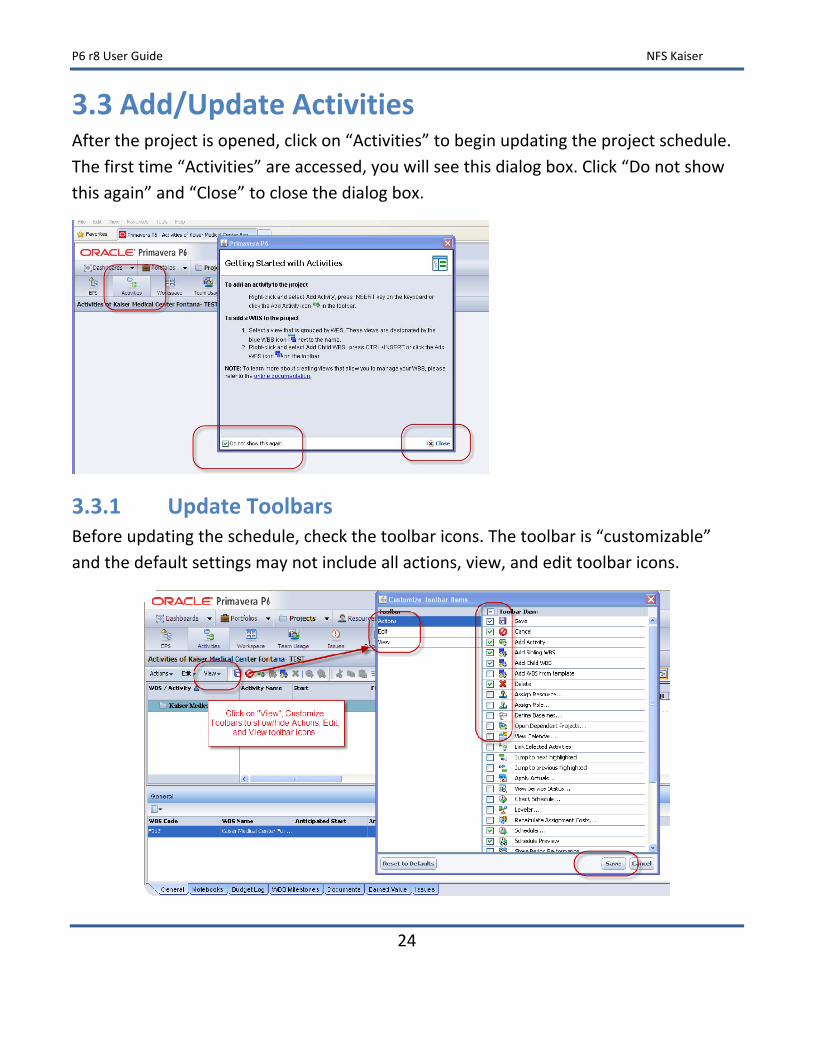
3.3 Add/Update Activities After the project is opened, click on “Activities” to begin updating the project schedule.
The first time “Activities” are accessed, you will see this dialog box. Click “Do not show
this again” and “Close” to close the dialog box.
3.3.1 Update Toolbars Before updating the schedule, check the toolbar icons. The toolbar is “customizable”
and the default settings may not include all actions, view, and edit toolbar icons.

P6 r8 User Guide NFS Kaiser
25
Updated toolbar‐ some icons are “grayed out” when the action/view/edit is not
available, based on the current selection.
3.3.2 Add WBS and Activities 1. Click the “Add WBS Element” icon to add another project “grouping”. Use the
“Add Activity” icon to add an activity to the schedule. (Or right‐click on an activity and select “Add Activity”.) The activity is auto‐numbered, but can be modified In the Activity ID column. Enter Activity ID, Activity Name, Original Duration, Activity Type (Milestone or Task Dependent), and Calendar. “Save” changes.
“Full Screen Mode” allows the project schedule view to fill the screen to view more
of the schedule.

P6 r8 User Guide NFS Kaiser
26
3.3.3 Update Activity Duration 1. Update the duration for each of the activities to reflect the number of days
required for each activity. Enter the duration either in the Activity Table (columns)
or in the Activity Details (tabs). Click the “Save” icon to save the changes. (Planned
Duration is the same as Original Duration.)
3.3.4 Add/Modify Relationships In the Activity View, relationships between activities can be created by (1) assigning
relationships in the Activity Details (Predecessor or Successor tab) or (2) by
“dragging” relationship lines in the Gantt Chart view or (3) “Link Activities” by
selecting activities in sequence.
3.3.4.1 Edit Predecessor or Successor 1. Click on the activity and select “Predecessor” or “Successor” tab. Click “Assign”
and select the dependent activity. Click “Close” and then the “Save” button to apply the changes.

P6 r8 User Guide NFS Kaiser
27
NOTE: If relationship lines don’t show, check the “Show/Hide Relationship Lines” setting.
3.3.4.2 “Drag” Relationship Lines 1. Select the activity “bar”. Rt‐click on the bar. Select “Create Relationship”. The
relationship line is visible. Click the bar and drag the line to the successor activity.
Click on the white square at the start of the bar.
2. “Save” the changes.
3.3.4.3 “Link” Activities 1. Use “link activities” to create relationships. Select the activities to be “linked”.
Right‐click on the activity and click “Link selected activities”.

P6 r8 User Guide NFS Kaiser
28
2. Finish‐Start relationships are created in sequence.
3. “Save” the changes.
3.3.5 Add Activity Constraints In addition to the overall Project “Must Finish by” date (project constraint), constraints
can be added to the activities to indicate specific activities that are “constrained” by
external factors. Constraints should be used with caution as, in some cases, they may
override the schedule logic.
1. The Activity View “View Schedule by WBS” contains a column for the “Primary
Constraint” and the “Primary Constraint Date”. “Double‐click” in the cell to assign
a constraint and constraint date.
P6 r8 User Guide NFS Kaiser
29
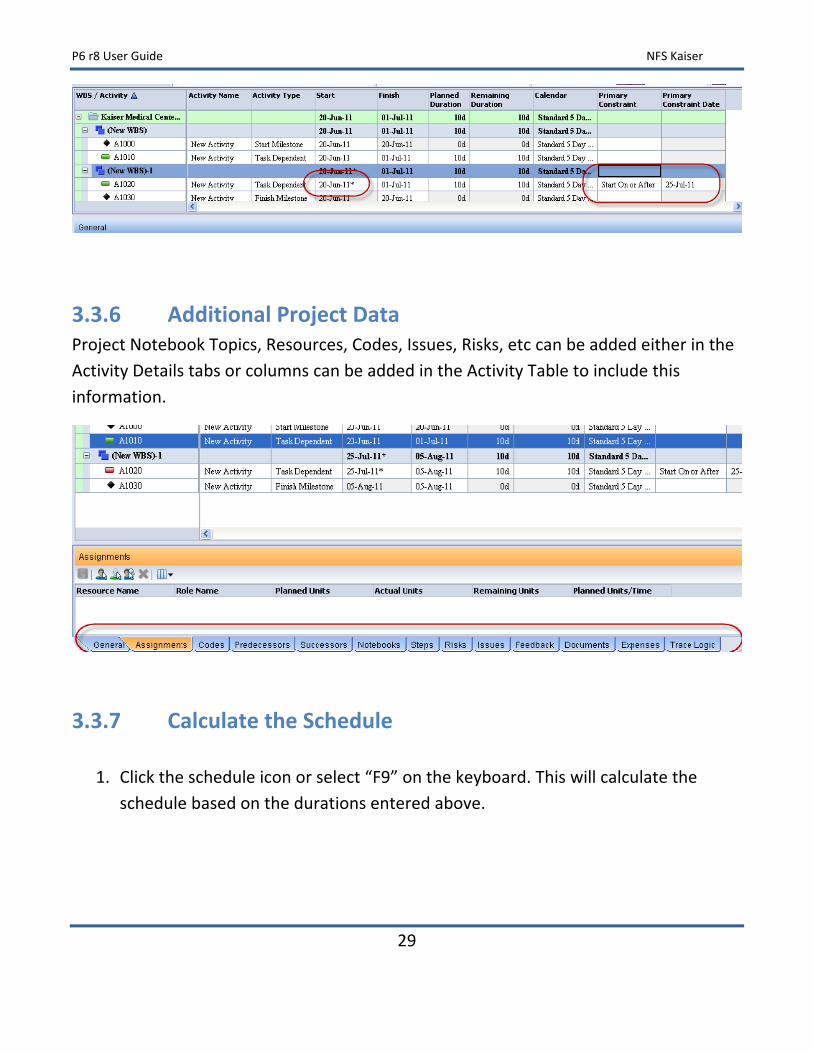
3.3.6 Additional Project Data Project Notebook Topics, Resources, Codes, Issues, Risks, etc can be added either in the
Activity Details tabs or columns can be added in the Activity Table to include this
information.
3.3.7 Calculate the Schedule
1. Click the schedule icon or select “F9” on the keyboard. This will calculate the
schedule based on the durations entered above.

P6 r8 User Guide NFS Kaiser
30
2. Check the “Data Date” to equal the Planned Start date. Click “Schedule”.
3. The schedule will be calculated and the scheduling log will display (if checked).

P6 r8 User Guide NFS Kaiser
31
4 Project Workspace
The “Project Workspace” is a “dashboard” created for each Project. The “default”
workspace can be modified and will appear for all users of that project.
4.1 Customize Project Workspace 1. Click on Workspace, Customize to modify the workspace.
2. Select the Content (typically, Project Statistics, Risks and Issues (if used), Project
Notebooks, Milestones)… Custom Portlets can be added for specific web sites, Project Collaboration requires “workflow”, and Project Performance is generally associated with some “earned value” calculations.) “Save” the selections.

P6 r8 User Guide NFS Kaiser
32
3. Go to Layout tab and configure the Workspace layout. Click “Save and Close”.
4. Customize the Project Statistics to add the columns. Click “Customize” in the
Project Statistics portlet.

P6 r8 User Guide NFS Kaiser
33
5. The Milestone Status portlet enables you to view all project milestones
completed or due within a specified number of days before and after the current
date. The default setting for the milestone status is 10 days for both settings. The
recommended setting is 30 days. Click “Customize” in the Workspace.

P6 r8 User Guide NFS Kaiser
34
5 Project Baseline
5.1 Create Baseline Once the schedule has been updated, a “Baseline” can be added for the schedule. (A
Baseline is a copy of the current schedule at any point in time‐ the Baseline function
replaces saving “schedule versions” and ensures that the project schedule is always
the most current.) Multiple baselines can be added to a project schedule, but in P6
Web, only one baseline can be “assigned” for comparison purposes at any one time.
1. In the Activities window, Select the “Define Baselines” icon or Actions, Define
Baselines.
2. Select “Add Baseline”. A baseline is added‐ default name is the Project Name‐ B1

P6 r8 User Guide NFS Kaiser
35
1. Assign the Baseline type. Name the Baseline, Assign a Type and click “Save”. Close
the dialog box. Select “Baselines” again and the Data Date is populated for the
baseline.
5.2 Assign Baseline 1. Select the baseline to be used in the Activity Table and Gantt Chart bars for
comparison. Assign the “Project Baseline” and the “Primary Baseline”. Click
“Save”.
Using the Activity View “Compare Baseline”, the current schedule can be compared to the “assigned” baseline schedule.

P6 r8 User Guide NFS Kaiser
36
6 Project Progress Updates
6.1 Enter Actuals 1. Log into P6. Open the project. Select “Activities” and open the view
“Progress Updates”.
2. For Completed Activities (including milestones), enter Actual Start and
Actual Finish dates directly in the columns. (Milestones will have either an
Actual Start, for Start Milestones, or Actual Finish for Finish Milestones).
3. For In Progress Activities, enter Actual Start and either Remaining Duration
or Expected Finish date.
4. Select the “Save” button.
5. If Resources are assigned to the activities, update the actual units in the
Activity Details‐ Assignments tab.
6. Select the Save button to save the changes.
Once the actual progress has been applied, re‐calculate the schedule (advance the
data date) and open the Baseline Comparison view to compare “planned vs actual”.

P6 r8 User Guide NFS Kaiser
37
7 Activity Views
The project schedule (Activities) views can be modified by each user to create “user”
activity views.
In the Activities window for each project, the Activity View selection is located in the
upper‐right section of the screen.
Global views are available to all users. Only admin users can create/modify global
views. These are typically views that all users will need to perform specific functions .
Select a view by clicking on the arrow in the view selection window.
Customize a view by selecting the menu next to the selection drop‐down.
Views can be customized by: Columns, Grouping, Filters, Bars, Gantt Chart, Activity
Network, and Access (which users can access the view). (Apply will make the
changes, but keep the dialog box open. OK will apply the changes and close the
dialog box.)

P6 r8 User Guide NFS Kaiser
38
Create a new view by starting with a view that is close to the one you want to create.
Select “Save View as” and rename the view. Then select “Customize View” and pick
the columns, grouping, filters, and bars. Select the Access tab to make the view
available to just a single user or pick other users who can access the view.