kfc-1 sms cooking computer user guide
TRANSCRIPT

Frymaster, a member of the Commercial Food Equipment Service Association, recommends using CFESA Certified Technicians.
24-Hour Service Hotline 1-800-551-8633 FEB 2001
8195733
K
FC-1 SM
S Cooking C
omputer
USER
GU
IDE

1-1
KFC-1 SMS COMPUTERCHAPTER 1: IMPORTANT INFORMATION
1.1 General
The KFC-1 SMS Cooking Computer is designed to operate with both full- and split-pot fryers. Fora full-pot fryer, turn the computer on by pressing either switch. For split-pot fryers, press theleft switch to operate the left pot and the right switch to operate the right pot.
The KFC-1 SMS Cooking Computer is designed to control either single ormultiple cooking cycles. The computer has 10 product buttons, which can beindividually programmed with up to 10 cooking intervals, three pre-alarms, andstraight or flex time for each product. The KFC-1 SMS can track the number ofheads cooked by the fryer and calculate recovery time. Also, the KFC-1 SMScan be programmed to calculate recovery time and the number of cook cyclessince the last filtering. It is used on Frymaster KJ3FC, KSCF18G, andKSCFH18E open fryers and can be programmed for heat curves for any product.It is designed to operate in both full-pot and split-pot fryers. The KFC-1 SMS also has shorteningmanagement programming and an internal real time clock.
If power outages of less than 5 seconds occur, KFC-1 SMS computers will automatically return tocurrent operational status once power is restored. If the computer fails to return to the currentoperation when power is restored, reset the computer by unplugging the fryer from the powersource. The computer should reset when the fryer is plugged back in, and this, many times,eliminates costly, unneeded service calls.
1.2 Service Information
Call the “800” number on the cover of this manual for the location of your nearest maintenance &repair center. When requesting service assistance, always give the model and serial numbers of yourcooking computer and the type of fryer this cooking computer is installed on.
To assist you more efficiently, the following information will be needed:
Model NumberSerial NumberType of FryerNature of theProblem
Any other information which may be helpful in solving your service problem.
NOTE: Activation ofthe oil managementsystem is optional. Allother features of theKFC-1 SMS remainoperational with theoil managementprogramming idle.

1-2
1.3 KFC-1 SMS Computer Controls
KFC-1 SMS Computer
Button Function
On/Off
Turns the fryer ON and OFF.
For a full-pot fryer, press either ON/OFF switch to turn the computer on.
For a split-pot fryer, press the left ON/OFF switch to operate the left pot andpress the right ON/OFF switch to operate the right pot.
Product Buttons
Each of the 10 product buttons selects a cook cycle, starts the cycle, cancels thecycle, and stops the end-of-cycle alarm. A flashing LED above the productnumber indicates that product has been selected.
In programming mode, these buttons are used to select the head count, cooktime, setpoint, flex, and alarm settings.

1-3
1.3 KFC-1 SMS Computer Controls (cont.)
Button Function
Program Scan
Shows the remaining cook time for other active cook cycles when operating inthe multiple cook cycle mode.
In programming mode, this button activates programming mode, andadvances through the programming steps.
Enter
Shows the remaining cook time.
In programming mode, this button is pressed to move to the next step in theprogramming sequence.
Temp
Shows the actual fryer temperature.
Pressing twice will show programmed setpoint temperature. Pressing three timeswill show time.
In programming mode, this button is pressed to select menu options.
Exit/Cool Filter
Returns the computer and fryer from the standby mode to normal operatingmode.
During Filter Lockout Mode, pressing this button returns fryer and computer tothe setback mode once filtering has been completed. During operating mode,press left Exit/Cool Filter to view time.

1-4
1.4 Morning (AM) Polishing Cycle
1
2
3
4
5
Computer display changes to PLSH.
When the fryer reaches filtration setpoint, the display alternates between START andPLSH.
Press EXIT/COOL FILTER button on computerface.
Assemble filter. Sprinkle 8 ouncesof filter powder over filter paper infilter pan.
Open drain valve. Turn pump ON. Computer displays PLSH 30:00 to polish shortening for 30 min.
ComputerON/OFF buttonto turn fryer ON.

1-5
1.4 Morning (AM) Polishing Cycle (cont.)
6
Computer counts down. Polishing lasts 30 minutes.
7
8
9
10
Computer displays FILLand an alarm sounds.Press Exit/Cool Filter toshut off alarm.
Cool appears in right display.
PressEXIT/COOLFILTERbutton
Computer displays oil temperatureand fryer heats to setpoint.
Fryer displays drop when it’s atsetpoint and ready to cook.
Close drainvalve. Pumpshortening intofrypot. Turnpump OFF.
PressEXIT/COOLFILTERbutton

1-6
1.5 Afternoon (PM) Polishing Cycle
1Assemble filter. Sprinkle filter powder over filter paper in filter pan.
2
3
4
At 2 p.m. an alarm sounds and computer display alternates between START and PLSH.
Press EXIT/COOL FILTER button on computerface to shut off alarm.
Open drain valve. Turn pump ON. Computer displays PLSH 30:00 to polish shortening for 30 minutes.

1-7
1.5 Afternoon (PM) Polishing Cycle (cont.)
5
Computer counts down.
6
7
8
9
At the end of the polishingcycle, the computer displaysFILL and an alarm sounds.Press Exit/Cool Filter to shutoff alarm.
COOL appears in right display.
Computer displays LOW and fryerheats to setpoint.
Fryer displays DROP whenoil/shortening temperature is atsetpoint and ready to cook.
PressEXIT/COOLFILTERbutton
PressEXIT/COOLFILTERbutton
Close drain valve. Turn pump off.Pump shortening intofrypot.

1-8
1.6 Delaying Afternoon (PM) Polishing Cycle
1
2
3
4
5Press any program button. The fryer will cook normally until the preprogrammed delay period expires.The polish can only be delayed once. Polish must be performed within three-hour period or the controllerwill go into polish lockout.
At 2 p.m. an alarm sounds and computer display alternates between START and PLSH.
Press EXIT/COOL FILTER button on computerface and fryer returns to Drop mode.
Press and hold PROG SCAN and ENTER buttons for five seconds.
Display alternates between DYPL and the oil temperature.

1-9
1.7 Using Polish Now Feature
1
2 Assemble filter. Sprinkle 8 ounces of filter powder over filter paper in filter pan.
3
4
Computer displays START and PLSH.
5
Computer display alternates between DYPL and temperature display, indicating the polishcycle has been delayed.
Press and hold both EXIT/COOL FILTER buttonson computer face.
Press EXIT/COOL FILTER button on computer face toshut off alarm.

1-10
1.7 Using Polish Now Feature (cont.)
6
7
Computer counts down
8
9
10
Computer displays FILL and analarm sounds. Press Exit/CoolFilter to cancel alarm.
PressEXIT/COOLFILTERbutton to exitCOOL mode.
Open drain valve. Turn pump on. Computer displays PLSH 30:00 to polish shortening for 30min.
Close drain valve. Pump shortening into frypot. Watch for bubbles to form in the frypot. Turnpump off.
PressEXIT/COOLFILTERbutton.
Computer displays COOL.

1-11
1.7 Using Polish Now Feature (cont.)
11
1.8 Operating Instructions
1
2
Computer displays LOW and fryerheats to setpoint.
Fryer displays DROP when oil/shorteningtemperature is at setpoint and ready tocook.
Fryer is heating.
Turn the fryer ON for cooking operations.
If HEAT light alternates on and off, it indicates thefryer is in the melt cycle.

1-12
1.8 Operating Instructions (cont.)
3
4
5
6
Computer displays LOW.
Select a product, i.e. product4. Fryer heats to presettemperature.
Oil temperature at 255 °F (124 °C). Actualoil temperature will be displayed until oiltemperature is within ±2 °F (±1 °C) ofsetpoint temperature (SET--TEMP).
Computer displays DROP. Dropproduct into frypot. Theoil/shortening has reachedsetpoint temperature.
Press the TEMP button during the cook cycle countdown tocheck actual cooking temperature (if desired). Pressing theTEMP button twice will display set temperature for the selectedproduct.
Note: If the wrong productbutton was selected, pressand hold button for threeseconds to cancel productselection.
Press product button to starttimer.

1-13
1.8 Operating Instructions (cont.)
7
8
9
Computer displays DONE and analarm sounds. Cook cycle iscomplete.
Pressing the flashingproduct number willstop the alarm and returnthe fryer to selectedstandby cycle mode(COOL, SET--TEMP,FILTER).
Computer displays COOLindicating oil/shortening hascooled to a standby temperatureof 250 °F (121 °C).
Pressing EXIT/COOLFILTER button will exitCOOL standby modeand return fryer to aprevious setpointtemperature.
Computer displays FILTER indicating that a pre-selectednumber of cook cycles has been reached and theoil/shortening needs filtering. If FILTER displays duringa busy time of day, a cook cycle can be initiated.Computer does not lock out.
If filtering is chosen, open drain valve. The computerwill lock out after drain valve is open for 4 seconds.
Computer display alternates between DRAIN and OPEN, indicating that drain valve is open,and the computer is locked out.
After drain valve is open for 30 seconds, Computer display alternates between DRAIN,OPEN and FILL, indicating that the filtering process can be initiated.
1-14
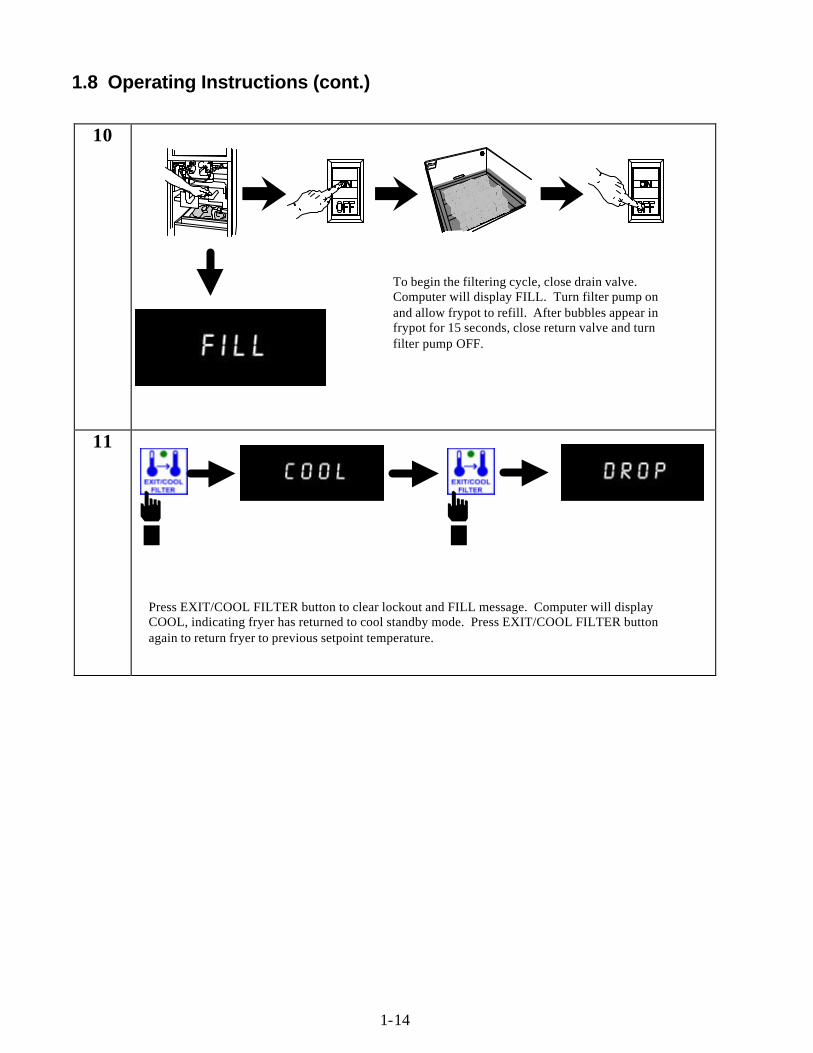
1.8 Operating Instructions (cont.)
10
11
To begin the filtering cycle, close drain valve.Computer will display FILL. Turn filter pump onand allow frypot to refill. After bubbles appear infrypot for 15 seconds, close return valve and turnfilter pump OFF.
Press EXIT/COOL FILTER button to clear lockout and FILL message. Computer will displayCOOL, indicating fryer has returned to cool standby mode. Press EXIT/COOL FILTER buttonagain to return fryer to previous setpoint temperature.

2-1
KFC-1 SMS COMPUTERCHAPTER 2: PROGRAMMING INSTRUCTIONS
2.1 General
The KFC-1 SMS Computer arrives with a default program loaded in its nonvolatile memory.Nonvolatile memory retains product-cooking instructions so this information will not be lost if thereis a power surge or outage.
To begin programming, ensure the computer is OFF on each side and both displays show OFF.When ready, press the PROG SCAN button. When CODE is displayed, enter 1 6 5 0, in thatsequence, to enter the product programming mode. Below is detailed information for specificproducts (See Section 2.2).
NOTE: When programming products, program the product being cooked in Product Selection
buttons labeled the same (i.e. Extra Crispy /Hot & Spicy- "Hand dropped": )
2.2 Programming the Computer for Product Entry
1
2
Press ON/OFF button to turn computer OFF.Press PROG SCAN button to enter CODE.
Enter Code #: 1 6 5 0, in that sequence.
As each number is entered, dashes appear in theright display. Product is ready for programmingafter the last number is entered.
Computer displays CODEin the left display and(Blank) in the rightdisplay.

2-2
2.2.1 Programming for Extra Tasty Crispy Chicken
Enter Programming Mode as outlined in Section 2.2
1
2
3
4
Computer displays PRODUCT.
Press button #1 for product.
Computer displays HEADS.
Press button #4 to set head count to "4".Press ENTER for next step.
Computer displays INTERVAL in the left displayand PROD 1 in the right display.
Press button #1 to set Product 1 Interval#1.
Computer displaysCOOKTIME.
Enter 1 3 0 0, in that sequence. PressENTER to program cook time of 13minutes for interval #1.

2-3
2.2.1 Programming for Extra Tasty Crispy Chicken (cont.)
5
6
7
8
Computer displays SET--TEMP.
Enter 3 4 0, in that sequence. PressENTER to save 340 °F (171 °C) as set--temp for interval #1.
Computer displays FLEX.
Press button #0 to set straight timecooking mode. Press ENTER to lock insetting.
Computer displays INTERVAL in the left displayand PROD 1 in the right display.
Press button #2 to set Product 1 Interval#2.
Computer displaysCOOKTIME.
Enter 1 2 5 0, in that sequence. PressENTER to program cook time of 12minutes, 30 seconds for interval #2.

2-4
2.2.1 Programming for Extra Tasty Crispy Chicken (cont.)
9
10
11
12
Computer displays SET--TEMP.
Enter 3 1 0, in that sequence. PressENTER to save 310 °F (154 °C) as set--temp for interval #2.
Computer displays FLEX.
Press button #0 to set straight timecooking mode. Press ENTER to lock insetting.
Computer displays INTERVAL in the left displayand PROD 1 in the right display.
Press button #3 to set Product 1 Interval#3.
Computer displaysCOOKTIME.
Enter 6 0 0, in that sequence. PressENTER to program cook time of 6minutes for interval #3.

2-5
2.2.1 Programming for Extra Tasty Crispy Chicken (cont.)
13
14
15
16
Computer displays SET--TEMP.
Enter 3 3 0, in that sequence. PressENTER to save 330 °F (166 °C) as set--temp for interval #2.
Computer displays FLEX.
Press button #0 to setstraight time cookingmode. Press ENTERto lock in setting.
Computer displays INTERVAL in the left displayand PROD 1 in the right display.
Press PROG SCAN to advance to pre-set alarm program mode.
Computer displaysPREALM 1.
Enter 1 1 0 0, in that sequence. PressENTER to set alarm to 11 minutes cooktime remaining.

2-6
2.2.1 Programming for Extra Tasty Crispy Chicken (cont.)
17
18
Computer displaysPREALM 2.
Enter 0 0, in that sequence. Press PROG SCAN button toadvance to Exit Cycle program mode.
Computer displays EX-CYCLE in the left displayand SET--TEMP in the right display.
Press TEMP button to togglebetween SET--TEMP, COOLAND FILTER. Stopselection at FILTER.
Computer displays FILTER.
Press ENTER to set FilterCounter Mode.

2-7
2.2.1 Programming for Extra Tasty Crispy Chicken (cont.)
19
20
21
Computer displays NUM FILT.
Press button #1 to select Filter Lockoutmode of "1". Press ENTER to set FilterLockout Mode of "1".
Computer displays INTERVAL in the left displayand PROD 1 in the right display.
Press TEMP button to exit Product #1programming.
Press ON/OFF button to exitprogramming mode.

2-8
2.2.2 Programming for Colonel’s Crispy Strips
Enter Programming Mode as outlined in Section 2.2
1
2
3
4
Computer displays PRODUCT.
Press button #2 for product.
Computer displays HEADS.
Press button #0 to set head count to "0".Press ENTER for next step.
Computer displays INTERVAL in the left displayand PROD 2 in the right display.
Press button #1 to set Product 2 Interval#1.
Computer displaysCOOKTIME.
Enter 4 3 0, in that sequence. PressENTER to program cook time of 4minutes, 30 seconds for interval #1.

2-9
2.2.2 Programming for Colonel’s Crispy Strips (cont.)
5
6
7
8
Computer displays SET--TEMP.
Enter 3 4 0, in that sequence. PressENTER to save 340 °F (171 °C) as set--temp for interval #1.
Computer displays FLEX.
Press button #3 to set flex mode = "3".Press ENTER to lock in setting.
Computer displays INTERVAL in the left displayand PROD 2 in the right display.
Press PROG SCAN to advance to pre-set alarm program mode.
Computer displaysPREALM 1. Enter 0 0, in that sequence. Press
ENTER to set alarm to zero minutes cooktime remaining.

2-10
2.2.2 Programming for Colonel’s Crispy Strips (cont.)
9
10
11
12
Computer displaysPREALM 2.
Press PROG SCANbutton to advance toExit Cycle programmode.
Computer displays EX-CYCLE in the left displayand SET--TEMP in the right display.
Press ENTER button to save default setting ofSET--TEMP.
Computer displays INTERVAL in the left displayand PROD 2 in the right display.
Press TEMP button to exit Product #2programming.
Press ON/OFF button to exitprogramming mode.

2-11
2.2.3 Programming for Hot Wings/Hot BBQ Wings
Enter Programming Mode as outlined in Section 2.2
1
2
3
4
Computer displays PRODUCT.
Press button #3 for product.
Computer displays HEADS.
Press button #0 to set head count to "0".Press ENTER for next step.
Computer displays INTERVAL in the left displayand PROD 3 in the right display.
Press button #1 to set Product 3 Interval#1.
Computer displaysCOOKTIME.
Enter 9 3 0, in that sequence. PressENTER to program cook time of 9minutes, 30 seconds for interval #1.

2-12
2.2.3 Programming for Hot Wings/Hot BBQ Wings (cont.)
5
6
7
8
Computer displays SET--TEMP.
Enter 3 4 0, in that sequence. PressENTER to save 340 °F (171 °C) as set--temp for interval #1.
Computer displays FLEX.
Press button #3 to set flex mode = "3".Press ENTER to lock in setting.
Computer displays INTERVAL in the left displayand PROD 3 in the right display.
Press PROG SCAN to advance to pre-set alarm program mode.
Computer displaysPREALM 1.
Enter 8 3 0, in that sequence. Press ENTER to set alarm to 8minutes, 30 seconds cook time remaining.

2-13
2.2.3 Programming for Hot Wings/Hot BBQ Wings (cont.)
9
10
11
12
Computer displaysPREALM 2.
Press PROG SCANbutton to advance toExit Cycle programmode.
Computer displays EX-CYCLE in the left displayand SET--TEMP in the right display.
Press ENTER button to save default setting ofSET--TEMP.
Computer displays INTERVAL in the left displayand PROD 3 in the right display.
Press TEMP button to exit Product #3programming.
Press ON/OFF button to exitprogramming mode.

2-14
2.2.4 Programming for Potato Wedges
Enter Programming Mode as outlined in Section 2.2
1
2
3
4
Computer displays PRODUCT.
Pressbutton #4or #5 forproduct.
Computer displays HEADS.
Press button #0 to set head count to "0".Press ENTER for next step.
Computer displays INTERVAL in the left displayand PROD 4 or 5 in the right display.
Press button #1 to set Product 4 or 5,Interval #1.
Computer displaysCOOKTIME.
Enter 5 0 0, in that sequence. PressENTER to program cook time of 5minutes for interval #1.
OR

2-15
2.2.4 Programming for Potato Wedges (cont.)
5
6
7
8
Computer displays SET--TEMP.
Enter 3 4 0, in that sequence. PressENTER to save 340 °F (171 °C) as set--temp for interval #1.
Computer displays FLEX.
Press button #3 to set flex mode = "3".Press ENTER to lock in setting.
Computer displays INTERVAL in the left displayand PROD 4 or 5 in the right display.
Press PROG SCAN to advance to pre-set alarm program mode.
Computer displaysPREALM 1.
Enter 4 3 0, in that sequence. Press ENTER to set alarm to 4minutes, 30 seconds cook time remaining.

2-16
2.2.4 Programming for Potato Wedges (cont.)
9
10
11
12
Computer displaysPREALM 2.
Press PROG SCANbutton to advance toExit Cycle programmode.
Computer displays EX-CYCLE in the left displayand SET--TEMP in the right display.
Press ENTER button to save default setting ofSET--TEMP.
Computer displays INTERVAL in the left displayand PROD 4 or 5 in the right display.
Press TEMP button to exit Product #4 or5 programming.
Press ON/OFF button to exitprogramming mode.

2-17
2.2.5 Programming for Sandwiches/Filets
Enter Programming Mode as outlined in Section 2.2
1
2
3
4
Computer displays PRODUCT.
Pressbutton #6or #7 forproduct.
Computer displays HEADS.
Press button #0 to set head count to "0".Press ENTER for next step.
Computer displays INTERVAL in the left displayand PROD 6 or 7 in the right display.
Press button #1 to set Product 6 or 7,Interval #1.
Computer displaysCOOKTIME.
Enter 6 3 0, in that sequence. PressENTER to program cook time of 6minutes, 30 seconds for interval #1.
OR

2-18
2.2.5 Programming for Sandwiches/Filets (cont.)
5
6
7
8
Computer displays SET--TEMP.
Enter 3 4 0, in that sequence. PressENTER to save 340 °F (171 °C) as set--temp for interval #1.
Computer displays FLEX.
Press button #3 to set flex mode = "3".Press ENTER to lock in setting.
Computer displays INTERVAL in the left displayand PROD 6 or 7 in the right display.
Press PROG SCAN to advance to pre-set alarm program mode.
Computer displaysPREALM 1.
Enter 0 0, in that sequence. Press ENTER to set alarm to zerominutes cook time remaining.

2-19
2.2.5 Programming for Sandwiches/Filets (cont.)
9
10
11
12
Computer displaysPREALM 2.
Press PROG SCANbutton to advance toExit Cycle programmode.
Computer displays EX-CYCLE in the left displayand SET--TEMP in the right display.
Press ENTER button to save default setting ofSET--TEMP.
Computer displays INTERVAL in the left displayand PROD 6 or 7 in the right display.
Press TEMP button to exit Product #6 or#7 programming.
Press ON/OFF button to exitprogramming mode.

2-20
2.2.6 Programming for Popcorn Chicken
Enter Programming Mode as outlined in Section 2.2
1
2
3
4
Computer displays PRODUCT.
Press button #8 for product.
Computer displays HEADS.
Press button #0 to set head count to "0".Press ENTER for next step.
Computer displays INTERVAL in the left displayand PROD 8 in the right display.
Press button #1 to set Product 8 Interval#1.
Computer displaysCOOKTIME.
Enter 2 3 0, in that sequence. PressENTER to program cook time of 2minutes, 30 seconds for interval #1.
2-21
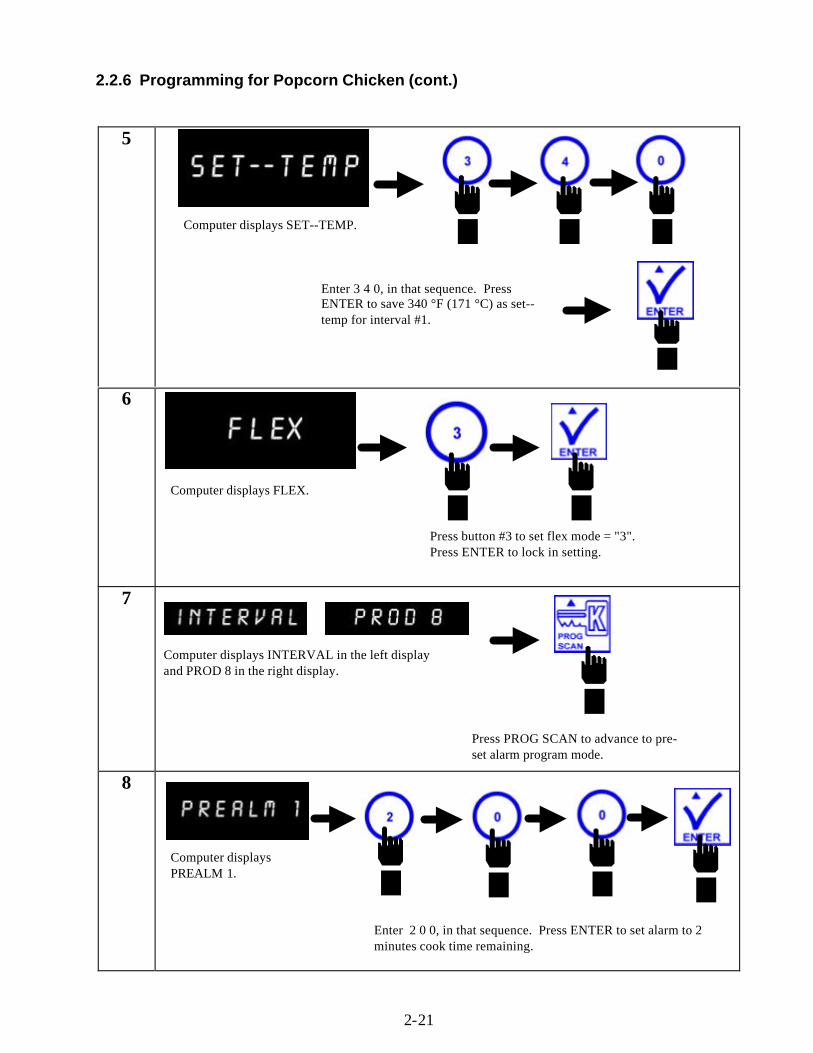
2.2.6 Programming for Popcorn Chicken (cont.)
5
6
7
8
Computer displays SET--TEMP.
Enter 3 4 0, in that sequence. PressENTER to save 340 °F (171 °C) as set--temp for interval #1.
Computer displays FLEX.
Press button #3 to set flex mode = "3".Press ENTER to lock in setting.
Computer displays INTERVAL in the left displayand PROD 8 in the right display.
Press PROG SCAN to advance to pre-set alarm program mode.
Computer displaysPREALM 1.
Enter 2 0 0, in that sequence. Press ENTER to set alarm to 2minutes cook time remaining.

2-22
2.2.6 Programming for Popcorn Chicken (cont.)
9
10
11
12
Computer displaysPREALM 2.
Press PROG SCANbutton to advance toExit Cycle programmode.
Computer displays EX-CYCLE in the left displayand SET--TEMP in the right display.
Press ENTER button to save default setting ofSET--TEMP.
Computer displays INTERVAL in the left displayand PROD 8 in the right display.
Press TEMP button to exit Product #8programming.
Press ON/OFF button to exitprogramming mode.

3-1
KFC-1 SMS COMPUTERCHAPTER 3: ADDITIONAL COMPUTER SETTINGS
3.1 Programming for Shortening Management
Listed below are procedures for initiating the Shortening Management System softwareand setting local time, daylight savings time and stagger between polishings. SettingStagger Time prevents frypots in the same battery from entering a “Polish” cyclesimultaneously. Proper computer settings allow maximum performance from the fryer,resulting in a quality product every time.
1
2
3
4
Press ON/OFF button to turn computer OFF.Press PROG SCAN button to enter CODE.
Computer displays CODEin the left display and(Blank) in the rightdisplay.
As each number is entered, dashes appear in theright display.
Upon pressing the last number, T-Zone appears in theleft display, Eastern (the default setting) appears inthe right. Press Temp button
to toggle betweentime zones.
With desired time zone shown on right display,press the enter key to lock in choice.
Enter Code #: 1890, in that sequence. This code initializes the Shortening Management Systemprogram, which will become active the next day. Once activated, the system is not readily deactivated.
NOTE: Activation of theoil management systemis optional. All otherfeatures of the KFC-1SMS remain operationalwith the oil managementprogramming idle.

3-2
3.2 Setting Daylight Savings Time/Stagger Between Polishings
1
2
3
Enter Code #: 1 6 5 5, in that sequence.
Press ON/OFF button to turn computer OFF.Press PROG SCAN button to enter CODE.
Computer displays CODEin the left display and(Blank) in the rightdisplay.
As each number is entered, dashes appear in theright display. The computer is ready forprogramming after the last number is entered.
Computer displays DAYLIGHT in the left displayand XXXX in the right display.
Press TEMP button to toggle betweenFALL and SPRING. Press ENTER tolock in choice.

3-3
4
3.3 Setting Local Time
1
2 Enter Code #: 2 0 0 0, in that sequence.
Press ON/OFF button to turn computer OFF.Press PROG SCAN button to enter CODE.
Computer displays CODEin the left display and(Blank) in the rightdisplay.
As each number is entered, dashes appear in theright display. The computer is ready for time entryafter the last number is entered.
Computer displays STAGGER in the left displayand 0 MIN in the right display.
Press TEMP button to toggle between 0,15, 30 or 45 MIN. Press ENTER to lockin choice.

3-4
3
4 Example:
Computer displays SET TIME in left displayand 00:00 in right display. Enter correct time (military style)
using product selection keys.
To enter 8:00 AM, enter 0 8 0 0, in thatsequence. Press ENTER to set time.
To enter 4:00 PM, enter 1 6 0 0, in thatsequence. Press ENTER to set time.

Frymaster, L.L.C.8700 Line Avenue, Shreveport, Louisiana USA 71106
Service Center (800) 551-8633 or (318) 865-1711
Printed in the United States of America 819-5733English 02/01