kohler generator warranty systemgeneratorwarranty.kohlernet.com/training/documentation.pdf · 1...
TRANSCRIPT

1
Generator Warranty On-Line System Documentation
INDEX ** Use control key and click on topic to advance to that section in the document
1. Warranty Repair Claims
2. Failed Part Claims
3. Sales Consideration Claims
4. Shipment Claims
5. Stock Part Claims
6. Copying a Claim
7. Claims Pending Feedback
8. Claims: Approved Pre-Authorization
9. Extended Warranty Purchase Requests
10. Extended Warranty Feedback
11. Pending Part Return – Creating a PSR
12. Pending Part Return – Editing a PSR
13. Registration Submissions
14. Registration Transfers
15. Navigation and Reports

2
Warranty Repair Claims 1. Creating a Warranty Repair Claim
Place cursor / move mouse over the DRAFT folder Icon and left click to continue
Place cursor / move mouse over the ADD button, in the lower right corner, and click
3
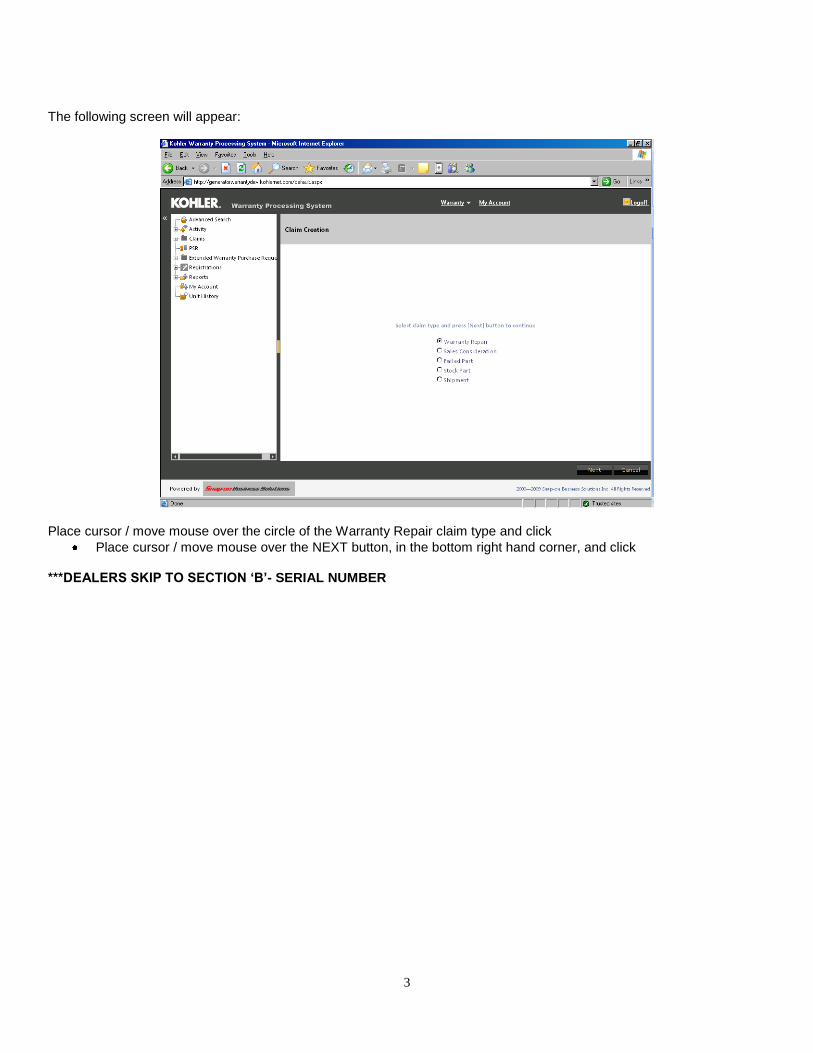
The following screen will appear:
Place cursor / move mouse over the circle of the Warranty Repair claim type and click
Place cursor / move mouse over the NEXT button, in the bottom right hand corner, and click ***DEALERS SKIP TO SECTION „B‟- SERIAL NUMBER
4
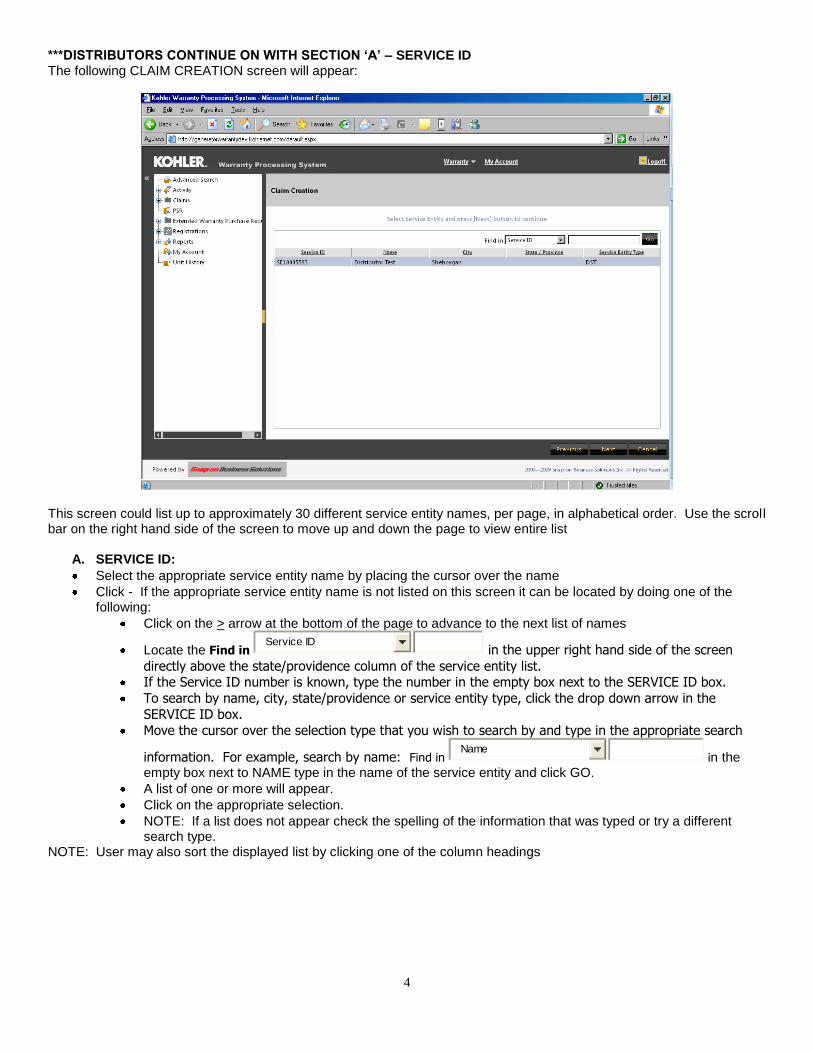
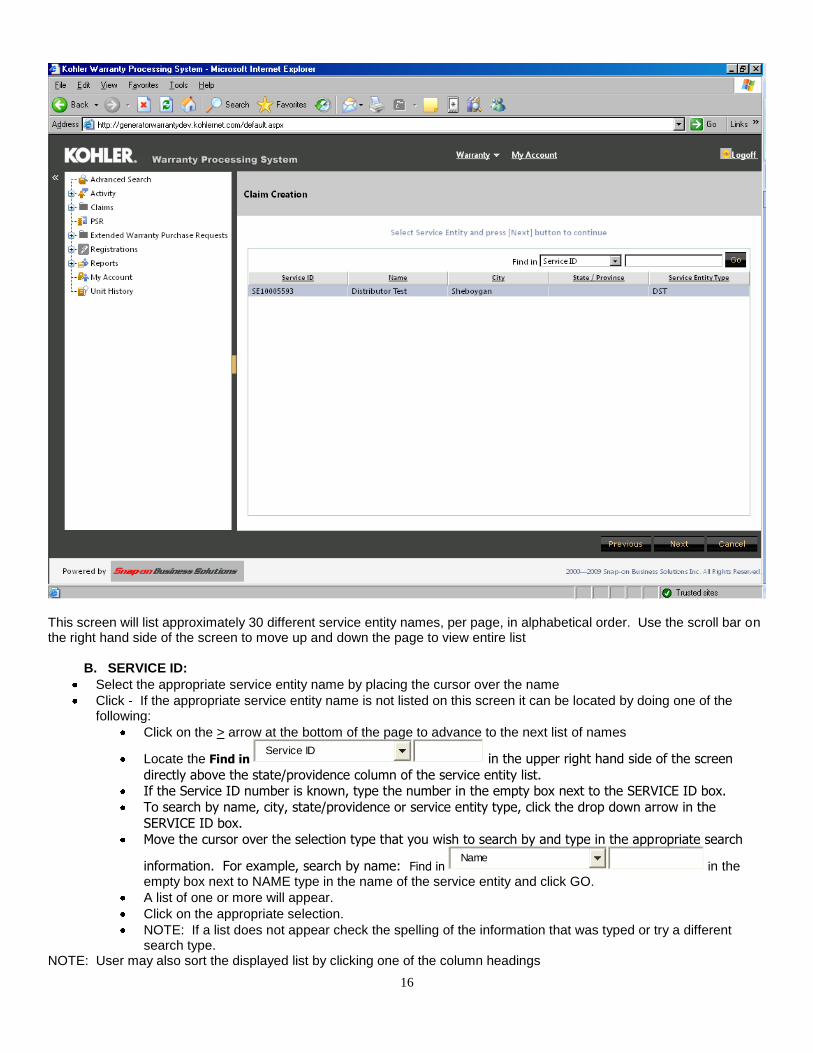
***DISTRIBUTORS CONTINUE ON WITH SECTION „A‟ – SERVICE ID The following CLAIM CREATION screen will appear:
This screen could list up to approximately 30 different service entity names, per page, in alphabetical order. Use the scroll bar on the right hand side of the screen to move up and down the page to view entire list
A. SERVICE ID:
Select the appropriate service entity name by placing the cursor over the name
Click - If the appropriate service entity name is not listed on this screen it can be located by doing one of the following:
Click on the > arrow at the bottom of the page to advance to the next list of names
Locate the Find in Service ID
in the upper right hand side of the screen
directly above the state/providence column of the service entity list. If the Service ID number is known, type the number in the empty box next to the SERVICE ID box.
To search by name, city, state/providence or service entity type, click the drop down arrow in the
SERVICE ID box.
Move the cursor over the selection type that you wish to search by and type in the appropriate search
information. For example, search by name: Find in Name
in the empty box next to NAME type in the name of the service entity and click GO.
A list of one or more will appear.
Click on the appropriate selection.
NOTE: If a list does not appear check the spelling of the information that was typed or try a different search type.
NOTE: User may also sort the displayed list by clicking one of the column headings
5
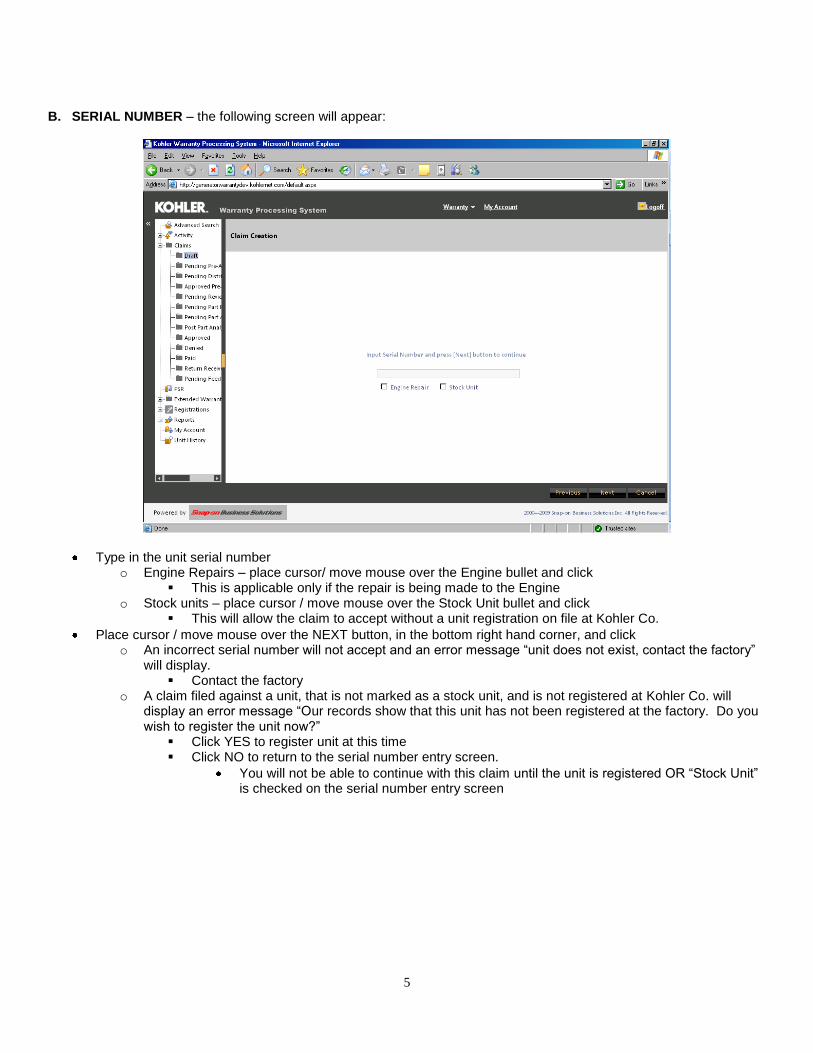
B. SERIAL NUMBER – the following screen will appear:
Type in the unit serial number o Engine Repairs – place cursor/ move mouse over the Engine bullet and click
This is applicable only if the repair is being made to the Engine o Stock units – place cursor / move mouse over the Stock Unit bullet and click
This will allow the claim to accept without a unit registration on file at Kohler Co.
Place cursor / move mouse over the NEXT button, in the bottom right hand corner, and click o An incorrect serial number will not accept and an error message “unit does not exist, contact the factory”
will display. Contact the factory
o A claim filed against a unit, that is not marked as a stock unit, and is not registered at Kohler Co. will display an error message “Our records show that this unit has not been registered at the factory. Do you wish to register the unit now?”
Click YES to register unit at this time Click NO to return to the serial number entry screen.
You will not be able to continue with this claim until the unit is registered OR “Stock Unit” is checked on the serial number entry screen

6
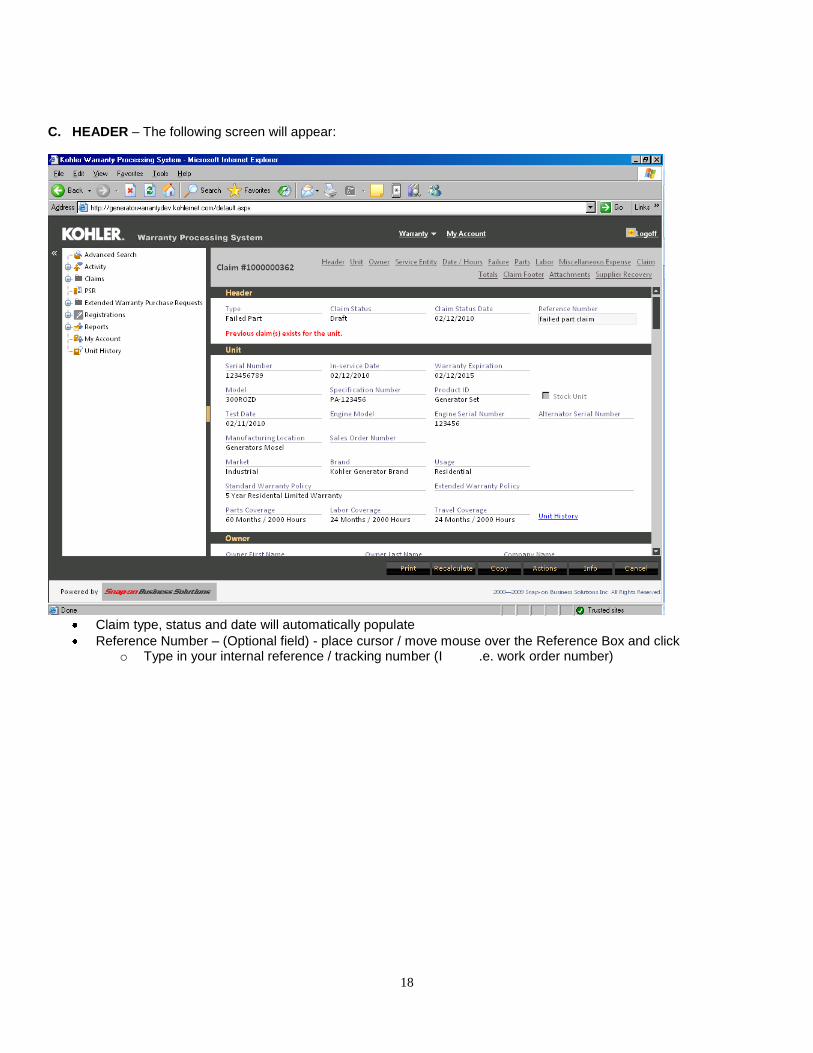
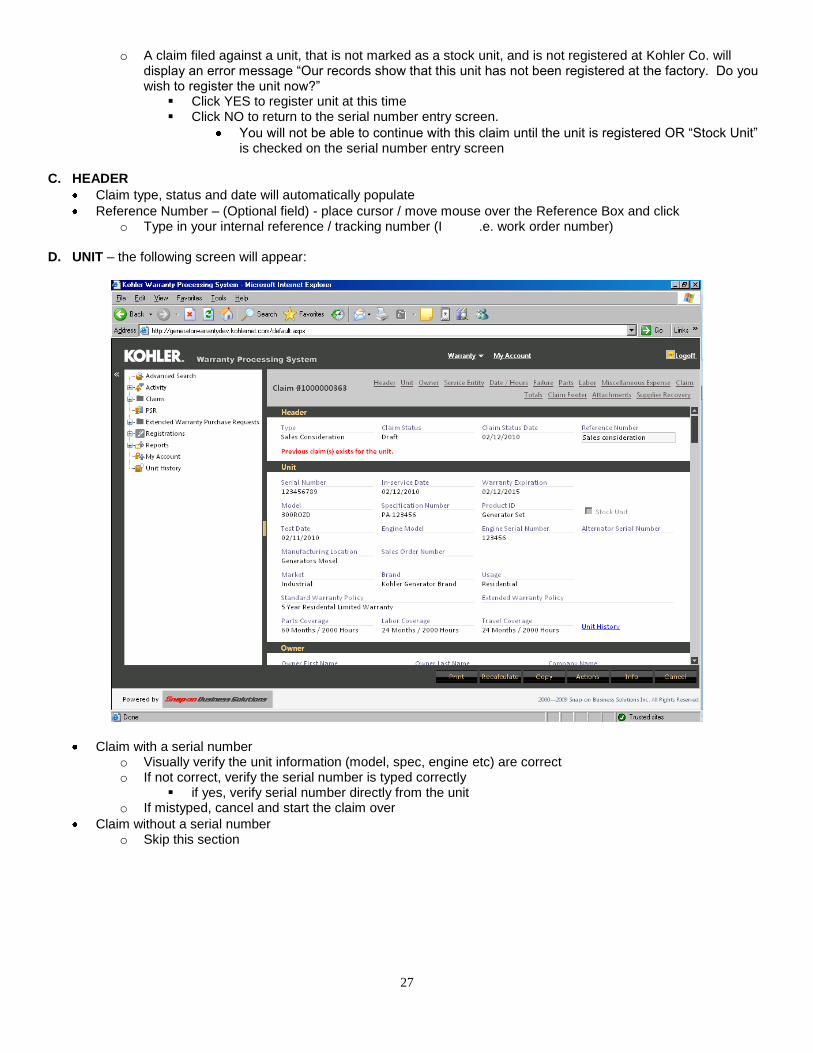
C. HEADER – the following screen will appear:
Place cursor / move mouse over the Reference Box and click (optional field)
Type in your internal reference / tracking number (i.e. work order number) D. UNIT
Visually verify the unit information (model, spec, engine etc) are correct
If not correct, verify the serial number is typed correctly o if yes, verify serial number directly from the unit
If mistyped, cancel and start the claim over
7
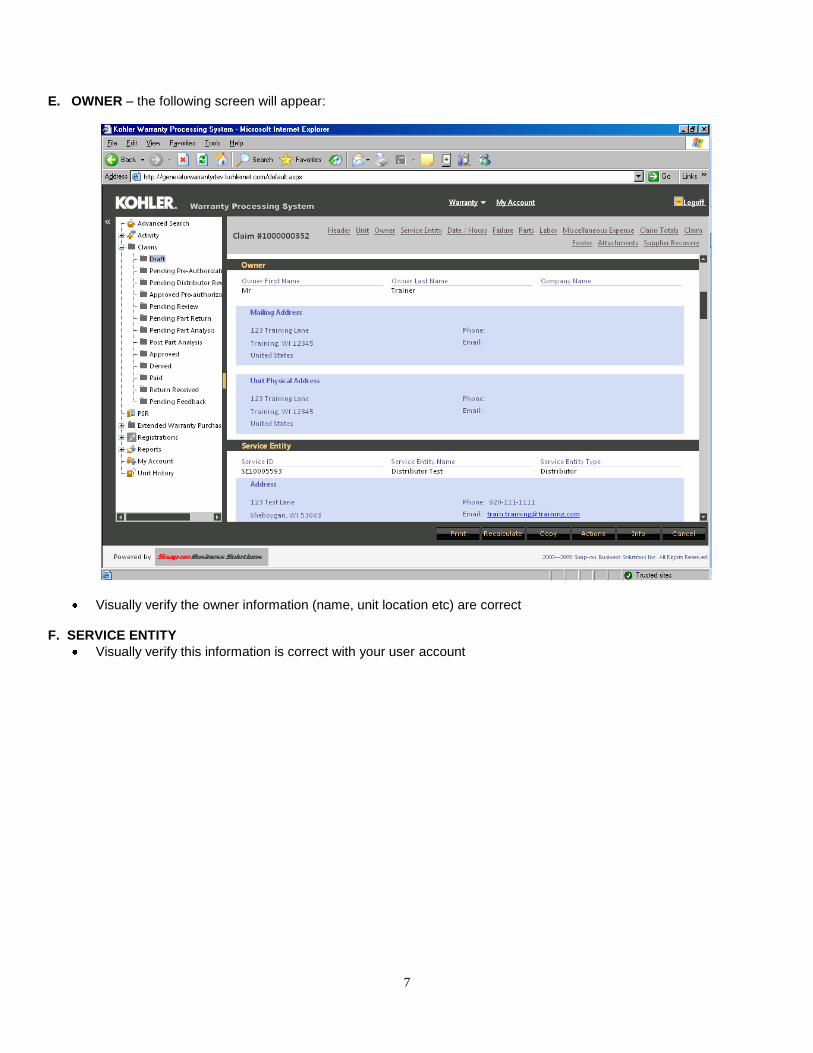
E. OWNER – the following screen will appear:
Visually verify the owner information (name, unit location etc) are correct F. SERVICE ENTITY
Visually verify this information is correct with your user account
8
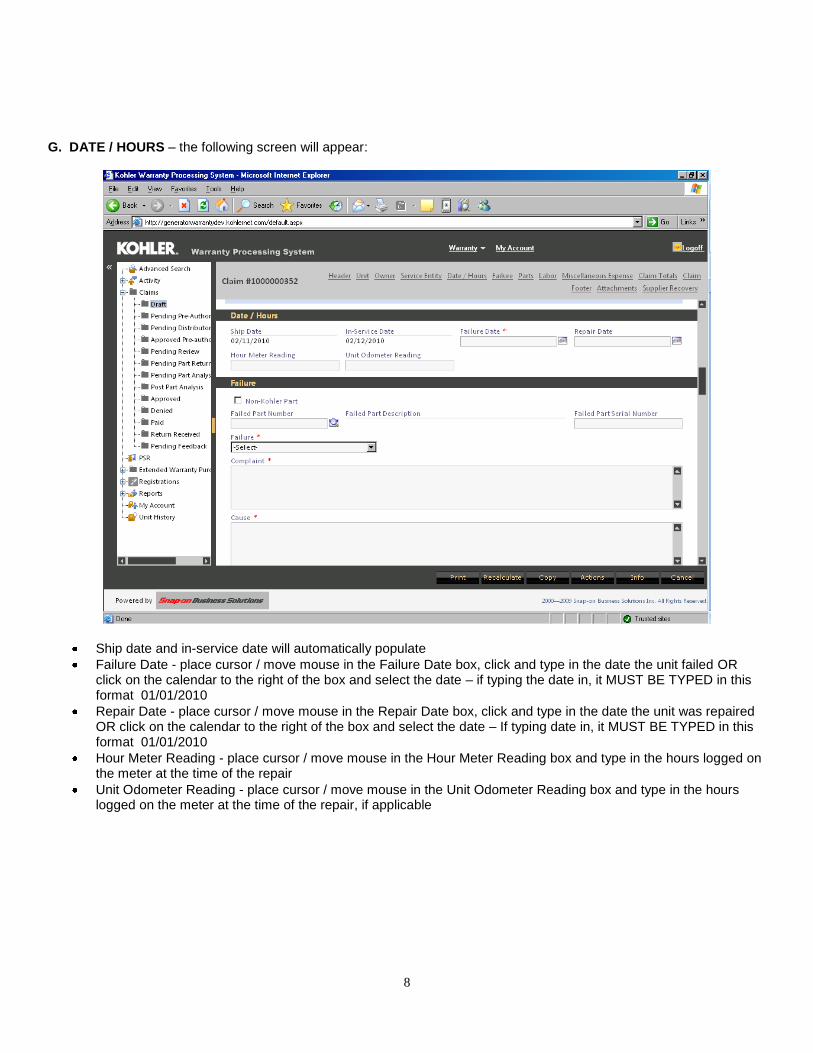
G. DATE / HOURS – the following screen will appear:
Ship date and in-service date will automatically populate
Failure Date - place cursor / move mouse in the Failure Date box, click and type in the date the unit failed OR click on the calendar to the right of the box and select the date – if typing the date in, it MUST BE TYPED in this format 01/01/2010
Repair Date - place cursor / move mouse in the Repair Date box, click and type in the date the unit was repaired OR click on the calendar to the right of the box and select the date – If typing date in, it MUST BE TYPED in this format 01/01/2010
Hour Meter Reading - place cursor / move mouse in the Hour Meter Reading box and type in the hours logged on the meter at the time of the repair
Unit Odometer Reading - place cursor / move mouse in the Unit Odometer Reading box and type in the hours logged on the meter at the time of the repair, if applicable

9
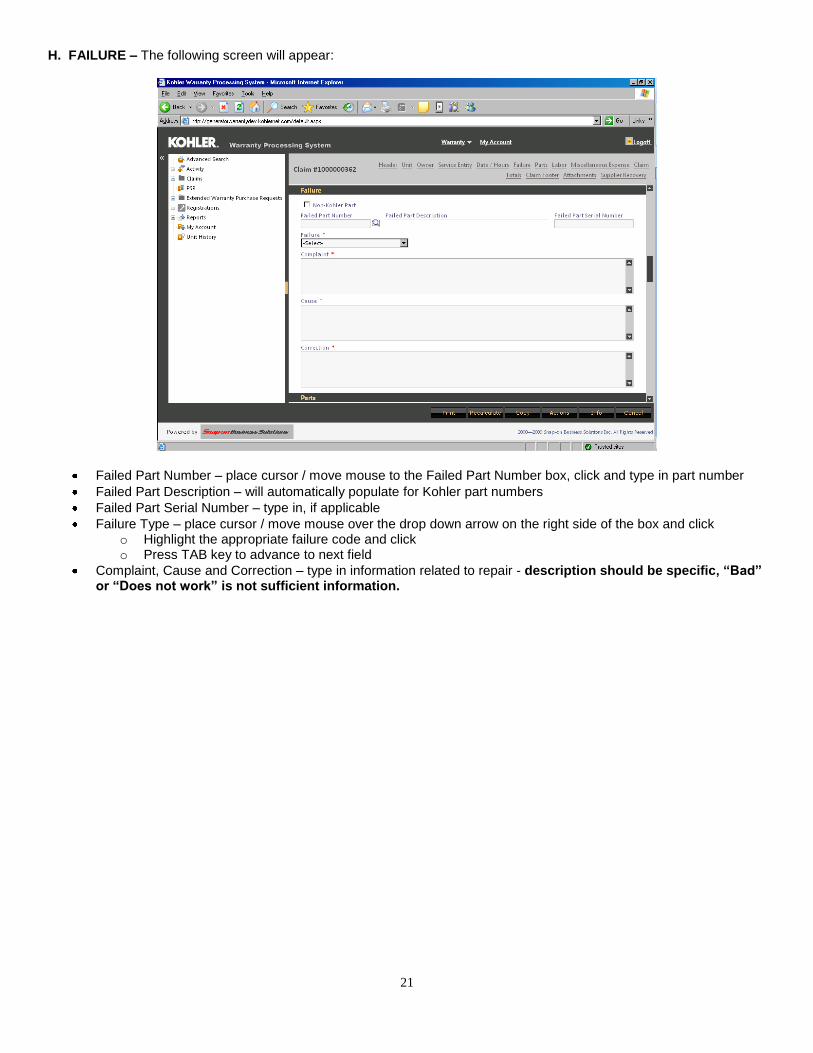
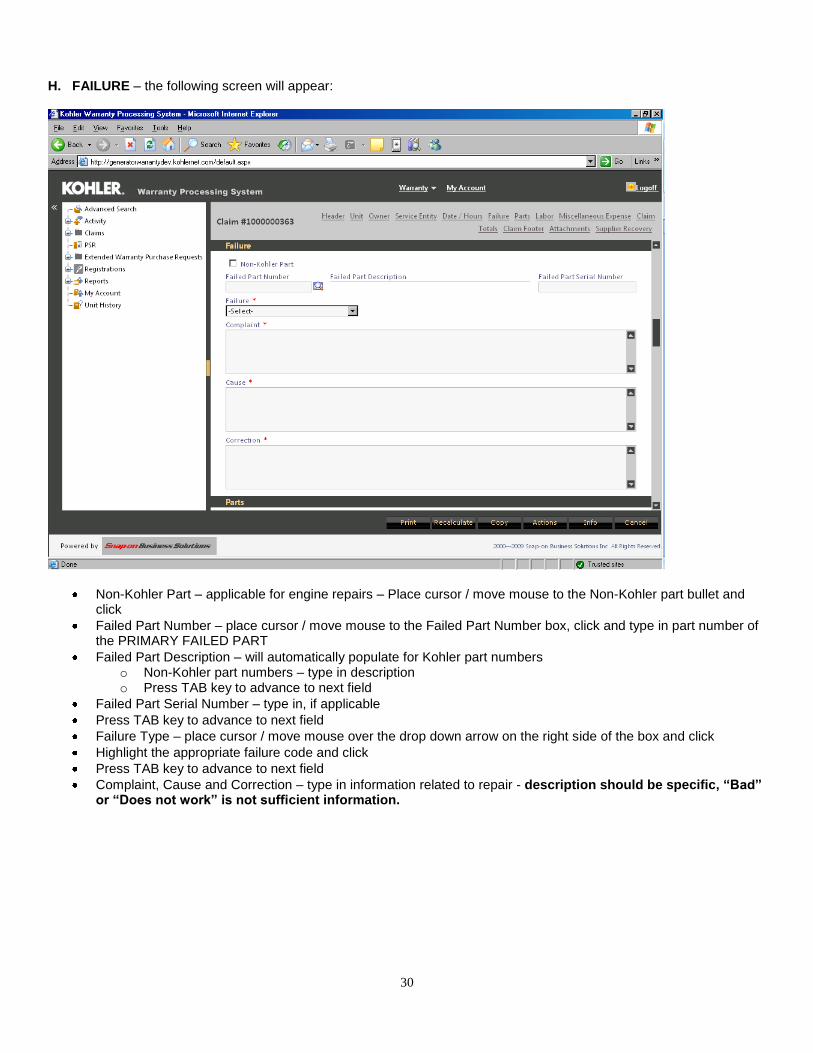
H. FAILURE:
Non-Kohler Part – applicable for engine repairs – Place cursor / move mouse to the Non-Kohler part bullet and
click
Failed Part Number – place cursor / move mouse to the Failed Part Number box, click and type in part number of the PRIMARY FAILED PART
Failed Part Description – will automatically populate for Kohler part numbers o Non-Kohler part numbers – type in description o Press TAB key to advance to next field
Failed Part Serial Number – type in, if applicable
Press TAB key to advance to next field
Failure Type – place cursor / move mouse over the drop down arrow on the right side of the box and click
Highlight the appropriate failure code and click
Press TAB key to advance to next field
Complaint, Cause and Correction – type in information related to repair - description should be specific, “Bad” or “Does not work” is not sufficient information.
10
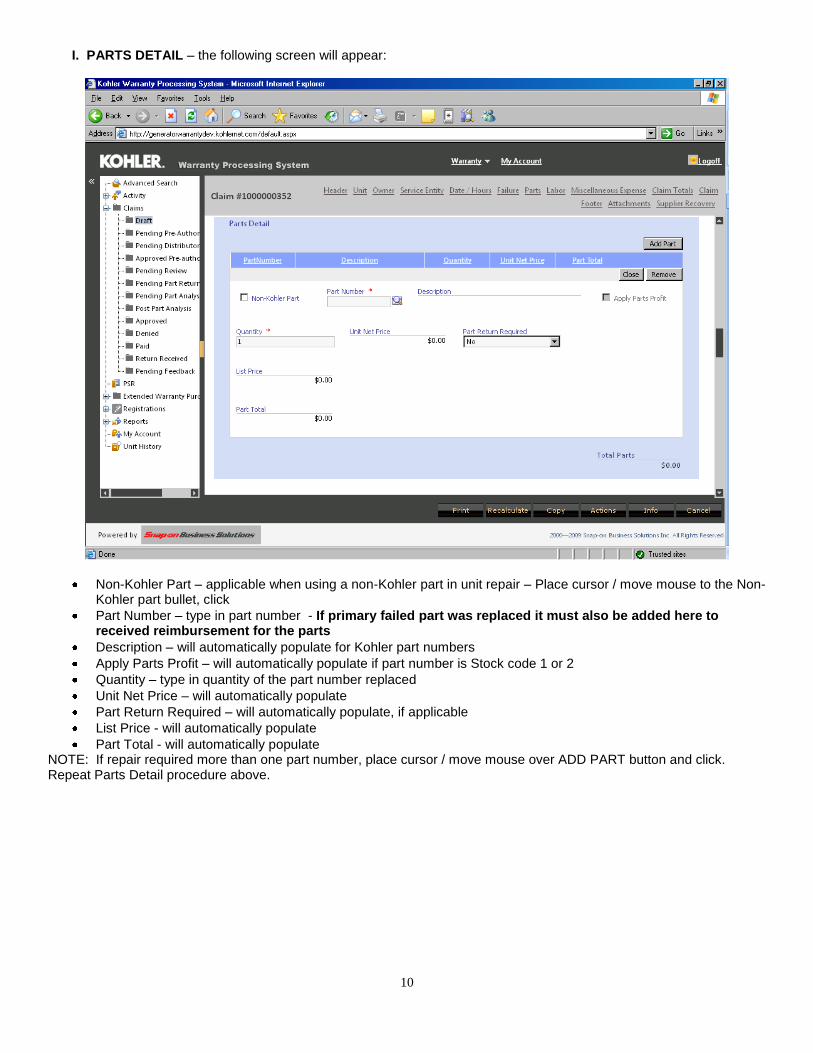
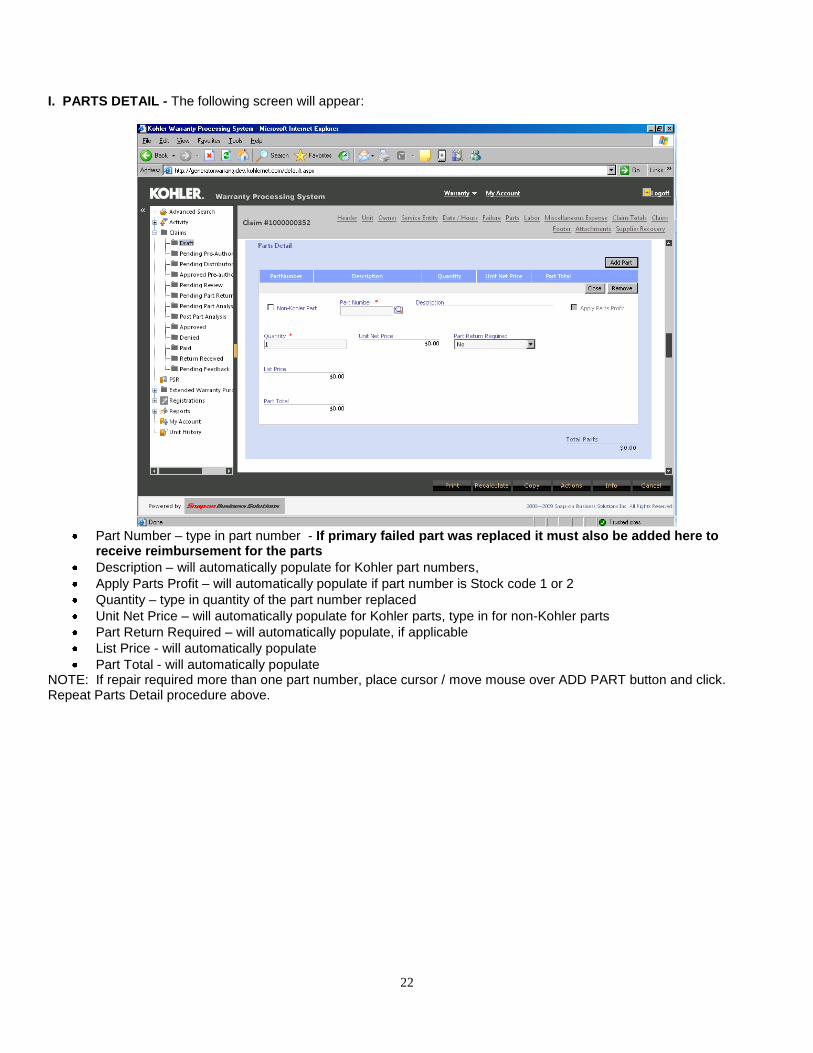
I. PARTS DETAIL – the following screen will appear:
Non-Kohler Part – applicable when using a non-Kohler part in unit repair – Place cursor / move mouse to the Non-Kohler part bullet, click
Part Number – type in part number - If primary failed part was replaced it must also be added here to received reimbursement for the parts
Description – will automatically populate for Kohler part numbers
Apply Parts Profit – will automatically populate if part number is Stock code 1 or 2
Quantity – type in quantity of the part number replaced
Unit Net Price – will automatically populate
Part Return Required – will automatically populate, if applicable
List Price - will automatically populate
Part Total - will automatically populate NOTE: If repair required more than one part number, place cursor / move mouse over ADD PART button and click. Repeat Parts Detail procedure above.
11
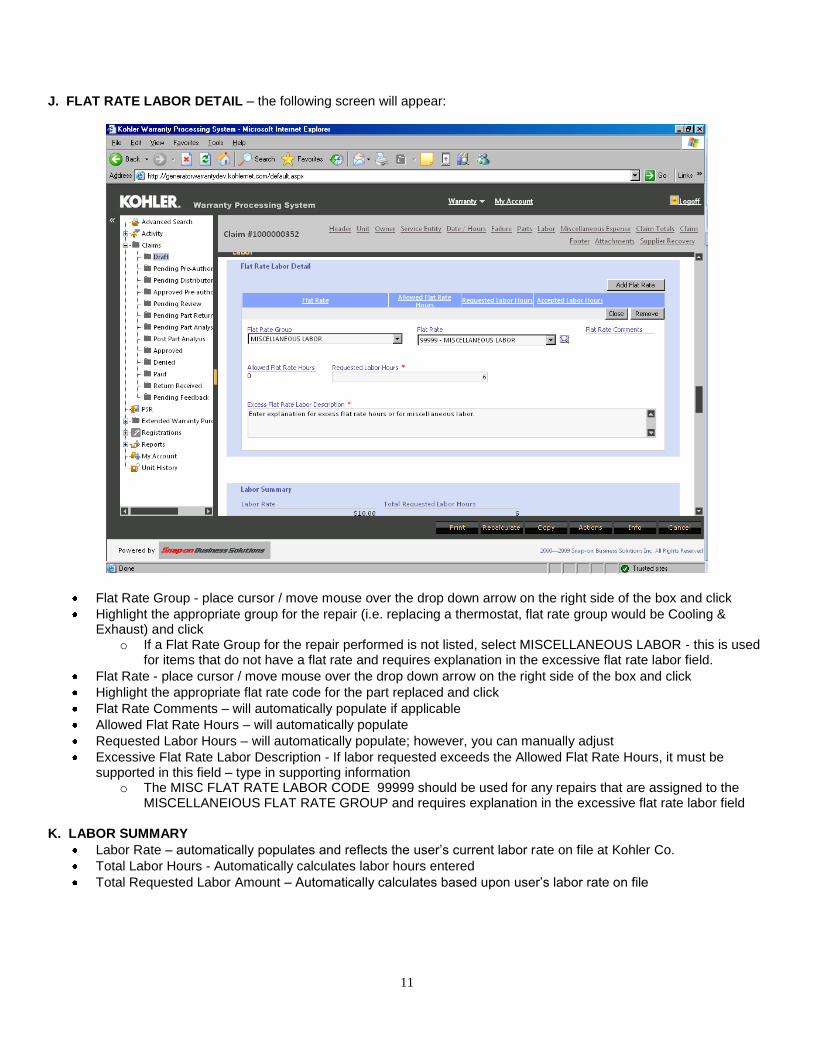
J. FLAT RATE LABOR DETAIL – the following screen will appear:
Flat Rate Group - place cursor / move mouse over the drop down arrow on the right side of the box and click
Highlight the appropriate group for the repair (i.e. replacing a thermostat, flat rate group would be Cooling & Exhaust) and click
o If a Flat Rate Group for the repair performed is not listed, select MISCELLANEOUS LABOR - this is used for items that do not have a flat rate and requires explanation in the excessive flat rate labor field.
Flat Rate - place cursor / move mouse over the drop down arrow on the right side of the box and click
Highlight the appropriate flat rate code for the part replaced and click
Flat Rate Comments – will automatically populate if applicable
Allowed Flat Rate Hours – will automatically populate
Requested Labor Hours – will automatically populate; however, you can manually adjust
Excessive Flat Rate Labor Description - If labor requested exceeds the Allowed Flat Rate Hours, it must be supported in this field – type in supporting information
o The MISC FLAT RATE LABOR CODE 99999 should be used for any repairs that are assigned to the MISCELLANEIOUS FLAT RATE GROUP and requires explanation in the excessive flat rate labor field
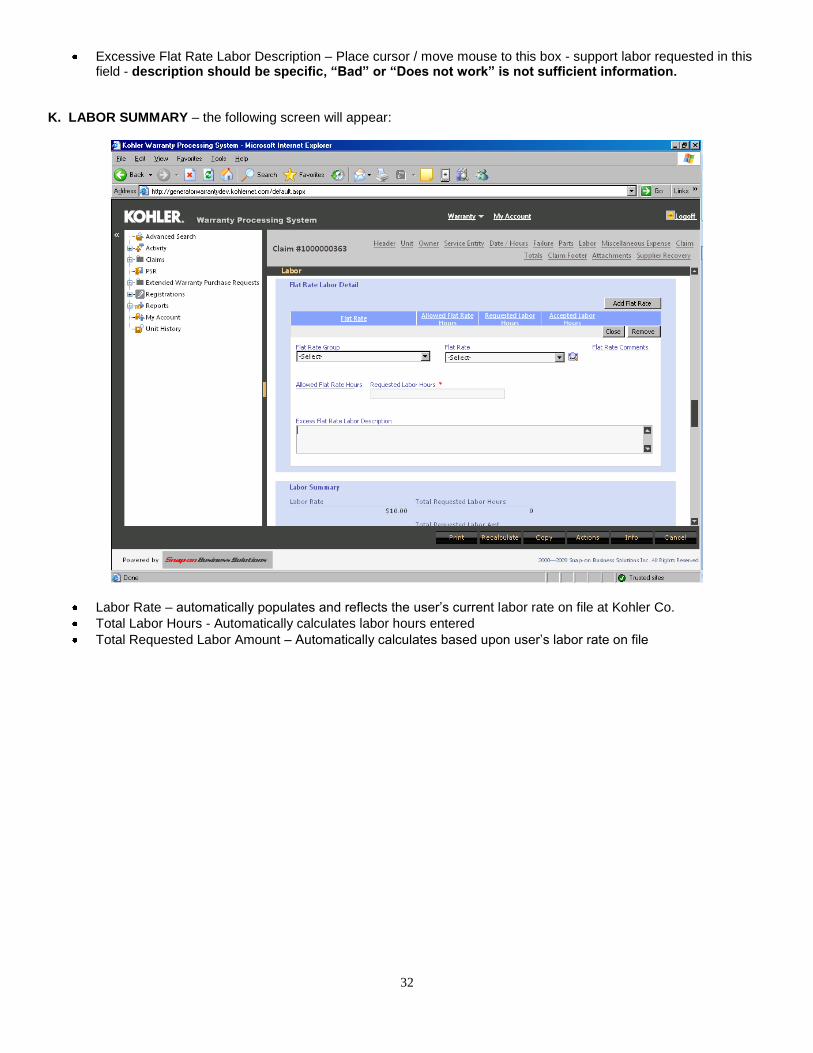
K. LABOR SUMMARY
Labor Rate – automatically populates and reflects the user‟s current labor rate on file at Kohler Co.
Total Labor Hours - Automatically calculates labor hours entered
Total Requested Labor Amount – Automatically calculates based upon user‟s labor rate on file

12
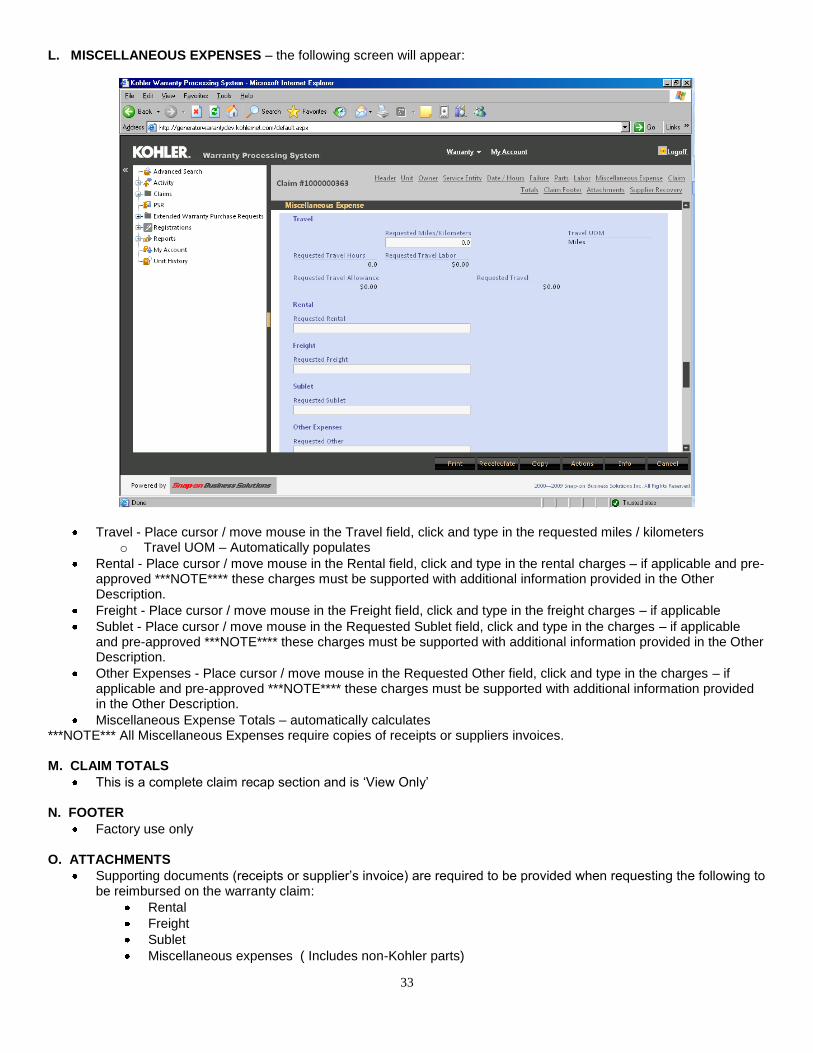
L. MISCELLANEOUS EXPENSES – the following screen will appear:
Travel - Place cursor / move mouse in the Travel field, click and type in the requested miles / kilometers o Travel UOM – Automatically populates
Rental - Place cursor / move mouse in the Rental field, click and type in the rental charges – if applicable and pre-approved ***NOTE**** these charges must be supported with additional information provided in the Other Description.
Freight - Place cursor / move mouse in the Freight field, click and type in the freight charges – if applicable
Sublet - Place cursor / move mouse in the Requested Sublet field, click and type in the charges – if applicable and pre-approved ***NOTE**** these charges must be supported with additional information provided in the Other Description.
Other Expenses - Place cursor / move mouse in the Requested Other field, click and type in the charges – if applicable and pre-approved ***NOTE**** these charges must be supported with additional information provided in the OTHER DESCRIPTION section.
NOTE: This field is also utilized when filing for a replacement unit.
Type in the value of the replacement unit – obtain from the replacement unit invoice
Attach a copy of the invoice for the replacement unit
Add the serial number of the replacement unit in the OTHER DESCRIPTION section
Miscellaneous Expense Totals – automatically calculates ***NOTE*** All Miscellaneous Expenses require copies of receipts or suppliers invoices.
13
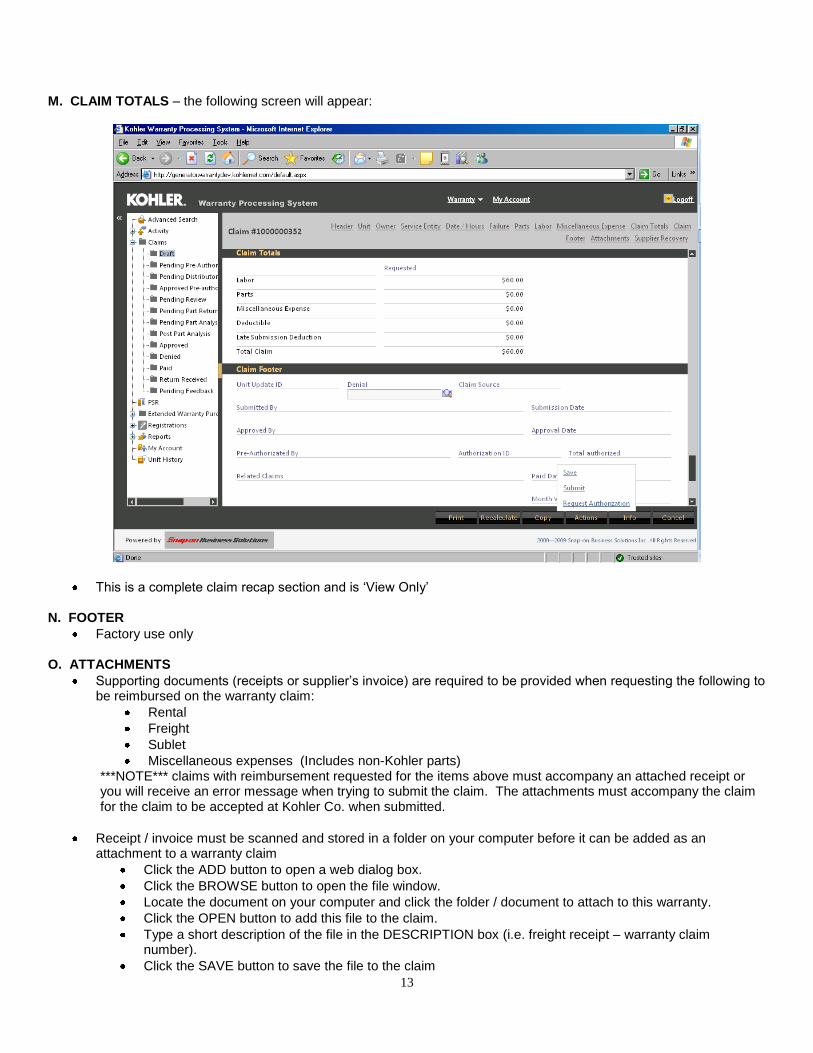
M. CLAIM TOTALS – the following screen will appear:
This is a complete claim recap section and is „View Only‟ N. FOOTER
Factory use only O. ATTACHMENTS
Supporting documents (receipts or supplier‟s invoice) are required to be provided when requesting the following to be reimbursed on the warranty claim:
Rental
Freight
Sublet
Miscellaneous expenses (Includes non-Kohler parts) ***NOTE*** claims with reimbursement requested for the items above must accompany an attached receipt or you will receive an error message when trying to submit the claim. The attachments must accompany the claim for the claim to be accepted at Kohler Co. when submitted.
Receipt / invoice must be scanned and stored in a folder on your computer before it can be added as an attachment to a warranty claim
Click the ADD button to open a web dialog box.
Click the BROWSE button to open the file window.
Locate the document on your computer and click the folder / document to attach to this warranty.
Click the OPEN button to add this file to the claim.
Type a short description of the file in the DESCRIPTION box (i.e. freight receipt – warranty claim number).
Click the SAVE button to save the file to the claim
14
If you have selected an incorrect document, click CANCEL to eliminate the file from the claim.
If you wish to view the file, move the cursor to the line information o Single click to highlight the line o Click the DOWNLOAD button to open the file down load box o Click open. The file will open.
To remove the line item from this section, click the line item to highlight it and click the REMOVE button to delete it.
P. SUBMIT CLAIM, SAVE CLAIM OR REQUEST AUTHORIZATION FOR ITEMS ON THIS CLAIM
Place cursor / move mouse ACTIONS button, in the bottom right corner, click, highlight your option choice and click
SUBMIT – claim will be sent to Kohler Co. for processing ****NOTE**** you will not be able to make any changes to this claim, including adding parts and labor, after the claim has been submitted to Kohler Co. for processing
o A confirmation will be displayed advising Claim has been sent to Kohler Co.
SAVING – claim will be held in the DRAFT folder o A confirmation will be displayed “Do you want to save your changes” – place cursor / move mouse over
your selection and click
REQUEST AUTHORIZATION – use this option when requesting reimbursement for items that require pre-authorization.
o A confirmation will be displayed advising “Claim has been sent to Pending Pre-Authorization folder” This completes the warranty claim process

15
Failed Part Claims Creating a FAILED PART Claim is used for part replacement that failed within the repair parts warranty period and guidelines Place cursor / move mouse over the DRAFT folder Icon and left click to continue
Place cursor / move mouse over the ADD button, in the lower right corner, and click
Place cursor / move mouse over the circle of the FAILED PART claim type and click
Place cursor / move mouse over the NEXT button, in the bottom right hand corner, and click ***DEALERS SKIP TO SECTION „B‟- SERIAL NUMBER ***DISTRIBUTORS CONTINUE ON WITH SECTION „A‟ – SERVICE ID The following CLAIMS CREATION screen will appear
16
This screen will list approximately 30 different service entity names, per page, in alphabetical order. Use the scroll bar on the right hand side of the screen to move up and down the page to view entire list
B. SERVICE ID:
Select the appropriate service entity name by placing the cursor over the name
Click - If the appropriate service entity name is not listed on this screen it can be located by doing one of the following:
Click on the > arrow at the bottom of the page to advance to the next list of names
Locate the Find in Service ID
in the upper right hand side of the screen
directly above the state/providence column of the service entity list. If the Service ID number is known, type the number in the empty box next to the SERVICE ID box.
To search by name, city, state/providence or service entity type, click the drop down arrow in the
SERVICE ID box.
Move the cursor over the selection type that you wish to search by and type in the appropriate search
information. For example, search by name: Find in Name
in the empty box next to NAME type in the name of the service entity and click GO.
A list of one or more will appear.
Click on the appropriate selection.
NOTE: If a list does not appear check the spelling of the information that was typed or try a different search type.
NOTE: User may also sort the displayed list by clicking one of the column headings

17
B. SERIAL NUMBER – The following screen will appear:
Type in the unit serial number.
Place cursor / move mouse over the NEXT button, in the bottom right hand corner, and click o An incorrect serial number will not accept and an error message “unit does not exist, contact the factory”
will display. Please Contact the factory by sending an email to [email protected]
o A claim filed against a unit, that is not marked as a stock unit, and is not registered at Kohler Co. will display an error message “Our records show that this unit has not been registered at the factory. Do you wish to register the unit now?”
Click YES to register unit at this time Click NO to return to the serial number entry screen.
You will not be able to continue with this claim until the unit is registered OR “Stock Unit” is checked on the serial number entry screen
18
C. HEADER – The following screen will appear:
Claim type, status and date will automatically populate
Reference Number – (Optional field) - place cursor / move mouse over the Reference Box and click o Type in your internal reference / tracking number (I .e. work order number)

19
D. UNIT – The following screen will appear:
Visually verify the unit information (model, spec, engine etc) are correct E. OWNER - The following screen will appear:

20
Visually verify the owner information (name, unit location etc) are correct F. SERVICE ENTITY
Visually verify this information is correct with your user account G. DATE / HOURS – The following screen will appear:
Ship date – automatically populates
In-Service Date – automatically populates
Failure Date - place cursor / move mouse in the Failure Date box, click and type in the date the unit failed OR click on the calendar to the right of the box and select the date – if typing the date in, it MUST BE TYPED in this format 01/01/2010
Part Installation Date – place cursor / move mouse in the Part Installation Date box, click and type in the date the unit failed OR click on the calendar to the right of the box and select the date – if typing the date in, it MUST BE TYPED in this format 01/01/2010
Repair Date - place cursor / move mouse in the Repair Date box, click and type in the date the unit failed OR click on the calendar to the right of the box and select the date – if typing the date in, it MUST BE TYPED in this format 01/01/2010
Hour Meter Reading - Not Applicable
Unit Odometer Reading - Not Applicable
21
H. FAILURE – The following screen will appear:
Failed Part Number – place cursor / move mouse to the Failed Part Number box, click and type in part number
Failed Part Description – will automatically populate for Kohler part numbers
Failed Part Serial Number – type in, if applicable
Failure Type – place cursor / move mouse over the drop down arrow on the right side of the box and click o Highlight the appropriate failure code and click o Press TAB key to advance to next field
Complaint, Cause and Correction – type in information related to repair - description should be specific, “Bad” or “Does not work” is not sufficient information.
22
I. PARTS DETAIL - The following screen will appear:
Part Number – type in part number - If primary failed part was replaced it must also be added here to
receive reimbursement for the parts
Description – will automatically populate for Kohler part numbers,
Apply Parts Profit – will automatically populate if part number is Stock code 1 or 2
Quantity – type in quantity of the part number replaced
Unit Net Price – will automatically populate for Kohler parts, type in for non-Kohler parts
Part Return Required – will automatically populate, if applicable
List Price - will automatically populate
Part Total - will automatically populate NOTE: If repair required more than one part number, place cursor / move mouse over ADD PART button and click. Repeat Parts Detail procedure above.

23
J. LABOR DETAIL –The following screen will appear:
Flat Rate Group - place cursor / move mouse over the drop down arrow on the right side of the box and click
Highlight the appropriate group for the repair (i.e. replacing a thermostat, flat rate group would be Cooling & Exhaust) and click
o If a Flat Rate Group for the repair performed is not listed, select MISCELLANEOUS LABOR
Flat Rate - place cursor / move mouse over the drop down arrow on the right side of the box and click
Highlight the appropriate flat rate code for the part replaced and click
Flat Rate Comments – will automatically populate if applicable
Allowed Flat Rate Hours – will automatically populate
Requested Labor Hours – will automatically populate; however, you can manually adjust
Excessive Flat Rate Labor Description - If labor requested exceeds the Allowed Flat Rate Hours, it must be supported in this field – type in supporting information
The MISC FLAT RATE LABOR CODE 99999 should be used for any repairs that are assigned to the MISCELLANEIOUS FLAT RATE GROUP
K. LABOR SUMMARY
Labor Rate – automatically populates and reflects the user‟s current labor rate on file at Kohler Co.
Total Labor Hours - Automatically calculates labor hours entered
Total Requested Labor Amount – Automatically calculates based upon user‟s labor rate on file L. MISCELLANEOUS EXPENSES
.
Freight - Place cursor / move mouse in the Freight field, click and type in the freight charges – if applicable
Miscellaneous Expense Totals – automatically calculates ***NOTE*** All Miscellaneous Expenses require copies of receipts or suppliers invoices.

24
M. CLAIM TOTALS
This is a complete claim recap section and is „View Only‟ N. FOOTER
Factory use only O. ATTACHMENT
Supporting documents invoice is required to be provided when requesting freight reimbursement. ***NOTE*** claims with freight reimbursement requested must accompany an attached invoice or you will receive an error message when trying to submit the claim. The attachment must accompany the claim for the claim to be accepted at Kohler Co. when submitted.
Invoice must be scanned and stored in a folder on your computer before it can be added as an attachment to a warranty claim
Click the ADD button to open a web dialog box.
Click the BROWSE button to open the file window.
Locate the document on your computer and click the folder / document to attach to this warranty.
Click the OPEN button to add this file to the claim.
Type a short description of the file in the DESCRIPTION box (i.e. freight receipt – warranty claim number).
Click the SAVE button to save the file to the claim
If you have selected an incorrect document, click CANCEL to eliminate the file from the claim.
If you wish to view the file, move the cursor to the line information o Single click to highlight the line o Click the DOWNLOAD button to open the file down load box o Click open. The file will open.
To remove the line item from this section, click the line item to highlight it and click the REMOVE button to delete it.
P. SUBMIT CLAIM, SAVE CLAIM OR REQUEST AUTHORIZATION FOR ITEMS ON THIS CLAIM
Place cursor / move mouse ACTIONS button, in the bottom right corner, click, highlight your option choice and click
SUBMIT – claim will be sent to Kohler Co. for processing ****NOTE**** you will not be able to make any changes to this claim, including adding parts and labor, after the claim has been submitted to Kohler Co. for processing
o A confirmation will be displayed advising Claim has been sent to Kohler Co.
SAVING – claim will be held in the DRAFT folder o A confirmation will be displayed “Do you want to save your changes” – place cursor / move mouse over
your selection and click
REQUEST AUTHORIZATION – use this option when requesting reimbursement for items that require pre-authorization.
o A confirmation will be displayed advising “Claim has been sent to Pending Pre-Authorization folder” This completes the FAILED PART claim process
25
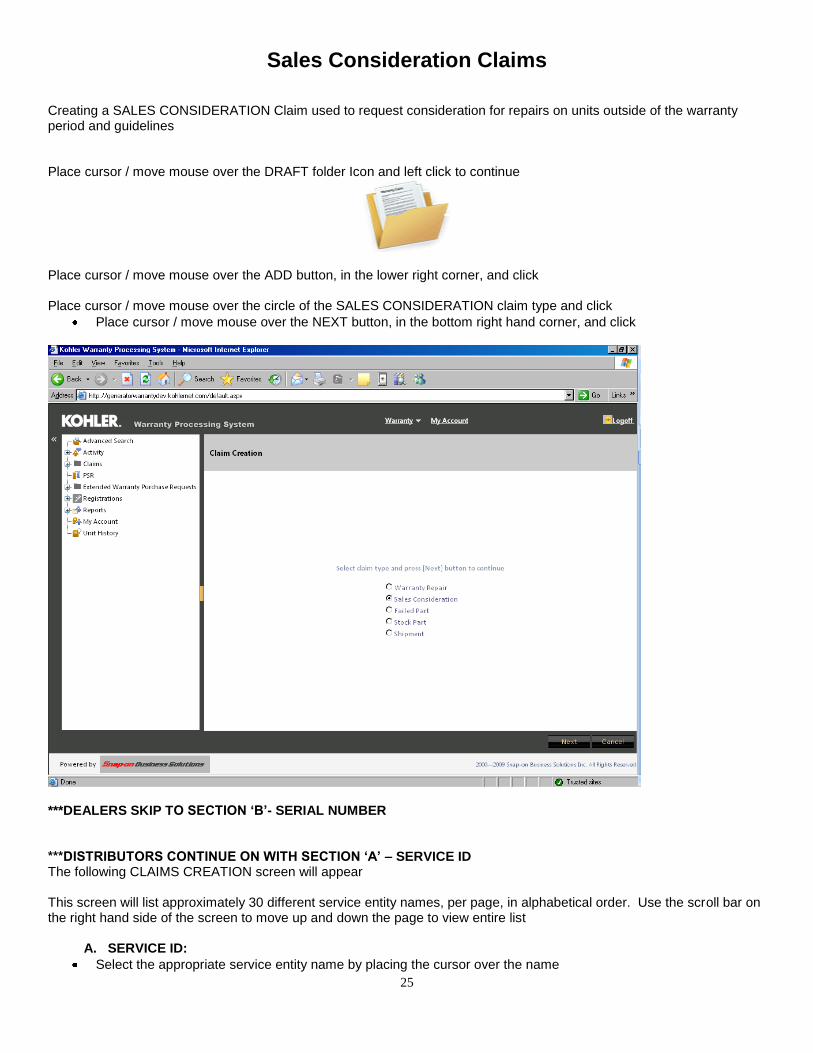
Sales Consideration Claims
Creating a SALES CONSIDERATION Claim used to request consideration for repairs on units outside of the warranty period and guidelines Place cursor / move mouse over the DRAFT folder Icon and left click to continue
Place cursor / move mouse over the ADD button, in the lower right corner, and click Place cursor / move mouse over the circle of the SALES CONSIDERATION claim type and click
Place cursor / move mouse over the NEXT button, in the bottom right hand corner, and click
***DEALERS SKIP TO SECTION „B‟- SERIAL NUMBER ***DISTRIBUTORS CONTINUE ON WITH SECTION „A‟ – SERVICE ID The following CLAIMS CREATION screen will appear This screen will list approximately 30 different service entity names, per page, in alphabetical order. Use the scroll bar on the right hand side of the screen to move up and down the page to view entire list
A. SERVICE ID:
Select the appropriate service entity name by placing the cursor over the name

26
Click - If the appropriate service entity name is not listed on this screen it can be located by doing one of the following:
Click on the > arrow at the bottom of the page to advance to the next list of names
Locate the Find in Service ID
in the upper right hand side of the screen
directly above the state/providence column of the service entity list.
If the Service ID number is known, type the number in the empty box next to the SERVICE ID box.
To search by name, city, state/providence or service entity type, click the drop down arrow in the
SERVICE ID box.
Move the cursor over the selection type that you wish to search by and type in the appropriate search
information. For example, search by name: Find in Name
in the empty box next to NAME type in the name of the service entity and click GO.
A list of one or more will appear.
Click on the appropriate selection.
NOTE: If a list does not appear check the spelling of the information that was typed or try a different search type.
NOTE: User may also sort the displayed list by clicking one of the column headings
B. SERIAL NUMBER – the following screen will appear:
Type in the unit serial number, if available. If not available follow instructions on the screen
Place cursor / move mouse over the NEXT button, in the bottom right hand corner, and click o An incorrect serial number will not accept and an error message “unit does not exist, contact the factory”
will display. Please Contact the factory by sending an email to [email protected]
27
o A claim filed against a unit, that is not marked as a stock unit, and is not registered at Kohler Co. will display an error message “Our records show that this unit has not been registered at the factory. Do you wish to register the unit now?”
Click YES to register unit at this time Click NO to return to the serial number entry screen.
You will not be able to continue with this claim until the unit is registered OR “Stock Unit” is checked on the serial number entry screen
C. HEADER
Claim type, status and date will automatically populate
Reference Number – (Optional field) - place cursor / move mouse over the Reference Box and click o Type in your internal reference / tracking number (I .e. work order number)
D. UNIT – the following screen will appear:
Claim with a serial number o Visually verify the unit information (model, spec, engine etc) are correct o If not correct, verify the serial number is typed correctly
if yes, verify serial number directly from the unit o If mistyped, cancel and start the claim over
Claim without a serial number o Skip this section

28
E. OWNER – the following screen will appear:
Claim with a serial number o Visually verify the owner information (name, unit location etc) are correct
Claim without a serial number o Skip this section
F. SERVICE ENTITY
Visually verify this information is correct with your user account
29
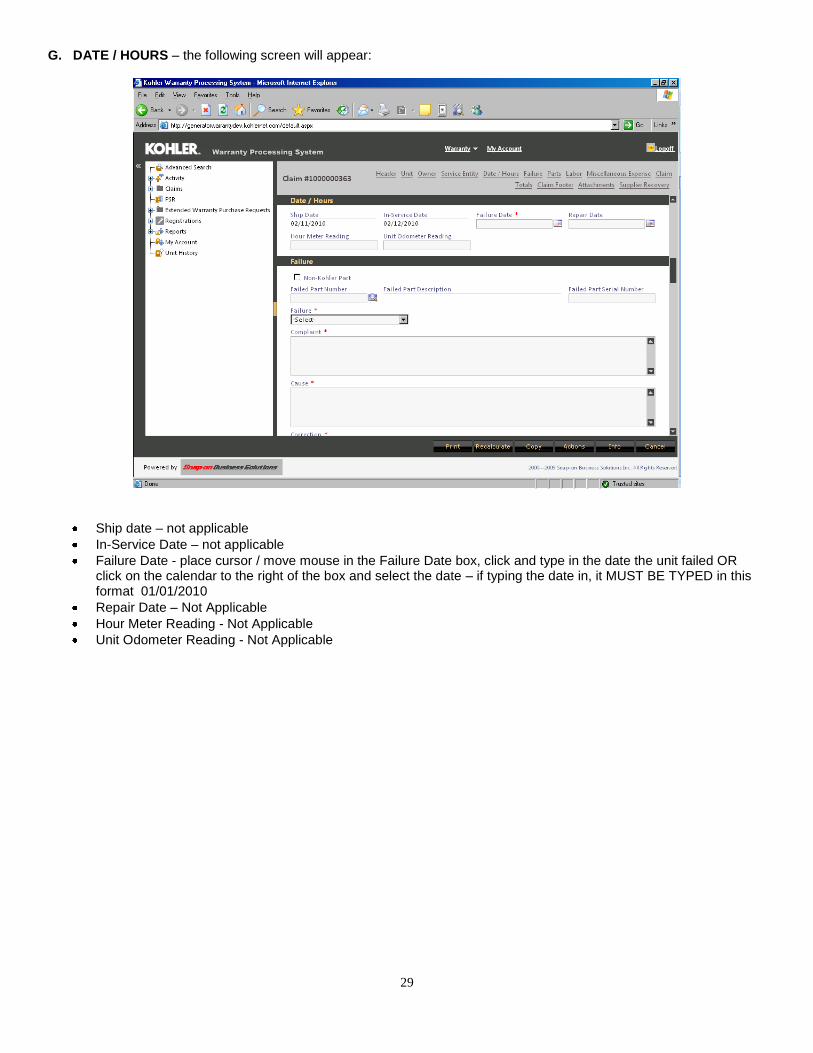
G. DATE / HOURS – the following screen will appear:
Ship date – not applicable
In-Service Date – not applicable
Failure Date - place cursor / move mouse in the Failure Date box, click and type in the date the unit failed OR click on the calendar to the right of the box and select the date – if typing the date in, it MUST BE TYPED in this format 01/01/2010
Repair Date – Not Applicable
Hour Meter Reading - Not Applicable
Unit Odometer Reading - Not Applicable
30
H. FAILURE – the following screen will appear:
Non-Kohler Part – applicable for engine repairs – Place cursor / move mouse to the Non-Kohler part bullet and click
Failed Part Number – place cursor / move mouse to the Failed Part Number box, click and type in part number of the PRIMARY FAILED PART
Failed Part Description – will automatically populate for Kohler part numbers o Non-Kohler part numbers – type in description o Press TAB key to advance to next field
Failed Part Serial Number – type in, if applicable
Press TAB key to advance to next field
Failure Type – place cursor / move mouse over the drop down arrow on the right side of the box and click
Highlight the appropriate failure code and click
Press TAB key to advance to next field
Complaint, Cause and Correction – type in information related to repair - description should be specific, “Bad” or “Does not work” is not sufficient information.

31
I. PARTS DETAIL – the following screen will appear:
Non-Kohler Part – applicable when using a non-Kohler part in unit repair – Place cursor / move mouse to the Non-
Kohler part bullet, click
Part Number – type in part number - If primary failed part was replaced it must also be added here to received reimbursement for the parts
Description – will automatically populate for Kohler part numbers
Apply Parts Profit – will automatically populate if part number is Stock code 1 or 2
Quantity – type in quantity of the part number replaced
Unit Net Price – will automatically populate
Part Return Required – will automatically populate, if applicable
List Price - will automatically populate
Part Total - will automatically populate NOTE: If repair required more than one part number, place cursor / move mouse over ADD PART button and click. Repeat Parts Detail procedure above. J. FLAT RATE LABOR DETAIL
Flat Rate Group - Not Applicable
Flat Rate - Not Applicable
Flat Rate Comments – Not Applicable
Allowed Flat Rate Hours – Not Applicable
Requested Labor Hours – Place cursor / move mouse to this box, click and type in labor hours / minutes requested
32
Excessive Flat Rate Labor Description – Place cursor / move mouse to this box - support labor requested in this field - description should be specific, “Bad” or “Does not work” is not sufficient information.
K. LABOR SUMMARY – the following screen will appear:
Labor Rate – automatically populates and reflects the user‟s current labor rate on file at Kohler Co.
Total Labor Hours - Automatically calculates labor hours entered
Total Requested Labor Amount – Automatically calculates based upon user‟s labor rate on file
33
L. MISCELLANEOUS EXPENSES – the following screen will appear:
Travel - Place cursor / move mouse in the Travel field, click and type in the requested miles / kilometers o Travel UOM – Automatically populates
Rental - Place cursor / move mouse in the Rental field, click and type in the rental charges – if applicable and pre-approved ***NOTE**** these charges must be supported with additional information provided in the Other Description.
Freight - Place cursor / move mouse in the Freight field, click and type in the freight charges – if applicable
Sublet - Place cursor / move mouse in the Requested Sublet field, click and type in the charges – if applicable and pre-approved ***NOTE**** these charges must be supported with additional information provided in the Other Description.
Other Expenses - Place cursor / move mouse in the Requested Other field, click and type in the charges – if applicable and pre-approved ***NOTE**** these charges must be supported with additional information provided in the Other Description.
Miscellaneous Expense Totals – automatically calculates ***NOTE*** All Miscellaneous Expenses require copies of receipts or suppliers invoices. M. CLAIM TOTALS
This is a complete claim recap section and is „View Only‟ N. FOOTER
Factory use only O. ATTACHMENTS
Supporting documents (receipts or supplier‟s invoice) are required to be provided when requesting the following to be reimbursed on the warranty claim:
Rental
Freight
Sublet
Miscellaneous expenses ( Includes non-Kohler parts)
34
***NOTE*** claims with reimbursement requested for the items above must accompany an attached receipt or you will receive an error message when trying to submit the claim. The attachments must accompany the claim for the claim to be accepted at Kohler Co. when submitted.
Receipt / invoice must be scanned and stored in a folder on your computer before it can be added as an attachment to a warranty claim
Click the ADD button to open a web dialog box.
Click the BROWSE button to open the file window.
Locate the document on your computer and click the folder / document to attach to this warranty.
Click the OPEN button to add this file to the claim.
Type a short description of the file in the DESCRIPTION box (i.e. freight receipt – warranty claim number).
Click the SAVE button to save the file to the claim
If you have selected an incorrect document, click CANCEL to eliminate the file from the claim.
If you wish to view the file, move the cursor to the line information o Single click to highlight the line o Click the DOWNLOAD button to open the file down load box o Click open. The file will open.
To remove the line item from this section, click the line item to highlight it and click the REMOVE button to delete it.
P. SUBMIT CLAIM, SAVE CLAIM OR REQUEST AUTHORIZATION FOR ITEMS ON THIS CLAIM
Place cursor / move mouse ACTIONS button, in the bottom right corner, click, highlight your option choice and click
SUBMIT – claim will be sent to Kohler Co. for processing ****NOTE**** you will not be able to make any changes to this claim, including adding parts and labor, after the claim has been submitted to Kohler Co. for processing
o A confirmation will be displayed advising Claim has been sent to Kohler Co.
SAVING – claim will be held in the DRAFT folder o A confirmation will be displayed “Do you want to save your changes” – place cursor / move mouse over
your selection and click
REQUEST AUTHORIZATION – use this option when requesting reimbursement for items that require pre-authorization.
o A confirmation will be displayed advising “Claim has been sent to Pending Pre-Authorization folder” This completes the SALES CONSIDERATION claim process
35
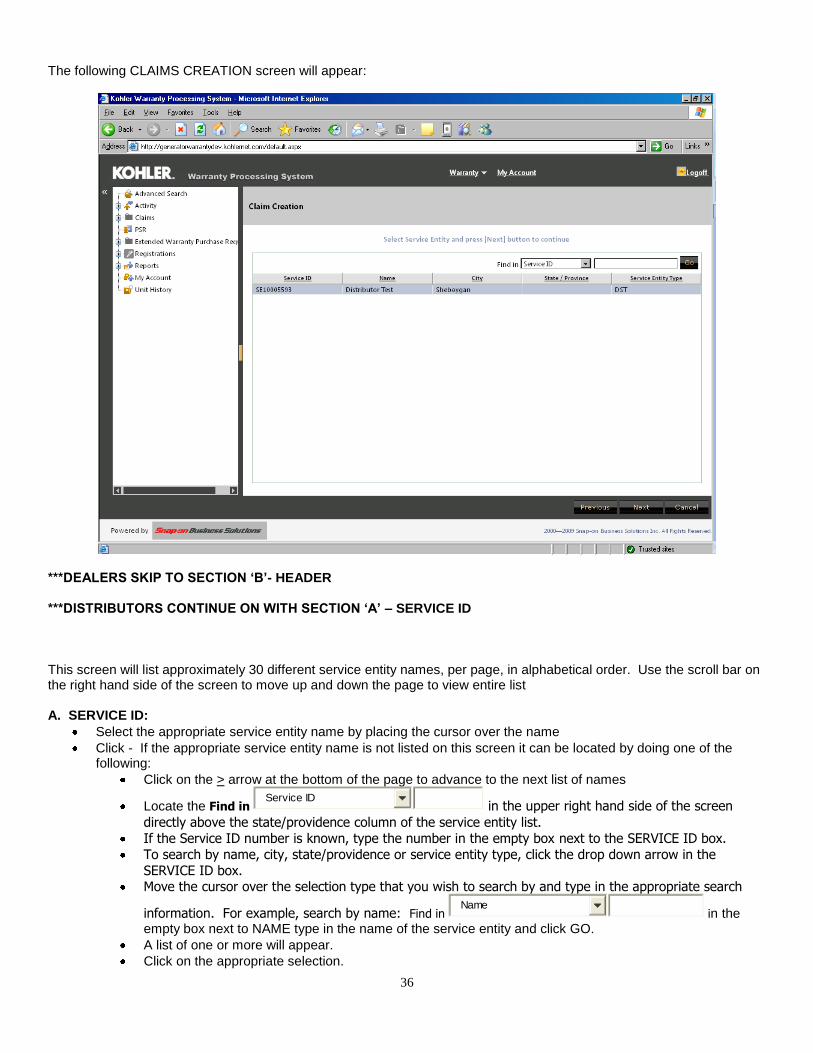
Shipment Claims Creating a SHIPMENT Claim is used to request consideration for units damaged in shipment as well as „short on shipment‟ Place cursor / move mouse over the DRAFT folder Icon and left click to continue
Place cursor / move mouse over the ADD button, in the lower right corner, and click The following screen will appear
Place cursor / move mouse over the circle of the SHIPMENT claim type and click
Place cursor / move mouse over the NEXT button, in the bottom right hand corner, and click
36
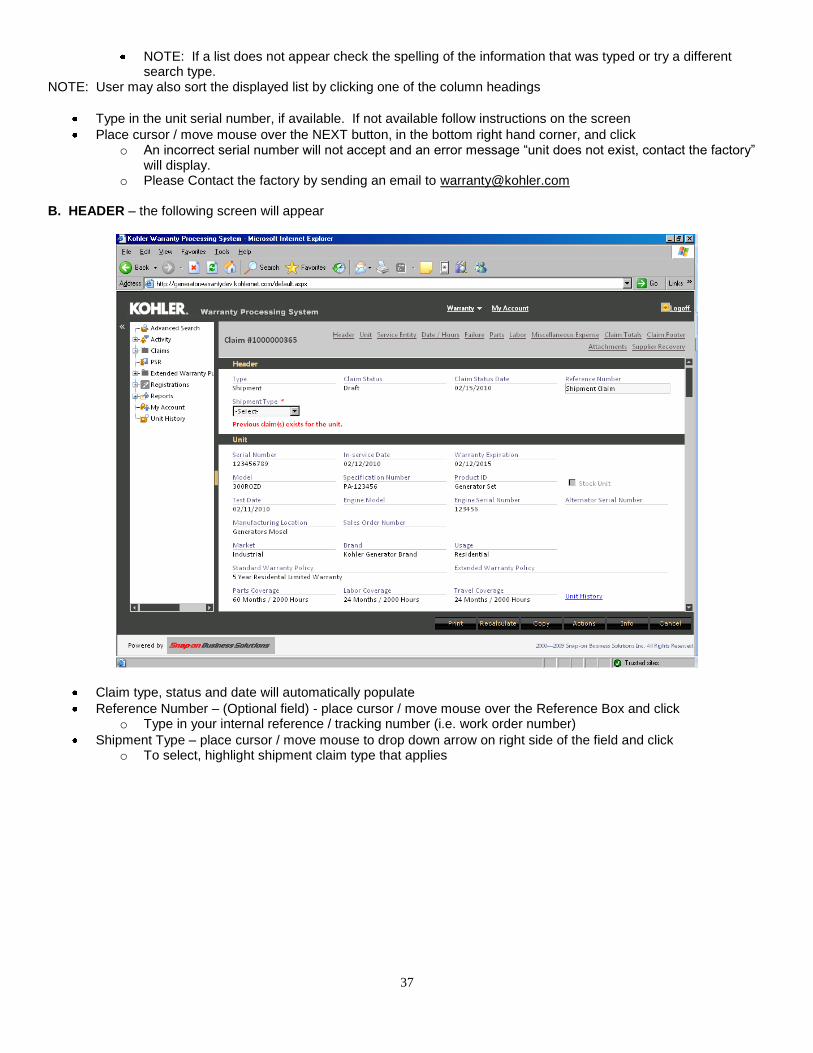
The following CLAIMS CREATION screen will appear:
***DEALERS SKIP TO SECTION „B‟- HEADER ***DISTRIBUTORS CONTINUE ON WITH SECTION „A‟ – SERVICE ID This screen will list approximately 30 different service entity names, per page, in alphabetical order. Use the scroll bar on the right hand side of the screen to move up and down the page to view entire list A. SERVICE ID:
Select the appropriate service entity name by placing the cursor over the name
Click - If the appropriate service entity name is not listed on this screen it can be located by doing one of the following:
Click on the > arrow at the bottom of the page to advance to the next list of names
Locate the Find in Service ID
in the upper right hand side of the screen
directly above the state/providence column of the service entity list.
If the Service ID number is known, type the number in the empty box next to the SERVICE ID box.
To search by name, city, state/providence or service entity type, click the drop down arrow in the
SERVICE ID box. Move the cursor over the selection type that you wish to search by and type in the appropriate search
information. For example, search by name: Find in Name
in the empty box next to NAME type in the name of the service entity and click GO.
A list of one or more will appear.
Click on the appropriate selection.
37
NOTE: If a list does not appear check the spelling of the information that was typed or try a different search type.
NOTE: User may also sort the displayed list by clicking one of the column headings
Type in the unit serial number, if available. If not available follow instructions on the screen
Place cursor / move mouse over the NEXT button, in the bottom right hand corner, and click o An incorrect serial number will not accept and an error message “unit does not exist, contact the factory”
will display. o Please Contact the factory by sending an email to [email protected]
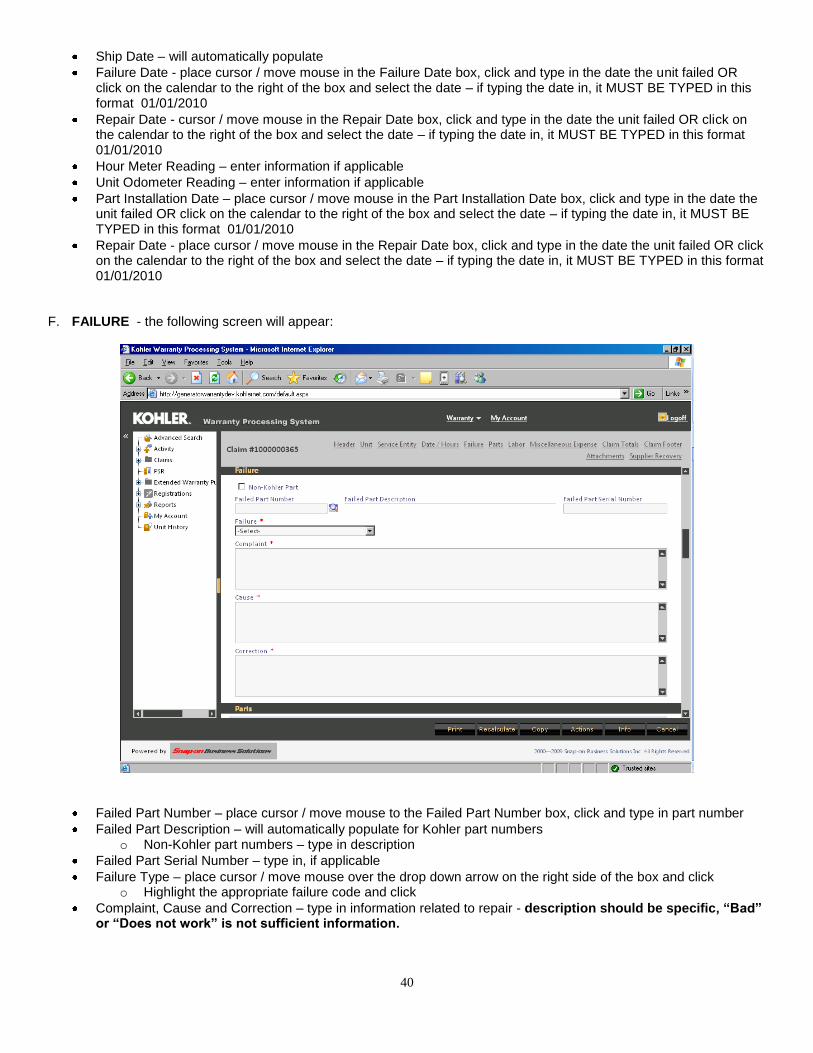
B. HEADER – the following screen will appear
Claim type, status and date will automatically populate
Reference Number – (Optional field) - place cursor / move mouse over the Reference Box and click o Type in your internal reference / tracking number (i.e. work order number)
Shipment Type – place cursor / move mouse to drop down arrow on right side of the field and click o To select, highlight shipment claim type that applies

38
C. UNIT – the following screen will appear
o All fields in this section should automatically populate when a serial number has been provided o Visually verify information is correct
D. SERVICE ENTITY – the following screen will appear:

39
Visually verify this information is correct with your user account
E. DATE / HOURS – the following screen will appear:
40
Ship Date – will automatically populate
Failure Date - place cursor / move mouse in the Failure Date box, click and type in the date the unit failed OR click on the calendar to the right of the box and select the date – if typing the date in, it MUST BE TYPED in this format 01/01/2010
Repair Date - cursor / move mouse in the Repair Date box, click and type in the date the unit failed OR click on the calendar to the right of the box and select the date – if typing the date in, it MUST BE TYPED in this format 01/01/2010
Hour Meter Reading – enter information if applicable
Unit Odometer Reading – enter information if applicable
Part Installation Date – place cursor / move mouse in the Part Installation Date box, click and type in the date the unit failed OR click on the calendar to the right of the box and select the date – if typing the date in, it MUST BE TYPED in this format 01/01/2010
Repair Date - place cursor / move mouse in the Repair Date box, click and type in the date the unit failed OR click on the calendar to the right of the box and select the date – if typing the date in, it MUST BE TYPED in this format 01/01/2010
F. FAILURE - the following screen will appear:
Failed Part Number – place cursor / move mouse to the Failed Part Number box, click and type in part number
Failed Part Description – will automatically populate for Kohler part numbers o Non-Kohler part numbers – type in description
Failed Part Serial Number – type in, if applicable
Failure Type – place cursor / move mouse over the drop down arrow on the right side of the box and click o Highlight the appropriate failure code and click
Complaint, Cause and Correction – type in information related to repair - description should be specific, “Bad” or “Does not work” is not sufficient information.

41
G. PARTS DETAIL – the following screen will appear:
Part Number – type in part number
Description – will automatically populate for Kohler part numbers, type in for non-Kohler parts
Apply Parts Profit – will automatically populate if part number is Stock code 1 or 2
Quantity – type in quantity of the part number replaced
Unit Net Price – will automatically populate for Kohler parts, type in for non-Kohler parts
Part Return Required – will automatically populate, if applicable
List Price - will automatically populate
Part Total - will automatically populate NOTE: If repair required more than one part number, place cursor / move mouse over ADD PART button and click. Repeat Parts Detail procedure above.

42
H. LABOR DETAIL - the following screen will appear:
Flat Rate Group - place cursor / move mouse over the drop down arrow on the right side of the box and click
Highlight the appropriate group for the repair (i.e. replacing a thermostat, flat rate group would be Cooling & Exhaust) and click
o If a Flat Rate Group for the repair performed is not listed, select MISCELLANEOUS LABOR
Flat Rate - place cursor / move mouse over the drop down arrow on the right side of the box and click
Highlight the appropriate flat rate code for the part replaced and click
Flat Rate Comments – will automatically populate if applicable
Allowed Flat Rate Hours – will automatically populate
Requested Labor Hours – will automatically populate; however, you can manually adjust
Excessive Flat Rate Labor Description - If labor requested exceeds the Allowed Flat Rate Hours, it must be supported in this field – type in supporting information
The MISC FLAT RATE LABOR CODE 99999 should be used for any repairs that are assigned to the MISCELLANEIOUS FLAT RATE GROUP
43
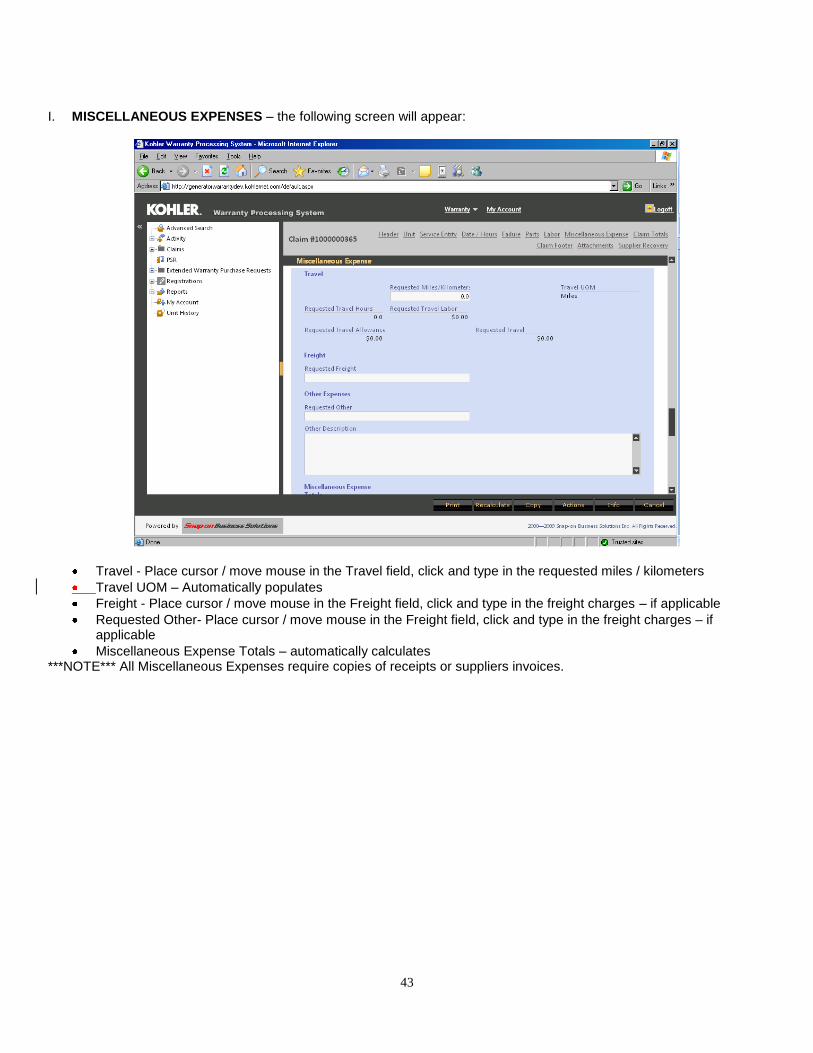
I. MISCELLANEOUS EXPENSES – the following screen will appear:
Travel - Place cursor / move mouse in the Travel field, click and type in the requested miles / kilometers
Travel UOM – Automatically populates
Freight - Place cursor / move mouse in the Freight field, click and type in the freight charges – if applicable
Requested Other- Place cursor / move mouse in the Freight field, click and type in the freight charges – if applicable
Miscellaneous Expense Totals – automatically calculates ***NOTE*** All Miscellaneous Expenses require copies of receipts or suppliers invoices.

44
J. CLAIM TOTALS – the following screen will appear:
This is a complete claim recap section and is „View Only‟
K. FOOTER
Factory use only L. ATTACHMENTS
Supporting documents (receipts or supplier‟s invoice) are required to be provided when requesting the following to be reimbursed on the warranty claim:
Freight
Requested other ( Includes non-Kohler parts)
Miscellaneous Expense Totals – automatically calculates
***NOTE*** claims with reimbursement requested for the items above must accompany an attached receipt or you will receive an error message when trying to submit the claim. The attachments must accompany the claim for the claim to be accepted at Kohler Co. when submitted.
Receipt / invoice must be scanned and stored in a folder on your computer before it can be added as an attachment to a warranty claim
Click the ADD button to open a web dialog box.
Click the BROWSE button to open the file window.
Locate the document on your computer and click the folder / document to attach to this warranty.
Click the OPEN button to add this file to the claim.
Type a short description of the file in the DESCRIPTION box (i.e. freight receipt – warranty claim number).
Click the SAVE button to save the file to the claim
If you have selected an incorrect document, click CANCEL to eliminate the file from the claim.
If you wish to view the file, move the cursor to the line information o Single click to highlight the line o Click the DOWNLOAD button to open the file down load box o Click open. The file will open.
To remove the line item from this section, click the line item to highlight it and click the REMOVE button to delete it.
45
M. SUBMIT CLAIM, SAVE CLAIM OR REQUEST AUTHORIZATION FOR ITEMS ON THIS CLAIM Place cursor / move mouse ACTIONS button, in the bottom right corner, click, highlight your option choice and click
SUBMIT – claim will be sent to Kohler Co. for processing ****NOTE**** you will not be able to make any changes to this claim, including adding parts and labor, after the claim has been submitted to Kohler Co. for processing
o A confirmation will be displayed advising Claim has been sent to Kohler Co.
SAVING – claim will be held in the DRAFT folder o A confirmation will be displayed “Do you want to save your changes” – place cursor / move mouse over
your selection and click
REQUEST AUTHORIZATION – use this option when requesting reimbursement for items that require pre-authorization.
o A confirmation will be displayed advising “Claim has been sent to Pending Pre-Authorization folder” This completes the SHIPMENT claim process

46
Stock Part Claims Creating a STOCK PART Claim is used for parts that are defective off the shelf, as well as damaged parts Place cursor / move mouse over the DRAFT folder Icon and left click to continue
Place cursor / move mouse over the ADD button, in the lower right corner, and click Place cursor / move mouse over the circle of the STOCK PART claim type and click
Place cursor / move mouse over the NEXT button, in the bottom right hand corner, and click The following CLAIMS CREATION screen will appear
***DEALERS SKIP TO SECTION „B‟- HEADER ***DISTRIBUTORS CONTINUE ON WITH SECTION „A‟ – SERVICE ID

47
A. SERVICE ID: - the following screen will appear This screen will list approximately 30 different service entity names, per page, in alphabetical order. Use the scroll bar on the right hand side of the screen to move up and down the page to view entire list
Select the appropriate service entity name by placing the cursor over the name
Click - If the appropriate service entity name is not listed on this screen it can be located by doing one of the following:
Click on the > arrow at the bottom of the page to advance to the next list of names
Locate the Find in Service ID
in the upper right hand side of the screen
directly above the state/providence column of the service entity list. If the Service ID number is known, type the number in the empty box next to the SERVICE ID box.
To search by name, city, state/providence or service entity type, click the drop down arrow in the
SERVICE ID box.
Move the cursor over the selection type that you wish to search by and type in the appropriate search
information. For example, search by name: Find in Name
in the empty box next to NAME type in the name of the service entity and click GO.
A list of one or more will appear.
Click on the appropriate selection.
NOTE: If a list does not appear check the spelling of the information that was typed or try a different search type.
NOTE: User may also sort the displayed list by clicking one of the column headings

48
B. HEADER – the following screen will appear
Claim type, status and date will automatically populate
Reference Number – (Optional field) - place cursor / move mouse over the Reference Box and click o Type in your internal reference / tracking number (i.e. work order number)
C. SERVICE ENTITY – the following information will appear
49
Visually verify this information is correct with your user account
D. DATE / HOURS – the following screen will appear:
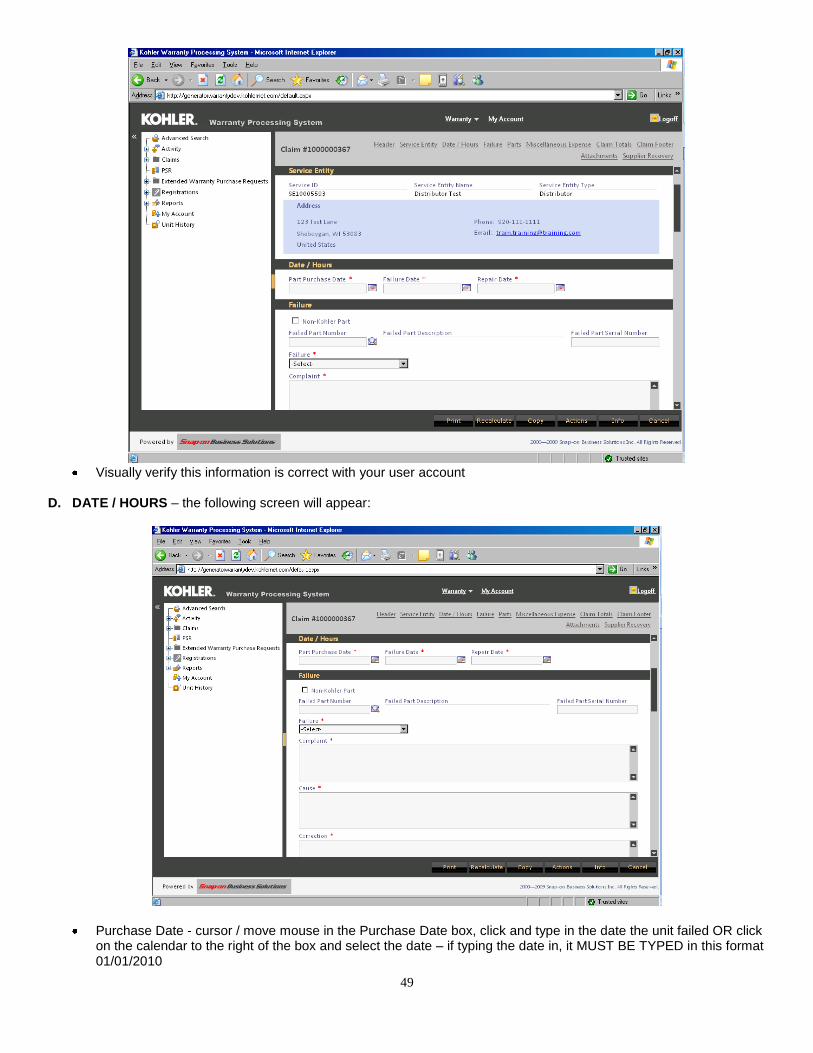
Purchase Date - cursor / move mouse in the Purchase Date box, click and type in the date the unit failed OR click on the calendar to the right of the box and select the date – if typing the date in, it MUST BE TYPED in this format 01/01/2010

50
Failure Date - place cursor / move mouse in the Failure Date box, click and type in the date the unit failed OR click on the calendar to the right of the box and select the date – if typing the date in, it MUST BE TYPED in this format 01/01/2010
Repair Date - cursor / move mouse in the Repair Date box, click and type in the date the unit failed OR click on the calendar to the right of the box and select the date – if typing the date in, it MUST BE TYPED in this format 01/01/2010
Part Installation Date – place cursor / move mouse in the Part Installation Date box, click and type in the date the unit failed OR click on the calendar to the right of the box and select the date – if typing the date in, it MUST BE TYPED in this format 01/01/2010
Repair Date - place cursor / move mouse in the Repair Date box, click and type in the date the unit failed OR click on the calendar to the right of the box and select the date – if typing the date in, it MUST BE TYPED in this format 01/01/2010
E. FAILURE – the following screen will appear
Failed Part Number – place cursor / move mouse to the Failed Part Number box, click and type in part number
Failed Part Description – will automatically populate for Kohler part numbers
Failed Part Serial Number – type in, if applicable
Failure Type – place cursor / move mouse over the drop down arrow on the right side of the box and click o Highlight the appropriate failure code and click
Complaint, Cause and Correction – type in information related to repair - description should be specific, “Bad” or “Does not work” is not sufficient information.
F. PARTS DETAIL – the following screen will appear

51
Part Number – type in part number
Description – will automatically populate for Kohler part numbers
Apply Parts Profit – will automatically populate if part number is Stock code 1 or 2
Quantity – type in quantity of the part number replaced
Unit Net Price – will automatically populate for Kohler parts,
Part Return Required – will automatically populate, if applicable
List Price - will automatically populate
Part Total - will automatically populate NOTE: If repair required more than one part number, place cursor / move mouse over ADD PART button and click. Repeat Parts Detail procedure above. G. MISCELLANEOUS EXPENSES – the following screen will appear
52
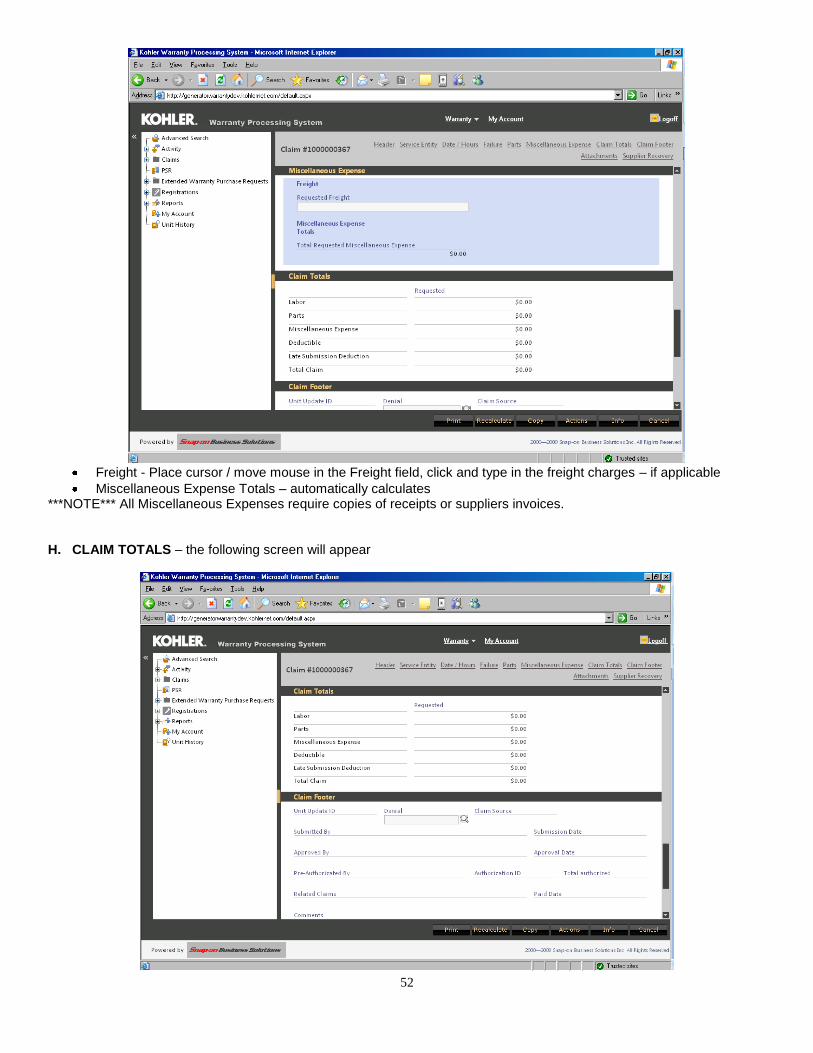
Freight - Place cursor / move mouse in the Freight field, click and type in the freight charges – if applicable
Miscellaneous Expense Totals – automatically calculates ***NOTE*** All Miscellaneous Expenses require copies of receipts or suppliers invoices. H. CLAIM TOTALS – the following screen will appear

53
This is a complete claim recap section and is „View Only‟ I. FOOTER
Factory use only J. ATTACHMENTS
Supporting invoice required when requesting reimbursement for freight. ***NOTE***. The attachments must accompany the claim for the claim to be accepted at Kohler Co. when submitted.
Invoice must be scanned and stored in a folder on your computer before it can be added as an attachment to a warranty claim
Click the ADD button to open a web dialog box.
Click the BROWSE button to open the file window.
Locate the document on your computer and click the folder / document to attach to this warranty.
Click the OPEN button to add this file to the claim.
Type a short description of the file in the DESCRIPTION box (i.e. freight receipt – warranty claim number).
Click the SAVE button to save the file to the claim
If you have selected an incorrect document, click CANCEL to eliminate the file from the claim.
If you wish to view the file, move the cursor to the line information o Single click to highlight the line o Click the DOWNLOAD button to open the file down load box o Click open. The file will open.
To remove the line item from this section, click the line item to highlight it and click the REMOVE button to delete it.
K. SUBMIT CLAIM, SAVE CLAIM OR REQUEST AUTHORIZATION FOR ITEMS ON THIS CLAIM Place cursor / move mouse ACTIONS button, in the bottom right corner, click, highlight your option choice and click
SUBMIT – claim will be sent to Kohler Co. for processing ****NOTE**** you will not be able to make any changes to this claim, including adding parts and labor, after the claim has been submitted to Kohler Co. for processing
o A confirmation will be displayed advising Claim has been sent to Kohler Co.
SAVING – claim will be held in the DRAFT folder o A confirmation will be displayed “Do you want to save your changes” – place cursor / move mouse over
your selection and click
REQUEST AUTHORIZATION – use this option when requesting reimbursement for items that require pre-authorization.
o A confirmation will be displayed advising “Claim has been sent to Pending Pre-Authorization folder” This completes the STOCK PART claim process

54
Copying a Claim
Lesson Overview In this lesson you will learn how to COPY a claim. The copy option is beneficial:
To create a claim on a unit that has previous claims – the user does not have to type in all the unit information
A claim has been denied and the service entity is requesting reconsideration, with additional information to support the payment reconsideration
IMPORTANT NOTE –
Claims can copied from the DRAFT and DENIED status only
When using the COPY option, you will not be able to change any information in the following sections o HEADER (except the reference number) o UNIT o OWNER o SERVICE ENTITY
To use the COPY option a claim must be opened and displayed on your screen After the claim of your choice has been selected and opened
Locate and click the COPY button at the bottom of the page
A new claim will be generated, click OK
Make any necessary changes to the affected sections and follow the same procedures used when creating a new claim to submit for review.
This completes the session on COPYING a claim

55
Claims Pending Feedback Folder Lesson Overview In this lesson you will learn how to locate and provide feedback on claims returned for information. IMPORTANT NOTE –
Claims not responded to within the time frame allowed per the published warranty policies will be automatically denied.
Any claim that has been placed in denied status cannot be re-instated or re-activated. o To request reconsideration for a claim that has been placed in denied status, a COPY of the claim will
need to be generated. Please refer to instructions on COPYING a claim. CLAIMS PENDING FEEDBACK DEALER – DISTRIBUTOR Using the Navigation Tree on the left side of the screen place the cursor / move mouse over the plus (+) symbol next to CLAIMS or click on the folder in the body of the Warranty Home page PENDING FEEDBACK – used to hold claims that have been returned for more information. 1. Place the cursor on the FEEDBACK folder and click
Place cursor on the line of the claim of your choice and click
Locate and click the EDIT button in the lower right hand corner of the screen
Locate and click the FEEDBACK button at the bottom of the screen i. A feedback screen will be displayed with a REQUEST heading – under the heading an message
indicating what information is needed to further review the claim
To provide the requested information, place the cursor in the COMMENTS box, click and type your response. i. Click CANCEL to respond at a later date ii. This will take you back to the claim – cancel out of the claim to return to the original list of claims
PENDING FEEDBACK
Locate and click the RESPONSE button in the lower right hand corner of the feedback screen
A message will be displayed stating “message has been sent” with additional information stating what folder it was sent to at Kohler Co. (i.e. message has been sent to pre-authorization folder)
Click OK to return to the original list of claims PENDING FEEDBACK
NOTE: Distributors have access to their own Dealer‟s claims in a LIVE status, NOT JUST VIEWING. This allows the distributor to assist their dealers if necessary. The feedback can be input by either the dealer or the distributor; however, DEALERS ARE RESPSONSIBLE FOR THEIR OWN CLAIMS.
DISTRIBUTORS ARE NOT RESPSONSIBLE FOR PROVIDING THE FEEDBACK TO THEIR DEALER‟S CLAIMS UNLESS AGREED UPON BETWEEN THE DEALER AND THE DISTRIBUTOR.

56
Claims: Approved Pre-Authorized Lesson Overview In this lesson you will learn how to locate and process APPROVED PRE-AUTHORIZED claims. Using the Navigation Tree on the left side of the screen place the cursor / move mouse over the plus (+) symbol next to CLAIMS or click on the folder in the body of the Warranty Home page APPROVED PRE-AUTHORIZED – used to hold claims that were submitted for and received pre-authorization for unit repairs. Claim should remain in the APPROVED PRE-AUTHORIZED folder until the repair has been completed. DO NOT SUBMIT FOR PAYMENT PRIOR TO COMPLETING THE REPAIR. 2. Place the cursor on the APPROVED PRE-AUTHORIZED folder and click
Using the navigation bar on the right side of the screen, scroll down the screen to the DATE / HOURS section of the claim OR click on DATE / HOURS button at the top of the screen
Complete the repair date to reflect the actual date unit was repaired
Locate and click the ACTIONS button at the bottom of the screen
Click SUBMIT button
A confirmation message will appear advising as to which folder your claim was sent NOTE: If a change is made to a field that affects reimbursement, the claim will automatically return to the Pending Pre-Authorization folder when submitted.
57
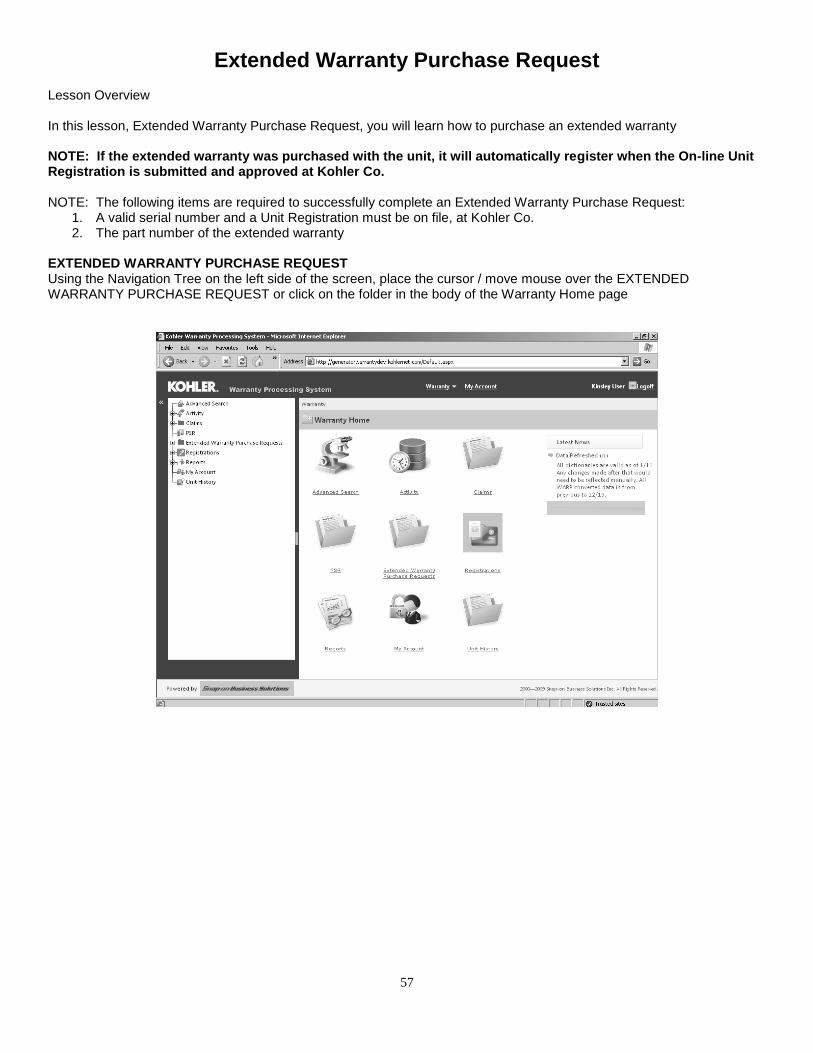
Extended Warranty Purchase Request Lesson Overview In this lesson, Extended Warranty Purchase Request, you will learn how to purchase an extended warranty NOTE: If the extended warranty was purchased with the unit, it will automatically register when the On-line Unit Registration is submitted and approved at Kohler Co. NOTE: The following items are required to successfully complete an Extended Warranty Purchase Request:
1. A valid serial number and a Unit Registration must be on file, at Kohler Co. 2. The part number of the extended warranty
EXTENDED WARRANTY PURCHASE REQUEST Using the Navigation Tree on the left side of the screen, place the cursor / move mouse over the EXTENDED WARRANTY PURCHASE REQUEST or click on the folder in the body of the Warranty Home page

58
DRAFT FOLDER – used to create a new Extended Warranty Purchase Request or to edit and / or remove a previously created request that has saved in the draft folder and not yet submitted. The following screen will appear:
CREATING
Place the cursor on the DRAFT folder and click i. If you have any extended warranty purchase requests saved (not yet submitted) they will displayed in
a list ii. To edit or remove any items from this list please refer to the EDIT / REMOVE section below
Locate and click the ADD button in the lower right hand corner of the screen The following screen will appear

59
IF PURCHASING the Extended Warranty, type in the purchase order number
NVOICE NUMBER FIELD IS USED ONLY FOR UPGRADES. i. If Extended warranty was purchased with the unit, the Extended Warranty registers automatically at
the time of Registration Submission ii. FOR UPGRADES – both the PURCHASE ORDER NUMBER AND INVOICE FIELDS MUST BE
POPULATED. a. Obtain the invoice number from the invoice that the original extended warranty was
purchased.
Type in the unit serial number and press the TAB key i. If the unit registration is not on file at Kohler Co., you will receive an error message “unit registration
not found” and you will not be able to continue with the Extended Warranty Purchase Request until the unit has been registered.
ii. Refer to the REGISTRATION SUBMISSION procedures to properly register the unit. iii. After the unit has been successfully and properly registered, return to these procedures and begin
again.
The following fields will automatically fill in i. Model, Specification Number, Product Type, Contactor Serial Number (ATS Only), Market, Brand,
Usage, Standard Warranty Policy Part Number
Place cursor over the drop down arrow next to the EXTENDED WARRANTY POLICY NUMBER box i. Select the part number that corresponds with the extended warranty policy desired ii. Extended Warranty Policy will automatically fill in
Type in the Hour Meter Reading number (obtained directly from the unit hour meter) OWNER
VERIFY the owner information is correct SERVICE ENTITY
This should be your Distributor information i. VERIFY this information is correct
FOOTER
All fields in this section are VIEW only except Comments
COMMENTS – type in any notes that are applicable for this extended warranty VERIFY all information on the form is correct Locate and click on the ACTION button in the bottom right hand corner of the screen
Select Save in Draft folder to submit for approval at a later date
60
Select SUBMIT to send to KOHLER for approval EDIT / REMOVE
Place the cursor on the DRAFT folder and click
Extended Warranty Purchase Requests saved (not yet submitted) will display in a list
Place cursor on the line of the extended warranty and click
To EDIT – locate and click the EDIT button in the lower right hand corner of the screen. o Refer to procedures above to complete and submit request
To REMOVE – locate and click the REMOVE button in the lower right hand corner of the screen o A pop up box will appear that reads “press OK to remove selected item” o Click OK to confirm o Click cancel to cancel return to draft folder
FEEDBACK FOLDER This folder contains Extended Warranty Purchase Requests that have been returned for to you for additional information
Place the cursor on the FEEDBACK folder and click
Extended Warranty Purchase Requests requiring feedback will display in a list o This fold may be empty
Place cursor on the line of the extended warranty and click
To view feedback – locate and click the FEEDBACK button in the lower right hand corner of the screen. o Reply to the questions by typing information in the comment section
Locate and click the RESPONSE button to submit your feedback.

61
Extended Warranty Pending Feedback Folder
Lesson Overview In this lesson you will learn how to locate and provide feedback on Extended Warranty Purchase Requests returned for information. IMPORTANT NOTES –
Extended Warranty Purchase Requests returned for feedback must be responded to prior to the warranty period expiring – this does not apply to Extended Warranties that were purchased with the unit.
Any Extended Warranty Purchase Request that has been placed in denied status cannot be re-instated or re-activated.
PENDING FEEDBACK Using the Navigation Tree on the left side of the screen place the cursor / move mouse over the plus (+) symbol next to EXTENDED WARRANTY PURCHASE REQUEST or click on the folder in the body of the Warranty Home page PENDING FEEDBACK – used to hold Extended Warranty Purchase Requests that have been returned for more information. 3. Place the cursor on the FEEDBACK folder and click
Place cursor on the line of the claim of your choice and click
Locate and click the VIEW button in the lower right hand corner of the screen
Locate and click the FEEDBACK button at the bottom of the screen i. A feedback screen will be displayed with a REQUEST heading – under the heading an message
indicating what information is needed to further review the Extended Warranty Purchase Request
To provide the requested information, place the cursor in the COMMENTS box, click and type your response. i. Click CANCEL to respond at a later date ii. This will take you back to the Extended Warranty Purchase Request – cancel out of the purchase
request to return to the original list of Extended Warranty Purchase Request PENDING FEEDBACK
Locate and click the RESPONSE button in the lower right hand corner of the feedback screen
A message confirming your response has been sent should be displayed
Click OK to return to the original list of Extended Warranty Purchase Request PENDING FEEDBACK

62
Pending Part Return
Provides information on claims that contain parts to be returned and instructions on creating a PSR (Power Systems Return) You must be logged onto the Kohler Co. Warranty System IMPORTANT NOTE –
Parts that are not returned to Kohler Co., according to the following instructions, within the time frame allowed per the published warranty policies, will result in automatic denial of the claim.
If there is more than one part on a claim that needs to be returned to Kohler Co., all parts must be received within in the time frame allowed per the published warranty policies before the claim will be released for payment.
If all of the parts requested for return are not received within the time frame allowed per the published warranty policies, the entire payment of the claim will be denied. You will not receive partial payment for the parts that were returned.
Any claim that has been placed in denied status cannot be re-instated or re-activated. User would have the option of creating a copy of the original claim to submit again for reimbursement.
Using the Navigation Tree on the left hand side of the screen, locate and click the plus (+) symbol to the left of CLAIMS
This will expand a list of folders which can also be accessed by clicking the claims folder from the Warranty Home page.
Locate and click on the PENDING PART RETURN folder
1. A list of all claims pending part(s) return will be displayed o Please note that you may not always have claims pending parts return

63
NOTE: If the PSR CREATION DATE field for a corresponding claim is blank, the PSR needs to be created to return the parts. If the column contains a date, the PSR has already been created.
2. Place the cursor on the specific claim, click to highlight and then click the View button o The claim will open
TO CREATE A PSR FOLLOW THE PROCEDURES BELOW
3. Locate and click the CREATE PSR button at the bottom of the screen
The following screen will appear:

64
a. HEADER - view only b. PARTS – view only c. COMMENTS – type in any information pertaining to this claim that needs to be communicated to the
factory d. PART RETURN SHIPPING ADDRESS / INFO
i. Supplier RGA – Not applicable - factory use only e. CUSTOMER TRACKING # – Service entity fills this in when part(s) are shipped back to factory f. SHIP DATE FROM CUSTOMER – Service entity fills this in when part(s) are shipped back to factory g. CARRIER – place cursor on the drop down arrow on the right hand side of the CARRIER box and click
i. A list of preferred carriers will be displayed NOTE: Freight costs incurred to return parts using one of the preferred carriers will be paid by Kohler Co.
ii. Place cursor on the carrier option of your choice and click
NOTE: Freight costs incurred to return parts using the OTHER option will NOT be paid by Kohler Co. – Service Entity will be responsible for the freight costs incurred to return these parts to Kohler Co.
iii. Shipping address information – view only h. COMPLAINT, CAUSE AND CORRECTION – view only i. SERVICE ENTITY – view only
4. Locate and click the PRINT button in the lower right hand corner of the screen
The following screen will appear:

65
a. The PSR shipping form will display in a PDF type format b. Locate and click the printer ICON at the top of the screen OR perform a FILE, PRINT command c. To close, click the X located in the upper right hand corner of the form
5. Follow the following instructions (also found on the printed PSR form) to return part(s)
a. Return all parts freight collect, using the ground carrier that was selected on the PSR form b. Return parts to address shown on the PSR c. The First Line of the shipping label MUST be addressed to Attn: Warranty Return Department d. CLEARLY identify all parts with the part number and claim number e. Include a copy of the PSR with your return f. Returns must be packaged properly to avoid shipping damage g. Populate tracking number and ship date in PSR form once shipment is sent out. Follow the below
instructions to edit a PSR OR refer to the PSR procedure for instructions.
6. To save your changes, locate and click the OK button at the bottom right hand corner of the screen. Notice that the CREATE PSR button is now displayed as EDIT PSR.
7. To exit and not save your changes, locate and click the CLOSE button at the bottom right hand corner of the screen.
- The PSR list screen will now display the PSR CREATION date for this claim.

66
Viewing and Editing a PSR PSR (Power Systems Return) - Provides information on claims that contain parts to be returned or have been received at the factory, PSR creation date, shipping date and shipment tracking information.
Used to log ship date and shipment tracking number NOTE: This section is view only with the exception of editing the PSR to log the ship date and shipment tracking number You must be logged onto the Kohler Co. Warranty System
On the Warranty Home page, place the cursor on the PSR Folder or select the PSR option using the Navigation Tree on the left side of the screen and click
A list of ALL PSRs will be displayed
The following 3 columns provide IMPORTANT “at a glance” information i. Ship date – Date that the part(s) on the corresponding claim was / were shipped back to
Kohler Co. 1. NOTE: This date is populated by the service entity if this field is blank the ship date
did not get logged by the service entity. ii. Creation Date – Date the PSR was created – If the claim is not displayed, the PSR has not
yet been created – see Pending Part Return procedure. iii. Claim Status – Information on where the specific claim is in the warranty process
To view a specific PSR, highlight your selection by placing the cursor / mouse on the line of your choice and click, then click the VIEW button.
The PSR will open in VIEW only status
To exit, locate and click the CANCEL button located in the lower right hand corner of the screen.
To search by a specific PSR type
Place cursor / move mouse on the drop down arrow, on the right side of the DISPLAY PSRs box
Two options should be displayed 1. Parts have been Returned 2. Parts have not been returned
To edit a specific PSR to add the ship date and/or tracking number, highlight your selection by placing the cursor / mouse on the line of your choice and click, then click the EDIT button found in the lower right hand corner of the screen.
Click on the PART RETURN SHIPPING ADDRESS / INFO option located at the top of the screen OR use the navigation bar on the right hand side of the screen, to scroll down to the PART RETURN SHIPPING ADDRESS / INFO section
Place cursor in the box located under CUSTOMER TRACKING # and click o Type in the shipment tracking number
Move cursor to SHIP DATE FROM CUSTOMER BOX, click and type the date OR click on the calendar to the right of the box and select the date – if typing the date in, it MUST BE TYPED in this format 01/01/2010
Locate and click the SAVE button in the lower right hand corner of the screen o To confirm changes, click yes o To abort, click cancel to clear popup box and then click the CANCEL button found in the
lower right hand corner of the screen.
This will return you to the original list of PSR claims.
To print additional copies of a PSR, follow steps above for viewing or editing to access the PSR screen. The print button can be found in the lower right hand corner of the screen.

67

68
Unit Registration Lesson Overview In this lesson, Registration Submission, you will learn how to register a unit (formerly known as a start-up notification) REQUIREMENTS: A valid serial number, on file, at Kohler Co. is required to successfully complete this process.
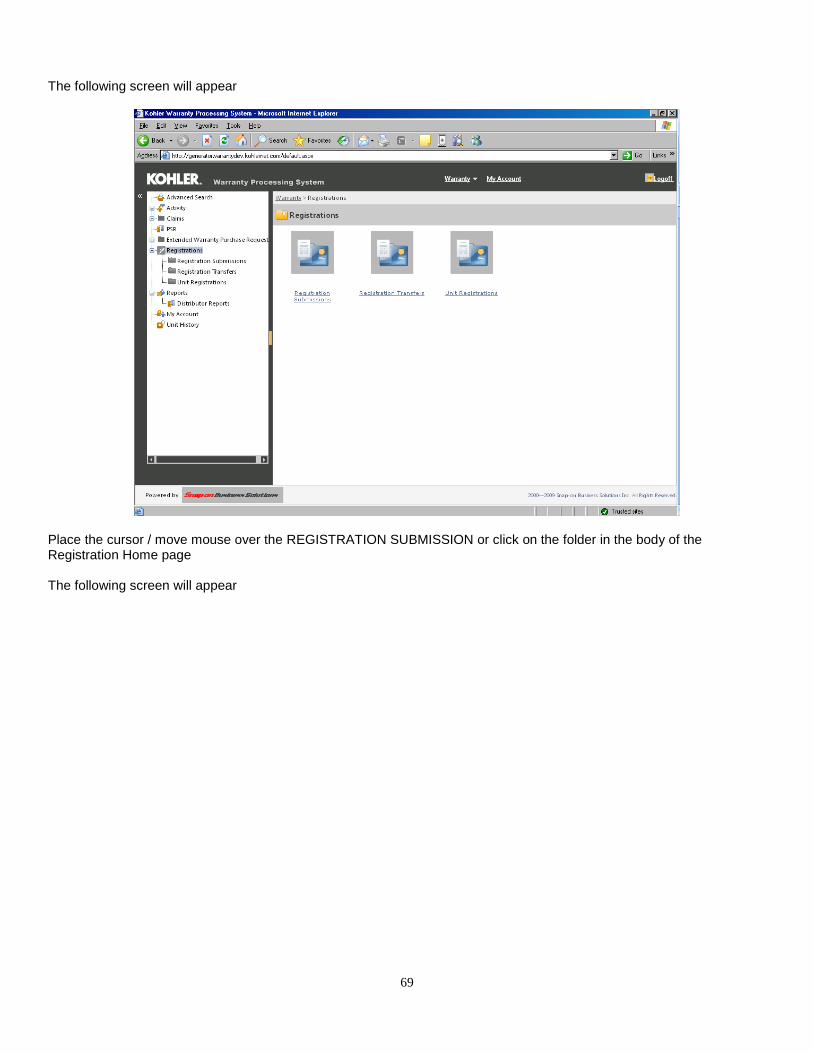
REGISTRATION SUBMISSION Using the Navigation Tree on the left side of the screen, place the cursor / move mouse over the REGISTRATION or click on the folder in the body of the Warranty Home page
69
The following screen will appear
Place the cursor / move mouse over the REGISTRATION SUBMISSION or click on the folder in the body of the Registration Home page The following screen will appear

70
Click on the ADD button in the right hand corner – the following screen will appear
Enter the in-service date
Place cursor / move mouse over ADD UNIT box for the unit type you are registering and click

71
Type serial number in corresponding box and press TAB key o Model, specification number, engine model, engine serial number, market and brand fields will
automatically populate
NOTE: If an incorrect serial number is entered the following error message will appear:
USAGE - Place cursor / move mouse over the drop down arrow, click and select the appropriate usage type NOTE: For Marine and Mobile units, follow steps below as an additional section will display before the owner information. For all other units, proceed to Owner section
MARINE o Vessel Manufacturer, Vessel Hull Number, Vessel Model and Vessel Model Year information are
required. o Populate these fields by placing the cursor in the corresponding field, click and type the information
MOBILE o Vehicle Manufacturer, Vehicle Vin Number, Vehicle Model and Vehicle Model Year information are
required o Populate these fields by placing the cursor in the corresponding field, click and type the information
OWNER – the following screen will appear

72
Type in the owner mailing address information and unit physical address location, using the TAB key to advance to the next field
The Country and State fields can be populated by placing the cursor / moving the mouse over the drop down arrow, click and scrolling down to find the correct selection. Click on the “Copy from Mailing Address” if unit Physical address is the same as owner mailing address.
SERVICE ENTITY – the following screen will appear
Verify the user information is YOUR information and is correct
START UP (This section is required for industrial and residential products only). Installation checklist – place cursor / move mouse over the bullet and click ONLY IF THE INSTALLATION
CHECKLIST has been completed
Unit Accepted by – type in name of customer representative that signed the Start Up Notification
Kohler Representative Signature Received - place cursor / move mouse over the bullet and click AFTER the Kohler Rep performing the startup has signed the form
Kohler Representative name – type in name of Kohler representative that signed the Start Up Notification
Owner Signature – place cursor / move mouse over the bullet and click ONLY IF THE OWNER HAS SIGNED THE START UP NOTIFICATION
Owner Signature date – Type in date the owner signed the Start Up Notification FOOTER
Reference – this field is used for your internal cross reference number (i.e. work order number) if applicable
Registered by – not applicable
Registration date – not applicable
Comments – type in any additional information related to this start up Place cursor / move mouse over the SUBMIT button in the lower right hand corner and click A VERIFICATION message will appear that reads
Please confirm the following information is correct
Correct – click YES
Incorrect – click No
Do not submit – click CANCEL NOTE: If an extended warranty was purchased with the unit, the extended warranty will automatically register when the On-line Unit Registration is submitted and approved at Kohler Co.

73
Registration Transfer NOTE: Viewing of Registration Transfers will be limited to only the transfers submitted by your Service Entity. You will not be able to view any other Service Entity‟s Registration Transfers. From the Warranty Home Page, place cursor / move mouse over REGISTRATION folder The following screen will appear
Place cursor / move mouse over REGISTRATION TRANSFER Icon and left click to continue The following screen will appear

74
To locate an existing Registration Transfer, use the FIND IN box in the upper right hand corner near the top of the screen
Click on the drop down arrow to the right of this box, select the search criteria option and then click the GO button.
o SERIAL NUMBER – Use when the serial number is known Enter the serial number.
o SERVICE ENTITY – Use when searching by name of registering distributor / dealer Enter the name.
o ORIGINAL OWNER LASTNAME – Use when original owner‟s last name is known Enter the original owner‟s last name.
o ORIGINAL OWNER COMPANY NAME – Use when original company owner name is known Enter the company name.
o TRANSFER OWNER LAST NAME – Use when an owner, other than the original, is known Type in the transfer owner‟s last name.
Unit - Verify information is correct
Original Owner - Verify information is correct
New Owner
Type in new owner information using TAB key to advance to next field
The Country and State fields can be populated by placing the cursor / moving the mouse over the drop down arrow, click and scrolling down find the correct selection.
Service Entity – will automatically populated with the user information Footer
In-service date will automatically populate
Registered by – does not apply
Registration Date – does not apply
SUBMIT
Place cursor / move mouse over SUBMIT button in bottom right hand corner and click
A message “Are you sure you want to submit Transfer Registration” o Place cursor / move mouse over OK if yes
You will receive a confirmation message the transfer has been accepted or denied CANCEL
Place cursor / move mouse over CANCEL button in bottom right hand corner and click
Selecting CANCEL will return you to the Registration Transfer home page

75
ADDING A REGISTRATION TRANSFER The following screen will appear
Click the ADD button in the lower right hand corner of the screen. The following screen will appear Enter the unit serial number and click the TAB key to refresh the screen to display unit information – the following screen will appear

76
VERIFY that the information in the unit and original owner sections are correct
Scroll down to the NEW OWNER section,
Enter either the FIRST NAME and LAST NAME OR the COMPANY NAME of the new owner, the system will not accept both
MAILING ADDRESS
Address line 1, 2 & 3 – Enter address
Enter the required information in each of the remaining Mailing Address fields. UNIT PHYSICAL ADDRESS
If same address as mailing address click box next to “Copy from Mailing Address
If different, enter in address
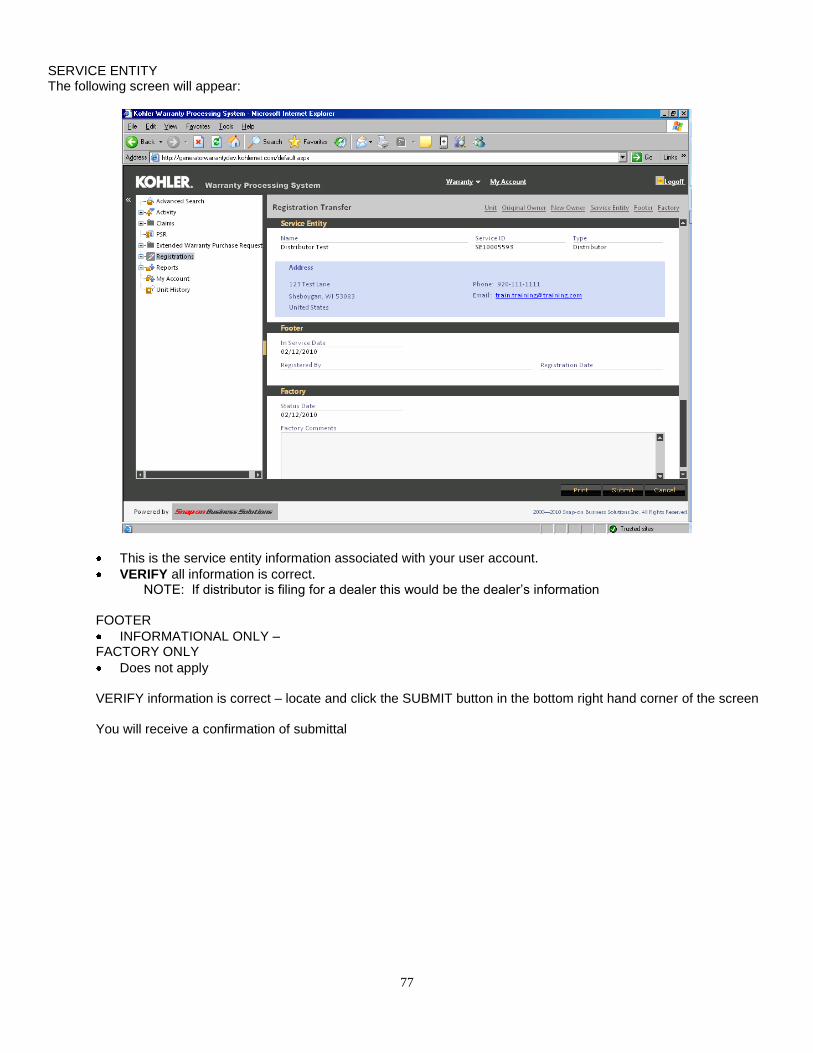
77
SERVICE ENTITY The following screen will appear:
This is the service entity information associated with your user account.
VERIFY all information is correct. NOTE: If distributor is filing for a dealer this would be the dealer‟s information
FOOTER
INFORMATIONAL ONLY – FACTORY ONLY
Does not apply
VERIFY information is correct – locate and click the SUBMIT button in the bottom right hand corner of the screen You will receive a confirmation of submittal
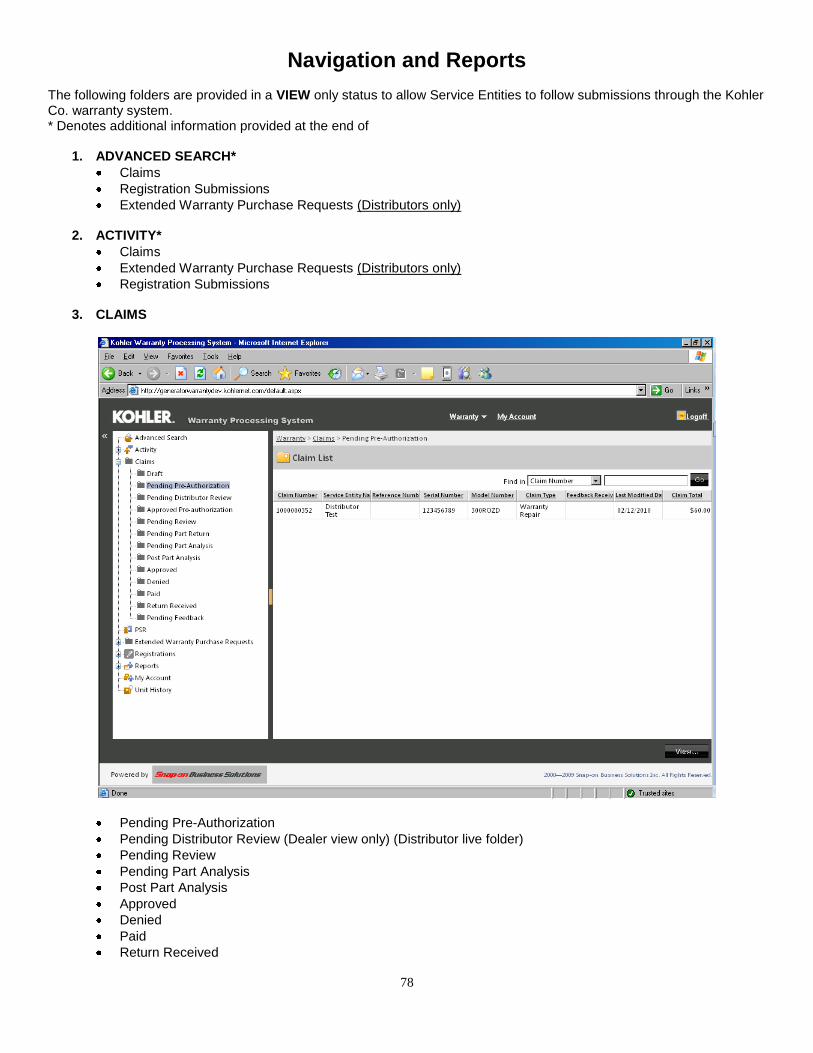
78
Navigation and Reports The following folders are provided in a VIEW only status to allow Service Entities to follow submissions through the Kohler Co. warranty system. * Denotes additional information provided at the end of
1. ADVANCED SEARCH*
Claims
Registration Submissions
Extended Warranty Purchase Requests (Distributors only)
2. ACTIVITY*
Claims
Extended Warranty Purchase Requests (Distributors only)
Registration Submissions
3. CLAIMS
Pending Pre-Authorization
Pending Distributor Review (Dealer view only) (Distributor live folder)
Pending Review
Pending Part Analysis
Post Part Analysis
Approved
Denied
Paid
Return Received

79
4. EXTENDED WARRANTY – DISTRIBUTOR ONLY
Pending Review
Approved
Denied
Follow the procedures listed below to access to any of the VIEW folders listed above. Additional procedures for VIEW only folders not listed above can be found later on in this section.
A. You must be logged onto the Kohler Co. Warranty System
1. From the Warranty Home Page place the cursor on the folder of your choice and click or from the Navigation tree, on the left hand side of the screen, click the [+] to the right of each main folder, this will display all subfolders within each section
B. To search for specific criteria
2. Place cursor / move mouse to the drop down arrow, on the right side of the FIND IN and click
A list of options to search by will display 3. Highlight your selection by placing the cursor / mouse on the line of your choice and click (i.e. serial number)
4. Type in the information in the empty box SEARCH FOR box, place the cursor / move the mouse over GO and
click 5. If more than one item is displayed in a list
Place cursor on the line item of your choice, click to highlight
Locate and click the VIEW or OPEN button found in the lower right hand corner of the screen
User can also click on individual column headings to sort the list either alphabetically or numerically. *NOTE:
ADVANCED SEARCH: If specific data to search with is not available (i.e. serial number, claim number etc), simply locate and click the SEARCH button on the right hand side in the middle of the screen.
Follow instructions from B6 to view a specific item.

80
This search options allows you to quickly view your own claims, registrations (and extended warranty purchase requests for distributors). You will not be able to view any other service entity‟s submission.
ACTIVITY: An additional search option is available in this folder. Select one of the displayed folders (Claims, (Extended Warranty Purchase Requests for distributors) or Registration Submissions. Locate and click on the drop down arrow next to ACTIVITY located at the top left hand corner of the screen.
Place cursor on the time frame of activity you would like to view and click o Options are 2 days, 1 week, 1 month or all
Follow the procedures listed below to access these VIEW folders REPORTS - Allows Service Entities to create informational reports DEALERS
Two report options will be displayed
Claim Detail – provides information on paid claims
Owner Detail – provides owner information on units you have registered
Place cursor on the appropriate report type and click
SEARCHING BY DATE
Place cursor in the START DATE box OR click on the calendar to the right of the box and select the date – if typing the date in, it MUST BE TYPED in this format 01/01/2010
Place cursor in the END DATE box OR click on the calendar to the right of the box and select the date – if typing the date in, it MUST BE TYPED in this format 01/01/2010
NOTE – Both date fields must be populated
SEARCHING BY OWNER NAME – OWNER DETAIL REPORT ONLY o Place cursor in the Company OR Owner Last Name box and type in name
Locate and click VIEW REPORT
The REPORT will be display (if any information is available) o scroll down the screen to view line items on the report
To print a report see instructions below.
Click CANCEL to exit DISTRIBUTORS
Three report options will be displayed
Claim Detail - provides information on you and your dealers paid claims
Dealer Detail – provides information on your dealers, both active and inactive and market
Owner Detail – provides information on units registered in your defined area
Follow instructions listed above in DEALERS section to create reports – the following additional option is available to distributors
Using the drop down box on the right side of the SERVICE ENTITY box you can searching for information on a specific dealer‟s claims or units registered
Locate the name of the Dealer by scrolling down the list of names and highlighting your selection PRINTING REPORT
Locate the SELECT A FORMAT box and click the drop down arrow on the right side of the box o XML File with Report Data o CSV (Comma Delimited) o Tiff File o Acrobat (PDF) File o Web Archive o Excel
Click the EXPORT button to the right of the drop down arrow o A FILE DOWNLOAD box will display o Click OPEN to display the report
Print using normal printing options

81
UNIT HISTORY
NOTE: A valid serial number, on file at the factory, is required to utilize this search / view option.

82
Place cursor in the SERIAL NUMBER box and click
Type in the serial number
Locate and click the NEXT button located in the lower right hand corner The following screen will appear:

83
Unit information, along with installed kits will be displayed. The following screen will appear:

84
o Claims are listed ONLY if you have filed claims against this unit. User can view claim by highlighting it and clicking the VIEW CLAIM button.
You will be able to view only your claims, not another dealer DISTRIBUTORS can also view claims filed by their dealers
85
o Unit Registrations - users can view unit registrations by highlighting it and clicking the VIEW UNIT REGISTRATION button.
Service entities will be able to view unit registrations for any product that they are authorized to service.
o Unit Updates. User can view unit updates by highlighting it and clicking the VIEW UNIT UPDATE button.
Posted by the factory when there are any unit updates issued for specific units.
Click CANCEL to exit