ks3 graphics year 7 - theparkeracademy.e-act.org.uk
TRANSCRIPT

KS3 Graphics Year 7
Unit title/key question: What are Graphics and what processes do we use to produce designs? Term: All on rotation Number of hours: 3/week
Sequence of learning:
Base Component: Graphics
Following a brief
Students should be ensuring they refer back to their brief continuously, remind students it details all the various design elements their clients want which is crucial in a design setting.
Students must ensure that their design is a repeating pattern with a seasonal design or the have not fit the client brief.
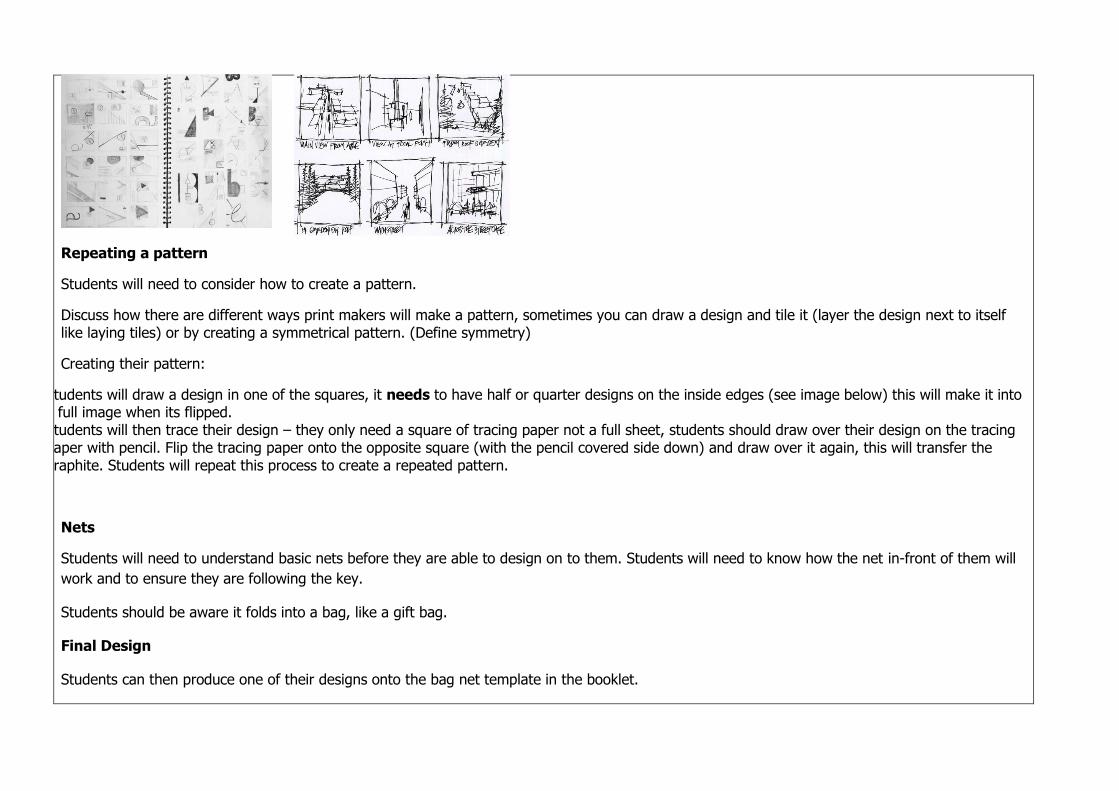
Thumbnails
Once students have the basic elements of their ideas together, they will move onto beginning their design. They will start this by using a design
technique of thumbnail sketches.
-What key design elements do you need to feature in your thumbnail and what details can be left until later in your planning?
-Thumbnails should be small fast sketches to show a basic idea.
-applying the correct amount of pressure of their pencil; showing different elements through tone.
-taking into consideration composition of each element.
Repeating a pattern
Students will need to consider how to create a pattern.
Discuss how there are different ways print makers will make a pattern, sometimes you can draw a design and tile it (layer the design next to itself like laying tiles) or by creating a symmetrical pattern. (Define symmetry)
Creating their pattern:
• Students will draw a design in one of the squares, it needs to have half or quarter designs on the inside edges (see image below) this will make it into a full image when its flipped.
• Students will then trace their design – they only need a square of tracing paper not a full sheet, students should draw over their design on the tracing paper with pencil. Flip the tracing paper onto the opposite square (with the pencil covered side down) and draw over it again, this will transfer the graphite. Students will repeat this process to create a repeated pattern.
Nets
Students will need to understand basic nets before they are able to design on to them. Students will need to know how the net in-front of them will
work and to ensure they are following the key.
Students should be aware it folds into a bag, like a gift bag.
Final Design
Students can then produce one of their designs onto the bag net template in the booklet.

Students can either:
• Draw their pattern all over the template
• Create their design and flip it using the technique learned
• Draw a square of design trace it and tile it across their bag.
Students should then colour in their design ready to cut and fold.

Exemplar in booklet to help students understand task

Pre-folded unstuck version to show students how it should fold. Students can reuse design from repeating pattern page

Component 1: What is Typography and how do we use it?
Introduce students to Typography, discuss the difference between normal text they see day to day and between designed typography in a design setting. Looking at and discussing typography in context – how does the word fluffy look written in a horror font? Students produce their own typographic samples.
Pupils will produce Typography samples of their own names looking at serif fonts and sans serif fonts. They will use their new understanding of typography in context to produce samples of clever typography and grid typography.
All traditional typography looks like this. The top dotted line is the cap height this is the point where any Capital letter or letter with an Ascender (an
Ascender is the point of a letter that extends above other letters e.g. l, t, h, d) will reach. The flat lines are the x height this is where your smaller
letters will sit e.g. e, a, c. The dotted line below that is the baseline this is where any letters with descenders sit (a descender being the opposite of
an ascender e.g. y, p, q). There are two different types of fonts we can create. A serif font is a “fancier” font that has flourishes on the ends of
letters – Times New Roman (the font shown) for example is a serif font which you can tell be the flicks on the letters. The other is a sans serif font
(sans from the French ‘without’) sans serif fonts tend to be more simplistic and minimal.
Explain how clever typography can be used to create a visual effect with words. Clever typography is a typographic style where the designer uses letters within the word to create a word image, like the examples below:
X Height Typeface Cap Height
Baseline
Ascender
Descender Serif

Component 2: How do we use Art skills to begin our ideas in graphics?
Rendering
Students begin looking at tone. This will either be previously built schema from studying the art project or will be new learning that will be built upon
in Art. They will look at how to hold and control a pencil to develop a range of tone becoming progressively lighter and darker. They will then look at
mark making and it’s importance in creating texture.
When shading or creating tone you can use an HB pencil but if you want to create a darker tone you could use a 2B or 4B (B in pencils meaning
black and H meaning hard, HB is the middle point of these). Using low pressure on the side edge of the pencil first move up the bar gradually
applying more pressure. You should have very little pencil on one end and nearly black by the end.
Students will then take this schema and will apply it to rendering in 3D considering light source and how it impacts shadow.
Students need to consider that whereever the lightsource is the darker the shadows will be getting further away from from said lightsource. It may
help students to draw a faint X on their 3D examples in the booklet to understand and remember where their lightsource is.
Tonal Rendering – using a combination of shade, tone and mark making to give the impression of texture. Discussing 3D rendered GIF – considering how rendering has been achieved to create a 3D twirling effect.
Any form of pattern or hatching is considered mark making. Students should think about how they could use lines to create a texture – cross hatching could produce a hessian type of effect etc. In the GIF digital rendering is used. The balls have the effect of movement because as they follow that trajectory of the S shape the two colours lighten or darken based on their position, and their proximity to each other changes, at the back they are spaced apart in the middle of the S they are close together.

Colour Rendering – how to create tone using a coloured pencil, exploring a new media.
Students should utilise their understanding of tone and mark making here. You can create some tone with a coloured pencil as with a drawing pencil, but there are some differences. They will also need to use some cross hatching (lines drawn in one direction with lines drawn in another direction over the top). They will also want to use a similar toned pencil to create darker tones – e.g. if using yellow, shadows will want to be shaded with orange.
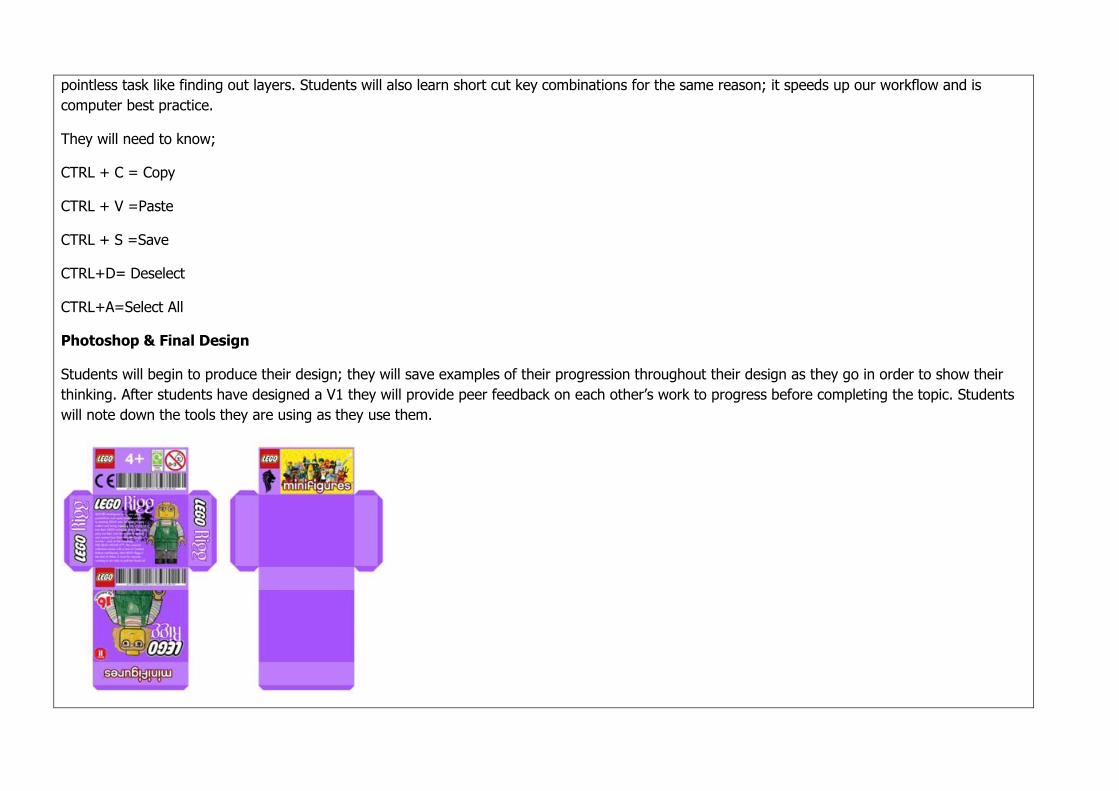
Bringing learned rendering techniques together to produce a variety of rendered blocks to student’s choice. Producing their rendered Lego character being able to use graphics skills to do so.
Students are allowed to use the computers to look up how certain features look on Lego characters. About me sheet provided for students to decide on some key elements of themselves that would stand out as the Lego characters key characteristics. Their design should be drawn and coloured.
Component 3: How do we use computer-based design skills to complete our work?
Pupils will be taught about workflow and short cut key combinations – E.G CTRL + C = Copy CTRL + V = Paste. They will rename the layers on the
photoshop template they will be using. This gives them an introduction to opening documents, saving them and to photoshop controls.
Students will go through the template provided and double click to rename each layer. Teacher to talk to students about workflow, in Photoshop we
group/name our layers so that we can quickly and easily find the element we want to move or change. If we don’t do this, we spend too long on a
pointless task like finding out layers. Students will also learn short cut key combinations for the same reason; it speeds up our workflow and is
computer best practice.
They will need to know;
CTRL + C = Copy
CTRL + V =Paste
CTRL + S =Save
CTRL+D= Deselect
CTRL+A=Select All
Photoshop & Final Design
Students will begin to produce their design; they will save examples of their progression throughout their design as they go in order to show their
thinking. After students have designed a V1 they will provide peer feedback on each other’s work to progress before completing the topic. Students
will note down the tools they are using as they use them.
Component 4: How do you draw using One Point Perspective?
Students will learn the key elements to perspective drawing, this will be revisited in their Art project and in their Year 8 Art project. They will gain an
understanding of the horizon line, vanishing point, and how to draw a scene using one point perspective.
The horizon line is the point in a drawing where you see the horizon and can’t see anything beyond it, apart from larger background elements –
mountains, clouds etc. The horizon line has a vanishing point, students would start with this being in the centre this is the point where what you’re
looking at vanishes into the horizon. Students would then drawn diagonal lines from the bottom of their page to the vanishing point; this is the focus
of the drawing, a road or traintrack is a good example. The would then draw parallel lines to this one to the vanishing point this is the sloped
rooves/tree etc going towards the vanishing point. Students need to understand that as they draw elements closer to the vanishing point they get
closer together, so tracks on a train track get closer together as you go towards the vanishing point. They also need to understand that while the top
of their drawn elements slope, vertical lines do not and stay up right to the page this creates the effect of looking at a 3D scene.
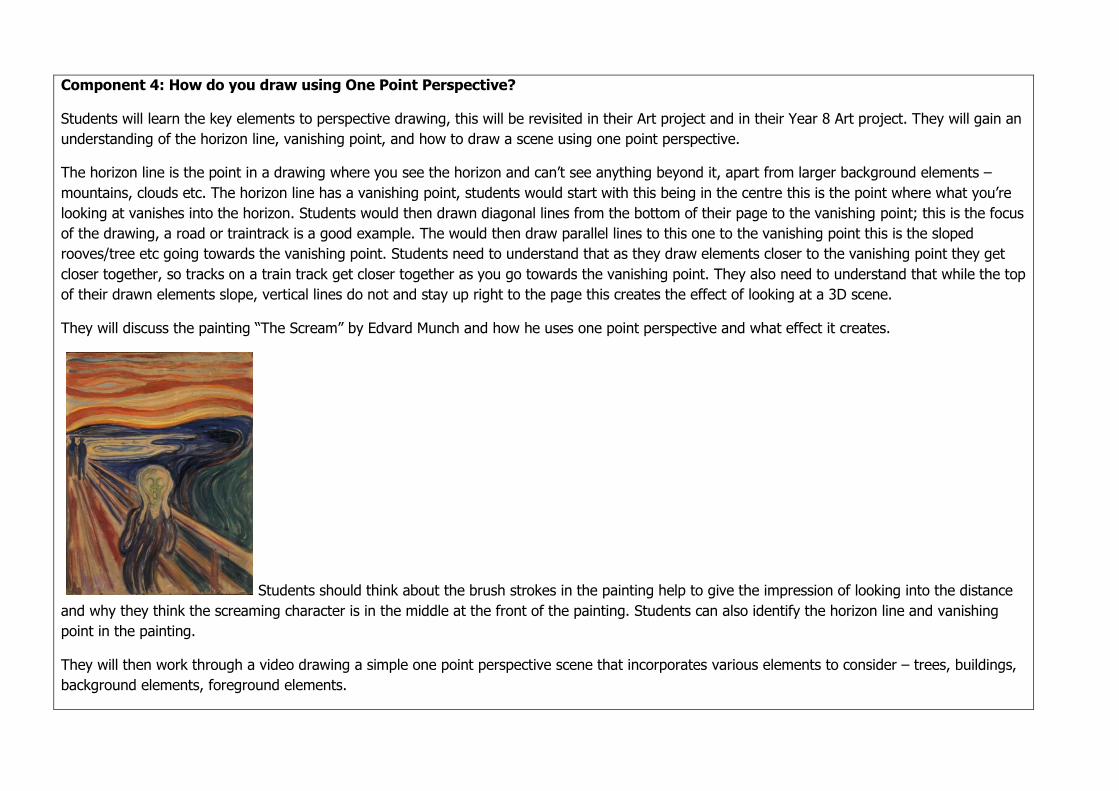
They will discuss the painting “The Scream” by Edvard Munch and how he uses one point perspective and what effect it creates.
Students should think about the brush strokes in the painting help to give the impression of looking into the distance
and why they think the screaming character is in the middle at the front of the painting. Students can also identify the horizon line and vanishing
point in the painting.
They will then work through a video drawing a simple one point perspective scene that incorporates various elements to consider – trees, buildings,
background elements, foreground elements.
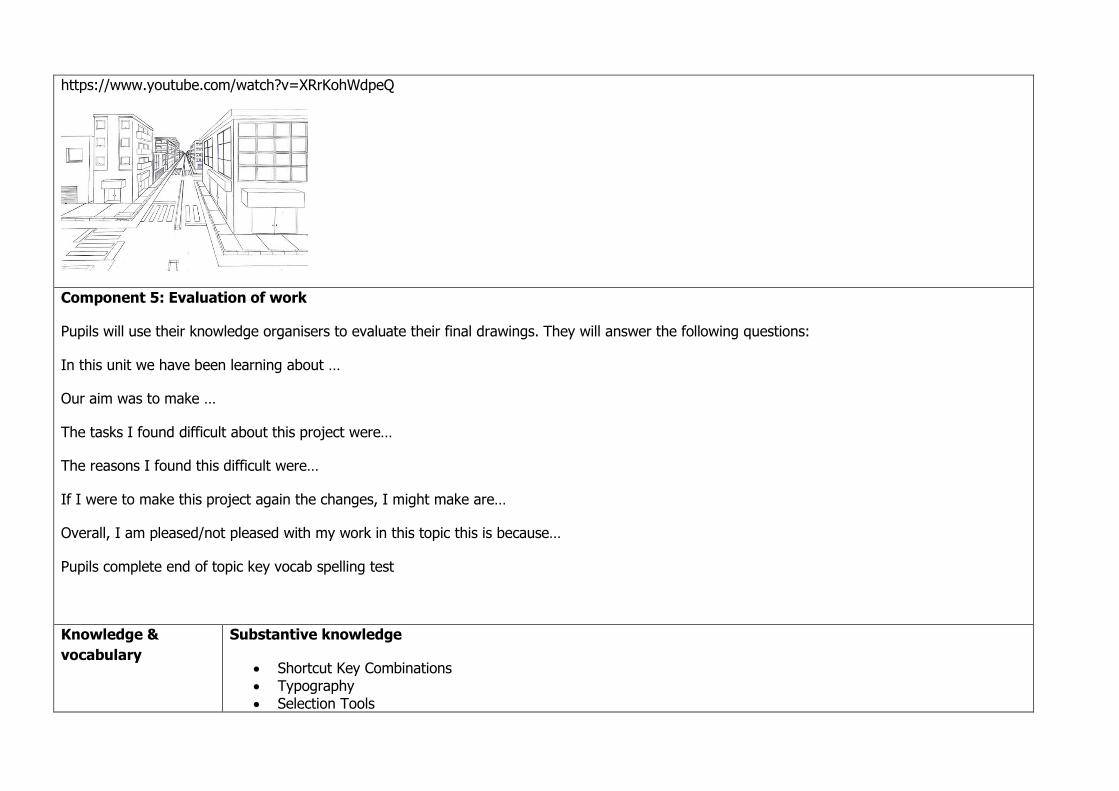
https://www.youtube.com/watch?v=XRrKohWdpeQ
Component 5: Evaluation of work
Pupils will use their knowledge organisers to evaluate their final drawings. They will answer the following questions:
In this unit we have been learning about …
Our aim was to make …
The tasks I found difficult about this project were…
The reasons I found this difficult were…
If I were to make this project again the changes, I might make are…
Overall, I am pleased/not pleased with my work in this topic this is because…
Pupils complete end of topic key vocab spelling test
Knowledge &
vocabulary
Substantive knowledge
• Shortcut Key Combinations • Typography • Selection Tools

• One Point Perspective • Rendering • Tone
Disciplinary knowledge
• Ways of working/workflow • Working to a brief • Analysing format • Fine motor skills
Vocabulary
Subject methods
and resources
• PPT to display image examples of various visual examples.
• Booklet produced with guidance throughout of activity pages.
• Key vocabulary on PPT with visual examples
• Knowledge Organisers • Writing guides for evaluating own work
Prior Knowledge
▪ As this is a year 7 project it is unclear what prior knowledge they will have gained. However, if they come to Graphics after Art in their rotation, they will have learned about one-point perspective.
Assessment of
components and
Components: Likely
misconceptions and
When working in Photoshop you must hold shift to resize an image and maintain its proportions. Using quiz style questioning
• Render - Drawing in Graphics using shade and tone or colour
• Perspective – In drawing (particularly drawing in 3D) giving the effect of looking into the distance
• Selection – The photoshop tools we use to select areas of our work, all with different uses
• Typography – The study and design of type • Analysis – Critically discussing a piece of work.
• Composition – How elements in our work come together to create an overall piece.
• Shade – How we use a pencil to create the illusion of shadow
• Tone – How much pressure you put on the pencil to create a variety of dark/light areas
• Mark Making – using a variety of pencil techniques to create texture.
• Short Cut Key Combination – The combination of keys we use to do a certain task on photoshop or a computer.

summative assessment
of the unit (composite).
Starters will be used to check knowledge retrieval and pupils will demonstrate prior learning of topic.
Questioning across course of lessons will be used to assess learning during components.
Two whole class feedback points factored into booklet to assess components at key points.
Composite:
Towards the end of the topic students will have
individual teacher tutorials after completing their
version 1 design, using feedback to then work on
their final design as well as allowing for
assessment of knowledge.
suggested strategies
to tackling them
throughout lessons at random points to ensure understanding of these kinds of rules. While drawing upright objects in one-point perspective the lines remain straight and vertical not slanted. Students will use a ruler to align with fence pieces on “The Scream”