learning management system (lms) user guide for … 29, 2013; version 2 page 1 of 13 learning...
TRANSCRIPT

August 29, 2013; Version 2 Page 1 of 13
Learning Management System (LMS) User Guide for Network Learners
Table of Contents 1) Create an Account ................................................................................................................. 1 2) Log In ..................................................................................................................................... 3 3) Find Courses .......................................................................................................................... 4 4) Register for Courses .............................................................................................................. 5 5) Complete Presentation Activity .............................................................................................. 6 6) Complete Policy/Document Activity (if applicable) ................................................................. 8 7) Take Assessment (if applicable) ............................................................................................ 9 8) Find Certificate ..................................................................................................................... 11 9) Password Help: What to do if you forget.............................................................................. 12
1: Create an Account
NOTE: By creating an account in this learning management system (LMS), you are verifying that you work at a center within the NMDP/Be The Match or CIBMTR Networks. All user accounts will be validated against current membership information. User accounts in the LMS will be terminated immediately if it is determined that an individual does not work at a Network center.
a) Click on the link below or copy/paste the URL (we don’t recommend typing this in), then click on “Create your own account” https://nmdp.sumtotalsystems.com/sumtotal/app/SYS_Login.aspx?DomainId=700D22DE18EA1836C728CC881F3D5545954EA89A739D81C68772EBE7AD8A33E2A7C19A4C04AA3982030957667C1DBAA7D98FB84D1FF6&lang=en-us
b) The following information is required to create an account: 1. Username 2. Password 3. First name / Last name 4. Position 5. Email address – this must be an address associated with your center. Personal emails will
cause your account to be rejected. 6. Center name 7. Center type

August 29, 2013; Version 2 Page 2 of 13
c) Click the ‘Submit’ button at the bottom of the page to request your account.
d) The administrator will review your request and approve or reject it within 2 business days. Either
way, you will receive an email with additional information.
Note: Please choose HTML to ensure links emailed from the LMS work.
Note: Fields with an asterisk are required.

August 29, 2013; Version 2 Page 3 of 13
2: Log In a) Click on the link below or copy/paste the URL (we don’t recommend typing this in).
https://nmdp.sumtotalsystems.com/sumtotal/app/SYS_Login.aspx?DomainId=700D22DE18EA1836C728CC881F3D5545954EA89A739D81C68772EBE7AD8A33E2A7C19A4C04AA3982030957667C1DBAA7D98FB84D1FF6&lang=en-us The Log On screen looks like this:
b) Enter your Username and Password and click the ‘Log On’ button.
c) You will be taken to your homepage in the LMS; any course you have registered for and not yet completed will appear in your To Do list.

August 29, 2013; Version 2 Page 4 of 13
3: Find Courses You can find courses in two different ways:
• navigating through the catalog • searching by course title
Navigating Through the Catalog a) Log into the LMS and then go to the catalog box on your Home screen. Select a category by
clicking on it and the courses in that category will appear.
Searching by Course Title a) Type a word from the course title in the search box and click ‘Go’. Courses with that word in the
title will appear. You may also type the first part of a word and then an asterisk to represent the rest of the word (example: entering report* will return any courses with ‘report’, ‘reports’, or ‘reporting’ in the title).

August 29, 2013; Version 2 Page 5 of 13
4: Register for Courses Note: Some courses do not require registration. When selected, instead of a ‘Register’ button, you will see a green ‘Start’ button. a) Once you have the course you intend to take on the screen, select it and click ‘Register’.
b) If there are any optional activities, select them (if you want to), and then click the ‘Submit’ button.
c) The course activity list will appear. Click the ‘Start’ button next to an activity to begin.

August 29, 2013; Version 2 Page 6 of 13
5: Complete Presentation Activity a) Find the course you need to complete in your To Do list.
Click the ‘Start’ button in the ‘Action’ column next to the presentation activity you need to complete. If there are no ‘Start’ buttons visible, click the triangle to the left of the course name and all the required activities will appear. The ‘Start’ button for each activity will now be visible.
b) In the pop-up window that appears, click ‘Next’ to continue to the presentation.
c) If the presentation doesn’t run automatically, click the blinking button to start and progress through it.

August 29, 2013; Version 2 Page 7 of 13
d) After completing the presentation, click ‘Exit’ in the upper right-hand corner Then click ‘Exit Now’.
e) You will see the message shown below. Click the ‘Close’ button. If applicable, you will be taken back to the Activity Details page where you will be able to start the next part of the course.
August 29, 2013; Version 2 Page 8 of 13
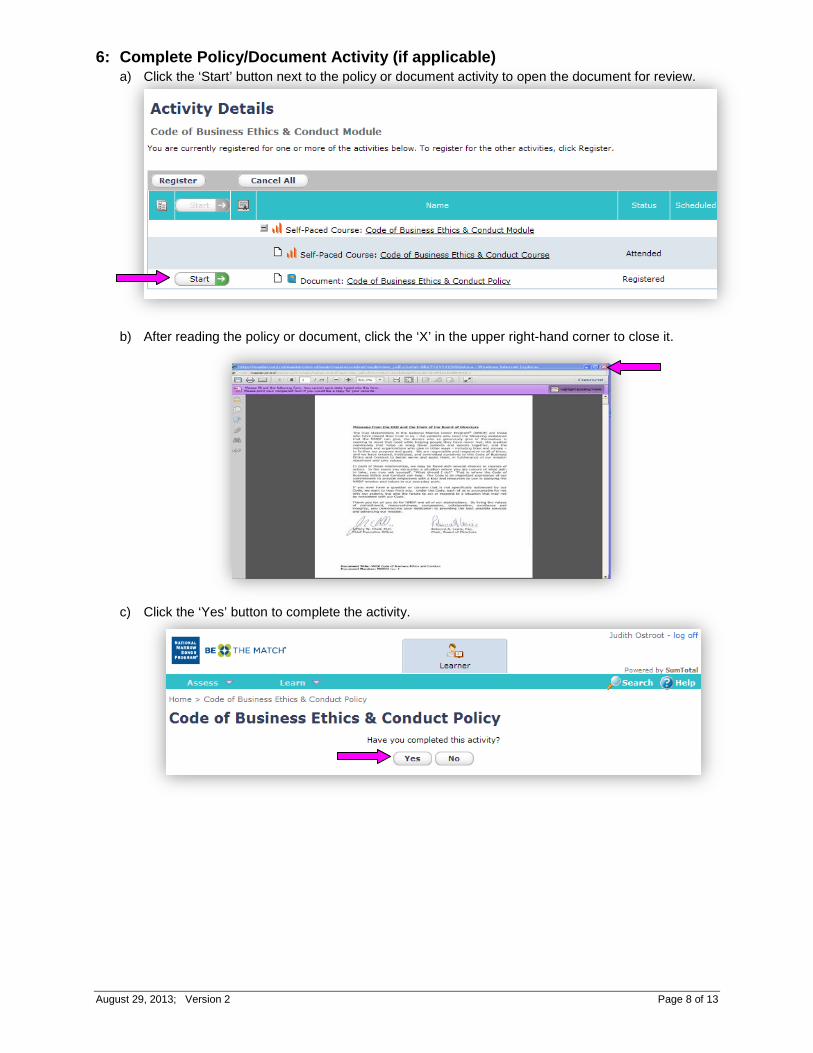
6: Complete Policy/Document Activity (if applicable) a) Click the ‘Start’ button next to the policy or document activity to open the document for review.
b) After reading the policy or document, click the ‘X’ in the upper right-hand corner to close it.
c) Click the ‘Yes’ button to complete the activity.

August 29, 2013; Version 2 Page 9 of 13
7: Take Assessment (if applicable) a) Click the ‘Start” button next to the assessment activity to begin.
b) In the pop-up window, click ‘Start’ at the bottom of the page to begin the assessment.
c) After you answer each question, click ‘Next’ to continue to the next question. When you have completed all the questions, the ‘Next’ button will by grayed-out.
d) Once you have completed the assessment, click ‘Submit Assessment’ to view your assessment results.
e) If you passed the assessment, you will see a “Congratulations!” message. Click the ‘Close’ button to continue.

August 29, 2013; Version 2 Page 10 of 13
f) If you do not pass the assessment, you will see a “Sorry!” message. Click the ‘Close’ button.
This returns you to the Activity Details page where you can click on the ‘Start’ button to retake the assessment.

August 29, 2013; Version 2 Page 11 of 13
8: Find Certificate Notes: 1) Not all courses offer certificates of completion; 2) you must have successfully completed a course in order to earn a certificate. a) On the left-hand side of the Home page, click ‘Training Transcript’.
b) In the Activities List, find the name of the course and click the little diploma next to it. The diploma opens and may be printed. NOTE: On the certificate pop-up screen the ‘Export to PDF’ function does not work. If you would like an electronic copy, open your certificate, click Alt-Print Screen, and paste the certificate in to a Word document.

August 29, 2013; Version 2 Page 12 of 13
9: Password Help: What to do if you forget a) If you are unable to log into the LMS with your username and password, you will need to reset
your password. Below the Password box, click “Forgot your password?”
b) In the next window, enter your username and email address After you click the ‘Submit’ button, this message will appear on the Log On screen:
c) Within a few minutes you will receive an email like the one below. Click on the link included, or copy/paste the link into your browser.

August 29, 2013; Version 2 Page 13 of 13
d) Enter your username and copy/paste the password from the email into the Password box. Click the ‘Log On’ button.
e) Enter the password from the email for ‘Old password’ and then the new password you’ve chosen in the next two boxes. Click ‘OK’.
f) This message should appear. Click on the link indicated to log in to your account.