osd learning management system (lms) user guide · osd . learning management system (lms) user...
TRANSCRIPT

Learn.Develop.Renew
OSD Learning Management System
(LMS)
User Guide

Learn.Develop.Renew
2
User Guide This User Guide will help you login to and use the OSD’s Learning Management System (LMS). You can keep this file open as you work through the LMS or you can print it and place it on your desk for quick reference. As with any new system, taking the time to become familiar with how the navigation works and how the LMS is organized is key to becoming comfortable with OSD’s new LMS. As well the LMS is dynamic which means that as programming changes the information in the LMS will also change. The basic processes will remain the same, but some of the screens may change or look different. The following topics are covered in this user guide: Step-by-Step LMS Login Instructions ................................................................................ 3 LMS Frequently Asked Questions...................................................................................... 5 Navigating the LMS.......................................................................................................... 10 Message Center................................................................................................................. 12 Searching for a Course...................................................................................................... 13
Search by Catalogue ..................................................................................................... 15 Search by Date .............................................................................................................. 17 Advanced Search .......................................................................................................... 18 Search by Program Registration ................................................................................... 19 Search by Calendar ....................................................................................................... 20
Registering for a Course ................................................................................................... 21 Registering for a No-cost Course.................................................................................. 21 Registering for a Course with a Tuition Fee................................................................. 23 Registering for On-Line Courses:................................................................................. 30 Wait Lists ...................................................................................................................... 36
Learning Plan .................................................................................................................... 37 Achievement Record......................................................................................................... 41
Transcripts..................................................................................................................... 41

Learn.Develop.Renew
3
Step-by-Step LMS Login Instructions for Manitoba Government Employees
Step 1 Finding your User Name:
You will need a user name to login to the LMS. Your user name is your personnel number, which can be found on the top left corner of your pay advice.
For example: If your personnel number on your pay advice is 123456, then your user name is 123456
User names must have 6 characters If your personnel number has less than 6 characters you must add the number of zeros to make 6 characters to the front of your employee number.
For example: If your personnel number on your pay advice is 3456, you must add 2 zeros in front of it to create your user name, which should look like this 003456
Step 2 Creating your Password:
You will need a password to login to the LMS. You will create your password by taking:
the last 4 numbers from your user name and the first 3 letters of your last name
Note: the first letter must be capitalized, and the rest are lower case.
For example: Jane Smith’s personnel number from her pay advice is 123456; which means her user name is 123456. Jane’s password will be 3456Smi
If your last name contains less than 3 letters, you will need to add the number 1 at the end of the password.
For example: If your last name is Ng and your user name is 456789 your password would be 6789Ng1

Learn.Develop.Renew
4
Step 3 Logging into the LMS:
Once you know your user name and password you are ready to type that information into the login page.
For example: Jane would enter her user name and password into the login page and click enter as follows:
Step 4 Changing Your Password:
After the first time you log in, you will be asked to change your password.
Your new passwords must be: No more than 7 characters long
Composed of a combination of upper and lower case letters,
numbers and special characters of your choice
Some examples of special characters are:
/ # : ? ! * + % - < > @ [ ]\ /_{ } |
123456
3456Smi

Learn.Develop.Renew
5
LMS Frequently Asked Questions
1. Why do I need a user name and password to enter the Learning Management System (LMS)?
The LMS is a secure site and requires each user to login with a distinct user name and password. This process ensures that only you can access your learning information.
2. Where do I get my user name and password?
Your user name is your personnel number, which appears on your pay advice. If you are a Manitoba government employee your pay advice looks like the example below.
3. What if my pay advice looks different than the example above?
If you work for the Manitoba government and your pay advice has the name of a payroll company such as ADP, etc., you should contact OSD at [email protected], and we will help you to login to the LMS.

Learn.Develop.Renew
6
4. Do I have to set up an account in the LMS?
No. If you work for the Manitoba government and your pay advice looks like the example in question 2 above, then an account has been created for you. If you are not paid by SAP then you will need to have an account created for you. Please contact OSD at [email protected], and we will create an account for you.
5. What do I do if I forget my password?
On the LMS Login Page there is a link called “email me my password.” Click on this link and you will be taken to a password reminder page. Here you will type in your user name and your password will be sent you by email.
If you don’t receive an email with your password, please contact OSD by email at [email protected], and we will help you.
6. What if I have trouble logging in?
If you have trouble logging in at any other time, please contact OSD by email at [email protected], and we will help you.

Learn.Develop.Renew
7
7. After I logged in my screen didn’t look right. What should I do?
You may need to “allow Pop-Up Windows” so that you can see the screen properly. To allow Pop-Up Windows please follow these steps:
Click on Tools on your browser From the drop-down menu click on Pop-up Blocker Then Pop-up Blocker Settings (Diagram 1) In the "address of website to allow" field type in OSD.learnflex.net
(Diagram 2) Click Add and Close the window
Diagram 1
Diagram 2
Learn.Develop.Renew
8
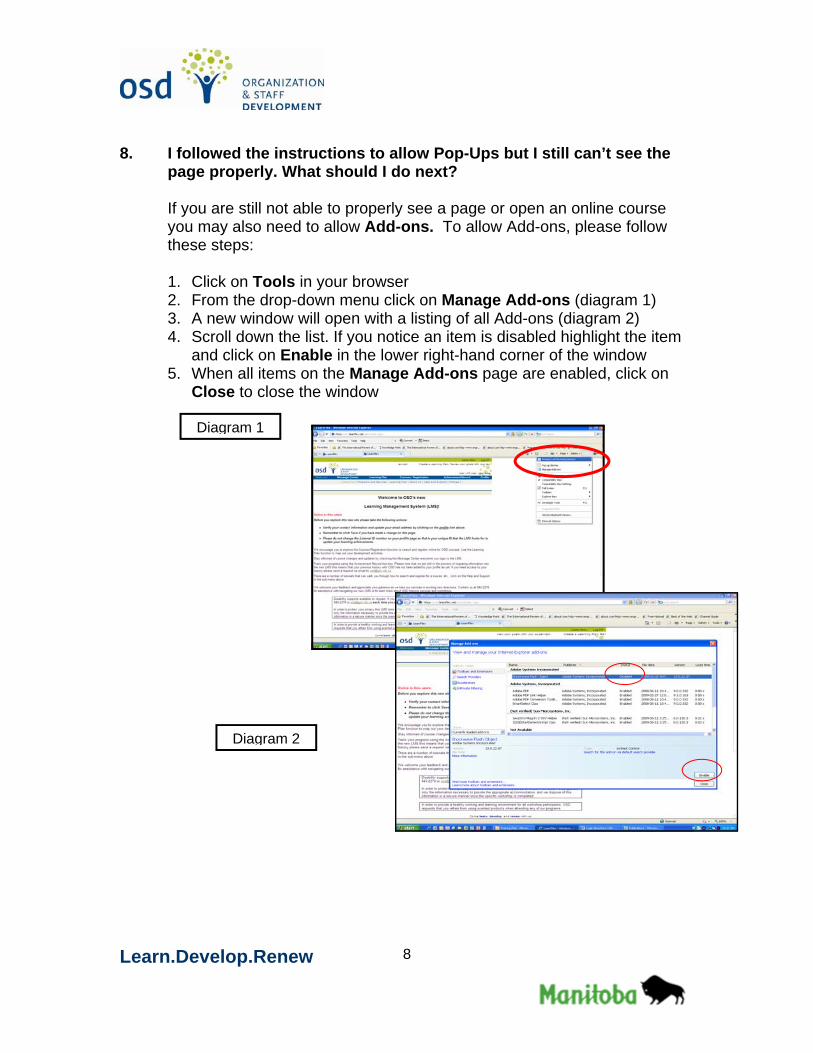
8. I followed the instructions to allow Pop-Ups but I still can’t see the
page properly. What should I do next?
If you are still not able to properly see a page or open an online course you may also need to allow Add-ons. To allow Add-ons, please follow these steps:
1. Click on Tools in your browser 2. From the drop-down menu click on Manage Add-ons (diagram 1) 3. A new window will open with a listing of all Add-ons (diagram 2) 4. Scroll down the list. If you notice an item is disabled highlight the item
and click on Enable in the lower right-hand corner of the window 5. When all items on the Manage Add-ons page are enabled, click on
Close to close the window
Diagram 1
Diagram 2

Learn.Develop.Renew
9
9. What are Add-Ons and why are they important?
Add-ons allow Flash and other small applications to run, which are typically included in on-line courses.
10. I tried to follow these instructions and I still cannot see the page
properly.
If you are still having difficulty seeing the page properly please contact the ICT Services Help Desk at 926-3400 or toll free at 1-888-281-1139.
11. What are the other links on the login page?
OSD also provides training and consulting services to external agencies that are not part of government. The other links on the login page are intended for that audience:
Create Account This option is for learners who are not
employees of the Government of Manitoba.
Note to Government of Manitoba of Manitoba employees: Please do not create an account here as your account has been created for you.
Browse Calendar Without logging in, you can access OSD’s
calendar. The courses listed here are targeted to our external clients so not all courses are shown here. To view the entire OSD catalogue for government employees or to register for a course you must login to the LMS.
12. How do I get back to the login page from these instructions?
To return to the login page from these instructions please click on the Back button on your browser.

Learn.Develop.Renew
10
Navigating the LMS
The first page you see when you login to the LMS is the Welcome page. Your name will appear in the top right corner, just below the Log Off button. For this Guide we have created a user called “LMS User.” Please note our accommodation and scent free policies stated at the bottom of the Welcome page.

Learn.Develop.Renew
11
The LMS is organized using clickable headers along the top blue bar as highlighted below. Welcome The Welcome tab has six subheadings organized to provide
you with information about OSD’s programs and services, learning tips, help and support, etc. This is where you can also find out about what’s new with OSD courses and other programming information.
Message Center The Message Center will deliver specific information about
courses you have registered for, including confirmations, cancellations, changes in times, or dates. We recommend that you check here often to keep up to date.
Learning Plan The Learning Plan area lists all of the courses and programs
in which you are registered. Here you can view a quick status of what courses you have completed and which are pending.
Courses/Registration The Courses / Registration area is where you search for
courses or programs and then register for the offerings that work for you.
Achievement Record Your Achievements are tracked for you here. We are in the
process of migrating information into the new LMS, which means that your previous history with OSD has not been added to your profile as yet. If you need access to your history please send a request via email to [email protected].
Profile The Profile holds your work contact information. Please verify your information and update your email address and click save. Please do not change the External ID number as that is your unique ID that the LMS uses to update your learning achievements.

Message Center To read important notices from OSD, you should make it a habit to check the Message Center every time you log in. Once you arrive at the Welcome page, click Message Center in the top blue bar.
Learn.Develop.Renew
12
In this example there is one unread message for the user in the screen shot above. To read messages, click on the subject of the message, which will open a pop-up window, as shown below. Once you have read the message, use the X in the top right to close the window and return to the Message Center page of the LMS.
To print the course registration information from the pop-up window scroll down to the bottom of the page and click on print.

Learn.Develop.Renew
13
Searching for a Course Your main interactions with OSD’s LMS will occur when you want to register for courses and programs. Navigation is important in the LMS. Take a moment to review the screen below. This is what you will see when you click on Courses/Registration. The blue navigation bar shows Courses/Registration highlighted in green. In the screen shot below, the menu shows you options for Courses/Registration. OSD has three main catalogues:
1. Manitoba Civil Service Learning and Development – this catalogue lists all of OSD’s Workshops.
2. Microsoft Courses – lists all of Microsoft Office 2007 courses. These are all
on-line courses. 3. SAP Courses – provides a listing of the SAP courses offered through OSD.

Learn.Develop.Renew
14
Notice that there is also a sub-menu just under the main blue navigation bar. This menu changes depending on which navigation bar heading you have clicked on. You can use one of the following five methods to find a course or program in which you wish to register:
1. By Catalogue, using subject and / or curriculum group course lists
2. By Date which courses are running on a particular date
3. By Advanced where more specific search criteria can be keyed in
4. By Program registration
5. By Calendar, a more visual way to search by date
Each of these methods of searching will be explained in detail on the following pages.

Search by Catalogue Currently OSD has categorized its courses into nine subject areas. These subjects make up the Manitoba Civil Service Learning and Development Catalogue and may change as courses are added or deleted. Courses relating to these subject areas can be viewed by clicking on the appropriate subject area. For example, to view courses within the Health and Wellness subject area click on the link as indicated in the screen shot below. The following screen shows courses related to Health and Wellness. To see a course description and more information about the course, click on a course title.
Learn.Develop.Renew
15
Learn.Develop.Renew
16
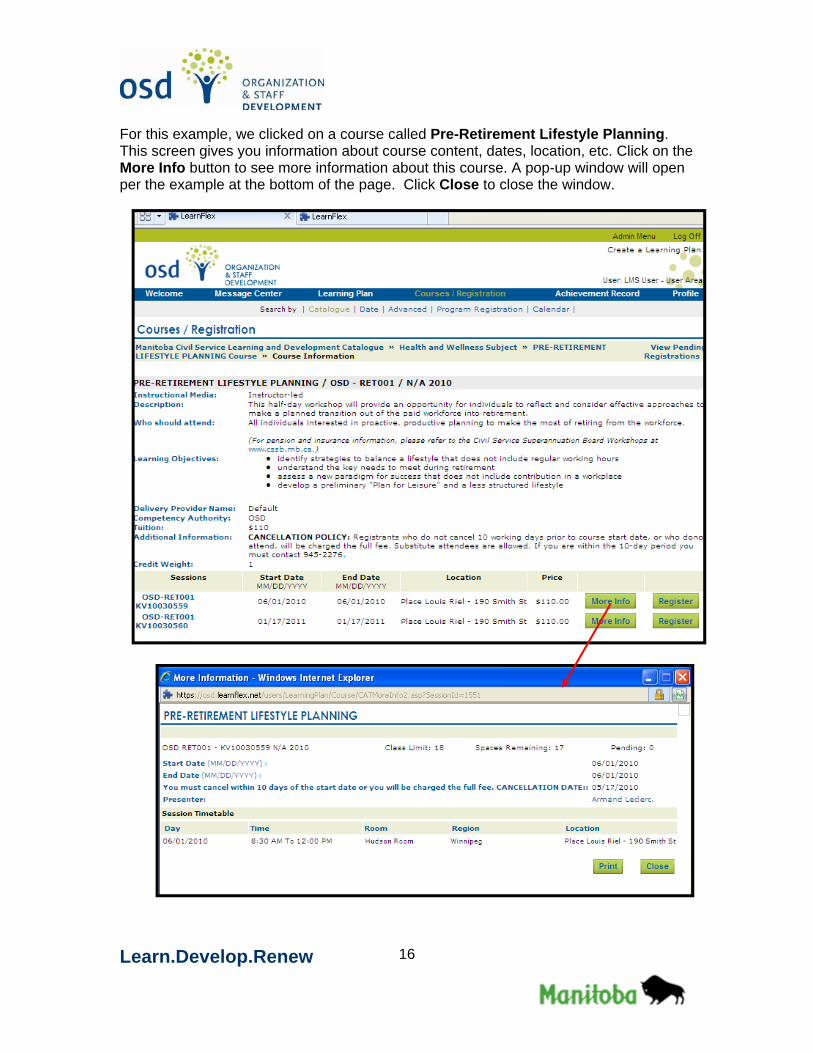
For this example, we clicked on a course called Pre-Retirement Lifestyle Planning. This screen gives you information about course content, dates, location, etc. Click on the More Info button to see more information about this course. A pop-up window will open per the example at the bottom of the page. Click Close to close the window.

Learn.Develop.Renew
17
Search by Date If you know the date that you are available to take training, you can do a date search for courses that are scheduled to run on that date. Use the date search tools to enter your criteria.
For example, if you are interested in courses that are running between September 1, 2010 and October 29, 2010, you would pick that date rate range from the drop down windows as shown below and click Search. The search results are listed on the bottom of the page as displayed in the example above. As with the Catalogue search, you can click on a course title to get more information about the course and register for it.

Learn.Develop.Renew
18
Advanced Search Advanced search allows you to enter as many search criteria as you wish. For example, you might only be interested in instructor-led courses held in your region. Simply enter data or make selections where you need to, and then click Search to get a list of courses that match your criteria. The example below shows the results of an advanced search looking for instructor-led courses in Brandon. From here you can then select a course and register.

Learn.Develop.Renew
19
Search by Program Registration To search for programs, click on the Program Registration link. Select OSD as the Curriculum Group, and then enter a title of the program if you know it. If you leave the title blank, your search will return a list of all of the programs. Click Search.
Your search result will show all of the programs that are available for registration. Read about the program and then select More Info or Register.
Learn.Develop.Renew
20
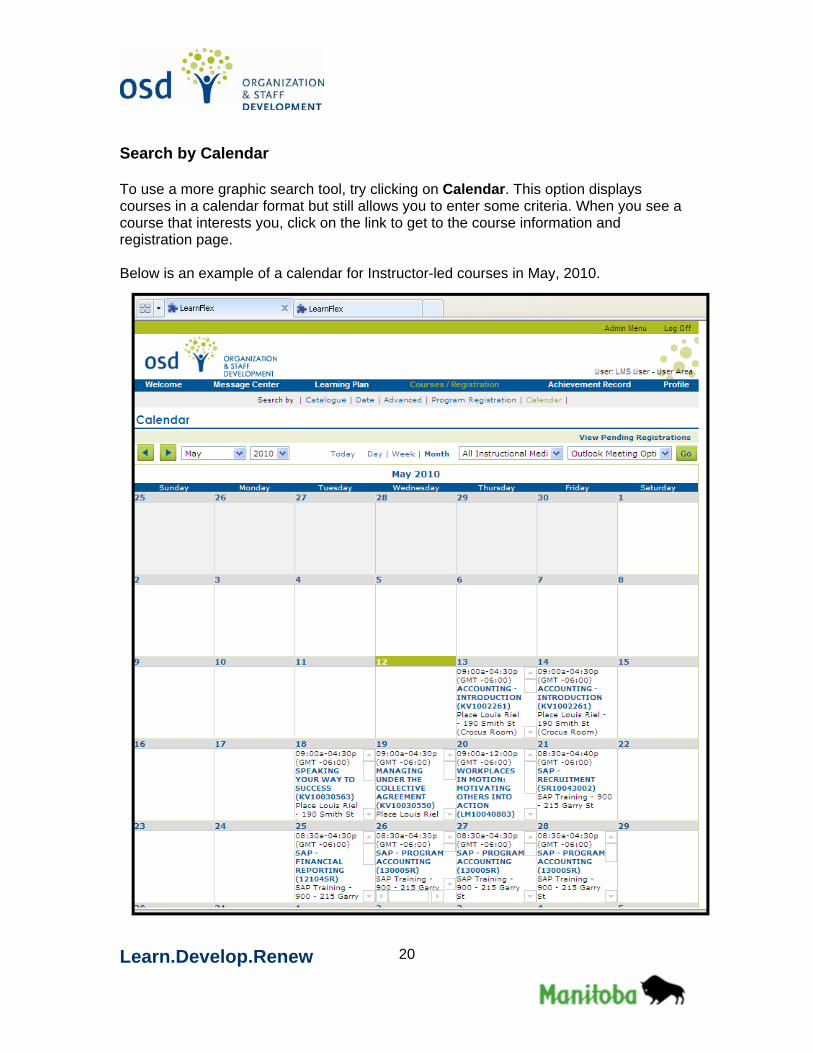
Search by Calendar To use a more graphic search tool, try clicking on Calendar. This option displays courses in a calendar format but still allows you to enter some criteria. When you see a course that interests you, click on the link to get to the course information and registration page. Below is an example of a calendar for Instructor-led courses in May, 2010.

Learn.Develop.Renew
21
Registering for a Course Once you have chosen the course you would like to attend, click on that course to arrive at the Courses / Registration page for that specific course. There are two registration processes. One process applies to courses that are offered at no cost to civil servants and one process where there is a tuition fee. Both processes are easy to follow and you will be prompted with instructions as you go. To determine if there is a cost to attend a course, check the Tuition and Price areas on the registration page (see the red highlighted areas in the example below). Registering for a No-cost Course: In the example below you will notice that there are a number of sessions offered for this course. First determine which date you would like to attend and then click on the corresponding Register button for that date.

Learn.Develop.Renew
22
When you click Register a pop-up window will appear with a number of messages. Please make sure you read these messages to ensure you understand the implications of clicking OK. In the case where there is no charge to attend these messages will not apply. However, even if there is no charge you should ensure you supervisor has approved your attendance as you would be away from your office. When you click OK, you will receive a confirmation notice as in the screen shot below.

Learn.Develop.Renew
23
Registering for a Course with a Tuition Fee When a course has a tuition fee you will see the amount displayed on the course information page as indicated by the red circles below:

Learn.Develop.Renew
24
When you click Register, you will be prompted to confirm that you are sure you want to register. Please read this message carefully. By clicking OK you are confirming that you have approval from your supervisor to attend and that fees are to be invoiced to your department or organization per the billing information you entered. You should also be aware that if your department does not approve your attendance you will be billed directly.

Learn.Develop.Renew
25
When you click OK you will be brought to a series of billing information pages that require you to key in information in order to complete your registration. In the above example you will see the course you are registering for listed. To continue with the registration process click Next. If you wish to cancel out before the registration process is completed highlight the course and click Remove.

Learn.Develop.Renew
26
When you click Next you are brought to the Billing Information page. Here you are required to fill in your billing information. The most important information on this screen is the email address of the person responsible to pay the invoice. To enter a different address for that person click on the Other button and key in the address information only. (Note: the system recognizes you as the person registering for a course and automatically puts your name in the “Name” field – this cannot be changed; however you can key in an alternate address of the person where the invoice is to be sent.) Click Next to move to the Payment Method page.

Learn.Develop.Renew
27
The Payment Method page requires you to indicate the method of payment. This is a required field and you cannot complete the registration process unless you choose one of the following methods SAP / Cheque / Other. Please Note: Credit cards payments are not accepted.

Learn.Develop.Renew
28
When you click Next you are brought to the Confirmation page. Please read over the information you have keyed in. Click Process Request to finalize the registration. You will receive a registration confirmation message. Click Print to print out a copy for your records. When your registration is final you will also receive a course registration message in your Message centre. Click on Message Centre and click on Course Registration message to review.

Learn.Develop.Renew
29
There may be occasions where you have to exit the registration process from a tuition-based course before you have entered all the required information. You can go back and complete the registration process by clicking on View Pending Registrations from the Courses/Registration page. You will be brought back to the first page of the course registration page as in the example below. Click Next to continue and follow the instructions to finalize the registration process.

Learn.Develop.Renew
30
Registering for On-Line Courses: OSD offers a series of on-lines courses as well as classroom courses. The current the catalogue of on-line courses are Microsoft Office 2007 courses. To register for an on-line course click on Microsoft Courses as indicated in red below. A list of course subjects will appear and you would then choose the topic you are looking for and click on it.

Learn.Develop.Renew
31
In this example we will register for Getting Started with Microsoft Office Word 2007. The Microsoft on-line courses are offered at no cost so the same no-cost registration process for classroom applies for on-line course registration as well. You will notice that the start and end dates are different than classroom dates. Microsoft on-line courses are offered on a license basis which coincides with an overall contract date.

Learn.Develop.Renew
32
The same registration message will appear for on-line courses as it does for classroom registrations. The same message is also delivered confirming your on-line registration. There are no course maximums set, so you will always be able to register and immediately launch an an-line course.

Learn.Develop.Renew
33
When you press continue you are returned to your Learning Plan page and you will notice that a launch button appears. Click the Launch button to start the on-line course. While your course is loading you will see the following screen. It may take a few moments for the course to load. If the course does not load please email us at [email protected] and report the problem.

Learn.Develop.Renew
34
When the course is loaded and ready to start it will open in a pop-up window. To start the course click on Begin the Course as highlighted in the red circle below: In this example the course provides you with a table of contents to help you navigate the course. The course keeps track of the sections you complete. If you have to quit the course you can X out of it and come back later.

Learn.Develop.Renew
35
To go back into the course you would go back to your Learning Plan page and click on Launch. When you are back in the course you will notice that the percent complete is registered. In this case only 4% was completed. To resume the course click on Resume the Course. You will be brought back to the table of contents area where you will see a checkmark indicating you have completed that section and an arrow marking the spot where you should begin. Click here to resume the course.

Learn.Develop.Renew
36
Wait Lists The LMS keeps track of the number of people that have registered for an instructor-led classroom course. The typical course maximum for this type of course is 20. If you click register and the course has reached its maximum you will receive a message letting you know that you have been placed on a wait list. When you click Continue, regardless of whether you are registered or on a wait list, you will be brought to your learning plan and you will see the course listed there. If you are on a wait list you will see a status of Waiting as in the example below. If someone cancels out of that course, and you were next on the list to attend, the status will change to enrolled. You can also call OSD at 945-2276 to confirm your status.

Learn.Develop.Renew
37
Learning Plan
The Learning Plan page keeps track of the courses and programs in which you have registered. You can review the location and time of the course and check your status. If you are registered in course your status will show as Enrolled as in the example below. To view more details about the course click View. Click Print to print those details.

Learn.Develop.Renew
38
You can also cancel out of the course from your Learning Plan page. Click Cancel and a pop-up box will appear asking you to confirm your request to cancel. NOTE: If you are within OSD’s 10-day cancellation policy this cancel button will be “greyed out” or inactive. This means that you will have to call OSD at 945-2276 to cancel. If you fail to notify OSD within the 10-day cancellation timeframe you will be charged. The Learning Plan page also enables you to view and manage the certificate programs in which you are registered by clicking Programs. The programs are broken down into modules and are registered separately. You can view the program requirements, get session information, and register for programs from your Learning Plan.

Learn.Develop.Renew
39
There is a Calendar View on the Learning Plan page where you can see a personalized view of your registrations in a calendar format where you can get more information and session details. You can also save this date in your Outlook calendar as a meeting notice as follows:
1. Display the course date in Calendar Day view. 2. Choose Save as Outlook Meeting and click on Go. 3. A pop-up box will open letting you know that action is required. 4. Click OK; a message will appear asking you whether you want to open or save
this file. Click on Open.

Learn.Develop.Renew
40
When you click Open you will be brought to your personal Outlook Appointment page. Notice that all the information regarding date, time and location of the course are filled in for you. NOTE: An important action you must take is to set the reminder to 2 weeks prior to the course start date as this date will coincide with OSD’s 10-day cancellation policy. If you are not able to attend the course, the 2 week reminder date will be the last day you can cancel without being charged. If you do not cancel prior to this date and do not attend the course you or your department will be required to pay the full tuition fee. To set the reminder date click on the down arrow and scroll down the options. Select 2 weeks which is the last option in the list. Click on Save and Close to update your calendar.

Learn.Develop.Renew
Achievement Record The Achievement Record maintains a record of the course and program completions that you have achieved through OSD. The various sub-links on this page will show you various aspects of your achievements. You can also print this page for your records.
LMS User
Achievements are updated at the end of every month. If you took a course this month, you likely won’t see it in your achievement record until the middle to end of the next month. Updates are made based on the attendance roster of each course where either the instructor has taken attendance, or the person has initialled the attendance sheet.
Transcripts The Transcript feature will list all your completed courses; however if you need an official transcript you must contact OSD for this request. Official transcripts are printed on letterhead and sent directly to the requesting institution or to you directly. Please Note: With the migration to the new system, it was not possible to globally import the achievement history of all past course participants. This means that OSD must import the history of past participants through a manual process. It will take some time to accomplish this. OSD will only migrate achievements from 2004 onward; however, the records will remain accessible should information prior to 2004 be required. If you are currently registered in a program and need your records, please contact OSD at [email protected] to arrange for your information to be imported to your account.
41