leathercraft projects to-go - tandyleather.com file• instructions & handbook you will or might...
TRANSCRIPT
Page 1 of 7
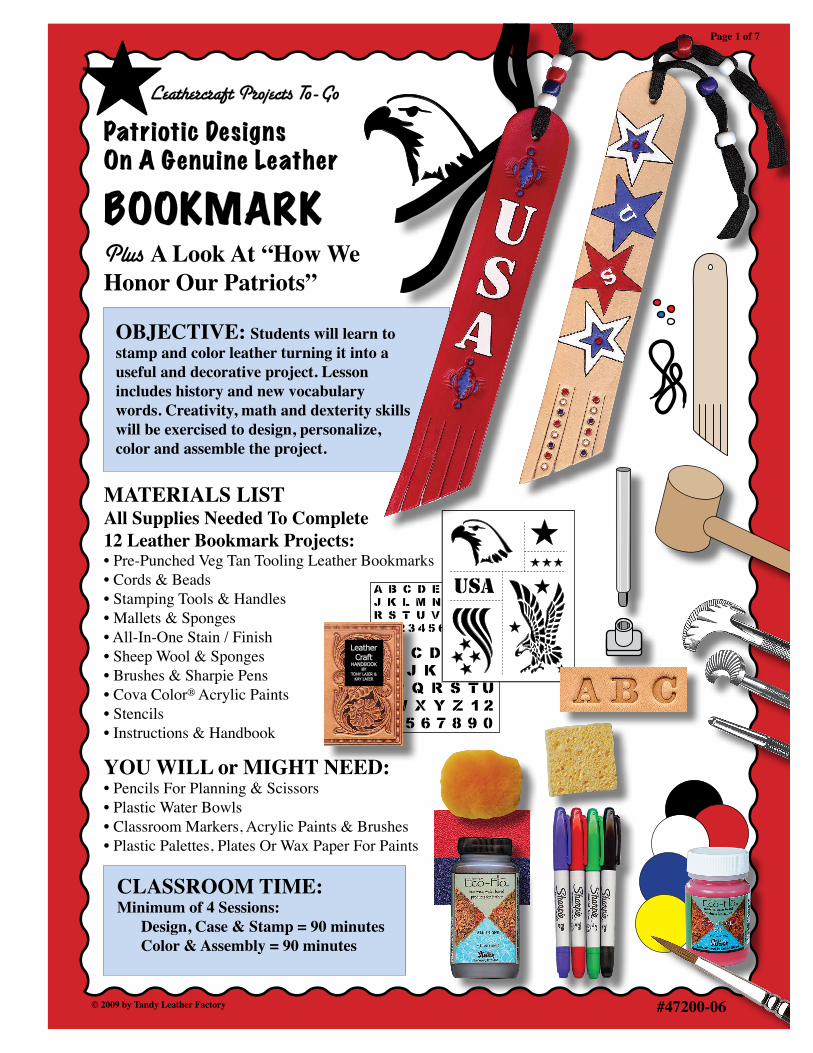
MATERIALS LISTAll Supplies Needed To Complete 12 Leather Bookmark Projects:• Pre-Punched Veg Tan Tooling Leather Bookmarks• Cords & Beads• Stamping Tools & Handles• Mallets & Sponges• All-In-One Stain / Finish• Sheep Wool & Sponges• Brushes & Sharpie Pens• Cova Color® Acrylic Paints • Stencils• Instructions & Handbook
YOU WILL or MIGHT NEED:• Pencils For Planning & Scissors• Plastic Water Bowls• Classroom Markers, Acrylic Paints & Brushes• Plastic Palettes, Plates Or Wax Paper For Paints
CLASSROOM TIME:Minimum of 4 Sessions: Design, Case & Stamp = 90 minutes Color & Assembly = 90 minutes
Leathercraft Projects To-Go
OBJECTIVE: Students will learn to stamp and color leather turning it into a useful and decorative project. Lessonincludes history and new vocabulary words. Creativity, math and dexterity skills will be exercised to design, personalize, color and assemble the project.
BOOKMARK
A B C D E F G H I J K L M N O P Q R S T UV W X Y Z 1 2 3 4 5 6 7 8 9 0
A B C D E F G H I J K L M N O P Q R S T U V W X Y Z 1 2 3 4 5 6 7 8 9 0
EASY TO USELEATHERCRAFT
STENCIL
TANDYLEATHER FACTORY
C 2009
PATRIOTIC STENCIL
usa
Patriotic Designs On A Genuine Leather
Plus A Look At “How We Honor Our Patriots”
LeatherCraft
HANDBOOKBY
TONY LAIER &KAY LAIER
© 2009 by Tandy Leather Factory #47200-06
Page 2 of 7
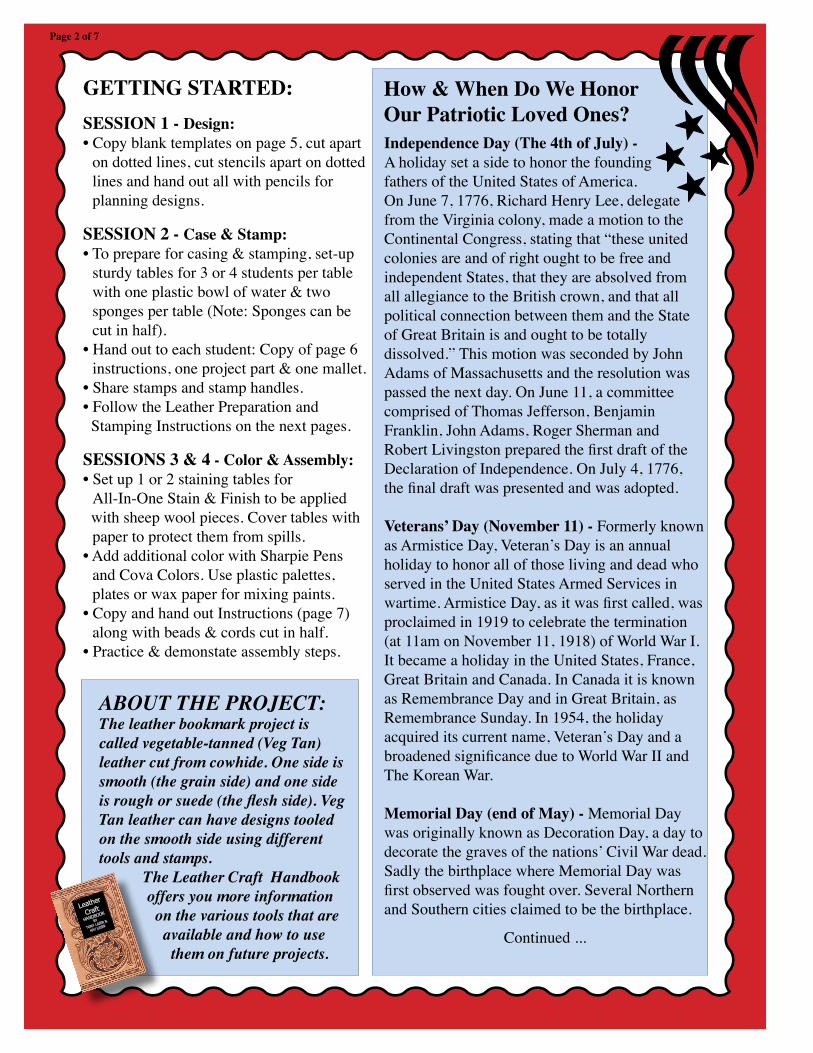
ABOUT THE PROJECT: The leather bookmark project is called vegetable-tanned (Veg Tan) leather cut from cowhide. One side is smooth (the grain side) and one side is rough or suede (the flesh side). Veg Tan leather can have designs tooled on the smooth side using different tools and stamps. The Leather Craft Handbook offers you more information on the various tools that are available and how to use them on future projects.
Independence Day (The 4th of July) -A holiday set a side to honor the foundingfathers of the United States of America. On June 7, 1776, Richard Henry Lee, delegate from the Virginia colony, made a motion to the Continental Congress, stating that “these united colonies are and of right ought to be free and independent States, that they are absolved from all allegiance to the British crown, and that all political connection between them and the Stateof Great Britain is and ought to be totally dissolved.” This motion was seconded by John Adams of Massachusetts and the resolution was passed the next day. On June 11, a committee comprised of Thomas Jefferson, Benjamin Franklin, John Adams, Roger Sherman and Robert Livingston prepared the first draft of the Declaration of Independence. On July 4, 1776, the final draft was presented and was adopted.
Veterans’ Day (November 11) - Formerly known as Armistice Day, Veteran’s Day is an annual holiday to honor all of those living and dead who served in the United States Armed Services in wartime. Armistice Day, as it was first called, was proclaimed in 1919 to celebrate the termination (at 11am on November 11, 1918) of World War I. It became a holiday in the United States, France, Great Britain and Canada. In Canada it is known as Remembrance Day and in Great Britain, as Remembrance Sunday. In 1954, the holiday acquired its current name, Veteran’s Day and a broadened significance due to World War II and The Korean War.
Memorial Day (end of May) - Memorial Day was originally known as Decoration Day, a day to decorate the graves of the nations’ Civil War dead. Sadly the birthplace where Memorial Day was first observed was fought over. Several Northern and Southern cities claimed to be the birthplace. Continued ...
How & When Do We HonorOur Patriotic Loved Ones?
GETTING STARTED:SESSION 1 - Design:• Copy blank templates on page 5, cut apart
on dotted lines, cut stencils apart on dotted lines and hand out all with pencils for planning designs.
SESSION 2 - Case & Stamp:• To prepare for casing & stamping, set-up
sturdy tables for 3 or 4 students per table with one plastic bowl of water & two sponges per table (Note: Sponges can be cut in half).
• Hand out to each student: Copy of page 6 instructions, one project part & one mallet.
• Share stamps and stamp handles.• Follow the Leather Preparation and Stamping Instructions on the next pages.
SESSIONS 3 & 4 - Color & Assembly:• Set up 1 or 2 staining tables for All-In-One Stain & Finish to be applied with sheep wool pieces. Cover tables with
paper to protect them from spills. • Add additional color with Sharpie Pens
and Cova Colors. Use plastic palettes, plates or wax paper for mixing paints.
• Copy and hand out Instructions (page 7) along with beads & cords cut in half.
• Practice & demonstate assembly steps.
Leather
CraftHANDBOOK
BY
TONY LAIER &
KAY LAIER

© 2009 by Tandy Leather Factory
Page 3 of 7
LEATHER PREPARATION:
Before you can stamp a design on leather,it needs to be moistened. This is called “casing the leather”. (Note: Sponges can becut in half.) Students should share spongesand water bowls per table.
1) Apply water to the smooth (grain) side of your leather using a clean sponge and water. Dampen leather but not too much.
2) Set leather aside and wait until it begins to return to its natural color and feels cool to the touch. Then it is ready to stamp. While waiting for your leather to partially dry, plan the designs.
3) If some areas begin to dry too fast, lightly re-dampen with the sponge and water.
VOCABULARY:
Casing - Adding water to one or both sides of vegetable tanned tooling leather to prepare the surface for tooling.
Flesh Side - The rough (suede) underside of leather.
Grain Side - The hair side of the leather with the hair removed.
Tanning - The process using tannins to change a fresh animal hide into leather.
Tannins - Yellowish substance from oak bark and other plants used to tan leather.
Staining - Adding color to the leather using dif-ferent types of stains and paints.
Stamping - Using metal stamps with designs or shapes on the end and a mallet to put a design on the grain side of vegetable tanned leather.
Vegetable Tanned (Veg-Tan) - Leather which has been tanned with vegetable materials that are derived from certain plants and woods, often called bark tannins.
In 1966 under the direction of President Lyndon Johnson, Waterloo, N.Y. was declared the birthplace of Decoration (or Memorial) Day. Today the observance of Memorial Day honors all those (not just veterans) who died in all of America’s wars. In 1971, Congress declared Memorial Day to be a national holiday celebrated on the last Monday in May of each year.
Did You Know: Decoration Day was firstwidely observed on May 30, 1868, to honor those who made sacrifices during the Civil War. General John A. Logan declared: The 30th of May, 1868, is designated for the purpose of strewing with flowers, or otherwise decorating the graves of comrades who died in defense of their country during the late rebellion, and whose bodies now lie in almost every city, village, and hamlet churchyards in the land. In this observance no form of ceremony is prescribed, but posts and comrades will in their own way arrange such fitting services & testimonials of respect as circumstance may permit.
The project for this lesson is to decorate a leather bookmark with a Patriotic Theme.
History Continued:
Page 4 of 7
RECYCLE ME! “I am your Theme Bucket - be sure to recycle me! I would like to end up in your closet with many of my friends. I could store art supplies, extra leather project parts, or even help you organize your files. Create a new label for me so I can help you find what is stored in me. But until it’s time to recycle, I am happy to bring fun & learning into your classroom by offering you Projects To-Go from Tandy Leather Factory.”
CLASSROOM EXPANSION IDEAS: ~ Study the writing and adoption of the Declaration of Independence. ~ Discover how many students have military families or friends and discuss the difference in the branches of United States Military.
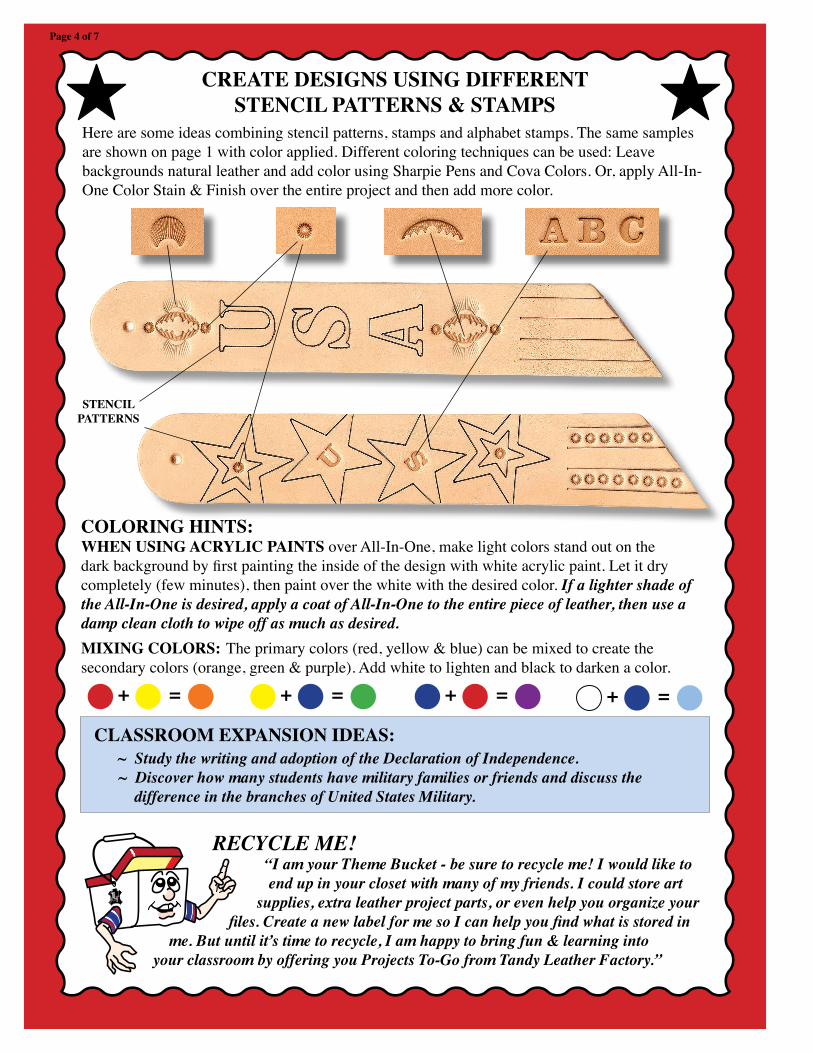
STENCILPATTERNS
COLORING HINTS:WHEN USING ACRYLIC PAINTS over All-In-One, make light colors stand out on the dark background by first painting the inside of the design with white acrylic paint. Let it dry completely (few minutes), then paint over the white with the desired color. If a lighter shade of the All-In-One is desired, apply a coat of All-In-One to the entire piece of leather, then use a damp clean cloth to wipe off as much as desired.MIXING COLORS: The primary colors (red, yellow & blue) can be mixed to create the secondary colors (orange, green & purple). Add white to lighten and black to darken a color.
+ = + = + = + =
CREATE DESIGNS USING DIFFERENTSTENCIL PATTERNS & STAMPS
Here are some ideas combining stencil patterns, stamps and alphabet stamps. The same samples are shown on page 1 with color applied. Different coloring techniques can be used: Leave backgrounds natural leather and add color using Sharpie Pens and Cova Colors. Or, apply All-In-One Color Stain & Finish over the entire project and then add more color.

© 2009 by Tandy Leather Factory
Page 5 of 7
TEMPLATES FOR PLANNING DESIGNS Copy this page, cut apart on dotted lines and hand out to students so they
can practice designs on paper before applying them to the leather.
Page 6 of 7
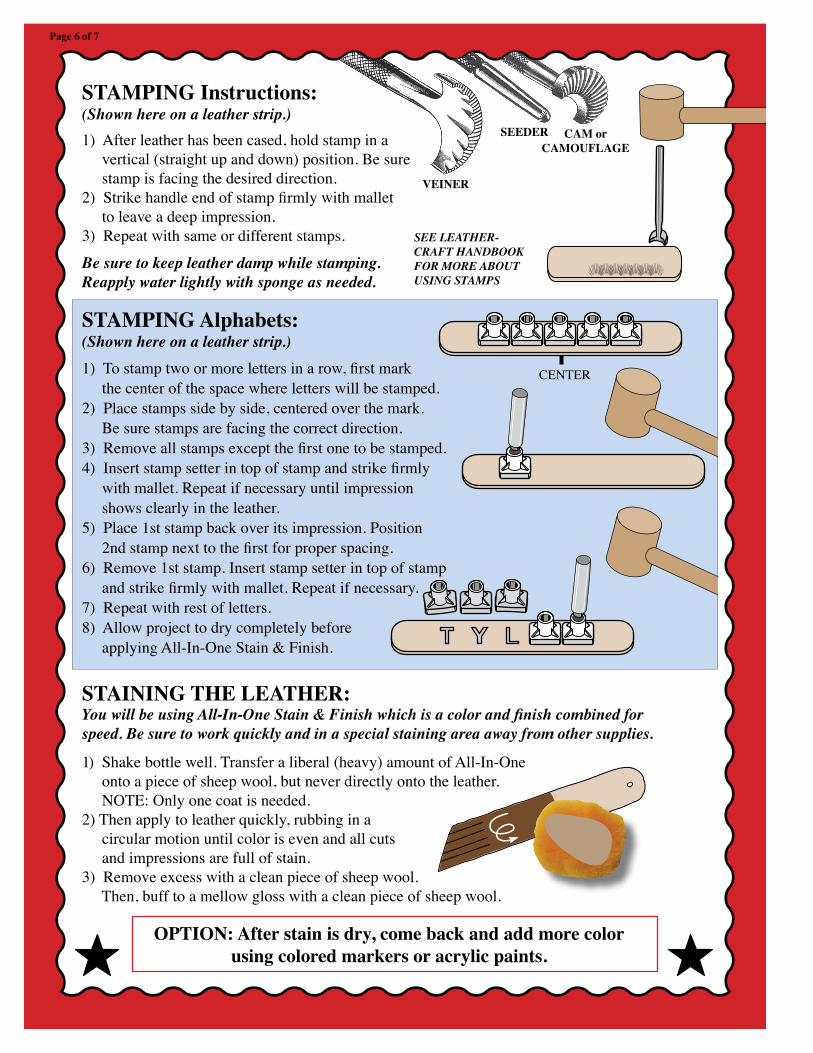
STAINING THE LEATHER:You will be using All-In-One Stain & Finish which is a color and finish combined forspeed. Be sure to work quickly and in a special staining area away from other supplies.
1) Shake bottle well. Transfer a liberal (heavy) amount of All-In-One onto a piece of sheep wool, but never directly onto the leather. NOTE: Only one coat is needed. 2) Then apply to leather quickly, rubbing in a circular motion until color is even and all cuts and impressions are full of stain.3) Remove excess with a clean piece of sheep wool. Then, buff to a mellow gloss with a clean piece of sheep wool.
OPTION: After stain is dry, come back and add more color using colored markers or acrylic paints.
CENTER
STAMPING Instructions:(Shown here on a leather strip.)1) After leather has been cased, hold stamp in a vertical (straight up and down) position. Be sure stamp is facing the desired direction.2) Strike handle end of stamp firmly with mallet to leave a deep impression. 3) Repeat with same or different stamps.
Be sure to keep leather damp while stamping.Reapply water lightly with sponge as needed.
STAMPING Alphabets:(Shown here on a leather strip.)1) To stamp two or more letters in a row, first mark the center of the space where letters will be stamped. 2) Place stamps side by side, centered over the mark. Be sure stamps are facing the correct direction.3) Remove all stamps except the first one to be stamped.4) Insert stamp setter in top of stamp and strike firmly with mallet. Repeat if necessary until impression shows clearly in the leather.5) Place 1st stamp back over its impression. Position 2nd stamp next to the first for proper spacing. 6) Remove 1st stamp. Insert stamp setter in top of stamp and strike firmly with mallet. Repeat if necessary.7) Repeat with rest of letters.8) Allow project to dry completely before applying All-In-One Stain & Finish.
VEINER
SEEDER CAM orCAMOUFLAGE
SEE LEATHER-CRAFT HANDBOOKFOR MORE ABOUT USING STAMPS

© 2009 by Tandy Leather Factory
Page 7 of 7
ASSEMBLY INSTRUCTIONS:
HINT: To keep cut cord ends from unraveling, put a drop of classroom white glue on cut end and let it dry completely.
There are so many different ways to decorate the bookmark using beads and cord. Here are just a couple of examples. Have fun creating your own designs.
OPTIONALKEY FOB:• String beads on cord as
shown in Sample A or B instructions below.
• Before tieing knots in the ends of the cord, add a key.
• Then tie both cord ends together in a knot to secure the key.
• Trim off excess cord.
BEADING SAMPLE A:• Use 1/2 of a cord. • Push tip of cord through bead.• Then bring cord over edge of bead and back through the same hole again. • Repeat on second bead. • Stitch through hole. Tie a knot close to the leather. Pull cord tight. • Then add a 3rd & 4th bead.• Tie a knot in the ends of cord.• Trim off excess cord.
BEADING SAMPLE B:• Use 1/2 of a cord.• Push tip of cord through all four beads. • Then stitch through hole.• Push tip of cord back through all four beads. Push beads up to edge of leather, but not too tight.• Pull cord straight.• Tie a knot in the cord ends together or separate.• Trim off excess cord.
A
B