leema acoustics pyxis reference standard pre-amplifier manual... · 2014-10-07 · acoustics...
TRANSCRIPT

PYXIS
HANDBOOK
Leema Acoustics PyxisReference Standard Pre-amplifier

PYXIS
Contents
Contents . . . . . . . . . . . . . . . . . . . . . . . . . . . . . . . . . . . . . . . . . . . . . . . . . . . . . . . . . . . . . . . . . . . . . . . . . . . . . . . .2
Introduction . . . . . . . . . . . . . . . . . . . . . . . . . . . . . . . . . . . . . . . . . . . . . . . . . . . . . . . . . . . . . . . . . . . . . . . . . . . . .5
Declaration of Conformity . . . . . . . . . . . . . . . . . . . . . . . . . . . . . . . . . . . . . . . . . . . . . . . . . . . . . . . . . . . . . . . . .5
Environmental Issues . . . . . . . . . . . . . . . . . . . . . . . . . . . . . . . . . . . . . . . . . . . . . . . . . . . . . . . . . . . . . . . . . . . . . . .5
Made in the UK . . . . . . . . . . . . . . . . . . . . . . . . . . . . . . . . . . . . . . . . . . . . . . . . . . . . . . . . . . . . . . . . . . . . . . . . . . .5
Contact Us . . . . . . . . . . . . . . . . . . . . . . . . . . . . . . . . . . . . . . . . . . . . . . . . . . . . . . . . . . . . . . . . . . . . . . . . . . . . . .5
VERY IMPORTANT . . . . . . . . . . . . . . . . . . . . . . . . . . . . . . . . . . . . . . . . . . . . . . . . . . . . . . . . . . . . . . . . . . . . . . . . . .6
User Installation and Safety Advice . . . . . . . . . . . . . . . . . . . . . . . . . . . . . . . . . . . . . . . . . . . . . . . . . . . . . . . . . . . .6
Pyxis Overview . . . . . . . . . . . . . . . . . . . . . . . . . . . . . . . . . . . . . . . . . . . . . . . . . . . . . . . . . . . . . . . . . . . . . . . . . . . .6Design Philosophy . . . . . . . . . . . . . . . . . . . . . . . . . . . . . . . . . . . . . . . . . . . . . . . . . . . . . . . . . . . . . . . . . . . . . . .7Phono Options . . . . . . . . . . . . . . . . . . . . . . . . . . . . . . . . . . . . . . . . . . . . . . . . . . . . . . . . . . . . . . . . . . . . . . . . .7Simple to use . . . . . . . . . . . . . . . . . . . . . . . . . . . . . . . . . . . . . . . . . . . . . . . . . . . . . . . . . . . . . . . . . . . . . . . . . .7
Construction . . . . . . . . . . . . . . . . . . . . . . . . . . . . . . . . . . . . . . . . . . . . . . . . . . . . . . . . . . . . . . . . . . . . . . . . . . . . .7
System . . . . . . . . . . . . . . . . . . . . . . . . . . . . . . . . . . . . . . . . . . . . . . . . . . . . . . . . . . . . . . . . . . . . . . . . . . . . . . . . . .7
What is Leema LIPS ? . . . . . . . . . . . . . . . . . . . . . . . . . . . . . . . . . . . . . . . . . . . . . . . . . . . . . . . . . . . . . . . . . . . . . . .7
Connecting LIPS . . . . . . . . . . . . . . . . . . . . . . . . . . . . . . . . . . . . . . . . . . . . . . . . . . . . . . . . . . . . . . . . . . . . . . . . . .8LIPS2 . . . . . . . . . . . . . . . . . . . . . . . . . . . . . . . . . . . . . . . . . . . . . . . . . . . . . . . . . . . . . . . . . . . . . . . . . . . . . . . . .8
BI-AMPING . . . . . . . . . . . . . . . . . . . . . . . . . . . . . . . . . . . . . . . . . . . . . . . . . . . . . . . . . . . . . . . . . . . . . . . . . . . . . . .8What is Bi-Amping? . . . . . . . . . . . . . . . . . . . . . . . . . . . . . . . . . . . . . . . . . . . . . . . . . . . . . . . . . . . . . . . . . . . . . .8BI-AMPING and LIPS . . . . . . . . . . . . . . . . . . . . . . . . . . . . . . . . . . . . . . . . . . . . . . . . . . . . . . . . . . . . . . . . . . . . . .9
Leema system overview . . . . . . . . . . . . . . . . . . . . . . . . . . . . . . . . . . . . . . . . . . . . . . . . . . . . . . . . . . . . . . . . . . . .9
Analogue Connections . . . . . . . . . . . . . . . . . . . . . . . . . . . . . . . . . . . . . . . . . . . . . . . . . . . . . . . . . . . . . . . . . . . .10Input connections . . . . . . . . . . . . . . . . . . . . . . . . . . . . . . . . . . . . . . . . . . . . . . . . . . . . . . . . . . . . . . . . . . . . . . .10Phono> . . . . . . . . . . . . . . . . . . . . . . . . . . . . . . . . . . . . . . . . . . . . . . . . . . . . . . . . . . . . . . . . . . . . . . . . . . . . . .10Phono Mode . . . . . . . . . . . . . . . . . . . . . . . . . . . . . . . . . . . . . . . . . . . . . . . . . . . . . . . . . . . . . . . . . . . . . . . . . . .10CD> . . . . . . . . . . . . . . . . . . . . . . . . . . . . . . . . . . . . . . . . . . . . . . . . . . . . . . . . . . . . . . . . . . . . . . . . . . . . . . . .11CD Mode . . . . . . . . . . . . . . . . . . . . . . . . . . . . . . . . . . . . . . . . . . . . . . . . . . . . . . . . . . . . . . . . . . . . . . . . . . . . .11AUX> . . . . . . . . . . . . . . . . . . . . . . . . . . . . . . . . . . . . . . . . . . . . . . . . . . . . . . . . . . . . . . . . . . . . . . . . . . . . . . . .11MP3 . . . . . . . . . . . . . . . . . . . . . . . . . . . . . . . . . . . . . . . . . . . . . . . . . . . . . . . . . . . . . . . . . . . . . . . . . . . . . . . . . .11AV DIR> . . . . . . . . . . . . . . . . . . . . . . . . . . . . . . . . . . . . . . . . . . . . . . . . . . . . . . . . . . . . . . . . . . . . . . . . . . . . . .11TAPE IN . . . . . . . . . . . . . . . . . . . . . . . . . . . . . . . . . . . . . . . . . . . . . . . . . . . . . . . . . . . . . . . . . . . . . . . . . . . . . . .12Output Connections . . . . . . . . . . . . . . . . . . . . . . . . . . . . . . . . . . . . . . . . . . . . . . . . . . . . . . . . . . . . . . . . . . . . .12TAPE OUT . . . . . . . . . . . . . . . . . . . . . . . . . . . . . . . . . . . . . . . . . . . . . . . . . . . . . . . . . . . . . . . . . . . . . . . . . . . . . .12LIPS / VARIABLE Push Switch . . . . . . . . . . . . . . . . . . . . . . . . . . . . . . . . . . . . . . . . . . . . . . . . . . . . . . . . . . . . . . . .12PREAMP OUTPUTS . . . . . . . . . . . . . . . . . . . . . . . . . . . . . . . . . . . . . . . . . . . . . . . . . . . . . . . . . . . . . . . . . . . . . . . .13HEADPHONES . . . . . . . . . . . . . . . . . . . . . . . . . . . . . . . . . . . . . . . . . . . . . . . . . . . . . . . . . . . . . . . . . . . . . . . . . .13
Digital Audio Connections . . . . . . . . . . . . . . . . . . . . . . . . . . . . . . . . . . . . . . . . . . . . . . . . . . . . . . . . . . . . . . . . . .13USB . . . . . . . . . . . . . . . . . . . . . . . . . . . . . . . . . . . . . . . . . . . . . . . . . . . . . . . . . . . . . . . . . . . . . . . . . . . . . . . . . .13S/PDIF . . . . . . . . . . . . . . . . . . . . . . . . . . . . . . . . . . . . . . . . . . . . . . . . . . . . . . . . . . . . . . . . . . . . . . . . . . . . . . . .14
LIPS Connections . . . . . . . . . . . . . . . . . . . . . . . . . . . . . . . . . . . . . . . . . . . . . . . . . . . . . . . . . . . . . . . . . . . . . . . . . .14LIPS 1> . . . . . . . . . . . . . . . . . . . . . . . . . . . . . . . . . . . . . . . . . . . . . . . . . . . . . . . . . . . . . . . . . . . . . . . . . . . . . . .14LIPS 2> . . . . . . . . . . . . . . . . . . . . . . . . . . . . . . . . . . . . . . . . . . . . . . . . . . . . . . . . . . . . . . . . . . . . . . . . . . . . . . .14
2

PYXIS
Front Panel Controls . . . . . . . . . . . . . . . . . . . . . . . . . . . . . . . . . . . . . . . . . . . . . . . . . . . . . . . . . . . . . . . . . . . . . . .15Standby Button . . . . . . . . . . . . . . . . . . . . . . . . . . . . . . . . . . . . . . . . . . . . . . . . . . . . . . . . . . . . . . . . . . . . . . . . .15Source Selection Switch . . . . . . . . . . . . . . . . . . . . . . . . . . . . . . . . . . . . . . . . . . . . . . . . . . . . . . . . . . . . . . . . . .16Volume Control . . . . . . . . . . . . . . . . . . . . . . . . . . . . . . . . . . . . . . . . . . . . . . . . . . . . . . . . . . . . . . . . . . . . . . . . .17Mute . . . . . . . . . . . . . . . . . . . . . . . . . . . . . . . . . . . . . . . . . . . . . . . . . . . . . . . . . . . . . . . . . . . . . . . . . . . . . . . . .17Setup . . . . . . . . . . . . . . . . . . . . . . . . . . . . . . . . . . . . . . . . . . . . . . . . . . . . . . . . . . . . . . . . . . . . . . . . . . . . . . . .17Centre Buttons . . . . . . . . . . . . . . . . . . . . . . . . . . . . . . . . . . . . . . . . . . . . . . . . . . . . . . . . . . . . . . . . . . . . . . . . .18EQ . . . . . . . . . . . . . . . . . . . . . . . . . . . . . . . . . . . . . . . . . . . . . . . . . . . . . . . . . . . . . . . . . . . . . . . . . . . . . . . . . . .18INVERT . . . . . . . . . . . . . . . . . . . . . . . . . . . . . . . . . . . . . . . . . . . . . . . . . . . . . . . . . . . . . . . . . . . . . . . . . . . . . . . .18MONO . . . . . . . . . . . . . . . . . . . . . . . . . . . . . . . . . . . . . . . . . . . . . . . . . . . . . . . . . . . . . . . . . . . . . . . . . . . . . . .18AV DIRECT . . . . . . . . . . . . . . . . . . . . . . . . . . . . . . . . . . . . . . . . . . . . . . . . . . . . . . . . . . . . . . . . . . . . . . . . . . . . .18
Remote Control . . . . . . . . . . . . . . . . . . . . . . . . . . . . . . . . . . . . . . . . . . . . . . . . . . . . . . . . . . . . . . . . . . . . . . . . . .19Button Functions . . . . . . . . . . . . . . . . . . . . . . . . . . . . . . . . . . . . . . . . . . . . . . . . . . . . . . . . . . . . . . . . . . . . . . . .20
Audio Specifications Under construction . . . . . . . . . . . . . . . . . . . . . . . . . . . . . . . . . . . . . . . . . . . . . . . . . . . . .21
3

PYXIS
4
No part of this documentation may be reproduced in any form whatsoever or be stored in any data retrieval system without prior written permission of the copyright owners.
This documentation is supplied on an as-is basis. Information contained within this documentation is subject to change at any time without notice and must not be relied upon.
All company and product names are ™ or Registered Trademarks ® of their respective owners.
Leema Acoustic makes no warranties express or implied regarding the software contained in this product, its quality, performance, merchantability or fitness for a particular purpose. The software is supplied “as is” you, the purchaser, are assuming the entire risk of the results of using this Leema Acoustics software.
Leema Acoustics manufacturers importers or dealers shall not be liable for any incidental damages including personal injury or any other damages caused by improper use or operation of the hardware or software.
In no circumstances will Leema Acoustics, its owners, directors, officers, employees or agents be liable to you for any consequential, incidental or indirect loss or damages including loss of time, loss of business, loss of profits, loss of data or similar resulting from the use of or inability to use the Leema Acoustics hardware and or software or for any defect in the hardware software or documentation.
© Leema Acoustics. 2008. All rights reserved
Document Version 0.2 10th November 2008

PYXISIntroduction
Introduction
Congratulations on your purchase of a Leema Pyxis reference standard precision pre-amplifier.
The Leema range of products has been painstakingly engineered in the United Kingdom to offer genuine state-of-the-art performance.
Partnered with suitable equipment, Leema pre-amplifiers will provide audio performance far beyond competitors capabilities and will equal or better the performance of products costing many times the purchase price.
In a system with the Leema Antila CD player and Altair power amplifiers, Pyxis offers a totally balanced signal path from and including the digital domain all the way through to the power amplifiers.
Purchasers should read and follow the advice in this handbook, paying particular attention to the Connection, Positioning and Product Care sections.
This handbook has been written to enable you to achieve the very best performance and maximum listening pleasure from your investment.
We wish you many years of pleasurable listening... Move Your World!
With best regards,
The Leema Team
Declaration of Conformity
We hereby declare that the product to which this declaration relates, is in conformity with the following standards:
EN60065, EN55013, EN55020, EN61000-3-2, EN61000-3-3. The product design also follows the provisions of 73/23/EEC, 89/336/EEC and 93/68/EEC Directives.
Environmental Issues
Leema operates a 100% recycling program. All waste materials generated as part of the manufacturing process at Leema’s headquarters are recycled via a licensed specialist company. When this product reaches the end of it’s working life it must not be treated as household waste. It should be disposed of via a collection point for the recycling of electrical and electronic equipment. Please contact Leema Acoustics to arrange appropriate re-cycling.
THIS UNIT MUST NOT BE DISPOSED OF IN LANDFILL SITES.
Although Leema electronics operate in stand-by mode as opposed to being fully switched off, the power drain has been optimised to a negligible level. Contrary to popular audiophile practice, we do not recommend leaving our power amplifiers permanently powered. All Leema amplifiers have been designed to attain full operational specifica-tions and sound quality within a few minutes of switch-on.
Made in the UK
Leema products are designed and manufactured in the UK. This includes all metalwork, printed circuit boards and power transformers.
Contact Us
Leema may be contacted via our website: www.leema-acoustics.com or by telephone: +44 (0)1938-811900
5

PYXIS
6
VERY IMPORTANT
VERY IMPORTANT
Before connecting your new Leema Pyxis to the rest of your system, please ensure that all other devices are powered OFF. All required sources, destinations and LIPS cables should also be connected BEFORE inserting the mains power lead and powering for the first time.
User Installation and Safety Advice
Please ensure that the mains voltage of your new Pyxis pre-amplifier is correct for your region. The current setting is displayed in a window to the right of the power switch on the rear panel.
The fuse carrier is reversible to select 115 volts and 115 will then be displayed in the voltage window. The fuses have to be uprated from 800mA for 230v to 1.6A for 115v. The fuses required are ceramic sand filled T (slow blow) types. To alter the voltage setting and fit the appropriate fuse first remove the IEC mains lead. Then locate the small slot on the right hand edge of the socket/fuse carrier and lever open the fuse carrier door carefully using a small flat bladed screw-driver. The red fuse carrier can now be withdrawn and the appropriate fuses installed. Carefully re-insert the carrier oriented to display the appropriate voltage.
Ensure the mains supply is switched off at the wall socket, or unplugged before installing or moving the pre-amplifier.
Do not use near water, for example do not place a potted plant on top of the unit or allow drinks to be placed near the unit. If liquid is spilt into the cabinet, remove the mains lead from the wall immediately. The pre-amplifier should then be returned to your dealer for safety testing before re-use. Failure to do so may result in electric shock or even fire! Do not use the pre-amplifier in damp conditions, e.g. outside of the house.
Keep away from direct sunlight and other heat sources and ensure adequate ventilation around the pre-amplifier to maintain proper cooling. Units MUST NOT be stacked directly on top of each other.
Avoid touching the pre-amplifier cabinet heat sinks after prolonged use in high ambient temperatures since the heat sinks may become hot to the touch.
Never attempt to open the cabinet. There are no user adjustable parts inside and doing so will invalidate the pre-amplifier’s warranty.
In the event of an electrical storm, remove the mains power lead from the wall outlet.
Never remove the mains lead earth connection if there is an issue with hum. The earth is there for your protection and there are other ways of dealing with hum problems.
Pyxis Overview
The Leema Pyxis is a reference standard, microprocessor controlled, stereo precision pre-amplifier.
Thanks to the innovative LIPS (Leema Intelligent Protocol System) it can also be the heart of a stunning home cinema or surround music system. Each component in such a system automatically configures itself in real-time depending on the requirements of each input source. The microprocessor offers an unprecedented degree of sophistication without operational complexity, making the Leema constellation series easy to use for all the family. No longer will only one member of the family know how to play a CD or watch a movie. The built-in intelligence learns your preferences without recourse to menus and confusing options.

PYXISConstruction
Design Philosophy
Pyxis employs a totally balanced internal topology from end to end. This even includes the EQ. The Leema Antila CD player multi-DAC architecture inherently produces a balanced output in the digital domain due to the way the converters are configured and this is maintained after analogue conversion. Thus, in a Leema CD system there is a balanced path from source to pre-amp output and on the power amplifier(s).
For the analogue inputs all level control and equalisation is carried out in the analogue domain without resorting to unnecessary digital signal conversion and processing.
Equalisation is passive Baxendall with up to plus or minus 6dB at 50Hz and 15kHz in 0.5dB steps.
Pyxis has two independent listen and record paths. The record output is configurable to use a different source to the one feeding the power amplifier(s). Similarly, the pre-amplifier outputs take either the selected input or the tape return input at the touch of a button.
Recognising that there are occasions when even the most dedicated audiophile will find it expedient to listen to digital sources from a PC, Mac or portable digital entertainment source, Pyxis provides a USB connection and S/PDIF input and output.
Phono Options
A built-in phono-stage is available as an option. Alternatively, balanced and single ended inputs provide for connecting an external phono-stage such as the Leema Agena.
Simple to use
Straight out of the box, the system is extremely simple to use. The user simply powers up the Pyxis, selects the required input source and the rest of the system will respond accordingly.
This level of simplicity in everyday operation has been provided to ensure that all members of the family can enjoy their favourite material without reading a manual.
Construction
The non-magnetic case is hewn from alloy billet and austenitic stainless steel. Finished in either silver or black anodise, the attention paid to the fit and finish is echoed in the internal construction and choice of components. Mains input is a medical grade, filtered IEC socket and the Pyxis power supply is linear analogue with discrete voltage regulators. The torroidal transformer is very different to a conventional transformer or indeed a switch-mode power supply. Pyxis is extremely efficient thanks to the very low losses conferred by the torroidal transformer. Power consumption in stand-by is negligible making this pre-amplifier as energy efficient as possible. Pyxis is equipped with superior Burr Brown precision binary-weighted resistor stack gain control elements. Leema Acoustics do not use motorised potentiometers because of the degradation they introduce. S/PDIF Analogue to Digital converters and digital to analog converters are Cirrus Logic Crystal devices and the USB A to D and D to A converters are Burr Brown. All op-amps are Analog Devices preci-sion audio components. EQ uses gold-palladium relay switching.
System
Pyxis cannot be used in isolation. It must be used in a system which includes a source or sources and a power amplifier or amplifiers and loudspeakers. Significant control and compatibility advantages apply if the entire system is designed using Leema units.
The Leema system provides audiophile performance with convenient control both locally and via the convenient hand-held remote control. (Included with Pyxis) All Pyxis settings are configurable on an ‘input associative’ basis. This means that settings are stored per input and are recalled when the relevant input is selected.
What is Leema LIPS ?
The Leema audio components communicate using a system called LIPS.
7

PYXIS
8
Connecting LIPS
LIPS stands for “Leema Intelligent Protocol system”. This is an open architecture (I.e. the architecture is published to enable third party suppliers to support it) communication stream that connects the control processors in each unit and passes information between them, allowing for a high degree of control sophistication. A degree of intelligence is instilled into each unit enabling the devices to make informed decisions based on user requirements and or system configuration. For example, in a multi-channel system the components ‘know’ which of them is required for normal stereo material and which are required for multi-channel playback. When the user switches between input formats, the units and power amps respond by powering up or down as required. In this way, the system is made much easier to use and valuable energy is not wasted powering units that are not required for the current mode. Pyxis adds consider-ably to the versatility of the LIPS concept and can control other LIPS enabled units. Thus enabling the majority of the system to be hidden away if required.
There are two types of physical connection for the LIPS system. LIPS1 uses simple 3.5mm jack cables for local units while LIPS2 uses balanced XLR-5 cables for connections to power amplifiers at greater distances.
The audio units, Antila, Pyxis, Corvus and so on, are connected in a daisy chain fashion using simple 3.5mm jack cables. When the Pyxis is powered on, the other units in the chain receive instructions as to which input has been selected, which units also need to switch themselves on and what the current volume setting is etc.
The LIPS language is designed to encompass the requirements of other Leema devices as they become available. For instance, simply switching on the Leema Antila CD player will cause the Pyxis to switch out of stand-by and automati-cally select it's CD input ready to play.
Connecting LIPS
The LIPS1cables are directional and must be connected the right way round for the system to operate. No harm will be done if cables are connected the wrong way round, the system will simply not work correctly. The black plug is inserted in to the sending unit and the red plug in to the receiving unit. The chain will normally be:
Pyxis > Hydra(s) > Optional Accessories.
If you have purchased Leema Altair power amplifiers the LIPS connection to these will be made using LIPS2 XLR-5 cables.
Only one Pyxis is allowed in the system and the chain normally starts here unless a Leema player and/or home automa-tion controller is to be installed. In these cases, the order would be:
Controller > Player > Pyxis > Accessories
Multi-channel installations can become quite complex and are best performed by a Leema dealer.
LIPS2
LIPS2 is a fully balanced version specifically designed for robust communication. IT uses locking connectors and a balanced line driver to ensure control signal integrity over distances of up to 500 meters
BI-AMPING
What is Bi-Amping?
Bi-amping, literally meaning two amplifiers, is a connection method where a different amplifier is used to drive each section of a two-way loudspeaker system. One amplifier drives the woofer and the other drives the tweeter. The advan-tage of this configuration, is that the loudspeaker section only draws power from the amplifier within a limited band of frequencies, i.e., the tweeter section will only draw power from around 1 to 3KHz upwards. Below this frequency, no power is drawn and so the amplifier has a much easier time. Similarly, the woofer section will only draw power from low frequencies up to around 1 to 3KHz. The result is a reduction in distortion caused by the interaction of these two frequency bands called ‘inter-modulation distortion’. The improvement is perceived as increased ‘sweetness’ and transparency in the midband and treble. Imaging may also be improved.
The loudspeakers must be suitable for bi-amping, this is normally the case where there are two pairs of binding post connections available on the rear of the loudspeaker cabinets. When bi-amping, it is Vital to remove the bridging links from the connection panel on the rear of the speakers, otherwise the outputs of the two stereo amplifiers will be

PYXISLeema system overview
connected together which will result in considerable damage. If you are considering bi-amping, please contact your dealer or Leema Electro Acoustics Ltd. for advice.
BI-AMPING and LIPS
In a simple, stereo bi-amplified system the connections simply go from the Pyxis to the first (Left) Hydra and then on to the second (Right) Hydra. So the chain is:
Pyxis > Hydra > Hydra
If a multi-channel system is to be bi-amplified, the order in which the Leema devices are connected together is crucial. For instance, if the entire system is bi-amplified then the system could consist of a Pyxis and two Hydras for the front left/right pair, two Hydras for the surround left/right pair, a Corvus and an additional Hydra for the centre channel. In a system such as this, the units must be plugged together in the correct order. The Pyxis must be plugged to the first, Left Hydra. This Hydra would then connect to the second, Right, Hydra and thence to the first (or master) surround channel Hydra that would then loop through to its bi-amplifying partner Hydra. Finally this bi-amplifying Hydra would plug to the Corvus and then on to it's slave bi-amplifying Hydra. The chain would then be:
Pyxis > Hydra > Hydra > Hydra > Hydra > Corvus > Hydra
Leema system overview
The Leema system consists of a Pyxis stereo pre-amplifier for front left and right reproduction; Hydra stereo slave ampli-fiers for left and right and left and right surround sound reproduction and a Corvus single channel amplifier normally used for front centre reproduction. The Corvus also includes a comprehensive bass management controller.
The concept behind the Leema system was simply to make a top-class audiophile quality system for superlative music reproduction that could, if desired, be added to make a phenomenal stereo music, surround music and home cinema system.
The system had to be simple to use so that everybody in the family could enjoy it. The design team decided early on that extensive menu systems, graphic displays and lots of techno jargon were best avoided. Dozens of buttons littering the front panels and remote were clearly not going to produce a clean, stylish and desirable product.
It was decided that each system component should be capable of reconfiguring itself dynamically according to the input selected on Pyxis. The Pyxis would provide the day-to-day control surface and a very simple remote control.
For more information about the Leema system, please contact your dealer.
9

PYXIS
10
Analogue Connections
Analogue Connections
Input connections
Phono>
The Phono pre-amplifier stage is optional. When this option is not fitted the sockets are replaced by a blanking plate. Both MM (Moving Magnet) and MC (Moving Coil) phono (RCA Cinch) sockets are provided. After determining the cartridge type these inputs should be connected directly to the analogue outputs (usually marked left/right and colour coded white/red) of the turntable.
A phono ground terminal provides for turntables/tone arms equipped with a separate ground cable. If hum is audible disconnecting this ground may effect a cure.
EXT PH provides unbalanced left/right line inputs for connecting an external phono pre-amplifier. These inputs should be connected directly to the analogue outputs (usually marked left/right and colour coded white/red) of the phono pre-amplifier. The two EXT BAL PHONO XLR-3 sockets offer the possibility of connecting an external phono pre-amplifier with balanced outputs. These should be connected directly to the balanced analogue outputs of the phono pre-amplifier (usually marked left/right).
Phono Mode
Above the EXT PH sockets the three position PHONO MODE miniature toggle switch determines which of PHONO (left position), EXT PHONO (centre position) or EXT BALanced PHONO (right position) will feed the pre-amplifier when PHONO is the selected input.

PYXISAnalogue Connections
CD>
The Pyxis’ unbalanced (phono/cinch sockets) CD input should be connected directly to the analogue outputs (usually marked left/right and colour coded white/red) of the CD player. DO NOT connect any available digital outputs from the CD player to any the Pyxis analogue input terminals since damage to loudspeakers is likely to occur. The two BALANCED XLR-3 sockets are provided to cater for CD players with balanced outputs. These should be connected directly to the balanced analogue outputs of the CD player (usually marked left/right).
CD Mode
Above the CD input sockets the CD two position CD MODE miniature toggle switch determines whether the unbal-anced (left position) or balanced (right position) inputs will feed the pre-amplifier when CD is the selected input.
Tuner>
The Tuner input should be connected directly to the analogue inputs (usually marked left/right and colour coded white/red) of the TUNER.
AUX>
The Pyxis’ AUX input is intended for direct connection to any device equipped with line-level stereo outputs (-10dB). Some devices such as MP3 or other portable digital players have a comparatively low output which will require the Pyxis volume control to be set at a higher position than would normally be required.
MP3
On the left-hand side of the front panel a 3.5mm stereo jack is provided for convenient connection to MP3 players and similar devices. This socket is wired in parallel with the rear panel AUX phono sockets.
AV DIR>
WARNING: The AV DIRECT input must not be used with sources that are not equipped with an independent volume control e.g. most CD players and DVD players. This input is designed for use only with an external surround sound processor equipped with volume control over its line level outputs.
11

PYXIS
12
Analogue Connections
The AV DIRECT input is provided for those people using a dedicated external multi-channel processor equipped with a volume control over its outputs. Sources with fixed output levels such as CD and DVD players MUST NOT be connected here. When AV is selected, the volume setting defaults to a low level and then slowly rises to a pre-set unity gain point. If further Leema units such as a Corvus centre channel amplifier and bass manager and Hydra or Altair power amplifiers are connected via LIPS to the Pyxis then the volume setting of all units will follow that of the Pyxis.
Selecting another input on the Pyxis then re-selecting the AV-DIRECT input will reset the unity gain point.
For a more detailed description of how to connect the system in AV Direct mode please refer to the Corvus handbook.
TAPE IN
The Pyxis TAPE input should be connected directly to the analogue outputs (usually marked left/right and colour coded white/red) of a recording device such as a tape machine or PC audio card.DO NOT connect any available digital outputs from the source player to the input terminals of the Pyxis since damage to the loudspeakers is likely to occur.
Output Connections
TAPE OUT
Any input selection other than TAPE will automatically be fed to the tape record outputs. The Pyxis volume control has no effect on the record output level. When TAPE is selected as the pre-amplifier source the tape record output feed is disconnected to prevent feedback. The tape input and record loop are also suitable for other recording formats, for example MP3 devices, mini disk recorders, CD-R disk recorders or DVD-Recorders
LIPS / VARIABLE Push Switch
Variable = switch protruding = variable PREAMP OUTPUT gain
LIPS = switch pressed in = PREAMP OUTPUT gain is fixed
Pyxis operates in conjunction with gain control elements in one of two modes. By default, volume control adjusts the internal gain control. I.e. the pre-amplifier outputs are variable. However, in order to maintain optimal signal-to-noise performance, resolution and dynamic range it is desirable to maintain full line level to the power amplifier(s). Leema Acoustics power amplifiers such as Hydra and Altair feature precision gain adjustment, remote controlled via LIPS. When Pyxis is used in conjunction with these power amplifiers, although the user interface is the same, I.e. turning the gain knob on Pyxis varies the level, the signal sent from the pre-amplifier is always at optimum (full) level. In this case the actual gain control takes place in the power amplifier(s). Balance control is achieved in the same way.
Volume and balance control are system wide. Balance does not affect the record outputs. The gain (not VOLUME) adjustment setting is applied to to the record out in both fixed and variable listen output modes.

PYXISDigital Audio Connections
PREAMP OUTPUTS
The PREAMP OUTPUTS are fed with the signal from the selected MONITOR source. Connections from here go to the power amplifier(s). The L & R phono (cinch) connectors should be connected directly to the power amplifier(s) analogue inputs (usually marked left/right and colour coded white/red) as unbalanced signals. The male XLR-3 recep-tacles also output the selected MONITOR source as balanced signals. These should be connected directly to a suitably equipped power amplifier (or amplifiers).
HEADPHONES
A 3.5mm headphone jack is provided on the front panel. Inserting a jack powers down Leema Acoustics power ampli-fiers connected to the LIPs bus. When a jack is inserted or removed Volume is reduced automatically to a low level in order to avoid possible hearing damage from an unexpectedly loud source.
Digital Audio Connections
USB
The USB record and replay connection behaves exactly like an external sound card. One USB ‘B’ Type socket is provided for direct connection to USB 1.1 or higher sockets on PCs or Macs. To avoid clicks and crackles Leema recommend a direct connection rather than connecting via an external USB hub. Pyxis is ‘plug-and-play’ with PCs running up to date versions of Windows XP or Windows Vista and Apple Macs. On a PC you will find a new entry in Windows Device manager labelled ‘USB Audio CODEC’. The device will be then be available to any audio application for recording and playback.On Apple Macs the interface will be recognised automatically by OS-X. Once Pyxis is plugged in and powered ON go to ‘System Preferences' - 'Sounds' and select 'USB Audio CODEC' for input and output. Set volume to maximum.
USB I/O is capable of operating at up to 48 kHz sampling rate, 16 bit
Note : Record level is optimised by using Pyxis gain trim or by setting Agena cartridge gain for best results.
Note : Do NOT send a surround stream to the Pyxis USB input. E.g. Dolby AC3 or DTS. This may result in high level digital noise being output.
Users of older operating systems may require a specific driver. Suitable drivers can be downloaded from the Leema Acoustics website : www.leema-acoustics.com Please contact your Leema dealer if necessary.
13

PYXIS
14
LIPS Connections
S/PDIF
Co-axial S/PDIF (Sony/Philips Digital Interconnect Format) input and output is available on two phono (cinch) sockets.
S/PDIF input is clocked to the incoming digital stream and can accept standard sampling rates and bit depths up to 192 kHz 24 bit.
Note : If an encoded surround stream is input to the S/PDIF input it will mute. However, we strongly recommend that you do not do this.
The S/PDIF output offers 44.1 kHz / 48 kHz 16 bit.
Note : This output follows the data returned from the PC or Mac at the clock rate defined in the PC/Mac settings. That is to say that it is only available during a PC/Mac session and may also be used to connect a PC or Mac to a higher quality DAC for playback purposes.
Note : There is an automatic muting function on the analogue tape loop which mutes the Tape Out when Tape is selected as the input to avoid feedback. By default there is no equivalent mute on the USB record and replay connec-tion. If you wish the USB to behave in the same way as the analogue tape loop your Leema Acoustics dealer can carry out a modification.
LIPS Connections
LIPS 1>
The two LIPS1 3.5mm four pole jack sockets are provided for use in a system using other suitably equipped Leema units. Note that special Leema cables MUST be used. The connections are not pin to pin and the cables are directional colour coded black for source, red for destination. Although no harm will result from incorrect connection, the system will not work correctly.
LIPS 2>
For control of suitably equipped LIPS2 devices two male XLR-5 receptacles are provided. These will be typically used to connect a pair of Leema Altair power amplifiers.

PYXISFront Panel Controls
Front Panel Controls
Standby Button
The Blue LED in the centre of the Stand-by button is illuminated when the unit is in stand-by mode. Pressing the Stand-by button once or pressing the Power button on the remote control will power the unit on. The blue LED ring around the Volume control will flash for a few seconds while the Pyxis initialises. If mains power has not been removed from the unit or the rear panel mains switch has not been turned off then the last input previously selected is re-selected and the volume setting is slowly raised to a low level. This fade up can be interrupted at any time by turning the volume control on the front panel or by pressing either of the Volume buttons on the remote control.
All settings are remembered in stand-by mode. When the unit is powered off all settings are remembered but the input defaults to phono when the unit is re-powered subsequently.
15

PYXIS
16
Front Panel Controls
Source Selection Switch
Two source modes are available. when one of the blue LEDs in the left-hand arc is lit turning the input source selection switch cycles sequentially through the pre-amplifier’s LISTEN output sources. Pressing the knob changes mode and the current RECORD output selection is indicated by a red LED in the right-hand arc. Selections are remembered which-ever mode the switch is in. In this way separate assignments are made for the listen (PREAMP OUT) and the tape (RECORD) outputs. While the Source selection mode is RECORD the selected record source is fed to the PREAMP outputs. This also provides a simple method of comparing two sources quickly. Simply pressing the selection switch knob switches the PREAMP OUT outputs between the RECORD and LISTEN sources.

PYXISFront Panel Controls
Volume Control
Smooth and sensitive, the Volume control is in fact a high quality rotary encoder which controls a Burr Brown precision attenuator under microprocessor control. The ring of blue LEDs around the volume control act as a visual indication of the volume setting. This has the advantage of being clearly visible from a distance or when using the remote control. The blue LEDs turn on in a 1,1&2, 2, 2&3, 3 etc. sequence in order to double the number of visible steps. There is twice this number of actual steps and the gain control employs a logarithmic taper which matches the way we perceive loudness. This method of volume control permanently ensures the highest fidelity without the gradual degeneration experienced with conventional motorised volume controls. The volume control has no effect on the tape, S/PDIF and USB outputs.
Mute
Pressing the MUTE button during playback causes the volume to fade rapidly to zero. A second press restores the previous volume level.
Setup
The key to Pyxis simplicity is that settings are made and stored on an input associative basis. In other words all the settings made, BASS, TREBLE, BALANCE and GAIN are stored separately for each input and recalled when the input is selected. Press the SETUP button to enter set-up mode. Bass is the default parameter. Subsequent presses on the SETUP button cycle through BASS TREBLE BALANCE and GAIN. A further press loops back to BASS. Adjust the current parameter with the Volume knob. Indicator LEDs at the bottom of the Volume control circle show the parameter the knob will affect currently and the blue annular LEDs show the current value.
To exit set-up mode and save all parameters for the currently selected input source simply press and hold the SETUP button for three seconds until the parameter LED goes out.
All settings are remembered in stand-by mode. When the unit is powered off all settings are remembered but the input defaults to phono when the unit is re-powered subsequently.
Note : The GAIN setting affects both main and record outputs, other settings do not affect the record outputs.
17
PYXIS
18
Front Panel Controls
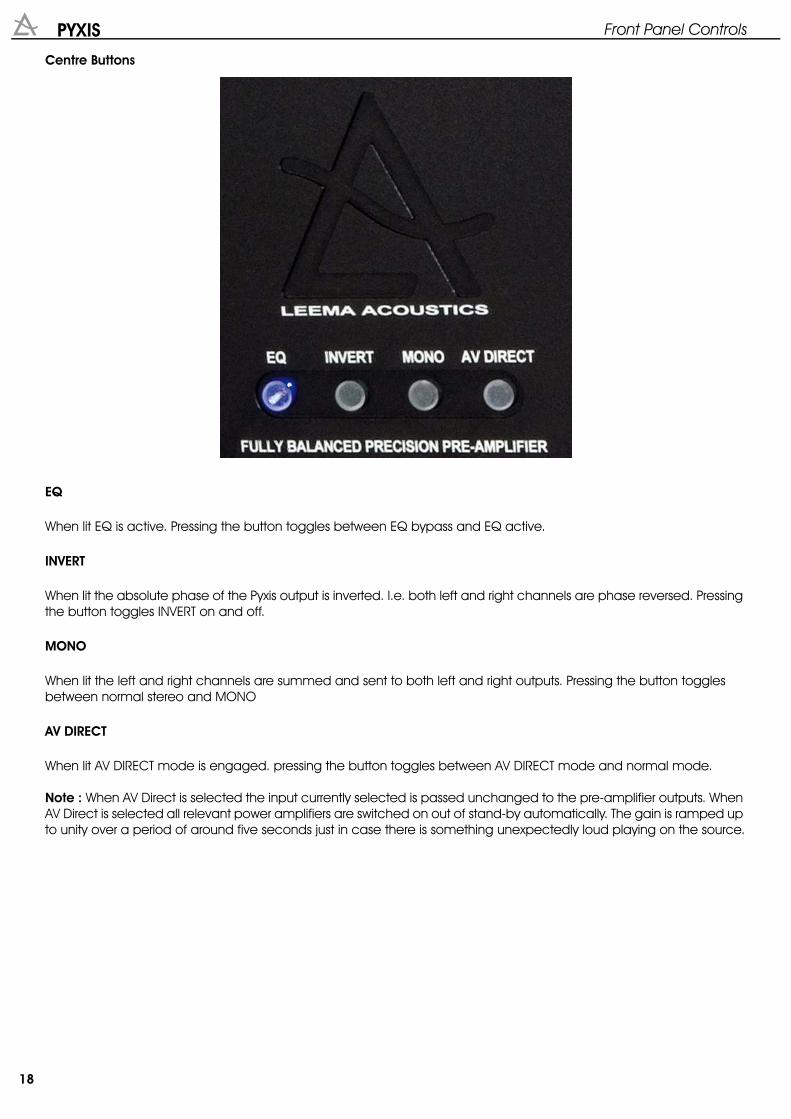
Centre Buttons
EQ
When lit EQ is active. Pressing the button toggles between EQ bypass and EQ active.
INVERT
When lit the absolute phase of the Pyxis output is inverted. I.e. both left and right channels are phase reversed. Pressing the button toggles INVERT on and off.
MONO
When lit the left and right channels are summed and sent to both left and right outputs. Pressing the button toggles between normal stereo and MONO
AV DIRECT
When lit AV DIRECT mode is engaged. pressing the button toggles between AV DIRECT mode and normal mode.
Note : When AV Direct is selected the input currently selected is passed unchanged to the pre-amplifier outputs. When AV Direct is selected all relevant power amplifiers are switched on out of stand-by automatically. The gain is ramped up to unity over a period of around five seconds just in case there is something unexpectedly loud playing on the source.

PYXISRemote Control
Remote Control
19

PYXIS
20
Remote Control
Button Functions
Stand-by Brings Pyxis into and out of Stand-by mode
AV DIRECT Engages and disengages AV DIRECT mode
< VOLUME DOWN
> VOLUME UP
SETUP First press enters setup mode with BASS selected. Subsequent presses cycle through TREBLE, BALANCE and GAIN then back to BASS. A long (3 seconds or more) press stores the current settings and exits SETUP mode.
INVERT Inverts phase of Left and Right Outputs (absolute phase)
MONO Sums Left and Right Outputs
EQ Switches between EQ in circuit and EQ bypassed
+ VOLUME UP
- VOLUME DOWN
LISTEN RECORD Switches PREAMP outputs between LISTEN and RECORD outputs
MUTE MUTES or UNMUTES the PREAMP outputs
+ Select next INPUT above current INPUT
- Select next INPUT below current INPUT

PYXISAudio Specifications Under
Audio Specifications Under construction
21