lifecast spa manual - spadepot.com · lifecast-spa-manual.pdf (rev. 10-24-17) own. ... or connected...
TRANSCRIPT
SpaDepot.com1-800-823-3638
M-F 6am - 5pm Pacific Time Order Supplies Online
LifeCast-Spa-Manual.pdf (rev. 10-24-17)
OWNER’S MANUAL
LifeCastLifeCast
ContentsImportant Safety Instructions and Warnings..........................................................................Prepare for Your New Spa Prepare a Good Foundation........................................................................................... Plan the Best Location................................................................................................... Moving the Spa.............................................................................................................. 120V Electrical Installation............................................................................................ 120V to 240V Conversion.............................................................................................. 240V Electrical Installation............................................................................................ GFCI Wiring Diagram....................................................................................................Operating Your Spa Filling and Starting for the First Time........................................................................... Priming the Pump......................................................................................................... Control Panel Operation............................................................................................... Error Codes................................................................................................................... Operational and Energy Tips......................................................................................... Jets, Controls, and Features........................................................................................ Lighting.........................................................................................................................Maintaining Spa Water Quality Testing and Adjusting Water........................................................................................ Ozone System & Water Balance................................................................................... Shocking....................................................................................................................... Filtration....................................................................................................................... Drain Procedure............................................................................................................ Refill Procedure............................................................................................................Cleaning and Care Spa Shell and Cabinet Care.......................................................................................... Spa Cover...................................................................................................................... Vacation Care...............................................................................................................Maintenance Schedule..........................................................................................................Winterizing.............................................................................................................................Troubleshooting Water Quality Problems................................................................................................ Operational Problems...................................................................................................LifeCast Warranty..................................................................................................................
3
455678
11
12131416171819
202122232424
2627282930
313235
2 LifeCast Owner’s Manual

READ AND FOLLOW ALL INSTRUCTIONSTo reduce the risk of injury, do not permit children to use this product unless they are closely supervised at all times.
• Children should not use spas or hot tubs without adult supervision.• Do not use spas or hot tubs unless all suction guards are installed to prevent body and hair
entrapment.• People using medications and/or having an adverse medical history should consult a physician
before using a spa or hot tub.• People with infectious diseases should not use a spa or hot tub.• To avoid injury, exercise care when entering or exiting the spa or hot tub.• Do not use drugs or alcohol before or during the use of a spa or hot tub, to avoid unconsciousness and
possible drowning.• Pregnant or possibly pregnant women should consult a physician before using a spa or hot tub.• Water temperature in excess of 104° may be injurious to your health.• Before entering the spa or hot tub, measure the water temperature with an accurate thermometer. Do not use
a spa or hot tub immediately following strenuous exercise.• Prolonged immersion in a spa or hot tub may be injurious to your health.• Do not permit or use electric appliances (such as a light, telephone, radio or television) within 5 feet of spa or
hot tub.• Maintain water chemistry in accordance with the manufacturer’s instructions.• In order to avoid hazard due to inadvertent resetting of the thermal cut-out, this appliance must not be
supplied through an external switching device, such as a timer, or connected to a circuit that is regularly switched on and off by the utility.
• The use of alcohol or drugs can greatly increase the risk of fatal hypethermia in hot tubs or spas.• The appliance is not to be used by persons (including children) with reduced physical, sensory or mental
capabilities, or lack of experience and knowledge, unless they have been given supervision or instruction.
Safety Warning!
SAVE THESE INSTRUCTIONS
HYPERTHERMIAHyperthermia occurs when the internal temperature of the body reaches a level of several degrees above the normal body temperature of 98.6°F. The symptoms of hyperthermia include:
1) Unawareness
2) Failure to perceive heat;
3) Failure to recognize the need to exit the spa or hot tub;
4) Physical inability to exit the spa or hot tub;
5) Fetal damage in pregnant women; and
6) Unconsciousness resulting in the danger of drowning.
Customer Care: (800) 823-3638 3
Important Safety Instructions and Warnings
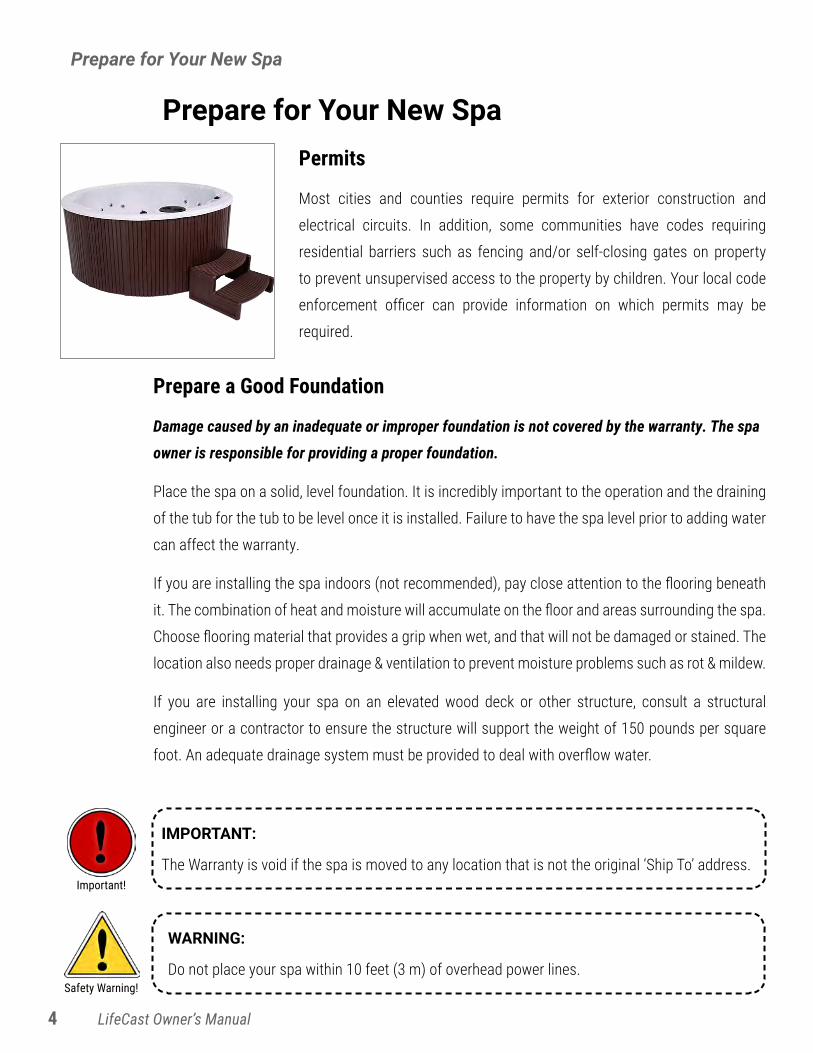
Prepare for Your New SpaPermits
Most cities and counties require permits for exterior construction and
electrical circuits. In addition, some communities have codes requiring
residential barriers such as fencing and/or self-closing gates on property
to prevent unsupervised access to the property by children. Your local code
enforcement officer can provide information on which permits may be
required.
Prepare a Good Foundation
Damage caused by an inadequate or improper foundation is not covered by the warranty. The spa
owner is responsible for providing a proper foundation.
Place the spa on a solid, level foundation. It is incredibly important to the operation and the draining
of the tub for the tub to be level once it is installed. Failure to have the spa level prior to adding water
can affect the warranty.
If you are installing the spa indoors (not recommended), pay close attention to the flooring beneath
it. The combination of heat and moisture will accumulate on the floor and areas surrounding the spa.
Choose flooring material that provides a grip when wet, and that will not be damaged or stained. The
location also needs proper drainage & ventilation to prevent moisture problems such as rot & mildew.
If you are installing your spa on an elevated wood deck or other structure, consult a structural
engineer or a contractor to ensure the structure will support the weight of 150 pounds per square
foot. An adequate drainage system must be provided to deal with overflow water.
Important!
IMPORTANT:
The Warranty is void if the spa is moved to any location that is not the original ‘Ship To’ address.
Safety Warning!
WARNING:
Do not place your spa within 10 feet (3 m) of overhead power lines.
4 LifeCast Owner’s Manual
Prepare for Your New Spa

Plan the Best Location
Consider Spa Use
How you intend to use your spa will help you determine where you should
position it. If your spa is mainly used for family recreation, be sure to leave
plenty of room around it for activity. If you will use it for relaxation and
therapy, you may want to place your spa in an out-of-the-way location.
Climate, Privacy and View
Place the spa near a house entry if you live in a snowy or rainy environment
to avoid a long, cold walk to the spa. Consider seasonal changes, too. Bare
trees don’t provide much privacy. And don’t forget to think of your neighbors’
view of you, and your view of your neighbors.
Keep Your Spa Clean
In planning your spa’s location, consider a location where there is a clean
path to and from the house. Use a mat at the spa’s entrance to encourage
bathers to clean their feet before entering your spa.
Allow for Service Access
If you are installing your spa near a wall or with any type of structure on the
outside, such as a gazebo, remember to allow access for service panel.
Moving the Spa
Moving the spa to it’s final location doesn’t need to be difficult or expensive.
Furniture dollies or a pallet jack can be rented by the hour or day from a home
improvement store. Use several helpers to assure the spa stays upright while
moving. Always use safe lifting practices.
For uneven ground or grass, create a “boardwalk” with 3/4” plywood. Sheets
can be cut in half lengthwise to make 2’ by 8’ planks. Slightly overlap boards
to avoid the wheels getting stuck between them.
For locations that are difficult to reach such as a raised deck, hire a moving
company or crane service.
Customer Care: (800) 823-3638 5
Prepare for Your New Spa

120 Volt Electrical Installation
Do not use both
a GFCI outlet
and a GFCI cord!
Always follow applicable local, state and federal codes and guidelines.
• On existing dedicated* electrical service, a 15A breaker will work with no other appliances/accessories on that line.
• On new electrical service, usage of a 20A breaker on a dedicated* line is recommended with no other appliances/accessories on that line.
• Cord-and-plug connections may not use a cord longer than 15 feet and must be plugged into a dedicated 15A GFCI connection (NEC 680.42(A))
• Do not use extension cords!
• Always use a weatherproof-covered receptacle.
• Receptacle shall be located not less than 5 feet from and not exceeding 10 feet from the inside wall of the spa. (NEC 680.43(A))
• Do not bury the power cord. If your cord becomes damaged, replace it before next usage.
• All 120V spas use a GFCI cord and plug as shown.
• Test the GFCI plug prior to first use and periodically when the spa is powered. To test the 120V GFCI plug version, follow these instructions. (Spa should already be plugged in.)
1. Press the TEST button on the GFCI. The GFCI will trip and the spa will stop operating.
2. Press the RESET button on the GFCI. The GFCI will reset and the spa will turn back on. The spa is now safe to use.
3. If the GFCI trips while the spa is in use, press the RESET button. If the GFCI does not reset, unplug the spa and call your local spa dealer for service. DO NOT USE THE SPA!
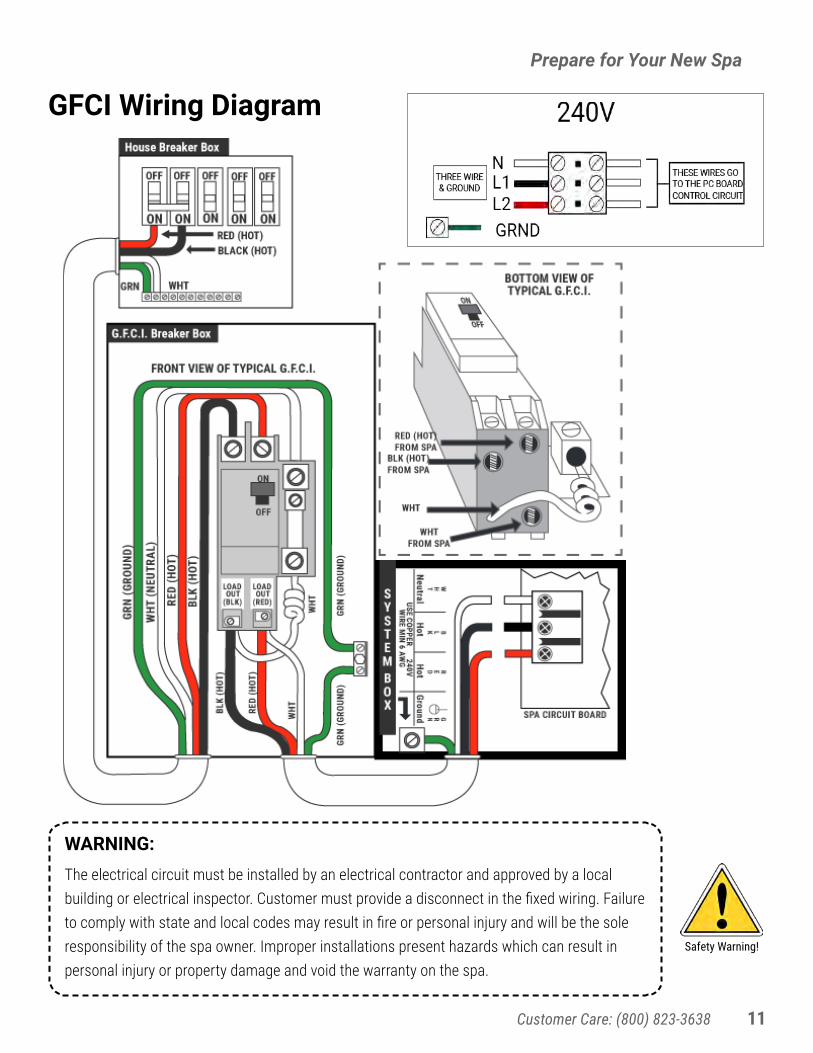
THREE WIRE & GROUND
HOT BLACK
NEUTRALNL1L2GRND
THESE WIRES GO TO THE PC BOARD CONTROL CIRCUIT
120V
Safety Warning!
WARNING:* If using the standard 120V service, you must use a dedicated line without other household items connected to the circuit or outlet. Having any other electrical appliances at all on this circuit while the spa is running will trip the breaker immediately.
Do not use any type of extension between the spa and the wall outlet; this will also cause the breaker to trip and can be a potential fire hazard.
6 LifeCast Owner’s Manual
Prepare for Your New Spa

120V to 240V Conversion
WARNING:The steps to converting your spa from 120V to 240V operation are shown below and must be completed by a licensed electrician.
Some spa owners choose to have their spa converted from 120V operation to 240V operation for faster heating.
Power supply installation must include a properly rated GFCI circuit breaker. The circuit must be dedicated and should not be shared with any other appliances. It should be labeled and easily accessible to users.
The power supply must be hardwired into the power pack. A hole may be drilled through the resin cabinet near the electrical pack to accommodate wiring. Foam insulation should be sprayed around the hole to fill any gaps between the cabinet and the wiring.
1. Disconnect the jumper from WHT AC. See “120V HEATER LOOP” in image.
2. Disconnect other end of same jumper from RED AC.
DO NOT DISCONNECT ANY OTHER JUMPERS.
3. Turn DIP switch #10 off (down). All other dipswitches should remain the same.
Your 240V wiring should look like the image on page 11. See the wiring diagram for
further information.
If wiring appears differently, DO NOT power your spa! Consult a certified electrician.
Persistent Memory Reset
Your spa has a Persistent Memory that stores settings without a battery. Each time a DIP switch is changed, the Persistent Memory must be reset for changes to take effect.
• TURN OFF THE SPA AT THE BREAKER.
• Remove the cover to the pack and locate the J43 Persistent Memory. This is located
above and to the right the red DIP switch bank. The small black plastic jumper on
J43 should be hanging on one pin and in a vertical position.
• Gently remove the black jumper and place it back on the pin horizontally, connecting it to the adjacent pin.
• Power on the spa. Once you see on the top display, wait one minute and turn the breaker back off.
• Remove the jumper again and replace it vertically on just one pin (so the jumper does not become lost).
• Replace the cover to the pack, and power the spa back on.
Safety Warning!
Customer Care: (800) 823-3638 7
Prepare for Your New Spa

240 Volt Electrical Installation
Prepare for Your New Spa
WARNING:The electrical circuit must be installed by an electrical contractor and approved by a local building or electrical inspector. Customer must provide a disconnect in the fixed wiring. Failure to comply with state and local codes may result in fire or personal injury and will be the sole responsibility of the spa owner. Improper installations present hazards which can result in personal injury or property damage and void the warranty on the spa.
Safety Warning!
Spa jumpers and DIP switches are preconfigured for a 240V installation.
All 240V spas must be permanently hardwired to the power supply. See wiring
diagram on page 11.
• Spas must be wired using this procedure. Any variance from these instructions
will void your warranty and may result in serious injury.
• When installed in the United States, the electrical wiring of this spa must
meet the requirements of National Electric Code, ANSI/NFPA 70-2008 and any
applicable local, state, and federal codes.
GFCI and Wiring Requirements
• The power supplied to the spa must be on a dedicated GFCI protected circuit as
required by ANSI/NFPA 70 with no other appliances or lights sharing the power.
• Use copper wire with THHN insulation. Do not use aluminum wire.
• When NEC requires the use of wires larger than #6 AWG, install a junction box
near the spa and use #6 AWG wire between the junction box and the spa.
• Wire runs over 85 feet must use a lower gauge (larger sized) wire.
• Means for disconnection must be incorporated in the fixed wiring in accordance
with the wiring rules.
8 LifeCast Owner’s Manual
Important!
IMPORTANT:GFCI is required for proper operation, and removing or bypassing the GFCI breakers in the sub-panel at any time is unsafe and will void your spa’s warranty. The exact GFCI rating is on the spa’s metal ID tag.
Safety Warning!
WARNING:The electrical circuit must be installed by an electrical contractor and approved by a local building or electrical inspector. Customer must provide a disconnect in the fixed wiring. Failure to comply with state and local codes may result in fire or personal injury, and will be the sole responsibility of the spa owner. Improper installations present hazards which can result in personal injury or property damage, and void the warranty on the spa.
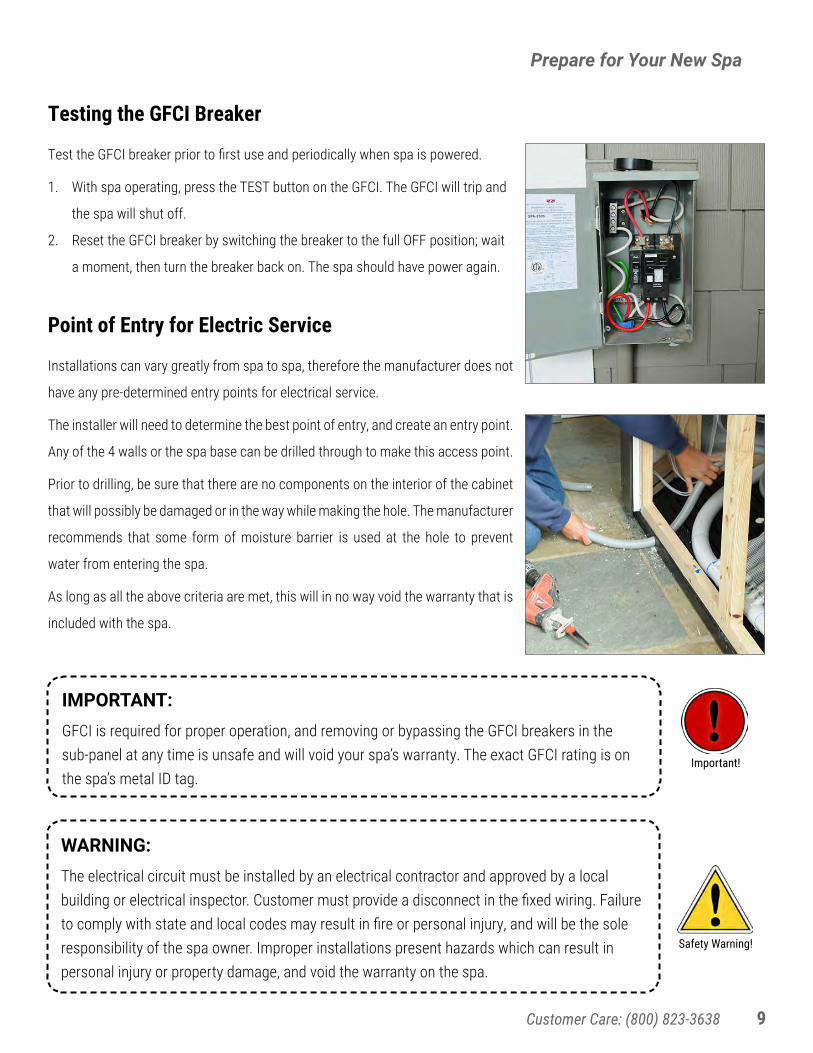
Testing the GFCI Breaker
Test the GFCI breaker prior to first use and periodically when spa is powered.
1. With spa operating, press the TEST button on the GFCI. The GFCI will trip and
the spa will shut off.
2. Reset the GFCI breaker by switching the breaker to the full OFF position; wait
a moment, then turn the breaker back on. The spa should have power again.
Point of Entry for Electric Service
Installations can vary greatly from spa to spa, therefore the manufacturer does not
have any pre-determined entry points for electrical service.
The installer will need to determine the best point of entry, and create an entry point.
Any of the 4 walls or the spa base can be drilled through to make this access point.
Prior to drilling, be sure that there are no components on the interior of the cabinet
that will possibly be damaged or in the way while making the hole. The manufacturer
recommends that some form of moisture barrier is used at the hole to prevent
water from entering the spa.
As long as all the above criteria are met, this will in no way void the warranty that is
included with the spa.
Customer Care: (800) 823-3638 9
Prepare for Your New Spa

Prepare for Your New Spa
Quick Tip!
For a step-by-step guide to wiring your spa and much more, visit the SpaCyclopedia Hot Tub & Spa Care Guide on the SpaDepot.com website.
WARNING:The electrical circuit must be installed by an electrical contractor and approved by a local building or electrical inspector. Customer must provide a disconnect in the fixed wiring. Failure to comply with state and local codes may result in fire or personal injury and will be the sole responsibility of the spa owner. Improper installations present hazards which can result in personal injury or property damage and void the warranty on the spa.
Safety Warning!
Electrical Safety PrecautionsBasic safety precautions should always be followed, including the following:
• A pressure wire connector is provided on the outside of the control box to
permit the connection of a solid copper bonding wire between the spa and any
metal equipment, metal enclosures of electrical equipment, metal water pipe or
conduit within 5 feet of the spa as needed to comply with local requirements.
• A green colored terminal (or a wire connector marked “G”, “GR”, “Ground”, or
“Grounding”) is provided. To reduce the risk of electric shock, connect this
terminal to the grounding terminal of your electric service or supply panel with
a continuous green insulated copper wire equivalent to the circuit conductor
supplying this equipment.
• The electrical supply must include a suitably rated Ground Fault Interrupter
Circuit to open all underground supply conductors to comply with section
422-20 of the National Electrical Code. ANSI/NFPA 70-1987. The power supply
cut-off must be readily accessible to the spa occupant, but installed at least 5
feet from spa water.
• Test the performance of the GFCI according to manufacturer’s
recommendations. If the GFCI does not perform correctly, there may be a
ground current flowing, indicating the possibility of electric shock. Disconnect
the power until the fault has been identified and corrected.
10 LifeCast Owner’s Manual
Prepare for Your New Spa
Safety Warning!
WARNING:The electrical circuit must be installed by an electrical contractor and approved by a local building or electrical inspector. Customer must provide a disconnect in the fixed wiring. Failure to comply with state and local codes may result in fire or personal injury and will be the sole responsibility of the spa owner. Improper installations present hazards which can result in personal injury or property damage and void the warranty on the spa.
GFCI Wiring Diagram
Customer Care: (800) 823-3638 11

Filling & Starting Your Spa for the First Time
Operate Your Spa
Note: When the power is turned on, the controls will perform a diagnostic check for a few minutes. When complete, the spa will automatically operate at filter speed and continue heating until water reaches 100ºF.
1. Place spa on an approved level surface and have it properly wired by a licensed
electrician. Do not turn the spa on until it is filled with water.
2. Remove exterior spa panels by removing screws and trim.
3. Hand-tighten any unions that may have loosened during shipping. There will be 4
unions on a 1-pump spa; 6 unions on a 2-pump spa.
4. Open all gate valves in the equipment area. Before operation, these valves must be
in the UP/OPEN position and have plastic clips inserted. Never run the spa with the
gate valves closed or without water circulating for any period of time.
5. Remove the filter(s) (and weir and basket, if equipped) from filter chamber. Photos
may vary from your particular spa model.
6. Clean the spa shell with a gentle, non-foaming cleaner like CleanAll. With a garden
hose, fill the spa approximately with about 12” of water, rinsing residue from the
sides of the shell.
7. Open the drain valve (located in the equipment cabinet) & drain the water in the
footwell. Close the drain valve.
8. Place the hose in the empty filter chamber and fill your spa with regular tap water
to 2” higher than the highest jet (excluding neck/shoulder jets).
9. Once the water is at the correct level and air is bled, turn on the power at the GFCI
breaker, or plug in.
10. If water does not flow from jets when the pump is running, there could be an air
pocket. See next page, Priming the Pump, for methods of removing air pockets
from the pump(s).
11. Re-install the filter(s) (and weir and basket, if equipped) into the filter chamber.
With spa operating, press the TEST button on the GFCI. The GFCI will trip and the
spa will shut off.
Quick Tip:Do not fill your spa with soft water. It is difficult to maintain proper water chemistry with soft water. Also, the water may foam, which will eventually void your warranty. Use a PreFresh Water Fill Filter to reduce minerals and metals in the water.Quick Tip
12 LifeCast Owner’s Manual

Operate Your Spa
Treating the Spa Water
Once the spa has been filled and pump primed, it will take 8-24 hours to heat to the preset temperature,
depending on model, electrical connection & fill water temperature.
Before using the spa, it is imperative that the spa water be balanced, shocked and treated using the
Cleanwater Blue kit that comes with your spa, or another sanitizer of your choice.
Read more about testing and maintaining clean, healthy spa water in the Maintaining Spa Water Quality
section starting on page 20.
Quick Tip:If you press the COOL button at any time during Priming Mode, it will exit that mode and begin Standard mode. To return to priming mode, disconnect the power to the spa and reconnect. Priming mode comes on as soon as the spa power is reconnected.
Priming the PumpIf the pump is not functioning after filling, air may be trapped inside the pump. The pump will operate, but no
water will be moving.
The pump will not work properly while air is trapped in it. Continuing to operate the pump in this way will
cause damage.
To remove small air bubbles trapped in the pump:
1. Turn the spa on and wait for (Priming Mode) to appear on the topside display.
2. Press the JETS button once to turn the pump on low and let it run for 10 seconds.
3. Press the JETS button again and let the pump run on high speed for 10
seconds.
4. Press the JETS button again to turn off the pump for 10 to 15 seconds.
5. Repeat steps 1 through 4 until water is flowing through all the jets and all air is
removed from the plumbing.
To remove a large air lock within the pump:
1. Turn off power at the breaker.
2. Remove the spa panel closest to the pump.
3. Loosen the white Pressure Union on top of the pump by hand or with a strap
wrench. When air has bled out, hand tighten the union, turn breaker on and set
the pump on high speed.
Quick Tip
Customer Care: (800) 823-3638 13

Operate Your Spa
Control Panel OperationThe control panel is the keypad that operates the spa’s main functions:
jets, lighting, filtration cycles, and operating modes. The
default temperature is set to 100°F/37°C. The last measured
temperature is constantly displayed on the LCD, but is current
only when the pump has been running for at least 2 minutes.
Maximum Temperature is set to 104°F/40°C as required by UL/CSA. Minimum Temperature is 80°F/26°C.
Heating Modes Standard - Standard is the default setting. You are in standard mode if no other setting codes appear.
• Temperature will be at or near set temperature constantly
• Pumps turn on at regular intervals to maintain temperature
• Best to use at startup of spa to heat to desired temperature
• Best to use in cold climates
• Most costly to operate
Economy - Economy is the power saving setting. The current temperature and “Ec” code will
alternate on the display while the pump is running.
• Spa will only heat during filter period
• Temperature will remain close to set temperature, but it will drop between filter periods
• If users can establish a routine, filter period should overlap the usage time by a half hour. This
will have spa temperature closest to the desired temperature. Example, if using the spa at 8:00
have spa filter from 6:30 – 8:30.
• Best used in mild to warm climates
• 20% reduction in energy consumption compared to standard mode
Sleep – Sleep is the vacation heater setting, and will maintain a cooler temperature.
• Spa will only heat during your filter period
• The water temperature may drop up to 20 degrees below your desired temperature
• Will work in all climates, and will not allow the spa to freeze
• 50%+ reduction in energy consumption compared to standard mode
14 LifeCast Owner’s Manual
Operate Your Spa
Filter CyclesFiltration keeps the spa clean and the water moving through the plumbing.
• Filter times - The first filter cycle takes place 6 minutes after the spa is turned on. The second
cycle begins 12 hours later. To set filtration to a specific time, turn the spa off, and turn on at
desired filtration time.
• Filter setting - Programmable for 2, 4, 6, or 8 hours, or continuous filtration.
The factory setting is F2, which means the spa will filter for 2 hours in every 12 hour period, or 4
hours total per day. We recommend you keep your filtration at no more than F4, as anything longer
can waste energy, and may overheat the spa in warm climates.
Error Codes See page 16.
Note: If the spa is currently in a heating or filtration cycle the pump will only switch between high and low. It cannot be
turned off until the heating or filtration cycle is completed.
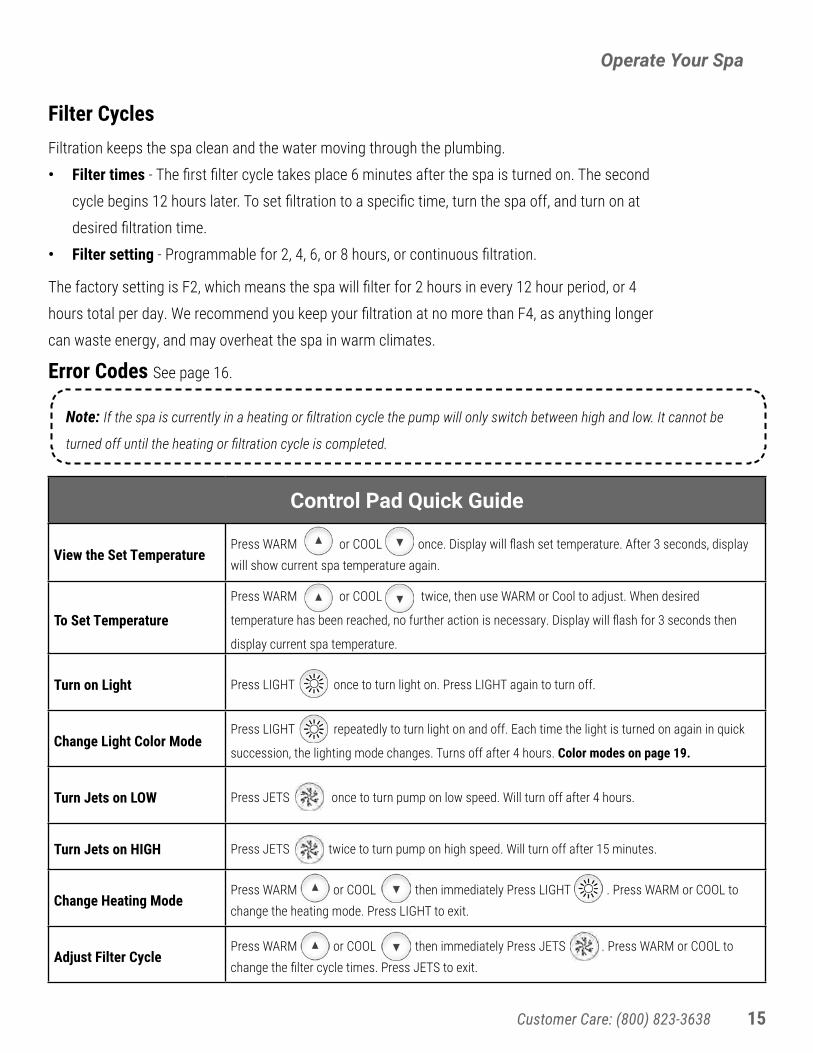
Control Pad Quick Guide
View the Set TemperaturePress WARM or COOL once. Display will flash set temperature. After 3 seconds, display will show current spa temperature again.
To Set Temperature
Press WARM or COOL twice, then use WARM or Cool to adjust. When desired
temperature has been reached, no further action is necessary. Display will flash for 3 seconds then
display current spa temperature.
Turn on Light Press LIGHT once to turn light on. Press LIGHT again to turn off.
Change Light Color ModePress LIGHT repeatedly to turn light on and off. Each time the light is turned on again in quick
succession, the lighting mode changes. Turns off after 4 hours. Color modes on page 19.
Turn Jets on LOW Press JETS once to turn pump on low speed. Will turn off after 4 hours.
Turn Jets on HIGH Press JETS twice to turn pump on high speed. Will turn off after 15 minutes.
Change Heating ModePress WARM or COOL then immediately Press LIGHT . Press WARM or COOL to change the heating mode. Press LIGHT to exit.
Adjust Filter CyclePress WARM or COOL then immediately Press JETS . Press WARM or COOL to change the filter cycle times. Press JETS to exit.
Customer Care: (800) 823-3638 15

Message Meaning/Frequency Action Required
No message on display. Power has been cut off to the spa.
The control panel will be disabled until power returns. Spa settings will be preserved until next power up.
Temperature unknown. After the pump has been running for 2 minutes, the temperature will be displayed.
Possible inadequate water, poor flow, or air bubbles detected in the heater. Spa is shut down for 15 minutes.
If water level is normal, make sure all pumps have been primed. Press any button to reset. This message will reset within 15 minutes.
Inadequate water detected in heater. (Displays on third occurrence or “dr” message.
If water level is normal, make sure all pumps have been primed. Spa will not automatically reset. Press any button to reset manually. If problem persists, contact Customer Care.
“Overheat” - The spa has shut down. One of the sensors has detected 118°F at the heater.
DO NOT ENTER THE WATER. Remove the spa cover and allow water to cool. Once the heater has cooled, reset by pushing any button.
A significant difference between the temperature sensors was detected. This could indicate a flow problem.
Check water level in spa. Refill if necessary. If the water level is okay, make sure the pumps have been primed. Press any button to reset.
Potential freeze condition detected. No action required. The pumps will automatically activate regardless of the spa status.
Persistent low flow problems. (Displays on the fifth occurrence of the “Heater Flow Low” message within 24 hours.) Heater is shut down, but other spa functions continue to run normally.
Follow action required for “HFL” or “HL” message. Heating capacity of the spa will not reset automatically; you may press any button to reset.
“Overheat” - The spa has shut down. One of the sensors has detected that the spa water is 110°F.
DO NOT ENTER THE WATER. Remove the spa cover and allow water to cool. At 107°F/41.7°C, the spa should automatically reset. If the spa does not reset, shut off the power and call Customer Care.
Spa is shut down. The sensor that is plugged into the “A” jack is not working.
May appear temporarily in overheat condition. If problem persists, call Customer Care.
Spa is shut down. The sensor that is plugged into the “B” jack is not working.
May appear temporarily in overheat condition. If problem persists, contact Customer Care.
Sensors are out of balance. If this is alternating with the temperature, it may just be a temporary condition. If the display shows only this message (periodically blinking), the spa is shut down.
If problem persists, contact Customer Care.
Error Codes
Operate Your Spa
16 LifeCast Owner’s Manual

Operational and Energy Tips
Operate Your Spa
Control Valves - air and water controls on the top of spa
• Average to Cold Climate - When not in the spa, make sure the valves are turned off. All these
valves will inject a certain amount of air into the water which causes a
cooling effect. Therefore your spa will have to heat more often and cost
more money to operate.
• Hot Climate – Hot tubs are only designed to heat up and maintain
temperature, therefore hot climate can actually make a spa overheat.
In these areas, the control valves should be left open at all times to help
cool the spa down.
Spa Cover - steam loss / venting
It is normal to see an occasional burst of steam from around the cover due to
pressure releasing from a high to low area. However, heat loss can be greatly
impacted by use of the spa.
• Control valves should be turned off when getting out of the spa in a cool
climate. Air injects from the cabinet and enters into the water area. That
air will not only cool the cabinet area, but will also greatly increase the
pressure under the cover and cause more steam to release.
• Surfaces are different for all spas, and covers may provide a better seal
when rotated 90°. If the folding seam goes over the controller area, often
more steam will be able to escape. Try to position the cover so that the
fold seam goes over the wider top surface areas on the adjacent sides.
• Locking straps should be snugly latched when the spa is not in use to
promote a better seal.
Freeze ProtectionIf the temperature sensors detect a drop to below 44°F within the heater, the pumps will automatically
activate to provide freeze protection. The equipment stays on until 4 minutes after the sensors detect
that the spa water temperature has risen to 45°F or higher.
Customer Care: (800) 823-3638 17
Jets, Controls & Features
Operate Your Spa
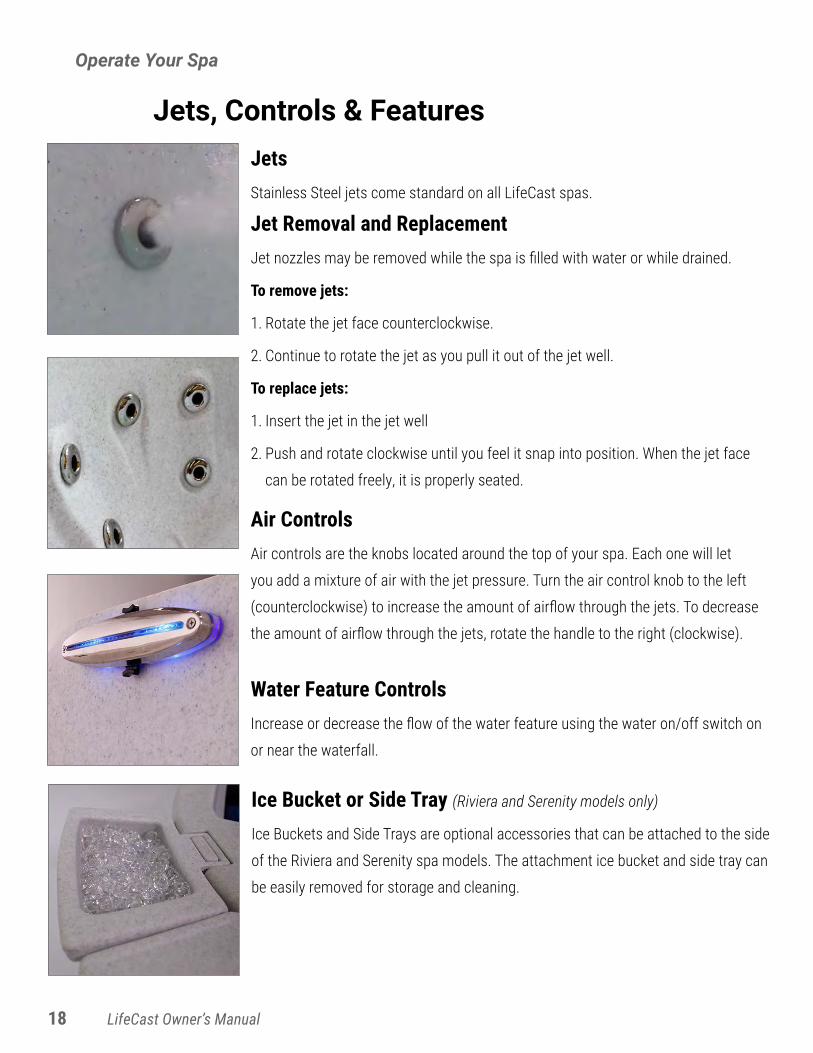
JetsStainless Steel jets come standard on all LifeCast spas.
Jet Removal and ReplacementJet nozzles may be removed while the spa is filled with water or while drained.
To remove jets:
1. Rotate the jet face counterclockwise.
2. Continue to rotate the jet as you pull it out of the jet well.
To replace jets:
1. Insert the jet in the jet well
2. Push and rotate clockwise until you feel it snap into position. When the jet face
can be rotated freely, it is properly seated.
Air ControlsAir controls are the knobs located around the top of your spa. Each one will let
you add a mixture of air with the jet pressure. Turn the air control knob to the left
(counterclockwise) to increase the amount of airflow through the jets. To decrease
the amount of airflow through the jets, rotate the handle to the right (clockwise).
Water Feature ControlsIncrease or decrease the flow of the water feature using the water on/off switch on
or near the waterfall.
Ice Bucket or Side Tray (Riviera and Serenity models only)
Ice Buckets and Side Trays are optional accessories that can be attached to the side
of the Riviera and Serenity spa models. The attachment ice bucket and side tray can
be easily removed for storage and cleaning.
18 LifeCast Owner’s Manual

Lighting
Operate Your Spa
Underwater & Waterfall LightingAll LifeCast spas have a color changing underwater LED and a 6” LED light feature on the waterfall.
Press the light button on the topside control panel to turn the spa lights on. Color lighting operates in four
modes. The mode is changed by pressing the light button off then immediately back on.
1. Fading: The first time you press the light button, the lights will cycle through all the colors in this order: Blue,
Violet, Pink, Red, White, Yellow, Green, Cyan.
2. Color Locked: This cycle offers a hard color change without fading.
3. Quick Color Change: To cycle through the different color choices, press the light button repeatedly. Each time
you press the button, you advance to the next color.
4. Flashing White: When you have cycled through all the colors, the next time you push the light button, the LED
lights will flash white.
Customer Care: (800) 823-3638 19

Testing and Adjusting WaterClean, healthy hot tub water requires regular maintenance. Establish a routine based on a regular schedule to maintain the water quality, increase enjoyment and extends your spa’s life.
Water SanitationProper testing and treatment of your spa water is extremely important. Although this is not difficult, it needs to be done regularly to kill bacteria and other harmful microorganisms.
Your spa includes a Cleanwater Blue Pro Supply kit for easy maintenance. Cleanwater Blue is a unique liquid bactericide/algaecide, which kills bacteria and algae by introducing copper ions into the water. These ions disrupt the cell structure and chemical makeup of microorganisms, eliminating them in a safe way.
Refer to the Cleanwater Blue Quick Start Guide inside the supply box for precise instructions for use. If using another sanitizer, use as directed on the packaging. Only use chemicals appropriate for hot tub use, such as bromine or chlorine. Biguanides are not recommended.
Cleanwater Blue, or another sanitizer such as bromine or chlorine, is necessary regardless of the presence of an ozonator or combination UV/Ozone purifier.
Maintaining Spa Water Quality
Important!
IMPORTANT:Do not use third-party salt-based systems in your spa! Damage caused by salt-based systems that have not been factory installed will not be covered under your warranty.
WARNING:• Never add chemicals to your spa while bathers are in the spa!
• Do not allow chemicals to come in contact with skin, eyes or clothing. Remove and wash clothing that
may have been exposed to chemical contact prior to wearing them again.
• Inhaling or ingesting chemicals will cause serious injury, sickness, or even death.
• Read and follow all printed instructions listed on bottles and packages and do not exceed chemical
dosages as recommended. Failure to follow chemical directions may result in serious injury, sickness, or
even death.
• Never change chemical brands or types without completely draining, flushing and cleaning the spa and
cover first.
• Chemicals must be stored completely out of the reach of children in an area that is well vented, cool, and
dry. Do not store your chemicals inside the equipment area of your spa.
• Add chemicals to the center of the spa with the pump running.
• Never add chemicals to cold water or mix chemicals together, as this will affect chemical action. Never
add chemicals directly into the skimmer.
Safety Warning!
20 LifeCast Owner’s Manual
OzoneAll LifeCast spas come standard with an ozone generator. The ozonator will turn on with the pump, infusing ozone gas with the hot tub water as it passes through.
Chemically known as O3, ozone is a strong oxidizer. Ozone breaks down oils, lotions, sweat and other contaminants that cause water clarity and foaming issues. A sanitizer (Cleanwater Blue, bromine, etc.) is still required.
Water BalanceThe correct balance of water acidity/alkalinity and minerals is necessary to keep water soft and for optimum performance of the spa’s components. Use test strips to measure the levels of Total Alkalinity, pH and Hardness before adjusting to the proper levels.
Step 1— Balance Total AlkalinityTotal alkalinity (TA) is the measure of the total levels of carbonates, bicarbonates and other alkaline substances in the water. TA is an indicator of how easily pH will change after spa use or when other chemicals are added.
The recommended TA is 30 - 90 ppm for Cleanwater Blue, and 80 - 120 ppm for all other sanitizers.
If the TA is too low, the pH level will fluctuate widely from high to low. Raise TA by adding Alkalinity Increaser. If the TA is too high, the pH level will tend to be too high and may be difficult to bring down. High TA can be corrected by adding pH Decreaser.
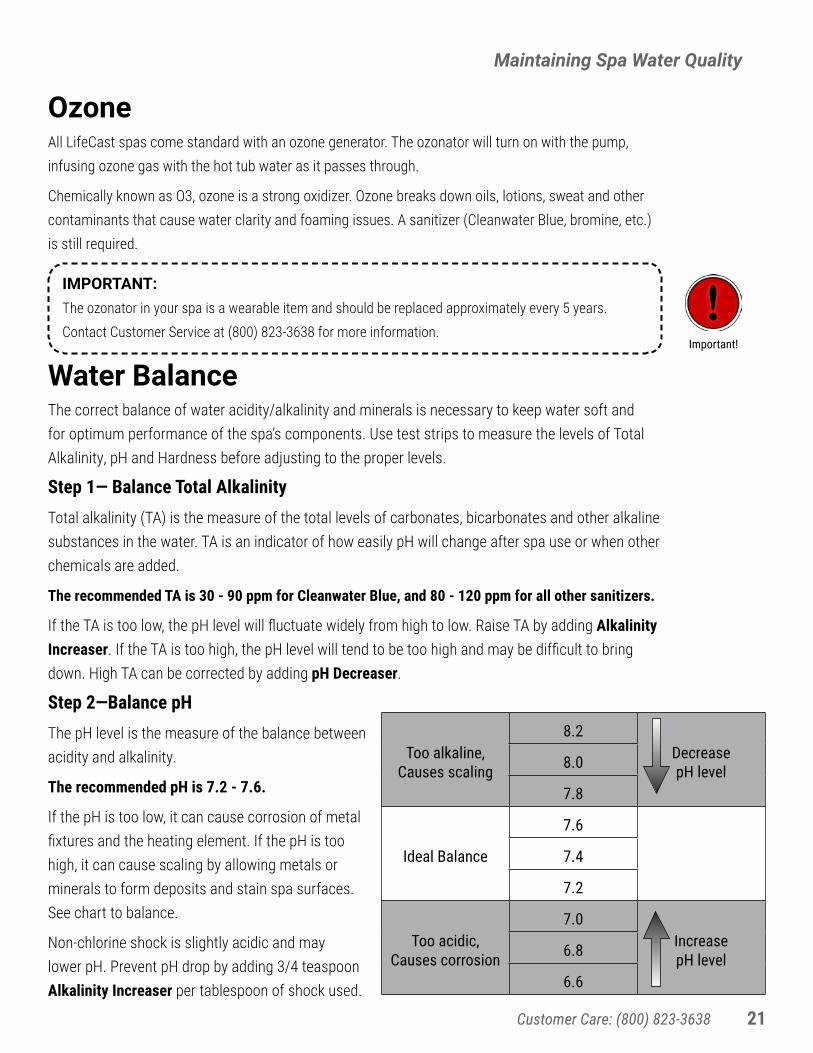
Step 2—Balance pHThe pH level is the measure of the balance between acidity and alkalinity.
The recommended pH is 7.2 - 7.6.
If the pH is too low, it can cause corrosion of metal fixtures and the heating element. If the pH is too high, it can cause scaling by allowing metals or minerals to form deposits and stain spa surfaces. See chart to balance.
Non-chlorine shock is slightly acidic and may lower pH. Prevent pH drop by adding 3/4 teaspoon Alkalinity Increaser per tablespoon of shock used.
Too alkaline,Causes scaling
8.2DecreasepH level8.0
7.8
Ideal Balance
7.6
7.4
7.2
Too acidic,Causes corrosion
7.0IncreasepH level6.8
6.6
Maintaining Spa Water Quality
IMPORTANT:The ozonator in your spa is a wearable item and should be replaced approximately every 5 years. Contact Customer Service at (800) 823-3638 for more information.
Important!
Customer Care: (800) 823-3638 21

Step 3—Balance Calcium HardnessCalcium hardness is a measure of the total amount of dissolved calcium in the water. If using Cleanwater Blue system, it is not necessary to test for calcium hardness as the Cleanwater Prep solution removes excess calcium from the water and deposits it on the filter.
For other sanitizers, calcium helps control the corrosive nature of the spa’s water and is why soft water is not recommended. The low calcium content of soft water is very corrosive to the equipment and can cause staining of the spa shell.
The recommended calcium hardness for spas that do not use Cleanwater Blue is 150 - 300 ppm.
If the hardness is too low, add Increase Calcium. If the hardness is too high, dilute the spa water with soft water. If soft water is not available, add Metal Free or other mineral sequestrant at start up and Spa Defense or other stain and scale control weekly. When the hardness is balanced, it normally remains stable until more water is added.
Maintaining Spa Water Quality
Shocking the WaterIn addition to using a chemical sanitizer, you will periodically need to shock the water. Shock, also called oxidizer, helps remove burned-out chemicals, dead bacteria, and other organic material from your spa’s water and improves your sanitizer’s effectiveness.
Use Oxy Spa Non-Chlorine Oxidizing Shock after each use for best results.
Occasional shocking with a small dose of Spa Sanitizing Granules (dichlor chlorine shock) at start-up, when the water is cloudy or after heavy use is beneficial.
To shock, turn the spa’s jets on high and add the recommended amount as per the instructions on the bottle. Leave the cover off the spa for 30 minutes after shocking to avoid damage to your spa cover.
Test for: Ideal RangeMin. < > Max.
Chemicals to use:
To Raise To Lower
Total Alkalinity
Cleanwater Blue30 ppm < > 90 ppm
Other Sanitizers80 ppm < > 120 ppm
Alkalinity Increaser pH Decreaser
pH 7.2 < > 7.6 pH Increaser pH Decreaser
Calcium Hardness
Cleanwater Bluenot necessary
Other Sanitizers150 ppm < > 300 ppm
Increase CalciumMetal Free
or Spa Defense
22 LifeCast Owner’s Manual

Maintaining Spa Water Quality
FiltrationCleaning your filter regularly is one of the easiest and most effective things you can do to keep your water clear. A clogged or dirty filter will cause the heater and pump to work harder than they need to, possibly causing them to fail. The spa’s heating system will only function with the proper amount of water flow through the system.
Filter CleaningThe filter is the part of your spa that removes debris from the water. The filter needs to be cleaned on a regular basis to maximize your spa’s filtering performance and heating efficiency.
In addition to spraying off the filter bi-weekly to remove surface debris, your filter should be deep cleaned periodically to dissolve scale and particles that get lodged deep within the filter fibers and impede the filtration process. Even if the filter looks clean, scale and particles can clog the fibers and prevent water flow; This results in the most common spa
problem – no heat, caused by a dirty filter.
Filter Deep Cleaning We recommend you deep-clean your filter at each water change (every 3-4 months) and replace it annually. Deep-clean more frequently for heavy spa use.
1. Remove the filter.
2. Spray the filter with a hose sprayer nozzle to remove surface debris.
3. In a 5 gallon bucket of hot or cold water, dissolve 1/2 cup of Power Soak filter cleaner or 1 cup of Eco Soak filter cleaner and fully submerge the filter.
4. Soak the filter for at least an hour, preferably overnight. Hot water works faster than cold water.
5. Thoroughly rinse the filter with a hose sprayer nozzle.
6. Allow filter to dry then reinstall. If you keep a clean spare filter (recommended), install the spare. Rotate filters
at each water change to extend the life of your filters.
Replacement Filter CartridgesYour new spa is equipped with Clarathon Antimicrobial filters. This antimicrobial technology inhibits the growth of bacteria and mold on the filtration media. Replacement part numbers:
Riviera & Serenity Spas ............................................................................................FC9950M
Marina, Monaco & Sonoma Spas ................................................................................FC9941M
Buy replacement Clarathon filter cartridges at www.SpaDepot.com or by calling Customer Care.
Test for: Ideal RangeMin. < > Max.
Chemicals to use:
To Raise To Lower
Total Alkalinity
Cleanwater Blue30 ppm < > 90 ppm
Other Sanitizers80 ppm < > 120 ppm
Alkalinity Increaser pH Decreaser
pH 7.2 < > 7.6 pH Increaser pH Decreaser
Calcium Hardness
Cleanwater Bluenot necessary
Other Sanitizers150 ppm < > 300 ppm
Increase CalciumMetal Free
or Spa Defense
Customer Care: (800) 823-3638 23
Maintaining Spa Water Quality
Over time, contaminates such as sweat, dead skin, and body oils, along with depleted chemicals,
build up in the spa and are no longer able to be broken down further or filtered out. To limit the
amount of chemicals needed to maintain a sanitary environment, your hot tub must be drained
every 3-4 months, depending on use.
Adjust the chemical dosages to the capacity of your particular spa after filling, following instruction
on packaging. For a more detailed start-up procedure, consult your Cleanwater Blue quick start
guide.
Drain Procedure
Refill Procedure
To Drain the Spa:1. Turn off the power at the breaker.
2. Remove all filters and deep clean (every drain/refill) or replace (yearly).
3. Locate the drain valve. See below for instructions.
4. Fully drain the spa. Any remaining water in the foot well can be removed with a wet/dry vacuum
or hose siphon.
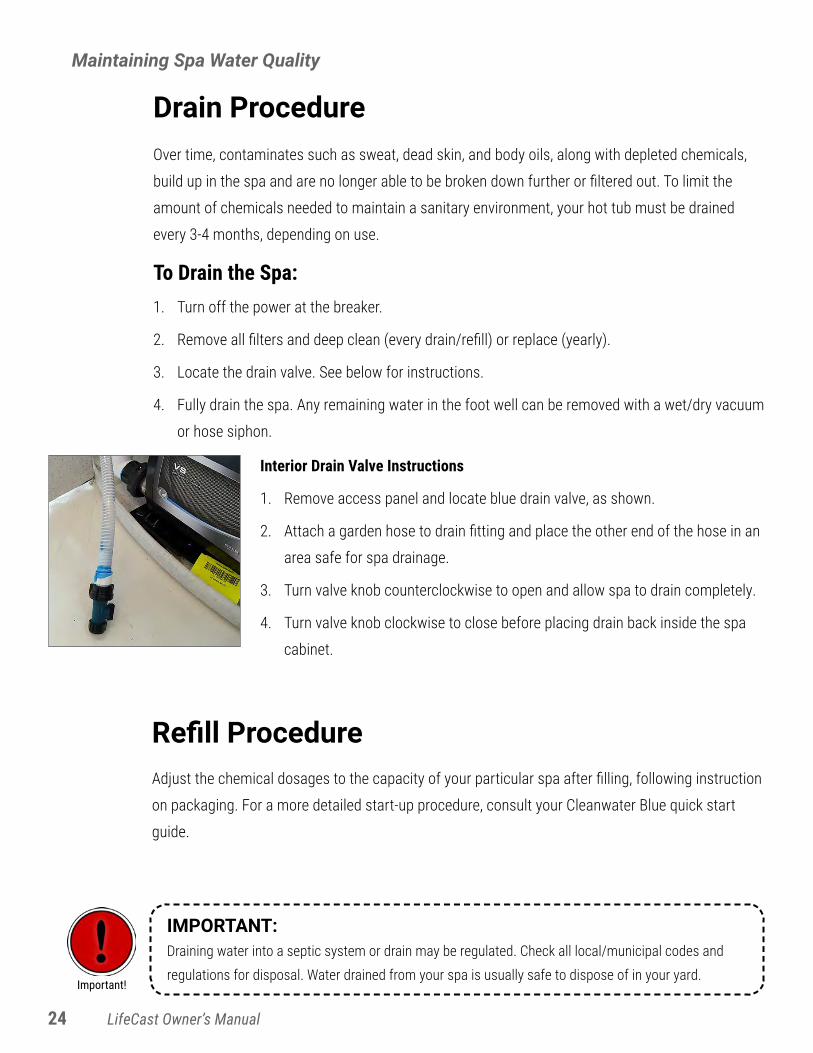
Interior Drain Valve Instructions
1. Remove access panel and locate blue drain valve, as shown.
2. Attach a garden hose to drain fitting and place the other end of the hose in an
area safe for spa drainage.
3. Turn valve knob counterclockwise to open and allow spa to drain completely.
4. Turn valve knob clockwise to close before placing drain back inside the spa
cabinet.
Important!
IMPORTANT:Draining water into a septic system or drain may be regulated. Check all local/municipal codes and regulations for disposal. Water drained from your spa is usually safe to dispose of in your yard.
24 LifeCast Owner’s Manual

Maintaining Spa Water Quality
Refill ProcedureFor a more detailed start-up procedure, consult your Cleanwater Blue quick start guide.
To Refill the Spa:1. Clean the surface of the spa with CleanAll Spa Surface non-abrasive cleaner and rise thoroughly.
2. Fill the spa to the proper water level with normal tap water and replace the filters. (Do not use soft water.)
3. Turn on spa at the breaker and allow spa to heat to at least 90º.
4. Using a Copper 3-Way test strip (or other test strip for your sanitizer), test for total alkalinity and pH and adjust to proper range.
5. Add 1 tablespoon Oxy Spa non-chlorine shock per 150 gallons.
6. Add 1 teaspoon Spa Sanitizing Granules (dichlor) per 250 gallons (optional, but recommended).
7. Add 10 ml Cleanwater Prep per 100 gallons, and allow to circulate overnight while heating. Clean filter per Cleanwater Blue quick-start guide. (Cleanwater Blue only. Test and adjust hardness for other sanitizers.)
8. Add 5 ml Cleanwater Blue per 100 gallons. (For other sanitizers, follow directions on packaging.)
9. After the first 2 weeks, retest and add 5ml Cleanwater Purge twice a month. (Cleanwater Blue only.)
Water level is very important. If the water level is too low or too high, your spa will not operate properly.The water level should be about two inches over the highest jet (excluding neck/shoulder jets) when the spa is not being used.Consult dosage recommendations on chemical packaging. Chemicals may have similar names and/or usage descriptions but due to manufacturing differences, there is the likelihood of under or overdosing the spa chemicals.
IMPORTANT:• WAIT 5 – 10 MINUTES WHEN ADDING DIFFERENT CHEMICALS! Adding too many chemicals at once
can create cloudy water that takes days to clear and is often difficult to balance.
• Never add chemicals to cold water, as this will affect chemical action. After spa has reached set
temperature, add chemicals to the center of the spa with the pump running.
• Do not allow chemicals to come in contact with skin, eyes or clothing. Remove and wash clothing that
may have been exposed to chemical contact prior to wearing them again.
• Read and follow all printed instructions listed on bottles and packages and do not exceed chemical
dosages as recommended. Failure to follow chemical directions may result in serious injury, sickness, or
even death.
• Drain spa completely and flush plumbing before switching sanitizers to avoid harmful chemical
reactions.
Important!
Customer Care: (800) 823-3638 25
Cleaning and Care
Spa ShellThe shell of your spa is easy to maintain, and will stay beautiful for many years with proper cleaning and maintenance. Protect your spa by thoroughly cleaning the shell each time you drain your spa, and shielding from the sun by keeping the spa covered when not in use.
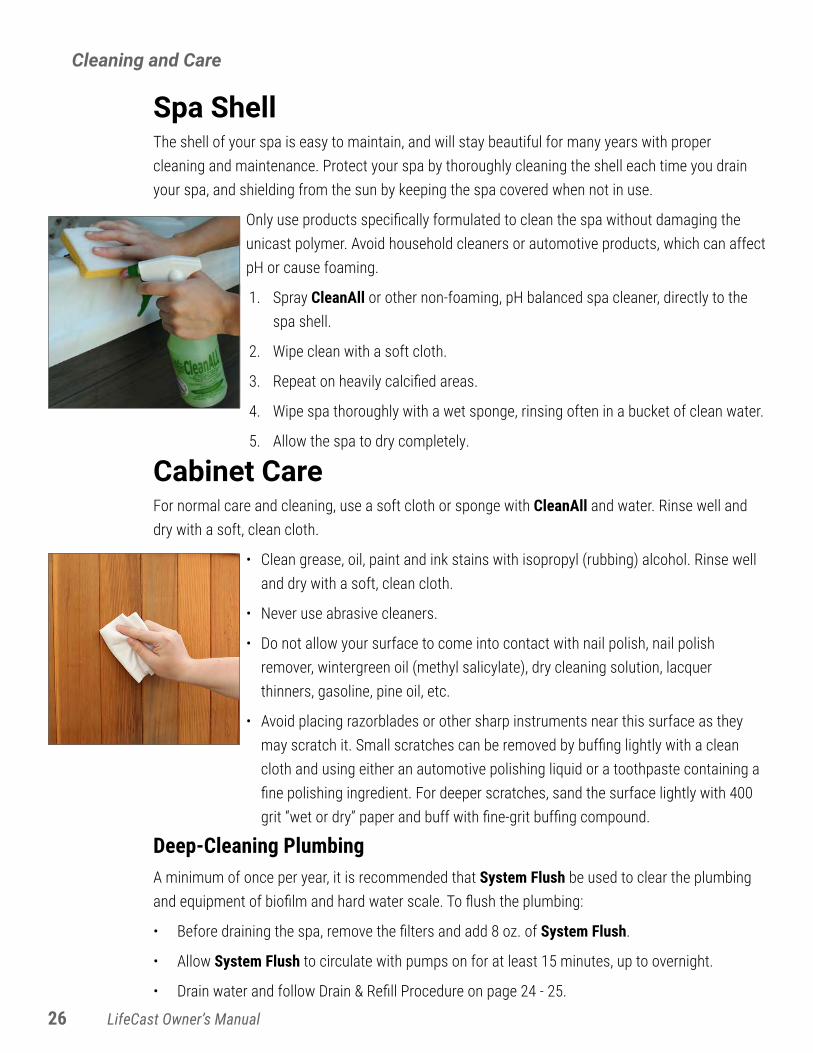
Only use products specifically formulated to clean the spa without damaging the unicast polymer. Avoid household cleaners or automotive products, which can affect pH or cause foaming.
1. Spray CleanAll or other non-foaming, pH balanced spa cleaner, directly to the spa shell.
2. Wipe clean with a soft cloth.
3. Repeat on heavily calcified areas.
4. Wipe spa thoroughly with a wet sponge, rinsing often in a bucket of clean water.
5. Allow the spa to dry completely.
Cabinet CareFor normal care and cleaning, use a soft cloth or sponge with CleanAll and water. Rinse well and dry with a soft, clean cloth.
• Clean grease, oil, paint and ink stains with isopropyl (rubbing) alcohol. Rinse well and dry with a soft, clean cloth.
• Never use abrasive cleaners.
• Do not allow your surface to come into contact with nail polish, nail polish remover, wintergreen oil (methyl salicylate), dry cleaning solution, lacquer thinners, gasoline, pine oil, etc.
• Avoid placing razorblades or other sharp instruments near this surface as they may scratch it. Small scratches can be removed by buffing lightly with a clean cloth and using either an automotive polishing liquid or a toothpaste containing a fine polishing ingredient. For deeper scratches, sand the surface lightly with 400 grit “wet or dry” paper and buff with fine-grit buffing compound.
Deep-Cleaning PlumbingA minimum of once per year, it is recommended that System Flush be used to clear the plumbing and equipment of biofilm and hard water scale. To flush the plumbing:
• Before draining the spa, remove the filters and add 8 oz. of System Flush.
• Allow System Flush to circulate with pumps on for at least 15 minutes, up to overnight.
• Drain water and follow Drain & Refill Procedure on page 24 - 25.
26 LifeCast Owner’s Manual

Cleaning and Care
Spa Cover Maintenance & TipsThe spa cover included with your hot tub is an integral component that should last for years if properly maintained. However, spa covers are not permanent items, and will need to be replaced eventually. A few tips to keep your spa cover in good condition:
• Protect spa cover by applying 303 Aerospace Protectant monthly. 303 is designed to protect vinyl from chemical and UV damage without oily residue.
• Keep spa covered when not in use. The sun’s UV rays can damage the shell if left uncovered; the cover keeps the heat in, lowering running cost.
• Install cover latches and lock the straps down when not in use. Locks help prevent unwanted entry and keep the cover secure in windy conditions.
• Never set anything on top of the spa cover, including lightweight objects like pool toys. The sun’s rays amplify the heat as it passes through objects, melting the cover.
• Do not sit, stand, or lie on the cover. Even though spa cover is rigid, it is not designed to support any weight.
• Keep spa water balanced & sanitized, and always remove the cover when shocking or adding chemicals. Excessive chemicals or unbalanced pH can quickly degrade the spa cover.
• Avoid carrying the cover by the handles, skirt, or steam blocking pads. A cover lifter, when installed correctly, can make removing the cover easy and relieve stress on cover seams.
Important!
IMPORTANT:Do not use any cover care products on spas full of water. Only apply to clean, cool, dry surfaces. Incorrect product usage may cause water balancing issues.
Safety Warning!
WARNING:Keep spa covered when not in use. You are required to keep the spa covered to maintain warranty coverage.
Do not use automotive vinyl protectants on spa covers or pillows. These products are generally oil-based and will cause severe water clarity issues that are difficult to correct, and can damage vinyl.
Customer Care: (800) 823-3638 27

With these instructions, you can prepare to leave your spa unattended for up to two weeks. If you will not be using your spa for longer than 14 days and a spa maintenance service is not available, we strongly recommend you shut the spa down and drain or winterize your spa. See page 30 for Winterization Procedure.
• Following the water quality instructions starting on page 20, adjust the Alkalinity and pH.
• Shock the water using Spa Sanitizing Granules (dichlor).
• Check spa for sufficient sanitizer and add more if necessary.
• Set the spa to Sleep Mode. (See instructions on pages 14-17 for changing modes.)
• Lock your cover. Always use the cover locks if you plan to be away from home.
Upon return, before using the spa:
• Set spa back to Standard Mode.
• Check and adjust Alkalinity and pH.
• Shock the water using Spa Sanitizing Granules (dichlor).
• Test for sanitizer and add more if necessary.
Cleaning and Care
Vacation Care
28 LifeCast Owner’s Manual

Maintenance Schedule
Maintenance ScheduleAfter each use
• Add 1 tablespoon per 150 gallons of Oxy Spa non-chlorine shock.
Every two weeks
• Test the spa water using test strips. Adjust Cleanwater Blue levels as necessary.
• Add Cleanwater Purge.
• Remove & rinse surface debris from filter cartridge with hose sprayer nozzle.
Once per month
• Apply 303 Aerospace Protectant to vinyl spa cover and pillows.
Every three to four months
• Follow the section Drain and Refill Procedure on page 24.
• Remove filter & use Spa System Flush to deep-clean spa plumbing, and drain spa.
• While drained, clean your spa shell with CleanAll non-abrasive cleaner & rinse.
• Refill your spa, following the section Drain and Refill Procedure.
• Deep-clean spa filters.
Once per year
• Replace filter cartridge(s).
Customer Care: (800) 823-3638 29

Winterizing and De-Winterizing Your Spa
Winterization ProcedureYour spa should be winterized if left unattended or when there is risk of freezing temperatures. Winterizing ensures no plumbing will be cracked by freezing water left in pumps and pipes after draining.
1. Turn off power at the GFCI circuit breaker before draining or servicing your spa.
2. Remove exterior panels by prying out decorative plugs and unscrewing screws panels.
3. Attach a garden hose to the drain and open the blue ball valve. Water will start to drain. You may have some water left in the spa shell that did not drain. Remove it with a wet-vac or by hand with a small cup.
4. Loosen all large unions from heater and pump to let excess water drain from the lines.
5. Remove lowest drain plug on front of the pump. Drain out any water in pump.
6. Remove and store filter outside of spa.
7. After the spa has drained, you MUST also use a wet-vac to remove the water from the lines by vacuum/suction. Water left in the lines and jets will freeze and damage them. To adequately dry plumbing, place the wet-vac for 10-15 seconds over: each drain; each union; each jet face; each suction; and the filter cavity.
8. Once all the water is removed from the spa, jets, and plumbing, re-insert drain plug into the pump. Tighten all unions and make sure all gate valves are open with clips installed.
9. Pour a gallon of spa antifreeze into the top of the pump and a gallon into the filter cavity. (Dilute concentrate per label instructions.)
10. Replace all exterior panels.
11. Close and secure spa cover and straps.
De-Winterization Procedure1. Fill the spa’s foot well with water.
2. Drain the spa to clear the antifreeze out of the spa. See page 24, Drain and Refill Procedure.
IMPORTANT:Damage caused by improper winterization is not covered under the manufacturer’s warranty. If you have any questions, please call Technical Support at 800-823-3638. You may also contact a professional to perform these services for you.Important!
30 LifeCast Owner’s Manual

Troubleshooting
Symptom Probable Causes Possible SolutionsCloudy Water • Dirty filter
• Inadequate or improper sanitizing• Oils, lotions, organic matter• Old water
• Clean or replace the filter• Run jet pumps and clean filter• Add sanitizer• Shock spa with dichlor• Balance alkalinity or pH• Drain and refill spa
Algae • pH too high• Sanitizer too low• Spa uncovered
• Shock spa with dichlor• Adjust pH• Maintain sanitizer use and shock after
each use• Keep the spa covered with straps
secured when the spa is not in use
Organic buildup or scum ring around spa water line
• Oils, lotions, dirt in spa water• Not shocking after each use
• Shower before use• Use a Zorbo floating scum absorber• Use a clarifier• Spray with CleanAll & wipe scum with a
rag
Water odor • Inadequate or improper sanitizing• pH too low• Oils, lotions, dirt in spa• Algae or bacteria
• Shock spa with dichlor• Shock with Oxy Spa after each use• Maintain proper sanitizer levels• Balance pH• If severe, use Spa System Flush, drain
and refill spa
Chlorine odor • Chloramine (used chlorine) level too high
• pH too low
• Shock spa • Balance pH
Eye irritation • pH too low• Sanitizer too low
• Balance pH• Maintain sanitizer level and shock after
each use
Skin irritation or rash • Insufficient sanitizer• Chlorine level too high (above 5 ppm)
• Shock spa and add sanitizer• Allow chlorine level to drop• If rash reoccurs, shock with dichlor, use
Spa System Flush, drain and refill spa
Stains • Total alkalinity and/or pH are too low• High amounts of copper, iron in water
• First adjust total alkalinity then pH if necessary
• Use PreFresh, a hose-end filter• Use Metal Free at start up
Scale • Calcium content is too high• Total alkalinity and/or pH are too high
• Use Spa Defense scale inhibitor • First adjust total alkalinity then pH if
necessary
Water Quality Problems
Customer Care: (800) 823-3638 31
Troubleshooting
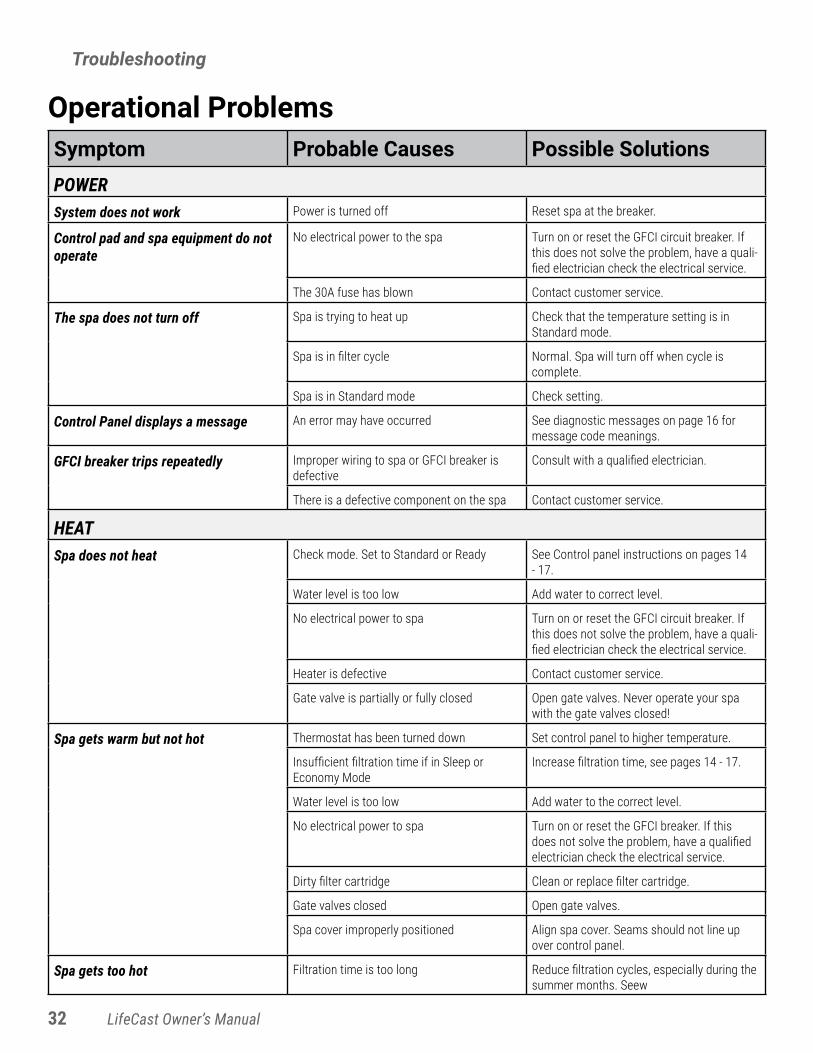
Symptom Probable Causes Possible SolutionsPOWERSystem does not work Power is turned off Reset spa at the breaker.
Control pad and spa equipment do not operate
No electrical power to the spa Turn on or reset the GFCI circuit breaker. If this does not solve the problem, have a quali-fied electrician check the electrical service.
The 30A fuse has blown Contact customer service.
The spa does not turn off Spa is trying to heat up Check that the temperature setting is in Standard mode.
Spa is in filter cycle Normal. Spa will turn off when cycle is complete.
Spa is in Standard mode Check setting.
Control Panel displays a message An error may have occurred See diagnostic messages on page 16 for message code meanings.
GFCI breaker trips repeatedly Improper wiring to spa or GFCI breaker is defective
Consult with a qualified electrician.
There is a defective component on the spa Contact customer service.
HEATSpa does not heat Check mode. Set to Standard or Ready See Control panel instructions on pages 14
- 17.
Water level is too low Add water to correct level.
No electrical power to spa Turn on or reset the GFCI circuit breaker. If this does not solve the problem, have a quali-fied electrician check the electrical service.
Heater is defective Contact customer service.
Gate valve is partially or fully closed Open gate valves. Never operate your spa with the gate valves closed!
Spa gets warm but not hot Thermostat has been turned down Set control panel to higher temperature.
Insufficient filtration time if in Sleep or Economy Mode
Increase filtration time, see pages 14 - 17.
Water level is too low Add water to the correct level.
No electrical power to spa Turn on or reset the GFCI breaker. If this does not solve the problem, have a qualified electrician check the electrical service.
Dirty filter cartridge Clean or replace filter cartridge.
Gate valves closed Open gate valves.
Spa cover improperly positioned Align spa cover. Seams should not line up over control panel.
Spa gets too hot Filtration time is too long Reduce filtration cycles, especially during the summer months. Seew
Operational Problems
32 LifeCast Owner’s Manual
Troubleshooting
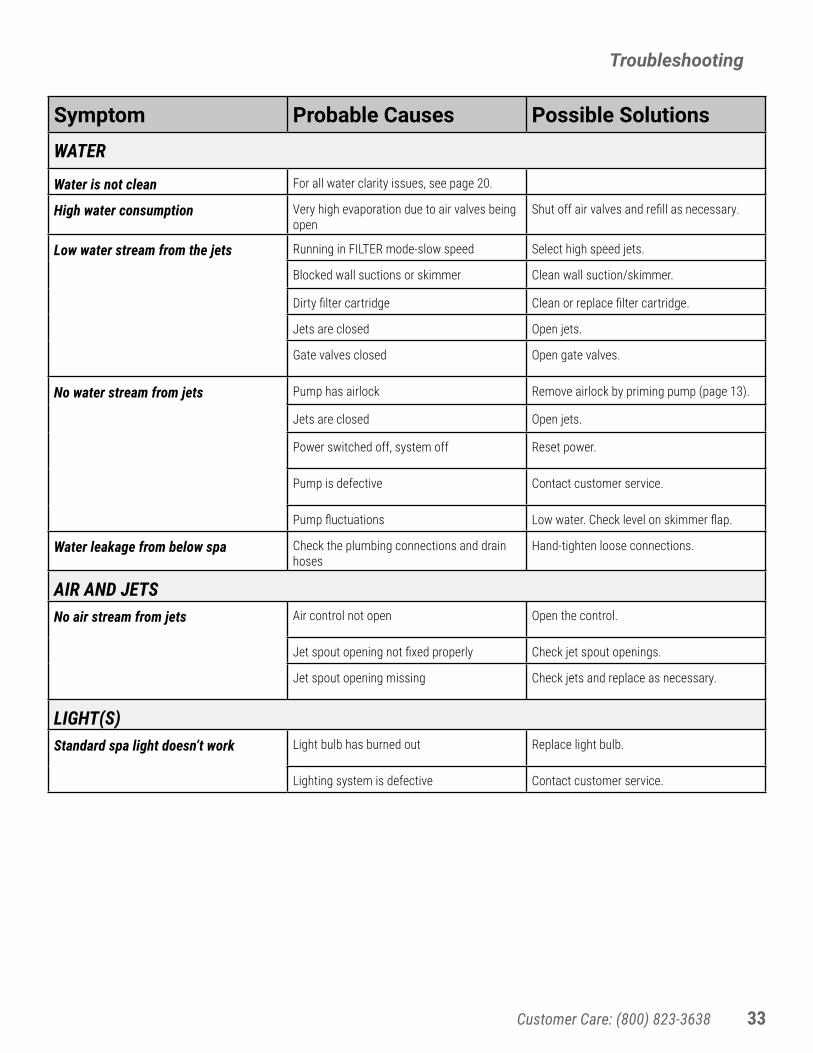
Symptom Probable Causes Possible SolutionsWATER
Water is not clean For all water clarity issues, see page 20.
High water consumption Very high evaporation due to air valves being open
Shut off air valves and refill as necessary.
Low water stream from the jets Running in FILTER mode-slow speed Select high speed jets.
Blocked wall suctions or skimmer Clean wall suction/skimmer.
Dirty filter cartridge Clean or replace filter cartridge.
Jets are closed Open jets.
Gate valves closed Open gate valves.
No water stream from jets Pump has airlock Remove airlock by priming pump (page 13).
Jets are closed Open jets.
Power switched off, system off Reset power.
Pump is defective Contact customer service.
Pump fluctuations Low water. Check level on skimmer flap.
Water leakage from below spa Check the plumbing connections and drain hoses
Hand-tighten loose connections.
AIR AND JETSNo air stream from jets Air control not open Open the control.
Jet spout opening not fixed properly Check jet spout openings.
Jet spout opening missing Check jets and replace as necessary.
LIGHT(S)Standard spa light doesn’t work Light bulb has burned out Replace light bulb.
Lighting system is defective Contact customer service.
Customer Care: (800) 823-3638 33

Troubleshooting Operations
Symptom Probable Causes Possible SolutionsPUMPSPump runs constantly-will not shut off Problem with circuit board Service required. Contact customer service.
Noisy pump Water level is too low Add water to normal level.
Blocked wall suctions or skimmer Clean the wall suctions/skimmer.
Damaged or worn-out motor block Replacement likely required. Contact customer service.
Leakage of air into suction line Service required. Contact customer service.
Debris is caught inside pump Service required. Contact customer service.
Gate valves are closed Open gate valves. Never operate your spa with the gate valves closed!
Damaged or worn out motor bearings Replacement likely required. Contact customer service.
Improper or defective wiring Service required. Contact customer service.
Pump turns off during operation Automatic timer has completed its cycle Start the cycle again.
Improper or defective wiring Service required. Contact customer service.
Pump has a burning smell while running
Automatic timer has completed its cycle Start the cycle again.
The pump motor is defective Replacement likely required. Contact customer service.
Pump does not work Power may be turned off Reset power.
Pump has overheated Let cool for one hour.
Incorrect or faulty wiring of electrical supply Service required. Contact customer service.
Switch is off Auto reset after the motor has cooled down.
House circuit breaker tripped or if OFF position
Reset circuit breaker.
Motor overload condition Motor overload will reset automatically. If problem persists, contact customer service.
Damaged electrical cord Plug pump cord into appropriate receptacle.
Pump cord not plugged in Service required. Contact customer service.
GFCI tripped or in OFF position Reset GFCI.
34 LifeCast Owner’s Manual

www.SpaDepot.com
LIFECAST SPAS SERIES Limited Warranty Rotationally Molded Spa Shell & Cabinet: LIFETIME WARRANTY parts & labor LifeCast® Spas warrants the original retail purchaser the integrity of the spa’s cabinet structure will not rot, crack, or peel as a result of defects in material or workmanship as long as the original customer owns the spa. Warranty does NOT cover damage due to abuse, vandalism, or acts of nature.
Plumbing & Equipment: 1 year parts, 90 days labor LifeCast® Spas warrants the original retail purchaser the integrity of the spa’s plumbing against leaks as a result of defects in material or workmanship for a period of 1 year on parts and 90 days on labor. LifeCast® Spas warrants the original retail purchaser the integrity of the spa’s Equipment Pack (pumps, heater, control system) to be free from defects in material and workmanship for a period of 1 year on parts and 90 days on labor from the date of the original retail purchase. This warranty does NOT cover damage due to abuse, vandalism, or acts of nature.
Replacement Parts Only: 1 year, no labor LifeCast® Spas warrants the original retail purchaser the integrity of the spa’s accessories (where applicable) including jet inserts and spa cover or spa cover skin for one year. Covered parts will be shipped directly to the customer for customer replacement. This warranty does NOT cover damage due to abuse, vandalism, or acts of nature.
Warranty Specifics Ozonators: LifeCast® Spas warrants the original retail purchaser that the factory installed ozonators will not malfunction due to defects in
workmanship for a period of 1 year from the date of the original retail purchase. LED Lighting: LifeCast® Spas warrants the original retail purchaser that the factory installed LED Lighting System will have a 1 year warranty
to be free from defects in workmanship and materials from the date of the original retail purchase. Please Note: Electrical Connections must be made by a qualified, licensed residential electrician. Improper installations present hazards which can result in personal injury or property damage and void the warranty on the spa. Please see the Owner’s Manual for additional information.
Exclusions This limited warranty is enforceable only by the original retail purchaser. Fuses and any dealer-supplied accessories are specifically excluded from this limited warranty.
All warranties are null and void if any of the following occur: Spa has been subject to alteration, neglect, misuse or abuse. Any damages caused by failure to install, maintain, and operate the spa in accordance with LifeCast® Spas Owner’s Manual instructions. Any and all costs of spa’s removal and replacement including but not limited to transportation, damages to landscaping, house structures. Spa has been used in a non-residential application or an application in which it was not designed. Spa shell damage caused by excessive heat build-up due to failure to cover the spa while empty of water and/or exposure to direct sunlight. Any damages caused by improper maintenance of spa water chemistry or by any undissolved spa chemicals which may cause bleaching of
the spa shell and erosion or discoloration of stainless jets or any other components. Any repairs by anyone other than authorized LifeCast® Spas agent, without expressed written permission by LifeCast® Spas warranty dept. Any and all costs associated with obtaining warranty service. LifeCast® Spas is not responsible for any form of service provider Trip Charge. Misuse or improper setup of salt-based systems in your spa. Damage caused by salt-based systems will not be covered under your warranty. LifeCast® Spas Warranty is void if the spa is moved to any location that is not the original ‘Ship To’ address.
Warranty Duration Upgrades Optional warranty coverage upgrades which extend the duration of parts and/or labor coverage, if available, must be purchased at the time of spa purchase. All other terms, conditions, parts only coverage, and exclusions of the LifeCast® Spas Limited Warranty apply. DISCLAIMERS: TO BE COVERED UNDER THE LIFECAST SPAS WARRANTY YOU MUST REGISTER YOUR PRODUCT WITHIN 30 CALENDAR DAYS OF DELIVERY. LIFECAST SPAS AND ITS AUTHORIZED AGENTS SHALL NOT BE LIABLE FOR ANY INJURY, LOSS, COST OR OTHER DAMAGE, WHETHER INCIDENTAL, CONSEQUENTIAL, SPECIAL OR PUNITIVE, ARISING OUT OF ANY DEFECT COVERED BY THIS LIMITED WARRANTY, INCLUDING WITHOUT LIMITATION, LOSS OF USE OF THE SPA AND COST FOR REMOVAL OF DEFECTIVE PRODUCT, EVEN IF LIFECAST SPAS HAS BEEN ADVISED OF THE POSSIBILITY OF SUCH DAMAGE, THE LIABILITY OF LIFECAST SPAS UNDER THIS LIMITED WARRANTY, IF ANY, SHALL NOT EXCEED THE ORIGINAL AMOUNT PAID FOR THE DEFECTIVE PRODUCT. COVERAGE UNDER THIS LIMITED WARRANTY SHALL COMMENCE AS OF THE ORIGINAL DATE OF PURCHASE AND THE DURATION OF SUCH COVERAGE SHALL NOT EXTEND FOR ANY REASON WHATSOEVER BEYOND THE STATED TIME PERIOD. THESE DISCLAIMERS SHALL BE EQUALLY APPLICABLE TO ANY SERVICE PROVIDED BY LIFECAST SPAS OR ITS AUTHORIZED AGENTS.
LIMITATIONS: THIS LIMITED WARRANTY IS NONTRANSFERABLE AND ONLY APPLIES TO THE ORIGINAL PURCHASER. THIS LIMITED WARRANTY SUPERSEDES THE PLACE OF ALL OTHER WARRANTIES EXPRESSED OR IMPLIED, IN FACT OR AT LAW, INCLUDING IMPLIED WARRANTIES OF FITNESS FOR A PARTICULAR PURPOSE. ALL WARRANTY SERVICE MUST BE AUTHORIZED BY LIFECAST SPAS AND PERFORMED BY ITS AUTHORIZED AGENT. NO DEALER, DISTRIBUTOR, SERVICE COMPANY, OR OTHER PARTY IS AUTHORIZED TO CHANGE, MODIFY, OR EXTEND THE TERMS OF THIS LIMITED WARRANTY IN ANY MANNER WHATSOEVER.
FOR WARRANTY QUESTIONS OR CLAIMS ASSISTANCE PLEASE CONTACT CUSTOMER SUPPORT: (800) 823-3638 - M-F 6AM-5PM PACIFIC TIME 08-08-17
35

36 LifeCast Owner’s Manual

Customer Care: (800) 823-3638 37

Copyright © LifeCast Spas®. All rights reserved. Specifications may change without notice. For use in USA only.
Unit is IPX5 Compliant
Monday - Friday6am - 5pm Pacific TimeOrder Supplies Online
1-800-823-3638
38 LifeCast Owner’s Manual