lionbridge connector for episerver cms 11 user guide
TRANSCRIPT

Lionbridge Connector for Episerver CMS 11
User Guide Version 1.4.2
June 8, 2018

Copyright© Copyright 2018 Lionbridge Technologies, Inc. All rights reserved.
Lionbridge and the Lionbridge logotype are registered trademarks or trademarks of Lionbridge Technologies, Inc. in the United States and other countries. All other trademarks used herein are the property of their respective owners. The opinions of third-party contributors remain theirs alone and do not necessarily represent the views of Lionbridge Technologies.

Contents
1 Welcome to the Lionbridge Connector for Episerver CMS 11 41.1 The Translation Lifecycle 4
1.2 How the Connector Helps You Manage Your Translation Lifecycle 4
1.3 Using this Guide 5
1.4 How to Contact Lionbridge Connector Support 6
2 Getting Started with the Connector for Episerver 10
3 Sending a Project for Translation 113.1 Canceling a Translation Job 18
4 Viewing Translation Status 19
5 Importing and Reviewing Translated Content 20
6 Publishing Translated Content 24
Lionbridge Connector for Episerver CMS 11 User Guide Page 3Version 1.4.2 June 8, 2018

1 Welcome to the Lionbridge Connector for Episerver CMS 11Welcome to the Lionbridge Connector for Episerver CMS 11 (Connector). The Connector enables you to automate sending and retrieving content from Episerver, which dramatically reduces the effort required to create, maintain, and publish Web content in multiple languages.
1.1 The Translation LifecycleThe translation lifecycle is the broad process of selecting content, sending it out for translation, and then receiving the translated content back from translation.
This set of steps usually fits inside a larger, more general process called the content lifecycle, which is the process of creating, reviewing, editing, approving, and publishing content.
When you consider the translation lifecycle and the content lifecycle together, you have the global content value chain, which is the strategy for managing multilingual content.
Remember that localizing content is a subset of steps in the broader content lifecycle. This will improve your focus on key localization considerations, improve processes, and keep all content stakeholders included. Together, this results in better content management.
1.2 How the Connector Helps You Manage Your Translation LifecycleThe Lionbridge Connector for Episerver (Connector) is a plug-in module for Episerver. It provides a range of features and user interface enhancements in Episerver that enable you to select, send, monitor, and retrieve content for translation into any language Episerver supports.
These features automate the process, which dramatically reduces the effort and time required to export and re-import content that needs to be localized. This is very helpful when translating large volumes of content or ensuring that translated content is quickly re-imported to meet deadlines.
When you use the Connector, you manage your translation lifecycle entirely from within Episerver:
1. The Connector exports your content from Episerver in XML format and delivers these content files to the central, hosted Clay Tablet Platform.
2. The Clay Tablet Platform delivers your content to your translation providers, based on routing rules that your company chooses and Clay Tablet Technologies implements.
3. When the translated content is ready, the Clay Tablet Platform retrieves it from your translators and delivers it to the Connector.
4. The Connector automatically re-imports the content into the correct location in Episerver.
You can then review, revise, reject, or publish the translated content as needed.
Note: Neither the Connector nor the Clay Tablet Platform performs any translation. Similarly, Clay Tablet Technologies does not provide any translation services. Your company chooses the translation provider that performs the translation.
Lionbridge Connector for Episerver CMS 11 User Guide Page 4Version 1.4.2 June 8, 2018
1 Welcome to the Lionbridge Connector for EpiserverCMS 11
1 Welcome to the Lionbridge Connector for EpiserverCMS 11

1.3 Using this Guide
Purpose of this guide
This guide describes how to use the Lionbridge Connector (Connector) for Episerver to manage your translation lifecycle. It describes how to send out content items from Episerver for translation and receive them back from translation.
Who should use this guide
This guide is intended for content editors, project, marketing, localization or translation managers, or others who are responsible for creating, editing, or approving assets for translation that reside in your Episerver instance. This guide is also useful for translation providers who receive assets from your Episerver instance, because it describes your company's translation management process.
What your company setup should be
This document assumes that:
Your company already has a functioning instance of Episerver .
The Connector has been installed, configured, and tested on your Episerver instance.
Clay Tablet Technologies has set up the Clay Tablet Platform to send assets to your translation providers.
Optional. Lionbridge is your company's translation provider, and Freeway is already set up for your company.
What you should already know
This document assumes that:
You are familiar with the Connector's configuration for your Episerver instance, and the reasons for choosing certain configuration options. This is important because your company's configuration determines which features are available.
You have a strong working knowledge of Episerver.
You are familiar with your company's translation process and requirements.
You have valid user credentials to log into Episerver.
You have the required permissions to access the Connector functionality described in this guide.
Note: Not all the features described in this guide may be available. Feature availability depends on both your company's Connector setup and the roles to which you are assigned. If you cannot access functionality that you need, contact your company's Episerver administrator.
How this guide is organized
This guide contains the following chapters:
Lionbridge Connector for Episerver CMS 11 User Guide Page 5Version 1.4.2 June 8, 2018
1 Welcome to the Lionbridge Connector for Episerver CMS 11 1.3 Using this Guide

Chapter Description
"Welcome to the Lionbridge Connector for Episerver CMS 11" on page 4
A brief description of the Clay Tablet for Episerver solution and how it fits into the translation lifecycle. It also includes information about this guide and Clay Tablet Technologies Support contact information.
"Getting Started with the Connector for Episerver" on page 10
How to get started and an overview of the Connector interface and key features.
"Sending a Project for Translation" on page 11
How to create a translation project and send out content for translation.
"Importing and Reviewing Translated Content" on page 20
How to import translated content into Episerver.
"Publishing Translated Content" on page 24
How to publish translated content.
How to find out more about the Lionbridge Connector for Episerver
For information on installing and configuring the Lionbridge Connector for Episerver, read the Lionbridge Connector for Episerver Installation and Configuration Guide.
Documentation conventions
This guide uses the following conventions:
Convention Description
Bold Highlights screen elements such as buttons, menu items, and fields.
Courier Highlights input, file names, and paths.
Italics Highlights terms for emphasis, variables, or document titles.
> Indicates a menu choice. For example, "Select Edit> Select All."
1.4 How to Contact Lionbridge Connector SupportEmail @: [email protected]
Telephone: +1-416-363-0888
Lionbridge Connector for Episerver CMS 11 User Guide Page 6Version 1.4.2 June 8, 2018
1 Welcome to the Lionbridge Connector for Episerver CMS 11 1.4 How to Contact Lionbridge Connector Support

You can submit a support ticket either:
by email
from the Lionbridge Connectors Zendesk page, using your web browser
To submit a support ticket:
1. Do one of the following:
Email [email protected], and cc (carbon copy) anyone to include in the ticket correspondence.
Important: Include the information and attachments in your email that are listed in the sub-sections below.
Create a ticket in Zendesk:
a. Open the Lionbridge Connectors Zendesk page in your browser: https://connectors.zendesk.com. b. Sign in to Zendesk. If you do not have sign-in credentials, see "To view and update your support ticket
in Zendesk:" below.
Important: Include the information and attachments that are listed in the sub-sections below.
c. Click Submit a request. d. In the CCs field, add anyone to include in the ticket correspondence.
Zendesk automatically creates a ticket and responds to everyone included in the cc field.
2. Everyone in the original cc receives updates unless they request to be removed from the ticket.
Important: Check your email spam folder (especially first-time Zendesk users) as sometimes email notifications from Zendesk are marked as spam.
When the issue is resolved, Lionbridge closes the ticket.
Information to include in the support ticket:
client name
CMS or content system name and version
Connector or App version installed
name of job for which the issue occurs
date of job submission
detailed description of the issue
any error text–copy and paste, if applicable
Lionbridge Connector for Episerver CMS 11 User Guide Page 7Version 1.4.2 June 8, 2018
1 Welcome to the Lionbridge Connector for Episerver CMS 11 1.4 How to Contact Lionbridge Connector Support

Files to attach to the support ticket:
CMS log files for the date the issue occurred
Connector or App log files for the date the issue occurred
screen capture of the issue
To view and update your support ticket in Zendesk:
Important: You must log into Zendesk to view your support tickets there.
1. Open the Lionbridge Connectors Zendesk page in your browser: https://connectors.zendesk.com.
2. In the top-right corner, click Sign in, and enter your credentials.
Note: If you do not have sign-in credentials yet, then click either Sign up or Get a password, and follow the onscreen instructions.
3. After signing in, click My activities to view the tickets you opened or where you are cc’d.
4. To update tickets, you can reply or attach files.
Lionbridge Connector for Episerver CMS 11 User Guide Page 8Version 1.4.2 June 8, 2018
1 Welcome to the Lionbridge Connector for Episerver CMS 11 1.4 How to Contact Lionbridge Connector Support

For more information, refer to "Submitting and tracking support requests" in Zendesk's Help Center guide for end-users, at: https://support.zendesk.com/hc/en-us/articles/203664386-Help-Center-guide-for-agents-and-end-users.
Important: Zendesk refers to a support ticket as a support request. These terms are interchangeable.
Lionbridge Connector for Episerver CMS 11 User Guide Page 9Version 1.4.2 June 8, 2018
1 Welcome to the Lionbridge Connector for Episerver CMS 11 1.4 How to Contact Lionbridge Connector Support

2 Getting Started with the Connector for EpiserverYou access the Connector from Episerver, so that you can send out content items for translation. You perform the following basic tasks:
1. "Sending a Project for Translation" on page 11.
2. "Importing and Reviewing Translated Content" on page 20.
3. "Publishing Translated Content" on page 24.
Lionbridge Connector for Episerver CMS 11 User Guide Page 10Version 1.4.2 June 8, 2018
2 Getting Started with the Connector for Episerver 2 Getting Started with the Connector for Episerver

3 Sending a Project for TranslationWhen you send out content for translation, they are part of a translation project.
You can add content for translation to a new or an existing project.
You can send out the following types of content for translation:
Content Type
Description Additional Notes
Episerver Blocks
Blocks that are referenced on a page in a Content Area or ContentReference fields.
If the same block has multiple references, the Connector sends it out for translation once, in the context of the first page where it is referenced.
Episerver page properties
The following page properties are supported:
StringXHtmlStringContentAreaContentReference
Unsupported page properties will be blank, so you cannot publish the corresponding pages, as described in "Publishing Translated Content" on page 24. Tip: Review these pages manually and populate the blank page properties so that you can publish the pages.
custom properties
Custom properties created by the customer.
The Connector supports sending for translation only custom properties that inherit from the ProperyLongString and PropertyString classes.
How the Connector packages the files for translation
Either:
The Connector sends each page and block for translation as a separate file.
The Connector bundles all pages and blocks in the translation project for translation into a single XML file, creating one file for each target language.
You configure this setting using the Use grouped asset handling check box. For detailed instructions, refer to the Lionbridge Connector for Episerver CMS 11 Installation and Configuration Guide.
Recommendation: If Lionbridge Freeway will translate terms for SEO, select this check box.
To send out a project for translation:
1. In Episerver CMS, click Edit.
Lionbridge Connector for Episerver CMS 11 User Guide Page 11Version 1.4.2 June 8, 2018
3 Sending a Project for Translation 3 Sending a Project for Translation

2. Click the Toggle assets pane icon .
The Assets pane is displayed on the right. The Lionbridge Connector gadget is displayed at the bottom of the pane, displaying all the translation projects.
3. Optional. To create a new project, click the plus icon at the bottom-left corner of the gadget.
The project you created is displayed in the list.
4. Click a project in the list to select it.
The System workspace, on the left, updates.
Lionbridge Connector for Episerver CMS 11 User Guide Page 12Version 1.4.2 June 8, 2018
3 Sending a Project for Translation 3 Sending a Project for Translation

5. Specify the following settings for your translation project:
Setting Description
Name Enter or update the name of your project. This will also be the Freeway title of your project.
Source Language Select the source language of the pages in the project
Lionbridge Connector for Episerver CMS 11 User Guide Page 13Version 1.4.2 June 8, 2018
3 Sending a Project for Translation 3 Sending a Project for Translation
Setting Description
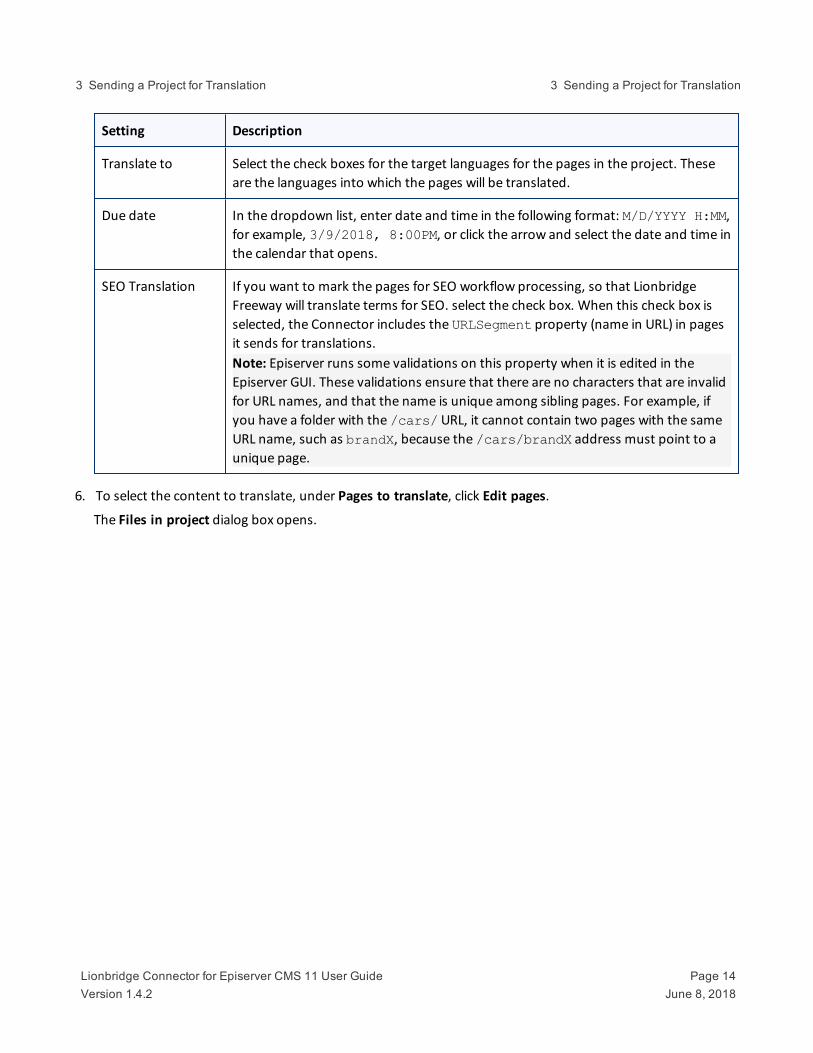
Translate to Select the check boxes for the target languages for the pages in the project. These are the languages into which the pages will be translated.
Due date In the dropdown list, enter date and time in the following format: M/D/YYYY H:MM, for example, 3/9/2018, 8:00PM, or click the arrow and select the date and time in the calendar that opens.
SEO Translation If you want to mark the pages for SEO workflow processing, so that Lionbridge Freeway will translate terms for SEO. select the check box. When this check box is selected, the Connector includes the URLSegment property (name in URL) in pages it sends for translations.Note: Episerver runs some validations on this property when it is edited in the Episerver GUI. These validations ensure that there are no characters that are invalid for URL names, and that the name is unique among sibling pages. For example, if you have a folder with the /cars/ URL, it cannot contain two pages with the same URL name, such as brandX, because the /cars/brandX address must point to a unique page.
6. To select the content to translate, under Pages to translate, click Edit pages.
The Files in project dialog box opens.
Lionbridge Connector for Episerver CMS 11 User Guide Page 14Version 1.4.2 June 8, 2018
3 Sending a Project for Translation 3 Sending a Project for Translation

The Available pages pane on the left side displays the content tree. a. At the top of this pane, click the Pages or the Blocks tab to display the corresponding content in the
content tree. b. Expand the tree structure and select the check boxes of the pages or blocks to add to the translation
project. c. Optional. Mouseover the page to display the +All and -All buttons. Click these buttons to add or remove
all child pages or blocks from the translation project. d. To remove a page or block from your content selection, click the corresponding Remove button. This
button is displayed after a page or block is selected. e. Optional. In the Pages tab, to automatically include all blocks associated with the selected pages in your
translation job, select the Include blocks check box.
Tip: To view which pages have not yet been translated, select the desired target language in the Filter on missing translation dropdown list. The content page tree updates to display any pages that have not yet been translated into that language in Italic font. Pages that have already been translated into that target
Lionbridge Connector for Episerver CMS 11 User Guide Page 15Version 1.4.2 June 8, 2018
3 Sending a Project for Translation 3 Sending a Project for Translation

language are displayed in regular font.
f. Click Save to save your changes.
The System workspace reopens.
7. Optional. Enter or update the following information about the project:
Field Description
Source Language In the dropdown list, select the source language of the pages in the project.
Translate to Select the check boxes for the target languages for the pages in the project. These are the languages into which the pages will be translated.
Lionbridge Connector for Episerver CMS 11 User Guide Page 16Version 1.4.2 June 8, 2018
3 Sending a Project for Translation 3 Sending a Project for Translation

Field Description
Due date The requested delivery date. Either:Enter the date and time in the following format: M/D/YYYY H:MM,for example, 3/9/2016, 8:00 PM.Click the arrow and select the date and time in the calendar that opens.
8. Mouseover the right end of the project in the Lionbridge Connector gadget, and in the project's context menu, select Options > Translation.
A message box opens, stating that the project was sent for translation.
9. Click OK to close the message box.
The Connector sends your translation project as a scheduled job. It displays a clock icon next to it.
When your job displays a status of 10%, it has been delivered to Lionbridge Freeway.
When the job displays a status of 100%, it is ready to be imported into Episerver, where you can review it.
Lionbridge Connector for Episerver CMS 11 User Guide Page 17Version 1.4.2 June 8, 2018
3 Sending a Project for Translation 3 Sending a Project for Translation

3.1 Canceling a Translation JobYou can cancel a translation job from within the Connector, if its status is Created or Sent for translation. For a list and description of translation-job statuses, see "Viewing Translation Status" on page 19.
Note: If the status of your translation job is In Production, then Lionbridge Freeway has already received the job. Contact your Lionbridge Project Manager immediately before selecting to cancel the job.
To cancel a translation job:
1. In Episerver CMS, click Edit.
2. Click the Toggle assets pane icon .
The Assets pane is displayed on the right. The Lionbridge Connector gadget is displayed at the bottom of the pane, displaying all the translation projects.
3. Click a project in the list to select it.
4. Mouseover the right end of the project in the Lionbridge Connector gadget, and in the project's context menu, select Options > Cancel Project.
Lionbridge Connector for Episerver CMS 11 User Guide Page 18Version 1.4.2 June 8, 2018
3 Sending a Project for Translation 3.1 Canceling a Translation Job

4 Viewing Translation StatusYou can view the status of your translation projects in the Lionbridge Connector gadget.
Translation projects can have the following statuses:
Translation Job Status
Icon Description
Created The Connector created the translation job, but it did not send it for translation yet.
Sent for translation
The Connector sent out the translation job, but Lionbridge Freeway did not receive it yet.
In Production Lionbridge Freeway has received the translation job.
Delivered The Connector has delivered the completed translation job, and it is ready to be imported into Episerver.
Imported The completed translation job has been imported, but it has not yet been published.
Published The translation job has been published.
Lionbridge Connector for Episerver CMS 11 User Guide Page 19Version 1.4.2 June 8, 2018
4 Viewing Translation Status 4 Viewing Translation Status

5 Importing and Reviewing Translated ContentWhen the translation project is complete and has been returned to the Connector, its project status is 100%. It is ready to import into Episerver, where you can review it.
You can import the translated content into Episerver.
Note: You can import a project even if it has not been fully translated. However, to import and publish a page, all its dependent blocks must be translated.
Note: The Connector automatically updates translation projects with redelivered assets. If an imported project has redelivered assets, its status is 100%.
To import translated content into Episerver:
1. In Episerver CMS, click Edit.
2. Click the Toggle assets pane icon .
The Assets pane is displayed on the right. The Lionbridge Connector gadget is displayed at the bottom of the pane, displaying all the translation projects.
3. In the list, click a project whose status of 100% to select it.
4. Mouseover the right end of the project in the Lionbridge Connector gadget, and in the project's context menu, select Options > Import translations.
Lionbridge Connector for Episerver CMS 11 User Guide Page 20Version 1.4.2 June 8, 2018
5 Importing and Reviewing Translated Content 5 Importing and Reviewing Translated Content

A message box opens, stating that the project has been imported, but that it has not been published. The project is ready for review.
5. Click OK to close the message box.
6. In the top-left corner, click the Toggle navigation pane icon .
The Navigation pane is displayed on the left.
7. In the Navigation pane, click the Sites tab, and click the language version of the site to review. Alternatively, install the Versions Add-On to display the different language versions you have created.
8. Click the Pages tab, and in the tree structure, navigate to each page to review.
9. Optional. Click the Compare different versions icon to compare the source and target language versions of a page side by side and review before publishing or performing further edits.
Lionbridge Connector for Episerver CMS 11 User Guide Page 21Version 1.4.2 June 8, 2018
5 Importing and Reviewing Translated Content 5 Importing and Reviewing Translated Content

10. Optional. Click in a page to edit it.
Note: Blocks are displayed as translated within a page only after the page is published. To view the translated draft version of blocks for review purposes, in the Assets pane on the right, select the blocks, as shown below.
Lionbridge Connector for Episerver CMS 11 User Guide Page 22Version 1.4.2 June 8, 2018
5 Importing and Reviewing Translated Content 5 Importing and Reviewing Translated Content

11. When you are done, click Publish? in the top-right corner and select Publish changes from the context menu.
The Connector published the updated page.
Lionbridge Connector for Episerver CMS 11 User Guide Page 23Version 1.4.2 June 8, 2018
5 Importing and Reviewing Translated Content 5 Importing and Reviewing Translated Content

6 Publishing Translated ContentAfter you import translated content, you can publish it via the Connector. Publishing a translation project publishes all pages contained within that project. Alternatively, you can publish pages individually via the regular Episerver publishing method.
Note: To import and publish a page, all its dependent blocks must be translated.
Note: The Connector automatically updates translation projects with redelivered assets. If a published project has redelivered assets, its status is 100%.
For instructions on importing and reviewing content before publishing it, see "Importing and Reviewing Translated Content" on page 20.
To publish translated content:
1. In Episerver CMS, click Edit.
2. Click the Toggle assets pane icon .
The Assets pane is displayed on the right. The Lionbridge Connector gadget is displayed at the bottom of the pane, displaying all the translation projects.
3. Click a project in the list to select it.
4. Mouseover the right end of the project in the Lionbridge Connector gadget, and in the project's context menu, select Options > Publish translations.
A message box opens, confirming that the pages are being published.
5. Click OK to close the message box.
Lionbridge Connector for Episerver CMS 11 User Guide Page 24Version 1.4.2 June 8, 2018
6 Publishing Translated Content 6 Publishing Translated Content