little ruffle skirtstatic-sympoz.s3.amazonaws.com/upload/246280/pattern/...around top edge of band....
TRANSCRIPT


Little Ruffle Skirt © 2015 Caroline Critchfield 1
Little Ruffle Skirt (or skort)
This little skirt is an easy project to make for your little princess. Suggested fabrics
include lightweight cotton and cotton/poly blends. An optional ruffle (see photo
below) can be made with knit fabric. The knit fabric for the ruffle can be cut from a
lightweight t-shirt, or from store-bought knit fabric. This tutorial also includes an optional
pattern for shorts that can be sewn to the inside of the skirt to make a ‘skort.’ For a
baby, you can put elastic in the short legs (bloomer style).
Pattern pieces are included at the end
of this tutorial to make a skirt or skort in
sizes 12 months, 18 months, 2T, 3/4, 5/6,
and 7/8. Refer to page 3 for finished
waist and length measurements.
* There are many different variations
possible with this pattern… girls’ skirt
with or without shorts; baby skirt with
or without shorts or bloomers; skirt with
or without a bow on the front.
The pattern and instructions contained in this eBook
are for personal use only. No part may be copied or
transferred electronically unless permission is given.
Hand-made garments created by the purchaser
may be sold. U.S. and international copyright laws
apply. Any questions may be directed to:

Little Ruffle Skirt © 2015 Caroline Critchfield 2
Materials: Refer to the chart below for yardage requirements
and the skirt/skort finished length:
Size Yardage needed
Infant 12 mo.
(waist 18-19”)
1/2 yard (skirt) or 3/4 yd (skort)
Finished length 9”
Infant 18 mo.
(waist 19-20”)
1/2 yard (skirt) or 3/4 yd (skort)
Finished length 9 ¼”
2T
(waist 20-21”)
1/2 yard (skirt) or 3/4 yd (skort)
Finished length 9 ½”
3/4
(waist 21-22”)
3/4 yd (skirt) or 1 yd (skort)
Finished length 11”
5/6
(waist 22-23”)
3/4 yd (skirt) or 1 yd (skort)
Finished length 11 ½”
7/8
(waist 24-25”)
3/4 yd (skirt) or 1 yd (skort)
Finished length 12”
Printing instructions: Pattern pieces are found at the end of this tutorial.
Baby sized and little girl sized skirt pieces print up
separately, but the optional short/bloomer piece
that you can make for the inside of your skirt prints
for all sizes. If you are making a skirt only, you will
need to print page 18 (baby sizes) or pages 19-20
(little girl sizes). If you are making a skort (skirt with
shorts), you will also need to print pages 21-24.
After you click print, make sure that 'fit to page'
or ‘page scaling’ is set to ‘none.’ This will ensure
that the pattern pieces are not enlarged or
reduced. There is a one inch square with each
pattern so you can check to make sure.
Desired
Skirt/Skort
Print these
pages
Size 12 mo.,
18 mo., or 2T
18
Skirt size 3/4,
5/6, or 7/8
19-20
You will also need:
1 yard of 1” elastic (or enough to
go around the child’s waist)
1 yard of ¼” elastic for a bloomer
style skort
A bit of ribbon or ric-rac for the bow
Some lightweight knit fabric for the
ruffle:
You can cut this from a lightweight
women’s t-shirt (if you want to recycle
) or you will cut a 1 ½” strip from a
piece of 60” wide lightweight knit
fabric – so buy the smallest amount
they will sell you.
Print pages 21-24 also if you are
making a skort (skirt with shorts or
bloomers)

Little Ruffle Skirt © 2015 Caroline Critchfield 3
Step 1. Put the pattern piece together.
The paper pattern for the little girls skirt and the shorts pattern pieces must be taped together
before you can cut out your fabric (the baby skirt pattern piece fits on one page). The pieces
are designed so that they can be printed in black and white.
The little girls skirt pieces will tape together like this:
The short pieces will tape together like this:
1
2
1 2
3 4

Little Ruffle Skirt © 2015 Caroline Critchfield 4
Step 2. Lay out and cut
1. I strongly recommend washing your fabric before you use it, so there will be no surprise
shrinkage later. After washing your fabric, refold it along the grainline (the way that it was at
the fabric store), and get ready to cut.
2. First cut out your skirt piece. Fold your fabric
again along the grainline (so there is a double
fold on one side), and place your pattern piece
along the double fold.
This way you will be cutting through 4 layers
and will cut out the front and back at the
same time.
3. Optional shorts/bloomers piece: cut this
next, if you are making it. Open fabric out so
that it is just single-folded, and cut two.
4. Now cut out two strips that will be sewn
together and gathered to make the bottom
of the skirt. (You can lengthen the skirt by
lengthening this band.)
Bands – cut 2 strips the
right length and width
for your skirt size:
12 mo. 5” x 24”
18 mo. 5” x 26”
2T 5” x 28”
3/4 6” x 30”
5/6 6” x 32”
7/8 6” x 34”
Double fold here

Little Ruffle Skirt © 2015 Caroline Critchfield 5
Step 3. Skirt
1. Pin skirt pieces at sides, right sides together.
2. Stitch with a ½” seam allowance.
Serge finish or zig-zag finish edge, if desired.
3. Place the strips right
sides together; pin
and then stitch the
short ends.
4. Sew a ¼” hem on
the bottom edge
by pressing to the
inside ¼” twice,
and then stitching
it down close to
the fold.
Little Ruffle Skirt © 2015 Caroline Critchfield 6
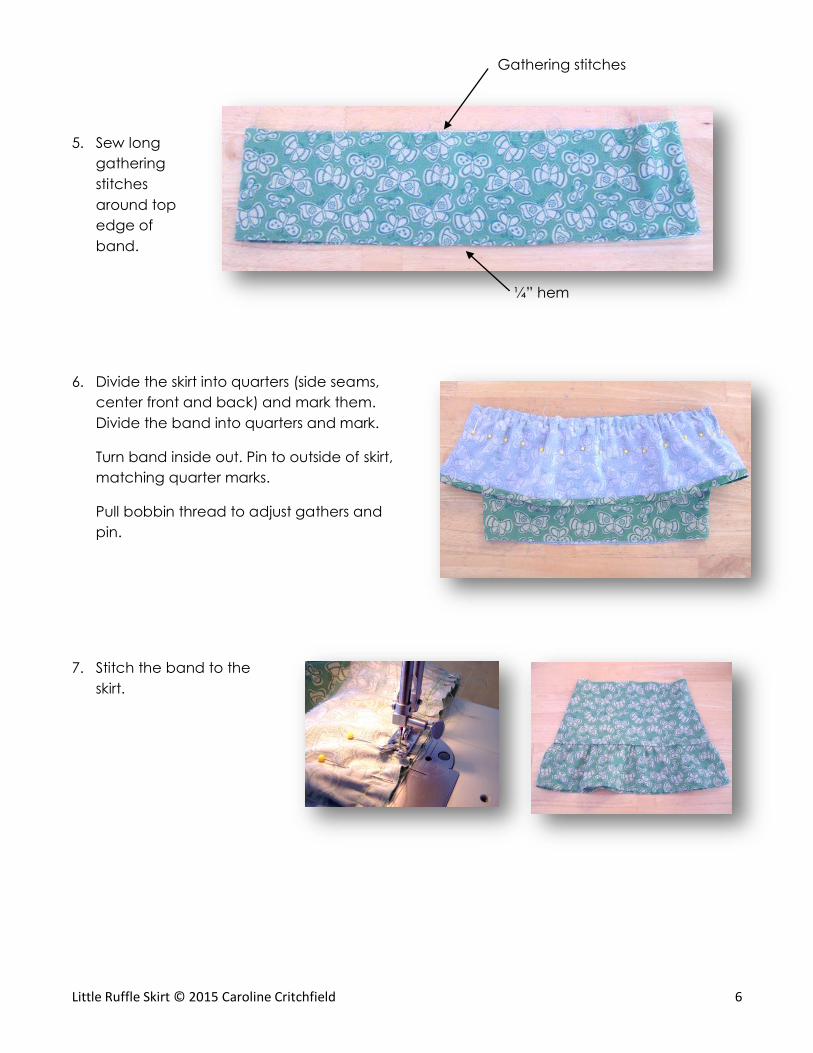
5. Sew long
gathering
stitches
around top
edge of
band.
6. Divide the skirt into quarters (side seams,
center front and back) and mark them.
Divide the band into quarters and mark.
Turn band inside out. Pin to outside of skirt,
matching quarter marks.
Pull bobbin thread to adjust gathers and
pin.
7. Stitch the band to the
skirt.
Gathering stitches
¼” hem
Little Ruffle Skirt © 2015 Caroline Critchfield 7
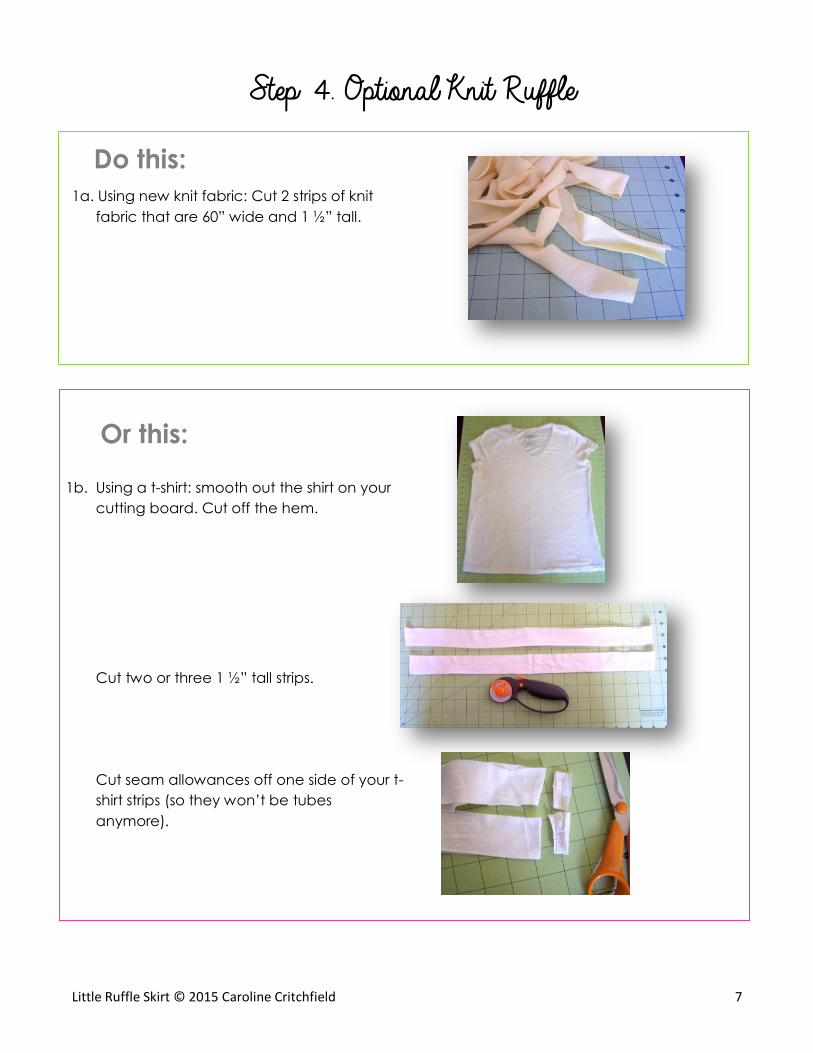
Step 4. Optional Knit Ruffle
1a. Using new knit fabric: Cut 2 strips of knit
fabric that are 60” wide and 1 ½” tall.
1b. Using a t-shirt: smooth out the shirt on your
cutting board. Cut off the hem.
Cut two or three 1 ½” tall strips.
Cut seam allowances off one side of your t-
shirt strips (so they won’t be tubes
anymore).
Do this:
Or this:

Little Ruffle Skirt © 2015 Caroline Critchfield 8
2. Stitch both ruffling strips together along one
short edge. I just used little a zig-zag stitch,
because it doesn’t have to be strong.
If your knit material curls to one side, make
sure that you pin same sides together so
that the curling continues in the same
direction.
3. Sew a long gathering stitch all the way
down the middle of the ruffling strip.
4. Pin the seam on the ruffling strip to the
seam on the band. Pull the bobbin thread
until one side is bunchy enough to cover
band.
Pin ruffle strip to band.
Repeat on other side.

Little Ruffle Skirt © 2015 Caroline Critchfield 9
5. Turn ends of ruffle strip under ¼” before
pinning down.
6. Stitch ruffle strip to skirt, sewing right down
the middle over your gathering threads.
I used green thread for contrast when I
stitched on this ruffling strip.
If your needle snags on the fabric
here (or gives you trouble) you can
always switch to a ball-point
needle – which is made for knits.
Since this is just a quick step and
there is woven fabric underneath, I
usually don’t go to the trouble.

Little Ruffle Skirt © 2015 Caroline Critchfield 10
Step 5. Optional Shorts or Bloomers
(skip to Step 7 if you don’t want these)
1. Pin the two pieces right sides together along
the curved front and back seams.
Stitch, using a ½” seam allowance.
2. Serge or trim and finish your seams with a zig-zag
stitch.
3. Open up the shorts or bloomers and pin the
crotch seam together.
4. Stitch, trim, and finish seam. (1/2” seam
allowance)
front back

Little Ruffle Skirt © 2015 Caroline Critchfield 11
For shorts:
5a. Press edge of leg opening to the inside ¼” twice
to make a ¼” hem.
Topstitch from the outside. (See pictures from
step 3.4 also).
For bloomers:
5b. Press edge of leg opening to the inside ¼” and
then ½” to make a casing for the elastic.
Stitch, leaving a 1” opening for inserting elastic.
Once your casings are
made, cut 2 pieces of elastic
for the leg openings. If you
have the baby nearby to
measure the right lengths,
that would be perfect. If not,
here are some guidelines.
Insert elastic using a safety pin or bodkin, stitch ends of elastic together securely, and stitch
opening closed.
Elastic needed
for leg openings
12 mo 11”
18 mo 12”
2T 13”
(or measure
baby)

Little Ruffle Skirt © 2015 Caroline Critchfield 12
Step 6. Attaching the Shorts or Bloomers to the Skirt
1. Turn both the skirt and the shorts (or bloomers)
inside out.
Place the skirt over the shorts, making sure that
the seams of the shorts are at the front and back
and the seams of the skirt are at the sides. They
don’t match up. Pin.
(This picture shows bloomers that don’t have
elastic in the legs yet.)
2. Stitch.
3. Turn right side out and press. Make sure that
the shorts are all the way inside the skirt so
they won’t show.
4. Topstitch 1/8” from the top edge.

Little Ruffle Skirt © 2015 Caroline Critchfield 13
5. Topstitch again, 1 ¼” from the top edge.
Leave a 2” opening for inserting the elastic.
6. Measure around child’s waist for exact elastic
measurement, or refer to the chart on page 2. Cut a
piece of 1” elastic the same measurement as child’s waist.
Lift up the skirt and insert the elastic through opening using a safety pin or bodkin. Pull the
elastic all the way through. Don’t let the elastic fold over or get twisted.
7. Overlap elastic ends by ½” and sew them together
using zig-zag stitching or a little rectangle.
Stretch the waist to pull the elastic in, and check again
to make sure it’s not twisted.
Don’t panic if it DID get twisted. It’s easy enough to
pull some elastic out, cut it anywhere, untwist it, and
overlap & stitch again.
8. Stitch the elastic opening closed from the outside.

Little Ruffle Skirt © 2015 Caroline Critchfield 14
Step 7. Waistband Without Shorts or Bloomers
1. Press top of skirt to the inside ¼”, and then 1 ¼”.
2. Topstitch very close to the top fold, if desired.
3. Topstitch 1 1/8” from top edge. Leave a 2”
opening for inserting elastic.
4. Measure around child’s waist for exact elastic
measurement, or refer to the chart on page 2.
Cut a piece of 1” elastic the same measurement
as child’s waist.
Insert elastic through opening using a safety pin
or bodkin.

Little Ruffle Skirt © 2015 Caroline Critchfield 15
5. When elastic is all the way through, make
sure it is not folded or twisted, overlap ends,
and secure by zig-zagging or sewing a
small rectangle.
Stretch waistband to pull elastic in and evenly
distribute gathers.
6. Stitch elastic opening closed.
7. Stitch in the ditch on either side seam to secure
elastic and prevent rolling.

Little Ruffle Skirt © 2015 Caroline Critchfield 16
Step 9. Little Bow
Since it can be hard to tell the front from the back of
handmade clothes, sometimes I add a little bow to the front.
1. Measure and cut a piece of trim or ribbon 15” long. Lay it
vertically down the middle of your little skirt.
Match the middle of your trim to the second stitching line
1 ¼” from the top edge.
2. Tack the trim to the skirt along the stitching line
(either by hand or using your sewing machine).
3. Tie in a bow.
Done!
This is where the trim is tacked down.
This stitching is where I sewed bias
tape together to use for the bow.


