lms learnis server 4
TRANSCRIPT

LMS Learnis Server 4.0
Server Admin Manual(English)
www.cover.cz
1 / 59 Last update 2017-04-18, 20:24:28

2 / 59 Last update 2017-04-18, 20:24:28

Table of ContentsRequirements and stack setup for Linux..............................................................................................5
Supported operation systems and stack components.......................................................................5Download application......................................................................................................................5Ubuntu 14........................................................................................................................................5Optional - Stack for CRON.............................................................................................................8Optional - PPT conversions.............................................................................................................8General troubleshooting...................................................................................................................9
Requirements and stack setup for Windows.......................................................................................10Overview........................................................................................................................................10Download.......................................................................................................................................10Stack for CRON (optional)............................................................................................................13Mailserver setup (optional)............................................................................................................13Stack for PPT conversions (optional)............................................................................................13General troubleshooting.................................................................................................................14
Installing application..........................................................................................................................16Prerequisites...................................................................................................................................16Installation package.......................................................................................................................16Installation URL............................................................................................................................16Installation Wizard.........................................................................................................................16What to do after installation...........................................................................................................20Trial period.....................................................................................................................................20Activating lifetime license.............................................................................................................20Further steps...................................................................................................................................21Troubleshooting.............................................................................................................................21
Setup or change domain (hostname) and configure HTTPS..............................................................23The goal.........................................................................................................................................23Prerequisites...................................................................................................................................23How to setup HTTPS.....................................................................................................................23Troubleshooting.............................................................................................................................24
Changing the production domain.......................................................................................................25Prerequisities..................................................................................................................................25Synopsis.........................................................................................................................................25How to change a production domain after installation..................................................................25Troubleshooting.............................................................................................................................26
Performance........................................................................................................................................27Hardware decisions........................................................................................................................27How much RAM?..........................................................................................................................27What storage?.................................................................................................................................29What CPU?....................................................................................................................................29Optimalizations..............................................................................................................................29Further tuning................................................................................................................................30Database performance issues.........................................................................................................30Load tests.......................................................................................................................................30
Caching...............................................................................................................................................32Performance test report.......................................................................................................................34
Disclaimer......................................................................................................................................34Methodology..................................................................................................................................34Test case scenario...........................................................................................................................34
3 / 59 Last update 2017-04-18, 20:24:28

Test software used..........................................................................................................................35Application version........................................................................................................................35Database items...............................................................................................................................35Configuration A.............................................................................................................................35Configuration B.............................................................................................................................47Configuration C.............................................................................................................................48Configuration D.............................................................................................................................49Configuration E..............................................................................................................................50Configuration F..............................................................................................................................51Configuration G.............................................................................................................................52Configuration H.............................................................................................................................53Conclusion.....................................................................................................................................54How to understand reports?...........................................................................................................54Amazon AWS EC2 configurations................................................................................................56
Project structure..................................................................................................................................58
4 / 59 Last update 2017-04-18, 20:24:28

Requirements and stack setup for LinuxSpecification of software stack when deploying to in-house hosting (your hosting or web server).
Supported operation systems and stack components
Warning: it is NOT recommended to use 3rd party WAPP or simillar software bundle to establish the web server environment. Also, we will not teach you how to use Linux. We assume you know what are you doing. We recommend you use some "base" or "minimal" installation and run updates,upgrades and additional pacakges installations based on your specific needs and conditions to establish stable and secure environment.
Netventic version Supported stack
Since 4.0.0 Ubuntu 14Apache 2.4PHP 5.5Postgre 9.3
For more info about Ubuntu releases & news see https://wiki.ubuntu.com/Releases
Note: many other Linux distributions suitable for web server will work just fine, such as:
• Amazon Linux• Red Hat• SuSE Linux• Slackware• Gentoo• Debian
We do not officially support other distributions than Ubuntu yet.
For Windows OS see "Requirements and stack setup for Windows" chapter.
Download application
First, log into Netventic account at http:// www.netventic.com/account and download installation package (netventic_x.x.x.zip).
Ubuntu 14
Basic requirementsThese requirements should be matched:
• Apache 2.4• PHP 5.5 • PostgreSQL 9.3
Optional requirementsThese is required for PPT to PNG conversion while inporting PowerPoint presentations. If you do not need this fuctionality, you can ignore this part.
• Java
Requirements and stack setup for Linux 5 / 59 Last update 2017-04-18, 20:24:28

• Open Office• For PHP must be allowed the exec() function
Required software
Web server
Apache 2.4 - http://httpd.apache.org/
#apt-get install apache2
enable mod_rewrite:#a2enmod rewrite#service apache2 restart
enable the use of .htaccess for desired directory (typically /var/www/) in file /etc/apache2/sites-available/default using the directive „AllowOverride All“, sample:<Directory /var/www/> Options FollowSymLinks MultiViews AllowOverride All Order allow,deny allow from all </Directory>
Database
PostreSQL - http://www.postgresql.org/
PostreSQL 9.3
#apt-get install postgresql
#apt-get install php5-pgsql
PhpPgAdmin - http://www.pgadmin.org/
Install PhpPgAdmin - http://www.pgadmin.org/
#apt-get install phppgadmin
PostgreSQL - Tools & new database basic setup
– If you need to acces phppgadmin from another computer (getting Forbidden (403) error when tryiing to access phppgadmin), locate /etc/apache2/conf.d/phppgadmin and allow access from your IP address(s) or to all (not recommended)
– Set password for “postgres” superuser:# su postgres# psqlposgres=# \password postgresposgres=# \q
– Disable extra login security (otherwise you wil not be able to log in using phpPgAdmin):- locate /etc/phppgadmin/config.inc.php and change following property value true:
Requirements and stack setup for Linux 6 / 59 Last update 2017-04-18, 20:24:29

$conf['extra_login_security'] = false;
– Restart postgresql# /etc/init.d/postgresql restart
– Browse phpPgAdmin http:// your servername.com/phppgadmin
– Login using “postgres” superuser credentials
– Create new role (user) named “projectcom001”* - set password - allow create DBs + allow login
– Logout and re-login as user “projectcom001”*
– Create new empty database named “projectcom”Note: database encoding must be UTF-8, use strong password and keep all credentials on safe place.
– In this new database create new schema named “projectcom001”** you can choose different name according to your projectImportant: you must keep the same database role (user) name and database schema name, otherwise the installation process will fail.
– Then create procedural language “plpgsql” using this command in psql console:
CREATE PROCEDURAL LANGUAGE plpgsql;
PHP
PHP 5.5 - http://www.php.net/
#apt-get install libapache2-mod-php5 php5 php5-gd
ionCube Loader
http://www.ioncube.com/loaders.php
Download Linux x64 loader:
#wget http://downloads.ioncube.com/loader_downloads/ioncube_loaders_lin_x86-64.tar.gz
Extract and move:
#tar zxvf ioncube_loaders_lin_x86-64.tar.gz
#mv ioncube /usr/local/
Add ioncube extension to php ini:
#echo "zend_extension=/usr/local/ioncube/ioncube_loader_lin_5.5.so"> '/etc/php5/conf.d/00-ioncube_loader.ini'
restart apache:
#/etc/init.d/apache2 restart
Requirements and stack setup for Linux 7 / 59 Last update 2017-04-18, 20:24:29

Optional - Stack for CRON
Required for automatic initiation of reccurring tasks – used in e-mailing component or for regular tmp cleanups and simillar tasks.
If you need support to e-mail sending, mail server have to be installed:
#apt-get install exim4
#dpkg-reconfigure exim4-config
Setup cron to run cron_launcher.php as often as you want. Following example show how to enable 1 minute period:
#mkdir /etc/cron.1minute
edit /etc/crontab file - add this line:* * * * * root cd / && run-parts /etc/cron.1minute
Create file /etc/cron.1minute/netventic_cron and run cron_launcher.php
#vim /etc/cron.1minute/netventic_cron
file content:#! /bin/sh
php /var/www/components/cron_launcher.php
set execute permissions to file /etc/cron.1minute/netventic_cron
Optional - PPT conversions
Java Open Document convertor – used for importing PPT files into courses.
Open Office - http://www.openoffice.org
#apt-get install openoffice.org
Java - http://java.com (optional, should be installed by OOO)
#apt-get install openjdk-6-jre
Open Office needs to run as an service listening on port 8100. Example of start command:
#soffice --headless --accept="socket,host=127.0.0.1,port=8100;urp;" --nofirststartwizard&
Note: generally is a good idea to add start command of the Openoffice service into scripts executed after server stratup (for case of restarting the machine).
– Create file /etc/init.d/soffice.sh
file content:#! /bin/sh
# /etc/init.d/soffice.sh
Requirements and stack setup for Linux 8 / 59 Last update 2017-04-18, 20:24:29

#
case "$1" in
start)
/usr/bin/soffice --headless --accept="socket,host=127.0.0.1,port=8100;urp;" --nofirststartwizard&
;;
stop)
;;
*)
echo "Usage: /etc/init.d/soffice.sh {start|stop}"
exit 1
;;
esac
exit 0
– #chmod 755 /etc/init.d/soffice.sh
– #update-rc.d soffice.sh defaults
In addition for PHP must be allowed the exec() function.
Troubleshooting
• Check <app_root>\config\cfg.ini.php file, variable "platform". This must match your platform (1 = Linux, 2 = Windows).
• Folder for temporary files must be edabled for writing by Open Office service owner and apache. This path is required to running the converting functuions and must be properly configured in <app_root>/config/config.php ('tmp_import_path')Note: good idea is to ensure regular cleanup of tmp files within this temporary folder.
General troubleshooting
If installation fail even when all requirements are matched and php.ini directives mentioned above are set up, then first use this php.ini directive to turn PHP error messages on:
display_errors = On
Please note: do not use display_errors = On in production!
Then please provide more info about error:
1) Provide operating system including version.
2) Provide what software did you use including versions.
2) Provide (copy & paste) text(s) or screenshot(s) of any error(s) displayed.
3) Provide any other additional info that can help us to find a solution for error.
Requirements and stack setup for Linux 9 / 59 Last update 2017-04-18, 20:24:29

Requirements and stack setup for WindowsSpecification of software stack when deploying to in-house hosting (your hosting or web server).
Overview
Supported operation systems
• Windows Server 2012 R2 64-bit
Basic requirements
These requirements must be matched.• Apache 2.4• PHP 5.5 • PostgreSQL 9.3
Optional requirements
• Stack for PPT conversions◦ Java◦ Open Office◦ For PHP must be allowed the exec() function
Download
Log into Netventic account at http:// www.netventic.com/account and download the following files:
• Netventic installation package (netventic_x.x.x.zip)
Warning: it is not recommended to use 3rd party WAPP or simillar software bundle to establish the web server environment.
Install webserver - Apache 2.4
Download apache 2.4 from apache.org: http://www.apachelounge.com/download/VC15/binaries/httpd-2.4.33-Win32-VC15.zip
Extract Apache 2.4 into “C:\Apache24\”
Install httpd service:
To install as a service. Open command prompt as Administrator and type:
httpd.exe -k install
Double click ApacheMonitor.exe, or put it in your Startup folder.
Start apache service in apacheMonitor.
To enable mod_rewrite uncomment in file “C:\Apache24\conf\httpd.conf” this line:
LoadModule rewrite_module modules/mod_rewrite.so
and change AllowOverride=None to AllowOverride=All in <Directory "C:/A pache2 4 /htdocs "> section
Requirements and stack setup for Windows 10 / 59 Last update 2017-04-18, 20:24:29

• Tip: for more visit Apache website http://httpd.apache.org/
Install database manager – PgAdmin 3
Download pgadmin from: https://ftp.postgresql.org/pub/pgadmin/pgadmin3/v1.22.2/win32/pgadmin3-1.22.2.zip
Install PgAdmin 3
• For more info visit http://www.pgadmin.org/
Install database - PostgreSQL 9.3
Download postgresql 32-bit from: http://www.enterprisedb.com/postgresql-9351-installers-win32?ls=Crossover&type=Crossover
Install PostgreSQL 9.3 into “C:\PostgreSQL\“ folder
To enable postgres support in php add in file “C:\apache2\conf\httpd.conf” this line:
LoadFile "C:\PostgreSQL\bin\libpq.dll"
Create PostgreSQL database
1) Run PgAdmin3
2) Log into PostgreSQL using “postgres” superuser
3) Create new empty database named “projectcom” 1)
Note: database encoding must be set to UTF-8 otherwise the installation will fail.
4) In this new database create new schema named “postgres” 2)
1) You can choose different name according to your project name2) Important: you must keep the same database schema name and the database role (user) name and, otherwise the installation process will fail.
Install PHP 5.5
Download PHP 5.5 from: https://windows.php.net/downloads/releases/archives/php-5.5.38-Win32-VC11-x86.zip
Copy all files from archive to C:\php.
Enable PHP 5.5 in file “C:\apache2\conf\httpd.conf” by adding this lines:LoadModule php5_module "C:/php/php5apache2_4.dll"
AddHandler application/x-httpd-php .php
# configure the path to php.ini
PHPIniDir "C:/php"
<FilesMatch \.php$>
SetHandler application/x-httpd-php
</FilesMatch>
Rename php-production.ini file to php.ini
Requirements and stack setup for Windows 11 / 59 Last update 2017-04-18, 20:24:29

Changes in php.ini:
switch short open tag from Off to On:
short_open_tag = On
enable pgsql extension (uncomment and change line):
extension=C:/php/ext/php_pgsql.dll
enable mbstring extension (uncomment and change line):
extension=C:/php/ext/php_mbstring.dll
Enable GD library extension in php.ini file (uncomment and change line):
extension=C:/php/ext/php_gd2.dll
Enable Fileinfo extension in php.ini file (uncomment and change line):
extension=C:/php/ext/php_ fileinfo .dll
set correct timezone (uncomment and change line):
date.timezone = Europe/Dublin
Download ioncube loader from: http://downloads3.ioncube.com/loader_downloads/ioncube_loaders_win_vc 11 _x86.zip
Copy ioncube_loader_win_5.5.dll from downloaded archive to C:\php\ext\
Add this line to php.ini file:
zend_extension=C:/php/ext/ioncube_loader_win_5.5.dll
Incrase upload files size to 500MB in php.ini file :
upload_max_filesize = 500M
post_max_size = 508M
Add C:\php to windows environment variable Path
STOP Apache and START it again.Note: RESTART will not work.
You have successfully finished stack setup.
Futher steps:Now you can continue with setup of the optional stacks, or, you can run the Netventic installation process. This process is described in „learnis_installation_tutorial.pdf“. You can
Requirements and stack setup for Windows 12 / 59 Last update 2017-04-18, 20:24:29

download this file in Netventic account.
Stack for CRON (optional)
Required for automatic initiation of reccurring tasks – used in e-mailing component or for regular tmp cleanups and simillar tasks.
Launch Windows Task Scheduler (Start > Administrative Tools > Task scheduler)
Add new task triggered as often as you want (recommended 5 minute) with action Start a program –C:\php\php.exe C:\Apache24\htdocs\components\cron_launcher.php
Mailserver setup (optional)
Required by e-mailing component to send messages using SMTP server. Mail server should listening on port 25 for localhost requests.
Stack for PPT conversions (optional)
Required for PPT to PNG conversion when converting and importing PowerPoint presentations intocourses. If you do not need this fuctionality, you can ignore this part.
• Download and install Open Office from:
For more info visit http://www.openoffice.org
• Download and instal Java JRE into “C:\java\“ folder from:
http://javadl.sun.com/webapps/download/AutoDL?BundleId=94212
For more info visit http://java.com
• Download and install Windows Server 2003 Resource Kit Tools into “C:\reskit\“ folder from:
http://www.microsoft.com/en-us/download/details.aspx?id=17657
For more info visit http://go.microsoft.com/fwlink/?LinkId=4544
Openoffice needs to run as an service listening on port 8100.
Instructions to run Open Office as Windows service:
1) At a MS-DOS command prompt (running CMD.EXE), type the following command:
C:\reskit\Instsrv.exe OpenOfficeService C:\reskit\Srvany.exe
2) Run Registry Editor (Regedt32.exe) and locate the following subkey:
HKEY_LOCAL_MACHINE\SYSTEM\CurrentControlSet\Services\ OpenOfficeService
3) From the Edit menu, click Add Key. Type the following and click OK:
Key Name: Parameters
Requirements and stack setup for Windows 13 / 59 Last update 2017-04-18, 20:24:29

Class : <leave blank>
4) Select the Parameters key
5) From the Edit menu, click Add Value (String value). Type the following and click OK:
Value Name: Application
Data Type : REG_SZ
String: C:\Program Files (x86)\OpenOffice.org 3\program\soffice.exe
6) Add another value (String value) to the Parameters key:
Value name: AppParameters
Data Type: REG_SZ
String: -headless -accept=socket,port=8100;urp; -nologo -nofirststartwizard
7) Close Registry Editor
8) Start service by typing the following command at command prompt:
NET START OpenOfficeService
9) To check is our service running from a command prompt do:
netstat -anp tcp
(this shoud show a listening on port 8100)
10) If you use firewall, you may need to allow connections to port 8100.
In addition for PHP must be allowed the exec() function.
Troubleshooting
• Check C:\apache2\htdocs\config\cfg.ini.php file, variable "platform". This must match your platform (1 = Linux, 2 = Windows).
• Folder for temporary files must be edabled for writing by Open Office service owner and apache. This path is required to running the converting functuions and must be properly configured in config/config.php ('tmp_import_path')Note: good idea is to ensure regular cleanup of tmp files within this temporary folder.
General troubleshooting
If installation fail even when all requirements are matched and php.ini directives mentioned above are set up, then first use this php.ini directive to turn PHP error messages on:
display_errors = On
Please note: do not use display_errors = On in production!
Then please provide more info about error:
1) Provide operating system including version.
Requirements and stack setup for Windows 14 / 59 Last update 2017-04-18, 20:24:29

3) Provide (copy & paste) text(s) or screenshot(s) of any error(s) displayed.
4) Provide any other additional info that can help us to find a solution for error.
Requirements and stack setup for Windows 15 / 59 Last update 2017-04-18, 20:24:29

Installing applicationApplication is installed automatically using Netventic Installation Wizard.
Prerequisites
• Make sure to read and match Netventic software requirements and environment setup for your platform
• Make sure to enable JavaScript in your browser and allow pop-up windows for URL of the installation
• Do the backup of the server before installation, specially if there are any other apps or services running
Installation package
To download the installation package please proceed with following steps:
1) Download the installation package via Netventic Account
2) Upload the package archive to server folder where where application will be placed (on Windows “C:\apache2\htdocs“ or /var/www/ on Linux for example).
3) Extract the archiveNote: on Linux might be needed to set permissions to /var/www folder recursive otherwise the installation will fail on first attempt to write.Use commands:chmod -R 775 /var/wwwchown -R www-data:www-data /var/www
Installation URL
Installation URL is the address where the application is being installed and where it will be accessible after installation.
Important: However the installation URL can be changed after the installation, to avoid this migration it is recommended to install to a final URL.
Application supports almost any type of valid URL, namely https:// protocol and port number.
Examples of valid installation URLs:
• http://project.com , http://www.project.com, http:// subdomain .project.c om:722
• https://project.com , https://www.project.com, http s :// subdomain .project.co: 722
• http://localhost , http://127.0.0.1, http://192.168.1.100:30500
Note: “hosts” file can be used for temporary or permanent URL routing
Installation Wizard
1) Go to http://<project.com>/admin/service/appmanager/install.phpNote: <project.com> is your installation URL
2) Start page of the Installation Wizard is launched:
Installing application 16 / 59 Last update 2017-04-18, 20:24:29

3) Read the license agreement and confirm it.
4) Click button Start installation
5) Page Requirements is displayed:
6) Check if your system matches the requirements.If yes, click Next on the bottom of the page.
7) Page Database is displayed:
Installing application 17 / 59 Last update 2017-04-18, 20:24:29

8) Fill in the form with properties of your database:Name, Schema, Host, User, PasswordNote: Installation Wizard will check database connection at this point.
9) When done, click Next
10) Page Profile is displayed:
11) Fill in Protocol and domain where the application is being installed.Note: Protocol and domain values are automatically detected from current URL but we recommend to check if everything is correct. If needed, you can override this values manually
12) Fill in password for superadmin user.
Installing application 18 / 59 Last update 2017-04-18, 20:24:29
Important: use strong password and keep it on safe place (use some password manager for example).
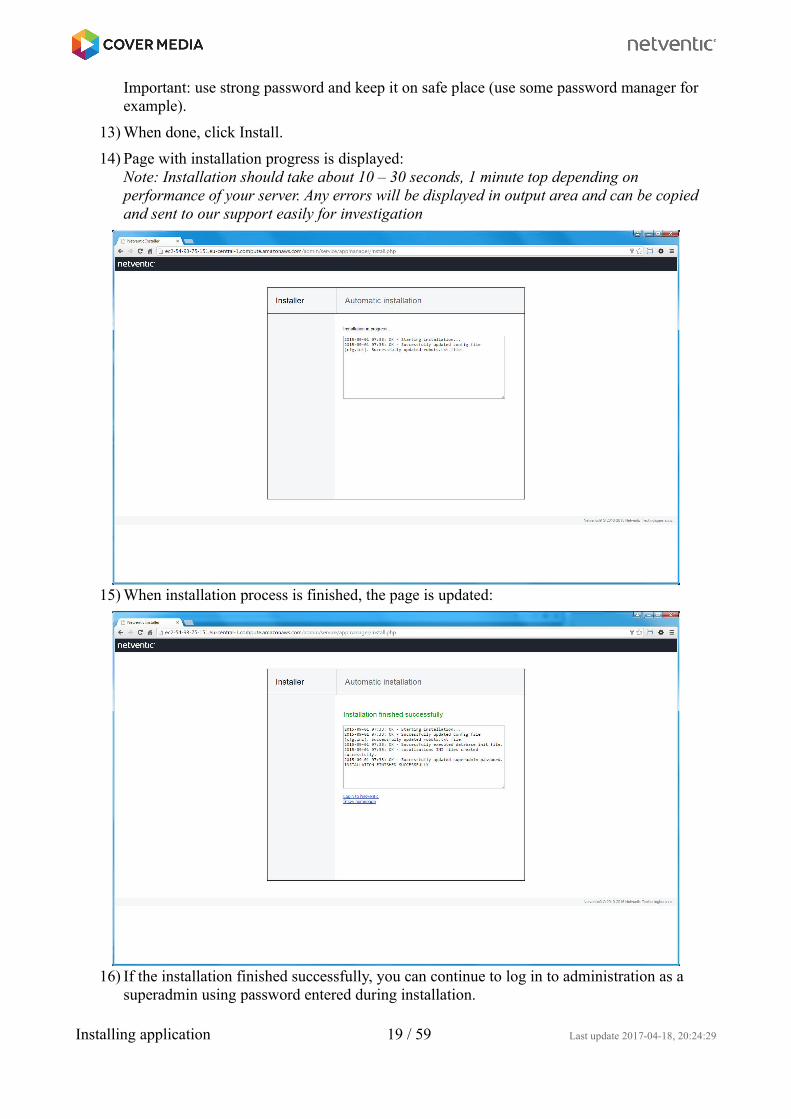
13) When done, click Install.
14) Page with installation progress is displayed:Note: Installation should take about 10 – 30 seconds, 1 minute top depending on performance of your server. Any errors will be displayed in output area and can be copied and sent to our support easily for investigation
15) When installation process is finished, the page is updated:
16) If the installation finished successfully, you can continue to log in to administration as a superadmin using password entered during installation.
Installing application 19 / 59 Last update 2017-04-18, 20:24:29

To go to the login page click Login to Netventic.Tip: You can bookmark login page for easy access in the future.
17) After logging in, You can start using the application.
What to do after installation
Trial period
Important: After installation the system is using the 30 day trial license key.
You can evaluate the all features in this period.
Activating lifetime license
To use Netventic application for a longer time you will need to load valid license key.
You License will be activated after receiving a payment.
When you are notified about a license activation, please:
1. Proceed to the Netventic Account and log in using your credentialLogin page: https://www.netventic.com/login
2. Navigate to the My Products → Downloadable instances
3. Click Download license key and save the license key file to your local computer
4. To activate application using license key, go to Setup → System section
5. Switch to tab License key
6. Click Browse and navigate to a license key file (named lic.txt) on your computer
7. When done, click SaveNote: If Save button is disabled, there is more active administrators in system than allowed
Installing application 20 / 59 Last update 2017-04-18, 20:24:29

by license. To continue, you must deactivate some administrators first (to do this please navigate to the Setup → Administrators, edit the administrators you want to deactivate a usetool Deactivate.
18) Congratulations. System is activated with and ready to use.
Further steps
Security
Default accounts are only for first steps with new system, so they have password set to 1234 which can be easily broken.
Important: If the application is publicly accessible over the internet, mind the security and go to Setup → Administrators and:
1. Change default passwords for Admin, Trainer and Webmaster users to some strong one,
2. and / or deactivate (or delete) all unused default accounts.
Create new accounts
1. As a next step you can create new accounts and assign user roles to users as needed
Setup & Personalize the system
1. Go to Setup → Websites, select current site and personalize the system.2. Go to Setup → System to configure external SMTP server or Active Directory
Troubleshooting
If installation fails and yo want to try again, drop the database schema and all installation files from installation folder.
If installation is not able to write/update on whole folder and all installation files, the installation
Installing application 21 / 59 Last update 2017-04-18, 20:24:29

will fail. See how to change permissions for Linux above.
Installing application 22 / 59 Last update 2017-04-18, 20:24:29

Setup or change domain (hostname) and configure HTTPSSystem was originally installed to "http://www.project.com" and it was also a production domain where application was accessed.
The goal
Reconfigure Netventic to to support HTTPS protocol, so the application should be available on "https://www.project.com" in production.
Note: Application files will physically remain in the same location.
Prerequisites
We assume the application to be properly configured on original server with IP / address entered during the installation process.
That is needed because you will have to access the Setup section via Administration in order to finish this tutorial (otherwise you will be incorrectly redirected by system and you will not be able to access the Setup section and modify the data in database).
You need have properly generated and installed SSL certificate on you web server.
If you are not able to match the prerequisites, please see the solution in Troubleshooting section below.
How to setup HTTPS
Follow theese steps:
1. Log into Administration as an superadmin and navigate to Setup > Websites
2. There should be one record with server name www.project.com. Click Edit.
3. On tab Basic properties please change ALL values http://www.project.com to your new domain with SSL support (https://www.project.com)Note: Please be careful on slashes. The mistake can cause the system to malfunction.
4. When done click Save.
5. Locate file <approot>/config/cfg.ini.php and open it for editingNote: please make sure to keep the encoding of the file at UTF-8 when rewriting the file!
6. Look for key "core_domain" - change value http://www.project.com to your new production domain https://www.project.comNote: Please be careful on slashes again.
7. Save the file.
8. Now we can redirect all queries from "http://..." to "https://..." to avoid the instance of system to be accessible on old and new address (which is not wanted as system can be configured to be correctly working only on one address (URL) at the same time); this is important namely when the system was already running on the "http://..." address.Please modify <approot>/.htaccess file, as shown below:- locate second line with #WWW comment a change "http://..." to "https://..."
Setup or change domain (hostname) and configure HTTPS 23 / 59Last update 2017-04-18, 20:24:29

- after that line, add following lines (and replace project.com with your domain name):#redirect all queries to httpsRewriteCond %{HTTPS} offRewriteRule ^(.*)$ https://www.project.com/$1 [R=301,QSA,L]
9. Save the .htaccess file
10. Reconfigure also to your CRON or whatever you use to running Launcher
Troubleshooting
If you are not able to access the Admin section, use any available postgreSQL tool (PgAdminIII for example) to access the database directly. Locate table "settings", look for columns "domain", "repository", "domain_admin", "domain_io", "domain_noHttp" - change ALL values to your new production domain.
Note: Please be careful on slashes. The mistake can cause the system to malfunction.
Setup or change domain (hostname) and configure HTTPS 24 / 59Last update 2017-04-18, 20:24:29

Changing the production domainHow to change production domain of the Learnis Server already installed on your server.
Prerequisities
We assume the application to be properly configured on original server with IP / address entered during the installation process.
That is needed because you will have to access the Setup section via Administration in order to finish this tutorial (otherwise you will be incorectly redirected by system and you will not be able toaccess the Setup section and modify the data in database).
If you are not able to match the prerequisities, please see the solution in Troubleshooting section below.
Synopsis
System was originally installed to „192.168.0.1“ and it was also a production domain where application was accessed.
Later we need to change the production domain – application schould be available on „www.project.com“ in production.
Also, the application files will physically remain in original location (192.168.0.1).
How to change a production domain after installation
Follow theese steps:
1. Setup new DNS records for new production domain (www.project.com) first:A records for „www.project.com“ (and also possibly „project.com“ for non-www format) must be routing to IP of production server, where the instance is physically placed. In this case the records should looks like this:A record for www.project.com: 192.168.0.1A record for project.com: 192.168.0.1Note: propagate of new DNS records may take up to 24-48 hrs depending on DNS records update time setting (TTL cache)
2. Log into Administration as an superadmin and navigate to Setup > Websites
3. There should be one record with server name 192.168.0.1. Click Edit.
4. On tab Basic properties please change ALL values 192.168.0.1 to your new production domain (www.project.com)Note: Please be careful on slashes. The mistake can cause the system to malfunction.
5. When done click Save.
6. Locate file <approot>/config/cfg.ini.php and open it for editingNote: please make sure to keep the encoding of the file at UTF-8 when rewriting the file!
7. Look for keys "domain_noHttp" and "core_domain" - change BOTH values 192.168.0.1 toyour new production domain (www.project.com)Note: Please be careful on slashes again.
8. Save the file.
Changing the production domain 25 / 59 Last update 2017-04-18, 20:24:30

9. To avoid the instace of system to be accessible on both addresses, which is not wanted as system can be configured to be correctly working only on one production domain at the same time, please modify <approot>/.htaccess file, as shown below:
10. Locate second line with #WWW comment:#WWW##RewriteCond …#WWW##RewriteRule … [R=301,QSA,L]
11. Add following lines to line under the second #WWW conditions:#redirect all queries to production domainRewriteCond %{HTTP_HOST} ^192.168.0.1$RewriteRule ^(.*)$ http://www.project.com/$1 [R=301,QSA,L]
12. Save the .htaccess file
13. Go to your cron folders, for example CRON.10minutes and locate launcher file and add newdomain into task. Remove old one.
Troubleshooting
If you are not able to access the Admin section, use any available postgreSQL tool (PgAdminIII for example) to access the database directly. Locate table "settings", look for columns "domain", "repository", "domain_admin", "domain_io", "domain_noHttp" - change ALL values (should be 192.168.0.1) to your new production domain (www.project.com)
Note: Please be careful on slashes. The mistake can cause the system to malfunction.
Changing the production domain 26 / 59 Last update 2017-04-18, 20:24:30

PerformanceNetventic Learnis can be configured to perform quite well and scale up to many thousands of users. The factors involved in performance are basically the same as for any PHP based system with data stored in SQL database.
Hardware decisions
Before choosing the server and installing the system we recommend you to make a few hardware configuration decisions based on a some calculations.
1) How many concurrent users you want/need to handle?
2) What will be the character of the load? Peaks?
3) What are the requirements for storage? I/O banwith, size, redundancy, speed (latecny)?
4) How many total data you expect to store? Videos? Hi-res photos?
5) Are there any other specific issues? Public e-learning portal, public courses f.e.?
Based on this we should be able to decide:
• how much RAM...
• how many CPUs / cores - frequency, cache...
• what disk type - SATA, SCSI, SSD...
• what disk configuration - which RAID...
• how many machines - one server, farm with loadbalancer, cloud solution...
How much RAM?
Amount of the RAM has usually the biggest impact on the performance. So, get as much as you can. Ofcourse, on the other hand, it is not economicall to over-estimate the required memory. It can be very expensive mistake.
For calculating the RAM we need to estimate the number required concurrent users, the average size of processes (apache and postgre process) combined in one HTTP request and the amount of RAM used by OS and other services.
Concurrent users
The load on the server at a particular time depends on the number of concurrent users.
Not on the total number of user accounts and not on the number of users logged-in. The term "concurrent users" is used to mean those users for whom the server is actively doing something - sending HTTP requests by clicking is the most often.
As the concurrent users activity is quite random, it is hard to measure and calculate with. So when calculating the exact concurrency is the only wasy to strictly mean a number of active web server processes - concurrent processes.
Performance 27 / 59 Last update 2017-04-18, 20:24:30

Concurrent processes
Every user's click generates a HTTP request to the server and require an Apache subprocess, and, if the database is involved in the particular part of the application, also the postgres sub-process. Each of which consume some memory and also it require an webserver connection and database connection.
Size of the processes
Netventic Learnis is a quite complex application. One HTTP request, like a rendering a page with a course content, require approx. 40-75 MB of RAM. Statistically there is more processes of the morecomplex ones, so we calculate with the average size of the 68 MB*. This includes both apache and postgress process.
* This is only informative. Environment used: Netventic Learnis 3.6.1, Debian 6 with 24GB of memory. On different versions and different configs the size may wary. Windows Server processes size may be quite different! Please make your own investigation on this for your particular situation.
OS memory consuption
It depend on many things. Best way is to install configuration of your choice and see what are the demands.
For more info see:Reqirements and Environment setup for LinuxReqirements and Environment setup for Windows
For standard Linux distribution suitable for webserver, if you dont want to spent a time with this, use about the 1 GB per each 8 GB of installed memory.
Calculation
For 150 concurrent processes it is:
150 x 68 = 10.2 GB of RAM.
So your option will be probably 16 GB of RAM, so add more 2 GB for OS:
10.2 + 2 = 12.2 GB
And you have also some spare RAM for additional tasks like running backups f.e.
See follown table for pre-caltulated estimates*:
Required amount of concurrent processes Estimated amount of RAM needed
100 8 GB
200 16 GB
450 32 GB
850 64 GB
1700 128 GB
3000 224 GB* for simplicity let's assume one physical server dedicated only to LMS
Performance 28 / 59 Last update 2017-04-18, 20:24:30

What storage?
Disk types
Fast SSD or Ultra SCSI disks are the best option, however high end SATA drives are also very good.
Disk configuration
If you dont have any specific requirements go with 4 SATA disk in RAID 10 (RAID 1+0).
What CPU?
More CPUs is better. But it is not only speed that matters. As the LAPP stack running on unix machines is very well scalling using multi-threaded architecture, the biggest impact on performance has more cores (threads or vCPUs in cloud). This is most important namely for environment with high concurrency.
To understand the impact of number of cores and to see what is possible to handle with various configurations, please see the Performance test report chapter.
Optimalizations
There are other possible server-side optimalizations to speed up the entire application. This is supposed to be tuned based on analysis of the real situation to determine the bottlenecks.
Apache configuration
All changes are recommended to do using apache .conf file.After changes restart the webserver (stop+start can be not enough).
Note: All following setting are done on Apache 2.2.16 on Debian 6
Option Recommended value
MaxClients Set to number of calculated concurrent processes.Note: when going above 256 you need to change ServerLimit option too (default is 256), need to add (is not listed by default).
KeepAliveTimeout Set this number to lower values (5s f.e.) then default (15s) if this is the problem. We reccomment to set this based on real-life tests and real-life audience.
Postgres configuration
All changes are recommended to do using potgres .conf file.After changes restart the postgres.
Note: All following setting are done on PostgreSQL 8.4 on Debian 6 with 24GB RAM.
Option Recommended value
shared_buffers* Set allocation of 25% availlable free memory to postgres - 5,5GB
effective_cache_size* Set allocation of 50% availlable free memory to postgres - 11 GB
max_connections Set to at least to apache MaxClients option* need to change kernel SHMMAX to value of combined needed amount of memory, in this case
Performance 29 / 59 Last update 2017-04-18, 20:24:30

50% of availlable free memory with some spare space - 12 GB.
How to change SHMMAX option on Debian 6
• add to /etc/sysctl.conf this line:kernel.shmmax = <value in bytes>
• apply new setting by running:sysctl -p /etc/sysctl.conf
Further tuning
Webserver
• Apache tuning - minimalising the memory footprint (unused modules, custom compilation)
• Change MPM module from prefork to worker (less memory usage, better for more CPUs)
• Choosing a different webserver faster and less memory consuming than Apache (nginx, lightppd,...)
Connection pooling
If the bottleneck is a number of connections, setup a pgpool or other connection pooling software.
Kernel
Tune kernel parameters according to webserver and postgres needs (SHMMAX etc.).
Enable gzip compression support
Turn on zlib.output_compression for exampleon your server. Also the compression schould be set for various possible mimetypes:- HTML- CSS- JS- other cacheable mimetypes
Database performance issues
Performace problems can be often solved by optimalization of database views and functions after analysis of current bottlenecks. Also, an indexes can be build to speed and lower the load.
Load tests
Testing of the app/server performace cannot be done properly without a right tools. There is many load or stress test tools so let's pick at least this two:
ab - ApacheBench
Apachebench is available out of the box with Apache.
ab is a tool for benchmarking your Apache Hypertext Transfer Protocol (HTTP) server. It is designed to give you an impression of how your current Apache installation performs. This
Performance 30 / 59 Last update 2017-04-18, 20:24:30

especially shows you how many requests per second your Apache installation is capable of serving.
It is operated from command line. Opensource.
http://httpd.apache.org/docs/2.2/programs/ab.html
JMeter
The Apache JMeter™ desktop application is open source software, a 100% pure Java application designed to load test functional behavior and measure performance. It was originally designed for testing Web Applications but has since expanded to other test functions.
On image: Examples of load test visualisation using graph in JMeter
JMeter simulates the concurrent users nicely, can export logs to CSV,...
Opensource, written in JAVA. Has UI which allows to set up load tests for non-programmers.
https://jmeter.apache.org
Performance 31 / 59 Last update 2017-04-18, 20:24:30
CachingAlso whole caching subsystem is implemented for two reasons – speed and server load (both processing and bandwith load). There are several types of chaching involved in server-client interactions:
Type Level or technique
Application cache Images cache (class ImageGenerator, fce getSrc & loadScr)Localization strings cacheCSS images - sprites technique
Browser cache Expiration of cache in browser (set via HTTP headers)
Images cache
This type of cache is implemented everywhere the image is processed via imageGenerator class.
ImageGenerator classThis class is placed in <approot>\class\class_imagegenerator.php
Class is using this methods:• loadSrc – used for loading the url of cached image (string)• getSrc - used for loading the url of cached image (output echo)
getSrcThis class is used for caching images. When image from Media-library is used in page (anywhere insystém, both admin and site – depending on used template) then following procedure is applied:
• first hash of original image is acquired• then required image dimensions are acquired (input for method, defined in template
typically)• then other parametres are acquired (if any) like „square“, „crop“, „watermark“ etc.• in other step this data are compared to existing files in image cache directory• if file is matched, then this cached image path is returned into method• if file is not matched, then appropriate cached image is builded via GD library and cached
image path is returned into method
Image cache directory / pathBoth values are defined in config.php.Default value is: tmp\cache\images
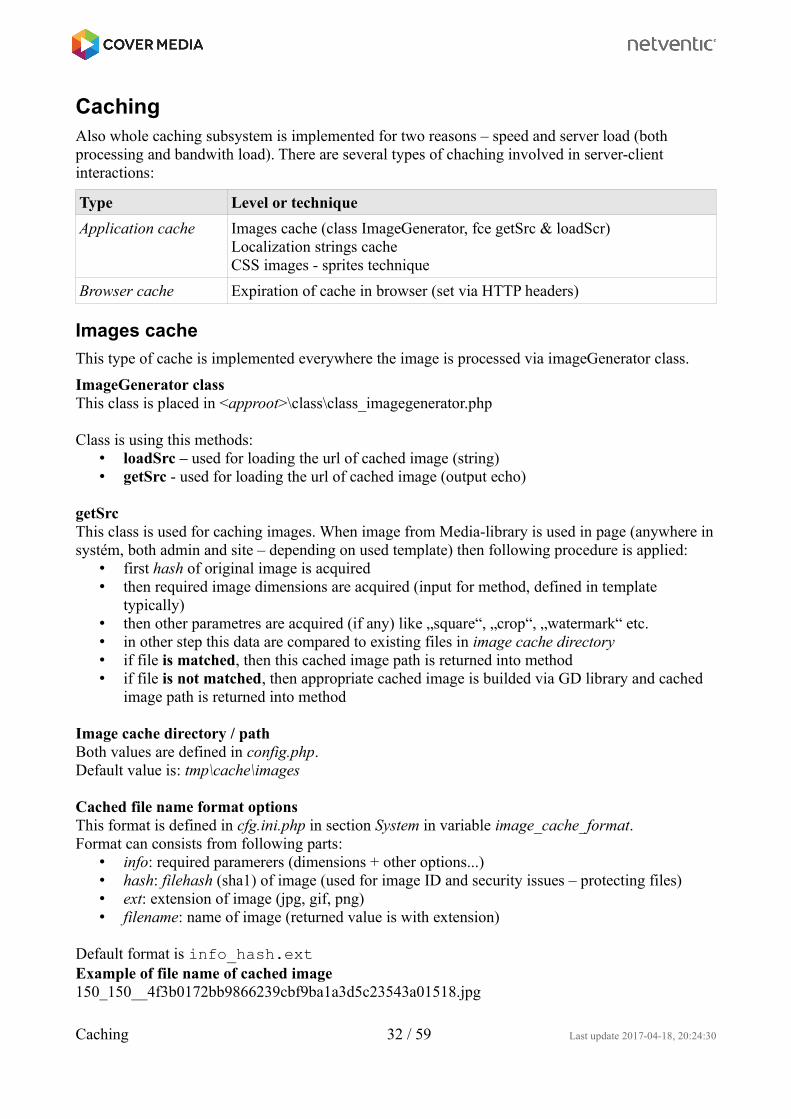
Cached file name format optionsThis format is defined in cfg.ini.php in section System in variable image_cache_format.Format can consists from following parts:
• info: required paramerers (dimensions + other options...)• hash: filehash (sha1) of image (used for image ID and security issues – protecting files)• ext: extension of image (jpg, gif, png)• filename: name of image (returned value is with extension)
Default format is info_hash.extExample of file name of cached image150_150__4f3b0172bb9866239cbf9ba1a3d5c23543a01518.jpg
Caching 32 / 59 Last update 2017-04-18, 20:24:30

Example of syntax of using imagegenerator in templates:ImageGenerator::loadSrc(security::image_getFullPath($value['image_path'] . $value['image_filename']), 180, 220, true, true, true);
For more examples see code_examples.tpl.php.
Localization strings cache
This type of cache is implemented everywhere the localization string is processed via Lang class.Cache folder is located in systemfiles repository: /tmp/cache/localization_strings/
Caching 33 / 59 Last update 2017-04-18, 20:24:30

Performance test report
Disclaimer
This report was proceeded by Netventic Technologies staff with intention to provide customers withinformation on what performance they can expect from Netventic Learnis LMS. We put maximum effort to setup environment and application to perform as much unbiased tests as possible. Anyway, the performance of the application depends on many circumstances, such as:
• computer hardware
• network configuration
• client configuration
• operating system and software configuration & condition
• LMS content
• number of items in database
As this is not a complete list, even other conditions may interfere with the tests.
Warning: Netventic does not provide any guarantee, that the same values will be achieved with different configurations and/or conditions and Netventic is in no case liable for any loss resulting from using this report.
Methodology
All tests performed and presented here are synthetic tests by it's nature. However, we try to simulatethe real users behavior as truly as possible.
All tests were repeated multiple times (at least 3 times). Data presented here are from average test run (best and worst results were excluded out). If there was more than one result remaining, the "most average" was hand picked.
Apache and Postgres was restarted before each test run.
Test case scenario
Following operations were performed in one loop:
1) Acess Login page URL and sign user in
2) Visit URL of Courses list page
3) Visit URL of Course 1 detail page
4) Visit URL of Course 1 player page
5) Visit URL of Test 1 info page and start the Test 1 and generate test attempt (14 questions, random questions, random answers, unlimited attempt; otherwise kept default settings)
6) Visit URL of Test player, loading test attempt generated forwared to first question
7) Visit URL of Course 2 detail page
Ramp-up Period 1): allways 1s1) How long should take to get all the threads started.
Performance test report 34 / 59 Last update 2017-04-18, 20:24:30

Test software used
Apache JMeter (2.11 r1554548) on Windows 7 64-bit
Application version
Netventic Learnis 3.6.2
Database items
Please note: amount of items in database is increasing during tests as they perform all kinds of queries (including INSERT).
Table Item count
users 1.000~6.500
test_attempts 1.500~15.000
attempt_answers 50.000~500.000
attempt_questions 17.000~170.000
course_visit_history 7.000~21.000
courses_progress 4.000~12.000
Configuration A
Server Physical dedicated production grade web server (tuned)32GB RAM1x Xeon Quadcore 3.5Ghz1TB storage (hardware Raid1)100 Mbps networkRemote location with ~30ms latency
Hardware Motherboard SuperMicro X9SCI-LN4F Intel Xeon SingleProc SATA [1Proc]Processor Intel Xeon-IvyBridge E3-1270-V2-Quadcore [3.5GHz]RAM slot 1 Kingston 8GB DDR3 2rx8 8GB DDR3 2rx8 [8GB]RAM slot 2 Kingston 8GB DDR3 2rx8 8GB DDR3 2rx8 [8GB]RAM slot 3 Kingston 8GB DDR3 2rx8 8GB DDR3 2rx8 [8GB]RAM slot 4 Kingston 8GB DDR3 2rx8 8GB DDR3 2rx8 [8GB]Drive Controller Adaptec \ 5405 Z \ SATA/SAS RAIDBattery Adaptec Super Capacitor ZMM-100CCHard Drive 1 Western Digital WD RE4 WD1003FBYX [1000GB]Hard Drive 2 Western Digital WD RE4 WD1003FBYX [1000GB]Hard Drive 3+4 EmptyRemote Mgmt Card SuperMicro Nuvoton WPCM450 - Onboard IPMI-KVMPower Supply SuperMicro PWS-605P-1H 600WBackplane SuperMicro BPN-SAS-815TQ 4 Port Passive
System & software Debian 6.0.5-64PHP 5.3.3Apache 2.2.16, mpm_prefork_modulePostgreSQL 8.4.20IonCube loader 4.2.2 Linux (64 bits)Munin 1.4.5top
Storage configuration 2x 1TB in Raid1 (hardware)
Network (public) Max speed 100 Mbps
Network (private) Max speed 100 Mbps
Performance test report 35 / 59 Last update 2017-04-18, 20:24:30

Apache & Postgres setup
set Apache MaxClients to 140
set Postgre max_connections to 150
set Postgre working_mem to 32MB
set Postgre random_page_cost to 2.0
set Postgre shared_buffers to 5,5GB
set Postgre effective_cache_size to 11GB
apache KeepAliveTimeout = 15s (default)
other = default
Results
Summary
Overview of results by test case:
Testcase
Users1) Loops2) Responsetime3)
Throughput4) Totalrequests
Runtime5)
Errors
A#1 1 25 147ms 6,8/s* 175 25,0s 0%
A#2 8 25 226ms 33,8/s* 1400 41,4s 0%
A#3 16 15 386ms 39,3/s 1680 42,7s 0%
A#4 24 10 570ms 39,4/s 1680 42,6s 0%
A#5 32 10 771ms 39,2/s 2240 57,1s 0%
A#6 48 5 1135ms 38,4/s 1680 43,7s 0%
A#7 64 5 1530ms 38,0/s 2240 58,9s 0%
A#8 96 5 2400ms 37,8/s 3360 88,8s 0%
A#9 128 5 3187ms 37,4/s 4480 119,7s 0%
A#10 128 ~800 3374ms 37,9/s ~30000 ~13min 0,43%For explanation of headers see "Legend to Summary table" chapter.
Performance test report 36 / 59 Last update 2017-04-18, 20:24:30

Test case A#1
Performance test report 37 / 59 Last update 2017-04-18, 20:24:30

Test case A#2
Performance test report 38 / 59 Last update 2017-04-18, 20:24:30

Test case A#3
Performance test report 39 / 59 Last update 2017-04-18, 20:24:30

Test case A#4
Performance test report 40 / 59 Last update 2017-04-18, 20:24:30

Test case A#5
Performance test report 41 / 59 Last update 2017-04-18, 20:24:30

Test case A#6
Performance test report 42 / 59 Last update 2017-04-18, 20:24:30

Test case A#7
Performance test report 43 / 59 Last update 2017-04-18, 20:24:30

Test case A#8
Performance test report 44 / 59 Last update 2017-04-18, 20:24:30

Test case A#9
Test case A#10
Monitoring
Top
memory 12-15,5GB used
CPU 90% reached at 80 concurrent users
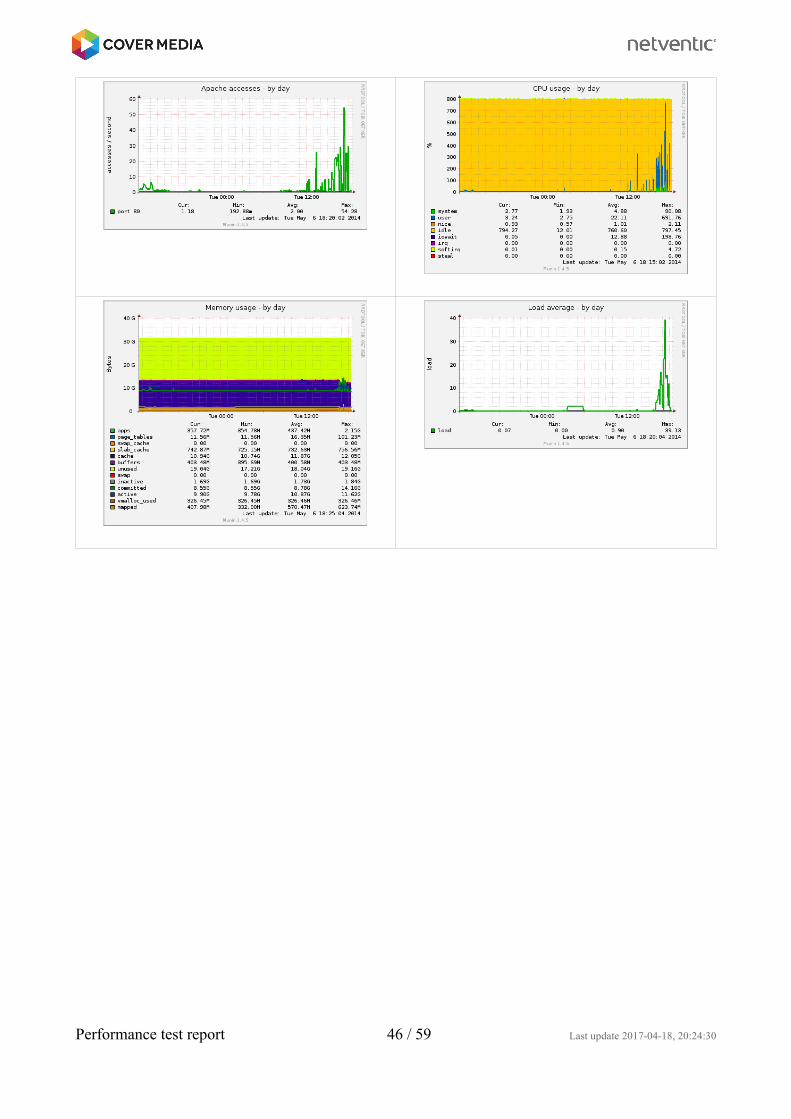
Munin
Performance test report 45 / 59 Last update 2017-04-18, 20:24:30
Performance test report 46 / 59 Last update 2017-04-18, 20:24:30
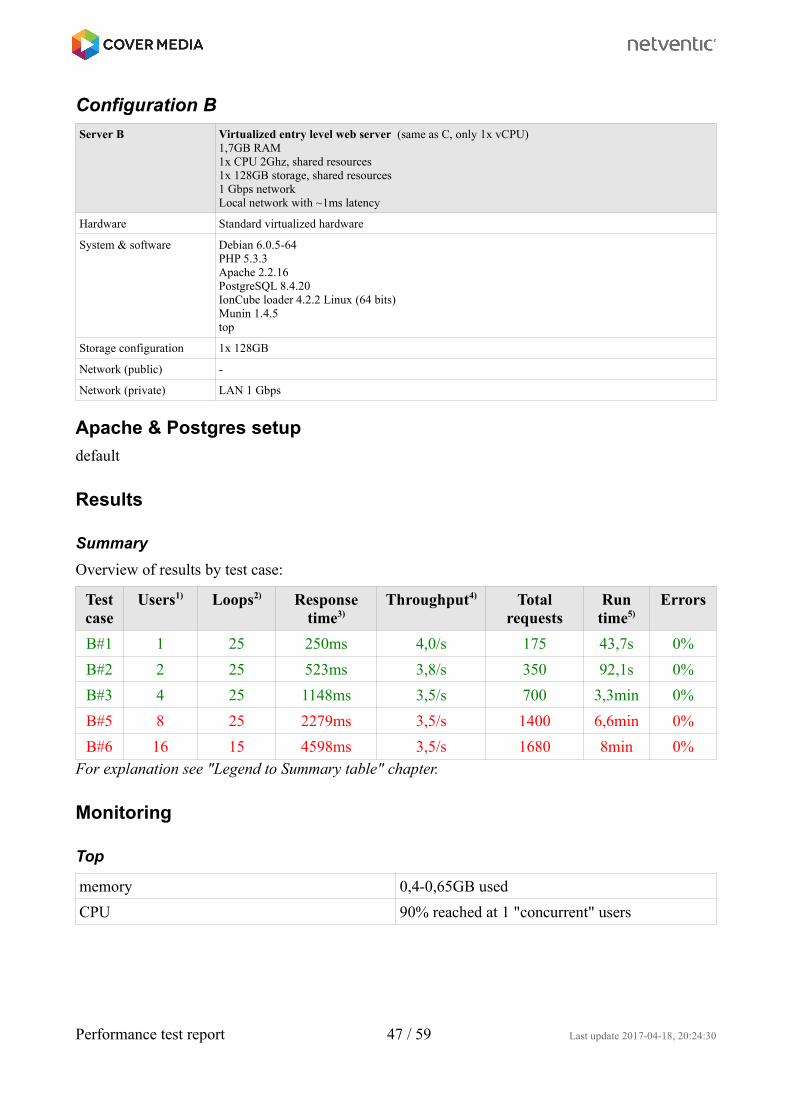
Configuration B
Server B Virtualized entry level web server (same as C, only 1x vCPU)1,7GB RAM1x CPU 2Ghz, shared resources1x 128GB storage, shared resources1 Gbps networkLocal network with ~1ms latency
Hardware Standard virtualized hardware
System & software Debian 6.0.5-64PHP 5.3.3Apache 2.2.16PostgreSQL 8.4.20IonCube loader 4.2.2 Linux (64 bits)Munin 1.4.5top
Storage configuration 1x 128GB
Network (public) -
Network (private) LAN 1 Gbps
Apache & Postgres setup
default
Results
Summary
Overview of results by test case:
Testcase
Users1) Loops2) Responsetime3)
Throughput4) Totalrequests
Runtime5)
Errors
B#1 1 25 250ms 4,0/s 175 43,7s 0%
B#2 2 25 523ms 3,8/s 350 92,1s 0%
B#3 4 25 1148ms 3,5/s 700 3,3min 0%
B#5 8 25 2279ms 3,5/s 1400 6,6min 0%
B#6 16 15 4598ms 3,5/s 1680 8min 0%For explanation see "Legend to Summary table" chapter.
Monitoring
Top
memory 0,4-0,65GB used
CPU 90% reached at 1 "concurrent" users
Performance test report 47 / 59 Last update 2017-04-18, 20:24:30

Configuration C
Server C Virtualized entry level web server (same as B, only 2x vCPU)1,7GB RAM2x vCPU 2Ghz, shared resources1x 128GB storage, shared resources1 Gbps networkLocal network with ~1ms latency
Hardware Standard virtualized hardware
System & software Debian 6PHP 5.3Apache 2.2PostgreSQL 8.4.IonCube loader 4.2.2 Linux (64 bits)top
Storage configuration 1x 128GB
Network (public) -
Network (private) LAN 1 Gbps
Apache & Postgres setup
default
Results
Summary
Overview of results by test case:
Testcase
Users1) Loops2) Responsetime3)
Throughput4) Totalrequests
Runtime5)
Errors
C#1 1 25 266ms 3,8/s* 175 46,0s 0%
C#2 2 25 275ms 7,2/s 350 48,6s 0%
C#3 4 25 561ms 7,0/s 700 100,0s 0%
C#5 8 25 1233ms 6,4/s 1400 3,6min 0%
C#6 16 15 2514ms 6,3/s 1680 4,4min 0%For explanation see "Legend to Summary table" chapter.
Monitoring
Top
memory 0,4-0,65GB used
CPU 90% reached at 1 "concurrent" users
Performance test report 48 / 59 Last update 2017-04-18, 20:24:31

Configuration D
Server D Amazon AWS EC2 m3.2xlarge instance8 vCPU26 ECU30 Memory (GiB)Remote location with ~40ms latency
Hardware Standard Amazon virtualized hardwarehttp://aws.amazon.com/ec2/
System & software Debian 6.0 64 bits base AMIPHP 5.3Apache 2.2PostgreSQL 8.4.IonCube loader 4.2.2 Linux (64 bits)top
Storage configuration Attached 10GB EBS volume (standard IOPS)
EC2 instance configuration
1 - default
See Amazon AWS EC2 configurations chapter...
Apache & Postgres setup
default
Results
Summary
Overview of results by test case:
Testcase
Users1) Loops2) Responsetime3)
Throughput4) Totalrequests
Runtime5)
Errors
D#1 1 25 298ms 3,3/s* 175 53,0s 0%
D#2 8 25 400ms 19,6/s* 1400 71,4s 0%
D#3 16 15 637ms 24,4/s 1680 68,8s 0%
D#4 32 10 1280ms 24,0/s 2240 93,3s 0%
D#5 48 5 1900ms 23,8/s 1680 70,6s 0%
D#6 64 5 2529ms 23,9/s 2240 93,7s 0%For explanation of headers see "Legend to Summary table" chapter.
Performance test report 49 / 59 Last update 2017-04-18, 20:24:31
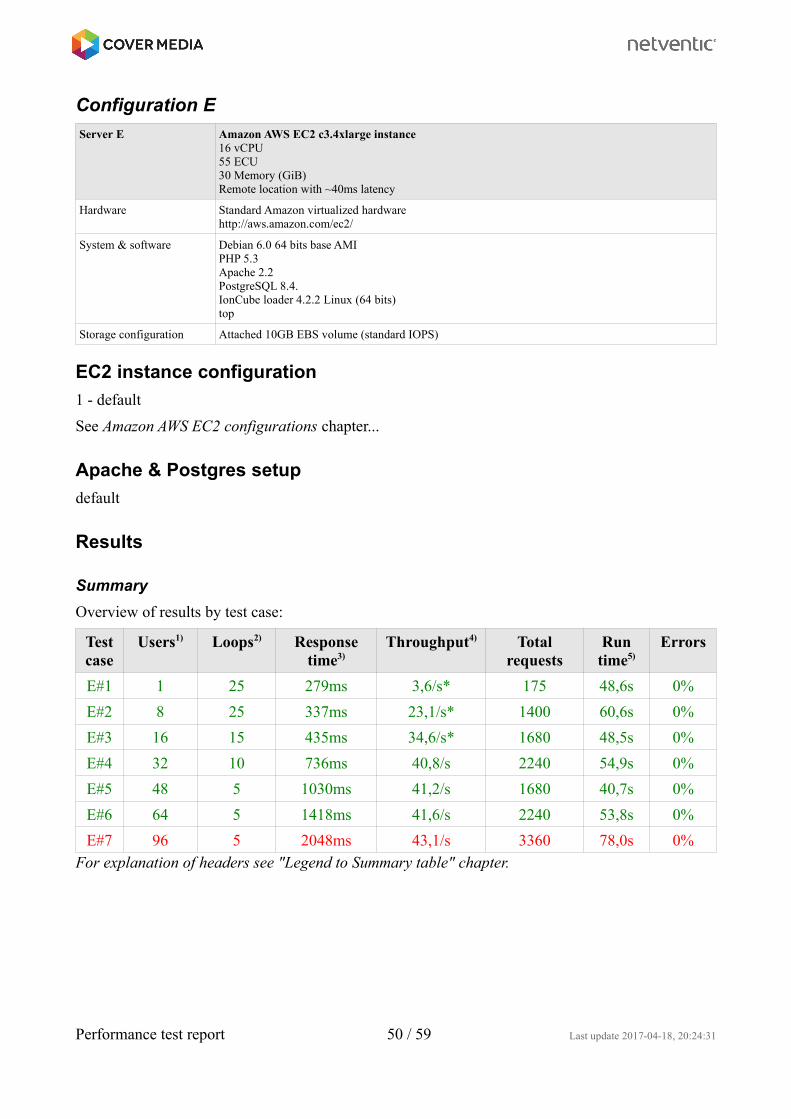
Configuration E
Server E Amazon AWS EC2 c3.4xlarge instance16 vCPU55 ECU30 Memory (GiB)Remote location with ~40ms latency
Hardware Standard Amazon virtualized hardwarehttp://aws.amazon.com/ec2/
System & software Debian 6.0 64 bits base AMIPHP 5.3Apache 2.2PostgreSQL 8.4.IonCube loader 4.2.2 Linux (64 bits)top
Storage configuration Attached 10GB EBS volume (standard IOPS)
EC2 instance configuration
1 - default
See Amazon AWS EC2 configurations chapter...
Apache & Postgres setup
default
Results
Summary
Overview of results by test case:
Testcase
Users1) Loops2) Responsetime3)
Throughput4) Totalrequests
Runtime5)
Errors
E#1 1 25 279ms 3,6/s* 175 48,6s 0%
E#2 8 25 337ms 23,1/s* 1400 60,6s 0%
E#3 16 15 435ms 34,6/s* 1680 48,5s 0%
E#4 32 10 736ms 40,8/s 2240 54,9s 0%
E#5 48 5 1030ms 41,2/s 1680 40,7s 0%
E#6 64 5 1418ms 41,6/s 2240 53,8s 0%
E#7 96 5 2048ms 43,1/s 3360 78,0s 0%For explanation of headers see "Legend to Summary table" chapter.
Performance test report 50 / 59 Last update 2017-04-18, 20:24:31

Configuration F
Server F Amazon AWS EC2 c3.8xlarge instance32 vCPU108 ECU60 Memory (GiB)Remote location with ~40ms latency
Hardware Standard Amazon virtualized hardwarehttp://aws.amazon.com/ec2/
System & software Debian 6.0 64 bits base AMIPHP 5.3Apache 2.2PostgreSQL 8.4.IonCube loader 4.2.2 Linux (64 bits)top
Storage configuration Attached 10GB EBS volume (standard IOPS)
EC2 instance configuration
1 - default
See Amazon AWS EC2 configurations chapter...
Apache & Postgres setup
default
Results
Summary
Overview of results by test case:
Testcase
Users1) Loops2) Responsetime3)
Throughput4) Totalrequests
Runtime5)
Errors
E#1 1 25 277ms 3,6/s* 175 48,6s 0%
E#2 8 25 308ms 25,5/s* 1400 54,9s 0%
E#3 16 15 308ms 38,5/s 1680 43,6s 0%
E#4 32 10 672ms 44,1/s 2240 50,7s 0%
E#5 48 5 1111ms 38,9/s 1680 43,2s 0%
E#6 64 5 1364ms 42,5/s 2240 52,7s 0%
E#7 96 5 2022ms 43,8/s 3360 76,7s 0%
E#8 128 5 2270ms 49,6/s 4480 90,3s 0%
E#9 150 5 2887ms 46,3/s 5250 113,4s 0%For explanation see "Legend to Summary table" chapter.
Performance test report 51 / 59 Last update 2017-04-18, 20:24:31

Configuration G
Server G Amazon AWS EC2 c3.2xlarge instance8 vCPU28 ECU15 Memory (GiB)Remote location with ~40ms latency
Hardware Standard Amazon virtualized hardwarehttp://aws.amazon.com/ec2/
System & software Debian 6.0 64 bits base AMIPHP 5.3Apache 2.2PostgreSQL 8.4.IonCube loader 4.2.2 Linux (64 bits)top
Storage configuration Attached 10GB EBS volume (standard IOPS)
EC2 instance configuration
1 - default
See Amazon AWS EC2 configurations chapter...
Apache & Postgres setup
default
Results
Summary
Overview of results by test case:
Testcase
Users1) Loops2) Responsetime3)
Throughput4) Totalrequests
Runtime5)
Errors
E#1 1 25 293ms 3,4/s 175 0%
E#2 8 25 369ms 21,3/s 1400 0%
E#3 16 15 604ms 25,7/s 1680 0%
E#4 32 10 1230ms 25,0/s 2240 0%
E#5 48 5 1803ms 25,0/s 1680 0%
E#6 64 5 2409ms 25,0/s 2240 0%For explanation of headers see "Legend to Summary table" chapter.
Performance test report 52 / 59 Last update 2017-04-18, 20:24:31

Configuration H
Same as Configuration A, but reconfigured to use mpm_worker_module with default setting
App version: 3.7.1
Results
Summary
Overview of results by test case:
Testcase
Users1) Loops2) Responsetime3)
Throughput4) Totalrequests
Runtime5)
Errors
A#1 1 25 161ms 6,2/s 175 0%
A#2 8 25 257ms 29,8/s 1400 0%
A#3 16 15 427ms 35,8/s 1680 0%
A#4 24 10 622ms 36,4/s 1680 0%
A#5 32 10 859ms 35,9/s 2240 0%
A#6 48 5 1289ms 35,4/s 1680 0%
A#7 64 5 1758ms 34,9/s 2240 0%
A#8 96 5 2653ms 35,0/s 3360 0,12%For explanation of headers see "Legend to Summary table" chapter.
Worker is 3 reqs/s slower than prefork at 24 users.
Performance test report 53 / 59 Last update 2017-04-18, 20:24:31

Conclusion
Conclusion depends on use case you can expect to experience.
High concurency, unpredictable spikes
Use case Public facing multi-user (or evenmulti-tenant) environments
Setup variants To handle lot of concurrentusers at a reasonable response times, we need(based on number of concurrent users) to useat least following hw configurations:
A) up to ~64 req/s: single server with 4 cores(8 threads) and 16-24GB of ram, or
B) up to ~128 req/s: single server with 2processors, each with 4 cores (16 threads) and32-48GB of ram, or
C) up to ~256 req/s: setup a cluster from 2 double-processor servers, one as a web server, one as a database server, dividing processing of apache and postgres to 2 different machines, or
D) even higher or unpredictable req/s: setup a dedicated server farm with capacity over-dimensioned to handle the spikes, or
E) even higher or unpredictable req/s: use cloud environment with auto scaling support, possibly off-loading the serving of static content to CDN
Bottlenecks The main bottleneck for high concurrency, if the servers does not swap to disk (has enough RAM), is usually the number of CPU threads available for parallel processing. In extreme cases the I/O performance can became an issue.
Costs This use case is the most expensive as multi-processor machines are very expensive and appropriate cloud environment is not easy to configure, but can be most economicall (you don't pay for extra capacity when it is not used only to cover ocassional spikes).
Recommended solution Recommended solution is the cloud environment with ability to auto-scaleallowing you to scale your capacity up or down automatically according to conditions you define.
High speed response, limited concurrency
Use case Controlled environment (f.e. intanet )with predictable and relatively-low number of simultaneously working users with demand for low latency.
Bottleneck Response bottleneck for low latency, if the servers does not swap to disk (has enough RAM), is usually latency to remote server and slow CPU (low frequency of the processor).
Costs For cost optimalization is essential to deterine the amount of RAM based on number of concurrent users we must handle.
Recommended solution Without high concurrency demands the best option is single processor server with multi-core support (quadcore) with maximum GHz you can get placed on LAN.
How to understand reports?
We are using Aggregate Report which provides the decisive data.
Performance test report 54 / 59 Last update 2017-04-18, 20:24:31

For visualization of data we use Graph result.
Aggregate Report
The aggregate report creates a table row for each differently named request in your test. For each request, it totals the response information and provides request count, min, max, average, error rate, approximate throughput (request/second) and Kilobytes per second throughput. Once the test is done, the throughput is the actual through for the duration of the entire test.
The thoughput is calculated from the point of view of the sampler target (e.g. the remote server in the case of HTTP samples). JMeter takes into account the total time over which the requests have been generated. If other samplers and timers are in the same thread, these will increase the total time, and therefore reduce the throughput value. So two identical samplers with different names willhave half the throughput of two samplers with the same name. It is important to choose the sampler names correctly to get the best results from the Aggregate Report.
Label - The label of the sample. If "Include group name in label?" is selected, then the name of the thread group is added as a prefix. This allows identical labels from different thread groups to be collated separately if required.
# Samples - The number of samples with the same label
Average - The average time of a set of results
Median - The median is the time in the middle of a set of results. 50% of the samples took no more than this time; the remainder took at least as long.
90% Line - 90% of the samples took no more than this time. The remaining samples at least as longas this. (90 th percentile )
Min - The shortest time for the samples with the same label
Max - The longest time for the samples with the same label
Error % - Percent of requests with errors
Throughput - the Throughput is measured in requests per second/minute/hour. The time unit is chosen so that the displayed rate is at least 1.0. When the throughput is saved to a CSV file, it is expressed in requests/second, i.e. 30.0 requests/minute is saved as 0.5.
Kb/sec - The throughput measured in Kilobytes per second
Times are in milliseconds.
Graph result
Warning: Graph Results MUST NOT BE USED during load test as it consumes a lot of resources (memory and CPU). This means, that results from graph are different (usually worse) than from Aggregate report. Graph results are also taken in different test-run than Aggregate report!
The Graph Results listener generates a simple graph that plots all sample times. Along the bottom ofthe graph, the current sample (black), the current average of all samples(blue), the current standard deviation (red), and the current throughput rate (green) are displayed in milliseconds.
The throughput number represents the actual number of requests/minute the server handled. This calculation includes any delays you added to your test and JMeter's own internal processing time. The advantage of doing the calculation like this is that this number represents something real - your server in fact handled that many requests per minute, and you can increase the number of threads
Performance test report 55 / 59 Last update 2017-04-18, 20:24:31

and/or decrease the delays to discover your server's maximum throughput. Whereas if you made calculations that factored out delays and JMeter's processing, it would be unclear what you could conclude from that number.
The following table briefly describes the items on the graph. Further details on the precise meaning of the statistical terms can be found on the web - e.g. Wikipedia - or by consulting a book on statistics.
• Data - plot the actual data values• Average - plot the Average• Median - plot the Median (midway value)• Deviation - plot the Standard Deviation (a measure of the variation)• Throughput - plot the number of samples per unit of time
The individual figures at the bottom of the display are the current values. "Latest Sample" is the current elapsed sample time, shown on the graph as "Data".
Legend to Summary table1) Number of concurrent processes (threads) per second - simulating the users2) Number of times to perform the test case3) Average response of the application (in miliseconds) including latency to server4) Requests per second5) Total run time of whole test (in seconds)
* Max throughput is not reached as there is not enough requests per second.
Red rows = application responses times are considered too slow to be "interactive"...
Amazon AWS EC2 configurations
1 - Default confuguration:
Performance test report 56 / 59 Last update 2017-04-18, 20:24:31

Performance test report 57 / 59 Last update 2017-04-18, 20:24:31

Project structureProject files and folders.
Folder Description
admin/ Bootstrap file index.php for launching administration. Administration page “admin” is now created as CMS pageFolder /admin/ was removed from .htaccess.
admin/service/ Service utilities for application installation, package creation, Localization Strings, export and import, serialize tool and component DB setup (component_columns).
class/ Folder with some of application classes.
config/ Application configuration files (general, Media Library, paths and folders, wysiwyg editor)
help/ Folder containig static „Help this page“ html files.
include/ Include folder containg 3rd party libs.
interfaces/ Application interfaces.
io/ Templates of printouts and records etc.
js/ Javascript files and libs.
repository/zip/ Temporary folder for downloading on-the-fly compressed archives from Media Library.
site/ Folder containing bootstrap file index.php for launching websites.
site/class/ Application logic of the sites.
static/ Folder for static html files, css or images.
templates/ Default system templates root folder (admin, docs, site)
templates/admin/ Default templates with admin UI skin assets - (css + images) and templates (.tpl.php)
templates/docs/ Default templates for /io/ (messaging, printout, reporting, xml)
templates/site/ Default folder with site themes.
templates/site/<themename>/editor/ TinyMCE editor content template files.
Project structure 58 / 59 Last update 2017-04-18, 20:24:31

Project structure 59 / 59 Last update 2017-04-18, 20:24:31