mabel - · pdf fileswoon sewing patterns mabel vintage handbag this is a test square to...
TRANSCRIPT

swoonS E W I N G PAT T E R N S
vintage handbagmabel
9” wide, 6” tall, 3.5” deep
Always print at “Actual Size” or 100%. • www.swoonpatterns.com • www.pellonprojects.comFeel free to sell your bags made with this pattern. Copyright 2015 Swoon Sewing Patterns
Bag sewn byLaurette Chandler

Instructions & Pattern Mabel Vintage Handbag
Materials Needed:• 1/2 yard 44” wide quilting weight exterior fabric• 1/2 yard 44” wide quilting weight lining fabric• 2 yards fusible Pellon® Shape-flex® SF101 interfacing • 1 yard sew-in Pellon® Peltex® 70 stabilizer• 1 magnetic snap or turn lock• Coordinating thread• Erasable marking pen• Fabric glue (Beacon Fabri-tac)
1) PREPPINGPrint the pattern. Cut out the pattern pieces along the solid black lines.Tape together, matching up the corresponding letters in the black boxes. They should butt together, not overlap. Trace the pattern pieces onto the wrong side of the fabric and cut out. Make sure you cut on the fold of your fabric where marked. Repeat to cut stabilizer and woven interfacing. Tip: Use sticky notes or masking tape to label the names of your pieces, some look very similar to others.
Where to stitch
Exterior Lining Wrong Side
Flap Top Stabilizer
Flap Bottom Stabilizer
Lining Flap
Now place a Flap interfacing panel over the stabilizer on the wrong side, fusible side down and matching the edges with the raw edges of the lining Flap, and fuse into place, taking care to fuse the 1/4” area between the two stabilizer pieces as well as the 1/2” around the raw edge.
Repeat to center the Main Panel Stabilizer panels onto the wrong side of the exterior Main Panels, centering them so that there is a 1/2” gap on every side. Then, fuse the Main Panel interfacing overtop.
Pin the two exterior Gusset panels right sides together and matching all raw edges. Sew across the wider short edge at 1/2” seam allowance.
Press the seam flat, then on the wrong side, center the Gusset stabilizer(like you did with the exterior Main Panels) and fuse the full piece Exterior Gusset Interfacing overtop.
Apply a thin line of glue around the edges of the Flap Top Stabilizer. Lay the Flap Top Stabilizer into place (glue side down) on the wrong side of the lining Flap, 1/2” from the top straight edge and each curved side edge. Apply a thin line of glue around the edges of the Flap Bottom Stabilizer, then place 1/4” below the Flap Top Stabilizer, 1/2” from the bottom edge and side edges. It should look like the image to the right.
Fuse woven interfacing to the exterior Flap, lining Main Panels, lining Gussets and Handle. Don’t do anything with the Handle Stabilizer yet.
1
swoonS E W I N G PAT T E R N S

2) INSTALL HARDWAREFold one exterior Main Panel in half, wrong sides together and matching all raw edges to find the vertical center. Measure from the top straight edge down 2” and mark (on the right side). Now you will install the female part of the magnetic snap, or the part of the turn lock that twists, centered over the mark.
Repeat these steps to make a centered mark 1.5” from the bottom edge of the lining Flap. Then install the male part of the magnetic snap or the hole part of the turn lock, centered over the mark.
2”
1.5”
3) ASSEMBLE FLAPPin the exterior Flap to the lining Flap right sides together and matching all raw edges. Starting at the top straight edge, sew at a 1/2” seam allowance down the curved side, across the bottom, and back to the top, backstitching at start and stop. You’ll be leaving the top raw edges open.
Trim the seam allowance down to about 1/8” and turn right side out. Press the flap well. Pin the top openedges together and machine baste (sew with a longstitch length) across the top at a 1/4” seam allowance.
Still using a longer stitch length, top stitch around the entire seam, about 1/4” from the finished edge of the flap.
1
2
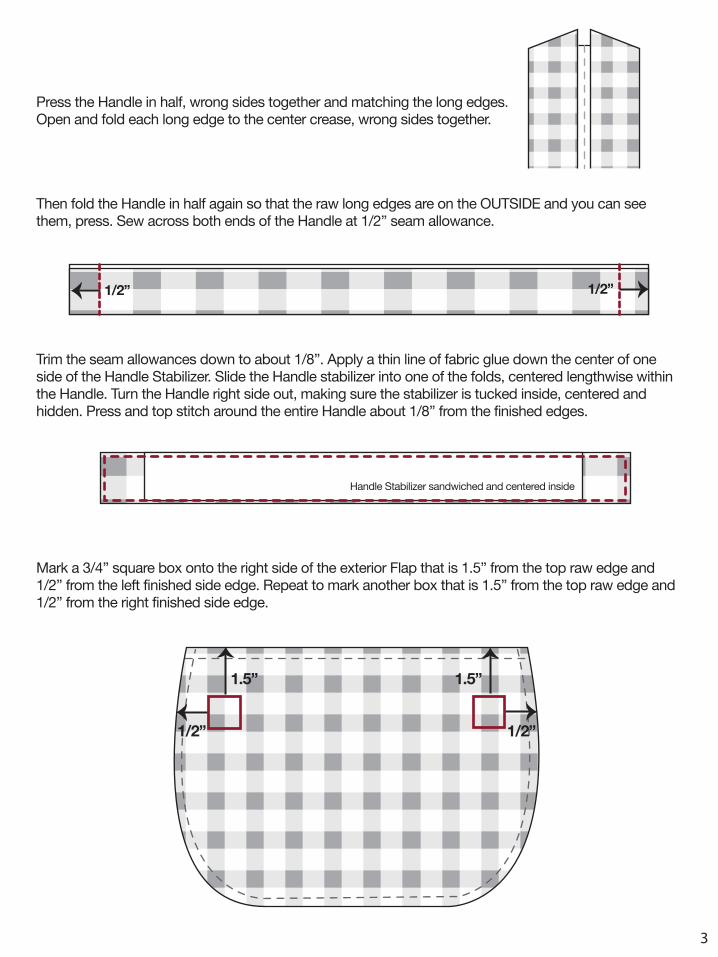
Press the Handle in half, wrong sides together and matching the long edges. Open and fold each long edge to the center crease, wrong sides together.
Then fold the Handle in half again so that the raw long edges are on the OUTSIDE and you can see them, press. Sew across both ends of the Handle at 1/2” seam allowance.
Trim the seam allowances down to about 1/8”. Apply a thin line of fabric glue down the center of one side of the Handle Stabilizer. Slide the Handle stabilizer into one of the folds, centered lengthwise within the Handle. Turn the Handle right side out, making sure the stabilizer is tucked inside, centered and hidden. Press and top stitch around the entire Handle about 1/8” from the finished edges.
1/2” 1/2”
Handle Stabilizer sandwiched and centered inside
Mark a 3/4” square box onto the right side of the exterior Flap that is 1.5” from the top raw edge and 1/2” from the left finished side edge. Repeat to mark another box that is 1.5” from the top raw edge and 1/2” from the right finished side edge.
1/2” 1/2”
1.5” 1.5”
2
3

Apply a small amount of glue inside each marked square. Place one end of the Handle over one of the squares you marked, matching the Handle edges with the lines of the square. Repeat to place the other end of the Handle into the other marked square. Wait until the glue has set, then top stitch a 5/8” by 5/8” box over both ends of the Handle to permanently secure the Handle to the Flap.
4) ASSEMBLE EXTERIOR & LININGFold the exterior Gusset in half, right sides together and matching the two short edges. Mark the centers along each long edge in the seam allowance. Fold an exterior Main Panel in half, right sides together and matching all raw edges. Mark the bottom center in the seam allowance. Repeat with the remaining exterior Main Panel. All centers below should be marked.
3
4

Match one center mark on the exterior Gusset with the center point of one exterior Main Panel and pin once right at the center, right sides together and matching the raw edges.
Match one end of the corresponding long edge of the Gusset with the top of the Main Panel, and pin once, right sides together and matching the raw edges. Repeat to pin the other end of the Gusset to the top of the other side of the Main Panel.
Now start at the bottom center and work your way up each side, pinning every inch or so matching the raw edges until the entire Main Panel (except the top edge) is pinned to the Gusset. You can clip into the seam allowance a few times about 1/4” from the raw edge to help ease the Gusset around the curves.
With the Main Panel up, start at the top edge and sew at 1/2” down one curved side, across the bottom, and up the other side, and stopping at the top edge, backstitching at start and stop. You will be sewing directly next to, but not through, the sandwiched stabilizer. There will be points where you may have to smash your bag down, it’s okay, you can reshape it later by pressing with a little steam.
Repeat all of the steps on this page to sew the remaining exterior Main Panel to the other long edge of the exterior Gusset. Trim all seam allowances down to about 1/8”.
4
5

Pin the two lining Gusset panels right sides together and matching all raw edges. Sew across the wider short edge at 1/2” seam allowance.Trim seam allowance and press seam flat.
Repeat Step 4 to sew both of the lining Main Panels to the lining Gusset.
5) BASTE FLAPPin the Flap to the exterior Main Panel without hardware, exterior side of the flap against the right side of the Main Panel, matching the top raw edges and making sure the flap is centered between the two side seams of that Main Panel. Machine baste along the top raw edges of the Flap at 1/4” seam allowance to attach it to the bag’s exterior.
6) FINAL ASSEMBLYPlace the exterior of the bag, right side out, inside the lining, wrong side out, tucking the Flap down in between the layers. The exterior and lining should be right sides together with the Flap sandwiched in between. Match the raw edges and corresponding side seams and pin around the entire top of the bag.
Sew around the top raw edges of the bag at 1/2” seam allowance, leaving about 5” open along the top of the Main Panel without the flap. Backstitch at start and stop.
Trim the seam allowance down to about 1/4” (except at the opening) and turn the bag right side out through the opening. Fold the raw edges into the opening 1/2” and press the entire bag well. Pin the opening closed. Top stitch around the entire top of the bag about 1/4” from the top finished edge, which will also close the opening.
6

Mai
n Pa
nel
Cut
2 E
xter
ior F
abric
Cut
2 L
inin
g Fa
bric
Cut
4 P
ello
n® S
hape
-flex
®
FOLD
Turn
lock
or f
emal
e sn
ap p
lace
men
t
swoo
nS
EW
IN
G P
AT
TE
RN
S
vin
ta
ge
ha
nd
ba
gmabel
This is a test square toensure the pattern printed
at the correct size.
3”

GussetCut 2 Exterior FabricCut 2 Lining Fabric
Cut 2 Pellon® Shape-flex®
(these are not cut on the fold)
Exterior Gusset InterfacingFold bottom short edge under 1/2” at dashed line, then:
Cut 1 Pellon® Shape-flex® (on the fold)
swoonS E W I N G PAT T E R N S
vintage handbagmabel
A

Main Panel StabilizerCut 2 Pellon® Peltex®
FOLD
FOLD
swoonS E W I N G PAT T E R N S
vintage handbagmabel
A

Flap Bottom Stabilizer
Cut 1 Pellon
® Peltex®
Flap Top StabilizerC
ut 1 Pellon® Peltex
®
swoonS
EW
IN
G P
AT
TE
RN
S
swoonS
EW
IN
G P
AT
TE
RN
S
vin
ta
ge
ha
nd
ba
gmabel
vin
ta
ge
ha
nd
ba
gmabel
vintage handbagmabel
B

Gusset StabilizerCut 1 Pellon® Peltex®
FOLD
Han
dle
Stab
ilize
rC
ut 1
Pel
lon®
Pel
tex®
Cut
Siz
e: 3
/4”
x 7”
swoonS E W I N G PAT T E R N S
vin
ta
ge
ha
nd
ba
gmabel
B

Flap
Cut
1 E
xter
ior F
abric
Cut
1 L
inin
g Fa
bric
Cut
2 P
ello
n® S
hape
-flex
®
FOLD
HandleCut 1 Exterior Fabric
Cut 1 Pellon® Shape-flex®
FOLD
Cut Size: 10” x 3”
Turn
lock
hol
e or
mal
e sn
ap p
lace
men
t
swoo
nS
EW
IN
G P
AT
TE
RN
S
swoonS E W I N G PAT T E R N S
vin
ta
ge
ha
nd
ba
gmabel
vintage handbagmabel