made with by
TRANSCRIPT

Made with♥ by

Pottery At Home: Getting Started & Beyond
Made with ♥ from SoulCeramics.com
Table Of Contents
Introduction 3 Materials & Equipment 4 Clay 4 Glaze and other decorating materials 5 Tools 5 Pottery Wheels 6 Kilns 7 How To Start Pottery At Home 7 Things To Consider Before Buying Clay 8 What is clay? 8 Types Of Clay For Pottery 9 How to make pottery clay 10 Where to buy clay for pottery 11 How to dry pottery clay 11 What to Consider When Buying a Pottery Wheel 12 1. Pottery Wheel Cost 12 2. Longevity 13 3. Portability 14 4. Wheelhead Con�guration 14 5. Workspace 15 6. Electric vs. Kickwheel Wheels 16 How To Use a Pottery Wheel 17

Pottery At Home: Getting Started & Beyond
Made with ♥ from SoulCeramics.com
How to use a pottery wheel: A step by step guide 17 Getting Equipped 20 Choosing Your Perfect Dream Kiln 21 Electric vs. Gas Kilns 21 Kiln Temperature 21 What is a Cone and Why is it Important? 22 Pyrometric Cone Chart 23 What Size Kiln Should I Buy? 24 Top-Loading vs Front-Loading 24 Electricity and Voltage 25 Kiln Accessories 27 Kiln Controller Types 30 How much does a kiln cost? 31 The Basics of Firing Electric Kilns 32 Understanding the Process 32 Before You Begin 33 Getting Ready to Fire your Kiln 33 Kiln Operation Safety 40 Taking Care of Your Kiln 43 Calculating the Cost of Firing a Kiln 45 A Mini Guide to Starting Your Own Pottery Business 48
The space & equipment: clay, wheels, kilns and othertools 48
The legal procedures to start a new business* 50
Promoting and selling your art: Marketing for potterybusinesses 50
Conclusion 52

Pottery At Home: Getting Started & Beyond
Made with ♥ from SoulCeramics.com
And congratulations! By taking the time to educate yourself through reading this book, you've taken the �rststep to truly begin honing your craft. We're so happy to be a part of your journey 😄Throughout this book, you'll �nd a wealth of knowledge. Everything from the basic tools & materials you'llneed, all the way to starting your own pottery business!
We've put a lot of time and e�ort in content of this book to really provide as much value to you as possibleand we truly hope you share that feeling upon �nishing.
Speaking of values - Let me tell you a bit about ours at Soul Ceramics.
Here at , our mission is to help others along their journey into heat treated crafts: Pottery &Ceramics, Glass Fusing & Slumping, and Metal Working & Knife Making.
Soul Ceramics
As you can tell with our name though, Pottery & Ceramics is our bread and butter and will always stay closeto our heart.
Every day, we receive dozens of inquiries from beginners and seasoned artists alike. As our small companyhas grown, we've always made an e�ort to ensure our customer service & support is unmatched by anyother.
We're available and ensure every phone call, every voicemail, every email, and every chat isresponded to in a timely fashion, and followed through to completion. We get
- and we're damn well proud of it!
7 days a weekglowing reviews from all of our
customers
We hope to see your name alongside the thousands of other happy customers in the future 😊And without further adieu - please enjoy the book!
IntroductionWelcome!

Pottery At Home: Getting Started & Beyond
Made with ♥ from SoulCeramics.com
Clay
There are 3 types of clays: stoneware, earthenware and porcelain clay. They are all used for di�erentpurposes and have di�erent �ring temperatures as well as water absorption and shrinkage percentages.
Stoneware clay is the most versatile and easiest to work with. If you are a beginner who's trying potterymaking at home for the �rst time, we recommend you to get stoneware clay. It comes in a variety of colorsfrom white to dark brown. Once �red, stoneware clay is non-porous, which means it’s capable of holdingliquid without having to glaze it.
While porcelain pottery looks beautiful, you might want to wait until you’re more experienced to give it a try.
Materials & EquipmentMaking pottery at home is a fun activity that everyone in the family can enjoy. Whether you are looking tostart making pottery as a hobby or professionally, the �rst thing you’ll need to do to start making ceramics athome is to get the right materials and equipment.
Regardless of the kind of objects you want to make, there are basic items you’ll need to buy to get started. Inthis section, we’ll tell you everything you need to buy to start making pottery at home.
Clay is obviously the most important one, you’ll learn more about it down below. A pottery wheel willde�nitely make the pottery making process easier as it will help you shape the objects. Kilns are ovens whereclay dries and transforms into beautiful ceramic pieces. We’ll also give you a list of basic tools that will helpyou create more precise, well-shaped and professional-looking pieces. Lastly, we’ll cover glazing, paint andthe easiest ways to decorate ceramics at home.
Clay is nothing but �ne-grained earth that can be shaped when wet. It contains sand, minerals, tiny rocks andother natural soil components in di�erent concentrations. It comes in a variety of textures and colorsdepending on their particle size and composition. Clays that have high concentrations of iron oxide tend tohave a rusty, red or orange appearance while those with no iron at all look gray or even white, which is thecase with porcelain clay.
Earthenware tends to be thicker, heavier but weaker than stoneware. It’s also easy to work with but it needs tobe glazed if you want your pottery to be permeable. This extra step requires extra time and materials, whichmight not be ideal for beginners.
Porcelain clay is quite di�cult to shape and requires a generous amount of water that needs to bestrategically added to the mix while shaping it. If you don’t add enough water it quickly dries out and if youadd too much water it can easily lose its shape and collapse. Learning how to work with porcelain clay takestime and a lot of practice, so it might not be the best option for those who want to try pottery making athome for the very �rst time.

Pottery At Home: Getting Started & Beyond
Made with ♥ from SoulCeramics.com
There are quite a few pottery decorating techniques out there. However, if you are just getting started withpottery making at home, we recommend you to stick to glaze and paints while you learn how to use otherdecorating materials and more complex decoration techniques like carving or transfer printing.
Glazing is one of the most common and easiest decorating techniques. Glaze is a liquid, very much like paint,that gives ceramics a smooth, glass-like surface. It comes in any color and it’s used to decorate andwaterproof pieces. And, when it comes to paints, liquid latex or acrylic paints are the best for decoratingpottery at home.
Glaze and other decorating materials
Tools
Although you can technically start making pottery at home with just clay, a pottery wheel and a kiln, thereare endless tools that can help you create more precise, well-shaped and professional-looking pieces.
Your pottery at home kit should have the following tools:Needles Used for measuring thickness, carving, trimming and piercing clay.
Cutter wire Used for dividing large blocks of clay into chunks.Ribbon tools Used for trimming and carving when shaping clay by hand.
Scrappers Used for �nal smoothing of the pieces.Fettling Knives They are very versatile, they can be used to separate molds, trim, pierce, carve, sculpt
and even cut chunks of clay.Chamois cloth Used to compress the clay while it’s on the wheel to create smooth surfaces.
Calipers Used to measure the distance between two opposite sides.Brushes Used for a variety of purposes but especially for glazing or applying slip.
Sponges Used for shaping and cleaning surfaces.Towels and aprons Making pottery at home can get messy! A few towels and an apron will help you keep
yourself and your space as clean as possible.

Pottery At Home: Getting Started & Beyond
Made with ♥ from SoulCeramics.com
Pottery Wheels
If you are planning on making pottery at home more than once and especially any kind of round ceramicware like pots, cups, plates or jugs, we encourage you to get a pottery wheel so you can unleash yourimagination and create as many pieces as you want, the right way.
Potters and ceramic artists use di�erent pottery making techniques depending on the kind of items theywant to make. If you want to make pottery at home, you can absolutely do it without a pottery wheel, butbeware that you will be limited to creating objects based on molds or entirely shaped by hand, which willmost likely result in pieces with imprecise and uneven looks.
Generally, pottery wheels range in price from just over $400 to almost $1,500. Budget pottery wheels, likethe Speedball Artista Pottery Wheel, cost around $500. Similar models are perfect for beginners and thosewho want to start making pottery at home.
Such basic models however, are slower, less durable and have a smaller clay load capacity than a high-techprofessional model. It all depends on how much you’d want to use it.
We'll discuss what to consider when buying a pottery wheel if you want to buy a pottery wheel to makepottery at home later in this e-book.

Pottery At Home: Getting Started & Beyond
Made with ♥ from SoulCeramics.com
Kilns
One way or another, clay needs to be �red and westrongly recommend you to get a kiln to do so. Kitchenovens don’t get hot enough to �re pottery. You canalways pit �re clay at home, but it’s quite complicatedto set it up and even more di�cult to achieve thespeci�c temperature needed for speci�c kinds of clay.If it’s too hot your clay will melt and if it’s not hotenough it won’t dry properly.
Depending on whether you’re working withearthenware, stoneware, or porcelain, the temperaturerange of the kiln you need will vary; and an electric kilncan easily be adjusted to �t your needs.
Before you choose what kiln to buy, you might want toconsider things like the kind of glaze you’ll be using,the size and quantities of the pieces you’ll make aswell as the space you have available at home.
Later in this book, we'll have a comprehensive guide on the best ceramic kilns for home use. We recommendyou to give it a read and get the kiln that best �ts your needs.
Kilns are a type of oven capable of producing temperatures high enough to �re things like pottery and bricks;it simply dries the clay and turns it into ceramics once you’re done shaping it.
How To Start Pottery At Home
The �rst step to start making pottery at home is to get the right tools and equipment. All the abovementioned items are easily available online. You can �nd the pottery wheels and kilns here at
. All the other materials, including the clay can be found in most art supply stores.SoulCeramics.com
If you are a beginner and want to start with the basics, we recommend you to get clay, a small ceramic kiln,a basic pottery wheel, and a few modeling tools. You can always upgrade your equipment as you learn newtechniques to make pottery at home.
If you are interested in learning more about pottery and ceramics, keep reading!

Pottery At Home: Getting Started & Beyond
Made with ♥ from SoulCeramics.com
Clay is �ne-grained earth that can be shaped when wet. It contains sand, minerals, tiny rocks and othernatural soil components in di�erent concentrations. Clay comes in a variety of textures and colors dependingon their particle size and composition. Clays that have high concentrations of iron oxide tend to have a rusty,red or orange appearance while those with no iron at all look gray or even white, which is the case withporcelain clay.
There are di�erent kinds of pottery clay and they all have their own properties that make them more or lesssuitable than others for speci�c projects. Here are the properties you need to keep in mind when buyingpottery clay:
Clay is used in a variety of �elds and has endless applications. Industrial clay, for example, is commonlyused in the building industry to make bricks, walls and pipes while it can also be used for 3D modelingdesign products. In this article, however, we’ll only cover clay used for pottery making.
What is clay?
Things To Consider Before Buying Clay
Shrinkage Clay shrinks when it dries, which means that your pieces will be slightly smalleronce they go through the �ring process. Shrinkage percentages go anywherefrom 5% to 15% depending on the kind of clay.
Absorption The absorption percentage refers to the amount of water a �red piece absorbs inrelation to its own weight. It goes anywhere from 0 to 15%.
Firing temperature The temperature in which a piece needs to be �red at to reach maturity. Thesetemperatures and the time the pieces need to be �red vary depending on boththe type of clay and the size or thickness of the piece.
Plasticity This refers to how easy it is to pull, shape or manipulate clay when wet. Thehigher the plasticity, the more �exible and easy-to-work the clay is.
Grog Grog is clay that has previously been �red and then crushed. It comes in di�erentparticle sizes and it’s usually added to clay to give it a di�erent texture andreduce the shrinkage of the piece. You can buy clay and grog separately and mixthem together yourself, or buy clay that already has grog in it.

Pottery At Home: Getting Started & Beyond
Made with ♥ from SoulCeramics.com
There are 3 main types of clay for pottery: stoneware, earthenware and porcelain clay. They are all used fordi�erent purposes and have di�erent characteristics and properties.
Types Of Clay For Pottery
Stoneware Clay
Stoneware clay is the most versatile and easiest to work with. If you are a beginner who's trying potterymaking at home for the �rst time, we recommend you to get stoneware clay. It comes in a variety of colorsfrom white to dark brown. Once �red, pottery made out of stoneware clay is very durable, strong and non-porous, which means it will be capable of holding liquid without having to glaze it.
It has a �ring temperature range of 1100 °C (2000 °F) to 1300 °C (2370 °F) and it can be �red more than once.
Stoneware clay is ideal for making objects of any size, from small plates to big vases. You can use it on apottery wheel or to make items using handbuilding techniques.

Pottery At Home: Getting Started & Beyond
Made with ♥ from SoulCeramics.com
Porcelain pottery looks beautiful. However, you might want to wait until you’re more experienced to give it atry.
What’s the best clay for pottery wheels? Well, all stoneware, earthenware and porcelain clays work well onpottery wheels. As we explained before, some are easier to shape than others, but they are all suitable forwheel throwing.
Making pottery clay at home is quite an easy process. There are a few techniques you can use to processclay, of which the easiest and most popular technique is known as “the wet method”.
Making pottery clay from dirt or soil using the wet method consists of mixing soil and water in a big containerand letting the mix sit for a few minutes to let gravity pull down the bigger rocks and sand to the bottom ofthe container, leaving just water mixed with clay on top. This water is then �ltered using a �ne cloth, leavingnothing but wet, smooth clay that can be used immediately or saved for later.
Earthenware Clay
Earthenware clay tends to be thicker and heavier, but weaker than stoneware. The most common kind isTerracotta, it has a rich red color and is commonly used to make tiles and �ower pots.
Earthenware clay is known to be a low-�re clay as it only needs to be �red at approximately 1100 °C (2000°F). Items made out of this kind of clay are naturally porous, which means that they are not capable ofholding any liquids; if you want them to be permeable, you’d need to glaze them and �re them a secondtime. This extra step requires extra time and materials, which might not be ideal for beginners.
Porcelain Clay
Porcelain clay is very soft and more �exible than the other kinds of clay but it's quite di�cult to shape. Itrequires a lot of water that needs to be strategically added to the mix while shaping it; if you don’t addenough water it quickly dries out and if you add too much water it can easily lose its shape and collapse.Learning how to work with porcelain clay takes time and a lot of practice, so it might not be the best optionfor those who want to try pottery making at home for the very �rst time.
Porcelain clay has the highest �ring temperatures of the list, which varies between 1,200 °C (2,200 °F) to 1,400°C (2,550 °F). Such high temperatures are quite di�cult to achieve without a kiln.
How to make pottery clay

Pottery At Home: Getting Started & Beyond
Made with ♥ from SoulCeramics.com
If you are looking to buy more speci�c types of pottery clay, or if you want to buy over 20 lbs of it, we adviseyou to get it directly from a local supplier as it’s going to be cheaper than getting it online. Also, by going toa local supplier, you will get all the help you might need to buy the right kind of clay for your projects. Mostsuppliers make their very own clay so you will be supporting a local business too!
To dry pottery clay, you’ll need a kiln.
A kiln is an oven used to �re clay and melt glass.
There are gas kilns and electric kilns.
Gas kilns work with natural gas or propane. They give ceramics adarker color and a rustic, aged look. Electric kilns are easier to installand operate than gas kilns. They work with heating elements that arebasically pieces of wire designed to resist the passage of electricity,similar to most heating appliances.
Electric kilns are de�nitely the best option for both beginners andprofessionals. They come in a variety of sizes and prices that �tanyones’ needs.
At Soul Ceramics, we are experts on electric kilns. We know everythingabout them! If you want to take a look at our catalogue, you can check our . If you wantmore information about them, this e-book has a multitude of information for you. Keep on, keepin' on!
electric kilns page
Where to buy clay for pottery
You can buy clay for pottery in di�erent places depending on the quantity and type of clay you need.
If you are looking to buy small quantities for making pottery at home just as a hobby, you can get them inmost art supply stores or online suppliers.
How to dry pottery clay

Pottery At Home: Getting Started & Beyond
Made with ♥ from SoulCeramics.com
Are you ready to take your passion for pottery to the next level?
Whether you’re a new enthusiast, a hobbyist who’d like to avoid the inconvenience of a communal studio, oran established artist looking to expand your studio, choosing the right pottery wheel for creating ceramic artis essential. Seeing as this investment can be both exciting and overwhelming, we’ve put together a guide tohelp you better understand what factors to consider when viewing and evaluating di�erent models.
1. Pottery Wheel Cost
No matter the model you chose, all pottery wheels are an investment, but generally they range in price fromjust over $400 to almost $1,500. Because the cost of a pottery wheel depends mainly on its capabilities andspecial features, it’s �rst important for you to consider what your needs are based on the art you’d like tocreate, the space in which you’ll be creating it, and how long you plan on using it for. Once you’ve determinedyour requirements, look for the wheel that can �t them for the best price.
After addressing the six most important things you’ll want to take into account, we hope you’ll be morecon�dent in �nding the perfect pottery wheel for your individual needs and artistic interests.
What to Consider When Buying a Pottery Wheel
Budget pottery wheels, like the Speedball Artista Pottery Wheel, tend tohover around the $500 price range, making them much more reasonablethan a high-tech professional model, and perfect for beginners and budgethobbyists. However, such models are less durable, have a smaller clay loadcapacity (clay weight limit), have lower power and speed, and are generallymore basic in their capabilities.
Pottery At Home: Getting Started & Beyond
Made with ♥ from SoulCeramics.com
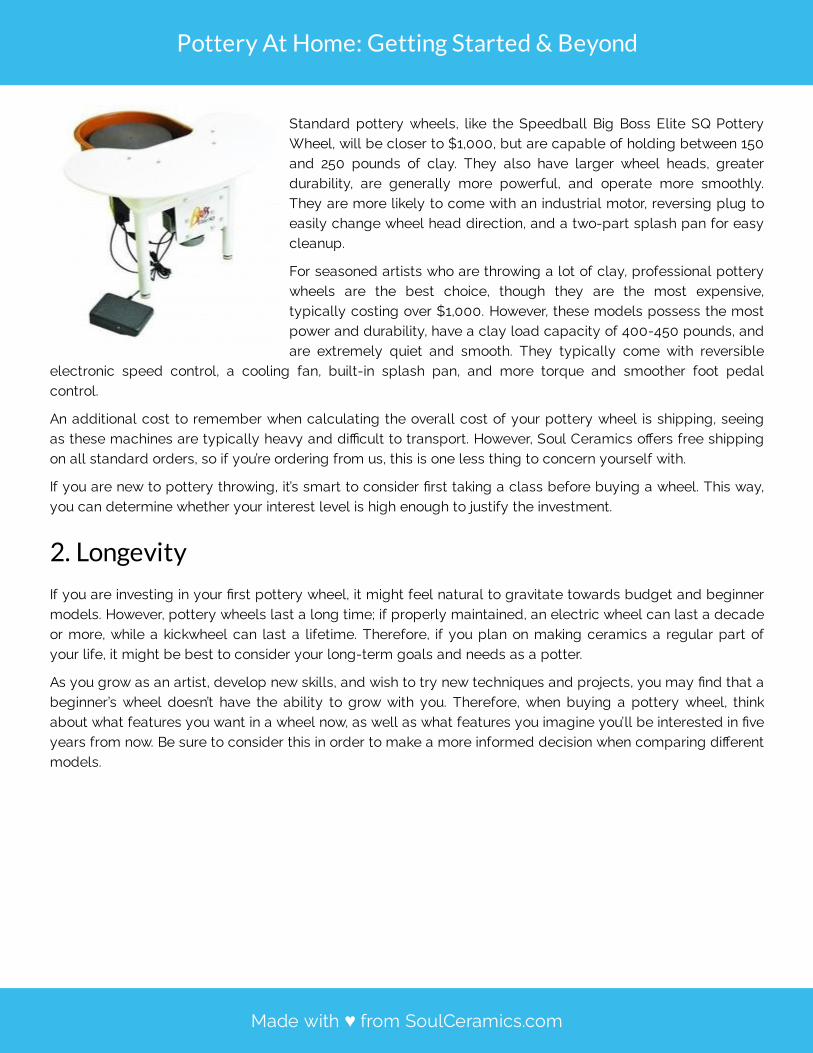
Standard pottery wheels, like the Speedball Big Boss Elite SQ PotteryWheel, will be closer to $1,000, but are capable of holding between 150and 250 pounds of clay. They also have larger wheel heads, greaterdurability, are generally more powerful, and operate more smoothly.They are more likely to come with an industrial motor, reversing plug toeasily change wheel head direction, and a two-part splash pan for easycleanup.
For seasoned artists who are throwing a lot of clay, professional potterywheels are the best choice, though they are the most expensive,typically costing over $1,000. However, these models possess the mostpower and durability, have a clay load capacity of 400-450 pounds, andare extremely quiet and smooth. They typically come with reversible
electronic speed control, a cooling fan, built-in splash pan, and more torque and smoother foot pedalcontrol.
An additional cost to remember when calculating the overall cost of your pottery wheel is shipping, seeingas these machines are typically heavy and di�cult to transport. However, Soul Ceramics o�ers free shippingon all standard orders, so if you’re ordering from us, this is one less thing to concern yourself with.
If you are new to pottery throwing, it’s smart to consider �rst taking a class before buying a wheel. This way,you can determine whether your interest level is high enough to justify the investment.
2. Longevity
If you are investing in your �rst pottery wheel, it might feel natural to gravitate towards budget and beginnermodels. However, pottery wheels last a long time; if properly maintained, an electric wheel can last a decadeor more, while a kickwheel can last a lifetime. Therefore, if you plan on making ceramics a regular part ofyour life, it might be best to consider your long-term goals and needs as a potter.
As you grow as an artist, develop new skills, and wish to try new techniques and projects, you may �nd that abeginner’s wheel doesn’t have the ability to grow with you. Therefore, when buying a pottery wheel, thinkabout what features you want in a wheel now, as well as what features you imagine you’ll be interested in �veyears from now. Be sure to consider this in order to make a more informed decision when comparing di�erentmodels.

Pottery At Home: Getting Started & Beyond
Made with ♥ from SoulCeramics.com
If portability is a factor you can’t compromise on, ruling out a kickwheel pottery wheel is a smart move. Akickwheel is a motorless, manually-operated wheel that functions by relying on the power the artist supplieswith their own foot to keep the pottery wheel moving.
The problem with kickwheels is that they are incredibly heavy, and therefore extremely di�cult to move andtransport.
On the other hand, electric wheels, which are operated through a pedal-system that electronically controlsthe wheel’s speed, are almost always more portable than kickwheels, seeing as they are both smaller andmuch lighter. For example, while an electric wheel may be 35 pounds, an average kickwheel is 250 pounds.
4. Wheelhead Con�guration
The wheelhead is the revolving piece mounted in the center of a pottery wheel where your clay will beformed during the throwing process. While they do come in di�erent shapes and sizes, most wheelheads are�at, metal, circular surfaces, ranging from 8” to 14” in diameter.
The size you chose will depend largely on the types of projects you plan to create. If you are throwing verylarge pots, platters, and other pottery pieces with wide bases, you’ll want a larger wheelhead toaccommodate your work. If, however, you do not plan on creating pieces of this size, you can settle for amodel with a smaller wheelhead.
Another thing to consider when looking at di�erent wheelheads is what types of bats and bat pins will �t withit. Bats are thin disks made out of plaster, wood, or plastic that are a�xed to the wheel head with pins. Theyare used when an artist must throw a piece that might be too di�cult to lift o� the wheel head. If you alreadyhave bats you plan on using, you will �rst have to ensure that they will �t the dimensions of your chosenwheelhead, seeing as pin con�guration, number, and distance from the center of the wheelhead can vary.
Additionally, some wheels have bat pins that are more easily removed, which allows the potter to trim theirpiece directly on the wheelhead. If you foresee the need to trim your ware easily while still set on yourpottery wheel, you will want to be certain the model you invest in has pins that can be removed withoutmuch di�culty.
Some potters living and/or working in a humid environment may prefer to use plaster bats, due to the factthat they help remove water. For throwing on plaster bats, you will want to �nd a pottery wheel with abucket-style wheelhead, which is the only main type of wheelhead which isn’t �at.
Portable pottery wheels tend to be smaller and lighter, and though they have lower clay load capacities,they are very popular with teachers and those who give demonstrations at events and arts festivals. If youforesee studio space relocation in the future, wish to easily move around your pottery wheel in a multi-usestudio, or would like to have the ability to take your wheel with you when traveling, a portable pottery wheelis essential.
The ability to move your pottery wheel when desired is not a necessity for every artist, but you shouldde�nitely know whether or not this characteristic is important to you before purchasing a pottery wheel.
3. Portability

Pottery At Home: Getting Started & Beyond
Made with ♥ from SoulCeramics.com
5. Workspace
While some pottery wheels are extremely basic, and consist solely of a wheelhead, frame, and powersource,others come complete with attached work tables, splash pans, and many accessories.
First, you will want to consider the space in which you will be housing your pottery wheel to determine whatsize you can and wish to accommodate. If you already have a work table and see no need for a largermachine, there is no reason to make a larger investment. However, if you would like a wheel that can provideall services in one, attached work spaces come in di�erent sizes and placement options around thewheelhead, so chose a setup which is best for your own style.
Another component of workspace to consider when looking at di�erent pottery wheel models is theimportance of cleanliness.
Will you be working in a space that is easy to clean?
Do you care about your own personal cleanliness during the throwing process?
Some wheels come with a splash pan, which is a molded plastic tray that is placed around the pottery wheelto keep clay and water from spraying the artist, �oor, or surrounding area. They signi�cantly reduce the messof throwing, but some artists feel they interfere with the throwing process.
Based on your personal preferences and workspace, you can decide whether or not a splash pan is acomponent you desire in a pottery wheel.

Pottery At Home: Getting Started & Beyond
Made with ♥ from SoulCeramics.com
Choosing a pottery wheel can be a lot less daunting if you are armed with the facts and some good optionsto chose from. If you have any additional questions, please , and best of luck!don’t hesitate to contact us
Electric Pottery Wheel Kickwheel
Portability Lighter and smaller in size, and thereforeeasy to move and travel with
Very heavy and therefore extremely di�cultto move and travel with
PowerSource
Rely on electricity to function Typically rely on no electricity; powered bythe artist’s foot
NoiseControl
Especially cheaper models can be ratherloud during throwing, emitting hums, squeals,grinding, or rumbling
Typically very quiet
PhysicalDemand
Since the motor creates the wheel’smomentum, very little physical e�ort isrequired to work it
Prolonged use may result in knee problemsand aggravate arthritis because of thephysical input required
Speed Throwing is faster, and therefore better forproduction work, but inexperienced potterstend to increase rotational speed too quickly,adversely a�ecting their throw
Slower throwing process, but many comewith motors to assist with increasing speed
ThrowingProcess
Centering clay is typically easier with amotor, and most models have pedals thatallow for clockwise and counterclockwiserotation of the wheelhead for both right-handed and left-handed throwing
Easily allows for both clockwise andcounterclockwise rotation of the wheelheadfor both right-handed and left-handedthrowing; can give the artist a better feel andcontrol for the throwing process
As discussed earlier, one important di�erence between kickwheel and electric pottery wheels is in theirweight. However, there are many other di�erences between them that might cause you to lean more heavilytowards using one rather than the other. Below is a chart outlining the most important di�erences betweenthese two types of wheels:
6. Electric vs. Kickwheel Wheels

Pottery At Home: Getting Started & Beyond
Made with ♥ from SoulCeramics.com
Throwing your own pottery at home, as a hobby or for a business, can be a thoroughly rewarding experience.From vases through to bowls, the �nished articles that you can create are many and varied. The key skill tomaster when creating your pottery piece is the use of your pottery wheel. In this article, we look at how touse a pottery wheel for beginners, to create your perfect pottery piece.
How to use a pottery wheel: A step by step guide
One key element to successfully using your own pottery wheel is through thorough preparation. The �rst partof this preparation is to ensure that your ‘bat’ (the �at disk attached to the head of your pottery wheel) iscleaned by scraping o� any excess clay using a wooden rib or metal scraper. You should avoid using toomuch water, as bats are liable to warp over time.
Step 1
Spin the wheel and slightly moisten the center of your bat with your sponge.
Step 2
Place your clay on to the center of the bat in a gumdrop shape. Flatten the edges of the clay with the palmof your hand, turning the wheel manually until all sides are �attened down. Following this, use your index�nger to press the edges of the clay, sealing the edge of the clay to the bat.
How To Use a Pottery Wheel

Pottery At Home: Getting Started & Beyond
Made with ♥ from SoulCeramics.com
Step 4
Use your left hand to push the clay up (this is called coning up) and use your right hand as support. Use thepalms of your hands to squeeze the clay inwards, allowing the clay to pop up between your hands. As themanipulated clay gets taller, maintain an ‘A’ shape with your thumbs.
Step 5
Following the coning up of your clay, you also need to cone down in order to center the clay and ensure thatyou can push the clay to where you need it to go. At this point you should add more water if needed. Placethe fat part of your left thumb (where it meets the palm of your hand) directly on top of the center of theclay and place pressure away from you (not down on to the clay). The �ngers of your left hand should wrapgently around the front of the clay.
Step 6
Your right hand should also be placed at the top of your clay but on the side and gently pushing the clay tothe center. The �ngers of your right hand should also be gently wrapped around the clay.
Both hands should be pushed in the directions described above and then slowly slide your hands down theclay in tandem. At this point you should have created a ‘cone up’ position for your clay. Keep repeating thismethod, with more water if necessary, until the clay is centered. The best method of establishing whetherthe clay is centered is by placing your hands gently around the clay and slowly spinning the wheel. If yourhands stay in place then your clay is centered, but if they move and wobble then you will need to repeatmore coning.
Once you are satis�ed that the clay is �rmly in place, increase the speed of the wheel and put some wateron to your hands. Before starting to manipulate the clay, ensure that your elbows are locked to your legs.
Step 3
Step 7

Pottery At Home: Getting Started & Beyond
Made with ♥ from SoulCeramics.com
To make the opening for your bowl, plate or vase, the next stage is called drilling. Place your left thumb inthe previously created divot and turn the wheel, waiting until your thumb is centered and not moving about.Use your right hand �ngers to guide your left hand thumb down towards the bat.
Step 11
Step 10
Step 9
At this point, you will start to form the size and shape of your pottery. Rest your hands on the sides of yourclay, with the right thumb knuckle placed over the top of your left thumb knuckle, keeping your thumbsparallel to the �oor. Press the top knuckle into the bottom in order to create a small divot in the top of theclay.
Step 8
Once you are satis�ed with your desired shape, you can also add di�erent elements including a lip or handle,depending on what you are creating. You can also use a wooden rib to clean the inside and outside of thepot.
Now is the time to form your pottery! Insert the middle �nger of your left hand into the divot. Put your righthand over the top of your left hand and slowly pull the clay back towards you to create your desired shape.

Pottery At Home: Getting Started & Beyond
Made with ♥ from SoulCeramics.com
If you want to learn more about what to consider when buying a pottery wheel, or if you simply wish to knowmore about how to make pottery at home, this guide talks you through all the materials and equipment youwill need.
If you are keen to learn how to use your own pottery wheel or even to invest in your own, and we’ll be happy to help. In the meantime, you can .
feel free to contactus view our range of pottery wheels here
Whether you are looking to buy a pottery wheel for a hobby or to use for a business venture, there are arange of pottery wheels available, from simpler models through to more advanced.
If you want to learn how to throw pottery, we advise that you invest in a high quality pottery wheel.
Getting Equipped
When learning how to use a pottery wheel, it’s all about practice. Your �rst e�ort may not be perfect, but themore time and patience you use, the more successful you will be. Following the above steps is a good startand having the right equipment in place ensures a consistent �nished product.
Step 12
To remove your pottery from the bat, place a taut wire on the far side of your piece and slowly slide the wireback towards you.

Pottery At Home: Getting Started & Beyond
Made with ♥ from SoulCeramics.com
The type of art you want to create will ultimately decide whether you chose to buy a gas or electric kiln.Certain materials and styles are better in electric kilns and others in gas.
The majority of kilns sold today, speci�cally for home use, are electric. This is for various reasons, primarilythe high quality of �nished pottery from electric kilns, known for producing bright colors. Electric kilns arealso used for convenience - gas kilns tend to require permits for �re safety, which can add additional barriersfor use. However, gas �ring tends to result in earth like colors such as dark browns, giving the end piece amore rustic, aged look. One of the advantages to gas kilns is that “reduction” �ring can be achieved. Gas �ringis speci�cally used in raku pottery however, due to new advances in technology electric raku kilns are nowavailable.
Soul Ceramics specializes in the sale of electric kilns ranging from to capableof handling the biggest ceramic projects.
small electric kilns larger kilns
Kiln Temperature
To put this into perspective the following types of materials require the following temperature ranges, indescending order:
When in the market for a home kiln the maximum temperature needed will ultimately dictate the kiln youbuy. With that said, when looking to buy a kiln, the product you select will depend on what your project orfocus is, and the temperature level required.
Electric vs. Gas Kilns
Soul Ceramics carries at the guaranteed lowest prices. If theanswer to your question is not answered below please do not hesitate to .
the largest selection of ceramic kilns onlinecontact us
There are several factors that must be considered when purchasing a kiln. The following chapter has beencreated to ease your research in deciding what type of home kiln to purchase. The chapter includesinformation on the di�erence between electric and gas kilns, temperature range, price, kiln size, electricvoltage, kiln controllers, and lastly kiln accessories. All of the following sections are important components toconsider so you can ensure you buy a kiln that meets your needs.
Choosing Your Perfect Dream Kiln
1. Porcelain requires the highest temperature levels2. Stoneware3. Earthenware4. Low-�re ceramics

Pottery At Home: Getting Started & Beyond
Made with ♥ from SoulCeramics.com
Ceramic ware is most often �red to a “Cone” as opposed to a temperature. Your ceramic ware provider canprovide guidance on which cone to �re to for your speci�c ware.
One of the reasons the term cones is still used among potters, instead of quantifying temperature infahrenheit, is the fact that the term cone represents a measurement of temperature overtime, as well as ameasurement of energy.
Pyrometric cones are designed to deform at certain moments during a �ring. This deforming action allowsthe kiln to shut o� automatically at the proper point (as in the case of the mini bar and Kiln Sitter) or simply torecord what happened during the �ring (as in the case of the witness cone).
The exact moment the cone deforms depends primarily upon two factors: time and temperature. Thetemperature present at the moment "cone" is achieved depends upon the rate of temperature increase.
With this simple concept in mind it's easy to understand why "cone" and temperature are not the same thing.For a proper cone �ring, time and temperature must always be considered.
Cone numbers indicate the color of clay, �nal temperature achieved, end product to material i.e. matures,melts, begins, burns out, etc., and the types of wares and glaze that can be used with said cone number.
Higher cone temperatures are labeled as i.e. 13, 14, 15 etc and lower cone temperatures appear with a 0 infront i.e. 019, 020, 021. The 0 indicates a negative number within cone temperatures.
The placement of cones within a kiln also help indicate heat uniformity. Cone placement occur withindi�erent levels of the kiln to asses temperature variance, and the number of cones placed within the kin canalso range.
Cones measurement abilities also range by manufacturer. Therefore, it is important to consider cones varyingmeasurement abilities when switching between cone brands.
What is a Cone and Why is it Important?
Additionally, it is important to buy a kiln that exceeds the maximum temperature needed for you work.Overtime the power of kilns will be reduced and hence the energy and heat they produce. Therefore, afteryou have decided the minimum temperatures needed for your projects, over-estimate the temperature by200-300 degrees Fahrenheit at a minimum, or various cone numbers. Voltage use also in�uences kilncapacity. If voltage use is low, then a kiln with higher temperature capacity will help ensure that the productis still able to reach the temperature needed.
The materials that require the lowest temperatures are typically glass. Therefore, in the case of pottery,ceramic work a high, medium-high, medium-low temperature ceramic kiln would be ideal.

Pottery At Home: Getting Started & Beyond
Made with ♥ from SoulCeramics.com
Please note that the Cone Chart gives 3 di�erent temperatures for each cone number. As discussed above,the equivalent cone temperature depends upon how fast one gets to it. Generally speaking, thetemperatures in the 108°F/Hour column are used when discussing ceramics, porcelain and china.
Pyrometric Cone Chart

Pottery At Home: Getting Started & Beyond
Made with ♥ from SoulCeramics.com
As a potter advances larger scales will be come of advantage for larger, more complicated pieces.Therefore, large kilns are typically used by more advanced potters and/or potters designing larger pieces.
Top-Loading vs Front-Loading
Although, it may seem silly you should also consider your height when deciding between a top-loading or afront-loading kiln. Top-loading kilns can be di�cult to load due to height, which can be addressed throughother means, such as stools, but height should de�nitely be considered prior. Additionally, strain on your backmay be another issue with top-loading kilns, but do tend to be more a�ordable than front-loading kilns.Front-loading kilns will tend to be more expensive, due the convenience allowed in relation to loading andunloading of work pieces.
As many potters agree the question between purchasing a top-loading versus a front-loading kiln is backover wallet and vice-a-versa.
Soul Ceramics o�ers a variety of kiln sizes for sale, just let us know what you are looking for and we arehappy to help.
Another factor to consider when choosing what size of kiln to purchase is the space that the kiln will belocated. The kiln will need a minimum of two feet on each side for breathing room, so don't purchase aproduct that can't be properly ventilated.
If you are a beginner potter a small kin may be an ideal �rst kiln purchase. Small kilns can be ideal for testingpieces and for beginner potters. However, the kiln size you will ultimately purchase is dependent on theproject size. For example, if you're a beginner potter who desires to make large pieces, perhaps you are inthe market to buy a large kiln.
As is evident in the name, a small kiln is best for smaller items, and a large kiln for larger items. However,apart from the obvious characteristics that di�erentiate these kilns there are additional variables that helpbuyers di�erentiate between kiln sizes.
The following factors should be considered when choosing between a small or large kiln since each kiln hasunique bene�ts and disadvantages, again depending on the intention of the potter.
The size of kiln you buy will depend on the size of the pieces you intend to create. Some �rst time kilnpurchasers may choose to begin with a small electric kiln or home electric kiln, but they are simple tooperate at any size.
What Size Kiln Should I Buy?

Pottery At Home: Getting Started & Beyond
Made with ♥ from SoulCeramics.com
A confusing and common scenario is seeing an appliance as one of these three, and your electrical capacityas another. However, this is no cause for concern - it's all the same. If you have a 220V wiring, a 240Vappliance will work well and all the same.
Ensure wiring is suitable for project Ensure plug matches the ceramic kiln plug Verify the wiring of the breaker
This is common in homes in the US and typically used for larger electronics devices such as washingmachines, dishwashers, etc.
There are various ceramic kilns that will require 240 voltage. 240V kilns will almost always require the aid ofan electrician.
220V, 230V and 240V
Is a voltage power most commonly found in industrial buildings, schools, etc. This is an uncommon choice,but we do see it a few times a year when ordering for a commercial building.
Electricity and Voltage120 Volt vs. 240 Volt
Voltage, just as the other factors, is important to consider when purchasing a kiln. For residential use, smallervoltage power of 120V is likely to be available whereas, if the kiln will be used in a industrial space highervoltage capacity may be accessible. Depending on the voltage of the kiln, additional resources may benecessary, including the aid of an electrician. If purchasing a 240V kiln, a electrician will likely be required,considering that most homes in the US are wired for 120V. In addition, a dedicated line will be necessary for a240V kiln.
This information is intended as a reference, additional concerns should be addressed with an electrician. As aside note most electricians will come to your home and give you a quote for free, this way you can ensure toget the best o�er for the work required.
The following three factors need to be considered for ceramic kiln electric and plug requirements:
Similar to the need for temperature requirements to exceed the actual temperature required for �ring,circuit/breakers require around 20% more power than the amp required.
208V

Pottery At Home: Getting Started & Beyond
Made with ♥ from SoulCeramics.com
If you're getting a small or medium kiln, this will likely not be an issue as most models run on a standardNEMA 5-20 plug and under 20 amps.
However, if you're looking for larger model - it's a simple problem to solve. Should the kiln you desire have adi�erent plug than your outlet supports - an electrician can usually get you setup correctly so long as youhave the correct voltage being run to your home and a circuit that can support the amperage.
Electrical Plug Types
The electrical outlets installed in your home or studio are very important when purchasing a kiln. With theamount of power required to run these machines, it's very common that you'll begin seeing some "strange"plugs compared to the usuals.
The most common plugs you'll see in the product speci�cations of various models will be:
NEMA 5-15 NEMA 5-20 NEMA 6-20 NEMA 6-30 NEMA 6-50

Pottery At Home: Getting Started & Beyond
Made with ♥ from SoulCeramics.com
You'll hear some opinions about kiln furniture being optional - but we couldn't disagree more. Furniture Kitsare necessary accessories for any kiln owner as �ring directly on the kiln �oor is not only bad for the kiln, butyour pieces as well. If you want your investment in a kiln to last for years to come, and have the highestquality in your pieces - you'll purchase a set of kiln furniture to match your new kiln.
Furniture kits can increase kilning e�ciency, allowing potters to �re several pieces simultaneously. Furniturekits come in various forms depending on the needs of the potter.
What comes in a furniture kits depends on the model, but usually it's a combination of: Shelves, posts, andkiln wash.
Kiln Shelves
Kiln Wash
Also referred to as shelf primer, kiln wash is a liquid substance that is brushed onto kiln shelves to preventglaze from an art piece sticking to the shelf. Though you can make your own kiln wash from one of the manyrecipes that exist, most people buy kiln wash pre-mixed.
Solid State Relays
Relays are housed within the kiln control box and are used to switch the kiln power on and o�. The relay willmake a settle clicking noise when the kiln is powered on or o�.
Kiln Accessories
The most common kiln shelves are Cordierite (alumina) shelves. They can repeatedly be �red at cone 10 andare the most common shelves to come with ceramic kilns. Corelite shelves are another option that are bothlighter and more durable. Higher �rings may be required silicon carbide shelves. There are additional kilnshelves apart from the shelve examples above. Shelves can also come in di�erent shapes rectangular orround.
Kiln Posts
Kin posts are used to support kiln shelves within the ceramic kiln, and are used to optimize space within thekiln for �ring.
There are various accessories available for kiln buyers. Below are a few examples of kiln accessories that aregood complements to a kiln. Kiln furniture is designed to withstand repetitive �rings, but will need toreplaced overtime.
Furniture Kits
If a relay is worn out it will impact the power and ability for the kiln to operate. For this reason, we highlyrecommend upgrading to solid state relays.

Pottery At Home: Getting Started & Beyond
Made with ♥ from SoulCeramics.com
Kiln Stilts
The solid state relays are incredibly e�cient compared to the standard mechanical relays and are able tooperate at much faster speeds. What this equates to is incredibly tight temperature control for accurate�rings, longer element life, and savings on your electrical bill!
The standard mechanical relays have moving parts which cause wear and tear over the years and willeventually need to be replaced; however with a solid state relay it's likely to last the entire life of the kiln! Youwill save money and time by never needing to worry about this in the future!
Bead Racks
Jewelers and potters can both bene�t from the use of bead racks. Ideal for smaller items hence thereference to jeweler use.
Kin stilts are ideal for low to medium-low �rings because as the kiln reaches higher temperatures above cone6 the stilts can begin to deform. Some stilts may be an exception able to reach cone 10 temperatures. Thestilts can be used to hold pieces, protecting the edges of the piece.
Bricks are used to help retain energy and heat within ceramic kilns. Bricks come in a variety of shapes, aswell as are available in di�erent materials, in order to best �t the potters �ring needs.
Bricks
Downdraft Vent Systems
With all ceramic and glass kilns, we highly recommend that they be vented to the outside. But why?First andforemost - is your safety! When heating various materials in your kiln, many have byproducts that burn o�and are released into the air. These byproducts are toxic and you don’t want that mixing with the air you’rebreathing.
By manufacturing the kiln with a hole in the bottom, we’re able to attach the vent here and pull the fumes outand vent them outside through a duct or window through a process call downdraft venting.
This process helps improve the air �ow and produce more uniform temperatures throughout the chamber,ensuring that each of your pieces is accurately being heated. The additional oxygen will ensure your colorsdevelop to their truest nature.
In addition, with downdraft venting - you’ll extend the life of the elements and other metals within our kiln,ensuring your kiln lasts longer and you have reduced repair costs down the road. We often hear fromcustomers that they are con�dent that by utilizing their venting system their kiln will last much longer than itwould have otherwise and that the investment has more than paid for itself.

Pottery At Home: Getting Started & Beyond
Made with ♥ from SoulCeramics.com
The standard order of most kilns comes with a stationary stand built to handle the weight, heat, and shape ofthe kiln. While this works perfectly �ne, attempting to move your kiln can be a di�cult maneuver and couldresult in a damaged stand, or worse - a broken kiln!
An optional lid lifter lightens the force necessary to operate the kiln lid. This usually isn't available on smallermodels as it's not needed.
With many of these larger kilns, the lids tend to pack a solid punch when it comes to weight. While they'restill manageable without the optional lid lifter, we've always found them to be a joy to use and make ourday-to-day lives in the studio that much easier.
A power interrupt switch is a useful safety feature which removes power from the heating elements of yourkiln once it is opened, and reapplies the power once the lid has been closed.
If you believe you'd ever like to open the kiln during �ring, the power interrupt switch is a highlyrecommended addition to your new purchase.
Only available on select models, and sometimes built-in, the dual media lid element brings elements into thelid - as opposed to only being installed on the side walls of the kiln.
This is useful if you'd like to �re both glass and ceramics with the same kiln. Usually we'd recommend havingan independent secondary kiln if you're �ring glass as you'll have better results, but this is a great optionespecially for those on a budget.
Only available on select models, multi-zone thermocouples is just like it sounds: There will be multiple spotsin the kiln where a thermocouple is installed which can feed temperature information back into yourcontroller.
This is a fantastic addition, especially on larger kilns, as you're able to see exactly what the temperature is indi�erent parts of your kiln (eg: bottom, middle, and top) and can then adjust the power to elements in thoseregions to ensure your pieces are being evenly �red.
Ordering a stand with caster wheels ensures the whole process of moving your kiln for any reason is asmooth & simple process.
Stand with caster wheels
Lid Lifter
Dual Media Lid Element
Power Interrupt Switch / Automatic Lid Shutoff
Multi-Zone Thermocouples

Pottery At Home: Getting Started & Beyond
Made with ♥ from SoulCeramics.com
The following examples give a brief explanation of various kiln controls. This is not an extensive list, as eachkiln manufacturer has their own selection of controllers for their o�erings. A few models, such as the TAPcontroller, as very popular and can be found across multiple brands.
Kiln Controller Types
Although the kilns at Soul Ceramics come equipped with remotes, picking exactly what model of control isdesired is dependent on the kiln buyer.
The TAP Smart Control
Genesis Control
Rampmaster Control
The Rampmaster control is an automatic control that allows the user to select both the cone number and�ring speed. It also has additional user bene�ts and modes that can ease the �ring process.
Set-Pro Control
This is an economic control option composed of a 3-button system. The bene�t of this control is that itseconomic and e�cient.
Manual Control
The genesis control is a touchscreen device, user-friendly with easy to follow instructions, allows for storageof up to 12 di�erent unique programs, adjustments can be made during �ring process.
Unlike the following kiln controls, the manual control is operated manually by switching controls throughoutthe �ring process. Many kiln manufacturers have moved away from manual controls in favor of digitalcontrollers, or are in the process of doing so.
The Temperature Automation by Proportional-Integral Derivative (TAP) control is a technologically advancedcontrol which includes a touchscreen and allows for wi� connection. The technology includes in this controlallows for very precise �ring and is user friendly. This, and and other fully-digital touchscreen models are ourpreferred models due to their extreme ease of use and powerful feature set.

Pottery At Home: Getting Started & Beyond
Made with ♥ from SoulCeramics.com
As kiln experts, we receive dozens and dozens of inquiries every day from excited new individuals venturinginto this world, just like you! It's not just our job, but our pleasure to assist you in your journey - so please,should you have any questions at all - we're more than happy to help 😄
How much does a kiln cost?
Soul Ceramics o�ers a variety of kilns at di�erent price levels. The following are a few examples of the kilnso�ered at distinct price levels as a reference for individuals interested in buying a kiln.
Soul Ceramics guarantees the lowest online price and will beat our competitor’s prices every time. If you seea lower advertised price anywhere online just let us know and we will beat it.
It's important to note here that these are just a very select few examples. Soul Ceramics has an incrediblyextensive catalog of kilns from a variety of the industries leading brands, a great selection of sizes andtemperature capabilities and other feature sets.
The highest price range of Soul Ceramics ceramic kilns are within this category which, is composed primarilyof Evenheat Ceramic Kilns and Jen-Ken Ceram-a-Glass Kins. This price category of kins includes the
up to the .Evenheat Ceramic Kiln- High Fire 2927 Jen-Ken AF Oval 31” 3” Ceramic Kiln
$2000-$4000
$1000-$2000
There are several popular Evenheat Ceramic Kilns o�ered within this price range such as, the and the .
EvenheatCeramic Kiln - RM II 1822 Evenheat Ceramic Kiln - RM II 2322
Soul Ceramics has nearly ten di�erent Ceramic Kilns within this price range. On the lower end, thereasonable priced is good for home user. The
is our best-selling ceramic kiln.Evenheat Ceramic Kiln - RM II 810 Evenheat Ceramic Kiln -
High Fire 1210B
$750-1000

Pottery At Home: Getting Started & Beyond
Made with ♥ from SoulCeramics.com
The image that many immediately conjure when envisioning a ceramics artist is of an individual throwingclay or molding a �gure, not standing idly in front of a kiln. While �ring may not be the most visually excitingpart of the ceramic-making process, it is the most critical part, as it ensures the creative energy put forth inall previous stages will be properly preserved in a durable, functional end-product.
Due to the fact that they are readily available and easy to install, are the most common way to�re ceramic pieces, so knowing how to operate them e�ectively is an essential skill for ceramics artists. Inorder to help you achieve the best results with your electric kiln, we’ve created a guide composed of usefulinformation, tips, and general advice to direct you through the process.
electric kilns
From the moment you acquire your kiln to the instant you reveal your completed pieces, we hope to provideyou with the con�dence, capability, and knowledge to create the best work you can.
Understanding the Process
Before considering the speci�cs of operating an electric kiln, it’s important to �rst understand a few basicsabout the �ring process:
Firing Stages
Typical ceramics �ring occurs in two stages: bisque �ring and glaze �ring. During the �rst �ring - bisque -greenware transforms into a durable, semi-vitri�ed porous state where it can be handled safely while beingglazed and decorated. Carbonaceous materials are also burned out in this phase.
The second �ring occurs after the artist has applied glaze to the piece, hence the name, and is typicallyfaster than bisque �rings because most of the water has already been driven out of the clay.
How Heat is Transferred in a Kiln
All electric kilns have heating elements, which are essentially pieces of wire designed to resist the passageof electricity. Similar to a stovetop or other home heating appliance (except designed for far highertemperatures), coiled heating elements inside a kiln impede electrical movement and subsequently causethe wire to heat up and radiate heat throughout the kiln’s interior. This radiant heat rises and is absorbed byeverything in the kiln.
Pyrometric Cones
Pyrometric cones are devices that measure how much heat is being absorbed inside a kiln. The higher acone’s number, the higher temperature it responds to, so an artist chooses cones to match the internaltemperature they plan to �re to. As the cone nears its peak range, it softens at the tip and begins to bend.This lets the artist know that their work has reached the intended temperature.
The Basics of Firing Electric Kilns
Pottery At Home: Getting Started & Beyond
Made with ♥ from SoulCeramics.com
Low cone temperatures appear with a 0 in front of the number, such as 018, 019, and 020, while higher conetemperatures are two-digit numbers like 12, 13, and 14. Traditionally, a three-cone system is used with every�ring, consisting of a guide cone (numbered one below the target temperature), a �ring cone (set at thetarget temperature), and a guard cone (numbered one above the target temperature).
If you have an automatic controller for your kiln, pyrometric cones are not required. However, cones stillprovide the best feedback while �ring, and their use is suggested at least every three �rings in an automatickiln to ensure your kiln temperature is calibrated correctly, to help you determine if there are hot or coldspots in the kiln, and to troubleshoot glaze color and inconsistencies. Especially as heating elements ageand therefore generate less reliable temperatures, pyrometric cones are essential.
Before You Begin
As you prepare to �re, be sure to double check your needs and take the following into consideration:
Determine your Required Temperature
All clays and glazes are created to mature at speci�c temperatures. If you �re clay at too high atemperature, it will deform or even melt. If you �re it at too low a temperature, it will not solidify and bedurable. As for glazes, �ring too high can result in runo�, �ring too low will make your pieces dry and rough,and a glaze’s color can be a�ected negatively by any temperature variance as well.
Be sure to consult the labels on your glazes for cone requirements and consider the type of clay you’re usingbefore choosing a �ring temperature. Speci�c temperatures for bisque and glaze �ring will be discussedbelow.
Invest in Kiln Furniture
There are an assortment of accessories you will need to hold and support your work during �ring. Kilnfurniture is designed to withstand the repeated high temperatures of �ring without deforming. For additionalinformation about kiln furniture, see the kiln accessories section of this e-book.
Getting Ready to Fire your Kiln
In preparation for �ring, be sure your kiln is clean and in top condition. Check heating elements for damage,kiln lid braces for security, and electrical cords and connections.
After making any repairs that are required, vacuum out your kiln if necessary and chisel o� any glaze dripson the shelves. Especially for kilns insulated with �rebrick, frequent and thorough cleanings are crucial sothat no foreign matter will be exposed to the heating elements and short them out.
For more information on kilns, you can revisit the "What is a Cone and Why is it Important?" section of this e-book.
Finally, double check that all potentially combustible materials have been removed from the surroundingarea and that there is at least a foot of clearance around your kiln.

Pottery At Home: Getting Started & Beyond
Made with ♥ from SoulCeramics.com
Preparation with Kiln Wash
Though a successful kiln �ring is dependent on many factors, one particularly valuable tool which is used toensure both an artist’s work and machine are protected, is kiln wash.
What is kiln wash and why do you need it, you ask?
This section will cover just that; we’ll guide you through kiln wash’s purpose, how to mix and apply it, andwhat you should know before using it.
Whether you’re a ceramic or glass artist, new hobbiest or professional, knowing the properties of kiln washand the rules of its use are essential for you to make your best work and will help you avoid costly problems.
What is kiln wash?
Also referred to as shelf primer, kiln wash is a liquid substance that is brushed onto kiln shelves to preventglaze from an art piece sticking to the shelf. Though you can make your own kiln wash from one of the manyrecipes that exist, most people buy kiln wash pre-mixed.
Kiln wash is made of refractory substances, like silica, alumina, or zirconium, that have high melting pointsand don’t cause melting when combined. The exact formula is adjusted based on an artist’s intended �ringtemperature; silica is typically used in low- or mid-�re temperature ranges, while alumina, which is sourcedfrom kaolin, the foundation of porcelain clay bodies, is typically used for higher temperatures since it has ahigher melting point.
Zirconium oxide or zirconium silicate are used for high-�re programs because these ingredients have evenhigher melting point than alumina. Though higher temperature formulas always work at lower temperaturesas well, they are more expensive.
Why do you need kiln wash?
Kiln wash provides a protective layer between your artwork and your kiln shelves. Though glaze is neverintended to come in direct contact with kiln shelves - hence, why stilting or wiping glaze o� the bottom of aproject is important - sometimes it will unexpectedly run, spit, drip, or melt onto the shelf.
Because kiln shelves are typically made of hard ceramic material, glaze will stick to them if one of theaforementioned situations occurs. Therefore, kiln wash is used to ensure your pieces won’t stick to theshelves if something goes awry during �ring.
It is also used as a preventative measure in case of bloating or melting clay bodies, or in case a piece tipsover, all of which could similarly lead to an unfortunate fusion between a piece and a kiln shelf.
Kiln wash should be used during every glaze �ring. If it isn’t, you’ll risk not only the di�cult job of removing astuck piece, but the task of grinding all the glaze o� the kiln shelf. This is both hard work and damaging tothe smooth surface of your shelf.
Any glaze you miss during the grinding, along with what seeped into the pores of the shelf, will continue toeat away at the shelf and weaken it.

Pottery At Home: Getting Started & Beyond
Made with ♥ from SoulCeramics.com
How do you mix and apply kiln wash?
If you are using a pre-made kiln wash, it typically will come in a powder form. Here are the steps you shouldtake to mix and apply it:
What to do if glaze runs onto kiln shelves
If you’ve used kiln wash, you should have no trouble detaching a piece from a kiln shelf where glaze hasdripped. When you lift it, the kiln wash in that area will come up with it, but you can grind it o� the bottom ofyour pot if it otherwise looks good. You can �ll the spot on the shelf back in with more kiln wash, but overtime the shelf will become uneven from multiple applications.
Continuing to �re on a rough shelf can cause pots to get hung-up and crack, warp, or break. Therefore, afterseveral �rings, you need to clean o� the remaining kiln wash and start fresh with new layers.
Here are some important things to keep in mind when cleaning kiln wash o� your shelves:
It’s also important to note that you should only apply kiln wash to the top surface of your shelves. If youwould like to �ip your shelves over, you need to scrape all the kiln wash o� the side you’ve already used toprevent �akes from falling onto the pots below.
1. Before even mixing your kiln wash, if you are using brand new kiln shelves, itis recommended you �rst �re them once in an empty kiln. This initial step will drive out any organicmaterial from manufacturing and transport. Now they are ready to have kiln wash applied.
Fire new kiln shelves dry.
2. Mix some of the powder with water until it has the consistencyof skim milk.Mix a small amount of wash in a bowl.
3. Using a wide paintbrush, utility brush, roller, or even sprayer, apply a thin layer ofwash to the kiln shelf. If the coat is too thick, it could cause more cracking and peeling. Also, be carefulto avoid getting kiln wash on the edge of the shelf; it can �ake o� during �ring and onto your glazedpieces below. Many artists sponge o� a half-inch of kiln wash around the perimeter to ensure it won’tgo over the edge.
Apply thin coats.
4. To ensure that there is enough protection between your ware andthe kiln shelves, you should apply three full coats of kiln wash. Let each coat dry thoroughly beforeapplying the next one - allow about 60 minutes per layer. Some artists even chose to �re between theapplication of each coat, building it up during bisque �rings or adding additional layers during glaze�rings.
Apply at least 3 coats of kiln wash.
5. If you notice that your kiln wash is �aking, remove any loose pieceswith a paint scraper and reapply. Similarly, if any glaze drips onto your shelf, use the paint scraper toremove it, clean up any loose �akes around it, and then dab some kiln wash on the bare spot.
Scrape any wash that �akes o�.
Examine your shelves carefully before �ring, and besure to remove any kiln wash remnants from a previous �ring with a sturdy metal scraper or wire brush.Before loading, scrape loose, �aky kiln wash o�:
Glasses or a face shield along with a good dust mask is suggested, and whenscraping, brushing, or grinding shelves, it is safest to do the work outdoors.Wear safety gear:
Minor glaze drips can be chipped o� with a hammer andchisel, but never hold the chisel vertically against the shelf. For more serious glaze runs, you will haveto grind the glaze and kiln wash o�.
Remove any accumulation of glaze residue:

Pottery At Home: Getting Started & Beyond
Made with ♥ from SoulCeramics.com
On occasion, kiln wash is unnecessary. Here are the situations in which you will not need to use this otherwiseessential tool:
During a bisque �ring
The �rst �ring of your ware, known as a bisque �ring, doesn’t include glazes, so poses fewer threats to bothyour work and kiln shelves. While kiln wash is not necessary for this stage, it is still recommended due to thefact that expansion and contraction can cause pot “feet” to get stuck, some porcelain clays have a habit ofsticking, and the risk of clay meltdown is always a possibility.
If your kiln has �ber shelves
Some glass kiln shelves are made from �ber, allowing them to be made larger and �atter than most ceramicshelves. Kiln wash should not be applied to �ber shelves, as they can absorb water and will therefore bedestroyed. If you have a kiln with �ber shelves, use kiln shelf paper instead (more on this below).
If your kiln has nitride bonded silicon carbide shelves
Glaze does not stick to nitride bonded silicon carbide, so if you own kiln shelves made of this material, it istypically unnecessary to apply kiln wash. However, if you are �ring �nicky materials - namely porcelain -which can become glaze-like under certain �ring circumstances, you might want to use kiln wash to preventyour clay bodies from sticking, especially when using a gas kiln.
Other miscellaneous kiln wash information
It is recommended that you also apply kiln wash to the brick on the kiln �oor. If any glaze drips onto the �oorof the kiln, the wash will prevent the bricks from being penetrated and destroyed by the liquid.
However, if there are kiln elements in the bottom of your kiln, do not apply kiln wash to it; the ingredients inkiln wash will aggressively destroy heating elements, so in general you should steer clear of applying washto the side walls or any other areas elements might be located. To reduce the chance of contact betweenkiln wash �akes or chips and heating elements, be sure to keep your kiln clean by occasional vacuuming.
While silica is the preferred refractory ingredient in many kiln washes, it is not a good choice for salt or soda�rings. Silica is a glass-former, meaning that if a lot of glaze drips onto a shelf coated with kiln wash, theglaze can melt the silica in the kiln wash and form a new glaze on the shelf. This is particularly likely in anenvironment where sodium oxide is introduced atmospherically - such as in salt and soda �rings - so thebest kiln washes for such �rings are ones not made with silica. You can mix your own kiln wash with a salt-speci�c formula that uses a di�erent refractory (like kaolin or alumina oxide), and use “wadding,” a thickerversion of kiln wash that more closely resembles bread dough, to place under your pieces.
An alternative to kiln wash is kiln paper, which performs the same function as kiln wash but instead comes inthe form of a thin, paper-resembling sheet that disintegrates after �ring. It is quicker and easier to use, but itis more expensive. Typically it is preferred by glass artists who don’t want the brush strokes from kiln washapplication to show through their transparent pieces or otherwise alter the texture of their work’s bottom.
Exceptions to the kiln wash rules
Pottery At Home: Getting Started & Beyond
Made with ♥ from SoulCeramics.com
Before loading or unloading the kiln all switches must be in the OFF position(s) and power to the kilndisconnected. Contact with heating elements or other electrically conductive components within the kiln canresult in electrical shock causing injury or death. Before loading or unloading the kiln the kiln should be cool,135°F (57°C) or less to prevent burn injury.
Begin by placing 3 to 4 posts on the kiln �oor. These posts will support a shelf and it’s best to use ½” to 1” forthis purpose. These posts allow for proper air and heat circulation throughout the kiln and to help preventserious damage and to the kiln �oor in the case of an over�re.
Place a shelf on the �oor posts, placing carefully to avoid contact with the kiln walls, thermocouple(temperature sensor) or Kiln Sitter tube assembly. Check for stability and reposition posts or add more postsif necessary.
Place your ware on bottom shelf. All ware that is placed in the kiln must be dry. Ware that is not completelydry may crack or explode causing damage to other ware, heating elements, �rebrick or Kiln Sitter tubeassembly. Slipcast greenware may be �red from several days to one week after pouring. Hand modeledpieces need more drying time, as much as a few weeks. Glazed pieces can typically be �red 6 hours afterapplication. Consult with your materials supplier for guidance on proper drying time and procedures.
Most ceramic �rings use multiple shelf layers separated by posts. To form additional shelf levels chooseposts that are about ½” to 1” taller than any ware placed on the proceeding shelf. Use a minimum of 3 posts,with 4 being preferred. Once posts are placed, place in a shelf and check for stability and readjust or addmore posts as necessary. Place your ware on the shelf.
When placing posts, shelves and ware in the kiln place them at least 1” (more is better) away fromthermocouple(s) and Kiln Sitter tube assemblies. These components respond to temperature and you’ll wantto give them room to operate. Kiln ware located too close to these components can negatively a�ect theresponse of these components. Give them room!
Repeat loading procedure for all remaining shelf levels. When loading is complete make sure that the lid ordoor will close without making contact with ware, posts or shelves. There should be at least 1” between allkiln ware and the lid or door. The kiln is now loaded and ready to be �red!
Loading your kiln

Pottery At Home: Getting Started & Beyond
Made with ♥ from SoulCeramics.com
The Bisque Load
When you’re all set to �re, here are some basic rules you should follow for a safe and successful bisque:
Your Work Must be Bone Dry
Do not �re your ceramic pieces until you are certain there is no water left in the clay. If your piece is evenslightly damp and you �re too fast, the steam will cause it to explode. “Candling” is one technique you canuse to dry your clay if it is still damp; in this process, the kiln is programmed to remain at around 180degrees Fahrenheit for eight to ten hours. This method eliminates chances of breakage even with thickerpieces, and is particularly helpful when pieces of varied clay thickness are in the kiln together.
Fire a Full Load
In order to take advantage of conduction heating and save electricity, try your best to �re a full load everytime you use your kiln.
Handle Work Carefully
Because all work is very fragile at this stage, it is crucial to handle your pieces with great care.
Low Fire or High Fire?
Bisque �ring requires between cone 010-04, with cone 08-06 being the most common. There are two mainapproaches to bisque �ring: low �re or high �re. Counterintuitively, in low �re, the cone number is higher - upto 04 - to ensure that all the carbon and other materials in the clay burn out during the �rst �ring. Thiseliminates the chance of carbon burning out during the glaze �ring and causing blisters in the glaze. It alsomakes your pieces stronger, lowering the chance of cracking during cooling. However, the risks of the high�re route include the chance that the clay will not absorb enough glaze, and it leaves pieces less porous and�exible, and therefore more sensitive to thermal shock.
The other option is high �re; bisquing closer to cone 010 leaves the ware very porous and able to absorbglazes well. However, if it absorbs too much glaze, the piece can be too thick and actually fall apart.Additionally, �ring at cone 010 leads to a piece that is weaker. Therefore, you should chose a cone based onthe type of glaze you’re using as well as the type of project you’re creating.
Fire Slower if You’re Uncertain
A good rule of thumb is that a slow �re is safer than a fast one. Unless a glaze looks better �red fast, slowdown the process to ensure your pieces don’t become damaged by the quickly rising temperatures.
Properly Place Your Pieces

Pottery At Home: Getting Started & Beyond
Made with ♥ from SoulCeramics.com
Make Sure Steam Can Escape
To keep your pieces from exploding, steam needs a way to exit your kiln. If you don’t have a venting system,prop your kiln lid open a few inches with a kiln brick or similar item during the �rst few hours of �ring. If yourkiln has an upper peep hole, leave this unplugged during this time as well.
Don’t Unload Until the Kiln is Completely Cooled
Even after your kiln has been turn o�, it will remain hot for hours. Don’t open or touch it until it is fully cooledto avoid injury or thermal shock that could endanger your work and kiln elements. Unloading the kiln shouldonly take place when your pieces can be easily touched by hand.
Glaze Firing
Though many of the same rules apply to glaze �ring as bisque �ring - such as the need for ventilation the�rst couple of hours and a suggested tendency to �re slower when you’re uncertain of how best to proceed -there are a few key di�erences to keep in mind during this second �ring:
Glaze Firings Take Less Time
As mentioned in the beginning of the guide, glaze �ring typically is a faster process than bisque �ringbecause most of the moisture in the clay has been driven out. However, some glazes look better after a slow�ring, so you’ll want to experiment.
Glaze Fire at a Lower or Equal Cone to Your Bisque Firing
Most commercial glazes recommend glaze �ring two cones cooler than your chosen bisque �ring cone.However, many artists �nd that �ring low-�re pieces at the same cone as they glaze them works well. Cone06 is a good choice a typical glaze �ring, though of course what will work best depends on the project, glazetype, and kiln.
Mid- to High-Fire Glazes Often Look Better if they are Cooled Slowly
If using a manual kiln, turn the switch down to “medium” when you would normally just turn the kiln o�, and ifusing an automatic controller, program the �nal cooling ahead of time.
Use a Soak / Hold Temperature at the End of Firing
Use one-inch stilts to hold up the bottom shelf of your kiln to aid circulation, and keep all of your pieces oneinch away from heating elements, walls, the thermocouple, and the KilnSitter (if you have one).
Pottery At Home: Getting Started & Beyond
Made with ♥ from SoulCeramics.com
Kiln Operation Safety
Though modern technology has led to the creation of ceramic and glass kilns with far greater safetyfeatures than early potters could have ever imagined, there’s no getting around the fact that kilns operate atextremely high temperatures and therefore pose severe dangers when used incorrectly or with negligence.
And a kiln’s heat isn’t the only safety concern: toxic volatiles are often released during fuel-burning (carbondioxide), when �ring soluble metal salts (sulfur dioxide), and during reduction �ring (carbon monoxide).Overexposure to these volatiles can lead to blood oxygen levels falling, a rise in blood pressure, lungirritation, and in the case of carbon monoxide, drowsiness, fatigue, and even death.
In order to ensure the health and safety of yourself and others, as well as the longevity of your kiln, it iscritical to familiarize yourself with the precautions and upkeep requirements that accompany kiln ownership.
Pre-Firing Safety
Before you even begin �ring, there are a few simple but crucial steps you won’t want to forget. Here are somethings to get sorted before creating your glass or ceramic masterpieces:
Invest in personal protective gear
Even though kilns are built with a signi�cant amount of insulation, their outer surfaces can become hotenough to seriously burn bare skin. Whenever handling any part of the kiln, kiln mitts or gloves should beworn. Additionally, be sure to buy dark glasses from a safety supply house - long-term viewing inside a kilncan cause serious eye damage due to the radiant heat. IR and UV protective glasses will not only keep yourvision safe, they will allow you to see your cone packs more easily. Note that regular sunglasses are notsu�cient and may melt when exposed to a kiln’s heat.
Proper installation is critical
If bought new, your kiln will come with a manual; be sure to follow it closely. If you buy a used kiln, be surethe previous owner includes a manual or visit the manufacturer’s website to obtain proper installationinstructions. Observe building and safety codes, never use an extension cord, and make sure your kiln islocated in a dry place to prevent electrical shock and corrosion.
Vent your kiln
All kilns need to be properly vented either outdoors or to the outside so as to limit the user’s contact withtoxic and irritating gases. While there are several venting methods to choose from, if installing a ventingsystem, it is recommended you use a licensed heating, ventilation, and air-conditioning (HAC) contractor, asthey will have the equipment for installing and accurately testing the adequacy of a system’s ventilation.
To even the temperature throughout the kiln and assure the pieces have all achieved the desiredtemperature, a soak or holding temperature can be extremely useful. Particularly if the kiln is denselypacked, this step is recommended. However, don’t soak for too long, as this can over�re your pieces.

Pottery At Home: Getting Started & Beyond
Made with ♥ from SoulCeramics.com
Be aware of your kiln’s surroundings
A kiln needs at least a foot of clearance, so double-check that you’ve given your machine suitable space andthat you’ve removed any potentially combustible materials from the surrounding area. Additionally, nothingshould ever be left on top of a kiln during �ring. Before starting your kiln, make sure that the power corddoesn’t touch any portion of the kiln that gets hot, and keep a �re extinguisher near by. Finally, be aware ofany �re sprinkler systems located in the kiln room that might be triggered by high �ring temperatures. Tomake sure they are high enough, test them by setting your kiln to peak temperature with the ventilationsystem turned o� and all doors and windows closed.
Safety During Firing
Once your pieces are in the kiln, here are some tips for safe �ring:
Be cautious opening a top-loading kiln
If it is necessary to open your kiln during �ring, caution should obviously be practiced for all models, butwhile a front-loader or clamshell allows you to stand to the side, a top-loading kiln results in heat escapingstraight up and potentially into your face. When opening a top-loading kiln, be sure to avoid standingdirectly in front of it and wear protective gear.
Wear protective eyewear when looking through peepholes
Even for short periods of time, it is important to shield your eyes from radiation. Never touch a heatingelement during �ring: Even if you are wearing gloves, heating elements will cause an electrical shock iftouched. To further avoid electric shock, never insert metal instruments into the kiln while it is �ring.
Be cautious removing peephole plugs
Due to the fact that trapped heat will be let out quickly and intensely when they’re removed, peephole plugsshould be removed with caution.
Post-Firing Safety
Once your projects have �nished �ring, there are still a few essential steps you’ll want to take. Here’s whatyou should keep in mind:
Don’t take your gloves off yet!
Even after your kiln has been turn o�, it will remain hot for hours. Don’t open or touch it until it is fully cooledand handle it only while wearing gloves or kiln mitts. Unloading the kiln should only take place when yourpieces can be easily touched by hand.

Pottery At Home: Getting Started & Beyond
Made with ♥ from SoulCeramics.com
Though it may sound obvious, it is very important to unplug your kiln before performing any maintenance,repairs, or work on the electrical components, so unplug it after �ring every time, just to be safe. Additionally,don’t unplug or plug in an electric kiln unless the circuit is o�.
Clean your kiln after �ring
Especially for kilns insulated with �rebrick, frequent and thorough cleanings are crucial so that no foreignmatter will be exposed to the heating elements and short them out.
Other General Safety Tips
Finally, here are some general rules all artists should live by to ensure the wellbeing of themselves, others, aswell as their kiln:
Unplug your kiln
Keep your kiln away from kids and pets. Never allow your kiln to exceed the temperature rating listed on the serial plate. Fuel-�red kilns need to be attended during the beginning of their warm-up period until the �ash pointof the fuel has been reached. Don’t place anything in the kiln you are unsure of. Firing unknown materials is risky; some items maymelt, explode, or release toxic fumes when �red. Kiln upkeep is extremely important. Be sure to regularly check electrical components and immediatelyreplace any that are damaged, discolored, corroded, or brittle. Additionally, make sure kiln lids have braces that are secure and not corroded. Never wear loose-�tting clothing around a hot kiln. Avoid eating and drinking in the studio. Toxins and dust are easily ingested when you handle food andkiln working materials in the same space. Always wash your hands upon leaving the studio so as not to risk tracking or exposing toxins and dustto other locations or people. In a similar vein, consider dedicating a pair of shoes to studio use only. Don’t smoke while your kiln is �ring. Smoking has been proven to increase the rate at which many toxinsare ingested.

Pottery At Home: Getting Started & Beyond
Made with ♥ from SoulCeramics.com
Taking Care of Your Kiln
With proper maintenance, you can add many extra years of life to your kiln and elements by following a fewguidelines.
Before any maintenance, please remove power from the kiln!
Before Each Firing
Check inside your kiln, look for anything out of the ordinary.
Vacuuming your kiln before each �ring will help insure that dust will not fall on the ware or cause prematureelement ware. (Kiln Sitter and switches must be o�)
Remove any glaze or glass spots from the shelves, posts, kiln bottom or side walls. If not, glaze and glasswill re-melt and spread getting in the element grooves to cause shorter element life.
Make sure there are no loose fragments on the lid that may drop on your ware.
Check your shelves for cracks before �ring. This may save a possible over�re, disappointment and a lot ofhard work. Sand any rough spots on the bottom or shelves and recoat with kiln wash.
Check the tightness of the lid band and tighten if necessary.
It is not necessary to kiln wash after each �ring but a su�cient coating should be maintained.
Inspect your tube assembly or thermocouple for any signs of damage and replace immediately if so.
Lid Maintenance
During �ring your lid will expand and contract so it's necessary to tighten the lid band clamps occasionally,using care not to over-tighten and strip threads.
Should chips or cracks appear they should be repaired to prevent "sifting" or becoming larger. Small chipsmay be cemented back into place using Evenheat Repair Cement. Sometimes a portion of the brick needs tobe gouged out and a new brick, cut to the proper shape, cemented in place. Sanding smooth to create a �atsurface once again.
The lid is manufactured with a protective coating on its "hot side". This coating serves to prevent "sifting" ofbrick dust onto the ware. Because of this coating it is not necessary to kiln wash the "hot side" of the lid.Having said that, it's also not necessary to kiln wash the outer surface of the lid.

Pottery At Home: Getting Started & Beyond
Made with ♥ from SoulCeramics.com
It's possible that small pieces of brick will break free from the sidewall. While this is normal and does note�ect the operation of the kiln, these pieces may be cemented back into place using Evenheat RepairCement. Use care not to get cement on the heating elements as this will destroy the element.
Also please note that while it seems logical that the sidewalls "should" have a layer of kiln wash applied tothem we �rmly suggest you refrain from doing so. The concern is that the kiln wash will �nd its way onto yourheating elements during the application. If this happens the element will likely fail.
Element Maintenance
There really isn't much maintenance that can be performed on an element other than a visual check. Take alook at your elements every now and then and check to see that there is no foreign material in the elementgroove. Remove anything you �nd.
A note to those of you using silica sand. If you allow silica sand to enter the element grooves it will cover theelement and cause it to overheat (yes, overheat). This will cause element failure. So please, check yourelement grooves for silica sand.
Please refer to your operators manual for the discussion and photo's of "Element Replacement".
Power Receptacle Maintenance
Periodically inspect the power cable receptacle and plug for any signs of discoloration or heat. If either isnoticed replace both the plug and receptacle. What generally happens is the contacts in the receptaclebecome weak as a result of constant unplugging or strain and cause heat (loose connections cause heat).This heat discolors the power cable and even travels down the copper wire (copper is a great conductor ofheat) toward the fuses/breakers and kiln control panel. This heat causes the fuses /breakers to "blow" or tripat lower amperage levels making you think the trouble is in the fuses and breakers!!
The power cable should easily plug into the receptacle without any strain. If your power cable "just makes it"to the receptacle or is positioned in an "odd" way (upside down for instance) then your asking for trouble.Reposition the receptacle or move the kiln or get a longer power cable to make sure there is no straining. Asnoted above, straining of the receptacle causes a loose connection, which causes heat, which causes failure.
So check your plug/receptacle periodically.
Area Surrounding the Kiln
The area around the kiln should always be free of combustible or �ammable materials, ALWAYS! A kiln is apowerful piece of equipment that gets hot while doing its job. Anything that can burn or explode, with heat,should be kept well away from the kiln. This includes, but is not limited to, paper, cardboard, fuels, toiletpaper, packing materials, plastics, clothing, etc.
Remove any foreign objects (glaze, slip, clay, glass, silica sand) from the sidewalls before any �ring. Failing todo so may cause this material to further damage the sidewalls and possibly the heating elements. Removethe material with a small screwdriver or knife. Be careful, the brick is fragile.
Sidewall Maintenance

Pottery At Home: Getting Started & Beyond
Made with ♥ from SoulCeramics.com
Calculating the Cost of Firing a Kiln
Kilns have a reputation for requiring costly amounts of electricity, and many hobbyists give this drawback asa rationale for using a communal studio instead of starting their own personal home studio.
However, is it actually true that kilns are too expensive to �re, or is this simply a myth?
As it turns out, owning a kiln may actually be more a�ordable than you think. In order to help you price yourpieces or decide if owning a kiln is cost-e�ective, we’ve put together a guide that explains what factors a�ectthe cost of �ring a kiln, how to calculate exactly what �ring will cost you, and how to use a formula whenconsidering di�erent kiln models.
Once you know how to calculate the total cost of kiln ownership, you can be certain you are making aninformed decision on a serious investment.
5 Factors Affecting Cost of Firing A Kiln
The overall cost of �ring a kiln is not dependent on a single factor; details regarding an artist’s electricalsituation as well as their interests and habits are equally important when determining how much money willbe spent. Here are �ve main factors to consider when evaluating the cost of kiln �ring:
Cost of Electricity
How much an individual is charged for the use of electricity varies from state to state, and from provider toprovider. The cost of energy is measured in cents per kilowatt hour (kW), and though the U.S. average is 12.70cents per kilowatt, the price typically ranges from just over 9 to almost 22 cents per kilowatt (if you live inHawaii, you could be facing over 30 cents per kilowatt).
The U.S. Energy Information Administration website breaks down the monthly average costs by both regionand state, so if you’d like to know how your regional environment a�ects the cost of kiln �ring, you can accessthe EIA’s database .here
How Much Power Your Kiln Uses
A kiln’s power consumption is largely dependent on its size and design. Smaller kilns that operate on a 120-volt standard household outlet will typically draw between 1.5 and 1.8 kilowatts whereas a medium-sized kilnwill draw around 5 kW or 8 kW. Some large kilns can even be as rated as 11kW, so be sure to check theenergy requirements on a kiln when considering potential �ring costs.
Duration of a Single Firing
Some �ring programs take longer than others - �ring time can be less than an hour or up to 20 hours - soconsider what kinds of projects you’ll be doing. How many steps are involved in each �ring program you’ll berunning? Are there many annealing periods or ramp/hold cycles, and how long will each take? The longeryour �ring programs are, the more energy is used, therefore increasing the price exponentially.

Pottery At Home: Getting Started & Beyond
Made with ♥ from SoulCeramics.com
Frequency of Firings
How often your kiln is used also a�ects the cost of running it. Consider if you plan to �re every day,periodically, or only on occasion. If you are �ring throughout the day more than once a week, this will increaseyour cost signi�cantly.
Pieces Fired
The characteristics of the artwork you are �ring are also important to note, as they a�ect the frequency andduration the kiln will be running. Quantity, size, and composition are all important factors to consider; forinstance, the more pieces you �re, the more frequently you’ll be �ring, and using materials or techniques thatrequire slower or longer �ring programs will increase your �ring time as well.
Similarly, since big pieces consume more space in a kiln, artists who regularly work on larger projects aremore likely to need a larger, higher-energy consuming kiln, or �re more frequently in a medium-sized kiln.
The Cost-Calculating Formula
In order to calculate the cost of a given �ring program for a speci�c kiln, you will need four speci�c �gures.Here’s how to determine each one:
1. First, you will need to establish the cost of electricity in your studio location, as dictated by yourprovider. Locate your most recent electricity or utility bill, and look for an indication of how much yourprovider charges per kilowatt hour. As mentioned above, this rate will likely be between $0.09 and$0.22.
2. Next, determine how many kilowatts your kiln uses. If you already have a kiln, locate the electrical dataplate attached to the side of the control box to �nd the volt, phase, amp, and watt capacities of thekiln. If you are still in the research stage, �nd the watt capacity listed in the product description of thekiln online. Once you know the wattage, convert this number to kilowatts by simply dividing by 1000;for example, 18,000 watts is 1.8 kW.
3. Now �gure out how many hours your �ring program will take. Again, if you are calculating the cost of akiln you already own, digital controllers will display the time elapsed at the end of a �ring cycle. Ifusing a manual controller, simply measure the time from when you start the kiln to when you turn it o�.If you are still considering di�erent kiln models, you can follow this same procedure by measuring yourexpected �ring cycle of choice from start time to end time.
4. Finally, establish your kiln’s duty cycle. A kiln’s elements are not engaged for the full duration of �ring;electricity passes through the elements only when the relays are on, a phenomenon that can bedetected by the clicking or humming sound heard when the kiln is operating. A duty cycle refers to theperiod of time in which a kiln’s elements are actively drawing electricity, and is given in a percentageform (a 100% duty cycle would imply the elements were powered during the entire �ring procedure).For a �ring program that contains controlled ramp rates, hold times, and other temperaturemanipulations, the duty cycle is typically 50-60%, meaning a 6-hour program would consist of relaysactively drawing power for about 3-4 hours. A low or bisque �ring generally has a 50% duty cycle, aglaze �ring might be closer to 65%, and preheating only has a 15% duty cycle. It is also important tonote that as a kiln ages, its e�ciency goes down and therefore its duty cycle goes up.

Pottery At Home: Getting Started & Beyond
Made with ♥ from SoulCeramics.com
Once you have deduced these numbers, input your data into the following formula:
Once you have the information regarding your electrical costs, your kiln’s energy requirements, and your�ring program of choice, you can apply the above formula to a kiln you already have or any kiln you may beinterested in purchasing. As a demonstration of how the formula works, here is the cost breakdown of twopopular kilns sold at Soul Ceramics:
Example 1: Jen-Ken AF3P 11/9 Electric Glass Kiln
Example 2: Evenheat High Fire 2318
Now that you’re able to more accurately estimate the cost of �ring various kilns and programs, you might besurprised to �nd that �ring glass and ceramic projects is more a�ordable than you expected. If you have anyquestions or concerns regarding kiln �ring costs, please don’t hesitate to !contact us
Calculation: ($0.12 cost/kW-hr) x (7.4 kW rating) x (8 hr duration) x (0.6 duty cycle) = $4.26 cost of �ringprogram
Besides manually calculating costs, you may �nd your kiln has a digital controller capable of calculating thecost of each �ring cycle. Models with this technology require the owner to simply enter the kilowatt per hourcost of their electricity, and will then display the cost at the end of the �ring program.
Calculation: ($0.15 cost/kW-hr) x (1.5 kW rating) x (2 hr duration) x (0.6 duty cycle) = $0.27 cost of �ringprogram
Examples of How to Calculate Total Kiln Firing Cost
cost of �ring program=
(Cost per kilowatt hour) x (kilowatt rating of the kiln) x (program duration) x (duty cycle of the kiln)
$0.15. In this scenario, we will assume an electricity charge of medium range,commonly found in many households across the U.S.Cost per kilowatt hour:
1.5 kW. The Jen-Ken AF3P 11/49 is a small kiln operating on standard 120-volthousehold power, so it is rated at 1560 watts.Kilowatt rating:
2 hours. This is a short total �ring time for a smaller project with a basic �ringprogram.Program duration:
0.6. For this scenario, a 60% duty cycle is assumed, meaning the number you’ll insert intothe formula is 0.60.Duty cycle:
$0.12. This scenario assumes the near average electricity price charged byproviders in the U.S.Cost per kilowatt hour:
7.4 kW. The Evenheat Porcelain 2318 is a large, high-�re kiln and operates on 240 volts,meaning its energy requirements are higher than what typical household power can accommodate,which is why it is rated dramatically higher than the Jen-Ken AF3P 11/9 at 7400 watts.
Kilowatt rating:
8 hours. This is also a signi�cant increase from our last example, due to the longer�ring time needed to �re larger, more complex projects and high-temperature materials.Program duration:
0.6. As in the �rst example, this scenario will assume a 60% duty cycle.Duty cycle:

Pottery At Home: Getting Started & Beyond
Made with ♥ from SoulCeramics.com
Let’s get started.
While you do need your own equipment to start a pottery business, you don’t need to have your own privatestudio. Any space in which you can comfortably and safely work from can become your pottery studiowhether that’s a spare room in your house, the basement, the garage or even the attic.
You can always �nd more convenient spaces as your business grows and makes more money. Just makesure to read and understand the safety information on any equipment you’ll be working with, especially kilns,as they need special setup depending on a variety of factors such as heat, size or voltage. You can readmore about kilns and safety earlier in this book.
When it comes to equipment, it really depends on the kind of pieces you will be creating and the techniquesyou use to create your art.
The space & equipment: clay, wheels, kilns and other tools
In this mini-guide you’ll �nd the basic information about how to start a pottery business divided in 3categories: The space and equipment you’ll need, the legal requirements to start a business* and how topromote and sell your art.
Pottery is de�nitely one of the best hobbies you can turn into a business. Starting your own pottery businessdoesn't require large amounts of money nor crazy skills. As long as you know the basics of pottery making,have some practice and basic equipment, you can start selling your art either as a side hustle or as a full-time business.
A Mini Guide to Starting Your Own Pottery Business
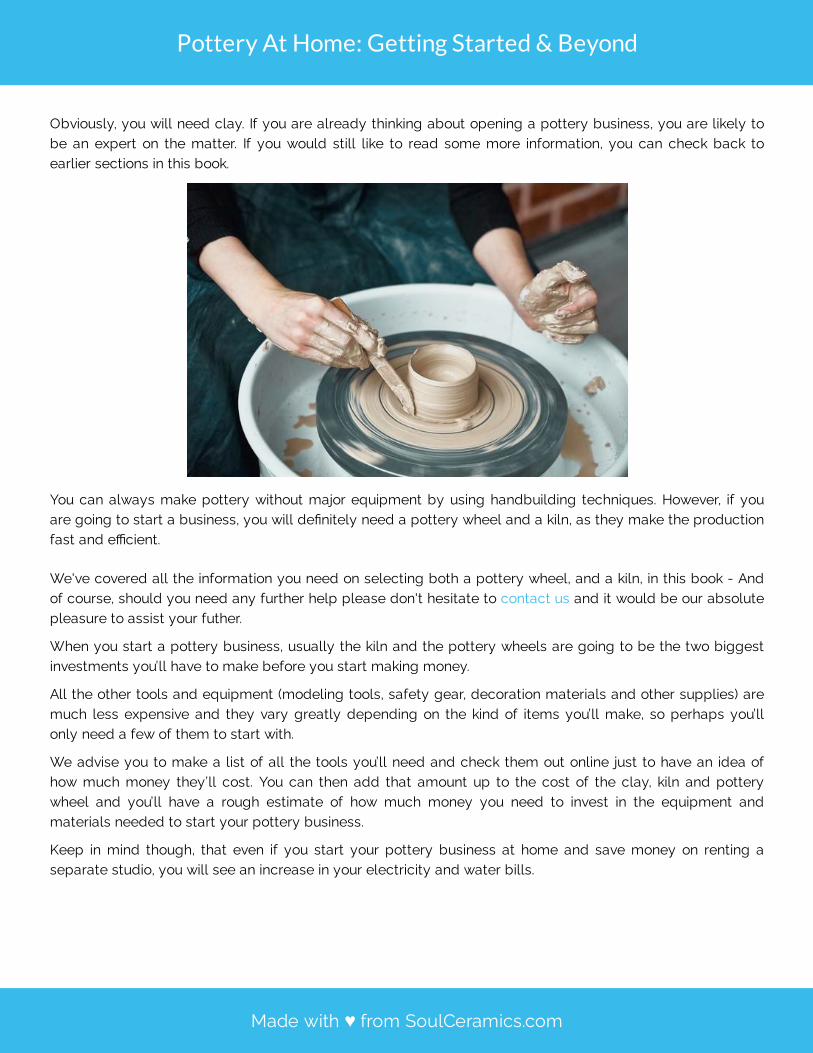
Pottery At Home: Getting Started & Beyond
Made with ♥ from SoulCeramics.com
When you start a pottery business, usually the kiln and the pottery wheels are going to be the two biggestinvestments you’ll have to make before you start making money.
Keep in mind though, that even if you start your pottery business at home and save money on renting aseparate studio, you will see an increase in your electricity and water bills.
We advise you to make a list of all the tools you’ll need and check them out online just to have an idea ofhow much money they’ll cost. You can then add that amount up to the cost of the clay, kiln and potterywheel and you’ll have a rough estimate of how much money you need to invest in the equipment andmaterials needed to start your pottery business.
All the other tools and equipment (modeling tools, safety gear, decoration materials and other supplies) aremuch less expensive and they vary greatly depending on the kind of items you’ll make, so perhaps you’llonly need a few of them to start with.
We've covered all the information you need on selecting both a pottery wheel, and a kiln, in this book - Andof course, should you need any further help please don't hesitate to and it would be our absolutepleasure to assist your futher.
contact us
You can always make pottery without major equipment by using handbuilding techniques. However, if youare going to start a business, you will de�nitely need a pottery wheel and a kiln, as they make the productionfast and e�cient.
Obviously, you will need clay. If you are already thinking about opening a pottery business, you are likely tobe an expert on the matter. If you would still like to read some more information, you can check back toearlier sections in this book.

Pottery At Home: Getting Started & Beyond
Made with ♥ from SoulCeramics.com
The legal procedures to start a new business*
In the United States of America, the legal procedures and the �ling fees to start a new business vary fromstate to state. You can run your business on your own as a sole proprietorship or register a Limited Liabilitycompany, also known as LLC.
In very simple terms, being a sole proprietorship means that you are making and selling your art on yourown; there’s no separation between you and your business and as a consequence, the money you make byselling pottery gets taxed as your personal income at your personal tax level. A LLC, however, is a di�erentlegal entity that you might own but that gets taxed on its own and even has a di�erent tax identi�cationnumber. So technically, you won’t be selling the pottery but the LLC will.
One option might be better for you than others. It depends on the size of your pottery business, how muchmoney it makes, how you might want to be taxed, how you want to protect your assets and many otherfactors.
In this article published by Entrepreneur you can read more about the basics about business structures inthe US.
The most sensible thing to do is to consult with your CPA or tax advisor so they help you �gure out whichoption is best for you*.*The information provided on this book does not, and is not intended to, constitute legal advice; all content is for general informational purposes only. Youshould not act on the basis of any content included in this article without seeking legal or other professional advice.
Promoting and selling your art: Marketing for pottery businesses
If you want to start a business, marketing is the single most important tool that’ll help you drive sales.
There are several options in both the digital and traditional marketing worlds that will help you sell pottery.
Digital marketing, however, is the way to go for smallbusinesses with limited resources.
There are several ways you can go about selling yourpottery online. You can create your own eCommerce store and promote it yourself or you can sell your artthrough an ecommerce platform/marketplace that is already known and has tra�c, in exchange for acommission. You could also consider utilizing social media.
Digital marketing includes promoting your potterybusiness on the Internet through social media, your ownwebsite, eCommerce store or through other ecommerceplatforms and marketplaces. Selling pottery using digitalplatforms is by far the best options for those who areplanning to start a small business from scratch simplybecause it can be done quite cheaply when compared torenting a showroom or other kind of retail space.

Pottery At Home: Getting Started & Beyond
Made with ♥ from SoulCeramics.com
For example, you can create your own eStore and list your products on your own website using Shopify. Youcould then drive tra�c by running paid ads on Facebook & Instagram, by building a strong social mediapresence and then sending your followers to your site or by using content marketing strategies to driveorganic tra�c.
On the other hand, an example of a great ecommerce platform where you can create an account and startselling pottery quite easily without having to deal with creating a full website and running ads, is Etsy.
Etsy is a platform focused on handmade items and craft supplies in which artists, including potters can selland promote their products. It’s not free, it charges some fees depending on the items you sell. However, youonly need to pay 20 cents per listing to get started. Yes, 20 cents!
If you want to learn more about Etsy and how you can sell your pottery there, you can read moreabout them .here If you want to learn more about how to create and promote your very own eCommerce store, you canread on how to start an online business.Shopify’s blueprint If you need help choosing the right equipment to start your pottery business, we can give you a hand.Check out our in which you’ll �nd all the pottery wheels and kilns for both beginnersand professionals available in our store. You can always and we’ll help you decide what’sthe best equipment for you to start your pottery business based on your speci�c needs.
products pagecontact us

Pottery At Home: Getting Started & Beyond
Made with ♥ from SoulCeramics.com
ConclusionYou made it! Well done, and again - congratulations on having taken such a great step in educating yourselfon the wonderful world of pottery & ceramics.
We really do hope that this book has proven to be of extreme value for you, and please - should you haveany feedback at all - please don't hesitate to ! This book will evolve over time as we want to keepit fresh and up to date with the latest information and we'd love to have your input on additions for the nextbook.
let us know
While we've done our best to cover as much information as possible, we'd be naïve to believe that you don'thave further questions.
Our customer support is available 7 days a week, and we really do strive to ensure that every single one ofour inquiries is responded to in a timely manner and robust fashion.
Should you have any inquiries at all, please don't hesitate to , we're here for you!contact us
+1 831 256 3248
Contact Us
