make a fusion fighter - fighterkitecentral.com a fusion fighter.pdf · convert a traditional indian...
TRANSCRIPT

2/2005 by Bruce Lambert
Convert A Traditional Indian Mylar Fighter Kite Into A
Competitive North American Style
Line-Touch Fighter Kite;
Make your own ‘Fusion Fighter’ Kite
Bruce Lambert [email protected]
An idea that has been discussed at length among fighter kite enthusiasts is that of developing an inexpensive competitive line touch fighter kite. I thought maybe there could be a union between a bamboo framed traditional Indian kite and providing an inexpensive good flying competitive line touch kite. This article does not provide an inexpensive 'ready to fly' competitive line touch fighter kite. However it does provide an easy way for anyone to produce a competitive line touch fighter kite from a relatively inexpensive already made traditional Indian Mylar fighter kite with few tools and no kite making skill. Indian Mylar/bamboo kites fly very well and are some of the best kites for manjha flying. For short line fighter kite games such as line touch, they are too slow. I have experimented with modifying these traditional Indian Mylar/bamboo kites to make them competitive line touch kites and have been pleasantly surprised at the results! These modified Indian kites are not slow; but they are slightly slower than the 'best' of the current crop of line touch fighter kites. On the other hand, the other flight characteristics of these modified Indian kites are about equal to the current 'best performing' line touch kites. In fact I would say these kites are better performing than many of the current kites flown in line touch competitions today. I also think these kites can open the door to a true 'one design' class of line touch competition. If that happens, my bet is the 'one design' competitions may quickly become the most popular line touch competitions ever! This is because of these kites' relatively high performance, their low price and a person doesn't need to be a kite maker to create one; there could be lots of people flying them. The best place I've found to buy Indian kites is: http://www.one-world-trading.com When you're at their home page, click on kites on the top menu bar and then choose prices or various other pages. One-
World-Trading has the best selection of really high quality Indian kites at very reasonable prices, less than $3 for the small Mylar kites like I'm modifying here. They also sell high quality Indian cotton flying line, Manjha and other accessories; all very reasonably priced. However, the best feature of this site is the owner, Kirti Shah. He is a fighter kite fan who really knows his fighter kite 'stuff'!! The kites I used in these conversions I got from www.one-world-trading.com. Here's a list of changes you'll make to a traditional Indian Mylar fighter kite:
1. Mark and cut the nose to a different shape. 2. Remove the 'patch' tail on the kite and the associated bamboo battens or cut the patch tail and
battens when re-cutting the trailing edges. 3. Re-cut the trailing edges so they are straight. 4. Add battens of split bamboo, small diameter drinking straws or carbon fiber. 5. Glue the newly created hem to the bow. 6. Attach either a 2-point or 3-point bridle.

2/2005 by Bruce Lambert
Tools and supplies needed for the conversion:
1. Felt tipped marker. 2. Straight edge that is at least 18", 460mm, long. 3. Scissors, hobby knife or hot cutter. 4. A couple drops of CA glue (superglue). 5. A small amount of contact cement or rubber cement. 6. About a foot, 30cm, of clear or other tape that will adhere to the Mylar. 7. About 4', 1.25M, of bridle line. 8. A large eyed needle. 9. Toothpick
Here's how to modify a typical Indian Mylar fighter kite such as the ones shown below.
These kites are generally about 22"-22.5", 55.8cm-57cm, wide by about 18"-19", 45.7cm-48cm, tall. This sized kite is considered a small fighter kite in Indian fighter kite terms. There are at least 2 larger sizes available. The larger kites convert well also.
This kite is shown with the traditional 2-point bridle. This bridle style will continue to work on the converted kite, however, I prefer a 3-point bridle on the converted kites.
Three different sized kites, the smallest is the one used in this article.

2/2005 by Bruce Lambert
RE-SHAPING THE NOSE
On this kite I decided to leave the original nose length; this is the distance from the cross point of the bow and spine to the nose tip of the spine. You could shorten it so it's about 2-1/2" – 2-3/4", 70mm, and this would add a little speed to the kite. The nose length is usually longer on an Indian design than what we use in line touch kites. If you decide to shorten the nose, mark the spine at the new nose length. Whether you shorten the nose or not, measure and mark the new nose shape of the Mylar kite skin. Measure from the center of the spine to a point about 3-3/4", 95mm, on the bow and make a mark on the bow. Do this equally on each side of the kite. The exact measurement doesn't seem to be critical; what is critical is that the dimension be equal on both sides of the kite. You can get the idea from the photos. Next, lay your straight edge on the nose area of the kite skin so it lines up with the mark on the bow and the nose end of the spine, or the mark you made for the new shorter nose, and draw a line. Apply a piece of tape about ½", 12mm, wide along the nose lines. Make the tape long enough to extend under and beyond the bow about ½", 12mm. I used black tape because it shows better in the photos, but clear tape or packing tape cut to size works fine. The tape can extend on both sides of the new nose line. From the mark on the bow also draw, freehand, about a 3/8",1cm, hem on the Mylar along the bow towards the wingtip. The hem area will extend a short distance along the bow as you can see in the photos. You need enough of a hem to secure the Mylar to the bow along as much of the bow as you can. Each kite will be slightly different in the amount of Mylar available in this area.

2/2005 by Bruce Lambert
Cut the new nose shape along the nose lines. The cut should begin at the edge of the bow closest to the nose of the kite. It doesn't need to be exactly at the bow, but it should be close to the bow. You do NOT
want the cut to extend under the bow. Your cuts should produce a finished shape similar to the one shown in the photo above. You may cut away some of the tape, which is fine.
THE 'PATCH' TAIL
There are two options to deal with the patch tail. You can remove it or you can leave it and modify it. To modify it draw the new straight trailing edge line. Cut the battens along that line, then cut the patch tail when you re-cutting the trailing edge. I use a pair of diagonal wire cutters to cut the bamboo battens. I cut through the Mylar and the battens at the same time. I cut the battens before I re-cut the trailing edge.
To remove the 'patch tail', peel off the extra 'patches' of Mylar. On some kites there are two patches, one on each side of the kite, on others only one. Remove the 2 short bamboo battens that are usually sandwiched between the two layers of Mylar.
RE-CUTTING THE TRAILING EDGE
The reason to re-cut the trailing edge is because many of the Indian fighter kites have a slightly outward curve to the trailing edge and we want the trailing edge straight or a slight concave, inward curve.
Align your straight edge with the very tip of the bow and the tip of the tail of the spine and cut the trailing edge so it is straight. Do this on both trailing edges. Remember to use the tip of the spine and the tips of the bow as your guides, sometimes the Mylar extends beyond the ends of the spars. You can see in the photo on the left how much I cut from this kite and how much extra Mylar was extending beyond the tip of the bow. Each kite will be slightly different in how much Mylar is extending beyond the bow and spine ends because each of these fine kites is hand made.
2/2005 by Bruce Lambert
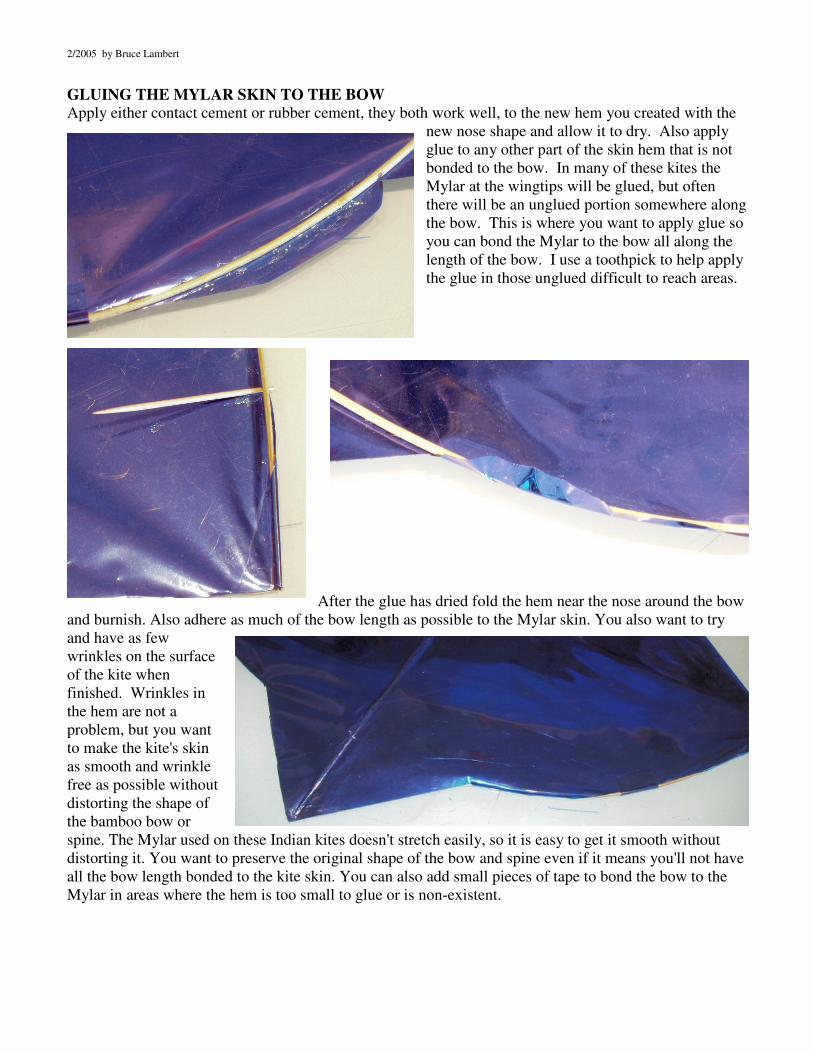
GLUING THE MYLAR SKIN TO THE BOW
Apply either contact cement or rubber cement, they both work well, to the new hem you created with the new nose shape and allow it to dry. Also apply glue to any other part of the skin hem that is not bonded to the bow. In many of these kites the Mylar at the wingtips will be glued, but often there will be an unglued portion somewhere along the bow. This is where you want to apply glue so you can bond the Mylar to the bow all along the length of the bow. I use a toothpick to help apply the glue in those unglued difficult to reach areas.
After the glue has dried fold the hem near the nose around the bow
and burnish. Also adhere as much of the bow length as possible to the Mylar skin. You also want to try and have as few wrinkles on the surface of the kite when finished. Wrinkles in the hem are not a problem, but you want to make the kite's skin as smooth and wrinkle free as possible without distorting the shape of the bamboo bow or spine. The Mylar used on these Indian kites doesn't stretch easily, so it is easy to get it smooth without distorting it. You want to preserve the original shape of the bow and spine even if it means you'll not have all the bow length bonded to the kite skin. You can also add small pieces of tape to bond the bow to the Mylar in areas where the hem is too small to glue or is non-existent.

2/2005 by Bruce Lambert
REINFORCING
Apply small pieces of tape to protect the Mylar from potential tears where it's most vulnerable; at the corner at the nose/bow junction. Any tape will work that will bond well to the Mylar, (and most tapes do
bond well to Mylar). Apply a piece of tape about ½"x1", 12mm x 25mm, on the back of the skin and fold it over the and around the bow so the tape also adheres to a small amount of the back side of the nose
area. Then fold the tape around to the front side and burnish. It's a very good idea to put reinforcing tape on the nose and tail of the kite also.
BRIDLING
You can use either a 2-point or a 3-point bridle on these kites; each works well. The 2-point bridle doesn't offer as many adjustment options as the 3-point bridle, but is simpler to make. If you use a 2-point bridle it requires only one bridle line plus a small loop of line called the 'tow
connection loop'. You tie one end of the bridle line to the cross point of the bow and spine and the other end to the lower bridle connection point described next. Locating the lower bridle point: Work on the backside of the kite. Along the spine measure 6", 152mm, noseward from the tail of the spine and make a mark; this is the location of the lower bride connection. Apply a small piece of tape on the backside of the kite skin under the bow/spine crossing, under the
bow at each of the bridle connection points if you're using a 3-point bridle, and at the lower bridle connection point. These pieces of tape reinforce the bridle punctures in the Mylar. If you want a 3-point bridle you need to tie a 'yoke' or upper bridle line to the bow. To locate the points where to tie the yoke ends measure 1-1/4", 32mm, either side of the center of the spine and make a mark on the bow. This is the location of the upper bridle yoke connection points for a 3-point bridle. Use the lower bridle connection point described above for the lower bridle connection point. Then you will need a small loop of line called the 'tow connection loop'.

2/2005 by Bruce Lambert
For a 2-point bridle cut a piece of bridle line about 3', 1M, long. Bridle line can be any line that has a 10#-15# breaking strength; Dacron, Spectra, cotton, polyester or linen are all good bridle materials. Use a large eyed needle to puncture the Mylar and tape, then thread the bridle through the kite's skin.
Tie one end of the bridle line to the bow/spine cross point. Tie the bridle line it so it is diagonally across the bow/spine cross so the bridle line holds the bow tightly against the spine. Tie the other end of the bridle line to the lower bridle connection point you marked from above step. Before you secure the lower bridle knot stretch the bridle toward a wingtip; the finished bridle should not be long enough to reach the wingtip. Keep the bridle about 1", 25mm, inward from the wingtip.
Next, cut a piece of bridle line about 8", 20cm, long. Fold it in half and tie the loose ends together with an overhand or figure eight knot to form a small loop. This is the tow connection loop; the point on the bridle where you tie the flying line. Tie the loop onto the bridle line as shown in the photo; this is called a 'larkshead' knot. The photo on the left shows how to 'lock a larkshead knot. Simply pull the loop apart and firmly tug on the two parts of the loop until you feel or hear a 'soft click' indicating the knot has locked. To unlock the knot, pull firmly on the lower bridle line on both sides of the knot. When
unlocked, the larkshead knot is easily moveable along the lower bridle line. 3-POINT BRIDLE
A 3-point bridle is the most popular bridle arrangement used on North American competition fighter kites. To make a 3-point bridle measure and mark on the bow the location of the upper bridle yoke connection points. On this kite I placed them at 1-3/4", 45mm,either side of the center of the spine, but typically they can be from 1", 25mm to 2", 50mm, either side of the center of the spine. It's your choice.

2/2005 by Bruce Lambert
Next cut 2 pieces of bridle line, one about 14",35cm, this is the upper bridle line or yoke and one about 30",76cm, this is the lower bridle line. Tie one end of the 14",35cm, piece to one of the marks you made on the bow. You'll need to use the large eyed needle to puncture the Mylar and feed the bridle line through. Tie the other end of the line to the other mark on the bow. You will end up with a loop or yoke between the two marks on the bow. In one end of the 30",76cm, bridle line make a 4", 10cm, long loop by looping over the line onto itself and tying an overhand or figure eight knot. The small loop in the photo is the tow connection loop that will be attached last.
Create a larkshead knot on the yoke with the loop at the end of the lower bridle line. Creating a larkshead knot is described above in the 2-point bridle about attaching the tow connection loop. Pull the lower bridle line so the larkshead knot is in the center of the upper bridle loop and lock the larkshead knot. (In the photo to the left the kite has both a 2-point and a 3-point bridle; your kite will have only one bridle of your choice) Next tie the other end of the lower bridle line to the lower bridle connection point on the spine. The last step to the 3-point bridle is to attach a tow connection loop. Cut a piece of bridle line about 8",20cm, long. Fold it in half and tie the loose ends together with an overhand or figure eight knot. This is the tow connection loop; the point on the bridle where you tie the flying line. Look at the photos in the 2-point bridle description for directions for attaching the tow connection loop.
2/2005 by Bruce Lambert
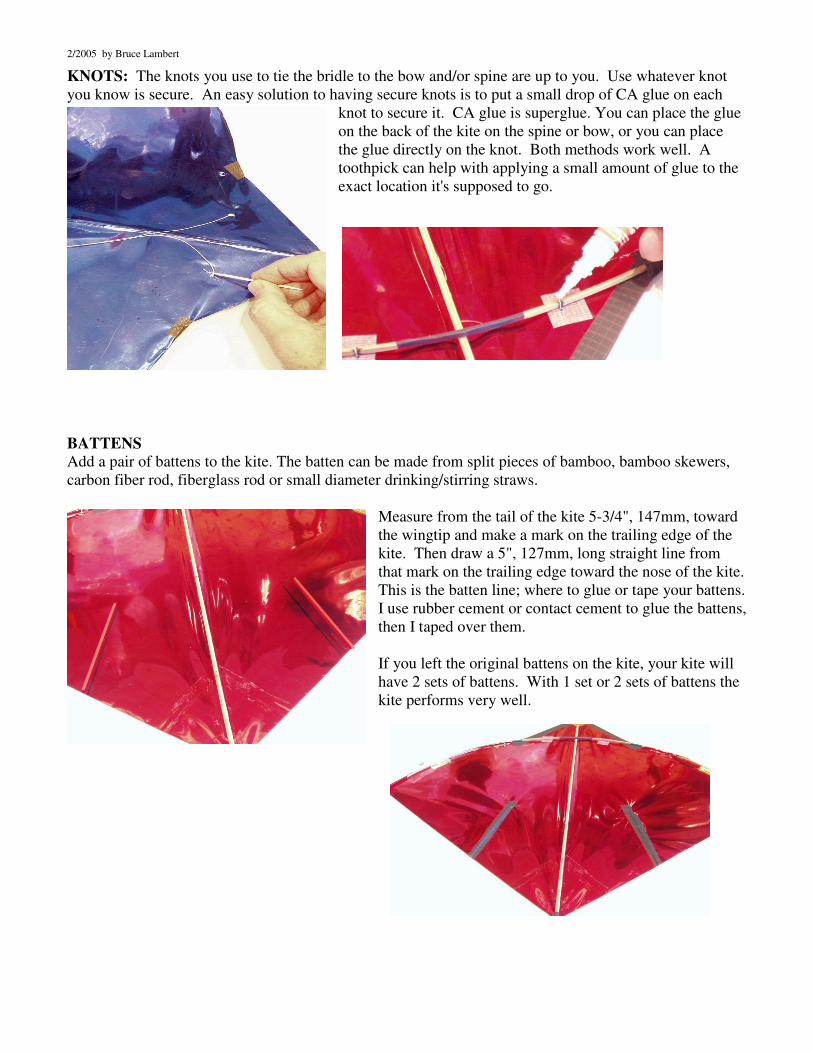
KNOTS: The knots you use to tie the bridle to the bow and/or spine are up to you. Use whatever knot you know is secure. An easy solution to having secure knots is to put a small drop of CA glue on each
knot to secure it. CA glue is superglue. You can place the glue on the back of the kite on the spine or bow, or you can place the glue directly on the knot. Both methods work well. A toothpick can help with applying a small amount of glue to the exact location it's supposed to go.
BATTENS Add a pair of battens to the kite. The batten can be made from split pieces of bamboo, bamboo skewers, carbon fiber rod, fiberglass rod or small diameter drinking/stirring straws.
Measure from the tail of the kite 5-3/4", 147mm, toward the wingtip and make a mark on the trailing edge of the kite. Then draw a 5", 127mm, long straight line from that mark on the trailing edge toward the nose of the kite. This is the batten line; where to glue or tape your battens. I use rubber cement or contact cement to glue the battens, then I taped over them. If you left the original battens on the kite, your kite will have 2 sets of battens. With 1 set or 2 sets of battens the kite performs very well.

2/2005 by Bruce Lambert
PRE-TUNING
To pre-tuning the kite before flying it will assure much greater initial flight success. It is easy to do. Hold the kite above a flat surface by the 'tow connection loop'. The correct positioning for the tow connection loop along the bridle line is the point where the tail of the kite is touching the flat surface and nose is elevated above the surface about 1-1/2"-2", 38-50mm. After you fly the kite you will probably want to adjust the location of the tow loop to optimize it for the wind conditions, but for the initial flight this position will virtually guarantee the kite will fly well.
A note about FUSION FIGHTERS: I told Kirti at www.one-world-trading.com about my modification of Indian fighters and sent him some samples to fly. He asked if he could have the modified kite produced in India and sold on his website. I said sure, but that I want no money from the Fusion Fighters. This is how Fusion Fighters came to be. The name was Kirti’s idea, because the kite is a fusion of Indian and North American fighter kite designs.
OPTIONS There are many additional changes that you can make to these kites as with any fighter kite. I call these additions 'options'. They include things like additional battens and/or battens at different locations and at different angles and shaping the nose leading edge and the kite's trailing edge with a slight concave curved shape. The photo on the left shows several popular locations of battens and also the general concave shape that is popular for trailing edges.
I hope you enjoy flying these modified traditional Indian Mylar/bamboo kites, I sure do!
BigGrins, bruce