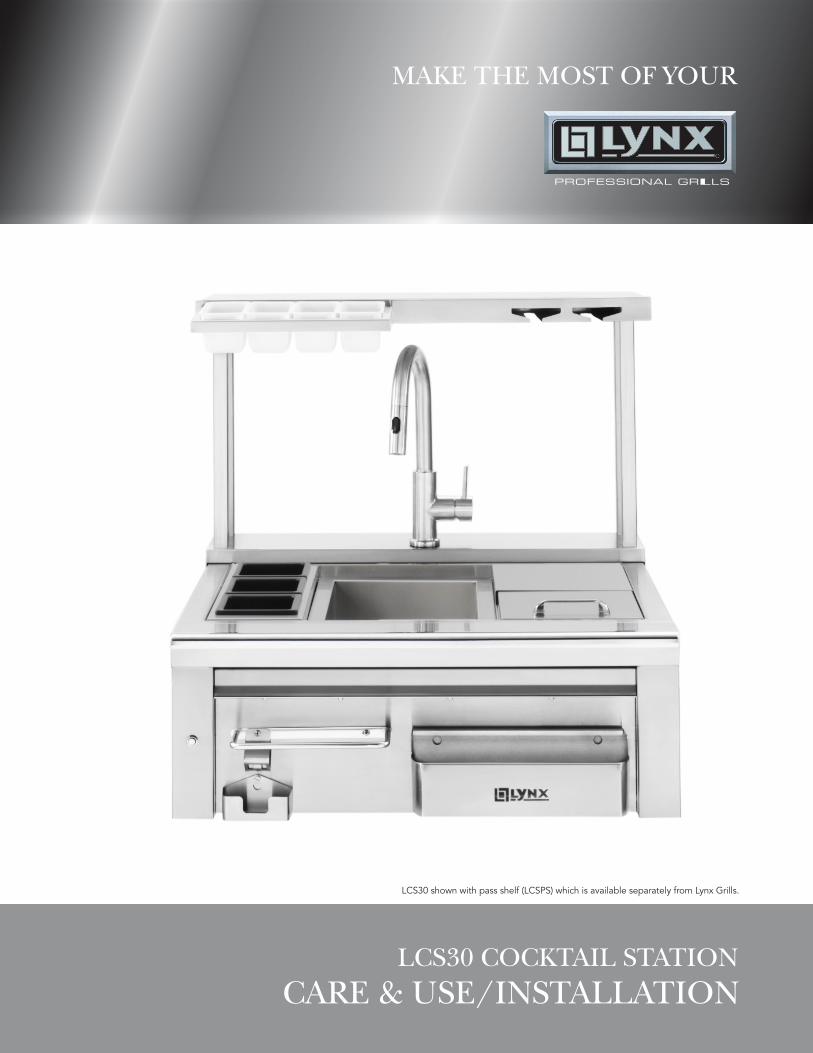
make the most of your
TRANSCRIPT
1LCS30 COCKTAIL STATION CARE & USE/INSTALLATION |
CARE & USE/INSTALLATION
MAKE THE MOST OF YOUR
LCS30 COCKTAIL STATION
LCS30 shown with pass shelf (LCSPS) which is available separately from Lynx Grills.

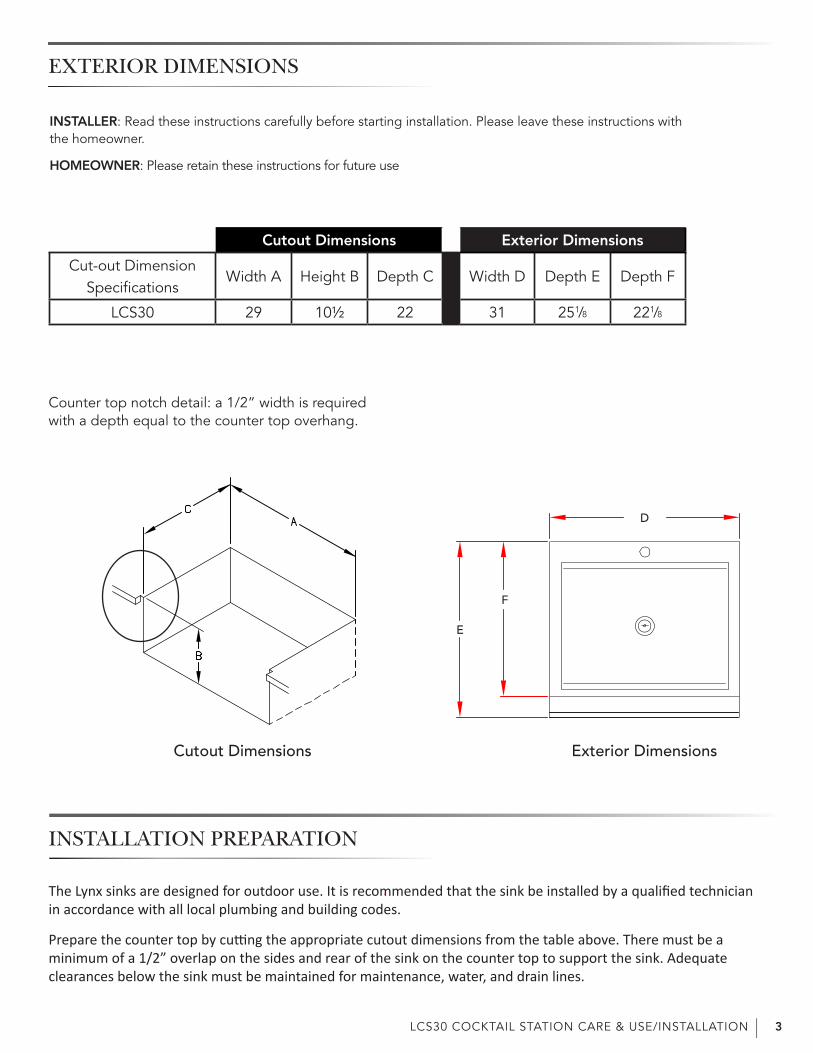
LCS30 COCKTAIL STATION CARE & USE/INSTALLATION | 3
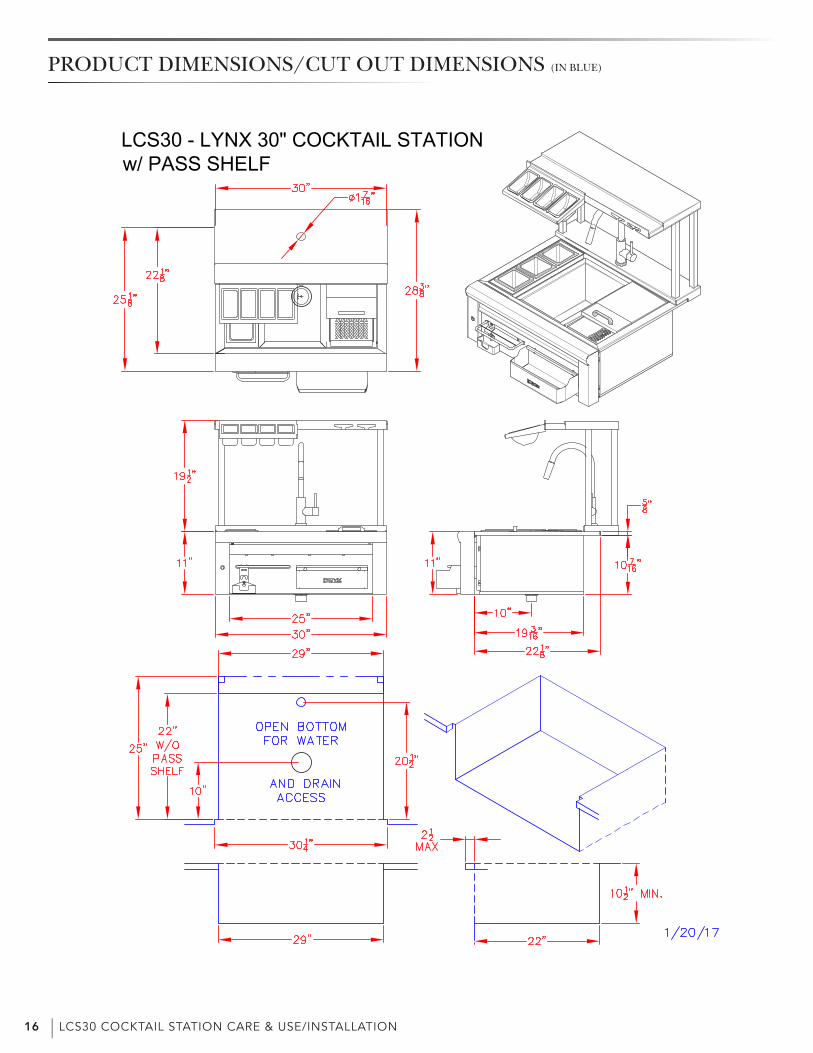
Cutout Dimensions Exterior Dimensions
Cut-out Dimension Specifications
Width A Height B Depth C Width D Depth E Depth F
LCS30 29 10½ 22 31 251/8 221/8
Counter top notch detail: a 1/2” width is required with a depth equal to the counter top overhang.
EXTERIOR DIMENSIONS
INSTALLATION PREPARATION
The Lynx sinks are designed for outdoor use. It is recommended that the sink be installed by a qualified technician in accordance with all local plumbing and building codes.
Prepare the counter top by cutting the appropriate cutout dimensions from the table above. There must be a minimum of a 1/2” overlap on the sides and rear of the sink on the counter top to support the sink. Adequate clearances below the sink must be maintained for maintenance, water, and drain lines.
Exterior DimensionsCutout Dimensions
E
F
D
INSTALLER: Read these instructions carefully before starting installation. Please leave these instructions with the homeowner.
HOMEOWNER: Please retain these instructions for future use

| LCS30 COCKTAIL STATION CARE & USE/INSTALLATION4
INSTALLING THE DRAIN ASSEMBLY
For ease of installation we recommend that the drain assembly be installed before installing the sink into the counter top.
1. Remove the drain assembly from the box and identify the following parts:
INSTALLING THE DRAIN ASSEMBLY
a. Drain Plug/Strainer Basket
b. Upper Drain Fitting
c. Rubber Gasketd. Paper Gaskete. Locknutf. Tailpieceg. Threaded Coupling
Sink Bottom
2. Remove the drain plug strainer basket (a) and separate the upper drain fitting (b) from the remainder of thedrain assembly.
3. Place a bead of Plumbers Putty* around the underside lip of the upper drain fitting. Drop the upper drain fitting(b) into the sink bottom opening and press it firmly into place. From the bottom of the sink position the rubbergasket (c) and then the paper gasket (d) on the upper drain fitting (b). The paper gasket (d) is used to preventkinking of the rubber gasket (c) while tightening the locknut (e).
4. Align the drain assembly so that it sits centered in the sink drain cut-out. Screw the locknut (e) on to the upperdrain fitting (b) threaded connection until it is hand tight. Now use a tool to tighten the locknut (e) anotherquarter turn.
5. Remove any excess Plumber Putty with a damp cloth.
* Plumbers Putty is available at most home improvement centers. Plumbers putty is aneasy-to-mold setting compound for use with stainless steel sealing applications. Do Not Omit This Step.
Sink Opening
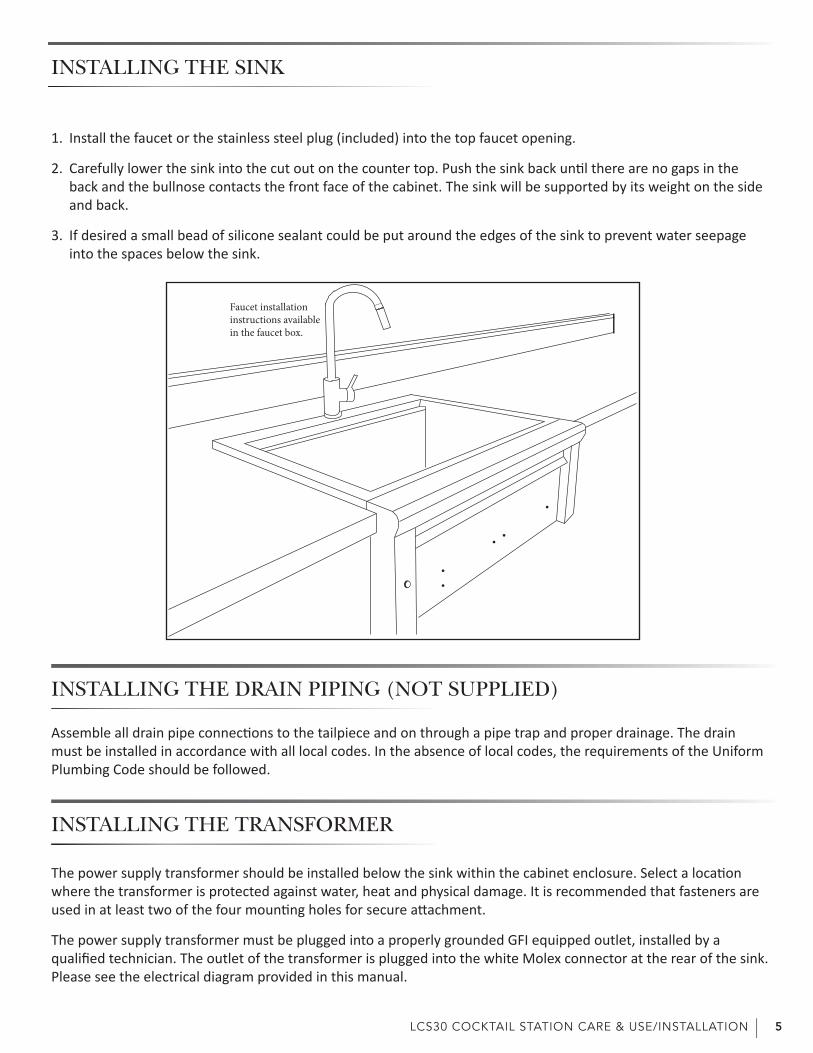
LCS30 COCKTAIL STATION CARE & USE/INSTALLATION | 5
1. Install the faucet or the stainless steel plug (included) into the top faucet opening.
2. Carefully lower the sink into the cut out on the counter top. Push the sink back until there are no gaps in theback and the bullnose contacts the front face of the cabinet. The sink will be supported by its weight on the sideand back.
3. If desired a small bead of silicone sealant could be put around the edges of the sink to prevent water seepageinto the spaces below the sink.
Assemble all drain pipe connections to the tailpiece and on through a pipe trap and proper drainage. The drain must be installed in accordance with all local codes. In the absence of local codes, the requirements of the Uniform Plumbing Code should be followed.
INSTALLING THE SINK
INSTALLING THE DRAIN PIPING (NOT SUPPLIED)
INSTALLING THE TRANSFORMER
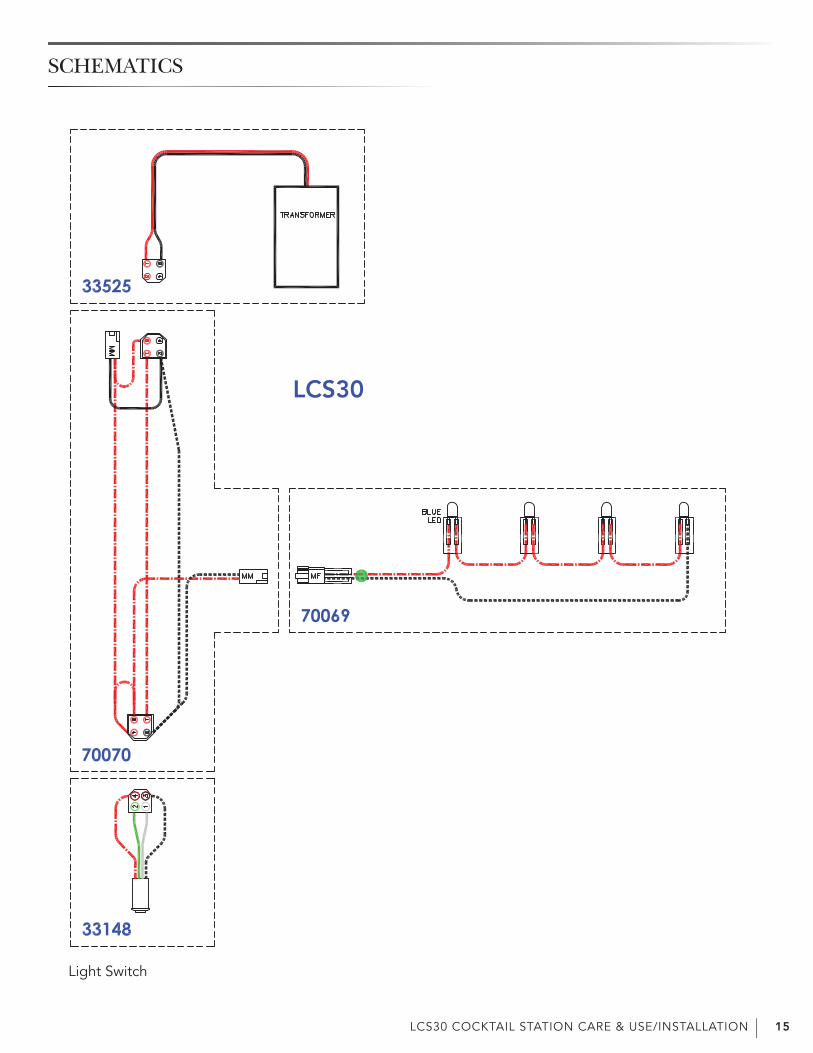
The power supply transformer should be installed below the sink within the cabinet enclosure. Select a location where the transformer is protected against water, heat and physical damage. It is recommended that fasteners are used in at least two of the four mounting holes for secure attachment.
The power supply transformer must be plugged into a properly grounded GFI equipped outlet, installed by a qualified technician. The outlet of the transformer is plugged into the white Molex connector at the rear of the sink. Please see the electrical diagram provided in this manual.
Faucet installation instructions available in the faucet box.
| LCS30 COCKTAIL STATION CARE & USE/INSTALLATION6
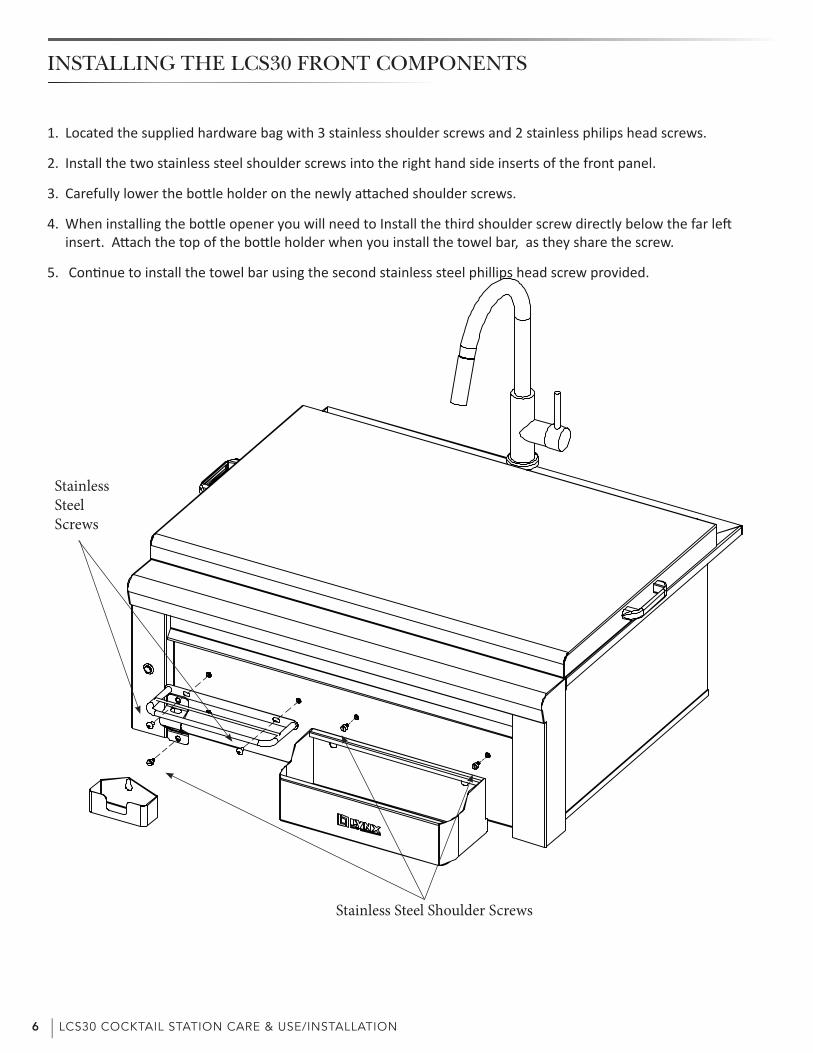
INSTALLING THE LCS30 FRONT COMPONENTS
1. Located the supplied hardware bag with 3 stainless shoulder screws and 2 stainless philips head screws.
2. Install the two stainless steel shoulder screws into the right hand side inserts of the front panel.
3. Carefully lower the bottle holder on the newly attached shoulder screws.
4. When installing the bottle opener you will need to Install the third shoulder screw directly below the far leftinsert. Attach the top of the bottle holder when you install the towel bar, as they share the screw.
5. Continue to install the towel bar using the second stainless steel phillips head screw provided.
Stainless Steel Screws
Stainless Steel Shoulder Screws
LCS30 COCKTAIL STATION CARE & USE/INSTALLATION | 7
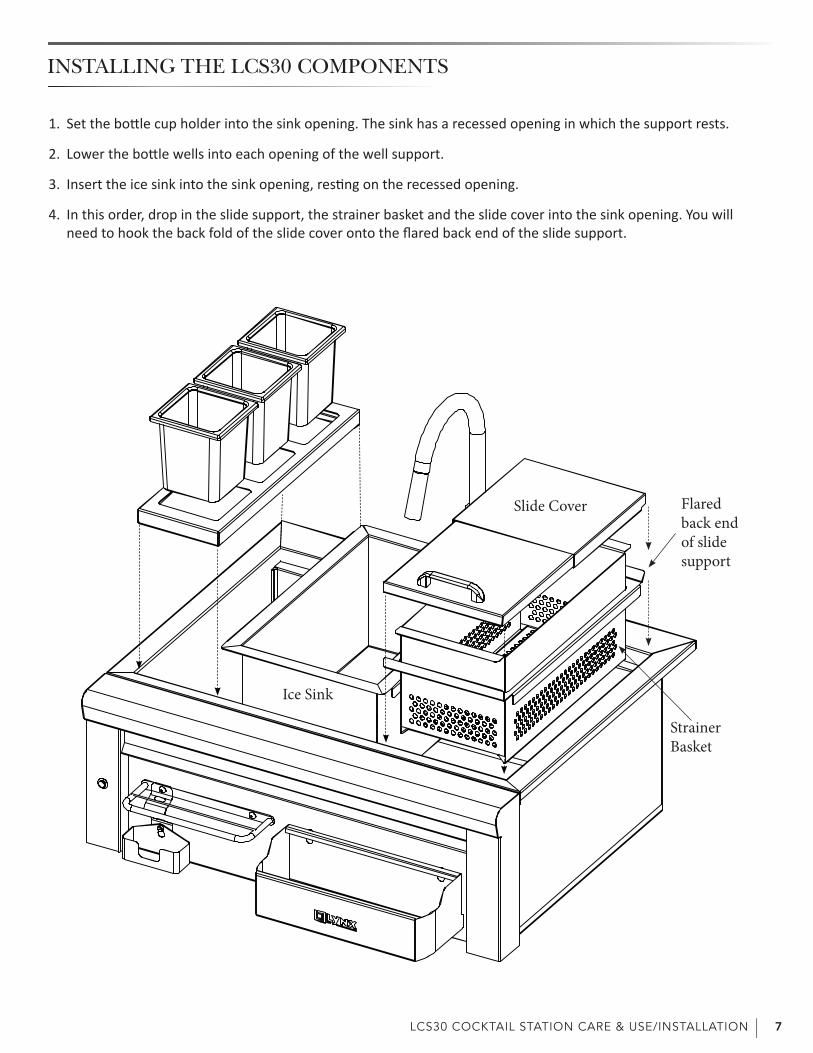
INSTALLING THE LCS30 COMPONENTS
1. Set the bottle cup holder into the sink opening. The sink has a recessed opening in which the support rests.
2. Lower the bottle wells into each opening of the well support.
3. Insert the ice sink into the sink opening, resting on the recessed opening.
4. In this order, drop in the slide support, the strainer basket and the slide cover into the sink opening. You willneed to hook the back fold of the slide cover onto the flared back end of the slide support.
Flared back end of slide support
Ice Sink
Slide Cover
Strainer Basket
| LCS30 COCKTAIL STATION CARE & USE/INSTALLATION8
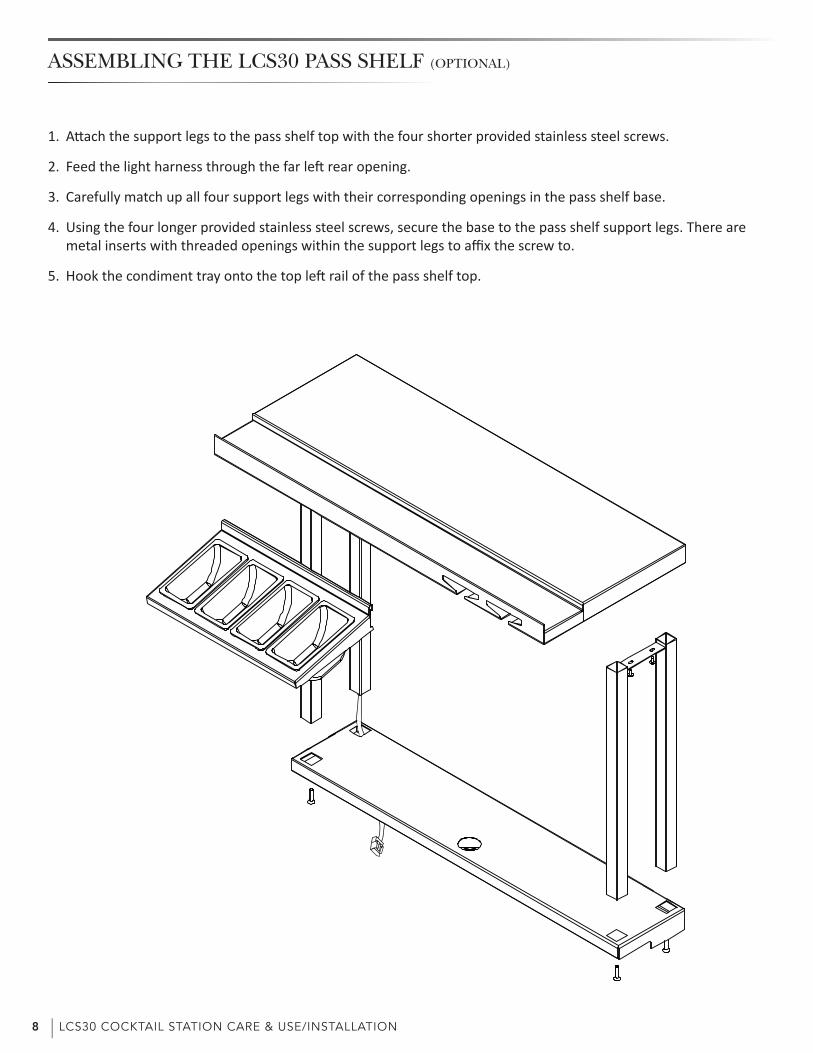
ASSEMBLING THE LCS30 PASS SHELF (OPTIONAL)
1. Attach the support legs to the pass shelf top with the four shorter provided stainless steel screws.
2. Feed the light harness through the far left rear opening.
3. Carefully match up all four support legs with their corresponding openings in the pass shelf base.
4. Using the four longer provided stainless steel screws, secure the base to the pass shelf support legs. There aremetal inserts with threaded openings within the support legs to affix the screw to.
5. Hook the condiment tray onto the top left rail of the pass shelf top.
LCS30 COCKTAIL STATION CARE & USE/INSTALLATION | 9
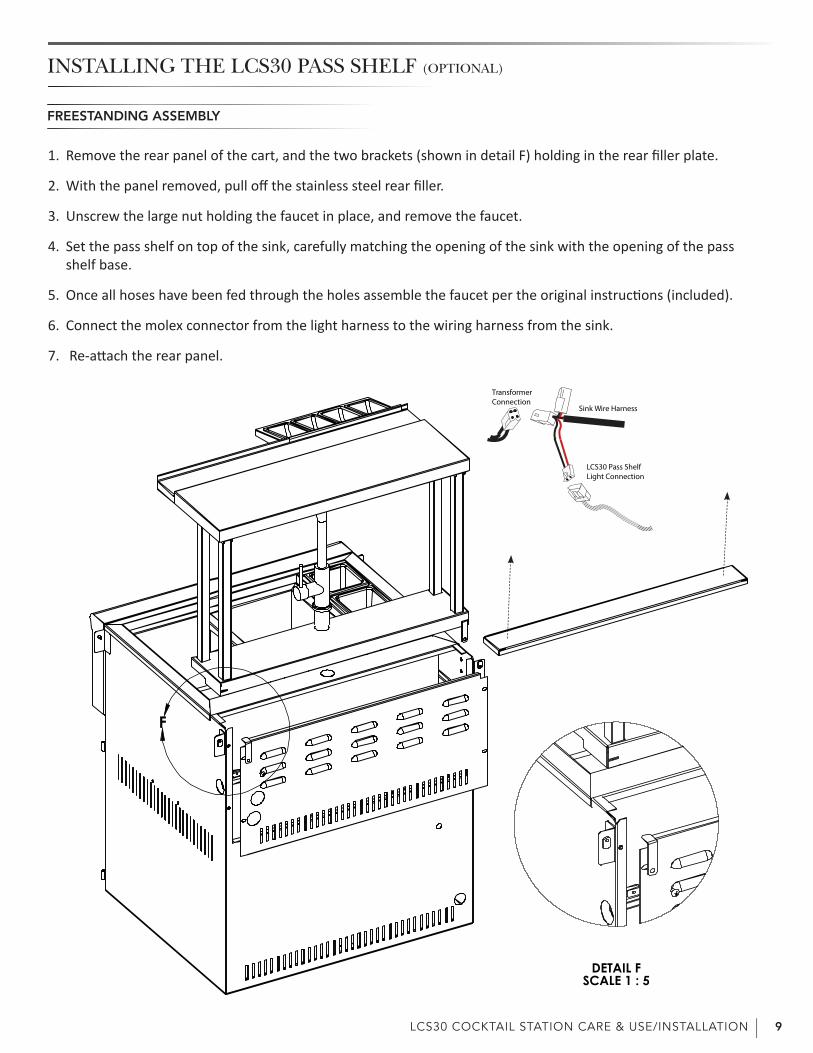
INSTALLING THE LCS30 PASS SHELF (OPTIONAL)
DETAIL FSCALE 1 : 5
F
FREESTANDING ASSEMBLY
1. Remove the rear panel of the cart, and the two brackets (shown in detail F) holding in the rear filler plate.
2. With the panel removed, pull off the stainless steel rear filler.
3. Unscrew the large nut holding the faucet in place, and remove the faucet.
4. Set the pass shelf on top of the sink, carefully matching the opening of the sink with the opening of the passshelf base.
5. Once all hoses have been fed through the holes assemble the faucet per the original instructions (included).
6. Connect the molex connector from the light harness to the wiring harness from the sink.
7. Re-attach the rear panel.
TransformerConnection
Sink Wire Harness
LCS30 Pass ShelfLight Connection
| LCS30 COCKTAIL STATION CARE & USE/INSTALLATION10
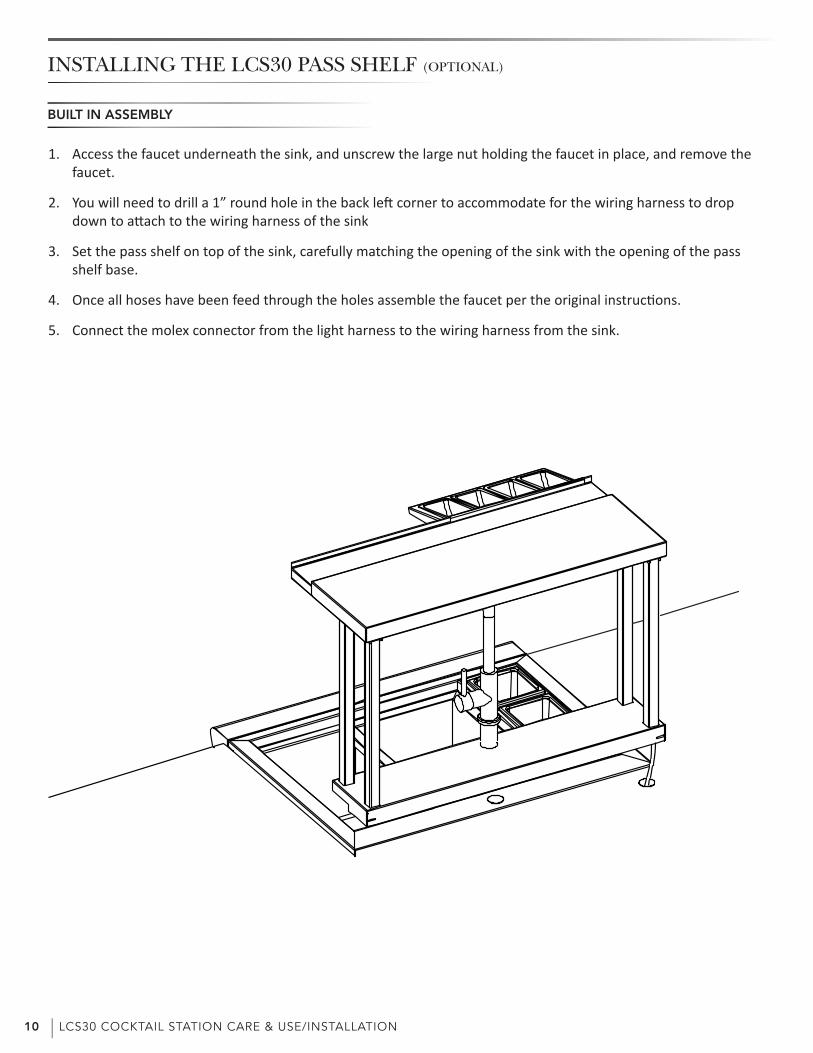
INSTALLING THE LCS30 PASS SHELF (OPTIONAL)
BUILT IN ASSEMBLY
1. Access the faucet underneath the sink, and unscrew the large nut holding the faucet in place, and remove thefaucet.
2. You will need to drill a 1” round hole in the back left corner to accommodate for the wiring harness to dropdown to attach to the wiring harness of the sink
3. Set the pass shelf on top of the sink, carefully matching the opening of the sink with the opening of the passshelf base.
4. Once all hoses have been feed through the holes assemble the faucet per the original instructions.
5. Connect the molex connector from the light harness to the wiring harness from the sink.
LCS30 COCKTAIL STATION CARE & USE/INSTALLATION | 11
CONTACTING LYNX CUSTOMER CARE
Before calling Lynx Customer Care, please make sure you have the following information:
• Model number
• Date of purchase
• Proof of purchase by the original owner
• Serial number
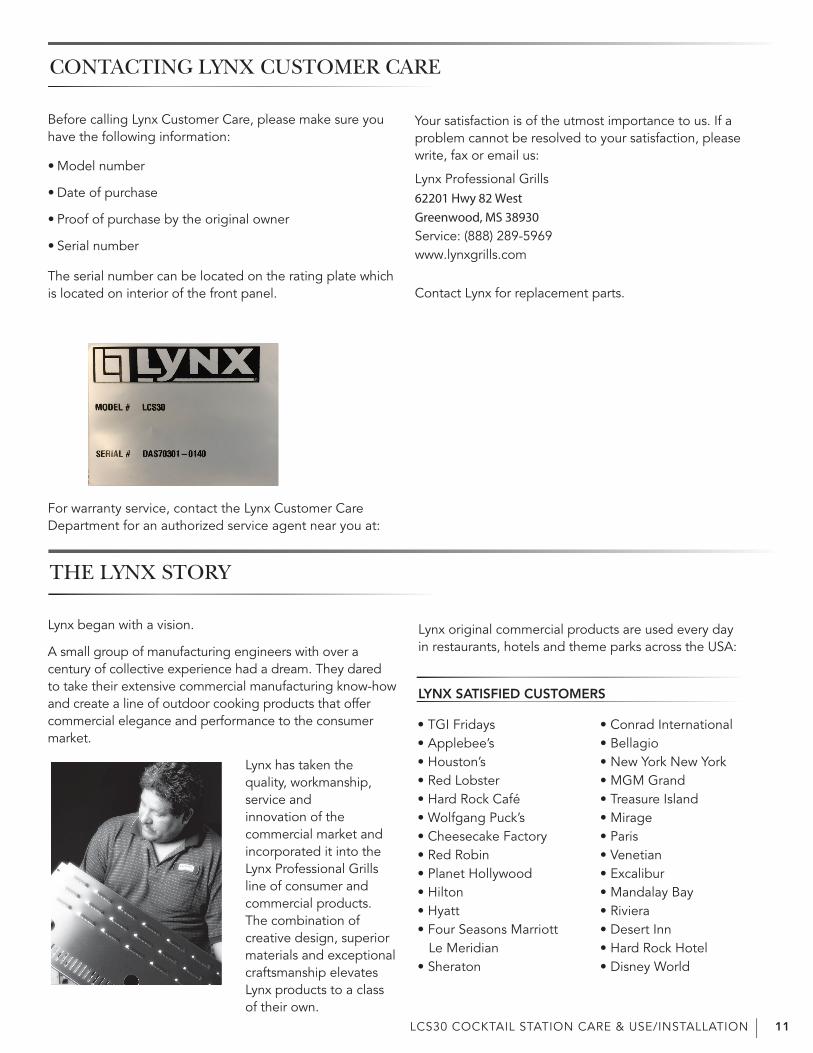
The serial number can be located on the rating plate which is located on interior of the front panel.
For warranty service, contact the Lynx Customer Care Department for an authorized service agent near you at:
THE LYNX STORY
Lynx began with a vision.
A small group of manufacturing engineers with over a century of collective experience had a dream. They dared to take their extensive commercial manufacturing know-how and create a line of outdoor cooking products that offer commercial elegance and performance to the consumer market.
Lynx has taken the quality, workmanship, service and innovation of the commercial market and incorporated it into the Lynx Professional Grills line of consumer and commercial products. The combination of creative design, superior materials and exceptional craftsmanship elevates Lynx products to a class of their own.
Your satisfaction is of the utmost importance to us. If a problem cannot be resolved to your satisfaction, please write, fax or email us:
Lynx Professional Grills62201 Hwy 82 WestGreenwood, MS 38930Service: (888) 289-5969www.lynxgrills.com
Contact Lynx for replacement parts.
Lynx original commercial products are used every day in restaurants, hotels and theme parks across the USA:
LYNX SATISFIED CUSTOMERS
• TGI Fridays• Applebee’s• Houston’s• Red Lobster• Hard Rock Café• Wolfgang Puck’s• Cheesecake Factory• Red Robin• Planet Hollywood• Hilton• Hyatt• Four Seasons Marriott
Le Meridian• Sheraton
• Conrad International• Bellagio• New York New York• MGM Grand• Treasure Island• Mirage• Paris• Venetian• Excalibur• Mandalay Bay• Riviera• Desert Inn• Hard Rock Hotel• Disney World
| LCS30 COCKTAIL STATION CARE & USE/INSTALLATION12
*For optional pass shelf*
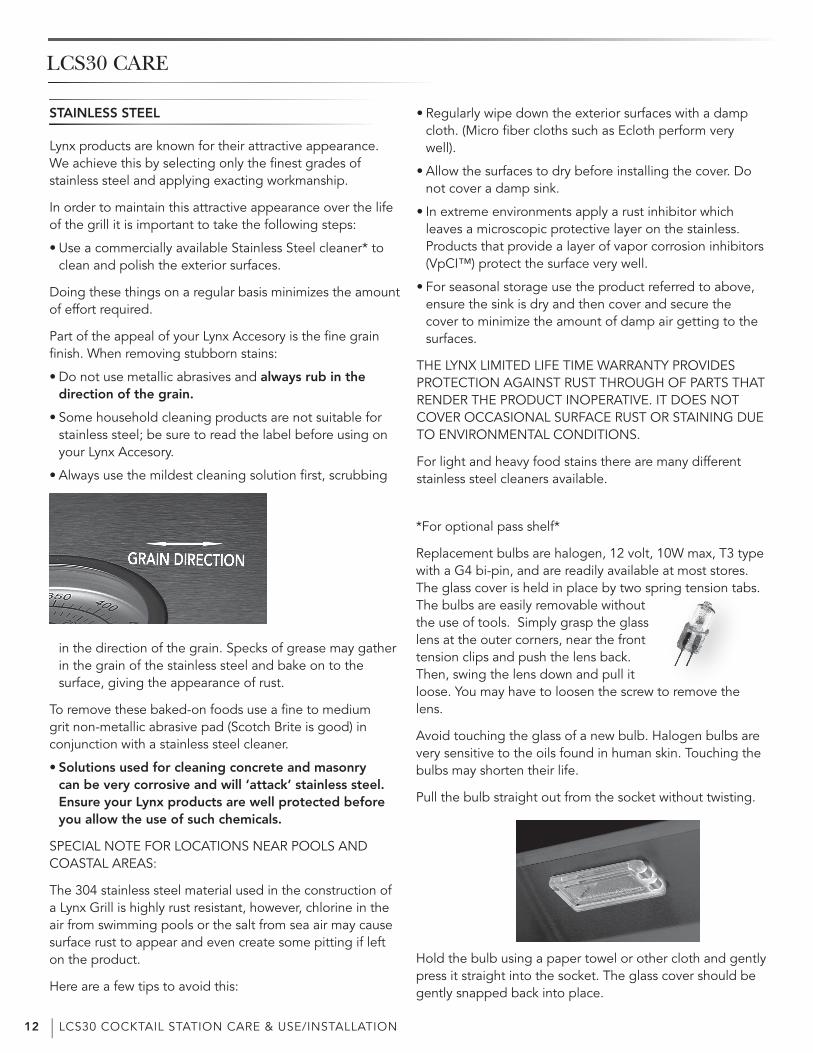
Replacement bulbs are halogen, 12 volt, 10W max, T3 type with a G4 bi-pin, and are readily available at most stores. The glass cover is held in place by two spring tension tabs. The bulbs are easily removable without the use of tools. Simply grasp the glass lens at the outer corners, near the front tension clips and push the lens back. Then, swing the lens down and pull it loose. You may have to loosen the screw to remove the lens.
Avoid touching the glass of a new bulb. Halogen bulbs are very sensitive to the oils found in human skin. Touching the bulbs may shorten their life.
Pull the bulb straight out from the socket without twisting.
Hold the bulb using a paper towel or other cloth and gently press it straight into the socket. The glass cover should be gently snapped back into place.
STAINLESS STEEL
Lynx products are known for their attractive appearance. We achieve this by selecting only the finest grades of stainless steel and applying exacting workmanship.
In order to maintain this attractive appearance over the life of the grill it is important to take the following steps:
• Use a commercially available Stainless Steel cleaner* toclean and polish the exterior surfaces.
Doing these things on a regular basis minimizes the amount of effort required.
Part of the appeal of your Lynx Accesory is the fine grain finish. When removing stubborn stains:
• Do not use metallic abrasives and always rub in thedirection of the grain.
• Some household cleaning products are not suitable forstainless steel; be sure to read the label before using onyour Lynx Accesory.
• Always use the mildest cleaning solution first, scrubbing
in the direction of the grain. Specks of grease may gather in the grain of the stainless steel and bake on to the surface, giving the appearance of rust.
To remove these baked-on foods use a fine to medium grit non-metallic abrasive pad (Scotch Brite is good) in conjunction with a stainless steel cleaner.
• Solutions used for cleaning concrete and masonrycan be very corrosive and will ‘attack’ stainless steel.Ensure your Lynx products are well protected beforeyou allow the use of such chemicals.
SPECIAL NOTE FOR LOCATIONS NEAR POOLS AND COASTAL AREAS:
The 304 stainless steel material used in the construction of a Lynx Grill is highly rust resistant, however, chlorine in the air from swimming pools or the salt from sea air may cause surface rust to appear and even create some pitting if left on the product.
Here are a few tips to avoid this:
• Regularly wipe down the exterior surfaces with a dampcloth. (Micro fiber cloths such as Ecloth perform verywell).
• Allow the surfaces to dry before installing the cover. Donot cover a damp sink.
• In extreme environments apply a rust inhibitor whichleaves a microscopic protective layer on the stainless.Products that provide a layer of vapor corrosion inhibitors(VpCI™) protect the surface very well.
• For seasonal storage use the product referred to above,ensure the sink is dry and then cover and secure thecover to minimize the amount of damp air getting to thesurfaces.
THE LYNX LIMITED LIFE TIME WARRANTY PROVIDES PROTECTION AGAINST RUST THROUGH OF PARTS THAT RENDER THE PRODUCT INOPERATIVE. IT DOES NOT COVER OCCASIONAL SURFACE RUST OR STAINING DUE TO ENVIRONMENTAL CONDITIONS.
For light and heavy food stains there are many different stainless steel cleaners available.
LCS30 CARE
LCS30 COCKTAIL STATION CARE & USE/INSTALLATION | 13
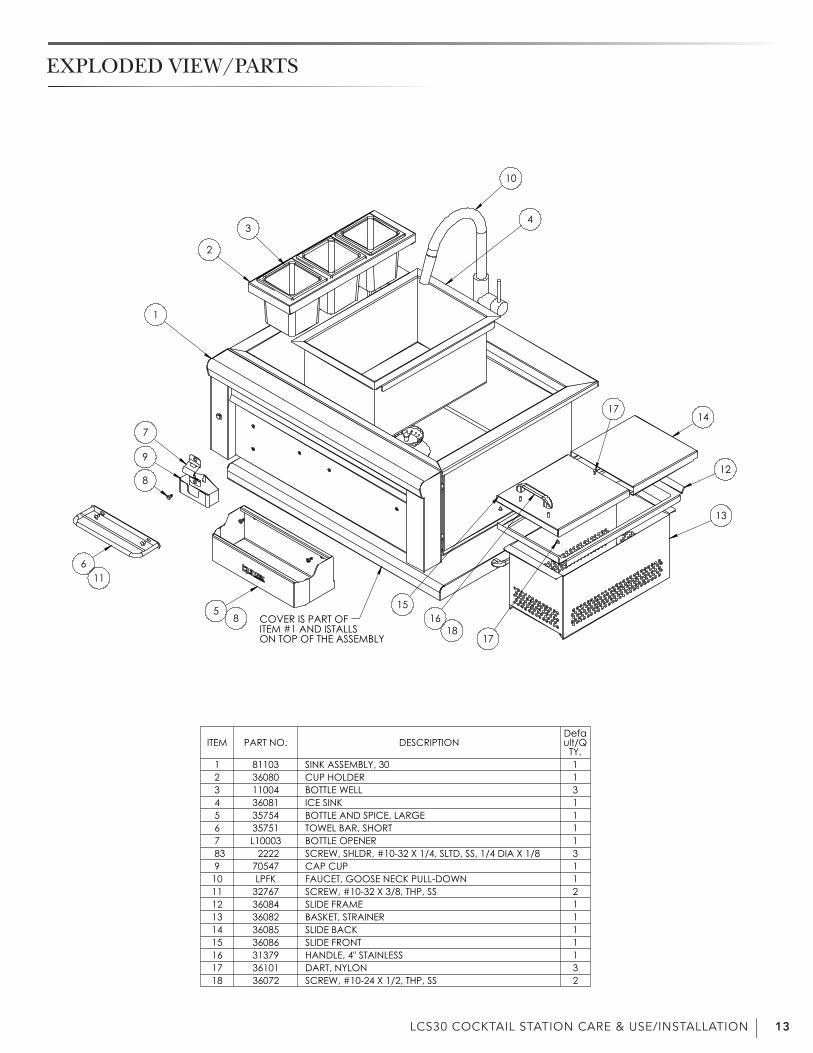
EXPLODED VIEW/PARTS
1
2
34
5
6
7
9
8
10
11
12
14
1516
13
17
17
188 COVER IS PART OF
ITEM #1 AND ISTALLS ON TOP OF THE ASSEMBLY
ITEM PART NO. DESCRIPTIONDefault/Q
TY.1 81103 SINK ASSEMBLY, 30 12 36080 CUP HOLDER 13 11004 BOTTLE WELL 34 36081 ICE SINK 15 35754 BOTTLE AND SPICE, LARGE 16 35751 TOWEL BAR, SHORT 17 L10003 BOTTLE OPENER 183 2222 SCREW, SHLDR, #10-32 X 1/4, SLTD, SS, 1/4 DIA X 1/8 39 70547 CAP CUP 110 LPFK FAUCET, GOOSE NECK PULL-DOWN 111 32767 SCREW, #10-32 X 3/8, THP, SS 212 36084 SLIDE FRAME 113 36082 BASKET, STRAINER 114 36085 SLIDE BACK 115 36086 SLIDE FRONT 116 31379 HANDLE, 4" STAINLESS 117 36101 DART, NYLON 318 36072 SCREW, #10-24 X 1/2, THP, SS 2
| LCS30 COCKTAIL STATION CARE & USE/INSTALLATION14
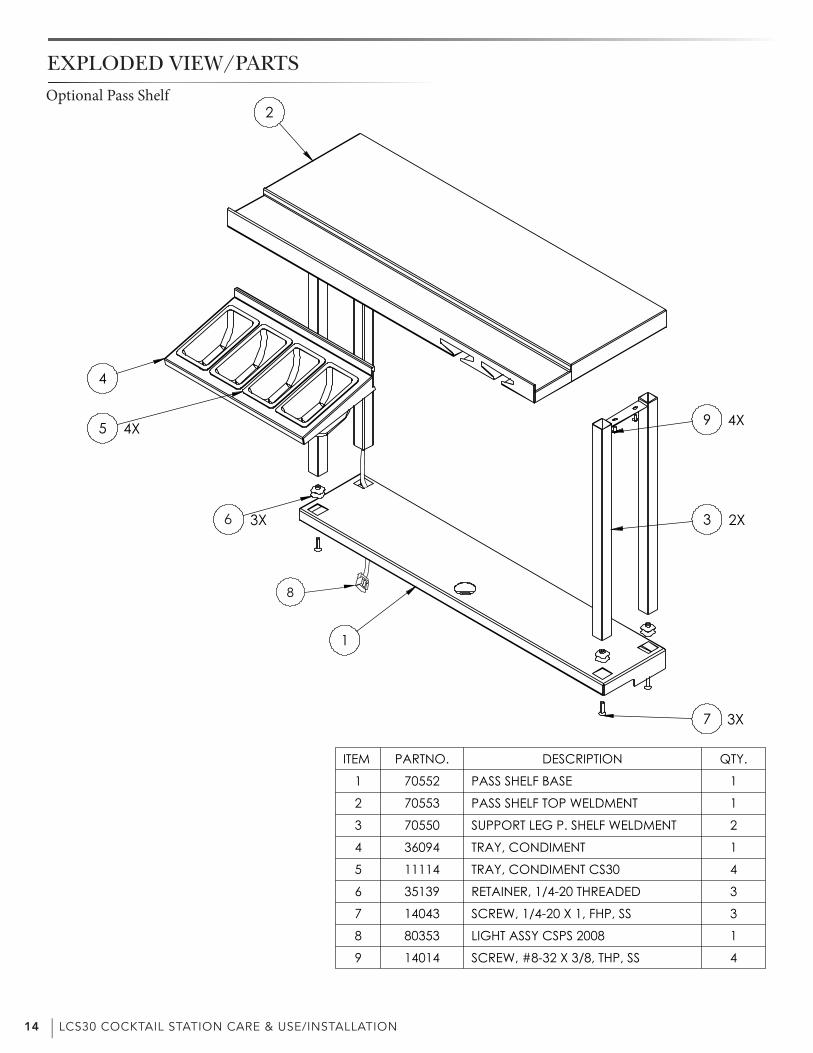
EXPLODED VIEW/PARTS
ITEM PARTNO. DESCRIPTION QTY.
1 70552 PASS SHELF BASE 1
2 70553 PASS SHELF TOP WELDMENT 1
3 70550 SUPPORT LEG P. SHELF WELDMENT 2
4 36094 TRAY, CONDIMENT 1
5 11114 TRAY, CONDIMENT CS30 4
6 35139 RETAINER, 1/4-20 THREADED 3
7 14043 SCREW, 1/4-20 X 1, FHP, SS 3
8 80353 LIGHT ASSY CSPS 2008 1
9 14014 SCREW, #8-32 X 3/8, THP, SS 4
2
9 4X
3 2X
1
7 3X
3X
5 4X
4
6
8
Optional Pass Shelf
LCS30 COCKTAIL STATION CARE & USE/INSTALLATION | 15
SCHEMATICS
Light Switch
LCS30
| LCS30 COCKTAIL STATION CARE & USE/INSTALLATION16
PRODUCT DIMENSIONS/CUT OUT DIMENSIONS (IN BLUE)
LCS30 COCKTAIL STATION CARE & USE/INSTALLATION | 17
LYNX LIMITED WARRANTY
I. Limited Lifetime WarrantyThe stainless steel housing is warranted to be free from defects in material and workmanship when subjected to normal domestic use and service for the lifetime of the original purchaser. This warranty excludes surface corrosion, scratches, and discoloration which may occur during regular use. This warranty is limited to the replacement of the defective parts, with the owner paying all other cost including labor.
II. Limited ONE-Year WarrantyAll other components are warranted to be free from defects in material and workmanship for a period of one year from the original date of purchase. Lynx will replace or repair parts found to be defective at no cost to the original purchaser.
III. Limitations & Exclusions1. This Warranty shall apply to products purchased and located in the United States and Canada. Products must be purchased in the
country where service is requested.
2. Warranty applies only to the original purchaser and may not be transferred.
3. Warranty is in lieu of all other warranties expressed or implied and all other obligations or liabilities related to the sale or use ofits products.
4. Warranty shall not apply and Lynx is not responsible for damage resulting from misuse, abuse, alteration of or tampering with theappliance, accident, hostile environment, improper installation, or installation not in accordance with the instructions containedin this manual, or the local codes.
5. Lynx shall not be liable for incidental, consequential, special or contingent damages resulting from its breach of this writtenwarranty or any implied warranty.
6. Some states do not allow limitations on how long an implied warranty lasts, or the exclusions of or limitations on consequentialdamages. This warranty gives you specific legal rights and you may have other rights which vary from state to state.
7. No one has the authority to add to or vary Lynx’s warranty, or to create for Lynx any other obligation or liability in connection withthe sale or use of its products.
8. Limited to the replacement of defective parts with the owner paying all other costs including labor.
IV. What is not covered: Lynx shall not be responsible for and shall not pay for the following1. Damages or problems caused by improper installation or use;
2. Service by an unauthorized service provider;
3. Damage or repair due to service by an unauthorized service provider or use of unauthorized parts;
4. Warranty does not apply to products installed in any commercial or non-residential application. Examples of excluded applicationsinclude, but are not limited to day care centers, schools, bed and breakfast centers, churches, private clubs, fire stations, clubhouses, common areas in multi-family dwellings, restaurants, hotels, nursing homes, food service locations and institutional foodservice locations.
5. To correct normal adjustments or settings, due to improper installation, commissioning or local supply properties;
6. Shipping and handling costs, export duties, installation, removal, or re-installation cost.
7. Display models are generally sold “as is.” If you have purchased a display model, please be advised that it is sold “as is” and thatit is subject to the following warranty exclusions: any exterior or cosmetic damage is non warrantable; any missing componentswill be re-placed at consumers expense; major handling damage will be serviced at consumer’s expense; all other warranty’s(standard warranty) will remain in effect.
8. The cost of a service call to diagnose trouble.


The best outdoor kitchen products come from:
Lynx Grills, Inc. 62201 Hwy 82 West Greenwood, MS 38930
Service: (888)-289-5969
www.lynxgrills.com
P/N 36110 Rev.A 2/2017