making games with_python_&_pygame
TRANSCRIPT

Making Games with
Python & Pygame
By Al Sweigart

Email questions to the author: [email protected]
Copyright © 2012 by Albert Sweigart
Some Rights Reserved. ―Making Games with Python & Pygame‖) is licensed under a Creative
Commons Attribution-Noncommercial-Share Alike 3.0 United States License.
You are free:
To Share — to copy, distribute, display, and perform the work
To Remix — to make derivative works
Under the following conditions:
Attribution — You must attribute the work in the manner specified by the author or
licensor (but not in any way that suggests that they endorse you or your use of the work).
(Visibly include the title and author's name in any excerpts of this work.)
Noncommercial — You may not use this work for commercial purposes.
Share Alike — If you alter, transform, or build upon this work, you may distribute
the resulting work only under the same or similar license to this one.
This summary is located here: http://creativecommons.org/licenses/by-nc-sa/3.0/us/
Your fair use and other rights are in no way affected by the above. There is a human-readable
summary of the Legal Code (the full license), located here:
http://creativecommons.org/licenses/by-nc-sa/3.0/us/legalcode
Book Version 2
If you've downloaded this book from a torrent, it’s probably out of date. Go
to http://inventwithpython.com/pygame to download the latest version.
ISBN (978-1469901732)
1st Edition
For Calvin Chaos

Email questions to the author: [email protected]

Who is this book for? i
WHO IS THIS BOOK FOR? When you get down to it, programming video games is just about lighting up pixels to make
pretty pictures appear on the screen in response to keyboard and mouse input.
And there are very few things that are as fun.
This book will teach you how to make graphical computer games in the Python programming
language using the Pygame library. This book assumes you know a little bit about Python or
programming in general. If you don’t know how to program, you can learn by downloading the
free book ―Invent Your Own Computer Games with Python‖ from http://inventwithpython.com.
Or you can jump right into this book and mostly pick it up along the way.
This book is for the intermediate programmer who has learned what variables and loops are, but
now wants to know, ―What do actual game programs look like?‖ There was a long gap after I first
learned programming but didn’t really know how to use that skill to make something cool. It’s
my hope that the games in this book will give you enough ideas about how programs work to
provide a foundation to implement your own games.
The full text of this book is available in HTML or PDF format at
http://inventwithpython.com/pygame.
-Al Sweigart

ii http://inventwithpython.com/pygame
Email questions to the author: [email protected]
ABOUT THIS BOOK Hello! This book will teach you how to make graphical computer games with the Pygame
framework (also called the Pygame library) in the Python programming language. Pygame makes
it easy to create programs with 2D graphics. Both Python and the Pygame framework can be
downloaded for free from http://python.org and http://pygame.org. All you need is a computer
and this book to begin making your own games.
This book is an intermediate programming book. If you are completely new to programming,
you can still try to follow along with the source code examples and figure out how programming
works. However, it might be easier to learn how to program in Python first. ―Invent Your Own
Computer Games with Python‖ is a book that is available completely for free from
http://inventwithpython.com. That book teaches programming by making non-graphical, text-
based games for complete beginners, and also has a few chapters about using the Pygame library.
However, if you already know how to program in Python (or even some other language, since
Python is so easy to pick up) and want to start making games beyond just text, then this is the
book for you. The book starts with a short introduction to how the Pygame library works and the
functions it provides. Then it provides the complete source code for some actual games and
explains how the code works, so you can understand how actual game programs make use of
Pygame.
This book features seven different games that are clones of popular games that you’ve probably
already played. The games are a lot more fun and interactive than the text-based games in ―Invent
with Python‖, but are still fairly short. All of the programs are less than 600 lines long. This is
pretty small when you consider that professional games you download or buy in a store can be
hundreds of thousands of lines long. These games require an entire team of programmers and
artists working with each other for months or years to make.
The website for this book is http://inventwithpython.com/pygame. All the programs and files
mentioned in this book can be downloaded for free from this website, including this book itself.
Programming is a great creative activity, so please share this book as widely as possible. The
Creative Commons license that this book is released under gives you the right to copy and
duplicate this book as much as you want (as long as you don’t charge money for it).
If you ever have questions about how these programs work, feel free to email me at

About This Book iii
TABLE OF CONTENTS Who is this book for? ........................................................................................................................ i
About This Book .............................................................................................................................. ii
Chapter 1 – Installing Python and Pygame ...................................................................................... 1
What You Should Know Before You Begin ................................................................................ 1
Downloading and Installing Python ............................................................................................. 1
Windows Instructions .................................................................................................................. 1
Mac OS X Instructions ................................................................................................................. 2
Ubuntu and Linux Instructions .................................................................................................... 2
Starting Python............................................................................................................................. 2
Installing Pygame......................................................................................................................... 3
How to Use This Book ................................................................................................................. 4
The Featured Programs ................................................................................................................ 4
Downloading Graphics and Sound Files ...................................................................................... 4
Line Numbers and Spaces ............................................................................................................ 4
Text Wrapping in This Book ....................................................................................................... 5
Checking Your Code Online ........................................................................................................ 6
More Info Links on http://invpy.com ........................................................................................... 6
Chapter 2 – Pygame Basics .............................................................................................................. 7
GUI vs. CLI ................................................................................................................................. 7
Source Code for Hello World with Pygame ................................................................................ 7
Setting Up a Pygame Program ..................................................................................................... 8
Game Loops and Game States ................................................................................................... 10
pygame.event.Event Objects ........................................................................................... 11
The QUIT Event and pygame.quit() Function .................................................................. 12
Pixel Coordinates ....................................................................................................................... 13

iv http://inventwithpython.com/pygame
Email questions to the author: [email protected]
A Reminder About Functions, Methods, Constructor Functions, and Functions in Modules (and
the Difference Between Them) .................................................................................................. 14
Surface Objects and The Window ............................................................................................. 15
Colors ......................................................................................................................................... 16
Transparent Colors ..................................................................................................................... 17
pygame.Color Objects .......................................................................................................... 18
Rect Objects ............................................................................................................................... 18
Primitive Drawing Functions ..................................................................................................... 20
pygame.PixelArray Objects .............................................................................................. 23
The pygame.display.update() Function ...................................................................... 24
Animation .................................................................................................................................. 24
Frames Per Second and pygame.time.Clock Objects ....................................................... 27
Drawing Images with pygame.image.load() and blit() ............................................ 28
Fonts ........................................................................................................................................... 28
Anti-Aliasing.............................................................................................................................. 30
Playing Sounds........................................................................................................................... 31
Summary .................................................................................................................................... 32
Chapter 3 – Memory Puzzle .......................................................................................................... 33
How to Play Memory Puzzle ..................................................................................................... 33
Nested for Loops ..................................................................................................................... 33
Source Code of Memory Puzzle ................................................................................................ 34
Credits and Imports .................................................................................................................... 42
Magic Numbers are Bad ............................................................................................................ 42
Sanity Checks with assert Statements ................................................................................... 43
Telling If a Number is Even or Odd .......................................................................................... 44
Crash Early and Crash Often! .................................................................................................... 44
Making the Source Code Look Pretty ........................................................................................ 45
Using Constant Variables Instead of Strings ............................................................................. 46
Making Sure We Have Enough Icons ........................................................................................ 47
Tuples vs. Lists, Immutable vs. Mutable ................................................................................... 47

About This Book v
One Item Tuples Need a Trailing Comma ................................................................................. 48
Converting Between Lists and Tuples ....................................................................................... 49
The global statement, and Why Global Variables are Evil.................................................... 49
Data Structures and 2D Lists ..................................................................................................... 51
The ―Start Game‖ Animation ..................................................................................................... 52
The Game Loop ......................................................................................................................... 52
The Event Handling Loop .......................................................................................................... 53
Checking Which Box The Mouse Cursor is Over ..................................................................... 54
Handling the First Clicked Box ................................................................................................. 55
Handling a Mismatched Pair of Icons ........................................................................................ 56
Handling If the Player Won ....................................................................................................... 56
Drawing the Game State to the Screen ...................................................................................... 57
Creating the ―Revealed Boxes‖ Data Structure ......................................................................... 58
Creating the Board Data Structure: Step 1 – Get All Possible Icons ......................................... 58
Step 2 – Shuffling and Truncating the List of All Icons ............................................................ 59
Step 3 – Placing the Icons on the Board .................................................................................... 59
Splitting a List into a List of Lists.............................................................................................. 60
Different Coordinate Systems .................................................................................................... 61
Converting from Pixel Coordinates to Box Coordinates ........................................................... 62
Drawing the Icon, and Syntactic Sugar ...................................................................................... 63
Syntactic Sugar with Getting a Board Space’s Icon’s Shape and Color .................................... 64
Drawing the Box Cover ............................................................................................................. 64
Handling the Revealing and Covering Animation ..................................................................... 65
Drawing the Entire Board .......................................................................................................... 66
Drawing the Highlight ............................................................................................................... 67
The ―Start Game‖ Animation ..................................................................................................... 67
Revealing and Covering the Groups of Boxes ........................................................................... 68
The ―Game Won‖ Animation .................................................................................................... 68
Telling if the Player Has Won ................................................................................................... 69

vi http://inventwithpython.com/pygame
Email questions to the author: [email protected]
Why Bother Having a main() Function? ................................................................................ 69
Why Bother With Readability? .................................................................................................. 70
Summary, and a Hacking Suggestion ........................................................................................ 74
Chapter 4 – Slide Puzzle ................................................................................................................ 77
How to Play Slide Puzzle ........................................................................................................... 77
Source Code to Slide Puzzle ...................................................................................................... 77
Second Verse, Same as the First ................................................................................................ 85
Setting Up the Buttons ............................................................................................................... 86
Being Smart By Using Stupid Code .......................................................................................... 87
The Main Game Loop ................................................................................................................ 88
Clicking on the Buttons ............................................................................................................. 89
Sliding Tiles with the Mouse ..................................................................................................... 90
Sliding Tiles with the Keyboard ................................................................................................ 90
―Equal To One Of‖ Trick with the in Operator ........................................................................ 91
WASD and Arrow Keys ............................................................................................................ 91
Actually Performing the Tile Slide ............................................................................................ 92
IDLE and Terminating Pygame Programs ................................................................................. 92
Checking for a Specific Event, and Posting Events to Pygame’s Event Queue ........................ 92
Creating the Board Data Structure ............................................................................................. 93
Not Tracking the Blank Position ................................................................................................ 94
Making a Move by Updating the Board Data Structure ............................................................ 94
When NOT to Use an Assertion ................................................................................................ 95
Getting a Not-So-Random Move ............................................................................................... 96
Converting Tile Coordinates to Pixel Coordinates .................................................................... 97
Converting from Pixel Coordinates to Board Coordinates ........................................................ 97
Drawing a Tile ........................................................................................................................... 97
The Making Text Appear on the Screen .................................................................................... 98
Drawing the Board ..................................................................................................................... 99
Drawing the Border of the Board ............................................................................................... 99

About This Book vii
Drawing the Buttons ................................................................................................................ 100
Animating the Tile Slides ........................................................................................................ 100
The copy() Surface Method ................................................................................................. 101
Creating a New Puzzle ............................................................................................................. 103
Animating the Board Reset ...................................................................................................... 104
Time vs. Memory Tradeoffs .................................................................................................... 105
Nobody Cares About a Few Bytes ........................................................................................... 106
Nobody Cares About a Few Million Nanoseconds .................................................................. 107
Summary .................................................................................................................................. 107
Chapter 5 – Simulate .................................................................................................................... 108
How to Play Simulate .............................................................................................................. 108
Source Code to Simulate .......................................................................................................... 108
The Usual Starting Stuff .......................................................................................................... 114
Setting Up the Buttons ............................................................................................................. 115
The main() Function ............................................................................................................. 115
Some Local Variables Used in This Program .......................................................................... 116
Drawing the Board and Handling Input ................................................................................... 117
Checking for Mouse Clicks ..................................................................................................... 118
Checking for Keyboard Presses ............................................................................................... 118
The Two States of the Game Loop .......................................................................................... 119
Figuring Out if the Player Pressed the Right Buttons .............................................................. 119
Epoch Time .............................................................................................................................. 121
Drawing the Board to the Screen ............................................................................................. 122
Same Old terminate() Function ....................................................................................... 122
Reusing The Constant Variables .............................................................................................. 123
Animating the Button Flash ..................................................................................................... 123
Drawing the Buttons ................................................................................................................ 126
Animating the Background Change ......................................................................................... 126
The Game Over Animation ...................................................................................................... 127

viii http://inventwithpython.com/pygame
Email questions to the author: [email protected]
Converting from Pixel Coordinates to Buttons ........................................................................ 129
Explicit is Better Than Implicit ................................................................................................ 129
Chapter 6 – Wormy ...................................................................................................................... 131
How to Play Wormy ................................................................................................................ 131
Source Code to Wormy ............................................................................................................ 131
The Grid ................................................................................................................................... 137
The Setup Code ........................................................................................................................ 137
The main() Function ............................................................................................................. 138
A Separate runGame() Function .......................................................................................... 139
The Event Handling Loop ........................................................................................................ 139
Collision Detection .................................................................................................................. 140
Detecting Collisions with the Apple ........................................................................................ 141
Moving the Worm .................................................................................................................... 142
The insert() List Method................................................................................................... 142
Drawing the Screen .................................................................................................................. 143
Drawing ―Press a key‖ Text to the Screen ............................................................................... 143
The checkForKeyPress() Function ................................................................................ 143
The Start Screen ....................................................................................................................... 144
Rotating the Start Screen Text ................................................................................................. 145
Rotations Are Not Perfect ........................................................................................................ 146
Deciding Where the Apple Appears ........................................................................................ 147
Game Over Screens .................................................................................................................. 147
Drawing Functions ................................................................................................................... 148
Don’t Reuse Variable Names ................................................................................................... 151
Chapter 7 - Tetromino .................................................................................................................. 153
How to Play Tetromino ............................................................................................................ 153
Some Tetromino Nomenclature ............................................................................................... 153
Source Code to Tetromino ....................................................................................................... 154
The Usual Setup Code ............................................................................................................. 166

About This Book ix
Setting up Timing Constants for Holding Down Keys ............................................................ 166
More Setup Code ..................................................................................................................... 166
Setting Up the Piece Templates ............................................................................................... 168
Splitting a ―Line of Code‖ Across Multiple Lines ................................................................... 171
The main() Function ............................................................................................................. 172
The Start of a New Game ......................................................................................................... 173
The Game Loop ....................................................................................................................... 174
The Event Handling Loop ........................................................................................................ 174
Pausing the Game .................................................................................................................... 174
Using Movement Variables to Handle User Input ................................................................... 175
Checking if a Slide or Rotation is Valid .................................................................................. 175
Finding the Bottom .................................................................................................................. 178
Moving by Holding Down the Key.......................................................................................... 179
Letting the Piece ―Naturally‖ Fall ............................................................................................ 182
Drawing Everything on the Screen .......................................................................................... 182
makeTextObjs(), A Shortcut Function for Making Text .................................................. 183
The Same Old terminate() Function ................................................................................ 183
Waiting for a Key Press Event with the checkForKeyPress() Function ........................ 183
showTextScreen(), A Generic Text Screen Function ..................................................... 184
The checkForQuit() Function .......................................................................................... 185
The calculateLevelAndFallFreq() Function .......................................................... 185
Generating Pieces with the getNewPiece() Function ....................................................... 188
Adding Pieces to the Board Data Structure ............................................................................. 189
Creating a New Board Data Structure ...................................................................................... 189
The isOnBoard() and isValidPosition() Functions ............................................... 190
Checking for, and Removing, Complete Lines ........................................................................ 192
Convert from Board Coordinates to Pixel Coordinates ........................................................... 195
Drawing a Box on the Board or Elsewhere on the Screen ....................................................... 195
Drawing Everything to the Screen ........................................................................................... 196

x http://inventwithpython.com/pygame
Email questions to the author: [email protected]
Drawing the Score and Level Text .......................................................................................... 196
Drawing a Piece on the Board or Elsewhere on the Screen ..................................................... 197
Drawing the ―Next‖ Piece ........................................................................................................ 197
Summary .................................................................................................................................. 198
Chapter 8 – Squirrel Eat Squirrel ................................................................................................. 200
How to Play Squirrel Eat Squirrel............................................................................................ 200
The Design of Squirrel Eat Squirrel ......................................................................................... 200
Source Code to Squirrel Eat Squirrel ....................................................................................... 201
The Usual Setup Code ............................................................................................................. 211
Describing the Data Structures ................................................................................................ 212
The main() Function ............................................................................................................. 213
The pygame.transform.flip() Function .................................................................... 214
A More Detailed Game State than Usual ................................................................................. 214
The Usual Text Creation Code................................................................................................. 215
Cameras ................................................................................................................................... 215
The ―Active Area‖ ................................................................................................................... 217
Keeping Track of the Location of Things in the Game World ................................................ 218
Starting Off with Some Grass .................................................................................................. 219
The Game Loop ....................................................................................................................... 219
Checking to Disable Invulnerability ........................................................................................ 219
Moving the Enemy Squirrels ................................................................................................... 219
Removing the Far Away Grass and Squirrel Objects .............................................................. 221
When Deleting Items in a List, Iterate Over the List in Reverse ............................................. 221
Adding New Grass and Squirrel Objects ................................................................................. 223
Camera Slack, and Moving the Camera View ......................................................................... 223
Drawing the Background, Grass, Squirrels, and Health Meter ................................................ 224
The Event Handling Loop ........................................................................................................ 226
Moving the Player, and Accounting for Bounce ...................................................................... 228
Collision Detection: Eat or Be Eaten ....................................................................................... 229

About This Book xi
The Game Over Screen ............................................................................................................ 231
Winning ................................................................................................................................... 232
Drawing a Graphical Health Meter .......................................................................................... 232
The Same Old terminate() Function ................................................................................ 232
The Mathematics of the Sine Function .................................................................................... 233
Backwards Compatibility with Python Version 2 .................................................................... 236
The getRandomVelocity() Function .............................................................................. 237
Finding a Place to Add New Squirrels and Grass .................................................................... 237
Creating Enemy Squirrel Data Structures ................................................................................ 238
Flipping the Squirrel Image ..................................................................................................... 239
Creating Grass Data Structures ................................................................................................ 239
Checking if Outside the Active Area ....................................................................................... 240
Summary .................................................................................................................................. 241
Chapter 9 – Star Pusher ................................................................................................................ 242
How to Play Star Pusher .......................................................................................................... 242
Source Code to Star Pusher ...................................................................................................... 242
The Initial Setup ....................................................................................................................... 256
Data Structures in Star Pusher ................................................................................................. 271
The ―Game State‖ Data Structure ............................................................................................ 271
The ―Map‖ Data Structure ....................................................................................................... 271
The ―Levels‖ Data Structure .................................................................................................... 272
Reading and Writing Text Files ............................................................................................... 272
Text Files and Binary Files ...................................................................................................... 272
Writing to Files ........................................................................................................................ 273
Reading from Files ................................................................................................................... 274
About the Star Pusher Map File Format .................................................................................. 274
Recursive Functions ................................................................................................................. 280
Stack Overflows ....................................................................................................................... 281
Preventing Stack Overflows with a Base Case ........................................................................ 283

xii http://inventwithpython.com/pygame
Email questions to the author: [email protected]
The Flood Fill Algorithm ......................................................................................................... 284
Drawing the Map ..................................................................................................................... 285
Checking if the Level is Finished ............................................................................................ 287
Summary .................................................................................................................................. 288
Chapter 10 – Four Extra Games ................................................................................................... 289
Flippy, an ―Othello‖ Clone ...................................................................................................... 290
Source Code for Flippy ............................................................................................................ 292
Ink Spill, a ―Flood It‖ Clone .................................................................................................... 305
Source Code for Ink Spill ........................................................................................................ 305
Four-In-A-Row, a ―Connect Four‖ Clone ................................................................................ 317
Source Code for Four-In-A-Row ............................................................................................. 317
Gemgem, a ―Bejeweled‖ Clone ............................................................................................... 327
Source Code for Gemgem ........................................................................................................ 327
Summary .................................................................................................................................. 340
Glossary ....................................................................................................................................... 342
About the Author ......................................................................................................................... 347

About This Book xiii
This page intentionally left blank.
…except for the above text.
And the above text.
And the above text.
And the above text.
And the above text.
And the above text.
And the above text.
And the above text.
And the above text.
Traceback (most recent call last):
File "<pyshell#1>", line 1, in blankpage
def blankpage(): blankpage()
RuntimeError: maximum recursion depth exceeded


Chapter 1 – Installing Python and Pygame 1
CHAPTER 1 – INSTALLING
PYTHON AND PYGAME
What You Should Know Before You Begin It might help if you know a bit about Python programming (or how to program in another
language besides Python) before you read through this book; however even if you haven’t you
can still read this book anyway. Programming isn’t nearly as hard as people think it is. If you ever
run into some trouble, you can read the free book ―Invent Your Own Computer Games with
Python‖ online at http://inventwithpython.com or look up a topic that you find confusing on the
Invent with Python wiki at http://inventwithpython.com/wiki.
You don’t need to know how to use the Pygame library before reading this book. The next
chapter is a brief tutorial on all of Pygame’s major features and functions.
Just in case you haven’t read the first book and already installed Python and Pygame on your
computer, the installation instructions are in this chapter. If you already have installed both of
these then you can skip this chapter.
Downloading and Installing Python Before we can begin programming you'll need to install software called the Python interpreter on
your computer. (You may need to ask an adult for help here.) The interpreter is a program that
understands the instructions that you’ll write (or rather, type out) in the Python language. Without
the interpreter, your computer won't be able to run your Python programs. We'll just refer to ―the
Python interpreter‖ as ―Python‖ from now on.
The Python interpreter software can be downloaded from the official website of the Python
programming language, http://www.python.org. You might want the help of someone else to
download and install the Python software. The installation is a little different depending on if
your computer’s operating system is Windows, Mac OS X, or a Linux OS such as Ubuntu. You
can also find videos online of people installing the Python software on their computers at
http://invpy.com/installing.
Windows Instructions When you get to http://python.org, you should see a list of links on the left (such as ―About‖,
―News‖, ―Documentation‖, ―Download‖, and so on). Click on the Download link to go to the

2 http://inventwithpython.com/pygame
Email questions to the author: [email protected]
download page, then look for the file called ―Python 3.2 Windows Installer (Windows binary --
does not include source)‖ and click on its link to download Python for Windows.
Double-click on the python-3.2.msi file that you've just downloaded to start the Python installer.
(If it doesn’t start, try right-clicking the file and choosing Install.) Once the installer starts up,
just keep clicking the Next button and just accept the choices in the installer as you go (no need
to make any changes). When the install is finished, click Finish.
Mac OS X Instructions Mac OS X 10.5 comes with Python 2.5.1 pre-installed by Apple. Currently, Pygame only
supports Python 2 and not Python 3. However, the programs in this book work with both Python
2 and 3.
The Python website also has some additional information about using Python on a Mac at
http://docs.python.org/dev/using/mac.html.
Ubuntu and Linux Instructions Pygame for Linux also only supports Python 2, not Python 3. If your operating system is Ubuntu,
you can install Python by opening a terminal window (from the desktop click on Applications >
Accessories > Terminal) and entering ―sudo apt-get install python2.7‖ then
pressing Enter. You will need to enter the root password to install Python, so ask the person who
owns the computer to type in this password if you do not know it.
You also need to install the IDLE software. From the terminal, type in ―sudo apt-get
install idle‖. The root password is also needed to install IDLE (ask the owner of your
computer to type in this password for you).
Starting Python We will be using the IDLE software to type in our programs and run them. IDLE stands for
Interactive DeveLopment Environment. The development environment is software that makes it
easy to write Python programs, just like word processor software makes it easy to write books.
If your operating system is Windows XP, you should be able to run Python by clicking the Start
button, then selecting Programs, Python 3.1, IDLE (Python GUI). For Windows Vista or
Windows 7, just click the Windows button in the lower left corner, type ―IDLE‖ and select
―IDLE (Python GUI)‖.
If your operating system is Max OS X, start IDLE by opening the Finder window and click on
Applications, then click Python 3.2, then click the IDLE icon.
Chapter 1 – Installing Python and Pygame 3
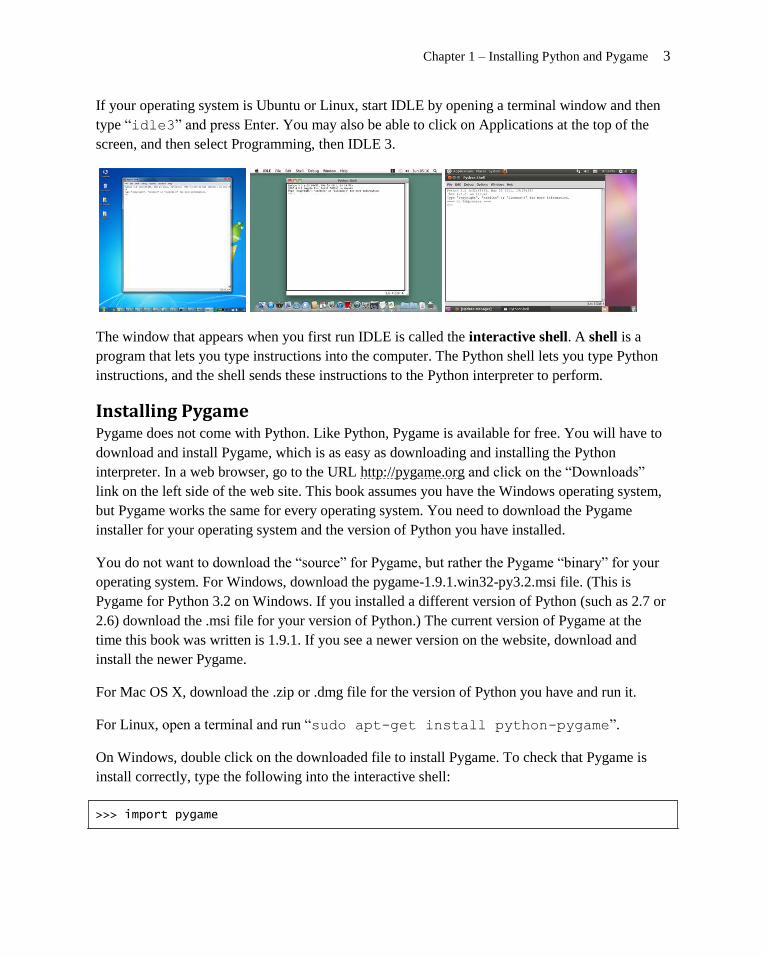
If your operating system is Ubuntu or Linux, start IDLE by opening a terminal window and then
type ―idle3‖ and press Enter. You may also be able to click on Applications at the top of the
screen, and then select Programming, then IDLE 3.
The window that appears when you first run IDLE is called the interactive shell. A shell is a
program that lets you type instructions into the computer. The Python shell lets you type Python
instructions, and the shell sends these instructions to the Python interpreter to perform.
Installing Pygame Pygame does not come with Python. Like Python, Pygame is available for free. You will have to
download and install Pygame, which is as easy as downloading and installing the Python
interpreter. In a web browser, go to the URL http://pygame.org and click on the ―Downloads‖
link on the left side of the web site. This book assumes you have the Windows operating system,
but Pygame works the same for every operating system. You need to download the Pygame
installer for your operating system and the version of Python you have installed.
You do not want to download the ―source‖ for Pygame, but rather the Pygame ―binary‖ for your
operating system. For Windows, download the pygame-1.9.1.win32-py3.2.msi file. (This is
Pygame for Python 3.2 on Windows. If you installed a different version of Python (such as 2.7 or
2.6) download the .msi file for your version of Python.) The current version of Pygame at the
time this book was written is 1.9.1. If you see a newer version on the website, download and
install the newer Pygame.
For Mac OS X, download the .zip or .dmg file for the version of Python you have and run it.
For Linux, open a terminal and run ―sudo apt-get install python-pygame‖.
On Windows, double click on the downloaded file to install Pygame. To check that Pygame is
install correctly, type the following into the interactive shell:
>>> import pygame

4 http://inventwithpython.com/pygame
Email questions to the author: [email protected]
If nothing appears after you hit the Enter key, then you know Pygame has successfully been
installed. If the error ImportError: No module named pygame appears, then try to
install Pygame again (and make sure you typed import pygame correctly).
This chapter has five small programs that demonstrate how to use the different features that
Pygame provides. In the last chapter, you will use these features for a complete game written in
Python with Pygame.
A video tutorial of how to install Pygame is available from this book's website at
http://invpy.com/videos.
How to Use This Book ―Making Games with Python & Pygame‖ is different from other programming books because it
focuses on the complete source code for several game programs. Instead of teaching you
programming concepts and leaving it up to you to figure out how to make programs with those
concepts, this book shows you some programs and then explains how they are put together.
In general, you should read these chapters in order. There are many concepts that are used over
and over in these games, and they are only explained in detail in the first game they appear in.
But if there is a game you think is interesting, go ahead and jump to that chapter. You can always
read the previous chapters later if you got ahead of yourself.
The Featured Programs Each chapter focuses on a single game program and explain how different parts of the code work.
It is very helpful to copy these programs by typing in the code line by line from this book.
However, you can also download the source code file from this book's website. In a web browser,
go to the URL http://invpy.com/source and follow the instructions to download the source code
file. But typing in the code yourself really helps you learn the code better.
Downloading Graphics and Sound Files While you can just type in the code you read out of this book, you will need to download the
graphics and sound files used by the games in this book from http://invpy.com/downloads. Make
sure that these image and sound files are located in the same folder as the .py Python file
otherwise your Python program will not be able to find these files.
Line Numbers and Spaces When entering the source code yourself, do not type the line numbers that appear at the beginning
of each line. For example, if you see this in the book:

Chapter 1 – Installing Python and Pygame 5
1. number = random.randint(1, 20)
2. spam = 42
3. print('Hello world!')
You do not need to type the ―1.‖ on the left side, or the space that immediately follows it. Just
type it like this:
number = random.randint(1, 20)
spam = 42
print('Hello world!')
Those numbers are only used so that this book can refer to specific lines in the code. They are not
a part of the actual program.
Aside from the line numbers, be sure to enter the code exactly as it appears. Notice that some of
the lines don’t begin at the leftmost edge of the page, but are indented by four or eight or more
spaces. Be sure to put in the correct number of spaces at the start of each line. (Since each
character in IDLE is the same width, you can count the number of spaces by counting the number
of characters above or below the line you're looking at.)
For example in the code below, you can see that the second line is indented by four spaces
because the four characters (―whil‖) on the line above are over the indented space. The third line
is indented by another four spaces (the four characters, ―if n‖ are above the third line's indented
space):
while spam < 10:
if number == 42:
print('Hello')
Text Wrapping in This Book Some lines of code are too long to fit on one line on the pages in this book, and the text of the
code will wrap around to the next line. When you type these lines into the file editor, enter the
code all on one line without pressing Enter.
You can tell when a new line starts by looking at the line numbers on the left side of the code. For
example, the code below has only two lines of code, even though the first line wraps around:
1. print('This is the first line! xxxxxxxxxxxxxxxxxxxxxxxxxxxxx
xxxxxxxxxxxxxx’)
2. print('This is the second line, not the third line.')

6 http://inventwithpython.com/pygame
Email questions to the author: [email protected]
Checking Your Code Online Some of the programs in this book are a little long. Although it is very helpful to learn Python by
typing out the source code for these programs, you may accidentally make typos that cause your
programs to crash. It may not be obvious where the typo is.
You can copy and paste the text of your source code to the online diff tool on the book’s website.
The diff tool will show any differences between the source code in the book and the source code
you’ve typed. This is an easy way of finding any typos in your program.
Copying and pasting text is a very useful computer skill, especially for computer programming.
There is a video tutorial on copying and pasting at this book’s website at
http://invpy.com/copypaste.
The online diff tool is at this web page: http://invpy.com/diff/pygame. There is also a video
tutorial on how to use this tool on the book’s website.
More Info Links on http://invpy.com There is a lot that you can learn about programming. But you don’t need to learn all of it now.
There are several times in this book where you might like to learn these additional details and
explanations, but if I included them in this book then it would add many more pages. If this
larger, heavier book accidentally fell on you the weight of these many additional pages would
crush you, resulting in death. Instead, I have included ―more info‖ links in this book that you can
follow on this book’s website. You do not have to read this additional information to understand
anything in this book, but it is there if you are curious. These (and other) links have been
shortened and begin with http://invpy.com.
All of the information from these ―more info‖ links can also be downloaded from
http://invpy.com/pygamemoreinfo.
Even though this book is not dangerously heavy, please do not let it fall on you anyway.
Chapter 2 – Pygame Basics 7
CHAPTER 2 – PYGAME BASICS Just like how Python comes with several modules like random, math, or time that provide
additional functions for your programs, the Pygame framework includes several modules with
functions for drawing graphics, playing sounds, handling mouse input, and other things.
This chapter will cover the basic modules and functions that Pygame provides and assumes you
already know basic Python programming. If you have trouble with some of the programming
concepts, you can read through the ―Invent Your Own Computer Games with Python‖ book
online at http://invpy.com/book. This book is aimed at complete beginners to programming.
The ―Invent with Python‖ book also has a few chapters covering Pygame. You can read them
online at http://invpy.com/chap17.
Once you learn more about Pygame, you can view the other modules that Pygame provides from
the online documentation at http://pygame.org/docs.
GUI vs. CLI The Python programs that you can write with Python’s built-in functions only deal with text
through the print() and input() functions. Your program can display text on the screen and
let the user type in text from the keyboard. This type of program has a command line interface,
or CLI (which is pronounced like the first part of ―climb‖ and rhymes with ―sky‖). These
programs are somewhat limited because they can’t display graphics, have colors, or use the
mouse. These CLI programs only get input from the keyboard with the input() function and
even then user must press Enter before the program can respond to the input. This means real-
time (that is, continuing to run code without waiting for the user) action games are impossible to
make.
Pygame provides functions for creating programs with a graphical user interface, or GUI
(pronounced, ―gooey‖). Instead of a text-based CLI, programs with a graphics-based GUI can
show a window with images and colors.
Source Code for Hello World with Pygame Our first program made with Pygame is a small program that makes a window that says ―Hello
World!‖ appear on the screen. Open a new file editor window by clicking on IDLE’s File menu,
then New Window. Type in the following code into IDLE’s file editor and save it as
blankpygame.py. Then run the program by pressing F5 or selecting Run > Run Module from the
menu at the top of the file editor.

8 http://inventwithpython.com/pygame
Email questions to the author: [email protected]
Remember, do not type the numbers or the periods at the beginning of each line (that’s just for
reference in this book).
1. import pygame, sys
2. from pygame.locals import *
3.
4. pygame.init()
5. DISPLAYSURF = pygame.display.set_mode((400, 300))
6. pygame.display.set_caption('Hello World!')
7. while True: # main game loop
8. for event in pygame.event.get():
9. if event.type == QUIT:
10. pygame.quit()
11. sys.exit()
12. pygame.display.update()
When you run this program, a black window like this will appear:
Yay! You’ve just made the world’s most boring video game! It’s just a blank window with ―Hello
World!‖ at the top of the window (in what is called the window’s title bar, which holds the
caption text). But creating a window is the first step to making graphical games. When you click
on the X button in the corner of the window, the program will end and the window will disappear.
Calling the print() function to make text appear in the window won’t work because
print() is a function for CLI programs. The same goes for input() to get keyboard input
from the user. Pygame uses other functions for input and output which are explained later in this
chapter. For now, let’s look at each line in our ―Hello World‖ program in more detail.
Setting Up a Pygame Program The first few lines of code in the Hello World program are lines that will begin almost every
program you write that uses Pygame.
1. import pygame, sys

Chapter 2 – Pygame Basics 9
Line 1 is a simple import statement that imports the pygame and sys modules so that our
program can use the functions in them. All of the Pygame functions dealing with graphics, sound,
and other features that Pygame provides are in the pygame module.
Note that when you import the pygame module you automatically import all the modules that
are in the pygame module as well, such as pygame.images and pygame.mixer.music.
There’s no need to import these modules-inside-modules with additional import statements.
2. from pygame.locals import *
Line 2 is also an import statement. However, instead of the import modulename format, it
uses the from modulename import * format. Normally if you want to call a function that
is in a module, you must use the modulename.functionname() format after importing the
module. However, with from modulename import *, you can skip the modulename.
portion and simply use functionname() (just like Python’s built-in functions).
The reason we use this form of import statement for pygame.locals is because
pygame.locals contains several constant variables that are easy to identify as being in the
pygame.locals module without pygame.locals. in front of them. For all other modules,
you generally want to use the regular import modulename format. (There is more
information about why you want to do this at http://invpy.com/namespaces.)
4. pygame.init()
Line 4 is the pygame.init() function call, which always needs to be called after importing
the pygame module and before calling any other Pygame function. You don’t need to know what
this function does, you just need to know that it needs to be called first in order for many Pygame
functions to work. If you ever see an error message like pygame.error: font not
initialized, check to see if you forgot to call pygame.init() at the start of your
program.
5. DISPLAYSURF = pygame.display.set_mode((400, 300))
Line 5 is a call to the pygame.display.set_mode() function, which returns the
pygame.Surface object for the window. (Surface objects are described later in this chapter.)
Notice that we pass a tuple value of two integers to the function: (400, 300). This tuple tells
the set_mode() function how wide and how high to make the window in pixels. (400,
300) will make a window with a width of 400 pixels and height of 300 pixels.

10 http://inventwithpython.com/pygame
Email questions to the author: [email protected]
Remember to pass a tuple of two integers to set_mode(), not just two integers themselves. The
correct way to call the function is like this: pygame.display.set_mode((400, 300)).
A function call like pygame.display.set_mode(400, 300) will cause an error that
looks like this: TypeError: argument 1 must be 2-item sequence, not int.
The pygame.Surface object (we will just call them Surface objects for short) returned is
stored in a variable named DISPLAYSURF.
6. pygame.display.set_caption('Hello World!')
Line 6 sets the caption text that will appear at the top of the window by calling the
pygame.display.set_caption() function. The string value 'Hello World!' is
passed in this function call to make that text appear as the caption:
Game Loops and Game States
7. while True: # main game loop
8. for event in pygame.event.get():
Line 7 is a while loop that has a condition of simply the value True. This means that it never
exits due to its condition evaluating to False. The only way the program execution will ever
exit the loop is if a break statement is executed (which moves execution to the first line after the
loop) or sys.exit() (which terminates the program). If a loop like this was inside a function,
a return statement will also move execution out of the loop (as well as the function too).
The games in this book all have these while True loops in them along with a comment calling
it the ―main game loop‖. A game loop (also called a main loop) is a loop where the code does
three things:
1. Handles events.
2. Updates the game state.
3. Draws the game state to the screen.
The game state is simply a way of referring to a set of values for all the variables in a game
program. In many games, the game state includes the values in the variables that tracks the
player’s health and position, the health and position of any enemies, which marks have been
made on a board, the score, or whose turn it is. Whenever something happens like the player

Chapter 2 – Pygame Basics 11
taking damage (which lowers their health value), or an enemy moves somewhere, or something
happens in the game world we say that the game state has changed.
If you’ve ever played a game that let you saved, the ―save state‖ is the game state at the point that
you’ve saved it. In most games, pausing the game will prevent the game state from changing.
Since the game state is usually updated in response to events (such as mouse clicks or keyboard
presses) or the passage of time, the game loop is constantly checking and re-checking many times
a second for any new events that have happened. Inside the main loop is code that looks at which
events have been created (with Pygame, this is done by calling the pygame.event.get()
function). The main loop also has code that updates the game state based on which events have
been created. This is usually called event handling.
pygame.event.Event Objects Any time the user does one of several actions (they are listed later in this chapter) such as
pressing a keyboard key or moving the mouse on the program’s window, a
pygame.event.Event object is created by the Pygame library to record this ―event‖. (This is
a type of object called Event that exists in the event module, which itself is in the pygame
module.) We can find out which events have happened by calling the pygame.event.get()
function, which returns a list of pygame.event.Event objects (which we will just call Event
objects for short).
The list of Event objects will be for each event that has happened since the last time the
pygame.event.get() function was called. (Or, if pygame.event.get() has never been
called, the events that have happened since the start of the program.)

12 http://inventwithpython.com/pygame
Email questions to the author: [email protected]
7. while True: # main game loop
8. for event in pygame.event.get():
Line 8 is a for loop that will iterate over the list of Event objects that was returned by
pygame.event.get(). On each iteration through the for loop, a variable named event
will be assigned the value of the next event object in this list. The list of Event objects returned
from pygame.event.get() will be in the order that the events happened. If the user clicked
the mouse and then pressed a keyboard key, the Event object for the mouse click would be the
first item in the list and the Event object for the keyboard press would be second. If no events
have happened, then pygame.event.get() will return a blank list.
The QUIT Event and pygame.quit() Function
9. if event.type == QUIT:
10. pygame.quit()
11. sys.exit()
Event objects have a member variable (also called attributes or properties) named type
which tells us what kind of event the object represents. Pygame has a constant variable for each
of possible types in the pygame.locals modules. Line 9 checks if the Event object’s type is
equal to the constant QUIT. Remember that since we used the from pygame.locals
import * form of the import statement, we only have to type QUIT instead of
pygame.locals.QUIT.
If the Event object is a quit event, then the pygame.quit() and sys.exit() functions are
called. The pygame.quit() function is sort of the opposite of the pygame.init()
function: it runs code that deactivates the Pygame library. Your programs should always call
pygame.quit() before they call sys.exit() to terminate the program. Normally it doesn’t
really matter since Python closes it when the program exits anyway. But there is a bug in IDLE
that causes IDLE to hang if a Pygame program terminates before pygame.quit() is called.
Since we have no if statements that run code for other types of Event object, there is no event-
handling code for when the user clicks the mouse, presses keyboard keys, or causes any other
type of Event objects to be created. The user can do things to create these Event objects but it
doesn’t change anything in the program because the program does not have any event-handling
code for these types of Event objects. After the for loop on line 8 is done handling all the Event
objects that have been returned by pygame.event.get(), the program execution continues
to line 12.
12. pygame.display.update()

Chapter 2 – Pygame Basics 13
Line 12 calls the pygame.display.update() function, which draws the Surface object
returned by pygame.display.set_mode() to the screen (remember we stored this object
in the DISPLAYSURF variable). Since the Surface object hasn’t changed (for example, by some
of the drawing functions that are explained later in this chapter), the same black image is redrawn
to the screen each time pygame.display.update() is called.
That is the entire program. After line 12 is done, the infinite while loop starts again from the
beginning. This program does nothing besides make a black window appear on the screen,
constantly check for a QUIT event, and then redraws the unchanged black window to the screen
over and over again. Let’s learn how to make interesting things appear on this window instead of
just blackness by learning about pixels, Surface objects, Color objects, Rect objects, and the
Pygame drawing functions.
Pixel Coordinates The window that the ―Hello World‖ program creates is just composed of little square dots on your
screen called pixels. Each pixel starts off as black but can be set to a different color. Imagine that
instead of a Surface object that is 400 pixels wide and 300 pixels tall, we just had a Surface object
that was 8 pixels by 8 pixels. If that tiny 8x8 Surface was enlarged so that each pixel looks like a
square in a grid, and we added numbers for the X and Y axis, then a good representation of it
could look something like this:
We can refer to a specific pixel by using a Cartesian Coordinate system. Each column of the X-
axis and each row of the Y-axis will have an ―address‖ that is an integer from 0 to 7 so that we
can locate any pixel by specifying the X and Y axis integers.
For example, in the above 8x8 image, we can see that the pixels at the XY coordinates (4, 0), (2,
2), (0, 5), and (5, 6) have been painted black, the pixel at (2, 4) has been painted gray, while all
the other pixels are painted white. XY coordinates are also called points. If you’ve taken a math
class and learned about Cartesian Coordinates, you might notice that the Y-axis starts at 0 at the
top and then increases going down, rather than increasing as it goes up. This is just how Cartesian
Coordinates work in Pygame (and almost every programming language).

14 http://inventwithpython.com/pygame
Email questions to the author: [email protected]
The Pygame framework often represents Cartesian Coordinates as a tuple of two integers, such as
(4, 0) or (2, 2). The first integer is the X coordinate and the second is the Y coordinate. (Cartesian
Coordinates are covered in more detail in chapter 12 of ―Invent Your Own Computer Games with
Python‖ at http://invpy.com/chap12)
A Reminder About Functions, Methods, Constructor Functions, and
Functions in Modules (and the Difference Between Them) Functions and methods are almost the same thing. They can both be called to execute the code in
them. The difference between a function and a method is that a method will always be attached to
an object. Usually methods change something about that particular object (you can think of the
attached object as a sort of permanent argument passed to the method).
This is a function call of a function named foo():
foo()
This is a method call of a method also named foo(), which is attached to an object stored in a
variable named duckie:
duckie.foo()
A call to a function inside of a module may look like a method call. To tell the difference, you
need to look at the first name and see if it is the name of a module or the name of a variable that
contains an object. You can tell that sys.exit() is a call to function inside of a module,
because at the top of the program will be an import statement like import sys.
A constructor function is the same thing as a normal function call, except that its return value is
a new object. Just by looking at source code, a function and constructor function look the same.
Constructor functions (also called simply a ―constructor‖ or sometimes ―ctor‖ (―see-tor‖) for
short) are just a name given to functions that return a new object. But usually ctors start with a
capital letter. This is why when you write your own programs, your function names should only
begin with a lowercase letter.
For example, pygame.Rect() and pygame.Surface() are both constructor functions
inside the pygame module that return new Rect and Surface objects. (These objects are
described later.)
Here’s an example of a function call, a method call, and a call to a function inside a module:
import whammy
fizzy()
Chapter 2 – Pygame Basics 15
egg = Wombat()
egg.bluhbluh()
whammy.spam()
Even though these names are all made up, you can tell which is a function call, a method call, and
a call to a function inside a method. The name whammy refers to a module, since you can see it is
being imported on the first line. The fizzy name has nothing before it and parentheses after it,
so you know it is a function call.
Wombat() is also a function call, in this case it is a constructor function that returns an object.
(The capital letter that it starts with isn’t a guarantee that it’s a constructor function rather than a
regular function, but it is a safe bet.) The object is stored in a variable named egg. The
egg.bluhbluh() call is a method call, which you can tell because bluhbluh is attached to a
variable with an object in it.
Meanwhile, whammy.spam() is a function call, not a method call. You can tell it is not a
method because the name whammy was imported as a module earlier.
Surface Objects and The Window Surface objects are objects that represent a rectangular 2D image. The pixels of the Surface object
can be changed by calling the Pygame drawing functions (described later in this chapter) and then
displayed on the screen. The window border, title bar, and buttons are not part of the display
Surface object.
In particular, the Surface object returned by pygame.display.set_mode() is called the
display Surface. Anything that is drawn on the display Surface object will be displayed on the
window when the pygame.display.update() function is called. It is a lot faster to draw
on a Surface object (which only exists in the computer’s memory) than it is to draw a Surface
object to the computer screen. Computer memory is much faster to change than pixels on a
monitor.
Often your program will draw several different things to a Surface object. Once you are done
drawing everything on the display Surface object for this iteration of the game loop (called a
frame, just like a still image on a paused DVD is called) on a Surface object, it can be drawn to
the screen. The computer can draw frames very quickly, and our programs will often run around
30 frames per second (that is, 30 FPS). This is called the ―frame rate‖ and is explained later in
this chapter.
Drawing on Surface objects will be covered in the ―Primitive Drawing Functions‖ and ―Drawing
Images‖ sections later this chapter.

16 http://inventwithpython.com/pygame
Email questions to the author: [email protected]
Colors There are three primary colors of light: red, green and blue. (Red, blue, and yellow are the
primary colors for paints and pigments, but the computer monitor uses light, not paint.) By
combining different amounts of these three colors you can form any other color. In Pygame, we
represent colors with tuples of three integers. The first value in the tuple is how much red is in the
color. An integer value of 0 means there is no red in this color, and a value of 255 means there is
the maximum amount of red in the color. The second value is for green and the third value is for
blue. These tuples of three integers used to represent a color are often called RGB values.
Because you can use any combination of 0 to 255 for each of the three primary colors, this
means Pygame can draw 16,777,216 different colors (that is, 256 x 256 x 256 colors). However,
if try to use a number larger than 255 or a negative number, you will get an error that looks like
―ValueError: invalid color argument‖.
For example, we will create the tuple (0, 0, 0) and store it in a variable named BLACK. With
no amount of red, green, or blue, the resulting color is completely black. The color black is the
absence of any color. The tuple (255, 255, 255) for a maximum amount of red, green, and
blue to result in white. The color white is the full combination of red, green, and blue. The tuple
(255, 0, 0) represents the maximum amount of red but no amount of green and blue, so the
resulting color is red. Similarly, (0, 255, 0) is green and (0, 0, 255) is blue.
You can mix the amount of red, green, and blue to form other colors. Here are the RGB values for
a few common colors:
Color RGB Values
Aqua ( 0, 255, 255)
Black ( 0, 0, 0)
Blue ( 0, 0, 255)
Fuchsia (255, 0, 255)
Gray (128, 128, 128)
Green ( 0, 128, 0)
Lime ( 0, 255, 0)
Maroon (128, 0, 0)
Navy Blue ( 0, 0, 128)
Olive (128, 128, 0)
Purple (128, 0, 128)
Red (255, 0, 0)
Silver (192, 192, 192)
Teal ( 0, 128, 128)
White (255, 255, 255)
Yellow (255, 255, 0)

Chapter 2 – Pygame Basics 17
Transparent Colors When you look through a glass window that has a deep red tint, all of the colors behind it have a
red shade added to them. You can mimic this effect by adding a fourth 0 to 255 integer value to
your color values.
This value is known as the alpha value. It is a measure of how opaque (that is, not transparent) a
color is. Normally when you draw a pixel onto a surface object, the new color completely
replaces whatever color was already there. But with colors that have an alpha value, you can
instead just add a colored tint to the color that is already there.
For example, this tuple of three integers is for the color green: (0, 255, 0). But if we add a
fourth integer for the alpha value, we can make this a half transparent green color: (0, 255,
0, 128). An alpha value of 255 is completely opaque (that is, not transparency at all). The
colors (0, 255, 0) and (0, 255, 0, 255) look exactly the same. An alpha value of 0
means the color is completely transparent. If you draw any color that has an alpha value of 0 to a
surface object, it will have no effect, because this color is completely transparent and invisible.
In order to draw using transparent colors, you must create a Surface object with the
convert_alpha() method. For example, the following code creates a Surface object that
transparent colors can be drawn on:
anotherSurface = DISPLAYSURF.convert_alpha()
Once things have been drawn on the Surface object stored in anotherSurface, then
anotherSurface can be ―blitted‖ (that is, copied) to DISPLAYSURF so it will appear on the
screen. (See the ―Drawing Images with pygame.image.load() and blit()‖ section later
in this chapter.)
It’s important to note that you cannot use transparent colors on Surface objects not returned from
a convert_alpha() call, including the display Surface that was returned from
pygame.display.set_mode().
If we were to create a color tuple to draw the legendary Invisible Pink Unicorn, we would use
(255, 192, 192, 0), which ends up looking completely invisible just like any other color
that has a 0 for its alpha value. It is, after all, invisible.

18 http://inventwithpython.com/pygame
Email questions to the author: [email protected]
(Above is a screenshot of a drawing of the Invisible Pink Unicorn.)
pygame.Color Objects You need to know how to represent a color because Pygame’s drawing functions need a way to
know what color you want to draw with. A tuple of three or four integers is one way. Another
way is as a pygame.Color object. You can create Color objects by calling the
pygame.Color() constructor function and passing either three or four integers. You can store
this Color object in variables just like you can store tuples in variables. Try typing the following
into the interactive shell:
>>> import pygame
>>> pygame.Color(255, 0, 0)
(255, 0, 0, 255)
>>> myColor = pygame.Color(255, 0, 0, 128)
>>> myColor == (255, 0, 0, 128)
True
>>>
Any drawing function in Pygame (which we will learn about in a bit) that has a parameter for
color can have either the tuple form or Color object form of a color passed for it. Even though
they are different data types, a Color object is equal to a tuple of four integers if they both
represent the same color (just like how 42 == 42.0 will evaluate to True).
Now that you know how to represent colors (as a pygame.Color object or a tuple of three or
four integers for red, green, blue, and optionally alpha) and coordinates (as a tuple of two integers
for X and Y), let’s learn about pygame.Rect objects so we can start using Pygame’s drawing
functions.
Rect Objects Pygame has two ways to represent rectangular areas (just like there are two ways to represent
colors). The first is a tuple of four integers:
1. The X coordinate of the top left corner.

Chapter 2 – Pygame Basics 19
2. The Y coordinate of the top left corner.
3. The width (in pixels) of the rectangle.
4. Then height (in pixels) of the rectangle.
The second way is as a pygame.Rect object, which we will call Rect objects for short. For
example, the code below creates a Rect object with a top left corner at (10, 20) that is 200 pixels
wide and 300 pixels tall:
>>> import pygame
>>> spamRect = pygame.Rect(10, 20, 200, 300)
>>> spamRect == (10, 20, 200, 300)
True
The handy thing about this is that the Rect object automatically calculates the coordinates for
other features of the rectangle. For example, if you need to know the X coordinate of the right
edge of the pygame.Rect object we stored in the spamRect variable, you can just access the
Rect object’s right attribute:
>>> spamRect.right
210
The Pygame code for the Rect object automatically calculated that if the left edge is at the X
coordinate 10 and the rectangle is 200 pixels wide, then the right edge must be at the X
coordinate 210. If you reassign the right attribute, all the other attributes are automatically
recalculated:
>>> spam.right = 350
>>> spam.left
150
Here’s a list of all the attributes that pygame.Rect objects provide (in our example, the
variable where the Rect object is stored in a variable named myRect):

20 http://inventwithpython.com/pygame
Email questions to the author: [email protected]
Attribute Name Description
myRect.left The int value of the X-coordinate of the left side of the rectangle.
myRect.right The int value of the X-coordinate of the right side of the rectangle.
myRect.top The int value of the Y-coordinate of the top side of the rectangle.
myRect.bottom The int value of the Y-coordinate of the bottom side.
myRect.centerx The int value of the X-coordinate of the center of the rectangle.
myRect.centery The int value of the Y-coordinate of the center of the rectangle.
myRect.width The int value of the width of the rectangle.
myRect.height The int value of the height of the rectangle.
myRect.size A tuple of two ints: (width, height)
myRect.topleft A tuple of two ints: (left, top)
myRect.topright A tuple of two ints: (right, top)
myRect.bottomleft A tuple of two ints: (left, bottom)
myRect.bottomright A tuple of two ints: (right, bottom)
myRect.midleft A tuple of two ints: (left, centery)
myRect.midright A tuple of two ints: (right, centery)
myRect.midtop A tuple of two ints: (centerx, top)
myRect.midbottom A tuple of two ints: (centerx, bottom)
Primitive Drawing Functions Pygame provides several different functions for drawing different shapes onto a surface object.
These shapes such as rectangles, circles, ellipses, lines, or individual pixels are often called
drawing primitives. Open IDLE’s file editor and type in the following program, and save it as
drawing.py.
1. import pygame, sys
2. from pygame.locals import *

Chapter 2 – Pygame Basics 21
3.
4. pygame.init()
5.
6. # set up the window
7. DISPLAYSURF = pygame.display.set_mode((500, 400), 0, 32)
8. pygame.display.set_caption('Drawing')
9.
10. # set up the colors
11. BLACK = ( 0, 0, 0)
12. WHITE = (255, 255, 255)
13. RED = (255, 0, 0)
14. GREEN = ( 0, 255, 0)
15. BLUE = ( 0, 0, 255)
16.
17. # draw on the surface object
18. DISPLAYSURF.fill(WHITE)
19. pygame.draw.polygon(DISPLAYSURF, GREEN, ((146, 0), (291, 106), (236, 277),
(56, 277), (0, 106)))
20. pygame.draw.line(DISPLAYSURF, BLUE, (60, 60), (120, 60), 4)
21. pygame.draw.line(DISPLAYSURF, BLUE, (120, 60), (60, 120))
22. pygame.draw.line(DISPLAYSURF, BLUE, (60, 120), (120, 120), 4)
23. pygame.draw.circle(DISPLAYSURF, BLUE, (300, 50), 20, 0)
24. pygame.draw.ellipse(DISPLAYSURF, RED, (300, 250, 40, 80), 1)
25. pygame.draw.rect(DISPLAYSURF, RED, (200, 150, 100, 50))
26.
27. pixObj = pygame.PixelArray(DISPLAYSURF)
28. pixObj[480][380] = BLACK
29. pixObj[482][382] = BLACK
30. pixObj[484][384] = BLACK
31. pixObj[486][386] = BLACK
32. pixObj[488][388] = BLACK
33. del pixObj
34.
35. # run the game loop
36. while True:
37. for event in pygame.event.get():
38. if event.type == QUIT:
39. pygame.quit()
40. sys.exit()
41. pygame.display.update()
When this program is run, the following window is displayed until the user closes the window:

22 http://inventwithpython.com/pygame
Email questions to the author: [email protected]
Notice how we make constant variables for each of the colors. Doing this makes our code more
readable, because seeing GREEN in the source code is much easier to understand as representing
the color green than (0, 255, 0) is.
The drawing functions are named after the shapes they draw. The parameters you pass these
functions tell them which Surface object to draw on, where to draw the shape (and what size), in
what color, and how wide to make the lines. You can see how these functions are called in the
drawing.py program, but here is a short description of each function:
fill(color) – The fill() method is not a function but a method of pygame.Surface
objects. It will completely fill in the entire Surface object with whatever color value you pass
as for the color parameter.
pygame.draw.polygon(surface, color, pointlist, width) – A polygon is shape made up of
only flat sides. The surface and color parameters tell the function on what surface to
draw the polygon, and what color to make it.
The pointlist parameter is a tuple or list of points (that is, tuple or list of two-integer
tuples for XY coordinates). The polygon is drawn by drawing lines between each point and
the point that comes after it in the tuple. Then a line is drawn from the last point to the first
point. You can also pass a list of points instead of a tuple of points.
The width parameter is optional. If you leave it out, the polygon that is drawn will be filled
in, just like our green polygon on the screen is filled in with color. If you do pass an integer
value for the width parameter, only the outline of the polygon will be drawn. The integer
represents how many pixels width the polygon’s outline will be. Passing 1 for the width
parameter will make a skinny polygon, while passing 4 or 10 or 20 will make thicker
polygons. If you pass the integer 0 for the width parameter, the polygon will be filled in
(just like if you left the width parameter out entirely).
All of the pygame.draw drawing functions have optional width parameters at the end,
and they work the same way as pygame.draw.polygon()’s width parameter.
Probably a better name for the width parameter would have been thickness, since that
parameter controls how thick the lines you draw are.

Chapter 2 – Pygame Basics 23
pygame.draw.line(surface, color, start_point, end_point, width) – This function draws a
line between the start_point and end_point parameters.
pygame.draw.lines(surface, color, closed, pointlist, width) – This function draws a series
of lines from one point to the next, much like pygame.draw.polygon(). The only
difference is that if you pass False for the closed parameter, there will not be a line from
the last point in the pointlist parameter to the first point. If you pass True, then it will
draw a line from the last point to the first.
pygame.draw.circle(surface, color, center_point, radius, width) – This function draws a
circle. The center of the circle is at the center_point parameter. The integer passed for
the radius parameter sets the size of the circle.
The radius of a circle is the distance from the center to the edge. (The radius of a circle is
always half of the diameter.) Passing 20 for the radius parameter will draw a circle that
has a radius of 20 pixels.
pygame.draw.ellipse(surface, color, bounding_rectangle, width) – This function draws an
ellipse (which is like a squashed or stretched circle). This function has all the usual
parameters, but in order to tell the function how large and where to draw the ellipse, you must
specify the bounding rectangle of the ellipse. A bounding rectangle is the smallest rectangle
that can be drawn around a shape. Here’s an example of an ellipse and its bounding rectangle:
The bounding_rectangle parameter can be a pygame.Rect object or a tuple of four
integers. Note that you do not specify the center point for the ellipse like you do for the
pygame.draw.circle() function.
pygame.draw.rect(surface, color, rectangle_tuple, width) – This function draws a
rectangle. The rectangle_tuple is either a tuple of four integers (for the XY coordinates
of the top left corner, and the width and height) or a pygame.Rect object can be passed
instead. If the rectangle_tuple has the same size for the width and height, a square will
be drawn.
pygame.PixelArray Objects Unfortunately, there isn’t a single function you can call that will set a single pixel to a color
(unless you call pygame.draw.line() with the same start and end point). The Pygame
framework needs to run some code behind the scenes before and after drawing to a Surface
object. If it had to do this for every single pixel you wanted to set, your program would run much
slower. (By my quick testing, drawing pixels this way is two or three times slower.)
Instead, you should create a pygame.PixelArray object (we’ll call them PixelArray objects
for short) of a Surface object and then set individual pixels. Creating a PixelArray object of a
Surface object will ―lock‖ the Surface object. While a Surface object is locked, the drawing

24 http://inventwithpython.com/pygame
Email questions to the author: [email protected]
functions can still be called on it, but it cannot have images like PNG or JPG images drawn on it
with the blit() method. (The blit() method is explained later in this chapter.)
If you want to see if a Surface object is locked, the get_locked() Surface method will return
True if it is locked and False if it is not.
The PixelArray object that is returned from pygame.PixelArray() can have individual
pixels set by accessing them with two indexes. For example, line 28’s pixObj[480][380] =
BLACK will set the pixel at X coordinate 480 and Y coordinate 380 to be black (remember that
the BLACK variable stores the color tuple (0, 0, 0)).
To tell Pygame that you are finished drawing individual pixels, delete the PixelArray object with
a del statement. This is what line 33 does. Deleting the PixelArray object will ―unlock‖ the
Surface object so that you can once again draw images on it. If you forget to delete the
PixelArray object, the next time you try to blit (that is, draw) an image to the Surface the program
will raise an error that says, ―pygame.error: Surfaces must not be locked
during blit‖.
The pygame.display.update() Function After you are done calling the drawing functions to make the display Surface object look the way
you want, you must call pygame.display.update() to make the display Surface actually
appear on the user’s monitor.
The one thing that you must remember is that pygame.display.update() will only make
the display Surface (that is, the Surface object that was returned from the call to
pygame.display.set_mode()) appear on the screen. If you want the images on other
Surface objects to appear on the screen, you must ―blit‖ them (that is, copy them) to the display
Surface object with the blit() method (which is explained next in the ―Drawing Images‖
section).
Animation Now that we know how to get the Pygame framework to draw to the screen, let’s learn how to
make animated pictures. A game with only still, unmoving images would be fairly dull. (Sales of
my game ―Look At This Rock‖ have been disappointing.) Animated images are the result of
drawing an image on the screen, then a split second later drawing a slightly different image on the
screen. Imagine the program’s window was 6 pixels wide and 1 pixel tall, with all the pixels
white except for a black pixel at 4, 0. It would look like this:

Chapter 2 – Pygame Basics 25
If you changed the window so that 3, 0 was black and 4,0 was white, it would look like this:
To the user, it looks like the black pixel has ―moved‖ over to the left. If you redrew the window
to have the black pixel at 2, 0, it would continue to look like the black pixel is moving left:
It may look like the black pixel is moving, but this is just an illusion. To the computer, it is just
showing three different images that each just happen to have one black pixel. Consider if the
three following images were rapidly shown on the screen:
To the user, it would look like the cat is moving towards the squirrel. But to the computer, they’re
just a bunch of pixels. The trick to making believable looking animation is to have your program
draw a picture to the window, wait a fraction of a second, and then draw a slightly different
picture.
Here is an example program demonstrating a simple animation. Type this code into IDLE’s file
editor and save it as catanimation.py. It will also require the image file cat.png to be in the same
folder as the catanimation.py file. You can download this image from http://invpy.com/cat.png.
This code is available at http://invpy.com/catanimation.py.

26 http://inventwithpython.com/pygame
Email questions to the author: [email protected]
1. import pygame, sys
2. from pygame.locals import *
3.
4. pygame.init()
5.
6. FPS = 30 # frames per second setting
7. fpsClock = pygame.time.Clock()
8.
9. # set up the window
10. DISPLAYSURF = pygame.display.set_mode((400, 300), 0, 32)
11. pygame.display.set_caption('Animation')
12.
13. WHITE = (255, 255, 255)
14. catImg = pygame.image.load('cat.png')
15. catx = 10
16. caty = 10
17. direction = 'right'
18.
19. while True: # the main game loop
20. DISPLAYSURF.fill(WHITE)
21.
22. if direction == 'right':
23. catx += 5
24. if catx == 280:
25. direction = 'down'
26. elif direction == 'down':
27. caty += 5
28. if caty == 220:
29. direction = 'left'
30. elif direction == 'left':
31. catx -= 5
32. if catx == 10:
33. direction = 'up'
34. elif direction == 'up':
35. caty -= 5
36. if caty == 10:
37. direction = 'right'
38.
39. DISPLAYSURF.blit(catImg, (catx, caty))
40.
41. for event in pygame.event.get():
42. if event.type == QUIT:
43. pygame.quit()
44. sys.exit()
45.
46. pygame.display.update()

Chapter 2 – Pygame Basics 27
47. fpsClock.tick(FPS)
Look at that animated cat go! This program will be much more of a commercial success than my
game, ―Look At This Rock 2: A Different Rock‖.
Frames Per Second and pygame.time.Clock Objects The frame rate or refresh rate is the number of pictures that the program draws per second, and
is measured in FPS or frames per second. (On computer monitors, the common name for FPS is
hertz. Many monitors have a frame rate of 60 hertz, or 60 frames per second.) A low frame rate in
video games can make the game look choppy or jumpy. If the program has too much code to run
to draw to the screen frequently enough, then the FPS goes down. But the games in this book are
simple enough that this won’t be issue even on old computers.
A pygame.time.Clock object can help us make sure our program runs at a certain maximum
FPS. This Clock object will ensure that our game programs don’t run too fast by putting in
small pauses on each iteration of the game loop. If we didn’t have these pauses, our game
program would run as fast as the computer could run it. This is often too fast for the player, and
as computers get faster they would run the game faster too. A call to the tick() method of a
Clock object in the game loop can make sure the game runs at the same speed no matter how
fast of a computer it runs on. The Clock object is created on line 7 of the catanimation.py
program.
7. fpsClock = pygame.time.Clock()
The Clock object’s tick() method should be called at the very end of the game loop, after the
call to pygame.display.update(). The length of the pause is calculated based on how
long it has been since the previous call to tick(), which would have taken place at the end of
the previous iteration of the game loop. (The first time the tick() method is called, it doesn’t
pause at all.) In the animation program, is it run on line 47 as the last instruction in the game loop.
All you need to know is that you should call the tick() method once per iteration through the
game loop at the end of the loop. Usually this is right after the call to
pygame.display.update().
47. fpsClock.tick(FPS)
Try modifying the FPS constant variable to run the same program at different frame rates. Setting
it to a lower value would make the program run slower. Setting it to a higher value would make
the program run faster.

28 http://inventwithpython.com/pygame
Email questions to the author: [email protected]
Drawing Images with pygame.image.load() and blit() The drawing functions are fine if you want to draw simple shapes on the screen, but many games
have images (also called sprites). Pygame is able to load images onto Surface objects from PNG,
JPG, GIF, and BMP image files. The differences between these image file formats is described at
http://invpy.com/formats.
The image of the cat was stored in a file named cat.png. To load this file’s image, the string
'cat.png' is passed to the pygame.image.load() function. The
pygame.image.load() function call will return a Surface object that has the image drawn
on it. This Surface object will be a separate Surface object from the display Surface object, so we
must blit (that is, copy) the image’s Surface object to the display Surface object. Blitting is
drawing the contents of one Surface onto another. It is done with the blit() Surface object
method.
If you get an error message like ―pygame.error: Couldn't open cat.png‖ when
calling pygame.image.load(), then make sure the cat.png file is in the same folder as the
catanimation.py file before you run the program.
39. DISPLAYSURF.blit(catImg, (catx, caty))
Line 39 of the animation program uses the blit() method to copy catImg to DISPLAYSURF.
There are two parameters for blit(). The first is the source Surface object, which is what will
be copied onto the DISPLAYSURF Surface object. The second parameter is a two-integer tuple
for the X and Y values of the topleft corner where the image should be blitted to.
If catx and caty were set to 100 and 200 and the width of catImg was 125 and the height
was 79, this blit() call would copy this image onto DISPLAYSURF so that the top left corner
of the catImg was at the XY coordinate (100, 200) and the bottom right corner’s XY coordinate
was at (225, 279).
Note that you cannot blit to a Surface that is currently ―locked‖ (such as when a PixelArray object
has been made from it and not yet been deleted.)
The rest of the game loop is just changing the catx, caty, and direction variables so that
the cat moves around the window. There is also a call to pygame.event.get() to handle the
QUIT event.
Fonts If you want to draw text to the screen, you could write several calls to pygame.draw.line()
to draw out the lines of each letter. This would be a headache to type out all those

Chapter 2 – Pygame Basics 29
pygame.draw.line() calls and figure out all the XY coordinates, and probably wouldn’t
look very good.
The above message would take forty one calls to the pygame.draw.line() function to
make. Instead, Pygame provides some much simpler functions for fonts and creating text. Here is
a small Hello World program using Pygame’s font functions. Type it into IDLE’s file editor and
save it as fonttext.py:
1. import pygame, sys
2. from pygame.locals import *
3.
4. pygame.init()
5. DISPLAYSURF = pygame.display.set_mode((400, 300))
6. pygame.display.set_caption('Hello World!')
7.
8. WHITE = (255, 255, 255)
9. GREEN = (0, 255, 0)
10. BLUE = (0, 0, 128)
11.
12. fontObj = pygame.font.Font('freesansbold.ttf', 32)
13. textSurfaceObj = fontObj.render('Hello world!', True, GREEN, BLUE)
14. textRectObj = textSurfaceObj.get_rect()
15. textRectObj.center = (200, 150)
16.
17. while True: # main game loop
18. DISPLAYSURF.fill(WHITE)
19. DISPLAYSURF.blit(textSurfaceObj, textRectObj)
20. for event in pygame.event.get():
21. if event.type == QUIT:
22. pygame.quit()
23. sys.exit()
24. pygame.display.update()
There are six steps to making text appear on the screen:
1. Create a pygame.font.Font object. (Like on line 12)
2. Create a Surface object with the text drawn on it by calling the Font object’s render()
method. (Line 13)
3. Create a Rect object from the Surface object by calling the Surface object’s
get_rect() method. (Line 14) This Rect object will have the width and height
correctly set for the text that was rendered, but the top and left attributes will be 0.

30 http://inventwithpython.com/pygame
Email questions to the author: [email protected]
4. Set the position of the Rect object by changing one of its attributes. On line 15, we set the
center of the Rect object to be at 200, 150.
5. Blit the Surface object with the text onto the Surface object returned by
pygame.display.set_mode(). (Line 19)
6. Call pygame.display.update() to make the display Surface appear on the screen.
(Line 24)
The parameters to the pygame.font.Font() constructor function is a string of the font file to
use, and an integer of the size of the font (in points, like how word processors measure font size).
On line 12, we pass 'freesansbold.ttf' (this is a font that comes with Pygame) and the
integer 32 (for a 32-point sized font).
See http://invpy.com/usingotherfonts for more info on using other fonts.
The parameters to the render() method call are a string of the text to render, a Boolean value
to specify if we want anti-aliasing (explained later in this chapter), the color of the text, and the
color of the background. If you want a transparent background, then simply leave off the
background color parameter in the method call.
Anti-Aliasing Anti-aliasing is a graphics technique for making text and shapes look less blocky by adding a
little bit of blur to their edges. It takes a little more computation time to draw with anti-aliasing,
so although the graphics may look better, your program may run slower (but only just a little).
If you zoom in on an aliased line and an anti-aliased line, they look like this:
To make Pygame’s text use anti-aliasing, just pass True for the second parameter of the
render() method. The pygame.draw.aaline() and pygame.draw.aalines()
functions have the same parameters as pygame.draw.line() and

Chapter 2 – Pygame Basics 31
pygame.draw.lines(), except they will draw anti-aliased (smooth) lines instead of aliased
(blocky) lines.
Playing Sounds Playing sounds that are stored in sound files is even simpler than displaying images from image
files. First, you must create a pygame.mixer.Sound object (which we will call Sound objects
for short) by calling the pygame.mixer.Sound() constructor function. It takes one string
parameter, which is the filename of the sound file. Pygame can load WAV, MP3, or OGG files.
The difference between these audio file formats is explained at http://invpy.com/formats.
To play this sound, call the Sound object’s play() method. If you want to immediately stop the
Sound object from playing call the stop() method. The stop() method has no arguments.
Here is some sample code:
soundObj = pygame.mixer.Sound('beeps.wav')
soundObj.play()
import time
time.sleep(1) # wait and let the sound play for 1 second
soundObj.stop()
You can download the beeps.wav file from http://invpy.com/beeps.wav.
The program execution continues immediately after play() is called; it does not wait for the
sound to finish playing before moving on to the next line of code.
The Sound objects are good for sound effects to play when the player takes damage, slashes a
sword, or collects a coin. But your games might also be better if they had background music
playing regardless of what was going on in the game. Pygame can only load one music file to
play in the background at a time. To load a background music file, call the
pygame.mixer.music.load() function and pass it a string argument of the sound file to
load. This file can be WAV, MP3, or MIDI format.
To begin playing the loaded sound file as the background music, call the
pygame.mixer.music.play(-1, 0.0) function. The -1 argument makes the
background music forever loop when it reaches the end of the sound file. If you set it to an integer
0 or larger, then the music will only loop that number of times instead of looping forever. The
0.0 means to start playing the sound file from the beginning. If you pass a larger integer or float,
the music will begin playing that many seconds into the sound file. For example, if you pass
13.5 for the second parameter, the sound file with begin playing at the point 13.5 seconds in
from the beginning.

32 http://inventwithpython.com/pygame
Email questions to the author: [email protected]
To stop playing the background music immediately, call the pygame.mixer.music.stop()
function. This function has no arguments.
Here is some example code of the sound methods and functions:
# Loading and playing a sound effect:
soundObj = pygame.mixer.Sound('beepingsound.wav')
soundObj.play()
# Loading and playing background music:
pygame.mixer.music.load(backgroundmusic.mp3')
pygame.mixer.music.play(-1, 0.0)
# ...some more of your code goes here...
pygame.mixer.music.stop()
Summary This covers the basics of making graphical games with the Pygame framework. Of course, just
reading about these functions probably isn’t enough to help you learn how to make games using
these functions. The rest of the chapters in this book each focus on the source code for a small,
complete game. This will give you an idea of what complete game programs ―look like‖, so you
can then get some ideas for how to code your own game programs.
Unlike the ―Invent Your Own Computer Games with Python‖ book, this book assumes that you
know the basics of Python programming. If you have trouble remembering how variables,
functions, loops, if-else statements, and conditions work, you can probably figure it out just
by seeing what’s in the code and how the program behaves. But if you are still stuck, you can
read the ―Invent with Python‖ book (it’s for people who are completely new to programming) for
free online at http://inventwithpython.com.

Chapter 3 – Memory Puzzle 33
CHAPTER 3 – MEMORY
PUZZLE
How to Play Memory Puzzle In the Memory Puzzle game, several icons are covered up by white boxes. There are two of each
icon. The player can click on two boxes to see what icon is behind them. If the icons match, then
those boxes remain uncovered. The player wins when all the boxes on the board are uncovered.
To give the player a hint, the boxes are quickly uncovered once at the beginning of the game.
Nested for Loops One concept that you will see in Memory Puzzle (and most of the games in this book) is the use
of a for loop inside of another for loop. These are called nested for loops. Nested for loops
are handy for going through every possible combination of two lists. Type the following into the
interactive shell:
>>> for x in [0, 1, 2, 3, 4]:
... for y in ['a', 'b', 'c']:
... print(x, y)
...
0 a
0 b
0 c
1 a
1 b
1 c
2 a

34 http://inventwithpython.com/pygame
Email questions to the author: [email protected]
2 b
2 c
3 a
3 b
3 c
4 a
4 b
4 c
>>>
There are several times in the Memory Puzzle code that we need to iterate through every possible
X and Y coordinate on the board. We’ll use nested for loops to make sure that we get every
combination. Note that the inner for loop (the for loop inside the other for loop) will go
through all of its iterations before going to the next iteration of the outer for loop. If we reverse
the order of the for loops, the same values will be printed but they will be printed in a different
order. Type the following code into the interactive shell, and compare the order it prints values to
the order in the previous nested for loop example:
>>> for y in ['a', 'b', 'c']:
... for x in [0, 1, 2, 3, 4]:
... print(x, y)
...
0 a
1 a
2 a
3 a
4 a
0 b
1 b
2 b
3 b
4 b
0 c
1 c
2 c
3 c
4 c
>>>
Source Code of Memory Puzzle This source code can be downloaded from http://invpy.com/memorypuzzle.py.
Go ahead and first type in the entire program into IDLE’s file editor, save it as memorypuzzle.py,
and run it. If you get any error messages, look at the line number that is mentioned in the error
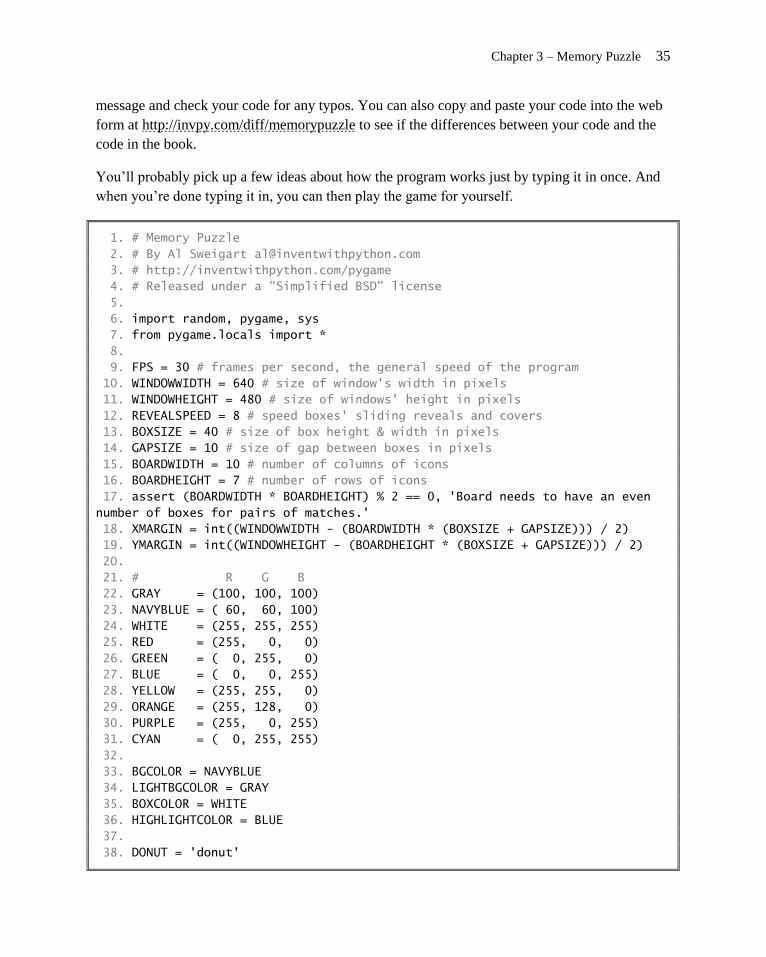
Chapter 3 – Memory Puzzle 35
message and check your code for any typos. You can also copy and paste your code into the web
form at http://invpy.com/diff/memorypuzzle to see if the differences between your code and the
code in the book.
You’ll probably pick up a few ideas about how the program works just by typing it in once. And
when you’re done typing it in, you can then play the game for yourself.
1. # Memory Puzzle
2. # By Al Sweigart [email protected]
3. # http://inventwithpython.com/pygame
4. # Released under a "Simplified BSD" license
5.
6. import random, pygame, sys
7. from pygame.locals import *
8.
9. FPS = 30 # frames per second, the general speed of the program
10. WINDOWWIDTH = 640 # size of window's width in pixels
11. WINDOWHEIGHT = 480 # size of windows' height in pixels
12. REVEALSPEED = 8 # speed boxes' sliding reveals and covers
13. BOXSIZE = 40 # size of box height & width in pixels
14. GAPSIZE = 10 # size of gap between boxes in pixels
15. BOARDWIDTH = 10 # number of columns of icons
16. BOARDHEIGHT = 7 # number of rows of icons
17. assert (BOARDWIDTH * BOARDHEIGHT) % 2 == 0, 'Board needs to have an even
number of boxes for pairs of matches.'
18. XMARGIN = int((WINDOWWIDTH - (BOARDWIDTH * (BOXSIZE + GAPSIZE))) / 2)
19. YMARGIN = int((WINDOWHEIGHT - (BOARDHEIGHT * (BOXSIZE + GAPSIZE))) / 2)
20.
21. # R G B
22. GRAY = (100, 100, 100)
23. NAVYBLUE = ( 60, 60, 100)
24. WHITE = (255, 255, 255)
25. RED = (255, 0, 0)
26. GREEN = ( 0, 255, 0)
27. BLUE = ( 0, 0, 255)
28. YELLOW = (255, 255, 0)
29. ORANGE = (255, 128, 0)
30. PURPLE = (255, 0, 255)
31. CYAN = ( 0, 255, 255)
32.
33. BGCOLOR = NAVYBLUE
34. LIGHTBGCOLOR = GRAY
35. BOXCOLOR = WHITE
36. HIGHLIGHTCOLOR = BLUE
37.
38. DONUT = 'donut'

36 http://inventwithpython.com/pygame
Email questions to the author: [email protected]
39. SQUARE = 'square'
40. DIAMOND = 'diamond'
41. LINES = 'lines'
42. OVAL = 'oval'
43.
44. ALLCOLORS = (RED, GREEN, BLUE, YELLOW, ORANGE, PURPLE, CYAN)
45. ALLSHAPES = (DONUT, SQUARE, DIAMOND, LINES, OVAL)
46. assert len(ALLCOLORS) * len(ALLSHAPES) * 2 >= BOARDWIDTH * BOARDHEIGHT,
"Board is too big for the number of shapes/colors defined."
47.
48. def main():
49. global FPSCLOCK, DISPLAYSURF
50. pygame.init()
51. FPSCLOCK = pygame.time.Clock()
52. DISPLAYSURF = pygame.display.set_mode((WINDOWWIDTH, WINDOWHEIGHT))
53.
54. mousex = 0 # used to store x coordinate of mouse event
55. mousey = 0 # used to store y coordinate of mouse event
56. pygame.display.set_caption('Memory Game')
57.
58. mainBoard = getRandomizedBoard()
59. revealedBoxes = generateRevealedBoxesData(False)
60.
61. firstSelection = None # stores the (x, y) of the first box clicked.
62.
63. DISPLAYSURF.fill(BGCOLOR)
64. startGameAnimation(mainBoard)
65.
66. while True: # main game loop
67. mouseClicked = False
68.
69. DISPLAYSURF.fill(BGCOLOR) # drawing the window
70. drawBoard(mainBoard, revealedBoxes)
71.
72. for event in pygame.event.get(): # event handling loop
73. if event.type == QUIT or (event.type == KEYUP and event.key ==
K_ESCAPE):
74. pygame.quit()
75. sys.exit()
76. elif event.type == MOUSEMOTION:
77. mousex, mousey = event.pos
78. elif event.type == MOUSEBUTTONUP:
79. mousex, mousey = event.pos
80. mouseClicked = True
81.
82. boxx, boxy = getBoxAtPixel(mousex, mousey)

Chapter 3 – Memory Puzzle 37
83. if boxx != None and boxy != None:
84. # The mouse is currently over a box.
85. if not revealedBoxes[boxx][boxy]:
86. drawHighlightBox(boxx, boxy)
87. if not revealedBoxes[boxx][boxy] and mouseClicked:
88. revealBoxesAnimation(mainBoard, [(boxx, boxy)])
89. revealedBoxes[boxx][boxy] = True # set the box as
"revealed"
90. if firstSelection == None: # the current box was the first
box clicked
91. firstSelection = (boxx, boxy)
92. else: # the current box was the second box clicked
93. # Check if there is a match between the two icons.
94. icon1shape, icon1color = getShapeAndColor(mainBoard,
firstSelection[0], firstSelection[1])
95. icon2shape, icon2color = getShapeAndColor(mainBoard,
boxx, boxy)
96.
97. if icon1shape != icon2shape or icon1color !=
icon2color:
98. # Icons don't match. Re-cover up both selections.
99. pygame.time.wait(1000) # 1000 milliseconds = 1 sec
100. coverBoxesAnimation(mainBoard,
[(firstSelection[0], firstSelection[1]), (boxx, boxy)])
101. revealedBoxes[firstSelection[0]][firstSelection
[1]] = False
102. revealedBoxes[boxx][boxy] = False
103. elif hasWon(revealedBoxes): # check if all pairs found
104. gameWonAnimation(mainBoard)
105. pygame.time.wait(2000)
106.
107. # Reset the board
108. mainBoard = getRandomizedBoard()
109. revealedBoxes = generateRevealedBoxesData(False)
110.
111. # Show the fully unrevealed board for a second.
112. drawBoard(mainBoard, revealedBoxes)
113. pygame.display.update()
114. pygame.time.wait(1000)
115.
116. # Replay the start game animation.
117. startGameAnimation(mainBoard)
118. firstSelection = None # reset firstSelection variable
119.
120. # Redraw the screen and wait a clock tick.
121. pygame.display.update()

38 http://inventwithpython.com/pygame
Email questions to the author: [email protected]
122. FPSCLOCK.tick(FPS)
123.
124.
125. def generateRevealedBoxesData(val):
126. revealedBoxes = []
127. for i in range(BOARDWIDTH):
128. revealedBoxes.append([val] * BOARDHEIGHT)
129. return revealedBoxes
130.
131.
132. def getRandomizedBoard():
133. # Get a list of every possible shape in every possible color.
134. icons = []
135. for color in ALLCOLORS:
136. for shape in ALLSHAPES:
137. icons.append( (shape, color) )
138.
139. random.shuffle(icons) # randomize the order of the icons list
140. numIconsUsed = int(BOARDWIDTH * BOARDHEIGHT / 2) # calculate how many
icons are needed
141. icons = icons[:numIconsUsed] * 2 # make two of each
142. random.shuffle(icons)
143.
144. # Create the board data structure, with randomly placed icons.
145. board = []
146. for x in range(BOARDWIDTH):
147. column = []
148. for y in range(BOARDHEIGHT):
149. column.append(icons[0])
150. del icons[0] # remove the icons as we assign them
151. board.append(column)
152. return board
153.
154.
155. def splitIntoGroupsOf(groupSize, theList):
156. # splits a list into a list of lists, where the inner lists have at
157. # most groupSize number of items.
158. result = []
159. for i in range(0, len(theList), groupSize):
160. result.append(theList[i:i + groupSize])
161. return result
162.
163.
164. def leftTopCoordsOfBox(boxx, boxy):
165. # Convert board coordinates to pixel coordinates
166. left = boxx * (BOXSIZE + GAPSIZE) + XMARGIN
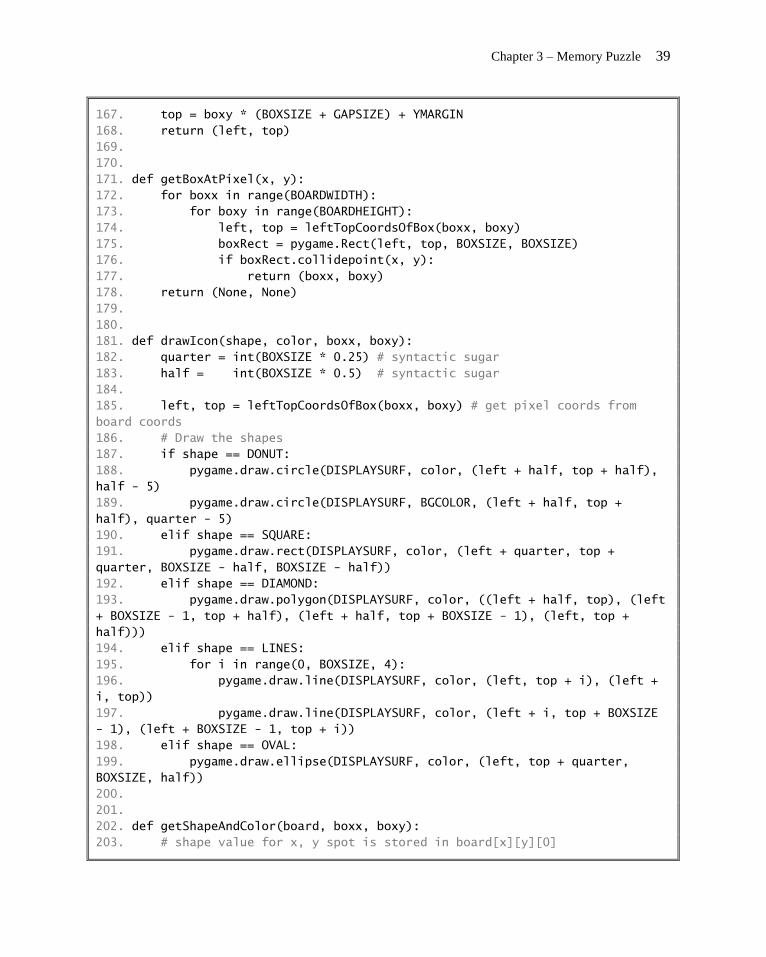
Chapter 3 – Memory Puzzle 39
167. top = boxy * (BOXSIZE + GAPSIZE) + YMARGIN
168. return (left, top)
169.
170.
171. def getBoxAtPixel(x, y):
172. for boxx in range(BOARDWIDTH):
173. for boxy in range(BOARDHEIGHT):
174. left, top = leftTopCoordsOfBox(boxx, boxy)
175. boxRect = pygame.Rect(left, top, BOXSIZE, BOXSIZE)
176. if boxRect.collidepoint(x, y):
177. return (boxx, boxy)
178. return (None, None)
179.
180.
181. def drawIcon(shape, color, boxx, boxy):
182. quarter = int(BOXSIZE * 0.25) # syntactic sugar
183. half = int(BOXSIZE * 0.5) # syntactic sugar
184.
185. left, top = leftTopCoordsOfBox(boxx, boxy) # get pixel coords from
board coords
186. # Draw the shapes
187. if shape == DONUT:
188. pygame.draw.circle(DISPLAYSURF, color, (left + half, top + half),
half - 5)
189. pygame.draw.circle(DISPLAYSURF, BGCOLOR, (left + half, top +
half), quarter - 5)
190. elif shape == SQUARE:
191. pygame.draw.rect(DISPLAYSURF, color, (left + quarter, top +
quarter, BOXSIZE - half, BOXSIZE - half))
192. elif shape == DIAMOND:
193. pygame.draw.polygon(DISPLAYSURF, color, ((left + half, top), (left
+ BOXSIZE - 1, top + half), (left + half, top + BOXSIZE - 1), (left, top +
half)))
194. elif shape == LINES:
195. for i in range(0, BOXSIZE, 4):
196. pygame.draw.line(DISPLAYSURF, color, (left, top + i), (left +
i, top))
197. pygame.draw.line(DISPLAYSURF, color, (left + i, top + BOXSIZE
- 1), (left + BOXSIZE - 1, top + i))
198. elif shape == OVAL:
199. pygame.draw.ellipse(DISPLAYSURF, color, (left, top + quarter,
BOXSIZE, half))
200.
201.
202. def getShapeAndColor(board, boxx, boxy):
203. # shape value for x, y spot is stored in board[x][y][0]

40 http://inventwithpython.com/pygame
Email questions to the author: [email protected]
204. # color value for x, y spot is stored in board[x][y][1]
205. return board[boxx][boxy][0], board[boxx][boxy][1]
206.
207.
208. def drawBoxCovers(board, boxes, coverage):
209. # Draws boxes being covered/revealed. "boxes" is a list
210. # of two-item lists, which have the x & y spot of the box.
211. for box in boxes:
212. left, top = leftTopCoordsOfBox(box[0], box[1])
213. pygame.draw.rect(DISPLAYSURF, BGCOLOR, (left, top, BOXSIZE,
BOXSIZE))
214. shape, color = getShapeAndColor(board, box[0], box[1])
215. drawIcon(shape, color, box[0], box[1])
216. if coverage > 0: # only draw the cover if there is an coverage
217. pygame.draw.rect(DISPLAYSURF, BOXCOLOR, (left, top, coverage,
BOXSIZE))
218. pygame.display.update()
219. FPSCLOCK.tick(FPS)
220.
221.
222. def revealBoxesAnimation(board, boxesToReveal):
223. # Do the "box reveal" animation.
224. for coverage in range(BOXSIZE, (-REVEALSPEED) - 1, - REVEALSPEED):
225. drawBoxCovers(board, boxesToReveal, coverage)
226.
227.
228. def coverBoxesAnimation(board, boxesToCover):
229. # Do the "box cover" animation.
230. for coverage in range(0, BOXSIZE + REVEALSPEED, REVEALSPEED):
231. drawBoxCovers(board, boxesToCover, coverage)
232.
233.
234. def drawBoard(board, revealed):
235. # Draws all of the boxes in their covered or revealed state.
236. for boxx in range(BOARDWIDTH):
237. for boxy in range(BOARDHEIGHT):
238. left, top = leftTopCoordsOfBox(boxx, boxy)
239. if not revealed[boxx][boxy]:
240. # Draw a covered box.
241. pygame.draw.rect(DISPLAYSURF, BOXCOLOR, (left, top,
BOXSIZE, BOXSIZE))
242. else:
243. # Draw the (revealed) icon.
244. shape, color = getShapeAndColor(board, boxx, boxy)
245. drawIcon(shape, color, boxx, boxy)
246.

Chapter 3 – Memory Puzzle 41
247.
248. def drawHighlightBox(boxx, boxy):
249. left, top = leftTopCoordsOfBox(boxx, boxy)
250. pygame.draw.rect(DISPLAYSURF, HIGHLIGHTCOLOR, (left - 5, top - 5,
BOXSIZE + 10, BOXSIZE + 10), 4)
251.
252.
253. def startGameAnimation(board):
254. # Randomly reveal the boxes 8 at a time.
255. coveredBoxes = generateRevealedBoxesData(False)
256. boxes = []
257. for x in range(BOARDWIDTH):
258. for y in range(BOARDHEIGHT):
259. boxes.append( (x, y) )
260. random.shuffle(boxes)
261. boxGroups = splitIntoGroupsOf(8, boxes)
262.
263. drawBoard(board, coveredBoxes)
264. for boxGroup in boxGroups:
265. revealBoxesAnimation(board, boxGroup)
266. coverBoxesAnimation(board, boxGroup)
267.
268.
269. def gameWonAnimation(board):
270. # flash the background color when the player has won
271. coveredBoxes = generateRevealedBoxesData(True)
272. color1 = LIGHTBGCOLOR
273. color2 = BGCOLOR
274.
275. for i in range(13):
276. color1, color2 = color2, color1 # swap colors
277. DISPLAYSURF.fill(color1)
278. drawBoard(board, coveredBoxes)
279. pygame.display.update()
280. pygame.time.wait(300)
281.
282.
283. def hasWon(revealedBoxes):
284. # Returns True if all the boxes have been revealed, otherwise False
285. for i in revealedBoxes:
286. if False in i:
287. return False # return False if any boxes are covered.
288. return True
289.
290.
291. if __name__ == '__main__':

42 http://inventwithpython.com/pygame
Email questions to the author: [email protected]
292. main()
Credits and Imports
1. # Memory Puzzle
2. # By Al Sweigart [email protected]
3. # http://inventwithpython.com/pygame
4. # Released under a "Simplified BSD" license
5.
6. import random, pygame, sys
7. from pygame.locals import *
At the top of the program are comments about what the game is, who made it, and where the user
could find more information. There’s also a note that the source code is freely copyable under a
―Simplified BSD‖ license. The Simplified BSD license is more appropriate for software than the
Creative Common license (which this book is released under), but they basically mean the same
thing: People are free to copy and share this game. More info about licenses can be found at
http://invpy.com/licenses.
This program makes use of many functions in other modules, so it imports those modules on line
6. Line 7 is also an import statement in the from (module name) import * format,
which means you do not have to type the module name in front of it. There are no functions in the
pygame.locals module, but there are several constant variables in it that we want to use such
as MOUSEMOTION, KEYUP, or QUIT. Using this style of import statement, we only have to
type MOUSEMOTION rather than pygame.locals.MOUSEMOTION.
Magic Numbers are Bad
9. FPS = 30 # frames per second, the general speed of the program
10. WINDOWWIDTH = 640 # size of window's width in pixels
11. WINDOWHEIGHT = 480 # size of windows' height in pixels
12. REVEALSPEED = 8 # speed boxes' sliding reveals and covers
13. BOXSIZE = 40 # size of box height & width in pixels
14. GAPSIZE = 10 # size of gap between boxes in pixels
The game programs in this book use a lot of constant variables. You might not realize why
they’re so handy. For example, instead of using the BOXSIZE variable in our code we could just
type the integer 40 directly in the code. But there are two reasons to use constant variables.
First, if we ever wanted to change the size of each box later, we would have to go through the
entire program and find and replace each time we typed 40. By just using the BOXSIZE
constant, we only have to change line 13 and the rest of the program is already up to date. This is

Chapter 3 – Memory Puzzle 43
much better, especially since we might use the integer value 40 for something else besides the
size of the white boxes, and changing that 40 accidentally would cause bugs in our program.
Second, it makes the code more readable. Go down to the next section and look at line 18. This
sets up a calculation for the XMARGIN constant, which is how many pixels are on the side of the
entire board. It is a complicated looking expression, but you can carefully piece out what it
means. Line 18 looks like this:
XMARGIN = int((WINDOWWIDTH - (BOARDWIDTH * (BOXSIZE + GAPSIZE))) / 2)
But if line 18 didn’t use constant variables, it would look like this:
XMARGIN = int((640 – (10 * (40 + 10))) / 2)
Now it becomes impossible to remember what exactly the programmer intended to mean. These
unexplained numbers in the source code are often called magic numbers. Whenever you find
yourself entering magic numbers, you should consider replacing them with a constant variable
instead. To the Python interpreter, both of the previous lines are the exact same. But to a human
programmer who is reading the source code and trying to understand how it works, the second
version of line 18 doesn’t make much sense at all! Constants really help the readability of source
code.
Of course, you can go too far replacing numbers with constant variables. Look at the following
code:
ZERO = 0
ONE = 1
TWO = 99999999
TWOANDTHREEQUARTERS = 2.75
Don’t write code like that. That’s just silly.
Sanity Checks with assert Statements
15. BOARDWIDTH = 10 # number of columns of icons
16. BOARDHEIGHT = 7 # number of rows of icons
17. assert (BOARDWIDTH * BOARDHEIGHT) % 2 == 0, 'Board needs to have an even
number of boxes for pairs of matches.'
18. XMARGIN = int((WINDOWWIDTH - (BOARDWIDTH * (BOXSIZE + GAPSIZE))) / 2)
19. YMARGIN = int((WINDOWHEIGHT - (BOARDHEIGHT * (BOXSIZE + GAPSIZE))) / 2)

44 http://inventwithpython.com/pygame
Email questions to the author: [email protected]
The assert statement on line 15 ensures that the board width and height we’ve selected will
result in an even number of boxes (since we will have pairs of icons in this game). There are three
parts to an assert statement: the assert keyword, an expression which, if False, results in
crashing the program. The third part (after the comma after the expression) is a string that appears
if the program crashes because of the assertion.
The assert statement with an expression basically says, ―The programmer asserts that this
expression must be True, otherwise crash the program.‖ This is a good way of adding a sanity
check to your program to make sure that if the execution ever passes an assertion we can at least
know that that code is working as expected.
Telling If a Number is Even or Odd If the product of the board width and height is divided by two and has a remainder of 0 (the %
modulus operator evaluates what the remainder is) then the number is even. Even numbers
divided by two will always have a remainder of zero. Odd numbers divided by two will always
have a remainder of one. This is a good trick to remember if you need your code to tell if a
number is even or odd:
>>> isEven = someNumber % 2 == 0
>>> isOdd = someNumber % 2 != 0
In the above case, if the integer in someNumber was even, then isEven will be True. If it was
odd, then isOdd will be True.
Crash Early and Crash Often! Having your program crash is a bad thing. It happens when your program has some mistake in the
code and cannot continue. But there are some cases where crashing a program early can avoid
worse bugs later.
If the values we chose for BOARDWIDTH and BOARDHEIGHT that we chose on line 15 and 16
result in a board with an odd number of boxes (such as if the width were 3 and the height were 5),
then there would always be one left over icon that would not have a pair to be matched with. This
would cause a bug later on in the program, and it could take a lot of debugging work to figure out
that the real source of the bug is at the very beginning of the program. In fact, just for fun, try
commenting out the assertion so it doesn’t run, and then setting the BOARDWIDTH and
BOARDHEIGHT constants both to odd numbers. When you run the program, it will immediately
show an error happening on a line 149 in memorypuzzle.py, which is in
getRandomizedBoard() function!
Traceback (most recent call last):

Chapter 3 – Memory Puzzle 45
File "C:\book2svn\src\memorypuzzle.py", line 292, in <module>
main()
File "C:\book2svn\src\memorypuzzle.py", line 58, in main
mainBoard = getRandomizedBoard()
File "C:\book2svn\src\memorypuzzle.py", line 149, in getRandomizedBoard
columns.append(icons[0])
IndexError: list index out of range
We could spend a lot of time looking at getRandomizedBoard() trying to figure out what’s
wrong with it before realizing that getRandomizedBoard() is perfectly fine: the real source
of the bug was on line 15 and 16 where we set the BOARDWIDTH and BOARDHEIGHT constants.
The assertion makes sure that this never happens. If our code is going to crash, we want it to
crash as soon as it detects something is terribly wrong, because otherwise the bug may not
become apparent until much later in the program. Crash early!
You want to add assert statements whenever there is some condition in your program that
must always, always, always be True. Crash often! You don’t have to go overboard and put
assert statements everywhere, but crashing often with asserts goes a long way in detecting the
true source of a bug. Crash early and crash often!
(In your code that is. Not, say, when riding a pony.)
Making the Source Code Look Pretty
21. # R G B
22. GRAY = (100, 100, 100)
23. NAVYBLUE = ( 60, 60, 100)
24. WHITE = (255, 255, 255)
25. RED = (255, 0, 0)
26. GREEN = ( 0, 255, 0)
27. BLUE = ( 0, 0, 255)
28. YELLOW = (255, 255, 0)
29. ORANGE = (255, 128, 0)
30. PURPLE = (255, 0, 255)
31. CYAN = ( 0, 255, 255)
32.
33. BGCOLOR = NAVYBLUE
34. LIGHTBGCOLOR = GRAY
35. BOXCOLOR = WHITE
36. HIGHLIGHTCOLOR = BLUE
Remember that colors in Pygame are represented by a tuple of three integers from 0 to 255.
These three integers represent the amount of red, green, and blue in the color which is why these

46 http://inventwithpython.com/pygame
Email questions to the author: [email protected]
tuples are called RGB values. Notice the spacing of the tuples on lines 22 to 31 are such that the
R, G, and B integers line up. In Python the indentation (that is, the space at the beginning of the
line) is needs to be exact, but the spacing in the rest of the line is not so strict. By spacing the
integers in the tuple out, we can clearly see how the RGB values compare to each other. (More
info on spacing and indentation is as http://invpy.com/whitespace.)
It is a nice thing to make your code more readable this way, but don’t bother spending too much
time doing it. Code doesn’t have to be pretty to work. At a certain point, you’ll just be spending
more time typing spaces than you would have saved by having readable tuple values.
Using Constant Variables Instead of Strings
38. DONUT = 'donut'
39. SQUARE = 'square'
40. DIAMOND = 'diamond'
41. LINES = 'lines'
42. OVAL = 'oval'
The program also sets up constant variables for some strings. These constants will be used in the
data structure for the board, tracking which spaces on the board have which icons. Using a
constant variable instead of the string value is a good idea. Look at the following code, which
comes from line 187:
if shape == DONUT:
The shape variable will be set to one of the strings 'donut', 'square', 'diamond',
'lines', or 'oval' and then compared to the DONUT constant. If we made a typo when
writing line 187, for example, something like this:
if shape == DUNOT:
Then Python would crash, giving an error message saying that there is no variable named DUNOT.
This is good. Since the program has crashed on line 187, when we check that line it will be easy
to see that the bug was caused by a typo. However, if we were using strings instead of constant
variables and made the same typo, line 187 would look like this:
if shape == 'dunot':
This is perfectly acceptable Python code, so it won’t crash at first when you run it. However, this
will lead to weird bugs later on in our program. Because the code does not immediately crash
where the problem is caused, it can be much harder to find it.

Chapter 3 – Memory Puzzle 47
Making Sure We Have Enough Icons
44. ALLCOLORS = (RED, GREEN, BLUE, YELLOW, ORANGE, PURPLE, CYAN)
45. ALLSHAPES = (DONUT, SQUARE, DIAMOND, LINES, OVAL)
46. assert len(ALLCOLORS) * len(ALLSHAPES) * 2 >= BOARDWIDTH * BOARDHEIGHT,
"Board is too big for the number of shapes/colors defined."
In order for our game program to be able to create icons of every possible color and shape
combination, we need to make a tuple that holds all of these values. There is also another
assertion on line 46 to make sure that there are enough color/shape combinations for the size of
the board we have. If there isn’t, then the program will crash on line 46 and we will know that we
either have to add more colors and shapes, or make the board width and height smaller. With 7
colors and 5 shapes, we can make 35 (that is, 7 x 5) different icons. And because we’ll have a pair
of each icon, that means we can have a board with up to 70 (that is, 35 x 2, or 7 x 5 x 2) spaces.
Tuples vs. Lists, Immutable vs. Mutable You might have noticed that the ALLCOLORS and ALLSHAPES variables are tuples instead of
lists. When do we want to use tuples and when do we want to use lists? And what’s the difference
between them anyway?
Tuples and lists are the same in every way except two: tuples use parentheses instead of square
brackets, and the items in tuples cannot be modified (but the items in lists can be modified). We
often call lists mutable (meaning they can be changed) and tuples immutable (meaning they
cannot be changed).
For an example of trying to change values in lists and tuples, look at the following code:
>>> listVal = [1, 1, 2, 3, 5, 8]
>>> tupleVal = (1, 1, 2, 3, 5, 8)
>>> listVal[4] = 'hello!'
>>> listVal
[1, 1, 2, 3, 'hello!', 8]
>>> tupleVal[4] = 'hello!'
Traceback (most recent call last):
File "<stdin>", line 1, in <module>
TypeError: 'tuple' object does not support item assignment
>>> tupleVal
(1, 1, 2, 3, 5, 8)
>>> tupleVal[4]
5
Notice that when we try to change the item at index 2 in the tuple, Python gives us an error
message saying that tuple objects do not support ―item assignment‖.

48 http://inventwithpython.com/pygame
Email questions to the author: [email protected]
There is a silly benefit and an important benefit to tuple’s immutability. The silly benefit is that
code that uses tuples is slightly faster than code that uses lists. (Python is able to make some
optimizations knowing that the values in a tuple will never change.) But having your code run a
few nanoseconds faster is not important.
The important benefit to using tuples is similar to the benefit of using constant variables: it’s a
sign that the value in the tuple will never change, so anyone reading the code later will be able to
say, ―I can expect that this tuple will always be the same. Otherwise the programmer would have
used a list.‖ This also lets a future programmer reading your code say, ―If I see a list value, I
know that it could be modified at some point in this program. Otherwise, the programmer who
wrote this code would have used a tuple.‖
You can still assign a new tuple value to a variable:
>>> tupleVal = (1, 2, 3)
>>> tupleVal = (1, 2, 3, 4)
The reason this code works is because the code isn’t changing the (1, 2, 3) tuple on the
second line. It is assigning an entirely new tuple (1, 2, 3, 4) to the tupleVal, and
overwriting the old tuple value. You cannot however, use the square brackets to modify an item
in the tuple.
Strings are also an immutable data type. You can use the square brackets to read a single
character in a string, but you cannot change a single character in a string:
>>> strVal = 'Hello'
>>> strVal[1]
'e'
>>> strVal[1] = 'X'
Traceback (most recent call last):
File "<stdin>", line 1, in <module>
TypeError: 'str' object does not support item assignment
One Item Tuples Need a Trailing Comma Also, one minor details about tuples: if you ever need to write code about a tuple that has one
value in it, then it needs to have a trailing comma in it, such as this:
oneValueTuple = (42, )

Chapter 3 – Memory Puzzle 49
If you forget this comma (and it is very easy to forget), then Python won’t be able to tell the
difference between this and a set of parentheses that just change the order of operations. For
example, look at the following two lines of code:
variableA = (5 * 6)
variableB = (5 * 6, )
The value that is stored in variableA is just the integer 30. However, the expression for
variableB’s assignment statement is the single-item tuple value (30, ). Blank tuple values
do not need a comma in them, they can just be a set of parentheses by themselves: ().
Converting Between Lists and Tuples You can convert between list and tuple values just like you can convert between string and
integer values. Just pass a tuple value to the list() function and it will return a list form of that
tuple value. Or, pass a list value to the tuple() function and it will return a tuple form of that
list value. Try typing the following into the interactive shell:
>>> spam = (1, 2, 3, 4)
>>> spam = list(spam)
>>> spam
[1, 2, 3, 4]
>>> spam = tuple(spam)
>>> spam
(1, 2, 3, 4)
>>>
The global statement, and Why Global Variables are Evil
48. def main():
49. global FPSCLOCK, DISPLAYSURF
50. pygame.init()
51. FPSCLOCK = pygame.time.Clock()
52. DISPLAYSURF = pygame.display.set_mode((WINDOWWIDTH, WINDOWHEIGHT))
53.
54. mousex = 0 # used to store x coordinate of mouse event
55. mousey = 0 # used to store y coordinate of mouse event
56. pygame.display.set_caption('Memory Game')
This is the start of the main() function, which is where (oddly enough) the main part of the
game code is. The functions called in the main() function will be explained later in this chapter.
Line 49 is a global statement. The global statement is the global keyword followed by a
comma-delimited list of variable names. These variable names are then marked as global

50 http://inventwithpython.com/pygame
Email questions to the author: [email protected]
variables. Inside the main() function, those names are not for local variables that might just
happen to have the same name as global variables. They are the global variables. Any values
assigned to them in the main() function will persist outside the main() function. We are
marking the FPSCLOCK and DISPLAYSURF variables as global because they are used in several
other functions in the program. (More info is at http://invpy.com/scope.)
There are four simple rules to determine if a variable is local or global:
1. If there is a global statement for a variable at the beginning of the function, then the
variable is global.
2. If the name of a variable in a function has the same name as a global variable and the
function never assigns the variable a value, then that variable is the global variable.
3. If the name of a variable in a function has the same name as a global variable and the
function does assign the variable a value, then that variable is a local variable.
4. If there isn't a global variable with the same name as the variable in the function, then
that variable is obviously a local variable.
You generally want to avoid using global variables inside functions. A function is supposed to be
like a mini-program inside your program with specific inputs (the parameters) and an output (the
return value). But a function that reads and writes to global variables has additional inputs and
output. Since the global variable could have been modified in many places before the function
was called, it can be tricky to track down a bug involving a bad value set in the global variable.
Having a function as a separate mini-program that doesn’t use global variables makes it easier to
find bugs in your code, since the parameters of the function are clearly known. It also makes
changing the code in a function easier, since if the new function works with the same parameters
and gives the same return value, it will automatically work with the rest of the program just like
the old function.
Basically, using global variables might make it easier to write your program but they generally
make it harder to debug.
In the games in this book, global variables are mostly used for variables that would be global
constants that never change, but need the pygame.init() function called first. Since this
happens in the main() function, they are set in the main() function and must be global for
other functions to see them. But the global variables are used as constants and don’t change, so
they are less likely to cause confusing bugs.
If you don’t understand this, don’t worry. Just write your code so that you pass in values to
functions rather than have the functions read global variables as a general rule.

Chapter 3 – Memory Puzzle 51
Data Structures and 2D Lists
58. mainBoard = getRandomizedBoard()
59. revealedBoxes = generateRevealedBoxesData(False)
The getRandomizedBoard() function returns a data structure that represents the state of the
board. The generateRevealedBoxesData() function returns a data structure that
represents which boxes are covered, respectively. The return values of these functions are two
dimensional (2D) lists, or lists of lists. A list of lists of lists of values would be a 3D list. Another
word for two or more dimensional lists is a multidimensional list.
If we have a list value stored in a variable named spam, we could access a value in that list with
the square brackets, such as spam[2] to retrieve the third value in the list. If the value at
spam[2] is itself a list, then we could use another set of square brackets to retrieve a value in
that list. This would look like, for example, spam[2][4], which would retrieve the fifth value
in the list that is the third value in spam. Using the this notation of lists of lists makes it easy to
map a 2D board to a 2D list value. Since the mainBoard variable will store icons in it, if we
wanted to get the icon on the board at the position (4, 5) then we could just use the expression
mainBoard[4][5]. Since the icons themselves are stored as two-item tuples with the shape
and color, the complete data structure is a list of list of two-item tuples. Whew!
Here’s an small example. Say the board looked like this:
The corresponding data structure would be:
mainBoard = [[(DONUT, BLUE), (LINES, BLUE), (SQUARE, ORANGE)], [(SQUARE,
GREEN), (DONUT, BLUE), (DIAMOND, YELLOW)], [(SQUARE, GREEN), (OVAL, YELLOW),
(SQUARE, ORANGE)], [(DIAMOND, YELLOW), (LINES, BLUE), (OVAL, YELLOW)]]
(If your book is in black and white, you can see a color version of the above picture at
http://invpy.com/memoryboard.) You’ll notice that mainBoard[x][y] will correspond to the
icon at the (x, y) coordinate on the board.

52 http://inventwithpython.com/pygame
Email questions to the author: [email protected]
Meanwhile, the ―revealed boxes‖ data structure is also a 2D list, except instead of two-item tuples
like the board data structure, it has Boolean values: True if the box at that x, y coordinate is
revealed, and False if it is covered up. Passing False to the
generateRevealedBoxesData() function sets all of the Boolean values to False. (This
function is explained in detail later.)
These two data structures are used to keep track of the state of the game board.
The “Start Game” Animation
61. firstSelection = None # stores the (x, y) of the first box clicked.
62.
63. DISPLAYSURF.fill(BGCOLOR)
64. startGameAnimation(mainBoard)
Line 61 sets up a variable called firstSelection with the value None. (None is the value
that represents a lack of a value. It is the only value of the data type, NoneType. More info at
http://invpy.com/None) When the player clicks on an icon on the board, the program needs to
track if this was the first icon of the pair that was clicked on or the second icon. If
firstSelection is None, the click was on the first icon and we store the XY coordinates in
the firstSelection variable as a tuple of two integers (one for the X value, the other for Y).
On the second click the value will be this tuple and not None, which is how the program tracks
that it is the second icon click. Line 63 fills the entire surface with the background color. This will
also paint over anything that used to be on the surface, which gives us a clean slate to start
drawing graphics on.
If you’ve played the Memory Puzzle game, you’ll notice that at the beginning of the game, all of
the boxes are quickly covered and uncovered randomly to give the player a sneak peek at which
icons are under which boxes. This all happens in the startGameAnimation() function,
which is explained later in this chapter.
It’s important to give the player this sneak peek (but not long enough of a peek to let the player
easily memorize the icon locations), because otherwise they would have no clue where any icons
are. Blindly clicking on the icons isn’t as much fun as having a little hint to go on.
The Game Loop
66. while True: # main game loop
67. mouseClicked = False
68.
69. DISPLAYSURF.fill(BGCOLOR) # drawing the window
70. drawBoard(mainBoard, revealedBoxes)

Chapter 3 – Memory Puzzle 53
The game loop is an infinite loop that starts on line 66 that keeps iterating for as long as the game
is in progress. Remember that the game loop handles events, updates the game state, and draws
the game state to the screen.
The game state for the Memory Puzzle program is stored in the following variables:
mainBoard
revealedBoxes
firstSelection
mouseClicked
mousex
mousey
On each iteration of the game loop in the Memory Puzzle program, the mouseClicked variable
stores a Boolean value that is True if the player has clicked the mouse during this iteration
through the game loop. (This is part of keeping track of the game state.)
On line 69, the surface is painted over with the background color to erase anything that was
previously drawn on it. The program then calls drawBoard() to draw the current state of the
board based on the board and ―revealed boxes‖ data structures that we pass it. (These lines of
code are part of drawing and updating the screen.)
Remember that our drawing functions only draw on the in-memory display Surface object. This
Surface object will not actually appear on the screen until we call
pygame.display.update(), which is done at the end of the game loop on line 121.
The Event Handling Loop
72. for event in pygame.event.get(): # event handling loop
73. if event.type == QUIT or (event.type == KEYUP and event.key ==
K_ESCAPE):
74. pygame.quit()
75. sys.exit()
76. elif event.type == MOUSEMOTION:
77. mousex, mousey = event.pos
78. elif event.type == MOUSEBUTTONUP:
79. mousex, mousey = event.pos
80. mouseClicked = True
The for loop on line 72 executes code for every event that has happened since the last iteration
of the game loop. This loop is called the event handling loop (which is different from the game
loop, although the event handling loop is inside of the game loop) and iterates over the list of
pygame.Event objects returned by the pygame.event.get() call.

54 http://inventwithpython.com/pygame
Email questions to the author: [email protected]
If the event object was a either a QUIT event or a KEYUP event for the Esc key, then the program
should terminate. Otherwise, in the event of a MOUSEMOTION event (that is, the mouse cursor
has moved) or MOUSEBUTTONUP event (that is, a mouse button was pressed earlier and now the
button was let up), the position of the mouse cursor should be stored in the mousex and mousey
variables. If this was a MOUSEBUTTONUP event, mouseClicked should also be set to True.
Once we have handled all of the events, the values stored in mousex, mousey, and
mouseClicked will tell us any input that player has given us. Now we should update the game
state and draw the results to the screen.
Checking Which Box The Mouse Cursor is Over
82. boxx, boxy = getBoxAtPixel(mousex, mousey)
83. if boxx != None and boxy != None:
84. # The mouse is currently over a box.
85. if not revealedBoxes[boxx][boxy]:
86. drawHighlightBox(boxx, boxy)
The getBoxAtPixel() function will return a tuple of two integers. The integers represent the
XY board coordinates of the box that the mouse coordinates are over. How getBoxAtPixel()
does this is explained later. All we have to know for now is that if the mousex and mousey
coordinates were over a box, a tuple of the XY board coordinates are returned by the function and
stored in boxx and boxy. If the mouse cursor was not over any box (for example, if it was off to
the side of the board or in a gap in between boxes) then the tuple (None, None) is returned by
the function and boxx and boxy will both have None stored in them.
We are only interested in the case where boxx and boxy do not have None in them, so the next
several lines of code are in the block following the if statement on line 83 that checks for this
case. If execution has come inside this block, we know the user has the mouse cursor over a box
(and maybe has also clicked the mouse, depending on the value stored in mouseClicked).
The if statement on line 85 checks if the box is covered up or not by reading the value stored in
revealedBoxes[boxx][boxy]. If it is False, then we know the box is covered.
Whenever the mouse is over a covered up box, we want to draw a blue highlight around the box
to inform the player that they can click on it. This highlighting is not done for boxes that are
already uncovered. The highlight drawing is handled by our drawHighlightBox() function,
which is explained later.
87. if not revealedBoxes[boxx][boxy] and mouseClicked:
88. revealBoxesAnimation(mainBoard, [(boxx, boxy)])

Chapter 3 – Memory Puzzle 55
89. revealedBoxes[boxx][boxy] = True # set the box as
"revealed"
On line 87, we check if the mouse cursor is not only over a covered up box but if the mouse has
also been clicked. In that case, we want to play the ―reveal‖ animation for that box by calling our
revealBoxesAnimation() function (which is, as with all the other functions main() calls,
explained later in this chapter). You should note that calling this function only draws the
animation of the box being uncovered. It isn’t until line 89 when we set
revealedBoxes[boxx][boxy] = True that the data structure that tracks the game state
is updated.
If you comment out line 89 and then run the program, you’ll notice that after clicking on a box
the reveal animation is played, but then the box immediately appears covered up again. This is
because revealedBoxes[boxx][boxy] is still set to False, so on the next iteration of the
game loop, the board is drawn with this box covered up. Not having line 89 would cause quite an
odd bug in our program.
Handling the First Clicked Box
90. if firstSelection == None: # the current box was the first
box clicked
91. firstSelection = (boxx, boxy)
92. else: # the current box was the second box clicked
93. # Check if there is a match between the two icons.
94. icon1shape, icon1color = getShapeAndColor(mainBoard,
firstSelection[0], firstSelection[1])
95. icon2shape, icon2color = getShapeAndColor(mainBoard,
boxx, boxy)
Before the execution entered the game loop, the firstSelection variable was set to None.
Our program will interpret this to mean that no boxes have been clicked, so if line 90’s condition
is True, that means this is the first of the two possibly matching boxes that was clicked. We
want to play the reveal animation for the box and then keep that box uncovered. We also set the
firstSelection variable to a tuple of the box coordinates for the box that was clicked.
If this is the second box the player has clicked on, we want to play the reveal animation for that
box but then check if the two icons under the boxes are matching. The getShapeAndColor()
function (explained later) will retrieve the shape and color values of the icons. (These values will
be one of the values in the ALLCOLORS and ALLSHAPES tuples.)

56 http://inventwithpython.com/pygame
Email questions to the author: [email protected]
Handling a Mismatched Pair of Icons
97. if icon1shape != icon2shape or icon1color !=
icon2color:
98. # Icons don't match. Re-cover up both selections.
99. pygame.time.wait(1000) # 1000 milliseconds = 1 sec
100. coverBoxesAnimation(mainBoard,
[(firstSelection[0], firstSelection[1]), (boxx, boxy)])
101. revealedBoxes[firstSelection[0]][firstSelection
[1]] = False
102. revealedBoxes[boxx][boxy] = False
The if statement on line 97 checks if either the shapes or colors of the two icons don’t match. If
this is the case, then we want to pause the game for 1000 milliseconds (which is the same as 1
second) by calling pygame.time.wait(1000) so that the player has a chance to see that the
two icons don’t match. Then the ―cover up‖ animation plays for both boxes. We also want to
update the game state to mark these boxes as not revealed (that is, covered up).
Handling If the Player Won
103. elif hasWon(revealedBoxes): # check if all pairs found
104. gameWonAnimation(mainBoard)
105. pygame.time.wait(2000)
106.
107. # Reset the board
108. mainBoard = getRandomizedBoard()
109. revealedBoxes = generateRevealedBoxesData(False)
110.
111. # Show the fully unrevealed board for a second.
112. drawBoard(mainBoard, revealedBoxes)
113. pygame.display.update()
114. pygame.time.wait(1000)
115.
116. # Replay the start game animation.
117. startGameAnimation(mainBoard)
118. firstSelection = None # reset firstSelection variable
Otherwise, if line 97’s condition was False, then the two icons must be a match. The program
doesn’t really have to do anything else to the boxes at that point: it can just leave both boxes in
the revealed state. However, the program should check if this was the last pair of icons on the
board to be matched. This is done inside our hasWon() function, which returns True if the
board is in a winning state (that is, all of the boxes are revealed).

Chapter 3 – Memory Puzzle 57
If that is the case, we want to play the ―game won‖ animation by calling
gameWonAnimation(), then pause slightly to let the player revel in their victory, and then
reset the data structures in mainBoard and revealedBoxes to start a new game.
Line 117 plays the ―start game‖ animation again. After that, the program execution will just loop
through the game loop as usual, and the player can continue playing until they quit the program.
No matter if the two boxes were matching or not, after the second box was clicked line 118 will
set the firstSelection variable back to None so that the next box the player clicks on will
be interpreted as the first clicked box of a pair of possibly matching icons.
Drawing the Game State to the Screen
120. # Redraw the screen and wait a clock tick.
121. pygame.display.update()
122. FPSCLOCK.tick(FPS)
At this point, the game state has been updated depending on the player’s input, and the latest
game state has been drawn to the DISPLAYSURF display Surface object. We’ve reached the end
of the game loop, so we call pygame.display.update() to draw the DISPLAYSURF
Surface object to the computer screen.
Line 9 set the FPS constant to the integer value 30, meaning we want the game to run (at most) at
30 frames per second. If we want the program to run faster, we can increase this number. If we
want the program to run slower, we can decrease this number. It can even be set to a float value
like 0.5, which will run the program at half a frame per second, that is, one frame per two
seconds.
In order to run at 30 frames per second, each frame must be drawn in 1/30th of a second. This
means that pygame.display.update() and all the code in the game loop must execute in
under 33.3 milliseconds. Any modern computer can do this easily with plenty of time left over.
To prevent the program from running too fast, we call the tick() method of the
pygame.Clock object in FPSCLOCK to have to it pause the program for the rest of the 33.3
milliseconds.
Since this is done at the very end of the game loop, it ensures that each iteration of the game loop
takes (at least) 33.3 milliseconds. If for some reason the pygame.display.update() call
and the code in the game loop takes longer than 33.3 milliseconds, then the tick() method will
not wait at all and immediately return.

58 http://inventwithpython.com/pygame
Email questions to the author: [email protected]
I’ve kept saying that the other functions would be explained later in the chapter. Now that we’ve
gone over the main() function and you have an idea for how the general program works, let’s
go into the details of all the other functions that are called from main().
Creating the “Revealed Boxes” Data Structure
125. def generateRevealedBoxesData(val):
126. revealedBoxes = []
127. for i in range(BOARDWIDTH):
128. revealedBoxes.append([val] * BOARDHEIGHT)
129. return revealedBoxes
The generateRevealedBoxesData() function needs to create a list of lists of Boolean
values. The Boolean value will just be the one that is passed to the function as the val parameter.
We start the data structure as an empty list in the revealedBoxes variable.
In order to make the data structure have the revealedBoxes[x][y] structure, we need to
make sure that the inner lists represent the vertical columns of the board and not the horizontal
rows. Otherwise, the data structure will have a revealedBoxes[y][x] structure.
The for loop will create the columns and then append them to revealedBoxes. The columns
are created using list replication, so that the column list has as many val values as the
BOARDHEIGHT dictates.
Creating the Board Data Structure: Step 1 – Get All Possible Icons
132. def getRandomizedBoard():
133. # Get a list of every possible shape in every possible color.
134. icons = []
135. for color in ALLCOLORS:
136. for shape in ALLSHAPES:
137. icons.append( (shape, color) )
The board data structure is just a list of lists of tuples, where each tuple has a two values: one for
the icon’s shape and one for the icon’s color. But creating this data structure is a little
complicated. We need to be sure to have exactly as many icons for the number of boxes on the
board and also be sure there are two and only two icons of each type.
The first step to do this is to create a list with every possible combination of shape and color.
Recall that we have a list of each color and shape in ALLCOLORS and ALLSHAPES, so nested
for loops on lines 135 and 136 will go through every possible shape for every possible color.
These are each added to the list in the icons variable on line 137.

Chapter 3 – Memory Puzzle 59
Step 2 – Shuffling and Truncating the List of All Icons
139. random.shuffle(icons) # randomize the order of the icons list
140. numIconsUsed = int(BOARDWIDTH * BOARDHEIGHT / 2) # calculate how many
icons are needed
141. icons = icons[:numIconsUsed] * 2 # make two of each
142. random.shuffle(icons)
But remember, there may be more possible combinations than spaces on the board. We need to
calculate the number of spaces on the board by multiplying BOARDWIDTH by BOARDHEIGHT.
Then we divide that number by 2 because we will have pairs of icons. On a board with 70 spaces,
we’d only need 35 different icons, since there will be two of each icon. This number will be
stored in numIconsUsed.
Line 141 uses list slicing to grab the first numIconsUsed number of icons in the list. (If you’ve
forgotten how list slicing works, check out http://invpy.com/slicing.) This list has been shuffled
on line 139, so it won’t always be the same icons each game. Then this list is replicated by using
the * operator so that there are two of each of the icons. This new doubled up list will overwrite
the old list in the icons variable. Since the first half of this new list is identical to the last half,
we call the shuffle() method again to randomly mix up the order of the icons.
Step 3 – Placing the Icons on the Board
144. # Create the board data structure, with randomly placed icons.
145. board = []
146. for x in range(BOARDWIDTH):
147. column = []
148. for y in range(BOARDHEIGHT):
149. column.append(icons[0])
150. del icons[0] # remove the icons as we assign them
151. board.append(column)
152. return board
Now we need to create a list of lists data structure for the board. We can do this with nested for
loops just like the generateRevealedBoxesData() function did. For each column on the
board, we will create a list of randomly selected icons. As we add icons to the column, on line
149 we will then delete them from the front of the icons list on line 150. This way, as the
icons list gets shorter and shorter, icons[0] will have a different icon to add to the columns.
To picture this better, type the following code into the interactive shell. Notice how the del
statement changes the myList list.
>>> myList = ['cat', 'dog', 'mouse', 'lizard']

60 http://inventwithpython.com/pygame
Email questions to the author: [email protected]
>>> del myList[0]
>>> myList
['dog', 'mouse', 'lizard']
>>> del myList[0]
>>> myList
['mouse', 'lizard']
>>> del myList[0]
>>> myList
['lizard']
>>> del myList[0]
>>> myList
[]
>>>
Because we are deleting the item at the front of the list, the other items shift forward so that the
next item in the list becomes the new ―first‖ item. This is the same way line 150 works.
Splitting a List into a List of Lists
155. def splitIntoGroupsOf(groupSize, theList):
156. # splits a list into a list of lists, where the inner lists have at
157. # most groupSize number of items.
158. result = []
159. for i in range(0, len(theList), groupSize):
160. result.append(theList[i:i + groupSize])
161. return result
The splitIntoGroupsOf() function (which will be called by the
startGameAnimation() function) splits a list into a list of lists, where the inner lists have
groupSize number of items in them. (The last list could have less if there are less than
groupSize items left over.)
The call to range() on line 159 uses the three-parameter form of range(). (If you are
unfamiliar with this form, take a look at http://invpy.com/range.) Let’s use an example. If the
length of the list is 20 and the groupSize parameter is 8, then range(0,
len(theList), groupSize) evaluates to range(0, 20, 8). This will give the i
variable the values 0, 8, and 16 for the three iterations of the for loop.
The list slicing on line 160 with theList[i:i + groupSize] creates the lists that are
added to the result list. On each iteration where i is 0, 8, and 16 (and groupSize is 8), this
list slicing expression would be theList[0:8], then theList[8:16] on the second
iteration, and then theList[16:24] on the third iteration.

Chapter 3 – Memory Puzzle 61
Note that even though the largest index of theList would be 19 in our example,
theList[16:24] won’t raise an IndexError error even though 24 is larger than 19. It will
just create a list slice with the remaining items in the list. List slicing doesn’t destroy or change
the original list stored in theList. It just copies a portion of it to evaluate to a new list value.
This new list value is the list that is appended to the list in the result variable on line 160. So
when we return result at the end of this function, we are returning a list of lists.
Different Coordinate Systems
164. def leftTopCoordsOfBox(boxx, boxy):
165. # Convert board coordinates to pixel coordinates
166. left = boxx * (BOXSIZE + GAPSIZE) + XMARGIN
167. top = boxy * (BOXSIZE + GAPSIZE) + YMARGIN
168. return (left, top)
You should be familiar with Cartesian Coordinate systems. (If you’d like a refresher on this topic,
read http://invpy.com/coordinates.) In most of our games we will be using multiple Cartesian
Coordinate systems. One system of coordinates that is used in the Memory Puzzle game is for the
pixel or screen coordinates. But we will also be using another coordinate system for the boxes.
This is because it will be easier to use (3, 2) to refer to the 4th box from the left and 3
rd from the
top (remember that the numbers start with 0, not 1) instead of using the pixel coordinate of the
box’s top left corner, (220, 165). However, we need a way to translate between these two
coordinate systems.
Here’s a picture of the game and the two different coordinate systems. Remember that the
window is 640 pixels wide and 480 pixels tall, so (639, 479) is the bottom right corner (because
the top left corner’s pixel is (0, 0), and not (1, 1)).

62 http://inventwithpython.com/pygame
Email questions to the author: [email protected]
The leftTopCoordsOfBox() function will take box coordinates and return pixel
coordinates. Because a box takes up multiple pixels on the screen, we will always return the
single pixel at the top left corner of the box. This value will be returned as a two-integer tuple.
The leftTopCoordsOfBox() function will often be used when we need pixel coordinates for
drawing these boxes.
Converting from Pixel Coordinates to Box Coordinates
171. def getBoxAtPixel(x, y):
172. for boxx in range(BOARDWIDTH):
173. for boxy in range(BOARDHEIGHT):
174. left, top = leftTopCoordsOfBox(boxx, boxy)
175. boxRect = pygame.Rect(left, top, BOXSIZE, BOXSIZE)
176. if boxRect.collidepoint(x, y):
177. return (boxx, boxy)
178. return (None, None)
We will also need a function to convert from pixel coordinates (which the mouse clicks and
mouse movement events use) to box coordinates (so we can find out over which box the mouse
event happened). Rect objects have a collidepoint() method that you can pass X and Y
coordinates too and it will return True if the coordinates are inside (that is, collide with) the Rect
object’s area.

Chapter 3 – Memory Puzzle 63
In order to find which box the mouse coordinates are over, we will go through each box’s
coordinates and call the collidepoint() method on a Rect object with those coordinates.
When collidepoint() returns True, we know we have found the box that was clicked on or
moved over and will return the box coordinates. If none of them return True, then the
getBoxAtPixel() function will return the value (None, None). This tuple is returned
instead of simply returning None because the caller of getBoxAtPixel() is expecting a tuple
of two values to be returned.
Drawing the Icon, and Syntactic Sugar
181. def drawIcon(shape, color, boxx, boxy):
182. quarter = int(BOXSIZE * 0.25) # syntactic sugar
183. half = int(BOXSIZE * 0.5) # syntactic sugar
184.
185. left, top = leftTopCoordsOfBox(boxx, boxy) # get pixel coords from
board coords
The drawIcon() function will draw an icon (with the specified shape and color) at the
space whose coordinates are given in the boxx and boxy parameters. Each possible shape has a
different set of Pygame drawing function calls for it, so we must have a large set of if and elif
statements to differentiate between them. (These statements are on lines 187 to 198.)
The X and Y coordinates of the left and top edge of the box can be obtained by calling the
leftTopCoordsOfBox() function. The width and height of the box are both set in the
BOXSIZE constant. However, many of the shape drawing function calls use the midpoint and
quarter-point of the box as well. We can calculate this and store it in the variables quarter and
half. We could just as easily have the code int(BOXSIZE * 0.25) instead of the variable
quarter, but this way the code becomes easier to read since it is more obvious what quarter
means rather than int(BOXSIZE * 0.25).
Such variables are an example of syntactic sugar. Syntactic sugar is when we add code that
could have been written in another way (probably with less actual code and variables), but does
make the source code easier to read. Constant variables are one form of syntactic sugar. Pre-
calculating a value and storing it in a variable is another type of syntactic sugar. (For example, in
the getRandomizedBoard() function, we could have easily made the code on lines 140 and
line 141 into a single line of code. But it’s easier to read as two separate lines.) We don’t need to
have the extra quarter and half variables, but having them makes the code easier to read.
Code that is easy to read is easy to debug and upgrade in the future.
186. # Draw the shapes
187. if shape == DONUT:

64 http://inventwithpython.com/pygame
Email questions to the author: [email protected]
188. pygame.draw.circle(DISPLAYSURF, color, (left + half, top + half),
half - 5)
189. pygame.draw.circle(DISPLAYSURF, BGCOLOR, (left + half, top +
half), quarter - 5)
190. elif shape == SQUARE:
191. pygame.draw.rect(DISPLAYSURF, color, (left + quarter, top +
quarter, BOXSIZE - half, BOXSIZE - half))
192. elif shape == DIAMOND:
193. pygame.draw.polygon(DISPLAYSURF, color, ((left + half, top), (left
+ BOXSIZE - 1, top + half), (left + half, top + BOXSIZE - 1), (left, top +
half)))
194. elif shape == LINES:
195. for i in range(0, BOXSIZE, 4):
196. pygame.draw.line(DISPLAYSURF, color, (left, top + i), (left +
i, top))
197. pygame.draw.line(DISPLAYSURF, color, (left + i, top + BOXSIZE
- 1), (left + BOXSIZE - 1, top + i))
198. elif shape == OVAL:
199. pygame.draw.ellipse(DISPLAYSURF, color, (left, top + quarter,
BOXSIZE, half))
Each of the donut, square, diamond, lines, and oval functions require different drawing primitive
function calls to make.
Syntactic Sugar with Getting a Board Space’s Icon’s Shape and Color
202. def getShapeAndColor(board, boxx, boxy):
203. # shape value for x, y spot is stored in board[x][y][0]
204. # color value for x, y spot is stored in board[x][y][1]
205. return board[boxx][boxy][0], board[boxx][boxy][1]
The getShapeAndColor() function only has one line. You might wonder why we would
want a function instead of just typing in that one line of code whenever we need it. This is done
for the same reason we use constant variables: it improves the readability of the code.
It’s easy to figure out what a code like shape, color = getShapeAndColor() does.
But if you looked a code like shape, color = board[boxx][boxy][0],
board[boxx][boxy][1], it would be a bit more difficult to figure out.
Drawing the Box Cover
208. def drawBoxCovers(board, boxes, coverage):
209. # Draws boxes being covered/revealed. "boxes" is a list
210. # of two-item lists, which have the x & y spot of the box.
211. for box in boxes:
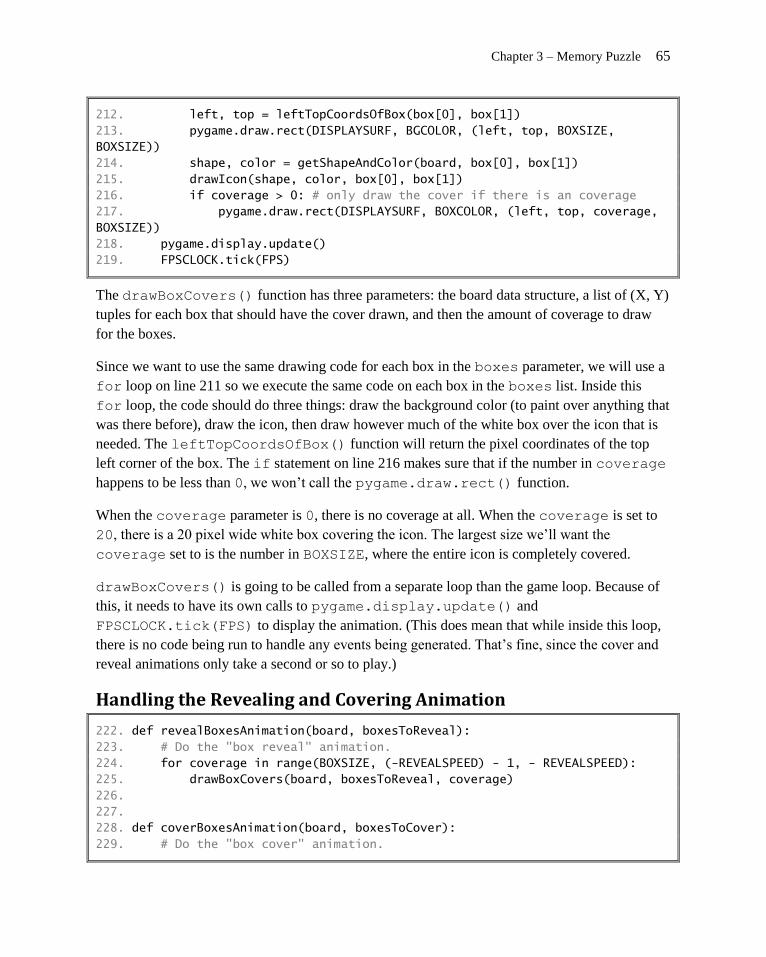
Chapter 3 – Memory Puzzle 65
212. left, top = leftTopCoordsOfBox(box[0], box[1])
213. pygame.draw.rect(DISPLAYSURF, BGCOLOR, (left, top, BOXSIZE,
BOXSIZE))
214. shape, color = getShapeAndColor(board, box[0], box[1])
215. drawIcon(shape, color, box[0], box[1])
216. if coverage > 0: # only draw the cover if there is an coverage
217. pygame.draw.rect(DISPLAYSURF, BOXCOLOR, (left, top, coverage,
BOXSIZE))
218. pygame.display.update()
219. FPSCLOCK.tick(FPS)
The drawBoxCovers() function has three parameters: the board data structure, a list of (X, Y)
tuples for each box that should have the cover drawn, and then the amount of coverage to draw
for the boxes.
Since we want to use the same drawing code for each box in the boxes parameter, we will use a
for loop on line 211 so we execute the same code on each box in the boxes list. Inside this
for loop, the code should do three things: draw the background color (to paint over anything that
was there before), draw the icon, then draw however much of the white box over the icon that is
needed. The leftTopCoordsOfBox() function will return the pixel coordinates of the top
left corner of the box. The if statement on line 216 makes sure that if the number in coverage
happens to be less than 0, we won’t call the pygame.draw.rect() function.
When the coverage parameter is 0, there is no coverage at all. When the coverage is set to
20, there is a 20 pixel wide white box covering the icon. The largest size we’ll want the
coverage set to is the number in BOXSIZE, where the entire icon is completely covered.
drawBoxCovers() is going to be called from a separate loop than the game loop. Because of
this, it needs to have its own calls to pygame.display.update() and
FPSCLOCK.tick(FPS) to display the animation. (This does mean that while inside this loop,
there is no code being run to handle any events being generated. That’s fine, since the cover and
reveal animations only take a second or so to play.)
Handling the Revealing and Covering Animation
222. def revealBoxesAnimation(board, boxesToReveal):
223. # Do the "box reveal" animation.
224. for coverage in range(BOXSIZE, (-REVEALSPEED) - 1, - REVEALSPEED):
225. drawBoxCovers(board, boxesToReveal, coverage)
226.
227.
228. def coverBoxesAnimation(board, boxesToCover):
229. # Do the "box cover" animation.

66 http://inventwithpython.com/pygame
Email questions to the author: [email protected]
230. for coverage in range(0, BOXSIZE + REVEALSPEED, REVEALSPEED):
231. drawBoxCovers(board, boxesToCover, coverage)
Remember that an animation is simply just displaying different images for brief moments of time,
and together they make it seem like things are moving on the screen. The
revealBoxesAnimation() and coverBoxesAnimation() only need to draw an icon
with a varying amount of coverage by the white box. We can write a single function called
drawBoxCovers() which can do this, and then have our animation function call
drawBoxCovers() for each frame of animation. As we saw in the last section,
drawBoxCovers() makes a call to pygame.display.update() and
FPSCLOCK.tick(FPS) itself.
To do this, we’ll set up a for loop to make decreasing (in the case of
revealBoxesAnimation()) or increasing (in the case of coverBoxesAnimation())
numbers for the converage parameter. The amount that the coverage variable will
decrease/increase by is the number in the REVEALSPEED constant. On line 12 we set this
constant to 8, meaning that on each call to drawBoxCovers(), the white box will
decrease/increase by 8 pixels on each iteration. If we increase this number, then more pixels will
be drawn on each call, meaning that the white box will decrease/increase in size faster. If we set it
to 1, then the white box will only appear to decrease or increase by 1 pixel on each iteration,
making the entire reveal or cover animation take longer.
Think of it like climbing stairs. If on each step you take, you climbed one stair, then it would take
a normal amount of time to climb the entire staircase. But if you climbed two stairs at a time on
each step (and the steps took just as long as before), you could climb the entire staircase twice as
fast. If you could climb the staircase 8 stairs at a time, then you would climb the entire staircase 8
times as fast.
Drawing the Entire Board
234. def drawBoard(board, revealed):
235. # Draws all of the boxes in their covered or revealed state.
236. for boxx in range(BOARDWIDTH):
237. for boxy in range(BOARDHEIGHT):
238. left, top = leftTopCoordsOfBox(boxx, boxy)
239. if not revealed[boxx][boxy]:
240. # Draw a covered box.
241. pygame.draw.rect(DISPLAYSURF, BOXCOLOR, (left, top,
BOXSIZE, BOXSIZE))
242. else:
243. # Draw the (revealed) icon.
244. shape, color = getShapeAndColor(board, boxx, boxy)

Chapter 3 – Memory Puzzle 67
245. drawIcon(shape, color, boxx, boxy)
The drawBoard() function makes a call to drawIcon() for each of the boxes on the board.
The nested for loops on lines 236 and 237 will loop through every possible X and Y coordinate
for the boxes, and will either draw the icon at that location or draw a white square instead (to
represent a covered up box).
Drawing the Highlight
248. def drawHighlightBox(boxx, boxy):
249. left, top = leftTopCoordsOfBox(boxx, boxy)
250. pygame.draw.rect(DISPLAYSURF, HIGHLIGHTCOLOR, (left - 5, top - 5,
BOXSIZE + 10, BOXSIZE + 10), 4)
To help the player recognize that they can click on a covered box to reveal it, we will make a blue
outline appear around a box to highlight it. This outline is drawn with a call to
pygame.draw.rect() to make a rectangle with a width of 4 pixels.
The “Start Game” Animation
253. def startGameAnimation(board):
254. # Randomly reveal the boxes 8 at a time.
255. coveredBoxes = generateRevealedBoxesData(False)
256. boxes = []
257. for x in range(BOARDWIDTH):
258. for y in range(BOARDHEIGHT):
259. boxes.append( (x, y) )
260. random.shuffle(boxes)
261. boxGroups = splitIntoGroupsOf(8, boxes)
The animation that plays at the beginning of the game gives the player a quick hint as to where all
the icons are located. In order to make this animation, we have to reveal and cover up groups of
boxes one group after another. To do this, first we’ll create a list of every possible space on the
board. The nested for loops on lines 257 and 258 will add (X, Y) tuples to a list in the boxes
variable.
We will reveal and cover up the first 8 boxes in this list, then the next 8, then the next 8 after that,
and so on. However, since the order of the (X, Y) tuples in boxes would be the same each time,
then the same order of boxes would be displayed. (Try commenting out line 260 and then running
to program a few times to see this effect.)
To change up the boxes each time a game starts, we will call the random.shuffle() function
to randomly shuffle the order of the tuples in the boxes list. Then when we reveal and cover up

68 http://inventwithpython.com/pygame
Email questions to the author: [email protected]
the first 8 boxes in this list (and each group of 8 boxes afterwards), it will be random group of 8
boxes.
To get the lists of 8 boxes, we call our splitIntoGroupsOf() function, passing 8 and the
list in boxes. The list of lists that the function returns will be stored in a variable named
boxGroups.
Revealing and Covering the Groups of Boxes
263. drawBoard(board, coveredBoxes)
264. for boxGroup in boxGroups:
265. revealBoxesAnimation(board, boxGroup)
266. coverBoxesAnimation(board, boxGroup)
First, we draw the board. Since every value in coveredBoxes is set to False, this call to
drawBoard() will end up drawing only covered up white boxes. The
revealBoxesAnimation() and coverBoxesAnimation() functions will draw over the
spaces of these white boxes.
The for loop will go through each of the inner lists in the boxGroups lists. We pass these to
revealBoxesAnimation(), which will perform the animation of the white boxes being
pulled away to reveal the icon underneath. Then the call to coverBoxesAnimation() will
animate the white boxes expanding to cover up the icons. Then the for loop goes to the next
iteration to animate the next set of 8 boxes.
The “Game Won” Animation
269. def gameWonAnimation(board):
270. # flash the background color when the player has won
271. coveredBoxes = generateRevealedBoxesData(True)
272. color1 = LIGHTBGCOLOR
273. color2 = BGCOLOR
274.
275. for i in range(13):
276. color1, color2 = color2, color1 # swap colors
277. DISPLAYSURF.fill(color1)
278. drawBoard(board, coveredBoxes)
279. pygame.display.update()
280. pygame.time.wait(300)
When the player has uncovered all of the boxes by matching every pair on the board, we want to
congratulate them by flashing the background color. The for loop will draw the color in the
color1 variable for the background color and then draw the board over it. However, on each
iteration of the for loop, the values in color1 and color2 will be swapped with each other

Chapter 3 – Memory Puzzle 69
on line 276. This way the program will alternate between drawing two different background
colors.
Remember that this function needs to call pygame.display.update() to actually make the
DISPLAYSURF surface appear on the screen.
Telling if the Player Has Won
283. def hasWon(revealedBoxes):
284. # Returns True if all the boxes have been revealed, otherwise False
285. for i in revealedBoxes:
286. if False in i:
287. return False # return False if any boxes are covered.
288. return True
The player has won the game when all of the icon pairs have been matched. Since the ―revealed‖
data structure gets values in it set to True as icons have been matched, we can simply loop
through every space in revealedBoxes looking for a False value. If even one False value
is in revealedBoxes, then we know there are still unmatched icons on the board.
Note that because revealedBoxes is a list of lists, the for loop on line 285 will set the inner
list as the values of i. But we can use the in operator to search for a False value in the entire
inner list. This way we don’t need to write an additional line of code and have two nested for
loops like this:
for x in revealedBoxes:
for y in revealedBoxes[x]:
if False == revealedBoxes[x][y]:
return False
Why Bother Having a main() Function?
291. if __name__ == '__main__':
292. main()
It may seem pointless to have a main() function, since you could just put that code in the global
scope at the bottom of the program instead, and the code would run the exact same. However,
there are two good reasons to put them inside of a main() function.
First, this lets you have local variables whereas otherwise the local variables in the main()
function would have to become global variables. Limiting the number of global variables is a
good way to keep the code simple and easier to debug. (See the ―Why Global Variables are Evil‖
section in this chapter.)

70 http://inventwithpython.com/pygame
Email questions to the author: [email protected]
Second, this also lets you import the program so that you can call and test individual functions. If
the memorypuzzle.py file is in the C:\Python32 folder, then you can import it from the interactive
shell. Type the following to test out the splitIntoGroupsOf() and getBoxAtPixel()
functions to make sure they return the correct return values:
>>> import memorypuzzle
>>> memorypuzzle.splitIntoGroupsOf(3, [0,1,2,3,4,5,6,7,8,9])
[[0, 1, 2], [3, 4, 5], [6, 7, 8], [9]]
>>> memorypuzzle.getBoxAtPixel(0, 0)
(None, None)
>>> memorypuzzle.getBoxAtPixel(150, 150)
(1, 1)
When a module is imported, all of the code in it is run. If we didn’t have the main() function,
and had its code in the global scope, then the game would have automatically started as soon as
we imported it, which really wouldn’t let us call individual functions in it.
That’s why the code is in a separate function that we have named main(). Then we check the
built-in Python variable __name__ to see if we should call the main() function or not. This
variable is automatically set by the Python interpreter to the string '__main__' if the program
itself is being run and 'memorypuzzle' if it is being imported. This is why the main()
function is not run when we executed the import memorypuzzle statement in the interactive
shell.
This is a handy technique for being able to import the program you are working on from the
interactive shell and make sure individual functions are returning the correct values by testing
them one call at a time.
Why Bother With Readability? A lot of the suggestions in this chapter haven’t been about how to write programs that computers
can run so much as how to write programs that programmers can read. You might not understand
why this is important. After all, as long as the code works, who cares if it is hard or easy for
human programmers to read?
However, the important thing to realize about software is that it is rarely ever left alone. When
you are creating your own games, you will rarely be ―done‖ with the program. You will always
get new ideas for game features you want add, or find new bugs with the program. Because of
this, it is important that your program is readable so that you can look at the code and understand
it. And understanding the code is the first step to changing it to add more code or fix bugs.
As an example, here is an obfuscated version of the Memory Puzzle program that was made
entirely unreadable. If you type it in (or download it from

Chapter 3 – Memory Puzzle 71
http://invpy.com/memorypuzzle_obfuscated.py) and run it you will find it runs exactly the same
as the code at the beginning of this chapter. But if there was a bug with this code, it would be
impossible to read the code and understand what’s going on, much less fix the bug.
The computer doesn’t mind code as unreadable as this. It’s all the same to it.
import random, pygame, sys
from pygame.locals import *
def hhh():
global a, b
pygame.init()
a = pygame.time.Clock()
b = pygame.display.set_mode((640, 480))
j = 0
k = 0
pygame.display.set_caption('Memory Game')
i = c()
hh = d(False)
h = None
b.fill((60, 60, 100))
g(i)
while True:
e = False
b.fill((60, 60, 100))
f(i, hh)
for eee in pygame.event.get():
if eee.type == QUIT or (eee.type == KEYUP and eee.key == K_ESCAPE):
pygame.quit()
sys.exit()
elif eee.type == MOUSEMOTION:
j, k = eee.pos
elif eee.type == MOUSEBUTTONUP:
j, k = eee.pos
e = True
bb, ee = m(j, k)
if bb != None and ee != None:
if not hh[bb][ee]:
n(bb, ee)
if not hh[bb][ee] and e:
o(i, [(bb, ee)])
hh[bb][ee] = True
if h == None:
h = (bb, ee)
else:
q, fff = s(i, h[0], h[1])
r, ggg = s(i, bb, ee)

72 http://inventwithpython.com/pygame
Email questions to the author: [email protected]
if q != r or fff != ggg:
pygame.time.wait(1000)
p(i, [(h[0], h[1]), (bb, ee)])
hh[h[0]][h[1]] = False
hh[bb][ee] = False
elif ii(hh):
jj(i)
pygame.time.wait(2000)
i = c()
hh = d(False)
f(i, hh)
pygame.display.update()
pygame.time.wait(1000)
g(i)
h = None
pygame.display.update()
a.tick(30)
def d(ccc):
hh = []
for i in range(10):
hh.append([ccc] * 7)
return hh
def c():
rr = []
for tt in ((255, 0, 0), (0, 255, 0), (0, 0, 255), (255, 255, 0), (255, 128,
0), (255, 0, 255), (0, 255, 255)):
for ss in ('a', 'b', 'c', 'd', 'e'):
rr.append( (ss, tt) )
random.shuffle(rr)
rr = rr[:35] * 2
random.shuffle(rr)
bbb = []
for x in range(10):
v = []
for y in range(7):
v.append(rr[0])
del rr[0]
bbb.append(v)
return bbb
def t(vv, uu):
ww = []
for i in range(0, len(uu), vv):
ww.append(uu[i:i + vv])
return ww
def aa(bb, ee):
return (bb * 50 + 70, ee * 50 + 65)
def m(x, y):

Chapter 3 – Memory Puzzle 73
for bb in range(10):
for ee in range(7):
oo, ddd = aa(bb, ee)
aaa = pygame.Rect(oo, ddd, 40, 40)
if aaa.collidepoint(x, y):
return (bb, ee)
return (None, None)
def w(ss, tt, bb, ee):
oo, ddd = aa(bb, ee)
if ss == 'a':
pygame.draw.circle(b, tt, (oo + 20, ddd + 20), 15)
pygame.draw.circle(b, (60, 60, 100), (oo + 20, ddd + 20), 5)
elif ss == 'b':
pygame.draw.rect(b, tt, (oo + 10, ddd + 10, 20, 20))
elif ss == 'c':
pygame.draw.polygon(b, tt, ((oo + 20, ddd), (oo + 40 - 1, ddd + 20),
(oo + 20, ddd + 40 - 1), (oo, ddd + 20)))
elif ss == 'd':
for i in range(0, 40, 4):
pygame.draw.line(b, tt, (oo, ddd + i), (oo + i, ddd))
pygame.draw.line(b, tt, (oo + i, ddd + 39), (oo + 39, ddd + i))
elif ss == 'e':
pygame.draw.ellipse(b, tt, (oo, ddd + 10, 40, 20))
def s(bbb, bb, ee):
return bbb[bb][ee][0], bbb[bb][ee][1]
def dd(bbb, boxes, gg):
for box in boxes:
oo, ddd = aa(box[0], box[1])
pygame.draw.rect(b, (60, 60, 100), (oo, ddd, 40, 40))
ss, tt = s(bbb, box[0], box[1])
w(ss, tt, box[0], box[1])
if gg > 0:
pygame.draw.rect(b, (255, 255, 255), (oo, ddd, gg, 40))
pygame.display.update()
a.tick(30)
def o(bbb, cc):
for gg in range(40, (-8) - 1, -8):
dd(bbb, cc, gg)
def p(bbb, ff):
for gg in range(0, 48, 8):
dd(bbb, ff, gg)
def f(bbb, pp):
for bb in range(10):
for ee in range(7):
oo, ddd = aa(bb, ee)
if not pp[bb][ee]:
pygame.draw.rect(b, (255, 255, 255), (oo, ddd, 40, 40))

74 http://inventwithpython.com/pygame
Email questions to the author: [email protected]
else:
ss, tt = s(bbb, bb, ee)
w(ss, tt, bb, ee)
def n(bb, ee):
oo, ddd = aa(bb, ee)
pygame.draw.rect(b, (0, 0, 255), (oo - 5, ddd - 5, 50, 50), 4)
def g(bbb):
mm = d(False)
boxes = []
for x in range(10):
for y in range(7):
boxes.append( (x, y) )
random.shuffle(boxes)
kk = t(8, boxes)
f(bbb, mm)
for nn in kk:
o(bbb, nn)
p(bbb, nn)
def jj(bbb):
mm = d(True)
tt1 = (100, 100, 100)
tt2 = (60, 60, 100)
for i in range(13):
tt1, tt2 = tt2, tt1
b.fill(tt1)
f(bbb, mm)
pygame.display.update()
pygame.time.wait(300)
def ii(hh):
for i in hh:
if False in i:
return False
return True
if __name__ == '__main__':
hhh()
Never write code like this. If you program like this while facing the mirror in a bathroom with the
lights turned off, the ghost of Ada Lovelace will come out of the mirror and throw you into the
jaws of a Jacquard loom.
Summary, and a Hacking Suggestion This chapter covers the entire explanation of how the Memory Puzzle program works. Read over
the chapter and the source code again to understand it better. Many of the other game programs in
this book make use of the same programming concepts (like nested for loops, syntactic sugar,

Chapter 3 – Memory Puzzle 75
and different coordinate systems in the same program) so they won’t be explained again to keep
this book short.
One idea to try out to understand how the code works is to intentionally break it by commenting
out random lines. Doing this to some of the lines will probably cause a syntactic error that will
prevent the script from running at all. But commenting out other lines will result in weird bugs
and other cool effects. Try doing this and then figure out why a program has the bugs it does.
This is also the first step in being able to add your own secret cheats or hacks to the program. By
breaking the program from what it normally does, you can learn how to change it to do something
neat effect (like secretly giving you hints on how to solve the puzzle). Feel free to experiment.
You can always save a copy of the unchanged source code in a different file if you want to play
the regular game again.
In fact, if you’d like some practice fixing bugs, there are several versions of this game’s source
code that have small bugs in them. You can download these buggy versions from
http://invpy.com/buggy/memorypuzzle. Try running the program to figure out what the bug is,
and why the program is acting that way.


Chapter 4 – Slide Puzzle 77
CHAPTER 4 – SLIDE PUZZLE
How to Play Slide Puzzle The board is a 4x4 grid with fifteen tiles (numbered 1 through 15 going left to right) and one
blank space. The tiles start out in random positions, and the player must slide tiles around until
the tiles are back in their original order.
Source Code to Slide Puzzle This source code can be downloaded from http://invpy.com/slidepuzzle.py. If you get any error
messages, look at the line number that is mentioned in the error message and check your code for
any typos. You can also copy and paste your code into the web form at
http://invpy.com/diff/slidepuzzle to see if the differences between your code and the code in the
book.
1. # Slide Puzzle
2. # By Al Sweigart [email protected]
3. # http://inventwithpython.com/pygame
4. # Creative Commons BY-NC-SA 3.0 US
5.
6. import pygame, sys, random
7. from pygame.locals import *
8.
9. # Create the constants (go ahead and experiment with different values)
10. BOARDWIDTH = 4 # number of columns in the board
11. BOARDHEIGHT = 4 # number of rows in the board
12. TILESIZE = 80

78 http://inventwithpython.com/pygame
Email questions to the author: [email protected]
13. WINDOWWIDTH = 640
14. WINDOWHEIGHT = 480
15. FPS = 30
16. BLANK = None
17.
18. # R G B
19. BLACK = ( 0, 0, 0)
20. WHITE = (255, 255, 255)
21. BRIGHTBLUE = ( 0, 50, 255)
22. DARKTURQUOISE = ( 3, 54, 73)
23. GREEN = ( 0, 204, 0)
24.
25. BGCOLOR = DARKTURQUOISE
26. TILECOLOR = GREEN
27. TEXTCOLOR = WHITE
28. BORDERCOLOR = BRIGHTBLUE
29. BASICFONTSIZE = 20
30.
31. BUTTONCOLOR = WHITE
32. BUTTONTEXTCOLOR = BLACK
33. MESSAGECOLOR = WHITE
34.
35. XMARGIN = int((WINDOWWIDTH - (TILESIZE * BOARDWIDTH + (BOARDWIDTH - 1))) /
2)
36. YMARGIN = int((WINDOWHEIGHT - (TILESIZE * BOARDHEIGHT + (BOARDHEIGHT -
1))) / 2)
37.
38. UP = 'up'
39. DOWN = 'down'
40. LEFT = 'left'
41. RIGHT = 'right'
42.
43. def main():
44. global FPSCLOCK, DISPLAYSURF, BASICFONT, RESET_SURF, RESET_RECT,
NEW_SURF, NEW_RECT, SOLVE_SURF, SOLVE_RECT
45.
46. pygame.init()
47. FPSCLOCK = pygame.time.Clock()
48. DISPLAYSURF = pygame.display.set_mode((WINDOWWIDTH, WINDOWHEIGHT))
49. pygame.display.set_caption('Slide Puzzle')
50. BASICFONT = pygame.font.Font('freesansbold.ttf', BASICFONTSIZE)
51.
52. # Store the option buttons and their rectangles in OPTIONS.
53. RESET_SURF, RESET_RECT = makeText('Reset', TEXTCOLOR, TILECOLOR,
WINDOWWIDTH - 120, WINDOWHEIGHT - 90)

Chapter 4 – Slide Puzzle 79
54. NEW_SURF, NEW_RECT = makeText('New Game', TEXTCOLOR, TILECOLOR,
WINDOWWIDTH - 120, WINDOWHEIGHT - 60)
55. SOLVE_SURF, SOLVE_RECT = makeText('Solve', TEXTCOLOR, TILECOLOR,
WINDOWWIDTH - 120, WINDOWHEIGHT - 30)
56.
57. mainBoard, solutionSeq = generateNewPuzzle(80)
58. SOLVEDBOARD = getStartingBoard() # a solved board is the same as the
board in a start state.
59. allMoves = [] # list of moves made from the solved configuration
60.
61. while True: # main game loop
62. slideTo = None # the direction, if any, a tile should slide
63. msg = '' # contains the message to show in the upper left corner.
64. if mainBoard == SOLVEDBOARD:
65. msg = 'Solved!'
66.
67. drawBoard(mainBoard, msg)
68.
69. checkForQuit()
70. for event in pygame.event.get(): # event handling loop
71. if event.type == MOUSEBUTTONUP:
72. spotx, spoty = getSpotClicked(mainBoard, event.pos[0],
event.pos[1])
73.
74. if (spotx, spoty) == (None, None):
75. # check if the user clicked on an option button
76. if RESET_RECT.collidepoint(event.pos):
77. resetAnimation(mainBoard, allMoves) # clicked on
Reset button
78. allMoves = []
79. elif NEW_RECT.collidepoint(event.pos):
80. mainBoard, solutionSeq = generateNewPuzzle(80) #
clicked on New Game button
81. allMoves = []
82. elif SOLVE_RECT.collidepoint(event.pos):
83. resetAnimation(mainBoard, solutionSeq + allMoves)
# clicked on Solve button
84. allMoves = []
85. else:
86. # check if the clicked tile was next to the blank spot
87.
88. blankx, blanky = getBlankPosition(mainBoard)
89. if spotx == blankx + 1 and spoty == blanky:
90. slideTo = LEFT
91. elif spotx == blankx - 1 and spoty == blanky:

80 http://inventwithpython.com/pygame
Email questions to the author: [email protected]
92. slideTo = RIGHT
93. elif spotx == blankx and spoty == blanky + 1:
94. slideTo = UP
95. elif spotx == blankx and spoty == blanky - 1:
96. slideTo = DOWN
97.
98. elif event.type == KEYUP:
99. # check if the user pressed a key to slide a tile
100. if event.key in (K_LEFT, K_a) and isValidMove(mainBoard,
LEFT):
101. slideTo = LEFT
102. elif event.key in (K_RIGHT, K_d) and
isValidMove(mainBoard, RIGHT):
103. slideTo = RIGHT
104. elif event.key in (K_UP, K_w) and isValidMove(mainBoard,
UP):
105. slideTo = UP
106. elif event.key in (K_DOWN, K_s) and isValidMove(mainBoard,
DOWN):
107. slideTo = DOWN
108.
109. if slideTo:
110. slideAnimation(mainBoard, slideTo, 'Click tile or press arrow
keys to slide.', 8) # show slide on screen
111. makeMove(mainBoard, slideTo)
112. allMoves.append(slideTo) # record the slide
113. pygame.display.update()
114. FPSCLOCK.tick(FPS)
115.
116.
117. def terminate():
118. pygame.quit()
119. sys.exit()
120.
121.
122. def checkForQuit():
123. for event in pygame.event.get(QUIT): # get all the QUIT events
124. terminate() # terminate if any QUIT events are present
125. for event in pygame.event.get(KEYUP): # get all the KEYUP events
126. if event.key == K_ESCAPE:
127. terminate() # terminate if the KEYUP event was for the Esc key
128. pygame.event.post(event) # put the other KEYUP event objects back
129.
130.
131. def getStartingBoard():
132. # Return a board data structure with tiles in the solved state.

Chapter 4 – Slide Puzzle 81
133. # For example, if BOARDWIDTH and BOARDHEIGHT are both 3, this function
134. # returns [[1, 4, 7], [2, 5, 8], [3, 6, None]]
135. counter = 1
136. board = []
137. for x in range(BOARDWIDTH):
138. column = []
139. for y in range(BOARDHEIGHT):
140. column.append(counter)
141. counter += BOARDWIDTH
142. board.append(column)
143. counter -= BOARDWIDTH * (BOARDHEIGHT - 1) + BOARDWIDTH - 1
144.
145. board[BOARDWIDTH-1][BOARDHEIGHT-1] = None
146. return board
147.
148.
149. def getBlankPosition(board):
150. # Return the x and y of board coordinates of the blank space.
151. for x in range(BOARDWIDTH)):
152. for y in range(BOARDHEIGHT):
153. if board[x][y] == None:
154. return (x, y)
155.
156.
157. def makeMove(board, move):
158. # This function does not check if the move is valid.
159. blankx, blanky = getBlankPosition(board)
160.
161. if move == UP:
162. board[blankx][blanky], board[blankx][blanky + 1] =
board[blankx][blanky + 1], board[blankx][blanky]
163. elif move == DOWN:
164. board[blankx][blanky], board[blankx][blanky - 1] =
board[blankx][blanky - 1], board[blankx][blanky]
165. elif move == LEFT:
166. board[blankx][blanky], board[blankx + 1][blanky] = board[blankx +
1][blanky], board[blankx][blanky]
167. elif move == RIGHT:
168. board[blankx][blanky], board[blankx - 1][blanky] = board[blankx -
1][blanky], board[blankx][blanky]
169.
170.
171. def isValidMove(board, move):
172. blankx, blanky = getBlankPosition(board)
173. return (move == UP and blanky != len(board[0]) - 1) or \
174. (move == DOWN and blanky != 0) or \

82 http://inventwithpython.com/pygame
Email questions to the author: [email protected]
175. (move == LEFT and blankx != len(board) - 1) or \
176. (move == RIGHT and blankx != 0)
177.
178.
179. def getRandomMove(board, lastMove=None):
180. # start with a full list of all four moves
181. validMoves = [UP, DOWN, LEFT, RIGHT]
182.
183. # remove moves from the list as they are disqualified
184. if lastMove == UP or not isValidMove(board, DOWN):
185. validMoves.remove(DOWN)
186. if lastMove == DOWN or not isValidMove(board, UP):
187. validMoves.remove(UP)
188. if lastMove == LEFT or not isValidMove(board, RIGHT):
189. validMoves.remove(RIGHT)
190. if lastMove == RIGHT or not isValidMove(board, LEFT):
191. validMoves.remove(LEFT)
192.
193. # return a random move from the list of remaining moves
194. return random.choice(validMoves)
195.
196.
197. def getLeftTopOfTile(tileX, tileY):
198. left = XMARGIN + (tileX * TILESIZE) + (tileX - 1)
199. top = YMARGIN + (tileY * TILESIZE) + (tileY - 1)
200. return (left, top)
201.
202.
203. def getSpotClicked(board, x, y):
204. # from the x & y pixel coordinates, get the x & y board coordinates
205. for tileX in range(len(board)):
206. for tileY in range(len(board[0])):
207. left, top = getLeftTopOfTile(tileX, tileY)
208. tileRect = pygame.Rect(left, top, TILESIZE, TILESIZE)
209. if tileRect.collidepoint(x, y):
210. return (tileX, tileY)
211. return (None, None)
212.
213.
214. def drawTile(tilex, tiley, number, adjx=0, adjy=0):
215. # draw a tile at board coordinates tilex and tiley, optionally a few
216. # pixels over (determined by adjx and adjy)
217. left, top = getLeftTopOfTile(tilex, tiley)
218. pygame.draw.rect(DISPLAYSURF, TILECOLOR, (left + adjx, top + adjy,
TILESIZE, TILESIZE))
219. textSurf = BASICFONT.render(str(number), True, TEXTCOLOR)

Chapter 4 – Slide Puzzle 83
220. textRect = textSurf.get_rect()
221. textRect.center = left + int(TILESIZE / 2) + adjx, top + int(TILESIZE
/ 2) + adjy
222. DISPLAYSURF.blit(textSurf, textRect)
223.
224.
225. def makeText(text, color, bgcolor, top, left):
226. # create the Surface and Rect objects for some text.
227. textSurf = BASICFONT.render(text, True, color, bgcolor)
228. textRect = textSurf.get_rect()
229. textRect.topleft = (top, left)
230. return (textSurf, textRect)
231.
232.
233. def drawBoard(board, message):
234. DISPLAYSURF.fill(BGCOLOR)
235. if message:
236. textSurf, textRect = makeText(message, MESSAGECOLOR, BGCOLOR, 5,
5)
237. DISPLAYSURF.blit(textSurf, textRect)
238.
239. for tilex in range(len(board)):
240. for tiley in range(len(board[0])):
241. if board[tilex][tiley]:
242. drawTile(tilex, tiley, board[tilex][tiley])
243.
244. left, top = getLeftTopOfTile(0, 0)
245. width = BOARDWIDTH * TILESIZE
246. height = BOARDHEIGHT * TILESIZE
247. pygame.draw.rect(DISPLAYSURF, BORDERCOLOR, (left - 5, top - 5, width +
11, height + 11), 4)
248.
249. DISPLAYSURF.blit(RESET_SURF, RESET_RECT)
250. DISPLAYSURF.blit(NEW_SURF, NEW_RECT)
251. DISPLAYSURF.blit(SOLVE_SURF, SOLVE_RECT)
252.
253.
254. def slideAnimation(board, direction, message, animationSpeed):
255. # Note: This function does not check if the move is valid.
256.
257. blankx, blanky = getBlankPosition(board)
258. if direction == UP:
259. movex = blankx
260. movey = blanky + 1
261. elif direction == DOWN:
262. movex = blankx

84 http://inventwithpython.com/pygame
Email questions to the author: [email protected]
263. movey = blanky - 1
264. elif direction == LEFT:
265. movex = blankx + 1
266. movey = blanky
267. elif direction == RIGHT:
268. movex = blankx - 1
269. movey = blanky
270.
271. # prepare the base surface
272. drawBoard(board, message)
273. baseSurf = DISPLAYSURF.copy()
274. # draw a blank space over the moving tile on the baseSurf Surface.
275. moveLeft, moveTop = getLeftTopOfTile(movex, movey)
276. pygame.draw.rect(baseSurf, BGCOLOR, (moveLeft, moveTop, TILESIZE,
TILESIZE))
277.
278. for i in range(0, TILESIZE, animationSpeed):
279. # animate the tile sliding over
280. checkForQuit()
281. DISPLAYSURF.blit(baseSurf, (0, 0))
282. if direction == UP:
283. drawTile(movex, movey, board[movex][movey], 0, -i)
284. if direction == DOWN:
285. drawTile(movex, movey, board[movex][movey], 0, i)
286. if direction == LEFT:
287. drawTile(movex, movey, board[movex][movey], -i, 0)
288. if direction == RIGHT:
289. drawTile(movex, movey, board[movex][movey], i, 0)
290.
291. pygame.display.update()
292. FPSCLOCK.tick(FPS)
293.
294.
295. def generateNewPuzzle(numSlides):
296. # From a starting configuration, make numSlides number of moves (and
297. # animate these moves).
298. sequence = []
299. board = getStartingBoard()
300. drawBoard(board, '')
301. pygame.display.update()
302. pygame.time.wait(500) # pause 500 milliseconds for effect
303. lastMove = None
304. for i in range(numSlides):
305. move = getRandomMove(board, lastMove)
306. slideAnimation(board, move, 'Generating new puzzle...',
int(TILESIZE / 3))

Chapter 4 – Slide Puzzle 85
307. makeMove(board, move)
308. sequence.append(move)
309. lastMove = move
310. return (board, sequence)
311.
312.
313. def resetAnimation(board, allMoves):
314. # make all of the moves in allMoves in reverse.
315. revAllMoves = allMoves[:] # gets a copy of the list
316. revAllMoves.reverse()
317.
318. for move in revAllMoves:
319. if move == UP:
320. oppositeMove = DOWN
321. elif move == DOWN:
322. oppositeMove = UP
323. elif move == RIGHT:
324. oppositeMove = LEFT
325. elif move == LEFT:
326. oppositeMove = RIGHT
327. slideAnimation(board, oppositeMove, '', int(TILESIZE / 2))
328. makeMove(board, oppositeMove)
329.
330.
331. if __name__ == '__main__':
332. main()
Second Verse, Same as the First Much of the code in Wormy is similar to the previous games we’ve looked at, especially the
constants being set at the start of the code.
1. # Slide Puzzle
2. # By Al Sweigart [email protected]
3. # http://inventwithpython.com/pygame
4. # Creative Commons BY-NC-SA 3.0 US
5.
6. import pygame, sys, random
7. from pygame.locals import *
8.
9. # Create the constants (go ahead and experiment with different values)
10. BOARDWIDTH = 4 # number of columns in the board
11. BOARDHEIGHT = 4 # number of rows in the board
12. TILESIZE = 80
13. WINDOWWIDTH = 640

86 http://inventwithpython.com/pygame
Email questions to the author: [email protected]
14. WINDOWHEIGHT = 480
15. FPS = 30
16. BLANK = None
17.
18. # R G B
19. BLACK = ( 0, 0, 0)
20. WHITE = (255, 255, 255)
21. BRIGHTBLUE = ( 0, 50, 255)
22. DARKTURQUOISE = ( 3, 54, 73)
23. GREEN = ( 0, 204, 0)
24.
25. BGCOLOR = DARKTURQUOISE
26. TILECOLOR = GREEN
27. TEXTCOLOR = WHITE
28. BORDERCOLOR = BRIGHTBLUE
29. BASICFONTSIZE = 20
30.
31. BUTTONCOLOR = WHITE
32. BUTTONTEXTCOLOR = BLACK
33. MESSAGECOLOR = WHITE
34.
35. XMARGIN = int((WINDOWWIDTH - (TILESIZE * BOARDWIDTH + (BOARDWIDTH - 1))) /
2)
36. YMARGIN = int((WINDOWHEIGHT - (TILESIZE * BOARDHEIGHT + (BOARDHEIGHT -
1))) / 2)
37.
38. UP = 'up'
39. DOWN = 'down'
40. LEFT = 'left'
41. RIGHT = 'right'
This code at the top of the program just handles all the basic importing of modules and creating
constants. This is just like the beginning of the Memory Puzzle game from the last chapter.
Setting Up the Buttons
43. def main():
44. global FPSCLOCK, DISPLAYSURF, BASICFONT, RESET_SURF, RESET_RECT,
NEW_SURF, NEW_RECT, SOLVE_SURF, SOLVE_RECT
45.
46. pygame.init()
47. FPSCLOCK = pygame.time.Clock()
48. DISPLAYSURF = pygame.display.set_mode((WINDOWWIDTH, WINDOWHEIGHT))
49. pygame.display.set_caption('Slide Puzzle')
50. BASICFONT = pygame.font.Font('freesansbold.ttf', BASICFONTSIZE)
51.

Chapter 4 – Slide Puzzle 87
52. # Store the option buttons and their rectangles in OPTIONS.
53. RESET_SURF, RESET_RECT = makeText('Reset', TEXTCOLOR, TILECOLOR,
WINDOWWIDTH - 120, WINDOWHEIGHT - 90)
54. NEW_SURF, NEW_RECT = makeText('New Game', TEXTCOLOR, TILECOLOR,
WINDOWWIDTH - 120, WINDOWHEIGHT - 60)
55. SOLVE_SURF, SOLVE_RECT = makeText('Solve', TEXTCOLOR, TILECOLOR,
WINDOWWIDTH - 120, WINDOWHEIGHT - 30)
56.
57. mainBoard, solutionSeq = generateNewPuzzle(80)
58. SOLVEDBOARD = getStartingBoard() # a solved board is the same as the
board in a start state.
Just like in the last chapter, the functions called from the main() function calls will be
explained later in the chapter. For now, you just need to know what they do and what values they
return. You don’t need to know how they work.
The first part of the main() function will handle creating the window, Clock object, and Font
object. The makeText() function is defined later in the program, but for now you just need to
know that it returns a pygame.Surface object and pygame.Rect object which can be used
to make clickable buttons. The Slide Puzzle game will have three buttons: a ―Reset‖ button that
will undo any moves the player has made, a ―New‖ button that will create a new slide puzzle, and
a ―Solve‖ button that will solve the puzzle for the player.
We will need to have two board data structures for this program. One board will represent the
current game state. The other board will have its tiles in the ―solved‖ state, meaning that all the
tiles are lined up in order. When the current game state’s board is exactly the same as the solved
board, then we know the player has won. (We won’t ever change this second one. It’ll just be
there to compare the current game state board to.)
The generateNewPuzzle() will create a board data structure that started off in the ordered,
solved state and then had 80 random slide moves performed on it (because we passed the integer
80 to it. If we want the board to be even more jumbled, then we can pass a larger integer to it).
This will make the board into a randomly jumbled state that the player will have to solve (which
will be stored in a variable named mainBoard). The generateNewBoard() also returns a
list of all the random moves that were performed on it (which will be stored in a variable named
solutionSeq).
Being Smart By Using Stupid Code
59. allMoves = [] # list of moves made from the solved configuration

88 http://inventwithpython.com/pygame
Email questions to the author: [email protected]
Solving a slide puzzle can be really tricky. We could program the computer to do it, but that
would require us to figure out an algorithm that can solve the slide puzzle. That would be very
difficult and involve a lot of cleverness and effort to put into this program.
Fortunately, there’s an easier way. We could just have the computer memorize all the random
slides it made when it created the board data structure, and then the board can be solved just by
performing the opposite slide. Since the board originally started in the solved state, undoing all
the slides would return it to the solved state.
For example, below we perform a ―right‖ slide on the board on the left side of the page, which
leaves the board in the state that is on the right side of the page:
After the right slide, if we do the opposite slide (a left slide) then the board will be back in the
original state. So to get back to the original state after several slides, we just have to do the
opposite slides in reverse order. If we did a right slide, then another right slide, then a down slide,
we would have to do an up slide, left slide, and left slide to undo those first three slides. This is
much easier than writing a function that can solve these puzzles simply by looking at the current
state of them.
The Main Game Loop
61. while True: # main game loop
62. slideTo = None # the direction, if any, a tile should slide
63. msg = '' # contains the message to show in the upper left corner.
64. if mainBoard == SOLVEDBOARD:
65. msg = 'Solved!'
66.
67. drawBoard(mainBoard, msg)
In the main game loop, the slideTo variable will track which direction the player wants to slide
a tile (it starts off at the beginning of the game loop as None and is set later) and the msg
variable tracks what string to display at the top of the window. The program does a quick check
on line 64 to see if the board data structure has the same value as the solved board data structure
stored in SOLVEDBOARD. If so, then the msg variable is changed to the string 'Solved!'.

Chapter 4 – Slide Puzzle 89
This won’t appear on the screen until drawBoard() has been called to draw it to the
DISPLAYSURF Surface object (which is done on line 67) and pygame.display.update()
is called to draw the display Surface object on the actual computer screen (which is done on line
291 at the end of the game loop).
Clicking on the Buttons
69. checkForQuit()
70. for event in pygame.event.get(): # event handling loop
71. if event.type == MOUSEBUTTONUP:
72. spotx, spoty = getSpotClicked(mainBoard, event.pos[0],
event.pos[1])
73.
74. if (spotx, spoty) == (None, None):
75. # check if the user clicked on an option button
76. if RESET_RECT.collidepoint(event.pos):
77. resetAnimation(mainBoard, allMoves) # clicked on
Reset button
78. allMoves = []
79. elif NEW_RECT.collidepoint(event.pos):
80. mainBoard, solutionSeq = generateNewPuzzle(80) #
clicked on New Game button
81. allMoves = []
82. elif SOLVE_RECT.collidepoint(event.pos):
83. resetAnimation(mainBoard, solutionSeq + allMoves)
# clicked on Solve button
84. allMoves = []
Before going into the event loop, the program calls checkForQuit() on line 69 to see if any
QUIT events have been created (and terminates the program if there have). Why we have a
separate function (the checkForQuit() function) for handling the QUIT events will be
explained later. The for loop on line 70 executes the event handling code for any other event
created since the last time pygame.event.get() was called (or since the program started, if
pygame.event.get() has never been called before).
If the type of event was a MOUSEBUTTONUP event (that is, the player had released a mouse
button somewhere over the window), then we pass the mouse coordinates to our
getSpotClicked() function which will return the board coordinates of the spot on the board
the mouse release happened. The event.pos[0] is the X coordinate and event.pos[1] is
the Y coordinate.
If the mouse button release did not happen over one of the spaces on the board (but obviously still
happened somewhere on the window, since a MOUSEBUTTONUP event was created), then
getSpotClicked() will return None. If this is the case, we want to do an additional check to

90 http://inventwithpython.com/pygame
Email questions to the author: [email protected]
see if the player might have clicked on the Reset, New, or Solve buttons (which are not located on
the board).
The coordinates of where these buttons are on the window are stored in the pygame.Rect
objects that are stored in the RESET_RECT, NEW_RECT, and SOLVE_RECT variables. We can
pass the mouse coordinates from the Event object to the collidepoint() method. This
method will return True if the mouse coordinates are within the Rect object’s area and False
otherwise.
Sliding Tiles with the Mouse
85. else:
86. # check if the clicked tile was next to the blank spot
87.
88. blankx, blanky = getBlankPosition(mainBoard)
89. if spotx == blankx + 1 and spoty == blanky:
90. slideTo = LEFT
91. elif spotx == blankx - 1 and spoty == blanky:
92. slideTo = RIGHT
93. elif spotx == blankx and spoty == blanky + 1:
94. slideTo = UP
95. elif spotx == blankx and spoty == blanky - 1:
96. slideTo = DOWN
If getSpotClicked() did not return (None, None), then it will have returned a tuple of
two integer values that represent the X and Y coordinate of the spot on the board that was clicked.
Then the if and elif statements on lines 89 to 96 check if the spot that was clicked is a tile that
is next to the blank spot (otherwise the tile will have no place to slide).
Our getBlankPosition() function will take the board data structure and return the X and Y
board coordinates of the blank spot, which we store in the variables blankx and blanky. If the
spot the user clicked on was next to the blank space, we set the slideTo variable with the value
that the tile should slide.
Sliding Tiles with the Keyboard
98. elif event.type == KEYUP:
99. # check if the user pressed a key to slide a tile
100. if event.key in (K_LEFT, K_a) and isValidMove(mainBoard,
LEFT):
101. slideTo = LEFT
102. elif event.key in (K_RIGHT, K_d) and
isValidMove(mainBoard, RIGHT):
103. slideTo = RIGHT

Chapter 4 – Slide Puzzle 91
104. elif event.key in (K_UP, K_w) and isValidMove(mainBoard,
UP):
105. slideTo = UP
106. elif event.key in (K_DOWN, K_s) and isValidMove(mainBoard,
DOWN):
107. slideTo = DOWN
We can also let the user slide tiles by pressing keyboard keys. The if and elif statements on
lines 100 to 107 let the user set the slideTo variable by either pressing the arrow keys or the
WASD keys (explained later). Each if and elif statement also has a call to isValidMove()
to make sure that the tile can slide in that direction. (We didn’t have to make this call with the
mouse clicks because the checks for the neighboring blank space did the same thing.)
“Equal To One Of” Trick with the in Operator The expression event.key in (K_LEFT, K_a) is just a Python trick to make the code
simpler. It is a way of saying ―evaluate to True if event.key is equal to one of K_LEFT or
K_a‖. The following two expressions will evaluate the exact same way:
event.key in (K_LEFT, K_a)
event.key == K_LEFT or event.key == K_a
You can really save on some space by using this trick when you have to check if a value is equal
to one of multiple values. The following two expressions will evaluate the exact same way:
spam == 'dog' or spam == 'cat' or spam == 'mouse' or spam == 'horse' or spam ==
42 or spam == 'dingo'
spam in ('dog', 'cat', 'mouse', 'horse', 42, 'dingo')
WASD and Arrow Keys The W, A, S, and D keys (together called the WASD keys, pronounced ―waz-dee‖) are
commonly used in computer games to do the same thing as the arrow keys, except the player can
use their left hand instead (since the WASD keys are on the left side of the keyboard). W is for
up, A is for left, S is for down, and D is for right. You can easily remember this because the
WASD keys have the same layout as the arrow keys:

92 http://inventwithpython.com/pygame
Email questions to the author: [email protected]
Actually Performing the Tile Slide
109. if slideTo:
110. slideAnimation(mainBoard, slideTo, 'Click tile or press arrow
keys to slide.', 8) # show slide on screen
111. makeMove(mainBoard, slideTo)
112. allMoves.append(slideTo) # record the slide
113. pygame.display.update()
114. FPSCLOCK.tick(FPS)
Now that the events have all been handled, we should update the variables of the game state and
display the new state on the screen. If slideTo has been set (either by the mouse event or
keyboard event handling code) then we can call slideAnimation() to perform the sliding
animation. The parameters are the board data structure, the direction of the slide, a message to
display while sliding the tile, and the speed of the sliding.
After it returns, we need to update the actual board data structure (which is done by the
makeMove() function) and then add the slide to the allMoves list of all the slides made so
far. This is done so that if the player clicks on the ―Reset‖ button, we know how to undo all the
player’s slides.
IDLE and Terminating Pygame Programs
117. def terminate():
118. pygame.quit()
119. sys.exit()
This is a function that we can call that calls both the pygame.quit() and sys.exit()
functions. This is a bit of syntactic sugar, so that instead of remembering to make both of these
calls, there is just a single function we can call instead.
Checking for a Specific Event, and Posting Events to Pygame’s Event
Queue
122. def checkForQuit():
123. for event in pygame.event.get(QUIT): # get all the QUIT events
124. terminate() # terminate if any QUIT events are present

Chapter 4 – Slide Puzzle 93
125. for event in pygame.event.get(KEYUP): # get all the KEYUP events
126. if event.key == K_ESCAPE:
127. terminate() # terminate if the KEYUP event was for the Esc key
128. pygame.event.post(event) # put the other KEYUP event objects back
The checkForQuit() function will check for QUIT events (or if the user has pressed the Esc
key) and then call the terminate() function. But this is a bit tricky and requires some
explanation.
Pygame internally has its own list data structure that it creates and appends Event objects to as
they are made. This data structure is called the event queue. When the
pygame.event.get() function is called with no parameters, the entire list is returned.
However, you can pass a constant like QUIT to pygame.event.get() so that it will only
return the QUIT events (if any) that are in the internal event queue. The rest of the events will
stay in the event queue for the next time pygame.event.get() is called.
You should note that Pygame’s event queue only stores up to 127 Event objects. If your program
does not call pygame.event.get() frequently enough and the queue fills up, then any new
events that happen won’t be added to the event queue.
Line 123 pulls out a list of QUIT events from Pygame’s event queue and returns them. If there
are any QUIT events in the event queue, the program terminates.
Line 125 pulls out all the KEYUP events from the event queue and checks if any of them are for
the Esc key. If one of the events is, then the program terminates. However, there could be KEYUP
events for keys other than the Esc key. In this case, we need to put the KEYUP event back into
Pygame’s event queue. We can do this with the pygame.event.post() function, which adds
the Event object passed to it to the end of the Pygame event queue. This way, when line 70 calls
pygame.event.get() the non-Esc key KEYUP events will still be there. Otherwise calls to
checkForQuit() would ―consume‖ all of the KEYUP events and those events would never be
handled.
The pygame.event.post() function is also handy if you ever want your program to add
Event objects to the Pygame event queue.
Creating the Board Data Structure
131. def getStartingBoard():
132. # Return a board data structure with tiles in the solved state.
133. # For example, if BOARDWIDTH and BOARDHEIGHT are both 3, this function
134. # returns [[1, 4, 7], [2, 5, 8], [3, 6, None]]
135. counter = 1

94 http://inventwithpython.com/pygame
Email questions to the author: [email protected]
136. board = []
137. for x in range(BOARDWIDTH):
138. column = []
139. for y in range(BOARDHEIGHT):
140. column.append(counter)
141. counter += BOARDWIDTH
142. board.append(column)
143. counter -= BOARDWIDTH * (BOARDHEIGHT - 1) + BOARDWIDTH - 1
144.
145. board[BOARDWIDTH-1][BOARDHEIGHT-1] = None
146. return board
The getStartingBoard() data structure will create and return a data structure that
represents a ―solved‖ board, where all the numbered tiles are in order and the blank tile is in the
lower right corner. This is done with nested for loops, just like the board data structure in the
Memory Puzzle game was made.
However, notice that the first column isn’t going to be [1, 2, 3] but instead [1, 4, 7].
This is because the numbers on the tiles increase by 1 going across the row, not down the column.
Going down the column, the numbers increase by the size of the board’s width (which is stored in
the BOARDWIDTH constant). We will use the counter variable to keep track of the number that
should go on the next tile. When the numbering of the tiles in the column is finished, then we
need to set counter to the number at the start of the next column.
Not Tracking the Blank Position
149. def getBlankPosition(board):
150. # Return the x and y of board coordinates of the blank space.
151. for x in range(BOARDWIDTH)):
152. for y in range(BOARDHEIGHT):
153. if board[x][y] == None:
154. return (x, y)
Whenever our code needs to find the XY coordinates of the blank space, instead of keeping track
of where the blank space is after each slide, we can just create a function that goes through the
entire board and finds the blank space coordinates. The None value is used in the board data
structure to represent the blank space. The code in getBlankPosition() simply uses nested
for loops to find which space on the board is the blank space.
Making a Move by Updating the Board Data Structure
157. def makeMove(board, move):
158. # This function does not check if the move is valid.

Chapter 4 – Slide Puzzle 95
159. blankx, blanky = getBlankPosition(board)
160.
161. if move == UP:
162. board[blankx][blanky], board[blankx][blanky + 1] =
board[blankx][blanky + 1], board[blankx][blanky]
163. elif move == DOWN:
164. board[blankx][blanky], board[blankx][blanky - 1] =
board[blankx][blanky - 1], board[blankx][blanky]
165. elif move == LEFT:
166. board[blankx][blanky], board[blankx + 1][blanky] = board[blankx +
1][blanky], board[blankx][blanky]
167. elif move == RIGHT:
168. board[blankx][blanky], board[blankx - 1][blanky] = board[blankx -
1][blanky], board[blankx][blanky]
The data structure in the board parameter is a 2D list that represents where all the tiles are.
Whenever the player makes a move, the program needs to update this data structure. What
happens is that the value for the tile is swapped with the value for the blank space.
The makeMove() function doesn’t have to return any values, because the board parameter has
a list reference passed for its argument. This means that any changes we make to board in this
function will be made to the list value that was passed to makeMove(). (You can review the
concept of references at http://invpy.com/references.)
When NOT to Use an Assertion
171. def isValidMove(board, move):
172. blankx, blanky = getBlankPosition(board)
173. return (move == UP and blanky != len(board[0]) - 1) or \
174. (move == DOWN and blanky != 0) or \
175. (move == LEFT and blankx != len(board) - 1) or \
176. (move == RIGHT and blankx != 0)
The isValidMove() function is passed a board data structure and a move the player would
want to make. The return value is True if this move is possible and False if it is not. For
example, you cannot slide a tile to the left one hundred times in a row, because eventually the
blank space will be at the edge and there are no more tiles to slide to the left.
Whether a move is valid or not depends on where the blank space is. This function makes a call to
getBlankPosition() to find the X and Y coordinates of the blank spot. Lines 173 to 176
are a return statement with a single expression. The \ slashes at the end of the first three lines
tells the Python interpreter that that is not the end of the line of code (even though it is at the end

96 http://inventwithpython.com/pygame
Email questions to the author: [email protected]
of the line). This will let us split up a ―line of code‖ across multiple lines to look pretty, rather
than just have one very long unreadable line.
Because the parts of this expression in parentheses are joined by or operators, only one of them
needs to be True for the entire expression to be True. Each of these parts checks what the
intended move is and then sees if the coordinate of the blank space allows that move.
Getting a Not-So-Random Move
179. def getRandomMove(board, lastMove=None):
180. # start with a full list of all four moves
181. validMoves = [UP, DOWN, LEFT, RIGHT]
182.
183. # remove moves from the list as they are disqualified
184. if lastMove == UP or not isValidMove(board, DOWN):
185. validMoves.remove(DOWN)
186. if lastMove == DOWN or not isValidMove(board, UP):
187. validMoves.remove(UP)
188. if lastMove == LEFT or not isValidMove(board, RIGHT):
189. validMoves.remove(RIGHT)
190. if lastMove == RIGHT or not isValidMove(board, LEFT):
191. validMoves.remove(LEFT)
192.
193. # return a random move from the list of remaining moves
194. return random.choice(validMoves)
At the beginning of the game, we start with the board data structure in the solved, ordered state
and create the puzzle by randomly sliding around tiles. To decide which of the four directions we
should slide, we’ll call our getRandomMove() function. Normally we could just use the
random.choice() function and pass it a tuple (UP, DOWN, LEFT, RIGHT) to have
Python simply randomly choose a direction value for us. But the Sliding Puzzle game has a small
restriction that prevents us from choosing a purely random number.
If you had a slide puzzle and slid a tile to left, and then slid a tile to the right, you would end up
with the exact same board you had at the start. It’s pointless to make a slide followed by the
opposite slide. Also, if the blank space is in the lower right corner than it is impossible to slide a
tile up or to the left.
The code in getRandomMove() will take these factors into account. To prevent the function
from selecting the last move that was made, the caller of the function can pass a directional value
for the lastMove parameter. Line 181 starts with a list of all four directional values stored in
the validMoves variable. The lastMove value (if not set to None) is removed from

Chapter 4 – Slide Puzzle 97
validMoves. Depending on if the blank space is at the edge of the board, lines 184 to 191 will
remove other directional values from the lastMove list.
Of the values that are left in lastMove, one of them is randomly selected with a call to
random.choice() and returned.
Converting Tile Coordinates to Pixel Coordinates
197. def getLeftTopOfTile(tileX, tileY):
198. left = XMARGIN + (tileX * TILESIZE) + (tileX - 1)
199. top = YMARGIN + (tileY * TILESIZE) + (tileY - 1)
200. return (left, top)
The getLeftTopOfTile() function converts board coordinates to pixel coordinates. For the
board XY coordinates that are passed in, the function calculates and returns the pixel XY
coordinates of the pixel at the top left of that board space.
Converting from Pixel Coordinates to Board Coordinates
203. def getSpotClicked(board, x, y):
204. # from the x & y pixel coordinates, get the x & y board coordinates
205. for tileX in range(len(board)):
206. for tileY in range(len(board[0])):
207. left, top = getLeftTopOfTile(tileX, tileY)
208. tileRect = pygame.Rect(left, top, TILESIZE, TILESIZE)
209. if tileRect.collidepoint(x, y):
210. return (tileX, tileY)
211. return (None, None)
The getSpotClicked() function does the opposite of getLeftTopOfTile() and
converts from pixel coordinates to board coordinates. The nested loops on lines 205 and 206 go
through every possible XY board coordinate, and if the pixel coordinates that were passed in are
within that space on the board, it returns those board coordinates. Since all of the tiles have a
width and height that is set in the TILESIZE constant, we can create a Rect object that
represents the space on the board by getting the pixel coordinates of the top left corner of the
board space, and then use the collidepoint() Rect method to see if the pixel coordinates are
inside that Rect object’s area.
If the pixel coordinates that were passed in were not over any board space, then the value
(None, None) is returned.
Drawing a Tile
214. def drawTile(tilex, tiley, number, adjx=0, adjy=0):

98 http://inventwithpython.com/pygame
Email questions to the author: [email protected]
215. # draw a tile at board coordinates tilex and tiley, optionally a few
216. # pixels over (determined by adjx and adjy)
217. left, top = getLeftTopOfTile(tilex, tiley)
218. pygame.draw.rect(DISPLAYSURF, TILECOLOR, (left + adjx, top + adjy,
TILESIZE, TILESIZE))
219. textSurf = BASICFONT.render(str(number), True, TEXTCOLOR)
220. textRect = textSurf.get_rect()
221. textRect.center = left + int(TILESIZE / 2) + adjx, top + int(TILESIZE
/ 2) + adjy
222. DISPLAYSURF.blit(textSurf, textRect)
The drawTile() function will draw a single numbered tile on the board. The tilex and
tiley parameters are the board coordinates of the tile. The number parameter is a string of the
tile’s number (like '3' or '12'). The adjx and adjy keyword parameters are for making
minor adjustments to the position of the tile. For example, passing 5 for adjx would make the
tile appear 5 pixels to the right of the tilex and tiley space on the board. Passing -10 for
adjx would make the tile appear 10 pixels to the left of the space.
These adjustment values will be handy when we need to draw the tile in the middle of sliding. If
no values are passed for these arguments when drawTile() is called, then by default they are
set to 0. This means they will be exactly on the board space given by tilex and tiley.
The Pygame drawing functions only use pixel coordinates, so first line 217 converts the board
coordinates in tilex and tiley to pixel coordinates, which we will store in variables left
and top (since getLeftTopOfTile() returns the top left corner’s coordinates). We draw the
background square of the tile with a call to pygame.draw.rect() while adding the adjx
and adjy values to left and top in case the code needs to adjust the position of the tile.
Lines 219 to 222 then create the Surface object that has the number text drawn on it. A Rect
object for the Surface object is positioned, and then used to blit the Surface object to the display
Surface. The drawTile() function doesn’t call pygame.display.update() function,
since the caller of drawTile() probably will want to draw more tiles for the rest of the board
before making them appear on the screen.
The Making Text Appear on the Screen
225. def makeText(text, color, bgcolor, top, left):
226. # create the Surface and Rect objects for some text.
227. textSurf = BASICFONT.render(text, True, color, bgcolor)
228. textRect = textSurf.get_rect()
229. textRect.topleft = (top, left)
230. return (textSurf, textRect)

Chapter 4 – Slide Puzzle 99
The makeText() function handles creating the Surface and Rect objects for positioning text on
the screen. Instead of doing all these calls each time we want to make text on the screen, we can
just call makeText() instead. This saves us on the amount of typing we have to do for our
program. (Though drawTile() makes the calls to render() and get_rect() itself
because it positions the text Surface object by the center point rather than the topleft point and
uses a transparent background color.)
Drawing the Board
233. def drawBoard(board, message):
234. DISPLAYSURF.fill(BGCOLOR)
235. if message:
236. textSurf, textRect = makeText(message, MESSAGECOLOR, BGCOLOR, 5,
5)
237. DISPLAYSURF.blit(textSurf, textRect)
238.
239. for tilex in range(len(board)):
240. for tiley in range(len(board[0])):
241. if board[tilex][tiley]:
242. drawTile(tilex, tiley, board[tilex][tiley])
This function handles drawing the entire board and all of its tiles to the DISPLAYSURF display
Surface object. The fill() method on line 234 completely paints over anything that used to be
drawn on the display Surface object before so that we start from scratch.
Line 235 to 237 handles drawing the message at the top of the window. We use this for the
―Generating new puzzle…‖ and other text we want to display at the top of the window.
Remember that if statement conditions consider the blank string to be a False value, so if
message is set to '' then the condition is False and lines 236 and 237 are skipped.
Next, nested for loops are used to draw each tile to the display Surface object by calling the
drawTile() function.
Drawing the Border of the Board
244. left, top = getLeftTopOfTile(0, 0)
245. width = BOARDWIDTH * TILESIZE
246. height = BOARDHEIGHT * TILESIZE
247. pygame.draw.rect(DISPLAYSURF, BORDERCOLOR, (left - 5, top - 5, width +
11, height + 11), 4)
Lines 244 to 247 draw a border around the tiles. The top left corner of the boarder will be 5 pixels
to the left and 5 pixels above the top left corner of the tile at board coordinates (0, 0). The width
and height of the border are calculated from the number of tiles wide and high the board is (stored

100 http://inventwithpython.com/pygame
Email questions to the author: [email protected]
in the BOARDWIDTH and BOARDHEIGHT constants) multiplied by the size of the tiles (stored in
the TILESIZE constant).
The rectangle we draw on line 247 will have a thickness of 4 pixels, so we will move the boarder
5 pixels to the left and above where the top and left variables point so the thickness of the line
won’t overlap the tiles. We will also add 11 to the width and length (5 of those 11 pixels are to
compensate for moving the rectangle to the left and up).
Drawing the Buttons
249. DISPLAYSURF.blit(RESET_SURF, RESET_RECT)
250. DISPLAYSURF.blit(NEW_SURF, NEW_RECT)
251. DISPLAYSURF.blit(SOLVE_SURF, SOLVE_RECT)
Finally, we draw the buttons off to the slide of the screen. The text and position of these buttons
never changes, which is why they were stored in constant variables at the beginning of the
main() function.
Animating the Tile Slides
254. def slideAnimation(board, direction, message, animationSpeed):
255. # Note: This function does not check if the move is valid.
256.
257. blankx, blanky = getBlankPosition(board)
258. if direction == UP:
259. movex = blankx
260. movey = blanky + 1
261. elif direction == DOWN:
262. movex = blankx
263. movey = blanky - 1
264. elif direction == LEFT:
265. movex = blankx + 1
266. movey = blanky
267. elif direction == RIGHT:
268. movex = blankx - 1
269. movey = blanky
The first thing our tile sliding animation code needs to calculate is where the blank space is and
where the moving tile is. The comment on line 255 reminds us that the code that calls
slideAnimation() should make sure that the slide it passes for the direction parameter is a
valid move to make.

Chapter 4 – Slide Puzzle 101
The blank space’s coordinates come from a call to getBlankPosition(). From these
coordinates and the direction of the slide, we can figure out the XY board coordinates of the tile
that will slide. These coordinates will be stored in the movex and movey variables.
The copy() Surface Method
271. # prepare the base surface
272. drawBoard(board, message)
273. baseSurf = DISPLAYSURF.copy()
274. # draw a blank space over the moving tile on the baseSurf Surface.
275. moveLeft, moveTop = getLeftTopOfTile(movex, movey)
276. pygame.draw.rect(baseSurf, BGCOLOR, (moveLeft, moveTop, TILESIZE,
TILESIZE))
The copy() method of Surface objects will return a new Surface object that has the same image
drawn to it. But they are two separate Surface objects. After calling the copy() method, if we
draw on one Surface object using blit() or the Pygame drawing functions, it will not change
the image on the other Surface object. We store this copy in the baseSurf variable on line 273.
Next, we paint another blank space over the tile that will slide. This is because when we draw
each frame of the sliding animation, we will draw the sliding tile over different parts of the
baseSurf Surface object. If we didn’t blank out the moving tile on the baseSurf Surface,
then it would still be there as we draw the sliding tile. In that case, here is what the baseSurf
Surface would look like:
And then what it would look like when we draw the ―9‖ tile sliding upwards on top of it:

102 http://inventwithpython.com/pygame
Email questions to the author: [email protected]
You can see this for yourself by commenting out line 276 and running the program.
278. for i in range(0, TILESIZE, animationSpeed):
279. # animate the tile sliding over
280. checkForQuit()
281. DISPLAYSURF.blit(baseSurf, (0, 0))
282. if direction == UP:
283. drawTile(movex, movey, board[movex][movey], 0, -i)
284. if direction == DOWN:
285. drawTile(movex, movey, board[movex][movey], 0, i)
286. if direction == LEFT:
287. drawTile(movex, movey, board[movex][movey], -i, 0)
288. if direction == RIGHT:
289. drawTile(movex, movey, board[movex][movey], i, 0)
290.
291. pygame.display.update()
292. FPSCLOCK.tick(FPS)
In order to draw the frames of the sliding animation, we must draw the baseSurf surface on the
display Surface, then on each frame of the animation draw the sliding tile closer and closer to its
final position where the original blank space was. The space between two adjacent tiles is the
same size as a single tile, which we have stored in TILESIZE. The code uses a for loop to go
from 0 to TILESIZE.
Normally this would mean that we would draw the tile 0 pixels over, then on the next frame draw
the tile 1 pixel over, then 2 pixels, then 3, and so on. Each of these frames would take 1/30th of a
second. If you have TILESIZE set to 80 (as the program in this book does on line 12) then
sliding a tile would take over two and a half seconds, which is actually kind of slow.

Chapter 4 – Slide Puzzle 103
So instead we will have the for loop iterate from 0 to TILESIZE by several pixels each frame.
The number of pixels it jumps over is stored in animationSpeed, which is passed in when
slideAnimation() is called. For example, if animationSpeed was set to 8 and the
constant TILESIZE was set to 80, then the for loop and range(0, TILESIZE,
animationSpeed) would set the i variable to the values 0, 8, 16, 24, 32, 40, 48, 56, 64,
72. (It does not include 80 because the range() function goes up to, but not including, the
second argument.) This means the entire sliding animation would be done in 10 frames, which
would mean it is done in 10/30th of a second (a third of a second) since the game runs at 30 FPS.
Lines 282 to 289 makes sure that we draw the tile sliding in the correct direction (based on what
value the direction variable has). After the animation is done, then the function returns.
Notice that while the animation is happening, any events being created by the user are not being
handled. Those events will be handled the next time execution reaches line 70 in the main()
function or the code in the checkForQuit() function.
Creating a New Puzzle
295. def generateNewPuzzle(numSlides):
296. # From a starting configuration, make numSlides number of moves (and
297. # animate these moves).
298. sequence = []
299. board = getStartingBoard()
300. drawBoard(board, '')
301. pygame.display.update()
302. pygame.time.wait(500) # pause 500 milliseconds for effect
The generateNewPuzzle() function will be called at the start of each new game. It will
create a new board data structure by calling getStartingBoard() and then randomly
scramble it. The first few lines of generateNewPuzzle() get the board and then draw it to
the screen (freezing for half a second to let the player see the fresh board for a moment).
303. lastMove = None
304. for i in range(numSlides):
305. move = getRandomMove(board, lastMove)
306. slideAnimation(board, move, 'Generating new puzzle...',
int(TILESIZE / 3))
307. makeMove(board, move)
308. sequence.append(move)
309. lastMove = move
310. return (board, sequence)
The numSlides parameter will show tell the function how many of these random moves to
make. The code for doing a random move is the getRandomMove() call on line 305 to get the

104 http://inventwithpython.com/pygame
Email questions to the author: [email protected]
move itself, then call slideAnimation() to perform the animation on the screen. Because
doing the slide animation does not actually update the board data structure, we update the board
by calling makeMove() on line 307.
We need to keep track of each of the random moves that was made so that the player can click the
―Solve‖ button later and have the program undo all these random moves. (The ―Being Smart By
Using Stupid Code‖ section talks about why and how we do this.) So the move is appended to the
list of moves in sequence on line 308.
Then we store the random move in a variable called lastMove which will be passed to
getRandomMove() on the next iteration. This prevents the next random move from undoing
the random move we just performed.
All of this needs to happen numSlides number of times, so we put lines 305 to 309 inside a
for loop. When the board is done being scrambled, then we return the board data structure and
also the list of the random moves made on it.
Animating the Board Reset
313. def resetAnimation(board, allMoves):
314. # make all of the moves in allMoves in reverse.
315. revAllMoves = allMoves[:] # gets a copy of the list
316. revAllMoves.reverse()
317.
318. for move in revAllMoves:
319. if move == UP:
320. oppositeMove = DOWN
321. elif move == DOWN:
322. oppositeMove = UP
323. elif move == RIGHT:
324. oppositeMove = LEFT
325. elif move == LEFT:
326. oppositeMove = RIGHT
327. slideAnimation(board, oppositeMove, '', int(TILESIZE / 2))
328. makeMove(board, oppositeMove)
When the player clicks on ―Reset‖ or ―Solve‖, the Slide Puzzle game program needs to undo all
of the moves that were made to the board. The list of directional values for the slides will be
passed as the argument for the allMoves parameter.
Line 315 uses list slicing to create a duplicate of the allMoves list. Remember that if you don’t
specify a number before the :, then Python assumes the slice should start from the very
beginning of the list. And if you don’t specify a number after the :, then Python assumes the slice
should keep going to the very end of the list. So allMoves[:] creates a list slice of the entire

Chapter 4 – Slide Puzzle 105
allMoves list. This makes a copy of the actual list to store in revAllMoves, rather than just a
copy of the list reference. (See http://invpy.com/references for details.)
To undo all the moves in allMoves, we need to perform the opposite move of the moves in
allMoves, and in reverse order. There is a list method called reverse() which will reverse
the order of the items in a list. We call this on the revAllMoves list on line 316.
The for loop on line 318 iterates over the list of directional values. Remember, we want the
opposite move, so the if and elif statements from line 319 to 326 set the correct directional
value in the oppositeMove variable. Then we call slideAnimation() to perform the
animation, and makeMove() to update the board data structure.
331. if __name__ == '__main__':
332. main()
Just like in the Memory Puzzle game, after all the def statements have been executed to create
all the functions, we call the main() function to begin the meat of the program.
That’s all there is to the Slide Puzzle program! But let’s talk about some general programming
concepts that came up in this game.
Time vs. Memory Tradeoffs Of course, there are a few different ways to write the Slide Puzzle game so that it looks and acts
the exact same way even though the code is different. There are many different ways the a
program that does a task could be written. The most common differences are making tradeoffs
between execution time and memory usage.
Usually, the faster a program can run, the better it is. This is especially true with programs that
need to do a lot of calculations, whether they are scientific weather simulators or games with a
large amount of detailed 3D graphics to draw. It’s also good to use the least amount of memory
possible. The more variables and the larger the lists your program uses, the more memory it takes
up. (You can find out how to measure your program’s memory usage and execution time at
http://invpy.com/profiling.)
Right now, the programs in this book aren’t big and complicated enough where you have to
worry about conserving memory or optimizing the execution time. But it can be something to
consider as you become a more skilled programmer.
For example, consider the getBlankPosition() function. This function takes time to run,
since it goes through all the possible board coordinates to find where the blank space is. Instead,
we could just have a blankspacex and blankspacey variable which would have these XY

106 http://inventwithpython.com/pygame
Email questions to the author: [email protected]
coordinates so we would not have to look through the entire board each time we want to know
where it was. (We would also need code that updates the blankspacex and blankspacey
variables whenever a move is done. This code could go in makeMove().) Using these variables
would take up more memory, but they would save you on execution time so your program would
run faster.
Another example is that we keep a board data structure in the solved state in the SOLVEDBOARD
variable, so that we can compare the current board to SOLVEDBOARD to see if the player has
solved the puzzle. Each time we wanted to do this check, we could just call the
getStartingBoard() function and compare the returned value to the current board. Then
we would not need the SOLVEDBOARD variable. This would save us a little bit of memory, but
then our program would take longer to run because it is re-creating the solved-state board data
structure each time we do this check.
There is one thing you must remember though. Writing code that is readable is a very important
skill. Code that is ―readable‖ is code that is easy to understand, especially by programmers who
did not write the code. If another programmer can look at your program’s source code and figure
out what it does without much trouble, then that program is very readable. Readability is
important because when you want to fix bugs or add new features to your program (and bugs and
ideas for new features always come up), then having a readable program makes those tasks much
easier.
Nobody Cares About a Few Bytes Also, there is one thing that might seem kind of silly to say in this book because it seem obvious,
but many people wonder about it. You should know that using short variable names like x or num
instead of longer, more descriptive variable names like blankx or numSlides does not save
you any memory when your program actually runs. Using these longer variable names is better
because they’ll make your program more readable.
You might also come up with some clever tricks that do save a few bytes of memory here and
there. One trick is that when you no longer need a variable, you can reuse that variable name for a
different purpose instead of just using two differently named variables.
Try to avoid the temptation to do this. Usually, these tricks reduce code readability and make it
harder to debug your programs. Modern computers have billions of bytes of memory, and saving
a few bytes here and there really isn’t worth making the code more confusing for human
programmers.

Chapter 4 – Slide Puzzle 107
Nobody Cares About a Few Million Nanoseconds Similarly, there are times when you can rearrange your code in some way to make it slightly
faster by a few nanoseconds. These tricks also usually make the code harder to read. When you
consider that several billion nanoseconds have passed in the time it takes you to read this
sentence, saving a few nanoseconds of execution time in your program won’t be noticed by the
player.
Summary This chapter hasn’t introduced any new Pygame programming concepts that the Memory Puzzle
game didn’t use, aside from using the copy() method of Surface objects. Just knowing a few
different concepts will let you create completely different games.
For practice, you can download buggy versions of the Sliding Puzzle program from
http://invpy.com/buggy/slidepuzzle.

108 http://inventwithpython.com/pygame
Email questions to the author: [email protected]
CHAPTER 5 – SIMULATE
How to Play Simulate Simulate is a clone of the game Simon. There are four colored buttons on the screen. The buttons
light up in a certain random pattern, and then the player must repeat this pattern by pressing the
buttons in the correct order. Each time the player successfully simulates the pattern, the pattern
gets longer. The player tries to match the pattern for as long as possible.
Source Code to Simulate This source code can be downloaded from http://invpy.com/simulate.py. If you get any error
messages, look at the line number that is mentioned in the error message and check your code for
any typos. You can also copy and paste your code into the web form at
http://invpy.com/diff/simulate to see if the differences between your code and the code in the
book.
You can download the four sound files that this program uses from:
http://invpy.com/beep1.ogg
http://invpy.com/beep2.ogg
http://invpy.com/beep3.ogg
http://invpy.com/beep4.ogg
1. # Simulate (a Simon clone)
2. # By Al Sweigart [email protected]
3. # http://inventwithpython.com/pygame

Chapter 5 – Simulate 109
4. # Creative Commons BY-NC-SA 3.0 US
5.
6. import random, sys, time, pygame
7. from pygame.locals import *
8.
9. FPS = 30
10. WINDOWWIDTH = 640
11. WINDOWHEIGHT = 480
12. FLASHSPEED = 500 # in milliseconds
13. FLASHDELAY = 200 # in milliseconds
14. BUTTONSIZE = 200
15. BUTTONGAPSIZE = 20
16. TIMEOUT = 4 # seconds before game over if no button is pushed.
17.
18. # R G B
19. WHITE = (255, 255, 255)
20. BLACK = ( 0, 0, 0)
21. BRIGHTRED = (255, 0, 0)
22. RED = (155, 0, 0)
23. BRIGHTGREEN = ( 0, 255, 0)
24. GREEN = ( 0, 155, 0)
25. BRIGHTBLUE = ( 0, 0, 255)
26. BLUE = ( 0, 0, 155)
27. BRIGHTYELLOW = (255, 255, 0)
28. YELLOW = (155, 155, 0)
29. DARKGRAY = ( 40, 40, 40)
30. bgColor = BLACK
31.
32. XMARGIN = int((WINDOWWIDTH - (2 * BUTTONSIZE) - BUTTONGAPSIZE) / 2)
33. YMARGIN = int((WINDOWHEIGHT - (2 * BUTTONSIZE) - BUTTONGAPSIZE) / 2)
34.
35. # Rect objects for each of the four buttons
36. YELLOWRECT = pygame.Rect(XMARGIN, YMARGIN, BUTTONSIZE, BUTTONSIZE)
37. BLUERECT = pygame.Rect(XMARGIN + BUTTONSIZE + BUTTONGAPSIZE, YMARGIN,
BUTTONSIZE, BUTTONSIZE)
38. REDRECT = pygame.Rect(XMARGIN, YMARGIN + BUTTONSIZE + BUTTONGAPSIZE,
BUTTONSIZE, BUTTONSIZE)
39. GREENRECT = pygame.Rect(XMARGIN + BUTTONSIZE + BUTTONGAPSIZE, YMARGIN +
BUTTONSIZE + BUTTONGAPSIZE, BUTTONSIZE, BUTTONSIZE)
40.
41. def main():
42. global FPSCLOCK, DISPLAYSURF, BASICFONT, BEEP1, BEEP2, BEEP3, BEEP4
43.
44. pygame.init()
45. FPSCLOCK = pygame.time.Clock()
46. DISPLAYSURF = pygame.display.set_mode((WINDOWWIDTH, WINDOWHEIGHT))

110 http://inventwithpython.com/pygame
Email questions to the author: [email protected]
47. pygame.display.set_caption('Simulate')
48.
49. BASICFONT = pygame.font.Font('freesansbold.ttf', 16)
50.
51. infoSurf = BASICFONT.render('Match the pattern by clicking on the
button or using the Q, W, A, S keys.', 1, DARKGRAY)
52. infoRect = infoSurf.get_rect()
53. infoRect.topleft = (10, WINDOWHEIGHT - 25)
54. # load the sound files
55. BEEP1 = pygame.mixer.Sound('beep1.ogg')
56. BEEP2 = pygame.mixer.Sound('beep2.ogg')
57. BEEP3 = pygame.mixer.Sound('beep3.ogg')
58. BEEP4 = pygame.mixer.Sound('beep4.ogg')
59.
60. # Initialize some variables for a new game
61. pattern = [] # stores the pattern of colors
62. currentStep = 0 # the color the player must push next
63. lastClickTime = 0 # timestamp of the player's last button push
64. score = 0
65. # when False, the pattern is playing. when True, waiting for the
player to click a colored button:
66. waitingForInput = False
67.
68. while True: # main game loop
69. clickedButton = None # button that was clicked (set to YELLOW,
RED, GREEN, or BLUE)
70. DISPLAYSURF.fill(bgColor)
71. drawButtons()
72.
73. scoreSurf = BASICFONT.render('Score: ' + str(score), 1, WHITE)
74. scoreRect = scoreSurf.get_rect()
75. scoreRect.topleft = (WINDOWWIDTH - 100, 10)
76. DISPLAYSURF.blit(scoreSurf, scoreRect)
77.
78. DISPLAYSURF.blit(infoSurf, infoRect)
79.
80. checkForQuit()
81. for event in pygame.event.get(): # event handling loop
82. if event.type == MOUSEBUTTONUP:
83. mousex, mousey = event.pos
84. clickedButton = getButtonClicked(mousex, mousey)
85. elif event.type == KEYDOWN:
86. if event.key == K_q:
87. clickedButton = YELLOW
88. elif event.key == K_w:
89. clickedButton = BLUE

Chapter 5 – Simulate 111
90. elif event.key == K_a:
91. clickedButton = RED
92. elif event.key == K_s:
93. clickedButton = GREEN
94.
95.
96.
97. if not waitingForInput:
98. # play the pattern
99. pygame.display.update()
100. pygame.time.wait(1000)
101. pattern.append(random.choice((YELLOW, BLUE, RED, GREEN)))
102. for button in pattern:
103. flashButtonAnimation(button)
104. pygame.time.wait(FLASHDELAY)
105. waitingForInput = True
106. else:
107. # wait for the player to enter buttons
108. if clickedButton and clickedButton == pattern[currentStep]:
109. # pushed the correct button
110. flashButtonAnimation(clickedButton)
111. currentStep += 1
112. lastClickTime = time.time()
113.
114. if currentStep == len(pattern):
115. # pushed the last button in the pattern
116. changeBackgroundAnimation()
117. score += 1
118. waitingForInput = False
119. currentStep = 0 # reset back to first step
120.
121. elif (clickedButton and clickedButton != pattern[currentStep])
or (currentStep != 0 and time.time() - TIMEOUT > lastClickTime):
122. # pushed the incorrect button, or has timed out
123. gameOverAnimation()
124. # reset the variables for a new game:
125. pattern = []
126. currentStep = 0
127. waitingForInput = False
128. score = 0
129. pygame.time.wait(1000)
130. changeBackgroundAnimation()
131.
132. pygame.display.update()
133. FPSCLOCK.tick(FPS)
134.

112 http://inventwithpython.com/pygame
Email questions to the author: [email protected]
135.
136. def terminate():
137. pygame.quit()
138. sys.exit()
139.
140.
141. def checkForQuit():
142. for event in pygame.event.get(QUIT): # get all the QUIT events
143. terminate() # terminate if any QUIT events are present
144. for event in pygame.event.get(KEYUP): # get all the KEYUP events
145. if event.key == K_ESCAPE:
146. terminate() # terminate if the KEYUP event was for the Esc key
147. pygame.event.post(event) # put the other KEYUP event objects back
148.
149.
150. def flashButtonAnimation(color, animationSpeed=50):
151. if color == YELLOW:
152. sound = BEEP1
153. flashColor = BRIGHTYELLOW
154. rectangle = YELLOWRECT
155. elif color == BLUE:
156. sound = BEEP2
157. flashColor = BRIGHTBLUE
158. rectangle = BLUERECT
159. elif color == RED:
160. sound = BEEP3
161. flashColor = BRIGHTRED
162. rectangle = REDRECT
163. elif color == GREEN:
164. sound = BEEP4
165. flashColor = BRIGHTGREEN
166. rectangle = GREENRECT
167.
168. origSurf = DISPLAYSURF.copy()
169. flashSurf = pygame.Surface((BUTTONSIZE, BUTTONSIZE))
170. flashSurf = flashSurf.convert_alpha()
171. r, g, b = flashColor
172. sound.play()
173. for start, end, step in ((0, 255, 1), (255, 0, -1)): # animation loop
174. for alpha in range(start, end, animationSpeed * step):
175. checkForQuit()
176. DISPLAYSURF.blit(origSurf, (0, 0))
177. flashSurf.fill((r, g, b, alpha))
178. DISPLAYSURF.blit(flashSurf, rectangle.topleft)
179. pygame.display.update()
180. FPSCLOCK.tick(FPS)

Chapter 5 – Simulate 113
181. DISPLAYSURF.blit(origSurf, (0, 0))
182.
183.
184. def drawButtons():
185. pygame.draw.rect(DISPLAYSURF, YELLOW, YELLOWRECT)
186. pygame.draw.rect(DISPLAYSURF, BLUE, BLUERECT)
187. pygame.draw.rect(DISPLAYSURF, RED, REDRECT)
188. pygame.draw.rect(DISPLAYSURF, GREEN, GREENRECT)
189.
190.
191. def changeBackgroundAnimation(animationSpeed=40):
192. global bgColor
193. newBgColor = (random.randint(0, 255), random.randint(0, 255),
random.randint(0, 255))
194.
195. newBgSurf = pygame.Surface((WINDOWWIDTH, WINDOWHEIGHT))
196. newBgSurf = newBgSurf.convert_alpha()
197. r, g, b = newBgColor
198. for alpha in range(0, 255, animationSpeed): # animation loop
199. checkForQuit()
200. DISPLAYSURF.fill(bgColor)
201.
202. newBgSurf.fill((r, g, b, alpha))
203. DISPLAYSURF.blit(newBgSurf, (0, 0))
204.
205. drawButtons() # redraw the buttons on top of the tint
206.
207. pygame.display.update()
208. FPSCLOCK.tick(FPS)
209. bgColor = newBgColor
210.
211.
212. def gameOverAnimation(color=WHITE, animationSpeed=50):
213. # play all beeps at once, then flash the background
214. origSurf = DISPLAYSURF.copy()
215. flashSurf = pygame.Surface(DISPLAYSURF.get_size())
216. flashSurf = flashSurf.convert_alpha()
217. BEEP1.play() # play all four beeps at the same time, roughly.
218. BEEP2.play()
219. BEEP3.play()
220. BEEP4.play()
221. r, g, b = color
222. for i in range(3): # do the flash 3 times
223. for start, end, step in ((0, 255, 1), (255, 0, -1)):
224. # The first iteration in this loop sets the following for loop
225. # to go from 0 to 255, the second from 255 to 0.

114 http://inventwithpython.com/pygame
Email questions to the author: [email protected]
226. for alpha in range(start, end, animationSpeed * step): #
animation loop
227. # alpha means transparency. 255 is opaque, 0 is invisible
228. checkForQuit()
229. flashSurf.fill((r, g, b, alpha))
230. DISPLAYSURF.blit(origSurf, (0, 0))
231. DISPLAYSURF.blit(flashSurf, (0, 0))
232. drawButtons()
233. pygame.display.update()
234. FPSCLOCK.tick(FPS)
235.
236.
237.
238. def getButtonClicked(x, y):
239. if YELLOWRECT.collidepoint( (x, y) ):
240. return YELLOW
241. elif BLUERECT.collidepoint( (x, y) ):
242. return BLUE
243. elif REDRECT.collidepoint( (x, y) ):
244. return RED
245. elif GREENRECT.collidepoint( (x, y) ):
246. return GREEN
247. return None
248.
249.
250. if __name__ == '__main__':
251. main()
The Usual Starting Stuff
1. # Simulate (a Simon clone)
2. # By Al Sweigart [email protected]
3. # http://inventwithpython.com/pygame
4. # Creative Commons BY-NC-SA 3.0 US
5.
6. import random, sys, time, pygame
7. from pygame.locals import *
8.
9. FPS = 30
10. WINDOWWIDTH = 640
11. WINDOWHEIGHT = 480
12. FLASHSPEED = 500 # in milliseconds
13. FLASHDELAY = 200 # in milliseconds
14. BUTTONSIZE = 200
15. BUTTONGAPSIZE = 20
16. TIMEOUT = 4 # seconds before game over if no button is pushed.

Chapter 5 – Simulate 115
17.
18. # R G B
19. WHITE = (255, 255, 255)
20. BLACK = ( 0, 0, 0)
21. BRIGHTRED = (255, 0, 0)
22. RED = (155, 0, 0)
23. BRIGHTGREEN = ( 0, 255, 0)
24. GREEN = ( 0, 155, 0)
25. BRIGHTBLUE = ( 0, 0, 255)
26. BLUE = ( 0, 0, 155)
27. BRIGHTYELLOW = (255, 255, 0)
28. YELLOW = (155, 155, 0)
29. DARKGRAY = ( 40, 40, 40)
30. bgColor = BLACK
31.
32. XMARGIN = int((WINDOWWIDTH - (2 * BUTTONSIZE) - BUTTONGAPSIZE) / 2)
33. YMARGIN = int((WINDOWHEIGHT - (2 * BUTTONSIZE) - BUTTONGAPSIZE) / 2)
Here we set up the usual constants for things that we might want to modify later such as the size
of the four buttons, the shades of color used for the buttons (the bright colors are used when the
buttons light up) and the amount of time the player has to push the next button in the sequence
before the game times out.
Setting Up the Buttons
35. # Rect objects for each of the four buttons
36. YELLOWRECT = pygame.Rect(XMARGIN, YMARGIN, BUTTONSIZE, BUTTONSIZE)
37. BLUERECT = pygame.Rect(XMARGIN + BUTTONSIZE + BUTTONGAPSIZE, YMARGIN,
BUTTONSIZE, BUTTONSIZE)
38. REDRECT = pygame.Rect(XMARGIN, YMARGIN + BUTTONSIZE + BUTTONGAPSIZE,
BUTTONSIZE, BUTTONSIZE)
39. GREENRECT = pygame.Rect(XMARGIN + BUTTONSIZE + BUTTONGAPSIZE, YMARGIN +
BUTTONSIZE + BUTTONGAPSIZE, BUTTONSIZE, BUTTONSIZE)
Just like the buttons in the Sliding Puzzle games for ―Reset‖, ―Solve‖ and ―New Game‖, the
Simulate game has four rectangular areas and code to handle when the player clicks inside of
those areas. The program will need Rect objects for the areas of the four buttons so it can call the
collidepoint() method on them. Lines 36 to 39 set up these Rect objects with the
appropriate coordinates and sizes.
The main() Function
41. def main():
42. global FPSCLOCK, DISPLAYSURF, BASICFONT, BEEP1, BEEP2, BEEP3, BEEP4

116 http://inventwithpython.com/pygame
Email questions to the author: [email protected]
43.
44. pygame.init()
45. FPSCLOCK = pygame.time.Clock()
46. DISPLAYSURF = pygame.display.set_mode((WINDOWWIDTH, WINDOWHEIGHT))
47. pygame.display.set_caption('Simulate')
48.
49. BASICFONT = pygame.font.Font('freesansbold.ttf', 16)
50.
51. infoSurf = BASICFONT.render('Match the pattern by clicking on the
button or using the Q, W, A, S keys.', 1, DARKGRAY)
52. infoRect = infoSurf.get_rect()
53. infoRect.topleft = (10, WINDOWHEIGHT - 25)
54. # load the sound files
55. BEEP1 = pygame.mixer.Sound('beep1.ogg')
56. BEEP2 = pygame.mixer.Sound('beep2.ogg')
57. BEEP3 = pygame.mixer.Sound('beep3.ogg')
58. BEEP4 = pygame.mixer.Sound('beep4.ogg')
The main() function will implement the bulk of the program and call the other functions as they
are needed. The usual Pygame setup functions are called to initialize the library, create a Clock
object, create a window, set the caption, and create a Font object that will be used to display the
score and the instructions on the window. The objects that are created by these function calls will
be stored in global variables so that they can be used in other functions. But they are basically
constants since the value in them is never changed.
Lines 55 to 58 will load sound files so that Simulate can play sound effects as the player clicks on
each button. The pygame.mixer.Sound() constructor function will return a Sound object,
which we store in the variables BEEP1 to BEEP4 which were made into global variables on line
42.
Some Local Variables Used in This Program
60. # Initialize some variables for a new game
61. pattern = [] # stores the pattern of colors
62. currentStep = 0 # the color the player must push next
63. lastClickTime = 0 # timestamp of the player's last button push
64. score = 0
65. # when False, the pattern is playing. when True, waiting for the
player to click a colored button:
66. waitingForInput = False
The pattern variable will be a list of color values (either YELLOW, RED, BLUE, or GREEN) to
keep track of the pattern that the player must memorize. For example, if the value of pattern was
[RED, RED, YELLOW, RED, BLUE, BLUE, RED, GREEN] then the player would

Chapter 5 – Simulate 117
have to first click the red button twice, then the yellow button, then the red button, and so on until
the final green button. As the player finishes each round, a new random color is added to the end
of the list.
The currentStep variable will keep track of which color in the pattern list the player has to
click next. If currentStep was 0 and pattern was [GREEN, RED, RED, YELLOW],
then the player would have to click the green button. If they clicked on any other button, the code
will cause a game over.
There is a TIMEOUT constant that makes the player click on next button in the pattern within a
number of seconds, otherwise the code causes a game over. In order to check if enough time has
passed since the last button click, the lastClickTime variable needs to keep track of the last
time the player clicked on a button. (Python has a module named time and a time.time()
function to return the current time. This will be explained later.)
It may be hard to believe, but the score variable keeps track of the score. Inconceivable!
There are also two modes that our program will be in. Either the program is playing the pattern of
buttons for the player (in which case, waitingForInput is set to False), or the program has
finished playing the pattern and is waiting for the user to click the buttons in the correct order (in
which case, waitingForInput is set to True).
Drawing the Board and Handling Input
68. while True: # main game loop
69. clickedButton = None # button that was clicked (set to YELLOW,
RED, GREEN, or BLUE)
70. DISPLAYSURF.fill(bgColor)
71. drawButtons()
72.
73. scoreSurf = BASICFONT.render('Score: ' + str(score), 1, WHITE)
74. scoreRect = scoreSurf.get_rect()
75. scoreRect.topleft = (WINDOWWIDTH - 100, 10)
76. DISPLAYSURF.blit(scoreSurf, scoreRect)
77.
78. DISPLAYSURF.blit(infoSurf, infoRect)
Line 68 is the start of the main game loop. The clickedButton will be reset to None at the
beginning of each iteration. If a button is clicked during this iteration, then clickedButton
will be set to one of the color values to match the button (YELLOW, RED, GREEN, or BLUE).

118 http://inventwithpython.com/pygame
Email questions to the author: [email protected]
The fill() method is called on line 70 to repaint the entire display Surface so that we can start
drawing from scratch. The four colored buttons are drawn with a call to the drawButtons()
(explained later). Then the text for the score is created on lines 73 to 76.
There will also be text that tells the player what their current score is. Unlike the call to the
render() method on line 51 for the instruction text, the text for the score changes. It starts off
as 'Score: 0' and then becomes 'Score: 1' and then 'Score: 2' and so on. This is
why we create new Surface objects by calling the render() method on line 73 inside the game
loop. Since the instruction text (―Match the pattern by…‖) never changes, we only need one call
to render() outside the game loop on line 50.
Checking for Mouse Clicks
80. checkForQuit()
81. for event in pygame.event.get(): # event handling loop
82. if event.type == MOUSEBUTTONUP:
83. mousex, mousey = event.pos
84. clickedButton = getButtonClicked(mousex, mousey)
Line 80 does a quick check for any QUIT events, and then line 81 is the start of the event
handling loop. The XY coordinates of any mouse clicks will be stored in the mousex and
mousey variables. If the mouse click was over one of the four buttons, then our
getButtonClicked() function will return a Color object of the button clicked (otherwise it
returns None).
Checking for Keyboard Presses
85. elif event.type == KEYDOWN:
86. if event.key == K_q:
87. clickedButton = YELLOW
88. elif event.key == K_w:
89. clickedButton = BLUE
90. elif event.key == K_a:
91. clickedButton = RED
92. elif event.key == K_s:
93. clickedButton = GREEN
Lines 85 to 93 check for any KEYDOWN events (created when the user presses a key on the
keyboard). The Q, W, A, and S keys correspond to the buttons because they are arranged in a
square shape on the keyboard.
The Q key is in the upper left of the four keyboard keys, just like the yellow button on the screen
is in the upper left, so we will make pressing the Q key the same as clicking on the yellow button.

Chapter 5 – Simulate 119
We can do this by setting the clickedButton variable to the value in the constant variable
YELLOW. We can do the same for the three other keys. This way, the user can play Simulate with
either the mouse or keyboard.
The Two States of the Game Loop
97. if not waitingForInput:
98. # play the pattern
99. pygame.display.update()
100. pygame.time.wait(1000)
101. pattern.append(random.choice((YELLOW, BLUE, RED, GREEN)))
102. for button in pattern:
103. flashButtonAnimation(button)
104. pygame.time.wait(FLASHDELAY)
105. waitingForInput = True
There are two different ―modes‖ or ―states‖ that the program can be in. When
waitingForInput is False, the program will be displaying the animation for the pattern.
When waitingForInput is True, the program will be waiting for the user to select buttons.
Lines 97 to 105 will cover the case where the program displays the pattern animation. Since this
is done at the start of the game or when the player finishes a pattern, line 101 will add a random
color to the pattern list to make the pattern one step longer. Then lines 102 to 104 loops through
each of the values in the pattern list and calls flashButtonAnimation() which makes that
button light up. After it is done lighting up all the buttons in the pattern list, the program sets the
waitingForInput variable to True.
Figuring Out if the Player Pressed the Right Buttons
106. else:
107. # wait for the player to enter buttons
108. if clickedButton and clickedButton == pattern[currentStep]:
109. # pushed the correct button
110. flashButtonAnimation(clickedButton)
111. currentStep += 1
112. lastClickTime = time.time()
If waitingForInput is True, then the code in line 106’s else statement will execute. Line
108 checks if the player has clicked on a button during this iteration of the game loop and if that
button was the correct one. The currentStep variable keeps track of the index in the pattern
list for the button that the player should click on next.

120 http://inventwithpython.com/pygame
Email questions to the author: [email protected]
For example, if pattern was set to [YELLOW, RED, RED] and the currentStep variable
was set to 0 (like it would be when the player first starts the game), then the correct button for the
player to click would be pattern[0] (the yellow button).
If the player has clicked on the correct button, we want to flash the button the player clicked by
calling flashButtonAnimation() then, increase the currentStep to the next step, and
then update the lastClickTime variable to the current time. (The time.time() function
returns a float value of the number of seconds since January 1st, 1970, so we can use it to keep
track of time.)
114. if currentStep == len(pattern):
115. # pushed the last button in the pattern
116. changeBackgroundAnimation()
117. score += 1
118. waitingForInput = False
119. currentStep = 0 # reset back to first step
Lines 114 to 119 are inside the else statement that started on line 106. If the execution is inside
that else statement, we know the player clicked on a button and also it was the correct button.
Line 114 checks if this was the last correct button in the pattern list by checking if the integer
stored in currentStep is equal to the number of values inside the pattern list.
If this is True, then we want to change the background color by calling our
changeBackgroundAnimation(). This is a simple way to let the player know they have
entered the entire pattern correctly. The score is incremented, currentStep is set back to 0,
and the waitingForInput variable is set to False so that on the next iteration of the game
loop the code will add a new Color value to the pattern list and then flash the buttons.
121. elif (clickedButton and clickedButton != pattern[currentStep])
or (currentStep != 0 and time.time() - TIMEOUT > lastClickTime):
If the player did not click on the correct button, the elif statement on line 121 handles the case
where either the player clicked on the wrong button or the player has waited too long to click on a
button. Either way, we need to show the ―game over‖ animation and start a new game.
The (clickedButton and clickedButton != pattern[currentStep]) part of
the elif statement’s condition checks if a button was clicked and was the wrong button to click.
You can compare this to line 108’s if statement’s condition clickedButton and
clickedButton == pattern[currentStep] which evaluates to True if the player
clicked a button and it was the correct button to click.

Chapter 5 – Simulate 121
The other part of line 121’s elif condition is (currentStep != 0 and time.time()
- TIMEOUT > lastClickTime). This handles making sure the player did not ―time out‖.
Notice that this part of the condition has two expressions connected by an and keyword. That
means both sides of the and keyword need to evaluate to True.
In order to ―time out‖, it must not be the player’s first button click. But once they’ve started to
click buttons, they must keep clicking the buttons quickly enough until they’ve entered the entire
pattern (or have clicked on the wrong pattern and gotten a ―game over‖). If currentStep !=
0 is True, then we know the player has begun clicking the buttons.
Epoch Time Also in order to ―time out‖, the current time (returned by time.time()) minus four seconds
(because 4 is stored in TIMEOUT) must be greater than the last time clicked a button (stored in
lastClickTime). The reason why time.time() - TIMEOUT > lastClickTime
works has to do with how epoch time works. Epoch time (also called Unix epoch time) is the
number of seconds it has been since January 1st, 1970. This date is called the Unix epoch.
For example, when I run time.time() from the interactive shell (don’t forget to import the
time module first), it looks like this:
>>> import time
>>> time.time()
1320460242.118
What this number means is that the moment the time.time() function was called was a little
over 1,320,460,242 seconds since midnight of January 1st, 1970. (This translates to November 4
th,
2011 at 7:30:42pm. You can learn how to convert from Unix epoch time to regular English time
at http://invpy.com/epochtime)
If I call time.time() from the interactive shell a few seconds later, it might look like this:
>>> time.time()
1320460261.315
1320460261.315 seconds after midnight of the Unix epoch is November 4th, 2011 at 7:31:01pm.
(Actually, it’s 7:31 and 0.315 seconds if you want to be precise.)
Dealing with time would be difficult if we had to deal with strings. It’s hard to tell that 19
seconds have passed if we only had the string values '7:30:42 PM' and '7:31:01 PM' to
compare. But with epoch time, it’s just a matter of subtracting the integers 1320460261.315
- 1320460242.118, which evaluates to 19.197000026702881. This value is the number

122 http://inventwithpython.com/pygame
Email questions to the author: [email protected]
of seconds between those two times. (The extra 0.000026702881 comes from very small
rounding errors that happen when you do math with floating point numbers. They only happen
sometimes and are usually too tiny to matter. You can learn more about floating point rounding
errors at http://invpy.com/roundingerrors.)
Going back to line 121, if time.time() - TIMEOUT > lastClickTime evaluates to
True, then it has been longer than 4 seconds since time.time() was called and stored in
lastClickTime. If it evaluates to False, then it has been less than 4 seconds.
122. # pushed the incorrect button, or has timed out
123. gameOverAnimation()
124. # reset the variables for a new game:
125. pattern = []
126. currentStep = 0
127. waitingForInput = False
128. score = 0
129. pygame.time.wait(1000)
130. changeBackgroundAnimation()
If either the player clicked on the wrong button or has timed out, the program should play the
―game over‖ animation and then reset the variables for a new game. This involves setting the
pattern list to a blank list, currentStep to 0, waitingForInput to False, and then
score to 0. A small pause and a new background color will be set to indicate to the player the
start of a new game, which will begin on the next iteration of the game loop.
Drawing the Board to the Screen
132. pygame.display.update()
133. FPSCLOCK.tick(FPS)
Just like the other game programs, the last thing done in the game loop is drawing the display
Surface object to the screen and calling the tick() method.
Same Old terminate() Function
136. def terminate():
137. pygame.quit()
138. sys.exit()
139.
140.
141. def checkForQuit():
142. for event in pygame.event.get(QUIT): # get all the QUIT events
143. terminate() # terminate if any QUIT events are present
144. for event in pygame.event.get(KEYUP): # get all the KEYUP events

Chapter 5 – Simulate 123
145. if event.key == K_ESCAPE:
146. terminate() # terminate if the KEYUP event was for the Esc key
147. pygame.event.post(event) # put the other KEYUP event objects back
The terminate() and checkForQuit() functions were used and explained in the Sliding
Puzzle chapter, so we will skip describing them again.
Reusing The Constant Variables
150. def flashButtonAnimation(color, animationSpeed=50):
151. if color == YELLOW:
152. sound = BEEP1
153. flashColor = BRIGHTYELLOW
154. rectangle = YELLOWRECT
155. elif color == BLUE:
156. sound = BEEP2
157. flashColor = BRIGHTBLUE
158. rectangle = BLUERECT
159. elif color == RED:
160. sound = BEEP3
161. flashColor = BRIGHTRED
162. rectangle = REDRECT
163. elif color == GREEN:
164. sound = BEEP4
165. flashColor = BRIGHTGREEN
166. rectangle = GREENRECT
Depending on which Color value is passed as an argument for the color parameter, the sound,
color of the bright flash, and rectangular area of the flash will be different. Line 151 to 166 sets
three local variables differently depending on the value in the color parameter: sound,
flashColor, and rectangle.
Animating the Button Flash
168. origSurf = DISPLAYSURF.copy()
169. flashSurf = pygame.Surface((BUTTONSIZE, BUTTONSIZE))
170. flashSurf = flashSurf.convert_alpha()
171. r, g, b = flashColor
172. sound.play()
The process of animating the button flash is simple: On each frame of the animation, the normal
board is drawn and then on top of that, the bright color version of the button that is flashing is
drawn over the button. The alpha value of the bright color starts off at 0 for the first frame of
animation, but then on each frame after the alpha value is slowly increased until it is fully opaque

124 http://inventwithpython.com/pygame
Email questions to the author: [email protected]
and the bright color version completely paints over the normal button color. This will make it
look like the button is slowly brightening up.
The brightening up is the first half of the animation. The second half is the button dimming. This
is done with the same code, except that instead of the alpha value increasing for each frame, it
will be decreasing. As the alpha value gets lower and lower, the bright color painted on top will
become more and more invisible, until only the original board with the dull colors is visible.
To do this in code, line 168 creates a copy of the display Surface object and stores it in
origSurf. Line 169 creates a new Surface object the size of a single button and stores it in
flashSurf. The convert_alpha() method is called on flashSurf so that the Surface
object can have transparent colors drawn on it (otherwise, the alpha value in the Color objects we
use will be ignored and automatically assumed to be 255). In your own game programs, if you are
having trouble getting color transparency to work, make sure that you have called the
convert_alpha() method on any Surface objects that have transparent colors painted on
them.
Line 171 creates individual local variables named r, g, and b to store the individual RGB values
of the tuple stored in flashColor. This is just some syntactic sugar that makes the rest of the
code in this function easier to read. Before we begin animating the button flash, line 172 will play
the sound effect for that button. The program execution keeps going after the sound effect has
started to play, so the sound will be playing during the button flash animation.
173. for start, end, step in ((0, 255, 1), (255, 0, -1)): # animation loop
174. for alpha in range(start, end, animationSpeed * step):
175. checkForQuit()
176. DISPLAYSURF.blit(origSurf, (0, 0))
177. flashSurf.fill((r, g, b, alpha))
178. DISPLAYSURF.blit(flashSurf, rectangle.topleft)
179. pygame.display.update()
180. FPSCLOCK.tick(FPS)
181. DISPLAYSURF.blit(origSurf, (0, 0))
Remember that to do the animation, we want to first draw the flashSurf with color that has
increasing alpha values from 0 to 255 to do the brightening part of the animation. Then to do the
dimming, we want the alpha value to go from 255 to 0. We could do that with code like this:
for alpha in range(0, 255, animationSpeed): # brightening
checkForQuit()
DISPLAYSURF.blit(origSurf, (0, 0))
flashSurf.fill((r, g, b, alpha))
DISPLAYSURF.blit(flashSurf, rectangle.topleft)

Chapter 5 – Simulate 125
pygame.display.update()
FPSCLOCK.tick(FPS)
for alpha in range(255, 0, -animationSpeed): # dimming
checkForQuit()
DISPLAYSURF.blit(origSurf, (0, 0))
flashSurf.fill((r, g, b, alpha))
DISPLAYSURF.blit(flashSurf, rectangle.topleft)
pygame.display.update()
FPSCLOCK.tick(FPS)
But notice that the code inside the for loops handles drawing the frame and are identical to each
other. If we wrote the code like the above, then the first for loop would handle the brightening
part of the animation (where the alpha value goes from 0 to 255) and the second for loop would
handle the dimming part of the animation (where the alpha values goes from 255 to 0). Note that
for the second for loop, the third argument to the range() call is a negative number.
Whenever we have identical code like this, we can probably shorten our code so we don’t have to
repeat it. This is what we do with the for loop on line 173, which supplies different values for
the range() call on line 174:
173. for start, end, step in ((0, 255, 1), (255, 0, -1)): # animation loop
174. for alpha in range(start, end, animationSpeed * step):
On the first iteration of line 173’s for loop, start is set to 0, end is set to 255, and step is
set to 1. This way, when the for loop on line 174 is executed, it is calling range(0, 255,
animationSpeed). (Note that animationSpeed * 1 is the same as animationSpeed.
Multiplying a number by 1 gives us the same number.)
Line 174’s for loop then executes and performs the brightening animation.
On the second iteration of line 173’s for loop (there are always two and only two iterations of
this inner for loop), start is set to 255, end is set to 0, and step is set to -1. When the line
174’s for loop is executed, it is calling range(255, 0, -animationSpeed). (Note that
animationSpeed * -1 evaluates to -animationSpeed, since multiplying any number
by -1 returns the negative form of that same number.)
This way, we don’t have to have two separate for loops and repeat all the code that is inside of
them. Here’s the code again that is inside line 174’s for loop:
175. checkForQuit()
176. DISPLAYSURF.blit(origSurf, (0, 0))
177. flashSurf.fill((r, g, b, alpha))

126 http://inventwithpython.com/pygame
Email questions to the author: [email protected]
178. DISPLAYSURF.blit(flashSurf, rectangle.topleft)
179. pygame.display.update()
180. FPSCLOCK.tick(FPS)
181. DISPLAYSURF.blit(origSurf, (0, 0))
We check for any QUIT events (in case the user tried to close the program during the animation),
then blit the origSurf Surface to the display Surface. Then we paint the flashSurf Surface
by calling fill() (supplying the r, g, b values of the color we got on line 171 and the alpha
value that the for loop sets in the alpha variable). Then the flashSurf Surface is blitted to
the display Surface.
Then, to make the display Surface appear on the screen, pygame.display.update() is
called on line 179. To make sure the animation doesn’t play as fast as the computer can draw it,
we add short pauses with a call to the tick() method. (If you want to see the flashing animation
play very slowly, put a low number like 1 or 2 as the argument to tick() instead of FPS.)
Drawing the Buttons
184. def drawButtons():
185. pygame.draw.rect(DISPLAYSURF, YELLOW, YELLOWRECT)
186. pygame.draw.rect(DISPLAYSURF, BLUE, BLUERECT)
187. pygame.draw.rect(DISPLAYSURF, RED, REDRECT)
188. pygame.draw.rect(DISPLAYSURF, GREEN, GREENRECT)
Since each of the buttons is just a rectangle of a certain color in a certain place, we just make four
calls to pygame.draw.rect() to draw the buttons on the display Surface. The Color object
and the Rect object we use to position them never change, which is why we stored them in
constant variables like YELLOW and YELLOWRECT.
Animating the Background Change
191. def changeBackgroundAnimation(animationSpeed=40):
192. global bgColor
193. newBgColor = (random.randint(0, 255), random.randint(0, 255),
random.randint(0, 255))
194.
195. newBgSurf = pygame.Surface((WINDOWWIDTH, WINDOWHEIGHT))
196. newBgSurf = newBgSurf.convert_alpha()
197. r, g, b = newBgColor
198. for alpha in range(0, 255, animationSpeed): # animation loop
199. checkForQuit()
200. DISPLAYSURF.fill(bgColor)
201.
202. newBgSurf.fill((r, g, b, alpha))

Chapter 5 – Simulate 127
203. DISPLAYSURF.blit(newBgSurf, (0, 0))
204.
205. drawButtons() # redraw the buttons on top of the tint
206.
207. pygame.display.update()
208. FPSCLOCK.tick(FPS)
209. bgColor = newBgColor
The background color change animation happens whenever the player finishes entering the entire
pattern correctly. On each iteration through the loop which starts on line 198 the entire display
Surface has to be redrawn (blended with a less and less transparent new background color, until
the background is completely covered by the new color). The steps done on each iteration of the
loop are:
Line 200 fills in the entire display Surface (stored in DISPLAYSURF) with the old
background color (which is stored in bgColor).
Line 202 fills in a different Surface object (stored in newBgSurf) with the new
background color’s RGB values (and the alpha transparency value changes on each
iteration since that is what the for loop on line 198 does).
Line 203 then draws the newBgSurf Surface to the display Surface in DISPLAYSURF.
The reason we didn’t just paint our semitransparent new background color on
DISPLAYSURF to begin with is because the fill() method will just replace the color
on the Surface, whereas the blit() method will blend the colors.
Now that we have the background the way we want it, we’ll draw the buttons over it with
a call to drawButtons() on line 205.
Line 207 and 208 then just draws the display Surface to the screen and adds a pause.
The reason there is a global statement at the beginning of the
changeBackgroundAnimation() function is for the bgColor variable is because this
function modifies the content of the variable with an assignment statement on line 209. Any
function can read the value of a global variable without specifying the global statement.
If that function assigns a value to a global variable without a global statement, then Python
considers that variable to be a local variable that just happens to have the same name as a global
variable. The main() function uses the bgColor variable but doesn’t need a global statement
for it because it only reads the contents of the bgColor the main() function never assigns
bgColor a new value. This concept is explained in more detail at http://invpy.com/global.
The Game Over Animation
212. def gameOverAnimation(color=WHITE, animationSpeed=50):

128 http://inventwithpython.com/pygame
Email questions to the author: [email protected]
213. # play all beeps at once, then flash the background
214. origSurf = DISPLAYSURF.copy()
215. flashSurf = pygame.Surface(DISPLAYSURF.get_size())
216. flashSurf = flashSurf.convert_alpha()
217. BEEP1.play() # play all four beeps at the same time, roughly.
218. BEEP2.play()
219. BEEP3.play()
220. BEEP4.play()
221. r, g, b = color
222. for i in range(3): # do the flash 3 times
Each of the iterations of the for loop on the next line (line 223 below) will perform a flash. To
have three flashes done, we put all of that code in a for loop that has three iterations. If you want
more or fewer flashes, then change the integer that is passed to range() on line 222.
223. for start, end, step in ((0, 255, 1), (255, 0, -1)):
The for loop on line 223 is exactly the same as the one line 173. The start, end, and step
variables will be used on the next for loop (on line 224) to control how the alpha variable
changes. Reread the ―Animating the Button Flash‖ section if you need to refresh yourself on how
these loops work.
224. # The first iteration in this loop sets the following for loop
225. # to go from 0 to 255, the second from 255 to 0.
226. for alpha in range(start, end, animationSpeed * step): #
animation loop
227. # alpha means transparency. 255 is opaque, 0 is invisible
228. checkForQuit()
229. flashSurf.fill((r, g, b, alpha))
230. DISPLAYSURF.blit(origSurf, (0, 0))
231. DISPLAYSURF.blit(flashSurf, (0, 0))
232. drawButtons()
233. pygame.display.update()
234. FPSCLOCK.tick(FPS)
This animation loop works the same as the previous flashing animation code in the ―Animating
the Background Change‖ section. The copy of the original Surface object stored in origSurf is
drawn on the display Surface, then flashSurf (which has the new flashing color painted on it)
is blitted on top of the display Surface. After the background color is set up, the buttons are drawn
on top on line 232. Finally the display Surface is drawn to the screen with the call to
pygame.display.update().

Chapter 5 – Simulate 129
The for loop on line 226 adjusts the alpha value for the color used for each frame of animation
(increasing at first, and then decreasing).
Converting from Pixel Coordinates to Buttons
238. def getButtonClicked(x, y):
239. if YELLOWRECT.collidepoint( (x, y) ):
240. return YELLOW
241. elif BLUERECT.collidepoint( (x, y) ):
242. return BLUE
243. elif REDRECT.collidepoint( (x, y) ):
244. return RED
245. elif GREENRECT.collidepoint( (x, y) ):
246. return GREEN
247. return None
248.
249.
250. if __name__ == '__main__':
251. main()
The getButtonClicked() function simply takes XY pixel coordinates and returns either the
values YELLOW, BLUE, RED, or GREEN if one of the buttons was clicked, or returns None if the
XY pixel coordinates are not over any of the four buttons.
Explicit is Better Than Implicit You may have noticed that the code for getButtonClicked() ends with a return None
statement on line 247. This might seem like an odd thing to type out, since all functions return
None if they don’t have any return statement at all. We could have left line 47 out entirely and
the program would have worked the exact same way. So why bother writing it in?
Normally when a function reaches the end and returns the None value implicitly (that is, there is
no return statement outright saying that it is returning None) the code that calls it doesn’t care
about the return value. All function calls have to return a value (so that they can evaluate to
something and be part of expressions), but our code doesn’t always make use of the return value.
For example, think about the print() function. Technically, this function returns the None
value, but we never care about it:
>>> spam = print('Hello')
Hello
>>> spam == None
True
>>>
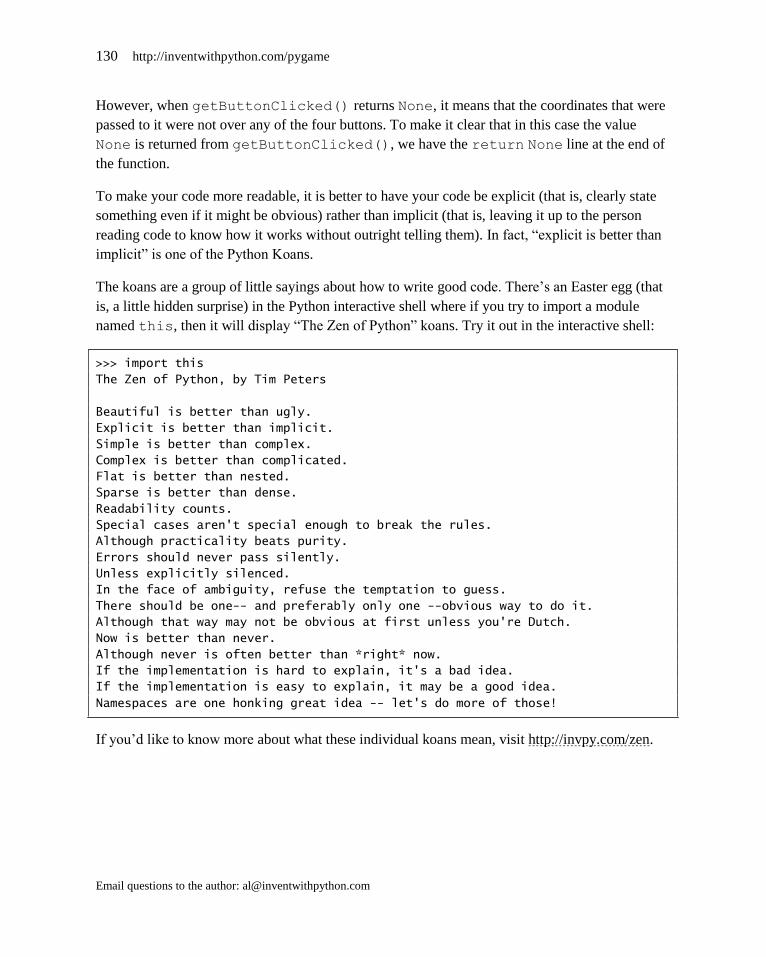
130 http://inventwithpython.com/pygame
Email questions to the author: [email protected]
However, when getButtonClicked() returns None, it means that the coordinates that were
passed to it were not over any of the four buttons. To make it clear that in this case the value
None is returned from getButtonClicked(), we have the return None line at the end of
the function.
To make your code more readable, it is better to have your code be explicit (that is, clearly state
something even if it might be obvious) rather than implicit (that is, leaving it up to the person
reading code to know how it works without outright telling them). In fact, ―explicit is better than
implicit‖ is one of the Python Koans.
The koans are a group of little sayings about how to write good code. There’s an Easter egg (that
is, a little hidden surprise) in the Python interactive shell where if you try to import a module
named this, then it will display ―The Zen of Python‖ koans. Try it out in the interactive shell:
>>> import this
The Zen of Python, by Tim Peters
Beautiful is better than ugly.
Explicit is better than implicit.
Simple is better than complex.
Complex is better than complicated.
Flat is better than nested.
Sparse is better than dense.
Readability counts.
Special cases aren't special enough to break the rules.
Although practicality beats purity.
Errors should never pass silently.
Unless explicitly silenced.
In the face of ambiguity, refuse the temptation to guess.
There should be one-- and preferably only one --obvious way to do it.
Although that way may not be obvious at first unless you're Dutch.
Now is better than never.
Although never is often better than *right* now.
If the implementation is hard to explain, it's a bad idea.
If the implementation is easy to explain, it may be a good idea.
Namespaces are one honking great idea -- let's do more of those!
If you’d like to know more about what these individual koans mean, visit http://invpy.com/zen.

Chapter 6 – Wormy 131
CHAPTER 6 – WORMY
How to Play Wormy Wormy is a Nibbles clone. The player starts out controlling a short worm that is constantly
moving around the screen. The player cannot stop or slow down the worm, but they can control
which direction it turns. A red apple appears randomly on the screen, and the player must move
the worm so that it eats the apple. Each time the worm eats an apple, the worm grows longer by
one segment and a new apply randomly appears on the screen. The game is over if the worm
crashes into itself or the edges of the screen.
Source Code to Wormy This source code can be downloaded from http://invpy.com/wormy.py. If you get any error
messages, look at the line number that is mentioned in the error message and check your code for
any typos. You can also copy and paste your code into the web form at
http://invpy.com/diff/wormy to see if the differences between your code and the code in the book.
1. # Wormy (a Nibbles clone)
2. # By Al Sweigart [email protected]
3. # http://inventwithpython.com/pygame
4. # Creative Commons BY-NC-SA 3.0 US
5.
6. import random, pygame, sys
7. from pygame.locals import *
8.
9. FPS = 15
10. WINDOWWIDTH = 640
11. WINDOWHEIGHT = 480

132 http://inventwithpython.com/pygame
Email questions to the author: [email protected]
12. CELLSIZE = 20
13. assert WINDOWWIDTH % CELLSIZE == 0, "Window width must be a multiple of
cell size."
14. assert WINDOWHEIGHT % CELLSIZE == 0, "Window height must be a multiple of
cell size."
15. CELLWIDTH = int(WINDOWWIDTH / CELLSIZE)
16. CELLHEIGHT = int(WINDOWHEIGHT / CELLSIZE)
17.
18. # R G B
19. WHITE = (255, 255, 255)
20. BLACK = ( 0, 0, 0)
21. RED = (255, 0, 0)
22. GREEN = ( 0, 255, 0)
23. DARKGREEN = ( 0, 155, 0)
24. DARKGRAY = ( 40, 40, 40)
25. BGCOLOR = BLACK
26.
27. UP = 'up'
28. DOWN = 'down'
29. LEFT = 'left'
30. RIGHT = 'right'
31.
32. HEAD = 0 # syntactic sugar: index of the worm's head
33.
34. def main():
35. global FPSCLOCK, DISPLAYSURF, BASICFONT
36.
37. pygame.init()
38. FPSCLOCK = pygame.time.Clock()
39. DISPLAYSURF = pygame.display.set_mode((WINDOWWIDTH, WINDOWHEIGHT))
40. BASICFONT = pygame.font.Font('freesansbold.ttf', 18)
41. pygame.display.set_caption('Wormy')
42.
43. showStartScreen()
44. while True:
45. runGame()
46. showGameOverScreen()
47.
48.
49. def runGame():
50. # Set a random start point.
51. startx = random.randint(5, CELLWIDTH - 6)
52. starty = random.randint(5, CELLHEIGHT - 6)
53. wormCoords = [{'x': startx, 'y': starty},
54. {'x': startx - 1, 'y': starty},
55. {'x': startx - 2, 'y': starty}]

Chapter 6 – Wormy 133
56. direction = RIGHT
57.
58. # Start the apple in a random place.
59. apple = getRandomLocation()
60.
61. while True: # main game loop
62. for event in pygame.event.get(): # event handling loop
63. if event.type == QUIT:
64. terminate()
65. elif event.type == KEYDOWN:
66. if (event.key == K_LEFT or event.key == K_a) and direction
!= RIGHT:
67. direction = LEFT
68. elif (event.key == K_RIGHT or event.key == K_d) and
direction != LEFT:
69. direction = RIGHT
70. elif (event.key == K_UP or event.key == K_w) and direction
!= DOWN:
71. direction = UP
72. elif (event.key == K_DOWN or event.key == K_s) and
direction != UP:
73. direction = DOWN
74. elif event.key == K_ESCAPE:
75. terminate()
76.
77. # check if the worm has hit itself or the edge
78. if wormCoords[HEAD]['x'] == -1 or wormCoords[HEAD]['x'] ==
CELLWIDTH or wormCoords[HEAD]['y'] == -1 or wormCoords[HEAD]['y'] ==
CELLHEIGHT:
79. return # game over
80. for wormBody in wormCoords[1:]:
81. if wormBody['x'] == wormCoords[HEAD]['x'] and wormBody['y'] ==
wormCoords[HEAD]['y']:
82. return # game over
83.
84. # check if worm has eaten an apply
85. if wormCoords[HEAD]['x'] == apple['x'] and wormCoords[HEAD]['y']
== apple['y']:
86. # don't remove worm's tail segment
87. apple = getRandomLocation() # set a new apple somewhere
88. else:
89. del wormCoords[-1] # remove worm's tail segment
90.
91. # move the worm by adding a segment in the direction it is moving
92. if direction == UP:

134 http://inventwithpython.com/pygame
Email questions to the author: [email protected]
93. newHead = {'x': wormCoords[HEAD]['x'], 'y':
wormCoords[HEAD]['y'] - 1}
94. elif direction == DOWN:
95. newHead = {'x': wormCoords[HEAD]['x'], 'y':
wormCoords[HEAD]['y'] + 1}
96. elif direction == LEFT:
97. newHead = {'x': wormCoords[HEAD]['x'] - 1, 'y':
wormCoords[HEAD]['y']}
98. elif direction == RIGHT:
99. newHead = {'x': wormCoords[HEAD]['x'] + 1, 'y':
wormCoords[HEAD]['y']}
100. wormCoords.insert(0, newHead)
101. DISPLAYSURF.fill(BGCOLOR)
102. drawGrid()
103. drawWorm(wormCoords)
104. drawApple(apple)
105. drawScore(len(wormCoords) - 3)
106. pygame.display.update()
107. FPSCLOCK.tick(FPS)
108.
109. def drawPressKeyMsg():
110. pressKeySurf = BASICFONT.render('Press a key to play.', True,
DARKGRAY)
111. pressKeyRect = pressKeySurf.get_rect()
112. pressKeyRect.topleft = (WINDOWWIDTH - 200, WINDOWHEIGHT - 30)
113. DISPLAYSURF.blit(pressKeySurf, pressKeyRect)
114.
115.
116. def checkForKeyPress():
117. if len(pygame.event.get(QUIT)) > 0:
118. terminate()
119.
120. keyUpEvents = pygame.event.get(KEYUP)
121. if len(keyUpEvents) == 0:
122. return None
123. if keyUpEvents[0].key == K_ESCAPE:
124. terminate()
125. return keyUpEvents[0].key
126.
127.
128. def showStartScreen():
129. titleFont = pygame.font.Font('freesansbold.ttf', 100)
130. titleSurf1 = titleFont.render('Wormy!', True, WHITE, DARKGREEN)
131. titleSurf2 = titleFont.render('Wormy!', True, GREEN)
132.
133. degrees1 = 0

Chapter 6 – Wormy 135
134. degrees2 = 0
135. while True:
136. DISPLAYSURF.fill(BGCOLOR)
137. rotatedSurf1 = pygame.transform.rotate(titleSurf1, degrees1)
138. rotatedRect1 = rotatedSurf1.get_rect()
139. rotatedRect1.center = (WINDOWWIDTH / 2, WINDOWHEIGHT / 2)
140. DISPLAYSURF.blit(rotatedSurf1, rotatedRect1)
141.
142. rotatedSurf2 = pygame.transform.rotate(titleSurf2, degrees2)
143. rotatedRect2 = rotatedSurf2.get_rect()
144. rotatedRect2.center = (WINDOWWIDTH / 2, WINDOWHEIGHT / 2)
145. DISPLAYSURF.blit(rotatedSurf2, rotatedRect2)
146.
147. drawPressKeyMsg()
148.
149. if checkForKeyPress():
150. pygame.event.get() # clear event queue
151. return
152. pygame.display.update()
153. FPSCLOCK.tick(FPS)
154. degrees1 += 3 # rotate by 3 degrees each frame
155. degrees2 += 7 # rotate by 7 degrees each frame
156.
157.
158. def terminate():
159. pygame.quit()
160. sys.exit()
161.
162.
163. def getRandomLocation():
164. return {'x': random.randint(0, CELLWIDTH - 1), 'y': random.randint(0,
CELLHEIGHT - 1)}
165.
166.
167. def showGameOverScreen():
168. gameOverFont = pygame.font.Font('freesansbold.ttf', 150)
169. gameSurf = gameOverFont.render('Game', True, WHITE)
170. overSurf = gameOverFont.render('Over', True, WHITE)
171. gameRect = gameSurf.get_rect()
172. overRect = overSurf.get_rect()
173. gameRect.midtop = (WINDOWWIDTH / 2, 10)
174. overRect.midtop = (WINDOWWIDTH / 2, gameRect.height + 10 + 25)
175.
176. DISPLAYSURF.blit(gameSurf, gameRect)
177. DISPLAYSURF.blit(overSurf, overRect)
178. drawPressKeyMsg()

136 http://inventwithpython.com/pygame
Email questions to the author: [email protected]
179. pygame.display.update()
180. pygame.time.wait(500)
181. checkForKeyPress() # clear out any key presses in the event queue
182.
183. while True:
184. if checkForKeyPress():
185. pygame.event.get() # clear event queue
186. return
187.
188. def drawScore(score):
189. scoreSurf = BASICFONT.render('Score: %s' % (score), True, WHITE)
190. scoreRect = scoreSurf.get_rect()
191. scoreRect.topleft = (WINDOWWIDTH - 120, 10)
192. DISPLAYSURF.blit(scoreSurf, scoreRect)
193.
194.
195. def drawWorm(wormCoords):
196. for coord in wormCoords:
197. x = coord['x'] * CELLSIZE
198. y = coord['y'] * CELLSIZE
199. wormSegmentRect = pygame.Rect(x, y, CELLSIZE, CELLSIZE)
200. pygame.draw.rect(DISPLAYSURF, DARKGREEN, wormSegmentRect)
201. wormInnerSegmentRect = pygame.Rect(x + 4, y + 4, CELLSIZE - 8,
CELLSIZE - 8)
202. pygame.draw.rect(DISPLAYSURF, GREEN, wormInnerSegmentRect)
203.
204.
205. def drawApple(coord):
206. x = coord['x'] * CELLSIZE
207. y = coord['y'] * CELLSIZE
208. appleRect = pygame.Rect(x, y, CELLSIZE, CELLSIZE)
209. pygame.draw.rect(DISPLAYSURF, RED, appleRect)
210.
211.
212. def drawGrid():
213. for x in range(0, WINDOWWIDTH, CELLSIZE): # draw vertical lines
214. pygame.draw.line(DISPLAYSURF, DARKGRAY, (x, 0), (x, WINDOWHEIGHT))
215. for y in range(0, WINDOWHEIGHT, CELLSIZE): # draw horizontal lines
216. pygame.draw.line(DISPLAYSURF, DARKGRAY, (0, y), (WINDOWWIDTH, y))
217.
218.
219. if __name__ == '__main__':
220. main()

Chapter 6 – Wormy 137
The Grid
If you play the game a little, you’ll notice that the apple and the segments of the worm’s body
always fit along a grid of lines. We will call each of the squares in this grid a cell (it’s not always
what a space in a grid is called, it’s just a name I came up with). The cells have their own
Cartesian coordinate system, with (0, 0) being the top left cell and (31, 23) being the bottom right
cell.
The Setup Code
1. # Wormy (a Nibbles clone)
2. # By Al Sweigart [email protected]
3. # http://inventwithpython.com/pygame
4. # Creative Commons BY-NC-SA 3.0 US
5.
6. import random, pygame, sys
7. from pygame.locals import *
8.
9. FPS = 15
10. WINDOWWIDTH = 640
11. WINDOWHEIGHT = 480
12. CELLSIZE = 20
13. assert WINDOWWIDTH % CELLSIZE == 0, "Window width must be a multiple of
cell size."
14. assert WINDOWHEIGHT % CELLSIZE == 0, "Window height must be a multiple of
cell size."
15. CELLWIDTH = int(WINDOWWIDTH / CELLSIZE)
16. CELLHEIGHT = int(WINDOWHEIGHT / CELLSIZE)

138 http://inventwithpython.com/pygame
Email questions to the author: [email protected]
The code at the start of the program just sets up some constant variables used in the game. The
width and height of the cells are stored in CELLSIZE. The assert statements on lines 13 and
14 ensure that the cells fit perfectly in the window. For example, if the CELLSIZE was 10 and
the WINDOWWIDTH or WINDOWHEIGHT constants were set to 15, then only 1.5 cells could fit.
The assert statements make sure that only a whole integer number of cells fits in the window.
18. # R G B
19. WHITE = (255, 255, 255)
20. BLACK = ( 0, 0, 0)
21. RED = (255, 0, 0)
22. GREEN = ( 0, 255, 0)
23. DARKGREEN = ( 0, 155, 0)
24. DARKGRAY = ( 40, 40, 40)
25. BGCOLOR = BLACK
26.
27. UP = 'up'
28. DOWN = 'down'
29. LEFT = 'left'
30. RIGHT = 'right'
31.
32. HEAD = 0 # syntactic sugar: index of the worm's head
Some more constants are set on lines 19 to 32. The HEAD constant will be explained later in this
chapter.
The main() Function
34. def main():
35. global FPSCLOCK, DISPLAYSURF, BASICFONT
36.
37. pygame.init()
38. FPSCLOCK = pygame.time.Clock()
39. DISPLAYSURF = pygame.display.set_mode((WINDOWWIDTH, WINDOWHEIGHT))
40. BASICFONT = pygame.font.Font('freesansbold.ttf', 18)
41. pygame.display.set_caption('Wormy')
42.
43. showStartScreen()
44. while True:
45. runGame()
46. showGameOverScreen()
In the Wormy game program, we’ve put the main part of the code in a function called
runGame(). This is because we only want to show the ―start screen‖ (the animation with the
rotating ―Wormy‖ text) once when the program starts (by calling the showStartScreen()

Chapter 6 – Wormy 139
function). Then we want to call runGame(), which will start a game of Wormy. This function
will return when the player’s worm collides into a wall or into itself and causes a game over.
At that point we will show the game over screen by calling showGameOverScreen(). When
that function call returns, the loop goes back to the start and calls runGame() again. The
while loop on line 44 will loop forever until the program terminates.
A Separate runGame() Function
49. def runGame():
50. # Set a random start point.
51. startx = random.randint(5, CELLWIDTH - 6)
52. starty = random.randint(5, CELLHEIGHT - 6)
53. wormCoords = [{'x': startx, 'y': starty},
54. {'x': startx - 1, 'y': starty},
55. {'x': startx - 2, 'y': starty}]
56. direction = RIGHT
57.
58. # Start the apple in a random place.
59. apple = getRandomLocation()
At the beginning of a game, we want the worm to start in a random position (but not too close to
the edges of the board) so we store a random coordinate in startx and starty. (Remember
that CELLWIDTH and CELLHEIGHT is the number of cells wide and high the window is, not the
number of pixels wide and high).
The body of the worm will be stored in a list of dictionary values. There will be one dictionary
value per body segment of the worm. The dictionary will have keys 'x' and 'y' for the XY
coordinates of that body segment. The head of the body to be at startx and starty. The other
two body segments will be one and two cells to the left of the head.
The head of the worm will always be the body part at wormCoords[0]. To make this code
more readable, we’ve set the HEAD constant to 0 on line 32, so that we can use
wormCoords[HEAD] instead of wormCoords[0].
The Event Handling Loop
61. while True: # main game loop
62. for event in pygame.event.get(): # event handling loop
63. if event.type == QUIT:
64. terminate()
65. elif event.type == KEYDOWN:
66. if (event.key == K_LEFT or event.key == K_a) and direction
!= RIGHT:

140 http://inventwithpython.com/pygame
Email questions to the author: [email protected]
67. direction = LEFT
68. elif (event.key == K_RIGHT or event.key == K_d) and
direction != LEFT:
69. direction = RIGHT
70. elif (event.key == K_UP or event.key == K_w) and direction
!= DOWN:
71. direction = UP
72. elif (event.key == K_DOWN or event.key == K_s) and
direction != UP:
73. direction = DOWN
74. elif event.key == K_ESCAPE:
75. terminate()
Line 61 is the start of the main game loop and line 62 is the start of the event handling loop. If the
event is a QUIT event, then we call terminate() (which we’ve defined the same as the
terminate() function in the previous game programs).
Otherwise, if the event is a KEYDOWN event, then we check if the key that was pressed down is an
arrow key or a WASD key. We want an additional check so that the worm does not turn in on
itself. For example, if the worm is moving left, then if the player accidentally presses the right
arrow key, the worm would immediate start going right and crash into itself.
That is why we have this check for the current value of the direction variable. That way, if
the player accidentally presses an arrow key that would cause them to immediately crash the
worm, we just ignore that key press.
Collision Detection
77. # check if the worm has hit itself or the edge
78. if wormCoords[HEAD]['x'] == -1 or wormCoords[HEAD]['x'] ==
CELLWIDTH or wormCoords[HEAD]['y'] == -1 or wormCoords[HEAD]['y'] ==
CELLHEIGHT:
79. return # game over
80. for wormBody in wormCoords[1:]:
81. if wormBody['x'] == wormCoords[HEAD]['x'] and wormBody['y'] ==
wormCoords[HEAD]['y']:
82. return # game over
The worm has crashed when the head has moved off the edge of the grid or when the head moves
onto a cell that is already occupied by another body segment.
We can check if the head has moved off the edge of the grid by seeing if either the X coordinate
of the head (which is stored in wormCoords[HEAD]['x']) is -1 (which is past the left edge
Chapter 6 – Wormy 141
of the grid) or equal to CELLWIDTH (which is past the right edge, since the rightmost X cell
coordinate is one less than CELLWIDTH).
The head has also moved off the grid if the Y coordinate of the head (which is stored in
wormCoords[HEAD]['y']) is either -1 (which is past the top edge) or CELLHEIGHT
(which is past the bottom edge).
All we have to do to end the current game is to return out of runGame(). When runGame()
returns to the function call in main(), the next line after the runGame() call (line 46) is the
call to showGameOverScreen() which makes the large ―Game Over‖ text appear. This is
why we have the return statement on line 79.
Line 80 loops through every body segment in wormCoords after the head (which is at index 0.
This is why the for loop iterates over wormCoords[1:] instead of just wormCoords). If
both the 'x' and 'y' values of the body segment are the same as the 'x' and 'y' of the head,
then we also end the game by returning out of the runGame() function.
Detecting Collisions with the Apple
84. # check if worm has eaten an apply
85. if wormCoords[HEAD]['x'] == apple['x'] and wormCoords[HEAD]['y']
== apple['y']:
86. # don't remove worm's tail segment
87. apple = getRandomLocation() # set a new apple somewhere
88. else:
89. del wormCoords[-1] # remove worm's tail segment
We do a similar collision detection check between the head of the worm and the apple’s XY
coordinates. If they match, we set the coordinates of the apple to a random new location (which
we get from the return value of getRandomLocation()).
If the head has not collided with an apple, then we delete the last body segment in the
wormCoords list. Remember that negative integers for indexes count from the end of the list.
So while 0 is the index of the first item in the list and 1 is for the second item, -1 is for the last
item in the list and -2 is for the second to last item.
The code on lines 91 to 100 (described next in the ―Moving the Worm‖ section) will add a new
body segment (for the head) in the direction that the worm is going. This will make the worm one
segment longer. By not deleting the last body segment when the worm eats an apple, the overall
length of the worm increases by one. But when line 89 deletes the last body segment, the size
remains the same because a new head segment is added right afterwards.

142 http://inventwithpython.com/pygame
Email questions to the author: [email protected]
Moving the Worm
91. # move the worm by adding a segment in the direction it is moving
92. if direction == UP:
93. newHead = {'x': wormCoords[HEAD]['x'], 'y':
wormCoords[HEAD]['y'] - 1}
94. elif direction == DOWN:
95. newHead = {'x': wormCoords[HEAD]['x'], 'y':
wormCoords[HEAD]['y'] + 1}
96. elif direction == LEFT:
97. newHead = {'x': wormCoords[HEAD]['x'] - 1, 'y':
wormCoords[HEAD]['y']}
98. elif direction == RIGHT:
99. newHead = {'x': wormCoords[HEAD]['x'] + 1, 'y':
wormCoords[HEAD]['y']}
100. wormCoords.insert(0, newHead)
To move the worm, we add a new body segment to the beginning of the wormCoords list.
Because the body segment is being added to the beginning of the list, it will become the new
head. The coordinates of the new head will be right next to the old head’s coordinates. Whether 1
is added or subtracted from either the X or Y coordinate depends on the direction the worm was
going.
This new head segment is added to wormCoords with the insert() list method on line 100.
The insert() List Method Unlike the append() list method that can only add items to the end of a list, the insert() list
method can add items anywhere inside the list. The first parameter for insert() is the index
where the item should go (all the items originally at this index and after have their indexes
increase by one). If the argument passed for the first parameter is larger than the length of the list,
the item is simply added to the end of the list (just like what append() does). The second
parameter for insert() is the item value to be added. Type the following into the interactive
shell to see how insert() works:
>>> spam = ['cat', 'dog', 'bat']
>>> spam.insert(0, 'frog')
>>> spam
['frog', 'cat', 'dog', 'bat']
>>> spam.insert(10, 42)
>>> spam
['frog', 'cat', 'dog', 'bat', 42]
>>> spam.insert(2, 'horse')
>>> spam
['frog', 'cat', 'horse', 'dog', 'bat', 42]

Chapter 6 – Wormy 143
>>>
Drawing the Screen
101. DISPLAYSURF.fill(BGCOLOR)
102. drawGrid()
103. drawWorm(wormCoords)
104. drawApple(apple)
105. drawScore(len(wormCoords) - 3)
106. pygame.display.update()
107. FPSCLOCK.tick(FPS)
The code for drawing the screen in the runGame() function is fairly simple. Line 101 fills in
the entire display Surface with the background color. Lines 102 to 105 draw the grid, worm,
apple, and score to the display Surface. Then the call to pygame.display.update() draws
the display Surface to the actual computer screen.
Drawing “Press a key” Text to the Screen
109. def drawPressKeyMsg():
110. pressKeySurf = BASICFONT.render('Press a key to play.', True,
DARKGRAY)
111. pressKeyRect = pressKeySurf.get_rect()
112. pressKeyRect.topleft = (WINDOWWIDTH - 200, WINDOWHEIGHT - 30)
113. DISPLAYSURF.blit(pressKeySurf, pressKeyRect)
While the start screen animation is playing or the game over screen is being shown, there will be
some small text in the bottom right corner that says ―Press a key to play.‖ Rather than have the
code typed out in both the showStartScreen() and the showGameOverScreen(), we
put it in a this separate function and simply call the function from showStartScreen() and
showGameOverScreen().
The checkForKeyPress() Function
116. def checkForKeyPress():
117. if len(pygame.event.get(QUIT)) > 0:
118. terminate()
119.
120. keyUpEvents = pygame.event.get(KEYUP)
121. if len(keyUpEvents) == 0:
122. return None
123. if keyUpEvents[0].key == K_ESCAPE:
124. terminate()
125. return keyUpEvents[0].key

144 http://inventwithpython.com/pygame
Email questions to the author: [email protected]
This function first checks if there are any QUIT events in the event queue. The call to
pygame.event.get() on line 117 returns a list of all the QUIT events in the event queue
(because we pass QUIT as an argument). If there are not QUIT events in the event queue, then
the list that pygame.event.get() returns will be the empty list: []
The len() call on line 117 will return 0 if pygame.event.get() returned an empty list. If
there are more than zero items in the list returned by pygame.event.get() (and remember,
any items in this list will only be QUIT events because we passed QUIT as the argument to
pygame.event.get()), then the terminate() function gets called on line 118 and the
program terminates.
After that, the call to pygame.event.get() gets a list of any KEYUP events in the event
queue. If the key event is for the Esc key, then the program terminates in that case as well.
Otherwise, the first key event object in the list that was returned by pygame.event.get() is
returned from this checkForKeyPress() function.
The Start Screen
128. def showStartScreen():
129. titleFont = pygame.font.Font('freesansbold.ttf', 100)
130. titleSurf1 = titleFont.render('Wormy!', True, WHITE, DARKGREEN)
131. titleSurf2 = titleFont.render('Wormy!', True, GREEN)
132.
133. degrees1 = 0
134. degrees2 = 0
135. while True:
136. DISPLAYSURF.fill(BGCOLOR)
When the Wormy game program first begins running, the player doesn’t automatically begin
playing the game. Instead, a start screen appears which tells the player what program they are
running. A start screen also gives the player a chance to prepare for the game to begin (otherwise
the player might not be ready and crash on their first game).
The Wormy start screen requires two Surface objects with the ―Wormy!‖ text drawn on them.
These are what the render() method calls create on lines 130 and 131. The text will be large:
the Font() constructor function call on line 129 creates a Font object that is 100 points in size.
The first ―Wormy!‖ text will have white text with a dark green background, and the other will
have green text with a transparent background.
Line 135 begins the animation loop for the start screen. During this animation, the two pieces of
text will be rotated and drawn to the display Surface object.

Chapter 6 – Wormy 145
Rotating the Start Screen Text
137. rotatedSurf1 = pygame.transform.rotate(titleSurf1, degrees1)
138. rotatedRect1 = rotatedSurf1.get_rect()
139. rotatedRect1.center = (WINDOWWIDTH / 2, WINDOWHEIGHT / 2)
140. DISPLAYSURF.blit(rotatedSurf1, rotatedRect1)
141.
142. rotatedSurf2 = pygame.transform.rotate(titleSurf2, degrees2)
143. rotatedRect2 = rotatedSurf2.get_rect()
144. rotatedRect2.center = (WINDOWWIDTH / 2, WINDOWHEIGHT / 2)
145. DISPLAYSURF.blit(rotatedSurf2, rotatedRect2)
146.
147. drawPressKeyMsg()
148.
149. if checkForKeyPress():
150. pygame.event.get() # clear event queue
151. return
152. pygame.display.update()
153. FPSCLOCK.tick(FPS)
The showStartScreen() function will rotate the images on the Surface objects that the
―Wormy!‖ text is written on. The first parameter is the Surface object to make a rotated copy of.
The second parameter is the number of degrees to rotate the Surface. The
pygame.transform.rotate() function doesn’t change the Surface object you pass it, but
rather returns a new Surface object with the rotated image drawn on it.
Note that this new Surface object will probably be larger than the original one, since all Surface
objects represent rectangular areas and the corners of the rotated Surface will stick out past the
width and height of original Surface. The picture below has a black rectangle along with a
slightly rotated version of itself. In order to make a Surface object that can fit the rotated
rectangle (which is colored gray in the picture below), it must be larger than the original black
rectangle’s Surface object:
The amount you rotate it is given in degrees, which is a measure of rotation. There are 360
degrees in a circle. Not rotated at all is 0 degrees. Rotating to one quarter counter-clockwise is 90
degrees. To rotate clockwise, pass a negative integer. Rotating 360 degrees is rotating the image
all the way around, which means you end up with the same image as if you rotated it 0 degrees. In
fact, if the rotation argument you pass to pygame.transform.rotate() is 360 or larger,

146 http://inventwithpython.com/pygame
Email questions to the author: [email protected]
then Pygame automatically keeps subtracting 360 from it until it gets a number less than 360.
This image shows several examples of different rotation amounts:
The two rotated ―Wormy!‖ Surface objects are blitted to the display Surface on each frame of the
animation loop on lines 140 and 145.
On line 147 the drawPressKeyMsg() function call draws the ―Press a key to play.‖ text in the
lower corner of the display Surface object. This animation loop will keep looping until
checkForKeyPress() returns a value that is not None, which happens if the player presses a
key. Before returning, pygame.event.get() is called simply to clear out any other events
that have accumulated in the event queue which the start screen was displayed.
Rotations Are Not Perfect You may wonder why we store the rotated Surface in a separate variable, rather than just
overwrite the titleSurf1 and titleSurf2 variables. There are two reasons.
First, rotating a 2D image is never completely perfect. The rotated image is always approximate.
If you rotate an image by 10 degrees counterclockwise, and then rotate it back 10 degrees
clockwise, the image you have will not be the exact same image you started with. Think of it as
making a photocopy, and then a photocopy of the first photocopy, and the another photocopy of
that photocopy. If you keep doing this, the image gets worse and worse as the slight distortions
add up.
(The only exception to this is if you rotate an image by a multiple of 90 degrees, such as 0, 90,
180, 270, or 360 degrees. In that case, the pixels can be rotated without any distortion.)
Second, if you rotate a 2D image then the rotated image will be slightly larger than the original
image. If you rotate that rotated image, then the next rotated image will be slightly larger again. If
you keep doing this, eventually the image will become too large for Pygame to handle, and your
Chapter 6 – Wormy 147
program will crash with the error message, pygame.error: Width or height is too
large.
154. degrees1 += 3 # rotate by 3 degrees each frame
155. degrees2 += 7 # rotate by 7 degrees each frame
The amount that we rotate the two ―Wormy!‖ text Surface objects is stored in degrees1 and
degrees2. On each iteration through the animation loop, we increase the number stored in
degrees1 by 3 and degrees2 by 7. This means on the next iteration of the animation loop
the white text ―Wormy!‖ Surface object will be rotated by another 3 degrees and the green text
―Wormy!‖ Surface object will be rotated by another 7 degrees. This is why the one of the Surface
objects rotates slower than the other.
158. def terminate():
159. pygame.quit()
160. sys.exit()
The terminate() function calls pygame.quit() and sys.exit() so that the game
correctly shuts down. It is identical to the terminate() functions in the previous game
programs.
Deciding Where the Apple Appears
163. def getRandomLocation():
164. return {'x': random.randint(0, CELLWIDTH - 1), 'y': random.randint(0,
CELLHEIGHT - 1)}
The getRandomLocation() function is called whenever new coordinates for the apple are
needed. This function returns a dictionary with keys 'x' and 'y', with the values set to random
XY coordinates.
Game Over Screens
167. def showGameOverScreen():
168. gameOverFont = pygame.font.Font('freesansbold.ttf', 150)
169. gameSurf = gameOverFont.render('Game', True, WHITE)
170. overSurf = gameOverFont.render('Over', True, WHITE)
171. gameRect = gameSurf.get_rect()
172. overRect = overSurf.get_rect()
173. gameRect.midtop = (WINDOWWIDTH / 2, 10)
174. overRect.midtop = (WINDOWWIDTH / 2, gameRect.height + 10 + 25)
175.
176. DISPLAYSURF.blit(gameSurf, gameRect)

148 http://inventwithpython.com/pygame
Email questions to the author: [email protected]
177. DISPLAYSURF.blit(overSurf, overRect)
178. drawPressKeyMsg()
179. pygame.display.update()
The game over screen is similar to the start screen, except it isn’t animated. The words ―Game‖
and ―Over‖ are rendered to two Surface objects which are then drawn on the screen.
180. pygame.time.wait(500)
181. checkForKeyPress() # clear out any key presses in the event queue
182.
183. while True:
184. if checkForKeyPress():
185. pygame.event.get() # clear event queue
186. return
The Game Over text will stay on the screen until the player pushes a key. Just to make sure the
player doesn’t accidentally press a key too soon, we will put a half second pause with the call to
pygame.time.wait() on line 180. (The 500 argument stands for a 500 millisecond pause,
which is half of one second.)
Then, checkForKeyPress() is called so that any key events that were made since the
showGameOverScreen() function started are ignored. This pause and dropping of the key
events is to prevent the following situation: Say the player was trying to turn away from the edge
of the screen at the last minute, but pressed the key too late and crashed into the edge of the
board. If this happens, then the key press would have happened after the
showGameOverScreen() was called, and that key press would cause the game over screen to
disappear almost instantly. The next game would start immediately after that, and might take the
player by surprise. Adding this pause helps the make the game more ―user friendly‖.
Drawing Functions The code to draw the score, worm, apple, and grid are all put into separate functions.
188. def drawScore(score):
189. scoreSurf = BASICFONT.render('Score: %s' % (score), True, WHITE)
190. scoreRect = scoreSurf.get_rect()
191. scoreRect.topleft = (WINDOWWIDTH - 120, 10)
192. DISPLAYSURF.blit(scoreSurf, scoreRect)
The drawScore() function simply renders and draws the text of the score that was passed in
its score parameter on the display Surface object.

Chapter 6 – Wormy 149
195. def drawWorm(wormCoords):
196. for coord in wormCoords:
197. x = coord['x'] * CELLSIZE
198. y = coord['y'] * CELLSIZE
199. wormSegmentRect = pygame.Rect(x, y, CELLSIZE, CELLSIZE)
200. pygame.draw.rect(DISPLAYSURF, DARKGREEN, wormSegmentRect)
201. wormInnerSegmentRect = pygame.Rect(x + 4, y + 4, CELLSIZE - 8,
CELLSIZE - 8)
202. pygame.draw.rect(DISPLAYSURF, GREEN, wormInnerSegmentRect)
The drawWorm() function will draw a green box for each of the segments of the worm’s body.
The segments are passed in the wormCoords parameter, which is a list of dictionaries each with
an 'x' key and a 'y' key. The for loop on line 196 loops through each of the dictionary values
in wormCoords.
Because the grid coordinates take up the entire window and also begin a 0, 0 pixel, it is fairly
easy to convert from grid coordinates to pixel coordinates. Line 197 and 198 simply multiply the
coord['x'] and coord['y'] coordinate by the CELLSIZE.
Line 199 creates a Rect object for the worm segment that will be passed to the
pygame.draw.rect() function on line 200. Remember that each cell in the grid is
CELLSIZE in width and height, so that’s what the size of the segment’s Rect object should be.
Line 200 draws a dark green rectangle for the segment. Then on top of this, a smaller bright green
rectangle is drawn. This makes the worm look a little nicer.
The inner bright green rectangle starts 4 pixels to the right and 4 pixels below the topleft corner of
the cell. The width and height of this rectangle are 8 pixels less than the cell size, so there will be
a 4 pixel margin on the right and bottom sides as well.
205. def drawApple(coord):
206. x = coord['x'] * CELLSIZE
207. y = coord['y'] * CELLSIZE
208. appleRect = pygame.Rect(x, y, CELLSIZE, CELLSIZE)
209. pygame.draw.rect(DISPLAYSURF, RED, appleRect)
The drawApple() function is very similar to drawWorm(), except since the red apple is just
a single rectangle that fills up the cell, all the function needs to do is convert to pixel coordinates
(which is what lines 206 and 207 do), create the Rect object with the location and size of the
apple (line 208), and then pass this Rect object to the pygame.draw.rect() function.
212. def drawGrid():
213. for x in range(0, WINDOWWIDTH, CELLSIZE): # draw vertical lines

150 http://inventwithpython.com/pygame
Email questions to the author: [email protected]
214. pygame.draw.line(DISPLAYSURF, DARKGRAY, (x, 0), (x, WINDOWHEIGHT))
215. for y in range(0, WINDOWHEIGHT, CELLSIZE): # draw horizontal lines
216. pygame.draw.line(DISPLAYSURF, DARKGRAY, (0, y), (WINDOWWIDTH, y))
Just to make it easier to visualize the grid of cells, we call pygame.draw.line() to draw out
each of the vertical and horizontal lines of the grid.
Normally, to draw the 32 vertical lines needed, we would need 32 calls to
pygame.draw.line() with the following coordinates:
pygame.draw.line(DISPLAYSURF, DARKGRAY, (0, 0), (0, WINDOWHEIGHT))
pygame.draw.line(DISPLAYSURF, DARKGRAY, (20, 0), (20, WINDOWHEIGHT))
pygame.draw.line(DISPLAYSURF, DARKGRAY, (40, 0), (40, WINDOWHEIGHT))
pygame.draw.line(DISPLAYSURF, DARKGRAY, (60, 0), (60, WINDOWHEIGHT))
...skipped for brevity...
pygame.draw.line(DISPLAYSURF, DARKGRAY, (560, 0), (560, WINDOWHEIGHT))
pygame.draw.line(DISPLAYSURF, DARKGRAY, (580, 0), (580, WINDOWHEIGHT))
pygame.draw.line(DISPLAYSURF, DARKGRAY, (600, 0), (600, WINDOWHEIGHT))
pygame.draw.line(DISPLAYSURF, DARKGRAY, (620, 0), (620, WINDOWHEIGHT))
Instead of typing out all these lines of code, we can just have one line of code inside a for loop.
Notice that the pattern for the vertical lines is that the X coordinate of the start and end point
starts at 0 and goes up to 620, increasing by 20 each time. The Y coordinate is always 0 for the
start point and WINDOWHEIGHT for the end point parameter. That means the for loop should
iterate over range(0, 640, 20). This is why the for loop on line 213 iterates over
range(0, WINDOWWIDTH, CELLSIZE).
For the horizontal lines, the coordinates would have to be:
pygame.draw.line(DISPLAYSURF, DARKGRAY, (0, 0), (WINDOWWIDTH, 0))
pygame.draw.line(DISPLAYSURF, DARKGRAY, (0, 20), (WINDOWWIDTH, 20))
pygame.draw.line(DISPLAYSURF, DARKGRAY, (0, 40), (WINDOWWIDTH, 40))
pygame.draw.line(DISPLAYSURF, DARKGRAY, (0, 60), (WINDOWWIDTH, 60))
...skipped for brevity...
pygame.draw.line(DISPLAYSURF, DARKGRAY, (0, 400), (WINDOWWIDTH, 400))
pygame.draw.line(DISPLAYSURF, DARKGRAY, (0, 420), (WINDOWWIDTH, 420))
pygame.draw.line(DISPLAYSURF, DARKGRAY, (0, 440), (WINDOWWIDTH, 440))
pygame.draw.line(DISPLAYSURF, DARKGRAY, (0, 460), (WINDOWWIDTH, 460))
The Y coordinate ranges from 0 to 460, increasing by 20 each time. The X coordinate is always
0 for the start point and WINDOWWIDTH for the end point parameter. We can also use a for loop
here so we don’t have to type out all those pygame.draw.line() calls.

Chapter 6 – Wormy 151
Noticing regular patterns needed by the calls and using loops is a clever programmer trick to save
us from a lot of typing. We could have typed out all 56 pygame.draw.line() calls and the
program would have worked the exact same. But by being a little bit clever, we can save
ourselves a lot of work.
219. if __name__ == '__main__':
220. main()
After all the functions and constants and global variables have been defined and created, the
main() function is called to start the game.
Don’t Reuse Variable Names Take a look at a few lines of code from the drawWorm() function again:
199. wormSegmentRect = pygame.Rect(x, y, CELLSIZE, CELLSIZE)
200. pygame.draw.rect(DISPLAYSURF, DARKGREEN, wormSegmentRect)
201. wormInnerSegmentRect = pygame.Rect(x + 4, y + 4, CELLSIZE - 8,
CELLSIZE - 8)
202. pygame.draw.rect(DISPLAYSURF, GREEN, wormInnerSegmentRect)
Notice that two different Rect objects are created on lines 199 and 201. The Rect object created
on line 199 is stored in the wormSegmentRect local variable and is passed to the
pygame.draw.rect() function on line 200. The Rect object created on line 201 is stored in
the wormInnerSegmentRect local variable and is passed to the pygame.draw.rect()
function on line 202.
Every time you create a variable, it takes up a small amount of the computer’s memory. You
might think it would be clever to reuse the wormSegmentRect variable for both Rect objects,
like this:
199. wormSegmentRect = pygame.Rect(x, y, CELLSIZE, CELLSIZE)
200. pygame.draw.rect(DISPLAYSURF, DARKGREEN, wormSegmentRect)
201. wormSegmentRect = pygame.Rect(x + 4, y + 4, CELLSIZE - 8, CELLSIZE
- 8)
202. pygame.draw.rect(DISPLAYSURF, GREEN, wormInnerSegmentRect)
Because the Rect object returned by pygame.Rect() on line 199 won’t be needed after 200,
we can overwrite this value and reuse the variable to store the Rect object returned by
pygame.Rect() on line 201. Since we are now using fewer variables we are saving memory,
right?

152 http://inventwithpython.com/pygame
Email questions to the author: [email protected]
While this is technically true, you really are only saving a few bytes. Modern computers have
memory of several billion bytes. So the savings aren’t that great. Meanwhile, reusing variables
reduces the code readability. If a programmer was reading through this code after it was written,
they would see that wormSegmentRect is passed to the pygame.draw.rect() calls on
line 200 and 202. If they tried to find the first time the wormSegmentRect variable was
assigned a value, they would see the pygame.Rect() call on line 199. They might not realize
that the Rect object returned by line 199’s pygame.Rect() call isn’t the same as the one that is
passed to the pygame.draw.rect() call on line 202.
Little things like this make it harder to understand how exactly your program works. It won’t just
be other programmers looking at your code who will be confused. When you look at your own
code a couple weeks after writing it, you may have a hard time remembering how exactly it
works. Code readability is much more important than saving a few bytes of memory here and
there.
For additional programming practice, you can download buggy versions of Wormy from
http://invpy.com/buggy/wormy and try to figure out how to fix the bugs.

Chapter 7 - Tetromino 153
CHAPTER 7 - TETROMINO
How to Play Tetromino Tetromino is a Tetris clone. Differently shaped blocks (each made up of four boxes) fall from the
top of the screen, and the player must guide them down to form complete rows that have no gaps
in them. When a complete row is formed, the row disappears and each row above it moves down
one row. The player tries to keep forming complete lines until the screen fills up and a new
falling block cannot fit on the screen.
Some Tetromino Nomenclature In this chapter, I have come up with a set of terms for the different things in the game program.
Board – The board is made up of 10 x 20 spaces that the blocks fall and stack up in.
Box – A box is a single filled-in square space on the board.
Piece – The things that fall from the top of the board that the player can rotate and
position. Each piece has a shape and is made up of 4 boxes.
Shape – The shapes are the different types of pieces in the game. The names of the
shapes are T, S, Z, J, L, I, and O.

154 http://inventwithpython.com/pygame
Email questions to the author: [email protected]
Template – A list of shape data structures that represents all the possible rotations of a
shape. These are store in variables with names like S_SHAPE_TEMPLATE or
J_SHAPE_TEMPLATE.
Landed – When a piece has either reached the bottom of the board or is touching a box
on the board, we say that the piece has landed. At that point, the next piece should start
falling.
Source Code to Tetromino This source code can be downloaded from http://invpy.com/tetromino.py. If you get any error
messages, look at the line number that is mentioned in the error message and check your code for
any typos. You can also copy and paste your code into the web form at
http://invpy.com/diff/tetromino to see if the differences between your code and the code in the
book.
You will also need the background music files in the same folder of as the tetromino.py file. You
can download them from here:
http://invpy.com/tetrisb.mid
http://invpy.com/tetrisc.mid
1. # Tetromino (a Tetris clone)
2. # By Al Sweigart [email protected]
3. # http://inventwithpython.com/pygame
4. # Creative Commons BY-NC-SA 3.0 US
5.
6. import random, time, pygame, sys
7. from pygame.locals import *
8.
9. FPS = 25
10. WINDOWWIDTH = 640
11. WINDOWHEIGHT = 480
12. BOXSIZE = 20
13. BOARDWIDTH = 10
14. BOARDHEIGHT = 20
15. BLANK = '.'
16.
17. MOVESIDEWAYSFREQ = 0.15
18. MOVEDOWNFREQ = 0.1
19.
20. XMARGIN = int((WINDOWWIDTH - BOARDWIDTH * BOXSIZE) / 2)
21. TOPMARGIN = WINDOWHEIGHT - (BOARDHEIGHT * BOXSIZE) - 5
22.
23. # R G B

Chapter 7 - Tetromino 155
24. WHITE = (255, 255, 255)
25. GRAY = (185, 185, 185)
26. BLACK = ( 0, 0, 0)
27. RED = (155, 0, 0)
28. LIGHTRED = (175, 20, 20)
29. GREEN = ( 0, 155, 0)
30. LIGHTGREEN = ( 20, 175, 20)
31. BLUE = ( 0, 0, 155)
32. LIGHTBLUE = ( 20, 20, 175)
33. YELLOW = (155, 155, 0)
34. LIGHTYELLOW = (175, 175, 20)
35.
36. BORDERCOLOR = BLUE
37. BGCOLOR = BLACK
38. TEXTCOLOR = WHITE
39. TEXTSHADOWCOLOR = GRAY
40. COLORS = ( BLUE, GREEN, RED, YELLOW)
41. LIGHTCOLORS = (LIGHTBLUE, LIGHTGREEN, LIGHTRED, LIGHTYELLOW)
42. assert len(COLORS) == len(LIGHTCOLORS) # each color must have light color
43.
44. TEMPLATEWIDTH = 5
45. TEMPLATEHEIGHT = 5
46.
47. S_SHAPE_TEMPLATE = [['.....',
48. '.....',
49. '..OO.',
50. '.OO..',
51. '.....'],
52. ['.....',
53. '..O..',
54. '..OO.',
55. '...O.',
56. '.....']]
57.
58. Z_SHAPE_TEMPLATE = [['.....',
59. '.....',
60. '.OO..',
61. '..OO.',
62. '.....'],
63. ['.....',
64. '..O..',
65. '.OO..',
66. '.O...',
67. '.....']]
68.
69. I_SHAPE_TEMPLATE = [['..O..',

156 http://inventwithpython.com/pygame
Email questions to the author: [email protected]
70. '..O..',
71. '..O..',
72. '..O..',
73. '.....'],
74. ['.....',
75. '.....',
76. 'OOOO.',
77. '.....',
78. '.....']]
79.
80. O_SHAPE_TEMPLATE = [['.....',
81. '.....',
82. '.OO..',
83. '.OO..',
84. '.....']]
85.
86. J_SHAPE_TEMPLATE = [['.....',
87. '.O...',
88. '.OOO.',
89. '.....',
90. '.....'],
91. ['.....',
92. '..OO.',
93. '..O..',
94. '..O..',
95. '.....'],
96. ['.....',
97. '.....',
98. '.OOO.',
99. '...O.',
100. '.....'],
101. ['.....',
102. '..O..',
103. '..O..',
104. '.OO..',
105. '.....']]
106.
107. L_SHAPE_TEMPLATE = [['.....',
108. '...O.',
109. '.OOO.',
110. '.....',
111. '.....'],
112. ['.....',
113. '..O..',
114. '..O..',
115. '..OO.',

Chapter 7 - Tetromino 157
116. '.....'],
117. ['.....',
118. '.....',
119. '.OOO.',
120. '.O...',
121. '.....'],
122. ['.....',
123. '.OO..',
124. '..O..',
125. '..O..',
126. '.....']]
127.
128. T_SHAPE_TEMPLATE = [['.....',
129. '..O..',
130. '.OOO.',
131. '.....',
132. '.....'],
133. ['.....',
134. '..O..',
135. '..OO.',
136. '..O..',
137. '.....'],
138. ['.....',
139. '.....',
140. '.OOO.',
141. '..O..',
142. '.....'],
143. ['.....',
144. '..O..',
145. '.OO..',
146. '..O..',
147. '.....']]
148.
149. SHAPES = {'S': S_SHAPE_TEMPLATE,
150. 'Z': Z_SHAPE_TEMPLATE,
151. 'J': J_SHAPE_TEMPLATE,
152. 'L': L_SHAPE_TEMPLATE,
153. 'I': I_SHAPE_TEMPLATE,
154. 'O': O_SHAPE_TEMPLATE,
155. 'T': T_SHAPE_TEMPLATE}
156.
157.
158. def main():
159. global FPSCLOCK, DISPLAYSURF, BASICFONT, BIGFONT
160. pygame.init()
161. FPSCLOCK = pygame.time.Clock()

158 http://inventwithpython.com/pygame
Email questions to the author: [email protected]
162. DISPLAYSURF = pygame.display.set_mode((WINDOWWIDTH, WINDOWHEIGHT))
163. BASICFONT = pygame.font.Font('freesansbold.ttf', 18)
164. BIGFONT = pygame.font.Font('freesansbold.ttf', 100)
165. pygame.display.set_caption('Tetromino')
166.
167. showTextScreen('Tetromino')
168. while True: # game loop
169. if random.randint(0, 1) == 0:
170. pygame.mixer.music.load('tetrisb.mid')
171. else:
172. pygame.mixer.music.load('tetrisc.mid')
173. pygame.mixer.music.play(-1, 0.0)
174. runGame()
175. pygame.mixer.music.stop()
176. showTextScreen('Game Over')
177.
178.
179. def runGame():
180. # setup variables for the start of the game
181. board = getBlankBoard()
182. lastMoveDownTime = time.time()
183. lastMoveSidewaysTime = time.time()
184. lastFallTime = time.time()
185. movingDown = False # note: there is no movingUp variable
186. movingLeft = False
187. movingRight = False
188. score = 0
189. level, fallFreq = calculateLevelAndFallFreq(score)
190.
191. fallingPiece = getNewPiece()
192. nextPiece = getNewPiece()
193.
194. while True: # main game loop
195. if fallingPiece == None:
196. # No falling piece in play, so start a new piece at the top
197. fallingPiece = nextPiece
198. nextPiece = getNewPiece()
199. lastFallTime = time.time() # reset lastFallTime
200.
201. if not isValidPosition(board, fallingPiece):
202. return # can't fit a new piece on the board, so game over
203.
204. checkForQuit()
205. for event in pygame.event.get(): # event handling loop
206. if event.type == KEYUP:
207. if (event.key == K_p):

Chapter 7 - Tetromino 159
208. # Pausing the game
209. DISPLAYSURF.fill(BGCOLOR)
210. pygame.mixer.music.stop()
211. showTextScreen('Paused') # pause until a key press
212. pygame.mixer.music.play(-1, 0.0)
213. lastFallTime = time.time()
214. lastMoveDownTime = time.time()
215. lastMoveSidewaysTime = time.time()
216. elif (event.key == K_LEFT or event.key == K_a):
217. movingLeft = False
218. elif (event.key == K_RIGHT or event.key == K_d):
219. movingRight = False
220. elif (event.key == K_DOWN or event.key == K_s):
221. movingDown = False
222.
223. elif event.type == KEYDOWN:
224. # moving the block sideways
225. if (event.key == K_LEFT or event.key == K_a) and
isValidPosition(board, fallingPiece, adjX=-1):
226. fallingPiece['x'] -= 1
227. movingLeft = True
228. movingRight = False
229. lastMoveSidewaysTime = time.time()
230.
231. elif (event.key == K_RIGHT or event.key == K_d) and
isValidPosition(board, fallingPiece, adjX=1):
232. fallingPiece['x'] += 1
233. movingRight = True
234. movingLeft = False
235. lastMoveSidewaysTime = time.time()
236.
237. # rotating the block (if there is room to rotate)
238. elif (event.key == K_UP or event.key == K_w):
239. fallingPiece['rotation'] = (fallingPiece['rotation'] +
1) % len(SHAPES[fallingPiece['shape']])
240. if not isValidPosition(board, fallingPiece):
241. fallingPiece['rotation'] =
(fallingPiece['rotation'] - 1) % len(SHAPES[fallingPiece['shape']])
242. elif (event.key == K_q): # rotate the other direction
243. fallingPiece['rotation'] = (fallingPiece['rotation'] -
1) % len(SHAPES[fallingPiece['shape']])
244. if not isValidPosition(board, fallingPiece):
245. fallingPiece['rotation'] =
(fallingPiece['rotation'] + 1) % len(SHAPES[fallingPiece['shape']])
246.
247. # making the block fall faster with the down key

160 http://inventwithpython.com/pygame
Email questions to the author: [email protected]
248. elif (event.key == K_DOWN or event.key == K_s):
249. movingDown = True
250. if isValidPosition(board, fallingPiece, adjY=1):
251. fallingPiece['y'] += 1
252. lastMoveDownTime = time.time()
253.
254. # move the current block all the way down
255. elif event.key == K_SPACE:
256. movingDown = False
257. movingLeft = False
258. movingRight = False
259. for i in range(1, BOARDHEIGHT):
260. if not isValidPosition(board, fallingPiece,
adjY=i):
261. break
262. fallingPiece['y'] += i - 1
263.
264. # handle moving the block because of user input
265. if (movingLeft or movingRight) and time.time() -
lastMoveSidewaysTime > MOVESIDEWAYSFREQ:
266. if movingLeft and isValidPosition(board, fallingPiece, adjX=-
1):
267. fallingPiece['x'] -= 1
268. elif movingRight and isValidPosition(board, fallingPiece,
adjX=1):
269. fallingPiece['x'] += 1
270. lastMoveSidewaysTime = time.time()
271.
272. if movingDown and time.time() - lastMoveDownTime > MOVEDOWNFREQ
and isValidPosition(board, fallingPiece, adjY=1):
273. fallingPiece['y'] += 1
274. lastMoveDownTime = time.time()
275.
276. # let the piece fall if it is time to fall
277. if time.time() - lastFallTime > fallFreq:
278. # see if the piece has landed
279. if not isValidPosition(board, fallingPiece, adjY=1):
280. # falling piece has landed, set it on the board
281. addToBoard(board, fallingPiece)
282. score += removeCompleteLines(board)
283. level, fallFreq = calculateLevelAndFallFreq(score)
284. fallingPiece = None
285. else:
286. # piece did not land, just move the block down
287. fallingPiece['y'] += 1
288. lastFallTime = time.time()

Chapter 7 - Tetromino 161
289.
290. # drawing everything on the screen
291. DISPLAYSURF.fill(BGCOLOR)
292. drawBoard(board)
293. drawStatus(score, level)
294. drawNextPiece(nextPiece)
295. if fallingPiece != None:
296. drawPiece(fallingPiece)
297.
298. pygame.display.update()
299. FPSCLOCK.tick(FPS)
300.
301.
302. def makeTextObjs(text, font, color):
303. surf = font.render(text, True, color)
304. return surf, surf.get_rect()
305.
306.
307. def terminate():
308. pygame.quit()
309. sys.exit()
310.
311.
312. def checkForKeyPress():
313. # Go through event queue looking for a KEYUP event.
314. # Grab KEYDOWN events to remove them from the event queue.
315. checkForQuit()
316.
317. for event in pygame.event.get([KEYDOWN, KEYUP]):
318. if event.type == KEYDOWN:
319. continue
320. return event.key
321. return None
322.
323.
324. def showTextScreen(text):
325. # This function displays large text in the
326. # center of the screen until a key is pressed.
327. # Draw the text drop shadow
328. titleSurf, titleRect = makeTextObjs(text, BIGFONT, TEXTSHADOWCOLOR)
329. titleRect.center = (int(WINDOWWIDTH / 2), int(WINDOWHEIGHT / 2))
330. DISPLAYSURF.blit(titleSurf, titleRect)
331.
332. # Draw the text
333. titleSurf, titleRect = makeTextObjs(text, BIGFONT, TEXTCOLOR)

162 http://inventwithpython.com/pygame
Email questions to the author: [email protected]
334. titleRect.center = (int(WINDOWWIDTH / 2) - 3, int(WINDOWHEIGHT / 2) -
3)
335. DISPLAYSURF.blit(titleSurf, titleRect)
336.
337. # Draw the additional "Press a key to play." text.
338. pressKeySurf, pressKeyRect = makeTextObjs('Press a key to play.',
BASICFONT, TEXTCOLOR)
339. pressKeyRect.center = (int(WINDOWWIDTH / 2), int(WINDOWHEIGHT / 2) +
100)
340. DISPLAYSURF.blit(pressKeySurf, pressKeyRect)
341.
342. while checkForKeyPress() == None:
343. pygame.display.update()
344. FPSCLOCK.tick()
345.
346.
347. def checkForQuit():
348. for event in pygame.event.get(QUIT): # get all the QUIT events
349. terminate() # terminate if any QUIT events are present
350. for event in pygame.event.get(KEYUP): # get all the KEYUP events
351. if event.key == K_ESCAPE:
352. terminate() # terminate if the KEYUP event was for the Esc key
353. pygame.event.post(event) # put the other KEYUP event objects back
354.
355.
356. def calculateLevelAndFallFreq(score):
357. # Based on the score, return the level the player is on and
358. # how many seconds pass until a falling piece falls one space.
359. level = int(score / 10) + 1
360. fallFreq = 0.27 - (level * 0.02)
361. return level, fallFreq
362.
363. def getNewPiece():
364. # return a random new piece in a random rotation and color
365. shape = random.choice(list(SHAPES.keys()))
366. newPiece = {'shape': shape,
367. 'rotation': random.randint(0, len(SHAPES[shape]) - 1),
368. 'x': int(BOARDWIDTH / 2) - int(TEMPLATEWIDTH / 2),
369. 'y': -2, # start it above the board (i.e. less than 0)
370. 'color': random.randint(0, len(COLORS)-1)}
371. return newPiece
372.
373.
374. def addToBoard(board, piece):
375. # fill in the board based on piece's location, shape, and rotation
376. for x in range(TEMPLATEWIDTH):

Chapter 7 - Tetromino 163
377. for y in range(TEMPLATEHEIGHT):
378. if SHAPES[piece['shape']][piece['rotation']][y][x] != BLANK:
379. board[x + piece['x']][y + piece['y']] = piece['color']
380.
381.
382. def getBlankBoard():
383. # create and return a new blank board data structure
384. board = []
385. for i in range(BOARDWIDTH):
386. board.append([BLANK] * BOARDHEIGHT)
387. return board
388.
389.
390. def isOnBoard(x, y):
391. return x >= 0 and x < BOARDWIDTH and y < BOARDHEIGHT
392.
393.
394. def isValidPosition(board, piece, adjX=0, adjY=0):
395. # Return True if the piece is within the board and not colliding
396. for x in range(TEMPLATEWIDTH):
397. for y in range(TEMPLATEHEIGHT):
398. isAboveBoard = y + piece['y'] + adjY < 0
399. if isAboveBoard or
SHAPES[piece['shape']][piece['rotation']][y][x] == BLANK:
400. continue
401. if not isOnBoard(x + piece['x'] + adjX, y + piece['y'] +
adjY):
402. return False
403. if board[x + piece['x'] + adjX][y + piece['y'] + adjY] !=
BLANK:
404. return False
405. return True
406.
407. def isCompleteLine(board, y):
408. # Return True if the line filled with boxes with no gaps.
409. for x in range(BOARDWIDTH):
410. if board[x][y] == BLANK:
411. return False
412. return True
413.
414.
415. def removeCompleteLines(board):
416. # Remove any completed lines on the board, move everything above them
down, and return the number of complete lines.
417. numLinesRemoved = 0
418. y = BOARDHEIGHT - 1 # start y at the bottom of the board

164 http://inventwithpython.com/pygame
Email questions to the author: [email protected]
419. while y >= 0:
420. if isCompleteLine(board, y):
421. # Remove the line and pull boxes down by one line.
422. for pullDownY in range(y, 0, -1):
423. for x in range(BOARDWIDTH):
424. board[x][pullDownY] = board[x][pullDownY-1]
425. # Set very top line to blank.
426. for x in range(BOARDWIDTH):
427. board[x][0] = BLANK
428. numLinesRemoved += 1
429. # Note on the next iteration of the loop, y is the same.
430. # This is so that if the line that was pulled down is also
431. # complete, it will be removed.
432. else:
433. y -= 1 # move on to check next row up
434. return numLinesRemoved
435.
436.
437. def convertToPixelCoords(boxx, boxy):
438. # Convert the given xy coordinates of the board to xy
439. # coordinates of the location on the screen.
440. return (XMARGIN + (boxx * BOXSIZE)), (TOPMARGIN + (boxy * BOXSIZE))
441.
442.
443. def drawBox(boxx, boxy, color, pixelx=None, pixely=None):
444. # draw a single box (each tetromino piece has four boxes)
445. # at xy coordinates on the board. Or, if pixelx & pixely
446. # are specified, draw to the pixel coordinates stored in
447. # pixelx & pixely (this is used for the "Next" piece).
448. if color == BLANK:
449. return
450. if pixelx == None and pixely == None:
451. pixelx, pixely = convertToPixelCoords(boxx, boxy)
452. pygame.draw.rect(DISPLAYSURF, COLORS[color], (pixelx + 1, pixely + 1,
BOXSIZE - 1, BOXSIZE - 1))
453. pygame.draw.rect(DISPLAYSURF, LIGHTCOLORS[color], (pixelx + 1, pixely
+ 1, BOXSIZE - 4, BOXSIZE - 4))
454.
455.
456. def drawBoard(board):
457. # draw the border around the board
458. pygame.draw.rect(DISPLAYSURF, BORDERCOLOR, (XMARGIN - 3, TOPMARGIN -
7, (BOARDWIDTH * BOXSIZE) + 8, (BOARDHEIGHT * BOXSIZE) + 8), 5)
459.
460. # fill the background of the board

Chapter 7 - Tetromino 165
461. pygame.draw.rect(DISPLAYSURF, BGCOLOR, (XMARGIN, TOPMARGIN, BOXSIZE *
BOARDWIDTH, BOXSIZE * BOARDHEIGHT))
462. # draw the individual boxes on the board
463. for x in range(BOARDWIDTH):
464. for y in range(BOARDHEIGHT):
465. drawBox(x, y, board[x][y])
466.
467.
468. def drawStatus(score, level):
469. # draw the score text
470. scoreSurf = BASICFONT.render('Score: %s' % score, True, TEXTCOLOR)
471. scoreRect = scoreSurf.get_rect()
472. scoreRect.topleft = (WINDOWWIDTH - 150, 20)
473. DISPLAYSURF.blit(scoreSurf, scoreRect)
474.
475. # draw the level text
476. levelSurf = BASICFONT.render('Level: %s' % level, True, TEXTCOLOR)
477. levelRect = levelSurf.get_rect()
478. levelRect.topleft = (WINDOWWIDTH - 150, 50)
479. DISPLAYSURF.blit(levelSurf, levelRect)
480.
481.
482. def drawPiece(piece, pixelx=None, pixely=None):
483. shapeToDraw = SHAPES[piece['shape']][piece['rotation']]
484. if pixelx == None and pixely == None:
485. # if pixelx & pixely hasn't been specified, use the location
stored in the piece data structure
486. pixelx, pixely = convertToPixelCoords(piece['x'], piece['y'])
487.
488. # draw each of the blocks that make up the piece
489. for x in range(TEMPLATEWIDTH):
490. for y in range(TEMPLATEHEIGHT):
491. if shapeToDraw[y][x] != BLANK:
492. drawBox(None, None, piece['color'], pixelx + (x *
BOXSIZE), pixely + (y * BOXSIZE))
493.
494.
495. def drawNextPiece(piece):
496. # draw the "next" text
497. nextSurf = BASICFONT.render('Next:', True, TEXTCOLOR)
498. nextRect = nextSurf.get_rect()
499. nextRect.topleft = (WINDOWWIDTH - 120, 80)
500. DISPLAYSURF.blit(nextSurf, nextRect)
501. # draw the "next" piece
502. drawPiece(piece, pixelx=WINDOWWIDTH-120, pixely=100)
503.

166 http://inventwithpython.com/pygame
Email questions to the author: [email protected]
504.
505. if __name__ == '__main__':
506. main()
The Usual Setup Code
1. # Tetromino (a Tetris clone)
2. # By Al Sweigart [email protected]
3. # http://inventwithpython.com/pygame
4. # Creative Commons BY-NC-SA 3.0 US
5.
6. import random, time, pygame, sys
7. from pygame.locals import *
8.
9. FPS = 25
10. WINDOWWIDTH = 640
11. WINDOWHEIGHT = 480
12. BOXSIZE = 20
13. BOARDWIDTH = 10
14. BOARDHEIGHT = 20
15. BLANK = '.'
These are the constants used by our Tetromino game. Each box is a square that is 20 pixels wide
and high. The board itself is 10 boxes wide and 20 boxes tall. The BLANK constant will be used
as a value to represent blank spaces in the board’s data structure.
Setting up Timing Constants for Holding Down Keys
17. MOVESIDEWAYSFREQ = 0.15
18. MOVEDOWNFREQ = 0.1
Every time the player pushes the left or right arrow key down, the falling piece should move one
box over to the left or right, respectively. However, the player can also hold down the left or right
arrow key to keep moving the falling piece. The MOVESIDEWAYSFREQ constant will set it so
that every 0.15 seconds that passes with the left or right arrow key held down, the piece will
move another space over.
The MOVEDOWNFREQ constant is the same thing except it tells how frequently the piece drops by
one box while the player has the down arrow key held down.
More Setup Code
20. XMARGIN = int((WINDOWWIDTH - BOARDWIDTH * BOXSIZE) / 2)

Chapter 7 - Tetromino 167
21. TOPMARGIN = WINDOWHEIGHT - (BOARDHEIGHT * BOXSIZE) - 5
The program needs to calculate how many pixels are to the left and right side of the board to use
later in the program. WINDOWWIDTH is the total number of pixels wide the entire window is. The
board is BOARDWIDTH boxes wide and each box is BOXSIZE pixels wide. If we subtract
BOXSIZE pixels from this for each of the boxes wide in the board (which is BOARDWIDTH *
BOXSIZE), we’ll have the size of the margin to the left and right of the board. If we divide this
by 2, then we will have the size of just one margin. Since the margins are the same size, we can
use XMARGIN for either the left-side or right-side margin.
We can calculate the size of the space between the top of the board and the top of the window in a
similar manner. The board will be drawn 5 pixels above the bottom of the window, so 5 is
subtracted from topmargin to account for this.
23. # R G B
24. WHITE = (255, 255, 255)
25. GRAY = (185, 185, 185)
26. BLACK = ( 0, 0, 0)
27. RED = (155, 0, 0)
28. LIGHTRED = (175, 20, 20)
29. GREEN = ( 0, 155, 0)
30. LIGHTGREEN = ( 20, 175, 20)
31. BLUE = ( 0, 0, 155)
32. LIGHTBLUE = ( 20, 20, 175)
33. YELLOW = (155, 155, 0)
34. LIGHTYELLOW = (175, 175, 20)

168 http://inventwithpython.com/pygame
Email questions to the author: [email protected]
35.
36. BORDERCOLOR = BLUE
37. BGCOLOR = BLACK
38. TEXTCOLOR = WHITE
39. TEXTSHADOWCOLOR = GRAY
40. COLORS = ( BLUE, GREEN, RED, YELLOW)
41. LIGHTCOLORS = (LIGHTBLUE, LIGHTGREEN, LIGHTRED, LIGHTYELLOW)
42. assert len(COLORS) == len(LIGHTCOLORS) # each color must have light color
The pieces will come in four colors: blue, green, red, and yellow. When we draw the boxes
though, there will be a thin highlight on the box in a lighter color. So this means we need to create
light blue, light green, light red, and light yellow colors as well.
Each of these four colors will be stored in tuples named COLORS (for the normal colors) and
LIGHTCOLORS (for the lighter colors).
Setting Up the Piece Templates
44. TEMPLATEWIDTH = 5
45. TEMPLATEHEIGHT = 5
46.
47. S_SHAPE_TEMPLATE = [['.....',
48. '.....',
49. '..OO.',
50. '.OO..',
51. '.....'],
52. ['.....',
53. '..O..',
54. '..OO.',
55. '...O.',
56. '.....']]
57.
58. Z_SHAPE_TEMPLATE = [['.....',
59. '.....',
60. '.OO..',
61. '..OO.',
62. '.....'],
63. ['.....',
64. '..O..',
65. '.OO..',
66. '.O...',
67. '.....']]
68.
69. I_SHAPE_TEMPLATE = [['..O..',
70. '..O..',

Chapter 7 - Tetromino 169
71. '..O..',
72. '..O..',
73. '.....'],
74. ['.....',
75. '.....',
76. 'OOOO.',
77. '.....',
78. '.....']]
79.
80. O_SHAPE_TEMPLATE = [['.....',
81. '.....',
82. '.OO..',
83. '.OO..',
84. '.....']]
85.
86. J_SHAPE_TEMPLATE = [['.....',
87. '.O...',
88. '.OOO.',
89. '.....',
90. '.....'],
91. ['.....',
92. '..OO.',
93. '..O..',
94. '..O..',
95. '.....'],
96. ['.....',
97. '.....',
98. '.OOO.',
99. '...O.',
100. '.....'],
101. ['.....',
102. '..O..',
103. '..O..',
104. '.OO..',
105. '.....']]
106.
107. L_SHAPE_TEMPLATE = [['.....',
108. '...O.',
109. '.OOO.',
110. '.....',
111. '.....'],
112. ['.....',
113. '..O..',
114. '..O..',
115. '..OO.',
116. '.....'],

170 http://inventwithpython.com/pygame
Email questions to the author: [email protected]
117. ['.....',
118. '.....',
119. '.OOO.',
120. '.O...',
121. '.....'],
122. ['.....',
123. '.OO..',
124. '..O..',
125. '..O..',
126. '.....']]
127.
128. T_SHAPE_TEMPLATE = [['.....',
129. '..O..',
130. '.OOO.',
131. '.....',
132. '.....'],
133. ['.....',
134. '..O..',
135. '..OO.',
136. '..O..',
137. '.....'],
138. ['.....',
139. '.....',
140. '.OOO.',
141. '..O..',
142. '.....'],
143. ['.....',
144. '..O..',
145. '.OO..',
146. '..O..',
147. '.....']]
Our game program needs to know how each of the shapes are shaped, including for all of their
possible rotations. In order to do this, we will create lists of lists of strings. The inner list of
strings will represent a single rotation of a shape, like this:
['.....',
'.....',
'..OO.',
'.OO..',
'.....']
We will write the rest of our code so that it interprets a list of strings like the one above to
represent a shape where the periods are empty spaces and the O’s are boxes, like this:

Chapter 7 - Tetromino 171
Splitting a “Line of Code” Across Multiple Lines You can see that this list is spread across many lines in the file editor. This is perfectly valid
Python, because the Python interpreter realizes that until it sees the ] closing square bracket, the
list isn’t finished. The indentation doesn’t matter because Python knows you won’t have different
indentation for a new block in the middle of a list. This code below works just fine:
spam = ['hello', 3.14, 'world', 42, 10, 'fuzz']
eggs = ['hello', 3.14,
'world'
, 42,
10, 'fuzz']
Though, of course, the code for the eggs list would be much more readable if we lined up all the
items in the list or put on a single line like spam.
Normally, splitting a line of code across multiple lines in the file editor would require putting a \
character at the end of the line. The \ tells Python, ―This code continues onto the next line.‖ (This
slash was first used in the Sliding Puzzle game in the isValidMove() function.)
We will make ―template‖ data structures of the shapes by creating a list of these list of strings,
and store them in variables such as S_SHAPE_TEMPLATE. This way,
len(S_SHAPE_TEMPLATE) will represent how many possible rotations there are for the S
shape, and S_SHAPE_TEMPLATE[0] will represent the S shape’s first possible rotation. Lines
47 to 147 will create ―template‖ data structures for each of the shapes.
Imagine that each possible piece in a tiny 5 x 5 board of empty space, with some of the spaces on
the board filled in with boxes. The following expressions that use S_SHAPE_TEMPLATE[0]
are True:
S_SHAPE_TEMPLATE[0][2][2] == 'O'
S_SHAPE_TEMPLATE[0][2][3] == 'O'
S_SHAPE_TEMPLATE[0][3][1] == 'O'
S_SHAPE_TEMPLATE[0][3][2] == 'O'
If we represented this shape on paper, it would look something like this:

172 http://inventwithpython.com/pygame
Email questions to the author: [email protected]
This is how we can represent things like Tetromino pieces as Python values such as strings and
lists. The TEMPLATEWIDTH and TEMPLATEHEIGHT constants simply set how large each row
and column for each shape’s rotation should be. (The templates will always be 5x5.)
149. SHAPES = {'S': S_SHAPE_TEMPLATE,
150. 'Z': Z_SHAPE_TEMPLATE,
151. 'J': J_SHAPE_TEMPLATE,
152. 'L': L_SHAPE_TEMPLATE,
153. 'I': I_SHAPE_TEMPLATE,
154. 'O': O_SHAPE_TEMPLATE,
155. 'T': T_SHAPE_TEMPLATE}
The SHAPES variable will be a dictionary that stores all of the different templates. Because each
template has all the possible rotations of a single shape, this means that the SHAPES variable
contains all possible rotations of every possible shape. This will be the data structure that contains
all of the shape data in our game.
The main() Function
158. def main():
159. global FPSCLOCK, DISPLAYSURF, BASICFONT, BIGFONT
160. pygame.init()
161. FPSCLOCK = pygame.time.Clock()
162. DISPLAYSURF = pygame.display.set_mode((WINDOWWIDTH, WINDOWHEIGHT))
163. BASICFONT = pygame.font.Font('freesansbold.ttf', 18)
164. BIGFONT = pygame.font.Font('freesansbold.ttf', 100)
165. pygame.display.set_caption('Tetromino')
166.
167. showTextScreen('Tetromino')

Chapter 7 - Tetromino 173
The main() function handles creating some more global constants and showing the start screen
that appears when the program is run.
168. while True: # game loop
169. if random.randint(0, 1) == 0:
170. pygame.mixer.music.load('tetrisb.mid')
171. else:
172. pygame.mixer.music.load('tetrisc.mid')
173. pygame.mixer.music.play(-1, 0.0)
174. runGame()
175. pygame.mixer.music.stop()
176. showTextScreen('Game Over')
The code for the actual game is all in runGame(). The main() function here simply randomly
decides what background music to start playing (either the tetrisb.mid or tetrisc.mid MIDI music
file), then calls runGame() to begin the game. When the player loses, runGame() will return
to main(), which then stops the background music and displays the game over screen.
When the player presses a key, the showTextScreen() function that displays the game over
screen will return. The game loop will loop back to the beginning at line 169 and start another
game.
The Start of a New Game
179. def runGame():
180. # setup variables for the start of the game
181. board = getBlankBoard()
182. lastMoveDownTime = time.time()
183. lastMoveSidewaysTime = time.time()
184. lastFallTime = time.time()
185. movingDown = False # note: there is no movingUp variable
186. movingLeft = False
187. movingRight = False
188. score = 0
189. level, fallFreq = calculateLevelAndFallFreq(score)
190.
191. fallingPiece = getNewPiece()
192. nextPiece = getNewPiece()
Before the game begins and pieces start falling, we need to initialize some variables to their start-
of-game values. On line 191 the fallingPiece variable will be set to the currently falling
piece that can be rotated by the player. On line 192 the nextPiece variable will be set to the
piece that shows up in the ―Next‖ part of the screen so that player knows what piece is coming up
after setting the falling piece.

174 http://inventwithpython.com/pygame
Email questions to the author: [email protected]
The Game Loop
194. while True: # main game loop
195. if fallingPiece == None:
196. # No falling piece in play, so start a new piece at the top
197. fallingPiece = nextPiece
198. nextPiece = getNewPiece()
199. lastFallTime = time.time() # reset lastFallTime
200.
201. if not isValidPosition(board, fallingPiece):
202. return # can't fit a new piece on the board, so game over
203.
204. checkForQuit()
The main game loop that starts on line 194 handles all of the code for the main part of the game
when pieces are falling to the bottom. The fallingPiece variable is set to None after the
falling piece has landed. This means that the piece in nextPiece should be copied to the
fallingPiece variable, and a random new piece should be put into the nextPiece variable.
A new piece can be generated from the getNewPiece() function. The lastFallTime
variable is also reset to the current time so that the piece will fall in however many seconds is in
fallFreq.
The pieces that getNewPiece() are positioned a little bit above the board, usually with part of
the piece already on the board. But if this is an invalid position because the board is already filled
up there (in which case the isValidPosition() call on line 201 will return False), then
we know that the board is full and the player should lose the game. When this happens, the
runGame() function returns.
The Event Handling Loop
205. for event in pygame.event.get(): # event handling loop
206. if event.type == KEYUP:
The event handling loop takes care of when the player rotates the falling piece, moves the falling
piece, or pauses the game.
Pausing the Game
207. if (event.key == K_p):
208. # Pausing the game
209. DISPLAYSURF.fill(BGCOLOR)
210. pygame.mixer.music.stop()
211. showTextScreen('Paused') # pause until a key press
212. pygame.mixer.music.play(-1, 0.0)

Chapter 7 - Tetromino 175
213. lastFallTime = time.time()
214. lastMoveDownTime = time.time()
215. lastMoveSidewaysTime = time.time()
If the player has pressed the P key, then the game should pause. We need to hide the board from
the player (otherwise the player could cheat by pausing the game and taking time to decide where
to move the piece).
The code blanks out the display Surface with a call to DISPLAYSURF.fill(BGCOLOR) and
stops the music. The showTextScreen() function is called to display the ―Paused‖ text and
wait for the player to press a key to continue.
Once the player has pressed a key, showTextScreen() will return. Line 212 will restart the
background music. Also, since a large amount of time could have passed since the player paused
the game, the lastFallTime, lastMoveDownTime, and lastMoveSidewaysTime
variables should all be reset to the current time (which is done on lines 213 to 215).
Using Movement Variables to Handle User Input
216. elif (event.key == K_LEFT or event.key == K_a):
217. movingLeft = False
218. elif (event.key == K_RIGHT or event.key == K_d):
219. movingRight = False
220. elif (event.key == K_DOWN or event.key == K_s):
221. movingDown = False
Letting up on one of the arrow keys (or the WASD keys) will set the movingLeft,
movingRight, or movingDown variables back to False, indicating that the player no longer
wants to move the piece in those directions. The code later will handle what to do based on the
Boolean values inside these ―moving‖ variables. Note that the up arrow and W keys are used for
rotating the piece, not moving the piece up. This is why there is no movingUp variable.
Checking if a Slide or Rotation is Valid
223. elif event.type == KEYDOWN:
224. # moving the block sideways
225. if (event.key == K_LEFT or event.key == K_a) and
isValidPosition(board, fallingPiece, adjX=-1):
226. fallingPiece['x'] -= 1
227. movingLeft = True
228. movingRight = False
229. lastMoveSidewaysTime = time.time()

176 http://inventwithpython.com/pygame
Email questions to the author: [email protected]
When the left arrow key is pressed down (and moving to the left is a valid move for the falling
piece, as determined by the call to isValidPosition()), then we should change the position
to one space to the left by subtracting the value of fallingPiece['x'] by 1. The
isValidPosition() function has optional parameters called adjX and adjY. Normally the
isValidPosition() function checks the position of the data provided by the piece object
that is passed for the second parameter. However, sometimes we don’t want to check where the
piece is currently located, but rather a few spaces over from that position.
If we pass -1 for the adjX (a short name for ―adjusted X‖), then it doesn’t check the validity of
the position in the piece’s data structure, but rather if the position of where the piece would be if
it was one space to the left. Passing 1 for adjX would check one space to the right. There is also
an adjY optional parameter. Passing -1 for adjY checks one space above where the piece is
currently positioned, and passing a value like 3 for adjY would check three spaces down from
where the piece is.
The movingLeft variable is set to True, and just to make sure the falling piece won’t move
both left and right, the movingRight variable is set to False on line 228. The
lastMoveSidewaysTime variable will be updated to the current time on line 229.
These variables are set so that the player can just hold down the arrow key to keep moving the
piece over. If the movingLeft variable is set to True, the program can know that the left
arrow key (or A key) has been pressed and not yet let go. And if 0.15 seconds (the number stored
in MOVESIDEWAYSFREQ) has passed since the time stored in lastMoveSidewaysTime,
then it is time for the program to move the falling piece to the left again.
The lastMoveSidewaysTime works just like how the lastClickTime variable did in the
Simulate chapter.
231. elif (event.key == K_RIGHT or event.key == K_d) and
isValidPosition(board, fallingPiece, adjX=1):
232. fallingPiece['x'] += 1
233. movingRight = True
234. movingLeft = False
235. lastMoveSidewaysTime = time.time()
The code on lines 231 to 235 is almost identical to lines 225 to 229, except that it handles moving
the falling piece to the right when the right arrow key (or D key) has been pressed.
237. # rotating the block (if there is room to rotate)
238. elif (event.key == K_UP or event.key == K_w):

Chapter 7 - Tetromino 177
239. fallingPiece['rotation'] = (fallingPiece['rotation'] +
1) % len(SHAPES[fallingPiece['shape']])
The up arrow key (or W key) will rotate the falling piece to its next rotation. All the code has to
do is increment the 'rotation' key’s value in the fallingPiece dictionary by 1.
However, if incrementing the 'rotation' key’s value makes it larger than the total number of
rotations, then ―modding‖ by the total number of possible rotations for that shape (which is what
len(SHAPES[fallingPiece['shape']]) is) then it will ―roll over‖ to 0.
Here’s an example of this modding with the J shape, which has 4 possible rotations:
>>> 0 % 4
0
>>> 1 % 4
1
>>> 2 % 4
2
>>> 3 % 4
3
>>> 5 % 4
1
>>> 6 % 4
2
>>> 7 % 4
3
>>> 8 % 4
0
>>>
240. if not isValidPosition(board, fallingPiece):
241. fallingPiece['rotation'] =
(fallingPiece['rotation'] - 1) % len(SHAPES[fallingPiece['shape']])
If the new rotated position is not valid because it overlaps some boxes already on the board, then
we want to switch it back to the original rotation by subtracting 1 from
fallingPiece['rotation']. We can also mod it by
len(SHAPES[fallingPiece['shape']]) so that if the new value is -1, the modding
will change it back to the last rotation in the list. Here’s an example of modding a negative
number:
>>> -1 % 4
3

178 http://inventwithpython.com/pygame
Email questions to the author: [email protected]
242. elif (event.key == K_q): # rotate the other direction
243. fallingPiece['rotation'] = (fallingPiece['rotation'] -
1) % len(SHAPES[fallingPiece['shape']])
244. if not isValidPosition(board, fallingPiece):
245. fallingPiece['rotation'] =
(fallingPiece['rotation'] + 1) % len(SHAPES[fallingPiece['shape']])
Lines 242 to 245 do the same thing 238 to 241, except they handle the case where the player has
pressed the Q key which rotates the piece in the opposite direction. In this case, we subtract 1
from fallingPiece['rotation'] (which is done on line 243) instead of adding 1.
247. # making the block fall faster with the down key
248. elif (event.key == K_DOWN or event.key == K_s):
249. movingDown = True
250. if isValidPosition(board, fallingPiece, adjY=1):
251. fallingPiece['y'] += 1
252. lastMoveDownTime = time.time()
If the down arrow or S key is pressed down, then the player wants the piece to fall faster than
normal. Line 251 moves the piece down one space on the board (but only if it is a valid space).
The movingDown variable is set to True and lastMoveDownTime is reset to the current
time. These variables will be checked later so that the piece keeps falling at the faster rate as long
as the down arrow or S key is held down.
Finding the Bottom
254. # move the current block all the way down
255. elif event.key == K_SPACE:
256. movingDown = False
257. movingLeft = False
258. movingRight = False
259. for i in range(1, BOARDHEIGHT):
260. if not isValidPosition(board, fallingPiece,
adjY=i):
261. break
262. fallingPiece['y'] += i - 1
When the player presses the space key the falling piece will immediately drop down as far as it
can go on the board and land. The program first needs to find out how many spaces the piece can
move until it lands.
Lines 256 to 258 will set all the moving variables to False (which makes the code in later parts
of the programming think that the user has let up on any arrow keys that were held down). This is

Chapter 7 - Tetromino 179
done because this code will move the piece to the absolute bottom and begin falling the next
piece, and we don’t want to surprise the player by having those pieces immediately start moving
just because they were holding down an arrow key when they hit the space key.
To find the farthest that the piece can fall, we should first call isValidPosition() and pass
the integer 1 for the adjY parameter. If isValidPosition() returns False, we know that
the piece cannot fall any further and is already at the bottom. If isValidPosition() returns
True, then we know that it can fall 1 space down.
In that case, we should call isValidPosition() with adjY set to 2. If it returns True
again, we will call isValidPosition() with adjY set to 3, and so on. This is what the for
loop on line 259 handles: calling isValidPosition() with increasing integer values to pass
for adjY until the function call returns False. At that point, we know that the value in i is one
space more past the bottom. This is why line 262 increases fallingPiece['y'] by i - 1
instead of i.
(Also note that the second parameter to range() on line 259’s for statement is set to
BOARDHEIGHT because this is the maximum amount that the piece could fall before it must hit
the bottom of the board.)
Moving by Holding Down the Key
264. # handle moving the block because of user input
265. if (movingLeft or movingRight) and time.time() -
lastMoveSidewaysTime > MOVESIDEWAYSFREQ:
266. if movingLeft and isValidPosition(board, fallingPiece, adjX=-
1):
267. fallingPiece['x'] -= 1
268. elif movingRight and isValidPosition(board, fallingPiece,
adjX=1):
269. fallingPiece['x'] += 1
270. lastMoveSidewaysTime = time.time()
Remember that on line 227 the movingLeft variable was set to True if the player pressed
down on the left arrow key? (The same for line 233 where movingRight was set to True if
the player pressed down on the right arrow key.) The moving variables were set back to False if
the user let up on these keys also (see line 217 and 219).
What also happened when the player pressed down on the left or right arrow key was that the
lastMoveSidewaysTime variable was set to the current time (which was the return value of
time.time()). If the player continued to hold down the arrow key without letting up on it,
then the movingLeft or movingRight variable would still be set to True.

180 http://inventwithpython.com/pygame
Email questions to the author: [email protected]
If the user held down on the key for longer than 0.15 seconds (the value stored in
MOVESIDEWAYSFREQ is the float 0.15) then the expression time.time() -
lastMoveSidewaysTime > MOVESIDEWAYSFREQ would evaluate to True. Line 265’s
condition is True if the user has both held down the arrow key and 0.15 seconds has passed, and
in that case we should move the falling piece to the left or right even though the user hasn’t
pressed the arrow key again.
This is very useful because it would become tiresome for the player to repeatedly hit the arrow
keys to get the falling piece to move over multiple spaces on the board. Instead, they can just hold
down an arrow key and the piece will keep moving over until they let up on the key. When that
happens, the code on lines 216 to 221 will set the moving variable to False and the condition on
line 265 will be False. That is what stops the falling piece from sliding over more.
To demonstrate why the time.time() - lastMoveSidewaysTime >
MOVESIDEWAYSFREQ returns True after the number of seconds in MOVESIDEWAYSFREQ has
passed, run this short program:
import time
WAITTIME = 4
begin = time.time()
while True:
now = time.time()
message = '%s, %s, %s' % (begin, now, (now - begin))
if now - begin > WAITTIME:
print(message + ' PASSED WAIT TIME!')
else:
print(message + ' Not yet...')
time.sleep(0.2)
This program has an infinite loop, so in order to terminate it, press Ctrl-C. The output of this
program will look something like this:
1322106392.2, 1322106392.2, 0.0 Not yet...
1322106392.2, 1322106392.42, 0.219000101089 Not yet...
1322106392.2, 1322106392.65, 0.449000120163 Not yet...
1322106392.2, 1322106392.88, 0.680999994278 Not yet...
1322106392.2, 1322106393.11, 0.910000085831 Not yet...
1322106392.2, 1322106393.34, 1.1400001049 Not yet...
1322106392.2, 1322106393.57, 1.3710000515 Not yet...
1322106392.2, 1322106393.83, 1.6360001564 Not yet...
1322106392.2, 1322106394.05, 1.85199999809 Not yet...

Chapter 7 - Tetromino 181
1322106392.2, 1322106394.28, 2.08000016212 Not yet...
1322106392.2, 1322106394.51, 2.30900001526 Not yet...
1322106392.2, 1322106394.74, 2.54100012779 Not yet...
1322106392.2, 1322106394.97, 2.76999998093 Not yet...
1322106392.2, 1322106395.2, 2.99800014496 Not yet...
1322106392.2, 1322106395.42, 3.22699999809 Not yet...
1322106392.2, 1322106395.65, 3.45600008965 Not yet...
1322106392.2, 1322106395.89, 3.69200015068 Not yet...
1322106392.2, 1322106396.12, 3.92100000381 Not yet...
1322106392.2, 1322106396.35, 4.14899992943 PASSED WAIT TIME!
1322106392.2, 1322106396.58, 4.3789999485 PASSED WAIT TIME!
1322106392.2, 1322106396.81, 4.60700011253 PASSED WAIT TIME!
1322106392.2, 1322106397.04, 4.83700013161 PASSED WAIT TIME!
1322106392.2, 1322106397.26, 5.06500005722 PASSED WAIT TIME!
Traceback (most recent call last):
File "C:\timetest.py", line 13, in <module>
time.sleep(0.2)
KeyboardInterrupt
The first number on each line of output is the return value of time.time() when the program
first started (and this value never changes). The second number is the latest return value from
time.time() (this value keeps getting updated on each iteration of the loop). And the third
number is the current time minus the start time. This third number is the number of seconds that
have elapsed since the begin = time.time() line of code was executed.
If this number is greater than 4, the code will start printing ―PASSED WAIT TIME!‖ instead of
―Not yet...‖. This is how our game program can know if a certain amount of time has passed since
a line of code was run.
In our Tetromino program, the time.time() – lastMoveSidewaysTime expression will
evaluate to the number of seconds that has elapsed since the last time
lastMoveSidewaysTime was set to the current time. If this value is greater than the value in
MOVESIDEWAYSFREQ, we know it is time for the code to move the falling piece over one more
space.
Don’t forget to update lastMoveSidewaysTime to the current time again! This is what we
do on line 270.
272. if movingDown and time.time() - lastMoveDownTime > MOVEDOWNFREQ
and isValidPosition(board, fallingPiece, adjY=1):
273. fallingPiece['y'] += 1
274. lastMoveDownTime = time.time()

182 http://inventwithpython.com/pygame
Email questions to the author: [email protected]
Lines 272 to 274 do almost the same thing as lines 265 to 270 do except for moving the falling
piece down. This has a separate move variable (movingDown) and ―last time‖ variable
(lastMoveDownTime) as well as a different ―move frequency‖ variable (MOVEDOWNFREQ).
Letting the Piece “Naturally” Fall
276. # let the piece fall if it is time to fall
277. if time.time() - lastFallTime > fallFreq:
278. # see if the piece has landed
279. if not isValidPosition(board, fallingPiece, adjY=1):
280. # falling piece has landed, set it on the board
281. addToBoard(board, fallingPiece)
282. score += removeCompleteLines(board)
283. level, fallFreq = calculateLevelAndFallFreq(score)
284. fallingPiece = None
285. else:
286. # piece did not land, just move the block down
287. fallingPiece['y'] += 1
288. lastFallTime = time.time()
The rate that the piece is naturally moving down (that is, falling) is tracked by the
lastFallTime variable. If enough time has elapsed since the falling piece last fell down one
space, lines 279 to 288 will handle dropping the piece by one space.
If the condition on line 279 is True, then the piece has landed. The call to addToBoard() will
make the piece part of the board data structure (so that future pieces can land on it), and the
removeCompleteLines() call will handle erasing any complete lines on the board and
pulling the boxes down. The removeCompleteLines() function also returns an integer
value of how many lines were removed, so we add this number to the score.
Because the score may have changed, we call the calculateLevelAndFallFreq()
function to update the current level and frequency that the pieces fall. And finally, we set the
fallingPiece variable to None to indicate that the next piece should become the new falling
piece, and a random new piece should be generated for the new next piece. (That is done on lines
195 to 199 at the beginning of the game loop.)
If the piece has not landed, we simply set its Y position down one space (on line 287) and reset
lastFallTime to the current time (on line 288).
Drawing Everything on the Screen
290. # drawing everything on the screen
291. DISPLAYSURF.fill(BGCOLOR)
292. drawBoard(board)

Chapter 7 - Tetromino 183
293. drawStatus(score, level)
294. drawNextPiece(nextPiece)
295. if fallingPiece != None:
296. drawPiece(fallingPiece)
297.
298. pygame.display.update()
299. FPSCLOCK.tick(FPS)
Now that the game loop has handled all events and updated the game state, the game loop just
needs to draw the game state to the screen. Most of the drawing is handled by other functions, so
the game loop code just needs to call those functions. Then the call to
pygame.display.update() makes the display Surface appear on the actual computer
screen, and the tick() method call adds a slight pause so the game doesn’t run too fast.
makeTextObjs(), A Shortcut Function for Making Text
302. def makeTextObjs(text, font, color):
303. surf = font.render(text, True, color)
304. return surf, surf.get_rect()
The makeTextObjs() function just provides us with a shortcut. Given the text, Font object,
and a Color object, it calls render() for us and returns the Surface and Rect object for this text.
This just saves us from typing out the code to create the Surface and Rect object each time we
need them.
The Same Old terminate() Function
307. def terminate():
308. pygame.quit()
309. sys.exit()
The terminate() function works the same as in the previous game programs.
Waiting for a Key Press Event with the checkForKeyPress()
Function
312. def checkForKeyPress():
313. # Go through event queue looking for a KEYUP event.
314. # Grab KEYDOWN events to remove them from the event queue.
315. checkForQuit()
316.
317. for event in pygame.event.get([KEYDOWN, KEYUP]):
318. if event.type == KEYDOWN:

184 http://inventwithpython.com/pygame
Email questions to the author: [email protected]
319. continue
320. return event.key
321. return None
The checkForKeyPress() function works almost the same as it did in the Wormy game.
First it calls checkForQuit() to handle any QUIT events (or KEYUP events specifically for
the Esc key) and terminates the program if there are any. Then it pulls out all the KEYUP and
KEYDOWN events from the event queue. It ignores any KEYDOWN events (KEYDOWN was
specified to pygame.event.get() only to clear those events out of the event queue).
If there were no KEYUP events in the event queue, then the function returns None.
showTextScreen(), A Generic Text Screen Function
324. def showTextScreen(text):
325. # This function displays large text in the
326. # center of the screen until a key is pressed.
327. # Draw the text drop shadow
328. titleSurf, titleRect = makeTextObjs(text, BIGFONT, TEXTSHADOWCOLOR)
329. titleRect.center = (int(WINDOWWIDTH / 2), int(WINDOWHEIGHT / 2))
330. DISPLAYSURF.blit(titleSurf, titleRect)
331.
332. # Draw the text
333. titleSurf, titleRect = makeTextObjs(text, BIGFONT, TEXTCOLOR)
334. titleRect.center = (int(WINDOWWIDTH / 2) - 3, int(WINDOWHEIGHT / 2) -
3)
335. DISPLAYSURF.blit(titleSurf, titleRect)
336.
337. # Draw the additional "Press a key to play." text.
338. pressKeySurf, pressKeyRect = makeTextObjs('Press a key to play.',
BASICFONT, TEXTCOLOR)
339. pressKeyRect.center = (int(WINDOWWIDTH / 2), int(WINDOWHEIGHT / 2) +
100)
340. DISPLAYSURF.blit(pressKeySurf, pressKeyRect)
Instead of separate functions for the start screen and game over screens, we will create one
generic function named showTextScreen(). The showTextScreen() function will draw
whatever text we pass for the text parameter. Also, the text ―Press a key to play.‖ will be
displayed in addition.
Notice that lines 328 to 330 draw the text in a darker shadow color first, and then lines 333 to 335
draw the same text again, except offset by 3 pixels to the left and 3 pixels upward. This creates a
―drop shadow‖ effect that makes the text look a bit prettier. You can compare the difference by
commenting out lines 328 to 330 to see the text without a drop shadow.

Chapter 7 - Tetromino 185
The showTextScreen() will be used for the start screen, the game over screen, and also for a
pause screen. (The pause screen is explained later in this chapter.)
342. while checkForKeyPress() == None:
343. pygame.display.update()
344. FPSCLOCK.tick()
We want the text to stay on the screen until the user presses a key. This small loop will constantly
call pygame.display.update() and FPSCLOCK.tick() until
checkForKeyPress() returns a value other than None. This happens when the user presses
a key.
The checkForQuit() Function
347. def checkForQuit():
348. for event in pygame.event.get(QUIT): # get all the QUIT events
349. terminate() # terminate if any QUIT events are present
350. for event in pygame.event.get(KEYUP): # get all the KEYUP events
351. if event.key == K_ESCAPE:
352. terminate() # terminate if the KEYUP event was for the Esc key
353. pygame.event.post(event) # put the other KEYUP event objects back
The checkForQuit() function can be called to handle any events that will cause the program
to terminate. This happens if there are any QUIT events in the event queue (this is handle by lines
348 and 349), or if there is a KEYUP event of the Esc key. The player should be able to press the
Esc key at any time to quit the program.
Because the pygame.event.get() call on line 350 pulls out all of the KEYUP events
(including events for keys other than the Esc key), if the event is not for the Esc key, we want to
put it back into the event queue by calling the pygame.event.post() function.
The calculateLevelAndFallFreq() Function
356. def calculateLevelAndFallFreq(score):
357. # Based on the score, return the level the player is on and
358. # how many seconds pass until a falling piece falls one space.
359. level = int(score / 10) + 1
360. fallFreq = 0.27 - (level * 0.02)
361. return level, fallFreq
Every time the player completes a line, their score will increase by one point. Every ten points,
the game goes up a level and the pieces start falling down faster. Both the level and the falling
frequency can be calculated from the score that is passed to this function.

186 http://inventwithpython.com/pygame
Email questions to the author: [email protected]
To calculate the level, we use the int() function to round down the score divided by 10. So if
the score any number between 0 and 9, the int() call will round it down to 0. The + 1 part of
the code is there because we want the first level to be level 1, not level 0. When the score reaches
10, then int(10 / 10) will evaluate to 1, and the + 1 will make the level 2. Here is a graph
showing the values of level for the scores 1 to 34:
To calculate the falling frequency, we start with a base time of 0.27 (meaning that the piece will
naturally fall once every 0.27 seconds). Then we multiply the level by 0.02, and subtract that
from the 0.27 base time. So on level 1, we subtract 0.02 * 1 (that is, 0.02) from 0.27 to
get 0.25. On level 2, we subtract 0.02 * 2 (that is, 0.04) to get 0.23. You can think of the
level * 0.02 part of the equation as ―for every level, the piece will fall 0.02 seconds faster
than the previous level.‖
We can also make a graph showing how fast the pieces will fall at each level of the game:
0
1
2
3
4
5
1 3 5 7 9 11 13 15 17 19 21 23 25 27 29 31 33
Leve
l
Score
level = int(score / 10) + 1

Chapter 7 - Tetromino 187
You can see that at level 14, the falling frequency will be less than 0. This won’t cause any bugs
with our code, because line 277 just checks that the elapsed time since the falling piece last fell
one space is greater than the calculated falling frequency. So if the falling frequency is negative,
then the condition on line 277 will always be True and the piece will fall on every iteration of
the game loop. From level 14 and beyond, the piece cannot fall any faster.
If the FPS is set at 25, this means that at reaching level 14, the falling piece will fall 25 spaces a
second. Considering that the board is only 20 spaces tall, that means the player will have less than
a second to set each piece!
If you want the pieces to start (if you can see what I mean) falling faster at a slower rate, you can
change the equation that the calculateLevelAndFallFreq() uses. For example, let’s say
line 360 was this:
360. fallFreq = 0.27 - (level * 0.01)
In the above case, the pieces would only fall 0.01 seconds faster on each level rather than 0.02
seconds faster. The graph would look like this (the original line is also in the graph in light grey):
-0.05
0
0.05
0.1
0.15
0.2
0.25
0.3
1 2 3 4 5 6 7 8 9 10 11 12 13 14 15
Fall
Fre
qu
en
cy (
seco
nd
s)
Level
fallFreq = 0.27 - (level * 0.02)

188 http://inventwithpython.com/pygame
Email questions to the author: [email protected]
As you can see, with this new equation, level 14 would only be as hard as the original level 7.
You can change the game to be as difficult or easy as you like by changing the equations in
calculateLevelAndFallFreq().
Generating Pieces with the getNewPiece() Function
363. def getNewPiece():
364. # return a random new piece in a random rotation and color
365. shape = random.choice(list(SHAPES.keys()))
366. newPiece = {'shape': shape,
367. 'rotation': random.randint(0, len(SHAPES[shape]) - 1),
368. 'x': int(BOARDWIDTH / 2) - int(TEMPLATEWIDTH / 2),
369. 'y': -2, # start it above the board (i.e. less than 0)
370. 'color': random.randint(0, len(COLORS)-1)}
371. return newPiece
The getNewPiece() function generates a random piece that is positioned at the top of the
board. First, to randomly choose the shape of the piece, we create a list of all the possible shapes
by calling list(SHAPES.keys()) on line 365. The keys() dictionary method returns a
value of the data type ―dict_keys‖, which must be converted to a list value with the list()
function before being passed to random.choice(). This is because the random.choice()
function only accepts list values for its parameter. The random.choice() function then
randomly returns the value of an item from the list.
The piece data structures are simply a dictionary value with the keys 'shape', 'rotation',
'x', 'y', and 'color'.
-0.05
0
0.05
0.1
0.15
0.2
0.25
0.3
1 2 3 4 5 6 7 8 9 10 11 12 13 14 15
Fall
Fre
qu
en
cy (
seco
nd
s)
Level
fallFreq = 0.27 - (level * 0.01)

Chapter 7 - Tetromino 189
The value for the 'rotation' key is a random integer between 0 to one less than however
many possible rotations there are for that shape. The number of rotations for a shape can be found
from the expression len(SHAPES[shape]).
Notice that we don’t store the list of string values (like the ones store in the constants like
S_SHAPE_TEMPLATE) in each piece data structure to represent the boxes of each piece. Instead,
we just store an index for the shape and rotation which refer to the PIECES constant.
The 'x' key’s value is always set to the middle of the board (also accounting for the width of the
pieces themselves, which is found from our TEMPLATEWIDTH constant). The 'y' key’s value is
always set to -2 to place it slightly above the board. (The top row of the board is row 0.)
Since the COLORS constant is a tuple of the different colors, selecting a random number from 0
to the length of COLORS (subtracting one) will give us a random index value for the piece’s
color.
Once all of the values in the newPiece dictionary are set, the getNewPiece() function
returns newPiece.
Adding Pieces to the Board Data Structure
374. def addToBoard(board, piece):
375. # fill in the board based on piece's location, shape, and rotation
376. for x in range(TEMPLATEWIDTH):
377. for y in range(TEMPLATEHEIGHT):
378. if SHAPES[piece['shape']][piece['rotation']][y][x] != BLANK:
379. board[x + piece['x']][y + piece['y']] = piece['color']
The board data structure is a data representation for the rectangular space where pieces that have
previously landed are tracked. The currently falling piece is not marked on the board data
structure. What the addToBoard() function does is takes a piece data structure and adds its
boxes to the board data structure. This happens after a piece has landed.
The nested for loops on lines 376 and 377 go through every space in the piece data structure,
and if it finds a box in the space (line 378), it adds it to the board (line 379).
Creating a New Board Data Structure
382. def getBlankBoard():
383. # create and return a new blank board data structure
384. board = []
385. for i in range(BOARDWIDTH):
386. board.append([BLANK] * BOARDHEIGHT)

190 http://inventwithpython.com/pygame
Email questions to the author: [email protected]
387. return board
The data structure used for the board is fairly simple: it’s a list of lists of values. If the value is the
same as the value in BLANK, then it is an empty space. If the value is an integer, then it represents
a box that is the color that the integer indexes in the COLORS constant list. That is, 0 is blue, 1 is
green, 2 is red, and 3 is yellow.
In order to create a blank board, list replication is used to create the lists of BLANK values which
represents a column. This is done on line 386. One of these lists is created for each of the
columns in the board (this is what the for loop on line 385 does).
The isOnBoard() and isValidPosition() Functions
390. def isOnBoard(x, y):
391. return x >= 0 and x < BOARDWIDTH and y < BOARDHEIGHT
The isOnBoard() is a simple function which checks that the XY coordinates that are passed
represent valid values that exist on the board. As long as both the XY coordinates are not less 0
or greater than or equal to the BOARDWIDTH and BOARDHEIGHT constants, then the function
returns True.
394. def isValidPosition(board, piece, adjX=0, adjY=0):
395. # Return True if the piece is within the board and not colliding
396. for x in range(TEMPLATEWIDTH):
397. for y in range(TEMPLATEHEIGHT):
398. isAboveBoard = y + piece['y'] + adjY < 0
399. if isAboveBoard or
SHAPES[piece['shape']][piece['rotation']][y][x] == BLANK:
400. continue
The isValidPosition() function is given a board data structure and a piece data structure,
and returns True if all the boxes in the piece are both on the board and not overlapping any
boxes on the board. This is done by taking the piece’s XY coordinates (which is really the
coordinate of the upper right box on the 5x5 boxes for the piece) and adding the coordinate inside
the piece data structure. Here’s a couple pictures to help illustrate this:

Chapter 7 - Tetromino 191
The board with a falling piece in a valid
position.
The board with the falling piece in an invalid
position.
On the left board, the falling piece’s (that is, the top left corner of the falling piece’s) XY
coordinates are (2, 3) on the board. But the boxes inside the falling piece’s coordinate system
have their own coordinates. To find the ―board‖ coordinates of these pieces, we just have to add
the ―board‖ coordinates of the falling piece’s top left box and the ―piece‖ coordinates of the
boxes.
On the left board, the falling piece’s boxes are at the following ―piece‖ coordinates:
(2, 2) (3, 2) (1, 3) (2, 3)
When we add the (2, 3) coordinate (the piece’s coordinates on the board) to these coordinates, it
looks like this:
(2 + 2, 2 + 3) (3 + 2, 2 + 3) (1 + 2, 3 + 3) (2 + 2, 3 + 3)
After adding the (2, 3) coordinate the boxes are at the following ―board‖ coordinates:
(4, 5) (5, 5) (3, 6) (4, 6)

192 http://inventwithpython.com/pygame
Email questions to the author: [email protected]
And now that we can figure out where the falling piece’s boxes are as board coordinates, we can
see if they overlap with the landed boxes that are already on the board. The nested for loops on
lines 396 and 397 go through each of the possible coordinates on the falling piece.
We want to check if a box of the falling piece is either off of the board or overlapping a box on
the board. (Although one exception is if the box is above the board, which is where it could be
when the falling piece just begins falling.) Line 398 creates a variable named isAboveBoard
that is set to True if the box on the falling piece at the coordinates pointed to be x and y is above
the board. Otherwise it is set to False.
The if statement on line 399 checks if the space on the piece is above the board or is blank. If
either of those is True, then the code executes a continue statement and goes to the next
iteration. (Note that the end of line 399 has [y][x] instead of [x][y]. This is because the
coordinates in the PIECES data structure are reversed. See the previous section, ―Setting Up the
Piece Templates‖).
401. if not isOnBoard(x + piece['x'] + adjX, y + piece['y'] +
adjY):
402. return False
403. if board[x + piece['x'] + adjX][y + piece['y'] + adjY] !=
BLANK:
404. return False
405. return True
The if statement on line 401 checks that the piece’s box is not located on the board. The if
statement on line 403 checks that the board space the piece’s box is located is not blank. If either
of these conditions are True, then the isValidPosition() function will return False.
Notice that these if statements also adjust the coordinates for the adjX and adjY parameters
that were passed in to the function.
If the code goes through the nested for loop and hasn’t found a reason to return False, then the
position of the piece must be valid and so the function returns True on line 405.
Checking for, and Removing, Complete Lines
407. def isCompleteLine(board, y):
408. # Return True if the line filled with boxes with no gaps.
409. for x in range(BOARDWIDTH):
410. if board[x][y] == BLANK:
411. return False
412. return True

Chapter 7 - Tetromino 193
The isCompleteLine does a simple check at the row specified by the y parameter. A row on
the board is considered to be ―complete‖ when every space is filled by a box. The for loop on
line 409 goes through each space in the row. If a space is blank (which is caused by it having the
same value as the BLANK constant), then the function return False.
415. def removeCompleteLines(board):
416. # Remove any completed lines on the board, move everything above them
down, and return the number of complete lines.
417. numLinesRemoved = 0
418. y = BOARDHEIGHT - 1 # start y at the bottom of the board
419. while y >= 0:
The removeCompleteLines() function will find any complete lines in the passed board data
structure, remove the lines, and then shift all the boxes on the board above that line down one
row. The function will return the number of lines that were removed (which is tracked by the
numLinesRemoved variable) so that this can be added to the score.
The way this function works is by running in a loop starting on line 419 with the y variable
starting at the lowest row (which is BOARDHEIGHT - 1). Whenever the row specified by y is
not complete, y will be decremented to the next highest row. The loop finally stops once y
reaches -1.
420. if isCompleteLine(board, y):
421. # Remove the line and pull boxes down by one line.
422. for pullDownY in range(y, 0, -1):
423. for x in range(BOARDWIDTH):
424. board[x][pullDownY] = board[x][pullDownY-1]
425. # Set very top line to blank.
426. for x in range(BOARDWIDTH):
427. board[x][0] = BLANK
428. numLinesRemoved += 1
429. # Note on the next iteration of the loop, y is the same.
430. # This is so that if the line that was pulled down is also
431. # complete, it will be removed.
432. else:
433. y -= 1 # move on to check next row up
434. return numLinesRemoved
The isCompleteLine() function will return True if the line that y is referring to is
complete. In that case, the program needs to copy the values of each row above the removed line
to the next lowest line. This is what the for loop on line 422 does (which is why its call to the
range() function begins at y, rather than 0. Also note that it uses the three argument form of

194 http://inventwithpython.com/pygame
Email questions to the author: [email protected]
range(), so that the list it returns starts at y, ends at 0, and after each iteration ―increases‖ by -
1.)
Let’s look at the following example. To save space, only the top five rows of the board are
shown. Row 3 is a complete line, which means that all the rows above it (row 2, 1, and 0) must be
―pulled down‖. First, row 2 is copied down to row 3. The board on the right shows what the board
will look like after this is done:
This ―pulling down‖ is really just copying the higher row’s values to the row below it on line 424.
After row 2 is copied to row 3, then row 1 is copied to row 2 followed by row 0 copied to row 1:
Row 0 (the row at the very top) doesn’t have a row above it to copy values down. But row 0
doesn’t need a row copied to it, it just needs all the spaces set to BLANK. This is what lines 426
and 427 do. After that, the board will have changed from the board shown below on the left to the
board shown below on the right:
After the complete line is removed, the execution reaches the end of the while loop that started
on line 419, so the execution jumps back to the beginning of the loop. Note that at no point when

Chapter 7 - Tetromino 195
the line was being removed and the rows being pulled down that the y variable changed at all. So
on the next iteration, the y variable is pointing to the same row as before.
This is needed because if there were two complete lines, then the second complete line would
have been pulled down and would also have to be removed. The code will then remove this
complete line, and then go to the next iteration. It is only when there is not a completed line that
the y variable is decremented on line 433. Once the y variable has been decremented all the way
to 0, the execution will exit the while loop.
Convert from Board Coordinates to Pixel Coordinates
437. def convertToPixelCoords(boxx, boxy):
438. # Convert the given xy coordinates of the board to xy
439. # coordinates of the location on the screen.
440. return (XMARGIN + (boxx * BOXSIZE)), (TOPMARGIN + (boxy * BOXSIZE))
This helper function converts the board’s box coordinates to pixel coordinates. This function
works the same way to the other ―convert coordinates‖ functions used in the previous game
programs.
Drawing a Box on the Board or Elsewhere on the Screen
443. def drawBox(boxx, boxy, color, pixelx=None, pixely=None):
444. # draw a single box (each tetromino piece has four boxes)
445. # at xy coordinates on the board. Or, if pixelx & pixely
446. # are specified, draw to the pixel coordinates stored in
447. # pixelx & pixely (this is used for the "Next" piece).
448. if color == BLANK:
449. return
450. if pixelx == None and pixely == None:
451. pixelx, pixely = convertToPixelCoords(boxx, boxy)
452. pygame.draw.rect(DISPLAYSURF, COLORS[color], (pixelx + 1, pixely + 1,
BOXSIZE - 1, BOXSIZE - 1))
453. pygame.draw.rect(DISPLAYSURF, LIGHTCOLORS[color], (pixelx + 1, pixely
+ 1, BOXSIZE - 4, BOXSIZE - 4))
The drawBox() function draws a single box on the screen. The function can receive boxx and
boxy parameters for board coordinates where the box should be drawn. However, if the pixelx
and pixely parameters are specified, then these pixel coordinates will override the boxx and
boxy parameters. The pixelx and pixely parameters are used to draw the boxes of the
―Next‖ piece, which is not on the board.
If the pixelx and pixely parameters are not set, then they will be set to None by default
when the function first begins. Then the if statement on line 450 will overwrite the None values
196 http://inventwithpython.com/pygame
Email questions to the author: [email protected]
with the return values from convertToPixelCoords(). This call gets the pixel coordinates
of the board coordinates specified by boxx and boxy.
The code won’t fill the entire box’s space with color. To have a black outline in between the
boxes of a piece, the left and top parameters in the pygame.draw.rect() call have + 1
added to them and a - 1 is added to the width and height parameters. In order to draw the
highlighted box, first the box is drawn with the darker color on line 452. Then, a slightly smaller
box is drawn on top of the darker box on line 453.
Drawing Everything to the Screen
456. def drawBoard(board):
457. # draw the border around the board
458. pygame.draw.rect(DISPLAYSURF, BORDERCOLOR, (XMARGIN - 3, TOPMARGIN -
7, (BOARDWIDTH * BOXSIZE) + 8, (BOARDHEIGHT * BOXSIZE) + 8), 5)
459.
460. # fill the background of the board
461. pygame.draw.rect(DISPLAYSURF, BGCOLOR, (XMARGIN, TOPMARGIN, BOXSIZE *
BOARDWIDTH, BOXSIZE * BOARDHEIGHT))
462. # draw the individual boxes on the board
463. for x in range(BOARDWIDTH):
464. for y in range(BOARDHEIGHT):
465. drawBox(x, y, board[x][y])
The drawBoard() function is responsible for calling the drawing functions for the board’s
border and all the boxes on the board. First the board’s border is drawn on DISPLAYSURF,
followed by the background color of the board. Then a call to drawBox() is made for each
space on the board. The drawBox() function is smart enough to leave out the box if
board[x][y] is set to BLANK.
Drawing the Score and Level Text
468. def drawStatus(score, level):
469. # draw the score text
470. scoreSurf = BASICFONT.render('Score: %s' % score, True, TEXTCOLOR)
471. scoreRect = scoreSurf.get_rect()
472. scoreRect.topleft = (WINDOWWIDTH - 150, 20)
473. DISPLAYSURF.blit(scoreSurf, scoreRect)
474.
475. # draw the level text
476. levelSurf = BASICFONT.render('Level: %s' % level, True, TEXTCOLOR)
477. levelRect = levelSurf.get_rect()
478. levelRect.topleft = (WINDOWWIDTH - 150, 50)
479. DISPLAYSURF.blit(levelSurf, levelRect)

Chapter 7 - Tetromino 197
The drawStatus() function is responsible for rendering the text for the ―Score:‖ and ―Level:‖
information that appears in the upper right of the corner of the screen.
Drawing a Piece on the Board or Elsewhere on the Screen
482. def drawPiece(piece, pixelx=None, pixely=None):
483. shapeToDraw = SHAPES[piece['shape']][piece['rotation']]
484. if pixelx == None and pixely == None:
485. # if pixelx & pixely hasn't been specified, use the location
stored in the piece data structure
486. pixelx, pixely = convertToPixelCoords(piece['x'], piece['y'])
487.
488. # draw each of the blocks that make up the piece
489. for x in range(TEMPLATEWIDTH):
490. for y in range(TEMPLATEHEIGHT):
491. if shapeToDraw[y][x] != BLANK:
492. drawBox(None, None, piece['color'], pixelx + (x *
BOXSIZE), pixely + (y * BOXSIZE))
The drawPiece() function will draw the boxes of a piece according to the piece data structure
that is passed to it. This function will be used to draw the falling piece and the ―Next‖ piece.
Since the piece data structure will contain all of the shape, position, rotation, and color
information, nothing else besides the piece data structure needs to be passed to the function.
However, the ―Next‖ piece is not drawn on the board. In this case, we ignore the position
information stored inside the piece data structure and instead let the caller of the drawPiece()
function pass in arguments for the optional pixelx and pixely parameters to specify where
exactly on the window the piece should be drawn.
If no pixelx and pixely arguments are passed in, then lines 484 and 486 will overwrite those
variables with the return values of convertToPixelCoords() call.
The nested for loops on line 489 and 490 will then call drawBox() for each box of the piece
that needs to be drawn.
Drawing the “Next” Piece
495. def drawNextPiece(piece):
496. # draw the "next" text
497. nextSurf = BASICFONT.render('Next:', True, TEXTCOLOR)
498. nextRect = nextSurf.get_rect()
499. nextRect.topleft = (WINDOWWIDTH - 120, 80)
500. DISPLAYSURF.blit(nextSurf, nextRect)
501. # draw the "next" piece
502. drawPiece(piece, pixelx=WINDOWWIDTH-120, pixely=100)

198 http://inventwithpython.com/pygame
Email questions to the author: [email protected]
503.
504.
505. if __name__ == '__main__':
506. main()
The drawNextPiece() draws the ―Next‖ piece in the upper right corner of the screen. It does
this by calling the drawPiece() function and passing in arguments for drawPiece()’s
pixelx and pixely parameters.
That’s the last function. Line 505 and 506 are run after all the function definitions have been
executed, and then the main() function is called to begin the main part of the program.
Summary The Tetromino game (which is a clone of the more popular game, ―Tetris‖) is pretty easy to
explain to someone in English: ―Blocks fall from the top of a board, and the player moves and
rotates them so that they form complete lines. The complete lines disappear (giving the player
points) and the lines above them move down. The game keeps going until the blocks fill up the
entire board and the player loses.‖
Explaining it in plain English is one thing, but when we have to tell a computer exactly what to
do there are many details we have to fill in. The original Tetris game was designed and
programmed one person, Alex Pajitnov, in the Soviet Union in 1984. The game is simple, fun,
and addictive. It is one of the most popular video games ever made, and has sold 100 million
copies with many people creating their own clones and variations of it.
And it was all created by one person who knew how to program.
With the right idea and some programming knowledge you can create incredibly fun games. And
with some practice, you will be able to turn your game ideas into real programs that might
become as popular as Tetris!
For additional programming practice, you can download buggy versions of Tetromino from
http://invpy.com/buggy/tetromino and try to figure out how to fix the bugs.
There are also variations of the Tetromino game on the book’s website. ―Pentomino‖ is a version
of this game with pieces made up of five boxes. There is also ―Tetromino for Idiots‖, where all of
the pieces are made up of just one box.

Chapter 7 - Tetromino 199
These variations can be downloaded from:
http://invpy.com/pentomino.py
http://invpy.com/tetrominoforidiots.py

200 http://inventwithpython.com/pygame
Email questions to the author: [email protected]
CHAPTER 8 – SQUIRREL EAT
SQUIRREL
How to Play Squirrel Eat Squirrel Squirrel Eat Squirrel is loosely based on the game ―Katamari Damacy‖. The player controls a
small squirrel that must hop around the screen eating smaller squirrels and avoiding larger
squirrels. Each time the player’s squirrel eats a squirrel that is smaller than it, it grows larger. If
the player’s squirrel gets hit by a larger squirrel larger than it, it loses a life point. The player wins
when the squirrel becomes a monstrously large squirrel called the Omega Squirrel. The player
loses if their squirrel gets hit three times.
I’m not really sure where I got the idea for a video game where squirrels eat each other. I’m a
little strange sometimes.
The Design of Squirrel Eat Squirrel There are three types of data structures in this game, which are represented as dictionary values.
The types are player squirrels, enemy squirrels, and grass objects. There is only one player
squirrel object at a time in the game.
Note: Technically, ―object‖ means something specific in Object-Oriented Programming. Python
does have OOP features, but they aren’t covered in this book. Technically the Pygame objects
such as ―Rect object‖ or ―Surface object‖ are objects. But I’m going to use the term ―object‖ in
this book to refer to ―things that exist in the game world‖. But really, the player squirrel, enemy
squirrels, and grass ―objects‖ are just dictionary values.
Chapter 8 – Squirrel Eat Squirrel 201
All the objects have the following keys in their dictionary value: 'x', 'y', and 'rect'. The
'x' and 'y' key’s value give the coordinates of the top left of the object in game world
coordinates. These are different from pixel coordinates (which is what the 'rect' key’s value
tracks). The difference between game world and pixel coordinates will be explained when you
learn about the concept of cameras.
In addition, the player squirrel, enemy squirrel, and grass objects have other keys which are
explained in a large comment at the start of the source code.
Source Code to Squirrel Eat Squirrel This source code can be downloaded from http://invpy.com/squirrel.py. If you get any error
messages, look at the line number that is mentioned in the error message and check your code for
any typos. You can also copy and paste your code into the web form at
http://invpy.com/diff/squirrel to see if the differences between your code and the code in the
book.
You will also need to download the following image files:
http://invpy.com/gameicon.png
http://invpy.com/squirrel.png
http://invpy.com/grass1.png
http://invpy.com/grass2.png
http://invpy.com/grass3.png
http://invpy.com/grass4.png
1. # Squirrel Eat Squirrel (a 2D Katamari Damacy clone)
2. # By Al Sweigart [email protected]
3. # http://inventwithpython.com/pygame
4. # Creative Commons BY-NC-SA 3.0 US
5.
6. import random, sys, time, math, pygame
7. from pygame.locals import *
8.
9. FPS = 30 # frames per second to update the screen
10. WINWIDTH = 640 # width of the program's window, in pixels
11. WINHEIGHT = 480 # height in pixels
12. HALF_WINWIDTH = int(WINWIDTH / 2)
13. HALF_WINHEIGHT = int(WINHEIGHT / 2)
14.
15. GRASSCOLOR = (24, 255, 0)
16. WHITE = (255, 255, 255)
17. RED = (255, 0, 0)
18.

202 http://inventwithpython.com/pygame
Email questions to the author: [email protected]
19. CAMERASLACK = 90 # how far from the center the squirrel moves before
moving the camera
20. MOVERATE = 9 # how fast the player moves
21. BOUNCERATE = 6 # how fast the player bounces (large is slower)
22. BOUNCEHEIGHT = 30 # how high the player bounces
23. STARTSIZE = 25 # how big the player starts off
24. WINSIZE = 300 # how big the player needs to be to win
25. INVULNTIME = 2 # how long the player is invulnerable after being hit
in seconds
26. GAMEOVERTIME = 4 # how long the "game over" text stays on the screen
in seconds
27. MAXHEALTH = 3 # how much health the player starts with
28.
29. NUMGRASS = 80 # number of grass objects in the active area
30. NUMSQUIRRELS = 30 # number of squirrels in the active area
31. SQUIRRELMINSPEED = 3 # slowest squirrel speed
32. SQUIRRELMAXSPEED = 7 # fastest squirrel speed
33. DIRCHANGEFREQ = 2 # % chance of direction change per frame
34. LEFT = 'left'
35. RIGHT = 'right'
36.
37. """
38. This program has three data structures to represent the player, enemy
squirrels, and grass background objects. The data structures are dictionaries
with the following keys:
39.
40. Keys used by all three data structures:
41. 'x' - the left edge coordinate of the object in the game world (not a
pixel coordinate on the screen)
42. 'y' - the top edge coordinate of the object in the game world (not a
pixel coordinate on the screen)
43. 'rect' - the pygame.Rect object representing where on the screen the
object is located.
44. Player data structure keys:
45. 'surface' - the pygame.Surface object that stores the image of the
squirrel which will be drawn to the screen.
46. 'facing' - either set to LEFT or RIGHT, stores which direction the
player is facing.
47. 'size' - the width and height of the player in pixels. (The width &
height are always the same.)
48. 'bounce' - represents at what point in a bounce the player is in. 0
means standing (no bounce), up to BOUNCERATE (the completion of the bounce)
49. 'health' - an integer showing how many more times the player can be
hit by a larger squirrel before dying.
50. Enemy Squirrel data structure keys:

Chapter 8 – Squirrel Eat Squirrel 203
51. 'surface' - the pygame.Surface object that stores the image of the
squirrel which will be drawn to the screen.
52. 'movex' - how many pixels per frame the squirrel moves horizontally. A
negative integer is moving to the left, a positive to the right.
53. 'movey' - how many pixels per frame the squirrel moves vertically. A
negative integer is moving up, a positive moving down.
54. 'width' - the width of the squirrel's image, in pixels
55. 'height' - the height of the squirrel's image, in pixels
56. 'bounce' - represents at what point in a bounce the player is in. 0
means standing (no bounce), up to BOUNCERATE (the completion of the bounce)
57. 'bouncerate' - how quickly the squirrel bounces. A lower number means
a quicker bounce.
58. 'bounceheight' - how high (in pixels) the squirrel bounces
59. Grass data structure keys:
60. 'grassImage' - an integer that refers to the index of the
pygame.Surface object in GRASSIMAGES used for this grass object
61. """
62.
63. def main():
64. global FPSCLOCK, DISPLAYSURF, BASICFONT, L_SQUIR_IMG, R_SQUIR_IMG,
GRASSIMAGES
65.
66. pygame.init()
67. FPSCLOCK = pygame.time.Clock()
68. pygame.display.set_icon(pygame.image.load('gameicon.png'))
69. DISPLAYSURF = pygame.display.set_mode((WINWIDTH, WINHEIGHT))
70. pygame.display.set_caption('Squirrel Eat Squirrel')
71. BASICFONT = pygame.font.Font('freesansbold.ttf', 32)
72.
73. # load the image files
74. L_SQUIR_IMG = pygame.image.load('squirrel.png')
75. R_SQUIR_IMG = pygame.transform.flip(L_SQUIR_IMG, True, False)
76. GRASSIMAGES = []
77. for i in range(1, 5):
78. GRASSIMAGES.append(pygame.image.load('grass%s.png' % i))
79.
80. while True:
81. runGame()
82.
83.
84. def runGame():
85. # set up variables for the start of a new game
86. invulnerableMode = False # if the player is invulnerable
87. invulnerableStartTime = 0 # time the player became invulnerable
88. gameOverMode = False # if the player has lost
89. gameOverStartTime = 0 # time the player lost

204 http://inventwithpython.com/pygame
Email questions to the author: [email protected]
90. winMode = False # if the player has won
91.
92. # create the surfaces to hold game text
93. gameOverSurf = BASICFONT.render('Game Over', True, WHITE)
94. gameOverRect = gameOverSurf.get_rect()
95. gameOverRect.center = (HALF_WINWIDTH, HALF_WINHEIGHT)
96.
97. winSurf = BASICFONT.render('You have achieved OMEGA SQUIRREL!', True,
WHITE)
98. winRect = winSurf.get_rect()
99. winRect.center = (HALF_WINWIDTH, HALF_WINHEIGHT)
100.
101. winSurf2 = BASICFONT.render('(Press "r" to restart.)', True, WHITE)
102. winRect2 = winSurf2.get_rect()
103. winRect2.center = (HALF_WINWIDTH, HALF_WINHEIGHT + 30)
104.
105. # camerax and cameray are where the middle of the camera view is
106. camerax = 0
107. cameray = 0
108.
109. grassObjs = [] # stores all the grass objects in the game
110. squirrelObjs = [] # stores all the non-player squirrel objects
111. # stores the player object:
112. playerObj = {'surface': pygame.transform.scale(L_SQUIR_IMG,
(STARTSIZE, STARTSIZE)),
113. 'facing': LEFT,
114. 'size': STARTSIZE,
115. 'x': HALF_WINWIDTH,
116. 'y': HALF_WINHEIGHT,
117. 'bounce':0,
118. 'health': MAXHEALTH}
119.
120. moveLeft = False
121. moveRight = False
122. moveUp = False
123. moveDown = False
124.
125. # start off with some random grass images on the screen
126. for i in range(10):
127. grassObjs.append(makeNewGrass(camerax, cameray))
128. grassObjs[i]['x'] = random.randint(0, WINWIDTH)
129. grassObjs[i]['y'] = random.randint(0, WINHEIGHT)
130.
131. while True: # main game loop
132. # Check if we should turn off invulnerability

Chapter 8 – Squirrel Eat Squirrel 205
133. if invulnerableMode and time.time() - invulnerableStartTime >
INVULNTIME:
134. invulnerableMode = False
135.
136. # move all the squirrels
137. for sObj in squirrelObjs:
138. # move the squirrel, and adjust for their bounce
139. sObj['x'] += sObj['movex']
140. sObj['y'] += sObj['movey']
141. sObj['bounce'] += 1
142. if sObj['bounce'] > sObj['bouncerate']:
143. sObj['bounce'] = 0 # reset bounce amount
144.
145. # random chance they change direction
146. if random.randint(0, 99) < DIRCHANGEFREQ:
147. sObj['movex'] = getRandomVelocity()
148. sObj['movey'] = getRandomVelocity()
149. if sObj['movex'] > 0: # faces right
150. sObj['surface'] = pygame.transform.scale(R_SQUIR_IMG,
(sObj['width'], sObj['height']))
151. else: # faces left
152. sObj['surface'] = pygame.transform.scale(L_SQUIR_IMG,
(sObj['width'], sObj['height']))
153.
154.
155. # go through all the objects and see if any need to be deleted.
156. for i in range(len(grassObjs) - 1, -1, -1):
157. if isOutsideActiveArea(camerax, cameray, grassObjs[i]):
158. del grassObjs[i]
159. for i in range(len(squirrelObjs) - 1, -1, -1):
160. if isOutsideActiveArea(camerax, cameray, squirrelObjs[i]):
161. del squirrelObjs[i]
162.
163. # add more grass & squirrels if we don't have enough.
164. while len(grassObjs) < NUMGRASS:
165. grassObjs.append(makeNewGrass(camerax, cameray))
166. while len(squirrelObjs) < NUMSQUIRRELS:
167. squirrelObjs.append(makeNewSquirrel(camerax, cameray))
168.
169. # adjust camerax and cameray if beyond the "camera slack"
170. playerCenterx = playerObj['x'] + int(playerObj['size'] / 2)
171. playerCentery = playerObj['y'] + int(playerObj['size'] / 2)
172. if (camerax + HALF_WINWIDTH) - playerCenterx > CAMERASLACK:
173. camerax = playerCenterx + CAMERASLACK - HALF_WINWIDTH
174. elif playerCenterx – (camerax + HALF_WINWIDTH) > CAMERASLACK:
175. camerax = playerCenterx – CAMERASLACK - HALF_WINWIDTH

206 http://inventwithpython.com/pygame
Email questions to the author: [email protected]
176. if (cameray + HALF_WINHEIGHT) - playerCentery > CAMERASLACK:
177. cameray = playerCentery + CAMERASLACK - HALF_WINHEIGHT
178. elif playerCentery – (cameray + HALF_WINHEIGHT) > CAMERASLACK:
179. cameray = playerCentery – CAMERASLACK - HALF_WINHEIGHT
180.
181. # draw the green background
182. DISPLAYSURF.fill(GRASSCOLOR)
183.
184. # draw all the grass objects on the screen
185. for gObj in grassObjs:
186. gRect = pygame.Rect( (gObj['x'] - camerax,
187. gObj['y'] - cameray,
188. gObj['width'],
189. gObj['height']) )
190. DISPLAYSURF.blit(GRASSIMAGES[gObj['grassImage']], gRect)
191.
192.
193. # draw the other squirrels
194. for sObj in squirrelObjs:
195. sObj['rect'] = pygame.Rect( (sObj['x'] - camerax,
196. sObj['y'] - cameray -
getBounceAmount(sObj['bounce'], sObj['bouncerate'], sObj['bounceheight']),
197. sObj['width'],
198. sObj['height']) )
199. DISPLAYSURF.blit(sObj['surface'], sObj['rect'])
200.
201.
202. # draw the player squirrel
203. flashIsOn = round(time.time(), 1) * 10 % 2 == 1
204. if not gameOverMode and not (invulnerableMode and flashIsOn):
205. playerObj['rect'] = pygame.Rect( (playerObj['x'] - camerax,
206. playerObj['y'] – cameray -
getBounceAmount(playerObj['bounce'], BOUNCERATE, BOUNCEHEIGHT),
207. playerObj['size'],
208. playerObj['size']) )
209. DISPLAYSURF.blit(playerObj['surface'], playerObj['rect'])
210.
211.
212. # draw the health meter
213. drawHealthMeter(playerObj['health'])
214.
215. for event in pygame.event.get(): # event handling loop
216. if event.type == QUIT:
217. terminate()
218.
219. elif event.type == KEYDOWN:

Chapter 8 – Squirrel Eat Squirrel 207
220. if event.key in (K_UP, K_w):
221. moveDown = False
222. moveUp = True
223. elif event.key in (K_DOWN, K_s):
224. moveUp = False
225. moveDown = True
226. elif event.key in (K_LEFT, K_a):
227. moveRight = False
228. moveLeft = True
229. if playerObj['facing'] == RIGHT: # change player image
230. playerObj['surface'] =
pygame.transform.scale(L_SQUIR_IMG, (playerObj['size'], playerObj['size']))
231. playerObj['facing'] = LEFT
232. elif event.key in (K_RIGHT, K_d):
233. moveLeft = False
234. moveRight = True
235. if playerObj['facing'] == LEFT: # change player image
236. playerObj['surface'] =
pygame.transform.scale(R_SQUIR_IMG, (playerObj['size'], playerObj['size']))
237. playerObj['facing'] = RIGHT
238. elif winMode and event.key == K_r:
239. return
240.
241. elif event.type == KEYUP:
242. # stop moving the player's squirrel
243. if event.key in (K_LEFT, K_a):
244. moveLeft = False
245. elif event.key in (K_RIGHT, K_d):
246. moveRight = False
247. elif event.key in (K_UP, K_w):
248. moveUp = False
249. elif event.key in (K_DOWN, K_s):
250. moveDown = False
251.
252. elif event.key == K_ESCAPE:
253. terminate()
254.
255. if not gameOverMode:
256. # actually move the player
257. if moveLeft:
258. playerObj['x'] -= MOVERATE
259. if moveRight:
260. playerObj['x'] += MOVERATE
261. if moveUp:
262. playerObj['y'] -= MOVERATE
263. if moveDown:

208 http://inventwithpython.com/pygame
Email questions to the author: [email protected]
264. playerObj['y'] += MOVERATE
265.
266. if (moveLeft or moveRight or moveUp or moveDown) or
playerObj['bounce'] != 0:
267. playerObj['bounce'] += 1
268.
269. if playerObj['bounce'] > BOUNCERATE:
270. playerObj['bounce'] = 0 # reset bounce amount
271.
272. # check if the player has collided with any squirrels
273. for i in range(len(squirrelObjs)-1, -1, -1):
274. sqObj = squirrelObjs[i]
275. if 'rect' in sqObj and
playerObj['rect'].colliderect(sqObj['rect']):
276. # a player/squirrel collision has occurred
277.
278. if sqObj['width'] * sqObj['height'] <=
playerObj['size']**2:
279. # player is larger and eats the squirrel
280. playerObj['size'] += int( (sqObj['width'] *
sqObj['height'])**0.2 ) + 1
281. del squirrelObjs[i]
282.
283. if playerObj['facing'] == LEFT:
284. playerObj['surface'] =
pygame.transform.scale(L_SQUIR_IMG, (playerObj['size'], playerObj['size']))
285. if playerObj['facing'] == RIGHT:
286. playerObj['surface'] =
pygame.transform.scale(R_SQUIR_IMG, (playerObj['size'], playerObj['size']))
287.
288. if playerObj['size'] > WINSIZE:
289. winMode = True # turn on "win mode"
290.
291. elif not invulnerableMode:
292. # player is smaller and takes damage
293. invulnerableMode = True
294. invulnerableStartTime = time.time()
295. playerObj['health'] -= 1
296. if playerObj['health'] == 0:
297. gameOverMode = True # turn on "game over mode"
298. gameOverStartTime = time.time()
299. else:
300. # game is over, show "game over" text
301. DISPLAYSURF.blit(gameOverSurf, gameOverRect)
302. if time.time() - gameOverStartTime > GAMEOVERTIME:
303. return # end the current game

Chapter 8 – Squirrel Eat Squirrel 209
304.
305. # check if the player has won.
306. if winMode:
307. DISPLAYSURF.blit(winSurf, winRect)
308. DISPLAYSURF.blit(winSurf2, winRect2)
309.
310. pygame.display.update()
311. FPSCLOCK.tick(FPS)
312.
313.
314.
315.
316. def drawHealthMeter(currentHealth):
317. for i in range(currentHealth): # draw red health bars
318. pygame.draw.rect(DISPLAYSURF, RED, (15, 5 + (10 * MAXHEALTH) - i
* 10, 20, 10))
319. for i in range(MAXHEALTH): # draw the white outlines
320. pygame.draw.rect(DISPLAYSURF, WHITE, (15, 5 + (10 * MAXHEALTH) - i
* 10, 20, 10), 1)
321.
322.
323. def terminate():
324. pygame.quit()
325. sys.exit()
326.
327.
328. def getBounceAmount(currentBounce, bounceRate, bounceHeight):
329. # Returns the number of pixels to offset based on the bounce.
330. # Larger bounceRate means a slower bounce.
331. # Larger bounceHeight means a higher bounce.
332. # currentBounce will always be less than bounceRate
333. return int(math.sin( (math.pi / float(bounceRate)) * currentBounce ) *
bounceHeight)
334.
335. def getRandomVelocity():
336. speed = random.randint(SQUIRRELMINSPEED, SQUIRRELMAXSPEED)
337. if random.randint(0, 1) == 0:
338. return speed
339. else:
340. return -speed
341.
342.
343. def getRandomOffCameraPos(camerax, cameray, objWidth, objHeight):
344. # create a Rect of the camera view
345. cameraRect = pygame.Rect(camerax, cameray, WINWIDTH, WINHEIGHT)
346. while True:

210 http://inventwithpython.com/pygame
Email questions to the author: [email protected]
347. x = random.randint(camerax - WINWIDTH, camerax + (2 * WINWIDTH))
348. y = random.randint(cameray - WINHEIGHT, cameray + (2 * WINHEIGHT))
349. # create a Rect object with the random coordinates and use
colliderect()
350. # to make sure the right edge isn't in the camera view.
351. objRect = pygame.Rect(x, y, objWidth, objHeight)
352. if not objRect.colliderect(cameraRect):
353. return x, y
354.
355.
356. def makeNewSquirrel(camerax, cameray):
357. sq = {}
358. generalSize = random.randint(5, 25)
359. multiplier = random.randint(1, 3)
360. sq['width'] = (generalSize + random.randint(0, 10)) * multiplier
361. sq['height'] = (generalSize + random.randint(0, 10)) * multiplier
362. sq['x'], sq['y'] = getRandomOffCameraPos(camerax, cameray,
sq['width'], sq['height'])
363. sq['movex'] = getRandomVelocity()
364. sq['movey'] = getRandomVelocity()
365. if sq['movex'] < 0: # squirrel is facing left
366. sq['surface'] = pygame.transform.scale(L_SQUIR_IMG, (sq['width'],
sq['height']))
367. else: # squirrel is facing right
368. sq['surface'] = pygame.transform.scale(R_SQUIR_IMG, (sq['width'],
sq['height']))
369. sq['bounce'] = 0
370. sq['bouncerate'] = random.randint(10, 18)
371. sq['bounceheight'] = random.randint(10, 50)
372. return sq
373.
374.
375. def makeNewGrass(camerax, cameray):
376. gr = {}
377. gr['grassImage'] = random.randint(0, len(GRASSIMAGES) - 1)
378. gr['width'] = GRASSIMAGES[0].get_width()
379. gr['height'] = GRASSIMAGES[0].get_height()
380. gr['x'], gr['y'] = getRandomOffCameraPos(camerax, cameray,
gr['width'], gr['height'])
381. gr['rect'] = pygame.Rect( (gr['x'], gr['y'], gr['width'],
gr['height']) )
382. return gr
383.
384.
385. def isOutsideActiveArea(camerax, cameray, obj):
386. # Return False if camerax and cameray are more than

Chapter 8 – Squirrel Eat Squirrel 211
387. # a half-window length beyond the edge of the window.
388. boundsLeftEdge = camerax - WINWIDTH
389. boundsTopEdge = cameray - WINHEIGHT
390. boundsRect = pygame.Rect(boundsLeftEdge, boundsTopEdge, WINWIDTH * 3,
WINHEIGHT * 3)
391. objRect = pygame.Rect(obj['x'], obj['y'], obj['width'], obj['height'])
392. return not boundsRect.colliderect(objRect)
393.
394.
395. if __name__ == '__main__':
396. main()
The Usual Setup Code
1. # Squirrel Eat Squirrel (a 2D Katamari Damacy clone)
2. # By Al Sweigart [email protected]
3. # http://inventwithpython.com/pygame
4. # Creative Commons BY-NC-SA 3.0 US
5.
6. import random, sys, time, math, pygame
7. from pygame.locals import *
8.
9. FPS = 30 # frames per second to update the screen
10. WINWIDTH = 640 # width of the program's window, in pixels
11. WINHEIGHT = 480 # height in pixels
12. HALF_WINWIDTH = int(WINWIDTH / 2)
13. HALF_WINHEIGHT = int(WINHEIGHT / 2)
14.
15. GRASSCOLOR = (24, 255, 0)
16. WHITE = (255, 255, 255)
17. RED = (255, 0, 0)
The start of the program assigns several constant variables. This program frequently makes use of
the half length of the width and height of the window so much that the HALF_WINWIDTH and
HALF_WINHEIGHT variables store these numbers.
19. CAMERASLACK = 90 # how far from the center the squirrel moves before
moving the camera
The ―camera slack‖ is described later. Basically, it means that the camera will begin following the
player squirrel when it moves 90 pixels away from the center of the window.
20. MOVERATE = 9 # how fast the player moves
21. BOUNCERATE = 6 # how fast the player bounces (large is slower)

212 http://inventwithpython.com/pygame
Email questions to the author: [email protected]
22. BOUNCEHEIGHT = 30 # how high the player bounces
23. STARTSIZE = 25 # how big the player starts off
24. WINSIZE = 300 # how big the player needs to be to win
25. INVULNTIME = 2 # how long the player is invulnerable after being hit
in seconds
26. GAMEOVERTIME = 4 # how long the "game over" text stays on the screen
in seconds
27. MAXHEALTH = 3 # how much health the player starts with
28.
29. NUMGRASS = 80 # number of grass objects in the active area
30. NUMSQUIRRELS = 30 # number of squirrels in the active area
31. SQUIRRELMINSPEED = 3 # slowest squirrel speed
32. SQUIRRELMAXSPEED = 7 # fastest squirrel speed
33. DIRCHANGEFREQ = 2 # % chance of direction change per frame
34. LEFT = 'left'
35. RIGHT = 'right'
The comments next to these constants explains what the constant variable is used for.
Describing the Data Structures
37. """
38. This program has three data structures to represent the player, enemy
squirrels, and grass background objects. The data structures are dictionaries
with the following keys:
39.
40. Keys used by all three data structures:
41. 'x' - the left edge coordinate of the object in the game world (not a
pixel coordinate on the screen)
42. 'y' - the top edge coordinate of the object in the game world (not a
pixel coordinate on the screen)
43. 'rect' - the pygame.Rect object representing where on the screen the
object is located.
44. Player data structure keys:
45. 'surface' - the pygame.Surface object that stores the image of the
squirrel which will be drawn to the screen.
46. 'facing' - either set to LEFT or RIGHT, stores which direction the
player is facing.
47. 'size' - the width and height of the player in pixels. (The width &
height are always the same.)
48. 'bounce' - represents at what point in a bounce the player is in. 0
means standing (no bounce), up to BOUNCERATE (the completion of the bounce)
49. 'health' - an integer showing how many more times the player can be
hit by a larger squirrel before dying.
50. Enemy Squirrel data structure keys:

Chapter 8 – Squirrel Eat Squirrel 213
51. 'surface' - the pygame.Surface object that stores the image of the
squirrel which will be drawn to the screen.
52. 'movex' - how many pixels per frame the squirrel moves horizontally. A
negative integer is moving to the left, a positive to the right.
53. 'movey' - how many pixels per frame the squirrel moves vertically. A
negative integer is moving up, a positive moving down.
54. 'width' - the width of the squirrel's image, in pixels
55. 'height' - the height of the squirrel's image, in pixels
56. 'bounce' - represents at what point in a bounce the player is in. 0
means standing (no bounce), up to BOUNCERATE (the completion of the bounce)
57. 'bouncerate' - how quickly the squirrel bounces. A lower number means
a quicker bounce.
58. 'bounceheight' - how high (in pixels) the squirrel bounces
59. Grass data structure keys:
60. 'grassImage' - an integer that refers to the index of the
pygame.Surface object in GRASSIMAGES used for this grass object
61. """
The comments from lines 37 to 61 are in one large, multi-line string. They describe the keys in
the player squirrel, enemy squirrel, and grass objects. In Python, a multi-line string value by itself
works as a multi-line comment.
The main() Function
63. def main():
64. global FPSCLOCK, DISPLAYSURF, BASICFONT, L_SQUIR_IMG, R_SQUIR_IMG,
GRASSIMAGES
65.
66. pygame.init()
67. FPSCLOCK = pygame.time.Clock()
68. pygame.display.set_icon(pygame.image.load('gameicon.png'))
69. DISPLAYSURF = pygame.display.set_mode((WINWIDTH, WINHEIGHT))
70. pygame.display.set_caption('Squirrel Eat Squirrel')
71. BASICFONT = pygame.font.Font('freesansbold.ttf', 32)
The first several lines of the main() function are the same setup code that we’ve seen in our
previous game programs. The pygame.display.set_icon() is a Pygame function that
sets the icon in the window’s title bar (just like pygame.display.set_caption() sets the
caption text in the title bar). The single argument to pygame.display.set_icon() is a
Surface object of a small image. The ideal image size is 32 x 32 pixels, although you can use
other sized images. The image will just be compressed into a smaller size to be used as the
window’s icon.

214 http://inventwithpython.com/pygame
Email questions to the author: [email protected]
The pygame.transform.flip() Function
73. # load the image files
74. L_SQUIR_IMG = pygame.image.load('squirrel.png')
75. R_SQUIR_IMG = pygame.transform.flip(L_SQUIR_IMG, True, False)
76. GRASSIMAGES = []
77. for i in range(1, 5):
78. GRASSIMAGES.append(pygame.image.load('grass%s.png' % i))
The image for the player and enemy squirrels is loaded from squirrel.png on line 74. Make sure
that this PNG file is in the same folder as squirrel.py, otherwise you will get the error
pygame.error: Couldn't open squirrel.png.
The image in squirrel.png (which you can download from http://invpy.com/squirrel.png) is of a
squirrel facing to the left. We also need a Surface object that contains a picture of the squirrel
facing to the right. Instead of creating a second PNG image file, we can call the
pygame.transform.flip() function. This function has three parameters: the Surface
object with the image to flip, a Boolean value to do a horizontal flip, and a Boolean value to do a
vertical flip. By passing True for the second parameter and False for the third parameter, the
Surface object that returns has the image of the squirrel facing to the right. The original Surface
object in L_SQUIR_IMG that we passed in is unchanged.
Here are examples of images being horizontally and vertically flipped:
Original Horizontal Flip Vertical Flip Horizontal and
Vertical Flip
80. while True:
81. runGame()
After the setup in main() is complete, the game begins with runGame() being called.
A More Detailed Game State than Usual
84. def runGame():
85. # set up variables for the start of a new game

Chapter 8 – Squirrel Eat Squirrel 215
86. invulnerableMode = False # if the player is invulnerable
87. invulnerableStartTime = 0 # time the player became invulnerable
88. gameOverMode = False # if the player has lost
89. gameOverStartTime = 0 # time the player lost
90. winMode = False # if the player has won
The Squirrel Eat Squirrel game has quite a few variables that track the game state. These
variables will be explained in more detail later when they are used in the code.
The Usual Text Creation Code
92. # create the surfaces to hold game text
93. gameOverSurf = BASICFONT.render('Game Over', True, WHITE)
94. gameOverRect = gameOverSurf.get_rect()
95. gameOverRect.center = (HALF_WINWIDTH, HALF_WINHEIGHT)
96.
97. winSurf = BASICFONT.render('You have achieved OMEGA SQUIRREL!', True,
WHITE)
98. winRect = winSurf.get_rect()
99. winRect.center = (HALF_WINWIDTH, HALF_WINHEIGHT)
100.
101. winSurf2 = BASICFONT.render('(Press "r" to restart.)', True, WHITE)
102. winRect2 = winSurf2.get_rect()
103. winRect2.center = (HALF_WINWIDTH, HALF_WINHEIGHT + 30)
These variables contain Surface objects with the ―Game Over‖, ―You have achieved OMEGA
SQUIRREL!‖, and ―(Press "r" to restart.)‖ text that appears on the screen after the game ends
(with either the player losing or winning).
Cameras
105. # camerax and cameray are where the middle of the camera view is
106. camerax = 0
107. cameray = 0
The camerax and cameray variables track the game coordinates of the ―camera‖. Imagine the
game world as an infinite 2D space. This could, of course, never fit on any screen. We can only
draw a portion of the infinite 2D space on the screen. We call the area of this portion a camera,
because it is as though our screen is just the area of the game world in front what a camera would
see. Here’s a picture of the game world (an infinite green field) and the area that the camera can
view:

216 http://inventwithpython.com/pygame
Email questions to the author: [email protected]
As you can see, the game world XY coordinates keep getting bigger and smaller forever. The
game world origin is where the (0, 0) game world coordinates are. You can see that the three
squirrels are located (in game world coordinates) at (-384, -84), (384, 306), and (585, -234).
But we can only display 640 x 480 pixel area on the screen (though this can change if we pass
different numbers to the pygame.display.set_mode() function), so we need to track
where the camera’s origin is located in game world coordinates. In the picture above, the camera
is placed at (-486, -330) in game world coordinates.
The picture below shows the same field and squirrels, except everything is given in camera
coordinates:

Chapter 8 – Squirrel Eat Squirrel 217
The area that the camera can see (called the camera view) has it’s center (that is, its origin) at the
game world coordinates (-486, -330). Since what the camera sees is displayed on the player’s
screen, the ―camera‖ coordinates are the same as the ―pixel‖ coordinates. To find out the pixel
coordinates of the squirrels (that is, where on the screen they appear), take the game coordinates
of the squirrel and subtract the game coordinates of the camera’s origin.
So the squirrel on the left has game world coordinates of (-384, -84) but appears at (102, 246) on
the screen in pixel coordinates. (For the X coordinate, -384 - -486 = 102 and for the Y coordinate,
-84 - -330 = 246.)
When we do the same calculation to find the pixel coordinates of the other two squirrels, we find
that they exist outside of the range of the screen. This is why they don’t appear in the camera’s
view.
The “Active Area” The ―active area‖ is just a name I came up with to describe the area of the game world that the
camera views plus an area around it the size of the camera area:

218 http://inventwithpython.com/pygame
Email questions to the author: [email protected]
Calculating if something is in the active area or not is explained in the
isOutsideActiveArea() function’s explanation later in this chapter. When we create new
enemy squirrel or grass objects, we don’t want them to be created inside the view of the camera,
since it’ll appear that they just pop out of nowhere.
But we also don’t want to create them too far away from the camera, because then they may
never wander into the camera’s view. Inside the active area but outside the camera is where
squirrel and grass objects can safely be created.
Also, when squirrel and grass objects are beyond the border of the active area then they are far
away enough to delete so that they don’t take up memory any more. Objects that far away aren’t
needed since it is much less likely that they’ll come back into view of the camera.
If you have ever played Super Mario World on the Super Nintendo, there is a good YouTube
video explaining how Super Mario World’s camera system works. You can find this video at
http://invpy.com/mariocamera.
Keeping Track of the Location of Things in the Game World
109. grassObjs = [] # stores all the grass objects in the game
110. squirrelObjs = [] # stores all the non-player squirrel objects
111. # stores the player object:
112. playerObj = {'surface': pygame.transform.scale(L_SQUIR_IMG,
(STARTSIZE, STARTSIZE)),
113. 'facing': LEFT,
114. 'size': STARTSIZE,
115. 'x': HALF_WINWIDTH,
116. 'y': HALF_WINHEIGHT,
117. 'bounce':0,
118. 'health': MAXHEALTH}
119.
120. moveLeft = False
121. moveRight = False
122. moveUp = False
123. moveDown = False
The grassObjs variable holds a list of all the grass objects in the game. As new grass objects
are created, they are added to this list. As grass objects are deleted, they are removed from this
list. The same goes for the squirrelObjs variable and the enemy squirrel objects.
The playerObj variable is not a list, but just the dictionary value itself.
The move variables on lines 120 to 123 track which of arrow keys (or WASD keys) are being
held down, just like in a few of the previous game programs.

Chapter 8 – Squirrel Eat Squirrel 219
Starting Off with Some Grass
125. # start off with some random grass images on the screen
126. for i in range(10):
127. grassObjs.append(makeNewGrass(camerax, cameray))
128. grassObjs[i]['x'] = random.randint(0, WINWIDTH)
129. grassObjs[i]['y'] = random.randint(0, WINHEIGHT)
The active area should start off with a few grass objects visible on the screen. The
makeNewGrass() function will create and return a grass object that is randomly located
somewhere in the active area but outside the camera view. This is what we normally want when
we call makeNewGrass(), but since we want to make sure the first few grass objects are on the
screen, the X and Y coordinates are overwritten.
The Game Loop
131. while True: # main game loop
The game loop, like the game loops in the previous game programs, will do event handling,
updating the game state, and drawing everything to the screen.
Checking to Disable Invulnerability
132. # Check if we should turn off invulnerability
133. if invulnerableMode and time.time() - invulnerableStartTime >
INVULNTIME:
134. invulnerableMode = False
When the player gets hit by an enemy squirrel and does not die, we make the player invulnerable
for a couple seconds (since the INVULNTIME constant is set to 2). During this time, the player’s
squirrel flashes and the won’t take any damage from other squirrels. If the ―invulnerability mode‖
time is over, line 134 will set invulnerableMode to False.
Moving the Enemy Squirrels
136. # move all the squirrels
137. for sObj in squirrelObjs:
138. # move the squirrel, and adjust for their bounce
139. sObj['x'] += sObj['movex']
140. sObj['y'] += sObj['movey']
The enemy squirrels all move according to the values in their 'movex' and 'movey' keys. If
these values are positive, the squirrels move right or down. If these values are negative, they

220 http://inventwithpython.com/pygame
Email questions to the author: [email protected]
move left or up. The larger the value, the farther they move on each iteration through the game
loop (which means they move faster).
The for loop on line 137 will apply this moving code to each of the enemy squirrel objects in the
squirrelObjs list. First, line 139 and 140 will adjust their 'x' and 'y' keys’ values.
141. sObj['bounce'] += 1
142. if sObj['bounce'] > sObj['bouncerate']:
143. sObj['bounce'] = 0 # reset bounce amount
The value in sObj['bounce'] is incremented on each iteration of the game loop for each
squirrel. When this value is 0, the squirrel is at the very beginning of its bounce. When this value
is equal to the value in sObj['bouncerate'] the value is at its end. (This is why a smaller
sObj['bouncerate'] value makes for a faster bounce. If sObj['bouncerate'] is 3,
then it only takes three iterations through the game loop for the squirrel to do a full bounce. If
sObj['bouncerate'] were 10, then it would take ten iterations.)
When sObj['bounce'] gets larger than sObj['bouncerate'], then it needs to be reset
to 0. This is what lines 142 and 143 do.
145. # random chance they change direction
146. if random.randint(0, 99) < DIRCHANGEFREQ:
147. sObj['movex'] = getRandomVelocity()
148. sObj['movey'] = getRandomVelocity()
149. if sObj['movex'] > 0: # faces right
150. sObj['surface'] = pygame.transform.scale(R_SQUIR_IMG,
(sObj['width'], sObj['height']))
151. else: # faces left
152. sObj['surface'] = pygame.transform.scale(L_SQUIR_IMG,
(sObj['width'], sObj['height']))
There is a 2% chance on each iteration through the game loop that the squirrel will randomly
change speed and direction. On line 146 the random.randint(0, 99) call randomly selects
an integer out of 100 possible integers. If this number is less than DIRCHANGEFREQ (which we
set to 2 on line 33) then a new value will be set for sObj['movex'] and sObj['movey'].
Because this means the squirrel might have changed direction, the Surface object in
sObj['surface'] should be replaced by a new one that is properly facing left or right and
scaled to the squirrel’s size. This is what lines 149 to 152 determine. Note that line 150 gets a
Surface object scaled from R_SQUIR_IMG and line 152 gets one scaled from L_SQUIR_IMG.

Chapter 8 – Squirrel Eat Squirrel 221
Removing the Far Away Grass and Squirrel Objects
155. # go through all the objects and see if any need to be deleted.
156. for i in range(len(grassObjs) - 1, -1, -1):
157. if isOutsideActiveArea(camerax, cameray, grassObjs[i]):
158. del grassObjs[i]
159. for i in range(len(squirrelObjs) - 1, -1, -1):
160. if isOutsideActiveArea(camerax, cameray, squirrelObjs[i]):
161. del squirrelObjs[i]
During each iteration of the game loop, the code will check all of the grass and enemy squirrel
objects to see if they are outside the ―active area‖. The isOutsideActiveArea() function
takes the current coordinates of the camera (which are stored in camerax and cameray) and
the grass/enemy squirrel object, and returns True if the object is not located in the active area.
If this is the case, this object is deleted on line 158 (for grass objects) or line 161 (for squirrel
objects). This is how squirrel and grass objects get deleted when the player moves far enough
away from them (or when the enemy squirrels move away far enough from the player). This
ensures that there is always a number of squirrels and grass objects near the player.
When Deleting Items in a List, Iterate Over the List in Reverse Deleting squirrel and grass objects is done with the del operator. However, notice that the for
loop on line 156 and 159 pass arguments to the range() function so that the numbering starts at
the index of the last item and then decrements by -1 (unlike incrementing by 1 as it normally
does) until it reaches the number -1. We are iterating backwards over the list’s indexes compared
to how it is normally done. This is done because we are iterating over the list that we are also
deleting items from.
To see why this reverse order is needed, say we had the following list value:
animals = ['cat', 'mouse', 'dog', 'horse']
So we wanted to write code to delete any instances of the string 'dog' from this list. We might
think to write out code like this:
for i in range(len(animals)):
if animals[i] == 'dog':
del animals[i]
But if we ran this code, we would get an IndexError error that looks like this:
Traceback (most recent call last):

222 http://inventwithpython.com/pygame
Email questions to the author: [email protected]
File "<stdin>", line 2, in <module>
IndexError: list index out of range
To see why this error happens, let’s walk through the code. First, the animals list would be set
to ['cat', 'mouse', 'dog', 'horse'] and len(animals) would return 4. This
means that the call to range(4) would cause the for loop to iterate with the values 0, 1, 2,
and 3.
When the for loop iterates with i set to 2, the if statement’s condition will be True and the
del animals[i] statement will delete animals[2]. This means that afterwards the
animals list will be ['cat', 'mouse', 'horse']. The indexes of all the items after
'dog' are all shifted down by one because the 'dog' value was removed.
But on the next iteration through the for loop, i is set to 3. But animals[3] is out of bounds
because the valid indexes of the animals list is no longer 0 to 3 but 0 to 2. The original call to
range() was for a list with 4 items in it. The list changed in length, but the for loop is set up
for the original length.
However, if we iterate from the last index of the list to 0, we don’t run into this problem. The
following program deletes the 'dog' string from the animals list without causing an
IndexError error:
animals = ['cat', 'mouse', 'dog', 'horse']
for i in range(len(animals) - 1, -1, -1):
if animals[i] == 'dog':
del animals[i]
The reason this code doesn’t cause an error is because the for loop iterates over 3, 2, 1, and 0.
On the first iteration, the code checks if animals[3] is equal to 'dog'. It isn’t
(animals[3] is 'horse') so the code moves on to the next iteration. Then animals[2] is
checked if it equals 'dog'. It does, so animals[2] is deleted.
After animals[2] is deleted, the animals list is set to ['cat', 'mouse', 'horse'].
On the next iteration, i is set to 1. There is a value at animals[1] (the 'mouse' value), so no
error is caused. It doesn’t matter that all the items in the list after 'dog' have shifted down by
one, because since we started at the end of the list and are going towards the front, all of those
items have already been checked.
Similarly, we can delete grass and squirrel objects from the grassObjs and squirrelObjs
lists without error because the for loop on lines 156 and 159 iterate in reverse order.

Chapter 8 – Squirrel Eat Squirrel 223
Adding New Grass and Squirrel Objects
163. # add more grass & squirrels if we don't have enough.
164. while len(grassObjs) < NUMGRASS:
165. grassObjs.append(makeNewGrass(camerax, cameray))
166. while len(squirrelObjs) < NUMSQUIRRELS:
167. squirrelObjs.append(makeNewSquirrel(camerax, cameray))
Remember that the NUMGRASS constant was set to 80 and the NUMSQUIRRELS constant was set
to 30 at the beginning of the program? These variables are set so that we can be sure there are
always plenty of grass and squirrel objects in the active area at all times. If the length of the
grassObjs or squirrelObjs drops below NUMGRASS or NUMSQUIRRELS respectively,
then new grass and squirrel objects are created. The makeNewGrass() and
makeNewSquirrel() functions that create these objects are explained later in this chapter.
Camera Slack, and Moving the Camera View
169. # adjust camerax and cameray if beyond the "camera slack"
170. playerCenterx = playerObj['x'] + int(playerObj['size'] / 2)
171. playerCentery = playerObj['y'] + int(playerObj['size'] / 2)
172. if (camerax + HALF_WINWIDTH) - playerCenterx > CAMERASLACK:
173. camerax = playerCenterx + CAMERASLACK - HALF_WINWIDTH
174. elif playerCenterx – (camerax + HALF_WINWIDTH) > CAMERASLACK:
175. camerax = playerCenterx – CAMERASLACK - HALF_WINWIDTH
176. if (cameray + HALF_WINHEIGHT) - playerCentery > CAMERASLACK:
177. cameray = playerCentery + CAMERASLACK - HALF_WINHEIGHT
178. elif playerCentery – (cameray + HALF_WINHEIGHT) > CAMERASLACK:
179. cameray = playerCentery – CAMERASLACK - HALF_WINHEIGHT
The camera’s position (which is stored as integers in the camerax and cameray variables)
needs to be updated when the player moves over. I’ve called the number of pixels the player can
move before the camera gets updated the ―camera slack‖. Line 19 set the CAMERASLACK
constant to 90, which our program will take to mean that the player squirrel can move 90 pixels
from the center before the camera position gets updated to follow the squirrel.
In order to understand the equations used in the if statements on lines 172, 174, 176, and 178,
you should note that (camerax + HALF_WINWIDTH) and (cameray +
HALF_WINHEIGHT) are the XY game world coordinates currently at the center of the screen.
The playerCenterx and playerCentery is set to the middle of the player’s squirrel’s
position, also in game world coordinates.
For line 172, if the center X coordinate minus the player’s center X coordinate is greater than the
CAMERASLACK value, that means the player is more pixels to the right of the center of the

224 http://inventwithpython.com/pygame
Email questions to the author: [email protected]
camera than the camera slack should allow. The camerax value needs to be updated so that the
player squirrel is just at the edge of the camera slack. This is why line 173 sets camerax to
playerCenterx + CAMERASLACK – HALF_WINWIDTH. Note that the camerax
variable is changed, not the playerObj['x'] value. We want to move the camera, not the
player.
The other three if statements follow similar logic for the left, up and down sides.
Drawing the Background, Grass, Squirrels, and Health Meter
181. # draw the green background
182. DISPLAYSURF.fill(GRASSCOLOR)
Line 182 begins the code that starts drawing the contents of the display Surface object. First, line
182 draws a green color for the background. This will paint over all of the previous contents of
the Surface so that we can start drawing the frame from scratch.
184. # draw all the grass objects on the screen
185. for gObj in grassObjs:
186. gRect = pygame.Rect( (gObj['x'] - camerax,
187. gObj['y'] - cameray,
188. gObj['width'],
189. gObj['height']) )
190. DISPLAYSURF.blit(GRASSIMAGES[gObj['grassImage']], gRect)
The for loop on line 185 goes through all the grass objects in the grassObjs list and creates a
Rect object from the x, y, width, and height information stored in it. This Rect object is stored in
a variable named gRect. On line 190, gRect is used in the blit() method call to draw the
grass image on the display Surface. Note that gObj['grassImage'] only contains an integer
that is an index to GRASSIMAGES. GRASSIMAGES is a list of Surface objects that contain all
the grass images. Surface objects take up much more memory than just a single integer, and all
the grass objects with similar gObj['grassImage'] values look identical. So it makes sense
to only have each grass image stored once in GRASSIMAGES and simply store integers in the
grass objects themselves.
193. # draw the other squirrels
194. for sObj in squirrelObjs:
195. sObj['rect'] = pygame.Rect( (sObj['x'] - camerax,
196. sObj['y'] - cameray -
getBounceAmount(sObj['bounce'], sObj['bouncerate'], sObj['bounceheight']),
197. sObj['width'],
198. sObj['height']) )
Chapter 8 – Squirrel Eat Squirrel 225
199. DISPLAYSURF.blit(sObj['surface'], sObj['rect'])
The for loop that draws all the enemy squirrel game objects is similar to the previous for loop,
except that the Rect object it creates is saved in the 'rect' key’s value of the squirrel
dictionary. The reason the code does this is because we will use this Rect object later to check if
the enemy squirrels have collided with the player squirrel.
Note that the top parameter for the Rect constructor is not just sObj['y'] - cameray but
sObj['y'] - cameray - getBounceAmount(sObj['bounce'],
sObj['bouncerate'], sObj['bounceheight']). The getBounceAmount()
function will return the number of pixels that the top value should be raised.
Also, there is no common list of Surface objects of the squirrel images, like there was with grass
game objects and GRASSIMAGES. Each enemy squirrel game object has its own Surface object
stored in the 'surface' key. This is because the squirrel images can be scaled to different
sizes.
202. # draw the player squirrel
203. flashIsOn = round(time.time(), 1) * 10 % 2 == 1
After drawing the grass and enemy squirrels, the code will draw the player’s squirrel. However,
there is one case where we would skip drawing the player’s squirrel. When the player collides
with a larger enemy squirrel, the player takes damage and flashes for a little bit to indicate that
the player is temporarily invulnerable. This flashing effect is done by drawing the player squirrel
on some iterations through the game loop but not on others.
The player squirrel will be drawn on game loop iterations for a tenth of a second, and then not
drawn on the game loop iterations for a tenth of second. This repeats over and over again as long
as the player is invulnerable (which, in the code, means that the invulnerableMode variable
is set to True). Our code will make the flashing last for two seconds, since 2 was stored in the
INVULNTIME constant variable on line 25.
To determine if the flash is on or not, line 202 grabs the current time from time.time(). Let’s
use the example where this function call returns 1323926893.622. This value is passed to
round(), which rounds it to one digit past the decimal point (since 1 is passed as round()’s
second parameter). This means round() will return the value 1323926893.6.
This value is then multiplied by 10, to become 13239268936. Once we have it as an integer,
we can do the ―mod two‖ trick first discussed in the Memory Puzzle chapter to see if it is even or
odd. 13239268936 % 2 evaluates to 0, which means that flashIsOn will be set to False,
since 0 == 1 is False.
226 http://inventwithpython.com/pygame
Email questions to the author: [email protected]
In fact, time.time() will keep returning values that will end up putting False into
flashIsOn until 1323926893.700, which is the next tenth second. This is why the
flashIsOn variable will constantly have False for one tenth of a second, and then True for
the next one tenth of a second (no matter how many iterations happen in that tenth of a second).
204. if not gameOverMode and not (invulnerableMode and flashIsOn):
205. playerObj['rect'] = pygame.Rect( (playerObj['x'] - camerax,
206. playerObj['y'] – cameray -
getBounceAmount(playerObj['bounce'], BOUNCERATE, BOUNCEHEIGHT),
207. playerObj['size'],
208. playerObj['size']) )
209. DISPLAYSURF.blit(playerObj['surface'], playerObj['rect'])
There are three things that must be True before we draw the player’s squirrel. The game must
currently be going on (which happens while gameOverMode is False) and the player is not
invulnerable and not flashing (which happens while invulnerableMode and flashIsOn
are False).
The code for drawing the player’s squirrel is almost identical to the code for drawing the enemy
squirrels.
212. # draw the health meter
213. drawHealthMeter(playerObj['health'])
The drawHealthMeter() function draws the indicator at the top left corner of the screen that
tells the player how many times the player squirrel can be hit before dying. This function will be
explained later in this chapter.
The Event Handling Loop
215. for event in pygame.event.get(): # event handling loop
216. if event.type == QUIT:
217. terminate()
The first thing that is checked in the event handling loop is if the QUIT event has been generated.
If so, then the program should be terminated.
219. elif event.type == KEYDOWN:
220. if event.key in (K_UP, K_w):
221. moveDown = False
222. moveUp = True
223. elif event.key in (K_DOWN, K_s):

Chapter 8 – Squirrel Eat Squirrel 227
224. moveUp = False
225. moveDown = True
If the up or down arrow keys have been pressed (or their WASD equivalents), then the move
variable (moveRight, moveDown, etc.) for that direction should be set to True and the move
variable for the opposite direction should be set to False.
226. elif event.key in (K_LEFT, K_a):
227. moveRight = False
228. moveLeft = True
229. if playerObj['facing'] == RIGHT: # change player image
230. playerObj['surface'] =
pygame.transform.scale(L_SQUIR_IMG, (playerObj['size'], playerObj['size']))
231. playerObj['facing'] = LEFT
232. elif event.key in (K_RIGHT, K_d):
233. moveLeft = False
234. moveRight = True
235. if playerObj['facing'] == LEFT: # change player image
236. playerObj['surface'] =
pygame.transform.scale(R_SQUIR_IMG, (playerObj['size'], playerObj['size']))
237. playerObj['facing'] = RIGHT
The moveLeft and moveRight variables should also be set when the left or right arrow keys
are pressed. Also, the value in playerObj['facing'] should be updated to either LEFT or
RIGHT. If the player squirrel is now facing a new direction, the playerObj['surface']
value should be replaced with a correctly scaled image of the squirrel facing the new direction.
Line 229 is run if the left arrow key was pressed and checks if the player squirrel was facing
right. If that was so, then a new scaled Surface object of the player squirrel image is stored in
playerObj['surface']. The code in line 232’s elif statement handles the opposite case.
238. elif winMode and event.key == K_r:
239. return
If the player has won the game by growing large enough (in which case, winMode will be set to
True) and the R key has been pressed, then runGame()should return. This will end the current
game, and a new game will start the next time that runGame() gets called.
241. elif event.type == KEYUP:
242. # stop moving the player's squirrel
243. if event.key in (K_LEFT, K_a):
244. moveLeft = False

228 http://inventwithpython.com/pygame
Email questions to the author: [email protected]
245. elif event.key in (K_RIGHT, K_d):
246. moveRight = False
247. elif event.key in (K_UP, K_w):
248. moveUp = False
249. elif event.key in (K_DOWN, K_s):
250. moveDown = False
If the player lets up on any of the arrow or WASD keys, then the code should set the move
variable for that direction to False. This will stop the squirrel from moving in that direction any
more.
252. elif event.key == K_ESCAPE:
253. terminate()
If the key that was pressed was the Esc key, then terminate the program.
Moving the Player, and Accounting for Bounce
255. if not gameOverMode:
256. # actually move the player
257. if moveLeft:
258. playerObj['x'] -= MOVERATE
259. if moveRight:
260. playerObj['x'] += MOVERATE
261. if moveUp:
262. playerObj['y'] -= MOVERATE
263. if moveDown:
264. playerObj['y'] += MOVERATE
The code inside the if statement on line 255 will move the player’s squirrel around only if the
game is not over. (This is why pressing on the arrow keys after the player’s squirrel dies will have
no effect.) Depending on which of the move variables is set to True, the playerObj dictionary
should have its playerObj['x'] and playerObj['y'] values changed by MOVERATE.
(This is why a larger value in MOVERATE makes the squirrel move faster.)
266. if (moveLeft or moveRight or moveUp or moveDown) or
playerObj['bounce'] != 0:
267. playerObj['bounce'] += 1
268.
269. if playerObj['bounce'] > BOUNCERATE:
270. playerObj['bounce'] = 0 # reset bounce amount

Chapter 8 – Squirrel Eat Squirrel 229
The value in playerObj['bounce'] keeps track of at what point in bouncing the player is
at. This variable stores an integer value from 0 to BOUNCERATE. Just like the bounce value for
the enemy squirrels, a playerObj['bounce'] value of 0 means the player squirrel is at the
start of a bounce and a value of BOUNCERATE means the player squirrel is at the end of the
bounce.
The player squirrel will bounce whenever the player is moving, or if the player has stopped
moving but the squirrel hasn’t finished its current bounce. This condition is captured in the if
statement on line 266. If any of the move variables is set to True or the current
playerObj['bounce'] is not 0 (which means the player is currently in a bounce), then the
variable should be incremented on line 267.
Because the playerObj['bounce'] variable should only be in the range of 0 to
BOUNCERATE, if incrementing it makes it larger than BOUNCERATE, it should be reset back to
0.
Collision Detection: Eat or Be Eaten
272. # check if the player has collided with any squirrels
273. for i in range(len(squirrelObjs)-1, -1, -1):
274. sqObj = squirrelObjs[i]
The for loop on 273 will go run code on each of the enemy squirrel game objects in
squirrelObjs. Notice that the parameters to range() on line 273 start at the last index of
squirrelObjs and decrement. This is because the code inside this for loop may end up
deleting some of these enemy squirrel game objects (if the player’s squirrel ends up eating them),
so it is important to iterate from the end down to the front. The reason why was explained
previously in the ―When Deleting Items in a List, Iterate Over the List in Reverse‖ section.
275. if 'rect' in sqObj and
playerObj['rect'].colliderect(sqObj['rect']):
276. # a player/squirrel collision has occurred
277.
278. if sqObj['width'] * sqObj['height'] <=
playerObj['size']**2:
279. # player is larger and eats the squirrel
280. playerObj['size'] += int( (sqObj['width'] *
sqObj['height'])**0.2 ) + 1
281. del squirrelObjs[i]
If the player’s squirrel is equal or larger than the size of the enemy squirrel it has collided with,
then the player’s squirrel will eat that squirrel and grow. The number that is added to the 'size'

230 http://inventwithpython.com/pygame
Email questions to the author: [email protected]
key in the player object (that is, the growth) is calculated based on the enemy squirrel’s size on
line 280. Here’s a graph showing the growth from different sized squirrels. Notice that larger
squirrels cause more growth:
So, according to the chart, eating a squirrel that has a width and height of 45 (that is, an area of
1600 pixels) would cause the player to grow 5 pixels wider and taller.
Line 281 deletes the eaten squirrel object from the squirrelObjs list so that it will no longer
appear on the screen or have its position updated.
283. if playerObj['facing'] == LEFT:
284. playerObj['surface'] =
pygame.transform.scale(L_SQUIR_IMG, (playerObj['size'], playerObj['size']))
285. if playerObj['facing'] == RIGHT:
286. playerObj['surface'] =
pygame.transform.scale(R_SQUIR_IMG, (playerObj['size'], playerObj['size']))
The player’s squirrel image needs to be updated now that the squirrel is larger. This can be done
by passing the original squirrel image in L_SQUIR_IMG or R_SQUIR_IMG to the
pygame.transform.scale() function, which will return an enlarged version of the image.
Depending on whether playerObj['facing'] is equal to LEFT or RIGHT determines
which original squirrel image we pass to the function.
288. if playerObj['size'] > WINSIZE:
289. winMode = True # turn on "win mode"
0
1
2
3
4
5
6
7
8
1 5 9
13
17
21
25
29
33
37
41
45
49
53
57
61
65
69
73
77
81
85
89
93
97
Gro
wth
Size of Eaten Squirrel (width & height)
int( (sqObj['width'] * sqObj['height'])**0.2 ) + 1

Chapter 8 – Squirrel Eat Squirrel 231
The way the player wins the game is by getting the squirrel to have a size larger than the integer
stored in the WINSIZE constant variable. If this is true, then the winMode variable is set to
True. Code in the other parts of this function will handle displaying the congratulations text and
checking for the player to press the R key to restart the game.
291. elif not invulnerableMode:
292. # player is smaller and takes damage
293. invulnerableMode = True
294. invulnerableStartTime = time.time()
295. playerObj['health'] -= 1
296. if playerObj['health'] == 0:
297. gameOverMode = True # turn on "game over mode"
298. gameOverStartTime = time.time()
If the player’s area was not equal to or larger than the area of the enemy squirrel, and
invulnerableMode was not set to True, then the player will take damage from colliding
with this larger squirrel.
To prevent the player from being damaged several times by the same squirrel immediately, we
will briefly make the player invulnerable to further squirrel attacks by setting
invulnerableMode to True on line 293. Line 294 will set invulnerableStartTime to
the current time (which is returned by time.time()) so that lines 133 and 134 can know when
to set invulnerableMode to False.
Line 295 decrements the player’s health by 1. Because there is a chance that the player’s health is
now at 0, line 296 checks for this and, if so, sets gameOverMode to True and
gameOverStartTime to the current time.
The Game Over Screen
299. else:
300. # game is over, show "game over" text
301. DISPLAYSURF.blit(gameOverSurf, gameOverRect)
302. if time.time() - gameOverStartTime > GAMEOVERTIME:
303. return # end the current game
When the player has died, the ―Game Over‖ text (which is on the Surface object in the
gameOverSurf variable) will be shown on the screen for the number of seconds that is in the
GAMEOVERTIME constant. Once this amount of time has elapsed, then the runGame() function
will return.

232 http://inventwithpython.com/pygame
Email questions to the author: [email protected]
This lets the enemy squirrels continue to be animated and moving around for a few seconds after
the player dies and before the next game starts. The ―game over screen‖ in Squirrel Eat Squirrel
does not wait until the player presses a key before a new game starts.
Winning
305. # check if the player has won.
306. if winMode:
307. DISPLAYSURF.blit(winSurf, winRect)
308. DISPLAYSURF.blit(winSurf2, winRect2)
309.
310. pygame.display.update()
311. FPSCLOCK.tick(FPS)
The winMode variable is set to True on line 289 if the player has reached a certain size (which
is dictated by the WINSIZE constant). All that happens when the player has won is that the ―You
have achieved OMEGA SQUIRREL!‖ text (which is on the Surface object stored in the
winSurf variable) and the ―(Press ―r‖ to restart.)‖ text (which is on the Surface object stored in
the winSurf2 variable) appears on the screen. The game continues until the user presses the R
key, at which point the program execution will return from runGame(). The event handling
code for the R key is done on lines 238 and 239.
Drawing a Graphical Health Meter
316. def drawHealthMeter(currentHealth):
317. for i in range(currentHealth): # draw red health bars
318. pygame.draw.rect(DISPLAYSURF, RED, (15, 5 + (10 * MAXHEALTH) - i
* 10, 20, 10))
319. for i in range(MAXHEALTH): # draw the white outlines
320. pygame.draw.rect(DISPLAYSURF, WHITE, (15, 5 + (10 * MAXHEALTH) - i
* 10, 20, 10), 1)
To draw the health meter, first the for loop on line 317 draws the filled-in red rectangle for the
amount of health the player has. Then the for loop on line 319 draws an unfilled white rectangle
for all of the possible health the player could have (which is the integer value stored in the
MAXHEALTH constant). Note that the pygame.display.update() function is not called in
drawHealthMeter().
The Same Old terminate() Function
323. def terminate():
324. pygame.quit()
325. sys.exit()

Chapter 8 – Squirrel Eat Squirrel 233
The terminate() function works the same as in the previous game programs.
The Mathematics of the Sine Function
328. def getBounceAmount(currentBounce, bounceRate, bounceHeight):
329. # Returns the number of pixels to offset based on the bounce.
330. # Larger bounceRate means a slower bounce.
331. # Larger bounceHeight means a higher bounce.
332. # currentBounce will always be less than bounceRate
333. return int(math.sin( (math.pi / float(bounceRate)) * currentBounce ) *
bounceHeight)
334.
There is a mathematical function (which is similar to functions in programming in that they both
―return‖ or ―evaluate‖ to a number based on their parameters) called sine (pronounced like ―sign‖
and often abbreviated as ―sin‖). You may have learned about it in math class, but if you haven’t it
will be explained here. Python has this mathematic function as a Python function in the math
module. You can pass an int or float value to math.sin(), and it will return a float value that is
called the ―sine value‖
In the interactive shell, let’s see what math.sin() returns for some values:
>>> import math
>>> math.sin(1)
0.8414709848078965
>>> math.sin(2)
0.90929742682568171
>>> math.sin(3)
0.14112000805986721
>>> math.sin(4)
-0.7568024953079282
>>> math.sin(5)
-0.95892427466313845
It seems really hard to predict what value math.sin() is going to return based on what value
we pass it (which might make you wonder what math.sin() is useful for). But if we graph the
sine values of the integers 1 through 10 on a graph, we would get this:

234 http://inventwithpython.com/pygame
Email questions to the author: [email protected]
You can kind of see a wavy pattern in the values returned by math.sin(). If you figure out the
sine values for more numbers besides integers (for example, 1.5 and 2.5 and so on) and then
connect the dots with lines, you can see this wavy pattern more easily:
In fact, if you kept adding more and more data points to this graph, you would see that the sine
wave looks like this:
-1.5
-1
-0.5
0
0.5
1
1.5
0 2 4 6 8 10 12
mat
h.s
in(a
rg)
arg
Values Returned by math.sin()
-1.5
-1
-0.5
0
0.5
1
1.5
0 0.5 1 1.5 2 2.5 3 3.5 4 4.5 5 5.5 6 6.5 7 7.5 8 8.5 9 9.5 10
mat
h.s
in(a
rg)
arg
Values Returned by math.sin()

Chapter 8 – Squirrel Eat Squirrel 235
Notice that math.sin(0) returns 0, then gradually increases until math.sin(3.14 / 2)
returns 1, then it begins to decrease until math.sin(3.14) returns 0. The number 3.14 is a
special number in mathematics called pi (pronounced the same as delicious ―pie‖). This value is
also stored in the constant variable pi in the math module (which is why line 333 uses the
variable, math.pi), which is technically the float value 3.1415926535897931. Since we
want a wavy-looking bounce for our squirrel, we’ll only pay attention to the return values of
math.sin() for the arguments 0 to 3.14:
Let’s take a look at the return value of getBounceAmount() and figure out what it does
exactly.
333. return int(math.sin( (math.pi / float(bounceRate)) * currentBounce ) *
bounceHeight)
Remember that on line 21 we set the BOUNCERATE constant to 6. This means that our code will
only increment playerObj['bounce'] from 0 to 6 and that we want to split up the range of
floating-point values from 0 to 3.14 into 6 parts, which we can do with simple division: 3.14
/ 6 = 0.5235. Each of the 6 equal parts of the 3.14 length on the graph for the ―sine wave
bounce‖ is 0.5235.
You can see that when playerObj['bounce'] is at 3 (halfway between 0 and 6), the value
passed to the math.sin() call is math.pi / 6 * 3, which is 1.5707 (halfway between 0
and 3.1415). Then math.sin(1.5707) will return 1.0, which is the highest part of the sine
wave (and the highest part of the sine wave happens half way through the wave).
0
0.2
0.4
0.6
0.8
1
1.2
0
0.1
2
0.2
4
0.3
6
0.4
8
0.6
0.7
2
0.8
4
0.9
6
1.0
8
1.2
1.3
2
1.4
4
1.5
6
1.6
8
1.8
1.9
2
2.0
4
2.1
6
2.2
8
2.4
2.5
2
2.6
4
2.7
6
2.8
8 3
3.1
4
mat
h.s
in(a
rg)
arg
Values Returned by math.sin()

236 http://inventwithpython.com/pygame
Email questions to the author: [email protected]
As playerObj['bounce'] gets its value incremented, the getBounceAmount() function
will return values that have the same bounce shape that the sine wave has from 0 to 3.14. If you
want to make the bounce higher, than increase the BOUNCEHEIGHT constant. If you want to
make the bounce slower, than increase the BOUNCERATE constant.
The sine function is a concept from trigonometry mathematics. If you’d like to learn more about
the sine wave, the Wikipedia page has detailed information: http://en.wikipedia.org/wiki/Sine
Backwards Compatibility with Python Version 2 The reason we call float() to convert bounceRate to a floating point number is simply so
that this program will work in Python version 2. In Python version 3, the division operator will
evaluate to a floating point value even if both of the operands are integers, like this:
>>> # Python version 3
...
>>> 10 / 5
2.0
>>> 10 / 4
2.5
>>>
However, in Python version 2, the / division operator will only evaluate to a floating point value
if one of the operands is also a floating point value. If both operands are integers, then Python 2’s
division operator will evaluate to an integer value (rounding down if needed), like this:
>>> # Python version 2
...
>>> 10 / 5
2
>>> 10 / 4
2
>>> 10 / 4.0
2.5
>>> 10.0 / 4
2.5
>>> 10.0 / 4.0
2.5
But if we always convert one of the values to a floating point value with the float() function,
then the division operator will evaluate to a float value no matter which version of Python runs
this source code. Making these changes so that our code works with older versions of software is
called backwards compatibility. It is important to maintain backwards compatibility, because

Chapter 8 – Squirrel Eat Squirrel 237
not everyone will always be running the latest version of software and you want to ensure that the
code you write works with as many computers as possible.
You can’t always make your Python 3 code backwards compatible with Python 2, but if it’s
possible then you should do it. Otherwise, when people with Python 2 try to run your games will
get error messages and think that your program is buggy.
A list of some differences between Python 2 and Python 3 can be found at
http://inventwithpython.com/appendixa.html.
The getRandomVelocity() Function
335. def getRandomVelocity():
336. speed = random.randint(SQUIRRELMINSPEED, SQUIRRELMAXSPEED)
337. if random.randint(0, 1) == 0:
338. return speed
339. else:
340. return -speed
The getRandomVelocity() function is used to randomly determine how fast an enemy
squirrel will move. The range of this velocity is set in the SQUIRRELMINSPEED and
SQUIRRELMAXSPEED constants, but on top of that, the speed is either negative (indicating the
squirrel goes to the left or up) or positive (indicating the squirrel goes to the right or down). There
is a fifty-fifty chance for the random speed to be positive or negative.
Finding a Place to Add New Squirrels and Grass
343. def getRandomOffCameraPos(camerax, cameray, objWidth, objHeight):
344. # create a Rect of the camera view
345. cameraRect = pygame.Rect(camerax, cameray, WINWIDTH, WINHEIGHT)
346. while True:
347. x = random.randint(camerax - WINWIDTH, camerax + (2 * WINWIDTH))
348. y = random.randint(cameray - WINHEIGHT, cameray + (2 * WINHEIGHT))
349. # create a Rect object with the random coordinates and use
colliderect()
350. # to make sure the right edge isn't in the camera view.
351. objRect = pygame.Rect(x, y, objWidth, objHeight)
352. if not objRect.colliderect(cameraRect):
353. return x, y
When a new squirrel or grass object is created in the game world, we want it to be within the
active area (so that it is near the player’s squirrel) but not within the view of the camera (so that it
doesn’t just suddenly pop into existence on the screen). To do this, we create a Rect object that

238 http://inventwithpython.com/pygame
Email questions to the author: [email protected]
represents the area of the camera (using camerax, cameray, WINWIDTH, and WINHEIGHT
constants).
Next, we randomly generate numbers for the XY coordinates that would be within the active area.
The active area’s left and top edge are WINWIDTH and WINHEIGHT pixels to the left and up of
camerax and cameray. So the active area’s left and top edge are at camerax - WINWIDTH
and cameray - WINHEIGHT. The active area’s width and height are also three times the size
of the WINWIDTH and WINHEIGHT, as you can see in this image (where WINWIDTH is set to
640 pixels and WINHEIGHT set to 480 pixels):
This means the right and bottom edges will be at camerax + (2 * WINWIDTH) and
cameray + (2 * WINHEIGHT). Line 352 will check if the random XY coordinates would
collide with the camera view’s Rect object. If not, then those coordinates are returned. If so, then
the while loop on line 346 will keep generating new coordinates until it finds acceptable ones.
Creating Enemy Squirrel Data Structures
356. def makeNewSquirrel(camerax, cameray):
357. sq = {}
358. generalSize = random.randint(5, 25)
359. multiplier = random.randint(1, 3)
360. sq['width'] = (generalSize + random.randint(0, 10)) * multiplier
361. sq['height'] = (generalSize + random.randint(0, 10)) * multiplier
362. sq['x'], sq['y'] = getRandomOffCameraPos(camerax, cameray,
sq['width'], sq['height'])
363. sq['movex'] = getRandomVelocity()
364. sq['movey'] = getRandomVelocity()
Creating enemy squirrel game objects is similar to making the grass game objects. The data for
each enemy squirrel is also stored in a dictionary. The width and height are set to random sizes on
line 360 and 361. The generalSize variable is used so that the width and height of each

Chapter 8 – Squirrel Eat Squirrel 239
squirrel aren’t too different from each other. Otherwise, using completely random numbers for
width and height could give us very tall and skinny squirrels or very short and wide squirrels. The
width and height of the squirrel are this general size with a random number from 0 to 10 added to
it (for slight variation), and then multiplied by the multiplier variable.
The original XY coordinate position of the squirrel will be a random location that the camera
cannot see, to prevent the squirrels from just ―popping‖ into existence on the screen.
The speed and direction are also randomly selected by the getRandomVelocity() function.
Flipping the Squirrel Image
365. if sq['movex'] < 0: # squirrel is facing left
366. sq['surface'] = pygame.transform.scale(L_SQUIR_IMG, (sq['width'],
sq['height']))
367. else: # squirrel is facing right
368. sq['surface'] = pygame.transform.scale(R_SQUIR_IMG, (sq['width'],
sq['height']))
369. sq['bounce'] = 0
370. sq['bouncerate'] = random.randint(10, 18)
371. sq['bounceheight'] = random.randint(10, 50)
372. return sq
The L_SQUIR_IMG and R_SQUIR_IMG constants contain Surface objects with left-facing and
right-facing squirrel images on them. New Surface objects will be made using the
pygame.transform.scale() function to match the squirrel’s width and height (stored in
sq['width'] and sq['height'] respectively).
After that, the three bounce-related values are randomly generated (except for sq['bounce']
which is 0 because the squirrel always starts at the beginning of the bounce) and the dictionary is
returned on line 372.
Creating Grass Data Structures
375. def makeNewGrass(camerax, cameray):
376. gr = {}
377. gr['grassImage'] = random.randint(0, len(GRASSIMAGES) - 1)
378. gr['width'] = GRASSIMAGES[0].get_width()
379. gr['height'] = GRASSIMAGES[0].get_height()
380. gr['x'], gr['y'] = getRandomOffCameraPos(camerax, cameray,
gr['width'], gr['height'])
381. gr['rect'] = pygame.Rect( (gr['x'], gr['y'], gr['width'],
gr['height']) )
382. return gr

240 http://inventwithpython.com/pygame
Email questions to the author: [email protected]
The grass game objects are dictionaries with the usual 'x', 'y', 'width', 'height', and
'rect' keys but also a 'grassImage' key which is a number from 0 to one less than the
length of the GRASSIMAGES list. This number will determine what image the grass game object
has. For example, if the value of the grass object’s 'grassImage' key is 3, then it will use the
Surface object stored at GRASSIMAGES[3] for its image.
Checking if Outside the Active Area
385. def isOutsideActiveArea(camerax, cameray, obj):
386. # Return False if camerax and cameray are more than
387. # a half-window length beyond the edge of the window.
388. boundsLeftEdge = camerax - WINWIDTH
389. boundsTopEdge = cameray - WINHEIGHT
390. boundsRect = pygame.Rect(boundsLeftEdge, boundsTopEdge, WINWIDTH * 3,
WINHEIGHT * 3)
391. objRect = pygame.Rect(obj['x'], obj['y'], obj['width'], obj['height'])
392. return not boundsRect.colliderect(objRect)
The isOutsideActiveArea() will return True if the object you pass it is outside of the
―active area‖ that is dictated by the camerax and cameray parameters. Remember that the
active area is an area around the camera view the size of the camera view (which has a width and
height set by WINWIDTH and WINHEIGHT), like this:
We can create a Rect object that represents the active area by passing camerax - WINWIDTH
for the left edge value and cameray - WINHEIGHT for the top edge value, and then
WINWIDTH * 3 and WINHEIGHT * 3 for the width and height. Once we have the active area
represented as a Rect object, we can use the colliderect() method to determine if the object
in the obj parameter is collides with (that is, is inside of) the active area Rect object.

Chapter 8 – Squirrel Eat Squirrel 241
Since the player squirrel, enemy squirrel and grass objects all have 'x', 'y', 'width' and
'height' keys, the isOutsideActiveArea() code can work with any type of those game
objects.
395. if __name__ == '__main__':
396. main()
Finally, after all the functions have been defined, the program will run the main() function and
start the game.
Summary Squirrel Eat Squirrel was our first game to have multiple enemies moving around the board at
once. The key to having several enemies was using a dictionary value with identical keys for each
enemy squirrel, so that the same code could be run on each of them during an iteration through
the game loop.
The concept of the camera was also introduced. Cameras weren’t needed for our previous games
because the entire game world fit onto one screen. However, when you make your own games
that involve a player moving around a large game world, you will need code to handle converting
between the game world’s coordinate system and the screen’s pixel coordinate system.
Finally, the mathematical sine function was introduced to give realistic squirrel hops (no matter
how tall or long each hop was). You don’t need to know a lot of math to do programming. In
most cases, just knowing addition, multiplication, and negative numbers is fine. However, if you
study mathematics, you’ll often find several uses for math to make your games cooler.
For additional programming practice, you can download buggy versions of Squirrel Eat Squirrel
from http://invpy.com/buggy/squirrel and try to figure out how to fix the bugs.

242 http://inventwithpython.com/pygame
Email questions to the author: [email protected]
CHAPTER 9 – STAR PUSHER
How to Play Star Pusher Star Pusher is a Sokoban or ―Box Pusher‖ clone. The player is in a room with several stars. There
are star marks on the grounds of some of the tile sprites in the room. The player must figure out
how to push the stars on top of the tiles with star marks. The player cannot push a star if there is a
wall or another star behind it. The player cannot pull stars, so if a star gets pushed into a corner,
the player will have to restart the level. When all of the stars have been pushed onto star-marked
floor tiles, the level is complete and the next level starts.
Each level is made up of a 2D grid of tile images. Tile sprites are images of the same size that
can be placed next to each other to form more complex images. With a few floor and wall tiles,
we can create levels of many interesting shapes and sizes.
The level files are not included in the source code. Instead, you can either create the level files
yourself or download them. A level file with 201 levels can be downloaded from
http://invpy.com/starPusherLevels.txt. When you run the Star Pusher program, make sure that this
level file is in the same folder as the starpusher.py file. Otherwise you will get this error message:
AssertionError: Cannot find the level file: starPusherLevels.txt
The level designs were originally made David W. Skinner. You can download more puzzles from
his website at http://users.bentonrea.com/~sasquatch/sokoban/.
Source Code to Star Pusher This source code can be downloaded from http://invpy.com/starpusher.py. If you get any error
messages, look at the line number that is mentioned in the error message and check your code for
any typos. You can also copy and paste your code into the web form at

Chapter 9 – Star Pusher 243
http://invpy.com/diff/starpusher to see if the differences between your code and the code in the
book.
The level file can be downloaded from http://invpy.com/starPusherLevels.txt. The tiles can be
downloaded from http://invpy.com/starPusherImages.zip.
Also, just like the squirrel, grass, and enemy ―objects‖ in the Squirrel Eat Squirrel game, when I
say ―map objects‖, ―game state objects‖, or ―level objects‖ in this chapter, I do not mean objects
in the Object-Oriented Programming sense. These ―objects‖ are really just dictionary values, but
it is easier to refer to them as objects since they represent things in the game world.
1. # Star Pusher (a Sokoban clone)
2. # By Al Sweigart [email protected]
3. # http://inventwithpython.com/pygame
4. # Creative Commons BY-NC-SA 3.0 US
5.
6. import random, sys, copy, os, pygame
7. from pygame.locals import *
8.
9. FPS = 30 # frames per second to update the screen
10. WINWIDTH = 800 # width of the program's window, in pixels
11. WINHEIGHT = 600 # height in pixels
12. HALF_WINWIDTH = int(WINWIDTH / 2)
13. HALF_WINHEIGHT = int(WINHEIGHT / 2)
14.
15. # The total width and height of each tile in pixels.
16. TILEWIDTH = 50
17. TILEHEIGHT = 85
18. TILEFLOORHEIGHT = 45
19.
20. CAM_MOVE_SPEED = 5 # how many pixels per frame the camera moves
21.
22. # The percentage of outdoor tiles that have additional
23. # decoration on them, such as a tree or rock.
24. OUTSIDE_DECORATION_PCT = 20
25.
26. BRIGHTBLUE = ( 0, 170, 255)
27. WHITE = (255, 255, 255)
28. BGCOLOR = BRIGHTBLUE
29. TEXTCOLOR = WHITE
30.
31. UP = 'up'
32. DOWN = 'down'
33. LEFT = 'left'
34. RIGHT = 'right'

244 http://inventwithpython.com/pygame
Email questions to the author: [email protected]
35.
36.
37. def main():
38. global FPSCLOCK, DISPLAYSURF, IMAGESDICT, TILEMAPPING,
OUTSIDEDECOMAPPING, BASICFONT, PLAYERIMAGES, currentImage
39.
40. # Pygame initialization and basic set up of the global variables.
41. pygame.init()
42. FPSCLOCK = pygame.time.Clock()
43.
44. # Because the Surface object stored in DISPLAYSURF was returned
45. # from the pygame.display.set_mode() function, this is the
46. # Surface object that is drawn to the actual computer screen
47. # when pygame.display.update() is called.
48. DISPLAYSURF = pygame.display.set_mode((WINWIDTH, WINHEIGHT))
49.
50. pygame.display.set_caption('Star Pusher')
51. BASICFONT = pygame.font.Font('freesansbold.ttf', 18)
52.
53. # A global dict value that will contain all the Pygame
54. # Surface objects returned by pygame.image.load().
55. IMAGESDICT = {'uncovered goal': pygame.image.load('RedSelector.png'),
56. 'covered goal': pygame.image.load('Selector.png'),
57. 'star': pygame.image.load('Star.png'),
58. 'corner': pygame.image.load('Wall Block Tall.png'),
59. 'wall': pygame.image.load('Wood Block Tall.png'),
60. 'inside floor': pygame.image.load('Plain Block.png'),
61. 'outside floor': pygame.image.load('Grass Block.png'),
62. 'title': pygame.image.load('star_title.png'),
63. 'solved': pygame.image.load('star_solved.png'),
64. 'princess': pygame.image.load('princess.png'),
65. 'boy': pygame.image.load('boy.png'),
66. 'catgirl': pygame.image.load('catgirl.png'),
67. 'horngirl': pygame.image.load('horngirl.png'),
68. 'pinkgirl': pygame.image.load('pinkgirl.png'),
69. 'rock': pygame.image.load('Rock.png'),
70. 'short tree': pygame.image.load('Tree_Short.png'),
71. 'tall tree': pygame.image.load('Tree_Tall.png'),
72. 'ugly tree': pygame.image.load('Tree_Ugly.png')}
73.
74. # These dict values are global, and map the character that appears
75. # in the level file to the Surface object it represents.
76. TILEMAPPING = {'x': IMAGESDICT['corner'],
77. '#': IMAGESDICT['wall'],
78. 'o': IMAGESDICT['inside floor'],
79. ' ': IMAGESDICT['outside floor']}

Chapter 9 – Star Pusher 245
80. OUTSIDEDECOMAPPING = {'1': IMAGESDICT['rock'],
81. '2': IMAGESDICT['short tree'],
82. '3': IMAGESDICT['tall tree'],
83. '4': IMAGESDICT['ugly tree']}
84.
85. # PLAYERIMAGES is a list of all possible characters the player can be.
86. # currentImage is the index of the player's current player image.
87. currentImage = 0
88. PLAYERIMAGES = [IMAGESDICT['princess'],
89. IMAGESDICT['boy'],
90. IMAGESDICT['catgirl'],
91. IMAGESDICT['horngirl'],
92. IMAGESDICT['pinkgirl']]
93.
94. startScreen() # show the title screen until the user presses a key
95.
96. # Read in the levels from the text file. See the readLevelsFile() for
97. # details on the format of this file and how to make your own levels.
98. levels = readLevelsFile('starPusherLevels.txt')
99. currentLevelIndex = 0
100.
101. # The main game loop. This loop runs a single level, when the user
102. # finishes that level, the next/previous level is loaded.
103. while True: # main game loop
104. # Run the level to actually start playing the game:
105. result = runLevel(levels, currentLevelIndex)
106.
107. if result in ('solved', 'next'):
108. # Go to the next level.
109. currentLevelIndex += 1
110. if currentLevelIndex >= len(levels):
111. # If there are no more levels, go back to the first one.
112. currentLevelIndex = 0
113. elif result == 'back':
114. # Go to the previous level.
115. currentLevelIndex -= 1
116. if currentLevelIndex < 0:
117. # If there are no previous levels, go to the last one.
118. currentLevelIndex = len(levels)-1
119. elif result == 'reset':
120. pass # Do nothing. Loop re-calls runLevel() to reset the level
121.
122.
123. def runLevel(levels, levelNum):
124. global currentImage
125. levelObj = levels[levelnum]
246 http://inventwithpython.com/pygame
Email questions to the author: [email protected]
126. mapObj = decorateMap(levelObj['mapObj'],
levelObj['startState']['player'])
127. gameStateObj = copy.deepcopy(levelObj['startState'])
128. mapNeedsRedraw = True # set to True to call drawMap()
129. levelSurf = BASICFONT.render('Level %s of %s' % (levelObj['levelNum']
+ 1, totalNumOfLevels), 1, TEXTCOLOR)
130. levelRect = levelSurf.get_rect()
131. levelRect.bottomleft = (20, WINHEIGHT - 35)
132. mapWidth = len(mapObj) * TILEWIDTH
133. mapHeight = (len(mapObj[0]) - 1) * (TILEHEIGHT - TILEFLOORHEIGHT) +
TILEHEIGHT
134. MAX_CAM_X_PAN = abs(HALF_WINHEIGHT - int(mapHeight / 2)) + TILEWIDTH
135. MAX_CAM_Y_PAN = abs(HALF_WINWIDTH - int(mapWidth / 2)) + TILEHEIGHT
136.
137. levelIsComplete = False
138. # Track how much the camera has moved:
139. cameraOffsetX = 0
140. cameraOffsetY = 0
141. # Track if the keys to move the camera are being held down:
142. cameraUp = False
143. cameraDown = False
144. cameraLeft = False
145. cameraRight = False
146.
147. while True: # main game loop
148. # Reset these variables:
149. playerMoveTo = None
150. keyPressed = False
151.
152. for event in pygame.event.get(): # event handling loop
153. if event.type == QUIT:
154. # Player clicked the "X" at the corner of the window.
155. terminate()
156.
157. elif event.type == KEYDOWN:
158. # Handle key presses
159. keyPressed = True
160. if event.key == K_LEFT:
161. playerMoveTo = LEFT
162. elif event.key == K_RIGHT:
163. playerMoveTo = RIGHT
164. elif event.key == K_UP:
165. playerMoveTo = UP
166. elif event.key == K_DOWN:
167. playerMoveTo = DOWN
168.

Chapter 9 – Star Pusher 247
169. # Set the camera move mode.
170. elif event.key == K_a:
171. cameraLeft = True
172. elif event.key == K_d:
173. cameraRight = True
174. elif event.key == K_w:
175. cameraUp = True
176. elif event.key == K_s:
177. cameraDown = True
178.
179. elif event.key == K_n:
180. return 'next'
181. elif event.key == K_b:
182. return 'back'
183.
184. elif event.key == K_ESCAPE:
185. terminate() # Esc key quits.
186. elif event.key == K_BACKSPACE:
187. return 'reset' # Reset the level.
188. elif event.key == K_p:
189. # Change the player image to the next one.
190. currentImage += 1
191. if currentImage >= len(PLAYERIMAGES):
192. # After the last player image, use the first one.
193. currentImage = 0
194. mapNeedsRedraw = True
195.
196. elif event.type == KEYUP:
197. # Unset the camera move mode.
198. if event.key == K_a:
199. cameraLeft = False
200. elif event.key == K_d:
201. cameraRight = False
202. elif event.key == K_w:
203. cameraUp = False
204. elif event.key == K_s:
205. cameraDown = False
206.
207. if playerMoveTo != None and not levelIsComplete:
208. # If the player pushed a key to move, make the move
209. # (if possible) and push any stars that are pushable.
210. moved = makeMove(mapObj, gameStateObj, playerMoveTo)
211.
212. if moved:
213. # increment the step counter.
214. gameStateObj['stepCounter'] += 1

248 http://inventwithpython.com/pygame
Email questions to the author: [email protected]
215. mapNeedsRedraw = True
216.
217. if isLevelFinished(levelObj, gameStateObj):
218. # level is solved, we should show the "Solved!" image.
219. levelIsComplete = True
220. keyPressed = False
221.
222. DISPLAYSURF.fill(BGCOLOR)
223.
224. if mapNeedsRedraw:
225. mapSurf = drawMap(mapObj, gameStateObj, levelObj['goals'])
226. mapNeedsRedraw = False
227.
228. if cameraUp and cameraOffsetY < MAX_CAM_X_PAN:
229. cameraOffsetY += CAM_MOVE_SPEED
230. elif cameraDown and cameraOffsetY > -MAX_CAM_X_PAN:
231. cameraOffsetY -= CAM_MOVE_SPEED
232. if cameraLeft and cameraOffsetX < MAX_CAM_Y_PAN:
233. cameraOffsetX += CAM_MOVE_SPEED
234. elif cameraRight and cameraOffsetX > -MAX_CAM_Y_PAN:
235. cameraOffsetX -= CAM_MOVE_SPEED
236.
237. # Adjust mapSurf's Rect object based on the camera offset.
238. mapSurfRect = mapSurf.get_rect()
239. mapSurfRect.center = (HALF_WINWIDTH + cameraOffsetX,
HALF_WINHEIGHT + cameraOffsetY)
240.
241. # Draw mapSurf to the DISPLAYSURF Surface object.
242. DISPLAYSURF.blit(mapSurf, mapSurfRect)
243.
244. DISPLAYSURF.blit(levelSurf, levelRect)
245. stepSurf = BASICFONT.render('Steps: %s' %
(gameStateObj['stepCounter']), 1, TEXTCOLOR)
246. stepRect = stepSurf.get_rect()
247. stepRect.bottomleft = (20, WINHEIGHT - 10)
248. DISPLAYSURF.blit(stepSurf, stepRect)
249.
250. if levelIsComplete:
251. # is solved, show the "Solved!" image until the player
252. # has pressed a key.
253. solvedRect = IMAGESDICT['solved'].get_rect()
254. solvedRect.center = (HALF_WINWIDTH, HALF_WINHEIGHT)
255. DISPLAYSURF.blit(IMAGESDICT['solved'], solvedRect)
256.
257. if keyPressed:
258. return 'solved'

Chapter 9 – Star Pusher 249
259.
260. pygame.display.update() # draw DISPLAYSURF to the screen.
261. FPSCLOCK.tick()
262.
263.
274. def decorateMap(mapObj, startxy):
275. """Makes a copy of the given map object and modifies it.
276. Here is what is done to it:
277. * Walls that are corners are turned into corner pieces.
278. * The outside/inside floor tile distinction is made.
279. * Tree/rock decorations are randomly added to the outside tiles.
280.
281. Returns the decorated map object."""
282.
283. startx, starty = startxy # Syntactic sugar
284.
285. # Copy the map object so we don't modify the original passed
286. mapObjCopy = copy.deepcopy(mapObj)
287.
288. # Remove the non-wall characters from the map data
289. for x in range(len(mapObjCopy)):
290. for y in range(len(mapObjCopy[0])):
291. if mapObjCopy[x][y] in ('$', '.', '@', '+', '*'):
292. mapObjCopy[x][y] = ' '
293.
294. # Flood fill to determine inside/outside floor tiles.
295. floodFill(mapObjCopy, startx, starty, ' ', 'o')
296.
297. # Convert the adjoined walls into corner tiles.
298. for x in range(len(mapObjCopy)):
299. for y in range(len(mapObjCopy[0])):
300.
301. if mapObjCopy[x][y] == '#':
302. if (isWall(mapObjCopy, x, y-1) and isWall(mapObjCopy, x+1,
y)) or \
303. (isWall(mapObjCopy, x+1, y) and isWall(mapObjCopy, x,
y+1)) or \
304. (isWall(mapObjCopy, x, y+1) and isWall(mapObjCopy, x-1,
y)) or \
305. (isWall(mapObjCopy, x-1, y) and isWall(mapObjCopy, x,
y-1)):
306. mapObjCopy[x][y] = 'x'
307.
308. elif mapObjCopy[x][y] == ' ' and random.randint(0, 99) <
OUTSIDE_DECORATION_PCT:

250 http://inventwithpython.com/pygame
Email questions to the author: [email protected]
309. mapObjCopy[x][y] =
random.choice(list(OUTSIDEDECOMAPPING.keys()))
310.
311. return mapObjCopy
312.
313.
314. def isBlocked(mapObj, gameStateObj, x, y):
315. """Returns True if the (x, y) position on the map is
316. blocked by a wall or star, otherwise return False."""
317.
318. if isWall(mapObj, x, y):
319. return True
320.
321. elif x < 0 or x >= len(mapObj) or y < 0 or y >= len(mapObj[x]):
322. return True # x and y aren't actually on the map.
323.
324. elif (x, y) in gameStateObj['stars']:
325. return True # a star is blocking
326.
327. return False
328.
329.
330. def makeMove(mapObj, gameStateObj, playerMoveTo):
331. """Given a map and game state object, see if it is possible for the
332. player to make the given move. If it is, then change the player's
333. position (and the position of any pushed star). If not, do nothing.
334.
335. Returns True if the player moved, otherwise False."""
336.
337. # Make sure the player can move in the direction they want.
338. playerx, playery = gameStateObj['player']
339.
340. # This variable is "syntactic sugar". Typing "stars" is more
341. # readable than typing "gameStateObj['stars']" in our code.
342. stars = gameStateObj['stars']
343.
344. # The code for handling each of the directions is so similar aside
345. # from adding or subtracting 1 to the x/y coordinates. We can
346. # simplify it by using the xOffset and yOffset variables.
347. if playerMoveTo == UP:
348. xOffset = 0
349. yOffset = -1
350. elif playerMoveTo == RIGHT:
351. xOffset = 1
352. yOffset = 0
353. elif playerMoveTo == DOWN:

Chapter 9 – Star Pusher 251
354. xOffset = 0
355. yOffset = 1
356. elif playerMoveTo == LEFT:
357. xOffset = -1
358. yOffset = 0
359.
360. # See if the player can move in that direction.
361. if isWall(mapObj, playerx + xOffset, playery + yOffset):
362. return False
363. else:
364. if (playerx + xOffset, playery + yOffset) in stars:
365. # There is a star in the way, see if the player can push it.
366. if not isBlocked(mapObj, gameStateObj, playerx + (xOffset*2),
playery + (yOffset*2)):
367. # Move the star.
368. ind = stars.index((playerx + xOffset, playery + yOffset))
369. stars[ind] = (stars[ind][0] + xOffset, stars[ind][1] +
yOffset)
370. else:
371. return False
372. # Move the player upwards.
373. gameStateObj['player'] = (playerx + xOffset, playery + yOffset)
374. return True
375.
376.
377. def startScreen():
378. """Display the start screen (which has the title and instructions)
379. until the player presses a key. Returns None."""
380.
381. # Position the title image.
382. titleRect = IMAGESDICT['title'].get_rect()
383. topCoord = 50 # topCoord tracks where to position the top of the text
384. titleRect.top = topCoord
385. titleRect.centerx = HALF_WINWIDTH
386. topCoord += titleRect.height
387.
388. # Unfortunately, Pygame's font & text system only shows one line at
389. # a time, so we can't use strings with \n newline characters in them.
390. # So we will use a list with each line in it.
391. instructionText = ['Push the stars over the marks.',
392. 'Arrow keys to move, WASD for camera control, P to
change character.',
393. 'Backspace to reset level, Esc to quit.',
394. 'N for next level, B to go back a level.']
395.
396. # Start with drawing a blank color to the entire window:

252 http://inventwithpython.com/pygame
Email questions to the author: [email protected]
397. DISPLAYSURF.fill(BGCOLOR)
398.
399. # Draw the title image to the window:
400. DISPLAYSURF.blit(IMAGESDICT['title'], titleRect)
401.
402. # Position and draw the text.
403. for i in range(len(instructionText)):
404. instSurf = BASICFONT.render(instructionText[i], 1, TEXTCOLOR)
405. instRect = instSurf.get_rect()
406. topCoord += 10 # 10 pixels will go in between each line of text.
407. instRect.top = topCoord
408. instRect.centerx = HALF_WINWIDTH
409. topCoord += instRect.height # Adjust for the height of the line.
410. DISPLAYSURF.blit(instSurf, instRect)
411.
412. while True: # Main loop for the start screen.
413. for event in pygame.event.get():
414. if event.type == QUIT:
415. terminate()
416. elif event.type == KEYDOWN:
417. if event.key == K_ESCAPE:
418. terminate()
419. return # user has pressed a key, so return.
420.
421. # Display the DISPLAYSURF contents to the actual screen.
422. pygame.display.update()
423. FPSCLOCK.tick()
424.
425.
426. def readLevelsFile(filename):
427. assert os.path.exists(filename), 'Cannot find the level file: %s' %
(filename)
428. mapFile = open(filename, 'r')
429. # Each level must end with a blank line
430. content = mapFile.readlines() + ['\r\n']
431. mapFile.close()
432.
433. levels = [] # Will contain a list of level objects.
434. levelNum = 0
435. mapTextLines = [] # contains the lines for a single level's map.
436. mapObj = [] # the map object made from the data in mapTextLines
437. for lineNum in range(len(content)):
438. # Process each line that was in the level file.
439. line = content[lineNum].rstrip('\r\n')
440.
441. if ';' in line:

Chapter 9 – Star Pusher 253
442. # Ignore the ; lines, they're comments in the level file.
443. line = line[:line.find(';')]
444.
445. if line != '':
446. # This line is part of the map.
447. mapTextLines.append(line)
448. elif line == '' and len(mapTextLines) > 0:
449. # A blank line indicates the end of a level's map in the file.
450. # Convert the text in mapTextLines into a level object.
451.
452. # Find the longest row in the map.
453. maxWidth = -1
454. for i in range(len(mapTextLines)):
455. if len(mapTextLines[i]) > maxWidth:
456. maxWidth = len(mapTextLines[i])
457. # Add spaces to the ends of the shorter rows. This
458. # ensures the map will be rectangular.
459. for i in range(len(mapTextLines)):
460. mapTextLines[i] += ' ' * (maxWidth - len(mapTextLines[i]))
461.
462. # Convert mapTextLines to a map object.
463. for x in range(len(mapTextLines[0])):
464. mapObj.append([])
465. for y in range(len(mapTextLines)):
466. for x in range(maxWidth):
467. mapObj[x].append(mapTextLines[y][x])
468.
469. # Loop through the spaces in the map and find the @, ., and $
470. # characters for the starting game state.
471. startx = None # The x and y for the player's starting position
472. starty = None
473. goals = [] # list of (x, y) tuples for each goal.
474. stars = [] # list of (x, y) for each star's starting position.
475. for x in range(maxWidth):
476. for y in range(len(mapObj[x])):
477. if mapObj[x][y] in ('@', '+'):
478. # '@' is player, '+' is player & goal
479. startx = x
480. starty = y
481. if mapObj[x][y] in ('.', '+', '*'):
482. # '.' is goal, '*' is star & goal
483. goals.append((x, y))
484. if mapObj[x][y] in ('$', '*'):
485. # '$' is star
486. stars.append((x, y))
487.
254 http://inventwithpython.com/pygame
Email questions to the author: [email protected]
488. # Basic level design sanity checks:
489. assert startx != None and starty != None, 'Level %s (around
line %s) in %s is missing a "@" or "+" to mark the start point.' % (levelNum+1,
lineNum, filename)
490. assert len(goals) > 0, 'Level %s (around line %s) in %s must
have at least one goal.' % (levelNum+1, lineNum, filename)
491. assert len(stars) >= len(goals), 'Level %s (around line %s) in
%s is impossible to solve. It has %s goals but only %s stars.' % (levelNum+1,
lineNum, filename, len(goals), len(stars))
492.
493. # Create level object and starting game state object.
494. gameStateObj = {'player': (startx, starty),
495. 'stepCounter': 0,
496. 'stars': stars}
497. levelObj = {'width': maxWidth,
498. 'height': len(mapObj),
499. 'mapObj': mapObj,
500. 'goals': goals,
501. 'startState': gameStateObj}
502.
503. levels.append(levelObj)
504.
505. # Reset the variables for reading the next map.
506. mapTextLines = []
507. mapObj = []
508. gameStateObj = {}
509. levelNum += 1
510. return levels
511.
512.
513. def floodFill(mapObj, x, y, oldCharacter, newCharacter):
514. """Changes any values matching oldCharacter on the map object to
515. newCharacter at the (x, y) position, and does the same for the
516. positions to the left, right, down, and up of (x, y), recursively."""
517.
518. # In this game, the flood fill algorithm creates the inside/outside
519. # floor distinction. This is a "recursive" function.
520. # For more info on the Flood Fill algorithm, see:
521. # http://en.wikipedia.org/wiki/Flood_fill
522. if mapObj[x][y] == oldCharacter:
523. mapObj[x][y] = newCharacter
524.
525. if x < len(mapObj) - 1 and mapObj[x+1][y] == oldCharacter:
526. floodFill(mapObj, x+1, y, oldCharacter, newCharacter) # call right
527. if x > 0 and mapObj[x-1][y] == oldCharacter:

Chapter 9 – Star Pusher 255
528. floodFill(mapObj, x-1, y, oldCharacter, newCharacter) # call left
529. if y < len(mapObj[x]) - 1 and mapObj[x][y+1] == oldCharacter:
530. floodFill(mapObj, x, y+1, oldCharacter, newCharacter) # call down
531. if y > 0 and mapObj[x][y-1] == oldCharacter:
532. floodFill(mapObj, x, y-1, oldCharacter, newCharacter) # call up
533.
534.
535. def drawMap(mapObj, gameStateObj, goals):
536. """Draws the map to a Surface object, including the player and
537. stars. This function does not call pygame.display.update(), nor
538. does it draw the "Level" and "Steps" text in the corner."""
539.
540. # mapSurf will be the single Surface object that the tiles are drawn
541. # on, so that it is easy to position the entire map on the DISPLAYSURF
542. # Surface object. First, the width and height must be calculated.
543. mapSurfWidth = len(mapObj) * TILEWIDTH
544. mapSurfHeight = (len(mapObj[0]) - 1) * (TILEHEIGHT - TILEFLOORHEIGHT)
+ TILEHEIGHT
545. mapSurf = pygame.Surface((mapSurfWidth, mapSurfHeight))
546. mapSurf.fill(BGCOLOR) # start with a blank color on the surface.
547.
548. # Draw the tile sprites onto this surface.
549. for x in range(len(mapObj)):
550. for y in range(len(mapObj[x])):
551. spaceRect = pygame.Rect((x * TILEWIDTH, y * (TILEHEIGHT -
TILEFLOORHEIGHT), TILEWIDTH, TILEHEIGHT))
552. if mapObj[x][y] in TILEMAPPING:
553. baseTile = TILEMAPPING[mapObj[x][y]]
554. elif mapObj[x][y] in OUTSIDEDECOMAPPING:
555. baseTile = TILEMAPPING[' ']
556.
557. # First draw the base ground/wall tile.
558. mapSurf.blit(baseTile, spaceRect)
559.
560. if mapObj[x][y] in OUTSIDEDECOMAPPING:
561. # Draw any tree/rock decorations that are on this tile.
562. mapSurf.blit(OUTSIDEDECOMAPPING[mapObj[x][y]], spaceRect)
563. elif (x, y) in gameStateObj['stars']:
564. if (x, y) in goals:
565. # A goal AND star are on this space, draw goal first.
566. mapSurf.blit(IMAGESDICT['covered goal'], spaceRect)
567. # Then draw the star sprite.
568. mapSurf.blit(IMAGESDICT['star'], spaceRect)
569. elif (x, y) in goals:
570. # Draw a goal without a star on it.
571. mapSurf.blit(IMAGESDICT['uncovered goal'], spaceRect)

256 http://inventwithpython.com/pygame
Email questions to the author: [email protected]
572.
573. # Last draw the player on the board.
574. if (x, y) == gameStateObj['player']:
575. # Note: The value "currentImage" refers
576. # to a key in "PLAYERIMAGES" which has the
577. # specific player image we want to show.
578. mapSurf.blit(PLAYERIMAGES[currentImage], spaceRect)
579.
580. return mapSurf
581.
582.
583. def isLevelFinished(levelObj, gameStateObj):
584. """Returns True if all the goals have stars in them."""
585. for goal in levelObj['goals']:
586. if goal not in gameStateObj['stars']:
587. # Found a space with a goal but no star on it.
588. return False
589. return True
590.
591.
592. def terminate():
593. pygame.quit()
594. sys.exit()
595.
596.
597. if __name__ == '__main__':
598. main()
The Initial Setup
1. # Star Pusher (a Sokoban clone)
2. # By Al Sweigart [email protected]
3. # http://inventwithpython.com/pygame
4. # Creative Commons BY-NC-SA 3.0 US
5.
6. import random, sys, copy, os, pygame
7. from pygame.locals import *
8.
9. FPS = 30 # frames per second to update the screen
10. WINWIDTH = 800 # width of the program's window, in pixels
11. WINHEIGHT = 600 # height in pixels
12. HALF_WINWIDTH = int(WINWIDTH / 2)
13. HALF_WINHEIGHT = int(WINHEIGHT / 2)
14.
15. # The total width and height of each tile in pixels.
16. TILEWIDTH = 50

Chapter 9 – Star Pusher 257
17. TILEHEIGHT = 85
18. TILEFLOORHEIGHT = 45
19.
20. CAM_MOVE_SPEED = 5 # how many pixels per frame the camera moves
21.
22. # The percentage of outdoor tiles that have additional
23. # decoration on them, such as a tree or rock.
24. OUTSIDE_DECORATION_PCT = 20
25.
26. BRIGHTBLUE = ( 0, 170, 255)
27. WHITE = (255, 255, 255)
28. BGCOLOR = BRIGHTBLUE
29. TEXTCOLOR = WHITE
30.
31. UP = 'up'
32. DOWN = 'down'
33. LEFT = 'left'
34. RIGHT = 'right'
These constants are used in various parts of the program. The TILEWIDTH and TILEHEIGHT
variables show that each of the tile images are 50 pixels wide and 85 pixels tall. However, these
tiles overlap with each other when drawn on the screen. (This is explained later.) The
TILEFLOORHEIGHT refers to the fact that the part of the tile that represents the floor is 45
pixels tall. Here is a diagram of the plain floor image:
The grassy tiles outside of the level’s room will sometimes have extra decorations added to them
(such as trees or rocks). The OUTSIDE_DECORATION_PCT constant shows what percentage of
these tiles will randomly have these decorations.
37. def main():
38. global FPSCLOCK, DISPLAYSURF, IMAGESDICT, TILEMAPPING,
OUTSIDEDECOMAPPING, BASICFONT, PLAYERIMAGES, currentImage
39.
40. # Pygame initialization and basic set up of the global variables.
41. pygame.init()
42. FPSCLOCK = pygame.time.Clock()
43.
44. # Because the Surface object stored in DISPLAYSURF was returned

258 http://inventwithpython.com/pygame
Email questions to the author: [email protected]
45. # from the pygame.display.set_mode() function, this is the
46. # Surface object that is drawn to the actual computer screen
47. # when pygame.display.update() is called.
48. DISPLAYSURF = pygame.display.set_mode((WINWIDTH, WINHEIGHT))
49.
50. pygame.display.set_caption('Star Pusher')
51. BASICFONT = pygame.font.Font('freesansbold.ttf', 18)
This is the usual Pygame setup that happens at the beginning of the program.
53. # A global dict value that will contain all the Pygame
54. # Surface objects returned by pygame.image.load().
55. IMAGESDICT = {'uncovered goal': pygame.image.load('RedSelector.png'),
56. 'covered goal': pygame.image.load('Selector.png'),
57. 'star': pygame.image.load('Star.png'),
58. 'corner': pygame.image.load('Wall Block Tall.png'),
59. 'wall': pygame.image.load('Wood Block Tall.png'),
60. 'inside floor': pygame.image.load('Plain Block.png'),
61. 'outside floor': pygame.image.load('Grass Block.png'),
62. 'title': pygame.image.load('star_title.png'),
63. 'solved': pygame.image.load('star_solved.png'),
64. 'princess': pygame.image.load('princess.png'),
65. 'boy': pygame.image.load('boy.png'),
66. 'catgirl': pygame.image.load('catgirl.png'),
67. 'horngirl': pygame.image.load('horngirl.png'),
68. 'pinkgirl': pygame.image.load('pinkgirl.png'),
69. 'rock': pygame.image.load('Rock.png'),
70. 'short tree': pygame.image.load('Tree_Short.png'),
71. 'tall tree': pygame.image.load('Tree_Tall.png'),
72. 'ugly tree': pygame.image.load('Tree_Ugly.png')}
The IMAGESDICT is a dictionary where all of the loaded images are stored. This makes it easier
to use in other functions, since only the IMAGESDICT variable needs to be made global. If we
stored each of these images in separate variables, then all 18 variables (for the 18 images used in
this game) would need to be made global. A dictionary containing all of the Surface objects with
the images is easier to handle.
74. # These dict values are global, and map the character that appears
75. # in the level file to the Surface object it represents.
76. TILEMAPPING = {'x': IMAGESDICT['corner'],
77. '#': IMAGESDICT['wall'],
78. 'o': IMAGESDICT['inside floor'],
79. ' ': IMAGESDICT['outside floor']}

Chapter 9 – Star Pusher 259
The data structure for the map is just a 2D list of single character strings. The TILEMAPPING
dictionary links the characters used in this map data structure to the images that they represent.
(This will become more clear in the drawMap() function’s explanation.)
80. OUTSIDEDECOMAPPING = {'1': IMAGESDICT['rock'],
81. '2': IMAGESDICT['short tree'],
82. '3': IMAGESDICT['tall tree'],
83. '4': IMAGESDICT['ugly tree']}
The OUTSIDEDECOMAPPING is also a dictionary that links the characters used in the map data
structure to images that were loaded. The ―outside decoration‖ images are drawn on top of the
outdoor grassy tile.
85. # PLAYERIMAGES is a list of all possible characters the player can be.
86. # currentImage is the index of the player's current player image.
87. currentImage = 0
88. PLAYERIMAGES = [IMAGESDICT['princess'],
89. IMAGESDICT['boy'],
90. IMAGESDICT['catgirl'],
91. IMAGESDICT['horngirl'],
92. IMAGESDICT['pinkgirl']]
The PLAYERIMAGES list stores the images used for the player. The currentImage variable
tracks the index of the currently selected player image. For example, when currentImage is
set to 0 then PLAYERIMAGES[0], which is the ―princess‖ player image, is drawn to the screen.
94. startScreen() # show the title screen until the user presses a key
95.
96. # Read in the levels from the text file. See the readLevelsFile() for
97. # details on the format of this file and how to make your own levels.
98. levels = readLevelsFile('starPusherLevels.txt')
99. currentLevelIndex = 0
The startScreen() function will keep displaying the initial start screen (which also has the
instructions for the game) until the player presses a key. When the player presses a key, the
startScreen() function returns and then reads in the levels from the level file. The player
starts off on the first level, which is the level object in the levels list at index 0.
101. # The main game loop. This loop runs a single level, when the user
102. # finishes that level, the next/previous level is loaded.
103. while True: # main game loop
104. # Run the level to actually start playing the game:

260 http://inventwithpython.com/pygame
Email questions to the author: [email protected]
105. result = runLevel(levels, currentLevelIndex)
The runLevel() function handles all the action for the game. It is passed a list of level objects,
and the integer index of the level in that list to be played. When the player has finished playing
the level, runLevel() will return one of the following strings: 'solved' (because the player
has finished putting all the stars on the goals), 'next' (because the player wants to skip to the
next level), 'back' (because the player wants to go back to the previous level), and 'reset'
(because the player wants to start playing the current level over again, maybe because they
pushed a star into a corner).
107. if result in ('solved', 'next'):
108. # Go to the next level.
109. currentLevelIndex += 1
110. if currentLevelIndex >= len(levels):
111. # If there are no more levels, go back to the first one.
112. currentLevelIndex = 0
113. elif result == 'back':
114. # Go to the previous level.
115. currentLevelIndex -= 1
116. if currentLevelIndex < 0:
117. # If there are no previous levels, go to the last one.
118. currentLevelIndex = len(levels)-1
If runLevel() has returned the strings 'solved' or 'next', then we need to increment
levelNum by 1. If this increments levelNum beyond the number of levels there are, then
levelNum is set back at 0.
The opposite is done if 'back' is returned, then levelNum is decremented by 1. If this makes
it go below 0, then it is set to the last level (which is len(levels)-1).
119. elif result == 'reset':
120. pass # Do nothing. Loop re-calls runLevel() to reset the level
If the return value was 'reset', then the code does nothing. The pass statement does nothing
(like a comment), but is needed because the Python interpreter expects an indented line of code
after an elif statement.
We could remove lines 119 and 120 from the source code entirely, and the program will still
work just the same. The reason we include it here is for program readability, so that if we make
changes to the code later, we won’t forget that runLevel() can also return the string
'reset'.

Chapter 9 – Star Pusher 261
123. def runLevel(levels, levelNum):
124. global currentImage
125. levelObj = levels[levelnum]
126. mapObj = decorateMap(levelObj['mapObj'],
levelObj['startState']['player'])
127. gameStateObj = copy.deepcopy(levelObj['startState'])
The levels list contains all the level objects that were loaded from the level file. The level object
for the current level (which is what levelNum is set to) is stored in the levelObj variable. A
map object (which makes a distinction between indoor and outdoor tiles, and decorates the
outdoor tiles with trees and rocks) is returned from the decorateMap() function. And to track
the state of the game while the player plays this level, a copy of the game state object that is
stored in levelObj is made using the copy.deepcopy() function.
The game state object copy is made because the game state object stored in
levelObj['startState'] represents the game state at the very beginning of the level, and
we do not want to modify this. Otherwise, if the player restarts the level, the original game state
for that level will be lost.
The copy.deepcopy() function is used because the game state object is a dictionary of that
has tuples. But technically, the dictionary contains references to tuples. (References are explained
in detail at http://invpy.com/references.) Using an assignment statement to make a copy of the
dictionary will make a copy of the references but not the values they refer to, so that both the
copy and the original dictionary still refer to the same tuples.
The copy.deepcopy() function solves this problem by making copies of the actual tuples in
the dictionary. This way we can guarantee that changing one dictionary will not affect the other
dictionary.
128. mapNeedsRedraw = True # set to True to call drawMap()
129. levelSurf = BASICFONT.render('Level %s of %s' % (levelObj['levelNum']
+ 1, totalNumOfLevels), 1, TEXTCOLOR)
130. levelRect = levelSurf.get_rect()
131. levelRect.bottomleft = (20, WINHEIGHT - 35)
132. mapWidth = len(mapObj) * TILEWIDTH
133. mapHeight = (len(mapObj[0]) - 1) * (TILEHEIGHT - TILEFLOORHEIGHT) +
TILEHEIGHT
134. MAX_CAM_X_PAN = abs(HALF_WINHEIGHT - int(mapHeight / 2)) + TILEWIDTH
135. MAX_CAM_Y_PAN = abs(HALF_WINWIDTH - int(mapWidth / 2)) + TILEHEIGHT
136.
137. levelIsComplete = False
138. # Track how much the camera has moved:
139. cameraOffsetX = 0

262 http://inventwithpython.com/pygame
Email questions to the author: [email protected]
140. cameraOffsetY = 0
141. # Track if the keys to move the camera are being held down:
142. cameraUp = False
143. cameraDown = False
144. cameraLeft = False
145. cameraRight = False
More variables are set at the start of playing a level. The mapWidth and mapHeight variables
are the size of the maps in pixels. The expression for calculating mapHeight is a bit
complicated since the tiles overlap each other. Only the bottom row of tiles is the full height
(which accounts for the + TILEHEIGHT part of the expression), all of the other rows of tiles
(which number as (len(mapObj[0]) - 1)) are slightly overlapped. This means that they
are effectively each only (TILEHEIGHT - TILEFLOORHEIGHT) pixels tall.
The camera in Star Pusher can be moved independently of the player moving around the map.
This is why the camera needs its own set of ―moving‖ variables: cameraUp, cameraDown,
cameraLeft, and cameraRight. The cameraOffsetX and cameraOffsetY variables
track the position of the camera.
147. while True: # main game loop
148. # Reset these variables:
149. playerMoveTo = None
150. keyPressed = False
151.
152. for event in pygame.event.get(): # event handling loop
153. if event.type == QUIT:
154. # Player clicked the "X" at the corner of the window.
155. terminate()
156.
The playerMoveTo variable will be set to the direction constant that the player intends to
move the player character on the map. The keyPressed variable tracks if any key has been
pressed during this iteration of the game loop. This variable is checked later when the player has
solved the level.
157. elif event.type == KEYDOWN:
158. # Handle key presses
159. keyPressed = True
160. if event.key == K_LEFT:
161. playerMoveTo = LEFT
162. elif event.key == K_RIGHT:
163. playerMoveTo = RIGHT
164. elif event.key == K_UP:

Chapter 9 – Star Pusher 263
165. playerMoveTo = UP
166. elif event.key == K_DOWN:
167. playerMoveTo = DOWN
168.
169. # Set the camera move mode.
170. elif event.key == K_a:
171. cameraLeft = True
172. elif event.key == K_d:
173. cameraRight = True
174. elif event.key == K_w:
175. cameraUp = True
176. elif event.key == K_s:
177. cameraDown = True
178.
179. elif event.key == K_n:
180. return 'next'
181. elif event.key == K_b:
182. return 'back'
183.
184. elif event.key == K_ESCAPE:
185. terminate() # Esc key quits.
186. elif event.key == K_BACKSPACE:
187. return 'reset' # Reset the level.
188. elif event.key == K_p:
189. # Change the player image to the next one.
190. currentImage += 1
191. if currentImage >= len(PLAYERIMAGES):
192. # After the last player image, use the first one.
193. currentImage = 0
194. mapNeedsRedraw = True
195.
196. elif event.type == KEYUP:
197. # Unset the camera move mode.
198. if event.key == K_a:
199. cameraLeft = False
200. elif event.key == K_d:
201. cameraRight = False
202. elif event.key == K_w:
203. cameraUp = False
204. elif event.key == K_s:
205. cameraDown = False
This code handles what to do when the various keys are pressed.
207. if playerMoveTo != None and not levelIsComplete:
208. # If the player pushed a key to move, make the move

264 http://inventwithpython.com/pygame
Email questions to the author: [email protected]
209. # (if possible) and push any stars that are pushable.
210. moved = makeMove(mapObj, gameStateObj, playerMoveTo)
211.
212. if moved:
213. # increment the step counter.
214. gameStateObj['stepCounter'] += 1
215. mapNeedsRedraw = True
216.
217. if isLevelFinished(levelObj, gameStateObj):
218. # level is solved, we should show the "Solved!" image.
219. levelIsComplete = True
220. keyPressed = False
If the playerMoveTo variable is no longer set to None, then we know the player intended to
move. The call to makeMove() handles changing the XY coordinates of the player’s position in
the gameStateObj, as well as pushing any stars. The return value of makeMove() is stored
in moved. If this value is True, then the player character was moved in that direction. If the
value was False, then the player must have tried to move into a tile that was a wall, or push a
star that had something behind it. In this case, the player can’t move and nothing on the map
changes.
222. DISPLAYSURF.fill(BGCOLOR)
223.
224. if mapNeedsRedraw:
225. mapSurf = drawMap(mapObj, gameStateObj, levelObj['goals'])
226. mapNeedsRedraw = False
The map does not need to be redrawn on each iteration through the game loop. In fact, this game
program is complicated enough that doing so would cause a slight (but noticeable) slowdown in
the game. And the map really only needs to be redrawn when something has changed (such as the
player moving or a star being pushed). So the Surface object in the mapSurf variable is only
updated with a call to the drawMap() function when the mapNeedsRedraw variable is set to
True.
After the map has been drawn on line 225, the mapNeedsRedraw variable is set to False. If
you want to see how the program slows down by drawing on each iteration through the game
loop, comment out line 226 and rerun the program. You will notice that moving the camera is
significantly slower.
228. if cameraUp and cameraOffsetY < MAX_CAM_X_PAN:
229. cameraOffsetY += CAM_MOVE_SPEED
230. elif cameraDown and cameraOffsetY > -MAX_CAM_X_PAN:

Chapter 9 – Star Pusher 265
231. cameraOffsetY -= CAM_MOVE_SPEED
232. if cameraLeft and cameraOffsetX < MAX_CAM_Y_PAN:
233. cameraOffsetX += CAM_MOVE_SPEED
234. elif cameraRight and cameraOffsetX > -MAX_CAM_Y_PAN:
235. cameraOffsetX -= CAM_MOVE_SPEED
If the camera movement variables are set to True and the camera has not gone past (i.e. panned
passed) the boundaries set by the MAX_CAM_X_PAN and MAX_CAM_Y_PAN, then the camera
location (stored in cameraOffsetX and cameraOffsetY) should move over by
CAM_MOVE_SPEED pixels.
Note that there is an if and elif statement on lines 228 and 230 for moving the camera up and
down, and then a separate if and elif statement on lines 232 and 234. This way, the user can
move the camera both vertically and horizontally at the same time. This wouldn’t be possible if
line 232 were an elif statement.
237. # Adjust mapSurf's Rect object based on the camera offset.
238. mapSurfRect = mapSurf.get_rect()
239. mapSurfRect.center = (HALF_WINWIDTH + cameraOffsetX,
HALF_WINHEIGHT + cameraOffsetY)
240.
241. # Draw mapSurf to the DISPLAYSURF Surface object.
242. DISPLAYSURF.blit(mapSurf, mapSurfRect)
243.
244. DISPLAYSURF.blit(levelSurf, levelRect)
245. stepSurf = BASICFONT.render('Steps: %s' %
(gameStateObj['stepCounter']), 1, TEXTCOLOR)
246. stepRect = stepSurf.get_rect()
247. stepRect.bottomleft = (20, WINHEIGHT - 10)
248. DISPLAYSURF.blit(stepSurf, stepRect)
249.
250. if levelIsComplete:
251. # is solved, show the "Solved!" image until the player
252. # has pressed a key.
253. solvedRect = IMAGESDICT['solved'].get_rect()
254. solvedRect.center = (HALF_WINWIDTH, HALF_WINHEIGHT)
255. DISPLAYSURF.blit(IMAGESDICT['solved'], solvedRect)
256.
257. if keyPressed:
258. return 'solved'
259.
260. pygame.display.update() # draw DISPLAYSURF to the screen.
261. FPSCLOCK.tick()
262.
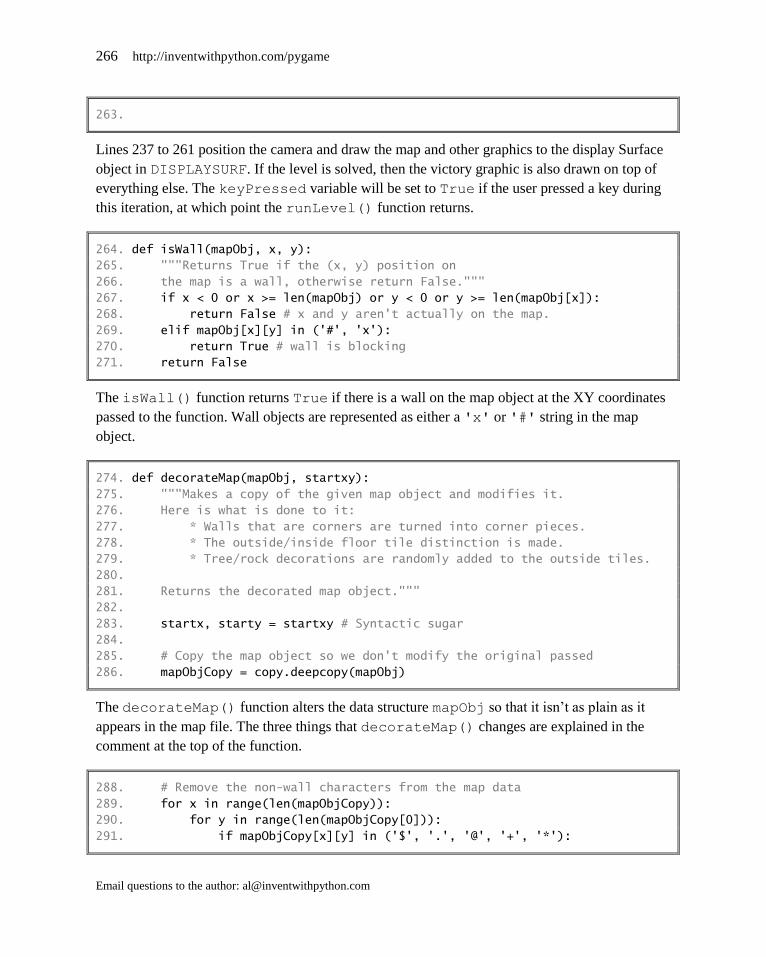
266 http://inventwithpython.com/pygame
Email questions to the author: [email protected]
263.
Lines 237 to 261 position the camera and draw the map and other graphics to the display Surface
object in DISPLAYSURF. If the level is solved, then the victory graphic is also drawn on top of
everything else. The keyPressed variable will be set to True if the user pressed a key during
this iteration, at which point the runLevel() function returns.
264. def isWall(mapObj, x, y):
265. """Returns True if the (x, y) position on
266. the map is a wall, otherwise return False."""
267. if x < 0 or x >= len(mapObj) or y < 0 or y >= len(mapObj[x]):
268. return False # x and y aren't actually on the map.
269. elif mapObj[x][y] in ('#', 'x'):
270. return True # wall is blocking
271. return False
The isWall() function returns True if there is a wall on the map object at the XY coordinates
passed to the function. Wall objects are represented as either a 'x' or '#' string in the map
object.
274. def decorateMap(mapObj, startxy):
275. """Makes a copy of the given map object and modifies it.
276. Here is what is done to it:
277. * Walls that are corners are turned into corner pieces.
278. * The outside/inside floor tile distinction is made.
279. * Tree/rock decorations are randomly added to the outside tiles.
280.
281. Returns the decorated map object."""
282.
283. startx, starty = startxy # Syntactic sugar
284.
285. # Copy the map object so we don't modify the original passed
286. mapObjCopy = copy.deepcopy(mapObj)
The decorateMap() function alters the data structure mapObj so that it isn’t as plain as it
appears in the map file. The three things that decorateMap() changes are explained in the
comment at the top of the function.
288. # Remove the non-wall characters from the map data
289. for x in range(len(mapObjCopy)):
290. for y in range(len(mapObjCopy[0])):
291. if mapObjCopy[x][y] in ('$', '.', '@', '+', '*'):

Chapter 9 – Star Pusher 267
292. mapObjCopy[x][y] = ' '
The map object has characters that represent the position of the player, goals, and stars. These are
necessary for the map object (they’re stored in other data structures after the map file is read) so
they are converted to blank spaces.
294. # Flood fill to determine inside/outside floor tiles.
295. floodFill(mapObjCopy, startx, starty, ' ', 'o')
The floodFill() function will change all of the tiles inside the walls from ' ' characters to
'o' characters. It does this using a programming concept called recursion, which is explained in
―Recursive Functions‖ section later in this chapter.
297. # Convert the adjoined walls into corner tiles.
298. for x in range(len(mapObjCopy)):
299. for y in range(len(mapObjCopy[0])):
300.
301. if mapObjCopy[x][y] == '#':
302. if (isWall(mapObjCopy, x, y-1) and isWall(mapObjCopy, x+1,
y)) or \
303. (isWall(mapObjCopy, x+1, y) and isWall(mapObjCopy, x,
y+1)) or \
304. (isWall(mapObjCopy, x, y+1) and isWall(mapObjCopy, x-1,
y)) or \
305. (isWall(mapObjCopy, x-1, y) and isWall(mapObjCopy, x,
y-1)):
306. mapObjCopy[x][y] = 'x'
307.
308. elif mapObjCopy[x][y] == ' ' and random.randint(0, 99) <
OUTSIDE_DECORATION_PCT:
309. mapObjCopy[x][y] =
random.choice(list(OUTSIDEDECOMAPPING.keys()))
310.
311. return mapObjCopy
The large, multi-line if statement on line 301 checks if the wall tile at the current XY
coordinates are a corner wall tile by checking if there are wall tiles adjacent to it that form a
corner shape. If so, the '#' string in the map object that represents a normal wall is changed to a
'x' string which represents a corner wall tile.
314. def isBlocked(mapObj, gameStateObj, x, y):
315. """Returns True if the (x, y) position on the map is
316. blocked by a wall or star, otherwise return False."""

268 http://inventwithpython.com/pygame
Email questions to the author: [email protected]
317.
318. if isWall(mapObj, x, y):
319. return True
320.
321. elif x < 0 or x >= len(mapObj) or y < 0 or y >= len(mapObj[x]):
322. return True # x and y aren't actually on the map.
323.
324. elif (x, y) in gameStateObj['stars']:
325. return True # a star is blocking
326.
327. return False
There are three cases where a space on the map would be blocked: if there is a star, a wall, or the
coordinates of the space are past the edges of the map. The isBlocked() function checks for
these three cases and returns True if the XY coordinates are blocked and False if not.
330. def makeMove(mapObj, gameStateObj, playerMoveTo):
331. """Given a map and game state object, see if it is possible for the
332. player to make the given move. If it is, then change the player's
333. position (and the position of any pushed star). If not, do nothing.
334.
335. Returns True if the player moved, otherwise False."""
336.
337. # Make sure the player can move in the direction they want.
338. playerx, playery = gameStateObj['player']
339.
340. # This variable is "syntactic sugar". Typing "stars" is more
341. # readable than typing "gameStateObj['stars']" in our code.
342. stars = gameStateObj['stars']
343.
344. # The code for handling each of the directions is so similar aside
345. # from adding or subtracting 1 to the x/y coordinates. We can
346. # simplify it by using the xOffset and yOffset variables.
347. if playerMoveTo == UP:
348. xOffset = 0
349. yOffset = -1
350. elif playerMoveTo == RIGHT:
351. xOffset = 1
352. yOffset = 0
353. elif playerMoveTo == DOWN:
354. xOffset = 0
355. yOffset = 1
356. elif playerMoveTo == LEFT:
357. xOffset = -1
358. yOffset = 0

Chapter 9 – Star Pusher 269
359.
360. # See if the player can move in that direction.
361. if isWall(mapObj, playerx + xOffset, playery + yOffset):
362. return False
363. else:
364. if (playerx + xOffset, playery + yOffset) in stars:
365. # There is a star in the way, see if the player can push it.
366. if not isBlocked(mapObj, gameStateObj, playerx + (xOffset*2),
playery + (yOffset*2)):
367. # Move the star.
368. ind = stars.index((playerx + xOffset, playery + yOffset))
369. stars[ind] = (stars[ind][0] + xOffset, stars[ind][1] +
yOffset)
370. else:
371. return False
372. # Move the player upwards.
373. gameStateObj['player'] = (playerx + xOffset, playery + yOffset)
374. return True
The makeMove() function checks to make sure if moving the player in a particular direction is
a valid move. As long as there isn’t a wall blocking the path, or a star that has a wall or star
behind it, the player will be able to move in that direction. The gameStateObj variable will be
updated to reflect this, and the True value will be returned to tell the function’s caller that the
player was moved.
If there was a star in the space that the player wanted to move, that star’s position is also changed
and this information is updated in the gameStateObj variable as well. This is how the ―star
pushing‖ is implemented.
If the player is blocked from moving in the desired direction, then the gameStateObj is not
modified and the function returns False.
377. def startScreen():
378. """Display the start screen (which has the title and instructions)
379. until the player presses a key. Returns None."""
380.
381. # Position the title image.
382. titleRect = IMAGESDICT['title'].get_rect()
383. topCoord = 50 # topCoord tracks where to position the top of the text
384. titleRect.top = topCoord
385. titleRect.centerx = HALF_WINWIDTH
386. topCoord += titleRect.height
387.
388. # Unfortunately, Pygame's font & text system only shows one line at

270 http://inventwithpython.com/pygame
Email questions to the author: [email protected]
389. # a time, so we can't use strings with \n newline characters in them.
390. # So we will use a list with each line in it.
391. instructionText = ['Push the stars over the marks.',
392. 'Arrow keys to move, WASD for camera control, P to
change character.',
393. 'Backspace to reset level, Esc to quit.',
394. 'N for next level, B to go back a level.']
The startScreen() function needs to display a few different pieces of text down the center
of the window. We will store each line as a string in the instructionText list. The title
image (stored in IMAGESDICT['title'] as a Surface object (that was originally loaded from
the star_title.png file)) will be positioned 50 pixels from the top of the window. This is because
the integer 50 was stored in the topCoord variable on line 383. The topCoord variable will
track the Y axis positioning of the title image and the instructional text. The X axis is always
going to be set so that the images and text are centered, as it is on line 385 for the title image.
On line 386, the topCoord variable is increased by whatever the height of that image is. This
way we can modify the image and the start screen code won’t have to be changed.
396. # Start with drawing a blank color to the entire window:
397. DISPLAYSURF.fill(BGCOLOR)
398.
399. # Draw the title image to the window:
400. DISPLAYSURF.blit(IMAGESDICT['title'], titleRect)
401.
402. # Position and draw the text.
403. for i in range(len(instructionText)):
404. instSurf = BASICFONT.render(instructionText[i], 1, TEXTCOLOR)
405. instRect = instSurf.get_rect()
406. topCoord += 10 # 10 pixels will go in between each line of text.
407. instRect.top = topCoord
408. instRect.centerx = HALF_WINWIDTH
409. topCoord += instRect.height # Adjust for the height of the line.
410. DISPLAYSURF.blit(instSurf, instRect)
Line 400 is where the title image is blitted to the display Surface object. The for loop starting on
line 403 will render, position, and blit each instructional string in the instructionText loop.
The topCoord variable will always be incremented by the size of the previously rendered text
(line 409) and 10 additional pixels (on line 406, so that there will be a 10 pixel gap between the
lines of text).
412. while True: # Main loop for the start screen.
413. for event in pygame.event.get():
Chapter 9 – Star Pusher 271
414. if event.type == QUIT:
415. terminate()
416. elif event.type == KEYDOWN:
417. if event.key == K_ESCAPE:
418. terminate()
419. return # user has pressed a key, so return.
420.
421. # Display the DISPLAYSURF contents to the actual screen.
422. pygame.display.update()
423. FPSCLOCK.tick()
There is a game loop in startScreen() that begins on line 412 and handles events that
indicate if the program should terminate or return from the startScreen() function. Until the
player does either, the loop will keep calling pygame.display.update() and
FPSCLOCK.tick() to keep the start screen displayed on the screen.
Data Structures in Star Pusher Star Pusher has a specific format for the levels, maps, and game state data structures.
The “Game State” Data Structure The game state object will be a dictionary with three keys: 'player', 'stepCounter', and
'stars'.
The value at the 'player' key will be a tuple of two integers for the current XY
position of the player.
The value at the 'stepCounter' key will be an integer that tracks how many moves
the player has made in this level (so the player can try to solve the puzzle in the future
with fewer steps).
The value at the 'stars' key is a list of two-integer tuples of XY values for each of the
stars on the current level.
The “Map” Data Structure The map data structure is simply a 2D list of lists where the two indexes used represent the X and
Y coordinates of the map. The value at each index in the list of lists is a single-character string
that represents the title that is on that map at each space:
'#' – A wooden wall.
'x' – A corner wall.
'@' – The starting space for the player on this level.
'.' – A goal space.
'$' – A space where a star is at the start of the level.

272 http://inventwithpython.com/pygame
Email questions to the author: [email protected]
'+' – A space with a goal and the starting player’s space.
'*' – A space with a goal and a star at the start of the level.
' ' – A grassy outdoor space.
'o' – An inside floor space. (This is a lowercase letter O, not a zero.)
'1' – A rock on grass.
'2' – A short tree on grass.
'3' – A tall tree on grass.
'4' – An ugly tree on grass.
The “Levels” Data Structure The level object contains a game state object (which will be the state used when the level first
starts), a map object, and a few other values. The level object itself is a dictionary with the
following keys:
The value at the key 'width' is an integer of how many tiles wide the entire map is.
The value at the key 'height' is an integer of how many tiles tall the entire map is.
The value at the key 'mapObj' is the map object for this level.
The value at the key 'goals' is a list of two-integer tuples with the XY coordinates of
each goal space on the map.
The value at the key 'startState' is a game state object used to show the starting
position of the stars and player at the start of the level.
Reading and Writing Text Files Python has functions for reading files off of the player’s hard drive. This will be useful for having
a separate file keep all of the data for each level. This is also a good idea because in order to get
new levels, the player doesn’t have to change the source code of the game but instead can just
download new level files.
Text Files and Binary Files Text files are files that contain simple text data. Text files are created in Windows by the Notepad
application, Gedit on Ubuntu, and TextEdit on Mac OS X. There are many other programs called
text editors that can create and modify text files. IDLE’s own file editor is a text editor.
The difference between text editors and word processors (like Microsoft Word, or OpenOffice
Writer, or iWork Pages) is that text editors have text only. You can’t set the font, size, or color of
the text. (IDLE automatically sets the color of the text based on what kind of Python code it is,
but you can’t change this yourself, so it is still a text editor.) The difference between text and
binary files isn’t important for this game program, but you can read about it at

Chapter 9 – Star Pusher 273
http://invpy.com/textbinary. All you need to know is the this chapter and the Star Pusher program
only deal with text files.
Writing to Files To create a file, call the open() function pass it two arguments: a string for the name of the file,
and the string 'w' to tell the open() function you want to open the file in ―write‖ mode. The
open() function returns a file object:
>>> textFile = open('hello.txt', 'w')
>>>
If you run this code from the interactive shell, the hello.txt file that this function creates will be
created in the same folder that the python.exe program is in (on Windows, this will probably be
C:\Python32). If the open() function is called from a .py program, the file is created in the same
folder that the .py file is in.
The ―write‖ mode tells open() to create the file if it does not exist. If it does exist, then
open() will delete that file and create a new, blank file. This is just like how an assignment
statement can create a new variable, or overwrite the current value in an already existing variable.
This can be somewhat dangerous. If you accidentally send a filename of an important file to the
open() function with 'w' as the second parameter, it will be deleted. This could result in
having to reinstall the operating system on your computer and/or the launching of nuclear
missiles.
The file object has a method called write() which can be used to write text to the file. Just pass
it a string like you would pass a string to the print() function. The difference is that write()
does not automatically add a newline character ('\n') to the end of the string. If you want to add
a newline, you will have to include it in the string:
>>> textFile = open('hello.txt', 'w')
>>> textFile.write('This will be the content of the file.\nHello world!\n')
>>>
To tell Python that you are done writing content to this file, you should call the close()
method of the file object. (Although Python will automatically close any opened file objects when
the program ends.)
>>> textFile.close()

274 http://inventwithpython.com/pygame
Email questions to the author: [email protected]
Reading from Files To read the content of a file, pass the string 'r' instead of 'w' to the open() function. Then
call the readlines() method on the file object to read in the contents of the file. Last, close
the file by calling the close() method.
>>> textFile = open('hello.txt', 'r')
>>> content = textFile.readlines()
>>> textFile.close()
The readlines() method returns a list of strings: one string for each line of text in the file:
>>> content
['This will be the content of the file.\n', 'Hello world!\n']
>>>
If you want to re-read the contents of that file, you will have to call close() on the file object
and re-open it.
As an alternative to readlines(), you can also call the read() method, which will return
the entire contents of the file as a single string value:
>>> textFile = open('hello.txt', 'r')
>>> content = textFile.read()
>>> content
'This will be the content of the file.\nHello world!\n'
On a side note, if you leave out the second parameter to the open() function, Python will
assume you mean to open the file in read mode. So open('foobar.txt', 'r') and
open('foobar.txt') do the exact same thing.
About the Star Pusher Map File Format We need the level text file to be in a specific format. Which characters represent walls, or stars, or
the player’s starting position? If we have the maps for multiple levels, how can we tell when one
level’s map ends and the next one begins?
Fortunately, the map file format we will use is already defined for us. There are many Sokoban
games out there (you can find more at http://invpy.com/sokobanclones), and they all use the same
map file format. If you download the levels file from http://invpy.com/starPusherLevels.txt and
open it in a text editor, you’ll see something like this:
; Star Pusher (Sokoban clone)

Chapter 9 – Star Pusher 275
; http://inventwithpython.com/blog
; By Al Sweigart [email protected]
;
; Everything after the ; is a comment and will be ignored by the game that
; reads in this file.
;
; The format is described at:
; http://sokobano.de/wiki/index.php?title=Level_format
; @ - The starting position of the player.
; $ - The starting position for a pushable star.
; . - A goal where a star needs to be pushed.
; + - Player & goal
; * - Star & goal
; (space) - an empty open space.
; # - A wall.
;
; Level maps are separated by a blank line (I like to use a ; at the start
; of the line since it is more visible.)
;
; I tried to use the same format as other people use for their Sokoban games,
; so that loading new levels is easy. Just place the levels in a text file
; and name it "starPusherLevels.txt" (after renaming this file, of course).
; Starting demo level:
########
## #
# . #
# $ #
# .$@$. #
####$ #
#. #
# ##
#####
The comments at the top of the file explain the file’s format. When you load the first level, it
looks like this:

276 http://inventwithpython.com/pygame
Email questions to the author: [email protected]
426. def readLevelsFile(filename):
427. assert os.path.exists(filename), 'Cannot find the level file: %s' %
(filename)
The os.path.exists() function will return True if the file specified by the string passed to
the function exists. If it does not exist, os.path.exists() returns False.
428. mapFile = open(filename, 'r')
429. # Each level must end with a blank line
430. content = mapFile.readlines() + ['\r\n']
431. mapFile.close()
432.
433. levels = [] # Will contain a list of level objects.
434. levelNum = 0
435. mapTextLines = [] # contains the lines for a single level's map.
436. mapObj = [] # the map object made from the data in mapTextLines
The file object for the level file that is opened for reading is stored in mapFile. All of the text
from the level file is stored as a list of strings in the content variable, with a blank line added
to the end. (The reason that this is done is explained later.)
After the level objects are created, they will be stored in the levels list. The levelNum
variable will keep track of how many levels are found inside the level file. The mapTextLines
list will be a list of strings from the content list for a single map (as opposed to how content
stores the strings of all maps in the level file). The mapObj variable will be a 2D list.
437. for lineNum in range(len(content)):
438. # Process each line that was in the level file.
439. line = content[lineNum].rstrip('\r\n')

Chapter 9 – Star Pusher 277
The for loop on line 437 will go through each line that was read from the level file one line at a
time. The line number will be stored in lineNum and the string of text for the line will be stored
in line. Any newline characters at the end of the string will be stripped off.
441. if ';' in line:
442. # Ignore the ; lines, they're comments in the level file.
443. line = line[:line.find(';')]
Any text that exists after a semicolon in the map file is treated like a comment and is ignored.
This is just like the # sign for Python comments. To make sure that our code does not
accidentally think the comment is part of the map, the line variable is modified so that it only
consists of the text up to (but not including) the semicolon character. (Remember that this is only
changing the string in the content list. It is not changing the level file on the hard drive.)
445. if line != '':
446. # This line is part of the map.
447. mapTextLines.append(line)
There can be maps for multiple levels in the map file. The mapTextLines list will contain the
lines of text from the map file for the current level being loaded. As long as the current line is not
blank, the line will be appended to the end of mapTextLines.
448. elif line == '' and len(mapTextLines) > 0:
449. # A blank line indicates the end of a level's map in the file.
450. # Convert the text in mapTextLines into a level object.
When there is a blank line in the map file, that indicates that the map for the current level has
ended. And future lines of text will be for the later levels. Note however, that there must at least
be one line in mapTextLines so that multiple blank lines together are not counted as the start
and stop to multiple levels.
452. # Find the longest row in the map.
453. maxWidth = -1
454. for i in range(len(mapTextLines)):
455. if len(mapTextLines[i]) > maxWidth:
456. maxWidth = len(mapTextLines[i])
All of the strings in mapTextLines need to be the same length (so that they form a rectangle),
so they should be padded with extra blank spaces until they are all as long as the longest string.
The for loop goes through each of the strings in mapTextLines and updates maxWidth

278 http://inventwithpython.com/pygame
Email questions to the author: [email protected]
when it finds a new longest string. After this loop finishes executing, the maxWidth variable
will be set to the length of the longest string in mapTextLines.
457. # Add spaces to the ends of the shorter rows. This
458. # ensures the map will be rectangular.
459. for i in range(len(mapTextLines)):
460. mapTextLines[i] += ' ' * (maxWidth - len(mapTextLines[i]))
The for loop on line 459 goes through the strings in mapTextLines again, this time to add
enough space characters to pad each to be as long as maxWidth.
462. # Convert mapTextLines to a map object.
463. for x in range(len(mapTextLines[0])):
464. mapObj.append([])
465. for y in range(len(mapTextLines)):
466. for x in range(maxWidth):
467. mapObj[x].append(mapTextLines[y][x])
The mapTextLines variable just stores a list of strings. (Each string in the list represents a
row, and each character in the string represents a character at a different column. This is why line
467 has the Y and X indexes reversed, just like the SHAPES data structure in the Tetromino
game.) But the map object will have to be a list of list of single-character strings such that
mapObj[x][y] refers to the tile at the XY coordinates. The for loop on line 463 adds an
empty list to mapObj for each column in mapTextLines.
The nested for loops on line 465 and 466 will fill these lists with single-character strings to
represent each tile on the map. This creates the map object that Star Pusher uses.
469. # Loop through the spaces in the map and find the @, ., and $
470. # characters for the starting game state.
471. startx = None # The x and y for the player's starting position
472. starty = None
473. goals = [] # list of (x, y) tuples for each goal.
474. stars = [] # list of (x, y) for each star's starting position.
475. for x in range(maxWidth):
476. for y in range(len(mapObj[x])):
477. if mapObj[x][y] in ('@', '+'):
478. # '@' is player, '+' is player & goal
479. startx = x
480. starty = y
481. if mapObj[x][y] in ('.', '+', '*'):
482. # '.' is goal, '*' is star & goal
483. goals.append((x, y))

Chapter 9 – Star Pusher 279
484. if mapObj[x][y] in ('$', '*'):
485. # '$' is star
486. stars.append((x, y))
After creating the map object, the nested for loops on lines 475 and 476 will go through each
space to find the XY coordinates three things:
1. The player’s starting position. This will be stored in the startx and starty variables,
which will then be stored in the game state object later on line 494.
2. The starting position of all the stars These will be stored in the stars list, which is later
stored in the game state object on line 496.
3. The position of all the goals. These will be stored in the goals list, which is later stored
in the level object on line 500.
Remember, the game state object contains all the things that can change. This is why the player’s
position is stored in it (because the player can move around) and why the stars are stored in it
(because the stars can be pushed around by the player). But the goals are stored in the level
object, since they will never move around.
488. # Basic level design sanity checks:
489. assert startx != None and starty != None, 'Level %s (around
line %s) in %s is missing a "@" or "+" to mark the start point.' % (levelNum+1,
lineNum, filename)
490. assert len(goals) > 0, 'Level %s (around line %s) in %s must
have at least one goal.' % (levelNum+1, lineNum, filename)
491. assert len(stars) >= len(goals), 'Level %s (around line %s) in
%s is impossible to solve. It has %s goals but only %s stars.' % (levelNum+1,
lineNum, filename, len(goals), len(stars))
At this point, the level has been read in and processed. To be sure that this level will work
properly, a few assertions must pass. If any of the conditions for these assertions are False, then
Python will produce an error (using the string from the assert statement) saying what is wrong
with the level file.
The first assertion on line 489 checks to make sure that there is a player starting point listed
somewhere on the map. The second assertion on line 490 checks to make sure there is at least one
goal (or more) somewhere on the map. And the third assertion on line 491 checks to make sure
that there is at least one star for each goal (but having more stars than goals is allowed).
493. # Create level object and starting game state object.
494. gameStateObj = {'player': (startx, starty),
495. 'stepCounter': 0,

280 http://inventwithpython.com/pygame
Email questions to the author: [email protected]
496. 'stars': stars}
497. levelObj = {'width': maxWidth,
498. 'height': len(mapObj),
499. 'mapObj': mapObj,
500. 'goals': goals,
501. 'startState': gameStateObj}
502.
503. levels.append(levelObj)
Finally, these objects are stored in the game state object, which itself is stored in the level object.
The level object is added to a list of level objects on line 503. It is this levels list that will be
returned by the readLevelsFile() function when all of the maps have been processed.
505. # Reset the variables for reading the next map.
506. mapTextLines = []
507. mapObj = []
508. gameStateObj = {}
509. levelNum += 1
510. return levels
Now that this level is done processing, the variables for mapTextLines, mapObj, and
gameStateObj should be reset to blank values for the next level that will be read in from the
level file. The levelNum variable is also incremented by 1 for the next level’s level number.
Recursive Functions Before you can learn how the floodFill() function works, you need to learn about recursion.
Recursion is a simple concept: A recursive function is just a function that calls itself, like the
one in the following program: (don’t type the letters at the beginning of each line though)
A. def passFortyTwoWhenYouCallThisFunction(param):
B. print('Start of function.')
C. if param != 42:
D. print('You did not pass 42 when you called this function.')
E. print('Fine. I will do it myself.')
F. passFortyTwoWhenYouCallThisFunction(42) # this is the recursive call
G. if param == 42:
H. print('Thank you for passing 42 when you called this function.')
I. print('End of function.')
J.
K. passFortyTwoWhenYouCallThisFunction(41)
(In your own programs, don’t make functions have names as long as
passFortyTwoWhenYouCallThisFunction(). I’m just being stupid and silly. Stupilly.)

Chapter 9 – Star Pusher 281
When you run this program, the function gets defined when the def statement on line A
executes. The next line of code that is executed is line K, which calls
passFortyTwoWhenYouCallThisFunction() and passes (gasp!) 41. As a result, the
function calls itself on line F and passes 42. We call this call the recursive call.
This is what our program outputs:
Start of function.
You did not pass 42 when you called this function.
Fine. I will do it myself.
Start of function.
Thank you for passing 42 when you called this function.
End of function.
End of function.
Notice that the ―Start of function.‖ and ―End of function.‖ text appears twice. Let’s figure out
what exactly happens and what order it happens in.
On line K, the function is called and 41 is passed for the param parameter. Line B prints out
―Start of function.‖. The condition on line C will be True (since 41 != 42) so Line C and D
will print out their messages. Line F will then make a call, recursively, to the function and passes
42 for the param parameter. So execution starts on line B again and prints out ―Start of
function.‖. Line C’s condition this time is False, so it skips to line G and finds that condition to
be True. This causes line H to be called and displays ―Thank you…‖ on the screen. Then the last
line of the function, line I, will execute to print out ―End of function.‖ and the function returns to
the line that called it.
But remember, the line of code that called the function was line F. And in this original call, param
was set to 41. The code goes down to line G and checks the condition, which is False (since 41
== 42 is False) so it skips the print() call on line H. Instead, it runs the print() call on
line I which makes ―End of function.‖ display for a second time.
Since it has reached the end of the function, it returns to the line of code that called this function
call, which was line K. There are no more lines of code after line K, so the program terminates.
Note that local variables are not just local to the function, but to a specific call of the function.
Stack Overflows Each time a function is called, the Python interpreter remembers which line of code made the call.
That way when the function returns Python knows where to resume the execution. Remembering
this takes up a tiny bit of memory. This isn’t normally a big deal, but take a look at this code:

282 http://inventwithpython.com/pygame
Email questions to the author: [email protected]
def funky():
funky()
funky()
If you run this program, you’ll get a large amount of output which looks like this:
...
File "C:\test67.py", line 2, in funky
funky()
File "C:\test67.py", line 2, in funky
funky()
File "C:\test67.py", line 2, in funky
funky()
File "C:\test67.py", line 2, in funky
funky()
File "C:\test67.py", line 2, in funky
funky()
RuntimeError: maximum recursion depth exceeded
The funky() function does nothing but call itself. And then in that call, the function calls itself
again. Then it calls itself again, and again, and again. Each time it calls itself, Python has to
remember what line of code made that call so that when the function returns it can resume the
execution there. But the funky() function never returns, it just keeps making calls to itself.
This is just like the infinite loop bug, where the program keeps going and never stops. To prevent
itself from running out of memory, Python will cause an error after you are a 1000 calls deep and
crash the program. This type of bug is called a stack overflow.
This code also causes a stack overflow, even though there are no recursive functions:
def spam():
eggs()
def eggs():
spam()
spam()
When you run this program, it causes an error that looks like this:
...
File "C:\test67.py", line 2, in spam
eggs()

Chapter 9 – Star Pusher 283
File "C:\test67.py", line 5, in eggs
spam()
File "C:\test67.py", line 2, in spam
eggs()
File "C:\test67.py", line 5, in eggs
spam()
File "C:\test67.py", line 2, in spam
eggs()
RuntimeError: maximum recursion depth exceeded
Preventing Stack Overflows with a Base Case In order to prevent stack overflow bugs, you must have a base case where the function stops
make new recursive calls. If there is no base case then the function calls will never stop and
eventually a stack overflow will occur. Here is an example of a recursive function with a base
case. The base case is when the param parameter equals 2.
def fizz(param):
print(param)
if param == 2:
return
fizz(param - 1)
fizz(5)
When you run this program, the output will look like this:
5
4
3
2
This program does not have a stack overflow error because once the param parameter is set to 2,
the if statement’s condition will be True and the function will return, and then the rest of the
calls will also return in turn.
Though if your code never reaches the base case, then this will cause a stack overflow. If we
changed the fizz(5) call to fizz(0), then the program’s output would look like this:
File "C:\rectest.py", line 5, in fizz
fizz(param - 1)
File "C:\rectest.py", line 5, in fizz
fizz(param - 1)
File "C:\rectest.py", line 5, in fizz

284 http://inventwithpython.com/pygame
Email questions to the author: [email protected]
fizz(param - 1)
File "C:\rectest.py", line 2, in fizz
print(param)
RuntimeError: maximum recursion depth exceeded
Recursive calls and base cases will be used to perform the flood fill algorithm, which is described
next.
The Flood Fill Algorithm The flood fill algorithm is used in Star Pusher to change all of the floor tiles inside the walls of
the level to use the ―inside floor‖ tile image instead of the ―outside floor‖ tile (which all the tiles
on the map are by default). The original floodFill() call is on line 295. It will convert any
tiles represented with the ' ' string (which represents an outdoor floor) to a 'o' string (which
represents an indoor floor).
513. def floodFill(mapObj, x, y, oldCharacter, newCharacter):
514. """Changes any values matching oldCharacter on the map object to
515. newCharacter at the (x, y) position, and does the same for the
516. positions to the left, right, down, and up of (x, y), recursively."""
517.
518. # In this game, the flood fill algorithm creates the inside/outside
519. # floor distinction. This is a "recursive" function.
520. # For more info on the Flood Fill algorithm, see:
521. # http://en.wikipedia.org/wiki/Flood_fill
522. if mapObj[x][y] == oldCharacter:
523. mapObj[x][y] = newCharacter
Line 522 and 523 converts the tile at the XY coordinate passed to floodFill() to the
newCharacter string if it originally was the same as the oldCharacter string.
525. if x < len(mapObj) - 1 and mapObj[x+1][y] == oldCharacter:
526. floodFill(mapObj, x+1, y, oldCharacter, newCharacter) # call right
527. if x > 0 and mapObj[x-1][y] == oldCharacter:
528. floodFill(mapObj, x-1, y, oldCharacter, newCharacter) # call left
529. if y < len(mapObj[x]) - 1 and mapObj[x][y+1] == oldCharacter:
530. floodFill(mapObj, x, y+1, oldCharacter, newCharacter) # call down
531. if y > 0 and mapObj[x][y-1] == oldCharacter:
532. floodFill(mapObj, x, y-1, oldCharacter, newCharacter) # call up
These four if statements check if the tile to the right, left, down, and up of the XY coordinate are
the same as oldCharacter, and if so, a recursive call is made to floodFill() with those
coordinates.
Chapter 9 – Star Pusher 285
To better understand how the floodFill() function works, here is a version that does not use
recursive calls, but instead uses a list of XY coordinates to keep track of which spaces on the map
should be checked and possibly changed to newCharacter.
def floodFill(mapObj, x, y, oldCharacter, newCharacter):
spacesToCheck = []
if mapObj[x][y] == oldCharacter:
spacesToCheck.append((x, y))
while spacesToCheck != []:
x, y = spacesToCheck.pop()
mapObj[x][y] = newCharacter
if x < len(mapObj) - 1 and mapObj[x+1][y] == oldCharacter:
spacesToCheck.append((x+1, y)) # check right
if x > 0 and mapObj[x-1][y] == oldCharacter:
spacesToCheck.append((x-1, y)) # check left
if y < len(mapObj[x]) - 1 and mapObj[x][y+1] == oldCharacter:
spacesToCheck.append((x, y+1)) # check down
if y > 0 and mapObj[x][y-1] == oldCharacter:
spacesToCheck.append((x, y-1)) # check up
If you would like to read a more detailed tutorial on recursion that uses cats and zombies for an
example, go to http://invpy.com/recursivezombies.
Drawing the Map
535. def drawMap(mapObj, gameStateObj, goals):
536. """Draws the map to a Surface object, including the player and
537. stars. This function does not call pygame.display.update(), nor
538. does it draw the "Level" and "Steps" text in the corner."""
539.
540. # mapSurf will be the single Surface object that the tiles are drawn
541. # on, so that it is easy to position the entire map on the DISPLAYSURF
542. # Surface object. First, the width and height must be calculated.
543. mapSurfWidth = len(mapObj) * TILEWIDTH
544. mapSurfHeight = (len(mapObj[0]) - 1) * (TILEHEIGHT - TILEFLOORHEIGHT)
+ TILEHEIGHT
545. mapSurf = pygame.Surface((mapSurfWidth, mapSurfHeight))
546. mapSurf.fill(BGCOLOR) # start with a blank color on the surface.
The drawMap() function will return a Surface object with the entire map (and the player and
stars) drawn on it. The width and height needed for this Surface have to be calculated from
mapObj (which is done on line 543 and 544). The Surface object that everything will be drawn

286 http://inventwithpython.com/pygame
Email questions to the author: [email protected]
on is created on line 545. To begin with, the entire Surface object is painted to the background
color on line 546.
548. # Draw the tile sprites onto this surface.
549. for x in range(len(mapObj)):
550. for y in range(len(mapObj[x])):
551. spaceRect = pygame.Rect((x * TILEWIDTH, y * (TILEHEIGHT -
TILEFLOORHEIGHT), TILEWIDTH, TILEHEIGHT))
The set of nested for loops on line 549 and 550 will go through every possible XY coordinate
on the map and draw the appropriate tile image at that location.
552. if mapObj[x][y] in TILEMAPPING:
553. baseTile = TILEMAPPING[mapObj[x][y]]
554. elif mapObj[x][y] in OUTSIDEDECOMAPPING:
555. baseTile = TILEMAPPING[' ']
556.
557. # First draw the base ground/wall tile.
558. mapSurf.blit(baseTile, spaceRect)
559.
The baseTile variable is set to the Surface object of the tile image to be drawn at the
iteration’s current XY coordinate. If the single-character string is in the
OUTSIDEDECOMAPPING dictionary, then TILEMAPPING[' '] (the single-character string
for the basic outdoor floor tile) will be used.
560. if mapObj[x][y] in OUTSIDEDECOMAPPING:
561. # Draw any tree/rock decorations that are on this tile.
562. mapSurf.blit(OUTSIDEDECOMAPPING[mapObj[x][y]], spaceRect)
Additionally, if the tile was listed in the OUTSIDEDECOMAPPING dictionary, the corresponding
tree or rock image should be drawn on top of the tile that was just drawn at that XY coordinate.
563. elif (x, y) in gameStateObj['stars']:
564. if (x, y) in goals:
565. # A goal AND star are on this space, draw goal first.
566. mapSurf.blit(IMAGESDICT['covered goal'], spaceRect)
567. # Then draw the star sprite.
568. mapSurf.blit(IMAGESDICT['star'], spaceRect)
If there is a star located at this XY coordinate on the map (which can be found out by checking
for (x, y) in the list at gameStateObj['stars']), then a star should be drawn at this XY

Chapter 9 – Star Pusher 287
coordinate (which is done on line 568). Before the star is drawn, the code should first check if
there is also a goal at this location, in which case, the ―covered goal‖ tile should be drawn first.
569. elif (x, y) in goals:
570. # Draw a goal without a star on it.
571. mapSurf.blit(IMAGESDICT['uncovered goal'], spaceRect)
If there is a goal at this XY coordinate on the map, then the ―uncovered goal‖ should be drawn on
top of the tile. The uncovered goal is drawn because if execution has reached the elif statement
on line 569, we know that the elif statement’s condition on line 563 was False and there is no
star that is also at this XY coordinate.
573. # Last draw the player on the board.
574. if (x, y) == gameStateObj['player']:
575. # Note: The value "currentImage" refers
576. # to a key in "PLAYERIMAGES" which has the
577. # specific player image we want to show.
578. mapSurf.blit(PLAYERIMAGES[currentImage], spaceRect)
579.
580. return mapSurf
Finally, the drawMap() function checks if the player is located at this XY coordinate, and if so,
the player’s image is drawn over the tile. Line 580 is outside of the nested for loops that began
on line 549 and 550, so by the time the Surface object is returned, the entire map has been drawn
on it.
Checking if the Level is Finished
583. def isLevelFinished(levelObj, gameStateObj):
584. """Returns True if all the goals have stars in them."""
585. for goal in levelObj['goals']:
586. if goal not in gameStateObj['stars']:
587. # Found a space with a goal but no star on it.
588. return False
589. return True
The isLevelFinished() function returns True if all the goals are covered stars. Some
levels could have more stars than goals, so it’s important to check that all the goals are covered
by stars, rather than checking if all the stars are over goals.
The for loop on line 585 goes through the goals in levelObj['goals'] (which is a list of
tuples of XY coordinates for each goal) and checks if there is a star in the
gameStateObj['stars'] list that has those same XY coordinates (the not in operators

288 http://inventwithpython.com/pygame
Email questions to the author: [email protected]
work here because gameStateObj['stars'] is a list of those same tuples of XY
coordinates). The first time the code finds a goal with no star at the same position, the function
returns False.
If it gets through all of the goals and finds a star on each of them, isLevelFinished()
returns True.
592. def terminate():
593. pygame.quit()
594. sys.exit()
This terminate() function is the same as in all the previous programs.
597. if __name__ == '__main__':
598. main()
After all the functions have been defined, the main() function is called on line 602 to begin the
game.
Summary In the Squirrel Eat Squirrel game, the game world was pretty simple: just an infinite green plain
with grass images randomly scattered around it. The Star Pusher game introduced something
new: having uniquely designed levels with tile graphics. In order to store these levels in a format
that the computer can read, they are typed out into a text file and code in the program reads those
files and creates the data structures for the level.
Really, rather than just make a simple game with a single map, the Star Pusher program is more
of a system for loading custom maps based on the level file. Just by modifying the level file, we
can change where walls, stars, and goals appear in the game world. The Star Pusher program can
handle any configuration that the level file is set to (as long as it passes the assert statements
that ensure the map makes sense).
You won’t even have to know how to program Python to make your own levels. A text editor
program that modifies the starPusherLevels.txt file is all that anyone needs to have their own
level editor for the Star Pusher game.
For additional programming practice, you can download buggy versions of Star Pusher from
http://invpy.com/buggy/starpusher and try to figure out how to fix the bugs.

Chapter 10 – Four Extra Games 289
CHAPTER 10 – FOUR EXTRA
GAMES Included in this chapter is the source code for four extra games. Unfortunately, only the source
code (including comments) is in this chapter without any detailed explanation of the code. By
now, you can play these games and figure out how the code works by looking at the source code
and comments.
The games are:
Flippy – An ―Othello‖ clone where the player tries to flip the computer AI player’s tiles.
Ink Spill – A ―Flood It‖ clone that makes use of the flood fill algorithm.
Four in a Row – A ―Connect Four‖ clone against the computer AI player.
Gemgem – A ―Bejeweled‖ clone where the player swaps gems to try to get three
identical gems in a row.
If you have any questions about the source code in this book, feel free to email the author at
Buggy versions of these programs are also available if you want to practice fixing bugs:
http://invpy.com/buggy/flippy
http://invpy.com/buggy/inkspill
http://invpy.com/buggy/fourinarow
http://invpy.com/buggy/gemgem

290 http://inventwithpython.com/pygame
Email questions to the author: [email protected]
Flippy, an “Othello” Clone
Othello, also known by the generic name Reversi, has an 8 x 8 board with tiles that are black on
one side and white on the other. The starting board looks like Figure 10-1. Each player takes turn
placing down a new tile of their color. Any of the opponent's tiles that are between the new tile
and the other tiles of that color is flipped. The goal of the game is to have as many of the tiles
with your color as possible. For example, Figure 10-2 is what it looks like if the white player
places a new white tile on space 5, 6.
The starting Reversi board has two white tiles
and two black tiles.
White places a new tile.
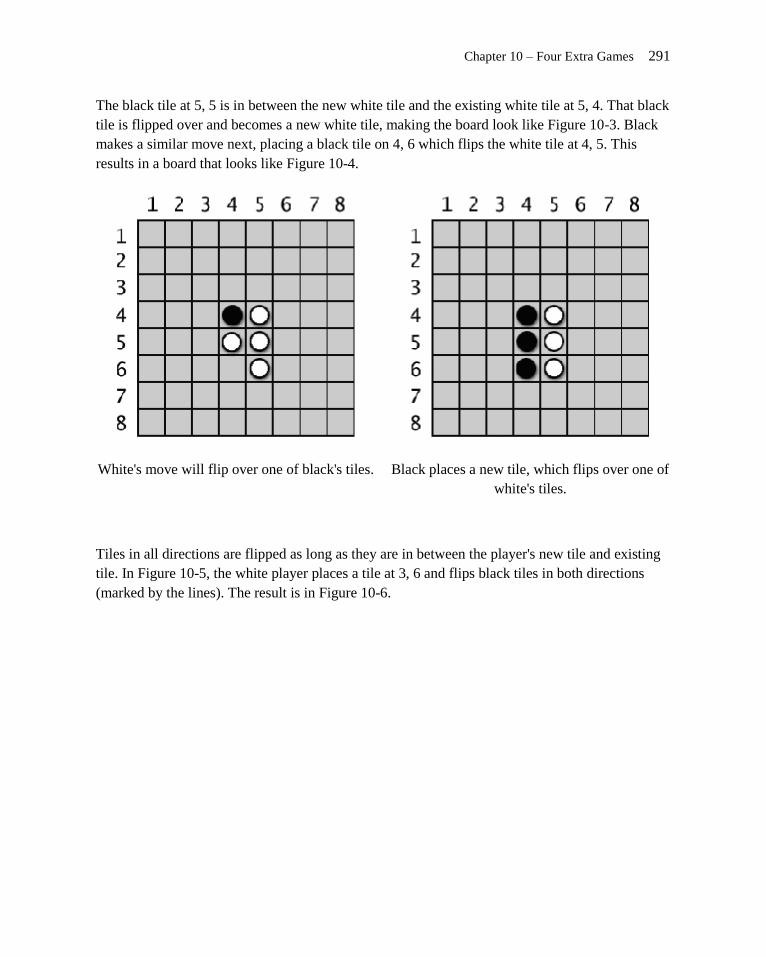
Chapter 10 – Four Extra Games 291
The black tile at 5, 5 is in between the new white tile and the existing white tile at 5, 4. That black
tile is flipped over and becomes a new white tile, making the board look like Figure 10-3. Black
makes a similar move next, placing a black tile on 4, 6 which flips the white tile at 4, 5. This
results in a board that looks like Figure 10-4.
White's move will flip over one of black's tiles. Black places a new tile, which flips over one of
white's tiles.
Tiles in all directions are flipped as long as they are in between the player's new tile and existing
tile. In Figure 10-5, the white player places a tile at 3, 6 and flips black tiles in both directions
(marked by the lines). The result is in Figure 10-6.

292 http://inventwithpython.com/pygame
Email questions to the author: [email protected]
White's second move at 3, 6 will flip two of
black's tiles.
The board after white's second move.
As you can see, each player can quickly grab a majority of the tiles on the board in just one or
two moves. Players must always make a move that captures at least one tile. The game ends when
a player either cannot make a move, or the board is completely full. The player with the most tiles
of their color wins.
You can learn more about Reversi from Wikipedia: http://en.wikipedia.org/wiki/Reversi
A text version of this game that uses print() and input() instead of Pygame is featured in
Chapter 15 of ―Invent Your Own Computer Games with Python‖. You can read that chapter for
details about how the computer AI’s algorithm was put together.
http://inventwithpython.com/chapter15.html
The computer AI for this game is pretty good, because it is easy for a computer to simulate every
possible move and take the one that flips over the most tiles. It usually beats me whenever I play
it.
Source Code for Flippy This source code can be downloaded from http://invpy.com/flippy.py.
The image files that Flippy uses can be downloaded from http://invpy.com/flippyimages.zip.
1. # Flippy (an Othello or Reversi clone)

Chapter 10 – Four Extra Games 293
2. # By Al Sweigart [email protected]
3. # http://inventwithpython.com/pygame
4. # Released under a "Simplified BSD" license
5.
6. # Based on the "reversi.py" code that originally appeared in "Invent
7. # Your Own Computer Games with Python", chapter 15:
8. # http://inventwithpython.com/chapter15.html
9.
10. import random, sys, pygame, time, copy
11. from pygame.locals import *
12.
13. FPS = 10 # frames per second to update the screen
14. WINDOWWIDTH = 640 # width of the program's window, in pixels
15. WINDOWHEIGHT = 480 # height in pixels
16. SPACESIZE = 50 # width & height of each space on the board, in pixels
17. BOARDWIDTH = 8 # how many columns of spaces on the game board
18. BOARDHEIGHT = 8 # how many rows of spaces on the game board
19. WHITE_TILE = 'WHITE_TILE' # an arbitrary but unique value
20. BLACK_TILE = 'BLACK_TILE' # an arbitrary but unique value
21. EMPTY_SPACE = 'EMPTY_SPACE' # an arbitrary but unique value
22. HINT_TILE = 'HINT_TILE' # an arbitrary but unique value
23. ANIMATIONSPEED = 25 # integer from 1 to 100, higher is faster animation
24.
25. # Amount of space on the left & right side (XMARGIN) or above and below
26. # (YMARGIN) the game board, in pixels.
27. XMARGIN = int((WINDOWWIDTH - (BOARDWIDTH * SPACESIZE)) / 2)
28. YMARGIN = int((WINDOWHEIGHT - (BOARDHEIGHT * SPACESIZE)) / 2)
29.
30. # R G B
31. WHITE = (255, 255, 255)
32. BLACK = ( 0, 0, 0)
33. GREEN = ( 0, 155, 0)
34. BRIGHTBLUE = ( 0, 50, 255)
35. BROWN = (174, 94, 0)
36.
37. TEXTBGCOLOR1 = BRIGHTBLUE
38. TEXTBGCOLOR2 = GREEN
39. GRIDLINECOLOR = BLACK
40. TEXTCOLOR = WHITE
41. HINTCOLOR = BROWN
42.
43.
44. def main():
45. global MAINCLOCK, DISPLAYSURF, FONT, BIGFONT, BGIMAGE
46.
47. pygame.init()

294 http://inventwithpython.com/pygame
Email questions to the author: [email protected]
48. MAINCLOCK = pygame.time.Clock()
49. DISPLAYSURF = pygame.display.set_mode((WINDOWWIDTH, WINDOWHEIGHT))
50. pygame.display.set_caption('Flippy')
51. FONT = pygame.font.Font('freesansbold.ttf', 16)
52. BIGFONT = pygame.font.Font('freesansbold.ttf', 32)
53.
54. # Set up the background image.
55. boardImage = pygame.image.load('flippyboard.png')
56. # Use smoothscale() to stretch the board image to fit the entire
board:
57. boardImage = pygame.transform.smoothscale(boardImage, (BOARDWIDTH *
SPACESIZE, BOARDHEIGHT * SPACESIZE))
58. boardImageRect = boardImage.get_rect()
59. boardImageRect.topleft = (XMARGIN, YMARGIN)
60. BGIMAGE = pygame.image.load('flippybackground.png')
61. # Use smoothscale() to stretch the background image to fit the entire
window:
62. BGIMAGE = pygame.transform.smoothscale(BGIMAGE, (WINDOWWIDTH,
WINDOWHEIGHT))
63. BGIMAGE.blit(boardImage, boardImageRect)
64.
65. # Run the main game.
66. while True:
67. if runGame() == False:
68. break
69.
70.
71. def runGame():
72. # Plays a single game of reversi each time this function is called.
73.
74. # Reset the board and game.
75. mainBoard = getNewBoard()
76. resetBoard(mainBoard)
77. showHints = False
78. turn = random.choice(['computer', 'player'])
79.
80. # Draw the starting board and ask the player what color they want.
81. drawBoard(mainBoard)
82. playerTile, computerTile = enterPlayerTile()
83.
84. # Make the Surface and Rect objects for the "New Game" and "Hints"
buttons
85. newGameSurf = FONT.render('New Game', True, TEXTCOLOR, TEXTBGCOLOR2)
86. newGameRect = newGameSurf.get_rect()
87. newGameRect.topright = (WINDOWWIDTH - 8, 10)
88. hintsSurf = FONT.render('Hints', True, TEXTCOLOR, TEXTBGCOLOR2)

Chapter 10 – Four Extra Games 295
89. hintsRect = hintsSurf.get_rect()
90. hintsRect.topright = (WINDOWWIDTH - 8, 40)
91.
92. while True: # main game loop
93. # Keep looping for player and computer's turns.
94. if turn == 'player':
95. # Player's turn:
96. if getValidMoves(mainBoard, playerTile) == []:
97. # If it's the player's turn but they
98. # can't move, then end the game.
99. break
100. movexy = None
101. while movexy == None:
102. # Keep looping until the player clicks on a valid space.
103.
104. # Determine which board data structure to use for display.
105. if showHints:
106. boardToDraw = getBoardWithValidMoves(mainBoard,
playerTile)
107. else:
108. boardToDraw = mainBoard
109.
110. checkForQuit()
111. for event in pygame.event.get(): # event handling loop
112. if event.type == MOUSEBUTTONUP:
113. # Handle mouse click events
114. mousex, mousey = event.pos
115. if newGameRect.collidepoint( (mousex, mousey) ):
116. # Start a new game
117. return True
118. elif hintsRect.collidepoint( (mousex, mousey) ):
119. # Toggle hints mode
120. showHints = not showHints
121. # movexy is set to a two-item tuple XY coordinate,
or None value
122. movexy = getSpaceClicked(mousex, mousey)
123. if movexy != None and not isValidMove(mainBoard,
playerTile, movexy[0], movexy[1]):
124. movexy = None
125.
126. # Draw the game board.
127. drawBoard(boardToDraw)
128. drawInfo(boardToDraw, playerTile, computerTile, turn)
129.
130. # Draw the "New Game" and "Hints" buttons.
131. DISPLAYSURF.blit(newGameSurf, newGameRect)

296 http://inventwithpython.com/pygame
Email questions to the author: [email protected]
132. DISPLAYSURF.blit(hintsSurf, hintsRect)
133.
134. MAINCLOCK.tick(FPS)
135. pygame.display.update()
136.
137. # Make the move and end the turn.
138. makeMove(mainBoard, playerTile, movexy[0], movexy[1], True)
139. if getValidMoves(mainBoard, computerTile) != []:
140. # Only set for the computer's turn if it can make a move.
141. turn = 'computer'
142.
143. else:
144. # Computer's turn:
145. if getValidMoves(mainBoard, computerTile) == []:
146. # If it was set to be the computer's turn but
147. # they can't move, then end the game.
148. break
149.
150. # Draw the board.
151. drawBoard(mainBoard)
152. drawInfo(mainBoard, playerTile, computerTile, turn)
153.
154. # Draw the "New Game" and "Hints" buttons.
155. DISPLAYSURF.blit(newGameSurf, newGameRect)
156. DISPLAYSURF.blit(hintsSurf, hintsRect)
157.
158. # Make it look like the computer is thinking by pausing a bit.
159. pauseUntil = time.time() + random.randint(5, 15) * 0.1
160. while time.time() < pauseUntil:
161. pygame.display.update()
162.
163. # Make the move and end the turn.
164. x, y = getComputerMove(mainBoard, computerTile)
165. makeMove(mainBoard, computerTile, x, y, True)
166. if getValidMoves(mainBoard, playerTile) != []:
167. # Only set for the player's turn if they can make a move.
168. turn = 'player'
169.
170. # Display the final score.
171. drawBoard(mainBoard)
172. scores = getScoreOfBoard(mainBoard)
173.
174. # Determine the text of the message to display.
175. if scores[playerTile] > scores[computerTile]:
176. text = 'You beat the computer by %s points! Congratulations!' % \
177. (scores[playerTile] - scores[computerTile])

Chapter 10 – Four Extra Games 297
178. elif scores[playerTile] < scores[computerTile]:
179. text = 'You lost. The computer beat you by %s points.' % \
180. (scores[computerTile] - scores[playerTile])
181. else:
182. text = 'The game was a tie!'
183.
184. textSurf = FONT.render(text, True, TEXTCOLOR, TEXTBGCOLOR1)
185. textRect = textSurf.get_rect()
186. textRect.center = (int(WINDOWWIDTH / 2), int(WINDOWHEIGHT / 2))
187. DISPLAYSURF.blit(textSurf, textRect)
188.
189. # Display the "Play again?" text with Yes and No buttons.
190. text2Surf = BIGFONT.render('Play again?', True, TEXTCOLOR,
TEXTBGCOLOR1)
191. text2Rect = text2Surf.get_rect()
192. text2Rect.center = (int(WINDOWWIDTH / 2), int(WINDOWHEIGHT / 2) + 50)
193.
194. # Make "Yes" button.
195. yesSurf = BIGFONT.render('Yes', True, TEXTCOLOR, TEXTBGCOLOR1)
196. yesRect = yesSurf.get_rect()
197. yesRect.center = (int(WINDOWWIDTH / 2) - 60, int(WINDOWHEIGHT / 2) +
90)
198.
199. # Make "No" button.
200. noSurf = BIGFONT.render('No', True, TEXTCOLOR, TEXTBGCOLOR1)
201. noRect = noSurf.get_rect()
202. noRect.center = (int(WINDOWWIDTH / 2) + 60, int(WINDOWHEIGHT / 2) +
90)
203.
204. while True:
205. # Process events until the user clicks on Yes or No.
206. checkForQuit()
207. for event in pygame.event.get(): # event handling loop
208. if event.type == MOUSEBUTTONUP:
209. mousex, mousey = event.pos
210. if yesRect.collidepoint( (mousex, mousey) ):
211. return True
212. elif noRect.collidepoint( (mousex, mousey) ):
213. return False
214. DISPLAYSURF.blit(textSurf, textRect)
215. DISPLAYSURF.blit(text2Surf, text2Rect)
216. DISPLAYSURF.blit(yesSurf, yesRect)
217. DISPLAYSURF.blit(noSurf, noRect)
218. pygame.display.update()
219. MAINCLOCK.tick(FPS)
220.

298 http://inventwithpython.com/pygame
Email questions to the author: [email protected]
221.
222. def translateBoardToPixelCoord(x, y):
223. return XMARGIN + x * SPACESIZE + int(SPACESIZE / 2), YMARGIN + y *
SPACESIZE + int(SPACESIZE / 2)
224.
225.
226. def animateTileChange(tilesToFlip, tileColor, additionalTile):
227. # Draw the additional tile that was just laid down. (Otherwise we'd
228. # have to completely redraw the board & the board info.)
229. if tileColor == WHITE_TILE:
230. additionalTileColor = WHITE
231. else:
232. additionalTileColor = BLACK
233. additionalTileX, additionalTileY =
translateBoardToPixelCoord(additionalTile[0], additionalTile[1])
234. pygame.draw.circle(DISPLAYSURF, additionalTileColor, (additionalTileX,
additionalTileY), int(SPACESIZE / 2) - 4)
235. pygame.display.update()
236.
237. for rgbValues in range(0, 255, int(ANIMATIONSPEED * 2.55)):
238. if rgbValues > 255:
239. rgbValues = 255
240. elif rgbValues < 0:
241. rgbValues = 0
242.
243. if tileColor == WHITE_TILE:
244. color = tuple([rgbValues] * 3) # rgbValues goes from 0 to 255
245. elif tileColor == BLACK_TILE:
246. color = tuple([255 - rgbValues] * 3) # rgbValues goes from 255
to 0
247.
248. for x, y in tilesToFlip:
249. centerx, centery = translateBoardToPixelCoord(x, y)
250. pygame.draw.circle(DISPLAYSURF, color, (centerx, centery),
int(SPACESIZE / 2) - 4)
251. pygame.display.update()
252. MAINCLOCK.tick(FPS)
253. checkForQuit()
254.
255.
256. def drawBoard(board):
257. # Draw background of board.
258. DISPLAYSURF.blit(BGIMAGE, BGIMAGE.get_rect())
259.
260. # Draw grid lines of the board.
261. for x in range(BOARDWIDTH + 1):

Chapter 10 – Four Extra Games 299
262. # Draw the horizontal lines.
263. startx = (x * SPACESIZE) + XMARGIN
264. starty = YMARGIN
265. endx = (x * SPACESIZE) + XMARGIN
266. endy = YMARGIN + (BOARDHEIGHT * SPACESIZE)
267. pygame.draw.line(DISPLAYSURF, GRIDLINECOLOR, (startx, starty),
(endx, endy))
268. for y in range(BOARDHEIGHT + 1):
269. # Draw the vertical lines.
270. startx = XMARGIN
271. starty = (y * SPACESIZE) + YMARGIN
272. endx = XMARGIN + (BOARDWIDTH * SPACESIZE)
273. endy = (y * SPACESIZE) + YMARGIN
274. pygame.draw.line(DISPLAYSURF, GRIDLINECOLOR, (startx, starty),
(endx, endy))
275.
276. # Draw the black & white tiles or hint spots.
277. for x in range(BOARDWIDTH):
278. for y in range(BOARDHEIGHT):
279. centerx, centery = translateBoardToPixelCoord(x, y)
280. if board[x][y] == WHITE_TILE or board[x][y] == BLACK_TILE:
281. if board[x][y] == WHITE_TILE:
282. tileColor = WHITE
283. else:
284. tileColor = BLACK
285. pygame.draw.circle(DISPLAYSURF, tileColor, (centerx,
centery), int(SPACESIZE / 2) - 4)
286. if board[x][y] == HINT_TILE:
287. pygame.draw.rect(DISPLAYSURF, HINTCOLOR, (centerx - 4,
centery - 4, 8, 8))
288.
289.
290. def getSpaceClicked(mousex, mousey):
291. # Return a tuple of two integers of the board space coordinates where
292. # the mouse was clicked. (Or returns None not in any space.)
293. for x in range(BOARDWIDTH):
294. for y in range(BOARDHEIGHT):
295. if mousex > x * SPACESIZE + XMARGIN and \
296. mousex < (x + 1) * SPACESIZE + XMARGIN and \
297. mousey > y * SPACESIZE + YMARGIN and \
298. mousey < (y + 1) * SPACESIZE + YMARGIN:
299. return (x, y)
300. return None
301.
302.
303. def drawInfo(board, playerTile, computerTile, turn):

300 http://inventwithpython.com/pygame
Email questions to the author: [email protected]
304. # Draws scores and whose turn it is at the bottom of the screen.
305. scores = getScoreOfBoard(board)
306. scoreSurf = FONT.render("Player Score: %s Computer Score: %s
%s's Turn" % (str(scores[playerTile]), str(scores[computerTile]),
turn.title()), True, TEXTCOLOR)
307. scoreRect = scoreSurf.get_rect()
308. scoreRect.bottomleft = (10, WINDOWHEIGHT - 5)
309. DISPLAYSURF.blit(scoreSurf, scoreRect)
310.
311.
312. def resetBoard(board):
313. # Blanks out the board it is passed, and sets up starting tiles.
314. for x in range(BOARDWIDTH):
315. for y in range(BOARDHEIGHT):
316. board[x][y] = EMPTY_SPACE
317.
318. # Add starting pieces to the center
319. board[3][3] = WHITE_TILE
320. board[3][4] = BLACK_TILE
321. board[4][3] = BLACK_TILE
322. board[4][4] = WHITE_TILE
323.
324.
325. def getNewBoard():
326. # Creates a brand new, empty board data structure.
327. board = []
328. for i in range(BOARDWIDTH):
329. board.append([EMPTY_SPACE] * BOARDHEIGHT)
330.
331. return board
332.
333.
334. def isValidMove(board, tile, xstart, ystart):
335. # Returns False if the player's move is invalid. If it is a valid
336. # move, returns a list of spaces of the captured pieces.
337. if board[xstart][ystart] != EMPTY_SPACE or not isOnBoard(xstart,
ystart):
338. return False
339.
340. board[xstart][ystart] = tile # temporarily set the tile on the board.
341.
342. if tile == WHITE_TILE:
343. otherTile = BLACK_TILE
344. else:
345. otherTile = WHITE_TILE
346.

Chapter 10 – Four Extra Games 301
347. tilesToFlip = []
348. # check each of the eight directions:
349. for xdirection, ydirection in [[0, 1], [1, 1], [1, 0], [1, -1], [0, -
1], [-1, -1], [-1, 0], [-1, 1]]:
350. x, y = xstart, ystart
351. x += xdirection
352. y += ydirection
353. if isOnBoard(x, y) and board[x][y] == otherTile:
354. # The piece belongs to the other player next to our piece.
355. x += xdirection
356. y += ydirection
357. if not isOnBoard(x, y):
358. continue
359. while board[x][y] == otherTile:
360. x += xdirection
361. y += ydirection
362. if not isOnBoard(x, y):
363. break # break out of while loop, continue in for loop
364. if not isOnBoard(x, y):
365. continue
366. if board[x][y] == tile:
367. # There are pieces to flip over. Go in the reverse
368. # direction until we reach the original space, noting all
369. # the tiles along the way.
370. while True:
371. x -= xdirection
372. y -= ydirection
373. if x == xstart and y == ystart:
374. break
375. tilesToFlip.append([x, y])
376.
377. board[xstart][ystart] = EMPTY_SPACE # make space empty
378. if len(tilesToFlip) == 0: # If no tiles flipped, this move is invalid
379. return False
380. return tilesToFlip
381.
382.
383. def isOnBoard(x, y):
384. # Returns True if the coordinates are located on the board.
385. return x >= 0 and x < BOARDWIDTH and y >= 0 and y < BOARDHEIGHT
386.
387.
388. def getBoardWithValidMoves(board, tile):
389. # Returns a new board with hint markings.
390. dupeBoard = copy.deepcopy(board)
391.
302 http://inventwithpython.com/pygame
Email questions to the author: [email protected]
392. for x, y in getValidMoves(dupeBoard, tile):
393. dupeBoard[x][y] = HINT_TILE
394. return dupeBoard
395.
396.
397. def getValidMoves(board, tile):
398. # Returns a list of (x,y) tuples of all valid moves.
399. validMoves = []
400.
401. for x in range(BOARDWIDTH):
402. for y in range(BOARDHEIGHT):
403. if isValidMove(board, tile, x, y) != False:
404. validMoves.append((x, y))
405. return validMoves
406.
407.
408. def getScoreOfBoard(board):
409. # Determine the score by counting the tiles.
410. xscore = 0
411. oscore = 0
412. for x in range(BOARDWIDTH):
413. for y in range(BOARDHEIGHT):
414. if board[x][y] == WHITE_TILE:
415. xscore += 1
416. if board[x][y] == BLACK_TILE:
417. oscore += 1
418. return {WHITE_TILE:xscore, BLACK_TILE:oscore}
419.
420.
421. def enterPlayerTile():
422. # Draws the text and handles the mouse click events for letting
423. # the player choose which color they want to be. Returns
424. # [WHITE_TILE, BLACK_TILE] if the player chooses to be White,
425. # [BLACK_TILE, WHITE_TILE] if Black.
426.
427. # Create the text.
428. textSurf = FONT.render('Do you want to be white or black?', True,
TEXTCOLOR, TEXTBGCOLOR1)
429. textRect = textSurf.get_rect()
430. textRect.center = (int(WINDOWWIDTH / 2), int(WINDOWHEIGHT / 2))
431.
432. xSurf = BIGFONT.render('White', True, TEXTCOLOR, TEXTBGCOLOR1)
433. xRect = xSurf.get_rect()
434. xRect.center = (int(WINDOWWIDTH / 2) - 60, int(WINDOWHEIGHT / 2) + 40)
435.
436. oSurf = BIGFONT.render('Black', True, TEXTCOLOR, TEXTBGCOLOR1)

Chapter 10 – Four Extra Games 303
437. oRect = oSurf.get_rect()
438. oRect.center = (int(WINDOWWIDTH / 2) + 60, int(WINDOWHEIGHT / 2) + 40)
439.
440. while True:
441. # Keep looping until the player has clicked on a color.
442. checkForQuit()
443. for event in pygame.event.get(): # event handling loop
444. if event.type == MOUSEBUTTONUP:
445. mousex, mousey = event.pos
446. if xRect.collidepoint( (mousex, mousey) ):
447. return [WHITE_TILE, BLACK_TILE]
448. elif oRect.collidepoint( (mousex, mousey) ):
449. return [BLACK_TILE, WHITE_TILE]
450.
451. # Draw the screen.
452. DISPLAYSURF.blit(textSurf, textRect)
453. DISPLAYSURF.blit(xSurf, xRect)
454. DISPLAYSURF.blit(oSurf, oRect)
455. pygame.display.update()
456. MAINCLOCK.tick(FPS)
457.
458.
459. def makeMove(board, tile, xstart, ystart, realMove=False):
460. # Place the tile on the board at xstart, ystart, and flip tiles
461. # Returns False if this is an invalid move, True if it is valid.
462. tilesToFlip = isValidMove(board, tile, xstart, ystart)
463.
464. if tilesToFlip == False:
465. return False
466.
467. board[xstart][ystart] = tile
468.
469. if realMove:
470. animateTileChange(tilesToFlip, tile, (xstart, ystart))
471.
472. for x, y in tilesToFlip:
473. board[x][y] = tile
474. return True
475.
476.
477. def isOnCorner(x, y):
478. # Returns True if the position is in one of the four corners.
479. return (x == 0 and y == 0) or \
480. (x == BOARDWIDTH and y == 0) or \
481. (x == 0 and y == BOARDHEIGHT) or \
482. (x == BOARDWIDTH and y == BOARDHEIGHT)

304 http://inventwithpython.com/pygame
Email questions to the author: [email protected]
483.
484.
485. def getComputerMove(board, computerTile):
486. # Given a board and the computer's tile, determine where to
487. # move and return that move as a [x, y] list.
488. possibleMoves = getValidMoves(board, computerTile)
489.
490. # randomize the order of the possible moves
491. random.shuffle(possibleMoves)
492.
493. # always go for a corner if available.
494. for x, y in possibleMoves:
495. if isOnCorner(x, y):
496. return [x, y]
497.
498. # Go through all possible moves and remember the best scoring move
499. bestScore = -1
500. for x, y in possibleMoves:
501. dupeBoard = copy.deepcopy(board)
502. makeMove(dupeBoard, computerTile, x, y)
503. score = getScoreOfBoard(dupeBoard)[computerTile]
504. if score > bestScore:
505. bestMove = [x, y]
506. bestScore = score
507. return bestMove
508.
509.
510. def checkForQuit():
511. for event in pygame.event.get((QUIT, KEYUP)): # event handling loop
512. if event.type == QUIT or (event.type == KEYUP and event.key ==
K_ESCAPE):
513. pygame.quit()
514. sys.exit()
515.
516.
517. if __name__ == '__main__':
518. main()

Chapter 10 – Four Extra Games 305
Ink Spill, a “Flood It” Clone
The game ―Flood It‖ begins with a board filled with colored tiles. On each turn the player chooses
a new color to paint the top left tile and any tiles adjacent to it of that same color. This game
makes use of the flood fill algorithm (described in the Star Pusher chapter). The goal of the game
is to turn the entire board into a single color before running out of turns.
This game also has a Settings screen where the player can change the size of the board and the
difficulty of the game. If the player gets board of the colors, there are a few other color schemes
they can switch to as well.
Source Code for Ink Spill This source code can be downloaded from http://invpy.com/inkspill.py.
The image files that Flippy uses can be downloaded from http://invpy.com/inkspillimages.zip.
1. # Ink Spill (a Flood It clone)
2. # http://inventwithpython.com/pygame
3. # By Al Sweigart [email protected]
4. # Released under a "Simplified BSD" license
5.
6. import random, sys, webbrowser, copy, pygame
7. from pygame.locals import *
8.
9. # There are different box sizes, number of boxes, and
10. # life depending on the "board size" setting selected.
11. SMALLBOXSIZE = 60 # size is in pixels
12. MEDIUMBOXSIZE = 20
13. LARGEBOXSIZE = 11
14.
15. SMALLBOARDSIZE = 6 # size is in boxes

306 http://inventwithpython.com/pygame
Email questions to the author: [email protected]
16. MEDIUMBOARDSIZE = 17
17. LARGEBOARDSIZE = 30
18.
19. SMALLMAXLIFE = 10 # number of turns
20. MEDIUMMAXLIFE = 30
21. LARGEMAXLIFE = 64
22.
23. FPS = 30
24. WINDOWWIDTH = 640
25. WINDOWHEIGHT = 480
26. boxSize = MEDIUMBOXSIZE
27. PALETTEGAPSIZE = 10
28. PALETTESIZE = 45
29. EASY = 0 # arbitrary but unique value
30. MEDIUM = 1 # arbitrary but unique value
31. HARD = 2 # arbitrary but unique value
32.
33. difficulty = MEDIUM # game starts in "medium" mode
34. maxLife = MEDIUMMAXLIFE
35. boardWidth = MEDIUMBOARDSIZE
36. boardHeight = MEDIUMBOARDSIZE
37.
38.
39. # R G B
40. WHITE = (255, 255, 255)
41. DARKGRAY = ( 70, 70, 70)
42. BLACK = ( 0, 0, 0)
43. RED = (255, 0, 0)
44. GREEN = ( 0, 255, 0)
45. BLUE = ( 0, 0, 255)
46. YELLOW = (255, 255, 0)
47. ORANGE = (255, 128, 0)
48. PURPLE = (255, 0, 255)
49.
50. # The first color in each scheme is the background color, the next six are
the palette colors.
51. COLORSCHEMES = (((150, 200, 255), RED, GREEN, BLUE, YELLOW, ORANGE,
PURPLE),
52. ((0, 155, 104), (97, 215, 164), (228, 0, 69), (0, 125,
50), (204, 246, 0), (148, 0, 45), (241, 109, 149)),
53. ((195, 179, 0), (255, 239, 115), (255, 226, 0), (147, 3,
167), (24, 38, 176), (166, 147, 0), (197, 97, 211)),
54. ((85, 0, 0), (155, 39, 102), (0, 201, 13), (255,
118, 0), (206, 0, 113), (0, 130, 9), (255, 180, 115)),
55. ((191, 159, 64), (183, 182, 208), (4, 31, 183), (167,
184, 45), (122, 128, 212), (37, 204, 7), (88, 155, 213)),

Chapter 10 – Four Extra Games 307
56. ((200, 33, 205), (116, 252, 185), (68, 56, 56), (52, 238,
83), (23, 149, 195), (222, 157, 227), (212, 86, 185)))
57. for i in range(len(COLORSCHEMES)):
58. assert len(COLORSCHEMES[i]) == 7, 'Color scheme %s does not have
exactly 7 colors.' % (i)
59. bgColor = COLORSCHEMES[0][0]
60. paletteColors = COLORSCHEMES[0][1:]
61.
62. def main():
63. global FPSCLOCK, DISPLAYSURF, LOGOIMAGE, SPOTIMAGE, SETTINGSIMAGE,
SETTINGSBUTTONIMAGE, RESETBUTTONIMAGE
64.
65. pygame.init()
66. FPSCLOCK = pygame.time.Clock()
67. DISPLAYSURF = pygame.display.set_mode((WINDOWWIDTH, WINDOWHEIGHT))
68.
69. # Load images
70. LOGOIMAGE = pygame.image.load('inkspilllogo.png')
71. SPOTIMAGE = pygame.image.load('inkspillspot.png')
72. SETTINGSIMAGE = pygame.image.load('inkspillsettings.png')
73. SETTINGSBUTTONIMAGE = pygame.image.load('inkspillsettingsbutton.png')
74. RESETBUTTONIMAGE = pygame.image.load('inkspillresetbutton.png')
75.
76. pygame.display.set_caption('Ink Spill')
77. mousex = 0
78. mousey = 0
79. mainBoard = generateRandomBoard(boardWidth, boardHeight, difficulty)
80. life = maxLife
81. lastPaletteClicked = None
82.
83. while True: # main game loop
84. paletteClicked = None
85. resetGame = False
86.
87. # Draw the screen.
88. DISPLAYSURF.fill(bgColor)
89. drawLogoAndButtons()
90. drawBoard(mainBoard)
91. drawLifeMeter(life)
92. drawPalettes()
93.
94. checkForQuit()
95. for event in pygame.event.get(): # event handling loop
96. if event.type == MOUSEBUTTONUP:
97. mousex, mousey = event.pos

308 http://inventwithpython.com/pygame
Email questions to the author: [email protected]
98. if pygame.Rect(WINDOWWIDTH -
SETTINGSBUTTONIMAGE.get_width(),
99. WINDOWHEIGHT -
SETTINGSBUTTONIMAGE.get_height(),
100. SETTINGSBUTTONIMAGE.get_width(),
101.
SETTINGSBUTTONIMAGE.get_height()).collidepoint(mousex, mousey):
102. resetGame = showSettingsScreen() # clicked on Settings
button
103. elif pygame.Rect(WINDOWWIDTH -
RESETBUTTONIMAGE.get_width(),
104. WINDOWHEIGHT -
SETTINGSBUTTONIMAGE.get_height() - RESETBUTTONIMAGE.get_height(),
105. RESETBUTTONIMAGE.get_width(),
106.
RESETBUTTONIMAGE.get_height()).collidepoint(mousex, mousey):
107. resetGame = True # clicked on Reset button
108. else:
109. # check if a palette button was clicked
110. paletteClicked = getColorOfPaletteAt(mousex, mousey)
111.
112. if paletteClicked != None and paletteClicked !=
lastPaletteClicked:
113. # a palette button was clicked that is different from the
114. # last palette button clicked (this check prevents the player
115. # from accidentally clicking the same palette twice)
116. lastPaletteClicked = paletteClicked
117. floodAnimation(mainBoard, paletteClicked)
118. life -= 1
119.
120. resetGame = False
121. if hasWon(mainBoard):
122. for i in range(4): # flash border 4 times
123. flashBorderAnimation(WHITE, mainBoard)
124. resetGame = True
125. pygame.time.wait(2000) # pause so the player can bask in
victory
126. elif life == 0:
127. # life is zero, so player has lost
128. drawLifeMeter(0)
129. pygame.display.update()
130. pygame.time.wait(400)
131. for i in range(4):
132. flashBorderAnimation(BLACK, mainBoard)
133. resetGame = True

Chapter 10 – Four Extra Games 309
134. pygame.time.wait(2000) # pause so the player can suffer in
their defeat
135.
136. if resetGame:
137. # start a new game
138. mainBoard = generateRandomBoard(boardWidth, boardHeight,
difficulty)
139. life = maxLife
140. lastPaletteClicked = None
141.
142. pygame.display.update()
143. FPSCLOCK.tick(FPS)
144.
145.
146. def checkForQuit():
147. # Terminates the program if there are any QUIT or escape key events.
148. for event in pygame.event.get(QUIT): # get all the QUIT events
149. pygame.quit() # terminate if any QUIT events are present
150. sys.exit()
151. for event in pygame.event.get(KEYUP): # get all the KEYUP events
152. if event.key == K_ESCAPE:
153. pygame.quit() # terminate if the KEYUP event was for the Esc
key
154. sys.exit()
155. pygame.event.post(event) # put the other KEYUP event objects back
156.
157.
158. def hasWon(board):
159. # if the entire board is the same color, player has won
160. for x in range(boardWidth):
161. for y in range(boardHeight):
162. if board[x][y] != board[0][0]:
163. return False # found a different color, player has not won
164. return True
165.
166.
167. def showSettingsScreen():
168. global difficulty, boxSize, boardWidth, boardHeight, maxLife,
paletteColors, bgColor
169.
170. # The pixel coordinates in this function were obtained by loading
171. # the inkspillsettings.png image into a graphics editor and reading
172. # the pixel coordinates from there. Handy trick.
173.
174. origDifficulty = difficulty
175. origBoxSize = boxSize

310 http://inventwithpython.com/pygame
Email questions to the author: [email protected]
176. screenNeedsRedraw = True
177.
178. while True:
179. if screenNeedsRedraw:
180. DISPLAYSURF.fill(bgColor)
181. DISPLAYSURF.blit(SETTINGSIMAGE, (0,0))
182.
183. # place the ink spot marker next to the selected difficulty
184. if difficulty == EASY:
185. DISPLAYSURF.blit(SPOTIMAGE, (30, 4))
186. if difficulty == MEDIUM:
187. DISPLAYSURF.blit(SPOTIMAGE, (8, 41))
188. if difficulty == HARD:
189. DISPLAYSURF.blit(SPOTIMAGE, (30, 76))
190.
191. # place the ink spot marker next to the selected size
192. if boxSize == SMALLBOXSIZE:
193. DISPLAYSURF.blit(SPOTIMAGE, (22, 150))
194. if boxSize == MEDIUMBOXSIZE:
195. DISPLAYSURF.blit(SPOTIMAGE, (11, 185))
196. if boxSize == LARGEBOXSIZE:
197. DISPLAYSURF.blit(SPOTIMAGE, (24, 220))
198.
199. for i in range(len(COLORSCHEMES)):
200. drawColorSchemeBoxes(500, i * 60 + 30, i)
201.
202. pygame.display.update()
203.
204. screenNeedsRedraw = False # by default, don't redraw the screen
205. for event in pygame.event.get(): # event handling loop
206. if event.type == QUIT:
207. pygame.quit()
208. sys.exit()
209. elif event.type == KEYUP:
210. if event.key == K_ESCAPE:
211. # Esc key on settings screen goes back to game
212. return not (origDifficulty == difficulty and
origBoxSize == boxSize)
213. elif event.type == MOUSEBUTTONUP:
214. screenNeedsRedraw = True # screen should be redrawn
215. mousex, mousey = event.pos # syntactic sugar
216.
217. # check for clicks on the difficulty buttons
218. if pygame.Rect(74, 16, 111, 30).collidepoint(mousex,
mousey):
219. difficulty = EASY

Chapter 10 – Four Extra Games 311
220. elif pygame.Rect(53, 50, 104, 29).collidepoint(mousex,
mousey):
221. difficulty = MEDIUM
222. elif pygame.Rect(72, 85, 65, 31).collidepoint(mousex,
mousey):
223. difficulty = HARD
224.
225. # check for clicks on the size buttons
226. elif pygame.Rect(63, 156, 84, 31).collidepoint(mousex,
mousey):
227. # small board size setting:
228. boxSize = SMALLBOXSIZE
229. boardWidth = SMALLBOARDSIZE
230. boardHeight = SMALLBOARDSIZE
231. maxLife = SMALLMAXLIFE
232. elif pygame.Rect(52, 192, 106,32).collidepoint(mousex,
mousey):
233. # medium board size setting:
234. boxSize = MEDIUMBOXSIZE
235. boardWidth = MEDIUMBOARDSIZE
236. boardHeight = MEDIUMBOARDSIZE
237. maxLife = MEDIUMMAXLIFE
238. elif pygame.Rect(67, 228, 58, 37).collidepoint(mousex,
mousey):
239. # large board size setting:
240. boxSize = LARGEBOXSIZE
241. boardWidth = LARGEBOARDSIZE
242. boardHeight = LARGEBOARDSIZE
243. maxLife = LARGEMAXLIFE
244. elif pygame.Rect(14, 299, 371, 97).collidepoint(mousex,
mousey):
245. # clicked on the "learn programming" ad
246. webbrowser.open('http://inventwithpython.com') # opens
a web browser
247. elif pygame.Rect(178, 418, 215, 34).collidepoint(mousex,
mousey):
248. # clicked on the "back to game" button
249. return not (origDifficulty == difficulty and
origBoxSize == boxSize)
250.
251. for i in range(len(COLORSCHEMES)):
252. # clicked on a color scheme button
253. if pygame.Rect(500, 30 + i * 60, MEDIUMBOXSIZE * 3,
MEDIUMBOXSIZE * 2).collidepoint(mousex, mousey):
254. bgColor = COLORSCHEMES[i][0]
255. paletteColors = COLORSCHEMES[i][1:]

312 http://inventwithpython.com/pygame
Email questions to the author: [email protected]
256.
257.
258. def drawColorSchemeBoxes(x, y, schemeNum):
259. # Draws the color scheme boxes that appear on the "Settings" screen.
260. for boxy in range(2):
261. for boxx in range(3):
262. pygame.draw.rect(DISPLAYSURF, COLORSCHEMES[schemeNum][3 * boxy
+ boxx + 1], (x + MEDIUMBOXSIZE * boxx, y + MEDIUMBOXSIZE * boxy,
MEDIUMBOXSIZE, MEDIUMBOXSIZE))
263. if paletteColors == COLORSCHEMES[schemeNum][1:]:
264. # put the ink spot next to the selected color scheme
265. DISPLAYSURF.blit(SPOTIMAGE, (x - 50, y))
266.
267.
268. def flashBorderAnimation(color, board, animationSpeed=30):
269. origSurf = DISPLAYSURF.copy()
270. flashSurf = pygame.Surface(DISPLAYSURF.get_size())
271. flashSurf = flashSurf.convert_alpha()
272. for start, end, step in ((0, 256, 1), (255, 0, -1)):
273. # the first iteration on the outer loop will set the inner loop
274. # to have transparency go from 0 to 255, the second iteration will
275. # have it go from 255 to 0. This is the "flash".
276. for transparency in range(start, end, animationSpeed * step):
277. DISPLAYSURF.blit(origSurf, (0, 0))
278. r, g, b = color
279. flashSurf.fill((r, g, b, transparency))
280. DISPLAYSURF.blit(flashSurf, (0, 0))
281. drawBoard(board) # draw board ON TOP OF the transparency layer
282. pygame.display.update()
283. FPSCLOCK.tick(FPS)
284. DISPLAYSURF.blit(origSurf, (0, 0)) # redraw the original surface
285.
286.
287. def floodAnimation(board, paletteClicked, animationSpeed=25):
288. origBoard = copy.deepcopy(board)
289. floodFill(board, board[0][0], paletteClicked, 0, 0)
290.
291. for transparency in range(0, 255, animationSpeed):
292. # The "new" board slowly become opaque over the original board.
293. drawBoard(origBoard)
294. drawBoard(board, transparency)
295. pygame.display.update()
296. FPSCLOCK.tick(FPS)
297.
298.
299. def generateRandomBoard(width, height, difficulty=MEDIUM):

Chapter 10 – Four Extra Games 313
300. # Creates a board data structure with random colors for each box.
301. board = []
302. for x in range(width):
303. column = []
304. for y in range(height):
305. column.append(random.randint(0, len(paletteColors) - 1))
306. board.append(column)
307.
308. # Make board easier by setting some boxes to same color as a neighbor.
309.
310. # Determine how many boxes to change.
311. if difficulty == EASY:
312. if boxSize == SMALLBOXSIZE:
313. boxesToChange = 100
314. else:
315. boxesToChange = 1500
316. elif difficulty == MEDIUM:
317. if boxSize == SMALLBOXSIZE:
318. boxesToChange = 5
319. else:
320. boxesToChange = 200
321. else:
322. boxesToChange = 0
323.
324. # Change neighbor's colors:
325. for i in range(boxesToChange):
326. # Randomly choose a box whose color to copy
327. x = random.randint(1, width-2)
328. y = random.randint(1, height-2)
329.
330. # Randomly choose neighbors to change.
331. direction = random.randint(0, 3)
332. if direction == 0: # change left and up neighbor
333. board[x-1][y] == board[x][y]
334. board[x][y-1] == board[x][y]
335. elif direction == 1: # change right and down neighbor
336. board[x+1][y] == board[x][y]
337. board[x][y+1] == board[x][y]
338. elif direction == 2: # change right and up neighbor
339. board[x][y-1] == board[x][y]
340. board[x+1][y] == board[x][y]
341. else: # change left and down neighbor
342. board[x][y+1] == board[x][y]
343. board[x-1][y] == board[x][y]
344. return board
345.

314 http://inventwithpython.com/pygame
Email questions to the author: [email protected]
346.
347. def drawLogoAndButtons():
348. # draw the Ink Spill logo and Settings and Reset buttons.
349. DISPLAYSURF.blit(LOGOIMAGE, (WINDOWWIDTH - LOGOIMAGE.get_width(), 0))
350. DISPLAYSURF.blit(SETTINGSBUTTONIMAGE, (WINDOWWIDTH -
SETTINGSBUTTONIMAGE.get_width(), WINDOWHEIGHT -
SETTINGSBUTTONIMAGE.get_height()))
351. DISPLAYSURF.blit(RESETBUTTONIMAGE, (WINDOWWIDTH -
RESETBUTTONIMAGE.get_width(), WINDOWHEIGHT - SETTINGSBUTTONIMAGE.get_height() -
RESETBUTTONIMAGE.get_height()))
352.
353.
354. def drawBoard(board, transparency=255):
355. # The colored squares are drawn to a temporary surface which is then
356. # drawn to the DISPLAYSURF surface. This is done so we can draw the
357. # squares with transparency on top of DISPLAYSURF as it currently is.
358. tempSurf = pygame.Surface(DISPLAYSURF.get_size())
359. tempSurf = tempSurf.convert_alpha()
360. tempSurf.fill((0, 0, 0, 0))
361.
362. for x in range(boardWidth):
363. for y in range(boardHeight):
364. left, top = leftTopPixelCoordOfBox(x, y)
365. r, g, b = paletteColors[board[x][y]]
366. pygame.draw.rect(tempSurf, (r, g, b, transparency), (left,
top, boxSize, boxSize))
367. left, top = leftTopPixelCoordOfBox(0, 0)
368. pygame.draw.rect(tempSurf, BLACK, (left-1, top-1, boxSize * boardWidth
+ 1, boxSize * boardHeight + 1), 1)
369. DISPLAYSURF.blit(tempSurf, (0, 0))
370.
371.
372. def drawPalettes():
373. # Draws the six color palettes at the bottom of the screen.
374. numColors = len(paletteColors)
375. xmargin = int((WINDOWWIDTH - ((PALETTESIZE * numColors) +
(PALETTEGAPSIZE * (numColors - 1)))) / 2)
376. for i in range(numColors):
377. left = xmargin + (i * PALETTESIZE) + (i * PALETTEGAPSIZE)
378. top = WINDOWHEIGHT - PALETTESIZE - 10
379. pygame.draw.rect(DISPLAYSURF, paletteColors[i], (left, top,
PALETTESIZE, PALETTESIZE))
380. pygame.draw.rect(DISPLAYSURF, bgColor, (left + 2, top + 2,
PALETTESIZE - 4, PALETTESIZE - 4), 2)
381.
382.

Chapter 10 – Four Extra Games 315
383. def drawLifeMeter(currentLife):
384. lifeBoxSize = int((WINDOWHEIGHT - 40) / maxLife)
385.
386. # Draw background color of life meter.
387. pygame.draw.rect(DISPLAYSURF, bgColor, (20, 20, 20, 20 + (maxLife *
lifeBoxSize)))
388.
389. for i in range(maxLife):
390. if currentLife >= (maxLife - i): # draw a solid red box
391. pygame.draw.rect(DISPLAYSURF, RED, (20, 20 + (i *
lifeBoxSize), 20, lifeBoxSize))
392. pygame.draw.rect(DISPLAYSURF, WHITE, (20, 20 + (i * lifeBoxSize),
20, lifeBoxSize), 1) # draw white outline
393.
394.
395. def getColorOfPaletteAt(x, y):
396. # Returns the index of the color in paletteColors that the x and y
parameters
397. # are over. Returns None if x and y are not over any palette.
398. numColors = len(paletteColors)
399. xmargin = int((WINDOWWIDTH - ((PALETTESIZE * numColors) +
(PALETTEGAPSIZE * (numColors - 1)))) / 2)
400. top = WINDOWHEIGHT - PALETTESIZE - 10
401. for i in range(numColors):
402. # Find out if the mouse click is inside any of the palettes.
403. left = xmargin + (i * PALETTESIZE) + (i * PALETTEGAPSIZE)
404. r = pygame.Rect(left, top, PALETTESIZE, PALETTESIZE)
405. if r.collidepoint(x, y):
406. return i
407. return None # no palette exists at these x, y coordinates
408.
409.
410. def floodFill(board, oldColor, newColor, x, y):
411. # This is the flood fill algorithm.
412. if oldColor == newColor or board[x][y] != oldColor:
413. return
414.
415. board[x][y] = newColor # change the color of the current box
416.
417. # Make the recursive call for any neighboring boxes:
418. if x > 0:
419. floodFill(board, oldColor, newColor, x - 1, y) # on box to the
left
420. if x < boardWidth - 1:
421. floodFill(board, oldColor, newColor, x + 1, y) # on box to the
right

316 http://inventwithpython.com/pygame
Email questions to the author: [email protected]
422. if y > 0:
423. floodFill(board, oldColor, newColor, x, y - 1) # on box to up
424. if y < boardHeight - 1:
425. floodFill(board, oldColor, newColor, x, y + 1) # on box to down
426.
427.
428. def leftTopPixelCoordOfBox(boxx, boxy):
429. # Returns the x and y of the left-topmost pixel of the xth & yth box.
430. xmargin = int((WINDOWWIDTH - (boardWidth * boxSize)) / 2)
431. ymargin = int((WINDOWHEIGHT - (boardHeight * boxSize)) / 2)
432. return (boxx * boxSize + xmargin, boxy * boxSize + ymargin)
433.
434.
435. if __name__ == '__main__':
436. main()

Chapter 10 – Four Extra Games 317
Four-In-A-Row, a “Connect Four” Clone
The game ―Connect Four‖ has a 7 x 6 board where the players take turns dropping tokens from
the top of the board. The tokens will fall from the top of each column and come to rest on the
bottom of the board or on top of the topmost token in that column. A player wins when four of
their tokens line up in a row either horizontally, vertically, or diagonally.
The AI for this game is pretty good. It simulates every possible move it can make, then simulates
every possible move the human player can make in response to each of those moves, and then
simulates every possible move it can make in response to that, and then simulates every possible
move the human player could make in response to each of those moves! After all that thinking,
the computer determines which move is most likely to lead to it winning.
So the computer is kind of tough to beat. I usually lose to it.
Since there are seven possible moves you can make on your turn (unless some columns are full),
and seven possible moves the opponent could make, and seven moves in response to that, and
seven moves in response to that, that means that on each turn the computer is considering 7 x 7 x
7 x 7 = 2,401 possible moves. You can make the computer consider the game even further by
setting the DIFFICULTY constant to a higher number, but when I set to a value larger than 2, the
computer takes a long time to calculate its turn.
You can also make the computer easier by setting DIFFICULTY to 1. Then the computer only
considers each of its moves and the player’s possible responses to those moves. If you set the
DIFFICULTY to 0, then the computer loses all intelligence and simply makes random moves.
Source Code for Four-In-A-Row This source code can be downloaded from http://invpy.com/fourinarow.py.

318 http://inventwithpython.com/pygame
Email questions to the author: [email protected]
The image files that Flippy uses can be downloaded from http://invpy.com/fourinarowimages.zip.
1. # Four-In-A-Row (a Connect Four clone)
2. # By Al Sweigart [email protected]
3. # http://inventwithpython.com/pygame
4. # Released under a "Simplified BSD" license
5.
6. import random, copy, sys, pygame
7. from pygame.locals import *
8.
9. BOARDWIDTH = 7 # how many spaces wide the board is
10. BOARDHEIGHT = 6 # how many spaces tall the board is
11. assert BOARDWIDTH >= 4 and BOARDHEIGHT >= 4, 'Board must be at least 4x4.'
12.
13. DIFFICULTY = 2 # how many moves to look ahead. (>2 is usually too slow)
14.
15. SPACESIZE = 50 # size of the tokens and individual board spaces in pixels
16.
17. FPS = 30 # frames per second to update the screen
18. WINDOWWIDTH = 640 # width of the program's window, in pixels
19. WINDOWHEIGHT = 480 # height in pixels
20.
21. XMARGIN = int((WINDOWWIDTH - BOARDWIDTH * SPACESIZE) / 2)
22. YMARGIN = int((WINDOWHEIGHT - BOARDHEIGHT * SPACESIZE) / 2)
23.
24. BRIGHTBLUE = (0, 50, 255)
25. WHITE = (255, 255, 255)
26.
27. BGCOLOR = BRIGHTBLUE
28. TEXTCOLOR = WHITE
29.
30. RED = 'red'
31. BLACK = 'black'
32. EMPTY = None
33. HUMAN = 'human'
34. COMPUTER = 'computer'
35.
36.
37. def main():
38. global FPSCLOCK, DISPLAYSURF, REDPILERECT, BLACKPILERECT, REDTOKENIMG
39. global BLACKTOKENIMG, BOARDIMG, ARROWIMG, ARROWRECT, HUMANWINNERIMG
40. global COMPUTERWINNERIMG, WINNERRECT, TIEWINNERIMG
41.
42. pygame.init()
43. FPSCLOCK = pygame.time.Clock()
44. DISPLAYSURF = pygame.display.set_mode((WINDOWWIDTH, WINDOWHEIGHT))

Chapter 10 – Four Extra Games 319
45. pygame.display.set_caption('Four in a Row')
46.
47. REDPILERECT = pygame.Rect(int(SPACESIZE / 2), WINDOWHEIGHT - int(3 *
SPACESIZE / 2), SPACESIZE, SPACESIZE)
48. BLACKPILERECT = pygame.Rect(WINDOWWIDTH - int(3 * SPACESIZE / 2),
WINDOWHEIGHT - int(3 * SPACESIZE / 2), SPACESIZE, SPACESIZE)
49. REDTOKENIMG = pygame.image.load('4row_red.png')
50. REDTOKENIMG = pygame.transform.smoothscale(REDTOKENIMG, (SPACESIZE,
SPACESIZE))
51. BLACKTOKENIMG = pygame.image.load('4row_black.png')
52. BLACKTOKENIMG = pygame.transform.smoothscale(BLACKTOKENIMG,
(SPACESIZE, SPACESIZE))
53. BOARDIMG = pygame.image.load('4row_board.png')
54. BOARDIMG = pygame.transform.smoothscale(BOARDIMG, (SPACESIZE,
SPACESIZE))
55.
56. HUMANWINNERIMG = pygame.image.load('4row_humanwinner.png')
57. COMPUTERWINNERIMG = pygame.image.load('4row_computerwinner.png')
58. TIEWINNERIMG = pygame.image.load('4row_tie.png')
59. WINNERRECT = HUMANWINNERIMG.get_rect()
60. WINNERRECT.center = (int(WINDOWWIDTH / 2), int(WINDOWHEIGHT / 2))
61.
62. ARROWIMG = pygame.image.load('4row_arrow.png')
63. ARROWRECT = ARROWIMG.get_rect()
64. ARROWRECT.left = REDPILERECT.right + 10
65. ARROWRECT.centery = REDPILERECT.centery
66.
67. isFirstGame = True
68.
69. while True:
70. runGame(isFirstGame)
71. isFirstGame = False
72.
73.
74. def runGame(isFirstGame):
75. if isFirstGame:
76. # Let the computer go first on the first game, so the player
77. # can see how the tokens are dragged from the token piles.
78. turn = COMPUTER
79. showHelp = True
80. else:
81. # Randomly choose who goes first.
82. if random.randint(0, 1) == 0:
83. turn = COMPUTER
84. else:
85. turn = HUMAN

320 http://inventwithpython.com/pygame
Email questions to the author: [email protected]
86. showHelp = False
87.
88. # Set up a blank board data structure.
89. mainBoard = getNewBoard()
90.
91. while True: # main game loop
92. if turn == HUMAN:
93. # Human player's turn.
94. getHumanMove(mainBoard, showHelp)
95. if showHelp:
96. # turn off help arrow after the first move
97. showHelp = False
98. if isWinner(mainBoard, RED):
99. winnerImg = HUMANWINNERIMG
100. break
101. turn = COMPUTER # switch to other player's turn
102. else:
103. # Computer player's turn.
104. column = getComputerMove(mainBoard)
105. animateComputerMoving(mainBoard, column)
106. makeMove(mainBoard, BLACK, column)
107. if isWinner(mainBoard, BLACK):
108. winnerImg = COMPUTERWINNERIMG
109. break
110. turn = HUMAN # switch to other player's turn
111.
112. if isBoardFull(mainBoard):
113. # A completely filled board means it's a tie.
114. winnerImg = TIEWINNERIMG
115. break
116.
117. while True:
118. # Keep looping until player clicks the mouse or quits.
119. drawBoard(mainBoard)
120. DISPLAYSURF.blit(winnerImg, WINNERRECT)
121. pygame.display.update()
122. FPSCLOCK.tick()
123. for event in pygame.event.get(): # event handling loop
124. if event.type == QUIT or (event.type == KEYUP and event.key ==
K_ESCAPE):
125. pygame.quit()
126. sys.exit()
127. elif event.type == MOUSEBUTTONUP:
128. return
129.
130.

Chapter 10 – Four Extra Games 321
131. def makeMove(board, player, column):
132. lowest = getLowestEmptySpace(board, column)
133. if lowest != -1:
134. board[column][lowest] = player
135.
136.
137. def drawBoard(board, extraToken=None):
138. DISPLAYSURF.fill(BGCOLOR)
139.
140. # draw tokens
141. spaceRect = pygame.Rect(0, 0, SPACESIZE, SPACESIZE)
142. for x in range(BOARDWIDTH):
143. for y in range(BOARDHEIGHT):
144. spaceRect.topleft = (XMARGIN + (x * SPACESIZE), YMARGIN + (y *
SPACESIZE))
145. if board[x][y] == RED:
146. DISPLAYSURF.blit(REDTOKENIMG, spaceRect)
147. elif board[x][y] == BLACK:
148. DISPLAYSURF.blit(BLACKTOKENIMG, spaceRect)
149.
150. # draw the extra token
151. if extraToken != None:
152. if extraToken['color'] == RED:
153. DISPLAYSURF.blit(REDTOKENIMG, (extraToken['x'],
extraToken['y'], SPACESIZE, SPACESIZE))
154. elif extraToken['color'] == BLACK:
155. DISPLAYSURF.blit(BLACKTOKENIMG, (extraToken['x'],
extraToken['y'], SPACESIZE, SPACESIZE))
156.
157. # draw board over the tokens
158. for x in range(BOARDWIDTH):
159. for y in range(BOARDHEIGHT):
160. spaceRect.topleft = (XMARGIN + (x * SPACESIZE), YMARGIN + (y *
SPACESIZE))
161. DISPLAYSURF.blit(BOARDIMG, spaceRect)
162.
163. # draw the red and black tokens off to the side
164. DISPLAYSURF.blit(REDTOKENIMG, REDPILERECT) # red on the left
165. DISPLAYSURF.blit(BLACKTOKENIMG, BLACKPILERECT) # black on the right
166.
167.
168. def getNewBoard():
169. board = []
170. for x in range(BOARDWIDTH):
171. board.append([EMPTY] * BOARDHEIGHT)
172. return board

322 http://inventwithpython.com/pygame
Email questions to the author: [email protected]
173.
174.
175. def getHumanMove(board, isFirstMove):
176. draggingToken = False
177. tokenx, tokeny = None, None
178. while True:
179. for event in pygame.event.get(): # event handling loop
180. if event.type == QUIT:
181. pygame.quit()
182. sys.exit()
183. elif event.type == MOUSEBUTTONDOWN and not draggingToken and
REDPILERECT.collidepoint(event.pos):
184. # start of dragging on red token pile.
185. draggingToken = True
186. tokenx, tokeny = event.pos
187. elif event.type == MOUSEMOTION and draggingToken:
188. # update the position of the red token being dragged
189. tokenx, tokeny = event.pos
190. elif event.type == MOUSEBUTTONUP and draggingToken:
191. # let go of the token being dragged
192. if tokeny < YMARGIN and tokenx > XMARGIN and tokenx <
WINDOWWIDTH - XMARGIN:
193. # let go at the top of the screen.
194. column = int((tokenx - XMARGIN) / SPACESIZE)
195. if isValidMove(board, column):
196. animateDroppingToken(board, column, RED)
197. board[column][getLowestEmptySpace(board, column)]
= RED
198. drawBoard(board)
199. pygame.display.update()
200. return
201. tokenx, tokeny = None, None
202. draggingToken = False
203. if tokenx != None and tokeny != None:
204. drawBoard(board, {'x':tokenx - int(SPACESIZE / 2), 'y':tokeny
- int(SPACESIZE / 2), 'color':RED})
205. else:
206. drawBoard(board)
207.
208. if isFirstMove:
209. # Show the help arrow for the player's first move.
210. DISPLAYSURF.blit(ARROWIMG, ARROWRECT)
211.
212. pygame.display.update()
213. FPSCLOCK.tick()
214.

Chapter 10 – Four Extra Games 323
215.
216. def animateDroppingToken(board, column, color):
217. x = XMARGIN + column * SPACESIZE
218. y = YMARGIN - SPACESIZE
219. dropSpeed = 1.0
220.
221. lowestEmptySpace = getLowestEmptySpace(board, column)
222.
223. while True:
224. y += int(dropSpeed)
225. dropSpeed += 0.5
226. if int((y - YMARGIN) / SPACESIZE) >= lowestEmptySpace:
227. return
228. drawBoard(board, {'x':x, 'y':y, 'color':color})
229. pygame.display.update()
230. FPSCLOCK.tick()
231.
232.
233. def animateComputerMoving(board, column):
234. x = BLACKPILERECT.left
235. y = BLACKPILERECT.top
236. speed = 1.0
237. # moving the black tile up
238. while y > (YMARGIN - SPACESIZE):
239. y -= int(speed)
240. speed += 0.5
241. drawBoard(board, {'x':x, 'y':y, 'color':BLACK})
242. pygame.display.update()
243. FPSCLOCK.tick()
244. # moving the black tile over
245. y = YMARGIN - SPACESIZE
246. speed = 1.0
247. while x > (XMARGIN + column * SPACESIZE):
248. x -= int(speed)
249. speed += 0.5
250. drawBoard(board, {'x':x, 'y':y, 'color':BLACK})
251. pygame.display.update()
252. FPSCLOCK.tick()
253. # dropping the black tile
254. animateDroppingToken(board, column, BLACK)
255.
256.
257. def getComputerMove(board):
258. potentialMoves = getPotentialMoves(board, BLACK, DIFFICULTY)
259. # get the best fitness from the potential moves
260. bestMoveFitness = -1

324 http://inventwithpython.com/pygame
Email questions to the author: [email protected]
261. for i in range(BOARDWIDTH):
262. if potentialMoves[i] > bestMoveFitness and isValidMove(board, i):
263. bestMoveFitness = potentialMoves[i]
264. # find all potential moves that have this best fitness
265. bestMoves = []
266. for i in range(len(potentialMoves)):
267. if potentialMoves[i] == bestMoveFitness and isValidMove(board, i):
268. bestMoves.append(i)
269. return random.choice(bestMoves)
270.
271.
272. def getPotentialMoves(board, tile, lookAhead):
273. if lookAhead == 0 or isBoardFull(board):
274. return [0] * BOARDWIDTH
275.
276. if tile == RED:
277. enemyTile = BLACK
278. else:
279. enemyTile = RED
280.
281. # Figure out the best move to make.
282. potentialMoves = [0] * BOARDWIDTH
283. for firstMove in range(BOARDWIDTH):
284. dupeBoard = copy.deepcopy(board)
285. if not isValidMove(dupeBoard, firstMove):
286. continue
287. makeMove(dupeBoard, tile, firstMove)
288. if isWinner(dupeBoard, tile):
289. # a winning move automatically gets a perfect fitness
290. potentialMoves[firstMove] = 1
291. break # don't bother calculating other moves
292. else:
293. # do other player's counter moves and determine best one
294. if isBoardFull(dupeBoard):
295. potentialMoves[firstMove] = 0
296. else:
297. for counterMove in range(BOARDWIDTH):
298. dupeBoard2 = copy.deepcopy(dupeBoard)
299. if not isValidMove(dupeBoard2, counterMove):
300. continue
301. makeMove(dupeBoard2, enemyTile, counterMove)
302. if isWinner(dupeBoard2, enemyTile):
303. # a losing move automatically gets the worst
fitness
304. potentialMoves[firstMove] = -1
305. break

Chapter 10 – Four Extra Games 325
306. else:
307. # do the recursive call to getPotentialMoves()
308. results = getPotentialMoves(dupeBoard2, tile,
lookAhead - 1)
309. potentialMoves[firstMove] += (sum(results) /
BOARDWIDTH) / BOARDWIDTH
310. return potentialMoves
311.
312.
313. def getLowestEmptySpace(board, column):
314. # Return the row number of the lowest empty row in the given column.
315. for y in range(BOARDHEIGHT-1, -1, -1):
316. if board[column][y] == EMPTY:
317. return y
318. return -1
319.
320.
321. def isValidMove(board, column):
322. # Returns True if there is an empty space in the given column.
323. # Otherwise returns False.
324. if column < 0 or column >= (BOARDWIDTH) or board[column][0] != EMPTY:
325. return False
326. return True
327.
328.
329. def isBoardFull(board):
330. # Returns True if there are no empty spaces anywhere on the board.
331. for x in range(BOARDWIDTH):
332. for y in range(BOARDHEIGHT):
333. if board[x][y] == EMPTY:
334. return False
335. return True
336.
337.
338. def isWinner(board, tile):
339. # check horizontal spaces
340. for x in range(BOARDWIDTH - 3):
341. for y in range(BOARDHEIGHT):
342. if board[x][y] == tile and board[x+1][y] == tile and
board[x+2][y] == tile and board[x+3][y] == tile:
343. return True
344. # check vertical spaces
345. for x in range(BOARDWIDTH):
346. for y in range(BOARDHEIGHT - 3):
347. if board[x][y] == tile and board[x][y+1] == tile and
board[x][y+2] == tile and board[x][y+3] == tile:

326 http://inventwithpython.com/pygame
Email questions to the author: [email protected]
348. return True
349. # check / diagonal spaces
350. for x in range(BOARDWIDTH - 3):
351. for y in range(3, BOARDHEIGHT):
352. if board[x][y] == tile and board[x+1][y-1] == tile and
board[x+2][y-2] == tile and board[x+3][y-3] == tile:
353. return True
354. # check \ diagonal spaces
355. for x in range(BOARDWIDTH - 3):
356. for y in range(BOARDHEIGHT - 3):
357. if board[x][y] == tile and board[x+1][y+1] == tile and
board[x+2][y+2] == tile and board[x+3][y+3] == tile:
358. return True
359. return False
360.
361.
362. if __name__ == '__main__':
363. main()

Chapter 10 – Four Extra Games 327
Gemgem, a “Bejeweled” Clone
―Bejeweled‖ is a game where gems fall to fill up a board. The player can swap any two adjacent
gems to try to match three gems in a row (vertically or horizontally, but not diagonally). The
matched gems then disappear, making way for new gems to fall from the top. Matching more
than three gems, or causing a chain reaction of gem matches will result in more points. The
player’s score slowly drops over time, so the player must constantly be making new matches. The
game ends when no possible match can be made on the board.
Source Code for Gemgem This source code can be downloaded from http://invpy.com/gemgem.py.
The image files that Flippy uses can be downloaded from http://invpy.com/gemgemimages.zip.
1. # Gemgem (a Bejeweled clone)
2. # By Al Sweigart [email protected]
3. # http://inventwithpython.com/pygame
4. # Released under a "Simplified BSD" license
5.
6. """
7. This program has "gem data structures", which are basically dictionaries
8. with the following keys:
9. 'x' and 'y' - The location of the gem on the board. 0,0 is the top left.
10. There is also a ROWABOVEBOARD row that 'y' can be set to,
11. to indicate that it is above the board.
12. 'direction' - one of the four constant variables UP, DOWN, LEFT, RIGHT.
13. This is the direction the gem is moving.
14. 'imageNum' - The integer index into GEMIMAGES to denote which image
15. this gem uses.
16. """
17.

328 http://inventwithpython.com/pygame
Email questions to the author: [email protected]
18. import random, time, pygame, sys, copy
19. from pygame.locals import *
20.
21. FPS = 30 # frames per second to update the screen
22. WINDOWWIDTH = 600 # width of the program's window, in pixels
23. WINDOWHEIGHT = 600 # height in pixels
24.
25. BOARDWIDTH = 8 # how many columns in the board
26. BOARDHEIGHT = 8 # how many rows in the board
27. GEMIMAGESIZE = 64 # width & height of each space in pixels
28.
29. # NUMGEMIMAGES is the number of gem types. You will need .png image
30. # files named gem0.png, gem1.png, etc. up to gem(N-1).png.
31. NUMGEMIMAGES = 7
32. assert NUMGEMIMAGES >= 5 # game needs at least 5 types of gems to work
33.
34. # NUMMATCHSOUNDS is the number of different sounds to choose from when
35. # a match is made. The .wav files are named match0.wav, match1.wav, etc.
36. NUMMATCHSOUNDS = 6
37.
38. MOVERATE = 25 # 1 to 100, larger num means faster animations
39. DEDUCTSPEED = 0.8 # reduces score by 1 point every DEDUCTSPEED seconds.
40.
41. # R G B
42. PURPLE = (255, 0, 255)
43. LIGHTBLUE = (170, 190, 255)
44. BLUE = ( 0, 0, 255)
45. RED = (255, 100, 100)
46. BLACK = ( 0, 0, 0)
47. BROWN = ( 85, 65, 0)
48. HIGHLIGHTCOLOR = PURPLE # color of the selected gem's border
49. BGCOLOR = LIGHTBLUE # background color on the screen
50. GRIDCOLOR = BLUE # color of the game board
51. GAMEOVERCOLOR = RED # color of the "Game over" text.
52. GAMEOVERBGCOLOR = BLACK # background color of the "Game over" text.
53. SCORECOLOR = BROWN # color of the text for the player's score
54.
55. # The amount of space to the sides of the board to the edge of the window
56. # is used several times, so calculate it once here and store in variables.
57. XMARGIN = int((WINDOWWIDTH - GEMIMAGESIZE * BOARDWIDTH) / 2)
58. YMARGIN = int((WINDOWHEIGHT - GEMIMAGESIZE * BOARDHEIGHT) / 2)
59.
60. # constants for direction values
61. UP = 'up'
62. DOWN = 'down'
63. LEFT = 'left'

Chapter 10 – Four Extra Games 329
64. RIGHT = 'right'
65.
66. EMPTY_SPACE = -1 # an arbitrary, nonpositive value
67. ROWABOVEBOARD = 'row above board' # an arbitrary, noninteger value
68.
69. def main():
70. global FPSCLOCK, DISPLAYSURF, GEMIMAGES, GAMESOUNDS, BASICFONT,
BOARDRECTS
71.
72. # Initial set up.
73. pygame.init()
74. FPSCLOCK = pygame.time.Clock()
75. DISPLAYSURF = pygame.display.set_mode((WINDOWWIDTH, WINDOWHEIGHT))
76. pygame.display.set_caption('Gemgem')
77. BASICFONT = pygame.font.Font('freesansbold.ttf', 36)
78.
79. # Load the images
80. GEMIMAGES = []
81. for i in range(1, NUMGEMIMAGES+1):
82. gemImage = pygame.image.load('gem%s.png' % i)
83. if gemImage.get_size() != (GEMIMAGESIZE, GEMIMAGESIZE):
84. gemImage = pygame.transform.smoothscale(gemImage,
(GEMIMAGESIZE, GEMIMAGESIZE))
85. GEMIMAGES.append(gemImage)
86.
87. # Load the sounds.
88. GAMESOUNDS = {}
89. GAMESOUNDS['bad swap'] = pygame.mixer.Sound('badswap.wav')
90. GAMESOUNDS['match'] = []
91. for i in range(NUMMATCHSOUNDS):
92. GAMESOUNDS['match'].append(pygame.mixer.Sound('match%s.wav' % i))
93.
94. # Create pygame.Rect objects for each board space to
95. # do board-coordinate-to-pixel-coordinate conversions.
96. BOARDRECTS = []
97. for x in range(BOARDWIDTH):
98. BOARDRECTS.append([])
99. for y in range(BOARDHEIGHT):
100. r = pygame.Rect((XMARGIN + (x * GEMIMAGESIZE),
101. YMARGIN + (y * GEMIMAGESIZE),
102. GEMIMAGESIZE,
103. GEMIMAGESIZE))
104. BOARDRECTS[x].append(r)
105.
106. while True:
107. runGame()

330 http://inventwithpython.com/pygame
Email questions to the author: [email protected]
108.
109.
110. def runGame():
111. # Plays through a single game. When the game is over, this function
returns.
112.
113. # initialize the board
114. gameBoard = getBlankBoard()
115. score = 0
116. fillBoardAndAnimate(gameBoard, [], score) # Drop the initial gems.
117.
118. # initialize variables for the start of a new game
119. firstSelectedGem = None
120. lastMouseDownX = None
121. lastMouseDownY = None
122. gameIsOver = False
123. lastScoreDeduction = time.time()
124. clickContinueTextSurf = None
125.
126. while True: # main game loop
127. clickedSpace = None
128. for event in pygame.event.get(): # event handling loop
129. if event.type == QUIT or (event.type == KEYUP and event.key ==
K_ESCAPE):
130. pygame.quit()
131. sys.exit()
132. elif event.type == KEYUP and event.key == K_BACKSPACE:
133. return # start a new game
134.
135. elif event.type == MOUSEBUTTONUP:
136. if gameIsOver:
137. return # after games ends, click to start a new game
138.
139. if event.pos == (lastMouseDownX, lastMouseDownY):
140. # This event is a mouse click, not the end of a mouse
drag.
141. clickedSpace = checkForGemClick(event.pos)
142. else:
143. # this is the end of a mouse drag
144. firstSelectedGem = checkForGemClick((lastMouseDownX,
lastMouseDownY))
145. clickedSpace = checkForGemClick(event.pos)
146. if not firstSelectedGem or not clickedSpace:
147. # if not part of a valid drag, deselect both
148. firstSelectedGem = None
149. clickedSpace = None

Chapter 10 – Four Extra Games 331
150. elif event.type == MOUSEBUTTONDOWN:
151. # this is the start of a mouse click or mouse drag
152. lastMouseDownX, lastMouseDownY = event.pos
153.
154. if clickedSpace and not firstSelectedGem:
155. # This was the first gem clicked on.
156. firstSelectedGem = clickedSpace
157. elif clickedSpace and firstSelectedGem:
158. # Two gems have been clicked on and selected. Swap the gems.
159. firstSwappingGem, secondSwappingGem =
getSwappingGems(gameBoard, firstSelectedGem, clickedSpace)
160. if firstSwappingGem == None and secondSwappingGem == None:
161. # If both are None, then the gems were not adjacent
162. firstSelectedGem = None # deselect the first gem
163. continue
164.
165. # Show the swap animation on the screen.
166. boardCopy = getBoardCopyMinusGems(gameBoard,
(firstSwappingGem, secondSwappingGem))
167. animateMovingGems(boardCopy, [firstSwappingGem,
secondSwappingGem], [], score)
168.
169. # Swap the gems in the board data structure.
170. gameBoard[firstSwappingGem['x']][firstSwappingGem['y']] =
secondSwappingGem['imageNum']
171. gameBoard[secondSwappingGem['x']][secondSwappingGem['y']] =
firstSwappingGem['imageNum']
172.
173. # See if this is a matching move.
174. matchedGems = findMatchingGems(gameBoard)
175. if matchedGems == []:
176. # Was not a matching move; swap the gems back
177. GAMESOUNDS['bad swap'].play()
178. animateMovingGems(boardCopy, [firstSwappingGem,
secondSwappingGem], [], score)
179. gameBoard[firstSwappingGem['x']][firstSwappingGem['y']] =
firstSwappingGem['imageNum']
180. gameBoard[secondSwappingGem['x']][secondSwappingGem['y']]
= secondSwappingGem['imageNum']
181. else:
182. # This was a matching move.
183. scoreAdd = 0
184. while matchedGems != []:
185. # Remove matched gems, then pull down the board.
186.

332 http://inventwithpython.com/pygame
Email questions to the author: [email protected]
187. # points is a list of dicts that tells
fillBoardAndAnimate()
188. # where on the screen to display text to show how many
189. # points the player got. points is a list because if
190. # the player gets multiple matches, then multiple
points text should appear.
191. points = []
192. for gemSet in matchedGems:
193. scoreAdd += (10 + (len(gemSet) - 3) * 10)
194. for gem in gemSet:
195. gameBoard[gem[0]][gem[1]] = EMPTY_SPACE
196. points.append({'points': scoreAdd,
197. 'x': gem[0] * GEMIMAGESIZE +
XMARGIN,
198. 'y': gem[1] * GEMIMAGESIZE +
YMARGIN})
199. random.choice(GAMESOUNDS['match']).play()
200. score += scoreAdd
201.
202. # Drop the new gems.
203. fillBoardAndAnimate(gameBoard, points, score)
204.
205. # Check if there are any new matches.
206. matchedGems = findMatchingGems(gameBoard)
207. firstSelectedGem = None
208.
209. if not canMakeMove(gameBoard):
210. gameIsOver = True
211.
212. # Draw the board.
213. DISPLAYSURF.fill(BGCOLOR)
214. drawBoard(gameBoard)
215. if firstSelectedGem != None:
216. highlightSpace(firstSelectedGem['x'], firstSelectedGem['y'])
217. if gameIsOver:
218. if clickContinueTextSurf == None:
219. # Only render the text once. In future iterations, just
220. # use the Surface object already in clickContinueTextSurf
221. clickContinueTextSurf = BASICFONT.render('Final Score: %s
(Click to continue)' % (score), 1, GAMEOVERCOLOR, GAMEOVERBGCOLOR)
222. clickContinueTextRect = clickContinueTextSurf.get_rect()
223. clickContinueTextRect.center = int(WINDOWWIDTH / 2),
int(WINDOWHEIGHT / 2)
224. DISPLAYSURF.blit(clickContinueTextSurf, clickContinueTextRect)
225. elif score > 0 and time.time() - lastScoreDeduction > DEDUCTSPEED:
226. # score drops over time

Chapter 10 – Four Extra Games 333
227. score -= 1
228. lastScoreDeduction = time.time()
229. drawScore(score)
230. pygame.display.update()
231. FPSCLOCK.tick(FPS)
232.
233.
234. def getSwappingGems(board, firstXY, secondXY):
235. # If the gems at the (X, Y) coordinates of the two gems are adjacent,
236. # then their 'direction' keys are set to the appropriate direction
237. # value to be swapped with each other.
238. # Otherwise, (None, None) is returned.
239. firstGem = {'imageNum': board[firstXY['x']][firstXY['y']],
240. 'x': firstXY['x'],
241. 'y': firstXY['y']}
242. secondGem = {'imageNum': board[secondXY['x']][secondXY['y']],
243. 'x': secondXY['x'],
244. 'y': secondXY['y']}
245. highlightedGem = None
246. if firstGem['x'] == secondGem['x'] + 1 and firstGem['y'] ==
secondGem['y']:
247. firstGem['direction'] = LEFT
248. secondGem['direction'] = RIGHT
249. elif firstGem['x'] == secondGem['x'] - 1 and firstGem['y'] ==
secondGem['y']:
250. firstGem['direction'] = RIGHT
251. secondGem['direction'] = LEFT
252. elif firstGem['y'] == secondGem['y'] + 1 and firstGem['x'] ==
secondGem['x']:
253. firstGem['direction'] = UP
254. secondGem['direction'] = DOWN
255. elif firstGem['y'] == secondGem['y'] - 1 and firstGem['x'] ==
secondGem['x']:
256. firstGem['direction'] = DOWN
257. secondGem['direction'] = UP
258. else:
259. # These gems are not adjacent and can't be swapped.
260. return None, None
261. return firstGem, secondGem
262.
263.
264. def getBlankBoard():
265. # Create and return a blank board data structure.
266. board = []
267. for x in range(BOARDWIDTH):
268. board.append([EMPTY_SPACE] * BOARDHEIGHT)

334 http://inventwithpython.com/pygame
Email questions to the author: [email protected]
269. return board
270.
271.
272. def canMakeMove(board):
273. # Return True if the board is in a state where a matching
274. # move can be made on it. Otherwise return False.
275.
276. # The patterns in oneOffPatterns represent gems that are configured
277. # in a way where it only takes one move to make a triplet.
278. oneOffPatterns = (((0,1), (1,0), (2,0)),
279. ((0,1), (1,1), (2,0)),
280. ((0,0), (1,1), (2,0)),
281. ((0,1), (1,0), (2,1)),
282. ((0,0), (1,0), (2,1)),
283. ((0,0), (1,1), (2,1)),
284. ((0,0), (0,2), (0,3)),
285. ((0,0), (0,1), (0,3)))
286.
287. # The x and y variables iterate over each space on the board.
288. # If we use + to represent the currently iterated space on the
289. # board, then this pattern: ((0,1), (1,0), (2,0))refers to identical
290. # gems being set up like this:
291. #
292. # +A
293. # B
294. # C
295. #
296. # That is, gem A is offset from the + by (0,1), gem B is offset
297. # by (1,0), and gem C is offset by (2,0). In this case, gem A can
298. # be swapped to the left to form a vertical three-in-a-row triplet.
299. #
300. # There are eight possible ways for the gems to be one move
301. # away from forming a triple, hence oneOffPattern has 8 patterns.
302.
303. for x in range(BOARDWIDTH):
304. for y in range(BOARDHEIGHT):
305. for pat in oneOffPatterns:
306. # check each possible pattern of "match in next move" to
307. # see if a possible move can be made.
308. if (getGemAt(board, x+pat[0][0], y+pat[0][1]) == \
309. getGemAt(board, x+pat[1][0], y+pat[1][1]) == \
310. getGemAt(board, x+pat[2][0], y+pat[2][1]) != None) or
\
311. (getGemAt(board, x+pat[0][1], y+pat[0][0]) == \
312. getGemAt(board, x+pat[1][1], y+pat[1][0]) == \
313. getGemAt(board, x+pat[2][1], y+pat[2][0]) != None):

Chapter 10 – Four Extra Games 335
314. return True # return True the first time you find a
pattern
315. return False
316.
317.
318. def drawMovingGem(gem, progress):
319. # Draw a gem sliding in the direction that its 'direction' key
320. # indicates. The progress parameter is a number from 0 (just
321. # starting) to 100 (slide complete).
322. movex = 0
323. movey = 0
324. progress *= 0.01
325.
326. if gem['direction'] == UP:
327. movey = -int(progress * GEMIMAGESIZE)
328. elif gem['direction'] == DOWN:
329. movey = int(progress * GEMIMAGESIZE)
330. elif gem['direction'] == RIGHT:
331. movex = int(progress * GEMIMAGESIZE)
332. elif gem['direction'] == LEFT:
333. movex = -int(progress * GEMIMAGESIZE)
334.
335. basex = gem['x']
336. basey = gem['y']
337. if basey == ROWABOVEBOARD:
338. basey = -1
339.
340. pixelx = XMARGIN + (basex * GEMIMAGESIZE)
341. pixely = YMARGIN + (basey * GEMIMAGESIZE)
342. r = pygame.Rect( (pixelx + movex, pixely + movey, GEMIMAGESIZE,
GEMIMAGESIZE) )
343. DISPLAYSURF.blit(GEMIMAGES[gem['imageNum']], r)
344.
345.
346. def pullDownAllGems(board):
347. # pulls down gems on the board to the bottom to fill in any gaps
348. for x in range(BOARDWIDTH):
349. gemsInColumn = []
350. for y in range(BOARDHEIGHT):
351. if board[x][y] != EMPTY_SPACE:
352. gemsInColumn.append(board[x][y])
353. board[x] = ([EMPTY_SPACE] * (BOARDHEIGHT - len(gemsInColumn))) +
gemsInColumn
354.
355.
356. def getGemAt(board, x, y):

336 http://inventwithpython.com/pygame
Email questions to the author: [email protected]
357. if x < 0 or y < 0 or x >= BOARDWIDTH or y >= BOARDHEIGHT:
358. return None
359. else:
360. return board[x][y]
361.
362.
363. def getDropSlots(board):
364. # Creates a "drop slot" for each column and fills the slot with a
365. # number of gems that that column is lacking. This function assumes
366. # that the gems have been gravity dropped already.
367. boardCopy = copy.deepcopy(board)
368. pullDownAllGems(boardCopy)
369.
370. dropSlots = []
371. for i in range(BOARDWIDTH):
372. dropSlots.append([])
373.
374. # count the number of empty spaces in each column on the board
375. for x in range(BOARDWIDTH):
376. for y in range(BOARDHEIGHT-1, -1, -1): # start from bottom, going
up
377. if boardCopy[x][y] == EMPTY_SPACE:
378. possibleGems = list(range(len(GEMIMAGES)))
379. for offsetX, offsetY in ((0, -1), (1, 0), (0, 1), (-1,
0)):
380. # Narrow down the possible gems we should put in the
381. # blank space so we don't end up putting an two of
382. # the same gems next to each other when they drop.
383. neighborGem = getGemAt(boardCopy, x + offsetX, y +
offsetY)
384. if neighborGem != None and neighborGem in
possibleGems:
385. possibleGems.remove(neighborGem)
386.
387. newGem = random.choice(possibleGems)
388. boardCopy[x][y] = newGem
389. dropSlots[x].append(newGem)
390. return dropSlots
391.
392.
393. def findMatchingGems(board):
394. gemsToRemove = [] # a list of lists of gems in matching triplets that
should be removed
395. boardCopy = copy.deepcopy(board)
396.
397. # loop through each space, checking for 3 adjacent identical gems

Chapter 10 – Four Extra Games 337
398. for x in range(BOARDWIDTH):
399. for y in range(BOARDHEIGHT):
400. # look for horizontal matches
401. if getGemAt(boardCopy, x, y) == getGemAt(boardCopy, x + 1, y)
== getGemAt(boardCopy, x + 2, y) and getGemAt(boardCopy, x, y) != EMPTY_SPACE:
402. targetGem = boardCopy[x][y]
403. offset = 0
404. removeSet = []
405. while getGemAt(boardCopy, x + offset, y) == targetGem:
406. # keep checking, in case there's more than 3 gems in a
row
407. removeSet.append((x + offset, y))
408. boardCopy[x + offset][y] = EMPTY_SPACE
409. offset += 1
410. gemsToRemove.append(removeSet)
411.
412. # look for vertical matches
413. if getGemAt(boardCopy, x, y) == getGemAt(boardCopy, x, y + 1)
== getGemAt(boardCopy, x, y + 2) and getGemAt(boardCopy, x, y) != EMPTY_SPACE:
414. targetGem = boardCopy[x][y]
415. offset = 0
416. removeSet = []
417. while getGemAt(boardCopy, x, y + offset) == targetGem:
418. # keep checking if there's more than 3 gems in a row
419. removeSet.append((x, y + offset))
420. boardCopy[x][y + offset] = EMPTY_SPACE
421. offset += 1
422. gemsToRemove.append(removeSet)
423.
424. return gemsToRemove
425.
426.
427. def highlightSpace(x, y):
428. pygame.draw.rect(DISPLAYSURF, HIGHLIGHTCOLOR, BOARDRECTS[x][y], 4)
429.
430.
431. def getDroppingGems(board):
432. # Find all the gems that have an empty space below them
433. boardCopy = copy.deepcopy(board)
434. droppingGems = []
435. for x in range(BOARDWIDTH):
436. for y in range(BOARDHEIGHT - 2, -1, -1):
437. if boardCopy[x][y + 1] == EMPTY_SPACE and boardCopy[x][y] !=
EMPTY_SPACE:
438. # This space drops if not empty but the space below it is

338 http://inventwithpython.com/pygame
Email questions to the author: [email protected]
439. droppingGems.append( {'imageNum': boardCopy[x][y], 'x': x,
'y': y, 'direction': DOWN} )
440. boardCopy[x][y] = EMPTY_SPACE
441. return droppingGems
442.
443.
444. def animateMovingGems(board, gems, pointsText, score):
445. # pointsText is a dictionary with keys 'x', 'y', and 'points'
446. progress = 0 # progress at 0 represents beginning, 100 means finished.
447. while progress < 100: # animation loop
448. DISPLAYSURF.fill(BGCOLOR)
449. drawBoard(board)
450. for gem in gems: # Draw each gem.
451. drawMovingGem(gem, progress)
452. drawScore(score)
453. for pointText in pointsText:
454. pointsSurf = BASICFONT.render(str(pointText['points']), 1,
SCORECOLOR)
455. pointsRect = pointsSurf.get_rect()
456. pointsRect.center = (pointText['x'], pointText['y'])
457. DISPLAYSURF.blit(pointsSurf, pointsRect)
458.
459. pygame.display.update()
460. FPSCLOCK.tick(FPS)
461. progress += MOVERATE # progress the animation a little bit more
for the next frame
462.
463.
464. def moveGems(board, movingGems):
465. # movingGems is a list of dicts with keys x, y, direction, imageNum
466. for gem in movingGems:
467. if gem['y'] != ROWABOVEBOARD:
468. board[gem['x']][gem['y']] = EMPTY_SPACE
469. movex = 0
470. movey = 0
471. if gem['direction'] == LEFT:
472. movex = -1
473. elif gem['direction'] == RIGHT:
474. movex = 1
475. elif gem['direction'] == DOWN:
476. movey = 1
477. elif gem['direction'] == UP:
478. movey = -1
479. board[gem['x'] + movex][gem['y'] + movey] = gem['imageNum']
480. else:
481. # gem is located above the board (where new gems come from)
Chapter 10 – Four Extra Games 339
482. board[gem['x']][0] = gem['imageNum'] # move to top row
483.
484.
485. def fillBoardAndAnimate(board, points, score):
486. dropSlots = getDropSlots(board)
487. while dropSlots != [[]] * BOARDWIDTH:
488. # do the dropping animation as long as there are more gems to drop
489. movingGems = getDroppingGems(board)
490. for x in range(len(dropSlots)):
491. if len(dropSlots[x]) != 0:
492. # cause the lowest gem in each slot to begin moving in the
DOWN direction
493. movingGems.append({'imageNum': dropSlots[x][0], 'x': x,
'y': ROWABOVEBOARD, 'direction': DOWN})
494.
495. boardCopy = getBoardCopyMinusGems(board, movingGems)
496. animateMovingGems(boardCopy, movingGems, points, score)
497. moveGems(board, movingGems)
498.
499. # Make the next row of gems from the drop slots
500. # the lowest by deleting the previous lowest gems.
501. for x in range(len(dropSlots)):
502. if len(dropSlots[x]) == 0:
503. continue
504. board[x][0] = dropSlots[x][0]
505. del dropSlots[x][0]
506.
507.
508. def checkForGemClick(pos):
509. # See if the mouse click was on the board
510. for x in range(BOARDWIDTH):
511. for y in range(BOARDHEIGHT):
512. if BOARDRECTS[x][y].collidepoint(pos[0], pos[1]):
513. return {'x': x, 'y': y}
514. return None # Click was not on the board.
515.
516.
517. def drawBoard(board):
518. for x in range(BOARDWIDTH):
519. for y in range(BOARDHEIGHT):
520. pygame.draw.rect(DISPLAYSURF, GRIDCOLOR, BOARDRECTS[x][y], 1)
521. gemToDraw = board[x][y]
522. if gemToDraw != EMPTY_SPACE:
523. DISPLAYSURF.blit(GEMIMAGES[gemToDraw], BOARDRECTS[x][y])
524.
525.

340 http://inventwithpython.com/pygame
Email questions to the author: [email protected]
526. def getBoardCopyMinusGems(board, gems):
527. # Creates and returns a copy of the passed board data structure,
528. # with the gems in the "gems" list removed from it.
529. #
530. # Gems is a list of dicts, with keys x, y, direction, imageNum
531.
532. boardCopy = copy.deepcopy(board)
533.
534. # Remove some of the gems from this board data structure copy.
535. for gem in gems:
536. if gem['y'] != ROWABOVEBOARD:
537. boardCopy[gem['x']][gem['y']] = EMPTY_SPACE
538. return boardCopy
539.
540.
541. def drawScore(score):
542. scoreImg = BASICFONT.render(str(score), 1, SCORECOLOR)
543. scoreRect = scoreImg.get_rect()
544. scoreRect.bottomleft = (10, WINDOWHEIGHT - 6)
545. DISPLAYSURF.blit(scoreImg, scoreRect)
546.
547.
548. if __name__ == '__main__':
549. main()
Summary I hope these game programs have given you your own ideas about what games you’d like to make
and how you can write the code for them. Even if you don’t have any ideas of your own, it’s great
practice to try to program clones of other games you’ve played.
Here are several websites that can teach you more about programming Python:
http://pygame.org – The official Pygame website has the source code to hundreds of
games that people have written that make use of the Pygame library. You can learn a lot
by downloading and reading other people’s source code.
http://python.org/doc/ - More Python tutorials and the documentation of all the Python
modules and functions.
http://pygame.org/docs/ - Complete documentation on the modules and functions for
Pygame
http://reddit.com/r/learnpython and http://reddit.com/r/learnprogramming have several
users that could help you with finding resources to learn programming.

Chapter 10 – Four Extra Games 341
http://inventwithpython.com/pygame - This book's website, which includes all the source
code for these programs and additional information. This site also has the image and
sound files used in the Pygame programs.
http://inventwithpython.com - The website for the book ―Invent Your Own Computer
Games with Python‖, which covers basic Python programming.
http://invpy.com/wiki - A wiki that covers individual Python programming concepts that
you can look up if you need to learn about something specific.
http://invpy.com/traces - A web application that helps you trace through the execution of
the programs in this book, step by step.
http://invpy.com/videos - Videos that accompany the programs in this book.
http://gamedevlessons.com - A helpful website about how to design and program video
games.
[email protected] - My email address. Feel free to email me your questions
about this book or about Python programming.
Or you can find out more about Python by searching the World Wide Web. Go to the search
website http://google.com and search for ―Python programming‖ or ―Python tutorials‖ to find
web sites that can teach you more about Python programming.
Now get going and invent your own games. And good luck!

342 http://inventwithpython.com/pygame
Email questions to the author: [email protected]
GLOSSARY Alpha Value - The amount of transparency for a color. In Pygame, alpha values range from 0
(completely transparent) to 255 (completely opaque).
Anti-Aliasing - A technique for making shapes look smoother and less blocky by adding fuzzy
colors to their edges. Anti-aliased drawings look smooth. Aliased drawings look blocky.
Attributes - A variable that is part of an object. For example, Rect objects have members such as
top and left which hold integer values for the Rect object.
Backwards Compatibility - Writing code that is compatible with older versions of software.
Python version 3 has some backwards-incompatible features with Python version 2, but it is
possible to write Python 3 programs that are backwards-compatible with Python 2.
Base Case - In recursion, the base case is the condition that stops further recursive function calls.
A base case is necessary to prevent stack overflow errors.
Blitting - A word that means copying the image on one Surface object to another. In
programming in general, it means to copy one image to another image.
Bounding Rectangle - The smallest rectangle that can be drawn around another shape.
Camera - A view of a particular part of the game world. Cameras are used when the game world
is too large to fit on the player's screen.
Caption - In programming, the caption is the text on the title bar of the window. In Pygame, the
caption can be set with the pygame.display.set_caption() function.
CLI - See, Command Line Interface
Command Line Interface - A program that the user can use by seeing text on the screen and
typing text through the keyboard. Old computers used to be able to only run CLI programs, but
new computers have Graphical User Interfaces.
Constructor Function - The function that creates a new object. In Python, these functions have
the same name as the kind of objects they produce. For example, pygame.Rect() creates Rect
objects.
Display Surface - The Surface object returned by the call to
pygame.display.set_mode(). This Surface object is special because anything drawn on it

Glossary 343
with the Pygame drawing or blitting functions will appear on the screen when
pygame.display.update() is called.
Drawing Primitives - The name for the basic shape-drawing functions in Pygame. Drawing
primitives include rectangles, lines, and ellipses. Drawing primitives do not include images like
the ones in .png or .jpg files.
Event Handling - The code that performs actions in response to Event objects that have been
generated by the user, such as key presses or mouse clicks.
Event Handling Loop - The event handling code is usually inside a loop to handle each of the
events that have been generated since the last time the event handling loop was executed.
Event Queue - When events such as mouse clicks or key presses happen, Pygame stores them in
an internal queue data structure. Events can be removed and retrieved from the event queue by
calling pygame.event.get().
FPS - See, Frames Per Second
Frame - A single image that is displayed on the screen as part of an animation. Animated
graphics will be composed of many frames, each shown for a split second.
Frame Rate - See, Refresh Rate
Frames Per Second - The measure of how many frames of an animation are displayed per
second. It is common for games to be run at 30 frames per second or more.
Game Loop - The game loop contains code that performs event handling, updates the game
world's state, and draws the game world's state to the screen. This is done many times a second.
Game State - The entire collection of values that make up the game world. This can include
information about the player's character, which pieces are on a board, or the score and level
number.
Graphical User Interface - A program that displays graphics to the user for output and can
accept keyboard presses and mouse clicks for input.
GUI - See, Graphical User Interface
Immutable - Not changeable or modifiable. In Python, list values are mutable and tuple values
are immutable.
Interactive Shell - A program (part of IDLE) that executes Python instructions one at a time. The
interactive shell is a good way to experiment with what a line of code does.

344 http://inventwithpython.com/pygame
Email questions to the author: [email protected]
Interpreter - The software that executes instructions written in the Python programming
language. On Windows, this is python.exe. When someone says, "Python runs this program", they
mean "the Python interpreter software runs this program."
Magic Numbers - Integers or floating-point values used in a program without explanation. Magic
numbers should be replaced by constant variables with descriptive names to increase readability.
Main Loop - See, Game Loop
Member Variable - See, Attributes.
Modulus Operator - In Python, the modulus operator is the % sign. It performs "remainder"
arithmetic. For example, since 22 / 7 is ―3 remainder 1‖, then 22 % 7 is 1.
Multidimensional - Having more than one dimension. In Python, this usually refers to when a
list contains another list, or a dictionary contains a tuple (which in turn could contain other lists,
tuples, or dictionaries.)
Mutable - Changeable or modifiable. In Python, list values are mutable and tuple values are
immutable.
Pi - The number of diameter lengths of a circle that can fit along the outside circumference. Pi is
the same number no matter what the size of the circle is. This value is available in the math
module as math.pi, which is the float value 3.1415926535897931.
Pixels - Stands for "picture element". A pixel is a single square of color on the computer screen.
The screen is made up of hundreds of thousands of pixels which can be set to different colors to
form an image.
Points - A point in Python is usually represented as a tuple of two integers (or float values) to
represent the X and Y coordinates of a position on a 2D surface.
Properties - See, Attributes.
Real-time - A program that runs continuously and does not wait for the player to do something is
said to run in real-time.
Recursive Call - The function call in a recursive function that calls that same function.
Recursive Function - A function that calls itself.
Refresh Rate - The frequency that the computer screen updates its image. A high or fast refresh
rate will make animations appear smoothly, while a low or slow refresh rate will make animation
look choppy. Refresh rate is measured in FPS or hertz (which mean the same thing).

Glossary 345
RGB Values - An RGB value is an exact value of a particular color. RGB stands for red, green
blue. In Pygame, an RGB value is a tuple of three integers (all between 0 and 255) which
represent the amount of red, green, and blue are in the color.
Shell - See, Interactive Shell.
Sine - A mathematical function that produces a wavey line when drawn on a graph. Python has a
sine function in the math module: math.sin().
Sprites - A name given for a picture of something. Games commonly have a sprite for each kind
of object in the game.
Stack Overflow - An error caused when a recursive function does not have a base case.
Syntactic Sugar - A bit of code that is written to make the program more readable, even though
it isn't necessary for the program to work.
Tile Sprites - Tiles are a kind of sprite designed to be drawn on a 2D grid. They are usually
images of the background, such as floors or walls.
Title Bar - The bar along the top of programs that usually contain the program's caption and
close button. The style of the title bar varies between operating systems.
X-axis - The horizontal arrangement of numbers used in cartesian coordinate systems. The X
coordinates get smaller going to the left and larger going to the right.
Y-axis - The vertical arrangement of numbers used in cartesian coordinate systems. The Y
coordinates get smaller going up and larger going down. (This is the opposite of how the Y-axis
works in mathematics.)


About the Author 347
ABOUT THE AUTHOR
Albert Sweigart (but you can call him Al), is a software developer in San Francisco, California
who enjoys bicycling, volunteering, haunting coffee shops, and making useful software. ―Making
Games with Python & Pygame‖ is his second book.
His first book, ―Invent Your Own Computer Games with Python‖ can be read online at
http://inventwithpython.com.
He is originally from Houston, Texas. He finally put his University of Texas at Austin computer
science degree in a frame. He laughs out loud when watching park squirrels, which makes people
think he’s a simpleton.
Email: [email protected]
Blog: http://coffeeghost.net
Twitter: @AlSweigart