making landslide potential map and banjir bandang hazard map … · geologi dan mikrotopografi”...
TRANSCRIPT

Training Module Making Landslide Potential Map and Banjir Bandang Hazard Map
53
23) On part of Show: choose Categories and choose Unique values. On combo box of Value Field,
choose Peringkat. Click Add All Values button, to display the values contained in the column
“Peringkat”.
24) Changes the symbol for the value 0 become white color, and symbol for the value 1 become
“Medium Coral Light” color. Change the label of the value 0 become “Tidak Berpotensi”, and
for the value 1 become “Berpotensi”. Uncheck <all other values>. Press OK button.

Training Module Making Landslide Potential Map and Banjir Bandang Hazard Map
54
25) The figure below shows the subarea data that potentially occur landslide based on the red
color of the subarea. If the data of this subarea intersect to the "landslides area past" layer, the
position correlation can be seen clearly.
26) Save the ArcMap workspace into the folder: Data source for training\07 Landslide potential by
past landslide factor, and give name “Potensi longsor dari kejadian longsor masa lalu.mxd”.

Training Module Making Landslide Potential Map and Banjir Bandang Hazard Map
55
III. Making Landslide Potential Map Based On Geological and Micro-
topographic Factor
Step 1. Intersection of geological elements and micro-topographic data with sub-area data
1) Open/run ArcMap, choose Blank Map.
2) Input the file of “subarea ref.shp”, “kelurusan ref.shp”, “punggung bukit rata ref.shp”,
“rayapan batu massal ref.shp” and “retakan busur lingkar ref.shp”, from the folder: Ref, into
ArcMap workspace.
3) Run the toolbox of Spatial Join. On combo box of Target Features, choose “subarea ref” layer.
On combo box of Join Features, choose “kelurusan ref”. On text box of Output Feature Class,
save the file into the folder: Data source for training\08 Landslide potential by geologic and
microtopographic factor, and give name “subarea SJ kelurusan.shp”. On combo box of Join
Operation, choose JOIN_ONE_TO_ONE. Check “Keep All Target Features”. On combo box of
Match Option, choose INTERSECT. Click OK button.
4) Do the steps of number 5 above for these elements with the parameter of Spatial Join toolbox:
punggung bukit rata ref; Join Features: punggung bukit rata ref, Output Feature Class: give
name “subarea SJ punggung bukit rata.shp”
rayapan batu massal ref; Join Features: rayapan batu massal ref, Output Feature Class: give
name “subarea SJ rayapan batu massal.shp”
retakan busur lingkar ref; Join Features: retakan busur lingkar ref, Output Feature Class:
give name “subarea SJ retakan busur lingkar.shp”

Training Module Making Landslide Potential Map and Banjir Bandang Hazard Map
56
Step 2. Processing of data table and determination of the two best elements
1) On this step we will find the best two (from four element), which are elements that has the
highest value of hitting ratio and cover ratio.
2) Open file of “Analisa potensi longsor - source.xlsx”, and open sheet “Ekstraksi elemen geologi”.
In this sheet there are two main column. The first main column contains subarea ID and
landslide potential that has obtained from the previous step. The second main column is a
template to insert data or the value of intersection results of geological and micro-topographic
elements with subarea data. From this template, can be seen that there are places for four
elements that are kelurusan, punggung bukit rata, rayapan batu massal, and retakan busur
lingkar.
In the main column of “Elemen-elemen faktor geologi dan mikrotopografi” there are several
column for each element represented by specific color.
The green column represents kelurusan elements. Sub-column of “Jumlah elemen kelurusan”
contains value that shows the total of kelurusan elements that intersect with a subarea; sub-
column “Kehadiran elemen kelurusan” contains value that shows subarea that intersect with
kelurusan elements; sub-column “Nilai S2 dari elemen kelurusan” contains value that shows
subarea that potential to landslide and also intersect with kelurusan element.
And so forth for the element columns that are represented by another color.
3) By using Windows Explorer, enter into folder: Data source for training\08 Landslide potential
by geologic and microtopographic factor. Open the file of “subarea SJ kelurusan.dbf” using
Microsoft Excel.
4) Copy all of the content of column “Join_Count” and paste into column “Jumlah elemen
kelurusan” on sheet “Ekstraksi elemen geologi” (Analisa potensi longsor - source.xlsx).
5) Do the copy and paste procedure of the content of column Join_Count for others elements
with the following order:
punggung bukit rata (gentle ridge top)
rayapan batu massal (mass rock creep slope)
retakan busur lingkar (circular arc crack)
Training Module Making Landslide Potential Map and Banjir Bandang Hazard Map
57
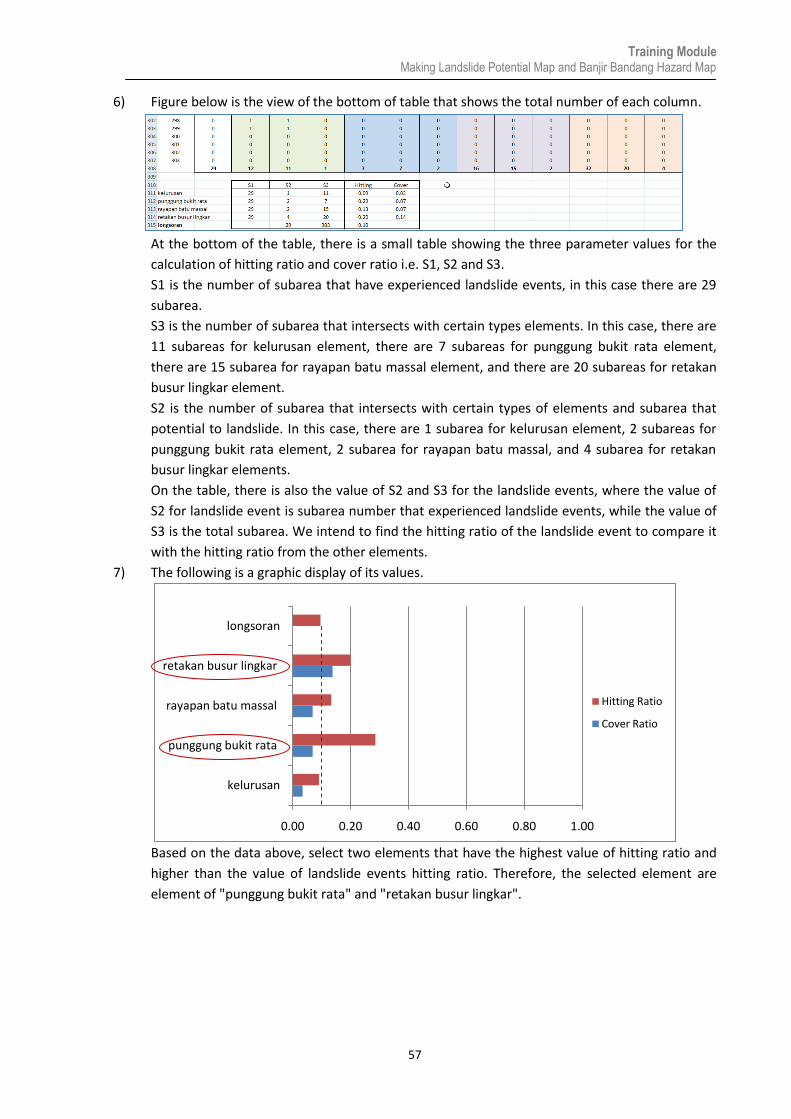
6) Figure below is the view of the bottom of table that shows the total number of each column.
At the bottom of the table, there is a small table showing the three parameter values for the
calculation of hitting ratio and cover ratio i.e. S1, S2 and S3.
S1 is the number of subarea that have experienced landslide events, in this case there are 29
subarea.
S3 is the number of subarea that intersects with certain types elements. In this case, there are
11 subareas for kelurusan element, there are 7 subareas for punggung bukit rata element,
there are 15 subarea for rayapan batu massal element, and there are 20 subareas for retakan
busur lingkar element.
S2 is the number of subarea that intersects with certain types of elements and subarea that
potential to landslide. In this case, there are 1 subarea for kelurusan element, 2 subareas for
punggung bukit rata element, 2 subarea for rayapan batu massal, and 4 subarea for retakan
busur lingkar elements.
On the table, there is also the value of S2 and S3 for the landslide events, where the value of
S2 for landslide event is subarea number that experienced landslide events, while the value of
S3 is the total subarea. We intend to find the hitting ratio of the landslide event to compare it
with the hitting ratio from the other elements.
7) The following is a graphic display of its values.
Based on the data above, select two elements that have the highest value of hitting ratio and
higher than the value of landslide events hitting ratio. Therefore, the selected element are
element of "punggung bukit rata" and "retakan busur lingkar".
0.00 0.20 0.40 0.60 0.80 1.00
kelurusan
punggung bukit rata
rayapan batu massal
retakan busur lingkar
longsoran
Hitting Ratio
Cover Ratio

Training Module Making Landslide Potential Map and Banjir Bandang Hazard Map
58
Step 3. Processing of data tables and the determination of the two best combination of
elements
1) After known two elements of geological and micro-topographic that has the highest value of
hitting ratio and cover ratio, the next step is to find the combination of element presence in its
correlation with landslide events in a subarea.
Open file of “Analisa potensi longsor - source.xlsx”, and open sheet “Kombinasi elemen”.
2) The first and the second column is a copy or link from column “ID subarea” and column
“Potensi longsor” from sheet “Analisa potensi longsor”.
“Elemen 1 (A)” contains the parameter value of S3 that is a link from column “Kehadiran
elemen punggung bukit rata”, and the parameter value of S2 that is a link from column “Nilai
S2 dari elemen punggung bukit rata“.
“Elemen 2 (B)” contains the parameter value of S3 that is a link from column “Kehadiran
elemen retakan busur lingkar”, and the parameter value of S2 that is a link from column “Nilai
S2 dari elemen retakan busur lingkar “.
If Elemen 1 considered as A and Elemen 2 considered as B, so the possible combination from
the two elements are “only A”, “only B”, “A and B”, “A or B”. Therefore the third and the
fourth column is a combination of “A and B”, “A or B”.
The value of S3 in column “A and B” based on requirement: if the value of S3 in column A and
column B both value is 1, so the value of S3 in column “A and B” will have value of 1, whereas
if one or none of which have value of 1, so the value of S3 on column “A and B” will have value
of 0.
The value of S3 in column “A or B” based on requirement: if the value of S3 in column A and
column B one or even both have value of 1, so the value of S3 in column “A and B” will have
value of 1, whereas both column have value of 0, so the value of S3 on column “A and B” will
have value of 0.
S2 value in column "A and B" or "A or B" is obtained by correlating the value 1 in column S3
with value of 1 in column “Potensi longsor”.

Training Module Making Landslide Potential Map and Banjir Bandang Hazard Map
59
3) The figure below is a view from the bottom of the table that shows the total of each column.
4) The following is a view the graph.
Based on the above chart, from the four combinations, select the combination of "A and B"
because it has that largest value of hitting ratio (0.67).
[Another option: in fact we can choose circular arc cracks (B) because it has a value of hitting
ratio and cover ratio that relatively big and balanced than others. We choose this option if you
prefer the coverage parameters to be addressed]
Step 4. Making landslide potential area
1) Open sheet “Analisa potensi longsor”. Connect the column “Potensi longsor berdasarkan
faktor geologi dan mikrotopografi” with column “Elemen 3” sheet “Ekstraksi elemen geologi”.
0.00 0.20 0.40 0.60 0.80 1.00
punggung bukit rata (A)
retakan busur lingkar (B)
A dan B
A atau B
Ratio
Ko
mb
inas
i ele
me
n
Hitting Ratio
Cover Ratio

Training Module Making Landslide Potential Map and Banjir Bandang Hazard Map
60
2) Open sheet “Peringkat geo”.
In this sheet, the first row is the column title, whereas from the second row and so forth on
the first column contain or a link from column “ID subarea” sheet “Analisa potensi longsor”,
and the second column contain or a link from column “Potensi longsor berdasarkan faktor
geologi dan mikrotopografi” sheet “Analisa potensi longsor”.
3) Save the file of “Analisa potensi longsor - source.xlsx”.
4) On ArcMap workspace, click Add Data, then point into folder: Data source for training.
5) Double click file of “Analisa potensi longsor - source.xlsx”, then double click ”Peringkat geo$”.
6) Automatically, sheet or data from Peringkat longsor will enter to ArcMap workspace. This data
will appear in Table Of Contents on part of “List By Source”.
7) On Table Of Contents window, press List By Drawing Order button.
8) Next, connect the data from sheet “Peringkat geo” with the attribute data on “subarea ref”
layer based on the same subarea ID.
Right click “subarea” layer, point the cursor to Joins and Relates, then click Join.
9) Next will appear Join Data window. On combo box of What do you want to join to this layer,
choose Join attributes from a table. On combo box 1, choose Id. On combo box 2, choose
Peringkat geo$. On combo box 3, choose ID subarea. On radio button of Joins Options, choose
Keep all records. Click OK button.
10) Right click “subarea” layer, point the cursor to Data, then click Export Data. Input the data that
will be exported into folder: Data source for training\08 Landslide potential by geologic and
microtopographic factor, and give name “potensial longsor berdasarkan geologi dan
mikrotopografi.shp”. If there is question whether the exported data will be incorporated into
ArcMap as a layer, answer Yes.

Training Module Making Landslide Potential Map and Banjir Bandang Hazard Map
61
11) Right click “subarea ref” layer, point the cursor to Joins and Relates, then Remove Join(s) and
click Remove All Joins.
12) Open attribute table of “potensial longsor berdasarkan geologi dan mikrotopografi” layer.
13) Right click “potensial longsor berdasarkan geologi dan mikrotopografi” layer and click
Properties. On Layer Properties window, click Symbologi tab.
14) On part of Show: choose Categories and choose Unique values. On combo box Value Field,
choose Peringkat. Click Add All Values button to shows the values contained in the of
“Peringkat”. Changes the symbol for value 0 become white color, and symbol for value 1
become Cordovan Brown. Change the label of value 0 become “Tidak Berpotensi”, and for
value 1 become “Berpotensi”. Press OK button.
15) The figure below shows the subarea data that potential to landslides based on a brown color
subarea.
16) Save the ArcMap workspace into folder: Data source for training\08 Landslide potential by
geologic and microtopographic factor, and give name “Potensi longsor berdasarkan geologi
dan mikrotopografi”.
Training Module Making Landslide Potential Map and Banjir Bandang Hazard Map
62
IV. Making Landslide Potential Map Based On Topographic Factor
Step 1. Making point data of slope and flow accumulation
1) Open/run ArcMap, choose Blank Map.
2) Insert file of “area longsoran masa lalu ref.shp” and “subarea ref.shp” from the folder: Ref, to
ArcMap workspace.
3) Insert data of “slope_50” and “flowacc_50” from the folder: Data source for training\02
Contour data, to ArcMap workspace.
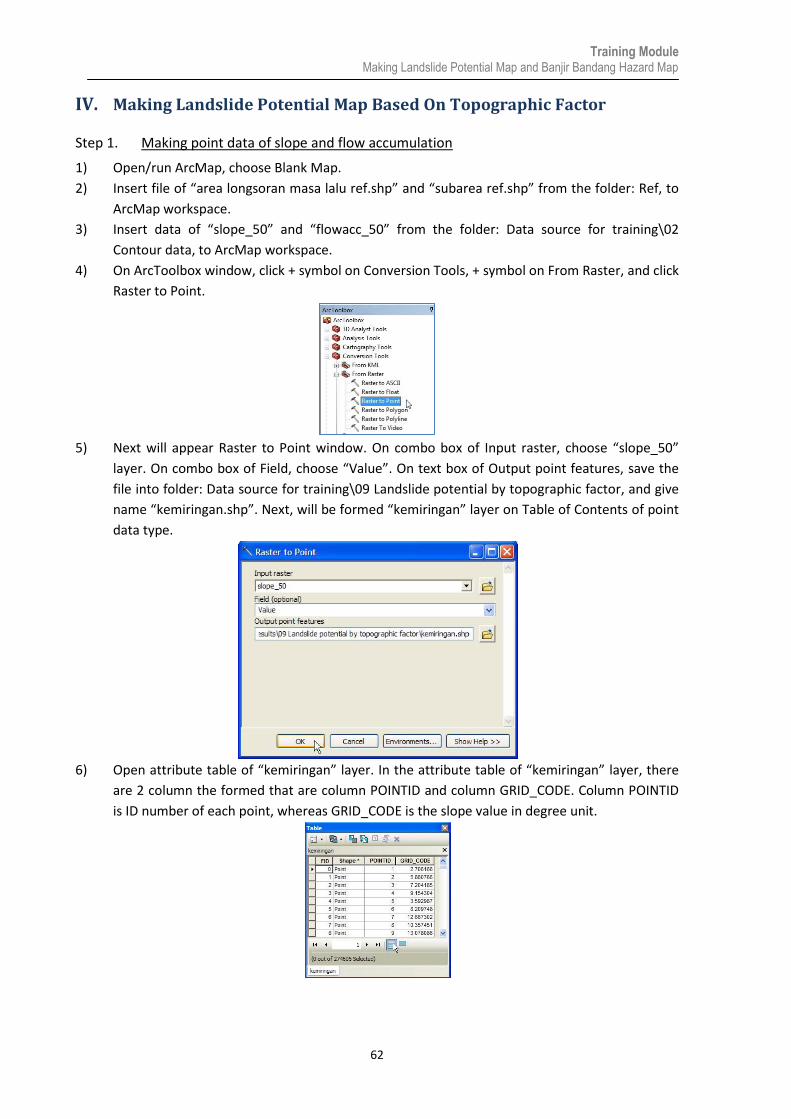
4) On ArcToolbox window, click + symbol on Conversion Tools, + symbol on From Raster, and click
Raster to Point.
5) Next will appear Raster to Point window. On combo box of Input raster, choose “slope_50”
layer. On combo box of Field, choose “Value”. On text box of Output point features, save the
file into folder: Data source for training\09 Landslide potential by topographic factor, and give
name “kemiringan.shp”. Next, will be formed “kemiringan” layer on Table of Contents of point
data type.
6) Open attribute table of “kemiringan” layer. In the attribute table of “kemiringan” layer, there
are 2 column the formed that are column POINTID and column GRID_CODE. Column POINTID
is ID number of each point, whereas GRID_CODE is the slope value in degree unit.

Training Module Making Landslide Potential Map and Banjir Bandang Hazard Map
63
7) Click Selection on ArcMap main menu, then click Select By Location. Next will appear Select By
Location window.
8) On combo box of Selection method, choose “select features from” and choose “kemiringan”.
On combo box of Source layer, choose “subarea ref” layer. On combo box of Spatial selection
method, choose Target layer(s) features intersect the Source layer feature. Click OK button.
9) After seen the selected data from “kemiringan” layer, next step is to export the selected data.
Right click “kemiringan” layer, point the cursor to Data, then click Export Data. Give name
“kemiringan_subarea.shp”.
10) On ArcToolbox window, click + symbol on Spatial Analyst Tools, + symbol on Extraction, double
click on Extract Values to Points. Next will appear Extract Values to Points window.
11) On combo box of Input point features, choose “kemiringan_subarea” layer. On combo box of
Input raster, choose “flowacc_50” layer. On text box of Output point features, save the file into
folder: Data source for training\09 Landslide potential by topographic factor, give name
“kemiringan_akumulasialiran_subarea.shp”. Click OK button.
Training Module Making Landslide Potential Map and Banjir Bandang Hazard Map
64
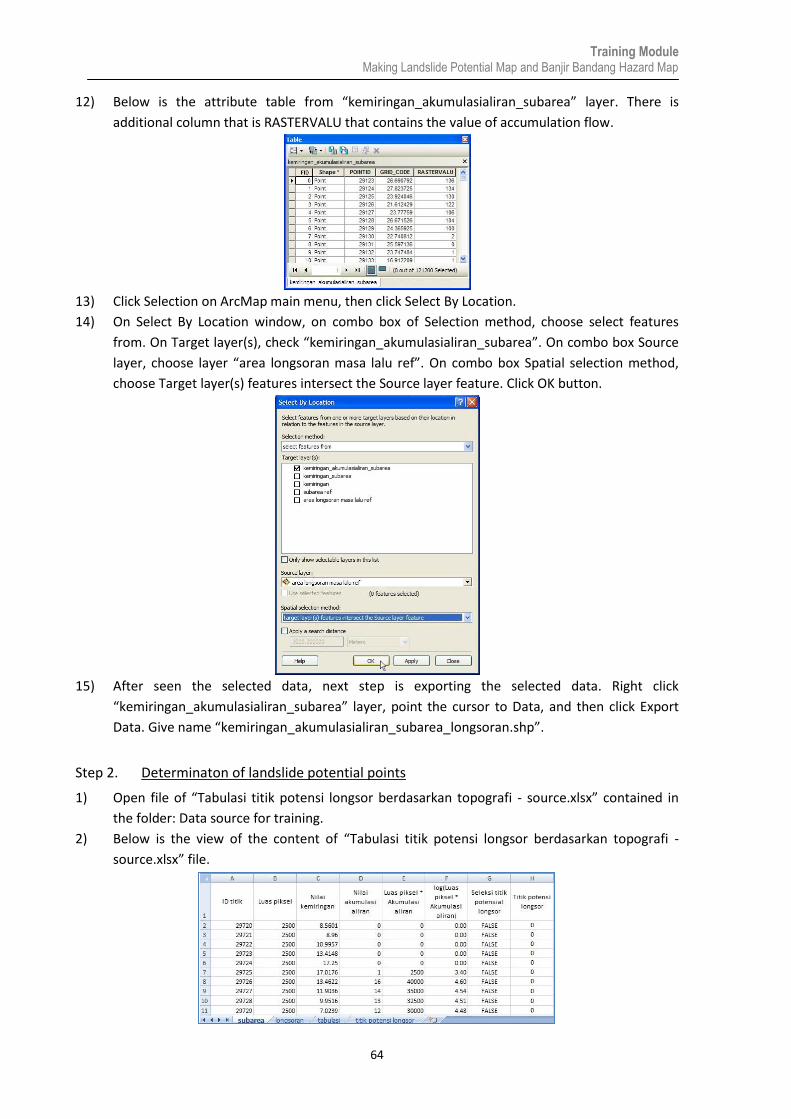
12) Below is the attribute table from “kemiringan_akumulasialiran_subarea” layer. There is
additional column that is RASTERVALU that contains the value of accumulation flow.
13) Click Selection on ArcMap main menu, then click Select By Location.
14) On Select By Location window, on combo box of Selection method, choose select features
from. On Target layer(s), check “kemiringan_akumulasialiran_subarea”. On combo box Source
layer, choose layer “area longsoran masa lalu ref”. On combo box Spatial selection method,
choose Target layer(s) features intersect the Source layer feature. Click OK button.
15) After seen the selected data, next step is exporting the selected data. Right click
“kemiringan_akumulasialiran_subarea” layer, point the cursor to Data, and then click Export
Data. Give name “kemiringan_akumulasialiran_subarea_longsoran.shp”.
Step 2. Determinaton of landslide potential points
1) Open file of “Tabulasi titik potensi longsor berdasarkan topografi - source.xlsx” contained in
the folder: Data source for training.
2) Below is the view of the content of “Tabulasi titik potensi longsor berdasarkan topografi -
source.xlsx” file.

Training Module Making Landslide Potential Map and Banjir Bandang Hazard Map
65
Inside sheet “subarea”,
The first column (A) is “ID titik”, which is ID from data of
“kemiringan_akumulasialiran_subarea” or “kemiringan_akumulasialiran_subarea_longsoran”.
Column “Luas piksel” (B), contains the pixel area that is 50 * 50 = 2500.
Column “Nilai kemiringan” (C), contains the value of slope from data of
“kemiringan_akumulasialiran_subarea” or “kemiringan_akumulasialiran_subarea_longsoran”.
Column “Nilai akumulasi aliran” (D), contains the value of flow accumulation from data of
“kemiringan_akumulasialiran_subarea” or “kemiringan_akumulasialiran_subarea_longsoran”.
Column “Luas piksel * Akumulasi aliran” (E), contains the value of the product of column (B)
and column (D).
Column “log(Luas piksel * Akumulasi aliran)” (F), contains the logarithmic value from column
(E).
Column “Seleksi titik potensi longsor” (G), contains identity whether if a point has the potential
of landslides or not.
Column “Titik potensi longsor” (H), contains the value 1 and 0 result from conversion from
column G column.
3) By using Windows Explorer, enter to the folder: Data source for training\09 Landslide potential
by topographic factor, and open file of “kemiringan_akumulasialiran_subarea.dbf” using
Microsoft Excel.
4) Copy all of the content of column “POINTID” (A), start from second row until the last.
5) Paste the data to column “ID titik”, sheet “subarea”, file of “Tabulasi titik potensi longsor
berdasarkan topografi - source.xlsx”.
6) Fill the entire row on column “Luas piksel” with the value 2500.
7) Copy all of content of column “GRID_CODE”, and paste to column “Nilai kemiringan” on sheet
“subarea”.
8) Copy all of content of column “RASTERVALU”, and paste to column “Nilai akumulasi aliran” on
sheet “subarea”.

Training Module Making Landslide Potential Map and Banjir Bandang Hazard Map
66
9) Fill the column E by using formula “=B2*D2”.
10) Fill the column F where the value on column F should be rounded into two numbers behind
comma by using ROUND formula. Here is a sample formula for column F
“=ROUND(IF(E2=0,0,LOG(E2)),2)”.
11) Do the steps number 3 – 10 above for “kemiringan_akumulasialiran_subarea_longsoran.dbf”
file contained in the folder: Data source for training\09 Landslide potential by topographic
factor. Copy and paste the entire data into sheet “longsoran”.
12) The following is a table contained in the sheet "subarea" (similar to that in the sheet
"longsoran"), along with the explanation of each part of the table.
This table is located to the right of the previous columns (A – F), where the contents of this
table is referenced to the content of column "nilai kemiringan" and column "log(Luas piksel *
Akumulasi aliran)".
Here is a sample formula in the top left cell,
=COUNTIFS($C2:$C1048576,">=0",$C2:$C1048576,"<10",$F2:$F1048576,">=3.4",$F2:$F10485
76,"<3.7")”. The meaning of this formula is, count the number of points that meet the range of
values of slope 0 - 10 degree and the log value range 3.4 - 3.7. Use this formula in each cell by
replacing the value range.
13) The following is a table of sheet “longsoran”.
The range of log
values (pixel area *
accumulated flow)
The range of
slope values
The number of points
corresponding range of values of
slope and log(area of pixels *
accumulated flow)
Total all the
points from all
cells

Training Module Making Landslide Potential Map and Banjir Bandang Hazard Map
67
14) Perform division process, where each table cell in a sheet "subarea" divided by each table cell
in a sheet "longsoran". Value of the average ratio is the total point sheet "subarea" divided by
the total point sheet "longsoran".
15) The following table is generated from each table cell division process of step 14, divided by the
average ratio.
16) The following table is a final stage table showing the cells of step 15 table, which has value
equal to or more than two times the average ratio values. The cells are indicated by the value
"1000".
After the position of these cells is known, mark all the cells located on the right and below. In
this step we know the range of slope and the value of log(luas piksel * akumulasi aliran) that
potential to landslide.
17) Open again sheet "subarea", and mark or coloring table cells in this sheet according to the
range value of slope and log (pixel area * accumulated flow) in step 16.
18) The next step is to create or define a formula for column G that is to find points that have
same criteria with the specified range requirements. Inside the folder: Data source for training,
open the file of "rumus penentuan titik potensi longsor.txt" in which there is a formula for the
cell in column G. The following is a content of the formula: IF(AND(C2>=25,C2<30,F2>=4.1,F2<4.44),1,0)
IF(AND(C2>=25,C2<30,F2>=4.44,F2<4.72),1,0)
IF(AND(C2>=25,C2<30,F2>=4.72,F2<5.11),1,0)
IF(AND(C2>=25,C2<30,F2>=5.11,F2<5.4),1,0)
IF(AND(C2>=25,C2<30,F2>=5.4,F2<5.7),1,0)
IF(AND(C2>=25,C2<30,F2>=5.7),1,0)

Training Module Making Landslide Potential Map and Banjir Bandang Hazard Map
68
IF(AND(C2>=30,C2<35,F2>=4.1,F2<4.44),1,0)
IF(AND(C2>=30,C2<35,F2>=4.44,F2<4.72),1,0)
IF(AND(C2>=30,C2<35,F2>=4.72,F2<5.11),1,0)
IF(AND(C2>=30,C2<35,F2>=5.11,F2<5.4),1,0)
IF(AND(C2>=30,C2<35,F2>=5.4,F2<5.7),1,0)
IF(AND(C2>=30,C2<35,F2>=5.7),1,0)
IF(AND(C2>=35,C2<40,F2>=4.1,F2<4.44),1,0)
IF(AND(C2>=35,C2<40,F2>=4.44,F2<4.72),1,0)
IF(AND(C2>=35,C2<40,F2>=4.72,F2<5.11),1,0)
IF(AND(C2>=35,C2<40,F2>=5.11,F2<5.4),1,0)
IF(AND(C2>=35,C2<40,F2>=5.4,F2<5.7),1,0)
IF(AND(C2>=35,C2<40,F2>=5.7),1,0)
IF(AND(C2>=40,F2>=3.4,F2<3.7),1,0)
IF(AND(C2>=40,F2>=3.7,F2<3.88),1,0)
IF(AND(C2>=40,F2>=3.88,F2<4.1),1,0)
IF(AND(C2>=40,F2>=4.1,F2<4.44),1,0)
IF(AND(C2>=40,F2>=4.44,F2<4.72),1,0)
IF(AND(C2>=40,F2>=4.72,F2<5.11),1,0)
IF(AND(C2>=40,F2>=5.11,F2<5.4),1,0)
IF(AND(C2>=40,F2>=5.4,F2<5.7),1,0)
IF(AND(C2>=40,F2>=5.7),1,0)
### the following are the results of the combined pieces of the above formula ###
IF(AND(C2>=25,C2<30,F2>=4.1,F2<4.44),1,0),IF(AND(C2>=25,C2<30,F2>=4.44,F2<4.72),1,0),IF(AND(C2>=25,C2<30,F
2>=4.72,F2<5.11),1,0),IF(AND(C2>=25,C2<30,F2>=5.11,F2<5.4),1,0),IF(AND(C2>=25,C2<30,F2>=5.4,F2<5.7),1,0),IF(A
ND(C2>=25,C2<30,F2>=5.7),1,0),IF(AND(C2>=30,C2<35,F2>=4.1,F2<4.44),1,0),IF(AND(C2>=30,C2<35,F2>=4.44,F2<4.
72),1,0),IF(AND(C2>=30,C2<35,F2>=4.72,F2<5.11),1,0),IF(AND(C2>=30,C2<35,F2>=5.11,F2<5.4),1,0),IF(AND(C2>=30,
C2<35,F2>=5.4,F2<5.7),1,0),IF(AND(C2>=30,C2<35,F2>=5.7),1,0),IF(AND(C2>=35,C2<40,F2>=4.1,F2<4.44),1,0),IF(AN
D(C2>=35,C2<40,F2>=4.44,F2<4.72),1,0),IF(AND(C2>=35,C2<40,F2>=4.72,F2<5.11),1,0),IF(AND(C2>=35,C2<40,F2>=5
.11,F2<5.4),1,0),IF(AND(C2>=35,C2<40,F2>=5.4,F2<5.7),1,0),IF(AND(C2>=35,C2<40,F2>=5.7),1,0),IF(AND(C2>=40,F2>
=3.4,F2<3.7),1,0),IF(AND(C2>=40,F2>=3.7,F2<3.88),1,0),IF(AND(C2>=40,F2>=3.88,F2<4.1),1,0),IF(AND(C2>=40,F2>=4
.1,F2<4.44),1,0),IF(AND(C2>=40,F2>=4.44,F2<4.72),1,0),IF(AND(C2>=40,F2>=4.72,F2<5.11),1,0),IF(AND(C2>=40,F2>=
5.11,F2<5.4),1,0),IF(AND(C2>=40,F2>=5.4,F2<5.7),1,0),IF(AND(C2>=40,F2>=5.7),1,0)
19) Copy the formula and paste to the cell of column G with the formulation as follows:
“=OR( paste the formula of step 18 ).
20) If the formula used (in step 18) is correct, then the number of potential landslide points in
column H sheet "subarea" landslide, will be equal to the number of points that calculated
according to the potential landslide area is red. In this case the numbers are the same that is
15175.

Training Module Making Landslide Potential Map and Banjir Bandang Hazard Map
69
21) Open sheet “titik potensi longsor” on file of “Tabulasi titik potensi longsor berdasarkan
topografi - source.xlsx”. In this sheet contains column “ID_titik” that contains or a link from
point ID (column A) sheet “subarea”, and there column “Potensi” that contains or a link from
“Titik potensi longsor” (column H) sheet “subarea”.
Step 3. Making landslide potential area
1) On ArcMap workspace, click Add Data, then point to folder: Data source for training.
2) Double click file of “Tabulasi titik potensi longsor berdasarkan topografi - source.xlsx”, then
double click ”titik potensi longsor$”. Automatically, data from sheet “titik potensi longsor” will
enter to ArcMap workspace.
3) On Table Of Contents window, click By Drawing Order List button.
4) Next, connect the data on sheet “titik potensi longsor” with attribute data on layer of
“kemiringan_akumulasialiran_subarea” based on the same point ID.
Right click layer of “kemiringan_akumulasialiran_subarea”, point the cursor to Joins and
Relates, then click Join. Next will appear Join Data window.
5) On combo box of What do you want to join to this layer, choose Join attributes from a table.
On combo box 1, choose column “POINTID”. On combo box 2, choose “titik potensi longsor$”
layer. On combo box 3, choose column “ID_titik”. On radio button of Joins Options, choose
Keep all records. Click OK button.
Training Module Making Landslide Potential Map and Banjir Bandang Hazard Map
70
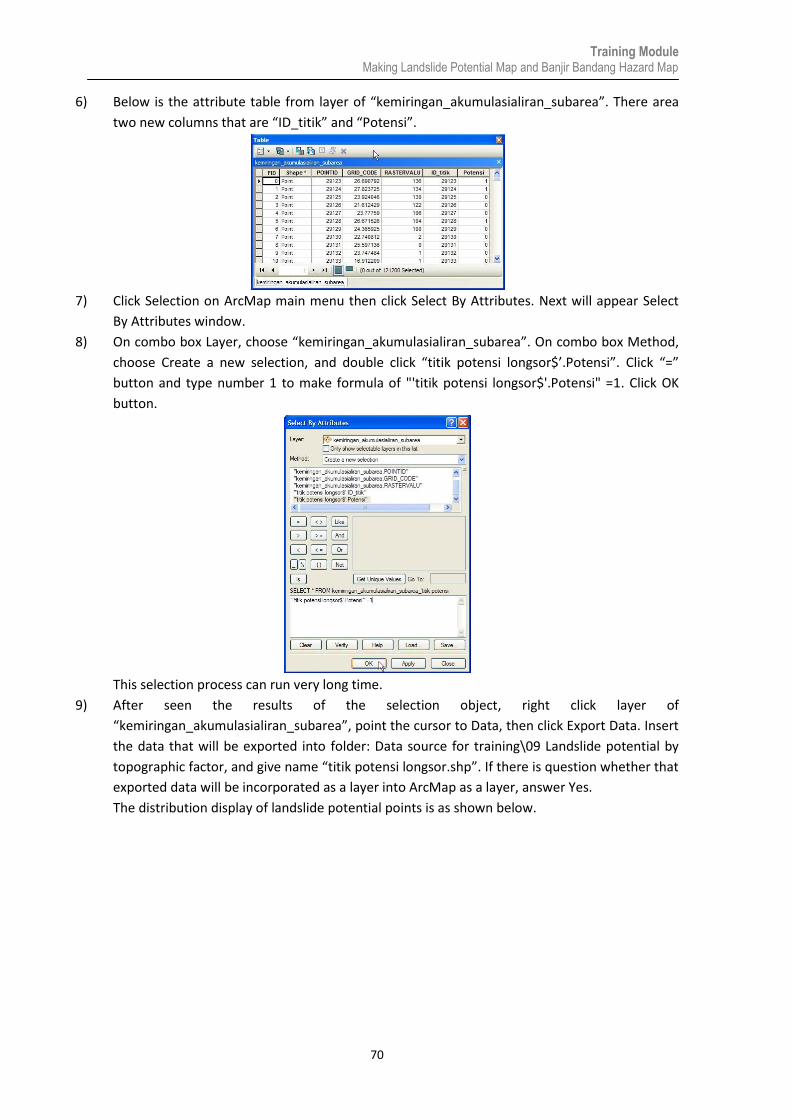
6) Below is the attribute table from layer of “kemiringan_akumulasialiran_subarea”. There area
two new columns that are “ID_titik” and “Potensi”.
7) Click Selection on ArcMap main menu then click Select By Attributes. Next will appear Select
By Attributes window.
8) On combo box Layer, choose “kemiringan_akumulasialiran_subarea”. On combo box Method,
choose Create a new selection, and double click “titik potensi longsor$’.Potensi”. Click “=”
button and type number 1 to make formula of "'titik potensi longsor$'.Potensi" =1. Click OK
button.
This selection process can run very long time.
9) After seen the results of the selection object, right click layer of
“kemiringan_akumulasialiran_subarea”, point the cursor to Data, then click Export Data. Insert
the data that will be exported into folder: Data source for training\09 Landslide potential by
topographic factor, and give name “titik potensi longsor.shp”. If there is question whether that
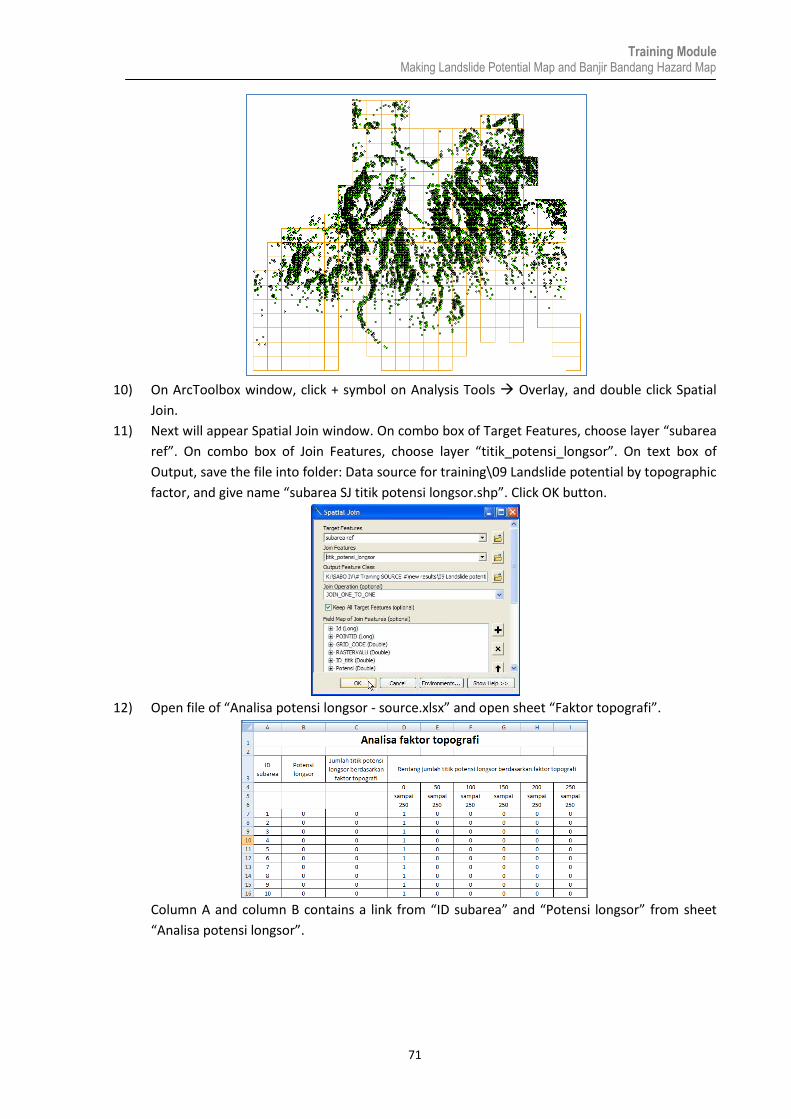
exported data will be incorporated as a layer into ArcMap as a layer, answer Yes.
The distribution display of landslide potential points is as shown below.
Training Module Making Landslide Potential Map and Banjir Bandang Hazard Map
71
10) On ArcToolbox window, click + symbol on Analysis Tools Overlay, and double click Spatial
Join.
11) Next will appear Spatial Join window. On combo box of Target Features, choose layer “subarea
ref”. On combo box of Join Features, choose layer “titik_potensi_longsor”. On text box of
Output, save the file into folder: Data source for training\09 Landslide potential by topographic
factor, and give name “subarea SJ titik potensi longsor.shp”. Click OK button.
12) Open file of “Analisa potensi longsor - source.xlsx” and open sheet “Faktor topografi”.
Column A and column B contains a link from “ID subarea” and “Potensi longsor” from sheet
“Analisa potensi longsor”.

Training Module Making Landslide Potential Map and Banjir Bandang Hazard Map
72
13) Open file “subarea SJ titik potensi longsor.dbf” from the folder: Data source for training\09
Landslide potential by topographic factor, using Microsoft Excel.
14) Copy the contents of column “Join_Count” and paste into column “Jumlah titik potensi longsor
berdasarkan faktor topografi” on the file “Analisa potensi longsor - source.xlsx” sheet “Faktor
topografi”.
15) Column “Rentang jumlah titik potensi longsor berdasarkan faktor topografi” has several sub-
columns that contain the value 1 and 0. These value shows if a subarea has the total of
landslide potential point according with a certain minimum number.
For example sub-column D gives information whether a subarea has the point number that
more than or equal with 0. Sub-column E gives information whether a subarea has the point
number that more than or equal with 50, and so on. The formula example on the second row
of sub-column E is “=IF(C7>=50,1,0)”, the formula example on the second row sub-column F is
“=IF(C7>=100,1,0)” and so on. Write all of the formula for all of sub-column, from column D
until column I.
In this case there are 6 units of sub-columns. In fact many sub-column is adjusted depending
on the value of the potential maximum number of points shown in the column " Jumlah titik
potensi longsor berdasarkan faktor topografi ", which in this case the maximum value is
number potential points is 235.

Training Module Making Landslide Potential Map and Banjir Bandang Hazard Map
73
16) Next step is to count the value of hitting ratio and cover ratio from column D until column I.
from the calculation result, known that sub-column G or subarea that has number of landslide
potential points is equal or more than 150, has the highest value of hitting ratio and cover
ratio.
17) Open sheet “Analisa potensi longsor”. Column E (Jumlah titik potensi longsor) contains link to
column C (Jumlah titik potensi longsor berdasarkan faktor topografi) on sheet “Faktor
topografi”, whereas column F contains link to sub-column G sheet “Faktor topografi”.
18) Open sheet “Peringkat topo”. In this sheet contains two column, column “ID subarea” is a link
to column “ID subarea” sheet “Analisa potensi longsor”, whereas column “Peringkat” is a link
to column “Potensi longsor berdasarkan faktor topografi” sheet “Analisa potensi longsor”.
19) Save the file “Analisa potensi longsor - source.xlsx”
20) On ArcMap workspace, click Add Data, then point to folder: Data source for training.
21) Double click file “Analisa potensi longsor - source.xlsx”, then double click ”Peringkat topo$”.
Automatically, sheet or data from “Peringkat longsor” will enter to ArcMap workspace.
22) On Table Of Contents window,click List By Drawing Order button.
23) Right click layer “subarea ref”, point the cursor to Joins and Relates, then click Join. Next will
appear Join Data window.

Training Module Making Landslide Potential Map and Banjir Bandang Hazard Map
74
24) On combo box of What do you want to join to this layer, choose Join attributes from a table.
On combo box 1, choose column “Id”. On combo box 2, choose layer “Peringkat topo$”. On
combo box 3, choose column “ID subarea”. On radio button Joins Options, choose Keep all
records. Click OK button.
25) Right click layer “subarea ref”, point the cursor to Data, then click Export Data. Insert the data
that want to exported into folder: Data source for training\09 Landslide potential by
topographic factor, and give name “potensi longsor berdasarkan faktor topografi.shp”. If there
is question whether the exported data will insert into ArcMap workspace, answer Yes.
26) Right click layer “subarea ref”, point the cursor to Joins and Relates Remove Join(s), click
Remove All Joins.
27) Right click layer “potensi longsor berdasarkan faktor topografi” and click Properties. On Layer
Properties window, click Symbologi tab.
28) On part of Show: choose Categories and choose Unique values. On combo box of Value Field,
choose column “Peringkat”. Click Add All Values button, to show the values contained in
column “Peringkat”. Changes the symbol for the value 0 become white color, and symbol for
the value 1 become “Fir Green” color. Change the value 0 become “Tidak Berpotensi”, and for
the value 1 become “Berpotensi”. Press OK button.

Training Module Making Landslide Potential Map and Banjir Bandang Hazard Map
75
29) Figure below shows subarea data that potential to landslide based on the color of subarea that
is green color.
30) Save the ArcMap workspace into folder: Data source for training\09 Landslide potential by
topographic factor, and give name “Potensi longsor berdasarkan topografi”.
Training Module Making Landslide Potential Map and Banjir Bandang Hazard Map
76
V. Making Landslide Potential Map Based On Combined Factor
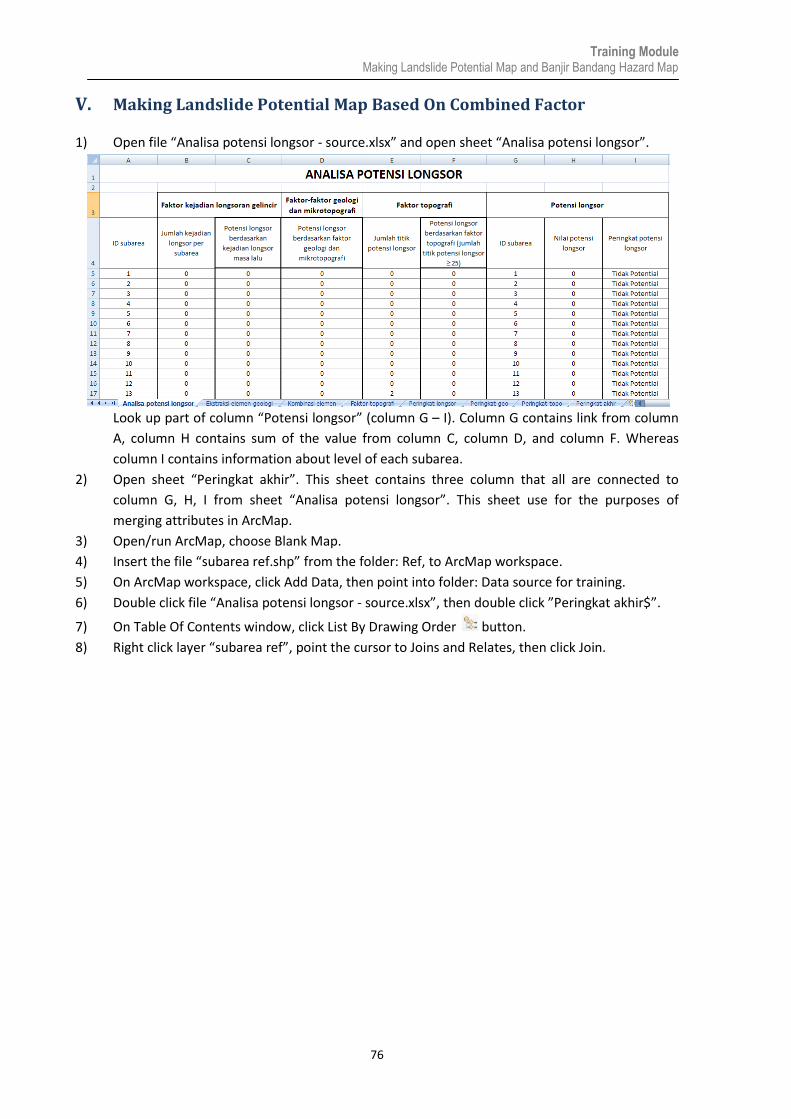
1) Open file “Analisa potensi longsor - source.xlsx” and open sheet “Analisa potensi longsor”.
Look up part of column “Potensi longsor” (column G – I). Column G contains link from column
A, column H contains sum of the value from column C, column D, and column F. Whereas
column I contains information about level of each subarea.
2) Open sheet “Peringkat akhir”. This sheet contains three column that all are connected to
column G, H, I from sheet “Analisa potensi longsor”. This sheet use for the purposes of
merging attributes in ArcMap.
3) Open/run ArcMap, choose Blank Map.
4) Insert the file “subarea ref.shp” from the folder: Ref, to ArcMap workspace.
5) On ArcMap workspace, click Add Data, then point into folder: Data source for training.
6) Double click file “Analisa potensi longsor - source.xlsx”, then double click ”Peringkat akhir$”.
7) On Table Of Contents window, click List By Drawing Order button.
8) Right click layer “subarea ref”, point the cursor to Joins and Relates, then click Join.

Training Module Making Landslide Potential Map and Banjir Bandang Hazard Map
77
9) Then will appear Join Data window. On combo box of What do you want to join to this layer,
choose Join attributes from a table. On combo box 1, choose column “Id”. On combo box 2,
choose layer “Peringkat akhir$”. On combo box 3, choose column “ID subarea”. On radio
button Joins Options, choose Keep all records. Click OK button.
10) Right click layer “subarea ref”, point the cursor to Data, then click Export Data. Enter the data
that will be exported into folder: Data source for training\09 Landslide potential by combine
factor, and give name “potensi longsor berdasarkan faktor gabungan.shp”. If there is question
whether the exported data will insert into ArcMap workspace, answer Yes.
11) Right click layer “subarea ref”, point the cursor to Joins and Relates, then Remove Join(s) and
click Remove All Joins.
12) Right click layer “potensi longsor berdasarkan faktor gabungan” and click Properties. On Layer
Properties window, click Symbologi tab.
13) On part of Show: choose Categories and choose Unique values. On combo box of Value Field,
choose Peringkat. Click Add All Values button, to shows the values contained in column
“Peringkat”. Changes symbol for the value Tidak Potensial become white color, symbol for the
value Rendah become “Solar Yellow” color, symbol for the value Sedang become “Electron
Gold” color, and symbol for the value Tinggi become “Mars Red” color. Press OK button.

Training Module Making Landslide Potential Map and Banjir Bandang Hazard Map
78
14) Figure below shows subarea data that potential to landslide based on combined factor.
15) Right click layer “potensi_longsor_berdasarkan_faktor_gabungan”, click Save As Layer File.
Save the file into folder: Data source for training\10 Landslide potential by combine factor, and
give name “Potensi longsor berdasarkan faktor gabungan.lyr”.
16) Save the ArcMap workspace into folder: Data source for training\10 Landslide potential by
combine factor, and give name “Potensi longsor berdasarkan faktor gabungan”.

Training Module Making Landslide Potential Map and Banjir Bandang Hazard Map
79
VI. Making Banjir Bandang Hazard Area
Step 1. Chooseing main river object/feature
1) Open/run ArcMap, choose Blank Map.
2) Insert data “slope_10” and “dem_10” from the folder: Data source for training\02 Contour
data.
3) Insert data “sungai utama.shp” from the folder: Data source for training\03 River vector data.
4) Insert data “das ref.shp” from the folder: Ref.
5) Next step is to choose one of river object/feature. The river feature that we want to choose is
the river are expected to experience flash floods, based on information from a landslide
potential map which showed that the upper river has a high potential for landslides.
By using Select Features by Rectangle button on Tools toolbar, select main feature of
main river that surround the watershed. For example here, the main river of Kali Jompo
watershed.
For tips, select an object that resembles a straight line. If there are other objects that are
branching from the same river, the object is selected in the next step.
6) Right click layer “sungai utama” and export data or selected objects into folder: Data source
for training\11 Creating banjir bandang hazard area. Give name “sungai utama 01”. If there is
question whether the exported data will insert into ArcMap workspace, answer Yes.
7) Press Clear Selected Features button.
Step 2. Defining the banjir bandang hazard area boundary based on topographic slope
1) On ArcToolbox window, click + symbol on Data Management Tools Generalization, double
click Dissolve. Next will appear Dissolve window.
Training Module Making Landslide Potential Map and Banjir Bandang Hazard Map
80
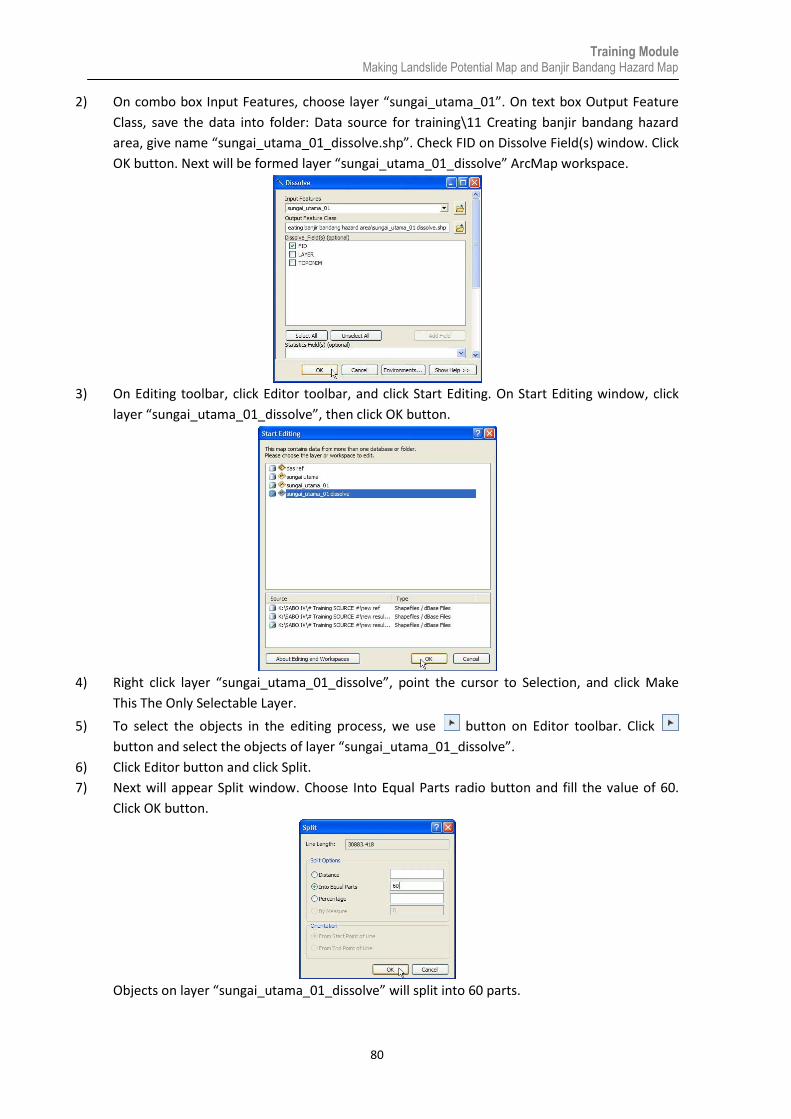
2) On combo box Input Features, choose layer “sungai_utama_01”. On text box Output Feature
Class, save the data into folder: Data source for training\11 Creating banjir bandang hazard
area, give name “sungai_utama_01_dissolve.shp”. Check FID on Dissolve Field(s) window. Click
OK button. Next will be formed layer “sungai_utama_01_dissolve” ArcMap workspace.
3) On Editing toolbar, click Editor toolbar, and click Start Editing. On Start Editing window, click
layer “sungai_utama_01_dissolve”, then click OK button.
4) Right click layer “sungai_utama_01_dissolve”, point the cursor to Selection, and click Make
This The Only Selectable Layer.
5) To select the objects in the editing process, we use button on Editor toolbar. Click
button and select the objects of layer “sungai_utama_01_dissolve”.
6) Click Editor button and click Split.
7) Next will appear Split window. Choose Into Equal Parts radio button and fill the value of 60.
Click OK button.
Objects on layer “sungai_utama_01_dissolve” will split into 60 parts.