manageengine supportcenter plus :: user guide · manageengine supportcenter plus :: user guide zoho...
TRANSCRIPT
ManageEngine SupportCenter Plus :: User Guide
Zoho Corporation Pvt. Ltd.
1
Table of Contents
INTRODUCTION ........................................................................................................ 2
CUSTOMER PORTAL WELCOME PAGE ................................................................ 3
HOME ........................................................................................................................ 9
Home Page ........................................................................................................................ 9
Dashboard ....................................................................................................................... 11
Support Team .................................................................................................................. 14
Announcements ............................................................................................................... 15
Preferences ..................................................................................................................... 16
Recent Items ................................................................................................................... 18
REQUEST ................................................................................................................ 19
Request List View ............................................................................................................ 20
Requests based on Filters ............................................................................................... 22
Customizing Request List View ........................................................................................ 24
Search Request ............................................................................................................... 25
Creating New Request ..................................................................................................... 26
Auto CC Recipient ........................................................................................................... 28
Request Details Page ...................................................................................................... 29
Adding Notes ................................................................................................................... 31
Printing Request .............................................................................................................. 32
Viewing Survey Results ................................................................................................... 33
SOLUTIONS ............................................................................................................ 34
Browsing Solutions by Topic ............................................................................................ 35
Search Solutions .............................................................................................................. 36
MY DETAILS ........................................................................................................... 38
Editing My Details ............................................................................................................ 39
ManageEngine SupportCenter Plus :: User Guide
Zoho Corporation Pvt. Ltd.
2
Introduction
ManageEngine SupportCenter Plus is a comprehensive customer suppport management software
that provides help desk agents and account managers, an integrated console to monitor and maintain
the customer accounts and track the support requests from the customers. The customer support
plays an important part in any product vendor or service vendor firm. It is very often the first contact
the contacts have in their use of product / services when something does not work as expected. The
customer support is a single point of contact for contacts who need help.
To make the process of reporting the issues to the customer support team easier, ManageEngine
SupportCenter Plus provides you with a Customer Portal where you can log your complaints and
issues online with the help of a web-based form. Once you have filed your issue, it gets listed in your
request view page, where you can keep track of the logged issue. You can also update your personal
information using the Customer Portal. In the Customer Portal, you will be able to access the following
modules: Requests: You can create a new request and view the same. Also all the requests that you have
raised till date will be saved in your requests module for future references. Solutions: From the solutions knowledge base that has been developed and maintained by your IT
help desk team, you can search for solutions for the issue that you are currently facing. If you do not
find any solution for the problem at hand, then you can post your issue as a request to the help desk
team. My Details: You can view and edit your account details including your password. This updated
information will be displayed whenever your information is requested.
In addition to this, you will also be able to see check the "presence" of the customer support support
reps; that is, you can know which customer support personnel is currently available for you to contact
him/her immediately.
ManageEngine SupportCenter Plus :: User Guide
Zoho Corporation Pvt. Ltd.
3
Customer Portal Welcome Page
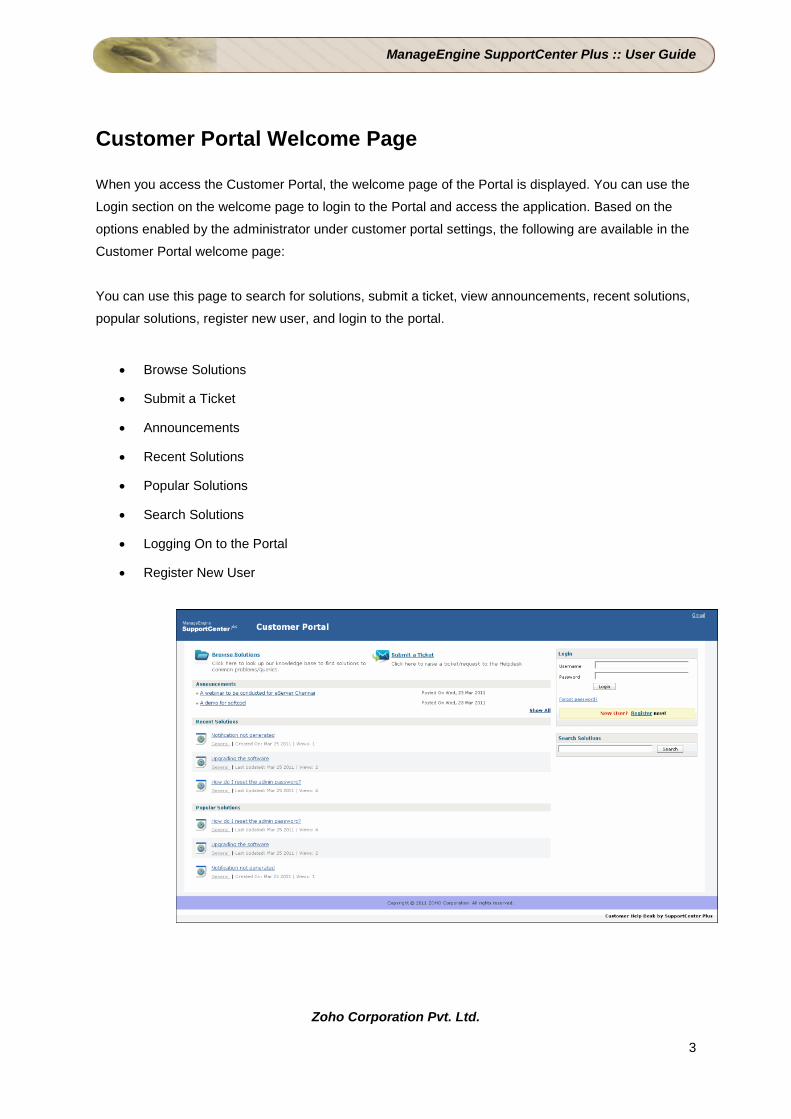
When you access the Customer Portal, the welcome page of the Portal is displayed. You can use the
Login section on the welcome page to login to the Portal and access the application. Based on the
options enabled by the administrator under customer portal settings, the following are available in the
Customer Portal welcome page:
You can use this page to search for solutions, submit a ticket, view announcements, recent solutions,
popular solutions, register new user, and login to the portal.
• Browse Solutions
• Submit a Ticket
• Announcements
• Recent Solutions
• Popular Solutions
• Search Solutions
• Logging On to the Portal
• Register New User
ManageEngine SupportCenter Plus :: User Guide
Zoho Corporation Pvt. Ltd.
4
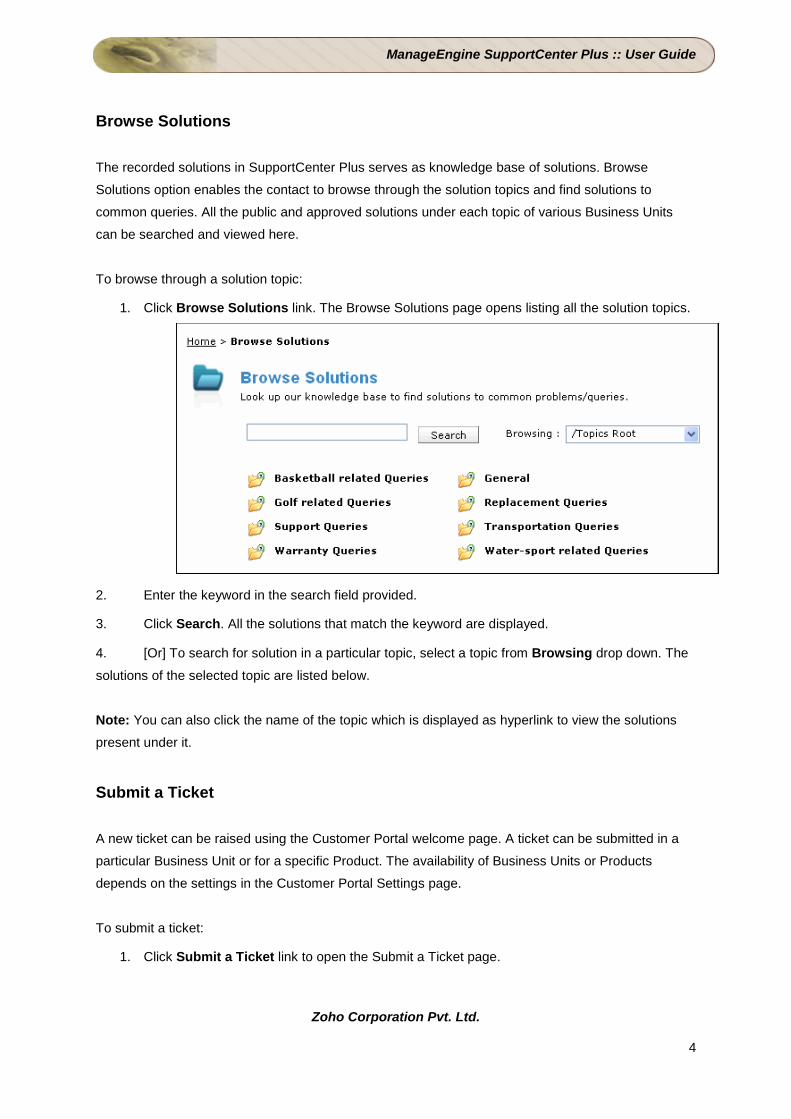
Browse Solutions
The recorded solutions in SupportCenter Plus serves as knowledge base of solutions. Browse
Solutions option enables the contact to browse through the solution topics and find solutions to
common queries. All the public and approved solutions under each topic of various Business Units
can be searched and viewed here.
To browse through a solution topic:
1. Click Browse Solutions link. The Browse Solutions page opens listing all the solution topics.
2. Enter the keyword in the search field provided.
3. Click Search. All the solutions that match the keyword are displayed.
4. [Or] To search for solution in a particular topic, select a topic from Browsing drop down. The
solutions of the selected topic are listed below. Note: You can also click the name of the topic which is displayed as hyperlink to view the solutions
present under it.
Submit a Ticket
A new ticket can be raised using the Customer Portal welcome page. A ticket can be submitted in a
particular Business Unit or for a specific Product. The availability of Business Units or Products
depends on the settings in the Customer Portal Settings page.
To submit a ticket:
1. Click Submit a Ticket link to open the Submit a Ticket page.

ManageEngine SupportCenter Plus :: User Guide
Zoho Corporation Pvt. Ltd.
5
2. To submit a ticket in a particular business unit, select a Business Unit from the drop down.
This is the mandatory field.
[OR]
To submit a request for a particular product, select a Product from the drop down. This is the
mandatory field. Note: The Business Unit or Product drop down is displayed based on the Portal Options
settings in the Customer Portal Settings page.
3. Enter your Name and E-mail ID. The E-mail is the mandatory field.
4. Specify the Subject of the ticket. This field is mandatory. Note: If the ticket raised here has a solution already available in SupportCenter Plus, the
solutions for the raised ticket will be suggested below this field. The solutions will be
suggested, only when intelligent response system is enabled by the administrator.
5. Provide a brief description about the ticket in the Message field.

ManageEngine SupportCenter Plus :: User Guide
Zoho Corporation Pvt. Ltd.
6
6. Enter the Verification Code by adding the given numbers to prevent the automated
submission of the ticket.
7. Click Submit. The ticket is submitted in SupportCenter Plus successfully and the Ticket
Details are displayed.
Announcements
In this section, you can view all the public announcements added in the SupportCenter Plus
application. To view the announcement details, click the title of the announcement which is displayed
as hyperlink.
Recent Solutions
The recently added solutions in the SupportCenter Plus application can be viewed in this section.
Click the solution subject which is displayed as hyperlink to view the solution details.
Popular Solutions
The frequently viewed solutions in SupportCenter Plus are listed in this section. Click the solution
subject which is displayed as hyperlink to view the solution details.
Search Solutions
You can search for solutions based on the keywords, from the Search Solutions section.
To search for solutions:
1. Enter the keyword in the search field provided.
2. Click Search. All the solutions that match the keyword are displayed.
Logging On to the Portal
You can use the Login section on the Self-Service Portal welcome page to login to the portal. A
unique user name and password are assigned to you by the administrator.
To log on to the portal:
1. Enter the Username and Password.
2. Click Login. The home page of the contact login is displayed.
ManageEngine SupportCenter Plus :: User Guide
Zoho Corporation Pvt. Ltd.
7
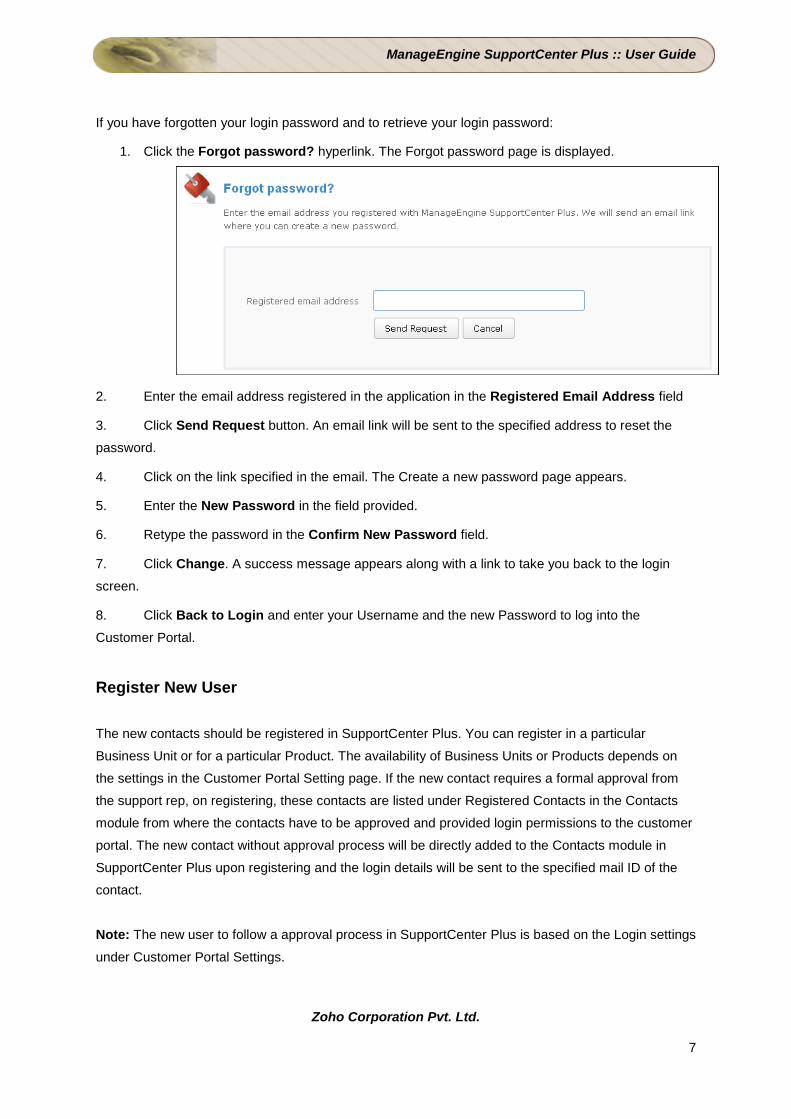
If you have forgotten your login password and to retrieve your login password:
1. Click the Forgot password? hyperlink. The Forgot password page is displayed.
2. Enter the email address registered in the application in the Registered Email Address field
3. Click Send Request button. An email link will be sent to the specified address to reset the
password.
4. Click on the link specified in the email. The Create a new password page appears.
5. Enter the New Password in the field provided.
6. Retype the password in the Confirm New Password field.
7. Click Change. A success message appears along with a link to take you back to the login
screen.
8. Click Back to Login and enter your Username and the new Password to log into the
Customer Portal.
Register New User
The new contacts should be registered in SupportCenter Plus. You can register in a particular
Business Unit or for a particular Product. The availability of Business Units or Products depends on
the settings in the Customer Portal Setting page. If the new contact requires a formal approval from
the support rep, on registering, these contacts are listed under Registered Contacts in the Contacts
module from where the contacts have to be approved and provided login permissions to the customer
portal. The new contact without approval process will be directly added to the Contacts module in
SupportCenter Plus upon registering and the login details will be sent to the specified mail ID of the
contact.
Note: The new user to follow a approval process in SupportCenter Plus is based on the Login settings
under Customer Portal Settings.
ManageEngine SupportCenter Plus :: User Guide
Zoho Corporation Pvt. Ltd.
8
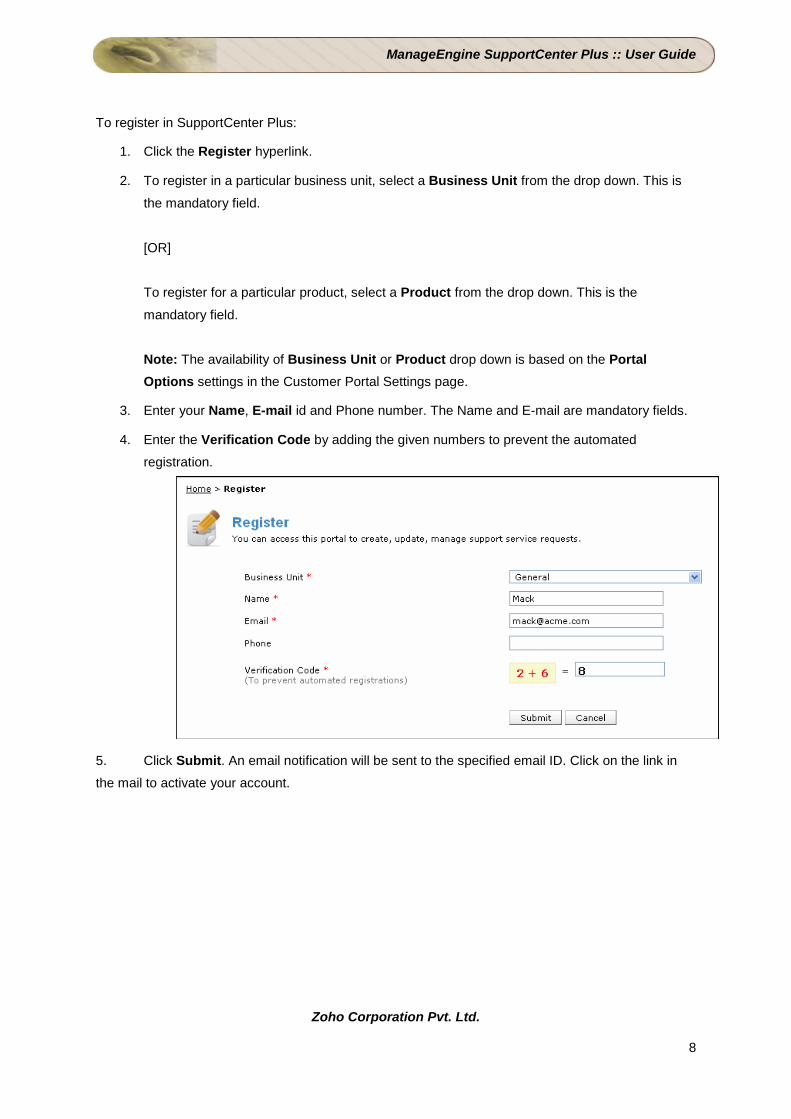
To register in SupportCenter Plus:
1. Click the Register hyperlink.
2. To register in a particular business unit, select a Business Unit from the drop down. This is
the mandatory field.
[OR]
To register for a particular product, select a Product from the drop down. This is the
mandatory field. Note: The availability of Business Unit or Product drop down is based on the Portal Options settings in the Customer Portal Settings page.
3. Enter your Name, E-mail id and Phone number. The Name and E-mail are mandatory fields.
4. Enter the Verification Code by adding the given numbers to prevent the automated
registration.
5. Click Submit. An email notification will be sent to the specified email ID. Click on the link in
the mail to activate your account.
ManageEngine SupportCenter Plus :: User Guide
Zoho Corporation Pvt. Ltd.
9
Home
Home Page
The home page for customer login of SupportCenter Plus has various useful information displayed
that enables a contact to take necessary action. Based on the configures enabled by the administrator
under Settings, the following are available in home page,
• Dashboard
• Reminders
• Add New Request button
• Search field
• Preferences
Dashboard Dashboards in the contact login displays the Request Summary, Public Announcements and an
option to raise a request using request template. Click here to know more on Dashboards.
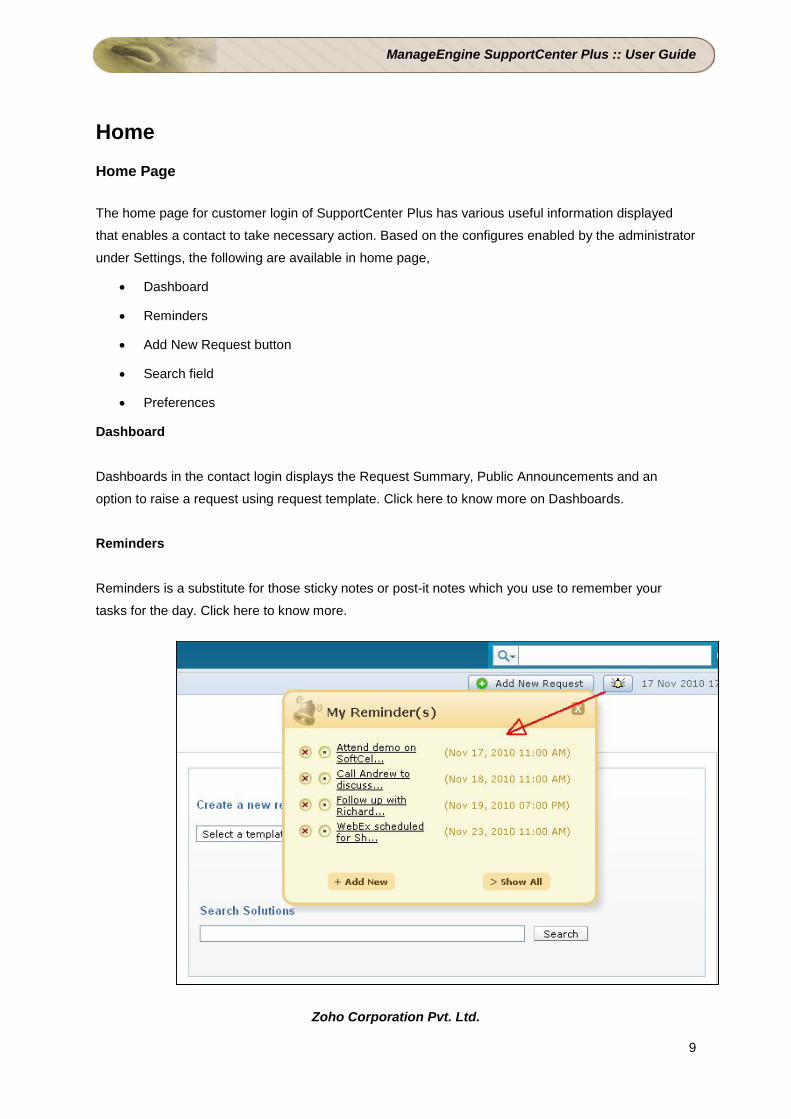
Reminders
Reminders is a substitute for those sticky notes or post-it notes which you use to remember your
tasks for the day. Click here to know more.
ManageEngine SupportCenter Plus :: User Guide
Zoho Corporation Pvt. Ltd.
10
Add New Request button
The Add New Request button beside the Reminders is a quick navigator to instantly access the new
request form.
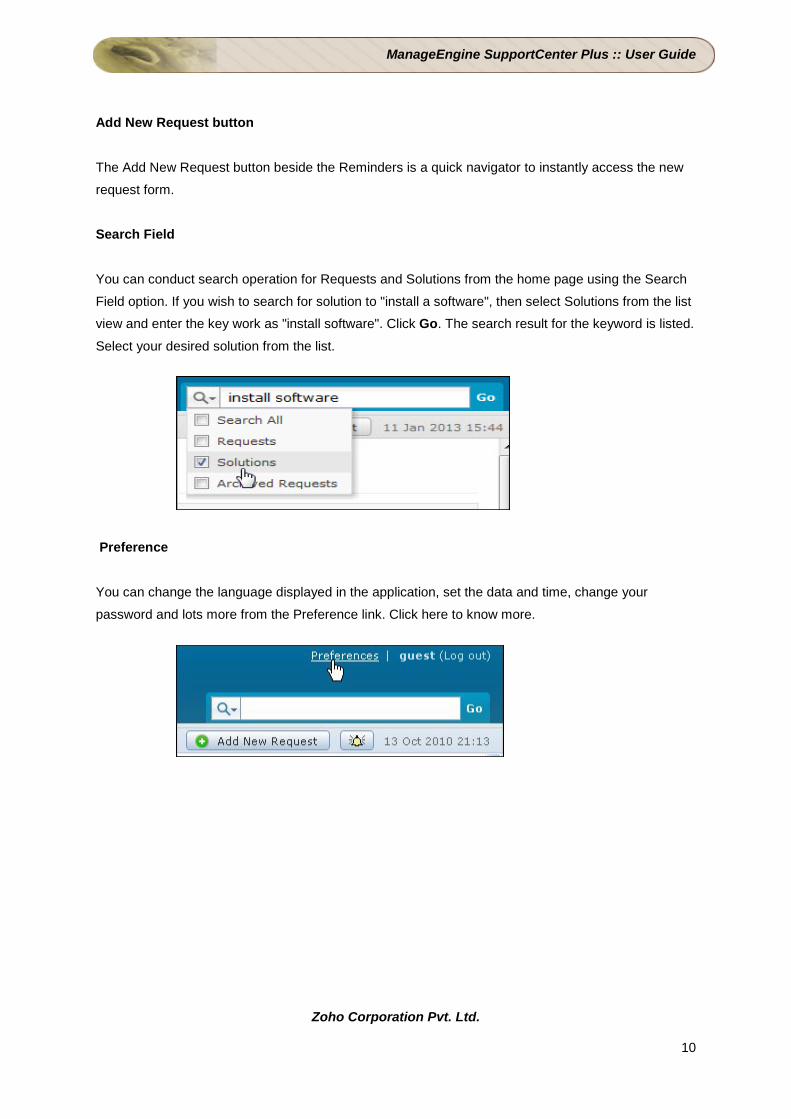
Search Field You can conduct search operation for Requests and Solutions from the home page using the Search
Field option. If you wish to search for solution to "install a software", then select Solutions from the list
view and enter the key work as "install software". Click Go. The search result for the keyword is listed.
Select your desired solution from the list.
Preference
You can change the language displayed in the application, set the data and time, change your
password and lots more from the Preference link. Click here to know more.
ManageEngine SupportCenter Plus :: User Guide
Zoho Corporation Pvt. Ltd.
11
Dashboard
The dashboard of SupportCenter Plus login home displays the following tabs,
• My Views
• Support Team
My Views
My View for a contact, displays information on summary of the requests raised by the logged in user
and the Announcements published company wide.
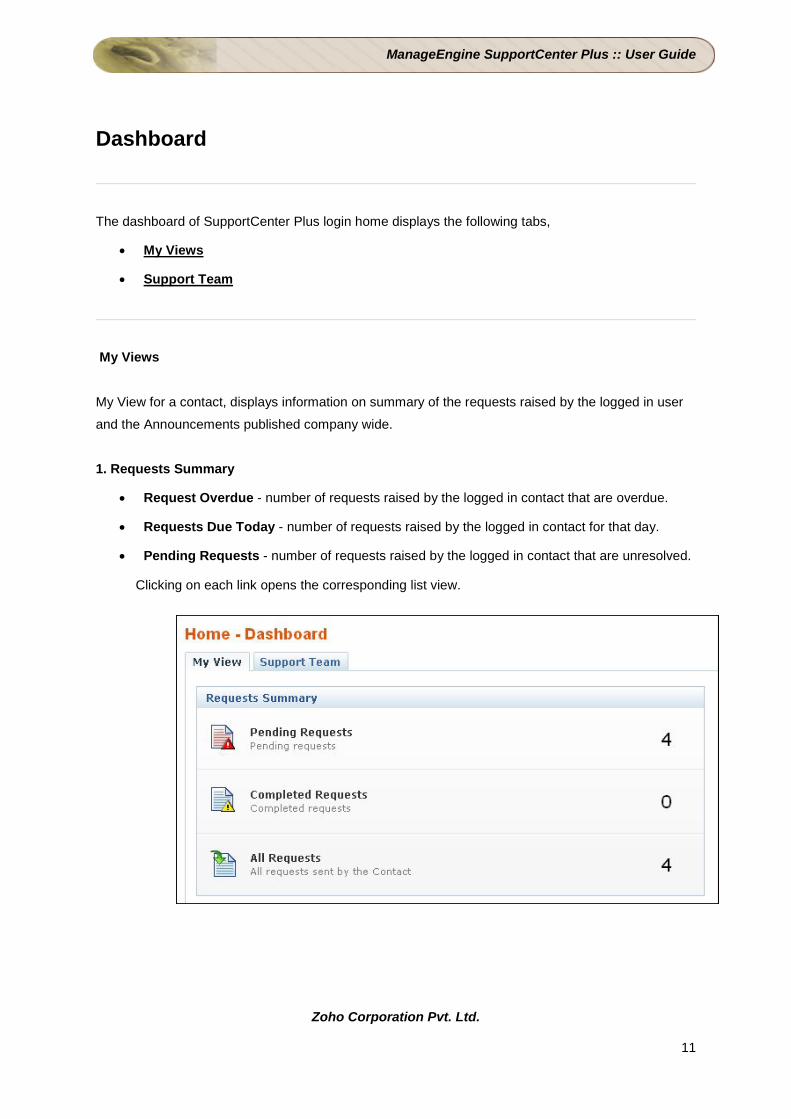
1. Requests Summary
• Request Overdue - number of requests raised by the logged in contact that are overdue.
• Requests Due Today - number of requests raised by the logged in contact for that day.
• Pending Requests - number of requests raised by the logged in contact that are unresolved.
Clicking on each link opens the corresponding list view.
ManageEngine SupportCenter Plus :: User Guide
Zoho Corporation Pvt. Ltd.
12
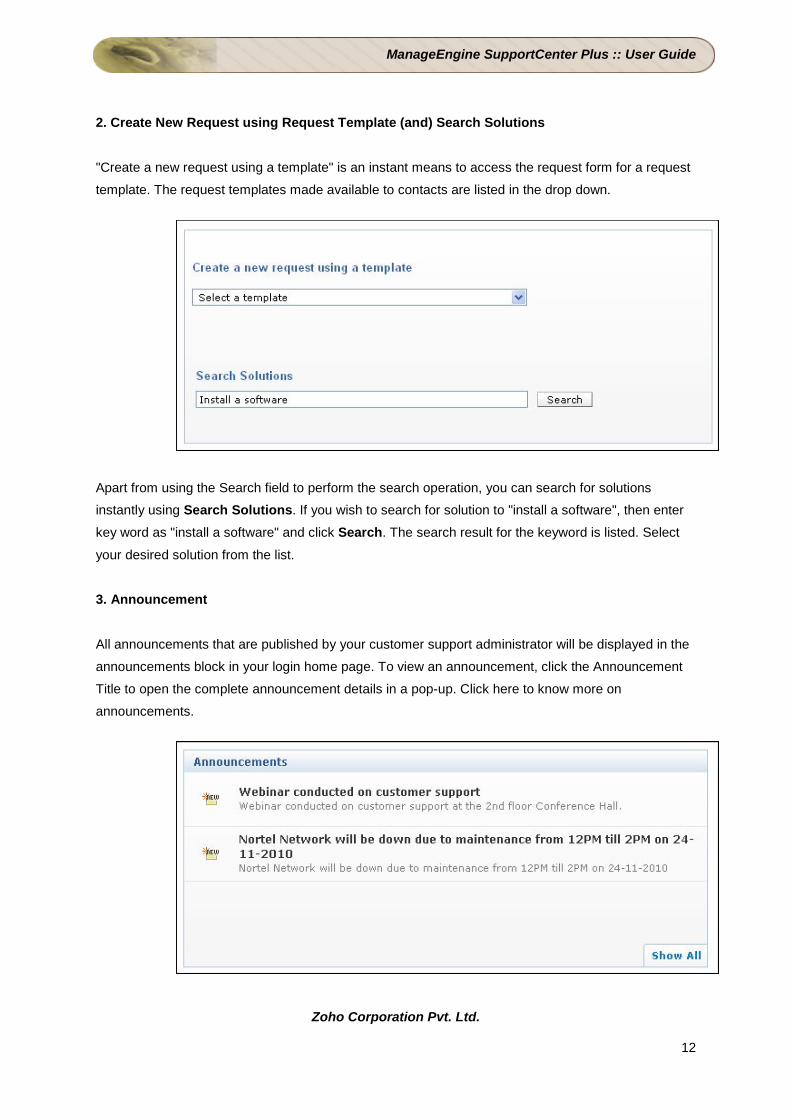
2. Create New Request using Request Template (and) Search Solutions
"Create a new request using a template" is an instant means to access the request form for a request
template. The request templates made available to contacts are listed in the drop down.
Apart from using the Search field to perform the search operation, you can search for solutions
instantly using Search Solutions. If you wish to search for solution to "install a software", then enter
key word as "install a software" and click Search. The search result for the keyword is listed. Select
your desired solution from the list.
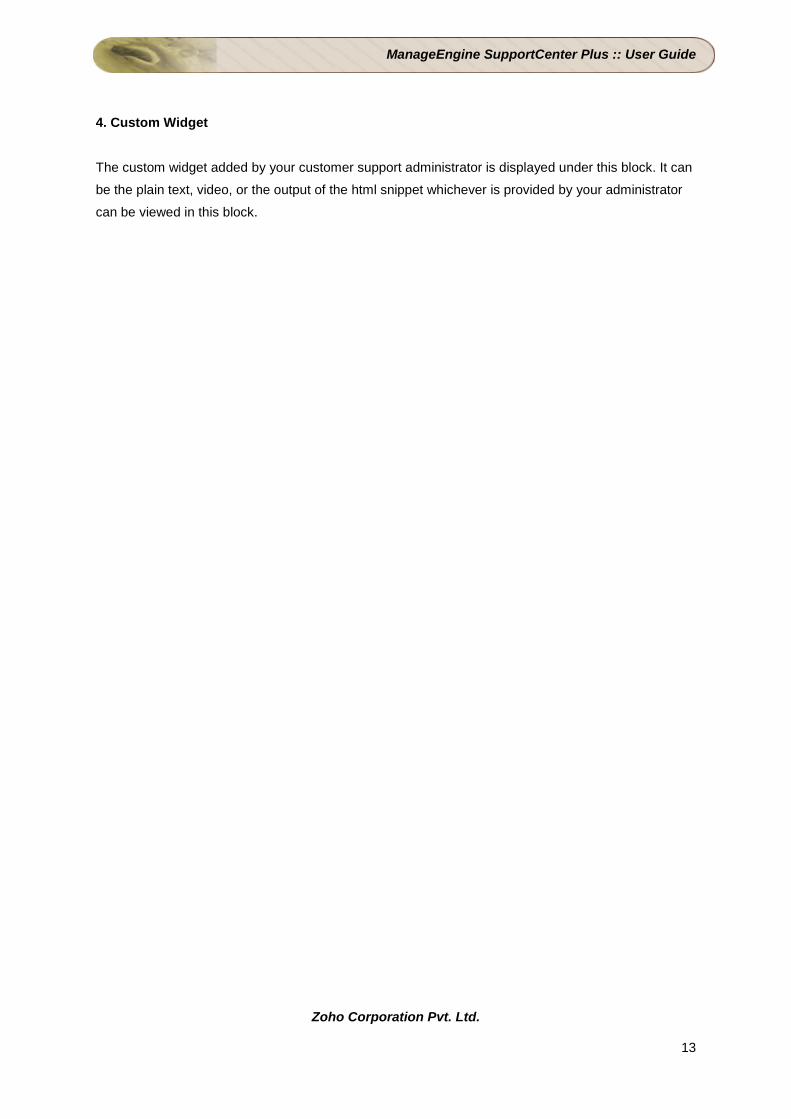
3. Announcement All announcements that are published by your customer support administrator will be displayed in the
announcements block in your login home page. To view an announcement, click the Announcement
Title to open the complete announcement details in a pop-up. Click here to know more on
announcements.
ManageEngine SupportCenter Plus :: User Guide
Zoho Corporation Pvt. Ltd.
13
4. Custom Widget The custom widget added by your customer support administrator is displayed under this block. It can
be the plain text, video, or the output of the html snippet whichever is provided by your administrator
can be viewed in this block.
ManageEngine SupportCenter Plus :: User Guide
Zoho Corporation Pvt. Ltd.
14
Support Team
ManageEngine SupportCenter Plus enables you to view the "presence" of the customer support rep;
that is, you can check their availability status and reach the support rep who is currently available for
contacting. Else, you can just send an email or submit your support query to the support team, which
will be attended by them once they are available.
The technical support team's availability chart contains their contact information, such as email ID and
phone number, along with the in-out status. Click the Support Team tab in the home page dashboard
to access the availability chart.
Warning
Support Team tab will be available only if the SupportDesk Plus administrator has
provided you the necessary access permissions for the same.
ManageEngine SupportCenter Plus :: User Guide
Zoho Corporation Pvt. Ltd.
15
Announcements
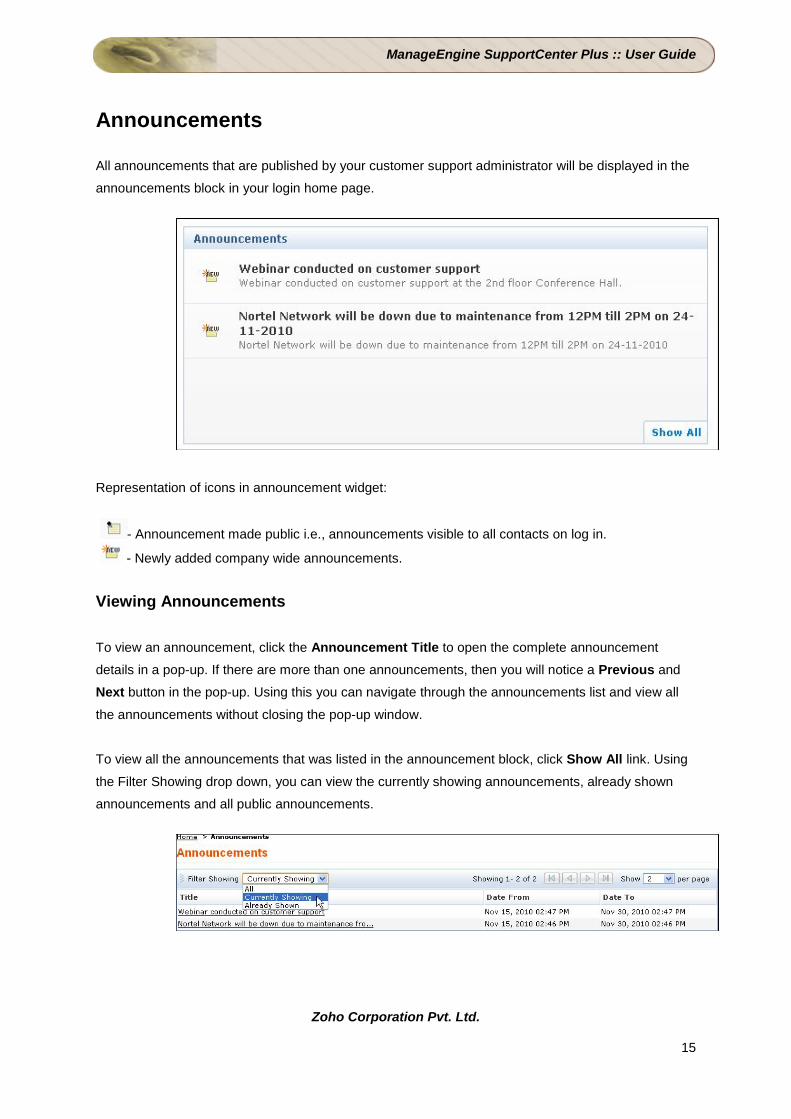
All announcements that are published by your customer support administrator will be displayed in the
announcements block in your login home page.
Representation of icons in announcement widget:
- Announcement made public i.e., announcements visible to all contacts on log in.
- Newly added company wide announcements.
Viewing Announcements
To view an announcement, click the Announcement Title to open the complete announcement
details in a pop-up. If there are more than one announcements, then you will notice a Previous and
Next button in the pop-up. Using this you can navigate through the announcements list and view all
the announcements without closing the pop-up window.
To view all the announcements that was listed in the announcement block, click Show All link. Using
the Filter Showing drop down, you can view the currently showing announcements, already shown
announcements and all public announcements.
ManageEngine SupportCenter Plus :: User Guide
Zoho Corporation Pvt. Ltd.
16
Preferences
You can customize your personalization such as the language to be displayed, time zone, data and
time format to be displayed in the application. Apart from this, you can also change your login
password.
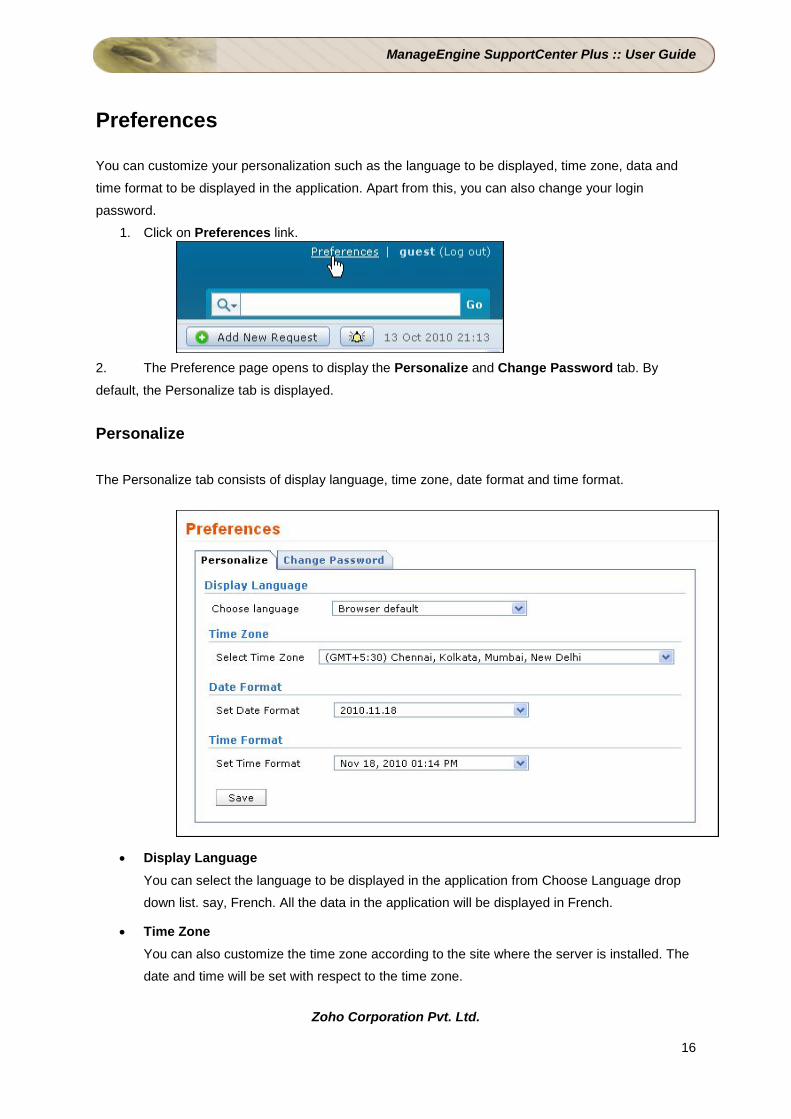
1. Click on Preferences link.
2. The Preference page opens to display the Personalize and Change Password tab. By
default, the Personalize tab is displayed. Personalize
The Personalize tab consists of display language, time zone, date format and time format.
• Display Language
You can select the language to be displayed in the application from Choose Language drop
down list. say, French. All the data in the application will be displayed in French.
• Time Zone
You can also customize the time zone according to the site where the server is installed. The
date and time will be set with respect to the time zone.
ManageEngine SupportCenter Plus :: User Guide
Zoho Corporation Pvt. Ltd.
17
• Date/Time Format Select the format of the date such as, 2009.09.10, from the Set Date Format drop down box.
Similarly, you can also set the time format from the Set Time Format drop down box. The
selected date and time format will be displayed where ever the date/time is mentioned.
Say, while creating a new request, the request created on and due by time will be displayed in
the selected date and time format. The date and time is set accordingly to the selected time
zone.
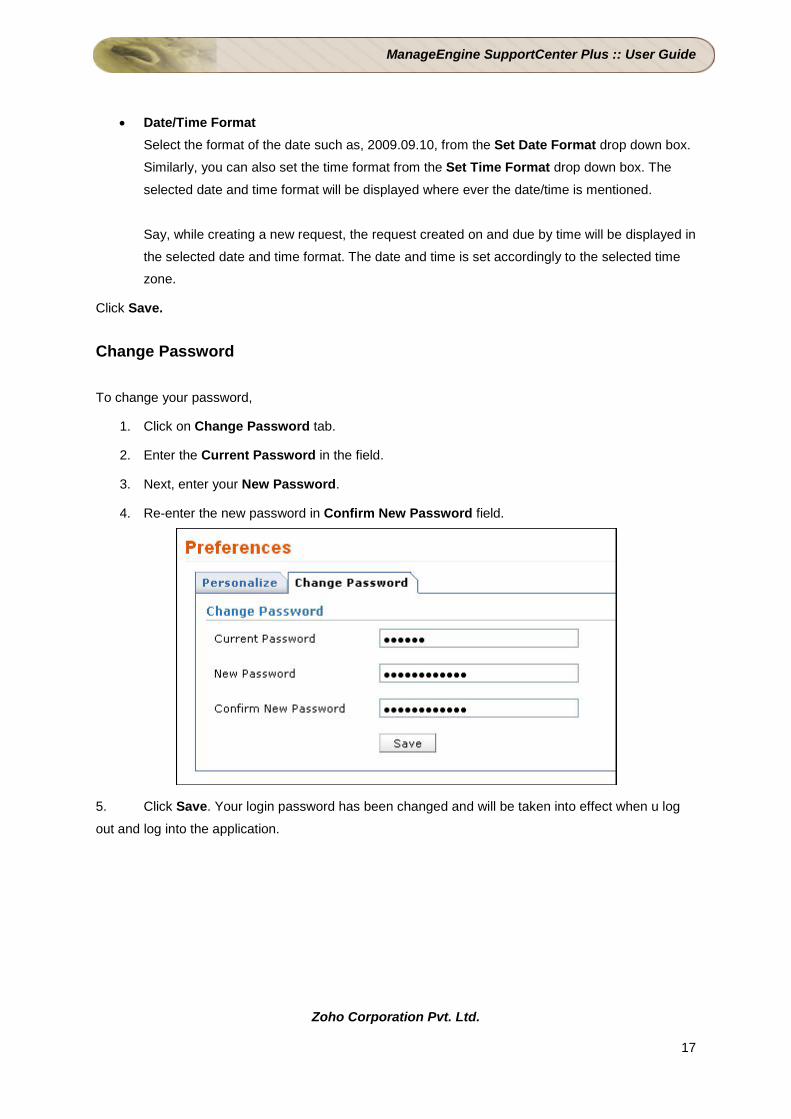
Click Save. Change Password
To change your password,
1. Click on Change Password tab.
2. Enter the Current Password in the field.
3. Next, enter your New Password.
4. Re-enter the new password in Confirm New Password field.
5. Click Save. Your login password has been changed and will be taken into effect when u log
out and log into the application.
ManageEngine SupportCenter Plus :: User Guide
Zoho Corporation Pvt. Ltd.
18
Recent Items
When you are using the ManageEngine SupportCenter Plus application, the application tracks your
last viewed items and lists them in the Recent Items block on the left side. This has a list of the last
10 items that you viewed in the application, with the latest viewed item appearing on the top of the list.
Clicking the hyperlinked item takes you directly to the item's details.
ManageEngine SupportCenter Plus :: User Guide
Zoho Corporation Pvt. Ltd.
19
Request
ManageEngine SupportCenter Plus provides you a Customer Portal with the request module. Here,
you can create new requests to post your concerns and issues to the customer support team. You
can also view the request that you have posted and keep track of its status. Once the request is
closed, you can view the same in the closed requests.
ManageEngine SupportCenter Plus :: User Guide
Zoho Corporation Pvt. Ltd.
20
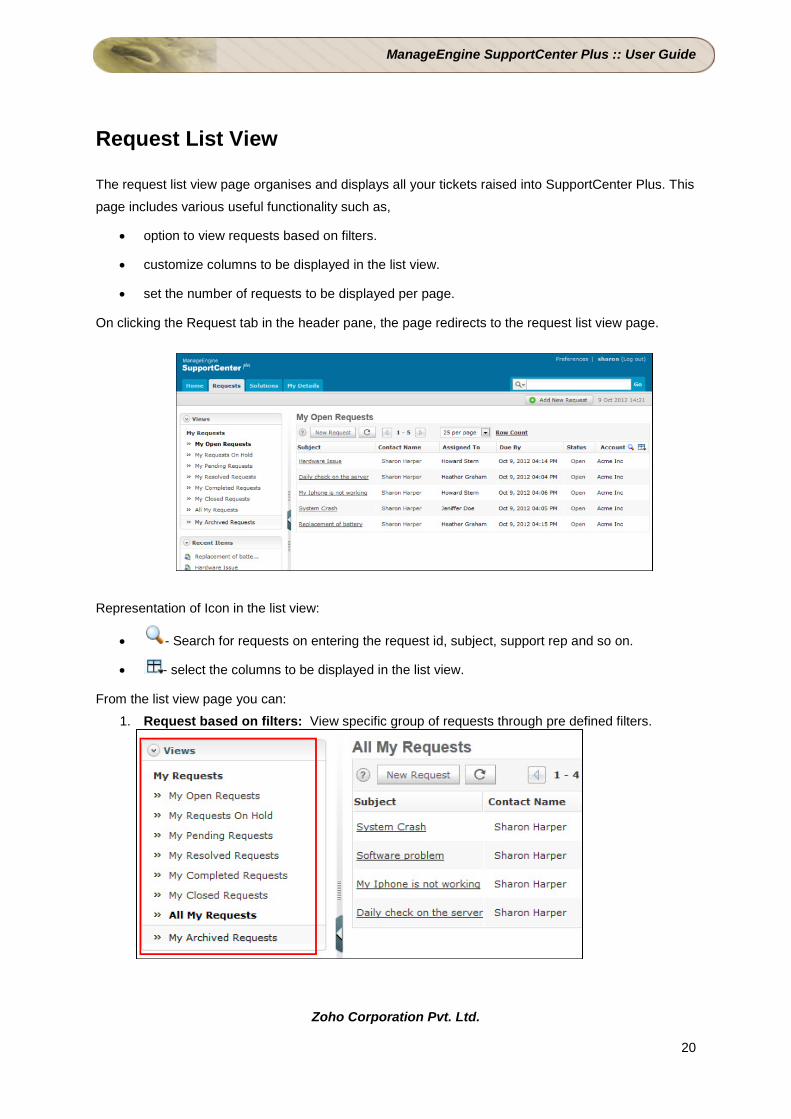
Request List View
The request list view page organises and displays all your tickets raised into SupportCenter Plus. This
page includes various useful functionality such as,
• option to view requests based on filters.
• customize columns to be displayed in the list view.
• set the number of requests to be displayed per page.
On clicking the Request tab in the header pane, the page redirects to the request list view page.
Representation of Icon in the list view:
• - Search for requests on entering the request id, subject, support rep and so on.
• - select the columns to be displayed in the list view.
From the list view page you can:
1. Request based on filters: View specific group of requests through pre defined filters.

ManageEngine SupportCenter Plus :: User Guide
Zoho Corporation Pvt. Ltd.
21
2. Set the number of requests per page and navigation buttons: You can set the number of
requests to be displayed in the request list view page.
3. New Request: Create new requests on specifying information such as, priority, category, sub
category and items. [Refer New Request to know more].
ManageEngine SupportCenter Plus :: User Guide
Zoho Corporation Pvt. Ltd.
22
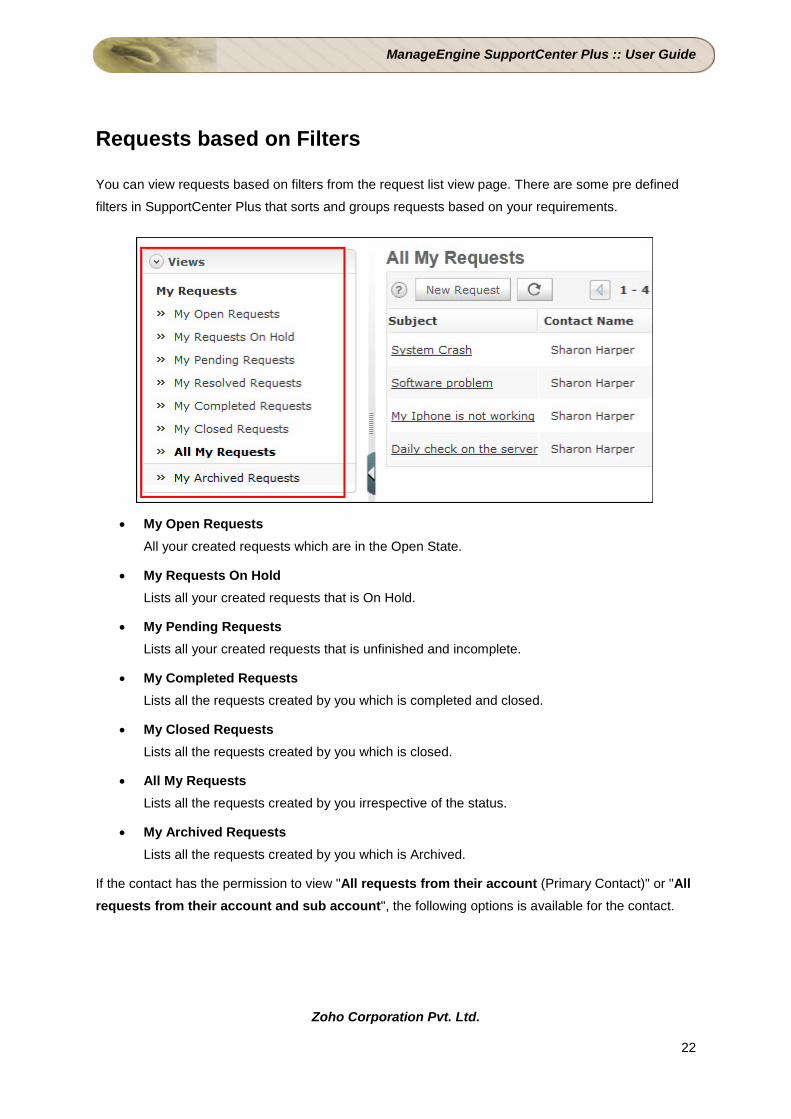
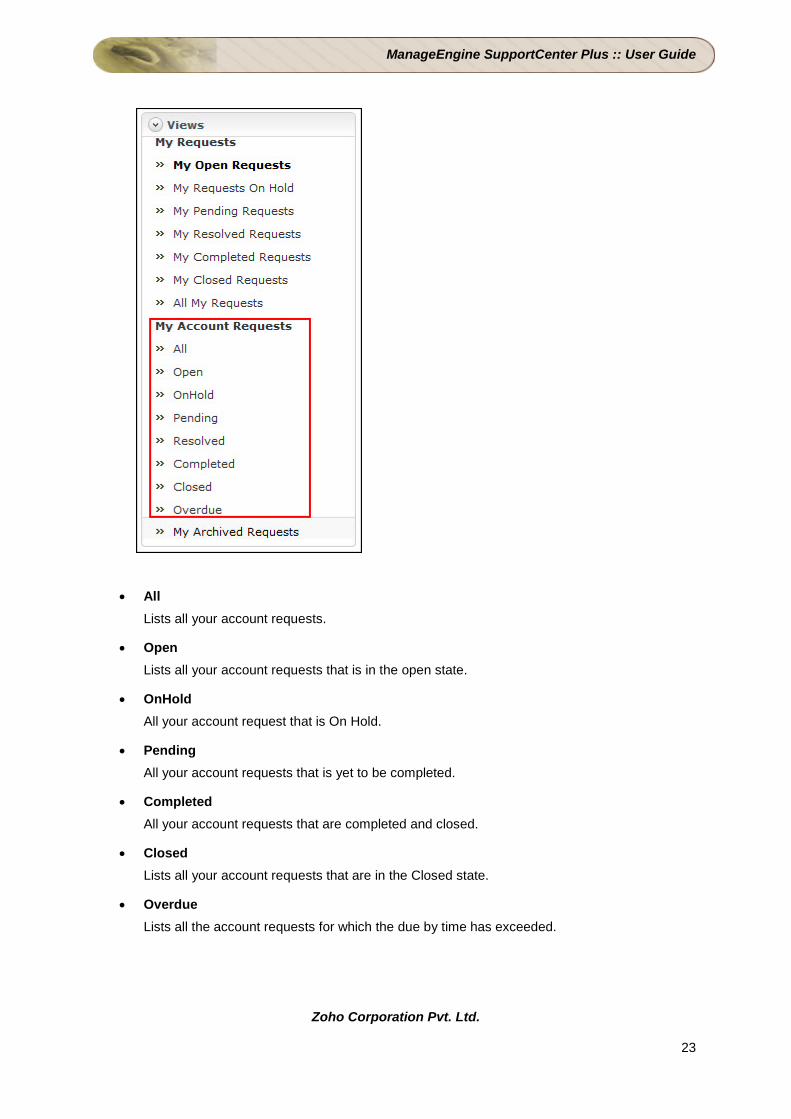
Requests based on Filters
You can view requests based on filters from the request list view page. There are some pre defined
filters in SupportCenter Plus that sorts and groups requests based on your requirements.
• My Open Requests
All your created requests which are in the Open State.
• My Requests On Hold
Lists all your created requests that is On Hold.
• My Pending Requests
Lists all your created requests that is unfinished and incomplete.
• My Completed Requests
Lists all the requests created by you which is completed and closed.
• My Closed Requests
Lists all the requests created by you which is closed.
• All My Requests
Lists all the requests created by you irrespective of the status.
• My Archived Requests
Lists all the requests created by you which is Archived.
If the contact has the permission to view "All requests from their account (Primary Contact)" or "All requests from their account and sub account", the following options is available for the contact.
ManageEngine SupportCenter Plus :: User Guide
Zoho Corporation Pvt. Ltd.
23
• All Lists all your account requests.
• Open
Lists all your account requests that is in the open state.
• OnHold
All your account request that is On Hold.
• Pending
All your account requests that is yet to be completed.
• Completed
All your account requests that are completed and closed.
• Closed
Lists all your account requests that are in the Closed state.
• Overdue
Lists all the account requests for which the due by time has exceeded.

ManageEngine SupportCenter Plus :: User Guide
Zoho Corporation Pvt. Ltd.
24
Customizing Request List View
ManageEngine SupportCenter Plus gives you an option to customize the request list view page by
including columns of your choice.
To customize columns displayed in the list view,
1. Click on the Request tab in the header pane to open the request list view page.
2. Click on Column Chooser icon . The available columns that can be displayed in the list
view pops up. The columns that are currently visible in the list view is indicated with selected
check box.
3. To remove a column, de-select the check box and click Save.
4. To add a column to the list view, select the check box beside the column you wish to add.
Click Save.
5. To change the column order, click the up and down arrow after selecting the column that you
wish to move.
6. Click Save. Only the selected columns are added in the request list view.
ManageEngine SupportCenter Plus :: User Guide
Zoho Corporation Pvt. Ltd.
25
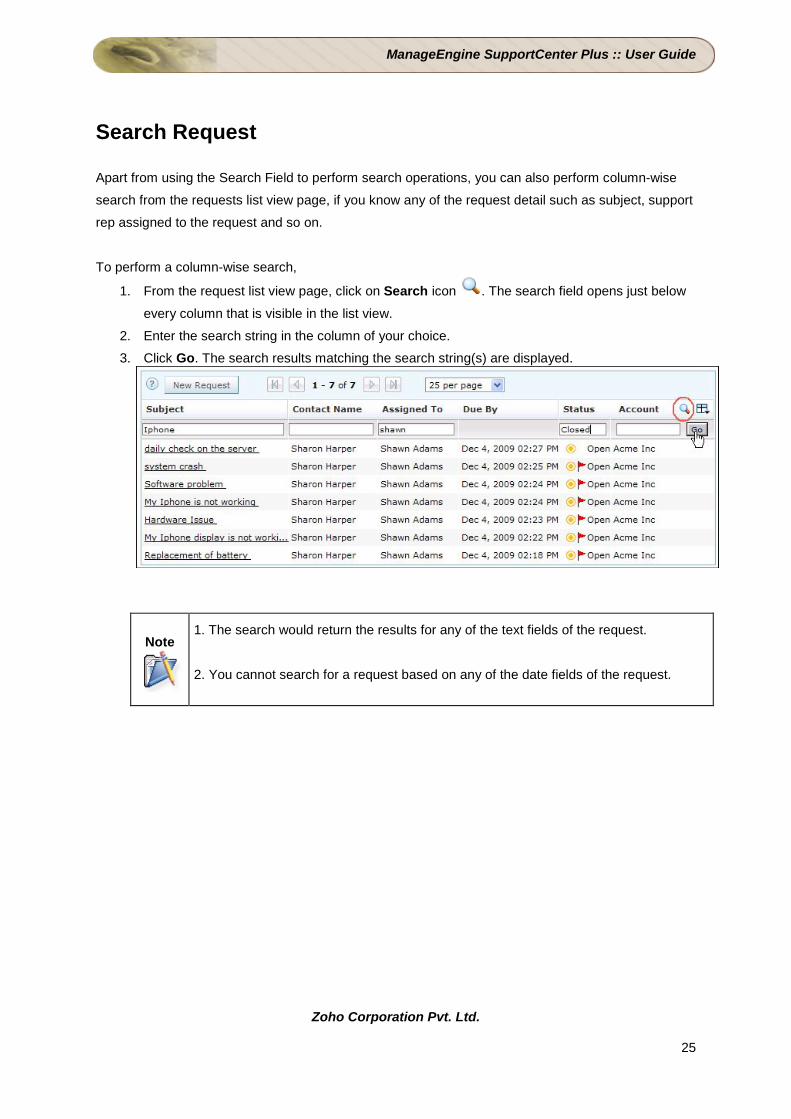
Search Request
Apart from using the Search Field to perform search operations, you can also perform column-wise
search from the requests list view page, if you know any of the request detail such as subject, support
rep assigned to the request and so on.
To perform a column-wise search,
1. From the request list view page, click on Search icon . The search field opens just below
every column that is visible in the list view.
2. Enter the search string in the column of your choice.
3. Click Go. The search results matching the search string(s) are displayed.
Note
1. The search would return the results for any of the text fields of the request.
2. You cannot search for a request based on any of the date fields of the request.
ManageEngine SupportCenter Plus :: User Guide
Zoho Corporation Pvt. Ltd.
26
Creating New Request
Any incident, request for service or request for information can be sent as requests to the supportdesk
team in many different ways. Some of the most common modes are,
1. You can call the helpdesk reporting their problem or requirement and he in turn will file it as a
request.
2. You can submit your query by logging into the customer portal and filing a request.
3. Or, you can send an Email to the support team, which will automatically get logged as a
service request in SupportCenter Plus.
Creating a new request from the application
The new request form can be accessed by two ways in SupportCenter Plus application.
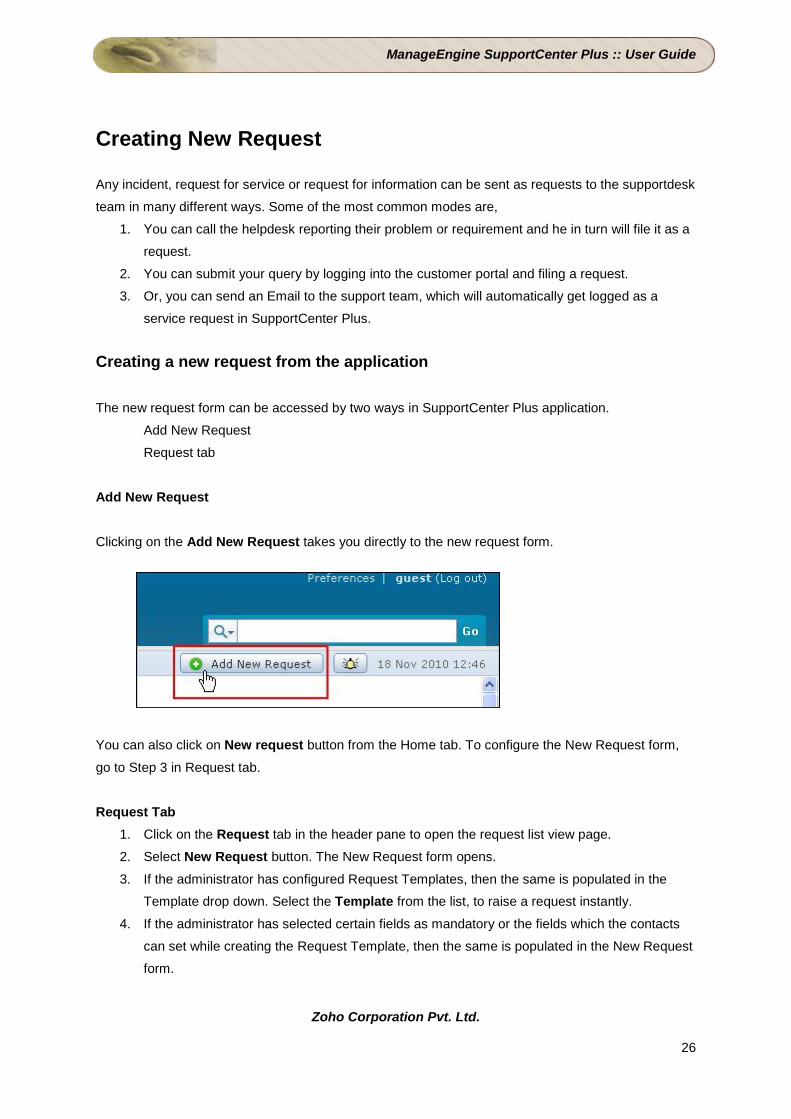
Add New Request
Request tab
Add New Request
Clicking on the Add New Request takes you directly to the new request form.
You can also click on New request button from the Home tab. To configure the New Request form,
go to Step 3 in Request tab.
Request Tab 1. Click on the Request tab in the header pane to open the request list view page.
2. Select New Request button. The New Request form opens.
3. If the administrator has configured Request Templates, then the same is populated in the
Template drop down. Select the Template from the list, to raise a request instantly.
4. If the administrator has selected certain fields as mandatory or the fields which the contacts
can set while creating the Request Template, then the same is populated in the New Request
form.
ManageEngine SupportCenter Plus :: User Guide
Zoho Corporation Pvt. Ltd.
27
5. If the administrator has specified Request Default Values for fields such as Category and
Priority to be displayed in the New Request form, then the same gets populated.
6. If the administrator has not configured the Request Default Values or the Request Template,
select the Priority that can be assigned to the request from the drop down.
7. By default, the contact logged into the application is displayed as the Contact Name. This
field is non editable.
8. Select the Product to be associated with the request.
9. You can also classify the request category by selecting the Category, Sub-Category and
Item.
10. Specify the Subject of the request. This field is mandatory.
11. Provide a brief description about the request in the Description field.
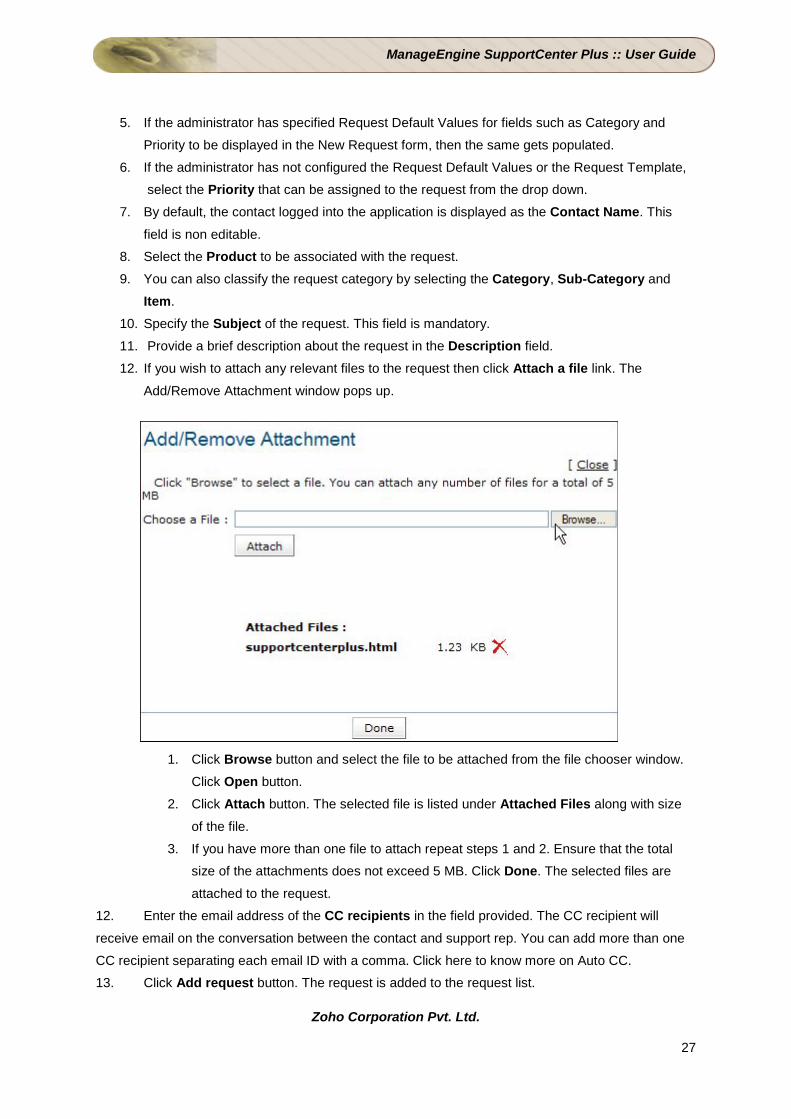
12. If you wish to attach any relevant files to the request then click Attach a file link. The
Add/Remove Attachment window pops up.
1. Click Browse button and select the file to be attached from the file chooser window.
Click Open button.
2. Click Attach button. The selected file is listed under Attached Files along with size
of the file.
3. If you have more than one file to attach repeat steps 1 and 2. Ensure that the total
size of the attachments does not exceed 5 MB. Click Done. The selected files are
attached to the request.
12. Enter the email address of the CC recipients in the field provided. The CC recipient will
receive email on the conversation between the contact and support rep. You can add more than one
CC recipient separating each email ID with a comma. Click here to know more on Auto CC.
13. Click Add request button. The request is added to the request list.

ManageEngine SupportCenter Plus :: User Guide
Zoho Corporation Pvt. Ltd.
28
Auto CC Recipient
For crucial requests, it becomes utmost import to inform your higher officials on the progress and
development of the request. The Auto CC recipient feature is a one time addition of the CC'ed
recipients, after which, the conversations between the contact and support rep are notified to the CC
recipients. The Auto CC recipient option is available while creating a new request and while replying
to a request via the application. The CC recipients added by the contact can be viewed and modified
by the support rep.
Adding CC Recipient The CC recipient field is available in the new request form of the contact login. Enter the email
address of the CC recipients to be notified. If more than one email ID is specified, use comma as a
separator as shown in the image.
The entered CC recipients will be notified of the conversation between the contact and support rep via
email.
ManageEngine SupportCenter Plus :: User Guide
Zoho Corporation Pvt. Ltd.
29
Request Details Page
The View Request page organizes the details of the request in a logical manner. To view the details
of a request,
1. Click on the Request tab in the header pane to open the request list view page.
2. Click on the Subject link of the request to be viewed. The View Request page opens.
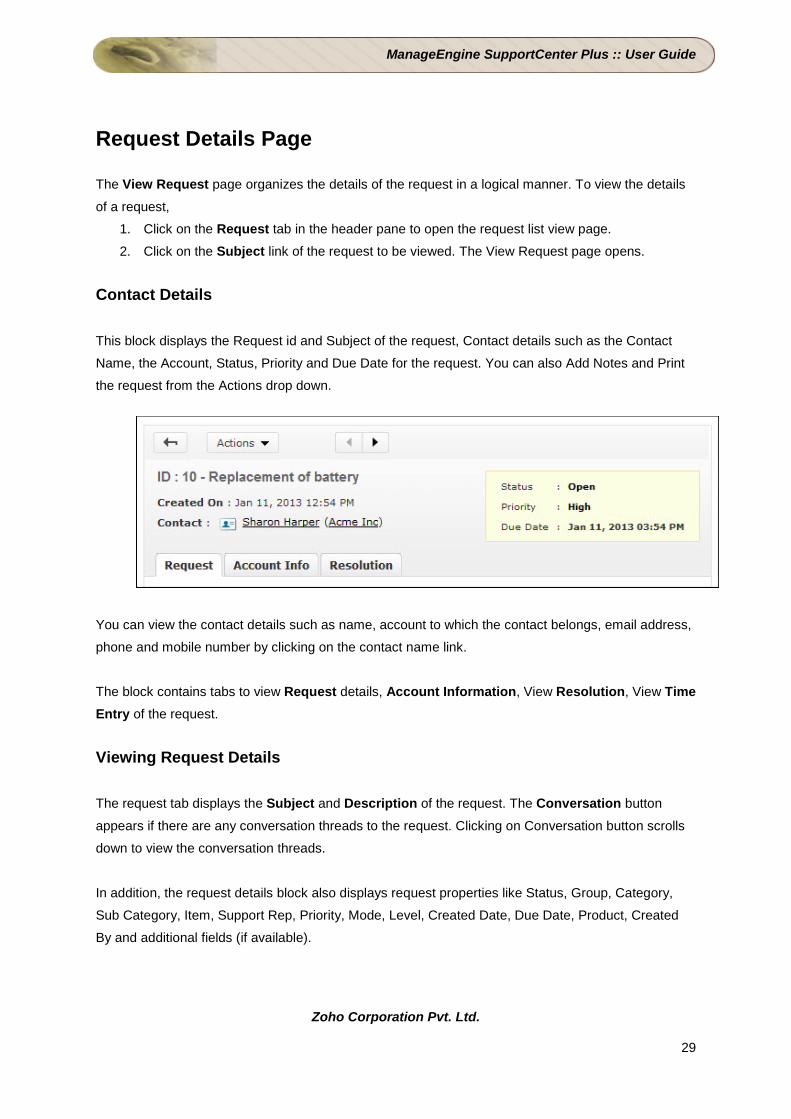
Contact Details This block displays the Request id and Subject of the request, Contact details such as the Contact
Name, the Account, Status, Priority and Due Date for the request. You can also Add Notes and Print
the request from the Actions drop down.
You can view the contact details such as name, account to which the contact belongs, email address,
phone and mobile number by clicking on the contact name link.
The block contains tabs to view Request details, Account Information, View Resolution, View Time Entry of the request.
Viewing Request Details The request tab displays the Subject and Description of the request. The Conversation button
appears if there are any conversation threads to the request. Clicking on Conversation button scrolls
down to view the conversation threads.
In addition, the request details block also displays request properties like Status, Group, Category,
Sub Category, Item, Support Rep, Priority, Mode, Level, Created Date, Due Date, Product, Created
By and additional fields (if available).
ManageEngine SupportCenter Plus :: User Guide
Zoho Corporation Pvt. Ltd.
30
If you have added any Notes to the request then the same can be viewed under Discussion Notes
block. The notes are displayed in descending order of their date of creation.
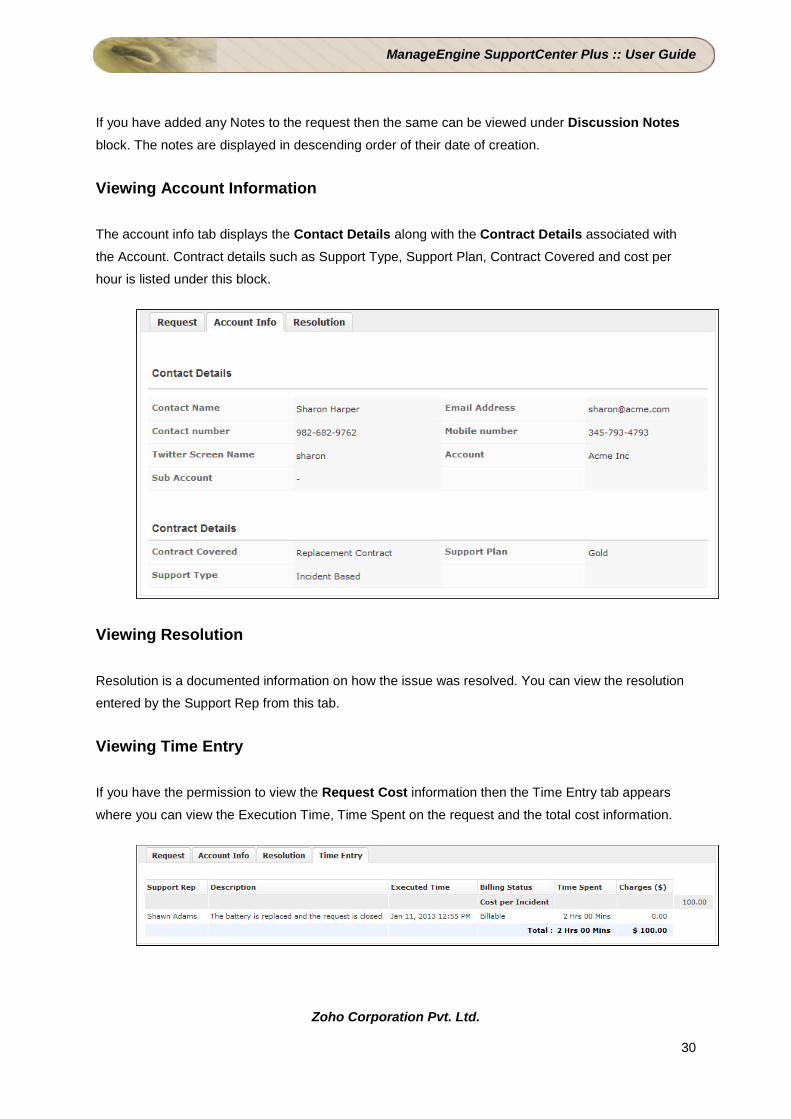
Viewing Account Information The account info tab displays the Contact Details along with the Contract Details associated with
the Account. Contract details such as Support Type, Support Plan, Contract Covered and cost per
hour is listed under this block.
Viewing Resolution
Resolution is a documented information on how the issue was resolved. You can view the resolution
entered by the Support Rep from this tab.
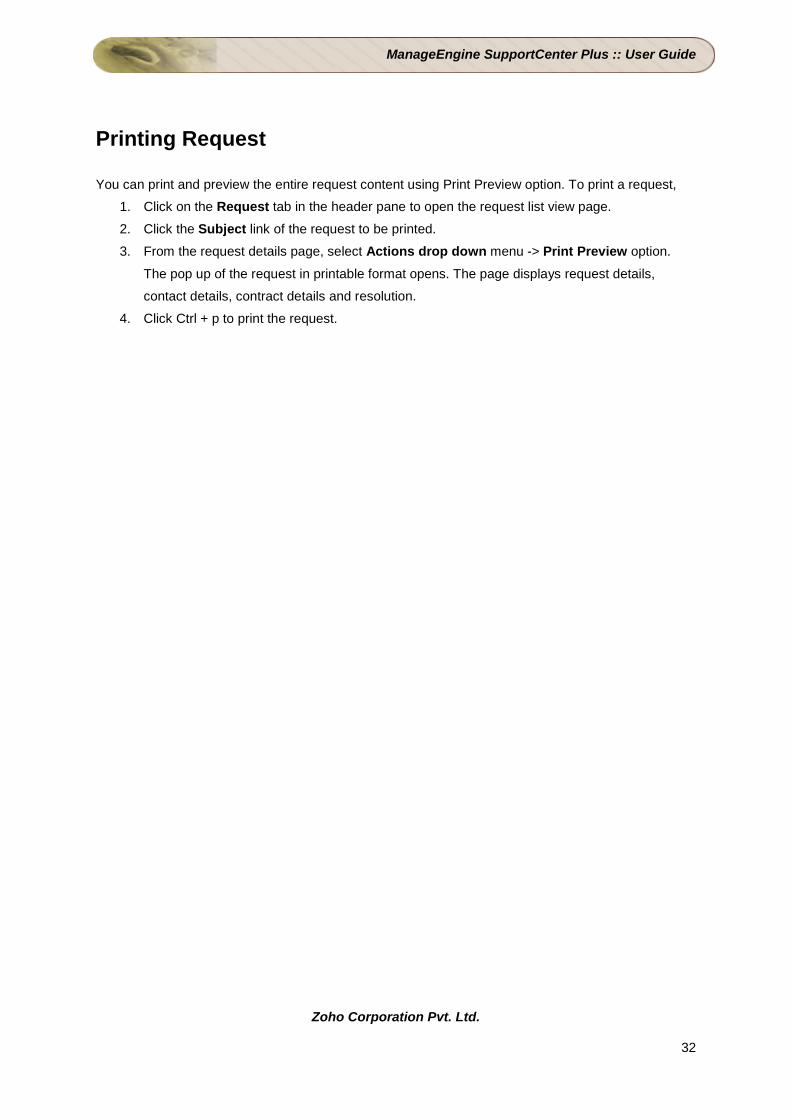
Viewing Time Entry If you have the permission to view the Request Cost information then the Time Entry tab appears
where you can view the Execution Time, Time Spent on the request and the total cost information.
ManageEngine SupportCenter Plus :: User Guide
Zoho Corporation Pvt. Ltd.
31
Adding Notes
You can add addition information which includes technical information based on your observations or
information to support reps for a particular request using the Add Notes option.
1. Click on the Request tab in the header pane to open the request list view page.
2. Click the Subject of the request to which you would like to add a note.
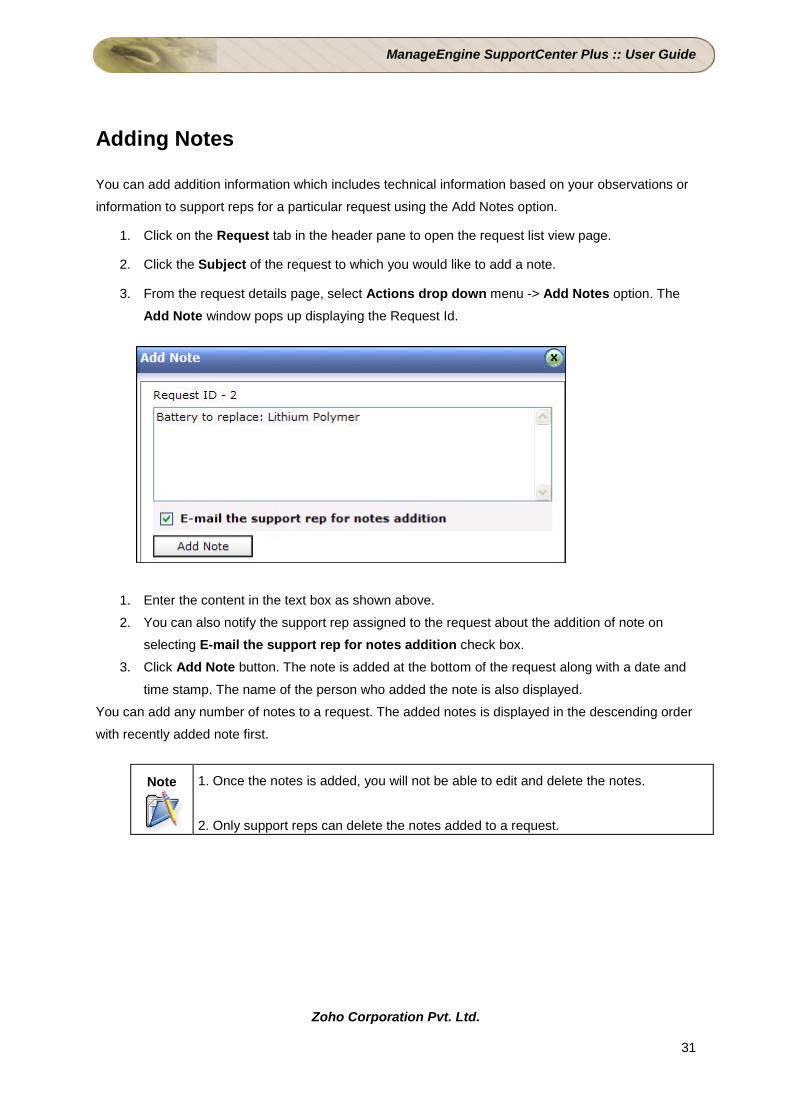
3. From the request details page, select Actions drop down menu -> Add Notes option. The
Add Note window pops up displaying the Request Id.
1. Enter the content in the text box as shown above.
2. You can also notify the support rep assigned to the request about the addition of note on
selecting E-mail the support rep for notes addition check box.
3. Click Add Note button. The note is added at the bottom of the request along with a date and
time stamp. The name of the person who added the note is also displayed.
You can add any number of notes to a request. The added notes is displayed in the descending order
with recently added note first.
Note
1. Once the notes is added, you will not be able to edit and delete the notes.
2. Only support reps can delete the notes added to a request.
ManageEngine SupportCenter Plus :: User Guide
Zoho Corporation Pvt. Ltd.
32
Printing Request
You can print and preview the entire request content using Print Preview option. To print a request,
1. Click on the Request tab in the header pane to open the request list view page.
2. Click the Subject link of the request to be printed.
3. From the request details page, select Actions drop down menu -> Print Preview option.
The pop up of the request in printable format opens. The page displays request details,
contact details, contract details and resolution.
4. Click Ctrl + p to print the request.
ManageEngine SupportCenter Plus :: User Guide
Zoho Corporation Pvt. Ltd.
33
Viewing Survey Results
Once the contact completes the survey, the administrator and the contact who took the survey can
view the survey results.
To view the survey results,
1. Click the Requests tab.
2. In the Requests list view select the My Completed Requests filter.
3. Click the request Title for which you wish to see the survey results.
4. Click View Survey Results link available under the Tasks block. The survey results opens in
a pop-up window.
5. Once you have viewed the results, click the Close button.
Note
1. The View Survey Results link appears only if the you have completed taking the
survey. Else this link will not be present.
2. Once the survey is submitted, the responses cannot be changed.
ManageEngine SupportCenter Plus :: User Guide
Zoho Corporation Pvt. Ltd.
34
Solutions
ManageEngine SupportCenter Plus gives a provision for the customer support personnel to add
resolutions for all the requests that have been posted. These resolutions can be directly converted to
knowledge base articles that are grouped under the solutions head. If your help desk team has
already added such knowledge base articles to the solutions section, then you can search for
solutions, specific to your problem and fix it. Thus, the solutions module serves as a knowledge base
to find solutions for known problems using the keyword-based search.
You can access the solutions even without logging in to the application, but will be able to view only
those solutions that are published in the Self Service Portal. To access the knowledge base directly
without having to login to the application, type the URL provided below in the address bar of the
browser:
http://<server name>:<port number>/sd/SolutionsHome.sd (OR)
http://<server name>:<port number>/portal
where,
<server name> is the name of the server where SupportCenter Plus is installed and
<port number> is the port where the application is running.
ManageEngine SupportCenter Plus :: User Guide
Zoho Corporation Pvt. Ltd.
35
Browsing Solutions by Topic
You can view the list of solutions for a topic using this option. To browse solutions under individual
topics,
1. Click the Solutions tab in the header pane.
2. Click on Browse by Topics drop down. The Topics window drops down listing all the
available topics and their sub topics.
3. To view all the sub topics, click >> Show All link. This lists out the topics and sub topics in
logical manner.
4. On clicking the topic, the solutions of the topics and its corresponding sub-topics gets listed.
5. To view solutions under a sub-topic, click on the sub-topic.
6. Click the solution's title to view the complete solution.
ManageEngine SupportCenter Plus :: User Guide
Zoho Corporation Pvt. Ltd.
36
Search Solutions
You can search for solutions based on the keywords, solution ID and column wise search based on
solution parameters such as subject, topic name, view status and so on from the solutions list view.
Search Solutions based on
• Keywords and Search Strings
• Column-wise search
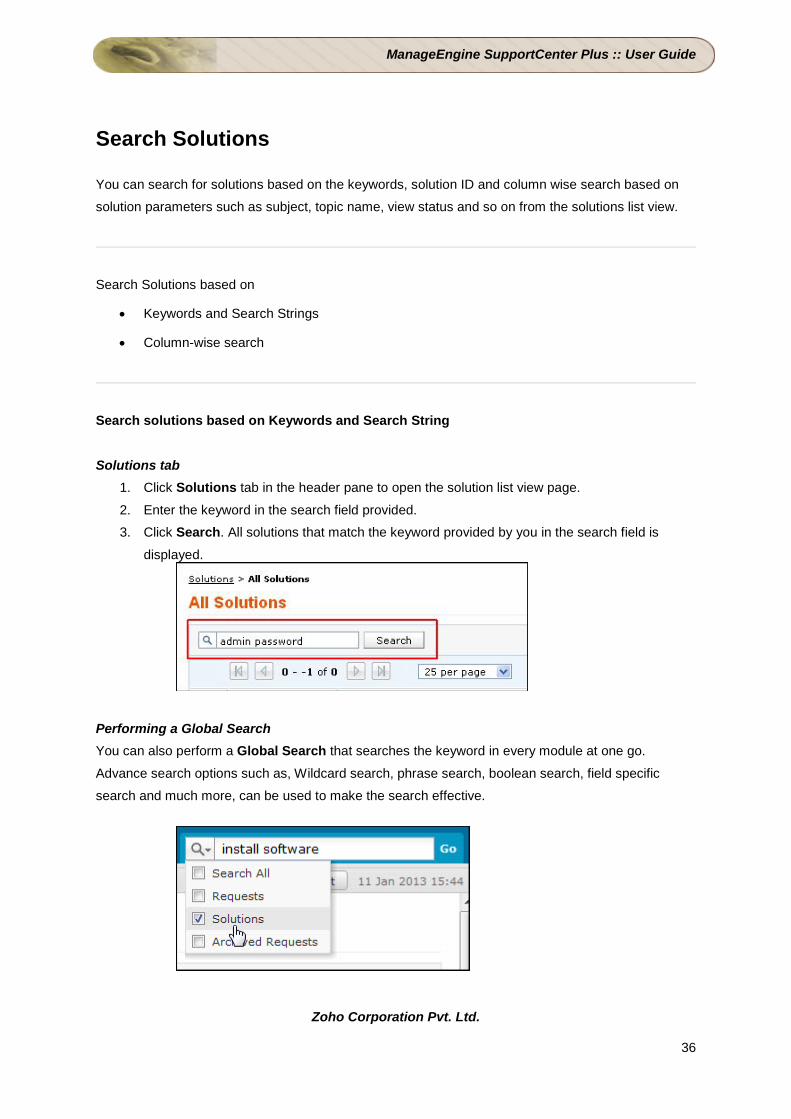
Search solutions based on Keywords and Search String Solutions tab
1. Click Solutions tab in the header pane to open the solution list view page.
2. Enter the keyword in the search field provided.
3. Click Search. All solutions that match the keyword provided by you in the search field is
displayed.
Performing a Global Search You can also perform a Global Search that searches the keyword in every module at one go.
Advance search options such as, Wildcard search, phrase search, boolean search, field specific
search and much more, can be used to make the search effective.
ManageEngine SupportCenter Plus :: User Guide
Zoho Corporation Pvt. Ltd.
37
Column-wise search of solutions You can also perform column-wise search of solutions if you know any of the solution detail such as
subject, topic name and so on. To perform a column-wise search,
1. From the solution list view page, click on Search icon . The search field opens just below
every column that is visible in the list view.
2. Enter the search string in the column of your choice. You can enter keywords in more than
one column to perform a combined column search.
3. Click Go. The search results matching the search string(s) are displayed.
Note
1. The search would return the results for any of the text fields of the solution.
2. You cannot search for a solution based on any of the date fields of the solution.
ManageEngine SupportCenter Plus :: User Guide
Zoho Corporation Pvt. Ltd.
38
My Details
When creating your login details in the SupportCenter Plus application, your profile would have some
default information. In the My Details section of the Customer Portal of SupportCenter Plus, you are
allowed to modify the information relating to your profile, including the password. This helps you
maintain your profile updated with the latest changes. It also gives you the freedom to edit your profile
at your will.
ManageEngine SupportCenter Plus :: User Guide
Zoho Corporation Pvt. Ltd.
39
Editing My Details
You can edit your details through the Self-Service Portal and need not depend on your customer
support team to do the same for you. It enables you to modify your own profile whenever you want
and saves considerable time.
To edit your profile
1. Click the My Details tab on the header pane.
2. Click the Edit Contact button in the center pane. The next page displays your user profile as
created/edited last time in an editable form.
3. All the fields except the Login Name and Account Name in this form are editable. Your
name is a mandatory field in the form. You can choose to leave the other fields blank. You
can also change your password using the Change Password link. Click here to know how to
change password.
4. When you are done with the modifications, click Update My details.