managing user identities with forefront identity manager...
TRANSCRIPT

Test Lab Guide: Managing User Identities with Forefront Identity Manager 2010
Microsoft Corporation
Published: March 2011
Last Update: May 2011
Author: Davanand Bahall, Brad Benefield, Bill Mathers
Version: 2.0
AcknowledgementsSpecial thanks to the following people for reviewing and providing invaluable feedback for this document:
Glenn Zuckerman, Microsoft Corp.
Markus Vilcinskas, Microsoft Corp.
Raffe Felts, Microsoft Corp.
AbstractThis document will assist architects, consultants, system engineers, and system administrators in configuring Microsoft® Forefront® Identity Manager 2010 to manage users in a test lab.
CopyrightThe information contained in this document represents the current view of Microsoft Corporation on the issues discussed as of the date of publication. Because Microsoft must respond to changing market conditions, it should not be interpreted to be a commitment on the part of Microsoft, and Microsoft cannot guarantee the accuracy of any information presented after the date of publication.
This White Paper is for informational purposes only. MICROSOFT MAKES NO WARRANTIES, EXPRESS, IMPLIED OR STATUTORY, AS TO THE INFORMATION IN THIS DOCUMENT.
Complying with all applicable copyright laws is the responsibility of the user. Without limiting the rights under copyright, no part of this document may be reproduced, stored in or introduced into a retrieval system, or transmitted in any form or by any means (electronic, mechanical, photocopying, recording, or otherwise), or for any purpose, without the express written permission of Microsoft Corporation.
Microsoft may have patents, patent applications, trademarks, copyrights, or other intellectual property rights covering subject matter in this document. Except as expressly provided in any written license agreement from Microsoft, the furnishing of this document does not give you any license to these patents, trademarks, copyrights, or other intellectual property.
Unless otherwise noted, the example companies, organizations, products, domain names, e-mail addresses, logos, people, places and events depicted herein are fictitious, and no association with any real company, organization, product, domain name, e-mail address, logo, person, place or event is intended or should be inferred.
© 2010 Microsoft Corporation. All rights reserved.
Active Directory, Forefront, Microsoft, MS-DOS, Visual Studio, Windows, and Windows NT are either registered trademarks or trademarks of Microsoft Corporation in the United States and/or other countries.
The names of actual companies and products mentioned herein may be the trademarks of their respective owners.

ContentsManaging User Identities with Forefront Identity Manager 2010.....................................................5
In This Guide............................................................................................................................... 5Scenario...................................................................................................................................... 5How the Solution Works..............................................................................................................5
Managing User Identities with Forefront Identity Manager 2010 Test Lab Guide............................6Test Lab Overview....................................................................................................................... 6Steps for Configuring the Managing User Identities with Forefront Identity Manager 2010 Test
Lab........................................................................................................................................... 7Step 1: Completing the Base Configuration.................................................................................8Step 2: Complete the Exchange Server 2010 with Service Pack 1 Test Lab Guide (TLG)..........8Step 3: Complete the SQL Server 2008 R2 TLG.........................................................................8Step 4: Complete the FIM 2010 TLG...........................................................................................8Step 5: Configure FIM 2010 to Manage User Identities...............................................................8
Create Active Directory Organizational Units...........................................................................9Create and Populating the HR Database...............................................................................10Create an EmployeeStatus Attribute in the FIM Portal...........................................................16Add EmployeeStatus to the MPR...........................................................................................18Create the HR Management Agent in the Synchronization Service.......................................19Create the Run Profiles for the HR MA..................................................................................21Configure Object Deletion Rule..............................................................................................22Create the FIM 2010 Management Agent..............................................................................23Create the Run Profiles for the FIM 2010 MA........................................................................26Enable Synchronization Rule Provisioning.............................................................................28Enable the Required MPRs....................................................................................................29Set Up the Inbound Synchronization Rule for the HR MA in FIM Portal.................................30Run Imports and Synchs on the MAs.....................................................................................32Set Attribute Precedence on Attributes...................................................................................34Run the HR and FIM Management Agents............................................................................35Create the AD Management Agent.........................................................................................36Create the Run Profiles for the AD MA...................................................................................39Set Up AD Provisioning Synchronization Rule for the AD MA in the FIM Portal.....................40Create an All Employees and Contractors Set.......................................................................43Set Up the AD User Provisioning Workflow............................................................................45Set Up the AD User Provisioning MPR..................................................................................46Set Up the Inbound Synchronization Rule for the AD MA in the FIM Portal...........................48Create an Inactive Employees Set.........................................................................................48Set Up the AD Make User Inactive Synchronization Rule......................................................49Set Up the AD Make User Inactive Workflow.........................................................................50

Set Up the AD Make User Inactive MPR................................................................................51Set Up the AD Deprovision Workflow.....................................................................................51Set Up the AD Deprovision MPR............................................................................................52Run the HR, FIM, and AD Management Agents.....................................................................53
Step 6: Verifying the Configuration............................................................................................54Test 1..................................................................................................................................... 54
Verifying the Current User State in AD DS..........................................................................54Changing the Status of the User.........................................................................................54Running the Management Agents.......................................................................................55Verifying the Changes in AD DS.........................................................................................56
Test 2..................................................................................................................................... 56Verifying the Current User State in AD DS..........................................................................56Changing the Status of the User.........................................................................................56Running the Management Agents.......................................................................................57Verifying the Changes in AD...............................................................................................57
Test 3..................................................................................................................................... 58Changing the Status of the User.........................................................................................58Running the Management Agents.......................................................................................58Verifying the Changes in AD...............................................................................................59
Test 4..................................................................................................................................... 59Verifying the User in the FIM Portal....................................................................................59Changing the Status of the User.........................................................................................60Running the Management Agents.......................................................................................60Verifying the Changes in the FIM Portal..............................................................................61

Managing User Identities with Forefront Identity Manager 2010Many organizations struggle managing the lifecycle of user identities. Employees (users) are in a constant state of flux, from changing roles or departments to leaving the organization all together. You can use Microsoft® Forefront® Identity Manager (FIM) 2010 to manage user identities from the time the identity is created through the time it is no longer needed.
In This GuideThis guide will walk you through how a solution works when using FIM 2010 to manage a user’s identity from the date of hire through departing the organization. The accompanying test lab guide (TLG), Managing User Identities with Forefront Identity Manager 2010 Test Lab Guide, demonstrates how to provision a user account (moving a user from one connected data source to another) and how to deprovision a user account (removing that user from a connected data source).
ScenarioContoso, a fictitious company, wants to evaluate a solution that will allow them to automatically manage users within Active Directory® Domain Services (AD DS). The management of user accounts will be based on information contained within their Human Resources database. This database is the authoritative source for all users within Contoso.
How the Solution WorksThe following process describes how this solution works:
1. Upon hire, a user object is created for the new hire in the HR database. The user is either a Full Time Employee (FTE) or a Contractor.
2. After the user object is created in the HR database, the FIM 2010 synchronization service then provisions the object into the FIM 2010 Portal.
3. The user is then provisioned into AD DS. The user object will be placed in either the contractors or FTE organizational unit (OU). This is determined by the EmployeeType attribute in the HR database.
4. If the EmployeeType changes in the HR database from contractor to FTE or vice versa, the user will be moved to the correct OU in AD°DS.
5. The EmploymentStatus and EndDate attributes in the HR database determine whether a user is no longer with the company.
5

6. FIM 2010 detects these attribute changes in the HR database and then FIM 2010 moves the user object in AD°DS to a specified organizational unit (the FIM_Inactive OU) for 30 days and disables the user account.
7. After 30 days has passed, the user object is then deleted in AD°DS. The object will still remain in the FIM 2010 Portal for an additional 15 days.
8. After 45 days the user will be removed from the HR database view and then removed from the FIM 2010 Portal.
Managing User Identities with Forefront Identity Manager 2010 Test Lab GuideThis guide provides steps for configuring a test lab for the solution detailed in the Managing User Identities with Forefront Identity Manager 2010 guide lab. The following sections provide details about how to perform these tasks.
Test Lab OverviewIn this test lab, Microsoft® Forefront® Identity Manager (FIM) 2010 is deployed with:
One preexisting server running FIM 2010. One preexisting server running SQL Server® 2008 R2, named APP1. One preexisting server running Microsoft Exchange Server 2010 with Service Pack 1, named
EX1. One preexisting client running Windows® 7 Ultimate, named CLIENT1.
The FIM test lab uses the following subnet:
The intranet established by the Base Configuration Test Lab Guide, referred to as the Corpnet subnet (10.0.0.0/24).
Computers on each subnet connect using a hub or switch. See the following figure.
6

This test lab will guide you through the Forefront Identity Manager 2010 configuration process. The purpose of this test lab is to allow for the creation of a test lab environment that uses Forefront Identity Manager 2010 for end-to-end user identity management. This test lab guide builds upon previously released test lab guides.
Steps for Configuring the Managing User Identities with Forefront Identity Manager 2010 Test LabThere are six steps to follow when configuring a Forefront Identity Manager 2010 test lab based on the Managing User Identities with Forefront Identity Manager 2010 Test Lab Guide.
Step 1: Completing the Base Configuration—The Base Configuration is the core of all Test Lab Guide scenarios. The first step is to complete the Base Configuration.
Step 2: Completing the Exchange Server 2010 with Service Pack 1 Test Lab Guide (TLG)—The second step is to complete the Exchange Server 2010 with Service Pack 1 test lab guide. This provides Active Directory® attributes and e-mail functionality for the FIM Service account.
Step 3: Completing the SQL Server 2008 R2 TLG—The third step is to complete the SQL Server 2008 R2 test lab guide. This provides the database server for your FIM 2010 installation.
7

Step 4: Completing the FIM 2010 TLG—The fourth step is to complete the FIM 2010 test lab guide. This provides the FIM installation.
Step 5: Configuring FIM 2010 to Manage User Identities—The fifth step includes configuring the environment.
Step 6: Verifying the Configuration—The sixth step includes verifying that everything is working.
Step 1: Completing the Base ConfigurationSet up the Base Configuration test lab for both the Corpnet and Internet subnets using the procedures in the “Steps for Configuring the Corpnet Subnet” and “Steps for Configuring the Internet Subnet” sections of the Test Lab Guide: Base Configuration (http://go.microsoft.com/fwlink/?LinkId=198140).
Step 2: Complete the Exchange Server 2010 with Service Pack 1 Test Lab Guide (TLG)Set up the Exchange Server 2010 with Service Pack 1 test lab using the procedures outlined in Test Lab Guide: Exchange Server 2010 with Service Pack 1 (http://go.microsoft.com/fwlink/?LinkId=206341).
Step 3: Complete the SQL Server 2008 R2 TLGSet up the SQL Server 2008 R2 test lab using the procedures outlined in Test Lab Guide: SQL Server 2008 R2 (http://go.microsoft.com/fwlink/?LinkId=206340).
Step 4: Complete the FIM 2010 TLGSet up the Forefront Identity Manager 2010 test lab using the procedures outlined in Test Lab Guide: Forefront Identity Manager 2010 (http://go.microsoft.com/fwlink/?LinkID=205228).
Step 5: Configure FIM 2010 to Manage User IdentitiesConfiguring FIM 2010 to manage user identities consists of the following:
Create Active Directory Organizational Units Create and Populating the HR Database Create an EmployeeStatus Attribute in the FIM Portal Add EmployeeStatus to MPR Create the HR Management Agent in the Synchronization Service Create the Run Profiles for the HR MA
8

Configure the Object Deletion Rule Create the FIM Management Agent Create the Run Profiles for the FIM MA Enable Synchronization Rule Provisioning Enable the Required MPRs Set Up an Inbound Synchronization Rule for the HR MA in the FIM Portal Run Imports and Synchs on the MAs Set the Attribute Precedence on Attributes Run the HR and FIM Management Agents Create the AD Management Agent Create the Run Profiles for the AD MA Set Up an AD Provisioning Synchronization Rule for the AD MA in the FIM Portal Create an All Employees and Contractors Set Set Up the AD User Provisioning Workflow Set Up the AD User Provisioning MPR Set Up an Inbound Synchronization Rule for the AD MA in the FIM Portal Create an Inactive Employees Set Set Up an AD Make User Inactive Synchronization Rule Set Up an AD Make User Inactive Workflow Set Up an AD Make User Inactive MPR Set Up an AD Deprovision Workflow Set Up an AD Deprovision MPR Run the HR, FIM, and AD Management Agents
Create Active Directory Organizational UnitsIn this step you will be creating three organizational units within Active Directory. These OUs will be used to contain your Full-Time Employees, Contractors, and your Terminated employees.
1. Log on to DC1 as corp\Administrator.2. Click Start, select Administrative Tools, and then click Active Directory Users and
Computers. This will open the Active Directory Users and Computers MMC.3. In the Active Directory Users and Computers MMC, from the tree-view on the left,
right-click corp.fabrikam.com, select New, and then select Organizational Unit.4. In the Name text box, type the following text, and then click OK:
FIM_FTE5. In the Active Directory Users and Computers MMC, from the tree-view on the left,
right-click corp.fabrikam.com, select New, and then select Organizational Unit.6. In the Name text box, type the following text, and then click OK:
To create Active Directory organizational units
9

FIM_Contractors7. In the Active Directory Users and Computers MMC, from the tree-view on the left,
right-click corp.fabrikam.com, select New, and then select Organizational Unit.8. In the Name text box, type the following text, and then click OK:
FIM_Inactive9. Close Active Directory Users and Computers.
Create Organizational Units
Create and Populating the HR DatabaseIn this step you will be creating and populating your HR database in SQL. This will simulate a real-world example of a Human Resources database.
1. Log on to APP1 as corp\Administrator.2. Click Start, click All Programs, click Microsoft SQL Server 2008, and then click SQL
Server Management Studio. This will launch SQL Server Management Studio.3. On the Connect to Server dialog box, under Server Type, select Database Engine.
To create and populate the HR database
10

4. On the Connect to Server dialog box, under Server name, select APP1.5. On the Connect to Server dialog box, under Authentication, select Windows
Authentication.6. Click Connect. This should be successful and the database information will be displayed
on the left.7. At the top, click New Query. SQL Server Management Studio will populate the center
with a blank white screen. There will be a blinking cursor at the top of this white center pane.
8. Copy the following code into the center pane.
USE [master]
GO
/****** Object: Database [HR] Script Date: 10/28/2010 14:55:39 ******/
CREATE DATABASE [HR] ON PRIMARY ( NAME = N'HR', FILENAME = N'C:\Program Files\Microsoft SQL Server\MSSQL10.MSSQLSERVER\MSSQL\DATA\HR.mdf' , SIZE = 2048KB , MAXSIZE = UNLIMITED, FILEGROWTH = 1024KB ) LOG ON
( NAME = N'HR_log', FILENAME = N'C:\Program Files\Microsoft SQL Server\MSSQL10.MSSQLSERVER\MSSQL\DATA\HR_log.ldf' , SIZE = 1024KB , MAXSIZE = 2048GB , FILEGROWTH = 10%)
GO
ALTER DATABASE [HR] SET COMPATIBILITY_LEVEL = 100
GO
IF (1 = FULLTEXTSERVICEPROPERTY('IsFullTextInstalled'))begin EXEC [HR].[dbo].[sp_fulltext_database] @action = 'enable'
end
GO
ALTER DATABASE [HR] SET ANSI_NULL_DEFAULT OFF
GO
ALTER DATABASE [HR] SET ANSI_NULLS OFF
GO
ALTER DATABASE [HR] SET ANSI_PADDING OFF
GO
ALTER DATABASE [HR] SET ANSI_WARNINGS OFF
GO
ALTER DATABASE [HR] SET ARITHABORT OFF
11

GO
ALTER DATABASE [HR] SET AUTO_CLOSE OFF
GO
ALTER DATABASE [HR] SET AUTO_CREATE_STATISTICS ON
GO
ALTER DATABASE [HR] SET AUTO_SHRINK OFF
GO
ALTER DATABASE [HR] SET AUTO_UPDATE_STATISTICS ON
GO
ALTER DATABASE [HR] SET CURSOR_CLOSE_ON_COMMIT OFF
GO
ALTER DATABASE [HR] SET CURSOR_DEFAULT GLOBAL
GO
ALTER DATABASE [HR] SET CONCAT_NULL_YIELDS_NULL OFF
GO
ALTER DATABASE [HR] SET NUMERIC_ROUNDABORT OFF
GO
ALTER DATABASE [HR] SET QUOTED_IDENTIFIER OFF
GO
ALTER DATABASE [HR] SET RECURSIVE_TRIGGERS OFF
GO
ALTER DATABASE [HR] SET DISABLE_BROKER
GO
ALTER DATABASE [HR] SET AUTO_UPDATE_STATISTICS_ASYNC OFF
GO
ALTER DATABASE [HR] SET DATE_CORRELATION_OPTIMIZATION OFF
GO
ALTER DATABASE [HR] SET TRUSTWORTHY OFF
GO
ALTER DATABASE [HR] SET ALLOW_SNAPSHOT_ISOLATION OFF
GO
ALTER DATABASE [HR] SET PARAMETERIZATION SIMPLE
GO
ALTER DATABASE [HR] SET READ_COMMITTED_SNAPSHOT OFF
12

GO
ALTER DATABASE [HR] SET HONOR_BROKER_PRIORITY OFF
GO
ALTER DATABASE [HR] SET READ_WRITE
GO
ALTER DATABASE [HR] SET RECOVERY FULL
GO
ALTER DATABASE [HR] SET MULTI_USER
GO
ALTER DATABASE [HR] SET PAGE_VERIFY CHECKSUM
GO
ALTER DATABASE [HR] SET DB_CHAINING OFF
GO
Create HR Database
9. At the top, click Execute. This will take a moment and you should see Command(s)
13

completed successfully in the lower part of the center pane.10. At the top, click New Query. SQL Server Management Studio will populate the center
with a blank white screen. There will be a blinking cursor at the top of this white center pane.
11. Copy the following code into the center pane.
USE [HR]
GO
/****** Object: Table [dbo].[Employees] Script Date: 10/28/2010 14:54:59 ******/
SET ANSI_NULLS ON
GO
SET QUOTED_IDENTIFIER ON
GO
SET ANSI_PADDING ON
GO
CREATE TABLE [dbo].[Employees]([EmployeeNumber] [nchar](10) NULL,[FirstName] [char](10) NULL,[LastName] [char](20) NULL,[UserID] [char](21) NULL,[EmployeeType] [char](2) NULL,[EmploymentStatus] [char](2) NULL,[StartDate] [date] NULL,[EndDate] [date] NULL,[Manager] [char](100) NULL,[Department] [char](100) NULL) ON [PRIMARY]
GO
SET ANSI_PADDING OFF
GO
12. At the top, click Execute. This will take a moment and you should see Command(s) completed successfully in the lower part of the center pane.
13. At the top, click New Query. SQL Server Management Studio will populate the center with a blank white screen. There will be a blinking cursor at the top of this white center pane.
14. Copy the following code into the center pane.
USE [HR]
GO
INSERT INTO Employees (EmployeeNumber, EmployeeType, EmploymentStatus, FirstName,LastName,UserID,Department,Manager,StartDate)
VALUES ('1101', 'F', 'A', 'Test', 'User1', 'tuser1', 'IT', 'Britta Simon', '2009-10-28')
14

INSERT INTO Employees (EmployeeNumber, EmployeeType, EmploymentStatus, FirstName,LastName,UserID,Department,Manager,StartDate)
VALUES ('1102', 'F', 'A', 'Test', 'User2', 'tuser2', 'Accounting', 'Britta Simon', '1995-09-28')
INSERT INTO Employees (EmployeeNumber, EmployeeType, EmploymentStatus, FirstName,LastName,UserID,Department,Manager,StartDate)
VALUES ('1103', 'C', 'A', 'Test', 'User3', 'tuser3', 'Marketing', 'Lola Jacobson', '2006-08-28')
INSERT INTO Employees (EmployeeNumber, EmployeeType, EmploymentStatus, FirstName,LastName,UserID,Department,Manager,StartDate) VALUES ('1104', 'C', 'A', 'Test', 'User4', 'tuser4', 'Legal', 'Lola Jacobson', '1999-07-28')
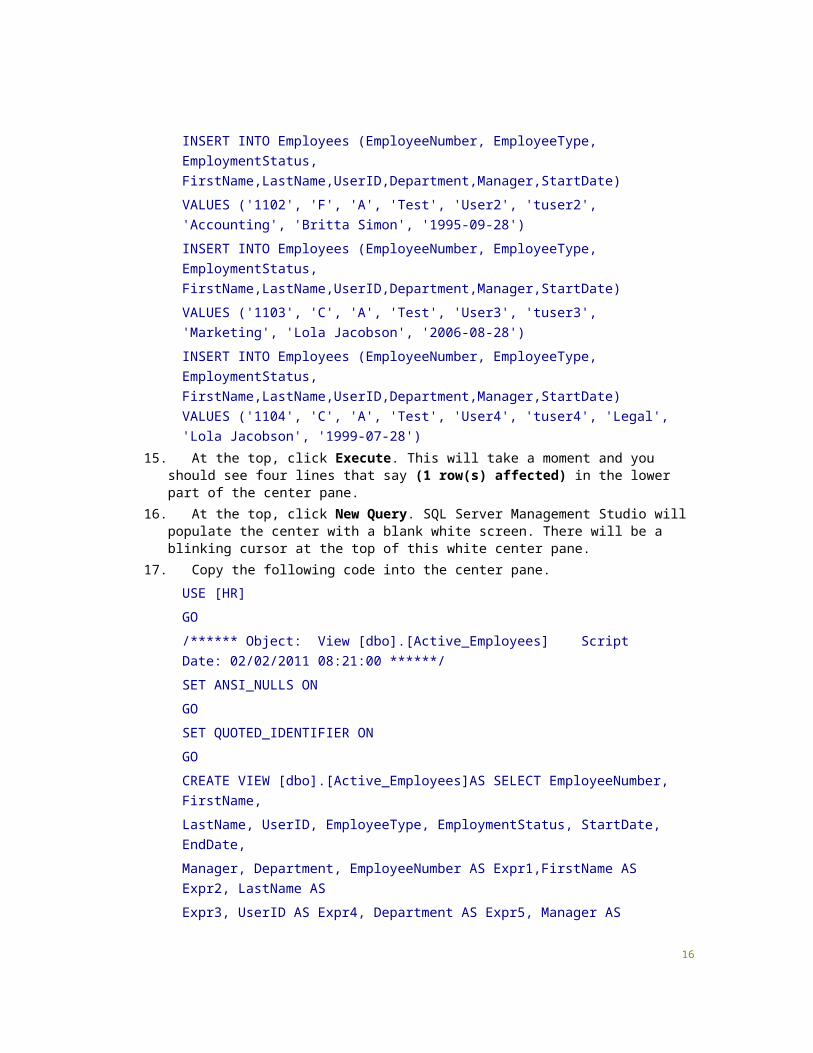
15. At the top, click Execute. This will take a moment and you should see four lines that say (1 row(s) affected) in the lower part of the center pane.
16. At the top, click New Query. SQL Server Management Studio will populate the center with a blank white screen. There will be a blinking cursor at the top of this white center pane.
17. Copy the following code into the center pane.
USE [HR]
GO
/****** Object: View [dbo].[Active_Employees] Script Date: 02/02/2011 08:21:00 ******/
SET ANSI_NULLS ON
GO
SET QUOTED_IDENTIFIER ON
GO
CREATE VIEW [dbo].[Active_Employees]AS SELECT EmployeeNumber, FirstName,
LastName, UserID, EmployeeType, EmploymentStatus, StartDate, EndDate,
Manager, Department, EmployeeNumber AS Expr1,FirstName AS Expr2, LastName AS
Expr3, UserID AS Expr4, Department AS Expr5, Manager AS Expr6, EndDate AS
15
Expr7, StartDate AS Expr8,EmploymentStatus AS Expr9, EmployeeType AS
Expr10
FROM dbo.Employees
WHERE(EndDate <= DATEADD(day, 0, GETDATE())) AND (EndDate > DATEADD(day, - 45, GETDATE())) OR (EndDate IS NULL)
GO
18. At the top, click Execute. This will take a moment and you should see Command(s) completed successfully in the lower part of the center pane.
19. Close SQL Server Management Studio.20. Log off APP1.
Create an EmployeeStatus Attribute in the FIM PortalIn this procedure, you will create the EmployeeStatus attribute in the FIM Portal.
1. Click Start, click All Programs, and then click Internet Explorer (64-bit). This will open Internet Explorer.
2. In the Internet Explorer toolbar, enter https://fim1/identitymanagement in the address box, and then hit Enter. This will open the Forefront Identity Manager 2010 home page.
3. On the right, under Administration, click Schema Management.4. Click All Attributes. The title bar should now show Schema Management—All Attributes.5. At the top, click New. This will bring up the Create Attribute screen.6. In the text box, next to System name, enter EmployeeStatus.7. In the text box, next to Display Name, enter Employee Status.8. From the drop-down, next to Data Type, select Unindexed string.9. In the text box, next to Description, enter Tracks an employee’s status as Active,
Retired, or Terminated.
Create Attribute Employee Status
To create an EmployeeStatus attribute in the FIM Portal
16

10. Click Finish, and then click Submit.11. At the top, click All Bindings. The title bar should now show Schema Management – All
Bindings.12. At the top, click New. This will bring up the Create Binding screen.13. In the box, next to Resource Type, enter User. Click the green check mark. User should
resolve with an underline.14. In the box, next to Attribute Type, enter EmployeeStatus. Click the green check mark.
EmployeeStatus should resolve with an underline.
Create Binding
17

15. Click Finish, and then click Submit.
Add EmployeeStatus to the MPRNow you will add the EmployeeStatus attribute to the Synchronization: Synchronization account controls users it synchronizes MPR.
1. At the bottom of the left column, click Administration. This will bring up the Administration page.
2. Click Management Policy Rules.3. In the list of MPRs, locate Synchronization: Synchronization account controls users
it synchronizes and click it. This will open the Configuration page.4. Click the Target Resources tab.5. Down under Select specific attributes, use the up-down arrows and scroll to the bottom
of the list.6. After Time Zone, enter EmployeeStatus. Click to select the green check mark. This
To add EmployeeStatus to the MPR
18

should resolve with an underline.
Add EmployeeStatus to MPR
7. Click OK, and then click Submit.
Create the HR Management Agent in the Synchronization ServiceNow you will create a SQL Server management agent (MA) named HR.
1. Click Start, All Programs, Microsoft Forefront Identity Manager, and then Synchronization Service. This will launch the Synchronization Service Manager.
2. At the top, click Management Agents.3. On the right, click Create. This will begin the Create Management Agent wizard.4. Under Management Agent for, select SQL Server from the drop-down list.
To create the HR management agent in the Synchronization Service
19

5. In the box under Name, type the following text, and then click Next:HR
6. On the Connect to Database page, in the Server text box, enter APP1.7. In the text box next to Database, type HR.8. In the text box next to Table/View, enter Active_Employees.9. In the box, next to the Authentication mode box, click Windows integrated
authentication.10. In the text box next to User name, type Administrator.11. In the Password text box, enter the Administrators password.12. In the Domain text box, type the following text, and then click Next:
CORP
Create Management Agent
13. On the Configure Columns page, click Set Anchor. This will bring up a Set Anchor window.
14. Under Available attributes, click EmployeeNumber, and then click Add. Click OK. Click
20

Next.15. On the Configure Connector Filter page, click Next.16. On the Configure Configure Join and Projection Rules page, click Next.17. On the Configure Attribute Flow page, click Next.18. On the Configure Deprovisioning page, click Next.19. On the Configure Extensions page, click Finish.
Create the Run Profiles for the HR MANow that the HR MA has been created, you will create run profiles for the management agent.
1. On the right, under Actions menu, click Configure Run Profiles. This opens the Configure run Profiles window.
2. Click New Profile. This will begin the Configure Run Profile wizard.3. On the Profile Name page, in the text box under Name box, type the following text, and
then click Next: Full Import
4. On the Configure Step page, from the drop-down list under Type, select Full Import (Stage Only), and then click Next.
5. On the Management Agent Configuration page, click Finish.6. Click New Profile.7. On the Profile Name page, in the text box under Name box, type the following text, and
then click Next: Full Synchronization
8. On the Configure Step screen, from the drop-down list under Type, select Full Synchronization, and then click Next.
9. On the Management Agent Configuration page, click Finish.10. Click Apply, and then click Close.
To create the run profiles for the HR MA
21

Create Run Profiles
Configure Object Deletion RuleNow we will configure the object deletion rule to delete the object from the metaverse once the HR connector is disconnected.
1. At the top, click Metaverse Designer.2. Under Object Types select Person.3. On the right, click Configure Object Deletion Rule. This will bring up the Configure
Object Deletion Rule screen.4. Select Delete metaverse object when connector from any of the following
management agents is disconnected. Place a check in the box next to HR.5. Click OK.
To Configure the Object Deletion Rule
22

Configure Object Deletion Rule
Create the FIM 2010 Management AgentNow it is time to create the FIM 2010 management agent.
1. At the top of the portal page, click Management Agents.2. On the right, click Create. This will begin the Create Management Agent wizard.3. Under Management Agent for, use the drop-down list and select FIM Service
Management Agent.4. In the text box under Name, type the following text, and then click Next:
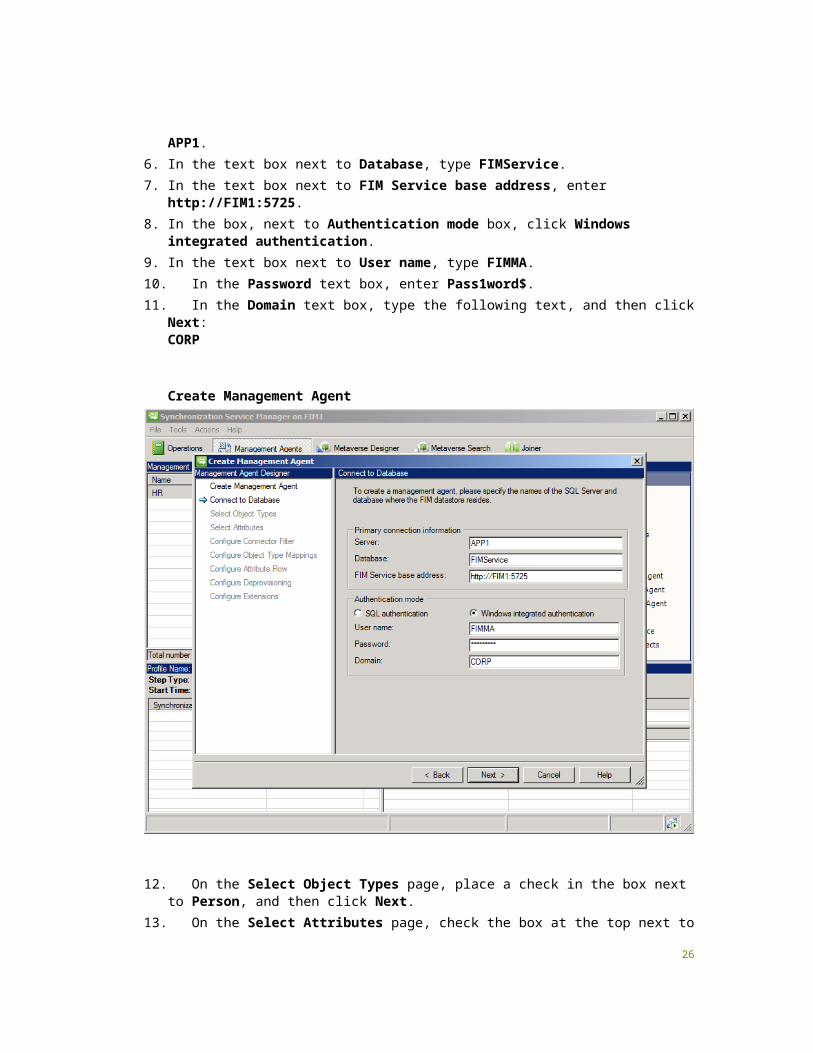
FIM5. On the Connect to Database page, in the Server text box, enter APP1.6. In the text box next to Database, type FIMService.7. In the text box next to FIM Service base address, enter http://FIM1:5725.8. In the box, next to Authentication mode box, click Windows integrated
To create the FIM 2010 Management Agent
23

authentication.9. In the text box next to User name, type FIMMA.10. In the Password text box, enter Pass1word$.11. In the Domain text box, type the following text, and then click Next:
CORP
Create Management Agent
12. On the Select Object Types page, place a check in the box next to Person, and then click Next.
13. On the Select Attributes page, check the box at the top next to Show All, verify that all of the attributes are selected, and then click Next.
14. On the Configure Connector Filter page, click Next.15. On the Configure Object Type Mappings page, click Person, and then click Add
Mapping. This will bring up a mapping window.16. On the mapping window, make sure person is selected for Metaverse object type, and
then click OK. This will close the mapping window. Click Next.
24

Create Management Agent
17. On the Configure Attribute Flow page, from the drop-down list under Data source object type, select Person.
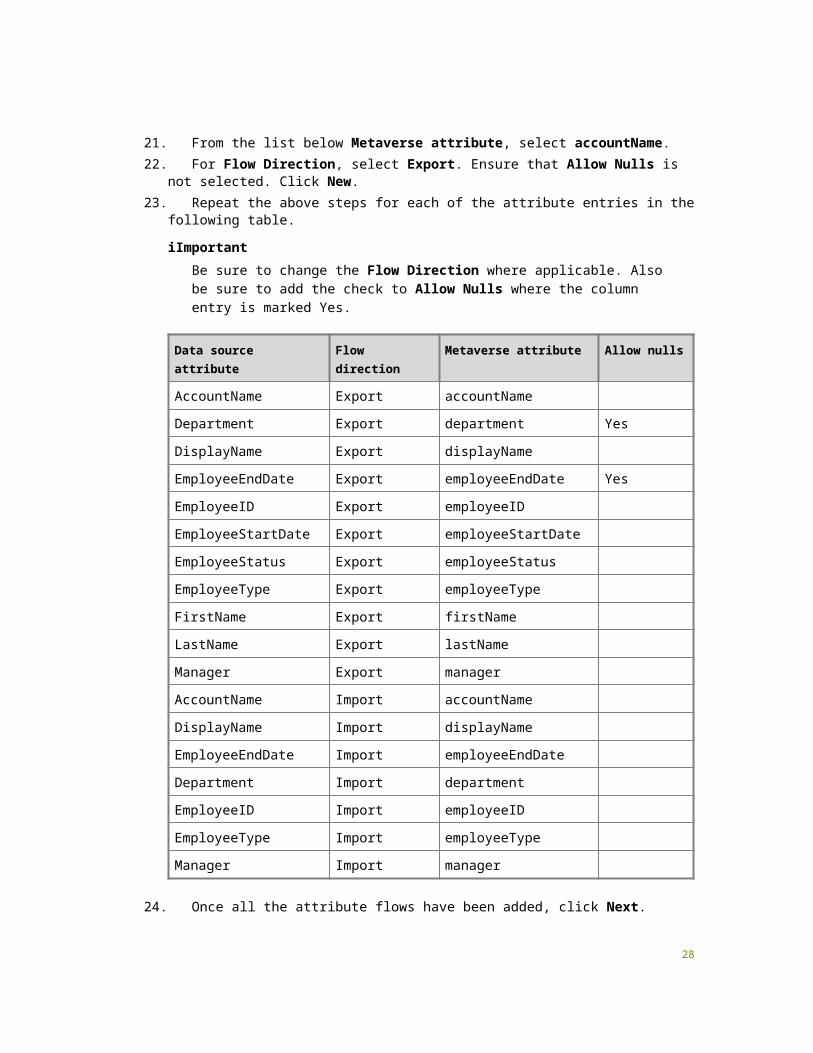
18. From the drop-down list under Metaverse object type list, select person.19. For Mapping Type, select Direct.20. From the list below Data source attribute, select AccountName.21. From the list below Metaverse attribute, select accountName.22. For Flow Direction, select Export. Ensure that Allow Nulls is not selected. Click New.23. Repeat the above steps for each of the attribute entries in the following table.
iImportantBe sure to change the Flow Direction where applicable. Also be sure to add the check to Allow Nulls where the column entry is marked Yes.
25
Data source attribute Flow direction Metaverse attribute Allow nulls
AccountName Export accountName
Department Export department Yes
DisplayName Export displayName
EmployeeEndDate Export employeeEndDate Yes
EmployeeID Export employeeID
EmployeeStartDate Export employeeStartDate
EmployeeStatus Export employeeStatus
EmployeeType Export employeeType
FirstName Export firstName
LastName Export lastName
Manager Export manager
AccountName Import accountName
DisplayName Import displayName
EmployeeEndDate Import employeeEndDate
Department Import department
EmployeeID Import employeeID
EmployeeType Import employeeType
Manager Import manager
24. Once all the attribute flows have been added, click Next.25. On the Configure Deprovisioning page, select Stage a delete on the object for the
next export run, and then click Next.26. On the Configure Extensions page, click Finish.
Create the Run Profiles for the FIM 2010 MANow that the FIM 2010 MA has been created, you will need to create run profiles for the management agent.
1. On the right of the portal page, under Actions menu, click Configure Run Profiles. This opens the Configure run Profiles window.
2. Click New Profile. This will begin the Configure Run Profile wizard.
To create the run profiles for the FIM 2010 MA
26

3. On the Profile Name page, in the text box under Name, type the following, and then click Next: Full Import
4. On the Configure Step page, from the drop-down list under Type, select Full Import (Stage Only), and then click Next.
5. On the Management Agent Configuration page, click Finish.6. Click New Profile.7. On the Profile Name page, in the text box under Name, type the following text, and then
click Next: Full Synchronization
8. On the Configure Step page, from the drop-down list under Type, select Full Synchronization, and then click Next.
9. On the Management Agent Configuration page, click Finish.10. Click New Profile.11. On the Profile Name page, in the text box under Name, type the following text, and then
click Next:Delta Import
12. On the Configure Step page, from the drop-down list under Type, select Delta Import (Stage Only), and then click Next.
13. On the Management Agent Configuration page, click Finish.14. Click New Profile.15. On the Profile Name page, in the text box under Name, type the following text, and then
click Next:Delta Synchronization
16. On the Configure Step page, from the drop-down under Type, select Delta Synchronization, and then click Next.
17. On the Management Agent Configuration page, click Finish.18. Click New Profile.19. On the Profile Name page, in the text box under Name, type the following text, and then
click Next: Export
20. On the Configure Step page, from the drop-down under Type, select Export, and then click Next.
21. On the Management Agent Configuration page, click Finish.22. Click Apply, and then click OK.
Configure Run Profiles
27
Enable Synchronization Rule ProvisioningNext you will enable Synchronization Rule Provisioning. This will enable the configured synchronization rules during a synchronization run.
1. In the Synchronization Service Manager, at the top of the portal page, click Tools, and then select Options.
2. Select Enable Synchronization Rule Provisioning.3. Click OK.
To enable Synchronization Rule Provisioning
28

Enable Synchronization Rule Provisioning
Enable the Required MPRsBy default, FIM has several Management Policy Rules disabled.
1. Click Start, click All Programs, and then click Internet Explorer (64-bit). This will open Internet Explorer.
2. In the Internet Explorer toolbar, enter https://fim1/identitymanagement in the address box, and then hit Enter. This will bring up the Forefront Identity Manager 2010 home page.
3. On the right, under Administration, click Management Policy Rules.4. In the list of MPRs, locate General: Users can read non-administrative configuration
resources and click it. This will open the Configuration page.5. Clear the check box next to Policy is disabled.6. Click OK, and then click Submit.
To enable the required MPRs
29

Enable MPR
7. Repeat the above steps for each of the MPR entries in the following table.
Management policy rule Disabled
General: Users can read nonadministrative configuration resources
No
User management: Users can read attributes of their own
No
User management: Users can read selected attributes of other users
No
30

Set Up the Inbound Synchronization Rule for the HR MA in FIM PortalNow you will create the Inbound Synchronization Rule for the HR MA in the FIM Portal.
1. At the bottom of the left column on the portal page, click Administration. This will bring up the Administration page.
2. Click Synchronization Rules.3. At the top of the portal page, click New.4. On the General tab, in the box next to Display Name, enter HR Inbound Synch Rule,
and then click Next.5. On the Scope tab, provide the following information, and then click Next:
Metaverse Resource Type: person External System: HR External System Resource Type: person
6. On the Relationship tab, provide the following information, and then click Next:a. Relationship Criteria:
MetaverseObject:person(Attribute): employeeID ConnectedSystemObject:person(Attribute): EmployeeNumber
b. Create Resource in FIM: select the check box7. On the Inbound Attribute Flow tab, click New Attribute Flow. This will bring up the
Flow Definition page.8. On the Source tab, from the drop-down list select Department. Click OK.9. On the Destination tab, from the drop-down list select department. Click OK.10. Repeat the above steps for each of the entries in the table below.
Source Destination
EmployeeNumber employeeID
FirstName firstName
LastName lastName
UserID accountName
11. On the Inbound Attribute Flow tab, click New Attribute Flow. This will bring up the Flow Definition page.
12. On the Source tab, from the drop-down list select FirstName. At the top, click Concatenate Value.
13. From the new drop-down list that appears, select String. In the text box that appears, enter a blank space.
To set up the Inbound Synchronization Rule for the HR MA in FIM Portal
31

iImportantThis can be done by clicking inside the box. Ensure that the cursor is in the box. Hit the Spacebar once.
14. Click Concatenate Value.15. From the new drop-down list that appears, select LastName, and then click OK.16. On the Destination tab, from the drop-down list select displayName, and then click OK.17. On the Inbound Attribute Flow tab, click New Attribute Flow. This will bring up the
Flow Definition page.18. On the Source tab, from the drop-down list select StartDate. At the top of the page, click
Concatenate Value.19. From the new drop-down list that appears, select String. In the text box that appears,
enter T08:00:00.000.20. Click OK.21. On the Destination tab, from the drop-down list select employeeStartDate, and then
click OK.22. On the Inbound Attribute Flow tab, click New Attribute Flow. This will bring up the
Flow Definition page.23. On the Source tab, from the drop-down list box select EndDate. At the top, click
Concatenate Value.24. From the new drop-down list that appears, select String. In the text box that appears,
enter T08:00:00.000.25. Click OK.26. On the Destination tab, from the drop-down list select employeeEndDate, and then
click OK.27. On the Inbound Attribute Flow tab, click New Attribute Flow. This will bring up the
Flow Definition page.28. On the Source tab, from the drop-down list select CustomExpression.29. In the box that appears, enter IIF(Eq(EmployeeType, “F”), “Full Time Employee”,
“Contractor”).30. Click OK.31. On the Destination tab, from the drop-down list select employeeType. Click OK.32. On the Inbound Attribute Flow tab, click New Attribute Flow. This will bring up the
Flow Definition page.33. On the Source tab, from the drop-down list select CustomExpression.34. In the text box that appears, enter IIF(Eq(EmploymentStatus, “A”), “Active”,
IIF(Eq(EmploymentStatus, “R”), “Retired”, “Terminated”)).35. Click OK.36. On the Destination tab, from the drop-down list select employeeStatus, and then click
OK.37. Click Finish. Click Submit.
32

Run Imports and Synchs on the MAsNow you will run your management agents and bring information into the metaverse.
1. In the Synchronization Service Manager, at the top, under Management Agents, click FIM.
2. On the right, under Actions menu, click Run. This opens the Run Management Agent window.
3. From the list, select Full Import, and then click OK. This will take a moment. It should finish with Import Statistics in the lower left window and no errors.
4. At the top, under Management Agents, click HR.5. On the right, under Actions menu, click Run. This opens the Run Management Agent
window.6. From the list, select Full Import, and then click OK. This will take a moment. It should
finish with Import Statistics in the lower left window and no errors.7. At the top, under Management Agents, click FIM.8. On the right, under Actions menu, click Run. This opens the Run Management Agent
window.9. From the list, select Full Synchronization, and then click OK. This will take a moment. It
should finish with Synchronization Statistics in the lower left window and no errors.10. At the top, under Management Agents, click HR.11. On the right, under Actions menu, click Run. This opens the Run Management Agent
window.12. From the list, select Full Synchronization, and then click OK. This will take a moment. It
should finish with Synchronization Statistics in the lower left window and no errors.
To run imports and synchs on the MAs
33

FIM Full Synchronization
Set Attribute Precedence on AttributesNow you will need to set the attribute precedence on attributes.
1. In the Synchronization Service Manager, at the top, click Metaverse Designer.2. From the list of Object types select person.3. Down under the list of attributes, select accountName, and on the lower right, click
Configure Attribute Flow Precedence.4. From the list, select one with the HR management agent and use the arrow on the right
to move it up to the first position.5. Repeat the above steps for each of the entries in the following list:
department displayName employeeEndDate employeeID employeeType
To set the attribute precedence on attributes
34

Run the HR and FIM Management AgentsNow that you have set the correct precedence for our attributes you will need to rerun your synchronizations and also do an export to populate the FIM Portal.
1. In the Synchronization Service Manager, at the top, under Management Agents, click FIM.
2. On the right, under Actions menu, click Run. This opens the Run Management Agent window.
3. From the list, select Full Synchronization, and then click OK. This will take a moment. It should finish with Synchronization Statistics in the lower left window and no errors.
4. At the top, under Management Agents, click HR.5. On the right, under Actions menu, click Run. This opens the Run Management Agent
window.6. From the list, select Full Synchronization, and then click OK. This will take a moment. It
should finish with Synchronization Statistics in the lower left windows and no errors.7. At the top, under Management Agents, click FIM.8. On the right, under Actions menu, click Run. This opens the Run Management Agent
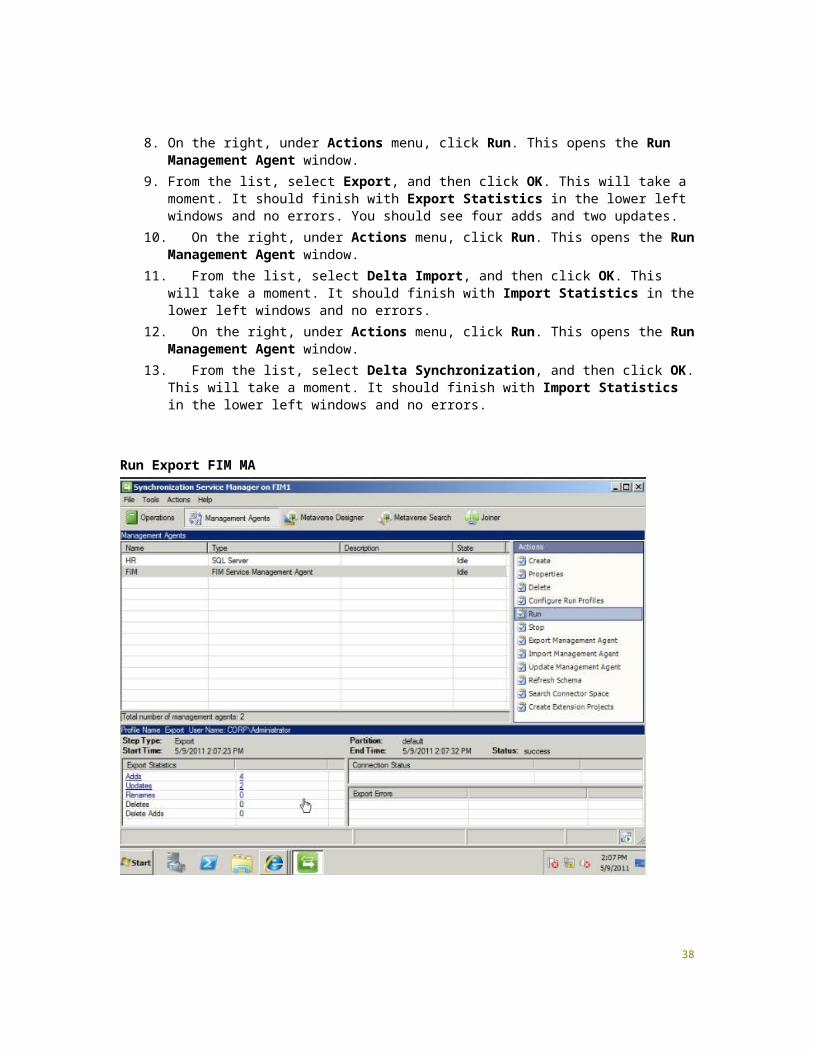
window.9. From the list, select Export, and then click OK. This will take a moment. It should finish
with Export Statistics in the lower left windows and no errors. You should see four adds and two updates.
10. On the right, under Actions menu, click Run. This opens the Run Management Agent window.
11. From the list, select Delta Import, and then click OK. This will take a moment. It should finish with Import Statistics in the lower left windows and no errors.
12. On the right, under Actions menu, click Run. This opens the Run Management Agent window.
13. From the list, select Delta Synchronization, and then click OK. This will take a moment. It should finish with Import Statistics in the lower left windows and no errors.
To run the HR and FIM management agents
35

Run Export FIM MA
Create the AD Management AgentIn this procedure, you will create the AD DS management agent.
1. At the top, click Management Agents.2. On the right, click Create. This will begin the Create Management Agent wizard.3. Under Management Agent for, use the drop-down list and select Active Directory
Domain Services.4. In the text box under Name, enter the following text, and then click Next:
AD5. In the text box next to Forest name, enter corp.contoso.com.6. In the text box next to User name, enter Administrator.7. In the text box next to Password, enter the Administrators password.8. In the text box next to Domain, enter the following text, and then click Next:
CORP
To create the AD DS management agent
36

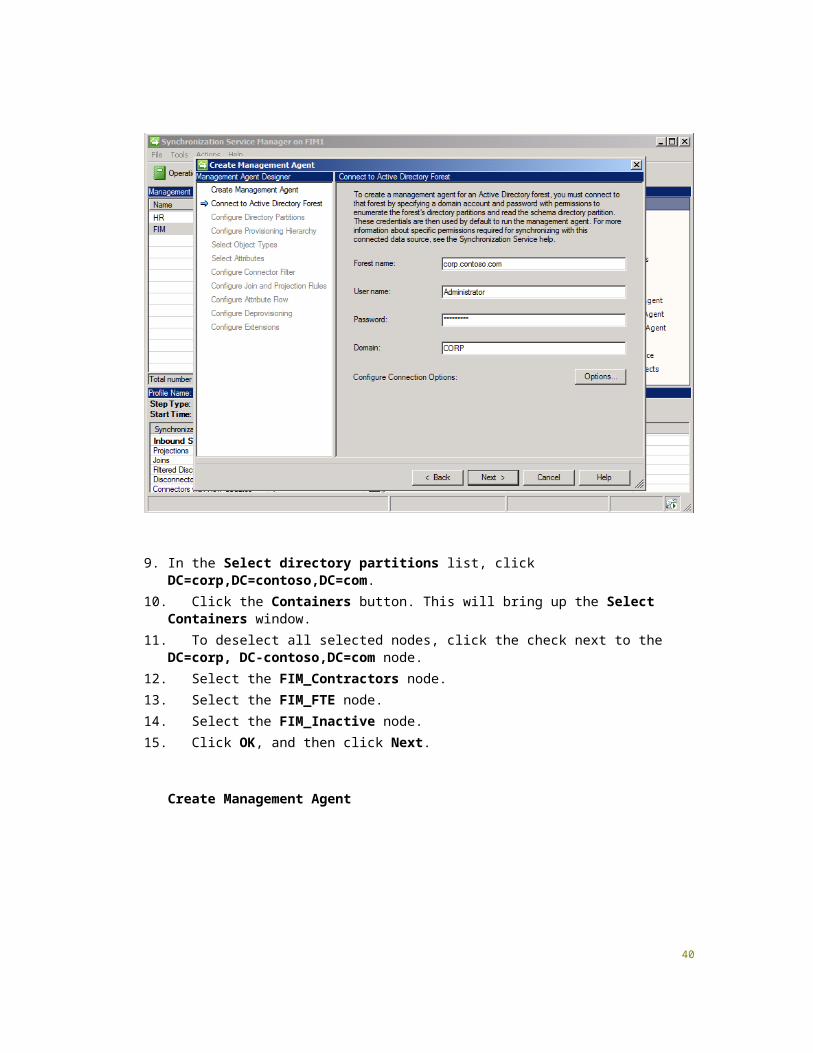
Create Management Agent
9. In the Select directory partitions list, click DC=corp,DC=contoso,DC=com.10. Click the Containers button. This will bring up the Select Containers window.11. To deselect all selected nodes, click the check next to the DC=corp, DC-
contoso,DC=com node.12. Select the FIM_Contractors node.13. Select the FIM_FTE node.14. Select the FIM_Inactive node.15. Click OK, and then click Next.
Create Management Agent
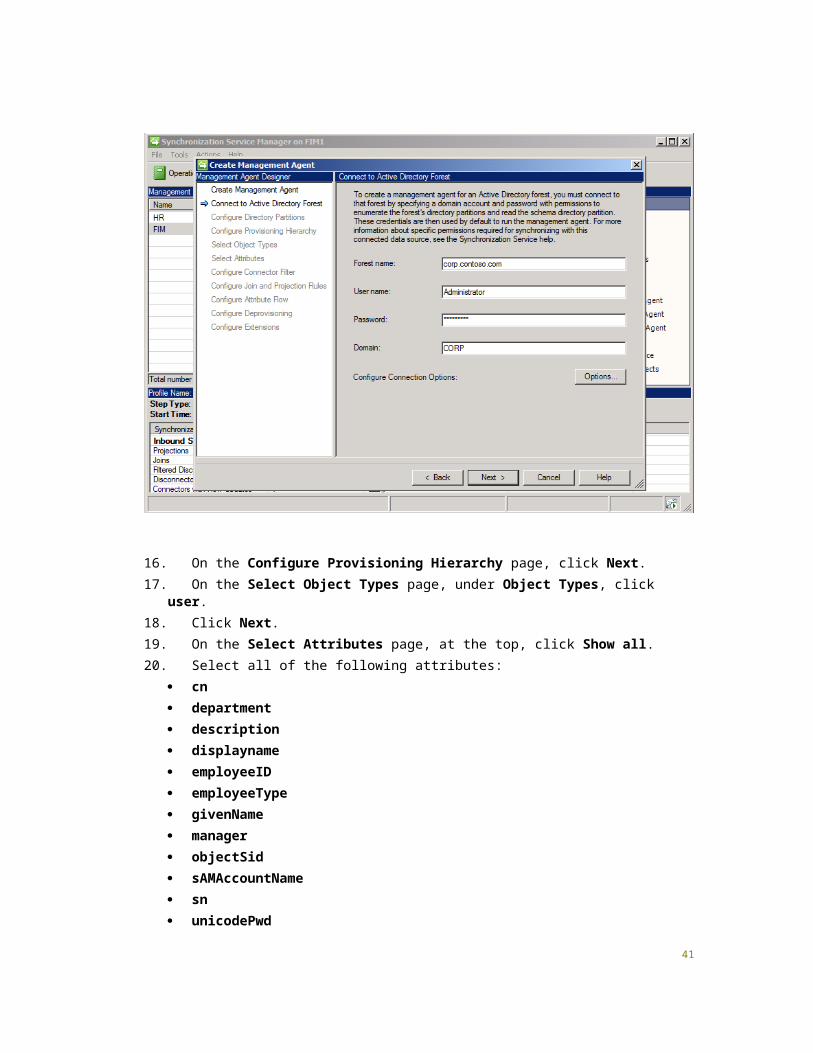
37
16. On the Configure Provisioning Hierarchy page, click Next.17. On the Select Object Types page, under Object Types, click user.18. Click Next.19. On the Select Attributes page, at the top, click Show all.20. Select all of the following attributes:
cn department description displayname employeeID employeeType givenName manager objectSid sAMAccountName sn unicodePwd userAccountControl
38

21. Click Next.22. On the Configure Connector Filter page, click Next.23. On the Configure Join and Projection Rules page, click Next.24. On the Configure Attribute Flow page, click Next.25. On the Configure Deprovisioning page, select Stage a delete on the object for the
next export run, and then click Next.26. On the Configure Provisioning Hierarchy page, click Next.27. On the Configure Extensions page, click Finish.
Create the Run Profiles for the AD MANow that the AD MA has been created, you will create run profiles for the management agent.
1. On the right, under Actions menu, click Configure Run Profiles. This opens the Configure Run Profiles window.
2. Click New Profile. This will begin the Configure Run Profile wizard.3. On the Profile Name page, in the text box under Name, type the following text, and then
click Next: Full Import
4. On the Configure Step page, from the drop-down list under Type, select Full Import (Stage Only), and then click Next.
5. On the Management Agent Configuration page, click Finish.6. Click New Profile.7. On the Profile Name page, in the text box under Name, type the following text, and then
click Next: Full Synchronization
8. On the Configure Step page, from the drop-down list under Type, select Full Synchronization, and then click Next.
9. On the Management Agent Configuration page, click Finish.10. Click New Profile.11. On the Profile Name page, in the text box under Name, type the following text, and then
click Next: Delta Import
12. On the Configure Step page, from the drop-down list under Type, select Delta Import (Stage Only), and then click Next.
13. On the Management Agent Configuration page, click Finish.14. Click New Profile.15. On the Profile Name page, in the text box under Name, type the following text, and then
click Next: Delta Synchronization
To create the run profiles for the AD MA
39
16. On the Configure Step page, from the drop-down list under Type, select Delta Synchronization, and then click Next.
17. On the Management Agent Configuration page, click Finish.18. Click New Profile.19. On the Profile Name page, in the text box under Name, type the following text, and then
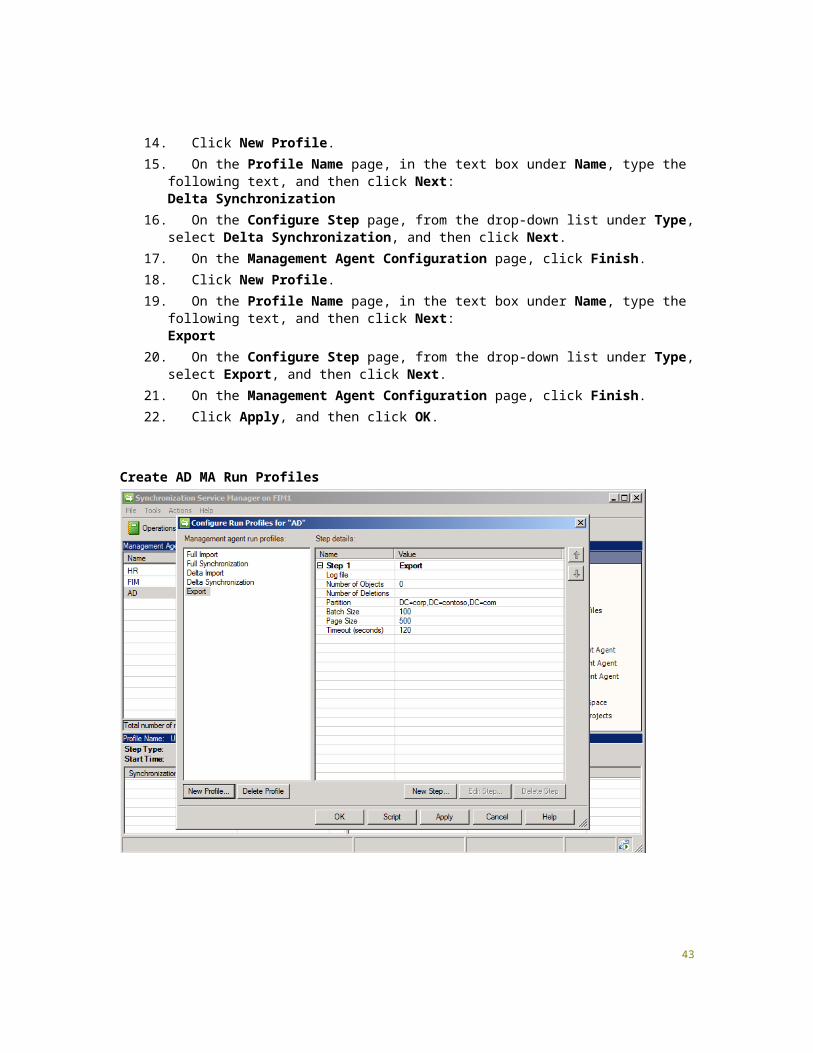
click Next: Export
20. On the Configure Step page, from the drop-down list under Type, select Export, and then click Next.
21. On the Management Agent Configuration page, click Finish.22. Click Apply, and then click OK.
Create AD MA Run Profiles
40
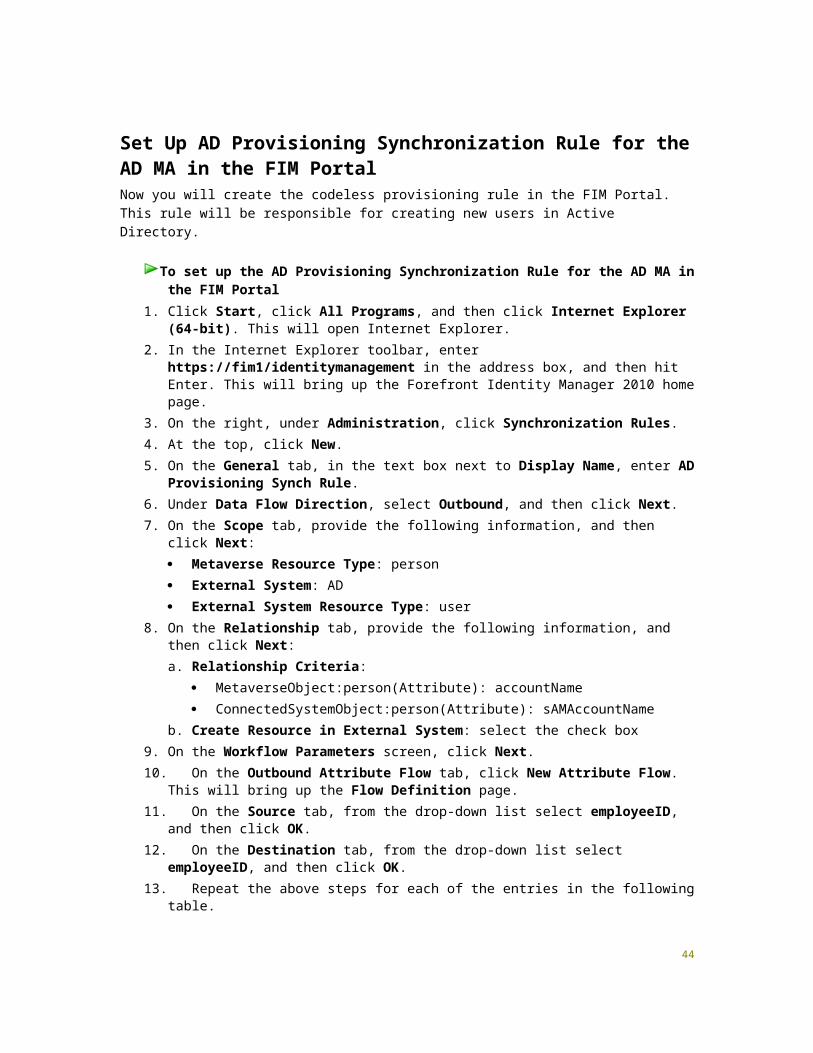
Set Up AD Provisioning Synchronization Rule for the AD MA in the FIM PortalNow you will create the codeless provisioning rule in the FIM Portal. This rule will be responsible for creating new users in Active Directory.
1. Click Start, click All Programs, and then click Internet Explorer (64-bit). This will open Internet Explorer.
2. In the Internet Explorer toolbar, enter https://fim1/identitymanagement in the address box, and then hit Enter. This will bring up the Forefront Identity Manager 2010 home page.
3. On the right, under Administration, click Synchronization Rules.4. At the top, click New.5. On the General tab, in the text box next to Display Name, enter AD Provisioning
Synch Rule.6. Under Data Flow Direction, select Outbound, and then click Next.7. On the Scope tab, provide the following information, and then click Next:
Metaverse Resource Type: person External System: AD External System Resource Type: user
8. On the Relationship tab, provide the following information, and then click Next:a. Relationship Criteria:
MetaverseObject:person(Attribute): accountName ConnectedSystemObject:person(Attribute): sAMAccountName
b. Create Resource in External System: select the check box9. On the Workflow Parameters screen, click Next.10. On the Outbound Attribute Flow tab, click New Attribute Flow. This will bring up the
Flow Definition page.11. On the Source tab, from the drop-down list select employeeID, and then click OK.12. On the Destination tab, from the drop-down list select employeeID, and then click OK.13. Repeat the above steps for each of the entries in the following table.
Source Destination
department department
displayName displayName
employeeType employeeType
firstName givenName
To set up the AD Provisioning Synchronization Rule for the AD MA in the FIM Portal
41

Source Destination
lastName sn
manager manager
14. On the Outbound Attribute Flow tab, click New Attribute Flow. This will bring up the Flow Definition page.
15. On the Source tab, from the drop-down list select String. In the text box that appears, enter the following text, and then click OK: Pass@word1
16. On the Destination tab, from the drop-down list select unicodePwd, and then click OK.17. Check the Initial Flow Only box next to “Pass@word1” -> unicodePwd.18. On the Outbound Attribute Flow tab, click New Attribute Flow. This will bring up the
Flow Definition page.19. On the Source tab, from the drop-down list select CustomExpression.20. In the text box that appears, enter IIF(Eq(employeeStatus, “Active”),
IIF(Eq(employeeType, “Full Time Employee”),“cn=” + displayName + “,OU=FIM_FTE,DC=corp,DC=contoso,DC=com”, “cn=” + displayName + “,OU=FIM_Contractors,DC=corp,DC=contoso,DC=com”), “cn=” + displayName + “,OU=FIM_Inactive,DC=corp,DC=contoso,DC=com”).
TipYou can copy and paste the above but be aware that the “” marks from the Word document are not part of the acceptable syntax. To work around this, copy the above into notepad and replace “” quotes from Word with “” marks from notepad then copy it into the Custom Expression box.
21. Click OK.22. On the Destination tab, from the drop-down list select dn, and then click OK.23. Check the box Initial Flow Only next to this rule.24. On the Outbound Attribute Flow tab, click New Attribute Flow. This will bring up the
Flow Definition page.25. On the Source tab, from the drop-down list select CustomExpression.26. In the box that appears, enter IIF(Eq(employeeStatus, “Active”),
IIF(Eq(employeeType, “Full Time Employee”),“cn=” + displayName + “,OU=FIM_FTE,DC=corp,DC=contoso,DC=com”, “cn=” + displayName + “,OU=FIM_Contractors,DC=corp,DC=contoso,DC=com”), “cn=” + displayName + “,OU=FIM_Inactive,DC=corp,DC=contoso,DC=com”).
27. Click OK.28. On the Destination tab, from the drop-down list select dn, and then click OK.
WarningThe following is not a typo. You want to add the same attribute flow twice. One is
42
for the creation of the user account and is initial flow only and the second one, which is not marked initial flow, is responsible for moving your user between the FIM_FTE and FIM_Contractors OUs.
29. On the Outbound Attribute Flow tab, click New Attribute Flow. This will bring up the Flow Definition page.
30. On the Source tab, from the drop-down list select CustomExpression.31. In the text box that appears, type IIF(Eq(employeeStatus, “Active”), 512, 514).32. Click OK.33. On the Destination tab, from the drop-down list select userAccountControl, and then
click OK.34. Check the Initial Flow Only box next to this rule.35. On the Outbound Attribute Flow tab, click New Attribute Flow. This will bring up the
Flow Definition page.36. On the Source tab, from the drop-down list select accountName.37. Click OK.38. On the Destination tab, from the drop-down list select sAMAccountName, and then
click OK.39. Check the Initial Flow Only box next to this rule.40. Check the Use as Existence Test box next to this rule.41. Click Finish, and then click Submit.
Create Synchronization Rule
43
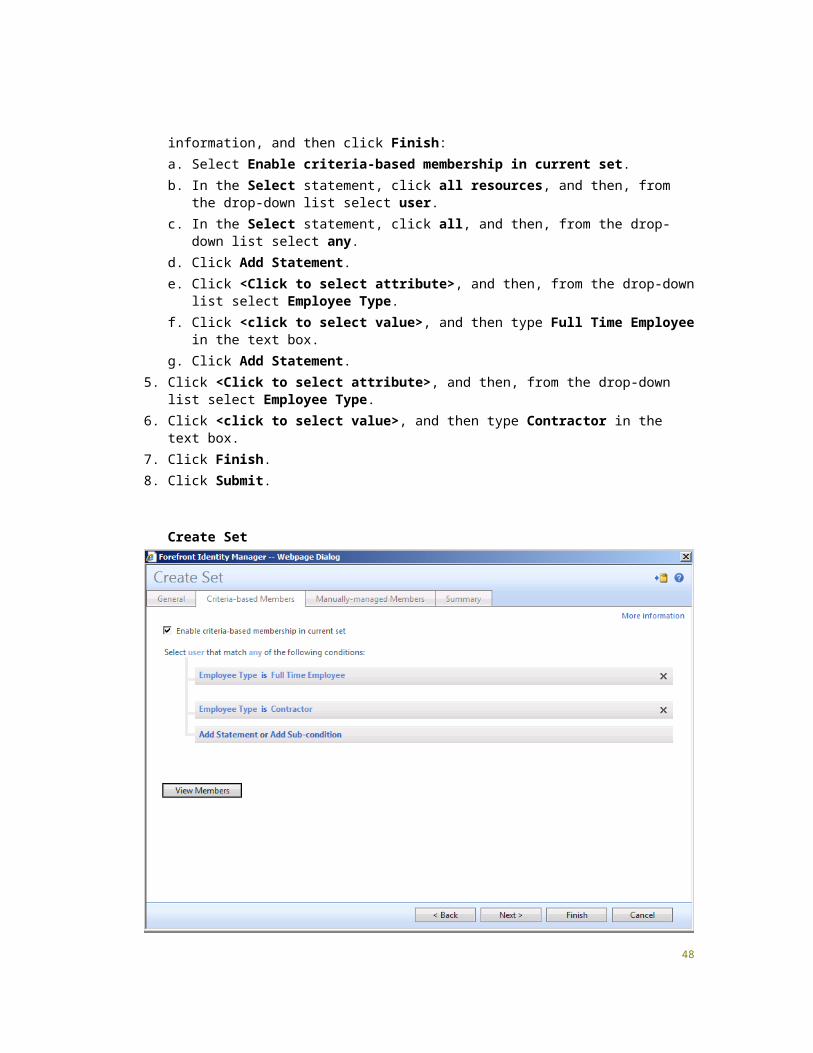
Create an All Employees and Contractors SetNow you will create a set that includes all employees and all contractors.
1. On the left side of the page, under Management Policy Rules, click Sets.2. At the top, click New.3. On the General tab, provide the following information, and then click Next:
Display Name: _ All Employees and Contractors
NoteThe “_” is used so that our newly created set will be at the top of the list in the FIM Portal.
4. On the Criteria-based Members page, provide the following information, and then click Finish:a. Select Enable criteria-based membership in current set.b. In the Select statement, click all resources, and then, from the drop-down list select
user.c. In the Select statement, click all, and then, from the drop-down list select any.
To create an all employees and contractors set
44

d. Click Add Statement.e. Click <Click to select attribute>, and then, from the drop-down list select Employee
Type.f. Click <click to select value>, and then type Full Time Employee in the text box.g. Click Add Statement.
5. Click <Click to select attribute>, and then, from the drop-down list select Employee Type.
6. Click <click to select value>, and then type Contractor in the text box.7. Click Finish.8. Click Submit.
Create Set
Set Up the AD User Provisioning WorkflowNow you will create the AD User Provisioning workflow.
1. On the left of the page, under Management Policy Rules, click Workflows.To set up the AD User Provisioning Workflow
45

2. At the top of the page, click New.3. On the General tab, provide the following information:
Workflow Name: _ AD User Provision Workflow Workflow Type: Action
4. Click Next.5. On the Activities tab, perform the following steps:
a. In the Activity Picker, select Synchronization Rule Activity, and then click Select.b. In the Synchronization Rules list, from the drop-down list select AD Provisioning
Synch Rule.c. In the Action Selection options, select Add.d. Click Save.
6. Click Finish, and then click Submit.
Set Up the AD User Provisioning MPRNow you will create the AD User Provisioning MPR.
1. On the left side of the page, click Management Policy Rules.2. At the top of the page, click New.3. On the General tab, provide the following information:
Display Name: _ AD User Provisioning MPR Type: Request
4. Click Next.5. On the Requesters and Operations tab, perform the following steps:
a. Select Specific Set of Requesters. In the text box below Requester is defined as the following user set type All People, and then click the green check mark.
b. Under Operation, select Create resource and Modify a single-valued attribute.6. Click Next.
Create Management Policy Rule
To set up the AD User Provisioning MPR
46

7. On the Target Resources tab, perform the following steps:a. In the text box next to Target Resource Definition Before Request, type the
following text, and then click the green check mark: _ All Employees and Contractors
b. In the text box next to Target Resource Definition After Request, type the following text, and then click the green check mark: _ All Employees and Contractors
c. Under Resource Attributes, select Select specific attributes and in the text box type Account Name. Click the green check mark.
8. Click Next.
Create Management Policy Rule
47
9. On Policy Workflows, perform the following steps: Under Action Workflows, select _ AD User Provision Workflow.
10. Click Finish, and then click Submit.
Set Up the Inbound Synchronization Rule for the AD MA in the FIM PortalNow you will create the codeless inbound synchronization rule. This allows the objectSid from AD DS to flow into the FIM Portal.
1. At the bottom of the left of the page , click Administration. This will bring up the Administration page.
2. Click Synchronization Rules.3. At the top, click New.4. On the General tab, in the text box next to Display Name type AD Inbound Synch
Rule.5. Under Data Flow Direction, select Inbound, and then click Next.6. On the Scope tab, provide the following information, and then click Next:
To set up the Inbound Synchronization Rule for the AD MA in the FIM Portal
48

Metaverse Resource Type: person External System: AD External System Resource Type: user
7. On the Relationship tab, provide the following information, and then click Next:a. Relationship Criteria:
MetaverseObject:person(Attribute): accountName ConnectedSystemObject:person(Attribute): sAMAccountName
8. On the Inbound Attribute Flow tab, click New Attribute Flow. This will bring up the Flow Definition page.
9. On the Source tab, from the drop-down list select objectSid, and then click OK.10. On the Destination tab, from the drop-down list select objectSid, and then click OK.11. Click Finish, and then click Submit.
Create an Inactive Employees SetNow you will create the Inactive Employees set. Transitioning this set will cause the users in AD to be moved into the FIM_Inactive OU and disabled. Transitioning out of this set, say for example, in 30 days, will cause the user to be removed from AD.
1. On the left side of the page, under Management Policy Rules, click Sets.2. At the top of the page, click New.3. On the General tab, provide the following information, and then click Next:
Display Name: _ All Inactive Employees4. On the Criteria-based Members page, provide the following information, and then click
Finish:a. Select Enable criteria-based membership in current set.b. In the Select statement, click all resources, and then, from the drop-down list select
user.c. Click Add Statement.d. Click <Click to select attribute>, and then, from the drop-down list select
EmployeeEndDate.e. Click After, and then from the drop-down list select prior to.f. Click <click to select value>, and then from the drop-down list select today in the
text box.g. Click Add Statement.h. Click <Click to select attribute>, and then from the drop-down list, select
EmployeeEndDate.i. Click <click to select value>, and then, from the drop-down list, select x days ago
in the text box. Click the 1 and change it to a 3. It should now read 3 days ago.
To create an inactive employees set
49

5. Click Finish.6. Click Submit.
Set Up the AD Make User Inactive Synchronization RuleIn this procedure, you will set up the AD make user inactive synchronization rule.
1. At the bottom of the left column, click Administration. This will bring up the Administration page.
2. Click Synchronization Rules.3. At the top, click New.4. On the General tab, in the text box next to Display Name, enter AD Make User Inactive
Synch Rule.5. Under Data Flow Direction, select Outbound, and then click Next.6. On the Scope tab, provide the following information, and then click Next:
Metaverse Resource Type: person External System: AD External System Resource Type: user
7. On the Relationship tab, provide the following information, and then click Next:a. Relationship Criteria:
MetaverseObject:person(Attribute): accountName ConnectedSystemObject:person(Attribute): sAMAccountName
b. Disconnect FIM resource from external system resource when this Synchronization Rule is removed: select the check box
8. On the Workflow Parameters screen, click Next.9. On the Outbound Attribute Flow tab, click New Attribute Flow. This will bring up the
Flow Definition page.10. On the Source tab, from the drop-down list select CustomExpression.11. In the text box that appears, enter IIF(Eq(employeeStatus, “Active”),
IIF(Eq(employeeType, “Full Time Employee”), “cn=” + displayName + “,OU=FIM_FTE,DC=corp,DC=contoso,DC=com”, “cn=” + displayName + “,OU=FIM_Contractors,DC=corp,DC=contoso,DC=com”), “cn=” + displayName + “,OU=FIM_Inactive,DC=corp,DC=contoso,DC=com”).
12. Click OK.13. On the Destination tab, from the drop-down list select dn, and then click OK.14. On the Outbound Attribute Flow tab, click New Attribute Flow. This will bring up the
Flow Definition page.15. On the Source tab, from the drop-down list select CustomExpression.16. In the text box that appears, enter IIF(Eq(employeeStatus, “Active”), 512, 514).
To set up the AD Make User Inactive Synchronization Rule
50

17. Click OK.18. On the Destination tab, from the drop-down list select userAccountControl, and then
click OK.19. Click Finish, and then click Submit.
Set Up the AD Make User Inactive WorkflowNow you will set up the workflow for making a user inactive in Active Directory.
1. On the left of the page, under Management Policy Rules, click Workflows.2. At the top of the page, click New.3. On the General tab, provide the following information:
Workflow Name: _ AD Make User Inactive Workflow Workflow Type: Action
4. Click Next.5. On the Activities tab, perform the following steps:
a. In the Activity Picker, select Synchronization Rule Activity, and then click Select.b. In the Synchronization Rules list, from the drop-down list select AD Provisioning
Synch Rule.c. In the Action Selection options, select Remove.d. Click Save.e. Click Add Activity.
6. In the Activity Picker, select Synchronization Rule Activity, and then click Select.7. In the Synchronization Rules list, from the drop-down list select AD Make User
Inactive Synch Rule.8. In the Action Selection options, select Add.9. Click Save.10. Click Finish, and then click Submit.
Set Up the AD Make User Inactive MPRNow you will create the MPR to associate with the workflow that will make your user inactive in AD.
1. On the left of the page, click Management Policy Rules.2. At the top of the page, click New.3. On the General tab, provide the following information:
Display Name: _ AD Make User Inactive MPR
To set up the AD Make User Inactive Workflow
To set up the AD Make User Inactive MPR
51

Type: Set Transition4. Click Next.5. On the Transition Definition tab, perform the following steps:
a. In the box next to Transition Set, type _ All Inactive Employees, and then click the green check mark.
b. Under Transition Type, select Transition In.6. Click Next.7. On Policy Workflows, perform the following steps:
Under Action Workflows, select _ AD Make User Inactive Workflow.8. Click Finish, and then click Submit.
Set Up the AD Deprovision WorkflowNow you will set up the workflow removing a user all together from AD.
1. On the left of the page, under Management Policy Rules, click Workflows.2. At the top of the page, click New.3. On the General tab, provide the following information:
Workflow Name: _ AD Deprovision Workflow Workflow Type: Action
4. Click Next.5. On the Activities tab, perform the following steps:
a. In the Activity Picker, select Synchronization Rule Activity, and then click Select.b. In the Synchronization Rules list, from the drop-down list select AD Make User
Inactive Synch Rule.c. In the Action Selection options, select Remove.d. Click Save.
6. Click Finish, and then click Submit.
Set Up the AD Deprovision MPRNow you will create the MPR to associate with the workflow that will remove your users from AD.
1. On the left side of the page, click Management Policy Rules.2. At the top of the page, click New.3. On the General tab, provide the following information:
Display Name: _ AD Deprovision MPR Type: Set Transition
To set up the AD Deprovision Workflow
To set up the AD Deprovision MPR
52

4. Click Next.5. On the Transition Definition tab, perform the following steps:
a. In the text box next to Transition Set, enter _ All Inactive Employees, and then click the green check mark.
b. Under Transition Type, select Transition Out.6. Click Next.7. On Policy Workflows, perform the following steps:
Under Action Workflows, select _ AD Deprovision Workflow.8. Click Finish, and then click Submit.
ImportantThere has been some feedback that the AD Provisioning Synch Rule is not being applied to the pre-existing users in the FIM portal. Prior to running the management agents in the next step, verify that the AD Provisioning Synch Rule has been applied to our 4 test users. To do this do the following:
a. On FIM1, click Start, click All Programs, and then click Internet Explorer (64-bit). This will open Internet Explorer.
b. In the Internet Explorer toolbar, enter https://fim1/identitymanagement in the address box, and then hit Enter. This will bring up the Forefront Identity Manager 2010 home page.
c. On the left side, click Users.d. On the Users page, in Search for, click the Magnifying Glass icon.e. In the list of users, double-click Test User1.f. At the top, click the Provisioning tab.g. Verify the AD Provisioning Synch Rule is under the Expected Rules List and the
Synchronization Rules Status is pending.
If it is not there use the method below to work around this issue. This will not affect newly created users in the HR database.
a. On Test User 1 click the General tab at the top.b. Scroll down and find Account Name.c. Change the value in Account Name from tuser1 to Tuser1.d. Click Ok. Click Submit. Repeat this for all four users.e. Verify that the AD Provisioning Synch Rule is under Expected Rules List and that the
Synchronization Status is Pending.
Run the HR, FIM, and AD Management AgentsNow you are going to run your management agents. This will populate the FIM Portal and AD DS
To run the HR, FIM, and AD management agents
53

1. In the Synchronization Service Manager, at the top, under Management Agents, click HR.
2. On the right, under Actions menu, click Run. This opens the Run Management Agent window.
3. From the list, select Full Import, and then click OK. This will take a moment. It should finish with Synchronization Statistics in the lower left windows and no errors.
4. Repeat the steps above for each item listed in the following table. You need to allow one management agent run to complete before doing the next one.
Management agent Run
HR Full Import
FIM Full Import
AD Full Import
HR Full Synchronization
FIM Export
FIM Full Import
FIM Full Synchronization
AD Export
AD Full Import
AD Full Synchronization
Step 6: Verifying the ConfigurationIn this section, you will modify the attributes of a user and then observe how the policy rules and management agents that you defined previously affect the user’s state.
Test 1In this test, you will change a user’s employee type from Contractor to Full Time, and then run management agents to move the user to the appropriate folder in AD DS.
Verifying the Current User State in AD DSIn this procedure, you will verify that Test User3 resides in the FIM_Contractors folder.
1. Log on to DC1 as corp\Administrator.2. Click Start, select Administrative Tools, and then click Active Directory Users and
To verify the current user state in AD DS
54

Computers. This will open the Active Directory Users and Computers MMC.3. Click FIM_Contractors and verify that Test User3 is in the folder.
ImportantDo not log off of DC1, as you will need to refer to it in later steps.
Changing the Status of the UserIn this procedure, you will change the employee type of Test User3 from Contractor to Full Time.
1. Log on to APP1 as corp\Administrator.2. Click Start, click All Programs, click Microsoft SQL Server 2008 R2, and then click
SQL Server Management Studio. This will launch SQL Server Management Studio.3. On the Connect to Server dialog box, under Server Type select Database Engine.4. On the Connect to Server dialog box, under Server name select APP1.5. On the Connect to Server dialog box, under Authentication select Windows
Authentication.6. Click Connect. This should be successful and the database information will be displayed
on the left.7. At the top of the page, click New Query. SQL Server Management Studio will populate
the center with a blank white screen. There will be a blinking cursor at the top of this white center pane.
8. Copy the following code into the center pane.
USE [HR]
GO
UPDATE Employees set EmployeeType = ‘F’ where EmployeeNumber = ‘1103’
9. At the top of the page, click Execute. This will take a moment and you should see Command(s) completed successfully in the lower part of the center pane.
NoteDo not log off of APP1, as you will need to refer to it in later steps.
Running the Management AgentsIn this step, you will run a sequence of management agents that will detect and synchronize the changes in Test User3, and apply the appropriate policy rules to move the user to a new folder.
To change the status of the user
55

1. Log on to FIM1 as corp\Administrator.2. Click Start, click All Programs, click Microsoft Forefront Identity Manager, and then
click Synchronization Service. This will launch Synchronization Service Manager.3. At the top of the page, click Management Agents, and then click HR.4. On the right, under Actions menu, click Run. This opens the Run Management Agent
window.5. From the list, select Full Import, and then click OK. This will take a moment. It should
finish with Synchronization Statistics in the lower left windows and no errors.6. Using steps 3 - 5 above, run the following management agent run profiles in order.
Management agent Run profile
HR Full Synchronization
FIM Export
FIM Full Import
FIM Full Synchronization
AD Export
AD Full Import
AD Full Synchronization
nNoteDo not log off of FIM1, as you will need to refer to it in later steps.
Verifying the Changes in AD DSIn this step, you will verify that Test User3 was successfully moved to a new folder.
1. On DC1, in Active Directory Users and Computers, click FIM_FTE and verify that Test User3 is now in that folder and is no longer in the FIM_Contractors folder.
Test 2In this test, you will change a user’s employee status from Active to Inactive, and then run management agents to move the user to the appropriate folder in AD DS.
To run the management agents
To verify the changes in AD DS
56

Verifying the Current User State in AD DSIn this procedure, you will verify that Test User1 resides in the FIM_FTE.
1. On DC1, in Active Directory Users and Computers, click FIM_FTE and verify that Test User1 is in the folder.
Changing the Status of the UserIn this procedure, you will change the employee status of Test User1 from Active to Inactive, with a termination date of one day before today.
1. On APP1, in SQL Server Management Studio, click New Query. SQL Server Management Studio will populate the center with a blank white screen. There will be a blinking cursor at the top of this white center pane.
2. Copy the following code into the center pane.
ImportantReplace the date in the following code with yesterday’s date using the format yyyy-mm-dd.
USE [HR]
GO
UPDATE Employees set EmploymentStatus = ‘T’ where EmployeeNumber = ‘1101’
UPDATE Employees set EndDate = ‘2011-02-02’ where EmployeeNumber = ‘1101’
3. At the top, click Execute. This will take a moment and you should see Command(s) completed successfully in the lower part of the center pane.
Running the Management AgentsIn this step, you will run a sequence of management agents that will detect and synchronize the changes in Test User1, and apply the appropriate policy rules to move the user to a new folder.
1. In Synchronization Service Manager, at the top, click Management Agents, and then
To verify the current user state in AD DS
To change the status of the user
To run the management agents
57

click HR.2. On the right, under Actions menu, click Run. This opens the Run Management Agent
window.3. From the list, select Full Import, and then click OK. This will take a moment. It should
finish with Synchronization Statistics in the lower left windows and no errors.4. Using steps 1 - 3 above, run the following management agent run profiles in order.
Management agent Run profile
HR Full Synchronization
FIM Export
FIM Full Import
FIM Full Synchronization
AD Export
AD Full Import
AD Full Synchronization
Verifying the Changes in ADIn this step, you will verify that Test User1 was successfully moved to a new folder.
1. On DC1, in Active Directory Users and Computers, click FIM_Inactive and verify that Test User1 is now in that folder and is no longer in the FIM_FTE folder.
Test 3In this test, you will increase a user’s EndDate to five days, and then run management agents to remove the user from AD DS.
Changing the Status of the UserIn this procedure, you will change the EndDate of Test User1, with a termination date of five days before today.
1. On APP1, in SQL Server Management Studio, click New Query. SQL Server Management Studio will populate the center with a blank white screen. There will be a blinking cursor at the top of this white center pane.
2. Copy the following code into the center pane.
To verify the changes in AD
To change the status of the user
58

ImportantReplace the date in the following code with a date five days before today, using the format yyyy-mm-dd.
USE [HR]
GO
UPDATE Employees set EndDate = ‘2011-01-27’ where EmployeeNumber = ‘1101’
3. At the top, click Execute. This will take a moment and you should see Command(s) completed successfully in the lower part of the center pane.
Running the Management AgentsIn this step, you will run a sequence of management agents that will detect and synchronize the changes in Test User1, and apply the appropriate policy rules to remove from AD DS.
1. In Synchronization Service Manager, at the top, click Management Agents, and then click HR.
2. On the right, under Actions menu, click Run. This opens the Run Management Agent window.
3. From the list, select Full Import, and then click OK. This will take a moment. It should finish with Synchronization Statistics in the lower left windows and no errors.
4. Using steps 1 - 3 above, run the following management agent run profiles in order.
Management agent Run profile
HR Full Synchronization
FIM Export
FIM Full Import
FIM Full Synchronization
AD Export
AD Full Import
AD Full Synchronization
To run the management agents
59

Verifying the Changes in ADIn this step, you will verify that Test User1 was successfully removed from AD DS.
1. On DC1, in Active Directory Users and Computers, click FIM_Inactive and verify that Test User1 has been removed from that folder and is no longer in AD DS.
Test 4In this test, you will increase a user’s EndDate to at least 45 days, and then run management agents to remove the user from the FIMdatabase.
Verifying the User in the FIM PortalIn this procedure, you will verify that Test User1 is still in the FIM Service database.
1. On FIM1, click Start, click All Programs, and then click Internet Explorer (64-bit). This will open Internet Explorer.
2. In the Internet Explorer toolbar, enter https://fim1/identitymanagement in the address box, and then hit Enter. This will bring up the Forefront Identity Manager 2010 home page.
3. On the left side, click Users.4. On the Users page, in Search for, click the Magnifying Glass icon.5. In the list of users, verify that Test User1 is there. Note that even though the user was
removed from AD DS, it is still in the FIM Service database.6. Leave the FIM Portal on the Users page.
Changing the Status of the UserIn this procedure, you will change the EndDate of Test User1, with a termination date of at least 45 days before today.
1. On APP1, in SQL Server Management Studio, click New Query. SQL Server Management Studio will populate the center with a blank white screen. There will be a blinking cursor at the top of this white center pane.
2. Copy the following code into the center pane.
ImportantReplace the date in the following code with a date at least 45 days before today.
USE [HR]
GO
To verify the changes in AD
To verify the user in the FIM Portal
To change the status of the user
60

UPDATE Employees set EndDate = ‘2010-01-27’ where EmployeeNumber = ‘1101’
3. At the top, click Execute. This will take a moment and you should see Command(s) completed successfully in the lower part of the center pane.
Running the Management AgentsIn this step, you will run a sequence of management agents that will detect and synchronize the changes in Test User1, and apply the appropriate policy rules to remove from AD DS.
1. In Synchronization Service Manager, at the top, click Management Agents, and then click HR.
2. On the right, under Actions menu, click Run. This opens the Run Management Agent window.
3. From the list, select Full Import, and then click OK. This will take a moment. It should finish with Synchronization Statistics in the lower left windows and no errors.
4. Using steps 1 - 3 above, run the following management agent run profiles in order.
Management agent Run profile
HR Full Synchronization
FIM Export
FIM Full Import
FIM Full Synchronization
Verifying the Changes in the FIM PortalIn this step, you will verify that Test User1 was successfully removed from the FIM database.
1. On FIM1, in the FIM Portal on the Users page, in Search for, click the Magnifying Glass icon to refresh the list.
2. In the list of users, verify that Test User1 has been removed.
To run the management agents
To verify the changes in the FIM Portal
61