managing your authorized user (proxy access) in · 04/2017 offices of the bursar and financial aid...
TRANSCRIPT

04/2017 Offices of the Bursar and Financial Aid RMB/GC/DMD
Fairfield University
Managing Your Authorized User (Proxy Access) in
The Fairfield University student portal, my.Fairfield, will be used to establish proxy access and assign passphrases for proxy’s to use when communicating via phone, email, writing or in-person with the offices of the Bursar and Financial Aid when assistance is needed. Refer to the navigation below as a how-to guide on these processes:
To establish a proxy:
1. Log into my.Fairfield with Net ID/password (for NetID issues, contact [email protected]).
2. Search for Proxy Access in the Search bar and select the Proxy Access task:

04/2017 Offices of the Bursar and Financial Aid RMB/GC/DMD
3. By selecting Proxy Access, a new window will generate. On this page, you will find detailed information: the Proxy Access tab.
To establish a proxy, select the Proxy Access Tab.
04/2017 Offices of the Bursar and Financial Aid RMB/GC/DMD
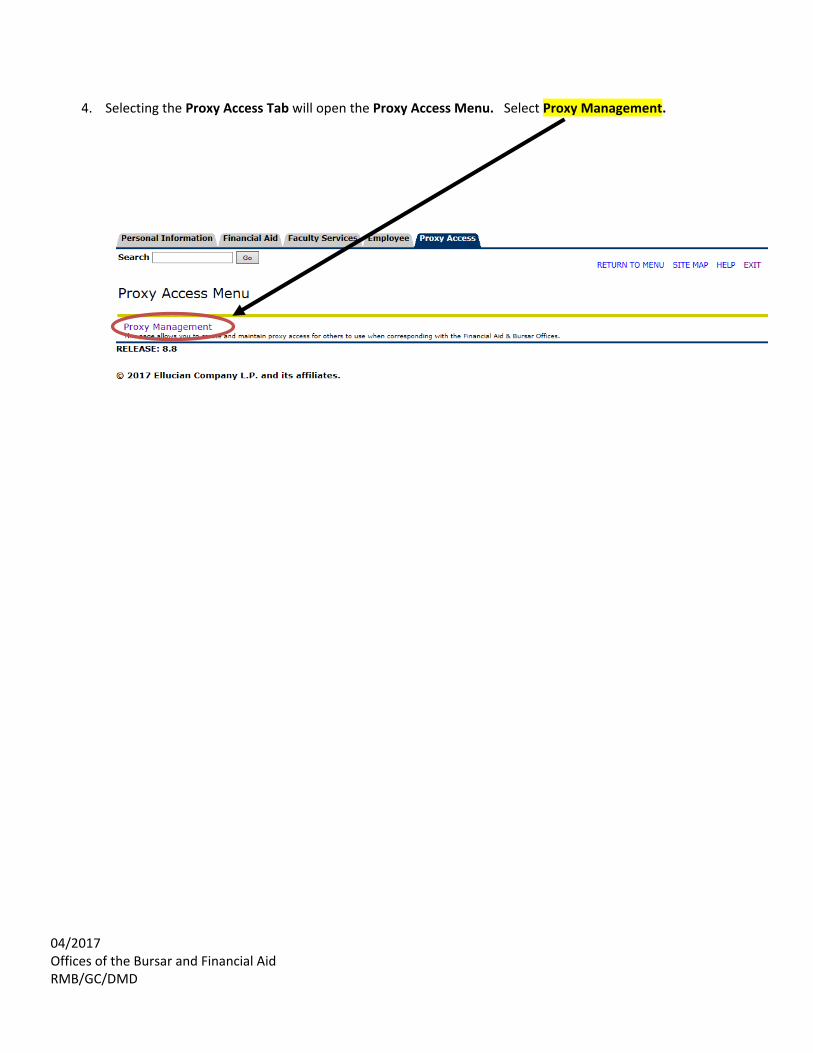
4. Selecting the Proxy Access Tab will open the Proxy Access Menu. Select Proxy Management.

04/2017 Offices of the Bursar and Financial Aid RMB/GC/DMD
5. The Proxy Management screen will open next. On this screen, you will complete the following 2 steps:
a. Add a Proxy
b. Establish a Passphrase. You will also be able to edit passphrases, assign your relationship to the proxy and expire the proxy access to rescind authorization
First, you must Add Proxy.

04/2017 Offices of the Bursar and Financial Aid RMB/GC/DMD
6. Once you click on Add Proxy, a new area of the window will open called Add a Proxy. Each proxy you add must have their own email address and cannot share an email address with another proxy. For example:
Complete all required fields. Once you fill in all required fields, click Add Proxy.
Enter all required fields and Click Add Proxy

04/2017 Offices of the Bursar and Financial Aid RMB/GC/DMD
7. Once you click on Add Proxy, the screen appears as follows below. The GREEN check appears to indicate that a new proxy has been successfully added. The reminder to assign a relationship and add a passphrase appears. *BOTH ARE REQUIRED FOR SUCCESSFUL COMPLETION OF PROXY SET-UP!
Expand the proxy to assign a relationship and add a passphrase
The proxy will appear with the ‘lock’ until the relationship & passphrase
have been assigned by the student.

04/2017 Offices of the Bursar and Financial Aid RMB/GC/DMD
8. After you have ‘clicked’ to Expand the proxy, the Proxy Profile will open. Please complete the following steps:
a. Select a relationship – the only choice is Parent or Legal Guardian.
In some instances, you, the student, may wish to assign to proxy access to someone other than a parent or legal guardian such as a grandparent or aunt/uncle. In those instances, please select parent or legal guardian as the relationship type and then indicate the actual relationship in the Description Field.
b. Description - Please use this field to indicate whom the proxy is to you the student.
c. Passphrase – While not starred as a required field, THIS IS A REQUIRED FIELD. This is a word or phrase assigned by the student that will be emailed to the proxy. The proxy will use this to be able to communicate, in accordance with FERPA, with the offices of the Bursar and Financial Aid.
d. Start Date – the defaulted start date will be the date that the proxy is being established by the student. e. Stop Date – the defaulted stop date will be 5 years from the date that the proxy is being established. The stop date can be edited at any time in the future to rescind/cancel/remove proxy access.
Once you have entered all of the fields, YOU MUST CLICK ON ‘E-mail Passphrase’ in order for your proxy to receive the PROXY PASSPHRASE. A GREEN check will appear once the passphrase has been emailed to the proxy.

04/2017 Offices of the Bursar and Financial Aid RMB/GC/DMD
9. On the same page, the authorization tab is not currently in use at this time. 10. On the same page, the communication tab is a log of the emails sent from the student to the proxy’s. In this example, you can see on the communication tab
*Please note: At this time, the RESEND icon is currently disabled. If you click on it, nothing will happen. If you need to resend the email with the passphrase to an established proxy, please complete the following steps:
1. Select the PROFILE tab as shown in the picture above. 2. Once on the PROFILE tab, select EMAIL PASSPHRASE 3. The passphrase will then be resent and you will be able to see the email logged on your COMMUNICATION tab.