manual de ayuda al usuario - claro ebill register in the ebill system, you must be a claro customer....
TRANSCRIPT
Published on: Copyright ©2014 Claro 01/27/2014
Copyright ©2014. All rights reserved by CLARO. This publication’s content is for information purpose only. It may only be used or copied according to the established Terms and Conditions.
Version 4.0
Copyright ©2014 Claro Page 2 of 38
Table of Contents
Page Access ............................................................................................................................. 3
User Access (Login to Claro’s eBill) …………………………………………………………..4 New Users Registration…………………………………………………………………………4 Forgot your Password?.................................................................................................. 16
Account Overview .......................................................................................................... 17
Invoices ......................................................................................................................... 19
Invoices Presentation .................................................................................................... 20
Make Payments ............................................................................................................. 21
My Profile ....................................................................................................................... 25
Edit or Change the User Information ............................................................................. 25
Accounts ........................................................................................................................ 26
Add an Account ............................................................................................................. 27
Make a Default Account ................................................................................................. 28
Delete an Account ......................................................................................................... 29
Change Passwords ....................................................................................................... 30
Users ............................................................................................................................. 31
Help ............................................................................................................................... 34
Frequently Asked Questions (FAQ’s) ............................................................................ 34
My Questions ................................................................................................................. 35
User’s Manual ................................................................................................................ 36
Demo ............................................................................................................................. 36
Contact Us ..................................................................................................................... 36
Logout............................................................................................................................ 38
Copyright ©2014 Claro Page 3 of 38
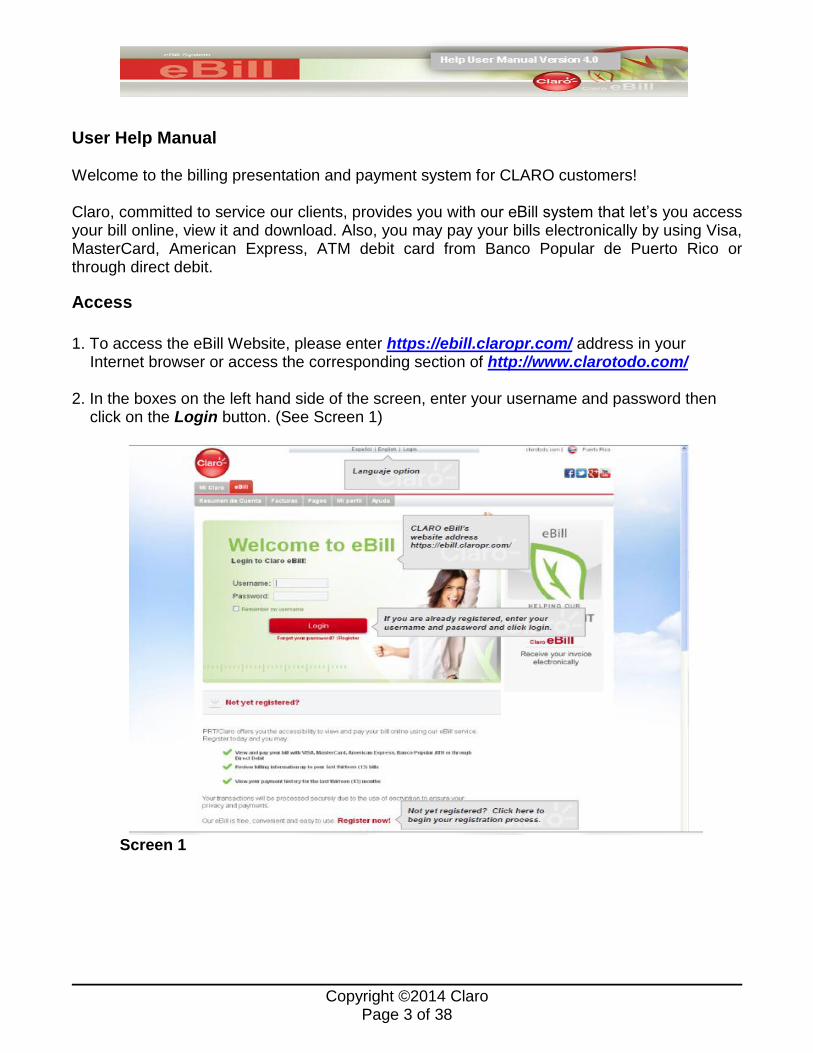
User Help Manual Welcome to the billing presentation and payment system for CLARO customers! Claro, committed to service our clients, provides you with our eBill system that let’s you access your bill online, view it and download. Also, you may pay your bills electronically by using Visa, MasterCard, American Express, ATM debit card from Banco Popular de Puerto Rico or through direct debit.
Access
1. To access the eBill Website, please enter https://ebill.claropr.com/ address in your
Internet browser or access the corresponding section of http://www.clarotodo.com/
2. In the boxes on the left hand side of the screen, enter your username and password then click on the Login button. (See Screen 1)
Screen 1
Copyright ©2014 Claro Page 4 of 38
User Access (Login to Claro’s eBill) 1. Choose your preferred language and enter your Username and Password. Remember that
the password is case sensitive and must be between 8 and 10 characters, including at least 2 letters and 2 numbers. A maximum of 4 consecutive repeated characters may be used.
2. Press the Login button to access the system. If the Username and Password you entered are valid, the Account Overview page will be displayed.
3. If your login fails, a message will be displayed indicating that your login attempt has failed. Verify the information and make sure the Caps Lock key is off. Remember that passwords are case sensitive.
4. After three attempts, the system interrupts the process and you will need to contact (787)
775-0000 from Monday to Friday before 7:00 p.m. or via CHAT before 6:00 p.m. on Saturdays. This is a measure of the security system in order to ensure the privacy of your information.
New Users Registration 1. If you are already an eBill user, refer to the Access section. 2. To register in the eBill system, you must be a Claro customer. You should have the mobile
or fixed telephone number you will like to view through the ebill system. You will then need to create a username and password.
3. Registration process:
a. On the Login to eBill page https://ebill.claropr.com/, click on the Register button found on the left hand side (See screen 1).
b. All active and suspended accounts registered under your Social Security number will be created automatically with the same username. You may add more accounts later under an established user. You may find this option under My Profile in the Accounts section.
c. Write the 10 digit telephone number of the account you wish to register (including the area code), without spaces or dashes, in the corresponding box. Press. Continue. (See screen 2).
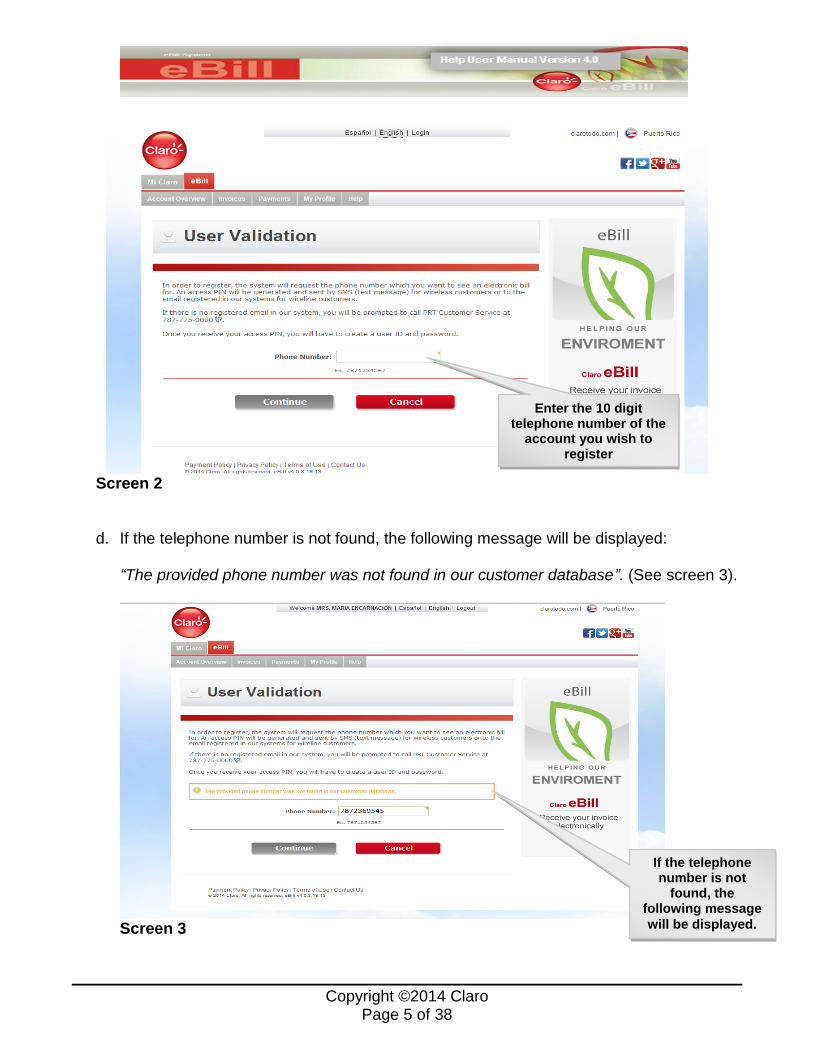
Copyright ©2014 Claro Page 5 of 38
Screen 2
d. If the telephone number is not found, the following message will be displayed: “The provided phone number was not found in our customer database”. (See screen 3).
Screen 3
If the telephone number is not
found, the following message
will be displayed.
Enter the 10 digit telephone number of the
account you wish to register

Copyright ©2014 Claro Page 6 of 38
e. If the telephone number is valid, the Account Number should be provided. Then enter the code which appears in the box at the bottom of the page, in the field designated with Confirm Code. If you cannot read the code, you can change it by pressing Press here. (See screen 4).
f. Once you complete the information in three (3) fields, press continue to obtain the next
screen. This process may take some time depending on the speed of your internet connection.
Screen 4
g. If the Accounting Number is not found the following message will be displayed: “The Account Number provided is invalid.” (See screen 5) The system will only allow three attempts.
Write the code of the captcha
(shadowed box)
here.
If you can’t understand the code Press here
to change it.
Copyright ©2014 Claro Page 7 of 38
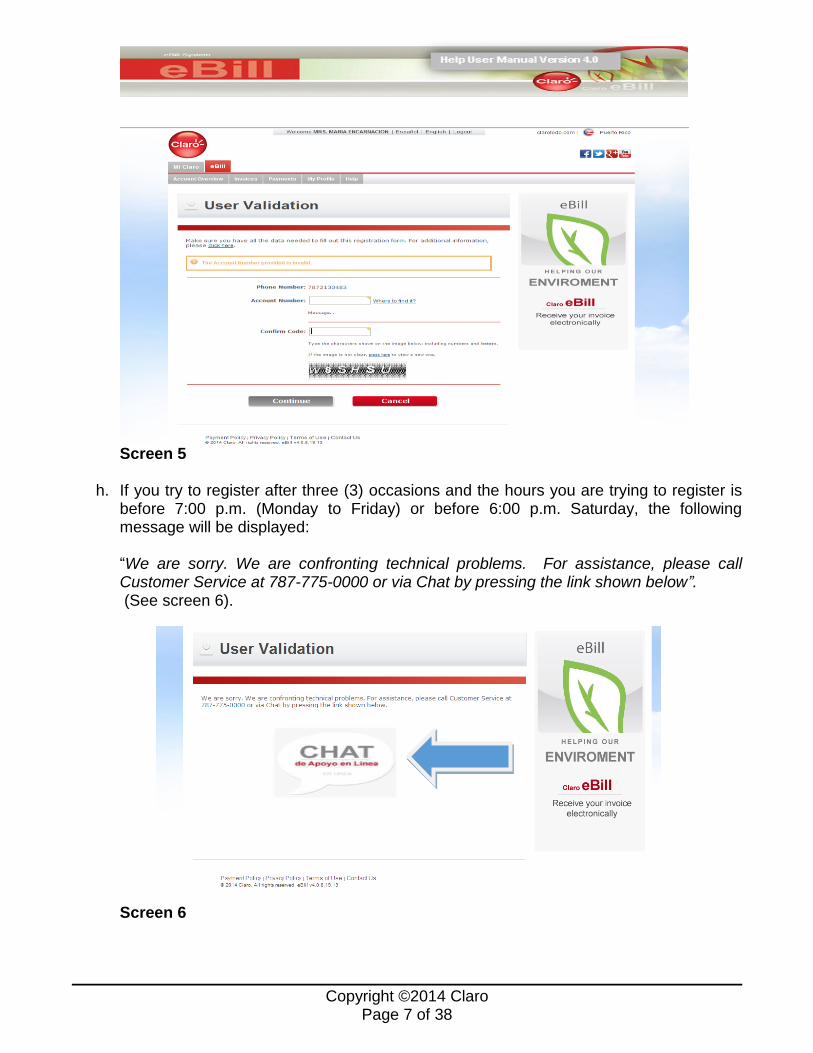
Screen 5
h. If you try to register after three (3) occasions and the hours you are trying to register is before 7:00 p.m. (Monday to Friday) or before 6:00 p.m. Saturday, the following message will be displayed: “We are sorry. We are confronting technical problems. For assistance, please call Customer Service at 787-775-0000 or via Chat by pressing the link shown below”. (See screen 6).
Screen 6
Copyright ©2014 Claro Page 8 of 38
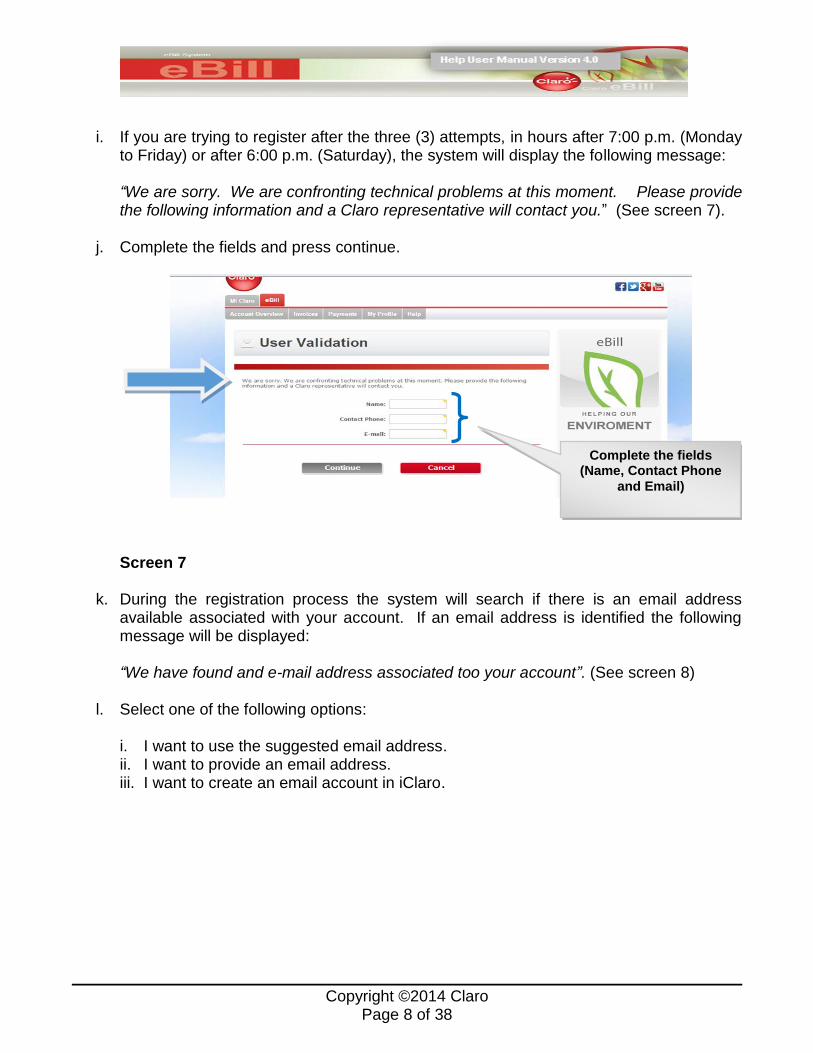
i. If you are trying to register after the three (3) attempts, in hours after 7:00 p.m. (Monday to Friday) or after 6:00 p.m. (Saturday), the system will display the following message: “We are sorry. We are confronting technical problems at this moment. Please provide the following information and a Claro representative will contact you.” (See screen 7).
j. Complete the fields and press continue.
Screen 7
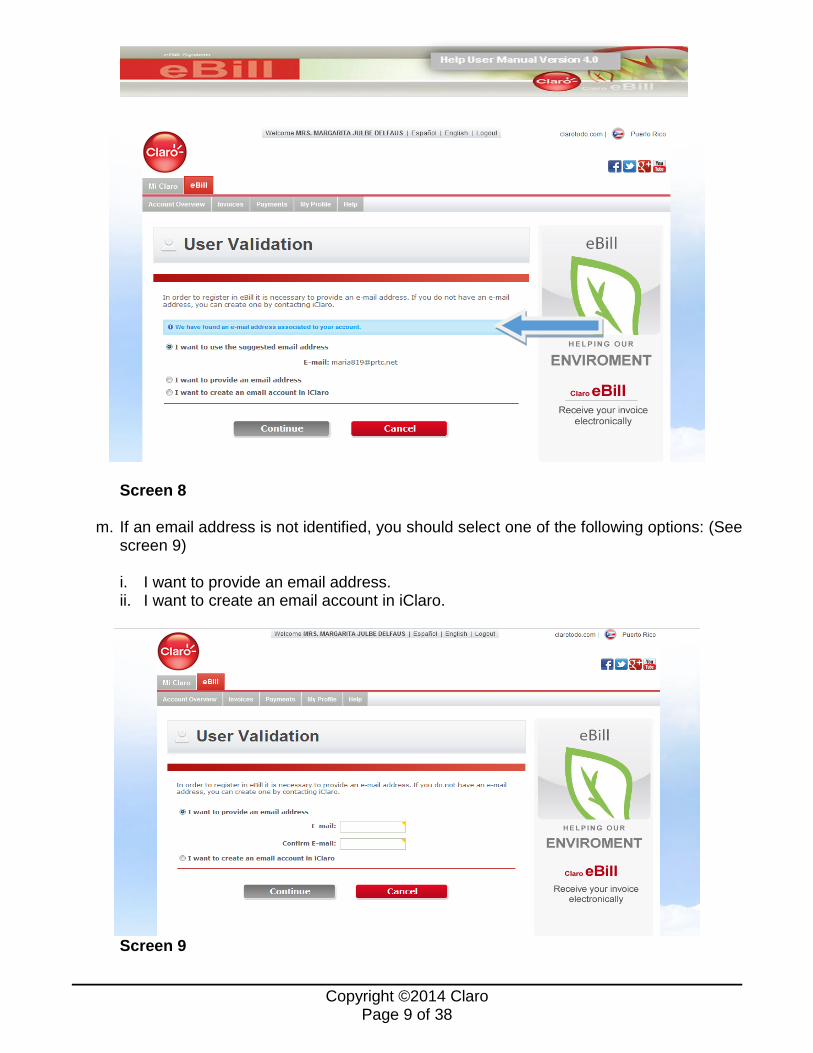
k. During the registration process the system will search if there is an email address
available associated with your account. If an email address is identified the following message will be displayed: “We have found and e-mail address associated too your account”. (See screen 8)
l. Select one of the following options:
i. I want to use the suggested email address. ii. I want to provide an email address. iii. I want to create an email account in iClaro.
Complete the fields (Name, Contact Phone
and Email)
Copyright ©2014 Claro Page 9 of 38
Screen 8
m. If an email address is not identified, you should select one of the following options: (See screen 9)
i. I want to provide an email address. ii. I want to create an email account in iClaro.
Screen 9
Copyright ©2014 Claro Page 10 of 38
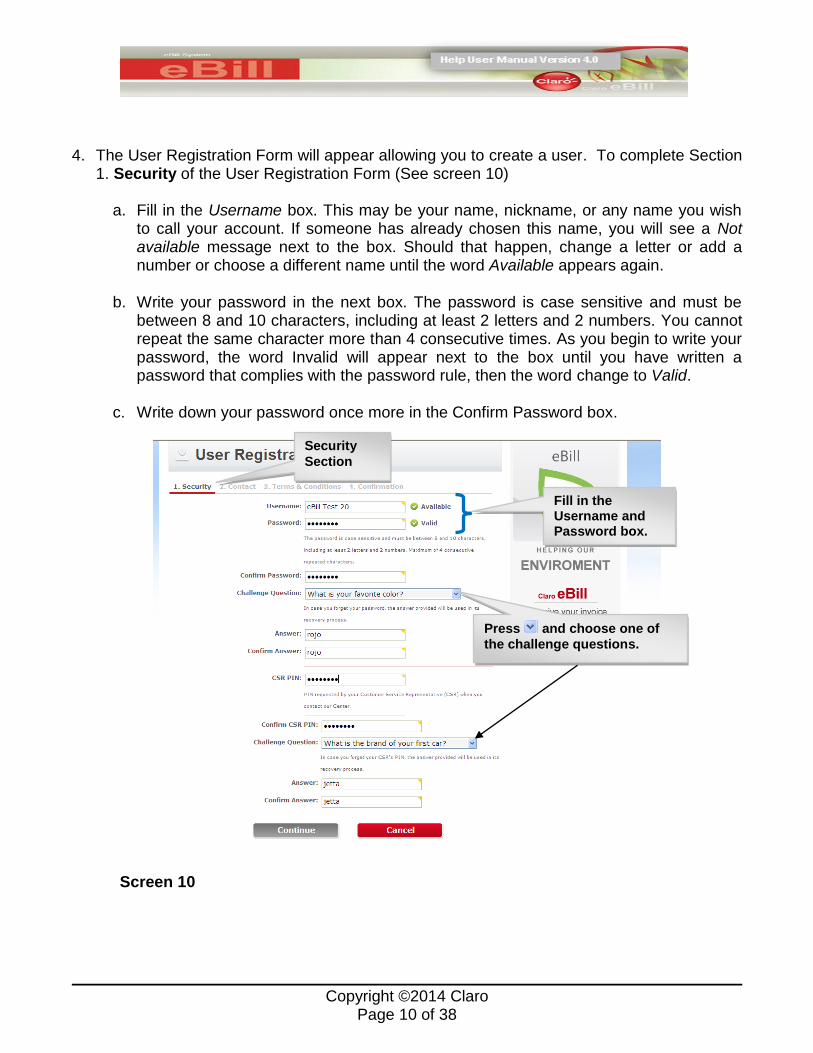
4. The User Registration Form will appear allowing you to create a user. To complete Section
1. Security of the User Registration Form (See screen 10)
a. Fill in the Username box. This may be your name, nickname, or any name you wish to call your account. If someone has already chosen this name, you will see a Not available message next to the box. Should that happen, change a letter or add a number or choose a different name until the word Available appears again.
b. Write your password in the next box. The password is case sensitive and must be
between 8 and 10 characters, including at least 2 letters and 2 numbers. You cannot repeat the same character more than 4 consecutive times. As you begin to write your password, the word Invalid will appear next to the box until you have written a password that complies with the password rule, then the word change to Valid.
c. Write down your password once more in the Confirm Password box.
Screen 10
Security
Section
Fill in the Username and Password box.
Press and choose one of
the challenge questions.
Copyright ©2014 Claro Page 11 of 38
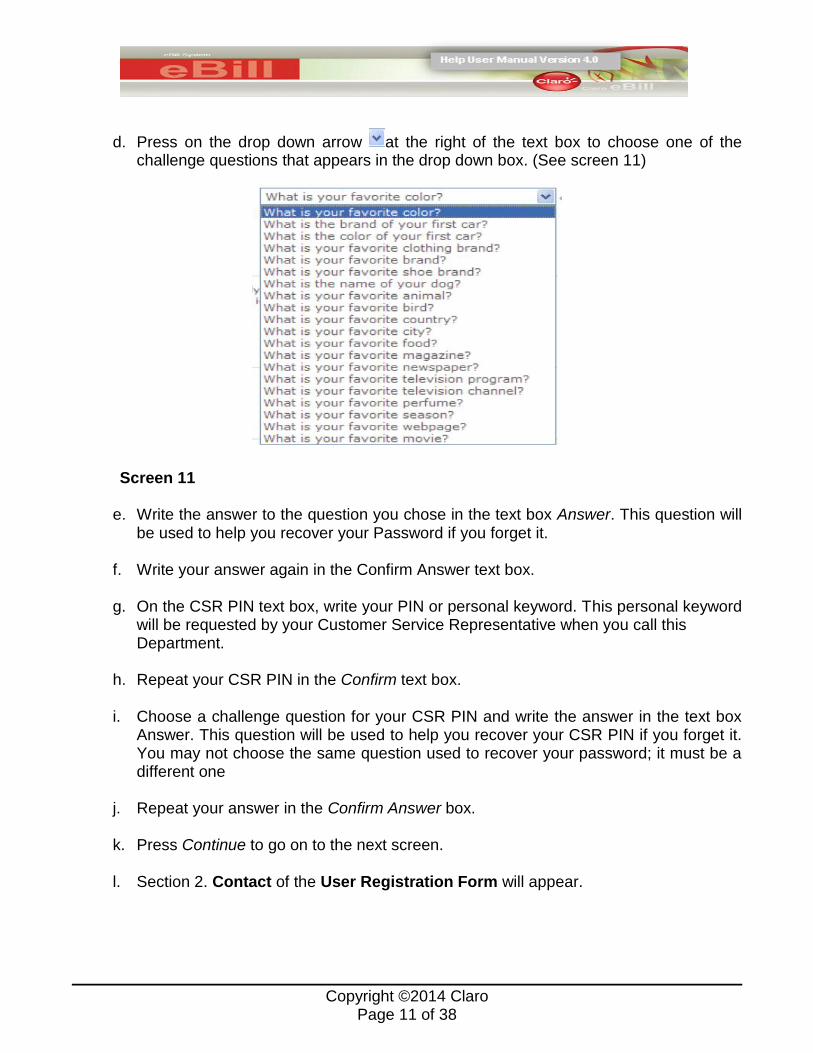
d. Press on the drop down arrow at the right of the text box to choose one of the challenge questions that appears in the drop down box. (See screen 11)
Screen 11
e. Write the answer to the question you chose in the text box Answer. This question will be used to help you recover your Password if you forget it.
f. Write your answer again in the Confirm Answer text box.
g. On the CSR PIN text box, write your PIN or personal keyword. This personal keyword will be requested by your Customer Service Representative when you call this Department.
h. Repeat your CSR PIN in the Confirm text box.
i. Choose a challenge question for your CSR PIN and write the answer in the text box Answer. This question will be used to help you recover your CSR PIN if you forget it. You may not choose the same question used to recover your password; it must be a different one
j. Repeat your answer in the Confirm Answer box.
k. Press Continue to go on to the next screen.
l. Section 2. Contact of the User Registration Form will appear.
Copyright ©2014 Claro Page 12 of 38
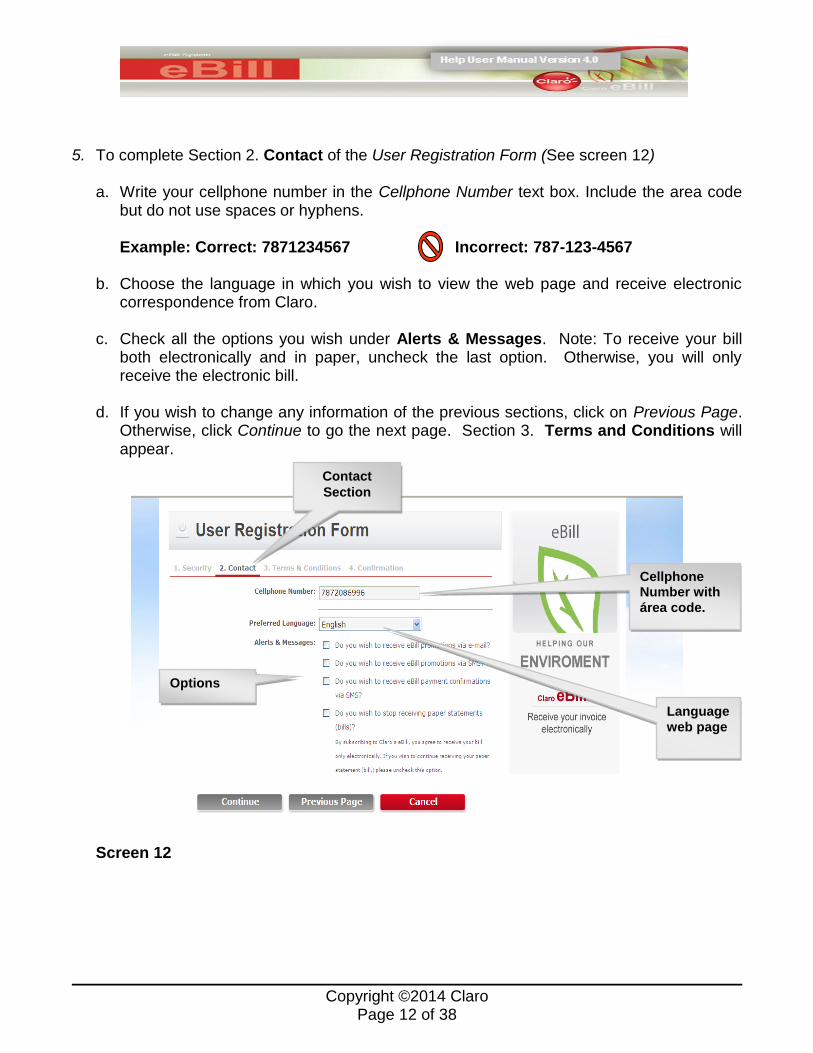
5. To complete Section 2. Contact of the User Registration Form (See screen 12)
a. Write your cellphone number in the Cellphone Number text box. Include the area code but do not use spaces or hyphens. Example: Correct: 7871234567 Incorrect: 787-123-4567
b. Choose the language in which you wish to view the web page and receive electronic
correspondence from Claro.
c. Check all the options you wish under Alerts & Messages. Note: To receive your bill both electronically and in paper, uncheck the last option. Otherwise, you will only receive the electronic bill.
d. If you wish to change any information of the previous sections, click on Previous Page.
Otherwise, click Continue to go the next page. Section 3. Terms and Conditions will appear.
Screen 12
Cellphone Number with
área code.
Language
web page
Options
Contact
Section
Copyright ©2014 Claro Page 13 of 38
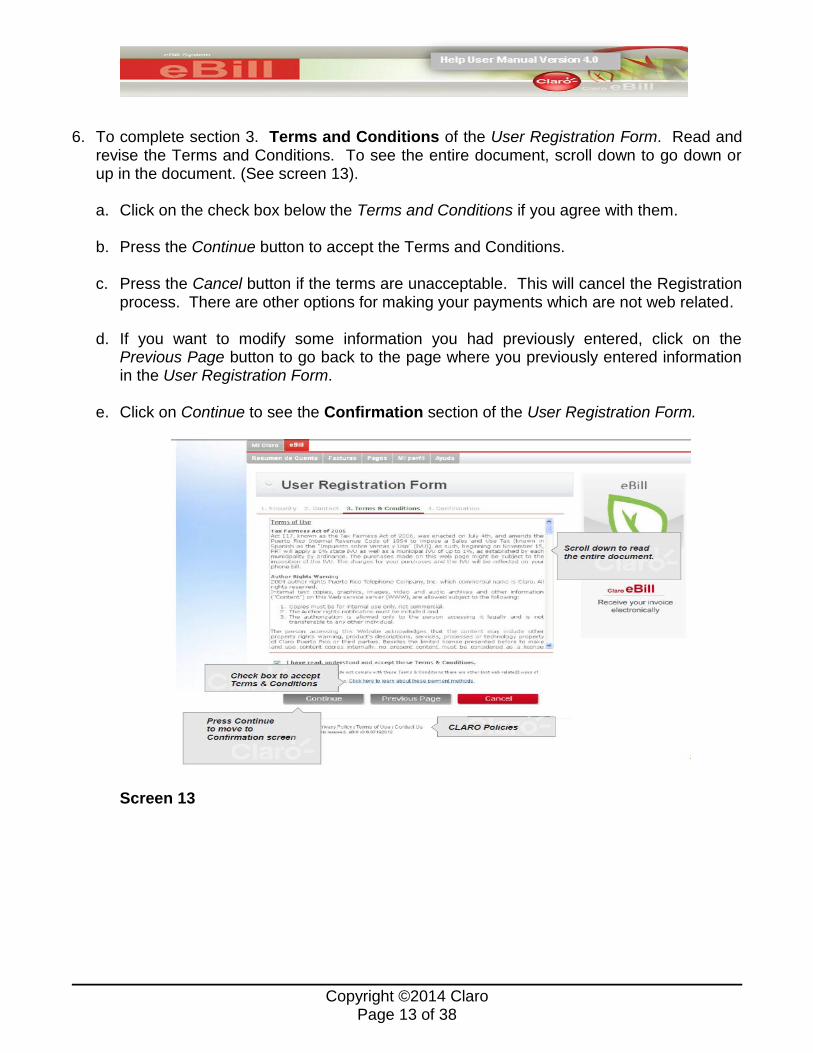
6. To complete section 3. Terms and Conditions of the User Registration Form. Read and revise the Terms and Conditions. To see the entire document, scroll down to go down or up in the document. (See screen 13). a. Click on the check box below the Terms and Conditions if you agree with them. b. Press the Continue button to accept the Terms and Conditions.
c. Press the Cancel button if the terms are unacceptable. This will cancel the Registration
process. There are other options for making your payments which are not web related.
d. If you want to modify some information you had previously entered, click on the Previous Page button to go back to the page where you previously entered information in the User Registration Form.
e. Click on Continue to see the Confirmation section of the User Registration Form.
Screen 13
Copyright ©2014 Claro Page 14 of 38
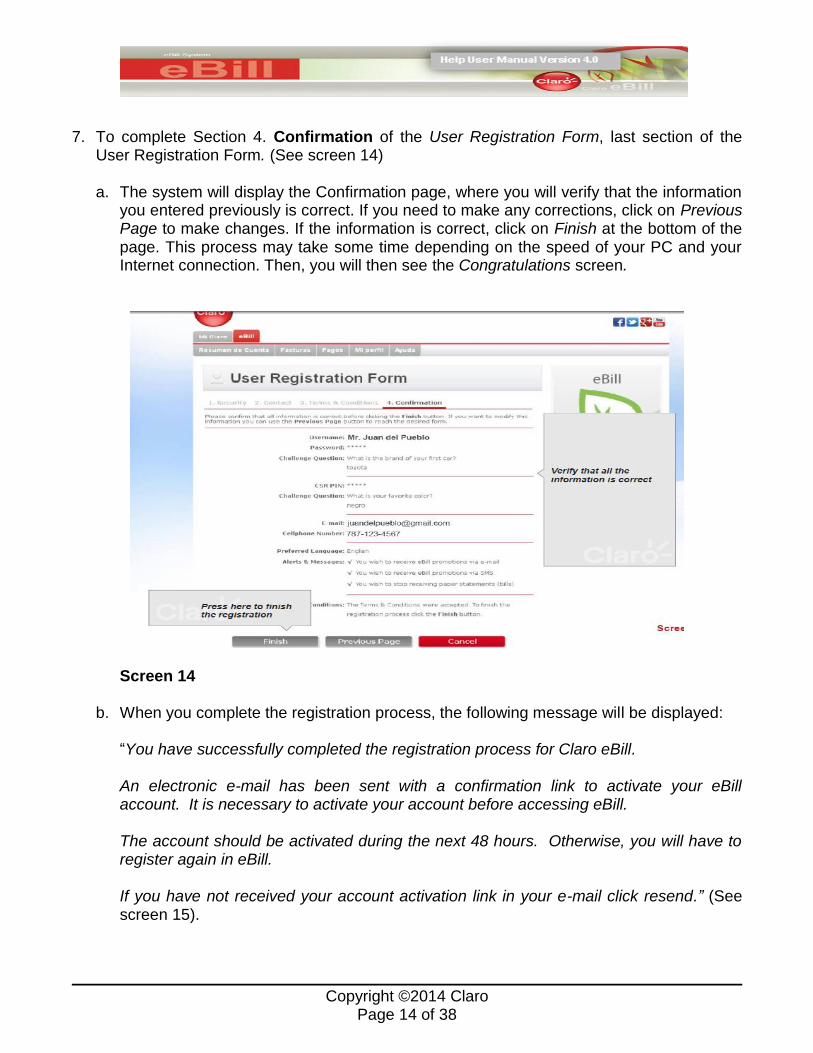
7. To complete Section 4. Confirmation of the User Registration Form, last section of the User Registration Form. (See screen 14) a. The system will display the Confirmation page, where you will verify that the information
you entered previously is correct. If you need to make any corrections, click on Previous Page to make changes. If the information is correct, click on Finish at the bottom of the page. This process may take some time depending on the speed of your PC and your Internet connection. Then, you will then see the Congratulations screen.
Screen 14
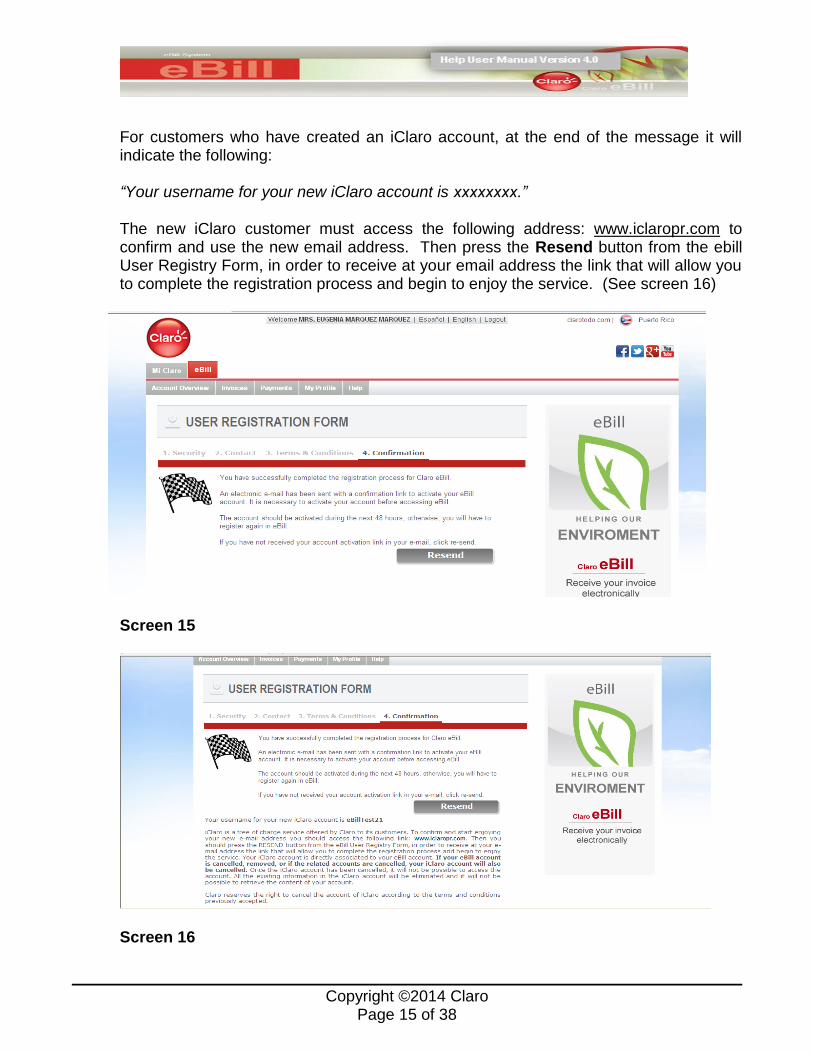
b. When you complete the registration process, the following message will be displayed:
“You have successfully completed the registration process for Claro eBill. An electronic e-mail has been sent with a confirmation link to activate your eBill account. It is necessary to activate your account before accessing eBill. The account should be activated during the next 48 hours. Otherwise, you will have to register again in eBill. If you have not received your account activation link in your e-mail click resend.” (See screen 15).
Copyright ©2014 Claro Page 15 of 38
For customers who have created an iClaro account, at the end of the message it will indicate the following:
“Your username for your new iClaro account is xxxxxxxx.” The new iClaro customer must access the following address: www.iclaropr.com to confirm and use the new email address. Then press the Resend button from the ebill User Registry Form, in order to receive at your email address the link that will allow you to complete the registration process and begin to enjoy the service. (See screen 16)
Screen 15
Screen 16
Copyright ©2014 Claro Page 16 of 38
Forgot your Password?
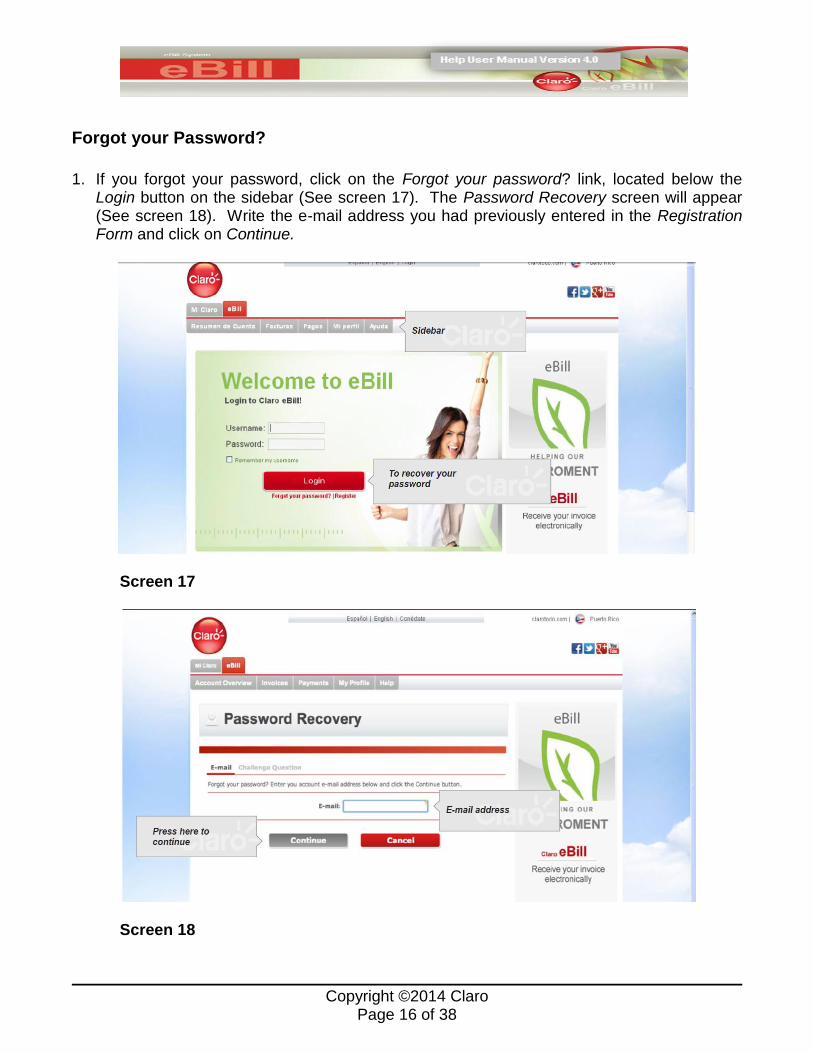
1. If you forgot your password, click on the Forgot your password? link, located below the Login button on the sidebar (See screen 17). The Password Recovery screen will appear (See screen 18). Write the e-mail address you had previously entered in the Registration Form and click on Continue.
Screen 17
Screen 18
Copyright ©2014 Claro Page 17 of 38
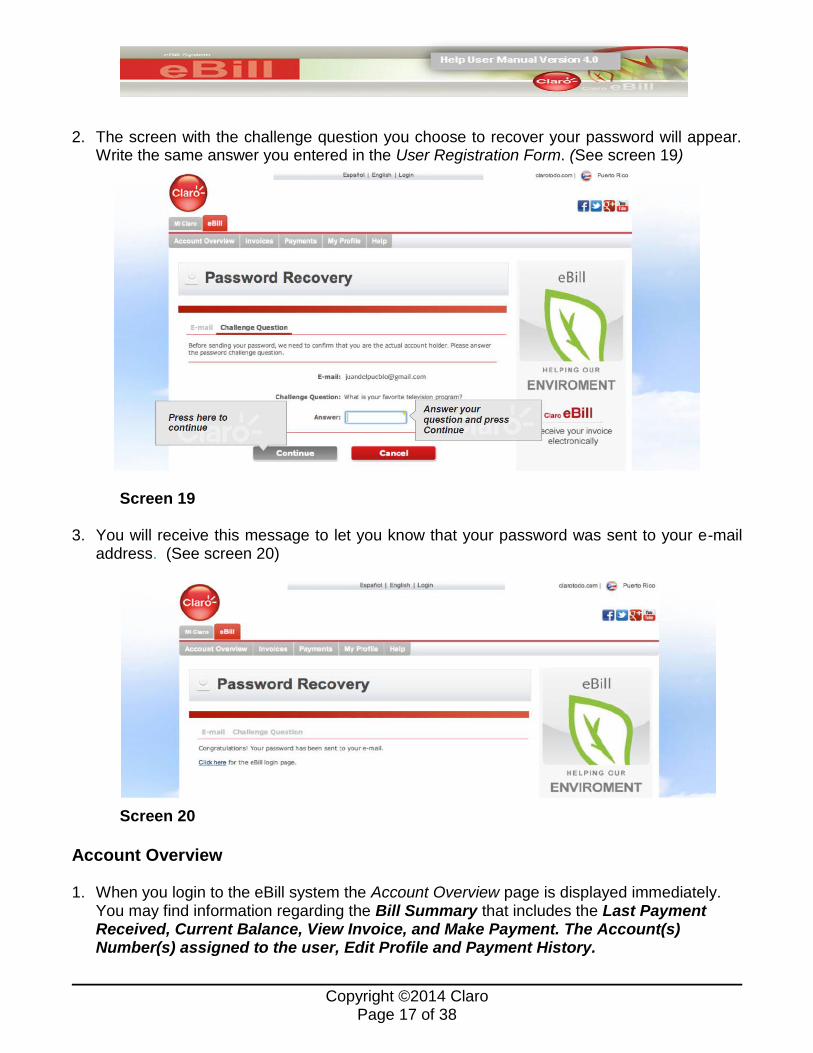
2. The screen with the challenge question you choose to recover your password will appear. Write the same answer you entered in the User Registration Form. (See screen 19)
Screen 19
3. You will receive this message to let you know that your password was sent to your e-mail
address. (See screen 20)
Screen 20
Account Overview 1. When you login to the eBill system the Account Overview page is displayed immediately.
You may find information regarding the Bill Summary that includes the Last Payment Received, Current Balance, View Invoice, and Make Payment. The Account(s) Number(s) assigned to the user, Edit Profile and Payment History.
Copyright ©2014 Claro Page 18 of 38
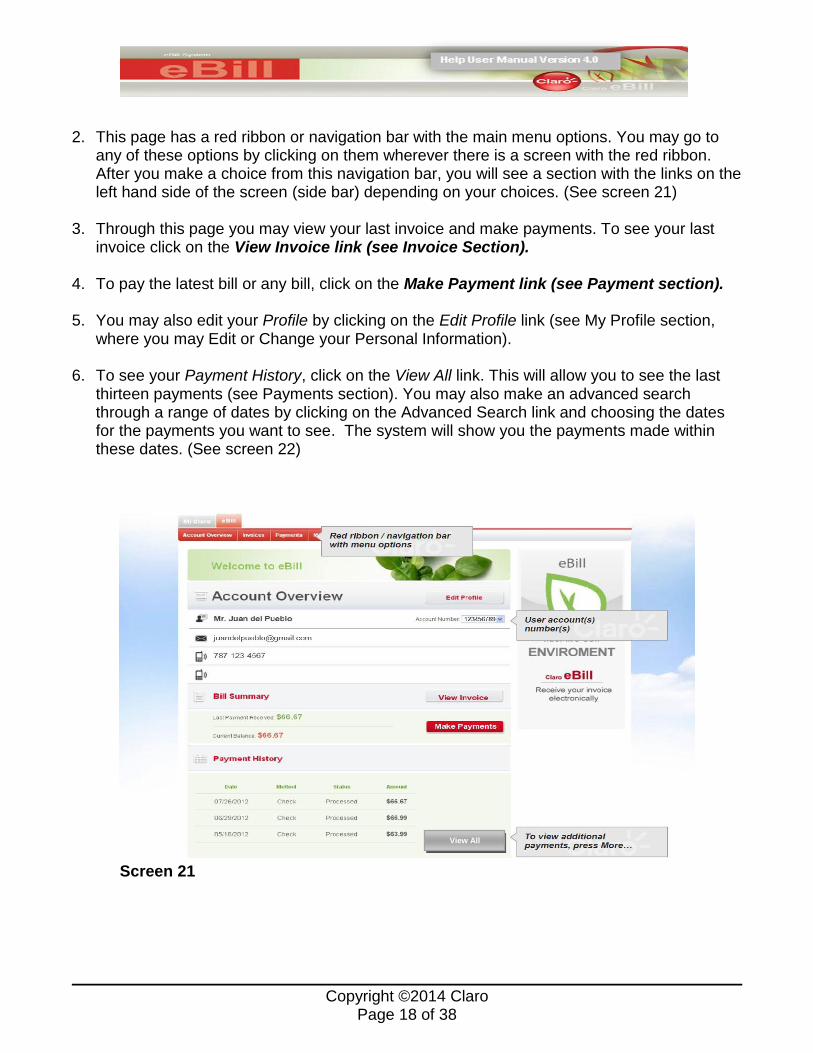
2. This page has a red ribbon or navigation bar with the main menu options. You may go to any of these options by clicking on them wherever there is a screen with the red ribbon. After you make a choice from this navigation bar, you will see a section with the links on the left hand side of the screen (side bar) depending on your choices. (See screen 21)
3. Through this page you may view your last invoice and make payments. To see your last invoice click on the View Invoice link (see Invoice Section).
4. To pay the latest bill or any bill, click on the Make Payment link (see Payment section).
5. You may also edit your Profile by clicking on the Edit Profile link (see My Profile section,
where you may Edit or Change your Personal Information). 6. To see your Payment History, click on the View All link. This will allow you to see the last
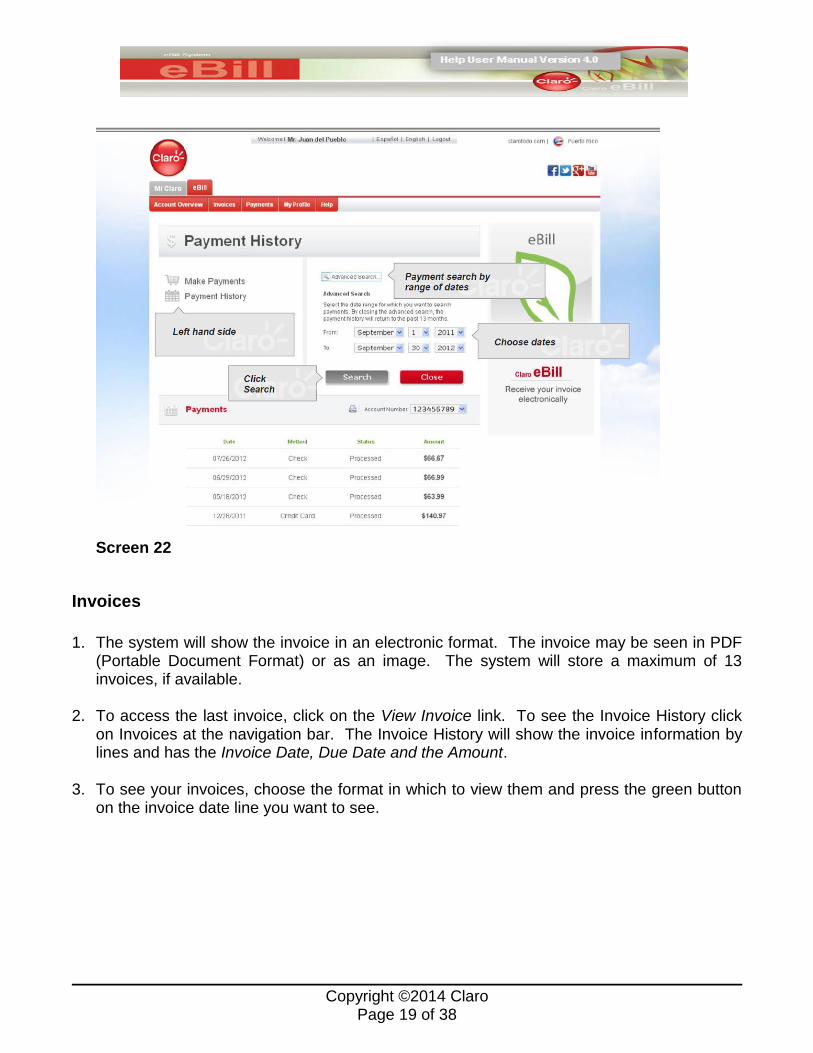
thirteen payments (see Payments section). You may also make an advanced search through a range of dates by clicking on the Advanced Search link and choosing the dates for the payments you want to see. The system will show you the payments made within these dates. (See screen 22)
Screen 21
View All
Copyright ©2014 Claro Page 19 of 38
Screen 22
Invoices
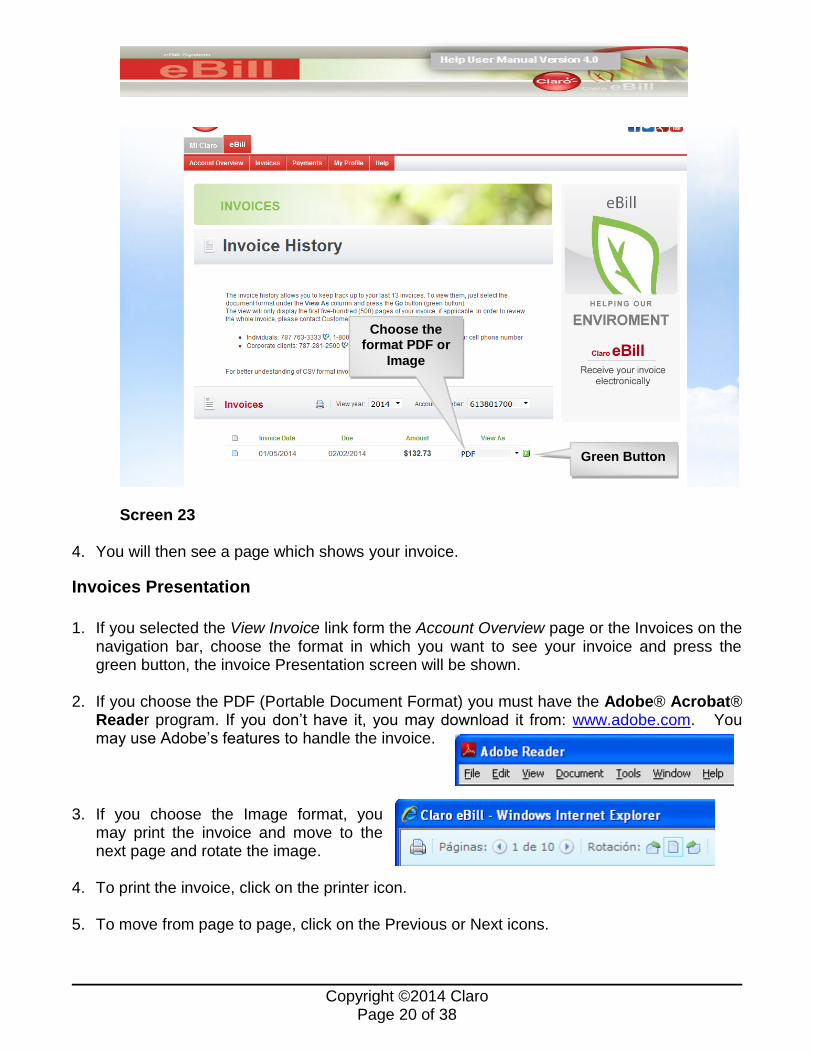
1. The system will show the invoice in an electronic format. The invoice may be seen in PDF
(Portable Document Format) or as an image. The system will store a maximum of 13 invoices, if available.
2. To access the last invoice, click on the View Invoice link. To see the Invoice History click on Invoices at the navigation bar. The Invoice History will show the invoice information by lines and has the Invoice Date, Due Date and the Amount.
3. To see your invoices, choose the format in which to view them and press the green button
on the invoice date line you want to see.
Copyright ©2014 Claro Page 20 of 38
Screen 23 4. You will then see a page which shows your invoice.
Invoices Presentation
1. If you selected the View Invoice link form the Account Overview page or the Invoices on the navigation bar, choose the format in which you want to see your invoice and press the green button, the invoice Presentation screen will be shown.
2. If you choose the PDF (Portable Document Format) you must have the Adobe® Acrobat®
Reader program. If you don’t have it, you may download it from: www.adobe.com. You may use Adobe’s features to handle the invoice.
3. If you choose the Image format, you
may print the invoice and move to the next page and rotate the image.
4. To print the invoice, click on the printer icon. 5. To move from page to page, click on the Previous or Next icons.
Green Button
Choose the format PDF or
Image
Copyright ©2014 Claro Page 21 of 38
6. To rotate the invoice to the right or left, click on the respective icons in the Rotation section. 7. Close the electronic invoice to return to the Invoice History.
Make Payments
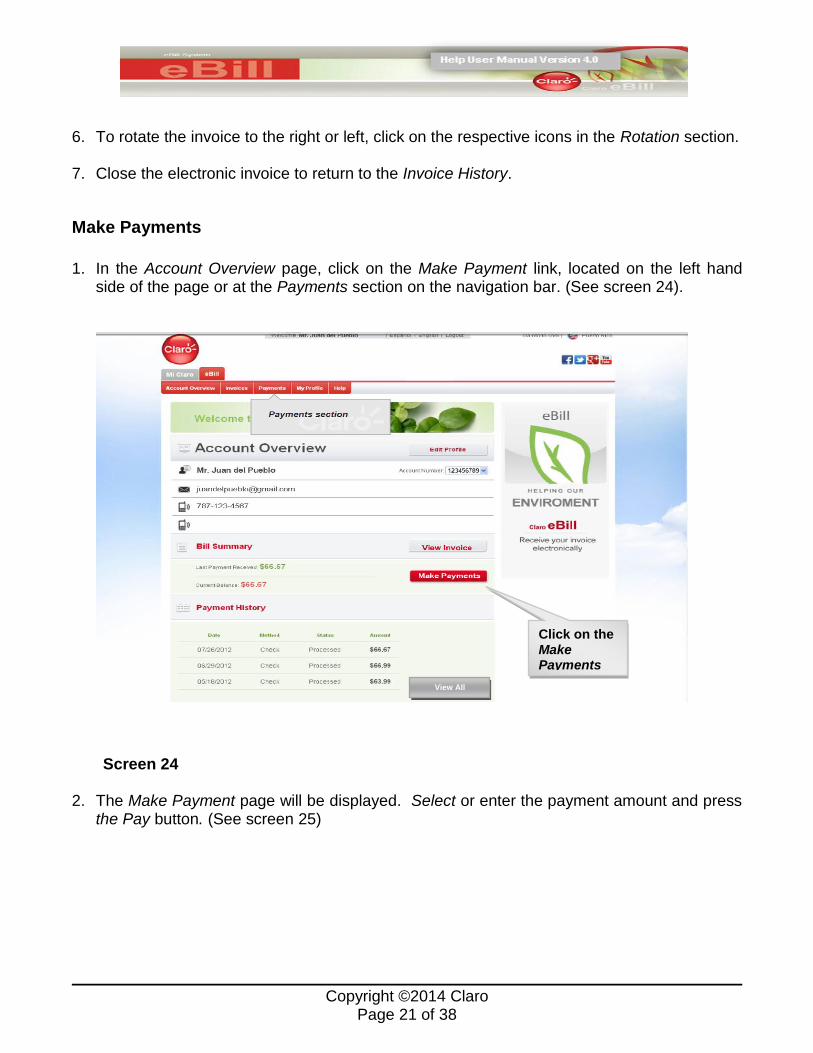
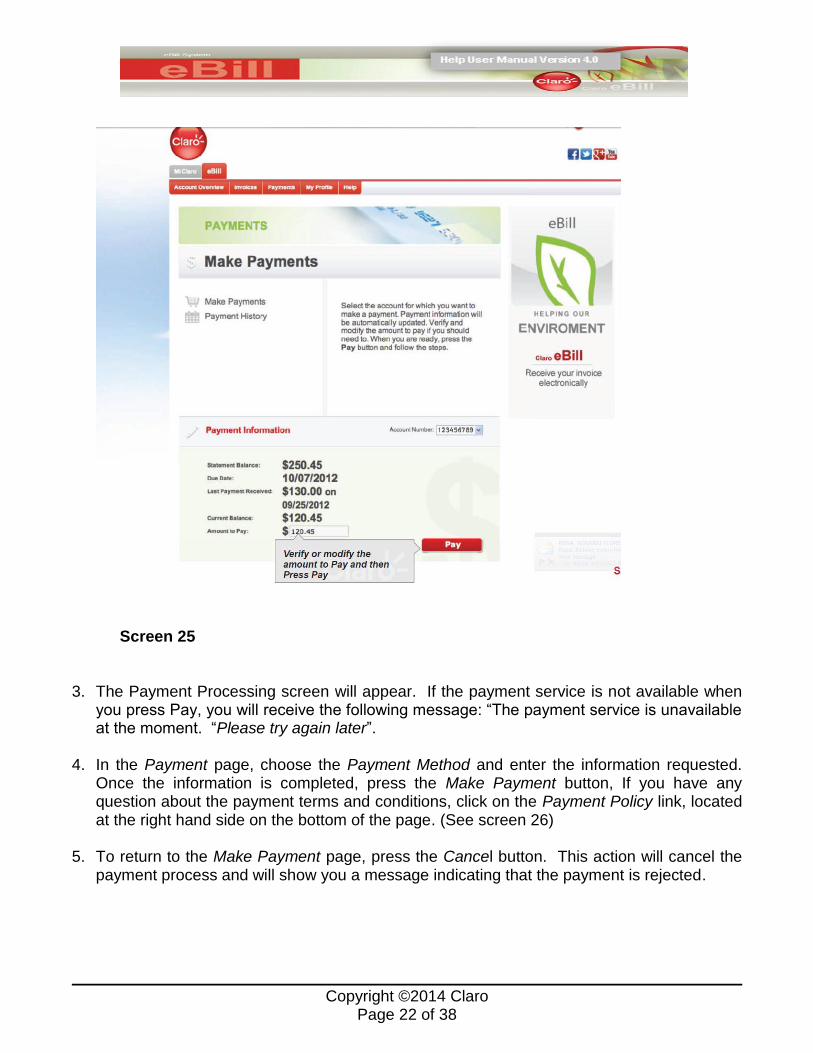
1. In the Account Overview page, click on the Make Payment link, located on the left hand side of the page or at the Payments section on the navigation bar. (See screen 24).
Screen 24 2. The Make Payment page will be displayed. Select or enter the payment amount and press
the Pay button. (See screen 25)
Click on the Make Payments
View All
Copyright ©2014 Claro Page 22 of 38
Screen 25 3. The Payment Processing screen will appear. If the payment service is not available when
you press Pay, you will receive the following message: “The payment service is unavailable at the moment. “Please try again later”.
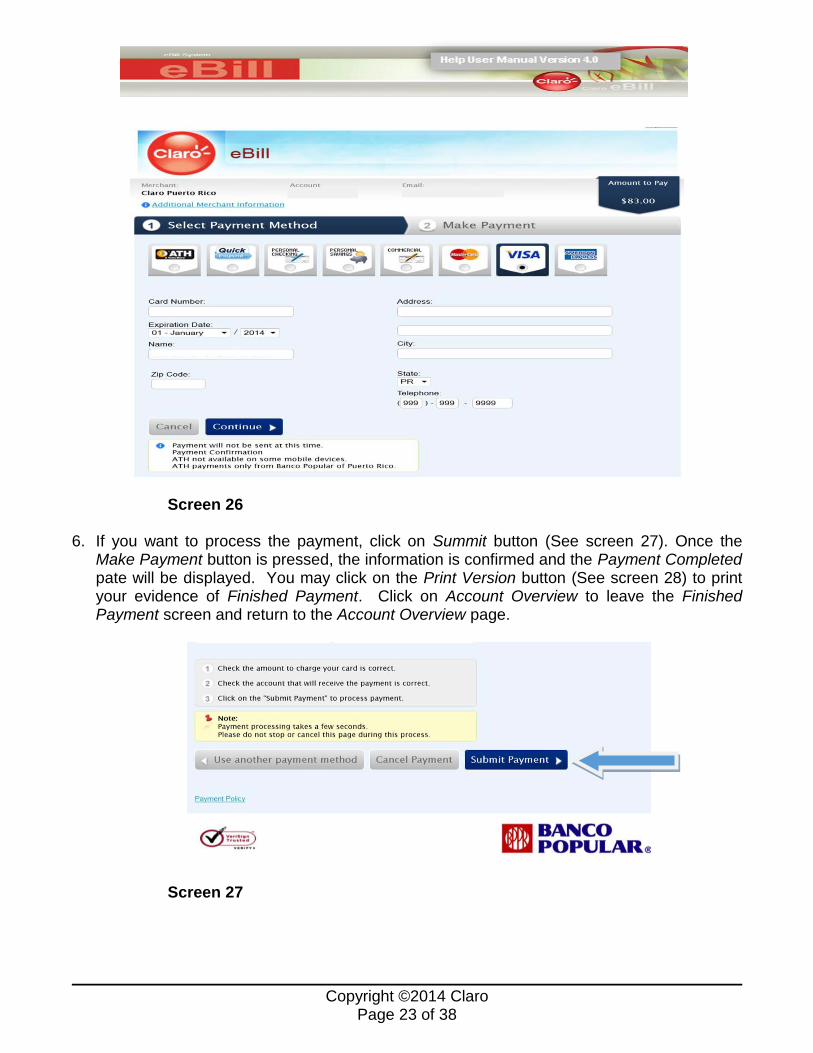
4. In the Payment page, choose the Payment Method and enter the information requested.
Once the information is completed, press the Make Payment button, If you have any question about the payment terms and conditions, click on the Payment Policy link, located at the right hand side on the bottom of the page. (See screen 26)
5. To return to the Make Payment page, press the Cancel button. This action will cancel the
payment process and will show you a message indicating that the payment is rejected.
Copyright ©2014 Claro Page 23 of 38
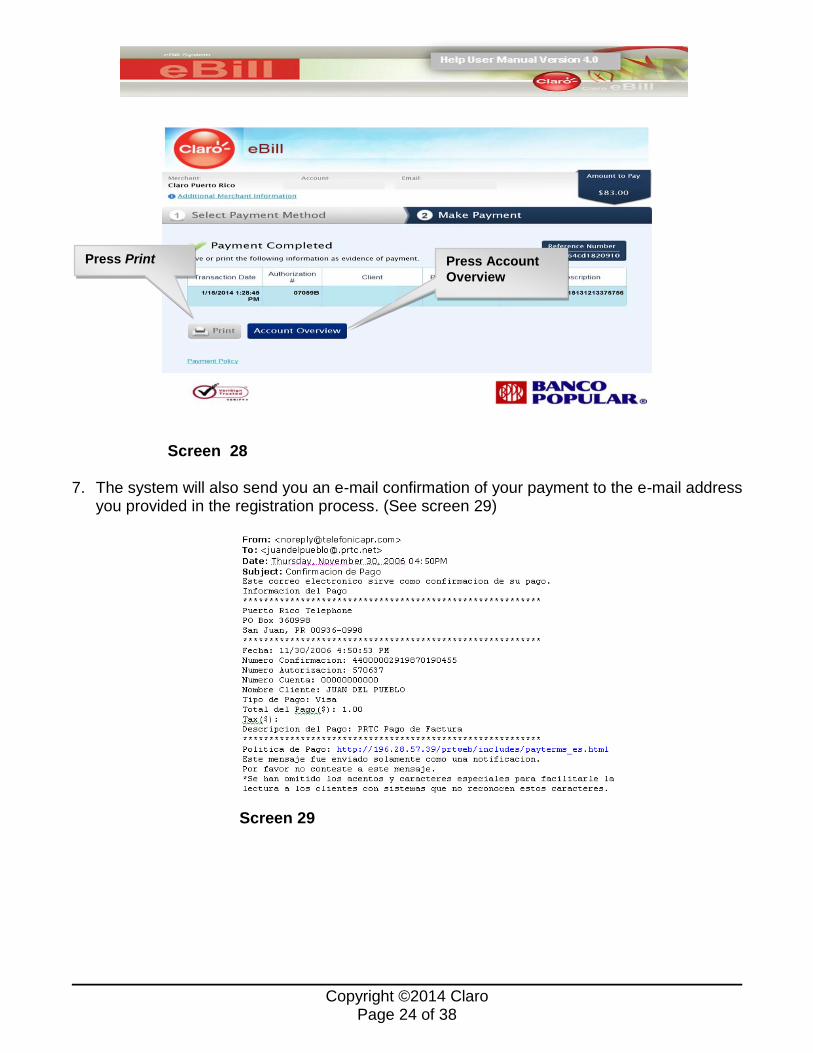
Screen 26 6. If you want to process the payment, click on Summit button (See screen 27). Once the
Make Payment button is pressed, the information is confirmed and the Payment Completed pate will be displayed. You may click on the Print Version button (See screen 28) to print your evidence of Finished Payment. Click on Account Overview to leave the Finished Payment screen and return to the Account Overview page.
Screen 27
Copyright ©2014 Claro Page 24 of 38
Screen 28
7. The system will also send you an e-mail confirmation of your payment to the e-mail address
you provided in the registration process. (See screen 29)
Screen 29
Press Print Press Account
Overview
Copyright ©2014 Claro Page 25 of 38
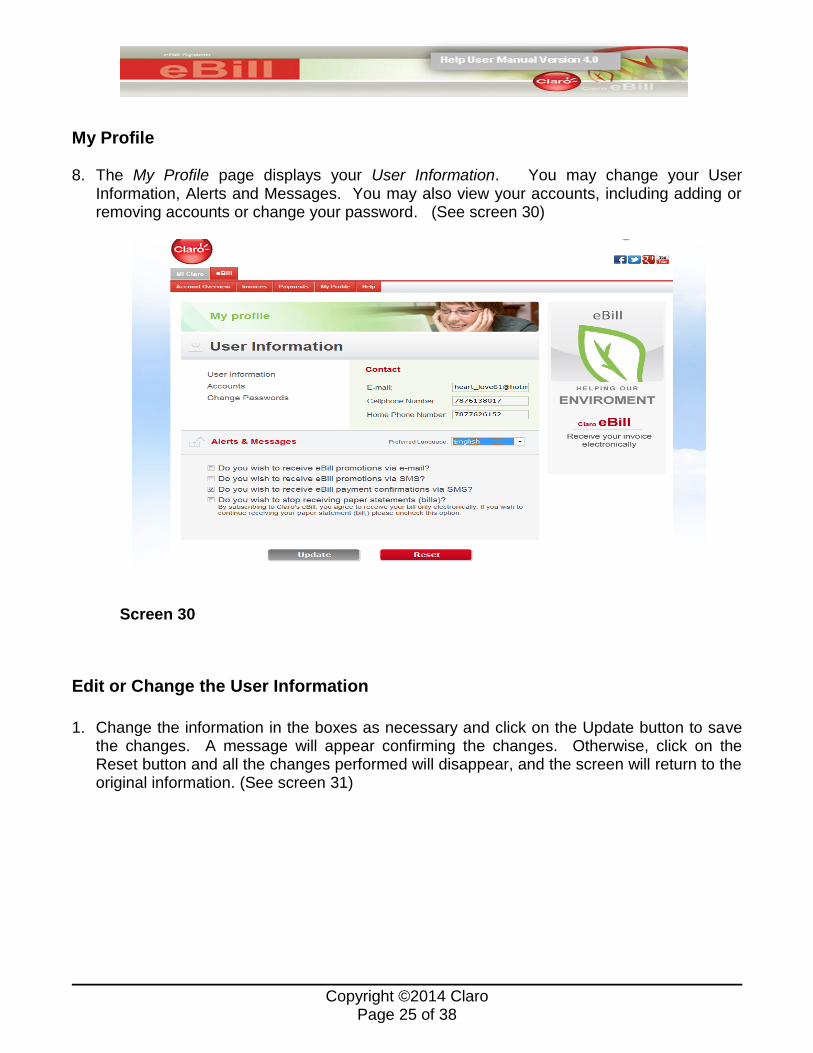
My Profile 8. The My Profile page displays your User Information. You may change your User
Information, Alerts and Messages. You may also view your accounts, including adding or removing accounts or change your password. (See screen 30)
Screen 30
Edit or Change the User Information
1. Change the information in the boxes as necessary and click on the Update button to save
the changes. A message will appear confirming the changes. Otherwise, click on the Reset button and all the changes performed will disappear, and the screen will return to the original information. (See screen 31)
Copyright ©2014 Claro Page 26 of 38
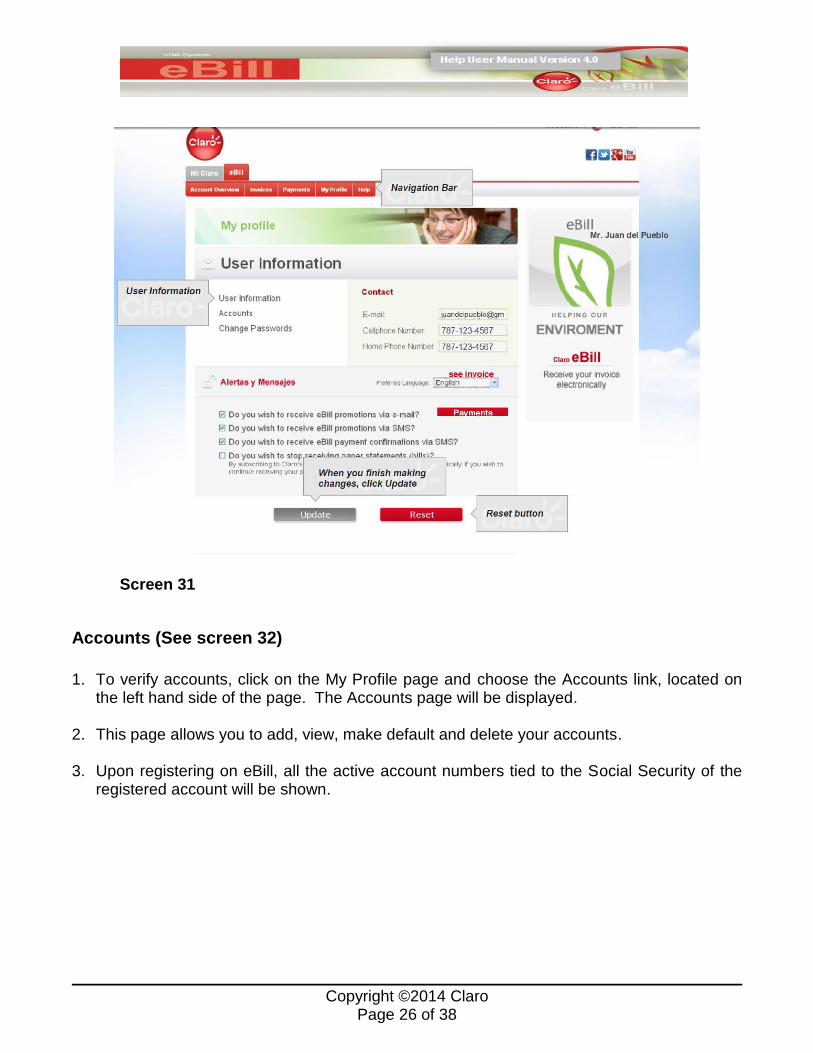
Screen 31
Accounts (See screen 32)
1. To verify accounts, click on the My Profile page and choose the Accounts link, located on
the left hand side of the page. The Accounts page will be displayed. 2. This page allows you to add, view, make default and delete your accounts. 3. Upon registering on eBill, all the active account numbers tied to the Social Security of the
registered account will be shown.
Copyright ©2014 Claro Page 27 of 38
Screen 32
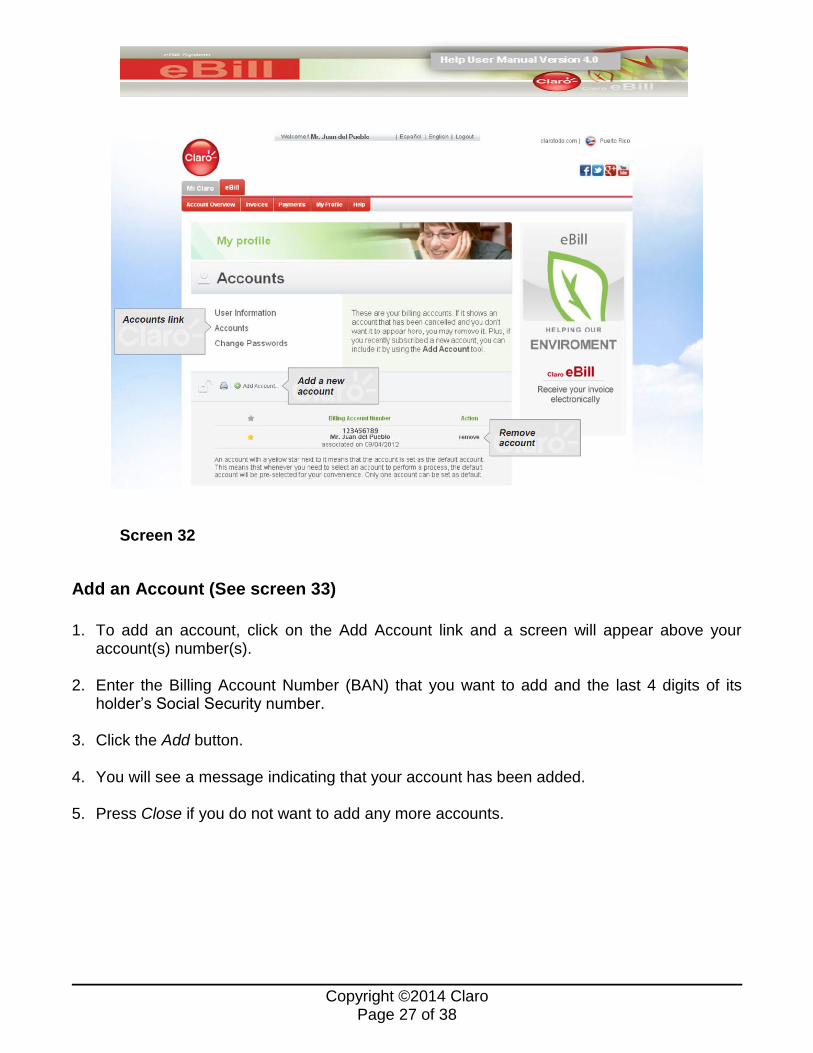
Add an Account (See screen 33)
1. To add an account, click on the Add Account link and a screen will appear above your
account(s) number(s). 2. Enter the Billing Account Number (BAN) that you want to add and the last 4 digits of its
holder’s Social Security number. 3. Click the Add button. 4. You will see a message indicating that your account has been added. 5. Press Close if you do not want to add any more accounts.

Copyright ©2014 Claro Page 28 of 38
Screen 33
Make a Default Account (See screen 34)
1. You may choose to make one of your accounts, the default or main account. Click over the
make default line next to the account you have chosen, the star before the account number will become yellow. This means that this account will be shown as the main account in your Account Summary.
2. If you only have an account, it will show up as the main account.
Copyright ©2014 Claro Page 29 of 38
Screen 34
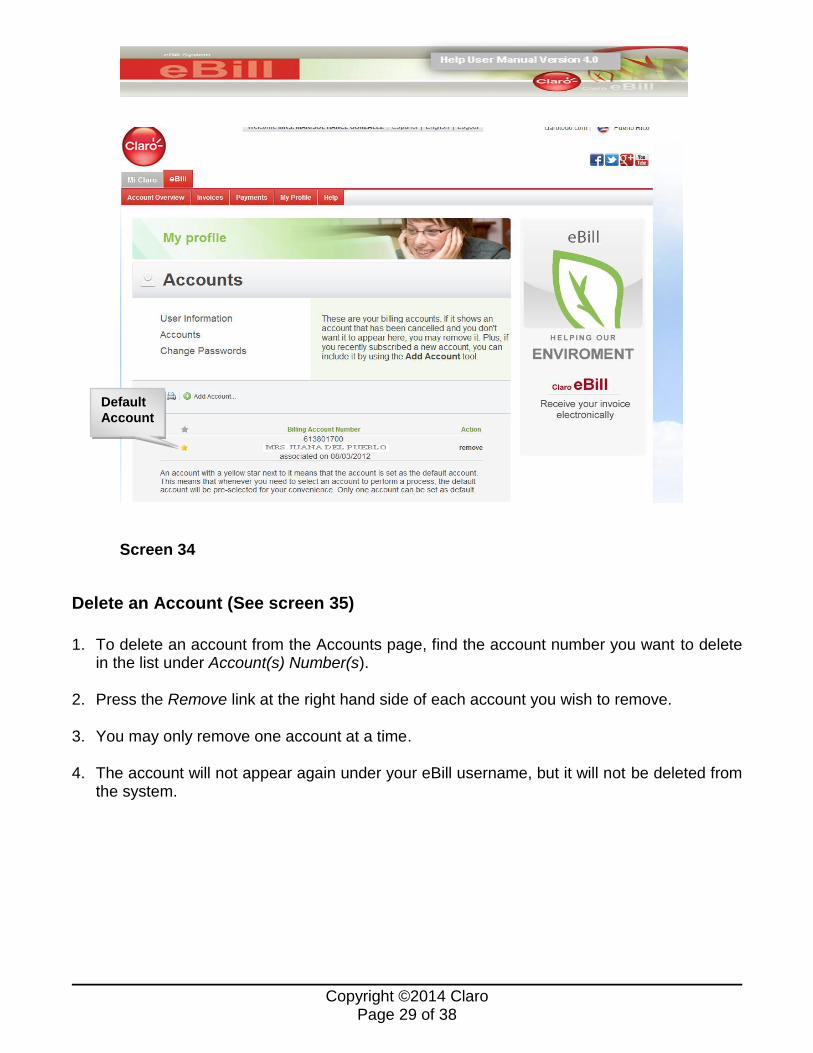
Delete an Account (See screen 35)
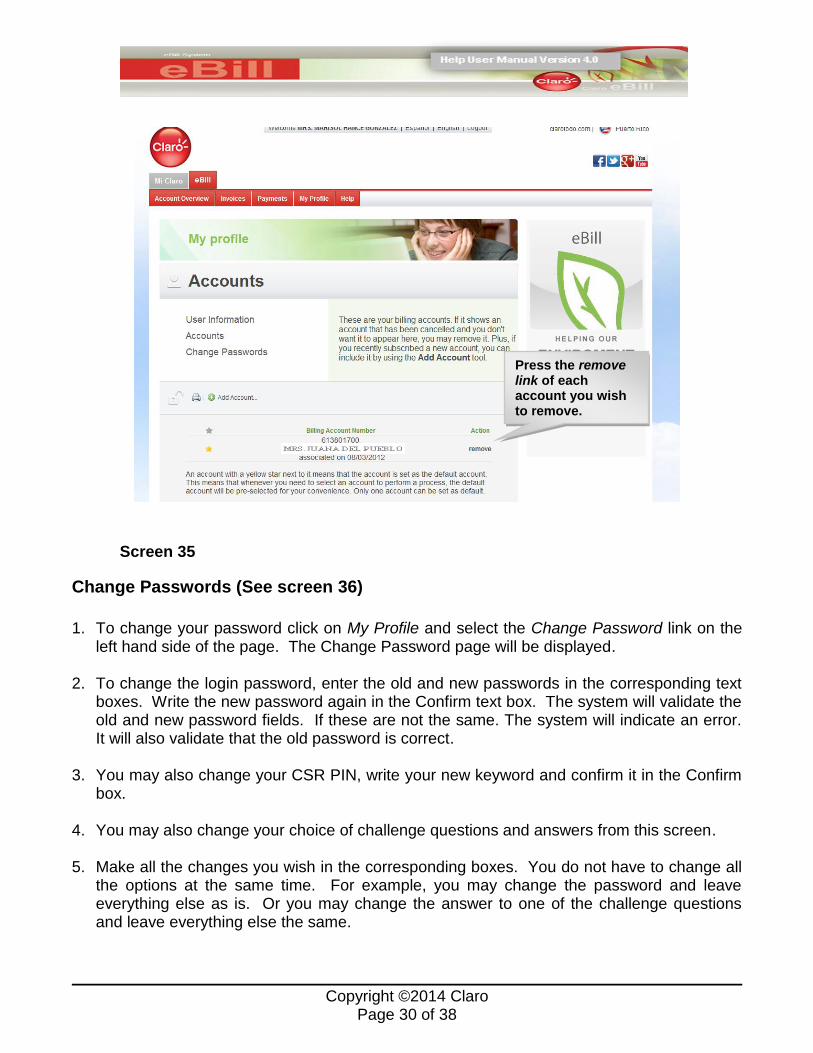
1. To delete an account from the Accounts page, find the account number you want to delete
in the list under Account(s) Number(s). 2. Press the Remove link at the right hand side of each account you wish to remove. 3. You may only remove one account at a time. 4. The account will not appear again under your eBill username, but it will not be deleted from
the system.
Default
Account
Copyright ©2014 Claro Page 30 of 38
Screen 35
Change Passwords (See screen 36)
1. To change your password click on My Profile and select the Change Password link on the
left hand side of the page. The Change Password page will be displayed. 2. To change the login password, enter the old and new passwords in the corresponding text
boxes. Write the new password again in the Confirm text box. The system will validate the old and new password fields. If these are not the same. The system will indicate an error. It will also validate that the old password is correct.
3. You may also change your CSR PIN, write your new keyword and confirm it in the Confirm
box. 4. You may also change your choice of challenge questions and answers from this screen. 5. Make all the changes you wish in the corresponding boxes. You do not have to change all
the options at the same time. For example, you may change the password and leave everything else as is. Or you may change the answer to one of the challenge questions and leave everything else the same.
Press the remove link of each account you wish to remove.

Copyright ©2014 Claro Page 31 of 38
6. Press the Update button to save the information you have changed. A message will be displayed indicating that the information has been updated.
Screen 36
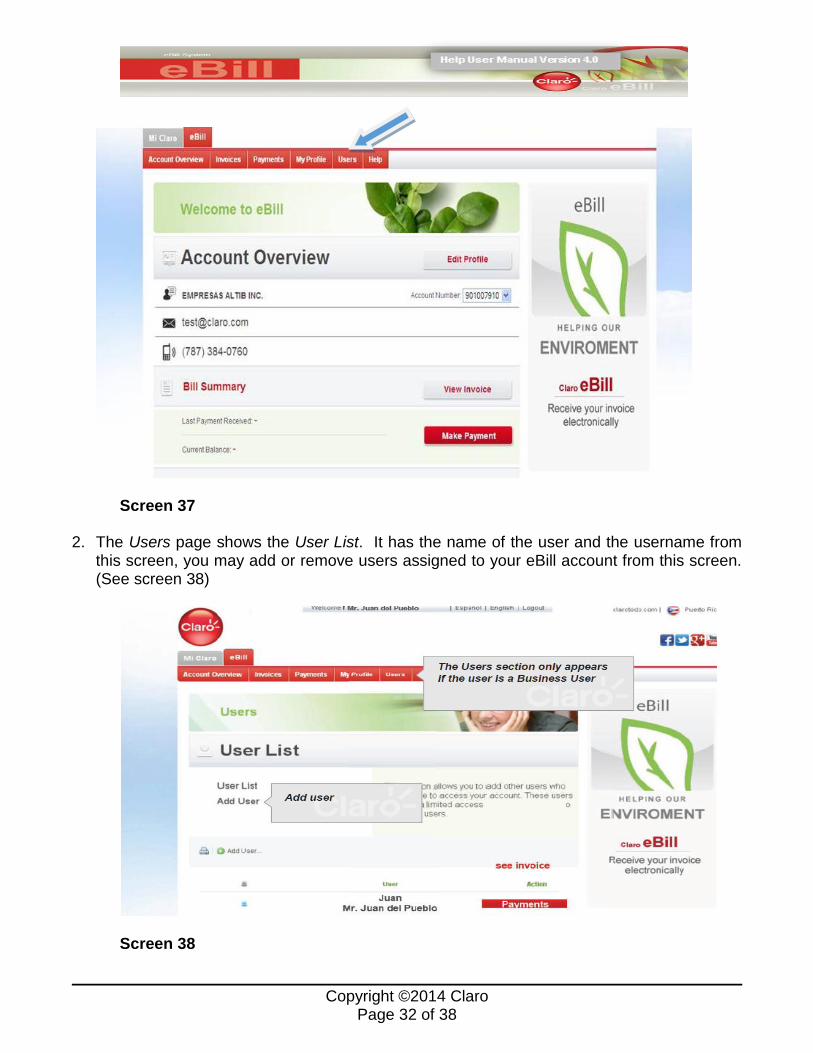
Users
1. This option is only available to business users with access to create additional business users within the same account. Otherwise this option is not shown. Use the User section from the navigation bar. (See screen 37).
Copyright ©2014 Claro Page 32 of 38
Screen 37
2. The Users page shows the User List. It has the name of the user and the username from this screen, you may add or remove users assigned to your eBill account from this screen. (See screen 38)
Screen 38
Copyright ©2014 Claro Page 33 of 38
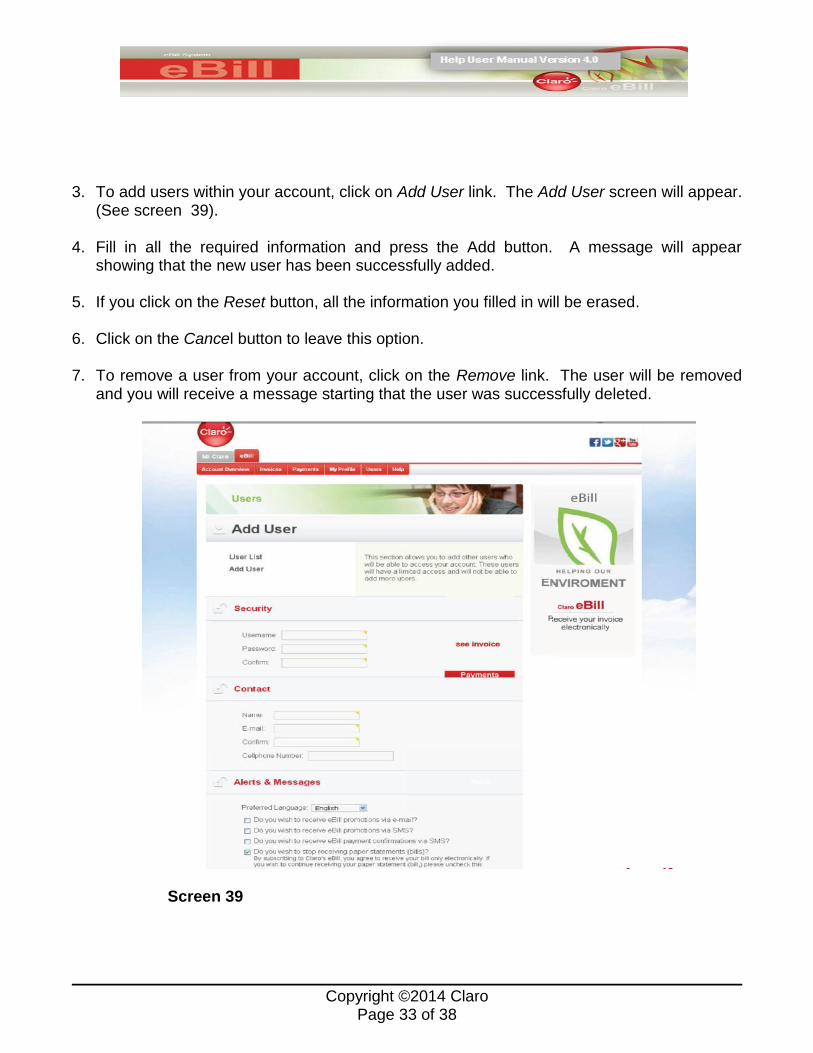
3. To add users within your account, click on Add User link. The Add User screen will appear.
(See screen 39). 4. Fill in all the required information and press the Add button. A message will appear
showing that the new user has been successfully added. 5. If you click on the Reset button, all the information you filled in will be erased. 6. Click on the Cancel button to leave this option. 7. To remove a user from your account, click on the Remove link. The user will be removed
and you will receive a message starting that the user was successfully deleted.
Screen 39
Copyright ©2014 Claro Page 34 of 38
Help
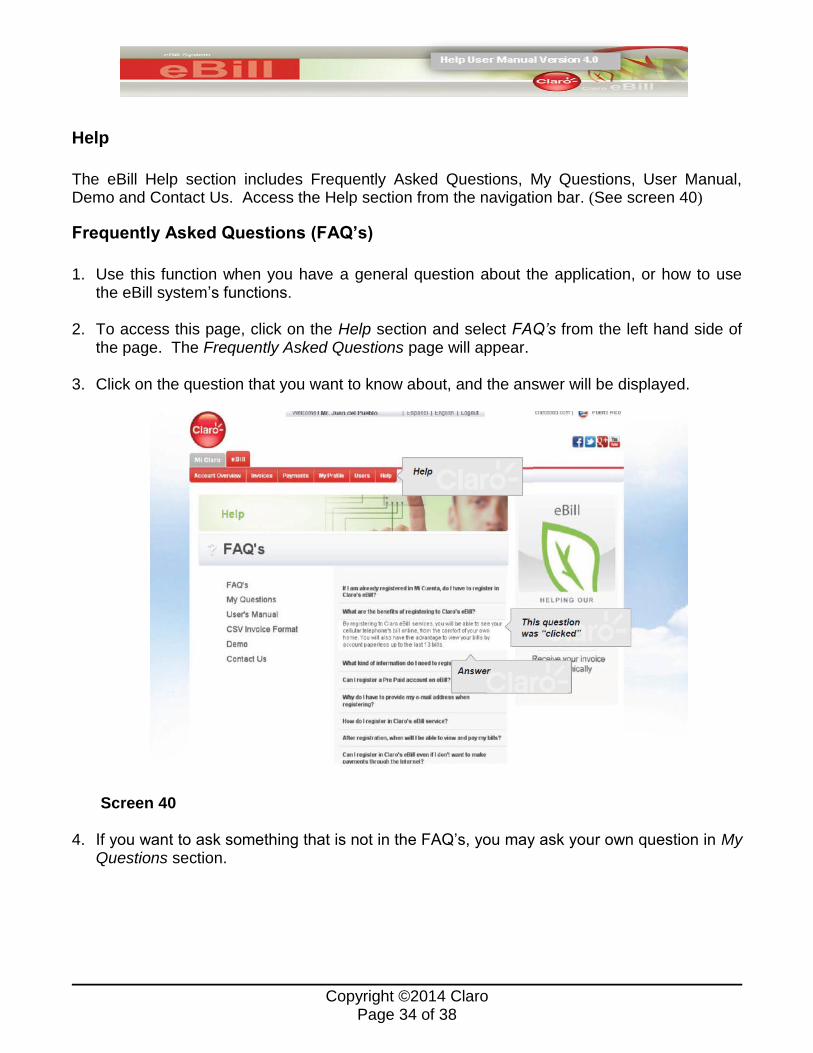
The eBill Help section includes Frequently Asked Questions, My Questions, User Manual, Demo and Contact Us. Access the Help section from the navigation bar. (See screen 40)
Frequently Asked Questions (FAQ’s)
1. Use this function when you have a general question about the application, or how to use
the eBill system’s functions. 2. To access this page, click on the Help section and select FAQ’s from the left hand side of
the page. The Frequently Asked Questions page will appear. 3. Click on the question that you want to know about, and the answer will be displayed.
Screen 40 4. If you want to ask something that is not in the FAQ’s, you may ask your own question in My
Questions section.
Copyright ©2014 Claro Page 35 of 38
My Questions
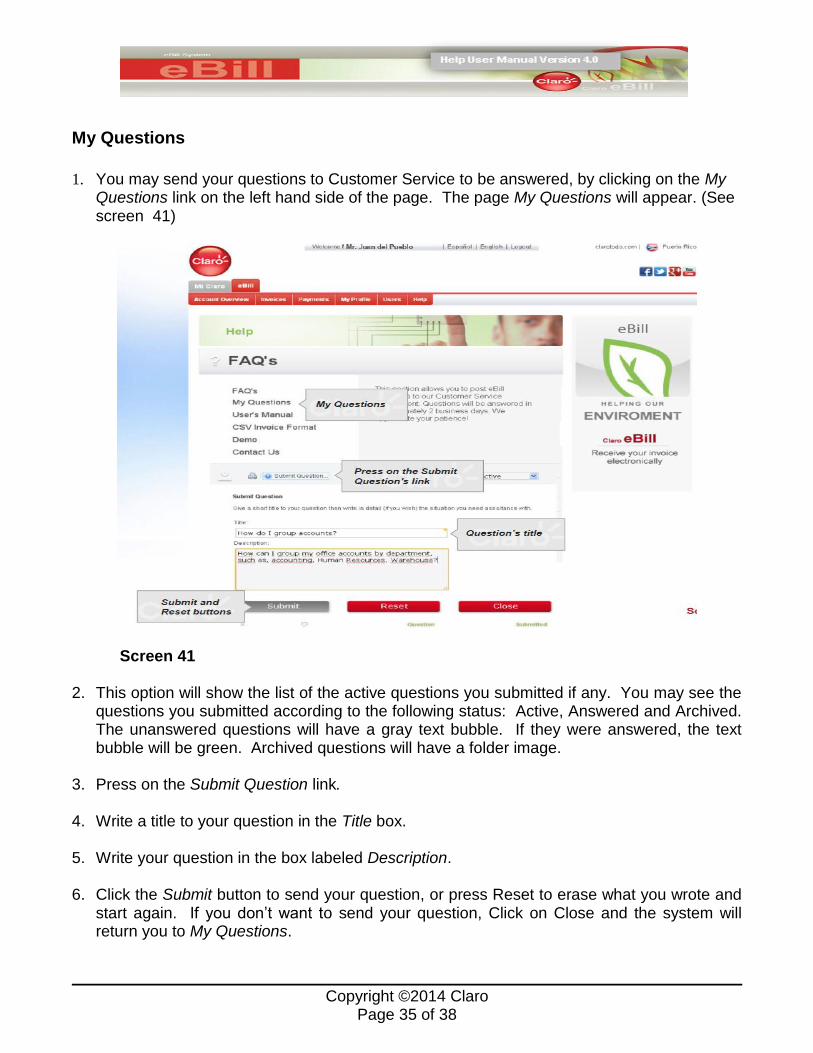
1. You may send your questions to Customer Service to be answered, by clicking on the My Questions link on the left hand side of the page. The page My Questions will appear. (See screen 41)
Screen 41 2. This option will show the list of the active questions you submitted if any. You may see the
questions you submitted according to the following status: Active, Answered and Archived. The unanswered questions will have a gray text bubble. If they were answered, the text bubble will be green. Archived questions will have a folder image.
3. Press on the Submit Question link. 4. Write a title to your question in the Title box. 5. Write your question in the box labeled Description. 6. Click the Submit button to send your question, or press Reset to erase what you wrote and
start again. If you don’t want to send your question, Click on Close and the system will return you to My Questions.
Copyright ©2014 Claro Page 36 of 38
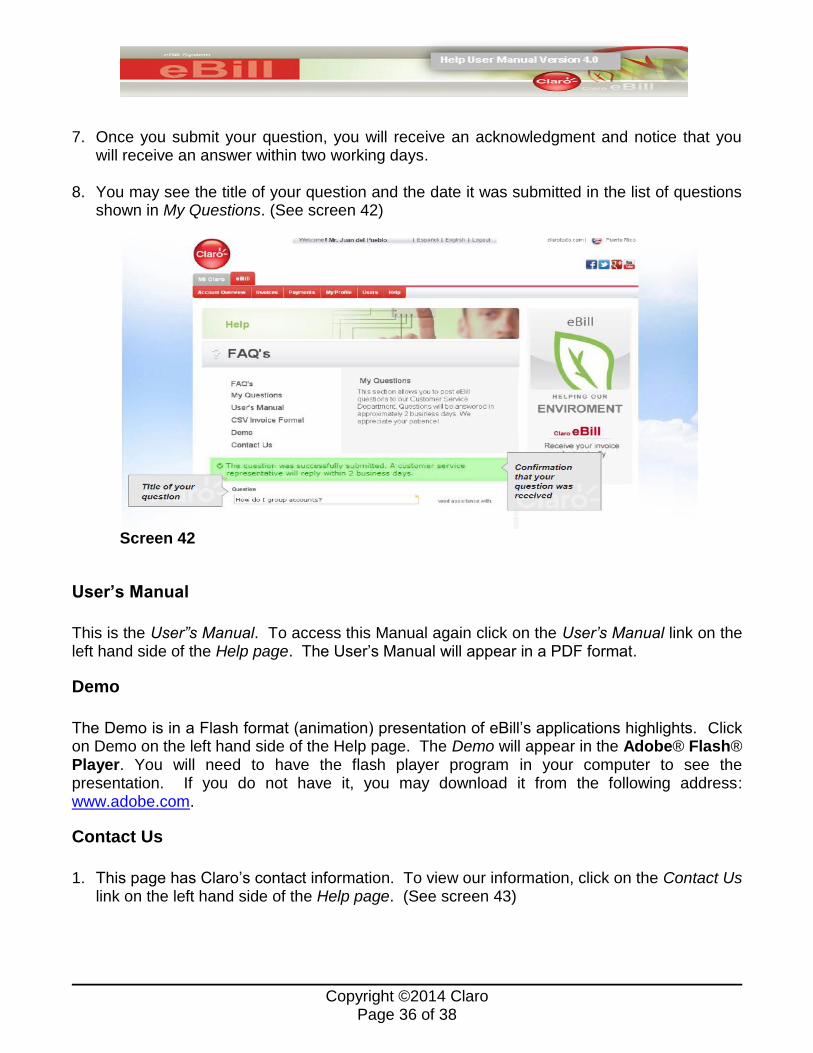
7. Once you submit your question, you will receive an acknowledgment and notice that you will receive an answer within two working days.
8. You may see the title of your question and the date it was submitted in the list of questions
shown in My Questions. (See screen 42)
Screen 42
User’s Manual
This is the User”s Manual. To access this Manual again click on the User’s Manual link on the left hand side of the Help page. The User’s Manual will appear in a PDF format.
Demo
The Demo is in a Flash format (animation) presentation of eBill’s applications highlights. Click on Demo on the left hand side of the Help page. The Demo will appear in the Adobe® Flash® Player. You will need to have the flash player program in your computer to see the presentation. If you do not have it, you may download it from the following address: www.adobe.com.
Contact Us
1. This page has Claro’s contact information. To view our information, click on the Contact Us link on the left hand side of the Help page. (See screen 43)
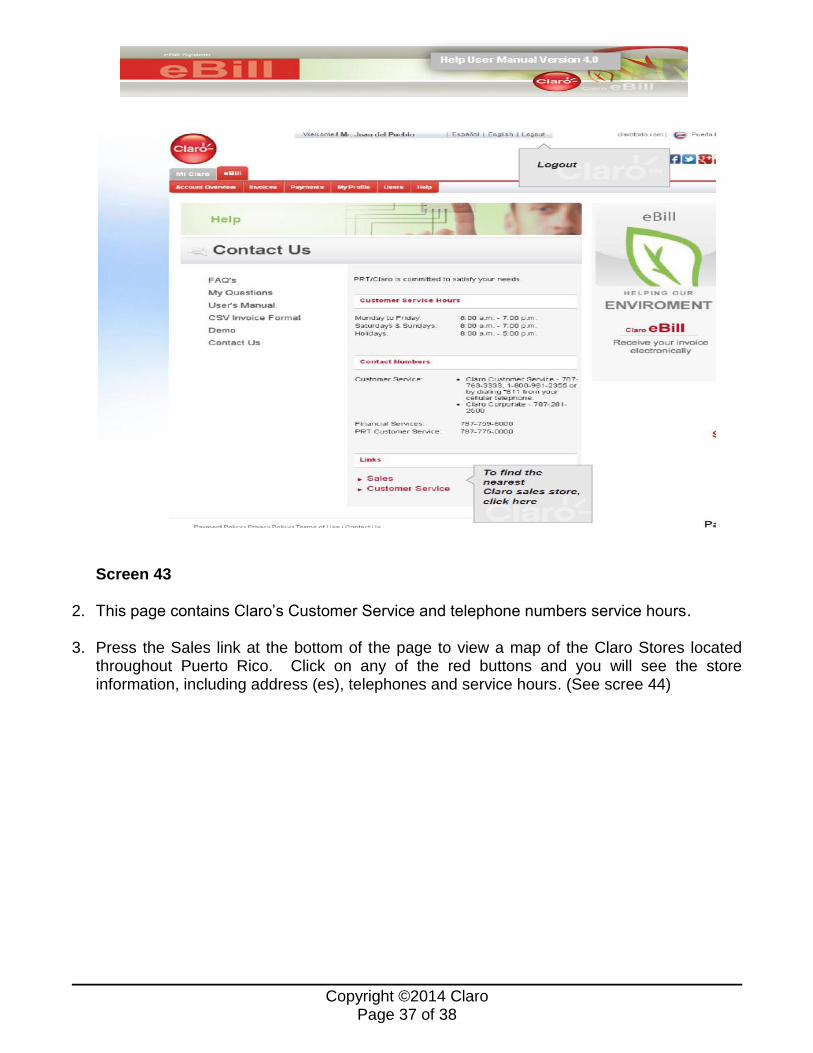
Copyright ©2014 Claro Page 37 of 38
Screen 43
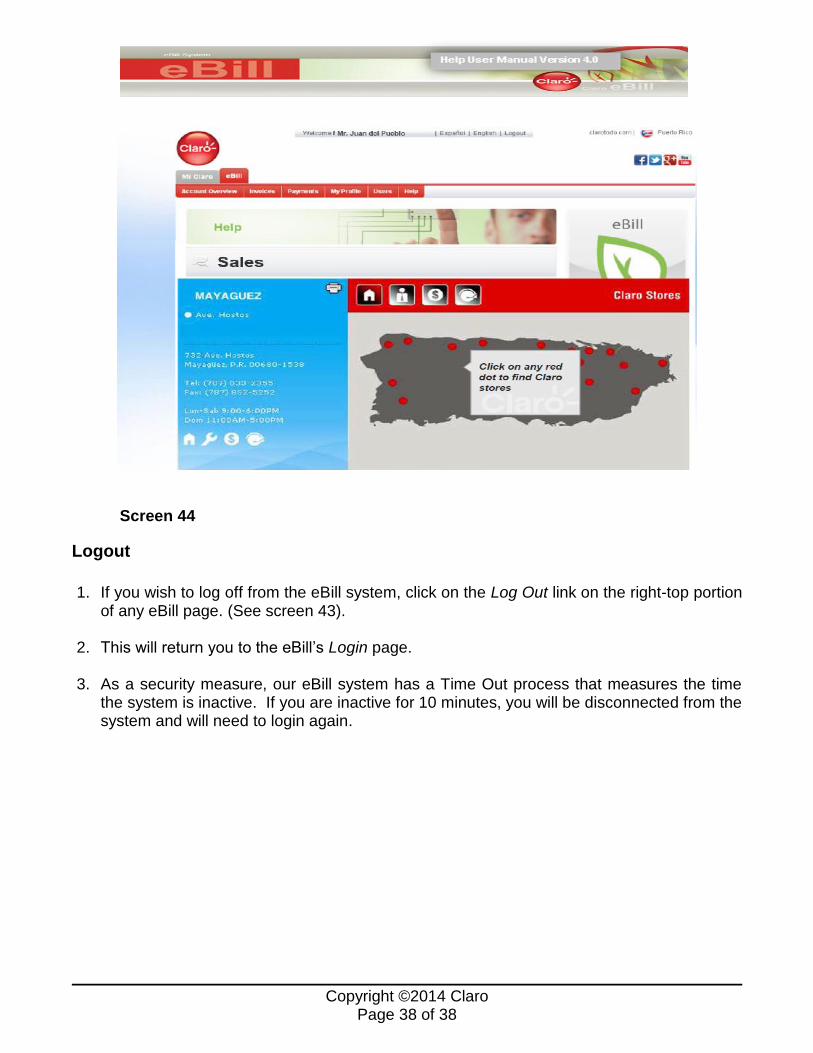
2. This page contains Claro’s Customer Service and telephone numbers service hours. 3. Press the Sales link at the bottom of the page to view a map of the Claro Stores located
throughout Puerto Rico. Click on any of the red buttons and you will see the store information, including address (es), telephones and service hours. (See scree 44)
Copyright ©2014 Claro Page 38 of 38
Screen 44
Logout
1. If you wish to log off from the eBill system, click on the Log Out link on the right-top portion
of any eBill page. (See screen 43). 2. This will return you to the eBill’s Login page.
3. As a security measure, our eBill system has a Time Out process that measures the time
the system is inactive. If you are inactive for 10 minutes, you will be disconnected from the system and will need to login again.