manual with circulation pump - 4seasonsspa
TRANSCRIPT

MANUAL
EasyTop Laing heater
circulation pump
with 2 jet pumps
ALL SPA MODELS

User manual EasyTop Laing heater 4SeasonsSpa®
2
About this manual This user manual contains information which will allow you and your family to enjoy your spa for years to come. It is imperative for you to read the entire manual, and adhere to all safety instructions before filling the spa and connecting it to the power supply. This manual is an integral part of the product and therefore must be kept for future reference, along with your warranty. Chapter 1 Safety information. Chapter 2 Installation instructions Chapter 3 Spa Operation Chapter 4 Using the Spa Chapter 5 Draining the Spa Chapter 6 DIP-SWITCHES and LOW LEVEL configuration Chapter 7 Problem solving

User manual EasyTop Laing heater 4SeasonsSpa®
3
1 Safety information
1.1 Private Use
This spa should only be used for private use. 4SeasonsSpa does not provide any warranties for use in public or commercial locations. 1.2 Electricity and Electrical Shock Risk
The installation of the spa and any repairs to its electrical components must be performed by a certified electrician. Do not place any electrical appliances within in or within 1.5 meter around the spa. Precautions regarding the risk of electrical shock:
• Non-earthed metal objects must not be present within an area of 1.5 m around the spa. • Electrical (household) equipment and electrical tools must not be present within a radius of 1.5 m around
the spa. Examples of these are lighting, telephones, radios. • The electrical supply to the spa must be protected by a RCD (earth tripper switch)
1.3 Child Safety.
Children should not use the spa without adult supervision. • Install a self-closing or lockable door or gate, a fence or a child safety gate. • Secure the supplied cover on the spa when not in use, including children safety locks.
1.4 Filter, filter components and suction force
The first ( plastic leaf) filter which is present in the skimmer (square opening with cover located at the half way point of the water level) covers entry to the pumps and plumbing. Serious accidents may occur should long hair or limbs be sucked by the pump into the supply pipe. This can only occur if the filter is faulty or missing. Preventing injuries:
• A faulty or missing filter or cover plate in the first filter must be replaced immediately. • The first filter in the spa is geared towards the suction force of the installed pump. Check whether the first
filter and the pump are compatible when one of the two components needs to be replaced. We recommend only using original 4SeasonsSpa parts.
• Do not use the spa if the first filter has been damaged or is missing.
1.5 Water Temperature
The water in a spa should never exceed 39 °C. Water temperatures between 37 °C and 39 °C are considered safe for a healthy adult. Lower water temperatures are recommended for young children and when spa use exceeds 10 minutes. Immersion in water that is too hot may cause your body temperature to rise by a few degrees from the normal body temperature of 36.6 °C. This is referred to as heat stroke. Heat stroke occurs when the internal temperature of the body reaches a level several degrees above the normal body temperature. The symptoms of a heat stroke include drowsiness, lethargy, fainting and dizziness. The consequences of not being fully aware of the potential dangers associated with heat stroke may increase the risk of drowning. Do not remain in the Spa for a period exceeding 20 minutes when the water temperature is equal to or exceeds 37°C. If you wish to remain in the Spa for longer periods of time, set the temperature equal to body temperature (36 °C). 1.6 Pregnancy
Since excessive water temperatures have a high potential for causing fatal damage during the early months of pregnancy, pregnant or possibly pregnant women should limit water temperatures to 36 °C, and limit immersion in the spa water to 10 minutes at a time. If pregnant, please consult your physician before using a spa. 1.7 Accurate thermometer
Before entering the spa, the user should measure the water temperature with an accurate thermometer to rule out possible errors on the display. 1.8 Use of Alcohol, Drugs and Medication
Do not use drugs, alcohol or certain medication before or during spa use. If combined with bathing in hot water it may lead to drowsiness or loss of consciousness resulting in an increased risk of drowning. Drinking alcohol and using drugs or certain medication in the spa may increase the risk of a fatal heat stroke. Consult with your physician before using a spa if you are taking medication. Sedatives, narcotics, antihistamines or medication for your blood can cause drowsiness and nausea or influence your blood pressure.
User manual EasyTop Laing heater 4SeasonsSpa®
4
1.9 Safety precautions
• Do not use the spa if you suffer from an infectious disease. • Do not use the spa immediately following strenuous exercise. • Bathing in high temperature water may lead to temporary changes in the circulatory system, such as
subcutaneous vascular dilatation. Therefore, we recommend consulting a doctor before using the spa if you suffer from obesity, heart disease, a blood pressure that is too low or high, blood circulation problems or diabetes.
• Do not overflow your spa. Overflowing your spa will invalidate your warranty, as it can cause damage to the electrical & mechanical parts of the spa.
1.10 Other Safety Measures
• Do not use glass or other breakable objects in or around your spa (eg beer bottles). • Do not remove any parts from the spa. • Keep the water clean and pure: use spa-specific products to destroy harmful bacteria and to prevent algae
growth, consult your local spa dealer for products and instructions. If you have an Ozonator supplied with your spa, do not rely on it completely, always add a small amount of chlorine or other kind of suitable steriliser, in order to make sure that the water is completely sterilised.
• The spa may become wet and slippery and has sharp or non-yielding parts. Ensure, therefore, that you know how to enter and leave the spa safely before you start using the spa.
• Always ensure someone is present to offer assistance should the user of the spa encounter difficulties due to injury, cramps or drowning; this is especially important when children use the spa.
• Prolonged immersion of your entire body (including the head) can have deleterious effects on your health. WARNING do not install the spa:
� On any floor above ground level, without permission from the owner/builder of the unit. � On a balcony, without permission from the builder of the building. � Underneath or next to power lines or close to underground electrical equipment (consult an electrician
when in doubt). � In a location that introduces the risk of water damage to your spa. � Your spa is designed for outdoor use only. If you use your spa indoors, or in any kind of building, then you
do so at your own risk. The manufacturer or dealer will not be held liable for damages caused by leaking whatsoever, and howsoever caused.
User manual EasyTop Laing heater 4SeasonsSpa®
5
2 Installation instructions
Check the packaging and the spa for damage. Inform the carrier and supplier immediately if you detect any visible damage. The spa is delivered in an upright position on a pallet. The front panel of the exterior portion of the spa is located on top of, or on the side of, the spa underneath a strong layer of silver-coloured foil. Thus, the wooden exterior portion of the spa is packed separately. Remove these before dropping the spa. The panel has been packaged in this fashion to prevent transportation damage to it due to water leakage. The front panel can be secured by using the 6 screws supplied with the spa and located within the technical room with tape connected to one of the tubes. The holes to attach the lower panel have been pre-drilled. 2.1 Location
Your new portable spa must be placed on a firm, flat and level surface, so the spa weight is supported uniformly. We recommend a concrete slab, or the equivalent. Uneven flooring can damage the spa and voids the warranty. The base must meet the following requirements:
• Strong
The base/surface must be strong and capable of supporting a weight of at least 370 kg/m2. • Horizontal
A horizontal surface is of critical importance. A flat and horizontal base will ensure that the weight is distributed equally. It is of critical importance that the entire surface of the spa is supported.
• Dry and well-ventilated The spa has to be installed on a dry surface. In other words, the frame of the spa should not be in contact with water. Make sure that the spa is installed a few centimetres above the level of the balcony or floor to
ensure that no water will remain under the spa during or after a rain shower. The ventilation of the frame is important for its life span. There should be at least 10 centimetres of free space around the spa to allow for the ventilation of all the side panels. Therefore, never place a spa right against a wall.
• If you sink your spa into a deck, or hole in the ground, then you should make sure that the area around the spa is properly drained. Customers who do this, do so at their own risk. You may have to arrange for the spa to be lifted out of the ground or deck, at your own cost, in the event that maintenance is required.
2.2 Filling the Spa with Water
1 Ensure that the electrical cord is outside the spa and has NOT YET been connected to the power supply. 2 Check the spa to ensure there is no damage that may have occurred during shipment. Make a note of any
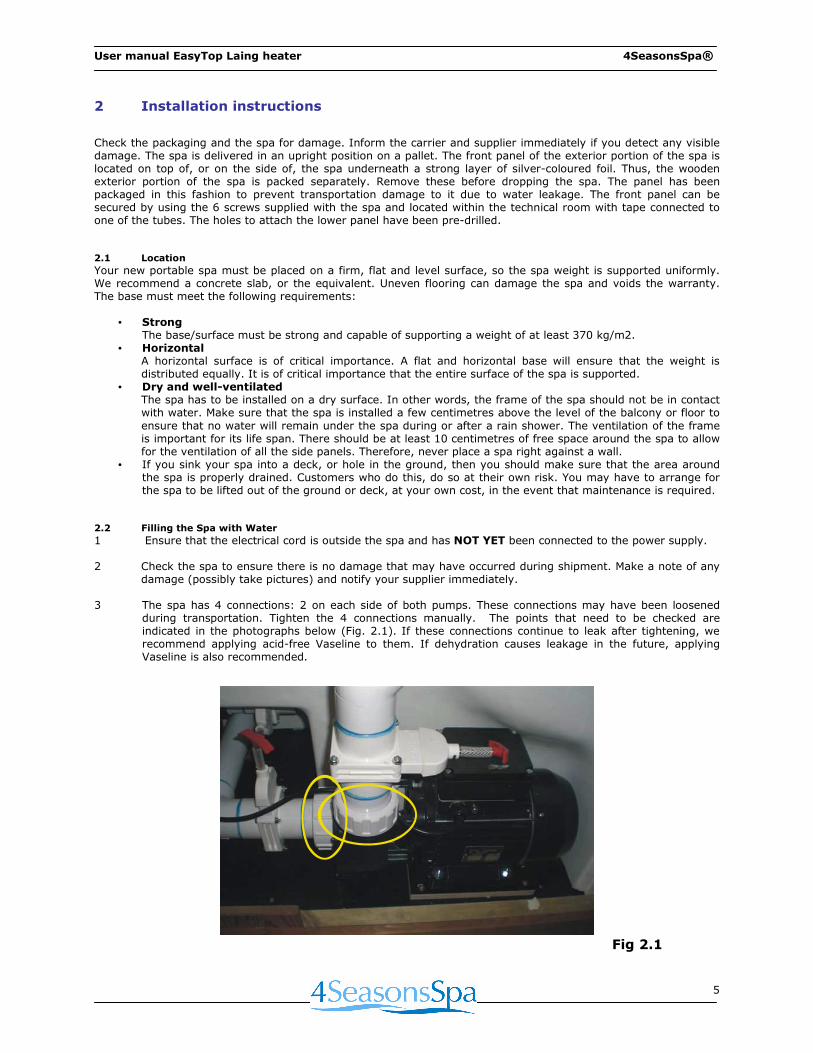
damage (possibly take pictures) and notify your supplier immediately. 3 The spa has 4 connections: 2 on each side of both pumps. These connections may have been loosened
during transportation. Tighten the 4 connections manually. The points that need to be checked are indicated in the photographs below (Fig. 2.1). If these connections continue to leak after tightening, we recommend applying acid-free Vaseline to them. If dehydration causes leakage in the future, applying Vaseline is also recommended.
Fig 2.1

User manual EasyTop Laing heater 4SeasonsSpa®
6
4 The filter cartridge(s) must be placed in the opening of the skimmer. • Remove the outer section with the skimmer (frame) by sliding it upwards. • Remove the tray for the collection of coarse dirt and leaves (slide forwards).
Place the filter with the thread downwards in the opening and tighten it with a few turns. Do not turn too tightly as it can damage the thread.
5 Ensure that all three gate valves (red handles, refer to fig. 2.1) in the machine compartment are open
(slide upwards). The spa has been delivered to you in this condition. The transparent tubes around this valve ensures the valve cannot close on its own. A closed valve is only necessary when performing maintenance on the pumps or controls.
6 Ensure the tap / drain is closed and that the plug is in place refer to figure 5.1. 7 Fill the spa with tap water up to the level indicated on the skimmer. Do not overfill the spa; the water
level will still rise when somebody uses the spa. Do not use rain or surface water to fill the spa. Ensure the water level is always on or around the indicated level on the skimmer. A water level that is not sufficiently high will cause air to enter the pipes and the pump, which voids the warranty. It is recommended that a garden hose is used to fill the spa through the skimmer. This will facilitate starting the pumps as it will automatically remove air from the plumbing.
8 Check the 4 connections (discussed in section 2.2, part 3) for leaks while filling the spa. If you detect
some moisture, you should attempt to teithen them a little more or use more acid-free Vaseline. If leaking persists, contact your dealer.
If the pumps are on, but there is no water movement in the spa, then it is likely that air is present inside the pumps. You can remove the air by loosening the air valve (Fig 2.3). As soon as water starts to run out (when pump is off), you can fasten it again. (Do not over tighten this bleed valve; if it snaps off through over tightening, then you may have to replace the pump). It is recommended to do this after you have run the pump five times for duration of 20 seconds. Between attempts, wait one minute.
User manual EasyTop Laing heater 4SeasonsSpa®
7
2.3 Connecting the Spa to the power supply
• Fill the spa with water as described in 2.2. • Hire a certified electrician to install your spa.
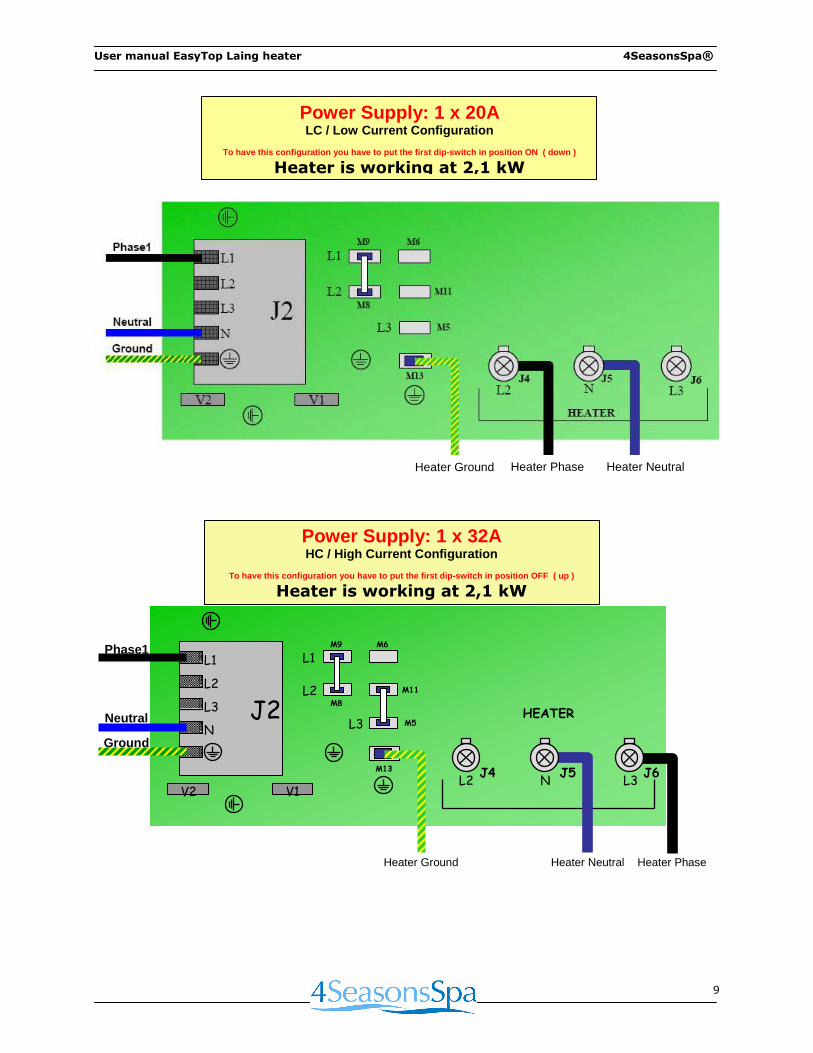
Laing heater with circulation pump Your spa contains a Laing heater with a circulation pump. These parts take care of filtering and heating of the water. Depending on the available power your Laing heater can heat at 2,1 kW, 3,3 kW or at 5,2 kW. This heating element has 3 wires (black, blue and brown); by connecting them in a different way on the board the power to the heater will change. Please check carefully the way the heater is connected on the board and pay attention that the
colours of the wires will match the drawing. Recommended setting:
• Augusta and Julia 2,1 kW • Laura, Sophia and Flora 3,2 kW
WARNING
This device contains live electrical components. Consequently, all the service and maintenance operations
must be performed by expert and qualified personnel, after having taken the necessary precautions.
IMPORTANT:
Read this paragraph carefully before connecting the spa. If you do not follow the instructions provided in
this paragraph, the spa pack and other electrical equipment may be severely damaged.
2,1 kW
• Single-phase: 230 V, 50/60 Hz, 20 A ( low current connection )
• Single-phase: 230 V, 50/60 Hz, 32 A ( high current connection )
• Double-phase: 230 V, 50/60 Hz, 2 x 16 A ( zero + grounded + 2 x 16 A) ( high current connection )
3,3 kW
• Single-phase: 230 V, 50/60 Hz, 32 A ( high current connection )
• Double-phase: 230 V, 50/60 Hz, 2 x 16 A ( zero + grounded + 2 x 16 A) ( high current connection )
5,2 kW
• 400 V, 50/60 Hz, 3 x 16 A ( zero + grounded + 3 x 16 A) ( high current connection )
The unused connections of the control box can let water flow through. For safety reasons and to prevent
personal injuries and material damage, these connections should be covered with approved covers. This
way the inside of the control box will not come into contact with water that is splashed, etc. This has to
be performed by a certified electrician.
• The electrical connection of the spa must only be performed by a certified electrician.
• Observe local rules and regulations (consult your electricity supplier or an electrician).
• Do not connect the spa to the power supply if the spa does not contain water.
• A fixed connection through a separate current group is required for the connection to the power supply. No
other equipment must use this fuse.
• This current group must have a RCD or grounding switch (30 mA) must have been included in the circuit.
User manual EasyTop Laing heater 4SeasonsSpa®
8
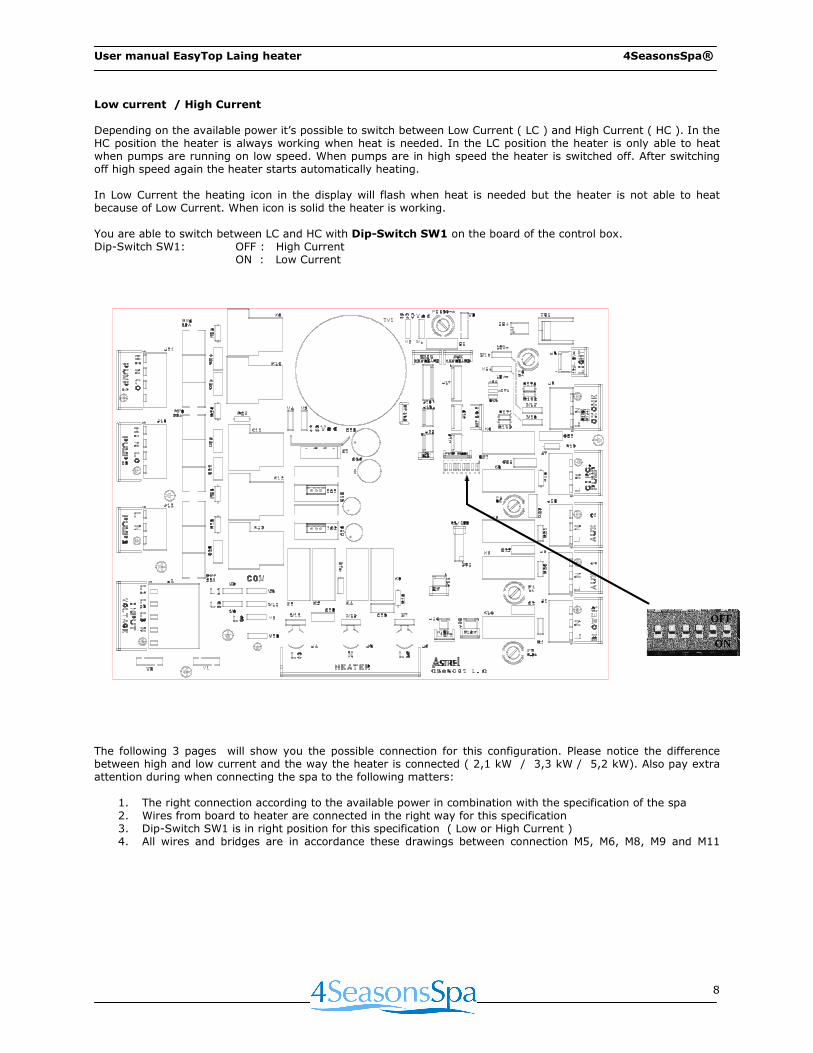
Low current / High Current Depending on the available power it’s possible to switch between Low Current ( LC ) and High Current ( HC ). In the HC position the heater is always working when heat is needed. In the LC position the heater is only able to heat when pumps are running on low speed. When pumps are in high speed the heater is switched off. After switching off high speed again the heater starts automatically heating. In Low Current the heating icon in the display will flash when heat is needed but the heater is not able to heat because of Low Current. When icon is solid the heater is working. You are able to switch between LC and HC with Dip-Switch SW1 on the board of the control box. Dip-Switch SW1: OFF : High Current ON : Low Current
The following 3 pages will show you the possible connection for this configuration. Please notice the difference between high and low current and the way the heater is connected ( 2,1 kW / 3,3 kW / 5,2 kW). Also pay extra attention during when connecting the spa to the following matters:
1. The right connection according to the available power in combination with the specification of the spa 2. Wires from board to heater are connected in the right way for this specification 3. Dip-Switch SW1 is in right position for this specification ( Low or High Current ) 4. All wires and bridges are in accordance these drawings between connection M5, M6, M8, M9 and M11
ON
OFF
User manual EasyTop Laing heater 4SeasonsSpa®
9
J2
L1
L2
L3
N
V1 V2
L1
L2
L3 M5
M6 M9
M8
M11
M13
HEATER
L2 N
Heater Phase Heater Ground
J4 J5
Power Supply: 1 x 32A HC / High Current Configuration
To have this configuration you have to put the first dip-switch in position OFF ( up )
Heater is working at 2,1 kW
Heater Neutral
Phase1
Neutral
Ground
J6 L3
Power Supply: 1 x 20A LC / Low Current Configuration
To have this configuration you have to put the first dip-switch in position ON ( down )
Heater is working at 2,1 kW
Heater Ground
Heater Phase Heater Neutral

User manual EasyTop Laing heater 4SeasonsSpa®
10
Power Supply: 2 x 16A HC / High Current Configuration
To have this configuration you have to put the first dip-switch in position OFF ( up )
Heater is working at 2,1 kW
Heater Ground
Heater Neutral
Heater Phase
Power Supply: 1 x 32A HC / High Current Configuration
To have this configuration you have to put the first dip-switch in position OFF ( up )
Heater is working at 3,3 kW
Heater Ground Heater Phase Heater Phase
Heater Neutral

User manual EasyTop Laing heater 4SeasonsSpa®
11
Power Supply: 2 x 16A HC / High Current Configuration
To have this configuration you have to put the first dip-switch in position OFF ( up )
Heater is working at 3,3 kW
Heater Ground Heater Netural Heater Phase Heater Phase
Power Supply: 3 x 16A HC / High Current Configuration
To have this configuration you have to put the first dip-switch in position OFF ( up )
Heater is working at 5,2 kW
Heater Ground
Heater Phase
Heater Neutral
Heater Phase

User manual EasyTop Laing heater 4SeasonsSpa®
12
3 Spa operation
Display Fig 3.1.
Icons meaning and light
Icon Solid Blinking
1
Pump 1 active at high speed Pump 1 active at low speed
2
Pump 2 active at high speed
Display shows desired temperature
Heater active Heater not active, but heat required (Low Current connection).
Light on at high intensity Light on at low intensity
Economy function active Economy function in stand-by
Filter or Purge function active Filter or Purge function in stand-by
3.1 Activating the control system/display Check the following before operating the spa:
- Ensure the spa is filled with water. - Ensure all valves are open. - Ensure the water flow through the pipes is not obstructed.
The temperature of the water used to fill the spa is, in general, lower than the standard set temperature of 36 °C. The controller will therefore, as soon as it is switched on, activate the circulation pump which will push the water
trough the heating system and automatically activate it. The circulation pump is set to run 24 hour a day.

User manual EasyTop Laing heater 4SeasonsSpa®
13
Pumps This spa has 2 pumps, both single speed pumps. The pumps are connected and operated through the control box, and you can switch them on or off using the display (Fig. 3.1). Pump 1
• Press Pump 1 key to turn Pump 1 on at high speed. • Press a second time to turns Pump 1 off. A built-in timer automatically turns Pump 1 off after 20 minutes,
unless it has been manually deactivated Pump 2
• Press Pump 2 key to turn Pump 2 on at high speed. • Press a second time to turns Pump 2 off. A built-in timer automatically turns Pump 2 off after 20 minutes,
unless it has been manually deactivated.
Note 1: If the system is running in smart winter mode (i.e., the pump is running at high speed) and you press the pump 1 key, the cycle will be cancelled and the pump will start running at low speed.
Lighting
• Press the light switch to turn light on in bright mode. • Press a second time to switch to lower intensity lighting. • By pressing the light switch a third time, the light will go off. • A built-in timer automatically turns the light off after 2 hours, unless it has been manually deactivated.
Water Temperature
• The display shows the current water temperature. • By using the arrow keys you can adjust the water temperature to the desired temperature.
The newly selected water temperature will be shown on the display for five seconds, confirming the new settings. After this period, the display will start to show the current temperature again.
The EasyTop controller can be used to set the water temperature to a value between 15 and 40 °C. The temperature can be adjusted using the arrow keys on the control panel. The water is heated by the heater located in a metal tube around the yellow control box in the technical room of the spa.
If the water temperature is too low, the controller initiates the following process:
• Activates the circulation pump, if it is not yet running, most of the time it is running 24 hours a day. • The control system checks that the circulation / capacity of the water running through the heater is
sufficiently large. This operates the pressure switch located on the heating element. • The control system activates the heater if enough power is available ( LC and HC ). The display will show a
blinking arrow on the heating icon when heat is needed but not available. This indicates that the heater will be activated as soon as one of the pumps starts running at decreased speed. At that point the heater icon will glow continuously on the display, indicating that the heater is now active.
Setting the water temperature above 40°C
This function is used to set the desired water temperature in the pool between 40°C and 42°C. Hold the Up button for 5 seconds; the display shows Or followed by the increase in temperature above 40°C (e.g.: to set 41.5°C the display must show Or +1.5). The temperature is decreased using the Down button.

User manual EasyTop Laing heater 4SeasonsSpa®
14
3.2 Filter and Purge In the Low Level program it is possible to activate a standard Filter Program or you can program the circulation pump to run 24 hours a day ( most common setting ). When a Filter program is activated the circulation pump will run 2 times a day for some hours to take care of filtration. We prefer to install the circulation pump on a 24 / 24 cycle because of the low water flow of this pump. PURGE FUNCTION ( recommended ) When DIP SWITCH 7 is ON ( low position ) and in your LowLevel program CPx is set at always ON and FCx is on Purge cycle your circulation pump will run 24 hours a day ( see page 23 and 24 ). Your spa is equipped with 2 jet pumps and a circulation pump. Most people install their circulation pump to work 24 hours a day. In this case you are able to set a PURGE cycle. The circulation pump is working 24 hour a day and you can set 1,2,3,4,6,8,12 or 24 times a day a 1 minute purge cycle. During a purge cycle the 2 jet pumps will run on high speed. For example, when you press the purge button on the display the message is P. When you program 24 the spa will have, hourly, a 1 minute purge cycle. If the purge function has been selected in the Low Level Programming, the Filter/Purge button and the Up and Down buttons can be used to set a certain number of automatic purge cycles per day (parameter Pxx, minimum value 1, maximum 12, default value 2). When you set the Pxx for example at 12 your spa will run a PURGE cycle each 2 hours for 1 minute. Filter function ( not recommended ): The Filter/Purge button and the Up and Down buttons can be used to set the filtering cycle settings in your LowLevel program. First check if DIP-SWITCH 7 is in down ( ON ) position, see page 23 and 24 and check LowLevel program if FC is on Filter Cycle ( 1 ) and CP is at filter and heat (1). Press the Filter / Purge button until you see F or FD in the display. After that please use the Up and Down buttons. The duration of the filtering cycle and the time for running the first cycle can be selected according to requirements, the remaining cycles follow at 12 hour intervals.
F : duration FD : delay of the starting time
duration of the filtering cycles
The duration of the filtering cycles can be set from 0 (filtering disabled) to 12 hours (continuous filtering) with 1 hour steps.
setting the delay of starting time
To set the time when the first filtering cycle is run, set the hours remaining, from the moment of programming to the start of the filtering cycle. Below is an example.
Programming at 14.00; a three-hour filtering cycle needs to be run starting at 19.00. Calculation of the delay until start: 19.00 – 14.00 = 5 hours On the keypad, set the duration of the filtering cycle (3 hours) and the delay until start, in this case 5 hours. The overall effect will be that the first filtering cycle lasting three hours will start at 19.00, the next at 7.00, and the next at 19.00 etc.
Note: if the delay to start is set to 0, the filtering cycle starts immediately.
User manual EasyTop Laing heater 4SeasonsSpa®
15
3.3 Heating When the water temperature reaches 0,5°C lower than the set temperature, the heater will automatically be activated until a temperature 0,5°C above the desired value is reached. The arrow next to the heater icon will activate giving a solid icon when the heating system is active. When LC ( Low Current ) is set and if both pumps are activated the system cannot heat the water, as this would require too much current, the heating icon will start blinking in this case. As soon as one of the pumps is switched to low speed or turned off, the heating system will automatically activate and the icon will be solid. ECONOMY MODE of heating As soon as the economy mode is activated the spa will allow the temperature to drop up to 11 degrees below the set temperature. Only use this mode if your spa will not be used for extended periods of time. Keeping the spa at the desired temperature is more economical than constantly reheating the water. By pushing the Economy button for a few seconds you can program: E ( duration ) ED ( delay of start time ) of the ECONOMY MODE. The E ( duration ) condition varies from 0 to 24 hours selected with the arrow key’s. 0 = function deactivated and 24 = function always active. The ED delay until start can be select with a value from 0 till 23 hours. ( see calculation filter time 3.2 ) 3.4 Display Lock It is possible to lock the display partially or entirely, which can be a useful safety measure for children. There are two options available: Full ( LOCK F ) : none of the buttons will function. Partial ( LOCK P ) : switches operating pump 1 / pump 2 / and the light can be operated. By pressing and holding the ECONOMY button for 5 seconds the partial ( LOCKP ) display locking is activated. By pressing and holding this same button for 10 seconds all functionality is disabled ( LOCKF ). By pressing and holding the ECONOMY button again for 5 seconds the display is reactivated. 3.5 Boost function This function is used to activate an accelerated filtering procedure of limited duration. Pump 1 is started at high speed, and the ozone generator runs for 45 minutes. To activate the function, press and hold the Pump 1 button for 5 seconds. This function has to be activated after heavy use of the SPA and/or addition of chemical products. The display shows the code BOO. 3.6 Inverting the display This function is used to invert the direction of the display so as to make it easy to read from the outside. Due to the
type of software installed, it is possible to activate the function as following: Press and hold for 5 seconds the Filter/Purge. The function is disabled in the same way. The function is also disabled by switching the pack off. 3.7 Temperature unit This function is used to the display the temperature in degrees centigrade or Fahrenheit. It is possible to activate the function as following: Press and hold for 5 seconds the Light
3.8 Smart Winter Mode The smart winter mode is a setting that is always activated. It protects your system from freezing pipes. The spa takes measurements of the temperature in the technical room. If the temperature passes below a threshold of 6 degrees Celsius, both pumps will be activated and run at high speed for one minute. The filtration icon on the screen will blink. The frequency of this cycle is dependant on the temperature in the technical room, irrespective of the water temperature in the spa which will be kept above 15 degrees at all times. 3.9 Power-UP signal The “Power Up” function is used to notify the user that a power failure has occurred. If the current water temperature flashes on the display (alternating with the time, if available) it means that a power failure has occurred. Pressing any button makes the information shown on the display come on steady.

User manual EasyTop Laing heater 4SeasonsSpa®
16
4. Using the Spa
4.1 First time use
Check the following before turning the spa on for the first time:
- Ensure there is sufficient water inside the spa - Ensure the appropriate valves are open in the mechanical room
4.2 Using the spa Generally, the temperature of the water used to fill the spa will be lower than the desired water temperature for use (36°C). For this reason, when started, the controller will start heating the spa. While you are inside the spa, it can be activated in the following manner: • First turn on pump 1 at high speed by pressing the pump 1 button once, and then the pump 2 button. • Check if all jets are open, by turning the end of the jets they can be closed or opened. • If you have adjustable jets, they can be turned in the desired direction. • It is normal for persons who are using the spa to regularly change location to enjoy the various massage
options at the various sitting and/or lying positions (depending on the spa type).
• Position the cover on top of the spa after use. This will have an insulating effect and will prevent children from entering the spa accidentally.
4.3 Regulating the Jet power
The pumps force a large amount of water through the jets. It is possible to add more force to the jet by adding air to the water. The air supply is regulated using 4 air valves/ controls, two for each pump. Turn the tap to the left to open the air supply or to the right to close the air supply. You will only see an effect when the pumps are operating at high speed. The air valves are the small turning buttons.
The 2 diverters can be used to distribute the massage jet evenly or towards the left or the right of the spa. Each pump has its own diverter which can divide the output of the pump over two groups. Using these diverters the desired massage intensity can be set. It is best for the diverter to turn the pumps off while setting it in the right direction. The force required to move it will be far less when it is not operational. It is beneficial to grease the inside of the diverters with acid-free Vaseline; this will keep them moving more smoothly. Fig. 4.2
Neck jets If the spa is equipped with neck jets at one of the seats then these can be activated by turning the handle nearby the seat to the open position. This button looks like an air valve. To use these neck jets the seat has to be in use by running the pump and the appropriate diverter to send the water to that particular seat.
Fig. 4.1

User manual EasyTop Laing heater 4SeasonsSpa®
17
4.4 Filtration As explained earlier we recommend allowing a 24 hour circulation. The circulation pump has a small flow of water so there needs to be enough time during a filter cycle. When you do not install a 24 hour circulation cycles we recommend at least a filter cycle of 2 x 6 hours. BOOST FILTRATION If the water could benefit from additional cleaning, for example after heavy use or addition of chemicals, it is possible to activate the BOOST FILTRATION function. By pressing and holding the pump 1 button for five seconds, pump 1 will be activated and filter for 40 minutes at high speed while the ozonator is activated as well. “BOO” will be indicated on the display. After 45 minutes the spa goes back to its regular settings. 4.4.1 Filter Cartridge Clean the filter cartridge every week by rinsing it with a powerful water jet. In the LOW LEVEL setting a warning can be activated that displays a clean filter (CF) warning on the display every week. By pressing any button this warning is removed. It is recommended to renew the filter cartridge every year. Your spa dealer will be able to provide you with special cleaning products for your filter cartridge. Never use regular soap as it will have a negative impact on the water quality in your spa. 4.5 Keeping the Spa Clean The housing is made of red cedar wood treated with oil. The housing is maintained by treating it every year with an oil-based product, ask your spa dealer for the special 4SeasonsSpa oil the ensure you have the same colour. Always cover the spa with the supplied cover when it is not in use. Mount the supplied clips using small self-tapping screws and secure the cover in place. Your spa dealer can supply you with the appropriate products to maintain the cover. The spa is made of die-cast acrylic, is weather-resistant and does not require any special maintenance. It is however imperative that the spa is always covered appropriately. Remove dirt using a wet cloth or a soft brush. Never use cleaning and/or abrasive products. It is best for the spa to keep it filled with water and maintain regular filtration cycles. An empty spa increases the chances of leaking as the connectors could dehydrate.

User manual EasyTop Laing heater 4SeasonsSpa®
18
WATER TREATMENT
1 Specific rules for water treatment in your residential spa cannot be prescribed. The minimum required
standards for spa maintenance are outlined below. 4SeasonsSpa is not responsible for providing information about water treatment. This page will only provide you with some guidelines. Each region or country has its own rules about water treatment.
2 Take into account the directions given by your dealer. Local dealers are familiar with different water
treatment products, specific to your region and water-type. Make sure you are properly informed. 3 Ensure proper information is provided on the chemicals being offered. Ensure the provided chemicals can
be used for the water treatment in your spa, and that they are allowed in the country you will be using your spa in. Very important: 4SeasonsSpa is not responsible for the water quality in your spa, as this is entirely dependant on water treatment and water quality.
4 To fill your spa only use regular tap water. 5 As soon as the spa is filled, begin water treatment. The filtration mechanism has to be on continuously,
which requires constant current to be available. 6 Test the pH value of the water and adjust if necessary. Keep the pH between 7.0 and 7.5. At this pH value
disinfecting products will work best. The total alkaline value should be kept between 80 and 120 ppm (mg/l). Record the values in a log-book for your records.
7 Free chlorine should be kept at a minimum of 1.5 mg/l. 8 Every two months, the night before draining the spa, add some Anti-scale to your spa water and leave it to
run overnight. This will remove any lime scale from your pipes and pumps. The manufacturer is not liable for replacing pumps which have seized up due to lime scale build up.
A regular checkup (at least twice a week before each spa use) of the water is necessary for the following parameters:
a pH-value between 7.0 and 7.5
b Free chlorine value must be at least 1.5 mg/l c Bound chlorine should be at most 0.2 mg/l d total alkaline value should be between 80 and 120 ppm
To test for these values use a reliable testing kit and record the values in a log book. This way you can get a good view of the manner in which the water is treated and used. The ESWA recommends replacing the water every two months if the spa is in standby. If the spa is used more often, the water should be changed more regularly. NEVER USE CHLORINE TABLETS (TRI-CHLORINE). THE ONLY FORM OF CHLORINE ALLOWED IS IN POWDER FORM (DI-CHLORINE). IF YOU DO USE CHLORINE TABLETS, THIS WILL VOID THE WARRANTY ON THE SPA COMPLETELY AND ENTIRELY.

User manual EasyTop Laing heater 4SeasonsSpa®
19
5. Draining the spa Follow the instructions for one of the methods given below when the spa is to be emptied: Method 1
• Turn power OFF at the breaker. • Locate the drain valve (Fig. 5.1). (located in the
mechanical room) • Remove the safety cap and attach a garden hose.
Turn outer ring counter clockwise and pull outward on the garden hose. This will open the drain valve fully.
• Drain water to a convenient area. (Spa water may harm grass or plants if sanitizer levels are high.)
• When water begins to flow out of the hose, open the air relief valve located on filter lid.
• Your spa will drain except for a small quantity left in the foot well. This can be removed with a sponge and bucket.
• Once empty, clean with a damp cloth, and do not use cleaning products. • To finish, push garden hose forward and turn outer ring clockwise, remove garden hose and attach safety
cap. Method 2
• Turn power OFF at the breaker • Purchase a small submersible pump (from a DIY store) and attach it to a hose pipe and place the pump in
the foot well of the spa. • Place the other end of the hose in a drain and switch on the pump. The pump should then drain all of the
water out of your spa.

User manual EasyTop Laing heater 4SeasonsSpa®
20
5.1 Winter modes The spa can be used throughout the year, and especially in winter spa use is very enjoyable. In the event of freezing there are special procedures to observe in order to prevent freezing of the plumbing if the spa is not in use.
We recommend the following if you are not using the spa: Winter Measures Method 1 (PREFERRED)
• We recommend to ALWAYS run the spa and to maintain the water correctly. This way the spa will use a minimal amount of power.
• Keep the spa filled with water. • Set the temperature to 16 °C. • Set the filter cycle to 2 hours. • Cover the spa.
The spa cannot freeze, as long as the power supply is maintained. Winter Measure Method 2 1. Add a significant amount of anti-freeze fluid to the water and ensure it is properly distributed by running
the pumps. Ask you dealer how much to use, this depends on the brand anti-freeze you use. 2. Empty the spa as described in section 5 (Emptying the spa). The spa, plumbing and pumps should not
contain any water. This cannot be achieved just by regularly emptying the spa. 3. Loosen all connections in the mechanical room and release them. All connections have to be greased with
acid-free Vaseline and stored in an area that will not experience frost. 4. Secure the cover on the spa, and pack the spa as best as possible. 5 Before re-using the spa make sure it is sufficiently flushed with clean water to remove any remaining old
water and anti-freeze fluid.
Note:
4SeasonsSpa recommends never leaving the spa without water and no warranty is given to damages
resulting from this. The various connectors and components could dehydrate resulting in the development
of leakages. 4 Seasons Spa cannot guarantee the spa will not freeze even if anti-freeze is used. Freezing
of the plumbing can cause cracks, which is also not covered by the warranty.

User manual EasyTop Laing heater 4SeasonsSpa®
21
6. DIP-SWITCHES and LOW LEVEL configuration
Inside the EASYTOP there is one dip-switch with 8 switches that allows modification the settings, see chapter 2.3 Low and High current. Herewith an explanation of the other 7 dip-switches. To access the dip-switch, first disconnect power from the EASYTOP, and then open the front cover of the pack. The dip-switch has two possible positions: ON toward down
OFF toward up The tables shown below describe the function of each individual switch, based on the type of software installed. The preferred settings for your spa are in bold.
Software 367
N° switch Position ON Position OFF
1 Low Current High Current
2 10-button keypad 8-button keypad
3 Blower installed Blower not installed
4 Pump 1, one-speed Pump 1, two-speed
5 Pump 2, one-speed Pump 2, two-speed
6 Pump 3 installed Pump 3 not installed
7 Circulation pump installed Circulation pump not installed
8 Ozon active during filtering Ozon always on
Once having modified the position of the switches on the dip-switch, close the cover on the pack and reconnect power, only then will the modifications become operational. ATTENTION: do not change the positions of the switches without first having disconnected the power supply to the pack! As well as the risk of electric shock, the switches settings become operational only after power has returned. These dip-switches setting are always in combination with the low-level program which we will explain on the next page.
User manual EasyTop Laing heater 4SeasonsSpa®
22
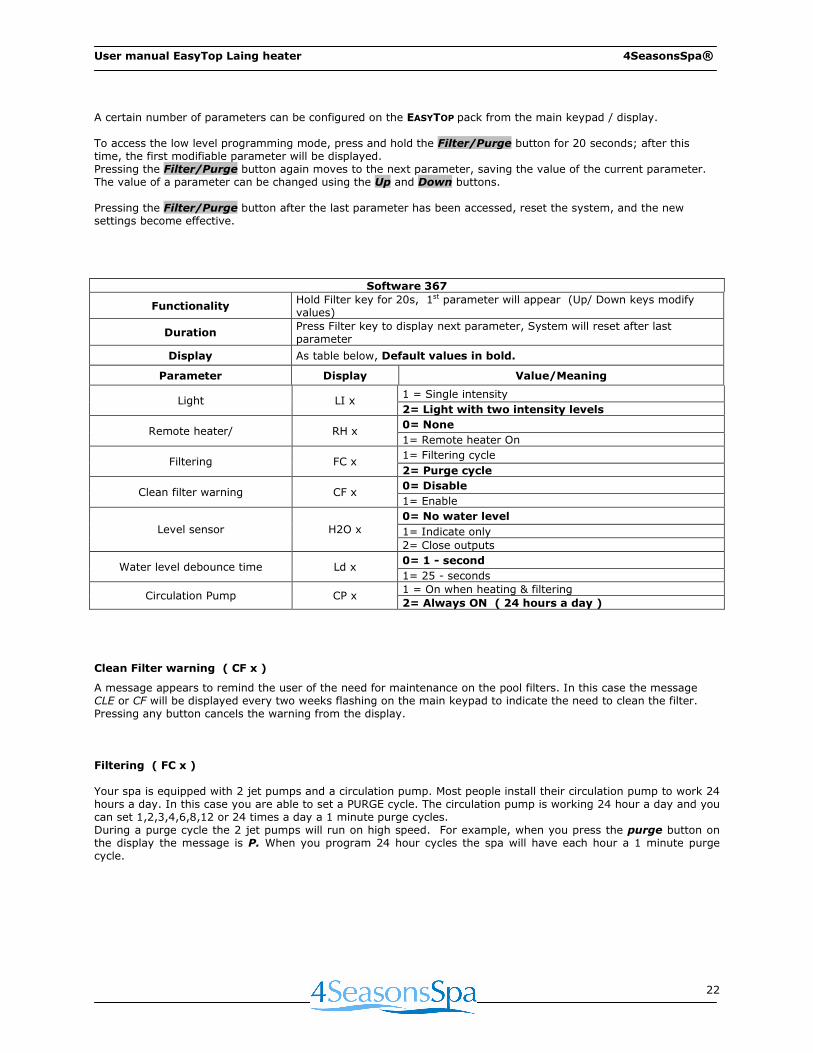
A certain number of parameters can be configured on the EASYTOP pack from the main keypad / display. To access the low level programming mode, press and hold the Filter/Purge button for 20 seconds; after this time, the first modifiable parameter will be displayed. Pressing the Filter/Purge button again moves to the next parameter, saving the value of the current parameter. The value of a parameter can be changed using the Up and Down buttons. Pressing the Filter/Purge button after the last parameter has been accessed, reset the system, and the new settings become effective.
Software 367
Functionality Hold Filter key for 20s, 1st parameter will appear (Up/ Down keys modify values)
Duration Press Filter key to display next parameter, System will reset after last parameter
Display As table below, Default values in bold.
Parameter Display Value/Meaning
1 = Single intensity Light LI x
2= Light with two intensity levels
0= None Remote heater/ RH x
1= Remote heater On
1= Filtering cycle Filtering FC x
2= Purge cycle
0= Disable Clean filter warning CF x
1= Enable
0= No water level
1= Indicate only Level sensor H2O x
2= Close outputs
0= 1 - second Water level debounce time Ld x
1= 25 - seconds
1 = On when heating & filtering Circulation Pump CP x
2= Always ON ( 24 hours a day )
Clean Filter warning ( CF x )
A message appears to remind the user of the need for maintenance on the pool filters. In this case the message CLE or CF will be displayed every two weeks flashing on the main keypad to indicate the need to clean the filter. Pressing any button cancels the warning from the display. Filtering ( FC x ) Your spa is equipped with 2 jet pumps and a circulation pump. Most people install their circulation pump to work 24 hours a day. In this case you are able to set a PURGE cycle. The circulation pump is working 24 hour a day and you can set 1,2,3,4,6,8,12 or 24 times a day a 1 minute purge cycles. During a purge cycle the 2 jet pumps will run on high speed. For example, when you press the purge button on the display the message is P. When you program 24 hour cycles the spa will have each hour a 1 minute purge cycle.
User manual EasyTop Laing heater 4SeasonsSpa®
23
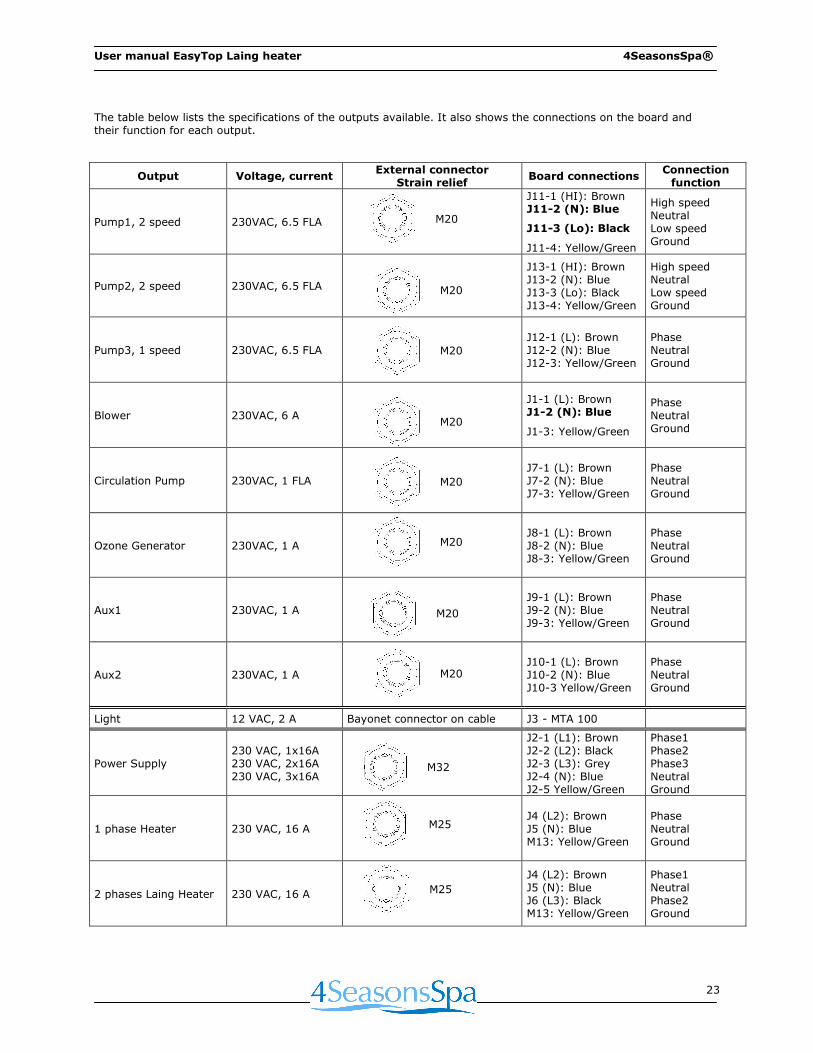
The table below lists the specifications of the outputs available. It also shows the connections on the board and their function for each output.
Output Voltage, current External connector
Strain relief Board connections
Connection function
Pump1, 2 speed 230VAC, 6.5 FLA
J11-1 (HI): Brown J11-2 (N): Blue
J11-3 (Lo): Black
J11-4: Yellow/Green
High speed Neutral Low speed Ground
Pump2, 2 speed 230VAC, 6.5 FLA
J13-1 (HI): Brown J13-2 (N): Blue J13-3 (Lo): Black J13-4: Yellow/Green
High speed Neutral Low speed Ground
Pump3, 1 speed 230VAC, 6.5 FLA
J12-1 (L): Brown J12-2 (N): Blue J12-3: Yellow/Green
Phase Neutral Ground
Blower 230VAC, 6 A
J1-1 (L): Brown J1-2 (N): Blue
J1-3: Yellow/Green
Phase Neutral Ground
Circulation Pump 230VAC, 1 FLA
J7-1 (L): Brown J7-2 (N): Blue J7-3: Yellow/Green
Phase Neutral Ground
Ozone Generator 230VAC, 1 A
J8-1 (L): Brown J8-2 (N): Blue J8-3: Yellow/Green
Phase Neutral Ground
Aux1 230VAC, 1 A
J9-1 (L): Brown J9-2 (N): Blue J9-3: Yellow/Green
Phase Neutral Ground
Aux2 230VAC, 1 A
J10-1 (L): Brown J10-2 (N): Blue J10-3 Yellow/Green
Phase Neutral Ground
Light 12 VAC, 2 A Bayonet connector on cable J3 - MTA 100
Power Supply 230 VAC, 1x16A 230 VAC, 2x16A 230 VAC, 3x16A
J2-1 (L1): Brown J2-2 (L2): Black J2-3 (L3): Grey J2-4 (N): Blue J2-5 Yellow/Green
Phase1 Phase2 Phase3 Neutral Ground
1 phase Heater 230 VAC, 16 A
J4 (L2): Brown J5 (N): Blue M13: Yellow/Green
Phase Neutral Ground
2 phases Laing Heater 230 VAC, 16 A
J4 (L2): Brown J5 (N): Blue J6 (L3): Black M13: Yellow/Green
Phase1 Neutral Phase2 Ground
M32
M25
M20
M25
M20
M20
M20
M20
M20
M20
M20

User manual EasyTop Laing heater 4SeasonsSpa®
24
7. Problem Solving
Signal on the display
Possible causes Actions
The display flashes
Not a malfunction. The pack signals a previous power failure.
• Press any button.
HL steady
The system has switched off the heater because the temperature at the heater has reached 48°C (119°F). DO NOT ENTER THE SPA
• DO NOT ENTER THE SPA. • Switch the pack OFF, then wait for the water to cool down.
• If the problem persists, refer to the troubleshooting manual or contact the technical service.
HL flashing
The system has switched off the pumps and heater because the water temperature in the whirlpool tub has reached 44°C (112°F). Only Smart Winter Mode is active. DO NOT ENTER THE SPA
• DO NOT ENTER THE SPA. • Switch the pack OFF, then wait for the water to cool down.
• If the problem persists, refer to the troubleshooting manual or contact the technical service.
FLO
The pressure switch/flow switch does not detect the movement of water when the circulation pump is on (pump 1 if the circulation pump is not installed).
• Check that the low level settings of the circulation pump and the pressure switch correspond to the configuration of the spa.
• Check that the level of the water is sufficient and that the valves are open.
• Clean the filter. • If the problem persists, refer to the troubleshooting manual or contact the technical service.
FLC
The pressure switch/flow switch detects the movement of water even when the circulation pump is off (pump 1 if the circulation pump is not installed).
• Check that the circulation pump (or pump 1 if the circulation pump is not installed) stops when the error occurs. Otherwise, check the connections of the loads.
• Check that the low level settings of the circulation pump correspond to the configuration of the spa.
• If the problem persists, refer to the troubleshooting manual or contact the technical service.
Prr Malfunction in the temperature probe.
• Refer to the troubleshooting manual or contact the technical service

User manual EasyTop Laing heater 4SeasonsSpa®
25
Pumps contain air
• The water level is to low, causing the skimmer to take in air The diverters are too difficult to turn
• Ask your spa dealer to grease them with acid-free Vaseline. They are easy to open when they need to be detached. On the inside you will find a black rubber ring which has to be properly greased.
• Also clean the white plastic part in the diverter or air valve and apply also some acid-free Vaseline. Hard water lime will inhibit smooth turning of the diverters and air valves.
Not all jets are working
• Ensure all pumps operate at high speed • Ensure all diverters are in the intermediate position so all jets receive adequate water • Ensure all jets are open, it is possible to open and close each jet separately
Water comes out of the jets intermittently
• Check the water level, if it is too low the skimmer takes in air which interrupts the water flow. Fill the tub to the indicated level on the skimmer.
Service In case of problems first contact your own dealer, after which the following contact address is available:
4SeasonsSpa Herengracht 444 1017 BZ Amsterdam The Netherlands [email protected] www.4seasonsspa.com

User manual EasyTop Laing heater 4SeasonsSpa®
26