marion county eplans applicant guide
TRANSCRIPT

ePlans Applicant Guide 1 Marion County, Florida
Applicant Guide – Version 1 05FEB2013
In addition to this applicant guide, please refer to the instructions provided in the electronic forms (eForms) for further assistance.

ePlans Applicant Guide 2 Marion County, Florida
Table of Contents
Welcome to ePlans ..................................................................................................................................................... 3
Getting Started ........................................................................................................................................................... 3
Security Timeout .................................................................................................................................................... 3
New Users ePlans Invitation......................................................................................................................................... 3
Existing Users ePlans Invitation .............................................................................................................................. 5
Project Tasks and eForms ........................................................................................................................................... 5
Applicant Upload Task .................................................................................................................................................. 5
Prescreening Task ................................................................................................................................................... 9
Applicant Resubmit Task ...................................................................................................................................... 10
County Approval Task ........................................................................................................................................... 11
Download Approved Plans ....................................................................................................................................... 11
Appendix A - Standards ............................................................................................................................................ 12
Folder Structure for Uploaded Drawings and Documents ................................................................................... 12
File Type ............................................................................................................................................................... 12
File Naming ........................................................................................................................................................... 13
Drawing files ........................................................................................................................................................... 13
Supporting Documents ..................................................................................................................................... 13
Drawing Sheet Layout .......................................................................................................................................... 13
Appendix B - Accessing Reviewer Comments ........................................................................................................... 14
Appendix C - Viewing Drawing Markups (Changemarks) ......................................................................................... 17
Appendix D - Printing Drawing Markups (Changemarks) ......................................................................................... 20
Appendix E - Windows 7 and Vista Install Instructions ............................................................................................ 22
Turning Off UAC in Windows 7 and Vista ............................................................................................................. 22
Turning Off Protected Mode in IE8....................................................................................................................... 22
Uninstall-Reinstall ProjectDox Components ......................................................................................................... 22

ePlans Applicant Guide 3 Marion County, Florida
Welcome to ePlans Marion County ePlans is a web based system that provides for electronic plan submittal and review. EPlans saves time and money while promoting a more efficient review process. Submittals are reviewed simultaneously, reviewer comments are viewed in ePlans as a written document as well as illustrated on the drawings, and only a minimal number of plans require printing. Marion County invites all applicants to use this new process and offers this applicant's guide to help the user get started.
Getting Started Please review the standards in this guide for how to submit projects, format files, name drawings and documents, layout sheets for approval stamp placement, etc.
To start the plan review process, applications can be found online at http://www.marioncountyfl.org/ePlans Then, proceed as follows:
1. For Building Permits, complete the application and submit it electronically or in person to the Building Safety Department located at 2710 East Silver Springs Boulevard Ocala, FL 34470. Applicable deposits must be submitted to this office in accordance with current county resolutions and practices.
2. For Development Review Submittals, complete the application and submit it electronically or in person to the Office of County Engineer, Development Review Section, located at 412 SE 25th Avenue Ocala, FL 34471. Applicable fees must be submitted to this office in accordance with current county resolutions and practices.
Security Timeout Due to security and resource concerns, the system will automatically sign users out after 240 minutes of inactivity. When ready to resume working with the system, click any button on the screen. The system automatically loads the login page. Also, the web browser window can be closed and the login page manually reloaded in a new browser window.
New Users ePlans Invitation When submitting electronic plans for review, after initiating the application as described above, the applicant shall receive an ePlans invitation by email with notification that the application has been received. For users that are new to Marion County ePlans, this email will prompt creation of a permanent password and user profile. To establish a new user profile:
1. Internet Explorer v6.0 or higher is required to access ePlans. 2. Prior to logging into the ePlans application, the following actions must be completed:
• Disable pop-up blocking for the ePlans web address (https://eplans.marioncountyfl.org/projectdox). The indicator that this has not been done will occur when the page immediately disappears upon clicking on the Login button after typing in the user login and password. It is not uncommon to have more than one pop-up blocker installed (Internet Explorer, Google Task Bar, etc.).
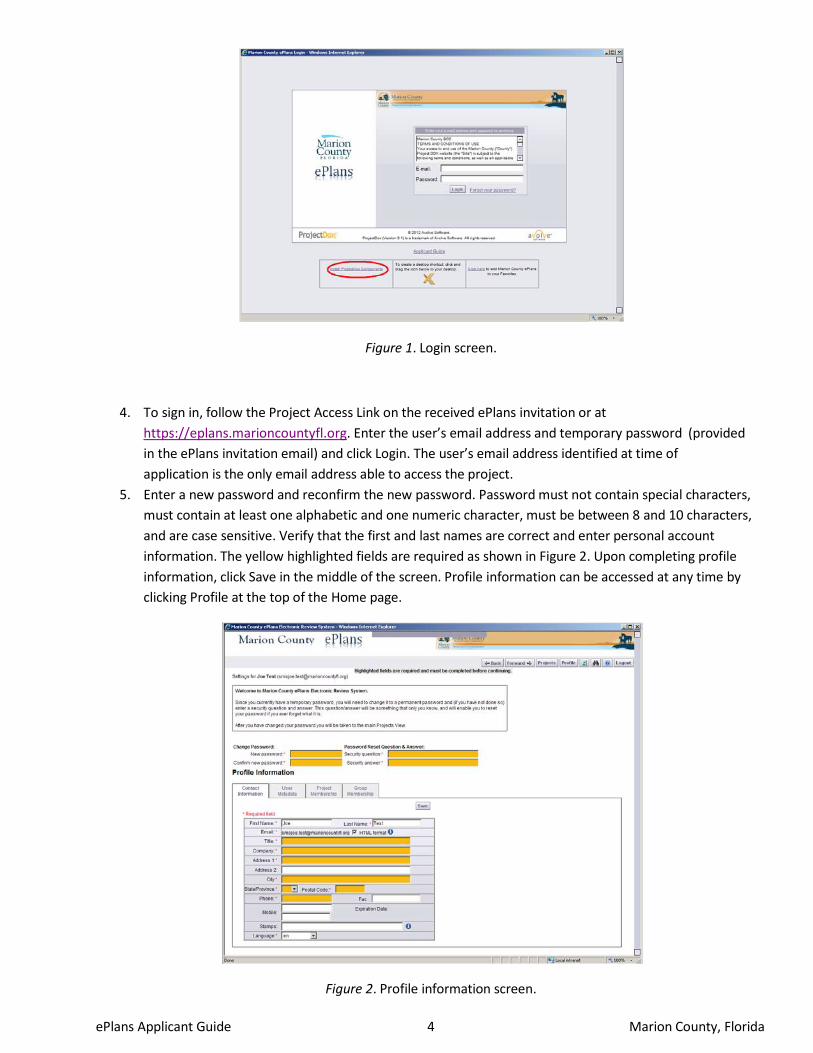
• ProjectDox components must be installed using MSI (Microsoft install program) to view drawings in ePlans. This installation will only need to be done once per computer. Click on Install ProjectDox Components (the MSI link) found at the bottom of the login screen as shown circled in Figure 1. If running Windows 7 or Vista on your computer refer to Appendix E.
3. At the bottom of the login screen are links and instructions to add ePlans as a Favorite or a Shortcut.
ePlans Applicant Guide 4 Marion County, Florida
Figure 1. Login screen.
4. To sign in, follow the Project Access Link on the received ePlans invitation or at https://eplans.marioncountyfl.org. Enter the user’s email address and temporary password (provided in the ePlans invitation email) and click Login. The user’s email address identified at time of application is the only email address able to access the project.
5. Enter a new password and reconfirm the new password. Password must not contain special characters, must contain at least one alphabetic and one numeric character, must be between 8 and 10 characters, and are case sensitive. Verify that the first and last names are correct and enter personal account information. The yellow highlighted fields are required as shown in Figure 2. Upon completing profile information, click Save in the middle of the screen. Profile information can be accessed at any time by clicking Profile at the top of the Home page.
Figure 2. Profile information screen.

ePlans Applicant Guide 5 Marion County, Florida
Existing Users ePlans Invitation When submitting electronic plans for review, after initiating the application as described above, the applicant shall receive an ePlans invitation by email with notification that the application has been received. For returning users, this is an informational email only.
At any given time, a project can be accessed at https://eplans.marioncountyfl.org. If you have forgotten your password, click the Forgot Your Password? link and it will be emailed to you. This link is only functional if the user has logged in once and added a security question and answer. The user’s email address identified at time of application is the only email address able to access the project.
Project Tasks and eForms Once a project is initiated, ePlans uses web pages designed as forms, known as eForms, to provide project information, task instructions, reviewer comments, and markups (also referred to as changemarks). The applicant is alerted by email when a task is pending. Tasks can be accessed by following the provided link in the email notification or by logging into ePlans at https://eplans.marioncountyfl.org.
When in a specific project, click on Workflow Tasks, and then click on the Task link to accept a task and display the eForm. The eForm opens in a separate window and will take a moment to generate. Appendix B describes how to use the eForm and access reviewers’ comments.
The applicant must complete each task by scrolling to the bottom of the eForm and clicking on the Complete button. Once the applicant confirms completion of a task, the county is automatically notified to move the project forward.
The various workflow tasks include Applicant Upload, Prescreening, Applicant Resubmit, and County Approval and are described as follows:
Applicant Upload Task Upon receipt of the Applicant Upload Task email notification, drawings and supporting documents can be uploaded. The instructions are provided in summary in the email and are as follows:
By accessing the project, the project screen displays. Click Workflow Tasks. Then click on the Applicant Upload task, as shown circled in Figure 3, to accept the task and display the eForm. The eForm will take a moment to generate and open in a separate window. The eForm window can be minimized until ready to complete the task.
If uploading drawings, click the Drawings folder; if uploading supporting documents click the Documents folder, as shown in the left hand pane in Figure 3. Prior to uploading any files, please review the standards found in Appendix A for how to format files, name drawings and documents, layout sheets for approval stamp placement, etc.
Figure 3: Project screen containing task link and folders.

ePlans Applicant Guide 6 Marion County, Florida
Click Upload Files, as shown circled in Figure 4.
Figure 4: Inside Drawings folder without files.
An Upload Files window opens as shown in Figure 5. Click Browse to display the Open file dialog window, navigate to the file location on your computer, and select or highlight the files to upload. Multiple files can be selected by using the Shift or Ctrl keys. Files can also be dragged and dropped into the upload window list. Click Open and the files selected will then be copied to the ePlans upload window.
Figure 5: Upload files window.

ePlans Applicant Guide 7 Marion County, Florida
Click Upload as shown in Figure 6 and uploading of selected files will begin. Uploading of files can be completed in multiple sessions.
Figure 6: Upload files screen after selection files.
A new window will open with a list of uploaded files as shown in Figure 7. Click Close to proceed.
Figure 7: Upload complete screen.

ePlans Applicant Guide 8 Marion County, Florida
Once the files are uploaded, the folder list is updated with thumbnail images of each file contained in the folder as shown in Figure 8. Next to each thumbnail the following are displayed: file name, date and time uploaded, file size, author, and history icon.
Figure 8: Inside Drawings folder with files.
To continue uploading files at a later time, return to the eForm window and click Save & Close.
Once upload of all drawings and documents is complete, return to the eForm window and click Upload Complete, as shown circled in Figure 9. The county will be automatically notified that the task is complete and to proceed with prescreening the uploaded project files.
Figure 9: Upload Complete button.

ePlans Applicant Guide 9 Marion County, Florida
Prescreening Task Prescreening is a review by the county of uploaded files in preparation for formal review. If there are questions or missing items, the applicant will receive a Prescreen Correction Request Task email as shown in Figure 10.
Figure 10: Prescreen Correction Request Task email.
After accessing the project, click Workflow Tasks. Then click on the Correction Complete task, to accept the task and display the eForm. Comments and instructions for the corrections being requested are displayed.
After reviewing and resolving requested corrections, access the eForm, scroll to the bottom, check the box indicating “I have uploaded the corrected documents and/or drawings as indicated below.”, and click Corrections Complete, as shown in Figure 11. The county will then be notified to continue prescreening the submittal.
Figure 11: Corrections Complete.

ePlans Applicant Guide 10 Marion County, Florida
Applicant Resubmit Task Once prescreening is complete, review of the submittal will be performed by all assigned reviewers simultaneously. If reviewers make comments and a resubmittal is required, the applicant will receive an Applicant Resubmit Task email notification, as shown in Figure 12, requesting revised drawings and/or documents. This will occur after all assigned reviewers have reviewed the submittal so that all identified issues may be addressed at one time.
Figure 12: Applicant Resubmit Task email.
After accessing the project, click on Workflow Tasks. Then click on the Applicant Resubmit Task, to accept the task and display the eForm. Comments and instructions for the corrections being requested are displayed. Comments are provided as written comments and/or as markups illustrated on the drawings. Instructions on accessing reviewers’ comments are found in Appendix B, instructions for viewing drawing markups are found in Appendix C, and instructions for printing out markups are found in Appendix D. Corrected drawings must always be resubmitted with the same file name as the original submittal.
After reviewing and resolving requested corrections, access the eForm, scroll to the bottom, check the box next to each item confirming its resolution, and then click Complete, as shown circled in Figure 13. The county will then be notified to continue reviewing the submittal.
Figure 13: Applicant resubmit complete button.

ePlans Applicant Guide 11 Marion County, Florida
County Approval Task When project review is completed by all reviewers, approval shall proceed in accordance with current county practices.
For Building Permits, a payment slip will be forwarded to the applicant with total applicable fees prior to electronically stamping plans as approved. The project is not approved and construction shall not commence until such time as fees are paid and a building permit is issued.
For Development Review Submittals, including Minor Site Plans, projects are approved by the Board of County Commissioners, Development Review Committee, the County Engineer, or the Planning/Zoning Manager, as applicable. For Final Plats, the executed mylar must be provided prior to approval.
Download Approved Plans After approval, plans will be electronically stamped by the county. The applicant will receive an email indicating that approved plans are available for download and are located in the ePlans project Approved folder.
For Building Permits, after plans have been electronically stamped approved and all permit fees have been paid, a building permit will be issued and the approved plans will be released to the applicant. A set of approved electronically stamped plans must be kept at the construction site during construction and for all inspections.
For Minor Site Plans, after electronically stamped approved, plans will be available for download by the applicant.
For Development Review Submittals, with the exception of Final Plats and Minor Site Plans, applicants are required to print, obtain required signatures, and sign and seal two 24”x 36” sets of the electronically stamped approved plan and deliver them to the Office of County Engineer, Development Review Section, located at 412 SE 25th Avenue Ocala, FL 34471. Upon receipt, a development order will be issued. Until such time as that development order is issued, the project does not have final approval and construction, if applicable, shall not commence. For plans requiring As-Builts, As-Builts and associated documentation shall be submitted on paper in accordance with current county requirements.

ePlans Applicant Guide 12 Marion County, Florida
Appendix A - Standards
Standards allow for consistency of application submittals and reviews. Adhering to these standards, such as file naming, file types, color-coding, etc., promotes an efficient and timely review.
Folder Structure for Uploaded Drawings and Documents Drawing files shall adhere to county standards. Each drawing sheet shall be uploaded as a separate file and multipage drawings are not allowed. Files shall be uploaded to the “Drawings” folder. All drawings greater than 8-1/2” x 11” must be saved, before uploading, in landscape orientation for approval stamp placement in the upper right hand corner. When applying for a Building Permit, the site layout for building plans shall also be uploaded into the “Drawings” folder.
Supporting documents including, but not limited to, truss calculations, drainage calculations, legal documents, certifications, geotechnical reports, response to comments, etc. shall be uploaded as individual files (which can be multipage) to the “Documents” folder. Place 8-1/2” x 11” drawings used as supporting documentation in the “Documents” folder.
File Type Drawing files shall only be submitted as DWG, DWF, DGN, DXF, or vector PDF files. Drawing sheets shall be in landscape orientation and sized 24” x 36”. When submitting a PDF, it is recommended that drawings created in AutoCAD be converted to vector PDF by using the Autodesk Vector Graphic Converter “DWG to PDF.pc3 plotter driver” as shown in Figure 14. For electrical, mechanical, plumbing/gas, etc. drawings, confirm that only the trade lines are dark by changing the background to grayscale prior to saving as a vector PDF file.
Supporting document files shall be submitted as PDF, DOC, DOCX, XLS, XLSX, PPT, PPS, PPTX, TIF, TIFF, JPG, PNG, IMG, or BMP. When submitting PDF files, searchable PDF files are preferred.
Figure 14: Plotter Configuration Editor.

ePlans Applicant Guide 13 Marion County, Florida
File Naming
Drawing files File names for drawings shall remain the same for all submittals. Do not version files when uploading resubmitted files. Submittals will be rejected if file names change. Drawing file names shall minimally be sheet number followed by discipline or drawing type. It is important for sheet number to be first as ePlans alphanumerically sorts the files. Example file names are 01 – Cover, C001COVER, 002 – Survey1, 003 – Survey2, 701PLUMB, 801-ELEC, L001LANDSCAPE, etc.
Supporting Documents When submitting supporting documents, file names shall remain the same if the entire document is being resubmitted. If the document is being supplemented or only portions have changed, use a new file name. It is important for file names to be representative of their content. Example file names are Truss, Geotech, Drainage, Traffic Study, Parallel Access Covenant, etc.
Response to comment documents are also uploaded as supporting documents. The file name is expected to change with each resubmittal.
Drawing Sheet Layout When creating each drawing sheet, a blank area shall be reserved for placement of the approval stamp. On all drawing sheets, leave the top right corner completely blank, with exception of the border, for the approval stamp. For Final Plats, the area below the plat book and page designation shall be left blank. The approval stamp area shall be portrait oriented, 3” x 5”, and located 2-3/4” from right edge of paper and 3/4" from the top edge of paper.

ePlans Applicant Guide 14 Marion County, Florida
Appendix B - Accessing Reviewer Comments
The eForm shares project information, task instructions, and reviewer comments, and markups. It contains multiple sections. The first section provides a variety of project information, including specific reviewer comments, depending on the tab selected. The sections that follow provide changemarks (markup information), additional department review information and comments, and task instructions.
For Building Permits, the Comment Report tab shown in Figure 15 contains a consolidated list of comments from all reviewers. The list may be sorted by clicking on the column headers. Comments can be exported to Excel by clicking on the Export to Excel link in the lower left hand corner. When responding to comments, upload the response to the Documents folder in the project screen.
Figure 15: Comment Report tab.
For Development Review Submittals, the Checklist Report tab shown in Figure 16 contains a a consolidated list of comments from all reviewers. Each comment will have an “INFO” or “NO” status. An item with an “INFO” status is informational only. An item with a “NO” status requires a response. Comments can be exported to Excel by clicking on the Export to Excel link in the lower left hand corner. When responding to comments, upload the response to the Documents folder in the project screen.
Figure 16: Checklist Report tab

ePlans Applicant Guide 15 Marion County, Florida
The Changemarks section shown in Figure 17 illustrates markups made by reviewers on the drawings. The File column contains a thumbnail image which can be clicked on to open a separate window containing a larger image for viewing only. The Markup column contains a link which will open the drawing file in a separate window for complete examination of the reviewer’s markups. The Summary and Description columns provide specific comments made by the reviewer about the markup. The applicant is to provide feedback comments to the reviewer utilizing the text box in the Applicant Response column. The Save Changemark Upates button at the bottom of the Changemarks section must be clicked on for responses to be saved. The Excel icon at the bottom of the Changemarks section may be used to export the text of the Changemarks section to an Excel file.
Figure 17: Changemarks section.

ePlans Applicant Guide 16 Marion County, Florida
The Department Review section shown in Figure 18 displays the Status, shown circled in red, and Notes, shown circled in blue, from each reveiwer. The Review Cycle drop down box can be used to view Status and Notes from previous submittals.
Figure 18: Department Review section.
The Task Instructions section, as shown in Figure 19, located at the bottom of the eForm, must be completed by checking each box and clicking Complete in order for the project to continue moving forward.
Figure 19: Task Instructions.

ePlans Applicant Guide 17 Marion County, Florida
Appendix C - Viewing Drawing Markups (Changemarks)
One way to open a drawing to view markups is by clicking on the reviewer’s Markup link, as shown circled in Figure 20, in the Changemarks section of the Applicant Resubmit Task eForm.
Figure 20: Markup link on eForm.
By clicking on this link, the drawing will be launched in a new window as shown in Figure 21.
Figure 21: Drawing file opened in ePlans viewer.

ePlans Applicant Guide 18 Marion County, Florida
As shown in Figure 22, markups (also referred to as changemarks) can be accessed by selecting the changemarks tab in the upper right hand corner of the drawing viewing window. To zoom in on a markup, click on any of the changemark summary items listed. The drawing will zoom to the changemark selected and a detailed description will be shown in the bottom pane.
Figure 22: Changemark tab, listing and description field

ePlans Applicant Guide 19 Marion County, Florida
As each changemark is selected, the drawing will zoom in on it, as shown in Figure 23.
Figure 23: Zoomed into first changemark on list.
Return to the drawing’s full extent by selecting the Fit All icon on the tool bar located at the bottom of the viewer window. From left to right, the circled icons shown in Figure 24 are: Rotate 90, Fit All, Fit Width, Zoom In/Out slider, Pan, Zoom Window, and Magnifier.
Figure 24: Viewing toolbar.

ePlans Applicant Guide 20 Marion County, Florida
Appendix D - Printing Drawing Markups (Changemarks)
Open drawing containing changemarks. In the Changmarks tab, select the Copy Changemarks button as shown in the upper right hand corner of Figure 25.
Figure 25: Copy Changemarks button
Check all boxes and change image size for larger thumbnails of changemarks as shown in Figure 26.
Figure 26: Copy Changemarks options.
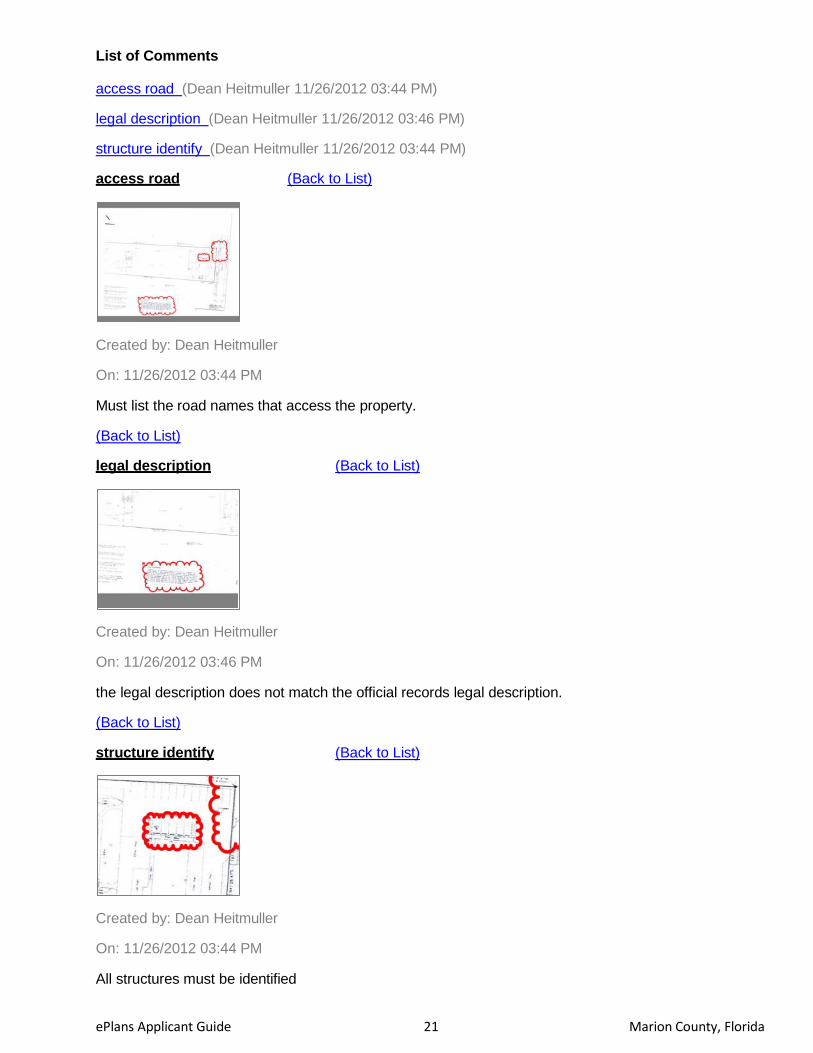
Open a new MS Word document and right click to paste. Below is an example of what is placed into MS Word when finished:
ePlans Applicant Guide 21 Marion County, Florida
List of Comments access road (Dean Heitmuller 11/26/2012 03:44 PM)
legal description (Dean Heitmuller 11/26/2012 03:46 PM)
structure identify (Dean Heitmuller 11/26/2012 03:44 PM)
access road (Back to List)
Created by: Dean Heitmuller
On: 11/26/2012 03:44 PM
Must list the road names that access the property.
(Back to List)
legal description (Back to List)
Created by: Dean Heitmuller
On: 11/26/2012 03:46 PM
the legal description does not match the official records legal description.
(Back to List)
structure identify (Back to List)
Created by: Dean Heitmuller
On: 11/26/2012 03:44 PM
All structures must be identified

ePlans Applicant Guide 22 Marion County, Florida
Appendix E - Windows 7 and Vista Install Instructions
Sometimes users will encounter errors or issues as a result of incomplete installation of the client components. This is often caused by permissions issues. The instructions below have proven useful in resolving the security/permissions issues and getting a successful installation. Note that the account executing these steps will need administrative privileges on the computer.
If the operating system is Windows 7 or Vista, the user will need to turn OFF UAC first. Additionally, if using IE 8, the user will need to turn off protected mode (apparently turning off UAC in Windows 7 also disables protected mode for IE8). It may be necessary to uninstall-reinstall ProjectDox components.
Turning Off UAC in Windows 7 and Vista The following link explains how to control UAC in Windows 7 and Vista. Follow the directions and screen shots. The remainder of the site is blog.
http://www.howtogeek.com/howto/windows-vista/disable-user-account-control-uac-the-easy-way-on- windows-vista/
Turning Off Protected Mode in IE8 The next link explains turning off protected mode in IE8 (apparently turning off UAC in Windows 7 also disables protected mode for IE8).
http://www.sevenforums.com/tutorials/63141-internet-explorer-protected-mode-turn-off.html
Uninstall-Reinstall ProjectDox Components Remove all ProjectDox components on the client:
1. Check for presence of program, and remove if found, using either a. or b. depending on the version of
the operating system: a. Windows 7, Vista - Using Control Panel (in classic view) -> Program Features, if ProjectDox
Components is listed then REMOVE. b. XP – Using Control Panel -> Add/Remove Programs, if ProjectDox Components is listed then
REMOVE. 2. In Internet Explorer (Internet Options->Browser History->Settings->View Objects) remove anything
Brava, ProjectDox, or Xupload. 3. After the above is completed, delete these directories and their contents: IGC (in Windows Vista or 7, do
a search for the filename IGC to locate, then delete) a. In XP Documents and Settings->User Account->IGC b. In XP Program Files->Avolve->Components).
Reinstall the ProjectDox components by clicking on Install ProjectDox Components on the login page, as described in the New Users ePlans Invitation section of this applicant guide. Again, if running Windows 7 or Vista, UAC must be OFF to work. Once the components are installed, UAC can be turned back on.