mastering the craft of painting (1985)
TRANSCRIPT

7/25/2019 Mastering the Craft of Painting (1985)
http://slidepdf.com/reader/full/mastering-the-craft-of-painting-1985 1/152
Mastering
the
Craft
qfPainting
BY
ANGELO
JOHN
GRADO
Basic instruction
in
form,
color,
and drawi^
^
based on Frank
Reil
1/s
famous teachings

7/25/2019 Mastering the Craft of Painting (1985)
http://slidepdf.com/reader/full/mastering-the-craft-of-painting-1985 2/152
Craft
ANGELO
JOHN
GRADO
artists must
master the
craft of
painting
they
can
fully develop
a unique,
style. In this
unusual book, An-
John
Grado takes you
into the
class-
of
one
of
the
Art
Students
League's
famous teachers—
Frank
J.
Reilly.
Grado's
lucid
notes,
sketches,
diagrams,
you
learn
the essentials
of
painting
and
drawing
just as
Reilly
them. In addition,
you
learn
how
to
beyond the
lessons
to
discover
your
individual
style.
The first
half
of
the
book
—
Lessons
Reilly
—includes valuable instruc-
for beginning
and
intermediate art-
on
line,
form,
relationships, action,
and shadows. There is
advice on
the
handling of both value
chroma,
as
well
as the
painting
of
tones.
Step-by-step
demonstrations
you
how to do
an
initial
wash-in
and
and
how
to
go
on
to
complete your
The emphasis
is
on the
figure,
the
information
extends
to
all painting
The
second half
of the
book is
de-
to
show
you
how
to adapt
what
have
learned from
Reilly
to
your own
needs. Grado offers advice
on
use
of
a free
palette and gives
a de-
demonstration
of procedures
for
up
your technique.
He
also
helpful
tips
on
working
with
pas-
handling
textures,
and creating
life-
portraits.
Filled
with
information
and
ideas, Mas-
the
Craft
of
Painting
is an
excellent
for all
artists,
and
it
can
be
easily
to
classroom
teaching.
Its
many
and exercises make
it
the ideal
for
anyone
who wants
to
learn
the
of
painting.
pages.
8
1
/4x11
(21
x
28
cm).
110
plates.
Over 400
black-and-white
Index

7/25/2019 Mastering the Craft of Painting (1985)
http://slidepdf.com/reader/full/mastering-the-craft-of-painting-1985 3/152
BOSTON
PUBLIC
LIBRARY
7/25/2019 Mastering the Craft of Painting (1985)
http://slidepdf.com/reader/full/mastering-the-craft-of-painting-1985 4/152

7/25/2019 Mastering the Craft of Painting (1985)
http://slidepdf.com/reader/full/mastering-the-craft-of-painting-1985 5/152
Mastering
the
Craft
of
Painting
Andrea Cella,
oil
on
canvas,
30
x
25
(76.2
x
63.5
cm)

7/25/2019 Mastering the Craft of Painting (1985)
http://slidepdf.com/reader/full/mastering-the-craft-of-painting-1985 6/152
Stanley Myron
Handleman,
pastel
on
paper,
23
x
17
(58.4
x
43.2
cm)
7/25/2019 Mastering the Craft of Painting (1985)
http://slidepdf.com/reader/full/mastering-the-craft-of-painting-1985 7/152
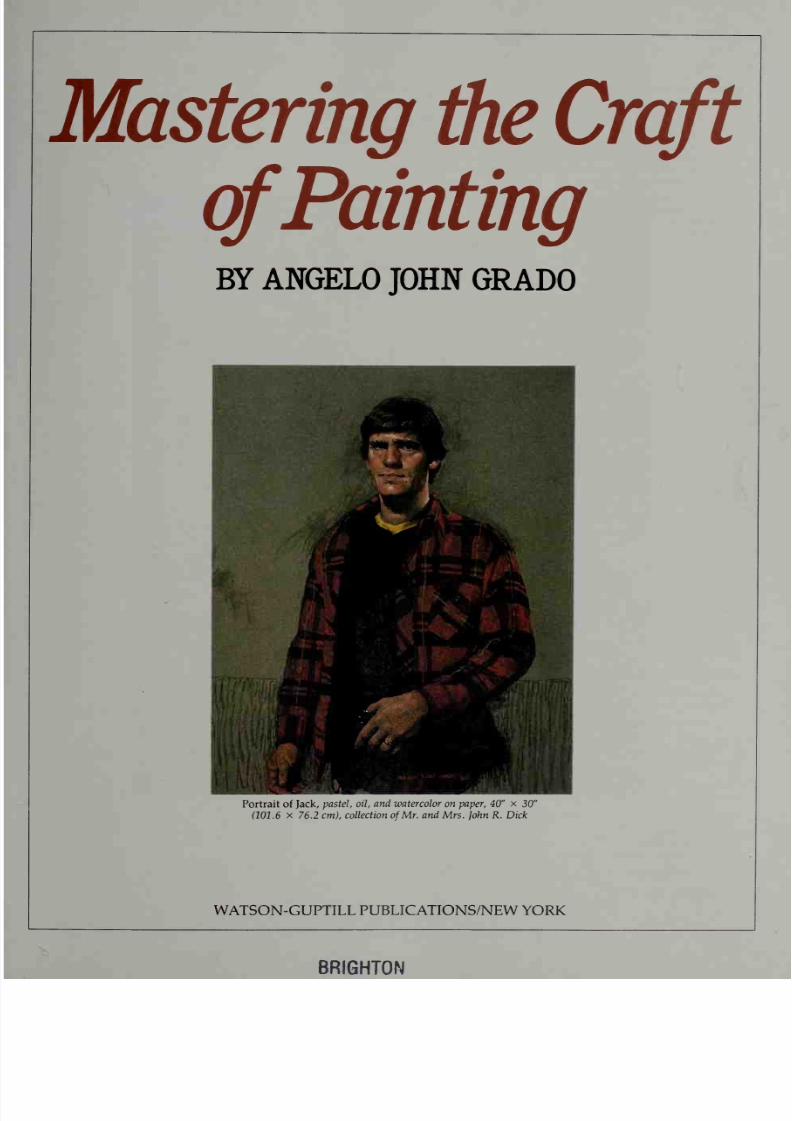
Mastering
the
Craft
qfPainting
BY
ANGELO
JOHN
GRADO
Hi
Portrait
of
Jack,
pastel, oil,
and watercolor on
paper,
40
x
30
(101.6
x
76.2 cm),
collection
of
Mr.
and
Mrs.
John
R. Dick
WATSON-GUPTILL
PUBLICATIONS/NEW
YORK
7/25/2019 Mastering the Craft of Painting (1985)
http://slidepdf.com/reader/full/mastering-the-craft-of-painting-1985 8/152
Special acknowledgment
and
thanks
to:
My mother and
father,
Rose
and
Pasquale
Grado,
who
are
responsible for
my
being
here.
My
late
Uncle John,
for taking me
to
my
first
museum and
encouraging
me
as a
child; Uncle Fred
Polizzi,
who is always
ready
to
pose;
and
my
son
John,
who
always
makes
things easier
for me.
To my daughter Barbara and
her
husband Richard Devir, my son Paul and
his
wife Janet,
my
son
Frank and his wife Kathy,
my youngest
son
Richard,
and
my
grandchildren Paul,
Nanette,
Megan, Kate.
Stevan,
Delia,
K.C.,
and
Justin. My
special
thanks to Andrea and Grace Cella,
Peter
Matulavage,
and
last
but
not least,
to
Mary Galletti, who
is
always
ready
to help
in
any
way needed.
First
published
in
1985
in
New York
by Watson-Guptill
Publications,
a
division
of
Billboard Publications,
Inc.,
1515
Broadway.
New York.
NY
10036
Library
of
Congress
Cataloging
in
Publication
Data
Grado, Angelo
John,
1922-
Mastenng
the
craft
of
painting
Includes index
1. Painting—Technique.
I.
Title
ND1500.G65
1985
7514
85-13724
ISBN
0-8230-3016-4
Distributed in
the United Kingdom
by
Phaidon
Press
Ltd
,
Littlegate
House,
St
Ebbe's St.,
Oxford
All
rights
reserved
No
part of
this
publication
may
be reproduced
or
used
in
any
form
or
by any
means—graphic,
electronic,
or
mechanical,
including
photocopying, recording,
taping,
or
information
storage and
retrieval
systems
—without
written permission
of
the
publisher
Manufactured in
Japan
First
printing,
1985
123456789
10/90
89
88 87
86
85

7/25/2019 Mastering the Craft of Painting (1985)
http://slidepdf.com/reader/full/mastering-the-craft-of-painting-1985 9/152
This
book
is
dedicated
to
my
wife
Justine
for
her
love and
patience
Still Life with
Lemon,
oil
on
canvas,
24
x
18
(61
x
45.7 cm)
7/25/2019 Mastering the Craft of Painting (1985)
http://slidepdf.com/reader/full/mastering-the-craft-of-painting-1985 10/152
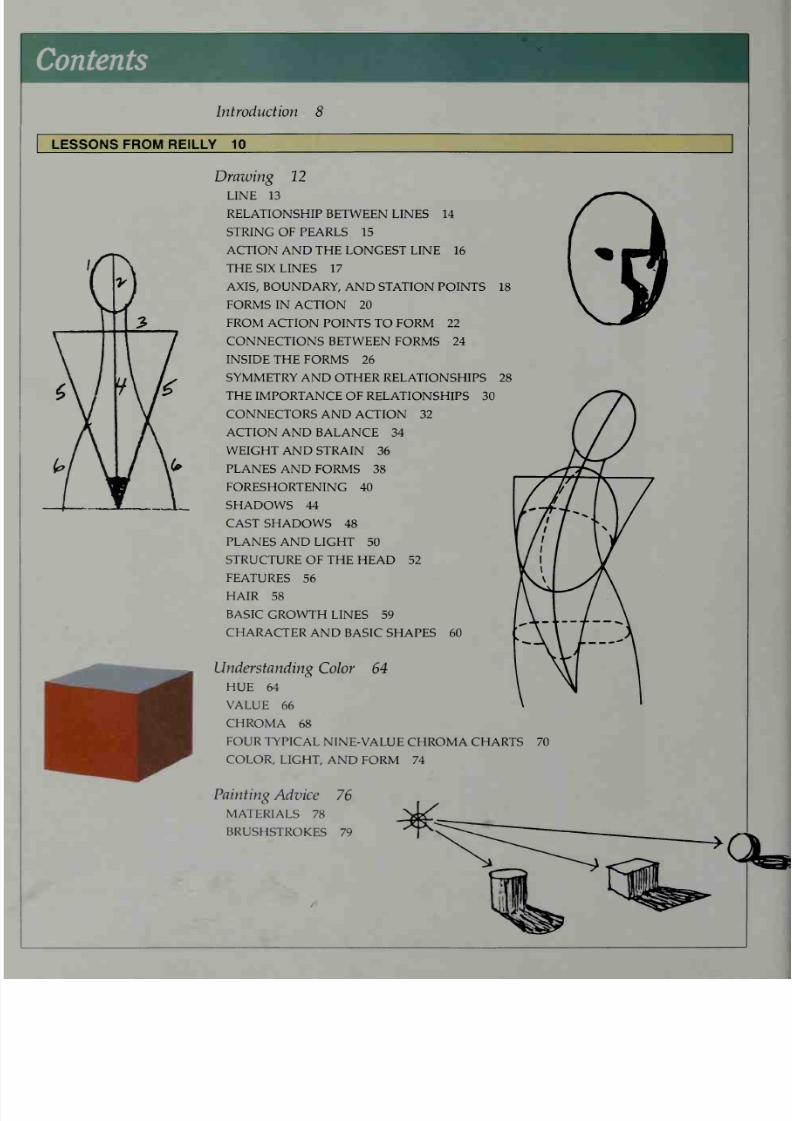
Introduction 8
LESSONS FROM
REILLY
10
Drawing
12
LINE
13
RELATIONSHIP BETWEEN
LINES
14
STRING OF
PEARLS
15
ACTION
AND
THE
LONGEST LINE
16
THE
SIX LINES 17
AXIS, BOUNDARY, AND STATION
POINTS
18
FORMS IN ACTION
20
FROM
ACTION POINTS
TO
FORM
22
CONNECTIONS BETWEEN FORMS 24
INSIDE
THE
FORMS
26
SYMMETRY
AND OTHER RELATIONSHIPS
THE
IMPORTANCE OF
RELATIONSHIPS 30
CONNECTORS
AND
ACTION
32
ACTION AND
BALANCE 34
WEIGHT AND STRAIN
36
PLANES
AND
FORMS 38
FORESHORTENING 40
SHADOWS 44
CAST SHADOWS
48
PLANES
AND
LIGHT
50
STRUCTURE
OF THE HEAD 52
FEATURES
56
HAIR
58
BASIC
GROWTH
LINES
59
CHARACTER
AND
BASIC
SHAPES 60
Understanding
Color
64
HUE 64
VALUE
66
CHROMA
68
FOUR
TYPICAL
NINE-VALUE CHROMA
CHARTS
70
COLOR,
LIGHT,
AND FORM 74
Painting
Advice
76
MATERIALS
78
BRUSHSTROKES
79

7/25/2019 Mastering the Craft of Painting (1985)
http://slidepdf.com/reader/full/mastering-the-craft-of-painting-1985 11/152
Wash-In
80
STARTING
WITH
AN INK
DRAWING
WORKING
DIRECTLY
84
Lay-In
and
Painting Stage
86
COLOR
NOTE 86
PAINTING
DEMONSTRATION
87
COMPLEXION
OR FLESH
COLOR
THE
EFFECT
94
HALFTONES
95
GRADATION
96
PROGRESSION
97
CENTER
LIGHTS
AND HIGHLIGHTS
PLANES 100
HARD
VS.
SOFT
EDGES
102
Finishing
Touches 104
81
92
98
BEYOND
THE
LESSONS:
DEVELOPING YOUR
INDIVIDUALITY 106
Choosing
a
Palette Arrangement
108
Loosening
Up:
A
Demonstration
110
ESTABLISH
THE ABSTRACT
PATTERN 111
BUILD
THE
FORMS
112
TAKE CONTROL
114
PULL
IT
TOGETHER 116
ADD
THE
FINISHING
TOUCHES
118
Gallery
of
Paintings
120
USING
A CONTROLLED
TECHNIQUE
120
A
STUDY
OF
TEXTURES
122
DIFFERENT
TECHNIQUES
WITH
THE
FIGURE
124
PAINTING
WITH
TEXTURE
126
TEXTURES
IN
PASTEL
128
MAKING
FLESH
LUMINOUS 130
TEXTURE IN
STILL
LIFES
132
FOCUS
ON
FACIAL
FEATURES 134
PASTEL
PORTRAITS
136
WORKING
LOOSELY 138
CREATING
INTEREST 140
TELLING A
STORY
142
Index
144

7/25/2019 Mastering the Craft of Painting (1985)
http://slidepdf.com/reader/full/mastering-the-craft-of-painting-1985 12/152
Introduction
The
most
difficult
problem
faced
by art students
has
always
been
to find
a
teacher
who knows how
to
paint, who
knows
his
or her
craft,
and who
has the teaching talent
to
impart this
knowledge to
students.
It
is
also
extremely
important that
the
teacher's knowledge
is
passed
on
without
the
student becoming
a
carbon
copy of the teacher.
Frank
J.
Reilly,
who
taught
at
the
Art
Students
League
in
New
York
City and eventually established his
own
art school, was
a teacher who
had
all these
qualities. His students were taught the
craft
of
painting
and
picture
making,
not just one teacher's personal
method,
as
is so
often
the
case.
In
viewing
paintings at
various art exhibitions,
I
usually find
it easy
to
see
who
studied
with whom. But
I
find
it difficult
to pick
out which
painters studied with Frank
Reilly.
To
this
day,
I don't know
of
a
single
former
student
who
paints using Reilly's
personal technique. Many
professionals
in
the art field saw his teachings
as
too mechanical
or
methodical,
but
I
disagree. Learning
the
mechanics
of art
is
as
important
to a
student
of
art
as
learning the scales or
correct
placement of
fingers
is
to a student of
music.
The
craft of painting
must
be
thoroughly
and
correctly learned
for a student to
develop complete
control
over the
medium.
Once
this control is
achieved, the student
can
choose whatever
direction
in painting suits his or
her
particular personality and tempera-
ment.
My
own study
of
painting actually began with
Robert
Brackman,
a
very
dominant,
dynamic teacher
at
the Art
Students
League. I
chose
Brackman
because I
sincerely
liked his paintings, and
I
still think his
best
paintings rank among
the
finest in
America.
His strong point in teaching
was the
conception
of
the
painting.
Without
a good
conception,
there
can
be no
art
to a
picture,
he
would
say,
no matter how well
the
painting
is
executed.
Brackman
taught
us
to see
in
terms of
color and relationships of one
thing
to
another. But the first step
was
a
good
conception.
If your
conception
was not
to
his satisfaction,
you had to
wash the
canvas
down
with
turpentine to the original
white priming.
After
washing down
several
canvases,
it's
amazing
how
much time you'd
spend
making the
next
conception
a good
one. This
is
how to
develop
discipline.
The
next
step was to
paint
in
the background, which
would then
be
the
key
to the
whole figure
painting. When the
background
was correct to
your
and
Brackman's satisfaction, you
proceeded to
paint
in the shadow
areas
of
the
figure. These
shadow areas
had to be
correctly
related to
the
background.
Sometimes
a whole
week
would
pass
with
only
the
background
and
the
shadow
areas
containing
paint.
The
light
areas
could
not
be
painted
until the shadows were
in
correct
relation
to
the
background.
After
three
years of study, and on
Brackman's advice,
I spent one
year
painting
on
my
own. By
the time the
year
was
up,
I
knew I
needed
more
7/25/2019 Mastering the Craft of Painting (1985)
http://slidepdf.com/reader/full/mastering-the-craft-of-painting-1985 13/152
experience
painting
from
the
model
and
someone
to
help me on
the next
phase
of
my
education.
Robert
Brackman
and Robert
Philipp
were
good
friends
from
their
art
school
days,
and
Brackman
always
had
the
highest praise for Philipp's
paintings.
With
this
in mind,
I enrolled
in
the
National
Academy Art
School
to
study with
Philipp,
although
not
full-time.
I
worked
with
him
for
three
months,
alternating
with three
months
by
myself,
for the next
few
years.
I
found
Philipp
a much
more
emotional
painter and
a warmer person
than
Brackman.
Given his
emotional
personality,
he
produced more
uneven
paintings
than
Brackman
did, but the aesthetic highpoints
were
much
greater
—which,
to me,
is
more
exciting.
He
was not
overly
concerned
with
the
conception or
procedure,
but
rather
with
beautiful
color
and
the application
of
pigment. He
was
truly an artist.
Even
after
studying with
Philipp, however, I
felt
a
lack in
my
craft.
Brackman
had
given
me
a
feeling
for
the
conception, as well as for
pastel,
and Philipp
taught
me
about the aesthetics of
painting. But
that
certain
control
of
the overall picture
was
still
missing.
All
during
these painting years
I continued
freelancing
in
commercial
art
to support my
wife
and
five
children.
One
of
my
accounts was as art
director
of Art
Times magazine, and through this
I
met
Frank
Reilly.
We
became
good friends, and
when
he
looked
at some of
my
paintings,
he
astounded
me with
his
knowledge of
the
craft of painting. He
knew
just
where
I went off
(primarily
in
my
values).
I
enrolled in
the
Frank
Reilly School
of
Art
and the final part of my
education
began.
At
the
time
I
was already a
member
of the
American
Watercolor
Society,
Salmagundi Club, and the American Artists Profes-
sional
League.
I
was
entering and
being
accepted
in
national
exhibitions
and
winning
awards.
But
I
purposely
entered
the
Frank
Reilly
School
with
the
mental
attitude of a beginner,
wanting
to
learn everything he
had
to
teach.
Reilly
gave weekly
lectures with
home
assignments.
There
was no
phase
of
painting or
drawing that was
not
covered,
from the conception
to
the
finish.
We
had
assignments
to
make charts
on
everything,
covering all
the variations
in
value,
hue,
and chroma for
landscapes
and
the
human form. I
think
I
spent
one
summer
just
mixing
and
tubing
paint
—
yes,
we
pre-mixed
and tubed
most of
our
colors
in
Reilly's class.
After
all
the
colors
were tubed,
I
made
charts for
every conceivable
human
complexion in
nine values
for every
hue
and
chroma.
While
I
was
in
Reilly's
class, he
became ill, and
he
died
in January
1967.
In
the
following
years,
whenever
I
felt
the
need
to
work
from
the
model,
I
enrolled
in Robert
Philipp's
class
at
the Academy
for
a
month or
two.
In
1972
I was
awarded a
bronze
medal for a
large oil of a nude
that I
painted
in his class.
From
then
on
I
painted on
my
own
entirely,
thankful
to
each
of my three
teachers.
Each
was different,
and each
certainly
contributed
to
the
quality
of my
paintings.
7/25/2019 Mastering the Craft of Painting (1985)
http://slidepdf.com/reader/full/mastering-the-craft-of-painting-1985 14/152

7/25/2019 Mastering the Craft of Painting (1985)
http://slidepdf.com/reader/full/mastering-the-craft-of-painting-1985 15/152
Lessons
from
Reilly
The
lessons
in this
section
stem from the
notes I
took in Frank Reilly's
classes.
The
focus is
on drawing
and painting the figure
—a good starting
point
for any art
student.
Once
you
learn how
to
deal with the problems
in
painting
the figure,
you can easily transfer
this
knowledge
to
any
other
situation.
Reilly's
teachings,
then, extend far beyond the figure
—
they introduce
you to the
underlying
craft of
drawing
and
painting. In mastering
this craft,
you will develop
the
control you
need to expand in other
directions.
The
important
thing
to
remember as
you
study these lessons
is
that the
ideas
are part of
a
learning
process.
Don't
be
concerned
with your
way
or
your
interpretation.
That
will
come later.
For
now, just stay
with the
correct
procedures and repeat
anything
that
seems difficult.
As you
practice,
you will be
developing your
skills,
and
it will also
help
you to
understand
what you
are
doing.
And
if
you
don't
get
it
right
at
first,
don't become
discouraged.
I
remember
reading
somewhere that
Leonardo
da
Vinci
was
an apprentice
for almost
fifteen years
before he
felt
confident
enough
to
open a
studio
of
his
own. Practice makes
perfect —but
only
if
you know
what you
are doing.
11

7/25/2019 Mastering the Craft of Painting (1985)
http://slidepdf.com/reader/full/mastering-the-craft-of-painting-1985 16/152
Drawing
Drawing
is
the first step in learning the language of
painting. Drawing
is
itself a
language
of
symbols.
There are
dots
for indicating
where
important forms
should be
placed,
lines
to
show boundaries between
forms,
and
patterns
that
are
formed
through repetition of similar shapes.
When
you
want
to
suggest
a
third
dimension,
there are additional
symbols
for
indicating
form,
planes,
edges,
and
perspective.
Drawing
teaches
you
how to
understand
what
you're seeing in nature
and express it simply and
clearly.
It isn't a matter of copying
what you
see.
Instead,
you
have
to be
able to
conceive
it and
translate it onto
your
paper
or canvas.
Having a conception when you
draw means that you must know
what
each
line
is
for
and
where
it
is
going
before
you
begin.
You start
with
the
longest lines and gradually work to
the smaller
ones. This
means
you
must
think
before
you
put
pencil
to
paper.
PRACTICE
EVERYTHING
~|
The lessons in this
section
present
different
principles for you to
remember in drawing
the
figure.
The best way
to
understand this
information
is to
try
it
out
as
you
go
along.
If
you
can't
work
from a
nude
model,
use a
clothed figure.
Do
quick
sketches
while a
friend is
reading,
or ask someone
to
pose briefly
for
you.
The
important thing
is
to
practice.
As you practice
each
point, you
will
absorb
different
ways
of
looking
at
the
figure
and
understanding
what
you
see. Try to
master one
point at a
time.
Don't worry about
learning
everything at once.
There are a
lot of
ideas
here,
and you
may
find some
principles
more helpful
than
others.
But
you
have
to
learn
all
the
different rules
before you can
know
which
ones
you want
to
eliminate
and
which
to
keep.
When
you
practice,
I suggest you
use
the
following
supplies:
18
x
24
newsprint
pad
No. 2B
Wolff
carbon
pencil
sharpened
to
a
point,
then sanded
down
to
three
flat,
pyramidal sides
Kneaded
eraser
uoocfT^
OJ28ca> pe**j^
tt
3
7/25/2019 Mastering the Craft of Painting (1985)
http://slidepdf.com/reader/full/mastering-the-craft-of-painting-1985 17/152
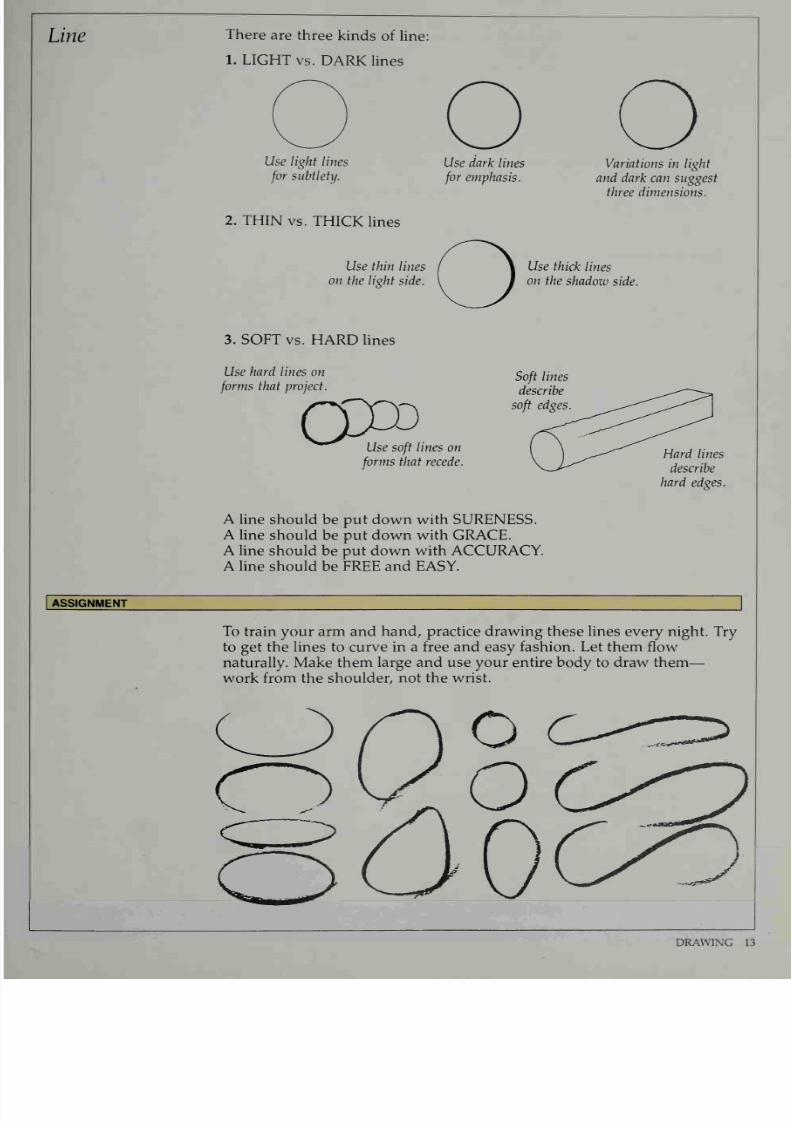
Line
There
are
three
kinds
of
line:
1.
LIGHT
vs.
DARK
lines
Use light
lines
for
subtlety.
2.
THIN
vs.
THICK
lines
Use thin lines
on
the
light
side.
3. SOFT
vs.
HARD lines
Use hard lines
on
forms
that project.
Use
dark
lines
for
emphasis.
Variations in light
and
dark can
suggest
three dimensions.
Use
thick
lines
on the
shadow side.
CCCD
Soft
lines
describe
soft
edges
Use
soft
lines on
forms
that
recede.
A
line
should
be
put
down with SURENESS.
A
line should
be
put
down
with
GRACE.
A
line
should be put
down
with
ACCURACY.
A line should
be
FREE and
EASY.
Hard
lines
describe
hard edges.
ASSIGNMENT
To
train
your
arm and
hand,
practice drawing
these lines
every night.
Try
to
get
the
lines to
curve in
a
free
and
easy fashion. Let
them flow
naturally. Make
them large and use your entire
body
to
draw them
work
from the
shoulder,
not
the
wrist.
DRAWING
13
7/25/2019 Mastering the Craft of Painting (1985)
http://slidepdf.com/reader/full/mastering-the-craft-of-painting-1985 18/152
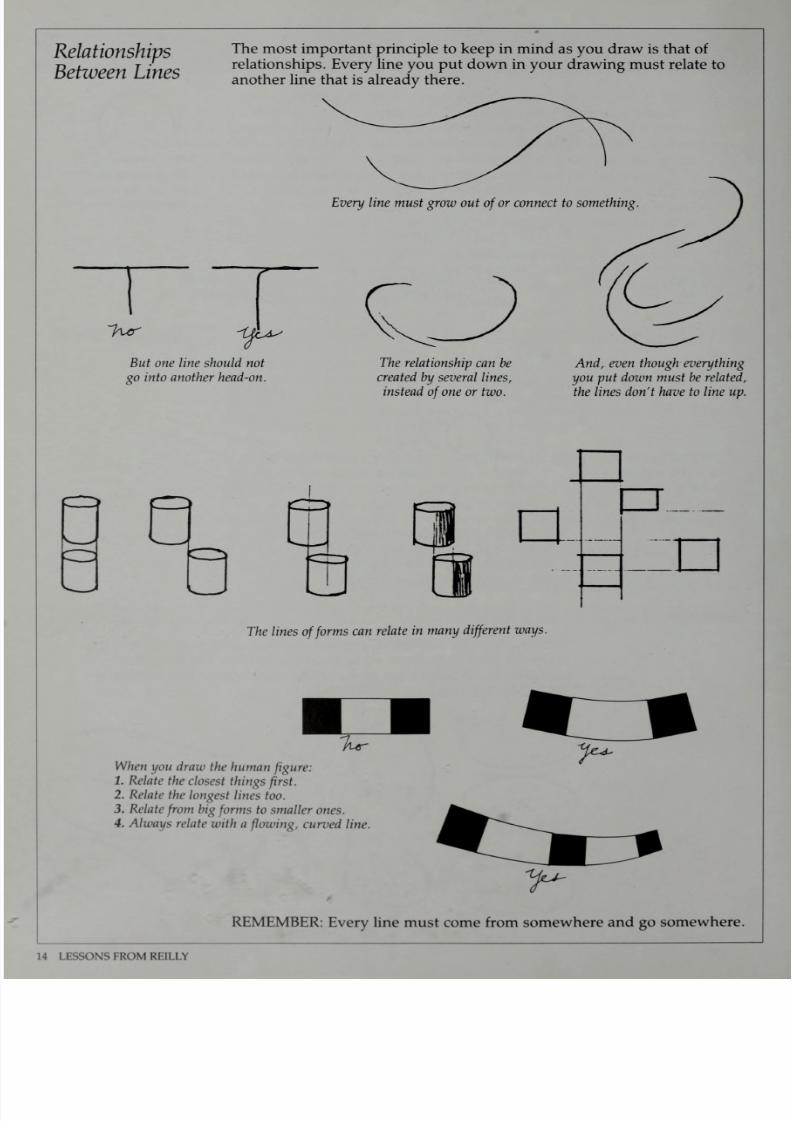
Relationships
Between
Lines
The most important
principle
to
keep
in mind as
you
draw
is
that
of
relationships.
Every line you put
down
in
your
drawing
must
relate to
another
line
that
is
already
there.
Every
line
must
grow out
of
or
connect
to something
7~
~Hv
if~
But
one
line
should
not
go into
another head-on.
The
relationship
can
be
created
by
several
lines,
instead
of
one
or two.
And,
even
though
everything
you
put
down
must
be
related,
the lines don't
have to line up.
The lines
of
forms
can
relate
in
many
different
ways.
tr
When
you
draw
the human
figure:
1. Relate
the
closest
things
first.
2. Relate
the
longest
lines too.
3.
Relate
from
big
forms
to
smaller
ones.
4.
Always
relate
with
a
flowing,
curved
line.
? -
REMEMBER:
Every line must come from somewhere
and go
somewhere.

7/25/2019 Mastering the Craft of Painting (1985)
http://slidepdf.com/reader/full/mastering-the-craft-of-painting-1985 19/152
String
of
Pearls
Before
you can
draw
a
form like the
human
figure, you
must
determine
its
basic action
—the gesture. This
action
imposes
order on
the
subject. It
holds the
individual
pieces
of
the
composition together.
To explain
this concept, Reilly
used
the now-famous example of
a
string
of
pearls.
If
you were
to
draw a
necklace, pearl
by
pearl,
the result
would
be
a
chaotic
and
disjointed series of balls. The
only way
to make
sense
of
the
pieces
is to draw the direction of the string
that connects
the
pearls
first. This
is
the longest
line of action:
it shows the movement of
the parts.
Once this
is
drawn,
you
can put the
individual pearls
(the
details)
on
that
line.
Apply
this
principle to
everything
you draw:
First
draw
the
conecting string
—
the
largest
action.
Then
put
on the
forms.
^4D£s\*4A3£^^<sO-^
Just
as
you draw a
log
before
the bumps,
put
the
main
action
line
down
be-
fore
the
forms.
Then the
forms
have something
to
rest on
and
somewhere
to
go.
They have a
direction
and movement.
Every
line
must
explain an
action
in
drawing. DON'T
use
stiff,
jerky
piecemeal
lines.
Choose long,
graceful
lines
that
connect
one form to
another.
Lines
of
action
can
go
into
and
out
of
forms.
But
make
sure
that
every
line
that
is
on
a
form
goes
around
it.
DRAWING
15
7/25/2019 Mastering the Craft of Painting (1985)
http://slidepdf.com/reader/full/mastering-the-craft-of-painting-1985 20/152
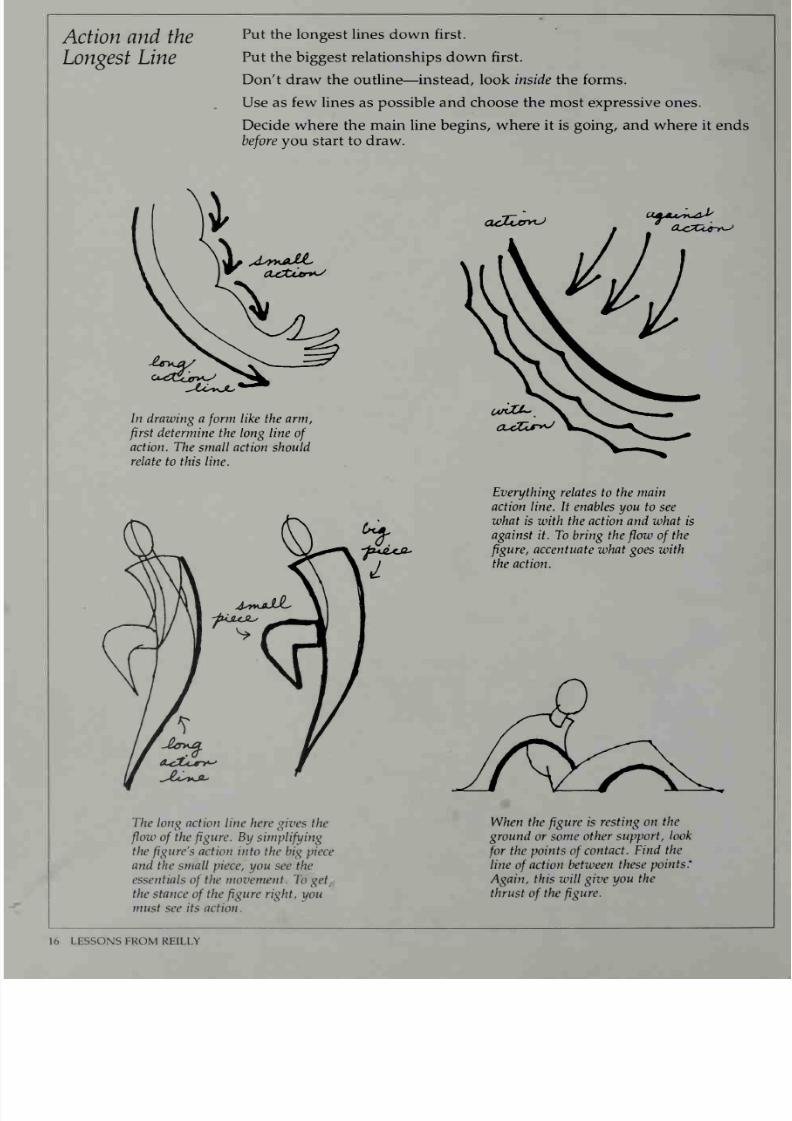
Action and
the
Longest Line
Put the
longest
lines
down
first.
Put
the biggest
relationships
down
first.
Don't draw the
outline
—
instead, look
inside the forms.
Use
as
few lines
as
possible and
choose
the
most
expressive
ones.
Decide
where
the main
line
begins,
where it is going, and where it
ends
before
you
start to draw.
acJCLtmJ
In drawing
a
form
like the arm,
first
determine the
long line
of
action.
The
small
action
should
relate
to this
line.
Everything
relates to the main
action
line. It
enables you to
see
what
is with the
action and
what
is
against
it. To
bring
the
flow
of
the
figure,
accentuate what goes with
the
action.
The
long action line
here gives the
flow
of
the
figure.
By
simplifying
the
figure's
action
into
the big piece
and
the small
piece,
you
see the
essentials
of
the movement. To
get
the stance
of
the
figure
right,
you
must
see
its
action.
When
the
figure
is
resting
on
the
ground
or some
other
support,
look
for
the
points
of
contact.
Find the
line
of
action
between
these
points'
Again,
this
will
give you
the
thrust
of
the
figure.
16
LESSONS
FROM
REILLY

7/25/2019 Mastering the Craft of Painting (1985)
http://slidepdf.com/reader/full/mastering-the-craft-of-painting-1985 21/152
The Six
Lines
To draw
the
action of the figure,
locate
the
six important lines of the
figure.
On the
stationary body, the six lines
are:
1.
Head 2.
Center
line
3. Shoulder line
to
pit
of
neck
4.
Center
line
from
pit
of
neck
to
crotch
5.
Shoulder
points
to
crotch point
6.
fawline
beneath
ear to
width
of
hips
The
rest of
the
body
follows
on
these
six
lines.
Add
the
legs
in
simple
lines,
starting
with
inside
line.
Draw
the lines
of
the
arms.
Add
the rib
cage
and
pelvic
forms.
Also
indicate
the
related
iliac
crest.
Complete
the
basic
structure
by
showing
the breasts,
neck
form,
and leg
forms.
DRAWING
17

7/25/2019 Mastering the Craft of Painting (1985)
http://slidepdf.com/reader/full/mastering-the-craft-of-painting-1985 22/152
Axis,
Boundary,
and
Station
Points
Because
the silhouette does not explain
the
forms well
enough,
you must
work
inside
the form.
Every form has an axis
—
a direction
or thrust—
and a
boundary, or
outside
shape.
The
axis
of a form
describes
its
action.
You can
find the
axis where
the boundary lines cross.
asjU^
JHXt^jiAAfj-
as&ls
^4WJsrulL*AJ-4.
/v^pla^
To
visualize
the
boundaries
and axis
of
the rib
cage,
picture
a black thread
glued
onto
a
hard-boiled
egg. Note
the tilt
of
the
axis and
the
way
the nipples
follow
the
curve of
the
form
along
the
boundary
line.
18 LESSONS
FROM REILLY
7/25/2019 Mastering the Craft of Painting (1985)
http://slidepdf.com/reader/full/mastering-the-craft-of-painting-1985 23/152
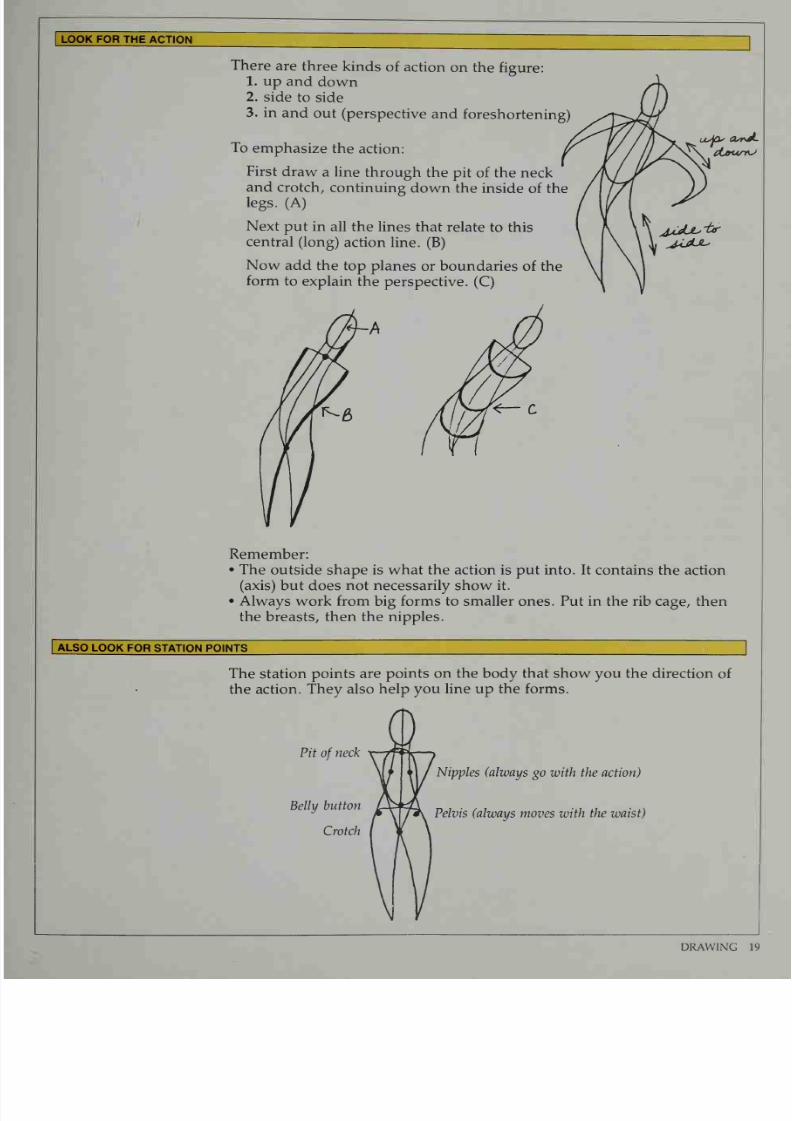
LOOK FOR
THE ACTION
There
are
three
kinds
of
action
on the
figure:
1. up
and
down
2.
side
to
side
3.
in
and
out
(perspective
and
foreshortening)
To
emphasize
the
action:
First
draw
a
line
through
the
pit of the
neck
and
crotch,
continuing
down
the
inside
of
the
legs.
(A)
Next
put
in
all
the lines
that
relate
to this
central
(long)
action
line.
(B)
Now add the
top planes
or boundaries
of the
form
to
explain
the
perspective.
(C)
Remember:
•
The
outside shape is
what the
action is put into. It contains
the
action
(axis)
but does
not
necessarily
show
it.
•
Always work from big forms to smaller
ones.
Put in the
rib
cage,
then
the
breasts, then the nipples.
ALSO
LOOK
FOR
STATION POINTS
The station points
are points
on the
body
that
show
you
the
direction
of
the
action. They also
help
you
line up
the
forms.
Pit
of
neck
Belly
button
Crotch
Nipples
(always
go with the
action)
Pelvis (always moves with the waist)
DRAWING
19
7/25/2019 Mastering the Craft of Painting (1985)
http://slidepdf.com/reader/full/mastering-the-craft-of-painting-1985 24/152
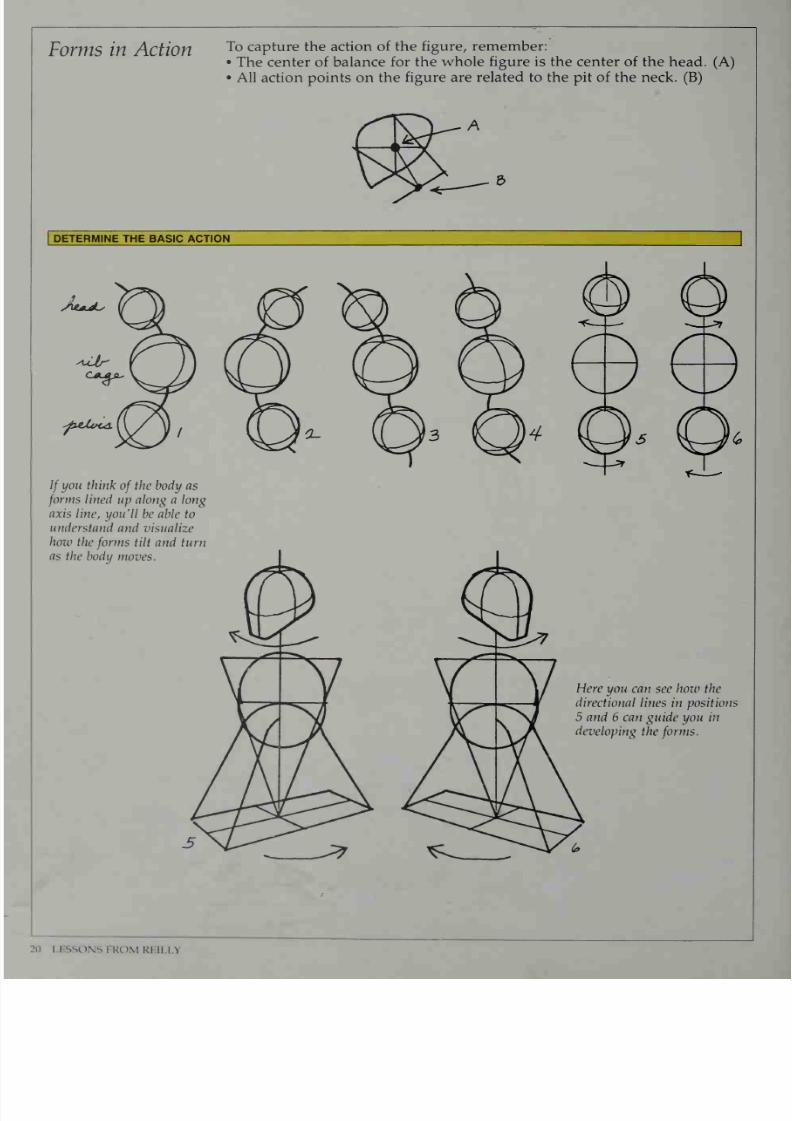
Forms in Action
To
capture the
action of
the
figure, remember:
•
The
center
of balance
for
the
whole figure
is
the center
of the head.
(A)
•
All
action points
on the
figure are related
to
the pit of the neck. (B)
DETERMINE
THE BASIC ACTION
A**JLs
jUltHA.
If
you
think
of
the body as
forms
lined
up along a long
axis
line, you'll
be able
to
understand
and
visualize
how
the
forms
tilt
and
turn
as the
body
moves.
Here
you
can
see
how
the
directional
lines
in
positions
5
and
6
can
guide
you
in
developing
the
forms.
LFSso\s|KO\1
Kill
n
7/25/2019 Mastering the Craft of Painting (1985)
http://slidepdf.com/reader/full/mastering-the-craft-of-painting-1985 25/152
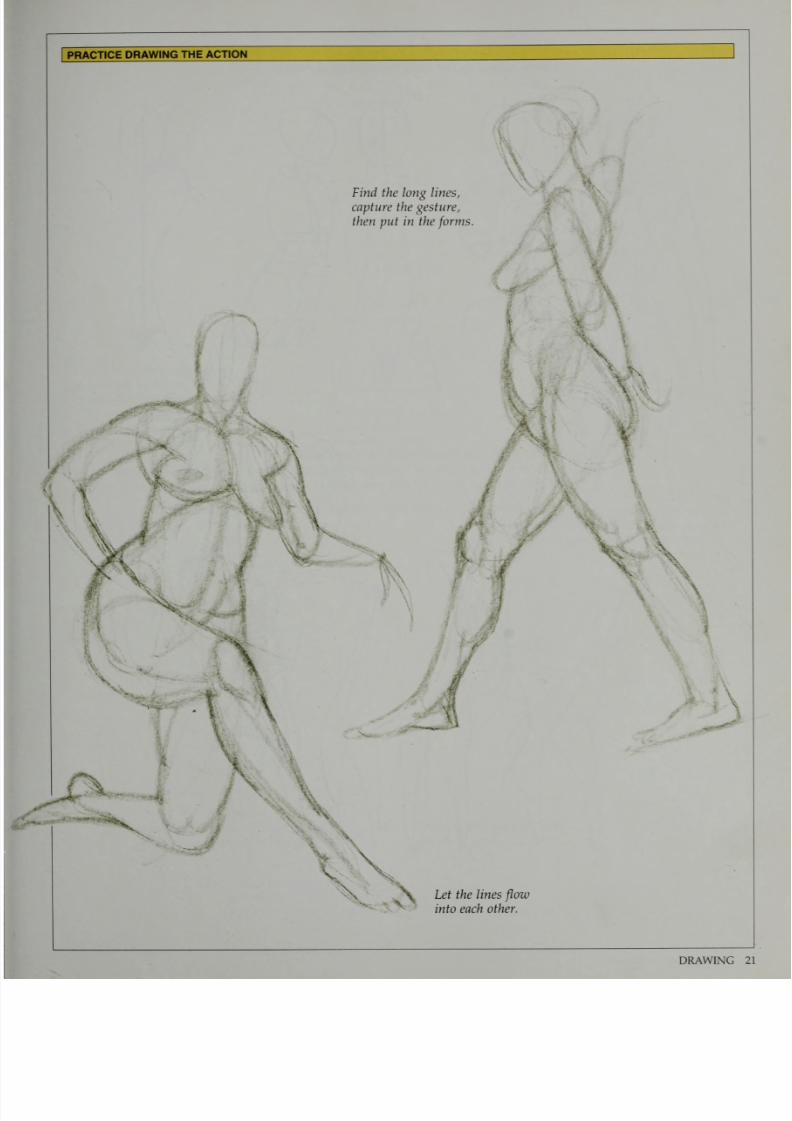
PRACTICE
DRAWING
THE
ACTION
Find the long
lines,
capture the gesture,
then
put in the
forms.
Let the lines
flow
into
each
other.
DRAWING 21
7/25/2019 Mastering the Craft of Painting (1985)
http://slidepdf.com/reader/full/mastering-the-craft-of-painting-1985 26/152
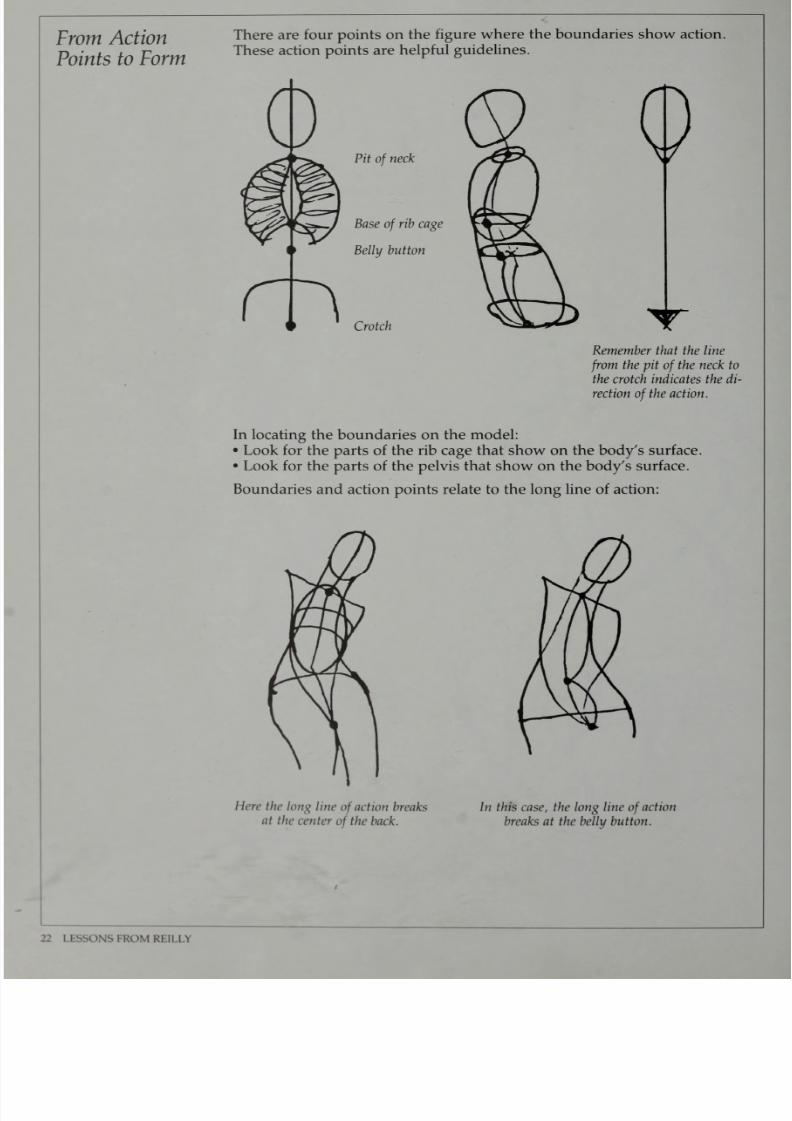
From
Action
Points
to Form
There
are
four
points
on
the
figure
where the boundaries
show
action.
These
action points are
helpful
guidelines.
Pit
of
neck
Base
of
rib
cage
Belly
button
Crotch
Remember that
the
line
from
the pit
of
the
neck to
the crotch indicates the di-
rection
of
the action.
In
locating
the boundaries on
the
model:
•
Look for the
parts
of the rib cage that
show on
the body's
surface.
•
Look for
the
parts
of
the
pelvis
that
show
on
the
body's
surface.
Boundaries
and
action
points
relate to
the
long
line of
action:
Here
the
long
line
of
action
breaks
at
the
center
of
the
back.
In
this case,
the long line
of
action
breaks at
the
belly
button.
22
LFSsu\slKOMKI
II n
7/25/2019 Mastering the Craft of Painting (1985)
http://slidepdf.com/reader/full/mastering-the-craft-of-painting-1985 27/152
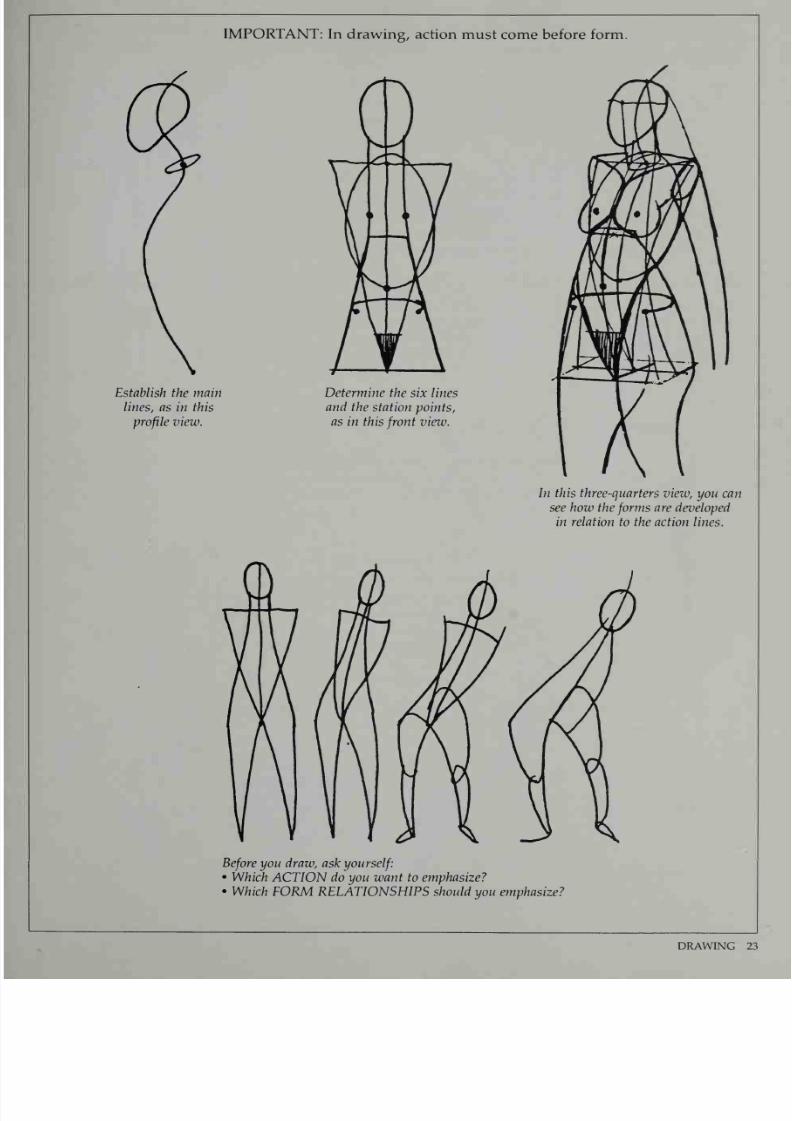
IMPORTANT:
In
drawing, action
must
come
before
form.
Establish the main
lines,
as in this
profile
view.
Determine
the
six
lines
and
the
station points,
as
in
this
front
view.
In this three-quarters
view, you can
see how the
forms
are
developed
in
relation
to
the
action
lines.
Before
you draw, ask
yourself:
•
Which
ACTION do
you
want to
emphasize?
•
Which
FORM
RELATIONSHIPS should
you
emphasize?
DRAWING 23
7/25/2019 Mastering the Craft of Painting (1985)
http://slidepdf.com/reader/full/mastering-the-craft-of-painting-1985 28/152
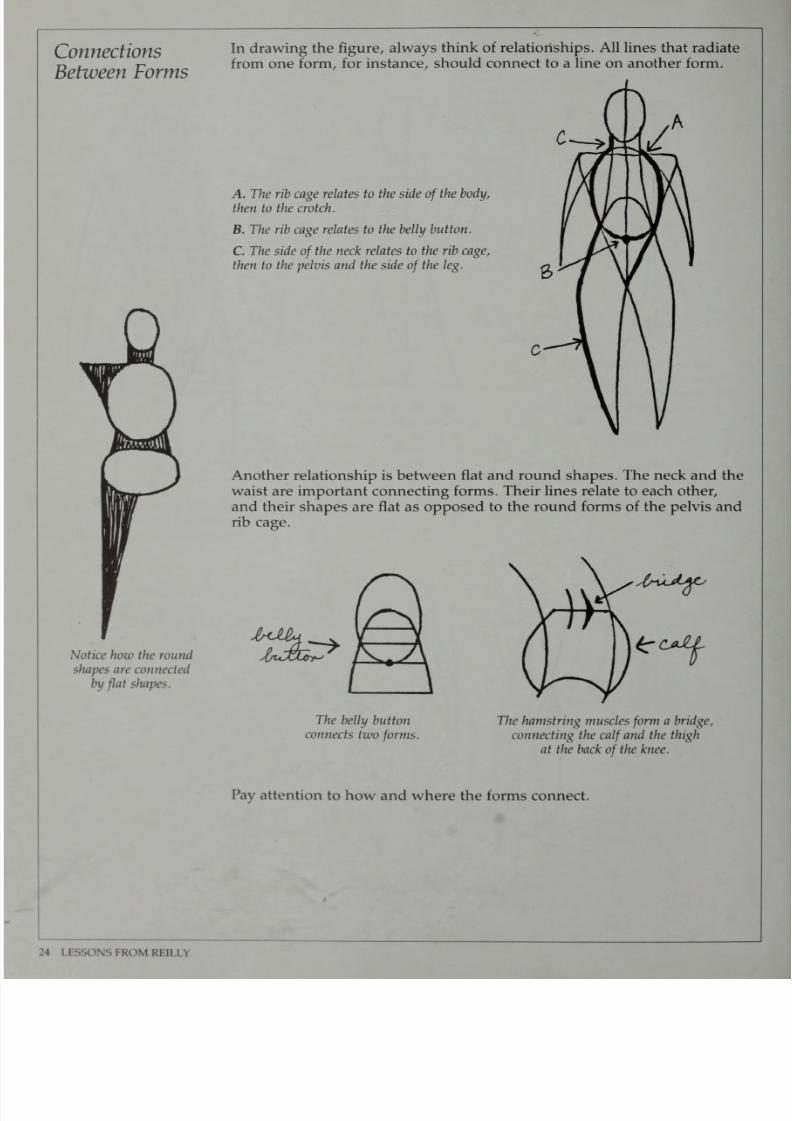
Connections
Between
Forms
In
drawing the
figure,
always
think of
relationships.
All lines that
radiate
from
one
form,
for
instance, should
connect to
a
line
on another
form.
A.
The rib cage
relates
to
the side
of
the
body,
then to
the crotch.
B.
The rib cage
relates to
the
belly
button.
C.
The side
of
the neck
relates to the rib cage,
then
to
the
pelvis
and
the
side
of
the leg.
Another relationship is between flat and round
shapes.
The neck and the
waist
are
important
connecting forms. Their
lines
relate
to
each other,
and their shapes
are
flat
as
opposed
to
the
round forms of the pelvis and
rib
cage.
Notice how
the round
shapes
are connected
by
flat
shapes.
sfacAftCs
The
belly
button
connects
two
forms.
The
hamstring
muscles
form
a
bridge,
connecting the
calf
and
the thigh
at the back
of
the knee.
Pay
attention
to
how
and
where
the forms connect.
24 LESSONS
FROM
Kill \\

7/25/2019 Mastering the Craft of Painting (1985)
http://slidepdf.com/reader/full/mastering-the-craft-of-painting-1985 29/152
And
always
look for
the action.
Is there
a
change of movement at the
point where
the forms connect?
Forms
can bend.
Forms
can
twist.
Forms can be at
right
angles to
the action.
WORK FROM LARGE TO SMALL
Once
you
have
the large
shape, look
for the
smaller
forms
within it. Keep
the
outline
simple
and draw as much as
possible from
the inside.
Note,
for
example,
the breast
and
belly
within
the
form
of
the
torso
and
the
developing
forms of
the
thigh and crotch.
CONSIDER
THE
OUTSIDE ENVELOPE
Each
pose
can
be
seen as enclosed within a large shape,
or envelope.
This
envelope can
clarify
relationships
between the outside lines
of
the
forms.
Here the line
from
the
top
of
the
head goes into
the
out-
side line
of
the
upper
arm
(A)
and then
relates
to
the
outside
line
of
the
leg
(B).
Notice
how the
envelope
reveals the
triangular
out-
side shapes.
This,
too,
is a
guide
to
how to
make all
the outside
lines
of
forms
relate to
each
other.
Remember, however, that all
outside
lines on
the
figure
should
be curved.
Keep
the
sides
of
the
outside
triangle
curved,
not
straight.
7/25/2019 Mastering the Craft of Painting (1985)
http://slidepdf.com/reader/full/mastering-the-craft-of-painting-1985 30/152
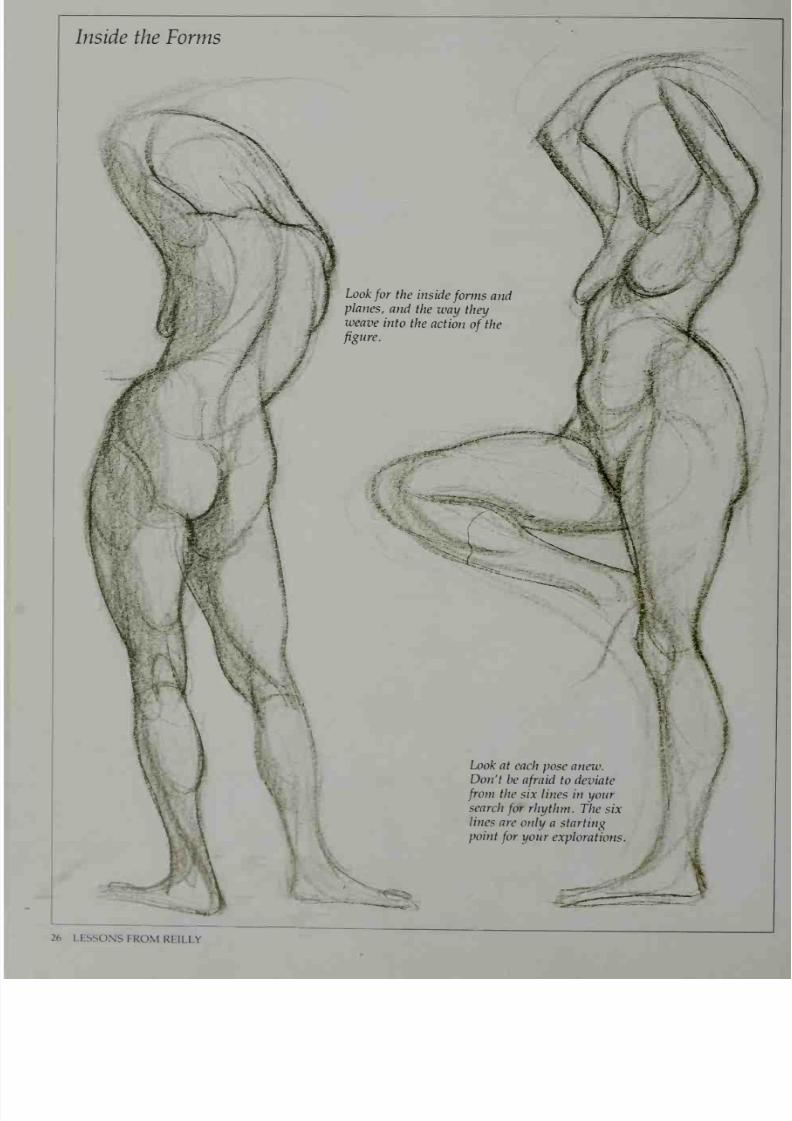
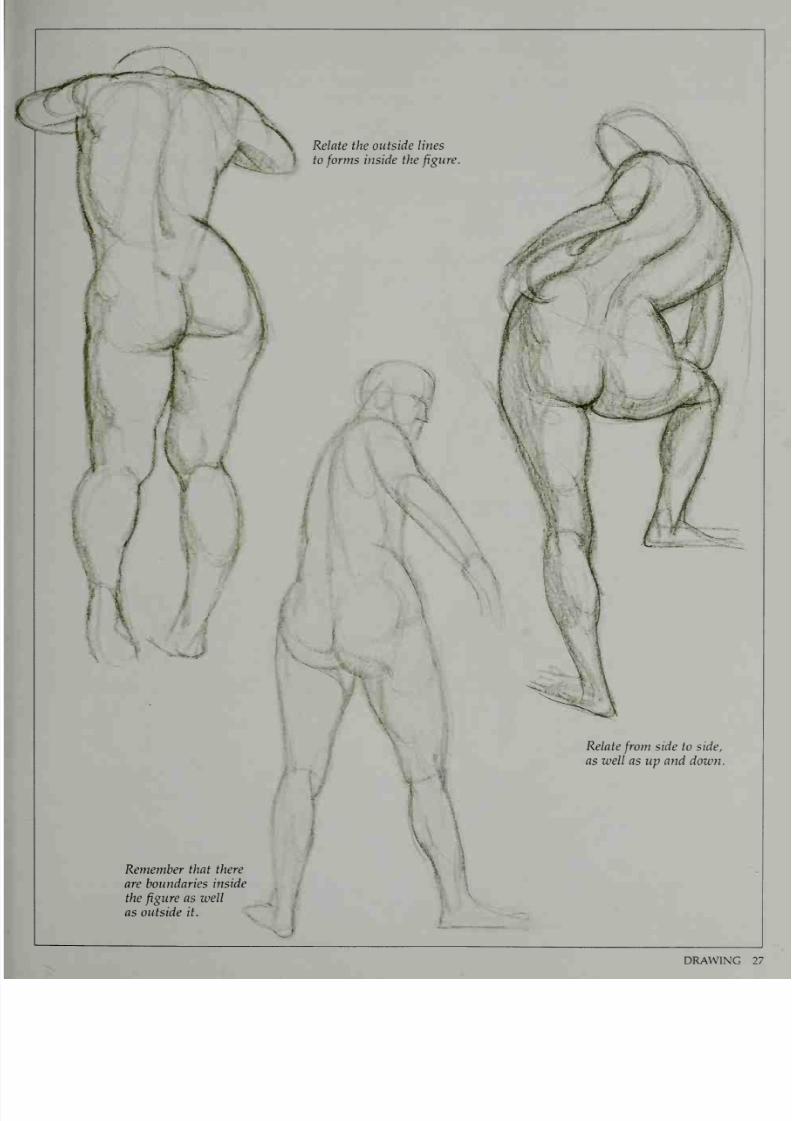
Inside
the Forms
Look
for
the
inside
forms
and
planes,
and
the
way
they
weave
into
the
action
of
the
figure.
Look
at
each pose
anew.
Don't
be
afraid
to
deviate
from
the
six lines
in
your
search
for
rhythm.
The
six
lines
are
only a
starting
point
for
your
explorations.
26
LESSONS
FROM Kl
II
I
>
7/25/2019 Mastering the Craft of Painting (1985)
http://slidepdf.com/reader/full/mastering-the-craft-of-painting-1985 31/152
/
t
Relate
the
outside lines
to
forms
inside
the
figure
Remember
that
there
are boundaries
inside
the
figure
as
well
as
outside it.
Relate
from
side
to
side,
as
well
as
up and
down.
7/25/2019 Mastering the Craft of Painting (1985)
http://slidepdf.com/reader/full/mastering-the-craft-of-painting-1985 32/152
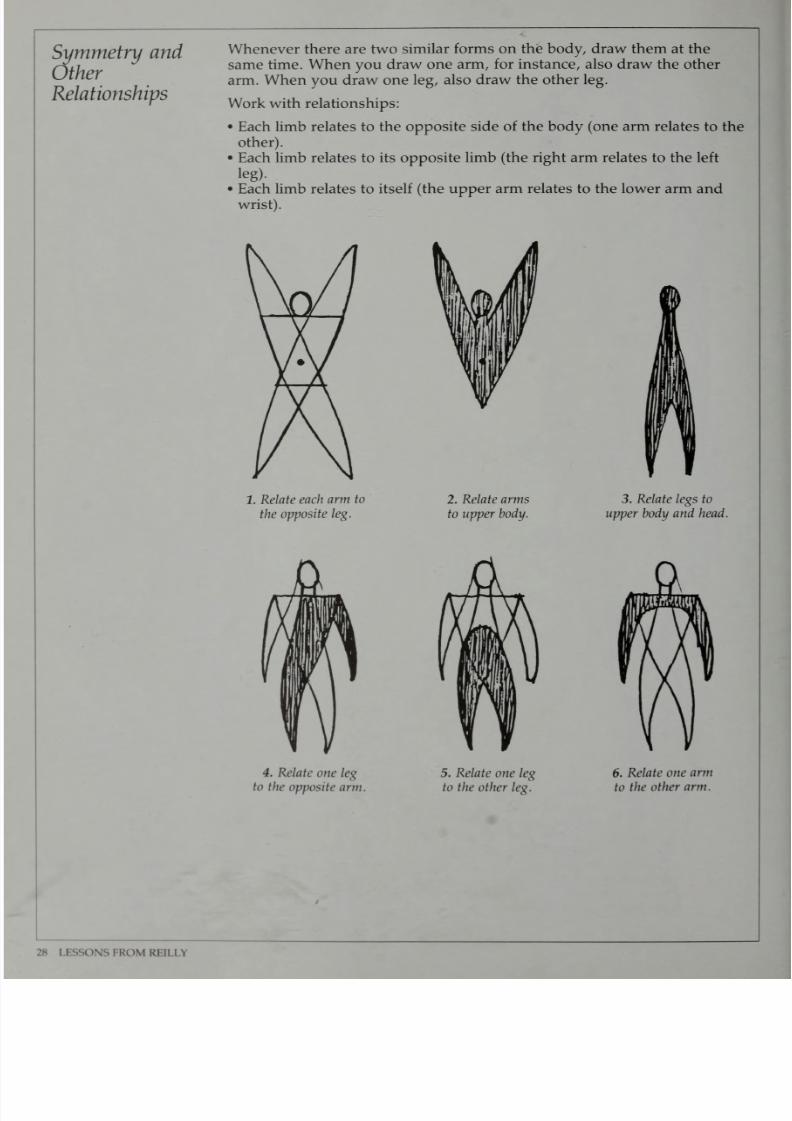
Symmetry
and
Other
Relationships
Whenever there are
two
similar
forms
on
the body, draw them
at the
same
time.
When
you draw
one arm, for
instance,
also draw the other
arm. When
you
draw
one leg,
also draw the other
leg.
Work with
relationships:
•
Each
limb
relates to
the opposite
side of the
body
(one arm
relates to
the
other).
•
Each
limb
relates to
its
opposite
limb
(the
right arm
relates
to
the left
leg)-
•
Each
limb relates to itself (the
upper
arm relates
to
the lower
arm and
wrist).
1. Relate
each
arm to
the
opposite leg.
2.
Relate arms
to
upper body.
4.
Relate
one
leg
to
the
opposite
arm.
5.
Relate
one
leg
to the
other
leg.
3.
Relate legs
to
upper
body
and head.
6. Relate
one
arm
to
the
other
arm.
28
I
issuNSFROM
Kill
n

7/25/2019 Mastering the Craft of Painting (1985)
http://slidepdf.com/reader/full/mastering-the-craft-of-painting-1985 33/152
OBSERVE
THE
NATURAL
GROWTH
PATTERNS
Always
relate
from
side to
side
to
establish the
natural
symmetry of the
body. Pay attention to
the flow
of movement on both sides of
the body.
Look
at
leaves
and
other natural
forms
to
see how
they
grow.
'toTLUr'
CA*tcM~>
Now
compare
the
movement in
different
areas
of
the
figure.
Don't
make the
curves on a
form
even.
Look
for
points
where
the
form
narrows
or
thickens,
giving variety
to
the
curves.
/Ajtr
f*
PAY
ATTENTION
TO MALE-FEMALE
DIFFERENCES
By
nature, the
body
of
the
male
is lean
and
narrow.
The
female
is
usually
broader
and
bulkier.
/y»J*JU,
-AtsmajLtLs
/WA&-
JUwedbis
Differences
between the
male
and
female
are especially
ap-
parent
in
forms
like the but-
tocks or
breasts.

7/25/2019 Mastering the Craft of Painting (1985)
http://slidepdf.com/reader/full/mastering-the-craft-of-painting-1985 34/152
The Importance
of
Relationships
Every line,
every
form
relates
to another. Follow
the
curves
from
one arm to
the
opposite
leg.
<
#5K
Make
sure
you
understand
the
action
before
you draw.
Individual
forms
mean
nothing
if
the action is
wrong.
Remember the string
of
pearls.
That will
tell
you
how
to
connect the
forms.
30
LESS<
>NS
I
ROM
REILLY
7/25/2019 Mastering the Craft of Painting (1985)
http://slidepdf.com/reader/full/mastering-the-craft-of-painting-1985 35/152
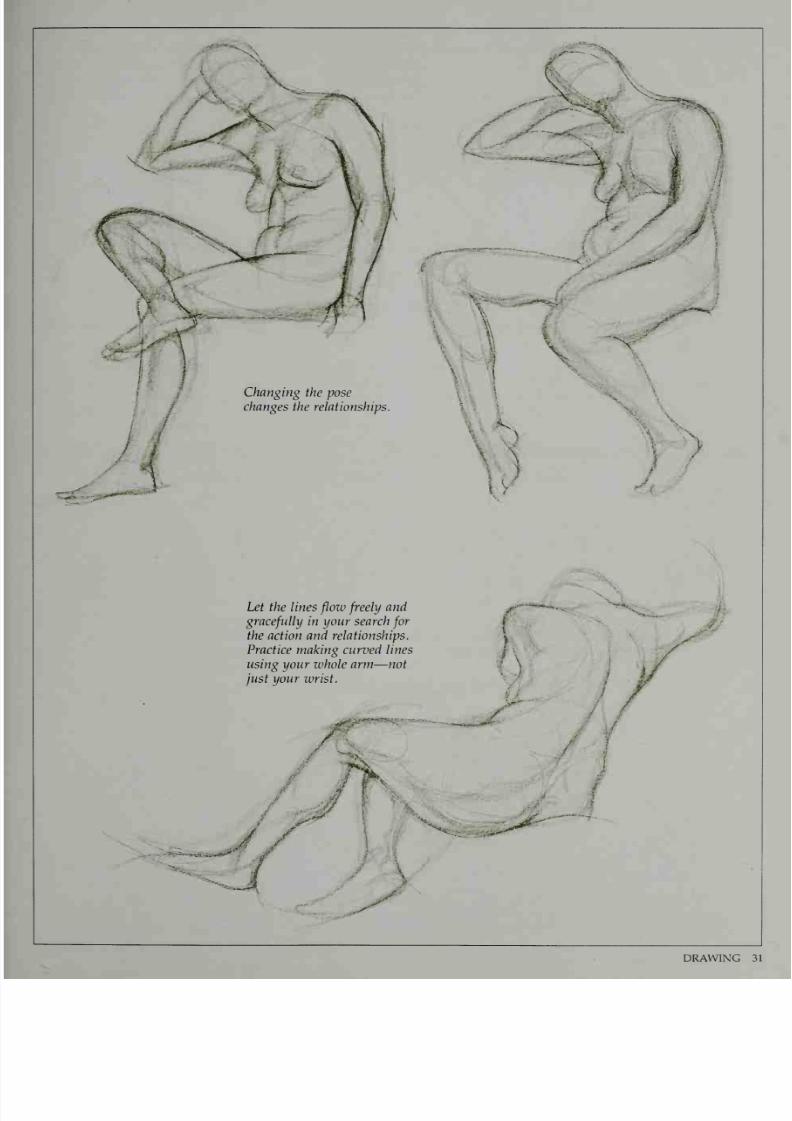
Let
the
lines
flow
freely
and
gracefully
in your
search
for
the action
and
relationships.
Practice
making
curved
lines
using
your whole
arm
—
not
just your
wrist.
7/25/2019 Mastering the Craft of Painting (1985)
http://slidepdf.com/reader/full/mastering-the-craft-of-painting-1985 36/152
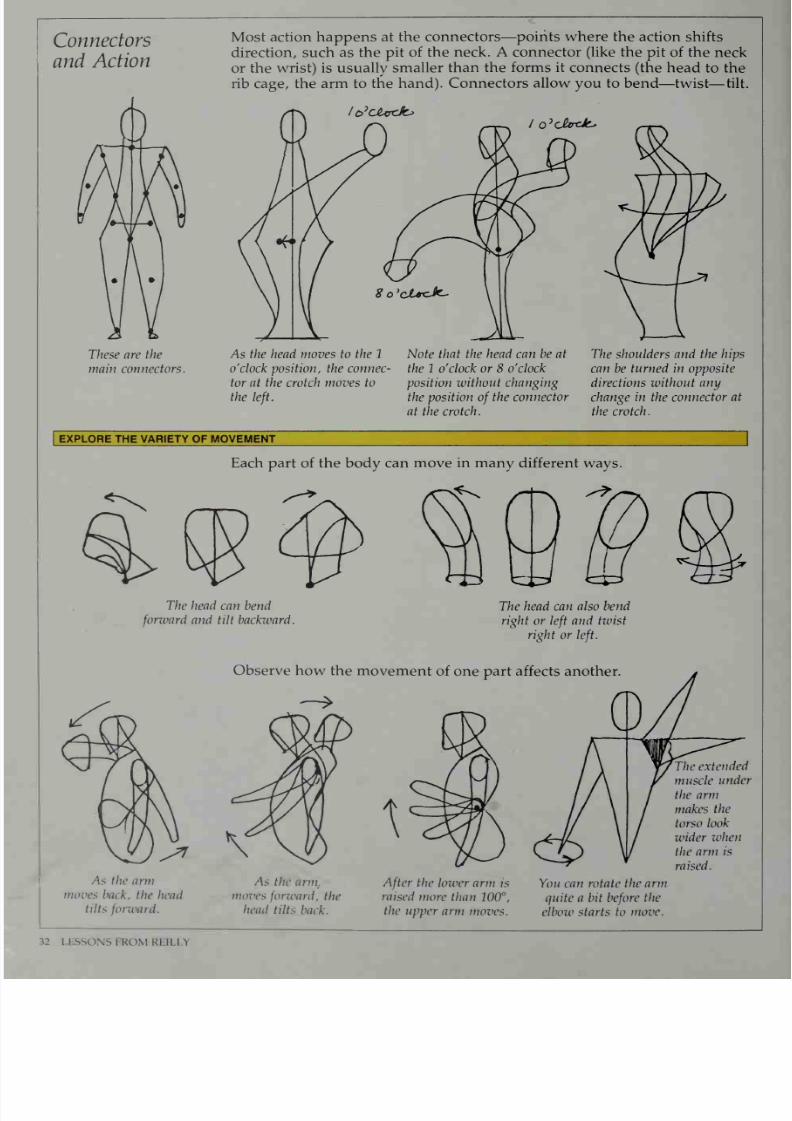
Connectors
and
Action
Most action happens at
the
connectors
—
points where the action
shifts
direction,
such as
the pit
of
the
neck.
A
connector
(like the
pit of the neck
or the
wrist) is usually
smaller
than
the
forms it connects
(the head
to
the
rib cage, the arm
to
the
hand). Connectors allow
you
to
bend
—
twist
—
tilt.
to
y
CJUrJZs
dUnJ^
These
are
the
main
connectors.
As
the
head moves to
the 1
o'clock
position,
the connec-
tor
at
the crotch moves to
the
left.
Note
that
the
head can be at
the 1
o'clock
or
8
o'clock
position
without
changing
the position
of
the
connector
at
the crotch.
The
shoulders
and
the hips
can
be
turned in
opposite
directions without
any
change
in the
connector at
the crotch.
EXPLORE THE VARIETY OF MOVEMENT
Each part of
the body
can
move
in many
different
ways.
The
head can bend
forward
and
tilt backward.
The head can also
bend
right
or
left
and twist
right
or
left.
Observe
how
the
movement
of one part affects
another
The
extended
muscle
under
the
arm
makes
the
torso
look
wider
when
the
arm
is
raised.
As
the
arm
back,
the
head
tilts forward.
As
the
urm
moves
forward,
the
head
tilts
back.
After
the
lower arm
is
raised
more than
100°,
the
upper
arm
moves.
You
can
rotate
the
arm
quite
a bit
before
the
elbow starts to move.
32
LI
iSS<
>NS
I
KOM
REILLY
7/25/2019 Mastering the Craft of Painting (1985)
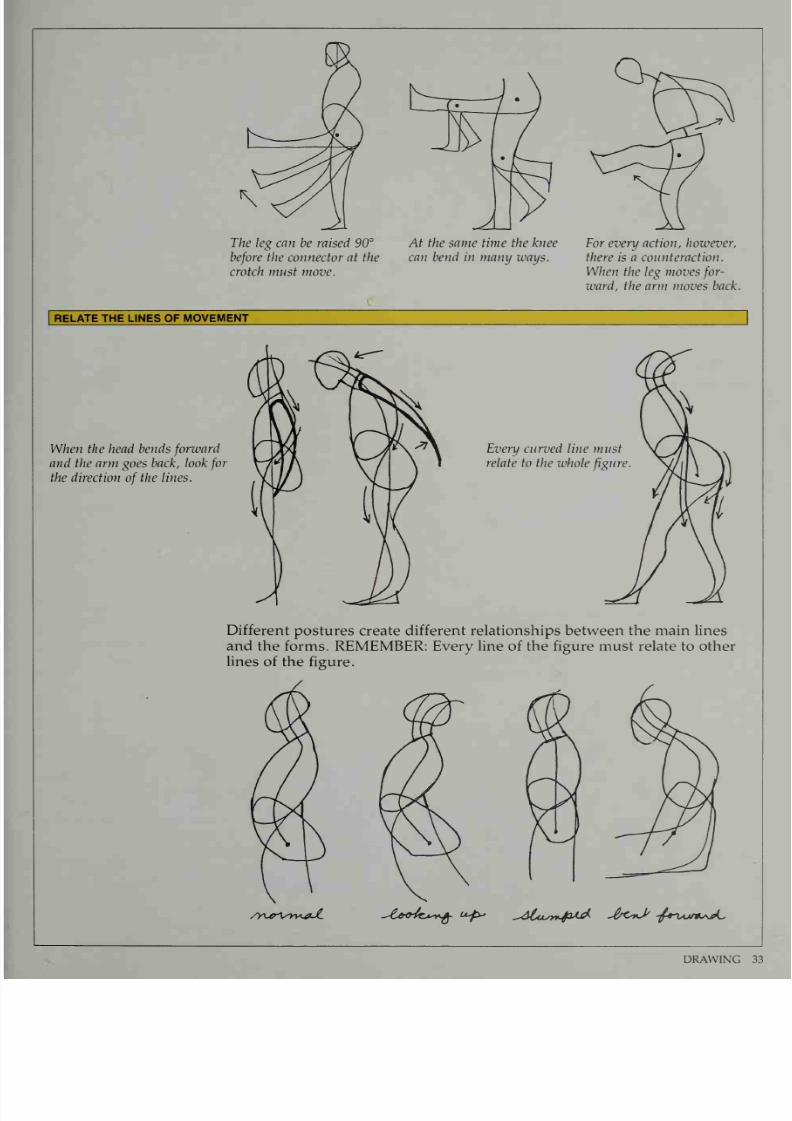
http://slidepdf.com/reader/full/mastering-the-craft-of-painting-1985 37/152
The
leg
can
be raised
90°
before
the connector
at
the
crotch
must move.
At the
same time the knee
can
bend
in many ways.
For
every
action,
however,
there is a
counteraction.
When
the leg moves
for-
ward, the arm moves
back.
RELATE THE LINES OF
MOVEMENT
When
the
head
bends
forward
and
the
arm
goes
back,
look
for
the direction
of
the
lines.
Every curved
line must
relate
to the whole
figure
Different
postures
create
different relationships between
the main lines
and the
forms. REMEMBER:
Every line
of
the
figure must relate to other
lines
of the
figure.
/Y^er^yv^aJL -&W7^*^.
Lij^
-M**sy+p*jA
JrtstJ'
-/*-Ux*lA*L

7/25/2019 Mastering the Craft of Painting (1985)
http://slidepdf.com/reader/full/mastering-the-craft-of-painting-1985 38/152
Action and
Balance
To
determine
how
the
figure is balanced, look for
the
points
of
support.
Make
sure
they're
lined
up—or
the
figure will fall over.
Figure
balanced over
points
of
support.
Check
the pivot points
to
see
where the
forms
are
moving
from:
The ilium, or
pelvic
bone
protrusion,
is
the
pivot point
for
the legs.
The
crotch
is
the
pivot point
for
the
torso.
Figure
balanced
between
points
of
support.
Points
of
support
in
action.
Also
look
for
the horizontal
and
vertical align-
ments of the figure.
This is
called
pointing
off.
Here
the head, shoulder,
and knee
are pointed
off.
You
can also
see
how the
forms
of
the
calf
and
kneecap align with the ac-
tion
of
the leg.
CHECK FOR
COUNTERPOINT
ON THE FIGURE
Counterpoint
on the
figure works in
much the
same
way as
a seesaw-
one
part of
the
figure
is off-balance,
it
is
counteracted
by
an
equal
movement
on
the
opposite side.
-if
When
the
forms
of
the body
are
at
rest,
they
show
a
kind
of
natural
counterpoint.
With
the head, the
axis
drawn
from
the
pit
of
the neck
to
the
top
balances
the front
and
back.
You
can
also
see
how
the
cylinder
of
the
neck
form
balances
the
thrust
of
the
head.
7^iw
A similar
seesaw
balance oc-
curs with
other
forms.
On
the leg,
the
curve
of
the
thigh
is
balanced
by
the
curve
of
the
calf.
Similarly,
on
the
torso
the
breasts
balance
the
buttocks.
J.
.<**r
VI
I
I
SSONS
I KUM
REILLY

7/25/2019 Mastering the Craft of Painting (1985)
http://slidepdf.com/reader/full/mastering-the-craft-of-painting-1985 39/152
When
the
figure
is active, the
movement
of
one
form
must
be
balanced
by
the
movement
of
another. Remember that
for
every
action, there is a coun-
teraction.
FIND THE
RHYTHM
AND BALANCE
The body
is
always
balanced on
points
of
support.
Can
you
find
the
points
of
support
here?
These
curves
set up a
rhythm.
Can
you see how
they
braid
into each other?
The boundary
lines
flow
through
the
form,
in
and out
of
the
body.
DRAWING 35

7/25/2019 Mastering the Craft of Painting (1985)
http://slidepdf.com/reader/full/mastering-the-craft-of-painting-1985 40/152
Weight and
Strain
In
drawing
the
action, you
must consider
the effect
of strain.
The
large
forms
of the body
will look
different,
depending on
whether
they
are
relaxed,
rigid,
or
strained.
AjL^ljlcL-
/\A^q/<-Ws
sdV^CUsriJid-J
Observe
the
difference
when
one
leg is
strained
and the
other is
relaxed.
AjJU^&d^.
The muscles
of the
body
also
take on
different
shapes,
depending on
whether
they are
relaxed,
rigid,
or
strained.
Relaxed muscles bulge
at the bottom.
Rigid muscles
bulge
in
the
middle.
Strained
muscles
bulge at
the
top.
Remember
that the
bulge
in the
muscle
always
goes
with the
action. If
the
action
of
the
leg
is
pushing
up,
off
the
ground,
the
muscle
will
be
strained
and
bulge
at
the
top.
When the leg
is relaxed, with
gravity
pulling
down, the bulge
is
toward the
bottom.
(up
<
71
^^
ASSIGNMENT
To
understand
the
difference
between
relaxed
and
strained
muscles,
draw
the
figure
in
two
different positions:
Sitting
in
a
chair
(relaxed muscles).
2.
Pushing
against
a
wall
(strained
muscles).
36
LE-.sso\s|KOMKMin
7/25/2019 Mastering the Craft of Painting (1985)
http://slidepdf.com/reader/full/mastering-the-craft-of-painting-1985 41/152
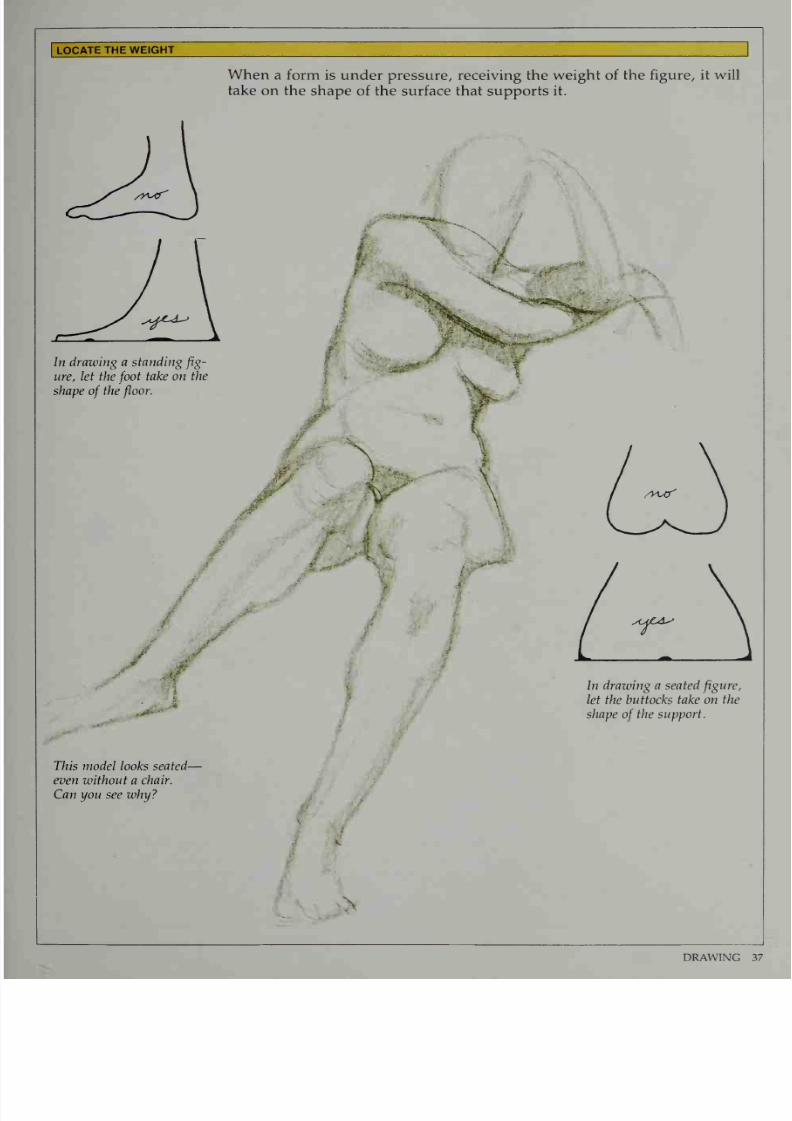
LOCATE
THE
WEIGHT
When
a form
is under
pressure,
receiving the
weight
of the
figure,
it
will
take on the
shape
of
the
surface
that supports
it.
In
drawing
a
standing
fig-
ure,
let
the
foot
take on
the
shape
of
the
floor.
This
model looks seated-
even
without a
chair.
Can
you
see why?
In drawing a
seated
figure,
let
the buttocks
take
on
the
shape
of
the support.
7/25/2019 Mastering the Craft of Painting (1985)
http://slidepdf.com/reader/full/mastering-the-craft-of-painting-1985 42/152
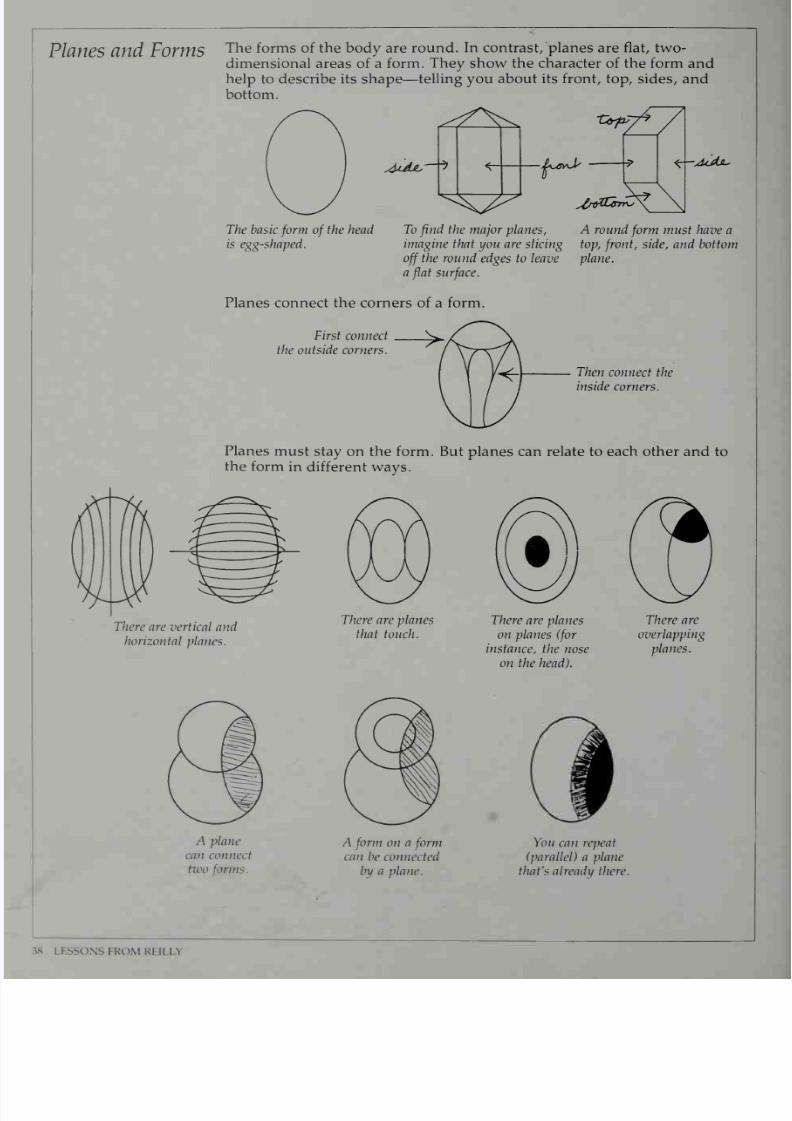
Planes
and
Forms
The
forms
of
the
body
are round.
In
contrast,
planes
are
flat,
two-
dimensional areas
of
a
form.
They
show the
character
of the form
and
help
to
describe
its
shape—
telling
you
about
its
front,
top, sides, and
bottom.
^\^
^tMs'
-Ccrpyfi
luSvd'
s&V&ims
*;-A<JU'
The basic
form
of
the head
is egg-shaped.
To
find
the
major planes, A round
form
must have
a
imagine
that you are
slicing top,
front,
side, and bottom
off
the
round
edges to leave plane,
a
flat
surface.
Planes connect
the
corners of
a
form.
First connect
the
outside
corners.
Then
connect the
inside
corners.
Planes
must
stay
on
the form.
But planes can
relate
to
each
other and
to
the
form in
different
ways.
There
are
vertical and
horizontal
planes.
There
are planes
There are
planes
There
are
that touch.
on
planes
(for
overlapping
instance,
the
nose
planes.
on the head).
A
plain-
A
form
on a
form
You
cat
i
repeat
can
connect
can
be
connected (parallel)
a plane
mm.
by
a plane.
that's already
there
Lhsso\slKOM
Kl
II n

7/25/2019 Mastering the Craft of Painting (1985)
http://slidepdf.com/reader/full/mastering-the-craft-of-painting-1985 43/152
7/25/2019 Mastering the Craft of Painting (1985)
http://slidepdf.com/reader/full/mastering-the-craft-of-painting-1985 44/152
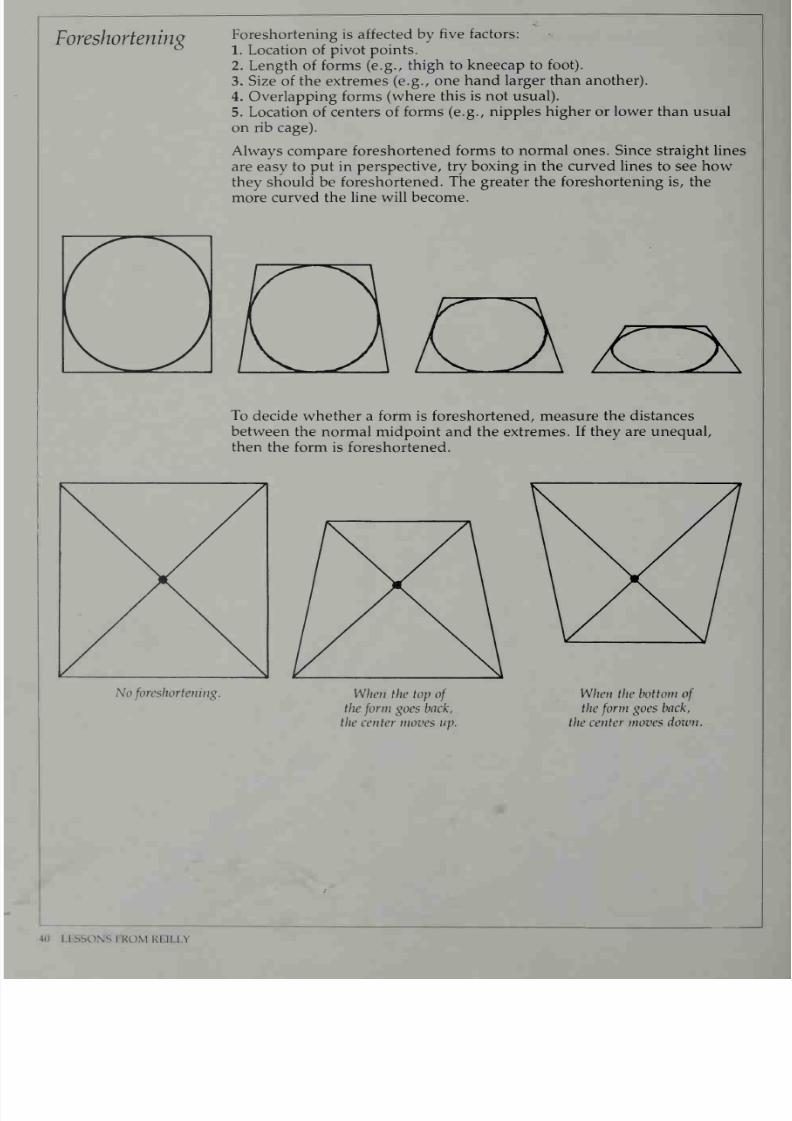
Foreshortening
Foreshortening is affected
by
five
factors:
1.
Location of pivot points.
2.
Length of forms (e.g.,
thigh to kneecap to
foot).
3. Size of the extremes
(e.g.,
one hand
larger
than
another).
4.
Overlapping forms
(where
this is not
usual).
5. Location
of
centers
of
forms
(e.g.,
nipples higher
or lower
than usual
on
rib
cage).
Always compare
foreshortened forms to
normal ones. Since straight
lines
are easy
to
put
in perspective,
try boxing
in the
curved
lines to see
how
they
should
be
foreshortened.
The
greater
the
foreshortening
is,
the
more
curved
the
line will become.
LJiO\^^
To decide whether
a
form
is foreshortened,
measure
the distances
between the
normal
midpoint
and the
extremes.
If they are
unequal,
then
the form
is
foreshortened.
No
foreshortening.
When the
top
of
the
form
goes
back,
the
center
moves
up.
When
the
bottom
of
the
form
goes
back,
the
center
moves down.
1
ssoNsJKOM
Kl II
n
7/25/2019 Mastering the Craft of Painting (1985)
http://slidepdf.com/reader/full/mastering-the-craft-of-painting-1985 45/152
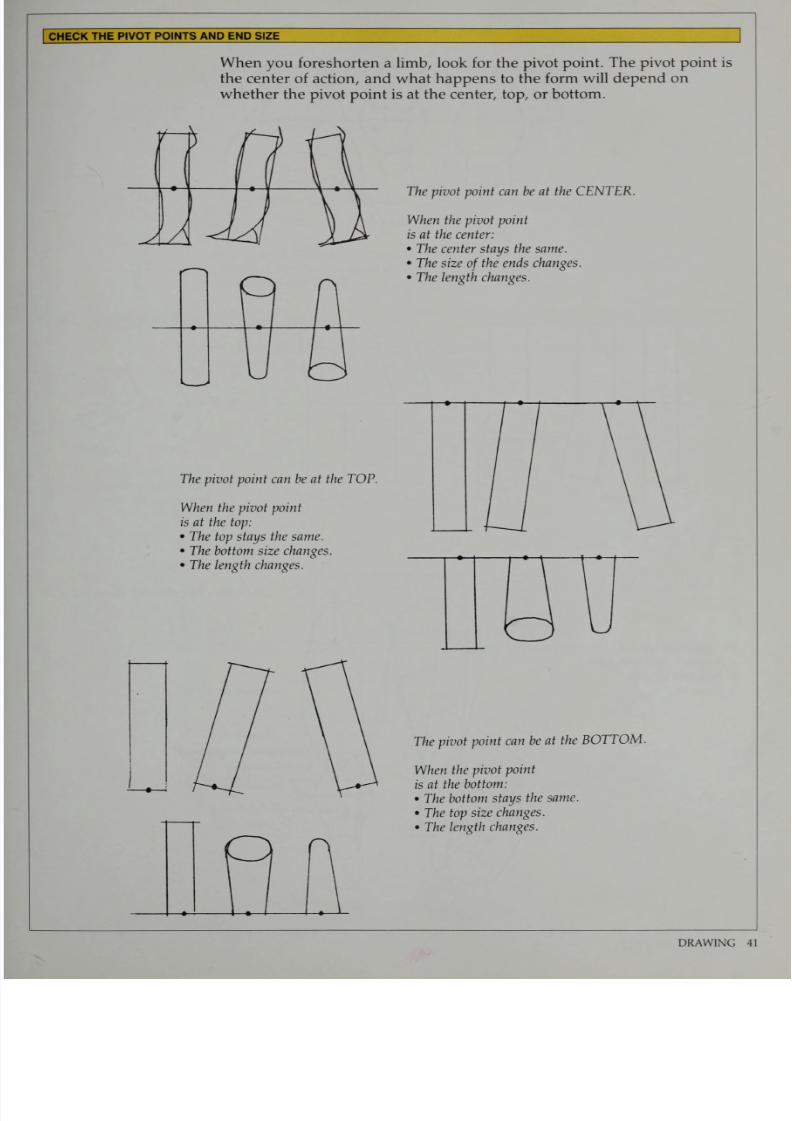
CHECK
THE
PIVOT
POINTS AND
END
SIZE
When
you
foreshorten
a limb, look for
the
pivot
point. The pivot point is
the
center
of action, and what
happens
to
the
form will
depend on
whether
the
pivot
point
is
at
the center,
top, or
bottom.
The
pivot point
can be at the
CENTER.
When the pivot point
is at the center:
•
The center stays the
same.
•
The
size
of
the
ends changes.
•
The length
changes.
The
pivot point can
be at
the TOP.
When
the
pivot
point
is
at
the
top:
•
The
top stays
the
same.
•
The bottom size
changes.
•
The
length
changes.
The
pivot
point
can
be
at
the
BOTTOM.
When
the
pivot
point
is
at
the
bottom:
•
The
bottom
stays
the
same.
•
The top
size
changes.
•
The
length
changes.
DRAWING 41
7/25/2019 Mastering the Craft of Painting (1985)
http://slidepdf.com/reader/full/mastering-the-craft-of-painting-1985 46/152
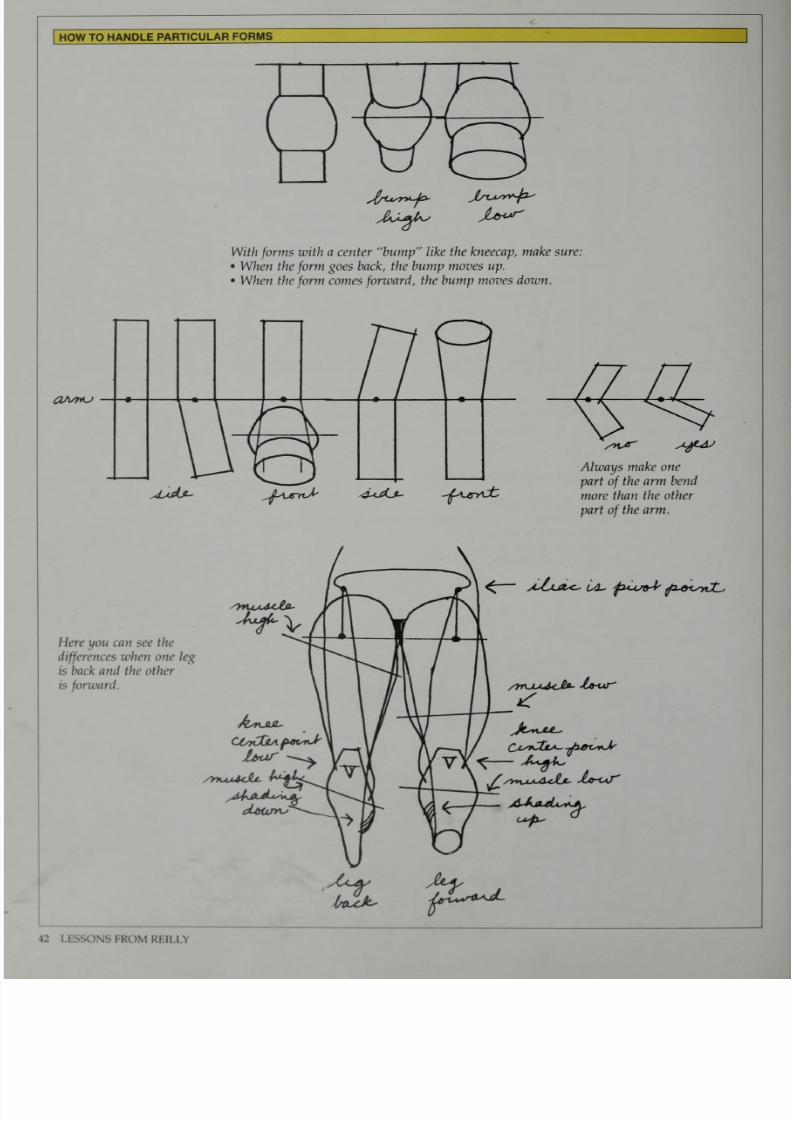
HOW TO
HANDLE
PARTICULAR
FORMS
With
forms
with a center
bump
like
the
kneecap,
make
sure:
•
When the
form
goes back,
the bump moves
up.
•
When
the
form
comes
forward,
the bump moves down.
OM*u
sOtST
^V
A^djL.
^um>
-d+tLf- -^<U5Yl£
Here
you
can
see the
differences
when
one
leg
is back and the other
is
forward.
Always make one
part
of
the
arm
bend
more
than
the other
part
of
the arm.
Cd~
p*-V&J<
tfL&tsyCJL;
AsrUUL*
/VaajlScJU.
Y/y>vuu<uJU.
Ao-UJ
42
LESSONS
FROM
K
I
II
\\
7/25/2019 Mastering the Craft of Painting (1985)
http://slidepdf.com/reader/full/mastering-the-craft-of-painting-1985 47/152
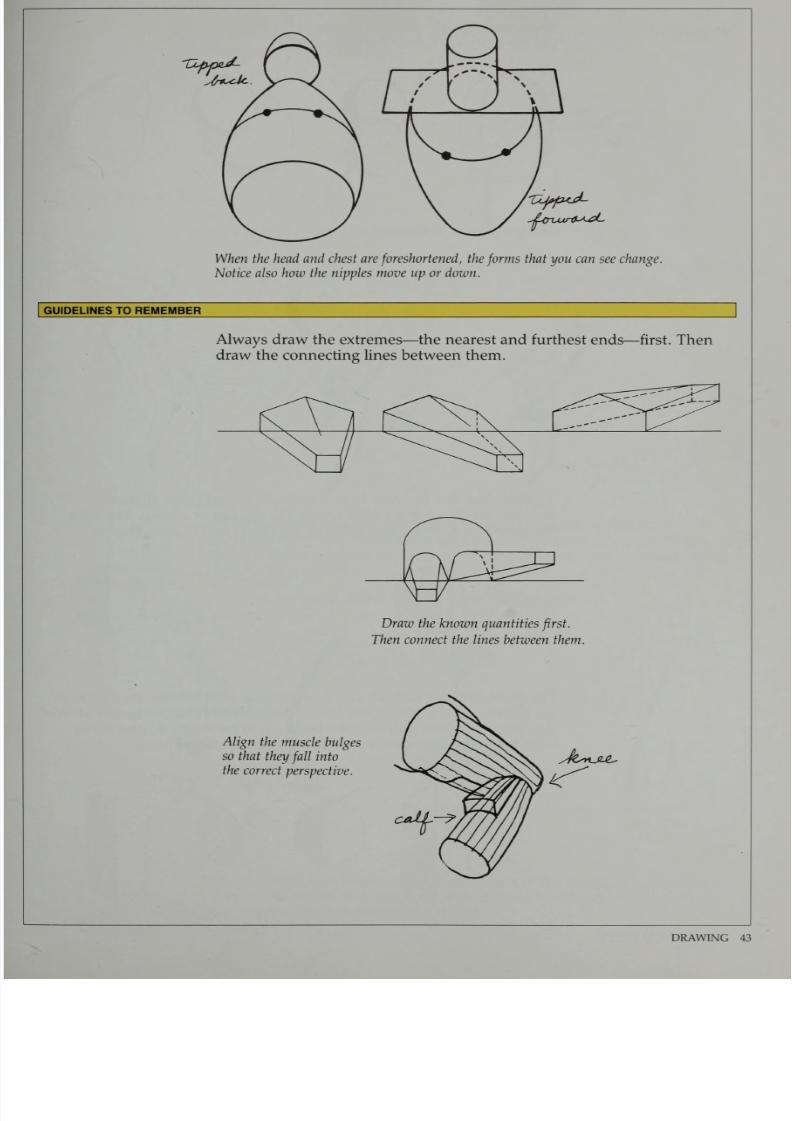
When
the
head and chest are
foreshortened,
the
forms
that
you
can see change.
Notice also how the nipples move
up
or down.
GUIDELINES
TO REMEMBER
Always
draw the
extremes
—
the nearest
and
furthest ends
—
first.
Then
draw
the
connecting
lines
between
them.
Draw the
known quantities
first.
Then connect the lines
between
them.
Align
the
muscle
bulges
so that
they
fall
into
the
correct
perspective.
Jts*j2j^
DRAWING
43
7/25/2019 Mastering the Craft of Painting (1985)
http://slidepdf.com/reader/full/mastering-the-craft-of-painting-1985 48/152
Shadows
Shadows
show
the
form
and
action of the figure.
Let
the
shadows follow
the
boundaries.
Here the shadow
shape
follows
the
form
of
the
head.
Make the main shadows
define
the action.
Shadows are
at
a right angle to
the
source
of
light.
The
dividing
line between
light and
shade
describes the distance
between
an
object and a light
source
like
the sun or a lamp. The light
becomes
more diffuse
and
softer
as
the
object
moves
away
from
it.
The
division
between light and shade is called the
halftone.
Its
direction
should
show
the
shape
of
the
form.
The
halftone
is
hard-edged
when
the
change
of
direction
is drastic
(for
instance,
at a
corner).
It has a
softer
edge
when
the change is
more
gradual,
as on
a
round
form.
44
I I
sso.NS
FROM
Kl
II I t
7/25/2019 Mastering the Craft of Painting (1985)
http://slidepdf.com/reader/full/mastering-the-craft-of-painting-1985 49/152
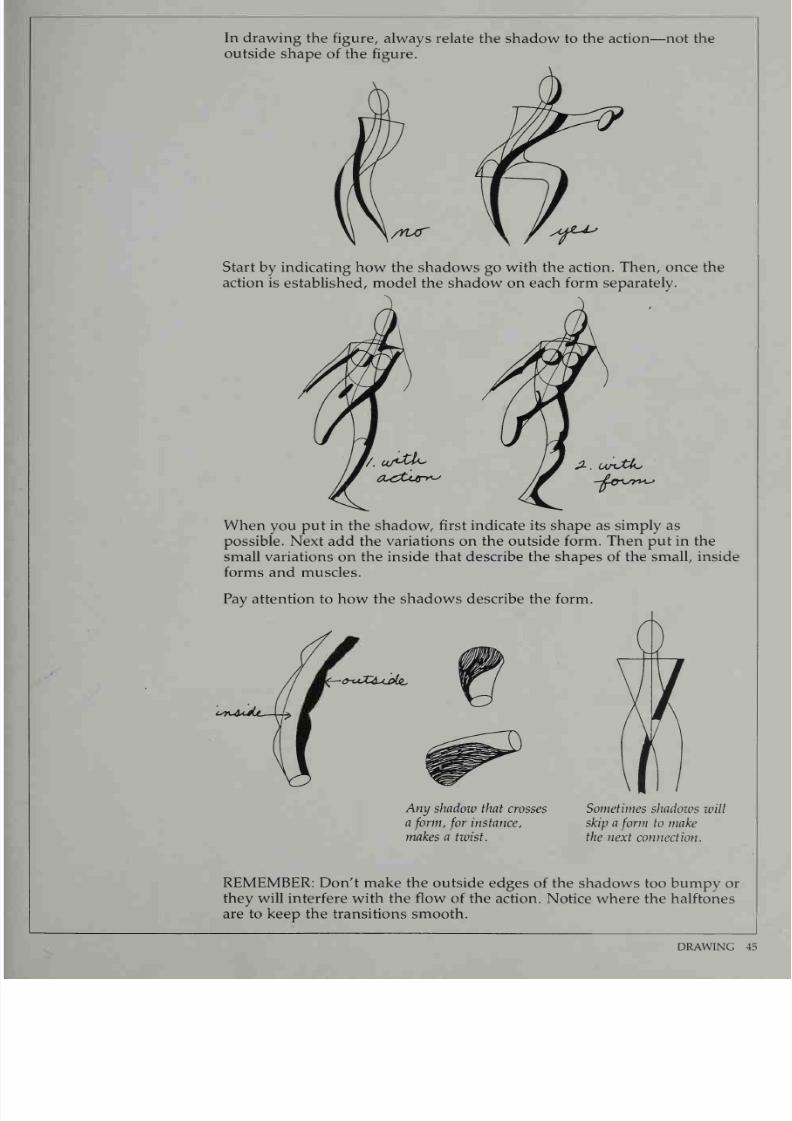
In drawing
the figure,
always
relate
the
shadow
to the
action-
outside
shape
of
the
figure.
-not the
/YUT
Start
by
indicating
how
the shadows
go
with
the
action. Then,
once
the
action is
established,
model the
shadow on
each
form separately.
When
you
put
in
the shadow, first
indicate its shape as
simply
as
possible.
Next
add
the
variations
on
the
outside
form.
Then
put
in
the
small
variations
on the
inside
that describe
the shapes
of the
small,
inside
forms
and
muscles.
Pay
attention
to how
the
shadows
describe
the form.
tsr^^s-djL.
'r-O^X&AjAz,
Any
shadow
that
crosses
a
form,
for
instance,
makes a
twist.
Sometimes
shadows
will
skip a
form
to make
the next
connection.
REMEMBER: Don't make the
outside edges
of the
shadows too bumpy
or
they
will
interfere
with
the
flow
of
the
action.
Notice
where
the halftones
are to keep the transitions
smooth.
DRAWING 45

7/25/2019 Mastering the Craft of Painting (1985)
http://slidepdf.com/reader/full/mastering-the-craft-of-painting-1985 50/152
Shadows
.
Shadows
help
to
express
the
action.
Let
them
flow
with
the
longest
lines.
Shadows can outline
inner
forms
of
the body.
46
LESSONS
FROM
REILLY
7/25/2019 Mastering the Craft of Painting (1985)
http://slidepdf.com/reader/full/mastering-the-craft-of-painting-1985 51/152
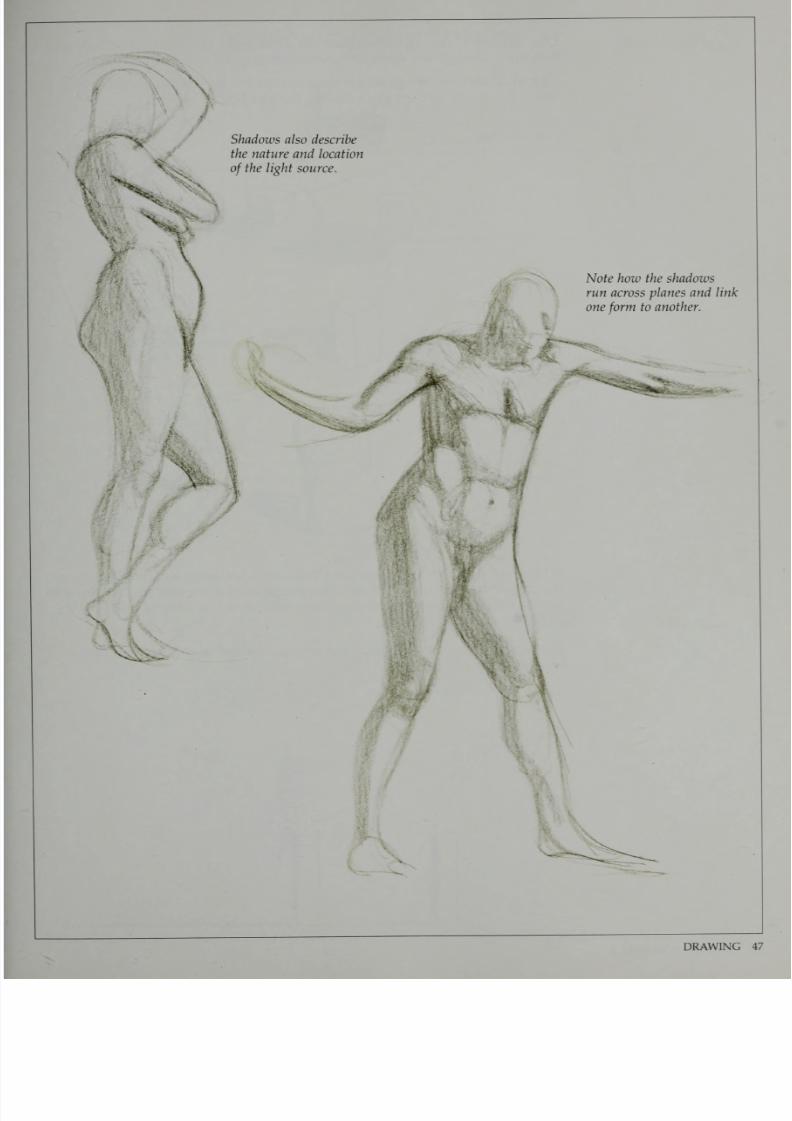
*
Shadows also
describe
the
nature
and
location
of
the
light
source.
x
•
Note
how
the
shadows
run
across planes and link
one
form
to
another.
DRAWING
47
7/25/2019 Mastering the Craft of Painting (1985)
http://slidepdf.com/reader/full/mastering-the-craft-of-painting-1985 52/152
Cast
Shadows
Like
shadows,
cast
shadows have no
direct
light on them.
Reflected
light,
however,
can lighten
them, or
surrounding walls
can darken them.
Cast
shadows
always
go
in the
direction of
the
light source, and
they
show
the shape
of
the
object
casting
the
shadow.
If
a cast shadow
falls
over
another
object,
it should
show
the shape
of
that
object.
Always try to
connect
the
shadows
and
cast shadows.
Whenever
a
cast
shadow does not follow the
action
or define the form of
the
object
casting it, leave it
out. For
example, if
a
shadow
cast by
the arm
on
the
torso
does not
follow the
action or
define the form
of
the arm or
torso,
leave it
out.
The
length
of
a
cast
shadow is determined by the
angle between the
model
and
the
light
source.
48
LKSSo\s|KOMKllin
7/25/2019 Mastering the Craft of Painting (1985)
http://slidepdf.com/reader/full/mastering-the-craft-of-painting-1985 53/152
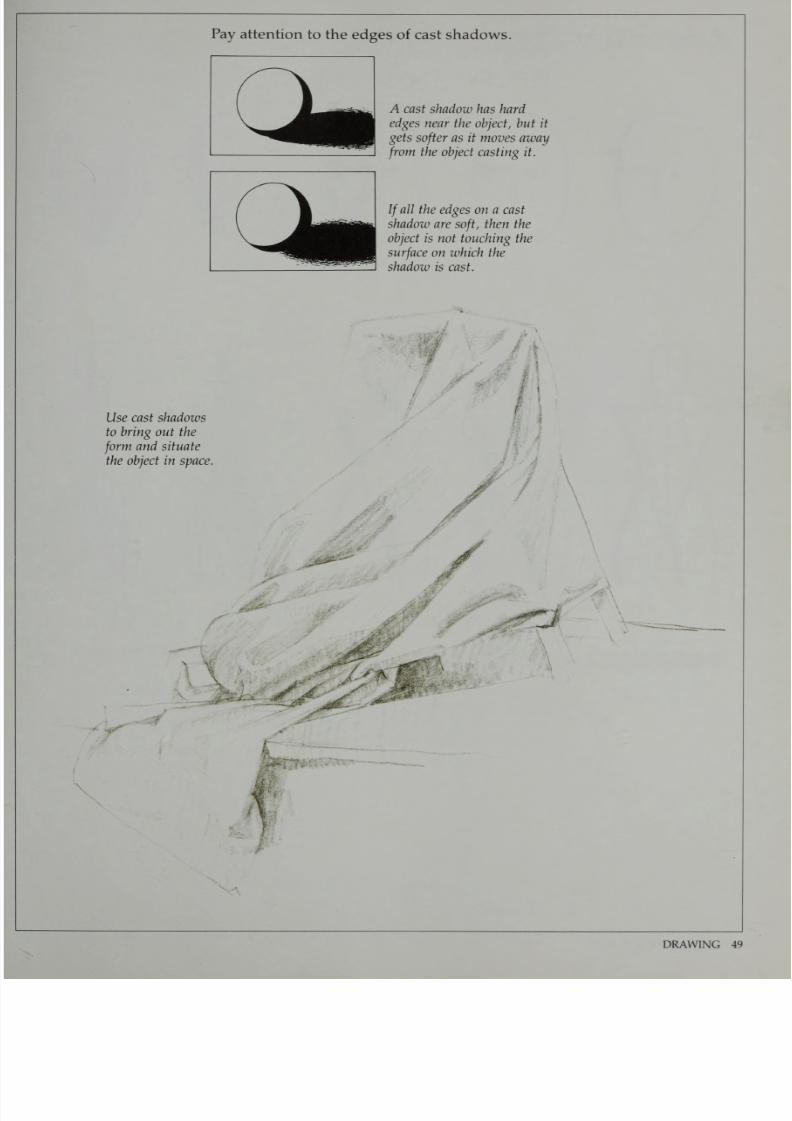
Pay
attention
to
the
edges
of cast shadows.
A cast
shadow has
hard
edges
near the
object, but
it
gets
softer
as it
moves
away
from
the
object
casting
it.
If
all the
edges on a cast
shadow are
soft,
then the
object is not touching
the
surface
on which
the
shadow
is cast.
Use
cast shadows
to
bring
out the
form
and situate
the
object in
space
DRAWING
49
7/25/2019 Mastering the Craft of Painting (1985)
http://slidepdf.com/reader/full/mastering-the-craft-of-painting-1985 54/152
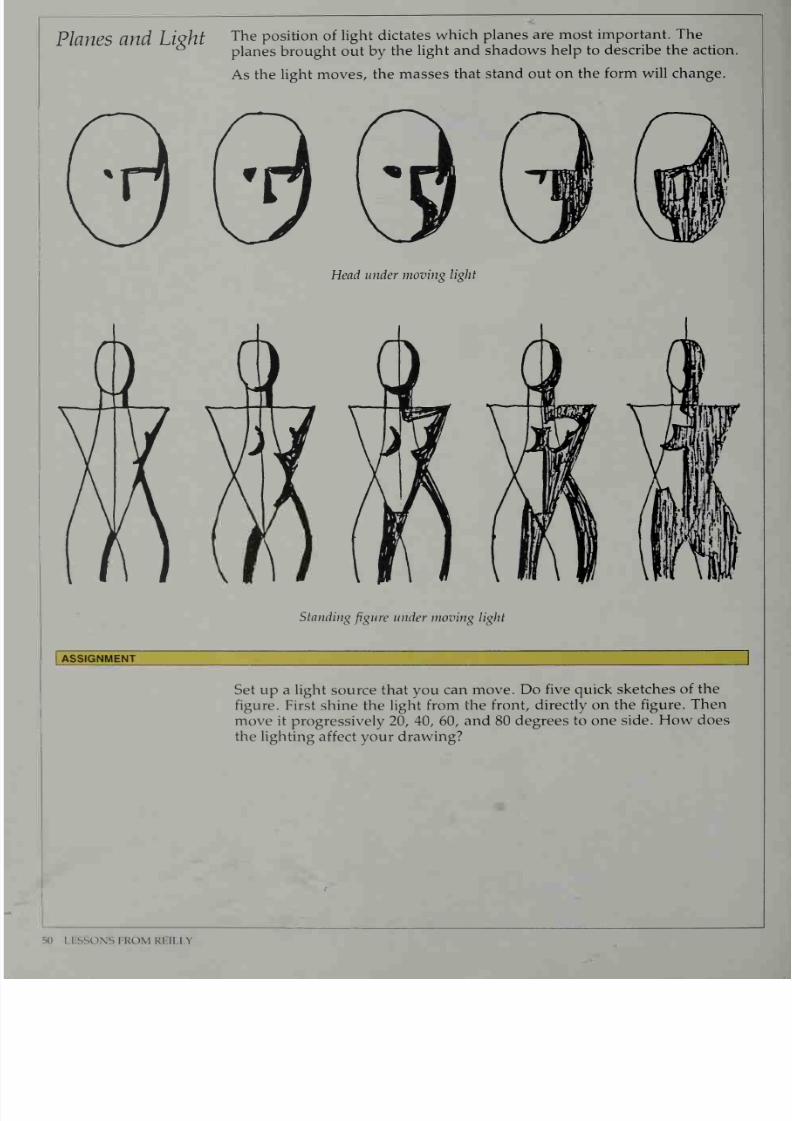
Planes
and
Light
The
position
of light
dictates
which planes
are most
important.
The
planes
brought
out by
the
light
and shadows
help to
describe
the
action.
As
the light
moves,
the masses
that
stand
out
on the
form will change.
Head
under moving
light
Standing
figure
under
moving
light
ASSIGNMENT
Set
up
a
light
source
that
you
can
move.
Do
five
quick
sketches
of the
figure.
First shine
the
light
from the
front,
directly
on
the
figure.
Then
move
it
progressively
20, 40, 60,
and
80
degrees
to
one
side.
How
does
the lighting
affect your
drawing?
50 LESSONS FROM Kl
II
n

7/25/2019 Mastering the Craft of Painting (1985)
http://slidepdf.com/reader/full/mastering-the-craft-of-painting-1985 55/152
BE
SELECTIVE
Choose
the shadows you
want
to
accent
carefully.
Don't
copy every
shadow
you
see. Only put
down
the
shadows
that
enhance the ac-
tion
of
your drawing.
-
'
:
*;»\
What
is
wrong
with
the
shadows
in
this
drawing?
How
would
you
correct
them?
DRAWING
51
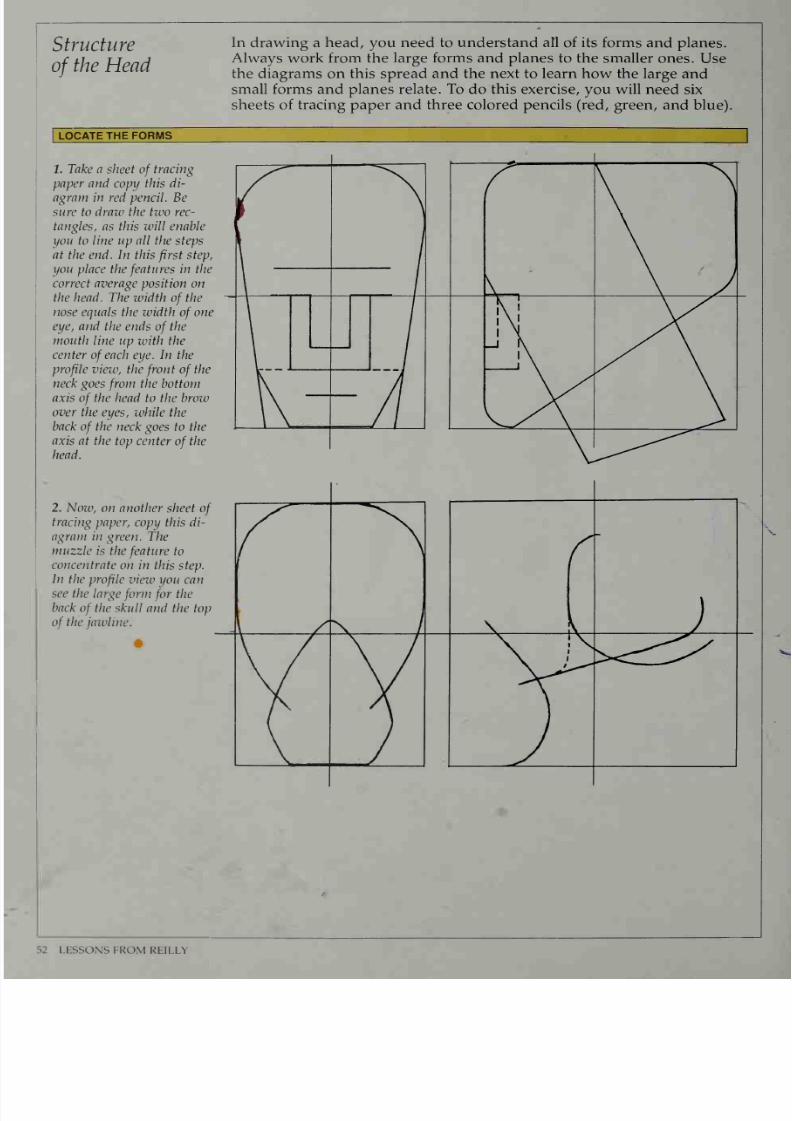
7/25/2019 Mastering the Craft of Painting (1985)
http://slidepdf.com/reader/full/mastering-the-craft-of-painting-1985 56/152
Structure
of
the Head
|
LOCATE
THE FORMS
1. Take a sheet
of
tracing
paper
and
copy
this
di-
agram
in red
pencil.
Be
sure
to draw the
two rec-
tangles, as this will enable
you to line up all the steps
at
the
end. In
this
first
step,
you
place
the
features
in the
correct average position
on
the head.
The
width
of
the
nose
equals the
width
of
one
eye, and
the
ends
of
the
mouth
line up with
the
center
of
each
eye.
In
the
profile
view, the
front
of
the
neck
goes
from
the
bottom
axis
of
the
head
to the brow
over the
eyes, while the
back
of
the
neck goes to
the
axis at
the
top
center
of
the
head.
2.
Now,
on another
sheet
of
tracing
paper,
copy
this di-
agram
in
green.
The
muzzle
is the
feature
to
concentrate
on in this step.
In
the
profile
view
you can
see
the
large
form
for
the
back
of
the skull
and the top
of
the
jawline.
In drawing
a
head,
you
need
to understand all
of its forms
and planes.
Always work
from
the large
forms and
planes
to
the smaller ones.
Use
the diagrams on this spread and the next to learn how the
large
and
small
forms and planes
relate. To
do
this
exercise,
you
will
need
six
sheets of tracing
paper
and three
colored
pencils (red, green,
and blue).
52
LESSONS FROM
REILLY
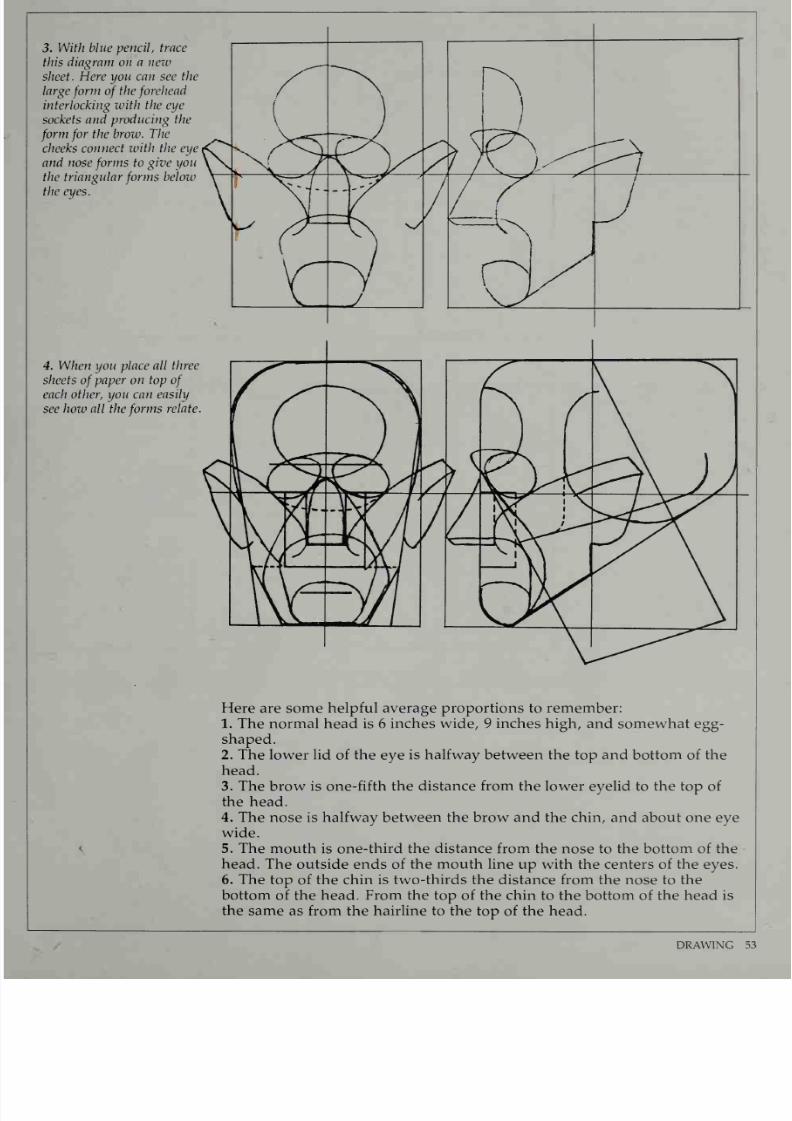
7/25/2019 Mastering the Craft of Painting (1985)
http://slidepdf.com/reader/full/mastering-the-craft-of-painting-1985 57/152
3.
With blue pencil,
trace
this diagram
on a new
sheet.
Here
you
can
see
the
large
form
of
the
forehead
interlocking with the eye
sockets
and
producing the
form
for
the brow.
The
cheeks connect with
the
eye
and nose
forms
to
give
you
the
triangular
forms
below
the eyes.
4. When
you
place
all three
sheets
of
paper on top
of
each
other, you can
easily
see
how
all
the
forms
relate.
Here
are
some
helpful average proportions
to
remember:
1.
The
normal
head
is
6
inches wide,
9
inches
high,
and
somewhat
egg-
shaped.
2.
The
lower lid of the eye is
halfway
between the top and bottom of the
head.
3. The
brow is one-fifth
the distance
from
the lower eyelid
to
the top of
the head.
4. The nose
is
halfway
between
the
brow and the chin, and
about
one
eye
wide.
5. The
mouth is
one-third the distance
from the nose to the bottom of
the
head.
The outside ends of
the
mouth
line
up
with
the
centers of
the
eyes.
6. The
top
of
the
chin is
two-thirds
the
distance from the nose
to
the
bottom of
the
head.
From
the
top
of
the
chin
to the
bottom
of
the head
is
the
same
as
from the
hairline to the
top of the head.
DRAWING
53
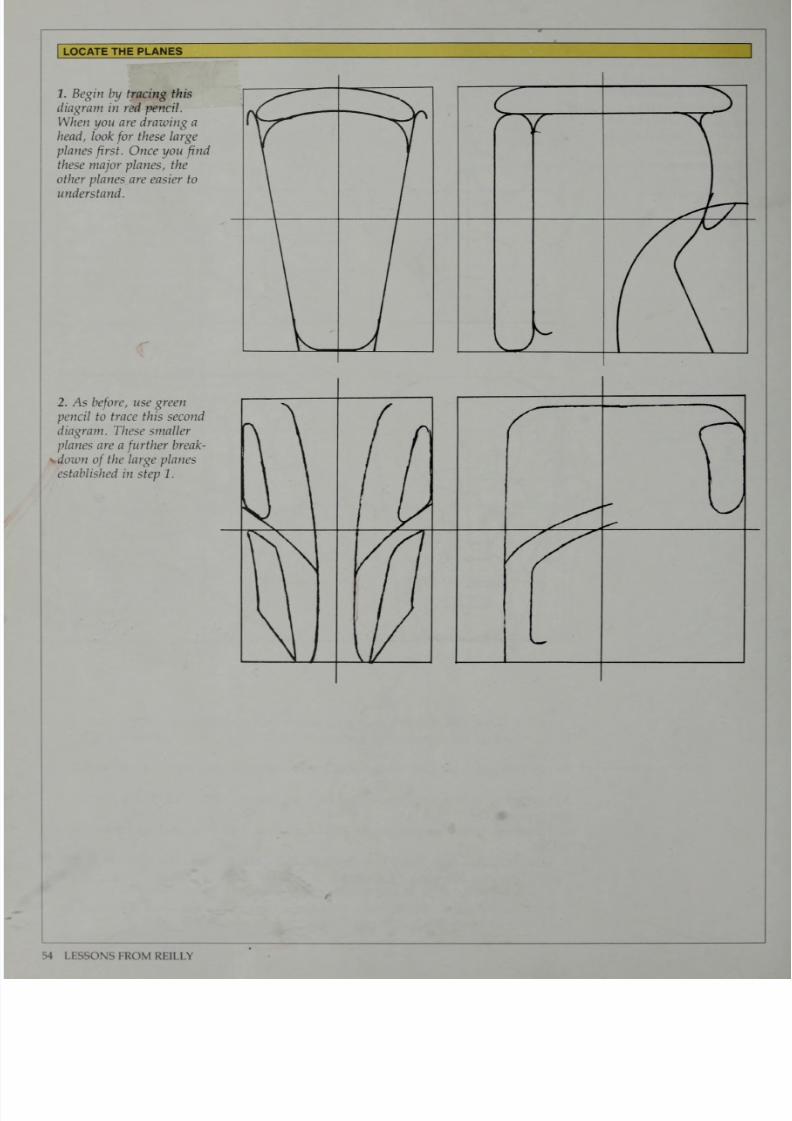
7/25/2019 Mastering the Craft of Painting (1985)
http://slidepdf.com/reader/full/mastering-the-craft-of-painting-1985 58/152
LOCATE THE PLANES
1.
Begin
by
tracing
this
diagram
in
red pencil.
When
you are drawing a
head,
look
for
these large
planes
first.
Once
you
find
these major planes, the
other
planes
are
easier
to
understand.
2. As
before,
use
green
pencil
to
trace
this
second
diagram.
These
smaller
planes
are a
further
break-
down
of
the
large
planes
established
in
step
1.

7/25/2019 Mastering the Craft of Painting (1985)
http://slidepdf.com/reader/full/mastering-the-craft-of-painting-1985 59/152
3.
Now,
with
your
blue
pencil,
trace
this diagram.
These small,
complex
planes
are important
in
fin-
ishing
your drawing (or
painting)
of
the
head. Get-
ting them right is
essential
to producing a
lifelike
por-
trait.
4. When you
put
your
three
sheets
of
tracing paper
to-
gether, you can
clearly see
the
progression
from
the
large,
simple
planes to
the
small,
complex
planes.
Once you
understand these
diagrams, practice
drawing
the
forms
and
planes
of
the
head
on your
own. Using
photographs
can
be
helpful
here.
GUIDELINES
TO REMEMBER
In drawing
the head,
once
you
have
established
the outside
shape,
you
follow
this basic order:
1. Draw
the skull and
cheekbones.
2. Position
the
muzzle
(the
area
beneath the
cheekbones,
including
the
jawline).
3.
Establish
the forehead
and
the hairline.
4.
Put in
the eyebrows and
eyes.
5. Indicate
the nose, mouth,
and
chin.
6. Position
the
ears.
7.
Correct
your drawing.
8.
Add the minor
forms.
DRAWING
55
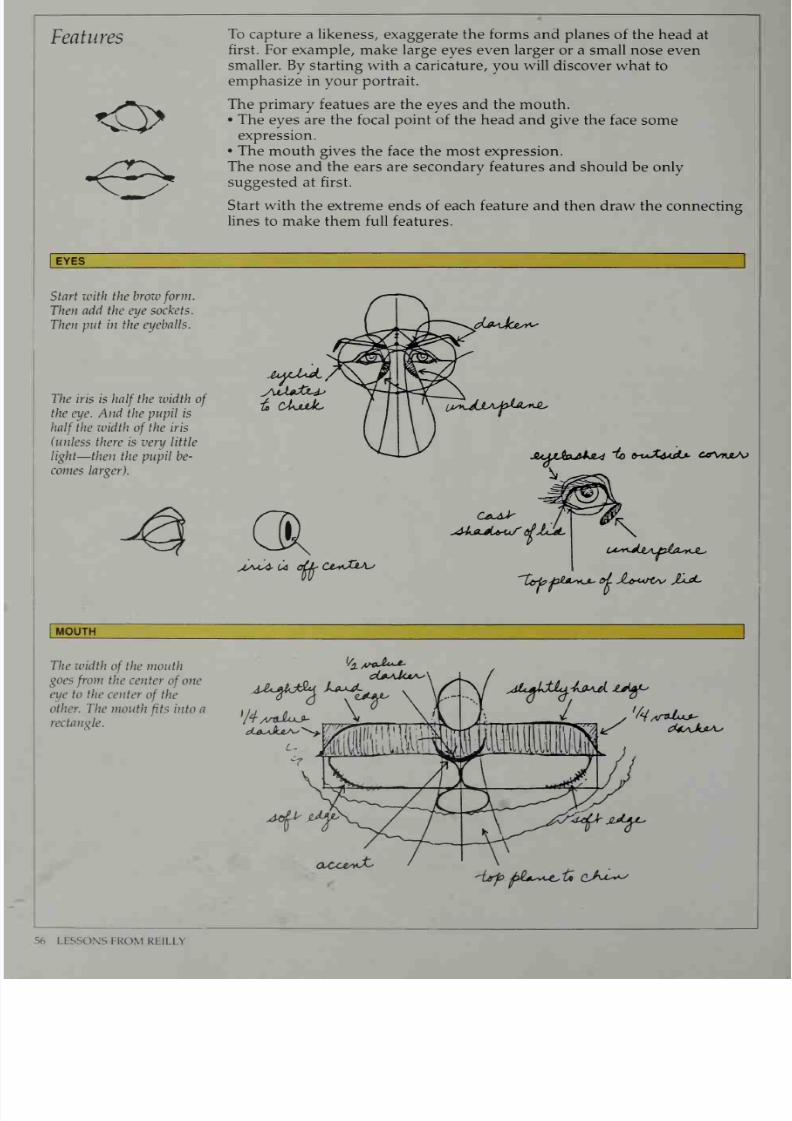
7/25/2019 Mastering the Craft of Painting (1985)
http://slidepdf.com/reader/full/mastering-the-craft-of-painting-1985 60/152
Features
To capture
a
likeness,
exaggerate
the
forms
and planes
of the head
at
first.
For
example, make large eyes
even
larger
or a
small
nose
even
smaller. By starting
with a
caricature,
you
will discover what
to
emphasize
in your portrait.
The primary
featues
are
the
eyes
and
the
mouth.
•
The
eyes are
the
focal
point
of the head and give the
face
some
expression.
•
The mouth
gives the face
the
most expression.
The
nose
and the ears
are secondary features and should
be
only
suggested
at
first.
Start
with
the
extreme ends
of
each
feature
and then draw
the connecting
lines
to
make
them full features.
EYES
Start
with the
brow
form.
Then add the eye
sockets.
Then put in the
eyeballs.
The
iris
is
half
the width
of
the
eye.
And
the pupil is
half
the width
of
the
iris
(unless
there is very little
light
—
then
the pupil
be-
comes larger).
fc>
bkuUc
cfo^Jce^'
tjs*^ULAjf>A-As*JL>
JUjxAx^ksui
~to
^uX^ajU.
cey*uL\>
sLa*s$-
u
oLL-
m^XtAs
\
MOUTH
The
width
of
the
mouth
goes
from
the
center
of
one
eye
to the center
of
the
other.
The
mouth
fits
into
a
rectangle.
cLasJUmas
sdLfjLJdluJdi^
JUfys
56
LESSONS
FROM
REILLY
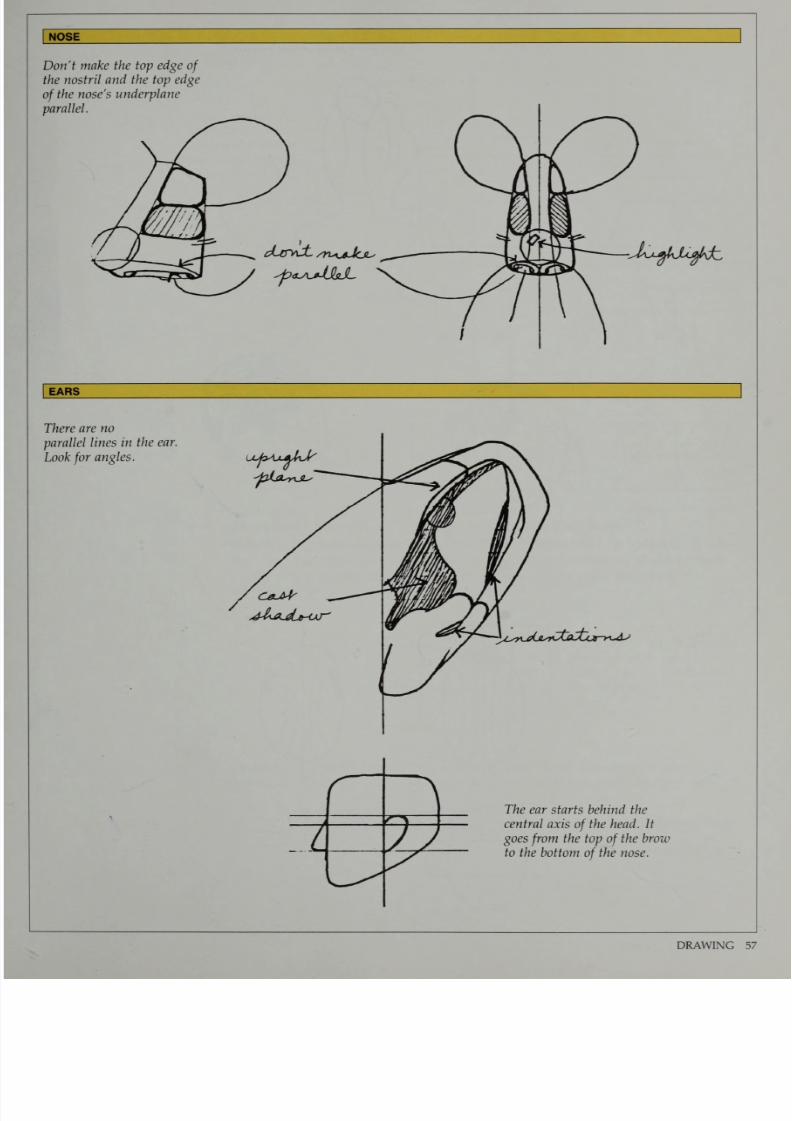
7/25/2019 Mastering the Craft of Painting (1985)
http://slidepdf.com/reader/full/mastering-the-craft-of-painting-1985 61/152
NOSE
Don't
make
the top
edge
of
the
nostril
and the
top
edge
of
the
nose's
underplane
parallel.
•J^flklLflktz
EARS
There
are
no
parallel
lines
in
the
ear.
Look
for
angles.
^L^udjisrCboLLcB-y*^
The ear starts
behind the
central
axis
of
the head. It
goes
from
the
top
of
the
brow
to the
bottom
of
the nose.
DRAWING 57
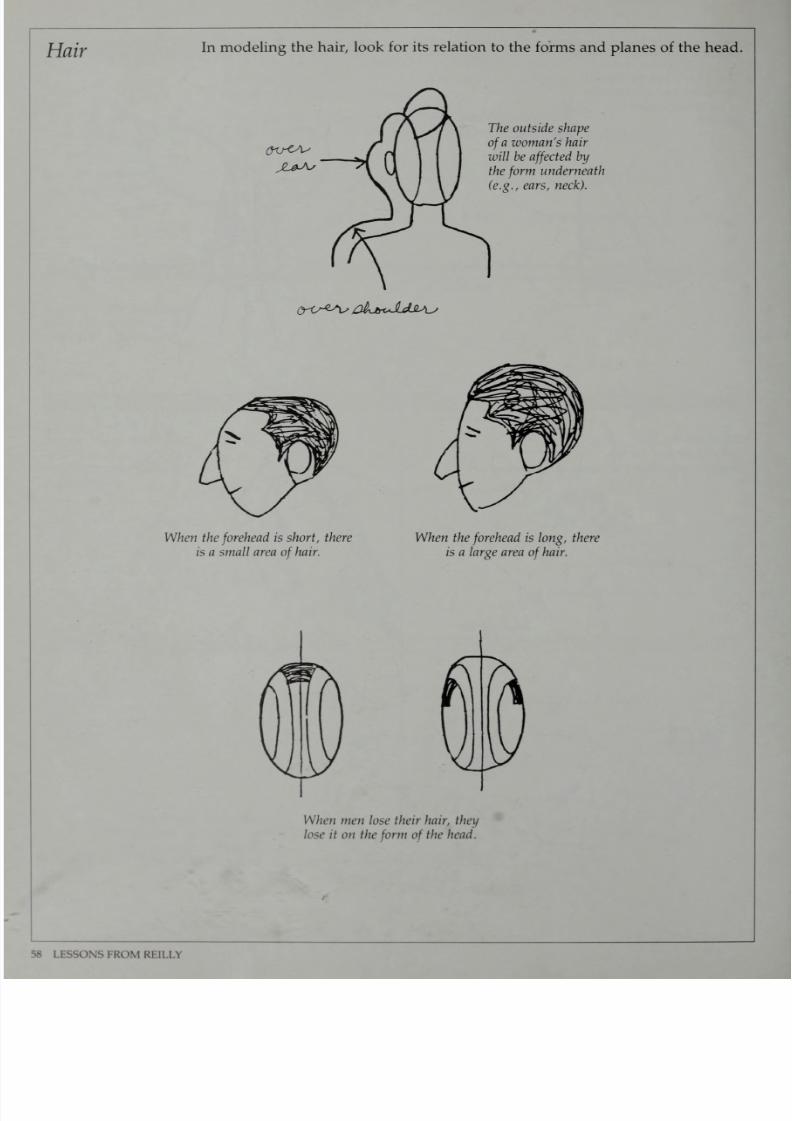
7/25/2019 Mastering the Craft of Painting (1985)
http://slidepdf.com/reader/full/mastering-the-craft-of-painting-1985 62/152
Hair
In
modeling
the hair,
look
for its relation
to the
forms and planes of the
head.
The
outside
shape
of
a woman's
hair
will be
affected
by
the
form
underneath
(e.g.,
ears,
neck).
(yt^zsis
objtn^LdJLAs
When
the
forehead
is
short, there
is a small
area
of
hair.
When
the
forehead
is
long,
there
is a large
area
of
hair.
When
men
lose
their
hair,
they
lose it
on the
form
of
the head.
LESSONS
FROM REILLY

7/25/2019 Mastering the Craft of Painting (1985)
http://slidepdf.com/reader/full/mastering-the-craft-of-painting-1985 63/152
Basic Growth
Lines
Understanding
the
basic
growth
lines can help you
draw
the head.
c^ryK/e/£
sdtAOUjtfdC,
OrrujxurZ-'
7K
<r
>
i.
yux^r-^
^dJU^jLAj^
^Sau^olAjl
CfyyjCoM*-*
%
<
±
>
&J&ut£^c*JL
-**»%
1^
<
>
V
jJJLja&t^
aslcZa^aI-^
ou-<jfjL
C*-r-<4uu-ts
To
see
how
these
lines
relate
to the shape
of
the
head, it
helps to
divide
the head into cross-sections. You
can
take
a
cross-section
at the widest
point, at
the center
of
the
form,
or wherever
you
want
the center of
interest
to
be.
The simplest
way to
determine
the
shape
of
the head is to see
how it
fits
into
a
cube with
the cross-sections shown
here.
Dividing
the
head into
thirds also
tells
you about the outside
shape
of
the
head. The size of the features
is
related
to
these parts of
the
head.
Upper
portion
dominates the hair.
Center
portion dominates
the
eyes,
nose,
and
ears.
Lower
portion
dominates
the
mouth and
chin.
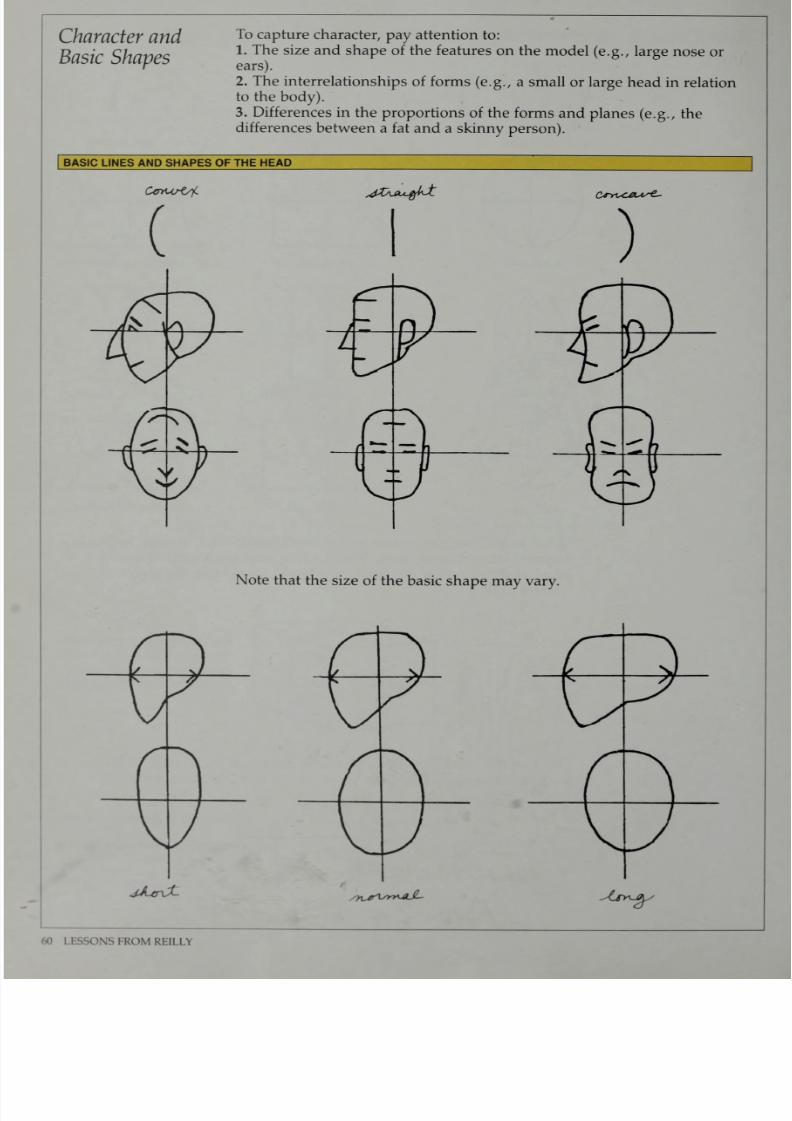
7/25/2019 Mastering the Craft of Painting (1985)
http://slidepdf.com/reader/full/mastering-the-craft-of-painting-1985 64/152
Character
and
Basic
Shapes
To
capture character,
pay attention
to:
1. The
size
and
shape
of
the
features
on
the model
(e.g.,
large
nose
or
ears).
2. The
interrelationships
of
forms
(e.g.,
a small
or large
head
in
relation
to
the
body).
3.
Differences
in
the
proportions
of
the
forms
and
planes
(e.g., the
differences
between
a fat and a
skinny
person).
BASIC
LINES AND
SHAPES OF THE
HEAD
Note
that
the
size
of
the
basic
shape
may
vary.
J^cr\X-
/yx^syy^-AjL
^Lfy^^y
60 LESSONS
FROM
Rl
II \\
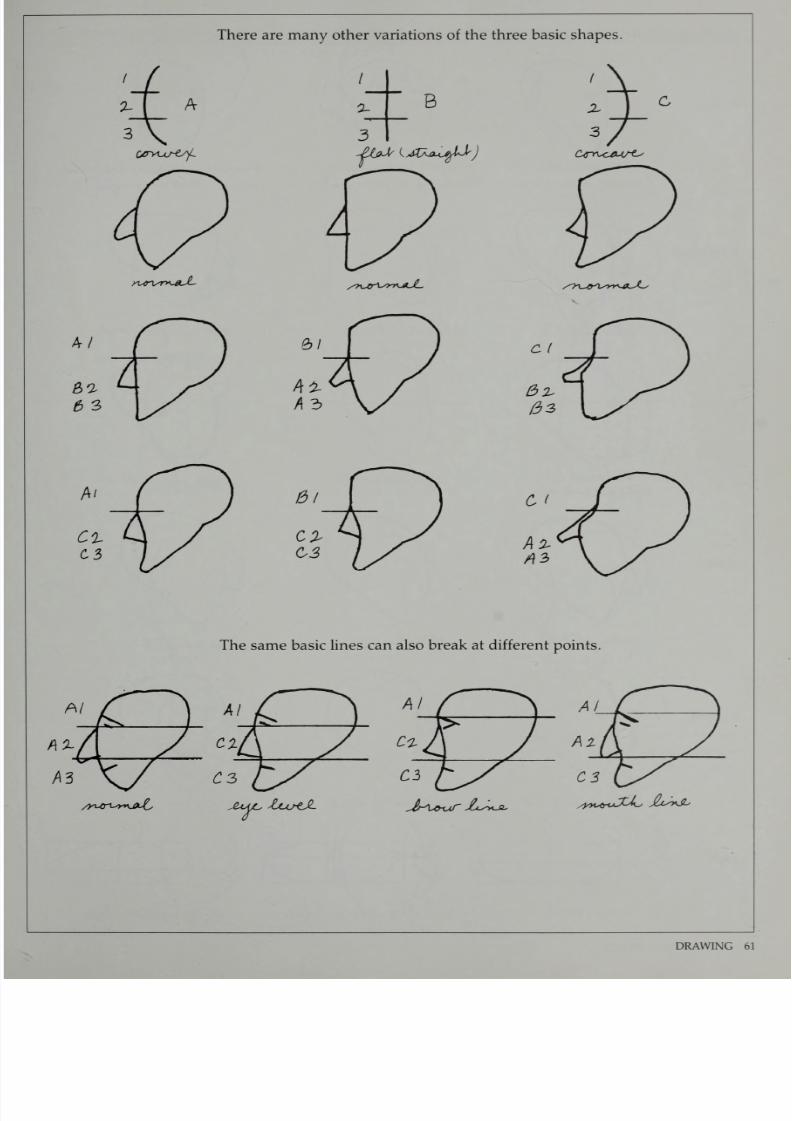
7/25/2019 Mastering the Craft of Painting (1985)
http://slidepdf.com/reader/full/mastering-the-craft-of-painting-1985 65/152
There
are many
other variations
of the
three basic
shapes.
A
/
2-
B
C/rvuj~es)L
JleJ/^j&uxAjtfd')
n*<r\sr*-0-JL
C3
The
same basic
lines can
also
break
at
different
points.
DRAWING 61
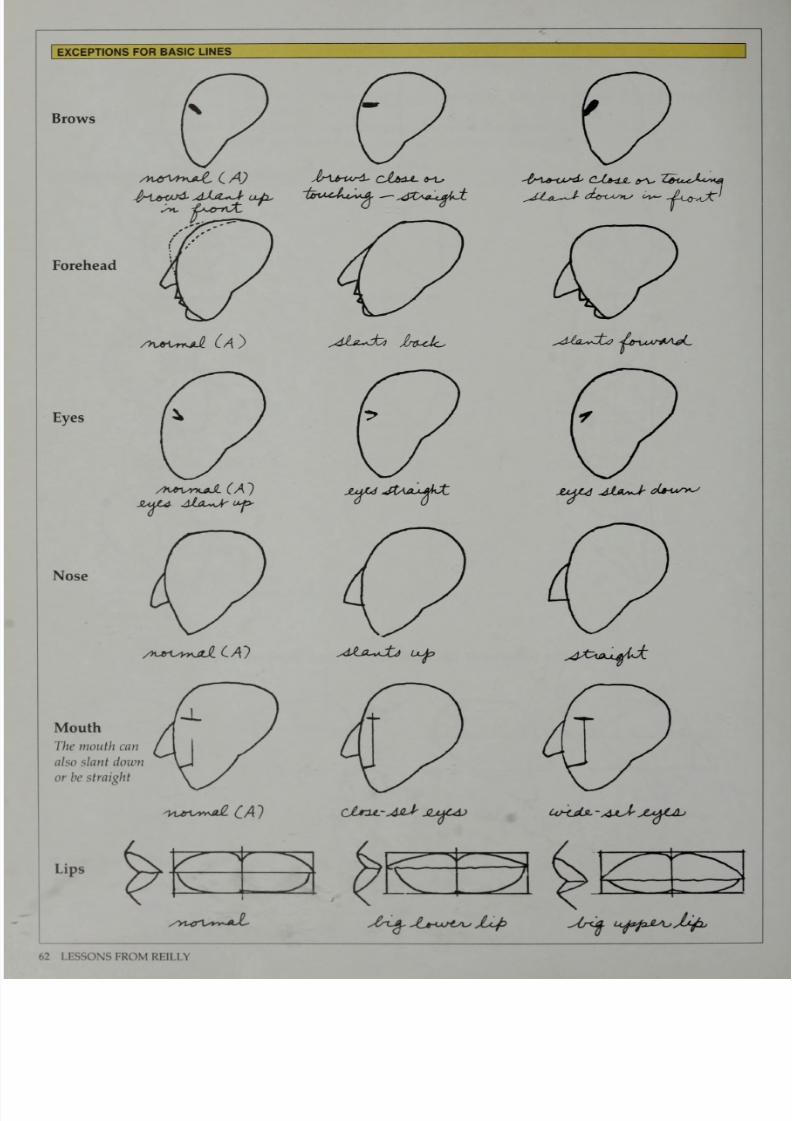
7/25/2019 Mastering the Craft of Painting (1985)
http://slidepdf.com/reader/full/mastering-the-craft-of-painting-1985 66/152
EXCEPTIONS
FOR
BASIC
LINES
Brows
/Ylt^TKSdL
LA)
Forehead
/T^&i^r^l
(A
)
Eyes
/KJnsrKjJL
(A~)
Nose
/K^L^I^JlJi
CAl
Mouth
The mouth
can
also slant down
or be
straight
->l^Vm^
CA1
Lips
^uU^bi
JU<U.
jbxU
Jt^-M^t
sdta^dtj
uuk>
CJjrLL-AsJ-
JUflLAJ
^d£&^ZL<3
Au<aM^L
^IfisJIr
d+US»~S
^^AjloA^A.
UhCdJL-
sAjlA-
jL<flUL>
3
/yt-erVw-ax^
^^
^
s£l^ ^*~U*SLs
ytcjb
-^it
l
^
a
p
JL
^J
J
^

7/25/2019 Mastering the Craft of Painting (1985)
http://slidepdf.com/reader/full/mastering-the-craft-of-painting-1985 67/152
Chin
yyur^yryjxJ.
(4)
sdXiucJk^
t^uJ^
aJIjcjzJjL&s
Jaw
/njrTsY>^*JL
(A)
-J^^IC
***
Ears
zn^rvm^
(A)
n^er^ry^-
(£>j
^>^>-\yrr\Jut
^Cj)
>
-*>
A
gasiA,
Atuck^
<mJ>-
7/25/2019 Mastering the Craft of Painting (1985)
http://slidepdf.com/reader/full/mastering-the-craft-of-painting-1985 68/152

7/25/2019 Mastering the Craft of Painting (1985)
http://slidepdf.com/reader/full/mastering-the-craft-of-painting-1985 69/152
REILLY/MUNSELL
COLOR
WHEEL
On
the
Reilly/Munsell color
wheel,
the
five
principal
hues
—
yellow,
green, blue,
purple,
and red
—
are
con-
nected by lines
to a neutral
center.
Halfway
between
these
hues are
the
five
inter-
mediate
hues:
yellow-green,
blue-green,
purple-blue,
red-purple, and
yellow-red.
MeUhxv
UgMeuT-
fad.
rf&l-
&U<f&L.
%AJUsrv-'tytkrur
/J*JLQsyV
BLl*A
-J£ju*.
fuApla.-
BZjuJL
SPECTRUM COLOR
WHEEL
Even though
the Reilly/
Munsell
color
wheel
is
more
scientific, you may
prefer
to
use the
spectrum
color
wheel
because
you are more
familiar
with
it.
The hues
on both
wheels
are
the
same.
Although
orange
on
the
spectrum
color
wheel
is
called
yellow-red
on the
Reilly/Munsell
color
wheel.
The
it?iportant
difference
is
in
the
positions
of
the
hues,
which
means
that the
com-
plementary
color
combina-
tions
differ
for
each wheel.
On the
spectrum color
wheel, the
primary
colors
—
red,
yellow,
and
blue
—
are
indicated
by a gray
tri-
angle,
while the
secondary
colors
—
orange,
green,
and
purple
—
are
indicated
by
the
lines
of
another,
in-
verted
triangle.
The
tertiary
colors
are
yellow-orange,
red-orange,
red-purple,
blue-purple,
blue-green,
and
yellow-green.
Ut£l*ur
Uc££*vr
^jdUUur-
JUjul*^
dhA>«4f~s
faoL-Qu**?'
rtu.
fijtd.-
CuA-jate-
e&ujt-
(m^al-
fiuAjJA,

7/25/2019 Mastering the Craft of Painting (1985)
http://slidepdf.com/reader/full/mastering-the-craft-of-painting-1985 70/152
Value
oj^Jjl,
Value
is
the
lightness or
darkness of any hue.
If we consider white
as
100% light and
black
as
0% light, we can,
for
practical
purposes,
divide
the
values
of each
hue
into
a
scale
of nine
steps
between
white
and
black:
90%,
80%, 70%,
60%, 50%,
40%,
30%, 20%,
and
10%
light.
A nine-value
neutral
gray
scale enables
you
to
measure
different hues
for specific values. Cadmium red light,
for
instance,
has
a
value
of
5
when it
comes out of
the tube.
If value 7 is
needed,
you add white
to
the
cadmium red light and measure
it
against value 7
on
the
neutral
gray
value
scale.
If
you
are painting
a
still
life
and
want
to know
the value
of
the
light
area
in
the background,
lay the scale
on
the
actual
background
and match
the background
to
one
of
the
values
on the
neutral gray
scale. Then
mix a
hue
to this value on
the
neutral
gray scale. By constantly checking
everything with
the neutral gray scale,
you
will train your
eyes to see
things
in terms
of
value.
Try
squinting
your
eyes while
checking
a
strong-
chroma
hue, as this will allow
you
to
compare the
value more
easily.
ASSIGNMENT
Make
a
nine-value neutral gray scale. Although you can
paint this gray
scale
on any support, I recommend
illustration board
because it
is
easy to
work
with. First
give it
a
coat of
shellac
or
acrylic gesso
to
seal it
from the
oil
paint.
Prepare
enough
boards
to
complete several
charts,
as you
will
want
to
make hue
and chroma
charts,
too.
Moreover, you
may
have to
repeat
the
gray scale
if you
make mistakes. In fact,
very
few
people get
the
scale
right
the first
time.
Mixing
the Values: Because
the tinting strength of
colors varies, you
can't
simply
mix 50%
white and 50%
black
to
get
value 5.
Instead, you
will
need
considerably
more
white
than
black.
Use
the gray
scale
printed
here
as
a rough guideline and
try to
gauge your
values by eye.
The
key
values
to start
with are
values
9, 5,
and
1.
Once
these are correct,
use
them
to
mix the following
values:
Value
7 (from value 9
+ value
5)
Value
3 (from
value
1
+
value
5)
Finally,
mix
these
values
to
get the
remaining
values:
Value
8 (from value 9
-I-
value
7)
Value
6
(from value 7
+
value
5)
Value
4 (from
value 5
+
value
3)
Value
2
(from
value 3
+
value
1)
LKSsuN'siKOMKHin
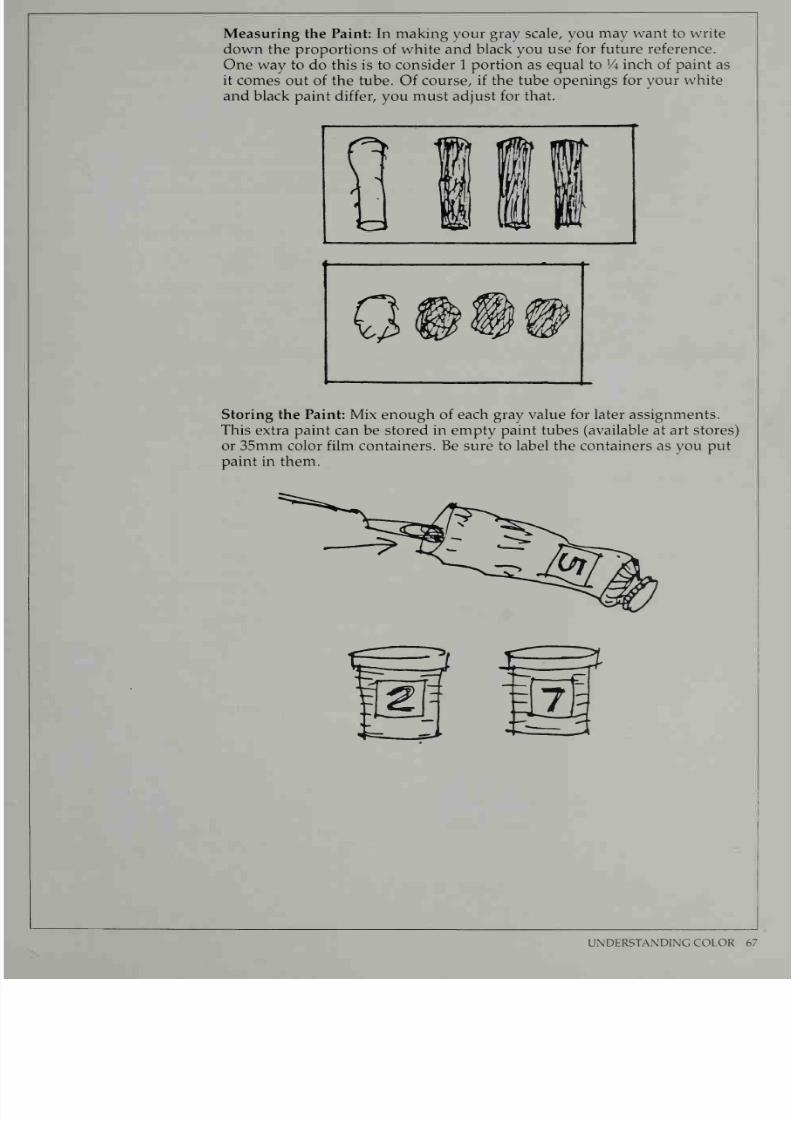
7/25/2019 Mastering the Craft of Painting (1985)
http://slidepdf.com/reader/full/mastering-the-craft-of-painting-1985 71/152
Measuring
the
Paint: In making
your
gray
scale,
you
may
want
to
write
down
the
proportions of white
and
black you use
for future reference.
One
way
to do this is to
consider 1
portion as
equal to
l
A inch of
paint
as
it
comes
out
of
the
tube.
Of
course,
if the
tube
openings
for your
white
and black
paint
differ,
you must
adjust
for
that.
Storing
the Paint: Mix enough of each
gray value for
later assignments.
This
extra paint can be stored in empty
paint
tubes
(available
at art
stores)
or
35mm
color
film containers.
Be
sure
to
label the
containers as
you
put
paint in them.
UNDERSTANDING COLOR 67

7/25/2019 Mastering the Craft of Painting (1985)
http://slidepdf.com/reader/full/mastering-the-craft-of-painting-1985 72/152
ChvOttlCl
Chroma
is
the
degree of
intensity
of a
hue.
A
change in
chroma must not
bring
about a change in value.
If, for
instance,
we
take a
hue
at
value
5
and wish
to
change
its chroma,
we
mix
it
with
a
neutral gray of
the same
value. Let's
take
cadmium red
light,
which has
a
value
of 5
and
is at maximum chroma when
it
comes
out of
the tube. To change
its
chroma,
use a
neutral
gray
that is also
value
5.
The
percentage
of this
neutral gray
(value
5)
added
to
the
cadmium red
light (value
5)
determines the chroma
of
that
mixture.
Although
the
number
of
steps
between
a
full-strength
hue and
a
neutral
gray
is unlimited,
for
practical
purposes
we
will use two
intermediary
steps:
medium
and
weak. Thus,
with
cadmium red
light,
we
would have:
2
parts
Red
Value
5
+
1
part Gray Value
5
=
Red Value
5/Medium
Chroma
1
part Red
Value
5
+
2 parts
Gray Value
5
=
Red
Value
5/Weak
Chroma
Note: In
the
Munsell system,
the hue
is
listed
first,
then the
value
(with
a
slash), then
the chroma. Thus,
R
5/6 refers to a red with
a
value
of 5 and
a chroma of 6.
]
ASSIGNMENT
|
Make a simple
three-value chroma
chart
for
a
particular hue,
using
onlv
values
3,
5,
and
8,
and showing strong (maximum),
medium,
and
weak
chromas.
(If you are more
ambitious,
make a full
nine-value
chroma
chart,
showing
strong, medium, and weak chromas). Repeat this
process
with
each
hue
on your palette.
%
5
3
>~t
WjuJ^
'^h\JjdLu*sr*J ^CLo-y^a,
}4uj^

7/25/2019 Mastering the Craft of Painting (1985)
http://slidepdf.com/reader/full/mastering-the-craft-of-painting-1985 73/152
Mixing
the Paint:
Use
the mixing
chart
below
to
determine how
to
lighten
or
darken
a
hue. Let's take
cadmium
red
light,
which comes out
of the
tube
at
value
5. To get
value 8
for
cadmium
red light,
add white
and
measure it
against
value
8
on the gray
value
scale.
For
value
3,
make
a
combination
of
90%
alizarin crimson
and
10% burnt
umber, add
this
to
the cadmium
red light and
measure this against
value
3
on the gray
scale.
TUBE
COLOR
HOME-LEVEL
VALUE*
ADD
TO
LIGHTEN
ADD
TO
DARKEN
Cadmium
Yellow
Light
9
White
Raw
Sienna
to
Value
4;
Raw Umber
to
Value 1
Cadmium Orange
7
White
Burnt
Umber
Cadmium
Red
Light
5
White 90%
Alizarin
Crimson
plus
10%
Burnt
Umber
Alizarin
Crimson 1
White
Black**
Viridian 1
White
Black**
Cerulean
Blue
4
White Black
Ultramarine
Blue 1
White
Black**
Yellow
Ocher
6
White
Raw Umber
Raw
Sienna
4 White
Raw Umber
Burnt Sienna
2
White
Burnt Umber
*Be sure to check
the
tube color
values against
your neutral gray
scale
as
colors
may
vary
from brand
to
brand,
or
even in
the
same brand.
*
Because
these hues are already
value
1,
they
should
not be darkened in a
painting
as nothing
should
be
below value
1 or
above
value
9.
Special Tips: When you make your
chroma charts, first
cut pieces of
paper
into
rectangles
about
2x5
inches.
Paint
these
with
your
gray
values so
that
you
have nine pieces of paper,
each painted
a different
value. Then, when
you
mix your colors for
the chroma charts, put the
color
on
the corresponding
gray
value to see
if it is
correct.
If it
sinks
into the
gray
value when
you
squint,
the
value
is correct
and
you
can put
it
in
the right place
on
your
chart.
It also
helps to add
a
drop of
cobalt
drier to each
color
to
speed
the
drying time.
UNDERSTANDING
COLOR 69
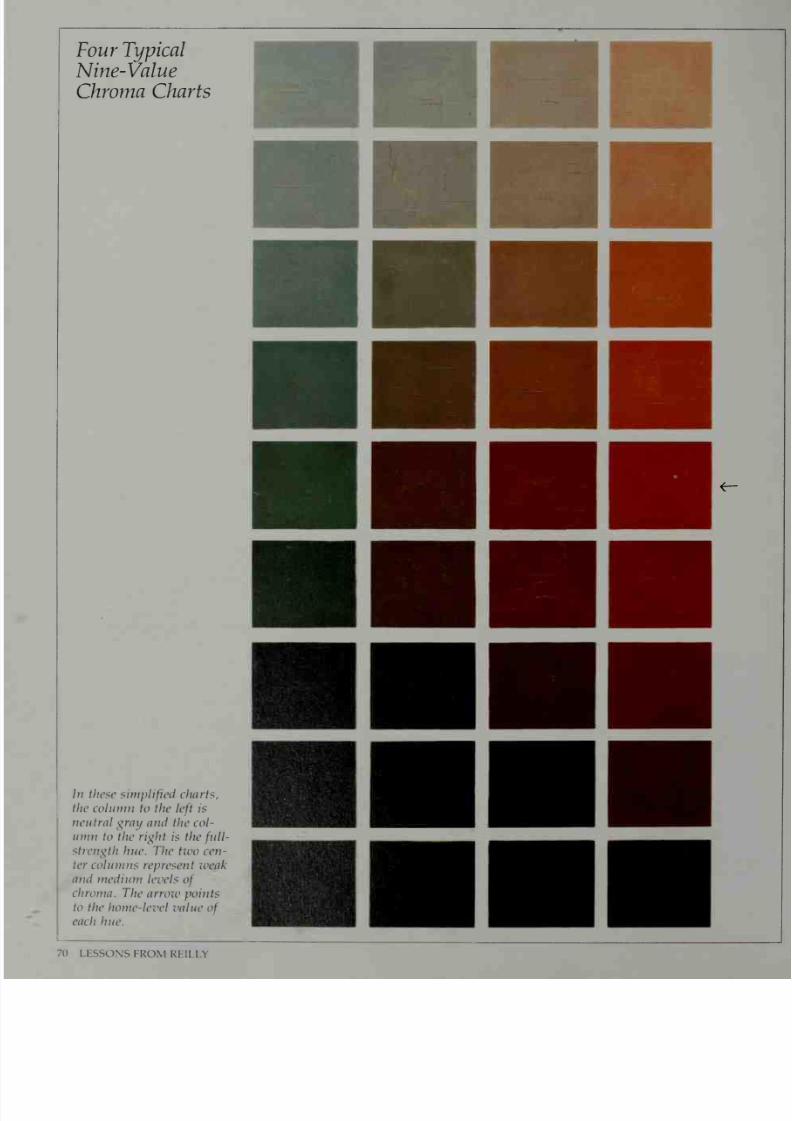
7/25/2019 Mastering the Craft of Painting (1985)
http://slidepdf.com/reader/full/mastering-the-craft-of-painting-1985 74/152
Four Typical
Nine-Value
Chroma
Charts
In
these
simplified
charts,
the
column
to the
left
is
neutral
gray and the
col-
umn
to
the
right
ts the
full-
strength
hue.
The
two
cen-
ter
columns represent
weak
and
medium
levels
of
chroma.
The
arrow
points
to
the
home-level value
of
each
hue.
70
LESSONS
FROM
REILLY

7/25/2019 Mastering the Craft of Painting (1985)
http://slidepdf.com/reader/full/mastering-the-craft-of-painting-1985 75/152
UNDERSTANDING COLOR
71

7/25/2019 Mastering the Craft of Painting (1985)
http://slidepdf.com/reader/full/mastering-the-craft-of-painting-1985 76/152
tfoH^^B^^^H
^^^B^^^^H
I
72
LESSONS I
Ki
)M
RLILLY
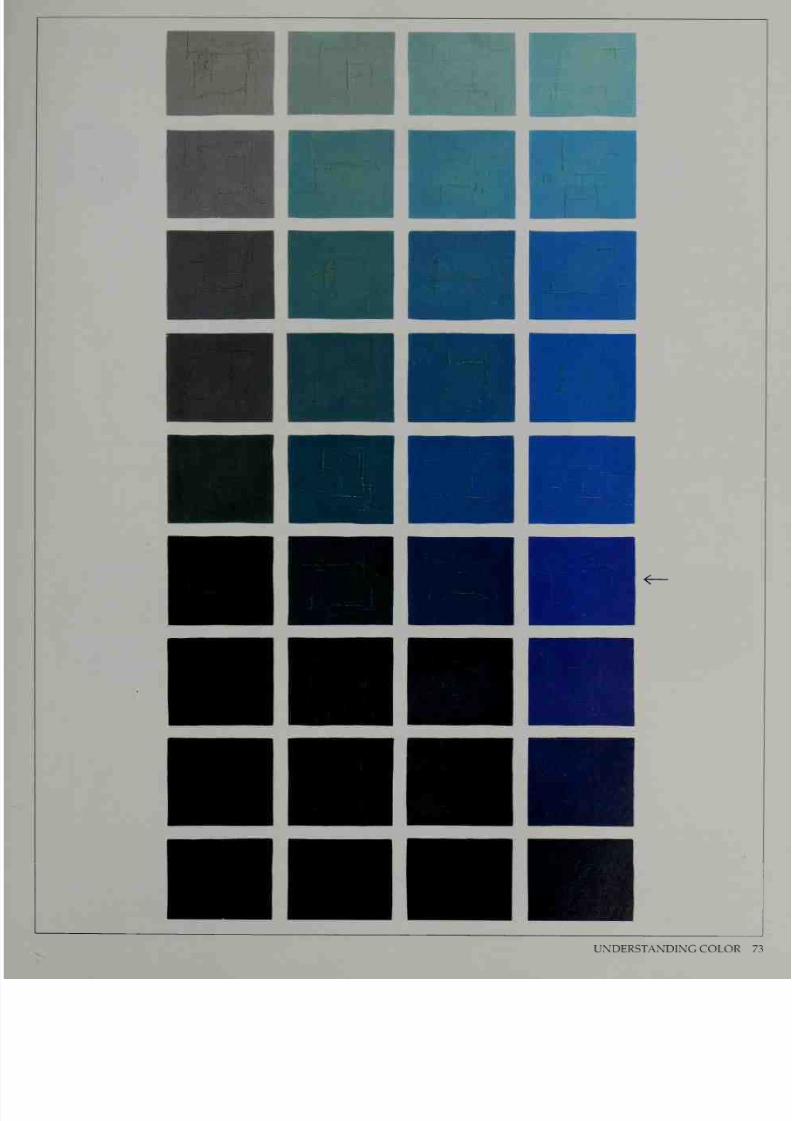
7/25/2019 Mastering the Craft of Painting (1985)
http://slidepdf.com/reader/full/mastering-the-craft-of-painting-1985 77/152
UNDERSTANDING COLOR
73

7/25/2019 Mastering the Craft of Painting (1985)
http://slidepdf.com/reader/full/mastering-the-craft-of-painting-1985 78/152
Color, Light,
and
Form
These
balls are shown
in
front
lighting. The
edges
are painted two
values
darker
than
the rest, and
the
chroma
is
strongest
in
the
center. The
examples
below show one
hue
—
yellow-red (the
flesh
color)
—
under
different
lighting
conditions.
You can
see
how
form
light-
ing
reveals
the
form.
The
strongest chroma is in
the
light,
and
it
gets
weaker
in
the
shadow.
In
rim
lighting,
the
chroma
is
weak in the
light
and
even
weaker
in the shadow.
A
touch
of
stronger chroma
in
the
center,
however,
helps
to
clarify
the
form.
In
backlighting,
the
overall
chroma
is
weak,
but
again
the chroma
is
stronger
in
the
center
to
clarify
the
form.
Note
that
the
edge
is
one-half
to
one
value
darker
than
the
form.
Different
lighting
conditions have
different effects
on
value and
chroma.
In
painting
the
model, try
to
use form lighting,
where the lighting
is
at
an angle
that
best
reveals the
form.
You
should, however,
observe
what
happens
when
the light is
from the
front
or
back, or when
it
just hits the
rim
of
an
object.
74
LESSONS FROM
REILl.Y
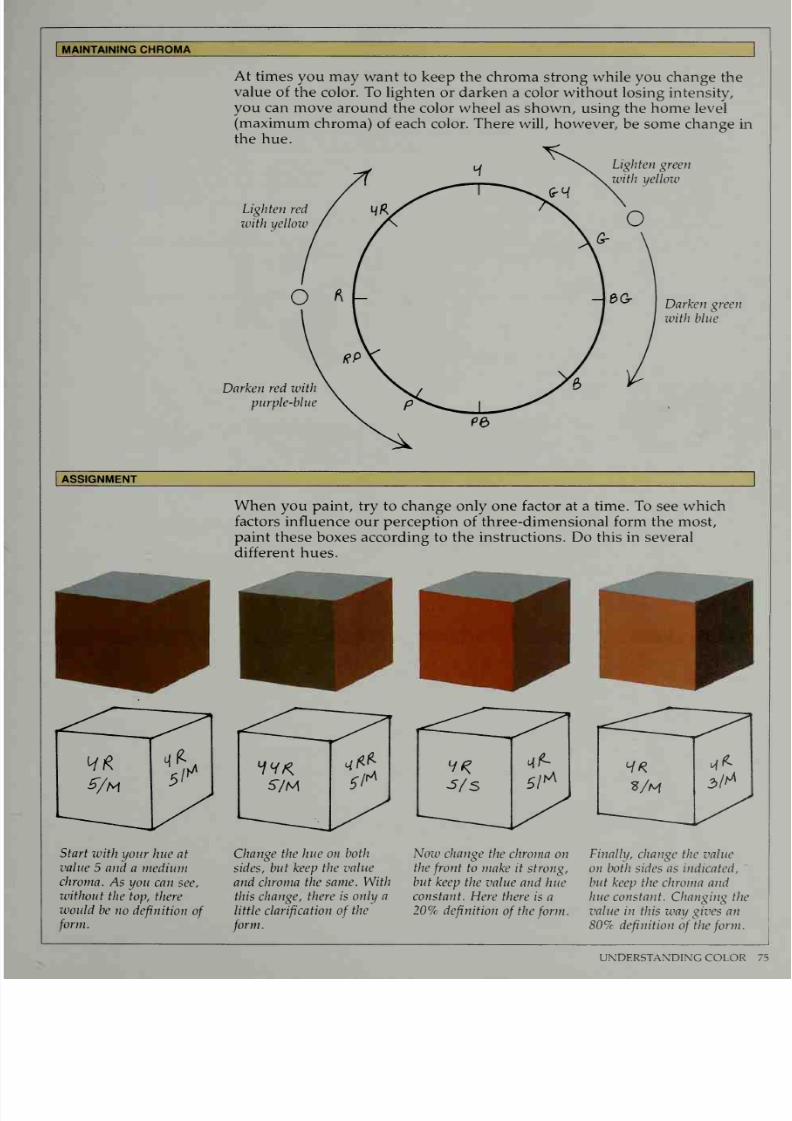
7/25/2019 Mastering the Craft of Painting (1985)
http://slidepdf.com/reader/full/mastering-the-craft-of-painting-1985 79/152
MAINTAINING CHROMA
At times
you
may
want
to
keep
the chroma
strong
while
you
change
the
value
of
the
color.
To
lighten or darken
a
color without
losing intensity,
you
can move
around the
color
wheel
as shown,
using the
home
level
(maximum
chroma)
of each color. There
will,
however,
be
some change
in
the hue.
Lighten green
with yellow
Lighten
red
with
yellow
Darken red
with
purple-blue
O
«
Darken
green
with
blue
ASSIGNMENT
When
you paint,
try
to
change only one factor at a time. To
see
which
factors influence
our
perception
of
three-dimensional
form the most,
paint
these
boxes
according
to
the
instructions.
Do
this
in
several
different
hues.
Start
with
your
hue
at
value
5 and
a medium
chroma.
As you
can
see,
without
the
top,
there
would
be no
definition
of
form.
Change the
hue
on
both
sides, but keep
the value
and
chroma
the
same.
With
this change, there
is
only
a
little
clarification
of
the
form.
Now change
the
chroma on
the
front
to
make
it
strong,
but
keep
the
value and hue
constant.
Here
there is a
20%
definition
of
the
form.
Finally,
change
the
value
on both sides
as indicated,
but keep the
chroma
and
hue constant.
Changing
the
value
in this
way
gives an
80%
definition
of
the
form.

7/25/2019 Mastering the Craft of Painting (1985)
http://slidepdf.com/reader/full/mastering-the-craft-of-painting-1985 80/152
In painting,
remember that
it
is the
mind
that
really
sees
—
the eye only
looks. In other words,
you
can
see
only what
the
mind
knows.
Don't try
to
copy nature or
the
model.
Instead,
learn
the theory of nature
and
the
procedure for translating
it.
Paint
by principle
only.
The mind
is
selective
—
you can
focus
on only
one
object at a
time.
You
must look at things in the correct order, from the big things
to the smaller
ones. Also,
because we
see
with two eyes (binocular vision),
you must
have
soft
edges in
painting.
In moving
from
the
scale
of nature into
the scale
of
paint,
you
must adjust
the values
of nature
into
the
values
of
paint.
a^AcXJn,
7T-aZc(A4^
M^Jc
urf^Xe^
la^sflJC.
sCrfaiJc
There are
two ways
to
paint:
1. Direct painting
(where
you
create the
form
by
the direct application of
pigment, without scumbling or glazing).
2.
Suggestion
(where you
suggest the form
through
glazing
or
scum-
bling).
When you're learning to paint, try
to
paint the
form directly.
Don't take
the easy
way
out and
simply
suggest it. Also, as a
beginner, remember
that
your
paintings
are
for study
only.
Don't
worry about a
finished look.
The
important
thing at this point is to
learn.
WORK IN MASSES
In
the
beginning, mass your
paint.
If
you keep
the masses
simple, you'll
learn
to
paint
more
quickly.
Put in
the large
masses
first. Then,
once
they're
correct, put in the
smaller masses.
Paint
the
same way you draw:
1.
In
blocking
in the figure,
first define
the action.
2.
Once
the
action is established,
begin
to
model
the forms.
LESSONS FROM
REILLY
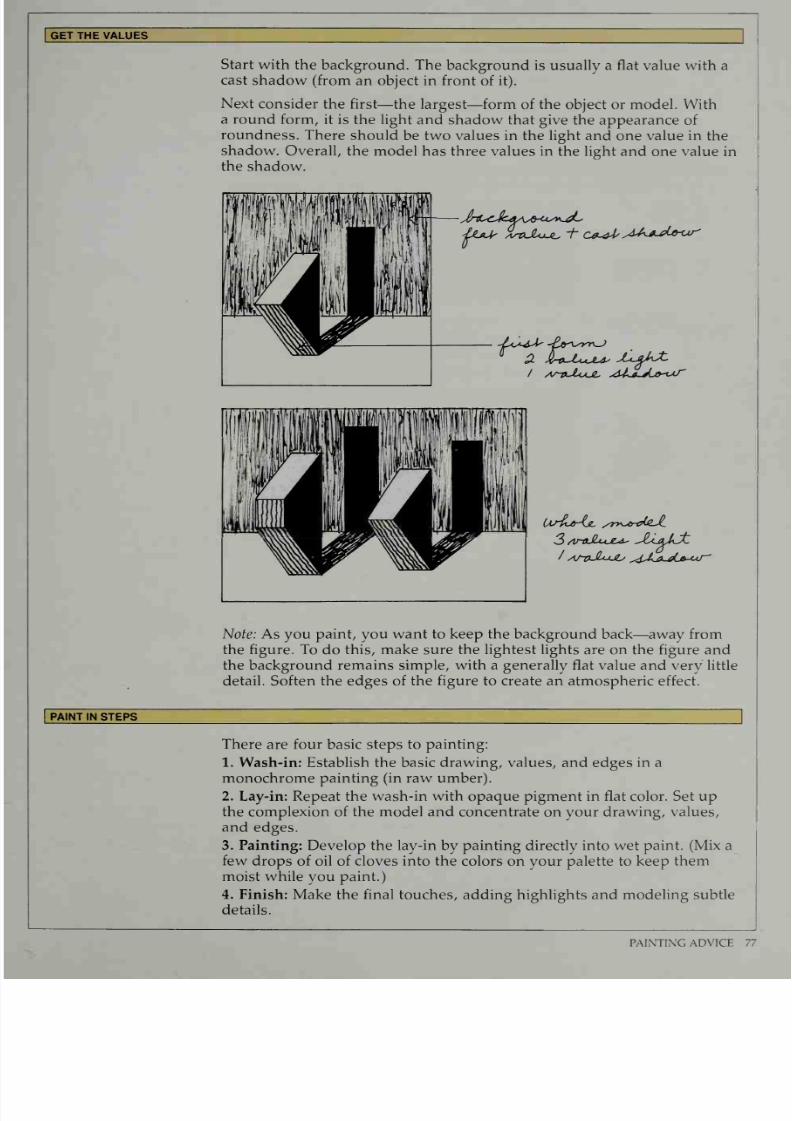
7/25/2019 Mastering the Craft of Painting (1985)
http://slidepdf.com/reader/full/mastering-the-craft-of-painting-1985 81/152
GET THE
VALUES
Start with
the
background. The
background
is
usually
a
flat value
with
a
cast shadow
(from
an object
in front
of
it).
Next
consider the
first
—
the largest
—form of the
object
or
model. With
a
round
form,
it
is
the light
and shadow that
give the appearance
of
roundness.
There
should
be
two
values
in the light and one value in
the
shadow.
Overall,
the
model has three values in
the light
and
one
value
in
the shadow.
Note: As
you
paint,
you want
to keep
the
background
back—away from
the
figure.
To
do
this,
make sure the lightest
lights
are on the
figure and
the
background
remains
simple, with a generally
flat
value
and
very
little
detail. Soften the edges
of
the
figure
to create an
atmospheric
effect.
PAINT IN
STEPS
There
are
four basic steps to painting:
1.
Wash-in:
Establish
the
basic
drawing, values, and
edges
in
a
monochrome painting
(in
raw
umber).
2.
Lay-in: Repeat the wash-in
with
opaque pigment in flat color. Set up
the complexion
of the model and concentrate
on
your
drawing, values,
and
edges.
3.
Painting:
Develop the
lay-in by painting
directly
into wet
paint. (Mix
a
few
drops
of
oil of cloves into the colors
on your
palette
to
keep
them
moist
while
you
paint.)
4.
Finish:
Make the
final
touches,
adding
highlights
and modeling
subtle
details.
PAINTING
ADVICE
77
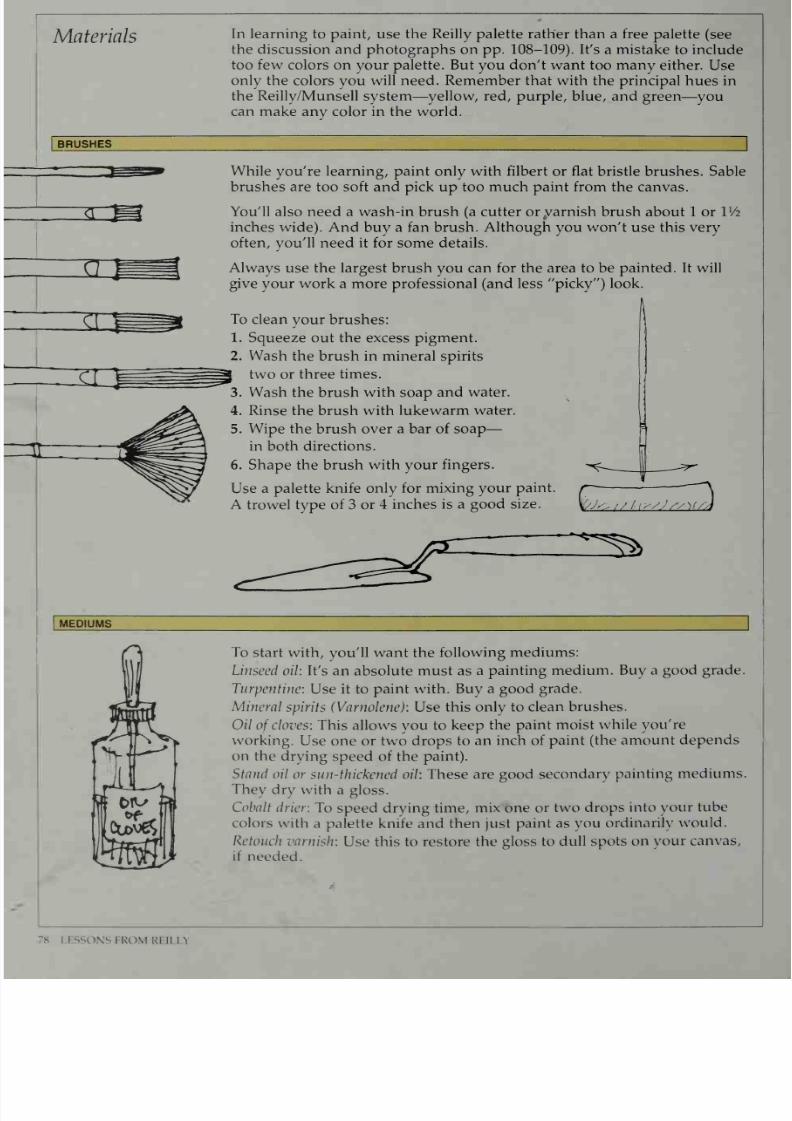
7/25/2019 Mastering the Craft of Painting (1985)
http://slidepdf.com/reader/full/mastering-the-craft-of-painting-1985 82/152
Materials
BRUSHES
In learning
to paint, use the
Reilly palette
rather
than
a
free palette
(see
the discussion and photographs on
pp.
108-109).
It's
a
mistake
to include
too few
colors on your palette. But
you
don't want too many either.
Use
only
the
colors
you will need. Remember
that with
the principal
hues
in
the
Reilly/Munsell
system
—
yellow, red,
purple,
blue, and green
—
you
can
make
any color
in
the
world.
While
you're learning, paint only
with
filbert
or
flat bristle brushes.
Sable
brushes
are
too
soft and pick up
too
much
paint
from
the
canvas.
You'll also need a wash-in brush (a cutter
or
varnish
brush about
1
or
IV2
inches
wide).
And buy a fan
brush.
Although
you
won't
use
this
very
often, you'll need
it
for some
details.
Always
use
the largest
brush
you
can for the area to be
painted.
It
will
give your work
a more
professional
(and
less picky ) look.
To
clean
your brushes:
1. Squeeze
out
the
excess
pigment.
Wash
the
brush
in
mineral
spirits
two
or
three times.
Wash
the brush
with
soap
and water.
Rinse the brush
with lukewarm water.
Wipe the
brush
over
a bar
of
soap
in
both
directions.
Shape
the
brush
with your
fingers.
Use a
palette knife
only
for
mixing your
paint.
A
trowel
type
of
3
or
4 inches
is a good
size.
m
J^//l-tyy//y-
y^uj
'
*
<
S>
MEDIUMS
To
start with,
you'll
want the
following
mediums:
Linseed
oil: It's an
absolute must
as a
painting
medium. Buy
a
good
grade.
Turpentine:
Use
it
to
paint
with. Buy a
good
grade.
Mineral
spirits
(Varnolene): Use
this
only
to
clean
brushes.
Oil
of
cloves:
This
allows
you
to
keep
the paint
moist while
you're
working.
Use one or
two
drops
to an
inch
of
paint (the
amount
depends
on the
drying
speed of
the paint).
Stand
oil
or
sun-thickened
oil: These
are
good
secondary
painting
mediums.
They
dry
with
a gloss.
Cobalt drier:
To
speed
drying time,
mix
one or
two drops
into
your tube
colors
with
a
palette knife and
then
just paint as
you
ordinarily
would.
Retouch
varnish:
Use
this to restore
the gloss to
dull spots
on
your canvas,
if
needed.
78
llsso\s|Ko\1
REILLY

7/25/2019 Mastering the Craft of Painting (1985)
http://slidepdf.com/reader/full/mastering-the-craft-of-painting-1985 83/152

7/25/2019 Mastering the Craft of Painting (1985)
http://slidepdf.com/reader/full/mastering-the-craft-of-painting-1985 84/152
Wash-In
The wash-in
is an
initial
monochrome painting,
done in
raw umber.
Its
purpose
is
to solve
all
the
problems
of
drawing,
values, and
edges. It also
enables
you to get
rid
of the whiteness of the canvas
and
to
set up the
correct
atmosphere.
Doing a
wash-in is
particularly helpful when
you are
learning
to
paint
because
it
allows
you
to
solve
drawing
and
basic
value
problems
before
you
become involved in
brushwork and color. When I
worked
in
Reilly's
class,
I always
did
a wash-in first,
but frankly
it
never
appealed
to
me. As
I gained
experience,
I started
to
work in full color right
away. Today,
the
closest I
come
to a
wash-in
is to thin
my
color with turpentine
in the first
stages
of
painting.
Nevertheless,
while you're learning,
it's a
good
idea
to
start
with
a
wash-in.
I've
included two
demonstrations here to show
you two
different
procedures
you
can
use.
The
first
—
of
a female
model
—
begins
with
an ink
drawing; the
second
—
with
a
male model
—starts out
with
the direct
application
of
paint
to
the
canvas.
MATERIALS
1
Before
you
start,
be
sure
you
have
these materials:
A
stretched,
cotton duck
canvas. (Later on,
when
you're
more experienced,
you may
prefer
to
use
linen
canvas.)
A
painting
medium
of
one-half
linseed oil and
one-half
turpentine .
If,
however,
you find
the
paint dries
too
fast, increase
the
amount
of linseed oil, or
even
use it full strength.
Raw
umber
paint.
Raw
umber
is
used
because
it
does
not
bleed.
Burnt
umber, on
the
other hand, bleeds
—meaning that the paint
will
eventually
come through
any
paint you apply over
it.
Cheesecloth.
Use this to
wipe
out
the raw
umber
when
needed.
A
cutter
or
varnish brush
(1
or V/i
inches). This
brush
allows you to apply
the
paint
in broad
strokes.
LESSONS FROM REILLY
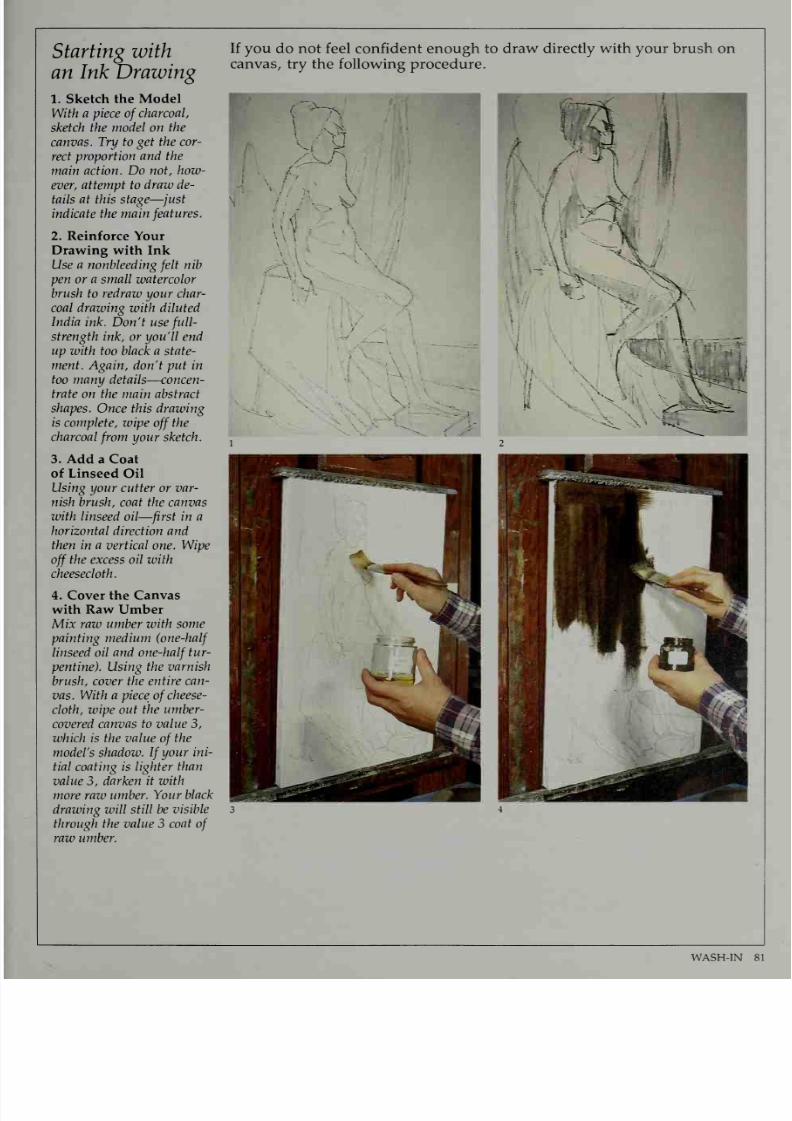
7/25/2019 Mastering the Craft of Painting (1985)
http://slidepdf.com/reader/full/mastering-the-craft-of-painting-1985 85/152
Starting
with
an Ink
Drawing
1.
Sketch the
Model
With a
piece
of
charcoal,
sketch
the model on the
canvas.
Try
to get
the
cor-
rect
proportion
and
the
main
action. Do not,
how-
ever, attempt to
draw de-
tails
at this stage
—
just
indicate the
main
features.
2. Reinforce
Your
Drawing
with
Ink
Use
a
nonbleeding
felt
nib
pen
or a small
watercolor
brush
to
redraw
your
char-
coal
drawing with diluted
India
ink.
Don't use
full-
strength ink, or
you 11
end
up
with
too
black
a
state-
ment. Again,
don't
put
in
too
many details
—
concen-
trate on
the
main abstract
shapes.
Once this
drawing
is
complete, wipe
off
the
charcoal
from
your
sketch.
3.
Add
a Coat
of
Linseed Oil
Using
your
cutter or var-
nish brush, coat the canvas
with linseed
oil
—
first
in
a
horizontal
direction and
then in
a
vertical one.
Wipe
off
the
excess
oil
with
cheesecloth.
4.
Cover the
Canvas
with
Raw Umber
Mix
raw
umber
with
some
painting
medium
(one-half
linseed
oil
and
one-half
tur-
pentine).
Using
the
varnish
brush,
cover
the
entire
can-
vas. With a piece
of
cheese-
cloth, wipe out the
umber-
covered
canvas
to
value
3,
which is
the
value
of
the
model's shadow.
If
your
ini-
tial
coating is
lighter than
value
3,
darken
it
with
more raw
umber. Your
black
drawing will still
be
visible
through
the
value 3
coat
of
raw
umber.
If
you do
not
feel confident
enough
to
draw
directly
with your brush
on
canvas,
try the following procedure.
(
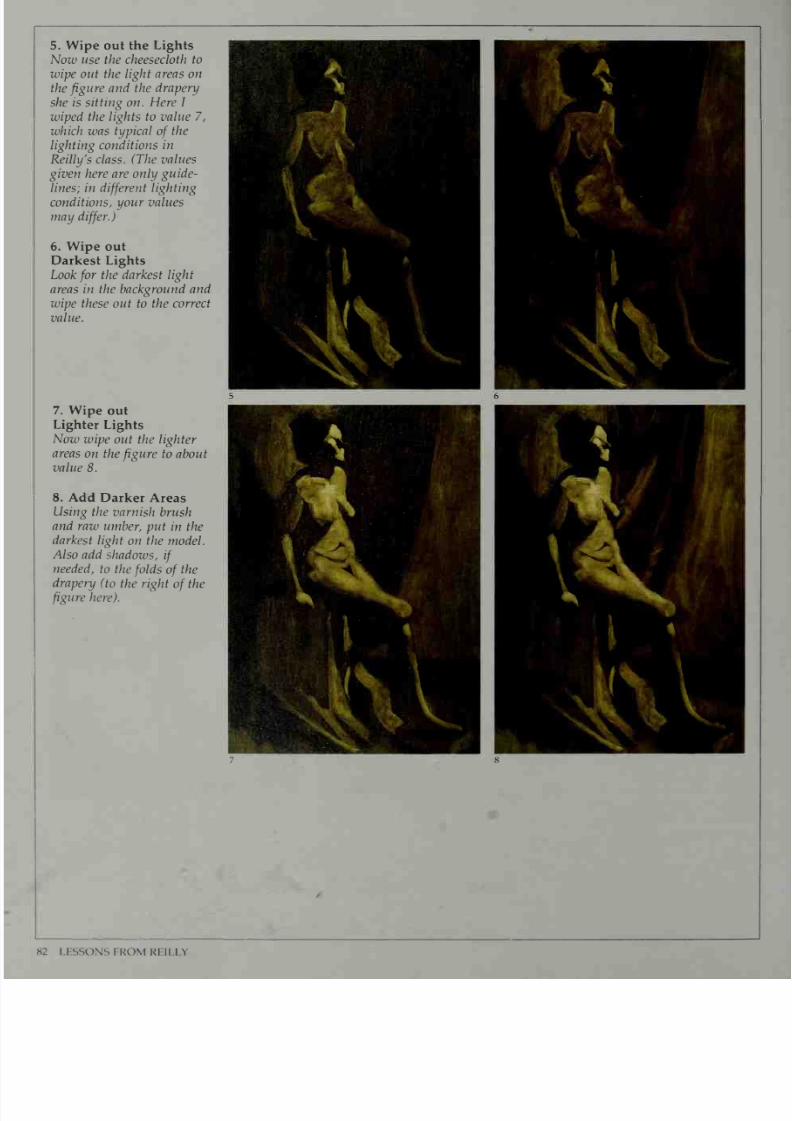
7/25/2019 Mastering the Craft of Painting (1985)
http://slidepdf.com/reader/full/mastering-the-craft-of-painting-1985 86/152
5.
Wipe
out
the
Lights
Now use the cheesecloth to
wipe out
the light areas on
the
figure
and the
drapery
she is sitting
on.
Here
I
wiped the
lights
to
value
7,
which was typical
of
the
lighting
conditions in
Reilly's
class. (The
values
given here
are
only
guide-
lines;
in
different
lighting
conditions, your values
may
differ.)
6. Wipe
out
Darkest Lights
Look
for
the
darkest light
areas
in the
background
and
wipe these
out
to
the correct
value.
7.
Wipe
out
Lighter
Lights
Now
wipe
out the lighter
areas
on the
figure
to about
value 8.
8. Add
Darker
Areas
Using
the varnish
brush
and raw
umber,
put
in
the
darkest
light
on
the
model.
Also
add
shadows,
if
needed,
to the
folds
of
the
drapery
(to
the
right
of
the
figure
here).
82
LESSONS
FROM
REILLY
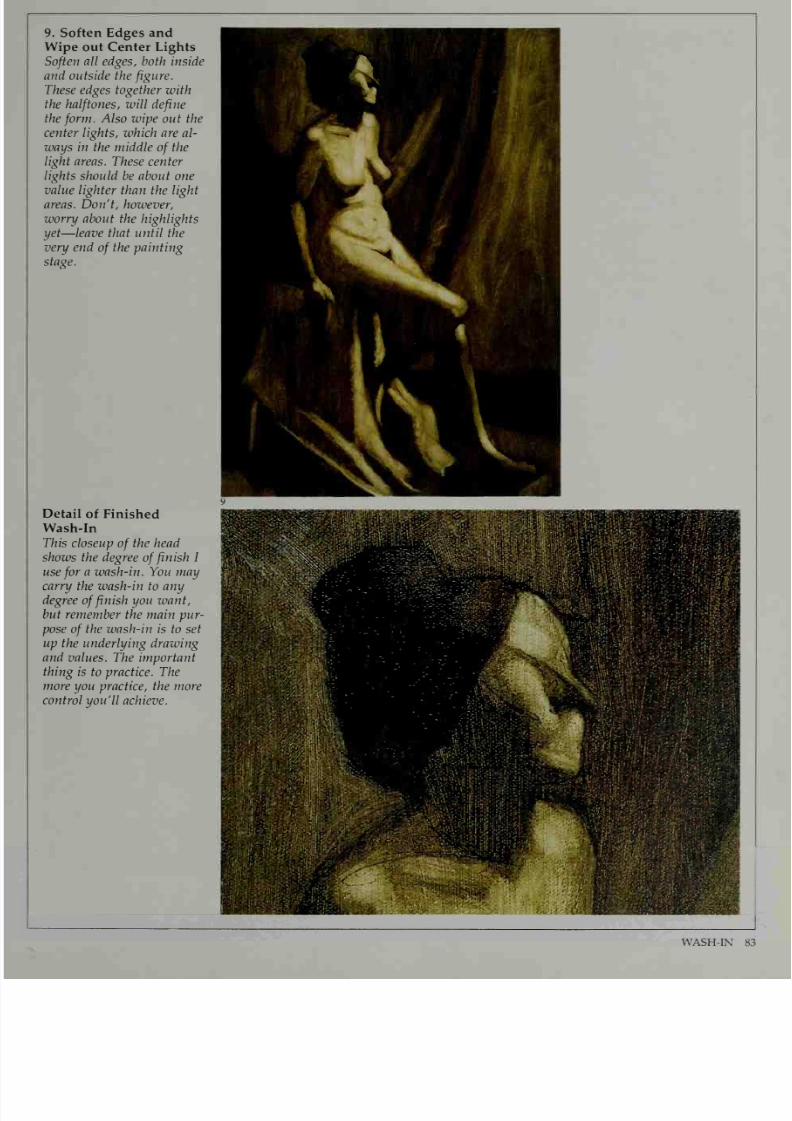
7/25/2019 Mastering the Craft of Painting (1985)
http://slidepdf.com/reader/full/mastering-the-craft-of-painting-1985 87/152
9. Soften
Edges and
Wipe
out
Center
Lights
Soften
all
edges, both
inside
and
outside
the
figure.
These edges
together with
the
halftones,
will
define
the
form.
Also wipe
out
the
center
lights, which are al-
f^Bm'
wL_
-
l
Y
M
ways
in
the middle
of
the
^^^^^^^L
,
j^T I
tjf
^wK^^m £9V
light areas. These center
lights
should
be
about one
value
lighter
than
the
light
areas.
Don't, however,
worry
about
the
highlights
yet
—
leave that
until the
^^^^^^^h
\
L^**^* ^B flr
very
end
of
the painting
stage.
H^
S
if v il
3
Detail
of Finished
88SBJ
WPflfSfltSfflffllM^^
HlfflBtitfMWBl'ffi^j^
Wash-In
^t^f
''
:
^:
l^^^f.^
.,
:
^^^^^sSSM^^^
This closeup
of
the
head
'- :<'S-^
''-^''-
'
'
KsHHmhBHHHbH
1
fewr* -^
^
'^ (Ussf
£#?^m{v
shows
the
degree
of
finish
I
'1.',
-•
/.^f,3fflfi^^^©
.
'.
:^Jp1l?
'-^^^^^^^/•'
use
for
a
wash-in. You
may
•',-.'
'^JeB^BB$s&S:±%&&^J^i*-
^
i-^^\?'k-:'-';'Wa^^^^^^'^M
carry the
wash-in to
any
degree
of
finish
you want,
.''••
:
^y|3BiHU«i^^^^^fg^'
^^SffljKSBHi|^ffi
,,
^^^^f^^
but remember
the
main
pur-
pose
of
the wash-in is
to
set
up
the underlying
drawing
B&
'
wBBJfflffBH^llggfiffllSlM
and
values.
The important
^y \Sl^A]'f?^^CTBsSBaiBroflHI'T^BfiiHBM
thing
is
to
practice.
The
more
you
practice,
the
more
l
t|HH|^H^:
'^''''-
control
you'll
achieve.
:':
ESSliilisiii'
TWMfflBIBwffiiH^^HH^WBI
fiVfeov
BKfiflfflffwflB
^
*
j&
-
*
MJEBBtc^wfeotfSfl^^BS'
^^^SBfljnDBsffuBuBfl^DwSlHi^S^^^^^^^HB^
•--
**£?*
5KJ5i
ScaS?
ti^H^llGliSSk
1
^
5
•-:'.•'•'':--
B
ASH-IN
83
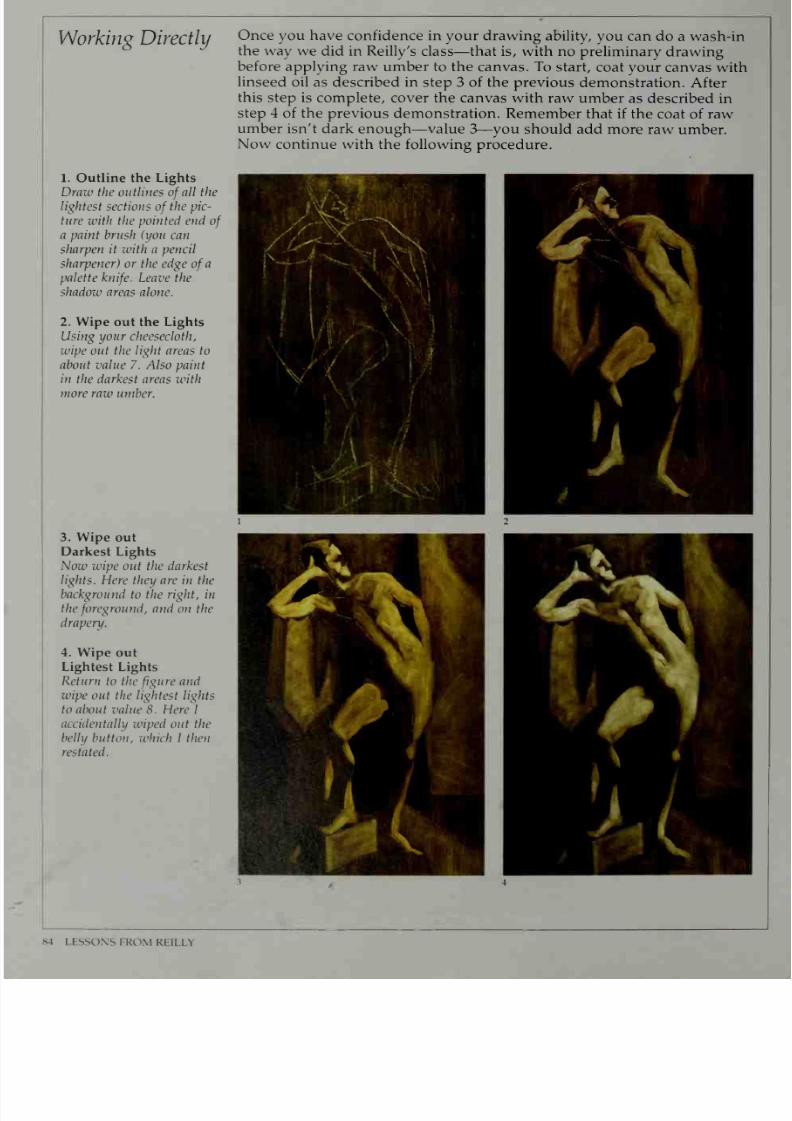
7/25/2019 Mastering the Craft of Painting (1985)
http://slidepdf.com/reader/full/mastering-the-craft-of-painting-1985 88/152
Working
Directly
1.
Outline
the
Lights
Draw the outlines
of
all
the
lightest sections
of
the pic-
ture with
the
pointed end
of
a
paint
brush (you can
sharpen it
with
a pencil
sharpener) or the edge
of
a
palette
knife.
Leave
the
shadow
areas alone.
2. Wipe
out the
Lights
Using
your cheesecloth,
wipe
out the light areas to
about value 7.
Also paint
in the
darkest areas
with
more
raw umber.
3.
Wipe
out
Darkest
Lights
Now
wipe
out
the
darkest
lights.
Here
they
are in the
background
to the right,
in
the
foreground
,
and
on the
drapery.
4. Wipe
out
Lightest
Lights
Return
to the
figure
and
wipe out
the
lightest
lights
to
about value
8.
Here
I
accidentally
wiped
out
the
belly
button, which
I
then
restated.
Once
you have
confidence in your
drawing
ability,
you
can
do
a
wash-in
the
way
we
did in Reilly's
class
—
that
is, with no
preliminary
drawing
before applying
raw umber
to
the
canvas.
To
start, coat
your
canvas
with
linseed
oil
as described
in
step
3
of the
previous
demonstration.
After
this
step is complete, cover the
canvas
with
raw
umber
as described in
step
4
of the
previous demonstration.
Remember that
if
the
coat of raw
umber
isn't dark
enough
—value
3
—
you
should
add more
raw umber.
Now continue with
the
following procedure.
84
LESSONS
FROM RtlLLY

7/25/2019 Mastering the Craft of Painting (1985)
http://slidepdf.com/reader/full/mastering-the-craft-of-painting-1985 89/152
5.
Wipe out
Reflected
Lights
and Add
Halftones
Look
for
the
reflected
lights
and wipe
them out.
Also
add
any
needed
halftones.
6. Put in
Accents
and
Soften
Edges
To bring out
form,
add
accents
where
needed. Here
they
were put
in
to
separate
the
torso
from
the
drapery
and
the
foot from
the
floor.
Also
soften
all the
edges,
which
—
together with
the
halftones
—
will
define
the
forms.
7.
Wipe out
Center Lights
Locate
the
center lights,
which are in
the
middle
of
the
light
areas,
and
wipe
them out.
Make
them
about
one value
lighter
than
the
surrounding
lights.
You
can also put
in
the high-
lights,
although this is
best
left
for
later,
during
the
painting
stage.
WASH-IN
85
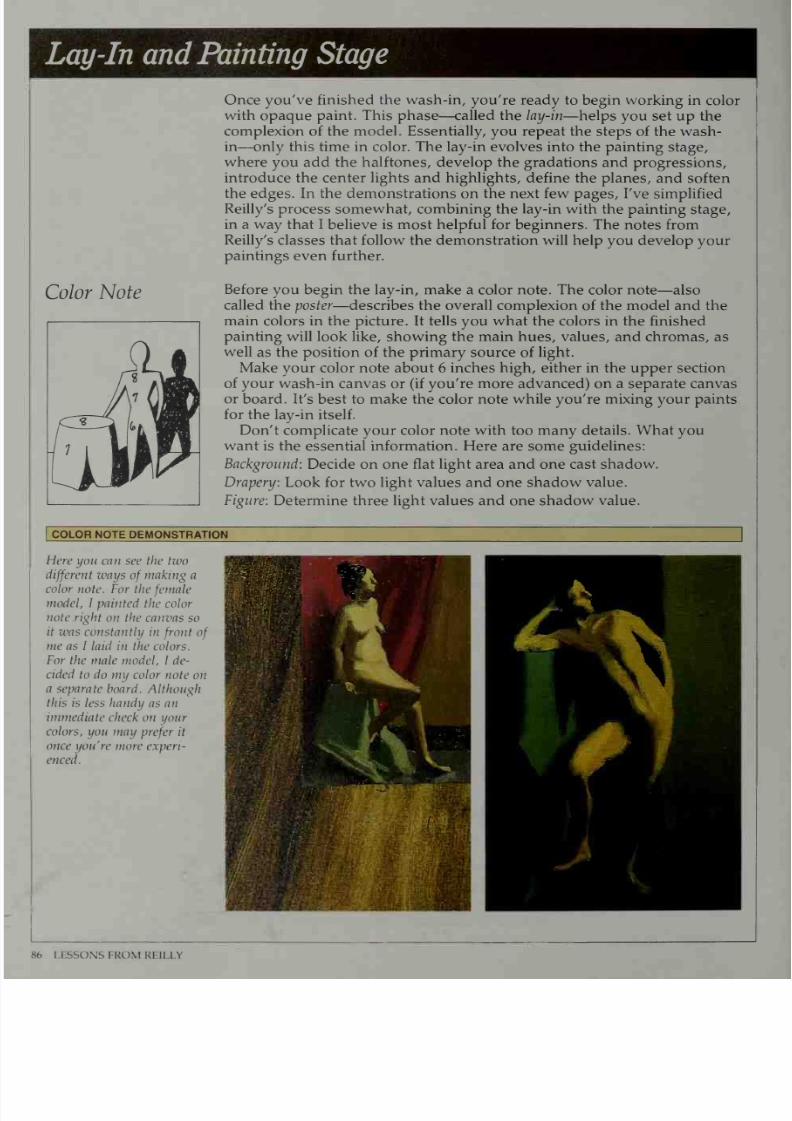
7/25/2019 Mastering the Craft of Painting (1985)
http://slidepdf.com/reader/full/mastering-the-craft-of-painting-1985 90/152
Lay-In
and
Painting Stage
Color Note
Once
you've
finished the wash-in, you're
ready
to
begin working
in color
with
opaque
paint. This phase
—
called the lay-in
—
helps
you set
up the
complexion
of the
model. Essentially,
you repeat the
steps
of the
wash-
in
—
only
this
time in
color. The
lay-in evolves
into
the painting
stage,
where
you add the halftones,
develop the
gradations
and
progressions,
introduce
the
center
lights
and
highlights,
define
the planes,
and
soften
the
edges. In
the demonstrations on the next few
pages, I've simplified
Reilly's
process somewhat,
combining
the
lay-in
with the painting
stage,
in
a
way
that I believe
is most
helpful for beginners.
The
notes from
Reilly's
classes that
follow
the
demonstration will
help you
develop
your
paintings even further.
Before you
begin
the
lay-in,
make
a
color
note.
The
color
note
—also
called
the poster
—describes the
overall
complexion of the
model and
the
main
colors in
the picture.
It tells
you
what the
colors in
the
finished
painting
will
look
like, showing
the main
hues, values,
and chromas,
as
well
as
the
position
of
the
primary source of light.
Make
your
color
note about 6
inches
high, either
in the upper section
of
your
wash-in canvas
or
(if you're
more
advanced)
on a separate canvas
or board.
It's best to make
the
color note
while
you're mixing your paints
for the
lay-in
itself.
Don't complicate
your
color
note with
too
many
details.
What
you
want
is the essential information.
Here
are some guidelines:
Background: Decide
on
one
flat
light
area
and one
cast
shadow.
Drapery:
Look for two
light values
and one
shadow value.
Figure:
Determine three
light
values
and
one
shadow
value.
)
COLOR
NOTE DEMONSTRATION
Here
you can
see
the
two
different
ways
of
making
a
color
note.
For
the
female
model,
I painted
the color
note.right
on the canvas
so
it
was
constantly
in
front
of
me
as I laid
in
the
colors.
For
the male
model,
I de-
cided
to do my
color
note
on
a
separate
board.
Although
this
is less handy
as an
immediate
check
on
your
colors,
you may
prefer
it
once you're
more experi-
enced.
LESSONS
FROM
REILLY
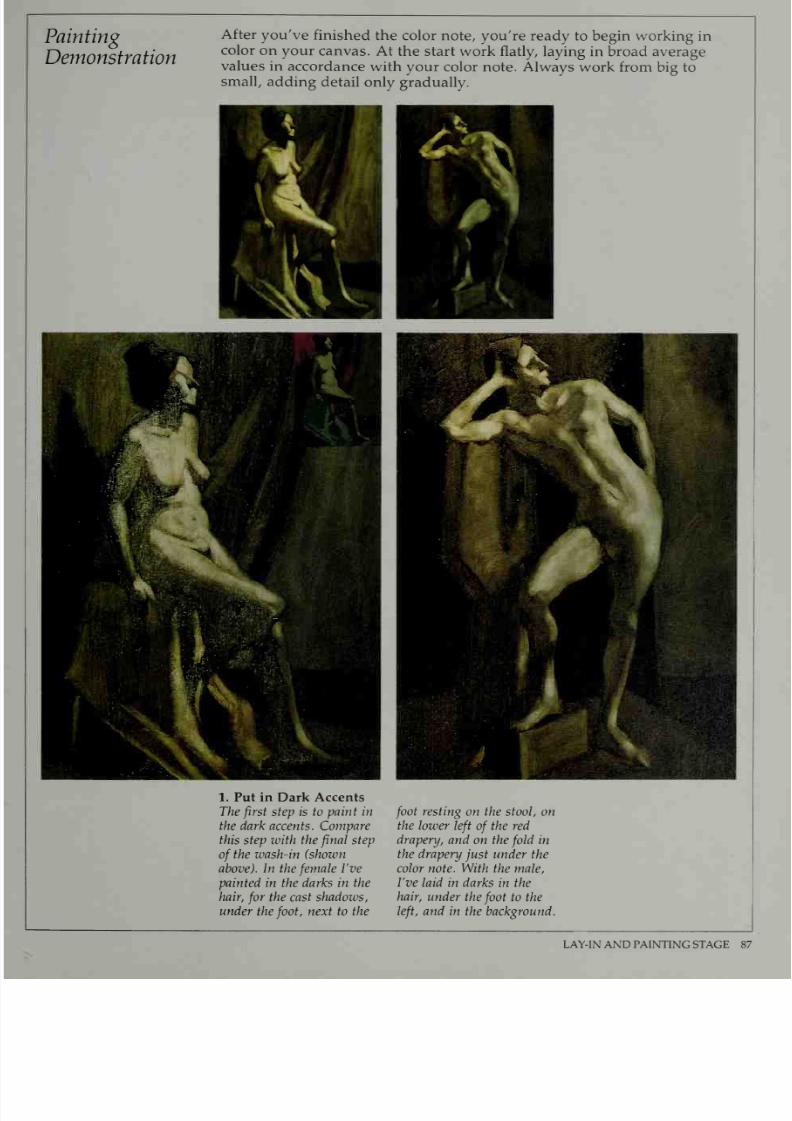
7/25/2019 Mastering the Craft of Painting (1985)
http://slidepdf.com/reader/full/mastering-the-craft-of-painting-1985 91/152
Painting
Demonstration
After
you've
finished the
color note,
you're
ready
to
begin
working
in
color
on
your canvas.
At
the
start work flatly, laying
in broad
average
values
in
accordance
with
your color note. Always work
from
big
to
small,
adding
detail
only
gradually.
1.
Put in Dark
Accents
The
first
step
is to paint
in
the dark accents. Compare
this step
with the
final
step
of
the wash-in
(shown
above). In the
female
I've
painted
in
the darks
in
the
hair,
for
the
cast
shadows,
under the
foot,
next
to the
foot
resting
on the stool, on
the
lower
left
of
the red
drapery, and
on the
fold
in
the drapery
just
under
the
color
note. With
the
male,
I've
laid
in darks
in
the
hair,
under the
foot
to
the
left,
and in the
background.
LAY-IN
AND PAINTING
STAGE
87

7/25/2019 Mastering the Craft of Painting (1985)
http://slidepdf.com/reader/full/mastering-the-craft-of-painting-1985 92/152
2. Indicate Local
Colors in
Shadows
Now paint in the local col-
ors
for
all
the
shadows
—
on
the
figure
and
drapery
as
well
as
in
the
background.
The
shadow on
the average
complexion is
value
3,
as
you
can see
on
the
female
model
here.
The
male
model,
however, had such a
light
complexion
and
there
was
so
much
reflected
light
that 1
went up to value
4.
By
the
way,
while you're
painting, it's a
good idea
to
soften
the
edges
when
two
wet
areas
of
paint are next
to each other.
3. Paint
in
the
Lights
around the
Model
The next
step is to
paint in
the local
colors
for
all
the
light
areas
in the back-
ground.
Once this
is done,
put in
the local
colors in the
light
areas
on everything
except the model.
It's
im-
portant
to
paint
the
back-
ground
first
so
that the
model
and
objects
in
the
middle and
foreground
can
overlap
the background
col-
ors.
Be
careful,
though,
not
to
overmodel
or
exagger-
ate the
contrasts in
the
background
—
if
you
do,
it
will
compete
with the
figure.
LESSONS
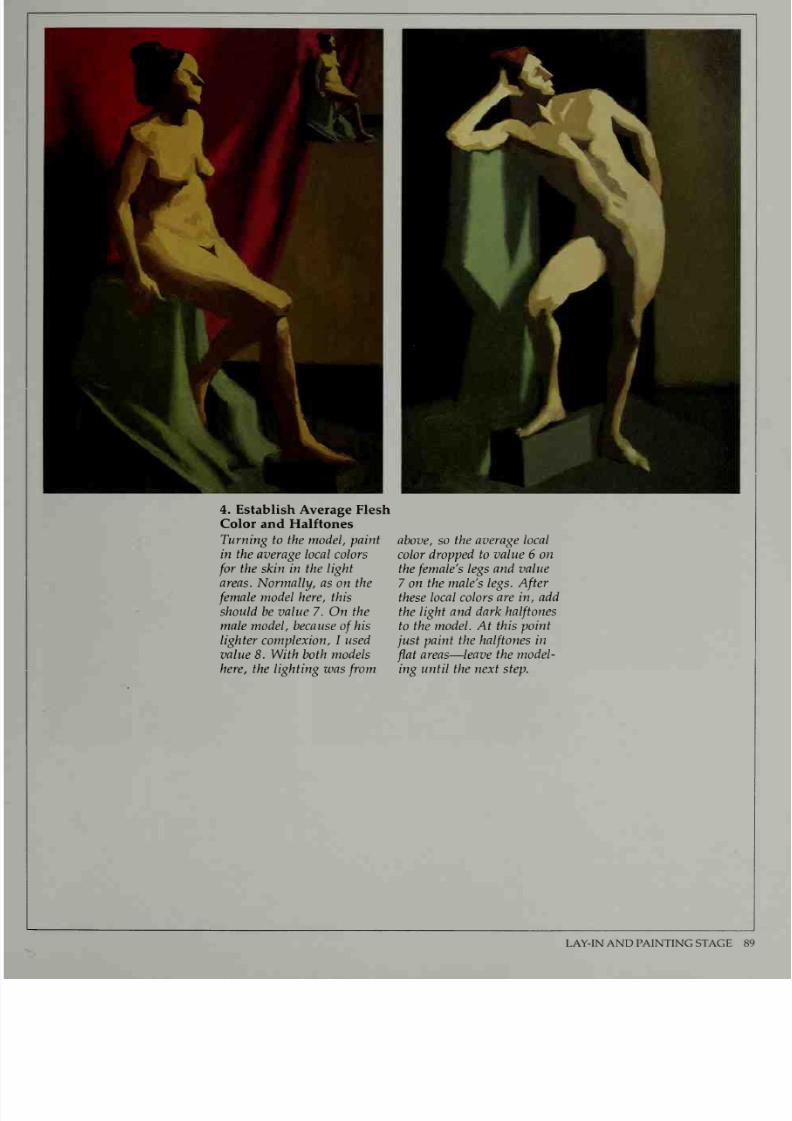
7/25/2019 Mastering the Craft of Painting (1985)
http://slidepdf.com/reader/full/mastering-the-craft-of-painting-1985 93/152
4. Establish
Average Flesh
Color
and Halftones
Turning
to
the
model,
paint
in the average
local
colors
for
the skin
in
the light
areas. Normally, as
on
the
female
model here, this
should
be
value
7. On the
male
model, because
of
his
lighter complexion, I
used
value 8. With both models
here, the lighting
was
from
above,
so the
average
local
color dropped
to value 6
on
the
female's
legs
and
value
7
on the
male's
legs.
After
these
local
colors
are in,
add
the light
and dark
halftones
to the
model.
At
this point
just
paint the
halftones
in
flat
areas
—
leave the model-
ing
until
the
next
step.
LAY-IN AND PAINTING
STAGE 89

7/25/2019 Mastering the Craft of Painting (1985)
http://slidepdf.com/reader/full/mastering-the-craft-of-painting-1985 94/152
5. Model
the
Form
with
Halftones
Now
you're
ready
to
soften
the
edges
of
the
halftones.
First, brush the
halftones
into the
light areas on
the
figure;
then brush
the shad-
ows into the
halftones.
6. Add
Center
Lights
The
next
step
is
to
paint
in
all
the
center lights, which
are in
the middle
of
the
light areas.
90
LESSONS FROM REILLY
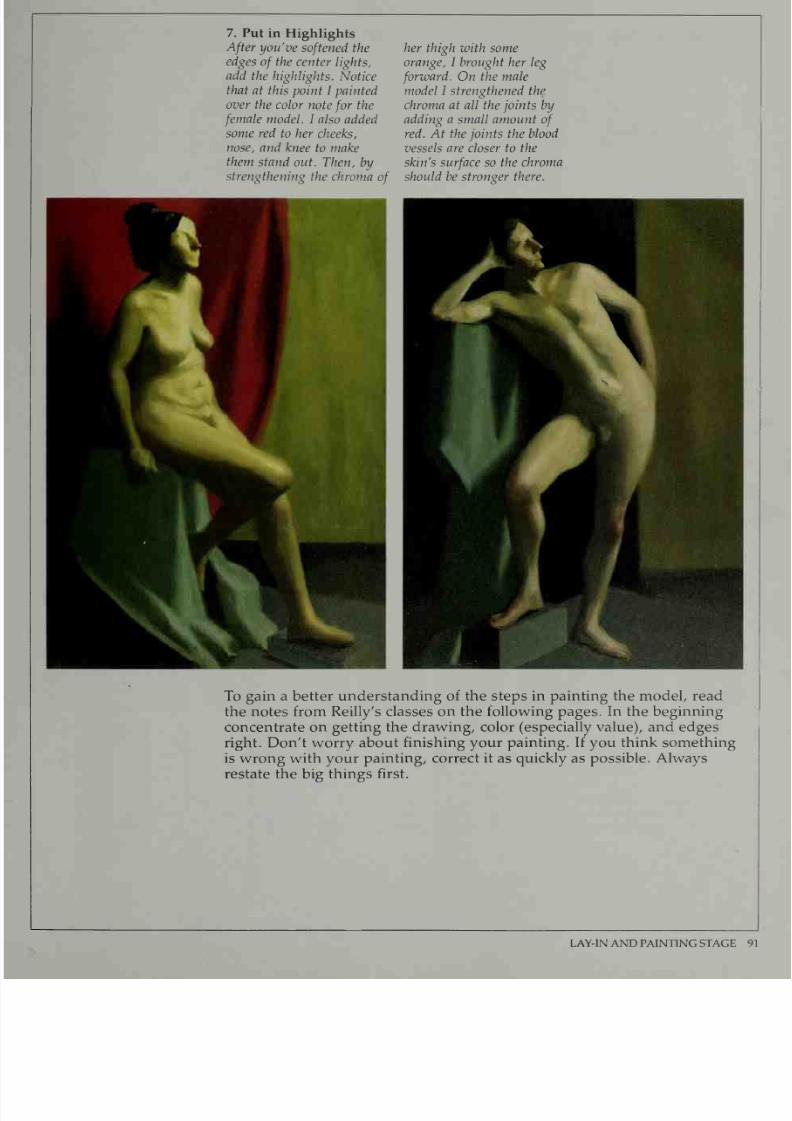
7/25/2019 Mastering the Craft of Painting (1985)
http://slidepdf.com/reader/full/mastering-the-craft-of-painting-1985 95/152
7. Put
in
Highlights
After
you've
softened
the
edges
of
the
center
lights,
add
the
highlights.
Notice
that
at
this
point I
painted
over the
color
note
for
the
female
model.
I also added
some red
to
her
cheeks,
nose,
and knee
to make
them
stand
out.
Then,
by
strengthening
the
chroma
of
her thigh
with
some
orange,
1
brought her leg
forward.
On
the male
model
I strengthened
the
chroma at all the joints by
adding
a small amount
of
red. At
the
joints
the blood
vessels
are
closer
to
the
skin's
surface
so
the chroma
should
be
stronger
there.
To gain a
better
understanding of
the
steps
in painting
the
model,
read
the notes
from Reilly's classes on
the
following
pages.
In the
beginning
concentrate
on
getting
the
drawing, color
(especially
value),
and
edges
right. Don't worry
about finishing
your painting. If
you think
something
is
wrong with your
painting,
correct
it
as quickly as
possible. Always
restate
the big
things
first.
LAY-IN AND PAINTING STAGE
91
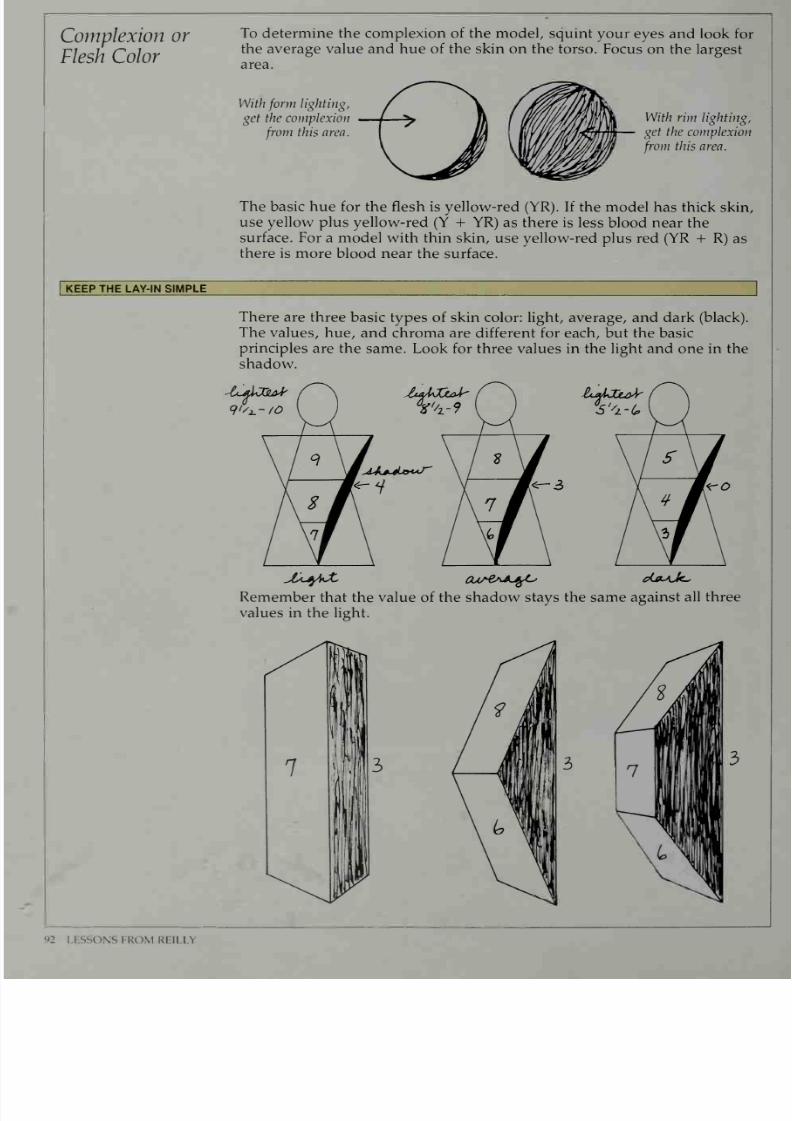
7/25/2019 Mastering the Craft of Painting (1985)
http://slidepdf.com/reader/full/mastering-the-craft-of-painting-1985 96/152
Complexion
or
Flesh
Color
To determine the
complexion
of
the
model,
squint your
eyes and look
for
the
average
value
and hue
of
the skin
on the torso.
Focus on the
largest
area.
With
form
lighting,
get
the
complexion
from
this area.
With rim
lighting,
get the complexion
from
this
area.
The
basic hue
for the flesh is yellow-red
(YR). If the model
has
thick
skin,
use
yellow plus yellow-red
(Y
-I-
YR)
as there is less
blood near the
surface.
For
a
model
with thin
skin,
use yellow-red
plus
red (YR
+
R)
as
there is more blood
near the surface.
KEEP
THE LAY-IN
SIMPLE
1
There
are
three
basic
types
of skin
color: light,
average, and
dark
(black).
The values, hue,
and chroma
are
different
for each,
but the
basic
principles
are the
same. Look for three
values
in the
light
and one
in
the
shadow.
lu^JOu>Jr
:—
Remember
that
the value
of
the
shadow
stays
the same
against
all
three
values
in
the
light.
92
LESSONS FROM
REILLY
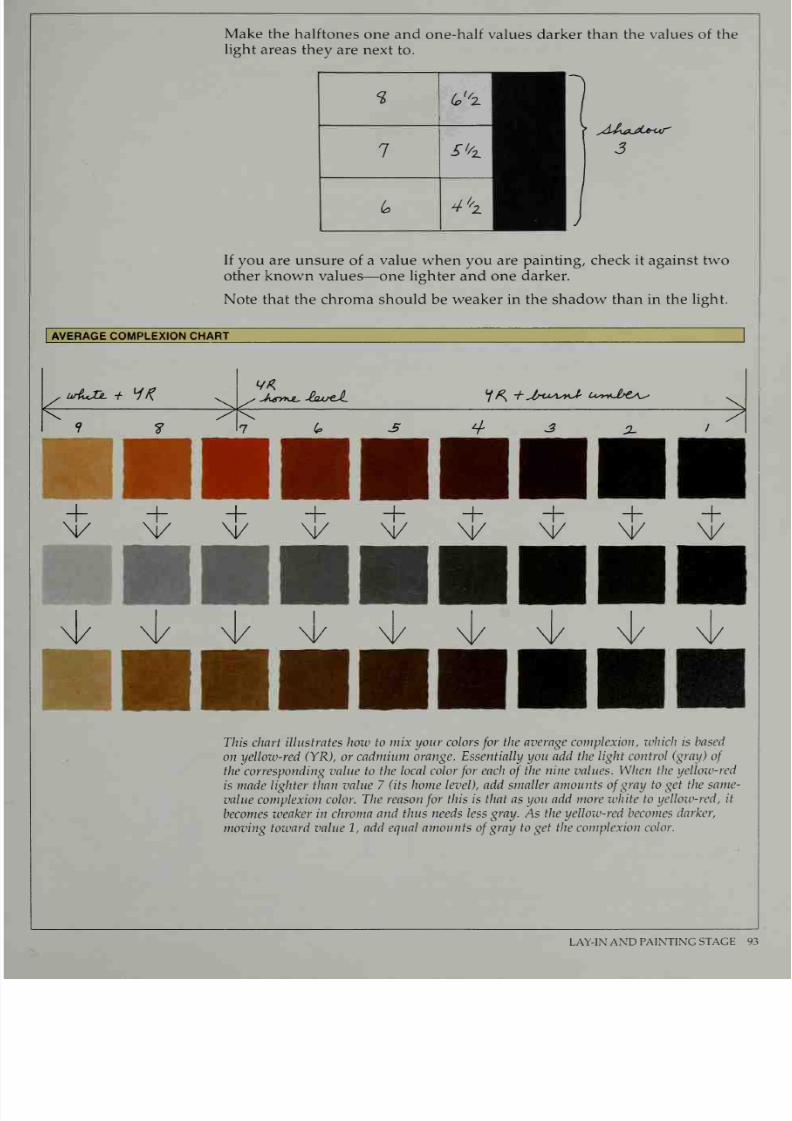
7/25/2019 Mastering the Craft of Painting (1985)
http://slidepdf.com/reader/full/mastering-the-craft-of-painting-1985 97/152
Make
the
halftones
one
and one-half
values darker than the values
of
the
light
areas they
are next to.
3
%
(* X
7
5'^
(c
4''z
If
you
are unsure of a value
when
you
are painting, check
it
against
two
other known values
—
one
lighter and one darker.
Note that the chroma should
be
weaker in the
shadow
than in the
light.
AVERAGE
COMPLEXION CHART
This
chart
illustrates
how to
mix
your
colors
for
the
average
complexion,
which
is
based
on yellow-red
(YR), or
cadmium orange.
Essentially you add the
light
control
(gray)
of
the corresponding
value to the
local color
for
each
of
the
nine
values.
When
the yellow-red
is
made
lighter than
value 7 (its
home level), add smaller amounts
of
gray to get
the
same-
value
complexion color.
The reason
for
this is that as
you
add more
white to
yellow-red,
it
becomes
weaker
in
chroma and
thus needs less gray. As the yellow-red
becomes
darker,
moving
toward value 1,
add equal
amounts
of
gray
to get the complexion
color.
LAY-IN AND
PAINTING
STAGE 93
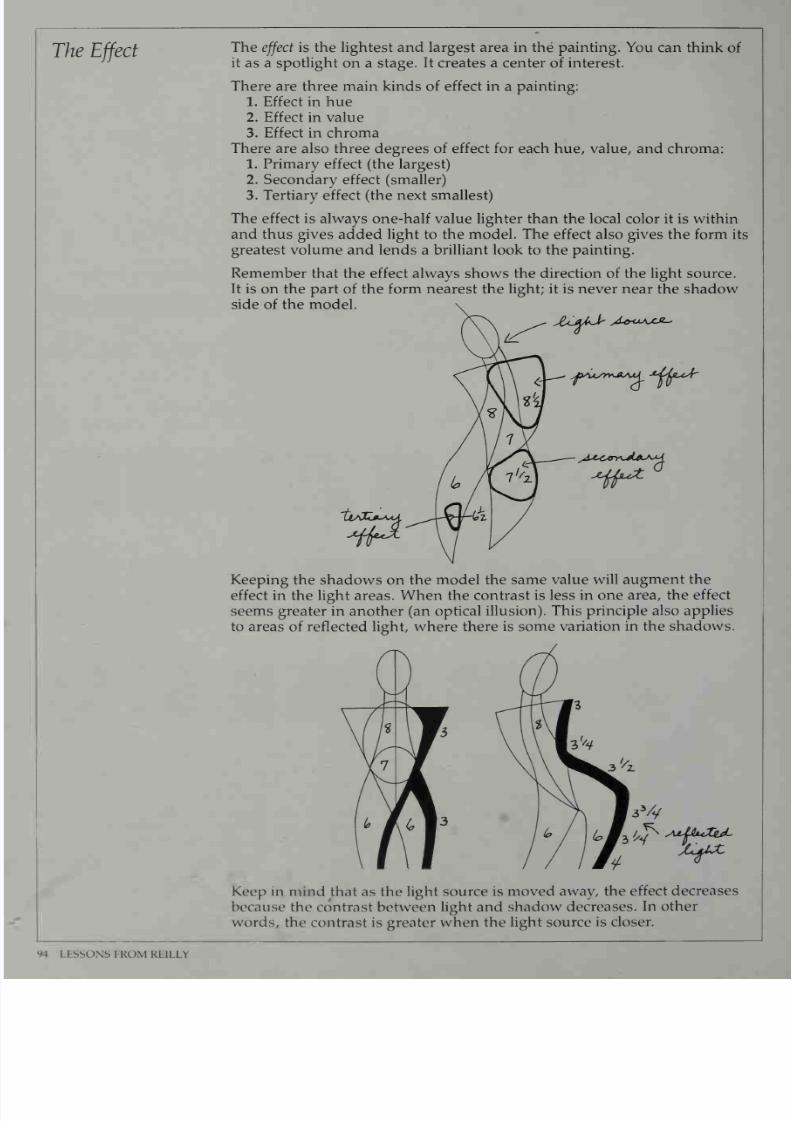
7/25/2019 Mastering the Craft of Painting (1985)
http://slidepdf.com/reader/full/mastering-the-craft-of-painting-1985 98/152
The
Effect
The
effect
is
the lightest and
largest
area
in the painting. You can
think
of
it
as a
spotlight
on a
stage.
It creates a center of interest.
There are three main
kinds
of effect in
a
painting:
1.
Effect
in hue
2.
Effect
in
value
3.
Effect
in chroma
There are also three
degrees
of effect
for
each
hue, value, and chroma:
1.
Primary effect (the largest)
2.
Secondary
effect
(smaller)
3. Tertiary
effect
(the next smallest)
The effect is always
one-half
value
lighter than the
local
color it
is within
and thus gives
added light
to
the model. The
effect
also gives the
form
its
greatest volume and
lends
a
brilliant
look to the painting.
Remember
that the effect always shows the
direction
of the
light source.
It is on
the
part
of
the form nearest the
light;
it
is never
near the
shadow
side
of
the
model.
f**s™*^*jif^
Keeping the
shadows
on
the
model the
same
value
will
augment
the
effect
in the light
areas. When the contrast is less
in
one area,
the
effect
seems
greater
in
another
(an
optical
illusion).
This
principle also applies
to areas of
reflected
light, where
there
is
some
variation in the
shadows.
Keep
in
mind that
as
the
light
source is moved
away,
the effect
decreases
because
the
contrast
between
light
and
shadow
decreases.
In other
words,
the contrast is greater when
the
light source
is
closer.
94
LESSONS
FROM
KEILLY
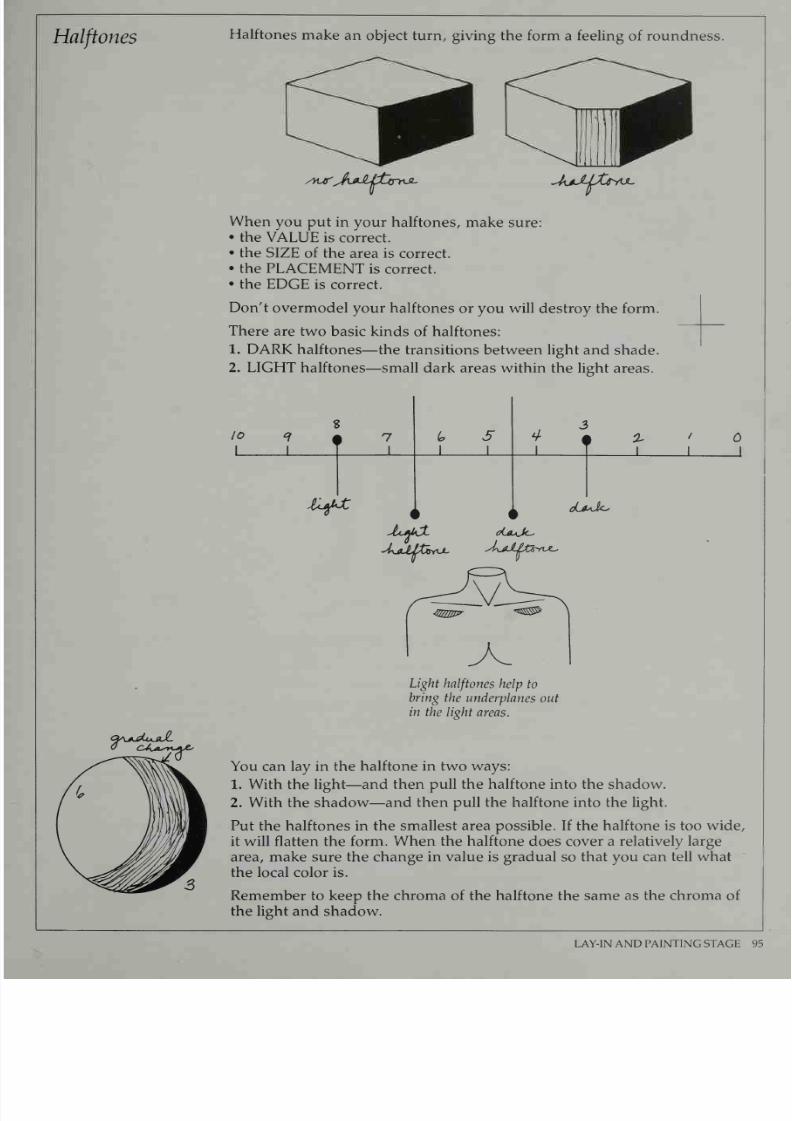
7/25/2019 Mastering the Craft of Painting (1985)
http://slidepdf.com/reader/full/mastering-the-craft-of-painting-1985 99/152
Halftones
Halftones
make
an
object
turn,
giving the form
a
feeling
of roundness.
/W
'JvdLLttrnJL
~4vk&LXfiVJ~
When
you
put in
your halftones,
make sure:
•
the
VALUE
is correct.
•
the
SIZE
of
the
area is
correct.
•
the
PLACEMENT
is correct.
•
the
EDGE is
correct.
Don't
overmodel
your
halftones or
you
will
destroy the form.
There
are two
basic
kinds
of
halftones:
1. DARK
halftones
—
the
transitions between light and
shade.
2.
LIGHT halftones
—
small dark areas within
the
light areas.
10
1
1
\
1
7
1
1
5
1
4
1
3
1
f
1
JUtf
X
<
\
i
>
djyJks
Light
halftones
help
to
bring
the
underplanes out
in the light
areas.
You
can lay
in
the
halftone in two ways:
1. With the
light—
and then pull the
halftone
into the shadow.
2.
With the
shadow—
and then pull
the
halftone into
the
light.
Put
the
halftones
in
the smallest area
possible. If
the halftone
is
too
wide,
it
will
flatten
the
form.
When the halftone
does
cover a
relatively large
area,
make
sure
the change in value
is
gradual
so
that
you can
tell what
the
local
color
is.
Remember
to
keep
the
chroma of the
halftone
the
same
as the chroma of
the light and shadow.
LAY-IN AND
PAINTING
STAGE
95
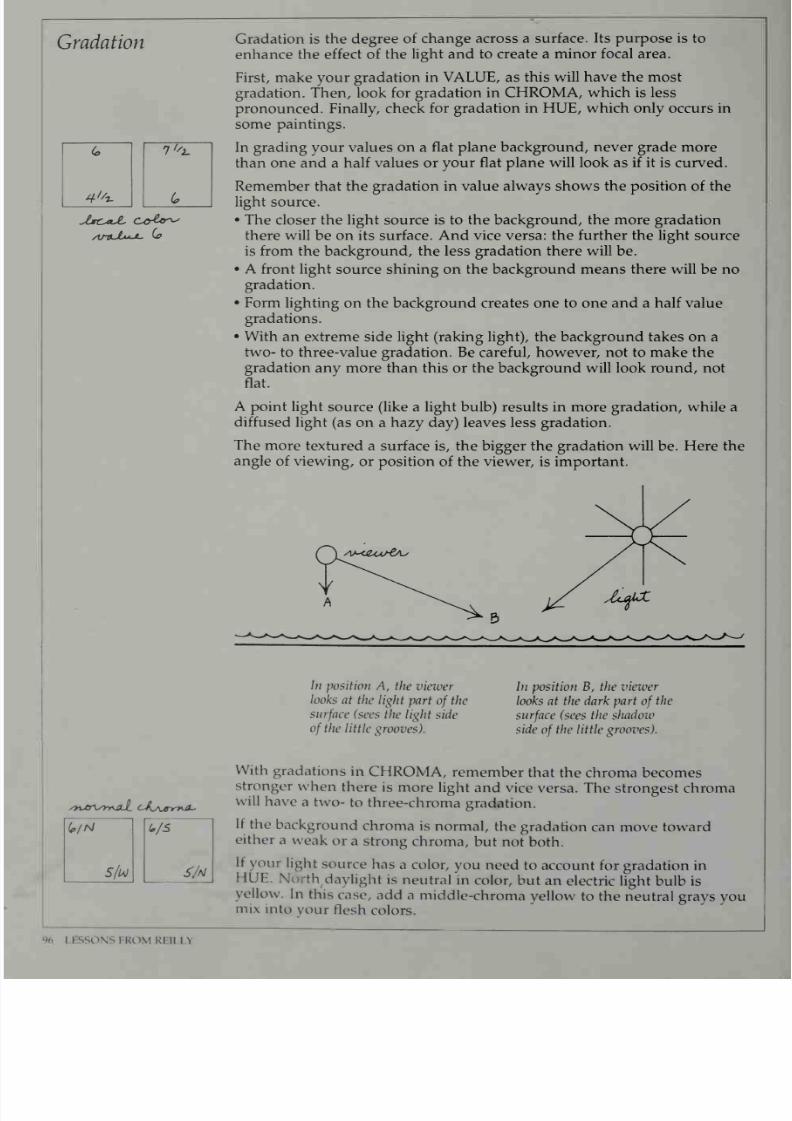
7/25/2019 Mastering the Craft of Painting (1985)
http://slidepdf.com/reader/full/mastering-the-craft-of-painting-1985 100/152
Gradation
zwaJU*-*-
ko
/y>JO\/rY<aJL
c^\/rmn~-
Gradation
is
the degree
of
change
across a surface.
Its purpose is
to
enhance
the effect
of
the
light and to
create a
minor
focal
area.
First, make your
gradation in
VALUE,
as
this will
have
the
most
gradation.
Then, look for
gradation in
CHROMA, which is
less
pronounced.
Finally, check
for gradation in HUE,
which only
occurs
in
some paintings.
In grading your values
on
a
flat plane
background, never
grade more
than
one
and
a
half values or
your
flat plane
will look as if
it
is curved.
Remember that the
gradation
in value
always
shows
the position
of the
light source.
•
The
closer
the
light source is to
the background, the more gradation
there will
be
on
its
surface. And vice
versa:
the
further
the light source
is
from the background, the less
gradation there will
be.
•
A
front light
source shining
on the background
means
there will
be
no
gradation.
•
Form lighting
on
the
background
creates
one
to
one and
a half
value
gradations.
•
With
an extreme
side
light
(raking light),
the background
takes on
a
two-
to
three-
value
gradation. Be careful,
however, not to make
the
gradation
any more than
this
or the background
will
look round,
not
flat.
A point
light
source (like a light
bulb)
results in more gradation, while a
diffused
light
(as
on
a
hazy
day)
leaves
less gradation.
The more
textured
a surface is, the bigger
the
gradation will
be. Here
the
angle
of viewing,
or
position
of
the
viewer,
is important.
In
position
A, the
viewer
looks
at
the light
part
of
the
surface
(sees the
light side
of
the little
grooves).
In
position
B,
the viewer
looks
at
the dark part
of
the
surface
(sees
the shadow
side
of
the little
grooves).
With
gradations
in
CHROMA,
remember
that
the chroma
becomes
stronger
when
there
is
more
light
and
vice
versa. The
strongest
chroma
will
have
a
two-
to three-chroma
gradation.
If
the
background
chroma
is
normal,
the
gradation
can
move
toward
either
a
weak
or a
strong
chroma,
but not
both.
If
your
light
source
has
a
color,
you
need
to
account
for gradation
in
HUE.
North daylight
is
neutral
in
color,
but
an
electric light bulb is
yellow.
In
this
case,
add a
middle-chroma
yellow
to
the neutral grays you
mix
into
your
flesh
colors.
96
llssONSFROMRHI
n

7/25/2019 Mastering the Craft of Painting (1985)
http://slidepdf.com/reader/full/mastering-the-craft-of-painting-1985 101/152
Progression
Gradation
essentially
works
across the
surface,
showing
the
passage
of
light
and
modeling the
form
in
rela-
tively even steps.
Progres-
sion,
on the
other hand,
moves
in
and out
of
the
canvas,
pushing the
form
forward
or pulling it
back.
To
give
the
feeling
of
pro-
gression, you need to
work
with
contrast
and hard vs.
soft
edges.
Progression
is
different
from
gradation.
Gradation
is
generally
a gradual
change,
which
occurs
naturally
across a
form
as
it
moves
from
near
the
light source to
further
away.
Progression,
on
the
other
hand,
refers
to
the
projection of
parts
of
the model
in and out
of
the
light,
creating a
sculptural,
three-dimensional
form.
Progression can
be
in:
•
VALUE (light
vs. dark)
•
CHROMA (strong
vs.
weak)
•
HUE (complementary colors)
Both gradations and progressions start as simple statements.
Build
the
changes
(the details) into
them
gradually.
Never
make
gradations
or
progressions
more
important than your main statement of
light
and
shadow.
The
greatest
progression occurs where the
contrasts are
greatest.
Add
more
detail
to this
area
to
make it
stand
out. If
the
contrasts
are
not
pronounced,
indicate progression
with
the
edges. Hard
edges
will come
forward;
soft edges go
back.
Make
the
relation
between the model and the
background
enhance
progression.
Blur the edges as
the model
recedes into the
background,
but
use
hard
edges
where the
model
projects forward.
Strong chroma
on
the
model
will
make
the
figure
come
away
from
a
weaker-chroma
background.
LAY-IN
AND PAINTING STAGE
97
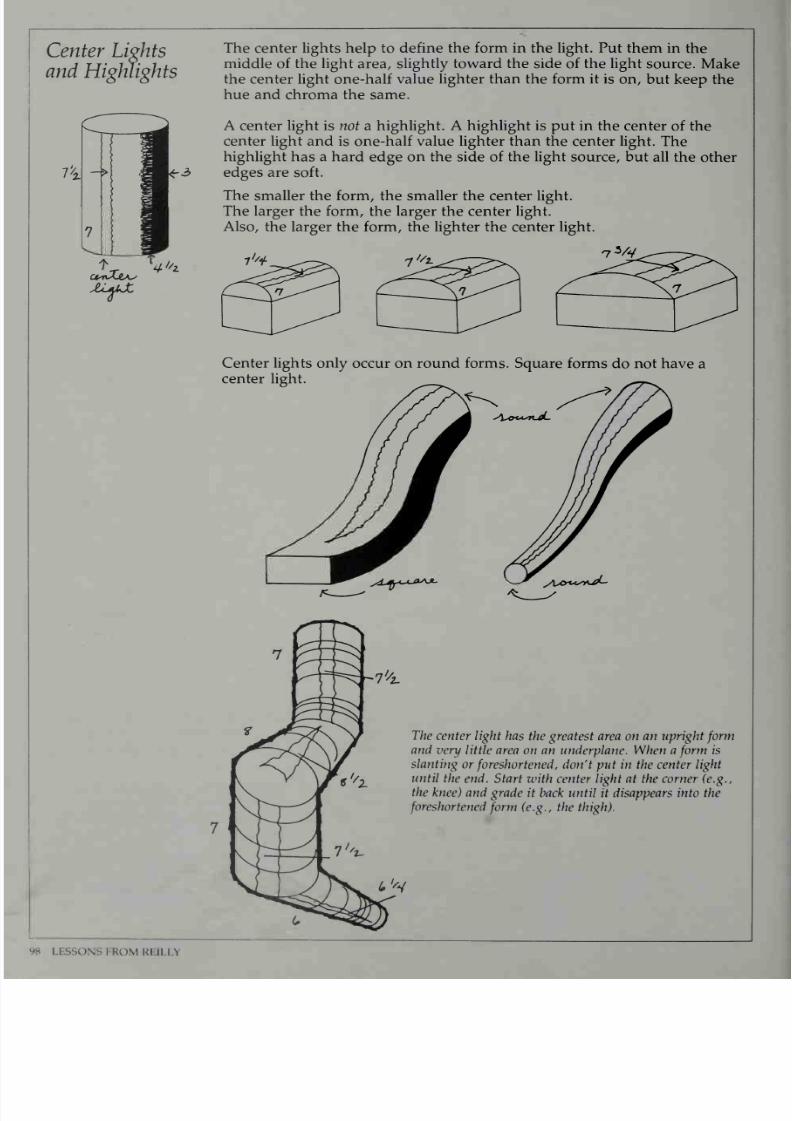
7/25/2019 Mastering the Craft of Painting (1985)
http://slidepdf.com/reader/full/mastering-the-craft-of-painting-1985 102/152
Center
Lights
and Highlights
JLLmJUX.
The
center
lights
help
to
define
the form in the
light. Put them in
the
middle of
the
light
area,
slightly toward
the side
of
the light
source. Make
the
center light one-half value
lighter
than the form it is
on, but keep
the
hue
and chroma
the
same.
A center
light
is
not
a
highlight. A highlight
is put
in
the center
of the
center
light and is one-half value
lighter
than the center light.
The
highlight has a hard
edge
on the
side of the light
source, but all
the other
edges are soft.
The
smaller the form,
the
smaller
the
center
light.
The
larger
the
form, the
larger
the
center light.
Also, the
larger the form,
the
lighter
the
center
light.
rj//]_
7Vy
Center
lights
only occur
on
round
forms.
Square forms
do
not
have
a
center
light.
The
center
light
has
the
greatest area on an
upright
form
and
very little area
on an underplane.
When
a
form
is
slanting or
foreshortened , don't put in the center
light
until
the
end.
Start
with center
light at
the
corner (e.g.,
the
knee)
and
grade
it
back until
it
disappears into
the
foreshortened
form
(e.g., the
thigh).
LESSONS
FROM
REILLY

7/25/2019 Mastering the Craft of Painting (1985)
http://slidepdf.com/reader/full/mastering-the-craft-of-painting-1985 103/152
How you paint the
center
light is
different for
different
parts of
the body.
With the ARMS
and LEGS:
Make
sure the
shape
of
the
form
is
correct
before
adding
the center
light.
Don't put
the center lights on
the
large
form.
Instead,
place
them in relation to
the ac-
tion
of
the small
forms.
Note that the
center
light
takes the shape
of
the
form
it
is on.
3~/yjx-
lM-
With
the
TORSO:
Always
make the
center
light
go
with
the action.
Put
the center light
on
the
big
forms first,
then on
the
smaller
forms
like
the
breasts.
Add
highlights
only at
the very
end
(if at all). The highlights
go
on
the
corners
or
in
the
center of a light (as on
the
torso). Always relate
the
highlight
to
the
light source,
and make sure it goes
toward
the hue
of
the
light
source. Also relate the
highlight
to texture—a very rough
texture
has almost
no
highlight,
while
a
smooth
texture
has
a
stronger
highlight.
The highlight
is
in
the
shape of
a
comet. It
has soft edges on
three sides,
but a hard
edge on
the
side of
the
light source.
Remember that the highlight
on
dark skin
will look
lighter
than it
really
is.
The highlight is one
value
lighter than the skin's
value
and
one-half
value lighter
than
the
center
light.
NOTE
ON
REFLECTED LIGHT
~
Reflected
light
is
mainly in
the
shadow. It is lighter than the shadow but
never
as light as
the
halftone. In fact,
it
may
reflect hue and
chroma more
than value.
The
shape of
the area
of reflected
light
goes
against the form.
Its
color
is
usually
on the
warm
side.
When
you are painting
indoors, an
object
reflecting light
must
not
be
more than
18 inches from
the
model. Outdoors, the object
reflecting
light
can
be
as
much
as 10
to
15
feet
from
the
figure.
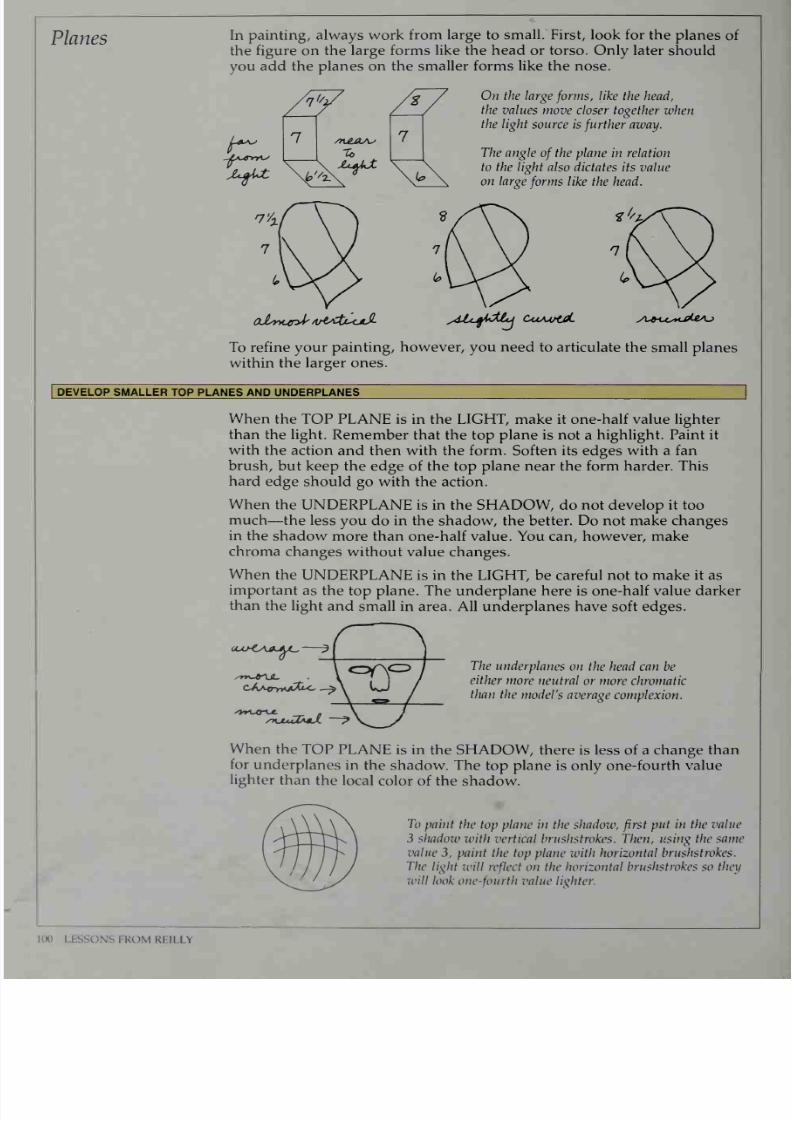
7/25/2019 Mastering the Craft of Painting (1985)
http://slidepdf.com/reader/full/mastering-the-craft-of-painting-1985 104/152
Planes
In painting,
always work
from large to
small.
First, look for the
planes
of
the
figure
on
the large
forms like
the
head or
torso.
Only
later should
you add
the planes on
the
smaller
forms
like the
nose.
On the
large
forms,
like
the head,
the
values move
closer
together
when
the
light
source
is
further
away.
The
angle
of
the plane in
relation
to the
light
also
dictates
its value
on
large
forms
like
the
head.
aJUtca^
n&dbUjJL
sdlt-fldLi
CuAArtjiL
yL*cc»cPte4->
To
refine
your
painting,
however,
you need
to
articulate
the
small
planes
within
the
larger
ones.
DEVELOP SMALLER
TOP PLANES AND
UNDERPLANES
When
the TOP PLANE
is
in
the LIGHT, make
it one-half
value
lighter
than
the light.
Remember that the
top
plane
is not
a highlight.
Paint
it
with
the
action
and
then
with
the
form.
Soften its edges with a
fan
brush,
but keep the
edge
of
the
top
plane near the form
harder.
This
hard
edge
should
go with
the action.
When
the
UNDERPLANE
is
in
the
SHADOW,
do not
develop it
too
much
—the less
you
do in
the shadow,
the better. Do not make changes
in the
shadow
more
than
one-half
value.
You
can,
however,
make
chroma
changes
without
value
changes.
When
the
UNDERPLANE
is
in the LIGHT,
be careful not to
make
it
as
important
as the
top plane. The underplane here is one-half
value
darker
than
the
light
and small
in
area.
All
underplanes
have
soft edges.
UULhts\j*J*JU
shjlJZasJI
The
underplanes
on the head can
be
either
more
neutral
or more
chromatic
than
the
model's
average
complexion.
When
the
TOP
PLANE
is in the
SHADOW, there
is less of a
change than
for
underplanes
in the
shadow. The
top
plane
is only one-fourth
value
lighter
than
the
local
color
of the shadow.
To
paint the
top
plane
in the
shadow,
first
put
in
the
value
3
shadow
with
vertical
brushstrokes.
Then,
usitig the
same
value
3,
paint
the top
plane
with
horizontal
brushstrokes.
The
light
will
reflect
on
the
horizontal
brushstrokes
so
they
will
look
one-fourth value lighter.
100
LESSONS
FROM
REILLY

7/25/2019 Mastering the Craft of Painting (1985)
http://slidepdf.com/reader/full/mastering-the-craft-of-painting-1985 105/152
ADD EDGE
PLANES
An edge plane is never the
main
plane
you are
looking
at, but
it
is
different from
a side
plane. The
edge plane is
the
actual
edge of a
form.
It
can
be
on the top,
side,
or bottom
of a
form.
Edge planes are
best defined
on a matte
surface
like
the skin.
Do
not
put
edge
planes
on
shiny
surfaces
like
glass
or
silk.
The
value
of
the edge
plane
is
the
same as the
main plane
it's
on.
The
chroma,
however,
becomes
more
neutral
—
it
is
usually
two
steps
weaker
than the
chroma of
the
front
plane. In this way
edge
planes
make
your
painting
look more colorful.
Because
they
are more
neutral,
they
make
the
chroma in the
front
plane
stand
out.
/tfS/fc
HRZ/i
The
narrower the
edge
plane is,
the more
neutral
it
is.
ASSIGNMENT
To
see how
the
edge planes are affected by different
lighting
conditions,
paint these
balls
according
to
the instructions.
Front
lighting
Form lighting
MW(*
HZ
3/2
Rim
lighti}ig Back
lighting
1K8/C,
t^
Hl/(e
HZ
2/(0
^r-
/
ArtJLuUL-
cLouJcaas
LAY-IN
AND
PAINTING STAGE 101
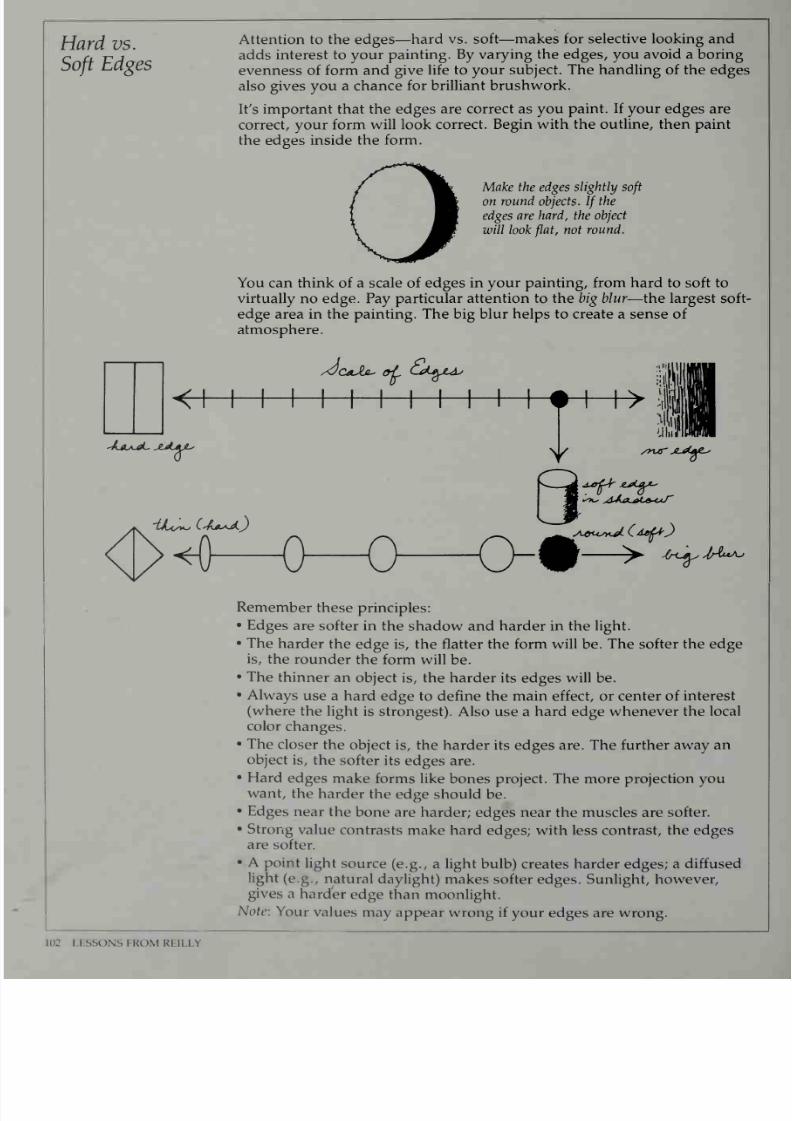
7/25/2019 Mastering the Craft of Painting (1985)
http://slidepdf.com/reader/full/mastering-the-craft-of-painting-1985 106/152
Hard
vs.
Soft
Edges
Attention
to
the
edges
—hard
vs.
soft—
makes
for
selective
looking
and
adds
interest
to
your painting.
By
varying the
edges,
you
avoid a
boring
evenness
of form
and
give
life to
your subject.
The handling
of
the
edges
also
gives
you a
chance
for
brilliant brushwork.
It's
important
that
the
edges
are correct as you
paint.
If your
edges
are
correct,
your
form
will
look
correct. Begin
with the
outline,
then paint
the edges inside
the form.
Make the
edges
slightly
soft
on
round objects.
If
the
edges
are
hard, the object
will look
flat,
not
round.
You
can think of a
scale
of edges
in
your
painting,
from
hard
to soft
to
virtually
no
edge.
Pay
particular
attention
to
the
big
blur
—
the
largest soft-
edge
area
in
the
painting.
The
big blur helps
to
create
a
sense
of
atmosphere.
/dcoM-
of.
UA^za,
<
-Aaa-oL
^r
iXcs*^
CsAjlaAJ
Remember
these
principles:
•
Edges
are
softer in
the
shadow and
harder in the
light.
•
The
harder
the
edge
is,
the
flatter
the
form
will
be.
The softer
the
edge
is,
the
rounder
the
form will
be.
•
The
thinner
an
object
is, the harder its
edges
will
be.
•
Always
use a
hard edge
to
define the main effect,
or
center
of
interest
(where
the light
is
strongest).
Also use a
hard
edge
whenever
the local
color
changes.
•
The
closer
the
object
is,
the harder
its edges are.
The
further away an
object
is,
the
softer
its
edges are.
•
Hard
edges
make
forms
like
bones
project.
The more projection
you
want,
the
harder
the
edge should
be.
•
Edges
near
the
bone
are
harder;
edges
near
the muscles
are softer.
•
Strong
value
contrasts
make hard
edges;
with
less
contrast,
the
edges
are softer.
•
A
point
light
source
(e.g.,
a
light bulb) creates
harder
edges;
a
diffused
light
(e.g.,
natural
daylight)
makes
softer
edges.
Sunlight,
however,
gives
a
harder
edge than
moonlight.
Note:
Your
values
may
appear wrong if
your
edges
are wrong.
id:
lessons
from
rf.illy
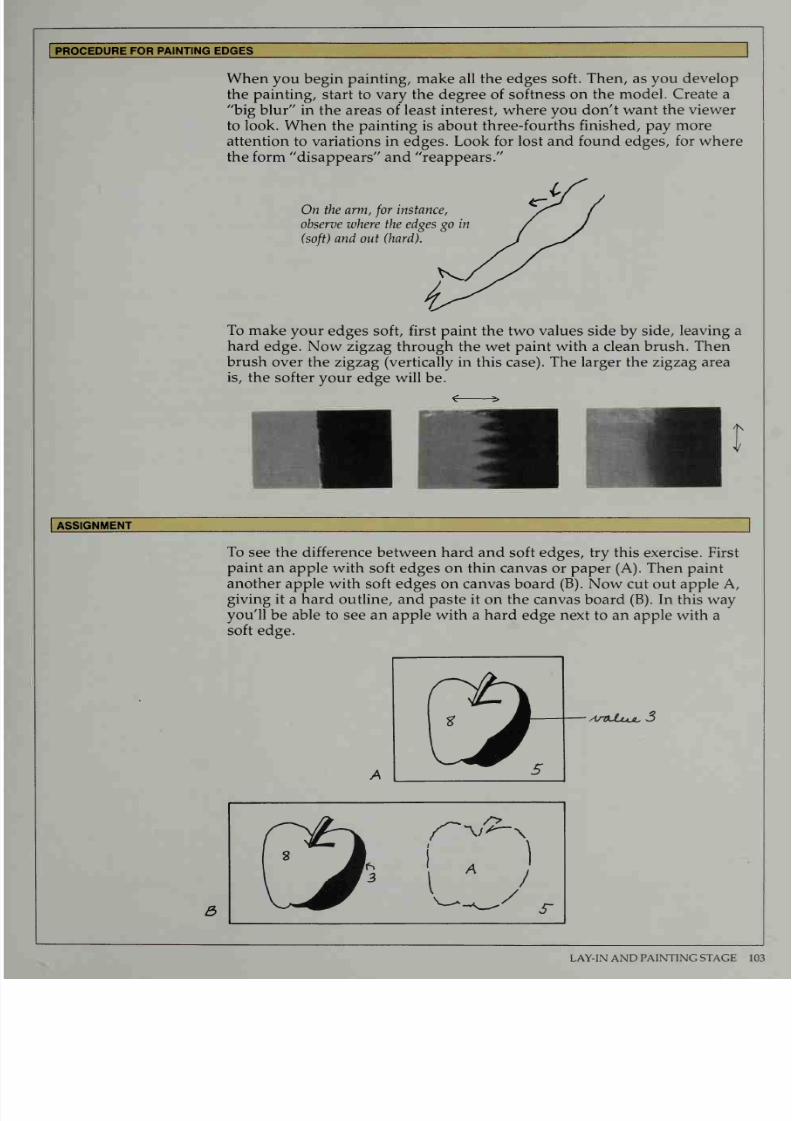
7/25/2019 Mastering the Craft of Painting (1985)
http://slidepdf.com/reader/full/mastering-the-craft-of-painting-1985 107/152
PROCEDURE
FOR
PAINTING
EDGES
When
you begin
painting,
make all the
edges soft.
Then, as
you
develop
the
painting,
start
to
vary the
degree of softness
on the
model.
Create
a
big
blur in the
areas
of least interest,
where you
don't
want the viewer
to
look.
When
the
painting is
about
three-fourths
finished,
pay
more
attention
to
variations
in
edges.
Look
for lost and
found
edges,
for
where
the form
disappears and
reappears.
On the
arm,
for
instance,
observe
where the
edges go
in
(soft)
and
out (hard).
To make
your
edges
soft,
first
paint the
two
values side
by
side,
leaving
a
hard
edge.
Now zigzag through
the wet
paint with
a
clean
brush.
Then
brush
over
the
zigzag
(vertically
in
this case).
The
larger
the
zigzag
area
is,
the softer
your
edge
will
be.
ASSIGNMENT
To
see
the
difference between hard and
soft edges,
try
this
exercise.
First
paint an
apple
with soft
edges
on thin
canvas
or paper
(A). Then
paint
another
apple with
soft
edges on canvas
board
(B).
Now cut out
apple A,
giving it
a
hard
outline,
and
paste
it on the canvas board
(B).
In
this way
you'll
be
able
to
see
an
apple
with a hard edge next to an
apple
with
a
soft
edge.
3
AstldLujL,
3
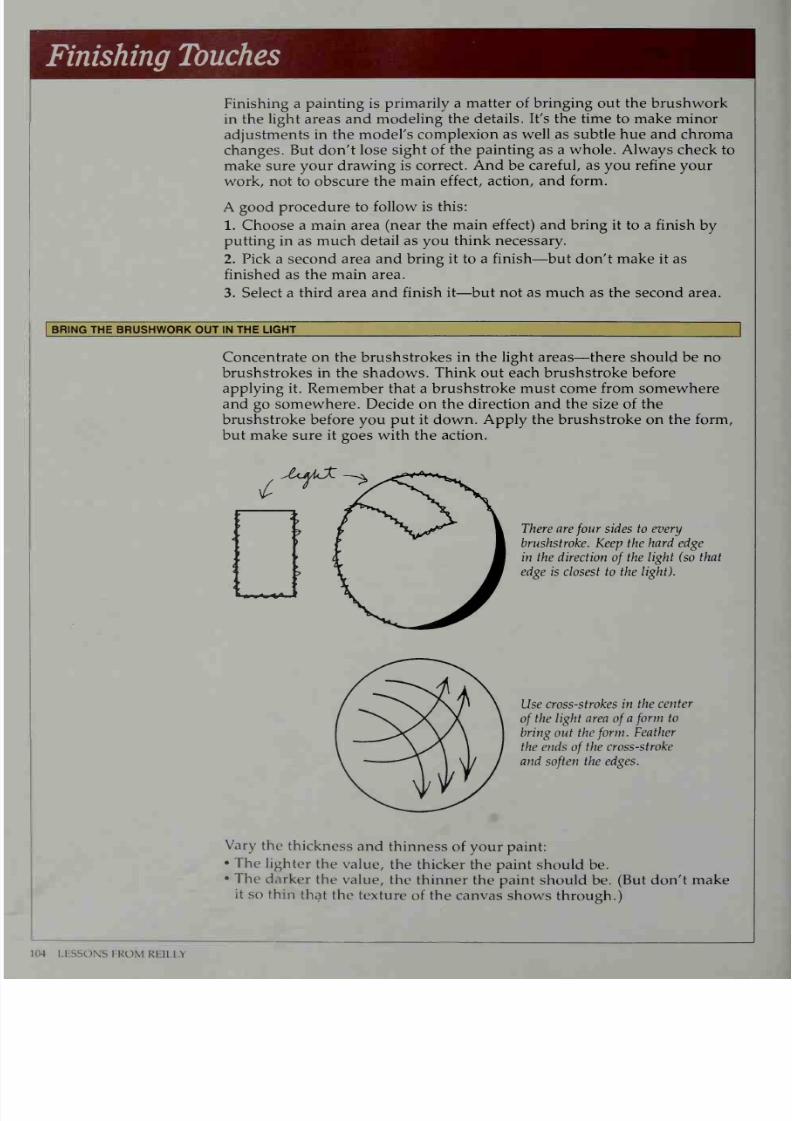
7/25/2019 Mastering the Craft of Painting (1985)
http://slidepdf.com/reader/full/mastering-the-craft-of-painting-1985 108/152
Finishing
Touches
Finishing
a
painting is
primarily
a
matter of bringing out
the
brushwork
in the
light areas and
modeling the
details.
It's
the time to make
minor
adjustments in
the model's
complexion as well as subtle hue and
chroma
changes. But don't lose
sight
of the
painting
as
a
whole. Always
check to
make sure
your drawing
is
correct.
And
be
careful, as you
refine
your
work,
not
to
obscure
the
main
effect,
action,
and
form.
A good
procedure
to
follow
is this:
1. Choose a
main area (near the
main effect) and bring
it
to
a finish
by
putting
in
as
much
detail
as
you
think
necessary.
2.
Pick
a
second
area and
bring
it to
a
finish
—
but
don't
make
it as
finished
as
the
main
area.
3.
Select a
third area and
finish it
—
but not as much
as the second area.
BRING THE
BRUSHWORK
OUT IN THE
LIGHT
Concentrate
on
the
brushstrokes
in
the
light
areas
—
there
should be
no
brushstrokes
in the shadows.
Think
out
each
brushstroke before
applying
it.
Remember
that a
brushstroke
must
come
from somewhere
and
go
somewhere. Decide
on the
direction
and
the size
of
the
brushstroke
before
you
put
it down.
Apply
the brushstroke on the form,
but make
sure it
goes
with
the action.
^tujAlZ
—
-^
There
are
four
sides to every
brushstroke.
Keep
the
hard
edge
in the direction
of
the
light
(so
that
edge
is
closest to the
light).
Use
cross-strokes
in
the center
of
the light
area
of a
form
to
bring out the
form.
Feather
the
ends
of
the
cross-stroke
and
soften
the edges.
Vary
the
thickness
and
thinness
of your paint:
•
The
lighter
the
value,
the
thicker
the paint should
be.
•
The
darker
the
value,
the
thinner the paint
should
be.
(But don't
make
it
so
thin
that
the
texture
of
the
canvas shows
through.)
LESSONS
FROM
RFJLLY
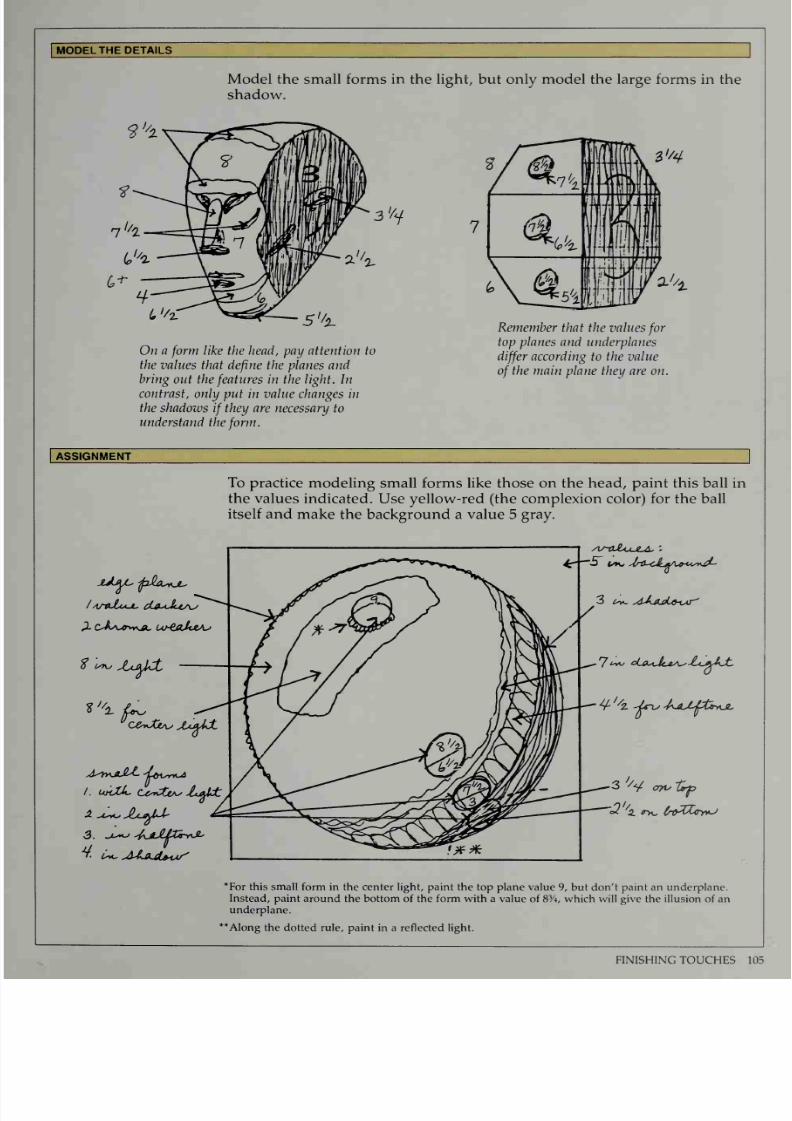
7/25/2019 Mastering the Craft of Painting (1985)
http://slidepdf.com/reader/full/mastering-the-craft-of-painting-1985 109/152
MODEL
THE DETAILS
Model the small forms in the
light,
but
only model the large
forms in
the
shadow.
S''3-
On a
form
like
the head, pay attention to
the
values that
define
the
planes
and
bring
out
the
features
in
the light.
In
contrast,
only
put in value changes in
the shadows
if
they
are necessary
to
understand the
form.
Remember
that
the values
for
top planes and
underplanes
differ
according
to
the
value
of
the main
plane
they
are on.
]
SSIGNMENT
To
practice
modeling small forms like
those
on
the
head, paint this ball
in
the values
indicated. Use
yellow-red
(the
complexion
color)
for
the
ball
itself and
make
the
background
a
value
5
gray.
%
JU^dL
t»±fL
3. U^*~>
^jL£Z&ytX-
3
is*.
aAaJLgw'
3
V
ayu
£p
*For this small
form
in
the center
light,
paint the top
plane value
9,
but don't paint an underplane.
Instead,
paint around
the
bottom
of the
form
with
a
value
of
8%,
which
will give
the
illusion
of
an
underplane.
Along
the
dotted rule,
paint
in
a
reflected
light.
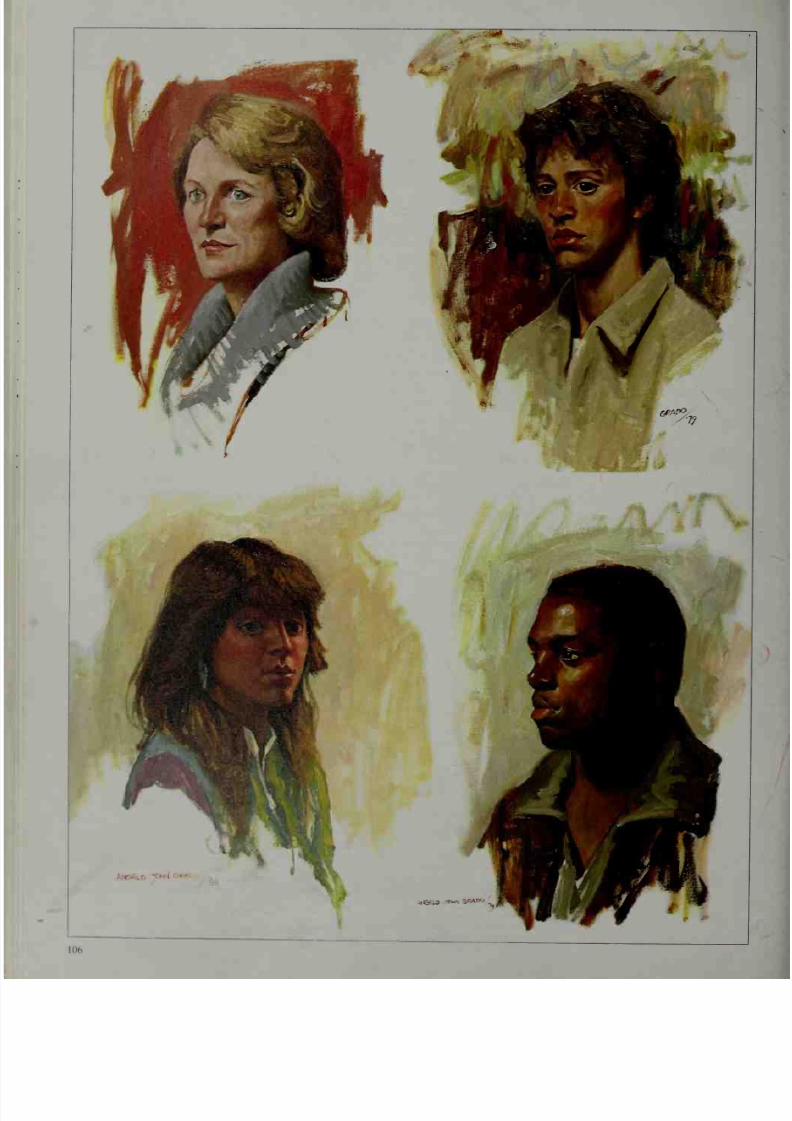
7/25/2019 Mastering the Craft of Painting (1985)
http://slidepdf.com/reader/full/mastering-the-craft-of-painting-1985 110/152
i m
lIGfij
T~s
SKAW-'

7/25/2019 Mastering the Craft of Painting (1985)
http://slidepdf.com/reader/full/mastering-the-craft-of-painting-1985 111/152
Beyond theLessons:
Developing
Your
Individuality
A good way
to
loosen
up is
to set
yourself
a time limit.
These
life-size
(20
x
16 )
portrait
sketches
were
done
in under
three
hours.
Try
some
yourself.
Spend
the
first
hour
blocking
in
the
head.
Be sure to
carefully
measure
four
inches
be-
tween
the
center
of
the
pupils
of
the
eyes and
the
chin.
Also indicate the
background
and clothes.
Once the head is
blocked
in,
devote about
a-half-hour
to
each
of
the
features.
I say
about because
you
should
give
your model
a
five-
minute break
every
twenty-
five
minutes.
No
matter
what
state the painting
is
in,
stop at
the
end
of
three
hours
and
start another
canvas.
The
human braih
is similar to a
computer
storing
information.
As you
learn the
craft
of
painting, this information is programmed into your
computer-brain
for later
use.
Extreme
care
must
be
taken
to
program
only
the
correct information,
because your
brain
will also
store
incorrect
information.
After many
years of
painting, however,
I found it
was not
necessary for
me
to consciously
control
every
stage
of
my painting
—
as
if only my
computer-brain were
in
charge. I began
to
allow certain
things
to
just
happen, without
premeditation.
As
you look at
the
gallery of my paintings
in
this
section,
you'll
see
how
I've moved away from
Frank
Reilly
's
methods.
At
the
same
time
all
my
work
stems from
the
basic craft taught by Reilly. I like
to
think of my
personal way
of painting as an
extension
of
what I
have
learned from
all
my
teachers—
not only
Reilly,
but
also Robert Brackman and Robert
Philipp.
For me,
each painting presents a specific problem to be
solved.
Primarily these
problems concern
the light within the canvas
and
the
tactile quality.
By tactile quality, I
mean
that the figures
or
objects
on
the
canvas
must
not
only
look real,
but they must also
project
a
feeling
of
being
real.
The captions for my paintings
will
help you
to understand
the
thinking
process
behind my
work. By
showing
you
how I
have developed
beyond
the lessons my teachers taught, I hope to encourage
you to
explore
further on your
own.
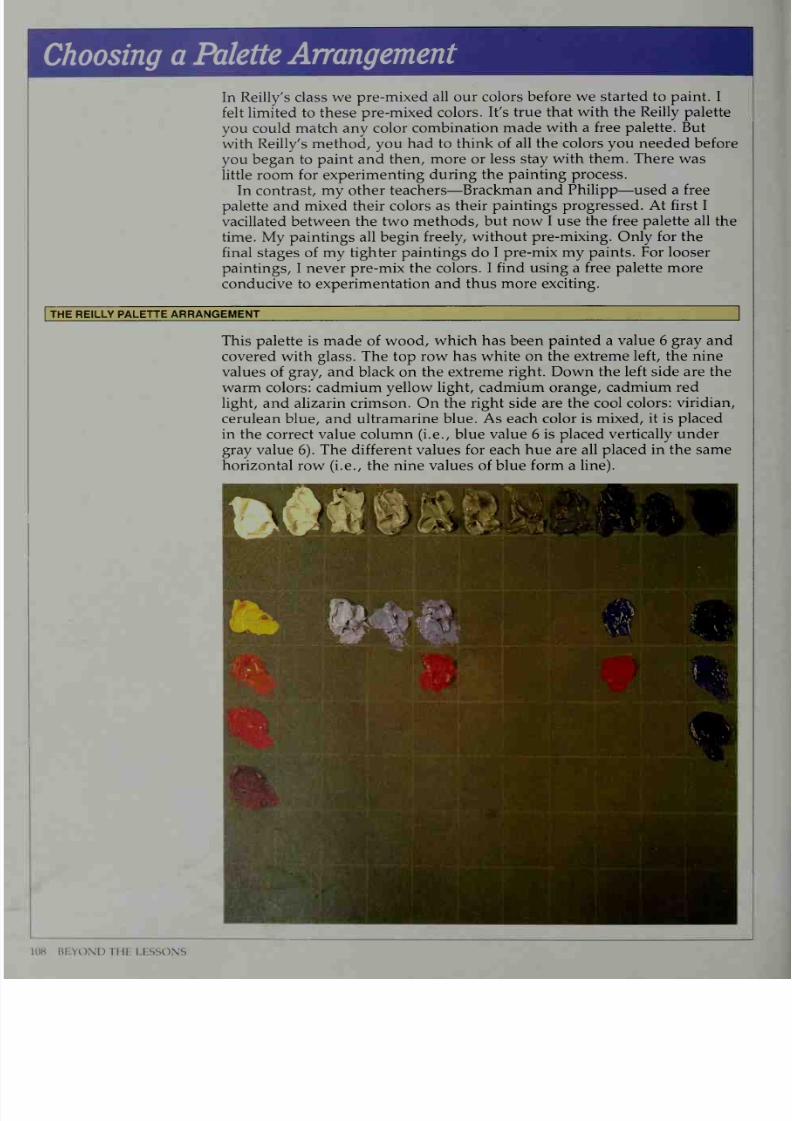
7/25/2019 Mastering the Craft of Painting (1985)
http://slidepdf.com/reader/full/mastering-the-craft-of-painting-1985 112/152

7/25/2019 Mastering the Craft of Painting (1985)
http://slidepdf.com/reader/full/mastering-the-craft-of-painting-1985 113/152
FREE
PALETTE ARRANGEMENT
This
palette
can
be
made
of wood or
W
Masonite, with a coat
of
shellac
to
make
it
less absorbent. On
the
top
row, from left
to
right,
the pig-
ments are
white,
cadmium
yellow
light,
cadmium
orange, cadmium
red
light,
alizarin
crimson,
ultramarine
blue, cerulean
blue, and viridian. The
vertical
column under
the
white includes the
earth
colors (yellow ocher,
raw
sienna, burnt sienna, raw umber, burnt
umber) and, at
the bottom,
ivory black.
In
using
this palette as a
free
palette, I
don't
follow
any
particular
system.
When
I
use it
as a
controlled palette,
however,
I
follow
Reilly's
method and pre-mix
my
colors, with
one horizontal
row
for
each
color, always
starting
with the lighter
value on
the
left.
%-^m
PALETTE
ARRANGEMENT
109
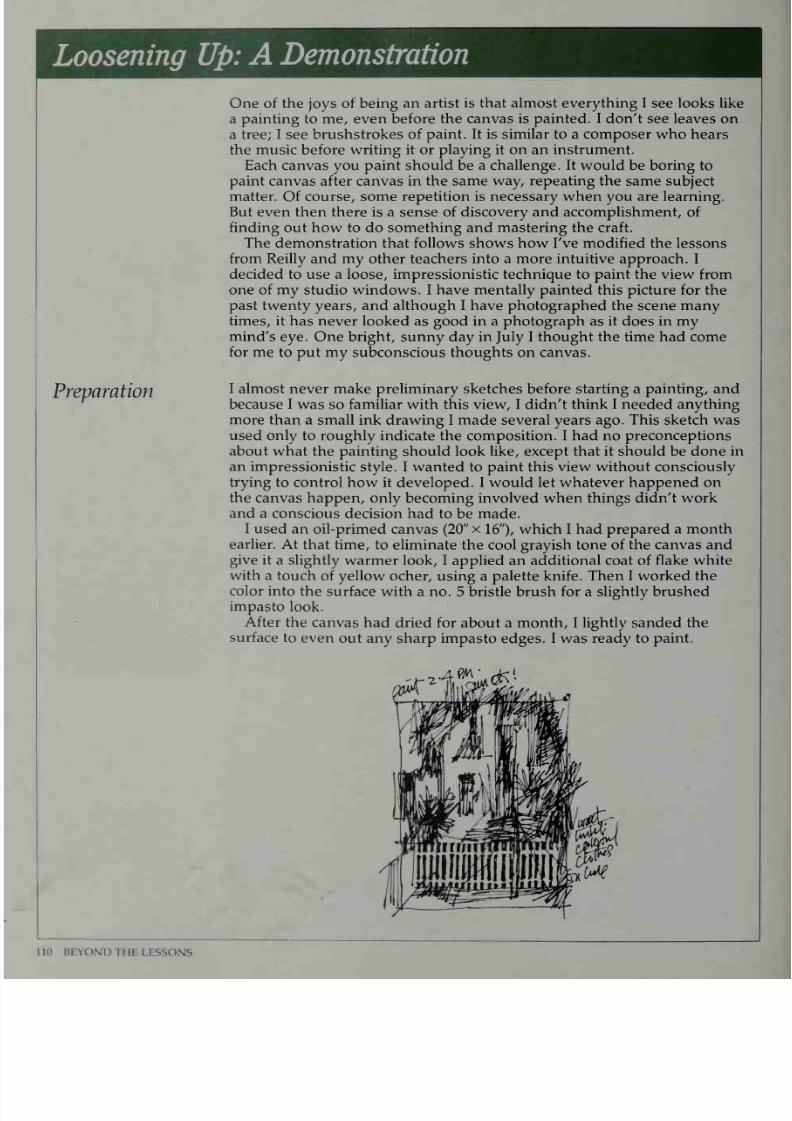
7/25/2019 Mastering the Craft of Painting (1985)
http://slidepdf.com/reader/full/mastering-the-craft-of-painting-1985 114/152
Loosening
Up:
A
Demonstration
Preparation
One of
the
joys
of being an
artist is that
almost everything
I
see
looks
like
a painting
to
me,
even
before
the
canvas
is painted.
I
don't
see
leaves
on
a
tree;
I
see
brushstrokes
of paint. It is similar
to
a composer who
hears
the music before writing
it
or
playing
it
on an instrument.
Each
canvas
you paint
should
be
a
challenge. It
would
be
boring
to
paint
canvas
after
canvas
in
the
same
way,
repeating
the
same
subject
matter. Of
course, some repetition is necessary when you are
learning.
But even
then
there
is a
sense
of
discovery and accomplishment,
of
finding
out
how
to do
something
and
mastering the
craft.
The
demonstration
that follows
shows
how
I've
modified
the
lessons
from
Reilly
and my other
teachers into a more
intuitive
approach.
I
decided
to use a
loose,
impressionistic
technique to paint the view from
one
of my studio windows.
I
have
mentally
painted
this
picture for the
past
twenty
years,
and although I
have
photographed the
scene many
times,
it
has
never
looked as good in a photograph as it
does
in
my
mind's eye.
One
bright, sunny
day
in
July
I
thought
the time
had
come
for me
to
put my subconscious
thoughts
on canvas.
I almost
never
make
preliminary sketches before
starting
a
painting,
and
because I
was
so familiar
with this view,
I didn't
think I needed anything
more
than a small ink drawing
I
made several years ago. This sketch was
used
only
to roughly indicate
the
composition.
I
had no
preconceptions
about
what
the
painting should
look like,
except
that
it should
be
done in
an
impressionistic style. I wanted
to
paint
this
view
without
consciously
trying
to
control
how it developed. I would let
whatever
happened
on
the
canvas
happen,
only
becoming
involved when
things
didn't work
and
a conscious
decision
had to
be
made.
I
used an
oil-primed
canvas
(20 x
16 ),
which
I had
prepared a month
earlier.
At
that
time,
to
eliminate the cool
grayish
tone
of the
canvas
and
give
it
a slightly
warmer look, I applied an
additional coat
of
flake white
with
a touch
of
yellow
ocher, using a palette knife.
Then
I worked
the
color
into
the
surface with
a
no.
5
bristle
brush for
a
slightly
brushed
impasto
look.
After
the canvas
had dried
for about a month,
I lightly sanded
the
surface
to
even
out
any sharp impasto
edges.
I was ready
to
paint.
110
BEYOND
THE LESSONS
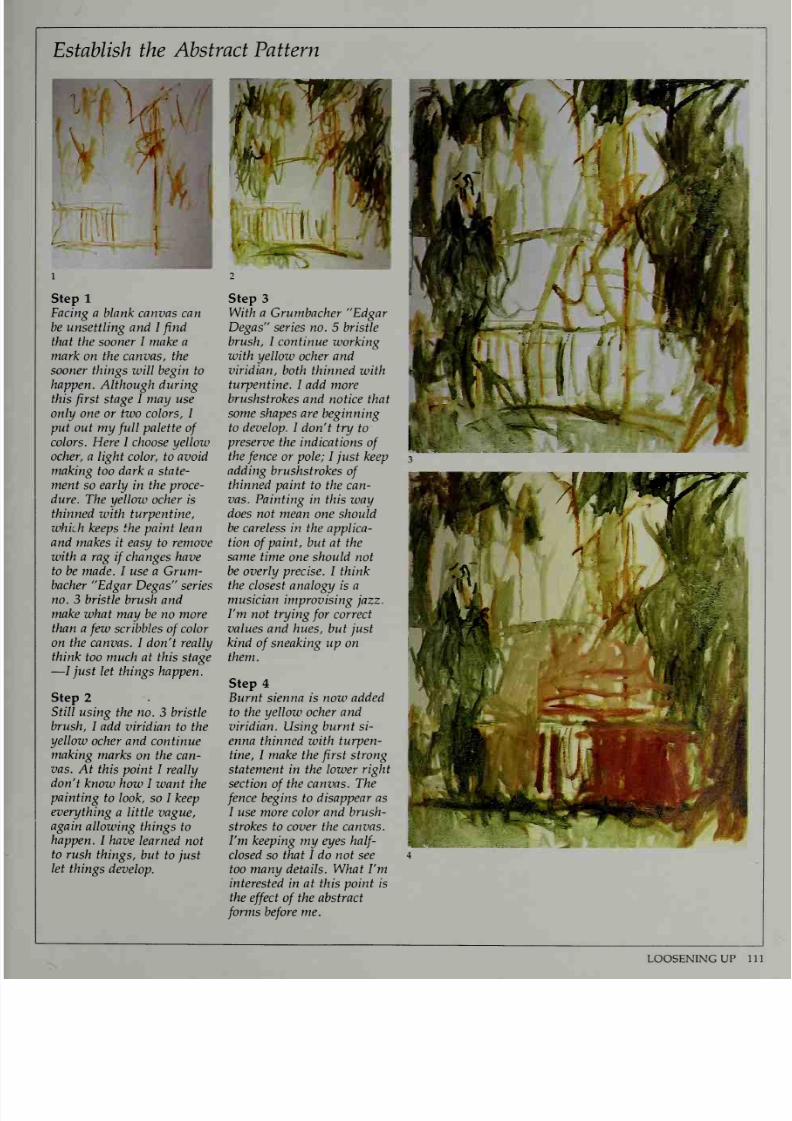
7/25/2019 Mastering the Craft of Painting (1985)
http://slidepdf.com/reader/full/mastering-the-craft-of-painting-1985 115/152
Establish
the
Abstract
Pattern
V
Wi
\i
i
1
Step
1
Facing a blank canvas can
be unsettling
and
I
find
that the
sooner
I make
a
mark
on
the
canvas,
the
sooner
things
will
begin
to
happen.
Although during
this
first
stage I may
use
only
one or two colors, I
put out
my
full
palette
of
colors.
Here I
choose
yellow
ocher,
a
light
color,
to
avoid
making too
dark a state-
ment
so early
in
the
proce-
dure.
The
yellow ocher is
thinned
with
turpentine,
which
keeps
the paint lean
and
makes
it
easy
to
remove
with
a
rag
if
changes have
to
be made.
I
use
a Grum-
bacher
Edgar
Degas series
no.
3
bristle brush
and
make what
may
be no more
than a
few
scribbles
of
color
on
the canvas.
I don't
really
think
too
much at this
stage
—
I just
let things
happen.
Step 2
Still using
the
no. 3
bristle
brush,
I add
viridian to the
yellow
ocher
and
continue
making
marks on
the
can-
vas.
At
this
point I
really
don't
know
how
I want
the
painting
to look,
so I keep
everything
a little vague,
again
allowing
things
to
happen.
I have
learned
not
to
rush
things,
but
to
just
let
things
develop.
Step
3
With
a
Grumbacher
Edgar
Degas
series no. 5 bristle
brush, I
continue
working
with yellow
ocher
and
viridian,
both thinned
with
turpentine.
I
add
more
brushstrokes
and
notice
that
some shapes
are beginning
to
develop.
I
don't
try to
preserve
the indications
of
the
fence
or
pole; I
just
keep
adding
brushstrokes
of
thinned
paint
to
the
can-
vas.
Painting
in
this way
does
not mean
one
should
be
careless
in
the applica-
tion
of
paint,
but
at the
same
time
one
should not
be overly
precise.
I think
the
closest
analogy
is a
musician
improvising
jazz.
I'm
not trying
for
correct
values and
hues,
but just
kind
of
sneaking
up on
them.
Step 4
Burnt sienna is now added
to the yellow
ocher
and
viridian. Using burnt si-
enna
thinned with turpen-
tine,
I make
the
first
strong
statement
in
the
lower
right
section
of
the canvas. The
fence
begins to
disappear as
I use
more
color
and
brush-
strokes
to
cover the canvas.
I'm
keeping my
eyes
half-
closed
so
that I do
not
see
too
many
details.
What
I'm
interested in at
this
point is
the
effect
of
the
abstract
forms
before me.
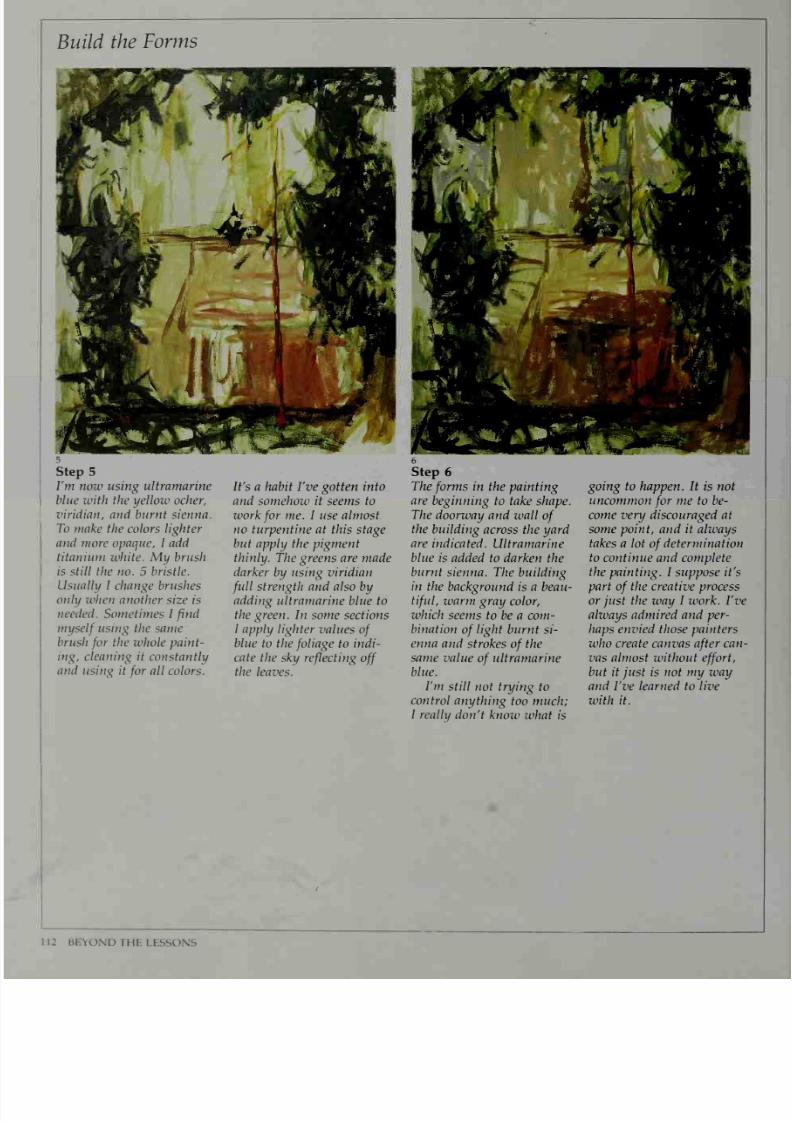
7/25/2019 Mastering the Craft of Painting (1985)
http://slidepdf.com/reader/full/mastering-the-craft-of-painting-1985 116/152
Build
the
Forms
Step
5
I'm now
using
ultramarine
blue with the yellow ocher,
viridian,
and burnt
sienna.
To make
the colors lighter
and
more
opaque,
I
add
titanium
white. My
brush
is still the no.
5
bristle.
Usually
I
change brushes
only
when
another size
is
needed.
Sometimes I
find
myself
using
the
same
brush
for
the
whole paint-
ing,
cleaning
it
constantly
and
using it
for
all
colors.
It's
a
habit
I've
gotten
into
and
somehow
it seems
to
work
for
me.
I use
almost
no turpentine
at
this stage
but
apply
the
pigment
thinly.
The greens are made
darker
by using viridian
full
strength
and also by
adding
ultramarine
blue
to
the green.
In some
sections
I
apply lighter
values
of
blue
to the
foliage
to
indi-
cate the
sky
reflecting
off
the
leaves.
Step
6
The
forms
in
the painting
are
beginning
to
take
shape.
The
doorway
and wall
of
the building
across
the yard
are indicated.
Ultramarine
blue
is added
to darken
the
burnt
sienna.
The
building
in
the
background
is
a beau-
tiful,
warm
gray color,
which
seems
to
be
a
com-
bination
of
light burnt
si-
enna
and strokes
of
the
same
value
of
ultramarine
blue.
I'm
still
not trying
to
control
anything
too
much;
I really
don't
know
what is
going to happen.
It
is not
uncommon
for
me to
be-
come very
discouraged at
some point,
and
it
always
takes
a
lot
of
determination
to continue
and complete
the painting.
I
suppose it's
part
of
the creative
process
or just the way I work. I've
always admired
and
per-
haps
envied
those
painters
who
create
canvas
after
can-
vas almost without
effort,
but it just is
not my
way
and
I've
learned to live
with
it.
1
1
2
BEYOND
THE
LESSONS
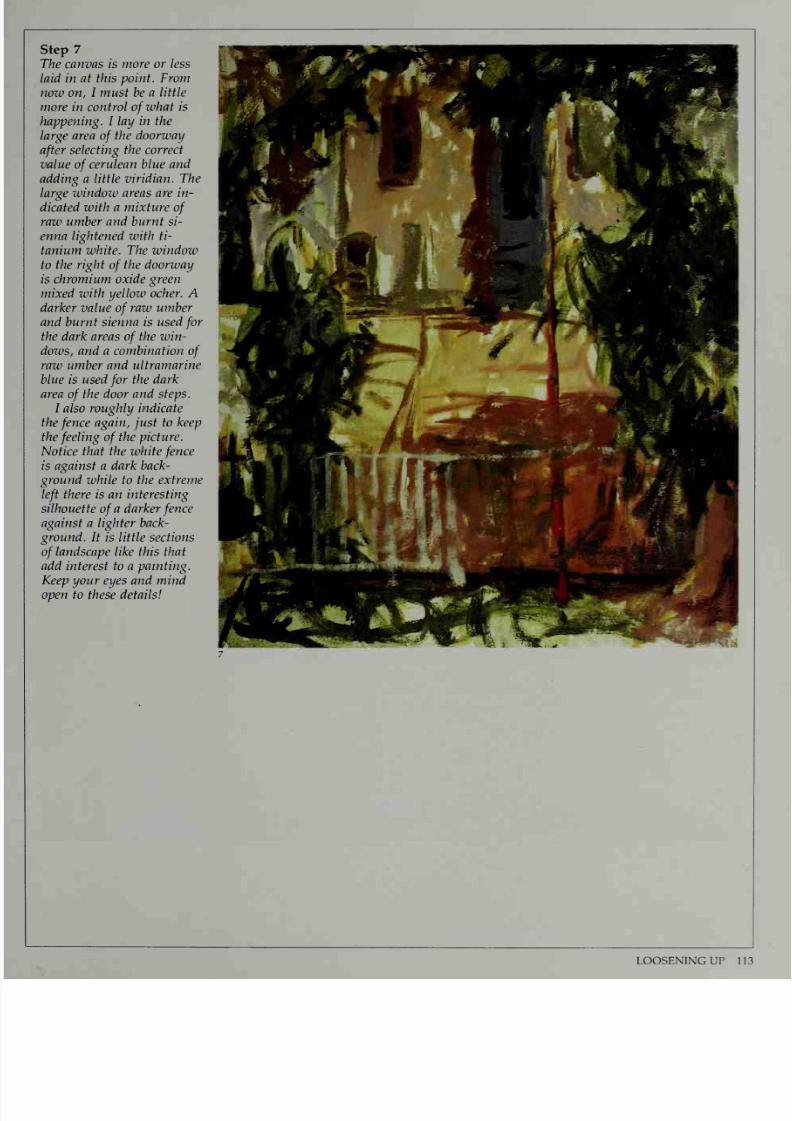
7/25/2019 Mastering the Craft of Painting (1985)
http://slidepdf.com/reader/full/mastering-the-craft-of-painting-1985 117/152
Step
7
The canvas is
more or less
laid
in
at
this point.
From
now on,
I must be
a little
more
in control
of
what is
happening.
I
lay
in
the
large
area
of
the doorway
after
selecting
the correct
value
of
cerulean
blue
and
adding
a
little
viridian.
The
large window areas
are in-
dicated
with
a
mixture
of
raw umber and burnt si-
enna
lightened
with
ti-
tanium
white. The
window
to the
right
of
the
doorway
is chromium oxide
green
mixed with yellow ocher. A
darker
value
of
raw umber
and burnt sienna
is used
for
the
dark areas
of
the win-
dows, and
a
combination
of
raw
umber and
ultramarine
blue is used
for
the
dark
area
of
the
door
and steps.
I also
roughly
indicate
the
fence
again, just to
keep
the
feeling
of
the
picture.
Notice that the
white
fence
is against
a dark back-
ground
while to the extreme
left
there
is
an
interesting
silhouette
of
a darker
fence
against a lighter
back-
ground.
It
is
little
sections
of
landscape
like
this that
add
interest
to a painting.
Keep your
eyes
and
mind
open to these details
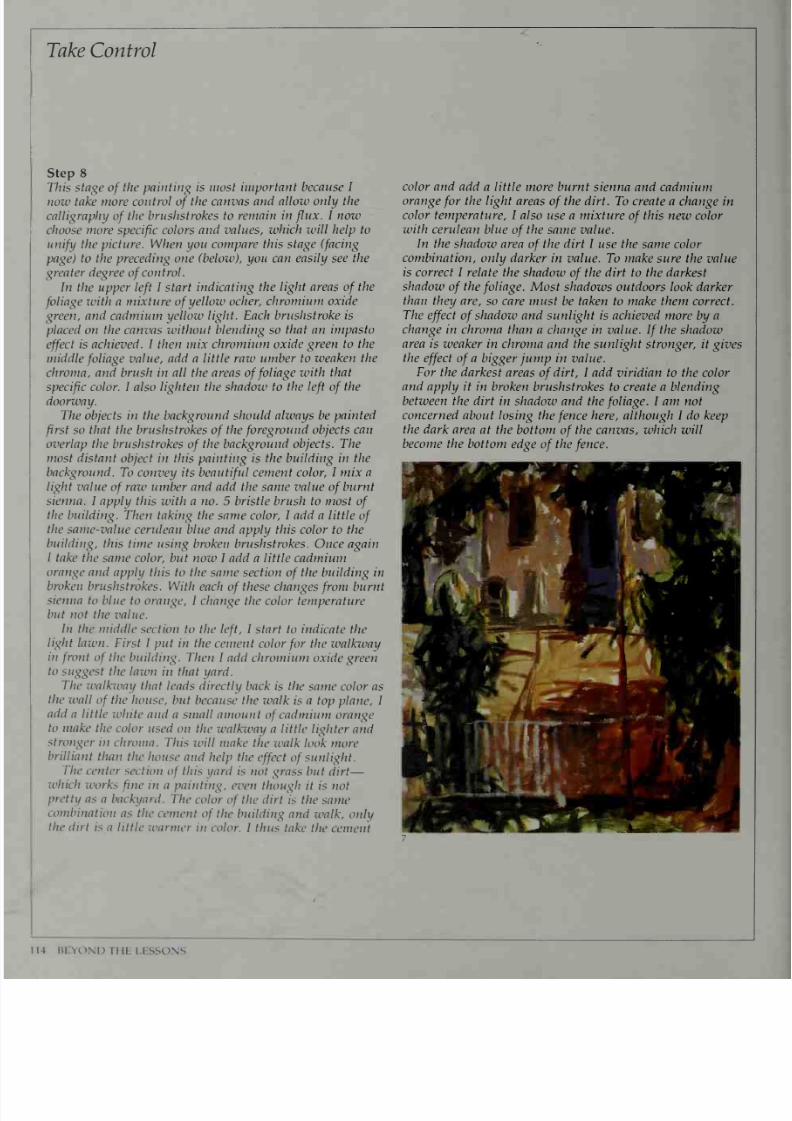
7/25/2019 Mastering the Craft of Painting (1985)
http://slidepdf.com/reader/full/mastering-the-craft-of-painting-1985 118/152
Take Control
Step 8
This
stage
of
the
painting
is
most important
because I
now
take
more
control
of
the canvas
and
allow only
the
calligraphy
of
the
brushstrokes
to
remain in
flux.
I
now
choose more
specific
colors and values,
which will help to
unify
the
picture. When you
compare this stage
(facing
page)
to the preceding one
(below), you can easily see the
greater
degree
of
control.
In the upper
left
I
start
indicating
the light areas
of
the
foliage
with a
mixture
of
yellow
ocher,
chromium
oxide
green, and
cadmium yellow
light. Each
brushstroke
is
placed
on the
canvas
without
blending
so
that an
impasto
effect
is achieved.
I
then mix
chromium
oxide green to the
middle
foliage
value,
add
a
little
raw umber
to
weaken
the
chroma, and
brush
in all the areas
of
foliage
with
that
specific
color.
I also
lighten
the shadow to the
left
of
the
doorway.
The
objects
in
the background
should
always be
painted
first
so that the brushstrokes
of
the
foreground
objects
can
overlap
the
brushstrokes
of
the
background
objects. The
most distant object
in
this painting is the building in the
background.
To convey its
beautiful
cement
color,
1 mix
a
light
value
of
raw umber and add the same value
of
burnt
sienna.
I
apply
this with a no.
5
bristle
brush
to
most
of
the
building.
Then
taking
the
same
color, I
add
a little
of
the
same-value cerulean blue
and
apply this color
to
the
building,
this
time
using
broken brushstrokes.
Once
again
I
take the
same color,
but
now I add
a
little cadmium
orange and
apply
this
to
the
same section
of
the building in
broken
brushstrokes. With
each
of
these changes
from
burnt
sienna to
blue to orange,
I change the color
temperature
but
not the
value.
In the
middle
section to the
left,
I
start to
indicate the
light
lawn.
First I
put
in
the
cement
color
for
the
walkway
in
front
of
the
building.
Then
I add
chromium
oxide green
to
suggest
the lawn
in that yard.
The
walkivay that
leads directly
back
is the same
color
as
the
wall
of
the
house,
but
because
the walk
is a top plane, I
add
a little
white and a
small
amount
of
cadmium
orange
to
make
the
color used
on the walkway
a
little
lighter
and
stronger
in
chroma.
This will
make the
walk
look
more
brilliant
than the
house
and help
the
effect
of
sunlight.
The
center section
of
this
yard
is not grass
but
dirt
—
which
works
fine
in
a
painting,
even though
it
is
not
pretty
as a
backyard.
The color
of
the
dirt
is
the
same
combination
as
the
cement
of
the
building
and
walk,
only
the dirt
is
a little warmer
in
color.
I thus take
the cement
color
and add
a
little more burnt
sienna
and
cadmium
orange
for
the
light areas
of
the
dirt. To create a change
in
color
temperature, I also
use
a mixture
of
this new
color
with
cerulean blue
of
the
same value.
In the
shadow
area
of
the
dirt
I
use the same
color
combination,
only darker
in
value.
To
make
sure the value
is
correct
I relate the
shadow
of
the
dirt to the darkest
shadow
of
the
foliage.
Most shadows
outdoors
look
darker
than
they are,
so care must
be
taken
to
make them
correct.
The
effect
of
shadow and
sunlight is achieved more
by
a
change
in chroma
than a change in
value.
If
the
shadow
area is
weaker
in chroma and
the sunlight stronger,
it gives
the
effect
of
a bigger
jump
in
value.
For the
darkest
areas
of
dirt,
1
add viridian to the color
and
apply
it in broken brushstrokes
to
create
a blending
between
the dirt
in
shadow
and
the
foliage.
1
am
not
concerned about
losing
the
fence
here, although
I do keep
the
dark area
at the bottom
of
the canvas, which will
become
the
bottom
edge
of
the
fence.
Bno\n
mi
i
ESSONS
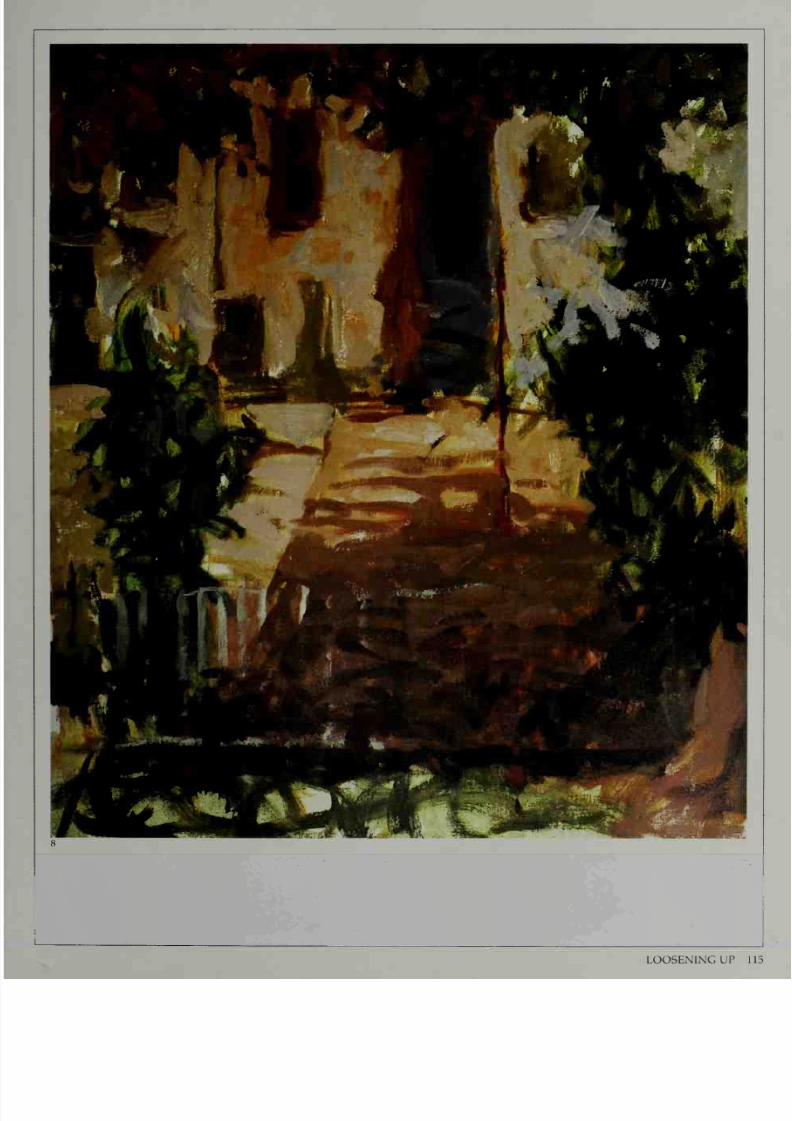
7/25/2019 Mastering the Craft of Painting (1985)
http://slidepdf.com/reader/full/mastering-the-craft-of-painting-1985 119/152

7/25/2019 Mastering the Craft of Painting (1985)
http://slidepdf.com/reader/full/mastering-the-craft-of-painting-1985 120/152
Pull
It
Together
Step
8
(Detail)
In
this detail
from
step
8,
you
can
see that
my
brush-
strokes
are still
imprecise. I
am simply
putting
paint on
the canvas
in
an
attempt
to
get closer to
the
correct
colors
of
the
foliage
and
buildings.
It is a
stage dur-
ing
which
major
decisions
are
made.
Step
9
(Detail)
Once I'm
satisfied
with my
decisions,
I
start
to use
specific
brushes
to get the
kind
of
impasto and brush-
work I
want
for
the
various
objects
in the painting.
Es-
sentially
it
is
a matter
of
repeating
what
was
done
in
the
last
step,
but being
a
little
more
careful
about the
abstract
shapes
and
color
relationships.
Almost all
my
paintings
are started
with
a
loose
technique.
Fcr
a
more
controlled
look,
I
just
carry
the
painting
sev-
eral
steps
further.
The great
changes
in
the
appearance
of
the
canvas
usually
o CUT
in the
early stages
From
then
on,
the
changes
be-
come
more
subtle.
'Mdft.llll
16 BEYOND
THE LESSONS
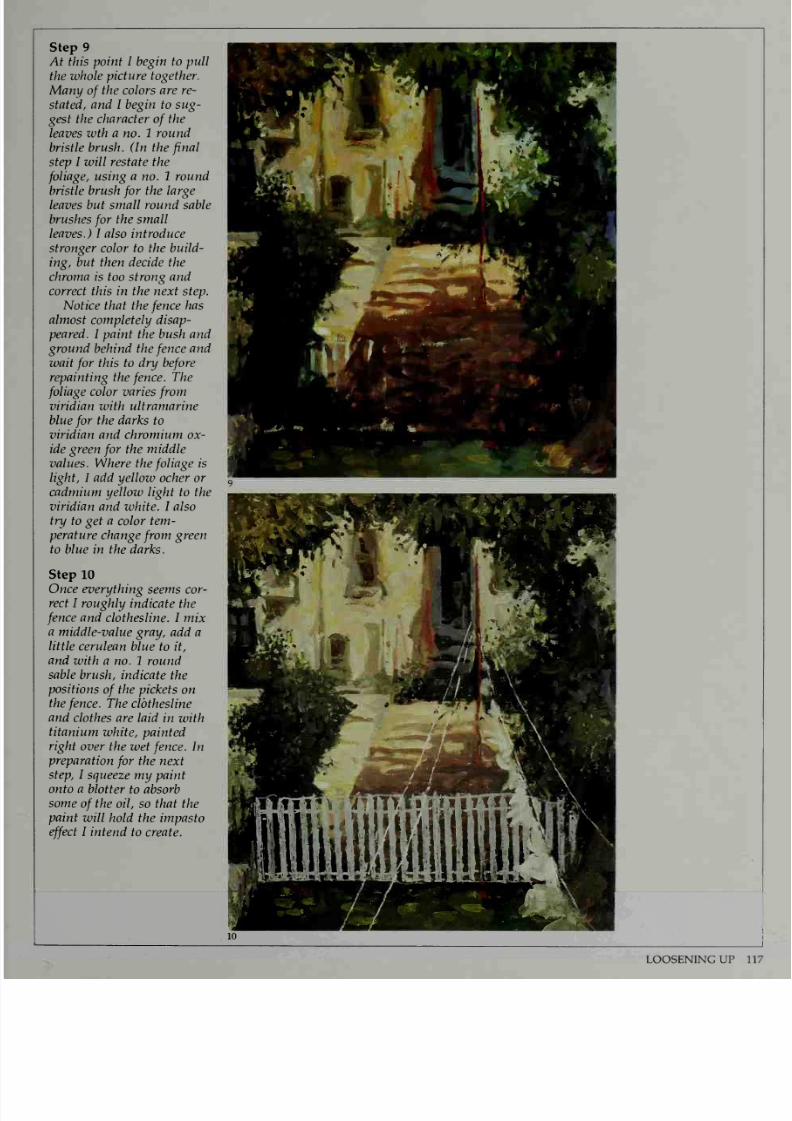
7/25/2019 Mastering the Craft of Painting (1985)
http://slidepdf.com/reader/full/mastering-the-craft-of-painting-1985 121/152
Step
9
At this point
I begin
to
pull
the whole
picture together.
Many
of
the colors are re-
stated, and
1
begin
to
sug-
gest
the
character
of
the
leaves wth a no.
1 round
bristle
brush.
(In the
final
step I will
restate
the
foliage,
using
a
no.
1
round
bristle brush
for
the large
leaves
but small round sable
brushes
for
the small
leaves.)
I
also
introduce
stronger color to the
build-
ing, but
then
decide the
chroma
is too
strong and
correct
this in the
next step.
Notice
that
the
fence
has
almost completely disap-
peared.
I
paint
the bush
and
ground behind the
fence
and
wait
for
this to
dry
before
repainting
the
fence.
The
foliage
color varies
from
viridian
with
ultramarine
blue
for
the darks to
viridian
and chromium ox-
ide green
for
the
middle
values.
Where the
foliage
is
light, I
add yellow
ocher or
cadmium
yellow light to
the
viridian
and
white. I
also
try
to
get
a color tem-
perature change
from
green
to
blue in the
darks.
Step
10
Once everything
seems
cor-
rect
1 roughly
indicate
the
fence
and
clothesline.
I mix
a
middle-value
gray,
add
a
little
cerulean
blue
to it,
and
with
a
no.
1 round
sable
brush,
indicate the
positions
of
the
pickets
on
the
fence.
The
clothesline
and
clothes
are
laid
in
with
titanium
white, painted
right
over
the
wet
fence.
In
preparation
for
the
next
step,
I
squeeze my
paint
onto a
blotter
to
absorb
some
of
the
oil,
so that the
paint
will
hold
the
impasto
effect
I
intend
to create.
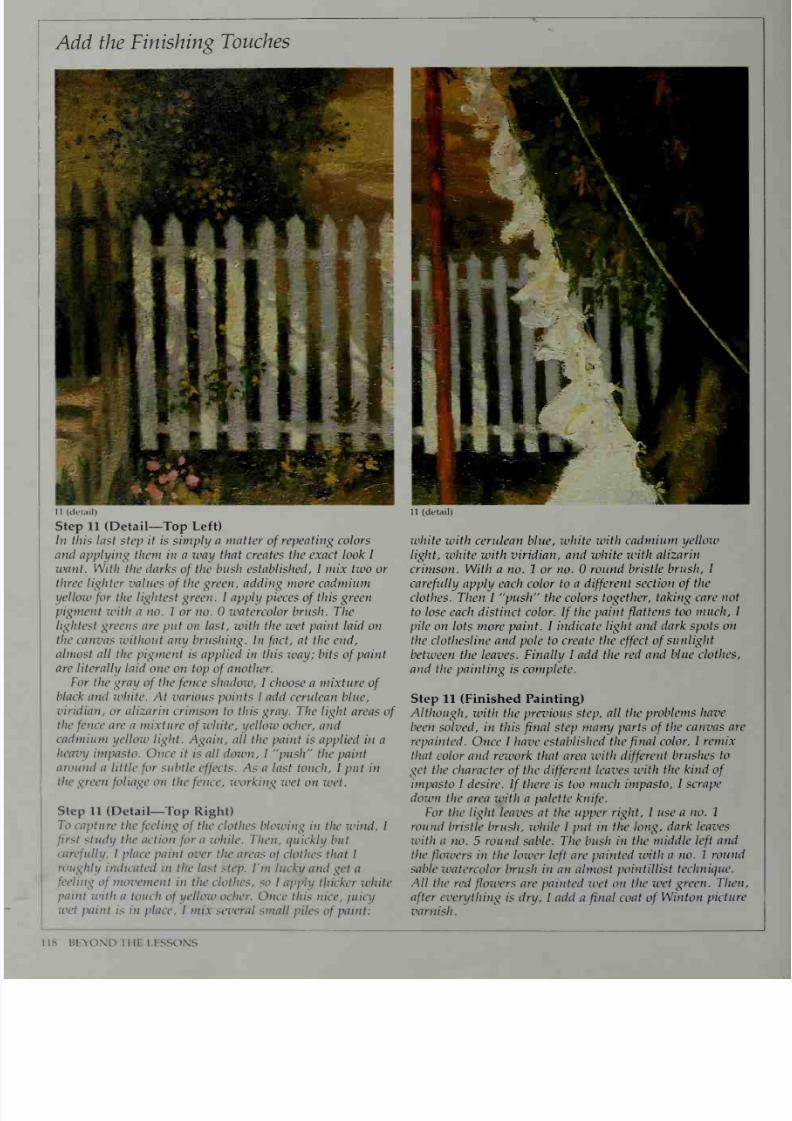
7/25/2019 Mastering the Craft of Painting (1985)
http://slidepdf.com/reader/full/mastering-the-craft-of-painting-1985 122/152
Add
the
Finishing
Touches
11
(detail)
Step
11
(Detail—
Top
Left)
In
this last
step
it
is
simply
a
matter
of
repeating
colors
and
applying them in a way that creates the exact
look
I
want.
With
the
darks
of
the bush
established,
I mix two or
three
lighter values
of
the
green,
adding more cadmium
yellow
for
the
lightest
green. I apply pieces
of
this green
pigment
with a no. 1
or
no.
watercolor brush. The
lightest
greens are
put
on
last,
with the
wet paint
laid on
the
canvas
without
any brushing.
In
fact,
at
the
end,
almost all the pigment
is applied
in this way; bits
of
paint
are literally
laid
one on top
of
another.
For
the
gray
of
the
fence
shadow, 1
choose a
mixture
of
black
and white. At various
points I add
cerulean
blue,
viridian,
or alizarin
crimson
to this gray. The
light areas
of
the
fence
are a
mixture
of
white,
yellow
ocher,
and
cadmium
yellow light.
Again,
all
the
paint is applied
in
a
heavy
impasto.
Once
it
is all down,
I push
the
paint
around a
little
for subtle
effects.
As a last touch,
I
put
in
the green
foliage on
the
fence,
working
wet
on
wet.
Step 11 (Detail—
Top
Right)
To capture
the
feeling
of
the
clothes
blowing
in
the
wind. I
first
study
the
action
for
a
while.
Then,
quickly
but
carefully, I place
paint over
the areas
of
clothes
that
I
roughly
indicated in the
last
step.
I'm lucky
and
get
a
feeling
of
movement
in
the
clothes, so
I
apply
thicker
white
paint
with
a touch
of
yellow
ocher.
Once
this
nice,
juicy
wet
paint
is
in
place,
I
mix several
small
piles
of
paint:
11 (detail)
white
with
cerulean
blue,
white with
cadmium
yellow
light,
white
with
viridian, and
white
with
alizarin
crimson.
With a no. 1 or no. round
bristle
brush,
I
carefully apply
each
color
to a
different
section
of
the
clothes.
Then
I
push
the
colors
together,
taking care not
to lose each
distinct
color.
If
the
paint flattens
too
much, I
pile
on lots more paint. I indicate
light and
dark spots on
the
clothesline and pole to
create the
effect
of
sunlight
between the
leaves.
Finally I
add
the
red
and
blue
clothes,
and
the painting
is
complete.
Step
11
(Finished
Painting)
Although,
with the previous step,
all
the
problems
have
been
solved,
in this
final
step
many parts
of
the
canvas are
repainted.
Once
I have
established the
final
color,
I
remix
that color
and rework
that
area
with
different
brushes
to
get
the
character
of
the
different
leaves
with
the kind
of
impasto
I desire.
If
there is
too
much
impasto,
I
scrape
down
the area
with
a
palette
knife.
For the
light leaves at
the
upper
right,
I
use
a no.
1
round
bristle
brush,
while
I
put in
the
long, dark
leaves
with a
no.
5
round sable. The
bush
in
the middle
left
and
the
flowers in the
lower
left
are
painted
with
a
no.
I
round
sable
watercolor brush in
an
almost
pointillist technique.
All the red
flowers
are painted wet on
the
wet
green.
Then,
after everything
is
dry,
I add a
final
coat
of
Winton
picture
varnish.
118 Bl>0\n I
HE
LESSONS
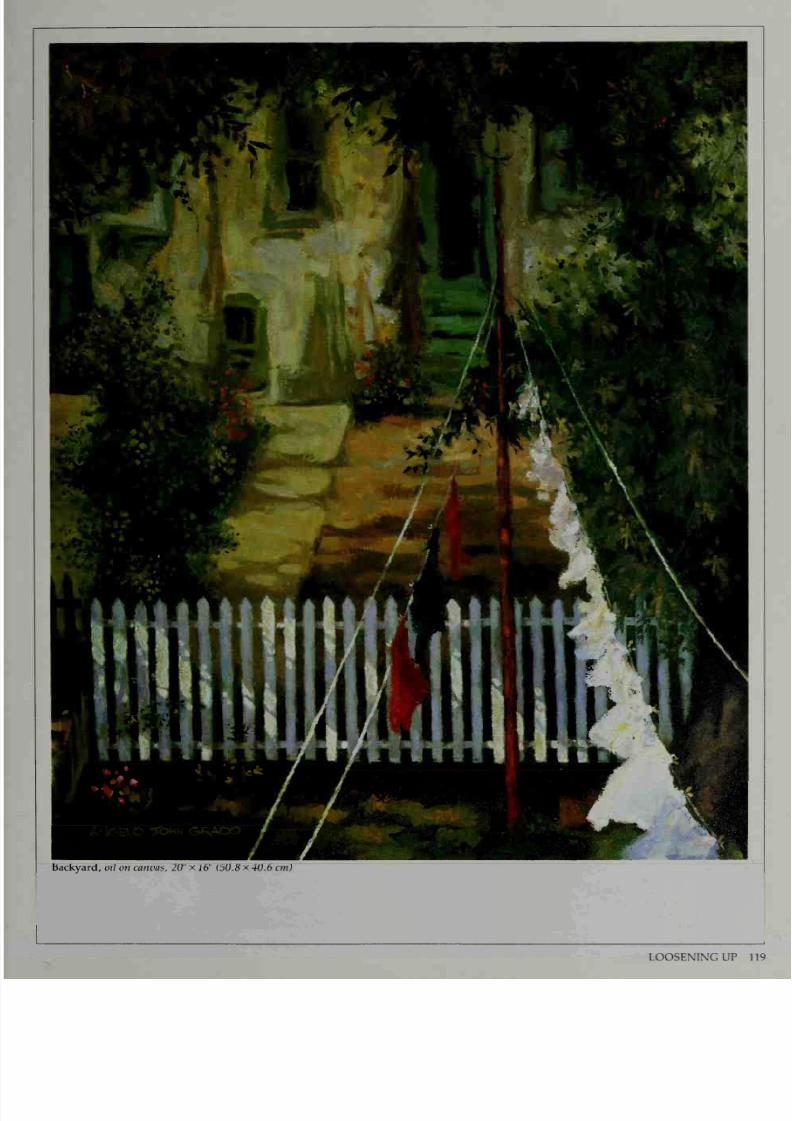
7/25/2019 Mastering the Craft of Painting (1985)
http://slidepdf.com/reader/full/mastering-the-craft-of-painting-1985 123/152
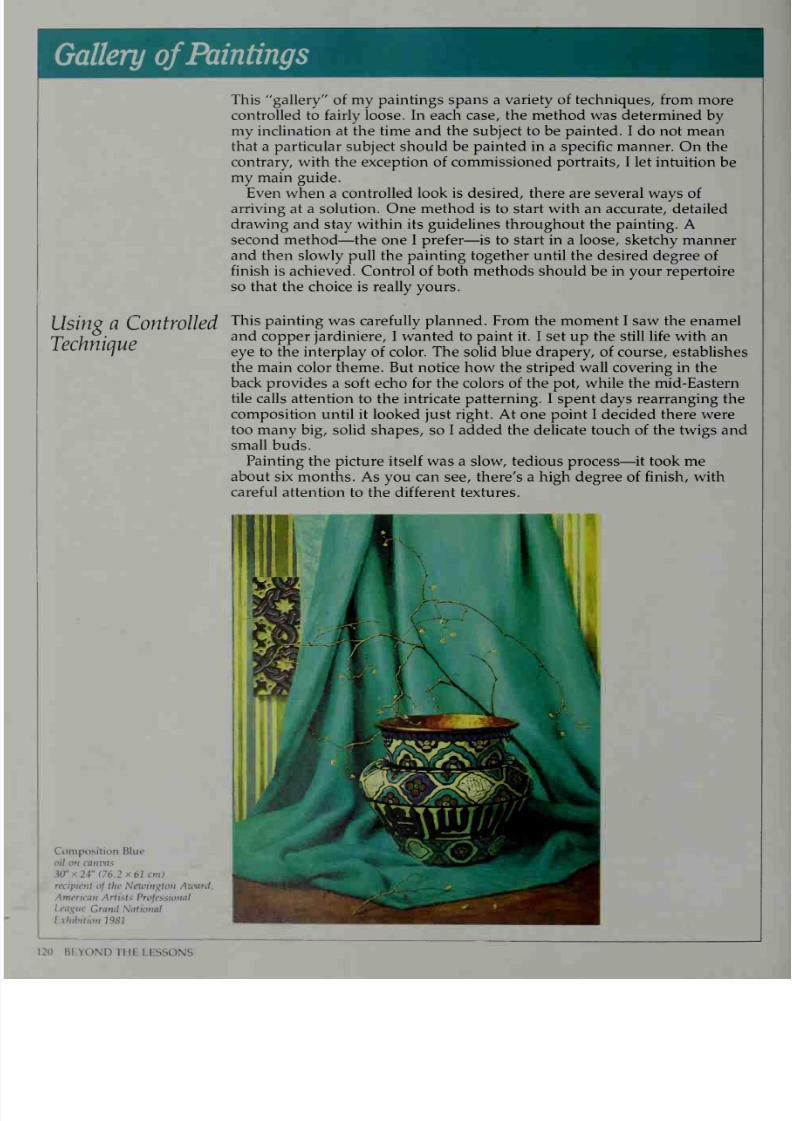
7/25/2019 Mastering the Craft of Painting (1985)
http://slidepdf.com/reader/full/mastering-the-craft-of-painting-1985 124/152
Gallery
of
Paintings
This
gallery of my
paintings
spans
a
variety of techniques,
from
more
controlled to
fairly loose. In each case, the method was determined
by
my
inclination at
the time
and
the
subject to be
painted.
I
do not mean
that
a
particular subject should be
painted
in a specific
manner. On the
contrary,
with
the exception
of commissioned portraits, I
let intuition
be
my
main
guide.
Even when
a controlled
look is
desired,
there
are
several
ways
of
arriving
at
a
solution. One method is
to
start with an accurate,
detailed
drawing
and stay within
its
guidelines
throughout
the painting. A
second method
—
the
one
I
prefer—
is
to
start in
a loose, sketchy
manner
and
then slowly pull
the
painting
together
until the desired
degree
of
finish is achieved. Control
of
both methods should
be
in
your repertoire
so
that
the
choice is really yours.
Using
CL
(Zotltwllcd
This
painting was carefully
planned.
From the moment I saw the enamel
Tprhviimip
anc
*
co
PP
er
jardiniere,
I
wanted
to
paint it. I
set up the
still
life with an
w
eye
to
the
interplay
of
color.
The solid
blue
drapery, of
course,
establishes
the
main
color theme. But notice how the striped wall covering in the
back
provides
a soft echo for
the
colors of the
pot, while
the mid-Eastern
tile
calls attention
to
the
intricate
patterning.
I spent
days rearranging the
composition
until
it
looked
just
right. At one point
I
decided there were
too
many big,
solid
shapes,
so
I added the delicate touch
of
the
twigs and
small
buds.
Painting
the
picture itself
was
a
slow,
tedious process
—
it took
me
about six
months.
As you can
see,
there's a
high
degree of finish,
with
careful
attention
to
the
different textures.
Composition
Blue
oil on canvas
3(Tx
24
(76.2x61
cm)
recipient
of
the
Newmgton
Award,
American
Artist-*
Professional
Grand National
I
xhtbition
1981
120
BEYOND
THE LESSONS
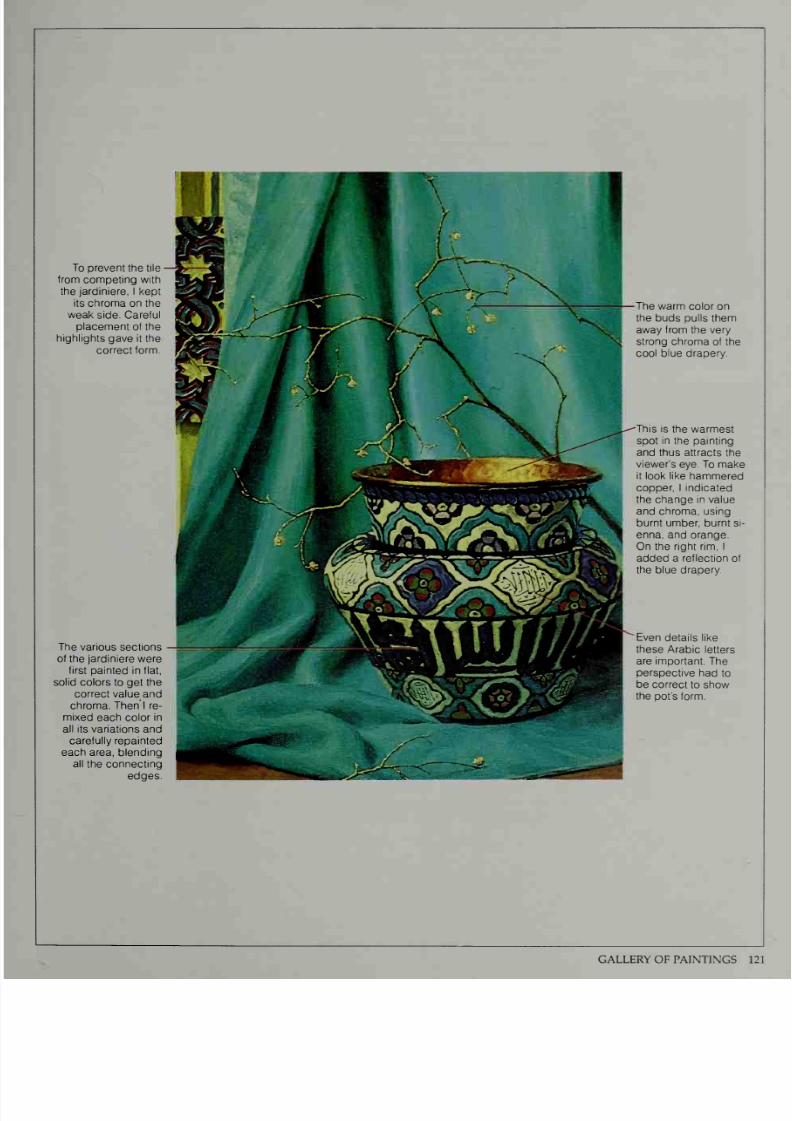
7/25/2019 Mastering the Craft of Painting (1985)
http://slidepdf.com/reader/full/mastering-the-craft-of-painting-1985 125/152
To prevent the
tile
from
competing
with
the jardiniere,
I
kept
its chroma on the
weak
side.
Careful
placement
of
the
highlights
gave it the
correct form.
The various sections
of
theiardmiere were
first
painted in flat,
solid colors
to
get
the
correct
value
and
chroma.
Then
I
re-
mixed
each
color
in
all
its variations
and
carefully
repainted
each
area,
blending
all
the
connecting
edges.
The warm
color on
the
buds
pulls
them
away
from the
very
strong chroma of
the
cool blue drapery.
This is
the
warmest
spot
in the painting
and thus
attracts the
viewer's
eye.
To
make
it
look like hammered
copper, I
indicated
the change
in
value
and
chroma,
using
burnt
umber,
burnt si-
enna,
and
orange.
On
the right rim, I
added
a
reflection
of
the blue
drapery.
Even details
like
these
Arabic
letters
are
important.
The
perspective
had
to
be
correct
to
show
the
pot's
form.
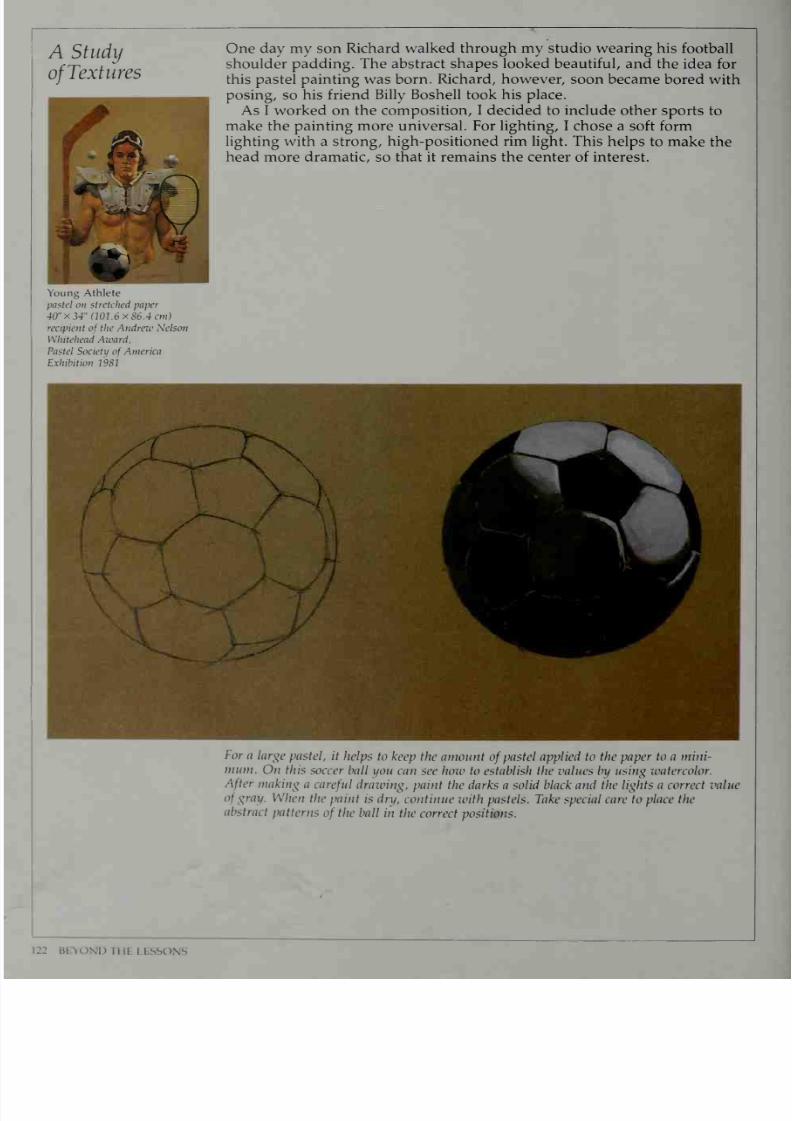
7/25/2019 Mastering the Craft of Painting (1985)
http://slidepdf.com/reader/full/mastering-the-craft-of-painting-1985 126/152
A
Study
ofTextures
One day
my
son
Richard
walked through
my
studio wearing
his
football
shoulder
padding. The abstract
shapes looked beautiful, and
the
idea
for
this pastel
painting
was born.
Richard, however,
soon
became
bored with
posing,
so
his
friend
Billy
Boshell took his place.
As I worked
on
the
composition, I
decided
to
include
other
sports
to
make the
painting
more
universal. For lighting, I
chose
a soft form
lighting
with
a
strong,
high-positioned
rim light. This
helps to make
the
head
more
dramatic,
so
that
it
remains
the center
of interest.
Young Athlete
pastel
on
stretched paper
40
x
34
(101.6x86.4
cm)
recipient
of
the
Andreic Nelson
Whitehead Award,
Pastel Society
of
America
Exhibition
1981
^
v A
/ Ji
W^^^^^^H
B
j^
r*JL3
MB^^^^^fc
V ^^m
^^1
For
a
large
pastel,
it
helps
to keep the
amount
of
pastel applied to
the paper to
a mini-
mum. On this
soccer
ball
you
can
see
how
to
establish the values
by
using
water
color.
After
making
a
careful
drawing,
paint
the
darks a solid
black
and
the
lights
a correct value
of
gray.
When
the
paint
is dry,
continue
with pastels. Take special care
to
place
the
abstract
patterns
of
the ball
in
the
correct positions.
Bl
>o\|)
him
ESSONS
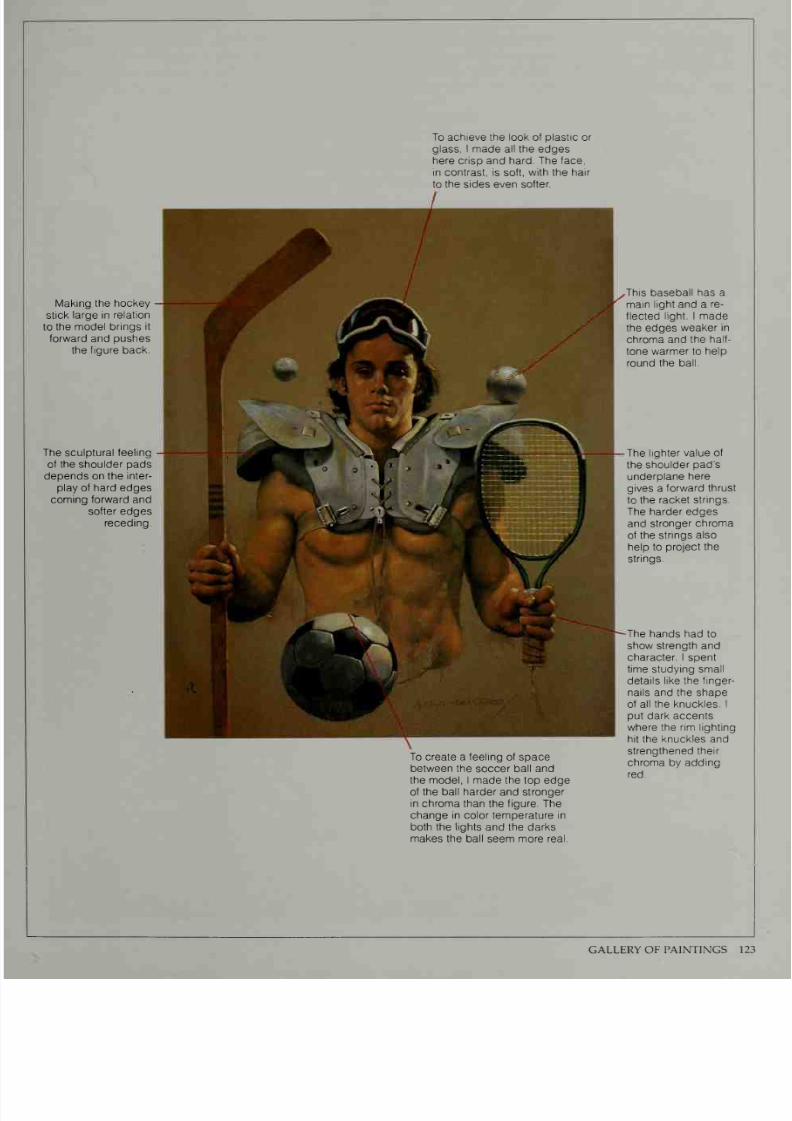
7/25/2019 Mastering the Craft of Painting (1985)
http://slidepdf.com/reader/full/mastering-the-craft-of-painting-1985 127/152
To
achieve
the look
of
plastic or
glass,
I
made
all the edges
here
crisp
and hard.
The
face,
in contrast,
is soft,
with
the
hair
to
the
sides
even
softer.
Making the hockey
stick
large
in
relation
to
the model brings
it
forward and
pushes
the
figure back.
The
sculptural feeling
of
the
shoulder
pads
depends
on the inter-
play of
hard
edges
coming
forward and
softer
edges
receding.
To
create a
feeling
of
space
between
the
soccer
ball and
the model, I made the
top
edge
of the
ball
harder and
stronger
in chroma
than
the
figure. The
change
in
color temperature
in
both
the
lights and the darks
makes
the
ball
seem
more real.
This baseball
has a
main
light and a re-
flected
light. I made
the edges
weaker
in
chroma
and the
half-
tone
warmer
to
help
round
the
ball.
The
lighter
value
of
the
shoulder
pad's
underplane
here
gives
a
forward thrust
to
the
racket
strings.
The
harder edges
and stronger
chroma
of the
strings
also
help
to
project the
strings.
The hands had
to
show strength
and
character.
I
spent
time
studying
small
details like the finger-
nails and the shape
of
all
the
knuckles.
I
put
dark accents
where the
rim
lighting
hit
the
knuckles and
strengthened
their
chroma
by
adding
red
GALLERY OF
PAINTINGS
123

7/25/2019 Mastering the Craft of Painting (1985)
http://slidepdf.com/reader/full/mastering-the-craft-of-painting-1985 128/152
Different
Techniques
with
the
Figure
This
loosely
painted
picture
is one of my
personal
favorites,
perhaps
because
of
its
simplicity.
I applied
the paint fairly smoothly on the
background,
somewhat more
broadly
on
the
figure, and
quite broadly on
the shawl.
All the
lines
lead up to
the head, which
is
the center of
interest.
The
prevailing
grayish color is made
with
raw
umber. Once I
established
the
value
of the
raw umber,
I
put
in
the other
hues—but
I
kept the values the same.
In fact, most
of the colors are
this
value. I
did,
however,
subtly grade
the background,
making the
value slightly
lighter
at
the
top.
I
also
made
the
color
warmer
near
the
top.
Lady
with
Black
Hat
(>//
on
canws
XT (76.2x50
124
BEYOND
THE LESSONS
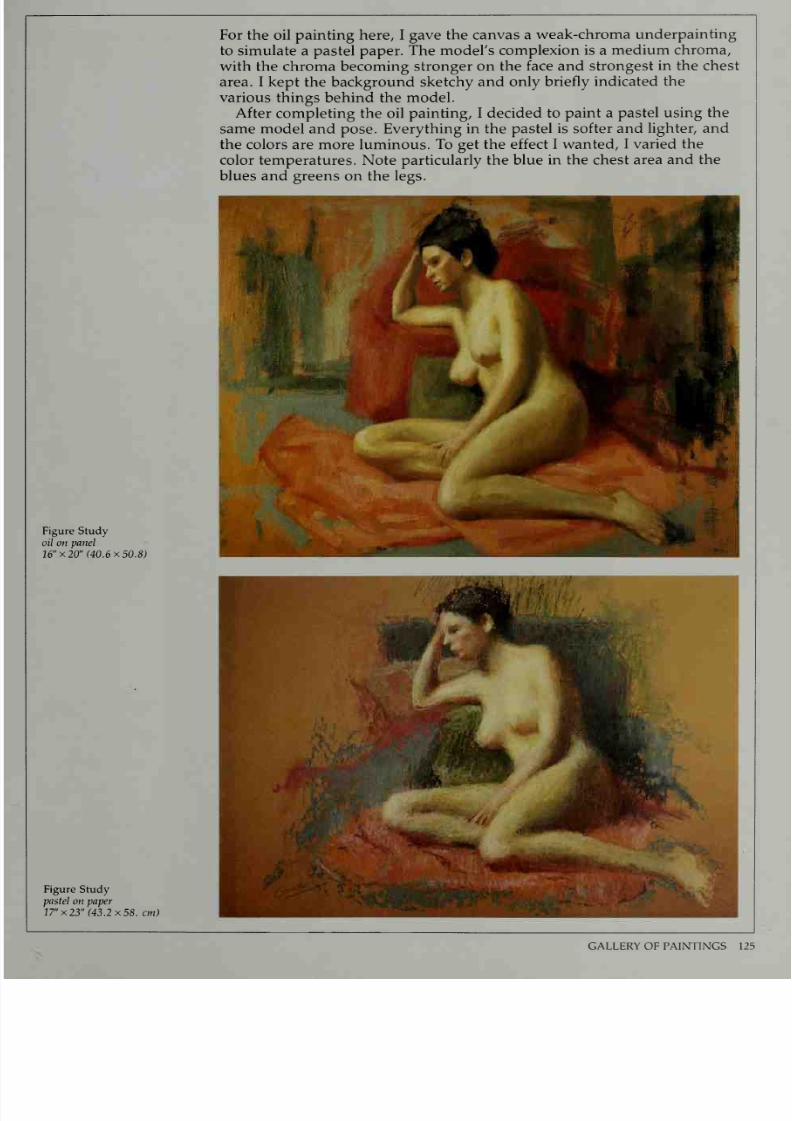
7/25/2019 Mastering the Craft of Painting (1985)
http://slidepdf.com/reader/full/mastering-the-craft-of-painting-1985 129/152
For the oil painting
here,
I
gave
the
canvas a
weak-chroma
underpainting
to
simulate a pastel paper.
The
model's complexion
is a
medium
chroma,
with the chroma
becoming
stronger
on
the face
and
strongest
in
the chest
area. I kept
the background
sketchy
and only briefly
indicated
the
various things
behind
the model.
After
completing
the oil painting,
I decided to
paint
a pastel
using
the
same
model
and
pose.
Everything in
the pastel is
softer
and lighter, and
the colors
are more luminous.
To get
the
effect
I wanted,
I varied the
color
temperatures.
Note
particularly
the
blue in the
chest
area and the
blues
and
greens
on
the
legs.
Figure
Study
oil
on
panel
16
x
20
(40.6x50.8)
Figure Study
pastel
on
paper
17
x
23
(43.2x58.
an)
GALLERY
OF
PAINTINGS 125
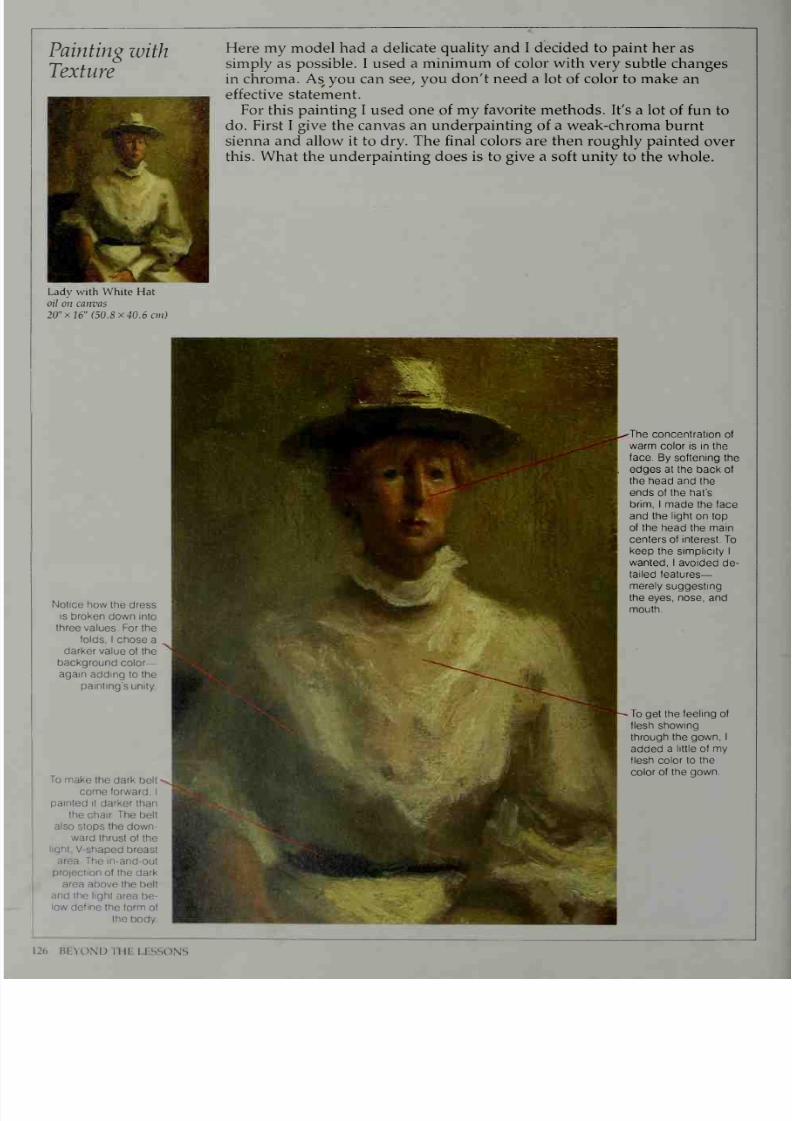
7/25/2019 Mastering the Craft of Painting (1985)
http://slidepdf.com/reader/full/mastering-the-craft-of-painting-1985 130/152
Painting
with
Texture
Here
my model had
a
delicate
quality
and
I decided
to
paint
her as
simply
as possible.
I
used
a
minimum
of
color with very
subtle
changes
in chroma. As you can see,
you don't need a
lot
of color to
make an
effective statement.
For this painting
I
used
one
of
my favorite methods. It's
a lot of fun
to
do.
First
I
give
the
canvas
an underpainting
of a
weak-chroma
burnt
sienna
and allow
it to dry. The
final colors
are
then
roughly painted over
this. What
the
underpainting does is
to give
a soft
unity
to
the whole.
Lady with White Hat
oz7
on
canvas
20
x
16
(50.8x40.6
cm)
Notice
how
the
dress
is
broken down
into
three
values For
the
folds,
I
chose
a
darker
value of the
background
color
again
adding
to the
painting's
unity
To
make the
dark belt
come
forward.
I
painted
it
darker than
the chair
The
belt
also
stops
the
down-
ward thrust
of the
light.
V-shaped breast
area The
in-and-out
proiection
of the
dark
area
above
the belt
and the light
area
be-
low define the form
of
the
body
The concentration
of
warm
color is
in
the
face.
By
softening the
edges
at
the
back of
the
head and the
ends of
the hat's
brim, I
made
the face
and the
light
on
top
of the
head
the
main
centers
of interest.
To
keep
the simplicity
I
wanted, I
avoided
de-
tailed features
merely
suggesting
the
eyes, nose, and
mouth.
To get
the feeling of
flesh showing
through the
gown,
I
added
a
little
of
my
flesh color to
the
color of the gown.
HI
YOND
I
HI
I
ESSONS
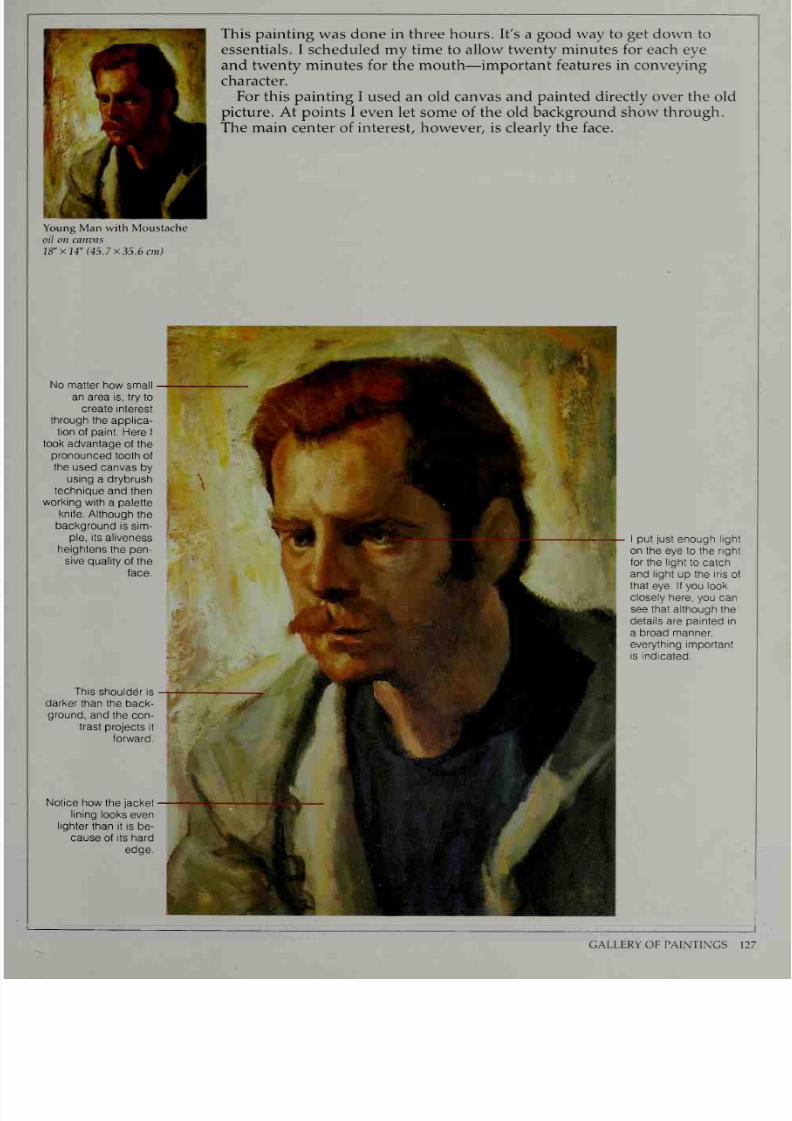
7/25/2019 Mastering the Craft of Painting (1985)
http://slidepdf.com/reader/full/mastering-the-craft-of-painting-1985 131/152
This
painting was done in three hours. It's a good
way to get
down
to
essentials.
I scheduled my
time
to allow twenty
minutes
for
each
eye
and
twenty minutes
for the
mouth
—
important
features
in conveying
character.
For this
painting I
used
an
old canvas and
painted directly
over
the
old
picture. At points
I
even let some of
the
old
background show through.
The
main center
of interest, however, is
clearly
the
face.
Young Man with
Moustache
oil on canvas
18
xl4 (45.7x35.6
cm)
No
matter
how
small
an
area
is,
try
to
create
interest
through
the applica-
tion of
paint.
Here
I
took advantage of
the
pronounced
tooth of
the
used
canvas
by
using
a drybrush
technique
and
then
working
with
a
palette
knife.
Although
the
background
is sim-
ple,
its
aliveness
heightens
the
pen-
sive
quality of
the
face.
This
shoulder
is
darker
than
the
back-
ground,
and
the
con-
trast
projects it
forward.
Notice how
the jacket
lining
looks even
lighter
than it
is
be-
cause of its hard
edge.
I
put
just
enough
light
on
the
eye to the right
for the
light to catch
and light
up
the iris
of
that
eye.
If
you
look
closely
here,
you
can
see
that
although the
details
are
painted
in
a
broad
manner,
everything
important
is indicated.
GALLERY
OF
PAINTINGS
127

7/25/2019 Mastering the Craft of Painting (1985)
http://slidepdf.com/reader/full/mastering-the-craft-of-painting-1985 132/152
Textures in
Pastel
Originally
I
tried to get
Megan, one
of my
eight grandchildren,
to
pose
for
a more
formal portrait, but
she was
uncooperative.
She finally
agreed
to play-act and
posed
as a
mother
with
her
child. In
painting
children,
it
helps
to
get
them involved by
using fantasy.
All my
paintings
are
really studies
in
texture.
Here the texture
of the
drapery,
the
girl's face, and
the doll's
head
had to
be
carefully
controlled.
The
loose handling
of
the drapery
conveys
its
roughness.
For
the girl's
head, which
is
smoother,
I
used
a
tighter
technique.
The Little Mother
pastel
on
stretched
paper
24
x
20
(61x50.
8
cm)
recipient
of
Best Portrait
Award,
Pastel
Society
of
America
Exhibition
1978
collection
of
Megan
Devir
I
almost always
use
the
paper
as the
background color,
but I introduce other,
weak-chroma
colors
so
that it
does not
look
too
flat.
The
doll's
head
is
the
smoothest,
shiniest
object
in
the
painting
To
get
this
effect, I
closed
up
my
pastel
strokes,
used my fin-
ger to
smooth
the
sur-
face
a
little,
and
made
the
edges and
highlight
somewhat
hard.
In
painting
drapery
with pastels, the cal-
ligraphy
is
very
im-
portant.
The
direction
of
the pastel strokes
should
be
varied
as
much
as
possible
The
round
shape of
the
chin
is repeated
in the
round
shape of
the dress
and then
reversed
in
the
round
shape
of the
doll's
head
1
28
BEYOND
THE
LESSONS
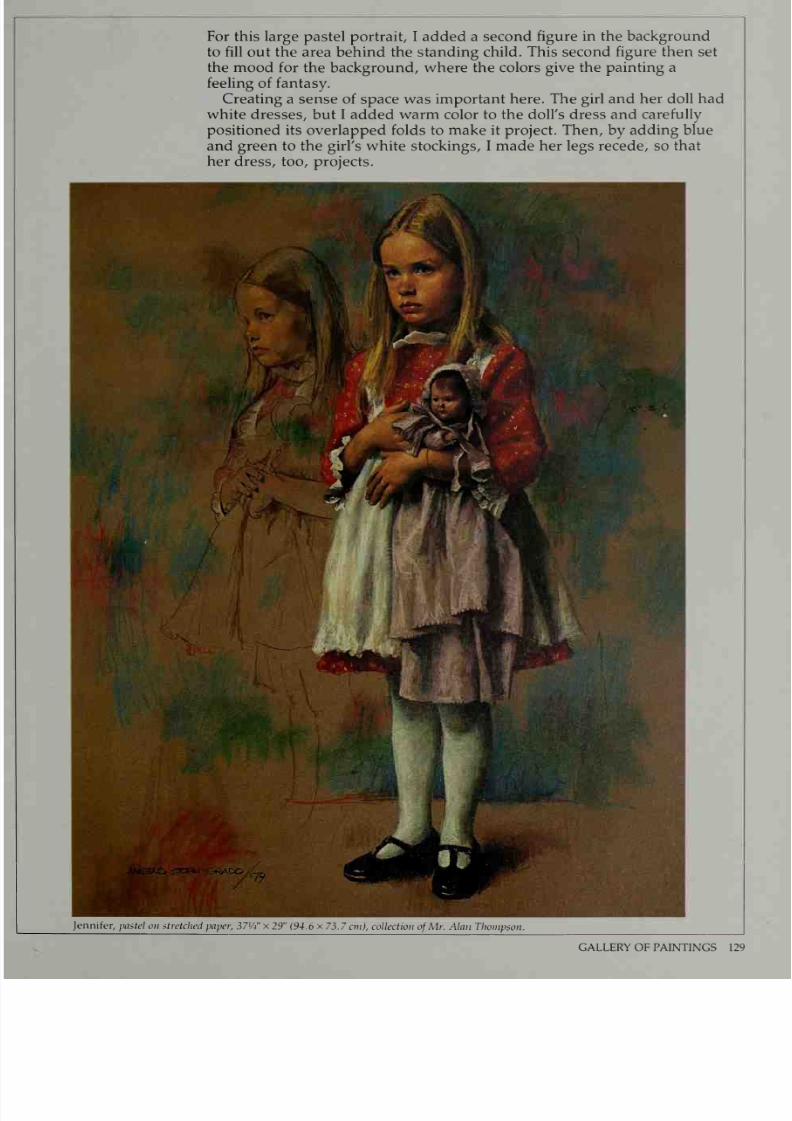
7/25/2019 Mastering the Craft of Painting (1985)
http://slidepdf.com/reader/full/mastering-the-craft-of-painting-1985 133/152
For
this large
pastel
portrait, I
added
a
second
figure in the
background
to
fill out
the
area
behind the
standing
child. This second figure then set
the mood
for the
background,
where the colors
give
the
painting
a
feeling of fantasy.
Creating a
sense
of space was
important
here.
The
girl and
her doll had
white
dresses,
but
I added warm
color
to
the doll's dress
and
carefully
positioned
its
overlapped folds
to
make it project. Then, by
adding blue
and
green to the girl's white
stockings,
I made her legs recede,
so
that
her dress,
too, projects.
Jennifer,
pastel
on
stretched
paper,
37'A
x
29
(94.6
x
73.7
cm),
collection
of
Mr. Alan Thompson.
GALLERY OF PAINTINGS 129

7/25/2019 Mastering the Craft of Painting (1985)
http://slidepdf.com/reader/full/mastering-the-craft-of-painting-1985 134/152
Making
Flesh
Luminous
One of
the
most challenging
tasks
in painting nudes is to get the
luminosity of
the
human flesh
in the
light,
especially when
the model
has
a very light
skin.
Here
I
used the
texture
of the
background
as
a
contrast
to
the
flesh. To
give
the skin
its iridescent quality,
I
concentrated
on the
interplay of
changes
in
color temperature. Notice,
by
the
way,
how
the whole composition is
structured
on
a
triangle, which
is
repeated in
the
head.
Because
the
center
of
interest
is
the lower
section
of
the
figure,
the head
and
and up-
per
background
have
thin
paint
and soft
edges.
This
dark
area
of the
drapery
helps to
bring
out the model's
legs. Observe how
this thigh
shows ten-
sion
because of the
pressure
of leaning
on
the
seat,
while
the
thigh
to the right is
more relaxed.
The
straight
line
here
stabilizes the
diago-
nal
thrust
of
the drap-
ery and
the arm
on
the
left
side of the
canvas.
This
straight arm
along
with the
straight
drape
coun-
teracts the busyness
of
the
figure on the
left
side. The
straight
arm
also
emphasizes
the
curve
of the
hip
and leg
This
section
of
the
hips
and upper
thigh
is painted
with
a
heavier
impasto
After
building
up
the
im-
pasto.
I intermingled
cool and
warm
col-
ors, using
almost a
drybrush
technique.
1
30 BEYOND
THE LESSONS
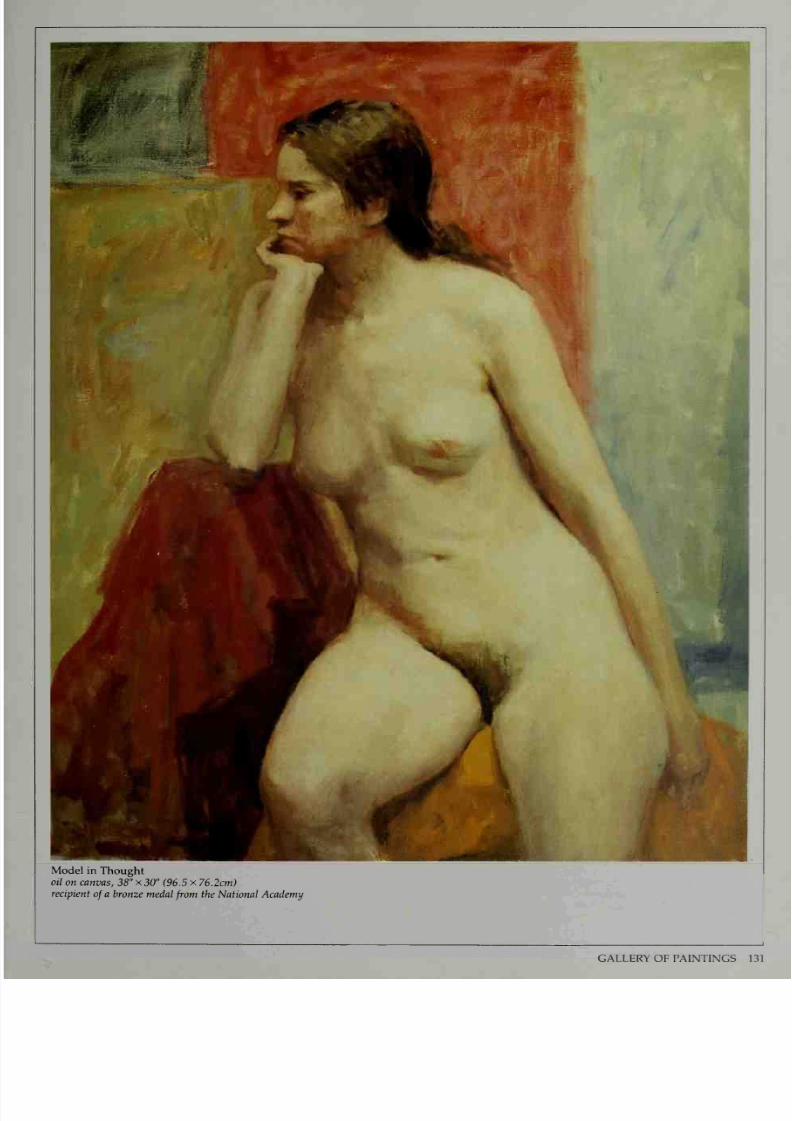
7/25/2019 Mastering the Craft of Painting (1985)
http://slidepdf.com/reader/full/mastering-the-craft-of-painting-1985 135/152
I
Model
in
Thought
oil
on
canvas,
38
x
30
(96.5
x
76.2cm)
recipient
of
a bronze
medal
from
the National Academy
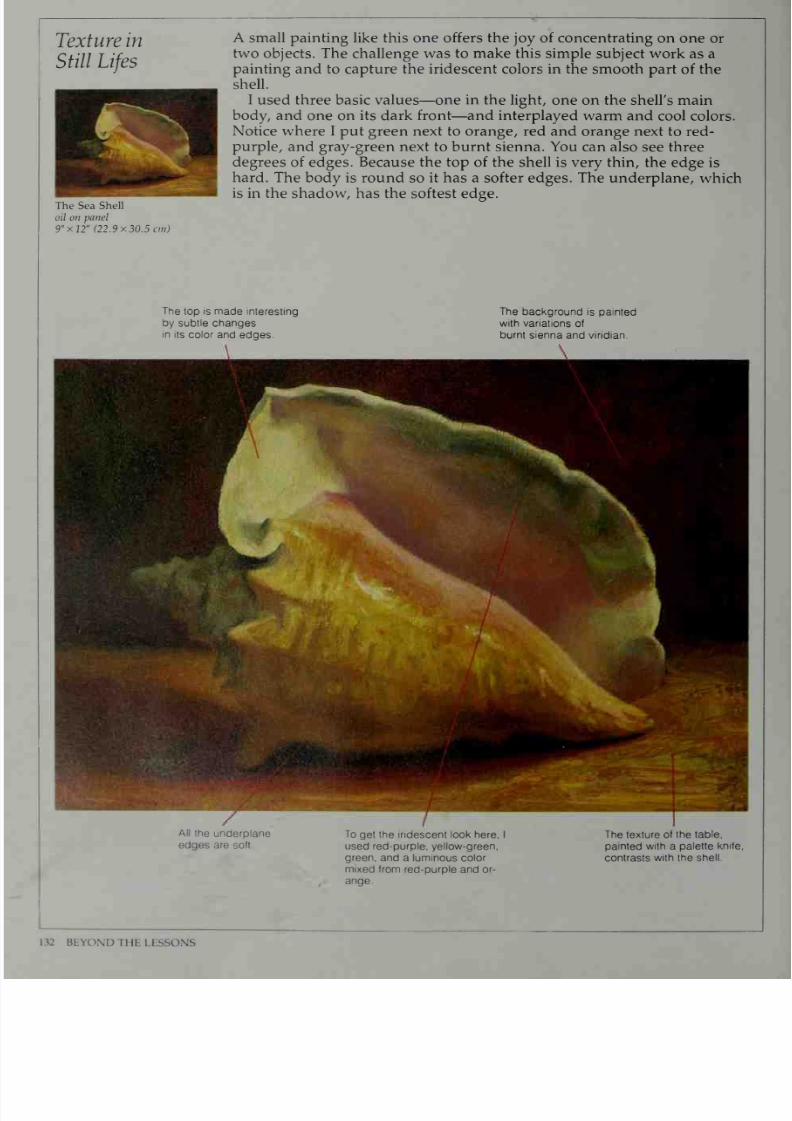
7/25/2019 Mastering the Craft of Painting (1985)
http://slidepdf.com/reader/full/mastering-the-craft-of-painting-1985 136/152
Texture
in
Still
Lifes
The
Sea Shell
oil
on
panel
9 xU
(22.9x30.5
cm)
A small painting
like
this
one offers
the
joy
of concentrating
on
one
or
two
objects.
The
challenge
was to make
this
simple
subject
work
as a
painting and to
capture
the
iridescent colors
in the smooth
part of the
shell.
I
used
three basic values
—
one
in
the light,
one on the shell's
main
body,
and
one
on its
dark
front
—and interplayed
warm
and cool
colors.
Notice where
I
put green next to
orange,
red
and orange
next
to red-
purple,
and
gray-green next to
burnt sienna.
You
can also
see
three
degrees of
edges.
Because the
top
of the
shell
is very thin,
the edge is
hard.
The
body
is
round
so
it
has
a
softer
edges.
The
underplane,
which
is
in the
shadow,
has
the
softest
edge.
The
top
is made interesting
by
subtle
changes
in
its color
and
edges.
The
background
is
painted
with variations
of
burnt
sienna
and
vindian.
All
the
underplane
edges
are
soft
To
get
the iridescent look here.
I
used red-purple, yellow-green,
green, and
a luminous
color
mixed
from
red-purple and
or-
ange
The texture
of the
table,
painted
with
a
palette
knife,
contrasts
with
the
shell.
132
BEYOND THE
LESSONS
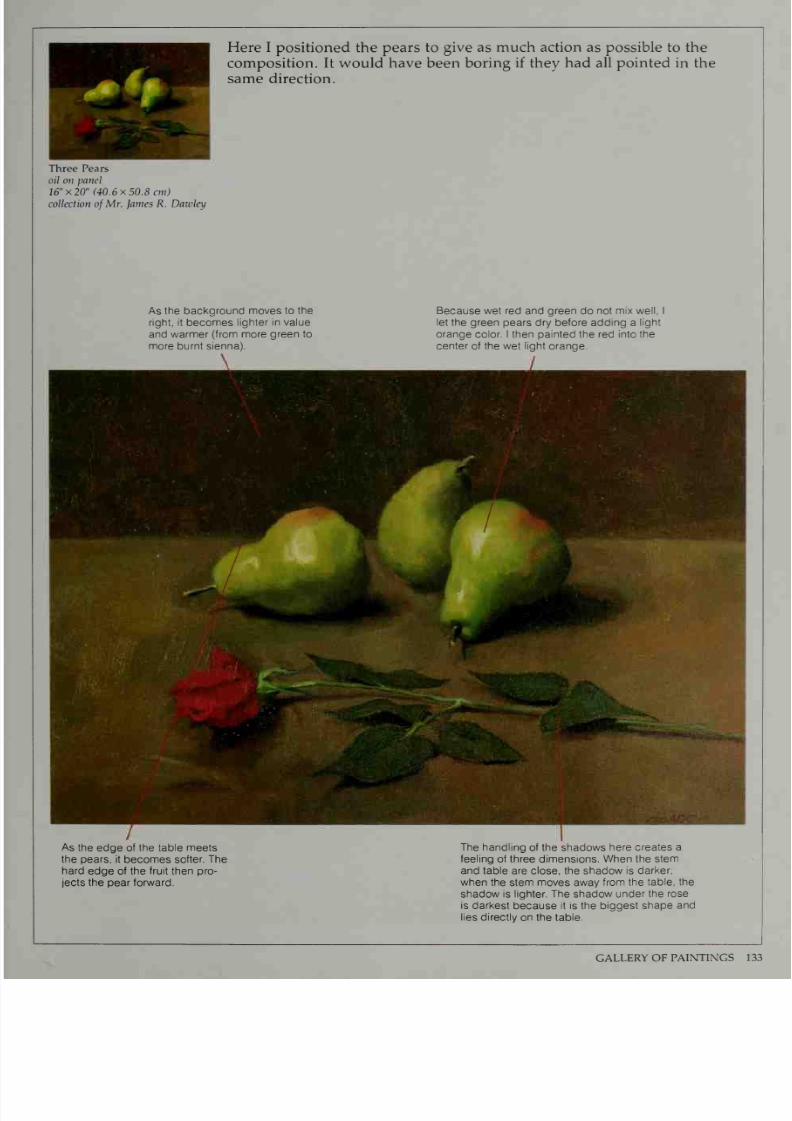
7/25/2019 Mastering the Craft of Painting (1985)
http://slidepdf.com/reader/full/mastering-the-craft-of-painting-1985 137/152
Here I
positioned
the
pears to give as much action as possible to the
composition. It
would have been boring if
they
had
all
pointed
in the
same direction.
Three Pears
oil
on
panel
16 x20
(40.6x50.8
cm)
collection
of
Mr.
James
R. Dawley
As
the
background
moves
to
the
right, it
becomes
lighter in
value
and warmer (from
more green
to
more
burnt
sienna).
Because
wet
red and green
do
not mix
well,
I
let
the
green pears
dry
before adding a
light
orange
color. I then
painted the
red into
the
center
of the
wet
light orange.
As
the
edge
of the
table
meets
the pears, it
becomes
softer.
The
hard
edge
of
the
fruit then pro-
jects the pear forward.
The handling
of
the shadows
here creates a
feeling
of three dimensions. When the
stem
and
table
are
close,
the
shadow is
darker;
when the
stem moves
away
from
the
table,
the
shadow is lighter. The
shadow
under
the rose
is darkest
because
it
is
the
biggest
shape
and
lies
directly
on
the table.
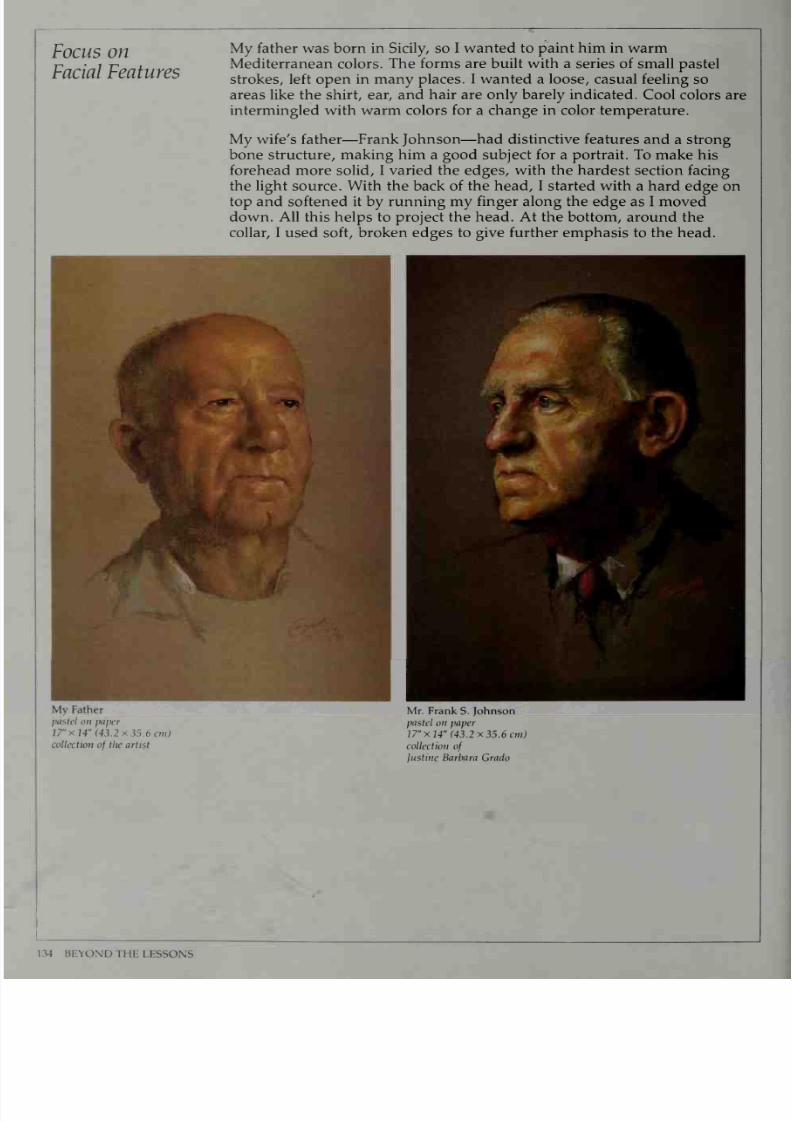
7/25/2019 Mastering the Craft of Painting (1985)
http://slidepdf.com/reader/full/mastering-the-craft-of-painting-1985 138/152
Focus
on
Facial
Features
My father
was
born in
Sicily,
so
I
wanted
to
paint him in
warm
Mediterranean colors.
The forms are built
with
a series of small
pastel
strokes,
left
open in
many
places.
I
wanted
a
loose,
casual feeling
so
areas
like the
shirt,
ear,
and
hair
are
only barely
indicated. Cool
colors are
intermingled with
warm
colors for a change in color
temperature.
My
wife's
father—Frank
Johnson
—had distinctive
features and a strong
bone structure, making him a good
subject
for a portrait. To
make his
forehead
more solid,
I
varied the
edges,
with
the hardest
section facing
the light
source.
With the
back of
the head, I
started with
a
hard
edge
on
top
and
softened
it
by running
my finger along
the
edge as
I moved
down. All this helps to project
the
head. At
the bottom,
around the
collar,
I used
soft,
broken
edges to
give
further
emphasis
to
the
head.
My
Father
pastel
on
paper
17
x
14
(43.2x35.6
cm)
collection
of
the
artist
Mr.
Frank
S. Johnson
pastel
on
paper
17
xH (43.2x35.6
cm)
collection
of
Justine
Barbara
Grado
134
BEYOND
THE
LESSONS
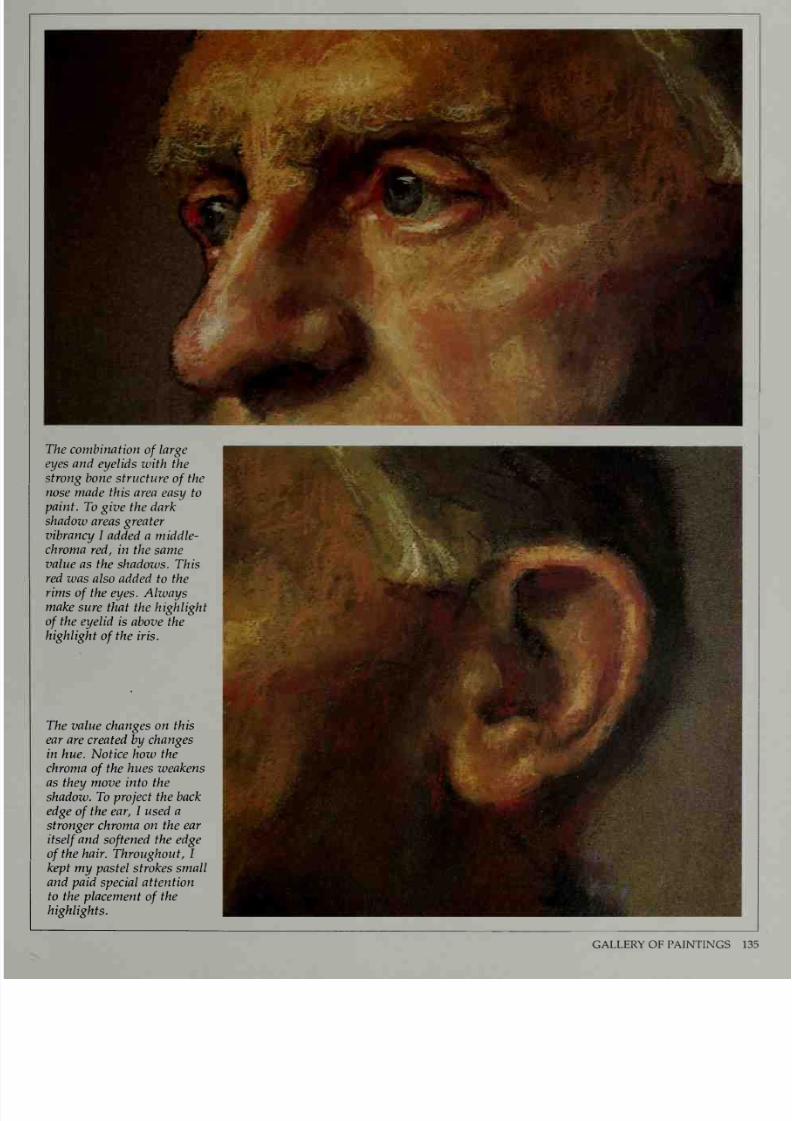
7/25/2019 Mastering the Craft of Painting (1985)
http://slidepdf.com/reader/full/mastering-the-craft-of-painting-1985 139/152
The
combination
of
large
eyes and
eyelids
with
the
strong
bone
structure
of
the
nose
made
this area easy
to
paint.
To give the
dark
shadow areas
greater
vibrancy
I added
a
middle-
chroma
red,
in the same
value
as
the
shadows.
This
red
was
also
added
to
the
rims
of
the eyes. Always
make
sure
that the
highlight
of
the
eyelid is
above
the
highlight
of
the
iris.
The value changes
on
this
ear are created
by
changes
in
hue. Notice
how the
chroma
of
the
hues weakens
as they move into
the
shadow.
To project the back
edge
of
the ear, I used a
stronger
chroma
on the
ear
itself
and
softened
the
edge
of
the hair.
Throughout,
I
kept
my
pastel
strokes
small
and
paid
special
attention
to the placement
of
the
highlights.
GALLERY
OF PAINTINGS 135
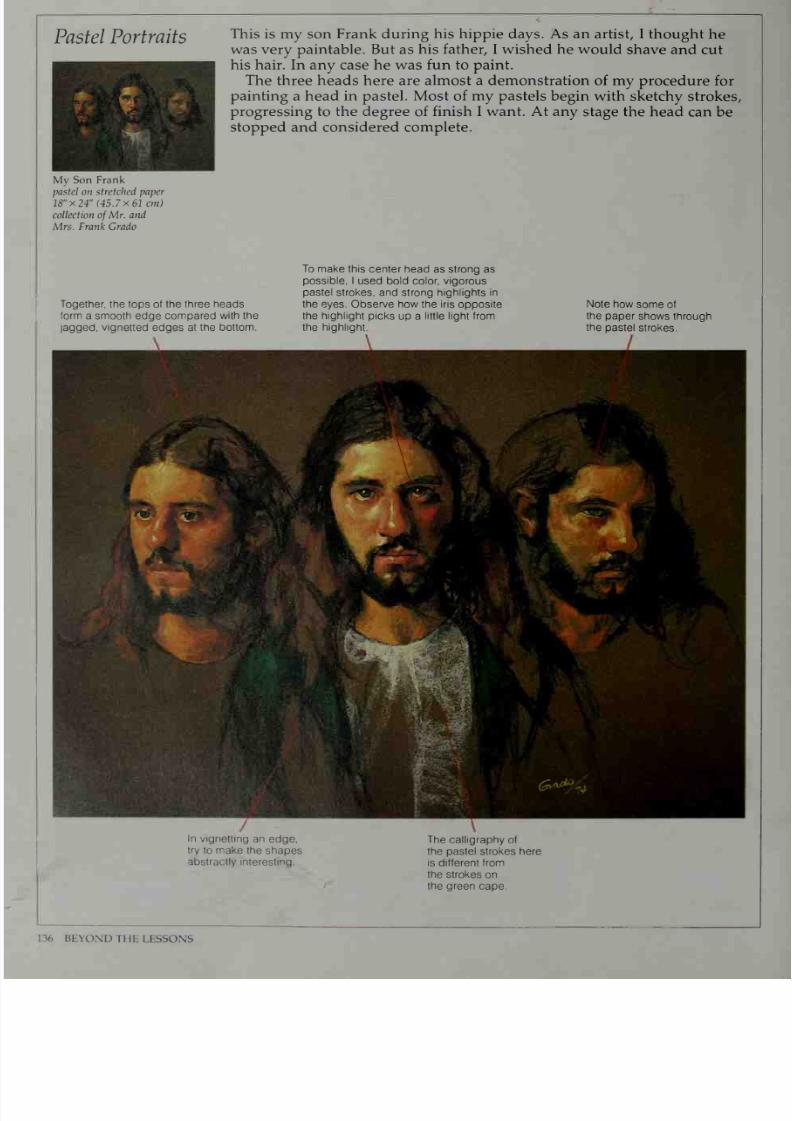
7/25/2019 Mastering the Craft of Painting (1985)
http://slidepdf.com/reader/full/mastering-the-craft-of-painting-1985 140/152
Pastel
Portraits
This
is
my
son Frank
during his
hippie
days. As an artist,
I thought
he
was
very paintable.
But
as
his father,
I
wished
he
would
shave
and
cut
his
hair. In any case he
was fun
to
paint.
The three heads here are almost a demonstration
of my
procedure
for
painting
a head
in
pastel.
Most
of my
pastels
begin with sketchy
strokes,
progressing
to
the
degree of
finish I
want. At any
stage
the
head can
be
stopped
and
considered
complete.
My
Son
Frank
pastel on
stretched paper
18
x
24
(45.7x61
cm)
collection
of
Mr.
and
Mrs. Frank Grado
Together, the
tops
of
the three heads
form
a
smooth
edge
compared
with
the
jagged,
vignetted
edges
at
the bottom.
To make this
center head
as
strong
as
possible, I
used bold color, vigorous
pastel
strokes, and strong highlights in
the
eyes. Observe how the
iris
opposite
the
highlight
picks up
a
little light
from
the
highlight.
Note how
some
of
the
paper
shows
through
the
pastel
strokes.
In vignetting
an
edge,
try
to make
the
shapes
abstractly
interesting.
The
calligraphy
of
the pastel strokes here
is
different
from
the
strokes on
the
green
cape
136 BEYOND
THE
LESSONS
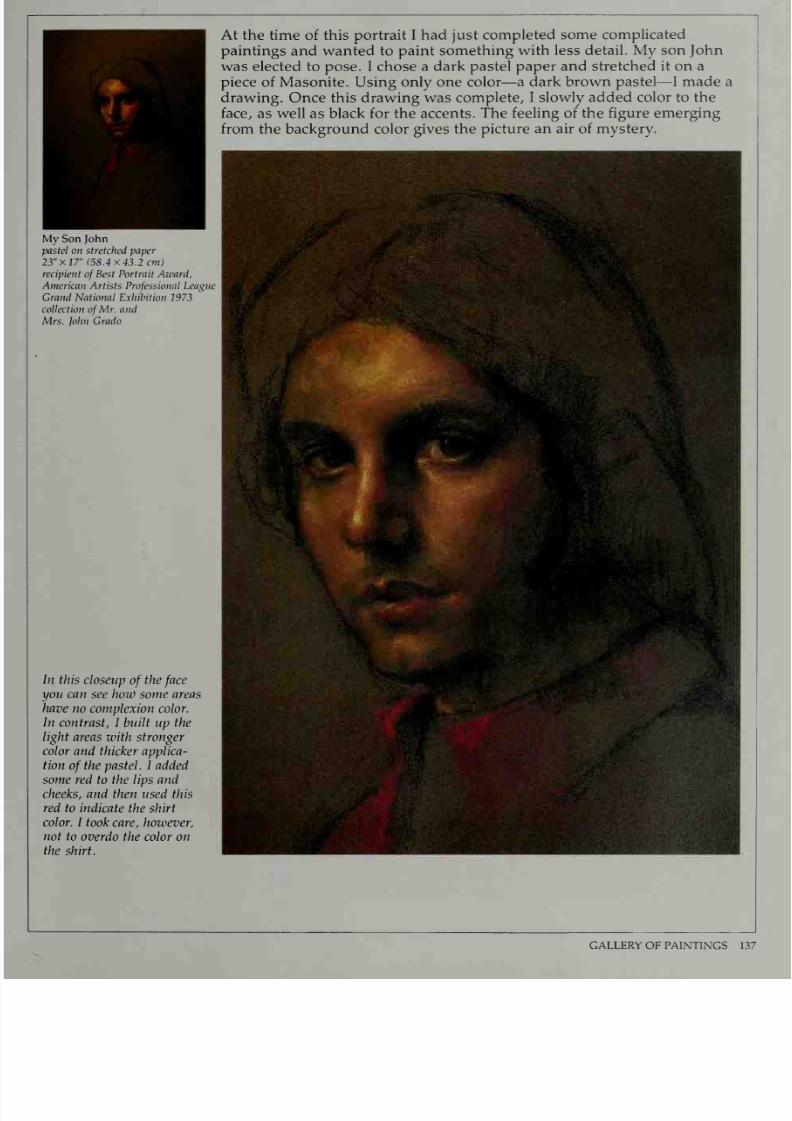
7/25/2019 Mastering the Craft of Painting (1985)
http://slidepdf.com/reader/full/mastering-the-craft-of-painting-1985 141/152
At the time
of
this portrait I
had
just completed
some complicated
paintings and wanted
to
paint
something
with
less
detail. My son
John
was
elected
to
pose.
I
chose a
dark
pastel
paper and stretched
it on
a
piece
of
Masonite. Using only
one
color
—a
dark brown
pastel—
I
made a
drawing.
Once
this
drawing
was
complete,
I slowly
added
color
to the
face,
as
well
as black for
the
accents. The
feeling of the figure
emerging
from the
background color
gives
the picture
an
air
of mystery.
My
Son
John
pastel
on
stretched
paper
23
x
17
(58.4x43.2
cm)
recipient
of
Best Portrait
Award,
American
Artists
Professional
League
Grand
National
Exhibition 1973
collection
of
Mr.
and
Mrs.
John
Grado
In this
closeup
of
the
face
you can
see
how
some
areas
have
no
complexion
color.
In
contrast,
I
built
up
the
light areas
with
stronger
color
and thicker applica-
tion
of
the pastel. I added
some
red
to
the
lips and
cheeks,
and
then used
this
red
to indicate
the shirt
color.
I took
care,
however,
not
to overdo
the color
on
the
shirt.
•
^
fei
^^^H
r
|H
V
Vi
'
t-,
',%
1
^|
1
1
IIF
%J&*&
aWWwB
WuB&$3tt£%
~
'-
m
agfe
?
.
'
m
;
•
Br*
-
BBSsf^^ fit
:
*
f
*W&
•
1
-
v
^flSV*
'•'
,
t '
-
••
frlMi-''-
^ ^
f™i£
r^J^Sf^'
'
^gTO^S
*$&
/
.:
,;'-_
GALLERY
OF
PAINTINGS
137
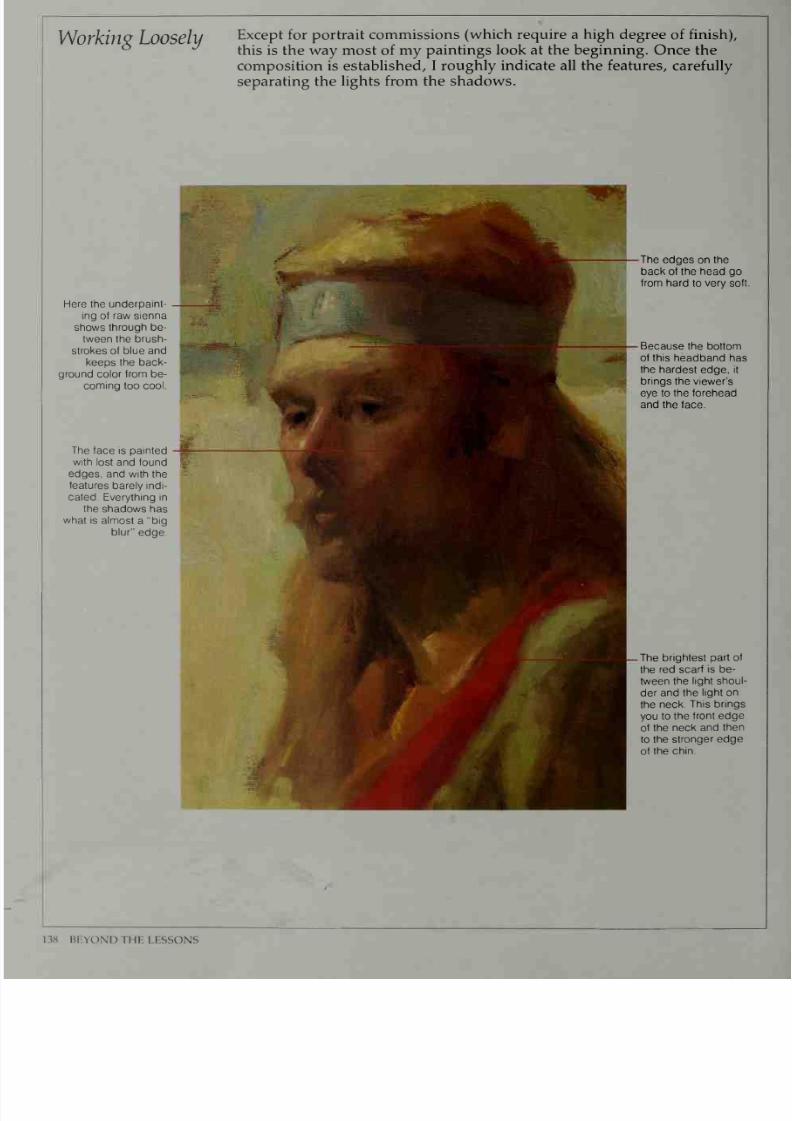
7/25/2019 Mastering the Craft of Painting (1985)
http://slidepdf.com/reader/full/mastering-the-craft-of-painting-1985 142/152
Working
Loosely
Except
for portrait
commissions
(which require
a
high
degree
of
finish),
this is
the
way most of
my
paintings
look
at the
beginning.
Once
the
composition
is
established,
I roughly
indicate
all
the
features, carefully
separating
the lights
from the shadows.
Here the underpaint-
ing of
raw sienna
shows through
be-
tween the
brush-
strokes
of blue
and
keeps
the
back-
ground color
from
be-
coming
too
cool.
The
face
is painted
with
lost and found
edges, and with
the
features
barely
indi-
cated.
Everything in
the
shadows
has
what
is
almost
a
big
blur
edge.
The
edges
on the
back of
the head
go
from hard
to
very soft.
Because
the
bottom
of this
headband
has
the
hardest
edge,
it
brings the
viewer's
eye
to
the forehead
and
the face.
The
brightest
part
of
the red
scarf
is
be-
tween
the light
shoul-
der
and the
light on
the
neck.
This
brings
you
to
the
front edge
of the
neck
and
then
to
the
stronger
edge
of the
chin.
1
38
BE
YOND
TH
E LESSONS

7/25/2019 Mastering the Craft of Painting (1985)
http://slidepdf.com/reader/full/mastering-the-craft-of-painting-1985 143/152
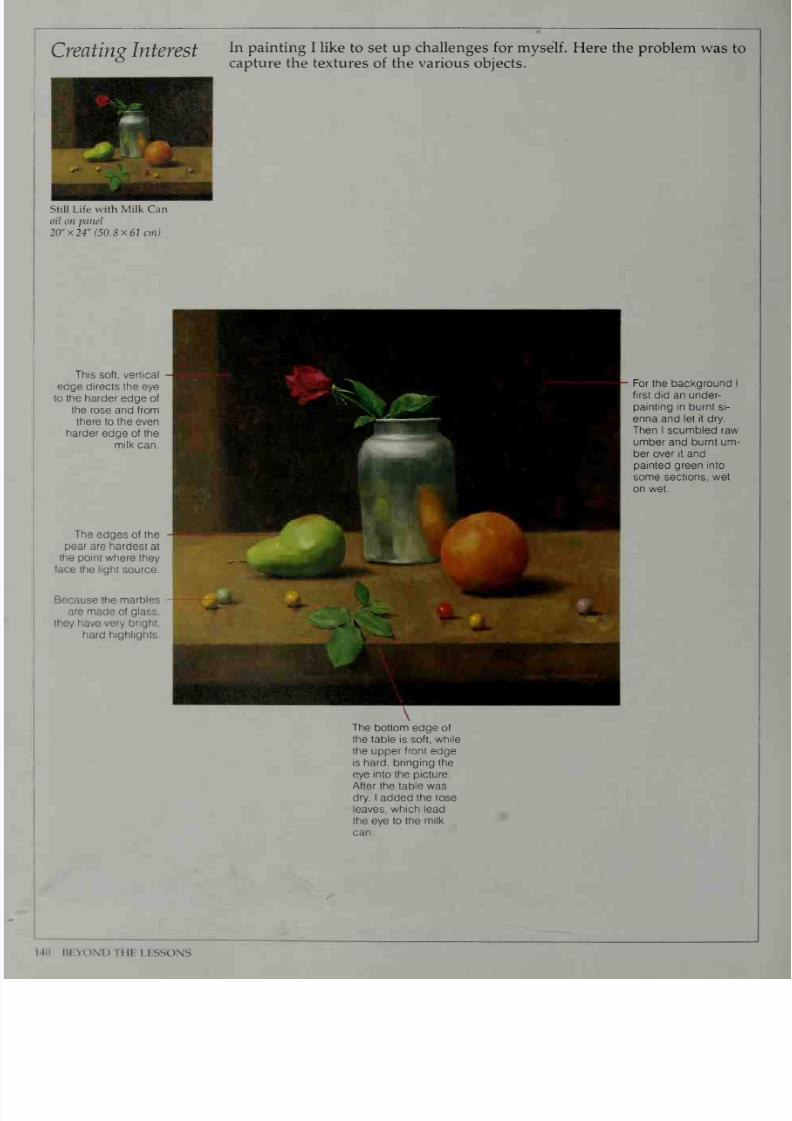
7/25/2019 Mastering the Craft of Painting (1985)
http://slidepdf.com/reader/full/mastering-the-craft-of-painting-1985 144/152
Creating
Interest
In
painting
I like
to set
up challenges
for
myself.
Here
the
problem
was
to
capture
the textures
of the
various
objects.
Still
Life
with Milk Can
oil
on
panel
20 x24 (50.8x61
cm)
This
soft, vertical
edge
directs the
eye
to
the
harder
edge
of
the
rose
and
from
there
to
the even
harder
edge
of the
milk
can.
The
edges
of
the
pear are
hardest
at
the
point
where
they
face
the light
source.
Because the
marbles
are made
of glass,
they have very
bright,
hard
highlights.
For
the background
I
first did an under-
painting
in burnt si-
enna
and
let
it
dry.
Then I scumbled raw
umber and burnt um-
ber
over
it
and
painted green into
some sections,
wet
on wet.
The
bottom edge
of
the table
is
soft,
while
the
upper
front
edge
is
hard, bringing the
eye
into the picture.
After
the table
was
dry,
I
added the rose
leaves,
which
lead
the
eye
to
the
milk
can.
140
BEYOND
THE LESSONS

7/25/2019 Mastering the Craft of Painting (1985)
http://slidepdf.com/reader/full/mastering-the-craft-of-painting-1985 145/152
The
first
thing to
notice
in
this
painting
is
the axis of
each
onion.
The
varied
directions
of the onions
add
interest and
movement
to the
composition.
The top lighting
also
creates
interest
by
giving a specific
shape
to each shadow.
For the
shadows
I used a dark-value,
weak-chroma
burnt
sienna
and
added
touches
of the
same-value green. The netted sack was painted
directly,
with
almost
no
blending.
On the
right I
simply
laid
the
net color
on
top of
the
wet
onion
color.
When
painting
on
wet paint,
just place
the
new
paint
on the
wet
paint and then
don't disturb it.
Onions,
oil
on
canvas,
11
x
14
(27.9
x
35.6
cm), collection
of
Mr. and Mrs. Walter
Nelson
GALLERY
OF PAINTINGS 141

7/25/2019 Mastering the Craft of Painting (1985)
http://slidepdf.com/reader/full/mastering-the-craft-of-painting-1985 146/152
Telling
a
Story
In painting
an interior like
this one,
I
always try to
think
of
a
story for
the
painting, which gives
it
a
focus. The open letter and single
rose
on the
desk create a feeling of
mystery, while
the
lit-up but
empty
chair
adds
drama. The title Love
Lost
—
suggests
the
story
I imagined.
The reflections
and shadows
of these
two wall
lights
cross each
other
and
form interesting
patterns.
Notice
how
the
smaller
opening
at
the
top
allows less
light
to
shine
on
the wall than the larger
opening
at the bottom does.
\
The
hall,
which
is lit
with an
overhead
light,
has the lightest
value,
but
its weak
chroma
keeps the
color outside the
room.
Because the two
sheets from
the
letter
have the hardest
edges
in
the
painting,
they stand
out.
Look
for
the
change
in value, hue, and
chroma in
the folds
of
the
top
sheet.
To
make the
rose
important,
I painted it
in the
dark
area
under
the
open desk.
The
cast
shadow of
the picture
frame
helps
make
the
scene
more
dramatic
It's like
an
explosion
on the
wall,
and it
contrasts
with the
straight shadow
line
of the
door
on
the
opposite
wall.
To
make
for
more in-
terest
in
the shadow,
I
let the
top
of
the
tea-
pot
catch the light.
Without
the teapot,
the picture
on
the
wall
would
be too
iso-
lated.
Try,
whenever
possible,
to
interlock
as
many
shapes as
you can.
142
BEYOND
THE
LESSONS
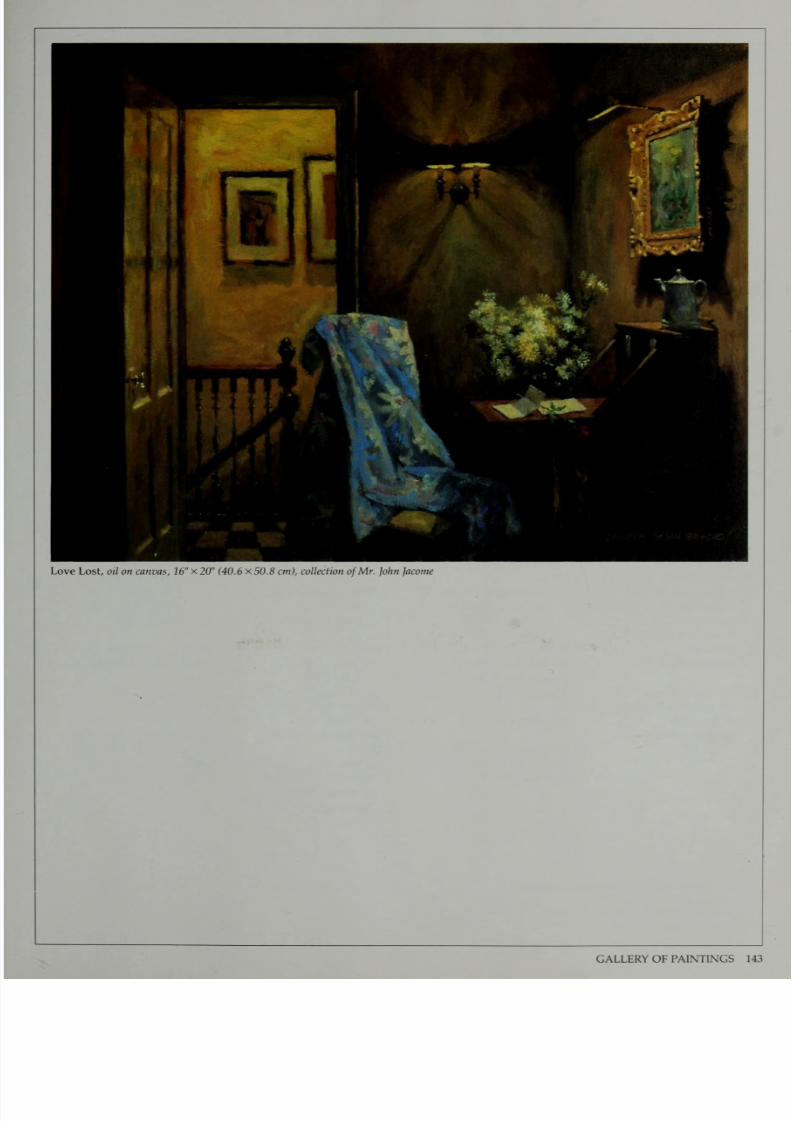
7/25/2019 Mastering the Craft of Painting (1985)
http://slidepdf.com/reader/full/mastering-the-craft-of-painting-1985 147/152
7/25/2019 Mastering the Craft of Painting (1985)
http://slidepdf.com/reader/full/mastering-the-craft-of-painting-1985 148/152
Index
Abstract
pattern,
111
Drawing,
12-63 Light
Pointing
off, 34
Action,
19,
22-23,
34,
39,
direction
of,
50-51
Points
of
support,
34
41
Edges,
101-103
effect,
94
Portraiture,
106,
134-137;
balance
and,
34-35
Effect,
94
shadows
and,
44, 46,
see
also Head
connectors
and,
32-33
48-49,
94,
100
Progression,
97
forms
in,
20-23, 25
Features,
56-57
Lines, 13-16,
33
lines of, 16
character
and,
62-63
action, 16
Reilly,
Frank
J.,
8-9,
shadows and,
44-47
in
portrait
sketches,
six,
17,
23 107-109
Action points,
22-23
106
Little Mother, The,
128
lessons
from,
10-105
Axis,
18-19,
34
proportions of,
53
Loose
technique,
Reilly/Munsell
color
Figure Study
(oil),
125
124-125,
138-139
wheel,
65
Balance,
34-35
Figure Study
(pastel), 125
demonstration of,
Relationships,
28-31
Boundary,
18-19,
26,
35 Finishing touches,
110-119
Brackman, Robert,
8-9,
104-105,
118
Love
Lost,
142-143
Sea
Shell, 132
107-108
Flesh,
130-131 Shadows,
44-47
Brushes,
78 Foreshortening,
40-43
Materials,
78,
80
cast,
48-49
Brushstrokes,
79,
Forms,
19-26,
28, 74,
Model in Thought,
forms
and,
44-45
104-105
112-113
130-131
light
source and,
44,
action
and,
19-23
Modeling,
104-105
46, 94, 100,
133
Cast shadows,
48-49
boundaries of,
18
Movement,
32, 33,
35
Six
lines,
17,
23
Center lights,
98-99
foreshortening
of,
40,
Mr.
Frank S.
Johnson,
134, Spectrum
color
wheel,
Character
42-43 135
65
features and,
62-63
of
head,
52-53
My
Father, 134
Station points,
19,
23,
26
head
shape
and,
60-61
planes
and,
38-39
My Son
Frank,
136
Still life,
132-133,
Chroma,
68-69
relationship of,
24-25,
My
Son
John,
137
140-141
charts,
70-73
30-31
Still
Life
with Milk Can,
lighting
and,
74-75
shadows
on,
44-45
Onions,
141 140
Color
Outside envelope, 25
Strain,
36-37
chroma,
68-73
Gradation,
96 String of
pearls,
15
hue,
64-65
Growth
lines,
59
Painting,
76-77,
81
Symmetry,
28-29
lighting
and,
74-75
controlled
technique
value, 66-67
Hair,
58-59
in,
120-123
Textures
Color
note,
86
Halftones,
44-45,
95
loose
technique
in,
oil,
126-127
Color
wheels,
65
Head
110-119
pastel,
122-123,
Complexion,
92-93
features of,
53,
56-57
Reilly
method of, 128-129
Composition
Blue,
120-121
forms
of,
52-53
80-91
still
life,
132-133
Connectors,
32-33
hair on,
58-59
Painting stage,
87-91
Three
Pears,
133
Controlled technique,
planes
of,
54-55
Palette,
78,
108-109
120-123
shape of,
59-61
Pastel Value,
66,
67,
74-75
Counterpoint,
34
Highlights,
98-99
figures,
122-123,
Vinci, Leonardo da, 11
Home level,
64
128-129
Demonstrations
Hue,
64-65
portraits,
134-137
Wash-in,
80-85
of
loose technique,
Philipp,
Robert,
9,
Weight,
36-37
110-119
Jennifer,
129
107-108
of
Reilly
method,
Pivot points,
40-41
Young
Athlete,
122-123
80-91
Lady with
Black
Hat,
124
Planes
Young
Hippie,
138-139
Lady with
White
Hat,
126
edges
and,
101-103
Young
Man with
Lay-in,
86-91
forms and,
38-39
of head,
54-55
lighting and,
50-51,
100
Moustache, 127
Concept
and structure
by
Bonnie
Silverstem
Designed
by
Bob Filhe
Graphic
production
by
Hector
Campbell
Text
set
in 1
1
-point Palatmo
144
7/25/2019 Mastering the Craft of Painting (1985)
http://slidepdf.com/reader/full/mastering-the-craft-of-painting-1985 149/152
7/25/2019 Mastering the Craft of Painting (1985)
http://slidepdf.com/reader/full/mastering-the-craft-of-painting-1985 150/152
BOSTON
PUBLIC
LIBRARY
3
9999
01612
874
4
Boston
Public
Library
BRIGHTON
BRANCH
LIBRARY
NE1500
.G6
5
1965
The Dat
8
*°_?
^£ii*Ltat
indi-
cates the date on
or before which this
book
should
be
returned
to
the
Library.
Please
do not remove
cards from
this
pocket.

7/25/2019 Mastering the Craft of Painting (1985)
http://slidepdf.com/reader/full/mastering-the-craft-of-painting-1985 151/152
Angelo
John
Grado teaches, lectures
and demonstrates the
craft
of
painting
oil
and
pastel. He also
judges
many a
exhibitions.
The
recipient of
dozens
o
prizes
for his work,
Grado
has
had numer
ous
solo
exhibitions.
He
is
President
of th
American
Artists Professional
League, a
art
organization
that
actively
promote
traditional realism in
American
art
an
which
is
also
responsible
for
the
highe
standards of artists'
paint
quality
amon
American manufacturers.
Grado
is also
member
of the
American
Watercolor
So
ciety,
the
Hudson
Valley
Art
Association
the National Art
League,
and
the
Paste
Society
of
America. His work appears
Joe
Singer's How
to
Paint Figures in Pas
tel,
and he is listed
in
Who's
Who in Amer
ican
Art
and Who's Who in America.
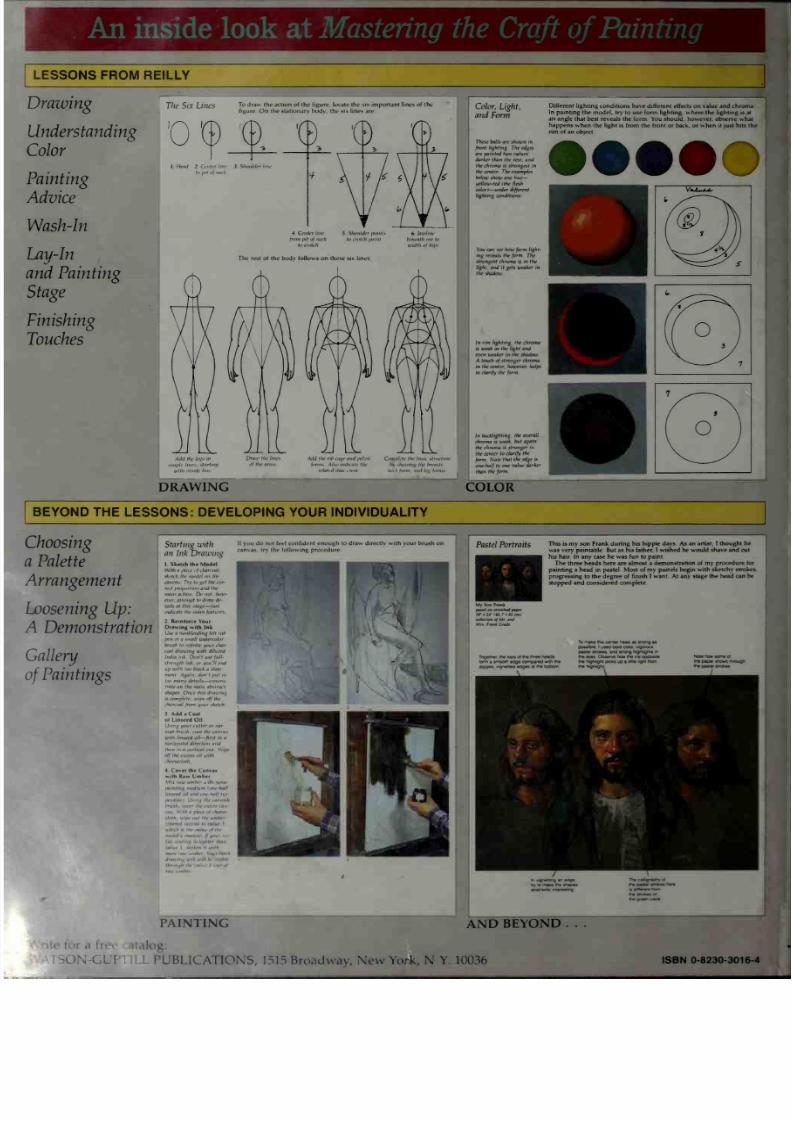
7/25/2019 Mastering the Craft of Painting (1985)
http://slidepdf.com/reader/full/mastering-the-craft-of-painting-1985 152/152
An
inside
look
at
Mastering
the
Craft
of
Painting
FROM
REILLY
Painting
The Six LilteS
To draw
the action
of
the
figure,
locate
the
six
important lines of
the
figure.
On
the
stationary
bodv,
the
si*
lines
are;
'0
'©
'(£
(D
4. Center
line 5.
Shoulder
pnnft 6. lawlme
from pit
of
neck
to crotch
joint
beneath
car
to
to crvtdt
width
of hif*
The rest of
the body
follows on
these
six lines
Color,
Light,
and Form
These
balls are
shown
in
front lighting The edges
are
painted two values
darker
than the
rest, and
the chroma
is strongest in
the
center.
The examples
below
show
one hue
—
yellow-red
(the
flesh
color)
—
under
different
lighting conditions
You can
see
how
form
light-
ing reveals
the
form
The
strongest chroma
is in
the
light,
and
it
gets
weaker
in
the
shadow
Different lighting
conditions
have different
effects
on
value and chroma.
In
painting the model, try to
use form
lighting, where
the lighting is at
an
angle
that best reveals the form.
You should,
however,
observe what
happens
when
the
light is from
the
front
or back,
or
when
it
just hits
the
nm of an
object
In
rim
lighting,
the
chroma
is
weak
in
the light and
even
weaker in the shadow
A
touch
of
stronger chroma
in
the
center,
however,
helps
to
clarify
the
form.
In
backlighting,
the
overall
chroma
is
weak, but
again
the
chroma is
stronger
m
thecenter
to clarify
the
form
Note
that the
edge is
one-half
to
one
value
darker
than
the
form
DRAWING
COLOR
THE
LESSONS:
DEVELOPING YOUR
INDIVIDUALITY