md profiler instruction manual - md reed products · 2 limited warranty the md bassoon reed...
TRANSCRIPT

0
MD Bassoon Reed Profiler
Instruction and User Manual
By MD Reed Products

1
Table of Contents Limited Warranty ............................................................................................................................ 2 Product Description ........................................................................................................................ 3 Preparing the profiler for use ......................................................................................................... 5 Using the profiler ............................................................................................................................ 7 Replacing the blade ......................................................................................................................... 9

2
Limited Warranty The MD Bassoon Reed Profiler is covered by a limited 1 year warranty from the date of delivery. Every effort is made to produce a machine of the highest quality. If you find defects in the materials or workmanship of any part of the machine that affect the proper function of the machine, MD Reed Products will either repair or replace all necessary parts at no charge. What is not covered? Any defect or problem that is caused by abuse, misuse, or an act of God (such as a flood) is not covered. This also includes defects caused by the failure to follow the instructions provided in this manual. Consequential and incidental damages are not recoverable under this warranty. Cosmetic defects are also not covered. MD Reed Products does not provide refunds. This warranty gives you specific legal rights, and you may also have other rights which vary from state to state. How to get service: Contact MD Reed Products by email at [email protected], by phone at 888‐540‐5530, or by mail at: MD Reed Products 129 W. Minneapolis Ave. Salina, KS 67401 Some issues will allow for the defective part to be returned to MD Reed Products and some will require that the entire machine be returned. MD Reed Products reserves the right to make this determination.

3
Product Description
The MD Bassoon Reed Profiler from MD Reed Products gives the user the ability to quickly and easily adjust the thickness of the reed as well as the angle of the profile. The MD Profiler not only provides maximum adjustability, it also allows the user to return to previous settings or select new settings without tools and without disassembling any components.
The MD Profiler is equipped with adjustment knobs that change both the height and angle of the ramp upon which the blade carrier bearing rides. This in turn changes the distance between the blade and barrel upon which the gouged cane is mounted, both at the fold line and at the collar, independently. The knobs are numbered 1 to 8, with each number representing a thickness .057 millimeters. The knobs will also stop between numbers, giving the user a height adjustment of .028 millimeters for each click. Turn the adjustment knobs to a lower number for a thinner profile and a higher number for the thicker result.
The round hole in the blade of the profiler keeps the blade from moving out of adjustment inadvertently. After sharpening, the leading edge of the blade can be returned to its original position by removing the included shim washers.
The limits of travel of the blade carrier can be adjusted to set the center of the cane (the fold line) and the collar. The primary reason for adjustment of the center stop is to make minor adjustments when the blade is sharpened. The pins in each end of the barrel contain flat spots that automatically create a spine in the center of the cane along the length of the profile. The ramp contains a slight slope that profiles the portion of the cane from the fold line to the heart. The ramp is made from hardened stainless steel that will resist wear over time. It is also contains slotted holes that allow for adjustment.

4
Part Terms:
Blade Carrier
Blade Carrier Bearing
Center Stop Knob
Ramp Adjustment Knob
Forward Barrel Rest
Profiler Base
Blade Carrier Knob
Cane Strap
Ramp
Blade
Forward Shaft
Support
Rear Shaft Support / Barrel Rest
Collar Stop Knob
Blade Mount
Barrel
Stop Locking Knob
Thickness Bar

5
Preparing the profiler for use
Adjusting the center stop: Your MD Profiler is adjusted prior to shipment so that the blade carrier stops when the blade cuts to the center of the cane (to the fold line). However, should the center stop need adjustment, follow these steps: 1. Loosen the stop locking knob and turn it 3‐4 turns away from the forward shaft support. If you find that it is difficult to turn the stop locking knob, turn the center stop knob to left until it becomes loose.
2. Slide the blade carrier forward until it contacts the center stop and look down onto the barrel and from the top of the profiler. Turn the center stop knob clockwise until the leading edge of the blade aligns with the center etch mark on the barrel. Tighten the stop locking knob to prevent the center stop knob from moving during use. Adjusting the collar stop: 1. The machine is adjusted prior to shipment to profile a distance of 30mm from the collar to the fold line. If you desire a different profile, begin by loosening the stop locking knob as described above. 2. Mark the center line of a piece of cane as well as the desired collar line. Place the marked cane onto the barrel and secure it with the straps. Place the barrel in the machine and slide the blade carrier backward until it contacts the collar stop and look down onto the cane from the top of the profiler. Turn the collar stop knob either clockwise or counter‐clockwise until the leading edge of the blade aligns with the mark on the cane for the start of the collar. Tighten the stop locking knob to prevent the collar stop knob from moving during use.
6
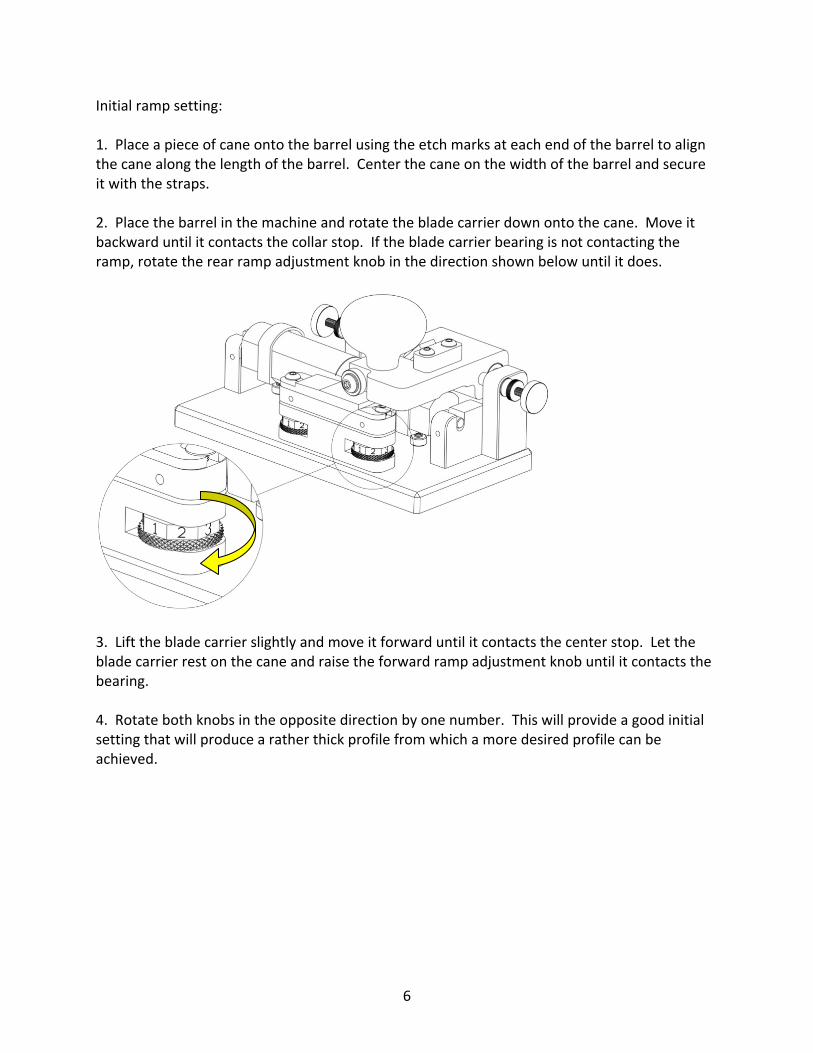
Initial ramp setting: 1. Place a piece of cane onto the barrel using the etch marks at each end of the barrel to align the cane along the length of the barrel. Center the cane on the width of the barrel and secure it with the straps. 2. Place the barrel in the machine and rotate the blade carrier down onto the cane. Move it backward until it contacts the collar stop. If the blade carrier bearing is not contacting the ramp, rotate the rear ramp adjustment knob in the direction shown below until it does.
3. Lift the blade carrier slightly and move it forward until it contacts the center stop. Let the blade carrier rest on the cane and raise the forward ramp adjustment knob until it contacts the bearing. 4. Rotate both knobs in the opposite direction by one number. This will provide a good initial setting that will produce a rather thick profile from which a more desired profile can be achieved.

7
Using the profiler:
1. Rotate the barrel so that one edge of the cane is underneath the blade. Begin profiling the cane by sliding the blade carrier forward. Slight downward pressure is required when the blade makes the initial cut into the cane when the carrier is at the collar stop. After that only forward movement is needed. It is important to ensure that you start each pass with the carrier contacting the collar stop and continuing until it contacts the center stop. Be sure to lift the carrier off of the cane when returning to the collar stop. The carrier bearing may not contact the ramp at this time. The thickness bar prevents this, allowing only .004 to .006 inches (.1mm to .15mm) of cane to be removed during one pass. Rotate the barrel as you work (see drawing below) until you have made one complete pass over the width of the cane. Profile systematically, making one cut right next to the previous cut, from one side of the cane to the other.
When complete, rotate the barrel lengthwise and profile the opposite side of the cane. Continue this process until the bearing contacts the ramp and no additional cane is removed. Determine if the cane has the profile you desire. If it does not, rotate the ramp adjustment knobs and continue removing cane until it you achieve the desired profile. Note: rotating the knobs in the direction of increasing numbers will raise the ramp and therefore create a thicker profiler. Rotating the knobs in the direction of decreasing numbers will lower the ramp and create a thinner profiler.
ThickerThinner

8
You can also adjust the ramp by loosening the screws with a 1/8” allen key and sliding the ramp forward or backward as shown below.
9
Replacing the blade
WARNING! The profiler blades are sharp and must be handled with care to avoid injury.
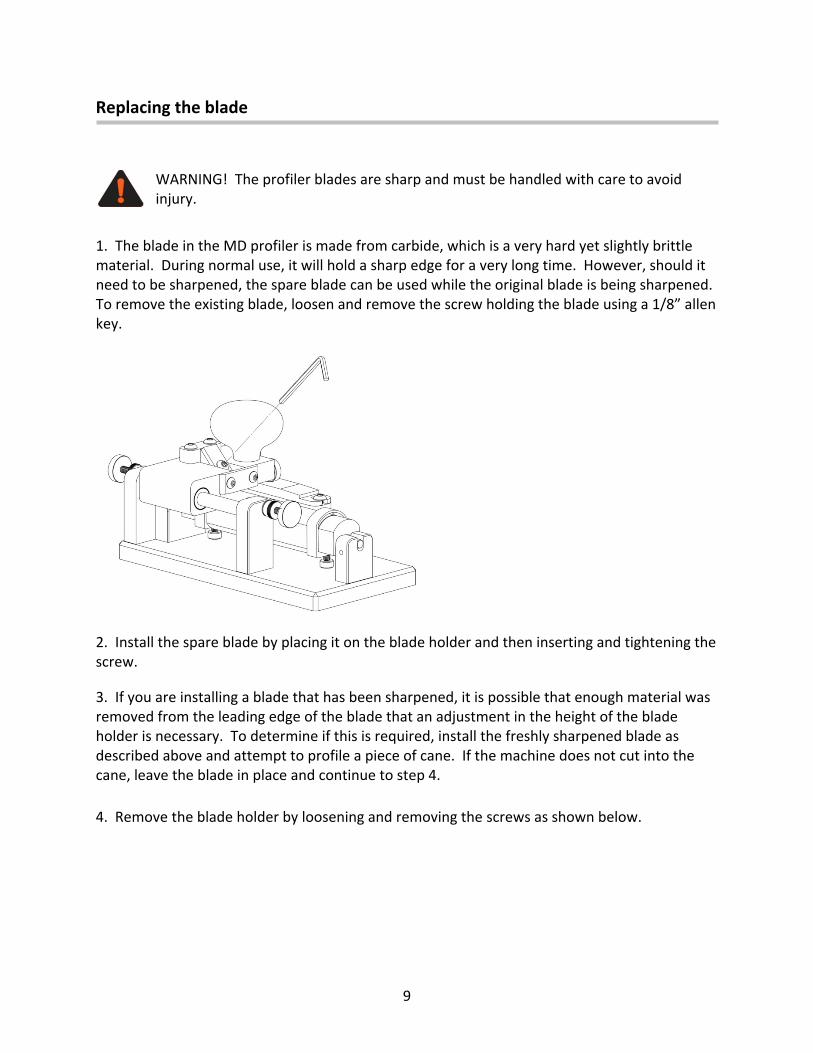
1. The blade in the MD profiler is made from carbide, which is a very hard yet slightly brittle material. During normal use, it will hold a sharp edge for a very long time. However, should it need to be sharpened, the spare blade can be used while the original blade is being sharpened. To remove the existing blade, loosen and remove the screw holding the blade using a 1/8” allen key.
2. Install the spare blade by placing it on the blade holder and then inserting and tightening the screw.
3. If you are installing a blade that has been sharpened, it is possible that enough material was removed from the leading edge of the blade that an adjustment in the height of the blade holder is necessary. To determine if this is required, install the freshly sharpened blade as described above and attempt to profile a piece of cane. If the machine does not cut into the cane, leave the blade in place and continue to step 4.
4. Remove the blade holder by loosening and removing the screws as shown below.

10
5. Carefully lift the blade holder out of the blade carrier. Between the blade carrier and the blade holder you will find 3‐5 sets of shim washers. Remove one set on shim washers and reinstall the blade holder.
6. Attempt to profile a piece of cane. If the machine still does not cut into the cane, repeat steps 4 and 5 until it does. If all of the shim washers have been removed and the machine still does not cut into the cane, the blade must be replaced. Note: You can store any removed shim washers under the screw that secures the spare blade.