measuring method manual for portable …wtlab.iis.u-tokyo.ac.jp/images/facility/manual.pdf1...
TRANSCRIPT

1
Measuring method manual for Portable Spectroradiometer of FieldSpec HandHeld2
Preparation
Put size AA batteries or connect a power cable
in spectroradiometer.
Put lens of FOV (field of view) in
spectroradiometer beforehand.
Experimental tool
・Spectroradiometer
・White board
・Field note
・Measurement object
・Tripod stand
・Measure
・Artificial illuminant (in the indoor experiment)
1. Setting of Foreoptic
① Press the power button
② Press the MENU button
③ Press arrow buttons to move selection box
to Foreoptic menu
Select “Bare Fiber” for no attached
foreoptic, and Press Select button.
※Bare Fiber is 25 degree.

2
2. Spectrum Counts Averaging (Only First
measurement after purchase)
① Press the left and right arrow buttons to
move the selection box to the Spectrum
Counts menu icon
② Press the left or right arrow buttons to
move the selection box to the icons: White
for white reference averaging count, Dark
for dark current averaging count, or sample
for sample averaging count. Press the SEL
button.
③ Press the left pointing arrow to move to
the desired number position. Press the up
or down arrow buttons to change the
numbers. Ten spectrums averaging is
convenient in terms of measurement
speed. When finished, press the SEL button
④ Press the EXIT button to return to the main
menu

3
3. Optimize
Optimization should be updated when
illumination changes significantly. This function
will help find the ideal integration time in order
to maximize the signal-tonoise ratio without
saturation.
① Press the OPT button.
② When prompted by the “Push trigger to
optimize” message, point the HandHeld 2
instrument at the white reference panel.
Keep pointing the HandHeld 2 instrument
at the panel until the process is completed.
4. Dark Current and White Reference
Dark Current and White Reference to collect
reflectance spectra, the HandHeld2 instrument
must first establish a baseline measurement by
calculating both the dark current (DC) and
white reference (WR).
① Press the OPT button.
② When prompted by the “Push trigger to
collect white” message, point the
HandHeld 2 instrument at the white
reference panel.

4
5. Caution and example of measurement
・ Record the spectrum data number and
measurement object in a notebook.
・Keep the difference and angle between object
and spectrometer.
・ Be careful diameter of diameter
・Wear dark clothing
Ex 1 Indoor experiment
Start the measurement after illuminance of
artificial illumination rise enough. Fix an
artificial illumination and spectrometer, only
change samples.
Ex 2 Interval measurement
Use the spectrum values of average or
intermediate by interval measurement, in case
the object affected by wind such as tree and
water surface.
5
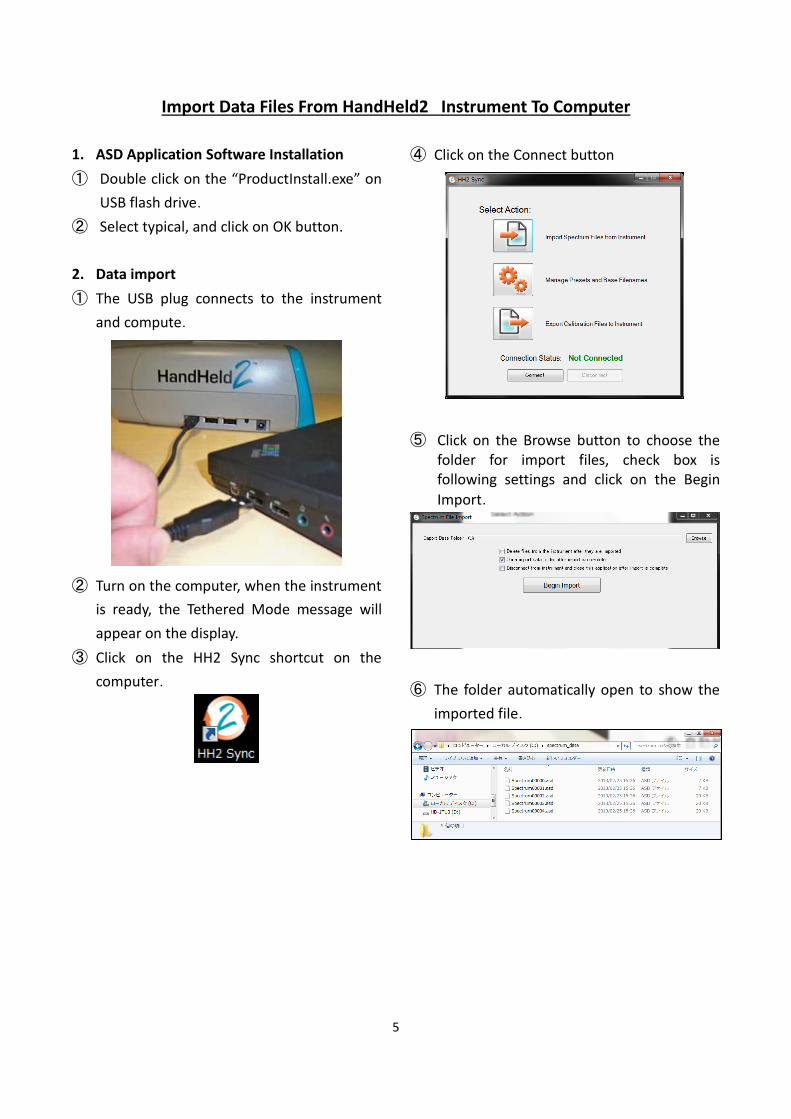
Import Data Files From HandHeld2 Instrument To Computer
1. ASD Application Software Installation
① Double click on the “ProductInstall.exe” on
USB flash drive.
② Select typical, and click on OK button.
2. Data import
① The USB plug connects to the instrument
and compute.
② Turn on the computer, when the instrument
is ready, the Tethered Mode message will
appear on the display.
③ Click on the HH2 Sync shortcut on the
computer.
④ Click on the Connect button
⑤ Click on the Browse button to choose the folder for import files, check box is following settings and click on the Begin
Import.
⑥ The folder automatically open to show the
imported file.

6
3. Translation the asd file to txt files
① Click on the ViewSpec Pro shortcut to open
the application.
② Click the asd files from File → Open.
③ Select the files to export.
④ Confirm the Input and output folder.It is
possible to change the folder.
⑤ Click the ASCII Export from Process → ASCII
Export.
⑥ Set as follow figure and click the OK
button.

7
4. Combine the txt files using software
① Click the spectrum_merge.xlsm file
② Enter the follow fields
Folder: Folder that contains txt files
Sheet Name: Arbitrary name
File Name: Name of txt file
Start No.: Start number
End No.: End number
Ex.
③ Click the Run button.
④ When follow dialogue shown, hold down
the Enter key until the process is completed
⑤ Completion!

1
FieldSpec HandHeld2 を用いたスペクトル計測のマニュアル
前準備
スペクトロメータに単三電池を装着するか,
電源ケーブルを接続する.
視野角変更レンズは予め装着しておく.
必要な物
・スペクトロメータ
・白色板
・記録用ノート
・対象物
・三脚
・メジャー
・人工光源(室内実験の場合)
1. センサ視野角の設定
① 電源ボタンを押す.
② MENU ボタンを押す.
③ 矢印ボタンで Foreoptic アイコンを選択
何も装着していない場合は「Bare Fiber」を
選択して SEL ボタンで決定.
※Bare Fiber の視野角は 25°.装着したレン
ズに該当する視野角を選択.

2
2. スペクトルデータ平均化のための計測
回数の設定(購入後初回のみで良い)
① Spectrum Counts menu アイコンを選択
② 矢印ボタンで白色(左),暗色(中央)
と対象物(右)いずれかを選択し,SEL
ボタンを押す.
③ 左矢印で桁を変更可能,上下矢印で値を
変更可能.光源や対象物の反射に依存す
るが,計測時間ふまえると「10」が良い.
値を決定したら SEL ボタンを押す.
④ EXIT ボタンを押してメインメニューへ
戻る

3
3. Optimize(最適化)
適切なデータ積分時間とノイズを取り除い
た良いシグナルを収集するために行う.計
測を始める時,光源の状況が変わった時は
必ず Optimize を行う.
① OPT ボタンを押す.
② 下記画面が出たら,センサを白色板に向
けトリガーを押す.画面が切り替わるま
で動かない.
4. Dark Current and White Reference
白色(全反射)と暗色(全吸収)のベース
ラインの設定を行う.
① DC/WR ボタンを押す.
.
② 下図の画面が出たら分光放射計を白色
板に向けてトリガーを押す.画面が切り
替わるまで動かない.

4
5. 計測時の注意点および計測例
・スペクトルデータの番号と計測した対象
物は必ずノートに記入する.
・計測対象物とスペクトロメータの距離と
角度はなるべく固定する.
・暗色の洋服を着る.
例1 屋内実験
人工光源の照度が十分に上昇してから,
計測を始める.人工光源とスペクトロメー
タは固定し,サンプルだけ入れ替えて計測
する.
例2 インターバル計測
樹木や水面のような風の影響を受ける対
象物の場合,インターバル計測により平均
値や中間値のスペクトルデータを使用した
方が良い.

5
スペクトロメータから PCへのデータインポート
1. ソフトウェアのインストール
① USB 内の ProductInstall.exe をダブルクリ
ック.
② Installation type は typical を選択して OK.
2. データ取込み
① USB ケーブルをスペクトロメータと PC
に接続する.
② ス ペ ク ト ロ メ ー タ の 電 源 を 入
れ,”Tethered Mode” と表示されるまで
待つ.
③ HH2 Sync をクリックしてソフトを起動.
④ Connect ボタンをクリック
⑤ インポートするフォルダを指定し,下記
の設定で Begin Import をクリック.
⑥ インポートされたファイルが自動的に
表示される.
3. asd ファイルを txtファイルに変換
① ViewSpecPro をクリックしてソフトを起
動

6
② File-Open で asd ファイルを開く.
③ エクスポートしたいファイルを選択す
る.
Input と output フォルダを確認する.フォル
ダを変更することも可能.
④ Process-ASCII Export を選択
⑤ 下記の設定とし,OK をクリック.

7
4. txt ファイルの結合
① spectrum_merge.xlsm を開く
② 下記の項目を入力
Folder:txt ファイルが保存されているフォ
ルダ
Sheet Name: 任意の名前
File Name:txt ファイルの名前
Start No.:開始番号
End No.: 停止番号
例
③ Run ボタンをクリック.
④ 下記の画面が出たら,処理が終わるまで Enter
キーを押したままにする.
⑤ 完成