media monorail application how-to and user guide media management services media monorail how-to 1...
TRANSCRIPT

ENTERPRISE MEDIA MANAGEMENT SERVICES MEDIA MONORAIL HOW-TO
1
Media Monorail
Application
How-To and User Guide
Prepared by:
Enterprise Media Management Services (EMMS)
The Walt Disney Company
Version 0.9
September 20, 2011
ENTERPRISE MEDIA MANAGEMENT SERVICES MEDIA MONORAIL HOW-TO
2
Welcome!
This document highlights a few of the new features in the upgrade to Media Monorail. It is
intended for current users of the TRON system. For assistance, please contact the Enterprise
Media Management Services team at Disney via email at [email protected]
TABLE OF CONTENTS
Introduction
New Dashboard
I. Templates and Workflows
II. History
III. Sticky Notes
IV. Toolbar
Inside Workflows
I. Workflow Layout
II. Form Entries
III. Features
Managing Templates
I. Template Manager
II. Template Features and Permissions

ENTERPRISE MEDIA MANAGEMENT SERVICES MEDIA MONORAIL HOW-TO
3
Introduction
Media Monorail (http://mediamonorail.disney.com) is the completely
updated and reconstructed upload and submission tool for sending files
to The Walt Disney Company. This application allows you to send
media files from your local workstation or storage and submit them for
processing, whether that’s into Jellyroll Digital Asset Management, sending to Landing
Pads, forwarding for User Delivery, or submitting to specific application processes. The
application will provide choices and assist you in creating the metadata for each file
transfer. There are a number of new features in Media Monorail, and this document will
demonstrate how to use them to your advantage.
The Media Monorail application is maintained by The Walt Disney Company’s Enterprise
Media Management Services (EMMS) group. If you have questions or encounter
problems, please contact us at [email protected] .
The following pages will describe the interface that you will see upon logging in to the
system. In each section, the intent is to help the user understand how to interact with
the tool. For specific questions regarding metadata, content, or use of the tool for a
particular work order, a user should contact the person at Disney requesting the upload
to ensure that process-specific tasks are followed and to obtain any specific information
regarding metadata and templates to use.

ENTERPRISE MEDIA MANAGEMENT SERVICES MEDIA MONORAIL HOW-TO
4
Dashboard
Your Dashboard will be the first thing you see after logging in to Media
Monorail. This layout was designed to create a friendly user-interface
for the starting point of your file transfer. You can always get back to
the Dashboard by clicking on the Dashboard link in the Toolbar at the top. From here,
you’ll have quick access to often-used submission templates as well as a browsable
history of assets you’ve submitted or are uploading to Media Monorail.
The graphic above provides a sample dashboard. The next pages will describe how to
interact with the dashboard.
ENTERPRISE MEDIA MANAGEMENT SERVICES MEDIA MONORAIL HOW-TO
5
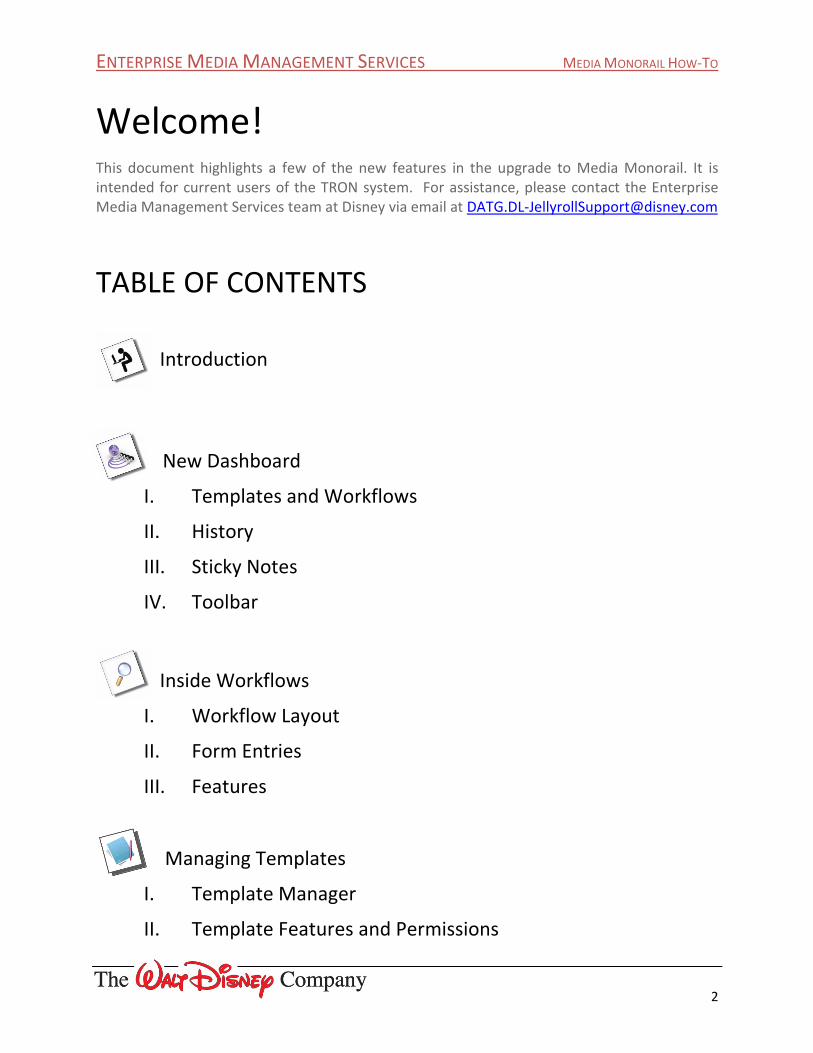
TOOLBAR
This toolbar will always be located at the top of the page when you are using Media
Monorail. The name of your current section will be displayed next to the Media
Monorail logo for clarification purposes (below, it shows you are on the Dashboard). The
right side of the toolbar allows for easy access to 4 pages:
• Templates - Drag your mouse over Templates to either create a new template or
manage your current ones.
• Dashboard - Click on Dashboard to bring you back to the Dashboard no matter
where you are.
• Active Transfers - Click on Active Transfers to view current file transfer activity. This
is done by instructing the Aspera Browser Plug-in to show its “Transfers” window. In
some operating system/browser combinations, this may bring it up behind or not
bring it to the front of all your windows if it’s already open. The Aspera Transfers
window and the Aspera Connect plug-in functionality are not covered here.
• Help - Drag your mouse over Help to access the FAQ, Documentation, or Support
page.
TEMPLATES AND WORKFLOWS
Templates are specifically designed to streamline data entry, reduce time to enter data,
improve data consistency and reduce data entry errors. Generally, a user accessing the
MediaMonorail site will have both a file that needs to be uploaded as well as
instructions from the recipient as to a specific template to use or metadata to supply.
Templates do more than just supply information, they ensure that the user is selecting
the correct workflow, as different workflows can handle and route files in very different

ENTERPRISE MEDIA MANAGEMENT SERVICES MEDIA MONORAIL HOW-TO
6
fashions to different destinations or locations. Creating Templates and managing them
is restricted to select users, and that is covered later in the document.
Start your file transfer at the Recent Templates section displayed at the top of the page.
Most users will always work with the same few templates, so their desired template
should always be displayed as:
• Recent Templates - One of the 9 most recently used templates.
• View All - Choose a template from all available templates.
• No Template - Start a transfer by selecting the desired workflow.
Recent Templates
If your desired template is visible in the Recent Templates box, simply click on the
template and proceed. It will open the workflow belonging to the template and all of its
prepopulated data would be available. For users who send files along multiple
workflows, Media Monorail incorporates specific visual cues in this list to help you.
• The highlighted bar for each template contains the short name of the workflow
that the template applies to. In the sample above, There are two workflows
(Dailies and CNG Program) represented in this list of templates.
• Workflows are color-coded to make it easy to differentiate between them in the
display even if the template names are similar.
• Users will only see workflows for which they have been granted access.

ENTERPRISE MEDIA MANAGEMENT SERVICES MEDIA MONORAIL HOW-TO
7
View All
If your desired template is not visible, either because you haven’t used it before or
you’ve more than nine other templates more recently, you can search for it among all
templates by using the View All Templates interface. Follow these steps:
1. Click on View All Templates link in your recent template history and a screen will
appear that shows all templates. The screen should look something like the one
shown below:
2. Filter the results by one or more of the following ways:
a. You can limit your selection to only display templates applicable to a specific
workflow by choosing that workflow name from the drop down list. Or, you
can select “All” to see templates for all the workflows you have access to.
b. Whether you choose to limit to a specific workflow, you can search for a
template by entering part of the name in the SEARCH box. The results will
filter after a brief lookup, allowing you to select from the portion of the list
that matches your search string. To reset, simply delete any text you typed in
the search box, or click “Cancel”
3. Click on your desired template and proceed, or you can browse through the list
using the page links at the bottom. Clicking Cancel will close this window and
take you back to the dashboard.

ENTERPRISE MEDIA MANAGEMENT SERVICES MEDIA MONORAIL HOW-TO
8
Uploading without using a template
If you do not have a required template, click on Submit a file without template in your
Recent Template history. A screen will appear showing all the available workflows. Click
on your desired workflow and proceed.
Warning: Before uploading files without using a template, a user should verify
this with their Disney contact, as most uses of the MediaMonorail tool are strongly
suggested to use templates
HISTORY
The History section allows you to view and check the status of past and current
transfers. These is the history of the logged in user id.
You can arrange the columns in the History table to match your preferences. Click the
top of each column (DATE, FILE NAME, PRIORITY, STATUS) once to sort in ascending
order and twice to sort in descending order.

ENTERPRISE MEDIA MANAGEMENT SERVICES MEDIA MONORAIL HOW-TO
9
Click on the to the left of
each record to view the
metadata that was sent with
the file.
STICKY NOTES
Sticky notes will appear in the top
right of the Dashboard to inform you
when there is a scheduled
maintenance, available upgrade, or
any change to the system. Simply
click on the sticky note to open and
click on the to close.
Inside Workflows
After selecting a template (or selecting to upload without a template),
you will be directed to a specific workflow form that has been
constructed to more easily select files, add metadata, and send to
different destinations.
The new features inside workflow forms are (I) Workflow Layout, (II) Entries, and (III)
Features.

ENTERPRISE MEDIA MANAGEMENT SERVICES MEDIA MONORAIL HOW-TO
10
WORKFLOW LAYOUT
The layout of each workflow is split into sections. These sections can be manipulated
and better understood by the symbols and hints used in the application. The sections
represent the logical groupings of metadata and information for the workflow, and each
may have specific fields and functionality that vary by workflow. Generally, each section
may be expanded or collapsed by the user.
Symbols
You will notice the use of symbols in the workflow layout that are new to Media
Monorail. Each symbol has a specific function that helps make the interface more user-
friendly.
Side Arrow – Click this arrow to expand the section.
Down Arrow – Click this arrow to contract the section.
Red Asterisk – This indicates a required field.
Green Check – This indicates that you have entered a sufficient value in the field
to satisfy the business rule.
Sections
The workflow form is divided into several sections. Each section has a specific set of
related fields for selecting files and entering metadata. Some examples of sections are:
• Files
This section is where you select the file(s) that you would like to transfer. Some
workflows allow the user to attach multiple files, others only a single file. Some
workflows support naming specifications that provide you a specific file name that must
be used.

ENTERPRISE MEDIA MANAGEMENT SERVICES MEDIA MONORAIL HOW-TO
11
• File Properties
This section allows you to enter metadata to describe the file(s). Each workflow will
have a different set of fields for entering the necessary metadata.
(Some workflows will have an Additional Metadata section, which allows you to enter
any extra metadata to your file transfer.)
• Delivery Info
This section allows you to specify the Jellyroll destination, landing pad, and flexible
delivery. The following fields are important to understand:
���� Primary Contact - Enter the email address in this field that belongs to the person
that should be contacted in case there are questions about the asset.
���� Sender Email - This will be filled by default and will appear as the email address
of the person sending the file.
���� Priority (new) - Indicate whether your transfer is a high, medium, or low priority
by clicking on the drop-down menu and selecting your desired choice.
���� Email Notifications - Enter an email address to receive a notification when the
file has been transferred. The template may default certain email addresses, but
the user can add more contacts to the list if necessary.
FORM FIELDS
The workflows forms are comprised of numerous fields that allow you to enter data.
There are several types of fields and features that come along with them.
Types
You will find 5 different types of fields. Each one has a different procedure for entering
metadata, so it is important to understand how they work. Below is each type of field
and the icon that signifies the specific field:

ENTERPRISE MEDIA MANAGEMENT SERVICES MEDIA MONORAIL HOW-TO
12
Buttons
Search Field
Read-Only Field
(may be any field type)
Drop-Down Field
Free-Form Field
•••• Select Files – This field allows you to select files for your transfer. Click Select Files to
choose one or more files from your computer. When you have highlighted the
desired file, click Choose or Open.
You have the option to select additional files at this point. Repeat the same
process by clicking Select Files, highlight the desired file, and clicking Choose or
Open.

ENTERPRISE MEDIA MANAGEMENT SERVICES MEDIA MONORAIL HOW-TO
13
Note: As mentioned previously, some workflows allow only a single file, others will
allow the user to attach multiple files, so this may not be applicable to the workflow you
are using.
On workflows that allow multiple file selection, the metadata you enter will be attached
to all the files selected.
•••• Input Field – These fields allow you to search for values that are found in the
nomenclature registry. Begin typing any portion of the title and the flexible search
will show 10 hits. Select the title with your mouse or keyboard and the value will be
validated. The progression below shows a user selecting the Brazilian Portuguese
language folder for “Phineas and Ferb” language masters.
ENTERPRISE MEDIA MANAGEMENT SERVICES MEDIA MONORAIL HOW-TO
14
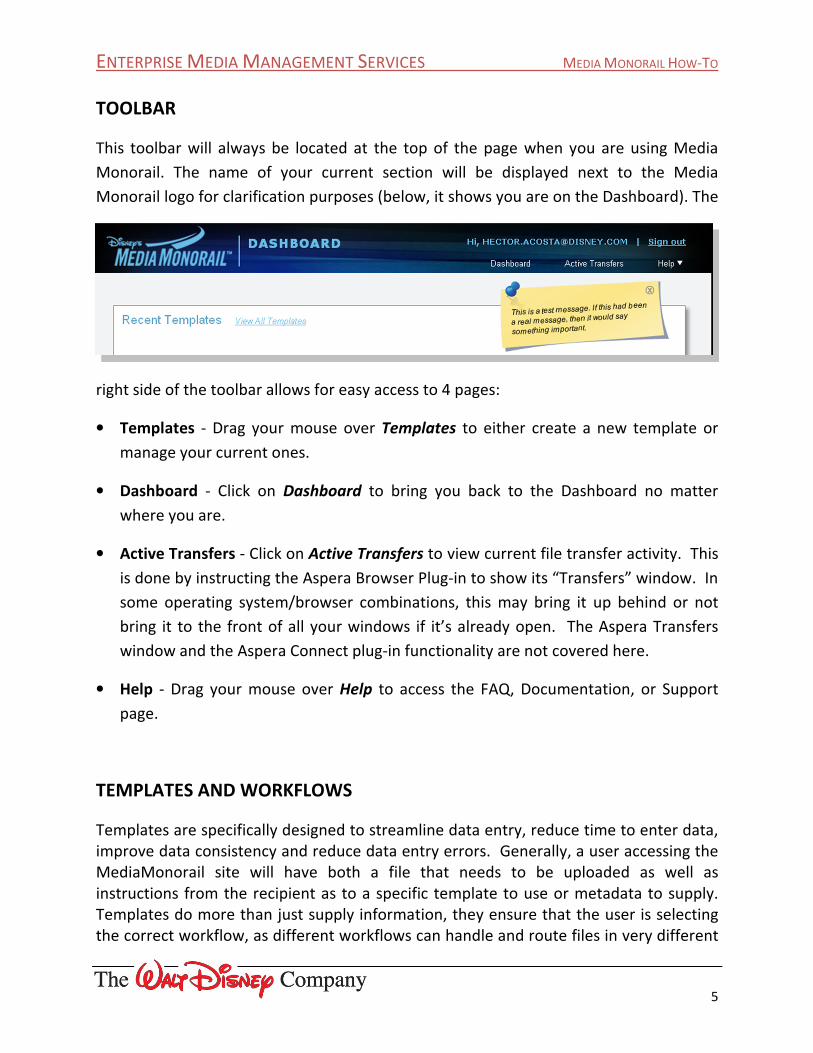
•••• Read-Only Field - These fields will be colored grey
and are pre-populated by the template. You can
see the value, but you cannot change it. The
template author controls whether template values
are read-only. If read-only template values make a template unusable, contact the
template author or your Disney contact.
•••• Drop-Down Field – Click on the boxed-
arrow to select from a drop-down list of
options.
•••• Free-Form Field – When there is no icon, this means that the field is a free-form
entry, though there may still be business
rules applied to it. If you have questions
about specific contents to enter, the
best person to ask is your Disney contact.
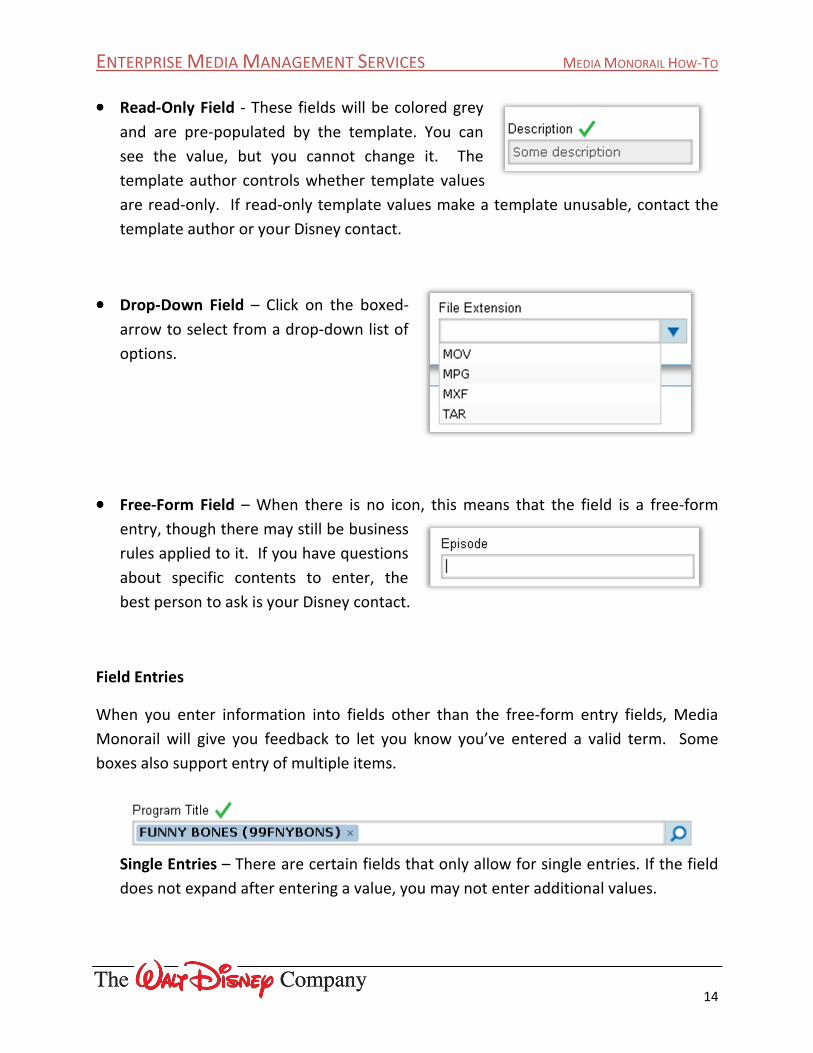
Field Entries
When you enter information into fields other than the free-form entry fields, Media
Monorail will give you feedback to let you know you’ve entered a valid term. Some
boxes also support entry of multiple items.
Single Entries – There are certain fields that only allow for single entries. If the field
does not expand after entering a value, you may not enter additional values.

ENTERPRISE MEDIA MANAGEMENT SERVICES MEDIA MONORAIL HOW-TO
15
Multiple Entries - Some fields allow for multiple entries. If the field expands after
entering a value, you may enter additional values. Examples are titles, keywords,
landing pads, and User Delivery recipients
Validated Entries – If you enter an accepted value in the field, it will become
validated by a green check above the field. In this example, Media Monorail is
checking to make sure you’ve entered valid email addresses.
Tip: Email addresses will validate when you enter a comma, press enter, or use
the tab key. You can copy/paste a comma separated list of email addresses into
the Email Notifications space and it will automatically validate all of them at
once.
Incorrect Entries – If you enter an incorrect value in a field, you will notice a red X
above the field. You must enter a correct value in order to send a file. Items that are
not free-form, the selection you entered could also be colored red to further indicate
hint you to the problem.
Deleting Entries – If you have entered an
incorrect value or have selected the wrong
value, you can delete this by clicking on the
delete button (X) to the right of the value. Note that for read only entries supplied
by templates, you will not see an (X) on the token and will not be able to delete the
entry.
ENTERPRISE MEDIA MANAGEMENT SERVICES MEDIA MONORAIL HOW-TO
16
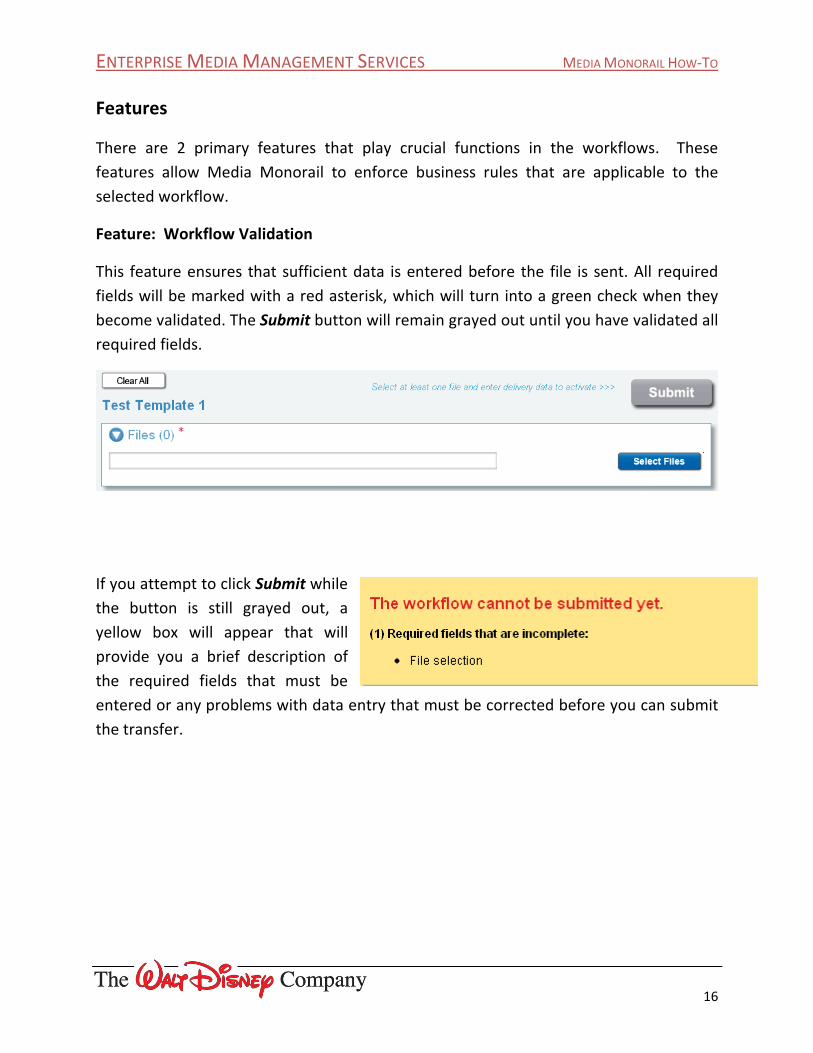
Features
There are 2 primary features that play crucial functions in the workflows. These
features allow Media Monorail to enforce business rules that are applicable to the
selected workflow.
Feature: Workflow Validation
This feature ensures that sufficient data is entered before the file is sent. All required
fields will be marked with a red asterisk, which will turn into a green check when they
become validated. The Submit button will remain grayed out until you have validated all
required fields.
If you attempt to click Submit while
the button is still grayed out, a
yellow box will appear that will
provide you a brief description of
the required fields that must be
entered or any problems with data entry that must be corrected before you can submit
the transfer.

ENTERPRISE MEDIA MANAGEMENT SERVICES MEDIA MONORAIL HOW-TO
17
Submitting Files
When all required fields are
validated, the Submit button
will turn blue in the workflow.
Click on it to review the entered
metadata (an example shown
here). In some cases, you may
find that you forgot to enter
metadata that may not be
strictly required, or you may have entered incorrect metadata inadvertently. If this is
the case, click Cancel to return to the workflow form. If everything is ready for upload,
click Submit.
After you confirm the Transfer
Information and click the
dialog’s Submit button, Media
Monorail will supply you a dialog
confirming the submission of the
metadata and it will attempt to
queue the file for transfer to the
Media Monorail servers via the
Aspera Connect plug-in on your
machine. Once the file is
queued, Aspera should start transferring the file. The Aspera Plug-in has multiple
options for setting and monitoring bandwidth and reporting errors, and it may require
some firewall updates or configuration to optimize use if it’s the first time you’re using
the tool. The files will transfer using the Aspera Connect service, so you do not have to
wait on this page or keep the browser open to complete uploading the file. You may
move immediately onto sending your next file. When the file is finished uploading, the
Aspera Connect Transfers window will show you that status, and it will be updated in
the Dashboard History section.

ENTERPRISE MEDIA MANAGEMENT SERVICES MEDIA MONORAIL HOW-TO
18
Bandwidth Warning: The Aspera Connect plug-in allows the user to set the bandwidth
to use for the connection, or it will use a default speed of 45mbps. If the connection
speed in the plug-in is set too high for the user’s connection, the file transfer may flood
the user’s network and cause applications (including Media Monorail) to become
sluggish, unresponsive, or even crash. If in doubt, work with your networking contact to
set appropriate bandwidth levels from your machine.
Aspera file transfer Status: Once a file is queued in Aspera Connect, any connection
problems or status on that transfer is only visible through the Aspera Connect plug-in.
The plug-in does not currently support providing that status within the Media Monorail
application. The plug-in does support pausing, resuming, viewing bandwidth usage, and
other capabilities. See documentation from Asperasoft.com on the Aspera Connect
browser plug-in client for details.
Feature: File Renaming
Some workflows, such as the CNG Program workflow, require the upload of specific file
names that are based on the entered metadata. Media Monorail will help ensure your
file is named correctly by generating the correct file name from the metadata that you
enter.
1. As you enter metadata in the required fields, it will fill in portions of the file
name. Some fields may not be required except in certain situations (e.g.
“Revision” or “Episode Number”). If you leave them blank, then their
corresponding token will be hidden from the filename being generated. The
token will appear if you enter text in this field. Be sure to enter all the metadata
required for this upload, which may in some cases be more than just the required

ENTERPRISE MEDIA MANAGEMENT SERVICES MEDIA MONORAIL HOW-TO
19
fields.
2. After all of the required fields are filled in, highlight and copy the filename. You
can readily spot missing required elements in the file name because Media
Monorail shows them as having bullets for their contents.
3. Go to your file system to ensure your file is named correctly (if not, rename the
file). To assist with this, you can use your mouse to highlight the filename being
shown and copy/paste that onto the file on your local disk/storage. If your
workflow supports it, you may also see a button that will help you select the
filename so that you can copy it to your clipboard more easily.
4. Use the Select Files button to attach the properly named file.
If you select a file that is
named incorrectly per
the workflow, there will
be an error message
explaining this. To
correct this, you will
need to select either a
different file that
matches the name
Media Monorail is
expecting, or change the name of the file on your local machine/storage to the name
Media Monorail displays. Then, you will be able to select the file for upload.
Managing Templates
The use of templates in uploading files has already been described in this
document, this section covers specific functionality for users granted the
rights to create and manage templates. You will be able to easily identify
whether your account has this right by looking for the “Template” menu in the header
of Media Monorail. If you see it, you are able to manage templates. Standard users will
not see that menu. If you do not see that, then this section does not apply to you.

ENTERPRISE MEDIA MANAGEMENT SERVICES MEDIA MONORAIL HOW-TO
20
The template menu is accessible at all times within Media Monorail, but depending on
where you are, some options may not be active. The contents of the template window
are described in the following table.
Template
Menu Option
What it does…
New Prompts you to select a workflow and opens a blank data entry
screen to start a brand new template. Always active on the menu.
Save Saves the current contents of the workflow screen as a template.
See later discussions about template ownership. Active when you
on a workflow screen.
Save As Saves the current contents of the workflow screen allowing you to
choose a new template name. Active when you are on a workflow
screen
Manage Opens the Template Manager (described next). Always active on the
menu.

ENTERPRISE MEDIA MANAGEMENT SERVICES MEDIA MONORAIL HOW-TO
21
Template Manager
The Template Manager is a screen that is an enhanced version of the “View all
Templates” screen. In this screen, you can see and browse templates just as before, but
as a manager, you have additional capabilities for template you author.
From the Template Manager, you can:
• Delete your templates by selecting their checkbox(es) and clicking the delete
button. After confirming the delete, the template will be removed from the
database. This is non-recoverable, there is no “undelete”. This will not impact
previous files uploaded using that template, it will be unavailable for future use.
There will only be a checkbox if you are the author.
• View the template contents by selecting the button.
• Use the template by selecting its name. This is an easy way to update templates,
just select them for use, make your updates in the workflow screen, and then use
the “Save” option on the Template menu.

ENTERPRISE MEDIA MANAGEMENT SERVICES MEDIA MONORAIL HOW-TO
22
Template Features and Permissions
Media Monorail offers a greatly expanded set of capabilities and features for templates
that give the template creator much finer control over how the user makes use of the
templates and interacts with the tool. This section provides information on those
features and offers tips to template authors to help create robust templates for their
users.
Getting started on a template is simple: just start entering metadata on the workflow
screen as though you are using the tool for an upload. Templates can be saved on a
workflow screen by an author without completing all business rule validations and
metadata entry. The author chooses how much metadata needs to be captured within
the template, and there is no need to select a file for upload when you’re creating a
template.
Enter any information you want the user to have on the template, then select “Save” or
“Save as” from the Template Menu. Save As allows you to choose a name for a
template, Save will save your changes if you are editing an existing template that you
authored. Media Monorail will not allow you to “Save” changes to a template that was
not authored by you, but you can always “Save As” to make a new template that you
would own. The method for data entry on any field is identical to that described
previously in this document.
When you elect to save the template through one of the two options, you’ll be given the
Save confirmation dialog. A sample is shown below and the different sections are
described in more detail:

ENTERPRISE MEDIA MANAGEMENT SERVICES MEDIA MONORAIL HOW-TO
23
• Enter the name of the template in the box provided. There is a limit on name
length to ensure that names fit in the Dashboard.
• Select whether a template is public or private. Private templates are only
available to their owner. Public templates are available to all users with access to
the workflow the template supports. The default is public.
• Review the information captured as part of the template in the center section
• Near the Save button, there is an option to Lock the supplied values of the
template when it’s used. This is enabled by default and its function is described
in detail later.
From this point, the user can select to cancel the save or continue to save the template.
If the user attempts to save a template that they do not own, this will only allow them
to review the information, not make any changes. To save a new copy, they should
select “Save As” instead.
If the user enters a template name that’s already in use, a message will be shown on
save that explains the problem and the user will be returned to the save screen to
change the name.

ENTERPRISE MEDIA MANAGEMENT SERVICES MEDIA MONORAIL HOW-TO
24
Locking Supplied Values
New in Media Monorail is the ability to force the user to use your template values for
any fields you set. If you save your template with the “Lock Supplied Values” option
selected, any metadata supplied by your template will be read-only for the user when
they start their data entry. This means that if you select, for example, a Jellyroll folder
for upload, the template will always upload to that folder, users cannot change it. Any
field you leave without values will follow the normal rules for the workflow.
Some points to keep in mind when considering using locked values:
1. This feature allows the template author to ensure that the template is followed,
increasing consistency.
2. Locked fields in a template are easily identified by the user as grey read-only fields,
and the user will easily see which fields are still left to potentially fill in with
metadata
3. In fields that support multiple values (e.g. landing pads, email notifications, user
delivery recipients), the user can supply additional entries by adding more items to
those lists, but they cannot change or remove any values provided by the template.
In this fashion, an author could dictate that deliveries are always send to landing pad
X by locking that in the template. When sending a file, a user of this template could
add landing pad Y as a second destination, but they cannot stop the file from sending
to landing pad X.
4. The data is truly locked. Entering an invalid entry in a field will make it so that no
user can correct that invalid entry. Likewise, entering text such as “Enter a
description here” in the “Description” field will lock that field, the user will be unable
to edit it.
If you save a template without the “Lock Supplied Values” option, a user can remove or
change any of the metadata values when they use that template.