method for positioning musical instrument frets that ... · pdf filemethod for positioning...
TRANSCRIPT

Drawing Sheet1 of 6
Method for Positioning Musical Instrument Frets That Compensate for Fretting-Induced String Tension
END
START
BASICDIMENSIONS
ANDPROPERTIES
PROPERTIESAND
DIMENSIONSFRETTED
FRETTEDTENSION BASED
INTERVALS
INTER-STRINGINTERVAL
ALIGNMENT
Copyright © 2006 - 2011 Gary Magliari
BASICSCALE
LENGTH
TO B
RID
GE
FRETTEDVIBRATING
LENGTH
TO B
RID
GE
PRESSED HERE
NUT
FINGERBOARD
FRET
NECK
Fig. 2a Fig. 2b
VIBRATING LENGTH(SCALE LENGTH)
LBSFig. 1
Drawing Sheet2 of 6
Method for Positioning Musical Instrument Frets That Compensate for Fretting-Induced String Tension

START
DATA
STRINGPROPERTY
yes
TEST STRINGS FOR no
(T) (L )CALCULATE
(m ) (A * E)
or
ul
DETERMINEFRETTED LENGTH
(L )s
s(T )FRETTED TENSION
CALCULATE
CALCULATEFRET INTERVALS
no
FRET SETSINTER-STR
ALIGNED
END
ALIGN FRET SETSSTART LOC.ALIGN. DIST
noavg(d )
NUT & SADDLEDERIVE
yes OFFSETS
then
yes
AVG
d*L
ADJUSTSCALE LENGTH
L sug = ( ) / davg
assug(L ) (L)ENTER
CALC AVG ALIGN DIST
SELECT END LOC.
(d )avg
&
3 of 6Drawing Sheet
Fig. 3
Method for Positioning Musical Instrument Frets That Compensate for Fretting-Induced String Tension
1
( )to
L fret n( )
L fret n( )
2L fret n( )
1L fret n 2L fret n
6 5 4 3 2 1NUT
SADDLE
Fig. 4
COMMONNUT-TO-SADDLESCALE LENGTH
FRETS NOT ALIGNED
Drawing Sheet4 of 6
Method for Positioning Musical Instrument Frets That Compensate for Fretting-Induced String Tension

6 5 4 3 2 1
"ZERO-out" FRET 3
FRET 14
NUT
SADDLE
AVG DISTB/T FRETS
3 & 14
Fig. 5
Fig. 6
6 5 4 3 2 1
"ZERO-out" FRET 3
"EVEN-out" FRET 14
NUT
SADDLE
ADJUSTSCALE LENGTH
ANDFRET POS. RECALC. FOR EACH STRING
UNTIL FRET 14IS ALIGNED
(FRETS ALIGNED)
(FRETS ALIGNED)
(FRETS ALIGNED)
(FRETS NOT ALIGNED)
Drawing Sheet5 of 6
Method for Positioning Musical Instrument Frets That Compensate for Fretting-Induced String Tension

Fig. 7
COMPENSATEDNUT
COMPENSATEDSADDLE
3 14
Drawing Sheet6 of 6
COMPENSATEDFRET PLACEMENT
Method for Positioning Musical Instrument Frets That Compensate for Fretting-Induced String Tension

Copyright © 2006 – 2011 Gary Magliari
Method for Positioning Musical Instrument Frets That Compensate for Fretting-Induced String Tension
by Gary Magliari
Overview
The procedure disclosed in this paper specifically applies to stringed musical
instruments with fretted fingerboards. Though the process relates to all fretted
instruments, I will be discussing guitars in particular to explain the concept. All formulae
shown are not depicted in typical mathematical notation but are written in a manner that
would make them easier to enter directly into a computer spreadsheet application such
as Excel, etc. The user need only substitute actual numerical values or “cell addresses”
in place of formulae variables.
Background of the Procedure
When a musician picks up a guitar and places their hand on the fingerboard, then
presses a string down to a fret and plucks that string, it creates a sound with a pitch that
is specific to that string and fret position. The fret positions or intervals have traditionally
been determined by a mathematical relationship known as the “rule of 18”, or more
precisely: 17.817153. The rule basically states that:
If you divide the scale length (the distance from the nut to the bridge)
by 17.817, you end up with the first fret position starting from the nut
end of the fingerboard. If you then take the scale length minus the first
fret distance and divide the remainder by 17.817, you end up with the
second fret position located from the first fret. Next if you take the
scale length minus the first and second fret distances and divide the
2 of 19
remainder by 17.817, you end up with the third fret position located
from the second fret. This process is repeated until all frets required
are located.
Mathematically this is known as a “geometric progression”. It is based on the 12th root
of 2 or “2^(1/12)”, which equals 1.059463. The “12” comes from the twelve steps or
intervals between octaves; A, A#, B, C, C#, D, D#, E, F, F#, G, G# & A. The number
1.059463 is the ratio between fret intervals. For example, on a guitar with a 25.5” scale
length, the distance between the nut and the first fret is 1.4312. The distance between
the first and second frets is 1.3509. If you divide the two (1.4312/1.3509) you get
1.0594. This value is fundamental to a system of tuning known as “twelve-tone equal temperament” (12-TET) and is the basis for all western music. It affects all musical
instruments designed for the equal tempered scale.
Another way to calculate fret position or vibrating length as measured from the bridge
this time would be as follows:
L0 = Scale Length = 25.500
L1 = L0 / 1.059463 = 24.069
L2 = L1 / 1.059463 = 22.718
L3 = etc…
where,
L1 = 1st fret
L2 = 2nd fret
L3 = 3rd fret, etc…
A variation of the formula above can be used to calculate the frequencies (Hz) of the
notes in the equal tempered scale. Starting with a particular note such as “A4” (440 Hz.)
we can find the following:

3 of 19
If,
A4 = 440 Hz.
then,
When the mathematics described above was created for deriving pitch intervals and, as
applied to stringed instruments, establishing vibrating length and ultimately fret locations
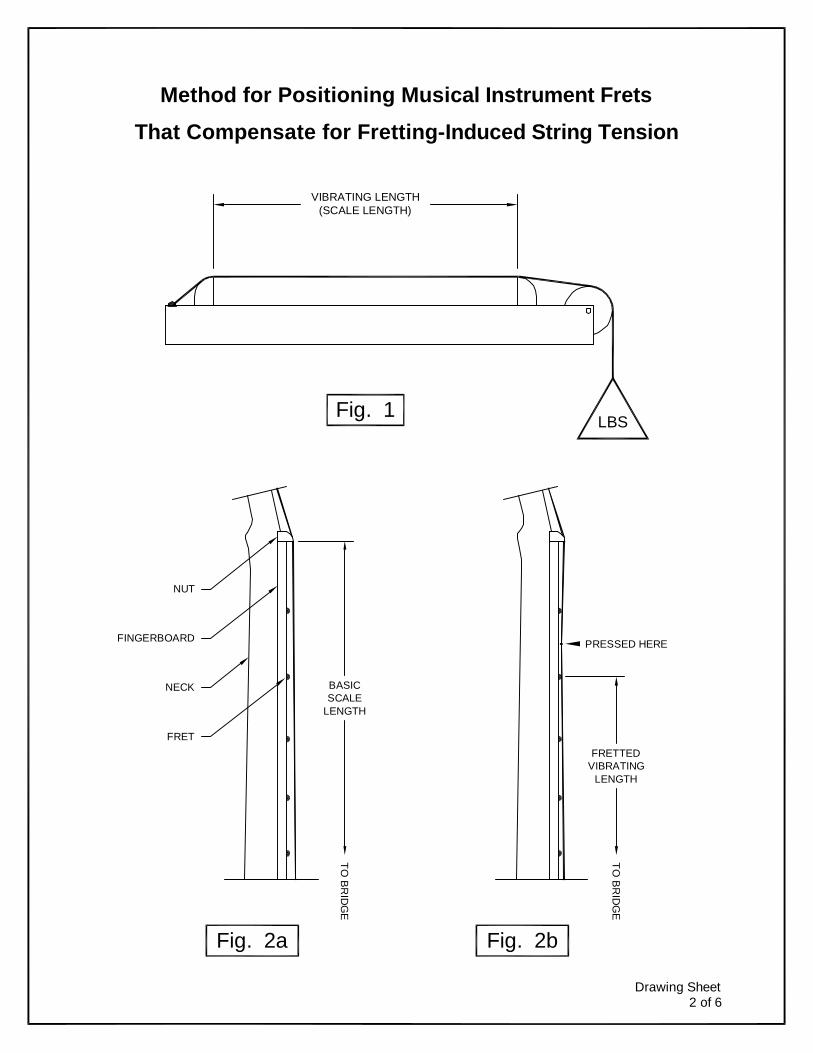
on a fingerboard, it was based on a string with equal tension. This means that if we
start with a 25.5” vibrating length (or scale length) and tighten the 0.013 dia. high “E”
string until it reaches a tension force of 27.4 lbs., and we pluck the string, it will ring out
at a frequency of 329.63 Hz. or a pitch of “E4” (see fig. 1). If we physically shorten the
vibrating length by one fret interval (-1.431) and maintain the tension at 27.4 lbs. the
new vibrating length will be:
vibrating length = 25.500 - 1.431 = 24.069
Knowing that the starting frequency is 329.63 Hz. (E4) for a vibrating length of 25.5” we
can easily calculate the frequency for the length shortened by one interval, i.e., 24.069”,
using the formula from the previous section which gives us a new higher frequency of
349.2 Hz. (F4). But let’s assume for the moment that we have no idea what the starting
frequency or original vibrating length is. Assume that all we know is vibrating length (L),
tension (T), and the string property (mul) known as “mass per unit length” (lbs./in.).
Using the following formula we can calculate the new frequency (f):
f = SQRT((g * T) / mul) / (2 * L)
f = SQRT((386.089 * 27.4) / 0.00003744) / (2 * 24.069)
f = 349.2 Hz
A#4 = 440 * 1.059463
A#4 = 466.16 Hz.

4 of 19
Plucking the string again will cause it to ring out at a frequency of 349.2 Hz. or a pitch of
“F4”. By the way, (g) is the constant for gravity (386.089 in./sec2) and is necessary to
use in this formula if we want units of measurement to be in “inches and pounds”.
The reason for using this alternate and slightly more complicated formula to solve for
frequency (f) is because later on when tension compensated fret placement is
discussed in more detail a variation of this formula will be used to locate frets. However
what these examples thus far demonstrate is how strings of varying lengths but kept
under equal tension can produce different notes. This is also what the mathematics of
equal temperament are based on as applied to stringed instruments; “equal tension and vibrating length”. The examples also clearly illustrate how vibrating length (L),
tension (T), frequency (f), and the basic string property (mul) relate to each other. If you
know the value of any three of these variables you can easily solve for the fourth.
This is all well and good for establishing the theory and setting up the basis for
calculating fret intervals, but in the real world of fretted instruments the vibrating length
is controlled by pressing a string down to a particular fret. Deflecting a string out of its “straight-line” nut-to-bridge equilibrium causes it to stretch (see fig. 2a & 2b).
When a string is stretched its tension increases which in turn causes the pitch to
increase. And now the fret, whose position was based on the string’s pre-stretched
tension, is not in the correct location because its actual fretted tension is higher. And
therein lies the dilemma. Fret intervals based on the “rule of 18” are accurate as long as you don’t press a string down to a fret.
The fret location should be recalculated based on the new higher tension. Theoretically
this means shifting the fret slightly away from the bridge to increase its vibrating length
thereby reducing its pitch to the correct frequency. However, traditionally the vibrating
length is increased by moving the bridge or saddle away from the fret (or nut). This is
known typically as “bridge compensation” and is sometimes accomplished with the aid
of an adjustable saddle. The technique involves adjusting the saddle until the note
fretted and plucked at the 12th fret equals the pitch of the 1st overtone or harmonic

5 of 19
plucked at approximately the same location, i.e., center of the vibrating length of the
open string.
Traditionally this method has allowed luthiers to intonate their instruments reasonably
well especially given the fact that it can be performed with little or no special equipment,
just a discerning ear. It may accurately compensate for fretted tension at the 12th fret,
but it does not accurately compensate for fretted tension at the remaining frets. The
reason for this is because fretted tension, or the amount that tension increases above
the open string tension, varies from fret-to-fret. So bridge compensation corrects only
by using a middle of the road location, e.g., the 12th fret, and compensating for what is
more or less a rough average of the fretted tension of all fret locations at once. This
leaves every remaining fret location below and above the 12th fret either over-
compensated or under-compensated by design.
In order of importance, the two primary factors that affect the amount of compensation
required are string “stiffness” (spring rate “k”) and “action” or string height. The stiffness
of a string is the relationship between the elastic modulus of the core material and the
physical size of the core itself (cross-section and unstressed length). The stiffness
determines how much the tension goes up for a given amount of stretch. This is to say
that strings with greater stiffness will have a higher increase () in tension than strings
with lower stiffness given the same amount of stretch. So consequently strings with
higher stiffness and ultimately higher fretted tension require more compensation.
Action, on the other hand, determines how much the strings will stretch during fretting.
A note will not ring out clearly unless the string is pressed down to a fret and slightly
beyond. The action or string height above the frets varies from being low at the first fret
and gradually gets higher as you go up the fingerboard. The action can also vary from
string-to-string, being lower for the thinner strings and higher for the thicker ones. And
the higher it is the more the strings stretch. As with stiffness, action contributes greatly
to fretted tension.

6 of 19
What the previous few paragraphs illustrate is that fretted tension is not linear but varies
depending on what string your pressing down on and at what fret location your pressing
it down to. They are all different.
Investigating the intonation issues associated with fretted instruments has been an
extremely enlightening experience. I can understand why so few have taken up the
challenge of an in-depth study. Prior to desktop computers becoming commonplace,
performing this exercise by hand would have been a long slow laborious process.
Changing one or two variables could require many hours or even days of recalculation,
whereas, with a computer answers come instantly.
In many cases we are dealing with very small numbers and even smaller results. An
accurate and significant conclusion could be hard to come by due to rounding-off errors
which tend to accumulate. For example, a medium set of strings set at a low-to-medium
action will only stretch roughly between 0.0008” and 0.0035” depending on where they
are fretted. These are very small numbers. Still they have a significant effect on pitch
especially considering that instruments are traditionally intonated at the 12th fret. In this
scenario the average stretch at the 12th fret is approximately 0.0015”. What happens to
the difference? It is certainly easy to overlook.
Over the years luthiers have followed time-honored methods for placing frets and
intonating their instruments. They have been able to produce meaningful results that
provided acceptable intonation just by compensating at the bridge or maybe tweaking
the nut through trial and error. They may have even limited themselves to improving
only those areas which were audibly most noticeable such as regions involving the first
few strings or frets. Everyone has their methods. So why not stay with tradition?
As a player, I can tell you that there is nothing more inspiring then when everything is
clicking. I mean when the feel and action are dead on, you strum a chord and it speaks
back with a thunderous response and sustaining notes ring out like chimes with perfect
intonation. There is nothing more satisfying. This is what players want. And I believe a

7 of 19
very big part of that equation is intonation, without a doubt. And it is an attribute that
most players are not aware of how good it can be. They usually just get moments of
good intonation or areas of good intonation. They rarely, if ever, get consistently great
intonation top to bottom. For this reason, and this reason alone, departing from tradition
is certainly worth considering.
The effect that intonation has, whether it is good or bad, on the perception of an
instrument is much greater than the sum of its parts. Its significance cannot be
overstated. Take four instruments made exactly the same way, made from the same
tree in fact. Put “rule of eighteen” fret placement on three and tension compensated fret
placement on one. Allow a group of respected musicians to thoroughly evaluate them
and they will pick out the latter almost every time as being the one they favor. Their
reasons may vary but they all will basically equate to the same thing, “There’s just
something special about this one.” Perception!
From a builder’s perspective there is another and more practical reason to try tension
compensated fret placement. Besides the fact that it will make the instrument sound
better, it does not add to the cost of construction. Not in time or materials. You still
have a nut, the same amount of frets, a bridge and a saddle. There are no extra parts,
spring-loaded devices or contraptions to install. All you will be doing is placing the frets
in a slightly different location and possibly changing the shape of the nut and saddle.
The physical differences are so visually subtle that unless pointed out most players will
not even notice them.
Lets summarize what has been discussed so far relative to traditional fret placement
and intonation:
The 12th root of 2 or “1.059463” is the ratio between pitch frequencies or
intervals in the “twelve-tone equal tempered scale”. This value also
determines the spacing between frets in traditional placement.

8 of 19
It is not possible to accurately intonate a fretted instrument throughout the
fingerboard using “rule of 18” fret placement and bridge saddle compensation
alone. Fretted tension is not linear but varies at every fret interval.
There is a close relationship between vibrating length (L), tension (T),
frequency (f), and the string property (mul). If you know the value of any three
of these variables you can solve for the fourth.
The two most important factors that determine the amount of compensation
an instrument will require are string “stiffness” (spring rate “k”) and “action” or
string height. Greater stiffness requires more compensation for a given
amount of stretch. Action determines how much the strings will stretch when
they are pressed down to a fret.
Intonation quality can have a significant effect on a player’s overall perception
of an instrument. Instruments with better than average intonation are
“perceived” as being physically or mechanically superior as a whole.
Traditionally fretted tension is, and has been, compensated for at the 12th fret. By
design this leaves quite a bit of error built into the fingerboard. The only simple way to
correct for this inaccuracy without adding extra parts or effort is through fret
compensation. Fret placement based on real string tension is a natural progression in
the evolution of fretted instruments. This could virtually eliminate the intonation short
comings that have been inherent to the history of fretted instruments.
Tension Compensated Fret Placement
The following pages will describe a detailed method for determining musical instrument
fret intervals, nut offsets, and bridge/saddle offsets based on actual fretted tension. The
ultimate goal being to provide an instrument with a much improved intonation profile
throughout the fingerboard given a specific set of circumstances based on string

9 of 19
properties, action height, scale length, etc. It is highly recommended that the user
develop a comprehensive spreadsheet or similar computer application to facilitate this
process. A software program would not only allow the user to create a tension-
compensated fingerboard, nut, and bridge saddle, but also allow them to study different
scenarios and variables while scrutinizing the results.
The following detailed procedure illustrates one way this can be achieved (see fig. 3),
however anyone skilled in the art could arrive at a similar conclusion using a variety of
other mathematical or empirical means.
P r o c e d u r e
1) Select a set of strings to use and supply the following property values for each string. This data will be used for the remainder of the procedure:
mul = String mass per unit length, lbs./ inch
A = Area, core wire, in.2
E = Modulus of Elasticity, core wire, psi If some or all of this information is unavailable then the user may have to
extract this data directly from the strings through testing. See the section entitled “String Evaluation” for more information on this subject. Once these properties are known, start by calculating the open string tension (T) for each of the strings based on their open string frequencies (see Pitch/Frequency Chart):
T = (mul * (2* L* f )^2) / g where,
T = Tension, lbs.

10 of 19
L = Scale Length, in.
f = Frequency, Hz.
g = Gravity, 386.089 in./sec2 Next, calculate the original “unstressed” string length (Lor) for each string using the following equation:
Lor = L / ((T / (E * A)) + 1)
2) Create a set of “rule of 18” derived fret intervals, or equivalent, as a location reference for knowing where to press the string down at each interval. Use the formulae shown on the first few pages of this disclosure to facilitate this process.
Next “graphically” press each string down to each fret interval (and beyond depending on touch preferred). Determine how much longer the strings grow or stretch beyond the basic scale length. The total fretted (stretched) length (Ls) must be found for each string pressed at each fret interval (n). This can be facilitated with the help of a CAD (computer-aided-design) program or string geometry section within a spreadsheet software application.
If you decide to use a CAD program to facilitate this process the following procedure is
one way you can accomplish this. Make sure you draw as carefully and accurately as
possible since the dimensions you derive from this will be used to calculate fretted
tension and ultimately compensated fret placement.
Start by drawing a side profile of the fingerboard with the “rule of 18” derived frets
shown. Include a nut and saddle shown at the uncompensated location exactly the
“scale length” distance apart. Knowing the 1st fret clearance dimension (action) and the

11 of 19
12th fret clearance dimension, draw a line between these two points above the frets,
then extend the line to the nut and then to the saddle. Now you have the open string
depicted at the preferred action height. If you check the actual length (at least four
decimal places) of this string you will find that it is a little longer than the actual scale
length. This is because it is on a slight angle due to the action. Now create a similar
profile for each of the remaining strings since the action will vary slightly from string-to-
string.
Next starting with the first string profile, draw a line from the saddle to the top of the 1st
fret. Then draw a line from the top of the 1st fret to where your finger would be. And
finally draw a line from where your finger would be to the nut. You can join the pieces
together into a single “polyline” or just trim them to each other before adding up their
lengths (at least four decimal places) to arrive at the total fretted length (Ls) for the first
string at the first fret. At the remaining fret locations (ex. 2 thru 20) there will probably
be more than (3) string sections to add up.
Repeat this process the same way for all fret locations and for all strings. If you have
(20) frets & (6) strings you will end up with (120) values for total fretted length (Ls). I
believe you can see where a spreadsheet would come in handy.
3) With the total fretted length (Ls) determined for each string and fret interval (n), the stretched or fretted tension (Ts) can be found. Calculate the fretted tension (Ts1 , Ts2 , Ts3 , …) for each string at each fret interval:
Tsn = ((Lsn - Lor) / Lor) * E * A where,
Lsn = Length, fretted, in., (Ls at fret position “n”)
Lor = Length, original unstressed, in.

12 of 19
4) With the fretted tensions (Tsn) known for each string at each fret interval,
the tension-compensated fret positions can now be calculated. You will be
creating a complete set of fret intervals for each string based on a common scale length. In order to proceed we also need to know what the pitch frequencies (fn) are at each of these intervals (see Pitch/Frequency [Hz.] Chart). The results will give you the vibrating lengths (Lfret n) from the bridge saddle offset to the fret intervals.
Calculate the fret placement (Lfret 1 , Lfret 2 , Lfret 3 ,…) for each string at each fret interval as measured from the bridge saddle offset:
Lfret n = SQRT((g * Tsn )/ mul ) / (2 * fn ) where,
g = Gravity, 386.089 in./sec2
Tsn = Tension, fretted, lbs., (Ts at interval “n”)
mul = String mass per unit length, lbs./in.
fn = Frequency, Hz., (f at interval “n”)
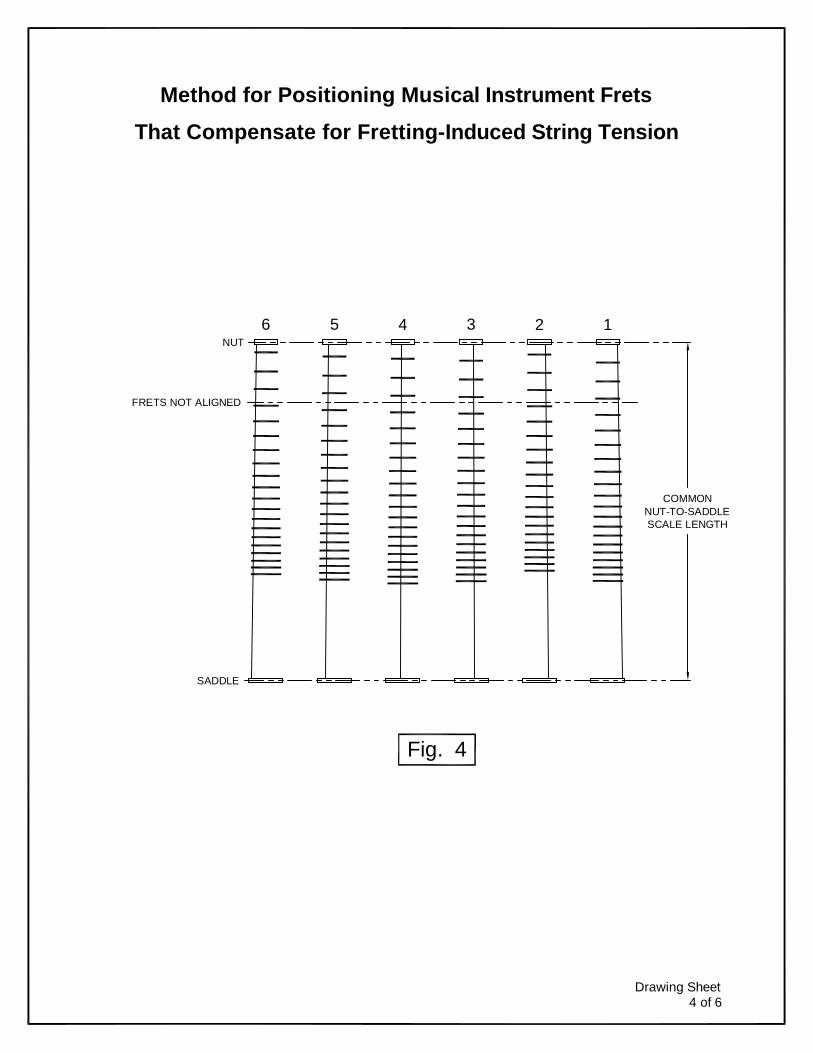
What the process should reveal to you at this point is that each string’s fret placement varies from string-to-string by a significant amount even though they share the same
scale length (see fig. 4). This is to say that each string will have its own dimensionally
unique set of tension compensated fret intervals given a common scale length. The
reason for this is because each string has its own stiffness value and action height.
These properties cause each string’s fret placement to move as a set, either closer to,
or farther away from the saddle offsets. It even causes the fret-to-fret spacing to vary
between strings.

13 of 19
These variations do increase the complexity of the problem somewhat. If we just line up
the fret sets, for example let’s say at the 1st fret, and average the remaining fret
locations for all the strings, we end up with a set of tension-compensated fret intervals
that are derived from dimensional windows at each interval that can be quite large for a
set of medium acoustic guitar strings. This would produce intonation errors from
various strings and fret locations that could fluctuate from approximately 4 to 15 cents
(one cent = 1/100 of a semitone). As a design baseline this would not be acceptable.
In order for this method to produce an optimal intonation profile, each string’s tension-
compensated fret spacing must be made more dimensionally in synch with every other
string’s fret spacing. The total average difference between them must be reduced to
just fractions of a cent to be acceptable. This can be accomplished by varying the scale length of each string and recalculating the results until all six strings share a dimensionally common set of fret intervals. You can visualize this as working
something like an accordion. When you increase the scale length the frets spread apart
and when you reduce the scale length the frets squeeze closer together. When the fret
spacing’s are all aligned and matching between the strings you’ll end up with an
accurate set of tension compensated fret intervals. And by default you will also end up
with the distances between the nut and first fret, which are different for each string
(compensated nut), and the distances between the first fret and the saddle, which are
also different for each string (compensated bridge saddle).
The following continuation of the procedure explains how to dimensionally unify the fret
intervals for all strings.
5) With the tension-compensated fret intervals (Lfret n) established for each
string, first select a specific starting fret interval to be used as a “ZERO-out” (datum-0) location to align all string fret sets to. For example, using fret location 3 (Lfret 3), align and affix all string fret sets so they line up

14 of 19
exactly at fret 3. Hold each string’s fret set together at this location during the following steps.
6) Select a second fret interval farther up the fingerboard some distance apart
from the ZERO-out fret to be used as an “EVEN-out” (floating) fret location. For example, let’s select fret 14 (Lfret 14) for the EVEN-out fret location. Now calculate the “average” distance between fret 3 and fret 14 for all string fret sets (see fig. 5).
7) Using the calculated average distance (davg ) between frets 3 and 14 as a
reference, start varying the scale length (L) for each string and recalculate the entire application. This will cause EVEN-out fret 14 to start shifting either longer or shorter depending on the new scale length chosen. Continue varying the scale lengths until the EVEN-out fret for all strings are in dimensional alignment to each other. The distance between fret 3 and fret 14 for all string fret sets should equal the reference average distance (davg ) within three decimal places (see fig. 6).
To speed this process, use the equation below to derive a suggested scale
length (Lsug ). Enter the result into the application and recalculate. This may have to be performed two or three times until (d) equals (davg). Also remember to input the updated variables (L & d) each time before recalculating.
Lsug = (L * davg ) / d where,
Lsug = suggested scale length, in. (single string)
davg = average distance, in. (ZERO-out to EVEN-out for all strings)
d = distance, in. (ZERO-out to EVEN-out for a single string)

15 of 19
8) The fret intervals for all strings should line up exactly together at frets 3 and 14. With all strings still in alignment at fret 3, you will find that the distance between fret 3 and the nut will be different for each string. This will give you the dimensional offsets for a compensated nut. The same holds true for the distances between fret 3 and the bridge. The differences here will yield the dimensional offsets for a compensated bridge saddle (see fig. 7). The remaining fret locations (1, 2, 4-13, and 15-24) can be averaged for the different strings. Now that two fret locations are in alignment, the calculated error from averaging the remaining fret locations will be reduced to just fractions of a cent.
Conclusion
There are a few things to be careful of when attempting this procedure. For one, there
are many subtleties that can affect the outcome. They can range from fret geometry,
string action, core wire properties to finger pressure. However one of the most
important considerations is accurately obtaining the total fretted (stretched) lengths (Ls)
for all fret intervals. Make sure you do this operation carefully. After all this is what your
compensating for.
In general no quantity or property, regardless of its size, can be ignored because
deriving a useable result is a cumulative effort. Forces and deflections on this scale are
part of the micro world, not the macro. Get used to using decimal places.

16 of 19
String Evaluation
To perform accurate fret interval calculations it is very important to have precise string
property data. However, it is most unfortunate that many, if not all, musical instrument
string manufacturers are reluctant to share this information, especially their core wire
data. It appears that if we want meaningful data to work with, then we will have to
extract this information from the strings ourselves. To be more specific we need to
know the following string properties:
mul = String mass per unit length, lbs. per linear inch
A = Area, core wire, in.2
E = Modulus of Elasticity, core wire, psi
In the most critical formulae the product of the two (E * A) is acceptable in lieu of
individual values. This data can be extracted directly from the strings using a test
fixture. The fixture will have a known and reasonably accurate scale length (L)
spanning two supports, one of which will be moveable for stretching the sample string a
known distance. This can be accomplished with a sliding bed or rack with the moveable
support mounted to it. The movement can be controlled by a “draw-screw” such as a
½”-20 bolt or equivalent and monitored by a dial indicator for accuracy. The string will
be put under tension (T) with accurately measured weights or with a tuner at one end
and a force gauge at the other. Once stabilized, the string will be lightly plucked or
excited in some consistent manner (for frequency stability) and it’s frequency will be
measured directly with a “frequency counter” such as one that may be included as part
of a digital strobe tuner or related software. The frequency’s unit of measure will need
to be in “hertz” (Hz). Once the frequency (f) and tension (T) are known, the mass per
unit length (mul) in “lbs. per linear inch” can be derived using the following equation:
mul = (g * T) / (2* L* f )^2

17 of 19
where,
g = Gravity, 386.089 in./sec2
T = Tension, lbs.
L = Scale Length, in.
f = Frequency, Hz.
Next, the string will be locked or clamped down at the weight or force gauge side to
prevent slippage. The string’s frequency should be checked again to make sure it’s
reading hasn’t changed or adjusted if it has. Now the string can be stretched using the
draw-screw to shift the moveable support a known distance (as confirmed by a dial
indicator). The amount of movement should probably be in the 0.005-0.010 range
lengthening or stretching the string. At this point it’s increased frequency will be
measured again. With the extended total length (Ls) known and the higher frequency
(fs) measured, the new higher tension (Ts) can now be calculated using the following
equation:
Ts = (mul* (2* Ls* fs)^2) / g
where,
Ls = Length, stretched, in.
fs = Frequency, stretched, Hz.
Calculate the length of original stretch (Lor ) from no-load to full tension (T) using the
following equation:
Lor = T / ((1/Ls) *Ts)
where,
Ls = Ls - L, in.
Ts = Ts - T, lbs.

18 of 19
Calculate the original no-load string length (Lor) before tension was applied using the
equation:
Lor = L - Lor
Now calculate the modulus of Elasticity x Area (E * A):
(E*A) = Lor * (1/Ls) *Ts
where,
E = Modulus of Elasticity, core wire, psi
A = Area, core wire, in.2

19 of 19
E2 - Guitar 6 82.407 A3 220.000 D5 587.330
F2 87.307 A#3 233.082 D#
5 622.254
F#2 92.499 B3 - Guitar 2 246.942 E5 659.255
G2 97.999 C4 261.626 F5 698.456
G#2 103.826 C#
4 277.183 F#5 739.989
A2 - Guitar 5 110.000 D4 293.665 G5 783.991
A#2 116.541 D#
4 311.127 G#5 830.609
B2 123.471 E4 - Guitar 1 329.628 A5 880.000
C3 130.813 F4 349.228 A#5 932.328
C#3 138.591 F#
4 369.994 B5 987.767
D3 - Guitar 4 146.832 G4 391.995 C6 1046.502
D#3 155.563 G#
4 415.305 C#6 1108.731
E3 164.814 A4 440.000 D6 1174.659
F3 174.614 A#4 466.164 D#
6 1244.508
F#3 184.997 B4 493.883 E6 1318.510
G3 - Guitar 3 195.998 C5 523.251
G#3 207.652 C#
5 554.365
Pitch / Frequency (Hz) Chart