mich turner's cake masterclass sample
DESCRIPTION
In her Cake Materclass Britain's Best Bakery Judge Mich Turner shows you how to create showstopper cakes like a pro.TRANSCRIPT

Cake Baking
10161CTP-pp014-045 Text Black UK.qxp 10/25/10 11:14 AM Page 14

17cake-making methods16 cake bak ing
CreamingCakes made by the creaming method rely on precisemeasurements, all the ingredients being at roomtemperature and the mixture being beaten well at eachstage. They also need to have air incorporated at eachof the beating stages to result in a well-risen cake,with even texture and a clean bite. The cake shouldnot be dense or crumbly.
Beat the butter and sugar together until really light andfluffy. This should be done with an electric whisk andwill take 10 minutes. If you do not have an electricwhisk, you will have to use a wooden spoon and beatfor a long time!
The eggs should be beaten together before beingadded a little at a time, with the whisk still beating, to prevent the mixture curdling (separating). If themixture does separate, simply add a spoonful of flourand continue beating in the egg. It will not ruin thecake, but the texture will be a little more dense.
Sift the flour in and fold it into the mixture carefullywith a metal spoon, to avoid breaking down the airbubbles that were created during the beating stages.
Stir in any final ingredients, then transfer the mixtureto the tin carefully, to preserve as much air as possible.
MeltingCakes made by the melting method are the mostreliable and so are perfect for beginners. They rely onthe addition of a strong raising agent (bicarbonate ofsoda), rather than the inclusion of air, to raise the cake.
Melt the sugar and butter or oil together, then combinethis liquid with the eggs. Stir the dry ingredients into themixture before transferring it to the tin. Bicarbonate ofsoda has a distinctive taste, so spices such as ginger,cinnamon and nutmeg are often added to these cakesto mask the flavour. These cakes tend to be verymoist, but are more dense in texture than other cakes.
All-in-oneFor all-in-one cakes, the ingredients must be at roomtemperature and accurately weighed. The method is as simple as it sounds: you put all the ingredients intoa bowl and beat them together with an electric whisk(or a wooden spoon, if you don’t have a whisk) untilthey are well combined. In addition to using self-raisingflour, you will need to add another raising agent (in thiscase baking powder). Baking powder is a gentler raisingagent than bicarbonate of soda, because although itdoes contain some bicarbonate of soda, it is blendedwith cream of tartar, which counterbalances the harshflavour. These cakes will have a similar, but more dense,texture to the creamed cakes.
TIP It is important to use fresh self-raising flour andbaking power, as their potency does fade over time.
WhiskingWhisked cakes have very little, if any, fat in them,relying instead on air being incorporated when theeggs and sugar are whisked together. These cakes areincredibly light and airy, making them a good choicefollowing a heavy meal, but must be eaten on the daythey are made as they will dry out quickly, having nobutter or oil to keep them moist.
Whisked cakes will generally be accompanied by acream- or butter-based filling, frosting or topping tointroduce a fat content to keep them moist andbalance the taste and texture.
Again, all ingredients should be at room temperature.Whisk the eggs and sugar until they are really pale andthick, which can take 10 minutes even with an electricwhisk. Stir in all the other ingredients carefully to avoidbreaking down the air bubbles.
There are several methods of cake making, resultingin different-style cakes. In this chapter I will show and explain thebasic methods, which include creaming, melting, all-in-one andwhisking, plus provide you with lots of delicious recipes. Somecakes have a delicious filling or frosting and are perfect for servingfor afternoon tea, whereas others are more suited to being used asa base for covering and decorating. There are also those that areversatile enough to be considered for either. I will identify thesewhere they are included in this chapter. As a rule of thumb, allingredients should be at room temperature unless otherwise stated.I like to use unrefined sugars, organic flours, organic free-rangeeggs, 70% cocoa solids plain chocolate and fresh fruits for zesting.
10161CTP-pp014-045 Text Black UK.qxp 10/25/10 11:14 AM Page 16

20 cake bak ing
1 Preheat the oven. Grease and line a deep 20cm (8in) cake tin with non-stick baking paper or use a non-stick cake tin. Ensure all the ingredients areat room temperature. Beat the butter, sugar and vanilla seeds together untilthey are light and fluffy (a).
2 Add the eggs a little at a time, beating well after each addition. If themixture starts to curdle, stir in 1 tablespoon of one of the flours. Beat in theyogurt. Sift the flours together and fold into the creamed mixture, followedby the milk. Spoon half the mixture into the base of the prepared cake tinand stir the raspberries and blueberries into the remainder (b). Spoon thismixture on top of the bottom layer and bake in the oven for 1 hour 20 minutes.
3 Remove the cake from the oven and leave to cool a little on a wire rack, thenturn out and leave to cool completely. To serve, spoon the crème fraîcheonto the top of the cake and dress with the raspberries and blueberries (c).
Note that this cake can settle and sink slightly overnight. It can therefore be a good idea to dowel tiers made using this recipe as close to the time ofstacking or blocking as possible (see pp.82–3), to ensure the cake is stable.
*TO STORE With no filling or topping, this cake will keep for 7 days wrappedin greaseproof paper or covered with marzipan and icing or chocolate.Alternatively, wrap the cake in a double layer of greaseproof paper andaluminium foil and place in the freezer for up to 1 month. This recipe isperfect to use as a base for a decorated celebration cake. Once the cake isfilled and covered, it must be refrigerated and eaten on the day.
For the cake:• 250g (9oz) unsalted butter,
plus extra for greasing• 250g (9oz) golden caster sugar• seeds from 1 vanilla pod• 5 large eggs, lightly beaten• 85g (31/4oz) plain flour• 250g (9oz) self-raising flour• 100g (31/2oz) full-fat Greek-style
coconut yogurt• 3 tbsp milk• 100g (31/2oz) raspberries • 100g (31/2oz) blueberries
For the topping:• 250ml (9fl oz) crème fraîche • 50g (2oz) raspberries• 50g (2oz) blueberries
• bake: fan 160˚C (325˚F) • conventional 180˚C (350˚F) gas mark 4
Madagascan Berry Vanilla Cake
a b c
Creaming • For a truly authentic flavour, it is imperative to use seeds from vanilla pods tomake this cake. The addition of Greek-style yogurt in the mixture gives the cake a lovelytexture, and the cake is finished off with a creamy berry topping.
10161CTP-pp014-045 Text Black UK.qxp 10/25/10 11:14 AM Page 20
Fillings andFrostings
10161CTP-pp046-061 Text Black UK.qxp 10/25/10 11:16 AM Page 46

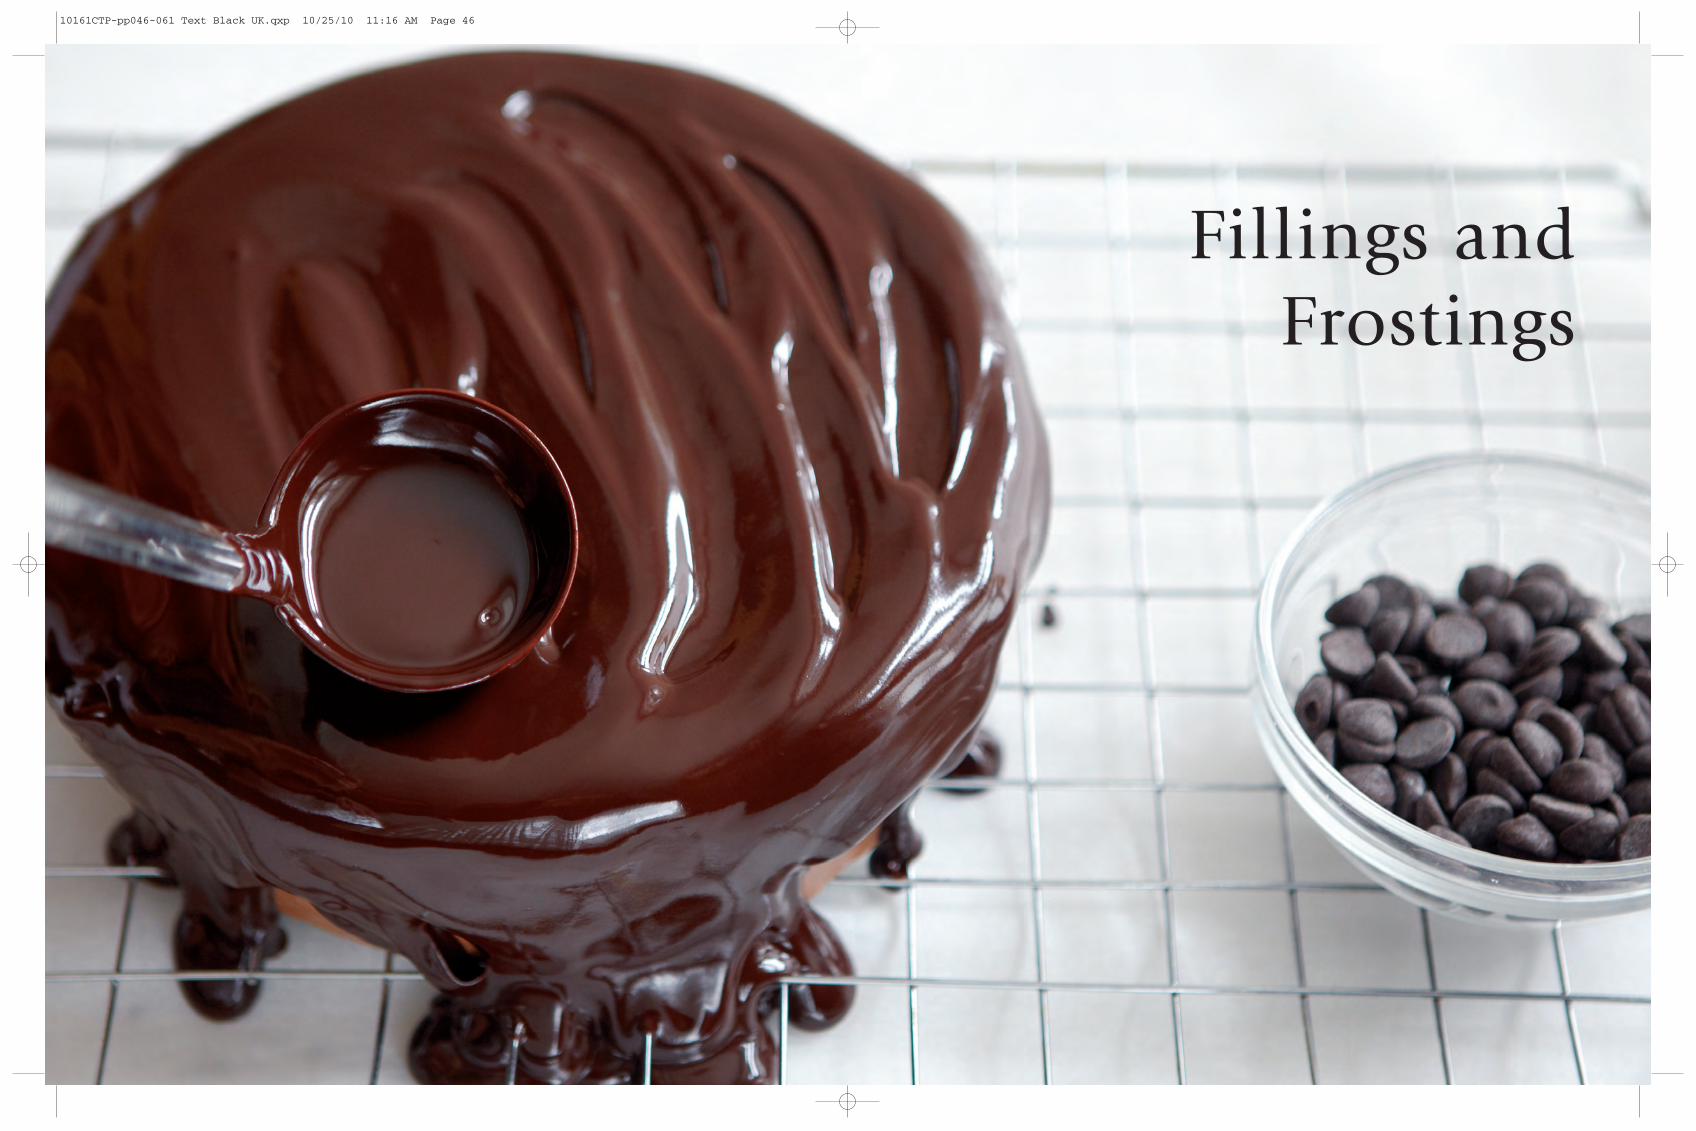
51chocolate ganache50 f i l l ings and f rost ings
1 Heat the double cream in a heavy saucepan until it begins to boil, then remove from the heat. Put thebutter and chocolate in a bowl and place over a pan ofsimmering water to warm gently until just beginning tomelt. Alternatively, melt in a microwave. Pour the creamover the chocolate and butter and stir gently to combine.
2 Beat the ganache with a wooden spoon until wellcombined, rich and glossy. Use straight away for pouringor allow to thicken for piping (see below). Alternatively,store in an airtight container in a refrigerator for up to 2 weeks or freeze for 3 months.
POURED GANACHE
1 Cover the top and sides of the cake with a thin layer ofbuttercream (see p.52) to seal the crumbs and edgesand create a smooth base for the ganache. Chill the cakefor 30 minutes in a fridge or 15 minutes in a freezer.
2 Place the cake on a wire rack over a sheet of siliconebaking paper. Warm the ganache (if necessary) in a bowlover a pan of simmering water until glossy and smooth,then ladle it over the top and sides of the cake, using thebase of the ladle or a palette knife to smooth it all over.Then, gently but firmly hold the wire rack and tap sharplyonto the worktop to even out the ganache and ensure allareas of the cake are covered.
3 Use a palette knife to lift the cake gently from belowto remove it from the rack and place it on a cake boardor stand. Leave to set at room temperature, which maytake 2–3 hours.
You will need:• 125ml (4fl oz) double cream• 250g (9oz) unsalted butter, diced• 500g (1lb 2oz) plain chocolate (70%
cocoa solids), broken into pieces
• This makes enough to cover a 20cm(8in) cake with leftovers for piping.
Chocolate Ganache
Chocolate ganache is the result of combining chocolate with creamto create a rich, velvet-smooth filling or frosting. Served warm, thiscan be poured over cakes for a wonderful frosting. Once chilled, itbegins to thicken and can be used for piping pearls, beads or scrollsonto cakes (see opposite). It can also be combined with a basicvanilla buttercream (see p.52) to make a decadent filling for cakes.
PIPED GANACHE
Ganache will thicken as it cools to room temperature.Beat well until it is firm enough to hold its shape, thenspoon into a piping bag fitted with the appropriate icingnozzle. Note that if the ganache sets too firm in thepiping bag or nozzle, you will need to empty the bag and gently reheat the ganache before filling a fresh bag.
TIP Warm the nozzle by running it under warm water anddrying well before filling the piping bag with ganache. Thiswill help to prevent the ganache setting in the nozzle andpiping bag.
1
2
10161CTP-pp046-061 Text Black UK.qxp 10/25/10 11:17 AM Page 50

Careful Coveringand Stacking
10161CTP-pp062-083 Text Black UK.qxp 10/25/10 11:47 AM Page 62

65carefu l cover ing and stack ing64 carefu l cover ing and stack ing
MarzipanThe role of marzipan as a base coat is threefold:
• It gives the cake a really firm, smooth foundation onwhich to apply the top coat of sugar paste, chocolateplastique or royal icing.
• It is oil based (being made from almonds), whichmeans it is perfect for locking in moisture, so helpingto keep cakes moist.
• It will mask the colour of the cake bleeding throughto the icing.
For a single-tier birthday cake, which may be servedand eaten within 2–3 days of baking, it is not essentialto cover it with marzipan first. I would, however, coverit with two thinner layers of sugar paste.
For a multi-tiered wedding cake, however, it is essentialto have the initial layer of marzipan to ensure the cakesare firm and can support the dowels.
For fresher cakes (such as chocolate, vanilla and lemon),you could substitute the marzipan with a base coat ofwhite chocolate plastique before adding the top coat.
Sugar paste Sugar paste is a sweet icing rolled out like marzipanand used as the top coat for many celebration cakesand for lining boards. It is available commercially in avariety of colours, although white, ivory and chocolateare the most popular. Made from sugar, glucose syrup,water and a little vegetable oil, it covers beautifully anddries to a firm smooth finish with a soft sheen, andcan easily be cut with a knife. It is the perfect canvasfor further decoration, including hand piping, mouldingand painting, as it is less porous than royal icing. It canbe stored safely in a sealed polythene bag for up to 12 months and should be kneaded with minimal icingsugar until it is pliable and soft but not sticky.
BRUSHING WITH ALCOHOL
Cakes to be covered with sugar paste should have a base coat of marzipan, sugar paste or chocolateplastique, which should be brushed with brandy, orother alcohol, before the sugar paste top coat is applied.This reacts gently with the sugar in the base coat,forming a sticky glue for the sugar paste to adhere to.The alcohol acts as an antiseptic to help prevent mouldgrowth between marzipan and sugar paste layers,which is of particular concern on a fruit cake, which
may be covered and decorated some considerabletime before the celebration. This is less likely for afreshly baked sponge-based cake, as they are generallyprepared within a week of the celebration and eatensoon after. There is little flavour added to the cakeitself, so this is not a major concern for children’s cakes.However, you can use cooled boiled water instead.Note that using boiled jam, as for attaching marzipan,is unsuitable here: it is too viscous and creates lumps.
Chocolate plastique Chocolate plastique is malleable, yet sets firm and canbe used to make hand-moulded roses, cut-out leavesand collars and fans for helterskelter-style cakes (seep.164). The roses, leaves and fans can be made up to 3 months in advance and stored in an airtight containerat room temperature. They are perfect decorations forfinishing individual cakes, adding to poured ganachechocolate cakes or adorning majestic wedding cakes.
Chocolate plastique on its own can be rather chewy,so it is best to mix it 1:1 with white or chocolate sugarpaste when using it to cover cakes. White chocolateplastique (see p.74) is the perfect base coat for sponge-based cakes – such as vanilla, lemon or chocolate – asan alternative to marzipan. It creates a good base for atop coat of white or dark chocolate plastique (see p.75),or sugar paste. Follow the instructions for coveringcakes with sugar paste.
Chocolate-covered and -decorated cakes tend to beless formal, less refined and more sculptural than icedcakes, with real wow factor. They can be easier tomake, as many of the components are made ahead.However, cakes covered with a top coat of chocolateplastique will be more susceptible to temperaturefluctuations. They will be very stable under the rightconditions but will be badly affected by moisture,humidity and direct sunlight.
As a rule of thumb:
• Cakes should not be refrigerated: they are quitehappy at room temperature.
• Cakes should not be allowed to get wet (avoidcarrying these cakes to and from party venues in therain, unless well covered).
• Cakes will droop if the humidity is high – which is ofparticular concern in marquees with no air conditioning.
• Cakes should not be placed in direct sunlight, as thiswill cause the chocolate to melt.
In this chapter I will show you how to cover avariety of shapes and sizes of cakes with marzipan, sugar paste,chocolate plastique and royal icing. A flawless covering is fundamentalto having the perfect canvas on which to decorate your cakes. Don’tworry if your cakes are not perfect when starting out, as manyundulations, bumps and bulges can be masked when you add thedecoration later on. However, do practise on a dummy tier ofpolystyrene, if possible, as it can really help to build your confidence.Once your cakes are covered, I will show you how to dowel and stackthem successfully so that they are secure, safe and even.
Note that cakes covered with marzipan and icing or chocolateplastique cannot be refrigerated once covered, as the icing orchocolate will pick up moisture in the fridge, which wouldadversely affect the texture.
TIPS Always wear a plain white cotton t-shirt whenworking, so that any fibres that land in the icing (you’dbe surprised!) don’t show up. Also, ensure you have allthe equipment you need to hand, including a clean dampcloth, and sharpen your knife to give it a really cleanedge. I like to work with a silicone rolling pin rather thana wood or marble one, as the former can impart a graineffect and the latter can affect the temperature of thecovering.
10161CTP-pp062-083 Text Black UK.qxp 10/25/10 11:47 AM Page 64

86 masterc lass
In this chapter I am going to show you the tricksof my trade. These will enable you to build up your own repertoireof intricate decorations that can be applied to so many cakedesigns. The masterclass will include hand piping, hand moulding,hand painting, cutters and ribbons. Many of these techniques arerelatively simple, yet effective to achieve, making them relevant to acommercial market and the time-strapped cake decorator. Beautifulwired flowers can look stunning, but they are painstaking andlengthy to make. I have therefore made a conscious decision not toinclude these in this book, focusing more on a larger number ofless time-consuming techniques. You will find cakes featuring allthese general techniques in the Cake Gallery (pp.116–211).
10161CTP-pp084-115 Text Black UK.qxp 10/25/10 12:07 PM Page 86

99hand mould ing98 masterc lass
Hand moulding
Hand-moulded decorations can include just aboutanything, from flowers, animals and insects to boats, carsand figurines. These models are an effective decoration,requiring a set of professional tools and nimble fingers.The beauty is that the models can be made well in advanceand lifted onto the covered cake, allowing the decorator tobuild up confidence. I have included hand-moulded roses,bumble bees and ladybirds in this masterclass section, asthey can be used on so many cake designs – from cupcakes to crown cakes, single-tier party cakes to fully tieredwedding cakes. You will find more specific projects usinghand moulding in the Cake Gallery section.
Hand-moulded rose
Once mastered, this method of making a hand-moulded rose is quick andeasy, and you should be able to make a rose in less than 1 minute! Themethod here refers only to making sugar paste roses, but you can use thesame method for making chocolate plastique or petal paste roses. Sugarpaste roses are perfect for crown cakes or larger cakes where they areactually going to be eaten. Chocolate plastique roses can be made in white,milk or dark chocolate plastique. You could even try making the centre petalswith darker shades and use lighter shades on the outside. Petal paste rosesare for more delicate decorations and, whilst more refined, will be too hardand brittle to consume. If making petal paste roses, use no more than 50g(2oz) at a time. See overleaf for the full process. For a spectacular finishingtouch, these roses, which can be made in varying sizes, can all be sprayedand then dredged in edible glitter.
On a clean worktop, knead the sugar paste until pliablebut not soft and warm. Work on a piece of paste weighingno more than 150g (51/2oz) at a time, and keep theremainder in a sealed polythene bag to prevent it dryingout. The paste should be gently tacky but not sticky. Usethe icing sugar to dust sparingly if the paste is particularlywarm and sticking.
Use the whole flat of your hand to roll it into a sausage –the diameter should be 1.5cm (15/8in) for a small rose,2.5cm (1in) for medium and 4cm (11/2in) for large.
1 Trim the end with a sharp knife and set aside. Cut 6discs per rose from the sausage – the thickness for eachshould be 4mm (1/8in), regardless of the size of thefinished rose.
2 Open the plastic document holder and lay the 6 discsdown with the straight edge facing you and the roundededges facing away. Replace the cover of the pouch overthe discs.
3 With the base of your thumb, gently and quickly presseach disc just once to begin to flatten them slightly. (Youwill need to work fairly swiftly to prevent the paste fromdrying out and cracking.)
4 To thin the petals, start at the base side of each petal,smoothing your thumb around the curved edge of thepetal in a smooth motion. Leave the flat base of eachpetal untouched.
5 Gently lift up the plastic and look for the smallest petal.
6 Using your thumb, gently rub the petal, starting fromthe thick, chunky base, to release it from the plastic.
7 As the petal comes away, turn it over so it naturallycurls away from you, and lay it over your first finger. Thethinner, rounded petal part should be facing away fromyou over your finger, while the thicker, chunky baserests this side of your finger, parallel to your finger.
8–9 Starting on one side of the petal, gently roll it,curling it up horizontally across your finger inwards toform the centre of the rose.
10 Rub the second petal off the plastic in the same wayand lay it over your finger. Lay the seam or join of thecentral rose in contact with the second petal, so that thetop of the central rose is halfway down the second petal.(Do not be tempted to lay the central rose too high.)
11 Gently pinch the second petal around the base of thecentral rose. Use your finger to gently press and shapethe outer edge of the second petal down.
12 Repeat with the third petal, laying the seam of thesecond petal in the centre of the third petal, so the topof the rose is halfway down the third petal.
13 Pinch around the base and gently shape the petal.
14–17 The final 3 petals form the outer layer of the rose.Lay, pinch and shape them in exactly the same way, sothat each covers one third of the outer layer of the rose.
18 Use a sharp knife to slice the chunky base off therose and set aside on a cake board to firm for about 2 hours.
TO STORE The roses can be kept safely in an airtightcontainer at room temperature for up to 3 months.
You can use sugar paste to make thehand-moulded roses in this section,but for finer-detailed or much largermodels, use petal paste (also knownas modelling paste). This is similar tosugar paste, with the addition of gumtragacanth, which allows the paste tobe rolled or handled in a much thinnerand finer form than usual, and setsreally firm very quickly. Petal pastecan be bought from specialist cakedecorating stores. Alternatively, add1 tsp gum tragacanth powder to 100g(31/2oz) sugar paste and knead well.
The paste will need to be kept in asealed freezer bag when not beingused to prevent it from drying out.Use white fat, or shortening, such asTrex, on your fingertips if the pasteis a little dry or crumbly.
Invest in a set of modelling tools –these include a ball tool, markers, a smiley tool, a pokey tool, a foampad, a friller, some sugar glue,paintbrushes and scissors.
For light dusting, make a smalldusting bag using a square of muslinfilled with a mixture of icing sugarcombined with cornflour, tied upwith an elastic band.
You will need:• sugar paste, as follows:for a 6cm (21/2in) diameter rose: 50g (2oz) for a 3cm (11/4in) diameter rose:25g (1oz) for a 2cm (3/4in) diameter rose:15g (1/2oz)
• icing sugar, for dusting
Equipment:
• knife• A4 plastic document holder cut
open on 3 sides with a pair ofscissors or knife
10161CTP-pp084-115 Text Black UK.qxp 10/25/10 12:14 PM Page 98

100 masterc lass
1 2 3
4 5 6
7 8 9
101hand mould ing
10 11 12
13 14 15
16 17 18
10161CTP-pp084-115 Text Black UK.qxp 10/25/10 12:15 PM Page 100

118 cake ga l lery
Welcome to the Cake Gallery. The collection of cakesin this section will feature techniques I have covered in theMasterclass, with additional skills specific to each design. Whetheryou want to create a selection of beautiful afternoon tea cakes, a funbirthday cake or a stunning four-tier wedding cake adorned withflowers and painted couture roses, my intention has been to giveyou a number of designs aimed at putting all your new skills intopractice. Many of these designs are interchangeable, and I wouldencourage you to experiment to create your own cakes using thesedesigns as inspiration.
10161CTP-pp116-149 Text Black UK.qxp 10/25/10 12:28 PM Page 118

135purp le aza lea lace
You will need:• 15cm (6in), 20cm (8in) and
25cm (10in) round cakes • 15cm (6in), 20cm (8in) and
25cm (10in) roundpolystyrene dummies, 2.5cm(1in) deep
• marzipan, sugar paste orwhite chocolate plastique,for the base coat (see pp.71and 72 for quantities)
• white sugar paste, for thetop coat (see p.72 forquantities)
• 33cm (13in) and 40cm (16in)round base boards
• purple sugar paste (see p.68)for the base boards (see p.72for quantities)
• 2.25m (7ft 6in) purple ribbon,35mm (11/2in) wide
• 2.5m (8ft 3in) purple ribbon,15mm (5/8in) wide
• 1 quantity purple royal icing(see pp.77–8)
• 12 dowelling rods• 45 white azalea-style roses
with purple centres (see thepoppy method on p.107)
• 3 fabric azaleas, to dress
Equipment:
• tracing paper and fine-linerpen
• small sharp scissors• turntable• pokey tool• 2 piping bags• no. 1.5 and no. 2 icing
nozzles
Purple Azalea Lace
This cake has been surrounded with deep purple ribbon, decorated with our hand-pipedLittle Venice Cake Company lace design and finished with rows of open azaleas withhand-piped pearls. This contemporary wedding cake combines pressure piping in a boldpurple colour, with the azalea-style roses. Less forgiving than hand piping in white, thistechnique will certainly test your skills. I have chosen to use a wide ribbon around the base of each tier to frame the azaleas and to still allow the hand piping to be fullyappreciated. To make the tiers super deep, with an overall height of 10cm (4in), each cake is placed on a 2.5cm (1in) deep polystyrene dummy of the same size as the cakebefore covering.
Decorating the cake1 Trace the LVCC Lace design on p.216 and transfer onto the cakes with thepokey tool as a single row around the base of each tier directly above theribbon. Place the top tier on a turntable.
2 Fit 1 of the piping bags with the no. 2 nozzle and fill with half the purpleroyal icing. Pressure-pipe the LVCC lace design (see pp.94–5) around the toptier, before moving on to the middle then base tiers (a). Leave to dry overnight.
3 Fit the second piping bag with the no. 1.5 nozzle and fill with the remainingpurple royal icing, then pipe pearls in the centre of each of the azalea-styleroses (b). Leave to dry overnight. Dowel and direct stack the top 3 tiers,using 6 dowels per tier, as shown on p.83. Surround each tier with theroses, iced directly on to the deep purple ribbon. Finally, lay the fabricazaleas on the top tier.
a b
Preparing the cakePlace each cake on a same-size polystyrene dummy and cover both the cakeand dummy together with a base coat of your choice, as shown on p.71, andthe white sugar paste top coat, as shown on p.72. Line the base boards withpurple sugar paste, as shown on p.73. Surround all the tiers with 35mm (11/2in)purple ribbon, fixed into position with a dab of royal icing, and the base boardswith 15mm (5/8in) purple ribbon, fixed with glue. Leave to dry overnight.
10161CTP-pp116-149 Text Black UK.qxp 10/25/10 12:31 PM Page 134

180 cake ga l lery
Preparing the cakeCover the cake with one coat of dark chocolate plastique, as shown on p.71.Line the base board with red sugar paste topped with glitter, as shown onp.73 (reserving some for the holly berries). Surround the base board with thered ribbon, fixed with glue. Leave the cake and base board to dry overnight.
Knead the white sugar paste until smooth and pliable and roll out on aworktop dusted with icing sugar to approximately a 20cm (8in) circle, 3mm(1/8in) thick. Cut a scalloped edge all the way around. Brush the top of thecake with cooled boiled water and place the white sugar paste into positionover the top of the cake.
Decorating the cake1 Knead the green sugar paste until smooth and pliable and roll out to athickness of 3mm (1/8in). Cut out 3 holly leaves, using the holly-leaf cutter.
Penguin Pudding
How cute is this Christmas cake? Our cheeky penguin, standing with his chef’s hat andwooden spoon, is hand moulded. The cake has been baked in a pudding mould and thencovered with chocolate plastique and finished with cut-out holly leaves and glitter berries.Guaranteed to fill you with festive cheer!
You will need:• 15cm (6in) quantity of
chocolate truffle torte recipe(see p.22) cooked in a450ml (1 pint) puddingbasin, 14cm (51/2in) indiameter
• 1 quantity dark chocolateplastique (see p.75)
• 23cm (9in) round base board • red sugar paste (see p.68),
for the base board (see p.72for quantity)
• edible varnish or sugar glue• red edible glitter • 80cm (32in) red ribbon,
15mm (3/8in) wide • 100g (31/2oz) white sugar
paste• icing sugar, for dusting• 75g (3oz) green sugar paste
(see p.68)• 50g (2oz) red sugar paste• royal icing, for fixing• cutter white snowflakes
(see p.189), optional
For the penguin:
• 20g (3/4oz) light brown petalpaste
• 80g (3oz) white petal paste• 80g (3oz) white sugar paste • food colourings in black and
orange• stick of spaghetti, broken to
give a 6cm (21/2in) piece anda 3cm (11/4in) piece
Equipment:
• paintbrush (optional)• glue stick• small rolling pin• 8cm (31/4in) holly cutter• marking tool• sharp knife• pastry brush• 3.5cm (11/2in) round cutter 1
10161CTP-pp150-183 Text Black UK.qxp 10/25/10 12:44 PM Page 180