microsoft word - c4cfirsttimeregistrationguide.doc€¦ · web view2. administrative rights set...
TRANSCRIPT

FIRST TIME PC AND VASCO TOKEN REGISTRATION PROCESS FOR C4C
C4C FIRST TIME PC AND VASCO TOKEN REGISTRATION PROCESS v7.5
SHELL C4C HELPDESK CONTACTS
For any issues please use the following dedicated Shell C4C Helpdesk numbers
Kazakhstan : +88005550079 Malaysia : 1-800-88-1507 Netherlands : 0800 0292059 Russia : +8800 700 9918 United Kingdom :0800 0284350 USA : +1 800 309 8352
REGISTRATION OVERVIEW
IMPORTANT: THIS IS A MUST READ SECTION.
The purpose of the first time registration process is to ensure your corporate (non-Shell) PC is configured properly to use the C4C Service and that your corporate (non-Shell) PC and Vasco token are registered for use. Without going through this process you will be unable to access C4C Service.
Pre-requisites: During the registration you are taken through a series of configuration steps to ensure your corporate (non-Shell) PC and your Web Browser are configured correctly. The key configuration steps are:
1. Anti-Malware Software installed2. Administrative rights set on your corporate (non-Shell) PC3. Active-X enabled for Internet Explorer or Java Runtime Environment (JRE) installed for Firefox.4. Vista Users: Add Shell.com to the list of trusted sites if using Internet Explorer
More information on the pre-requisites can be found in the ‘C4C Pre-requisite guide’ at:http://www-static.shell.com/static/c4c_v2/downloads/help/C4CPrerequisiteGuide.pdf
You are strongly advised to go through the C4C Pre-requisite Guide and check the pre-requisites in advance of starting the registration process.
PC registration: You must register your corporate (non-Shell) PC which you will use to access the C4C Service. You can only have one PC registered to you at all times. If you try to access your C4C Account from a different PC to one you registered you will be presented with a locked down version of C4C – Secure Virtual Workspace (SVW).
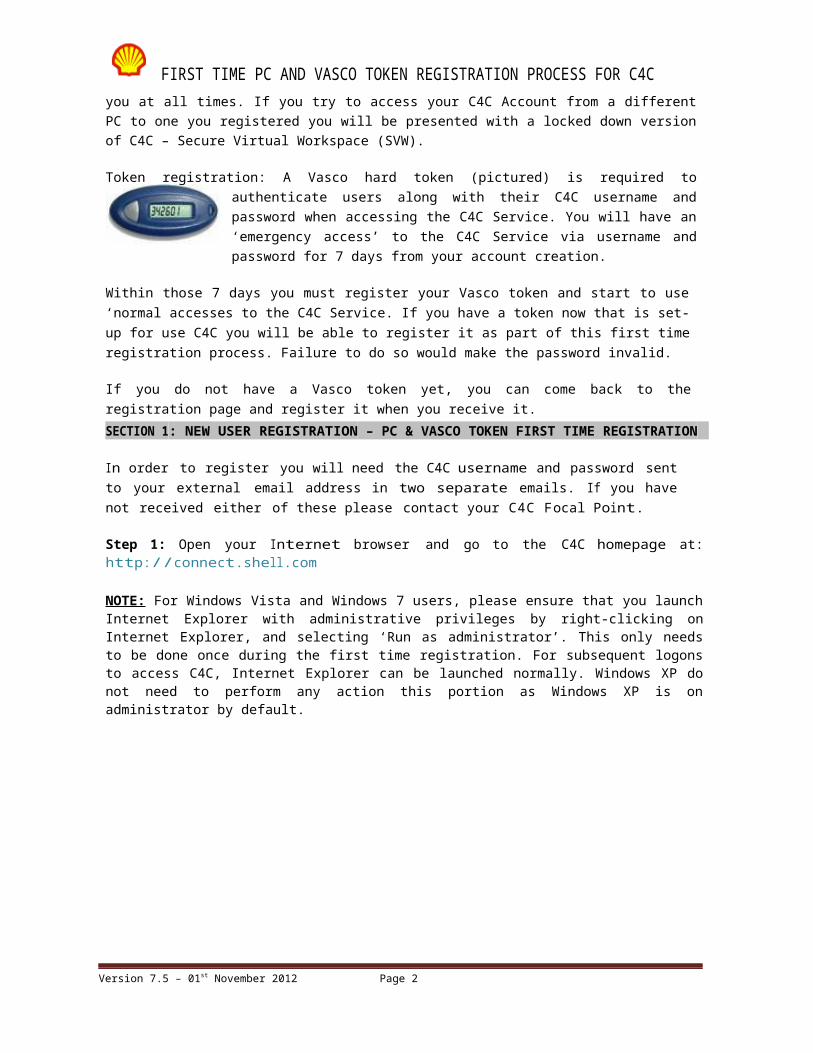
Token registration: A Vasco hard token (pictured) is required to authenticate users along with their C4C username and password when accessing the C4C Service. You will have an ‘emergency access’ to the C4C Service via username and password for 7 days from your account creation.
Within those 7 days you must register your Vasco token and start to use ‘normal accesses to the C4C Service. If you have a token now that is set-up for use C4C you will be able to register it as part of this first time registration process. Failure to do so would make the password invalid.
If you do not have a Vasco token yet, you can come back to the registration page and register it when you receive it.SECTION 1: NEW USER REGISTRATION – PC & VASCO TOKEN FIRST TIME REGISTRATION
Version 7.5 – 01st November 2012 Page 1
FIRST TIME PC AND VASCO TOKEN REGISTRATION PROCESS FOR C4C
In order to register you will need the C4C username and password sent to your external email address in two separate emails. If you have not received either of these please contact your C4C Focal Point.
Step 1: Open your Internet browser and go to the C4C homepage at: http://connect.shell.com
NOTE: For Windows Vista and Windows 7 users, please ensure that you launch Internet Explorer with administrative privileges by right-clicking on Internet Explorer, and selecting ‘Run as administrator’. This only needs to be done once during the first time registration. For subsequent logons to access C4C, Internet Explorer can be launched normally. Windows XP do not need to perform any action this portion as Windows XP is on administrator by default.
Step 2: Click the link under the ‘Registration’ heading.
Step 3: Select a regional gateway to connect to.
Step 4: Enter your C4C username and password and click ‘Sign-In’.
Step 5: Once you are successfully signed in the Pre-requisite is ini t iated Pre-Requisite Step 1: Confirm you are using a non-Shell PC by selecting the checkbox at the bottom of the page and click ‘Next’.
Version 7.5 – 01st November 2012 Page 2

FIRST TIME PC AND VASCO TOKEN REGISTRATION PROCESS FOR C4C
Pre-Requisite Step 2: Confirm supported Anti-malware software installed”. Follow the onscreen instructions and once you have confirmed you have a l l supported software installed, select the checkbox at the bottom of the page and click ‘Next’.
Pre-Requisite Step 3: Confirm that you have administrative rights on your P C . Follow the onscreen instructions and once you have confirmed you have administrative rights, select the checkbox at the bottom of the page and click ‘Next’.
Pre-Requisite Step 4: Confirm that your browser is configured correctly. Follow the onscreen instructions and once you have confirmed you browser is configured correctly, select the checkbox at the bottom of the page and click ‘Next’.
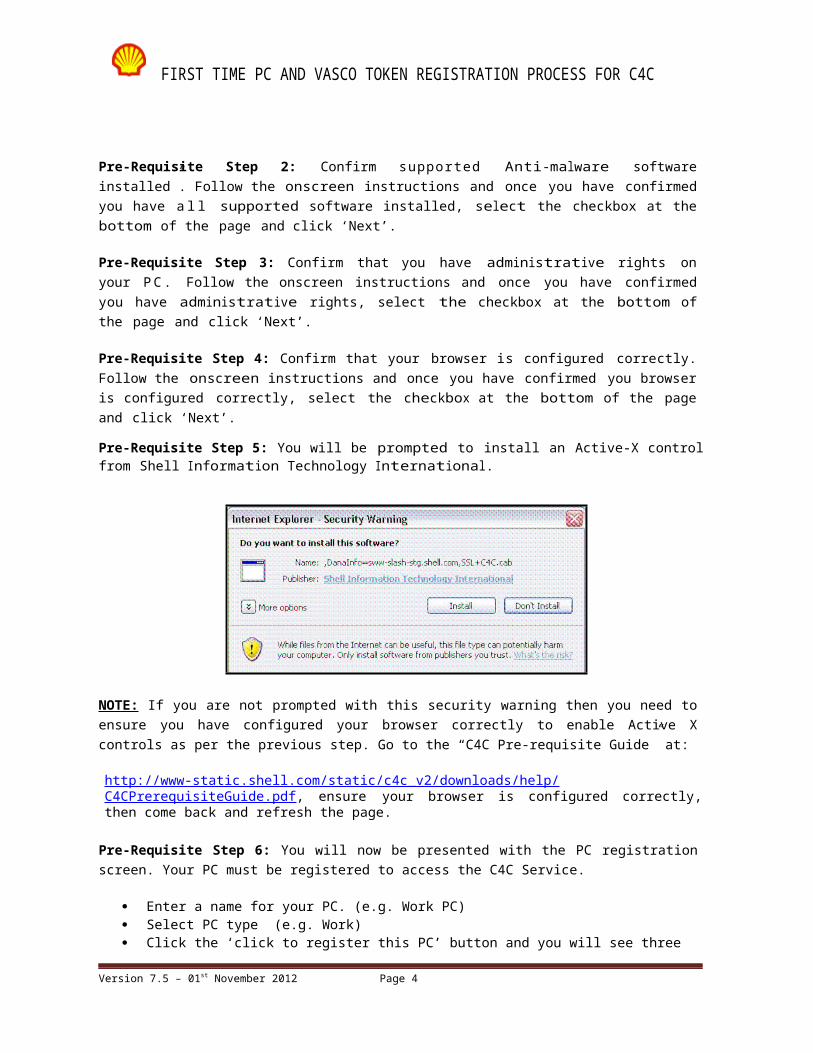
Pre-Requisite Step 5: You will be prompted to install an Active-X control from Shell Information Technology International.
NOTE: If you are not prompted with this security warning then you need to ensure you have configured your browser correctly to enable Active X controls as per the previous step. Go to the “C4C Pre-requisite Guide” at:
http://www-static.shell.com/static/c4c_v2/downloads/help/C4CPrerequisiteGuide.pdf, ensure your browser is configured correctly, then come back and refresh the page.
Pre-Requisite Step 6: You will now be presented with the PC registration screen. Your PC must be registered to access the C4C Service.
Enter a name for your PC. (e.g. Work PC) Select PC type (e.g. Work) Click the ‘click to register this PC’ button and you will see three status messages:
o Gathering Information
Version 7.5 – 01st November 2012 Page 3
FIRST TIME PC AND VASCO TOKEN REGISTRATION PROCESS FOR C4Co Building machine fingerprint
o Checking User trust status Click the ‘Submit’ button
Pre-Requisite Step 7: You will also be presented with the Shell Personal Question and Answer (SPQA) page. You are required to complete the question and submit. Once done please close the window.
IMPORTANT NOTE REGARDING THE: NEXT REGISTRATION STEP:
A Vasco token is needed to access the C4C Service long term. However in certain circumstances you may not have received your token yet.
If you do not have a Vasco token set-up for the C4C Service you should close your Internet Explorer Browser and exit at this step.
You will be able to access the C4C Portal via ‘emergency accesses at http://connect.shell.com for 7 days from your account creation.
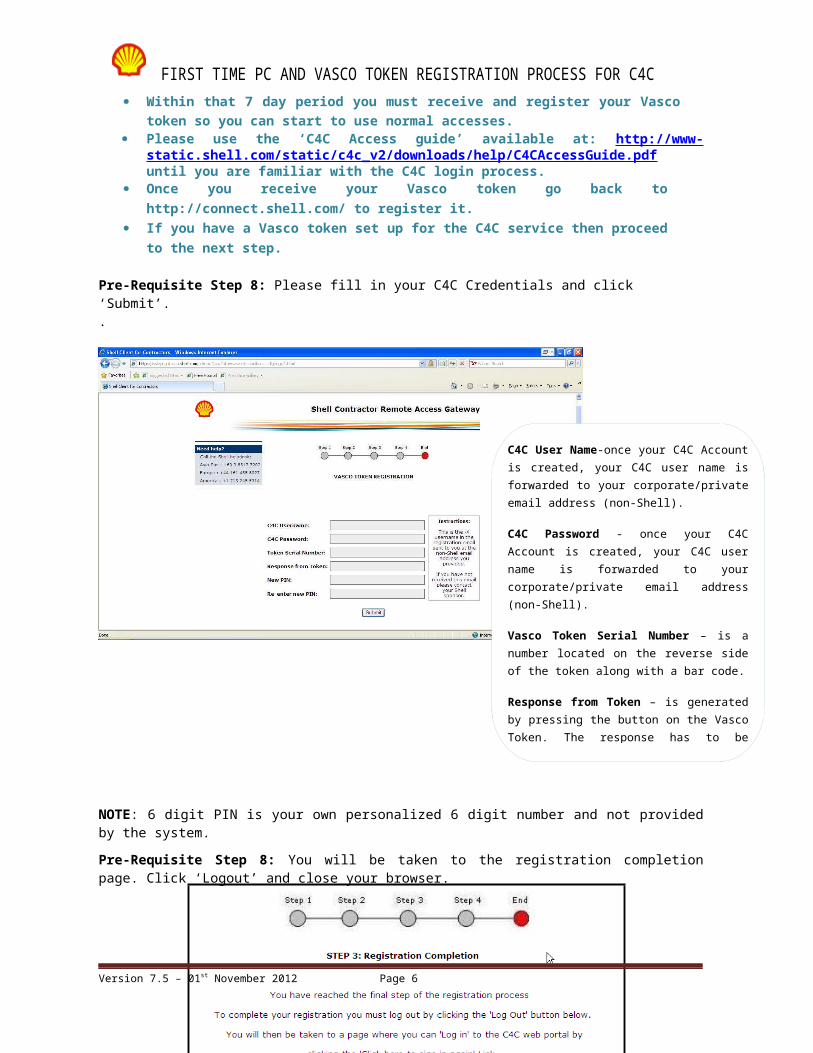
Within that 7 day period you must receive and register your Vasco token so you can start to use normal accesses.
Please use the ‘C4C Access guide’ available at: http://www-static.shell.com/static/c4c_v2/downloads/help/C4CAccessGuide.pdf until you are familiar with the C4C login process.
Once you receive your Vasco token go back to http://connect.shell.com/ to register it. If you have a Vasco token set up for the C4C service then proceed to the next step.
Pre-Requisite Step 8: Please fill in your C4C Credentials and click ‘Submit’..
Version 7.5 – 01st November 2012 Page 4

FIRST TIME PC AND VASCO TOKEN REGISTRATION PROCESS FOR C4C
NOTE: 6 digit PIN is your own personalized 6 digit number and not provided by the system.
Pre-Requisite Step 8: You will be taken to the registration completion page. Click ‘Logout’ and close your browser.
Pre-Req Step 9: Congratulations! You have successfully completed all registration activities. You will now be able to access the C4C Portal via ‘normal accesses at http://connect.shell.com
NOTE: Please use the ‘C4C Access Guide’ available at the C4C homepage at: http://www-static.shell.com/static/c4c_v2/downloads/help/C4CAccessGuide.pdf until you are familiar with the login process.
Version 7.5 – 01st November 2012 Page 5
C4C User Name-once your C4C Account is created, your C4C user name is forwarded to your corporate/private email address (non-Shell).
C4C Password - once your C4C Account is created, your C4C user name is forwarded to your corporate/private email address (non-Shell).
Vasco Token Serial Number – is a number located on the reverse side of the token along with a bar code.
Response from Token – is generated by pressing the button on the Vasco Token. The response has to be generated separately for each attempt to log in.
New PIN – please create your personalised 6 digit PIN and re-enter it in the confirmation unique six digit pin for your Vasco Token and re-enter it in the confirmation tab.
FIRST TIME PC AND VASCO TOKEN REGISTRATION PROCESS FOR C4CSECTION 2: ACCESSING THE C4C SERVICE
Step 1: Open your Internet Browser and go to the C4C Homepage at: http://connect.shell.com
Step 2: Click the link under the ‘Access C4C’ heading.
Step 3: Select a regional gateway to connect to.
Step 4: Type in your login id and C4C password that was forwarded to your external email in the Normal login. Pin + OTP Token are referring to your newly created 6 digit Pin plus the OTP token (pin number obtain from the Vasco Hard Token Screen when you press its button)
Step 5: You will be forwarded to a welcome screen (as shown below).
NOTE: WSAM icon appears in system tray. It is to indicate installed and status is running.
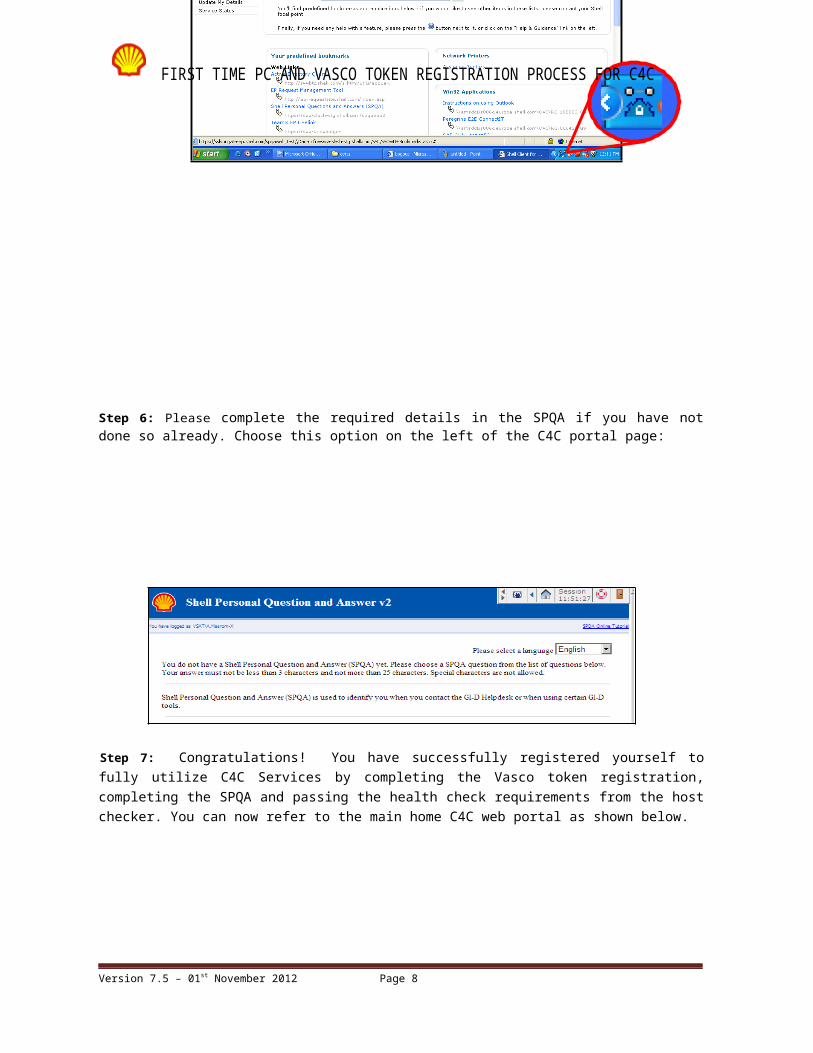
Step 6: Please complete the required details in the SPQA if you have not done so already. Choose this option on the left of the C4C portal page:
Version 7.5 – 01st November 2012 Page 6

FIRST TIME PC AND VASCO TOKEN REGISTRATION PROCESS FOR C4C
Step 7: Congratulations! You have successfully registered yourself to fully utilize C4C Services by completing the Vasco token registration, completing the SPQA and passing the health check requirements from the host checker. You can now refer to the main home C4C web portal as shown below.
Step 8: Accessing Pre-Defined Bookmarks: Click on this link to access the web and file share resources you have requested to be made available via C4C.
Step 9: Accessing File shares: Using these links you can access the download and configuration information for any Share folder you have requested.
Version 7.5 – 01st November 2012 Page 7
FIRST TIME PC AND VASCO TOKEN REGISTRATION PROCESS FOR C4C
Step 10: Accessing Network Printer: Using the link below you can access names of printers that have been assigned to you.
Step 11: Accessing Win32 applications:
a. To start using Win32 applications, you are required to have the application installed and configured onto your PC first
b. Once that is completed. Please make sure WSAM is started. (As shown below)
You will be able to see this icon in your system tray . This will confirm that you successfully installed and run WSAM on your PC.
INFO: Accessing Help and Guidance:
By accessing Help and Guidance link, you will be forwarded list of links that includes instructions and guidance as listed below:
1. First time registration and Initial Access Guide2. Configuration Guides3. General End User Guides4. Resource Configuration Guides5. Troubleshooting
Version 7.5 – 01st November 2012 Page 8