mict operator's manual
TRANSCRIPT

Operator's Manual
Masimo Instrument Configuration Tool™


Masimo Corporation www.masimo.com 1
These operating instructions provide the necessary information for proper operation of all models of MICT. There may be information provided in this manual that is not relevant for your system. General knowledge of pulse oximetry and an understanding of the features and functions of MICT are prerequisites for its proper use. Do not operate MICT without completely reading and understanding these instructions.
CAUTION: Federal (USA) law restricts this device to sale by or on the order of a physician.
Notice: Purchase or possession of this Masimo Configuration Utility compact disc or software does not carry any express or implied license to use this software with any device that is not an authorized device or separately authorized to use this Configuration Utility software.
For professional use. See instructions for use for full prescribing information, including indications, contraindications, precautions, and adverse events.
Masimo Corporation 52 Discovery Irvine, CA 92618, USA Tel.: 949-297-7000 Fax.: 949-297-7001 www.masimo.com
EU authorized representative for Masimo Corporation:
MDSS GmbH Schiffgraben 41 D-30175 Hannover, Germany
Patents: www.masimo.com/patents.htm
, Masimo, Radical-7, Radius-7, and Root are federally registered trademarks of Masimo Corporation.
Masimo Instrument Configuration Tool, Rad-67, and Rad-97 are trademarks of the Masimo Corporation. All other trademarks and registered trademarks are property of their respective owners.
© 2018 Masimo Corporation


Masimo Corporation www.masimo.com 3
Contents About This Manual ..................................................................................................................................................................................................................................... 5
Product Description and Intended Use ..................................................................................................................................................................................................... 7
Product Description .............................................................................................................................................................................................................................. 7
Key Features .......................................................................................................................................................................................................................................... 7
Intended Use ........................................................................................................................................................................................................................................ 7
Safety Information, Warnings and Cautions ............................................................................................................................................................................................. 9
Chapter 1: Description ............................................................................................................................................................................................................................. 11
MICT Overview .................................................................................................................................................................................................................................... 11
Serial and Network Cables .................................................................................................................................................................................................................. 13
Chapter 2: Installing and Uninstalling MICT .......................................................................................................................................................................................... 15
Installing MICT ................................................................................................................................................................................................................................... 15
Uninstalling MICT............................................................................................................................................................................................................................... 15
View MICT Software Version ............................................................................................................................................................................................................... 15
Chapter 3: Setting Up .............................................................................................................................................................................................................................. 17
Connecting MICT to a Masimo Device ................................................................................................................................................................................................ 17
Chapter 4: Operation ............................................................................................................................................................................................................................... 31
Working with Parameter Values ......................................................................................................................................................................................................... 31
Working with User Defined Profiles ................................................................................................................................................................................................... 33
Power on Profile ................................................................................................................................................................................................................................. 36
Saving and Loading a Workspace ...................................................................................................................................................................................................... 36
Downloading Trends ........................................................................................................................................................................................................................... 37
Configuring NIBP Schedules .............................................................................................................................................................................................................. 38
Sending a Scoring Template ............................................................................................................................................................................................................. 40
Sending a Policy File .......................................................................................................................................................................................................................... 40
Connecting to Masimo Systems ......................................................................................................................................................................................................... 41
Connecting to Kite .............................................................................................................................................................................................................................. 42
Rad-97 CCHD Mode ............................................................................................................................................................................................................................. 42
Root Vital Signs Check........................................................................................................................................................................................................................ 43
Chapter 5: Messages ................................................................................................................................................................................................................................ 45
Chapter 6: Troubleshooting ..................................................................................................................................................................................................................... 47
Troubleshooting MICT ........................................................................................................................................................................................................................ 47
Chapter 7: Specifications ......................................................................................................................................................................................................................... 49
Minimum Requirements ..................................................................................................................................................................................................................... 49
MICT Symbols ..................................................................................................................................................................................................................................... 49
Chapter 8: Service and Maintenance ...................................................................................................................................................................................................... 51
Return Procedure ................................................................................................................................................................................................................................ 51
Masimo Technical Services ................................................................................................................................................................................................................ 51
Contacting Masimo ............................................................................................................................................................................................................................. 51
Warranty ............................................................................................................................................................................................................................................. 52
Warranty Exclusions............................................................................................................................................................................................................................ 52
Appendix A: Compatible Masimo Devices ...............................................................................................................................................................................................53
Appendix B: Device Baud Rates ............................................................................................................................................................................................................... 55
Index ........................................................................................................................................................................................................................................................ 57


Masimo Corporation www.masimo.com 5
About This Manual This manual explains how to set up and use Masimo Instrument Configuration Tool. Important safety information relating to general use of MICT appears in this manual. Read and follow any warnings, cautions, and notes presented throughout this manual. The following are explanations of warnings, cautions, and notes.
A warning is given when actions may result in a serious outcome (for example, injury, serious adverse effect, death) to the patient or user.
WARNING: This is an example of a warning statement.
A caution is given when any special care is to be exercised by the patient or user to avoid injury to the patient, damage to this device, or damage to other property.
CAUTION: This is an example of a caution statement.
A note is given when additional general information is applicable.
Note: This is an example of a note.

Masimo Corporation www.masimo.com 7
Product Description and Intended Use
Product Description The Masimo Instrument Configuration Tool (MICT) is a standalone software tool used to configure Masimo device patient profile and network settings as well as downloading trends. The tool is compatible with the following Masimo devices:
• Root/Root with NIBPT (Noninvasive Blood Pressure and Temperature)
• Radical-7
• Rad-97
• Rad-67
Key Features MICT consists of the following features:
• Reading Masimo Device and Patient Profile Settings
• Configuring Masimo Device and Patient Profile Settings
• Configuring Masimo Device Network Settings
• Saving/Loading Workspaces to Replicate Settings on Multiple Masimo Devices
• Downloading Trends
• Adding Custom Patient Profiles (Up to 8 maximum)
• Removing User Defined Patient Profiles
• Configuring NIBP (Noninvasive Blood Pressure) Schedules
• Configuring EWS (Early Warning Scores)
• Configuring a Masimo Device to Connect to a Masimo System
• Configuring a Masimo Device to Connect to Kite
• Downloading Screening Results Data and Connecting to Masimo Systems in CCHD (Critical Congenital Heart Disease) Mode
Note: CCHD is available in countries where cleared. For more information about CCHD, refer to Addendum, Rad-97 Operator's Manual: Critical Congenital Heart Disease Screening: Eve™.
• Configuring Profile Parameter Values, Downloading Spot-Check Data, and Connecting to Masimo Systems in Vital Signs Check Mode
Note: Vital Signs Check is available in countries where cleared. For more information about Vital Signs Check, refer to Addendum, Root, Vital Signs Check.
Intended Use MICT is a software application intended to configure device settings and download parameter trends.


Masimo Corporation www.masimo.com 9
Safety Information, Warnings and Cautions WARNING: Patient monitoring must be suspended while configuring settings on the monitoring device.
WARNING: Do not connect MICT to a device that is actively monitoring a patient to avoid potential changes in device behavior.
WARNING: MICT is a tool for downloading device data. Clinical decisions should be based upon signs and symptoms.
CAUTION: Read the Radical-7, Rad-97, Rad-67, and/or Root operator's manual, accessories directions for use, all precautionary information, and specifications before use.
CAUTION: Confirm connections and settings before using MICT in order to ensure proper communication to the connected device.
CAUTION: Verify all settings before implementing any changes to avoid potential changes in expected device behavior.
CAUTION: Incorrect communication port setting may result in no or delayed download of data.
CAUTION: Devices connected through a network may be affected by network changes. Check network settings if devices do not communicate through the network.
Note: When connecting devices through a network connection, confirm the connecting devices are on the same network.


Masimo Corporation www.masimo.com 11
Chapter 1: Description
MICT Overview The diagram and corresponding table below describe MICT functions and features.
Ref Name Description
1 File
• Save Workspace: Save preferred device settings that will be used to configure multiple devices.
• Load Workspace: Load a saved workspace into MICT to configure multiple devices with the same settings.
For more information, see Saving and Loading Workspaces on page 36.
• Exit: Click File then select Exit to close the MICT application.

MICT Chapter 1: Description
Masimo Corporation www.masimo.com 12
Ref Name Description
2 Options
• Setup Connection: Setup MICT serial or network connectivity with a Masimo device.
For more information, see Connecting MICT to a Masimo Device on page 17.
• Send TCP/IP Config: Send wireless network configuration files to a Masimo device.
For more information, see Root/Root with NIBPT, Rad-97, Rad-67, and Radical-7 Wireless Network Connectivity on page 24.
• Send SSL: Send a secured network connection configuration file to a Masimo device.
For more information, see Rad-97 and Rad-67 Secured Network Connection on page 28.
• Download Trends: Download parameter trend data from a Masimo device.
For more information, see Downloading Trends on page 37.
• Send Scoring Template: Send an EWS (Early Warning Scores) configuration file to a Masimo device.
For more information, see Sending a Scoring Template on page 40.
• Send Policy File: Send a policy file to configure access permissions in a Root device for EWS and/or Vital Signs Check mode.
For more information, see Sending a Policy File on page 40.
• Advanced: Set the time zone in MICT. Click Options, select Advanced, then select a time zone setting for MICT.
3 Help • About MICT: Displays MICT version and copyright date. Click Help, then select About MICT.
For more information, see View MICT Software Version on page 15.
4 Edit Profile Name • Click the edit button to change an existing User Defined profile name in a Masimo device.
For more information, see Editing User Defined Profile Names on page 34.
5 Profile Type • Click the profile type drop-down menu to select the profile type that will be configured on the device.
6 Profile Name • Select the default or User Defined profile name to be configured in a Masimo device.
For more information, see Configuring Parameter Values on page 31.
7 Power on Profile • Select Power on Profile to configure a Masimo device to automatically display a selected profile type after next
device power cycle.
For more information, see Power on Profile on page 36.
8 Parameters • The Parameters field displays default parameter values after opening the MICT application. Parameter values can
be edited and written to a Masimo device.
For more information, see Configuring Parameter Values on page 31.
9 Add Profile/Edit Profile
• Click the Edit Profile button to edit parameter values in a default patient profile (Adult, Pediatric, or Neonatal).
For more information, see Configuring Parameter Values on page 31.
• Click the Add Profile button to create a new User Defined profile and edit parameter values in a User Defined profile.
For more information, see Adding a User Defined Profile on page 33.
10 Remove Profile • Click the Remove Profile button to remove a User Defined profile from a Masimo device.
For more information, see Removing User Defined Profiles on page 35.
11 Defaults • Click the Defaults button to reset all parameter values in MICT to default values.

MICT Chapter 1: Description
Masimo Corporation www.masimo.com 13
Ref Name Description
12 Read • Click the Read button to receive and display parameter values in MICT.
For more information, see Reading Parameter Values on page 31.
13 Write • Click the Write button to send parameter values from MICT to a Masimo device.
For more information, see Configuring Parameter Values on page 31.
14 Instrument • The Instrument field displays the Masimo device type selected for setup connection with MICT.
15 Status • The Status field displays successful or failed status of Read, Write, or Remove Profile actions.
16 Details • The Details field displays messages about Read or Write actions in progress and/or completed.
17 Progress Bar • The Progress Bar displays completed progress of Read or Write actions.
Serial and Network Cables The cables listed below are used to connect Masimo devices to the MICT host computer. If an adapter is required, it must be purchased separately.
Description Image
USB-Null Modem Cable
Root and Rad-97
USB-to-Serial Adapter
Radical-7 docked to RDS (Radical Docking Station)
Ethernet Cable
Root and Rad-97

MICT Chapter 1: Description
Masimo Corporation www.masimo.com 14
Description Image
Data Transfer Download Cable Rad-67
Rad-67
Note: requires the USB-Null Modem Cable

Masimo Corporation www.masimo.com 15
Chapter 2: Installing and Uninstalling MICT The host computer must have a minimum of Windows 7 and at least one USB port to install MICT.
Installing MICT To install MICT on a host computer:
1. Remove the USB from the packaging.
2. Insert the USB into a USB port on the host computer.
3. Locate the setup.exe file.
4. Double-click the setup.exe file to start the installation process.
5. By default a Desktop Shortcut to MICT is created. If this is not desired, uncheck the box next to "Create a desktop shortcut". Click Next to continue.
6. Click Install to continue with the installation, or click Back to review or change any settings.
7. By default, the check box to "Launch MICT" is selected (de-select if desired).
8. When MICT is installed, click Finish. The MICT application will open.
Uninstalling MICT To remove MICT from a host computer:
1. Locate the MICT Uninstall.exe file in C:\MICT.
2. Double-click the MICT Uninstall.exe file to start the process to uninstall MICT.
3. Click Yes to completely remove MICT and all of its components, or click No to cancel.
4. Click OK after MICT has been successfully removed.
View MICT Software Version To view the MICT software version installed on the host computer:
1. Open the MICT application.
2. Click Help in the menu bar.
3. Select About MICT. The pop-up window displays the MICT version and copyright date.


Masimo Corporation www.masimo.com 17
Chapter 3: Setting Up
Connecting MICT to a Masimo Device This chapter explains how to connect the MICT host computer to a Masimo device using either serial or network connectivity. After establishing a connection, MICT can be used to configure Masimo device settings or download trends.
• See Serial Connectivity on page 18. For more information, see When to Use Serial Connectivity with MICT below.
• See Network Connectivity on page 24. For more information, see When to Use Network Connectivity with MICT below.
When to Use Serial Connectivity with MICT
• If a USB or RS-232 serial cable is available, quickly connect the MICT host computer to a Masimo device.
• Serial connectivity is required if a Masimo device is not yet configured for network connection.
• Serial connectivity can be used to re-configure an existing network connection on a Masimo device.
• After establishing a serial connection, MICT can be used to configure Masimo device settings or download trends.
When to Use Network Connectivity with MICT
• If a wireless or hard-wired network is available, remotely connect the MICT host computer to a Masimo device.
• Network connectivity can be used to re-configure an existing network connection on a Masimo device.
• After establishing network connection, MICT can be used to configure Masimo device settings or download trends.
MICT Chapter 3: Setting Up
Masimo Corporation www.masimo.com 18
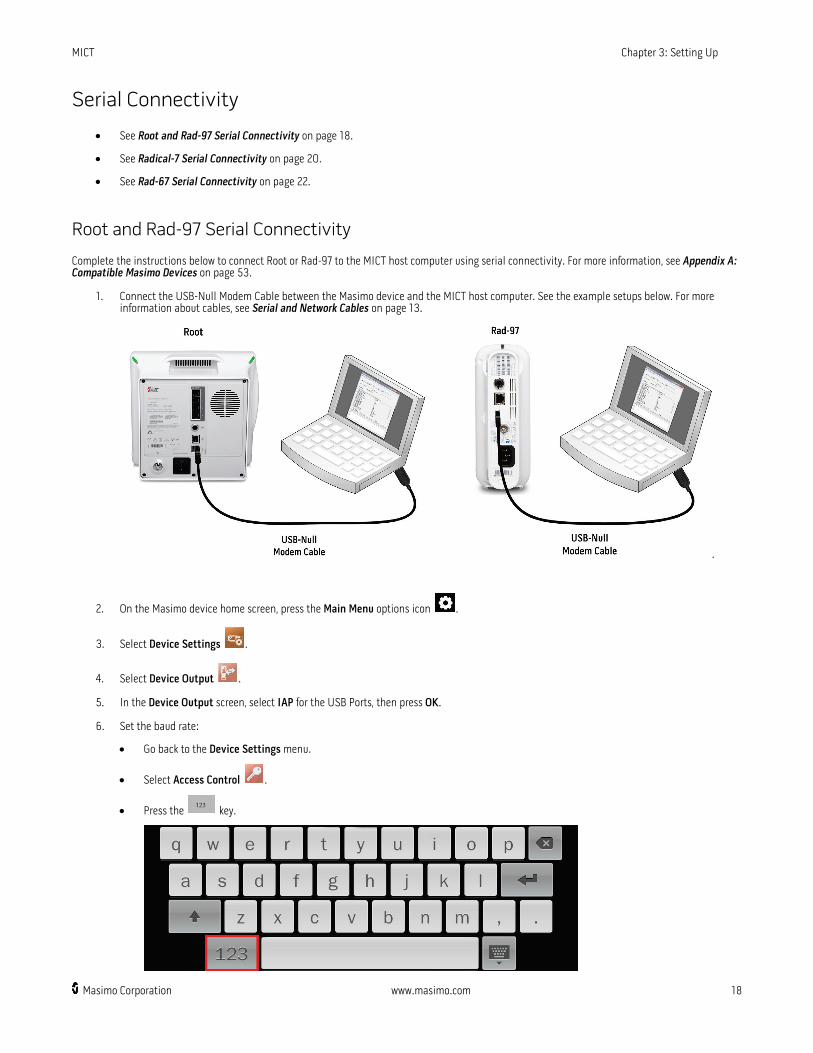
Serial Connectivity
• See Root and Rad-97 Serial Connectivity on page 18.
• See Radical-7 Serial Connectivity on page 20.
• See Rad-67 Serial Connectivity on page 22.
Root and Rad-97 Serial Connectivity
Complete the instructions below to connect Root or Rad-97 to the MICT host computer using serial connectivity. For more information, see Appendix A: Compatible Masimo Devices on page 53.
1. Connect the USB-Null Modem Cable between the Masimo device and the MICT host computer. See the example setups below. For more information about cables, see Serial and Network Cables on page 13.
.
2. On the Masimo device home screen, press the Main Menu options icon .
3. Select Device Settings .
4. Select Device Output .
5. In the Device Output screen, select IAP for the USB Ports, then press OK.
6. Set the baud rate:
• Go back to the Device Settings menu.
• Select Access Control .
• Press the key.

MICT Chapter 3: Setting Up
Masimo Corporation www.masimo.com 19
• When the numeric screen displays, enter the following numbers: 6 2 7 4
• Press Enter .
• In the Access Control menu, select a desired USB Port Baud Rate. For more information about baud rates, see the Masimo device operator's manual and Appendix B: Device Baud Rates on page 55.
• Power cycle the device if the baud rate is changed.
7. Open the MICT application.
8. In the Profile Type field, select Instrument.
9. In the MICT menu bar, click Options.
10. In the options menu, select Setup Connection.
11. In the Connection window:
• In the Instrument field, select either Root or Rad-97.
• In the Connection field, select Serial.
• Click the Config button to open the Serial Configuration window.
12. In the Serial Configuration window:
• In the Port field, verify a COM port has been automatically selected.
Note: If a COM port is not automatically selected, click the drop-down arrow and select a COM port. If no COM port is available in the drop-down menu, check the USB connections and re-open the Serial Configuration window.
• In the Baud Rate field, select a Baud Rate. The baud rate must match the USB baud rate setting in step 6.
• Click OK to close the Serial Configuration window.
13. Click OK to close the Connection window. Connecting MICT to a Masimo device is complete. After completing serial connectivity, perform one of these tasks:
• See Operation on page 31 to configure Masimo device settings and download trends.
• See Root and Rad-97 Hard-Wired Network Connectivity on page 24 to connect MICT to a Masimo device through an Ethernet network.
• See Root, Rad-97, Rad-67, and Radical-7 Wireless Network Connectivity on page 24 to connect MICT to a Masimo device through a WiFi network.

MICT Chapter 3: Setting Up
Masimo Corporation www.masimo.com 20
Radical-7 Serial Connectivity
Complete the instructions below to connect Radical-7 to the MICT host computer using serial connectivity. For more information, see Appendix A: Compatible Masimo Devices on page 53.
1. Power ON the Radical-7.
2. Snap the Radical-7 into the RDS Docking Station.
3. Connect the USB-to-Serial Adapter between the docking station and the MICT host computer. See the example setup below. For more information about cables, see Serial and Network Cables on page 13.
4. On the Radical-7 home screen, press the Main Menu options icon .
5. Select Device Settings .
6. Select Device Output .
7. In the Device Output screen, set the serial output protocol and baud rate.
• In the serial field, select either Data Collection or IAP output (only one will be available).
• Scroll to the bottom of the screen and select a baud rate. If no baud rate selection is available, then the following baud rates are automatically applied (see Appendix B: Device Baud Rates on page 55):
• Data Collection: 57600, or
• IAP: 9600
8. At the bottom of the Device Output screen, press OK.
9. Open the MICT application.
10. In Profile Type, select Instrument.

MICT Chapter 3: Setting Up
Masimo Corporation www.masimo.com 21
11. In the MICT menu bar, click Options.
12. In the options menu, select Setup Connection.
13. In the Connection window:
• In the Instrument field, select Radical-7.
• In the Connection field, select Serial.
• Click the Config button to open the Serial Configuration window.
14. In the Serial Configuration window:
• In the Port field, verify a COM port has been automatically selected.
Note: If a COM port is not automatically selected, click the drop-down arrow and select a COM port. If no COM port is available in the drop-down menu, check the USB connections and re-open the Serial Configuration window.
• In the Baud Rate field, select one of the following baud rates selected in step 7:
• For IAP output, select 9600, or
• For Data Collection output, select 57600.
• Click OK to close the Serial Configuration window.
15. Click OK to close the Connection window. Connecting MICT to a Masimo device is complete. After completing serial connectivity, perform one of these tasks:
• See Operation on page 31 to configure Masimo device settings and download trends.
• See Root, Rad-97, Rad-67, and Radical-7 Wireless Network Connectivity on page 24 to connect MICT to a Masimo device through a WiFi network.

MICT Chapter 3: Setting Up
Masimo Corporation www.masimo.com 22
Rad-67 Serial Connectivity
Complete the instructions below to connect Rad-67 to the MICT host computer using serial connectivity. For more information, see Appendix A: Compatible Masimo Devices on page 53.
1. Connect the Rad-67 to the MICT host computer using the Data Transfer Download Cable Rad-6/67 and USB-Null Modem Cable. See the example setup below. For more information about cables, see Serial and Network Cables on page 13.
2. On the Masimo device home screen, press the Main Menu options icon .
3. Select Device Settings .
4. Select Access Control .
5. Press the key.
6. When the numeric screen displays, enter the following numbers: 6 2 7 4
7. Press Enter .

MICT Chapter 3: Setting Up
Masimo Corporation www.masimo.com 23
8. In the Access Control menu, select a USB Port Baud Rate. For more information about baud rates, see the Masimo device operator's manual and Appendix B: Device Baud Rates on page 55.
9. Power cycle the device if the baud rate is changed.
10. Open the MICT application.
11. For Profile Type, select Instrument.
12. In the MICT menu bar, click Options.
13. In the options menu, select Setup Connection.
14. In the Connection window:
• In the Instrument field, select Rad-67.
• In the Connection field, select Serial.
• Click the Config button to open the Serial Configuration window.
15. In the Serial Configuration window:
• In the Port field, verify a COM port has been automatically selected.
Note: If a COM port does not appear, click the drop-down arrow and select a COM port. If no COM port is available in the drop-down window, check the USB connections and re-open the Serial Configuration window.
• In the Baud Rate field, select the baud rate that matches the baud rate setting in step 8.
• Click OK to close the Serial Configuration window.
16. Click OK to close the Connection window. Connecting MICT to Rad-67 is complete. After completing serial connectivity, perform one of these tasks:
• See Operation on page 31 to configure Masimo device settings and download trends.
• See Root and Rad-97 Hard-Wired Network Connectivity on page 24 to connect MICT to a Masimo device through an Ethernet network.
• See Root, Rad-97, Rad-67, and Radical-7 Wireless Network Connectivity on page 24 to connect MICT to a Masimo device through a WiFi network.

MICT Chapter 3: Setting Up
Masimo Corporation www.masimo.com 24
Network Connectivity The Masimo device and MICT host computer must be connected to the same network for successful communication.
• See Root/Root with NIBPT and Rad-97 Hard-Wired Network Connectivity on page 26.
• See Root/Root with NIBPT, Rad-97, Rad-67, and Radical-7 Wireless Network Connectivity on page 24.
• See Rad-67 and Rad-97 Secured Network Connectivity on page 28.
• See Radius-7 Wireless Network Connectivity on page 28.
Root, Rad-97, Rad-67, and Radical-7 Wireless Network Connectivity
Complete the instructions below to connect Root, Rad-97, Rad-67, or Radical-7 to the MICT host computer using wireless network connectivity.
Note: The Masimo device and MICT host computer must be connected to the same network for successful communication.
Note: Radius-7 needs a Root device for wireless configuration. See Configuring Radius-7 for Wireless Connection on page 28 after completing these instructions.
1. Setup the Masimo device for serial connectivity:
• For Root or Rad-97, see Root and Rad-97 Serial Connectivity on page 18.
• For Radical-7, see Radical-7 Serial Connectivity on page 20.
• For Rad-67, see Rad-67 Serial Connectivity on page 22.
2. Verify the wireless configuration file name is wifi.cfg. To obtain a wireless configuration file, contact Masimo Technical Services on page 51.
Note: The configuration file name must be wifi.cfg for successful upload to a Masimo device.
3. Place the wifi.cfg file in the proper MICT folder.
• For Root, Radical-7, Rad-67, or Rad-97, place the wifi.cfg file in C:\MICT\Configs.
• For Radius-7, place the wifi.cfg file in C:\MICT\Falcon\Configs.
Note: The MICT folders are automatically created during the installation process.
4. Open the MICT application.
5. In the MICT menu bar, click Options.
6. In the options menu, select Send TCP/IP Config:
• If successful, Write Successful appears in the Status field and WiFi Config File successfully sent appear in the Details field.
• If unsuccessful, Write Failed appears in the Status field. Verify the filename is correct (wifi.cfg); check the serial connection is correct; close and reopen MICT; and re-send the wifi.cfg file. If still unsuccessful, see Messages on page 45 and Troubleshooting on page 47.
7. On the Masimo device home screen, press the Main Menu options icon .
8. Select Device Settings .
9. Select Wi-Fi .
10. Toggle Wi-Fi OFF, then ON:
• If status displays Interface Down, cycle the device power OFF and ON. If still not connecting to the wireless network, see Messages on page 45 and Troubleshooting on page 47.
• If status displays Interface Up but the incorrect SSID (network name) is displayed, then verify the information in the wifi.cfg file is saved correctly to C:\MICT\Configs. If still not connecting to wireless network, see Messages on page 45 and Troubleshooting on page 47.

MICT Chapter 3: Setting Up
Masimo Corporation www.masimo.com 25
• If status displays Interface Up and the correct SSID (network name) is displayed, then the device is ready for wireless network connection.
11. Copy the device IP address.
12. In the MICT menu bar, click Options.
13. In the options menu, select Setup Connection.
14. In the Connection window:
• In the Instrument field, select Root, Rad-97, Rad-67 or Radical-7.
• In the Connection field, select TCP.
• Click the Config button to open the Network Configuration window.

MICT Chapter 3: Setting Up
Masimo Corporation www.masimo.com 26
15. In the Network Configuration window:
• In the IP Address field, enter the IP address from step 11.
• Click OK.
Optional: Select SSL to set up a secured connection for Rad-67 or Rad-97. If SSL is selected, see Rad-67 and Rad-97 Secured Network Connectivity on page 28 after completing the instructions in this section.
Root and Radical-7 Rad-67 and Rad-97
16. Click OK to close the Connection window. Connecting MICT to a Masimo device is complete. After completing serial connectivity, perform one of these tasks:
• If SSL was selected for Rad-67 or Rad-97, see Rad-67 and Rad-97 Secured Network Connectivity on page 28.
• See Operation on page 31 to configure Masimo device settings and download trends.
• See Connecting to Masimo Systems on page 41 to connect to Patient SafetyNet.
• See Connecting to Kite on page 42.
Root and Rad-97 Hard-Wired Network Connectivity
Complete the instructions below to connect Root or Rad-97 to the MICT host computer using hard-wired network connectivity.
Note: The Masimo device and MICT host computer must be connected to the same network for successful communication.
1. Use Ethernet cables to connect the Masimo device and host computer to the network. For more information about cables, see Serial and Network Cables on page 13.
2. On the Masimo device home screen, press the Main Menu options icon .
3. Select Device Settings .
4. Select Ethernet .
5. Toggle ethernet OFF, then ON:
• If the status is DOWN, cycle the device power OFF and ON. If the status is still DOWN, see Messages on page 45 and Troubleshooting on page 47.
• If the status is UP, then the device is connected to the hard-wired network. Go to the next instruction.

MICT Chapter 3: Setting Up
Masimo Corporation www.masimo.com 27
6. Copy the IP address.
7. Open the MICT application.
8. In the MICT menu bar, click Options.
9. In the options menu, select Setup Connection.
10. In the Connection window:
• In the Instrument field, select either Root or Rad-97.
• In the Connection field, select TCP.
• Click the Config button to open the Network Configuration window.
11. In the Network Configuration window, enter the Ethernet IP address.
Optional: Select SSL if using a secured link to connect to Rad-97. If SSL is selected, see Rad-67 and Rad-97 Secured Network Connectivity on page 28 after completing the instructions in this section.
12. Click OK.
Root Rad-97 with SSL

MICT Chapter 3: Setting Up
Masimo Corporation www.masimo.com 28
13. Click OK to close the Connection window. Connecting MICT to a Masimo device is complete. After completing serial connectivity, perform one of these tasks:
• If SSL was selected for Rad-67 or Rad-97, see Rad-67 and Rad-97 Secured Network Connectivity on page 28.
• See Operation on page 31 to configure Masimo device settings and download trends.
• See Root, Rad-97, Rad-67, and Radical-7 Wireless Network Connectivity on page 24 to connect MICT to a Masimo device through a WiFi network.
• See Connecting to Masimo Systems on page 41 to connect to Patient SafetyNet.
• See Connecting to Kite on page 42.
Rad-67 and Rad-97 Secured Network Connectivity
Complete the instructions below to connect Rad-67 or Rad-97 to the MICT host computer using a secured network connection.
Note: The Masimo device and MICT host computer must be connected to the same network for successful communication.
1. If Rad-67 or Rad-97 needs to be setup for wireless network connectivity, see Root, Rad-97, Rad-67, and Radical-7 Wireless Network Connectivity on page 24. If Rad-67 or Rad-97 is setup for wireless network connectivity, go to step 2.
2. Place the SSL certification files in the corresponding folders in C:\MICT\SSL\Client and C:\MICT\SSL\Server. To obtain SSL certification files, contact Masimo Technical Services on page 51.
3. Open the MICT application.
4. In the MICT menu bar, click Options.
5. In the options menu, select Send SSL Config. Configuring the Masimo device to a secured network connection is complete.After completing serial connectivity, perform one of these tasks:
• See Operation on page 31 to configure Masimo device settings and download trends.
• See Connecting to Masimo Systems on page 41 to connect to Patient SafetyNet.
• See Connecting to Kite on page 42.
Radius-7 Wireless Network Connectivity
Radius-7 is configured for wireless connectivity using a Root device.For more information about Radius-7 or Root, refer to the Operator's Manual, Radius-7®; Operator's Manual, Root®; or Operator's Manual, Root® with noninvasive blood pressure and temperature. Only Radius-7 Instrument Modules with Wi-Fi capability can be configured for wireless connectivity. The following equipment will be needed to configure Radius-7 to connect to a wireless network:
• Root Device
• Radius-7 Battery Module
• Radius-7 Battery Charging Adapter
• Radius-7 Instrument Module with Wi-Fi capability
To configure Radius-7 for wireless connectivity:
1. In the Root device, verify Bluetooth is toggled ON.
• Press the Main Menu options icon .
• Select Device Settings .
• Select Bluetooth .
• Toggle Bluetooth to ON.

MICT Chapter 3: Setting Up
Masimo Corporation www.masimo.com 29
2. Dock the Radius-7 Battery Charging Adapter to the Root device.
3. Dock the Radius-7 Battery Module to the Radius-7 Battery Charging Adapter.
4. Complete the instructions for setting up Root for wireless connectivity. See Root, Rad-97, Rad-67, and Radical-7 Wireless Network Connectivity on page 24. Radius-7 will emit an auditory tone indicating wireless configuration is complete.
5. Verify Radius-7 successfully connects to a wireless network through the Root device:
• Attach the Radius-7 Battery Module to a Radius-7 Instrument Module with Wi-Fi capability.
• If the Wi-Fi icon on Radius-7 is blue , then Radius-7 has successfully connected to a Wi-Fi network.
• If the Wi-Fi icon on Radius-7 is green , then Radius-7 has successfully connected to a Patient SafetyNet network.
• If the Wi-Fi icon on Radius-7 is gray , then Radius-7 is not connected to a network. In the Root device, toggle Bluetooth OFF then ON.
• If the Wi-Fi icon does not appear on Radius-7, then toggle Bluetooth on the Root device OFF then ON.
Note: Radius-7 is automatically configured to the same Patient SafetyNet server as the Root device during wireless configuration. To connect Root to Patient SafetyNet, see Connecting to Patient SafetyNet on page 41. For further information about Patient SafetyNet, see the Operator's Manual, Patient SafetyNet™ Supplemental Alarm System, Series 5.5.X.X.


Masimo Corporation www.masimo.com 31
Chapter 4: Operation This chapter describes how to configure a Masimo device and download trends using MICT. These instructions assume the user has installed MICT and connected MICT to a Masimo device. See Installing and Uninstalling MICT on page 15 and Connecting MICT to a Masimo Device on page 17.
Working with Parameter Values
Reading Parameter Values Follow the instructions below to retrieve parameter values from a Masimo device to MICT. Retrieved parameter values displayed in MICT can be edited and written to a Masimo device or saved as a Workspace and written to multiple Masimo devices.
Note: MICT reads all patient profile and instrument parameter values from a Masimo device. MICT cannot read individual patient profile or instrument parameters from a Masimo device.
To read Masimo device parameter values:
1. Click the Read button . The following messages will be displayed in the Status and Details fields:
• The Status field displays Read successful if parameter values were successfully read from the device. All parameter values are accessible for viewing and editing in MICT.
• The Status field displays Read failed if parameter values were NOT read from the device. See Messages on page 45 and Troubleshooting on page 47.
• The Details field displays Reading profiles to C:\MICT\InDir. while reading is in progress.
2. Reading parameter values is complete. To write parameter values to a Masimo device, see Configuring Parameter Values on page 31. To save MICT parameter values as a Workspace to configure multiple Masimo devices, see Saving and Loading Workspaces on page 36.
Configuring Parameter Values Follow the instructions below to Write parameter values from MICT to a Masimo device default profile or user defined profile. The parameter values edited for a profile in be saved as a Workspace to configure multiple Masimo device profiles. For more information, see Saving and Loading Workspaces on page 36.
To configure default profile parameter values:
1. In the Profile Type field, select a default profile available in the drop-down menu. If selecting User Defined, go to the next set of instructions.
Note: CCHD is available only for Rad-97 devices. Vital Signs Check is available only for Root devices.
2. Click the Edit Profile button .
WARNING: After clicking Edit Profile, the profile parameter values can be edited and written to the Masimo device profile to overwrite existing profile parameter values. All other profile types remain inaccessible for editing unless selected as described in steps 1 and 2.

MICT Chapter 4: Operation
Masimo Corporation www.masimo.com 32
3. In the Parameters field:
• Select a parameter tab.
• Double-click in a parameter value field.
• Enter/select the desired parameter value.
4. After all desired parameter values have been entered, click Write . The following messages will be displayed in the Status and Details fields:
• The Status field displays Write successful if parameter values were successfully written to the Masimo device, or
• The Status field displays Write failed if parameter values were NOT written to the Masimo device. See Messages on page 45 and Troubleshooting on page 47.
Note: If writing to a Radical-7 using an RS-232 connection, wait approximately 30 seconds after writing is successful before performing any other actions.
• The Details field displays Temporary files written to C:\MICT\OutDir. while writing is in progress.
5. After a successful write, power cycle the Masimo device.
6. Verify the edited parameter values have been configured in the Masimo device.
To configure user defined profile parameters:
1. In the Profile Type field, select User Defined.

MICT Chapter 4: Operation
Masimo Corporation www.masimo.com 33
2. In the Profile Name field, select a user defined profile. If no user defined profiles exist, see Working with User Defined Profiles on page 33.
3. Repeat steps 3 through 5 from the previous section.
Working with User Defined Profiles MICT can be used to configure up to 8 user defined profiles in a Masimo device. This section includes the following topics:
• Adding a User Defined Profile on page 33
• Editing a User Defined Profile Name on page 34
• Removing a User Defined Profile on page 35
Adding a User Defined Profile To add a user defined profile to a Masimo device:
1. In the Profile Type field, select User Defined.
2. Click Add Profile.
WARNING: After clicking Add Profile, the parameter value fields can be edited and written to the Masimo device to overwrite existing parameter values. All other profile types remain inaccessible for editing unless added as described in steps 1 and 2.
3. In the Add Profile window:
• In the Profile Name field, enter a the desired profile name. This name will be displayed on the Masimo device when the profile is active.
• Click OK. Repeat steps 2 through 3 to add multiple profiles (maximum 8 user defined profiles).
4. Assign a Profile LED color to the profile:
• In the Parameters field, select the System tab.
• Click the Profile Color drop-down menu.

MICT Chapter 4: Operation
Masimo Corporation www.masimo.com 34
• Select a color.
5. Edit parameter values as desire, then click Write . Upon successful completion, the Status field displays Write successful.
6. Power cycle the device and verify the added profile appears in the device.
Editing a User Defined Profile Name To edit a User Defined profile name:
1. In the Profile Type field, select User Defined.
2. In the Profile Name field, select a profile.
3. Next to the Profile Name field, click the Edit Profile button .
4. In the Edit Profile window:
• In the Profile Name field, edit the profile name.
• Click OK. Editing a user defined profile name is complete.

MICT Chapter 4: Operation
Masimo Corporation www.masimo.com 35
Removing a User Defined Profile To remove a User Defined profile:
1. In the Profile Type field, select User Defined.
2. Click the Remove Profile button . Remove successful will appear in the Status field.
3. Verify the profile has been removed from the Masimo device:
• On the Masimo device home screen, press the Main Menu options icon .
• Select Profiles .
• In profile name, verify the profile has been removed from the device.

MICT Chapter 4: Operation
Masimo Corporation www.masimo.com 36
Power on Profile Follow the instructions below to use the Power on Profile option to set a patient profile to automatically appear on a Masimo device home screen after one power cycle.
Note: Power on Profile sets the patient profile after only one power cycle. It does not configure the Power on Profile setting in the Masimo device Access Control menu.
1. In the Profile Type field, select a profile.
2. Select Power on Profile.
Note: If Power on Profile is inaccessible, click the Edit Profile button.
3. Click the Write button .
4. Power cycle the Masimo device. After the device powers ON, verify the desired profile is displayed on the home screen.
Saving and Loading a Workspace Follow the instructions below to save or load a workspace. Workspaces are designed to save MICT parameter values and setup connections for an entire Masimo device. This allows for fast replication of complete Masimo device configuration to multiple Masimo devices.
To save a Workspace:
1. Verify all desired parameter values and setup connections are entered in MICT.
Note: Any profile type not selected for editing will be saved in the Workspace with default parameter values.
2. In the MICT menu bar, click File.
3. Select Save Workspace.
4. In the Save As window:
• Select the desired folder location and enter a Workspace filename.
• Click Save. The Masimo device parameter values will be saved as a .wks file. Saving a workspace is complete.

MICT Chapter 4: Operation
Masimo Corporation www.masimo.com 37
To load a saved Workspace into MICT:
1. In the MICT menu bar, click File.
2. Select Load Workspace.
3. In the Open window:
• Locate the saved Workspace file.
• Click Open. The saved workspace parameter values and setup connections will load into MICT. MICT is ready to write to a Masimo device.
Note: While the parameter values are being loaded, all unedited parameters will be set to default values and listed in the Details field.
Downloading Trends Follow the instruction below to download parameter trends to an Excel spreadsheet.
1. In the MICT menu bar, click Options.
2. Select Download Trend.
3. In the Browse for Folder window:
• Select a folder to save the download files.
• Click OK.

MICT Chapter 4: Operation
Masimo Corporation www.masimo.com 38
While the trend is being downloaded, the Details field and the Progress Bar will display the download status.
4. After the download is successfully completed, the Status field displays the message Trend Download Successful.
5. Navigate to the folder specified in step 3 and locate the trend spreadsheet file.
6. Open the spreadsheet to verify the trend data.
Configuring NIBP Schedules Follow the instructions below to configure a customized NIBP schedule. A patient profile can have up to 5 customized NIBP schedules. For more information about NIBP schedules, see the Operator's Manual, Root with Noninvasive Blood Pressure and Temperature.
Note: MICT does not configure Rad-97 NIBP schedules.
1. In the Profile Type field, select a patient profile.
2. Click the Edit Profile button . If editing a user defined profile, select the profile name in the Profile Name field.
3. In the Parameters field:
• Select the NiBP-Temp tab.
• Set NIBP Schedules:
• In NIBP Schedule 1, click in the Duration Hour field and Minute field to enter desired settings.
• Click in the Interval Hour and Minute fields to select desired settings.

MICT Chapter 4: Operation
Masimo Corporation www.masimo.com 39
• Repeat for NIBP Schedule 2 through NIBP Schedule 5 as needed.
4. Click the Write button . Write Successful appears in the Status field when device configuration is completed.
5. Cycle the Root device power OFF then ON.
6. Verify the NIBP schedule was updated in the Root device:
• In the Root device, select the profile edited in steps 1 through 3.
• On the Root device main screen, in the NIBP window, press the Action Menu .
• Press Intervals.
• On the intervals screen:
• In the set mode field, select Schedule.
• In the interval : duration field, verify the settings match the desired settings in step 3.

MICT Chapter 4: Operation
Masimo Corporation www.masimo.com 40
• Press OK. Configuring NIBP schedules is complete.
Sending a Scoring Template Follow the instructions below to send a PatientScoreTemplate.xml file to a Root device for Early Warning Scores (EWS) and contributors configuration. The MICT option Send Scoring Template is supported by all Root software versions. For more information about EWS and contributors, see the Addendum, Root with EWS.
1. Request a PatientScoreTemplate.xml from Masimo Technical Services. See Masimo Technical Services on page 51.
2. Place the updated PatientScoreTemplate.xml file in C:\MICT\Scoring.
3. In the MICT menu bar, click Options.
4. In the options menu, select Send Scoring Template:
• The Status field displays Write Successful after the file has been successfully sent to the device.
• The Details field displays Attempting to send Scoring files from C:\MICT\Scoring.
5. Configuring EWS in Root is complete. Enable EWS in Root to verify configured scores and contributors appear on the Root home screen:
• In the Root home screen, press the Main Menu options icon .
• Select Layout .
• Select Active Channels .
• Slide EWS to enabled. EWS scores and contributors will appear on the Root home screen.
Sending a Policy File Follow the instructions below to send a policy file to a Root device. Policy files grant permissions to configure EWS (Early Warning Scores), Vital Signs Check mode, and/or EMR Push in a Root device. The MICT option Send Policy File is supported by Root devices with a software version of 1.9.x.x or later. To configure EWS in Root devices with software versions before 1.9.x.x, see Sending a Scoring Template on page 40.
1. Request the policy file (.json file type) from Masimo Technical Services. See Masimo Technical Services on page 51.
2. Place the policy file in the folder location C:\MICT\Policy.
3. In the MICT menu bar, click Options.
4. Select Send Policy File:
• The Details field displays the message Attempting to send policy files from C:\MICT\Policy.
• The Status field displays the message Write Successful after the file has been successfully sent to the device.
5. Sending a policy file is complete. For more information:
• See Root with Vital Signs Check on page 43.

MICT Chapter 4: Operation
Masimo Corporation www.masimo.com 41
• See the Operator's Manual, Root or Operator's Manual, Root with noninvasive blood pressure and temperature.
• See the Addendum, Root with EWS.
Connecting to Masimo Systems
Connecting to Patient SafetyNet MICT can configure Masimo device patient profiles (Adult, Pediatric, Neonatal, and User Defined) to connect to Patient SafetyNet. For further information about Patient SafetyNet, see the Operator's Manual, Patient SafetyNet™ Supplemental Alarm System, Series 5.5.X.X.
To configure a Masimo device patient profile to connect to Patient SafetyNet:
1. Ensure MICT and the Masimo device are setup for network connectivity. See Network Connectivity on page 24.
2. In the MICT application, for Profile Type, select User Defined, Adult, Neonatal, Pediatric, CCHD, or Vital Signs Check.
Note: CCHD is available only for Rad-97 devices.
Note: Vital Signs Check is available only for Root/Root with NIBPT devices.
3. Click Edit Profile . For User Defined profiles, select a Profile Name.
4. In Parameters, click the System tab.
5. In Safety Net Port, enter:
• 4201 for Patient SafetyNet versions 4.X.X.X or older, or
• 4202 for Patient SafetyNet versions 5.5.X.X or newer.

MICT Chapter 4: Operation
Masimo Corporation www.masimo.com 42
6. In Safety Net Address, enter the Patient SafetyNet destination IP address.
7. Click Write .
8. On the Masimo device home screen, press the Main Menu options icon .
9. Select Device Settings .
10. Select Wi-Fi or Ethernet .
11. Toggle Wi-Fi/Ethernet OFF, then ON.
12. Verify the correct destination IP address is displayed and the Wi-Fi icon on the Masimo device home screen is green .
• If the correct destination IP address is displayed and the Wi-Fi icon is green , then the device is connected to Patient SafetyNet.
• If the incorrect destination IP address is displayed and/or if the Wi-Fi icon is blue , then the device is NOT connected to Patient SafetyNet. Cycle the device power OFF then ON. If still not connected, see Messages on page 45 and Troubleshooting on page 47.
Connecting to Kite A Masimo device is able to connect to Kite after being configured for network connectivity using MICT. See Network Connectivity on page 24.
For more information about setting up Kite, see Operator's Manual, Kite Supplemental Display.
Note: The Masimo device and MICT host computer must be connected to the same network for successful communication.
Rad-97 CCHD Mode MICT is used to download screening results data from CCHD mode and configure CCHD mode patient profiles to connect to Patient SafetyNet.
Note: CCHD is available in countries where cleared. For more information about CCHD, refer to Addendum, Rad-97 Operator's Manual: Critical Congenital Heart Disease Screening: Eve™.
Perform one of the following tasks after enabling CCHD mode in Rad-97:
• Download screening results data from patient profiles in CCHD mode. See Downloading Trends on page 37.
• Configure patient profiles in CCHD mode for Patient SafetyNet connectivity. See Connecting to Masimo Systems on page 41.

MICT Chapter 4: Operation
Masimo Corporation www.masimo.com 43
Root Vital Signs Check MICT is used to configure patient profile parameter values, Patient SafetyNet connectivity settings, and downloading spot-check data in Vital Signs Check mode.
Note: Vital Signs Check is available in countries where cleared. For more information about Vital Signs Check, see Addendum, Root, Vital Signs Check.
Perform one of the following tasks after enabling Vital Signs Check mode in Root:
• Configure patient profile parameter values in Vital Signs Check mode. See Configuring Parameter Values on page 31.
• Configure patient profiles in Vital Signs Check mode to connect to Patient SafetyNet. See Connecting to Masimo Systems on page 41.
• Download spot-check data from patient profiles in Vital Signs Check mode. See Downloading Trends on page 37.


Masimo Corporation www.masimo.com 45
Chapter 5: Messages The following section lists common error messages, their potential causes, and next steps.
Message Potential Causes Next Steps
Timeout: Please check the
1. (Serial or TCP) connection or
2. baud rate or
3. com port or
4. Restart MICT
• Disconnected serial or Ethernet cable(s).
• Settings in MICT Setup Connection do not match Masimo device settings.
• Host computer and device not connected to same wireless network.
• Check USB/RS-232 serial cable connections. • Check Ethernet cable connections. • Check the host computer and device are connected to the same
wireless network. • Check baud rate settings in Masimo device match baud rate settings in
MICT. • Check the instrument type, connection type, baud rate, port, and IP
addresses in the MICT Setup Connection.
No more profiles are allowed for this profile type.
• The maximum number of profiles (8) have been used.
• Delete an unused profile, then add the desired profile. See Removing User Defined Profiles on page 35 and Adding a User Defined Profile on page 33.
Unknown Status • Device power needs to be cycled. • Power cycle the device.


Masimo Corporation www.masimo.com 47
Chapter 6: Troubleshooting
Troubleshooting MICT The following section lists possible MICT symptoms, potential causes, and next steps.
Symptom Potential Causes Next Steps
MICT does not successfully install in host computer
• Incompatible operating system • Verify the operating system is minimum Windows 7. See Supported Platforms on page 49.
• Contact Masimo Technical Services. See Masimo Technical Services on page 51.
MICT application does not open • Software installation unsuccessful • Incompatible operating system.
• Verify the operating system is minimum Windows 7. See Supported Platforms on page 49.
• Contact Masimo Technical Services. See Masimo Technical Services on page 51.
MICT does not communicate with device through serial connection
• External device is not compatible. • Device output settings are not configured correctly or
do not match with MICT settings. • Communication cable is not properly connected.
• Check external device compatibility. • Attempt to reconnect by restarting MICT. • Check device output settings. • Check communication cable connection. • Check serial port connections. • Check baud rates match within MICT and
device. • Contact Masimo Technical Services. See
Masimo Technical Services on page 51.
MICT does not communicate with device through a hard-wired network connection
• External device is not compatible. • Ethernet is not enabled in Masimo device and/or not
configured to the same network as the host computer. • Location does not have network availability. • Connected network is not available. • Internal failure.
• Check external device compatibility. • Attempt to reconnect by restarting MICT. • Check that the Ethernet feature is enabled
in Masimo device. • Check Masimo device and host computer
network settings match and network availability.
• Check network connection. • Check correct IP address is in MICT setup
connection. • Contact Masimo Technical Services. See
Masimo Technical Services on page 51.
MICT does not communicate with device through wireless network connection
• External device is not compatible. • Wi-Fi is not enabled in Masimo device and/or not
configured to the same network as the host computer. • Location does not have wireless and/or network
availability. • Connected network is not available. • Internal failure.
• Check external device compatibility. • Attempt to reconnect by restarting MICT. • Check that the Wi-Fi feature is ON and
correctly configured. • Check wireless availability for location. • Check network settings and availability. • Check network connection. • Check correct IP address is in MICT setup
connection. • Contact Masimo Technical Services. See
Masimo Technical Services on page 51.
Device Ethernet or WiFi status is down • Location does not have wireless and/or network availability.
• Connected network is not available. • Masimo device not configured to available Ethernet
or WiFi network.
• Check wireless and/or hard-wired network availability for location.
• Check network settings and availability. • Check network connection. • Contact Masimo Technical Services. See
Masimo Technical Services on page 51.
Unable to send wifi.cfg file using MICT • wifi.cfg filename is incorrect. • wifi.cfg file not placed in correct folder.
• The configuration filename must be wifi.cfg. • The wifi.cfg file must be placed in
C:\MICT\Configs. • Restart MICT. • Contact Masimo Technical Services. See
Masimo Technical Services on page 51.

MICT Chapter 6: Troubleshooting
Masimo Corporation www.masimo.com 48
Symptom Potential Causes Next Steps
Device unable to connect to Kite or Patient SafetyNet
• Location does not have network availability. • Connected network is not available. • Incorrect Ethernet or WiFi configuration in Masimo
device.
• Check external device compatibility. • Check that the Wi-Fi or Ethernet feature is
enabled. • Check network settings and availability. • Check network connection. • Check the host device is on the same
network with the Masimo device. • Contact Masimo Technical Services. See
Masimo Technical Services on page 51.

Masimo Corporation www.masimo.com 49
Chapter 7: Specifications
Minimum Requirements MICT works on the following Windows Operating Systems:
Windows 7 (Minimum Requirement)
Windows 8
Windows 10
MICT Symbols The following symbols may appear on the product or product labeling:
Symbol Description Symbol Description
Follow instructions for use
Consult instructions for use
Separate collection for electrical and electronic equipment (WEEE) Catalog number (model number)
Mark of conformity to European medical device directive 93/42/EEC Authorized representative in the European community
Recyclable Lot code
Instructions/Directions for Use/Manuals are available in electronic format @http://www.Masimo.com/TechDocs
Note: eIFU is not available for CE mark countries.


Masimo Corporation www.masimo.com 51
Chapter 8: Service and Maintenance
Return Procedure Clean contaminated/dirty equipment before returning, following instructions in Cleaning. Make sure the equipment is fully dry before packing. Call Masimo at 800-326-4890 and ask for Technical Support. Ask for an RMA number. Package the equipment securely, in the original shipping container if possible, and enclose or include the following information and items:
• A letter describing in detail any difficulties experienced with the MICT. Include the RMA number in the letter.
• Warranty information, a copy of the invoice or other applicable documentation must be included.
• Purchase order number to cover repair if the MICT is not under warranty, or for tracking purposes if it is.
• Ship-to and bill-to information.
• Person (name, telephone/Telex/fax number, and country) to contact for any questions about the repairs.
• A certificate stating the MICT has been decontaminated for bloodborne pathogens.
• Return the MICT to the shipping address listed in Contacting Masimo on page 51 below.
Masimo Technical Services To contact Masimo Technical Services, refer to the Masimo Technical Services web page:
http://www.masimo.co.uk/company/global-services/technical-services/
Contacting Masimo Masimo Corporation 52 Discovery Irvine, California 92618
Tel:+1 949 297 7000 Fax:+1 949 297 7001
Limited Warranty Masimo warrants to the original end-user purchaser the Masimo-branded hardware product (Masimo Instrument Configuration Tool) and any software media contained in the original packaging against defects in material and workmanship when used in accordance with Masimo’s user manuals, technical specifications, and other Masimo published guidelines for a period of 12 months and any batteries for six (6) months from the original date the Product was obtained by the end-user purchaser.
Masimo’s sole obligation under this warranty is the repair or replacement, at its option, of any defective Product or software media that is covered under the warranty.
To request a replacement under warranty, Purchaser must contact Masimo and obtain a returned goods authorization number so that Masimo can track the Product. If Masimo determines that a Product must be replaced under warranty, it will be replaced and the cost of shipment covered. All other shipping costs must be paid by purchaser.
Exclusions The warranty does not apply to any non-Masimo branded product or any software, even if packaged with the Product, or any Product that was: (a) not new or in its original packaging when supplied to purchaser; (b) modified without Masimo’s written permission; (c) supplies, devices, or systems external to the Product; (d) disassembled, reassembled, or repaired by anyone other than a person authorized by Masimo; (e) used with other products, like new sensors, reprocessed sensors, or other accessories, not intended by Masimo to be used with the Product; (f) not used or maintained as provided in the operator’s manual or as otherwise provided in its labeling; (g) reprocessed, reconditioned, or recycled; and (h) damaged by accident, abuse, misuse, liquid contact, fire, earthquake or other external cause.
No warranty applies to any Product provided to Purchaser for which Masimo, or its authorized distributor, is not paid; and these Products are provided AS-IS without warranty.

MICT Chapter 8: Service and Maintenance
Masimo Corporation www.masimo.com 52
Limitation of Warranty Except as otherwise required by law or altered by the purchase agreement, the above warranty is the exclusive warranty that applies to the Product and software media, and Masimo does not make any other promises, conditions, or warranties regarding the Product. No other warranty applies, express or implied, including without limitation, any implied warranty of merchantability, fitness for a particular purpose, satisfactory quality, or as to the use of reasonable skill and care. See the licensing terms for the terms and conditions that apply to and Software accompanying the Product. Additionally, Masimo will not be liable for any incidental, indirect, special, or consequential loss, damage, or expense arising from the use or loss of use of any Products or Software. In no event shall Masimo’s liability arising from any Product or Software (under contract, warranty, tort, strict liability, or otherwise) exceed the amount paid by purchaser for the Product or Software. The above limitations do not preclude any liability that cannot legally be disclaimed by contract.
Sales & End-User License Agreement This document is a legal agreement between you (“purchaser”) and Masimo Corporation (“Masimo”) for the purchase of this Product (“Product”) and a license in the included or embedded Software (“Software”) except as otherwise expressly agreed in a separate contract for the acquisition of this Product, the following terms are the entire agreement between the parties regarding your purchase of this Product. If you do not agree to the terms of this agreement, promptly return the entire Product, including all accessories, in their original packages, with your sales receipt to Masimo for a full refund.
Restrictions 1. Copyright Restrictions: The Software and the accompanying written materials are copyrighted. Unauthorized copying of the Software,
including Software that has been modified, merged, or included with other software, or the written materials is expressly forbidden. Purchaser may be held legally responsible for any copyright infringement that is caused or incurred by Purchaser’s failure to abide by the terms of this Agreement. Nothing in this License provides any rights beyond those provided by 17 U.S.C. §117.
2. Use Restrictions: Purchaser may physically transfer the Product from one location to another provided that the Software is not copied. Purchaser may not electronically transfer the Software from the Product to any other device. Purchaser may not disclose, publish, translate, release, distribute copies of, modify, adapt, translate, reverse engineer, decompile, disassemble, or create derivative works based on the Software or the written materials.
3. Transfer Restrictions: In no event may Purchaser transfer, assign, rent, lease, sell, or otherwise dispose of the Product or the Software on a temporary basis. Purchaser shall not assign or transfer this License, in whole or in part, by operation of law or otherwise without Masimo's prior written consent; except that the Software and all of Purchaser’s rights hereunder shall transfer automatically to any party that legally acquires title to the Product with which this Software is included. Any attempt to assign any rights, duties or obligations arising hereunder other than as set forth in this paragraph shall be void.
4. U.S. Government Rights: If Purchaser is acquiring Software (including the related documentation) on behalf of any part of the United State Government, the following provisions apply: the Software and documentation are deemed to be “commercial software” and “commercial computer software documentation,” respectively pursuant to DFAR Section 227.7202 FAR 12.212, as applicable. Any use, modification, reproduction, release, performance, display or disclosure of the Software (including the related documentation) by the U.S. Government or any of its agencies shall be governed solely by the terms of this Agreement and shall be prohibited except to the extent expressly permitted by the terms of this Agreement.
Warranty Masimo warrants to the initial buyer only that these products, when used in accordance with the directions provided with the Products by Masimo, will be free of defects in materials and workmanship for a period of six (6) months. The foregoing is the sole and exclusive warranty applicable to the products sold by Masimo to buyer. Masimo expressly disclaims all other oral, express or implied warranties, including without limitation any warranties of merchantability or fitness for particular purpose. Masimo’s sole obligation and buyer’s exclusive remedy for breach of any warranty shall be, at Masimo’s option, to repair or replace the product.
Warranty Exclusions This warranty does not extend to any product that has been used in violation of the operating instructions supplied with the product, or has been subject to misuse, neglect, accident or externally created damage. This warranty does not extend to any product that has been connected to any unintended instrument or system, has been modified, or has been disassembled or reassembled. This warranty does not extend to sensors or patient cables that have been reprocessed, reconditioned or recycled.
In no event shall Masimo be liable to buyer or any other person for any incidental, indirect, special or consequential damages (including without limitation lost profits), even if advised of the possibility thereof. In no event shall Masimo’s liability arising from any products sold to buyer (under a contract, warranty, tort or other claim) exceed the amount paid by buyer for the lot of product(s) involved in such claim. In no event shall Masimo be liable for any damages associated a product that has been reprocessed, reconditioned or recycled. The limitations in this section shall not be deemed to preclude any liability that, under applicable products liability law, cannot legally be precluded by contract.

Masimo Corporation www.masimo.com 53
Appendix A: Compatible Masimo Devices The following Masimo devices are compatible with MICT:
Device Minimum Software Level Requirement
Radical-7 v1.4.5.1 or above
RDS v5.1.3.2 or above
Root and Root with noninvasive blood pressure and temperature (NIBPT) v1.6.2.1 or above
Rad-67 v1.0.1.8 or above
Rad-97 v1.0.3.5 or above

Masimo Corporation www.masimo.com 55
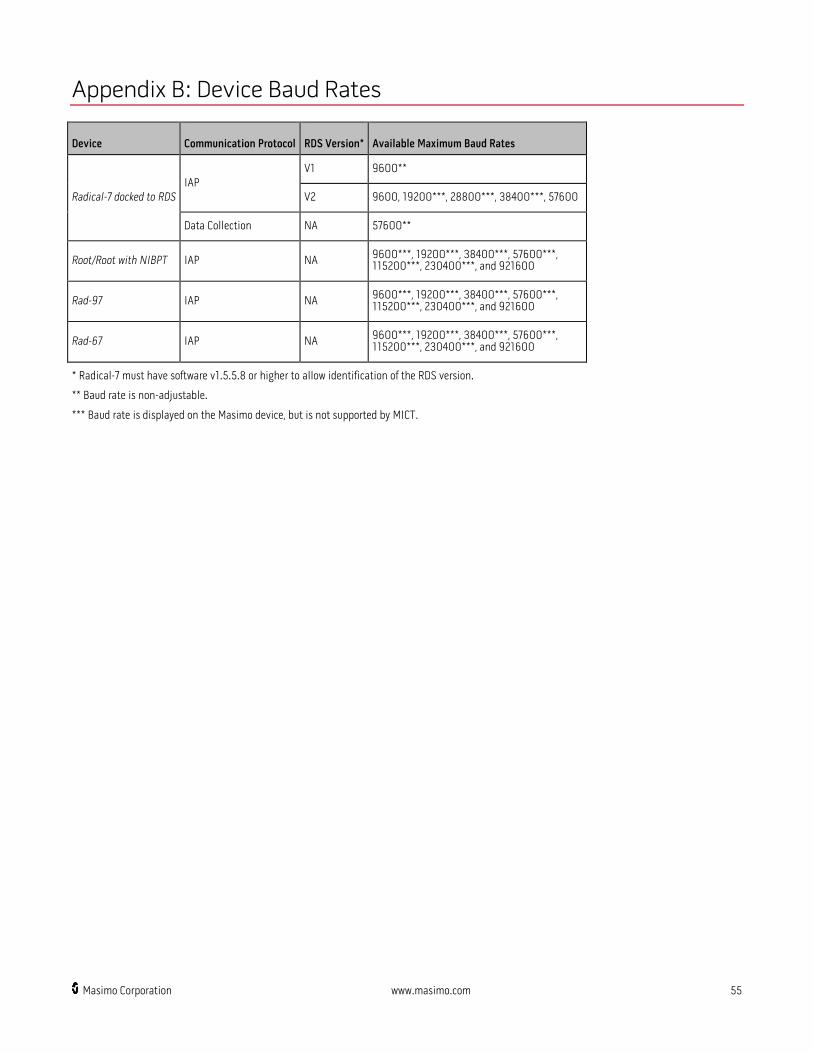
Appendix B: Device Baud Rates
Device Communication Protocol RDS Version* Available Maximum Baud Rates
Radical-7 docked to RDS IAP
V1 9600**
V2 9600, 19200***, 28800***, 38400***, 57600
Data Collection NA 57600**
Root/Root with NIBPT IAP NA 9600***, 19200***, 38400***, 57600***, 115200***, 230400***, and 921600
Rad-97 IAP NA 9600***, 19200***, 38400***, 57600***, 115200***, 230400***, and 921600
Rad-67 IAP NA 9600***, 19200***, 38400***, 57600***, 115200***, 230400***, and 921600
* Radical-7 must have software v1.5.5.8 or higher to allow identification of the RDS version.
** Baud rate is non-adjustable.
*** Baud rate is displayed on the Masimo device, but is not supported by MICT.


Masimo Corporation www.masimo.com 57
Index
A About This Manual • 5
Adding a User Defined Profile • 12, 33, 45 Appendix A
Compatible Masimo Devices • 18, 20, 22, 53
Appendix B Device Baud Rates • 19, 20, 23, 55
C Chapter 1
Description • 11
Chapter 2 Installing and Uninstalling MICT • 15, 31
Chapter 3 Setting Up • 17
Chapter 4 Operation • 19, 21, 23, 26, 28, 31
Chapter 5 Messages • 24, 26, 31, 32, 42, 45
Chapter 6 Troubleshooting • 24, 26, 31, 32, 42, 47
Chapter 7 Specifications • 49
Chapter 8 Service and Maintenance • 51
Configuring NIBP Schedules • 38 Configuring Parameter Values • 12, 13, 31, 43
Connecting MICT to a Masimo Device • 12, 17, 31
Connecting to Kite • 26, 28, 42 Connecting to Masimo Systems • 26, 28, 41, 42, 43
Connecting to Patient SafetyNet • 29, 41 Contacting Masimo • 51
D Downloading Trends • 12, 37, 42, 43
E Editing a User Defined Profile Name • 12, 33, 34 Exclusions • 51
I Installing MICT • 15
Intended Use • 7
K Key Features • 7
L Limitation of Warranty • 52
Limited Warranty • 51
M Masimo Technical Services • 24, 28, 40, 47, 48, 51 MICT Overview • 11
MICT Symbols • 49 Minimum Requirements • 47, 49
N Network Connectivity • 17, 19, 23, 24, 41, 42
P Power on Profile • 12, 36
Product Description • 7 Product Description and Intended Use • 7
R Rad-67 and Rad-97 Secured Network Connectivity • 12, 24, 26, 27, 28 Rad-67 Serial Connectivity • 18, 22, 24
Rad-97 CCHD Mode • 42 Radical-7 Serial Connectivity • 18, 20, 24
Radius-7 Wireless Network Connectivity • 24, 28
Reading Parameter Values • 13, 31 Removing a User Defined Profile • 12, 33, 35, 45
Restrictions • 52 Return Procedure • 51
Root and Rad-97 Hard-Wired Network Connectivity • 24, 26 Root and Rad-97 Serial Connectivity • 18, 24
Root Vital Signs Check • 40, 43 Root, Rad-97, Rad-67, and Radical-7 Wireless Network Connectivity • 12,
19, 21, 23, 24, 28, 29
S Safety Information, Warnings and Cautions • 9 Sales & End-User License Agreement • 52
Saving and Loading a Workspace • 11, 31, 36 Sending a Policy File • 12, 40
Sending a Scoring Template • 12, 40 Serial and Network Cables • 13, 18, 20, 22, 26
Serial Connectivity • 17, 18
T Troubleshooting MICT • 47
U Uninstalling MICT • 15

MICT Index
Masimo Corporation www.masimo.com 58
V View MICT Software Version • 12, 15
W Warranty • 52 Warranty Exclusions • 52
Working with Parameter Values • 31 Working with User Defined Profiles • 33


www.masimo.com
35533/LAB-7358F-1018