min arc 140
TRANSCRIPT

��������������
����������������� ����������������������� �������������� �������������� ���� ����������������������������� ���� ���� ����� ����������� �������������������� ������������������ ������!��"��� �#$��� ������� ���� ���$� ����������%���&������ �������� � ���'������# �(����)*+)*,���-����������������� �������������������� �� ����� �� ���� ��� ��������������������-������ �������������� ���������� ����������������������������� .���� �� ��������������� ��������� �������������� � ��������������������������� ��������� ������������ ����� ����������������� ����������� ������ ������ � /�� ����� ��� �� �� ���� � ����� $��� ������� 0�������� 12� !������ ���� ������ ��� ���� ����� ��������������
��������������������
� ����� ����������������� ���������������� �����
���������� March, 2002
����� ���������� ������ ������������ �� �������������� ��������� ����� �� ���!�� �

�
WARNING: These Safety Precautions are foryour protection. They summarize precaution-ary information from the references listed inAdditional Safety Information section. Before
performing any installation or operating procedures, besure to read and follow the safety precautions listed belowas well as all other manuals, material safety data sheets,labels, etc. Failure to observe Safety Precautions can resultin injury or death.
PROTECT YOURSELF AND OTHERS --Some welding, cutting, and gougingprocesses are noisy and require earprotection. The arc, like the sun, emitsultraviolet (UV) and other radiation and
can injure skin and eyes. Hot metal can cause burns.Training in the proper use of the processes and equip-ment is essential to prevent accidents. Therefore:
1. Always wear safety glasses with side shields in any workarea, even if welding helmets, face shields, and gogglesare also required.
2. Use a face shield fitted with the correct filter and coverplates to protect your eyes, face, neck, and ears fromsparks and rays of the arc when operating or observingoperations. Warn bystanders not to watch the arc andnot to expose themselves to the rays of the electric-arcor hot metal.
3. Wear flameproof gauntlet type gloves, heavy long-sleeveshirt, cuffless trousers, high-topped shoes, and a weld-ing helmet or cap for hair protection, to protect againstarc rays and hot sparks or hot metal. A flameproof apronmay also be desirable as protection against radiatedheat and sparks.
4. Hot sparks or metal can lodge in rolled up sleeves,trouser cuffs, or pockets. Sleeves and collars should bekept buttoned, and open pockets eliminated from thefront of clothing
5. Protect other personnel from arc rays and hot sparkswith a suitable non-flammable partition or curtains.
6. Use goggles over safety glasses when chipping slag orgrinding. Chipped slag may be hot and can fly far.Bystanders should also wear goggles over safety glasses.
FIRES AND EXPLOSIONS -- Heat fromflames and arcs can start fires. Hot slagor sparks can also cause fires and ex-plosions. Therefore:
1. Remove all combustible materials well away from thework area or cover the materials with a protective non-flammable covering. Combustible materials include wood,cloth, sawdust, liquid and gas fuels, solvents, paints andcoatings, paper, etc.
2. Hot sparks or hot metal can fall through cracks orcrevices in floors or wall openings and cause a hiddensmoldering fire or fires on the floor below. Make certainthat such openings are protected from hot sparks andmetal.“
3. Do not weld, cut or perform other hot work until theworkpiece has been completely cleaned so that thereare no substances on the workpiece which might pro-duce flammable or toxic vapors. Do not do hot work onclosed containers. They may explode.
4. Have fire extinguishing equipment handy for instant use,such as a garden hose, water pail, sand bucket, orportable fire extinguisher. Be sure you are trained in itsuse.
SAFETY PRECAUTIONS
10/98
5. Do not use equipment beyond its ratings. For example,overloaded welding cable can overheat and create a firehazard.
6. After completing operations, inspect the work area tomake certain there are no hot sparks or hot metal whichcould cause a later fire. Use fire watchers when neces-sary.
7. For additional information, refer to NFPA Standard 51B,"Fire Prevention in Use of Cutting and Welding Pro-cesses", available from the National Fire Protection Asso-ciation, Batterymarch Park, Quincy, MA 02269.
ELECTRICAL SHOCK -- Contact with liveelectrical parts and ground can causesevere injury or death. DO NOT use ACwelding current in damp areas, if move-ment is confined, or if there is danger offalling.
1. Be sure the power source frame (chassis) is connectedto the ground system of the input power.
2. Connect the workpiece to a good electrical ground.3. Connect the work cable to the workpiece. A poor or
missing connection can expose you or others to a fatalshock.
4. Use well-maintained equipment. Replace worn or dam-aged cables.
5. Keep everything dry, including clothing, work area,cables, torch/electrode holder, and power source.
6. Make sure that all parts of your body are insulated fromwork and from ground.
7. Do not stand directly on metal or the earth while workingin tight quarters or a damp area; stand on dry boards oran insulating platform and wear rubber-soled shoes.
8. Put on dry, hole-free gloves before turning on the power.9. Turn off the power before removing your gloves.
10. Refer to ANSI/ASC Standard Z49.1 (listed on next page)for specific grounding recommendations. Do not mis-take the work lead for a ground cable.
ELECTRIC AND MAGNETIC FIELDS —May be dangerous. Electric current flow-ing through any conductor causes lo-calized Electric and Magnetic Fields(EMF). Welding and cutting current cre-ates EMF around welding cables andwelding machines. Therefore:
1. Welders having pacemakers should consult their physi-cian before welding. EMF may interfere with some pace-makers.
2. Exposure to EMF may have other health effects which areunknown.
3. Welders should use the following procedures to minimizeexposure to EMF:A. Route the electrode and work cables together. Secure
them with tape when possible.B. Never coil the torch or work cable around your body.C. Do not place your body between the torch and work
cables. Route cables on the same side of your body.�� ������������ ������������ ��������������
������������������������������ ��������������������������������� �������
�����������������������

�
FUMES AND GASES -- Fumes andgases, can cause discomfort or harm,particularly in confined spaces. Donot breathe fumes and gases. Shield-ing gases can cause asphyxiation.Therefore:
1. Always provide adequate ventilation in the work area bynatural or mechanical means. Do not weld, cut, or gougeon materials such as galvanized steel, stainless steel,copper, zinc, lead, beryllium, or cadmium unless positivemechanical ventilation is provided. Do not breathe fumesfrom these materials.
2. Do not operate near degreasing and spraying opera-tions. The heat or arc rays can react with chlorinatedhydrocarbon vapors to form phosgene, a highly toxicgas, and other irritant gases.
3. If you develop momentary eye, nose, or throat irritationwhile operating, this is an indication that ventilation is notadequate. Stop work and take necessary steps to im-prove ventilation in the work area. Do not continue tooperate if physical discomfort persists.
4. Refer to ANSI/ASC Standard Z49.1 (see listing below)for specific ventilation recommendations.
5. WARNING: This product, when used for welding orcutting, produces fumes or gases whichcontain chemicals known to the State ofCalifornia to cause birth defects and, insome cases, cancer. (California Health &Safety Code �25249.5 et seq.)
CYLINDER HANDLING -- Cylinders, ifmishandled, can rupture and violentlyrelease gas. Sudden rupture of cylin-der, valve, or relief device can injure orkill. Therefore:
1. Use the proper gas for the process and use the properpressure reducing regulator designed to operate fromthe compressed gas cylinder. Do not use adaptors.Maintain hoses and fittings in good condition. Followmanufacturer's operating instructions for mounting regu-lator to a compressed gas cylinder.
2. Always secure cylinders in an upright position by chainor strap to suitable hand trucks, undercarriages, benches,walls, post, or racks. Never secure cylinders to worktables or fixtures where they may become part of anelectrical circuit.
3. When not in use, keep cylinder valves closed. Havevalve protection cap in place if regulator is not con-nected. Secure and move cylinders by using suitablehand trucks. Avoid rough handling of cylinders.
4. Locate cylinders away from heat, sparks, and flames.Never strike an arc on a cylinder.
5. For additional information, refer to CGA Standard P-1,"Precautions for Safe Handling of Compressed Gases inCylinders", which is available from Compressed GasAssociation, 1235 Jefferson Davis Highway, Arlington,VA 22202.
EQUIPMENT MAINTENANCE -- Faulty orimproperly maintained equipment cancause injury or death. Therefore:
1. Always have qualified personnel perform the installa-tion, troubleshooting, and maintenance work. Do notperform any electrical work unless you are qualified toperform such work.
2. Before performing any maintenance work inside a powersource, disconnect the power source from the incomingelectrical power.
3. Maintain cables, grounding wire, connections, powercord, and power supply in safe working order. Do notoperate any equipment in faulty condition.
4. Do not abuse any equipment or accessories. Keepequipment away from heat sources such as furnaces,wet conditions such as water puddles, oil or grease,corrosive atmospheres and inclement weather.
5. Keep all safety devices and cabinet covers in positionand in good repair.
6. Use equipment only for its intended purpose. Do notmodify it in any manner.
ADDITIONAL SAFETY INFORMATION -- Formore information on safe practices for elec-tric arc welding and cutting equipment, askyour supplier for a copy of "Precautions andSafe Practices for Arc Welding, Cutting andGouging", Form 52-529.
The following publications, which are available from theAmerican Welding Society, 550 N.W. LeJuene Road, Mi-ami, FL 33126, are recommended to you:1. ANSI/ASC Z49.1 - "Safety in Welding and Cutting"2. AWS C5.1 - "Recommended Practices for Plasma Arc
Welding"3. AWS C5.2 - "Recommended Practices for Plasma Arc
Cutting"4. AWS C5.3 - "Recommended Practices for Air Carbon
Arc Gouging and Cutting"5. AWS C5.5 - "Recommended Practices for Gas Tungsten
Arc Welding“6. AWS C5.6 - "Recommended Practices for Gas Metal Arc
Welding"“7. AWS SP - "Safe Practices" - Reprint, Welding Hand-
book.8. ANSI/AWS F4.1, "Recommended Safe Practices for
Welding and Cutting of Containers That Have HeldHazardous Substances."
MEANING OF SYMBOLS - As used through-out this manual: Means Attention! Be Alert!Your safety is involved.
Means immediate hazards which, ifnot avoided, will result in immediate,serious personal injury or loss of life.
Means potential hazards which couldresult in personal injury or loss of life.
Means hazards which could result inminor personal injury.

�
���������������� ���������������������������������������������������������������������������������������������������������� ������������������������������������������������ ��������������������������� ���!��������� �������������� �������������� ��"�#� �������� ������������ ��� �������� ��� ������ ��������������������������������
��� $��� ���������� �� ���� ���%������� ��������� ����������������������������������������������������������� ���� ��������� ���� ���� ��� �� ��������� ���"�������������������&��������������"��������������������������������������%����������������
���'������#����������������������������������������"�"��"������������������������� ����������� �������� �������� ����������� �� ������ �����������"������������������������������������������������������� ���������� ��� �������� ���� �������������������������(���
��� )�� ��� ��������� ��� ����������� ���� ���������� ������������������������������������������������� ���������� ��������������� ����(��� ������������"���������������������������������������������������
����*������������������������������������������#��������������+����������������(�������������������%������� ��� ������ ����������� ��� ���(�� ��� �����(��������������������
,���-.��/$)�0123*)���$��"�"��"������������������������������"�����������������������������������������������������4� ���� �������� ���(���� ��� ����� ��������"������������"���������� ����������������������������������(�����$��"������������������(���+�����������������������������������������������������������������������������
���'�� ������#� %������ ��� ��������������(��� ���� ��������������������������������������������� ���������������&�����#��������������"��������������
��� 5�� ���� ����#� �������� �� �������� ��� ��� ������������(������������������������������#����������������������������������������������������"����������� ���� �������� �� ��������� ��� ������ ��� ������ ������� ��� ��� ������� �� ��� ����������������
��6����#���%�������������������������������"�7���"����������������������������������������������������
���'�������#�%����������������������������"����'������"�#� %������ ��� ������ *������#� ��%���� ��(����������������������������
���6����#����(�������������������������(�����������������������������������������������������������������������(��������������������(�����������������"��� ����������� '�� ���� �������� �� ������� ��� ���������������������(����(���������
����&������#�������������������������������������������������� ������ ����� ������ (�� ��������� ��� ��� #���� ����������� $�� ����������� ���� ������ ��� ������ ����������� �� ��������� �� ��� �� ������ ����"��� ��� ��#���� ��� �������� �"������ ��� ������ ��� ���(�� ��� ������"��������������������������������8������
���������� ����������9&)10255)6)'0:�������"������������������������%�����������������������������&�����#����������������������������������� �������� ��������� ������ ��� ������� ���(�������� �� ��� �������� �� ����������� 0��� ����������������������������������� ���(���������8����������������"������������������;�� <1.0)�02.'� 2'=2&2=*)$$)��� $��� ��>����� ��� ��
���� ��� ���� ���� ���� �� ������������ ��� ����������(�����������������������������������"��� ������� �� �� ����������� �� ����� �� "�"��"�� ���������������������������"������(��������������������������������������"�������������9�����������������������������������������������:
��� <����#� �� ����� ������ ���(��� ���� ���� ���(����������������������������������������������������������������"�������������������"������������������������������������������ ��������������� �����������(�����(������������#����������������������������(����������������#�����������
� � � �9&)10255)?� ����������������� ������������������������+�������(������������"����������������������(������������������������������� ����������������������������������������
��� <����#� ���� "����� �"���"��� �� ��������� ��� ���(��������� �� ������� ���"���� ���� ���������� ����������������������������������������������(��������"��������������������������������������������������������������������������������������(�������������������������������"���������������������������� �� �������� �������������� ��� ��+��� �� �������"����������������������������������������(��
�� $��� ���������� �� ���� ���%������� ��������� ������������ ���(���� ��� ��� ��"��� ����� ���� ������������������������������������������������������������������9�������������������"����������������������� ����������������������������� ����������������������������
��� <����"�#� ���� ���������� ��� �� ������������ ��� ����������(��������������������������������������������������������������������������������(���
���'��%�������������������������������������������������(�� ���� ���� �����#� ����� �� ������ � � ���������������������������������"����������"��������� *������#� ���� �������� ��� ������� �� ������ �������� �������� ���� ��(��� ����>���� ��� ��������� $����(������ ������������� ��� �������� ������� ������%������ �� ���� ��������� �������������� $��������������������������������������������"���������������������������������������
��� �$��"�"��"������������ �������"����������������������������������������������� �������������@��;AA���;;B��CD�������"������������(�����������������������������������������������������������
E��<1/&)'02.'�=)5� 2'�)'=)5���$������%�������������������������������������������������������(����� "������ ��������� �� ������ ��� ��������� ������������ ��������� ��(����� �� "�#���� 9���� �������������������������������������:
��� /���"���� ������������ ���� ���� ��������� �����

�
����"��� ���� ������ ��� "��� �� ������� ������������(���
"��)�� ��#������������������������������������������������ ��������������������������������������������������������������������������������������������"�7���"���1�����#�����������������������������
B��&)'02$902.'���$��������������������"��������������������� ���� ����������� ��� ����"�7���"��� ������������� ���� ����� ����� ���� �����(��� ���� ����������� ��� ���� �����"��� ����������9���� ��������������������������������������������:
���9����#� ��� ���������� ��� ��������� ���(���� ��������������� ��� �������� �������������� ��� ������������� ��������� �� �� ������� ��� ������� �����(���'�������#� %������ ��� ������� ��� ����"�� �� �����"�� ��� ���� ��������� ��� #���� ��� ������� ����������� �� ��� ������ ��� ��������� ��� �����������(��� ��� ������������ �������� ����� ����������������������������"�"��������������������
��� '�������#� %������ ��� ������� ��� ����"�� �� �����"������������������������������������������������������������������������������"������"��������������������$����������"�"������������������������������������������������������������"������"�#� ��������������� ����(�� ��� ��� �������� "�#� �������������������������������������������
���*��������������������������������������#��������"��"�� ��������� �� ���� ��� ������������� �����(���������������������������������������9�� ��#����������������������������������������������������������������������������������������������'���������#��������������������������������������������������
������������������������������������������������� ����������������"�����$��������������������������������������������������������� ����������������������������������"��������(���������������������"��������������4����������������� ����������(���� ������������� ������������� �� ������� ������ �������� ����� ��� ��������� .'� @6����D�� &�����#� ����F������������������������������������������������������������������+���������������������������������������� ������ ���������� '�� %������ ���������� �������������
���$���������������������� �������������������"������ ���"�� ������� � ��������� ����(����9���� ����������������������������������������������������������(��� ��� ��������������� ��������������� ����� ���������������������"����� ����������� ������"�"���������������������
����������#�������������������������������������������������������������(���������������G�������������?BH�;�����9I5�
J�� )'01)02)'� =)� $�/3*2<)6)'0��� *�� �(���������������������+�������������������(�������(����� ��������� ��� ��������� �� �������� ��� �������
(���������������������"�������������������8������������"��� ��������� "������� ������ �������� ������������������������������������������(���.������#���������(��������������������������:
���)�����#����������%�������������������������(�������� ���������������� ����������"����� ���������������������� ����"�� ��� ��� ���"��� '�������#� ��������������������(����� ���(������������������ ���(�������������������
�� '��������#�%����������������������������(����(��� ����������� �� ������ ��� ����"�7���"��� �������������������������������������������(��
� 6�������#������������������������������������������� ����� ��� ������� ���� ������������� ��� �������������������� ��� ��� ������ ��� ����"�7���"��'�������#�%��������������������(�����������������������������������(����(��
���<����#���������������������"�����������"���������(��������� ����������� K����#����� �� ������� ��������� ��� �������� ���������� ���� ������ ��������������������(����������������#�����������������������������������"������������������������������������������������������
���$�����#��������������������������������������������������������������������������������������������������"������������������
����*������#�����������������"�7���"���������������������"������������������#�����������������
G�� 2'L.16902.'5� �.6<$/6)'0921)5� 1)$902&)5M�$9�5/�*120/��
����<���������������������������������������������������"���� ��� ������� �� ��������� ���� ��� �����"�� ������������������(����������������"������������"�������(��� ��� ��� ���� ��������� ��� ���������������������������#�����������������������'NJEJEH�O<�������������5����<�����������9��I������"�� �����"� ���� K�"��"P� ������ ���� )59C�� '������������� �"�������� ��� �������� ���� ��������������������� ������ �� ������ ������������ ���� ��9������I�����"�5�������JJA�'�I��$�Q����1�����6������L$,E;EG:
���O5���������I�����"����������"P�9I5�?BH�;��� O1����������5����<������� ����K���5��������9�
I�����"�O9I5�9G��;��� O5���� <������� ���� I�����"� ���� �����"� ����������
0����-����-���������������P�9I5�9G�A����O1����������5����<�����������<������9�������"P
9I5�9G��,����O1����������5����<�����������<������9��I����
��"P�9I5��J��;���� O1���������� 5���� <������� ���� 9��� ������� 9�
K�"��"����������"P�9I5��J��,�"��O�����L���5���������I�����"����������"P��59�5�������
I;;R��E�
SECTION 1 DESCRIPTION
6
Heliarc HW-17V-2 TIG Torch, 12 1/2-ft (33813). In-cludes gas valve, power cable, gas hose, and back cap.
Heliarc HW-17V TIG Torch, 12 1/2-ft (16X48LV). In-cludes gas valve, concentric power/gas cable, and backcap.
Heliarc HW-17 Torch Accessory Kit (999126). In-cludes accessories for 1/16, 1/8, and 3/32-in. electrodes(collet, collet bodies, and electrodes), 3 cups, and a shortcap.
Gas / Power Adaptor for Heliarc Torches (31758).Needed for use with Heliarc TIG torches with concentricpower/gas cables.
TC-2B Torch Control w/ 30-ft cable and 14-pin plug(33839). Attach to torch handle. Provides remote currentcontrol.
FC-5B Foot Control w/ 30-ft cable and 14-pin plug(33646). Provides remote current control.
FC-5B EHD Foot Control w/ 30-ft cable and 14-pinplug (33841). Extra Heavy Duty Foot Control providesremote current control.
1.1 GENERAL
The Miniarc 90i and Miniarc 140i are portable, DCconstant current, high performance welding powersources. Their ultra-light portability is due to an ad-vanced inverter design. This design provides outstand-ing welding performance for touch start TIG welding(GTAW) and Stick welding (SMAW).
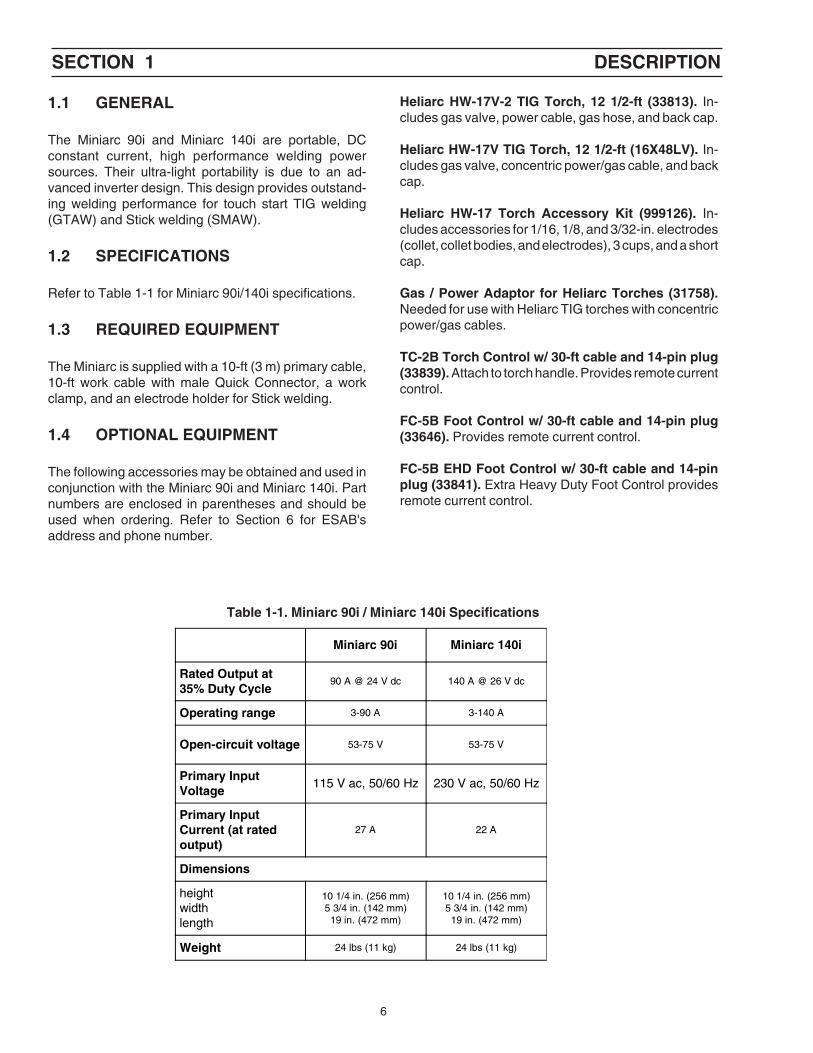
1.2 SPECIFICATIONS
Refer to Table 1-1 for Miniarc 90i/140i specifications.
1.3 REQUIRED EQUIPMENT
The Miniarc is supplied with a 10-ft (3 m) primary cable,10-ft work cable with male Quick Connector, a workclamp, and an electrode holder for Stick welding.
1.4 OPTIONAL EQUIPMENT
The following accessories may be obtained and used inconjunction with the Miniarc 90i and Miniarc 140i. Partnumbers are enclosed in parentheses and should beused when ordering. Refer to Section 6 for ESAB'saddress and phone number.
Miniarc 90i Miniarc 140i
Rated Output at35% Duty Cycle
90 A @ 24 V dc 140 A @ 26 V dc
Operating range 3-90 A 3-140 A
Open-circuit voltage 53-75 V 53-75 V
Primary InputVoltage
115 V ac, 50/60 Hz 230 V ac, 50/60 Hz
Primary InputCurrent (at ratedoutput)
27 A 22 A
Dimensions
heightwidthlength
10 1/4 in. (256 mm)5 3/4 in. (142 mm)
19 in. (472 mm)
10 1/4 in. (256 mm)5 3/4 in. (142 mm)
19 in. (472 mm)
Weight 24 lbs (11 kg) 24 lbs (11 kg)
Table 1-1. Miniarc 90i / Miniarc 140i Specifications

7
SECTION 2 INSTALLATION
2.1 GENERAL
Due to the built-in shoulder strap, removable dust filter,and double insulated construction, the Miniarc 90i andMiniarc 140i can be located almost anywhere. However,it is suggested that the following steps be followedcarefully in order to help provide the best possibleoperation.
2.2 UNPACKING AND PLACEMENT
A. Immediately upon receipt of the equipment, inspectfor damage which may have occurred in transit.Notify the carrier of any defects or damage at once.
B. After removing the components from the shippingcontainer(s), check the container for any looseparts. Remove all packing materials.
C. Check air passages of power source for any pack-ing materials that may obstruct air flow through thepower source.
D. If the equipment is not to be installed immediately,store it in a clean, dry, well-ventilated area.
E. The location of the welding equipment should becarefully selected to ensure satisfactory and de-pendable service. Choose a location relatively closeto a properly fuse source of electrical power. TheMiniarc should be placed within easy reach of theobject to be welded.
F. The machine components are maintained at properoperating temperatures by forced air which is drawnthrough the cabinet by the fan unit on the rear panel.For this reason, it is important that the machine belocated in an open area where air can circulatefreely at front and rear openings. If space is at apremium, leave at least 1 foot of clearance betweenthe rear of the power source and wall or otherobstruction. Even though the Power Source isequipped with a removable dust filter, the areaaround the unit should be relatively free of dust,fumes, and excessive heat.
2.3 INPUT CONNECTIONS
ELECTRIC SHOCK CAN KILL! Precautionary mea-sures should be taken to provide maximum protec-tion against electrical shock. Be sure that all poweris off by opening the line (wall) disconnect switchand by unplugging the power cord to the unit whenconnections are made inside of the power source.
The Miniarc 90i/140i comes equipped with 10 feet ofinput cable for connection to a 115 or 230 volt (dependingon the model) single phase 50/60 Hz properly fusedpower supply. Refer to Table 2-1 for proper fusing for thewelding output load.
Table 2-1. Recommended Fuse Sizes
Rated Load
Volts Amps
Input &GroundConductor*CU/AWG
Fuse SizeAmps
115 27230 22
1010
4030
* Sizes per National Electric Code for 90° C rated copper conductors@ 30<198>°C ambient. Not more than three conductors in racewayor cable. Local codes should be followed if they specify sizes otherthan those listed above.
Since the Miniarc is a double insulated power source, noearth ground is required.
2.4 OUTPUT CONNECTIONS
The Miniarc 90i/140i comes equipped with a 10-footelectrode cable and electrode holder, and a 10-foot workcable and work clamp. Each cable is equipped with amale Quick Connector so the desired electrode polaritymay be chosen by interchanging the electrode and workcables through the use of the output receptacles.
For reverse polarity (SMAW) welding, the electrodecable is connected to the positive (+) output receptacle,and the work cable is connected to the negative (-) outputreceptacle.
For straight polarity (GTAW & SMAW) welding, theelectrode cable is connected to the negative (-) outputreceptacle, and the work cable is connected to thepositive (+) output receptacle.

8
SECTION 2 INSTALLATION
ELECTRIC SHOCK CAN KILL! Do not carry or holdthe power source when it is plugged into a powersupply.
2.5 SHOULDER STRAP
The strap can be lowered into the slot, where it can beused as an ordinary handle, or it can be pulled out to allowthe Miniarc 90i/140i to be carried like a shoulder bag. Tofold up the belt, grip the belt above the front holder, pushthe belt forward, pull it out fully, and fold it into the rearslot.

SECTION 3 OPERATION
9
3.1 GENERAL
Never, under any circumstances, operate the powersource with the cover removed. In addition to thesafety hazard, improper cooling may cause damageto internal components.
To prevent serious injury, never touch any partsforward of the torch handle (nozzle, heat shield,electrode, etc.) unless the power switch is in the offposition.
Wear the usual protective gloves, clothing, ear pro-tection, and helmet. A helmet with filter lens shadeNo. 6 or 7 should provide adequate protection foryour eyes. Refer to the Safety Precautions in thebeginning of this manual for additional additionaloperating precautions.
3.2 DUTY CYCLE
The duty cycle of a Power Source is the percentage of a5-minute period that a unit can be safely operatedwithout overheating or being damaged, at a given outputcurrent. The Miniarc 90i is rated at 90 A @ 24 V dc. TheMiniarc 140i is rated at 140 A @ 26 V dc. Both of theseratings are at 35% duty cycle. This means that theMiniarc 90i/140i can be safely operated at 90/140 ampsoutput current for 1.7 minutes out of every 5 minutes. Ifthe welding current is decreased, the duty cycle can beincreased.
3.3 WELDING CONTROLS/INDICATORS
A. Power Switch. When placed in the ON position, thisswitch (located on the rear panel) will apply power to thecontrol circuitry and energize the cooling fan. The whiteindicating lamp on the front panel should illuminate.
B. Output Current Control. Adjustable from 3 to 90amperes for the Miniarc 90i and 3-140 amperes for theMiniarc 140i, this potentiometer allows the welding cur-rent to be varied to suit your welding application. Theexact welding current will depend on the arc length,which is determined to some extent by the operator. If aremote control accessory is used, welding current will beregulated from that location.
C. Remote Control Connection. This socket is locatedon the front panel of the Miniarc and allows for connect-ing any remote control accessory described in Section1.
D. Fault Light. The Miniarc incorporates a thermaloverload circuit in order to prevent damage to the unit ifthe operating temperature becomes excessive. Theyellow fault light on the front panel will illuminate if thiscondition occurs. This overload protection circuit resetsautomatically when the operating temperature has fallento a safe level.
3.4 SEQUENCE OF OPERATION
A. Make all the necessary input and output connec-tions for the desired polarity.
B. Set the Output Current Control knob to the desiredoutput current.
C. Place the Power Switch to the ON position. Open-circuit voltage should now be present between theelectrode holder and the work clamp. Do NOTinstall or remove the work clamp with the powerSwitch ON.
D. Lower your helmet and commence welding.
E. When the weld is completed, break the arc bypulling the electrode away from the workpiece.
F. Allow the Power Source to idle for a few minuteswith no load applied.
G. Place the Power Switch to the OFF position.
H. The work clamp may be removed with the poweroff.
SECTION 4 MAINTENANCE
10
4.2 INSPECTION & CLEANING
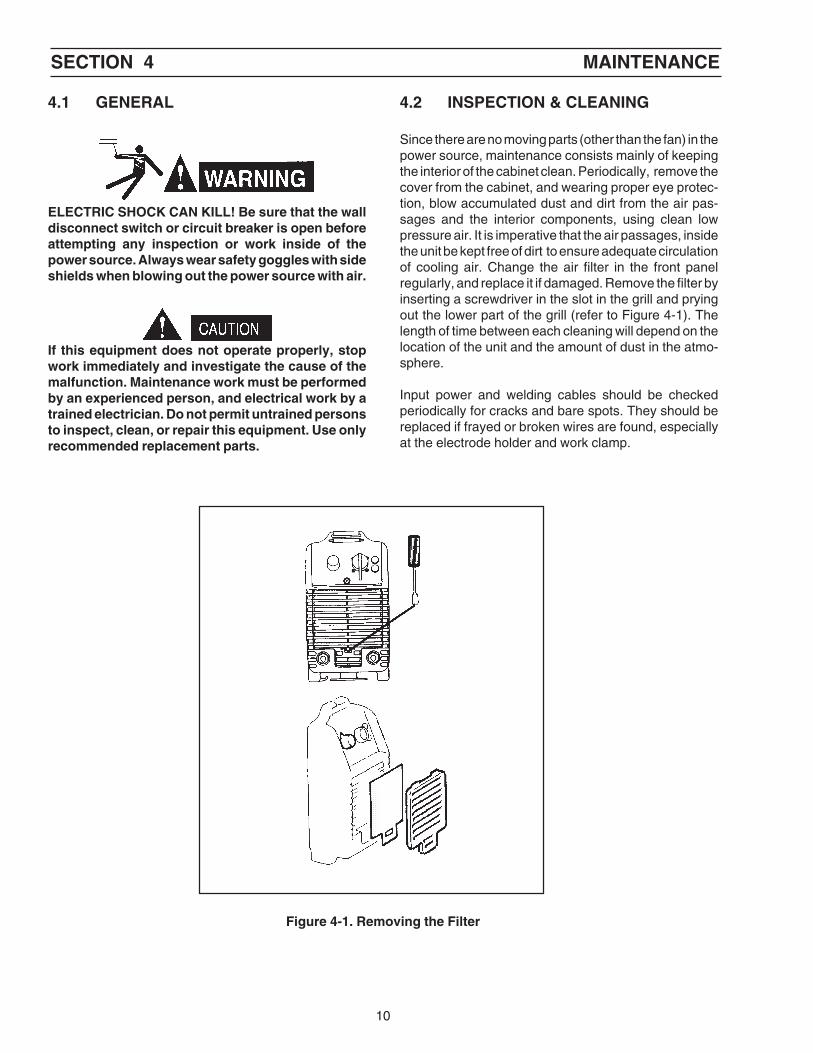
Since there are no moving parts (other than the fan) in thepower source, maintenance consists mainly of keepingthe interior of the cabinet clean. Periodically, remove thecover from the cabinet, and wearing proper eye protec-tion, blow accumulated dust and dirt from the air pas-sages and the interior components, using clean lowpressure air. It is imperative that the air passages, insidethe unit be kept free of dirt to ensure adequate circulationof cooling air. Change the air filter in the front panelregularly, and replace it if damaged. Remove the filter byinserting a screwdriver in the slot in the grill and pryingout the lower part of the grill (refer to Figure 4-1). Thelength of time between each cleaning will depend on thelocation of the unit and the amount of dust in the atmo-sphere.
Input power and welding cables should be checkedperiodically for cracks and bare spots. They should bereplaced if frayed or broken wires are found, especiallyat the electrode holder and work clamp.
4.1 GENERAL
ELECTRIC SHOCK CAN KILL! Be sure that the walldisconnect switch or circuit breaker is open beforeattempting any inspection or work inside of thepower source. Always wear safety goggles with sideshields when blowing out the power source with air.
If this equipment does not operate properly, stopwork immediately and investigate the cause of themalfunction. Maintenance work must be performedby an experienced person, and electrical work by atrained electrician. Do not permit untrained personsto inspect, clean, or repair this equipment. Use onlyrecommended replacement parts.
Figure 4-1. Removing the Filter

SECTION 5 TROUBLESHOOTING
11
5.1 GENERAL
Be sure that all primary power to the machine hasbeen externally disconnected. Open the wall discon-nect switch or circuit breaker before attemptinginspection or work inside of the power source.
If any troubleshooting situations require that powerremain on and that power terminals in the powersource carry voltage, exercise extreme caution whenworking on the "live" equipment. Avoid contact withelectrical components, except when testing with anappropriate instrument.
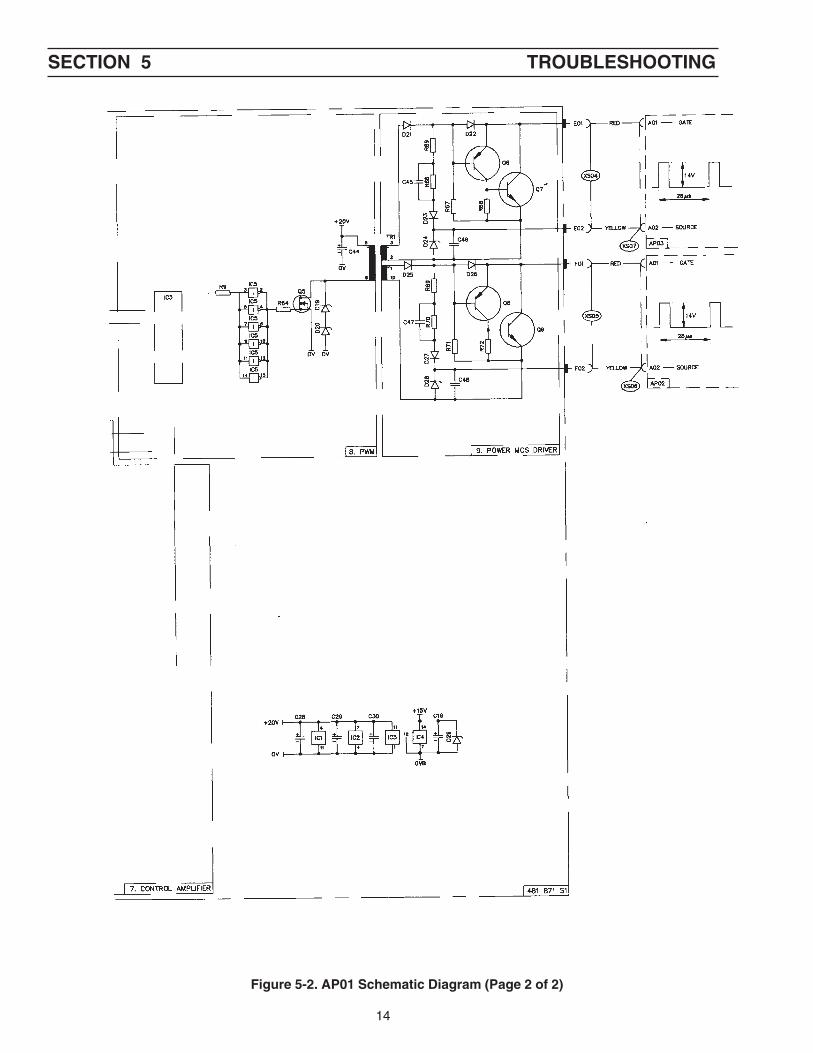
5.2 Schematics
The following pages contain schematics for use whentroubleshooting the power source.

SECTION 5 TROUBLESHOOTING
12
Figure 5-1. Miniarc 90i/140i Schematic Diagram

SECTION 5 TROUBLESHOOTING
13
Figure 5-2. AP01 Schematic Diagram (Page 1 of 2)
SECTION 5 TROUBLESHOOTING
14
Figure 5-2. AP01 Schematic Diagram (Page 2 of 2)

SECTION 6 REPLACEMENT PARTS
15
6.1 GENERAL
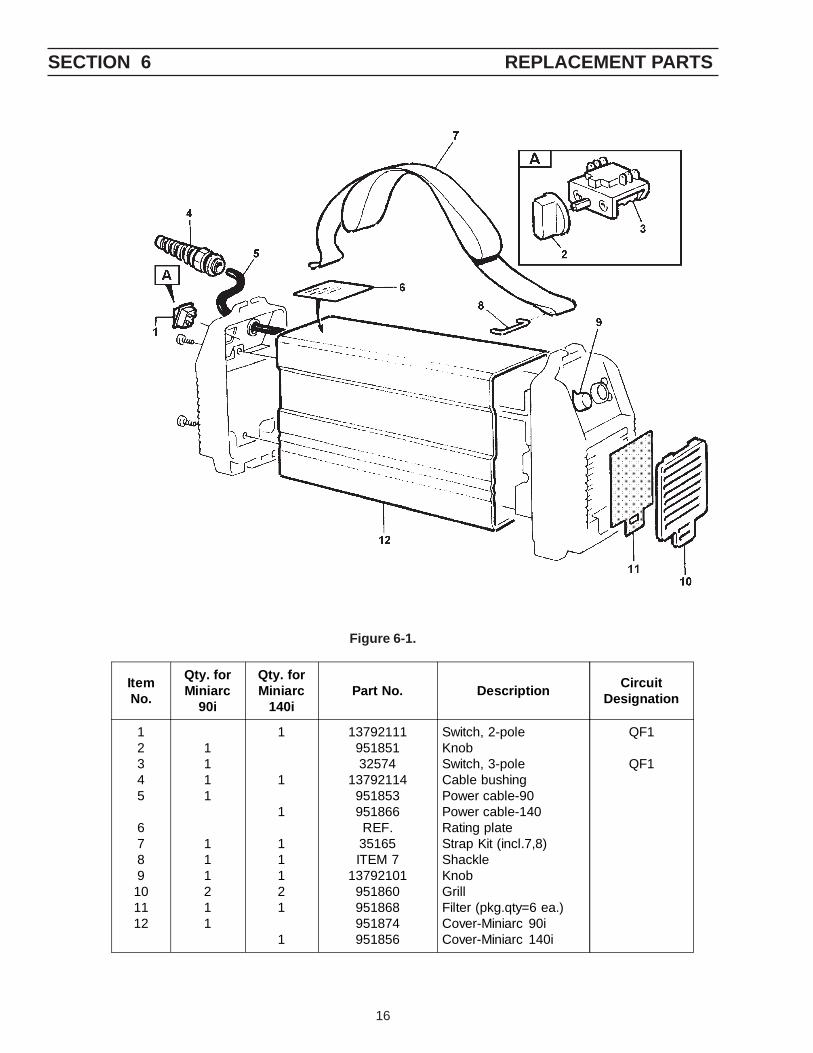
The following illustrations of the Miniarc 90i/140i identifyeach replacement part by item number as tabulated inthe associated parts list. The list identifies each part byItem No., Quantity for Miniarc 90i/140i, Part No., De-scription, and Circuit Designation.
6.2 ORDERING
Replacement parts may be ordered from your ESABdistributor or from:
ESAB Welding & Cutting ProductsPO Box 100545Florence, SC 29501-0545
For technical assistance directly from an ESAB servicerepresentative, call (803) 664-4416 or 5550. Addition-ally, ESAB offers toll free facsimile (FAX) service via 1-800-446-5693.
SECTION 6 REPLACEMENT PARTS
16
ItemNo.
Qty. forMiniarc
90i
Qty. forMiniarc
140iPart No. Description
CircuitDesignation
12345
6789101112
1111
111211
1
1
1
11121
1
1379211195185132574
13792114951853951866REF.35165ITEM 7
13792101951860951868951874951856
Switch, 2-poleKnobSwitch, 3-poleCable bushingPower cable-90Power cable-140Rating plateStrap Kit (incl.7,8)ShackleKnobGrillFilter (pkg.qty=6 ea.)Cover-Miniarc 90iCover-Miniarc 140i
QF1
QF1
Figure 6-1.

SECTION 6 REPLACEMENT PARTS
17
Figure 6-2.

SECTION 6 REPLACEMENT PARTS
18
Figure 6-2 (parts list).
* Refer to Spare Parts List.** Refer to Figure 6-3.
ItemNo.
Qty. forMiniarc
90i
Qty. forMiniarc
140i
Part No. Description CircuitDesignation
1
234
5678
9
10
11
1213
14151617
18
19202122
23
24
25
26272829
1
141
2115
51111111
1111
21
111111111111
11
114
12115
5111111
1111
1
1111111111111
11
951867951859
ITEM SP1*32639951873951854951852
ITEM SP2*ITEM SP3*
35166
ITEM 8ITEM 8
1379-2101951847951849951850951857951876
468028001ITEM 16ITEM 16351679518779518629518463262232589951846
ITEM SP1*ITEM SP1*ITEM SP1*
ITEM 8ITEM 8ITEM 8ITEM 8ITEM 8ITEM 8ITEM 8ITEM 8
ITEM SP1*ITEM SP1*
35170951879
End cover-Miniarc 90iEnd cover-Miniarc 140iBusbarNut (see item 28)Front panel-Miniarc 90iFront panel-Miniarc 140iWelding current connectorBusbarBusbarConnector kit (incl.8,9,22,23,24,25,28**,29**)CapConnectorKnob (Not Shown)PotentiometerIndicating lamp-whiteLED-yellowConnector, socketControl current transformerControl current transformerPlateTerminal blockVaristor kit (incl. 14,15,16)Primary inductor-90Primary inductor-140Panduit clamp, blueCapacitor, 3000 µfCapacitor, 1000 µfPanduit clamp, blueBusbarBusbarBusbarConnectorCapConnectorCapConnectorCapConnectorCapBusbar (not used)Link (not used)Guide kit (incl. 3,28,12**,15**)Circuit board
XS12
XS02 andXS04-XS07
XS09
RP01HL01V05
XS11TC01TC01
X01RV01L03L03
C02C02
XS01
XS02
XS10
XS03
RV01-RV03
AP01

SECTION 6 REPLACEMENT PARTS
19
Figure 6-3.

SECTION 6 REPLACEMENT PARTS
20
* Refer to Spare Parts List. ** Refer to Figure 6-2.
Figure 6-3 (parts list).
Spare Parts List
Item No. Part No. Description
SP1SP2SP3SP4SP5
951869951870951872951871951848
Busbars, primary (contains items 2,19,20,21,26, and 27 on Fig. 2)Busbars, secondary (contains items 6, 7 on Fig.2 and item 28 on Fig.3)Transistor boards - Miniarc 90i (contains items 6,11, and 5 on Fig.3)Transistor boards - Miniarc 140i (contains items 6,11, and 5 on Fig.3)Contact oil (to be used when mounting items SP3 and SP4)
ItemNo.
Qty. forMiniarc
90i
Qty. forMiniarc
140iPart No. Description Circuit
Designation
1
23
456
7891011
12131415161718
19
20212223242526272829
4
11
1151
21121
1112211
1
2211112111
4
1
1
15
12112
1111222
11
2211112111
ITEM 3ITEM 3ITEM 3ITEM 33516835169ITEM 3ITEM 6
ITEM SP3*ITEM SP4*
95185895186135174ITEM 9
ITEM SP3*ITEM SP4*ITEM 28**
951878951863
ITEM 28**ITEM 18ITEM 183517235173951865
ITEM 19ITEM 19ITEM 19ITEM 1935171
ITEM 24ITEM 24951864
ITEM SP2*ITEM 8**
Ferrite coreTapeGlueClipTransformer kit (incl. 1,3,4)Transformer kit (incl. 1,3,4)Thermal cutoutSpringCircuit boardCircuit boardHeat sinkFanCapacitor (incl. 9,10)Rectifier bridgeCircuit boardCircuit boardInsulationCircuit boardRectifier unitGuideSpacerCapacitorShunt kit (incl. 16,17,18)Shunt kit (incl. 16,17,18)Inductor (incl.19,20,21,22,23)ClipCoreBobbinWindingHolder (incl. 24,25,26)DiodeCapacitorInductorBusbarConnector
TC02TC02ST01
AP03AP03
EV01C01
V01,V02AP02AP02
AP04V03,V04
C04RS01RS01L02
V06C05L01
XS08

21
�����

22
�����

23
������
������������� ���������������������������������������������������� ������
�������������������������� �!����"���������������#����������������������������������
�����������������������������������

F-15-533-C 3/2002 Printed in U.S.A
IF YOU DO NOT KNOW WHOM TO CALL
Telephone: (800) ESAB-123/ Fax: (843) 664-4452/ Web:http://www.esab.com
Hours: 7:30 AM to 5:00 PM EST
A. CUSTOMER SERVICE QUESTIONS:Order Entry Product Availability Pricing DeliveryOrder Changes Saleable Goods Returns Shipping Information
Eastern Distribution Center Telephone: (800)362-7080 / Fax: (800) 634-7548
Central Distribution Center Telephone: (800)783-5360 / Fax: (800) 783-5362
Western Distribution Center Telephone: (800) 235-4012/ Fax: (888) 586-4670
B. ENGINEERING SERVICE: Telephone: (843) 664-4416 / Fax : (800) 446-5693Welding Equipment Troubleshooting Hours: 7:30 AM to 5:00 PM ESTWarranty Returns Authorized Repair Stations
C. TECHNICAL SERVICE: Telephone: (800) ESAB-123/ Fax: (843) 664-4452Part Numbers Technical Applications Hours: 8:00 AM to 5:00 PM ESTPerformance Features Technical Specifications Equipment Recommendations
D. LITERATURE REQUESTS: Telephone: (843) 664-5562 / Fax: (843) 664-5548Hours: 7:30 AM to 4:00 PM EST
E. WELDING EQUIPMENT REPAIRS: Telephone: (843) 664-4487 / Fax: (843) 664-5557Repair Estimates Repair Status Hours: 7:30 AM to 3:30 PM EST
F. WELDING EQUIPMENT TRAINING:Telephone: (843)664-4428 / Fax: (843) 679-5864Training School Information and Registrations Hours: 7:30 AM to 4:00 PM EST
G. WELDING PROCESS ASSISTANCE:Telephone: (800) ESAB-123 / Fax: (843) 664-4454 Hours: 7:30 AM to 4:00 PM EST
H. TECHNICAL ASST. CONSUMABLES:Telephone : (800) 933-7070 Hours: 7:30 AM to 5:00 PM EST
ESAB Welding & Cutting Products, Florence, SC Welding EquipmentCOMMUNICATION GUIDE - CUSTOMER SERVICES