mitex - pmp certificates user manuals/mitex, site profession… · mitex site professional two-way...
TRANSCRIPT
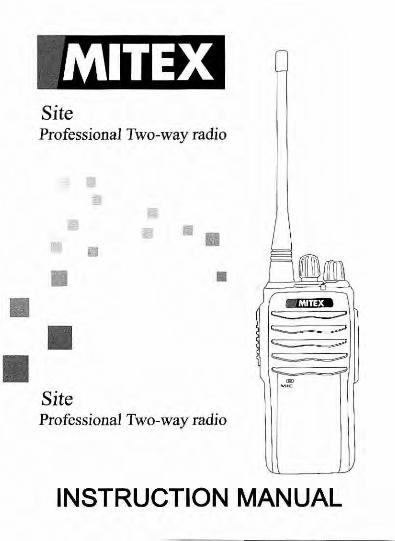
MITEX Site Professional Two-way radio
• •• • •
• c:::::: -;:::;;>
II c;;;;;; -::;? ...._ ~
• ...... ~
.., MOC
Site Professional Two-way radio
INSTRUCTION MANUAL
Mitex Site Professional Two-way radio Single Pack
Introduction
Thank you for purchasing this Mitex two-way radio, a
truly professional and durable radio that will provide
reliable, high quality communication, even under harsh
and demanding conditions. Before operation and to
obtain the best performance please read this manual
carefully to become familiar with the radios features
and uses.

.. ~ .~ ' ""
Contents '
User safety information .. .. . . .... .. .. . ....... ... ... ... ..... . .. ...... ... .. 1
Contents . .
Battery Information .... . . .............. . .
Accessories Installation .... ..... .. .. . ... . .. . ... .... .. . .. ... .. .
Radio Diagram ....
. . .. 2
. ... .. 3
.4-6
. .. 7
Function and Operation . . . ... .. ...... .. . .. .. ... ..... 8-11
Troubleshooting and Maintenance ..... .. . . ..... 12
Specifications .. . .. . ..... ... .. ......... .. .. . . .......... .... 13-14
Channel Table .... .. ... ...... . .. ........ ... .... .. ....... ... . . . .... 15
Declaration ..
Warranty and Service ..
. ... .. 16
. .. 17-18

-Please read the following information carefully to become familiar with
your new Mitex professional two-way radio:
• Do not attempt to repair, disassemble or re-assemble the radio.
Repair should only be carried out by a qualified Rad io Engineer
or Mitex (UK) Ltd (www.mitexuk.co.uk).
• In order to avoid electromagnetic interference, please turn off the
radio in any areas where radio transmissions are not permitted
e.g. Hospitals , A ircraft, etc.
• Do not place a radio in any area over, or in the deployment area
of an Air Bag within a vehicle .
• Never operate the radio in potentially flammab le and explosive
atmospheres.
• Never replace or charge batteries in potentially flammable or
explosive atmospheres.
• Do not operate the radio if its antenna is damaged.
• Do not expose the radio to long periods of direct sunlight, for example
on the dashboard of a vehicle or close to heating appliances.
• When using your radio, try to keep it vertical and at a distance of
5-1 Ocm from your mouth.
• Keep a distance of at least 2.Scm between the antenna and your
head and body when transmitting.
1

-Please open the box carefully and check that the following items are
included. If you find any items are missing or have been damaged
during shipment, please contact Mitex (UK) Ltd. (www.mitexuk.co.uk)
Equipment and Accessories Supplied:
Mitex Site Radio x1
Li-ion Battery Pack x1
AC adaptor x1
Intelligent Charger Pod x1
Antenna x1
Wrist strap x1
Belt Clip x1
Audio accessories retention cover x1
Protective Leather Case & strap x1
User Manual x1
License application x1
2
~ ~~~~~-:. ...... -~ .~ ;
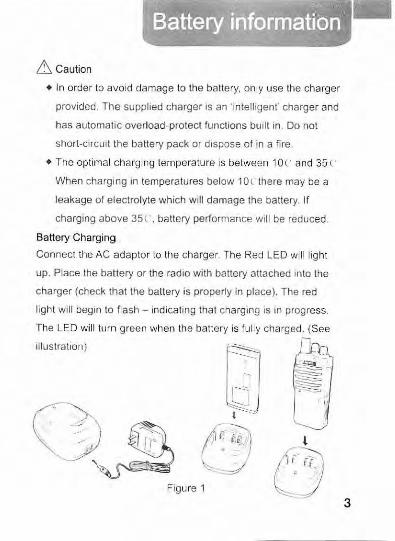
Battery information
6 Caution
• In order to avoid damage to the ba ttery, only use the charger
provided. The supplied charger is an ·intelligent' charger and
has automatic overload-protect functions built in. Do not
short-circuit the battery pack or dispose of in a fire .
• The optimal charging temperature is between 10 c and 35 c When charging in temperatures below 10cthere may be a
leakage of electrolyte which will damage the battery. If
charging above 35« . battery performance will be reduced.
Battery Charging
Connect the AC adaptor to the charger. The Red LED will light
up. Place the battery or the radio with battery attached into the
charger (check that the battery is properly in place). The red
light will begin to flash - indicating that charging is in progress.
The LED will turn green when the battery is fu lly charged. (See
illustration)
Figure 1
-
3
- - - ./<'":} ~,,~··~"~''1"" v~ '"·--~~'ftf.""'' r.::i.;t -r<', ,--.-. ~~1r••"'"-"' -~ .. ~
Accessories installation
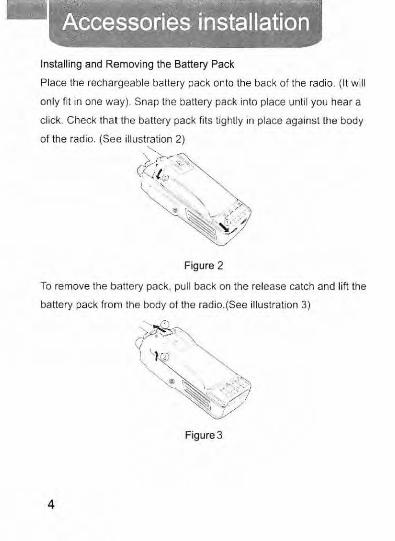
Installing and Removing the Battery Pack
Place the rechargeable battery pack onto the back of the radio . (It wil l
only fit in one way). Snap the battery pack into place until you hear a
click. Check that the battery pack fits tightly in place against the body
of the radio. (See illustration 2)
"'-cf:;;: '·"~· . ··h1
' '
Figure 2
To remove the battery pack, pull back on the release catch and lift the
battery pack from the body of the radio.(See illustration 3)
Figure 3
4

.. _ ~~· ,....~ .. ' - .... -..-,,.""~~<I"".._~ .. ,, '
·Accessories installation
Installing/Removing the Antenna
Screw the antenna into the connector on the top of the rad io by
holding the antenna at its base and turning it clockwise until it is
secure. (See illustration 4)
To remove the antenna . hold the antenna at its base and turn it
counter-clockwise until 11 is released from the thread.
(See illustra tion 5)
Figure 4 Figure 5
5
-
- • ...,,: 1,...,¥! ""-~ ..... ~ ~., ..... • ~· ~ ) ' ~ ~J1!~ '""f~-;r-r, ~
Accessories installation
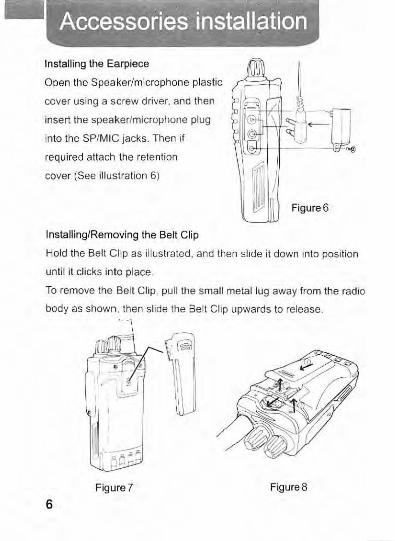
Installing the Earpiece
Open the Speaker/microphone plastic
cover using a screw driver. and then
insert the speaker/microphone plug
into the SP/MIC jacks. Then if
required attach the retention
cover (See illustration 6)
Installing/Removing the Belt Clip
Figure6
Hold the Belt Clip as illustrated, and then slide it down into position
until it clicks into place.
To remove the Belt Clip, pull the small metal lug away from the radio
body as shown. then slide the Belt Clip upwards to release.
Figure 7 Figure 8
6
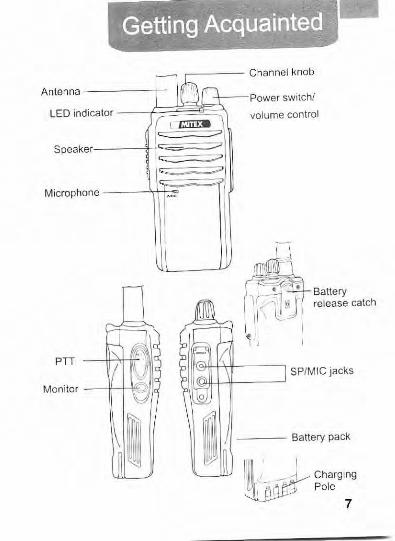
Getting A~q~_ai·_~t~~~-~~ r '": -
Microphone ---~~;:::;;;::;;:::=~/
. '• ·- -- ' .-:
Power switch/
volume control
Battery release catch
SP/MIC jacks ll.JJ.lil-l-.\1---- --'
Charging Pole
7

. --Function and operation
Switching power on
Turn the On/Off/volume control clockwise
to switch the radio ON. The radio will
bleep once.
Adjusting the Volume
Rotate the On/Off/volume control clockwise
or anti-clockwise to adjust the volume as
required. Clockwise increases the volume
and anti-clockwise decreases the volume.
Channel selection
Rotate the channel knob to select the
required channel. (Channel 16 is scan channel).
Transmitting
Press and hold the PTT (Push to Talk) switch.
then speak clearly into the microphone with
your normal voice. (Remember to keep the
microphone between 5-10 cm from your mouth}.
Release the PTT when you have finished talking.
Receiving
You do not need to do anything to receive a radio transmission.
(You will hear it automatically when someone transmits a message
on your channel)
8
.. Scan Function
Turn the channe l selector knob fully clockwise to reach channel 16 (S).
The rad io will then begin to scan. When a busy channel is found, the
radio will remain in scan mode for 5 seconds after the transmition has
ended. To end the scan, rotate the channel selector to any channel
between 1 and 15.
There are two kinds of scan modes: ordinary scan and priority scan
(a programmable setting)
1.0rdinary scan
CH 1 --> CH2 --+ CH3 --> · · · · · · --+ CH 16
"' "' 2.Priority scan: provided that priority scan channel is set to Channel10,
the scan sequence is as follows :
CH1 --+ CH 10 --+CH2 --+ CH10--+ · · · · · ·--+ CH 16
"' "' Time-out Timer (TOT )
The purpose of the Time-out Timer is to prevent a channel from being
used continuously for too long.
If you continuously transmit for a period of time that exceeds the
Time-out Timer the transceiver will stop transmitting and an alert tone
will sound. To stop the tone, release the PTT switch.
9
II ~ -..., ~~,.,."t~n,-,:>;"t~llf!'l ,\J- ,. '\"~ :':i.l" •• ~ ••
Fu nctiop,:~.np1:bp.~,~~t~on .: • • r ~
Battery Saver
The transceiver will switch to battery save mode when it hasn't
received any signal or hasn't been operated for more than 10 seconds.
When the transceiver receives an incoming signal or is used to transmit,
the battery saver mode will switch off automatically.
Low Battery Alert
If the battery is low. the red LED will come on and an alert tone will
sound. If this happens, the radio will not transmit. You must then
recharge the batter pack or insert a fresh battery.
Monitor
You can use the Monitor key to listen to weak signals that you cannot
hear during normal operation and to adjust the volume when no
signals are present on your selected channel.
CTCSS and DCS
CTCSS and DCS are used for privacy and to avoid receiving unwanted
radio transmissions from other radio operators. Radios that do not
transmit the correct CTCSS or DCS will not be heard . This means
that you will be able to communicate with the people you want to
without having to listen to other people who may also be sharing the
same channel.
These codes are pre-set and programmed by Mitex (www.mitexuk.co.uk)
10

VOX Function
VOX is programmed into the unit as standard. This enables a user to
transmit and call other users (When using a VOX enabled headset)
without having to first press the PTT button
Important
Notification of intended purpose and limitations of product use.
This product is an FM two way radio transceiver suitable for use in
Private Business Radio (PBR) systems. It utilises operating frequencies
not harmonized in intended country of use. A License must be obtained
before using the product in intended country of use. Ensure respective
country licensing requirements are complied with. Limitations of use
can apply in respect of operating frequency, transmitter power and/ or
channel spacing.
Mitex declares the radio types listed above comply with the essential
requirements and other relevant provisions of directive 1999/5/EC.
Note: A copy of a signed and dated Declaration of Conformity can be
obtained via Mitex (UK) Ltd (www.mitexuk.co.uk)
11
•
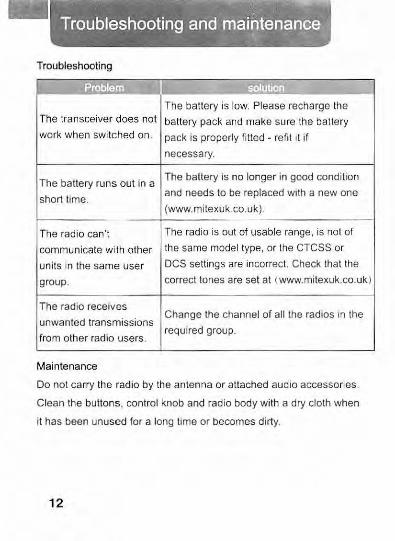
;;· '~ ,.-~~"'I'"::?•~,,,... - Troubleshooting and mai2~ena~~~~ . . . .: .....
Troubleshooting
I :lro111r;rw mmir.rn
The battery is low. Please recharge the The transceiver does not battery pack and make sure the ba ttery work when switc hed on. pack is properly fi tted - refit it if
necessary.
The battery runs out in a The battery is no longer in good condition
short time. and needs to be replaced with a new one
(www.mitexuk.co.uk).
The radio can't The radio is out of usable range, is not of
communicate with other the same model type, or the CTCSS or
units in the same user DCS settings are incorrect. Check that the
group. correct tones are set at (www.mitexuk.co.ukl
The radio receives
unwanted transmissions Change the channel of all the radios in the
from other radio users. required group.
Maintenance
Do not carry the radio by the antenna or attached audio accessories.
Clean the buttons, control knob and rad io body with a dry cloth when
it has been unused for a long time or becomes dirty.
12

-Mitex has a policy of continuous improvement which determines our
right to change specif ication or design and function without notice.
i Giii.Hilh. '
Frequency range 136-174MHZ
-403-470MHZ
Number of channels 16CH --- -
Span of channels 25KHZ/12.5KHZ - ·-
Step of channels 5, 6.25KHZ - - -Working Voltage 7.2V DC ±20%
-
Battery working time Lithium Battery ( 1300mHA) About 10 hours according lo 5-5-90
--Working temperatu re -30'c to+60 "c
--- --Frequency stability ±2.5ppm (-3o'c to+6o·c)
- ---Antenna Impedance 500
- -Dimensions 54 x 31 x 116 mm (exclude projection)
--Weight 25og(including battery and antenna)
13

-::: 4 '~~~ ~''"'°@~~"-'" ...... """'· .. • ~ 't~ ~ 'W'!\}'.~
u'ni.t;Technical Specific~tio~-~ ,,., '~.lfi '
- -'I ••. II -Carrier Frequency Error < 5 x 10'6
Carrier Output Power < 5W
\il odulatc Lim it < 5KHz
Audio distortion < 5%
Modulate characteristics i 3dB
Adjacent channd Power > 65d8
Spurious response < 7.5µW
In use Band < 16KHz
i'. - . ... '
Rcli:rcnce Sensitivity 12dB (SINAD) 0. 18µV
Audio disto11ion < 5%
Audio response +2dB • -10dB
Common Channel Rejection >-8dB
Adjacent Channel Selec ti vity > 55dB
lmcr-modulation distortion > 55dB
Spurious response > 55dB
Blocking characteristic > 85d8
14
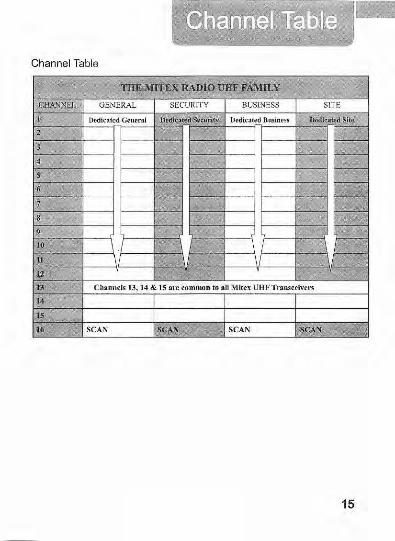
-Channel Table
- '.fHE Mll'E~ RADIO Um' FAMILY
Cl-IAN~EL GENERAL SECURITY BUSINESS SITE
1 Dedicated General t>edic~ted Security Dedieatcd Business Dcdkated Site
2 -3 . I---
4 ~
s ~ 1---L 6 ~
7 ~
>--8
~ 9 )---,.
10 "'' u \I "AL \I \/-;--
12 . ., ,,,
,_, 13 Channels 13, 14 & 15 are common to all Mitex UHF Transceivers
14
J:; 16 SCAN SCAN_ SCAN ~CAN*
'" " i
15
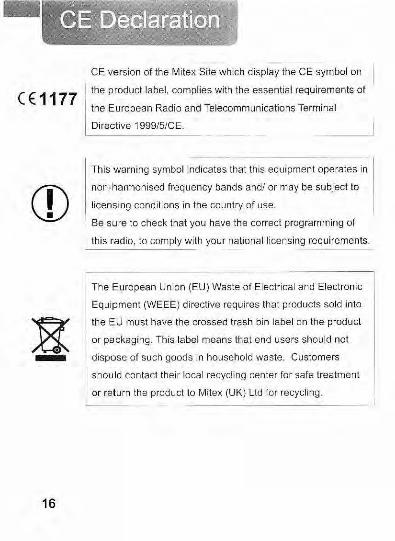
-CE version of the Mitex Site wh ich display the CE symbol on
( E 1177
I the product label, complies with the essential requ irements of
the European Radio and Telecommunications Terminal
Di rective 199915/CE.
CD
R -
16
This warning symbol indicates that this equ ipment operates in
non-harmonised frequency bands and/ or may be subject to
licensing cond itions in the country of use.
Be sure to check that you have the correct programming of
I this radio , to comply with your national licensing requ irements.
The European Union (EU) Waste of Electrical and Electronic
Equipment (WEEE) directive requires that products sold into
the EU must have the crossed trash bin label on the product
or packaging . This label means that end users should not
dispose of such goods in household waste . Customers
should contact their local recycling center for safe treatment
or return the product to Mitex (UK) Ltd for recycling .

Our warranty applies only to the purchaser if the radio has been properly
used and maintained. This warranty applies in lieu of any other warranty
or guarantee expressed or implied and variations of its terms are not
authorized without express written consent from Mitex (UK) Ltd. This
Warranty will not be effective unless you can produce upon request a
dated receipt or invoice to verify your proof of purchase within 12 months
period. This Warranty is an additional benefit and does not effect your
statutory rights.
Conditions of Warranty
Mitex (UK) Ltd warrants this transceiver for 1 year to the customer
(excluding Lithium battery pack and other accessories) to be free from
defects in materials and craftsmanship. Mitex (UK) Ltd warrants for 6
months to the customer the lithium battery pack to be free from defects
in materials and craftsmanship. Please refer to the warranty information
below or visit www.mitexuk.co.uk
Warranty Policy
We warrant this equipment against defects in material or workmanship,
with the exception of batteries and accessories, for a period of one year
from the date of original purchase.
This warranty is limited to repair or replacement of defective parts only
and is not valid if the equipment has been tampered with, misused or
damaged.
17
• If service or repair is required within the warranty period, repair will be
made free of charge by Mitex (UK) Ltd only. If the owner requires any
service or repair by anyone other than Mitex (UK) Ltd, the repair/service
cost must be paid by the owner and any such service or repair may
invalidate this warranty.
This warranty is valid if the enclosed card is properly fil led in and returned
to Mitex (UK) Ltd within Ten days from the date of purchase and is limited
to the terms and conditions contained herein.
Mitex (UK) Ltd retains the right to make changes or modifications without
any notice or obligation to the owner of this equipment.
Mitex (UK) Ltd www.mitexuk.co.uk
This manual is for the Mitex Site transceiver.
18

WARRANTY REGISTRATION CARD
Model
Serial No i i 0 ;{ 0 { S" 0 lJ 5 £1 'r (')
lS1}-i-ifn~1 q Cf cl J ci 5t f, Tl1is card must b~ mailed within 10 days from Ilic dale ofpurclmsc to
Mitcx (UK) Ltd,
Dale of Purchase
Dealer/Retailers name
0\\11cr's name
Address
Address/Postcode A.1~ 11 :>S ·r
E-mail Tel:

PLACE
STAMP
HERE
MITEX (UK) LTD UNIT 6 LION PARK
NEW STREET HOLBROOK INDUSTRIAL ESTATE
HOLBROOK SHEFFIELD
UNITED KINGDOM S20 3GH
. : ,
MITEX Site