model 300 0.01 hz - 30 mhz frequency response analyzer · ii the model 300 frequency response...
TRANSCRIPT
i
Model 300
0.01 Hz - 30 MHz
Frequency Response Analyzer
ANALYZER SOFTWARE VERSION 3.2
Copyright 2015
Copyright Notice
This manual is copyrighted. All rights reserved. This document may not, in whole or part, be
copied, reproduced, reduced or translated by any means, either mechanical or electronic,
without prior consent in writing from AP Instruments.
AP Instruments 355 Tesconi Circle, Suite #A, Santa Rosa, CA. 95401
Phone: (707) 544-2170 Fax: (707) 544-5816
Web: http://www.apinstruments.com
Federal Communications Requirements
Warning- This equipment generates, uses, and can radiate radio frequency energy and if not
installed and used in accordance with the instruction manual, may cause interference to radio
communications. It has been tested and found to comply with the limits for a class A
computing device pursuant to Subpart J of Part 15 of FCC rules, which are designed to
provide reasonable protection against such interference when operated in a commercial
environment. Operation of this equipment in residential areas is likely to cause interference
in which case the user at his own expense will be required to take whatever measures may be
required to correct the interference.
Doc# 000323

ii
The Model 300 Frequency Response Analyzer
The Model 300 Frequency Response Analyzer system is composed of an integrated
source/receiver unit, probes, interface cables and software for a user provided Windows
based computer.
The Model 300 Frequency Response Analyzer offers the following high
performance features
0.01 Hertz to 30 Megahertz coverage
110 dB's of dynamic range with 0.025 dB mag. and 0.2 degree phase accuracy
Up to 10,001 measurement points with linear or logarithmic frequency sweeps
Automatic magnitude and phase correction compensates for test leads or fixtures
Graphical interface features
Windows® based graphical user interface with real time plotting
Virtual instrument front panel for complete access to all system parameters
Automatic or manual scaling and shifting of screen plots for optimum viewing
Advanced marker functions and master graphs give data and delta readouts.
Advanced functions including complex impedance
Source features
Direct digital synthesis for fast sweeps
0.01 Hertz to 30 MHz range, 0.01 Hertz resolution
Output level adjustable from 1.25 millivolts to 7.08 volts rms (20Vpp)
Selectable 2 ohm or 50 ohm output impedance with 500mA peak output current
Output can be DC offset up to +/- 10 V eliminating large coupling capacitors at
low measurement frequencies
User programmable variable source level with frequency

iii
Receiver features
Two channels for B/A ratioed, transfer function measurements
High selectivity two stage receiver architecture for high noise immunity
Digital signal processing provides a user selectable IF bandwidth, optimizing
noise immunity and measurement speed
Selectable AC (>=10Hz) or DC coupling with one megohm input impedance
Inputs can be DC offset up to +/- 8 V facilitating DC coupled measurements
Table Of Contents
iv
Chapter 1 : System Installation ............................................................................................. 7
Hardware Installation ........................................................................................................ 7 Software Installation ......................................................................................................... 9
Chapter 2 : Virtual Front Panel Operation ........................................................................ 11
Software Overview ......................................................................................................... 11 Graph Display Modes ..................................................................................................... 14 The Graph Window ......................................................................................................... 15 The Data Window ........................................................................................................... 17 Menu Selections .............................................................................................................. 20
File Menu .................................................................................................................... 20 Edit Menu .................................................................................................................... 22 View Menu .................................................................................................................. 23 Graph Menu ................................................................................................................ 25 Tools Menu ................................................................................................................. 26
Probe Calibration ............................................................................................................ 38 Toolbars .......................................................................................................................... 41
Main Toolbar .............................................................................................................. 41 Sweep Control Toolbar ............................................................................................... 43 Sweep Frequency Toolbar .......................................................................................... 45 Source Parameters Toolbar ......................................................................................... 46 Receiver Parameters Toolbar ...................................................................................... 48 Graph Tools Toolbar ................................................................................................... 49 Marker Functions Toolbar .......................................................................................... 51
Chapter 3 : Data Transfer .................................................................................................... 53
Data Files ........................................................................................................................ 53 Image Files ...................................................................................................................... 54 The Clipboard ................................................................................................................. 55 Dynamic Data Exchange (DDE) ..................................................................................... 56
Data Links Reference .................................................................................................. 57 Execute Links Reference ............................................................................................ 61 Using DDE in Microsoft Excel ................................................................................... 64
v
Chapter 4 : Application Notes .............................................................................................. 71
Introduction to Analog Network Measurements ............................................................. 71 Basic Measurement Procedures ....................................................................................... 73 High Frequency Measurements ....................................................................................... 75 Circuits with Nonzero DC Voltage Levels at the Input / Output Node ........................... 76 Measuring Circuits with High Common Mode Voltages ................................................ 76 Measuring Feedback Loop Frequency Response ............................................................ 77 Measuring Complex Impedance ...................................................................................... 81 Line Current Harmonic Measurements ........................................................................... 83 Power Transmission/Reflection Measurements .............................................................. 84
Appendices ............................................................................................................................. 87
Appendix A: Theory of Operation ................................................................................. 87 Appendix B: Measurement Accuracy ............................................................................ 88 Appendix C: Specifications ............................................................................................ 92 Appendix D: File Types; Use and Format ...................................................................... 95 Appendix E: Default Setup Values ................................................................................. 98 Appendix F: Repair and Warranty Information ........................................................... 100 Appendix G: AC Power Fuse Replacement ................................................................. 102 Appendix H: System Calibration / Performance Verification ...................................... 103
Quick Performance Test ............................................................................................ 103 Full Performance Tests .............................................................................................. 104
Index ..................................................................................................................................... 113
Safety Notices ....................................................................................................................... 116

7
1 System Installation
Hardware Installation
[[ Note: Perform software installation prior to powering up the analyzer]]
Host PC requirements for using the Analyzer
Operating System: Windows versions XP, Vista, Windows 7, Windows 8
PC Hardware: 1 GHz processor or faster recommended, USB 2.0/1.1 port. XVGA
video card resolution or higher.
Verify that the local AC mains voltage level matches the setting of the line voltage
selector switch on the rear panel. Set the switch as required for the AC mains supply,
either 115VAC or 230VAC as appropriate. If the line selector switch was initially in
the incorrect position then the fuses will need to be inspected and possibly replaced
with the correct values since different fuses are used for 115VAC and 230VAC. See
appendix G for instructions on replacing the fuses.
Using the provided AC power cord connect the cord to the Analyzer’s rear panel
mains input while plugging the other end of the cord into the AC mains. Turn on the
Analyzer’s front panel power switch. The green power light should be on. Now turn
off the power switch in preparation for the software installation.
Connect the Analyzer’s rear panel USB connector to the host PC's USB port using
the provided USB cable.
Connect the source probe, a 1:1 cable with clips, to the source output BNC. Connect
the two input probes, labeled "A" and "B" to their respective BNC's.
Do not power up the analyzer. Proceed to the next step for installing the software
and drivers.

Chapter 1: System Installation
8
Model 300 Front Panel Showing Source Output BNC, Receiver Input BNC’s and the Power
Switch
Model 300 Rear Panel Showing USB Connector, AC Mains Voltage Selector Switch and the
AC Mains Input

Chapter 1: System Installation
9
Software Installation
Installing the Windows Software
Make sure the Analyzer’s power switch is turned off. Insert the software installation CD
media labeled "AP Instruments Windows Software for the Model 300 Frequency Response
Analyzer" into the host computers CD drive. The installation should start automatically when
the CD is inserted. If it does not start automatically, then while in Windows, use the program
manager's RUN command to execute the setup program "x:\setup" where x is the drive letter
of the PC's drive where the installation media is located. The setup program will create a
directory (default location of C:\AP Instruments) and transfer the required program files to
this directory. The setup program will also create a program group called "AP Instruments".
Installing the USB Port Driver
After the installation program installs the graphical user interface software it will
automatically start the USB driver install procedure. This procedure first displays a message
window followed by the installation of two drivers. The message window pops up prior to
driver installation as a reminder that two drivers are installed; click OK to begin driver
installation. Be aware, the hardware wizard will execute twice.
NOTE: Installation of the driver may require that the installer be logged on with
Administrator privileges.
IMPORTANT: The analyzer will not function without the correct driver installed.
Starting the Software
The Windows analyzer software icon, named APfra, is located within the AP Instruments
program group. Before starting the software ensure the hardware is properly configured, the
analyzer’s power is on and the USB cable is connected between the analyzer the PC. Double
clicking on the APfra icon will start the software.

Chapter 1: System Installation
10
DO NOT ATTEMPT TO MAKE MEASUREMENTS ON HOT OR UNGROUNDED
SYSTEMS !!!. DO NOT ATTEMPT TO SHIFT THE SOURCE/RECEIVER GROUND
BEYOND 42V PEAK FROM HOST PC (EARTH) GROUND OR OPERATOR SAFETY
WILL BE COMPROMISED AND EQUIPMENT DAMAGE MAY OCCUR!!!. If it is
necessary to make measurements on such systems then use an isolation transformer on the
system and ground the system under test to an earth ground. See application notes for high
common mode voltage measurement procedures. Working on or around line voltages has
electrical shock hazards for both the operator and the instrument that must be understood
before measurements are attempted!
To allow for proper cooling it is important that the analyzer unit have unobstructed air
venting slots. Maintain at least two inches between the Analyzer’s rear panel and other
objects. Keep the analyzer’s bottom air venting slots unobstructed.

11
2 Virtual Front Panel
Software Overview
The frequency response analyzer software (APfra.exe) program uses a PC based Windows
platform to provide a virtual control panel and graphing windows user interface to the
frequency response analyzer hardware. The software's user interface offers the following key
components :
A virtual front panel for Instrument control.
A graphics display which plots the acquired data in a variety of formats, called
display modes and provides real-time data analysis through markers and master or
reference traces.
Control over system parameters such as graph colors and data format.
Data transfer. Measured data is made available to other applications through data
files, the clipboard, image files, and Dynamic Data Exchange (DDE).
Environment persistence. Save and restore all the display attributes and analyzer
parameters (including special calibrations) for a particular measurement.
Working offline provides the convenience of analyzing data files without the
analyzer hardware connected.
Selectable Functionality with the Extended Functions Interface
The analyzer software has many features which initially can introduce unwanted complexity.
It is for this reason two user interface options are provided, the Standard and Extended
Functions Interface. The standard interface is active by default after installation. This
interface has basic control and measurement functionality but excludes many of the advanced
features. New and infrequent users are advised to use the standard interface, as most any
measurement can be made and the learning curve is greatly reduced.

Chapter 2: Virtual Front Panel
12
The extended functions interface is enabled (toggled on and off) using the View>Extended
Functions Interface menu item. In addition to the standard interface functionality the
extended interface includes :
Selectable number of graph markers up to five, and data analysis marker
functions which includes Min, Max, Goto, Find, Tracking and more.
Sweep data averaging.
Variable swept source (Power sweep).
Real-time graph zooming and panning.
Calibrations for unique probe and cabling configurations.
You may switch between the standard and extended interface at any time but be aware that
switching from the extended to standard interface will disable extended functions and
therefore reset any extended functions currently in use.
Offline Mode
Using the Analyzer Software Without Operational Hardware
Starting the analyzer software while the analyzer’s power is turned off or the USB cable
disconnected will display the following dialog box:
You have the option to exit and correct the hardware connection or continue and execute the
software in offline mode. When choosing ‘Offline’ the software will execute normally except
that any menu selections or toolbar buttons which control hardware will be disabled.
Chapter 2: Virtual Front Panel
13
All data analysis including master traces, reference traces, markers, and marker functions are
available, as well as data transfers such as the clipboard, data, and image files. DDE transfers
are not available.
Working offline is useful only when previously stored data files are available.
Use the menu selection File>Open Data>Open Data... to load a saved data trace and
File>Open Data>Open Master Data... to load a data file as the master trace. Data files which
do not have an associated ‘raw’ file will have some limitations, See the section on Data Files
for more information.
Note: While offline the software will not be able to detect if the analyzer has been
subsequently powered on or the USB cable reconnected. You must exit the analyzer software
and restart it.
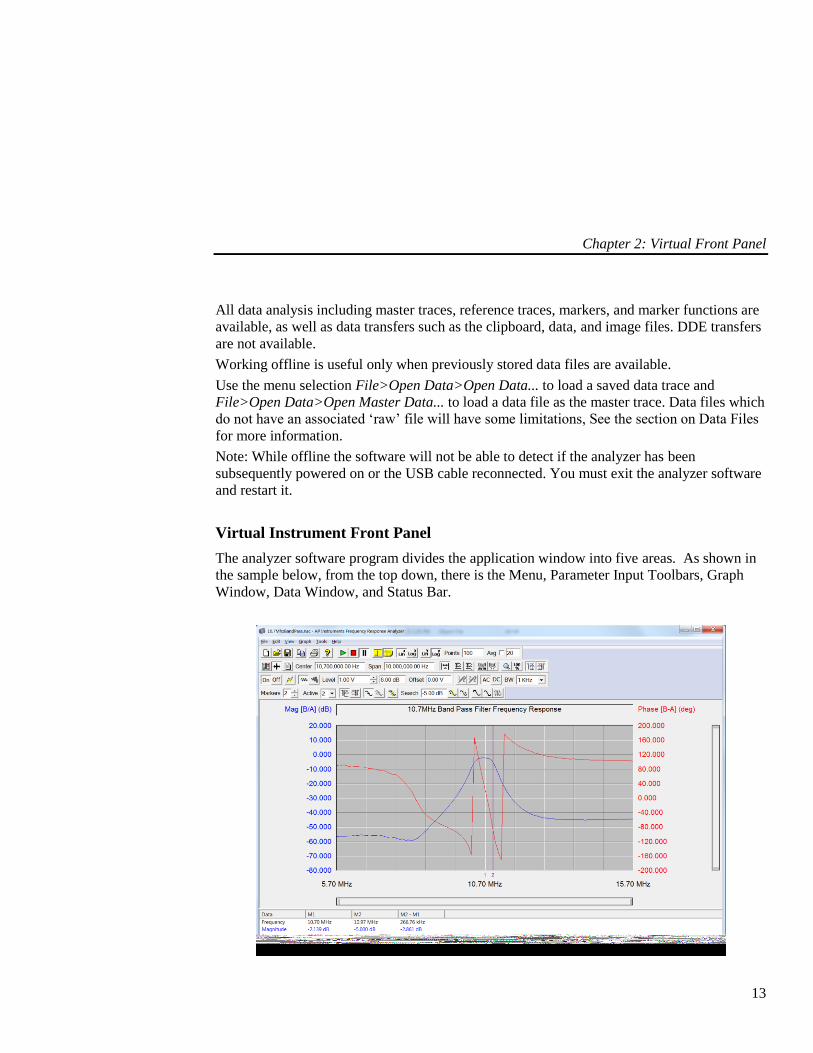
Virtual Instrument Front Panel
The analyzer software program divides the application window into five areas. As shown in
the sample below, from the top down, there is the Menu, Parameter Input Toolbars, Graph
Window, Data Window, and Status Bar.

Chapter 2: Virtual Front Panel
14
Graph Display Modes
The graph can display the acquired data in one of three basic Display Modes. The selectable
display modes are Magnitude & Phase, Absolute Mag ch. A & B, and Complex Impedance.
The labels above the left and right scaling always display the mode data types with units in
parenthesizes. A particular display mode is selected using the Graph menu.
Magnitude and Phase
The first display mode, magnitude and phase, graphs the ratioed measurement of channel B
divided by channel A. The magnitude represented is expressed in dB while the phase is
expressed in degrees. A positive value of magnitude indicates gain through the network under
test (i.e. B>A) while a negative value of magnitude indicates attenuation. The phase display
range can be chosen through the Data Format tab of the Tools>Options dialog box to wrap at
a selected angle or continuously unwrap (see Data Format Options). The phase shift indicates
the relative phase shift from channels A to B. Note that the source level does not enter the
equation. The source level does, however, become important for optimizing the signal to
noise ratio and preserving the linearity of the network under test.
Absolute Magnitude
The second display mode, measures the absolute magnitude of channels A and B displaying it
in RMS volts. This mode is useful for diagnosing a noisy B/A measurement by showing the
actual (absolute) signal strength of each channel.
Complex Impedance
The third display mode graphs the complex impedance of a network under test when using an
external reference resistor connected to the network in a specific manner (see application note
on measuring complex impedance). The reference resistor value is entered as a parameter.
The complex impedance, Z, can be displayed as one of the following :
Real Z and Imaginary Z
Magnitude and Phase of Z
Equivalent Capacitance and Resistance
Equivalent Inductance and Resistance
A choice of series or parallel circuit models are available.

Chapter 2: Virtual Front Panel
15
The Graph Window
The graph window is the area which displays the measurement data graphically in the traces,
this area also contains the graph title and additionally, in the extended interface, the pan /
zoom controls.
Within the Graph area use the left mouse button for movement and the right button for popup
menus and dialogs. To move an object place the mouse pointer within close proximity then
press and hold the left mouse button, release the button to drop the object at the desired
location. When more than one object is within the mouse selection range the object closest to
the mouse will be selected. Clicking the right mouse button will 'popup' either a menu or
dialog within the context of the current mouse location. When the mouse is close to a
movable object (either Marker or Ref trace) right-clicking will bring up a dialog box for
absolute placement of the object. Otherwise right-clicking will popup a menu which provides
basic functionality such as toggling Markers, Master, or Reference traces, scaling, and
locating Markers and Reference traces.
The recessed box just above the graph is the title area. Click the left mouse button within this
box to enter a title for the displayed data, while in edit mode the title box is white. When you
are through typing hit the Enter or Tab key, the text will be displayed centered within the title
area.
Real-Time Traces
The graph display window can display two separate real time data traces simultaneously,
generally referred to as the left and right trace, distinguishable by their color. The trace colors
can be selected by selecting the Color tab of the Tools>Options... dialog box. The minimum
and maximum range of the graphed data can be chosen manually or automatically using the
Manual Scale or Auto Scale toolbar buttons. The axis scaling for each trace is
indicated separately on the left and right ordinates. The format of all numeric data displayed
for either the axis scaling or the marker readout can be changed using the Data Format tab of
the Tools>Options... dialog box.
Extended Functions Interface Only: Use the and buttons to view/hide the left or
right trace, this also hides the left master/reference or right master/reference trace as well.
These trace view/hide buttons will not stop any data collection or post processing (such as
trace math or averaging), they only serve to hide data which is not of interest.

Chapter 2: Virtual Front Panel
16
Master traces
The master trace is a stored data trace available within the graph display. Master traces allow
comparisons between a stored trace and the active (real-time) trace. To add master traces to
the graph use the button (or select Master Trace from the graph popup menu). When
master traces are selected the current active trace data is copied as the master trace. Note that
this button is available only after a complete sweep of real-time data has been acquired. The
master trace marker data readout is displayed below the active trace marker data in the Data
Window (See The Data Window for information on its use). The delta data readout,
displayed to the right of the absolute marker data, gives the difference between the master
and the active data trace separately for both left and right traces. Master traces are also used
to display the data when a data file is loaded or data is pasted from the clipboard. This allows
saved data to be used for future comparisons and go/nogo testing. Note that the reference
trace and the master trace cannot be used simultaneously.
Reference traces
The reference trace is a floating horizontal baseline from which relative measurements are
made. Use the button to activate the references traces. when active, two reference traces
appear, a left and right reference trace. The reference value and delta data corresponding to
the vertical marker intersection are displayed in the Data Window. Setting the reference
value is accomplished by moving the trace with the mouse or typing a value in the ‘Set
Value’ dialog box (right-click on the reference trace to bring up the dialog box).
Important : Reference traces are value fixed, this means that they do not change
value when the graph scale changes. Therefore it is possible for a reference trace to lie
outside the graph. When this occurs the reference trace is not visible but the Data Window
display is still maintained and accurate. To change a reference trace value it must first be
visible, do this by either (1) change the scaling, or (2) bring the trace back into view using the
Find Reference item from the graph popup menu, the selected trace (either left or right) will
be placed at the current mouse position. Note that the reference trace and the master trace
cannot be used simultaneously.
Zooming within the Graph Window
The extended interface provides real-time panning and zooming of the graph. Zooming does
not alter setup parameters therefore the sweep span and graph scaling do not change, it just
provides viewing a smaller area of the graph. It is important to realize that a zoomed area
does not increase the real resolution of the collected data, the distance (in frequency) between

Chapter 2: Virtual Front Panel
17
data points is determined by the sweep span and number of data points selected. Data
between points are linear interpolated and displayed as a line segment.
Zooming is most useful when the examined region contains sufficient resolution for further
analysis. The sweep points should be set between 300 and 400 at a minimum, at 800 to 1000
points the traces are quite smooth at maximum magnification.
To narrow in on an area of interest use the Zoom button ( ) located on the Graph Tools
toolbar, when this button is selected the graph enters ‘zoom’ mode and the cursor changes to
a magnifying glass. While in zoom mode ‘zooming in’ is accomplished by either of two
methods:
Point centered selection - Click the left mouse button to zoom into an area
centered about the selected point.
Area selection - Position the mouse at the upper-left corner of an area of
interest then press and hold the left mouse button to begin the area selection,
a ‘selection rectangle’ will follow the mouse. Move the mouse to the
bottom-right corner and release the mouse button. The graph will now zoom
to display the selected area.
While zoomed the system behaves normally, nothing has changed, only the area of the graph
which is displayed. Zooming out is accomplished by holding down the control key (Ctrl) and
clicking the left mouse button, or use the Unzoom button to view the entire display
again.
The ‘PanZoom’ controls to the right and below the graph provide zoom control as well as
visual status of the zoomed area. These controls work very similar to the standard windows
scrollbars. Like scrollbars the handle is dragged by pressing and holding the left mouse
button, but unlike scrollbars dragging the edges (the area with the raised ridges) changes the
size of the handle. Moving the handle by selecting at the center provides a ‘panning’ action.
Selecting at an edge provides a ‘zoom’ action. The position and size of the handle serves as
an indicator to the level of magnification and area of the graph displayed.
The Data Window
The data window displays the trace data at marker locations. Note that graph markers must be
enabled to activate this window pane. Displayed data includes the marker frequency, real-
time trace data, master or reference trace data, delta (real-time – master or real-time –
reference) data, and variable source data. This data is arranged with markers running along

Chapter 2: Virtual Front Panel
18
the columns and trace data down the rows. The data window is displayed below the graph
window and is active only when markers are enabled. The window size is adjusted using the
sizing bar located between the graph and data windows, column widths are adjusted by
moving the dividers within the column heading.
Finding specific data can become difficult as the number of traces and markers increase due
to the sheer volume of data presented. Using the techniques described below to parse and
format the data can aid in location and analysis.
The first technique is to hide superfluous data. Using the left and right trace view/hide
buttons is the simplest and most effective way to reduce the quantity of data, hiding either
trace effectively reduces the data by half. Also, limit the number of markers as necessary.
Note : Both of these features (view/hide buttons and selectable marker count) require the
extended interface. Lastly, disable reference traces when they are not being used, while
enabled they add significantly to amount of displayed data. The Reference trace values are
maintained while they are disabled so they are right where you left them next time they are
enabled.
The second technique does not remove data but formats it, properly formatted data can aid
considerably in its comprehension. Use the Data Format Tab on the Tools>Options... dialog
to properly format the data for your application.
The last technique uses the Data Columns tab on the Tools>Options... dialog to specify and
arrange the columns in the data window. Data window columns display trace data of
individual markers and the difference between markers. The column order, individual
markers, and marker differences are all definable. This is an advanced technique which has
little usefulness when using two markers, the value is realized when making complex
measurements with three or more markers.
Markers
Graph markers are used to make measurements at specific frequencies, while markers are
enabled the Data Window displays the trace data at the marker frequencies. Markers are
toggled on and off with the button and appear as vertical lines with the marker number
displayed directly underneath. Setting a marker frequency is accomplished by moving the
marker with the mouse or typing a value in the ‘Set Frequency’ dialog box (right-click on the
marker to bring up the dialog box). Data for all visible traces, including master and reference
traces, is displayed in the Data Window. The Data Window also displays ‘delta marker’ (i.e.
M2 – M1) data. See The Data Window for more information on its use.
Important : Markers are value fixed, this means that they do not change frequency as the
display is panned or zoomed, and are independent of the sweep start and stop frequencies.

Chapter 2: Virtual Front Panel
19
Therefore it is possible for a marker to lie outside the graph making it impossible to move or
set. To bring a marker back into view use one of these two methods:
1. Left click at the extreme edge of the graph, either the left or right side. The
closest off-screen marker on that side of the graph, if one exists, will be placed at the current
mouse position. Each left-click will in turn 'bring' the next closest marker to the mouse
position.
2. Right click and select the 'Find Marker' menu item from the graph popup menu,
the selected marker (or All markers) will be placed at the current mouse position.
Extended Functions Interface Only: With the standard interface two markers are
available, the extended interface provides a selectable number of markers up to a maximum
of five. Also with the extended interface a Marker Functions toolbar is available. This
toolbar provides functions to search the real-time trace data.

Chapter 2: Virtual Front Panel
20
Menu Selections
There are six pull down menus available at the top of the window. The menu choices are
represented below.
File Menu
Open Setup...
Opens a dialog box which allows a previously saved configuration to be loaded. All
parameters will be set to the new values.
Save Setup
The current configuration file is updated. This updated setup can then be recalled using the
Open Setup... command. Only the configuration of the selected display mode is saved. See
File Types, Use and Format for more information.
Save Setup As...
Opens a dialog box which allows the current configuration to be saved as a file. This setup
can then be recalled using the Open Setup... command. Only the configuration of the selected
display mode is saved. See File Types, Use and Format for more information.
Open Data >
Loads a previously saved sweep data file and displays the data as a trace in the graph
window. A sub-menu selects to load the data as the main data traces or master data traces.
Once loaded, sweep data may be analyzed like measured realtime data.

Chapter 2: Virtual Front Panel
21
Save Data >
Saves the current displayed data sweep data as a text file, also saves the primitive data as an
associated raw binary file. A sub-menu selects to save the main data or master data to file.
Use the File>Open Data menu selection to load this saved data back again.
The text data is saved with the extension .dat, the binary data is saved with the .raw
extension. See 'Data Files' for additional information and 'File Types, Use and Format' for
details of the data (.dat) file format.
Save Graph Image...
Saves the screen image of the analyzer software’s graph display window to disk in one of
four image formats. See 'Image Files' in the Data Transfer chapter for more information.
Print Graph...
Opens the standard print dialog box. The graph display window is printed using the selected
print options. This command behaves differently than the toolbar print button which does
not invoke the dialog box.
Print Display Mode Setup...
Prints to the system printer a list of the current analyzer setup parameters.
Print Preview
Displays a preview of the printed page.
Printer Setup...
Opens the standard print setup dialog box.
Exit
Exits the application. Sweep data in memory will be lost unless saved. The present
configuration will be lost unless saved.

Chapter 2: Virtual Front Panel
22
Edit Menu
Copy Data
Copies sweep data to the clipboard. After executing this command the clipboard will contain
the last full sweep, except during the first sweep which will copy only the current collected
data. The sweep data will be copied with the same format as in Save Data As... and using the
selected phase format. This function is unavailable (grayed) when sweep data memory is
empty. This function is also available on the Toolbar.
Copy Master Data
Copies the Master sweep data to the clipboard. After executing this command the clipboard
will contain the contents of the master data. The sweep data will be copied with the same
format as in Save Data As... and using the selected phase format. This function is unavailable
(grayed) when the master trace is not active.
Copy Bitmap
Copies the (graphical) contents of the Graph Window and Data Window to the clipboard.
The resulting bitmap can be pasted into a program (i.e. MS Paint) that accepts bitmaps.
Paste Data to Master
Pastes the clipboard data, as previously copied using the Copy Data command, to the Master
Trace.

Chapter 2: Virtual Front Panel
23
View Menu
Toolbars...
This dialog box gives the option to display or hide, freeze or float, and resize the toolbars.
Individual toolbars can be displayed or hidden allowing unused functionality to be removed.
The toolbars may be displayed in one of three sizes (small, medium, large) to accommodate
specific display devices and equipment configurations. To change the toolbar size use the
pulldown list to select the desired size and click the 'OK' button. The software must then be
exited and restarted to enable the new toolbar size.
The medium sized toolbars are recommended monitors with resolution of greater than or
equal to 1200x900.
The 'Default Placement' button resets the toolbars back to the default configuration. This
includes toolbar placement and visibility. The 'freeze' checkbox is also unchecked (toolbars
can float). The only setting unaffected is the button size.

Chapter 2: Virtual Front Panel
24
Status Bar
In checking this option a status bar at the bottom of the display will be visible. The status bar
indicates the display mode the sweep status, the sweep count and a sweep bargraph.
Extended Functions Interface
In checking this option all of the analyzer software functions are available for use on the
virtual control panel. If unchecked a reduced set of functions are available for use.

Chapter 2: Virtual Front Panel
25
Graph Menu
Magnitude & Phase
Selects the Magnitude and Phase display mode. When this mode is selected the left trace will
display magnitude B/A data in decibels and the right trace displays phase B/A data in
degrees.
Absolute Magnitude
Selects the Absolute Magnitude display mode. When this mode is selected the left trace will
display the absolute magnitude of channel A in volts and the right trace displays the absolute
magnitude of channel B in volts.
Complex Impedance...
Selects the Complex Impedance display mode. When this mode is selected the Complex
Impedance option in the Tools menu appears allowing complex impedance parameters to be
selected. These parameters include :
Topology - The measurement configuration used.
Reference Resistor - The series resistor to the network under test.
Equivalent Circuit - Model the equivalent circuit as Series or Parallel.
Parasitic Compensation - Mathematically cancels the effects of unwanted series and
shunt elements.
The complex impedance measurement definitions are setup in the Tools menu under
Complex impedance.
Chapter 2: Virtual Front Panel
26
Tools Menu
Calibration...
Allows a user defined probe correction array to be generated and subsequently assigned to the
probe cal toolbar buttons. This feature is used to compensate for the frequency response of
probes and cables. This feature is described in detail later in the Tools Menu topic of Probe
Calibration.
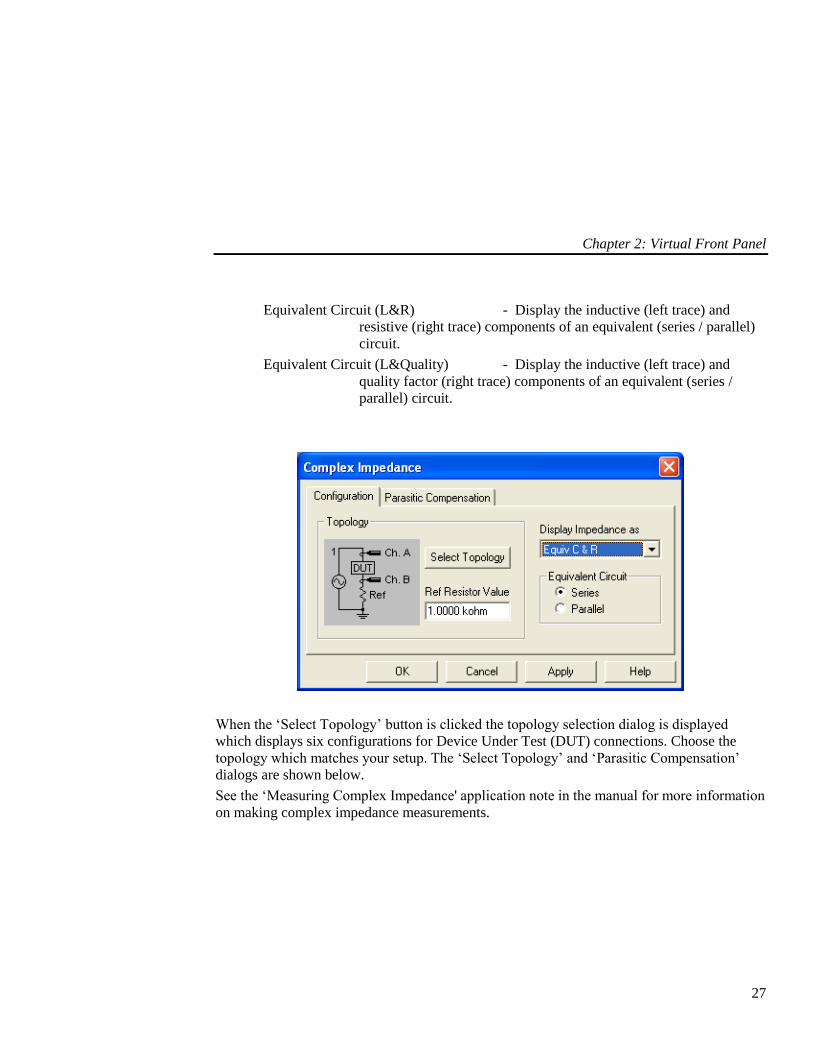
Complex Impedance...
Allows complex impedance parameters to be selected. These parameters include:
Topology - The measurement configuration used.
Reference Resistor - The series resistor to the network under test.
Equivalent Circuit - Model the equivalent circuit as Series or Parallel.
Parasitic Compensation - Mathematically cancels the effects of unwanted series and
shunt elements.
From the dialog box a display view selection is made from the following:
Complex Impedance (Rect) - Display complex impedance in rectangular
coordinates, Z(f)=X(f)+iY(f), the real part (X) on the left and the
imaginary part (Y) on the right.
Complex Impedance (Polar) - Display complex impedance in polar
coordinates, Z(f)=R(f)A(f), the magnitude (R = |Z|) on the left and
the angle (A) on the right.
Equivalent Circuit (C&R) - Display the capacitive (left trace) and
resistive (right trace) components of an equivalent (series / parallel)
circuit.
Equivalent Circuit (C&Dissipation) - Display the capacitive (left trace) and
dissipation factor (right trace) components of an equivalent (series /
parallel) circuit.
Chapter 2: Virtual Front Panel
27
Equivalent Circuit (L&R) - Display the inductive (left trace) and
resistive (right trace) components of an equivalent (series / parallel)
circuit.
Equivalent Circuit (L&Quality) - Display the inductive (left trace) and
quality factor (right trace) components of an equivalent (series /
parallel) circuit.
When the ‘Select Topology’ button is clicked the topology selection dialog is displayed
which displays six configurations for Device Under Test (DUT) connections. Choose the
topology which matches your setup. The ‘Select Topology’ and ‘Parasitic Compensation’
dialogs are shown below.
See the ‘Measuring Complex Impedance' application note in the manual for more information
on making complex impedance measurements.

Chapter 2: Virtual Front Panel
28

Chapter 2: Virtual Front Panel
29
Variable Source...
The variable or swept source is used to vary the source level along the sweep. This operation
is also known as a power sweep. It is common for the gain of a circuit to vary dramatically
along the sweep frequency span, this can compromise measurements when made with a
constant source amplitude because no single level will give adequate signal strength without
saturating over the entire span. Use the variable source in this situation to increase and
decrease the source level as required.
Activate the variable source with the button from the Source Parameters Toolbar. Upon
activation the variable source dialog and the variable source trace appears. The variable
source has the following attributes and constraints:
A series of points define the vertices of the curve (trace). There can be a maximum
of 20 points. Each point is defined by a frequency and voltage. The trace is created
by ‘connecting the dots’ of vertex points.
The trace must be defined over the entire frequency range of the instrument. This
requires that a point exist at the minimum and maximum frequencies. These two
points cannot be removed, the voltage level for these two points are user definable
whereas the frequencies are not.
The voltage level for a point may be any value within the range of the source:
1.25mV to 1.77V RMS (5mV to 7.08V RMS in high source level mode). The
voltage between any two points is the linear interpolated value. Note: All voltage
values are rounded to the nearest 1dB source attenuator step value.
Chapter 2: Virtual Front Panel
30
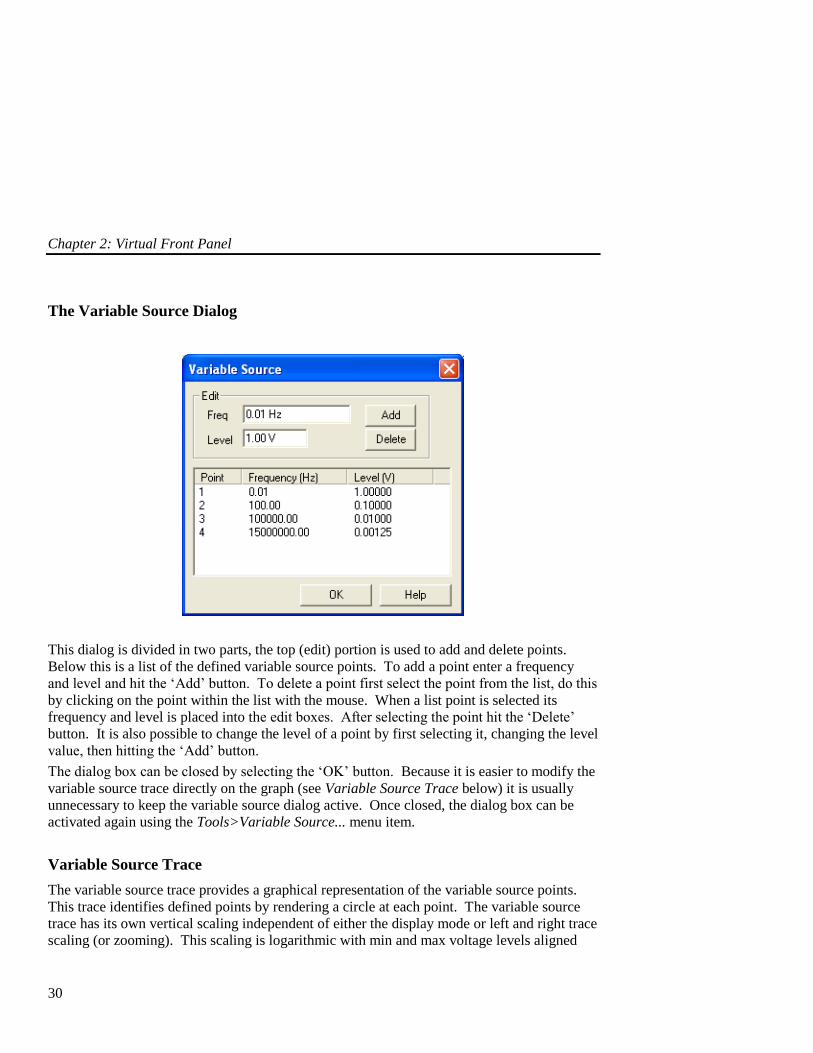
The Variable Source Dialog
This dialog is divided in two parts, the top (edit) portion is used to add and delete points.
Below this is a list of the defined variable source points. To add a point enter a frequency
and level and hit the ‘Add’ button. To delete a point first select the point from the list, do this
by clicking on the point within the list with the mouse. When a list point is selected its
frequency and level is placed into the edit boxes. After selecting the point hit the ‘Delete’
button. It is also possible to change the level of a point by first selecting it, changing the level
value, then hitting the ‘Add’ button.
The dialog box can be closed by selecting the ‘OK’ button. Because it is easier to modify the
variable source trace directly on the graph (see Variable Source Trace below) it is usually
unnecessary to keep the variable source dialog active. Once closed, the dialog box can be
activated again using the Tools>Variable Source... menu item.
Variable Source Trace
The variable source trace provides a graphical representation of the variable source points.
This trace identifies defined points by rendering a circle at each point. The variable source
trace has its own vertical scaling independent of either the display mode or left and right trace
scaling (or zooming). This scaling is logarithmic with min and max voltage levels aligned

Chapter 2: Virtual Front Panel
31
with the bottom and top gridline respectively, the grid lines associated with the variable
source trace have been omitted to avoid confusion.
This trace is interactive and points may be added, deleted, and moved directly on the graph.
To add or delete points right-click the mouse on the trace, this action is context sensitive such
that clicking the right mouse button over a vertex point pops up a dialog which allows the
point to be deleted, whereas, clicking between points (over a line segment) pops up a dialog
which allows a point to be added. Moving a vertex point is accomplished simply by dragging
(left mouse button click and hold) the point to a new location. While dragging a vertex point
a tool tip appears providing the frequency and level information.
Trace Summing...
Enables the master trace to be replaced by any one of the following: Master+Data, Master-
Data, Data-Master. This feature is useful for summing gains around a feedback loop and for
graphically comparing the difference between two traces. The master trace toolbar button
must be activated to enable this dialog box.

Chapter 2: Virtual Front Panel
32
Options Dialog
The Options dialog is a multi-tabbed window that allows modification of the look and feel of
the graph, data, and formatting. This is a ‘Modeless’ dialog which means that it may be
displayed concurrently as, and does not prevent the use of, the main APfra window and its
functionality.
Changes in these options can be applied without closing the dialog window, use the ‘Apply’
button for this. When the ‘OK’ button is clicked the option changes are applied and the dialog
window closes.
The ‘Defaults’ button on each tab changes the parameter settings on that tab only back to
their default values. The ‘Apply’ or ‘OK’ must be clicked for these default settings to become
active. Choose ‘Cancel’ to close the dialog and discard changes not yet applied.
Options, Colors tab
Allows color selections to be made for the various graph display window elements. Printer
line style options are assigned here.
Chapter 2: Virtual Front Panel
33
Options, Display tab
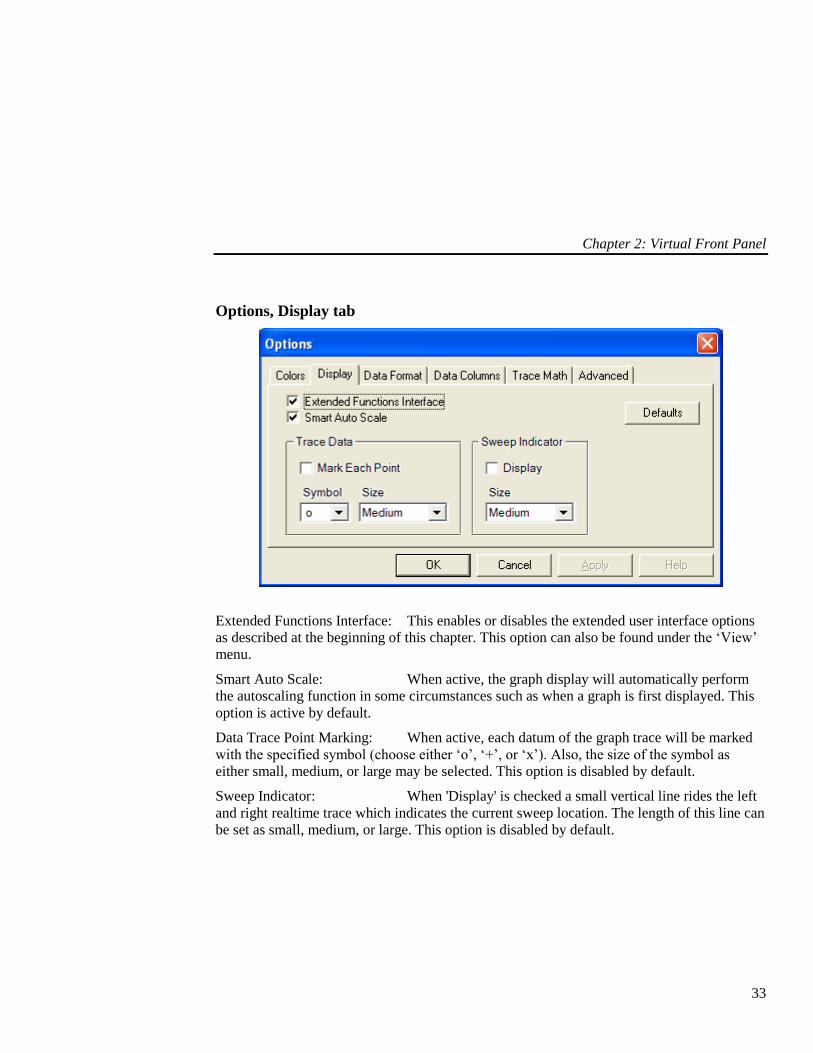
Extended Functions Interface: This enables or disables the extended user interface options
as described at the beginning of this chapter. This option can also be found under the ‘View’
menu.
Smart Auto Scale: When active, the graph display will automatically perform
the autoscaling function in some circumstances such as when a graph is first displayed. This
option is active by default.
Data Trace Point Marking: When active, each datum of the graph trace will be marked
with the specified symbol (choose either ‘o’, ‘+’, or ‘x’). Also, the size of the symbol as
either small, medium, or large may be selected. This option is disabled by default.
Sweep Indicator : When 'Display' is checked a small vertical line rides the left
and right realtime trace which indicates the current sweep location. The length of this line can
be set as small, medium, or large. This option is disabled by default.

Chapter 2: Virtual Front Panel
34
Options, Format Data tab
Allows formatting of the data displayed beside and below the graph. Data formatting is
independently available for Frequency data, Left trace data, Right trace data, and Delta
(Master trace minus the realtime trace) data. The three formatting options are as follows :
Standard - Numbers are formatted with the standard notation of commas
separating every three digits (i.e. 12,456,100.96).
Exponential - Numbers are formatted in exponential notation (i.e. 1.24 e07)
Engineering - Numbers are formatted in a scientific notation with the value
always between 1 and 1000, a unit modifier is added to represent the
decimal position (i.e. 12.45 M).
The number of displayed significant digits is entered in the sigfig edit box. The values above
were formatted with sigfig = 2.
The phase option allows the phase data to be displayed either wrapped or unwrapped.
Wrapped - Select the top radio button (next to the slider) to have the phase data wrap at every
2*pi transition. The transition point may be adjusted using the slider from (-360 to 0) to (0 to
360) in 45 degree steps.
Chapter 2: Virtual Front Panel
35
Unwrapped - Select the bottom radio button to unwrap the phase data. The phase is
unwrapped by adding or subtracting 2*pi at phase discontinuities. Warning: Phase
discontinuities which are multiples of 2*pi are indistinguishable from a single 2*pi
discontinuity and therefore only 2*pi is added (or subtracted) at the discontinuity. This can
produce inaccurate results with noisy data or large phase changes. In the case of a large phase
change increase the number of points per sweep so that no two successive points have a phase
difference of more than pi.
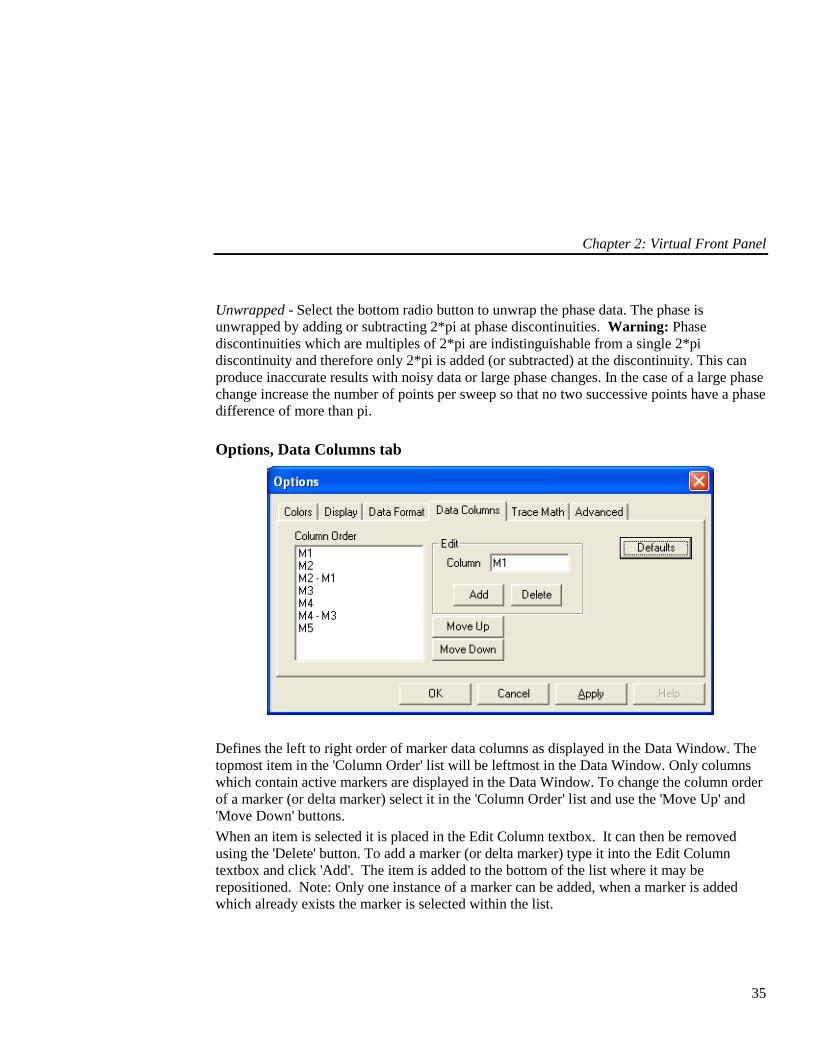
Options, Data Columns tab
Defines the left to right order of marker data columns as displayed in the Data Window. The
topmost item in the 'Column Order' list will be leftmost in the Data Window. Only columns
which contain active markers are displayed in the Data Window. To change the column order
of a marker (or delta marker) select it in the 'Column Order' list and use the 'Move Up' and
'Move Down' buttons.
When an item is selected it is placed in the Edit Column textbox. It can then be removed
using the 'Delete' button. To add a marker (or delta marker) type it into the Edit Column
textbox and click 'Add'. The item is added to the bottom of the list where it may be
repositioned. Note: Only one instance of a marker can be added, when a marker is added
which already exists the marker is selected within the list.
Chapter 2: Virtual Front Panel
36
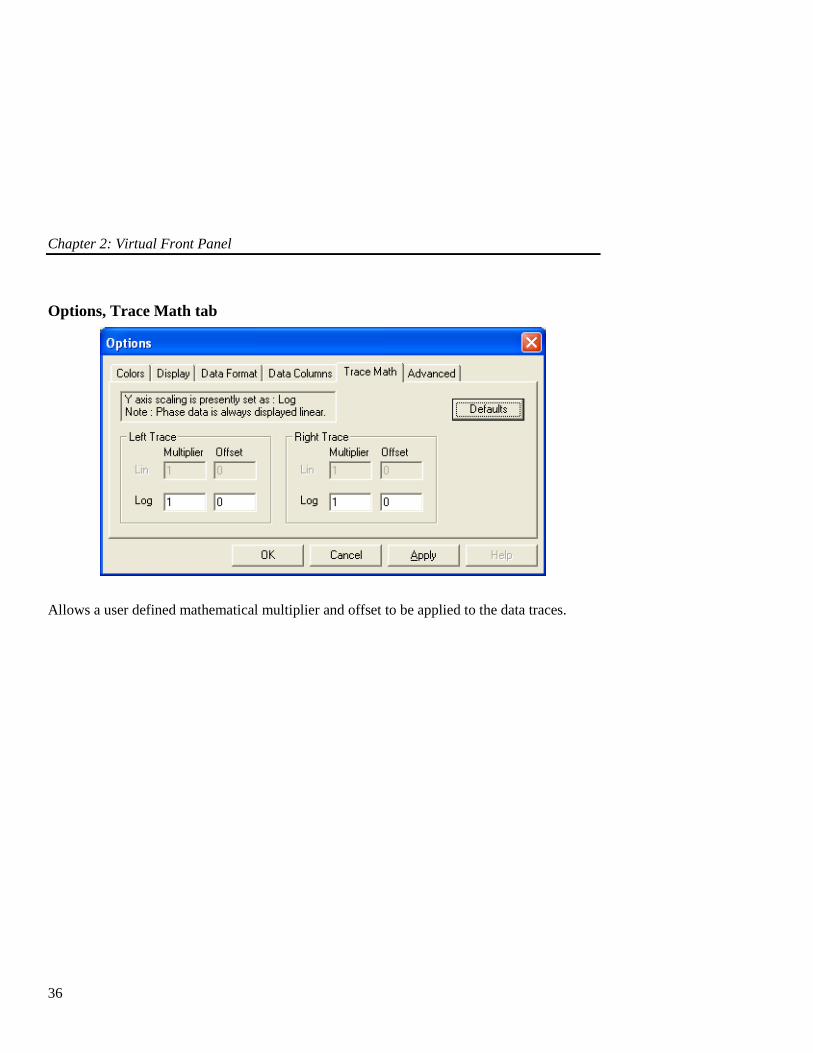
Options, Trace Math tab
Allows a user defined mathematical multiplier and offset to be applied to the data traces.
Chapter 2: Virtual Front Panel
37
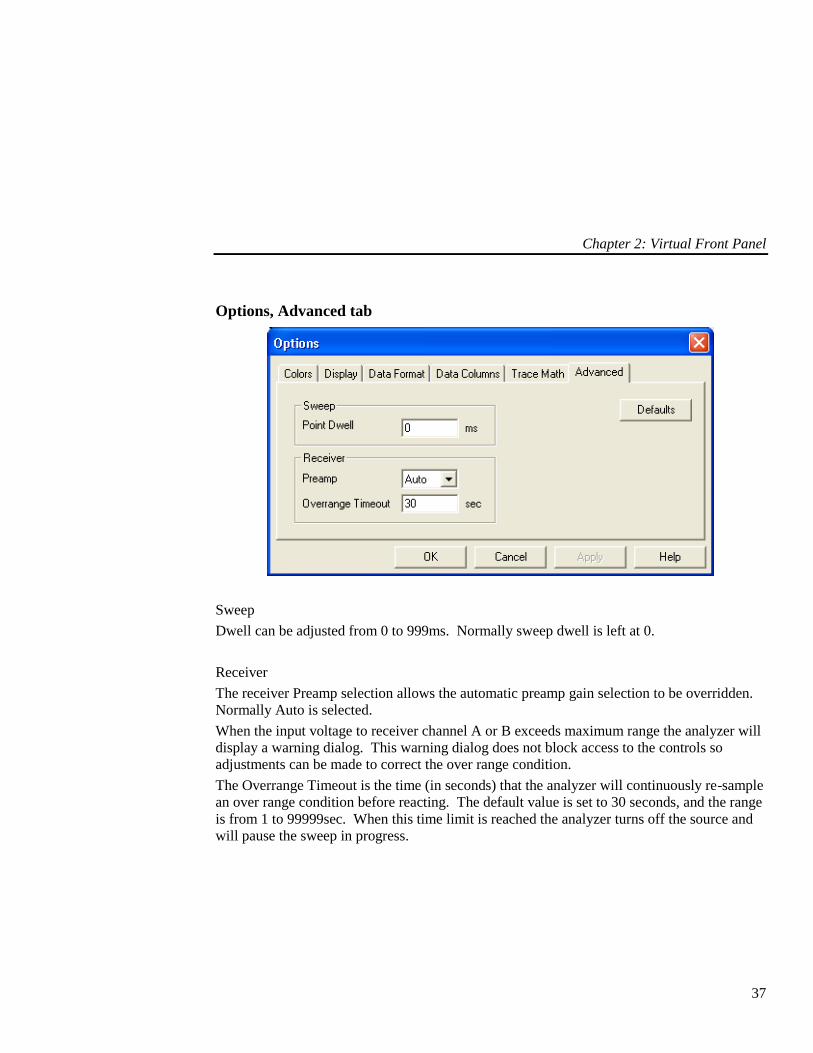
Options, Advanced tab
Sweep
Dwell can be adjusted from 0 to 999ms. Normally sweep dwell is left at 0.
Receiver
The receiver Preamp selection allows the automatic preamp gain selection to be overridden.
Normally Auto is selected.
When the input voltage to receiver channel A or B exceeds maximum range the analyzer will
display a warning dialog. This warning dialog does not block access to the controls so
adjustments can be made to correct the over range condition.
The Overrange Timeout is the time (in seconds) that the analyzer will continuously re-sample
an over range condition before reacting. The default value is set to 30 seconds, and the range
is from 1 to 99999sec. When this time limit is reached the analyzer turns off the source and
will pause the sweep in progress.

Chapter 2: Virtual Front Panel
38
Probe Calibration
It is generally desirable to have any probes that are connected to the analyzer to have a
negligible effect on the measured frequency response of the Device Under Test (DUT). To
help achieve this the software allows for a probe calibration so that the frequency response of
the probes can be compensated for and nulled out. Note that the probe calibration is not a full
system calibration. The system calibration is normally performed on an annual basis as
outlined in Appendix H.
Note: Probe Calibrations are only available in the Extended Functions Interface.
The menu item View>Extended Functions Interface will be check marked when the Extended
Functions Interface is enabled.
To check the validity of the probe calibration simply connect the source and receiver probes
together. The analyzer should give a reading of 0 dB magnitude and 0 degrees phase, within
the specified accuracy, across the frequency range.
Probe calibrations are saved as files which are then assigned to toolbar buttons. A calibration
is then activated using the assigned button. These three steps of calibration file usage
(creation, assignment, and activation) are detailed below.
Creating a Probe Calibration File
Select the menu item Tools>Calibration... to open the calibration dialog.

Chapter 2: Virtual Front Panel
39
The bottom part of this dialog is used for creating new calibration files. To create a new
calibration file perform the following steps
1. Disconnect the analyzer source and receiver probes from the DUT.
2. Connect the Channel A and B probes to the Source Out.
3. Select a file name to store this new calibration. Click the Browse... button to the
right of the New Calibration File name text box. The Save As dialog will pop up,
from here you may navigate to the directory to which to store the calibration file,
the ‘APfra\Cal’ directory is selected by default. Type in the file name in the ‘File
name:’ text box, you do not need to type in the extension, it will be appended
automatically. Then click the Save button, you should see the full path name
appear in the New Calibration File name text box.
4. Select either a Frequency Range or Frequency point list file (see appendix D for
more on frequency point list files). The default selection is a frequency range of
100Hz to 30MHz using 100 points separated logarithmically. You may change
any of these settings or choose a frequency point list (FPL) file. An FPL file of
the file name ‘DefaultCal.fpl’ was placed in the APfra\Cal directory during
installation, this FPL file contains the frequency points used during factory
calibration.
5. Select the ‘Begin Calibration’ button. A reminder to connect the probes is
displayed, if not already done so connect the probes/cables then click OK. Upon
completion the calibration file will be generated.
Assigning a Probe Calibration File to a Toolbar Button
The top portion of the calibration dialog is used to assign calibration files to the two Probe
Cal buttons on the Receiver Parameters Toolbar ( ). Click the Browse button to the
right of the text boxes to assign a calibration file to either the ‘Probe Cal 1’ or ‘Probe Cal 2’
buttons. Two Probe Cal buttons have been provided to allow for possible probe/fixture
configuration differences. Select OK to close the dialog when complete.
You will notice that the Toolbar Probe Cal buttons which have been assigned are no longer
disabled (grayed). Also when the mouse positioned over a button and held momentarily a
tool tip pops up which displays the calibration file name assigned to that button.
These assignments are saved as part of the setup configuration and will therefore be available
anytime the setup is opened. See Open Setup..., Save Setup, and Save Setup As... File Menu
options for more information on configuration setup files.
Chapter 2: Virtual Front Panel
40
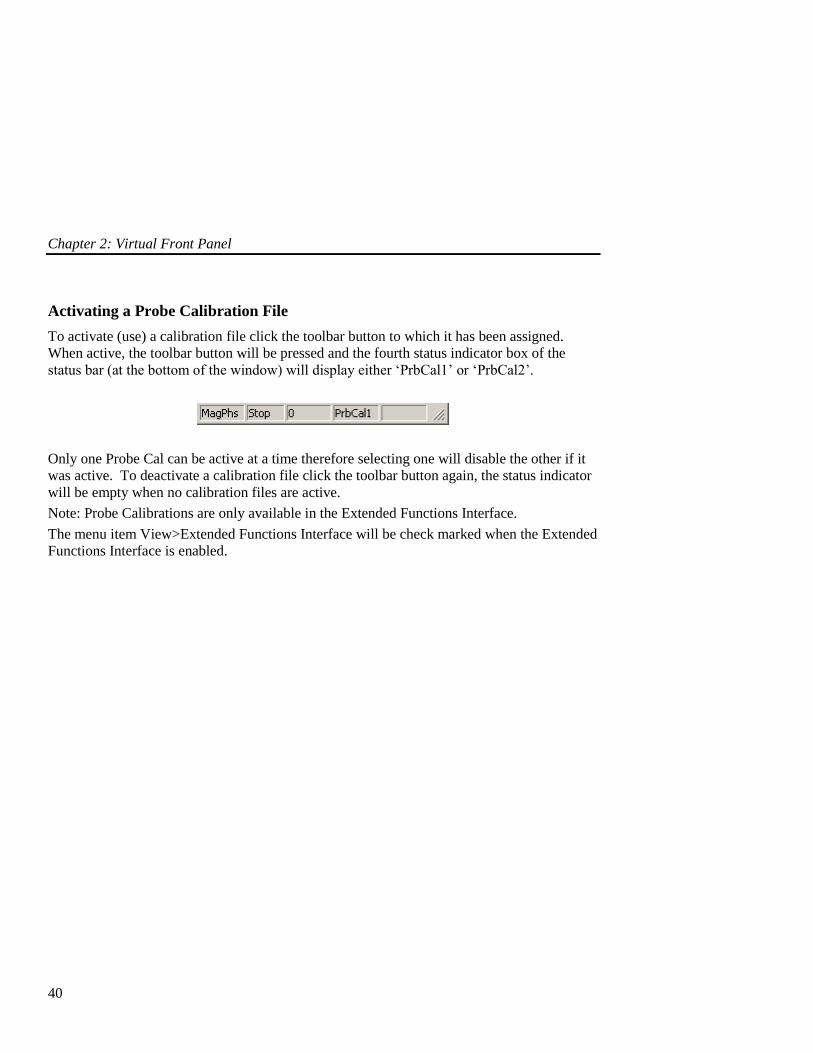
Activating a Probe Calibration File
To activate (use) a calibration file click the toolbar button to which it has been assigned.
When active, the toolbar button will be pressed and the fourth status indicator box of the
status bar (at the bottom of the window) will display either ‘PrbCal1’ or ‘PrbCal2’.
Only one Probe Cal can be active at a time therefore selecting one will disable the other if it
was active. To deactivate a calibration file click the toolbar button again, the status indicator
will be empty when no calibration files are active.
Note: Probe Calibrations are only available in the Extended Functions Interface.
The menu item View>Extended Functions Interface will be check marked when the Extended
Functions Interface is enabled.
Chapter 2: Virtual Front Panel
41
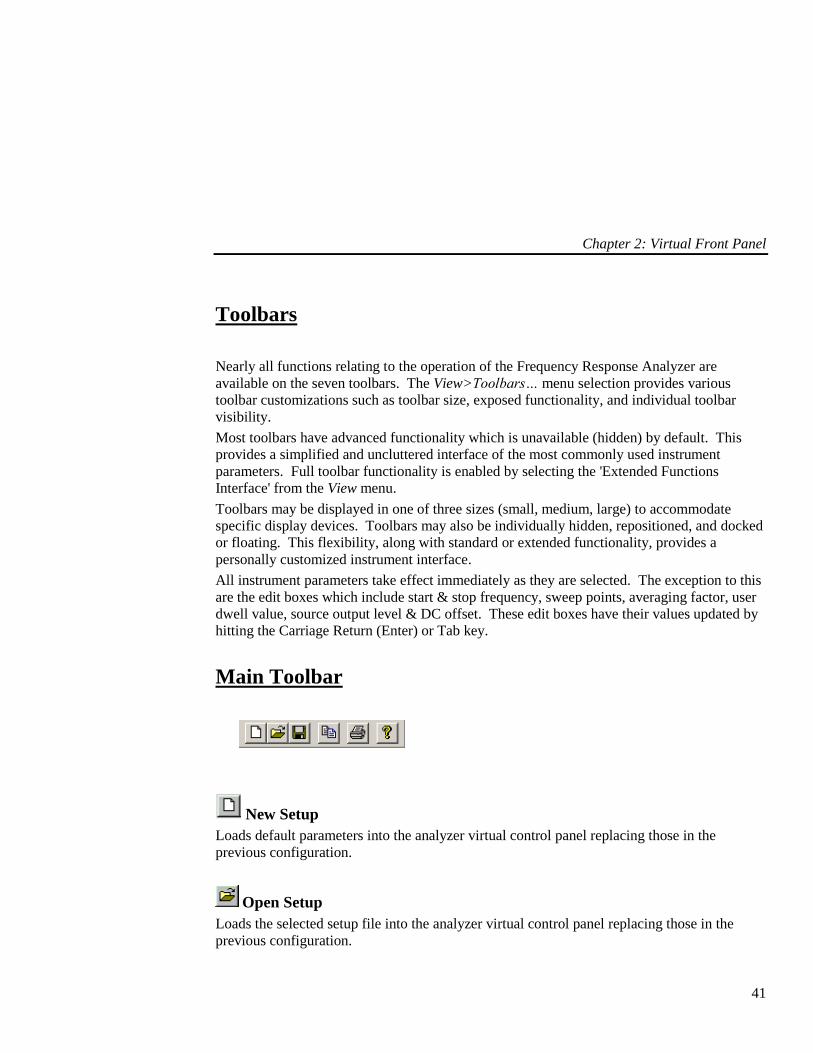
Toolbars
Nearly all functions relating to the operation of the Frequency Response Analyzer are
available on the seven toolbars. The View>Toolbars… menu selection provides various
toolbar customizations such as toolbar size, exposed functionality, and individual toolbar
visibility.
Most toolbars have advanced functionality which is unavailable (hidden) by default. This
provides a simplified and uncluttered interface of the most commonly used instrument
parameters. Full toolbar functionality is enabled by selecting the 'Extended Functions
Interface' from the View menu.
Toolbars may be displayed in one of three sizes (small, medium, large) to accommodate
specific display devices. Toolbars may also be individually hidden, repositioned, and docked
or floating. This flexibility, along with standard or extended functionality, provides a
personally customized instrument interface.
All instrument parameters take effect immediately as they are selected. The exception to this
are the edit boxes which include start & stop frequency, sweep points, averaging factor, user
dwell value, source output level & DC offset. These edit boxes have their values updated by
hitting the Carriage Return (Enter) or Tab key.
Main Toolbar
New Setup
Loads default parameters into the analyzer virtual control panel replacing those in the
previous configuration.
Open Setup
Loads the selected setup file into the analyzer virtual control panel replacing those in the
previous configuration.
Chapter 2: Virtual Front Panel
42
Save Setup
The current configuration file is updated. This updated setup can then be recalled using the
Open Setup... command. Only the configuration of the selected display mode is saved. See
File Types, Use and Format for more information.
Copy Data
Copies sweep data to the Windows clipboard. After executing this command the clipboard
will contain the last full sweep, except during the first sweep which will copy only the current
collected data. This function is unavailable (grayed) when sweep data memory is empty.
This function is also available from the edit menu.
Prints the graph display window on the default printer in landscape orientation. In order to
print using alternate options use the print command from the file menu.
Help
Executes the help. This function is also available from the help menu.
Chapter 2: Virtual Front Panel
43
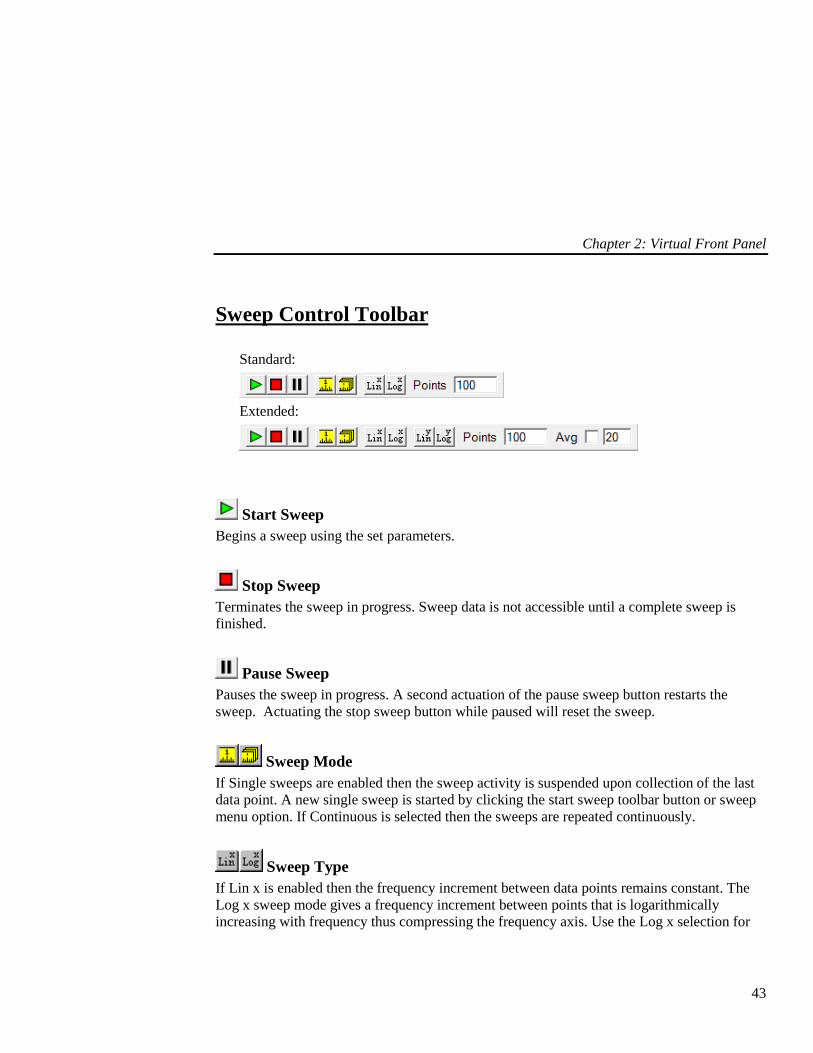
Sweep Control Toolbar
Standard:
Extended:
Start Sweep
Begins a sweep using the set parameters.
Stop Sweep
Terminates the sweep in progress. Sweep data is not accessible until a complete sweep is
finished.
Pause Sweep
Pauses the sweep in progress. A second actuation of the pause sweep button restarts the
sweep. Actuating the stop sweep button while paused will reset the sweep.
Sweep Mode
If Single sweeps are enabled then the sweep activity is suspended upon collection of the last
data point. A new single sweep is started by clicking the start sweep toolbar button or sweep
menu option. If Continuous is selected then the sweeps are repeated continuously.
Sweep Type
If Lin x is enabled then the frequency increment between data points remains constant. The
Log x sweep mode gives a frequency increment between points that is logarithmically
increasing with frequency thus compressing the frequency axis. Use the Log x selection for

Chapter 2: Virtual Front Panel
44
Bode type plots. This parameter is not used when sweeping with a frequency points list file.
The increment between each point is solely determined by each frequency point value.
Y Axis Graphing Type
If Lin y is enabled then the units are displayed formatted for linear units. If Log y is enabled
then the units (except phase) are displayed formatted for logarithmic units. Use the Log y
selection for Bode type plots.
Points
Enter the number of data points to collect. The maximum number of points is 10,001.
Available RAM may limit the number of points you can use. Roughly, 25K per 100 points
are required. This parameter is not used when sweeping with a frequency points list file. The
number of data points will be equal to the number of frequency values in the file.
Avg (Averaging)
Sweep averaging is toggled on and off by clicking the Avg checkbox. The Averaging Factor
specifies the weighting of each sweep into the displayed trace, is a value from 1 to 999,
entered into the Avg edit box. The weighting of a sweep (weighting factor) is 1 / Averaging
factor. When enabled, the averaging function averages each sweep into the trace with a
weighting factor equal to the sweep count, until the Averaging Factor is reached. When the
specified averaging factor is reached, the trace is updated with each sweep weighted by the
Averaging Factor.

Chapter 2: Virtual Front Panel
45
Sweep Frequency Toolbar
Standard:
Extended:
Sweep frequency limits may be entered as Start/Stop, Center/Span, or File list values.
Start/Stop
Two edit boxes allow for sweep start and stop frequencies to be entered. Frequency values
may be entered as standard values, with or without separating commas (i.e. 100.2 or 1,200),
exponential values (i.e. 1.2e5), or with one of three standard SI prefixes : m-milli, k-kilo, M-
mega (i.e. 1k, 2.6M). After typing a new frequency value you must enter it by hitting the
Carriage Return (Enter) or Tab key. Regardless of how the value was entered it will be
converted to the comma separated format.
In the event the frequency value entered causes an error (value out of range or start frequency
greater than stop frequency) a message box will be displayed and either value may be edited
to remove the error.
Center/Span
Two edit boxes allow for the sweep range to be entered as a center frequency and a total span.
Frequency values are entered exactly as described in Start/Stop above.
File List
When File list is selected, a frequency point list (.fpl) file is used as the sweep frequency
points. The file name is entered into the corresponding edit box either manually or selected
through the Browse dialog box.
Chapter 2: Virtual Front Panel
46
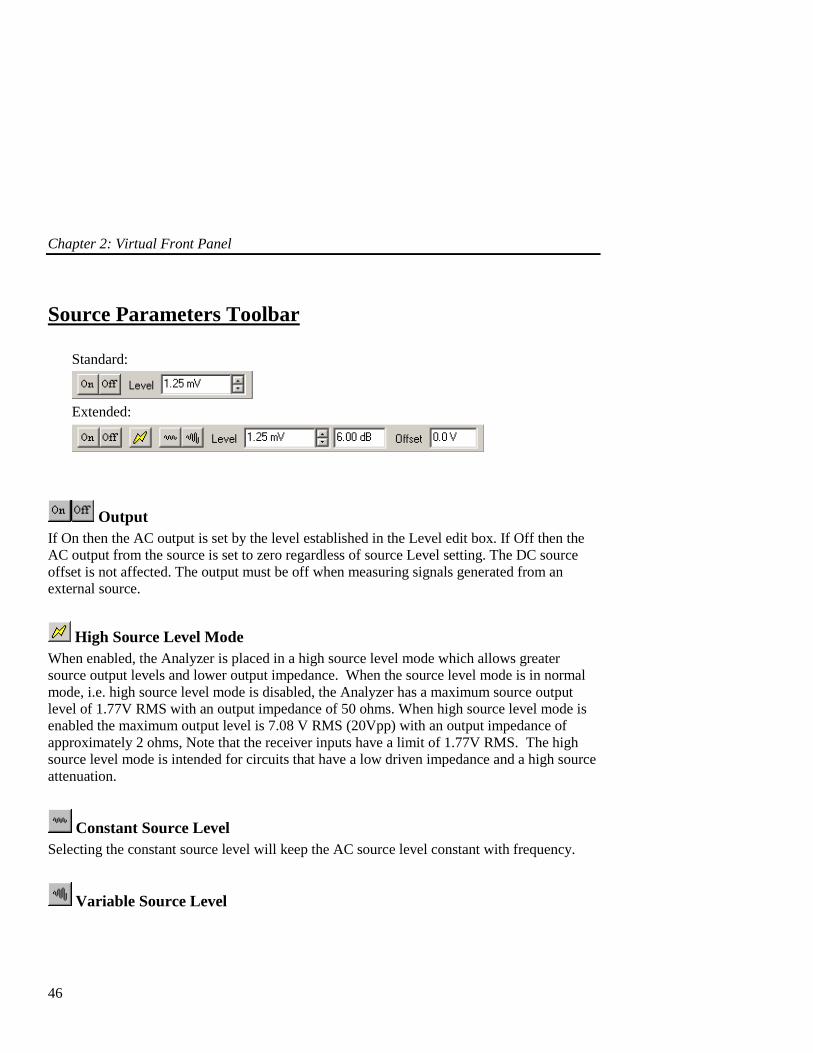
Source Parameters Toolbar
Standard:
Extended:
Output
If On then the AC output is set by the level established in the Level edit box. If Off then the
AC output from the source is set to zero regardless of source Level setting. The DC source
offset is not affected. The output must be off when measuring signals generated from an
external source.
High Source Level Mode
When enabled, the Analyzer is placed in a high source level mode which allows greater
source output levels and lower output impedance. When the source level mode is in normal
mode, i.e. high source level mode is disabled, the Analyzer has a maximum source output
level of 1.77V RMS with an output impedance of 50 ohms. When high source level mode is
enabled the maximum output level is 7.08 V RMS (20Vpp) with an output impedance of
approximately 2 ohms, Note that the receiver inputs have a limit of 1.77V RMS. The high
source level mode is intended for circuits that have a low driven impedance and a high source
attenuation.
Constant Source Level
Selecting the constant source level will keep the AC source level constant with frequency.
Variable Source Level

Chapter 2: Virtual Front Panel
47
Selecting the variable or swept source will allow the AC source level source to vary as a
function of the sweep frequency. Upon activation the variable source dialog and the variable
source trace appears for editing.
Level
The source output level entry ranges from 1.25 mV to 1.77 V RMS (5 mV to 7.08 V RMS in
high source level mode). This source value is associated with the constant source level mode
only. There are 64 discrete levels available in 1 dB increments. The level may be typed in
directly or increased / decreased in user definable dB steps. Note: When the level is typed in
directly use the Carriage Return (Enter) or Tab key to enter the new value. When using the
inc / dec buttons the source level will be updated automatically.
Source DC Offset
The Source DC offset entry has a range of +/- 10 Volts DC with a resolution of 0.01 Volts
DC. The new DC offset will be entered after hitting the Carriage Return (Enter) or Tab key.
Chapter 2: Virtual Front Panel
48
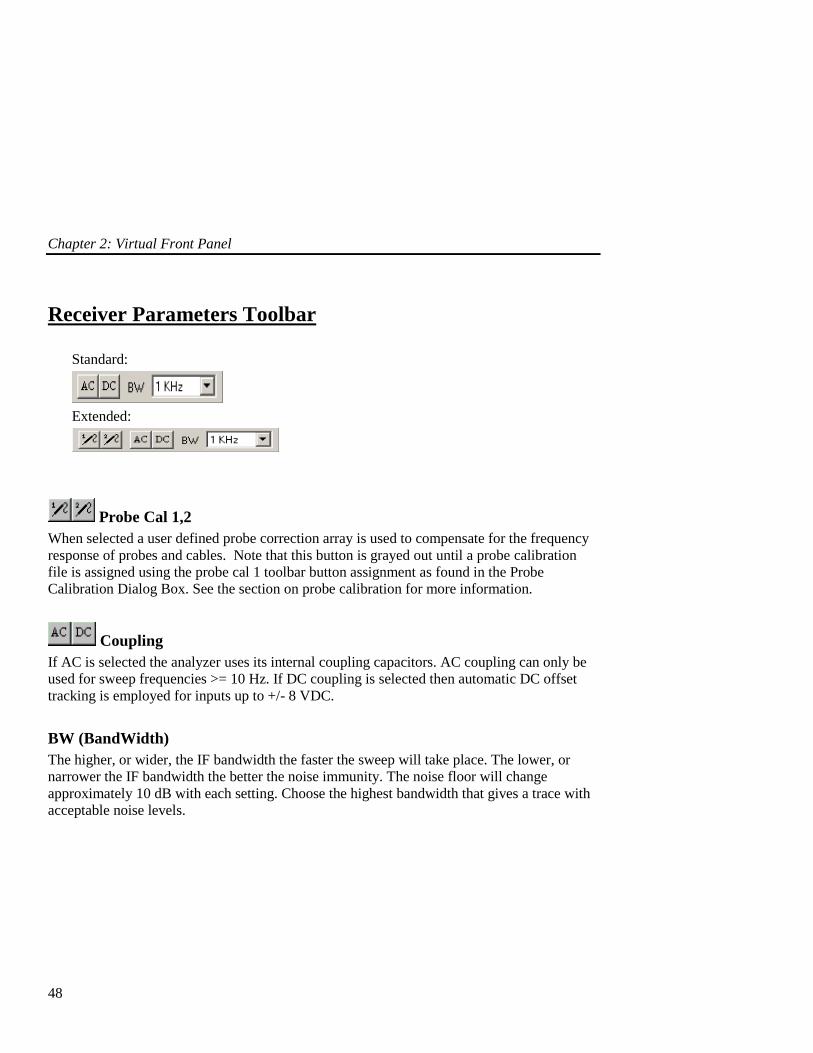
Receiver Parameters Toolbar
Standard:
Extended:
Probe Cal 1,2
When selected a user defined probe correction array is used to compensate for the frequency
response of probes and cables. Note that this button is grayed out until a probe calibration
file is assigned using the probe cal 1 toolbar button assignment as found in the Probe
Calibration Dialog Box. See the section on probe calibration for more information.
Coupling
If AC is selected the analyzer uses its internal coupling capacitors. AC coupling can only be
used for sweep frequencies >= 10 Hz. If DC coupling is selected then automatic DC offset
tracking is employed for inputs up to +/- 8 VDC.
BW (BandWidth)
The higher, or wider, the IF bandwidth the faster the sweep will take place. The lower, or
narrower the IF bandwidth the better the noise immunity. The noise floor will change
approximately 10 dB with each setting. Choose the highest bandwidth that gives a trace with
acceptable noise levels.
Chapter 2: Virtual Front Panel
49
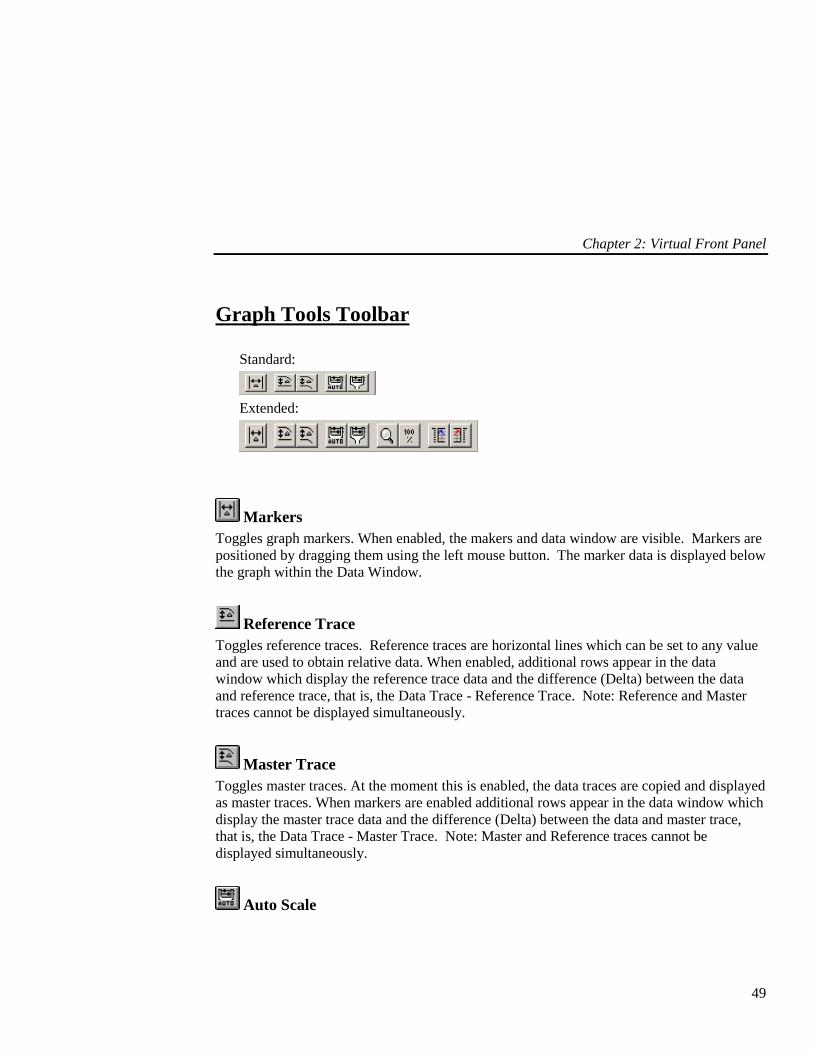
Graph Tools Toolbar
Standard:
Extended:
Markers
Toggles graph markers. When enabled, the makers and data window are visible. Markers are
positioned by dragging them using the left mouse button. The marker data is displayed below
the graph within the Data Window.
Reference Trace
Toggles reference traces. Reference traces are horizontal lines which can be set to any value
and are used to obtain relative data. When enabled, additional rows appear in the data
window which display the reference trace data and the difference (Delta) between the data
and reference trace, that is, the Data Trace - Reference Trace. Note: Reference and Master
traces cannot be displayed simultaneously.
Master Trace
Toggles master traces. At the moment this is enabled, the data traces are copied and displayed
as master traces. When markers are enabled additional rows appear in the data window which
display the master trace data and the difference (Delta) between the data and master trace,
that is, the Data Trace - Master Trace. Note: Master and Reference traces cannot be
displayed simultaneously.
Auto Scale

Chapter 2: Virtual Front Panel
50
Executes an automatic scaling procedure on both the left and right trace, then re-displays the
graph. Only the realtime trace data is used for autoscaling, Thus it is possible that master
trace data may lie outside the graph after auto Scale.
Manual Scale...
Opens the manual scale dialog box in which graph scaling for the left and right trace is
accomplished. When this dialog box opens, the current minimum and maximum values are
displayed
Zoom
Toggles zoom mode. When enabled (and the mouse is within the graph area) the cursor
changes to a magnifying glass which defines the new start, stop frequencies and the new
upper, lower graph limits.
UnZoom
Restores the display to view the graph as the limits existed before the Zoom command was
activated.
Display Left Trace
This button controls the visibility of the left trace. By default the trace is visible (button
pressed). While hidden, all left trace data, including reference or master trace data are
hidden, and all rows within the data window corresponding to this data are removed. Hiding
data does not in any way inhibit processing (i.e. averaging, trace math, etc.), it only removes
the data from view.
Display Right Trace
This button controls the visibility of the right trace. By default the trace is visible (button
pressed). While hidden, all right trace data, including reference or master trace data are
hidden, and all rows within the data window corresponding to this data are removed. Hiding
data does not in any way inhibit processing (i.e. averaging, trace math, etc.), it only removes
the data from view.

Chapter 2: Virtual Front Panel
51
Marker Functions Toolbar
Note: Toolbar active in the Extended Functions Interface only.
Markers in Use Select Box
The up/down arrows allow from 1 to 5 markers to be displayed.
Marker Active Selection Box
Chooses which marker (marker 1 to marker 5) is to be used as the active marker for the
advanced marker functions.
Search Left Data, Right Data
Depending on the button selected specifies the left or right data trace to be used as the data
trace source for the marker search functions.
Search Absolute
The value in the search value edit box is to be used as the search value by the search left/right
commands. Active marker will attempt to find the absolute value listed in the search value
edit box in the specified data trace.
Search Relative
The value in the search value edit box is to be used as the search value by the search left/right
commands. The active marker will attempt to find the relative value listed in the search value
edit box in the specified data trace. The relative value is based on the reference trace value
which must be active for this function to be ungreyed.

Chapter 2: Virtual Front Panel
52
Marker Tracking
With the search left or search right button selected the active marker will attempt to track the
value in the search value edit box. The marker frequency becomes the variable so that the
value in the search value edit box can be tracked.
Search Value Edit Box
A user defined quantity is entered and used for the marker search functions.
Search Left of Marker, Right of Marker
Will search, and located the active marker, at the marker's left or right. The absolute or
relative value as listed in the search value edit box is the search value. The left data trace or
right data trace to be searched is selected with the Search Left Data, Right Data toolbar
buttons.
Find Max, Min
Searching the specified data trace the active marker will locate the maximum or minimum
value.
Reference to Marker
The reference trace is relocated to the current value of the active marker in the
specified data trace. The reference trace must be active for this function to be
ungreyed.

53
3 Data Transfer
Data Transfer Options
The frequency response analyzer software (APfra.exe) provides several techniques
for transferring data to and from other applications.
Data files can be saved and imported into other programs or loaded back into
the software for future comparisons. Also, since the data file format is a
simple text file it is possible to reformat data from other programs (simulation
software for example) so it may be opened by the analyzer software.
The screen image of the analyzer software’s application window may be
saved to disk and imported into other programs.
The Windows clipboard can be used to copy and paste data to other programs
such as Excel. The analyzer software can also copy to the clipboard a bitmap
image of the display area which is useful documentation or presentation (i.e.
pasting into Word or PowerPoint).
Additionally, the analyzer software is a Dynamic Data Exchange (DDE)
server. This is a powerful feature which allows the analyzer software to be
controlled by, and send data to, any DDE client program in real time. A
sample Excel spreadsheet (APfra Dde Demo 300.xls) is provided which
demonstrates the DDE functionality.
Data files
Trace data of either the real-time or master trace can be saved as a text file using the
File>Save Data>Save [Master] Data As... menu commands. The data is saved with
the extension .dat. A secondary binary file with the same filename but with the ‘.raw’
extension is also created, this is used by the software when data files are read back
(Opened) and otherwise is not user consumable.
The data file (.dat) is a text file formatted with a single line column header followed
by one line per data point. On each line are three tab separated values ordered as
Chapter 3: Data Transfer
54
Frequency, Left data value, and Right data value. The left and right data values are
the data of the selected display mode. This is a useful flat file format which may be
viewed using any word processor, or imported directly into Excel as well as a number
of other applications.
Data files are read back using the File>Open Data menu items. Use the menu
selection File>Open Data>Open Data... to load a saved data trace and File>Open
Data>Open Master Data... to load a data file as the master trace. Only data (.dat)
files can be selected for loading, however when an associated raw file exists it will be
loaded also.
Data files may be loaded with or without an associated raw file but data files loaded
without a raw file are limited to the original display mode and display formatting
options. When a raw file is loaded with the data file the software has available the
primitive data and can therefore perform the necessary calculations to format the data
to virtually any display settings (one notable exception is switching between the ‘X’
axis lin/log setting).
Data files are analyzed prior to loading and a dialog box provides the option to
configure the system to best view the data, select the parameter change checkbox at
the bottom of the dialog box to make the setup changes. Note: Parameter changes are
required when loading data as primary data traces therefore the checkbox will be
selected and disabled.
The display mode will always change to that of the saved data. Note: There is no
guarantee that the newly loaded trace data will be visible if the parameter change
checkbox is not selected since this data may lie outside the current frequency span
and/or scaling.
Image Files
The screen image of the analyzer software’s application window may be saved to disk
in any one of four industry standard image formats. These images may be then
imported into applications such as word processors, image editors and presentation
software.
To save the display to an image file select the menu command File>Save Graph
Image... When the ‘Save As’ dialog appears choose the destination location, type a
Chapter 3: Data Transfer
55
file name and select the format of the image file. The image may be saved as a bitmap
(.bmp), JPEG (.jpg), PNG (.png), or GIF (.gif) file. If you are not sure which format
to use try saving in the JPEG format as nearly all software applications which import
images support the JPEG format.
The Clipboard (text data)
Trace data can be copied to the clipboard and therefore available for pasting into
other applications. The menu commands Edit>Copy Data and Edit>Copy Master
Data copies trace data to the clipboard as text. The data is formatted as one line per
data point, on each line are three tab separated values ordered as Frequency, Left data
value, and Right data value. This format is exactly the same as Data Files (above)
except the column headers are absent.
Clipboard text data may also paste into the analyzer software as master trace data
using Edit>Paste Data to Master. This capability allows data from other sources to
be used in analysis. The data may come from a simulation or post processing of
earlier measured data. The clipboard data must be in the same text form as that of the
Copy Data command; one line per point with each line containing three tab separated
numbers representing Frequency, Left data, and Right data, in that order. If the data
format is incorrect and the data cannot be successfully converted into master trace
data then the command will abort without warning. Important: Master traces are
static data and are not bound by system setup parameters (start/stop frequencies, etc.)
therefore it is possible to paste data outside the defined view area in either the X
(frequency) or Y direction.
The Clipboard (bitmap data)
Selecting the Edit>Copy Bitmap menu item places a bitmap image of the displayed
Graph and Marker Data windows onto the clipboard. The bitmap is exactly a screen
image of the analyzer software’s application window between the toolbars and status
bar, thus the size of the bitmap can be controlled by sizing the window.

Chapter 3: Data Transfer
56
Dynamic Data Exchange (DDE)
Dynamic Data Exchange (DDE) is a protocol which allows Windows applications to
communicate with one another. A DDE server is an application which can provide
data to other applications through the Windows dynamic data exchange protocol. A
DDE client is an application receiving data from a DDE server through a DDE link.
A DDE link is a communications channel between a client and server. A DDE link is
established by the client.
A DDE server can provide data to one or more DDE clients through DDE links.
Clients establish a communication (link) with a server in the form of a request for
information, Once this link is made the server will update the client with the
requested information. There are two types of DDE links, Hot and Cold, The hot link
is most common (and most useful). A DDE Hot link is a DDE link where, once
established, the server will notify the client as data changes. The client is not
required to initiate any other DDE communications. The server notifications will
continue until the link is terminated by the client, or the server application exits. A
DDE cold link is a DDE link in which data is sent by the server in response to a client
request, then the link is terminated. The client must initiate a request (link) each time
data is needed.
How a DDE Link is Established
A client will begin requesting data by sending the server three pieces of information
which describe the needed data. This information is the Service name, Topic name
and Item name. In general, a server can have many services with each service having
several topics and each topic handling several items. A client needs to know what
services, topics and items the server provides. Each client has its own technique
(syntax) for requesting this information, refer to your DDE client application software
owner’s manual for this syntax information.
The DDE Client
For the most part DDE is used as a means for one application (client) to receive real-
time data from another application (server). In some cases the server allows the client
to execute a command. This is accomplished as with a link, The client will send a
service, topic and item for the command the server is to execute. After receiving the

Chapter 3: Data Transfer
57
request the server will execute the command. Also, as with links, the client needs to
be aware of what services, topics and items are available for execution.
The Analyzer Software
The analyzer software (APfra) is a DDE server which supports access to the core
parameters for frequency response analyzer control and data collection. Higher level
APfra post processing (such as averaging and trace math) and data analysis (such as
markers and marker functions) are not supported.
APfra supports only one service. All DDE link and execute conversations use the
service name of APFRA (note that this is case sensitive).
Links:
The analyzer software, APfra.exe, data links are listed next. Each link is listed as
follows:
SERVICE / TOPIC / ITEM (Note: These values are case sensitive.)
Returns: The value(s) this link returns.
Format: The numeric format of the returned value (Note: All
values are returned as text data.)
APFRA / DATA / FREQ
Returns: The frequency value for all points of a sweep.
Format: An array of numbers (doubles as text) separated by a <CR/LF> (0x0D
0x0A). The size of the array is defined by the value of APFRA / SYSTEM /
POINTS.
Chapter 3: Data Transfer
58
APFRA / DATA / LDATA
Returns: The left side data values for all points of a sweep.
Format: An array of numbers (doubles as text) separated by a <CR/LF> (0x0D
0x0A). The size of the array is defined by the value of APFRA / SYSTEM /
POINTS.
APFRA / DATA / RDATA
Returns: The right side data values for all points of a sweep.
Format: An array of numbers (doubles as text) separated by a <CR/LF> (0x0D
0x0A). The size of the array is defined by the value of APFRA / SYSTEM /
POINTS.
APFRA / DATA / ERROR
Returns: The number of data points in error for a sweep.
Format: A single number. (Integer as text).
APFRA / SYSTEM / FREQSTART
Returns: The sweep start frequency.
Format: A single number. (double as text).
APFRA / SYSTEM / FREQSTOP
Returns: The sweep stop frequency.
Format: A single number. (double as text).
APFRA / SYSTEM / POINTS
Returns: The number of sweep points.
Format: A single number. (Integer as text).

Chapter 3: Data Transfer
59
APFRA / SYSTEM / XAXIS
Returns: The X axis Lin/Log selection. 0 = Linear, 1 = Log.
Format: A single number. (Integer as text).
APFRA / SYSTEM / YAXIS
Returns: The Y axis Lin/Log selection. 0 = Linear, 1 = Log.
Format: A single number. (Integer as text).
APFRA / SYSTEM / SRCOUTPUT
Returns: The source output state. 0 = Off, 1 = On.
Format: A single number. (Integer as text).
APFRA / SYSTEM / SRCLEVEL
Returns: The constant source level value.
Format: A single number. (double as text).
APFRA / SYSTEM / SRCHILEVEL
Returns: The source level mode state. 0 = Off (standard), 1 = On (high).
Format: A single number. (Integer as text).
APFRA / SYSTEM / SRCDCOFFSET
Returns: The source DC offset value.
Format: A single number. (double as text).
APFRA / SYSTEM / SRCUSE
Returns: The source usage mode. 0 = Constant level, 1 = Variable source curve.
Format: A single number. (Integer as text).

Chapter 3: Data Transfer
60
APFRA / SYSTEM / RCVRCOUPLE
Returns: The receiver coupling. 0 = AC, 1 = DC.
Format: A single number. (Integer as text).
APFRA / SYSTEM / RCVRBW
Returns: The receiver bandwidth. 0 = 1Hz, 1 = 3Hz, 2 = 10Hz, 3 = 30Hz, 4 =
100 Hz, 5 = 300Hz, 6 = 1kHz
Format: A single number. (Integer as text).
APFRA / CONTROL / DISPLAYMODE
Returns: The selected display mode and submode if applicable. LSNybble =
DisplayMode, 2nd LSNybble = SubMode. See the execute topic DISPLAYMODE
(below) for details of the DisplayMode and SubMode bit patterns and Note (1) below
for additional information.
Format: A single number. (Integer as text).
APFRA / CONTROL / SWEEPSTATE
Returns: The current sweep status. 0 = Start, 1 = Stop, 2 = Pause.
Format: A single number. (Integer as text).
APFRA / CONTROL / SWEEPMETHOD
Returns: The sweep running mode. 0 = Single sweep, 1 = Continuous sweeps.
Format: A single number. (Integer as text).
APFRA / STATUS / EXECERROR
Returns: A set of flags which provide completion status of DDE execute
commands. This link is established to monitor and verify parameters are set
successfully when specified through DDE using the execute commands. A flag is set
when an error occurred with a parameter of an execute command. The flag is reset
when a parameter is within accepted limits. The flags are as follows:
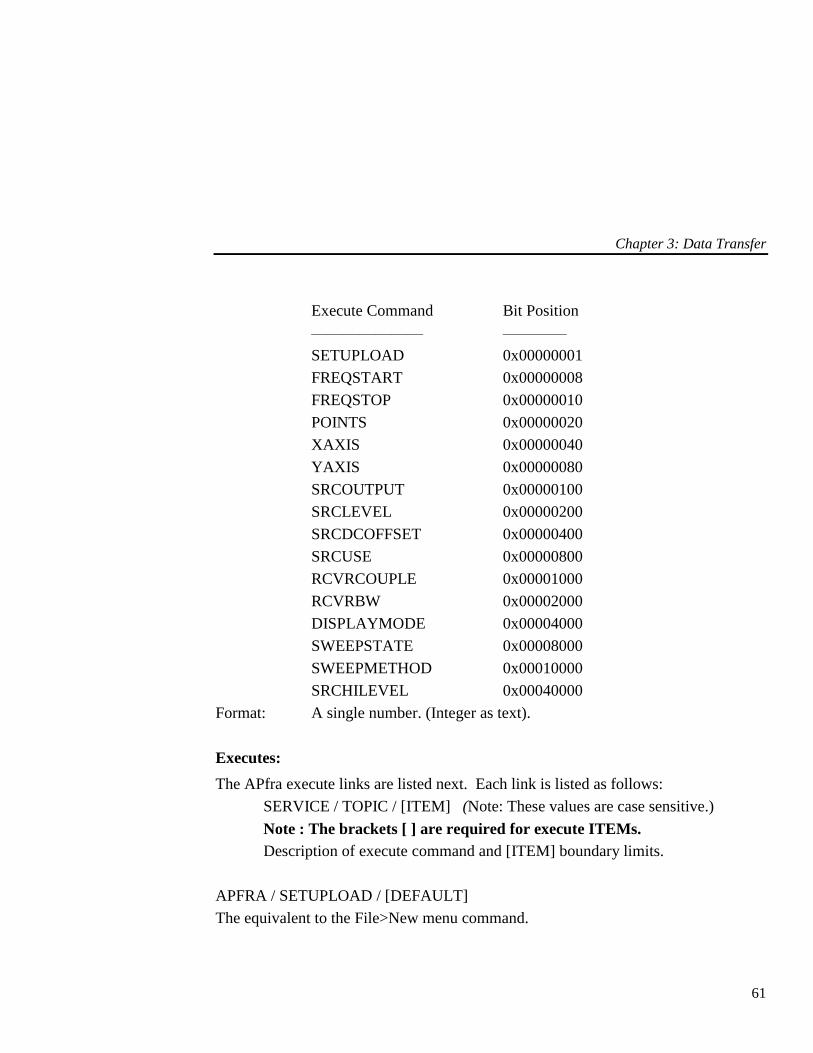
Chapter 3: Data Transfer
61
Execute Command Bit Position
——————— ————
SETUPLOAD 0x00000001
FREQSTART 0x00000008
FREQSTOP 0x00000010
POINTS 0x00000020
XAXIS 0x00000040
YAXIS 0x00000080
SRCOUTPUT 0x00000100
SRCLEVEL 0x00000200
SRCDCOFFSET 0x00000400
SRCUSE 0x00000800
RCVRCOUPLE 0x00001000
RCVRBW 0x00002000
DISPLAYMODE 0x00004000
SWEEPSTATE 0x00008000
SWEEPMETHOD 0x00010000
SRCHILEVEL 0x00040000
Format: A single number. (Integer as text).
Executes:
The APfra execute links are listed next. Each link is listed as follows:
SERVICE / TOPIC / [ITEM] (Note: These values are case sensitive.)
Note : The brackets [ ] are required for execute ITEMs.
Description of execute command and [ITEM] boundary limits.
APFRA / SETUPLOAD / [DEFAULT]
The equivalent to the File>New menu command.

Chapter 3: Data Transfer
62
APFRA / SETUPLOAD / [filename.ext]
File name of a setup file to load, extension must be included.
APFRA / FREQSTART / [float value]
Set the sweep frequency start value. (0.01 <= value <= 30.0e6)
APFRA / FREQSTOP / [float value]
Set the sweep frequency stop value. (0.01 <= value <= 30.0e6)
APFRA / POINTS / [integer value]
Set the number sweep points. (2 <= value <= 10001)
APFRA / XAXIS / [integer value]
Set the X (freq) axis Lin/Log selection. (0 = Linear, 1 = Log.)
APFRA / YAXIS / [integer value]
Set the Y axis Lin/Log selection. (0 = Linear, 1 = Log.)
APFRA / SRCOUTPUT / [integer value]
Turn the source on and off. (0 = Off, 1 = On.)
APFRA / SRCLEVEL / [float value]
Set the constant source level value (0.00125 <= value <= 1.77)
(high level mode: 0.005 <= value <= 7.08)
APFRA / SRCHILEVEL / [integer value]
Set the source level mode to high. (0 = Off, 1 = On.)

Chapter 3: Data Transfer
63
APFRA / SRCDCOFFSET / [float value]
Set the source DC offset value (-10.0 <= value <= 10.0)
APFRA / SRCUSE / [integer value]
Set Constant level or variable source selection. (0 = Constant level, 1 = Variable
source curve.)
APFRA / RCVRCOUPLE / [integer value]
Set receiver coupling. (0 = AC, 1 = DC)
APFRA / RCVRBW / [integer value]
Set receiver bandwidth (0 = 1Hz, 1 = 3Hz, 2 = 10Hz, 3 = 30Hz, 4 = 100 Hz, 5 =
300Hz, 6 = 1kHz)
APFRA / DISPLAYMODE / [integer value]
Set the display mode and sub mode. Display mode and Sub mode selections cannot
be sent in a single DISPLAYMODE execute command. The Display mode is
selected first and then issue a second execute to select a Sub mode. Only the
Complex Impedance display mode has submodes. See Note (1) below for more
information.
For display modes issue this command with the value of
0 = Mag/Phase, 1 = AbsMag, 2 = CmplxImped.
While in the CmplxImped display mode, change sub modes by issuing this
command with the value of
16 = Rect, 17 = Polar, 18 = CR, 19 = CD, 20 = LR, 21 = LQ.
APFRA / SWEEPSTATE / [integer value]
Set the sweep running status. (0 = Start, 1 = Stop, 2 = Pause)
Chapter 3: Data Transfer
64
APFRA / SWEEPMETHOD / [integer value]
Set the sweep running mode. (0 = Single sweep, 1 = Continuous sweeps)
Notes :
1. Clarification of DISPLAYMODE. When changing display modes via DDE
(execute command) each execute may be a DisplayMode or a SubMode, but
not both. To change the DisplayMode set the LSN to the proper value. When
changing the SubMode set the LSN to zero and set the next LSN to the
SubMode value. Note that a SubMode is set for the current selected
DisplayMode, therefore it is necessary to set the DisplayMode prior to setting
the SubMode. Also, not all DisplayModes have SubModes. If the
DISPLAYMODE execute command has an invalid parameter, for any reason,
the DISPLAYMODE bit will be set within the APFRA / STATUS /
EXECERROR link.
2. The Complex Impedance dialog box must be active when issuing
CmplxImped SubMode execute commands. This dialog box is activated
automatically when the CmplxImped DisplayMode is selected and therefore is
usually not an issue. Do not manually close this dialog box while controlling
APfra via DDE.
3. The value returned by the APFRA / SYSTEM / DISPLAYMODE link will
contain the DisplayMode in the LSN and the SubMode (if exists) in the 2nd
LSN. This is the same format as the execute link with the exception that all
information is present, whereas the execute link requires the DisplayMode and
SubMode to be sent separately.
Using DDE in Microsoft Excel
Note : DDE links may not work while the Excel Help Assistant is active (Office97
and future versions) unless APfra is the active application. It is recommended that
the Help Assistant be closed during DDE sessions to avoid potential problems.

Chapter 3: Data Transfer
65
It is recommended the user be familiar with Excel and Excel Visual Basic
programming. Also knowledge of APfra’s Services, Topics & Items is essential
(detailed above). For use with APfra there are three types of DDE links which are
useful. These are:
1. Hot data links for single values. Used to receive analyzer frequency points,
source level, etc…
2. Hot data links for arrays of numbers. Used to receive the sweep arrays for
Frequency and data.
3. Execute links to send commands to APfra (i.e. Start sweep, stop sweep, load
default settings, etc...).
Hot links to data items of single values
Excel provides a simple method of establishing a data hot link. To start a hot link,
enter into the cell:
=Service|Topic!Item
Select the cell to contain the data then enter an equal sign (=) followed by the name of
the Service (the service is always APFRA), a vertical bar (may be found above the
back slash), the Topic name (either DATA, SYSTEM, CONTROL, or STATUS), an
exclamation point (!), then finally the Item name (i.e. POINTS, SWEEPSTATE,
etc…). As an example, the following line when typed into a cell will display the
number of sweep points in use, this cell will be updated automatically whenever the
number of sweep points change:
=APFRA|SYSTEM!POINTS
Once the cell formula has been entered the DDE link is established and the
‘conversation’ will begin. Note: The DDE server (i.e. APfra) must be running or in
the PATH to start the link.
Hot links to data items of arrays
This is similar to single value hot links but there are two important differences. First,
multiple cells must be selected to hold the data (select as many cells as the number of
sweep points). Multiple cells are selected by first selecting a single cell then dragging
Chapter 3: Data Transfer
66
the bottom-right corner of the cell down the spreadsheet. While the cells are selected
type the DDE link string. The three data arrays available for hot link transfer are:
=APFRA|DATA!FREQ
=APFRA|DATA!LDATA
=APFRA|DATA!RDATA
Second, after typing in one of the above strings, enter the array formula by pressing
CTRL+SHIFT+ENTER (hold the CTRL & SHIFT keys then press ENTER).
Execute links
Several APfra commands are available through DDE to help automate data collection
and analysis. Execute commands are performed through cold link connections by
opening a DDE channel. Commands are sent using this open channel and the channel
is closed when no longer needed. The procedures to open, send commands through,
and close channels are executed in Visual Basic routines. To open a DDE channel
use the DDEInitiate command as follows:
ChannelID = DDEInitiate(“Service”, “Topic”)
DDEInitiate returns a channel ID, this ID is used to execute commands for the
Service and Topic used as arguments of the DDEInitiate. To send a command use the
DDEExecute command:
DDEExecute ChannelID, “Item”
And when finished with the channel close it using the DDETerminate command:
DDETerminate(ChannelID)
There are various ways to manage ChannelID’s. Here are two recommendations with
examples.
First, If the channel is to be used infrequently (possibly only once) then place all DDE
transactions in a single function. As an example, assume the configuration setup file
BANDPASS.NAC is required whenever the spreadsheet is used. Also it is assumed
that APfra has been installed using the default path location. The special function
Auto_Open() is defined by Excel and automatically executes whenever the
spreadsheet begins. The subroutine below uses this function to load the user defined
example setup file ‘bandpass.nac’.

Chapter 3: Data Transfer
67
Sub Auto_Open()
DDEChannel = DDEInitiate(“APFRA”, “SETUPLOAD”)
DDEExecute DDEChannel,
“[C:\AP INSTRUMENTS\APFRA\SETUP\BANDPASS.NAC]”
DDETerminate(DDEChannel)
End Sub
Next, If the channel is to be used frequently while the spreadsheet is active then it is
easier to break up the DDE commands. In this case be sure to define the DDE
Channel outside any function so it will have global variable scope. As an example,
assume a macro is required that will start a sweep when called. This macro,
ExecSweepStart(), may be called many times therefore the following programming
methodology is used.
Dim DDEChannel
Sub Auto_Open()
:
: other initialization
:
DDEChannel = DDEInitiate(“APFRA”,”SWEEPSTATE”)
End Sub
Sub Auto_Close()
DDETerminate(DDEChannel)
:
: other exit procedures
:
End Sub
Chapter 3: Data Transfer
68
Sub ExecSweepStart()
Rem ** Start sweep requires a SWEEPSTATE Item value of zero.
DDEExecute DDEChannel, “[0]”
End Sub
As with Auto_Open(), Auto_Close() is defined in Excel to execute whenever the
spreadsheet terminates.
Example Excel Spreadsheet
The spreadsheet provided with the analyzer software installation (APfra Dde Demo
300.xls) provides many examples of DDE communication and processing. This
spreadsheet can be used as is or modified for custom use.
‘APfra Dde Demo 300.xls’ is a demonstration spreadsheet which uses every DDE
link and execute command available. To use this spreadsheet first run APfra and then
start Excel (if not already running), close the Excel Help Assistant if it is running,
then open ‘APfra Dde Demo 300.xls’ It is important to have APfra running prior to
opening the spreadsheet. If any dialogs pop up asking if you would like to establish
macros and/or connections answer ‘Yes’. After a few seconds of initialization the
spreadsheet should display the first tab (Control) with the current APfra parameters
displayed in the column labeled ‘Current Value’. The second tab (Data) displays the
data in both tabular format and graphically, if sweep data is available in APfra (that
is, if data traces are displayed) then this data will be present in the spreadsheet as
well.
To change a parameter select (in the case of a combo box) or type (for edit boxes) the
new parameter value in the ‘Select’ column of the Control panel, and then press the
‘Send’ button to the right of the combo/edit box. APfra will update as if the selection
was made directly, then APfra will update the hot link parameter value (Current
Value). If a problem with the parameter value is encountered (i.e. start frequency >
30MHz, etc…) then the change will not be made and an ‘X’ will appear in the ‘Error’
column. In this case the Current Value will not change.
Upon closing the spreadsheet it is best to respond with ‘No’ when asked if you would
like to save changes, this ensures that the spreadsheet will not be altered. If you
would like to make changes or extend the spreadsheet it is recommended that you

Chapter 3: Data Transfer
69
make a copy with a new name for your own use, keeping ‘APfra Dde Demo 300.xls’
intact for future reference.
All functions and macros (subroutines) are defined in a single module (Module1).
The Excel menu item Tools>Macro>Visual Basic Editor will bring up the module for
viewing/editing.


71
4 Application Notes
Introduction to Analog Network Measurements
Network analysis and frequency response measurements determine the most fundamental
properties of a given network. These properties include the frequency response transfer
function, input/output impedance and group delay all over a given frequency range. In many
electronic applications, including filters, amplifiers and systems with feedback the most
important characteristic is the frequency response of that network, circuit or system. The
frequency response gives the magnitude (gain or attenuation) and phase, as a function of
frequency, between two desired points in the system under test. The frequency response is
measured directly by a frequency response analyzer for voltage-voltage transfer functions.
High frequency power transfer functions are measured by the addition of a power splitter and
through-line terminations. Impedance can be calculated using a known reference resistor in
series with the unknown network. Group delay can be derived from the phase data since it is
the negative derivative of phase with respect to frequency.
In the case of filters the two quantities of interest are typically the stopband attenuation and
the passband insertion loss along with possibly the group delay characteristic in the passband.
With amplifiers the main quantity of interest is gain “flatness” over frequency in which case
the 3 dB gain rolloff point defines the amplifiers bandwidth. With feedback systems, either
electrical or electromechanical, the open and closed loop frequency response characterize the
system. Feedback systems can exhibit unwanted oscillations, i.e. instabilities, unless the open
loop response is evaluated, and appropriately compensated for, to ensure stability.
The frequency response function of an electrical network is defined as the sinusoidal output
response divided by the sinusoidal input stimulus. The input and output can be voltage or
current depending of the desired transfer function. Note that the frequency response is a
ratioed quantity of output to input, and that the input and output are described by complex
numbers or phasors. The frequency response, at each frequency point of interest, is then
given by a complex number, or phasor. The phasor can be fully described by its magnitude
and phase components. It is these quantities, the magnitude and phase of the input and output
that are measured and ratioed by the frequency response analyzer to obtain the frequency
response.
The B/A ratioed measurement described above is equivalent to subtracting the input signal
from the output signal when each quantity is in logarithmic form. In the model 300
frequency response analyzer the network's input signal is, by convention, measured by

Chapter 4: Application Notes
72
channel A and the output signal is measured by channel B. The expression B/A then
describes the resulting frequency response transfer function.
Chapter 4: Application Notes
73
Basic Measurement Procedures
The optimum frequency response analyzer measurement setup is, as expected, highly
dependent on the circuit under test. The frequency range of interest, circuit gain, circuit
impedance at the probe points and DC voltage levels are among the factors affecting the
measurement setup. Passive circuits are generally easier to measure than active circuits
because they have low noise levels, don’t usually have special bias voltage requirements and
are typically insensitive to source drive levels. Active circuits, on the other hand, may have
the properties mentioned above that make measuring them in a linear mode of operation more
challenging. It is important to have a good idea of what the measurement results should be
before they are taken. The real value of network measurements is in finding the incalculable
and the miscalculated frequency response.
Users that are new to network measurements should become familiar with the analyzer's
operation by first measuring a simple passive network before advancing to measuring, for
example, the loop gain of a high gain feedback circuit.
General Measurement Procedure
Using the virtual front panel set the frequency response analyzer parameters to the following:
1. In the FILE menu load a specific configuration previously defined and saved
using the Open Setup menu selection. This will establish a set of system
parameters for general use. Specific requirements are met by using the
appropriate toolbar button or menu selection.
2. Set the desired frequency coverage by using the START and STOP or CENTER
and SPAN toolbar buttons located in the sweep frequency toolbar. If the start
frequency is less than 10 Hz then DC coupling will have to be selected in the
receiver parameters toolbar.
3. If desired set the graph title by typing text in the title bar.
4. Decide on what stage(s) in the circuit the transfer function is to be measured.
Locate the input node and output node of this network.
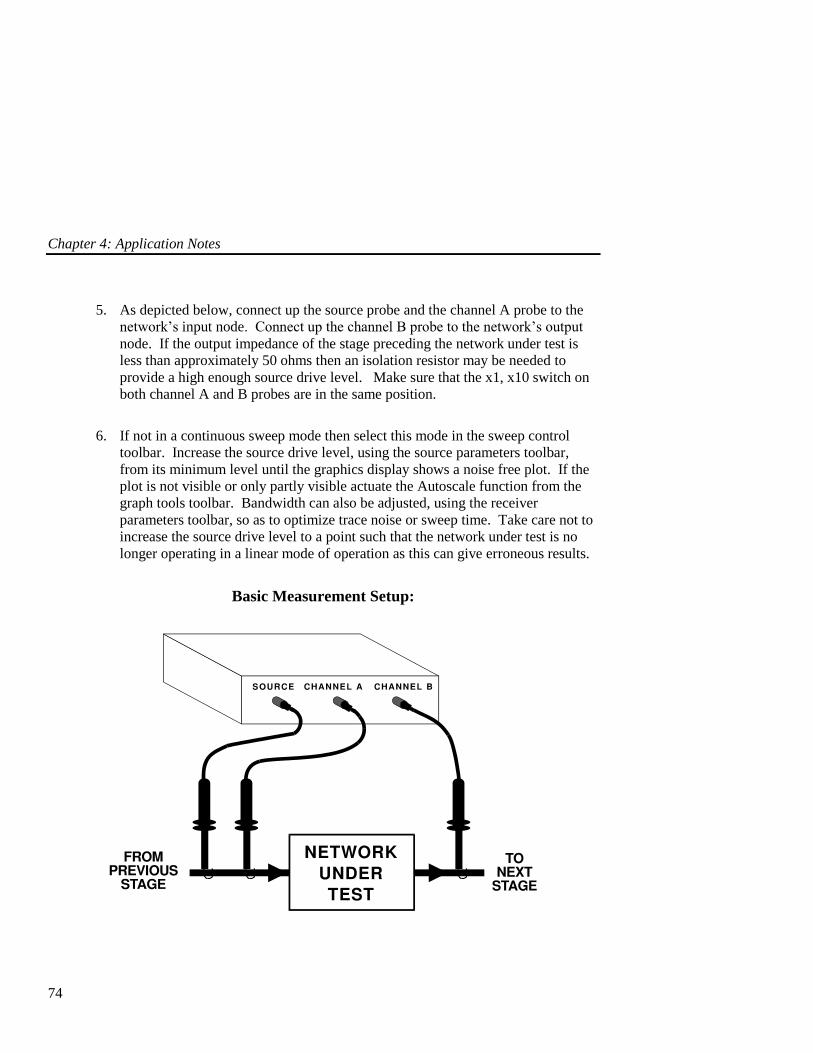
Chapter 4: Application Notes
74
5. As depicted below, connect up the source probe and the channel A probe to the
network’s input node. Connect up the channel B probe to the network’s output
node. If the output impedance of the stage preceding the network under test is
less than approximately 50 ohms then an isolation resistor may be needed to
provide a high enough source drive level. Make sure that the x1, x10 switch on
both channel A and B probes are in the same position.
6. If not in a continuous sweep mode then select this mode in the sweep control
toolbar. Increase the source drive level, using the source parameters toolbar,
from its minimum level until the graphics display shows a noise free plot. If the
plot is not visible or only partly visible actuate the Autoscale function from the
graph tools toolbar. Bandwidth can also be adjusted, using the receiver
parameters toolbar, so as to optimize trace noise or sweep time. Take care not to
increase the source drive level to a point such that the network under test is no
longer operating in a linear mode of operation as this can give erroneous results.
Basic Measurement Setup:

Chapter 4: Application Notes
75
High Frequency Measurements
At frequencies higher than a few hundred kilohertz two important issues arise in network
measurements. The first is that of isolation between a network's input and output nodes. The
analyzer has a minimum dynamic range of 100 dB which can be compromised by coupling
paths within the network under test or in the probe connections themselves. The source of
this isolation problem can be either 1) conducted through "common mode impedances"
and/or 2) radiated, with radiated coupling typically increasing with frequency. Basic RF
layout and design practices reduce or eliminate this problem. It is recommended that coaxial
cables with BNC interconnects be used above one megahertz.
The second issue is that of probe loading effects. For higher frequency measurements on
high impedance circuits determine (very approximately) if the 80 pf capacitance of the probe
tip in the x1 position on the output node will influence the measurement. The output node
should have an impedance commensurate with the desired measurement accuracy. For
example at 1MHz a capacitance of 80 pf has an impedance of 2K ohms and the node under
test should then have an impedance of 200 ohms or less, at 1 MHz. This will give errors of
less than 0.05 dB magnitude and 6 degrees phase. Although inconvenient, the effect of the
probe shunt capacitance can be factored out knowing the actual output impedance of the
circuit. The x10 position will reduce the probe capacitance to under 15 pf although the
dynamic range of the instrument will typically be lowered by 20 dB in this setting. Note that
BOTH channel A AND channel B probes must have the SAME setting or else the
measurement will have an erroneous result of 20 dB.

Chapter 4: Application Notes
76
Circuits with Nonzero DC Voltage Levels at the Input /
Output Node
If the circuit’s selected input node, also the frequency response analyzer’s source connection
and channel A connection, has a nonzero DC voltage it will be necessary use one of the
following techniques: 1) DC offset the source (+/- 10 VDC max) to match the circuit’s offset
using the DC OFFSET entry in the source parameters toolbar or 2) AC couple the source to
the circuit using a capacitor or transformer. If method 2 is used consideration will have to be
given to the difficulty in obtaining a sufficiently low driving impedance at low frequencies
with a reasonably sized coupling capacitor. In the case of a transformer low and high
frequency response needs to be considered. The coupling method does not need to have a flat
response since ratioed measurements cancel source flatness deviations. In both techniques
the input channels must also be either: 1) AC coupled using the frequency response
analyzer’s internal coupling capacitor (>=10Hz only), or 2) DC coupled which will enable the
automatic DC offset tracking up to a maximum of +/- 8VDC. To allow sufficient voltage
"headroom" for large amplitude signals the maximum DC offset should be +/- 5 VDC.
Measuring Circuits with High Common Mode Voltages
For frequency response measurements on circuits that have large voltage offsets (>10 VDC)
from ground it is necessary to couple the source to the circuit under test using a signal
injection transformer covering the frequency range of interest. Using 10-to-1 probes for the
receiver's input channels will increase the maximum input voltage to 200 Volts. For high
voltages the receiver channels can also be either transformer coupled, connected using active
differential probes, or connected using an isolation amplifier. Running a probe frequency
calibration with any of the aforementioned connection schemes, with the probes in place, will
remove (i.e. normalize) the frequency response of the probes.

Chapter 4: Application Notes
77
Measuring Feedback Loop Frequency Response
In feedback circuits it is necessary to measure the gain and phase for the complete path
around some chosen loop, i.e. the loop gain and phase. If the frequency response analyzer is
connected such that the source and channel A are connected to the desired “beginning” point
in the loop and channel B is connected to the desired “end” point in the loop the gain
measured is the desired loop gain and the phase measured is the phase change around the
loop. In the case of negative feedback, the phase change includes a 180 degree phase shift
when the feedback signal is inverted in the loop.
The frequency response analyzer display shows a +-180 degree phase range so the inversion
in the feedback loop will cause any additional phase shifts beyond -180 degrees to “wrap
around” and appear as a phase of +180 - (additional phase shifts). In a typical negative
feedback circuit with one pole (i.e. 20 dB/decade rolloff) the phase would start off at +180
degrees and, at the pole frequency, show +135 degrees. The phase reading can then be
directly interpreted as “phase margin” at the frequency where the loop gain magnitude is
equal to one (0 dB).
Basic Setup For Feedback Loop Measurements:

Chapter 4: Application Notes
78
In most cases to make a loop gain measurement the feedback loop must be left closed due to
high DC gain or bias conditions. These conditions would force the circuit into a nonlinear
area of operation if the loop was opened making a valid measurement impossible. If the node
at the source connection has a nonzero voltage then the source will have to be DC offset to
match the node voltage or AC coupled using a capacitor or transformer. The resistor Ropt can
be used to prevent circuit loading due to small differences in source and circuit voltages. For
high frequency loop gain measurements the source probe capacitance as well as the input
channel probe capacitance can have a destabilizing effect on the circuit - see the high
frequency measurement note above. The source probe capacitance effect can be reduced by
using a series resistor between the source and the circuit’s selected node. Use a resistor as
large as needed to maintain stability. The source drive level can be increased to the level
required to obtain a noise free trace.
Two measurement methods are detailed below. The first is a DC coupled technique which
has the advantages of a DC to 30 MHz frequency coverage. The disadvantage of this
technique is that its implementation may require the use of a buffer amplifier. The second,
AC coupled, technique is simpler in that it only requires a resistor and a transformer to
implement. The disadvantage of this technique is that it is frequency limited by the
bandwidth of the transformer used.
DC Coupled, Buffer Amplifier Method
Unless the feedback loop under test has a buffer stage with high input impedance and low
output impedance it may be necessary to temporarily add such a stage to maintain the existing
feedback loop characteristics and make a valid measurement. The diagram below shows the
placement of such a temporary buffer and the frequency response analyzer connections for a
feedback loop frequency response measurement. The buffer circuit below, with the 35 MHz
bandwidth op-amps, adds approximately 3 degrees of phase shift at 1 MHz to the
measurement. Lower speed op-amps can be used for lower frequencies, if desired. The
circuit shown assumes Zout @ Vout is much lower than RFEEDBACK over the frequencies
of interest. If this is not the case then to obtain the actual loop gain response it may be
necessary to terminate the Vout node with an impedance equivalent to RFEEDBACK and to
add a series impedance to RFEEDBACK equal to Zout.
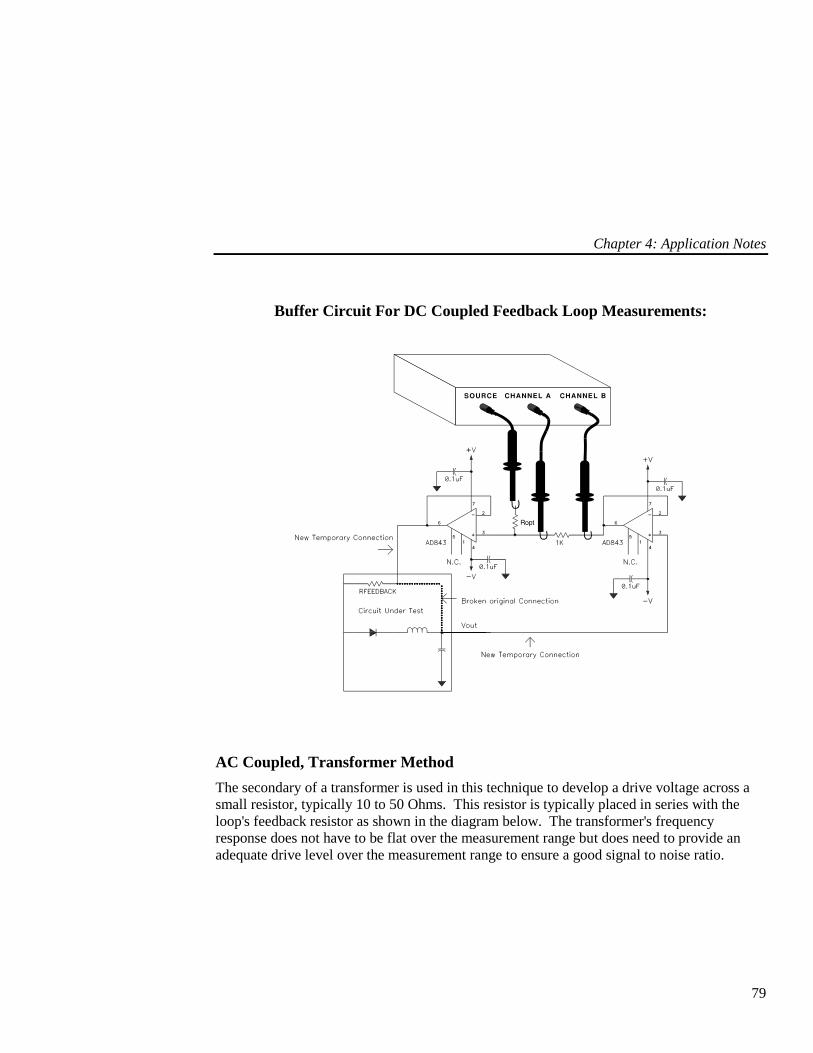
Chapter 4: Application Notes
79
Buffer Circuit For DC Coupled Feedback Loop Measurements:
AC Coupled, Transformer Method
The secondary of a transformer is used in this technique to develop a drive voltage across a
small resistor, typically 10 to 50 Ohms. This resistor is typically placed in series with the
loop's feedback resistor as shown in the diagram below. The transformer's frequency
response does not have to be flat over the measurement range but does need to provide an
adequate drive level over the measurement range to ensure a good signal to noise ratio.

Chapter 4: Application Notes
80
Configuration For Transformer Coupled Feedback Loop Measurements:
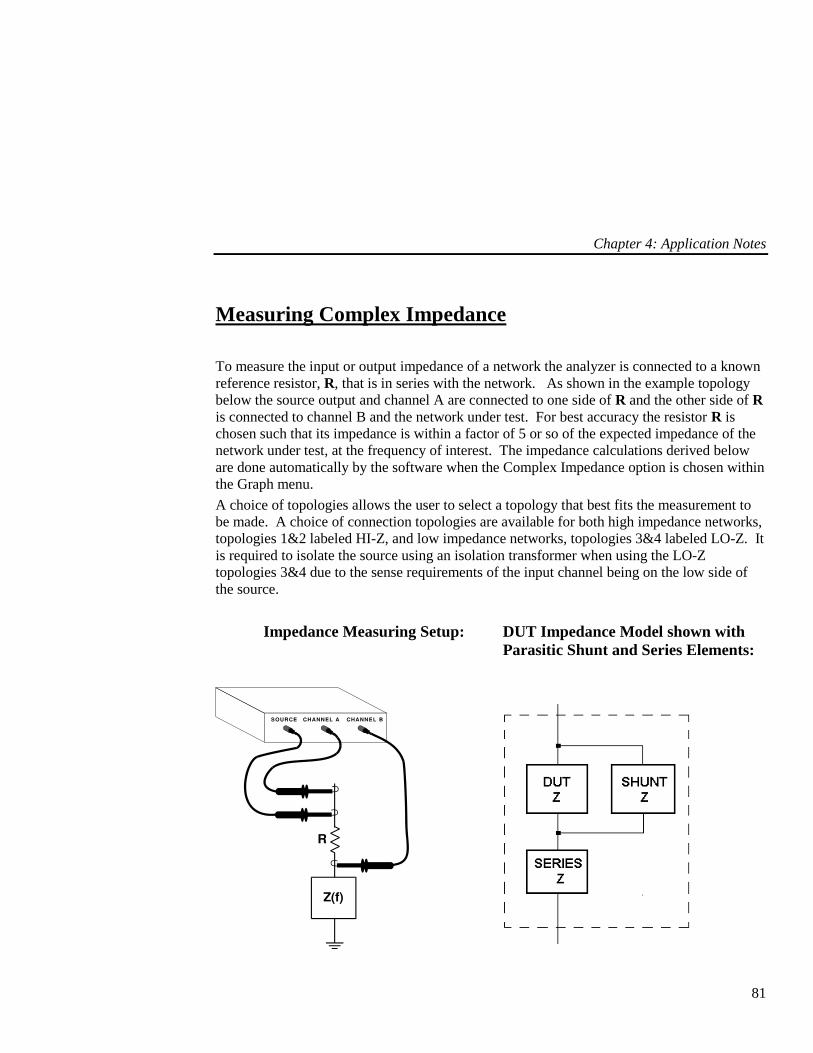
Chapter 4: Application Notes
81
Measuring Complex Impedance
To measure the input or output impedance of a network the analyzer is connected to a known
reference resistor, R, that is in series with the network. As shown in the example topology
below the source output and channel A are connected to one side of R and the other side of R
is connected to channel B and the network under test. For best accuracy the resistor R is
chosen such that its impedance is within a factor of 5 or so of the expected impedance of the
network under test, at the frequency of interest. The impedance calculations derived below
are done automatically by the software when the Complex Impedance option is chosen within
the Graph menu.
A choice of topologies allows the user to select a topology that best fits the measurement to
be made. A choice of connection topologies are available for both high impedance networks,
topologies 1&2 labeled HI-Z, and low impedance networks, topologies 3&4 labeled LO-Z. It
is required to isolate the source using an isolation transformer when using the LO-Z
topologies 3&4 due to the sense requirements of the input channel being on the low side of
the source.
Impedance Measuring Setup: DUT Impedance Model shown with
Parasitic Shunt and Series Elements:
Chapter 4: Application Notes
82
A choice of display modes are available which give options on how the complex impedance
data is formatted and displayed. The display modes include polar, rectangular and equivalent
circuit with a parallel or serial topology being options.
First order parasitic series and shunt elements, as introduced by the probes or other fixtures,
can be optionally mathematically subtracted out. To mathematically eliminate the probe
shunt capacitance, for example, choose the desired topology and connect the probes and
network under test. Display the impedance as Equiv C & R with a series equivalent circuit.
Temporarily remove the network under test (i.e. an open circuit) while keeping the probes
connected, then using the shunt element parasitic compensation capacitance entry, adjust this
capacitance value while reading the display to achieve the best approximation to an open
circuit. To mathematically eliminate the probe series resistance temporarily remove the
network under test and replace with a small resistance of known value ( i.e. 1 Ohm) while
keeping the probes connected. Display the impedance as Equiv L & R with a series
equivalent circuit. Using the series element parasitic compensation resistance entry, adjust
this resistance value while reading the display to achieve the best approximation to this
known value. Reinsert the network under test to make the final measurement.
Complex Impedance Measurement Calculations
Let the transfer function measured by the analyzer be H(f), the unknown complex impedance,
Z(f)= x + j•y, is then given by: Z(f) = R•H(f)/(1-H(f)). This result is derived using the
generalized voltage divider formula with the substitution of VB = H•VA. First the magnitude
of H(f) is converted from dB’s to linear form by dividing by 20 and taking the antilog (base
10). The phase is used directly as read from the analyzer taking care to include the sign. The
converted magnitude along with the phase now represents H(f) in polar form, and is then
converted to rectangular form and substituted into the formula above. The resulting complex
number is the impedance in ohms and will typically have a real part, x, representing the
equivalent series resistance, and a imaginary part, y, representing the equivalent reactance of
the network under test. A capacitive reactance will have a negative imaginary part, while an
inductive reactance will have a positive imaginary part. The equivalent capacitance is given
by C = -1/(2•pi•f•y) and the equivalent inductance given by L = y/(2•pi•f) where f is the
measurement frequency in Hz.
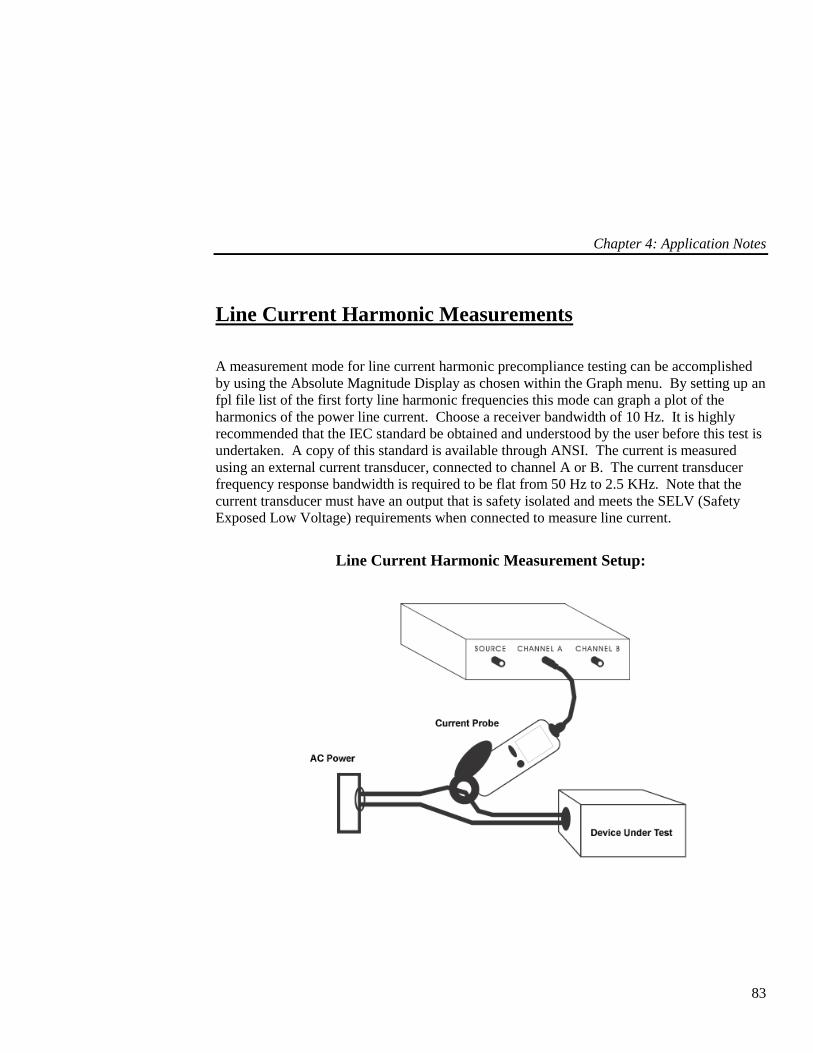
Chapter 4: Application Notes
83
Line Current Harmonic Measurements
A measurement mode for line current harmonic precompliance testing can be accomplished
by using the Absolute Magnitude Display as chosen within the Graph menu. By setting up an
fpl file list of the first forty line harmonic frequencies this mode can graph a plot of the
harmonics of the power line current. Choose a receiver bandwidth of 10 Hz. It is highly
recommended that the IEC standard be obtained and understood by the user before this test is
undertaken. A copy of this standard is available through ANSI. The current is measured
using an external current transducer, connected to channel A or B. The current transducer
frequency response bandwidth is required to be flat from 50 Hz to 2.5 KHz. Note that the
current transducer must have an output that is safety isolated and meets the SELV (Safety
Exposed Low Voltage) requirements when connected to measure line current.
Line Current Harmonic Measurement Setup:

Chapter 4: Application Notes
84
Power Transmission/Reflection Measurements
In applications such as passive filters and circuits for communications the parameters of
interest involve not voltage transfer functions but rather power transfer functions. Because
power can be reflected as well as transmitted through a network due to impedance
mismatches the voltage and power transfer functions are not necessarily the same. The model
300 frequency response analyzer, in its most basic configuration, measures voltage/voltage
transfer functions since it has high impedance inputs. To measure power transfer functions
the frequency response analyzer inputs need to be terminated, using feedthrough
terminations, to the desired impedance (typically 50 or 75 ohms). This will convert the
power into a voltage which is measured by the analyzer. Also the measurement configuration
must be able to determine the actual power transmitted through or reflected from the network
under test. This is accomplished by using a power splitter and, in the case of reflection
measurements, a directional coupler. The model 300 frequency response analyzer has the
capability to measure transmission (S21 or S12) as well as the return loss of a reflection
measurement directly. The derived quantities including the reflection coefficient, VSWR and
impedance can be calculated from the return loss measurement's magnitude and phase
information using the relationships given below.
Reflection coefficient magnitude = 10^(-return loss/20) where the return
loss is expressed as a positive quantity in dB. The reflection
coefficient magnitude is between 0 and 1.
Reflection coefficient phase = the phase measured at the return loss
measurement.
VSWR = (1+ reflection coefficient magnitude)/(1 - reflection coefficient
magnitude).
Impedance = Characteristic impedance (i.e. 50 Ohms) *( 1 + reflection
coefficient)/(1 - reflection coefficient)
Transmission Measurements
In the case of transmission measurements the power incident to the network under test can be
determined by sampling the incident source power using a power splitter and making a
ratioed measurement of the output power to input power. As shown in the drawing (below)
the sampled incident power is measured by channel A while the transmitted power is
measured by channel B. Note that the input channels A and B must be terminated to the
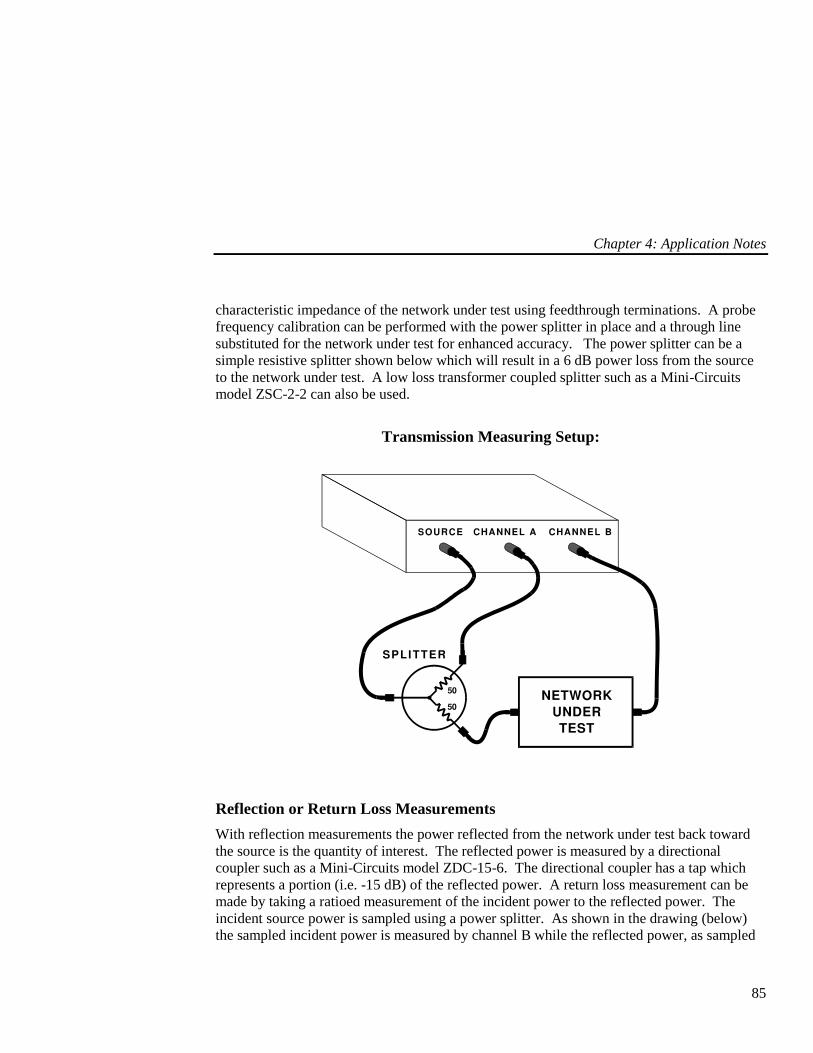
Chapter 4: Application Notes
85
characteristic impedance of the network under test using feedthrough terminations. A probe
frequency calibration can be performed with the power splitter in place and a through line
substituted for the network under test for enhanced accuracy. The power splitter can be a
simple resistive splitter shown below which will result in a 6 dB power loss from the source
to the network under test. A low loss transformer coupled splitter such as a Mini-Circuits
model ZSC-2-2 can also be used.
Transmission Measuring Setup:
Reflection or Return Loss Measurements
With reflection measurements the power reflected from the network under test back toward
the source is the quantity of interest. The reflected power is measured by a directional
coupler such as a Mini-Circuits model ZDC-15-6. The directional coupler has a tap which
represents a portion (i.e. -15 dB) of the reflected power. A return loss measurement can be
made by taking a ratioed measurement of the incident power to the reflected power. The
incident source power is sampled using a power splitter. As shown in the drawing (below)
the sampled incident power is measured by channel B while the reflected power, as sampled
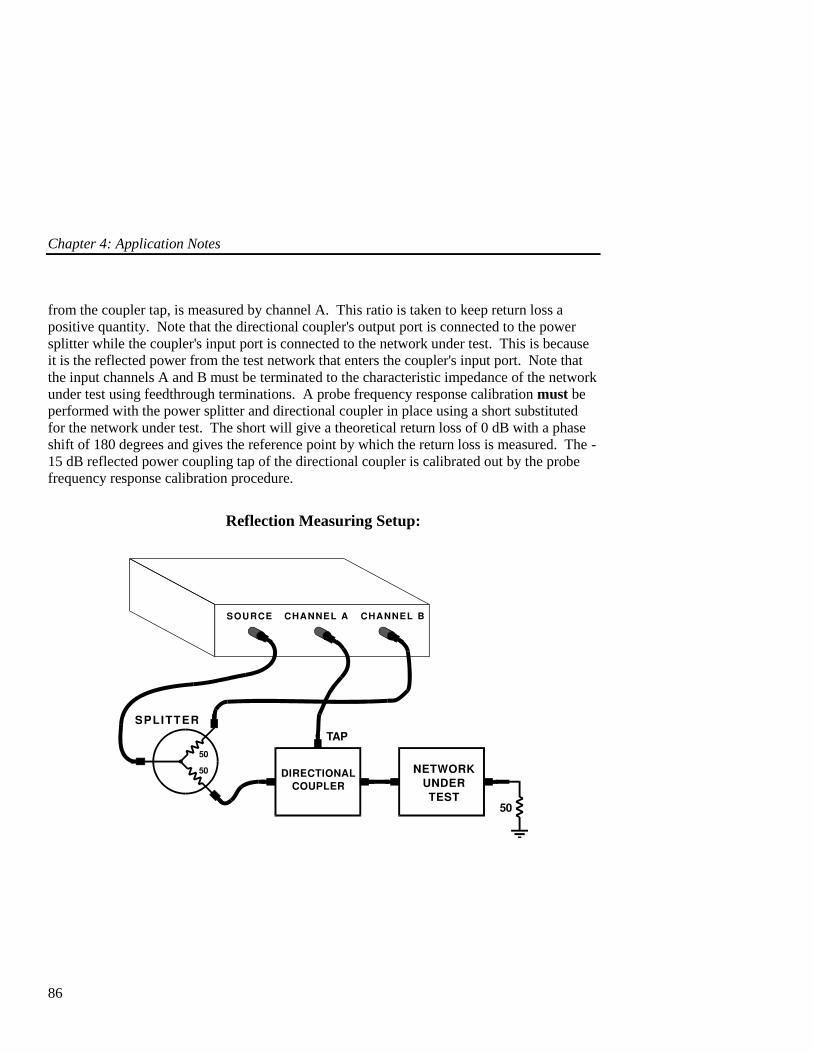
Chapter 4: Application Notes
86
from the coupler tap, is measured by channel A. This ratio is taken to keep return loss a
positive quantity. Note that the directional coupler's output port is connected to the power
splitter while the coupler's input port is connected to the network under test. This is because
it is the reflected power from the test network that enters the coupler's input port. Note that
the input channels A and B must be terminated to the characteristic impedance of the network
under test using feedthrough terminations. A probe frequency response calibration must be
performed with the power splitter and directional coupler in place using a short substituted
for the network under test. The short will give a theoretical return loss of 0 dB with a phase
shift of 180 degrees and gives the reference point by which the return loss is measured. The -
15 dB reflected power coupling tap of the directional coupler is calibrated out by the probe
frequency response calibration procedure.
Reflection Measuring Setup:
Appendix A: Theory of Operation
87
Appendix A: Theory of Operation
The model 300’s frequency response analyzer system is comprised of a host PC and analyzer
unit. The host PC provides the operator I/O, file storage and data post-processing. The
Analyzer unit contains the frequency source output and the two input, or receiver channels, as
well as the power supply and USB I/O circuitry.
The frequency response analyzer uses a “swept sine” approach to measure the transfer
function of the network under test. This approach requires a sinusoidal, variable frequency,
source output and two input channels capable of sampling the sinusoidal input over a broad
frequency range. The source is of the DDS or direct digital synthesis type which meets the
requirements of fast frequency changes, logarithmic or linear sweeps, wide frequency range
and low parts count. The receiver is of the heterodyning type which enables a broad
frequency range with a fixed low frequency I.F. for high accuracy and low noise analog to
digital conversion.
Both the source and L.O. use a DDS source which functions by accumulating a selectable
phase increment at the system clock rate. This accumulated phase value is then directly
mapped to the sine value using a ROM lookup table. The sine value is then converted to a
voltage using a high speed DAC, the output of which is low pass filtered to remove aliases.
The L.O. output is used directly to drive the L.O. side of the receiver mixers. The source
output, however, is passed through a stepped attenuator giving 0 to 63 dB’s of attenuation.
The attenuator’s output is then DC offset by a user selected amount and buffered enabling the
source output to drive 50 ohm loads.
The receiver channels A and B are identical thus the following description applies to both.
The input signal drives a high impedance input buffer which in turn drives a stage capable of
being DC offset for automatic DC offset tracking. The offset stage then drives an amplifier
stage switched by the DSP uP for maximum signal to noise ratio. The amplifiers output
drives the signal side of the mixer resulting in a mixer output that is a fixed I.F.. The I.F.
signal is then low pass filtered to remove aliases and sampled by the analog to digital
converter.
The receiver’s analog to digital converter output is sent to the DSP uP over the serial
interface. The DSP uP converts the data from both input channels, in real time, to complex
numbers representing the phase and magnitude of the sinusoids at the channel A and B
inputs. The DSP uP then passes these complex numbers to the PC for error correction and
scaling for presentation on the PC’s graphics display.

Appendix B: Measurement Accuracy
88
Appendix B: Measurement Accuracy
The basic accuracy of the analyzer is specified to be 0.025 dB magnitude and 0.2 degrees
phase. These specifications assume that a system calibration has been performed after a 30
minute warm-up period at the operating ambient temperature. The analyzer's accuracy can be
undermined by changing or swapping the input probes after calibration has been performed.
There are a number of factors that determine the accuracy, or lack thereof (uncertainty or
error) of a given frequency response measurement made by the frequency response analyzer.
They are listed below in an order which does not necessarily reflect their significance.
Possible error contributing factors external to the analyzer include:
Probe Loading
Probe Compensation
Transmission Line Effects
Possible error contributing factors internal to the analyzer include:
Signal to Noise Ratio
Source Frequency Accuracy
Temperature Drift
Receiver Linearity
To obtain the worst case measurement error the errors from all of these factors need to be
summed together as they relate to a given measurement situation. The term 'res', as used in
the charts below, indicates the values are below 0.01 dB magnitude or 0.1 degrees phase.
Probe Loading Error
Probe impedance, chiefly capacitance, can cause loading of the circuit under test and can be a
significant error source as described in the discussion on high frequency measurements.
Probe Compensation Error
Ten-to-one (x10) probes, needed for reducing the probe loading effect introduce a frequency
response error. The frequency response error can be canceled by performing a frequency
Appendix B: Measurement Accuracy
89
response calibration. The adjustment procedure is performed once at the factory on the
included probes and should be performed periodically as follows: Set the analyzer for a
0.994 V rms signal level output and sweep from 100 Hz to 100 kHz (log sweep). Connect the
source and input channels together. Place one probe in the x1 position, if available, or use a
1:1 cable. Place the other probe in the x10 position. Using a small screwdriver or adjustment
tool set the x10 probe compensation adjustment for maximum flatness. Likewise, adjust the
second x10 probe in a similar manner keeping the probe on its assigned channel (do not swap
probes back and forth between channels).
Transmission Line Effects
When using coaxial cables at higher frequencies and long cable lengths the transmission line
effects give rise to "standing wave patterns" on cables unless the cables are properly
terminated at their endpoints with the cable's characteristic impedance. The analyzer's inputs
have a one megohm impedance which may need to be terminated to the cables impedance.
To avoid this type of error use through-line terminators at the analyzer's input channel BNC's.
Signal to Noise Ratio Error
This error term is labeled “signal to noise ratio” or SNR and is the difference, in dB’s,
between the analyzer’s receiver noise floor and the smallest of the two input channel's signal
magnitude. The analyzer’s noise floor is specified to be at least 100 dB’s below the largest
allowable signal which is 1.7 volts rms. An input signal at the worst case noise floor level
would then have a magnitude of approximately 18 microvolts rms and the SNR would be 0
dB. The analyzer’s typical noise floor is approximately 5uV rms using a IF bandwidth of 10
Hz. This type of error is a random quantity that manifests itself as trace noise. The chart
below lists the measurement error as a function of SNR.

Appendix B: Measurement Accuracy
90
Signal to Noise Ratio Error Chart
Signal Strength SNR in dB’s Mag. Error (dB) Phase Error (deg.)
18 uV 0 3 45
56 uV 10 0.414 13.6
180 uV 20 0.043 5.7
560 uV 30 0.0043 (< res) 1.81
1.8 mV 40 < res 0.573
5.6 mV 50 < res 0.181
18 mV 60 < res 0.0573 (< res)
56 mV or more 70 or more < res < res
Source Frequency Error
The source frequency is accurate to 100 ppm (0.01%) which makes its consideration
important only on circuits with extremely high Q such as crystal filters.
Temperature Drift Error
The temperature drift error is due to magnitude and phase changes with the analyzer's internal
temperature changing. This results from the operating temperature being different from the
temperature at the time the frequency calibration was performed. This error source can be
minimized by performing a frequency calibration at the ambient operating temperature after a
30 minute warm-up period. The expected worst case temperature coefficients are 0.005 dB
magnitude and 0.02 degree phase, per degree Celsius.

Appendix B: Measurement Accuracy
91
Receiver Linearity Error
Since the frequency calibration is performed at a single, high, input level any variations in the
analyzer's linearity will cause a magnitude error at other, significantly different, input levels.
The chart below gives this error as a function of input level.
Receiver Linearity Error Chart
Input Signal Level Magnitude Error in dB's
0.1 mV 0.30
1 mV 0.15
10 mV 0.01
>10 mV < res

Appendix C: Specifications
92
Appendix C: Specifications
SYSTEM
PARAMETER TYPICAL SPEC. MIN. / MAX. SPEC.
Sweep Speed, Per Point 1 6 msec. (2 GHz PC) PC Dependent
Source / Receiver Isolation 120 dB 100 dB min.
Temperature, Operating 5 C / 35 C
Temperature, Storage -40 C / 70 C
Source / Receiver :
Weight 10 lbs.
Dimensions 4.5”H x 10”W x 12.5”L
Analyzer (BNC) ground to PC
ground common mode voltage
Input AC Voltage Range
Input AC Frequency
Input AC Power
115VAC, 230VAC
50-60Hz
80 Watts
42V Peak
+/- 10%

Appendix C: Specifications
93
SOURCE
PARAMETER TYPICAL SPEC. MIN. / MAX. SPEC.
Frequency Accuracy 100 ppm +/- 0.01 Hz
Frequency Resolution 0.01 Hz
Frequency Range 0.01 Hz – 30 MHz
Flatness, DC to 1 MHz 2 +/- 0.2 dB
1 to 30 MHz +/- 1 dB
Harmonics - 40 dBc
Spurious, Exc. Harmonics - 55 dBc
AC Output Level Range 1.25 mV / 1.77V rms (into 1M
Ohm), 5mV / 7.08V rms in
high level mode
AC Output Level Error 2 +/- 15 %
DC Offset Range -10 / +10 V Peak
DC Offset Error +/- 2 %
Residual DC Offset +/- 30 mV
Maximum Peak Current Output 500 mA
Output Impedance 50 Ohms (2 Ohms in high
level mode)
Absolute Maximum Safe Voltage
at Source Output
+/- 15 Volts Peak

Appendix C: Specifications
94
RECEIVER
PARAMETER TYPICAL SPEC. MIN. / MAX. SPEC.
Dynamic Range 3,4 < 5 MHz 115 dB 100 dB min.
>= 5 MHz 95 dB 90 dB min.
B/A Mag Accuracy 3 < 1 MHz
>= 1 MHz
+/- 0.025 dB
+/- 0.05 dB
See appendix B
Abs. Magnitude Accuracy < 1MHz
>= 1MHz,< 5MHz
>= 5MHz
+/- 2 %
+/-5 %
+/-10 %
Phase Accuracy 3 < 1 MHz +/- 0.2 degree See appendix B
>= 1 MHz +/- 0.8 degree
Resolution (IF) Bandwidth Depends on frequency and
Bandwidth selection
0.01 Hz / 1 KHz
Input Signal Range(AC) 3 5 uV to 1.77 V rms 17.7 uV / 1.77 V rms
Input Signal Range(AC+DC) -5 / + 5 V Peak -8 / + 8 V Peak
A to B Isolation < 5 MHz 115 dB 100 dB min.
>= 5 MHz 95 dB 90 dB min.
Input Imped., x1 probe 1 Megohm
Input Imped., x10 probe 10 Megohm
Input Cap., at BNC conn. 25 pF
Absolute Maximum Safe Voltage
at Receiver Input
+/- 15 V Peak
1
For measurement frequencies > 11KHz. A minimum of 1.2 cycles at the
source frequency are used giving a minimum time per point of
(1.2/frequency) + 2 ms. 2
Ratioed measurements cancel source flatness deviations and absolute source
level errors. 3 Using (IF) bandwidth of 10 Hz or less and 50 sweep Averages.
4 Spurious free dynamic range is 90dB minimum at the following frequencies:
N*100KHz and N*100KHz-20KHz for N=1 to 6.
Specifications subject to change without notice

Appendix D: File Types; Use and Format
95
Appendix D: File Types; Use and Format
Below is a description of the various files which are used by the frequency response analyzer
windows software.
Filename.nac
Files of extension .nac are user defined setup files. These files are created using the menu
command [File|Save Setup As...].
Filename.dat
Data files created with the [File|Save Data] commands are text files of sweep data. Both
realtime and Master data are saved in exactly the same format and are indistinguishable.
When copying, saving, or backing up data files be sure to include the raw files as well (see
.raw files below). The data is written in the following format:
A one line header describing the three columns of data followed by one line per data
point, On each line are three (3) tab separated values ordered as Frequency, Left
Graph data, and Right Graph data. The header text is unique and specific for each
graph display mode and sub-mode. The header text strings for each graph display
mode is defined as follows:
Display Mode Column 1 Header Column 2 Header Column 3 Header
Magnitude & Phase Frequency Mag Phase
or Frequency Mag [B/A] Phase [B-A]
Absolute Mag A & B Frequency ChA Abs ChB Abs.
Complex Impedance
Impedance (Rect) Frequency Imp. Real Imp. Imag
Impedance (Polar) Frequency Imp. Mag Imp. Angle
Equiv. C & R Frequency Equiv C Equiv R
Equiv C & Dissipation Frequency Equiv C Dissipation
Equiv L & R Frequency Equiv L Equiv R
Equiv L & Quality Frequency Equiv L Quality
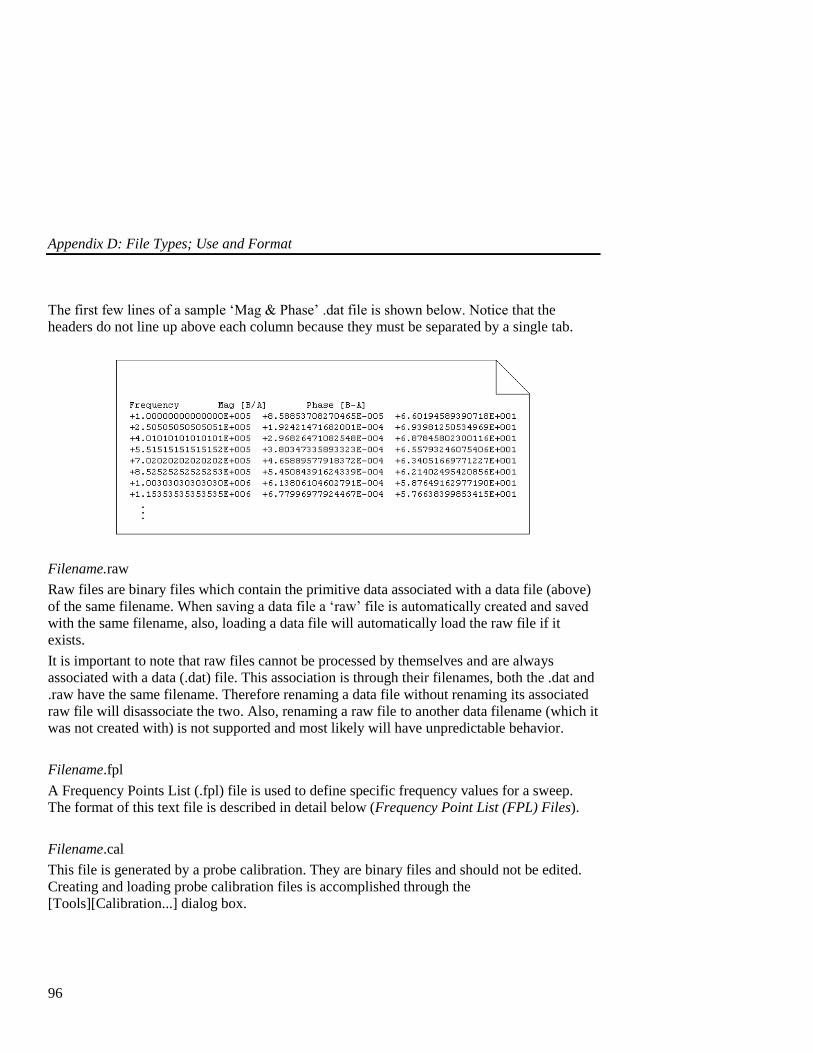
Appendix D: File Types; Use and Format
96
The first few lines of a sample ‘Mag & Phase’ .dat file is shown below. Notice that the
headers do not line up above each column because they must be separated by a single tab.
Filename.raw
Raw files are binary files which contain the primitive data associated with a data file (above)
of the same filename. When saving a data file a ‘raw’ file is automatically created and saved
with the same filename, also, loading a data file will automatically load the raw file if it
exists.
It is important to note that raw files cannot be processed by themselves and are always
associated with a data (.dat) file. This association is through their filenames, both the .dat and
.raw have the same filename. Therefore renaming a data file without renaming its associated
raw file will disassociate the two. Also, renaming a raw file to another data filename (which it
was not created with) is not supported and most likely will have unpredictable behavior.
Filename.fpl
A Frequency Points List (.fpl) file is used to define specific frequency values for a sweep.
The format of this text file is described in detail below (Frequency Point List (FPL) Files).
Filename.cal
This file is generated by a probe calibration. They are binary files and should not be edited.
Creating and loading probe calibration files is accomplished through the
[Tools][Calibration...] dialog box.
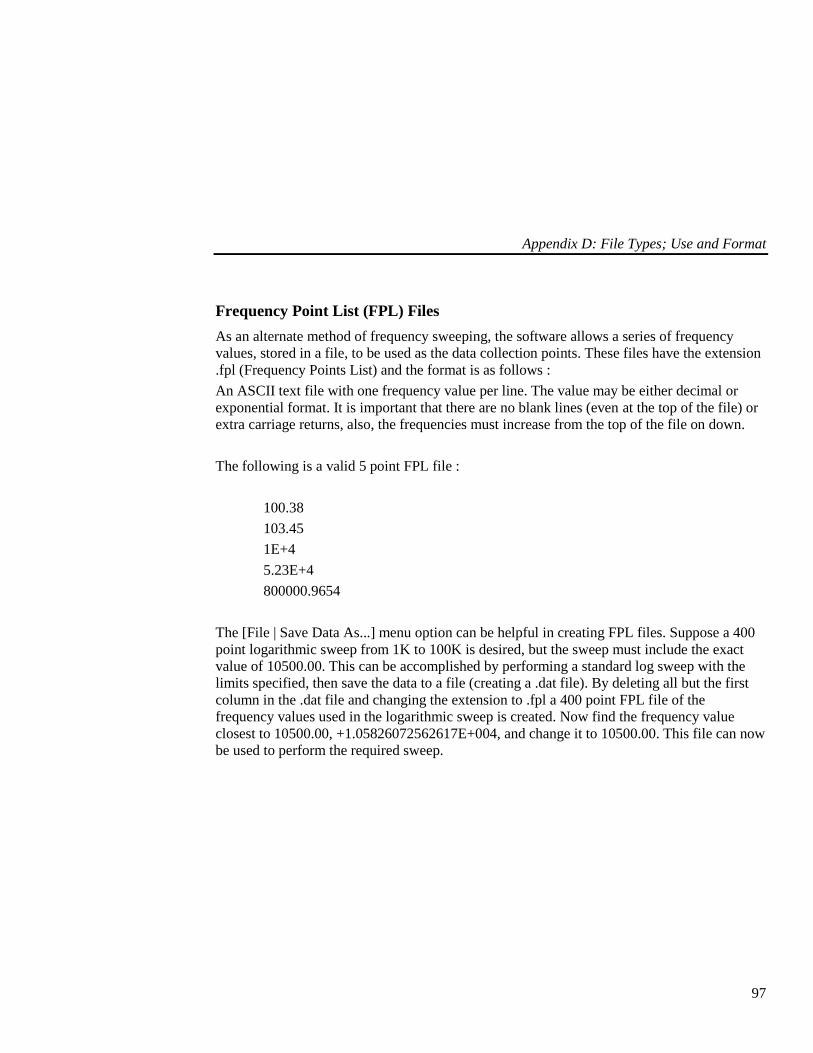
Appendix D: File Types; Use and Format
97
Frequency Point List (FPL) Files
As an alternate method of frequency sweeping, the software allows a series of frequency
values, stored in a file, to be used as the data collection points. These files have the extension
.fpl (Frequency Points List) and the format is as follows :
An ASCII text file with one frequency value per line. The value may be either decimal or
exponential format. It is important that there are no blank lines (even at the top of the file) or
extra carriage returns, also, the frequencies must increase from the top of the file on down.
The following is a valid 5 point FPL file :
100.38
103.45
1E+4
5.23E+4
800000.9654
The [File | Save Data As...] menu option can be helpful in creating FPL files. Suppose a 400
point logarithmic sweep from 1K to 100K is desired, but the sweep must include the exact
value of 10500.00. This can be accomplished by performing a standard log sweep with the
limits specified, then save the data to a file (creating a .dat file). By deleting all but the first
column in the .dat file and changing the extension to .fpl a 400 point FPL file of the
frequency values used in the logarithmic sweep is created. Now find the frequency value
closest to 10500.00, +1.05826072562617E+004, and change it to 10500.00. This file can now
be used to perform the required sweep.
Appendix E: Default Setup Values
98
Appendix E: Default Setup Values
Sweep
Sweep Points 100
Sweep Frequency Input Start / Stop
Sweep Start Frequency 10 Hz
Sweep Stop Frequency 30,000,000 Hz
Sweep Center Frequency 15,000,005 Hz
Sweep Span 29,999,990 Hz
Sweep Averaging Off
Sweep Averaging Factor 20
Sweep Mode Continuous
Sweep Type Linear
Sweep Dwell Auto
Sweep Dwell User Value 0 ms
Source
Source Output On
Source DC Offset (Source) 0.0 V
Source Level 1.25 mV
Source Level Mode Normal
Receiver
Receiver Coupling AC
Receiver Preamp Auto
Receiver BandWidth 1 Khz
Colors
Grid Light Gray

Appendix E: Default Setup Values
99
Markers Magenta
Left Trace Light Blue
Left Master Trace Dark Blue
Right Trace Light Red
Right Master Trace Dark Red
Data Format
Mag & Phase Frequency Eng / 2
Left Trace Std / 2
Right Trace Std / 2
Delta Exp / 1
Abs Mag Frequency Eng / 2
Left Trace Std / 3
Right Trace Std / 3
Delta Exp / 1
Cmplx Imp Frequency Eng / 2
Left Trace Exp / 3
Right Trace Exp / 3
Delta Exp / 1
Trace Display Left & Right Trace
Phase Format +/- 180º
Title Clear
Complex Impedance Setup
Reference Resistor 1000 ohms
Equivalent Circuit Mode Series
Display Mode Impedance (Rect)
Appendix F: Repair and Warranty Information
100
Appendix F: Repair and Warranty Information
Repair
If after reviewing and implementing the performance test procedures in appendix H the unit
is still non-operational then proceed as follows:
1. Contact AP Instruments for further assistance and, if needed, a return
authorization.
2. Pack the instrument, including all accessories, in the original packing and
shipping materials. If the original shipping materials are not available ensure
that there is at least four inches of packing material surrounding the
instrument and the individual components have been separately wrapped to
prevent scratches during shipping.
3. Ship the package, insured for full value, to the address obtained in the factory
return authorization contact above.
Warranty
The Model 300 comes with a one year limited warranty. During the warranty period, AP
Instruments will, at its option, either repair or replace the products that prove to be defective.
Should AP Instruments be unable to repair or replace the product within a reasonable amount
of time, a refund of the purchase price may be given upon return of the product.
Warranty Exclusions
The warranty on your Model 300 shall not apply to defects resulting from:
Customer supplied software or interfacing.
Damage by accident or abuse.
Unauthorized modifications or misuse.
Operation outside the environmental specifications of the product.

Appendix F: Repair and Warranty Information
101
SPECIFICALLY, AP INSTRUMENTS DOES NOT EXTEND TO YOU, THE END
USER, ANY EXPRESS WARRANTY OR ANY IMPLIED WARRANTY OF
MERCHANTABILITY, FITNESS FOR USE OR FITNESS FOR ANY
PARTICULAR PURPOSE IN CONNECTION WITH THE HARDWARE,
SOFTWARE, OR FIRMWARE EMBODIED IN OR USED IN CONJUNCTION
WITH THIS PRODUCT EVEN IF AP INSTRUMENTS HAS BEEN ADVISED OF
THAT PURPOSE.
AP INSTRUMENTS IS NOT RESPONSIBLE FOR ANY DAMAGES OR LOSS,
WHETHER DIRECT INCIDENTAL OR CONSEQUENTIAL, WHICH YOU, THE
END USER, MAY EXPERIENCE AS RESULT OF YOUR PURCHASE OR USE
OF THE HARDWARE, SOFTWARE OR FIRMWARE EMBODIED IN OR USED
IN CONJUNCTION WITH THIS PRODUCT.
Some states do not allow limitation of implied warranties, or exclusion or limitation of
incidental or consequential damages, so the above limitations may not apply to you. This
warranty gives you specific legal rights. You may have other rights which may vary from
state to state.
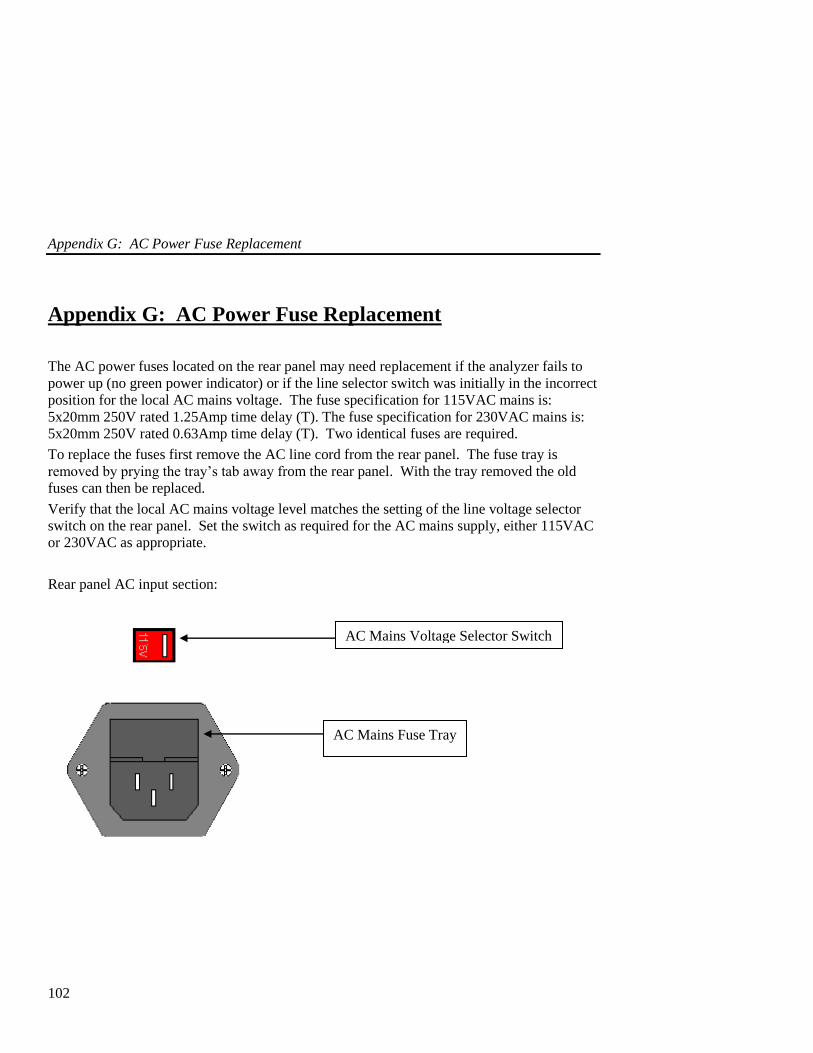
Appendix G: AC Power Fuse Replacement
102
Appendix G: AC Power Fuse Replacement
The AC power fuses located on the rear panel may need replacement if the analyzer fails to
power up (no green power indicator) or if the line selector switch was initially in the incorrect
position for the local AC mains voltage. The fuse specification for 115VAC mains is:
5x20mm 250V rated 1.25Amp time delay (T). The fuse specification for 230VAC mains is:
5x20mm 250V rated 0.63Amp time delay (T). Two identical fuses are required.
To replace the fuses first remove the AC line cord from the rear panel. The fuse tray is
removed by prying the tray’s tab away from the rear panel. With the tray removed the old
fuses can then be replaced.
Verify that the local AC mains voltage level matches the setting of the line voltage selector
switch on the rear panel. Set the switch as required for the AC mains supply, either 115VAC
or 230VAC as appropriate.
Rear panel AC input section:
AC Mains Voltage Selector Switch
AC Mains Fuse Tray

Appendix H: System Calibration / Performance Verification
103
Appendix H:
System Calibration / Performance Verification
System Calibration
Note that the probe calibration procedure, as performed by the user using the software’s
Tools menu, is not a system calibration and only compensates for the effects of the probes.
To obtain accurate measurements the system should be calibrated periodically. It is
recommended that system calibration be performed annually. To obtain a NIST traceable
calibration the analyzer must be sent to AP Instruments. AP Instruments uses custom
hardware fixtures and data logging software to verify the results of the calibration with NIST
traceable quantities.
Performance verification tests are outlined below. All tests are performed at room
temperature, i.e. 23 +/- 5 deg. Celsius with relative humidity: 20-80%, with the analyzer and
test equipment turned on at least 30 minutes prior to testing.
Quick Performance Test
This test gives a qualitative evaluation of the analyzer’s condition allowing the user to
determine if the analyzer is operating normally.
Hardware connections: Hardware connections: Analyzer receiver’s input channels A and B
connected to the source through a BNC Tee connector and two identical 12 inch BNC cables.
Alternatively the connection can be made using the included probes set to the x1 position.
The use of other than short BNC cables will limit the test frequency to 1MHz due to the
effects of the probe’s ground leads.
Initial analyzer settings:
View Menu: All toolbars except Marker Functions Toolbar selected. The Extended
Functions Interface unchecked (disabled).
Graph Menu: Magnitude and Phase selected.
Sweep Control Toolbar: Sweep Mode in continuous mode, Sweep Type is Log x and Points
equal to 100

Appendix H: System Calibration / Performance Verification
104
Sweep Frequency Toolbar: Start/Stop mode selected, Start Frequency is 10 Hz, Stop
Frequency is 30 MHz.
Source Parameters Toolbar: Source On and Source Level is 1 volt. High source level mode is
disabled.
Receiver Parameters Toolbar: AC Coupling active and Bandwidth set to 100 Hz.
Graph Tools Toolbar: Markers enabled.
Using the Sweep Control Toolbar start the sweep. After a full sweep has been completed use
the Graph Tools Toolbar to activate the autoscale button.
The observed Magnitude and Phase data should be within the following limits up to 1 MHz;
Magnitude: 0 dB+/- 0.05 dB maximum deviation. Phase: 0 Degree+/- 0.5 Degree maximum
deviation. From 1 MHz to 30 MHz, when using the 12 inch BNC cables, the observed
Magnitude and Phase data should be within the following limits: Magnitude: 0 dB+/- 0.1 dB
maximum deviation. Phase: 0 Degree +/- 1.5 Degrees maximum deviation.
Additionally, perform the next test by using the Graph Menu to select Absolute Magnitude
Channels A&B. After a full sweep has been completed use the Graph Tools Toolbar to
activate the autoscale button. The observed Absolute Magnitude for both channels A and B
should be within the following limits up to 1 MHz: Voltage: 0.95 to 1.05 VRMS.
Full Performance Tests
The full performance tests include the following:
Source: Frequency, AC Level, DC Offset, DC Null
Receiver: Magnitude and Phase, Absolute Magnitude, Dynamic Range
Recommended performance verification test equipment:
Mfg. Model Description
Agilent 34410A /34401A Multimeter (DVM)
Agilent 53131A Universal Counter
Other supplies recommended:
One BNC Tee adapter, two identical 12 inch 50 Ohm male to male BNC cables, one BNC to
banana jack adapter for the DVM, one 50 Ohm BNC terminator. One male to male 50 Ohm

Appendix H: System Calibration / Performance Verification
105
BNC cable of approximately 24 -48 inches. One each of the 20, 40, 60, 80 dB attenuators (see
below).
Since high value precision attenuators may be difficult to obtain the following attenuator
circuit can be constructed. Keeping the leads short will allow use up to approximately 1
MHz. Wire a female BNC connector to the attenuator’s input and a male BNC connector to
the attenuator’s output. These attenuators are adjusted for the correct attenuation value by
applying a stable DC voltage (5-10v) at the input and using the DC ratio function of the
Agilent 34410A DVM to measure the output/input ratio. Careful adjustment to within 0.06%
of the target ratio is required to ensure the attenuator is accurate within +/-0.005 dB.
Attenuation Value R1 R2 R3 R4 R5
dB Linear ratio
20 0.1 169 316 215 63.4 2K (Pot)
40 0.01 2.37K 1K 1K 63.4 2K (Pot)
60 0.001 4.87K 499 4.87K 63.4 2K (Pot)
80 0.0001 17.8K 316 10K 63.4 2K (Pot)
Source Frequency Test
This test measures the source frequency accuracy at 1MHz.
Hardware connections: Analyzer’s source output to the frequency counter’s input 1 using a
BNC cable.
Initial frequency counter’s settings: Default.
Initial analyzer settings:
View Menu: All toolbars except Marker Functions Toolbar selected. The Extended
Functions Interface unchecked (disabled).

Appendix H: System Calibration / Performance Verification
106
Sweep Control Toolbar: Sweep Mode in continuous mode, Sweep Type is Lin x and Points
equal to 100
Sweep Frequency Toolbar: Center/Span mode selected, Center Frequency is 1.0 MHz, Span
Frequency is 0 Hz.
Source Parameters Toolbar: Source On and Source Level is 1 volt. High source level mode is
disabled.
Using the Sweep Control Toolbar start the sweep and record the counters frequency.
Minimum frequency: 999,900 Hz. Maximum frequency: 1,000,100 Hz.
Source AC Level Test
This test measures the source AC output from maximum to minimum by using the attenuator
to vary the source level.
Hardware connections: Analyzer’s source output to the DVM’s input using a BNC cable and
a BNC to banana jack adapter.
Initial DVM settings: Default with AC voltage measurement selected.
Initial analyzer settings:
View Menu: All toolbars except Marker Functions Toolbar selected. The Extended
Functions Interface checked (enabled).
Sweep Control Toolbar: Sweep Mode in continuous mode, Sweep Type is Lin x and Points
equal to 100
Sweep Frequency Toolbar: Center/Span mode selected, Center Frequency is 1.0 KHz, Span
Frequency is 0 Hz.
Source Parameters Toolbar: Source On, Constant Source Level, Source Level is 1.77 volts,
step size set to 1dB and DC offset is 0 V. High source level mode is disabled.
Using the Sweep Control Toolbar start the sweep and record the DVM’s AC voltage.
Minimum Source AC level: 1.68 VRMS. Maximum Source AC level: 1.86 VRMS.
Select the DVM’s dB relative mode. The DVM should read 0 dB +/-0.01 dB maximum
deviation. Using the source decrement button on the Source Parameters Toolbar decrement
the source level 1dB while recording the value. Repeat until source reads 1.25mV on the
Source Parameters Toolbar. The limit is a 1 dB +/-1.0 dB maximum deviation for each
attenuator step change.
Enable high source level mode and set the source level to the maximum value of 7.08 volts.
Select the DVM’s to AC voltage mode and record the DVM’s AC voltage. Minimum Source
AC level: 6.73 VRMS. Maximum Source AC level: 7.43 VRMS.
Appendix H: System Calibration / Performance Verification
107
Select the DVM’s dB relative mode. The DVM should read 0 dB +/-0.01 dB maximum
deviation. Using the source decrement button on the Source Parameters Toolbar decrement
the source level 1dB while recording the value. Repeat until source reads 5mV on the Source
Parameters Toolbar. The limit is a 1 dB +/-1.0 dB maximum deviation for each attenuator
step change.
Using the Source decrement button on the Source Parameters Toolbar decrease the source
level in 1 dB increments while recording the DVM’s DC voltage at each step. Continue until
the Source Level reaches the minimum value (5mV volts). Maximum Source DC (null)
value: (+/-) 30mV DC.
Source DC Offset Test
This test measures the Source DC Output Offset from minimum to maximum.
Hardware connections: Analyzer’s source output to the DVM’s input using a BNC cable
and a BNC to banana jack adapter.
Initial DVM settings: Default with DC voltage measurement selected.
Initial analyzer settings:
View Menu: All toolbars except Marker Functions Toolbar selected. The Extended
Functions Interface checked (enabled).
Source Parameters Toolbar: Source On, Source Level is 1.25mV volts and Offset is 10.0 V.
High source level mode is disabled.
Record the DVM’s DC voltage. Minimum: 9.50 VDC. Maximum: 10.50 VDC.
Change the Offset entry in the Source Parameters Toolbar to –10.0 V (followed by a ENTER
on the keyboard).
Record the DVM’s DC voltage. Minimum Source DC level: -10.50 VDC. Maximum Source
DC level: -9.50 VDC.
Source DC Null Test
This test measures the source DC null value which is the undesired DC component of the AC
source signal.

Appendix H: System Calibration / Performance Verification
108
Hardware connections: Analyzer’s source output to the DVM’s input using a BNC cable and
a BNC to banana jack adapter.
Initial DVM settings: Default with DC voltage selected. NPLC (line cycle avg.) =10.
Initial analyzer settings:
View Menu: All toolbars except Marker Functions Toolbar selected. The Extended
Functions Interface checked (enabled).
Sweep Control Toolbar: Sweep Mode in continuous mode, Sweep Type is Lin x and Points
equal to 100
Sweep Frequency Toolbar: Center/Span mode selected, Center Frequency is 1.0 KHz, Span
Frequency is 0 Hz.
Source Parameters Toolbar: Source On, Constant Source Level, Source Level is 1.77 volts,
step size set to 1dB and DC offset is 0 V. High source level mode is disabled.
Receiver Parameters Toolbar: Bandwidth set to 10Hz.
Using the Sweep Control Toolbar start the sweep. Using the Source decrement button on the
Source Parameters Toolbar decrease the source level in 1 dB increments while recording the
DVM’s DC voltage at each step. Continue until the Source Level reaches the minimum value
(1.25mV volts). Maximum Source DC (null) value: (+/-) 30mV DC.
Enable high source level mode and set the source level to the maximum value of 7.08 volts.
Using the Source decrement button on the Source Parameters Toolbar decrease the source
level in 1 dB increments while recording the DVM’s DC voltage at each step. Continue until
the Source Level reaches the minimum value (5mV volts). Maximum Source DC (null)
value: (+/-) 30mV DC.
Receiver Dynamic Range Test
This test measures the dynamic range of each receiver channel.
Hardware connections: Analyzer’s source output connected to the receiver’s input channel A
using the 12 inch BNC cable. On the receiver’s input channel B use the 50 Ohm BNC
termination.
Initial analyzer settings:
View Menu: All toolbars except Marker Functions Toolbar selected. The Extended
Functions Interface unchecked (disabled).
Graph Menu: Magnitude and Phase selected.
Sweep Control Toolbar: Sweep Mode in continuous mode, Sweep Type is Log x and Points
equal to 200.

Appendix H: System Calibration / Performance Verification
109
Sweep Frequency Toolbar: Start/Stop mode selected, Start Frequency is 10 Hz, Stop
Frequency is 30 MHz.
Source Parameters Toolbar: Source On and Source Level set to 1.58 volts. High source level
mode is disabled.
Receiver Parameters Toolbar: AC Coupling active and Bandwidth set to 10 Hz.
Graph Tools Toolbar: Markers enabled.
Using the Sweep Control Toolbar start the sweep. After a full sweep has been completed use
the Graph Tools Toolbar to activate the autoscale button. The observed Magnitude data
should be within the following limits up to 5 MHz; Maximum magnitude: -100 dB. No
minimum magnitude. From 5 MHz to 30 MHz: Maximum magnitude: -90 dB. No minimum
magnitude. Additionally, perform the next test by connecting the analyzer’s source output to
the receiver’s input channel B using the 12 inch BNC cable. On the receiver’s input channel
A use the 50 Ohm BNC termination. Using the Sweep Control Toolbar stop and then restart
the sweep. After a full sweep has been completed use the Graph Tools Toolbar to activate
the autoscale button. The observed Magnitude data should be within the following limits up
to 5 MHz; Minimum magnitude: 100 dB. No maximum magnitude. From 5 MHz to 30
MHz: Minimum magnitude: 90 dB. No maximum magnitude.
Receiver Magnitude and Phase (Through-line) Test
This test gives measures the analyzer’s receiver accuracy using a through-line (0 dB
attenuator).
Hardware connections: Analyzer receiver’s input channels A and B connected to the source
through a BNC Tee connector and two identical 12 inch BNC cables.
Initial analyzer settings:
View Menu: All toolbars except Marker Functions Toolbar selected. The Extended
Functions Interface unchecked (disabled).
Graph Menu: Magnitude and Phase selected.
Sweep Control Toolbar: Sweep Mode in continuous mode, Sweep Type is Log x and Points
equal to 100
Sweep Frequency Toolbar: Start/Stop mode selected, Start Frequency is 10 Hz, Stop
Frequency is 30 MHz.
Source Parameters Toolbar: Source On and Source Level is 1.25 Volts. High source level
mode is disabled.
Receiver Parameters Toolbar: AC Coupling active and Bandwidth set to 10 Hz.

Appendix H: System Calibration / Performance Verification
110
Graph Tools Toolbar: Markers enabled.
Using the Sweep Control Toolbar start the sweep. After a full sweep has been completed use
the Graph Tools Toolbar to activate the autoscale button.
The Magnitude and Phase data should be within the following limits up to 1 MHz;
Magnitude: 0 dB+/- 0.025 dB maximum deviation. Phase: 0 Degree +/- 0.2 Degree
maximum deviation. From 1 MHz to 30 MHz the Magnitude and Phase data should be
within the following limits: Magnitude: 0 dB+/- 0.05 dB maximum deviation. Phase: 0
Degree +/- 0.8 Degree maximum deviation.
Receiver Magnitude (Attenuator) Test
This test gives measures the analyzer’s receiver accuracy using 20, 40, 60 and 80 dB
attenuators.
Hardware connections: The receiver’s input channel B connected to the source through a
BNC Tee connector and a 12 inch BNC cable. The attenuator’s input is connected to the
source through the remaining BNC Tee connector using a 12 inch BNC cable. The receiver’s
input channel A is connected to the selected attenuator’s output.
Initial analyzer settings:
View Menu: All toolbars except Marker Functions Toolbar selected. The Extended
Functions Interface unchecked (disabled).
Graph Menu: Magnitude and Phase selected.
Sweep Control Toolbar: Sweep Mode in continuous mode, Sweep Type is Log x and Points
equal to 100
Sweep Frequency Toolbar: Start/Stop mode selected, Start Frequency is 100 Hz, Stop
Frequency is 1 MHz.
Source Parameters Toolbar: Source On and Source Level set to 1.58 Volts. High source level
mode is disabled.
Receiver Parameters Toolbar: AC Coupling active and Bandwidth set to 10 Hz.
Graph Tools Toolbar: Markers enabled. Place marker 1 at 1KHz and marker 2 at 100KHz.
Select the first (20dB) attenuator and connect as instructed above.
Use the Sweep Control Toolbar to start the sweep. After a full sweep has been completed
record the magnitude data at the marker frequencies. To obtain the negative dB values
connect the attenuator output to receiver channel B while connecting channel A to the Tee
connector at the source. Use the Sweep Control Toolbar to stop then restart the sweep. After
a full sweep has been completed record the magnitude data at the marker frequencies. Repeat

Appendix H: System Calibration / Performance Verification
111
the measurement procedure using the remaining attenuators. The table below gives the
magnitude limits for each attenuator value.
Attenuation Test Minimum dB Maximum dB
+20 dB 19.975 20.025
-20 dB -20.025 -19.975
+40 dB 39.965 40.035
-40 dB -40.035 -39.965
+60 dB 59.7 60.3
-60 dB -60.3 -59.7
+80 dB 78.5 81.5
-80 dB -81.5 -78.5
Receiver Absolute Magnitude Test
This test gives measures the analyzer’s receiver accuracy for Absolute Magnitude Voltage.
Step one, measure the source level at 1KHz and 100KHz as follows:
Initial hardware connections: Analyzer’s source output to the DVM’s input using a BNC
cable and a BNC to banana jack adapter.
Initial DVM settings: Default with AC voltage measurement selected.
Initial analyzer settings:
View Menu: All toolbars except Marker Functions Toolbar selected. The Extended
Functions Interface unchecked (disabled).
Graph Menu: Absolute Magnitude selected.
Sweep Control Toolbar: Sweep Mode in continuous mode, Sweep Type is Lin x and Points
equal to 100
Sweep Frequency Toolbar: Center/Span mode selected, Center Frequency is 1.0 KHz, Span
Frequency is 0 Hz.
Source Parameters Toolbar: Source On, Source Level is 1.0 volts. High source level mode is
disabled.
Receiver Parameters Toolbar: AC Coupling active and Bandwidth set to 10 Hz.
Using the Sweep Control Toolbar start the sweep and record the DVM’s AC voltage.

Appendix H: System Calibration / Performance Verification
112
Using the Sweep Frequency Toolbar change the Center Frequency to 100 KHz and record the
DVM’s AC voltage.
Using the Sweep Control Toolbar stop the sweep.
Step two, use the receiver channels to measure the source at 1KHz and 100KHz as follows:
Hardware connections: Analyzer’s source output connected to the receiver’s input channels A
and B using two identical 12 inch BNC cables connected to the source through a BNC Tee
connector.
Additional analyzer settings:
Sweep Control Toolbar: Sweep Mode in continuous mode, Sweep Type is Log x and Points
equal to 100
Sweep Frequency Toolbar: Start/Stop mode selected, Start Frequency is 100 Hz, Stop
Frequency is 1 MHz.
Graph Tools Toolbar: Markers enabled. Place marker 1 at 1KHz and marker 2 at 100KHz.
Use the Sweep Control Toolbar to start the sweep. After a full sweep has been completed
record the absolute magnitude data at the marker frequencies for channels A and B. The data
should read within +/-2% of the voltage measured by the DVM

INDEX
113
A
Appendices .............................................87
Appendix A: Theory of Operation ....87
Appendix B: Measurement Accuracy88
Appendix C: Specifications ...............92
Appendix D: File Types, Use and
Format ............................................95
Appendix E: Default Setup Values....98
Appendix F: Repair and Warranty
Information ...................................100
Appendix G: Source Fuse Replacement
......................................................102
Appendix H: System Calibration ....103
Application Notes
Basic Measurement Procedures ..........73
Circuits with Nonzero DC Voltage
Levels at the Inp .............................76
High Frequency Measurements ..........75
Introduction to Analog Network
Measurements .................................71
Line Current Harmonic Measurements
........................................................83
Measuring Circuits with High Common
Mode Voltages ...............................76
Measuring Complex Impedance .........81
Measuring Feedback Loop Frequency
Response .........................................77
Power Transmission/Reflection
Measurements .................................84
C
Calibration, Probe ............................. 26, 38
D
Data Files .......................................... 53, 95
Data Transfer
Data Files ........................................... 53
Dynamic Data Exchange (DDE) ........ 56
Image Files ......................................... 54
The Clipboard (bitmap data) .............. 55
The Clipboard (text data) ................... 55
Data Window ......................................... 17
Markers .............................................. 18
Dynamic Data Exchange (DDE) ............ 56
Data Links .......................................... 57
Execute Commands ........................... 61
How a DDE Link is Established ........ 56
The Analyzer Software ...................... 57
The DDE Client ................................. 56
Using DDE in Microsoft Excel .......... 64
E
Edit Menu .............................................. 22
Copy Bitmap ...................................... 22
Copy Data .......................................... 22
Copy Master Data .............................. 22
Paste Data to Master .......................... 22
Extended Functions Interface ................ 11
F
File Menu ............................................... 20
Exit ..................................................... 21
Open Data .......................................... 20
Open Setup ......................................... 20
Print Display Mode Setup .................. 21
Print Graph ......................................... 21
Print Preview ..................................... 21
Printer Setup ...................................... 21
Save Data ........................................... 21
Save Graph Image .............................. 21
Save Setup ......................................... 20
114
Save Setup As .................................... 20
Frequency Point List (FPL) Files ........... 97
G
Graph Display Modes ............................ 14
Absolute Magnitude ........................... 14
Complex Impedance .......................... 14
Magnitude and Phase ......................... 14
Graph Menu ........................................... 25
Absolute Magnitude ........................... 25
Complex Impedance .......................... 25
Magnitude & Phase ............................ 25
Graph Tools Toolbar
Auto Scale .......................................... 49
Display Left Trace ............................. 50
Display Right Trace ........................... 50
Manual Scale ...................................... 50
Markers .............................................. 49
Master Trace ...................................... 49
Reference Trace ................................. 49
UnZoom ............................................. 50
Zoom .................................................. 50
Graph Window ....................................... 15
Master traces ...................................... 16
Real-Time Traces ............................... 15
Reference traces ................................. 16
Zooming ............................................. 16
I
Image Files ............................................. 54
Installation
Hardware .............................................. 7
Host PC requirements .......................... 7
Software ............................................... 9
M
Main Toolbar
Copy Data .......................................... 42
Help .................................................... 42
New Setup ......................................... 41
Open Setup ........................................ 41
Print ................................................... 42
Save Setup ......................................... 42
Marker Functions Toolbar
Find Max, Min ................................... 52
Marker Active Selection Box ............ 51
Marker Tracking ................................ 52
Markers Scroll Box............................ 51
Reference to Marker .......................... 52
Search Absolute ................................. 51
Search Left Data, Right Data ............. 51
Search Left of Marker, Right of Marker
....................................................... 52
Search Relative .................................. 51
Search Value Edit Box ...................... 52
Menu Selections .................................... 20
O
Offline Mode ......................................... 12
Options
Advanced ........................................... 37
Colors ................................................ 32
Data Columns .................................... 35
Data Format ....................................... 34
Display ............................................... 33
Trace Math ........................................ 36
P
Probe Calibration ................................... 38
R
Raw Data Files ...................................... 96
Receiver Parameters Toolbar
BW (Band Width).............................. 48
Coupling ............................................ 48
Probe Cal 1,2 ..................................... 48

115
S
Source Parameters Toolbar
Constant Source Level........................46
Level ...................................................47
Output .................................................46
Source DC Offset ...............................47
Variable Source Level ........................46
Sweep Control Toolbar
Avg (Averaging) ................................44
Pause Sweep .......................................43
Points ..................................................44
Start Sweep .........................................43
Stop Sweep .........................................43
Sweep Mode .......................................43
Sweep Type ........................................43
Y Axis Graphing Type .......................44
Sweep Frequency Toolbar
Center/Span ........................................45
File List ..............................................45
Start/Stop ............................................45
T
Toolbars ..................................................41
Graph Tools Toolbar .......................... 49
Main Toolbar ..................................... 41
Marker Functions Toolbar ................. 51
Receiver Parameters Toolbar ............. 48
Source Parameters Toolbar ................ 46
Sweep Control Toolbar ...................... 43
Sweep Frequency Toolbar ................. 45
Tools Menu ............................................ 26
Calibration ......................................... 26
Complex Impedance .......................... 26
Options ............................................... 32
Trace Summing .................................. 31
Variable Source.................................. 29
V
Variable Source...................................... 29
View Menu ............................................ 23
Extended Functions Interface ............ 24
Status Bar ........................................... 24
Toolbars ............................................. 23
Virtual Instrument Front Panel .............. 13

- Safety Notices -
116
• Do not defeat power cord safety ground feature. Plug in to a grounded (earthed)
outlet.
• Line and Current Protection Fuses: For continued protection against fire, replace the
line fuses and the current-protection fuses only with fuses of the specified type and
rating.
• Do not use product in any manner not specified by the manufacturer.
• Do not install substitute parts or perform any unauthorized modification to the
product.
• Return the product to AP Instruments for service and repair to ensure that safety
features are maintained
• Protection Limits: To avoid instrument damage and the risk of electric shock, do not
exceed any of the protection limits listed below:
Applied maximum voltage and current limits to source output and receiver inputs are
+-15V/50mA peak from source/receiver (BNC) ground
Applied maximum voltage between source/receiver (BNC) ground and safety earth
ground is 42V peak.