model 626b02 low frequency industrial icp® accelerometer
TRANSCRIPT

Model 626B02
Low Frequency Industrial ICP® Accelerometer
Installation and Operating Manual
For assistance with the operation of this product,contact PCB Piezotronics, Inc.
Toll-free: 800-959-446424-hour SensorLine: 716-684-0001
Fax: 716-684-3823E-mail: [email protected]
Web: www.imi-sensors.com

Manual 21354 Rev E ECN 50523
Repair and Maintenance
PCB guarantees Total Customer Satisfaction through its “Lifetime Warranty Plus” on all Platinum Stock Products sold by PCB and through its limited warranties on all other PCB Stock, Standard and Special products. Due to the sophisticated nature of our sensors and associated instrumentation, field servicing and repair is not recommended and, if attempted, will void the factory warranty. Beyond routine calibration and battery replacements where applicable, our products require no user maintenance. Clean electrical connectors, housings, and mounting surfaces with solutions and techniques that will not harm the material of construction. Observe caution when using liquids near devices that are not hermetically sealed. Such devices should only be wiped with a dampened cloth—never saturated or submerged.
In the event that equipment becomes damaged or ceases to operate, our Application Engineers are here to support your troubleshooting efforts 24 hours a day, 7 days a week. Call or email with model and serial number as well as a brief description of the problem.
Calibration
Routine calibration of sensors and associated instrumentation is necessary to maintain measurement accuracy. We recommend calibrating on an annual basis, after exposure to any extreme environmental influence, or prior to any critical test.
PCB Piezotronics is an ISO-9001 certified company whose calibration services are accredited by A2LA to ISO/IEC 17025, with full traceability to SI through N.I.S.T. In addition to our standard calibration services, we also offer specialized tests, including: sensitivity at elevated or cryogenic temperatures, phase response, extended high or low frequency response, extended range, leak testing, hydrostatic pressure testing, and others. For more information, contact your local PCB Piezotronics distributor, sales representative, or factory customer service representative.
Returning Equipment If factory repair is required, our representatives will provide you with a Return Material Authorization (RMA) number, which we use to reference any information you have already provided and expedite the repair process. This number should be clearly marked on the outside of all returned package(s) and on any packing list(s) accompanying the shipment.
Contact Information
PCB Piezotronics, Inc.
3425 Walden Ave.
Depew, NY14043 USA
Toll-free: (800) 828-8840 24-hour SensorLine: (716) 684-0001 General inquiries: [email protected] Repair inquiries: [email protected]
For a complete list of distributors, global offices and sales representatives, visit our website, www.pcb.com.
Safety Considerations
This product is intended for use by qualified personnel who recognize shock hazards and are familiar with the precautions required to avoid injury. While our equipment is designed with user safety in mind, the protection provided by the equipment may be impaired if equipment is used in a manner not specified by this manual.
Discontinue use and contact our 24-Hour Sensorline if:
Assistance is needed to safely operate equipment
Damage is visible or suspected
Equipment fails or malfunctions
For complete equipment ratings, refer to the enclosed specification sheet for your product.
Definition of Terms and Symbols
The following symbols may be used in this manual:
DANGER Indicates an immediate hazardous situation, which, if not avoided, may result in death or serious injury.

Manual 21354 Rev E ECN 50523
CAUTION Refers to hazards that could damage the instrument.
NOTE Indicates tips, recommendations and important information. The notes simplify processes and contain additional information on particular operating steps.
The following symbols may be found on the equipment described in this manual:
This symbol on the unit indicates that high voltage may be present. Use standard safety precautions to avoid personal contact with this voltage.
This symbol on the unit indicates that the user should refer to the operating instructions located in the manual.
This symbol indicates safety, earth ground.

Manual 21354 Rev E ECN 50523
PCB工业监视和测量设备 - 中国RoHS2公布表
PCB Industrial Monitoring and Measuring Equipment - China RoHS 2 Disclosure Table
部件名称
有害物质
铅 (Pb) 汞
(Hg)
镉
(Cd) 六价铬 (Cr(VI)) 多溴联苯 (PBB) 多溴二苯醚 (PBDE)
住房 O O O O O O
PCB板 X O O O O O
电气连接器 O O O O O O
压电晶体 X O O O O O
环氧 O O O O O O
铁氟龙 O O O O O O
电子 O O O O O O
厚膜基板 O O X O O O
电线 O O O O O O
电缆 X O O O O O
塑料 O O O O O O
焊接 X O O O O O
铜合金/黄铜 X O O O O O
本表格依据 SJ/T 11364 的规定编制。
O: 表示该有害物质在该部件所有均质材料中的含量均在 GB/T 26572 规定的限量要求以下。
X: 表示该有害物质至少在该部件的某一均质材料中的含量超出 GB/T 26572 规定的限量要求。
铅是欧洲RoHS指令2011/65/ EU附件三和附件四目前由于允许的豁免。
CHINA RoHS COMPLIANCE

Manual 21354 Rev E ECN 50523
Component Name Hazardous Substances
Lead (Pb) Mercury (Hg) Cadmium (Cd) Chromium VI Compounds (Cr(VI))
Polybrominated Biphenyls (PBB)
Polybrominated Diphenyl Ethers (PBDE)
Housing O O O O O O
PCB Board X O O O O O
Electrical Connectors O O O O O O
Piezoelectric Crystals X O O O O O
Epoxy O O O O O O
Teflon O O O O O O
Electronics O O O O O O
Thick Film Substrate O O X O O O
Wires O O O O O O
Cables X O O O O O
Plastic O O O O O O
Solder X O O O O O
Copper Alloy/Brass X O O O O O
This table is prepared in accordance with the provisions of SJ/T 11364.
O: Indicates that said hazardous substance contained in all of the homogeneous materials for this part is below the limit requirement of GB/T 26572.
X: Indicates that said hazardous substance contained in at least one of the homogeneous materials for this part is above the limit requirement of GB/T 26572. Lead is present due to allowed exemption in Annex III or Annex IV of the European RoHS Directive 2011/65/EU.

MANUAL NUMBER: 18405 MANUAL REVISION: A
ECN NUMBER: 49766
Operating Guide with Enclosed Warranty Information
3424 Walden Avenue, Depew, New York 14043-2495
Phone (716) 684-0003
Fax (716) 684-3823
Toll Free Line 1-800-959-4IMI
Piezoelectric ICP® Accelerometers Operating Guide

General
OPERATING GUIDE for use with
PIEZOELECTRIC ICP® ACCELEROMETERS SPECIFICATION SHEET, INSTALLATION DRAWING AND CALIBRATION INFORMATION ENCLOSED
IMI ASSUMES NO RESPONSIBILITY FOR DAMAGE CAUSED TO THIS PRODUCT AS A RESULT OF PROCEDURES THAT ARE INCONSISTENT WITH THIS OPERATING GUIDE
1.0 INTRODUCTION
Congratulations on the purchase of a quality ICP® industrial sensor. In order to ensure the highest level of performance for this product, it is imperative that you properly familiarize yourself with the correct mounting and installation techniques before attempting to operate this device. If, after reading this manual, you have any additional questions concerning this sensor or its application, feel free to call an Application Engineer at 716-684-0003 or 800-959-4464. Proper sensor selection requires special attention to three main areas: sensor design, dynamic expectations, and application environment. Sensor design encompasses the actual sensing element, the physical material, and component selection for the sensor. Preferred industrial accelerometers employ a shear sensing element with either a quartz or ceramic crystal. Quartz sensing elements are typically used when long-term stability and minimum output shifts due to temperature changes are desired. Ceramic sensing elements provide excellent resolution and durability in noisy environments, and can be designed to supply low-frequency and high-frequency measurements. Shear-design sensors are preferred because of their inherent insensitivity to
adverse environmental influences, such as case or base strain and thermal transients. Internal case isolation and shielding is important in avoiding erroneous signals resulting from ground loops and pick-up of electromagnetic and radio frequency interference. Other critical material selection criteria include non-magnetic stainless steel housing, hermetic sealing, and industrial military connectors. See Figure 1.
Dynamic expectations are application-specific and refer to the frequency range of measurement and the anticipated amplitudes of vibration. After careful review of the machinery to be monitored, minimum and maximum measurement frequency ranges may be established. The minimum measurement frequency is normally related to any sub-harmonics of running speed or any lower frequencies where vibration data is to be collected. The maximum measurement frequency of interest is determined by the maximum number of harmonics of an event like running speed, bearing frequencies, or gear mesh. This measurement frequency range should be well within the specified frequency range of the sensor. Amplitude range refers to the anticipated levels of vibration to be measured. These values are related to the alarm levels set for the machine. By carefully evaluating the idiosyncrasies of the machinery, the predictive maintenance engineer can estimate the minimum expected vibration levels and ensure that the electrical noise floor of the accelerometer is less than those levels.

The environment of the application is a critical consideration during program implementation. The sensor chosen must be capable of surviving the wide range of conditions to which it is subjected; therefore, take time to evaluate potential conditions, such as high temperatures and chemical contaminants. The specified temperature range of the sensor must conform to the fluctuations of the environmental temperature. If harsh industrial chemicals are present, the sensor requires hermetic sealing and construction that resists corrosion. Finally, specific location of the sensor within the environment must be sensible, as both cable and sensor may be damaged by imprudent installation in heavily traveled, physically punishing areas. 2.0 ICP® ACCELEROMETERS Enclosed in the back of this guide is a Specification Sheet, which lists the complete performance characteristics of the particular sensor. All ICP® sensors require a constant current power source for proper operation. A typical sensing system includes an ICP® sensor, ordinary two conductor cable and a basic constant current power supply (as shown in Figure 2).
The signal conditioner consists of a well-regulated 18 to 30 VDC source (battery or line-powered), a current-regulating diode (or equivalent constant current circuit), and a capacitor for decoupling (removing the bias voltage) the signal. The current-regulating device is used in place of a resistor for several reasons. The very high dynamic resistance of the diode yields a source follower gain which is extremely close to unity and independent of
input voltage. Also, the diode can be changed to supply higher currents for driving long cable lengths. Constant current diodes, as shown in Figure 3, should be used in ICP® signal conditioners. (The correct orientation of the diode within the circuit is critical for proper operation.) Except for special models, standard ICP® sensors require a minimum of 2 mA for proper operation.
The typical limits for this type of diode are to a 4 mA maximum rating; however, several diodes can be placed in parallel for higher current levels. All line-powered signal conditioners should use higher capacity (up to 20 mA) constant current circuits in place of the diodes, particularly when driving long signal cables (see Section 5). Decoupling of the data signal occurs at the output stage of the signal conditioner. A 10 to 30 µF capacitor coupled with a resistor shifts the signal level to essentially eliminate the sensor bias voltage. The result is a drift-free AC mode of operation. 3.0 OPTIONAL FEATURES In addition to standard features, a variety of options are also available. When listed before the model number, the following prefix letters indicate that the sensor is manufactured or supplied with optional features: CS - Canadian Standards Association Approved Sensor D - Dummy, non-working sensor for display purposes EX - Cenelec Approved Sensor FM - Factory Mutual Approval Sensor HT - High temperature accelerometer (325 ˚F) LB - Low Bias electronics LC - Limited Calibration (one point calibration) LP - Low Pass filter M - Metric mounting hardware and cable length U - Usable demonstration sensor (does not meet one of more minor specifications) VO - Velocity Output Sensors

MS – Mine Safety Approved Sensors TO – Temperature Output Sensor Note: Not all sensors are available with the optional prefixes. Contact the factory to discuss special features that may be needed. 4.0 INSTALLATION OVERVIEW When choosing a mounting method, consider closely both the advantages and disadvantages of each technique. Characteristics like location, ruggedness, amplitude range, accessibility, temperature, and portability are extremely critical. However, the most important and often overlooked consideration is the effect the mounting technique has on the high-frequency operating range of the accelerometer. Shown in Figure 4 are six possible mounting techniques and their effects on the performance of a typical piezoelectric accelerometer. (Note: Not all of the mounting methods may apply to your particular sensor.) The mounting configurations and corresponding graph demonstrate how the high-frequency response of the accelerometer may be compromised as mass is added to the system and/or the mounting stiffness is reduced. Note: The low-frequency response is unaffected by the mounting technique. This roll-off behavior is typically fixed by the sensor’s built-in electronics. However, when operating AC-coupled signal conditioners with readout devices having an input impedance of less than one megaohm, the low frequency range may be affected.
4.1 STANDARD STUD MOUNT This mounting technique requires smooth, flat contact surfaces for proper operation and is recommended for permanent and/or secure installations. Stud mounting is also recommended when testing at high frequencies. Note: Do NOT attempt mounting on curved, rough, or uneven surfaces, as the potential for misalignment and limited contact surface may significantly reduce the sensor’s upper operating frequency range.
STEP 1: First, prepare a smooth, flat mounting surface and then drill and tap a mounting hole in the center of this area as shown in Figure 5. A precision-machined mounting surface with a minimum finish of 63 µin (0.0016 mm) is recommended. (If it is not possible to properly prepare the machine surface, consider using an adhesive mounting pad as a possible alternative.) Inspect the area, checking that there are no burrs or other foreign particles interfering with the contact surface. STEP 2: Wipe clean the mounting surface and spread on a light film of grease, oil, or similar coupling fluid prior to installation. See Figure 6.
Adding a coupling fluid improves vibration transmissibility by filling small voids in the mounting surface and increasing the mounting stiffness. For

semi-permanent mounting, substitute epoxy or another type of adhesive. STEP 3: Hand-tighten the sensor/mounting stud to the machine, then secure the sensor with a torque wrench to the mounting surface by applying the recommended mounting torque. (See enclosed specification data sheet for proper mounting torque.) It is important to use a torque wrench during this step. Under-torqueing the sensor may not adequately couple the device; over-torqueing may result in stud failure and possibly permanent damage. 4.2 ADHESIVE MOUNT Adhesive mounting is often used for temporary installation or when the machine surface cannot be adequately prepared for stud mounting. Adhesives like hot glue or wax work well for temporary mounts; two-part epoxies and quick-bonding gels provide a more permanent mount. Note: Adhesively-mounted sensors often exhibit a reduction in high-frequency range. Generally, smooth surfaces and stiff adhesives provide the best frequency response. Contact the factory for recommended epoxies. METHOD 1 – Adhesive mounting base This method involves attaching a base to the machine surface, then securing the sensor to the base. This allows for easy removal of the accelerometer. STEP 1: Prepare a smooth, flat mounting surface. A minimum surface finish of 63 µin (0.0016 mm) generally works best. STEP 2: Stud-mount the sensor to the appropriate adhesive mounting base according to the guidelines set forth in STEPS 2 and 3 of the Stud Mount Procedure. STEP 3: Place a small portion of adhesive on the underside of the mounting base. Firmly press down on the assembly to displace any extra adhesive remaining under the base. See Figure 7.
METHOD 2 – Direct Adhesive Mount For restrictions of space or for convenience, most sensors (with the exception of integral stud models) can be adhesive-mounted directly to the machine surface. STEP 1: Prepare a smooth, flat mounting surface. A minimum surface finish of 63 µin (0.0016 mm) generally works best. STEP 2: Place a small portion of adhesive on the underside of the sensor. Firmly press down on the top of the assembly to displace any adhesive. Be aware that excessive amounts of adhesive can make sensor removal difficult. See Figure 8.
4.3 MAGNETIC MOUNT Magnetic mounting provides a convenient means for making portable measurements and is commonly used for machinery monitoring and other portable or trending applications. Note: The correct magnet choice and an adequately prepared mounting surface are critical for obtaining reliable measurements, especially at high frequencies. Poor installations can cause as much as a 50% drop in the sensor frequency range. Not every magnet is suitable for all applications. For example, rare earth magnets are commonly used because of their high strength. Flat magnets work well on smooth, flat surfaces, while dual-rail magnets are required for curved surfaces. In the case of non-magnetic or rough surfaces, it is recommended that the user first weld, epoxy, or otherwise adhere a steel mounting pad to the test surface. This provides a smooth and repeatable location for mounting. STEP 1: After choosing the correct magnet type, inspect the unit, verifying that the mounting surfaces are flat and smooth. See Figure 9.

STEP 2: Stud-mount the accelerometer to the appropriate magnet according to the guidelines set forth in STEPS 2 and 3 of the Stud Mount Procedure. STEP 3: Prepare a smooth, flat mounting surface. A minimum surface finish of 63 µin (0.0016 mm) generally works best. After cleaning the surface and checking for burrs, wipe on a light film of silicone grease, machine oil, or similar-type coupling fluid. STEP 4: Mount the magnet/sensor assembly to the prepared test surface by gently “rocking” or “sliding” it into place. See Figure 10.
Note: Magnetically mounting accelerometers carelessly has the potential to generate very high (and very damaging) g levels. To prevent damage, install the assembly gently. If unsure, please contact the factory for assistance. 4.4 HANDHELD OR PROVE TIP MOUNT This method is NOT recommended for most applications. It is generally used where access to machinery may be a safety concern. Both the accuracy and repeatability at low (<5 Hz) and high frequency (>1 kHz) ranges are questionable. 5.0 CABLING The selection of connectors and cables has a direct impact on the ruggedness and reliability of the sensor installation. A consideration when dealing with cables is the way in which the cable conductors are terminated.
ICP® accelerometers are internally amplified, two-wire accelerometers. Connections to the sensor require two leads: one for the power and signal, and the other for the common and signal return. Often, coaxial cables are used since only two conductors are needed. Coaxial cables are less expensive. With coaxial cables, however, erroneous signals can be introduced into sensor systems through ground loops, electromagnetic interference, or radio frequency interference (EMI or RFI). To avoid ground loops, there should only be one ground in the system. It is recommended for permanent installations that the sensor be case-isolated and internally shielded with a dual-case design and use a two-conductor shielded cable to insure clean vibration signal transmission. Two-conductor shielded cables allow the signal and the signal return (common) to be fully shielded from the sensor to the readout equipment. To insure that ground loop signals are not induced, the shield should only be terminated at one end. Typically, the shield of a two-conductor shielded cable is left open or not connected at the sensor end and is tied to earth ground at the instrumentation end. Operation over long cables may affect the frequency response of ICP® accelerometers, and introduce low frequency noise and high frequency distortion when an insufficient current is available to drive cable capacitance. Unlike charge mode systems, where the system noise is a function of cable length, ICP® sensors provide a high voltage, low impedance output well-suited for driving long cables through harsh environments. While there is virtually no increase in noise with ICP® sensors, the capacitive loading of the longer cable may be distort or filter higher frequency signals depending on the supply current and the output impedance of the sensor. Generally, this signal distortion is not a problem with lower frequency testing within a range up to 1,000 Hz. However, when monitoring higher frequency vibrations traveling over cables longer than 500ft, the possibility of signal distortion exists. The maximum frequency that can be transmitted over a given cable length is a function of both the cable capacitance and the ratio of the peak signal voltage to the current available from the signal conditioner according to:

𝑓max=
109
2𝜋𝐶𝑉[𝐿𝑐−1]
(Equation 1)
Where, fmax = maximum frequency (hertz)
C = cable capacitance (picofarads) V = maximum peak output from sensor (volts) Lc = constant current from signal conditioner (mA) 109 = scaling factor to equate units
Note that in this equation, 1 mA is subtracted from the total current supplied to sensor (Lc). This is done to compensate for powering the internal electronics. Also, note that these are typical values only. When driving long cables, Equation 1 shows that, as the length of the cable, peak voltage output or maximum frequency of interest increases, a greater constant current will be required to drive the signal. The nomograph on page 12 of this manual provides a simple, graphical method for obtaining the expected maximum frequency capability of an ICP® measurement system. The maximum peak signal voltage amplitude, cable capacitance and supplied constant current must be known or presumed. For example, when running at 100 ft (30.5 m) cable with a capacitance of 30 pF/ft, the total capacitance is 3,000pF. This value can be found along the diagonal cable capacitance lines. Assuming the sensor operates at a maximum output range of 5 volts and the constant current available from the power supply is 2 mA, the ratio on the vertical axis can be calculated to equal 5. The intersection of the total cable capacitance and this ratio result in a maximum frequency of approximately 10.2 kHz. The nomograph does not indicate whether the frequency amplitude response at a point is flat, rising or falling. For precautionary reasons, it is good general practice to increase the constant current (if possible) to the sensor (within its maximum limit) so that the frequency determined from the nomograph is approximately 1.5 to 2 times greater than the maximum frequency of interest. Note: Higher current levels will deplete battery-powered signal conditioners at a faster rate. Also, any current not used by the cable goes directly to power the internal electronics and will create heat. This may cause the sensor to
exceed its maximum temperature specification. For this reason, do not supply excessive current over short cable runs or when testing at elevated temperatures. 5.1 CABLE CONNECTOR PROCEDURE Care and attention to installation is essential, as the reliability and accuracy of your system is no better than that of the output cable. STEP 1: Ascertain that you have ordered the correct cable type. As with sensors, no cable can satisfy all applications. Special low-noise cabling should be used with high impedance, charge-output devices. ICP® sensors usually operate with any ordinary tow-wire cable. Industrial applications often require twisted/shielded cables to reduce the effects of EMI and RFI. PTFE-jacketed cabling may be necessary to withstand corrosive environments. STEP 2: Connect the cable to the accelerometer. A small amount of thread-locking compound placed on the connector prior to attachment helps secure the cable during testing. In harsh environments, the connection can be sealed with silicone rubber, O-rings, and flexible heat-shrink tubing. STEP 3: Plug the connector of the cable into the mating sensor connector. Then, holding the sensor stationary, secure the connector in place by tightening down the attached threaded cable sleeve. STEP 4: Route the cable to the signal conditioner, making certain to stress-relieve the sensor/cable connection and minimize motion by clamping the cable at regular intervals. Common sense should be used to avoid physical damage and minimize electrical noise. For instance, avoid routing cables near high-voltage wires. Do not route cables along floors or walkways where they be stepped on or become contaminated. Shielded cables should have the shield grounded at one end only, normally at the instrumentation end. STEP 5: Finally, connect the remaining cable end to the signal conditioner or readout device. To dissipate charge that may have accumulated in the cable short the signal to ground prior to attachment.

6.0 POWERING All ICP® sensors require constant current excitation for proper operation. For this reason only use approved constant-current sources. A typical system schematic is shown in Figure 11.
The power supply consists of a regulated 18 to 30 VDC source. In general, battery-powered devices offer versatility for portable, low-noise measurements, whereas line-powered units provide the capability for continuous monitoring. This power is regulated by a current-limiting circuit, which provides the constant-current excitation required for proper operation of sensors with integral electronics. Note: Under no circumstances should a voltage be supplied to an ICP® accelerometer without a current-regulating diode or equivalent electrical circuit. A capacitor at the output stage of the device removes the sensor output bias voltage from the measurement signal. This provides a zero-based, AC-coupled output compatible with most standard readout devices. Today, many FFT analyzers, data acquisition modules, and data collectors have constant-current excitation for direct use with ICP® sensors. However, before using this feature, check that the supply voltage and constant current are adequate for use with your sensor. Please contact the respective signal conditioner manufacturer or check the product manual for more information. 7.0 OPERATING After completing the system setup, switch on the conditioner, the meter (or LED) and allow the sensor to power up. If a faulty condition is monitored, first check all system connections, then check the functionality of the cable and signal conditioner. If
the system still does not operate properly, consult an IMI Application Engineer. Note: Always operate the accelerometer within the limitations listed on the Specification Sheet of your sensor. Operating the device outside of its parameters can cause temporary or permanent damage to the sensor. 8.0 ACCELEROMETER CALIBRATION Note: It is good measurement practice to verify the performance of each accelerometer before and after each measurement. Accelerometers are precision measuring instruments. They are highly engineered to provide accurate electrical signals representative of the vibration being monitored. Each sensor is calibrated by comparison to a known acceleration level. Some calibrations include frequency response curves, resonant frequency measurements, transvers sensitivity, and many other valuable tests. Applications requiring a high degree of accuracy or those in plants requiring certification and traceability require full calibration test results.
Some applications have much less stringent requirements for calibration certification. Simple sensitivity measurements at a single frequency may be sufficient; operational verification and certificates of conformance to published specifications may satisfy many plants’ calibration needs. Reducing the final calibration requirements reduces the cost of manufacturing the sensor and should lower the price for predictive maintenance users.

Periodic recalibration may be required by plants with strict certification and traceability requirements. It is always recommended that the user has the sensor recalibrated periodically, particularly if the sensor has experienced a very high shock level or extreme temperatures for extended periods of time. Some plants develop in-house calibration capabilities for periodically verifying the performance of accelerometers. Products are available that provide a set 1 g-acceleration level at a fixed frequency for quick sensor checking. For these reasons, it is recommended that a recalibration cycle be established for each accelerometer. This schedule is unique and is based on a variety of factors, such as extent of use, environmental conditions, accuracy requirements, trend information obtained from previous calibration records, contractual regulations, frequency of “cross-checking” against other equipment, manufacturer recommendation, and any risk associated with incorrect readings. International standards, such as ISO 10012-1, provide insight and suggested methods for determining recalibration intervals for most measuring equipment. With the above information in mind and under “normal” circumstances, a conservative suggestion of 12 to 24 month recalibration cycle for most piezoelectric accelerometers is advised. 8.1 SENSOR CALIBRATION Accelerometer recalibration services are typically performed by IMI’s internal metrology laboratory. (Other international and private laboratories are also available.) The IMI laboratory is certified to ISO 9001, complies with ISO 10012-1 (and former MIL-STD-45662A), and uses equipment directly traceable to NIST. This assures an accurate calibration of relevant specifications. The following includes a broad overview of the Back-to-Back Calibration technique normally used when calibrating accelerometers. This technique provides a quick and easy method for determining the sensitivity of a test accelerometer over a wide frequency range. 8.2 BACK-TO-BACK CALIBRATION THEORY Back-to-back calibration is perhaps the most common method for determining the sensitivity of
piezoelectric accelerometers. This method relies on a simple comparison to a previously calibrated accelerometer, typically referred to as a reference standard, as shown in Figure 12.
Figure 12. Reference Standard Accelerometer These high-accuracy devices, which are directly traceable to a recognized standards laboratory, are designed for stability, as well as configured to accept a test accelerometer. By mounting a test accelerometer to the reference standard and then connecting this combination to a suitable vibration source, it is possible to vibrate both devices and compare the data as shown in Figure 13. (Test set-ups may be automated and vary, depending on the type and number for accelerometers being calibrated.)
Figure 13. Typical Back-to-Back Calibration System Because the acceleration is the same on both sensors, the ratio of their outputs (VT/VR) must also be the ratio of their sensitivities. With the sensitivity of the reference standard (SR) known, the exact sensitivity of the test sensor (ST) is easily calculated by using the following equation:
𝑆𝑇 = 𝑆𝑅(𝑉𝑇
𝑉𝑅
)
By varying the frequency of the vibration, the sensor may be calibrated over its entire operating frequency range. The typical response of an unfiltered accelerometer is shown in Figure 14.
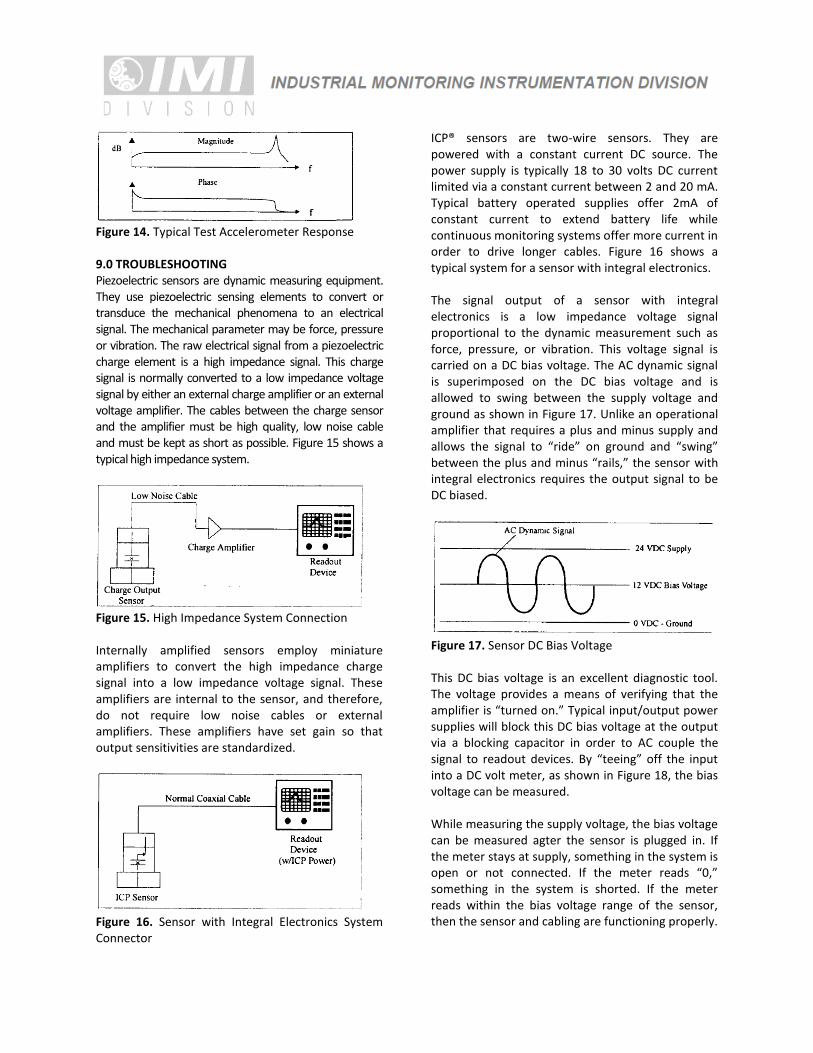
Figure 14. Typical Test Accelerometer Response 9.0 TROUBLESHOOTING Piezoelectric sensors are dynamic measuring equipment. They use piezoelectric sensing elements to convert or transduce the mechanical phenomena to an electrical signal. The mechanical parameter may be force, pressure or vibration. The raw electrical signal from a piezoelectric charge element is a high impedance signal. This charge signal is normally converted to a low impedance voltage signal by either an external charge amplifier or an external voltage amplifier. The cables between the charge sensor and the amplifier must be high quality, low noise cable and must be kept as short as possible. Figure 15 shows a typical high impedance system.
Figure 15. High Impedance System Connection Internally amplified sensors employ miniature amplifiers to convert the high impedance charge signal into a low impedance voltage signal. These amplifiers are internal to the sensor, and therefore, do not require low noise cables or external amplifiers. These amplifiers have set gain so that output sensitivities are standardized.
Figure 16. Sensor with Integral Electronics System Connector
ICP® sensors are two-wire sensors. They are powered with a constant current DC source. The power supply is typically 18 to 30 volts DC current limited via a constant current between 2 and 20 mA. Typical battery operated supplies offer 2mA of constant current to extend battery life while continuous monitoring systems offer more current in order to drive longer cables. Figure 16 shows a typical system for a sensor with integral electronics. The signal output of a sensor with integral electronics is a low impedance voltage signal proportional to the dynamic measurement such as force, pressure, or vibration. This voltage signal is carried on a DC bias voltage. The AC dynamic signal is superimposed on the DC bias voltage and is allowed to swing between the supply voltage and ground as shown in Figure 17. Unlike an operational amplifier that requires a plus and minus supply and allows the signal to “ride” on ground and “swing” between the plus and minus “rails,” the sensor with integral electronics requires the output signal to be DC biased.
Figure 17. Sensor DC Bias Voltage This DC bias voltage is an excellent diagnostic tool. The voltage provides a means of verifying that the amplifier is “turned on.” Typical input/output power supplies will block this DC bias voltage at the output via a blocking capacitor in order to AC couple the signal to readout devices. By “teeing” off the input into a DC volt meter, as shown in Figure 18, the bias voltage can be measured. While measuring the supply voltage, the bias voltage can be measured agter the sensor is plugged in. If the meter stays at supply, something in the system is open or not connected. If the meter reads “0,” something in the system is shorted. If the meter reads within the bias voltage range of the sensor, then the sensor and cabling are functioning properly.

Figure 18. DC Bias Voltage Measurement
10.0 REPAIR/RETURN PROCEDURE Because of the nature of most IMI instrumentation, field repair is typically NOT recommended and may void any warranty. If factory service is required, contact IMI for a RETURN MATERIAL AUTHORIZATION (RMA) number prior to sending equipment to the factory. Please have information available, such as model and serial number. Also, to insure efficient service, be sure to include a written description of the symptoms and problems with the equipment to a local sales representative or distributor, or contact IMI if none are located in your area. Customers outside the U.S. should consult their local IMI distributor for information on returning equipment. For exceptions, please contact the International Sales department at IMI to request shipping instructions and an
RMA. For assistance, please call (716) 684-0003, or fax us at (716) 684-3823. You may also receive assistance via e-mail at [email protected] or visit our website at www.pcb.com. 11.0 CUSTOMER SERVICE/WARRANTY IMI, a division of PCB Piezotronics, guarantees Total Customer Satisfaction. If, at any time, for any reason, you are not completely satisfied with any IMI product, IMI will repair, replace or exchange it at no charge. You may also choose to have your purchase price refunded. IMI instrumentation is warranted against defective material workmanship for 1 year unless otherwise expressly specified. Damage to instruments caused by incorrect power or misapplication, is not covered by warranty. If there are any questions regarding power, intended application, or general usage, please consult with your local sales contact or distributor. Batteries or expendable hardware items are not covered by warranty. IMI offers to all customers, at no charge, 24-hour phone support. This service makes product or application support available to our customers, day or night, seven days a week. When unforeseen problems or emergency situations arise, call the IMI Hot Line at (716) 684-0003, and an application specialist will assist you.


;
gm, _k PCB 11/L Muks MTS SYSTEMS CORPORATION
SIL Declaration of Conformity Functional safety according to IEC 61508
Manufacturer: PCB P iezotronics 3425 Walden Avenue Depew, NY 14043 USA
PCB Piezotronics declares as manufacturer, that the industrial, quartz or ceramic shear 1CP accelerometers:
• 621 Series - (XX)62 lyzzz/aaa (XX) Options include one or more of the following: • 622 Series - (XX)622yzzz/aaa • 623 Series - (XX)623yzzz/aaa EX - Approved for Hazardous Locations • 624 Series - (XX)624yzzz1aaa M - Metric Mounting Hardware • 625 Series - (XX)625yzzz1aaa TO - Dual Output (Vibration/Temperature) o 626 Series - (XX)626yzzz1aaa HT - High Temperature (325°F, 163°C) o 627 Series (XX)627yzzz/aaa VO - Velocity Output o 628 Series - (XX)628yzzz/aaa Note: "yzzz" completes the model, "aaa" indicates cable length (if applicable)
Is hardware suitable for use in safety-instrumented systems according to IEC 61508, if the safety instructions and the following parameters are observed:
Parameter 62x Series* EX, HT, TO, VO 62x Series* SIL 2 2 Proof Test Interval (Annual) 8,760 h 8,760 ii Device Type B B HFT 0 0 SFF 78.18% 78.18% PFDAV' 7.99 x iO 7.99 x iO
XduX 10.6 0.018 0.018 SIL Capability (Low Demand Mode) 2 2 SIL Capability (Continuous Demand Mode) 2 2 MTTF2 75.11y 7y 1. The values comply with SIL2 according to ISA S84.01 2. According to Siemens 5N29500 and Proven In Use data With or without the M (metric) option
The PCB sensor hardware is suitable for inclusion in Safety Instrumented Systems (SIS) that are designed using IEC 61511 (for the process industry sector), IEC 62061 (safety of machinery), EN 50129 (railway applications), and ISO 26262 (automotive industry).
Note: The use of SIL Hardware in specific safety standard a Uc ,ipn may apply different number of sequences or definitions to those in IEC 61508.
% ,11
June 28, 2019 Qj AI SE PCB Piezotronics Authori ed Re re tative: Q_ L
1996
Carrie Termnin Regulatory Affairs and Product Certification Specialist it (111%,000
PCB PIEZOTRONICS, INC. - CORPORATE HEADQUARTERS 3425 Walden Avenue, Depew, New York 14043-2495 USA
Phone: 716-684-0001 Fax: 716-684-0987 E-mail: [email protected]
Web site: www.pcb.com
AS9100 and IS09001 Certified IS017025 Accredited

ntertek Total Quality, Assured,
INTERTEK ASSURANCE SAFETY INTEGRITY LEVEL SUMMARY REPORT
-i iL i L b Lu A\a
CLIENT NAME PCB Pezotronics, Inc.
3425 Walden Ave
Depew, NY 14043-2417
REPORT NO 103685042C5L1-002
COMPILED BY Ashton D. Hainge, CFSP, PMP
PROJECT NAME G103685042
DATE 22 February 2019
000
r
I
C vitertek

in Vol
PCB FUNCTIONAL SAFETY SIL SUMMARY AND RESULTS Summary
This report details the results of the reliability analysis performed on the PCB Piezotronics ICP® Sensor model 62X series. Design changes from this documentation package would need to be evaluated for the impact on the reliability characteristics. These results are based on the following PCB Piezotronics documentation.
1. Electrical schematic 65009-NR 2. Electrical schematic 65010-NR 3. Electrical schematic 65038-NR 4. 622801 MTTF Calculation 5. 62X Returns FY 2018
Results
The reliability calculations were conducted at the component and circuit level using the methodology outlined in MIL-HDKB-217F. Product level failure parameters were then calculated in accordance with the functional safety approach of IEC 61508-1:2010, IEC 61508-2:2010, IEC 61508-6:2010, IEC 61508-7:2010. The results from the FMEA are given below for the ICP® Sensor model 62X:
Name Result
Architecture lool
Proof test interval (Annual) 81760 h
PFDavg 7.99x10 5
SFF 78.18%
HFT 0
SIL Capability (Low Demand Mode) 2
SIL Capability (Continuous Demand Mode) 2
PCB SIL Sensor Rating Report No: 103685042CSLT-002 2 of 3

M rm-, _Qk
Name
Safe Detected failure rate
Safe Undetected failure rate
Dangerous Detected failure rate
Dangerous Undetected failure rate
Average frequency of a dangerous failure on demand
Result
?.SDX 10 6 0.021
Xsux10 6 0.014
XDDXIO 6 0.029
?.ux10 6 0.018
PFHx 10 6 0.018
Type B components: 62X Series
The safety relevant parameter PFDavg is in compliance with the corresponding requirements for SIL 2 according to IEC 615081. If this sensor Is fully defined as type B, then the SIL capability is SIL 1 because the
SFF is 78.18 %. However, If this sensor is fully defined as type A, then the SIL capability is SIL 2. According to
IEC 61508-2 section 7.4,4.2.3 if the sensor has both type A and type B, then SFF may fall below 90% with
HFT of "0" and can be considered to have SIL 2 capability. Even though PFDavg has the range of SIL 4, the
hardware fault tolerance limits the capability to SIL 2. The user should consider, that the hardware fault
tolerance of all inspected devices is zero and that a single fault can lead to a dangerous failure.
Senior Consultant, 4-7'--- Ashton Hainge, lntertek
Certified Functional Safety Professional (CFSP)
1 The assessment results described in this report only refer to the safety-related parameters PFD avg, HFT, and SFF according to IEC 61508.
This report does not make any statements, that the manufacturer meets all other requirements of the above cited standards for hardware, software, documentation, management of functional safety, verification, and validation.
This report does not Imply that the examined pressure sensors have been certified for functional safety by the assessor according to IEC 61508 or any other standards.
The sensors are only one part of a complete safety function. It is at the responsibility of the end-user to prepare and to apply an extensive reliability model, that brings out the complete safety function and that meets all requirements of the claimed SIL level according to IEC 61508.
PCB SIL Sensor Rating Report No: 103685042CS11002 3 of 3