module 3 - underway - agwe' sailing · bareboat charter clinic module3 - underway this...
TRANSCRIPT
Authored by Captain Ed Mapes with Captain Grant Headifen,
NauticEd
NauticEd
BarEBoat CHartEr CliniCModule 3 - Underway

Please help nauticEd provide excellent service and continue to grow by not distributing this document to others.
If you’ve received this document from some one else, please respect our very hard work and efforts by purchasing it at
http://www.nauticed.org
Contents
INtroductIoN to GEttING uNdErwAy .................................3
M3.1 KNot tyING School .........................................................4
M3.2 coMMuNIcAtIoNS ...............................................................5
M3.3 thE NAutIcAl chArt ..........................................................7
M3.4 thE GPS ..................................................................................10
M3.5 thE AutoPIlot .................................................................... 11
M3.6 MoorING .............................................................................. 13
M3.7 ANchorING 1 ...................................................................... 17
M3.8 ANchorING 2 ...................................................................... 24
M3.9 ANchorING 3 ...................................................................... 29
M3.10 ANchorING 4 ...................................................................... 34
M3.11 thE wINdlASS ................................................................... 39
M3.12 docKING ............................................................................... 40
M3.13 SEASIcKNESS ...................................................................... 41
M3.14 thE dINGhy ......................................................................... 42
M3.15 BrIEfING thE crEw ....................................................... 44
M3.16 coNcluSIoN ....................................................................... 46
Cover Photo Courtesy of Beneteau

Bareboat Charter ClinicModule3 - Underway
this material forms part of the NauticEd Bareboat charter clinic and is Not for public distribution. NauticEd is the world’s Most Advanced online Sailing Education and certification company.
© NauticEd. All rights reserved. http://www.NauticEd.org
NauticEd
3
IntrodUCtIon to GettInG Underway
“Cast off”
that’s the sound that you want to toss.But just before you do we’ve got a few more tips for you.So that you have no loss.
I wonder if there is an online course for poetry?

Bareboat Charter ClinicModule3 - Underway
this material forms part of the NauticEd Bareboat charter clinic and is Not for public distribution. NauticEd is the world’s Most Advanced online Sailing Education and certification company.
© NauticEd. All rights reserved. http://www.NauticEd.org
NauticEd
4
M3.1 Knot tyInG sChool
on the first or seCond day out it is sometimes fun to hold knot tying school for those who are interested. this will help you during docking up later, tying the dingy on properly, setting the fenders etc. But you might want to brush up first before you begin your tenured professorship role. there are lots of books but here’s a link to one you can simply get from Barnes and noble or most other book sellers. take the book with you and a short piece of line. http://search.barnesandnoble.com/booksearch/isbnInquiry.asp?r=1&ISBN=9781585740673&ourl=the-complete-Book-of-Sailing-Knots/Geoffrey-Budworth
here is a list of the major knots that you should teach your crew: Bowline, round turn with two half hitches, clove hitch, cleat hitch.
y A bowline is typically used to tie the jib sheets to the clew of the jib sail. y A round turn with 2 half hitches is typically used to tie to a pylon y A clove hitch is typically used to tie the fenders to the life lines y A cleat hitch is typically used to tie the dock line to a dock cleat.
to learn how to tie these knots go to http://www.animatedknots.com/indexboating.php

Bareboat Charter ClinicModule3 - Underway
this material forms part of the NauticEd Bareboat charter clinic and is Not for public distribution. NauticEd is the world’s Most Advanced online Sailing Education and certification company.
© NauticEd. All rights reserved. http://www.NauticEd.org
NauticEd
5
M3.2 CoMMUnICatIons
ContaCt between vessels, or a boat and a land station, is usually carried out using VhF (Very high Frequency) radios. the VhF is usually hard-wired to dC power in the navigation station, and its antenna can be seen at the masthead. For purposes of a charter trip, you’ll typically use the VhF radio for
y listening to the daily weather report on a specific channel at specific times. y contacting the charter base about 30 minutes prior to return to base and again right
before you enter port for docking instructions. y conversing with fellow charterers on other boats y contacting the charter base for assistance. however your ability to contact the base is
limited by line of sight with a Vhf. So if you’re behind an island or any decent distance away from the base they will not receive the signal.
you’ll be given a list of specific channels for each specific communication type by the charter base.
to aCtivate the vhf, there will be a circuit breaker for the VhF on the control panel and also an on/off switch on the radio itself. the radio will have a knob labelled, “squelch”. adjust squelch until static begins, then turn back until the static disappears. this enables broadcasts to be heard without static interference. the transmitter power switch controls your radio’s wattage output on broadcasts. 1w, or 1 watt, a low power setting, limits your broadcast to about a mile’s distance, and should be used whenever possible to decrease radio traffic. 25w selects 25 watts of power for communications of up to about 25 miles. another knob or button is used for channel selection. Most communications are initiated on channel 16, the universal hailing frequency. all vessels worldwide, from those on inland lakes to offshore freighters, are hailed on this “hailing” channel. Choose 16 on the channel selection knob or button to initiate a hail. once contact is made, the

Bareboat Charter ClinicModule3 - Underway
this material forms part of the NauticEd Bareboat charter clinic and is Not for public distribution. NauticEd is the world’s Most Advanced online Sailing Education and certification company.
© NauticEd. All rights reserved. http://www.NauticEd.org
NauticEd
6
parties switch to a “working channel”, such as channel 68 or 72, to carry out conversation. other channels are designated for more specific purposes; 22 is used to speak with the Coast Guard, and channel 13 for contact with bridge operations for example.
to raise another vessel called for example “ranger”, the procedure is as follows:
turn the channel selector to channel 16, listen and wait for a clear transmission time, key the microphone and speak in a normal voice.
y “ranger, ranger, ranger. this is the sailing vessel Voyager.” y ranger responds with, “Voyager, Voyager, this is ranger, over”. y “ranger, ranger, this is Voyager. Please switch to channel 68 and stand by, over.
this establishes the ContaCt, and moves the conversation to the working channel. If you cannot reach the other vessel, it is common VhF etiquette to only hail three times. a word of warning here: - there are significant fines imposed by each country’s governmental communication department for misuse of VhF radio.
to end the conversation,
y “ranger, this is Voyager clear on channel 68, standing by on 16; out”.
In the united States the NoAA weather radio stations transmit weather information on a 24-hour per day basis. these stations may be labelled as “w-I” or wx I, or they may be channels 1-6 on the channel selector. these are reached by dialling down to channel 6 on the normal dial, and then continuing to dial down to reach the weather channels. for example, channel “6” might appear, with the weather broadcast in progress. If not heard, proceed downward through channel 1 until reaching a broadcasting frequency. In other worldwide locations, the weather station will be given to you by the charter base.
offshore sailing vessels communicate with either Single Sideband radio or Satellite phone technology. charter boats will not require this more sophisticated equipment; either the Vhf radio or a cell phone should suffice.

Bareboat Charter ClinicModule3 - Underway
this material forms part of the NauticEd Bareboat charter clinic and is Not for public distribution. NauticEd is the world’s Most Advanced online Sailing Education and certification company.
© NauticEd. All rights reserved. http://www.NauticEd.org
NauticEd
7
M3.3 the naUtICal Chart
even though most sailboat Charters are within island groups where the next landfall is typically within sight, every boat should be equipped with complete large scale charts of the area. Charter companies are usually fairly good about providing a set of charts for the cruising area in which you’ll be operating. however, check the boat’s navigation station to be sure that paper charts are available; even if electronic charting is also provided.
if you’re unfamiliar with Charts then you should certainly take the NauticEd coastal Navigation clinic. It’s a prerequisite for the Bareboat Charter Master Certification and ... really a prerequisite for safety.
Consult the Charts and plot courses to each destination you plan to visit. Note all possible hazards along the route, and avoid those areas. Be aware of currents, holding grounds, buoyage, and landmarks to use upon approach to anchor, moor, or dock. Make note of channel buoys, ranges, charted approach headings, depths, and land features that can help keep you on course. consult tide tables and tidal current data if they are applicable to your waters. Note that tide is typically not a concern in the Mediterranean or caribbean but currents are. you should have a very good idea of what to expect before you get there, but proceed slowly and under control; what you actually see can seem different or confusing once you’re on site.
I like to gather all pertinent charts for a given passage, arranged in order in which they’ll be used. you may only require one chart for short passages, but keep them orderly if more will be needed. Mark your course lines, labelled with distance and course heading (in either true or magnetic, but always use

Bareboat Charter ClinicModule3 - Underway
this material forms part of the NauticEd Bareboat charter clinic and is Not for public distribution. NauticEd is the world’s Most Advanced online Sailing Education and certification company.
© NauticEd. All rights reserved. http://www.NauticEd.org
NauticEd
8
the same system. I prefer to note chart headings in Magnetic, since that is what the helmsperson steers (unless significant deviation exists). If you don’t know the difference between true and magnetic course, please learn it. there are sometimes significant differences. the NauticEd Skipper course explains this phenomenon.
CardInal MarKers
the nautiCed skipper Course explains day markers, lights and beacons but a few extra are noted here because not all countries use the same. In particular the cardinal system is not used in the United states but is in certain parts of the Caribbean and the rest of the world.
cardinal markers tell you in which side there is safe passage around a hazard. for example a North cardinal marker will tell you to pass to the north of the marker for safe passage.
or in summary...

Bareboat Charter ClinicModule3 - Underway
this material forms part of the NauticEd Bareboat charter clinic and is Not for public distribution. NauticEd is the world’s Most Advanced online Sailing Education and certification company.
© NauticEd. All rights reserved. http://www.NauticEd.org
NauticEd
9
another sIGn to watCh oUt For
ameriCans are familiar with the recreational diver down warning flag as being red with a white stripe however the rest of the world uses the alpha flag. Most counties laws state that you must stay 300 ft or 100 meters away from a diver down flag.
american diver flag International dive flag and alpha flag
CrUIsInG GUIdes
Certainly, you should take with you a cruising guide and many times the charter company will provide one for you. a cruising guide is a book of local resources and information about harbors and anchorages etc. It has a wealth of information not only about safety but also restaurants to dine in, reefs to dive, caves to explore, rocks to watch out for, recommended approaches to a bay etc etc. you can usually buy these online and a simple search on the internet will reveal the exact guide you’re looking for. see below for the British Virgin Islands.
Another resource that is extremely useful if you can find it is a book with aerial shoots of bays and anchorages. these are extremely helpful in determining your safe approach. Virgin Anchorages is an example of one for the Virgin Islands.

Bareboat Charter ClinicModule3 - Underway
this material forms part of the NauticEd Bareboat charter clinic and is Not for public distribution. NauticEd is the world’s Most Advanced online Sailing Education and certification company.
© NauticEd. All rights reserved. http://www.NauticEd.org
NauticEd
10
M3.4 the GPs
this navigation tool has revolutionized sailing with its convenience and many applications. It is not to be trusted as the sole navigation source in close quarters situations or near land; inaccuracies do happen and can put you in harm’s way.
anECdotE
as an ExaMPlE, once in croatia the GPS showed us that we were on land while actually we were in a channel about 1/2 mile away. Always back up GPS positions with confirmation from coastal navigation, chart information, bearings on objects, depth readings, etc.
i reCommend using waypoints programmed into the GPs as a basis of course headings and distance, but when you approach navigation hazards or near your final approach, always confirm the GPs information with other sources.
GPS chart plotters have an MoB button. Inform your crew on how to hit that button if someone goes overboard.
anECdotE
and jUst anotHEr word of warning and a bit of a story as well to illustrate. once in Belize we were sailing along. the chart showed we were in deep water, the GPS placed us in the same position and in deep water. I had a crewmember sailing the boat. he asked me what did I think that was in the water approximately1/2 mile away ahead of us. to both of us it looked like a bunch of sticks. we quickly reconsulted the chart and GPS only to find that we were again in safe deepwater however the depth meter began to quickly tell us opposite. without further thought we tacked away for safety. By the time we had tacked the depth was only 10 feet and indeed they were sticks in the water placed there probably by the locals who were sick of hauling boats off the reef. this reef was not marked on any chart or GPS. It illustrates to not rely on single sources of information. this time it was the depth meter and a keen eye by the helmsman that saved us. thanks Mike!

Bareboat Charter ClinicModule3 - Underway
this material forms part of the NauticEd Bareboat charter clinic and is Not for public distribution. NauticEd is the world’s Most Advanced online Sailing Education and certification company.
© NauticEd. All rights reserved. http://www.NauticEd.org
NauticEd
11
M3.5 the aUtoPIlot
anECdotE
WE WErE tryinG to start a race from Monkey Point to cane Garden Bay on the back side of tortola in the BVI. we had a flotilla and so we decided to do a reverse start. this means the slowest boats and least experienced captains started first. the race was to end with the boats moored in cane Garden Bay and everyone from the boat on shore. the finish was really exciting with about 20 seconds between the first three finishers. however – seemingly the start was just as exciting. right before the start the Vhf was going crazy with requests from the captains for help. one had his sail stuck, one couldn’t get their anchor off the bottom and one mystery one was that their wheel was locked. I blurted out “um um um turn off your auto-pilot – ok who’s next? ”well after fixing a few other issues they came back on and admitted that their autopilot was now turned off and they were ready for the start. An autopilot can be easily knocked on unknowingly by anyone moving around the boat. If you’re experiencing wheel lock, this is the first thing to check.
the autopilot is a great tool for those long hauls and it’s probably better at holding a straight line than most of us. of course it does take away from the feeling of sailing but … after a while everyone needs a wee rest.
to turn it on, turn on the appropriate breakers on the dC electric panel. then once your on your approximate heading press “auto”. to disengage press “standby”. the autopilot will hold a true course. you can adjust the course in 1 degree or 10 degree increments by pushing the associated button.

Bareboat Charter ClinicModule3 - Underway
this material forms part of the NauticEd Bareboat charter clinic and is Not for public distribution. NauticEd is the world’s Most Advanced online Sailing Education and certification company.
© NauticEd. All rights reserved. http://www.NauticEd.org
NauticEd
12
the autopilot can automatically tack the boat 100°. Press the “–1” and “–10”buttons simultaneously to auto tack to port. Press the “+1” and “+10” buttons simultaneously to auto tack to starboard.
Sometimes the responsiveness of the autopilot will be too slow or too fast. to make a change to the responsiveness press the “–1” and “+1” buttons simultaneously. then use the “–1” or the “+1” buttons to increase or decrease the level of response. the higher the response level, the more frequently adjustments will be made by the autopilot. you’ll want a lower response level when sailing in big swells.
to adjust the brightness of the display hold down the “disp” button for about 1 sec then press the “disp” button again to cycle through the levels.
If the chart plotter is connected then you may be able to have the boat “track” to the next waypoint. this is very advantageous because the autopilot will take the boat to the waypoint not just steer a course. It takes into account set and drift from tidal flow and the lateral course deviation due to the wind pushing the boat sideways. with the autopilot engaged and waypoints programmed into the chart plotter, press “track”. the display response will be “Next wpt”. Press “track” again to accept the new heading. to exit track mode just press “Standby” or “Auto”.
And keep this in mind as well, in case of a steering system failure, the autopilot can be used like the emergency tiller.
Bareboat Charter ClinicModule3 - Underway
this material forms part of the NauticEd Bareboat charter clinic and is Not for public distribution. NauticEd is the world’s Most Advanced online Sailing Education and certification company.
© NauticEd. All rights reserved. http://www.NauticEd.org
NauticEd
13
M3.6 MoorInG
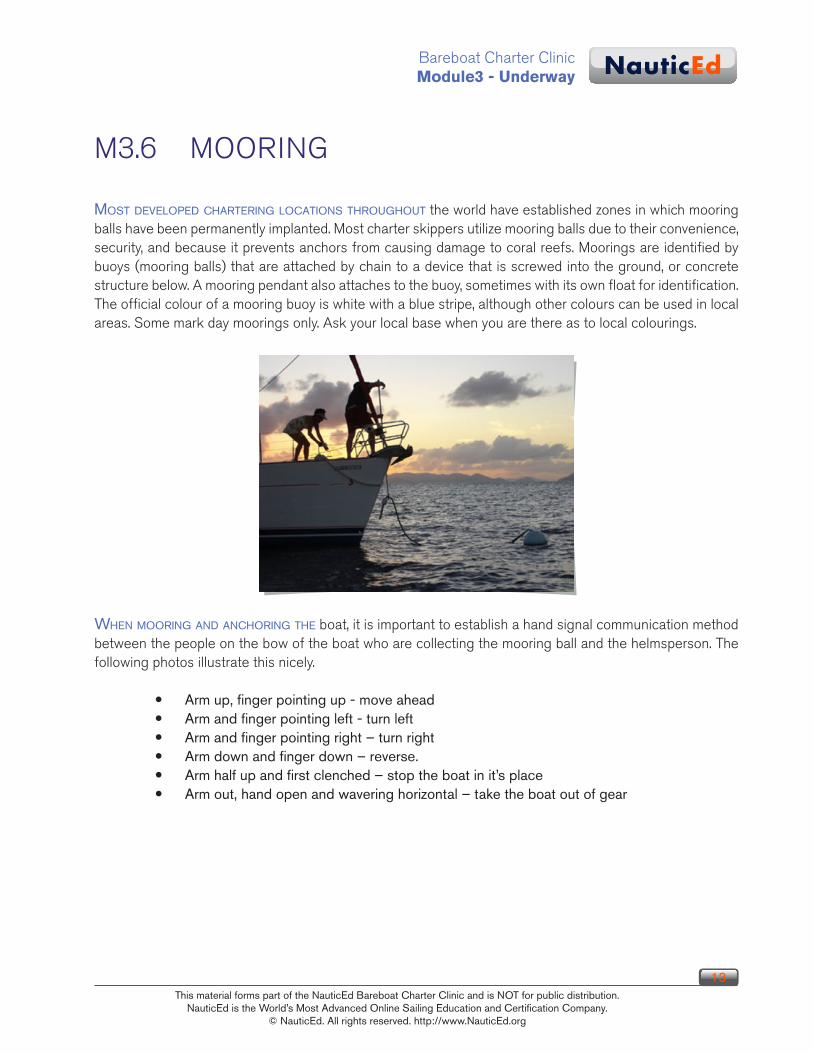
most developed Chartering loCations throughout the world have established zones in which mooring balls have been permanently implanted. Most charter skippers utilize mooring balls due to their convenience, security, and because it prevents anchors from causing damage to coral reefs. Moorings are identified by buoys (mooring balls) that are attached by chain to a device that is screwed into the ground, or concrete structure below. a mooring pendant also attaches to the buoy, sometimes with its own float for identification. the official colour of a mooring buoy is white with a blue stripe, although other colours can be used in local areas. some mark day moorings only. ask your local base when you are there as to local colourings.
when mooring and anChoring the boat, it is important to establish a hand signal communication method between the people on the bow of the boat who are collecting the mooring ball and the helmsperson. the following photos illustrate this nicely.
y Arm up, finger pointing up - move ahead y Arm and finger pointing left - turn left y Arm and finger pointing right – turn right y Arm down and finger down – reverse. y Arm half up and first clenched – stop the boat in it’s place y Arm out, hand open and wavering horizontal – take the boat out of gear

Bareboat Charter ClinicModule3 - Underway
this material forms part of the NauticEd Bareboat charter clinic and is Not for public distribution. NauticEd is the world’s Most Advanced online Sailing Education and certification company.
© NauticEd. All rights reserved. http://www.NauticEd.org
NauticEd
14
KEy Point: rEvErsinG the boat usually means to chop the dingy painter in to little pieces by wrapping it around the prop. try to remember to assign a crew member to the dingy when coming in to a mooring. Easiest way is to pull the dingy either alongside or hard up against the stern of the boat before mooring, anchoring or coming into port.
to moor the boat, maneuver upwind or against a current toward the mooring ball. stop the boat when the ball is within reach of the bow crew, who grab the pendant with a boat hook. the pendant usually has an eye spliced into its end for placement over a bow cleat. when cleated, the boat is allowed to swing to leeward on the mooring. It often pays to wear rubber gloves when grabbing the pendant; they’re usually slimy and may have barnacles on board that can cut bare hands.
Some harbors (Gustavia in St. Bart’s for example) provide a second mooring pendant for the stern. A line connects the bow and stern pendants. once the bow is secured, find the connecting line, and follow it hand over hand while walking toward the stern. As the connecting line is pulled short, it brings the second pendant up, and that is cleated at the stern.
to cast off a mooring, start the engine and move slowly toward the mooring ball to relieve tension on the pendant. the bow crew removes the pendant from the cleat, and releases it. when free of the mooring, the helmsperson allows the wind to move the bow clear of the mooring buoy, engages the propeller, and steers for a clear lane to open water.
when pendants are cleated to bow and stern, begin by casting off the leeward pendant, usually from the stern. Keep the propeller in neutral and allow this pendant to sink to avoid wrapping it in the propeller. when clear of the pendant, nudge the bow ahead so the forward pendant can be released, and allow the wind to push the bow away from any entanglements.
In tight situations, post crew members with roving fenders. these are to be placed in between your boat and other boats should the wind swing you into them.
Bareboat Charter ClinicModule3 - Underway
this material forms part of the NauticEd Bareboat charter clinic and is Not for public distribution. NauticEd is the world’s Most Advanced online Sailing Education and certification company.
© NauticEd. All rights reserved. http://www.NauticEd.org
NauticEd
15
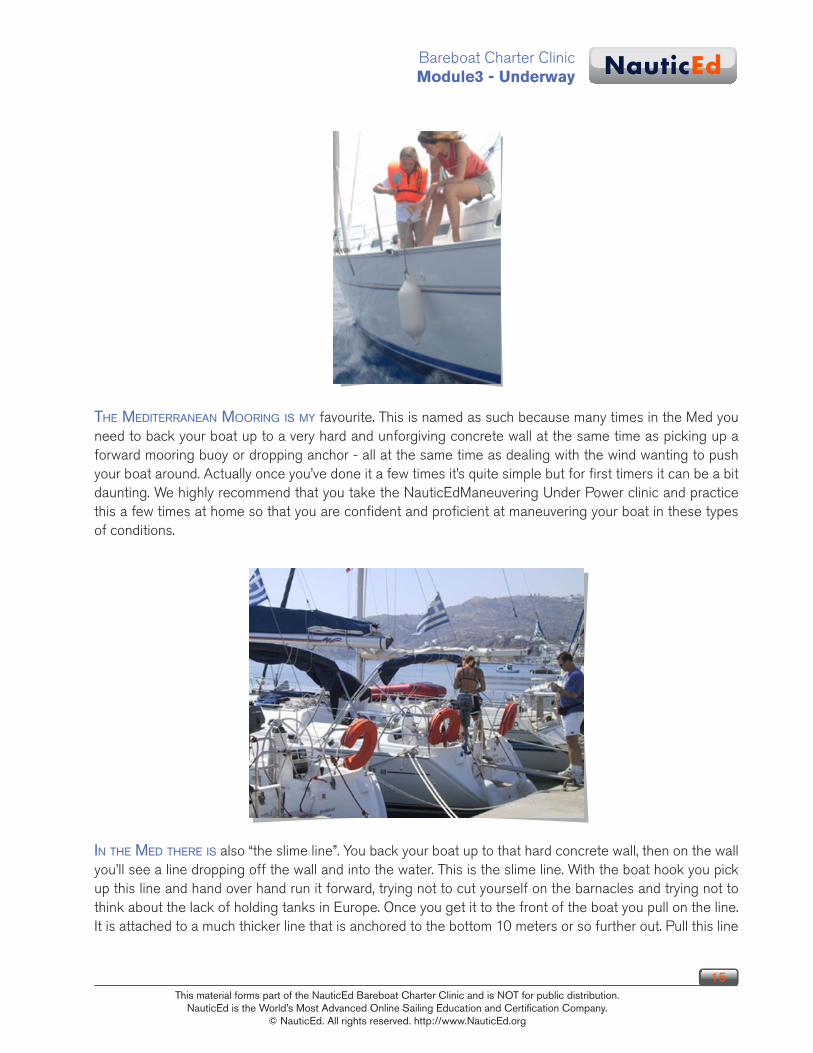
the mediterranean mooring is my favourite. this is named as such because many times in the Med you need to back your boat up to a very hard and unforgiving concrete wall at the same time as picking up a forward mooring buoy or dropping anchor - all at the same time as dealing with the wind wanting to push your boat around. actually once you’ve done it a few times it’s quite simple but for first timers it can be a bit daunting. we highly recommend that you take the nauticedManeuvering Under Power clinic and practice this a few times at home so that you are confident and proficient at maneuvering your boat in these types of conditions.
in the med there is also “the slime line”. you back your boat up to that hard concrete wall, then on the wall you’ll see a line dropping off the wall and into the water. this is the slime line. with the boat hook you pick up this line and hand over hand run it forward, trying not to cut yourself on the barnacles and trying not to think about the lack of holding tanks in europe. once you get it to the front of the boat you pull on the line. It is attached to a much thicker line that is anchored to the bottom 10 meters or so further out. Pull this line

Bareboat Charter ClinicModule3 - Underway
this material forms part of the NauticEd Bareboat charter clinic and is Not for public distribution. NauticEd is the world’s Most Advanced online Sailing Education and certification company.
© NauticEd. All rights reserved. http://www.NauticEd.org
NauticEd
16
as taut as possible and wrap it around your forward cleat. this serves to hold your boat off the wall. at the same time your crew should also tie the stern of the boat to cleats on the concrete wall. adjust all the lines so that the boat is positioned close enough to step off but far enough away so that it cannot touch the wall should a wake come rolling through.

Bareboat Charter ClinicModule3 - Underway
this material forms part of the NauticEd Bareboat charter clinic and is Not for public distribution. NauticEd is the world’s Most Advanced online Sailing Education and certification company.
© NauticEd. All rights reserved. http://www.NauticEd.org
NauticEd
17
M3.7 anChorInG 1
ok so sinCe muCh of the time on a charter trip is spent anchored in a really awesome location sipping on a gin or your favourite drink, and/or taking a run on the beach away from the boat, and/or dining in a beach side restaurant with a great evening sea breeze, and/or touring the island and sleeping most nights on the boat anchored - then anchoring becomes a fairly important topic right?
So even though we said that we’d not cover sailing basics in this Bareboat charter clinic, forgive us if we go back to the complete basics of anchoring just to make sure you’ve got it all. hope that’s ok and we don’t bore some of the more advanced people. But you never know some old sailing dogs do learn new tricks.
however, if you’re a bit green at anchoring in unfamiliar waters, you should really take the NauticEd Anchroing a Sailboat course. It’s a prerequisite to the Bareboat charter Master certification and as with coastal Navigation, it’s a prerequisite to safety.
this anchoring discussion takes place on the next 6 pages.
Below here we’ll discuss:
y why it’s important to have anchoring skills, y Selecting the type of anchor for the seabed, y rode y the electric windlass.

Bareboat Charter ClinicModule3 - Underway
this material forms part of the NauticEd Bareboat charter clinic and is Not for public distribution. NauticEd is the world’s Most Advanced online Sailing Education and certification company.
© NauticEd. All rights reserved. http://www.NauticEd.org
NauticEd
18
why anChor
why anChor when you have a wonderful slip to come home to? today many sailors keep their vessels in well-maintained marinas that offer a variety of amenities, including pools, restaurants, cable, bathing and clothes washing facilities. these are convenient and safe.
there are many good reasons why knowing how to anchor is important, including:
y Emergency Anchoring. you are in a spot where wind and current are pushing you dangerously towards objects you do not want to hit and your engine will not start. In this case anchoring becomes critical.
y wishing to take a break, sit quietly in your vessel, take a swim, fish and/or enjoy the ambience of the location and your crewmate’s antics, all the while knowing you are securely anchored.
y found a location where you wish to spend considerable time, and there are no slips or moorings. Shangri-la.
y Experiencing Mother Nature’s capriciousness as the wind abates and you decide to wait for it to return.
y for some unknown reason your engine is failing to start just as you decide to motor. No emergency, but you wish to hold still while fixing the problem or nuisance.
y Minor medical problem needing your attention, which is best done standing still. y legally you must have an anchor and the necessary line (rode) needed for anchoring in
case of an emergency. A wise sailor will carry at least two sets of anchors.

Bareboat Charter ClinicModule3 - Underway
this material forms part of the NauticEd Bareboat charter clinic and is Not for public distribution. NauticEd is the world’s Most Advanced online Sailing Education and certification company.
© NauticEd. All rights reserved. http://www.NauticEd.org
NauticEd
19
anChoring is not simply throwing a “hook” and letting out line. although by watching some sailors this seems to be their theory. the best way to approach anchoring is to dissect it into a series of individual steps.
Selecting the spot - consider the bottom - deploying - Setting - watching - retrieving.
seleCtInG the tyPe oF anChor For the seaBed
Anchoring is not always easy even when you understand these “baby steps”. there are many factors to consider: depth under keel and surrounding area depth, tidal currents, low tide depth, tidal rise, other boats in proximity, wind speed and direction changes, type of bottom and length of stay. All factors play into your anchoring decisions.
sizE of anCHor: anchors are selected based on vessel size and bottom conditions. the larger the vessel, the larger and heavier should be the anchor. the following table will give you typical boat size vs. anchor weight:
vessel length approx anchor Weight depends on design
20 ft (6m) 14lb (6 kg)30 ft (9m) 22lb (10 kg)
40 ft (12m) 35lb (17 kg)50 ft (15m) 44 lb (20 kg)
anCHor tyPE: anchor types are selected based on the bottom conditions. these are rock, mud, clay, sand, grass, coral and shoal.
charts will usually tell you what the bottom conditions are, as will local sailors from whom you should never be afraid to ask.
Bareboat Charter ClinicModule3 - Underway
this material forms part of the NauticEd Bareboat charter clinic and is Not for public distribution. NauticEd is the world’s Most Advanced online Sailing Education and certification company.
© NauticEd. All rights reserved. http://www.NauticEd.org
NauticEd
20
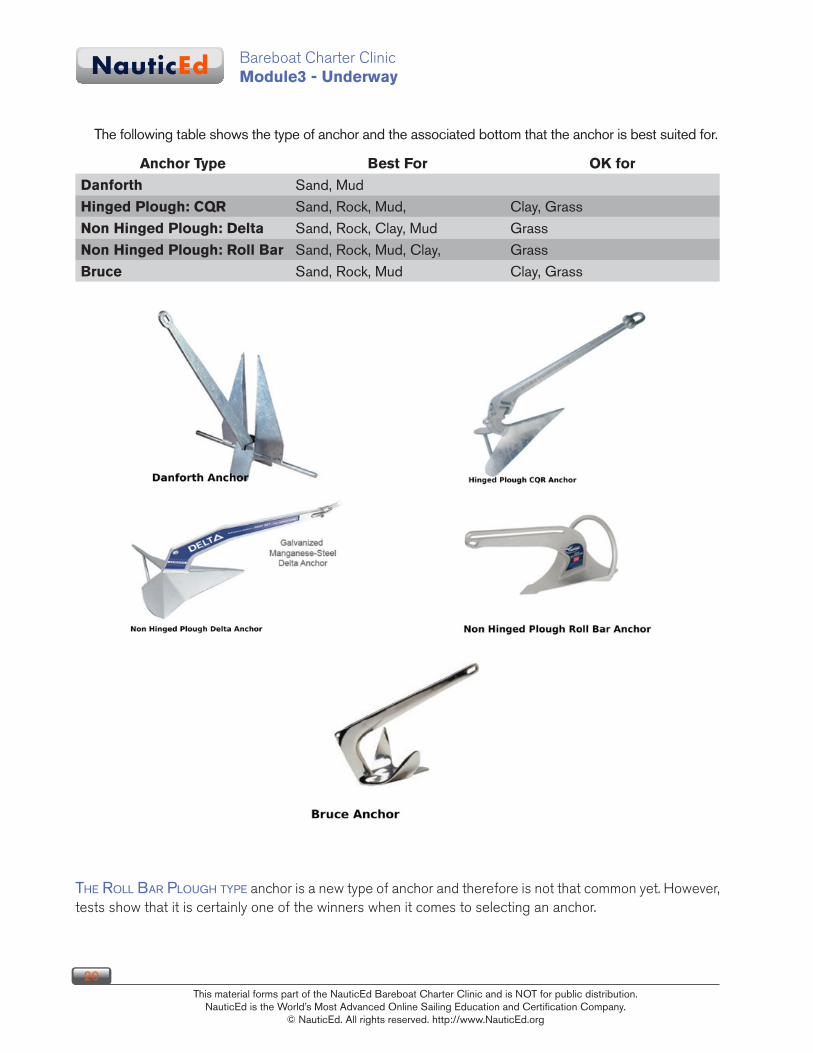
the following table shows the type of anchor and the associated bottom that the anchor is best suited for.
anchor type Best for oK for danforth Sand, MudHinged Plough: CQr Sand, rock, Mud, clay, Grass non Hinged Plough: delta Sand, rock, clay, Mud Grassnon Hinged Plough: roll Bar Sand, rock, Mud, clay, GrassBruce Sand, rock, Mud clay, Grass
the roll bar plough type anchor is a new type of anchor and therefore is not that common yet. however, tests show that it is certainly one of the winners when it comes to selecting an anchor.

Bareboat Charter ClinicModule3 - Underway
this material forms part of the NauticEd Bareboat charter clinic and is Not for public distribution. NauticEd is the world’s Most Advanced online Sailing Education and certification company.
© NauticEd. All rights reserved. http://www.NauticEd.org
NauticEd
21
rode
rode is the stuff that attaches the anchor to the boat. rode can be all chain, all rope, or more commonly a combination of rope and chain. anchors work best when they are being pulled horizontally across the bottom. this is achieved by making the rode from the anchor to the boat as long as possible and by making the rode as heavy as possible.
All chain then is best for holding power because of its weight but chain is expensive and almost certainly will require an electric windlass to retrieve. All rope provides poor holding power because it pulls the anchor up at an angle. for these reasons, you’ll usually encounter a combination of chain and rope. usually about 20-30 ft (6-9m) of chain attached to the anchor is common. the chain is heavy enough to hold the shank of the anchor down against the bottom, vastly increasing its holding power.
chain is attached to the anchor shank by a d-ring. It is extremely important to use stainless steel wire to tie the pin on the d-ring closed and locked. If the d-ring comes undone (which it will) you will lose the anchor - probably at the worst time.
An effective solution to making a rope rode lay closer to the bottom is to deploy a weight down the anchor rode. this makes the direction of pull on the anchor closer to horizontal.
eleCtrIC wIndlass
many modern vessels are now equipped with an electric windlass. this powerful electric winch greatly facilitates the lowering and raising of an anchor. since they are powerful, they use a substantial amount of dC power that can rapidly drain your battery.
the size and strength of electric windlass depends upon factors of vessel length, displacement and type of rode. Most windlasses will accommodate both chain and line.
usually there is an electric breaker/reset switch for the windlass. the breaker prevents too much current from overheating the wires to the windlass. If this “pops” you had either too much tension on the rode or you held the button on too long. you’ll need to hit the reset switch, which is not usually in a very convenient location. on some boats it’s next to the battery switch.

Bareboat Charter ClinicModule3 - Underway
this material forms part of the NauticEd Bareboat charter clinic and is Not for public distribution. NauticEd is the world’s Most Advanced online Sailing Education and certification company.
© NauticEd. All rights reserved. http://www.NauticEd.org
NauticEd
22
the eleCtriC windlass is not designed to pull the boat towards the anchor. the way to pull in the anchor using a windlass is to use what is called the catenary effect. this is the weight of the chain rising in a curve off the bottom. when the chain is pulled in a little, the new curve formed by the chain weight pulls the boat forward. In this manner then, when pulling in the anchor, you should first hold the windlass “up” button down for only 5 seconds or so. then let off and watch the boat move forward. then use another 5-second
burst and repeat. If you don’t do this you could overload your windlass and certainly reduce its working life.
watch out also for the chain stacking on top of itself in the anchor locker. It can quickly back itself up into the windlass and cause a nasty jam that is difficult, at best, to get clear. train your crew on this when asking them to pull in the anchor.
when letting out, most windlasses allow you to loosen the winch spindle a little so that the rode can free wheel out. on some, you simply place the winch handle in the top of the center of the winch and turn counter clockwise to loosen.
the electric windlass always has an electric breaker reset switch. If you over tension the rode, chances are that the breaker will trip preventing the windlass from working. you
can easily reset the breaker but you have to know where on the boat the switch is and it won’t be next to the windlass. More than likely it will be below decks next to the battery selector switch, but always ask before you depart on an unfamiliar boat.

Bareboat Charter ClinicModule3 - Underway
this material forms part of the NauticEd Bareboat charter clinic and is Not for public distribution. NauticEd is the world’s Most Advanced online Sailing Education and certification company.
© NauticEd. All rights reserved. http://www.NauticEd.org
NauticEd
23
there are hand-powered devices to raise anchors. Indeed some of the electric windlasses have this added feature to help save dc power or in the event power has been lost. here power is from a human being pulling on a lever attached to the windlass.
carefully check electric windlasses, including practicing the operation of these devices - before you intend to use them in a real anchoring situation. these are not toys and if the anchor line and chain get jammed on the winch, it can be a problem.
on the next page we’ll discuss selecting an anchoring spot, considering the bottom and deploying the anchor.

Bareboat Charter ClinicModule3 - Underway
this material forms part of the NauticEd Bareboat charter clinic and is Not for public distribution. NauticEd is the world’s Most Advanced online Sailing Education and certification company.
© NauticEd. All rights reserved. http://www.NauticEd.org
NauticEd
24
M3.8 anChorInG 2
In this section we will cover:
y Selecting an anchoring spot y Swing y considering the bottom y Scope
seleCtInG an anChorInG sPot
Charts, both eleCtroniC and paper will tell you where the reliable anchoring spots are. the listing of these anchorage locations will depend on several factors: protection from swells, protection from weather, bottom type, and depth. But it doesn’t mean that these are safe for you at any particular time. you’ll need to choose the anchorage based on the conditions at the time and predictions of swell and weather change during your intended stay.
Bareboat Charter ClinicModule3 - Underway
this material forms part of the NauticEd Bareboat charter clinic and is Not for public distribution. NauticEd is the world’s Most Advanced online Sailing Education and certification company.
© NauticEd. All rights reserved. http://www.NauticEd.org
NauticEd
25
depth is a major part in considering your anchoring position. And depth will vary with tide. In a previous learn to sail article we discussed tide tables. As the tide goes out, you may find your boat lying on the bottom. As the tide comes in you may find that the original amount of rode you let out is no longer adequate. well discuss this below in deploying the anchor.
Selecting a spot is also dependent upon other vessels anchored in the same anchorage area. you’ve got to give them enough room to not hit you as you both swing. they were there first and by convention - you must give them rights.
In a tight area, you can drop anchor directly behind the stern of another boat then as you drift back from the wind you’ll be far enough away from them to not bother them. As you both swing in the night it will be unlikely that you will bump into them.
on a typical day during high charter season, mooring balls are claimed quickly, and late afternoon arrivals must secure the boat with the anchor. It is important to understand that boats first to arrive in an anchorage area have the right to select their anchoring sites and method of anchoring; later arrivals must respect this by adjusting their anchor swing areas to avoid impinging on the those boats. this is especially concerning when other boats are moored with very small swing radii. Anyone in the same area intending to anchor must remember that their swing radius will be much larger than a moored boat, and take that into account when deploying the anchor. In general, don’t anchor in a mooring ball area because of that reason.

Bareboat Charter ClinicModule3 - Underway
this material forms part of the NauticEd Bareboat charter clinic and is Not for public distribution. NauticEd is the world’s Most Advanced online Sailing Education and certification company.
© NauticEd. All rights reserved. http://www.NauticEd.org
NauticEd
26
swInG
if you’ll be leaving the boat or staying overnight, you must assume that the wind will change direction up to 180 degrees in either direction. therefore select an anchoring position that, considering the amount of rode you will let out, will not put you against a shallow area or hazards. also consider the tide when deciding this. Ie you might be perfectly set with 20 ft (6m) of water below the keel. But if the wind changed you will swing around. Considering this you might still be in safe water, however compound this with 6 ft (2m) of tide and you could be high and dry on nasty rocks. see our section on reading tide charts in the skipper Course.
you should Consider that if you have let out 100 ft (30m) of rode, then with a wind change you could be almost 200 feet (60m) closer to shore or harbor obstacles.
considering all the above, selecting an anchoring spot is not as simple as just “dropping the hook”. fortunately, other boats in the harbor will swing with you. the only variable here is what if they have a chain rode and used a 3:1 scope and you have a combination rode and used 7:1 scope. In this case your swing radius will be different - oops!
when considering tying up to other vessels overnight, also consider swing. If the wind clocks around, then your anchor rodes can become seriously tangled. So what if the wind clocked around and picked up dangerously. Now you have tangled anchor lines, big swells, boats banging together in the middle of the night. Not good.

Bareboat Charter ClinicModule3 - Underway
this material forms part of the NauticEd Bareboat charter clinic and is Not for public distribution. NauticEd is the world’s Most Advanced online Sailing Education and certification company.
© NauticEd. All rights reserved. http://www.NauticEd.org
NauticEd
27
ConsIderInG the BottoM
eaCh bottom type has different holding power. your holding power against that bottom is also dependent on the anchor you select. If you’re chartering a sailboat on a sailing vacation then you will probably only have one type of anchor on board. Use the table below to consider the bottom against your anchor.
anchor type Best for oK for danforth Sand, MudHinged Plough: CQr Sand, rock, Mud, clay, Grass non Hinged Plough: delta Sand, rock, clay, Mud Grassnon Hinged Plough: roll Bar Sand, rock, Mud, clay, GrassBruce Sand, rock, Mud clay, Grass
sCoPe
based on the depth, you will know how much rode to deploy. For a rope and chain combination rode, the standard reported conventional number to safely anchor without the expectation of dragging is 7 to 1. this means to deploy 7 feet of rode for every 1 foot of depth. to put it in perspective if the bottom is 20 feet (6m) then you should deploy 140 ft (42m) of rode. you’ll note immediately that this becomes impractical in some cases. suffice to say that if you know you’re deploying less than 7:1 then the likelihood of dragging in the night is high. this is why an all chain rode is sometimes better. with all chain you can deploy much less rode, as little as 3:1 or 4:1. Many charter sailboats supply an all chain rode.

Bareboat Charter ClinicModule3 - Underway
this material forms part of the NauticEd Bareboat charter clinic and is Not for public distribution. NauticEd is the world’s Most Advanced online Sailing Education and certification company.
© NauticEd. All rights reserved. http://www.NauticEd.org
NauticEd
28
when considering depth you have to add the draft of your boat and the freeboard e.g. 10 ft (3m) indicated under your keel with a 5 foot draft and 4 feet of freeboard will give you a real “depth” of 19 ft. Now consider any safety off set that the charter company may have put into the depth meter - this is usually 5 feet so you’ve really got 24 ft (7m) of depth. the amount of rode to put out just went from 70 ft (21m) to168 ft (49m). wow!
Also you can consider the conditions under which you are anchoring. Perhaps you’re just stopping for lunch and you will be staying on board and the wind is light and there is little tide change during your stay. In this case you could prudently use less than the 7:1 ratio for the combination rope and chain rode.
consider also that your scope will change with the tide. Perhaps in the scenario below you have allowed for the correct scope.
But through out the night, the tide has risen and the wind has picked up. Now look what has happened - oops.
And as mentioned above a falling tide may ground you or at least increase your swing into other obstacles. Be wary that you may need to change your scope through out the night.

Bareboat Charter ClinicModule3 - Underway
this material forms part of the NauticEd Bareboat charter clinic and is Not for public distribution. NauticEd is the world’s Most Advanced online Sailing Education and certification company.
© NauticEd. All rights reserved. http://www.NauticEd.org
NauticEd
29
M3.9 anChorInG 3
on this page we will cover:
y deploying the Anchor y Setting the Anchor y watching the Anchor
dePloyInG the anChor
it is important that the person deploying the anchor and the helms person are in agreement about the anchoring plan first. discuss the placement, the direction, the depth, the desired scope and the setting plan.
once the boat is in place, it should be facing directly into wind or upstream if there is a strong current. the boat should not have forward movement.
when pushing the anchor out overboard be careful to not let it swing into the boat and ding the gel coat.
Allow the boat to drift backwards slowly or motor back slowly once the anchor is overboard so that the rode lies in a straight line downwind (or down stream) across the bottom from the anchor to the boat.
the bow person deploying the anchor should signal to the helms person when the anchor is overboard and again when it touches bottom.
the bow person should be noting the amount of rode going overboard to set the correct scope. If this is your boat you should place markers along the rode to indicate length. on most boats however, you’ll find that the owner or charter company has neglected to do this. In this case the bow person will need to estimate from the rate of deployment e.g. 1m/s will require 10 seconds to deploy 10m of rode.
when the desired scope is reached the bow person again signals to the helms person that the anchor is ready to be set.

Bareboat Charter ClinicModule3 - Underway
this material forms part of the NauticEd Bareboat charter clinic and is Not for public distribution. NauticEd is the world’s Most Advanced online Sailing Education and certification company.
© NauticEd. All rights reserved. http://www.NauticEd.org
NauticEd
30
settInG the anChor
setting the anChor Can be done by simply letting the boat pull back against the anchor as it drifts back with the wind. however Power setting is more reliable where the helms person sets the anchor by applying slightly more power to the boat in reverse for approximately 5 seconds to pull downwind against the anchor on the bottom. the action acts to dig the anchor flukes into the bottom.
the bow person can test if the anchor is dragging by putting a finger on the rode. If the anchor is bouncing across the bottom then this vibration will be transmitted up the rode.
Now it is assumed that the anchor is set and the “is it dragging?” game begins.
the best way to ensure the anchor is set is to dive down upon it. of course, in many cases diving on the anchor is not practical but if it is - then it is advisable. If you can dive the anchor then ensure that the flukes are turned such that the anchor is digging into the bottom or hooked securely against a big rock.
Most charter boats use all chain as the anchor rode as opposed to most private boats which use rope/chain combination.
In the case of all chain, you can use less scope. A scope of 3:1, 4:1 or 5:1 depending on the bottom can suffice. however, use of all-chain anchor line brings up another concern; shock loading to the windlass or bow when the boat is lifted by a wave. this is a major concern when using chain, and

Bareboat Charter ClinicModule3 - Underway
this material forms part of the NauticEd Bareboat charter clinic and is Not for public distribution. NauticEd is the world’s Most Advanced online Sailing Education and certification company.
© NauticEd. All rights reserved. http://www.NauticEd.org
NauticEd
31
calls for the attachment of a line snubber to absorb some of the shock. A snubber is a length of nylon line that is connected to the chain anchor rode after the anchor is set. It can be tied on with a rolling hitch, or by attaching a snap hook through an eye spliced in the line, which then attaches to the anchor chain. the snubber is then tied to a cleat. Since the nylon line stretches, it absorbs the shock loading of the chain anchor line. the snubber line should be long enough so that if you’re wanting to let out the anchor rode in the middle of the night, then the snubber line can be eased out with the rode at the same time.
Image courtesy of Bosun supplies, inc.
Catamarans typiCally have a snubber line attached to both hulls with a chain hook in the center. the hook is attached to the anchor chain when enough has been let out. then the windlass is let out some more to allow the line to take the load. this acts in a similar way to the snubber line and takes the load off the windlass while keeping the center of force from the anchor in the center of the two hulls.
A very cool snubber system we have come across is the shockles. these are extremely strong bungees with handy clips and hooks on them specially designed for boating requirements.

Bareboat Charter ClinicModule3 - Underway
this material forms part of the NauticEd Bareboat charter clinic and is Not for public distribution. NauticEd is the world’s Most Advanced online Sailing Education and certification company.
© NauticEd. All rights reserved. http://www.NauticEd.org
NauticEd
32
they also make a great shock absorber for towing a dinghy but that’s not really an anchoring topic.
Shockles are available at http://www.shockles.com/index.cfm
watChInG the anChor
onCe the anChor is set, a discussion about the scope should take place between the skipper and bow person to ensure the proper amount of rode was deployed.
As discussed previously, scope is dependant upon wind, length of stay, if you will be leaving the boat, other boats in the harbor, swell, tide etc. Make a cup of tea or something because this part takes a while. you’ve got to ensure that the anchor is not dragging. It’s a bit difficult because your boat will swing with the wind and so bearing off land will change. So wait until the full extent of a swing then take a bearing by aligning two points on land. then wait for a couple of swings and compare against the two-point bearing. then repeat that while you finish your tea.

Bareboat Charter ClinicModule3 - Underway
this material forms part of the NauticEd Bareboat charter clinic and is Not for public distribution. NauticEd is the world’s Most Advanced online Sailing Education and certification company.
© NauticEd. All rights reserved. http://www.NauticEd.org
NauticEd
33
If anchoring for a longer period of time than just lunch, your bearings will almost invariably change because the wind direction and strength will vary. So you’ll need to take these into account.
the other difficult part is that as light falls your bearings may not be seen, so pick out aligned lights on shore as they come on. Note your compass heading. Now when you get up in the middle of the night to check, if your heading is the same then the bearings to the aligned lights should be the same.
you can also use a hand-bearing compass to check bearings to point on land, but aligning two points is easier.
In summary the practical part here is much harder than the theory. the boat swings in the wind, the wind direction changes, the wind strength changes and night comes obscuring your original bearings.
A good friend however during all this, is your depth meter. And many depth meters have anchor alarms. you set the anchor alarm to go off when the depth changes by more than 10 ft (3m) or so.
Most GPS units have a drift alarm. you set the alarm for when the boat shifts by a certain distance, which should be more than the side-to-side swing.

Bareboat Charter ClinicModule3 - Underway
this material forms part of the NauticEd Bareboat charter clinic and is Not for public distribution. NauticEd is the world’s Most Advanced online Sailing Education and certification company.
© NauticEd. All rights reserved. http://www.NauticEd.org
NauticEd
34
M3.10 anChorInG 4
finally regarding anchoring we will cover:
y Multiple anchors y weighing Anchor
MUltIPle anChors
setting multiple anChors has multiple advantages. It reduces swing, reduces the holding load required by each anchor and can act as a backup.
disadvantages are: you will swing less than other boats in the same anchorage area increasing chances of a midnight collision. you may get tangled anchor rodes if the wind clocks around. More complicated deployment and retrieval plan.
front Anchor deployed with Several long ropes to rocks on land
other types of anChoring Can include tying off to points on land. this is desirable if you are in a narrow cove or your swing ability is restricted. Be wary however, that your lines ashore may not be visible by others especially in poor light conditions. we tie dock fenders at strategically visible points along the ashore line.

Bareboat Charter ClinicModule3 - Underway
this material forms part of the NauticEd Bareboat charter clinic and is Not for public distribution. NauticEd is the world’s Most Advanced online Sailing Education and certification company.
© NauticEd. All rights reserved. http://www.NauticEd.org
NauticEd
35
while jet skis can be annoying sometimes to sailors a strangled one just creates complications that we don’t want to encounter with the authorities.
Personally, I don’t particularly like a stern anchor. If the wind turns 90 degrees then extra windage force is placed on both anchors potentially causing both of them to drag.
the best multiple anChor teChniques are the 45 degree method and the 180 degree method (aka Bahamian anchoring). 45 degree anchoring means that you set two anchors from the bow so that when the anchoring process is complete, they are angled approximately 45 degrees apart. this method is best for holding in strong winds.
Similarly the Bahamian anchor method, the anchors are 180 degrees apart. with this method your swing will be minimized.

Bareboat Charter ClinicModule3 - Underway
this material forms part of the NauticEd Bareboat charter clinic and is Not for public distribution. NauticEd is the world’s Most Advanced online Sailing Education and certification company.
© NauticEd. All rights reserved. http://www.NauticEd.org
NauticEd
36
weIGhInG the anChor (retrIeVInG the anChor)
simple enough - motor the boat forward while pulling in the anchor rode right? yes - except there can be complications and considerations.
Using a windlass:first, in high winds, make sure that you do not use the windlass to pull the boat forward against the
wind, instead motor the boat forward. otherwise, you’ll over tension the windlass, blow the breaker switch and potentially damage the windlass. In light wind conditions you can operate the windlass for a few seconds. the weight of the rode will then act to pull the boat forward reducing the tension. then repeat. In this manner the boat starts moving forward purely from the weight of the anchor rode.
doing it by hand:Similarly as above use the motor or in lighter winds, similarly as above allow the weight of the anchor
rode to do the work of moving the boat forward for you.
unfortunately, you will at times get the anchor stuck on something. If you know you’re going to be anchoring in rocks then a good idea is to send down a trigger line as you deploy the anchor. A trigger line is a line attached the head of the anchor. It can be used to pull the anchor out backwards by its head. But it requires forethought.

Bareboat Charter ClinicModule3 - Underway
this material forms part of the NauticEd Bareboat charter clinic and is Not for public distribution. NauticEd is the world’s Most Advanced online Sailing Education and certification company.
© NauticEd. All rights reserved. http://www.NauticEd.org
NauticEd
37
So - here are your retrieval plans.
Plan a:as the vessel moves over the spot where the anchor is - pull it up - if you can. stop the vessel’s forward motion - as you continue pulling in the anchor. If you use an electric windlass to raise the anchor, be sure not to overstrain it by using it to pull the boat towards the anchor. allow the engine to do that work.
Plan B: If the anchor is set hard and you cannot pull it in, you may need to use the vessel’s forward motion to break the anchor loose. this means maintaining slight forward motion and cleating the rode as you pass over the spot. the theory is that the vessel’s momentum will break loose the anchor. Be Very wary of the strength of the cleat on your boat.
Plan C: If the anchor fails to break loose, due to rock formation, you can try pulling it out backwards by motoring to windward. the flatter the angle you pull the anchor out, the greater the chance of retrieval, so let out lots of rode when motoring to windward. Be conscious of the rode and propeller at all times.
Plan d: try pulling the anchor out sideways. let out lots of rode and motor
Plan E: Persistence and various combinations of the above will normally enable you to retreive your anchor
Plan f: see plan e

Bareboat Charter ClinicModule3 - Underway
this material forms part of the NauticEd Bareboat charter clinic and is Not for public distribution. NauticEd is the world’s Most Advanced online Sailing Education and certification company.
© NauticEd. All rights reserved. http://www.NauticEd.org
NauticEd
38
tip: If you don’t have a windlass and you’re feeling a little tired; you can run the rode back to one of the winches atop the cabin.
anECdotE
i onCE GavE assistance to a boat off the island of Bisevo in croatia who had anchored in very deep water. they could not retrieve the anchor because (1) the windlass was broken and (2) the weight of the anchor and all the chain was too heavy. we rigged up a method of tying a dock line to the chain at the bow then we ran the line back to the jib winch. we winched until the knot reached the jib winch then we tied another line to the chain at the bow and ran it back to the other jib winch. then we released the first winch and stowed the loose chain. we repeated the whole process until enough chain had come in to make the weight manageable to lift by hand. Btw- we were visiting a very cool place. It was a cave where the entrance was under the water. the light shining through the underwater entrance and up into the cave was spectacular. cool eh? you gotta go some day!
watch out that you’re not stuck on a boat dock cable from a marina. In lakes, often you might be stuck on an old stump.
the very worst scenario is that you will have to leave the anchor and rode for later recovery with a professional. In this case, don’t cut it but tie a floating bottle to the rode end. tie a note in a plastic bag to tell others that you’re coming back for it and to please not help themselves. you can cut the rode and just get another one, however, keep in mind that anchors with rode are not cheap; they range from $uS300 and up. this helps underscore the need to carry an extra anchor and rode for just such an unfortunate occasion. If the rode is all chain, the cost can be over $uS1000 to replace.
oK so that’s a pretty comprehensive section on anchoring, but as stated on a yacht charter you do spend a lot of time at anchor so knowing all the above is well worthwhile.

Bareboat Charter ClinicModule3 - Underway
this material forms part of the NauticEd Bareboat charter clinic and is Not for public distribution. NauticEd is the world’s Most Advanced online Sailing Education and certification company.
© NauticEd. All rights reserved. http://www.NauticEd.org
NauticEd
39
M3.11 the wIndlass
the windlass is the eleCtriC anchor motor. although it was called a windlass before Ben Franklin flew his kite. It will often trip its breaker and you’ll need someone to reset it. show your crew where it is at briefing time. the last thing you want to do is to leave the helm during an anchor retrieval process. If it is tripping, you’re probably using the windlass to pull the boat up to the anchor instead of letting the engine do the work for you.
on many windlasses there is a clutch nut on top in which the winch handle will fit into. By loosening this clutch nut you can allow the anchor rode to flow out freely under its own weight without operating the electric motor. tighten the clutch nut back up when you have deployed the rode.

Bareboat Charter ClinicModule3 - Underway
this material forms part of the NauticEd Bareboat charter clinic and is Not for public distribution. NauticEd is the world’s Most Advanced online Sailing Education and certification company.
© NauticEd. All rights reserved. http://www.NauticEd.org
NauticEd
40
M3.12 doCKInG
while we’re pretty sure you’ve done this before, there’s a few things to think about with an unfamiliar boat. one of those is prop walk. the larger boats tend to prop walk more than a smaller one that you’re perhaps used to. so we recommend spending a little time when you’re out in safer water, just testing out what the boat does when you’re engaging reverse. try backing the boat up to a mooring buoy or something. It’s pretty embarrassing messing it up at the dock.
Now since your crew has done knot tying school they’ve all put on the fenders with the right knots - right? And they all know how to cleat off the boat quickly in case the wind starts to take over the boat - right? IE make sure you do some crew training.
WE also rECoMMEnd that you take the NauticEd Maneuvering under Power clinic.

Bareboat Charter ClinicModule3 - Underway
this material forms part of the NauticEd Bareboat charter clinic and is Not for public distribution. NauticEd is the world’s Most Advanced online Sailing Education and certification company.
© NauticEd. All rights reserved. http://www.NauticEd.org
NauticEd
41
M3.13 seasICKness
here is some eduCation about sea sickness that can help you and your crew overcome it. you might even email it out to your crew before hand. this was taken from Kona hawaii Fishing with Captain Jeff rogers (http://fishinkona.com/seasick.htm) thanks Jeff!
avoidinG sEa siCKnEss: a fun day out on the water just might turn into one of the worst days of your life. while seasickness is somewhat rare in Kona because of the (mostly) calm seas, sea sickness hits some people even on the calmest of days. If you or someone in your party is prone to car sickness in any way, they need to prepare. sea sickness is 99 % preventable but not very curable. there are many remedies for sea sickness and the most popular of these is the worst. I’m referring to dramamine ®. don’t taKe It! not only is it a poor sea sickness medication but the side effect of “sleepiness” can ruin your fun also.
here’s a list of remedies in order of effectiveness:
sCoPolaMinE: for the hard core “I always get sea sick” and “I get car sick easy” types. this remedy is also referred to as “the patch” and can be obtained by prescription from your doctor. It looks like a little round Band-Aid and is worn behind your ear. there are a certain percentage of people who have adverse side effects to this medication. I highly suggest that if you’re using this remedy for the first time, try using one at home first. you don’t want to find out that you have an adverse reaction to this stuff when you’re several miles out at sea.
GinGEr: that’s right. Plain old ginger root. you can get this stuff in pill form, candied, raw, powdered, as a paste, dehydrated, in cookies … well, you get the idea. Ginger settles your stomach quickly and, just like with Sea Band ®, ginger can be added along with any of the other remedies without conflicting with them. I try to keep ginger candy on the boat and I can cure a good number of people with a combination of ginger candy and Sea Bands. don’t rely on me having either of them though. Just one more note. Some people have a tendency to “over do” a good thing when they’re on vacation. Go easy on the dinner the night before and breakfast in the morning before you go out. don’t stuff yourself. don’t get drunk the night before (hangovers are even worse out at sea) and get a good night’s sleep. Aloha, have a great day on the water!
BoninE ®: this is the best pill form, over the counter remedy. highly recommended! don’t let a doctor or pharmacist talk you into any other kind of pill form. there are no others that are “just like Bonine®”. you will need to get this stuff working in your system well in advance of your trip. there’s little to no side effect. the biggest mistake people make with pill form remedies is that they take their first dose either right before or right after stepping on the boat. that’s too late! Sea sick prone people usually spew these pills out before they can take full effect. I highly recommend taking one dose of Bonine® the night before your trip and another dose in the morning when you wake up. for long trips, don’t forget to keep up with the recommended dosage.
sEa Band ®: these are pressure point therapy wrist bands. Most people discount this remedy because it “sounds” like a gimmick. they work! there is also an electronic shock version but, the non-electric ones work just fine. the nice thing about this remedy is that they can be added along with any of the other remedies without conflicting with them. I try to keep at least one pair around for those that didn’t prepare but too often, people walk off the boat forgetting that they have them on. Many drug stores carry these bands as a cure for morning sickness. (Go onto www.westmarine.com and type in “seasick band” as a keyword)
we also recommend that as soon as someone begins to feel queasy that they take the helm and steer the boat. this is almost a guaranteed and almost instant cure. It completely takes their mind off the sickness.

Bareboat Charter ClinicModule3 - Underway
this material forms part of the NauticEd Bareboat charter clinic and is Not for public distribution. NauticEd is the world’s Most Advanced online Sailing Education and certification company.
© NauticEd. All rights reserved. http://www.NauticEd.org
NauticEd
42
M3.14 the dInGhy
Several things to note about the dinghy.
y first, like the fishing line out back, try to be one of the few captains who have never chopped up the dinghy painter while reversing the boat. (the painter is the line attached to the front of the dinghy)
y If your dinghy motor keeps stalling when you put it in gear, you’ve probably got a line wrapped around its prop.
y don’t think it’s a good idea to put the boat garbage into the dinghy. the bag wIll break and you’ll be cleaning up a really nasty mess.
y double check the locking clamp screws on the motor which attach it to the dinghy transom when you get your dinghy from the charter base and whenever you get in and out of the dinghy. charter bases are constantly swapping out engines and they tend to forget this slight detail.
y tow the dinghy about 20-30 feet back from the boat. If you have waves, adjust the length of the painter so that the dinghy is going up a wave when you are and down a wave when you are.
y Bail water out of the dinghy before you get under way. water in the dinghy increases drag but also increases the chance of breaking the painter due to the increased force. you may not notice this for several miles and you’ll be paying for a dinghy and motor.
y Pull the dinghy up tight when you are anchoring and mooring to prevent the painter from being wrapped around your prop.
y Pull the dinghy alongside if you are doing any backing. y watch your elbows when you start the dinghy engine so that you’re not slamming one of
your pretty crew members in the face. train other crewmembers to watch their elbows if they start the engine.
y don’t run the engine while the drive is out of the water. the impeller will burn out in a few seconds. yes, dinghy engines have impellers too. Some dinghy engines are 4 stroke and require no oil mixed with the fuel some are two stroke and do require oil mixed with the fuel. however typically you’ll be given enough fuel to last your charter trip.
y holding the dinghy sideways to waves on the beach will cause it to capsize. face the bow into the waves.
y don’t dinghy surf in rough weather. It’s been done, we regret it and it’s really dangerous. y train your crew on proper entry and exit techniques. IE it’s like rock climbing there should
always be - two hands and one foot or - two feet and one hand touching something whilst getting into the dinghy (and a drink does not count).
y train the crew on how to properly tie on the dinghy. you’ll be surprised at the number of people who cannot tie a cleat hitch.
y let others captain the dinghy. It’s fun and they want to do it.

Bareboat Charter ClinicModule3 - Underway
this material forms part of the NauticEd Bareboat charter clinic and is Not for public distribution. NauticEd is the world’s Most Advanced online Sailing Education and certification company.
© NauticEd. All rights reserved. http://www.NauticEd.org
NauticEd
43
shoCkles are Cool things to use to prevent jerking the dinghy painter in waves. they are an oversized and really tough bungee cord specially designed for this task. you can get them at http://www.shockles.com
Bareboat Charter ClinicModule3 - Underway
this material forms part of the NauticEd Bareboat charter clinic and is Not for public distribution. NauticEd is the world’s Most Advanced online Sailing Education and certification company.
© NauticEd. All rights reserved. http://www.NauticEd.org
NauticEd
44
M3.15 BrIeFInG the Crew
the following is a reminder list of things to brief your crew about prior to leaving the dock. this Captain has the nauticed list loaded onto on his iPad.

Bareboat Charter ClinicModule3 - Underway
this material forms part of the NauticEd Bareboat charter clinic and is Not for public distribution. NauticEd is the world’s Most Advanced online Sailing Education and certification company.
© NauticEd. All rights reserved. http://www.NauticEd.org
NauticEd
45
doCKinG
y head use. y Not to pump out when others are swimming
if applicable. y fresh water tank switch over. y water conservation. tell captain when
switching over tank. y oven and Stove use instructions. y location of propane shut off. y Position of windlass reset switch. y Battery isolation switch in case of electrical
fire. y location of fire extinguishers. y No wet bodies inside cabin. y No sand inside cabin.
y house tidiness rules: wet clothing, towels, food, cooler, bathrooms.
y hygiene - Soap it up. y close hatches in cabin when underway. y close hatches in salon when raining at night. y dealing with seasickness – take the helm -
eat ginger. y first aid kit location. y Shower pump switches. y water pump switches. y cabin light switches. y Vhf emergency broadcast if captain
overboard.
on dECK
y Extreme high tension on lines. Be careful when releasing. wrap lines around the winch first before releasing.
y whipping of jib sheet as the boat is tacked. y Sailing downwind: walk on the boom side of
the boat when going forward. y wind in fishing line when approaching
anchorage. y Bow to helm communication signals y Man over board routine. follow my lead.
y captain overboard. Appoint able body. y MoB button on chart plotter. y life jacket location. y throwable lines and floatation device. y watch elbows when starting the dingy engine. y Pull dingy up to boat when anchoring or
mooring. watch out for the dinghy painter before starting the engine.
y windlass use – let boat do the work. y Morning clean up and deck wash down.
Crew BrIeFInG reMInder lIst
CaBin
y fender clove hitch and fender placement. y fending off the boat with roving fenders not arms, legs and hands. y Stereo off. y the cleat hitch. y follow my lead for line responsibility appointment. y Step don’t jump between the dock and boat. y watch out for dock lines in water before starting engine.

Bareboat Charter ClinicModule3 - Underway
this material forms part of the NauticEd Bareboat charter clinic and is Not for public distribution. NauticEd is the world’s Most Advanced online Sailing Education and certification company.
© NauticEd. All rights reserved. http://www.NauticEd.org
NauticEd
46
M3.16 ConClUsIon
there are of Course many more sailing topics that could be helpful to the bareboat charter skipper. some of these include maneuvering the boat under power and docking, medical concerns, and coastal navigation skills and techniques. sailors wishing to gain further expertise in these and other areas are advised to seek out applicable texts or to investigate other clinics offered by nauticed.
thanks for taking the NauticEd Bareboat charter clinic.
Bye for now and have real fun on your charter.
oh and before you go - make sure you’ve taken the frEE Basic rules of right of Way for sailboats Clinic, the sail trim Clinic so that you can tinker with the sail trim while on those long legs between islands, the Maneuvering Under Power Clinic so that you do “no damage docking”, and if you’re captaining the vessel you might consider the skipper Course for a brush up. If you’re crew, then take the Crew Course.
If you’re chartering a catamaran - take the Catamaran sailing Confidence Clinic and play the frEE catamaran Maneuvering Game at http://www.nauticed.org/learn-to-sail-sailing-games it’s fun and educational.
Now Good lucK wIth thE fINAl tESt

© nauticEd 2007 - 2011. all rights reserved.
NauticEd