module 4: cash management – receivables and payables module …€¦ · · 2016-09-124 - 1...
TRANSCRIPT

4 - 1
MODULE 4: CASH MANAGEMENT – RECEIVABLES AND PAYABLES
Module Overview Cash management in Microsoft Dynamics® NAV 2013 is used to manage the company's bank accounts.
One of the main features of cash management is the Bank Account Card. The Bank Account Card contains all the company's bank details. On the Bank Account Card, users can perform the following:
• Process payments received from customers.
• Process payments to vendors.
• Void posted checks (known as financial voiding).
In Cash management, receivables and payables play an important role.
In the receivables management area, all information for a customer is kept in a customer card. This includes all customer ledger entries and detailed ledger entries.
The basic functions in receivables cash management include the following:
• Applying and posting customer payments.
• Unapplying and reversing posted entries.
In the payables management area, vendor information is kept on vendor cards. This includes vendor ledger entries and detailed ledger entries. Payables Management helps companies manage vendor payments more effectively and build up a comprehensive vendor database.
Objectives
The objectives are:
• Describe the Bank Account Card.
• Explain the Payments FastTab on the customer card.
• Explain the Payments FastTab on the vendor card.
• Show how to enter and post payments received from customers, by using cash receipt journals.
• Show how to enter and post payments to vendors by using the payment journal.
Microsoft Official Training Materials for Microsoft Dynamics ® Your use of this content is subject to your current services agreement

Finance Essentials in Microsoft Dynamics® NAV 2013
4 - 2
• Explain the Suggest Vendor Payments batch job.
• Explain how to print and post payables checks.
• Explain and show how to financially void a check.
• Explain how to void and reprint computer checks.
• Explain how to apply entries to customer and vendor ledger entries.
• Explain how to unapply entries to customer and vendor ledger entries.
• Explain how to reverse customer ledger entries posted by using journals.
Microsoft Official Training Materials for Microsoft Dynamics ® Your use of this content is subject to your current services agreement

Module 4: Cash Management – Receivables and Payables
4 - 3
Bank Account Overview For each transaction made in Microsoft Dynamics NAV 2013 that uses a bank account, the system will post an entry in the bank account ledger. The bank account posting group that is assigned to each bank account is used to post the related general ledger (G/L) entries with the transaction.
Additionally, if the user makes a manual or computer check payment, the system posts an entry to the check ledger to record the check transaction and the current status of the check.
Each bank account has its own card that contains different kinds of information. On the bank account card, you enter information that is specific to the individual bank account, and you can change this information, if this is necessary.
Bank Account Window
To access the Bank Account window from the navigation pane, click the Departments button, click Financial Management, click Cash Management, and then click Bank Accounts.
FIGURE 4.1: BANK ACCOUNT WINDOW
The Bank Account window provides an overview of all the bank accounts that are created in Microsoft Dynamics NAV 2013. To create a new bank account, or change an existing one, double-click the bank account to locate the bank account card.
Microsoft Official Training Materials for Microsoft Dynamics ® Your use of this content is subject to your current services agreement

Finance Essentials in Microsoft Dynamics® NAV 2013
4 - 4
Bank Account Card
The Bank Account card has four FastTabs:
• General
• Communication
• Posting
• Transfer
FIGURE 4.2: BANK ACCOUNT CARD GENERAL AND COMMUNICATION FASTTAB
General FastTab
The General FastTab contains all the general information about the bank where the account is held, such as the name, address, and contact person.
In addition to this information, the General FastTab includes the following fields:
• No. – A unique identifier to represent the bank account. This field is not used to specify the bank account number.
• Bank Branch No. – The alphanumeric code used to represent the bank branch number for the bank account. All banks have a number series that specifies the bank branch where the account is opened.
• Bank Account No. – The bank account number that is used by the bank.
• Balance – Displays the bank account’s balance denominated in the bank’s currency.
Microsoft Official Training Materials for Microsoft Dynamics ® Your use of this content is subject to your current services agreement

Module 4: Cash Management – Receivables and Payables
4 - 5
• Balance (LCY) – Displays the bank account’s balance in the local currency. For the bank account in local currency, the Balance and Balance (LCY) show the same amount.
• Min. Balance - The minimum balance the bank account can have. The amount is in the currency of the bank account and it can be positive or negative.
• Our Contact Code – The contact person in the user's company that is responsible for the bank account. In the program, this must be someone set up in the Salespeople/Purchasers table.
• Blocked – Specifies to block the bank account by selecting the check box. If you block the bank account, you will be unable to select the bank account on a journal line in the Account No. field or on an invoice in the Bal. Account No. field.
Communication FastTab
The Communication FastTab contains the following information:
• Telephone and fax numbers
• Home page addresses for the bank
Posting FastTab
All the posting information is entered on the Posting FastTab of the bank account card.
FIGURE 4.3: BANK ACCOUNT CARD POSTING AND TRANSFER FASTTAB
Microsoft Official Training Materials for Microsoft Dynamics ® Your use of this content is subject to your current services agreement

Finance Essentials in Microsoft Dynamics® NAV 2013
4 - 6
The Posting FastTab contains the following fields:
• Currency Code – The currency for the bank account. The following rules apply for check payments and bank account currencies:
o If the Currency Code field of a bank account is blank, you can only make check payments in local currency (LCY) for that account. If a currency code is selected in this field, only use this bank account to receive and make payments in the currency selected in this field.
o If a currency code is not selected, you can receive payments by using any currency including LCY. Non-check payments can use any currency including LCY. You can only make check payments in LCY.
• Last Check No. – If you are using checks, specify the last check number that is used. The program updates this number every time that a new check is printed.
• Transit No. – An alphanumeric code used to represent the bank where the account is held.
• Last Statement No – The statement number of the last Bank Account Statement reconciled in the program.
• Balance Last Statement – The statement ending balance of the last Bank Account Statement reconciled in the program.
• Bank Acc. Posting Group – The posting group assigned to this bank account. Microsoft Dynamics NAV 2013 uses this to post the related G/L entries for each transaction by using the bank account.
Transfer FastTab
The Transfer FastTab contains the following fields that you must have to make transfers to and from the bank account:
• Bank Branch No. – Defaults from the General FastTab.
• Bank Account No. – Defaults from the General FastTab.
• Transit No. – Defaults from the Posting FastTab.
• SWIFT Code – The international bank identifier code (BIC) that is assigned to the bank. SWIFT Codes are typically used in automatic payment transactions.
• IBAN – The bank account's International Bank Account Number (IBAN). The program checks whether the IBAN entered has the correct format and length.
Microsoft Official Training Materials for Microsoft Dynamics ® Your use of this content is subject to your current services agreement

Module 4: Cash Management – Receivables and Payables
4 - 7
Bank Account Card Ribbon
You can use the Bank Account Card ribbon for single-click access to several functions and overviews. The following tabs are available in the ribbon:
• Home
• Actions
• Navigate
• Report
FIGURE 4.4: BANK ACCOUNT CARD RIBBON
From the Home tab, you can view, edit, or create a new bank account.
The following single-click accesses are also available from the Home tab:
• Cash Receipt Journals – Use to register and post payments from customers.
• Payment Journals – Use to register and post payments to vendors.
• Statistics – Displays the current balance for the account in the bank account currency and LCY and comparative figures from prior periods.
• Statements – Displays the reconciled Bank Account Statements for this bank account.
• Bank Account Reconciliation – Displays the Bank Acc. Reconciliation List. This is described later in this module.
• Receivables-Payables – Contains a summary of receivables and payables.
• List – Displays a list of all bank accounts in the system.
• Detail Trial Balance – Displays options to print a detail trial balance for bank accounts.
• Check Details – Displays options to print a detailed trial balance for selected checks.
The Actions tab also provides access to the cash receipts journals and the payment journals.
You can use the Navigate tab to display information about the balances and transaction amounts for the bank account.
Microsoft Official Training Materials for Microsoft Dynamics ® Your use of this content is subject to your current services agreement
Finance Essentials in Microsoft Dynamics® NAV 2013
4 - 8
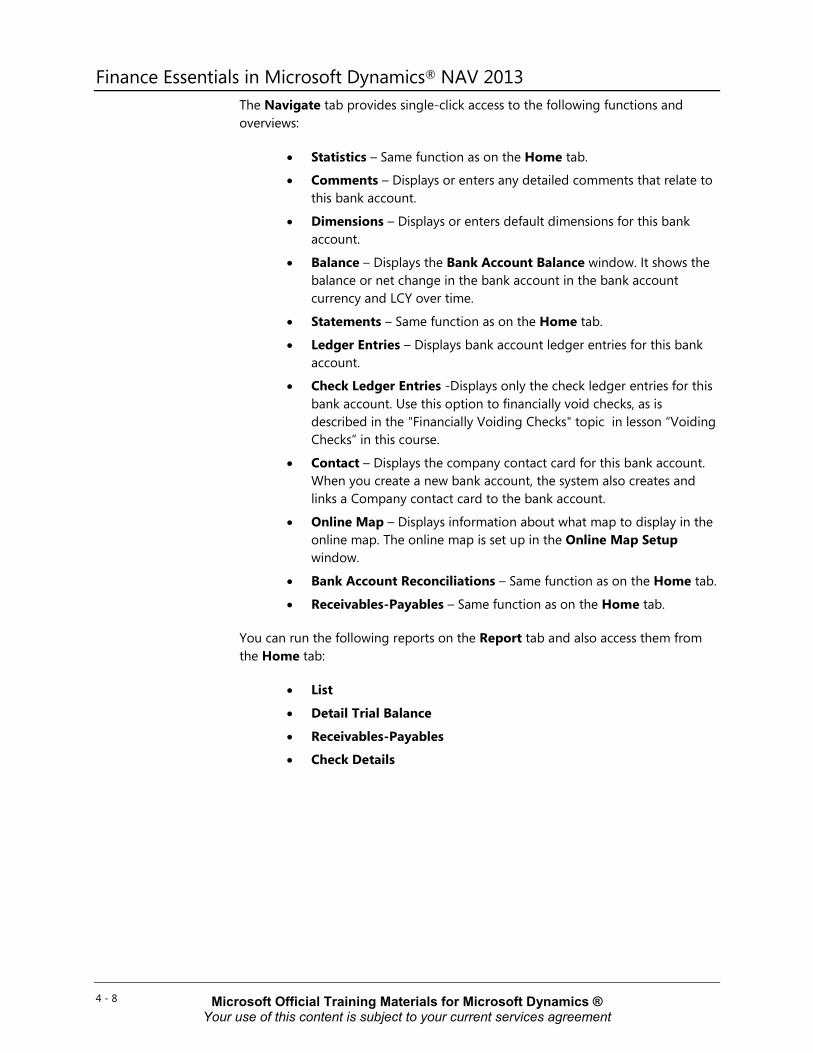
The Navigate tab provides single-click access to the following functions and overviews:
• Statistics – Same function as on the Home tab.
• Comments – Displays or enters any detailed comments that relate to this bank account.
• Dimensions – Displays or enters default dimensions for this bank account.
• Balance – Displays the Bank Account Balance window. It shows the balance or net change in the bank account in the bank account currency and LCY over time.
• Statements – Same function as on the Home tab.
• Ledger Entries – Displays bank account ledger entries for this bank account.
• Check Ledger Entries -Displays only the check ledger entries for this bank account. Use this option to financially void checks, as is described in the "Financially Voiding Checks" topic in lesson “Voiding Checks” in this course.
• Contact – Displays the company contact card for this bank account. When you create a new bank account, the system also creates and links a Company contact card to the bank account.
• Online Map – Displays information about what map to display in the online map. The online map is set up in the Online Map Setup window.
• Bank Account Reconciliations – Same function as on the Home tab.
• Receivables-Payables – Same function as on the Home tab.
You can run the following reports on the Report tab and also access them from the Home tab:
• List
• Detail Trial Balance
• Receivables-Payables
• Check Details
Microsoft Official Training Materials for Microsoft Dynamics ® Your use of this content is subject to your current services agreement

Module 4: Cash Management – Receivables and Payables
4 - 9
Lab 4.1: Create a Bank Account Scenario
CRONUS International Ltd. recently opened a new account at the Super Krone Bank in Denmark. As the accounting manager, it is your responsibility to set up the bank account in Microsoft Dynamics NAV 2013 with the criteria shown in the following table.
Field Value
Bank No. SK Bank - DK
Name SK Bank Denmark
Address 1-3 Remouladevej
City Vedbaek
Post Code DK-2950
Country/Region Code DK
Phone No. 46 75 75 34
Contact Name Anne Hellung-Larsen
Bank Branch No. 2396824
Bank Account No. 9652833
Additionally, Linda Martin is the resource responsible for all interactions with this bank. The bank's currency is Danish Kroner (DKK) and the bank must be assigned to the Currencies posting group.
Close the Bank Account Card when you have finished the setup process.
Exercise 1: Create a Bank Account
Task 1: Create the bank account in the Bank Account Card window
High Level Steps 1. Open the Bank Account Card and insert a new record. 2. Complete each FastTab by using the criteria that is specified in the
scenario.
Detailed Steps 1. Open the Bank Account Card and insert a new record.
a. In the Search box, enter Bank Accounts and then select the related link.
b. Click New in the ribbon.
Microsoft Official Training Materials for Microsoft Dynamics ® Your use of this content is subject to your current services agreement

Finance Essentials in Microsoft Dynamics® NAV 2013
4 - 10
2. Complete each FastTab by using the criteria that is specified in the scenario.
a. In the No. field, enter SK Bank / DK. b. In the Name field, enter Super Krone Bank. c. In the Address field, enter Remouladevej 1-3. d. In the Post Code field, click the drop-down list and select DK-
2950 and then click Enter. e. In the Country/Region Code field, click the drop-down list and
then select DK from the list. f. In the Phone No. field, enter 46 75 75 34 and then click Enter. g. In the Contact field, enter Ann Hellung/Larsen and then click
Enter. h. In the Bank Branch No. field, enter 2396824 and then click
Enter. i. In the Bank Account No. field, enter 9652833 and then click
Enter. j. In the Our Contact Code field, click the drop-down list and then
select Linda Martin.
k. On the Posting FastTab, in the Currency Code field, click the drop-down list and then select DKK.
l. In the Bank Account Posting Group field, click the drop-down list and then select CURRENCIES.
m. Click OK.
Customer Overview To manage the total finances of the company, you must be able to manage customer data. In Microsoft Dynamics NAV 2013, customer master data is maintained in customer cards. The customer card is used for customers in receivables management, financial management, and order management.
Customers Window
To access the Customers window from the navigation pane, click the Departments button, click Financial Management, click Receivables, and then click Customers.
Microsoft Official Training Materials for Microsoft Dynamics ® Your use of this content is subject to your current services agreement
Module 4: Cash Management – Receivables and Payables
4 - 11
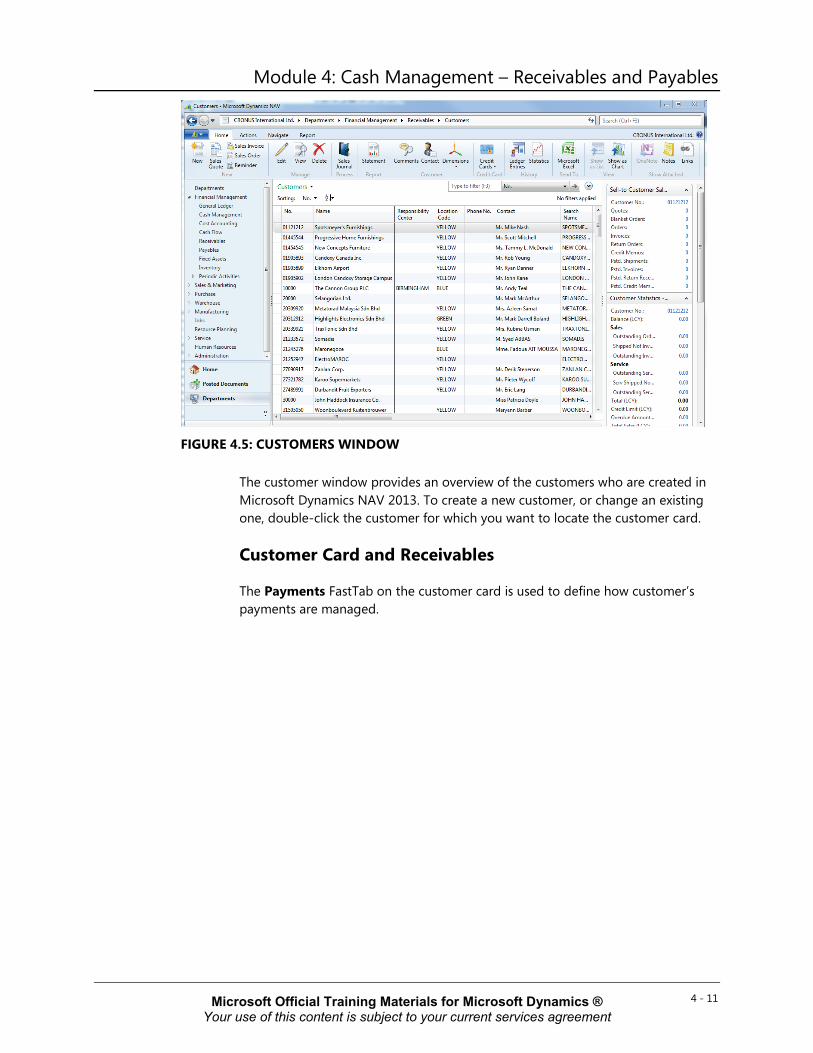
FIGURE 4.5: CUSTOMERS WINDOW
The customer window provides an overview of the customers who are created in Microsoft Dynamics NAV 2013. To create a new customer, or change an existing one, double-click the customer for which you want to locate the customer card.
Customer Card and Receivables
The Payments FastTab on the customer card is used to define how customer’s payments are managed.
Microsoft Official Training Materials for Microsoft Dynamics ® Your use of this content is subject to your current services agreement

Finance Essentials in Microsoft Dynamics® NAV 2013
4 - 12
FIGURE 4.6: CUSTOMER CARD PAYMENTS FASTTAB
The Payments FastTab contains the following fields:
• Application Method – Specify how to apply payments for this customer. The following options are available:
o Manual – Payments are only applied if you specify a document.
o Apply to Oldest – If you do not specify a document for the payment to be applied to, payments are applied to the oldest of the customer’s open entries.
• Payments Terms Code – Specifies a code for the payment terms that you will grant the customer. The payment term determines the due date of the invoices and credit memos the customer will receive. You also use the payment terms to specify the payment discount percentage.
• Payment Method Code – Specifies a code for the method that the customer usually uses to submit payment. To view the payment methods in the Payment Methods window, click the field.
• Reminder Terms Code – Specifies a reminder terms code for the customer. To view the reminder terms codes in the Reminder Terms window, click the field.
• Finance Charge Terms Code – Specifies a code that will be used to compute finance charges, such as interests, for the customer.
• Cash Flow Payments Term Code – Specifies a payment term that will be used for calculating cash flow. Cash flow payment terms are used in the Cash Flow Forecast Card window.
Microsoft Official Training Materials for Microsoft Dynamics ® Your use of this content is subject to your current services agreement

Module 4: Cash Management – Receivables and Payables
4 - 13
• Print Statements – Specifies whether to include this customer when you print statements.
• Last Statement No. – Shows the number for the last statement that is printed for this customer.
• Block Payment Tolerance – Specifies that the customer is not allowed payment tolerance.
Analyzing Receivables
When you post transactions to customers in Microsoft Dynamics NAV 2013, the following customer entries are created:
• Customer ledger entries
• Detailed customer ledger entries
Customer entries provide more information about customers and sales business. Customer ledger entries are posted entries from sales documents such as, sales orders and sales invoices.
FIGURE 4.7: CUSTOMER LEDGER ENTRIES
Note: The system shows open entries that have past their due date in bold, italic and red.
To view the detail of a customer ledger entry, you can drill down on the amount fields to the detailed customer ledger entries.
Microsoft Official Training Materials for Microsoft Dynamics ® Your use of this content is subject to your current services agreement

Finance Essentials in Microsoft Dynamics® NAV 2013
4 - 14
The Customer Entries Diagram figure shows the structure of the entries.
FIGURE 4.8: CUSTOMER ENTRIES DIAGRAM
The detailed customer ledger entries store the actual amounts of the customer transactions, such as an invoice. The customer ledger entries show the amounts as FlowFields.
Examples of where additional detailed customer ledger entries are created to change the customer ledger entries include the following:
• Foreign currency exchange rates
• Payment discounts
• Payment tolerances
• Applications
• Rounding
The Detailed Cust. Ledger Entries window figure shows the two detailed customer ledger entries of one (applied) customer ledger entry.
Microsoft Official Training Materials for Microsoft Dynamics ® Your use of this content is subject to your current services agreement

Module 4: Cash Management – Receivables and Payables
4 - 15
FIGURE 4.9: DETAILED CUST. LEDGER ENTRIES WINDOW
Vendor Overview To manage the total finances of the company, you must be able to manage vendor data and vendor payments. This helps avoid penalty fees if there is a late payment, maintain a good relationship with the vendors, and to receive a discount if the company makes an early payment.
Vendor Window
To access the Vendors window from the navigation pane, click the Departments button, click Financial Management, click Payables, and then click Vendors.
FIGURE 4.10: VENDORS WINDOW
The vendor window shows the most relevant vendor information. You can use the vendor card to view additional information, to create a new vendor, or to change an existing vendor.
Microsoft Official Training Materials for Microsoft Dynamics ® Your use of this content is subject to your current services agreement

Finance Essentials in Microsoft Dynamics® NAV 2013
4 - 16
Vendor Card and Payables
The Payments FastTab on the Vendor Card is used to define how payments to vendors are managed.
FIGURE 4.11: VENDOR CARD PAYMENTS FASTTAB
The Payments FastTab contains following fields:
• Application Method – Specify how to apply payments for this customer. The following options are available:
o Manual – Payments are only applied if you specify a document.
o Apply to Oldest – If you do not specify a document for the payment to be applied to, payments are applied to the oldest of the customer’s open entries.
• Payments Terms Code – Specifies a code for the payment terms that you will grant the customer. The payment term determines the due date of the invoices and credit memos from the vendor. You also use the payment terms to specify the payment discount percentage.
• Payment Method Code – Specifies a code for the method that the customer usually uses to submit payment. To view the payment methods in the Payment Methods window, click the field.
• Priority – Specifies a number that corresponds to the priority you give the vendor. The Priority field can be used if you have only a limited amount available for payments.
• Cash Flow Payments Term Code – Specifies a payment term that will be used for calculating cash flow. Cash flow payment terms are used in the Cash Flow Forecast Card window.
Microsoft Official Training Materials for Microsoft Dynamics ® Your use of this content is subject to your current services agreement
Module 4: Cash Management – Receivables and Payables
4 - 17
• Our Account No. – Specifies your account number with the vendor, if you have one.
• Block Payment Tolerance – Specifies that a vendor is not allowed payment tolerance.
Analyzing Payables
Similar to customers, vendor postings also result in two vendor entries:
• Vendor ledger entries
• Detailed vendor ledger entries
Vendor entries behave exactly like customer entries. Therefore, for more information, refer to the topic “Analyzing Receivables” in this module.
Cash Receipt Journal and Payment Journal Overview In Microsoft Dynamics NAV 2013, payments received from customers are recorded in the Cash Receipt Journal.
The Cash Receipt Journal can be accessed from the following two areas on the financial management menu:
• Cash Management
• Receivables
Payments to vendors are created and posted in the Payment Journal. You can use the payment journal to quickly record and post handwritten checks. Computer checks for open invoices can be entered manually, or by using the Suggest Vendor Payments batch job.
The Payment Journal can be accessed from the following two areas on the Financial Management menu:
• Cash Management
• Payables
Entering Cash Receipts
When payments from customers are received, they are recorded in the cash receipt journal. You can apply payments to open customer ledger entries, by using the Apply Entries function.
Microsoft Official Training Materials for Microsoft Dynamics ® Your use of this content is subject to your current services agreement

Finance Essentials in Microsoft Dynamics® NAV 2013
4 - 18
FIGURE 4.12: CASH RECEIPT JOURNAL WINDOW
The following fields are important when you enter and post a cash receipt:
• Document Type: When you receive payments from customers, select the document type Payment. For payments that you send to customers, the document type should be Refund.
• Account Type: The account type is set to Customer.
• Bal. Account Type: To post the payment to a bank account, select Bank Account in this field.
• Bal. Account No.: Select the bank account on which to post the payment.
Note: You can set up the balancing account type and balancing account number on the journal batch. Then they are populated automatically on the journal line when a payment is entered.
Demonstration: Enter Cash Receipt Payments
Scenario: On January 14, 2014, Arnie, the accounts receivable administrator at CRONUS International Ltd. receives a payment from customer 10000, The Cannon Group PLC. The following table shows the breakdown of the 63,269.04 LCY payment.
Invoice/Document No. Amount (LCY)
00-16 30,000.00
103005 8,269.04
n/a 25,000.00
Microsoft Official Training Materials for Microsoft Dynamics ® Your use of this content is subject to your current services agreement

Module 4: Cash Management – Receivables and Payables
4 - 19
The 30,000.00 is a partial payment for Document No. 00-16 and the payment for Document No. 103005 is a full amount.
Because the 25,000.00 LCY is not assigned to an invoice, Arnie decides to apply the amount to the customer account without applying it to a particular invoice.
The Cash Receipt Journal is used to post the payment.
Demonstration Steps
1. Enter the payment for this customer. a. In the Search box, enter Cash Receipt Journals, and then select
the related link.
b. In the Batch Name field, click the drop-down list and select Bank and then click OK.
c. In the Posting Date field, type 01/14/14. d. In the Document Type field, click the drop-down list and then
select Payment. e. In the Account Type field, click the drop-down list and then
select Customer. f. In the Account No. field, type 10000.
g. In the Amount field, type -63269.04. h. In the Home tab on the ribbon, click Apply Entries. i. In the line for Document No. 00-16, select the Amount to
Apply field and then type 30000. j. Press TAB or ENTER. This is the partial amount that is applied to
invoice 00-16. k. Locate and select the line for Document No. 103005.
l. Click Set Applies-to ID. This is the full amount that is applied to invoice 103005. The Amount field at the bottom of the window contains -25,000.00. This is the open amount that will be posted to the customer account without having it be applied to an invoice.
m. Click OK.
The Bal. Account No. field is populated with the WWB-OPERATING bank account. This is set up on the Bank batch.
To post the Cash Receipt Journal, follow these steps.
a. Click Post. b. Click Yes to post the journal lines. c. Click OK.
d. Click OK to close the Cash Receipt Journal.
Microsoft Official Training Materials for Microsoft Dynamics ® Your use of this content is subject to your current services agreement

Finance Essentials in Microsoft Dynamics® NAV 2013
4 - 20
To review the entry posted to the bank account, follow these steps.
a. In the Cash Management folder, click Bank Accounts.
b. Locate and select bank account WWB-OPERATING. c. In the Navigate tab on the ribbon, click Ledger Entries. d. Locate the payment line dated 01/14/14 for 63,269.04. This entry
represents the payment that is posted in the cash receipt journal.
e. Close the Bank Account Ledger Entries window.
To review the posted Customer Ledger Entries for this payment, follow these steps.
a. On the Financial Management menu, click Receivables > Customers.
b. Locate and select customer 10000, The Cannon Group PLC. c. In the Home tab on the ribbon, click Ledger Entries. d. Review the payment lines. The Remaining Amount field for the:
Partly paid invoice (00-16) displays the unpaid amount of 3,852.35.
Fully paid invoice (103005) displays a zero balance.
Payment line dated 01/14/14 displays the open -25,000.00 credit that is not applied to any invoice.
e. Click OK to close the Customer Ledger Entries.
Entering Payments
You can use the payment journal to prepare and post payments to vendors. With the Apply Entries function, you can apply payments to open vendor ledger entries.
When a vendor is paid by using a handwritten check, you can enter a line in the payment journal, by using the bank payment type Manual Check. This creates a corresponding check ledger entry for the amount.
Handwritten checks are quickly recorded and posted.
Printed computer checks can be entered:
• Manually
• By using the Suggest Vendor Payments batch job
Microsoft Official Training Materials for Microsoft Dynamics ® Your use of this content is subject to your current services agreement

Module 4: Cash Management – Receivables and Payables
4 - 21
FIGURE 4.13: PAYMENT JOURNAL WINDOW
The following fields are important when you enter and post a payment:
• Document Type: When you make payments to vendors, select the document type Payment. For payments that are created by vendors, the document type should be Refund.
• Account Type: The account type is set to Vendor for recording vendor payments.
• Bal. Account Type: To post the payment to a bank account, select Bank Account in this field.
• Bal. Account No.: Select the bank account on which to post the payment.
• Bank Payment Type: Select one of the following options:
o <Blank>: The payment is created without a check.
o Computer Check: Checks are printed from the payment journal.
o Manual Check: Use a handwritten check to pay the vendor.
The Document No. field represents the check number and is populated based on the selections in the Bank Payment Type field.
When you process manual checks, the Bank Payment Type is set to Manual Check, and the check number is entered in the Document No. field.
For computer checks, the Bank Payment Type is set to Computer Check and the Document No. field is specified as follows:
• To print one check for each vendor:
o The Document No. field is left empty.
o The Document No. field is populated with the check numbers that are specified during the check printing process.
Microsoft Official Training Materials for Microsoft Dynamics ® Your use of this content is subject to your current services agreement

Finance Essentials in Microsoft Dynamics® NAV 2013
4 - 22
• To print multiple checks for each vendor:
o Create separate lines for each vendor payment.
o In the Document No. field on each line, indicate separate check numbers, for example, enter 1 on the first line, 2 in the next line, and so on.
o During the check printing process, Microsoft Dynamics NAV 2013 recognizes that the numbers are different and prints multiple checks.
Bank Account Currency Restrictions on Payments
The currency of the bank account can limit the currency of payments that are made by using the bank account. The following table provides a summary of currency restrictions for bank accounts.
Bank Account Currency Code
Bank Payment Type = Computer Check or Manual Check
Bank Payment Type = Blank
Blank (LCY) Checks are only printed for LCY payment lines.
Only LCY payment lines post.
Payment lines with any currency code including LCY post.
Currency Code Checks are only printed for payment lines with the same currency code as the bank account. Only payment lines with the same currency code as the bank account post.
Only payment lines with the same currency code as the bank account post.
Demonstration: Enter and Post Payables Checks
Scenario: April, the accounts payable coordinator at CRONUS International Ltd., is informed of two checks that were handwritten in January, as shown in the following table.
Vendor Date Check No. Amount (LCY) Applies to
10000 01/21/14 1201 8,245.76 Document No. 108019
50000 01/28/14 1203 1,500.00 Deposit for future work
April enters and posts these checks in the Payment Journal as manual checks.
Microsoft Official Training Materials for Microsoft Dynamics ® Your use of this content is subject to your current services agreement

Module 4: Cash Management – Receivables and Payables
4 - 23
Demonstration Steps
1. Enter the two manual checks and apply if this is possible.
a. In the Search box, enter Payment Journals, and then select the related link.
b. In the Batch Name field, click the drop-down list and then select Bank.
c. Click OK. d. In the Posting Date field, enter 01/21/14. e. In the Document Type field, click the drop-down list and then
select Payment. f. In the Document No. field, enter 1201. g. In the Account Type field, click the drop-down list and then
select Vendor.
h. In the Account No. field, enter 10000. i. Click Apply Entries. j. Click the line for Document No. 108019. k. Click Set Applies-to ID.
l. Click OK.
The Amount field is populated with the invoice amount: 8,245.76.
a. Make sure that the Bal. Account No. field contains the WWB-OPERATING bank account. This is set up on the Bank batch.
b. In the Bank Payment Type field, click the drop-down list and select Manual Check.
To enter the second manual check and post the Payment Journal, follow these steps.
a. Click the next line. b. In the Posting Date field, enter 01/28/14. c. In the Document No. field, enter 1203.
d. In the Account Type field, click the drop-down list and then select Vendor.
e. In the Account No. field, enter 50000. f. In the Amount field, enter 1500.
g. In the Bank Payment Type field, click the drop-down list and select Manual Check.
h. Click Post. i. Click Yes to post the journal lines.
j. Click OK. k. Close the Payment Journal.
Microsoft Official Training Materials for Microsoft Dynamics ® Your use of this content is subject to your current services agreement

Finance Essentials in Microsoft Dynamics® NAV 2013
4 - 24
To review the posted entries to the bank account, follow these steps.
a. In the Cash Management page, click Bank Accounts.
b. Locate and select bank account WWB-OPERATING. c. Click Check Ledger Entries in the ribbon.
Check No. 1201 and 1203 represent the manual checks posted to this bank account.
a. Click Close in the Check Ledger Entries window.
To review the posted entries to the vendors, follow these steps.
a. On the Financial Management page, click Payables > Vendors. b. Locate and select vendor 10000.
c. Click Ledger Entries in the ribbon. d. Locate the payment line dated 01/21/14 and the line for
Document No. 108019.
Because a full payment is applied completely to the invoice, the Remaining Amount field on both lines displays 0.00.
a. Close the Vendor Ledger Entries window. b. Locate and select vendor 50000. c. Click Ledger Entries in the ribbon.
d. Locate the payment line dated 01/28/14. Because this payment is not applied to a specific invoice, the Remaining Amount field displays the full amount of the payment.
e. Close the Vendor Ledger Entries window.
Microsoft Official Training Materials for Microsoft Dynamics ® Your use of this content is subject to your current services agreement

Module 4: Cash Management – Receivables and Payables
4 - 25
Lab 4.2: Apply and Post Cash Receipts Scenario
On January 28, 2014, you receive a 154,251. 63 LCY payment from customer 30000, John Haddock Insurance Co. This payment is for the following invoices.
Invoice/Document No. Amount (LCY)
00-10 76,167.75
00-13 40,000.00
n/a 38,083.88
As the accounts receivable administrator for CRONUS International Ltd., it is your responsibility to apply and post this payment to this customer's invoices. Use the Bank batch for this posting.
After you post it, review the posted customer ledger entries.
Exercise 1: Enter, Apply, and Post the Cash Receipt Journal
Task 1: Create the payment line for customer 30000.
High Level Steps 1. Open the Bank batch in the Cash Receipt Journal.
2. Create the payment line for customer 30000.
Detailed Steps 1. Open the Bank batch in the Cash Receipt Journal.
a. In the Search box, enter Cash Receipt Journals, and then select the related links.
b. Make sure that the Bank batch is selected.
2. Create the payment line for customer 30000. a. In the Posting Date field, enter 01/28/14. b. In the Document Type field, click the drop-down list and then
select Payment. c. In the Account Type field, click the drop-down list and then
select Customer. d. In the Account No. field, enter 30000. e. In the Amount field, enter -154,251.63.
Microsoft Official Training Materials for Microsoft Dynamics ® Your use of this content is subject to your current services agreement

Finance Essentials in Microsoft Dynamics® NAV 2013
4 - 26
Task 2: Apply the full and partial payments.
High Level Steps 1. Apply the entries.
Detailed Steps 1. Apply the entries.
a. In the ribbon, click Apply Entries. b. Locate and select the line for Document No. 00-10.
c. In the ribbon, click Set Applies-to ID. d. Locate and select the line for Document No. 00-13. e. Click the Amount to Apply field and then enter 40.000.00. f. Verify that the Balance field at the bottom of the window
is -38,083.88. g. Click OK.
Task 3: Post the journal lines
High Level Steps 1. Post the journal lines.
Detailed Steps 1. Post the journal lines.
a. Click Post. b. Click Yes to post the journal lines.
c. Click OK. d. Close the Cash Receipt Journal window.
Task 4: Review the customer ledger entries.
High Level Steps 1. Open the Customer Card window and review the posted entries for
this payment.
2. Access the Customer Ledger Entries window. 3. Review the posted entries for this payment.
Detailed Steps 1. Open the Customer Card window and review the posted entries for
this payment. a. On the Financial Management menu, click Receivables >
Customers.
b. Locate and select customer 30000, “John Haddock Insurance Co.”
Microsoft Official Training Materials for Microsoft Dynamics ® Your use of this content is subject to your current services agreement

Module 4: Cash Management – Receivables and Payables
4 - 27
2. Access the Customer Ledger Entries window. a. Click Ledger Entries.
3. Review the posted entries for this payment.
a. Review the posted entries. Document No. 00-10 has a Remaining Amount of 0.00.
Document No. 00-13 has a Remaining Amount of 40,399.29.
The payment line posted on 01/28/14 has a Remaining Amount of -38,083.88.
b. Close the Customer Ledger Entries and Customer Card windows.
Microsoft Official Training Materials for Microsoft Dynamics ® Your use of this content is subject to your current services agreement

Finance Essentials in Microsoft Dynamics® NAV 2013
4 - 28
Lab 4.3: Enter and Post Manual Checks Scenario
In January, two manual checks are written:
• On 01/08/14, check number 1200, for 8,132.00 LCY, for Document No. 108018, to vendor 10000, London Postmaster.
• On 01/23/14, check number 1202, for 2,850.00 LCY, for a delivery that required payment on delivery to vendor 60000, Grassblue Ltd.
The invoice for the check to vendor 60000 is still not received. But because it is approaching the end of the month, the check must be recorded.
As the accounts payable coordinator at CRONUS International Ltd, it is your responsibility to apply and post these manual checks to the worldwide operating bank account, by using the Bank batch.
Exercise 1: Enter, Apply and Post the Payment Journal Using Manual Checks.
Task 1: Enter both manual checks in the Payment Journal, and apply if this is possible.
High Level Steps 1. Open the Payment Journal and apply if possible.
Detailed Steps 1. Open the Payment Journal and apply if possible.
a. In the Search box, enter Payment Journals, and then select the related link.
b. Make sure that the Bank batch is selected.
c. In the Posting Date field, enter 01/08/14. d. In the Document Type field, click the drop-down list and select
Payment. e. In the Document No. field, enter 1200.
f. In the Account Type field, click the drop-down list and select Vendor.
g. In the Account No. field, enter 10000.
h. Click Apply Entries. i. Click the line for Document No. 108018. j. Click Set Applies-to ID. k. Click OK.
Microsoft Official Training Materials for Microsoft Dynamics ® Your use of this content is subject to your current services agreement

Module 4: Cash Management – Receivables and Payables
4 - 29
l. In the Bank Payment Type field, click the drop-down list and select Manual Check.
m. Click the next line. n. In the Posting Date field, enter 01/23/14. o. In the Document No. field, enter 1202. p. In the Account No. field, enter 60000.
q. In the Amount field, enter 2850. r. In the Bank Payment Type field, click the drop-down list and
select Manual Check.
Task 2: Post the Journal.
High Level Steps 1. Post the journal.
Detailed Steps 1. Post the journal.
a. Click Post in the ribbon.
b. Click Yes to post the journal lines. c. Click OK.
Suggest Vendor Payments In the Payment Journal, the Suggest Vendor Payments function processes open vendor ledger entries, and creates payment suggestions based on criteria such as the following:
• Specific vendors
• Due Dates
• Vendor Priority
The Suggest Vendor Payments function can also be run to include payments for which you can obtain a discount, and to summarize a suggested line for each vendor, by dimension.
Suggest Vendor Payments Batch Job Overview
The Suggest Vendor Payments batch job contains two FastTabs:
• Vendor
• Options
To open the batch job, click Suggest Vendor Payments in the Home tab in the ribbon.
Microsoft Official Training Materials for Microsoft Dynamics ® Your use of this content is subject to your current services agreement

Finance Essentials in Microsoft Dynamics® NAV 2013
4 - 30
On the Vendor FastTab, filter the suggestion lines by vendor information. Additional filters can be added in a blank line.
To suggest vendor payments for all vendors, do not set filters on this FastTab.
The Options FastTab is used to determine how the batch job is executed and contains the following fields:
• Last Payment Date – The latest payment date that can appear on the vendor ledger entries to be included in the batch job.
o Only entries that have a due date or a payment discount date either before or on this date are included.
Microsoft Official Training Materials for Microsoft Dynamics ® Your use of this content is subject to your current services agreement

Module 4: Cash Management – Receivables and Payables
4 - 31
o If this date is earlier than the system date, the system displays a warning message.
• Find Payment Discounts – If this field is selected the batch job includes vendor ledger entries for which a payment discount can be received.
• Use Vendor Priority – If this field is selected, the contents of the Priority field on the Vendor Cards determine in which order vendor entries are suggested for payment by the batch job. Microsoft Dynamics NAV 2013 always prioritizes vendors for payment suggestions if an available amount is specified in the Available Amount (LCY) field.
• Available Amount (LCY) – Indicates that there is a maximum amount available (in local currency) for payments. Therefore, the batch job:
o Creates a payment suggestion from this amount and the vendor priority.
o Only includes vendor entries that can be paid fully.
• Summarize per Vendor – If this field is selected, the batch job suggests one line for each vendor, for each currency in which the vendor has ledger entries. If this field is not selected, the batch job suggests one line for each invoice.
• By Dimension – If the Summarize per Vendor check box contains a check mark select the dimensions to group the suggested payments. Based on the selected dimensions, Microsoft Dynamics NAV 2013:
o Calculates a total amount for each dimension value that is contained in the outstanding vendor ledger entries.
o Transfers each amount and the dimension value to a new payment line.
• Posting Date – The posting date that appears on the lines that the batch job inserts in the Payment Journal.
• Starting Document No. – Automatically populated with the next available number in the number series for the journal batch that is linked to the payment journal. This field can also be filled in manually.
• New Doc. No. per Line – If this field is selected, the batch job fills in the payment journal lines with consecutive document numbers, starting with the document number that is specified in the Starting Document No. field. This check box must contain a check mark if:
o The Bank Payment Type field is set to Manual Check.
o The Summarize per Vendor field does not contain a check mark.
Microsoft Official Training Materials for Microsoft Dynamics ® Your use of this content is subject to your current services agreement

Finance Essentials in Microsoft Dynamics® NAV 2013
4 - 32
• Bal. Account Type – The balance account type to be used in the batch job. The options are as follows:
o G/L Account
o Bank Account
• Bal. Account No. – Either the G/L Account or Bank Account number.
• Bank Payment Type – If the Bal. Account Type is set to Bank Account the selection in this field determines whether the suggested lines are Manual Checks or Computer Checks.
Note: If Bank Account is selected and the bank account contained in the Bal. Account No. field has a currency code other than LCY, only those entries with the same currency as the bank account are included in the batch job.
Demonstration: Suggest Vendor Payments for Local Vendors
Scenario: On the fifteenth of each month, April, the accounts payable coordinator, pays invoices for local vendors. Today is January 15, 2014, and she must run the Suggest Vendor Payments batch job as follows:
• For all open entries that are due on or before January 25, 2014.
• For vendors from Great Britain (GB).
• To search for payment discounts.
The checks are printed to create a single check for each vendor.
Demonstration Steps
1. Run the Suggest Vendor Payments batch job for all local vendors. a. In the Search box, enter Payment Journals, and then select the
related link.
b. Make sure that the Bank batch is selected. c. Click Suggest Vendor Payments. d. Open the Options FastTab. e. In the Last Payment Date field, enter 01/25/14.
f. Click the Find Payment Discounts check box. g. In the Posting Date field, enter 01/15/14. h. In the Starting Document No. field, enter CH001. i. In the Bal. Account Type field, click the drop-down list and then
select Bank Account. j. In the Bal. Account No. field, click the drop-down list and select
WWB-OPERATING and then click OK.
Microsoft Official Training Materials for Microsoft Dynamics ® Your use of this content is subject to your current services agreement

Module 4: Cash Management – Receivables and Payables
4 - 33
k. In the Bank Payment Type field, click the drop-down list and then select Computer Check.
l. In the Vendor FastTab, click the Payment Method Code drop-down list and select Country/Region Code.
m. In the Enter a value field for the Country/Region Code line, select GB.
n. Click OK. o. Click OK to the message that asks whether you still want to run
the batch job, because the payment date is earlier than 01/23/14. p. Click OK to the message that suggested vendor payments lines
for all currencies that are created.
To verify that open entries continue to be included in the Suggest Vendor Payments batch job, follow these steps.
a. Delete all Payment Journal lines.
b. Run the same Suggest Vendor Payment process by clicking Suggest Vendor Payments.
c. Click OK. d. Click OK to the message that states lines are created.
Be aware that the lines all appear again.
Until open entries are closed, they will appear in the Suggest Vendor Payment process if they are within the set filters and parameters.
To prepare for the "Suggest Payments for a Single Vendor" demonstration, delete all the Payment Journal lines again.
Suggest Payments Using Vendor Priority
Use vendor priority when there are limited funds available to pay vendors. Therefore, you must prioritize the order in which vendors are paid. Vendor priority is set on the Payments FastTab of the Vendor Card.
Microsoft Official Training Materials for Microsoft Dynamics ® Your use of this content is subject to your current services agreement

Finance Essentials in Microsoft Dynamics® NAV 2013
4 - 34
FIGURE 4.15: VENDOR CARD PAYMENTS FASTTAB
To determine which specific payments to suggest, Microsoft Dynamics NAV 2013 applies the following rules:
• Only vendor entries that can be fully paid are suggested.
• All Priority 1 vendor entries that can be fully paid within the Available Amount (LCY) are suggested first. Any vendor entries for lesser priority vendors that can be fully paid within the remaining amount are then suggested.
• For each vendor, the batch job suggests amounts based on the Due Date of the vendor ledger entries for that vendor. Invoices with the earliest due date are suggested first.
When specifying an Available Amount (LCY) in the Suggest Vendor Payments batch job, Microsoft Dynamics NAV 2013, does not automatically calculate the payment tolerance and the payment discount tolerance when suggesting the amounts to pay.
This lesson includes a demonstration that will show how to use vendor priorities that have specified available amounts. To provide a controlled demonstration environment, only two vendors are included. Typically when you are using vendor priority, specific vendors are not filtered.
Microsoft Official Training Materials for Microsoft Dynamics ® Your use of this content is subject to your current services agreement

Module 4: Cash Management – Receivables and Payables
4 - 35
Demonstration: Use Vendor Priority and Available Amounts
Scenario: On the twenty-fifth of each month, April, the accounts payable coordinator, pays all open vendor invoices. However, this month there is a limited fund issue because of previous holiday expenses. The accountant has informed April to use vendor priority to allocate the 100,000 available for payments.
April learns that vendor 10000 has Priority 1 and vendor 20000 has Priority 2. The following table shows the ledger entries that are ready for payment this month.
Vendor Document No. Due Date Amount (LCY)
10000 5578 01/17/14 -24,156.97
5672 01/18/14 -57,976.72
108023 01/31/14 -15,846.00
20000 108017 12/31/13 -1,535.63
108025 01/31/14 -1,368.90
Because of the limited funds, April also decides to search for available discounts when she runs the Suggest Vendor Payments batch job.
Demonstration Steps
1. Run the Suggest Vendor Payments batch job by using vendor priority and available amounts. a. In the Search box, enter Payment Journals, and then select the
related link.
b. Click Suggest Vendor Payments. c. In the Last Payment Date field, enter 01/31/14. d. Click the Find Payment Discounts check box to insert a check
mark.
e. Select the Use Vendor Priority check box. f. In the Available Amount (LCY) field, enter 100000. g. In the Posting Date field, enter 01/24/14. h. In the Bal. Account Type field, click the drop-down list and
select Bank Account. i. In the Bal. Account No. field, click the drop-down list and select
WWB-OPERATING.
j. Click OK. k. In the Bank Payment Type field, click the drop-down list and
select Computer Check.
Microsoft Official Training Materials for Microsoft Dynamics ® Your use of this content is subject to your current services agreement

Finance Essentials in Microsoft Dynamics® NAV 2013
4 - 36
l. On the Vendor FastTab, set a filter for the No. line, enter 10000..20000.
m. Click OK. n. Click OK to the message that suggested that the vendor payment
lines for all currencies are created.
The batch job suggests payments totaling less than 100,000.00 LCY. The following table shows how Microsoft Dynamics NAV 2013 applied the vendor priority rules to suggest the payments in the demonstration.
Vendor by
Priority
Document Number
Amount Available Amount
(LCY)
Remaining Available
Amount (LCY)
Payment Line
10000 5578 -24,156.97 100,000 75,843.03 Yes
5672 -57,976.72 75,843.03 17,866.31 Yes
108023 -15,846.00 17,866.31 2,020.31 Yes
20000 108017 -1,535.63 2,020.31 484,68 Yes
108025 -1,368.90 No
Note: The payments suggested by the batch job are listed by vendor order in the Payment Journal. They are not listed in the order of vendor priority or in the order they are suggested.
Do not delete the suggested vendor payment lines for vendors 10000 and 20000. These entries are used in the Print Computer Checks demonstration.
Microsoft Official Training Materials for Microsoft Dynamics ® Your use of this content is subject to your current services agreement

Module 4: Cash Management – Receivables and Payables
4 - 37
Lab 4.4: Suggest Vendor Payments for a Single Vendor Scenario
On the twenty-fifth of each month, the Suggest Vendor Payments batch job is run for vendor 30000, CoolWood Technologies, for any credit memos and all payments that are expected by the end of the month. It is January 25, 2014, and as the accounts payable coordinator, it is your responsibility to run the batch job by using the following criteria:
• Use the Bank batch.
• Have the batch job search for payment discounts.
• Post one single payment to this vendor.
• Use Starting Document No. CWT 012514.
After you run the batch job:
• Print a single check for all invoices to a file that is named CWTChecks 012514.
• Post the checks.
Exercise 1: Suggest Vendor Payments for a Single Vendor
Task 1: Set up and Run the Suggest Vendor Payments Batch Job
High Level Steps 1. Run the Suggest Vendor Payments batch job.
Detailed Steps 1. Run the Suggest Vendor Payments batch job.
a. In the Search box, enter Payment Journals, and then select the related link.
b. Make sure that the Bank batch is selected. c. Click Suggest Vendor Payments. d. Enter the following information on the Options FastTab.
i. In the Last Payment Date field, enter 01/31/14. ii. Make sure that the Find Payment Discounts check box
is selected. iii. Select the Summarize per Vendor check box.
iv. In the Posting Date field, enter 01/24/14. v. In the Starting Document No. field, enter CWT 012514. vi. In the Bal. Account Type field, click the drop-down list
and select Bank Account.
Microsoft Official Training Materials for Microsoft Dynamics ® Your use of this content is subject to your current services agreement

Finance Essentials in Microsoft Dynamics® NAV 2013
4 - 38
vii. In the Bal. Account No. field, click the drop-down list and select the WWB-OPERATING bank.
viii. In the Bank Payment Type field, click the drop-down list and select Computer Check.
e. On the Vendor FastTab, click Add Filter and point to No. f. In the Enter a value field, enter 30000.
g. Clear any other filters on this FastTab. h. Click OK to run the batch job. i. Click OK to the message about currencies.
Task 2: Print the Check
High Level Steps 1. Print the check as stated in the scenario.
Detailed Steps 1. Print the check as stated in the scenario.
a. Locate the line for vendor 30000.
b. In the Account No. field, right-click on 3000, and choose Filter to this Value.
c. Click Print Check. d. In the Options FastTab, do the following:
i. Make sure that the Bank Account field is set to WWB-OPERATING.
ii. Make sure that the One Check per Vendor per Document No. check box is not selected.
e. Click Print. f. In the Check - Print window, click the Print to file check box to
insert a check mark.
g. Click OK. h. In the Output File Name field, enter CWTChecks 012514. i. Click OK. j. Close the Microsoft Office Document Imaging window if it
appears.
Task 3: Post the Journal
High Level Steps 1. Post the journal.
Microsoft Official Training Materials for Microsoft Dynamics ® Your use of this content is subject to your current services agreement

Module 4: Cash Management – Receivables and Payables
4 - 39
Detailed Steps 1. Post the journal.
a. In the ribbon, click Post. b. Click Yes to post the journal lines. c. Click OK.
d. Close the Payment Journal.
Print and Post Payables Checks Both suggested payments and manually entered payments can be printed and posted.
Check printing is affected by the settings in the Document No. on the Suggest Vendor Payments batch job and One Check per Vendor per Document fields on the Print Check report.
Computer Check Printing
You can print computer checks from the Payment Journal, by clicking Print Check on the ribbon.
The Check report contains two FastTabs:
• Options
• Gen. Journal Line
Microsoft Official Training Materials for Microsoft Dynamics ® Your use of this content is subject to your current services agreement

Finance Essentials in Microsoft Dynamics® NAV 2013
4 - 40
FIGURE 4.16: PRINT CHECK REQUEST PAGE
The Options FastTab is used to determine how the batch job is executed and contains the following fields:
• Bank Account – The bank account that the printed checks are drawn from.
• Last Check No. – Automatically updated with the last check number that is used for the selected bank account. This field is not updated if the Last Check No. field is not populated on the selected bank account's card.
• One Check per Vendor per Document No. – If this field is selected only one check for each vendor, for each document number, is printed.
• Reprint Checks – If printed checks have to be reprinted before you post, click to insert a check mark to reprint the checks.
• Test Print – If this field is selected the checks are printed on blank paper.
• Preprinted Stub – If this field is selected it will indicate that check forms with preprinted stubs are used.
Microsoft Official Training Materials for Microsoft Dynamics ® Your use of this content is subject to your current services agreement
Module 4: Cash Management – Receivables and Payables
4 - 41
The Gen. Journal Line FastTab is populated with the journal name and batch. Additional filters can be added in a blank line.
Demonstration: Print Computer Checks
Scenario: In the "Use Vendor Priority and Available Amount" demonstration, April ran the Suggest Vendor Payments batch job for vendors 10000 and 20000. April now prints those checks by using the World Wide operating bank account. For this demonstration, the checks are printed to a file that is named Checks 012514.
Demonstration Steps
1. Print computer checks. a. In the Payment Journal with the checks ready to print, click
Print Check in the ribbon. b. In the Bank Account field, click the drop-down list and select
WWB-OPERATING. c. Press TAB, the Last Check No. field is populated with the last
check number that is used for the World Wide operating bank account.
d. Select the One Check per Vendor per Document No. check box.
e. Click Print. f. In the Check - Print window, click the Print to file check box to
insert a check mark. g. Click OK.
h. In the Output File Name field, enter Check 012514. i. Click OK.
The printed check lines are updated, and, depending on the printing setup, the images of the printed checks can appear in the Microsoft Office Document Imaging window.
Review the printed checks and check lines.
o If the printed check images appear:
One check is printed for each vendor.
Document numbers and amounts of the entries are individually displayed on the check stubs.
o On the payment journal lines:
The Document No. field is updated with the next check number that is from the selected bank account.
A balancing bank account entry is inserted for each vendor payment for the full amount of the payment.
Microsoft Official Training Materials for Microsoft Dynamics ® Your use of this content is subject to your current services agreement
Finance Essentials in Microsoft Dynamics® NAV 2013
4 - 42
The Bank Payment Type on the suggested lines is blank and the balancing bank account entry line is populated with Computer Check.
Document Number and Computer Check Printing
In Microsoft Dynamics NAV 2013, the number of checks to print and the check amount is determined by the following information:
• Selection of the One Check per Vendor per Document field in the Check report.
• Contents of the Document No. field in the Payment Journal window.
These fields affect one another, based on how entries are created in the following ways:
• Document No. in the Payment Journal, with and without summarizing by vendor.
• One Check per Vendor per Document No. field in the Check report.
When you are using the Suggest Vendor Payments batch job to populate the payment journal lines, the system specifies a starting document number. The following table shows the results when the batch job is run without selecting the Summarize per Vendor check box.
Number of Vendors
Starting Document No. field
Result in the Payment Journal Window
One Vendor Empty • One payment line for each open vendor ledger entry for the vendor. Each payment line:
• Is applied to the related open vendor ledger entry.
• Has an empty Document No. field.
One Vendor Contains a document number
• One payment line for each open vendor ledger entry for the vendor. Each payment line:
• Is applied to the related open vendor ledger entry.
• With the same currency has the same Document No.
Microsoft Official Training Materials for Microsoft Dynamics ® Your use of this content is subject to your current services agreement

Module 4: Cash Management – Receivables and Payables
4 - 43
Number of Vendors
Starting Document No. field
Result in the Payment Journal Window
Multiple Vendors
Empty • One payment line for each open vendor ledger entry for each vendor. Each payment line:
• Is applied to the related open vendor ledger entry
• Has an empty Document No. field.
Multiple Vendors
Contains a document number
• One payment line for each open vendor ledger entry for each vendor. Each payment line:
• Is applied to the related open vendor ledger entry.
• For the same vendor, with the same currency, has the same document number.
If the Summarize per Vendor check box is selected on the Suggest Vendor Payments batch job, the payment lines are populated as shown in the following table.
Number of Vendors
Starting Document No. field
Result in the Payment Journal Window
One Vendor only
Contains a document number
• One payment line for each currency, summarize the open vendor ledger entries with the same currency. Each payment line:
• Is applied to the related open vendor ledger entries.
• Has a different currency and different document number.
Multiple Vendors
Contains a document number
• For each vendor, one payment line for each currency, summarize the open vendor ledger entries with the same currency.
• Each payment line is applied to the related open vendor ledger entries.
• For each vendor, each payment line has a different currency and different document number.
Microsoft Official Training Materials for Microsoft Dynamics ® Your use of this content is subject to your current services agreement

Finance Essentials in Microsoft Dynamics® NAV 2013
4 - 44
Note: If you add a check mark in the New Doc. No. per Line check box and enter a document number in the Starting Document No. field, each suggested payment line has a different document number.
There are two options when you print checks:
• Print a check for each payment line.
• Sum payment lines into a single check.
The following table shows how the One Check per Vendor per Document No. field and Document No. field together affect how payment lines are created and printed. These payment lines are created and printed based on the assumption that the payment lines are in the same currency as the bank account contained in the Bal. Account No. field.
One Check per Vendor per
Document No. field
Document No. in Payment
Journal window
Number and Amount of Checks Printed
Empty Blank A check is printed for each payment line. If any payment line contains a negative amount, an error occurs and the program does not print checks for the remaining payment lines after the negative amount.
Empty Contains a document number
A check is printed for each payment line. If any payment line contains a negative amount, an error occurs and the program does not print checks for the remaining payment lines after the negative amount.
Contains a check mark
Blank • One check for each vendor is printed. For each vendor:
• The check amount is the net amount of all the payment lines for that vendor.
• The balancing bank account on all payment lines is cleared and a new payment line is created for the net amount.
The Account No. for the new payment line is the balancing bank account.
Microsoft Official Training Materials for Microsoft Dynamics ® Your use of this content is subject to your current services agreement

Module 4: Cash Management – Receivables and Payables
4 - 45
One Check per Vendor per
Document No. field
Document No. in Payment
Journal window
Number and Amount of Checks Printed
Contains a check mark
Contains a document number
• One check for each vendor, for each document a number is printed. For each vendor:
• The check amount is the net amount of the payment lines with the same Document No.
• The balancing bank account on payment lines with the same Document No. is cleared and a new payment line is created for the net amount.
• The Account No. for the new payment line is the balancing bank account.
Demonstration: Post the Payment Journal
Scenario: Now that all checks printed successfully, April can post the Payment Journal.
The Payment Journal is still populated from the previous demonstrations with the payment entries for vendors 10000, 20000, and 30000.
Demonstration Steps
1. Post the payment journal with printed checks. a. In the Search box, enter Payment Journal, and then select the
related link. b. Click Post. c. Click Yes to post the journal lines. d. Click OK.
e. Close the Payment Journal window.
Microsoft Official Training Materials for Microsoft Dynamics ® Your use of this content is subject to your current services agreement

Finance Essentials in Microsoft Dynamics® NAV 2013
4 - 46
Voiding Checks Voiding checks is performed when handwritten checks are not cleared by the bank, or when computer checks must be deleted or reprinted.
In Microsoft Dynamics NAV 2013, you can void checks two ways—financially void posted checks and void unposted checks.
Financially Voiding Checks
A posted check that must be voided is known as a financial void. When financially voiding a check, make sure that all financial transactions that result from the check payment are also canceled. In Microsoft Dynamics NAV 2013, users can unapply and void the check and the transactions, void only the check, and enter a date to use for the void.
In Microsoft Dynamics NAV 2013, financial voids are made from the Bank Account Card.
Demonstration: Financially Voiding a Check
Scenario: On January 10, 2014, April, the accounts payable coordinator at CRONUS International Ltd., posts a manual check to vendor 20000, AR Day Property Management, for invoice 108017.
Three weeks later, she receives a call from the accounts receivable clerk at London Postmaster, stating that payment on invoice 108017 is past due. April explains to the vendor that she sent check number 1204 three weeks ago, and that is must be lost in the mail. April tells the vendor a new check will be sent by overnight delivery.
April contacts Phyllis, the accounting manager at CRONUS International Ltd., and asks Phyllis to financially void the check so that a new check can be issued.
As soon as the check is financially voided, Phyllis reviews the entries to verify that all the transactions are successfully voided and then she notifies April that the check can be reissued.
Demonstration Steps
1. Post the manual check for London Postmaster. a. In the Search box, enter Payment Journals, and then select the
related link.
b. Make sure that the Bank batch is selected. c. Click OK. d. In the Posting Date field, enter 01/31/14.
Microsoft Official Training Materials for Microsoft Dynamics ® Your use of this content is subject to your current services agreement

Module 4: Cash Management – Receivables and Payables
4 - 47
e. In the Document Type field, click the drop-down list and select Payment.
f. In the Document No. field, enter 1204. g. In the Account Type field, click the drop-down list and select
Vendor. h. In the Account No. field, enter 20000.
i. Click Apply Entries. j. Click the line for Document No. 108025. k. Click Set Applies-to ID. l. Click OK.
m. In the Bank Payment Type field, click the drop-down list and select Manual Check.
n. Click Post. o. Click Yes to post the journal lines.
p. Click OK to the message that the lines are successfully posted. q. Close the Payment Journal window.
2. Financially void check 1204.
a. On the navigation pane, click Departments, click Financial Management, click Cash Management, and then select Bank Accounts.
b. Locate and select bank WWB-OPERATING. c. Click Check Ledger Entries in the Home tab of the ribbon. d. Locate and select check number 1204.
The Entry Status field is set to Posted.
1. Click Void Check in the Home tab of the ribbon. The Confirm Financial Void window appears.
2. In the Void Date field, enter 02/21/14. 3. Verify that the Type of Void field has the Unapply and void check
option selected. 4. Click Yes.
The Entry Status field is set to Financially Voided.
5. Close the Check Ledger Entries window.
6. Review the Vendor Ledger Entries to verify that the check is voided correctly on the vendor.
7. Use the Payment Journal to verify that the invoice (Document Number 108025) is available for repayment.
Microsoft Official Training Materials for Microsoft Dynamics ® Your use of this content is subject to your current services agreement
Finance Essentials in Microsoft Dynamics® NAV 2013
4 - 48
To review the vendor ledger entries and invoice availability, follow these steps.
1. On the navigation pane, click Departments, > Financial Management > Payables > Vendors.
2. Locate and select vendor 20000, AR Day Property Management. 3. Click Ledger Entries.
The line for check 1204 is displayed as voided on 02/21/14.
4. Close the Vendor Ledger Entries window. 5. In the navigation pane, click Payables and then select Payment
Journals. 6. In the Account No. field, click the drop-down list and select 20000.
7. Click Apply Entries. Document Number 108025 is displayed as an open invoice, ready for payment.
8. Close the Apply Vendor Entries window. 9. Delete the line and then close the Payment Journal window.
Void Unposted Checks
Before you post a check, if you must delete or reprint a check, you can void it in the Payment Journal. After you void a check, you can delete or reprint the payment lines(s) from the journal.
To void a single printed but unposted check, follow these steps.
1. In the Search box, enter Payment Journals, and select the related link.
2. In the Batch Name field, click the drop-down list and select the appropriate batch.
3. Click OK. 4. In the Payment Journal lines, click the line for the check to be voided. 5. Click Void Check.
6. Click Yes to the message that asks to void the check.
Now that the check is voided, you can delete or reprint it from the payment journal.
To void all printed but unposted checks in a batch, follow these steps.
1. On the navigation pane, click Departments, click Financial Management, click Payables, and then select Payment Journals.
2. In the Batch Name field, click the drop-down list and select the appropriate batch.
3. Click OK.
Microsoft Official Training Materials for Microsoft Dynamics ® Your use of this content is subject to your current services agreement

Module 4: Cash Management – Receivables and Payables
4 - 49
4. Click Void All Checks in the Home tab of the ribbon. 5. Click Yes to the message that asks to void all checks.
Note: Voiding an unposted check automatically clears the Check Printed check box. You can add this field by using the Choose Columns function.
After all checks are voided, you can delete or reprint them from the payment journal.
Reprint Voided Checks
When you print checks, the Last Check No. in the Check report is updated automatically with the last printed check number. When you reprint checks, make sure that the correct check number will be used. For example, if the check number must be 206, then enter 205 is in this field.
To reprint a single voided check, follow these steps.
1. In the Search box, enter Payment Journals, and then select the related link.
2. Select the relevant batch. 3. Click the line with the voided check.
4. Click Print Check. 5. Update the Last Check No. 6. Click to insert a check mark in the Reprint Checks check box. 7. Click Print.
Microsoft Official Training Materials for Microsoft Dynamics ® Your use of this content is subject to your current services agreement

Finance Essentials in Microsoft Dynamics® NAV 2013
4 - 50
Lab 4.5: Financially Void a Check Scenario
In the “Enter and Post Manual Checks“ lab, a manual check payment of 8,132.00 LCY (number 1200) for invoice 108018, is posted to London Postmaster. On January 29, 2014, the payables clerk at London Postmaster calls to inquire on the status of the payment. You review the payments for this vendor and discover you sent the check weeks ago. As a result, you are asked to resubmit payment.
As the accounting manager, you financially void the check in the World Wide Bank operating account by using the following criteria:
• Void date of 01/29/14.
• Review the Bank Ledger Entries for the voided check, by using Field filters.
The check is resubmitted by the accounts payable coordinator in the next check run.
Exercise 1: Financially Void a Check
Task 1: Void a Check
High Level Steps 1. Open the Bank Account Card for the World Wide Bank operating
account, access the Check Ledger Entries, and void check number 1200 by using the information specified in the scenario.
Detailed Steps 1. Open the Bank Account Card for the World Wide Bank operating
account, access the Check Ledger Entries, and void check number 1200 by using the information specified in the scenario. a. In the Search box, enter Bank Accounts, and then select the
related link.
b. Locate and select bank WWB-OPERATING. c. In the Navigate tab of the ribbon, click Check Ledger Entries. d. Locate and select check number 1200. e. In the Home tab of the ribbon, click Void Check.
f. In the Void Date field, enter 01/29/14. g. Verify that the Type of Void field has the Unapply and void
check option selected. h. Click Yes.
i. Close the Check Ledger Entries window.
Microsoft Official Training Materials for Microsoft Dynamics ® Your use of this content is subject to your current services agreement

Module 4: Cash Management – Receivables and Payables
4 - 51
Task 2: Review the Entries
High Level Steps 1. Access the Bank Account Ledger Entries and review the check
entries of check number 1200.
Detailed Steps 1. Access the Bank Account Ledger Entries and review the check
entries of check number 1200.
a. In the Navigate tab of the ribbon, click Ledger Entries. b. Set the Filter field to Document No. c. In the Type to filter field, enter 1200 and press search. d. Review the two check entries. The date for the line of the voided
check is 01/29/14. e. Close the Bank Account Ledger Entries window.
Microsoft Official Training Materials for Microsoft Dynamics ® Your use of this content is subject to your current services agreement

Finance Essentials in Microsoft Dynamics® NAV 2013
4 - 52
Lab 4.6: Void a Check Scenario
On February 1 2014, invoice F8306 for office supplies for an amount of 800.00 (exclusive VAT), is received from vendor 40000. The invoice is posted and it is approved for payment on February 10 2014. After you run the Suggest Vendor Payments batch job for vendor 40000, the check is printed to a file that is named VOID001.
Before the check is posted, the office manager informs you that there is still a problem and this invoice cannot yet be paid. Void and delete the payment line.
Exercise 1: Void a Check
Task 1: Run the Suggest Vendor Payments Batch
High Level Steps 1. Post the purchase invoice from vendor 61000.
2. Open the Payment Journal window and run the Suggest Vendor Payment batch by using the criteria that is specified in the scenario.
Detailed Steps 1. Post the purchase invoice from vendor 61000.
a. In the Search box, enter Purchase Invoices, and then select the related link.
b. In the Home tab, click New.
c. In the Buy-from Vendor No. field, enter 40000. d. In the Posting Date field, enter 02/01/14. e. In the Vendor Invoice No. field, enter F8306. f. In the Lines FastTab, enter G/L Account in the Type field.
g. In the No. field, enter 8210. h. In the Quantity field, enter 1. i. In the Direct Unit Cost Excl. VAT field, enter 800.
j. In the Home tab, click Post. k. Click Yes.
2. Open the Payment Journal window and run the Suggest Vendor Payment batch by using the criteria that is specified in the scenario.
a. In the Search box, enter Payment Journals, and then select the related link.
b. Click Suggest Vendor Payments. c. In the Last Payment Date field, enter 02/20/14.
d. Make sure that the vendor priority fields are empty.
Microsoft Official Training Materials for Microsoft Dynamics ® Your use of this content is subject to your current services agreement
Module 4: Cash Management – Receivables and Payables
4 - 53
e. In the Posting Date field, enter 02/10/14. f. In the Bal. Account Type field, click the drop-down list and
select Bank Account. g. In the Bal. Account No. field, click the drop-down list and select
WWB-OPERATING. h. In the Bank Payment Type field, click the drop-down list and
select Computer Check. i. On the Vendor FastTab, click Add Filter and point to No. j. In the Enter a value field, enter 40000. k. Clear any other filters on this FastTab.
l. Click OK to run the batch job. m. Click OK to the message about currencies.
Task 2: Print and Void the Check
High Level Steps 1. Open the Check report and print the check based on the criteria that
is specified in the scenario and void the check based on the criteria that is specified in the scenario.
Detailed Steps 1. Open the Check report and print the check based on the criteria that
is specified in the scenario and void the check based on the criteria that is specified in the scenario. a. Click Print Check. b. In the Bank Account field, click the drop-down list and then
select WWB-OPERATING. c. Press TAB. d. Make sure that the One Check per Vendor per Document No.
check box does not contain a check mark. e. Click Print. f. In the Check - Print window, click the Print to file check box to
insert a check mark.
g. Click OK. h. In the Output File Name field, enter VOID001. i. Note the check number. j. Click Void Check.
k. Click Yes to void the check. l. Click Delete in the ribbon. m. Click Yes to delete the line. n. Close the Payment Journal window.
Microsoft Official Training Materials for Microsoft Dynamics ® Your use of this content is subject to your current services agreement
Finance Essentials in Microsoft Dynamics® NAV 2013
4 - 54
Applying Payments Users can apply payments to customer or vendor ledger entries when the payment is processed and, or after a payment is processed without an application to an entry.
Some methods to apply payments in the cash receipt journal or payment journal include the following:
• Post a payment to a single invoice.
• Post a payment to multiple invoices.
• Post a partial payment to a single invoice.
• Post a partial payment to multiple invoices.
• Apply payments after posting.
Note: Applying payments is the same in receivables management and payables management. The demonstrations in this lesson are based on customer payments. However, the same applies to vendor payments.
Application Methods
When users post payments without an application to an entry, the option that is selected in the Application Method field on the Payments FastTab of the customer's card, determines how the open payment is managed in the customer ledger entries.
The two application method options are Manual and Apply to Oldest.
When the Manual option is selected, the payment that is posted to a customer's or vendor’s account is not applied to an invoice and it remains an open payment in the customer or vendor ledger entries.
Note: Most customers and vendors that are set up in Microsoft Dynamics NAV use the Manual application method.
When the Apply to Oldest option is selected, the payment that is posted to the customer’s or the vendor’s account is automatically applied to the customer’s or the vendor’s oldest open entries.
The option selected does not affect how applications are made when users post a payment. However, the user must understand how the application method affects the unapplied entries.
Microsoft Official Training Materials for Microsoft Dynamics ® Your use of this content is subject to your current services agreement
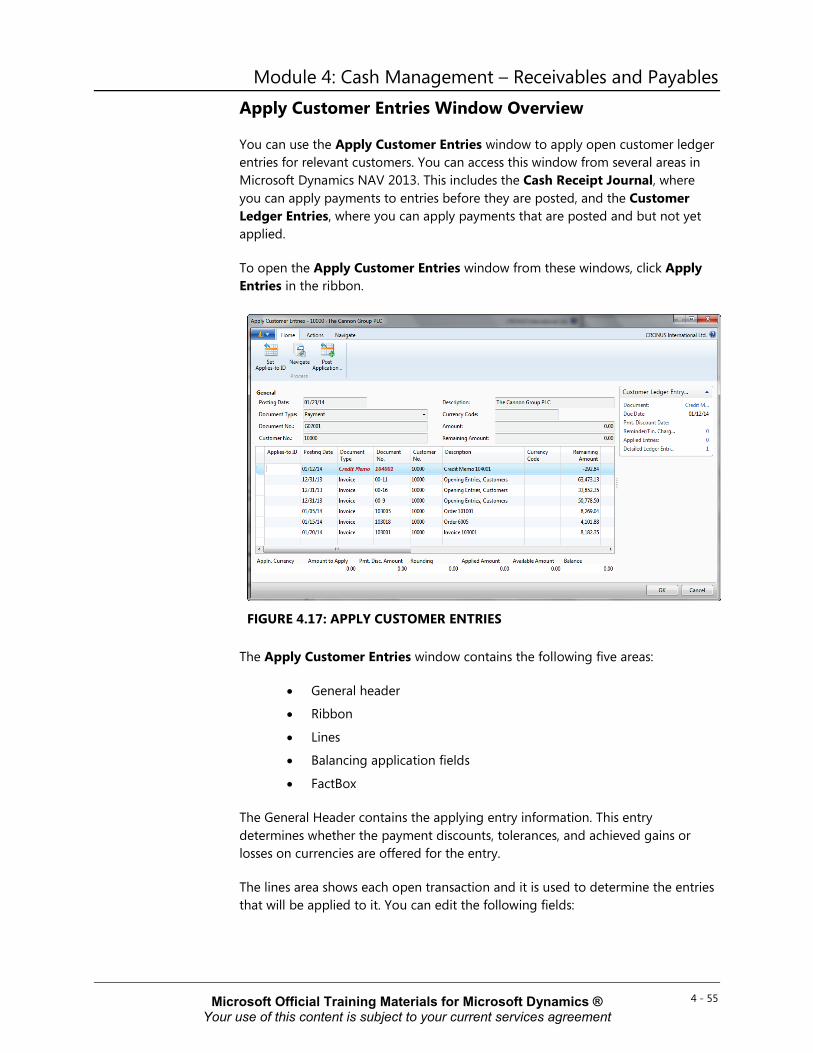
Module 4: Cash Management – Receivables and Payables
4 - 55
Apply Customer Entries Window Overview
You can use the Apply Customer Entries window to apply open customer ledger entries for relevant customers. You can access this window from several areas in Microsoft Dynamics NAV 2013. This includes the Cash Receipt Journal, where you can apply payments to entries before they are posted, and the Customer Ledger Entries, where you can apply payments that are posted and but not yet applied.
To open the Apply Customer Entries window from these windows, click Apply Entries in the ribbon.
FIGURE 4.17: APPLY CUSTOMER ENTRIES
The Apply Customer Entries window contains the following five areas:
• General header
• Ribbon
• Lines
• Balancing application fields
• FactBox
The General Header contains the applying entry information. This entry determines whether the payment discounts, tolerances, and achieved gains or losses on currencies are offered for the entry.
The lines area shows each open transaction and it is used to determine the entries that will be applied to it. You can edit the following fields:
Microsoft Official Training Materials for Microsoft Dynamics ® Your use of this content is subject to your current services agreement
Finance Essentials in Microsoft Dynamics® NAV 2013
4 - 56
• Applies-to ID – Identifies who or what is making the application and if it must be posted to the application.
• Amount to Apply – Used for partial payments to specify the exact amount to apply to the applying entry.
• Due Date – Indicates when an invoice is expected to be paid
• Pmt. Discount Date – Indicates the date on which the amount in the entry must be paid for a payment discount to be obtained.
• Pmt. Disc. Tolerance Date – Indicates the latest date on which the amount in the entry must be paid for payment discount tolerance to be granted.
• Remaining Pmt. Disc. Possible – Identifies the remaining payment discount that can be received if the payment is made before the payment discount date.
• Max. Payment Tolerance – Identifies the maximum tolerated amount that the amount in the entry can differ from the amount on the invoice or credit memo.
Underneath the lines are the following balancing fields that are used to track the application:
• Appln. Currency
• Amount to Apply
• Pmt. Disc. Amount
• Rounding
• Applied Amount
• Available Amount
• Balance
The Home tab of the ribbon includes the following three options:
• Set Applies-to ID – Used to set the Applies-to ID field on the line for each line that is applied against the Applying Entry in the General FastTab.
• Navigate – Used to navigate on the line that is highlighted.
• Post Application – Used to post the application when users are applying previously posted entries.
The FactBox on the Apply Customer Entries Card displays the Customer Ledger Entry Details.
Microsoft Official Training Materials for Microsoft Dynamics ® Your use of this content is subject to your current services agreement

Module 4: Cash Management – Receivables and Payables
4 - 57
Demonstration: Post a Payment for Multiple Sales Documents
Scenario: On January 21, 2014, Phyllis, the accounting manager at CRONUS International Ltd., receives a euro payment of 6,000.00 for customer 49633663 for the following documents:
• Invoice 2808
• Invoice 2809
• Credit memo 2810
Phyllis applies and posts the payment using the cash receipt journal.
Demonstration Steps
1. Apply and post the payment. a. In the Search box, enter Cash Receipt Journals, and then select
the related link.
b. Select the BANK cash receipt journal. c. Click the batch name, and then click New to create a new batch. d. Enter euro in the Name field. e. Enter “euro payments” in the Description field.
f. In the Bal. Account Type, select Bank Account. g. In the Bal. Account No., select WWB-EUR. h. Click OK to select the new batch.
i. In the Posting Date field, enter 01/25/14. j. In the Document Type field, select Payment. k. Update the Type field, select Customer. l. In the Account No. field, click the drop-down list and select
customer 49633663. m. Click OK. n. Click Apply Entries. o. Click the line with invoice 2808 to apply the payment to it.
p. Click Set Applies-to ID. q. Repeat steps 15 and 16 for invoice 2809 and credit memo 2810. r. Verify that the Balance field at the bottom of the window is
6,000.00
s. Click OK. t. Make sure that the Bal. Account Type and Bal. Account
Number fields indicate the bank account. u. Click Post. v. Click Yes to post the journal
Microsoft Official Training Materials for Microsoft Dynamics ® Your use of this content is subject to your current services agreement

Finance Essentials in Microsoft Dynamics® NAV 2013
4 - 58
w. Click OK. x. Close the Cash Receipt Journal.
Demonstration: Applying Entries After Posting
When you post a payment or credit memo without applying it to an open customer or vendor ledger entry, you can apply it later from the Customer Ledger Entries or Vendor Ledger Entries window.
Scenario: On January 31, 2014, a manual check payment for 70,860.66 LCY is sent to vendor 30000, CoolWood Technologies. April, the accounts payable coordinator, manually posts check number 1205 to the vendor account without applying it to a particular invoice.
Some days later, she realizes that this payment must be applied to document number 12345.
Demonstration Steps
1. Manually post the check.
a. In the Search box, enter Payment Journals, and then click the related link.
b. Make sure that the Bank batch is selected. c. In the Posting Date field, enter 01/31/14.
d. In the Document Type field, click the drop-down list and select Payment.
e. In the Document No. field, enter 1205. f. In the Account Type field, click the drop-down list and then
select Vendor. g. In the Account No. field, enter 30000. h. In the Amount field, enter 70860.66.
i. Make sure that the WWB-OPERATING bank account is selected. j. In the Bank Payment Type field, click the drop-down list and
then select Manual Check. k. Click Post. l. Click Yes to post the journal lines. m. Click OK. n. Close the Payment Journal window.
2. Apply the posted payment to the open invoice.
a. In the Payables folder, click Vendors. b. Locate and select vendor account 30000. c. Click Ledger Entries. d. Click the payment line dated 01/31/14. The amount is 70,860.66.
Microsoft Official Training Materials for Microsoft Dynamics ® Your use of this content is subject to your current services agreement

Module 4: Cash Management – Receivables and Payables
4 - 59
e. Click Actions, point to Function, and then select Apply Entries. i. The General FastTab in the header is populated with the
payment information. ii. The payment line is removed from the lines so that it
cannot be selected as an applied-to entry. f. In the lines, click the line for Document No. 12388. The amount
is -105,952.82. g. Click Set Applies-to ID.
The Balance field at the bottom of the window displays -35,092.16. This is the remaining amount.
To post the application, follow these steps.
a. Click Post Application. b. Click OK without changing the fields. c. Click OK to the message that the application is posted.
Close the Apply Vendor Entries and Vendor Ledger Entries windows.
Unapply Customer and Vendor Ledger Entries You can use the Unapply Customer Ledger Entries functionality to reverse entries while you make sure that the correct application is processed. This functionality is available from the Customer Ledger Entries window and the Detailed Cust. Ledg. Entries window.
FIGURE 4.18: UNAPPLY CUSTOMER ENTRIES WINDOW
Microsoft Official Training Materials for Microsoft Dynamics ® Your use of this content is subject to your current services agreement

Finance Essentials in Microsoft Dynamics® NAV 2013
4 - 60
When you unapply applications that are already posted, you can reopen closed customer ledger entries. All G/L postings that might be derived from an incorrect application, such as payment discounts and currency gains and, or losses, are also corrected when an entry is unapplied.
Note: You can only unapply from the bottom up. Therefore, if an entry is applied by more than one application entry, the last application entry must be unapplied first.
Unapplying a Ledger Entry
To unapply a ledger entry from the Customer Ledger Entries window, follow these steps.
1. On the navigation pane, click Departments > Financial Management > Receivables, and then select Customers.
2. Locate and select the customer to unapply entries for. 3. In the ribbon, click Ledger Entries. 4. Click the line with the entry to unapply. 5. In the ribbon, click Unapply Entries. The Unapply Customer Entries
window shows the original detailed ledger entries that can be used to unapply the original entry.
6. Click Unapply. 7. Click Yes to unapply the entries. When the entry is unapplied, a new
entry is created by using an opposite sign in the Amount field. 8. Click OK to the message that the entries are unapplied. 9. In the Customer Ledger Entries window, review the unapplied
entries:
o The Remaining Amount field contains the relevant unapplied amount.
o The Open check box is checked to indicate that the unapplied entries are open.
Now you can apply the open amount to the correct entry by using the Apply Customer Entries functionality.
Note: To view a complete overview of all the entries that resulted from a transaction, use the Navigate function on the ribbon.
Note: Vendor ledger entries are unapplied in the same manner.
Microsoft Official Training Materials for Microsoft Dynamics ® Your use of this content is subject to your current services agreement
Module 4: Cash Management – Receivables and Payables
4 - 61
Lab 4.7: Unapply Posted Ledger Entries Scenario
In late January, you receive a 50,778.50 LCY payment from customer 20000, Selangorian Ltd., for Document No. 00-8. As you start to apply the payment, you realize that a temporary employee incorrectly applied two credit memos to this invoice.
After additional investigation, you realize that these credit memos are to be applied to the invoices that correspond to the credit memo amounts. The following table shows these credit memos and the invoices in the order in which they are applied.
Credit Memo Invoice/Document No. Amount
104002 103008 787.40
104003 103014 1,145.33
As the accounts receivable administrator, it is your responsibility to correct this error. Use the Unapply Customer Entries function to reverse the application and then correctly apply the credit memos to the invoices.
The payment for Document No. 00-8 is not posted in this lab.
Exercise 1: Unapply Posted Ledger Entries
Task 1: Unapply the Credit Memo
High Level Steps 1. Open the Customer Ledger Entries for customer 20000 and unapply
the entries.
Detailed Steps 1. Open the Customer Ledger Entries for customer 20000 and unapply
the entries. a. On the navigation pane, click Departments > Financial
Management > Receivables, and then select Customers.
b. Locate and select customer 20000. c. Click Ledger Entries. d. Click the line for credit memo 104003. The amount is -1,145.33. e. In the ribbon, click Unapply Entries.
f. Click Unapply. g. Click Yes to unapply the entries. h. Click OK to the message that the entry is unapplied.
Microsoft Official Training Materials for Microsoft Dynamics ® Your use of this content is subject to your current services agreement

Finance Essentials in Microsoft Dynamics® NAV 2013
4 - 62
i. Click the line for credit memo 104002. The amount is -787.40. j. In the ribbon, click Unapply Entries. k. Click Unapply. l. Click Yes to unapply the entries. m. Click OK to the message that the entry is unapplied.
Task 2: Apply the Credit Memo
High Level Steps 1. Open the Apply Customer Entries window for credit memo 104002
and set it as the applying entry. 2. Set Document No. 103008 as the Applies-to ID and post the
application. 3. Open the Apply Customer Entries window for credit memo 104003
and set it as the applying entry. 4. Set Document No. 103014 as the Applies-to ID and post the
Application.
Detailed Steps 1. Open the Apply Customer Entries window for credit memo 104002
and set it as the applying entry. a. Click the line for Document No. 104002.
b. In the ribbon, click Apply Entries. 2. Set Document No. 103008 as the Applies-to ID and post the
application. a. Click the line for invoice 103008.
b. Click Set Applies-to ID. c. Click Post Application. d. Click OK to post the application.
e. Click OK to the message that the application is posted. 3. Open the Apply Customer Entries window for credit memo 104003
and set it as the applying entry. a. Click the line for Document No. 104003.
b. In the ribbon, click Apply Entries. 4. Set Document No. 103014 as the Applies-to ID and post the
Application. a. Click the line for invoice 103014.
b. Click Set Applies-to ID. c. Click Post Application. d. Click OK to post the application. e. Click OK to the message that the application is posted.
f. Close the Customer Ledger Entries.
Microsoft Official Training Materials for Microsoft Dynamics ® Your use of this content is subject to your current services agreement
Module 4: Cash Management – Receivables and Payables
4 - 63
Reversal of Posted Journals In Microsoft Dynamics NAV 2013, incorrect customer ledger entries posted from a journal, such as the Sales Journal or Cash Receipt Journal, can be reversed to correct the entries.
The following are conditions of using this reversal functionality:
• Entries must be generated from a general journal line or from a previous reversal.
• Customer Ledger Entries must not be applied.
• Bank Ledger Entries must not be closed by reconciliation.
• The total amount of G/L Entries to be reversed must equal zero.
Before you reverse an applied customer ledger entry, you must unapply the entry.
During the reversal process, you can create and post correcting entries with the same document number and posting date as the original entry for each line in the entry. After you reverse an entry, you can enter and post the correct entries manually.
Demonstration: Reverse a Posted Journal Entry
Scenario: When the beginning balance is posted on 12/31/13 for customer 10000, an error is entered for invoice 00-1. An incorrect amount of 25,389.25 LCY posted instead of the correct amount of 23,589.25 LCY.
Because this invoice is already paid (on 1/17/14 with Document No. 2597) and it is entered through a journal, it must be reversed.
Cassie, the accountant, wants you to make the reversing entry and then later she will post the correction and refund the customer. Before you can reverse the entry, you must unapply the payment.
Demonstration Steps
1. Unapply the invoice as specified in the scenario.
a. On the navigation pane, click the Departments > Financial Management > Receivables, and then select Customers.
b. Locate and select customer 10000. c. Click Ledger Entries.
d. With the line for Document No. 00-1 selected, in the ribbon, click Unapply Entries.
e. Click the first line for Document No. 00-1. f. Click Unapply.
Microsoft Official Training Materials for Microsoft Dynamics ® Your use of this content is subject to your current services agreement

Finance Essentials in Microsoft Dynamics® NAV 2013
4 - 64
g. Click Yes to unapply the entry. h. Click OK to the message that the entry is unapplied.
2. Reverse the journal entry as specified in the scenario.
a. With the line for Document No. 00-1 selected, in the ribbon, click Reverse Transaction.
b. Click Reverse. c. Click Yes to reverse the entry. d. Click OK to the message that the entry is reversed. e. Close the Customer Ledger Entries and Customer Card
windows.
Microsoft Official Training Materials for Microsoft Dynamics ® Your use of this content is subject to your current services agreement

Module 4: Cash Management – Receivables and Payables
4 - 65
Module Review Module Review and Takeaways
Cash Management is an important feature of Microsoft Dynamics NAV 2013 because it manages all payments in a company. Understanding how to use the banking features and the reconciliation process provides an increased awareness of a company's financial status.
The Check functions in Cash Management provide companies with a secure process when they use checks for payment and must void a check.
Receivables and payables management helps keep track of open balances and all entries that are posted to customers and vendors.
Test Your Knowledge
Test your knowledge with the following questions.
1. When you post a manual or computer check, what is posted to record the check transaction and the current status of the check?
( ) Bank Account Ledger Entry
( ) Detailed Bank Account Ledger Entry
( ) Check Ledger Entry
( ) Detailed Check Ledger Entry
2. On the Bank Account Card, what makes the program post the related G/L entries for each transaction by using the bank account?
( ) Posting Account No.
( ) Bank Acc. Posting Group
( ) Bank Account No.
( ) Bank Acc. G/L Group
3. Where are Application Methods specified?
( ) Cash Receipt Journal
( ) Customer Card
Microsoft Official Training Materials for Microsoft Dynamics ® Your use of this content is subject to your current services agreement

Finance Essentials in Microsoft Dynamics® NAV 2013
4 - 66
( ) Customer Ledger Entries
( ) Detailed Customer Ledger Entries
4. In what window are actual posted customer entries amounts located?
( ) Posted Customer Ledger Entries window
( ) Customer Ledger Entries window
( ) Detailed Ledger Entries window
( ) Detailed Customer Ledger Entries window
5. What should you do when a handwritten check is refused by the bank?
( ) Void the check
( ) Financially void the check
( ) Reprint the check
( ) Unapply the vendor ledger entries
6. What is not true about the Suggest Vendor Payments batch job?
( ) The Suggest Vendor Payments batch job always searches for a payment discount.
( ) The vendor priority can be used in combination with an available amount.
( ) The Suggest Vendor Payments batch job can be used to create computer checks.
( ) You can use the Suggest Vendor Payments batch job to summarize payments by vendor and by dimension.
Microsoft Official Training Materials for Microsoft Dynamics ® Your use of this content is subject to your current services agreement
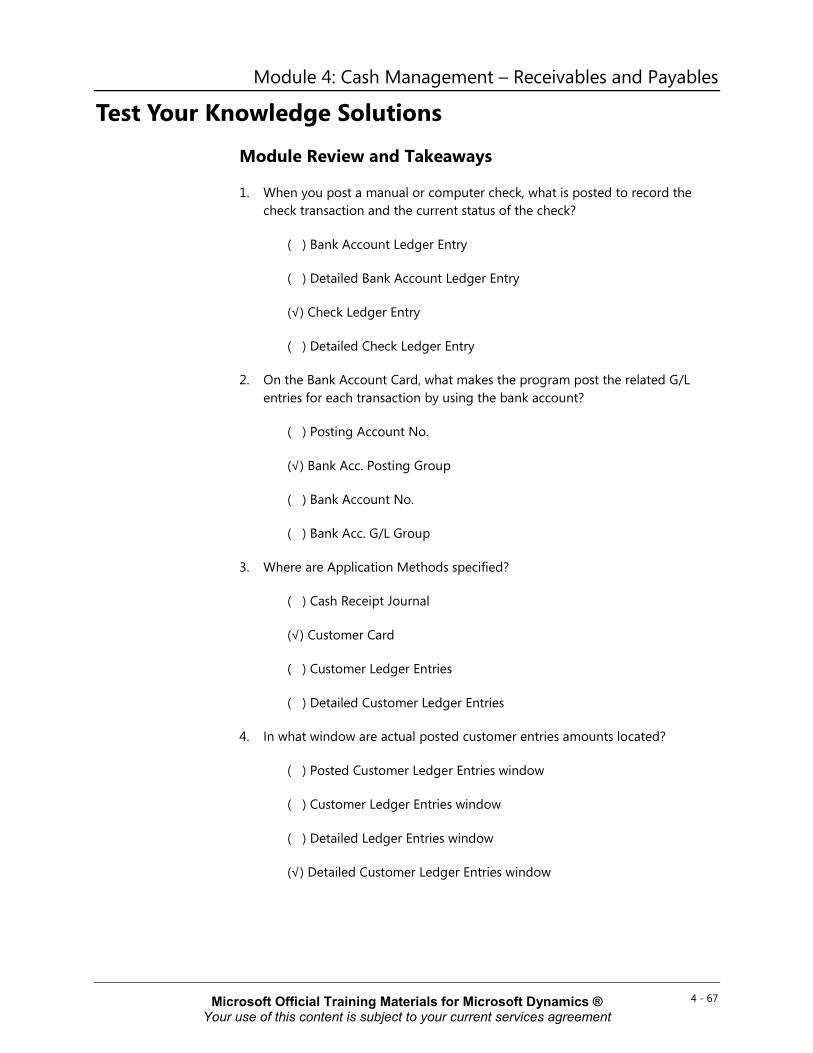
Module 4: Cash Management – Receivables and Payables
4 - 67
Test Your Knowledge Solutions
Module Review and Takeaways
1. When you post a manual or computer check, what is posted to record the check transaction and the current status of the check?
( ) Bank Account Ledger Entry
( ) Detailed Bank Account Ledger Entry
(√) Check Ledger Entry
( ) Detailed Check Ledger Entry
2. On the Bank Account Card, what makes the program post the related G/L entries for each transaction by using the bank account?
( ) Posting Account No.
(√) Bank Acc. Posting Group
( ) Bank Account No.
( ) Bank Acc. G/L Group
3. Where are Application Methods specified?
( ) Cash Receipt Journal
(√) Customer Card
( ) Customer Ledger Entries
( ) Detailed Customer Ledger Entries
4. In what window are actual posted customer entries amounts located?
( ) Posted Customer Ledger Entries window
( ) Customer Ledger Entries window
( ) Detailed Ledger Entries window
(√) Detailed Customer Ledger Entries window
Microsoft Official Training Materials for Microsoft Dynamics ® Your use of this content is subject to your current services agreement

Finance Essentials in Microsoft Dynamics® NAV 2013
4 - 68
5. What should you do when a handwritten check is refused by the bank?
( ) Void the check
(√) Financially void the check
( ) Reprint the check
( ) Unapply the vendor ledger entries
6. What is not true about the Suggest Vendor Payments batch job?
(√) The Suggest Vendor Payments batch job always searches for a payment discount.
( ) The vendor priority can be used in combination with an available amount.
( ) The Suggest Vendor Payments batch job can be used to create computer checks.
( ) You can use the Suggest Vendor Payments batch job to summarize payments by vendor and by dimension.
Microsoft Official Training Materials for Microsoft Dynamics ® Your use of this content is subject to your current services agreement