module 5: state management - pudn.comread.pudn.com/downloads154/ebook/682279/8951605.pdf · can...
TRANSCRIPT

Contents
Overview 1
Lesson: Configuring the Control State 2
Lesson: Extending the Session State Mechanism 8
Lesson: Creating the ASP.NET Cache Object 12
Lab A: State Management 27
Module 5: State Management

Information in this document, including URL and other Internet Web site references, is subject to change without notice. Unless otherwise noted, the example companies, organizations, products, domain names, e-mail addresses, logos, people, places, and events depicted herein are fictitious, and no association with any real company, organization, product, domain name, e-mail address, logo, person, place or event is intended or should be inferred. Complying with all applicable copyright laws is the responsibility of the user. Without limiting the rights under copyright, no part of this document may be reproduced, stored in or introduced into a retrieval system, or transmitted in any form or by any means (electronic, mechanical, photocopying, recording, or otherwise), or for any purpose, without the express written permission of Microsoft Corporation. Microsoft may have patents, patent applications, trademarks, copyrights, or other intellectual property rights covering subject matter in this document. Except as expressly provided in any written license agreement from Microsoft, the furnishing of this document does not give you any license to these patents, trademarks, copyrights, or other intellectual property. 2004 Microsoft Corporation. All rights reserved. Microsoft, Active Directory, FrontPage, IntelliSense, Microsoft Press, MSDN, PowerPoint, SharePoint, Verdana, Visual Basic, Visual Studio, Windows, and Windows Server are either registered trademarks or trademarks of Microsoft Corporation in the United States and/or other countries. The names of actual companies and products mentioned herein may be the trademarks of their respective owners.

Module 5: State Management iii
Instructor Notes In this module, you will teach students about the control state for custom ASP.NET controls, custom session-state management options, and a mechanism for handling custom cache dependencies, including Microsoft® SQL Server� database dependencies. After completing this module, students will be able to:
! Use the control state in ASP.NET 2.0 and avoid the common problems associated with information persisting across postbacks.
! Extend the session state mechanism. ! Create an ASP.NET Cache object.
To teach this module, you need the following materials:
! Microsoft PowerPoint® file 3201a_05.ppt
It is recommended that you use PowerPoint 2002 or later to display the slides for this course. If you use PowerPoint Viewer or an earlier version of PowerPoint, some of the features of the slides might not be displayed correctly.
To prepare for this module:
! Read all of the materials for this module. ! Read the chapter titled �State Management� in Introducing Microsoft
ASP.NET 2.0 (Microsoft Press). ! Complete the practices and lab.
Presentation, Demonstrations, and Student Practices: 60 minutes Lab: 35 minutes
Required materials
Important
Preparation task

iv Module 5: State Management
How to Teach This Module Key points to remember when teaching this module:
! When you are going through the slide topics, be sure to expound upon the bullet points when you feel students might need additional information. You can supplement the content on the slides with any real-world knowledge that you bring to the course and by discussing typical scenarios that you are aware of. You can also add further detail to the slides by explaining the specifics of a point. Be sure to try and add some detail to slides when appropriate, and encourage students to refer to their companion book for more information.
! When performing the hands-on activities, if you make any changes to the virtual machine that you do not want to keep, you can close the virtual machine without saving. This will take the virtual machine back to the most recently saved state. To close the virtual machine without saving, perform the following steps: a. On the virtual machine, on the Action menu, click Close. b. In the Close dialog box, on the What do you want the virtual machine
to do? list, select Turn off and delete changes, and then click OK. ! The focus of Module 5, �State Management,� is on the processes by which
ASP.NET 2.0 enables you to maintain state and page information over multiple requests for the same page.
! State management uses a similar underlying architecture to that in ASP.NET 1.x, but adds some key enhancements:
• Several new (or improved) ways to maintain state between server roundtrips in two categories: client-side and server-side.
• Control state for custom ASP.NET controls.
• Completely redesigned session object, with options for custom session-state management.
• System for handling custom cache dependencies, including SQL Server database dependencies.
! Many of the improvements for ASP.NET 2.0 are the direct result of developer requests, particularly the redesigned session object and database cache dependency features.
Demonstration Tips
When performing the instructor-led demonstrations in this course, you might consider showing the finished result of the demonstrations before you begin. By showing students the completed application before you begin performing the actual tasks to build it, they will have a mental picture of what you are trying to accomplish in the demonstration.
The finished solutions for each demonstration are provided in the solution folder.
For example, C:\Program Files\MicrosoftLearning\3201A\Practices\ Mod05\Solution\language\Demo1

Module 5: State Management v
Lesson: Configuring the Control State In this lesson, you will teach the students about the differences between view state and control state and how to configure control state on a Web form. You will then teach them how to create, maintain, and persist control state of controls.
This chapter of the book is weighted heavily on conceptual learning. To show students a page compacted into a single object that is serialized and Base64 encoded, refer them to Figure 9-1, �HTML source code for page using GridView control� in Introducing Microsoft ASP.NET 2.0.
You can begin by explaining that view state represents the state of the page when it was last processed on the server. It is also one of the most important features of ASP.NET because it enables the magic of the Web forms model.
If you use the View state carelessly, it can easily become a burden. This is because the view state is packed and sent with the page, adding extra kilobytes of data. Also, although it is designed to be reasonably safe, view state is a potential vehicle for malicious code because it uses hidden fields.
As far as performance is concerned, view state can become significant in size, especially for feature-rich pages that use several controls. This extra burden can cause serious overhead for the application as a whole.
To resolve this size issue, you can disable the feature by disabling the view state only for some of the server controls hosted in the page.
It is not a best practice to disable the view state for an entire page by setting the EnableViewState attribute of the @Page directive to false because of issues with postback and state management.
In addition to performance issues, you should discuss a security issue not mentioned in the book: View state is stored in a hidden field and left on the client, where it has the potential for compromise; the information can be read by viewing the source of the page. While this action alone is not a threat to the application, having the view state on the client is a potential security issue because it is information that all ASP.NET pages contain and transmit to the Web server for processing.
The diagram on the right of the slide illustrates the cycle of control state persistence: the folder and file structure represents a control variable, and the red arrows represent the cycle. The key is this: The control state will persist itself and all of its child controls.
The main point is that in ASP.NET 2.0, control state replaces the private use of the view state.
When discussing the bullet about controlling the size of control state, mention that like any ASP.NET control, the control state grows with the size of the control including any other child controls below it in the hierarchy.
The purpose of this topic is to reiterate to developers their ability to manage the control state. While it does offer the power and flexibility inherent with increased management, it comes at the cost of having to apply the serialization and deserialization.
The View State
Resolving View State Performance Issues
The Control State
Guidelines for Using the Control State
Programming the Control State

vi Module 5: State Management
Lesson: Extending the Session State Mechanism In this lesson, you will teach the students how to use the extensibility model for session state in two ways, either to define custom data stores for session state or to change the session data store of a module.
For information about the behavior, methods, and process of session state, refer to the following tables and figures in Introducing Microsoft ASP.NET 2.0.
! Figure 9-2, �Overall behavior of default session state module� ! Table 9-1, �Methods of the ISessionStateStore interface� ! Figure 9-3, �How the pieces of the session puzzle fit together� ! Table 9-2, �Methods of the ISessionIDModule Interface�
The key point for this topic is that you, as the developer, can define custom data stores for session state. Explain that there are two ways of doing this, and explain the pros and cons of each.
Customizing the session state module involves replacing or modifying up to four aspects of the session state module: the data store, the data dictionary, the session state item, and the session ID. The drawback of this method is that it offers the developer fewer features to customize.
Writing a custom session state is much more complex. You must write a HTTP module class that intercepts the AcquireRequestState, ReleaseRequestState, and EndRequest applications events. These events are required to implement a legitimate session state module. This method of customizing session state offers developers a great deal of control and flexibility.
Point out that although the default session module will meet your development needs most of the time, if you want to support functionality not covered by the standard module, you should consider replacing the session state module.
In this demonstration, you will use SQL Server for the session model. During the procedures, you must supply the server, log on, and disable the cookiestate. This allows the ASP.NET application to store all session data in the SQL Server database specified in the web.config configuration file.
Extensibility Model for the Session State
Demonstration: How to Customize the Session State

Module 5: State Management vii
Lesson: Creating the ASP.NET Cache Object In this lesson, you will teach students how to use the inheritable CacheDependency class in ASP.NET 2.0 to easily derive its own class, thus saving time and a lot of work. The biggest difference in dependencies between ASP.NET 1.x and ASP.NET 2.0 is that version 2.0 supports custom dependencies.
For visual aids, refer to the following diagrams about SQL Server Cache Dependency and triggers contained in Introducing Microsoft ASP.NET 2.0.
! Figure 9-4, �The SqlCacheDependencyAdmin class� ! Figure 9-5, �Trigger defined to track changes on a table�
You can mention that the most common type of custom dependency is a dependency set on a database table.
To summarize the cache dependency functionality, explain that it represents a logical dependency between a cached item and files, folders, or other cached items. When the dependency is broken, the bound cached item is removed from the cache.
So, for a database cache dependency, if the cache�s configured expiration data has passed, the data is retrieved again. Furthermore, if the data in the database is updated or changed, the cache will automatically be expired.
Be sure to point out the differences between ASP.NET 1.x and ASP.NET 2.0. In ASP.NET 1.1, the CacheDependency class is sealed and cannot be inherited to create custom classes. WithASP.NET 2.0, you have the ability to extend the range of sensitive objects and use your own objects in addition to files, folders, and other cached items.
If students need additional information to complete this practice, refer them to the following diagrams about the SQL Server Cache Dependency and triggers in Introducing Microsoft ASP.NET 2.0.
! Figure 9-4, �The SqlCacheDependencyAdmin class� ! Figure 9-5, �Trigger defined to track changes on a table�
The critical point of this slide is to advise students to use discretion when designing their custom dependencies. It is not a task that should be done until the following considerations are weighed: resource issues, concurrency issues, and size considerations. These potential issues should be fully vetted before building custom dependencies.
As you are working through this demonstration, ask students to consider the following questions about custom dependencies:
What type of custom cache dependency might you reasonably need? Database dependency? Anything else? Maybe you need a dependency on the results of a Web service call? Or a dependency on the HTML returned by a Web page? Or a dependency on any sort of incoming data like data coming over a socket connection?
The Cache Dependency
Differences in Cache Dependencies Between ASP.NET 1.x and ASP.NET 2.0
Practice: Creating a Web Service Cache Dependency
Designing a Custom Dependency
Demonstration: How to Design a Custom Dependency

viii Module 5: State Management
The primary focus for this topic is that the SQL Server Cache Dependency functionality is provided as an ad hoc class named SqlCacheDependency. It is important to stress to students that this class works only with versions SQL Server 7.0 and later!
One point worth noting is that after a SQL Server dependency is created and bound to a cache key, you will get notification based on changes in the entire table. But in SQL Server 2005, the second constructor, the SqlCommand object, is put to use. It will call the SqlCacheDependency class, which then sets up a dependency relationship with SQL Server 2005 called command notification. By doing this, whenever a change occurs to the involved tables that modifies the output of the command, the notification is sent to the caller.
Explain to students that before you can establish cache dependency with SQL Server 7.0 or SQL Server 2000, you need to perform the following steps:
! Insert the <cache> element in the configuration file web.confile. ! Perform one-time setup of the tables or databases you want to monitor using
either the aspnet_regsqlcache utility or the EnableTableForNotifications method.
After you have completed the above steps, ASP.NET can start invalidating the data in the cache when the SQL Server data changes, which is accomplished by a polling-mechanism approach.
SQL Server Cache Dependency
The SqlCacheDependency Class
Demonstration: How to Enable a Database to Support Notifications

Module 5: State Management ix
Lab: Working with State Management When introducing this lab, encourage students to read the scenarios and then reflect on how that information might apply to their own organizations. This will help them keep the purpose of this lab in their minds as they work through the practices. The biggest reason that managing state in ASP.NET 2.0 is valuable to developers is that the redesigned session object and database cache dependency features enable them to have a great deal of flexibility and control over session state.
The control state enables greater business intelligence due to its ability to filter and sort in GridView. Caching increases bandwidth over the network. By using the state management features of ASP.NET 2.0, organizations can:
! Increase employee productivity by providing them with the ability to gather better business intelligence faster than before.
! Increase network performance by enabling caching. ! Decrease IT costs by lowering the database administration maintenance on
various data tables.
In this exercise, there is a note for students in the procedure titled �To add paging to the Human Resources grid view.� The note explains that developers no longer need to handle paging operations manually by creating the OnPageChanged event. In ASP.NET 2.0, paging operations are handled automatically by the new framework. It is important to reiterate this fact to students.
Allow no more than 5 to 10 minutes for this activity. It should be a simple and informal discussion that offers students the opportunity to think about what they learned in the lab and to draw comparisons to situations in their own organizations. Just remember to keep students focused on the subject of this module�State Management.
Exercise 2: Creating Paging and Sorting for a GridView
Scenario reflection activity


Module 5: State Management 1
Overview
*****************************ILLEGAL FOR NON-TRAINER USE******************************

2 Module 5: State Management
Lesson: Configuring the Control State
*****************************ILLEGAL FOR NON-TRAINER USE******************************

Module 5: State Management 3
The View State
*****************************ILLEGAL FOR NON-TRAINER USE******************************
See Introducing Microsoft ASP.NET 2.0, Chapter 9, �State Management,� The Control State, page 204.

4 Module 5: State Management
Resolving View State Performance Issues
*****************************ILLEGAL FOR NON-TRAINER USE******************************
See Introducing Microsoft ASP.NET 2.0, Chapter 9, �State Management,� The Control State, page 204.

Module 5: State Management 5
The Control State
*****************************ILLEGAL FOR NON-TRAINER USE******************************
See Introducing Microsoft ASP.NET 2.0, Chapter 9, �State Management,� The Control State, pages 203�204.

6 Module 5: State Management
Guidelines for Using the Control State
*****************************ILLEGAL FOR NON-TRAINER USE******************************
See Introducing Microsoft ASP.NET 2.0, Chapter 9, �State Management,� The Control State, pages 203�204.
Module 5: State Management 7
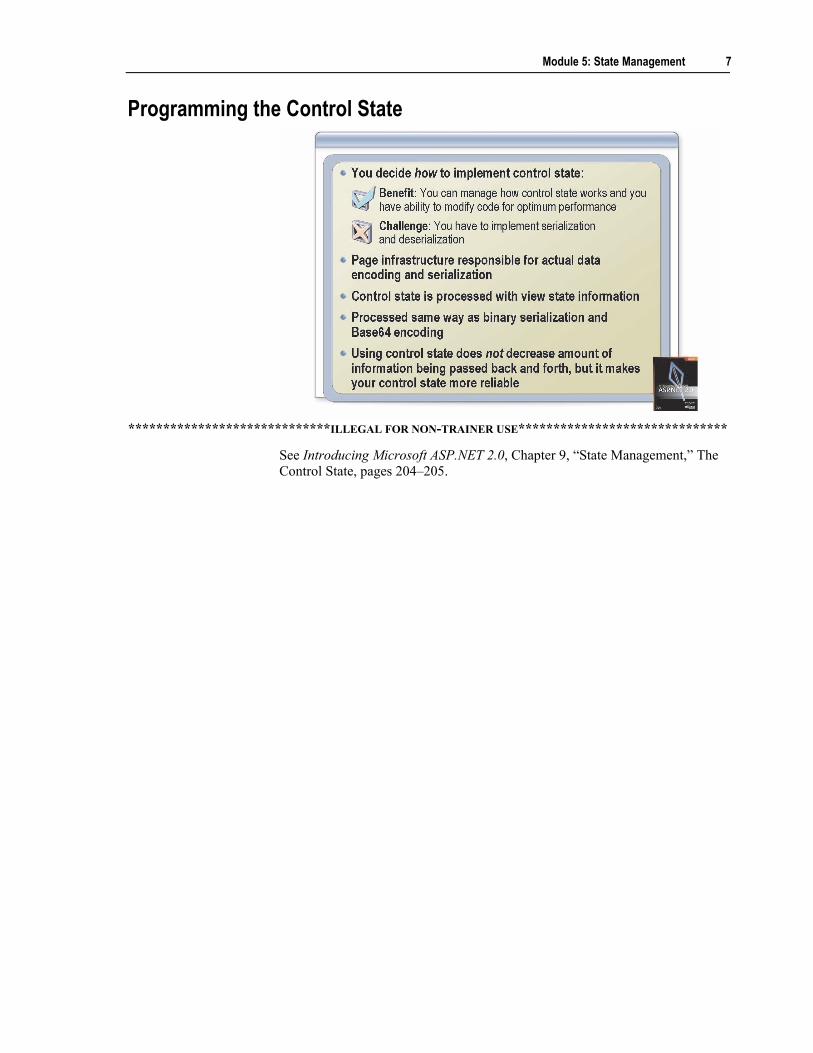
Programming the Control State
*****************************ILLEGAL FOR NON-TRAINER USE******************************
See Introducing Microsoft ASP.NET 2.0, Chapter 9, �State Management,� The Control State, pages 204�205.
8 Module 5: State Management
Lesson: Extending the Session State Mechanism
*****************************ILLEGAL FOR NON-TRAINER USE******************************

Module 5: State Management 9
Extensibility Model for the Session State
*****************************ILLEGAL FOR NON-TRAINER USE******************************
See Introducing Microsoft ASP.NET 2.0, Chapter 9, �State Management,� Extending the Session State Mechanism, page 206.

10 Module 5: State Management
Demonstration: How to Customize the Session State
*****************************ILLEGAL FOR NON-TRAINER USE******************************
See Introducing Microsoft ASP.NET 2.0, Chapter 9, �State Management,� Extending the Session State Mechanism, pages 206�212.
In this demonstration, you will learn how to customize the session state.
Your instructor will demonstrate how to modify the web.config file by adding the session state element to the configuration section of web.config file of a site. For the purposes of this demonstration, all session state information will be stored in a Microsoft® SQL Server� database, relieving memory consumption of the Web server.
Your instructor will use the following values in this demonstration:
Variable Value Virtual machine GEN-STU-01
User Name Administrator
Password P@ssw0rd
Introduction

Module 5: State Management 11
! To prepare for this demonstration
1. If the virtual machine has been paused:
• On the GEN-STU-01 virtual machine, on the Action menu, click Resume.
2. If the virtual machine has been shut down: a. From the desktop, double-click the Microsoft Virtual PC icon,
highlight GEN-STU-01, and then click Start. b. After the GEN-STU-01 virtual machine boots, log on with a user name
of Administrator and a password of P@ssw0rd. 3. On the GEN-STU-01 virtual machine, click Start, click Microsoft Visual
Studio 2005.
! To open the Demo project
1. In Microsoft Visual Studio® 2005, on the File menu, click Open Web site. 2. In the Open Web site window, browse to C:\Program Files\
Microsoft Learning\3201A\Democode\Mod05\Starter\language\Demo1, and then click Open.
This is a dual-language course that contains code samples and starter and solution files for both C# and Microsoft Visual Basic® .NET. You can choose the language in which you want to code to complete the procedures. When you see the word language (for example, StrongPassword.language), this indicates that the folder or file can be either C# or Visual Basic .NET. Choose the language you are using, and then proceed.
! To prepare the web.config
1. In Solution Explorer, double-click the web.config file. 2. Add the following code in the system.web section:
<sessionState mode="SQLServer" sqlConnectionString="SERVER=(local);UID=sa;Password=P@ssw0rd" cookieless="false"> </sessionState>
3. Save the web.config file.
! To verify that the configuration is correct
1. In Solution Explorer, right-click the Sales.aspx page, and then click View in Browser.
2. Verify that the page displays results. 3. Review the page. 4. Close the browser and any open files or projects, but leave Visual Studio
open. 5. On the GEN-STU-01 virtual machine, on the Action menu, click Pause.
Procedure
Note

12 Module 5: State Management
Lesson: Creating the ASP.NET Cache Object
*****************************ILLEGAL FOR NON-TRAINER USE******************************

Module 5: State Management 13
The Cache Dependency
*****************************ILLEGAL FOR NON-TRAINER USE******************************
See Introducing Microsoft ASP.NET 2.0, Chapter 9, �State Management,� The ASP.NET Cache Object, page 212.

14 Module 5: State Management
Differences in Cache Dependencies Between ASP.NET 1.x and ASP.NET 2.0
*****************************ILLEGAL FOR NON-TRAINER USE******************************
See Introducing Microsoft ASP.NET 2.0, Chapter 9, �State Management,� The ASP.NET Cache Object, pages 212�213.
Module 5: State Management 15
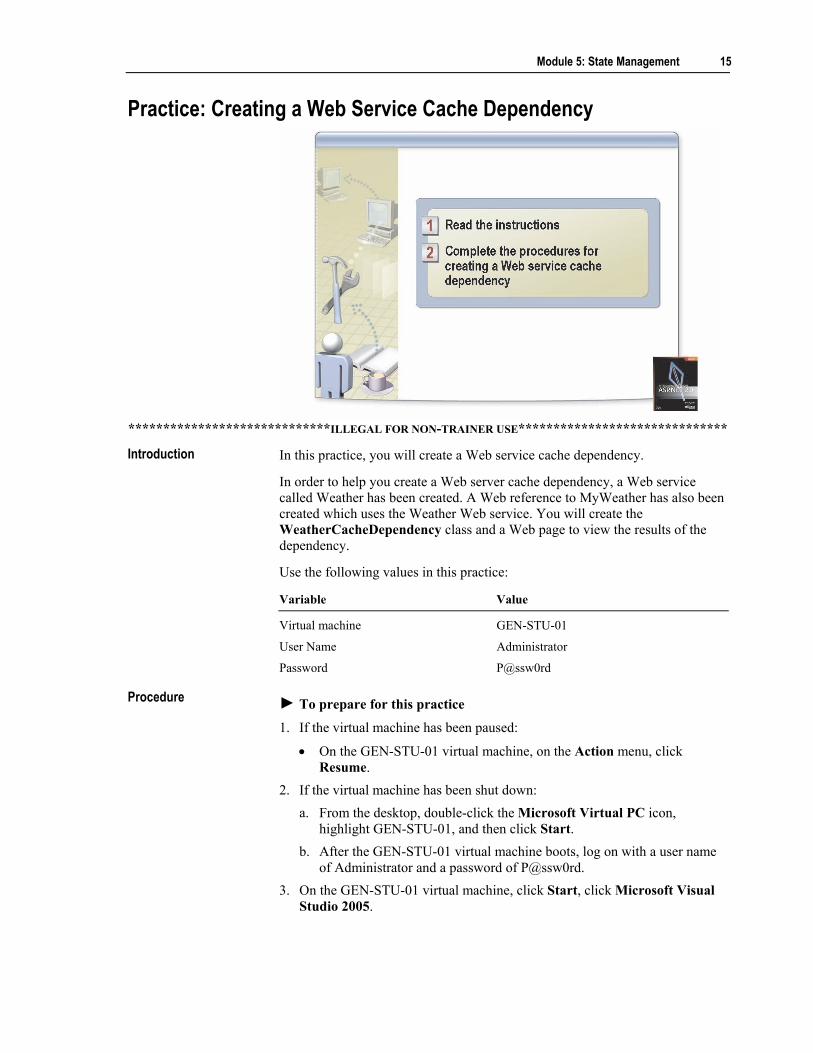
Practice: Creating a Web Service Cache Dependency
*****************************ILLEGAL FOR NON-TRAINER USE******************************
In this practice, you will create a Web service cache dependency.
In order to help you create a Web server cache dependency, a Web service called Weather has been created. A Web reference to MyWeather has also been created which uses the Weather Web service. You will create the WeatherCacheDependency class and a Web page to view the results of the dependency.
Use the following values in this practice:
Variable Value Virtual machine GEN-STU-01
User Name Administrator
Password P@ssw0rd
! To prepare for this practice
1. If the virtual machine has been paused:
• On the GEN-STU-01 virtual machine, on the Action menu, click Resume.
2. If the virtual machine has been shut down: a. From the desktop, double-click the Microsoft Virtual PC icon,
highlight GEN-STU-01, and then click Start. b. After the GEN-STU-01 virtual machine boots, log on with a user name
of Administrator and a password of P@ssw0rd. 3. On the GEN-STU-01 virtual machine, click Start, click Microsoft Visual
Studio 2005.
Introduction
Procedure

16 Module 5: State Management
! To open the Mod5 Web site
1. In Visual Studio, on the File menu, click Open Web site. 2. On the Open Site window, on File System, browse to
C:\Program Files\Microsoft Learning\3201A\Practices\Mod05\ Starter\language\Practice1, and then click Open.
! To modify the WeatherCacheDep.language file
1. In Solution Explorer, in the Code folder, double-click the WeatherCacheDep. language file.
2. Create a public method called WeatherCacheDepCallback that accepts the sending object as a parameter: C# public void WeatherCacheDepCallback(object sender) { }
Visual Basic .NET Public Sub WeatherCacheDepCallback(ByVal sender As Object) End Sub 'WeatherCacheDepCallback
3. In the WeatherCacheDepCallback method, create a variable dep of type
WeatherCacheDependency and set the value to the sending WeatherCacheDependency object: C# WeatherCacheDependency dep = (WeatherCacheDependency) sender;
Visual Basic .NET Dim dep As WeatherCacheDependency = CType(sender, _ WeatherCacheDependency)
4. Create a variable currentTemp of type Integer set equal to the value
returned from GetTemperature: C# int currentTemp = GetTemperature();
Visual Basic .NET Dim currentTemp As Integer = GetTemperature()
Module 5: State Management 17
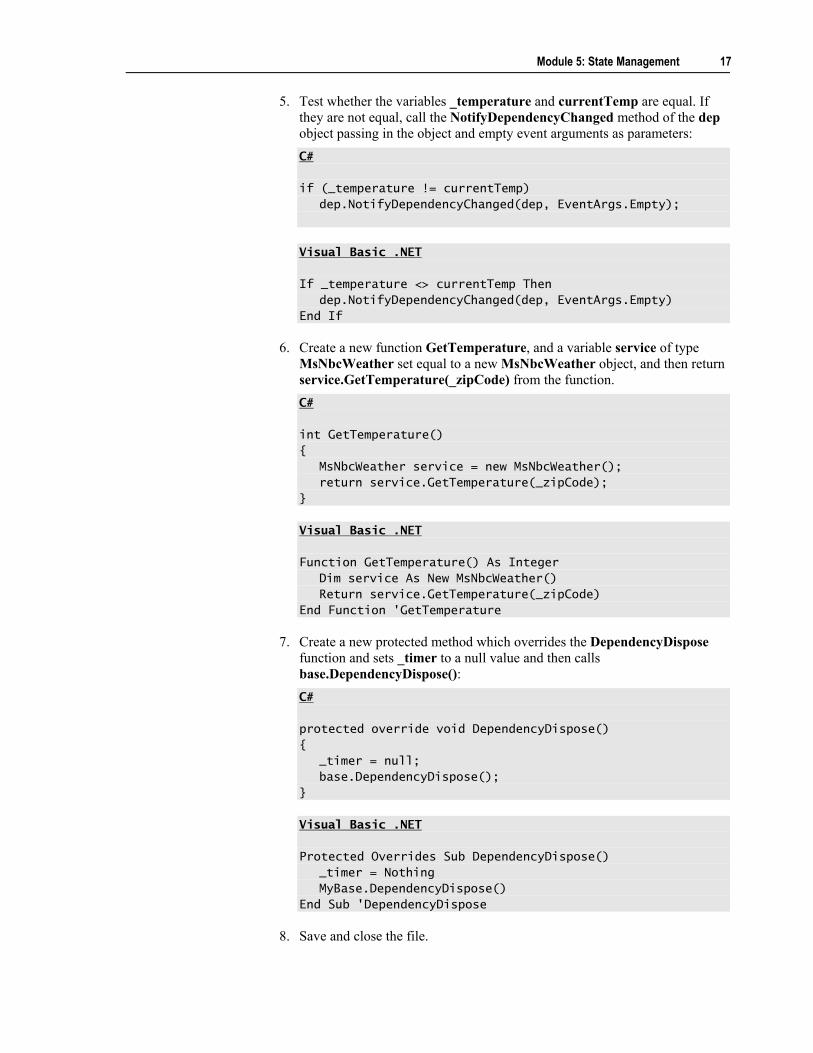
5. Test whether the variables _temperature and currentTemp are equal. If they are not equal, call the NotifyDependencyChanged method of the dep object passing in the object and empty event arguments as parameters: C# if (_temperature != currentTemp) dep.NotifyDependencyChanged(dep, EventArgs.Empty);
Visual Basic .NET If _temperature <> currentTemp Then dep.NotifyDependencyChanged(dep, EventArgs.Empty) End If
6. Create a new function GetTemperature, and a variable service of type
MsNbcWeather set equal to a new MsNbcWeather object, and then return service.GetTemperature(_zipCode) from the function. C# int GetTemperature() { MsNbcWeather service = new MsNbcWeather(); return service.GetTemperature(_zipCode); }
Visual Basic .NET Function GetTemperature() As Integer Dim service As New MsNbcWeather() Return service.GetTemperature(_zipCode) End Function 'GetTemperature
7. Create a new protected method which overrides the DependencyDispose
function and sets _timer to a null value and then calls base.DependencyDispose(): C# protected override void DependencyDispose() { _timer = null; base.DependencyDispose(); }
Visual Basic .NET Protected Overrides Sub DependencyDispose() _timer = Nothing MyBase.DependencyDispose() End Sub 'DependencyDispose
8. Save and close the file.
18 Module 5: State Management
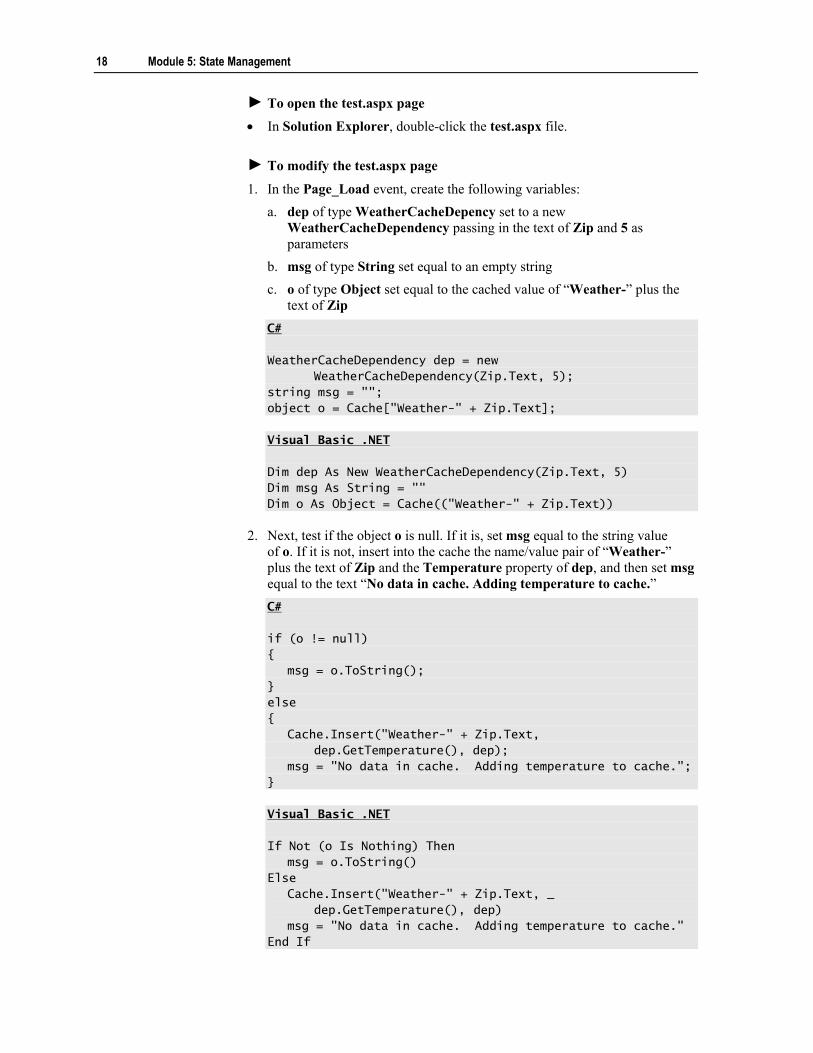
! To open the test.aspx page
• In Solution Explorer, double-click the test.aspx file.
! To modify the test.aspx page
1. In the Page_Load event, create the following variables: a. dep of type WeatherCacheDepency set to a new
WeatherCacheDependency passing in the text of Zip and 5 as parameters
b. msg of type String set equal to an empty string c. o of type Object set equal to the cached value of �Weather-� plus the
text of Zip C# WeatherCacheDependency dep = new WeatherCacheDependency(Zip.Text, 5); string msg = ""; object o = Cache["Weather-" + Zip.Text];
Visual Basic .NET Dim dep As New WeatherCacheDependency(Zip.Text, 5) Dim msg As String = "" Dim o As Object = Cache(("Weather-" + Zip.Text))
2. Next, test if the object o is null. If it is, set msg equal to the string value
of o. If it is not, insert into the cache the name/value pair of �Weather-� plus the text of Zip and the Temperature property of dep, and then set msg equal to the text �No data in cache. Adding temperature to cache.� C# if (o != null) { msg = o.ToString(); } else { Cache.Insert("Weather-" + Zip.Text, dep.GetTemperature(), dep); msg = "No data in cache. Adding temperature to cache."; }
Visual Basic .NET If Not (o Is Nothing) Then msg = o.ToString() Else Cache.Insert("Weather-" + Zip.Text, _ dep.GetTemperature(), dep) msg = "No data in cache. Adding temperature to cache." End If

Module 5: State Management 19
3. Finally, set the text of TempLabel equal to msg, and set the text of WSLabel equal to the string value of the Temperature property of dep. C# TempLabel.Text = msg; WSLabel.Text = dep.GetTemperature().ToString();
Visual Basic .NET TempLabel.Text = msg WSLabel.Text = dep.GetTemperature().ToString()
4. Save the test.aspx page.
! To review the test.aspx page
1. Right-click the page and select View in Browser. 2. Review the page. 3. Close the browser and any open files or projects, but leave Visual Studio
open. 4. On the GEN-STU-01 virtual machine, on the Action menu, click Pause.
20 Module 5: State Management
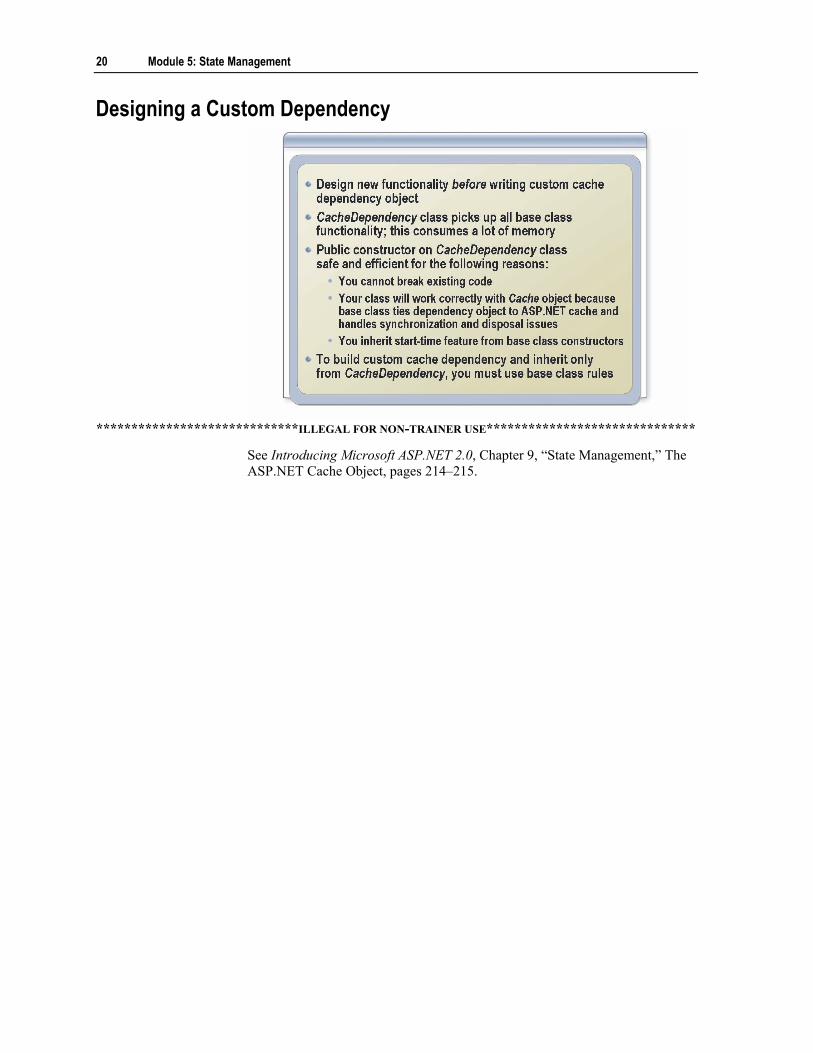
Designing a Custom Dependency
*****************************ILLEGAL FOR NON-TRAINER USE******************************
See Introducing Microsoft ASP.NET 2.0, Chapter 9, �State Management,� The ASP.NET Cache Object, pages 214�215.

Module 5: State Management 21
Demonstration: How to Design a Custom Dependency
*****************************ILLEGAL FOR NON-TRAINER USE******************************
In this demonstration, you will learn how to design a custom dependency.
Your instructor will demonstrate how to modify the web.config file by adding the caching element to the configuration section of web.config file of a site. For the purposes of this demonstration, your instructor will use a SQL Server connection to the Northwind database.
Your instructor will use the following values in this demonstration:
Variable Value Virtual machine GEN-STU-01
User Name Administrator
Password P@ssw0rd
! To prepare for this demonstration
• On the GEN-STU-01 virtual machine, on the Action menu, click Resume.
! To open the Demo project
1. In Visual Studio, on the File menu, click Open Web site. 2. In the Open Web site window, browse to C:\Program Files\
Microsoft Learning\3201A\Democode\Mod05\Starter\language\Demo2, and then click Open.
Introduction
Procedure

22 Module 5: State Management
! To prepare the web.config file
1. In Solution Explorer, double-click the web.config file. 2. Add the following code to the system.web section:
<caching> <sqlCacheDependency enabled="true" pollTime="60000"> <databases> <add name="Northwind" connectionStringName="NWindConn" pollTime="60000" /> </databases> </sqlCacheDependency> </caching>
! To review the web.config file
1. Review the file, and then discuss the changes to the web.config file as a result of adding the caching element to the configuration section.
2. Close the browser and any open files or projects, but leave Visual Studio open.
3. On the GEN-STU-01 virtual machine, on the Action menu, click Pause.

Module 5: State Management 23
SQL Server Cache Dependency
*****************************ILLEGAL FOR NON-TRAINER USE******************************
See Introducing Microsoft ASP.NET 2.0, Chapter 9, �State Management,� The ASP.NET Cache Object, pages 218�220.

24 Module 5: State Management
The SqlCacheDependency Class
*****************************ILLEGAL FOR NON-TRAINER USE******************************
See Introducing Microsoft ASP.NET 2.0, Chapter 9, �State Management,� The ASP.NET Cache Object, pages 218�220.

Module 5: State Management 25
Demonstration: How to Enable a Database to Support Notifications
*****************************ILLEGAL FOR NON-TRAINER USE******************************
In this demonstration, you will learn how to enable a database to support notifications.
Your instructor will demonstrate how to prepare your Microsoft ASP.NET 2.0 applications for publication. Any tables that you want to make dependencies on must have notifications enabled. This task must be accomplished before the application can be published. Publishing your application before you enable notifications on the tables will generate an error on the page.
You can use either the command-line tool aspnet_regsql, or the methods of the SqlCacheDependencyAdmin. For this demonstration, your instructor will accomplish the task by using the aspnet_regsql method.
Your instructor will use the following values in this demonstration:
Variable Value Virtual machine GEN-STU-01
User Name Administrator
Password P@ssw0rd
! To prepare for this demonstration
• On the GEN-STU-01 virtual machine, on the Action menu, click Resume.
Introduction
Procedure
26 Module 5: State Management
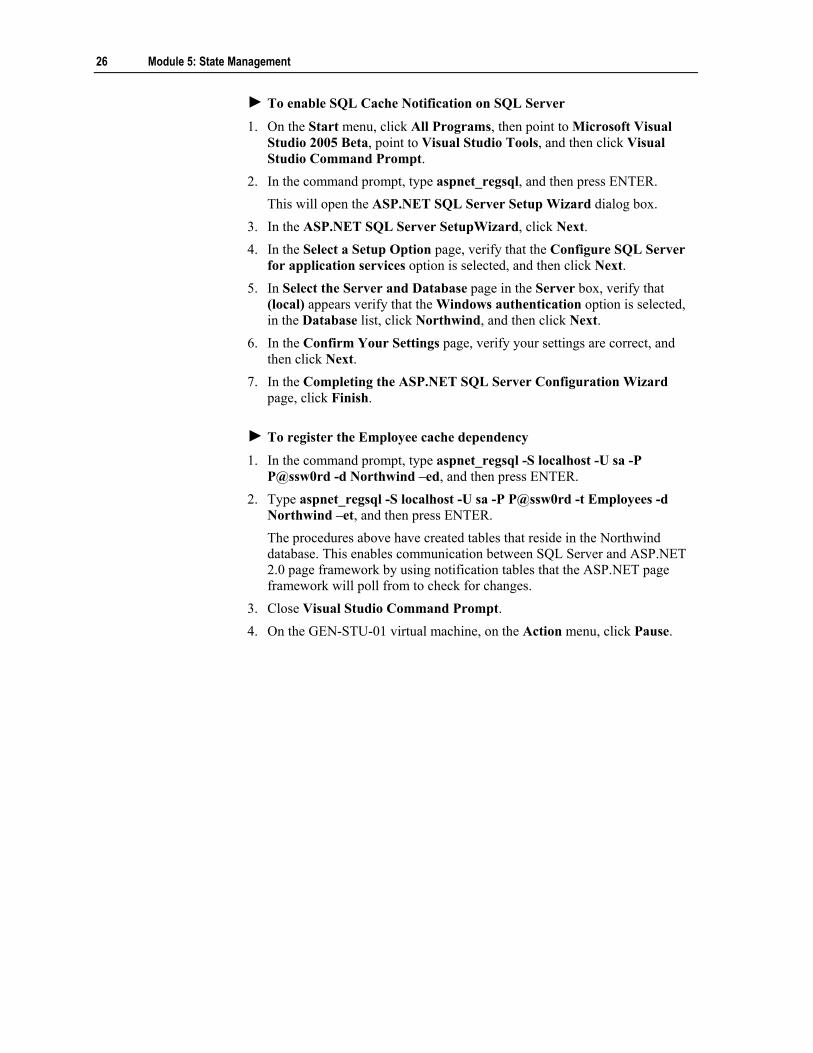
! To enable SQL Cache Notification on SQL Server
1. On the Start menu, click All Programs, then point to Microsoft Visual Studio 2005 Beta, point to Visual Studio Tools, and then click Visual Studio Command Prompt.
2. In the command prompt, type aspnet_regsql, and then press ENTER. This will open the ASP.NET SQL Server Setup Wizard dialog box.
3. In the ASP.NET SQL Server SetupWizard, click Next. 4. In the Select a Setup Option page, verify that the Configure SQL Server
for application services option is selected, and then click Next. 5. In Select the Server and Database page in the Server box, verify that
(local) appears verify that the Windows authentication option is selected, in the Database list, click Northwind, and then click Next.
6. In the Confirm Your Settings page, verify your settings are correct, and then click Next.
7. In the Completing the ASP.NET SQL Server Configuration Wizard page, click Finish.
! To register the Employee cache dependency
1. In the command prompt, type aspnet_regsql -S localhost -U sa -P P@ssw0rd -d Northwind �ed, and then press ENTER.
2. Type aspnet_regsql -S localhost -U sa -P P@ssw0rd -t Employees -d Northwind �et, and then press ENTER. The procedures above have created tables that reside in the Northwind database. This enables communication between SQL Server and ASP.NET 2.0 page framework by using notification tables that the ASP.NET page framework will poll from to check for changes.
3. Close Visual Studio Command Prompt. 4. On the GEN-STU-01 virtual machine, on the Action menu, click Pause.

Module 5: State Management 27
Lab A: State Management
*****************************ILLEGAL FOR NON-TRAINER USE******************************
After completing this lab, you will be able to:
! Configure a cache dependency. ! Create paging and sorting for a GridView.
This lab focuses on the concepts in this module and as a result might not comply with Microsoft security recommendations.
You must have either viewed all of the instructor-led demonstrations and completed all of the practices in this module, or have equivalent knowledge and experience.
If you would like supporting information to perform the lab exercises you can:
! Review the instructor-led demonstrations and practices in this module for detailed steps of the tasks required in this lab.
! Use Dynamic Help for detailed information on the controls, code, and objects.
! Refer to related content in the chapter titled �State Management� in Introducing Microsoft ASP.NET 2.0 (Microsoft Press).
! Open the solution files located on both the virtual machine and your Student compact disc at C:\Program Files\Microsoft Learning\3201A\Labfiles\ Mod05\language\Solution.
Objectives
Note
Prerequisites
For more information

28 Module 5: State Management
Employees are now actively using the Adventure Works intranet site. This morning, the IT helpdesk informed you that several users have recently logged complaints about the large number of records displayed in the Employee GridView control on the Human Resources page.
The user complaints could basically be summarized in the following way:
! Users said that the large number of records made the process of finding the data they needed very inefficient.
! They also expressed frustration over the long wait time while the page loaded initially, and the lag time that occurred while they were editing employee records.
Coincidentally, the Adventure Works database administrator recently reported that over the past few weeks, the number of hits on the Employee table has increased significantly, causing excessive network traffic.
These issues are tasked to you and your Web development team to resolve. So as a solution, you and your team decide to:
! Turn on paging for GridView. ! Set a cache dependency on the Employees table to track when the table is
modified by insertions, deletions, or updates.
This should alleviate both the user frustration and the network traffic alike.
The following figure provides a sample of the application that you will create during the lab exercises.
Scenario
Estimated time to complete this lab: 35 minutes
Module 5: State Management 29
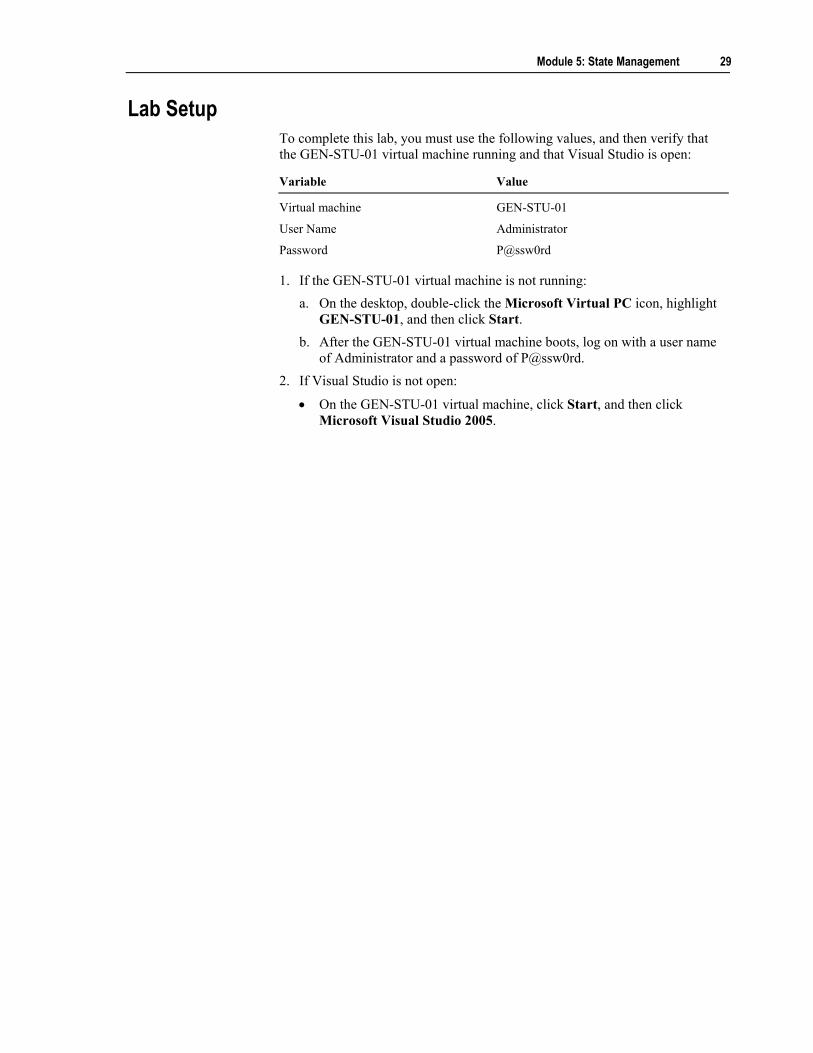
Lab Setup To complete this lab, you must use the following values, and then verify that the GEN-STU-01 virtual machine running and that Visual Studio is open:
Variable Value Virtual machine GEN-STU-01
User Name Administrator
Password P@ssw0rd
1. If the GEN-STU-01 virtual machine is not running: a. On the desktop, double-click the Microsoft Virtual PC icon, highlight
GEN-STU-01, and then click Start. b. After the GEN-STU-01 virtual machine boots, log on with a user name
of Administrator and a password of P@ssw0rd. 2. If Visual Studio is not open:
• On the GEN-STU-01 virtual machine, click Start, and then click Microsoft Visual Studio 2005.

30 Module 5: State Management
Exercise 1 Configuring a Cache Dependency
In this exercise, you will create a SQL cache dependency on the Employees table to track modification made to the table and its data.
Problem:
The Adventure Works database administrator noticed that the interactions with employee data have placed a considerable load on the database resource. The problem can be summarized as follows:
! An excessive database load is being caused by the employee table receiving queries regardless of whether or not the information has actually changed.
! After analyzing how the data was being used, the database administrator discovered that it very rarely changes. Therefore, constantly retrieving a fresh view of this data is not only unnecessary, but inefficient.
! The queries place an undue burden on the databases and impede the users� ability to make changes on those less-frequent occasions where the changes are actually required.
Solution:
A meeting among senior management, the database administrator, and your Web development team results in a solution to the problem.
You announce that by using new state management features of ASP.NET 2.0, specifically its support for custom cache dependencies, you can configure a cache dependency on the Employee table, which is both an effective and inexpensive solution.
! To open the starter Web site
1. In Visual Studio, from the File menu, click Open Web Site. 2. Browse to C:\Program Files\Microsoft Learning\3201A\LabFiles\Mod05\
Ex1\Starter\language\AdWorksWebSite, and then click Open.
! To prepare the web.config file
1. Insert cache element to the system.web section. 2. Insert a SqlCacheDependency element to the cache element with the
following attributes: Attribute Value enabled true
pollTime 60000
Scenario
Module 5: State Management 31
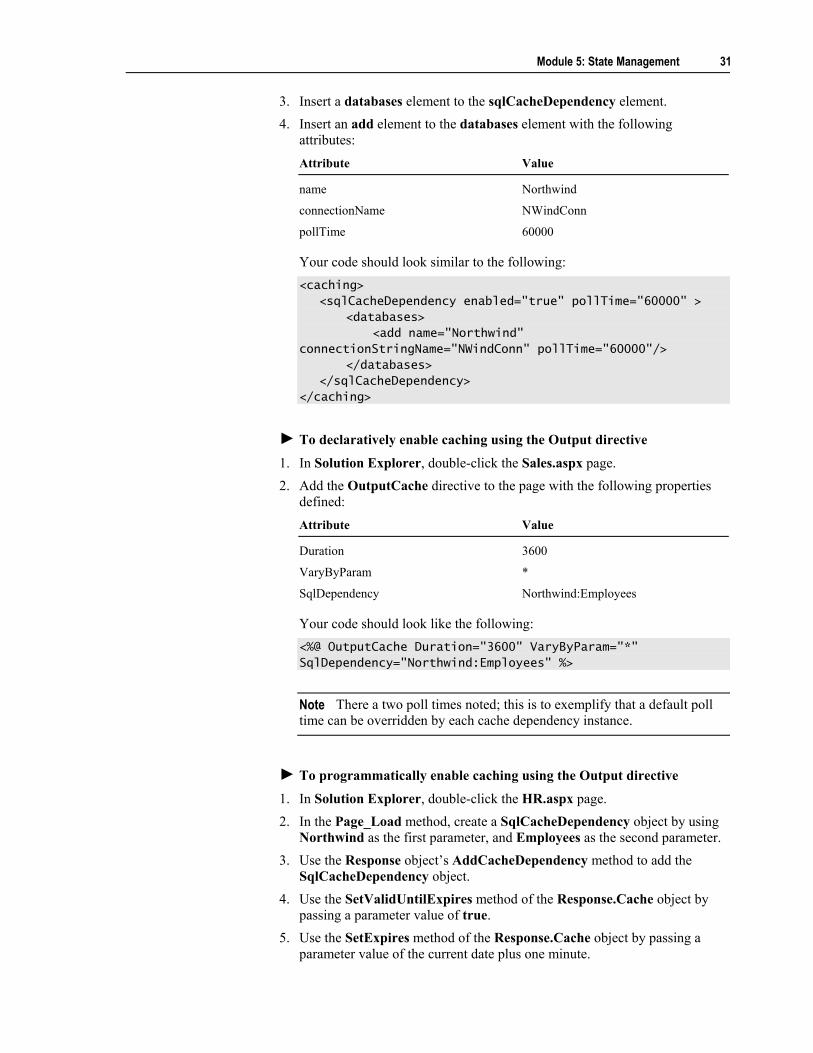
3. Insert a databases element to the sqlCacheDependency element. 4. Insert an add element to the databases element with the following
attributes: Attribute Value name Northwind
connectionName NWindConn
pollTime 60000
Your code should look similar to the following: <caching> <sqlCacheDependency enabled="true" pollTime="60000" > <databases> <add name="Northwind" connectionStringName="NWindConn" pollTime="60000"/> </databases> </sqlCacheDependency> </caching>
! To declaratively enable caching using the Output directive
1. In Solution Explorer, double-click the Sales.aspx page. 2. Add the OutputCache directive to the page with the following properties
defined: Attribute Value Duration 3600
VaryByParam *
SqlDependency Northwind:Employees
Your code should look like the following: <%@ OutputCache Duration="3600" VaryByParam="*" SqlDependency="Northwind:Employees" %>
There a two poll times noted; this is to exemplify that a default poll time can be overridden by each cache dependency instance.
! To programmatically enable caching using the Output directive
1. In Solution Explorer, double-click the HR.aspx page. 2. In the Page_Load method, create a SqlCacheDependency object by using
Northwind as the first parameter, and Employees as the second parameter. 3. Use the Response object�s AddCacheDependency method to add the
SqlCacheDependency object. 4. Use the SetValidUntilExpires method of the Response.Cache object by
passing a parameter value of true. 5. Use the SetExpires method of the Response.Cache object by passing a
parameter value of the current date plus one minute.
Note

32 Module 5: State Management
6. Use the SetCacheability method of the Response.Cache object by passing a parameter value of HttpCacheability.Public.
7. Display the UtcLastModified property of the dependency object.
Your code should look like the following: C# SqlCacheDependency sqlDependency = new SqlCacheDependency("Northwind", "Employees"); Response.AddCacheDependency(sqlDependency); Response.Cache.SetValidUntilExpires(true); Response.Cache.SetExpires(DateTime.Now.AddMinutes(1)); Response.Cache.SetCacheability(HttpCacheability.Public); Response.Write(sqlDependency.UtcLastModified.ToString());
Visual Basic .NET Dim sqlDependency As SqlCacheDependency = _ New SqlCacheDependency("Northwind", "Employees") Response.AddCacheDependency(sqlDependency) Response.Cache.SetValidUntilExpires(True) Response.Cache.SetExpires(DateTime.Now.AddMinutes(1)) Response.Cache.SetCacheability(HttpCacheability.Public) Response.Write(sqlDependency.UtcLastModified.ToString())
! To view the page
1. From the File menu, click Save All. 2. Right-click anywhere on the Sales.aspx page and click View in Browser. 3. Review the results. 4. From the left-hand navigation menu, click HR. 5. Review the results. 6. Close the browser. 7. From the File menu, click Close Project. Leave Visual Studio open for the
next exercise.

Module 5: State Management 33
Exercise 2 Creating Paging and Sorting for a GridView
In this exercise, you will enable paging on the Employee GridView control.
Problem:
You and your Web development team have received feedback from the users of the Human Resources application. A summary of the feedback is as follows:
! Many users say that they cannot easily find the data they need because so many entries appear in the grid at one time.
! Users complain that they waste time by constantly scrolling up and down the page to look for the information they want.
Solution:
Fortunately, these users have also offered a potential solution. In general, most users would like the application to display approximately five employee records at any given time. Several users also mention that they would like the ability to page through the records by using Previous and Next navigation links. Finally, all the users agree that they need the ability to sort the data easily.
You and your Web development team decide to implement a solution that:
! Displays only five records on the page at a time. ! Enables users to easily page through the records by using navigation links. ! Enables users to sort the data.
! To open the starter Web site
1. In Visual Studio, from the File menu, click Open Web Site. 2. Browse to C:\Program Files\Microsoft Learning\3201A\LabFiles\Mod05\
Ex2\Starter\language\AdvWorksWebSite and then click Open.
! To add paging to the Human Resources GridView
1. In Solution Explorer, double-click the HR.aspx file. 2. In the Edit Window, find and click the GridViewEmployees GridView. 3. In the Properties Window, set the following properties:
Attribute Value AllowPaging True
AllowSorting True
PagerSettings-Mode NextPrevious
PageSize 5
You no longer need to handle paging operations manually by creating the OnPageChanged event. In ASP.NET 2.0, paging operations are handled automatically by the new framework.
Scenario
Note

34 Module 5: State Management
! To view the HR.aspx page
1. Save the HR.aspx page. 2. Right-click anywhere on the page, and click View in Browser. 3. Review the results. 4. Close the browser and any open files or projects, but leave Visual Studio
open. 5. On the GEN-STU-01 virtual machine, on the Action menu, click Pause.
Now that you have completed the exercises in this lab, please take a moment to go back and read the scenarios again. Reflect on the business pains outlined in the scenarios, and how you solved those pains by completing the exercises.
Consider the questions below. You can write down your thoughts in the lines provided, and then discuss your answers as a class.
Are any of the scenarios described in this lab similar to business needs or pains in your own organization? If so, how could the ASP.NET 2.0 features and capabilities outlined in the exercises help your organization manage those needs or pains?
Answers will vary, but the discussion should focus around the issues of state management, including caching, paging, and sorting, and how these capabilities might be applicable to your organization. ________________________________________________________________
________________________________________________________________
________________________________________________________________
________________________________________________________________
________________________________________________________________
________________________________________________________________
________________________________________________________________
________________________________________________________________
________________________________________________________________
________________________________________________________________
Scenario reflection activity