moodle lti integration guide - university of edinburgh · moodle lti integration guide there are...
TRANSCRIPT
Collaborate Ultra
If you require this document in an alternative format, such as larger print, please email Kelly Hall at [email protected] July 2018
Moodle LTI Integration Guide There are two ways to create a Collaborate session within Moodle this document will provide instructions on using the Collaborate Ultra LTI.
To view the differences between each option please see the Collaborate Moodle Plugin vs LTI connection in the Selected Moodle Feature Comparisons Grids in Staff Moodle Help Course.
Contents Adding the Collaborate LTI to your Moodle course ............................................. 1
Creating a Collaborate Session in your Moodle course ...................................... 3
Editing your Collaborate Session ........................................................................ 7
Entering your Collaborate session ...................................................................... 7
Changing the participant communication settings in session. ............................. 8
Adding a Teacher on your course as a moderator to your Collaborate activity ... 8
Adding a guest to your Collaborate session ........................................................ 9
Promoting a Participant to a Moderator or Presenter within Collaborate Ultra .. 10
Recording your Collaborate session ................................................................. 10
Accessing your session recording in Moodle .................................................... 11
Download text chat from recording in Moodle ................................................... 12
Editing the name of your recording in Learn ..................................................... 12
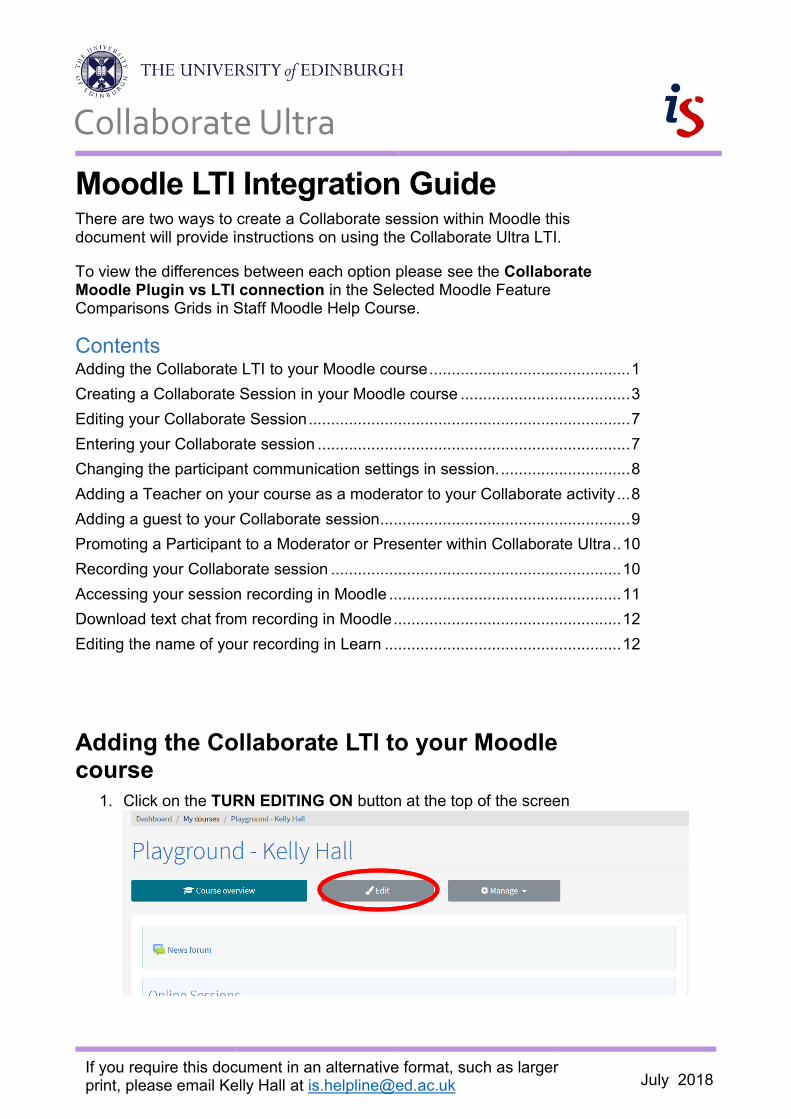
Adding the Collaborate LTI to your Moodle course
1. Click on the TURN EDITING ON button at the top of the screen

2 Educational Design and Engagement
Collaborate Ultra
2. Give the topic area a meaningful name for the Collaborate Ultra Sessions
such as “Online Sessions” or “Virtual Classroom”. 3. Go to the topic area you wish to add Collaborate Ultra and click on the
Add an activity or resource.
4. The Add an activity or resource dialogue box will be displayed.
Please Note:
Because the Collaborate Ultra LTI does not allow you to add individual sessions to a topic area one recommendation would be to create a topic area titled “Collaborate Ultra” or “Online Sessions” so that students know to find the links to all the online sessions in this area.

Collaborate Ultra
If you require this document in an alternative format, such as larger print, please email Kelly Hall at [email protected] July 2018
5. Choose Collaborate Ultra and click on the Add button. 6. A screen will appear asking for the activity name. It is recommend for
the Activity Name to be Collaborate Ultra.
7. Edit other sections as needed. 8. Click on Save and Return to course where you will find the saved
Collaborate Ultra activity.
The LTI has been successfully added to the Moodle course and now you will need to create the Collaborate Ultra sessions for the semester.
Creating a Collaborate Session in your Moodle course
1. Click on the Collaborate Ultra activity which you’ve added to the course.

4 Educational Design and Engagement
Collaborate Ultra
2. This screen will appear which will hold all the Collaborate sessions created as well as the recordings. Click on Create Session.
9. The Adding a New Collaborate Session screen will be displayed.
Please Note: Above the create session button there is a Course Room. This is created for each Moodle Course and is always open. If you do not want to use this space then select the icon with three dots on the far right and select Lock Course Room. At the moment there is not a way to hide or delete the course room. Locking it will make the room unavailable for students to join.
Collaborate Ultra
If you require this document in an alternative format, such as larger print, please email Kelly Hall at [email protected] July 2018
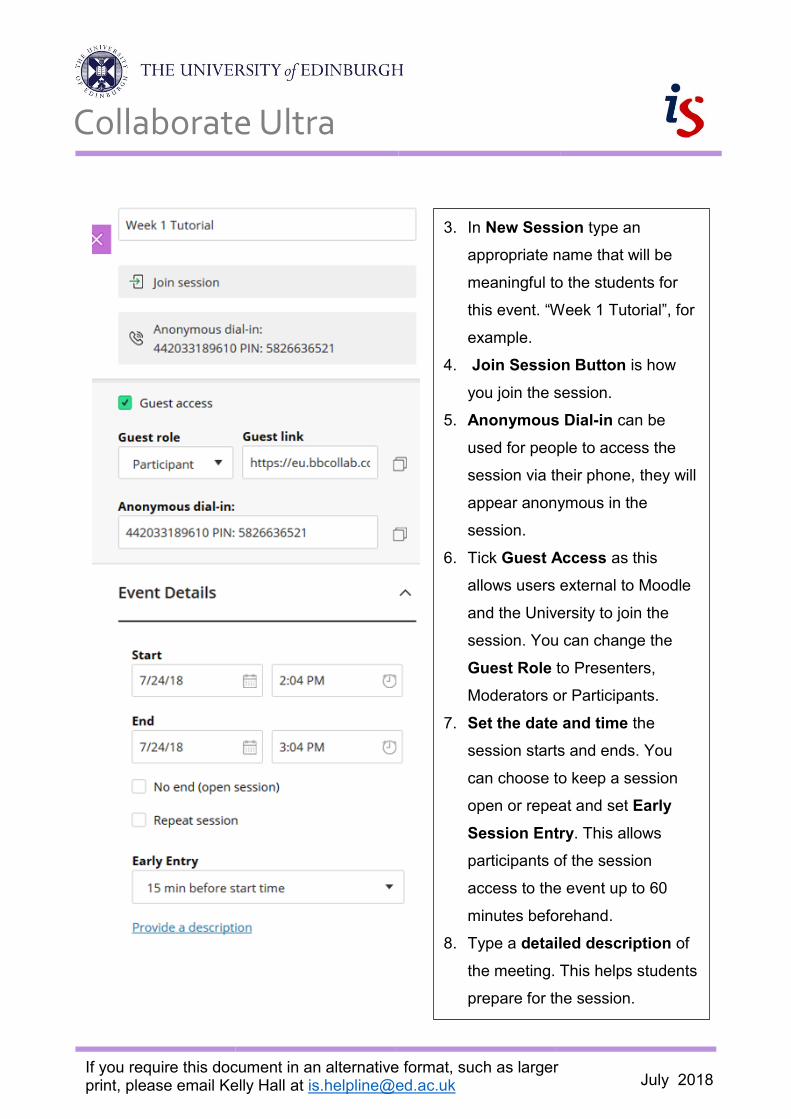
3. In New Session type an
appropriate name that will be
meaningful to the students for
this event. “Week 1 Tutorial”, for
example.
4. Join Session Button is how
you join the session.
5. Anonymous Dial-in can be
used for people to access the
session via their phone, they will
appear anonymous in the
session.
6. Tick Guest Access as this
allows users external to Moodle
and the University to join the
session. You can change the
Guest Role to Presenters,
Moderators or Participants.
7. Set the date and time the
session starts and ends. You
can choose to keep a session
open or repeat and set Early
Session Entry. This allows
participants of the session
access to the event up to 60
minutes beforehand.
8. Type a detailed description of
the meeting. This helps students
prepare for the session.

6 Educational Design and Engagement
Collaborate Ultra
11. The Session will now appear in the All Upcoming Sessions list:
9. Open Session Settings and
decide:
a. Default Role for
students entering the
session
b. If students can
Download recordings
c. Anonymise chat
messages in the
recordings
d. Share profile pictures
e. Use audio, video, chat,
and editing tools
f. Allow users to join via
telephone
g. Participants can only
chat privately with
moderators
h. Supervise the private
chat
10. Select Save
Collaborate Ultra
If you require this document in an alternative format, such as larger print, please email Kelly Hall at [email protected] July 2018
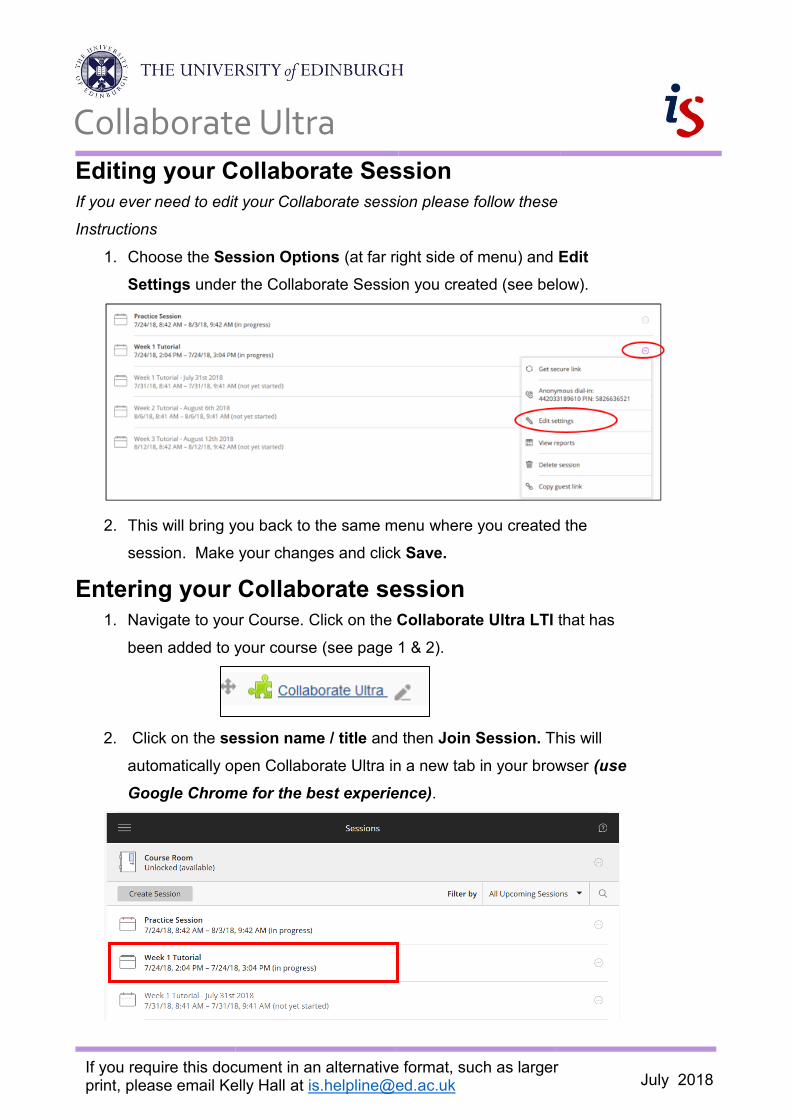
Editing your Collaborate Session
If you ever need to edit your Collaborate session please follow these
Instructions
1. Choose the Session Options (at far right side of menu) and Edit
Settings under the Collaborate Session you created (see below).
2. This will bring you back to the same menu where you created the
session. Make your changes and click Save.
Entering your Collaborate session
1. Navigate to your Course. Click on the Collaborate Ultra LTI that has
been added to your course (see page 1 & 2).
2. Click on the session name / title and then Join Session. This will
automatically open Collaborate Ultra in a new tab in your browser (use
Google Chrome for the best experience).
8 Educational Design and Engagement
Collaborate Ultra
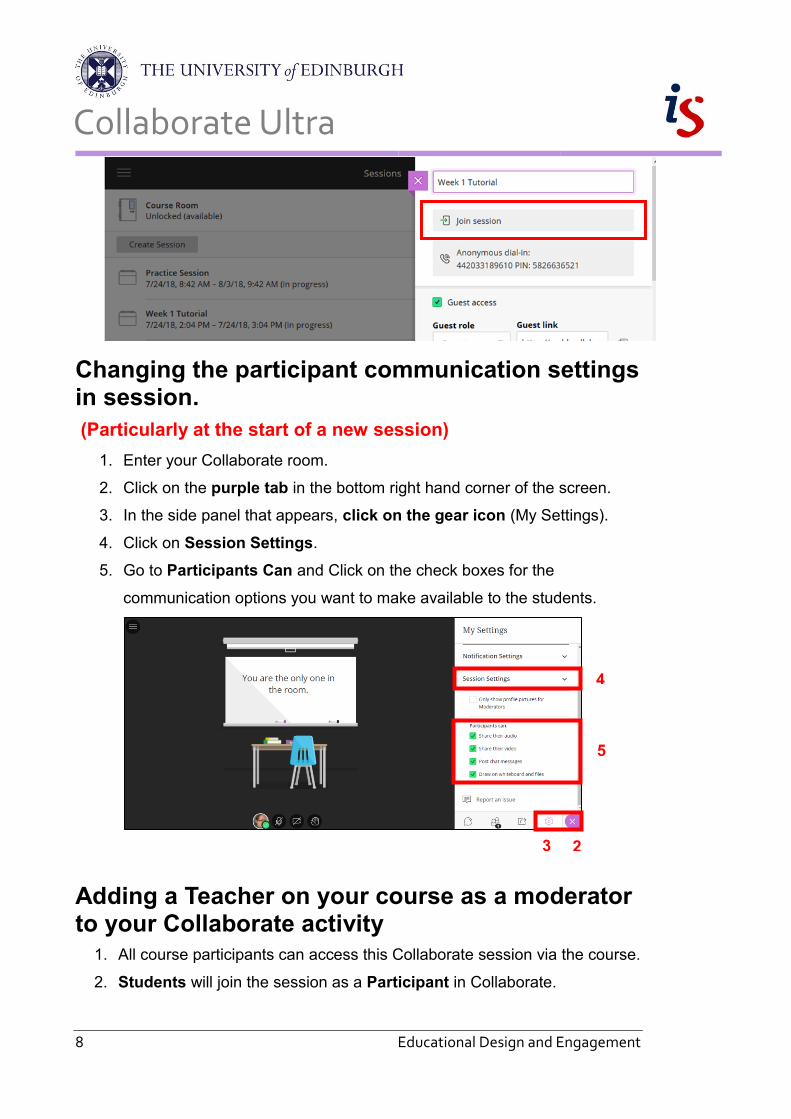
Changing the participant communication settings in session.
(Particularly at the start of a new session)
1. Enter your Collaborate room.
2. Click on the purple tab in the bottom right hand corner of the screen.
3. In the side panel that appears, click on the gear icon (My Settings).
4. Click on Session Settings.
5. Go to Participants Can and Click on the check boxes for the
communication options you want to make available to the students.
Adding a Teacher on your course as a moderator to your Collaborate activity
1. All course participants can access this Collaborate session via the course.
2. Students will join the session as a Participant in Collaborate.
3 2
5
4

Collaborate Ultra
If you require this document in an alternative format, such as larger print, please email Kelly Hall at [email protected] July 2018
3. All other roles (teacher, non-editing teacher, programme admin, course
secretary, course editor, course owner) will join the session as a
Moderator in Collaborate.
Adding a guest to your Collaborate session
1. In the collaborate session settings you have the option to check the box
‘Guest Access’ and select the Collaborate guest role from Presenter,
Participant or Moderator. This will generate a “guest link” which you can
send to people outside of your course (such as guest speakers) to let
them join the session.
2. Copy the Collaborate guest link and send to external users to join the
session.
10 Educational Design and Engagement
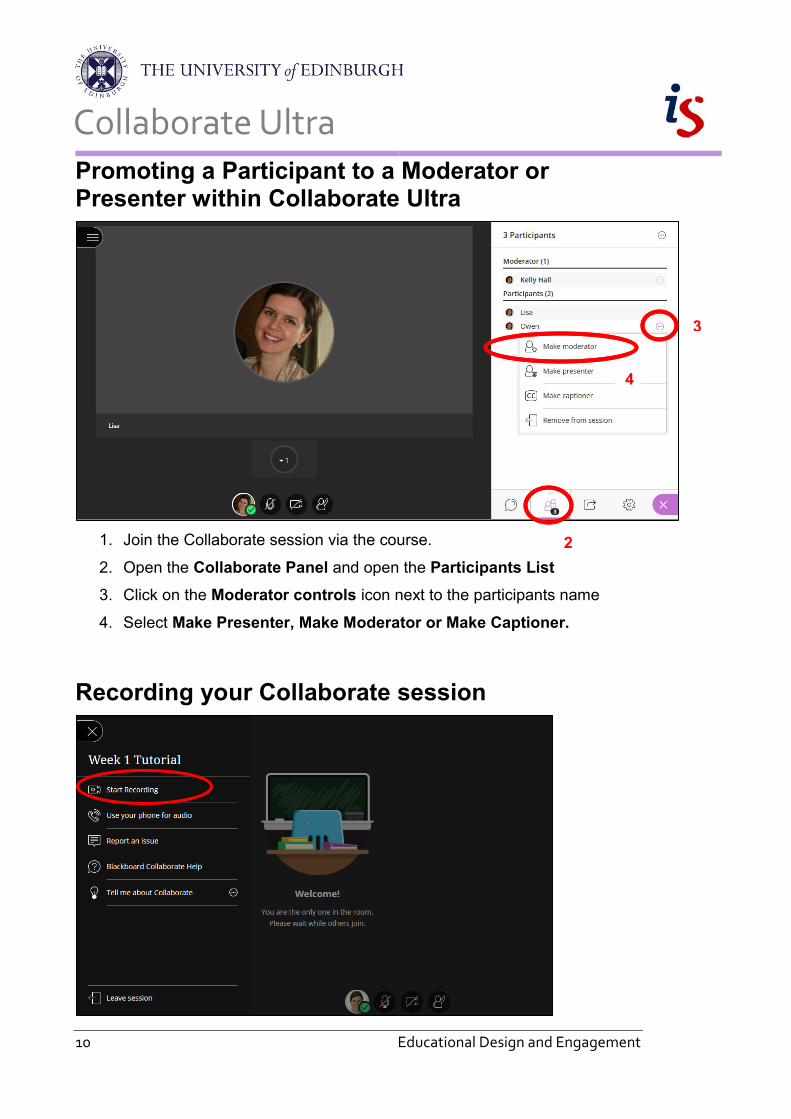
Collaborate Ultra Promoting a Participant to a Moderator or Presenter within Collaborate Ultra
1. Join the Collaborate session via the course.
2. Open the Collaborate Panel and open the Participants List
3. Click on the Moderator controls icon next to the participants name
4. Select Make Presenter, Make Moderator or Make Captioner.
Recording your Collaborate session
2
3
2
4
2
Collaborate Ultra
If you require this document in an alternative format, such as larger print, please email Kelly Hall at [email protected] July 2018
1. From within your Collaborate Session click on Open Session Menu at the
top left hand corner of the screen (icon like this ).
2. Click on Start Recording (highlighted in interface picture above) to start
recording your session.
3. To pause recording click on the Stop Recording button. This pauses the
recording. To start recording again you can click on Start Record.
4. Exit the Collaborate Session by closing the window.
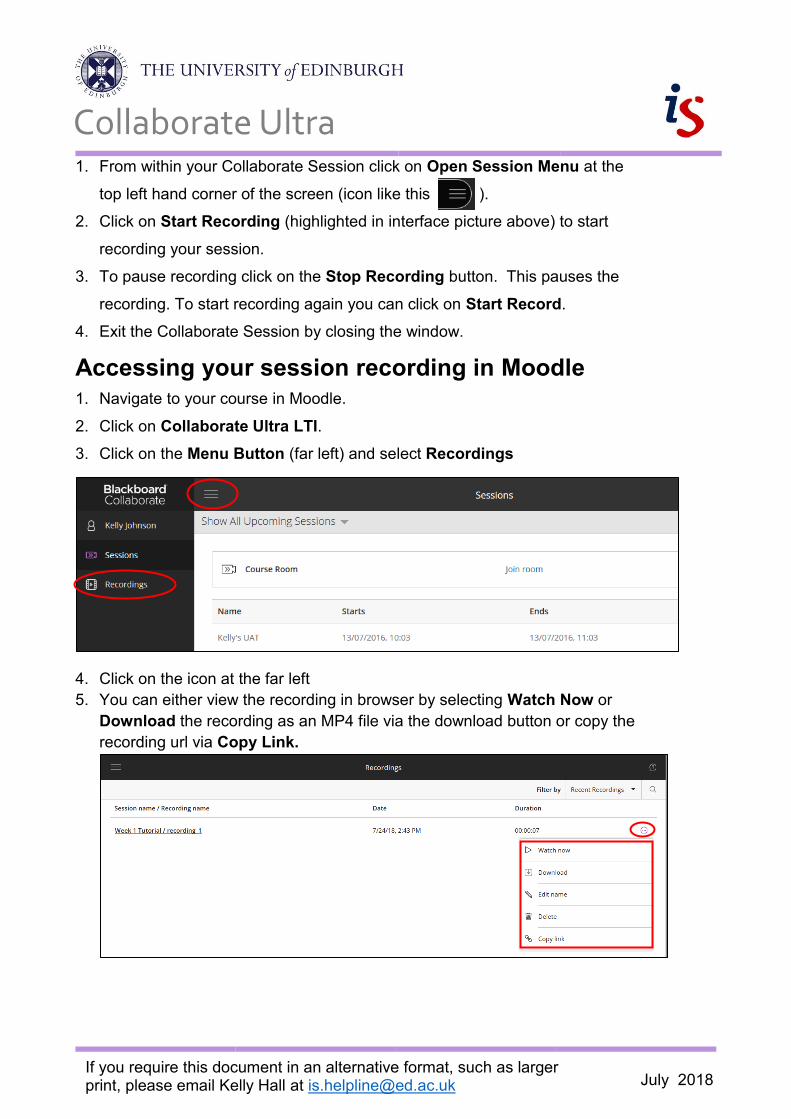
Accessing your session recording in Moodle
1. Navigate to your course in Moodle.
2. Click on Collaborate Ultra LTI.
3. Click on the Menu Button (far left) and select Recordings
4. Click on the icon at the far left 5. You can either view the recording in browser by selecting Watch Now or
Download the recording as an MP4 file via the download button or copy the
recording url via Copy Link.
12 Educational Design and Engagement
Collaborate Ultra
Download text chat from recording in Moodle
1. In recordings select Watch Now (it will open the recording in a new tab
within your browser)
2. Click on Open Recording Menu which is at the top left hand corner of the
screen (icon like this ).
3. Click on Download Chat.
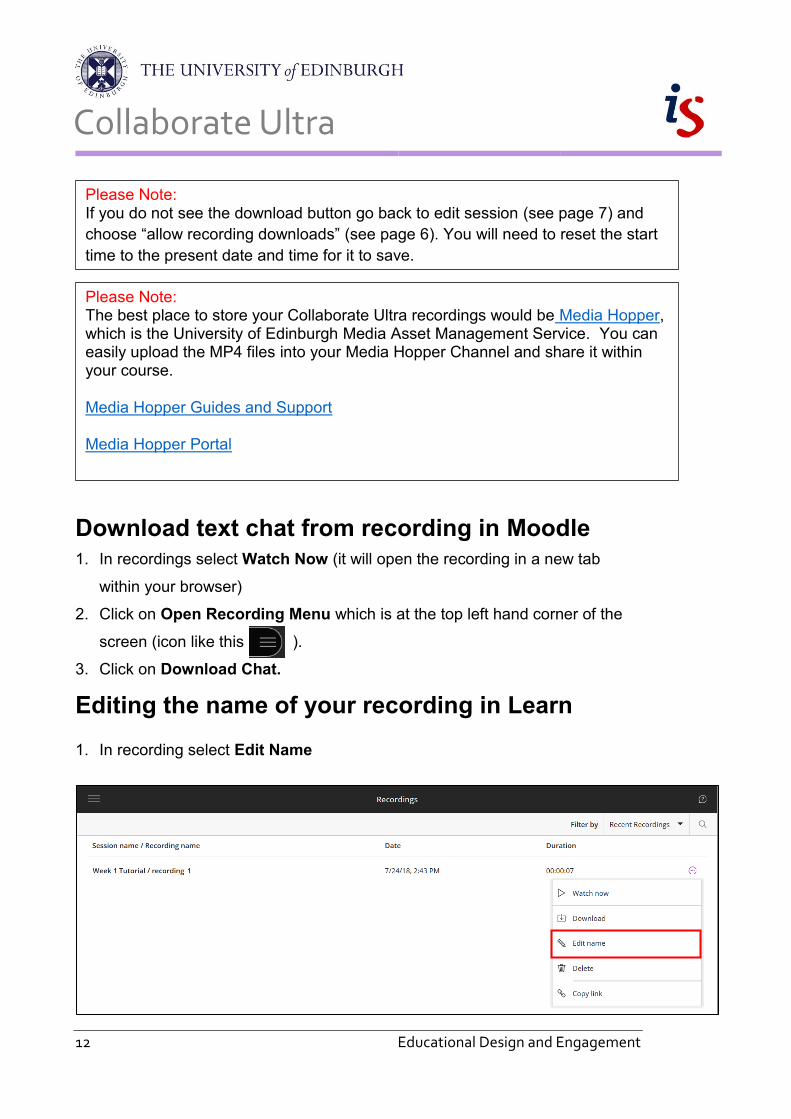
Editing the name of your recording in Learn
1. In recording select Edit Name
Please Note: The best place to store your Collaborate Ultra recordings would be Media Hopper, which is the University of Edinburgh Media Asset Management Service. You can easily upload the MP4 files into your Media Hopper Channel and share it within your course.
Media Hopper Guides and Support
Media Hopper Portal
Please Note: If you do not see the download button go back to edit session (see page 7) and
choose “allow recording downloads” (see page 6). You will need to reset the start
time to the present date and time for it to save.
Collaborate Ultra
If you require this document in an alternative format, such as larger print, please email Kelly Hall at [email protected] July 2018
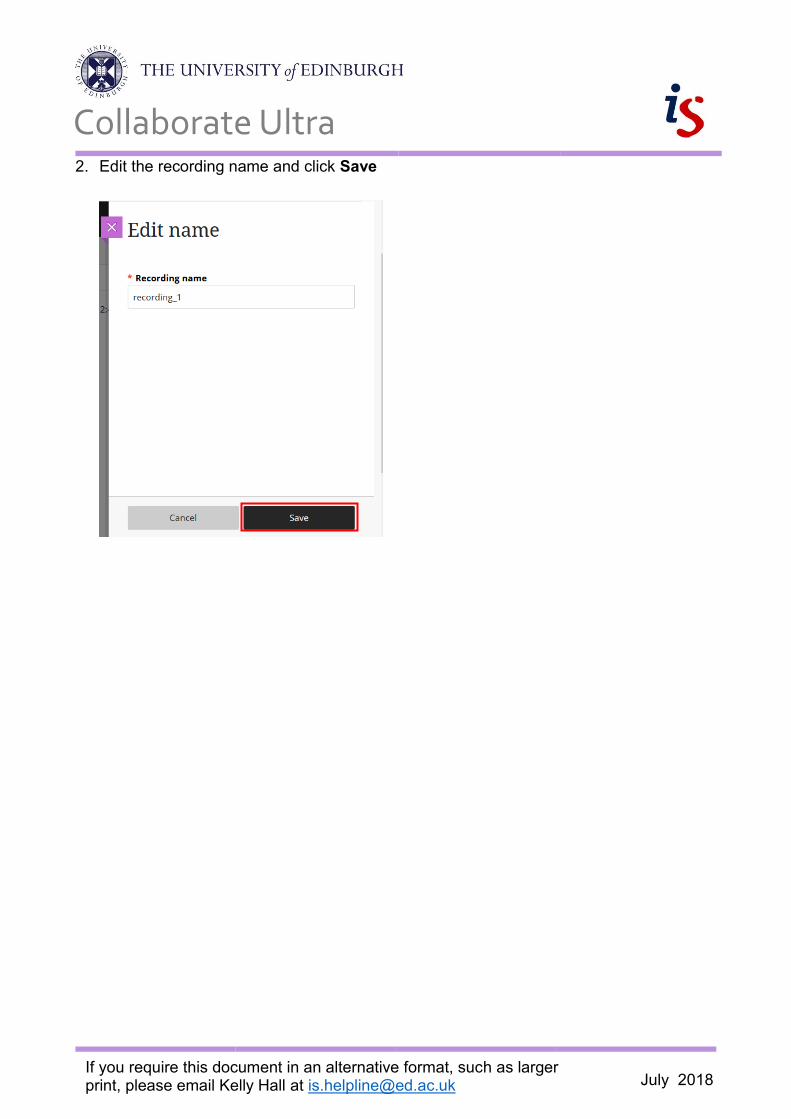
2. Edit the recording name and click Save