mountain dulcimer kit - musicmakers · pdf fileteardrop sides hourglass sides top back...
TRANSCRIPT

6 5 1 - 4 3 9 - 9 1 2 0 www.harpkit.com
Mountain DulcimerKIT

Teardrop Sides Hourglass sides
Top
Back
Fretboard
End Block
End Block
spacersspacer
Musicmakers Mountain Dulcimer Kit
WOOD PARTSSolid wood topSolid wood backFretboard2 End Blocks1 Peghead2 sides2 Braces for back (1 long, 1 short)Spacers (1 for teardrop, 3 for hourglass)
HARDWARE PARTS4 Geared Tuners with screws*Set of four dulcimer strings, ball end1 wood screw, 2”1 cherry plug, 3/8”Wood BridgeDelrin nut3 Ft. Fretwire2 Donuts for mounting rosettes, medium4 Pearl dots, 1/4” dia1 FlatpickAssembly Instructions
* The Teardrop peghead takes sealed geared tuners with sleeves and washers. The Hourglass peghead (scroll shape) takes our standard open gear tuners. Your kit will be packed with the appropriate tuners.
_____1. Please take the time to check over the parts of your kit now, to make sure everything is there. If you discover a problem, call us right away so we can rectify it quickly without causing you much delay in your project. We also suggest skimming through the entire directions before beginning, just to get an overview of the project. You may decide that you need to gather more tools or purchase a few optional decorations or accessories ( see list above) to enhance the finished instrument. Now is a good time to decide so you can avoid delays when you reach those steps of construction.
ASSEMBLY INSTRUCTIONS
tail end
head end
OPTIONAL DECORATIONS & ACCESSORIES
2 Medium size Rosettes4 Inlay banding stripsElectronic pickupFinishing kitStrap Gig BagTeaching materials (book, CD, DVD)
HourglassPeghead
Braces for back
TeardropPeghead
2

_____2. Mark a centerline on the outside of each END BLOCK, as shown below. It does not matter yet which block you put at which end. The blocks for the Hourglass kit are identical, and the blocks for the Teardrop kit will determine the head and tail of the instrument after you glue them.
Use a good woodworking glue (such as Elmer’s Carpenter’s Wood Glue or Titebond) to build this dulcimer. Start the assembly by gluing the SIDES to the END BLOCKS, as shown here.
These parts will be under some stress. Use enough glue so some squeezes out when the clamps are applied, and leave them clamped for 8 hours. You can proceed to steps 3 & 4 immediately if you leave the clamps in place.
Use c-clamps or spring clamps to hold the parts together until dry. It is always smart to add a scrap of wood under the clamp to protect the instrument from being dented by the pressure of the clamp.
CAUTION: It is possible to glue these parts at odd angles if you are not careful. We like to press the parts down against a flat work surface to make sure they are level and straight.
Position the end of the SIDE piece just a little beyond the flat of the END BLOCK. You can sand it flush after the glue is dry.
TEARDROP FRAME HOURGLASS FRAME
If you are making the Hourglass shape, there is one mistake you want to avoid: The side pieces are bent to shape already to form a large bout at one end and a smaller bout at the other. Make sure the two sides are oriented the same way when you glue them to the end blocks.
The Teardrop sides will take shape as you glue the end blocks into place. No need for the spacer stick yet. You’ll use that later when gluing the back in place.
END
BLOCK
SIDE
clamp
scrap wood pad
let side protrude slightly here
align top surfaces
flush
centerline
3

INSTALLING THE BACK
_____3. Find the spacer(s) for your kit and position them as shown to hold the shape of the instrument.
NOTE: The TOP and BACK panels of this instrument can be interchanged. Although we like putting mahogany on the top and cherry on the back, you may reverse them. Mahogany has the straighter, more open grain, and often has very interesting color variations. These panels are much larger than necessary to fit the frame of your instrument, so you’ll be cutting them down to shape as you progress through the building process.
Select which piece you want for the back panel and draw a cen-terline down the length of it on the inside surface. Then you can position the frame on the back, lining it up on the centerline, as shown.
Mark the center of your spacers also, so you can keep the frame straight.
The single spacer for the Teardrop kit can be pushed toward one end or the other to shift the center of the bout one way or the other. Just be careful to avoid spreading the SIDES too far apart to fit the TOP and BACK. We like to keep the instrument no wider than about 9-1/2” at the widest point.
The three spacers for the Hourglass kit will force the SIDES into position without much room for adjustment.
Centerlines
_____4. Take a minute to clean off any excess glue residue from around the END BLOCKS, and to sand the SIDES level with the END BLOCKS so the TOP and BACK can be glued firmly to those surfaces.
CAUTION: Use a flat sanding block for this purpose and try to avoid rounding the END BLOCKS.
_____5. Find yourself a nice flat piece of ply-wood about the size of the dulcimer (10” X 33’) to use as a clamping board. A particle board shelf would be inexpensive and ideal.
Rest the shelf on a couple supports to give room for your clamps to fit under the board.
clamping board
No glue!
No glue!
No glue onspacers!
4

Be sure to use plenty of clamps and/or weights. You don’t need great pressure, just even pressure all around.
Check all around the perimeter to make sure there are no gaps.
_____7. You can glue the two INNER BRACES to the inside of the BACK at the same time, as shown. Center them on the centerline, placing the shorter one toward bout 7” from the narrow end, and the longer one about 11” from the wider end. Use masking tape and weights to hold the BRACES as you glue them in place until dry.
flat plywood support
underneath
BACK
braces
_____6. When satisfied with the fit of the BACK, put a bead of glue on the edges of the SIDES and END BLOCKS that contact the BACK, all the way around the instrument, and clamp the entire assembly down on the BACK, against a flat board or table top so that you end up with a nice flat, straight frame.
DO NOT GLUE THE SPACERS! they need to be removed before you close up the box.
7” 9”
5
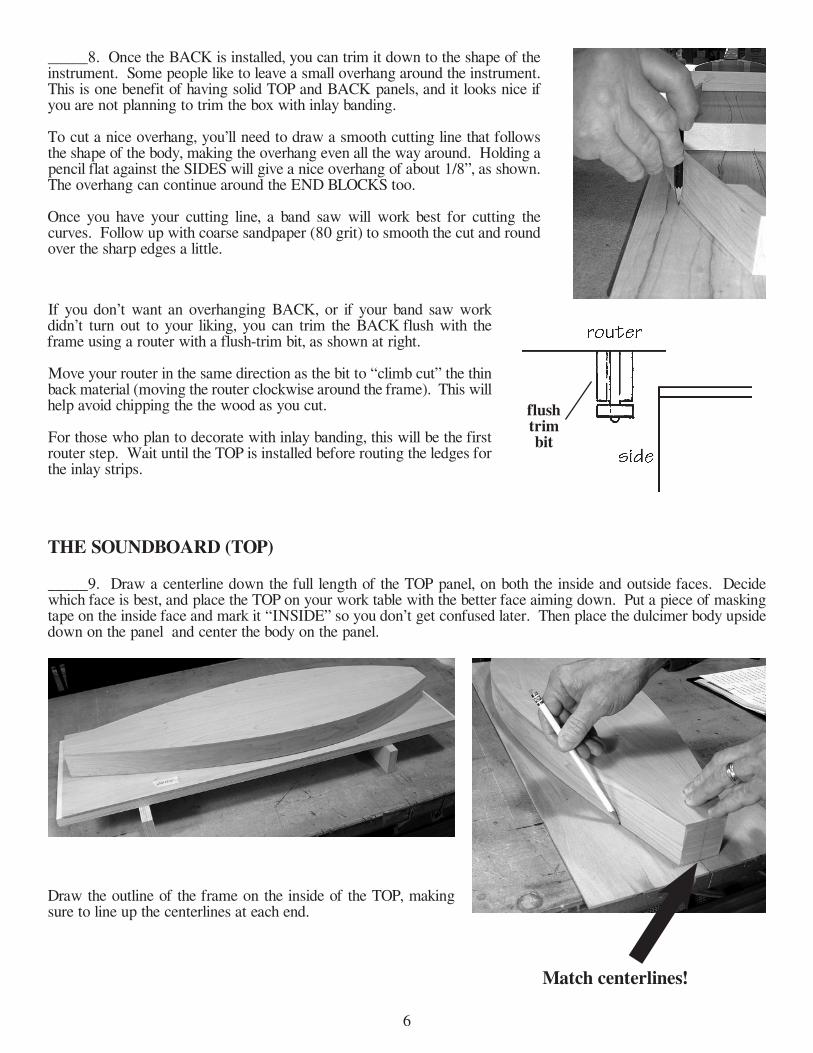
_____8. Once the BACK is installed, you can trim it down to the shape of the instrument. Some people like to leave a small overhang around the instrument. This is one benefit of having solid TOP and BACK panels, and it looks nice if you are not planning to trim the box with inlay banding.
To cut a nice overhang, you’ll need to draw a smooth cutting line that follows the shape of the body, making the overhang even all the way around. Holding a pencil flat against the SIDES will give a nice overhang of about 1/8”, as shown. The overhang can continue around the END BLOCKS too.
Once you have your cutting line, a band saw will work best for cutting the curves. Follow up with coarse sandpaper (80 grit) to smooth the cut and round over the sharp edges a little.
If you don’t want an overhanging BACK, or if your band saw work didn’t turn out to your liking, you can trim the BACK flush with the frame using a router with a flush-trim bit, as shown at right.
Move your router in the same direction as the bit to “climb cut” the thin back material (moving the router clockwise around the frame). This will help avoid chipping the the wood as you cut.
For those who plan to decorate with inlay banding, this will be the first router step. Wait until the TOP is installed before routing the ledges for the inlay strips.
THE SOUNDBOARD (TOP)
_____9. Draw a centerline down the full length of the TOP panel, on both the inside and outside faces. Decide which face is best, and place the TOP on your work table with the better face aiming down. Put a piece of masking tape on the inside face and mark it “INSIDE” so you don’t get confused later. Then place the dulcimer body upside down on the panel and center the body on the panel.
Draw the outline of the frame on the inside of the TOP, making sure to line up the centerlines at each end.
flushtrimbit
Match centerlines!
6

_____10. Set the body aside so you can plan the placement of your sound holes. Center the FRETBOARD on the centerline and mark its outline on the inside of the TOP also. The FRETBOARD need not span the entire length of the body, so don’t worry if it seems a little short.
2) EASY INLAY MOUNTINGCut round holes a little larger in diameter than the size of the rosette (1/8” or 1/4” larger). Glue a “donut” ring around the hole on the inside surface to provide a ledge on which to glue the rosette. The outside diameter of the donut ring must be larger than the hole, and the inside diameter must be about 1/4” smaller than the diameter of the rosette. Musicmaker’s Kits has donut rings available for each size rosette.
Glue the donut rings to the inside of the TOP now, as shown, but DON’T GLUE ROSETTES IN PLACE YET! YOU’LL NEED ACCESS THROUGH THESE SOUNDHOLES FOR CLAMPING LATER.
1) EASY SURFACE MOUNTINGCut a round hole 1/4” smaller in diameter than the rosette so the decoration will rest on top of the soundboard, glued to the rim of the hole. This is especially nice if you don’t have a method for cutting a clean accurate hole in the TOP. The rosette will cover the imperfections of your opening.
INSTALLING OPTIONAL DECORATIVE ROSETTESIf you’d like to install decorative rosettes in the TOP, as we do, here are two easy options for doing it:
inside surface
of TOP
CUTTING SOUND HOLES
Set the FRETBOARD aside and decide where you want to place your sound holes (see cover photo). Generally speaking, we like to place two fairly large holes at the widest point of the instrument, and then cut optional smaller holes closer to the head end, though we often omit the smaller holes on the Teardrop dulcimer. The holes look best when they are centerd between the edge of the TOP and the FRETBOARD -- thus in the middle of the space outlined in pencil.
Use a square to make sure the holes are placed directly opposite each other on each side of the FRETBOARD. Large holes can be as big as 2-1/2” diameter, and the small holes look best if they are about 3/4” to 1” diameter.
medium size rosettes fit nicely in the space available
DON’T GLUE ROSETTES IN PLACE YET! YOU’LL NEED ACCESS THROUGH THESE SOUNDHOLES FOR CLAMPING LATER.
donut ring
You have plenty of opportunity here for being creative. Some people like to cut fancy shapes for soundholes -- ovals, hearts, f-shapes, leaf shapes, etc. Our only concern is to have the larger holes big enough for you to fit a c-clamp through for clamp-ing the FRETBOARD later (step 23). The smaller holes are no problem -- no need for fitting clamps into them.
7

_____11. Once the soundholes are cut (or drilled), you can glue the frame to the TOP, as follows:
a) Set up your clamping board again, as you did for the BACK, and apply glue to the edges of the SIDES and END BLOCKS, just as before. Make sure you have the inside of the TOP facing up!
b) Place the body of the dulcimer on the inside surface of the TOP, aligning it with your penciled outline.
c) Place clamps all the way around the box, as before, making sure the body remains aligned with the centerline at both ends.
Watch centerlines
_____12. When the glue is dry, you can trim the TOP as you did the BACK, with or without a little overhang.
Use sandpaper (120-150 grit) to clean up all glue residue around the joints and make sure the END BLOCKS are flat and square at each end. This is another time you’ll appreciate having solid wood construction -- you don’t need to worry about sanding through a thin layer of veneer!
NOTE: If you left some overhang on your TOP, you will be trimming flush the narrow end when you install the PEGHEAD, but you can wait until later when fitting that part.
inside surface
8

OPTIONAL INLAY BANDING_____13. If you trimmed the TOP and/or BACK flush with the sides of the instrument, and are interested in really customizing the appearance, you can use a router to cut ledges around the perimeter for INLAY BANDING.
Inlays are very thin (about 1/16”), so they do not weaken the joints appreciably when inlaid around the TOP and BACK. This is not as scary as you might think, and you might learn some tricks with the old router, or maybe you’ve been looking for an excuse to purchase a new router....
NOTE: You will be cutting with the side of the router bit, not the end. It may take a minute of study for you to see how this will work.
Your router bit will cut a ledge along the side of the soundboard (and/or back) to fit the inlay banding. Make a test cut in a piece of scrap wood and check to make sure the inlay fits just right, as shown above.
A nice inexpensive way to begin is to adapt a 1/2” flush-trim router bit with a3/8” roller bearing so the cutters extend 1/16” beyond the roller, as shown at right. We have these router bits available on our website at www.harpkit.com/inlays.
When you put athis type of it in your router, you want the cutting edge to stick out beyond the router base just enough to fit the width of your inlay banding (see below).
CAUTION: When you cut these grooves around your instrument, we recommend pushing the router in a clockwise direction around the circumference. This is called “climb cut-ting”, and is opposite the normal direction for routing, which is to move the router against the spin of the bit.
But by moving the router with the spin of the bit, you eliminate any chance of chipping the grain as you cut. this may seem odd, or even unsafe, but it works easily and beautifully because the cut is so shallow. You may want to run the router around the instrument two or three times, just to make sure you caut the ledge to full depth. Remember that the roller prevents the bit from cutting too deeply.
You can also make minor adjustments to the cut by hand if necessary, using a razor knife, a file, or a sanding block to make sure the inlay strips fit nicely all around the body.
Router
9

_____14. Once the ledges are cut, you can glue the inlay strips in place. If your Inlay Bands are made of wood, use regular woodworking glue. If they are plastic strips, then you’ll need an adhesive that works with both plastic and wood (Duco Cement and Sig-Ment are commonly available, but we like Weld-On #16 best for acrylics).
Use short strips of masking tape to hold the inlay in place until dry. This job is easiest if you cut a bunch of masking tape pieces ahead of time and stick them to the edge of the table so you can grab them quickly. Then spread glue in about 8” - 12” of the ledge at a time as you move around the instrument.
If you want to miter the corners of the inlay strips when you reach the END BLOCKS, you can either use a sharp razor knife to cut the bevels, or a little flat sanding block to sand them, as shown.
When the glue is dry, peel off the masking tape and sand off the glue residue to clean up your decora-tions. If you installed plastic binding, you’ll find a cabinet scraper to be the best tool for working the plastic down flush with the surrounding wood.
You can sand the wood inlay strips a little too -- the color goes through the full thickness of these pieces.
PREPARING THE FRETBOARD
_____15. (OPTIONAL) Most people like to mark certain spaces on the FRETBOARD to guide their playing. We provide 1/4” diameter PEARL DOTS for this purpose, but you may choose to do something more or less ornate if you like. Here’s how to install the dots:
Find the centers of the spaces in your FRETBOARD corresponding to the dots in the diagram below. Punch-mark the wood to help keep your drill from wandering off-center. Then simply drill a shallow hole in the wood for each dot. The hole can be a little deeper than the thickness of the pearl.
To inlay the pearl, use 5-minute exposy or thick superglue to fill the hole, then push or tap the pearl dot down almost flush with the wood, being careful not to push it below the level of the surrounding wood. When dry, you can sand the dots flush to the wood.
CAUTION: Notice the numbering system with 6.5 and 13.5 spaces! That means #7 dot is actually in the 8th space, #10 is really #11 & #14 is really #16.
NOTE: The underside of the FRETBOARD is both hollowed out and scalloped on this kit to help lighten up the board and increase the sound. Some people ask if they can enlarge the arches even more, and we think that is fine. Use a large drum sander for that purpose, making the FRETBOARD look even more like an old Venetian bridge. Just don’t carve the arches any higher than the hollowed out space in the middle, and don’t make the contact points shorter than about 1-1/2”.
10

_____16. Now you are ready to install the frets. Place your FRETBOARD on a good firm surface for this opera-tion. A flimsy table top will not do. Better to work on a concrete floor or a cement block. Otherwise, your wood will just bounce around as you try to pound the frets into place.
Begin by placing the long length of fretwire over one of the slots cut in the fretboard, so the end hangs over the edge of the wood just 1/16” or so. Position the fretwire so that the ‘tang” will be driven down in the fret slot (see diagram).
Use a hammer to lightly tap the fretwire into the slot, until the crown of the fret contacts the wood surface.
HINT: Tap one end of the wire in first, then the other end, and finally the middle. DO NOT OVERWORK THE WIRE! You should be able to install each fret with four or five taps, total.
NOTE: The fret-wire is fairly soft metal, so if it bends the wrong way or gets kinked, you can easily straighten it again with a plyers.
When the fretwire is securely held by the wood, use a wire cutter to clip off the excess, as close to the wood as possible. Proceed to the next fret slot in the same way, and so on until all frets are installed.
_____18. File (or sand) the ragged ends of the frets down until they are smooth and flush with the sides of the FRETBOARD. If you happen to have access to a belt sander, you’ll find it very helpful for this part of the project. The fretwire is soft enough metal to work very easily with a sanding belt. Be careful, however, not to gouge the edge of the fretboard!
_____19. File (or sand) a 45 degree bevel at the ends of the frets, as shown, working the file in a downward motion only, to avoid lifting the frets up.
_____17. After the frets are installed, we like to look them over very carefully to make sure each one fits all the way down against the wood. If one fret stands higher than another, it may cause buzzing problems later when you try playing the dulcimer. Now is the time to take care of the problem. We generally find that a few good taps from the hammer are sufficient to seat any frets that are too high. But make sure you are working on a very firm surface. A bouncy table will only make this job impossible.
_____20. Use a flat mill file to level the tops of the frets now too. This will prevent problems of buzzing strings later. Lay the file on the frets and work it back and forth until each fret shows some sign of wear.
FRETBOARD
11

_____21. Check the PEGHEAD so see how it matches the width of the fretboard. The instrument looks best if these two parts meet with the same dimension, and that may require a little tapering or extra shaping on the peghead, as shown at right.
It also looks best if you sand the sharp corners to make the peghead feel smooth and nice in your hands. Use fairly fine (180-220 grit) sandpaper for this. Be sure to leave the end square and flat that will be attached to the instrument body.
INSTALLING THE PEGHEAD
Narrower end of dulcimer body
TOP
SIDEEND
BLOCK
cut away overhang here
_____22. Now you are ready to install the PEGHEAD onto the body. Here is where you could embarass yourself if you are not paying attention. The PEGHEAD will be glued first and then screwed to the narrower end of the body. If you install it at the wider end, it will work just fine, but other dulcimer players will tell you, hopefully in a quiet voice, that you assembled it backwards....
a) If you left some overhang on your TOP panel, you’ll need to cut away a small sec-tion to make room for the PEGHEAD, as shown. This wood is thin, so it should cut quite easily. Use a small saw to cut the ends of the notch flush to the END BLOCK, and then switch to a sharp razor knife to make the longer cut across the grain. Several passes should get through it, and you can clean up any roughness with a file or sanding block.
Obviously, if you trimmed your TOP panel flush with the END BLOCK earlier, you can skip this step.
b) Test the fit of the PEGHEAD to the END BLOCK as shown in these photos showing various perspectives. The important thing is to keep it centered and square on the END BLOCK.
Notice how the bottom of the PEGHEAD does not interfere with the overhang on the BACK. In fact, if you have an overhang there, you can let the PEGHEAD rest against that ledge.
Notice also, how the small ledge for the NUT stands about 1/8” above the surface of the TOP panel. If you have no overhang on the BACK panel, you should raise the PEGHEAD to approximately this height on the END BLOCK. Perfection is not neces-sary here, however, because the NUT is plenty tall, and you’ll be trimming it down later.
c) When satisfied with the position of the PEGHEAD, pencil the outline of it, and then glue it in place. Don’t install the screw yet. We just stand the instrument on end and let the PEGHEAD dry first.
BACK VIEWSIDE VIEW NUT
sand sharp corners
leavethisend
square
TEARDROP PEGHEADHOURGLASS PEGHEAD
sand sharp corners
leavethisend
square
taper pegheadto fit fretboard shape peghead
to fit fretboard
12
INSTALLING THE FRETBOARD
d) Once the PEGHEAD is glued in place, you’ll want to reinforce it with a screw. Use a 7/64” drill bit to bore a pilot hole into the END BLOCK, as shown. Then install the screw provided.
e) You can cover the screw head with the wood plug provided. Put a little glue into the hole first, and then tap the plug into place and let it dry.
f) Sand off the excess portion of the wood plug, making it flush with the surrounding wood.
7/64” drill bit
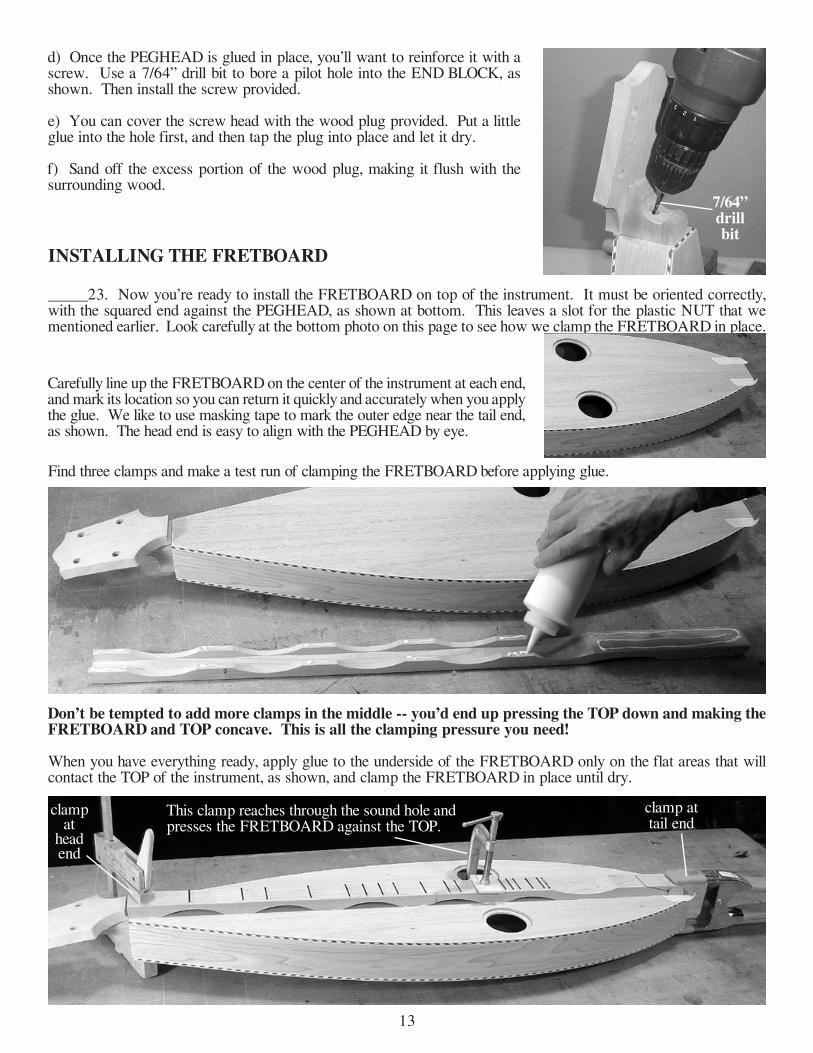
_____23. Now you’re ready to install the FRETBOARD on top of the instrument. It must be oriented correctly, with the squared end against the PEGHEAD, as shown at bottom. This leaves a slot for the plastic NUT that we mentioned earlier. Look carefully at the bottom photo on this page to see how we clamp the FRETBOARD in place.
Don’t be tempted to add more clamps in the middle -- you’d end up pressing the TOP down and making the FRETBOARD and TOP concave. This is all the clamping pressure you need!
When you have everything ready, apply glue to the underside of the FRETBOARD only on the flat areas that will contact the TOP of the instrument, as shown, and clamp the FRETBOARD in place until dry.
Find three clamps and make a test run of clamping the FRETBOARD before applying glue.
Carefully line up the FRETBOARD on the center of the instrument at each end, and mark its location so you can return it quickly and accurately when you apply the glue. We like to use masking tape to mark the outer edge near the tail end, as shown. The head end is easy to align with the PEGHEAD by eye.
This clamp reaches through the sound hole and presses the FRETBOARD against the TOP.
clamp at tail end
clamp at
head end
13

FINAL SANDING
_____26. Clean up all glue residue around the entire instrument. Nothing points to an amateur woodworker more than a project with glue blobs and fingerprints on the surface. They may be difficult to see now, but they will stand out prominently after applying the finish. We recommend wiping the entire instrument with a clean damp rag to help highlight these smudges. When you find one, use a scraper or sanding block to get down to bare wood.
Sand the entire instrument with about 180-220 grit sandpaper to smooth out all surfaces so they feel good in your hands. Sand with the grain whenever possible, to avoid putting scratches across the grain.
We like to knock off all sharp edges too. A slightly rounded corner actually looks sharper than a sharp one, and it feels better too. Aren’t you glad this kit has no thin veneers?
WA-LA! Your dulcimer is now ready for the finish. There are several finishes that will work fine for your instrument, and some are easier to apply than others. We give a few suggestions on the following page for selecting a nice-looking coat to protect your handiwork and enhance the beauty of the wood.
We recommend masking off the top of the fretboard to avoid getting varnish or lacquer on the playing surface because it can get gummy under the fingers as you play. After the finish dries, you can remove the tape and wipe one light coat of Linseed Oil on the playing surface.
INSTALLING ROSETTES (OPTIONAL)_____25. If you prepared your sound holes for rosettes, now is a good time to glue those in place, before applying the finish. Test the rosettes dry first, orienting and centering them as you like.
Then apply a thin bead of woodworking glue to the rim of the rosettes, as shown, and hold them in place with mask-ing tape and weights until dry.
INSTALLING A PICKUP (OPTIONAL)
_____24. If you plan to install a pickup in your dulcimer, this is your last chance -- before covering the soundholes with rosettes. A single Piezo pickup from Musicmakers works beautifully in this instrument for amplification. You’ll need to drill a 1/2” diameter hole through the tail END BLOCK. Then you can fish an electric patch cord through that hole and out one of the sound holes, plug it into the pickup jack, and pull the jack into the instrument to the END BLOCK where it can be permanently fastened with the nuts and washers provided with the pickup.
Once the jack is secured, you can reach a finger into a soundhole to adhere the sensor inside the TOP near the sound hole. Illustrated instructions will accompany the pickup if you order it from us.
14

STAIN -- STAINS are coloring agents and should only be used if you dislike the natural color of the wood. We usually do not apply stains to our projects, especially when they are made with naturally beautiful hardwoods such as on this project. These woods look very nice with just a clear finish. But, if you want to color the wood differently, your staining should be accomplished before applying a surface finish such as oil, varnish, or lacquer.
OIL -- An oil finish will give your wood a low luster appearance, bringing out the natural color of the grain, but it tends soak into the wood and appear dry and “thirsty” after awhile. The principal advantage of an oil finish is that it can be applied and wiped dry immediately, so you can proceed to installing hardware (and strings) right away. The disadvantage of oil is that it usually does not give much surface protection or sheen, although there are some brands that include waxes and/or varnishes to give more surface build-up and luster. If you want a hand-rubbed oil finish, be sure to purchase the highest quality oil designed for hand-rubbing.
VARNISH -- Any satin or semi-gloss varnish will work on this project, but we like a wipe-on gel urethane best. We offer this type of clear top coat, called MUSICMAKER’S INSTRUMENT FINISH. Our complete finishing kit includes instructions, sandpaper sheets and a half-pint can of satin gel urethane wiping varnish. The advantages of this finish are its simple application, durability, minimal odor during application, and deep, soft luster.
LACQUER -- Many professional instrument makers use nitrocellulose lacquer for their finish. The most readily avail-able lacquer is called Deft Clear Wood Finish. The semi-gloss version is the easiest to apply successfully. It is best to purchase a can of liquid DEFT to brush on as a sealer coat first, and then use an aerosol can of the same product to spray on the final coats. The advantage of this finish is its quick drying time, but the disadvantage is the strong odor of the toxic lacquer fumes.
OUR BEST ADVICE: AVOID GLOSS FINISHES unless you are an expert with spray equipment! Glossy finishes show off every speck of dust and irregularity in your sanding. Satin or semi-gloss is much easier for the amateur.
So go ahead and apply the finish of your choice, following the instructions on the container. Sand between coats with fine (400-600 grit) sandpaper or #0000 steel wool. Consult instructions on the can for proper drying time. If you want to change the sheen of the finish after it dries, you can smooth it out by rubbing with 0000 steel wool or with a Scotchbright scrubber. We often follow this procedure with a coat or two of paste wax (the same product that you would use on a wood floor) to bring out a nice luster.
_____27. The last item to glue into place is the NUT, which is not a piece of metal hardware that screws onto a bolt, but a small piece of black plastic that holds the strings at the PEGHEAD end of the fretboard. We like to trim it to size and round over one edge before gluing it into place, although you may find it easier to fasten it to the instrument and then work down the excess with a file or sanding block.
We like the NUT to stand a little about 3/32” above the play-ing surface of the FRETBOARD. Then you will only need to file shallow notches for the strings. Glue it with epoxy or superglue.
NUT
less than 1/8” above wood
_____28. Use a small triangle file to make shallow grooves for in the NUT for the strings, as shown below. Please note that the view is from the PEGHEAD. If you wish to make a left-handed dulcimer, you would reverse the image.
VIEW FROM PEGHEAD END OF DULCIMER
38 mm overall
THE NUT AND BRIDGE
4 13 13 4 4
15

_____29. The BRIDGE is a small triangular wood piece that will rest on the FRETBOARD near the tail end. We do not glue the BRIDGE in place. It is much better to leave it as a “floating” piece, held by the strings. That enables you to fine tune the scale length for perfect intonation after the instrument is strung.
You’ll need to file identical notches in the BRIDGE that you filed in the NUT, as shown here.
4 13 13 4 4
38 mm overall
INSTALLING TUNING GEARS
_____30. Install the individual GEARED TUNERS to the PEGHEAD, as shown. Note that two are meant for the right side and two for the left.
The Teardrop dulcimer uses sealed gears with washers as barrel nuts. Use a hex-drive wrench to fasten the barrel nuts into the TUNERS, and then drill 1/16” pilot holes for the tiny screws in the back side, taking care not to drill all the way through the PEGHEAD.
INSTALLING STRINGS
_____31. Now you can install the strings! Attach each string to the dulcimer by slipping the ball end into the hole near the tail end of the FRETBOARD, and poking it in to about the proper depth to line up with the notches in the BRIDGE.
We like hiding the ends of the strings this way. It eliminates the need for tail pins that might get caught on your clothing.
Thread the other end through the hole in the appropriate geared tuner, as shown.ball end
goes here
The Hourglass dulcimer with the scroll peghead uses open gear tuners. For best results, be sure to place them so the brass gear is closer to the body of the instru-ment than the handle with the white button, as shown.
Hold the gear in position as you drill a 1/16” pilot hole just 1/4” deep for the mounting screws (two screws per gear).
16

a) Begin with the thick wound string (.025” diameter). This is the bass string, and it goes to the far right-hand posi-tion shown in the photo at right. Push the ball end into the tail end of the FRETBOARD from the right hand side.
b) Thread the other end of the string through the hole in the first geared tuner (closest to the “nut” on the right side) and turn the button to wind the string until the slack is taken up. Note that we like to have all the strings pass to the inside edge of the tuning posts, as shown.
c) When the first string is installed, slip the BRIDGE into place. The top of the bridge should be about 27-1/8” from the NUT (you can make adjustments later).
d) All the other strings are the same size (.012” diameter) plain steel. Install them into the positions shown.
e) Tune them to the notes shown at the bottom of the photo.
Consult our free on-line tuner at www.harpkit.com/freetuner for tuning assistance.
.025” wound string
.012” plain
strings
“A” below Middle C
“D” below Middle C
NUT
_____32. Once the strings are installed, check their height above the frets to make sure they will be easy to play. The ideal string height would be about 1/16” above the first fret (near the PEGHEAD), and about 1/8” above the 17th fret (nearest the strum hollow). We recommend adjusting the height at the NUT first. Use a file to cut the notches deeper in the NUT to lower the strings, being careful not to cut too deeply, as it is difficult to raise the strings higher again.
The string height at the 17th fret is easier to adjust. You can raise it by adding a shim under the bridge, or lower it by sanding the bridge a little shorter or filing the notches a little deeper. Be careful not to lower the strings too much, or the strings will tend to buzz and rattle against the frets when you play.
_____33. (OPTIONAL) Adding a guitar strap to your dulcimer makes it considerably easier to hold firmly on our lap as you play. Install a mounting button to the tail end of the body and use the shoe string provided with the strap to tie the other end to the PEGHEAD.
Drill a 1/16” pilot hole for the screw that holds the mounting button. Then screw the button to the END BLOCK as shown.
mounting button for
strap
.012” plain strings
.025” wound string
17

MUSICMAKER’S KITS INCP.O. BOX 2117
STILLWATER, MN 55082
(651) [email protected]
D. If a string rattles or buzzes at just one or two positions (frets), or if you discover that two or three frets all give the same pitch, then look for a fret that stands up higher than its neighbors. You will need to either tap that fret back down into its slot in the fretboard or use the long flat file to level the tops of the frets some more. Just loosen the strings, lift them out of the grooves in the nut, and hold them along either side of the fingerboard as you work the file lengthwise along the tops of the frets. You can easily see which frets are the highest, as they are the ones that receive the most filing.
CONGRATULATIONS! You have successfully completed making a mountain dulcimer that should give you many years of musical satisfaction. We hope you have enjoyed the project. Don’t hesitate to contact us for any further help that you may need. We also appreciate hearing suggestions and hints that you think might help a future kit-builder.
_____34. Fine adjustments can be made in the placement of the BRIDGE to make sure the dulcimer plays perfectly in tune. The measurement given earlier (27-1/8”) should be very close to the exact placement, but some variations may occur depending upon final string height and string thickness.
The technique for finding the exact location of the bridge requires a good musical ear or an electronic tuner. Test the accuracy of the octave note by plucking a string with one hand while pressing it to the 8th space from the nut with the other hand. That note should sound exactly one octave above the same string when plucked in the “open” position (vibrating at full length).
If the octave note is a little too high (sharp), then slide the bridge a little toward the tail of the instrument. If the octave sounds too low (flat) compared to the open string, then slide the bridge toward the strum hollow. Make adjustments until you find the correct placement, then mark that location on the fretboard with a pencil in case the bridge gets bumped out of position in the future.
_____35. There may be some other fine adjustments needed to make your dulcimer work its best. Test each string by plucking it with one hand while you press it down at each playing position (fret) along the neck. Here is what to check for:
A. If the string is difficult to push all the way to the fretboard, it is too high. Filing the grooves deeper in the NUT will lower the string at the head end, and sanding the underside of the BRIDGE will lower the strings near the middle of the instrument.
B. If a string buzzes when plucked in the OPEN POSITION ONLY (when not held down to a fret), then the notch in the NUT is too deep -- the string is probably buzzing against the first fret. You’ll need to loosen the strings, knock the NUT loose and glue it back with a thin shim under it (even just gluing it back again will raise it a little because of the additional layer of glue build-up).
C. If your strings buzz and rattle in general as you play, sight down the FRETBOARD first to make sure it is not humped up in the middle. Let us know if you encounter this problem. If the FRETBOARD is reasonably level, then you simply need to shim up the BRIDGE to raise the strings a little more, giving them more room to vibrate.
TROUBLESHOOTING
18

19
Now that you are done with the woodworking, standard procedure calls for baking a pan of brownies or a batch of cookies. These are Jerry’s favorite family recipes. Oooh, the perks of kit-building!
MOTHER’S 29-MINUTE BROWNIESIngredients
2 oz baking (unsweetened) chocolate 1 stick butter (1/2 cup) 2 eggs, beaten 2 cups sugar 1 cup flour pinch of salt 1/2 tsp vanilla some chopped nuts (optional)
Baking Instructions
Pre-heat oven to 300 degrees. Mix ingredients until smooth. Spread into greased 9” X 13” pan. Bake for exactly 29 minutes -- no more, no less!
MONSTER COOKIES (Big Batch!)Ingredients
1 lb butter (4 sticks) 2 lbs brown sugar (4-2/3 cups) 4 cups granulated sugar 12 eggs 1 Tbsp vanilla 1 Tbsp corn syrup 8 tsp baking soda 3 lbs peanut butter 18 cups (or more) rolled oats (Oatmeal) 1 lb M&M candies 1 lb chocolate chips
Baking Instructions
Pre-heat oven to 350 degrees. Mix butter, sugars, eggs, vanilla, syrup and baking soda thoroughly. Stir in peanut butter, oats and candies (add more oats if you wish to thicken further). Use ice-cream scoop to measure cookies onto un-greased baking sheets, flattening slightly. Bake at 350 degrees for 12-15 minutes -- don’t overbake. Invite plenty of neighborhood kids.

20
Dulcimer Chord Book by Neal Hellman
This is the comprehensive Bible for dulcimer chords in every modal tuning common to the instrument. Neal explains different modal tunings, and shows all the ways to play each chord up and down the fingerboard. A must for people who want to play along with other musicians in a variety of keys.
MOUNTAIN DULCIMER TEACHING BOOKS
Complete Dulcimer Handbookby Mark Biggs
Another great instruction manual with lots of songs, chords, tabulature, different modal tunings, and basic chord structures. Includes common folk songs like “Oh Susanna”, “Silent Night”, “Shenandoah”, and many others.
You Can Teach Yourself Mt DulcimerBook/CD/DVD, by Maddie MacNeil
Maddie is a teacher’s teacher for dulcimer! This book starts at the very beginning but doesn’t bore you with a string of mindless exercises. Instead, you learn by playing actual songs, so you have fun right from the start. We like the CD and DVD included in this package to give you auditory and visual reinforcement.
Complete Children’s Dulcimer Method, by Mara Washburn The mountain dulcimer is especially well suited for children to learn. Dr. Washburn filled this book with good old favorites that children have loved to sing through the ages. She starts off with just melody lines, showing numbers
above the notes for easy following. Then she introduces harmonies and chords to embellish the melodies.
Dulcimer Players NewsQuarterly Issues
The DPN has become a great colorful reference guide to what is happening with all things dulcimer (hammered and mountain) around the country. Each new issue includes a sampler CD of recordings by dulcimer performers, contest winners, and enthusiasts of all sorts. Want to know where and when the dulcimer festivals are held around the country? This is your source!
Order these books and more from our web site, www.harpkit.com
MUSICMAKERSP.O. BOX 2117
Stillwater, MN 55082