mt rpg 1.5 ba 04 790037762 04 - orbitalum usa · operating instructions rpg 1.5 1 notes on safety...
TRANSCRIPT

��������������������� �
Operating instructions
Tube Squaring Machine
RPG 1.5
Code 790 037 762
│ Machine-no.:
________________________________

All rights reserved, in particular the rights of duplication and distribution as well as translation. Duplication and reproduction in any form (print, photocopy, microfilm or electronic) require the written permission of Orbitalum Tools GmbH.
Operating instructions RPG 1.5 Table of contents
���� ����� ��������� (10.07) MT_RPG 1.5_BA_04_790037762_04.doc I
Table of contents Page
0 About these instructions 10.1 Warning messages 10.2 Further symbols and displays 20.3 Abbreviations 2
1 Notes on safety 31.1 Proper use 31.2 Safety regulations 31.3 Working with safety in mind 41.4 Waste disposal / environmental protection 41.5 Further safety regulations 5
2 Construction of the product 62.1 Standard 62.2 Accessories 7
2.2.1 Standard tool holder (WH) and multifunctional tool (MFW) 7
2.3 Optional accessories 72.3.1 Optional tool holder (WH) 72.3.2 Clamping shells 8
3 Characteristics and range of applications 93.1 Characteristics 93.2 Range of applications 10
4 Technical data 114.1 Rating 11
5 Commissioning 125.1 Scope of delivery 125.2 Transportation 125.3 Connection requirements 12
6 Operation 136.1 Mounting the RPG 1.5 on the basic plate 136.2 Machining pipes with OD 3.0 – 38.1 mm (0.118 – 1.5 inch) 13
6.2.1 Preparation 136.2.2 Mounting the multifunctional tool (MFW) and the
tool holder (WH) 146.2.3 Inserting and replacing standard clamping shells 156.2.4 Mounting the pipe 166.2.5 Determining the speed 176.2.6 Setting the speed 176.2.7 Machining the pipe 18
6.3 Processing welded micro fittings 206.3.1 Preparation 206.3.2 Mounting the multifunctional tool (MFW) and the
elongated tool holder (WH) 206.3.3 Inserting and replacing optional clamping shells 206.3.4 Mounting the micro fitting 21

Table of contents Operating instructions RPG 1.5
II (10.07) MT_RPG 1.5_BA_04_790037762_04.doc ���� ����� ���������
6.3.5 Determining the speed 216.3.6 Setting the speed 216.3.7 Machining the micro fitting 21
7 Maintenance 22
8 What to do if ...? 238.1 Problem solving 238.2 Servicing/customer service 23

Operating instructions RPG 1.5 0 About these instructions
���� ����� ��������� (10.07) MT_RPG 1.5_BA_04_790037762_04.doc 1
0 About these instructions To allow quick understanding of these instructions and safe handling of the machine, all the warning messages, notes and symbols used in these instructions are presented here along with their meaning.
0.1 Warning messages In these instructions, warning messages are used to warn you against the dangers of injury or material damage. Always read and observe these warning messages!
This is a warning symbol. It should warn you against dangers of injury. Follow all instructions which are identified with this safety symbol in order to avoid injuries or death.
Warning symbol
Meaning
DANGER
Direct danger!
Non-observance could result in death or critical injury. Restrictions (if applicable).
Measures to prevent danger.
WARNING
Possible danger!
Non-observance could result in serious injury. Restrictions (if applicable).
Measures to prevent danger.
ATTENTION
Dangerous situation!
Non-observance could result in minor injuries.
ATTENTION
Dangerous situation!
Non-observance could result in material damage.
0 About these instructions Operating instructions RPG 1.5
2 (10.07) MT_RPG 1.5_BA_04_790037762_04.doc ���� ����� ���������
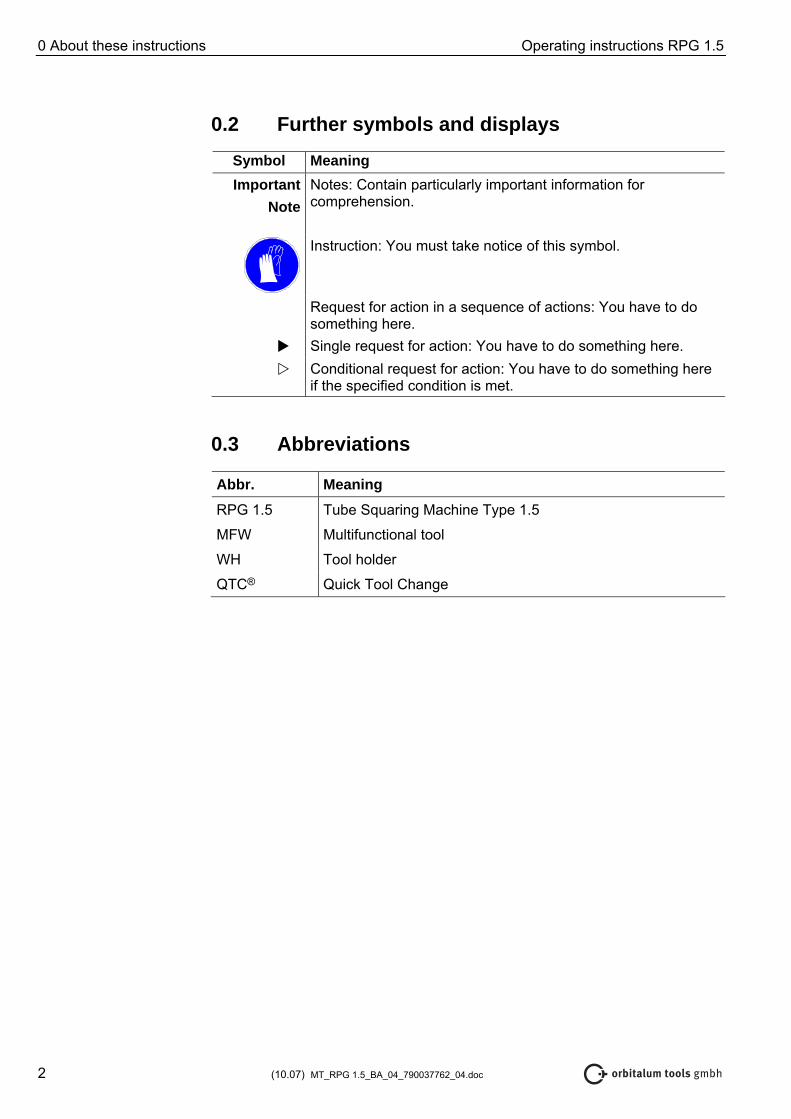
0.2 Further symbols and displays Symbol Meaning Important
Note Notes: Contain particularly important information for comprehension.
Instruction: You must take notice of this symbol.
Request for action in a sequence of actions: You have to do something here.
Single request for action: You have to do something here. Conditional request for action: You have to do something here
if the specified condition is met. 0.3 Abbreviations
Abbr. Meaning
RPG 1.5 Tube Squaring Machine Type 1.5
MFW Multifunctional tool
WH Tool holder
QTC® Quick Tool Change

Operating instructions RPG 1.5 1 Notes on safety
���� ����� ��������� (10.07) MT_RPG 1.5_BA_04_790037762_04.doc 3
1 Notes on safety The Tube Squaring Machine 1.5 (hereinafter referred to as RPG 1.5) is a state-of-the-art machine. Using it for purposes other than those described in this manual may cause injury to the user or to others. The machine or other equipment may also be damaged.
Therefore:
• Always ensure that the machine is in good working condition, and always comply with these notes on safety.
• Keep the complete documentation close by the machine.
• Generally valid regulations for the prevention of accidents must be observed.
1.1 Proper use • Use the RPG 1.5 exclusively for machining thin-walled pipes and welded
micro fittings.
• The user will be the only person liable for damages caused by improper use.
1.2 Safety regulations • Only use the dimensions and materials specified in these instructions (see
“Range of applications“, chapter 3.2, page 10). Other materials should only be used after consulting the Orbitalum Tools customer service department.
• Read the enclosed safety notes completely and carefully before working with the electric tool Metabo SBE 1010 Plus.
• Only use authentic Orbitalum Tools spare parts and materials.
• Check the RPG 1.5 daily for any externally visible damages or defects. Have any damages or defects repaired immediately.
• Work on the electrical equipment should only be carried out by a qualified electrician.
• Only operate the RPG 1.5 if the electrical restart prevention is working correctly.
• Pull out the mains plug before carrying out a tool change or maintenance and repair work.

1 Notes on safety Operating instructions RPG 1.5
4 (10.07) MT_RPG 1.5_BA_04_790037762_04.doc ���� ����� ���������
1.3 Working with safety in mind "Make your contribution to safety in the workplace."
• Report any deviations from normal operation to the person responsible immediately.
• Always keep safety in mind while working.
• When working with the RPG 1.5, wear protective goggles and safety gloves.
• Tie up long hair (hair-net); do not wear wide clothing. Attention: Jewellery, loose fitting clothing and ties can be caught in rotating parts!
• Make sure that the work piece has been clamped correctly.
• Turn the machine off at the end of each operating cycle and allow the machine to run a stop.
• Before carrying out a tool change, cleaning, performing any maintenance work, adjustments or repair work on the RPG 1.5, pull out the mains plug and allow the machine to run to a stop.
• Keep hands away from the tools during processing.
• Pay attention to the surroundings. Do not use any electric tools in a damp or wet area. Make sure to have good illumination. Do not work near combustible liquids or gases.
• Do not carry the electric tool holding it at the cable and do not use it to pull the plug out of the socket. Protect the cable against heat, oil and sharp edges (chips).
• Make sure the sight is closed before and during the treatment of pipes.
1.4 Waste disposal / environmental protection • Dispose of chips and used gear lubricant oil according to the regulations.
Discarded electric tools and accessories contain a large share of valuable raw and synthetic materials which can be recycled.
Therefore:
• Electrical (electronic) devices which are marked with the symbol to the left, may not be disposed of with household waste in accordance to the EU directive 2002/96/EC.
• By actively using the offered return and collection systems, you actively contribute to the reuse, recycling and utilization of electrical (electronic) devices.
• Electrical (electronic) used devices contain parts which must be handled selectively according to the EU directive. Separate collection and selective treatment is the basis for environment-friendly disposal and the protection of human health.
(RL 2002/96/EC)

Operating instructions RPG 1.5 1 Notes on safety
���� ����� ��������� (10.07) MT_RPG 1.5_BA_04_790037762_04.doc 5
• Our products that were sold to you after August 13th, 2005 are taken back and treated according to legal standards. These products have to be send free of charge.
• The return of used devices which pose a health or safety risk for human beings due to soiling during use may be refused.
• The legally compliant disposal of electrical (electronic) devices that were placed on the market before August 13th, 2005 are in the responsibility of the end-user.
1.5 Further safety regulations Observe country-specific regulations, norms and guidelines.
2 Construction of the product Operating instructions RPG 1.5
6 (10.07) MT_RPG 1.5_BA_04_790037762_04.doc ���� ����� ���������
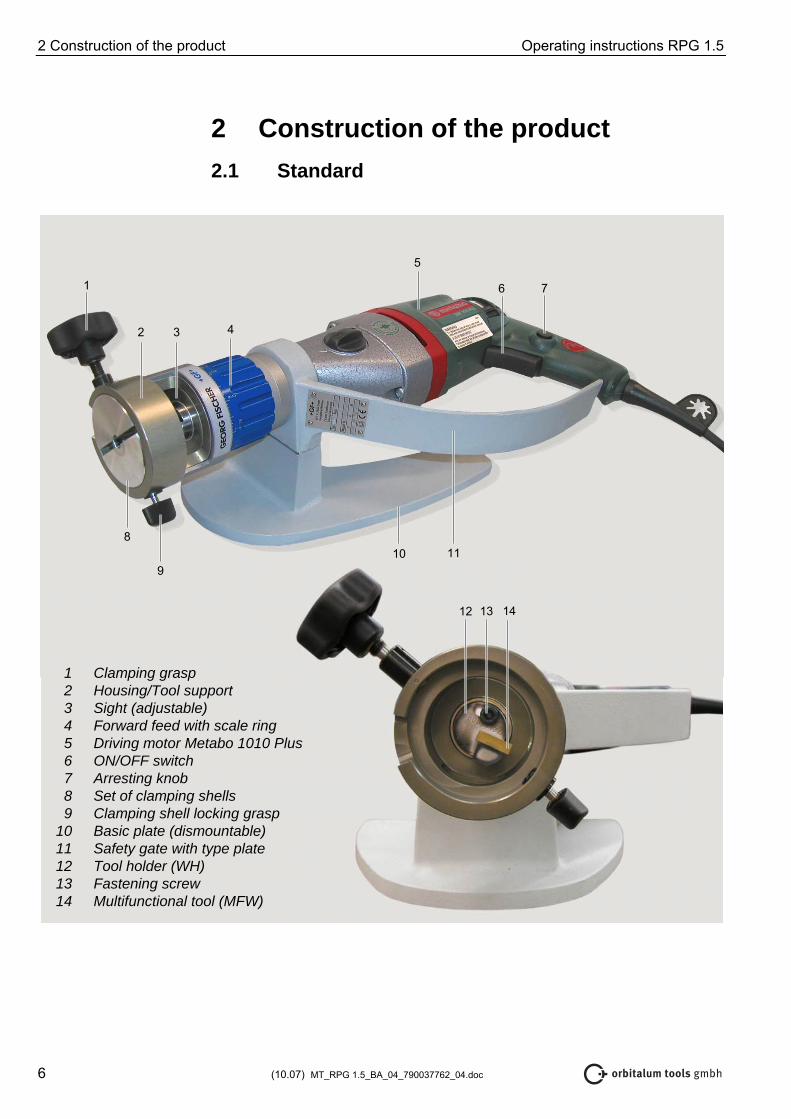
2 Construction of the product 2.1 Standard
1 Clamping grasp 2 Housing/Tool support 3 Sight (adjustable) 4 Forward feed with scale ring 5 Driving motor Metabo 1010 Plus 6 ON/OFF switch 7 Arresting knob 8 Set of clamping shells 9 Clamping shell locking grasp 10 Basic plate (dismountable) 11 Safety gate with type plate 12 Tool holder (WH) 13 Fastening screw 14 Multifunctional tool (MFW)
12 13 14
1
2 3 4
5
6
11109
8
7

Operating instructions RPG 1.5 2 Construction of the product
���� ����� ��������� (10.07) MT_RPG 1.5_BA_04_790037762_04.doc 7
2.2 Accessories 2.2.1 Standard tool holder (WH) and multifunctional tool (MFW)
Contained in the standard scope of delivery.
Multifunctional tool Working range (pipe OD) Characteristics Code
MFW-P-2
3.0 – 38.1 mm (0.118 – 1.500 inch)
Multifunctional tool with 2 cutting edges and high-performance coating Futura® Balinit.
Usable for all tool holders.
790 038 314
Standard tool holder Working range (pipe OD) Characteristics Adjust-
able Code
790 037 152
WH12-I
3.0 – 38.1 mm (0.118 – 1.500 inch)
For squaring pipe ends.
Also possible for electro-polished pipes up to OD 15 mm (0.590 inch).
Incl. Torx screw.
Yes Torx screw: 790 086 220
2.3 Optional accessories 2.3.1 Optional tool holder (WH)
Not contained in the standard scope of delivery.
Optional tool holder
Working range (pipe OD) Characteristics Adjust-
able Code
790 037 154
WH12-I
15.0 – 38.1 mm (0.590 – 1.500 inch)
Particularly for facing electropolished pipe ends.
Incl. Torx screw. Yes
Torx screw: 790 086 220
790 037 156
WH12-I
3.0 – 30.0 mm (0.118 – 1.180 inch)
Elongated tool holder for the treatment of welded micro fittings.
Incl. Torx screw.
No Torx screw: 790 086 220
2 Construction of the product Operating instructions RPG 1.5
8 (10.07) MT_RPG 1.5_BA_04_790037762_04.doc ���� ����� ���������
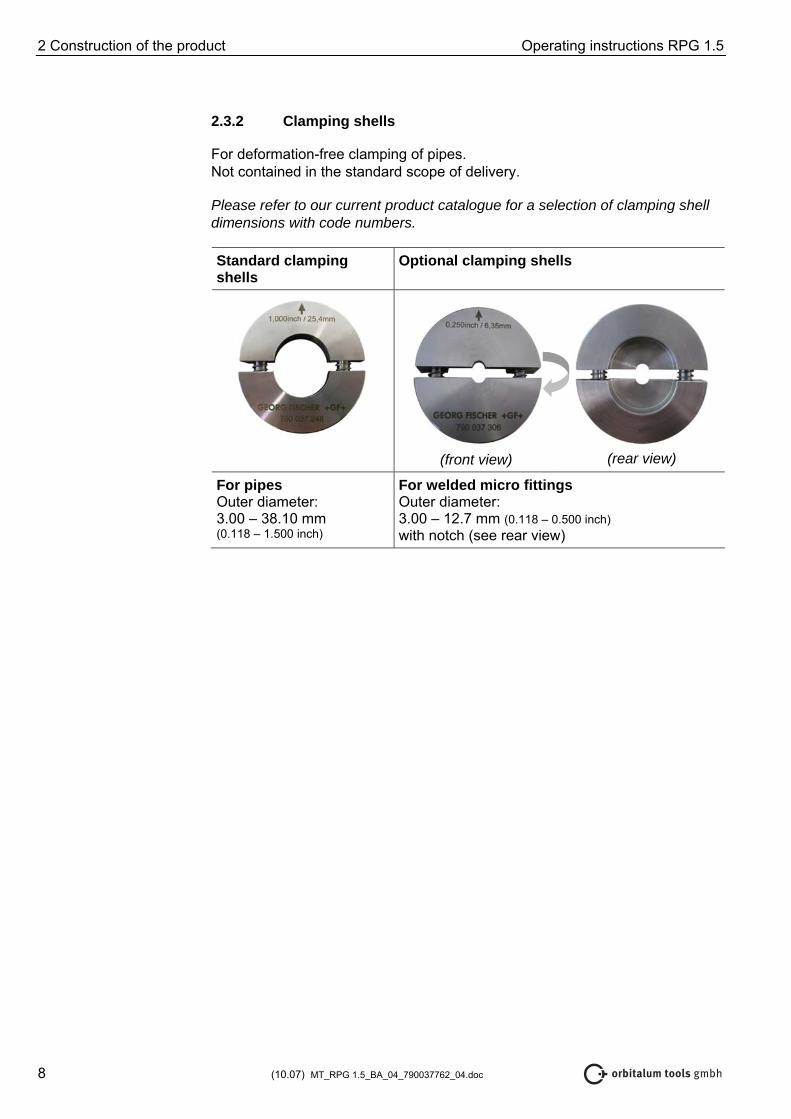
2.3.2 Clamping shells
For deformation-free clamping of pipes. Not contained in the standard scope of delivery.
Please refer to our current product catalogue for a selection of clamping shell dimensions with code numbers.
Standard clamping shells
Optional clamping shells
(front view)
(rear view)
For pipes Outer diameter: 3.00 – 38.10 mm (0.118 – 1.500 inch)
For welded micro fittings Outer diameter: 3.00 – 12.7 mm (0.118 – 0.500 inch) with notch (see rear view)

Operating instructions RPG 1.5 3 Characteristics and range of applications
���� ����� ��������� (10.07) MT_RPG 1.5_BA_04_790037762_04.doc 9
3 Characteristics and range of applications
3.1 Characteristics The RPG 1.5 is suitable for squaring pipe ends/welded micro fittings made of metallic materials. It has the following characteristics:
• Pipe end preparation for welds conforming to standards
• Tool holding system QTC® (Quick Tool Change): Rapid locking for fixing the tool holder to the tool support
• Only one multifunctional tool is necessary for:
– different pipe wall thicknesses (up to 3 mm/0.118 inch)
– different pipe materials (exclusively ferritic materials)
• Multifunctional tool:
– cutting geometry adapted to application
– multi-cutting tool
– only one screw is needed to fix and secure the tools
– tool coating TiN
• Machine:
– hand-operated
• Drive:
– twistable/detachable
– speed-controlled electric motor with speed stabilisation
– restart protection to prevent the machine from starting in an uncontrolled way after it has been re-connected to the electric mains or after the voltage supply has been re-established after a power failure
• Quick clamping system for pipes with adjusting facility
• Quick change system for clamping shells
• Forward feed with scale ring:
– total: 10 mm (0.393 inch)
– per revolution: 9 mm (0.354 inch)
– per pitch line: 0.1 mm (0.004 inch)
• A simply adjustable sight and/or chip guard allows clean working

3 Characteristics and range of applications Operating instructions RPG 1.5
10 (10.07) MT_RPG 1.5_BA_04_790037762_04.doc ���� ����� ���������
3.2 Range of applications
Outer diameter [mm] [inch]
min. 3.00 0.125
max. 38.10 1.500
The maximum workable wall thickness is 3 mm/0.118 inch.
• High-alloy steels (high-grade steel, material no. 1.40... – 1.45... according
to DIN 17 455 and DIN 17 456)
• Non-alloy and low-alloy steels
• Aluminum
• Others on request
Working range
Pipe materials

Operating instructions RPG 1.5 4 Technical data
���� ����� ��������� (10.07) MT_RPG 1.5_BA_04_790037762_04.doc 11
4 Technical data 4.1 Rating Dimensions (with drive) 400 x 350 x 160 mm
15.75 x 13.78 x 6.30 inch
Total weight (without clamping shells) 4.7 kg 10.4 lbs
Power 1010 W
Mains supply 230 V; 50 – 60 Hz
Speed (max. idling speed) 146 – 885 min–1
Noise level at the workplace*) Idle running approx. 82 dB (A)
Vibration level according to EN 28662, Part 1
2.5 m/s²
*) The noise level measurement was carried out under normal operating conditions according to EN 23741.

5 Commissioning Operating instructions RPG 1.5
12 (10.07) MT_RPG 1.5_BA_04_790037762_04.doc ���� ����� ���������
5 Commissioning Check all parts of the delivery for completeness and transportation
damage.
Report any missing parts or transportation damage to your supplier immediately.
5.1 Scope of delivery • 1 Tube Squaring Machine RPG 1.5
• 1 Durable storage and shipping case
• 1 Tool holder (Code 790 037 152) with multifunctional tool (Code 790 038 314)
• 1 Tool set
• 1 Operating instructions with spare parts list
Subject to alterations
5.2 Transportation The RPG 1.5 is a portable machine. Special transportation aids are not required (for safe transportation, hold the machine as shown in the left-hand illustration).
Danger of death by electric shock and restart of the machine
During transport, the ON/OFF switch could be actuated inadvertently so that the machine is started.
Cut off the power supply before carrying out the transport or changing the workplace and allow the machine to run a stop.
5.3 Connection requirements The mains supply must meet the following requirements:
• 1-phase alternating current 230 V, 50/60 Hz, protection class II
• Mains fuse at least 10 A
Checking the scope of delivery
DANGER

Operating instructions RPG 1.5 6 Operation
���� ����� ��������� (10.07) MT_RPG 1.5_BA_04_790037762_04.doc 13
6 Operation Danger of death by electric shock
Unintentional operation of the ON/OFF switch!
Pull out the mains plug before carrying out any adjustment, repair and maintenance work or changing the tool and allow the machine to run a stop at the end of each running cycle.
Danger of injury
Rotating tool support!
Do not reach into the tool support while machining, keep wide clothing away from the work area.
Only operate the machine after the pipe has been clamped in and the sight has been closed.
6.1 Mounting the RPG 1.5 on the basic plate 1. Place the basic plate on a stable base and put on the RPG 1.5.
2. Use the Allen key (SW4x150) to fasten the machine to the basic plate.
6.2 Machining pipes with OD 3.0 – 38.1 mm
(0.118 – 1.5 inch) 6.2.1 Preparation
1. Specify the pipe dimension to be processed.
2. Select the standard tool holder, the multifunctional tool and the clamping shells (for tool accessories, see chapter 2.2, p. 7).
DANGER
Specifying dimensions

6 Operation Operating instructions RPG 1.5
14 (10.07) MT_RPG 1.5_BA_04_790037762_04.doc ���� ����� ���������
6.2.2 Mounting the multifunctional tool (MFW) and the tool holder (WH)
Danger of injury
Sharp cutting edges!
Do not touch the cutting edges when mounting the multifunctional tool.
Wear safety gloves.
1. Screw the multifunctional tool (1) onto the tool holder (3) using the Torx
screwdriver (2).
2. Insert the tool holder (3) with multifunctional tool from the front into the guiding groove (4) and position it according to the outer pipe diameter.
3. Tighten the screw (5) of the tool holder with the Allen key.
If the tool holder is twisting during fitting: Move the sight back with one hand and hold it. Simultaneously, the tool holder can be held through the opened sight by means of the Torx screwdriver (6).
4. Remove the screwdriver, close the opened sight, if necessary.
The mounting of the tool holder with multifunctional tool is now completed.
WARNING
Note
3 12 3 4
5 6

Operating instructions RPG 1.5 6 Operation
���� ����� ��������� (10.07) MT_RPG 1.5_BA_04_790037762_04.doc 15
6.2.3 Inserting and replacing standard clamping shells
1. Select the appropriate set of clamping shells according to the pipe dimension (see chapter 2.3.2, p. 8).
2. Turn out the clamping grasp (1) until it is running freely (end of locking grasp must be flush with the inside of the housing).
3. Turn out the locking grasp of the clamping shells (2) until it is running freely (end of locking grasp must be flush with the inside of the housing).
If an already mounted set of clamping shells is to be replaced, it can now be removed by compressing it.
4. Compress the set of clamping shells (3) slightly and insert it into the housing:
• The inscription on the clamping shells must point to the operator. • The arrowhead (4) on the clamping shell must be positioned at the point (5)
on the housing.
The clamping shell is correctly inserted if it has engaged. If the clamping shell does not engage, readjustment is possible by slightly turning the clamping shell.
Removing clamping shells
Inserting clamping shells
1 2
3 5 4

6 Operation Operating instructions RPG 1.5
16 (10.07) MT_RPG 1.5_BA_04_790037762_04.doc ���� ����� ���������
5. Fix the clamping shell by means of the clamping shell locking grasp (6).
The set of clamping shells has now been inserted correctly.
6.2.4 Mounting the pipe
1. Insert the pipe to be machined into the machine allowing it to have sufficient distance to the multifunctional tool.
2. To clamp the pipe fast, turn the clamping grasp (1) clockwise to the limit stop.
The pipe has been clamped correctly and may be processed if it is no longer possible to turn or move the pipe.
3. To remove the pipe, turn the clamping grasp (1) anticlockwise to the limit
stop.
Mounting the pipe
Checking the pipe for correct clamping
Removing the pipe
6
1

Operating instructions RPG 1.5 6 Operation
���� ����� ��������� (10.07) MT_RPG 1.5_BA_04_790037762_04.doc 17
6.2.5 Determining the speed
The following table serves to determine the cutting speed recommended by Orbitalum Tools and, thus, the number of revolutions (applies to stainless steels such as e.g. 1.4435; 316L).
Outer diameter (Pipe OD)
[mm] [inch]
Adjusting wheel (1) for presetting
the speed [level A – G]
Speed n (1/min)
3.175 0.125 C 381
6.350 0.250 B 235
12.700 0.500 A 145
38.100 1.500 A 145 The table is based on a cutting speed of approx. 3 – 17 m/min with high-alloy steel.
The machining behaviour can be influenced by altering the speed.
6.2.6 Setting the speed
Set the adjusting wheel (1) for presetting the speed to the desired level (A – G); “A“ corresponds to the lowest and “G“ to the highest speed.
Standard values for the speed (n)
Note
Increasing/reducing the number of
revolutions
1

6 Operation Operating instructions RPG 1.5
18 (10.07) MT_RPG 1.5_BA_04_790037762_04.doc ���� ����� ���������
6.2.7 Machining the pipe
Hot and sharp-edged chips
Danger of injuries on eyes and hands.
Always wear protective goggles while working.
Only remove chips wearing safety gloves.
Tool damage
A pipe which has not been sawn off square may damage the tool (MFW) if the distance between the cutting edge and the pipe end is too short.
Before switching the RPG 1.5 on, make sure that there is sufficient distance between the cutting edge (MFW) and the pipe end.
1. Connect the RPG 1.5 (for connection requirements, see chapter 5.3, p. 12).
2. Set the recommended speed (see chapter 6.2.5, p. 17).
3. Press the ON/OFF switch (1).
The machine starts running.
If the tool chatters after starting up, the cutting speed is too high.
Reduce the speed (see chapter 6.2.6, p. 17).
WARNING
ATTENTION
Switching the RPG 1.5 on
Note
1

Operating instructions RPG 1.5 6 Operation
���� ����� ��������� (10.07) MT_RPG 1.5_BA_04_790037762_04.doc 19
Forward feed with scale ring (1):
• Each pitch line corresponds to an advance of 0.1 mm.
• When cutting, do not exceed a chip thickness of 0.05 mm. By exceeding the load-limiting device (square nut, code 790 037 118) can be cut (see problem solving, chapter 8.1, p. 23).
4. Move the tool towards the pipe by means of the forward feed (1) until the
tool contacts the pipe.
5. When the cutting edge of the tool is cutting along the entire circumference of the pipe:
Go on advancing the tool with constant pressure until the desired machining result is achieved.
6. Press the ON/OFF switch.
The machine comes to a stop.
7. The pipe may now be removed (see chapter 6.2.4, p. 16).
Note
Advancing the tool
Switching the RPG 1.5 off
1

6 Operation Operating instructions RPG 1.5
20 (10.07) MT_RPG 1.5_BA_04_790037762_04.doc ���� ����� ���������
6.3 Processing welded micro fittings 6.3.1 Preparation
1. Specify the micro fitting dimension to be processed.
2. Select the elongated tool holder, the multifunctional tool and the clamping shells (for tool accessories, see chapter 2.3, p. 7).
6.3.2 Mounting the multifunctional tool (MFW) and the elongated tool
holder (WH)
Danger of injury
Sharp cutting edges!
Do not touch the cutting edges when mounting the multifunctional tool.
Wear safety gloves.
Screw the multifunctional tool onto the elongated tool holder using the Torx
screwdriver.
Carry out the further working steps described in chapter 6.2.2, p. 14.
6.3.3 Inserting and replacing optional clamping shells
Danger of being injured by sharp cutting edges. Bruised fingers. Material damage.
The elongated tool holder has been designed specifically for welded micro fittings and has a shifted feed path. Wrong insertion of the clamping shell may lead to injuries of the operator or to a tool damage.
Do not insert the clamping shells the wrong way round (the inscription on the clamping shells must point to the operator).
Before switching the RPG 1.5 on, make sure that the sight is closed.
Wear safety gloves.
1. Select the appropriate set of clamping shells for welded micro fittings (with
notch) according to the pipe dimension (see chapter 2.3.2, p. 8).
Carry out the further working steps described in chapter 6.2.3, p. 15.
Specifying dimensions
WARNING
WARNING
Operating instructions RPG 1.5 6 Operation
���� ����� ��������� (10.07) MT_RPG 1.5_BA_04_790037762_04.doc 21
6.3.4 Mounting the micro fitting
Carry out the working steps described in chapter 6.2.4, p. 16.
6.3.5 Determining the speed
The speed is determined as described in chapter 6.2.5, p. 17.
6.3.6 Setting the speed
For setting the speed, see chapter 6.2.6, p. 17.
6.3.7 Machining the micro fitting
Carry out the working steps described in chapter 6.2.7, p. 18.

7 Maintenance Operating instructions RPG 1.5
22 (10.07) MT_RPG 1.5_BA_04_790037762_04.doc ���� ����� ���������
7 Maintenance The Tube Squaring Machine RPG 1.5 is designed for a long service life and low maintenance.
Please follow the maintenance instructions below.
Danger of death by electric shock
Pull the mains plug before carrying out any maintenance work and allow the machine to come to a stop.
Time / Interval Activity
Before starting work Check the pipe clamping if the pipe is already mounted in the machine.
At each cleaning Clean the clamping shells and the housing/tool support.
At each tool change Clean the tool support and the multifunctional tool.
DANGER
Operating instructions RPG 1.5 8 What to do if ...?
���� ����� ��������� (10.07) MT_RPG 1.5_BA_04_790037762_04.doc 23
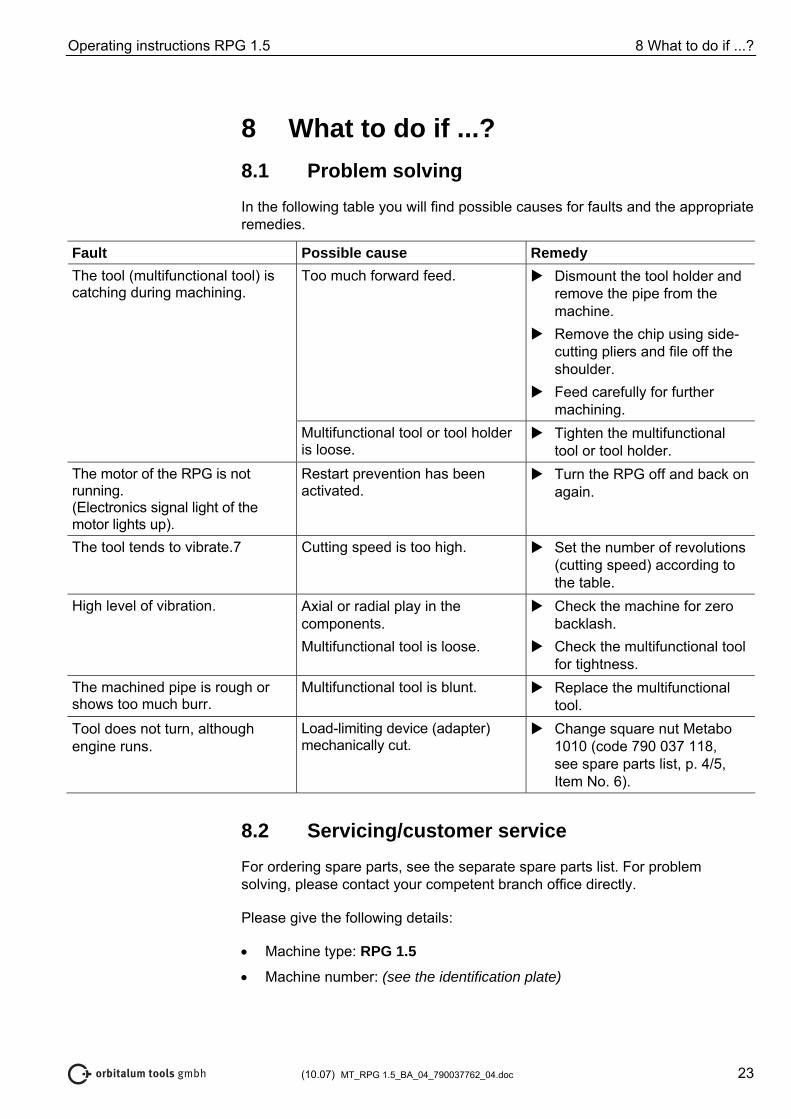
8 What to do if ...? 8.1 Problem solving In the following table you will find possible causes for faults and the appropriate remedies.
Fault Possible cause Remedy Too much forward feed.
Dismount the tool holder and remove the pipe from the machine.
Remove the chip using side-cutting pliers and file off the shoulder.
Feed carefully for further machining.
The tool (multifunctional tool) is catching during machining.
Multifunctional tool or tool holder is loose.
Tighten the multifunctional tool or tool holder.
The motor of the RPG is not running. (Electronics signal light of the motor lights up).
Restart prevention has been activated.
Turn the RPG off and back on again.
The tool tends to vibrate.7 Cutting speed is too high.
Set the number of revolutions (cutting speed) according to the table.
High level of vibration. Axial or radial play in the components. Multifunctional tool is loose.
Check the machine for zero backlash.
Check the multifunctional tool for tightness.
The machined pipe is rough or shows too much burr.
Multifunctional tool is blunt. Replace the multifunctional tool.
Tool does not turn, although engine runs.
Load-limiting device (adapter) mechanically cut.
Change square nut Metabo 1010 (code 790 037 118, see spare parts list, p. 4/5, Item No. 6).
8.2 Servicing/customer service For ordering spare parts, see the separate spare parts list. For problem solving, please contact your competent branch office directly.
Please give the following details:
• Machine type: RPG 1.5
• Machine number: (see the identification plate)

Orbitalum Tools GmbH
Freibühlstraße 19
78224 Singen, Deutschland
Tel. +49 (0) 77 31 / 792-0
Fax +49 (0) 77 31 / 792-500
www.orbitalum.com
An ITW Company
790 037 762_04/04 (10.07)
© Orbitalum Tools GmbH
D-78224 Singen 2007
Printed in Germany