n-central installation and upgrade guide - n-able …wherexxxisanumber....
TRANSCRIPT

Installation and Upgrade GuideVersion 10.2
- 2 -
Contents
Network Requirements 3
Agent and Probe Requirements 5
Software Requirements 6
Supported Platforms and Browsers 6
Supported Mobile Device Operating Systems 6
Remote Control 6
Report Manager 6
SNMP Community String 7
Installing N-central 8
Installing N-central on a Physical Server 9
Installing N-central as a Guest on an ESX Server 11
Installing N-central as a Guest on a Hyper-V Server 12
Installing N-central in Microsoft Azure 13
Upgrading N-central 19
Step 1: Backing Up the N-central Server 20
Step 2: Installing the N-central Server Upgrade 21
Step 3: Post-installation Steps 22
Rebuilding or Migrating Your N-central Server 25
Logging in to N-central for the First Time 29
Activating N-central 33
N-central 10.2 Installation and Upgrade Guide

- 3 -
Network Requirements
To get N-central up and running, provide access to the following essential ports. For a complete list of allports used by N-central, refer to the N-central Security Statement.
Port #
Port Location
DescriptionN-central Server Managed Device
Inbound Outbound Inbound Outbound
20 √ Used for FTP connections(especially when configured forbackups).
21 √ Used for FTP connections(especially when configured forbackups).
22 √ √ SSH: Used for remote controlsessions. The firewall must allowaccess from the Internet to thisport on the N-central server.
25 √ SMTP: Used for sending mail.
53 √ Used for DNS.
80 √ √ √ HTTP: Used to communicatebetween the N-central andAgents or Probes (includingMSP Connect). The firewall mustallow access from the Internet tothis port on the N-central server.This port must be open foroutbound traffic if the N-centralserver is monitoring HTTP on amanaged device.
N-central 10.2 Installation and Upgrade Guide

- 4 -
Port #
Port Location
DescriptionN-central Server Managed Device
Inbound Outbound Inbound Outbound
Note: Inbound access to port 80 can be blocked if Agents are configured to use HTTPS and the N-central server is accessed over port 443 using HTTPS.
123 √ Used by the NTP Date service tokeep the server clocksynchronized. Normally usingUDP (although some servers canuse TCP).
443 √ √ √ HTTPS: Used to communicatebetween the N-central andAgents or Probes.
Port 443 is the TCP port for SSL(HTTPS) connections. Thefirewall must allow access fromthe Inter net to this port on theN-central server.
This port must also be open foroutbound traffic if the N-centralserver is monitoring HTTPS on amanaged device.
10000 √ HTTPS: Used to access the NAC.The firewall must allow accessfrom the Internet to this port onthe N-central server.
N-central 10.2 Installation and Upgrade Guide

- 5 -
Agent and Probe Requirements
Observe the followingminimum hardware requirements for devices:
l RAM: 512 MBl Disk space: 500 MBl Processor: x86 or x64
Windows Agents require both:
l Microsoft .NET Framework 2.0.50727 (or later)l Microsoft .NET Framework 4.x (or later)
.NET Framework on device Probe Agent
Only Microsoft .NET Framework 4.0.x
Both Microsoft .NET Framework 2.0.50727 and Microsoft .NET Framework4.0.x
Note: For Windows 2003 devices, installing .NET Framework 4.0.x requires the Windows ImagingComponent (see http://msdn.microsoft.com/en-us/library/8z6watww.aspx).
N-central 10.2 Installation and Upgrade Guide
- 6 -
Software Requirements
Supported Platforms and Browsers
N-central is supported on the following browsers:
l Internet Explorer®, versions 10.x and laterl Mozilla Firefox®, versions 35.x and laterl Google Chrome®, versions 40.x and later
Notes
l Chrome 42.x does not support NPAPI plugins (including Java and Direct Connect). When youattempt to launch a remote control connections in Chrome 42.x, you will be repeatedly promptedto install Java or the NTRglobal plugin without success.
Workaround:
1. In the Chrome address bar, type chrome://flags.2. Under Enable NPAPI, click Enable.3. Restart Chrome.
l N-central is not supported on Internet Explorer in Compatibility View mode.
l Attended Remote Control and Direct Connect remote control connections are not supported on64-bit browsers.
Supported Mobile Device Operating Systems
N-central's Mobile Device Management supports the following:
l iOS 6.1.x and laterl Android 2.2.x and later
For more information, refer to Mobile Device Management.
Remote Control
Remote control connections require the following software on the computers that initiate connections:
l Java 6 Update 20 or greater
Report Manager
To use Report Manager with N-central, ensure the you upgrade to the latest version of Report Manager.
N-central 10.2 Installation and Upgrade Guide

- 7 -
SNMP Community String
When monitoring the N-central server using SNMP, the community string used for SNMP queries to theserver must use N-central_SNMP, not public.
N-central 10.2 Installation and Upgrade Guide
- 8 -
Installing N-central
You can install N-central on a physical or virtual server or in the Microsoft Azure cloud computingplatform.
Choose the installation procedure that applies to you:
l Installing N-central on a Physical Server on page 9
l Installing N-central as a Guest on an ESX Server on page 11
l Installing N-central as a Guest on a Hyper-V Server on page 12
l Installing N-central in Microsoft Azure on page 13
N-central 10.2 Installation and Upgrade Guide

- 9 -
Installing N-central on a Physical Server
1. Configure the server RAID array using the settings below.
HP Server
Cache Options Set to 50% Read and 50%Write.
Disk RAID 1+0 HP uses an 8 KB stripe size. Delete and recreate the logicaldrive to set the stripe size.
IBM Server
Cache Options Use the default settings.
Disk RAID 1+0 IBM uses an 8 KB stripe size. Use Express ConfigurationController 2 to enable all settings.
Dell Server
Cache Options Set Write Policy to Write-back and Read Policy to Adaptive.
Disk RAID 1+0 Dell uses an 8 KB stripe size.
Intel Server
Cache Options Set Write Policy to Write-back and Read Policy to Adaptive.
Disk RAID 1+0 Intel uses an 8 KB stripe size. Use the RAID utility to set thestripe size.
2. Insert the installation CD and restart the server.3. Type install.
Note: To install N-central on an HP ML-150G6 server, type install nodmraid.
4. Press Enter.
Note: If you are not prompted for network information, N-central was unable to locate a suitablenetwork card. The installation will continue but you will not be able to access N-central.
N-central 10.2 Installation and Upgrade Guide

- 10 -
5. Select a network configuration: Dynamic IP configuration (DHCP) orManual address con-figuration (recommended).
6. ClickOK and Enter.7. If you selectedManual address configuration, type the IP Address andNetmask, clickOK,
and Enter.8. In theMiscellaneous Network Settings screen, type theGateway, Primary DNS and
Secondary DNS addresses.9. ClickOK and Enter.10. In theHostname Configuration page, select the hostname configuration: automatically via
DHCP ormanually, and clickOK.11. In the Time Zone Selection page, select your time zone. UTC is recommended.12. Save and confirm the procedure.
N-central 10.2 Installation and Upgrade Guide

- 11 -
Installing N-central as a Guest on an ESX Server
1. Create a new virtual machine using the settings below.
OS Red Hat Enterprise Linux 6 (64-bit)
Do not enable paravirtualization
Virtual Disks Thick Provision
CPU/Memory/Storage Size according to tables in the System Requirements.
Network Adapter VMXNET3
2. Mount a disk or network file system to access the installation CD .ISO image.
Note: Ensure that the VMware guest is configured to use the mounted disk or network file system as aboot disk.
3. Start the new VM.4. At the installation prompt, type install and Enter.
Note: If you are not prompted for network information, N-central was unable to locate a network card.The installation will finish, but you cannot log in. To resolve this issue, verify that the server has anetwork card compatible with CentOS 5.5 and restart the installation.
5. Select the type of network configuration from one of the following: Dynamic IP configuration(DHCP) orManual address configuration (recommended).
6. Select OK and Enter.7. If you selectedManual address configuration, enter the IP Address andNetmask, select
OK and press Enter.8. In theMiscellaneous Network Settings screen, enter theGateway, Primary DNS and
Secondary DNS addresses.9. ClickOK and Enter.10. In theHostname Configuration screen, select the hostname configuration: Automatically
via DHCP orManually.11. ClickOK and Enter.12. In the Time Zone Selection page, select your time zone. UTC is recommended.13. Save and confirm the procedure.
N-central 10.2 Installation and Upgrade Guide

- 12 -
Installing N-central as a Guest on a Hyper-V Server
Note: Before you begin, note that N-central does not support the use of dynamic memory underHyper-V.
1. Create a new virtual machine using the settings below.
Generation Generation 1
CPU/Memory/Storage Size according to tables in the System Requirements.
Network Adapter Select a valid network to where the virtual machine can connect.
2. Start the new VM.3. In the Virtual Machine Connection window, type install and Enter.4. SelectManual address configuration for the of network configuration type.
Note: If you are not prompted for network information during the installation, N-central was unable tolocate a suitable network card. The installation will continue to conclusion, but you will not beable to log in. To resolve this issue, ensure that the virtual switch settings of the host areconfigured to the proper network and restart the installation. We recommend that you do notuse a Legacy Network Adapter.
5. Select OK and Enter.6. Type the IP Address andNetmask.7. Select OK and Enter.8. In theMiscellaneous Network Settings screen, type theGateway, Primary DNS and
Secondary DNS addresses.9. Select OK and Enter10. In theHostname Configuration screen, select automatically via DHCP ormanually.11. Select OK and press Enter.12. In the Time Zone Selection page, select your time zone. UTC is recommended.13. Save and confirm the procedure.
N-central 10.2 Installation and Upgrade Guide

- 13 -
Installing N-central in Microsoft Azure
This document describes how to create an Azure-based N-central installation starting with an N-centralAzure Virtual Machine image file.
Prerequisites
Microsoft Azure is a cloud computing platform for deploying applications and services through Microsoft-managed data centers.
Ensure that you have an Azure subscription and aWindows-based PC loadedwith PuTTY (or any SecureShell client) and PowerShell with Azure extensions.
Notes:
l You must configure N-central before you begin.
l Plan your deployment with N-central Support. A license may need to be applied before you areable to log in to N-central.
l You must know how to install and configure N-central and have a general understanding andknowledge of Microsoft Azure, including network and hardware troubleshooting.
Creating an Azure-based N-central Installation
1. Use the VM install file image in NRC:Software Downloads> N-central 10.x.2. Install and configure Azure PowerShell. PowerShell commands are used to convert and upload the
VM image file and create an Azure cloud VM based on the image. You must have Administratorprivileges in the Azure environment. Download the image file N-central-x.x.x.vhd.gz., extract thefile, and use the .vhd file in your Azure environment.
Note: You must have PowerShell with Azure extensions installed on the working PC.
a. For the PowerShell console, these imports add the required PowerShell Azure modules:
PS > Import-Module "C:\Program Files (x86)\Microsoft
SDKs\Azure\PowerShell\ServiceManagement\Azure\Azure.psd1"
PS > Import-Module "C:\Program Files (x86)\Microsoft
SDKs\Azure\PowerShell\ResourceManager\AzureResourceManager\AzureResourceManager.p
sd1"
N-central 10.2 Installation and Upgrade Guide

- 14 -
b. Connect the console to the Azure subscription.
- Get-AzurePublishSettingsFile.
- Import-AzurePublishSettingsFile “C:\file.publishsettings” and use the “Get-AzureSubscription”
c. There must be a network set up on the Azure account. If not, refer to the steps in this Azuredocument.
Note: The name length is 8 to 24 characters long. It must be unique and cannot be renamed.
N-central 10.2 Installation and Upgrade Guide

- 15 -
The Storage type must support page blobs (VM storage) Premium Storage:
l Local Redundantl Geo-Redundantl Premium Locally Redundant (only available on DS-series VMs)
Note: The previous step provides you with a storage container. To change the storage container,use the command shown in the example below:
Re-run this command:
PS > $sub = Get-AzureSubscription -ExtendedDetails
N-central 10.2 Installation and Upgrade Guide

- 16 -
3. Upload the VHD file to Azure and register it as an OS disk. This allows it to be used for VM creationin Azure.
Note: The upload URL is comprised of the Blob End Point concatenated with the folder name.
Tip: GUI apps can cause uploads to upload the entire 200GB image block-by-block. Microsoftrecommends using PowerShell to upload data blocks without empty spaces.
4. Create the Azure service (unit of deployment) and VM.
Note: To use the $Subnet and $Network variables shown in the example above, you must firstdefine them. For example:
$network = “Group SWIENG-Dev-CentralUS SWIENG-DevNet-CentralUS” $subnet =
“subnet0”
The commands used to create the VM can be used as written: (Set-AzureSubnet, New-AzureVM).
Note: InstanceSize should be the Azure Instance Size you selected for your region or storage type.For example: Standard_DS2.
# of Devices Azure Instance Size [VirtualizedAzure]
Optimal performance for up to …
1,000 or less Basic A2 1,000 Agents
1,000 – 3,000 Standard A4 (8 Cores, 14 GB memory) 3,000 Agents
3,000 – 6,000 Standard DS4 (8 Cores, 28 GB memory) 6,000 Agents
N-central 10.2 Installation and Upgrade Guide

- 17 -
Checkpoint VM Creation
Query the status of the VM and allow a few minutes for the VM to appear in the cloud. For futurereference, note the IpAddress and DNSName variables when connecting to this server. Thefollowing is an example of typical output:
5. Configure the endpoints for the VM:
Notes:
- Set a reserved IP address for the VM. This reserves the VIP assignment if the VM powers off andde-allocates.
- Set an instance IP. This IP is the IP you want to use publically and to set in N-central. It does notuse the Azure load balancer and allows full traffic to flow, including ICMP, which is not allowed usingthe VIP assignment/public DNS:
Instance level IP:
Get-AzureVM -ServiceName "fvc-cloud" -Name "fvc-noc" | Set-AzurePublicIP -
PublicIPName instanceIp1 | Update-AzureVM
N-central 10.2 Installation and Upgrade Guide

- 18 -
6. After the VM is created in Azure, the Azure portal monitors the VM state, as shown below.
7. After you have everything set up in Azure, activate the N-central Server.
You must also set the Appliance Setting in your N-central instance for the probe/agent com-munication and to propagate any changesmade to your Azure storage account.
Tomake the required change in N-central, navigate toAdministration > Appliance Settingsand add the Azure VM URL produced from the DNSName variable in in Step 5. For example:
Note: If the VM is powered off in Azure, it will be unallocated. Restarting will cause N- central torequire re-activation.
N-central 10.2 Installation and Upgrade Guide

- 19 -
Upgrading N-central
This document includes the following upgrade procedures:
l Step 1: Backing Up the N-central Server on page 20
l Step 2: Installing the N-central Server Upgrade on page 21
l Step 3: Post-installation Steps on page 22
Note: Refer to the release notes for compatible upgrade paths before you upgrade from one version toanother.
N-central 10.2 Installation and Upgrade Guide

- 20 -
Step 1: Backing Up the N-central Server
Before you upgrade, back up the N-central Server in the even of an upgrade failure. Back up the serverto a destination FTP server or, if N-central has been installed as a guest on an ESX or Hyper-V server,record a snapshot of the guest.
1. In the navigation pane, click Administration > System Backup and Restore >Configure Backups.
2. In the Configure Backups screen, configure the backup properties.3. Click Save and Run Backup.
Note: During the backup, a backup file and a backup digest file are created. The backup file contains allof the information needed to restore the system. The SHA1 file contains a SHA1 checksum of thebackup file and verifies that the backup file is not corrupted (for example, if changes have beenmade to the backup file).
4. Wait for the system to send you a notification about the backup success or failure.5. If the backup succeeded and you have not configured it to be uploaded to an FTP server, download
the backup image from the N-central server to a safe location:
a. In the navigation pane, click Administration > System Backup and Restore > DownloadBackups.
b. ClickDownload Backup beside the name of the backup file you want to download and save it toa known location (used to store backup files).
c. (Optional) ClickDownload Digest beside the name of the backup file and save the digest file toa known location (as above).
Note: The downloaded files can now be used to restore the database.
To continue the upgrade, see Step 2: Installing the N-central Server Upgrade on page 21.
N-central 10.2 Installation and Upgrade Guide

- 21 -
Step 2: Installing the N-central Server Upgrade
You can upgrade to N-central 10.2 by installing the upgrade file downloaded to your N-central server orfrom the N-able Resource Center.
1. On the Administrator Consolemenu bar, select Setup.2. On the Setup screen under Central Server, click Version Management.3. On the Version Management screen, do one of the following:
N-central Direct upgrade Remote upgrade from download location
a. Select Install upgrade from localrepository.
b. Select an upgrade version from the list ofavailable options.
a. Select Install upgrade remotely.
b. Click Browse and navigate to the .nsp file inthe N-able Resource Center.
4. Type an e-mail address in theNotify this email address when complete field.5. Click Install and confirm the action. The server will restart and the upgrade information will be
updated.
Note: The average upgrade takes approximately 30 minutes, but the upgrade process can take severalhours (depending on the size of your database). If five hours elapse after the upgrade and youhave not received a notification, contact SolarWinds N-able for assistance.
Warning! Do not reboot the N-central server during the upgrade process even if it appearsunresponsive.
To continue the upgrade, see Step 3: Post-installation Steps on page 22.
N-central 10.2 Installation and Upgrade Guide

- 22 -
Step 3: Post-installation Steps
After you have installed N-central, complete the following post-installation checklist.
Check items as they are completed
Verify the version of N-central by signing in and click Help> Version Information. The AssociatedUpgrades displayed must read Applied-update-10.2.0.xxx-b1_0_xxx, where xxx is a number.
Verify the Network Settings and Default Settings: Administration > Mail Network Settings >Network Setup.
Verify that the user accounts exist and are accessible.
Verify that the customer profiles are complete and accurate.
Verify that the devices are present.
Verify that the services for each device are reporting correctly.
Verify that all of the notification profiles are present.
N-central 10.2 Installation and Upgrade Guide

- 23 -
Check items as they are completed
Verify that the reports generate and display the accurate historical data.
At the SO level, perform the following to automatically upgrade all Probes and Agents on your customers'remote computers.
1. In the navigation pane, click Administration > Defaults > Appliance Settings.2. Select the Upgrade Windows Probes option as either Never (the Probe software will not
ever be upgraded) or Always (the Probe software is always upgraded).3. Select Propagate to distribute this configuration setting to existing devices.4. Select Reboot device if necessary to automatically restart devices after the Probe software
has been upgraded.5. Select the Upgrade Agents option as either Never (the Agent software will not ever be
upgraded) or Always (the Agent software is always upgraded).6. Select Propagate to distribute this configuration setting to existing devices.7. Select Reboot device if necessary to automatically restart devices after the Agent software
has been upgraded.
Note: You can perform the above procedure for specific Customers/Sites by navigating to theCustomer/Site level first. You will have to repeat the procedure for each Customer/Site that youwant to automatically upgrade their Windows Probes and Windows Agents.
Once the upgrade procedure has been completed, generate an Agent/Probe Overview report by clickingReports >Administrative > Agent/Probe Overview in the navigation pane. This will allow you toverify that all probes have been updated.
Note: After upgrading an Agent that monitors the Asigra Backup service or the XiloCore Backupservice, you will need to stop the Windows Agent services, place the Asigra .DLL files to theAgent's bin directory and re-start the Windows Agent services.
N-central 10.2 Installation and Upgrade Guide

- 24 -
Check items as they are completed
Upgrade your monitoring software automatically for specific SOs, Customers or Sites:
Upgrade your monitoring software automatically for specific Customers or Sites:
Upgrade your monitoring software automatically for specific devices:
1. In the navigation pane, click All Devices.
2. Select the Service Organizations, Customers or Sites, or devices to upgrade.
3. Click Update Monitoring Software.
4. In the Upgrade Monitoring Software dialog box, select Now for the monitoring software youwant to upgrade from the following:
l Upgrade Agentl Upgrade Remote Support Managerl Upgrade Backup Manager
Note: Upgrading Endpoint Security on devices will cause them to reboot twice: once after the existingsoftware is removed and again when the new software is installed.
Once the upgrade procedure has been completed, generate reports by clicking:
l Reports >Administrative > Remote Support Manager
l Reports >Status > AV Defender Status
N-central 10.2 Installation and Upgrade Guide

- 25 -
Rebuilding or Migrating Your N-central Server
There may be circumstances when you want to rebuild or migrate your N-central server. For example:
l your N-central server is not functioning properly or starting successfullyl an upgrade has failed but you can still log in to N-centrall you are migrating an existing N-central server to another computer
The following scenarios describe the best way to rebuild or migrate your N-central server.
Scenario A: The Server is not working properly or starting successfully
1. Verify the version of your N-central server. Technical Support can confirm the version of N-centralthat last communicated with SolarWinds N-able if your server is not working properly or can't berestarted.
2. Locate the last valid backup of your N-central server. Your N-central server software will auto-matically record backups but these will be saved to the same local hard drive as the server soft-ware (which may make retrieval more difficult). You can retrieve a backup from a:
a. Previously downloaded backup file in .TAR or .SHA1 format.
b. Pre-configured N-central that automatically sent backups to an FTP server.
c. Snapshot of your N-central server recorded by a virtualized host (Hyper-V or VMWare).
3. Install the version of N-central that you were previously running. You can re-install N-centralbydownloading the ISO for that build (in an ISO file, not NSP). This image should only be used fornew installations, not to upgrade an existing N-central server.
The following is an example of an ISO file available for download at http://nrc.n-able.com:
File: N-central 9.5 HF2 (9.5.0.574)ISOMD5: 4f0ac4baab9146cb0caeb1b63127cc35Size: 695 MB
4. Restore the backup that you located in Step #2.
5. When the system restore is completed, please contact SolarWinds N-able to have your N-centralserver activated.
Scenario B: An Upgrade has failed but you can still log in
Verify the version of your N-central server. ClickHelp> Version Information to display your N-central current version.
N-central 10.2 Installation and Upgrade Guide

- 26 -
1. Locate the last valid backup of your N-central server. Your N-central server software will auto-matically record backups but these will be saved to the same local hard drive as the server soft-ware itself which may make retrieval more difficult. Some options that may be used to retrieve abackup in this situation are:
a. Download the most recent backup that wasmade prior to the upgrade attempt.
i. Click Administration > System Backup and Restore > Download Backups.
ii. ClickDownload Backup beside the name of the backup file that you would like todownload.
iii. When prompted by the browser, save the backup file to the location you would liketo use for storing backup files.
iv. ClickDownload Digest beside the name of the backup file.
v. When prompted by the browser, save the digest file to the location you would like touse for storing backup files.
b. You had configured N-central to automatically send backups to an FTP server from whichthey can be obtained.
c. You have a snapshot of your N-central server recorded by a virtualized host (Hyper-V orVMWare). If this is the case, the following steps will not apply as you can restore yourserver using the snapshot.
Note: It is strongly recommended that snapshots of the N-central server should not betaken on a short-term schedule as this can affect system performance (and N-centralrecords its own backups)
2. Install the version of N-central that you were previously running.You can quickly re-install N-central to the exact version that you were using previously bydownloading the ISO for that build (in an ISO file, not NSP). This lets you install the ISO and thenrestore your backup. Here is an example of an ISO file available for download from http://nrc.n-able.com:
File:N-central 9.5 HF2 (9.5.0.574) ISO
MD5:4f0ac4baab9146cb0caeb1b63127cc35
Size:695 MB
Note: This image should only be used for new installations of N-central. It is not intended forupgrading an existing N-central server.
3. Restore the backup that you located in Step #2.
N-central 10.2 Installation and Upgrade Guide
- 27 -
4. When the system restore is completed, please contact SolarWinds N-able to have your N-centralserver activated.
Scenario C: Migrating an existing N-central server to another computer
1. Verify the version of your N-central server. ClickHelp> Version Information to display your N-central current version.
2. Locate the last valid backup of your N-central server. Your N-central server software will auto-matically record backups but these will be saved to the same local hard drive as the server soft-ware itself which may make retrieval more difficult. Some options that may be used to retrieve abackup include:
a. Create a new backup in order to minimize data loss.
i. Click Administration > System Backup and Restore > Configure Backups.
ii. Click Save and Run Backup.
Note: Backing up the N-central database will typically take several minutes to anhour.
b. Download the most recent backup.
i. Click Administration > System Backup and Restore > Download Backups.
ii. ClickDownload Backup beside the name of the backup file that you would like todownload.
iii. When prompted by the browser, save the backup file to the location you would liketo use for storing backup files.
iv. ClickDownload Digest beside the name of the backup file.
v. When prompted, save the digest file to the location used for storing backup files.
c. You had configured N-central to automatically send backups to an FTP server from whichthey can be obtained.
d. You have a snapshot of your N-central server recorded by a virtualized host (Hyper-V orVMWare). If this is the case, the following steps will not apply as you can restore yourserver using the snapshot.
Note: It is strongly recommended that snapshots of the N-central server should not betaken on a short-term schedule. This can affect system performance.
3. Install the version of N-central that you were previously running.
N-central 10.2 Installation and Upgrade Guide

- 28 -
For your convenience, you can quickly re-install N-central to the exact version that you wereusing previously by downloading the ISO for that build (in an ISO file, not NSP). This lets youinstall the ISO and then restore your backup. The following is an example of an ISO file availableat http://nrc.n-able.com:
File:N-central 9.5 HF2 (9.5.0.574) ISO
MD5:4f0ac4baab9146cb0caeb1b63127cc35
Size:695 MB
Note: This image should only be used for new installations of N-central. This image is notintended for upgrading an existing N-central server.
4. Restore the backup that you located in Step #2.
5. When the system restore is completed, please contact SolarWinds N-able to activate your N-cent-ral.
N-central 10.2 Installation and Upgrade Guide

- 29 -
Logging in to N-central for the First Time
You can log in to N-central activating N-central for a 30-day trial period.
During the trial period, N-central will not display the RSS feed or theWhat's New list. Both are availableafter activation.
1. From the N-central homepage, log in to https://192.168.1.1.
2. Login using the following credentials:
l Email: [email protected] Password: Password
3. The first time you log in, you will be prompted to submit information for the following fields:
N-central 10.2 Installation and Upgrade Guide
- 30 -
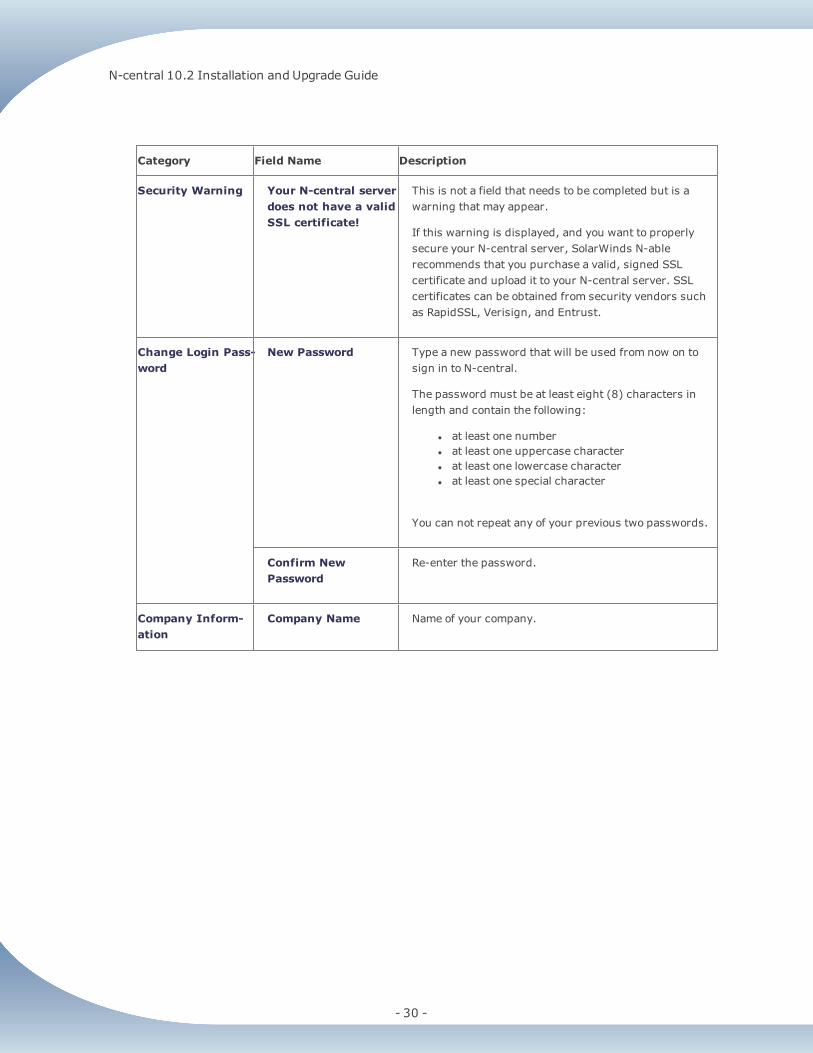
Category Field Name Description
Security Warning Your N-central serverdoes not have a validSSL certificate!
This is not a field that needs to be completed but is awarning that may appear.
If this warning is displayed, and you want to properlysecure your N-central server, SolarWinds N-ablerecommends that you purchase a valid, signed SSLcertificate and upload it to your N-central server. SSLcertificates can be obtained from security vendors suchas RapidSSL, Verisign, and Entrust.
Change Login Pass-word
New Password Type a new password that will be used from now on tosign in to N-central.
The password must be at least eight (8) characters inlength and contain the following:
l at least one numberl at least one uppercase characterl at least one lowercase characterl at least one special character
You can not repeat any of your previous two passwords.
Confirm NewPassword
Re-enter the password.
Company Inform-ation
Company Name Name of your company.
N-central 10.2 Installation and Upgrade Guide

- 31 -
Category Field Name Description
Activation ID The Activation ID number is a code required to use N-central. This should be sent to you in the initial welcomeemail.
If your Activation ID number is unavailable:
1. Log in to the NRC.
2. ClickMy Account.
3. Copy theN-central Activation ID on theMyAccount screen.
Email Information What email addressshould notificationsgo to?
Enter the email address that will receive notifications.
What email addressshould notificationscome from?
Enter the address that will be used as the "sender" foremail notifications.
Mail Relay Server A mail relay server is required to route email todestination addresses for notifications.
The default setting for the mail relay server is the N-central (localhost.localdomain) but you may wish tomodify this to conform to your own firewall and mailserver configurations.
If you modify the mail relay server address, it must be inthe format of a valid IP address or a resolvable fullyqualified domain name (FQDN).
4. Click Save and Continue.
Note: In theGetting StartedWizard, review the instructional videos to learn more beforeproceeding. Until you activate N-central, theGetting StartedWizard is available in thenavigation pane under the Actionsmenu and the Helpmenu. After activation, you canfind it under theHelpmenu.
5. Click Add Customer/Site to start the Customer/Site Wizard.6. Under Company Information, enter the Customer/Site Name.7. Select the License Type to use for the devices in this Customer/Site as either Professional or
Essential.
N-central 10.2 Installation and Upgrade Guide

- 32 -
8. If necessary, provide the default domain or network credentials that Windows Agents andWin-dows Probes will use when running scripts, pushing software, and performing other admin-istrative tasks.
9. IfDefault Credentials are provided, select Show Password to reveal the password as it istyped.
10. Click Save and Continue.11. On the Add Devices page, select the method for adding devices to the Customer/Site. Install a
Windows Probe to Search for Devices is the default and is recommended. ClickMoreOptions to select alternate methods.
12. Perform the selected process for adding devices.
a. Click Finish to launch N-central.
b. In the Introduction page, review the instructional videos as required and clickNextStep.
c. In theDiscovery Options page, configure the network discovery properties to discoverall the devices on your network.
d. In the Service Templates page, configure the templates to manage devices andapplications. ClickNext Step.
e. In theDashboards page, configure how to display the devices in your network. ClickNext Step.
f. In theNotifications page, configure how to notify you about network issues. ClickNextStep.
g. In the Rules page, configure the Rules to group devices together and apply settings tothem.Click Finish.
N-central 10.2 Installation and Upgrade Guide
- 33 -
Activating N-central
Your N-central server includes an initial 30-day activation period. Perform the activation process as soonas possible to take full advantage of your purchased licensing.
During the initial 30-day period, the following limits apply until N-central is activated:
l Branding cannot be customizedl Custom services cannot be uploadedl The server cannot be integrated with Report Manager
Also note the following limits for licenses and configuration settings:
l 500 Essential licensesl 500 Professional licensesl 500 Remote Support Manager agentsl 20 Customers/Sitesl 5 Mobile Devicesl 1 Service Organizationl 50 Probesl 100 Essential Mode Patch Management licensesl 100 Third Party Patch Management licenses
Note: There is no limit on the number of Attended Remote Control licenses available for a server thathas not been activated.
Before activating N-central
Before activating N-central:
l TCP ports 22, 80, 443, and, 10000 must be accessible to the N-central server over the Internet.l Ensure that the server has a publicly-accessible IP address.
Support
Contact SolarWinds N-able to activate your N-central server through the Self Service Portal athttp://www.n-able.com/support or by telephone at 866.302.4689 US/CAN or +00.800.6225.3000(International). After the N-central server is activated you will receive an email with your CompanyID and instructions.
Note: To purchase licenses for N-central features, contact your Channel Sales Specialist. You can findtheir contact information in the N-able Resource Center underMy Account or email [email protected].
N-central 10.2 Installation and Upgrade Guide

© 2016 SolarWinds N-able
All rights reserved. No part of this document may be reproduced by any means nor modified, decompiled, disassembled, publishedor distributed, in whole or in part, or translated to any electronic medium or other means without the written consent of SolarWindsN-able. All right, title, and interest in and to the software and documentation are and shall remain the exclusive property ofSolarWinds N-able and its respective licensors.
SOLARWINDS N-ABLE DISCLAIMS ALL WARRANTIES, CONDITIONS OR OTHER TERMS, EXPRESS OR IMPLIED, STATUTORY OROTHERWISE, ON SOFTWARE AND DOCUMENTATION FURNISHED HEREUNDER INCLUDINGWITHOUT LIMITATION THE WARRANTIESOF DESIGN, MERCHANTABILITY OR FITNESS FOR A PARTICULAR PURPOSE, AND NONINFRINGEMENT. IN NO EVENT SHALLSOLARWINDS N-ABLE, ITS SUPPLIERS, NOR ITS LICENSORS BE LIABLE FOR ANY DAMAGES, WHETHER ARISING IN TORT, CONTRACTOR ANY OTHER LEGAL THEORY EVEN IF SOLARWINDS N-ABLE HAS BEEN ADVISED OF THE POSSIBILITY OF SUCH DAMAGES.
The SOLARWINDS N-ABLE and N-CENTRAL marks are the exclusive property of SOLARWINDS N-ABLE and its affiliates, are registeredwith the U.S. Patent and Trademark Office, and may be registered or pending registration in other countries. All other N-ableTechnologies trademarks, service marks, and logos may be common law marks, registered or pending registration in the UnitedStates or in other countries. All other trademarks mentioned herein are used for identification purposes only and may be or aretrademarks or registered trademarks of their respective companies.
Feedback
SolarWinds N-able (formerly known as N-able Technologies) is a market driven organization that places importance on customer,partner and alliance feedback. All feedback is welcome at the following email address: [email protected].
About SolarWinds N-able
SolarWinds N-able is the global leader in remote monitoring and management software for managed service providers and ITdepartments. SolarWinds N-able’s award-winning N-central platform and complementary toolsets, backed by best-in-class businessand technical services, are proven to reduce IT support costs, improve network performance and increase productivity through theproactive monitoring, management and optimization of IP-enabled devices and IT infrastructure. SolarWinds N-able is 100%channel-friendly and maintains operations in North America, the U.K., the Netherlands and Australia.