national finance center government employee · pdf filenational finance center government...
TRANSCRIPT

National Finance Center
Government Employee Services Division (GESD) Training
Special Payroll Processing System (SPPS) Mainframe and
Document Tracking System External (DOTSE)
Facilitator Guide
Version 1.0
Updated as of August 1, 2016

1
Table of Contents
Table of Contents .......................................................................................................... 1
1.0. Course Information ............................................................................................ 4
1.1. Purpose ................................................................................................... 4
1.2. Course Objectives .................................................................................. 4
1.3. Agenda .................................................................................................... 4
1.4. Ground Rules and Expectations ........................................................... 5
1.5. Course Materials and Resources .......................................................... 6
2.0. SPPS Mainframe Overview ................................................................................ 7
2.1. Chapter Overview ................................................................................... 7
2.2. Introduction to SPPS Mainframe ........................................................... 8
2.3. Chapter Review .................................................................................... 10
3.0. SPPS Mainframe Navigation ............................................................................ 11
3.1. Chapter Overview ................................................................................. 11
3.2. Accessing SPPS Mainframe ................................................................ 12
3.3. General Navigation ............................................................................... 16
3.4. Chapter Review .................................................................................... 19
4.0. Processing Quick Service Requests .............................................................. 20
4.1. Chapter Overview ................................................................................. 20
4.2. Introduction to Quick Service Requests ............................................ 21
4.3. Processing Advance Pay Quick Service Requests ........................... 23
4.4. Chapter Review .................................................................................... 33
5.0. Processing Indebtedness for Separated Employees .................................... 34
5.1. Chapter Overview ................................................................................. 34
5.2. Introduction to Indebtedness for Separated Employees .................. 35
5.3. Processing Indebtedness for Separated Employees ........................ 38
5.4. Chapter Review .................................................................................... 62
6.0. Processing Death Cases .................................................................................. 63

2
6.1. Chapter Overview ................................................................................. 63
6.2. Introduction to Death Cases ................................................................ 64
6.3. Processing Death Cases ..................................................................... 66
6.4. Chapter Review .................................................................................... 96
7.0. DOTSE Overview .............................................................................................. 97
7.1. Chapter Overview ................................................................................. 97
7.2. Introduction to DOTSE Mainframe ...................................................... 98
7.3. Chapter Review .................................................................................. 101
8.0. DOTSE Navigation .......................................................................................... 102
8.1. Chapter Overview ............................................................................... 102
8.2. Accessing DOTSE .............................................................................. 103
8.3. General Navigation ............................................................................. 106
8.4. Chapter Review .................................................................................. 109
9.0. Recertifying Paper Checks and Direct Deposit Payments .......................... 110
9.1. Chapter Overview ............................................................................... 110
9.2. Recertifying a Paper Check ............................................................... 111
9.3. Recertifying a Direct Deposit/Electronic Funds Transfer Payment 124
9.4. Chapter Review .................................................................................. 137
10.0. Course Summary ......................................................................................... 138
10.1. SPPS Mainframe and DOTSE Knowledge check ............................. 138
10.2. Things to Remember .......................................................................... 139
10.3. Training Review .................................................................................. 140
10.4. Additional Resources ........................................................................ 140
11.0. Appendices ................................................................................................... 141
11.1. Appendix A: Course Glossary .......................................................... 141
11.2. Appendix B: Course Acronyms ....................................................... 143
11.3. Appendix C: PINQ Program PQ032 .................................................. 145
11.4. Appendix D: Processing a Delayed QSR ........................................ 146
11.5. Appendix E: Additional Notes on Quick Service Requests ........... 149

3
11.6. Appendix F: SPPS Mainframe Indebtedness Processing Tips ...... 150
11.7. Appendix G: Entries for RELATIONSHIP TO DECEASED Field .... 151
11.8. Appendix H: SPPS Mainframe Death Case Processing Tips ......... 152
4
1.0. Course Information
1.1. Purpose
This course focuses on the main functions of Special Payroll Processing System
(SPPS) Mainframe and Document Tracking System External (DOTSE) Mainframe. The
course provides detailed instructions for processing NFC special payments in both
systems.
1.2. Course Objectives
By the end of this course, you will be able to:
Provide colleagues with an overview of SPPS Mainframe and DOTSE
Describe how to process an Advance Pay Quick Service Request (QSR) in
SPPS Mainframe
Describe how to process an indebted case for a separating employee in SPPS
Mainframe
Describe how to process a death case in SPPS Mainframe
Describe how to recertify a paper check and a direct deposit/electronic funds
transfer (DD/EFT) payment
1.3. Agenda
This course includes the following chapters:
Chapter Duration
Welcome 15 Minutes
Course Information 15 Minutes
SPPS Mainframe Overview 15 Minutes
SPPS Mainframe Navigation 15 Minutes
Processing Quick Service Request 35 Minutes
Processing Indebtedness for Separated
Employees 35 Minutes
Processing Death Cases 35 Minutes
Comment [NFC1]: Slide 2
Welcome students to the course and provide a brief introduction of yourself. Make sure to verify all student registration and enrollment in the course.
Comment [NFC2]:
Show Slide 3: Agenda.

5
Chapter Duration
Document Tracking System External
Overview 15 Minutes
Document Tracking System External
Navigation 15 Minutes
Recertifying Direct Deposit and Paper
Checks 30 Minutes
Generating Reports 10 Minutes
Course Summary 20 Minutes
1.4. Ground Rules and Expectations
Please follow these ground rules throughout the training:
Sign the attendance sheet
Feel free to ask questions
Be respectful of other participants
Keep us on schedule with timely returns from breaks
Share your knowledge, experience, and ideas
Use the “Parking Lot” to revisit discussion topics
Give helpful feedback
Turn off your cell phones and refrain from checking email
Comment [NFC3]:
Show Slide 4: Ground Rules and Expectations.
Comment [NFC4]:
Share with participants the location of restrooms and break locations. Instruct students that there is one 15 minute break following Chapter 5.
Comment [NFC5]:
Show Slide 5: Introductions.
Ask the question, What are you hoping to get out of this training?

6
1.5. Course Materials and Resources
You are provided with the following course materials to support your learning:
Special Payroll Processing System (SPPS) Mainframe and Document Tracking
System External (DOTSE) Participant Guide
As you move through this participant guide, be sure to take note of the following icons.
Icon Meaning or Use
CAUTION: Advises users that failure to take or avoid a specified action
could result in loss of data.
IMPORTANT: Provides information essential to the completion of a task.
Users can disregard information in a note and still complete a task, but you
should not disregard an important note.
NOTE: Emphasizes or supplements important parts of the main text. A note
supplies information that may apply only in special cases.
TIP: Helps users apply the techniques and procedures described in the text
to their specific needs. A tip suggests alternative methods that may not be
obvious and helps users understand the benefits and capabilities of the
product.
Comment [NFC6]:
Transition from introduction information to Slide 6: NFC Overview.
Show Slide 7: About NFC.
7
2.0. SPPS Mainframe Overview
2.1. Chapter Overview
This chapter provides an introduction to the main functions and features of SPPS
Mainframe.
Chapter Objectives
By the end of this chapter, you will be able to:
Summarize the National Finance Center’s (NFC) payroll processing functions
Describe the main functions of SPPS Mainframe
Comment [NFC7]:
Show Slide 8: SPPS Mainframe Overview Chapter Overview.
Comment [NFC8]:
Ask the following questions:
1.How familiar are you with SPPS Mainframe?
2.How long have you been processing in SPPS Mainframe?

8
2.2. Introduction to SPPS Mainframe
Lesson Overview
This chapter introduces users to the main functions and features of SPPS Mainframe.
Lesson Objectives
By the end of this lesson, you will be able to:
Explain how SPPS Mainframe is related to the payroll process
Identify the three main functions of SPPS Mainframe
The NFC Payroll/Personnel System (PPS) is a full-service integrated payroll/personnel
system offering the full range of personnel and payroll processing. PPS enables the
processing of:
Standard Form (SF) 52 (Request for Personnel Action),
Awards,
Allotments,
Performance appraisals,
Health and life insurance,
Thrift Savings Plan (TSP),
Tax documents,
Severance pay,
Leave records, and
Payroll-related financial reporting operations.
PPS processes the above personnel and payroll information for the entire United States
Department of Agriculture (USDA) and numerous other Federal and non-Federal
Departments on a biweekly basis. PPS maintains NFC customers’ employee data
beginning with the hiring of the employee through separation/retirement.
The Special Payroll Processing System (SPPS) Mainframe is an online database
payment system, which can be accessed through the NFC Mainframe.
Comment [n9]: Slide 09
Comment [NFC10]:
Show Slide 10: Payroll Processing Overview.

9
SPPS Mainframe is responsible for:
1. Adding, changing, and querying Quick Service Requests (QSR)
2. Recording indebtedness for separated employees
3. Processing and disbursing payments to the estate of a deceased employee
NOTE: SPPS Mainframe payments are disbursed on the manual pay
schedule, which runs Monday – Friday, excluding holidays, at 11:00 AM
Central Time (CST).

10
2.3. Chapter Review
Knowledge Check
1. True or False: PPS maintains the employee data of NFC’s customer from hire
to separation/death.
___________
2. SPPS Mainframe is responsible for:
Chapter Summary
Having completed this chapter, you are now able to:
Summarize the National Finance Center’s (NFC) payroll processing functions
Describe the main functions of SPPS Mainframe
Comment [NFC11]:
Show Slides 11:
Knowledge Check
Chapter Review
Ask students to record their answers to the Knowledge Checks individually.
Comment [NFC12]:
Ask a volunteer to answer the first Knowledge Check. Explain that the correct answer is True.
Comment [NFC13]:
Ask a volunteer to answer the second Knowledge Check. Explain that the correct answers are: processing QSRs, final payment for a separating employee, and distributing monies to beneficiaries of a deceased employee.
Comment [NFC14]: Slide 12
Review previous chapter, and begin to transition to SPPS Mainframe Navigation chapter.

11
3.0. SPPS Mainframe Navigation
3.1. Chapter Overview
This chapter introduces the procedures for accessing and navigating in SPPS
Mainframe.
Chapter Objectives
By the end of this chapter, you will be able to:
Sign into SPPS Mainframe
Navigate between the SPPS MAIN MENU SCREEN and the menu options
Comment [NFC15]:
Show Slide 13-14: SPPS Mainframe Navigation Chapter Overview.

12
3.2. Accessing SPPS Mainframe
Lesson Overview
This lesson provides the procedures for accessing SPPS Mainframe. Additionally, it
covers the relevant security and access roles for SPPS Mainframe.
Lesson Objectives
By the end of this lesson, you will be able to:
Identify all of the security and access roles for SPPS Mainframe
Access the NFC mainframe
Access SPPS Mainframe through the Agency specific database within the
mainframe
SPPS Mainframe Security
SPPS Mainframe access security is designed to prevent unauthorized use of systems
and databases. To access SPPS Mainframe you must have sign on credentials and
access to the NFC Mainframe.
You must request access to SPPS Mainframe through your Agency’s Security Office
(ASO). In the request, you should provide the following data:
User name
User social security number (SSN)
User ID
Agency name
User access request level
o Retrieval only for all records
o Update access for Quick Service Requests
o Update access for death case records
o Update access for Indebtedness
Telephone number
Application name
User Security Access Code
Comment [n16]: Slide 15
Comment [n17]: Slide 16

13
Once you are granted system access, you can enter the SPPS application via the NFC
Mainframe. In the procedure below, you learn how to access SPPS Mainframe.
Step Action
1. On your computer’s desktop, open your Agencies’ network connection. The
U.S. Government Computer Warning screen displays.
Figure 1: U.S. Government Computer Warning Screen
Step Action
2. Press Enter. The NFC Banner screen displays.
NOTE: In the event that NFC needs to communicate special system
function messages, the Electronic Access Bulletin Board displays. In
this case, press Enter and the NFC Banner displays.
Comment [n18]: Slide 17

14
Figure 2: NFC Banner Screen
Step Action
3. Enter your User ID in the ENTER USER ID field.
4. Enter your password in the PASSWORD field.
5. Enter “SPPS” in the ENTER APPLICATION NAME field.
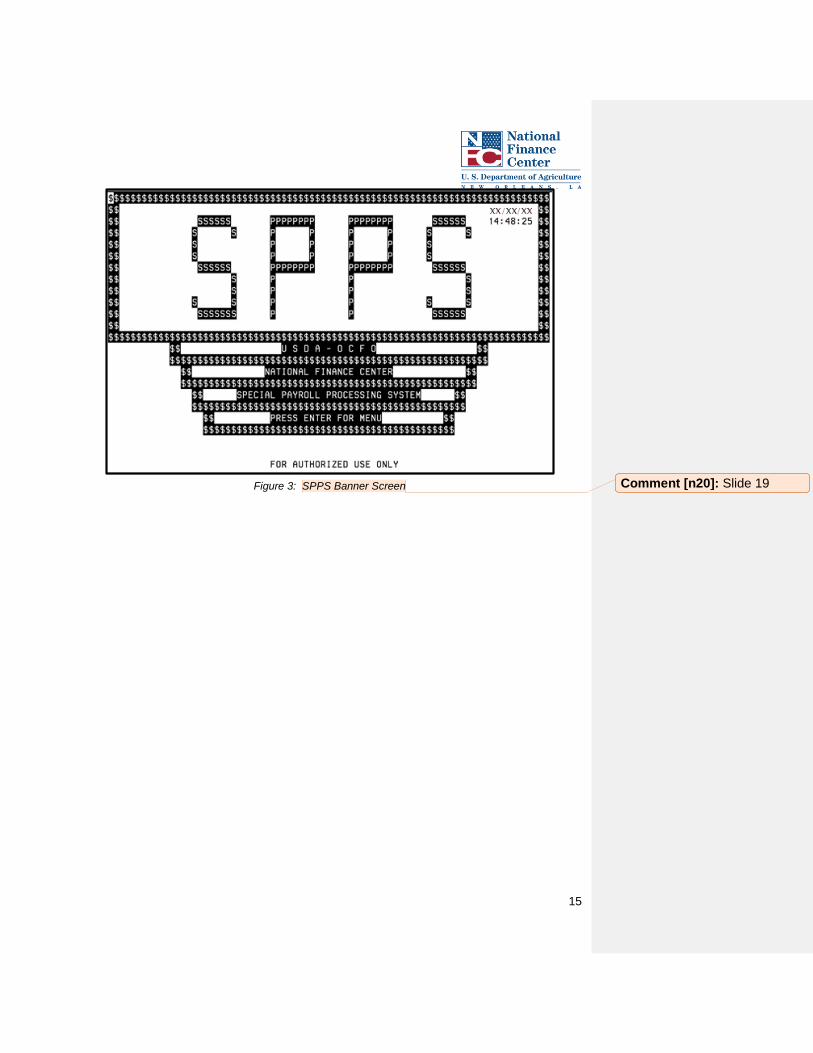
6. Press Enter. The SPPS Banner screen displays.
Comment [n19]: Slide 18
15
Figure 3: SPPS Banner Screen Comment [n20]: Slide 19

16
3.3. General Navigation
Lesson Overview
This lesson introduces the basic navigation features of SPPS Mainframe, including main
menu options and the system function keys.
Lesson Objectives
By the end of this lesson, you will be able to:
Navigate within SPPS Mainframe
Use SPPS Mainframe function keys
SPPS Mainframe is a menu-drive system. It consists of one main menu with three
options:
1. QUICK SERVICE REQUEST (QSR)
2. INDEBTEDNESS (FOR SEPARATIONS ONLY)
3. DEATH CASE
These options are described in greater detail in Chapters 4-6.
After you have accessed SPPS Mainframe, the SPPS MAIN MENU SCREEN displays
showing the three menu options.
Comment [n21]: Slide 20
Comment [n22]: Slide 21

17
Figure 4: SPPS MAIN MENU SCREEN
In the procedure below, you learn how to access the SPPS MAIN MENU SCREEN
options.
Step Action
1. Enter the option number in the SELECT (1-3) field.
2. Press Enter. The menu for the option selected displays.
Function Keys
Function keys are assigned functions relevant to the program operated. These function
keys are typically listed on a separate pad or across the top of the keyboard. Assigned
F key functions used in SPPS Mainframe are displayed on each screen.
NOTE: If you are using a laptop, the keys may be configured differently.
Comment [n23]: Slide 22

18
Key Description
F1 Press to return to the SPPS MAIN MENU SCREEN.
F5 Press to display additional help.
Clear Press to exit the system.
Enter Press to enter data into the system.
Tab Press to move the cursor from field to field.
NOTE: Additional functions keys may display, depending on the screen.

19
3.4. Chapter Review
Knowledge Check
1. What three fields are required on the NFC Banner screen to access SPPS
Mainframe?
1. _________________________________________________________
2. _________________________________________________________
3. _________________________________________________________
2. Fill in the blanks: What are three of the function keys?
3.
F1 – Return to the SPPS ___________
F5 – Used to display additional _______
Enter – Used to enter data into the _______
Chapter Summary
Having completed this chapter, you are now able to:
Sign into SPPS Mainframe
Navigate between the SPPS MAIN MENU SCREEN and the menu options
Comment [NFC24]:
Show Slide 23:
Knowledge Check
Chapter Review
Ask students to record their answers to the Knowledge Checks individually.
Comment [NFC25]:
Ask a volunteer to answer the first Knowledge Check. Explain that the correct answers are: USER ID, PASSWORD, and APPLICATION NAME.
Comment [NFC26]:
Ask a volunteer to answer the second Knowledge Check. Explain that the correct answers are: MAIN MENU SCREEN, information, and system.
Comment [NFC27]: Slide 24
Review previous chapter and transition to Processing Quick Service Requests chapter.

20
4.0. Processing Quick Service Requests
4.1. Chapter Overview
This chapter provides users with an introduction to processing Quick Service Requests
(QSR).
Chapter Objectives
By the end of this chapter, you will be able to:
Describe how the two formats of QSRs are organized
Explain the purpose of each QSR format
Describe the how to process an Advance Pay QSR in SPPS Mainframe
Explain how to process a Delayed (14-Liner) QSR
Comment [NFC28]:
Show Slide 25-26: Processing Quick Service Requests Chapter Overview.

21
4.2. Introduction to Quick Service Requests
Lesson Overview
This lesson introduces users to the two QSR formats and their uses. Additionally, this
lesson explains the purpose of each field on the QSR screens.
Lesson Objectives
By the end of this lesson, you will be able to:
Identify the two formats of QSRs
Explain the reasons for processing QSRs
QSRs provide salary payments when an employee is not paid through the automated
Payroll/Personnel System or the manual payment process. This can occur as a result
of:
A late personnel action or a late accession,
No check mailing address,
An Agency in the middle of performing cancellation and correction actions to
correct erroneous data in Personnel Action Processing System (PACT), or
A late Time and Attendance (T&A) Report.
Agency personnel offices initiate QSRs if it is determined that an employee has not
been paid. An Agency can determine if an employee has not been paid by conducting
inquiries in one of three systems:
Information/Research Inquiry System (IRIS)1
Payroll/Personnel Inquiry System (PINQ)2
DOTSE
1 IRIS is an online inquiry system that uses employee social security numbers to view employee data
contained in the Payroll/Personnel System database. 2 PINQ is an inquiry system used to research payroll-related inquiries received from employee data on the
Payroll/Personnel System database.
Comment [NFC29]: Slide 28
Explain that participants should submit a T&A for the pay period the QSR is being processed for, along with the T&A for the current pay period to assure that the receipt is deducted from the appropriate pay period. QSRs should be submitted in a timely fashion to ensure that the employee is paid as soon as possible.

22
There are two QSR formats. The first is an Advance Pay QSR, which is processed
within SPPS Mainframe, and the second is a Delayed QSR. To process a Delayed
QSR, an Agency must fax a completed Delayed QSR to NFC. If the Delayed QSR is
related to a leave payment, the Agency must also update the Time Inquiry Update
system (TINQ).
NOTE: For more information and procedures on processing a Delayed
QSR refer to Appendix D: Processing a Delayed QSR.
An Advance Pay QSR is used for the majority of QSR requests. There are three
situations when a Delayed QSR is required:
1. If an employee is separated
2. When an intervening pay period has been processed (Pay period prior to last
pay period in which the employee was paid through the Payroll Computation
System), this can be verified on PINQ Screen PQ0323
3. If an employee is transferring from one Agency to another Agency on the same
database and the employee is still active with the previous Agency
The Advance Pay QSR is for processing QSRs for the current pay period and the three
prior pay periods. Only one QSR record can be processed for a single pay period. You
should enter QSR data based on criteria established by the Agency personnel office.
IMPORTANT: A T&A must be transmitted for each employee and for each
pay period that an Advance Pay QSR is processed.
However, Agencies should not transmit a T&A for a Delayed QSR to avoid
the processing of a duplicate payment.
QSR records are maintained for the current pay period and previous 26 pay periods in SPPS Mainframe,
which is accessed through the History Inquiry function. QSR information that is no longer displayed in
SPPS Mainframe can be viewed in DOTSE. To receive information on data not in DOTSE, submit an email
request through Requester console [email protected]
3 Refer to Appendix C: PINQ Program PQ032 for a sample of PQ032.
Comment [n30]: Slide 29

23
4.3. Processing Advance Pay Quick Service Requests
Lesson Overview
This lesson describes the procedures and information required to process an Advance
Pay Quick Service Requests and provide examples.
Lesson Objectives
By the end of this lesson, you will be able to:
Describe the process for adding an Advance Pay QSR record in SPPS
Mainframe
Explain the process for viewing an existing QSR record in SPPS Mainframe
Explain the process for completing an Advance Pay Quick Service Request
Before submitting a QSR, the Agency personnel office must validate in IRIS or PINQ
that the payment has not been made.4 For a payment made manually the Agency
personnel office must validate in SPPS Web if the employee was paid through that
system. The employee’s payment information displays in IRIS and PINQ as early as the
Monday prior to the Thursday payday for payments being made through the Payroll
Processing System (PAYE).
Monday Tuesday Wednesday Thursday Friday
Payment information visible in IRIS and PINQ
Payday
Figure 5: Payment Schedule
Now that we have discussed the purpose of the QSR function in SPPS Mainframe and
how to verify if a QSR is required, the procedure below explains how to add a new QSR
in SPPS Mainframe.
4 More information on IRIS and PINQ can be found in the systems’ procedure manuals.
Comment [n31]: Slide 30
Comment [n32]: Slide 31
Comment [NFC33]:
Show Slide 32: SPPS MAIN MENU SCREEN.

24
Figure 6: SPPS MAIN MENU SCREEN
Step Action
1. From the SPPS MAIN MENU SCREEN, enter “1” in the SELECT (1-3) field.
The QSR MENU SCREEN displays.
2. Press Enter.
Comment [NFC34]:
Show Slide 33: QSR MENU SCREEN.

25
Figure 7: QSR MENU SCREEN
Step Action
3. Enter “1” in the SELECT OPTION (1-3) field.
4. Press Enter. The NEW REQUEST screen displays.
Comment [NFC35]:
NEW REQUEST screen.

26
Figure 8: NEW REQUEST Screen
Step Action
5. Enter the employee’s social security number in the SSNO field.
6. Enter the employee’s Agency Code in the AGCY field.
7. Enter the employee’s Personnel Office Identifier (POI) in the POI field.
8. Enter the pay period that the QSR covers in the PAY PERIOD NO field.
9. Enter the year that the QSR covers in the PAY PERIOD YR field.
10. Press Enter.
TIP: If the employee is currently in the database, you do not need to
populate the name fields.
11. Enter the employee’s last name in the LAST field.
12. Enter the employee’s first name in the FIRST field.
13. Enter the employee’s middle name in the MIDDLE field.
Comment [n36]: Slide 34

27
Step Action
14. Enter the “A” (Add) in the FUNCTION CODE field to add the QSR.
TIP: Enter “A” if you are adding a new QSR record, “C” to change a
record, or “D” to delete an erroneous record.
15. Press Enter. The message REVALIDATE SOCIAL SECURITY displays.
16. Enter the employee’s social security in the SSNO field for verification.
17. Press Enter. The PAY CONTACT/INFORMATION screen for a new request
displays.
Figure 9: PAY/CONTACT INFORMATION Screen
Comment [NFC37]:
Show Slide 35: PAY/CONTACT INFORMATION screen.

28
Step Action
18. Enter the payment reason code in the PAYMENT REASON CODE field.
TIP: Press F5 to display the available reason codes.
19. Enter the net pay amount (optional) in the NET PAY AMOUNT field.
TIP: The maximum net pay amount is $5,000.00 and the minimum
amount is $5.00.
If you leave this field blank, SPPS Mainframe calculates 70% of 80
hours of the employee’s base salary listed in the payroll database. If
the employee is not listed in the payroll database, enter the value of
70% of 80 hours of the employee’s base salary rounded to the
nearest $25.00 increment.
IMPORTANT: SPPS Mainframe can disburse more than 70% of 80 hours
base salary by overriding the system (such as for overtime). To override the
system, calculate 70% of the employee’s gross salary and enter the net pay
amount rounded to the nearest $25.00 increment. Complete the BASE
SALARY field with a base salary that is great enough to cover the net pay
amount. Then enter “Y” in the BASE SALARY OVERRIDE field.
You can also pay less than 80 hours if the employee didn’t work 80 hours.
(i.e. 40 hours x hourly rate x 70% = Net rounded to the nearest $25.00
increment)
20. Enter in the employee’s Federal grade in the GRADE field or the employee’s
base salary in the BASE SALARY field.
21. Enter in the employee’s Federal step in the STEP field. This step is
unnecessary if a base salary is provided.
IMPORTANT: Either the Federal grade and step, or the base salary
must be entered. If the pay plan does not relate to the GS schedule
or equivalent pay schedule, the requestor must calculate the
employee’s annual base salary.
NOTE: The AGENCY, STATE, CITY, UNIT, and TIMEKEEPER fields may
be system generated. If not, enter the appropriate information in each field.
22. Enter the T&A contact point’s Agency in the AGENCY field.

29
Step Action
23. Enter the T&A contact point’s state in the STATE field.
24. Enter the T&A contact point’s city in the CITY field.
25. Enter the T&A contact point’s unit code in the UNIT field.
26. Enter the T&A contact point’s timekeeper code in the TIMEKEEPER field.
27. Enter the QSR contact person’s last name in the LAST field.
28. Enter the QSR contact person’s first name in the FIRST field.
NOTE: The contact person is designated in the Table Management (TMGT)
Table 063,5 (Department/Agency/Bureau Contact) Contact Type 04 – Quick
Service Request, as the principal contact authorized to process QSRs.
29. Enter the QSR contact person’s area code in the AREA CODE field.
30. Enter the QSR contact person’s phone number in the NUMBER field.
31. Enter “Y” (Yes) in the PAYROLL/PERSONNEL database CHECK
ADDRESS field or SPECIFIED ADDRESS field.
NOTE: If “Y” is entered in the PAYROLL PERSONNEL DATA
BASE CHECK ADDRESS field, the specified address fields on the
CHECK MAILING INFORMATION screen auto-populate. If “Y” is
entered for the SPECIFIED ADDRESS field, complete the specified
address fields on the CHECK MAILING INFORMATION screen.
If an employee’s social security number is not on the
Payroll/Personnel database, the PAYROLL/PERSONNEL DATA
BASE CHECK ADDRESS field is unavailable, and a “Y” (Yes) is
system generated in the SPECIFIED ADDRESS field.
32. Press Enter. The CHECK MAILING INFORMATION screen displays.
5 Table Management (TMGT) Table 063, Contacts.
Comment [NFC38]:
Show Slide 36: CHECK MAILING INFORMATION screen.

30
Figure 10: CHECK MAILING INFORMATION Screen
Step Action
33. Enter the employee’s street address in the STREET ADDRESS field.
34. Enter the employee’s city in the CITY field.
35. Enter the employee’s state in the STATE field.
36. Enter the employee’s zip code in the ZIP CODE field.
TIP: You can either send the payment to a mailing address, a designated
agent, or a bank account number.
The bank deposit fields cannot be changed unless NFC is contacted.
37. Press Enter. The record is stored in the system.

31
History Inquiry
After you have added a QSR record to SPPS Mainframe, you can use Option 2, History
Inquiry, on the QSR MENU SCREEN to review the status of the QSR. Records for the
current pay period and previous 26 prior pay periods are maintained in the SPPS
Mainframe database for viewing.
In the procedure below, you learn how to view an existing QSR record in SPPS
Mainframe.
Figure 11: QSR MENU SCREEN
Step Action
1. From the QSR MENU SCREEN, enter “2” in the SELECT OPTION (1-3) field.
2. Press Enter. The HISTORY INQUIRY SCREEN 1 OF 3 displays.
3. Enter the employee’s social security number in the SSNO field.
4. Enter the pay period that the QSR covers in the PAY PERIOD NO field.
5. Enter the year that the QSR covers in the PAY PERIOD YR field.
Comment [n39]: Slide 37

32
Step Action
6. Press Enter. The HISTORY INQUIRY SCREEN 2 OF 3 displays.
NOTE: The HISTORY INQUIRY SCREEN 2 OF 3 is a view only
screen that displays the payment information for the QSR.
7. Press Enter. The HISTORY INQUIRY SCREEN 3 OF 3 displays.
NOTE: The HISTORY INQUIRY SCREEN 3 OF 3 is a view only
screen that displays the forwarding location of the employee’s salary
payment.

33
4.4. Chapter Review
Knowledge Check
1. Fill in the blanks: Advance Pay QSRs are for processing QSRs for the _____
pay period and the ______ prior pay periods. Only ______ QSR record can be
processed for a single pay period. What are two reasons for processing a QSR?
2. True or False: The following are reasons for processing an Advance Pay QSR:
If an employee is separated
When an intervening pay period has been processed (Pay period prior to last
pay period in which the employee was paid through the Payroll Computation
System), this can be verified on PQ0326
If an employee is transferring from one Agency to another Agency on the
same database and the employee is still active with the previous Agency
__________
Chapter Summary
Having completed this chapter, you are now able to:
Describe how the two formats of QSRs are organized
Explain the purpose of each QSR format
Describe the how to process an Advance Pay QSR in SPPS Mainframe
Explain how to process a Delayed (14-Liner) QSR
6 Refer to Appendix C: PINQ Program PQ032 for a sample of PQ032.
Comment [NFC40]:
Show Slide 38:
Knowledge Check
Chapter Review
Ask students to record their answers to the Knowledge Checks individually.
Comment [NFC41]:
Ask a volunteer to answer the first Knowledge Check. Explain that the correct answers are: current, three, and one. Answer: Slide 39
Comment [NFC42]:
Ask a volunteer to answer the second Knowledge Check. Explain that the correct answer is True.
Comment [NFC43]: Slide 40 Review previous chapter and transition to Processing Indebtedness for Separated Employees chapter.

34
5.0. Processing Indebtedness for Separated Employees
5.1. Chapter Overview
This chapter introduces the process for recording indebtedness for separated
employees. It describes the information necessary to record indebtedness, collect the
indebted amount, and process a final payment due to the employee.
Chapter Objectives
By the end of this chapter, you will be able to:
Summarize the reasons for processing indebtedness for a separate employee
Explain each function on the INDEBTEDNESS MENU
Explain how to process indebtedness for a separated employee
Comment [NFC44]:
Show Slide 41-42: Processing Indebtedness for Separated Employees Chapter Overview.

35
5.2. Introduction to Indebtedness for Separated Employees
Lesson Overview
This lesson describes the process for issuing a final payment for an employee that is
separating. Additionally, this lesson explains the type of receipt accounts that can be
included and how final debts can be collected from a separating employee.
Lesson Objectives
By the end of this lesson, you will be able to:
Describe the role of the Indebtedness for Separated Employees function in SPPS
Mainframe
Explain the reasons for processing Indebtedness for Separated Employees
Identify the types of receipt accounts that may be entered in SPPS Mainframe for
indebted employees separating from their Agency
Indebtedness (for separations only) is Option 2 on the SPPS MAIN MENU SCREEN.
This option in SPPS Mainframe is used to send a final payment for a separated
employee, after factoring in outstanding debts an employee owes and tax credits. This
process can only be completed one time for a separating employee. If the employee’s
debts outweigh a final payment, a bill is generated through Administrative Billings and
Collections System (ABCO).
The indebtedness option in SPPS Mainframe is used to:
Establish an indebtedness record for a separated employee;
Record debts not established in ABCO for a separated employee;
View existing debts for the separated employee; and
Process the final payment due the employee.
IMPORTANT: If all of an employee’s debts have been recorded in ABCO or
PAYE, a record does not need to be established in SPPS Mainframe.
Collection and payment is made through PPS.
Comment [n45]: Slide 43

36
The following receipt account types, which indicate the computation and tax treatment
of a collection, may be entered in SPPS Mainframe:
Educational Loans
Travel Advance Repayment (Originating in other than NFC’s Travel (TRVL)
System)
Lost, Destroyed or Stolen Property
Subsistence (Travel Payments)
Personal Telephone Calls
Parking Fees
Recovery of Jury Duty Fees
Travel Overpayment
Uniforms
Other Types (Other Departments) e.g., theft and embezzlement
Other Types (USDA)
If an indebted employee separates from an Agency before repaying a debt that is
already established in ABCO, the balance of the debt is automatically collected from
any subsequent payments due the employee. These must be processed through the
Payroll/Personnel Automated System and should not be sent to NFC for manual
processing.
NFC automatically collects these debts from the:
Final salary;
Cash award;
Lump sum leave payments; or
Any other payments processed by NFC.
Comment [n46]: Slide 44
37
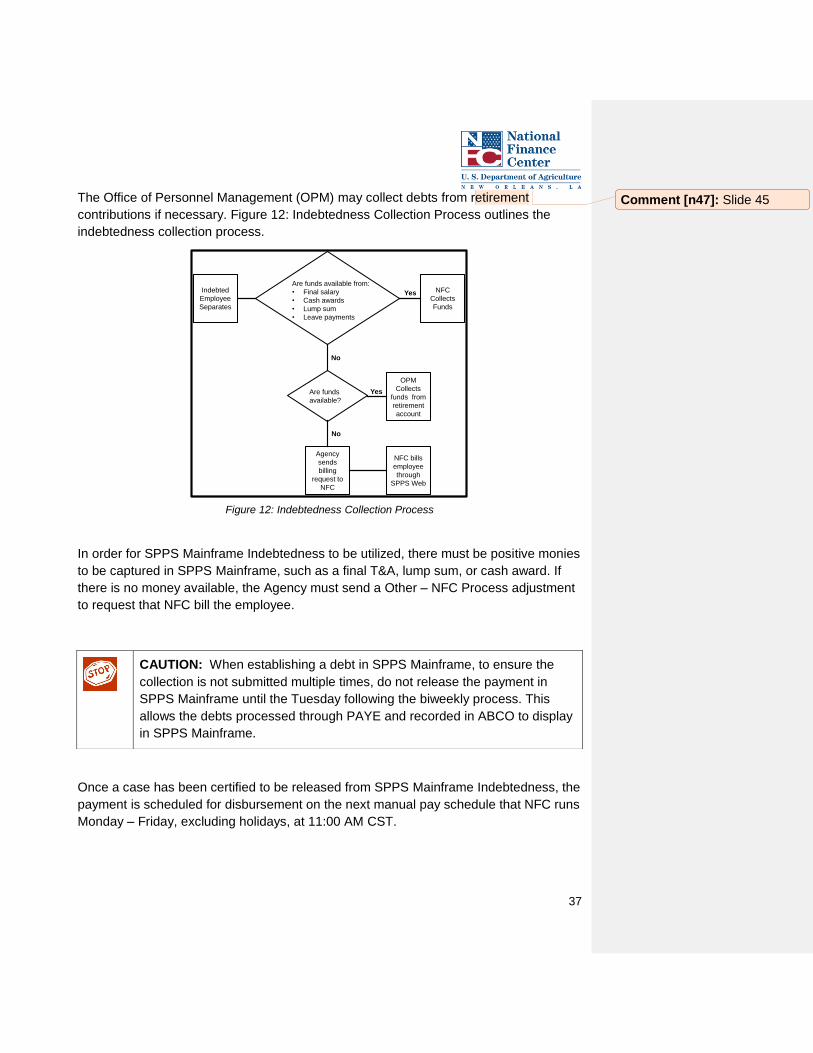
The Office of Personnel Management (OPM) may collect debts from retirement
contributions if necessary. Figure 12: Indebtedness Collection Process outlines the
indebtedness collection process.
Figure 12: Indebtedness Collection Process
In order for SPPS Mainframe Indebtedness to be utilized, there must be positive monies
to be captured in SPPS Mainframe, such as a final T&A, lump sum, or cash award. If
there is no money available, the Agency must send a Other – NFC Process adjustment
to request that NFC bill the employee.
Once a case has been certified to be released from SPPS Mainframe Indebtedness, the
payment is scheduled for disbursement on the next manual pay schedule that NFC runs
Monday – Friday, excluding holidays, at 11:00 AM CST.
CAUTION: When establishing a debt in SPPS Mainframe, to ensure the
collection is not submitted multiple times, do not release the payment in
SPPS Mainframe until the Tuesday following the biweekly process. This
allows the debts processed through PAYE and recorded in ABCO to display
in SPPS Mainframe.
Indebted
Employee
Separates
Are funds available from:
• Final salary
• Cash awards
• Lump sum
• Leave payments
Yes
No
NFC
Collects
Funds
Are funds
available?
OPM
Collects
funds from
retirement
account
Yes
No
Agency
sends
billing
request to
NFC
NFC bills
employee
through
SPPS Web
Comment [n47]: Slide 45

38
5.3. Processing Indebtedness for Separated Employees
Lesson Overview
This lesson introduces the procedures and information required for processing a final
payment for a separating employee, after all employee debts have been taken into
consideration.
Lesson Objectives
By the end of this lesson, you will be able to:
Describe how to establish an indebted case for a separated employee
Describe how to add administrative debts not already recorded in ABCO and
SPPS Mainframe
Describe how to query information on debts recorded in ABCO and SPPS
Mainframe
Describe how to collect payment for advanced leave not paid back at the date of
separation
Describe how to review a preliminary calculation of the amount owed to a
separated employee
Describe how to add pertinent remarks to a indebted case
Describe how to process the final payment for a separated employee
Figure 13: SPPS Mainframe Indebtedness Process outlines the five steps for
processing indebtedness for a separated employee. These steps are further described
in the bullets below.
Figure 13: SPPS Mainframe Indebtedness Process
Establish Record
Add Debts Submit
Request for Tax Credits
Add Remarks
Certify Payment
Comment [n48]: Slide 46
Comment [n49]: Slide 47

39
1. Establish the employee record in SPPS Mainframe Indebtedness before PAYE
runs for their final T&A.
NOTE: You should transmit T&A, lump sum, and cash award payments as
normal.
The message MONIES WITHHELD DUE TO EMPLOYEE INDEBTEDNESS
OF EMPLOYEE CONTACT PERSONNEL OFFICE displays on PQ032. The
net amount is maintained in SPPS Mainframe.
Refer to the Contact Center page at: https://www.nfc.usda.gov/Contact_Us/
Help_Desks/CHD/CHD_home.html, for whom to contact for the indebted
employee.
2. Add all debts, including advanced leave, that has not either been recorded in
ABCO or already exists in SPPS Mainframe.
3. Submit an Other – NFC Process adjustment through SPPS Web, for NFC to
calculate tax credits, if the indebtedness is for a negative leave balance.
NOTE: Tax credits are given for Federal, state, social security, Medicare,
and retirement taxes.
4. Add any additional remarks to the record. This is an optional step.
5. Certify the payment after all monies have been captured in SPPS Mainframe, all
debts have been recorded, and if applicable, tax credits have been calculated.
TIP: If the Agency determines no indebtedness exists after PAYE has run,
the funds can be released to the employee with no collection.
Comment [NFC50]:
Explain that participants can check CULPRPT Report P0162 to see if an employee is due a tax credit.

40
The below figure outlines what processes take place in SPPS Mainframe, SPPS Web,
and ABCO.
Figure 14: Outline of System Functionality
If an indebted, separated employee is normally paid manually, the Agency must
establish an indebtedness record in SPPS Mainframe by completing the
ESTABLISH/DELETE INDEBTEDNESS screen for the employee’s final payment to be
processed in SPPS Mainframe. The Agency must forward all payment information to
NFC’s Payroll/Personnel Operations Section on Form AD-343 (Payroll Action Request).
IMPORTANT: If payment information for a manually paid employee is not
forwarded to NFC, the indebtedness record remains in SPPS Mainframe and
the payment is not released.
SPPS Mainframe
•Establishes
indebtedness record for
separated employees
•Adds debts not already
recorded in ABCO or
SPPS Mainframe
•Adds additional remarks
•Certifies the final
payment
SPPS Web
•Submits Other - NFC
Process adjustment to
NFC, regarding tax
credits for outstanding
leave
•Submits Other - NFC
Process adjustment, if
no final compensation is
available, to generate a
bill
ABCO
•Sends the intent to
collect the debt, if the
result of the transaction
in SPPS Mainframe
results in a negative
amount
Comment [n51]: Slide 48

41
Establishing a Indebtedness Record in SPPS Mainframe
To begin processing an indebtedness case, you must first establish the record in SPPS
Mainframe. As mentioned earlier, this must be done before PAYE runs for the
employee’s final T&A. In the procedure below, you learn how to establish an
indebtedness record in SPPS Mainframe for separated employees.
Step Action
1. From the SPPS MAIN MENU SCREEN, enter “2” in the SELECT (1-3) field.
2. Press Enter. The FILE CONTROL INFORMATION screen displays.
Figure 15: FILE CONTROL INFORMATION Screen
Step Action
3. Enter the employee’s social security number in the SSNO field.
4. Enter the employee’s Agency Code in the AGCY field.
5. Enter the employee’s personnel office identifier in the POI field.
6. Press Enter. The INDEBTEDNESS MENU displays.
Comment [NFC52]: Slide 49
Explain that if an employee is paid manually, participants should submit an SPPS Web Other – NFC Process adjustment for the separating employee.
Comment [NFC53]:
FILE CONTROL INFORMATION screen.
Comment [NFC54]:
Show Slide 50: INDEBTEDNESS MENU.

42
Figure 16: INDEBTEDNESS MENU
Step Action
7. Enter “1” in the SELECT OPTION (1-8) field.
8. Press Enter. The ESTABLISH/DELETE INDEBTEDNESS screen displays. Comment [NFC55]: Slide 51
ESTABLISH/DELETE INDEBTEDNESS.

43
Figure 17: ESTABLISH/DELETE INDEBTEDNESS Screen
Step Action
TIP: The SSNO, AGENCY, LAST, FIRST, MIDDLE, and DATE RECORD
ESTABLISHED fields are auto-populated on the ESTABLISH/DELETE
INDEBTEDNESS screen.
9. Enter the employee’s date of separation in the SEPARATION DATE field.
NOTE: A record can be established before the employee is actually
separated. Once the personnel action separating the employee
applies to the Payroll/Personnel System, the SEPARATION DATE
field reflects the date entered on the personnel action. The date from
the personnel action overrides any data entered in this field.
10. Enter “A” (Add) in the FUNCTION CODE field to add an indebtedness record.
TIP: Enter “A” if you are adding a new indebted record, or “D” to
delete an erroneous record. A record cannot be deleted once SPPS
Mainframe has recovered the employee’s debt.
11. Enter “Y” (Yes) or “N” (No) in the DOES EMPLOYEE HAVE ANY
OUTSTANDING ADVANCED LEAVE field.

44
Step Action
12. Press Enter. You have established the employee’s indebtedness record.
Once you have established the record in SPPS Mainframe Indebtedness, transmit the
employee’s T&A, lump sum, or cash award payments as you would normally.
Adding Additional Employee Debts
Once you have established an indebtedness record in SPPS Mainframe, and PAYE has
run, you must make any adjustments to the employee’s indebtedness. Use Option 2 on
the INDEBTEDNESS MENU to display the ADJUSTMENT DUE TO EMPLOYEE
INDEBTEDNESS menu. From here you can add, change, delete, or query information
regarding administrative debts recorded in SPPS Mainframe and advanced leave debts.
In the procedure below, you learn how to add administrative debts, to an established
indebtedness record, that have not been recorded in ABCO to an employee’s
indebtedness record.
Step Action
1. From the INDEBTEDNESS MENU, enter “2” in the SELECT OPTION (1-8)
field.
2. Press Enter. The ADJUSTMENT DUE TO EMPLOYEE INDEBTEDNESS
menu displays. Comment [NFC56]:
Show Slide 52: ADJUSTMENT DUE TO EMPLOYEE INDEBTEDNESS.

45
Figure 18: ADJUSTMENT DUE TO EMPLOYEE INDEBTEDNESS Menu
Step Action
3. Enter “1” in the SELECT OPTION (1-3) field.
4. Press Enter. The EMPLOYEE INDEBTEDNESS UPDATE screen displays.
Comment [NFC57]:
Show Slide 53: EMPLOYEE INDEBTEDNESS UPDATE screen.

46
Figure 19: EMPLOYEE INDEBTEDNESS UPDATE Screen
Step Action
5. Enter “A” (Add) in the FUNC CODE field.
TIP: A code must be input for each debt. Enter “A” (Add) if you are
adding a new debt, “C” (Change) to change a debt, or “D” (Delete) to
delete an erroneous record.
6. Enter the receipt account code in the REC ACCT TYPE CD field.
TIP: Press F5 for a list of receipt account codes. Do not enter leave
debts here; use the ADVANCED LEAVE option on the
ADJUSTMENT DUE TO EMPLOYEE INDEBTEDNESS for that
purpose.
7. Enter in the amount of indebtedness for the receipt account involved in the
AMOUNT field.
TIP: Use a decimal to separate dollars and cents (i.e. $1000 is
1000.00)
8. Enter the employee’s accounting station in the ACCT STAT field.

47
Step Action
9. Enter the accounting code in the ACCOUNTING DATA field.
NOTE: Validate the accounting code against the Management
Accounting Structure Codes system (MASC). The proper accounting
format can be found on PQ046. Combine the following fields in the
listed order to verify the accounting code: ACCTG-DIST-FISC-YR-
CD, ACCTG-DIST-APPN-CD, and ACCTG-DIST-SUB-LVE-CD.7
10. Press Enter. The debts are added to the indebtedness record.
11. Press F3 to return to the ADJUSTMENT DUE TO EMPLOYEE
INDEBTEDNESS menu.
In addition to using SPPS Mainframe Indebtedness to collect administrative debts, you
also use it to collect debts for advanced leave. You use Option 3 on the ADJUSTMENT
DUE TO EMPLOYEE INDEBTEDNESS menu to collect payment for any advanced
leave not paid back at the date of separation.
You should enter all advanced leave debts at one time to facilitate the calculation of any
tax credits, which are processed by NFC’s Payroll Processing Branch. After you add the
advanced leave in SPPS Mainframe, you must use SPPS Web to send a Other – NFC
Process adjustment to NFC for them to calculate the tax credit. A tax credit is a sum of
money deducted from the total amount owed by the employee.
TIP: Separating employees with advanced leave and who are due tax credits
are listed on Payroll/Personnel Report Generator system (CULPRPT) Report
P0162, Indebtedness Advanced Leave – Tax Credit Suspense Report. A
message displays on this report indicating that the employee’s final payment
is ready to be released.
If the advanced leave dollar amount is greater than the payment due the employee, the
record is automatically sent to ABCO to establish a bill. If this is the case, no further
action is required in SPPS Mainframe.
7 Forest Service includes the ACCT-STATION-CD field at the end of its accounting code.

48
CAUTION: There must be a completed Leave Audit on file for the data
recorded on the ADVANCED LEAVE screen. It is your responsibility to
review the leave audit for accuracy and pay attention to any earned leave.
In the procedure below, you learn how collect payment for advanced leave not paid
back at the date of separation.
Step Action
1. From the INDEBTEDNESS MENU, enter “2” in the SELECT OPTION (1-8)
field.
2. Press Enter. The ADJUSTMENT DUE TO EMPLOYEE INDEBTEDNESS
MENU displays.
Figure 20: ADJUSTMENT DUE TO EMPLOYEE INDEBTEDNESS Screen
Step Action
3. Enter “3” in the SELECT OPTION (1-3) field.
4. Press Enter. The ADVANCED LEAVE screen displays.
Comment [NFC58]:
Show Slide 54 ADJUSTMENT DUE TO EMPLOYEE INDEBTEDNESS screen.
Comment [NFC59]:
Show Slide 55: ADVANCED LEAVE screen.

49
Figure 21: ADVANCED LEAVE Screen
Step Action
5. Enter “A” (Add) in the FUNC CODE field next to the appropriate leave type.
TIP: Enter “A” if you are adding a new debt, “C” to change a debt, or
“D” to delete an erroneous record. A code must be input for each
leave.
6. Enter the hours of advanced leave in the HOURS field next to the appropriate
leave type.
TIP: Enter the leave using whole and quarter hours (i.e. 3.25).
7. Enter the rate in the RATE field next to the appropriate type of leave.
TIP: Enter the rate using a decimal point to separate the dollars and
cents (i.e. 20.25).

50
Step Action
NOTE: The AMOUNT and TOTAL SICK LEAVE fields are system
generated based on the following criteria:
Sick leave is the rate of pay at the time the sick leave was advanced
The rate for annual leave is the current rate
The rate for compensatory time is the rate of pay at the time the
compensatory time was earned
8. Enter the accounting station code in the ACCT STAT field.
9. Enter the accounting code in the ACCOUNTING field.
NOTE: Validate the accounting code against the MASC. The proper
accounting format can be found on PQ046. Combine the following
fields in the listed order to verify the accounting code: ACCTG-DIST-
FISC-YR-CD, ACCTG-DIST-APPN-CD, and ACCTG-DIST-SUB-
LVE-CD.8
The TOTAL ADVANCED LEAVE field indicates the total amount
owed.
10. Enter “Y” (Yes) or “N” (No) in the HAS ALL ADVANCED LEAVE BEEN
FORGIVEN? field.
11. Press Enter. The advanced leave debts are added to the indebtedness
record.
12. Press F8 to add additional lines of sick leave if needed.
After the final payments are processed in SPPS Mainframe and the advanced leave
debt is collected, you must remove the negative leave balance in Payroll/Personnel
database by updating TINQ Program 01, ANNUAL & SICK LEAVE.
TIP: CULPRPT Report, P0167, Indebtedness Advanced Leave Hours
Collected by SPPS Mainframe for Processing Pay Period/Yr, lists the
employees whose leave balances should be changed to zero hours in TINQ.
8 The Forest Service includes the ACCT-STATION-CD field at the end of its accounting code.
51
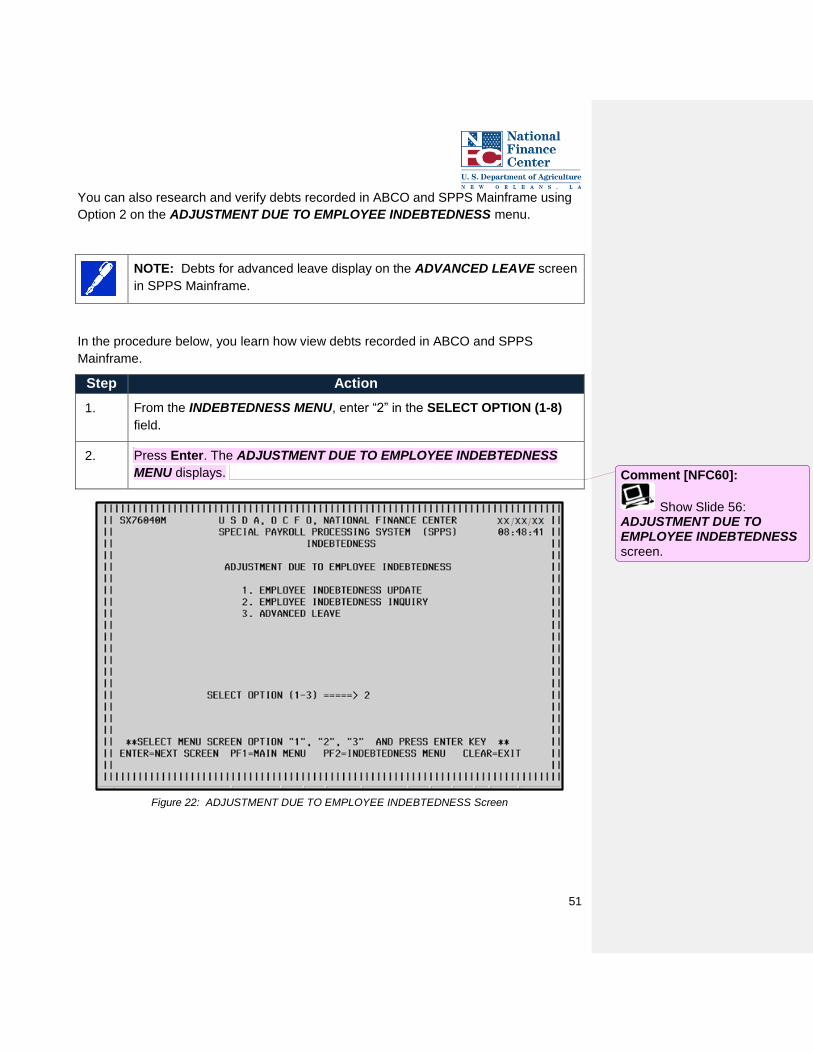
You can also research and verify debts recorded in ABCO and SPPS Mainframe using
Option 2 on the ADJUSTMENT DUE TO EMPLOYEE INDEBTEDNESS menu.
NOTE: Debts for advanced leave display on the ADVANCED LEAVE screen
in SPPS Mainframe.
In the procedure below, you learn how view debts recorded in ABCO and SPPS
Mainframe.
Step Action
1. From the INDEBTEDNESS MENU, enter “2” in the SELECT OPTION (1-8)
field.
2. Press Enter. The ADJUSTMENT DUE TO EMPLOYEE INDEBTEDNESS
MENU displays.
Figure 22: ADJUSTMENT DUE TO EMPLOYEE INDEBTEDNESS Screen
Comment [NFC60]:
Show Slide 56: ADJUSTMENT DUE TO EMPLOYEE INDEBTEDNESS screen.

52
Step Action
3. Enter “2” in the SELECT OPTION (1-3) field.
4. Press Enter. The EMPLOYEE INDEBTEDNESS INQUIRY screen displays.
Figure 23: EMPLOYEE INDEBTEDNESS INQUIRY Screen
NOTE: Existing debts that are established in ABCO before separation
display on this screen until the final payment is released.
If a debt has been recorded in ABCO and the employee has paid the debt,
the release of the final payment in SPPS Mainframe should not occur until the
payment is recorded in ABCO and the debt does not display on the
EMPLOYEE INDEBTEDNESS INQUIRY screen.
Comment [NFC61]:
Show Slide: 57 EMPLOYEE INDEBTEDNESS INQUIRY screen.

53
Review Pending Disbursement
Pending disbursements can be viewed in SPPS Mainframe. The records are view only
and display a preliminary calculation of the amount the employee is scheduled to
receive after all payroll amounts and debts have been recorded. Option 3 on the
INDEBTEDNESS MENU is used to view these pending disbursements.
In the procedure below, you learn how to review a calculation of the preliminary
payment an employee is scheduled to receive.
Step Action
1. From the INDEBTEDNESS MENU, enter “3” in the SELECT OPTION (1-8)
field.
2. Press Enter. The PENDING DISBURSEMENT screen displays.
Figure 24: PENDING DISBURSEMENT Screen
Comment [n62]: Slide 58
Comment [NFC63]:
PENDING DISBURSEMENT screen.

54
The following fields display on the PENDING DISBURSEMENT screen.
Field Description
PAY PERIOD NO/YR The pay period and year of the pending disbursement.
TYPE PAYMENT The following are the types of payments made to
employees:
01 - Regular T&A
02 - Adjustment
03 - NFC-29 (Live Payment)
04 - Lump Sum Payment
05 - Compensatory Payment
06 - Cash Award
07 - NFC-29 (Manual Payment)
11 - Severance Payment
AMOUNT The amount due to the employee.
TOTAL MONIES The total amount of money to be disbursed before
adjusting the indebtedness.
EMPLOYEE
INDEBTEDNESS
The total amount of indebtedness recorded in SPPS
Mainframe and ABCO.
TOTAL The total amount of money after adjusting the employee’s
indebtedness.
TAX CREDIT AMOUNT The employee’s tax credit amount for advanced leave that
has not been forgiven.
TOTAL MONIES TO BE
DISBURSED
The total amount of money to be disbursed to an
employee after factoring in remaining debts.
Comment [NFC64]:
Explain that the amount for this field comes from PQ032.

55
Verifying Payment Address
To verify or update the payment address, use Option 5, Check Mailing Information, on
the INDEBTEDNESS MENU. This option displays the check mailing address recorded
in the Payroll/Personnel database and allows the user to change this address for the
final payment processed through SPPS Mainframe. Any changes made to the
information on this screen result in an address change for the final payment processed
in SPPS Mainframe; these changes do not impact the address in the Payroll/Personnel
System.
In the procedure below, you learn how enter an employee’s check mailing information.
Step Action
1. From the INDEBTEDNESS MENU, enter “5” in the SELECT OPTION (1-8)
field.
2. Press Enter. The CHECK MAILING INFORMATION screen displays.
Figure 25: CHECK MAILING INFORMATION Screen
Comment [n65]: Slide 56
Comment [NFC66]:
Show Slide 59: CHECK MAILING INFORMATION screen.

56
Step Action
3. Make any necessary changes to the check mailing address.
TIP: Enter “C” in the FUNCTION CODE field, if any changes are
made to the CHECK MAILING INFORMATION screen.
4. Press Enter. The data is processed.
TIP: You can either send the payment to a mailing address, a designated
agent, or a bank account number.
Additional Remarks
Remarks is Option 6 on the INDEBTEDNESS MENU. This option is used to record
pertinent claim information, such as why an employee is being billed or why leave has
been forgiven.
In the procedure below, you learn how to enter any relevant remarks for a claim.
Step Action
1. From the INDEBTEDNEDD MENU, enter “6” in the SELECT OPTION (1-8)
field.
2. Press Enter. The REMARKS screen displays.
Comment [NFC67]:
Show Slide 60: REMARKS screen.
57
Figure 26: REMARKS Screen
Step Action
3. Enter any pertinent information for the claim in the field, such as why an
employee is being billed or why leave has been forgiven.
4. Enter “A” (Add) in the FUNCTION CODE field.
TIP: Enter “A” if you are adding remarks, “C” to change remarks, or
“D” to delete remarks.
5. Press Enter. The information is recorded.

58
Certification of the Final Payment
The last step in processing an indebtedness is to certify the final payment. Payment
Certification is Option 4 on the INDEBTEDNESS MENU. This option is used to confirm
receipt of all required documentation necessary to file indebtedness, process the final
payment, and authorize such collections and disbursements.
Before selecting this option, be sure to refer to the PENDING DISBURSEMENT screen
and the EMPLOYEE INDEBTEDNESS INQUIRY screen to ensure all payments and
debts are entered correctly and also to verify that duplicate payments have not been
recorded in ABCO, SPPS Web, or another SPPS Mainframe record.
IMPORTANT: Only one final payment is processed in SPPS Mainframe for
an indebted employee. Once a payment is coded for release, the release can
be rescinded only if the payment has not been processed in SPPS
Mainframe.
To rescind a payment enter “N” (No) in the RELEASE PAYMENT field on the
PAYMENT CERTIFICATION screen.
In the procedure below, you learn how certify a payment for indebted employees in
SPPS Mainframe.
Step Action
1. From the INDEBTEDNESS MENU, enter “4” in the SELECT OPTION (1-8)
field.
2. Press Enter. The PAYMENT CERTIFICATION screen displays.
Comment [n68]: Slide 61
Comment [NFC69]:
PAYMENT INQUIRY screen.

59
Figure 27: PAYMENT CERTIFICATION Screen
Step Action
3. Enter “Y” (Yes) or “N” (No) in the HAVE ALL APPLICABLE DEBTS BEEN
RECORDED IN SPPS?
CAUTION: The payment cannot be released until “Y” (Yes) is
entered.
4. Enter “Y” (Yes) or “N” (No) in the HAVE ALL PAYMENT DOCUMENTS
BEEN PROCESSED?
CAUTION: The payment cannot be released until “Y” (Yes) is
entered.
5. Enter “Y” (Yes) or “N” (No) in the RELEASE PAYMENT field.
TIP: Enter “N” (No) in the RELEASE PAYMENT field to have tax
credits calculated by NFC if the employee has advanced leave that
has not been forgiven.
When the tax credit amount is calculated by NFC, a message
displays on CULPRPT Report P0162 (Indebtedness Advanced Leave
– Tax Credit Suspense Report) indicating that the payment is ready
to be released or you can check to see if tax credits have been
calculated by checking the PENDING DISBURSEMENTS screen.

60
Step Action
6. Enter the function code in the FUNCTION CODE field.
TIP: If tax credits are involved in the payment, enter “A” (Add) in the
FUNCTION CODE field to have NFC calculate the tax credits. You
must submit an Other – NFC Process adjustment in SPPS Web for
NFC to calculate the tax credits.
NOTE: You must wait until the tax credits are applied in SPPS
Mainframe before continuing. Once the tax credits display on the
ADVANCED LEAVE screen, release the payment by entering “C”
(Change) in this field.
SPPS Mainframe jobs run at approximately 11:00 AM CST. The
FUNCTION CODE field cannot be changed to either “A” or “C” after
the SPPS Mainframe daily batch process has completed.
TIP: If you have released the payment to be disbursed and payment
information does not appear on the PAYMENT INQUIRY screen, run
CULPRPT Report P0163, Audit Errors for Processing Date XX/XX/XX. Errors
may exist that prevent the payment from being disbursed.
7. Press Enter. The message DISBURSEMENT RECORD STORED displays in
the bottom left of the screen.

61
Payment Research
Once the payment has been disbursed, the actual payment made can be viewed
through the PAYMENT INQUIRY screen which is Option 7 on the INDEBTEDNESS
MENU.
In the procedure below, you learn how review details of a payment made to a separated
employee.
Step Action
1. From the INDEBTEDNESS MENU, enter “7” in the SELECT OPTION (1-8)
field.
2. Press Enter. The PAYMENT INQUIRY screen displays.
Figure 28: PAYMENT INQUIRY Screen
Step Action
3. Verify the information on the PAYMENT INQUIRY screen.
NOTE: The PAYMENT INQUIRY screen is a view only screen.
Comment [NFC70]: Slide 62
Explain that you can conduct research on the payment after 1:00 PM CST on the day the payment is made.

62
5.4. Chapter Review
Knowledge Check
1. Fill in the missing blanks:
The indebtedness option in SPPS Mainframe is used to:
Establish an indebtedness record for a ________ employee
Record debts not established in _____________ for a separated employee
View _________ debts for the separated employee; and
Process the final __________ due the employee
2. Match each step with the correct order that it occurs with respect to the
indebtedness process:
1 A. Add Remarks
2 B. Certify Payment
3 C. Add Debts
4 D. Establish Record
5 E. Submit Request For Tax Credits
Chapter Summary
Having completed this chapter, you are now able to:
Summarize the reasons for processing indebtedness for a separate employee
Explain each function on the INDEBTEDNESS MENU
Explain how to process indebtedness for a separated employee
Comment [NFC71]:
Show Slide 63:
Knowledge Check
Chapter Review
Ask students to record their answers to the Knowledge Checks individually.
Comment [NFC72]: Answers: Slide 64
Ask a volunteer to answer the first Knowledge Check. Explain that the correct answers are: separated, ABCO, recorded, and, payment.
Comment [NFC73]:
Ask a volunteer to answer the second Knowledge Check. Explain that the correct answers are: 1 – D 2 – C 3 – E 4 – A 5 – B
Comment [NFC74]: Slide 65
Review previous chapter and transition to Processing Death Cases chapter.
Comment [NFC75]:
Provide participants with a 10-15 minute break, based on the pace of the training.

63
6.0. Processing Death Cases
6.1. Chapter Overview
This chapter provides an introduction to death cases. It includes all relevant information
to process a death case in SPPS Mainframe.
Chapter 6 Objectives
Explain the purpose of the death case function within SPPS Mainframe
Describe the different documents needed to process a death case
Describe the process for performing each function on the DEATH CASE MENU
Comment [NFC76]:
Show Slide 66-67: Processing Death Cases Chapter Overview.

64
6.2. Introduction to Death Cases
Lesson Overview
This lesson describes when it is appropriate to process a death case. Additionally, this
lesson explains the purpose of each function on the DEATH CASE MENU.
Lesson Objectives
By the end of this lesson, you will be able to:
List the reasons for processing Adjustments Due to Indebtedness for Deceased
Employees
Describe the beneficiary information for death cases
Identify the required documents to process a death case
A death case is a record that is established for an individual employee that has passed
away while under Federal employment. You establish a death case record in SPPS
Mainframe to disburse final compensation payments to the beneficiary of a deceased
employee. Processing a death case is Option 3 on the SPPS MAIN MENU SCREEN.
When a death case is established in SPPS Mainframe, all applicable employee
payment documents (Final T&A, Lump Sum, Cash Award, etc.) are processed through
the Payroll/Personnel database as usual. The documents can be viewed in PQ032, and
the net amounts are captured in SPPS Mainframe.
IMPORTANT: It is the agency’s responsibility to disburse final payment
through SPPS Mainframe to the beneficiary.
When calculating the final payment, any advanced leave that is owed to the deceased
employee is forgiven. Use TINQ to remove the advanced leave balance.
Federal and state taxes are not to be deducted from the deceased employee’s final T&A
or lump sum, and a Form W-2 is issued for the deceased.
Form 1099-MISC (Miscellaneous Income) is issued to each beneficiary for the taxable
gross not the net amount received.
Comment [n77]: Slide 68
Comment [NFC78]:
Explain that if a beneficiary passes away, the money to be disbursed is split amongst the remaining beneficiaries. If a beneficiary cannot be found, the money remains with the Federal Government.

65
Once a case has been certified to be released from an SPPS Mainframe death case,
the payment is scheduled for disbursement on the next manual pay schedule that NFC
runs Monday – Friday, excluding holidays, at 11:00 AM CST.

66
6.3. Processing Death Cases
Lesson Overview
This lesson focuses on the procedures and information required for processing a death
case.
Lesson Objectives
By the end of this lesson, you will be able to:
Identify the documents needed to process a death case
Describe how to establish a death case record
Described how to record beneficiaries for a death case
Describe how to update an employee’s indebtedness for a death case
Describe how to research debts recorded in ABCO and SPPS Mainframe
Describe how to review a preliminary calculation of the amount owed to the
beneficiaries
Describe how to add pertinent remarks to a death case
Describe how to process the final payment for a separated employee
There are five steps for processing a death case in SPPS Mainframe. The following
graphic outlines these steps.
Figure 29: SPPS Mainframe Death Case Process
The above steps are outlined further below.
1. Establish the death case record in SPPS Mainframe before PAYE runs for their
final T&A
2. Record any debts not already recorded in ABCO or SPPS Mainframe
3. Record all beneficiary information
4. Add any additional remarks to the record. This is an optional step.
5. Certify the payment, after all monies have been captured in SPPS Mainframe, all
debts have been recorded, and if applicable, tax credits have been calculated.
Establish Record
Record Debts Record
Beneficiary Information
Add Remarks Certify
Payment
Comment [n79]: Slide 69
67
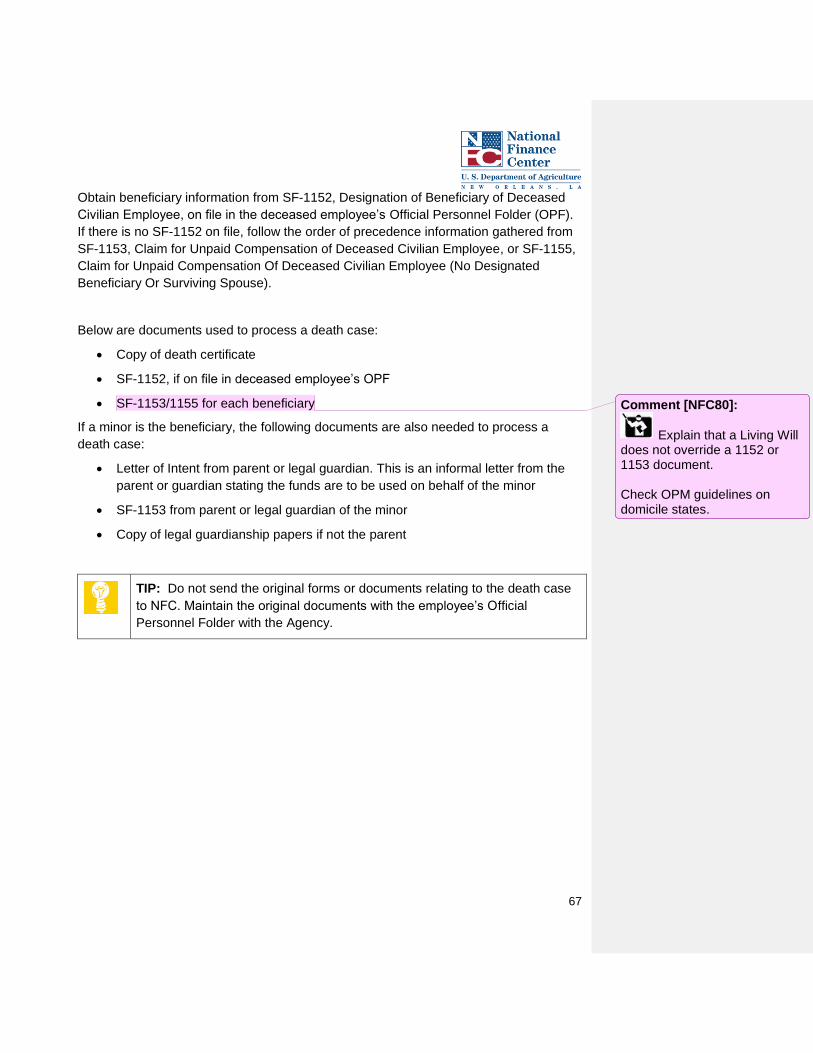
Obtain beneficiary information from SF-1152, Designation of Beneficiary of Deceased
Civilian Employee, on file in the deceased employee’s Official Personnel Folder (OPF).
If there is no SF-1152 on file, follow the order of precedence information gathered from
SF-1153, Claim for Unpaid Compensation of Deceased Civilian Employee, or SF-1155,
Claim for Unpaid Compensation Of Deceased Civilian Employee (No Designated
Beneficiary Or Surviving Spouse).
Below are documents used to process a death case:
Copy of death certificate
SF-1152, if on file in deceased employee’s OPF
SF-1153/1155 for each beneficiary
If a minor is the beneficiary, the following documents are also needed to process a
death case:
Letter of Intent from parent or legal guardian. This is an informal letter from the
parent or guardian stating the funds are to be used on behalf of the minor
SF-1153 from parent or legal guardian of the minor
Copy of legal guardianship papers if not the parent
TIP: Do not send the original forms or documents relating to the death case
to NFC. Maintain the original documents with the employee’s Official
Personnel Folder with the Agency.
Comment [NFC80]:
Explain that a Living Will does not override a 1152 or 1153 document. Check OPM guidelines on domicile states.

68
Establishing a Death Case Record
To begin processing a death case you must first establish the record in SPPS
Mainframe using Option 1 on the DEATH CASE MENU. A death case record can be
established before the employee’s personnel action is processed. When establishing a
Death Case record make sure that information is being entered for the correct employee
and that the correct option has been selected.
On the DEATH CASE MENU, you can also delete a death case record. A record can be
deleted as long as the payment has not been scheduled for disbursement. If the death
case has been submitted for disbursement. Refer to the Contact Center at:
https://www.nfc.usda.gov/Contact_Us/Help_Desks/CHD/CHD_home.html for assistance
with deleting a death case.
In the procedure below, you learn how establish a death case in SPPS Mainframe.
Figure 30: SPPS MAIN MENU SCREEN
Step Action
1. From the SPPS MAIN MENU SCREEN, enter “3” in the SELECT (1-3) field.
Comment [NFC81]: Slide 70
Explain that a death case remains open so that money can continue to be disbursed to beneficiary(ies) in the event additional money is due.
Comment [NFC82]:
Explain that a death case record can be established in SPPS Mainframe prior to processing of the death personnel action. However, the separation date and the date of death must match, otherwise the personnel action is put in suspense.
Comment [NFC83]:
SPPS MAIN MENU SCREEN.
69
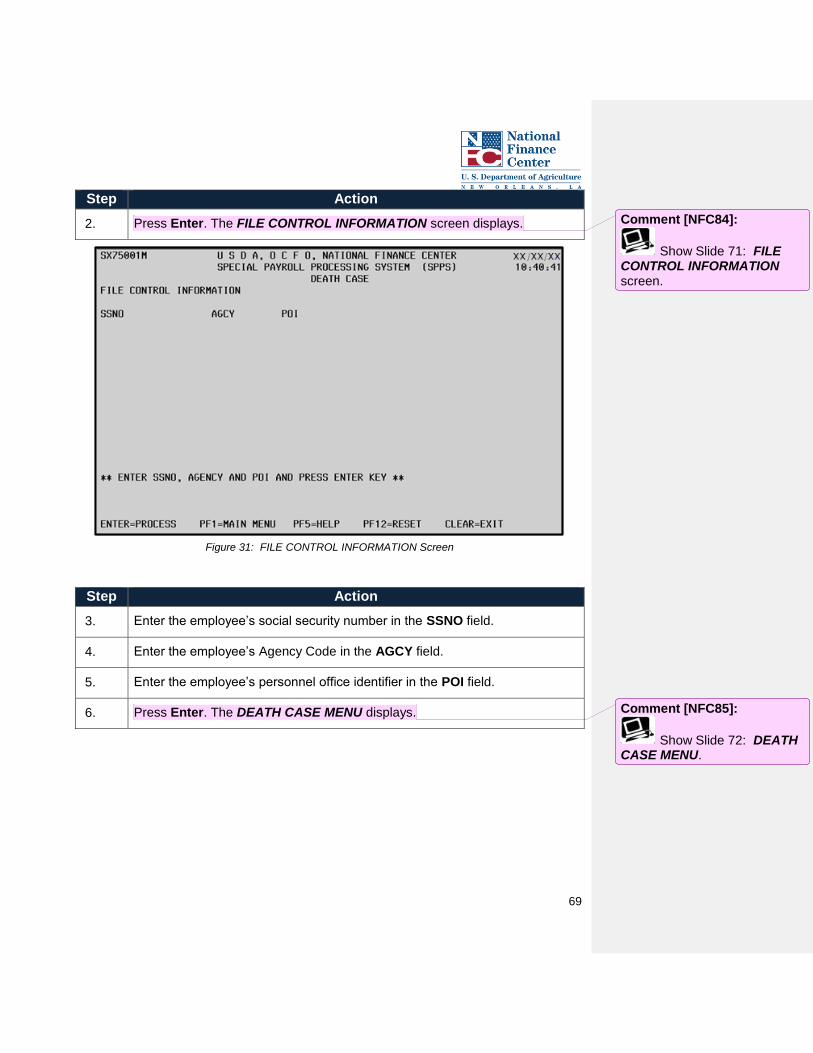
Step Action
2. Press Enter. The FILE CONTROL INFORMATION screen displays.
Figure 31: FILE CONTROL INFORMATION Screen
Step Action
3. Enter the employee’s social security number in the SSNO field.
4. Enter the employee’s Agency Code in the AGCY field.
5. Enter the employee’s personnel office identifier in the POI field.
6. Press Enter. The DEATH CASE MENU displays.
Comment [NFC84]:
Show Slide 71: FILE CONTROL INFORMATION screen.
Comment [NFC85]:
Show Slide 72: DEATH CASE MENU.

70
Figure 32: DEATH CASE MENU
Step Action
7. Enter “1” in the SELECT OPTION (1-7) field.
8. Press Enter. The ESTABLISH/DELETE DEATH CASE screen displays.
Comment [NFC86]:
Show Slide 73: ESTABLISH/DELETE DEATH CASE screen.

71
Figure 33: ESTABLISH/DELETE DEATH CASE Screen
Step Action
TIP: The SSNO, LAST, FIRST, MIDDLE, and SEPARATION DATE fields
are auto-populated on this screen. The separation date should be generated
from the death action. If there is no death action, enter the employee’s date of
death. The date entered and the date on the personnel record must be the
same.
9. Enter “A” (Add) in the FUNCTION CODE field.
TIP: Enter “A” if you are adding a death case, or “D” to delete an
erroneous one. Records can only be deleted, by the Agency, if they
have not been submitted for disbursement.
10. Press Enter. The death case is established.

72
Establishing a Beneficiary
Once you have established the death case you can enter the beneficiary information
using Option 2 on the DEATH CASE MENU. This option is used to add, change, or
delete information regarding the deceased employee’s beneficiary(ies).
NOTE: A record for each beneficiary must be established before the death
case can be processed.
In the procedure below, you learn how establish a beneficiary for a death case.
Step Action
1. From the DEATH CASE MENU, enter “2” in the SELECT OPTION (1-7) field.
2. Press Enter. The BENEFICIARY CLAIMANT INFORMATION SCREEN 1
OF 2 screen displays.
Figure 34: BENEFICIARY CLAIMANT INFORMATION SCREEN 1 of 2
Comment [n87]: Slide 74
Comment [NFC88]:
Show Slide 74: BENEFICIARY CLAIMANT INFORMATION SCREEN 1 OF 2.

73
Step Action
3. Enter “Y” (Yes) or “N” (No) in the SF DOCUMENT – FORM NO: 1152 –
COMPLTED AND ON FILE field.
NOTE: SF – 1152 is an optional form which can be completed when
an employee is first hired. It designates specific beneficiaries for the
employee.
4. Enter “Y” (Yes) or “N” (No) in the 1153/1155 RECEIVED, SIGNED &
WITNESSED field.
CAUTION: There must be a completed SF-1153 or SF-1155
submitted for all beneficiary(ies).
5. Enter the date the form was signed and witnessed in the DATE SIGNED (MM
DD YY) field.
CAUTION: Payments cannot be disbursed to the beneficiary(ies) if
this field is not completed.
6. Enter “Y” (Yes) or “N” (No) in the MINOR field to indicate if the beneficiary is
under the age of 18.
7. Enter the percentage from the Share To Be Paid To Each Beneficiary field
from the employee’s SF-1152 in the DESIGNATED SHARE (PERCENT)
field.
NOTE: If there is no SF-1152 on file for this beneficiary, leave this
field blank.
8. Enter the beneficiary’s social security number in the SSNO field.
9. Enter the beneficiary’s age in the AGE field if they are a minor.
10. Enter the beneficiary’s relationship to the deceased employee in the
RELATIONSHIP TO DECEASED field.9
NOTE: If the employee’s estate is administered by the state of
domicile, enter “Other-State” in the RELATIONSHIP TO DECEASED
field.
9 Refer to Appendix G: Entries for RELATIONSHIP TO DECEASED Field for a list of acceptable entries
for the RELATIONSHIP TO DECEASED field.

74
Step Action
11. Enter the beneficiary’s first, middle, last name, and relationship to the
deceased in the NAME field.
NOTE: If the beneficiary is a minor include the guardian’s name,
“Susan Smith guardian of…”
12. Enter “Y” (Yes) or “N” (No) in the SHOULD DISBURSEMENTS BE HELD.
TIP: SPPS Mainframe can hold one or more beneficiary’s share
while disbursing another beneficiary’s share.
13. Enter “A” (Add) in the FUNCTION CODE field.
TIP: Enter “A” if you are adding a beneficiary, “C” to change a
beneficiary record, or “D” to delete a beneficiary record.
14. Press Enter.
NOTE: If “Y” (Yes) is entered in the SHOULD DISBURSEMENTS
BE HELD field, continue with the below steps. If “N” (No) is entered
the BENEFICIARY CLAIMANT INFORMATION screen 2 of 2
displays.
15. Enter “P” or “O” in the REASON FOR HOLD STATUS field.
TIP: Enter “P” if the disbursement is pending legal review or “O” for
other reason.
16. Enter “Y” (Yes) or “N” (No) in the SHOULD DISBURSEMENTS BE
RELEASED FROM HOLD STATUS field.
17. Enter “X” next to DENIED or ACCEPTED for the CLAIM DECISION FOR
PENDING LEAGAL REVIEW field.
CAUTION: Only complete this field if REASON FOR HOLD STATUS
field is coded P.
18. Enter “A” (Add) in the FUNCTION CODE field.
TIP: Enter “A” if you are adding a beneficiary, “C” to change a
beneficiary record, or “D” to delete a beneficiary record.

75
Step Action
19. Press Enter. BENEFICIARY CLAIMANT INFORMATION SCREEN 2 OF 2
displays.
Figure 35: BENEFICIARY CLAIMANT INFORMATION SCREEN 2 of 2
Step Action
20. Enter the deceased employee’s name followed by “(dec)” in the STREET
ADDRESS 1 field.
NOTE: If the beneficiary is a minor, enter the minor’s name,
relationship to the deceased employee, deceased employee’s name,
followed by (dec) (i.e. Mary Doe daughter of Michael Doe (dec).
21. Enter the beneficiary’s street address in the STREET ADDRESS 2 field.
22. Enter the beneficiary’s city in the CITY field.
23. Enter the beneficiary’s state in the STATE field.
24. Enter the beneficiary’s zip code in the ZIP CODE field.
25. Press Enter.
Comment [NFC89]:
Show Slide 75: BENEFICIARY CLAIMANT INFORMATION SCREEN 2 OF 2.

76
Step Action
NOTE: The DESIGNATED AGENT CODE, TYPE OF ACCOUNT,
ACCOUNT NUMBER, and ROUTING NUMBER are not available due to the
fact that the beneficiary(ies) must be paid by a paper check.
26. Complete BENEFICIARY CLAIMANT INFORMATION SCREEN 1 and 2 for
every beneficiary.
NOTE: SPPS Mainframe can accommodate up to 99 beneficiaries.
Adding Additional Employee Debts
After entering the beneficiary information you can make updates to the deceased
employee’s indebtedness. This helps determine the final amount owed to the
beneficiaries. Use Option 3 on the DEATH CASE MENU to make adjustments due to
employee indebtedness.
This option is used to:
Add debts to SPPS Mainframe not recorded in ABCO
Change, delete, and query these debts
Query all debts recorded in ABCO, PAYE, and SPPS Mainframe
In the procedure below, you learn how make an adjustment to an employee’s
indebtedness for a death case.
Step Action
1. From the DEATH CASE MENU, enter “3” in the SELECT OPTION (1-7) field.
2. Press Enter. The ADJUSTMENT DUE TO EMPLOYEE INDEBTEDNESS
menu displays.
Comment [n90]: Slide 76
Comment [NFC91]:
ADJUSTMENT DUE TO EMPLOYEE INDEBTEDNESS menu.

77
Figure 36: ADJUSTMENT DUE TO EMPLOYEE INDEBTEDNESS Menu
Step Action
3. Enter “1” in the SELECT OPTION (1-2) field.
4. Press Enter. The EMPLOYEE INDEBTEDNESS UPDATE screen displays.
Comment [NFC92]:
Show Slide 77: EMPLOYEE INDEBTEDNESS UPDATE screen.

78
Figure 37: EMPLOYEE INDEBTEDNESS UPDATE Screen
Step Action
5. Enter “A” (Add) in the FUNC CODE field.
TIP: Enter “A” if you are adding a new debt, “C” to change a debt, or
“D” to delete an erroneous record. A code must be input for each
debt.
6. Enter the receipt account type in the REC ACCT TYPE CD field.
TIP: Press F5 for a list of the receipt account codes. Do not enter
leave debts here.
7. Enter the amount of indebtedness for each receipt account in the AMOUNT
field.
TIP: Use a decimal to separate dollars and cents (i.e. $1000 is
1000.00).
8. Enter the employee’s accounting station in the ACCT STAT field.

79
Step Action
9. Enter the accounting code in the ACCOUNTING DATA field.
NOTE: Validate the accounting code against the MASC. The proper
accounting format can be found on PQ046. Combine the following
fields in the listed order to verify the accounting code: ACCTG-DIST-
FISC-YR-CD, ACCTG-DIST-APPN-CD, and ACCTG-DIST-SUB-
LVE-CD.10
10. Press Enter. The debts are added to the death case record.
In addition to adding debts that haven’t already been recorded in ABCO, you can use
Option 2 on the ADJUSTMENT DUE TO EMPLOYEE INDEBTEDNESS menu to verify
and search for information on existing debts recorded in ABCO and SPPS Mainframe.
In the procedure below, you learn how to conduct an inquiry of the employee’s recorded
debts.
Step Action
1. From the DEATH CASE MENU, enter “3” in the SELECT OPTION (1-7) field.
2. Press Enter. The ADJUSTMENT DUE TO EMPLOYEE INDEBTEDNESS
menu displays.
10
Forest Service includes the ACCT-STATION-CD field at the end of its accounting code.
Comment [NFC93]:
Show Slide 78: ADJUSTMENT DUE TO EMPLOYEE INDEBTEDNESS menu.

80
Figure 38: ADJUSTMENT DUE TO EMPLOYEE INDEBTEDNESS Menu
Step Action
3. Enter “2” in the SELECT OPTION (1-2) field.
4. Press Enter. The EMPLOYEE INDEBTEDNESS INQUIRY screen displays.
Comment [NFC94]:
Show Slide 79: EMPLOYEE INDEBTEDNESS INQUIRY screen.

81
Figure 39: EMPLOYEE INDEBTEDNESS INQUIRY Screen
NOTE: The EMPLOYEE INDEBTEDNESS INQUIRY screen is a view only
screen. It displays all recorded debts until the final payment is released.

82
Adding Remarks to a Death Case
Before certifying a death case you can include any remarks related to the claim. Use
Option 6 on the DEATH CASE MENU to add any additional remarks.
Follow the steps below to add remarks for a death case.
Step Action
1. From the DEATH CASE MENU, enter “6” in the SELECT OPTION (1-7) field.
2. Press Enter. The REMARKS screen displays.
Figure 40: REMARKS Screen
Step Action
NOTE: The REMARKS screen is an optional screen.
3. Enter any pertinent information to the claim in the text field.
NOTE: Remarks can include information regarding the type of
documents, dates documents are received, and how the final
payment is divided amongst the beneficiaries, etc.
Comment [NFC95]:
Show Slide 80: REMARKS screen.

83
Step Action
4. Enter “A” (Add) in the FUNCTION CODE field.
TIP: Enter “A” if you are adding a new remarks, “C” to change
remarks, or “D” to delete remarks.
5. Press Enter.
Certifying a Payment
Now that you have established a death case, identified the beneficiary(ies), and made
any necessary adjustments to the deceased employee’s indebtedness, you can finalize
the payment for a death case.
Payment Certification is Option 4 on the DEATH CASE MENU. This option is used to:
Identify the type beneficiary(ies) who receive the deceased employee’s final
payment(s)
Confirm receipt of the necessary documentation to process the death claim and
allow authorization of the claim for final processing
Show a preliminary calculation of amounts already disbursed to the
beneficiary(ies) to date and amounts to be disbursed
Show beneficiary(ies) specific data based on information received to date
In the procedure below, you learn how to certify a payment for a death case.
Step Action
1. From the DEATH CASE MENU, enter “4” in the SELECT OPTION (1-7) field.
2. Press Enter. The ORDER OF PRECENDENCE IN ACCORDANCE WITH
SUSC5582 (B) screen displays.
Comment [NFC96]:
Show Slide 81: ORDER OF PRECEDENCE IN ACCORDANCE WITH 5USC5582(B) screen.

84
Figure 41: ORDER OF PRECEDENCE IN ACCORDANCE WITH SUSC5582(B) Screen
Step Action
3. Enter “Y” (Yes) in front of the appropriate beneficiary, only one beneficiary
can be selected.
TIP: Use the guidance below to determine which beneficiary field to
enter Y (Yes) for. The beneficiaries below are listed in order of
precedence in accordance with SUSC5582:
DESIGNATED BENEFICIARY(IES) – If there is a SF-1152 in the
employee’s file
WIDOR OR WIDOWER – If there is no SF-1152 on file and the
deceased is married
CHILD OR CHILDREN – If there is no SF-1152 on file and the
deceased is not married, but has children.
PARENTS – If there is no SF-1152 on file, the deceased is not
married, and has no children
EXECUTOR OR ADMINISTRATOR OF THE ESTATE – If there
is an executor or administrator of the estate.
PERSON(S) ENTITLED UNDER LAWS OF DOMICILE AT THE
TIME OF DEATH – If none of the above apply

85
Step Action
4. Enter “Y” (Yes) or “N” (No) in the LEGAL GUARDIANSHIP PAPERS, IF
OTHER THAN PARENT field, if “Y” (Yes) is entered in the CHILD OR
CHILDREN field.
5. Enter “Y” (Yes) or “N” (No) in the LETTER OF INTENT FROM OTHER
PARENT OR GUARDIAN field, if “Y” (Yes) is entered in the CHILD OR
CHILDREN field.
6. Enter “Y” (Yes) or “N” (No) in the COMPLETED SF-1153 FORM FROM
GUARDIAN field, if “Y” (Yes) is entered in the CHILD OR CHILDREN field.
7. Enter “Y” (Yes) or “N” in the COURT DOCUMENTS OF THE APPOINTMENT
field, if “Y” is entered in the EXECUTOR OR ADMINISTRATOR OF THE
ESTATE field.
8. Enter “A” (Add) in the FUNC CODE field.
TIP: Enter “A” if you are adding a record, “C” to change a record, or
“D” to delete an erroneous record.
9. Press Enter. The order of precedence data is recorded and the
AUTHORIZATION screen displays.
Comment [NFC97]:
Show Slide 82: AUTHORIZATION screen.

86
Figure 42: AUTHORIZATION Screen
Step Action
NOTE: The AUTHORIZATION screen is used to authorize the calculation
and distribution of payments to approved beneficiaries. It must be completed
to release payments.
10. Enter the employee’s date of death in the DATE OF DEATH (MM DD YY)
field.
IMPORTANT: The date of death must agree with the personnel
action.
11. Enter the employee’s marital status in the MARITAL STATUS field.
TIP: Enter “S” for single (including widowed), “M” for married, or “D”
for divorced. This code must agree with what is shown on the death
certificate.
12. Enter “Y” (Yes) or “N” (No) in the HAVE ALL APPLICABLE DEBTS BEEN
RECORDED IN SPPS? field.
NOTE: If “N” (No) is entered you must wait until all debts have been
recorded before disbursement is possible.

87
Step Action
13. Enter “Y” (Yes) for the CALCULATE DISTRIBUTION field.
NOTE: This begins the online certification and payment calculation
process. This is a preliminary payment calculation process to be
used for review and approval of payment calculation before
releasing the payment for distribution.
14. Enter “Y” (Yes) in the RELEASE PAYMENT(S) field.
NOTE: If this field is coded Y (Yes) and the payment information
does not display on the PAYMENT INQUIRY screen, request
CULPRPT Report P0163, Death Case/Indebtedness Audit Error(s)
For Processing Date XX/XX/XX. There may be errors that are
preventing the payment from being disbursed.
15. Enter “Y” (Yes) in the IF YES, IS THIS THE FINAL PAYMENT field.
16. Enter “A” (Add) in the FUNC CODE field.
TIP: Enter “A” if you are adding a new record, “C” to change a
record, or “D” to delete an erroneous record.
17. Press Enter. The data is processed.
18. Press F8. The PENDING DISBURSEMENT(S) SCREEN 3 OF 5 displays.
Comment [NFC98]:
Show Slide 83 : PENDING DISBURSEMENT(S) SCREEN 3 OF 5 screen.

88
Figure 43: PENDING DISBURSEMENT(S) SCREEN 3 of 5
Step Action
NOTE: The PENDING DISBURSEMENT(S) SCREEN 3 OF 5 is a view only
screen displaying each payment that is scheduled to be disbursed and shows
the total amount to be disbursed.

89
Step Action
TIP: The PAY PERIOD NO/YR field indicates the pay period number and year for the payment being processed.
The TYPE PAYMENT field indicates the type of payment being distributed.
The following are the different types of payments:
01 - Regular T&A
02 - Adjustment
03 - NFC-29 (Live Payment)
04 - Lump Sum Payment
05 - Comp Payment
06 - Cash Award
07 - NFC-29 (Manual Payment)
11 - Severance Payment
The AMOUNT field indicates the net amount distributed.
19. Press F4. The PENDING DISBURSEMENT(S) SCREEN 4 OF 5 displays.
20. Press Enter. The summary totals for the payment display.
Comment [NFC99]:
Show Slide 84: PENDING DISBURSEMENT(S) SCREEN 4 OF 5 screen.

90
Figure 44: PENDING DISBURSEMENT(S) SCREEN 4 of 5
Step Action
NOTE: The PENDING DISBURSEMENT(S) SCREEN 4 OF 5 is a view only
screen, which displays summary totals.

91
Step Action
TIP: The REISSUANCE field indicates the canceled payment amount that was made out to the deceased and reissued in the name of the beneficiary(ies). The amount may be different because of tax laws associated with death cases.
The TAX CREDIT field is a result of payments being distributed to beneficiaries in the tax year following the year of the employee’s death. If payments are made in the same year as the year of death, there are no tax credits.
The TAX YEAR field indicates the year of the employee’s death.
The HITS field indicates the amount to be disbursed as a result of HITS (Hospital Insurance) tax credits.
The SOCIAL SECURITY field indicates the amount to be disbursed as a result of social security tax credits.
The EMPLOYEE INDEBTEDNESS field indicates the total amount of indebtedness recorded in ABCO and SPPS Mainframe.
The TOTAL MONIES TO BE DISBURSED field indicates the total amount to
be disbursed to the deceased employee’s beneficiaries. If the amount it
negative and the payment is released, the employee’s estate is billed through
ABCO.
21. Press F10. The PENDING DISBURSEMENT(S) BY CLAIMANT screen
displays.
Comment [NFC100]:
Show Slide 85: PENDING DISBURSEMENT(S) BY CLAIMANT screen.

92
Figure 45: PENDING DISBURSEMENT(S) BY CLAIMANT SCREEN 5 of 5
Step Action
NOTE: The PENDING DISBURSEMENT(S) BY CLAIMANT screen is a
view only screen. All data on this screen is system generated and reflects the
pending disbursements from the most recent SPPS Mainframe entries. This
screen indicates the amount due and address for each beneficiary.
TIP: Press F7 to view the previous beneficiary and F8 to view the next.
Unlike an indebted case, a death case in SPPS Mainframe does not get closed. In the
event that an employee is posthumously given an additional payment (i.e. cash award
or bonus), an Agency can submit an adjustment through SPPS Web and include in the
Remarks field that it is for a death case. NFC then uses SPPS Mainframe to add the
net amount of the manual payment to the death case record.
TIP: The Agency can indicate in the Remarks field of the adjustment if they
would like NFC to certify the payment for distribution to the beneficiary(ies). If
it’s not indicated for NFC to certify, then the Agency is responsible for
certifying the payment.
Comment [NFC101]:
Each time a manual payment is added to a death case, the authorized Agency official must certify the payment.

93
Reviewing Disbursed Payments
After finalizing the payments, you must verify that the death case was disbursed by
conducting a payment inquiry. Payment Inquiry is Option 5 on the DEATH CASE
MENU. This option is used to query payments that have been disbursed and the
amount remaining to be disbursed.
In the procedure below, you learn how to conduct a payment inquiry for an employee’s
indebtedness regarding a death case.
Step Action
1. From the DEATH CASE MENU, enter “5” in the SELECT OPTION (1-7) field.
2. Press Enter. The PAYMENT INQUIRY SCREEN 1 OF 3 displays.
Figure 46: PAYMENT INQUIRY SCREEN 1 OF 3
Step Action
NOTE: All of the screens within the PAYMENT INQUIRY option are view
only.
3. Press F4. The PAYMENT INQUIRY SCREEN 2 OF 3 displays.
Comment [n102]: Slide 86
Comment [NFC103]:
PAYMENT INQUIRY SCREEN 1 OF 3 screen.
Comment [NFC104]:
Show Slide 87: PAYMENT INQUIRY SCREEN 2 OF 3 screen.

94
Figure 47: PAYMENT INQUIRY SCREEN 2 of 3
Step Action
NOTE: PAYMENT INQUIRY SCREEN 2 OF 3 displays the payments to be
disbursed, amount of indebtedness, the amount to be disbursed,
disbursements to date, and those payments yet to be disbursed.
4. Press F10. The PAYMENT INQUIRY BY CLAIMANT screen displays.
Comment [NFC105]:
Show Slide 88: PAYMENT INQUIRY BY CLAIMANT screen.

95
Figure 48: PAYMENT INQUIRY BY CLAIMANT Screen
Step Action
NOTE: PAYMENT INQUIRY BY CLAIMANT screen displays disbursement
data for each beneficiary.

96
6.4. Chapter Review
Knowledge Check
1. True or False: If all beneficiaries are adults, a death certificate, SF-1152, and a
SF/1153/1155 are the only documents needed to process a death case.
___________
2. Insert the following steps for processing a death case in the correct order in the
flow chart below:
Step Bank
Record Beneficiary Information Record Debts
Establish Record Certify Payment
Add Remarks
Chapter Summary
Having completed this chapter, you are now able to:
Explain the purpose of the death case function within SPPS Mainframe
Describe the different documents needed to process a death case
Describe the process for performing each function on the DEATH CASE MENU
Comment [NFC106]:
Show Slide 89-90
Knowledge Check
Chapter Review
Ask students to record their answers to the Knowledge Checks individually.
Comment [NFC107]:
Ask a volunteer to answer the first Knowledge Check. Explain that the correct answer is True.
Comment [NFC108]:
Ask a volunteer to answer the second Knowledge Check. Explain that the correct answers are: Establish Record, Record Beneficiary Information, Record Debts, Add Remarks, and Certify Payment.
Comment [NFC109]: Slide 91
Review previous chapter and transition to DOTSE Overview chapter.

97
7.0. DOTSE Overview
7.1. Chapter Overview
This chapter introduces users to the main functions and features of Document Tracking
System External (DOTSE) Mainframe.
Chapter Objectives
By the end of this chapter, you will be able to:
Describe the purpose of DOTSE
Discuss the main functions of DOTSE
Comment [NFC110]:
Show Slide 92-93: DOTSE Overview.

98
7.2. Introduction to DOTSE Mainframe
Lesson Overview
This lesson provides an introduction to DOTSE. It describes the main purpose of
DOTSE, and how DOTSE is incorporated into the overall payroll process.
Lesson Objectives
By the end of this lesson, you will be able to:
Explain how DOTSE is related to the overall payroll process
Describe the main purpose of DOTSE
The Document Tracking System External (DOTSE) is an online mainframe database
management system of the USDA that is used to process recertified payments. DOTSE
processing is a process involving Agency and NFC entries.
Recertification is the processing of a second payment when the employee claims non-
receipt, loss, theft, destruction, forgery or cancellation of a Treasury check or direct
deposit/electronic funds transmission (DD/EFT) issues for the initial payment.
The process involves both the Agency and NFC. Agencies enter data in DOTSE to
initiate the recertification process, NFC verifies the recertification data and completes
the recertification.
Before a recertification is processed, the Agency should review the claim to ensure that:
The beneficiary is entitled to the payment
A check was previously scheduled for issuance
The check is not in the possession of the employee or Agency
No check cancellation or deposit action has previously taken place
In each case where a claim is necessary, a personally signed statement from the
employee or other beneficiary should be obtained for the Agency’s records. If the check
is drawn jointly between two or more payees, all of the payees must sign.
Comment [n111]: Slide 94

99
The statement should include the following information:
What was the type of the payment (salary, travel, etc.);
Whether the check was received and, if not, whether the check was lost, stolen,
destroyed, or mutilated;
Whether the check was endorsed by the employee on the reverse side of the
check or if the check had a limited endorsement such as For Deposit Only;
What were the circumstances surrounding the loss, theft, destruction, or
mutilation of the check (if received); and
What is the present address of the beneficiary
TIP: To avoid the loss of a replacement check, it is strongly recommended
that the check be sent to an office or an address other than the one to which
the original was sent. Altering the mailing address for the recertification does
not change the employee’s address in the Personnel/Payroll system.
Recertification Payment Methods
In DOTSE, recertification, or secondary payment, can be paid out in any one of three
methods. The types of recertified payment methods are listed below.
Figure 49. Types of Recertified Payments
NOTE: If the original payment was a DD/EFT payment, the employee may
request a paper check for the recertified payment and vice versa.
Both the original
payment and the second
check are issued as a
paper check.
Both payments are
issued as an DD/EFT.
The method of payment
for the second check is
different than the
original.
Hard Copy DD/EFT Mixed
Comment [n112]: Slide 95

100
Replacement Instructions
If a recertification of a check is needed, the following steps should be taken:
1. Employee reports non-receipt of payment to the Agency personnel office if they
do not receive their paper check by Monday or their DD/EFT payment by
Tuesday (pay week)
2. Agency determines if the check was issued and sent to the correct mailing
address by checking: IR124, Address/Check Information; IR524, PERHIS,
Address/Check Information; and/or PQ032, Payroll Listing
NOTE: If the payment was not issued at all, you should process a QSR
through SPPS Mainframe.
3. Employee completes and signs Form AD-663, Request for Issuance of
Replacement Check.
4. Agency certifies that the information on the AD-663 is correct and maintains this
form at the Agency location.
If the employee inadvertently negotiates both checks, he/she becomes liable for the
return of the proceeds of the second check plus any interest and penalties that accrue
before the amount is repaid.
IMPORTANT: To ensure that a payment has not been returned or disbursed,
inquire for existing payments in DOTSE before beginning the recertification
process.
If a payment has been previously recertified, or a Standard Form (SF) – 1098
(Schedule of Cancelled or Undelivered Checks) or RO145 (Scheduled of
Cancelled EFT Items) was issued, do not enter the data; refer to the Contact
Center page at: https://www.nfc.usda.gov/Contact_Us/Help_Desks/CHD
/CHD_ home.html.
If the original check is received, it must be returned by certified or registered mail to:
Kansas City Financial Center
Attn: Anthony Barnes
4241 NE 34th St.
Kansas City, Missouri 64117

101
7.3. Chapter Review
Knowledge Check
1. The main purpose of DOTSE is:
A. To process payments that employee’s do not receive
B. To complete death cases caught in suspense
C. To track all document submitted by NFC’s customers
D. To process recertified payments
2. What four steps must an Agency conduct to verify that a recertification is
required?
1. _________________________________________________________
2. _________________________________________________________
3. _________________________________________________________
4. _________________________________________________________
Chapter Summary
Having completed this chapter, you are now able to:
Describe the purpose of DOTSE
Discuss the main functions of DOTSE
Comment [NFC113]:
Show Slide 96
Knowledge Check
Chapter Review
Ask students to record their answers to the Knowledge Checks individually.
Comment [NFC114]:
Ask a volunteer to answer the first Knowledge Check. Explain that the correct answer is D.
Comment [NFC115]:
Ask a volunteer to answer the second Knowledge Check. Explain that the correct answers are:
The beneficiary is entitled to the payment
A check was previously scheduled for issuance
The check is not in the possession of the employee or Agency
No check cancellation or deposit action has previously taken place
Comment [NFC116]: Slide 97
Review previous chapter and transition to DOTSE Navigation chapter.

102
8.0. DOTSE Navigation
8.1. Chapter Overview
This chapter discusses the procedures for accessing DOTSE through the NFC
Mainframe and navigating within DOTSE.
Chapter Objectives
By the end of this chapter, you will be able to:
Access DOTSE from another NFC Mainframe system
Use the correct steps to navigate within DOTSE
Comment [NFC117]:
Show Slide 98-99: DOTSE Navigation Chapter Overview.

103
8.2. Accessing DOTSE
Lesson Overview
This lesson explains the procedures for accessing DOTSE. Additionally, it covers the
relevant security and access roles for DOTSE.
Lesson Objectives
By the end of this lesson, you will be able to:
Access DOTSE through the NFC Mainframe
Describe the security and access roles for DOTSE
As mentioned previously, NFC secures access to the data residing on the NFC
mainframe, NFC’s data processing center. Multiple layers of stringent security
measures are in place to secure the data.
You must request access to DOTSE through your Agency’s security office. In the
request, you should provide the following data:
User name
User ID
Agency name
User access request level
o Inquiry read
o Inquiry Update
o Recertification
o MANLOG read
Telephone number
Application name
User Security Access Code
Comment [n118]: Slide 100

104
Switching Mainframe Application
For instructions regarding how to access the NFC Mainframe, refer back to Lesson 3.2
Accessing SPPS Mainframe.
In the procedure below, you learn how to transition between databases, specifically
from SPPS Mainframe to DOTSE.
Figure 50: CL/SUPERSESSION Main Menu
Step Action
4. Press F9. The cursor moves to the Command field.
Step Action
1. Press CLEAR, while in another Mainframe application. The message Enter
Next Task Code displays.
2. Enter “bye” below the message.
3. Press Enter. The CL/SUPERESSION Main Menu displays. Comment [NFC119]:
Show Slide 101: CL/SUPERSESSION Main Menu.

105
Step Action
5. Enter “s DOTSE” in the Command field.
6. Press Enter. The DOTSE MAIN MENU displays.
Figure 51: DOTSE MAIN MENU
Comment [NFC120]:
Show Slide 102: DOTSE MAIN MENU.

106
8.3. General Navigation
Lesson Overview
This lesson introduces users to the basic navigation features of DOTSE and the steps
required to navigate between the DOTSE MAIN MENU and the menu options.
Lesson Objectives
By the end of this lesson, you will be able to:
Access each of the DOTSE main menu options
Describe the DOTSE function keys at the bottom of each DOTSE screen
DOTSE is a menu-drive system consisting of one main menu with six menu options:
1. INQUIRY INFORMATION
2. INFORMATION ON FIRST CHECK
3. SF-1166 – SECOND CHECK
4. SF-1184 UNAVAILABLE CHECK CANCELLATION
5. CLAIM OF NON-RECEIPT (DD/EFT)
6. MANLOG
Recertified payments are processed using options 1 through 5. Each option must be
completed in its entirety before a recertified payment can be processed. These options
are described in greater detail in Chapter 9.0. No updates can be made to a record after
a recertified payment is disbursed and a record cannot be deleted once it has been
added in the system.
NOTE: The MANLOG function of DOTSE can be used to research manual
adjustments made prior to pay period 14, Fiscal Year (FY) 2000. All manual
adjustments processed since pay period 14, FY 2000, are now processed
and maintained in SPPS Web.
Due to the infrequency with which the MANLOG function is used, it is not
covered in this training. For more information regarding the MANLOG
function, please refer to the DOTSE Procedure Manual.
Comment [n121]: Slide 103
Comment [n122]: Slide 104

107
Navigating Within DOTSE
After you have accessed DOTSE, the DOTSE MAIN MENU displays with six menu
options.
In the procedure below, you learn how to access the options within DOTSE.
Figure 52: DOTSE MAIN MENU
Step Action
1. Enter the employee’s Department Code in the DEPARTMENT CODE field.
2. Enter the employee’s Agency Code in the AGENCY CODE field.
3. Enter the employee’s personnel office in the PERSONNEL OFFICE field.
4. Enter the menu option number in the SELECTION field.
5. Press Enter. The screen for the selected option displays.

108
Function Keys
Function keys are assigned functions relevant to the program operated. These function
keys are typically listed on a separate pad or across the top of the keyboard. Assigned
F key functions used in DOTSE are displayed on each screen.
NOTE: If you are using a laptop, the keys may be configured differently.
Key Description
F1 Press to return to the DOTSE MAIN MENU.
F2 Press to add or update a record.
Press to refresh a screen.
F3 Press to move between various submenus in DOTSE without having to
return to the main menu.
F4 Press to move to a specific screen.
F5 Press to return to the Inquiry Menu.
F6 Press to add an employee to the database in MANLOG.
F7 Press to return to the previous screen within a record.
F8 Press to go to the next screen within a record.
F9 Press to clear (initialize) the screen of keyed in data including the social
security number.
F10 Press to return to the previous record.
F11 Press to scroll to the next record.
Clear Press to exit the system.
Enter Press to enter data into the system after you have keyed it in at a screen.
Tab Press to move the cursor from field to field.
Comment [n123]: Slide 105

109
8.4. Chapter Review
Knowledge Check
1. True or False: DOTSE is accessible through the internet.
__________
2. Fill in the blanks:
F3 – Press to move between various ________ in DOTSE without having to
return to the main menu.
F9 – Press to _______ (initialize) the screen of keyed in data including the
social security number
F10 – Press to return to the ________ record.
Chapter Summary
Having completed this chapter, you are now able to:
Access DOTSE from another NFC Mainframe system
Use the correct steps to navigate within DOTSE
Comment [NFC124]:
Show Slide 106:
Knowledge Check
Chapter Review
Ask students to record their answers to the Knowledge Checks individually.
Comment [NFC125]:
Ask a volunteer to answer the first Knowledge Check. Explain that the correct answer is False.
Comment [NFC126]:
Ask a volunteer to answer the second Knowledge Check. Explain that the correct answers are: submenus, clear, and previous.
Comment [NFC127]: Slide 107 Review previous chapter and transition to Recertifying Paper Checks and Direct Deposit Payments chapter.

110
9.0. Recertifying Paper Checks and Direct Deposit Payments
9.1. Chapter Overview
This chapter provides users with the instructions and information required to recertify
direct deposit and paper check payments.
Chapter Objectives
By the end of this chapter, you will be able to:
Describe how to recertify a paper check
Describe how to recertify a direct deposit/electronic funds transfer (DD/EFT)
payment
Explain the differences between recertifying a paper check and a DD/EFT
Comment [NFC128]:
Show Slide 108-109 Recertifying Paper Check and Direct Deposit Payments Chapter Overview.

111
9.2. Recertifying a Paper Check
Lesson Overview
This lesson provides the information and procedures required to recertify a paper check.
Lesson Objectives
By the end of this lesson, you will be able to:
Describe how to add a new inquiry for a paper check
Describe how to document information for an issued paper check
Describe how to complete a SF-1184 to cancel an issued paper check
Describe how to complete a SF-1166 for the reissuance of a second paper check
As mentioned earlier, recertification is the process for reissuing a check to a Federal
employee. Figure 53: Paper Check Recertification Process outlines the recertification
process for a paper check. After the Agency certifies that the check requires
recertification, it completes the remaining steps in DOTSE for recertifying a paper
check:
Figure 53: Paper Check Recertification Process
These steps are outlined further below:
1. Add an inquiry record
2. Documents information for the first check disbursed
3. Add a SF-1184 (Unavailable Check Cancellation Record)
4. Add the information for the second payment to be disbursed
NOTE: Paper checks are recertified the Monday after pay week. In the
exception that the check was sent to an incorrect address, it should be
recertified immediately.
Add Inquiry
Document First Paper
Check
Add
SF-1184
Document Second Payment
Comment [n129]: Slide 110

112
While the screens for the following procedures flow to each other automatically, each
procedure begins by accessing the respective screens from the DOTSE MAIN MENU.
Adding a Recertified Paper Check Record
In the event that a paper check was issued and not received, a new check may be
created for recertification. To begin this process you must first add an inquiry record.
Inquiry records are added in DOTSE using Option 1. To create a new inquiry, you will
need to:
Add, update, and view information for an AD-354 (Request for Information)
Add, update and view recertified payment records
Add descriptions for the inquiry and/or recertification record
Summarize the results of the inquiry and/or recertification record
In the procedure below, you learn how to add a new inquiry for recertifying a paper
check.
Figure 54: DOTSE MAIN MENU
Step Action
1. From the DOTSE MAIN MENU, enter the employee’s Department Code in
the DEPARTMENT CODE field.
2. Enter the employee’s Agency Code in the AGENCY CODE field.
3. Enter the employee’s personnel office in the PERSONNEL OFFICE field.
Comment [n130]: Slide 111
Comment [NFC131]:
DOTSE MAIN MENU.

113
Step Action
4. Enter “1” in the SELECTION field.
5. Press Enter. The INQUIRY INFORMATION screen displays with the
message NOT FOUND, in the top right corner. This is the default message
that displays before conducting an inquiry search.
Figure 55: INQUIRY INFORMATION Screen
Step Action
6. Enter the employee’s social security number in the IDENTIFICATION
NUMBER field, next to the word PAYE.
7. Press Enter. If the record does not exist, the message NOT FOUND displays
in the top right corner. If an inquiry record exists, the established record
displays with the message FOUND in the top right corner.
NOTE: In the case that an inquiry record exists, enter in the next
alphanumeric character that follows the previous record (e.g. A, B, C),
after the social security number and press F2.
You can scroll through the existing records by pressing F11 (NEXT)
and F10 (PREV) to ensure the recertification has not been processed
already.
Comment [NFC132]:
Show Slide 112: INQUIRY INFORMATION screen.

114
Step Action
8. Press F2 to update the blank record. The message at the top right corner
changes from NOT FOUND to ADD. This record cannot be deleted once
added. Make sure to verify that the correct social security number is entered.
9. Enter the employee’s name in the PAYEE NAME field.
10. Enter the amount of the payment in the AMOUNT field.
TIP: Use a decimal to separate dollars and cents (i.e. $1000 is
1000.00)
NOTE: The METHOD INQUIRY RECEIVED is system generated with a 6,
Electronic Transmission. This code can be changed to a 3 (congressional,
special handling, etc.) if applicable.
11. Enter the appropriate code for the method of inquiry in the TYPE INQUIRY
field.
NOTE: The TYPE INQUIRY field is used to distinguish a paper
inquiry (001), i.e. fax, from an electronic method, i.e. Remedy (002).
12. Enter the name of the individual making the inquiry in the INQUIRER field.
13. Enter the inquirer’s phone number in the PHONE NUMBER.
14. Enter the inquirer’s extension in the EXT field.
15. Enter “2” (Electronic) in the REPLY METHOD field.
16. Enter “55” in the REPLY CODE field.
NOTE: The REPLY CODE field identifies the method the original
payment was made. Valid entries include 55 (paper check) and 64
(DD/EFT).
17. Press Enter. The INFORMATION ON FIRST CHECK displays.
Comment [NFC133]:
Show Slide 113: INFORMATION ON FIRST CHECK screen.

115
The system edits the data. If no errors are found:
The record is added to DOTSE; and
The message FOUND displays in the top right corner of the INQUIRY
INFORMATION screen confirming that the record was added.
If errors are found:
The message PLEASE CORRECT FIELD(S) IN ERROR displays at the bottom
of the screen; and
The errors are highlighted.
TIP: To enter additional information about the inquiry, press F7 and the
SUPPLEMENTAL INQUIRY INFORMATION screen displays.
Adding a First Check Record
Now that we have added a rectification record, we must record the information from the
first paper check. This is done from Option 2, INFORMATION ON FIRST CHECK, on
the DOTSE MAIN MENU. This option is also used to view and update existing
information.
If the first check was processed in the automated system, most of the fields, on the
screen, will be auto populated; if processed manually all fields will be blank and must be
entered manually.
The same menu option is used to view and update the first check information.
CAUTION: The information entered must be identical to the original payment
to successfully process the recertified payment.

116
In the procedure below, you learn how to add the information on the first paper check
that was issued.
Step Action
1. From the DOTSE Main Menu, enter the employee’s Department Code in the
DEPARTMENT CODE field.
2. Enter the employee’s Agency Code in the AGENCY CODE field.
3. Enter the employee’s personnel office in the PERSONNEL OFFICE field.
4. Enter “2” in the SELECTION field.
5. Press Enter. The INFORMATION ON FIRST CHECK screen displays.
Figure 56: INFORMATION ON FIRST CHECK Screen
Step Action
6. Enter the employee’s social security number in the IDENTIFICATION
NUMBER field, next to the word PAYE.
7. Press Enter. If the record is located, the message FOUND displays in the top
right corner on INFORMATION ON FIRST CHECK screen.
NOTE: If the message NOT FOUND displays in the top right corner,
begin the recertification process by adding an inquiry.
8. Press F2 to add the first check information. The message ADD displays in the

117
Step Action
top right corner.
NOTE: If the payment was processed in the automated system, most of the
fields on the INFORMATION ON FIRST CHECK screen are system-
generated and are transferred from the INQUIRY INFORMATION screen or
PAYE.
If the payment was processed manually, the system does not generate the
data; these fields must be completed by the Agency.
9. Enter the current date in the DATE ISSUED field.
NOTE: The date is system-generated if the payment was processed
in PPS. If the payment was not paid in the automated system or
processed prior to Tuesday after payday, use the current date.
10. Enter the amount of the original check in the CHECK AMOUNT field.
TIP: Use a decimal to separate dollars and cents (i.e. $1000 is
1000.00).
11. Enter the name of the employee, as it appears in the original payment, in the
NAME field.
12. Enter the employee’s street address as it appears in the original payment in
the ADDRESS (1) and ADDRESS (2) fields.
NOTE: If the original check went to a designated agent, enter “D/A”
followed by the designated agent number in the ADDRESS (1) field
(e.g. D/A 1234).
13. Enter the employee’s city, as it appears in the original payment, in the CITY
field.
14. Enter the employee’s state, as it appears in the original payment, in the ST
field.
NOTE: Enter “FF” in the ST field if it is a foreign address.

118
Step Action
15. Enter the employee’s zip code, as it appears in the original payment, in the
ZIP CODE field.
TIP: Leave the ZIP CODE field blank for a foreign address.
NOTE: The CHECK SERIES field is system generated for a paper check. If
the payment was not processed by the automated system, enter all “9”s in
this field.
16. Enter in the SF-1166 disbursing office number in the DISBURSING OFFICE
field, only if the SF-1166 SCHEDULE NUMBER field is to be completed.
TIP: If the payment was not processed by the automated system,
enter “0310” in the DISBURSING OFFICE field.
17. Enter the SF-1166 voucher and schedule number of the original check in the
SF-1166 SCHEDULE NUMBER field.
TIP: The schedule number can be found in PQ032. This schedule
number should be changed to reflect your Department Code and if
the payment was a paper check or DD/EFT.
The elements of the schedule number are as follows:
First position is the fiscal year
Second position distinguishes a paper check from an EFT: B
(paper check) or assigned database code used in the third
position (DD/EFT)
Third position is the assigned database code for your Agency: A
(Agriculture), H (Homeland Security), N (Other), and T (Treasury)
Fourth and fifth positions are the pay period
Sixth position indicates the first or second schedule of PAYE
The last position is always “-3”
An example of a paper check processed in Pay Period 04, 2013, on
the first schedule of PAYE for the Department of Agriculture is,
3BA041-3.

119
Step Action
18. Enter the pay period in the PAY PERIOD field.
19. Press Enter. The SF-1184 UNAVAILABLE CHECK CANCELLATION
screen displays.
The system edits the data. If no errors are found:
The record is added to DOTSE; and
The message FOUND displays in the top right corner of the INFORMATION ON
FIRST CHECK screen confirming that the record was added.
If errors are found:
The message PLEASE CORRECT FIELD(S) IN ERROR displays at the bottom
of the screen; and
The errors are highlighted.
Adding a SF-1184 Unavailable Check Cancellation Record
After you have entered the information for the first check into DOTSE, then you use
Option 4 on the DOTSE MAIN MENU to add Form SF-1184 (Unavailable Check
Cancellation). This generates an SF-1184 that is sent to the Department of Treasury to
alert them to put a stop payment on the original check. This option can also be used to
update and verify information for a SF-1184.
The Agency completes only two fields on this screen, NEW ADDRESS and STOP
REASON. The remaining fields are either system generated or completed by NFC.
The SF-1184 UNAVAILABLE CHECK CANCELLATION screen automatically displays
for paper checks with the message FOUND after the INFORMATION ON FIRST
CHECK screen is completed.
Comment [NFC134]:
Show Slide 114: SF-1184 UNAVAILABLE CHECK CANCELLATION screen.

120
In the procedure below, you learn how to complete the SF-1184 Unavailable Check
Cancellation form.
Step Action
1. From the DOTSE MAIN MENU, enter the employee’s Department Code in
the DEPARTMENT CODE field.
2. Enter the employee’s Agency Code in the AGENCY CODE field.
3. Enter the employee’s personnel office in the PERSONNEL OFFICE field.
4. Enter “4” in the SELECTION field.
5. Press Enter. The SF-1184 UNAVAILABLE CHECK CANCELLATION
screen displays.
Figure 57: SF-1184 UNAVAILABLE CHECK CANCELLATION Screen
Step Action
6. Enter the employee’s social security number in the IDENTIFICATION
NUMBER field, next to the word PAYE.
7. Press Enter. The message FOUND displays.
8. Press F2 to add an SF-1184 record. The message ADD displays in the top
right corner of the SF-1184 UNAVAILABLE CHECK CANCELLATION
screen.
9. Enter the employee’s name and full address for the second check in the NEW
ADDRESS field.

121
Step Action
10. Enter “A” (Recertified) in the STOP REASON CODES field.
11. Press Enter. The SF-1166 – SECOND CHECK screen displays.
The system edits the data. If no errors are found:
The record is added to DOTSE; and
The message FOUND displays in the top right corner of the SF-1184
UNAVAILABLE CHECK CANCELLATION screen confirming that the record
was added.
If errors are found:
The message PLEASE CORRECT FIELD(S) IN ERROR displays at the bottom
of the screen; and
The errors are highlighted.
Adding an SF-1166 Second Check Record
After completing the SF-1184 UNAVAILABLE CHECK CANCELLATION screen, you
can use Option 3 on the DOTSE MAIN MENU to insert the information for the second
payment to be issued to the employee. This option can also be used update, or view the
information for a replacement payment.
In the procedure below, you learn how to file information for recertifying a second check.
Step Action
1. From the DOTSE MAIN MENU, enter the employee’s Department Code in
the DEPARTMENT CODE field.
2. Enter the employee’s Agency Code in the AGENCY CODE field.
3. Enter the employee’s personnel office in the PERSONNEL OFFICE field.
4. Enter “3” in the SELECTION field.
5. Press Enter. The SF-1166 – SECOND CHECK screen displays.
Comment [NFC135]:
Show Slide 115: SF-1166 – SECOND CHECK screen.

122
Figure 58: SF-1166 – SECOND CHECK Screen
Step Action
6. Enter the employee’s social security number in the IDENTIFICATION
NUMBER field, next to the word PAYE.
7. Press Enter. The message FOUND displays.
8. Press F2 to add an SF-1166 record. The message ADD displays.
9. Enter “P” in the PAYMENT STATUS field.
NOTE: The PAYMENT STATUS field indicates the progress of the
recertified payment. This field is system generated with N (Waiting to
be processed). For paper checks, you must change the N to a P
(Process). For DD/EFT payments, N automatically changes to P
when Y is entered in the OK TO RECERTIFY field on the CLAIM OF
NON-RECEIPT screen. Once a payment is disbursed, the system
changes the field to D (Disbursed) for both a paper check and a
DD/EFT.
10. Enter “0” in the CHECK TYPE field.
NOTE: The CHECK TYPE field indicates the type of payment being
recertified. Enter “0” for a paper check, “9” for a DD/EFT address on
the database, or “2” for a DD/EFT address other than the one on the
database.

123
Step Action
11. Enter the employee’s name in the NAME field.
12. Enter the first line of the employee’s address in the ADDRESS (1) field
followed by the letters “RE” and the pay period (e.g. RE01).
13. Enter the second line of the employee’s address in the ADDRESS (2) field.
14. Enter the employee’s city in the CITY field.
15. Enter the employee’s state in the ST field.
NOTE: Enter “FF” in the ST field if it is a foreign address.
16. Enter the employee’s zip code in the ZIP CODE field.
17. Press Enter.
The system edits the data. If no errors are found:
The record is added to DOTSE; and
The message FOUND displays in the top right corner of the SF-1166 – SECOND
CHECK screen confirming that the record was added.
If errors are found:
The message PLEASE CORRECT FIELD(S) IN ERROR displays at the bottom
of the screen; and
The errors are highlighted.

124
9.3. Recertifying a Direct Deposit/Electronic Funds Transfer Payment
Lesson Overview
This lesson provides users with the information and procedures required to recertify a
direct deposit/electronic funds transfer (DD/EFT) payment.
Lesson Objectives
By the end of this lesson, you will be able to:
Describe how to add a new inquiry for a DD/EFT payment
Describe how to document necessary information for an employee’s first issued
check or DD/EFT
Describe how to complete a SF-1166 for the reissuance of a second DD/EFT
Describe how to complete a Claim of Non-Receipt
The process for recertifying a DD/EFT payment is slightly different than the
recertification of a paper check. After the Agency certifies that the DD/EFT payment has
not been issued, it completes the remaining steps in DOTSE for recertifying a DD/EFT
payment:
Figure 59: DD/EFT Recertification Process
These steps are outlined further below:
1. Add an inquiry record
2. Documents the information for the first check disbursed
3. Add the information for the second payment to be disbursed
4. File a Claim of Non-Receipt
NOTE: DD/EFT payments are recertified the Tuesday after a Monday
EFT/DD payday.
Add Inquiry
Document First
DD/EFT
Document Second Payment
File Claim of Non-Receipt
Comment [n136]: Slide 116

125
While the screens for the following procedures flow to each other automatically, each
procedure begins by accessing the respective screens from the DOTSE MAIN MENU.
Adding a Recertified DD/EFT Payment Record
As mentioned previously when an employee does not receive an initial DD/EFT, the
payment may be resent. To begin this process you must first add an inquiry, or record,
in DOTSE using Option 1 on the DOTSE MAIN MENU. This option is used to:
Add, update, and view information for an AD-354 (Request for Information)
Add, update, and view recertified payment records
Add descriptions for the inquiry and/or recertification record
Summarize the results of the inquiry and/or recertification record
In the procedure below, you learn how to add a new inquiry for recertifying a DD/EFT
payment.
Figure 60: DOTSE MAIN MENU
Step Action
1. From the DOTSE MAIN MENU, enter the employee’s Department Code in
the DEPARTMENT CODE field.
2. Enter the employee’s Agency Code in the AGENCY CODE field.
3. Enter the employee’s personnel office in the PERSONNEL OFFICE field.
Comment [n137]: Slide 117
Comment [NFC138]:
DOTSE MAIN MENU.

126
Step Action
4. Enter “1” in the SELECTION field.
5. Press Enter. The INQUIRY INFORMATION screen displays with the
message NOT FOUND, in the top right corner. This is the default message
that displays before conducting an inquiry search.
Figure 61: INQUIRY INFORMATION Screen
Step Action
6. Enter the employee’s social security number in the IDENTIFICATION
NUMBER field, next to the word PAYE.
7. Press Enter. If the record does not exist, the message NOT FOUND displays
in the top right corner.
NOTE: If an inquiry record exists, the established record displays
with the message FOUND in the top right corner.
In the case that an inquiry record exists, enter in the next alpha
character (e.g. A, B, C) after the social security number and press F2.
You can scroll through the existing records by pressing F11 (NEXT)
and F10 (PREV) to ensure the recertification has not been processed
already.
8. Press F2 to update the blank record. The message in the top right corner
changes from NOT FOUND to ADD.
Comment [NFC139]:
Show Slide 118: INQUIRY INFORMATION screen.

127
Step Action
9. Enter the employee’s name in the PAYEE NAME field.
10. Enter the amount of the payment in the AMOUNT field.
TIP: Use a decimal to separate dollars and cents (i.e. $1000 is
1000.00)
NOTE: The METHOD INQUIRY RECEIVED is system generated with a 6,
Electronic Transmission. This code can be changed to a 3 (congressional,
special handling, etc.) if applicable.
11. Enter the appropriate code for the method of inquiry in the TYPE INQUIRY
field.
NOTE: The TYPE INQUIRY field is used to distinguish a paper
inquiry (001), i.e. fax, from an electronic method, i.e. Remedy (002).
12. Enter the name of the individual making the inquiry in the INQUIRER field.
13. Enter the inquirer’s phone number in the PHONE NUMBER.
14. Enter the inquirer’s extension in the EXT field.
15. Enter “2” (Electronic) in the REPLY METHOD field.
16. Enter “64” in the REPLY CODE field.
NOTE: The REPLY CODE field identifies the method the original
payment was made. Valid entries include 55 (paper check) and 64
(DD/EFT).
17. Press Enter. The INFORMATION ON FIRST CHECK screen displays.
Comment [NFC140]:
Show Slide 119: INFORMATION ON FIRST CHECK screen.

128
The system edits the data. If no errors are found:
The record is added to DOTSE; and
The message FOUND displays in the top right corner of the INQUIRY
INFORMATION screen confirming that the record was added.
If errors are found:
The message PLEASE CORRECT FIELD(S) IN ERROR displays at the bottom
of the screen; and
The errors are highlighted.
TIP: To enter additional information about the inquiry, press F7 and the
SUPPLEMENTAL INQUIRY INFORMATION screen displays.
Adding a First Check Record
Now that we have added a recertification record, we must record the information from
the first paper check. After adding the record, the INFORMATION ON FIRST CHECK
screen displays where we record the information from the first payment. This can also
be done by selecting Option 2, INFORMATION ON FIRST CHECK, on the DOTSE
MAIN MENU. This option is also used to view and update existing information.
If the first payment was processed in the automated system, most of the fields, on the
screen, are system-generated; if processed manually all fields are blank and must be
entered manually.
CAUTION: Any information entered must be identical to the original payment
to successfully process the recertified payment.
In the procedure below, you learn how to add file information for a DD/EFT payment
that needs to be recertified.
Step Action
1. From the DOTSE MAIN MENU, enter the employee’s Department Code in
the DEPARTMENT CODE field.

129
Step Action
2. Enter the employee’s Agency Code in the AGENCY CODE field.
3. Enter the employee’s personnel office in the PERSONNEL OFFICE field.
4. Enter “2” in the SELECTION field.
5. Press Enter. The INFORMATION ON FIRST CHECK screen displays with
the message NOT FOUND, in the top right corner.
Figure 62: INFORMATION ON FIRST CHECK Screen
Step Action
6. Enter the employee’s social security number in the IDENTIFICATION
NUMBER field, next to the word PAYE.
7. Press Enter. If the record is located, the message FOUND displays in the top
right corner on INFORMATION ON FIRST CHECK screen.
NOTE: If the message NOT FOUND displays in the top right corner,
begin the recertification process by adding an inquiry.
8. Press F2 to add the first check information. The message ADD displays in the
top right corner.
9. Press Enter.

130
Step Action
NOTE: If the payment was processed in the automated system, most of the
fields on the INFORMATION ON FIRST CHECK screen are system-
generated and are transferred from the INQUIRY INFORMATION screen or
PAYE.
If the payment was processed manually, the system does not generate the
data; these fields must be completed by the Agency.
10. Enter the current date in the DATE ISSUED field.
NOTE: The date is system-generated if the payment was processed
in the automated Payroll/Personnel System. If the payment was not
paid in the automated system or processed prior to Tuesday after
payday, use the current date.
11. Enter the amount of the original check in the CHECK AMOUNT field.
TIP: Use a decimal to separate dollars and cents (i.e. $1000 is
1000.00)
12. Enter the name of the employee, as it appears in the original payment, in the
NAME field.
13. Enter “RT#” followed by the employee’s original routing number in the
ADDRESS (1) field.
14. Enter “ACCT#” followed by the employee’s original account number in the
ADDRESS (2) field.
NOTE: The CHECK SERIES field is not needed for DD/EFT payments.
15. Enter in the SF-1166 disbursing office number in the DISBURSING OFFICE
field, only if the SF-1166 SCHEDULE NUMBER field is also being entered.
TIP: If the payment was not processed by the automated system,
enter “0310” in the DISBURSING OFFICE field.

131
Step Action
16. Enter the SF-1166 voucher and schedule number of the original check in the
SF-1166 SCHEDULE NUMBER field.
TIP: The schedule number can be found in PQ032. This schedule
number should be changed to reflect your Department Code and if
the payment was a paper check or EFT.
The elements of the schedule number are as follows:
First position is the fiscal year
Second position distinguishes a paper check from an EFT: B
(paper check) or assigned database code used in the third
position (DD/EFT)
Third position is the assigned database code for your Agency:
A (Agriculture), H (Homeland Security), N (Other), and T
(Treasury)
Fourth and fifth positions are the pay period
Sixth position indicates the first or second schedule of PAYE
The last position is always “-3”
An example of a EFT processed in Pay Period 04, 2013, on the first
schedule of PAYE for the Department of Homeland Security is,
3HH041-3.
17. Enter the pay period in the PAY PERIOD field.
18. Press Enter. The SF-1166 – SECOND CHECK screen displays.
The system edits the data. If no errors are found:
The record is added to DOTSE; and
The message FOUND displays in the top right corner of the INFORMATION ON
FIRST CHECK screen confirming that the record was added.
If errors are found:
The message PLEASE CORRECT FIELD(S) IN ERROR displays at the bottom
of the screen; and
The errors are highlighted.
Comment [NFC141]:
Show Slide 120: SF-1166 – SECOND CHECK screen.

132
Adding an SF-1166 Second Check Record
After you have entered the information for the first check into DOTSE, the SF-1166 –
SECOND CHECK screen displays for you to insert the information for the second
payment to be issued. If an inquiry already exists, you can also access this screen
through Option 3, SF-1166 – SECOND CHECK, on the DOTSE MAIN MENU. This
option can also be used update or view inquiry information for a replacement payment.
In the procedure below, you learn how to enter information needed for recertifying a
second DD/EFT payment.
Step Action
1. From the DOTSE MAIN MENU, enter the employee’s Department Code in
the DEPARTMENT CODE field.
2. Enter the employee’s Agency Code in the AGENCY CODE field.
3. Enter the employee’s personnel office in the PERSONNEL OFFICE field.
4. Enter “3” in the SELECTION field.
5. Press Enter. The SF-1166 – SECOND CHECK screen displays with the
message NOT FOUND, in the top right corner.
Figure 63: SF-1166 – SECOND CHECK Screen

133
Step Action
6. Enter the employee’s social security number in the IDENTIFICATION
NUMBER field, next to the word PAYE.
7. Press Enter. The message FOUND displays in the top right corner.
8. Press F2 to add an SF-1166 record. The message ADD displays in the top
right corner.
NOTE: The PAYMENT STATUS field indicates the progress of the
recertified payment. This field is system generated with N (Waiting to be
processed). For paper checks, you must change the N to a P (Process). For
DD/EFT payments, N automatically changes to P when Y is entered in the
OK TO RECERTIFY field on the CLAIM OF NON-RECEIPT screen. Once a
payment is disbursed, the system changes the field to D (Disbursed) for both
a paper check and DD/EFT.
9. Enter the appropriate check type in the CHECK TYPE field.
TIP: The CHECK TYPE field indicates the type of payment being
recertified. Enter “0” for a paper check, “9” for a DD/EFT address on
the database, or “2” for a DD/EFT address other than the one on the
database.
If “2” is entered, you must enter a new routing number in the
ADDRESS (1) field and a new account number in the ADDRESS (2)
field.
10. Enter the employee’s name in the NAME field.
11. Enter “RT# ” followed by the employee’s routing number in the ADDRESS (1)
field. A space should be entered after the #.
12. Enter “ACCT# ” followed by the employee’s account number in the
ADDRESS (2) field (e.g. Acct# 3456). A space should be entered after the #.
NOTE: No entry is required for ADDRESS (1) and ADDRESS (2) fields if “9”
is entered for CHECK TYPE.
If the account is a savings account, enter “/S” after the account number.
13. Enter the employee’s city in the CITY field.

134
Step Action
14. Enter the employee’s state in the ST field.
TIP: Enter “FF” in the ST field if it is a foreign address.
15. Enter the employee’s zip code in the ZIP CODE field.
16. Press Enter. The CLAIM OF NON-RECEIPT (DD/EFT) screen displays.
The system edits the data. If no errors are found:
The record is added to DOTSE; and
The message FOUND displays in the top right corner of the SF-1166 – SECOND
CHECK screen confirming that the record was added.
If errors are found:
The message PLEASE CORRECT FIELD(S) IN ERROR displays at the bottom
of the screen; and
The errors are highlighted.
Comment [NFC142]:
Show Slide 121: CLAIM OF NON-RECEIPT DD/EFT screen.

135
Adding a Claim of Non-Receipt (DD/EFT)
Once you complete the SF-1166 – SECOND CHECK screen, the CLAIM OF NON-
RECEIPT DD/EFT screen displays. This screen is used to record and trace a claim of
non-receipt of a DD/EFT payment. If an inquiry already exists, you can access this
screen using Option 5, CLAIM OF NON-RECEIPT (DD/EFT), on the DOTSE MAIN
MENU. This option can also be used update, or view the information for a current Claim
of Non-Receipt.
In the procedure below, you learn how to submit a Claim of Non-Receipt for a DD/EFT
payment.
Step Action
1. From the DOTSE MAIN MENU, enter the employee’s Department Code in
the DEPARTMENT CODE field.
2. Enter the employee’s Agency Code in the AGENCY CODE field.
3. Enter the employee’s personnel office in the PERSONNEL OFFICE field.
4. Enter “5” in the SELECTION field.
5. Press Enter. The CLAIM OF NON-RECEIPT DD/EFT screen displays with
the message NOT FOUND, in the top right corner.
Figure 64: CLAIM OF NON-RECEIPT DD/EFT Screen

136
Step Action
6. Enter the employee’s social security number in the IDENTIFICATION
NUMBER field, next to the word PAYE.
7. Press Enter. The message FOUND displays in the top right corner.
8. Press F2 to add a Claim of Non-Receipt Record. The message ADD displays
in the top right corner.
9. Enter the name of the bank, the bank’s phone number, the full address of the
bank, and the contact person at the bank in the REMARK/BANK field.
10. Enter the date (MMDDYY) that the claim is sent to NFC’s certification area in
the SENT TO CERT field.
IMPORTANT: NFC contacts the bank to ensure the original payment funds
are returned. NFC enters “Y” (Yes) or “N” (No) in the OK TO RECERTIFY
field and enters additional comments in the FINAL RESULTS field.
11. Press Enter.
The system edits the data. If no errors are found:
The record is added to DOTSE; and
The message FOUND displays in the top right corner of the CLAIM OF NON-
RECEIPT DD/EFT screen confirming that the record was added.
If errors are found:
The message PLEASE CORRECT FIELD(S) IN ERROR displays at the bottom
of the screen; and
The errors are highlighted.

137
9.4. Chapter Review
Knowledge Check
1. The correct process for recertifying a paper check is:
A. Add an inquiry record, document the information for the first check disbursed,
add the information for the second payment to be disbursed, add a SF-1184
B. Document information for the first check to be disbursed, add an inquiry
record, add the information for the second payment to be disbursed, add a
SF-1184
C. Add a SF-1184, add an inquiry record, document the information for the first
check disbursed, and add the information for the second payment to be
disbursed
D. Add an inquiry record, document information for the first check disbursed,
add a SF-1184, and add the information for the second payment to be
disbursed
2. Which of the following DOTSE MAIN MENU option is not used to recertify a
DD/EFT payment:
A. INQUIRY INFORMATION
B. INFORMATION ON FIRST CHECK
C. SF-1184 UNAVAILABLE CHECK CANCELLATION
D. SF-1166 SECOND CHECK
Chapter Summary
Having completed this chapter, you are now able to:
Describe how to recertify a paper check
Describe how to recertify a direct deposit/electronic funds transfer (DD/EFT)
payment
Explain the differences in how to recertify a paper check and a DD/EFT
Comment [NFC143]:
Show Slide 122:
Knowledge Check
Chapter Review
Ask students to record their answers to the Knowledge Checks individually.
Comment [NFC144]:
Ask a volunteer to answer the first Knowledge Check. Explain that the correct answer is D.
Comment [NFC145]:
Ask a volunteer to answer the second Knowledge Check. Explain that the correct answer is C.
Comment [NFC146]: Slide 123
Review previous chapter and transition to the overall training Knowledge Check.

138
10.0. Course Summary
10.1. SPPS Mainframe and DOTSE Knowledge check
1. How do you access SPPS and DOTSE Mainframe?
.
2. What are the three major functions within SPPS Mainframe?
3. Under what circumstances do you process a Delayed QSR?
4. What are the main steps in processing an indebted record for a separated
employee?
5. What are the main steps in processing a death case?
6. What is the main function of DOTSE?
.
Comment [NFC147]:
Show 124-128 : SPPS Mainframe and DOTSE Knowledge Check. Review the knowledge check questions.
Comment [n148]: To access SPPS and DOTSE Mainframe you must have sign on credentials and access to the NFC Mainframe
Comment [n149]: Quick Service Request (QSR) Indebtedness (For Separations Only) Death Case
Comment [n150]: If an employee is separated b. When an intervening pay period has been processed (Pay period prior to last pay period in which the employee was paid through the Payroll Computation System), this can be verified on PINQ Screen PQ032 c. If an employee is transferring from one Agency to another Agency on the same database and the employee is still active with the previous Agency
Comment [n151]: Establish Record, Add debts, Submit Request for Tax Credits, Add Remarks and Certify payment
Comment [n152]: Establish Record, Add debts, Submit Request for Tax Credits, Add Remarks and Certify payment
Comment [n153]: process recertified payments

139
7. What must an Agency do before recertifying a check?
8. Describe the recertification process.
10.2. Things to Remember
Please remember the following items when using SPPS Mainframe and DOTSE:
Advanced Pay QSRs are processed in SPPS Mainframe
For an Advanced Pay QSR, SPPS Mainframe automatically calculates 70% of 80
hours of base salary, rounded down to the nearest $25 increment, leaving the
30% for deductions
Indebtedness is used to recoup debts from employees at separation
If no final compensation is available at the time of separation, a SPPS Web
request must be sent to NFC to establish a bill
Death case is used to issue final compensation to beneficiary(ies) of employees
who pass away while in Federal service
DOTSE is used to process recertified payments, both DD/EFT and paper checks,
resulting from an employee’s claim of non-receipt
.
Comment [n154]: The beneficiary is entitled to the payment b. A check was previously scheduled for issuance c. The check is not in the possession of the employee or Agency d. No check cancellation or deposit action has previously taken place
Comment [n155]: Employee reports non-receipt of payment to the Agency personnel office if they do not receive their paper check by Monday or their DD/EFT payment by Tuesday (pay week) b. Agency determines if the check was issued and sent to the correct mailing address by checking: IR124, Address/Check Information; IR524, PERHIS, Address/Check Information; and/or PQ032, Payroll Listing c. Employee completes and signs Form AD-663, Request for Issuance of Replacement Check. d. Agency certifies that the information on the AD-663 is correct and maintains this form at the Agency location
Comment [n156]: Slide 129

140
10.3. Training Review
SPPS Mainframe and DOTSE Training Objectives
Having completed this training, you are now able to:
Provide colleagues with an overview of SPPS Mainframe and DOTSE Mainframe
Describe how to process an Advance Pay QSR in SPPS Mainframe
Describe how to process an indebted case for a separating employee in SPPS
Mainframe
Describe how to process a death case in SPPS Mainframe
Describe how to recertify a paper check and a DD/EFT payment
10.4. Additional Resources
For additional resources regarding SPPS Mainframe please contact/refer to
https://www.nfc.usda.gov/Publications/Manual_Pay/Procedures/spps.pdf for the SPPS
Mainframe Procedure Manual.
For questions about NFC Processing visit the Contact Center page at:
https://www.nfc.usda.gov/Contact_Us/Help_Desks/CHD/CHD_home.html.
For additional resources regarding DOTSE Mainframe please contact/refer to
http://help.nfc.usda.gov/publications/DOTSE/index.htm for the DOTSE Procedure
Manual.
For questions about NFC Processing, visit the Contact Center page at:
https://www.nfc.usda.gov/Contact_Us/Help_Desks/CHD/CHD_home.html.
Comment [n157]: Slide 130
Comment [NFC158]:
Show Slide 131: Closing and Additional Resources.

141
11.0. Appendices
11.1. Appendix A: Course Glossary
Concept/Item Description
Accounting Station Code Agency-assigned code that allows for obligations and
payment information to be distributed to the proper unit.
Advance Pay (14-liner)
Quick Service Request
Document used for processing an advance of net salary
when the corresponding T&A is transmitted to be
processed with the next PAYE cycle.
Beneficiary Recipient(s) of a deceased employee’s final payment from
the Federal government.
Cost-of-Living Allowance
(COLA)
Identification that allows for the adjustment of basic pay
that is payable only in selected nonforeign areas (Alaska,
Hawaii, Guam/Commonwealth of Northern Mariana
Islands, Puerto Rico, U.S. Virgin Islands). COLA Rates are
based on living costs in the nonforeign areas relative to
living costs in Washington, DC, area.
Delayed Quick Service
Request
Document used when an Advance Pay QSR is not
applicable.
Direct Deposit/Electronic
Funds Transfer (DD/EFT)
Electronic payment from the government to an employee’s
financial institution.
Discretionary Allotments Voluntary allotments authorized typically for purposes of
paying monthly bills to a designated payee.
NFC Mainframe Central, secure data processing system.
Payment Transaction processed in SPPS Mainframe to establish
and/or update information in an employee’s record. The
data is used to compute and/or pay salaries, deductions,
leave records, accounting, indebtedness, etc.
Receipt Account Types Field that indicates the computation and tax treatment of a
collection
Recertification Process for reissuing a check for a Federal employee.

142
Concept/Item Description
Remarks Information regarding a specific transaction.
Table Management Menu-driven database management system of USDA that
provides direct access to table records containing selected
data elements from payroll/personnel, financial, and
administrative systems.
Voluntary Allotments Monies taken from an employee’s paycheck with his/her
consent, typically for purposes of spousal or child support

143
11.2. Appendix B: Course Acronyms
Acronym Definition
ABCO Administrative Billings and Collections System
DD/EFT Direct Deposit/Electronic Funds Transfer
DOTSE Document Tracking System External
FLSA Fair Labor Standards Act
FEGLI Federal Employee Group Life Insurance
FY Fiscal Year
HITS Hospital Insurance Taxes
IRIS Information/Research Inquiry System
MASC Management Accounting Structure Codes System
NFC National Finance Center
OPM Office of Personnel Management
PAYE Payroll Processing System
PINQ Payroll/Personnel Inquiry System
PPS Payroll/Personnel System
PACT Personnel Action Processing System
POI Personnel Office Identifier
QSR Quick Service Request
SSN Social Security Number
SPPS Special Payroll Processing System
SF Standard Form
TMGT Table Management

144
Acronym Definition
TSP Thrift Savings Plan
TINQ Time - Inquiry Leave Update System
T&A Time and Attendance
TRVL Travel
USDA United States Department of Agriculture

145
11.3. Appendix C: PINQ Program PQ032
PQ032 is the Payroll-Listing screen. This program is used to research nonreceipt of a
salary check. The program displays an employee’s current plus previous 25 pay periods
of pay data. If none of the fields are populated with information, it indicates that the
employee was not paid and a QSR is needed.

146
11.4. Appendix D: Processing a Delayed QSR
A Delayed QSR is submitted to NFC as an Other – NFC Process adjustment in SPPS
Web if an employee has not been paid either in the automated system or manually. The
three situations when a Delayed QSR is required are:
1. If an employee is terminated
2. When an intervening pay period has been processed (Pay period prior to last
pay period in which the employee was paid through the Payroll Computation
System), this can be verified on PQ032
3. If an employee is transferring from one Agency to another Agency on the same
database and the employee is still active with the previous Agency
For more information on where to send the Delayed QSR request, visit the Contact
Center page at: https://www.nfc.usda.gov/Contact_Us/Help_Desks/CHD/qsr.html.
The information below should be copied into the Remarks field of the Other – NFC
Process adjustment in the following line-by-line order:
Step Action
1. Enter “QSR” to indicate that a request is being made for quick service.
2. Enter the employee’s name and social security number: adding "C" if
employee is currently being paid by NFC or "N" for a new employee if never
paid in the system.
3. State the reason for the QSR, i.e., terminated employee, etc.
4. Enter the T&A contact point code, accounting station code, and submitting
office number.
5. Enter the employee’s Federal grade, step, and salary rate, If a wage board
employee, indicate applicable shift rates. Enter the COLA Code with
percentage rate and post differential with percentage rate, if applicable.
6. Enter the pay period to be paid.
7. Indicate whether an employee is covered by Fair Labor Standards Act
(FLSA). Enter "N" for non-exempt or "E" for exempt.
8. Enter the total hours to be paid per transaction code (If the QSR is for a wage

147
Step Action
board employee provide Shift Suffix Codes for differential pay).
9. Enter the tax withholding data, with federal data given first, followed by state,
state code, then city data with name of the city or city code.
10. Enter the other deductions, such as Federal Employees Group Life Insurance
(FEGLI) Code. If the employee has Additional or Family FEGLI insurance
plans provide the employee’s date of birth, type of retirement, Federal
Employees Health Benefits Code, Financial Organization route and account
numbers, Meals, Quarters, Commissary, TSP.
11. Enter the accounting code to be charged.
12. Enter the check mailing address. This does not have to match the AD-349 in
the database.
13. Enter the name, title, Agency, and signature of the official authorized to
complete the QSRs
14. Enter the name and telephone number of Agency representative who can
answer questions regarding the request
Agencies should submit separate Delayed QSRs for each payment. Conflicting data in
the employee's master file or on the T&A are disregarded.

148
Below is an example of a completed Delayed QSR.
1. QSR
2. JOHN DOE, SSN 123-45-6789, "C"
3. TERMINATED EMPLOYEE
4. 90-02-2360-03, 1003, 5194
5. WG-10, STEP 5, Shift Suffix 1, $14.40 PH
6. PP11
7. E
8. 30 hrs TC-01, 8 hrs TC-66, 2 hrs TC-61
9. M01-M01 AK
10. FEGLI-C, DOB 4/23/51, CS-1, FEHB-102
11. TC-01 - 802-960-01-40-7022
TC-61 - 802-071-06-40-7026
TC-66 - 827-00-011-614-00-1297
12. P. O. BOX 819, JUNEAU, AK 99835
13. MARY SMITHE, PERSONNEL SPECIALIST, AGENCY 90 (SIGNATURE
REQUIRED)
14. 555-586-2290, EXT 9, SUE BENNETT, SITKA, AK
NOTE: Delayed QSRs are processed in SPPS Web by NFC as Other- NFC
Process adjustments. For more information regarding processing Other –
NFC Process adjustments, please refer to the SPPS Web Procedure
Manual.

149
11.5. Appendix E: Additional Notes on Quick Service Requests
1. SPPS Mainframe automatically calculates 70% of 80 hours of base salary,
rounded down to the nearest $25.00 increment, leaving the 30% for deductions.
2. SPPS Mainframe can disburse more than 70% of 80 hours of base salary by
overriding the system, such as for overtime. Agency calculates 70% of the gross
rounded down to the nearest $25.00 increment and keys that amount in the NET
PAY AMOUNT field. Enter Y in the BASE SALARY OVERRIDE field.
3. SPPS Mainframe transactions are disbursed on the manual pay schedule which
runs Monday – Friday, excluding holidays, at 11:00 AM CST.
4. SPPS Mainframe automatically establishes a receipt account for the amount
that is disbursed through QSR - SPPS Mainframe. Check IR114 to be sure the
receipt account was established. The receipt account deducts from the next
T&A that is processed at NFC. If the T&A for the QSR is not transmitted, the
receipt account deducts from the net of the current T&A.
5. Transmit the T&A for the pay period of the QSR along with the current pay
period’s T&A to assure that the receipt account deducts from the appropriate
pay period.
6. The T&A for the QSR processes on PQ032 the next process of PAYE along with
the current T&A. It processes gross to net, deducting all of the employee’s
deductions as it would normally do and then deduct the receipt account from the
net amount.
7. If the net amount of the QSR T&A is greater than the receipt account, the
employee receives the remainder of the net of the QSR T&A along with the
current T&A.
8. If the net amount of the QSR T&A is less than the receipt account the balance of
the receipt account deducts from the net amount of the current T&A.

150
11.6. Appendix F: SPPS Mainframe Indebtedness Processing Tips
1. This system is used for separating employees only who are indebted to their
Agency for a debt that is NOT already recorded in ABCO.
2. A separating employee’s final compensation (T&A, lump sum, comp time, cash
award, etc) can be used to offset the debt that is NOT already recorded in
ABCO.
3. To use this system, there must be final compensation (positive net monies) to
be captured in this system (T&A, lump sum, comp time, cash award, etc.).
4. If no final compensation is available at the time of separation, an SPPS Web
request must be sent to NFC to establish a bill.
5. If it’s determined by the Agency that the employee is NOT indebted and monies
have been captured in this system, the Agency can release the funds to be
disbursed to the employee.
6. Before certifying, check to be sure the employee isn’t coded as owing advanced
leave. Choose Option 2, ADJUSTMENT DUE TO EMPLOYEE
INDEBTEDNESS, choose Option 3, ADVANCED LEAVE. There is a field HAS
ALL ADVANCED LEAVE BEEN FORGIVEN? this must be an “N” (No) in order
for this to be certified and released.
7. Choose Option 4, PAYMENT CERTIFICATION to certify the payment.

151
11.7. Appendix G: Entries for RELATIONSHIP TO DECEASED Field
Below is a list of acceptable entries for the RELATIONSHIP TO DECEASED field:
Husb (husband)
Wif (Wife)
Fath (Father)
Mot (Mother)
Sis (Sister)
Bro (Brother)
Aunt (Aunt)
Uncl (Uncle)
Neph (Nephew)
Niec (Niece)
Grandchil (Grandchild)
Grandpar (Grandparent)
Son (Son)
Daug (Daughter)
Other

152
11.8. Appendix H: SPPS Mainframe Death Case Processing Tips
1. This system is used to issue final compensation such as the final T&A, lump
sum, comp time and/or cash award to beneficiary(ies). If no final compensation
is due, this system is not utilized.
2. To hold one or more beneficiary’s share and disburse the others:
All the beneficiaries must be recorded in SPP.
If a beneficiary’s information is unknown, placeholder information must be
recorded in order to hold their share. It can be changed at a later date
3. If there is an SF-1152 on file, you must enter the percentage from the SF-1152
in the DESIGNATED SHARE (PERCENT) field on the BENEFICIARY
CLAIMANT INFORMATION screen (Option 2).
4. If no SF-1152 is on file, do NOT enter a percentage in the DESIGNATED
SHARE (PERCENT) field on the BENEFICIARY CLAIMANT INFORMATION
screen (Option 2). If you leave this field blank, the system divides the funds
equally amongst the beneficiaries.
5. If the Agency cannot determine the beneficiary, call NFC and the Certification
and Disbursement Section can make the determination.
6. As stated on the SF-1152, “If more than one beneficiary is named, the share for
any deceased beneficiary who may predecease me shall be distributed equally
among the surviving beneficiaries, or entirely to the survivor. I understand that
this Designation of Beneficiary shall be void if none of the designated
beneficiaries is living at the time of my death.”