navision logistics handbook step 6_2.1
TRANSCRIPT

Logistics Processes and IT tools Page 1 of 100 Navision master version
© Inter IK
EA S
ystems B
.V. 2011
MV Navision Handbook
Step 6 Efficient Goods flow
Version 2.1

Logistics Processes and IT tools Page 2 of 100 Navision master version
© Inter IK
EA S
ystems B
.V. 2011
This document is developed and produced through collaboration between Inter IKEA Systems B.V. and K3 Business Solutions B.V. The content of this material is owned and updated by Inter IKEA Systems B.V in collaboration with K3 Business Solutions B.V.
Inter IKEA Systems B.V IKEA Concept and IKEA Business Processes
Final document containing a description of operating IKEA business process in Navision Master Version
Documentation of technical work steps in Navision Master Version in a number of manuals
Documentation of IKEA business process operations in a number of manuals
K3 Business Solutions B.V Navision Master Version

Logistics Processes and IT tools Page 3 of 100 Navision master version
© Inter IK
EA S
ystems B
.V. 2011
Revision information Edition Date Comment Author Verified Approved 1.0 17.10.2011 The document was
published K3
2.0 30.08.2013 Restructured, Screen shots updated Processes included Graphics included, Service Pack 41 changes included
Holger Peters (HLGP)
Ron Tuk (RONT)
Michael Baron (BARO)
2.1 30.03.2015 Restructured, Screen shots updated, Service Pack 50, 51 changes included
Ivaylo Hristov (IVHRI)
Ron Tuk (RONT)
Holger Peters (HLGP)

Logistics Processes and IT tools Page 4 of 100 Navision master version
© Inter IK
EA S
ystems B
.V. 2011
Table of Contents Revision information .................................................................................... 3 6. Efficient goods flow ......................................................................... 6
6.1. Introduction ................................................................................ 6 6.1.1. Background ................................................................................. 6 6.1.2. Definition of terminology ............................................................... 7 6.2. Pre-planning and setup ................................................................. 9 6.2.1. Volume & resource planning .......................................................... 9 6.2.1.1. Planning volume .......................................................................... 9 6.2.1.2. Planning resources ..................................................................... 10 6.2.1.2.1. Co-workers ......................................................................... 10 6.2.1.2.2. Handling equipment ............................................................. 11 6.2.2. Capacity planning ....................................................................... 12 6.2.3. Traffic management ................................................................... 12 6.2.4. In-delivery planning ................................................................... 14 6.2.5. Graphical warehouse structure ..................................................... 15 6.2.5.1. The Global Naming Convention .................................................... 15 6.2.5.2. Definition of the location ............................................................. 20 6.2.5.3. Definition of the Bin .................................................................... 23 6.2.5.4. Bin measurements ..................................................................... 27 6.2.5.4.1. Width of the bin ................................................................... 27 6.2.5.4.2. Length of the bin.................................................................. 29 6.2.5.4.3. Height of the bin .................................................................. 29 6.2.5.4.4. Bin measurements in Navision ............................................... 30 6.2.5.5. Buffer space set up..................................................................... 32 6.2.5.5.1. Buffer space ........................................................................ 32 6.2.5.5.2. Length Buffer Space ............................................................. 32 6.2.5.5.3. Height Buffer Space.............................................................. 33 6.2.5.5.4. Width Buffer Space............................................................... 34 6.2.5.6. Bin Type ................................................................................... 35 6.2.5.7. Defining Sales Methods ............................................................... 36 6.2.5.8. Link Zones set up ....................................................................... 37 6.2.5.9. Metal Profiles ............................................................................. 38 6.2.5.10. Weight limitation .................................................................. 41 6.2.6. Sales Method Selection Order ...................................................... 43 6.2.7. Pre-planning of internal replenishment .......................................... 46 6.2.7.1. Set up of internal replenishment .................................................. 46 6.2.7.2. Pick decrease ............................................................................. 49 6.2.7.3. Days no Transfer ........................................................................ 50 6.2.7.4. Flex Factor ................................................................................ 53 6.2.7.5. Full Pallet Direct % ..................................................................... 55

Logistics Processes and IT tools Page 5 of 100 Navision master version
© Inter IK
EA S
ystems B
.V. 2011
6.2.7.6. Auto Stack In Container .............................................................. 55 6.3. Preparation ............................................................................... 56 6.4. Goods receiving ......................................................................... 57 6.4.1. Introduction .............................................................................. 57 6.4.2. Receiving shipment and consignment information .......................... 57 6.4.2.1. Shipment and consignment ......................................................... 57 6.4.2.2. Creating missing shipment in the consignment............................... 58 6.4.3. Releasing in-deliveries ................................................................ 60 6.4.4. Receiving .................................................................................. 62 6.4.4.1. Item Transfer Journal Batch ........................................................ 62 6.4.4.2. Pallet label ................................................................................ 64 6.4.4.3. Container manifest ..................................................................... 68 6.4.4.4. Handling Discrepancies ............................................................... 72 6.5. Internal retrieval ........................................................................ 74 6.5.1. Running internal replenishment .................................................... 75 6.5.2. Calculating the Need in the sales space ......................................... 77 6.6. Moving goods to destination ........................................................ 79 6.7. Replenishment ........................................................................... 80 6.8. Backflow and stack in ................................................................. 81 6.9. Goods flow process in the Full Serve Warehouse ............................ 84 6.10. Follow up .................................................................................. 87 6.10.1. Key Performance Indicators connected to Goods flow...................... 88 6.11. Meeting activities connected to Goods flow .................................... 88 Appendix I – Calculation and Formulas .................................................... 89 A.1. Safety stock .............................................................................. 89 A.2. Sales Space size ........................................................................ 91 A.3. EOQ calculation .......................................................................... 95 A.4. Need calculation for internal replenishment ................................... 96 A.5. Replenishment Level ................................................................... 98

Logistics Processes and IT tools Page 6 of 100 Navision master version
© Inter IK
EA S
ystems B
.V. 2011
6. Efficient goods flow
6.1. Introduction
6.1.1. Background
The Logistics operation in stores requires many resources. Approximately 20% of the worked hours of a store are within Logistics, approximately 18% of the store hours are used in Goods flow. Therefore achieving efficient goods flow for large volumes needs careful planning. Planning of in-deliveries, of staff and equipment needs to be considered. By finalizing replenishment every day before store opening it will be ensured that products, which are in the store, will be available for the customer to shop every day. Therefore efficiency of goods receiving, product movement, retrieval and replenishment has a big impact on costs and customer satisfaction.
The prerequisites to achieve efficient goods flow operation are a high quality level of forecasting accuracy, ordering, sales space management and use of available space.

Logistics Processes and IT tools Page 7 of 100 Navision master version
© Inter IK
EA S
ystems B
.V. 2011
6.1.2. Definition of terminology
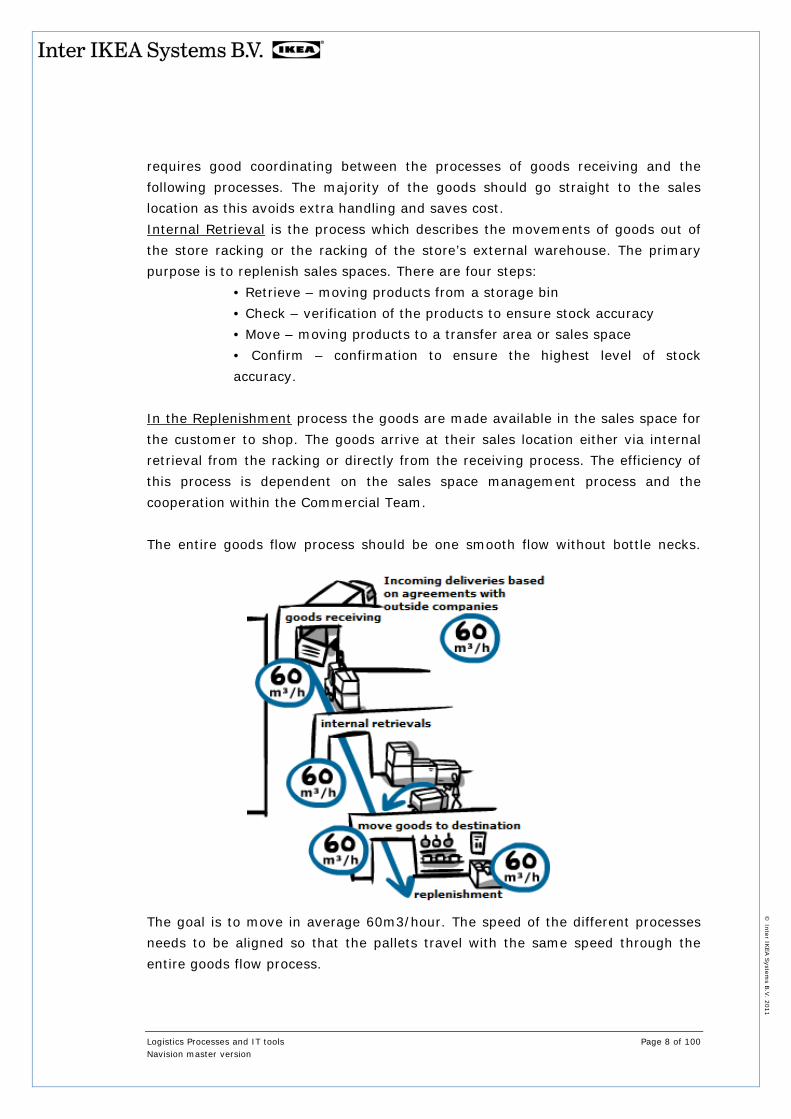
The goods flow process can be divided into different sub processes: pre-planning, preparation, goods receiving, moving goods to destination, internal retrieval, replenishment, goods flow processes in the warehouse and follow up. The process of Pre-planning involves the planning of resources and the configuration of the warehouse in the most efficient way in order to enable Navision to steer and allocate the goods automatically. The pre-planning process will secure that the following processes of goods receiving, moving goods to destination, internal retrieval and replenishment will run smoothly and with the best quality and at lowest possible cost. The Goods receiving involves the physical unloading of the goods from a trailer or container at the store loading dock and the receiving in the store Navision IT system. In-deliveries need to be completed in their scheduled time slots because space is limited and the goods need to reach their sales space before store opening. The goods receiving area needs to be free from waste and handling aids before the store opens. Moving goods to destination is the process of moving the goods between the different goods flow processes, e.g. from receiving to replenishment. The overall goal is to achieve a smooth flow of goods throughout the entire store. This
Logistics Processes and IT tools Page 8 of 100 Navision master version
© Inter IK
EA S
ystems B
.V. 2011
requires good coordinating between the processes of goods receiving and the following processes. The majority of the goods should go straight to the sales location as this avoids extra handling and saves cost. Internal Retrieval is the process which describes the movements of goods out of the store racking or the racking of the store’s external warehouse. The primary purpose is to replenish sales spaces. There are four steps:
• Retrieve – moving products from a storage bin • Check – verification of the products to ensure stock accuracy • Move – moving products to a transfer area or sales space • Confirm – confirmation to ensure the highest level of stock accuracy.
In the Replenishment process the goods are made available in the sales space for the customer to shop. The goods arrive at their sales location either via internal retrieval from the racking or directly from the receiving process. The efficiency of this process is dependent on the sales space management process and the cooperation within the Commercial Team. The entire goods flow process should be one smooth flow without bottle necks.
The goal is to move in average 60m3/hour. The speed of the different processes needs to be aligned so that the pallets travel with the same speed through the entire goods flow process.

Logistics Processes and IT tools Page 9 of 100 Navision master version
© Inter IK
EA S
ystems B
.V. 2011
6.2. Pre-planning and setup
6.2.1. Volume & resource planning
6.2.1.1. Planning volume
The first and most important prerequisite for a successful goods flow process is to plan the expected volume which will flow through the store. This information will be used to plan the available capacity but also resources of co-worker and handling equipment. The calculation of the yearly volume needs to be based on the annual sales forecast and the forecasted price per m3. To break down the yearly forecast to monthly, weekly and daily level other factors need to be considered. Those factors are the Commercial Calendar, historical peaks, the store business plan, the direct supply share and the weekly sales budget. Example: Planned sales budget: EUR 100,000,000 Planned price per m3: EUR 1,150 Calculated sales volume in m3: EUR 100,000,000/1,150=86,957m3 The planned volume for the year is 86,957m3. Every month will have in average 86,957m3 / 12month = 7,246m3. Of course not every month will have the same sales and volume. December might have a higher sales of 12% share = 10,435m3 February 7% of the yearly share = 6,087m3 Therefore the planned volume between the months will be different depending on the sales index. Take also into consideration that the inbound can deviate from the sold volume. Campaigns or splits could be delivered before the goods will be sold.

Logistics Processes and IT tools Page 10 of 100 Navision master version
© Inter IK
EA S
ystems B
.V. 2011
6.2.1.2. Planning resources
6.2.1.2.1. Co-workers
The most important resource we have within IKEA are the co-workers. With the help of the planned volume and the planned productivity the required number of worked hours can be defined. Example: Planned Logistics Productivity: 1.30 m3 / worked hour Planned yearly volume: 86,957m3 Planned worked Logistics hours: 86,957m3 / 1.30 = 66,890 work hours are need. Similar to the volume planning per month the hours can be broken down: December: 10,435m3 / 1.30 = 8,027 worked hours February: 6,087m3 / 1.30 = 4,682 worked hours To calculate the contractual hours needed the share of leave needs to be added to the worked hours. The share depends on sick leave rate and annual leave which is different from store to store. In this example leave is 15%. 66,890 + 15% = 76,923 Therefore this store would need 76,923 contractual hours. Those ones can now be broken down in actual contracts for full time or part time co-worker and number of co-worker on yearly, monthly, weekly and daily level. To gain the best flexibility, the share of part time co-workers in Logistics is usually higher than in the store average. The recommendation is 70%. The actual share per store depends on local legislation and the local cost per hour.

Logistics Processes and IT tools Page 11 of 100 Navision master version
© Inter IK
EA S
ystems B
.V. 2011
During the actual year the used worked hours and the sold volume need to be followed up, minimum on a monthly level in order to achieve the set goal for logistics productivity. To define the right goal for logistics productivity, the cluster approach of the Proven Solution Toolkit for Logistics productivity should be used. This can be found in Toolbox.
6.2.1.2.2. Handling equipment
The right amount of the handling equipment needs to be defined and secured. The handled volume in a peak month is an important factor as well as physical prerequisites and store specific goods flow processes. Therefore the different needed types and the correct amount of every type need to be planned for.
For example the number of counter balances will be defined by the number of in deliveries which will be unloaded at the same time. The number of power stackers depends on the flooring in Market hall. If, as it is recommended, the flooring is concrete then power stackers can be used in Market hall. Otherwise more pallet jacks will be needed.

Logistics Processes and IT tools Page 12 of 100 Navision master version
© Inter IK
EA S
ystems B
.V. 2011
The initial forecast for counter balances, reach trucks and power stackers for new stores is given by the store order calculation tool but needs to be adjusted to the specifics needs of the store and needs to be extended to manual equipment.
6.2.2. Capacity planning
With the forecasted volume per year, month and week the store capacity throughout the year can be determined and potential bottlenecks can be identified. In high sales and inbound periods the stock value in the store will increase and the store might reach the maximum storage capacity. On the other hand, the expected inbound into the store might be not in line with the maximum number of delivery slots the store has. This needs to be planned for the next year.
6.2.3. Traffic management
Planning of traffic management is needed to achieve a high level of efficiency and safety during the goods flow operation. Traffic management includes the definition of the goods flow routes, on which pallets will be moved either by handling equipment or by co-worker, as well as transfer areas.

Logistics Processes and IT tools Page 13 of 100 Navision master version
© Inter IK
EA S
ystems B
.V. 2011
These include routes within the store going from receiving to the sales location or buffer bins in the racking, or going from the sales location to the buffer bin. Goods flow routes should be always as short as possible and should avoid cross traffic as much as possible. Less cross traffic and defined drive ways will increase safety.
Also transfer areas, where goods are handed over between co-workers and different processes, need to be defined and recorded on a map. This map should be easy accessible to all goods flow co-workers. The goods flow routes and transfer areas will have an influence on the graphical structure of the warehouse. They will determine Link Zones and storage location of Market hall products.

Logistics Processes and IT tools Page 14 of 100 Navision master version
© Inter IK
EA S
ystems B
.V. 2011
6.2.4. In-delivery planning
The IKEA tool to plan in-deliveries, is called Delivery Scheduler (DES). The IKEA learning platform offers a self-learning training program, where users can obtain information in how to use DES. In this tool the Goods flow manger of every IKEA store has to provide the right amount of slots for in-deliveries. The number of slots should be based on the number of expected in-deliveries and should be defined for the full year. The slots need to be created in the Delivery Scheduler considering the available time frames for unloading and the unloading capacity.
The purpose of the slots is to secure an even flow throughout the store and to ensure that all incoming goods can be unloaded according to the target arrival date of the lead time. Unloading goods too late might result in empty sales locations, low service level and lost sales. It does not support an efficient goods flow process if the receiving process will be faster than the replenishment or the internal movement of goods. If this would be the case bottlenecks will be created and the receiving area or transfer areas could overflow. Therefore the order and time of unloading during the day need be aligned with the speed of the goods flow process in the store.

Logistics Processes and IT tools Page 15 of 100 Navision master version
© Inter IK
EA S
ystems B
.V. 2011
A consistent even flow from the goods receiving to the sales space is always the goal.
6.2.5. Graphical warehouse structure
6.2.5.1. The Global Naming Convention
The graphical structure of the warehouse is the physical layout of all picking and storage locations within the racking in the Self-serve furniture area and the Full Serve area. After ensuring that the graphical structure is in place, Navision automatically allocates all incoming unit loads from the goods receiving or backflow into the pre-defined areas. The graphical warehouse structure consists of certain physical parameters of the warehouse racking. In other words the IT system needs to know what number and what kind of buffer bins the store warehouse racking has. This will secure efficiency as well as health and safety.

Logistics Processes and IT tools Page 16 of 100 Navision master version
© Inter IK
EA S
ystems B
.V. 2011
First the racking, the sales locations and the buffer bins need to be numbered. This should be done according to the Global Naming Convention (GNC). The GNC is an IKEA document which defines how sales spaces and storage bins should be defined in every IKEA store worldwide. This defines a standard of a “language” in which the physical prerequisites of the bin and the racking are “translated” to make it understandable for the IT system.
The purpose of the Global Naming Convention is also to make it easy for co-workers and customers to identify where an article is located and if an article has multiple sales spaces. The Global Naming Convention can be found in Toolbox. Every sales location and storage bin in the warehouse racking is defined by a six digit number. The first two digits define the aisle, the second two digits define the location and the last two digits define the level.

Logistics Processes and IT tools Page 17 of 100 Navision master version
© Inter IK
EA S
ystems B
.V. 2011
Example: Sales space (picking bin): 24-02-10 24 – Aisle number 24 02 – Location number 02 10 – Level number 10 pick level Storage bin: 24-02-30 24 – Aisle number 24 02 – Location number 02 30 – Level number 30 – bin level In Self-serve level 00 and 10 are sales spaces. Level 20 and higher are storage bins. Level 05 or 15 should only be used in exceptional cases for sales locations in Self-serve. Otherwise the shopping experience could be impacted negatively.

Logistics Processes and IT tools Page 18 of 100 Navision master version
© Inter IK
EA S
ystems B
.V. 2011
In the Full Serve warehouse the locations are also defined by a same six digit number which follows the same logic as the ones in Self-serve. First the aisle number, then location number followed by the level number. Level 00, 05, 15 (exception) and level 10 are pick locations. Above level 10 are usually storage locations. Example: Pick location: 39-03-00 39 – Aisle number 39 03 – Location number 03 00 – Level number 00 pick level Storage location: 39-04-20 39 – Aisle number 39 04 – Location number 04 20 – Level number 20 bin level

Logistics Processes and IT tools Page 19 of 100 Navision master version
© Inter IK
EA S
ystems B
.V. 2011
Before setting up the individual bins, a store layout with all the numbering should be created.
The Self-serve furniture area for a standard store which has Self-serve and Full Serve in the same building, not divided by a wall, should always be numbered in odd and even numbers on either sides. This will help to operate efficiently with the Sales Method Selection Order. For non standard stores (e.g. with external warehouse or capacity solutions) the numbering of the aisles is different, which is defined in the Global Naming Convention as well.

Logistics Processes and IT tools Page 20 of 100 Navision master version
© Inter IK
EA S
ystems B
.V. 2011
6.2.5.2. Definition of the location To be able to control the inventory and stock movements all available locations need to be set up. This should be done in Setup/Locations/General.
In this screen all the necessary information about the location such as code, name and address can be specified.
Logistics Processes and IT tools Page 21 of 100 Navision master version
© Inter IK
EA S
ystems B
.V. 2011
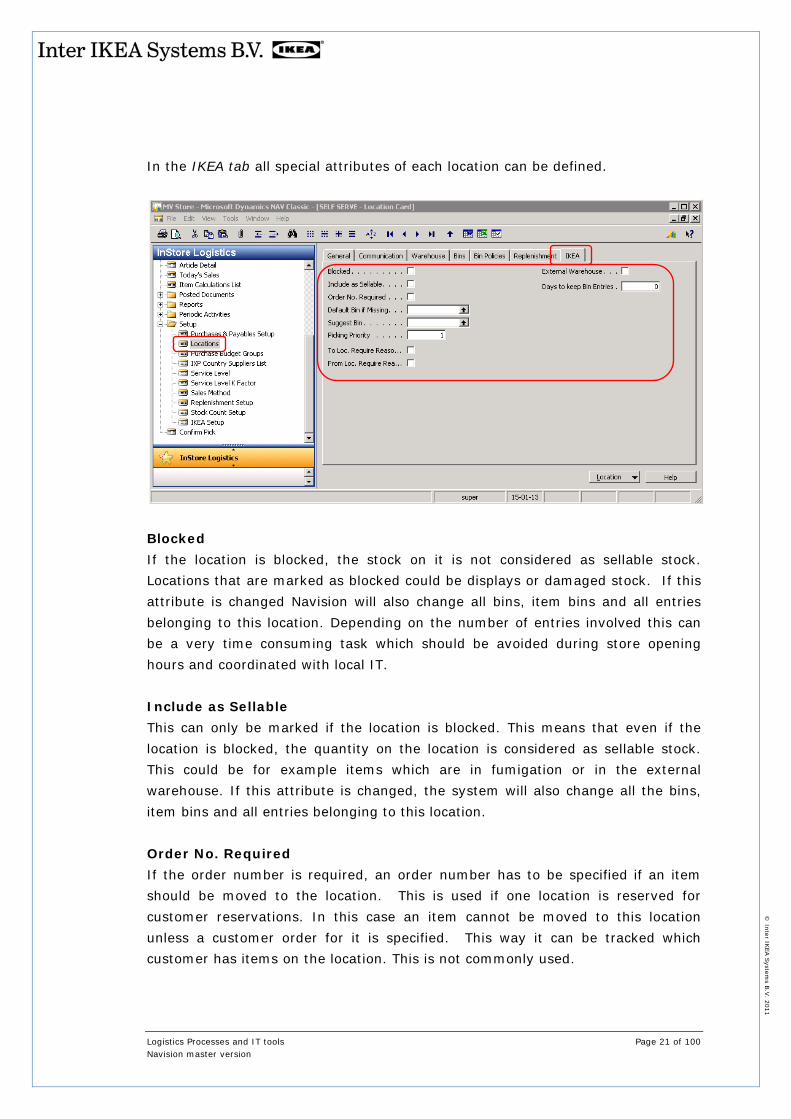
In the IKEA tab all special attributes of each location can be defined.
Blocked If the location is blocked, the stock on it is not considered as sellable stock. Locations that are marked as blocked could be displays or damaged stock. If this attribute is changed Navision will also change all bins, item bins and all entries belonging to this location. Depending on the number of entries involved this can be a very time consuming task which should be avoided during store opening hours and coordinated with local IT. Include as Sellable This can only be marked if the location is blocked. This means that even if the location is blocked, the quantity on the location is considered as sellable stock. This could be for example items which are in fumigation or in the external warehouse. If this attribute is changed, the system will also change all the bins, item bins and all entries belonging to this location. Order No. Required If the order number is required, an order number has to be specified if an item should be moved to the location. This is used if one location is reserved for customer reservations. In this case an item cannot be moved to this location unless a customer order for it is specified. This way it can be tracked which customer has items on the location. This is not commonly used.

Logistics Processes and IT tools Page 22 of 100 Navision master version
© Inter IK
EA S
ystems B
.V. 2011
Default Bin if Missing If a bin is defined as “Missing”, any items sold, if there is no Picking bin created, will be sold from the bin defined as “Missing”. If left blank, the Default Location if Missing under the Sale tab in Administration/IKEA Setup will be used. Suggest Bin If a bin is defined accordingly, then this bin will be always suggested when an item transfer is made to this location. Picking Priority This parameter is used to set the priority for retrieval (here called “picking”) when items are stacked out from buffer locations. The items on this location, which have the lowest value, will be retrieved first. If the location has no picking priority Navision will not suggest to retrieve from it. Navision will suggest what items to retrieve and where to take them from. Navision will first suggest taking items from the location with picking priority 1 then 2 etcetera, until the replenishment is fulfilled. To Loc. Require reason code If this parameter is ticked, every transfer to this location will require a reason code. From Loc. Require reason code If this is ticked, every transfer from this location will require a reason code. External Warehouse If this is ticked, this location is defined as being the External Warehouse location. Days to keep bin entries This parameter is used for date compressing of the bin entries. If this is not zero then the bin entries will be compressed to the number of days specified.

Logistics Processes and IT tools Page 23 of 100 Navision master version
© Inter IK
EA S
ystems B
.V. 2011
The location list shows all locations.
6.2.5.3. Definition of the Bin
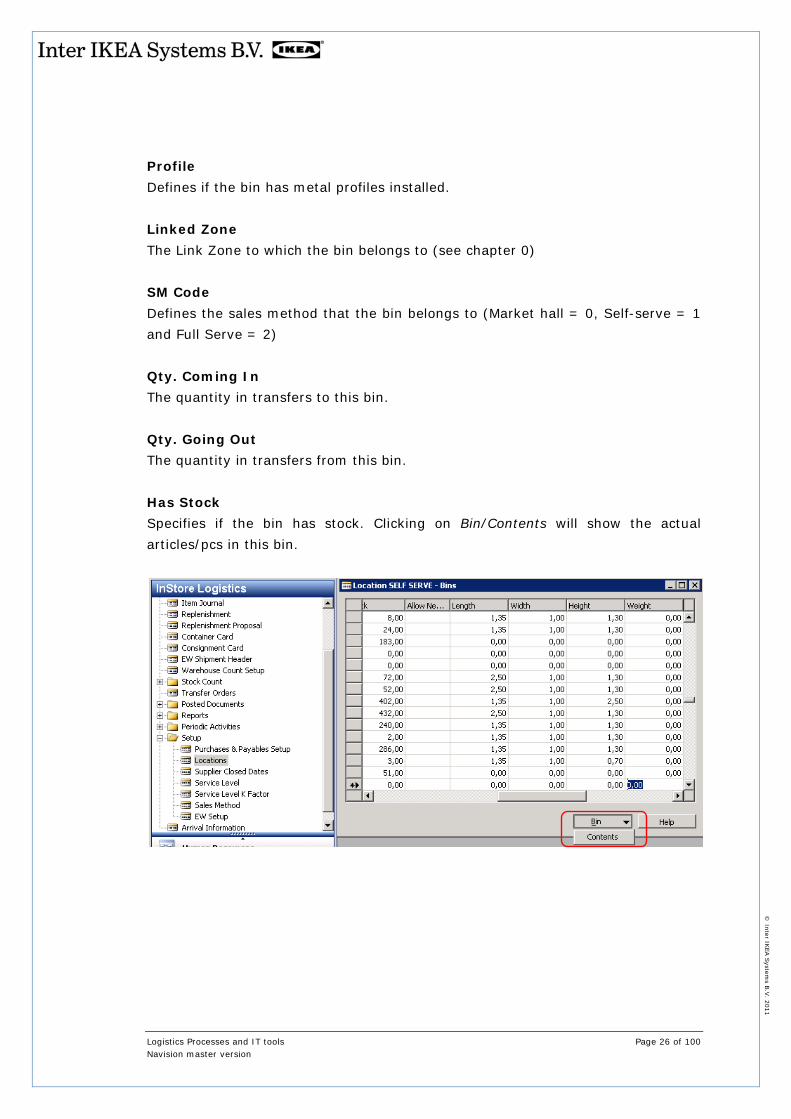
Choosing Bins in the menu of the Location list will show all the bins that belong to the Location, including bin measurements and parameters.

Logistics Processes and IT tools Page 24 of 100 Navision master version
© Inter IK
EA S
ystems B
.V. 2011
The available parameters are: Code Code of the bin. For creation of new bins, please refer to Global Naming Convention (see 6.2.5.1.). Description The description of the bin. Empty Indicates if the bin is empty or not. Type This defines whether the bin is a picking bin or not. Picking bin means that Navision always takes the needed stock from this bin when selling. All items must have one picking bin. It’s not possible to have more than one. Other values are ‘blank’ or ‘Manual’. ‘Blank’ means it is neither ‘Manual’ nor ‘Picking’ (for details see 6.2.5.5.). Auto Create When this is marked, Navision automatically creates the bin as an item bin when stock is transferred to it.

Logistics Processes and IT tools Page 25 of 100 Navision master version
© Inter IK
EA S
ystems B
.V. 2011
Allow Negative Transfer The system will not allow a bin to go to a negative value. It is not possible to transfer more stock from a bin than the actual value which is there already, unless this field is marked. This could be used for temporary receiving locations. Stock This field is a drilldown field that indicates the total stock of all items on the bin. Blocked This is inherited from the Location, but can be manually updated on bin level if needed Include as Sellable Is inherited from the Location, but can be manually updated on bin level if needed. Order No. Required Whether a customer order no. is required to transfer items from and to this bin. Stock The total stock on the bin (calculated figure, sum of the quantities of all items on the bin). Length Defines the length of the bin which limits the length of pallets which can be stacked on this bin location (see chapter 6.2.5.4.2). Width Defines the bin measurement of width of the bin which limits the width of pallets which can be stacked on this bin location (see chapter 6.2.5.4.1). Height Defines the bin measurement of height of the bin which limits the height of pallets which can be stacked on this bin location (see chapter 6.2.5.4.3). Weight Defines the maximum weight of the bin to ensure that the racking limitations are not exceeded.
Logistics Processes and IT tools Page 26 of 100 Navision master version
© Inter IK
EA S
ystems B
.V. 2011
Profile Defines if the bin has metal profiles installed. Linked Zone The Link Zone to which the bin belongs to (see chapter 0) SM Code Defines the sales method that the bin belongs to (Market hall = 0, Self-serve = 1 and Full Serve = 2) Qty. Coming In The quantity in transfers to this bin. Qty. Going Out The quantity in transfers from this bin. Has Stock Specifies if the bin has stock. Clicking on Bin/Contents will show the actual articles/pcs in this bin.

Logistics Processes and IT tools Page 27 of 100 Navision master version
© Inter IK
EA S
ystems B
.V. 2011
6.2.5.4. Bin measurements As part of the graphical structure in the warehouse the measurement and dimensions of the bin locations need to be defined. In order to automatically direct every pallet into the most suitable location, all bin measurements need to be setup correctly in Navision according to their physical dimensions, taking also into consideration risk and safety requirements. The measurements of pallets are proved by the suppliers and are used by Navision. With this information Navision will ensure that every pallet will fit efficiently and safely into its automatically selected bin location. Therefore the bin measurements need to be planned and updated correctly.
6.2.5.4.1. Width of the bin
Normal racking beams in IKEA stores are 290 cm wide between the inner sides of the vertical beams.
As a standard wooden pallet is 80 cm wide, usually three pallets can be stored on a beam. The mathematical width of a bin is 290cm/3 bins=97 cm.
There are still goods which are wider than the actual wooden pallet of 80cm. Therefore different bins with different width need to be set up in the graphical warehouse structure to accommodate goods with different dimensions.
← 290 cm →
70-20-20 70-21-20 70-22-20
← 97 cm → ← 97 cm → ← 97 cm →

Logistics Processes and IT tools Page 28 of 100 Navision master version
© Inter IK
EA S
ystems B
.V. 2011
A wider range of measurements of bins will enable Navision to find suitable locations. If only bins with dimensions smaller than the ones of the pallet are available, then Navision will not be able to select a bin location automatically. To achieve a wider range of bins with different dimension in width it is recommended to use the below model as a standard for the majority of the bins:
With this set up the bins at both sides are wide enough for a standard pallet of 80 cm width. The locations in the middle can accommodate wider pallets. The maximum possible width of a pallet which could fit in this bin depends on the parameter “Width Buffer Space” which is explained in chapter 6.2.5.5.4. Some extra wide bins need to be defined close to the sales location for extra wide products. In that case the beam length of 290 cm will be split only in two extra wide bin locations. The width of the bin in the middle will be reduced to 1 cm and can therefore never be chosen by Navision.
Some bins cannot be used as standard due to physical obstacles like columns in the racking or installations under the roof. Those bin dimensions need to be adjusted to the physical available space.
← 290 cm →
21-35-30 21-36-30 21-37-30
← 90 cm → ← 110 cm → ← 90 cm →
← 290 cm →
21-30-30 21-31-30 21-32-30
← 145 cm → ←1cm→ ← 145 cm →

Logistics Processes and IT tools Page 29 of 100 Navision master version
© Inter IK
EA S
ystems B
.V. 2011
6.2.5.4.2. Length of the bin
The racking bins need to be set up for a minimum of three different types of pallet length. The first is the IKEA pallet type which is 200 cm long. To accommodate longer products the length for this type should be set to 210 cm. The second is IKEA XXL for extra long bins facing the wall. Depending on the store those bin locations can be 230 to 250 cm long and will be needed for extra long products like PAX. The other one is the EURO pallet which is 120 cm long. Since goods can be longer than the pallet, the length for EURO bins is defined as 135 cm. The defined length in Navision needs to consider obstacles like pillars or pipes and the real available space.
6.2.5.4.3. Height of the bin
To define the height of the bins, for all levels - except the highest level - the exact measurement between two beams needs to be used. The standard height of bins in IKEA racking is 140cm minus the hight of the beam, if no sprinkler is installed in the racking. In case of in-rack sprinkler the usable height will be less and needs to be measured. For the highest level the exact distance between the beam and the first obstacle needs to be measured, like installations under the roof (light installation or air condition). Also local fire regulations need to be considered.
Logistics Processes and IT tools Page 30 of 100 Navision master version
© Inter IK
EA S
ystems B
.V. 2011
6.2.5.4.4. Bin measurements in Navision
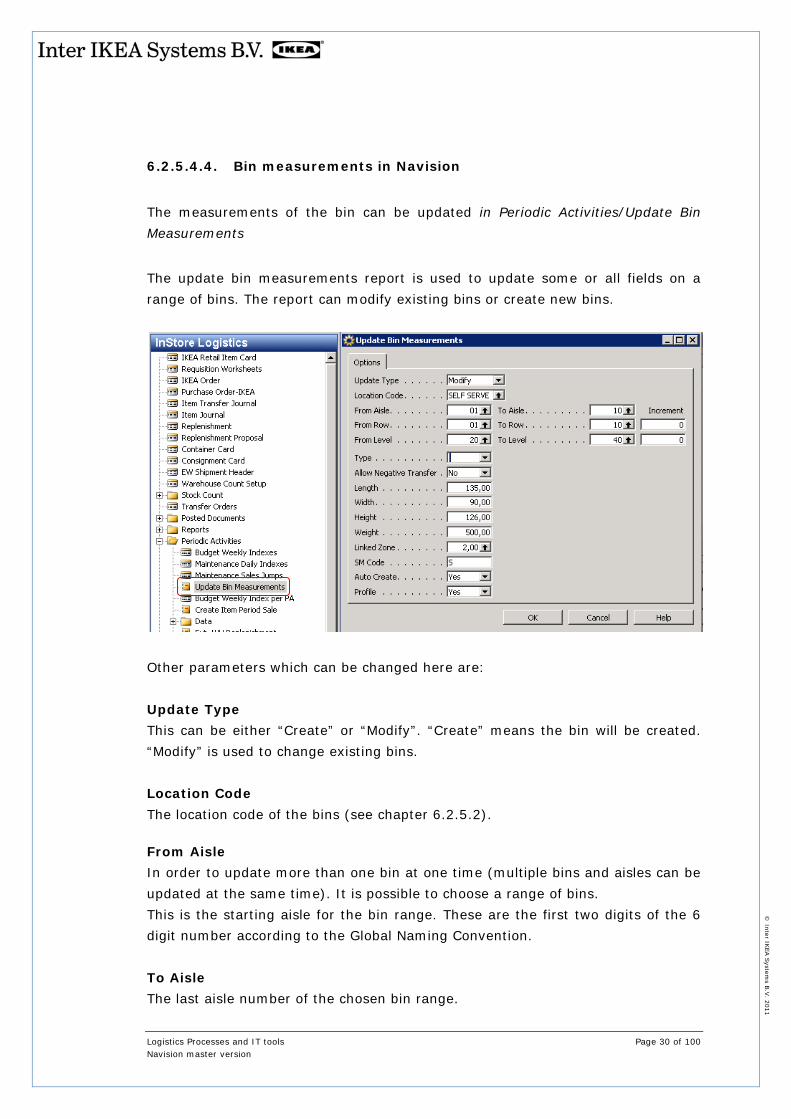
The measurements of the bin can be updated in Periodic Activities/Update Bin Measurements The update bin measurements report is used to update some or all fields on a range of bins. The report can modify existing bins or create new bins.
Other parameters which can be changed here are: Update Type This can be either “Create” or “Modify”. “Create” means the bin will be created. “Modify” is used to change existing bins. Location Code The location code of the bins (see chapter 6.2.5.2). From Aisle In order to update more than one bin at one time (multiple bins and aisles can be updated at the same time). It is possible to choose a range of bins. This is the starting aisle for the bin range. These are the first two digits of the 6 digit number according to the Global Naming Convention. To Aisle The last aisle number of the chosen bin range.

Logistics Processes and IT tools Page 31 of 100 Navision master version
© Inter IK
EA S
ystems B
.V. 2011
From Row The starting row for the bin range. These are digit 3 and 4 of the 6 digit number. To Row The last row for the bin range. Increment This field is used only when the Update Type is “Create”. The report will create the first row as the “from row” and then create the second row as the first row plus the increment. This can be used if only even or odd aisles need to be set up. From Level The starting level for the bin range. These are digit 5 and 6 of the 6 digit number. To Level The last level for the bin range. Increment This field is only used if the Update Type is “Create”. The report will create the first level as the “from level” and then create the second level as the first level plus the increment. Type The type has the options “No change”, blank, “Picking” and “Manual”. If the type is “No change” then the type is left as it was and not updated. Allow Negative Transfers This has three options: “blank”, “yes” and “no”. If blank, no update will occur. Length of the bin The length can be entered here. If this is 0, no update will be done. Width of the bin The width can be entered here. If this is 0, no update will be done. Height of the bin The height can be entered here. If this is 0, no update will be done.

Logistics Processes and IT tools Page 32 of 100 Navision master version
© Inter IK
EA S
ystems B
.V. 2011
Weight of the bin This parameter defines the maximum weight of every of those bins in order to ensure that the overall weight of the racking does not exceed a maximum. The weight can be entered here. If this is 0, no update will be done. Linked Zone The Link Zone can be set for the range. If this is 0, no update will be done (see chapter 0). SM Code The Sales Method Code can be set for the range. If blank, then no update will be done. Auto Create The Auto Create has three options: “blank”, “yes” and “no”. If blank, no update will occur. Profile The profile has three options: “blank”, “yes” and “no”. If blank, no update will occur (see chapter 6.2.5.99).
6.2.5.5. Buffer space set up
6.2.5.5.1. Buffer space
The buffer space parameters ensure that sufficient buffer space will be secured in between the racking, installations and/or the pallets, in order to be able to put the pallets in the racking in a normal way without touching the neighbouring pallets, pillars, beams or installations at the roof. The additional needed space will be automatically added by Navision to the pallet size information provided in the article supplier list when it calculates if the goods fit into a certain bin. This needs to be defined for the height, the length and the width of the bin.
6.2.5.5.2. Length Buffer Space
Length Buffer Space is the space in length needed to place the pallet in the racking without touching the racking or having too much overhang in the aisle. 5 cm is enough for the Length Buffer Space. The additional cm set in this parameter

Logistics Processes and IT tools Page 33 of 100 Navision master version
© Inter IK
EA S
ystems B
.V. 2011
will be automatically added to the length information provided in the article supplier list when the system calculates if the article fits into a certain bin. The Buffer Space Parameters can be defined in Setup/IKEA Setup and the Tab Warehouse.
Be aware that the “space” parameters have meters as unit of measure. Therefore a buffer space of 5 cm is set as 0,05. When setting up the buffer spaces, please take into consideration your local fire and safety requirements.
6.2.5.5.3. Height Buffer Space
Height Buffer Space is the vertical space needed to place pallets in the racking without touching the beam/sprinkler above or the roof (highest racking level). This parameter should be set between 5 cm and 15 cm, whereas 5 cm is the minimum for buffer space to be able to put the pallets in the racking in a normal way. The value set in this parameter will be automatically added to the height information provided in the article supplier list when the system calculates if the article fits into a certain bin. The dimensioning information provided by the IKEA Supply Chain for articles does not always include the pallet height. In this case it is possible to overwrite the height of an article in the articles supplier list. However if this happens more

Logistics Processes and IT tools Page 34 of 100 Navision master version
© Inter IK
EA S
ystems B
.V. 2011
frequently and the buffer bins are high enough the height buffer space value can be increased.
6.2.5.5.4. Width Buffer Space
This is the horizontal space needed to place pallets in the racking without touching the neighbouring pallets or pillars. 5 cm is enough for the Width Buffer Space. The additional cm set in this parameter will be automatically added to the width information provided in the article supplier list when the system calculates if the article fits into a certain bin. For example: a pallet is 80 cm wide. The 5 cm buffer space will be added: 80 cm + 5 cm = 85 cm. Navision will now search for the best possible buffer bin which needs to have the minimum width of 85 cm. A bin set as 90 cm wide will fulfil this criteria. In case the information of the dimensions of the pallets, which is proved by the IXP agreement from the supplier, is not correct, those ones can be overwritten in Navision (please see chapter 6.2.5.99).

Logistics Processes and IT tools Page 35 of 100 Navision master version
© Inter IK
EA S
ystems B
.V. 2011
6.2.5.6. Bin Type
The Usage Type of a bin is needed to identify if and which goods should be stored in this bin location. The following Usage Types are available in Navision: “<blank>”, “Picking” and “Manual”. If a bin location is set to “<blank>”, it can be used by Navision to automatically stack in pallets in this bin. If the bin is set to “Manual” this bin is not available for Navision for automatic stack in. Bins which are set to “Manual” are usually the ones which are not easy to access with reach trucks and the ones which are used for the storage of non-selling goods (e.g. store equipment). The share of bins used by non-selling goods should not exceed 3% of the total warehouse racking. The majority of the bins should be set to “<blank>” in order to give Navision a wider choice of bins to find the best suitable location. The update can be done in Setup/Locations/Locations/Bins.

Logistics Processes and IT tools Page 36 of 100 Navision master version
© Inter IK
EA S
ystems B
.V. 2011
6.2.5.7. Defining Sales Methods
The Sales Method code for bins will ensure that articles will be allocated by Navision in a bin which is in the same Sales Method as the sales space of this article. For example, Self-serve articles will be stacked in the racking in Self-serve furniture area. 0 is for Market hall, 1 is Self-serve furniture area and 2 is Full Serve area. The sales location of Market hall articles is not in the warehouse. Therefore it is recommended that Market hall products (and satellite products from Showroom like HFB 09) are stored close to the sales location which is either Market hall or Showroom. This means either close to the entrance into Self-serve furniture area from Market hall or - for stores with a second drive through between Self-serve and Market hall - close to that one, or even – for stores with a hatch or balcony into Showroom – close to that opening. The idea behind it is to have products stored as close as possible to the sales location to reduce traffic time.

Logistics Processes and IT tools Page 37 of 100 Navision master version
© Inter IK
EA S
ystems B
.V. 2011
6.2.5.8. Link Zones set up
Link zones allow to group storage bins in the same group which are located in different aisles with different aisle numbers. Link zones are used, for example, to separate the two sides in Self-serve. Odd aisles are closer together than the even ones at the other side. For example aisle 5 is closer to 7 than to 6.
In order to get link zones to work, both the picking bins and the buffer bins needs to have an assigned link zone. Before updating in Navision the link zones should be defined and mapped for later reference. For better maintenance the number of link zones should be limited, the recommendation for a standard store is <= 5. Market hall HFBs should be grouped in link zones close to the nearest transfer area for Market hall for short driving distances.

Logistics Processes and IT tools Page 38 of 100 Navision master version
© Inter IK
EA S
ystems B
.V. 2011
Every bin should have one link zone only. However different bins in the same aisle can have different link zones. Link zones can be set and updated in Navision in Periodic Activities/Update Bin Measurements or in Store Logistics/Setup/Locations/Bins.
6.2.5.9. Metal Profiles
IKEA has developed a paper pallet solution to replace wooden pallets. Eliminating the transport of wooden pallets in the supply chain results in a higher transport filling rate in containers and trailers and eliminates backflow of wooden pallets within the supply chain. This results in cost savings for IKEA but also contributes to use the environmental resources more efficiently. To avoid the need of palletising all in-delivered pallets, stores can install metal profiles in the store’s racking. This will contribute to maintain the efficiency in store goods flow. The solution in the store is to stack in the goods on, by IKEA developed, metal profiles without the wooden pallet. If possible, metal profiles should be installed on 60-80% of the warehouse racking. This includes all storage locations, except the locations of the highest level which should be used for over height pallets, like

Logistics Processes and IT tools Page 39 of 100 Navision master version
© Inter IK
EA S
ystems B
.V. 2011
sofas and mattresses (local regulations regarding health and safety need to be considered in every country). IKEA stores, which have metal profiles installed in the racking, should consider those profiles as part of their graphical warehouse structure and update the related parameter in Navision. The parameter for metal profiles in Navision can be ticked in IKEA Setup/Warehouse. This will automatically steer the goods on paper pallets to racking bins with metal profiles during stack in. Pallets needing a wooden pallet will be steered automatically to bin locations without profile. It should be activated if the store is equipped with storage bins with metal profiles.
Goods arrive on paper pallets at the store. The majority can be put on profile locations without a wooden pallet. Due to non-standard dimensions, some pallets cannot be stored on profiles due to safety risk, like sofas. Those ones need to be palletised in the store. In order to enable Navision to buffer suitable pallets only directly into a storage location with profile, the information regarding the pallet type will be sent in an IXP agreement together with the pallet measurements from the supplier. While creating the transfer journal from the shipment, Navision checks if the pallet is a

Logistics Processes and IT tools Page 40 of 100 Navision master version
© Inter IK
EA S
ystems B
.V. 2011
paper pallet, which is suitable for profiles. Only if this is the case, it will stack the pallet into a bin with a metal profile. In the IKEA Retail Item Card/ Item/Supply Communication/Suppliers/Article Supplier List the information if the pallet is suitable for profiles or not can be seen on article and supplier level.
In case the information for Pallet Type or Article dimensions (width, height, length, weight) provided by the supplier is not correct, it can be overwritten manually in the Article Supplier List table (accessible from the IKEA Retail Items Card), valid until the next update coming from the IXP agreement.
A onetime overwrite can be done in the Item Transfer Journal.

Logistics Processes and IT tools Page 41 of 100 Navision master version
© Inter IK
EA S
ystems B
.V. 2011
6.2.5.10. Weight limitation
Due to limitations regarding the weight a floor or a racking is designed to handle, there can be maximum weight limits of the racking. In addition, sometimes the machines which are used to lift the goods have some weight limitations above a certain height. It is also possible that local regulations will dictate what weight can be stored on which height. The parameter “Weight limitation” makes it possible for stores with weight limits to record this on bin level in Navision. Navision will then consider this weight parameter automatically during the stack in process and will support, if set correctly, to be conform to regulations. The parameter can be turned on by ticking in Setup/IKEA Setup/Warehouse in Navision.

Logistics Processes and IT tools Page 42 of 100 Navision master version
© Inter IK
EA S
ystems B
.V. 2011
The Weight parameter can be used in the Sales Method Selection Order. In order to enable Navision to steer goods in relation to its weight, the limitation of the racking or of the single bins need to be defined in Periodic Reports/Update Bin Measurements or in Location Card/Location List/Bins.

Logistics Processes and IT tools Page 43 of 100 Navision master version
© Inter IK
EA S
ystems B
.V. 2011
6.2.6. Sales Method Selection Order
If all parameters of the graphical warehouse structure are defined as described in the chapters above, Navision has all the information of all bins including their attributes of the warehouse. In order to enable Navision to self dependently decide which product fits in which storage bin, the logic which Navision uses to stack in pallets has to be defined. This logic is called Sales Method Selection Order and will be based on priorities which the user has to define. It needs to be defined per Sales Method in Navision under IKEA Setup/Sales Method/Sales Method/Sales Method Selection Order
As the Sales Method Selection Order needs to be done per Sales Method it is possible to have different stack in priorities per Sales Method. Selection 1 should always be Sales Method as the first criteria is to have the goods allocated close to the destination where the sales space is allocated: in Full Serve, in Self-serve furniture area or close to Market hall. Selection 2 should be link zone to keep the goods at the correct side of the aisle in SM 2 and to store the SM 0 goods close to their home. The other 5 selections should be selected according to the specifics of every store.

Logistics Processes and IT tools Page 44 of 100 Navision master version
© Inter IK
EA S
ystems B
.V. 2011
The following seven parameters are available: SM SM stands for Sales Method. With this option bins are selected according to the setup Sales Method and will allocate either in SM 0 (Market hall), 1 (Self-serve furniture area) or in 2 (Full Serve area). Link zones Link zones are used to group storage bins. When having very long aisles or aisles in different directions, it can happen that the logical numbering of the aisles is not always reflecting the shortest distances to a sales space. With link zones groups of buffer bins can be defined that are close together. Giving link zones a high priority will minimize driving distances. Distance to pick Distance to pick will calculate the distance between the buffer bin and the picking bin. Giving ‘distance to pick’ a high priority will minimize driving distances. Unlike the other criteria, ‘distance to pick’ always has 1 best bin and this bin will be assigned to the pallet. Criteria below distance to pick are then not used. As a consequence the closest bin might not be the narrowest fitting bin, which might lead to “wasting” the available space.

Logistics Processes and IT tools Page 45 of 100 Navision master version
© Inter IK
EA S
ystems B
.V. 2011
Length Navision compares the length of the pallet with the length of the storage bins. The smallest bin in which the pallet fits (including the Length Buffer Space) will be selected. Width Navision compares the width of the pallet with the width of the bins. The smallest bin in which the pallet fits (including the Width Buffer Space) will be selected. Height Navision compares the height of the pallet with the height of the bins. The smallest bin in which the pallet fits (including the Length Buffer Space) will be selected. Weight Weight compares the weight of the pallet with the weight of the bins. The bin with the lowest weight bigger than the weight of the pallet will be selected. Sales Method Extra Selection If the parameters described above are set according to the best possible set up, Navision will automatically ensure efficient stack in and retrieval processes. However in case that the filling rate of all buffer bins will be higher than 80% it can happen that Navision cannot find a suitable empty bin. For this case there is an extra parameter available, called Sales Method Extra Selection. The selection needs to be done according to the Sales Method. In case Navision cannot find a free bin in the article’s Sales Method area, Navision will select a free bin in the next Sales Method according the extra selection order.

Logistics Processes and IT tools Page 46 of 100 Navision master version
© Inter IK
EA S
ystems B
.V. 2011
In the example above if no storage bin is available in Full Serve, Navision will try to allocate the pallet in Self-serve. If there is still no suitable bin found, it will try to allocate in the bins defined as SM 0 (Market hall).
6.2.7. Pre-planning of internal replenishment
6.2.7.1. Set up of internal replenishment
With the graphical warehouse structure and the Selection Order in place, Navision is set up for an efficient automatic stack in process. In order to enable Navision to also operate the retrieval process efficiently and automatically, Navision needs to be set up for this process as well. This is called replenishment setup and needs to be done in Replenishment.

Logistics Processes and IT tools Page 47 of 100 Navision master version
© Inter IK
EA S
ystems B
.V. 2011
Here it can be set up which replenishment batches are to be executed when the replenishment function is run. The following fields are a part of the setup: Journal Batch Name This specifies the batch name to be used for the replenishment. Existing batches can be selected or if the batch does not exist, it will be created when the replenishment is executed. Item No. Filter This sets a filter on item numbers. HFB Filter This parameter sets filters on Home Furnishing Business area. RA Filter This sets filters on Product Range Area. PA Filter This sets filters on Product Area. SM Filter This sets filters on Sales Method level. Location Filter This filters on destination Location level. To Bin Filter This filters based on destination Bin. From Location Filter This filters based on current Location. From Bin Filter This filters based on current Bin. Document No. The document number, that the Item Transfers are to be posted with. Posting Date Replenishment posting date. If left empty, the date of execution will be used.

Logistics Processes and IT tools Page 48 of 100 Navision master version
© Inter IK
EA S
ystems B
.V. 2011
Execute If marked, the replenishment function will execute the replenishment batch, otherwise it will skip it. Type In the Replenishment setup it is possible to select between two types of Replenishments: “Filling” and “Space”. With “Filling” Navision will replenish a sales space based on the sales space size and the filling rate. An internal order will only be created if Navision identifies a need in the sales space. This is the most efficient way to order and replenish. If the Replenishment type is set to “Space”, Navision will try to free up as much space in the buffer as possible. It will do that by checking for every article if the stored quantity in the buffer bins can be accommodated in the sales space, starting with the smallest quantity. It is not the most efficient way because it will result in a more frequent replenishment of a sales space. “Space” should be used in case the store has capacity problems only. Time Executed The time when the replenishment was executed. Date Executed The date when the replenishment was executed. Total Records The number of replenishment lines generated in each batch after execution.

Logistics Processes and IT tools Page 49 of 100 Navision master version
© Inter IK
EA S
ystems B
.V. 2011
6.2.7.2. Pick decrease
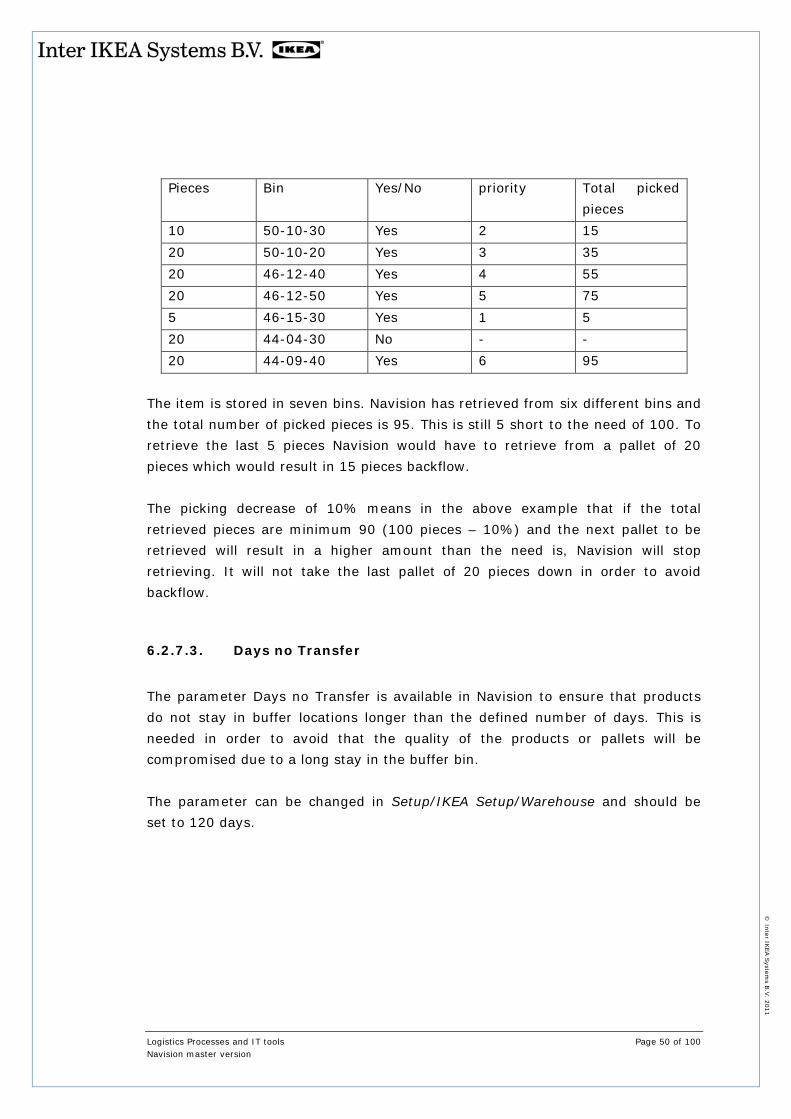
The pick decrease is a percentage on which Navision decides whether the remaining quantity of the total Replenishment Need of the item will be picked or not. This is a parameter which supports to optimise efficiency and to keep handling costs as low as possible by avoiding partial picks from a stored pallet. The parameter is set as a percentage in Setup/IKEA Setup/Warehouse. The recommendation value is <=10.
Example: The need for internal replenishment = 100 Pick decrease factor = 10% To fulfil the need, Navision has to retrieve quantities from more than one bin location. To free up space in the racking it will start retrieving quantities from the bin with the lowest number of pieces.
Logistics Processes and IT tools Page 50 of 100 Navision master version
© Inter IK
EA S
ystems B
.V. 2011
Pieces Bin Yes/No priority Total picked
pieces 10 50-10-30 Yes 2 15 20 50-10-20 Yes 3 35 20 46-12-40 Yes 4 55 20 46-12-50 Yes 5 75 5 46-15-30 Yes 1 5 20 44-04-30 No - - 20 44-09-40 Yes 6 95
The item is stored in seven bins. Navision has retrieved from six different bins and the total number of picked pieces is 95. This is still 5 short to the need of 100. To retrieve the last 5 pieces Navision would have to retrieve from a pallet of 20 pieces which would result in 15 pieces backflow. The picking decrease of 10% means in the above example that if the total retrieved pieces are minimum 90 (100 pieces – 10%) and the next pallet to be retrieved will result in a higher amount than the need is, Navision will stop retrieving. It will not take the last pallet of 20 pieces down in order to avoid backflow.
6.2.7.3. Days no Transfer
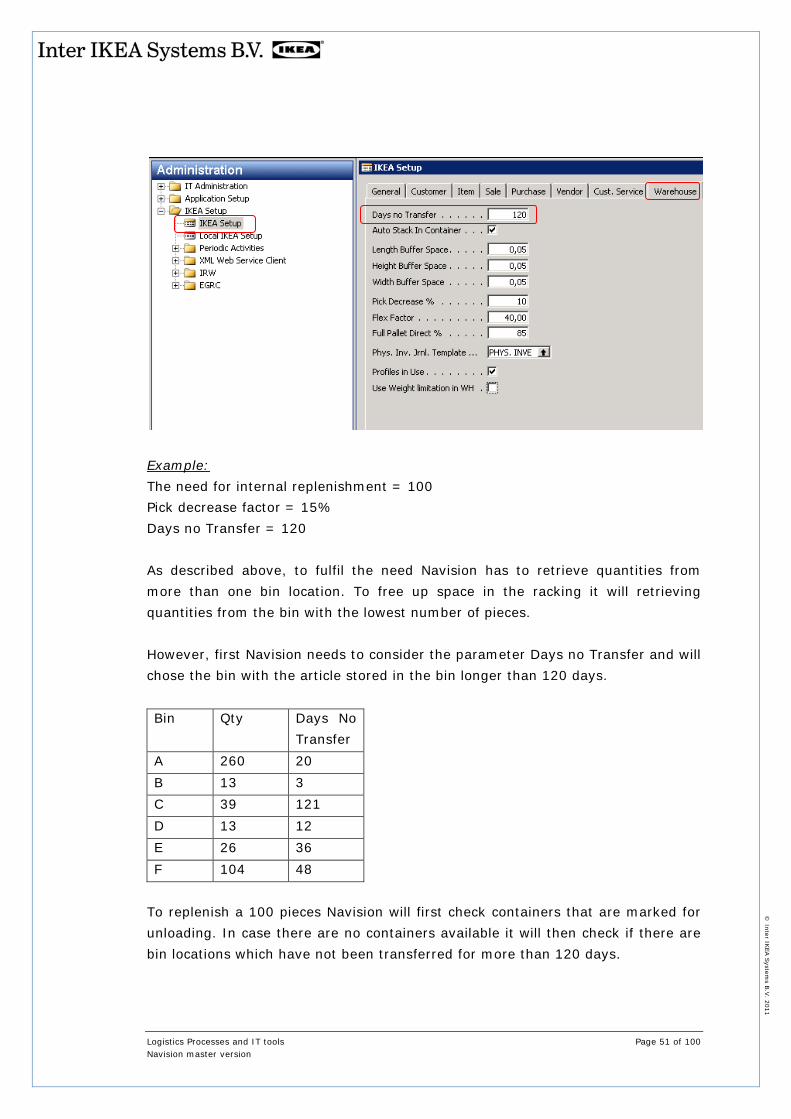
The parameter Days no Transfer is available in Navision to ensure that products do not stay in buffer locations longer than the defined number of days. This is needed in order to avoid that the quality of the products or pallets will be compromised due to a long stay in the buffer bin. The parameter can be changed in Setup/IKEA Setup/Warehouse and should be set to 120 days.
Logistics Processes and IT tools Page 51 of 100 Navision master version
© Inter IK
EA S
ystems B
.V. 2011
Example: The need for internal replenishment = 100 Pick decrease factor = 15% Days no Transfer = 120 As described above, to fulfil the need Navision has to retrieve quantities from more than one bin location. To free up space in the racking it will retrieving quantities from the bin with the lowest number of pieces. However, first Navision needs to consider the parameter Days no Transfer and will chose the bin with the article stored in the bin longer than 120 days. Bin Qty Days No
Transfer A 260 20 B 13 3 C 39 121 D 13 12 E 26 36 F 104 48
To replenish a 100 pieces Navision will first check containers that are marked for unloading. In case there are no containers available it will then check if there are bin locations which have not been transferred for more than 120 days.

Logistics Processes and IT tools Page 52 of 100 Navision master version
© Inter IK
EA S
ystems B
.V. 2011
This is the case for bin C with 39 pieces. Therefore Navision will first retrieve from this bin. This leaves 61 pieces still needed. It will now start to take the smallest quantities first to free up as much space as possible. It will first take bin B then bin D then bin E which leaves 9 pieces still needed (39 + 13 + 13 + 26 = 91). The system will perform a check on Pick Decrease every time a new location is needed. Original need was 100 pieces. The Pick Decrease in this example is set to 15%, therefore 15 pieces (15% out of 100 pieces). This means that the minimum to pick is 100 – 15 = 85. As this quantity has been reached Navision will not break down the pallets on the next bin location but only replenish 91 pieces. According to this logic Navision has secured that the goods stored longer than 120 days have been replenished and through the Pick Decrease that backflow will be avoided.

Logistics Processes and IT tools Page 53 of 100 Navision master version
© Inter IK
EA S
ystems B
.V. 2011
6.2.7.4. Flex Factor
One important part of Sales Space Management is the concept of flexible sales spaces. This means that the physical sales spaces are dimensioned to accommodate half of the in-delivery amount. The other half will be replenished in the sales spaces in the neighbourhood locations (see chapter 5). The calculated flexible size of the sales space, referred to as Flex Capacity is shown on the redesigned form Item Calculations, also known as “SSM-card”. Navision has a built in functionality to ensure that the flex concept is considered for internal replenishment. If the Total sales space Size of an article is smaller than or equal to the pallet quantity, a parameter called Flex Factor is used. It is defined as a percentage by which the Total Sales Space Size is increased if the Sales Space Type is set to “Flexible”. The result of this calculation is defined as Flex Capacity.
The Flex Factor value is set in IKEA Setup/Warehouse. The recommended value is 40.

Logistics Processes and IT tools Page 54 of 100 Navision master version
© Inter IK
EA S
ystems B
.V. 2011
If the Total sales space Size is larger than the pallet quantity, the Flex Capacity is equal to 50% of the pallet quantity, rounded up to the next unit of measure.
The complete calculation for Flex Capacity and Need can be found in Appendix I.

Logistics Processes and IT tools Page 55 of 100 Navision master version
© Inter IK
EA S
ystems B
.V. 2011
6.2.7.5. Full Pallet Direct %
The aim of this parameter is to increase the door-to-floor share of full pallets. When executing the function “Receive Shipment”, the system will check if the set percentage of the pallet quantity will fit in the sales location for every full pallet that was not already suggested for replenishment. The recommended value is 85, which means that the remaining part of the pallet quantity, being 15 percent, needs to be handled flexibly.
6.2.7.6. Auto Stack In Container
When this field is marked, Navision will automatically assign buffer locations to pallets that do not fit into the sales locations when the Receive Shipment functionality is ran.

Logistics Processes and IT tools Page 56 of 100 Navision master version
© Inter IK
EA S
ystems B
.V. 2011
6.3. Preparation Pre-planning, as explained above, is a very important prerequisite to ensure an efficient goods flow process. The pre-planning however is a midterm-planning. Once set up for a new store, it will be adjusted until the best possible setup for every store is found. This, of cause, need to be done very considered and in conjunction with the support of the Country Super User. Afterwards it usually will be revised once per year in preparation for every new Fiscal Year. Pre-planning secures the goods flow operation midterm. However in the goods flow process it is needed to do short term planning of the operations as well. Short term in this content means the next days, up to one week. This is called Preparation and involves all the following sub processes.
This process of preparation needs to involve the consideration of the number of containers or trucks which are expected to arrive the next days and the resources which will be available for unloading those expected in deliveries. Also the decision of how many counter balances are needed to unload, how many reach trucks are needed for the internal movement of the pallets to the transit area, how many reach trucks are needed for the internal retrieval operation and how many replenishment co-worker are needed for the internal movement of the goods from the transit area to the specific areas in the store and the actual replenishment of the sales spaces. The correct amount of needed resources has to be allocated to the sub processes. The relevant IT tools which are used are the Delivery Scheduler and Navision which has information regarding the expected in deliveries.

Logistics Processes and IT tools Page 57 of 100 Navision master version
© Inter IK
EA S
ystems B
.V. 2011
6.4. Goods receiving
6.4.1. Introduction
The process of goods receiving starts with receiving a container or truck in Navision. The container or truck can be seen as the initiator of the goods flow process. The unloading schedule and planning of resources are essentials to a successful operation which leads to refilled sales spaces before store opening. The receiving and internal movement should be synchronized with the replenishment of the sales spaces. The goods flow process can be seen as a pipeline; therefore congestions in the unloading area, transit area or on the sales floor should be avoided. The more even the pallet flow is, the better and more efficient the total process is. To receive goods the containers has to be released first, an item transfer journal has to be created, labels have to be printed and the container receiving needs to be confirmed.
6.4.2. Receiving shipment and consignment information
6.4.2.1. Shipment and consignment
To be able to receive a container, the information regarding the shipment and consignment in the container must be available. When a shipment is created, a purchase invoice for the container will be created from all the purchase orders that the shipment contains. There can be items from many purchase orders in one consignment. Many consignments can be in one container. In general, shipments, consignments and purchase invoices are processed automatically through the IXP platform (processing the purchase invoice can vary depending on the country). The moment a supplier closes the doors of the container or truck, information about content and arrival week becomes available in the IKEA transport systems (DES, CNS, STMS) and is sent to Navision of the receiving store.

Logistics Processes and IT tools Page 58 of 100 Navision master version
© Inter IK
EA S
ystems B
.V. 2011
6.4.2.2. Creating missing shipment in the consignment
In some cases it can happen that the shipment is missing in Navision. In this case a specific procedure has to be followed in Navision in order that the receiving process can continue. This procedure starts in Supply Communication/Distribution/Consignment Card/Consignment List. One of the consignments in the same shipment needs to be chosen. Then all of the consignments need to be renamed as the chosen one. This is done in the consignment card by pressing F5.
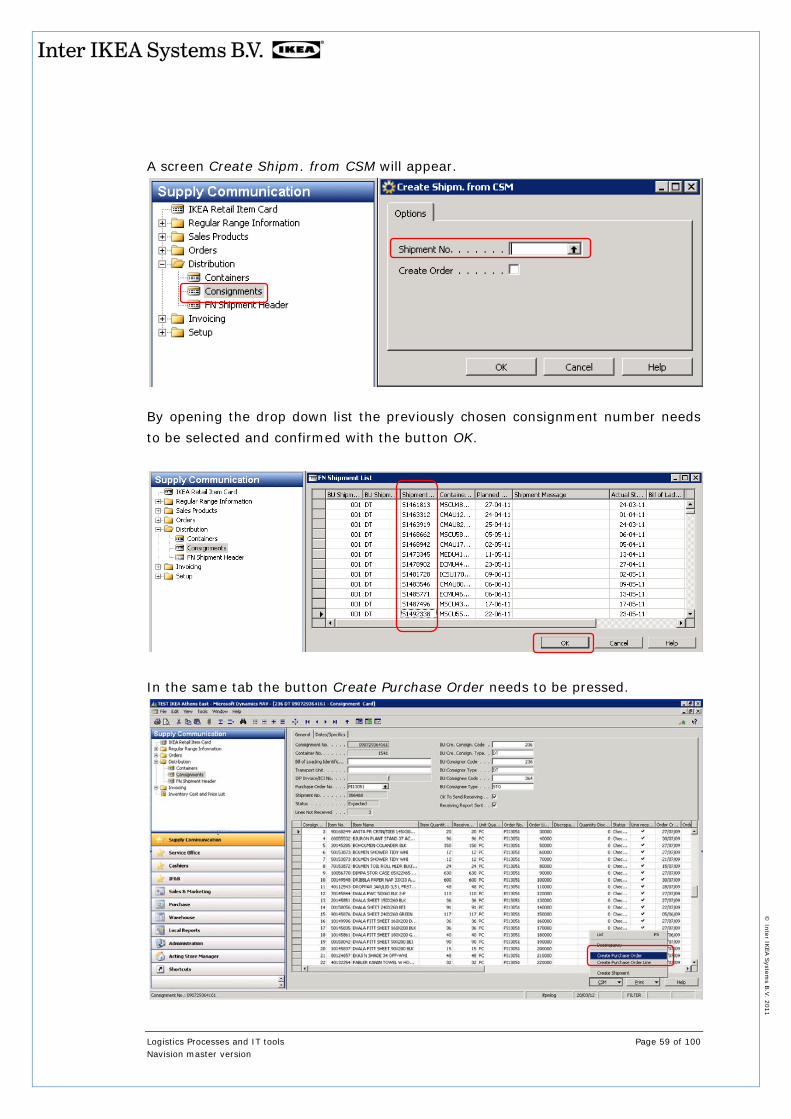
In Supply Communication/Distribution/Consignment Card the consignment with the missing shipment needs to be selected. The shipment can be created by using the button “CSM” and selecting “Create shipment”.
Logistics Processes and IT tools Page 59 of 100 Navision master version
© Inter IK
EA S
ystems B
.V. 2011
A screen Create Shipm. from CSM will appear.
By opening the drop down list the previously chosen consignment number needs to be selected and confirmed with the button OK.
In the same tab the button Create Purchase Order needs to be pressed.

Logistics Processes and IT tools Page 60 of 100 Navision master version
© Inter IK
EA S
ystems B
.V. 2011
The opening confirmation request window needs be confirmed with Yes.
6.4.3. Releasing in-deliveries Releasing in-deliveries means providing Navision information about the date of unloading of a container and confirming that it can be replenished on the next morning. This needs to be done in order to ensure that:
• Incoming quantities and date are confirmed and visible for Sales co-workers.
• Internal orders can be placed against incoming stock.
The process is completed in three steps – setting the Planned Unloading Date, marking the container as Available for Replenishment and setting Date Unloading. Sales co-workers should provide reliable information to the customer on the date that an item will be received in the store. This information is made available by setting the Planned Unloading Date in the Container Card. That is why it is critical that it is registered as early as possible.

Logistics Processes and IT tools Page 61 of 100 Navision master version
© Inter IK
EA S
ystems B
.V. 2011
Once the date is set, the container status will change to ‘Confirmed’ and the arrival information will be available in the Retail Item Card.
The next step is to make the container available for replenishment. Although not efficient, sometimes containers need to be unloaded during store opening hours. Since these articles cannot be replenished before store opening, you need to indicate which containers should be taken into consideration for the next day replenishment (see chapter 6.5.1.). This is done by marking the field Available for Replenishment.

Logistics Processes and IT tools Page 62 of 100 Navision master version
© Inter IK
EA S
ystems B
.V. 2011
Once the container has physically arrived, you need to confirm the actual date in the field Date Unloading. This will change the Order status to “Unloading” and thus will allow the receiving of the container. If a different date than the Planned Unloading Date is registered, it will also update the Next Arrival Information in the Retail Item Card.
6.4.4. Receiving
6.4.4.1. Item Transfer Journal Batch
When the containers and trucks are released and the internal replenishment has been run (see chapter6.5.1), the receiving of goods can start. This means the physical unloading and moving from the loading dock towards the final destination including the use of relevant IT tools. There are certain success factors in order to achieve a successful receiving process. One is the number and location of the loading doors in relation to the final destination of the products as well as having the right equipment and avoiding bottlenecks. Communication with external partners like the transport provider is very important.
Logistics Processes and IT tools Page 63 of 100 Navision master version
© Inter IK
EA S
ystems B
.V. 2011
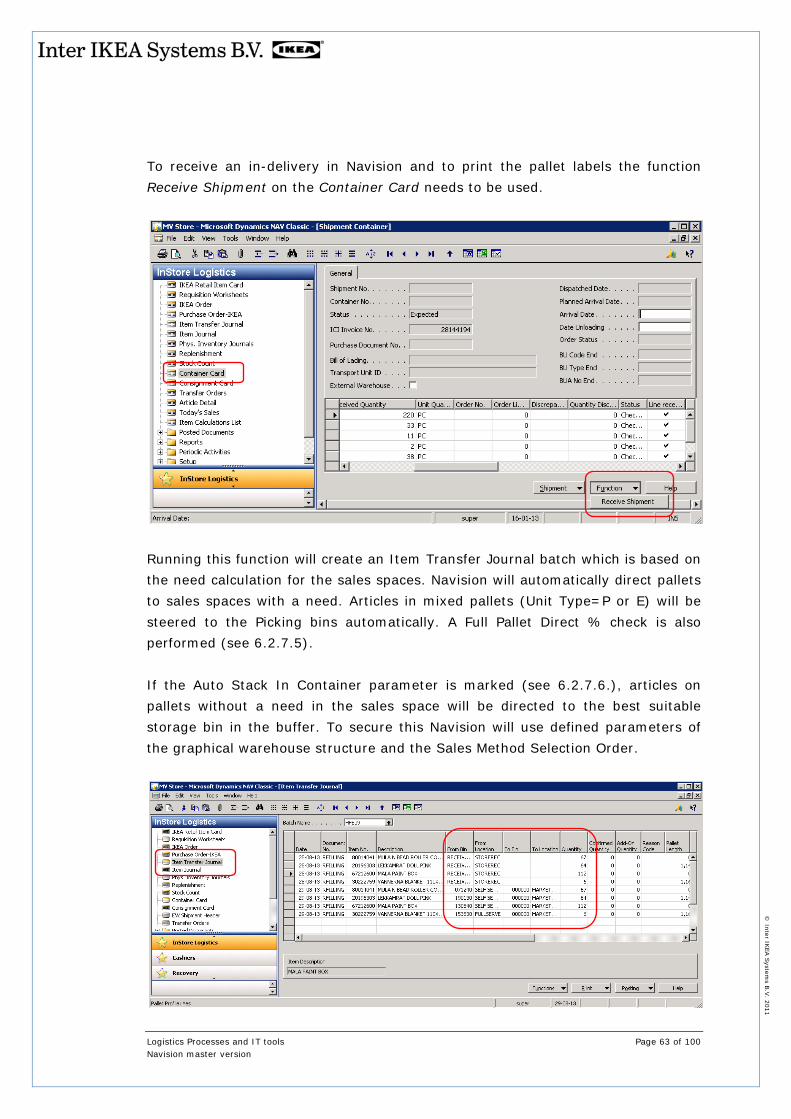
To receive an in-delivery in Navision and to print the pallet labels the function Receive Shipment on the Container Card needs to be used.
Running this function will create an Item Transfer Journal batch which is based on the need calculation for the sales spaces. Navision will automatically direct pallets to sales spaces with a need. Articles in mixed pallets (Unit Type=P or E) will be steered to the Picking bins automatically. A Full Pallet Direct % check is also performed (see 6.2.7.5). If the Auto Stack In Container parameter is marked (see 6.2.7.6.), articles on pallets without a need in the sales space will be directed to the best suitable storage bin in the buffer. To secure this Navision will use defined parameters of the graphical warehouse structure and the Sales Method Selection Order.

Logistics Processes and IT tools Page 64 of 100 Navision master version
© Inter IK
EA S
ystems B
.V. 2011
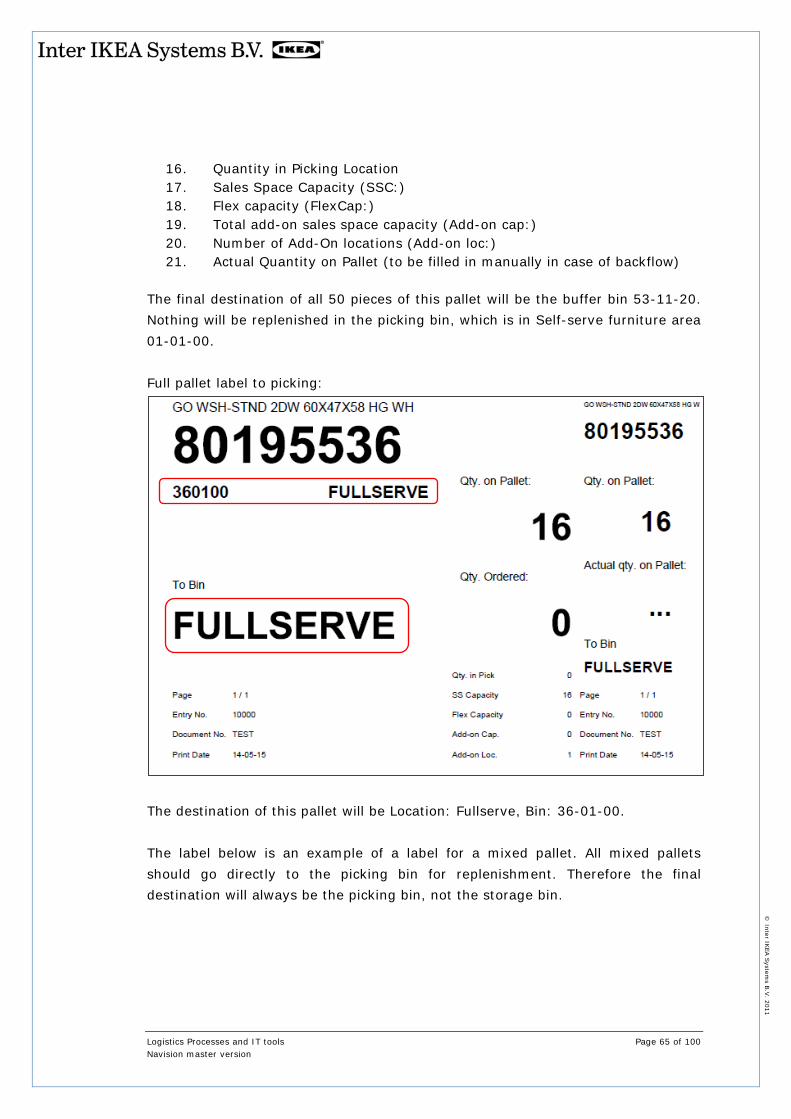
6.4.4.2. Pallet label
Pallet labels should be printed for the receiving process and need to be attached to every pallet while unloading. Pallet labels contain all the necessary information to move pallets quickly throughout the entire goods flow process to their final destination. The pallet label consists of two parts, a big left part and a small tear off part at the right. Full pallet label to buffer:
The full pallet label contains the following information:
1. Article number 2. Article name 3. Picking location 4. Picking Bin 5. Destination Bin 6. Ordered quantity 7. Page Number 8. Entry number 9. Document Number 10. Printing date 11. Quantity on pallet (Qty. on pallet:) 12. Quality Stop (Q will be shown if the article has a Q-stop) 13. Sales Stop (S will be shown if the article has a Sales stop) 14. NEWS (N will be shown when article comes in for the first time) 15. Profile on destination bin (Profile)
Logistics Processes and IT tools Page 65 of 100 Navision master version
© Inter IK
EA S
ystems B
.V. 2011
16. Quantity in Picking Location 17. Sales Space Capacity (SSC:) 18. Flex capacity (FlexCap:) 19. Total add-on sales space capacity (Add-on cap:) 20. Number of Add-On locations (Add-on loc:) 21. Actual Quantity on Pallet (to be filled in manually in case of backflow)
The final destination of all 50 pieces of this pallet will be the buffer bin 53-11-20. Nothing will be replenished in the picking bin, which is in Self-serve furniture area 01-01-00. Full pallet label to picking:
The destination of this pallet will be Location: Fullserve, Bin: 36-01-00. The label below is an example of a label for a mixed pallet. All mixed pallets should go directly to the picking bin for replenishment. Therefore the final destination will always be the picking bin, not the storage bin.

Logistics Processes and IT tools Page 66 of 100 Navision master version
© Inter IK
EA S
ystems B
.V. 2011
Mixed pallet label:
The Mixed pallet label contains the following information:
1. Article Number 2. Article Description 3. Received Quantity 4. Abbreviation of the Picking Location 5. Picking Bin 6. Total Sales Space Size and Flexible Capacity 7. Add-On Capacity and number of Add-On bins 8. Indicators for Quality Stop / Sales Stop / NEWS
The Item Transfer Journal batch will have the same name as the Invoice Header for the selected container/truck. If the setting “Print Pallets on Receive” in the Setup/IKEA setup is activated, the pallet labels will be printed in the step Receive Shipment as described above.
1 2 3 4 5 6 7 8

Logistics Processes and IT tools Page 67 of 100 Navision master version
© Inter IK
EA S
ystems B
.V. 2011
If this box is not checked then labels will not be printed. However, it is still possible to print the pallet labels from the Item Transfer Journal belonging to the chosen container/truck in Item Transfer Journal (the button Print).

Logistics Processes and IT tools Page 68 of 100 Navision master version
© Inter IK
EA S
ystems B
.V. 2011
6.4.4.3. Container manifest
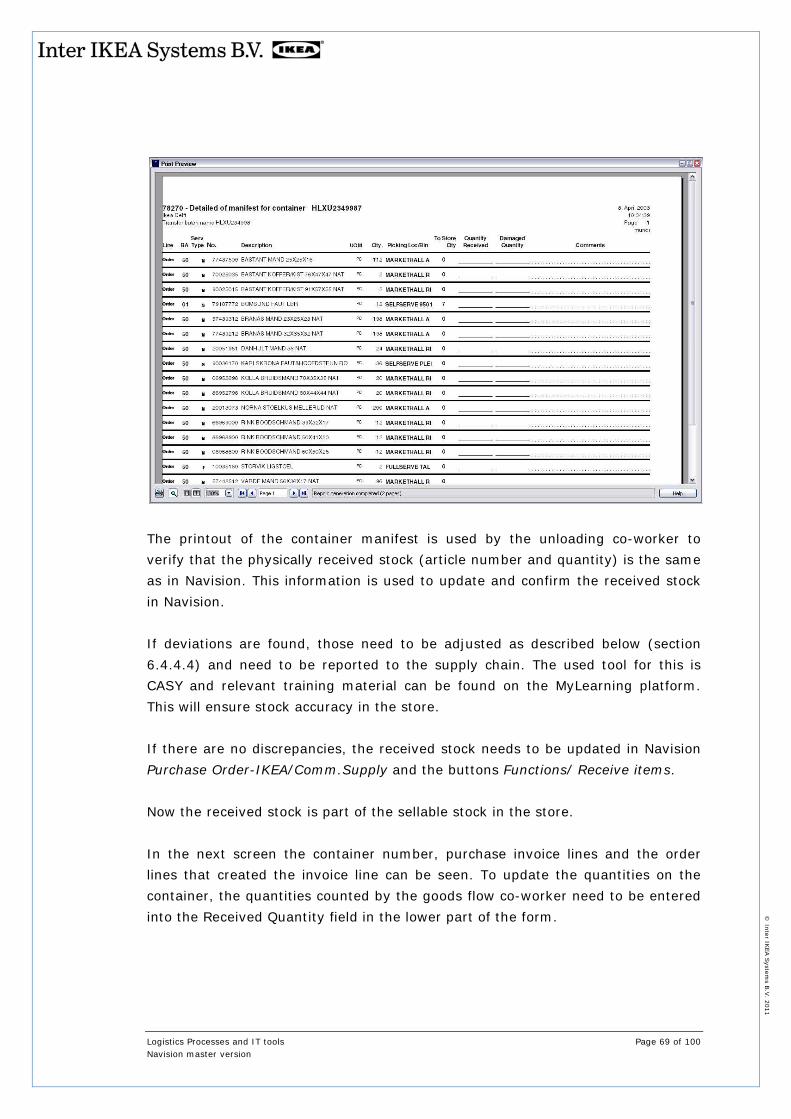
For the unloading process a container manifest can be created. This is a list of order lines of goods which are on the container or truck. The manifest can be used by the unloading co-worker to check and confirm if all products and the right amount have been received or if there have been any deviations. However, the better way of inbound check is done via checking the goods with the pallet label. Missing or extra labels while unloading indicate an over- or under-delivery. The container manifest can be printed in Purchase Order-IKEA/Comm. Supply/Print/Container Manifest Receiving. Before printing, the container/truck need to be chosen.
In this screen all the items that are arriving in the container can be seen. In the Container Manifest all the purchase order lines that exist in this purchase invoice can be seen. It is possible to get more than one order line for one invoice line. Reason being is that when the order is created it splits into lines with maximum 1 pallet per line. In the invoice it is all summed up but in the printout it is easier to acknowledge pallet lines instead of having manually to calculate what has been counted.
Logistics Processes and IT tools Page 69 of 100 Navision master version
© Inter IK
EA S
ystems B
.V. 2011
The printout of the container manifest is used by the unloading co-worker to verify that the physically received stock (article number and quantity) is the same as in Navision. This information is used to update and confirm the received stock in Navision. If deviations are found, those need to be adjusted as described below (section 6.4.4.4) and need to be reported to the supply chain. The used tool for this is CASY and relevant training material can be found on the MyLearning platform. This will ensure stock accuracy in the store. If there are no discrepancies, the received stock needs to be updated in Navision Purchase Order-IKEA/Comm.Supply and the buttons Functions/ Receive items. Now the received stock is part of the sellable stock in the store. In the next screen the container number, purchase invoice lines and the order lines that created the invoice line can be seen. To update the quantities on the container, the quantities counted by the goods flow co-worker need to be entered into the Received Quantity field in the lower part of the form.

Logistics Processes and IT tools Page 70 of 100 Navision master version
© Inter IK
EA S
ystems B
.V. 2011
As soon as the field Confirmed Received Quantity is updated, the field Received Quantity Confirmed in the upper part of the screen will also be updated.
The quantities which are missing or excess need to be entered. Otherwise the system would consider them as received in the full quantity. Missing quantities need to be entered into this field. For excess quantities a new purchase invoice line needs to be created. When the container quantities have been entered, the Update Invoice button needs to be used in order to update the data in the invoice and update the consignment information that created the invoice. Selecting “Yes” will update the item transfer journal that was created from the container form with the received

Logistics Processes and IT tools Page 71 of 100 Navision master version
© Inter IK
EA S
ystems B
.V. 2011
quantities and will also update the purchase invoice header to show that this has been done.
In the Purchase-Order-IKEA/Comm.Supply the fields ‘Consignment Updated’ and ‘Invoice Lines Updated’ are marked. To check if the quantity received is correct according to the invoice, the Container Discrepancy Report should be printed. This is done pressing the button Print and Quantity Discrepancy. In case that no discrepancies are found, the purchase invoice needs to be received. This is done via Posting and Post. The user will be asked to select from Receive, Invoice, or Receive and Invoice. Logistics users should confirm Receive only.

Logistics Processes and IT tools Page 72 of 100 Navision master version
© Inter IK
EA S
ystems B
.V. 2011
6.4.4.4. Handling Discrepancies
In case that the physically arrived and unloaded goods are different to the ones shown in Navision, this discrepancy needs to be registered straight away. Always securing the highest level of stock accuracy will ensure a high quality of the ordering process and will ensure the availability of the stock in the store. Therefore Navision always needs to be updated with the real figure of goods which arrived at the store. This can be checked with the Container Discrepancy Report which shows deviations between the physically received stock and the released stock in the container/trailer. It shows under and/or over deliveries. This report can be created in Purchase Order-IKEA/Comm.Supply and the button Print.
Two reports are available. The first one shows the discrepancy in quantities (pieces), the second one in amount (value).

Logistics Processes and IT tools Page 73 of 100 Navision master version
© Inter IK
EA S
ystems B
.V. 2011
The report shows the ordered quantity, the confirmed received quantity and the discrepancy. If needed this report can be used to initiate a recount of the received stock and if mistakes are found then the same procedure is followed again to correctly update the invoice.

Logistics Processes and IT tools Page 74 of 100 Navision master version
© Inter IK
EA S
ystems B
.V. 2011
6.5. Internal retrieval The internal retrieval is the process that handles the picking and movement of stored goods from buffer. The primary purpose of this is to replenish the sales space as part of the replenishment process. Goods are stored in the buffer because their sales spaces cannot accommodate the in-deliveries. In general this is the case when articles have sales spaces which are classified as “indirect”, “too small” or “missing”.
The process of replenishment consists of two different flows. First the “direct” also called “door-to-floor” flow from the container or truck directly to the sale space, secondly the “indirect” flow from the buffer bins to the sales space. The process of internal retrieval consists of four sub processes: retrieve, check, move and confirm. Retrieval of goods means moving the goods from a storage bin as a result of an internal order process or by any other request. Checking the retrieved goods is important to verify if the retrieved quantity is matching with the ordered and actually needed quantity. This will ensure efficiency and stock accuracy. After the checking process the goods will be transported directly to the sales space or a transfer area. The retrieved stock needs to be confirmed in Navision. Otherwise the stock accuracy would be compromised and the ordering process would not work correctly anymore.

Logistics Processes and IT tools Page 75 of 100 Navision master version
© Inter IK
EA S
ystems B
.V. 2011
6.5.1. Running internal replenishment
Once you have set up the filters in the Replenishment Setup (as described in chapter 6.2.7.1) you are able to run a Replenishment Proposal or a Replenishment order. There are three options to choose from in the Replenishment Setup: Create Replenishment Proposal, Open Replenishment Proposal and Replenish According to Setup. Running the replenishment or the proposal will clear the current replenishment or proposal.
The first step in the process is to run the Replenishment proposal. The purpose of this document is to provide information to Sales for the next replenishment quantities, so that sales spaces can be prepared. It also gives a chance for update of parameters (for example Sales Space Size, Sales Space Type, Product Dominance etcetera) in case an abnormality is identified or signalisation for inventory discrepancies. The execution of the proposal generation needs to happen after the releasing of in-deliveries is completed (see chapter 6.4.3). The timing must be agreed within the Commercial Team and defined in the Internal Service Agreement. The proposal will include all articles in mixed pallets from the containers that are available for replenishment (consignment lines with Unit Type P, E or BLANK) as these will be steered to the picking locations during the receiving process.

Logistics Processes and IT tools Page 76 of 100 Navision master version
© Inter IK
EA S
ystems B
.V. 2011
The next step is to run the replenishment order. This document is used for the execution of the internal retrieval. It needs to be generated as late as possible, recommended after closing hours, in order to capture the sales of the day It is possible to run an internal replenishment order in two ways: Either from Replenishment /Functions/Replenish according to Setup or from Item Transfer Journals. If it is run from the Replenishment it will run all the setups that are marked as “Execute”.
If it is run from the Item Transfer Journal, it will only run for that batch. Therefore this is not recommended as it requires manual work.

Logistics Processes and IT tools Page 77 of 100 Navision master version
© Inter IK
EA S
ystems B
.V. 2011
6.5.2. Calculating the Need in the sales space
The main trigger for an internal replenishment order is the need in a sales space. This means the decision if a sales space has enough stock for the next day’s sales or if the stock level is so low that it needs to be replenished. As the first step Navision will identify if there is a need in the sales space. If the actual stock level is equal to or lower than the replenishment point, then there is a need. Secondly, if a replenishment need exists the actual need in pieces will be calculated and a replenishment order either from the in-delivery or from storage location will be done. The need calculation for articles with flexible sales spaces is different to the calculation for non-flexible ones. The detailed calculation can be found in Appendix I. When the replenishment journal has been created the picking list for the items that are not taken from containers can be printed by selecting Print-Print to Pick Warehouse from the Item Transfer Journal:

Logistics Processes and IT tools Page 78 of 100 Navision master version
© Inter IK
EA S
ystems B
.V. 2011
This picking list will be used by the reach truck driver for the retrieval of ordered products.
If the container is late or cannot be handled before opening hours, it needs to be de-released. This is done by removing the Available for Replenishment mark. After confirmation Navision will check if there are any internal orders outstanding for this container and if so, create a substitute internal order for it if stock is available in the buffer. The batch name will be “S-” (meaning “substitute batch”) plus the container number. If there is no available stock in the buffer, then the lines will be removed from the replenishment lines. The user will be notified if a substitute batch is created, how many lines were created and what the batch name is.

Logistics Processes and IT tools Page 79 of 100 Navision master version
© Inter IK
EA S
ystems B
.V. 2011
6.6. Moving goods to destination Moving goods to different destinations connects the sub processes of goods flow. Goods need to be move to storage bins from the receiving process, to sales areas, either from receiving or from storage bins. Also the reverse flow of empty pallets and waste needs to be moved as well as backflow.
The efficiency of this flow is determined by the planning of the goods flow layout, the routines and the setup and the quality of the graphical warehouse structure and sales space management. Therefore the correct parameters in the Navision setup will influence the amount of goods which have to be moved and the distances which the goods will travel. The use of the automatic stack in and internal ordering system including pallet label increases the efficiency of moving goods within the store.

Logistics Processes and IT tools Page 80 of 100 Navision master version
© Inter IK
EA S
ystems B
.V. 2011
6.7. Replenishment The main purpose of replenishment is making the goods available for our customers. It is the last part of a long supply chain from developing the products, sourcing raw material, production and transport from the supplier until the sales location where it is sold.
The process of replenishment is part of the goods flow process and consists of the following sub processes: moving goods from the staging area to the sales space, refilling the sales space, transport and recycling of waste. Those sub processes need to be coordinated to avoid bottlenecks. For example: there should always be a reasonable number of pallets in each department of Market hall to enable the replenishment co-worker to work efficiently. On the other hand too many pallets could block access to sales spaces. Information in Navision and the pallet label provide useful information for the replenishment co-worker in order to replenish within a given time. This information is:
• Home location of the product • Ordered quantity • Add on locations • Quantities on the pallet and multipack

Logistics Processes and IT tools Page 81 of 100 Navision master version
© Inter IK
EA S
ystems B
.V. 2011
6.8. Backflow and stack in In some cases it is needed, as for backflow, to stack in products into a buffer bin. In deliveries of articles with sales space sizes which are indirect or too small will not entirely fit into the sales space. A certain part needs to be stored in a buffer bin. This can be done via Item Transfer Journal/Functions/Stack In. Navision will automatically find and assign an available location. This is also possible for more than one pallet at the same time. For a manual transfer the location and the bin need to be registered. It is strongly recommended to let Navision suggest a storage bin as this will be optimal according to the defined parameters of the graphical warehouse structure and the logic of the Sales Method Selection Order.
To ensure an efficient logistics process in the store it is required to analyze backflow on a daily level. Generally it can be separated between two types of backflow.

Logistics Processes and IT tools Page 82 of 100 Navision master version
© Inter IK
EA S
ystems B
.V. 2011
Backflow of articles which have the sales space classification ‘indirect’ or ‘too small’ is accepted. The reason being is that articles with a sales space size smaller than ‘direct’ will order more stock than what will fit in the sales space. This is defined by the parameter MaxBuffer and is usually 4 weeks of stock (see chapter 5). Backflow due to wrongly registered parameters in Navision, inventory differences or lacking preparation of sales spaces needs to be rectified every day straight away. A co-worker from Sales together with a co-worker Logistics should evaluate backflow daily. Actions to rectify the problem and to avoid future backflow need to be initiated. The Navision report Back Flow Analysis gives an overview of the backflow of the day:
The report can be created in Navision Reports/Back Flow Analysis:

Logistics Processes and IT tools Page 83 of 100 Navision master version
© Inter IK
EA S
ystems B
.V. 2011

Logistics Processes and IT tools Page 84 of 100 Navision master version
© Inter IK
EA S
ystems B
.V. 2011
6.9. Goods flow process in the Full Serve Warehouse For the process of picking Full Serve orders (Cash & Carry orders) in the warehouse, a print out of the picking list needs to be produced in Full Serve. This needs to be set in Setup/Sales Method by ticking Print Picking List for code F (Sales Method Type 2).
Once activated, a Picking List form will be automatically printed in Full Serve area for products with the Picking Bin allocated in Full Serve. There is one printout per transaction/receipt.

Logistics Processes and IT tools Page 85 of 100 Navision master version
© Inter IK
EA S
ystems B
.V. 2011
Using the picking list the goods are picked by the warehouse co-worker and handed over to the goods handout co-worker from customer relations. The goods hand out co-worker hands out the goods to the customer.
If the quantity in the picking bin is insufficient, the system will print an extra page showing where the buffer stock is located. This page can be handed to a reach truck driver and the item can be transferred from the buffer to the picking location. This is only a suggestion from Navision. No transfer line will be created. The item transfer should be registered manually in Navision.

Logistics Processes and IT tools Page 86 of 100 Navision master version
© Inter IK
EA S
ystems B
.V. 2011
Once the items are handed over to the goods handout co-worker he/she checks if the picked quantity matches the picking list. If this is the case the goods are ready to be handed over to the customer where they should be checked again.

Logistics Processes and IT tools Page 87 of 100 Navision master version
© Inter IK
EA S
ystems B
.V. 2011
6.10. Follow up The goods flow operation needs to be followed up regularly to ensure that it always works in the best possible way. There are different ways to do the follow up of the operation. Whatever way is chosen it should reflect the following different success criteria:
• Has the operation finished at opening hour of the store? • Walk the floor: Can the sales areas be handed over to visitors and sales
co-workers according to the agreements between the Commercial Team? • Fulfills the store every day the criteria of Store In Shape As New? • Goods flow KPIs • Health and Safety • Internal Service Agreement
One example of how to follow up is to measure the amount of movements, working hours, counter balances, reach truck and pallet jacks. Having a daily record of these figures will give not only the productivity but also the opportunity to schedule the needed hours according to the incoming container and/or trucks.
WHAT WHO WHEN
Report Back Flow Analysis Logistics-Sales Daily after replenishment
Report Stock In, stock out Logistics Weekly
Follow up on GF KPIs Logistics Weekly
Internal Service Agreement Commercial Team Tertialy
Safety Logistics Daily
Global Service Protocol Logistics Monthly

Logistics Processes and IT tools Page 88 of 100 Navision master version
© Inter IK
EA S
ystems B
.V. 2011
6.10.1. Key Performance Indicators connected to Goods flow
KPI SM 0 SM 1 SM 2
Ready for opening 100% Logistics Productivity
TBD per store/country
Accumulated number of picked order lines per sold M3 in the store (internal handlings)
<= 0.8 <= 1.0 <= 1.0
Local local shortage
<= 0.1% <= 2.0%
Local local shortage top 100 articles MH and SS/FS
= 0%
Share of automatic orders
>= 80%
6.11. Meeting activities connected to Goods flow
WHAT WHO WHEN
Walk the sales floor Commercial Team Daily after replenishment
Follow-up on daily operations
Logistics & Sales Daily
Replenishment Proposal Goods flow & Sales Daily
Backflow analysis Logistics & Sales Daily after replenishment
KPIs Goods flow Commercial Team Weekly
Follow-up of Internal Service Agreement
Commercial Team Tertially
Operational meeting with Distribution and transport
Logistics Monthly

Logistics Processes and IT tools Page 89 of 100 Navision master version
© Inter IK
EA S
ystems B
.V. 2011
Appendix I – Calculation and Formulas
A.1. Safety stock Mathematical safety stock =
K-factor * SQRT((Lead Time * (1.25 * Forecast Error))² + (Expected Weekly Sales² * Lead Time Variation²)
Auto Bin =
Calculation Non-flexible: Sales Space Size – Minimum of (Maximum of (Max SASP Qty Weeks * Average Weekly Sales and Multipack) and Pallet Qty) Calculation Flexible: Sales Space Size – Minimum of (Maximum of (Max SASP Qty Weeks * Average Weekly Sales/2 and Multipack) and Pallet Qty/2)
Minimum Safety Stock =
Manually set, default value = 2

Logistics Processes and IT tools Page 90 of 100 Navision master version
© Inter IK
EA S
ystems B
.V. 2011
Lowest Sales Quantity
Average_sales_receipt + 1.25 * Mean absolute deviation of the sales receipt
Maximum Safety Stock =
Max Safety Stock Factor * Average Weekly Sales
Used Safety Stock =
Calculation: Safety Stock1 = Max (Mathematical Safety Stock, Autobin) Safety Stock2= Min (Safety Stock1, Maximum Safety Stock) Safety Stock3 = Max (Min Safety Stock, Lowest Sales Quantity) Used Safety Stock = Max (Safety Stock2 , Safety Stock3) Example: Mathematical Safety Stock = 231 Auto Bin = 320 Minimum Safety Stock = 2 Maximum Safety Stock = 612 Lowest Sales Quantity = 3 Safety Stock1 = Max (231, 320) =320 Safety Stock2 = Min (320, 612) = 320 Safety Stock3 = Max (2, 3) = 3 Used Safety Stock = Max (320, 3) = 320
All results are rounded up to Unit of Measure

Logistics Processes and IT tools Page 91 of 100 Navision master version
© Inter IK
EA S
ystems B
.V. 2011
A.2. Sales Space size Min =
Calculation Non-flexible: Min = Average Weekly Sales If Min > 2 * Pallet Qty => Min = Average Weekly Sales / 2 [Rounded up to Unit of Measure] Example Non-flexible: AWS = 102,4; Pallet Qty = 40; MPQ = 40 Min = 102,4 102,4 > 2 * 40 = 80 ? Yes => Min = AWS/2 = 51,2 Rounded up to pieces => Min= 52 Calculation Flexible: Min = Average Weekly Sales / 2 If Min > 2 * Pallet Qty => Min = Average Weekly Sales/4 [Rounded up to Unit of Measure] Example Flexible: Min = 102,4/2 = 51,2 51,2 > 2 * 40 = 80 ? No Rounded up to pieces => Min = 52 In this examples the result for Min Flexible and Non-flexible is the same.

Logistics Processes and IT tools Page 92 of 100 Navision master version
© Inter IK
EA S
ystems B
.V. 2011
Max =
Calculation Non – flexible: Max SASP Qty Weeks = 4 Max Safety Stock Factor = 10 Average Weekly Sales = 102,4 Max = Max SASP Qty Weeks * Average Weekly Sales [Rounded up to Multipack] + Max Safety Stock Factor * Average Weekly Sales [rounded up to the next UoM] Example Non – flexible: [4 * 102,4] + [10 * 102,4] => 440 + 1024 = 1464 Calculation Flexible: Max = (Max SASP Qty Weeks * Average Weekly Sales) [Rounded up to Multipack] /2 + Max Safety Stock Factor * Average Weekly Sales [rounded up to the next UoM] Example Flexible: [(4 * 102,40]/2 + [10 * 102,4] = 220 + 1024= 1244
Min Dir =
Calculation Non – flexible: Min Dir = (Min QTY Weeks * Average Weekly Sales) [Rounded up to Multipack] + Biggest value of Mathematical Safety Stock and Lowest Sales Quantity If Min Dir > 2 * pallet qty=> Min Dir = Average Weekly Sales / 2 [Rounded up to pallet qty] with a minimum of two pallets If Min Dir < Min => Min Dir = Min Example Non – flexible: Min Qty Weeks = 2 [2 * 102,4] + 25 = [204,8] + 25 => 240 + 25 = 265

Logistics Processes and IT tools Page 93 of 100 Navision master version
© Inter IK
EA S
ystems B
.V. 2011
265 > 2 * 40 ? Yes => [102,4/2] = [51,2] = 80 80 < 52 ? No=> 80 Calculation Flexible: Min Dir = (Min QTY Weeks * Average Weekly Sales) [Rounded up to Multipack] / 2 + Biggest value of Mathematical Safety Stock and Lowest Sales Quantity If Min Dir > 2 * pallet qty => Min Dir = Average Weekly Sales / 4 [Rounded up to pallet qty] If Min Dir < Min => Min Dir = Min Example Flexible: [(2 * 102,4)]/2 + 25 => [204,8]/2 + 25 => 240/2 + 25 = 120 + 25 = 145 145 > 2 * 40 ? Yes => [102,4/4] => [25,6] = 40 40 < 52 ? Yes => 52
Suggestion =
Calculation Non – flexible: Suggestion = (Max SASP Qty Weeks + Min QTY Weeks) / 3 * Average Weekly sales + Mathematical Safety Stock [Rounded up to Multipack]
If Suggestion > 2 * pallet qty => Suggestion = Average Weekly Sales / 2 [Rounded up to pallet qty] If Suggestion < 110% * Min Dir => Suggestion = 110% * Min Dir [rounded up to next UoM]

Logistics Processes and IT tools Page 94 of 100 Navision master version
© Inter IK
EA S
ystems B
.V. 2011
Example Non – flexible: [(4 + 2) / 3 * 102,4 + 25] = [229,8] = 240 240 > 2 * 40 ? Yes => [102,4/2] = [51,2] = 80 80 < 110% * 80 ? Yes => = [110% * 80] = 88 Calculation Flexible: Suggestion = (Max SASP Qty Weeks + Min QTY Weeks) / 3 * Average Weekly Sales / 2 + Mathematical Safety Stock [Rounded to Multipack]
If Suggestion > 2 * pallet qty => Suggestion = Average Weekly Sales / 4 [Rounded to pallet qty] If Suggestion < 110% * Min Dir => Suggestion = 110% * Min Dir [rounded up to next UoM] Example Flexible: [(4 + 2) / 3 * 102,4 / 2 + 25] = [127,4] = 160 160 > 2 * 40 ? Yes => [102,4 / 4] = [25,6] = 40 40 < 110% * 52 ? Yes => [110% * 52] = 58

Logistics Processes and IT tools Page 95 of 100 Navision master version
© Inter IK
EA S
ystems B
.V. 2011
A.3. EOQ calculation
Minimum Order Quantity =
Calculation: MinQtyWeeks * AWS + (Extra Requirement) [rounded to UoM] Example: MinQtyWeeks = 2; AWS = 102,4; MPQ = 40 2 * 102.4 = [204.8] => 200
Max Order Quantity =
Calculation: MaxSaspQtyWeeks * AWS [rounded to UoM] Example: MaxSaspQtyWeeks = 4; AWS = 102,4: MPQ = 40 4 * 102.4 = [409.6] => 400
Max Buffer = Calculation: MaxBuffer * AWS [rounded to UoM] Example: Max Buffer = 4; AWS = 102,4; MPQ = 40
4 * 102.4 = [409.6] => 400

Logistics Processes and IT tools Page 96 of 100 Navision master version
© Inter IK
EA S
ystems B
.V. 2011
A.4. Need calculation for internal replenishment
Need identification =
Calculation: Stock – Qty sold not posted – Qty going out + Qty coming in< Total Sales Space Size * Replenishment Level % / 100 + Product Dominance Example: Stock: 100 Product Dominance: 20 Total Sales Space Size: 200 Replenishment Level: 50% Flex factor: 40% Pallet quantity = 300 Qty sold not posted = 0 Qty going out = 0 Qty coming in = 0 100 – 0 – 0 +0 = 100 200 * 50 / 100 + 20 = 120 100 < 120 ? Yes -> need identified
Flex Capacity =
Calculation: If Total Sales Space Size < Pallet Quantity = > Total Sales Space Size * Default Replenishment Level % / 100 If Total Sales Space Size > Pallet Quantity = > Pallet Quantity / 2 Example: Total Sales Space Size = 120 Default Replenishment Level % = 50 Pallet Quantity = 180 120 > 180 ? No => 120 * 50 / 100= 60
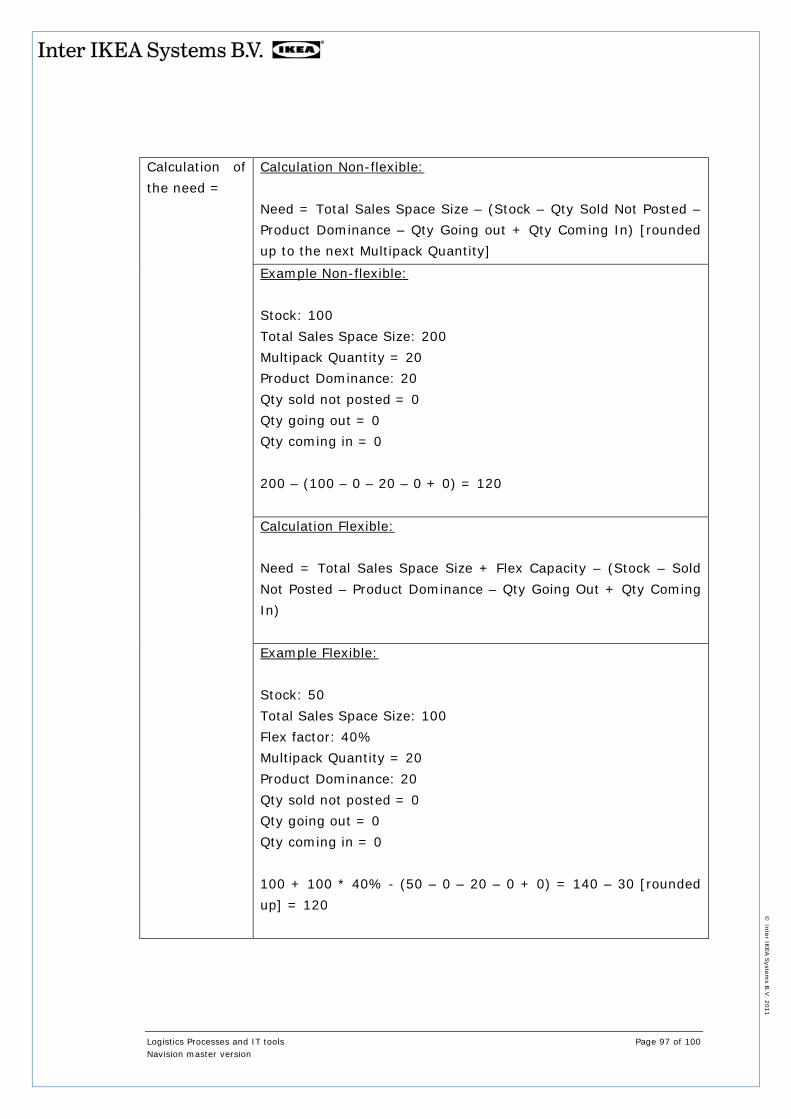
Logistics Processes and IT tools Page 97 of 100 Navision master version
© Inter IK
EA S
ystems B
.V. 2011
Calculation of the need =
Calculation Non-flexible: Need = Total Sales Space Size – (Stock – Qty Sold Not Posted – Product Dominance – Qty Going out + Qty Coming In) [rounded up to the next Multipack Quantity] Example Non-flexible: Stock: 100 Total Sales Space Size: 200 Multipack Quantity = 20 Product Dominance: 20 Qty sold not posted = 0 Qty going out = 0 Qty coming in = 0 200 – (100 – 0 – 20 – 0 + 0) = 120 Calculation Flexible: Need = Total Sales Space Size + Flex Capacity – (Stock – Sold Not Posted – Product Dominance – Qty Going Out + Qty Coming In) Example Flexible: Stock: 50 Total Sales Space Size: 100 Flex factor: 40% Multipack Quantity = 20 Product Dominance: 20 Qty sold not posted = 0 Qty going out = 0 Qty coming in = 0 100 + 100 * 40% - (50 – 0 – 20 – 0 + 0) = 140 – 30 [rounded up] = 120

Logistics Processes and IT tools Page 98 of 100 Navision master version
© Inter IK
EA S
ystems B
.V. 2011
A.5. Replenishment Level Minimum Internal Replenishment Level =
Calculation:
Maximum of (Minimum Safety Stock and Lowest Sales Quantity) + Rounded forecast of next opening day. Example: Minimum Safety Stock = 2 Lowest Sales Quantity = 3 Forecast of next opening day = 7,13 Max (2 and 3) + Round (7,13; 1) = 3 + 7 = 10 pcs
Maximum Internal Replenishment Level =
Calculation: Total Sales Space Size + Flex Capacity – Multipack quantity.
Example: Total Sales Space Capacity = 100 Flex Capacity = 40 Multipack Quantity = 25 100 + 40 – 25 = 115
Commercial Internal Replenishment Level =
Calculation: Total Sales Space Size + Flex Capacity - Rounddown [(Total Sales Space Size + Flex Capacity – Maximum (Auto Bin, Default Replenishment Level % * Total Sales Space Size) ) / Multipack Quantity] * Multipack Quantity
Example: Total Sales Space Capacity = 100 Flex Capacity = 40 Auto Bin = 80 Default Replenishment Level % = 40 Multipack Quantity = 20

Logistics Processes and IT tools Page 99 of 100 Navision master version
© Inter IK
EA S
ystems B
.V. 2011
(100 + 40 – (100 + 40 –Max(80, 40% * 100))/20 = (140 – 60)/20 * 20 = 80
Calculated Replenishment Level =
Calculation for Sales Method 0 or 1: Maximum of [Minimum of (Commercial Internal Replenishment Level and Maximum Internal Replenishment Level), Minimum Internal Replenishment Level] If Total Sales Space Size > Pallet quantity => Calculated Replenishment Level = Total Sales Space Size + Flex Capacity – Pallet quantity Example: Commercial Internal Replenishment Level = 60 Maximum Internal Replenishment Level = 115 Minimum Internal Replenishment Level = 22 Total Sales Space Size = 100 Flex Capacity = 40 Pallet Quantity = 250 Multipack Quantity = 25 100 > 250 ? No => Max [Min (60, 115), 22] = 60 Calculation for Sales Method 2: Total Sales Space Size – Rounddown (Total Sales Space Size / Multipack Quantity) * Multipack Quantity If Total Sales Space Size > Pallet quantity => Replenishment Level = Total Sales Space Size- Pallet quantity Example: Total Sales Space Size = 110 Pallet Quantity = 250 Multipack Quantity = 25

Logistics Processes and IT tools Page 100 of 100 Navision master version
© Inter IK
EA S
ystems B
.V. 2011
100 > 250 ? No => 110 – Rounddown (110/ 25) * 25 = 10
Calculated Replenishment Level % =
Calculation: Calculated Replenishment Level / Total Sales Space Size * 100 Example: Calculated Replenishment Level = 46 Total Sales Space Size = 200 92 / 200 *100 = 46
Replenishment Point =
Calculation: (Calculated Replenishment Level % * Total Sales Space Size) / 100 + Product Dominance Example: Calculated Replenishment Level % = 52 Total Sales Space Size = 200 Product Dominance = 30 (52 * 200)/ 100 + 30 = 134