neo threshold shower system installation guide on the purchase of your new shower system. this guide...
TRANSCRIPT

Neo Threshold Shower System Installation Guide
TM
Manor House Collection Shown

2
Watch our Installation Video on Youtube.com/AHQUAcom
IF YOU NEED ASSISTANCE,
CALL 1-951-220-6500 7:15AM - 4:00PM PST
MON. THRU FRI.
Sistine Stone showers are ideal for experienced “Do-It-Yourselfers.” Please read through this entire installation guide before beginning your installation. If you feel you can not confidently install this shower by yourself hire a licensed contractor, handyman, or professional installer that can install it for you.

Congratulations on the purchase of your new shower system. This guide will give you instructions on the installation.
Natural Travertine Stone Appearance All of our stone products are custom made and hand-crafted to look and feel like authentic travertine. As you may know, travertine is a form of limestone that has been under pressure for thousands of years. The product of long-ago hot and cold springs and waterfalls, travertine is a beautifully banded and colored stone with a unique character. Among its most appealing characteristics are the interesting craters and depressions, created by streams of water that flowed through the stone.
We have taken great care in reproducing the appearance of genuine travertine stone, including the craters and depressions to give it a beautiful and authentic look.
3
Installation time may vary depending on your experience, complexity of shower, and “Pre Installation Preparation Work” which may include: plumbing relocation, drain relocation and bathroom demolition. Prior to demolition, scheduling a contractor or building your shower, double check that you have all parts from the factory. Some applications may require a licensed plumber or contractor. Do not use any product spec sheets to begin installation before receiving product. These spec sheets are for reference only. Use actual product measurements only.The figures throughout this guide illustrate a 36” x 36” shower. Depending on the size of the shower purchased, actual parts may vary in size from the figures shown. Our goal is to help you achieve a quick and successful shower installation.
See the clock in each section for estimated installation time.
Missing or damaged hardware and tiles should be reported within 24 hours of receiving this shipment - Please call 1-951-220-6500 if you need assistance.

BASIC PACKAGE PACKING LIST
THRESHOLDS WALLS for 60” width shower WALLS for 36”-54” width shower
3T 1T 2T
3B 1B 2B
3T 1T
3B 1B
or
GROUT
1CHECK YOUR SHIPMENT AGAINST APPROPRIATE PACKING LIST Make sure you have received all the items necessary for the installation. This will also familiarize you with all the parts and hardware you will need to install your shower.Package contents are dependent upon which package you ordered: Basic, Supreme or Pan only.
PAN DRAIN
OPTIONAL ITEMSSHAMPOO SHELF
SHOWER BENCH
MISSING OR DAMAGED HARDWARE AND TILES SHOULD BE REPORTED WITHIN 24 HOURS AFTER YOU RECEIVE THIS SHIPMENT - PLEASE CALL 1-951-220-6500 FOR ASSISTANCE.
CAUTION: handle glass door and glass panels with care. Glass is heavy and fragile.
Depending on the size of the shower purchased, actual parts may vary in size from the figures shown.
Store panels on a clean, flat surface only. Leaning panels against a wall will cause them to bow.
4
PLUMBER’S UPGRADE

SUPREME PACKAGE PACKING LIST
WALLS for 60” width shower WALLS for 36”-54” width shower
DRAIN DOOR HANDLE
GROUT
HINGES
PAN
THRESHOLDS SETTING BLOCKS DOOR SEALS DOOR SWEEPGLASS PANELS & DOOR
(Found insmall baggy)
(Glass is tempered and cannot be cut)
GLASS HEADERS
(You will have either 2 or 3 pieces depending on the size of your shower)
5

6
GRAND PACKAGE PACKING LISTPAN DRAIN WALLS for 60” width shower WALLS for 36”-54” width shower
THRESHOLDS
GROUT
GLASS PANELS & DOOR
DOOR HANDLE
SETTING BLOCKS DOOR SEALS
DOOR SWEEP
SHOWER HEAD
HAND SHOWER HOSE
HAND SHOWER HANDLE
SHOWER VALVE
or
(Found insmall baggy)
SHOWER HEAD SHUTOFF (Included with Pressure
Balance Valve only)(Style may vary)(Style may vary)
THERMOSTATIC WALLMOUNT FAUCET
(Style may vary)
HINGES
(Glass is tempered and cannot be cut)
(You will have either 2 or 3 pieces depending on the size of your shower)
GLASS HEADERS
HOOKED SHOWER ARMHAND SHOWER SUPPLY HAND SHOWER MOUNT
(Items shown below Included with Thermostatic Faucet or Pressure Balance Valve only)
2 TOOLS AND SUPPLIES YOU WILL NEED TO INSTALL YOUR SHOWER
PENCIL & MARKERHAMMERDRILL WITH 3/16” & 5/8” DRILL BITLEVELCAULKING GUNPHILLIPS HEAD SCREWDRIVER or PHILLIPS DRILL BITJIG SAW or ROTO-ZIPMEASURING TAPE
SPONGEGROUT FLOAT & BUCKET1/8” PLASTIC TILE SPACERSSHEET ROCK SCREWSWOOD SHIMS1/2” CEMENT BOARDSSILICONE FOR CAULKING GUN (See Silicone Recommendationsnext page)
60 GRIT SANDPAPER CLEAN CLOTHPLASTIC SHEETING3” SCREWSCIRCULAR SAWCOPPER PIPE FITTINGS orSHARKBITE® FITTINGSBRACES TO SECURE WALL PANELSSILICONE FOR CAULKING GUN(See Silicone Recommendations next page)

7
SILICONE RECOMMENDATIONS
We recommend using GE Silicone II Window and Door 100% Silicone throughout this installation as well as for your wall panel silicone. During our tests we have found that using this silicone gives the best results. Please use GE Silicone II Window and Door 100% Silicone whenever the installation guide refers to the use of “silicone”. GE Silicone II Window and Door 100% Silicone can be found at your local hardware store DO NOT USE any Mastic or Mortar based Thin Sets. Mastic will not cure properly between two non-porous surfaces. The use of a water barrier also negatively affects the bond mastic has with the wall panels and the cement board.
Warranty coverage only extends to the brand and type of silicone we recommend and applied per the manufacturer’s directions and recommendations.
Recommendations for applying GE Silicone II Window and Door 100% Silicone to Wall Panels 1. Apply a 1/4” thick continuous bead of silicone along the perimeter of the wall panel 1/2” in from the edge. 2. Use a zig-zag pattern to cover the rest of the backside of the wall panels leaving 3”-4” between each 1/4” bead (diagram A). 3. Also apply silicone to the backer board. Apply in the same manner as steps 1 & 2.It is very important to ensure complete coverage of silicone to ensure the best bond. The above steps are only recommendations and are meant to supplement the specific manufacturer’s directions. You may be required to brace the wall panels in place while the silicone dries. Also, refer to the specific manufacturer’s recommendations for coverage of the silicone to determine the proper amount you will need for the project based on your shower size. Depending on the size and threshold type of your shower you will need from 10-20 9.8 oz. tubes of silicone to complete your shower installation
Tips for Bracing Wall PanelsIf you use the recommended silicone and apply it correctly, the wall panels will stick to the walls without any bracing required. If the studs or cement board surfaces are not perfectly even or square, the edges of the wall panels may not stay flush with one another. If this happens, we recommend using a brace to hold it in place as it dries. Your bathroom layout and shower style will determine the method in which you can brace the wall panels. Below are some tips and recommendations on how to apply bracing to your wall panels. 1. Always protect the wall panel tiles and shower pan floor from damage. Make sure the braces will not scratch the wall tiles. Use a piece of plywood or 2x4 to distribute the force across a larger surface area. 2. Brace the wall panels using a horizontal brace from one wall to the opposite wall (diagram B). Measure and cut a 2x4 or use an expandable curtain rod or telescoping painter’s pole. Cut the 2x4 larger so it has to be pushed into position or use shims in order to put pressure on the wall panels. 3. Brace the wall panel from the shower pan threshold to the wall panel (diagram C). Measure and cut a 2x4 to fit between the shower pan threshold and the wall panel. Then either apply weight downward on the wall panel side or put a 2x4 vertically between the ceiling and the top of the brace (diagram C). Push down on the angle brace and then screw it to the vertical 2x4 that is pushing on the ceiling. 4. Leave the braces in place until the Silicone has completely dried. Refer to the Silicone manufacturer’s recommendations for drying time.
(diagram C)(diagram B)(diagram A)

3 PRE-INSTALLATION TEAR DOWN
figure 1
This shower system is designed to be installed on a bare floor with bare walls (studs only). If you are replacing an existing shower, it is necessary for you to remove your old shower.
1. Tear out and remove all old material to expose the studs (fig.1).
2. Clean up the shower area, removing all dust and old material from the area.
Warning: when removing old material, be careful not to inhale the dust, it may contain harmful chemicals. Use the appropriate respirator to keep from inhaling dust and other hazardous materials.
4 PREPARING FOR INSTALLATION
TIME REQUIRED
8-16 HRS
TIME REQUIRED
8-16 HRS
14 ½” for shampoo shelf
triple studs
¾” overhang
The shower system is designed to be installed on a floor and walls that are straight and square. Please take the time to check how square the walls and floor are. Make the appropriate adjustments to fix any problems.
1. Add studs where the shower panel and door connect. We recommend triple studs in these areas to make room for the cement board and hinge attachment. Leave a 3/4” overhang outside of the shower pan threshold if possible. Refer to (fig. 2).
2. Check the location and size of the drain, make sure it is in the correct position, relocate drain if necessary. See section 5 for drain instructions.
3. Check to make sure that when the pan is installed, you will still be able to access any plumbing that needs to be connected.
4. If you purchased the Shampoo Shelf, check that everything fits with clearance between the studs. Measure the studs to make sure they are 14 1/2” apart. See recommended stud locations (fig. 2). Relocate studs if necessary.
Watch our Installation Video on Youtube.com/AHQUAcom
figure 2
Shower System may vary in size 1/4”.+_
8

5 SHOWER PAN INSTALLATION
BEFORE YOU START - Make sure floor is clean and level. Check to make sure existing plumbing will be accessible after pan is installed. Check your local building codes before installation.
rubber seal
trim plate
drain tool
figure 5
brass ring with tool
apply silicone around around ABS drain
drain collar
figure 4
drain collar
brass ring
figure 3
apply silicone
TIME REQUIRED
½ -1 HR.
To ensure that no damage has occurred to your shower pan during shipping, it is important to check your pan for damage prior to installation in your home. Damage caused by shipping may result in a hairline fracture that could leak over time.Move your shower pan to a location that will not be damaged by water run-off. A driveway or patio is suitable for testing your new shower pan. Set the pan on blocks high enough to see the underside of the pan. Plug the drain and fill the shower pan with water. Check for leaks and proper slope of the top pan surface. If there is no damage and no leaks then the shower pan is ready to be installed.Be careful while moving the shower pan. Bumping or dropping the shower pan can cause hairline fractures that can leak over time.Why are Sistine Stone Shower Drains Different?Old school drains rely on rubber gaskets, jam nuts, and plumber’s putty to seal along the top and bottom of the pan. This sometimes causes problems if the pans thickness around the drain flange isn’t perfectly even, the rubber gasket will not seal and will leak, plumber’s putty isn’t flexible and that leads to more leaks. Also, these types of drains are impossible to remove once the shower is installed since the jam nut is on the bottom making them irreplaceable. With the advent of high quality silicones, plumbing techniques like plumber’s putty and jam nuts are not needed. Our drains do not have a jam nut on the bottom. Our drains rely on an internal jam nut and a rubber seal to seal the drain pipe as well as Silicone to seal the drain to the pan. This leads to a dependable 100% leak free seal, and the drain could still be removed from the top if necessary.
1. The shower pan comes with a 2” drain assembly kit (fig. 3). 2. Measure from the wall studs to make sure your 2” ABS drain is in the correct location. Dry test by resting the shower pan over the 2” drain pipe. You may want to place 2 x 4’s on the floor to help support the pan from resting on the drain. 3. Make sure the 2” ABS drain pipe is in the center of the shower pan opening and at the right height (1” above floor). Dry fit the drain collar. 4. Place wood shims, if necessary, along the 2 x 4’s to square out the pan. This may cause problems installing the system if the walls are not straight and if the shower pan is not set against wall studs. 5. Remove the shower pan and any wood shims after checking and verifying the drain hole is in its correct location.
6. Apply Silicone to the floor area where the shower pan is to be installed (fig. 4). (See Silicone recommendations) 7. Carefully lift the shower pan and set it into place. 8. Apply a generous bead of silicone around the shower pan drain opening and slip the drain collar into position (fig. 5). Make sure the ABS pipe is still centered. 9. Wipe off any excess silicone and allow the silicone to dry. Follow the manufacturer’s directions for application and dry times. 10. Push and secure the rubber seal onto the 2” ABS pipe.11. Thread on the brass pressure ring around the drain with the provided tool. Remove tool after brass ring is installed.12. Test and snap the decorative diamond pattern trim plate into position. (Remove decorative trim plate and store in secure area until installation is complete, drain will be grouted when shower is grouted)13. After installing pan, cover with cardboard to protect pan from dirt and scuffs.
Use a level to make sure the 2 x 4’s for the walls are vertically straight. Make sure that the shower pan sets flush against the 2 x 4’s on each side.
9

6 FAUCET INSTALLATION
1. Most customers like flexibility in their faucet mounting locations. Refer to (fig. 7) for a recommended configuration showing approximate dimensions.
2. Please refer to the installation instructions included with your faucet. Also check your local codes for additional assistance with installation guidelines.
3. Finish wall surface is approximately 1” out from the stud. Make sure outer surface of the mud plate is approximately 1” from the stud. This will ensure the trim pieces on the faucet will fit properly (fig. 6).
If you have a pre-installed shower faucet check for leaks and then skip to section 7
1”
figure 6
1/8” wall panel backing
1/2” cement board
stud
1/8” tile
pan
1/4” wall panel silicone
10
If you purchased the optional Plumber’s Upgrade see section 7

shower head
figure 7
47 1/4”
38 5/8”
floor of pan
5 15/16”
80 3/4”
shower valve(style may vary)
handshowersupply
11

Congratulations on purchasing the optional Plumber’s Upgrade. This upgrade was specifically designed to simplify the faucet plumbing installation, saving you time and headaches. Refer to (fig. 8) to see key features.
7 PLUMBER’S UPGRADE (optional - disregard if not purchased) TIME REQUIRED
1-2 HR.
figure 8
figure 9
The manufacturer is not responsible for improper measurements or cuts made by the customer.
extra long 2 x 4’s fit many applications
½” cement board cut, drilled, and pre-installed, saves you time
shower valve
hand shower outlet
shower head outlet
shower head shut-off(may be part of shower valve)
½” copper tubingextensions for easy
hook-up toexisting plumbing
figure 10
mark studs
A - Locating the Faucet Wall Panel 3B 1. To begin installing the Plumber’s Upgrade you must first locate the bottom wall panel in order to get proper center and height positioning.
2. Go to section 10A and follow the directions for inspecting the wall panels, steps 1-3.
3. Place the faucet wall panel 3B into position. Slide the panel all the way towards the shower pan threshold (fig. 9). Use 1/8” spacers between the pan and the bottom of the wall panel. Check for proper fit and alignment.
B - Determine Horizontal Position of the Plumber’s Upgrade 1. From the center of the middle tile, check again to make sure there is a minimum of 14 1/2” between the studs where the plumber’s Upgrade will be placed (fig. 9).
2. Mark the wall studs across the top of the bottom wall panel (fig. 10).
3. Center the Plumber’s Upgrade above the bottom wall panel.
1/8” spacers
14 ½”
7 ¼”7 ¼”
12

figure 11
cut
cut
cut
cut
4. Make cut location marks on the horizontal 2 x 4’s of the Plumber’s Upgrade. The marks should line up with the inside edge of the existing 2 x 4 wall studs (fig. 11).
5. Before cutting horizontal 2 x 4’s on Plumber’s Upgrade, make sure Plumber’s Upgrade is centered above wall panel 3B. Take down and cut horizontal 2 x 4’s. Keep small cut off 2 x 4 blocks to help with installation in step 6.
6. If you purchased a shower with a decorative liner in the wall panels (all collections except Viejo Mission have decorative liners) then the center of the valve should be 6” above the top edge of the bottom wall panel 3B when installed (fig. 13). If you purchased a shower without a decorative liner, such as a Viejo Mission Collection shower, the valve should be 12 1/8” above the top edge of the bottom wall panel 3B when installed (fig. 12). From the horizontal center of the valve, measure 6” or 12 1/8” down (depending on which shower collection you have) and draw a horizontal line across the cement board. line “A” (fig.s 12&13).
7. Place Plumber’s Upgrade between 2 x 4 wall studs. Line up the line on the cement board with the lines you drew on the wall studs in step 2.
8. Mark on 2 x 4 wall studs the bottom of the Plumber’s Upgrade (fig. 12) and remove the Plumber’s Upgrade.
9. Line up the small 2 x 4 blocks from step 6 underneath the line you just marked. Screw them into the studs. The Plumber’s Upgrade will rest on them (fig. 12).
10. Place the Plumber’s Upgrade into position. Use a level to make sure the lines on the studs and the line on the cement board are still aligned. The 2 x 4’s on the Plumber’s Upgrade should be flush with the existing wall studs (fig. 14).
11. Dry fit both faucet panels 3B and 3T. Check for proper fit and alignment.
12. Remove the panels and screw the Plumber’s Upgrade to the studs at the top and bottom (fig. 14).
13. Dry fit the panels 3B and 3T again. Check for proper fit and alignment. Remember to use 1/8” spacers between the pan and the bottom panel.
C - Connecting Water Supply 1. You may solder your connections or use “Sharkbite” connectors. Check your local codes.
2. The hand shower outlet should already be plugged.
3. Connect the hand shower hose to the shower head outlet. Have an empty bucket ready to catch the water coming from the hose.
4. Remove the blue cover from the valve.
5. Place the levers on the main valve and the shutoff valve. Turn both to the OFF position.
6. Have someone hold the shower hose over the bucket while you slowly turn the water supply on and check for leaks.
7. Adjust the water flow and check for proper hot and cold operation and any leaks.
8. Once all is working properly, turn the water off and drain the system.
9. Uncap the hand shower outlet and remove the hose. Be careful because water may still be in lines.
10. Remove the valve handles.
figure 12
figure 14
screw
flush
screw
flush
screw
flush
screw
flush
Double check alignment of the Plumber’s Upgrade and also make
sure the Plumber’s Upgrade is level before making final cuts.
short 2 x 4blocks
mark from top of wall panel
short 2 x 4blocks
line “A”on cement board
12 1/8”
IMPORTANT: hook up water supply and check for leaks before installing
cement board or wall panels.
13
figure 13
short 2 x 4blocks
short 2 x 4blocks
line “A”on cement board
6”
For Viejo Mission Collection
For all other Collections

SHAMPOO SHELF CUSTOM PLACEMENT
1. Place the cement board on the wall and rest it on the top of the shower pan; top back edge. Attach the cement board to the studs with screws (fig.9).
Check that the shower pan sets flush against the wall studs on each side. Place wood shims, if necessary, along the length of the 2 x 4’s to square out the shower pan.
CEMENT BOARD INSTALLATION 9
8
figure 15
check for proper stud locations
TIME REQUIRED
1-2 HRS
figure 16
TIME REQUIRED
½ -1 HR.SHAMPOO SHELF CUSTOM PLACEMENT(optional - disregard if not purchased)
CEMENT BOARD INSTALLATION
IMPORTANT: Check for leaks before installing cement board or wall panels.
1. We have not cut the hole in the wall panel for the shampoo shelf so you can custom place the shampoo shelf where you desire. The shampoo shelf was designed to be installed in the place of 2 vertical tiles. 2. Select your desired location for the shampoo shelf by looking at the panels in section 11 . 3. Place the bottom panel that the shampoo shelf will go above into position. 4. Check that the studs are in the proper location and will not interfere with the shampoo shelf (fig. 15). These studs should have a minimum gap of 14 1/2”. 5. Add a horizontal 2”x 4” brace 1/2” – 1” below the shampoo shelf’s desired height. This will give you a platform to support the shampoo shelf. After the walls have been installed place shims between the 2”x 4” and the bottom of the shampoo shelf in order to add support to the shampoo shelf.
We recommend the use of ½” thick cement board as your shower backer. This is a common backer for stone and tile. Using this backer will help comply with almost all city codes. A cement-based product like Wonderboard or Hardibacker may also be used if it meets your local codes. Some codes require a vapor barrier to be installed as well.
Extend the cement board at least to the outside edge of the shower pan. DO NOT use any type of water resistant dry wall like “Green Board” for your shower backer.
Set cement board on top of pan here.
14
Draw line(both sides)
figure 17
figure 18
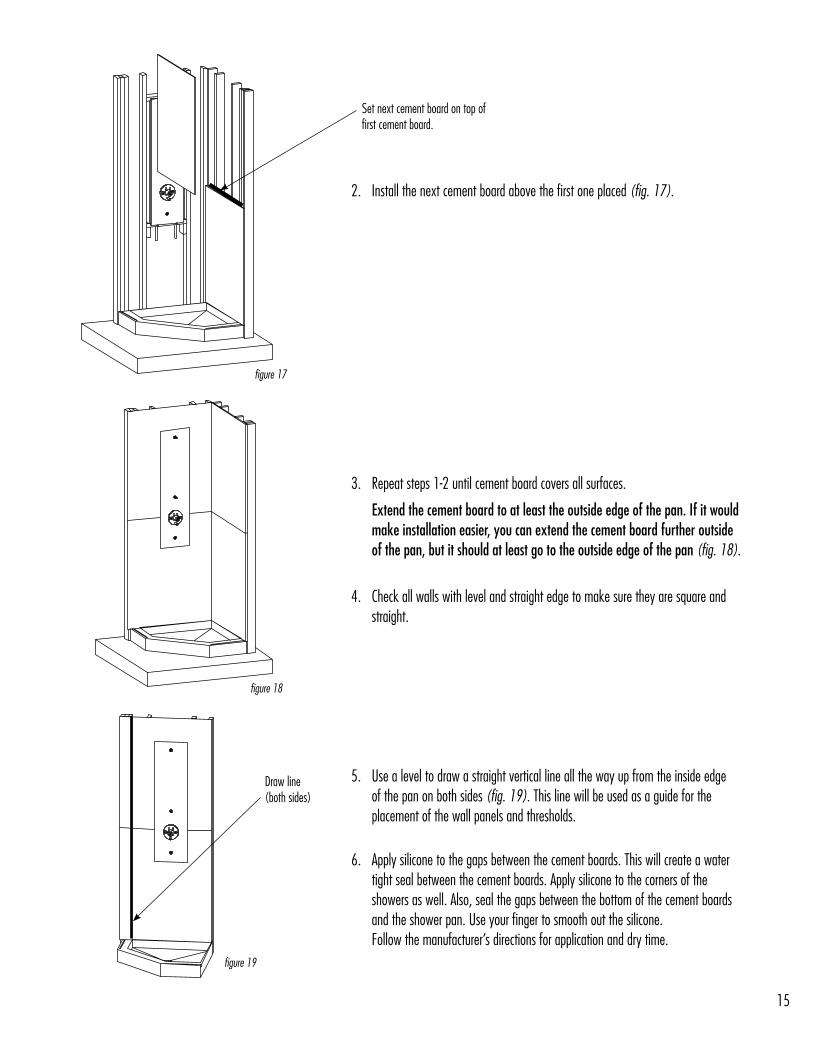
2. Install the next cement board above the first one placed (fig. 17).
3. Repeat steps 1-2 until cement board covers all surfaces.
Extend the cement board to at least the outside edge of the pan. If it would make installation easier, you can extend the cement board further outside of the pan, but it should at least go to the outside edge of the pan (fig. 18).
4. Check all walls with level and straight edge to make sure they are square and straight.
5. Use a level to draw a straight vertical line all the way up from the inside edge of the pan on both sides (fig. 19). This line will be used as a guide for the placement of the wall panels and thresholds.
6. Apply silicone to the gaps between the cement boards. This will create a water tight seal between the cement boards. Apply silicone to the corners of the showers as well. Also, seal the gaps between the bottom of the cement boards and the shower pan. Use your finger to smooth out the silicone. Follow the manufacturer’s directions for application and dry time.
Set next cement board on top of first cement board.
figure 19
15

10 WALL PANEL INSTALLATION TIME REQUIRED
3 - 4 HRS
A - Inspecting Wall PanelsInspecting panels at this point will give you confidence that the wall panels are straight and square from the factory. When installing wall panels, you may need to make adjustments to the panels to accommodate for unevenness of your existing walls. During the inspection process and/or dry-fitting process, if you have any concerns about the alignment or fit of the wall panels, please call 1-800-220-6500 for customer service, and we will gladly assist you with your installation.
1. Begin by determining whether you have a 4 or 6 panel wall set. (Set A) and (Set B) are for 36” to 54”, 4 panel sets. (Set C) and (Set D) are for 60”, 6 panel sets. The panels are labeled for your convenience. (Set A) is left faucet and (Set B) is right faucet. (Set C) is left faucet and (Set D) is right faucet.
2. Find a large area to layout and inspect all panels.
3. Align all panels to check for straightness. Make sure grout lines are straight and square to each other.
4. Sistine Stone wall panels are made to be flexible and may have a slight bow. This condition is normal and wall panels will flatten out when properly installed. If the wall panels have been stored improperly or seemingly have become extensively bowed, they can be easily flattened before installation (See trouble shooting section on last page for details).
16

figure 20
figure 21
figure 22
figure 23
B - Dry Fitting Panels
1. Dry fit the shower wall panel 1B into position. Use 1/8” spacers between the shower pan and the bottom of the panel (Fig. 20). Center the back wall panels so the gaps on both sides are equal. The thickness of the side panels will cover these small gaps.
2. Carefully place wall panel 3B into place, making sure the grout lines are aligned. Use a 1/8” spacer between the shower pan and the bottom of the panel. Push the side panels up against the shower pan threshold, any remaining gap between the side and back panels will be filled with grout after the shower has been installed. Match the space between the panels with the rest of the grout lines on the panel, use spacers if necessary. (Fig. 21)
3. Remember to use the line drawn in (fig. 19). Finish all bottom panels.
4. Inspect the bottom panels making sure they are square and straight. Due to variations in your existing walls, you may need to sand the edges of the panels slightly for proper fit.
5. Continue to install the top panels starting with panel 1T (fig. 22). Place the top panel above the bottom panel and match the space between the panels with the rest of the grout lines on the panel, use spacers if necessary.
6. You must drill the holes in the faucet panel 3T for your plumbing fixtures. Take careful measurements to determine the proper locations. Make a template if necessary.
7. On panel 3T, mark the locations for the holes. Double check your measurements.
8. Drill small pilot holes first so you can check whether or not the holes are in the right locations.
9. If the pilot holes are in the proper locations, carefully drill bigger holes that will fit your plumbing fixtures.
10. After drilling holes, dry fit the panel.
11. Inspect, making sure all top panels are square and straight. Also make sure faucet holes are positioned properly (fig. 23).
Do not place screws between tiles or through shower pan. Braces may be required to add pressure to some areas to ensure the walls are flush.
Do not bend wall panels, over bending can cause tiles to pop off.
17

figure 24
figure 25
figure 26
C - Cutting Hole For Shampoo Shelf (if purchased) 1. With the panels still dry fit, mark the two tiles that the shampoo shelf will replace. 2. Remove that panel and measure the backside of the shampoo shelf. Measure and mark the rectangle that will need to be cut out using a straight edge (fig. 24). 3. Drill 5/8” holes in the corners of the rectangle. Be sure not to drill outside the lines of the rectangle (fig. 24) 4. Insert the jigsaw blade in the holes and cut out the rectangle. Use masking tape to protect the surface of the tiles. Use a wood-cutting blade. 5. Place the shampoo shelf in the hole. Make any adjustments to the cut so the shelf fits straight and square. 6. Dry fit the panel again into its position and mark the outline of the cut out on the cement board. Remove all the panels from the shower. 7. Cut the rectangle out of the cement boards. Dry fit the shampoo shelf and make any adjustments to the cut, so it’s straight and square (fig. 25).
D - Installing Panels 1. Sand the backside surface of the wall panels with 60 grit sand paper. This will increase the bond with the silicone. Remove all dust and dirt with a clean dry cloth. 2. Start with panel 1B. Apply a generous amount of silicone to the cement board and to the backside of the wall panel. Refer to the Silicone recommendations on on page 7 for applying the silicone. Also refer to the manufacturer’s recommendations for application and dry time.
3. Press the wall firmly into position. Be sure to use 1/8” spacers between the bottom panels and the shower pan. Match the space between the panels with the rest of the grout lines on the panel. Use spacers if necessary 4. Complete steps 1-3 with the remaining panels in the following order: 2B, 3B, 1T, 2T, 3T. Match the space between the panels with the rest of the grout lines on the panel. Use spacers if necessary. Make sure the walls are square and straight.
E - Shampoo Shelf (if purchased) 1. Dry fit the shampoo shelf in position and check alignment. Make any adjustments to the cut if necessary. Place shims between the 2”x 4” brace and bottom of the shampoo shelf to provide added support. 2. Apply a continuous bead of silicone on the back edge of the shampoo shelf (fig. 26). 3. Set the shampoo shelf into position and apply pressure to ensure adhesion. 4. Wipe off any excess silicone with a clean cloth.
18
Braces may be required to add pressure to some areas to ensure the walls are flush.
boxwidth
boxheight
figure 25
apply silicone here
apply silicone here
apply silicone here

11 THRESHOLD TRIM & OPTIONAL BULLNOSE EDGE KIT
The threshold trim pieces complete the look of your new shower system. If you purchased a Basic package which does not come with glass, your threshold pieces will be solid with out a channel. If you purchased a Supreme package which comes with glass, the threshold pieces will have a channel for the glass panels (fig. 27). No matter what package you ordered there are 2 special cap trim pieces and 2 special bottom pieces.
1. Locate all the trim pieces and align them on the floor (fig. 27).
2. Apply silicone, using a zigzag pattern, to the wall along the panel’s edge approximately four inches out: to the far outside of the shower pan (fig. 28).
3. Starting with the special bottom threshold piece, place the threshold into position making sure to align the threshold with the vertical line previously drawn on the cement board. Apply pressure to the trim piece to bond it to the cement board. The trim piece should be flush with the inside of the shower pan threshold (fig. 29). Make sure to align the channels in the thresholds with the channel in the shower pan.
4. Place the remaining trim pieces into position. Make sure to use a level and the line previously drawn on the cement board to align the trim pieces vertically.
5. Do not install the small cap trim pieces if your package includes glass. These are to be installed after the glass and door have been installed.
If you did not purchase a package with glass, you can install them now.
figure 27
figure 28
cementboard
Refer to manufacturer’s recommendations for silicone drying time.
figure 29
cap trimpieces
TIME REQUIRED
½ -1 HR.
special bottom pieces
door sideglass panel side
The wall thresholds are designed to be 1/4” wider than the shower pan threshold. The wall thresholds should be flush on the inside of the pan and be 1/4” past the outside of the pan.
19

OPTIONAL BULLNOSE EDGE KIT INSTALLATION
If you like you can purchase the optional Bullnose Edge Kit by calling the number listed on page 2. The kit includes bullnose edge pieces that are 8” long and are designed to accent the lines of your shower by off setting the tile lines. Each kit includes enough pieces to go around your entire shower unit so you can start and end anywhere you desire. Refer to the table below to see which kit is right for your shower. You must add the stone color to the end of the kit number. LT = Light, NT = Natural, MD = Medium. Example Kit Number: 34x54 Single threshold, Medium Stone = 32327-MD
Size P/N 32325 (12 Piece) P/N 32326 (14 Piece) P/N 32327 (16 Piece) P/N 32328 (18 Piece) 30x60 X 32x36 X 32x48 X 32x54 X 32x60 X 34x48 X 34x54 X 34x60 X 36x36 X 36x48 X 36x54 X 36x60 X 42x42 X 42x48 X 42x54 X
30x60 X 32x36 X 32x48 X 32x54 X 32x60 X 34x48 X 34x54 X 34x60 X 36x36 X 36x48 X 36x54 X 36x60 X 42x42 X 42x48 X 42x54 X
Single Threshold
Neo/Double Threshold
NOTE: Be sure to specify stone color. (LT, NT, or MD)
1. If your package comes with glass and you have not installed the threshold trim cap, dry fit the threshold trim cap in place. Dry fit as many bullnose pieces as you can until you have obtained the look you want. 2. If you have to cut a piece, measure carefully and clamp the piece down on a solid work surface. 3. Apply silicone to the top edge of the wall panels as well as the back surface of the bull nose piece and place into position. Wipe off any excess silicone with a cloth. 4. Continue until all the pieces have been installed.20

12 GLASS DOOR & PANEL INSTALLATION TIME REQUIRED
2 - 3 HRS
Note: Two people are required for this installation. Take careful measurements before cutting or drilling products.
A - Glass Panel Installation 1. Carefully lift the glass panels and set them into position. Make sure the glass panels are stable (fig. 30).
2. The top of the glass panels should be 79 3/16” from the top of the pan threshold. The distance between the glass panels should be 28 1/2” from the outside edges of the glass and 28” from the inside edge of the glass (fig. 31 & fig. 32). Also, each panel should be the same distance from each wall threshold (fig. 30). Take all measurements from the outside edges of the glass.
The glass channels in the shower pan and wall thresholds will hold the glass in place while dry-fitting the panels and door.
Make sure the small wall threshold caps are not installed until after the glass panels have been installed
note: measurement taken from outside edges of glass
28 1/2”door width
79 3/16”height of
glass panel
glass panel
shower pan
84 1/8”
top of shower pan threshold
glass panel
figure 31
figure 32
Glass is tempered and cannot be cut.
Glass Panel
Glass Panel
Door
Inside of Shower
Outside of Shower
28” Inside Edges of Glass
28 1/2” Outside
Edges of Glass
X
figure 30
X
21

3. You may need to use the setting blocks provided to achieve the correct positioning. The setting blocks are small, clear, plastic blocks that are in a small baggy. There are thick and thin setting blocks. Place the setting blocks into the glass channel groove, starting on the outer edges then evenly spacing them out inside the channel as shown (fig. 33). 4. Measure the positioning of the glass panels to ensure they are in the correct position. Make sure the glass is level across the top and also the vertical edges are square and straight to each other. Measure diagonally to check for straightness. Make any necessary adjustments (fig. 31). 5. Locate the header pieces and lay them out in the correct orientation on the floor. Depending on the size of the shower there will be either 2 or 3 pieces. If your shower is not a square than one piece will be longer than the other. Place the long piece on the longer side and the short piece on the short side. The glass channels should be facing down (fig. 34). 6. Set the header center section onto the glass panels (fig. 35). Measure from the top of the shower pan threshold to the bottom of the header assembly. It should be 78 5/8”. Make any necessary adjustments to the glass panels (fig. 36). 7. Measure again (as in step 4) to make sure the glass panels are still positioned correctly (fig. 31). Adjust the panels if necessary. 8. Dry fit the header side pieces and make sure the ends meet with the wall thresholds and the glass panels fit in the channels correctly (fig. 35). Depending on how square your walls are, you may need to sand the edges of the side pieces to make them fit properly.
After installation is complete you will grout the joint between the side pieces and the center section. Leave a small gap between the center and side pieces to make a grout joint that matches your preference.
9. After everything is lined up correctly remove the header pieces. 10. The glass panels and header pieces are secured using 100% silicone. Remove the glass panels so you can access the glass channels. Be sure to do one side at a time so you keep the panels in the same positions they were in while dry fitting. 11. Apply a 1/4” thick bead of 100% silicone into the bottom of the glass channels in the pan and in the wall thresholds. 12. Re-install the glass panel in the same way you did before. Do this for the other glass panel as well. 13. Refer back to all of the previous steps and figures to make sure the glass panels are in the proper position. The top of the glass panels should be 79 3/16” from the top of the pan threshold. The distance between the glass panels should be 28 1/2” from the outside edges of the glass and 28” from the inside edges of the glass. Wipe away any excess silicone immediately with a clean cloth..
figure 34
figure 35
figure 36
78 5/8”
figure 33
Hinge Pinhole
Hinge Pinhole
Glass Channel
Center Section
Side Section Side Section
22

14. Dry fit the header center section and side pieces as in step 6 again and make sure it sits at the proper height as before. Measure from the top of the shower pan threshold to the bottom of the header assembly. It should be 78 5/8”. Make any necessary adjustments to the glass panels. Leave the header in place while the silicone dries. 15. Measure again (as in step 4) to make sure the glass panels are still positioned correctly (fig. 31). Adjust the panels if necessary. 16. Allow the glass panels to dry for 1 hour. Be careful not to disturb the panels while the silicone is drying. Check the measurements a couple of times to make sure the panels are remaining in the correct position.
C - Handle Installation 1. Set the glass door in a position to enable the assembly of the handle (fig. 37).
2. Loosen the set screws so you can separate the handles. 3. Unscrew the long bolt from the handle. Keep all rubber pieces on the screw. 4. Remove the first set of flat clear washers from the bolt. 5. Start with the top hole on the glass door. Place the long bolt through the hole in the door (keeping the remaining rubber pieces on the bolt). On the other side of the glass place the flat washers onto the threaded portion of the bolt (fig. 37). 6 . Take one side of the handle and screw the long bolt into the end. Just start the bolt until a few threads catch. Keep loose (fig. 37). 7 . Put the second bolt through the lower hole. Place the flat washer onto the bolt. Screw the bolt into the bottom handle (fig. 37). 8. Align the handle on the door and carefully tighten the long bolts. Do not over tighten. 9. Place the opposite handle over the long bolts and tighten the set screws to secure the handle.
D - Hinge Installation 1. Locate the top hinge and remove the side plate by loosening the two screws (fig. 38). 2. Place the hinge into the top cutout on the door so the screws will be facing into the shower and install the side plate. Tighten the screws until the hinge is secure. Make sure the hinge is centered in the cutout and that the screws are facing into the shower (fig. 38). 3. Repeat these steps for the bottom hinge. Make sure to place the spacer onto the bottom hinge pin. This allows the door to sit at the proper level for the door sweep seal.
Be careful not to rest the edges of the door on hard surfaces. Tempered glass is very strong and impact resistant but its weakest point is impact on the edges.figure 37
shower outside
shower inside
clear washer
clear spacer clear washer
long bolt
set screw
hinge pin side plate
screwsdoor
figure 38
12 GLASS DOOR & PANEL INSTALLATION (continued)
23

E – Final Assembly
The door can pivot with the hinges on the left or right side depending on your personal preference. We will illustrate an installation with the hinges on the right side.
1. After the silicone on the glass panels has dried for 1 hour carefully remove the header center section and apply a 1/4” thick bead of silicone to the top of glass channels of the header center section.
2. Have one person place the door in its open position by allowing the bottom hinge pin to slide into the hole in the pan threshold. Make sure the bottom hinge has the spacer on the pin, so it will be at the proper height for the door sweep (fig. 39, 40).
Be sure to keep the door in a vertical position. If the door is not kept vertical, damage to the hinge, glass, or pan may occur.
3. Next, have the other person place the header center section into position. Align the hole in the header center section with the hinge pin and align the glass channels with the glass panels (fig. 41).
4. Push the header center section all the way down onto the glass panels and then position the door in its closed position. Wipe away any excess silicone immediately with a clean cloth.
figure 39
figure 40
figure 41
glass door
glass panelspacer
hingepin
hingepinhole
24

3/16”door to panel
minimumclearance
3/8”door to panthresholdclearance
top of shower pan threshold
shower pan
glass panels
figure 42
3/16”
shower panshower pan
figure 43
to bottom of door
to inside of shower
figure 44
5. Check for clearance between the door and glass panels and top and
bottom of the door (fig. 42). There should be a minimum of 3/16”
between the door and panels (fig. 43). If you need to you can push the
panels into the wall thresholds to increase your gap.
6. Locate and install the clear door sweep seal and attach it to the bottom
of the glass door. The reflective shield should face into the shower
(fig. 44).
Leave the door in the closed position until the silicone on the header is
completely dry.
12 GLASS DOOR & PANEL INSTALLATION (continued)
25

7. Locate the wall threshold trim caps and install them using the same procedure for installing the wall threshold trim pieces (fig. 45).
8. Locate the header side pieces and apply a 1/4” bead of 100% silicone to the top of the glass channels. Place them into position and push them all the way down onto the glass panels. Be sure to align them to the header center section (fig. 46). Wipe away any excess silicone immediately with a clean cloth.
9. Allow the silicone to dry before continuing with the installation. Make sure the glass remains in the proper position. Leave the door in the closed position and use braces to support the glass until the silicone dries. Refer to the manufacturer’s instructions for silicone drying time.
10. When you grout the rest of the shower be sure to grout the extra hinge hole in the pan and the extra hinge hole in the stone header. Also grout between the glass and the pan, the glass and the wall thresholds, and the glass and the stone header. As well as between the joints between the stone header center section and side pieces
Important: We have provided door seals for water sensitive areas such as wood floors. If glass panels and door are installed correctly with the proper spacing, outside water spillage will be minimal and the seals will not be necessary. If you would like to use these seals follow the following steps.
11. Locate the plastic H shaped seals. One goes on the glass panel on the door strike side, and one goes on the door on the hinge side (fig. 47). Measure and cut the seals to length.12. Starting from the top, push the seal onto the glass, slowly working your way down.
figure 47
glass panel
glass panel
door hinge side
strike side
inside shower
outside shower
figure 45
figure 46
threshold trim cap
26

13 GROUTING TIME REQUIRED
1-2 HRS
Important Reminder For Zen Collection:
The Zen shower system comes with black and white grout. The white grout is for the “Natural Stone” tile (light colored tile) and the black grout is for the “Bali Stone” areas (black shower pan and liner). Do not get white grout on dark areas and black grout on light areas. When applying the grout protect the surrounding areas with painters tape and plastic sheeting. If unintended areas do get grout on them, remove the grout immediately with a clean damp cloth. If stains persist the area can be lightly sanded with 220 grit sandpaper. If you have any questions please call 951-220-6500.
figure 48
between wall panels and shower pan
between glass and panel (if purchased)
between wall thresholds
between wall panels
between panel and threshold
Apply grout between the top edge of the wall panels and the cement board or finished wall. Use masking tape to make a clean, straight line and to protect the wall from excess grout.
extra hinge hole in pan and stone header 27
CAUTION: Grout contains petroleum Distillates. If ingested, do not induce vomiting. Call a physician immediately. Use with adequate ventilation. Non-flammable. KEEP OUT OF REACH OF CHILDREN. DO NOT TAKE INTERNALLY. AVOID EYE CONTACT. STORE AWAY FROM EXTREME HEAT OR COLD. The wall panels and shower pan are pre-grouted for your convenience in order to save you time. The grout that was included with the shower system is for any spaces that exist after installation has been completed. Below is a diagram of spaces that should be grouted.Cleaning the Area to be Grouted: 1. Vacuum away any dirt or debris from the area you will need to grout. 2. Clean the area you are going to grout with a warm solution of dish soap and water. This will remove any oils or grease from the surface. Be sure to clean inside the grout lines removing any lose material. 3. Dry the area completely using clean paper towels. Use a hair dryer to help evaporate any leftover moisture or water trapped in any small crevices.
DO NOT apply any grout until the area is completely dry and clean of oil, grease, and debris.WARNING: HAIR DRYERS AND WATER POSE A RISK OF ELECTROCUTION. READ ALL SAFETY/WARNING LABELS
AND INSTRUCTION MANUALS FOR HAIR DRYER BEFORE USE.Applying Grout: 1. Follow the directions on the tube for specific application instructions. 2. We recommend cutting the tube tip to the same width as the gap you are trying to fill. 3. Work your way around the shower slowly, one section at a time. Be sure to clean off any excess grout before moving on to the next section. 4. When you have completed grouting the entire shower let the grout dry for 24 hours before exposing to water. 5. Multiple applications may be necessary depending on shrinkage and clean-up technique used. Just touch-up areas following same procedure as before.
Note: it is not necessary, but if you choose you may apply a protective layer of sealant to the grout. We recommend “Dupont Stone & Tile Sealer.” Allow the grout to dry for 24 hours before applying the sealer.
Follow the manufacturer’s recommendations for application instructions.

DO NOT CLEAN CUSTOM STONE WITH PAINT THINNER, ACETONE, LACQUER THINNER, M.E.K. or Other chemicals that attack the structural integrity of Resin Based Stone (including, but not limited to acetone). Use of these chemicals will destroy the surface of the stone and void your warranty. Soapy water, ammonia based cleaners or commercially available solid surface cleaners will remove most dirt and residue from all types of finishes. Stubborn residue will require a little stronger cleaner. The stone is naturally waterproof and will not absorb spills or soil, simply wipe away soil or spills with a damp sponge. Periodic cleaning with a sponge and warm, soapy water will remove any build up of dust or grime.For stubborn stains you may use a non-abrasive Scotchbrite pad. “Lightly” scrub the stained area in a circular motion.
CARE & MAINTENANCE OF YOUR SHOWER SYSTEM
SHOWER SYSTEM TROUBLESHOOTING
Correcting Bowed Panels
Sistine Stone wall panels are made to be flexible and may have a slight bow. This condition is normal and the wall panels will flatten when properly installed.
If the wall panels have been stored improperly or have become excessively bowed, they can be easily flattened before installation.Follow the directions below:
Using a heat gun or propane torch, heat the backside of the panel in the most bowed area. Hold the torch a few inches away and move the torch back and forth over the area. After the panel becomes malleable, lay on a flat surface and apply weight (wall thresholds work well, refer to Instal-lation Guide Packing List) until cool and flat.
28

SHOWER SYSTEM TROUBLESHOOTING
Shower Panels not bonding to walls • If the shower panels are not bonding to the cement board, double check the adhesive manufacturer’s recommendations for the proper application of their product. • When storing the panels, the panels may have become bowed. Clean off the adhesive and flatten them using the procedure on the previous page. • Not enough adhesive may have been used. Apply additional adhesive to the back side of each panel and to the cement board walls for extra grab and adhesion when installing the panels. • If the shower panels still want to pull away from the wall and the panels are straight and you have already applied adhesive to both surfaces, use a brace to support the panels while drying. • If you are still having difficulty, the panels and walls may have dust on them. Clean off the adhesive and then reapply the adhesive to both the shower panels and walls. • The type of adhesive purchased may need a rougher texture to adhere to. Try sanding the backside of the panels with 60 grit sandpaper.
Cracks in the Grout Lines • You might notice slight cracks in the grout lines of the shower pan when you receive it or in any of the grout lines of the walls once the shower has been installed. This can occur with any grout application. If any small cracks develop, clean and then moisten the area. Re-apply a thin coat of the grout already provided to you.
Low Water Pressure from the hand shower • If you are experiencing low water pressure from your hand shower, remove the showerhead and check for a white flow restrictor. If it does not have a flow restrictor then install one and check to see if the problem persists. • There may be a clog in the shower lines. Follow the following steps to find a clog. • Cap the showerhead outlet and check the flow out of just the hand shower. • If the flow is the same as before you have a clog in the hand shower system: Check the hand shower, hand shower hose, and hand shower supply for clogs. • If the flow increases there is no clog in the handshower system. • Cap the hand shower and check the flow from the shower head. • If the flow is the same as before, you have a clog in the showerhead system. Check the showerhead and lines for clogs. • If the flow increases, there is no clog in the showerhead system. • If the flow doesn’t increase and there are no visible clogs in either the shower head or hand shower the valve cartridge may be clogged. Follow the faucet instructions to check the valve cartridge for clogs.
29

G_00559 Rev J
13395 Estelle Street, Corona, California 92879 Phone 1.951.220.6500 Fax 951.734.1480