nia biospecimen best practices series induced pluripotent ... · nia biospecimen best practices...
TRANSCRIPT

NIA Biospecimen Best Practices Series
Induced Pluripotent Stem Cell Protocols
including Skin Biopsy & initial Fibroblast Culture
by Scott A. Noggle, Ph.D.
The NYSCF-Charles Evans Senior Research Fellow for Alzheimer’s Disease New York Stem Cell Foundation
For any questions, contact
Sam Gandy, M.D., Ph.D. Icahn School of Medicine at Mount Sinai
[email protected] 267-240-6551 cell 215-689-3741 efax

PROTOCOLS FOR HUMAN PLURIPOTENT STEM CELL WORK
UPDATED SUMMER 2011

CONTENTS
Growth Medium 3
MEF-Conditioned Medium (CM) 5
Producing MEF Feeder Cells 6
Matrigel Plate Coating 9
Fibroblast Cultures From Skin Biopsies 10
Fibroblast Cultures From Skin Biopsies Using Dry-Down Technique 12
iPSC Induction Protocols - Retrovirus 14
iPSC Induction Protocols – Sendai Virus 19
Passaging Methods for HES and iPS Cell Lines 28
Enzymatic Passaging of HES and iPS Cells 29
Feeder-Free Protocols 32
Freezing iPS Cells 35
Alternate Protocol: Freezing by Vitrification in Cryovials 36
Karyotyping 38
Teratoma Assays 40
Embryoid Body Assays 41
Immunofluorescent Procedures & Markers 42
Real-Time RT-PCR Protocols & Markers 44
Flow Cytometry Analysis of HES and iPS Cells 46
Magnetic Sorting of iPS Cells 52
2D Neuronal Directed Differentiation For iPS/HES Cells From Feeders 53
Adapted Sasai EB Preparation for Freezing and Sectioning 54
Endoderm Directed Differentiation – Beta Cells 55
Mycoplasma Testing 56
Nanostring Protocols 58

GROWTH MEDIUMScott Noggle, doc. version 7, 8-15-11
HUESM is the current growth medium that we use for growing hESCs and iPSCs and differs from the standard H1 medium described by Thomsonʼs group in the use of KO-DMEM rather than DMEM/F12. The original formulation of H1 medium called for 4ng/ml of bFGF. Current studies suggest that MEFs respond optimally to a higher concentration of bFGF. We have increased the bFGF concentration in HUESM to reflect this. This dose of bFGF seems to compensate for some degree of variation between MEF batches. However, it is best to culture cell lines in bFGF conditions recommended by the supplier of the cell line.
GROWTH MEDIUM RECIPES: Below are two different growth medium recipes that are both equally effective. The advantage of the second, however, is that you can take full advantage of the fact that KO-DMEM comes in 500ml bottles.
Recipe 1HUESM CATALOGUE NO. FINAL CON. FOR 500ML
Knockout-SR 10828 20% 100ml
GlutaMAX 35050 2mM 5ml
MEM non-essential amino acids 11140-050 0.1mM 5ml
Penicillin-streptomycin 15140-122 100U/ml-0.1mg/ml 5ml
2-Mercaptoethanol 21985-023 0.1mM 900μl
KO-DMEM 10829-018 to volume 385ml
Recipe 2 HUESM CATALOGUE NO. FINAL CON. FOR 610ML
Knockout-SR 10828 15% 90ml
GlutaMAX 35050 2.13mM 6.5ml
MEM non-essential amino acids 11140-050 0.106mM 6.5ml
Penicillin-streptomycin 15140-122 106U/ml-0.106mg/ml 6.5ml
2-Mercaptoethanol 21985-023 0.0586mM 650μl
KO-DMEM 10829-018 original 500ml 500ml
Notes: 1. KSR is thawed at 4°C, aliquoted into 100ml conical tubes and frozen at –20°C. 2. A stock of growth medium can be stored at 4°C for no more than two weeks.
3

TO PREPARE COMPLETE GROWTH MEDIUM:
To prepare complete growth medium, bFGF (Invitrogen cat no. 13256-029) is added just before feeding. From growth medium stocks, preheat only as much medium as is needed to feed cells for ~ 20 to 40 min at 37°C. Depending on how much medium you are working with and which recipe you are using, add the appropriate amount of bFGF to reach the final concentrations listed in the table below.
RECIPE FINAL CONC. BEFORE FEEDING HESCS
Recipe 1 10ng/ml
Recipe 2 8.20ng/ml
For example, if feeding cells grown on MEFs, add 10μg bFGF to a 1ml aliquot of KSR or growth media. Add 500μl of this
solution to 500ml of media for a final concentration of 10ng/ml. The leftover 500μl of bFGF solution can be frozen at –20°C for future use.
DEFINED MEDIA: We are currently evaluating several defined media, including mTeSR1 (Stem Cell Technologies) and NeutriStem XF/FF (Stemgent).

MEF-CONDITIONED MEDIUM (CM)Scott Noggle, doc. Version 1.6 8-2-11
For some studies, it may be important to culture HESCs or iPS cells in the absence of feeder cells. This protocol is provided for generating Mouse Embryonic Fibroblast (MEF) - conditioned medium for culture of HESCs or iPS cells on Matrigel coated dishes. Commercially available Mitomycin-C treated MEFs of the CF-1 strain can be used. We have used MEFs from GlobalStem (GSC-6001G or GSC-6001M) and Specialty Media (PMEF-CF). Alternatively, MEF feeder cells from derived in house can be used. Primary MEFs are used between 1 to 5 passages. See accompanying protocol for isolation and inactivation procedures if you are producing you own MEFs.
Passaged HESCs are plated in 2ml of CM per well of a 6-well plate. 5ml on a 60mm dish, or 8ml on a 10cm dish. They can be fed with the same volume for the first few days. When the colonies get bigger, increase the CM to 3ml/7ml/12ml, respectively. Cultures in CM on Matrigel can usually grow for 5 days before they need passaging.
MATERIALS AND PREPARATION OF CONDITIONED MEDIUM:
Dishes: Coat 10cm dishes in 0.1% gelatin (made in TC-grade distilled water) for at least 20 min in the incubator.
Medium:
FM10 CATALOGUE NO. FINAL CON. FOR 500ML
FBS 10% 50ml
GlutaMAX 35050 2mM 5ml
Penicillin-streptomycin 15140-122 100U/ml-0.1mg/ml 5ml
2-Mercaptoethanol 21985-023 0.1mM 900μl
DMEM (high glucose) 11965-084 to volume 439ml
Plating MEFs: Thaw one vial of GlobalStem or Specialty Media Mitomycin-C inactivated MEFs (5x10⁶ cells) or equivalent inactivated MEFs and resuspend in 12ml of FM10 medium. Aspirate the gelatin from the plates and immediately plate the 12ml of cells directly on one gelatin coated 10cm dish. Incubate overnight to attach.
Conditioning medium: The next day, rinse the MEFs with HUESM and replace with 12ml of HUESM with bFGF. Incubate overnight to condition the medium. After 24hrs, draw off the conditioned medium into a 50ml tube and replace with fresh HUESM. I try to keep to 24hrs of conditioning (+/- 2-4hrs is ok). The CM can be used immediately, stored at 4°C for a week or frozen at –80°C. When ready to use to feed Matrigel cultures, add fresh bFGF before plating (see table below for final concentrations).
APPLICATION BEFORE CONDITIONING ON MEFS BEFORE FEEDING HESCS
Maintenance on Matrigel 20ng/ml 20ng/ml

PRODUCING MEF FEEDER CELLSScott Noggle, doc. Version 1.4 7-5-11
We are currently using commercially available Mitomycin-C treated Mouse Embryonic Fibroblast (MEF) of the CF-1 strain from GlobalStem (GSC-6001G or GSC-6001M). Alternatively, feeder cells can be prepared from E13 ICR embryos (strain CD-1 from Charles River Laboratory) and inactivated using Mitomycin-C or gamma irradiation. Primary MEFs are used between 1 to 5 passages. This protocol is used for producing MEFs in house.
Medium: FM10: DMEM containing 10%FBS, 1X Lglutamine, 1X pen-strep, and 100μM 2-Mercaptoethanol (all from Gibco).
Isolation of p0 MEFs from embryos: Alternatively, primary Mouse Embryo Fibroblasts are isolated from E13 embryos essentially as described in Manipulating the Mouse Embyro1. Briefly, sacrifice a pregnant mouse by an institutionally approved method. Swab the mouse liberally with 70% ethanol. Using scissors make a cut across the belly and cut away the skin to expose the gut. With sterile forceps and scissors, dissect out the uterus and place it into a Petri dish in sterile PBS. Isolate the embryos from the uterus, and release the embryos from the embryonic membranes. Transfer embryos to a second Petri dish with sterile PBS. Using watchmaker forceps under a stereomicroscope, remove the embryo heads and liver, intestines, heart and all viscera and gonadal ridges with two pairs of watchmaker forceps leaving only the limbs and body cavity. Transfer the cleaned embryos into a sterile 10mL syringe with 5mls of 0.25%Trypsin/EDTA per 10 embryos. Pass the embryos and trypsin through an 18G needle slowly and gently, into a fresh Petri dish. Collect the partially dissociated embryos and trypsin with a serological pipette and pass through the needle a second time. Incubate the tissue for 15 minutes at 37°C, pipetting the tissue a few times through a 10ml pipette to dissociate the tissue. Allow the large pieces of cellular debris to settle (5 minutes 1g). Remove the supernatant into a fresh tube and add about an equal volume of fibroblast medium. Spin down cells and resuspend in medium. Discard the debris. One embryo is plated on a T175 flask in a total of 30mls of medium per flask. This density allows the cells to adhere but not become overly confluent before harvest at Day 3-4. Incubate at 37°C with 5% CO2. MEFs will attach and begin to divide overnight. Change the medium every other day. When the flasks are nearly confluent, usually in 3-4 days, the cultures are ready for freezing. Freeze cells in 10% DMSO/90%FBS at 6x10⁶ or 12x106 per vial. This is considered passage p0. It is also a good idea to screen MEF batches for mycoplasma.
Inactivation by Mitomycin-C: Inactivated MEFs are prepared by thawing p0 MEFs. Cells are thawed quickly in a 37°C water bath with gentle shaking. The cells are gently transferred to a 50ml conical tube with 20mls of fibroblast medium and centrifuged at 200xg for 4 minutes. The cells are resuspended in 30-50mls medium and counted with trypan. Viability should be >95%. Cells in fibroblast medium are seeded into T175 flasks at 1.8X10⁶ per flask with 25mls medium per flask. Flasks are incubated at 37°C 5% CO2. This cell number should be optimized to give 75-90% confluency by day 3. On day 2, aspirate medium and add 35mls fresh fibroblast medium to each T175. On day 3 after thawing, cells should be 75-90% confluent in T175 flasks. Check each flask to assure proper cell growth and sterility. Medium is aspirated and cells are treated with mitomycin-C at a final concentration of 10µg/ml in 15mls per T175 fibroblast medium for 2.5 hours at 37°C and 5% CO2. To prepare mitomycin-C, dissolve 2mgs per vial powdered mitomycin-C (Sigma, Cat#M4287) in 200mls fibroblast medium. This working stock is 10µg/ml. It can be stored at 4°C protected from light for up to 6 weeks or frozen at -20°C for longer storage. After use, add 15ml bleach per 500mls mitomycin-C solution to neutralize it.
After incubation, the mitomycin-C is aspirated and cells are washed with 20mls PBS. Aspirate the PBS and add 15mls fibroblast medium to each flask. It is convenient to only trypsinize five to six flasks at a time to minimize exposure to the trypsin. Start by rinsing the flasks an additional 3 times by rinsing once with 20mls PBS and twice with 15mls each of Ca-Mg-

free-PBS. After the last wash is aspirated add 2ml of 0.05% trypsin/EDTA. Disperse the trypsin by tilting the flask. Dissociation of the cell layer typically takes 1-2 minutes. When the cells detach from the flask 5mls of fibroblast medium are added to each flask to stop the trypsin. Pool cell suspensions from the flasks in a 50ml conical tubes and bring to 50mls with fibroblast medium. Wash the cells once with 25ml of fibroblast medium. Count the cells and access viability with trypan blue. Plate as described below. Alternatively, the inactivated MEFs can be frozen as above and thawed for subsequent use. Freeze cells in 10% DMSO/90%FBS at 5x10⁶ per vial.
Inactivation by gamma-irradiation: MEFs to be inactivated are harvested as above, combined into one 50ml tube and irradiated with a dose of 5000 to 8000RADs. The time of exposure must be calculated based on the activity of your gamma source. Optimal dose should be determined by plating irradiated cells at clonal density and monitoring for colony growth. Pick the lowest dose that yields little colony formation. Count the cells and access viability with trypan blue. Plate as described below. Alternatively, the inactivated MEFs can be frozen as above and thawed for subsequent use. Freeze cells in 10% DMSO/90%FBS at 5x10⁶ per vial.
Plating inactivated MEFs for HESC or iPS culture: Dishes are pre-coated with 0.1% gelatin made with cell culture grade water for 20-30 min in the incubator. Inactivated MEFs are plated fresh from the inactivation procedures outlined above or thawed from commercially available vials. If using previously frozen vials, MEFS are resuspended in the appropriate amount of medium and plated directly - they are not to be centrifuged. A density of 0.3X10⁵/cm2 is a good starting density for MEF plating. This value should be optimized to give complete coverage without being too dense, as increased MEFs in the culture will deplete culture media components (see pictures below). Conversely, too few MEFs will not provide adequate conditioning of the media. Plating density is shown in the table below. Inactivated MEF feeder cells should be plated a day or two before additions of HESCs to allow for attachment and spreading of the MEF layer to completely cover the surface of the dish. It is important that the HESCs not come in contact with tissue culture plastic before the MEFs have laid down sufficient ECM to prevent premature differentiation. 35mm tissue culture treated dishes are most convenient, however larger dishes also work well. MEFS are fed every other day until used. MEF feeder layers should not be used after 4 days.
7
4 hours (4x) 24 hours (4x)
48 hours (4x) 72 hours (4x)

PLATING DENSITIES:
VESSEL SURFACE AREA (PER WELL) NUMBER OF MEFS (PER WELL) OPTIMUM VOLUME
35mm dish 10cm2 0.25-0.5x10⁶ 2ml
60mm dish 20cm2 0.5-1x10⁶ 5ml
T25 flask 25cm2 0.75-1.2x10⁵ 5ml
4-well plate 2cm2 0.5x10⁵ 750µl
8

MATRIGEL PLATE COATINGScott Noggle, doc. Version 1.2 9-28-07
GENERATING MATRIGEL STOCKS:
The Matrigel that we are currently using is qualified by Stem Cell Technologies to maintain hESCs. Thaw one 5ml vial of Matrigel (BD cat# 354277) at 4°C overnight. The original Matrigel stocks came at different stock concentrations and were diluted to a final of 0.333mg/ml to coat plates. This usually meant roughly a 1:30 final dilution. The current stocks do not come with a concentration listed, but instead come with dilution instructions. Make sure to check the Product specification sheet for the dilution factor for the current lot of Matrigel. If these are not available, call BD at the phone number listed on the vial and give them the lot number. They will tell you or email the sheet for that lot. It is important to keep the vial and all pipettes and tubes ice cold to prevent premature gelling of the matrix. Using the cold pipette, dispense the 5ml vial into five 1ml aliquots in pre-chilled cryotubes on ice. These can be refrozen at –20°C.
COATING PLATES:The dilution factors will vary depending on which lot you are working with – be sure to check the instructions for the current lot. Generally, however, each 1ml aliquot is divided into four 250μl aliquots which are subsequently diluted to 25ml (250μl/25ml). In preparation, place a 250μl Matrigel aliquot (from above or thawed slowly on ice, about 2hours) on ice. Prepare an ice bucket with a metal support tray for the plates/dishes. We use shallow rectangular ice buckets filled with ice and with small metal incubator trays on top of the ice. Pre-cool 6-well plates or dishes. Pre-cool p1000 filter-tips at –20°C for about 20min.
Dilute the 250μl aliquot of Matrigel to 25ml with cold base medium (mTesR1, XVIVO-10, DMEM/F12, DMEM) in a pre-cooled 50ml conical tube. Mix well and dispense 1ml into each well of the 6-well plates (for 96-well plate - 80μl per well; for 10cm dish - 8ml). Keep the plates on the ice-cold platform at all times. If in a rush the plates can be kept at RT for about 4 hrs in a tissue culture hood (covered with foil) to coat. Some lots of Matrigel will tolerate this and some will not. Alternatively, place the entire ice bucket with plates into the refrigerator to coat overnight. Sometimes, the plates will coat better after two days in the refrigerator.
PREPARATION OF COATED PLATES FOR HESCS:30-2hr min before passaging, warm the plates with Matrigel in the incubator to allow the Matrigel to gel. Before plating cells, check the coating on the microscope for a meshwork-like single layer matrix (see photo to right). When ready to plate HESCs, aspirate the Matrigel from the wells using a Pasteur pipette in the corner of the well. Get as much Matrigel off of the dish as possible leaving a thin coating on the surface of the dish. Do not scrape the bottom of the dish. Rinsing the Matrigel-coated plate is not necessary. Plate HESCs in conditioned medium or other desired conditions.
9

FIBROBLAST CULTURES FROM SKIN BIOPSIESGist Croft (modified by Florian Merkle) 1-29-09modified by Scott Noggle 2-7-10
Purpose: This protocol is used to establish fibroblast cultures from human skin biopsies. The whole procedure usually takes ~4 weeks: 3 weeks for fibroblasts to expand to occupy most of the area underneath the coverslips, then another ~1 week for Passage 1 fibroblasts to cover a T25 or T75 flask.
MATERIALS:
A. Equipment •# Laminar Flow Hood •# Water Bath, 37°C •# Pipet-Aid •# Incubator, 5% CO2 •# Tabletop Centrifuge •# Hemacytometer with cover glass •# Microscope, inverted •# Ice buckets with lids •# Dry Ice •# Ice •# Label maker
B. Supplies
•# Plastic Serological Pipets: 1, 2, 5, and 10ml
•# Latex gloves •# Sterile straight and curved micro-forceps •# Sterile, disposable scalpels •# Spray Bottle, 70% Ethanol •# Tissue culture treated 60mm plates •# T25 Tissue Culture Treated Flask•# Microscope Cover Slips •# Autoclaved silicone grease •# Sterile 200ul pipet tips •# 15ml conical tubes •# Freezing Vials, 1.8ml
MEDIA AND CHEMICALS:
MATERIALS VENDOR CATALOG NUMBER
Freezing Media 1X Millipore ES-002-10F
Nucleosides Millipore ES-008-D
PBS Fisher MT21040CV
Trypsin-EDTA Invitrogen 25300-112
Coverslips Corning 2865-22
Silicon Grease Dow Corning 2021854-0499
Parker super O lube Silicon base 347306
BIOPSY PLATING MEDIA
CATALOGUE NO.
FINAL CON. FOR 500ML
FBS 10% 50ml
GlutaMAX 35050 2mM 5ml
MEM non-essential amino acids
11140-050 0.1mM 5ml
Antibiotic-antimycotic
15240-062 1X 5ml
2-Mercaptoethanol 21985-023 0.1mM 900μl
Nucleosides Millipore 5ml
KO-DMEM 10829-018 to volume 425ml
BIOPSY CULTURE MEDIA
CATALOGUE NO.
FINAL CON. FOR 500ML
FBS 10% 50ml
GlutaMAX 35050 2mM 5ml
Penicillin-streptomycin
15140-122 100U/ml-0.1mg/
ml
5ml
KO-DMEM 10829-018 to volume 440ml
Media and Buffer preparation: Media and Buffers must be prepared under sterile/aseptic conditions. Sanitize all exterior services of bottles and tubes prior to entry into laminar flow hood.
PROCEDURE:
On the Day of Patient Biopsy: a.# Arrangements are made for picking up
biopsy on retrieval dayb.# Biopsy samples are stored in the Biopsy
Plating Media (SOP #5000) at RT or 4°C until ready for pick-up
Plating Biopsy Samples:
a.# Carefully wipe all tubes with 70% Ethanol, make note of Subject ID, especially if there are multiple tubes.
b.# Set-up one 6-well plate for each biopsy sample. Using a sterile 200μl pipet tip, scoop out a little of the autoclaved silicone grease and dab in the middle of the well.
c. # Carefully extract the biopsy punch from the conical tube with 1ml pipet.
d.# Carefully hold the biopsy punch with a pair of curved forceps and with a sterile scalpel, carefully mince the biopsy core into 10-15 pieces.
e.# With a pair of straight-edge forceps, place 2-3 pieces of minced biopsy around the silicon droplet.
f. # Using a sterile forcep, take a coverslip and place over the grease and minced biopsy pieces. Press down on coverslip.
g.# Add 5mls of biopsy plating media and place into incubator. Press down on coverslip again to get rid of air bubbles. Do not disturb for 4 days.
Culturing and Freezing Fibroblast Cells:
a.# After five (5) days, replace spent media with culture media.
b.# Small outgrowths of cells should be visible at day 4-5. Replace spent culture media with 2-3ml of fresh culture media, every 3-4 days, until the coverslip is confluent.
c. # Cells are ready to be split when the entire coverslip is covered with fibroblast cell growths. This may take 3 weeks. Cells grow on plastic as well as on the glass coverslip.
d.# Pre-warm trypsin, prior to use. Wipe carefully with 70% Ethanol before placing inside laminar flow hood.
e.# Remove spent media and wash the plate surface with PBS. With a 200μl pipet, carefully pry the coverslip from the Petri dish bottom and overturn inside the Petri dish. The cell growth surface should be facing up. Add 3ml of pre-warmed trypsin and replace into incubator for 5 minutes. Make sure the overturn coverslip is covered with trypsin.
f. # Check trypsin digestion every 5 minutes by removing the petri dish and observing under microscope. Scrape glass coverslip and plastic surface with a cell scraper. When the cells are no longer attached to the coverslip, harvest the cells into a 15ml conical tube. Inactivate trypsin with 1:1 volume of fetal bovine serum, or culture media (contains 10% FBS).
g.# Spin at 500x g for 5 minutes. Wash once with 5mls of media and spin at 500x g for 5 minutes.
h.# After wash, aspirate media and re-suspend in 5mls. Add cell suspension to T25 flask.
i.# Feed T25s every 3-4 days until confluent, this may take 1-2 weeks. When cells are confluent, harvest and freeze cells. Freeze 3 vials per T25 flask. [Note Cryopreservation of cells is same as for primary mouse embryonic fibroblasts. Use the traditional 1 degree/minute slow freeze isopropanol chambers.]
11

FIBROBLAST CULTURES FROM SKIN BIOPSIES USING DRY-DOWN TECHNIQUESai Theja, doc version 1.0 7-6-11
# The major aspects of the two biopsy preparation protocols are essentially the same, such as the amount of time needed for an expansion in passage 1. They differ, however, in that when using the following technique, biopsy pieces can successfully lead to fibroblast outgrowths without the use of the coverslip “sandwich” method. Instead they are allowed to adhere to a tissue culture treated surface by drying. An alternate biopsy freezing protocol can also be found below. Either a 10cm dish or T25 flask will be sufficient for this purpose. It is imperative to observe sterile/aseptic techniques and to work only in a laminar flow hood.
MEDIA AND CHEMICALS:
Biopsy Plating Media – same as previous protocol
Biopsy Culture Media – same as previous protocol
Biopsy Collection Media/ Rinse Media• RPMI 1460# # 500ml• Antibiotic-antimycotic# 25ml
Biopsy Freezing Media• Biopsy Transfer Media 50% by volume• FBS## 40% by volume• DMSO# 10% by volume
PROCEDURES:
PLATING BIOPSY SAMPLE
1. Wash the biopsy sample several times in a 50ml conical tube containing 30ml of PBS.2. Place the sample into a 10cm dish containing 2ml of Biopsy Collection Media to keep the piece moist while being
processed.3. Typical punch biopsies are sliced with a scalpel into 5 pieces. The number of pieces will vary depending on the biopsy.
About 1-2mm pieces are desired.4. Pick up the pieces with forceps and remove excess fluid by streaking them along the dry portion of the 10cm dish. Be
careful to not fully dry away the fluid, as the pieces must remain somewhat moist.5. Arrange the processed sample pieces in a separate 10cm dish making sure to distance them from each other and the
edge of the dish.6. Allow approximately 15 min for the pieces to dry and adhere to the surface. By this time, the edges of the biopsy should
not have much visible liquid around them. Longer drying periods are not recommended.7. After drying, gently add 1ml of Biopsy Plating Media on top of the biopsy pieces using a p1000.8. Add 4mls of Biopsy Plating Media gently around the plate while rotating to ensure complete coverage.9. Place into an incubator, and do not disturb for 5 days.

CULTURING FIBROBLASTS
1. After 5 days in culture, replace media fully with Biopsy Culture Media.2. Every other day, perform a half media change until fibroblast outgrowths are sufficient to warrant full media changes.
FREEZING BIOPSY SAMPLES
Extra pieces from larger biopsy samples can be frozen down by the following protocol:
1. Slice the extra biopsy pieces into 5-10mm pieces within a 10cm dish containing Biopsy Collection Media.2. Label cryovials and prepare by adding 1ml of cold Biopsy Freezing Media.3. Place each piece into a separate vial using forceps and completely submerge the piece.4. Place the vials in a slow cooling container and store at -80oC overnight.5. The following day, transfer the vials to liquid nitrogen for extended storage.
THAWING BIOPSY SAMPLES
Biopsy samples can be successfully thawed and patient fibroblasts can be obtained up to 3 months after freezing. The original publication describing a protocol that this is based on claimed that outgrowths were successfully obtained from the majority of their samples 6 months after freezing.
1. Prepare two 50ml conical tubes containing 30mls of warm Biopsy Collection Media.2. Immediately bring the cryovial containing the biopsy piece to a 37oC water bath and warm until the outer portion of the
frozen sample is thawed.3. Spray the vial with 70% ethanol and bring it into a laminar flow hood.4. Immediately add 1ml of warm Biopsy Collection Media from one of the conical tubes into the cryovial. This should
completely thaw the sample within a matter of seconds.5. Immediately transfer the piece to the conical tube.6. Invert this tube several times and transfer it to the other prepared conical tube to repeat several more inversions.7. From this point on, continue with steps from “Plating Biopsy Sample” (above).
13

IPSC INDUCTION PROTOCOLS - RETROVIRUS
HUMAN IPS METHODS
Dieter Egli, doc version 1.1 7-5-11
The protocols for inducing bona fide iPS cells are still evolving. This protocol represents our current best practices for generating iPS cells. Our gold standard system for generating iPS cells relies on retroviral introduction of the factors identified by Yamanaka to reprogram adult fibroblasts. The original retroviruses have been modified for higher expression of the factors Oct4, Sox2, Klf4 and optionally c-myc. As a high rate of infection and high initial expression of the factors correlates with successful reprogramming, we currently purchase high-titer retroviral stocks based on these modified retrovirus vectors from the Harvard Gene Therapy Core Facility. The following is a brief description of how these high titer stocks were produced.
Retroviral production. Human cDNAs for KLF4, SOX2, OCT4, and CMYC (OpenBiosystems) were sub-cloned into the murine leukemia viral vector pMXs-Tcl1 (Addgene plasmid 13364) (S2, S3). Moloney gag-pol (pUMVC; Addgene plasmid 8449) and VSV-g envelope (pCMV-VSV-g; Addgene plasmid 8454) (S4) were obtained from Addgene. These plasmids were transiently co-transfected into 293FT packaging cells (ATCC) at a 10:9:1 ratio (transgene:gag-pol:VSV-g) using SuperFect (Qiagen). Viral supernatant fractions were harvested after 60 hours, filtered through a 0.45 µm low protein binding cellulose acetate filter, and concentrated by centrifugation.
iPS generation. To produce patient specific iPS (PS-iPS) cells, we are currently infecting 10,000 patient fibroblasts in a 6-well dish. The infections are in 1ml of HUESM with another 1ml of fibroblast medium added one day later. The cultures are fed every day with a half change of HUESM. When cultures become >70% confluent, HUESM medium is exchanged every day with 2-3ml of media. It is important not to let media turn yellow. On day 3, cells are cultured in standard HUESM medium plus SD factors 0.5μM Thiazovivin, 0.5μM PD0325901, and 2μM SB431542 for approximately 2-3 weeks. On day 7/8, cells are passaged in HUESM plus the SD factors at a density of 20-30,000 cells per well of a 6-well dish coated with MEFs. Colonies are circled (right) and remaining cells, including MEFS, are aspirated or scraped away under a dissection scope. Fresh MEFs are plated on top of the remaining colonies. Continue feeding with standard HUESM and repeat cleaning of cultures to prevent overgrowth of non-iPS cells, usually after three to four days. When iPS colonies are large, they are manually picked and passaged with a cell scraper or pipet (see protocol for colony picking). This is repeated for approximately 2 weeks before
14

adaptation to enzymatic passage with trypsin and subsequent characterization. Colonies below are examples of an iPS line after three pick passages.
Note: You may also perform multiple infections in smaller plate formats (24 or 48-well plates rather than 6-well plates) with
everything scaled down accordingly. If doing so, keep individual wells separate (approximately 8) and pick a single colony
from each line. Doing this generally improves your chance of having distinct integration sites for the different lines.
15
ALTERNATE PROTOCOL BASED ON FACS SORTINGFaizzan Ahmad, doc version 1.0 7-6-11
Follow the previous protocol for retroviral reprogramming up until day 7. On day 7, instead of passaging cells into a 6-well plate, follow the these protocols for FACS analysis and dissociation:
Note: the following protocols are copied from the Flow Cytometry section of this manual. For further details about the following processes and/or for further instructions, see that section (p. 46).
A. Prepare cells for FACS analysis:
1. Aspirate off media.
2. Add 0.5ml (12well) or 1ml (6well) of Accutase.
3. Incubate for 5 min at 37°C.
4. Neutralize with an equal volume of media.
5. Move to 15ml and conical bring up to 10ml w/ media.
6. Spin @ 800 rpm for 4 minutes.
7. Aspirate supernatant carefully.
8. Resuspend cells/pellet in FACS buffer (volume depends on cell #).
B. Stain and analyze the cells:
1. Define the goals of the assay.
2. Design a characterization panel including:
o Unstained, Compensation, Isotype and/or FMO controls
o Pluripotent and Differentiation markers (surface and intracellular)
3. Prepare antibody cocktails with 100μl per well (6-well plate). Deliver antibody cocktails to 75x12mm (FACS) tubes or 96well plates. Store protected from light.
4. Prepare single cell suspensions of samples to be included in the analysis.
5. Collect cells by spinning at 800 rpm for 4 min and aspirate supernatant.
6. Resuspend in 100μl PBS.
7. Once again spin at 800 rpm for 4 min and aspirate supernatant.
8. Add 100μl of single cell suspension (105 – 106) to each well containing Ab cocktails and mix gently.
9. Incubate for 15 min in dark at RT.
10. Wash 1x with 1ml ice cold buffer and spin at 800 rpm for 4 min.
11. Remove supernatant and resuspend cells in 300-500μl in FACS tubes.
12. Keep tubes protected from light prior to analysis.
13. Analyze immediately following staining or fix w/ 4% PFA in PBS.
After the cells have been analyzed, sort them onto MEFs, Matrigel, or any matrix thereof in 10μm of y-27632 (ROCK inhibitor).
16
Closely follow/watch the cells everyday for 8-14 days. After this period, use a glass tool to manually dissect colonies for
expansion (see following IPS colony picking section for glass tool instructions and safety precautions).
MOUSE IPS METHODSJustin Ichida, doc. version 1.0 6-16-09
Derivation of MEFs and cell culture: MEFs were derived from E12.5 embryos hemizygous for the Oct4::GFP transgenic allele. Gonads and internal organs were removed before processing the embryos for MEF isolation. MEFs were grown in DMEM supplemented with 10% FBS and penicillin/streptomycin. Low passage (up to passage 3) MEFs were used for generation of iPS cells.
Retroviral production and infection: Moloney-based retroviral vectors (pMXs) expressing the murine complementary DNAs of Oct4, Sox2, c-Myc, and Klf4 were obtained from Addgene. These plasmids were transfected separately into individual populations of Plat-E packaging cells using Fugene 6, with 27µl of Fugene 6 and 9µg of DNA per 10cm dish of Plat-E cells. Viral supernatants were obtained 48- 72 hours post-transfection, filtered through a .22mm filter, diluted 1:1 in MEF growth media, and supplemented with polybrene at a final concentration of 5mg/ml. The supernatants for the four factors were mixed in an equimolar ratio, and media was used in place of a factor when it was omitted from the infection. MEFs were infected with two to three pools of viral supernatant during a 72-hour period. The first day that viral supernatant was termed “day 1 post-infection.”
The following protocol was adapted from Takahashi et al. Induction of pluripotent stem cells from fibroblast cultures. Nature protocols (2007) vol. 2 (12) pp. 3081-9.
Thawing and passage of Plat-E cells: Prepare 9ml of FM10 medium in a 15-ml tube. Remove a vial of frozen Plat-E stocks from the liquid nitrogen tank and put the vial in a 37°C water bath until most (but not all) cells are thawed. Aseptically transfer the cell suspension to the tube. Centrifuge at 180g for 5 min, and then discard the supernatant. Resuspend the cells with 10ml of FM10 medium, and transfer to a gelatin-coated 100-mm dish. Incubate the cells in a 37°C, 5% CO2 incubator. Replace the medium 24hrs later with new media supplemented with 1µg/ml of puromycin and 10µg/ml of blastcidin S. Continue to incubate the cells in a 37°C, 5% CO2 incubator until they are 80–90% confluent. Passage with 0.05% trypsin/0.53 mM EDTA, at 1:4–1:6 dilution to 100cm plates with antibiotics. Cells should become confluent within 2–3 d.
Retrovirus production: Passage cells with 0.05% trypsin/0.53 mM EDTA. Count the number of cells and adjust the concentration to 8x10⁵ cells per ml with FM10 medium. Seed cells at 8x10⁶ cells (10 ml) per 100cm culture dish, and incubate overnight.
The next day prepare for transfection into Plat-E cells: Transfer 0.3 ml of DMEM into a 1.5-ml tube. Deliver 27µl of Fugene 6 transfection reagent into the prepared tube, mix gently by finger tapping and incubate for 5 min at room temperature. Add 9µg of pMXs plasmid DNA (encoding Oct3/4, Sox2, Klf4 and c-Myc) drop-by-drop into the Fugene 6/DMEM-containing tube, mix gently by finger tapping and incubate for 15 min. Add the DNA/Fugene 6 complex dropwise into the Plat-E dish, and incubate overnight at 37°C, 5% CO2. The next day, aspirate the transfection reagent–containing medium, add 10ml of fresh FM10 medium, and return the cells to the incubator. Collect the medium from the Plat-E dish 48-72 hrs later by using a 10-ml sterile disposable syringe, filtering it through a 0.22µm pore size cellulose acetate filter, and transferring into a 15-ml tube.
17

Dilute 1:1 with fresh FM10 medium and supplement to 5µg/ml polybrene. The supernatants for the four factors were mixed in an equimolar ratio and MEFs were infected with two to three pools of viral supernatant during a 72-hour period. Media was replaced with mouse ES media supplemented with Lif.
Generation of iPS cellsGFP+ P0 colonies were picked manually and incubated in .25% trypsin (Gibco) for 20 minutes at room temperature before plating on a feeder layer in mES cell media. This process was repeated until passage 3, at which time colonies were trypsinized and passaged in bulk and maintained on feeders in mES cell media.
18
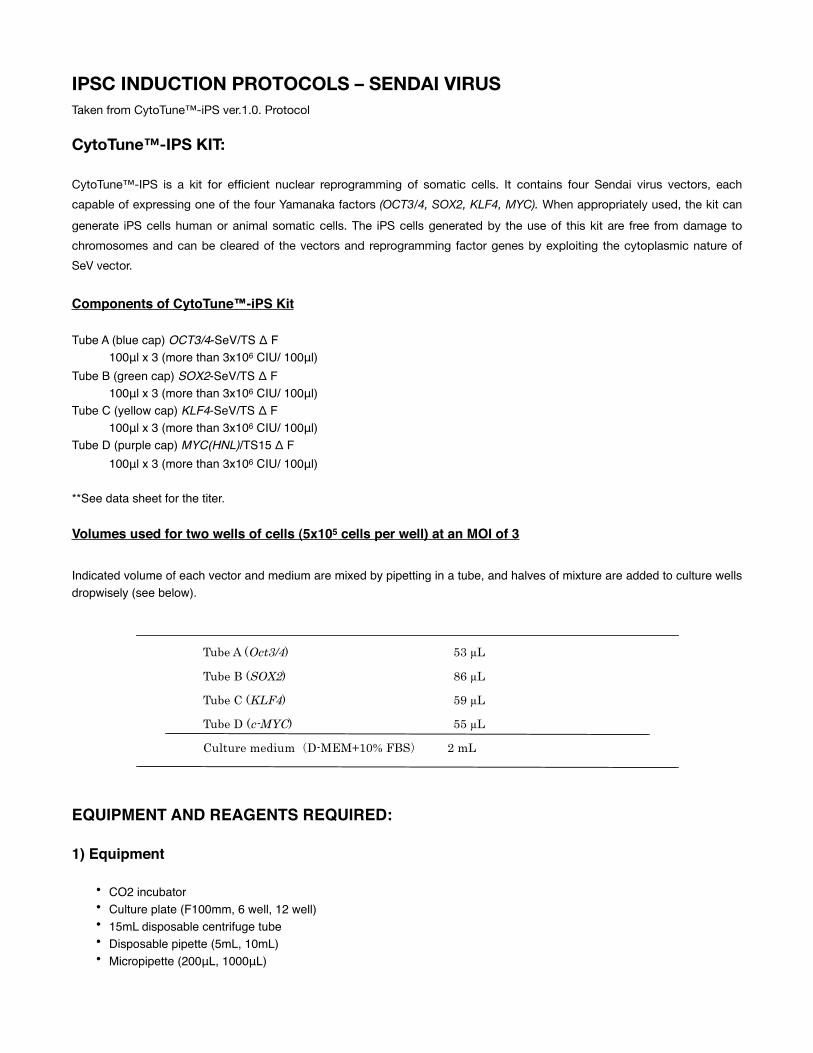
IPSC INDUCTION PROTOCOLS – SENDAI VIRUS Taken from CytoTune™-iPS ver.1.0. Protocol
CytoTune™-IPS KIT:
CytoTune™-IPS is a kit for efficient nuclear reprogramming of somatic cells. It contains four Sendai virus vectors, each
capable of expressing one of the four Yamanaka factors (OCT3/4, SOX2, KLF4, MYC). When appropriately used, the kit can
generate iPS cells human or animal somatic cells. The iPS cells generated by the use of this kit are free from damage to
chromosomes and can be cleared of the vectors and reprogramming factor genes by exploiting the cytoplasmic nature of
SeV vector.
Components of CytoTune™-iPS Kit
Tube A (blue cap) OCT3/4-SeV/TS Δ F# 100μl x 3 (more than 3x10⁶ CIU/ 100μl)Tube B (green cap) SOX2-SeV/TS Δ F# 100μl x 3 (more than 3x10⁶ CIU/ 100μl)Tube C (yellow cap) KLF4-SeV/TS Δ F# 100μl x 3 (more than 3x10⁶ CIU/ 100μl)Tube D (purple cap) MYC(HNL)/TS15 Δ F# 100μl x 3 (more than 3x10⁶ CIU/ 100μl)
**See data sheet for the titer.
Volumes used for two wells of cells (5x10⁵ cells per well) at an MOI of 3
Indicated volume of each vector and medium are mixed by pipetting in a tube, and halves of mixture are added to culture wells dropwisely (see below).
Datasheet
� � � � � � � � � � � � � � � � � CytoTune�-iPS� � Cat No. DV-0301
� � � � � � � � � � � � � � � � � � � � � �
Lot K0005
Tubes Lot no *Titer�CIU/mL� � �
Tube A (Oct3/4) A071101 5.7 � 107
Tube B (SOX2) B071101 3.5 � 107
Tube C (KLF4) C071101 5.1 � 107
Tube D (c-MYC) D071101 5.5 � 107
*Titer indicates the functional titer to LLCMK2 cells
� � � �
[Volumes used for two wells of cells (5�105 cells /well) at an MOI of 3
Indicated volume of each vector and medium are mixed by pipetting in a tube, and halves
of mixture are added to culture wells dropwisely�see the instruction manual�.
Tube A (Oct3/4) 53 !L
Tube B (SOX2)� 86 !L
Tube C (KLF4) 59 !L
Tube D (c-MYC) 55 !L
Culture medium�D-MEM+10% FBS� 2 mL
6 Ohkubo, Tsukuba Ibaraki 300-2611, Japan
DNAVEC Corporation
mail�[email protected]
URL�http://www.dnavec.co.jp
110201
EQUIPMENT AND REAGENTS REQUIRED:
1) Equipment !
• CO2 incubator#• Culture plate (F100mm, 6 well, 12 well)#• 15mL disposable centrifuge tube#• Disposable pipette (5mL, 10mL)#• Micropipette (200μL, 1000μL)#

• Microscope#• Transfer pipette for IVF (in vitro fertilization) and folder (recommend)#
2) Reagents and media
• D-MEM#• Basic fibroblast growth factor (bFgF): human recombinant#• ES medium (incl. 4ng/mL bFGF)#• ROCK inhibitor#• 0.1% gelatin solution#• Feeder cells (MEFs treated with mitomycine C)#• Dissociation solution for ES cells #• Freezing solution for ES cells #• 0.25% trypsin-EDTA solution#• Inactivated fetal bovine serum #• Penicillin-streptomycin solution# #• Phosphate buffered saline (PBS)#• Anti-Sendai virus antibodies#
PROCEDURES:
Procedure of iPS Cell Generation Using CytoTune™-iPS
1. Plate fibroblast cells in 2 wells of a 6-well plate so that there will be 5x10⁵ cells per well after step 2. Note: Use cells with as early passage number as possible since the passage number may affect the efficiency of reprogramming. Determine the growth rate of the target cell in advance
2. Culture fibroblast cells for 1-2 days making sure that the cells have well extended and adhered to the dish. 3. Take out a tube of CytoTune™-iPS from stock at -80° and partially thaw it by dipping the bottom of the tube in a 37°C
water bath for a few seconds. Take the tube out of the water bath, and keep it at RT until the content is completely thawed. Immediately spin the tube to collect the content and quickly move it on ice. Repeat this procedure one tube at a time until all necessary tubes have been thawed.
4. Place 2ml of 10% FBS/D-MEM and add the indicated volumes of contents of the four tubes labeled A through D (OCT3/4, SOX2, KLF4, c-MYC) as described in the data sheet into a 15ml centrifuge tube (this will produce a vector mixture for transduction at MOI=3). Mix the contents by pipetting up and down several times.
5. After 5 min, aspirate off the culture medium completely from the cells prepared in Step 2 and immediately add one half of the CytoTune-iPS-medium mixture gently to each of the two wells. Take caution not to disturb the cell layer. Swirl the plate so that the mixture covers the entire cell layer.
6. Place the plate into an incubator (37°C, 5% CO2). 7. The next day, replace the media with fresh 10% FBS/D-MEM (2ml per well)8. Continue incubation in the incubator for an additional 5 to 6 days, changing media every day with fresh 10% FBS/D-
MEM9. One day before the day of cell passage in Step 10, prepare feeder cells by inoculating MEF cells on gelatin-coated
plates* at 1~1.5x10⁶ cells per 100mm dish. Change the medium on the next day with fresh 10% FBS/D-MEM. Note: *Add 4ml of 0.1% gelatin (in water) per 100mm dish or 1 ml of the same per well (6 or 12 well plates), swirl to cover the entire surface with the solution, and let stand at 37°C for 30 min~overnight. Remove the gelatin solution immediately before use.
10. 6-7 days after gene transduction, remove the medium, wash the cells once with PBS, add 500μl per well of 0.05% trypsin (0.25% trypsin-EDTA solution diluted 5-fold with PBS), and let stand at room temperature. When cells have rounded up, add 10% FBS/D-MEM and collect cells by detaching them from the plate. It is important to keep the trypsin treatment as brief as possible so that it does not influence the efficiency of iPS cell generation. Chunks of cells
20

may remain in Step 11. 11. Count the cell number and inoculate the cells onto the feeder cells prepared in Step 9 at 5x10⁴ to 2x10⁵ cells per
100mm dish. Note: The remaining cells may be stored frozen and used as the positive control in the RT-PCR assay for the detection of SeV vector.
12. Return the culture plates to the incubator (37°C, 5% CO2).13. After 24 hours, change the medium with ES medium and transfer the plates to a CO2 incubator (37°C, 3% CO2). (If ES
medium without HEPES is to be used, incubation can be done in 5% CO2). Change the medium everyday with fresh preparation of the same ES medium.
14. One day before the day of colony passage in Step 15, prepare feeder cells by inoculating MEF cells at 1.7~2.5x10⁵ cells per well (6-well plate) or 5~9x10⁴ cells per well (12-well plate). The wells should be pre-coated with gelatin.
15. When the colonies have grown to an appropriate size for colony transfer (at least 20 days after gene transduction), transfer the colonies to the 6-well plates prepared in Step 14 using glass pipets for IVF under microscope (use 10μM ROCK inhibitor and ES medium).
16. Replace the 6-well plate to the incubator (37°C, 3% CO2 – if ES medium without HEPES is used, incubate plate in 5% CO2).
17. On the next day, change the medium with ES medium. Keep changing medium everyday with the same medium. 18. Passage cells 5~7 days after the colony transfer in Step 15 using conventional methods for ES/iPS cell cultures.
Preparation of SeV Vector-Free iPS Cells
The time needed to derive SeV vector-free colonies may vary depending on culture and passage conditions.
1. When passaging iPS cell colonies, prepare 2 plates, one for further passaging and the other for immunostaining. Perform immunostaining on one plate with anti-Sendai virus antibodies (see below).
2. If all colonies stain positive with anti-Sendai virus antibodies, perform cell cloning. 3. If any of the colonies stain negative, passage these negative colonies in the passage plate. Confirm absence of SeV
vector and transgenes in these colonies by RT-PCR (see below). 4. Repeat immunostaining with anti-Sendai virus antibodies on the cloned colonies.
Note: The rate of SeV vector-free colonies may increase if colonies are incubated for 5 days at 38~39°C and in 3% CO2 (5% CO2 if ES medium without HEPES is used) after more than 30 days post gene transduction.
Detection of Sendai Virus Vector (1)Immunohistostaining with anti-Sendai virus antibodies
1. Wash iPS cells cultured in a 12-well plate with PBS.2. Fix the cells at RT for 5 min in 1 ml Mildform 10N (WAKO). 3. Wash cells twice with PBS. 4. Add 500μl of anti-Sendai Virus antibodies (1/500 in 0.1% TritonX-100 PBS) and incubate at 37°C for 1 hour. 5. Wash three times with PBS. 6. Detect stained cells under fluorescence microscope.
Detection of Sendai Virus Vector (2)RT-PCR for the detection of SeV genome and transgenes
1. Extract RNA from iPS cells. Use the remaining cells from Step 10 above as the positive control. 2. Carry out reverse transcription (RT) reaction. For the detection of SeV vector, RT reaction is required because SeV
21

genome is RNA. 3. Use random primers. 4. Carry out PCR using the following parameters:
• Denaturation 95°C, 30 sec• Annealing 55°C, 30 sec• Elongation 72°C, 30 sec• 30-35 cycles
!"#$%&'()*+(,-./0123(."(#(45(#6#-.3'(6'$('$'12-.,7.-'3839((
+:;)*+(,-8<'-(3'23(=.-(27'(/'2'128."(.=(2-#"36'"'3(#"/(>'?(6'".<'(
2-#"36'"'( @.-A#-/( +'B'-3'(
,-./012(
38&'(
!"#$%&� ! ***C!!!C!C!!!C*C!!**!C( !!:C:!:*C!!CC:C*:*!!D( EFG(H,(
'!()* !*!!C!C!!!!!!*!:C:!:CCD( !:C*C*:CC::*!*C***C*C***!CC( IJKH,(
+,-&* !*!!C!C!!!!!!*!:C:!:CCD( *C*C*:CC*!CCC**C*:C*:*C!*( I4J(H,(
./01"234,5* :!!*:C!*:!C*!CC*::C:*CD( :**!*!:!*!C:**:CC!:C!:C!:C( IG4(H,(
'67* CC!:*!*:!CC:C!:!:*C!C*D( !**!C!*!!C!C:::!!C!C!:!:C:!:*D( KFK(H,(
D)-8<'-3( 1."2#8"8"6( >'?( 6'".<'( 3'L0'"1'39( )#8-8"6( 27'3'(,-8<'-3( A827( 2-#"36'"'( 3,'18=81( ,-8<'-3( #$$.A3( 3,'18=81(/'2'128."(.=(2-#"36'"'3(1#--8'/(H%(27'(>'?(B'12.-9( (
(
!
(
M?9(NO!((
NK( *'$$3(,''$(.==(#=2'-(6'"'(2-#"3/0128."9(!K( M"(3.<'(1#3'3P(2-#"3/01'/(1'$$3(2'"/(2.(-.0"/(0,(#"/(/'2#17(
=-.<(27'(,$#2'9(Q'1#03'(27'(,7'".<'"."(83(1#03'/(H%(#(7867($'B'$(.=(2-#"36'"'('R,-'338."(H%(>'?(B'12.-P(%.0(<#%(1."28"0'(A.-S8"6(."(27'3'(1'$$3('B'"(A7'"(,#-28#$(/'2#17<'"2(83(.H3'-B'/9(M"1-'#38"6(1'$$(/'"382%(.-(03'(.=(1.$$#6'";1.#2'/(,$#2'/(<#%(#$$'B8#2'(27'(,7'".<'"."9( ( (
(N4( :7'(8)>(1'$$3($..S(/8=='-'"28#28"69(!4( T827("#$!%&"'()*$+,-./!0-"P(%.0(<#%(.H2#8"(8)>(1'$$3(8"(#(
37.-2'-(,'-8./(.=(28<'(27#"(H%(.27'-(<'27./39(T'(
22

IPS COLONY PICKINGScott Noggle, doc. version 1.3 3-3-10
MICRO-DISSECTION METHOD FOR PICKING HESCS AND IPSC COLONIES:Scott Noggle, doc. version 1.5 2-7-10
Purpose: Used for initial colony picking of iPSCs and to maintain master stocks of HESCs and iPSCs.
Feeder cells: See accompanying protocol for generating MEF-feeder plates.
Tools: Glass tools or syringe needles can be used for micro-dissection of colonies for passaging. It is also possible to pick iPS colonies with a pipette tip or cell lifter. However, for fine control of dissection when initially isolating good areas of iPS colonies (or HESCs) from undesirable regions of the colony, glass tools are optimal. For glass tools, Pasteur pipettes are pulled hair thin. Fine glass needles with hooked ends are forged in two steps over a microburner assembled as described in Manipulating the Mouse Embyro1 as follows:1. While holding the two ends of a long Pasteur
pipette, place the thin end of the pipette at a distance of about half to two-thirds of the distance away from the tip into the orange part of the flame until the glass melts into a solid constriction.
2. In a single motion upon removing the pipette from the flame, pull on each end of the pipette gently and quickly to draw out a thin filament before the glass hardens. This is done without breaking the connection between the two ends of the pipet.
3. Beginning several inches above the flame and slowly moving the thin drawn part of the filament down towards the flame, pull a very fine filament as previously described. The two ends of the pipette should separate, this time forming a fine needle end on the tip of the pipette.
4. If the tip remained straight after the second pull, pass the fine end a few inches quickly over the top of the flame. The force of the rising heat will curl the tip of the needle into a hook. The hooked end should be thin enough for the micro-dissection of the colonies but thick enough to withstand some pressure during the dissection. Examples of the final product are shown in the picture above.
Glass tool safety precautions:1. Do not hold glass tool near the sharp (thinner) end - be very careful not to stick yourself with this end of the tool.2. In order to guide the tool, you can use your opposite hand to guide the thicker end of the tool.3. Be sure to make the appropriate number of tools - limit to one or two tools per cell line.4. Avoid manual dissection for multiple lines at a time. 5. Be sure to discard tools right after use in an appropriate glass tools waste receptacle.
23

Observation of cultures to be passaged: For iPS cell colony picking from the original induction, you must first identify HESC-like colonies from a mix of partially reprogrammed and transformed colonies. Some examples of good and bad iPS colonies are shown in the sections following this protocol. These protocols can also be used to passage master stocks of iPS cells or HESCs growing on feeders. In these instances, before passaging, examine the colonies under the microscope and choose colonies that are undifferentiated. Avoid colonies or parts of colonies that are showing signs of differentiation. Several types of differentiation can be morphologically identified in spontaneously differentiating cultures. Avoid the center of colonies that show a depression or “crater” appearance. Areas of colonies that have begun forming cystic structures should be avoided. Also avoid the edges of colonies that do not have a tight border between the feeder layer and the colony. In these areas, the HESCs/iPSCs have started to flatten, polarize and migrate into the feeder layer. Some differentiation on the borders of the colonies can be tolerated, as these cells can be left behind with the micro-dissection technique. In some cases, it may be necessary to dissect a colony that has begun to differentiate. The region of differentiation can be avoided selecting only the undifferentiated parts of the colony to dissect. Leave the differentiated regions untouched. Ideal colonies are comprised of small, round, and randomly organized cells with a high nuclear to cytoplasmic ratio that have not begun forming structures within the colony (examples are shown in panel A in the figure below).
Preparation for passaging: Prior to micro-dissection, medium is changed in the well to be passaged and on the feeders. The feeders are washed once and 2ml of fresh complete growth medium is placed on the new feeders on 35mm dishes. Care is taken to maintain temperature, pH and osmolarity of the media by working quickly. The feeders are kept in the incubator during the dissection. Alternatively, a humidified CO2/O2 mixed gas source and a warm plate are convenient to maintain an optimal environment while the cultures are out of the incubator. This is especially helpful after the colonies are transferred to the new feeders, as it is important to minimize handling of the dish. If the dishes are handled too much before the colonies have attached to the feeders, the chunks of HESCs will migrate to the center of the dish and attach too close together.
Passaging: Ideal colonies or parts of colonies are micro-dissected into chunks of about 100 cells using the glass hooks. The hook is used to gently pull apart pieces of the colony (see photo to right). This can also be accomplished by cutting a grid into the colony with the back of the hook and pulling the pieces away from the colony one at a time. It is easier to pull out one piece at a time, as large pieces are more difficult to cut into smaller pieces. The size of the piece should be large enough to survive the cutting and adhere to the feeder layer (see photo on next page). A piece too large will tend to form an embryoid body-like structure on the feeder layer as it takes too long for the entirety of a large colony to come into contact with the feeders. The resulting colony will have an area of differentiation in the center arising from the embryoid
24

body-like structure (see panel C in the figure above for an example). After micro-dissection, the cell chunks are swirled into the center of the dish and 20 to 50 chunks are transferred to the new feeder wells using 1ml micro-pipets. Pre-coat the micro-pipet tip with the medium so that the cells do not stick (a regular sterile pipet or Pasteur pipet can be used also). Transfer no more than 500μl of medium containing ROCK inhibitor (Y27632) to the new dish. In some cases, it may be necessary to transfer the entire well volume to the new feeder well or wells. Exchange medium 2.5 to 3ml/well. If possible, leave the dishes untouched on a warmed surface (preferably under O2/CO2 blood-gas mix) for 15-30 min to allow the chunks to begin attaching to the dish before moving to an incubator. Excessive handling of the new dish will cause the chunks to migrate to the center of the dish rather than remaining evenly distributed across the dish. Good spacing between the colonies will allow proper growth of the colonies.
Maintenance: Complete growth medium is exchanged on the growing colonies every day as the feeder layer can use up nutrients quickly. In the example photos BG01 cells are used. The cell cycle for this line is about 24-36 hours. The lines should culture for no more than 6 days to a week. The timing of passage is dependent upon the appearance of differentiation within the colonies—mainly from the center and edges of the colony (see figure above for examples of differentiation).
References:1. Hogan, B. Manipulating the mouse embryo: a laboratory manual (Cold Spring Harbor Laboratory Press, Plainview, N.Y., 1994).
25

EXAMPLES OF BAD IPS CELL COLONIES
These are examples of partially reprogrammed or transformed colonies. These can be recognized by lack of HESC morphological appearance (e.g. no bright borders between cells) or as small, phase-bright loosely adherent cells.
26

EXAMPLES OF GOOD IPS CELL COLONIES
These are examples of good iPS colonies in initial phases of induction. The top two photos are reasonably free of transformed cells (phase-bright, loosely adherent) and are composed of colonies with HESC morphology (e.g. bright borders between individual cells within the colony, large nuclei, large nucleus). The bottom two photos have good adherent colonies surrounded by transformed cells. It is possible to carefully clean the colony of the transformed cells before passaging the good colonies.
27

PASSAGING METHODS FOR HES AND IPS CELL LINES
THE EZPASSAGE TOOLDieter Egli, doc version 1.0 2-5-10
Purpose: Used to expand established and homogenous cultures and master stocks of HESCs or iPSCs.
Passaging: When colony density has reached confluence in the dish or become too numerous to manually passage, an alternate protocol is to use a serrated roller tool from Invitrogen to cut the colonies into small uniform sized pieces for passaging. To use the tool: 1. Exchange media 2. Use the to tool to roll over colonies several times in one direction (apply enough pressure so the entire roller blade
touches the plate and be sure to maintain uniform pressure during the rolling action)
3. Rotate the plate 90° and once again roll over the colonies several times4. Gently triterate the pieces with a pipette and plate onto fresh plates
Reusing tools: The tools can be cleaned by soaking in 70%ETOH for 1hr, then rinsing in sterile H2O. They are placed in a dry beaker and UV treated overnight.
Image from invitrogen.com
ENZYMATIC PASSAGING OF HES AND IPS CELLSScott Noggle (revised by Faizzan Ahmad), doc. Version 1.5 7-15-11
Purpose: For expansion of HESCs on Matrigel (or other matrix) coated plates in MEF-CM but can be modified for HESCs grown directly on MEFs.
MATERIALS AND PREPARATION:
Feeder cells for MEF-CM: See accompanying protocol for generating MEF-conditioned medium.
Matrix: Tissue culture plates are coated with Matrigel as described in the accompanying Matrigel plate coating protocol.
Medium: Growth medium is described in the section on Growth medium for HESCs and the section on generating Conditioned Medium. A stock of growth medium is stored at 4°C for no more than one week. Preheat only as much medium as is needed for ~ 20 to 40 min @37°C.
Enzyme: Dispase or Accutase/TrypLE (for single cell passaging) dissolved in growth medium (either at approximately 1mg/ml) and sterile filtered. We are currently buying Dispase from Stem Cell Technologies. Dilute these stocks 1:5 in DMEM or DMEM/F12.
TRANSFERRING HESCS:
Before passaging, examine the colonies under the microscope and look for any colonies that are differentiated. Spontaneously differentiating areas of the culture can be removed with a glass tool as described in the manual dissection protocol or aspirated using a pipette attached to a vacuum. Several types of differentiation can be morphologically identified in spontaneously differentiating cultures. Look for the center of colonies that show a depression or “crater” appearance. Areas of colonies that have begun forming cystic structures in the center of the colony should be removed. Also avoid the edges of colonies that do not have a tight border between the feeder layer and the colony. In these areas, the HESCs/iPSCs have started to flatten, polarize and migrate can also be removed. However, some differentiation on the borders of the colonies can be tolerated, as these cells will detach during the washing steps (see below). Ideal colonies are comprised of small, round, and randomly organized cells with a high nuclear to cytoplasmic ratio that have not begun forming structures within the colony (examples are similar to those shown in the manual dissection protocol).
Passaging (w/ Dispase):
1. Aspirate out growth medium from wells.
2. Add 1ml Dispase to each well.
3. Incubate at 37°C for about 10 min. Check the progress of the matrix digestion, beginning at about 4 min. The colony borders will begin to peel away from the plate, while the center will remain attached.
4. Gently wash the Dispase off of the plate with growth medium 2 times. The colonies should remain attached to the plate.
5. If the colonies have detached after the Dispase incubation, transfer all of the colonies and Dispase solution to a conical
29

tube and centrifuge at 800 rpm for 4 min.
6. Wash the colonies with growth medium. They should get two to three washes total – either on the plate or with centrifugation. Note: If the colonies remained attached after washing, harvest the colonies with a cell lifter (Costar 3008 – NOTE: DO NOT USE THE SWIVEL-HEAD CELL SCRAPER (3010)).
7. Transfer all of the colonies and growth medium to a conical tube and spin at 800 rpm for 4 min to pellet the colonies.
8. Using the MEF-CM, resuspend the colonies using a p1000 pipette tip in about 500-700μl of medium.
9. Triturate the colonies to clumps with an average size of about 100 cells using the p1000 tip.
10. Plate a proportion of the clumps (I currently use a 1:10 split ratio – but you will need to adjust this for the confluency of the starting population).
If possible, leave the dishes untouched on a warmed surface for 10 min. to allow the chunks to begin attaching to the dish before moving to an incubator. Excessive handling of the new dish will cause the chunks to migrate to the center of the dish rather than remaining evenly distributed across the dish. Good spacing between the colonies will allow proper growth of the colonies.
Single Cell Dissociation/ Passaging (w/ Accutase/ TrypLE):
1. Aspirate out growth medium from wells. 2. Add 1ml Dispase to each well. 3. Incubate at 37°C for about 5 min. 4. Take out of the incubator and aspirate the Dispase. 5. Wash 2 times with 2ml HuESM and aspirate.6. Add 1ml Accutase (or TrypLE) to each well and incubate at 37°C for 5 min. 7. Add 2ml HuESM to each well and triturate.8. Collect cells and medium in a 15ml tube and spin at 800rpm for 4 min.9. Resuspend cells in medium and y-27632 or Thiazovivin.
Maintenance: Complete conditioned growth medium is exchanged on the growing colonies every day from the MEF plates. The lines should be cultured for no more than 6 days before passage. The timing of passage is dependent upon the appearance of differentiation within the colonies—mainly from the center or outer edges of the colony.
Cryopreservation and recovery: See accompanying protocol for cryopreservation in tubes or straws.
30

This sequence shows (from top left to bottom right) colonies before dispase treatment, after treatment, during scraping, after scraping and after trituration in a 15ml conical tube.
31

FEEDER-FREE PROTOCOLS
The well-established techniques to culture human pluripotent stem cells, such as using MEF feeder cells or feeder-conditioned medium, are effective yet limiting. These methods not only make it difficult to maintain the culture of undifferentiated cells due to undefined conditions, but they also hinder the development of clinical applications. Therefore, we have begun using Serum-Free mediums such as StemPro and TesR that allow for the proliferation and culture of hPSCs without the need for feeders or animal-derived components.
STEMPRO© Adapted from the Invitrogen StemPro© hESC SFM Protocol, 7-12-11 One StemPro© hESC SFM kit (cat. no. A10007-01) contains:
DESCRIPTION CAT. NO. SIZE STORAGE SHELF LIFE
DMEM/F-12 with GlutaMAX© 10565-018 500ml 2 to 8 °C (protect from light) 12 months
StemPro© hESC Supplement A10006-01 10ml -5 to -20 °C (in the dark) 12 months
PBS Bovine Serum Albumin 25% (BSA) A10008-01 40ml 2 to 8 °C (protect from light) 12 months
STORAGE AND HANDLING:
• Supplement is supplied as a frozen sample. Thaw supplement prior to use, re-freeze in desired volumes, and store them immediately at -20°C. See Media Preparation.
• Avoid multiple freeze thaw cycles of supplement. • Thawed StemPro© hESC SFM Growth Supplement must be stored at 2 to 8°C (Stable up to 1 week) • StemPro© hESC SFM complete medium is stable for up to 7 days when stored at 2 to 8°C in the dark. Add 2-
Mercaptoethanol during storage. See Media Preparation.
ADDITIONAL REAGENTS REQUIRED (NOT SUPPLIED IN KIT):
PRODUCT SIZE CATALOG NUMBER
FGF-basic (10 μg/ ml) 50μg PHG0026
2-Mercaptoethanol 50ml 21985
Collagenase Type IV 1g 17104
Geltrex™ 5ml 12760
DPBS 500ml 14190
To prepare reagents: • FGF-basic: prepare 10μg/ml FGF-basic in DMEM/F-12 with 0.1% BSA; aliquot 80μl per tube and freeze down at
-20°C• Collagenase: Dissolve 10mg/ml collagenase IV in DMEM/F-12. Filter to sterilize and freeze in aliquots. • Thaw the Geltrex™ bottle at 2 to 8°C and prepare 1ml aliquots of Geltrex™ in 50ml conical tubes. Store tubes at
-20°C.

COATING PLATES WITH GELTREX™:
1. Thaw 1 tube of Geltrex™ (1 ml, aliquoted as above) at 2 to 8°C2. Remove DMEM/F-12 from 2 to 8°C storage and add 29ml of cold DMEM/F-12 to the 1ml of Geltrex™. Mix gently. 3. Cover the whole surface of each culture plate with Geltrex™ solution (1ml for a 35-mm dish, 1.5ml for a 60-mm dish). 4. Seal each dish with parafilm to prevent drying, and incubate for 1 hour at 37°C. 5. Transfer each dish to a laminar flow hood and allow it to equilibrate to RT (about 1 hour).6. Store the Geltrex™-treated dish at to 2 to 8°C for up to 1 week. 7. Before plating cells, tip the plate slightly and aspirate the Geltrex™ solution. Immediately plate cells in pre-
equilibrated complete medium.
MEDIA PREPARATION:
Wash Medium: Add BSA 25% at a final concentration of 0.1% to DMEM/F-12.
Complete Medium: Thaw supplement in 37°C water bath (minimize dwell time), and prepare according to the table:
STEMPRO® hESC SFM COMPLETE MEDIUM
FINAL CON. FOR 500ML FOR 100ML
DMEM/F-12 + GlutaMAX™ (1X)
1X 454ml 90.8ml
StemPro® hESC SFM Growth Supplement
(50X)
1X 10ml 2ml
BSA 25% 1.8% 36ml 7.2ml
FGF-basic (10μg/ml) 8ng/ml 400μl 80μl
2-Mercaptoethanol
(55mM)
0.1mM 909μl 182μl
Media Storage: Complete medium may be stored at 2 to 8°C in the dark for up to 7 days. Add 2-Mercaptoethanol daily during storage, at volumes listed in the table above.
PASSAGING USING COLLAGENASE:
1. Warm appropriate amount of 10-mg/ml Collagenase IV solution, complete medium, and wash medium to 37°C in a water bath. Minimize dwell time.
2. Set up hESC plate on a dissecting microscope in a bio-safety cabinet or laminar flow to comfortably observe colonies. 3. Cut out and remove any overtly differentiated colonies with a 21½-gauge needle. 4. Aspirate the medium and gently add 1-2ml of collagenase.5. Leave for 3 min to dislodge cell colonies from substrate.6. Remove collagenase, rinse with DPBS, and then add 3ml of wash medium.7. Gently scrape dish using a sterile 1000-μl pipette tip.8. Gently transfer clumps using a 5ml pipette and place into a 15ml tube.9. Wash plate with 3ml of wash medium and add to tube.10. Spin cells at 200xg for 2 min at RT (increase time?).11. Gently aspirate media and flick tube to loosen cells. 12. Gently resuspend the cells in pre-equilibrated complete medium using a 1ml or 5ml serological pipette. 13. Remove a Geltrex™-coated plate from 2 to 8°C and tip slightly to aspirate the Geltrex™ solution. Immediately plate
the cells. Do not allow the surface to dry out before plating. 14. Mix plates gently to evenly spread out clumps and place the plate into an incubator set at 37°C with 5% CO2 in air.
33

15. Gently change media the next day to remove excess cells and provide fresh nutrients, and every day thereafter. 16. Observe cells every day and passage by the above protocol whenever required (approximately every 5 to 7 days).
TesR™
We use mTesR™1 kits from StemCell Technologies (Cat. #05850). One kit contains:
COMPONENT COMPONENTCAT. NO.
VOLUME STORAGE TEMP
mTesR™1 Basal Medium #05851 400ml 4°C
mTesR™1 5X Supplement #05862 100ml -20 °C
**When getting the TesR components out of their respected refrigerators, take care to NOT take the Custom Basal Medium or Custom 5X Supplement.
PREPARATION OF COMPLETE TesR:
1. Thaw mTesR 5X supplement at RT (15 - 25°C) or overnight at 2-8°C.2. Aseptically add the entire 100ml of thawed 5X supplement to 400ml basal medium for a total volume of 500ml. Mix well.
Complete mTesR is stable when stored at 2-8°C for up to 2 weeks or is stable when frozen at -20°C for up to 6 months. Thaw frozen medium at RT (15 - 25°C) or overnight at 2-8°C.
TO USE TesR:
Combine:
• 250μl Substrate • 25ml Complete mTesR• 5ml Pen Strep (Optional)
Add to 4-6 well plates (1ml per well).
34

FREEZING IPS CELLSFaizzan Ahmad, doc. version 1.3 3-3-10
We currently freeze iPS lines using standard slow cooling in the presence of 10% DMSO. However, there are some modifications to the traditional procedure that improve viability of the iPS cells. If you are having difficulty with viability, an alternate protocol is included for vitrification of colonies. We freeze one confluent well of a 6-well plate into 3 vials at early passages. This can be increased at later passages when iPS cell cultures have stabilized.
MATERIALS:• DMSO [Sigma cat. D2650] - IMPORTANT NOT TO LET STOCKS GET OLD• Growth Medium (see section on Growth medium for HESCs)• FBS• Cryovials• Nalgene Cryo 1oC Freezing container
FREEZING MEDIA: • 50% Growth medium (e.g. HUESM)• 40% FBS• 10% DMSO
# Note: Prepare all fresh, sterile filter, and maintain on ice while working.
For thawing, prepare MEF coated plates according to MEF plating protocol. (6-well plates)
FREEZING PROTOCOL:1. Chill all solutions and tubes on ice and place Nalgene Cryo container at 4oC to begin cooling.2. Passage cells using either the EZpassage tool or by enzymatic passaging (Trypsin or Collagenase)3. Pellet and resuspend clumps in 1ml (per well of a 6-well plate) of cold Freezing media.4. Transfer to cryotubes on ice.5. Transfer to Nalgene Cryo container at -80°C6. Freeze overnight then transfer to LN2.
THAWING PROTOCOL:5. On the day prior to thawing, plate MEFs onto 6-well plates as described in the MEF plating protocol.6. Warm growth media at room temperature before starting the thaw.7. Remove vials from LN2.8. Thaw quickly in a 37°C water bath until only a small ice pellet remains.9. add 1.5ml of growth media slowly to the cryovial to dilute the cryoprotectant.10. Transfer the 2ml of cells and growth media from the cryovial to a 15ml conical tube.11. Add growth media to 10ml.12. spin at 800 for 5-7 min.13. resuspend in 2ml of growth media (with bFGF)14. plate onto 1 well of a 6-well plate.
35

ALTERNATE PROTOCOL: FREEZING BY VITRIFICATION IN CRYOVIALSScott Noggle, doc. Version 1.2 1-30-07
We have had difficulty cryopreserving RUES1 hES cells using traditional means of freezing hES cells. Survival is typically less than 1%. To improve recovery, we have optimized a protocol based on vitrification (Richards et al., 2004). This protocol uses cryovials instead of straws as originally described. This allows for higher through-put and faster processing times during the procedure. We have typically seen 40-50% recovery using this protocol. (The photo below is RUES2 on the day after thawing.)
MATERIALS:
1. Ethylene glycol [Sigma cat E9129]2. DMSO [Sigma cat. D2650]3. Growth Medium (see section on Growth
Medium for HESCs)4. Sucrose [Fisher cat S5-500]5. 1M HEPES solution [Invitrogen, cat
15630-080]6. Cryovials7. Liquid nitrogen in an ice bucket8. Square floating microtube rack [Nalgene
5974-0404]
PREPARE MEDIA:
HM (Growth Medium with 20mM HEPES):• 80% Growth medium (e.g. HUESM)• 20mM HEPES
HM+Sucrose:• 3.42g Sucrose in 10ml HM
VS2:• 30% HM• 30% HM+Sucrose• 20% ethylene glycol• 20% DMSO
VS3:• 40% HM+Sucrose• 30% ethylene glycol• 30% DMSO
WS3:• Growth medium +1M Sucrose
Note: Prepare all fresh, sterile filter, and maintain on ice while working.

FREEZING PROTOCOL:
Note: Work quickly. The HESC cannot be exposed to the cryoprotectants for very long or they will differentiate upon thawing. Viability may also be reduced if timing is not closely controlled. Steps 4-11 must be timed accurately.
1. Harvest HESCs in clumps by manual dissection or collagenase/dispase treatment. This protocol can also be used on collagenase/dispase-harvested HESC grown on Matrigel or MEFs.2. Wash clumps well to remove collagenase/dispase if necessary.3. Resuspend clumps into HM in about 0.5ml (depending on number of clumps). They can be kept at room temp in HM for up to 20min. Prolonged incubation will result in clumping and reduced attachment after thawing. 4. Transfer 40μl of the clumps into a sterile cryovial on ice in the microtube rack. Process 5 vials at a time. 5. Add 40μl of VS2 and mix by gentle pipetting let sit a 10-20 seconds6. Add 160μl of VS3 and mix by gentle pipetting. Steps 5-6 should be completed in no more than 1 min. Handle only as many tubes as can be processed in this amount of time. Remember that handling and capping the tubes will take time.7. Submerge the tubes quickly in liquid nitrogen and swirl while freezing. The frozen solution should have a pink glass-like appearance, while a thin layer at the top might be opaque. Be sure the caps are tightened and transfer vials to liquid nitrogen storage boxes. It is important to do this quickly to prevent the small solution volume from thawing. I usually place a storage box in 1-2 inches of LN2 in a large rectangular ice bucket while I am processing and transferring the tubes.
THAWING PROTOCOL:
Thawing is performed in the tubes and all solutions must be prepared in advance. Steps 1-3 must be performed quickly so that the cells are not exposed to the high concentration of cryoprotectants for too long. The incubation times in steps 4-7 remove the sucrose slowly and prevent osmotic shock and lysis of the cells.
1. Remove a tube from liquid nitrogen storage and quickly submerge bottom of tube in warm sterile water in a beaker. 2. Quickly wipe with 70%ETOH-soaked kim-wipe.3. Immediately add 800μl of cold WS3 (growth medium + sucrose), mix gently by stirring with the pipette tip and let sit for 30 seconds.4. Add 1ml of growth medium, mix as above, let sit for 2min.5. Transfer to 15ml conical tube.6. Rinse cryotube 2 times with 1ml each of growth medium and add to 15ml tube, mixing gently, and let sit for 1min.7. Add 6ml growth medium slowly dropwise to cells over about 2 min.8. Spin 1000/4min9. Resuspend gently in 1ml of growth medium with p1000.11. Using a p1000 to transfer to a well of a 6-well plate with MEFs in growth medium. I have also thawed directly onto Matrigel with success. The colonies should recover and show signs of growth within a week. Change medium daily.
37
KARYOTYPINGScott Noggle, doc. version 1.3 7-15-11
We currently send out iPS cultures to a commercial service for karyotyping (Cell Line Genetics). However, depending on your access to in house services, you may need to provide fixed cells for analysis. This protocol was communicated to me by Maya Mitilipova, who used it to generate samples of BG01 and BG02 for karyotype analysis by G-banding. I have used it to generate samples of RUES1 and RUES2 for karyotype analysis by the cytogenetics service at Sloan Kettering. Alternatively, some services like to have cell actively growing. Check with your service to be sure they are comfortable and have experience handling human ES cells or iPSCs.
Note: Karyotyping may soon be done in house using the Nanostring technology at NYSCF, simplifying the process by eliminating the need to send cultures away.
PROTOCOL:
1. Feed the cells the day before karyotyping2. Add colcemid for two hours (10μg/ml stock), 20μl per 1.5ml of medium.3. Collect the supernatant into 15ml conical tubes and trypsinize cells, break into single cells and collect into the same tubes.4. Centrifuge cells at 1000 rpm5. Add about 2ml warm KCL (0.56% or 0.075M) and incubate at 37 for 20 min6. Add 6-8 drops of fresh 3:1 (methanol:acetic acid) fixative and incubate for additional 15 min at room temp.7. Centrifuge for 8min at 1000 rpm8. Remove supernatant and add 2ml of 3:1 fixative and incubate at RT for 10 min9. Repeat step 710. Remove supernatant and add 2:1 fixative and refrigerate overnight at 4°C11. Next morning change fixative and drop slides to check for proportion of metaphase spreads12. Store at -20°C13. Send off for G-banding.
PROCEDURE FOR SHIPPING CELLS FOR KARYOTYPE:Adapted from the Cell Line Genetics procedure (www.clgenetics.com)
Preparing Culture for Mailing
1. Passage cells to a T25 culture flask 2. Seed the cells dense enough so that under a microscope the culture appears to be “peppered” with cells/ cell clusters
Note: If growing cells on a feeder layer, make sure the feeder layer is fresh3. Feed cells as usual. The culture is ready to send when the colonies are readily visible by eye and the culture appears
to be “peppered” with pinpoint size colonies 4. The cultures must be in log phase when you mail them
Mailing Instructions
1. Fill the culture flask with complete media, tighten the cap, and seal with parafilm

2. Place 25ml complete media in a T25 flask or a 50ml centrifuge tube, and seal with parafilm3. Place both the flask and the extra media in a sealed plastic bag and wrap the bag in bubble wrap4. Complete a test requisition form for EACH cell line you are sending for analysis 5. Place the test requisition form, culture flask, and 25ml of complete media in a padded mailing container or box6. Ship at ROOM TEMPERATURE (do NOT ship on ice packs or cold packs)7. Call the Cell Line Genetics laboratory when you are ready to ship the package8. Ship the box to Cell Line Genetics by FedEx or other next-day delivery service
Test Requisition Form: http://www.clgenetics.com/docs/gallery/downloads/General-Requisition-Form.pdf
Mailing Address
Attention: Julie Johnson Cell Line GeneticsSuite 254510 Charmany DriveMadison, WI 53719
Contact Information
Julie Johnson, MSDirector of Laboratory Operations Lab Phone: (608) 441-8163FAX: (608) 441-8162Email: [email protected]
Lorraine Meisner, PHD, ACMGChief Scientific Officer Office: (608) 441-8161
39
TERATOMA ASSAYSScott Noggle, Taken from chapter in Human Embryonic Stem Cells; The Practical Handbook. 9-28-07
The ability for hES cells to generate teratomas (Keller G, 2005; Spagnoli FM and AH, 2006) in immuno-compromised mice is used as a diagnostic criteria for bona fide embryonic stem cells. In this in vivo assay, hES cells are engrafted into immuno-compromised adult mice in various tissues to generate teratomas. The resulting tumors are routinely analyzed by histology for the various derivatives of the three primary germ layers. With the exception of the host vasculature within the tumor, the teratomas are predominantly derived from the hES graft (Gertow et al., 2004). In the case of the vasculature, it was noted that both human graft-derived cells and host derived mouse cells can contribute to the vessel structures. Frequently, other differentiated and organized tissue can be found in the tumors. This can include, for example, neural tissue and retinal pigmented epithelium, muscle, cartilage, bone, and epithelial cells of the endoderm and ectoderm. However, many of these tissues may be immature and definitive identification of the mature tissue can be difficult. The assistance of a trained pathologist in evaluating the tissues is highly recommended.
Teratoma can be generated at various sites in adult SCID mice by subcutaneous, intraperitoneal or intramuscular injection, implantation under the kidney capsule or beneath the testis capsule (Pera et al., 2003; Przyborski, 2005). As the site of implantation may also influence the growth and differentiation of the teratoma (Przyborski, 2005; Cooke et al., 2006), it is recommended that several sites be tested to access the developmental potential of the hES cells. The strain of SCID mice may also make a difference in the success of engraftment (Przyborski, 2005). NOD-SCID mice are probably the best recipients, followed by the SCID-beige strain. Two protocols for implantation of hES cells into immuno-compromised mice are provided below. The protocols for subcutaneous, intraperitoneal, and intramuscular injection are similar and have the advantage of being technically simple to perform and do not require surgical manipulation of the mice. Alternative protocols for teratoma formation can be found in: Sullivan et al. Human Embryonic Stem Cells: The Practical Handbook - Page 123. (2007) pp. 404.
PROCEDURES FOR ENGRAFTMENT OF HES CELLS IN SCID MICE:
1. hES cells are harvested as for passaging as described in the procedures for preparing cells for microinjection or aggregation with approximately 100-200 cells per clump. The hES cells are suspended in a small volume of media (100μl per injection), mixed with an equal volume of thawed Matrigel and transferred to cold cryotubes. The mixture is held on ice until loaded into the syringe just before injecting. 2. The hES cells are loaded into syringes fitted with a large gage needle. Load the cells into the syringe by drawing in a small amount of media followed by the hES cell suspension before attaching the needle.3. The suspension is injected at subcutaneous, intraperitoneal or intramuscular sites:# - For subcutaneous injection, target the needle beneath the skin on the rear flank.# - For intraperitoneal injections, target the abdomen.# - For intramuscular injection, penetrate the muscle of a single rear leg to minimize discomfort and alteration of the # mobility of the mouse.4. Monitor the mice and the site of injection weekly for 6-22 weeks. The mice should be weighed weekly and watched for signs of infection during the incubation period.5. Teratomas can be recovered by dissection with surrounding tissue and usually arise between 6-8 weeks after grafting. They are fixed in formalin and sent for histological examination by a pathology service. Alternatively, they can be embedded for cryosectioning and processed for immunohistochemical detection of germ layer markers.

EMBRYOID BODY ASSAYSScott Noggle, doc. version 1.1 9-28-07
Embryoid bodies are formed by aggregating or placing clumps of HESCs in suspension culture such that they differentiate into the three primary germ layers.
GENERAL PROTOCOL:1. Dispase treat cells for 20 min until colonies are released from Matrix, whether on MEFs or MG. 2. Rinse colonies at least 2 times in media to remove dispase. Try not to break up colonies - they must remain in large
chunks.3. Plate cell clumps on low-attachment 6-well plates (Costar - cat. #3471). Initial plating media can be MEF-CM or HUESM +
ROCK inhibitor (Y27632) (approx. 1-2 days), then changed to serum containing media or specialty media. # # Note: Cell clumps can also be plated on bacterial dishes as a group or individually transferred to 96-well ! ! non-tissue culture treated V-bottom plates. If EBs attach to the bacterial dishes, the dishes can be coated in ! ! agarose as follows:
1. Make a 1% stock of agarose in PBS.2. Autoclave to sterilize3. While hot, pipette 10ml onto a bacterial dish to cover the bottom of the dish, then immediately
aspirate as much of the agarose as possible to leave a thin coating on the dish. 4. Allow agarose to set up for 5-10 min at room temperature.5. Rinse once in media6. Plate EBs in media
4. Culture for desired number of days. Change media every 2-4 days depending on the density of the EBs in the dish. Media changes in bulk culture are performed as follows:
1. Using a 25ml pipette, transfer EBs to a 50ml conical tube.2. Allow EBs to settle by gravity (5-10min).3. Remove all but 5ml of media, being sure not to aspirate any EBs.4. Add fresh media and transfer to a bacterial dish (preferably agarose coated). It is not necessary to change
dishes at every media change - usually every other media change.

IMMUNOFLUORESCENT PROCEDURES & MARKERSThese general protocols can be used for cells in culture on Matek coverslip plates, clear-bottom dishes for imaging or on mouse embryos and chimeras. If doing stains on embryos, filter the solutions to prevent particulates from sticking to the embryos. This will result in cleaner images. Embryos can be stained by transferring the embryos from solution to solution in 4-well or 24-well plates using a mouth pipetting apparatus. It is important to transfer only small volumes or rinse the embryo into the next solution. For the final step, embryos can be plated on Matek coverslips in the absence of protein to allow them to stick to the plate. This will prevent some migration of the embryos around the dish while imaging.
GENERAL PROTOCOL:1. Wash plates once in 1X PBS.2. Fix in about 2ml of 4% PFA for 20 min at RT.3. Wash two times in 1X PBS. The dishes can be stored at 4°C if sealed with parafilm.4. Block with 3% normal serum (species dictated by host of secondary antibody, usually Donkey or Goat for Alexa-
conjugated secondaries) with 0.1% Triton-X in 1X PBS (without Ca/Mg) for 30 min at RT.5. Remove Block and Add primary antibodies in Block.6. Incubate at 4°C overnight.7. Wash three times for at least 30 min each wash in PBST (PBS with 0.1% Tween-20) at RT. Washes can go overnight.8. Add secondary diluted in Block.9. Incubate at RT for 30 min or overnight at 4°C.10. Wash twice in PBST for 30 min each wash.11. If counterstaining with DRAQ5 (or other nuclear counterstain), add in PBS or PBST. DRAQ5 is diluted at 1:5,000 to
1:10,000.12. Wash twice in PBST and leave in PBST. They can be stored at 4°C sealed with parafilm or imaged. If photobleaching is
a problem, the PBST can be removed and a drop of Vectashield mounting medium added. A coverslip can be placed on top to prevent evaporation.
MARKER ANTIBODIES:See chart below for pluripotency antibodies and the most commonly used antibodies for each germ layer. For other antibodies and a more extensive list, see the NYSCF antibody masterlist.
VENDOR CAT. NO. ISOTYPE DILUTION OTHER CONDITIONS
Pluripotency:
Oct3 BD Transduction Laboratories
611203 Mouse IgG 1:500 0.1%Triton in Block
Oct4 StemGent 09-0023 Rabbit IgG 1:1000 0.1%Triton in Block
Nanog R&D Systems AF1997 Goat IgG 1:500 0.1%Triton in Block
Sox2 StemGent 09-0024 Rabbit IgG 1:200 0.1%Triton in Block
SSEA4 R&D Systems MAB1435 Mouse IgG 1:500 no Triton
SSEA3 R&D Systems MAB1434 Rat IgM 1:500 no Triton

VENDOR CAT. NO. ISOTYPE DILUTION OTHER CONDITIONS
Ectoderm:
beta III Tubulin (Tuj1) R&D Systems MAB1195 Mouse, IgG 1:500 0.1% Triton
NFH Millipore (Chemicon) AB5539 Chicken poly 1:500 0.1% Triton
Mesoderm:
Muscle Actin (MF20) DSHB MF20 Mouse, IgG 1:500 0.1% Triton
Endoderm:
AFP DAKO A0502 Rabbit poly 1:500 0.1% Triton
Secondary Antibodies are from Molecular Probes and are conjugated to Alexa fluorophores. We use Alexa 488 (Green), Alexa 555 (orange-red), and Alexa 647 (far red). These match the best with our confocal using Multitrack settings.
Nuclear counterstains available for confocal work:
NAME COLOR DILUTION VENDOR CAT. NO.
DRAQ5 Far Red 1:5,000 to 1:10,000 Biostatus DR50050
Nuclear counterstains available for florescence work:
NAME COLOR DILUTION VENDOR CAT. NO.
Hoechst UV 1:1,000 to 1:2,000 Sigma B 2261
43

REAL-TIME RT-PCR PROTOCOLS & MARKERSScott Noggle, doc. version 1.2 2-7-10
General experimental design: Cells are harvested from duplicate or triplicate samples. Total RNA was isolated using RNAeasy kit (QIAGEN, Cat. No. 74104). 1μg RNA is used for cDNA synthesis with SuperScript III First-Strand system (Invitrogen, Cat. No. 18080-051) and Oligo (dT) primers and the resulting cDNA is diluted to the final volume of 200μl. 1μl of the cDNA dilution and 500nM of forward and reverse primers are used for each 10μl PCR reaction. Quantitative real-time PCR is performed using the LightCycler SYBR Green Master kit (Roche, Cat. No. 04707516001) and Mx3000p QPCR system (Stratagene).
The primer sequences for endogenous and transgene versions of the reprogramming factors are listed in the following table. These are used to check for silencing of the retroviral transgenes in iPS lines.
GENE FORWARD PRIMER 5’-3’ REVERSE PRIMER 5’-3’
Oct 4 (endogenous) CCCCAGGGCCCCATTTTGGTACC GGCACAAACTCCAGGTTTTC
Sox2 (endogenous) ACACTGCCCCTCTCACACAT GGGTTTTCTCCATGCTGTTTCT
Klf4 (endogenous) ACCCACACAGGTGAGAAACCTT GTTGGGAACTTGACCATGATTG
C-Myc (endogenous) AGCAGAGGAGCAAAAGCTCATT CCAAAGTCCAATTTGAGGCAGT
Oct4 (transgene) CCCCAGGGCCCCATTTTGGTACC AACCTACAGGTGGGGTCTTTCA
Sox2 (transgene) ACACTGCCCCTCTCACACAT AACCTACAGGTGGGGTCTTTCA
Klf4 (transgene) GACCACCTCGCCTTACACAT AACCTACAGGTGGGGTCTTTCA
C-Myc (transgene) AGCAGAGGAGCAAAAGCTCATT AACCTACAGGTGGGGTCTTTCA
B2M TAGCTGTGCTCGGGCTACT TCTCTGCTGGATGACGCG
These primer sequences are used for pluripotency markers and germ layer representation in embryoid bodies:
MARKER FORWARD PRIMER 5’-3’ REVERSE PRIMER 5’-3’ SIZE CROSSREACT WITH MOUSE?
Pluripotency:Oct4 CAAGCTCCTGAAGCAGAAGAGGAT CTCACTCGGTTCTCGATACTGGTT 275 F=Y
R=N
Nanog CCGGTCAAGAAACAGAAGACCAGA CCATTGCTATTCTTCGGCCAGTTG 214 F=N
R=N
Sox2 (Scott-microarr.)
TCAGGAGTTGTCAAGGCAGAGAAG GCCGCCGCCGATGATTGTTATTAT 172 F=Y
R=NEctoderm:
Cytokeratin (Melton)
AGGAAATCATCTCAGGAGGAAGGGC AAAGCACAGATCTTCGGGAGCTACC 782 F=N
R=N

MARKER FORWARD PRIMER 5’-3’ REVERSE PRIMER 5’-3’ SIZE CROSSREACT WITH MOUSE?
Sox1 GAGATTCATCTCAGGATTGAGATTCTA GGCCTACTGTAATCTTTTCTCCACT 94 F=N
R=N
NFH (Melton) TGAACACAGACGCTATGCGCTCAG CACCTTTATGTGAGTGGACACAGAG 397 F=N
R=NMesoderm:
Brachyury CACCTGCAAATCCTCATCCTCAGT TGTCATGGGATTGCAGCATGGA 188 F=N
R=NGoosecoid CGCCTCGGCTACAACAACTACTTCTA ACGTTCATGTAGGGCAGCATCT 193 F=N
R=YChordin TGTGAGCGGGATGACTGTTCACT AAGAGCCTTCGGCTTCTTTCTCCA 141 F=N
R=NCardiac actin TCTATGAGGGCTACGCTTTG CCTGACTGGAAGGTAGATGG 668 F=Y
R=NEndoderm:
Gata6 TTTCCGGCAGAGCAGTAAGAGG CCGTCAGTCAAGGCCATCCA 215 F=Y
R=Y
IFABP (Pedersen) TGCCTAGAGGCTGACTCAACTGAAA CCTTTTTAAAGATCCTTTTGGCTTC 420 F=N
R=NSox17 GGCGCAGCAGAATCCAGA CCACGACTTGCCCAGCAT 60 F=N
R=NFoxA2 CGTTCCGGGTCTGAACTG ACCGCTCCCAGCATACTTT 76 F=N
R=Y
CXCR4 CACCGCATCTGGAGAACCA GCCCATTTCCTCGGTGTAGTT 78 F=N
R=NTrophectoderm:
hCG beta ATCACCGTCAACACCACCATCTGTG AGAGTGCACATTGACAGCTGAG 198 F=N
R=NHouse keeping:
Beta-2-microglobulin
TTCTGGCCTGGAGGCTATC TCAGGAAATTTGACTTTCCATTC 85 F=N
R=NTBP GCTGGCCCATAGTGATCTTT CTTCACACGCCAAGAAACAGT 59 F=N
R=NATP5O ACTCGGGTTTGACCTACAGC GGTACTGAAGCATCGCACCT 86 F=Y
R=N
UBC ATTTGGGTCGCGGTTCTTG TGCCTTGACATTCTCGATGGT ? ?
HPRT TGACCTTGATTTATTTTGCATACC CGAGCAAGACGTTCAGTCCT 101 F=N
R=N
45

FLOW CYTOMETRY ANALYSIS OF HES AND IPS CELLSDavid Kahler doc. version 2.2 7-15-11
Introduction: Characterization of cell lines by flow cytometry can yield information about the health and differentiation status (as defined by cell surface receptor or nuclear transcription factor expression) of hES / iPS cells under defined culture or experimental conditions. Moreover, this information can be obtained rapidly with minimal effort from a low cell numbers that can be spared during routine passaging. For these reasons, flow cytometry can be a valuable technique once characterization panels have been properly designed and validated. This section will discuss a method of designing flexible characterization panels to assess the undifferentiated / differentiated status of hES / iPS cells in culture.
Summary of Protocol: The key to a successful characterization assay is to first accurately define the goals of the assay. This will ensure that all the relevant markers are included and the most meaningful information can be extracted from the experiment from the minimum number of samples using the minimum amount of reagents. Defining the goals of the assay will also ensure that the appropriate experimental and staining controls are included in the characterization panel and allow for the accurate and efficient collection, analysis, and interpretation data. Preparation of antibody cocktails according to the characterization panel can be performed concurrently with the dissociation protocol or a few hours in advance. It is helpful to have a partner to assist in cell preparation so that cells are ready to be added to the antibody cocktails immediately following dissociation. Antibody cocktails are made up at twice the concentration in staining buffer so that an equal volume of staining buffer containing the dissociated cells added to the cocktail creates the correct staining concentration. Cells should be added to the tubes or wells containing the antibody cocktails quickly, ideally with a multichannel pipet in order that all samples incubate for the same time period. Allow the cells to incubate at room temperature, protected from light for 15 minutes followed by one wash in ice cold buffer. Samples should then be resuspended in 300-500μl of ice cold buffer depending on cell number and stored on ice protected from light and analyzed immediately. It is possible to fix the cells in 4% PFA for 10-20 minutes at room temperature and stored at 4°C if analysis cannot occur immediately. However, strong fixation can introduce artifacts such as autofluorescence and alter the forward and side scatter properties, and binding ability of antibodies to their epitopes.
CELL DISSOCIATION FOR FACS ANALYSIS:
Cell prep for FACS analysis:
1. Aspirate off media.
2. Add 0.5ml (12well) or 1ml (6well) of Accutase.
3. Incubate for 5 min at 37°C.
4. Neutralize with an equal volume of media.
5. Move to 15ml conical tube and bring up to 10ml w/ media.
6. Spin @ 800 rpm for 4 minutes.
7. Aspirate supernatant carefully.
8. Resuspend cell pellet in FACS buffer (volume depends on cell #).
GENERAL STAINING PROTOCOL:
1.!!!Define the goals of the assay.
2. Design a characterization panel including:
(a) Unstained, Compensation, Isotype and/or FMO controls
46

(b) Pluripotent and Differentiation markers (surface and intracellular)
3. Prepare antibody cocktails with 100μl per well (6-well plate). Deliver antibody cocktails to 75x12mm (FACS) tubes or 96well plates. Store protected from light.
4. Prepare single cell suspensions of samples to be included in the analysis.
5. Collect cells by spinning at 800 rpm for 4 min and aspirate supernatant.
6. Resuspend in 100μl PBS.
7. Once again spin at 800 rpm for 4 min and aspirate supernatant.
8. Add 100μl of single cell suspension (105 – 106) to each well containing Ab cocktails and mix gently.
9. Incubate for 15 min in dark at RT.
10. Wash 1x with 1ml ice cold buffer and spin at 800 rpm for 4 min.
11. Remove supernatant and resuspend cells in 300-500μl in FACS tubes.
12. Keep tubes protected from light prior to analysis.
13. Analyze immediately following staining or fix w/ 4% PFA in PBS.
Defining Goals: The key to designing a successful characterization assay is to first accurately define the goal of the assay. If the goal is to assess viability following changes in culture or experimental conditions, very few cells will be required and preparation and analysis time will be short. If the goal is to detect changes in differentiation status over time, appropriate staining controls will be required and therefore cell numbers and preparation time will be increased. If the goal is to sort viable cells for culture, several pilot characterization experiments may be required to accurately identify populations of interest. Other factors to consider are the availability of the antibodies for your application and if they can be conjugated to fluorochromes that can be detected by the instrument. If you do not own your own flow cytometer or cell sorter, it is important to consult with an operator in your core lab to determine which fluorochromes can be detected by the instrument. Also, there may be restrictions on the types of cells that can be run unfixed on the instruments.
Designing a Characterization Panel: Control samples are an important component of every experimental procedure and ensure that instrumentation is working properly and that experimental conditions are such that biologically and statistically significant differences can be detected. The design of the characterization panel should include control samples which allow for the setup and calibration of the flow cytometer according to the fluorochromes used in the assay, and for the accurate placement of gates which discriminate negative from positive events. Compensation controls consist of unstained cells and cells which are stained for each color to be detected by the instrument. Unstained cells are used to set the initial detector voltages, and tubes containing cells which are stained for each color to be detected are required to set compensation values if the emission spectra of the fluorochromes overlap. The online spectral fluorescence viewers listed in the materials section are helpful in determining if the fluorescence combinations in the characterization panel can be compensated from each other, thus allowing accurate data analysis. Staining controls consist of two types – fluorescence minus one (FMO) and isotype controls. Fluorescence minus one (FMO) controls are tubes of cells stained with all the markers of interest minus one marker. FMO controls are compared to fully stained tubes to determine the gating criteria which discriminates the negative from the positive events. Isotype controls are included to determine the extent of non-specific antibody binding that occurs by cells. Isotype controls consist of cells stained using an antibody for an irrelevant antigen but consisting of the same isotype as the specific antigen of interested. In the flow cytometry community, much debate occurs over which control is the most appropriate. Inclusion of both controls is useful in initial characterization panels to rule out artifacts caused by autofluorescence and nonspecific antibody binding. Experimental controls are also an important consideration in designing stem cell characterization panels particularly if cells will express EGFP following treatments.
47

There are three overall steps involved in characterizing stem cell lines by flow cytometry:
1. Preparation of single cell suspensions from cultured cells.2. Preparation of antibody cocktails and staining the cells.3. Acquisition and analysis of the stained samples.
Preparation of single cell suspensions from cultured cells: Because individual cell lines grown on feeder layers or growth matrices respond differently to various dissociation protocols, it is important that the optimal conditions for the preparation of single cell suspensions from individual stem cell lines are already in place prior to the development of the characterization panel. It is important to preserve both viability and cell surface receptor expression particularly in cases of cell sorting for re-culture. Therefore, several dissociation techniques should be tested (Accutase®, Trypsin, TrypLE®) to identify the most effective protocol that produces a single cell solution which retains the highest level of cell surface receptor expression. In the case of multicolor characterization panels which include intracellular staining for transcription factor expression, it is important to verify that the fixation and permeabolization steps required to detect intracellular / nuclear components do not destroy the epitope of the surface receptors of interest.
Preparation of antibody cocktails and staining the cells: Antibody cocktails should be prepared just prior to staining the cells, although they may be prepared in advance and stored for 2-3 days without degradation of signal. This can be advantageous for time course experiments where cells will be treated with the same panel of antibodies over the course of a few days. Preparation of a sufficient volume of the same cocktail would reduce the variation in staining intensity introduced by preparing different cocktails each day of analysis. Prior to mixing, antibodies should be spun down in their tubes in order to prevent the production of “false positive” results or other fluorescent artifacts caused by highly fluorescent protein aggregates. Antibody cocktails should be prepared in a sterile environment to prevent contamination of the source antibodies. This is particularly important when preparing cocktails the will be used to sorting cells for subsequent culture and experimentation. Antibodies should also be kept on ice and protected from light to prevent degradation of fluorescence intensity, an important consideration especially if tandem dyes such as PE-Cy5, PE-Cy7 or PerCP-Cy5.5 are being used in the panel. Staining protocols consist of incubating single cell suspensions under conditions shown below in the table of staining parameters. Manufacturers suggested protocols usually are based on staining 106 cells with 5-20μl of each antibody in 100μl of staining buffer on ice protected from light for 30 minutes. The cell number and antibody volume is usually excessive for stem cell characterization and it is important to titrate individual antibodies down to the minimum volume that produces the maximum mean fluorescence intensity (MFI) at a given number of cells. Most directly conjugated antibodies work well when used at 1-2μl per 105 cells in 100μl total staining volume.
Data Acquisition and Analysis: As discussed in the previous section, individual cell lines cultured under different conditions will respond differently to various dissociation protocols. It is important that cells remain as a single cell solution during the staining period and not clump together, thus restricting the ability of the antibodies to bind their epitopes and producing inaccurate staining profiles. Clumping is detrimental to the flow cytometer as clumps of cell plug the sample tubing and flow cell and are difficult to remove and require extensive flushing of the instrument. To prevent clumping, it may be necessary to increase the concentration of serum in the buffer from 1-5% v/v and keep the cells on ice once dissociated. Filtering the cell suspension through cell strainers or filter cap FACS tubes shown in the suggested labware table just prior to placing samples on the cytometer greatly reduces the chance of plugging the machine.
Example of a 3 Color iPS Cell Characterization Panel:
Cell Type: 1018M iPS cell line transformed with 4 factors and cultured for 2 months on MEFs
Goal: Determine the viability and pluripotent status of the 1018M iPS cell line. We are interested in assessing which cells are negative for CD13 and double positive for SSEA4 and SSEA3 or SSEA4 and Tra-1-60.
48
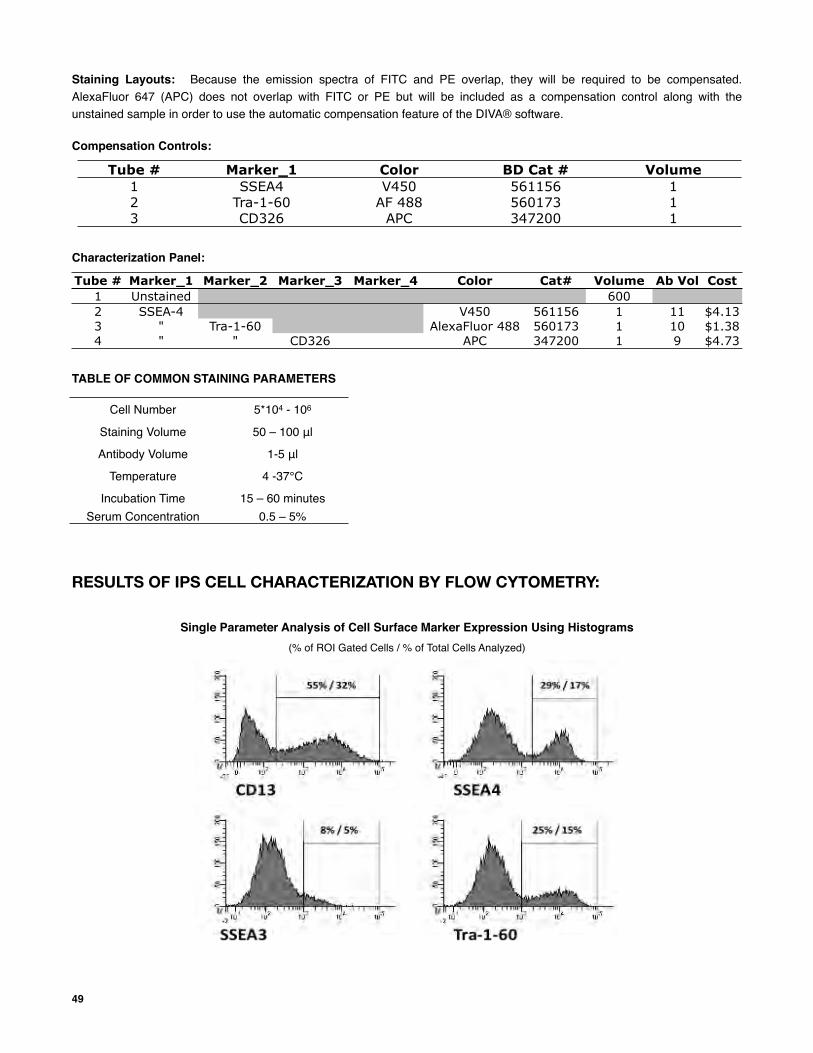
Staining Layouts: Because the emission spectra of FITC and PE overlap, they will be required to be compensated. AlexaFluor 647 (APC) does not overlap with FITC or PE but will be included as a compensation control along with the unstained sample in order to use the automatic compensation feature of the DIVA® software.
Compensation Controls:
Tube # Marker_1 Color BD Cat # Volume1 SSEA4 V450 561156 12 Tra-1-60 AF 488 560173 13 CD326 APC 347200 1
Characterization Panel:
Tube # Marker_1 Marker_2 Marker_3 Marker_4 Color Cat# Volume Ab Vol Cost1 Unstained 600 2 SSEA-4 V450 561156 1 11 $4.13 3 " Tra-1-60 AlexaFluor 488 560173 1 10 $1.38 4 " " CD326 APC 347200 1 9 $4.73
TABLE OF COMMON STAINING PARAMETERS
RESULTS OF IPS CELL CHARACTERIZATION BY FLOW CYTOMETRY:
Single Parameter Analysis of Cell Surface Marker Expression Using Histograms(% of ROI Gated Cells / % of Total Cells Analyzed)
49
Cell Number 5*104 - 106
Staining Volume 50 – 100 μl
Antibody Volume 1-5 μl
Temperature 4 -37°C
Incubation Time 15 – 60 minutesSerum Concentration 0.5 – 5%

Two Parameter Analysis of Cell Surface Marker Expression Using Dotplots
Three Parameter Analysis of Cell Surface Marker Expression Using Dotplots and Histograms
!!"#$%
&'()%
!!"#$%
*+,-(-./%
!!"#)%
50

MATERIALS:
Staining Buffer
General staining buffer for dissociation, analysis and sorting of neural stem cellsPrepare in sterile environment, vacuum filter through 0.22μm and store at +4°C
Components of Staining Buffer
Reagent Manufacturer Catalog # Volume Final Concentration
DPBS Invitrogen 14190250 460.0 ml 500 mlBSA Fraction V Solution (7.5%) Invitrogen 15260037 33.0 ml 0.5%Penicillin-streptomycin, liquid Invitrogen 15070063 5.0 ml 100 U/ml
0.5M EDTA, pH 8.0 Invitrogen 15575038 2.0 ml 2mMGlucose Sigma G6152 1.8 g 20mM
List of Suggested Labware
Item Description Manufacturer Catalog # Fisher #Polystyrene 12x75 5ml FACS Tubes BD 352052 149596
Polystyrene 12x75 w/snap cap BD 352058 149591APolypropylene 12x75 w/snap cap BD 352063 1495911A
Filter cap FACS tubes BD 352235 0877123U-Btm 96 well plates non-TC treated BD 35117 877254
40μm BD Falcon Cell Strainers BD 352340 087711Falcon 15ml conical tubes BD 352097 1495970CUnwire Rack 13mm tubes Nalgene 59760313 14809131Falcon 50ml conical tubes BD 352098 1495949A
Disposable Sterile pipets individually wrapped Fisher 1371120
Online Resources
Introduction to Flow Cytometry Training Video
http://www.bdbiosciences.com/immunocytometry_systems/support/training/online/
Flow Cytometry Tutorials / Presentations and spectral viewers
http://www.cyto.purdue.edu/
http://www.invitrogen.com/site/us/en/home/support/Research-Tools/Fluorescence-SpectraViewer.html
http://www.bdbiosciences.com/colors/fluorescence_spectrum_viewer//
51

MAGNETIC SORTING OF IPS CELLSSai Theja, Adapted from the MACS Miltenyi Biotec Protocol, version 1.0 7-13-11
Sorting iPS cells using a magnetic depletion system is an efficient and effective way to generate large quantities of iPS cells for the purpose of building a patient-specific iPS bank. Traditional methods of generating stable patient-specific iPS cell lines typically involve extensive manual labor and are therefore impractical for high throughput applications. When generating iPS cells, after infecting and reprogramming the cells, mixed populations of cells such as fibroblasts expressing CD13, D7-Fib, etc, iPS cells expressing pluripotency markers (SSEA-4, Tra-I-60, etc.), and partially transformed cells (surface antigen expression not known to a great extent) often result. Magnetic bead selection takes advantage of surface expression to trap and segregate select populations and sorts by depleting unwanted cells (a large portion of unwanted cells express CD13). By using this method, the cells can be almost fully automated into robotics systems. The process is also less time consuming than FACS both in terms of isolating populations and processing multiple samples at a time.
To sort iPS cells magnetically, we use MACS Miltenyi Biotec kits, which use Anti-Fibroblast Microbeads to magnetically label fibroblasts so that they can be sorted. The Anti-Fibroblast beads must be stored protected from light at 2 to 8°C and cannot be frozen.
PROTOCOL:
1.!!!!!Aspirate off media.2. Add 250μl (24-well format) Accutase. 3. Incubate for 5 min at 37°C.4. Neutralize with a double volume of media.5. Move to 15ml conical tube and bring up to 5ml w/ media. 6. Spin at 800 rpm for 4 minutes, and aspirate supernatant carefully.7. Resuspend cell pellet in 1ml FACS buffer. 8. Pass cells through a 35μm cell strainer.
9. Spin at 800 rpm for 4 min and resuspend cell pellet in 80μl FACS buffer.10. Add 20μl of Anti-Fibroblast Microbeads
11. Mix well and incubate for 15 min in the refrigerator (2-8°C).12. Wash cells by adding 4ml FACS buffer and centrifuge at 800 rpm for 4 min. Aspirate supernatant completely.
13. Resuspend cells in 500μl of FACS buffer.14. Put cells aside and set up MACS MS Column by placing properly onto the magnet, and attaching the 5ml collection
tube.15. Prepare the column by rinsing with approx. 500μl-1ml FACS buffer (stop adding buffer when drops begin coming
through the end of the column).16. Wait for buffer to elute out, dispose of the flow-through, and replace the 5ml collection tube with a new one.
17. Apply cell suspension (save the tube the samples are in for the next step) to the column and let elute out. 18. Add 500μl FACS buffer to the tube the cells were originally in and then transfer buffer to the column to wash it.
19. Wash the column two more times with 500μl FACS buffer. For each wash, wait for the buffer to flow-through before adding more.
20. The combined flow-through from steps 17-19 contains the desired iPS cells. Spin down cells 800 rpm for 4 minutes and then either plate them out or resuspend in solution needed for further analysis.
52

2D NEURONAL DIRECTED DIFFERENTIATION FOR IPS/HES CELLS FROM FEEDERSAndrew Sproul, Faizzan Ahmad doc. Ver 1.0 8-1-11
PROTOCOL:
1. Pre-warm matrigel plate(s) at 37°C for at least 1 hour.2. Remove MEF feeders one of two ways:
a. Pre-coat 10cm TC plate with 0.1% gelatin solution for at least 20 min. Aspirate media and add 1ml accutase for 5 min at 37°C. Add 1ml HUESM (see appropriate section for recipe) on top, transfer to 15ml conical tube, fill up to ~ 10mls with HUESM, and spin at 800 rpm for 3 min. Aspirate supernatant and resuspend in 5mls HUESM with 10μM ROCK inhibitor (Y27632). Remove gelatin from plate and add cells. Leave at 37°C for 1 hour. Remove supernatant (contains iPS cells, MEFs are stuck on plate) to a conical tube, spin at 800 rpm for 3 min, and resuspend in 1 to 2ml HUES + ROCK inhibitor (2mls better for large pellet).
b. Manually pick off feeders, accutase, spin and resusupend as above (without gelatin step).3. Count cells. Plate 18,000 cells per well of a 96-well plate (or 288,000 cells per well of a 6-well plate) on matrigel. 4. Let recover for 2-3 days in mTesR1, preferably with full media change on day 2 if allowing cells to recover for 3 days.5. Differentiate with dual smad-inhibition from days 0-9 in custom TesR1 (5x supplement, 1/100 Pen-Strep). Currently
we are using 10μM SB431542 and 0.25nM LDN193189. 6. Day 9: Split using accutase to bring to single cell, replate (288 thousand cells per well of a 6-well plate) in custom
TesR as in #5, with addition of ROCK inhibitor. 7. Plate cells on plates coated with polyOrnithine/Laminin (polyOrnithine: Sigma catalog # P4957, 500μg/ml final;
laminin: Inivtrogen catalog # 23017-015, 3μg/mL). These plates need to be made at least 1 day in advance (see pORN/Laminin plate protocol).
8. Day 11 – 18ish: Stepwise add in neuronal differentiation media (NB): neurobasal + B27 (without retinoic acid), glutamax (5mls per 500ml bottle, 2μM final), and penicillin-streptomycin (5mls per 500ml bottle (5000U/mL and 5000 mg/mL stock)). Generally we do ½ feeds so that the concentration of NB goes up. Cells should be fed every 2-3 days as needed.
9. Day 18ish: Split again as before. Perhaps best to go with less cells on the split, although we generally stick with concentrations above. Can split a 3rd time if necessary.
PROTOCOL MANIPULATION NOTES:
1. Shh may be necessary for ventral cells if plate on matrigel initially.2. PolyOrnithine/Laminin can also be used initially to plate.3. To remove MEFS, disaggregate hES-cell cultures with accutase for 20 min, wash using hES-cell media, and pre-plate
on gelatin for 1 hour at 37°C in the presence of ROCK inhibitor. 4. The non-adherent hES cells should be washed and plated at a density of 10,000–25,000 cells/cm2 on Matrigel (BD)-
coated dishes in MEF conditioned hES-cell medium spiked with 10ng/ml of FGF-2 and ROCK-inhibitor. Ideal cell density should be 18,000 cells/cm2.
5. Withdraw ROCK inhibitor and allow hES cells to expand in cell medium for 3 days or until they are nearly confluent. The initial differentiation media conditions include knockout serum replacement media with 10μM TGF-b inhibitor (Tocris) and 500ng/ml of Noggin (R&D).
6. On day 5 of differentiation, withdraw the TGF-b inhibitor and add increasing amounts of N2 media (25%, 50%, 75%) to the knockout serum replacement medium media every 2 days while maintaining 500ng/ml of Noggin.
7. For MS5 induction, use established methods previously reported.
53

ADAPTED SASAI EB PREPARATION FOR FREEZING AND SECTIONING Andrew Sproul, doc. version 1.0 7-20-11
Note: Similar protocol is used for undirected EBs used to assess in vitro pluripotency, although volumes of washes may change a bit. Also, at this point, does not need to be sterile if taking all samples off the plate.
PROTOCOL:
1. Remove EBs into either 15ml conical tube, or 2ml epp tubes with smaller collection area, with appropriate size pipet (200μl tips early points, 5ml pipets later points – basically donʼt want to damage EBs). Allow EBs to settle, then remove most of media.
2. Add PBS to wash (5mls or so, 1.5mls in smaller format). Allow to sit for 5 min, then either just allow EBs to settle or, if you are not certain they are at the bottom, spin for 3 min at 700 rpm.
3. Aspirate PBS close to pellet but donʼt suck up! Add 1-2mls of 4% PFA (500μl in 2ml conical format), and allow to fix for 20 min. If you are not sure the contents are mixed well, flick bottom of the tube. All PFA work should be done in a fume hood.
4. Remove PFA by pipetting in fume hood. Add PBS to wash (5mls or so, 1.5mls in conical tubes). Allow to sit for 5 min, spin if necessary (same as above), but can also just allow to settle if you feel confident they are on the bottom. Aspirate PBS.
5. Do two more PBS washes as above. These washes do not need to be in a fume hood.
6. After aspirating final PBS wash, add 2mls 15% sucrose (500μl in 2ml epp format). Keep at 4°C overnight to allow sucrose to diffuse in.
7. On the next day, allow EBs to settle or spin down as before. Aspirate most of the 15% sucrose and replace with 30% sucrose. Again leave at 4°C overnight to allow sucrose to diffuse in.
8. Place a small amount (maybe 50-100μl) of O.C.T. solution in a plastic mold. Next day allow EBs to settle or spin down as before. Aspirate most of the 30% sucrose. Using wide bore yellow pipet tip (or regular tip if that doesnʼt work), place EBs from tube into center of mold with O.C.T. Allow to settle in the spot for a few minutes, then slowly add O.C.T. to fill the mold. Allow EBs to sink for approximately 1 hour. Place mold carefully on dry ice to freeze. Store mold at -80°C, and keep there for at least 1 day before sectioning. EBs are stable for a long time at -80°C (months at minimum).
54

ENDODERM DIRECTED DIFFERENTIATION – BETA CELLSHaiqing Hua, doc. version 1.0 5-24-11
PLATE CELLS:
1. Detach and dissociate ES or iPS cells using Dispase (3-5 min @ RT) and, subsequently, Accutase (5 min @ RT). 2. Filter cell suspension through a 70μm (or 100μm) cell strainer. 3. Plate cells at a density of 400,000-800,000 cells per well of a 6-well plate, 200,000-400,000 cells per well of a 12-well
plate, or 100,000-200,000 cells per well of a 24-well plate. When plating cells, use human ES medium with ROCK inhibitor (Y27632).
4. Keep cells in such medium for 1 or 2 days and then start differentiation (the culture should be confluent).
DIFFERENTIATION:
Day 1: Briefly wash the cells once with RPMI medium (w/ 1xPS, 1xGlutamax). Treat with Activin A (100ng/ml), Wnt3A (25ng/ml) and 0.075mM EGTA in RPMI medium (w/ 1xPS, 1xGlutamax). Note: Dissolve one vial of Activin A, Wnt3A in 40ml medium. Activin A and Wnt3A are stored at -80°C. EGTA is stored in the 4°C refrigerator at 2000x – add 20μl into 40ml.
[Definitive endoderm: Activin A activates TGFbeta signaling; Wnt3A activates Wnt signaling; EGTA reduces cell-cell interaction by blocking E-cadherin]
**The rest of the medium can be aliquoted (5-10ml) and frozen in -30°C. Same for the following differentiation media.**
Day 2, 3: Treat with Activin A (100ng/ml) and 0.2% FBS in RPMI medium (w/ 1xPS, 1xGlutamax). [Definitive endoderm]
Day 4, 5: Treat with FGF10 (50ng/ml), KAAD-cyclopamine (0.25μM) and 2% FBS in RPMI medium (w/ 1xPS, 1xGlutamax). Note: Dissolve one vial of each factor into 50 ml medium. FGF10 is stored at -80°C and KAAD-cyclopamine is stored at -20°C.
[Foregut endoderm: FGF10 activates FGF signaling; KAAD-cyclopamine inhibits sonic hedgehog signaling]
Day 6-8 (light sensitive – wrap with aluminum foil): Treat with FGF10 (50ng/ml), KAAD-cyclopamine (0.25μM), retinoic acid (2μM), LDN (250nM) and B27 in DMEM (high glucose) medium (w/ 1xPS, 1xGlutamax). Note: Retinoic acid, LDN and B27 are stored at -20°C. Dissolve one vial of each into 50ml medium.
[Pancreatic precursors: RA specify pancreatic linage by activating various transcription factors; LDN inhibit BMP signaling which is important for liver cells specification] Day 9-10: Treat with Exendin-4 (50ng/ml), SB431542 (2μM) and B27 in CMRL medium (w/ 1xPS, 1xGlutamax). Note: Exendin-4 is stored at -20°C at 2000x – add 25μl into 50ml medium. Put back rest after use. SB431542 is stored at -20°C – dissolve one vial for 50ml medium. [Insulin producing cells: Exendin-4 is a GLP-1 analog which promotes beta cell generation/replication; SB431542 inhibits TGFbeta to increase beta cell generation]
Day11-12: Treat cells with B27 in CMRL (w/ 1xPS, 1xGlutamax).
Fix and stain cells.
ORDERING:
Activin A, FGF10, Wnt3A are from R&D systems.KAAD-cyclopamine is from VWR. LDN and SB431542 are from Stemgent.Exendin-4 and retinoic acid are from Sigma.
55

MYCOPLASMA TESTINGHector Martinez, doc. version 1.0 7-21-11
We use the MycoAlert Mycoplasma Detection Kit from Lonza Rockland (LT07-318).
This is a selective Biochemical test that makes use of the activity of certain mycoplasmal enzymes. The enzymes of the lysed mycoplasma react with the MycoAlert Substrate, catalyzing the conversion of ADP to ATP. Furthermore, by measuring the level of ATP in a sample both before and after the addition of the MycoAlert Substrate, a ratio can be obtained which is indicative of the presence or absence of mycoplasma. The reaction of mycoplasmal enzymes with their specific substrates in the MycoAlert Substrate leads to elevated ATP levels that can be detected using the following bioluminescent reaction:
LuciferaseATP + Luciferin + O2 --------------! Oxyluciferin + AMP + PPi + CO2 + Light Mg2+
The emitted light intensity is linearly related to the ATP concentration and is measured using a Luminometer at room temperature.
MATERIALS:• Lonza Mycoplasma Detection Kit LT07-318 (100rxn)• Assay plate: 96 white-walled plates (I am currently using Costar 3912 Assay plates, flat bottom, Non-sterile, Non-
treated, white polystyrene)• Plate reader (Synergy MX from Biotek)• Gen5: a data analysis software designated for the Synergy MX
Note: The optic position in the plate reader is on top. Therefore, when performing the assay, the brand of the plate shouldnʼt affect the sensitivity of the assay as long as a white-walled plate is use. Lonza has a 96- well white-walled plate LT27-102.
METHODS:1. Spin cells (to remove cells prior to performing the assay).2. Take 50μl of culture Supernatant as the sample.3. Add 50μl of MycoAlert Reagent.4. Wait 5 minutes at RT.5. Read Luminescence (three readings with intervals of 1minute each).6. Add 50μl of MycoAlert Substrate.7. Wait 10 minutes at RT.8. Read Luminescence (three readings with intervals of 1 minute each).
PROCEDURES:1. Bring all reagents to room temperature before use.2. Reconstitute the MycoAlert Reagent and Substrate in MycoAlert Assay Buffer. Leave for 15 min at room temperature
to ensure complete rehydration.
56

3. Transfer 1ml of cell culture supernatant into a luminescence compatible white-walled plate and pellet any cells at 1500 rpm for 5 minutes.
4. Transfer 50μl of the positive control into the first well of the compatible plate.5. Then transfer 50μl of the cleared supernatant (sample) into a well of a compatible plate.6. Add 50μl of MycoAlert Reagent to each sample and wait 5 minutes at RT.7. Place plate in luminometer and initiate the program. This will be the first set of readings . 8. Add 50μl of MycoAlert Substrate to each sample and wait 10 minutes.9. Place plate in luminometer and initiate the program. This will be the second set of readings.10. Export all readings from the first set to an Excel spreadsheet and take the average. 11. Calculate a ratio of the third reading of the second set over the calculated average of the first set.
PROCEDURES FOR PLATE READER (Synergy MX from BioteK):
1. Delay for 5 minutes.2. Start kinetics (Run for 3 min, intervals of 1min and 30 sec).3. Read.
Detection method: Luminescence Integration time : 00:01:00 (MMmmss)Optic positions : TopSensitivity : 135 Top probe vertical offset 1.00mm
4. End Kinetics.5. Plate out, add Substrate.6. Delay for 10 minutes.7. Start Kinetics (Run for 4 min, intervals of 2 min)8. Read.
Detection method: Luminescence Integration time : 00:01:00 (MMmmss)Optic positions : TopSensitivity : 135 Top probe vertical offset 1.00mm
9. End Kinetics.10. Plate out.11. Stop.
57

NANOSTRING PROTOCOLSAdapted from the NanoString Technologies protocols, 7-27-11
The NanoString nCounter system is comprised of two separate instruments, the nCounter Prep Station and the nCounter Digital Analyzer. The first is used for post-hybridization processing while the latter is used for data collection. All components and reagents required for the use of the Prep Station are provided in the nCounter Master Kit and are ready to be loaded directly onto the deck of the robot. The Digital Analyzer collects data by taking images of the immobilized fluorescent reporters in the sample cartridge, and at the highest standard data resolution, 600 fields of view are collected per sample yielding data of hundreds of thousands of target molecule counts. The images are processed internally, exported from the machine, and then opened on Microsoft Excel or another commonly used spreadsheet package.
SETTING UP TWELVE nCOUNTER™ ASSAYS:
This nCounter Gene Expression Assay protocol provides instruction for both the Total RNA Standard Protocol and the Cell Lysate Protocol.
General Probe Handling Warning: During the setup of your assay, do not vortex or pipet vigorously to mix as it may shear the Reporter Probes. Mixing should be done by flicking or inverting the tubes. Also, if you use a microfuge to spin down tubes, do not spin any faster than 1,000 rpm for more than 30 seconds and do not “pulse” it to spin because that will cause the centrifuge to go to maximum speed and you may spin your CodeSet out of solution.
The final hybridization reaction will contain the following components:
COMPONENT VOLUME
Reporter CodeSet 10μl
Hybridization Buffer 10μl
RNA sample 5μl
Capture ProbeSet 5μl
**The order of addition of components is important, so make sure to follow the protocol exactly.
PROTOCOL:
1. If following the Total RNA Standard Protocol go to Step 3. 2. If following the Cell Lysate Protocol: Lyse Cells according to Qiagen recommendations (see Qiagen RNeasy Mini
Handbook, supplied with product numbers 74104 and 74106) with the following modifications:a. Cells should be lysed at concentration between 2,500 and 10,000 cells/μl of RLT buffer. The nCounter cell
lysate hybridization procedure has been optimized for ~10,000 mammalian cells/reaction or the equivalent of approximately 100ng of total RNA.
b. Cell lysates should be aliquoted and stored at -80°C. Avoid freeze/thaw cycles.3. Remove aliquots of both Reporter CodeSet and Capture ProbeSet reagent from the freezer and thaw on ice. Invert
several times to mix well and spin down reagent. 4. Create a master mix containing 130μl of reporter CodeSet and 130μl of hybridization buffer. RNAse-free water may
also be added to this mix if the volume of the individual RNA samples is less than 5μl and is constant. (Add enough
58

water for 13 assays to allow one assayʼs worth of dead volume.) Do not add the Capture ProbeSet to the master mix. Invert to mix and spin down master mix.
5. Label a provided 12-strip tube and cut it in half so it will fit in a picofuge. 6. Add 20μl of master mix to each of the 12 tubes (if you added water to the master mix, adjust volumes). It is advisable
to use a fresh tip for each pipetting step to accurately pipet the correct volume. The CodeSet has components that can start to wick up into the tip and not dispense the correct amount if you use the same tip to dispense master mix into all of the hybridization tubes.
7. Add sample according to your protocol type as follows: a. If following the Total RNA Standard Protocol: Add total RNA sample (max. volume 5μl) for a total of 100ng to
each tube. Go to Step 8. b. If following the Cell Lysate Protocol: Add cell lysate sample (max. volume 4μl) for a total of approximately
10,000 cells per hybridization assay. Using less than 10,000 cells/reaction will result in fewer counts/gene. c. If using attenuation mix(es), add 1μl of each mix. Note: this reagent can also be added to the master mix if
all reactions are to be attenuated.8. If necessary, add RNAse-free water to each tube to bring the volume of each assay to 25μl.9. Pre-heat thermocycler to 65°C. Program the thermocycler using 30μl volume, calculated temperature, heated lid and
“forever” time setting. Do not set the thermocycler to ramp down to 4°C at the end of the run. 10. Add 5μl of Capture ProbeSet to each tube immediately before placing at 65°C. Cap tubes and mix the reagents by
inverting the strip tubes several times and flicking with your finger to ensure complete mixing. Briefly spin down and immediately place the strip tube in the 65°C thermocycler. Minimizing the time between the addition of the Capture ProbeSet and the placement of the reaction at 65°C will increase the sensitivity of your assay.
11. Incubate hybridization assays for at least 12 hours. Hybridizations should be left at 65°C until ready for processing. Maximum hybridization time should not exceed 30 hours.
12. Once removed from the thermocycler, proceed immediately to post-hybridization processing with the nCounter Prep Station. Do not store hybridizations at 4°C.
59