north dakota health information network clinical portal · pdf filenorth dakota health...
TRANSCRIPT

North Dakota Health Information Network Clinical Portal Primary Provider User Manual

Orion Health | Primary Provider User Manual V0.1 | 17 October 2013
Orion Health | Copyright © 2013 Orion Health Inc. 2
Document History
Version Date Author(s) Comment
0.1 September 24, 2013
Tami Jones Draft User Manual
Document Control Elements
Last Printed
Master Document Path & Name
Current Document Location
Distribution
Individuals added to the distribution list will receive all document updates:
Name Location Email
Orion Health | Primary Provider User Manual V0.1 | 17 October 2013
Orion Health | Copyright © 2013 Orion Health Inc. 3
Table of Contents Document History ........................................................................................................................................ 2
Document Control Elements......................................................................................................................... 2
Distribution ................................................................................................................................................. 2
Table of Contents ......................................................................................................................................... 3
Legal Notice ................................................................................................................................................. 7
Disclaimer .................................................................................................................................................... 7
Introduction ................................................................................................................................................. 8
Purpose ............................................................................................................................................................... 8 Roles and Responsibilities Overview .................................................................................................................. 8
Sample Workflow ........................................................................................................................................ 9
Sample Primary Provider Workflow ................................................................................................................... 9 NDHIN HIE Touchpoints ...................................................................................................................................... 9
Getting Acquainted with the User Interface ................................................................................................ 10
Logging into the NDHIN Clinical Portal ............................................................................................................. 10 Logging out of the NDHIN Clinical Portal .......................................................................................................... 12
Automatic Logout ......................................................................................................................................... 12
Clinician Homepage ................................................................................................................................... 12
Recent Patients ............................................................................................................................................. 13 My Worklist .................................................................................................................................................. 13
NDHIN Clinical Portal User Interface ........................................................................................................... 14
NDHIN Clinical Portal User Interface ................................................................................................................ 14 Global Menu ................................................................................................................................................. 14 Shortcut Keys ................................................................................................................................................ 15
Portal Menu ...................................................................................................................................................... 15 Portal Entry Points ........................................................................................................................................ 16
Patient Context Menu ...................................................................................................................................... 16
Patients ..................................................................................................................................................... 17
Patient Search ................................................................................................................................................... 17

Orion Health | Primary Provider User Manual V0.1 | 17 October 2013
Orion Health | Copyright © 2013 Orion Health Inc. 4
Patient Search Results .................................................................................................................................. 17 Favorite Search ................................................................................................................................................. 18 Recent Patients ................................................................................................................................................. 19
Remove from Recent Patient List ................................................................................................................. 19 Edit Recent Patient List Columns .................................................................................................................. 19
Worklists ........................................................................................................................................................... 19
Patient Record ........................................................................................................................................... 20
Patient Context Menu ...................................................................................................................................... 20
Patient Summary ....................................................................................................................................... 22
Patient Summary Panels ................................................................................................................................... 22 EMPI Demographics ...................................................................................................................................... 22 Allergies & Alerts .......................................................................................................................................... 23 Problems ....................................................................................................................................................... 23 Medication History ....................................................................................................................................... 23 Encounter History ......................................................................................................................................... 24 Procedures .................................................................................................................................................... 24
Document Tree .......................................................................................................................................... 26
Document Tree Options Panel .......................................................................................................................... 26 Filter Results ................................................................................................................................................. 27
Timeline ............................................................................................................................................................ 29
Worklists ................................................................................................................................................... 31
Adding Patients to a Worklist ........................................................................................................................... 31 Adding to Worklist from Patient Search ....................................................................................................... 31 Adding to Worklist From Context Bar ........................................................................................................... 32
Customizing Worklists ...................................................................................................................................... 33 Renaming a Worklist ..................................................................................................................................... 33 Edit the Columns that Appear on a Worklist ................................................................................................ 33 Remove a Person from a Worklist ................................................................................................................ 33
Patient Results ........................................................................................................................................... 34
View a Single Result .......................................................................................................................................... 34 Viewing Historical Results ............................................................................................................................. 37 Cumulative View of Numeric Laboratory Results ......................................................................................... 37 Results Table ................................................................................................................................................. 38
Graph Results .................................................................................................................................................... 38 Overview Graph ............................................................................................................................................ 39

Orion Health | Primary Provider User Manual V0.1 | 17 October 2013
Orion Health | Copyright © 2013 Orion Health Inc. 5
Individual Graph ........................................................................................................................................... 39 Print a Result..................................................................................................................................................... 40 Send a Result .................................................................................................................................................... 40
Continuity of Care Document (CCD) ............................................................................................................ 41
Patient Snapshot ............................................................................................................................................... 41 Customize CCD .................................................................................................................................................. 42
Notifications .............................................................................................................................................. 43
My Subscriptions .............................................................................................................................................. 43
Messaging .................................................................................................................................................. 47
Secure Messaging ............................................................................................................................................. 47 Secure Mailbox Icons .................................................................................................................................... 47
Working With Messages ................................................................................................................................... 48 Inbox ............................................................................................................................................................. 48 Send a new message ..................................................................................................................................... 50 Send a Group Message ................................................................................................................................. 50 Forward A Message ...................................................................................................................................... 50 Downloading or Printing a Message ............................................................................................................. 51 Opening and Downloading an Attachment .................................................................................................. 51 Draft Messages ............................................................................................................................................. 51 Sent Messages .............................................................................................................................................. 51 Spam Messages ............................................................................................................................................ 51 Emptying the Spam Folder ........................................................................................................................... 52 Deleting a Message ....................................................................................................................................... 52 Search Email ................................................................................................................................................. 52
Contacts ............................................................................................................................................................ 53 Add, Edit, and Delete contacts ..................................................................................................................... 54 Adding more fields ........................................................................................................................................ 54 Adding a new group ...................................................................................................................................... 55 Deleting Remembered or Sticky Email Addresses ........................................................................................ 55 Exporting and Importing Contacts ................................................................................................................ 55 Sync ............................................................................................................................................................... 55
Settings ............................................................................................................................................................. 56 Webmail Settings .......................................................................................................................................... 56 Anti-Spam Settings ....................................................................................................................................... 58 Email Filters .................................................................................................................................................. 59 Mail Options ................................................................................................................................................. 59

Orion Health | Primary Provider User Manual V0.1 | 17 October 2013
Orion Health | Copyright © 2013 Orion Health Inc. 6
Common .................................................................................................................................................... 61
My Details ......................................................................................................................................................... 61 Change My Password .................................................................................................................................... 61 Password Policy ............................................................................................................................................ 61 Set Security Question ................................................................................................................................... 62 Start Screen (Homepage) .............................................................................................................................. 62 Inactivity Timeout ......................................................................................................................................... 63 Roles I Perform ............................................................................................................................................. 63 Groups I Belong To........................................................................................................................................ 63
Additional User Attributes ................................................................................................................................ 64 Users ............................................................................................................................................................. 64 Clinician Homepage ...................................................................................................................................... 64 HIE Users ....................................................................................................................................................... 64 Notifications ................................................................................................................................................. 64 Patient Search ............................................................................................................................................... 64
Patient Privacy Policy ................................................................................................................................. 65
Access Descriptions .......................................................................................................................................... 65 State Descriptions ............................................................................................................................................. 65 Breaking the Privacy Seal .................................................................................................................................. 66
Appendix A ................................................................................................................................................ 67
Functional Roles Matrix .................................................................................................................................... 67
Appendix B ................................................................................................................................................ 68
Browser Support ............................................................................................................................................... 68 Connectivity ...................................................................................................................................................... 68

Orion Health | Primary Provider User Manual V0.1 | 17 October 2013
Orion Health | Copyright © 2013 Orion Health Inc. 7
Legal Notice
©2013 Orchestral Developments Limited. All rights reserved. Trademarks displayed in this document are the property of Orchestral Developments Limited or their respective owners, and may not be used without written permission of the owner. Oracle is a registered trademark of Oracle Corporation and/or its affiliates. Windows, SQL Server and IIS are registered trademarks of Microsoft Corporation and/or its affiliates. UNIX is a registered trademark of The Open Group and/or its affiliates. Acrobat and Reader are registered trademarks of Adobe Systems Incorporated and/or its affiliates. Linux is a registered trademark of Linus Torvalds and/or his affiliates. IBM is a registered trademark of International Business Machines Corporation and/or its affiliates. Mozilla and Firefox are registered trademarks of the Mozilla Foundation. Mac OS is a registered trademark of Apple Computer, Inc. This document is provided subject to the terms of the license and support agreement relating to the software application. Orchestral Developments Limited has made reasonable efforts to ensure that all information contained in this document is accurate, but no liability is accepted by Orchestral Developments Limited, its agents or suppliers for use of the documentation by the end user or any other party. Questions or concerns relating to this documentation should be addressed to the supplier from whom the product was obtained.
Disclaimer

Orion Health | Primary Provider User Manual V0.1 | 17 October 2013
Orion Health | Copyright © 2013 Orion Health Inc. 8
Introduction
Purpose The NDHIN Clinical Portal provides a secure and integrated view of a patient’s longitudinal record. The purpose of this document is to describe the key concepts within NDHIN Clinical Portal that will enable effective use of the solution. This document is intended as a guide for primary providers.
Roles and Responsibilities Overview Primary provides are assigned Level 1 access. Level 1 access is granted to clinicians that provide patient care in a variety of settings – offices, clinics, emergency departments and hospitals. Level 1 functions include:
• Search for patients
• View clinical information
• ‘Break the Seal’
• Configure subscription notifications
• Send clinical portal messages
• Send Direct Secure Messages
A full list of HIE user levels is provided in Appendix A Functional Roles Matrix.

Orion Health | Primary Provider User Manual V0.1 | 17 October 2013
Orion Health | Copyright © 2013 Orion Health Inc. 9
Sample Workflow
Sample Primary Provider Workflow A sample workflow of a patient encounter for a primary provider is shown below. Click the workflow block to jump to the user manual section relating to the activity.
NDHIN HIE Touchpoints Review patient history: Navigate to the Patient Summary and Timeline for a concise overview of the patient’s recent encounters, allergies, active medications and problems. Assess and treat patient: Review lab results, findings and clinical documents by accessing the Clinical Document Tree to avoid unnecessary duplication of tests and other treatment. Document Care and plan follow-up: Generate a Continuity of Care Document CCD to securely transmit patient data to another provider or the patient. Subscribe to notifications to receive alerts when new patient information is received.
Review Patient History
Assess and Treat
Patient
Document Care
Plan Follow-Up

Orion Health | Primary Provider User Manual V0.1 | 17 October 2013
Orion Health | Copyright © 2013 Orion Health Inc. 10
Getting Acquainted with the User Interface
Logging into the NDHIN Clinical Portal The NDHIN Clinical Portal Login screen is shown below. A username and password are required to gain access to the application. A temporary password will be assigned upon account creation. Once the user has entered the username and temporary password, the system will prompt the user to change the password.
Figure 1: NDHIN Clinical Portal Login Display
Tips for setting passwords: • Passwords must be at least 8 characters long • Password will expire every 90 days for all users • Passwords must be ‘strong’ (upper and lower case, number, special character) • Accounts will be locked out after 3 bad login attempts (counter and account reset after 15 minutes)
The Forgot Your Password link allows a user who has forgotten their password to gain access to Clinical Portal by (correctly) answering the secret question they have configured on the My Details screen. This means Help Desk or other support staff do not need to be involved when a user requires password assistance by utilizing the Forgot My Password link on the sign-in screen. See the My Details section of the User Manual for set-up instructions. Upon successful login, a disclaimer will appear and prompt the user to Accept or Cancel. If the user does not accept the disclaimer within five minutes, the user will be logged out and returned to the login page.
Note: Username is not case-sensitive; however, the password IS case-sensitive.

Orion Health | Primary Provider User Manual V0.1 | 17 October 2013
Orion Health | Copyright © 2013 Orion Health Inc. 11
Figure 2: Disclaimer
Clicking on the NDHIN Privacy and Participation Policies link will redirect the user to an external website to view the policies.
Figure 3: NDHIN Privacy and Participation Policies

Orion Health | Primary Provider User Manual V0.1 | 17 October 2013
Orion Health | Copyright © 2013 Orion Health Inc. 12
Logging out of the NDHIN Clinical Portal The Logout button is used to exit the NDHIN Clinical Portal. The logout button is located in the upper right portion of the display, to the left of the Orion Health logo.
Figure 4: Logout Button
It is important to use the Logout button as opposed to clicking on the X button of the browser. The Clinical Portal logout button will log the user out of the application and close the session. If the Logout function is not used, the session will remain active for a pre-defined period of time before the auto-logout feature is activated.
Automatic Logout The inactivity timeout feature in NDHIN Clinical Portal ensures robust security by logging out the user if he or she has been inactive for a pre-defined set of time. The inactivity timeout period is currently set to 30 minutes but may be edited by the user on the My Details screen. The user may set the inactivity logout time to increments lower than the time set by the HIE, but not higher. For more information, see the My Details section of the user manual.
Figure 5: Inactivity Logout Warning
Clicking the Cancel button allows the user to remain active.
Clinician Homepage
The Clinician Homepage automatically appears when a user logs in to NDHIN Clinical Portal. The homepage displays summary information relevant to a user. The layout of each user’s homepage is composed of one or more windowlets. Windowlets partition the display, allowing a user to see more than one view on a single screen. The homepage for Primary Providers is divided into three windowlets:
• Recent Patients • My Worklist

Orion Health | Primary Provider User Manual V0.1 | 17 October 2013
Orion Health | Copyright © 2013 Orion Health Inc. 13
Below is an overview of each windowlet.
Recent Patients The Recent Patients windowlet is a system-generated list of up to 40 patient records most recently viewed by the user. The list of patients is sorted into the following categories:
• Today • Last seven days • Last four weeks • Last twelve months
Figure 6: Recent Patients Windowlet
My Worklist The My Worklist windowlet displays all worklists or the single worklist selected in My Details. For more information, see the Worklist section of this document.
Figure 7: My Worklist Windowlet
Tip: The homepage may be displayed at any time by clicking the Home link located at the top of the screen display.

Orion Health | Primary Provider User Manual V0.1 | 17 October 2013
Orion Health | Copyright © 2013 Orion Health Inc. 14
NDHIN Clinical Portal User Interface
NDHIN Clinical Portal User Interface The Clinical Portal user interface includes menus, icons, buttons and other links for easy navigation. The following terms are used when referring to the Clinical Portal user interface:
• Global Menu • Portal Menu • Patient Context Menu – A secondary menu that will display when a specific patient record is in
context.
Global Menu The Global Menu refers to the user account information and the Home and Help options at the top right of the display.
Figure 8: Global Menu Links
Global Menu Item Function Description
Autohide Hide the menu bar, making more screen space available for viewing information
Home Displays Clinician Homepage
Help Provides context sensitive help window that relates to the page displayed
UserName Current Clinical Portal User
My Details Displays My Details screen
accessed by selecting the down arrow next to the user name
Logout End the current Clinical Portal
session
Last Login Displays date and time of last user login
Orion Health | Primary Provider User Manual V0.1 | 17 October 2013
Orion Health | Copyright © 2013 Orion Health Inc. 15
Shortcut Keys The following shortcut keys may be available:
Key Description
F11 Toggles between a full screen and a standard Windows ® display. This feature is not available on Mac OS machines.
F5 Refreshes the screen display.
Tab Moves to the next field on a screen.
Shift+Tab Moves to the previous field on a screen.
Enter Activates the current selected button or option.
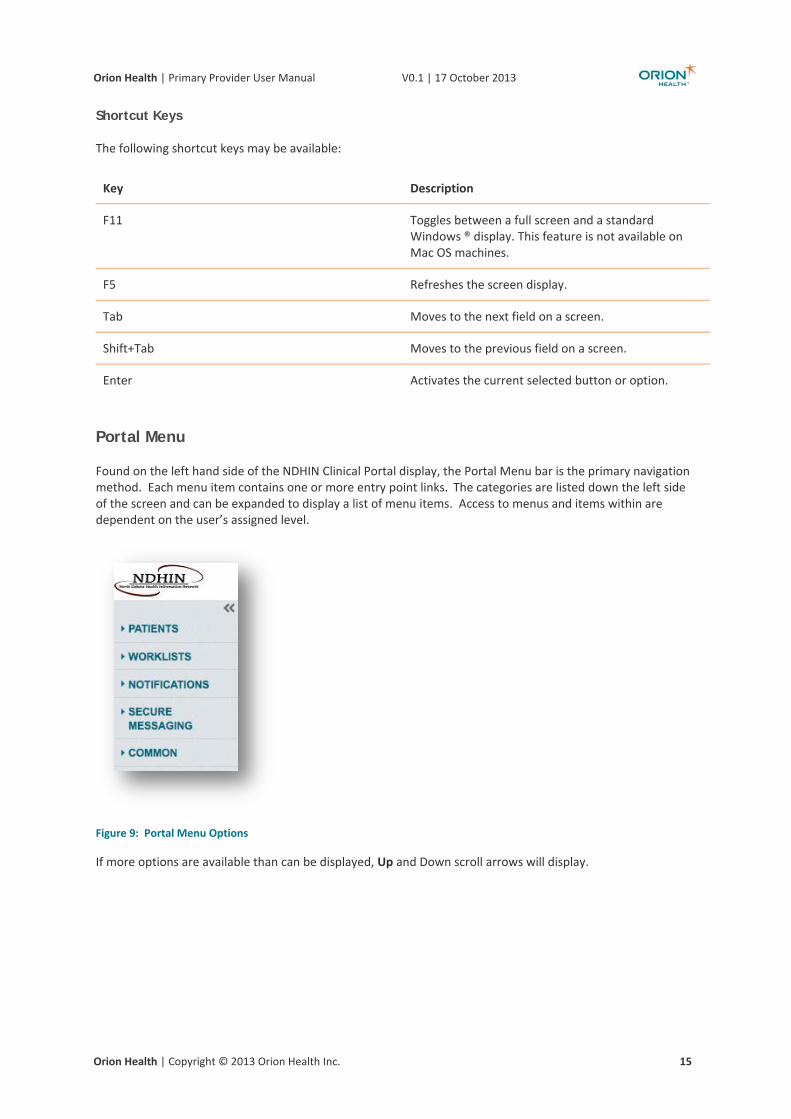
Portal Menu Found on the left hand side of the NDHIN Clinical Portal display, the Portal Menu bar is the primary navigation method. Each menu item contains one or more entry point links. The categories are listed down the left side of the screen and can be expanded to display a list of menu items. Access to menus and items within are dependent on the user’s assigned level.
Figure 9: Portal Menu Options
If more options are available than can be displayed, Up and Down scroll arrows will display.

Orion Health | Primary Provider User Manual V0.1 | 17 October 2013
Orion Health | Copyright © 2013 Orion Health Inc. 16
Portal Entry Points The following Portal Menu options and entry points are available:
Menu Description Entry Point (Screen)
Patients Locate a patient’s medical records Patient Search Recent Patients Worklists
Worklists Maintain links to the personal patient worklists. The user may change Worklist labels.
Red, Blue, Yellow, Green, Orange Purple
Notifications Subscribe to notifications to receive a notification when a specific event occurs for a patient or group of patients.
My Subscriptions
Secure Messaging Compose, receive and send messages to other Clinical Portal users and receive detailed notification messages.
Secure Mail
Common Maintain user account details My Details Worklists
Patient Context Menu The Patient Context Menu is visible once the patient’s record is open. The Context Menu displays a focused, detailed view of the patient’s record. When the patient record is open, the Portal Menu will be automatically hidden and only the patient’s details will display.
Figure 10: Patient Context Menu
Additional information on the Context Menu tabs may be found in the Patient Summary, Timeline Front Desk Summary and Laboratory Results Flow Sheet sections of the document.

Orion Health | Primary Provider User Manual V0.1 | 17 October 2013
Orion Health | Copyright © 2013 Orion Health Inc. 17
Patients
Within the NDHIN Clinical Portal Patients menu, the entry points are: • Patient Search • Recent Patients • Worklists
The following sections detail the above entry points.
Patient Search Patient Search allows users to find patients using a selection of search criteria. Once the patient is found, the user may easily access the patient record. Additionally, the search will return close matches (example: Peterson search will return matches for Petersen, Patterson, Pederson). The patient search allows a user to search for a patient using one or more of the following search criteria.
• The patient’s EMR (Local) Identifier: The Identifier must be an exact match. If entered as a part of the search criteria, it will take precedence over all other search criteria;
• The System Name: Defaults to the preferred patient ID set in the My Details page. Note: If the System Name is entered, the System Name (i.e., the facility associated with the Identifier) must also be selected from the dropdown list.
OR
• Last Name: The patient’s last or family name. The results are ranked on closeness of fit; • First Name The patient last name must also be entered. The results are ranked on closeness of fit; • The patient’s date of birth. The patient last name must also be entered; • The patient’s sex or gender. The patient last name must also be entered.
Figure 11: Patient Search Screen
Patient Search Results Up to 15 patients per page (50 total) are returned by a demographic patient search. The results are sorted by the patient’s last name (closeness of match) and displays name, date of birth, patient gender, patient phone and patient address. Click Reset to clear search fields and initiate a new search.
Note: If more that 15 results are returned, a Next link will appear allowing the user to view the next 15 results. To return to the previous page of results, select the Previous link.

Orion Health | Primary Provider User Manual V0.1 | 17 October 2013
Orion Health | Copyright © 2013 Orion Health Inc. 18
Favorite Search
A Favorite Search is a saved set of criteria that can be recalled for later reuse. A favorite search is personal to the user who created it and cannot be seen or accessed by any other user.
To save a favorite search: • Enter your search criteria to ensure the specified criteria return the expected results.
• Enter a name for the favorite search and click the Add icon .
Figure 12: Favorite Search
To access the favorite search: • Select favorite search name from dropdown
Figure 13: Access Favorite Search
To delete the favorite search: • Select the favorite search name from the dropdown to delete • Click ‘X’ icon to delete
Figure 14: Delete Favorite Search

Orion Health | Primary Provider User Manual V0.1 | 17 October 2013
Orion Health | Copyright © 2013 Orion Health Inc. 19
Recent Patients The Recent Patient menu option provides a system-generated list of the patient records most recently viewed by the user. The list can hold up to 50 names. If the list already includes 50 patient names and another patient is added, the oldest entry will be removed. The user can access the patient record by selecting the individual line. The list of patients is sorted into the following several categories:
• Today • Last seven days • Last four weeks • Last 12 months
The result columns displayed are: • MRN • Name • Gender • Age
Remove from Recent Patient List A user may remove a patient record from the Recent Patient list by clicking the check box next to the patient record and click Remove.
Figure 15: Remove Patient from Recent Patient List
Edit Recent Patient List Columns
Click on the Column icon in the far right corner of the Recent Patient List. Selecting MRN, Sex or Age from the drop down list removes the corresponding column from the list display. Name and EMPI columns cannot be removed from the Recent Patient List columns.
Worklists Worklists allow users to quickly access and manage patient records that may be of special interest. Six worklists are available to each user. Worklists are personal to the user who created them and cannot be seen or accessed by any other user. Up to 50 patient names can be added to a worklist. If a user adds more than 50 patients, the ones that have been on the list the longest are dropped. See Worklist section of the document for additional information.

Orion Health | Primary Provider User Manual V0.1 | 17 October 2013
Orion Health | Copyright © 2013 Orion Health Inc. 20
Patient Record
The patient’s longitudinal record is comprised of several sections:
• Patient Context Menu • Patient Summary • Clinical Document Tree • Timeline
Patient Context Menu The Patient Context Menu is visible once the patient’s record is open. The Context Menu displays a focused, detailed view of the patient’s record. When the patient record is open, the Portal Menu will be automatically hidden and only the patient’s details will display. Categories that relate to the patient in context will display in ‘tab;’ form across the top of the display. The patient context menu for the Primary Provider user displays the worklist flag, patient identification details, context close icon, context list icon, and next and previous item icons. Additionally, the Patient Summary tab, Timeline tab and Laboratory Results tab will also display. To exit the Context Menu and return to the Portal Menu, click the Close icon ‘X’.
Figure 16: Patient Context Menu
Navigation Icons (following table) display when the user is viewing details for the patient in context. These icons will allow a user to move between patients as well as closing the patient details completely and returning to the Portal Menu item. The following table lists the navigation icons and descriptions:
Icon/Link Function Description
Worklists If a patient is in context, allows the current patient to be added to or removed from one or more of the user's worklists.
Identification Details
Displays information about the patient record currently displayed; for example, if a patient record is open, it displays the patient's identifier, name, date of birth and gender.
Context Close Allows user close the patient details and return to
the Portal Menu item that displayed before opening the patient record

Orion Health | Primary Provider User Manual V0.1 | 17 October 2013
Orion Health | Copyright © 2013 Orion Health Inc. 21
Context List Lists all items in the originating list from which the current item was selected. Also includes the user's most recently visited patient record(s)
Tip: If a user has selected a patient from a list with multiple pages, the Context list icon will allow the user to view the patients from the same page as the patient record currently displayed.
Previous Item Displays the previous item in the originating list
Tip: If the list contains multiple pages and the current patient is at the start of a page, click the Previous icon and a message displays to indicate there are more patients in the list. Click the Please return to the original list to view more link to return to the first page of the full list of patients.
Next Item Displays the next item in the originating list
Tip: If the list contains multiple pages and the current patient is at the end of a page, click the Next icon and a message displays to indicate there are more patients in the list. Click the Please return to the original list to view more link to return to the first page of the full list of patients.
Patient Summary Displays a read-only snapshot of the patient’s electronic medical record
Timeline Displays overall perspective of a patient’s medical history using a visual representation of encounters and documents available

Orion Health | Primary Provider User Manual V0.1 | 17 October 2013
Orion Health | Copyright © 2013 Orion Health Inc. 22
Patient Summary
The Patient Summary provides an overview of key information. The following windowlets are typically included in the Patient Summary. Note that the exact content and order of the windowlets will vary depending on the information received from participant organizations.
• EMPI Demographics • Allergies & Alerts • Medication History • Problem List • Encounter History • Procedures
If the patient summary is not currently displayed on screen, it can be displayed by clicking the Patient Summary link at the top of the Document Tree or by clicking the Patient Summary tab. All of the information in the windowlets can be sorted in ascending or descending order (alphabetic or numeric) by clicking on the column label. Each windowlet has unique default sorting rules and is identified by the label highlighted in Blue font and a descending (or ascending) arrow.
Figure 17: Column Sort
Patient Summary Panels The following sub-sections describe the Patient Summary panels and the information contained within each.
EMPI Demographics The demographics panel displays the patient's contact information. If the patient is deceased, this is indicated by the presence of the Deceased icon alongside the patient name.
Figure 18: EMPI Demographics Panel

Orion Health | Primary Provider User Manual V0.1 | 17 October 2013
Orion Health | Copyright © 2013 Orion Health Inc. 23
Allergies & Alerts The Allergies & Alerts panel lists the patient’s recorded allergies, sensitivities and medical alerts. The columns displayed are:
• Details • Reaction • Severity • Date Entered • Source
Figure 19: Allergies & Alerts Panel
Problems The Problems panel displays a list of current and historic problems for the patient. The Problems panel data includes:
• Problem Description • Problem Type • Treating Provider • Status • Onset Time • Severity • Source
Figure 20: Problem List Panel
Medication History The Medication History panel displays a list of current and historic medications for the patient. The Medications data includes:
• Medication • Dose • Sig • Route • Start date • Stop date • Prescribed by

Orion Health | Primary Provider User Manual V0.1 | 17 October 2013
Orion Health | Copyright © 2013 Orion Health Inc. 24
• Status
Figure 21: Medication History Panel
Encounter History The Encounter History panel displays the patient’s previous contacts with participant organizations. The Encounter History windowlet data includes:
• Admission • Discharge • Admit reason • Discharge diagnosis • Visit type • Specialty • Facility • Clinician
Figure 22: Encounter History Panel
Procedures The Procedures panel displays a list of procedures performed for the patient. The Procedures data includes:
• Procedure Code • Procedure Description • Date • Procedure Provider • Source

Orion Health | Primary Provider User Manual V0.1 | 17 October 2013
Orion Health | Copyright © 2013 Orion Health Inc. 25
Figure 23: Procedures Panel

Orion Health | Primary Provider User Manual V0.1 | 17 October 2013
Orion Health | Copyright © 2013 Orion Health Inc. 26
Document Tree
The Document Tree is located on the left of the Patient Summary screen and provides links to lab results, diagnostic findings and clinical documents. It has two components:
• An Options panel, in which you can filter the patient's listed results by date, document author, service requested or search for a specific word or important results.
• The Folders list, which contains the results, reports and other documentation making up the patient's electronic medical record.
Figure 24: Document Tree
Document Tree Options Panel All available folders and documents are listed in the document tree by default. Selecting or entering information into the Filter section displayed in the Options Panel can apply filter options.
Figure 25: Options Panel
A user has several filter options that are listed when the Configure the Document Tree icon is selected. The options are as follows:
• Show: Options are All, Last 72 Hours, Last 14 Days, Last 3 Months, Last…, Specific Range. ‘Last….’ Allows the user to specify a specific quantity and time unit (days, weeks, months). ‘Specific Range’ allows the user to enter a specific date range.
• Group By: Options are Category, Date (date document received from external system), Service, Author (provider responsible for creating the document)
• Sort By: Options are Date, Title, Author
Users may also perform a search on reports in the Document Tree by selecting the Look For icon which allows a search for any text contained in the Title (document name), Author, Category, Date and Service. The
search can be further refined by selecting the Important icon or the Read or Unread buttons. Note: The
Sign Off icon is not active.

Orion Health | Primary Provider User Manual V0.1 | 17 October 2013
Orion Health | Copyright © 2013 Orion Health Inc. 27
Filter Results Group By Category By default, Clinical Portal sorts the folders in the Document Tree by category. If the category filter is selected, the following category and subcategory folders may be visible in the Document Tree:
• Laboratory • Pathology • Microbiology • Radiology Reports • Transcribed Documents
An abnormal report in the Document Tree will have the date and title displayed in red with one asterisk (*). A critical report in the Document Tree will have the date and title displayed in red with two asterisks (**). A normal report in the Document Tree will have the date and title displayed in black, normal font. Unread reports in the Document Tree will be displayed in bold font. Reports in the Document Tree that have been viewed by the current user will be displayed in normal font (not in bold). Group By Date
Figure 26: Date Filter
Group By Service If the service filter is selected, the folders and documents will be displayed based on the type of associated service.

Orion Health | Primary Provider User Manual V0.1 | 17 October 2013
Orion Health | Copyright © 2013 Orion Health Inc. 28
Figure 27: Service Filter
Group By Author If the author filter is selected, the folders will be displayed by the provider authoring the document.
Figure 28: Author Filter

Orion Health | Primary Provider User Manual V0.1 | 17 October 2013
Orion Health | Copyright © 2013 Orion Health Inc. 29
Tooltip Based on the data available for specific results, each document listed in the document tree will have an associated tooltip, which can be viewed by hovering the mouse pointer over the document's title.
Figure 29: Tooltip Example
Timeline Timeline gives the user an overall perspective of a patient's medical history using a visual representation of encounters and clinical information available in the patient’s longitudinal record. To access the Timeline view, click the Timeline tab on the Patient Context Menu.
Figure 30: Timeline View
To zoom in on a selected time frame, select a time frame in any panel of the timeline to zoom in on a specified time frame. Click the Reset Zoom link to redisplay the full timeline. To see the details of an item in the Timeline, hover your mouse over the relevant node. The details for the item are displayed, as shown in the following screenshot.

Orion Health | Primary Provider User Manual V0.1 | 17 October 2013
Orion Health | Copyright © 2013 Orion Health Inc. 30
Figure 31: Tooltip Display example
Click the Show Key link above each section of the timeline to display the key for that section. A key guide is displayed, advising that the different markers in that section identify. For example, the following screenshot shows an example of the Encounters key:
Figure 32: Show Key - Encounters Example
Click the Collapse icon to the left of a timeline section name to hide sections of the timeline. This enables the user to hide sections of the timeline that are not immediately relevant. Click the Expand icon to the left of the timeline section to display the section again.
Tip: Clinical Portal will remember the sections the user has displayed and hidden. The next time Timeline is accessed, previously hidden sections will remain hidden.

Orion Health | Primary Provider User Manual V0.1 | 17 October 2013
Orion Health | Copyright © 2013 Orion Health Inc. 31
Worklists
Worklists allow users to quickly access and manage patient records that may be of special interest. Six worklists are available to each user within the NMHIC HIE Portal. Users cannot see the names of patients on another user’s worklist, nor can they see the name that the user has given a worklist. Up to 50 patient names can be added to a worklist. If a user adds more than 50 patients, the ones that have been on the list the longest are dropped. By default, the following worklists and their display names are available:
• Red • Blue • Yellow • Green • Orange • Purple
A patient's record is added to the worklist either one at a time or in a group selected from the results of a search. Once on a worklist, a patient's record can be selected and viewed by clicking on the patient's name. A user may also change the display name by selecting the Rename link to the right of the worklist name.
Adding Patients to a Worklist
Adding to Worklist from Patient Search Users can add patient names to a worklist from the results of a patient search. Select the checkbox next to the patient’s identifier. To add the patient, the user then selects the worklist option from either of the drop-down lists at the bottom of the screen. Add checked results to worklist: Add the selected patient names to the top of the worklist without affecting the names, which are already on the list. If the results of this action increase the list past the maximum number of 50, the names, which have been on the list the longest, will be dropped off the list
Figure 33: Add to Worklist from Patient Search

Orion Health | Primary Provider User Manual V0.1 | 17 October 2013
Orion Health | Copyright © 2013 Orion Health Inc. 32
Replace worklist with checked results: Replaces all patient names in the worklist with the names selected from the patient search.
Figure 34: Replace Worklist Names
Adding to Worklist From Context Bar The Context Bar displayed for a selected patient includes a Worklist icon , which can be used to manage the user’s worklist memberships. If the patient is currently on a worklist, the flag's background color will match the color of the flag associated with that worklist. If the patient is on two or more worklists, the background color will match the first worklist the patient has been added to, based on the order displayed in the drop down list (red, blue, yellow, green, orange and purple).
Figure 35: Worklist Selection from Context Bar Figure 29: Red Worklist Selected

Orion Health | Primary Provider User Manual V0.1 | 17 October 2013
Orion Health | Copyright © 2013 Orion Health Inc. 33
Customizing Worklists
Renaming a Worklist A user can rename a worklist to make it more specific to his/her needs. To rename a worklist, select one of the worklist entry points (e.g. Green) from the Worklists menu. Alternatively, select the Worklists option on the Patients menu and select the desired worklist. Select the Rename option as shown in the diagram below.
Figure 36: Rename Worklist
After selecting the Rename link, the following highlighted field will appear:
Figure 37: Rename Worklist
Type in the new name of the worklist and click the Save button. This will change the name of the worklist in all locations for the individual user.
Edit the Columns that Appear on a Worklist
Click on the Column Selector icon in the far right corner of the worklist. Selecting MRN, Gender or Age from the drop down list removes the corresponding column from the worklist display. The Name field cannot be removed from the displayed columns.
Remove a Person from a Worklist A user may remove one or more patients from a Worklist by clicking the check box next to the patient record and click Remove.
Figure 38: Remove From Worklist

Orion Health | Primary Provider User Manual V0.1 | 17 October 2013
Orion Health | Copyright © 2013 Orion Health Inc. 34
Patient Results
The Clinical Portal uses folders to displays reports. Some folder examples include: • Laboratory • Radiology • Microbiology • Transcribed Documents
Users may also view cumulative numeric laboratory reports and graph numeric laboratory results.
View a Single Result When a user selects a laboratory report, the results are displayed based on data that has been transmitted from the source. Laboratory reports are read only. The Header and Results section contents will vary based on information received from the source and type of report or test. The following sample information may be found on the Header section of an individual laboratory report:
• Title: The title of the laboratory report • Collected: The date and time the test was collected • Order Number: The order number for the test • Ordering Provider: The name of the ordering provider • Status: The status of the results (updated, final or interim)
Figure 39: Results Header
The Results column may display the following information:
• Test: The name of the test • Result: The numeric laboratory result • Ref. Range (Units): The reference or normal range and unit of measurement • Abnormality: Red displays if it is an abnormal test result along with an (*); red displays if it is a
critically abnormal test result along with an (**) • Status: The status of the result (updated, final or interim)
Figure 40: Laboratory Result Details

Orion Health | Primary Provider User Manual V0.1 | 17 October 2013
Orion Health | Copyright © 2013 Orion Health Inc. 35
Expand a relevant heading by clicking on the heading label and selecting an individual result. Results can be displayed in the following formats: Numeric A numeric report contains numeric results in a table format and can also include textual observations, as shown in the following screenshot:
Figure 41: Numeric Report
Individual results, which have associated comments, are identified by a letter superscript and the associated comment will display underneath the table. When a numeric result has a textual observation, the full text will display across the Result and Ref. Range (Units) columns. Note: If a reference range is provided, the textual observation will only display in the Result column. Textural
Figure 42: Textural Report

Orion Health | Primary Provider User Manual V0.1 | 17 October 2013
Orion Health | Copyright © 2013 Orion Health Inc. 36
Microbiology
Figure 43: Microbiology Report
Radiology
Figure 44: Radiology Report

Orion Health | Primary Provider User Manual V0.1 | 17 October 2013
Orion Health | Copyright © 2013 Orion Health Inc. 37
Viewing Historical Results When viewing a result, the latest version of the result will always display. If there is more than one version of the result, a user can access earlier versions as well as any comments on those versions by clicking the Show Version or Show Version History links in the Report History section. This is applicable for all types of results. Upon selecting Show Version, the user can select Viewing options for version history of the selected result and you can use the Older Version, Newer Version and Latest Version links to further select which version you want to view.
Figure 45: Report and Access History
Cumulative View of Numeric Laboratory Results The cumulative report allows users to track trends over time by displaying a series of historical results for the same tests. Each is displayed as a separate column. Cumulative reports are only available for numeric laboratory results. The cumulative report will display the units of measure and the reference range for the specific result. To display the report in the Cumulative view, click the Cumulative link from the Single Result view. The screen contains a table of test results over time, allowing easy comparison between the currently selected set of results (with a blue background) and any earlier or later results of the same test, as shown in the following screenshot:
Figure 46: Cumulative Report

Orion Health | Primary Provider User Manual V0.1 | 17 October 2013
Orion Health | Copyright © 2013 Orion Health Inc. 38
Results Table The Cumulative report contains a table with the following header rows and body rows:
Header Description
Number The number assigned to the test in chronological order based on collection date. This row contains a checkbox for selecting all the tests to show on the Graph panel.
Collected The collection date for the sample. This header allows the user to show more collections details, as well as display the individual report in the single-result view. To view collection details, hover over the collection date link on the Collected head row.
Source The source of the result
Graph Results Once the user has selected the test results (up to 10) to graph, click the Graph button to graph the results. The following screenshot is an example of graph results. Hover over any point on the graph for more information about that data point. Information presented in the tooltip is the result value, abnormality (if any), the date/time collected, the reference range, and the source. To view multiple numeric results in a graph:
• In the Document Tree, select one of the results to include in the graph (i.e. Electrolytes) • The Cumulative Results view displays. • Select the result(s) you want included in the graph (up to a maximum of 10). • Click the Graph button. • The graphed view is displayed.
Figure 47: Graphed Results

Orion Health | Primary Provider User Manual V0.1 | 17 October 2013
Orion Health | Copyright © 2013 Orion Health Inc. 39
The first graph is an Overview with all the test results. Beneath that are individual graphs for the selected tests. By default, the Overview graph displays the periods covered by the columns in the Cumulative or Flow Sheet view. All graphs are scaled to show the highest value of all the test values.
Overview Graph The Overview graph shows the different test results over time on a single graph, where each line represents a particular test. The legends for the line colors are displayed below the graph. The Source panel displays a separate button for each information source with an indication of how many data points on the graph came from that source. In the sample screenshot above, the Overview graph includes 21 data points sourced from City Hospital. By default, the graph displays the results from all sources. To exclude the results provided by one or more sources, click the corresponding button on the Sources panel. Click the button again to show the data points from that source. The Overview graph allows a user to zoom into a specific period to be displayed on the individual graphs. Move the mouse (left click, hold and drag) to highlight a specific area or period on the Overview graph. This action automatically changes the zoom level for the individual graphs below. The individual graphs are automatically refreshed to reflect the period specified on the Overview graph. Zoom quick links are links to pre-configured zoom levels. To use the zoom quick links, click the All or Default link below the Overview graph.
• All - Zooms all individual graphs to show all test results. There is no selection indicator (pale blue overlay) in the Overview graph.
• Default - Zooms all individual graphs to show the test results selected on the Flow Sheet. The Overview graph shows the selection indicator (pale blue overlay) over the area of these results.
Individual Graph Each Individual graph represents a test involved in the result. The graph title displays the name of the test and its corresponding reference unit. The graph shows a data point for each result value. The pink shaded areas (see Figure 47) in Individual graphs represent areas outside the corresponding reference range. If any point in the graph has a differing reference range or unit, the § symbol is displayed next to the title of the graph. To display more information for a specific data point, hover the mouse pointer over the data point on an Individual graph. Details of the data point are displayed, as shown in the following screenshot:
Figure 48: Data Point Tooltip
To return to the previous screen, click the <test name> Cumulative link (if Graph was accessed from the Cumulative view) or Flowsheet link (if Graph was accessed from the Flow Sheet) from the breadcrumb trail at the upper-left corner of the panel.
Orion Health | Primary Provider User Manual V0.1 | 17 October 2013
Orion Health | Copyright © 2013 Orion Health Inc. 40
Print a Result Results can be printed using the Print functionality in the Results display. Individual Results, Cumulative Results, Graphed Results as well as Laboratory Results Flow Sheet may be printed. To print a result, open the result and click the Print link in the upper right hand corner of the display (see Figure 50 below). NOTE: It is strongly recommended that you do not use the browser printing functionality (for example, right-click and select the Print option) as this could lead to incomplete information being printed in some cases.
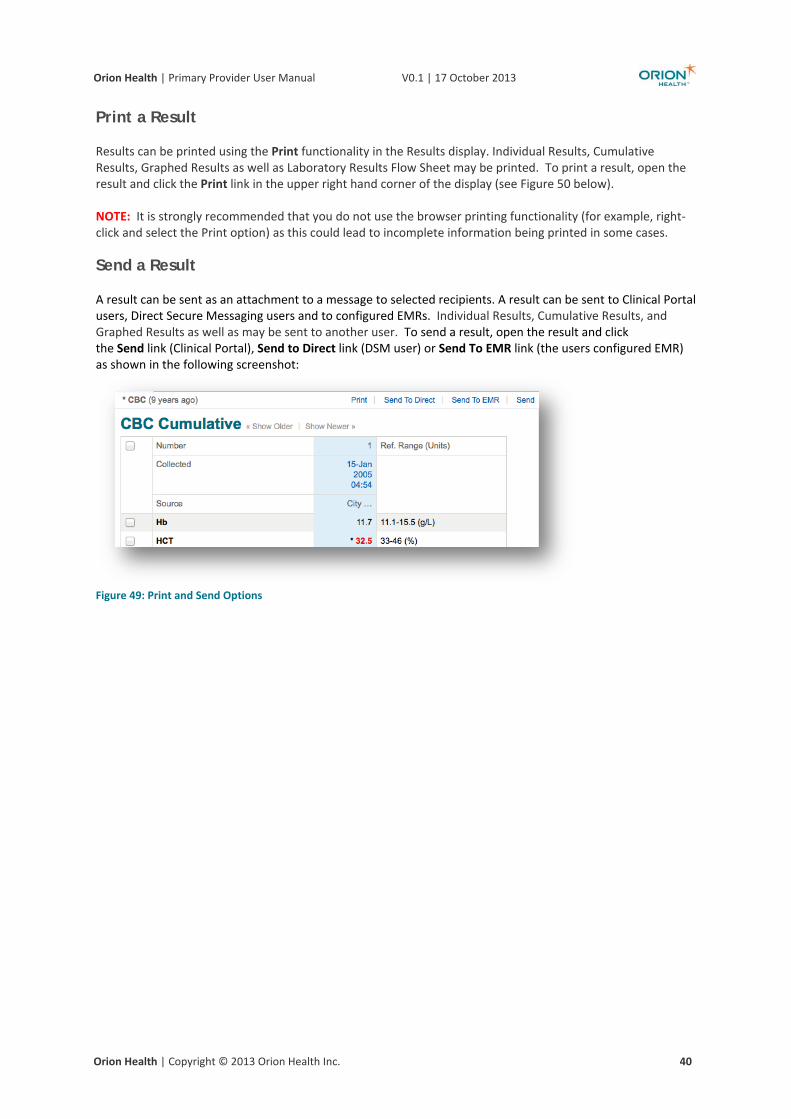
Send a Result A result can be sent as an attachment to a message to selected recipients. A result can be sent to Clinical Portal users, Direct Secure Messaging users and to configured EMRs. Individual Results, Cumulative Results, and Graphed Results as well as may be sent to another user. To send a result, open the result and click the Send link (Clinical Portal), Send to Direct link (DSM user) or Send To EMR link (the users configured EMR) as shown in the following screenshot:
Figure 49: Print and Send Options

Orion Health | Primary Provider User Manual V0.1 | 17 October 2013
Orion Health | Copyright © 2013 Orion Health Inc. 41
Continuity of Care Document (CCD)
Patient Snapshot A generated CCD (or Patient Snapshot) gathers key patient information (including Results, Details, Allergies/Reactions, Problems, Encounters, Procedures, Medications and Past Medical History) into a CCD-compliant format that a user can view, save (in XML format), print or send. To populate a CCD, search and select a patient. The Patient Summary is displayed. In the left pane, select Clinical Content>Patient Snapshot.
Figure 50: Patient Snapshot – CCD
Information displayed in the CCD is limited to the most recent data available for the patient. The following settings are applied to the summary data:
• Alert, Allergies and Adverse Reactions: All • Problems: Active and Resolved within the last 182 days • Medications: Active and with Stop Date within the last 182 days • Procedures: With Onset Date within the last 182 days • Results: Within the last 182 days • Encounters: With Admission Date within the last 182 days
The patient snapshot is generated and displayed, as shown below:
Figure 51: CCD

Orion Health | Primary Provider User Manual V0.1 | 17 October 2013
Orion Health | Copyright © 2013 Orion Health Inc. 42
From this CCD display screen, a user can:
• Download and/or Save a copy of the CCD in XML format by clicking the Download button. • View, save or print the CCD in PDF format by clicking the Print button.
A dialog is displayed, asking whether you want to open or save the PDF file. • Send a copy of this generated CCD (or 'Patient Snapshot') via Direct Secure Messaging by clicking the
Send to Direct link. • View CCD (text/HTML format) in a Clinical Document Architecture (CDA) format by clicking View CDA
button. • Customize the CCD by clicking the Customize link.
Customize CCD To customize a patient’s CCD, click the Customize link. The following window will display:
Figure 52: Customize CCD
The default order of the sections within a CCD is the same as displays on the Customize screen:
• Allergies • Problems • Medications • Procedures • Results • Encounters
Click the Customize button to regenerate the CCE with the changes selected. The CCD customizations will only affect the selected patient in context. If the user navigates away from the CCD, or the Patient Snapshot (CCD) is reloaded, the changes will be erased.

Orion Health | Primary Provider User Manual V0.1 | 17 October 2013
Orion Health | Copyright © 2013 Orion Health Inc. 43
Notifications
My Subscriptions The My Subscriptions entry point in the Notifications menu allows a user to subscribe to notifications in order to receive notifications when a specific event occurs for a patient or group of patients with which the user has a relationship. The user is able to subscribe to various notifications based on the relationship he/she has with the patient or patients and the access privileges of the user. If the checkbox alongside a notification event is checked, the user will receive notifications of that event. The My Subscriptions screen, as shown below, displays when selected.
Figure 53: My Subscriptions
Select one or more the delivery options available and Save changes. My Subscriptions fields are detailed as follows:
Label Description
Direct Direct Secure Messaging email address that has been assigned to the user. Messages can only be sent to, and received by users who have access to the Direct Messaging application. Notifications sent to Direct will be detailed in nature.
My Email Address External email address to receive notifications. If a user modifies the field from this screen, the ‘My Details’ screen will be updated to ensure both fields are in sync. Notifications sent to this address will be summary in nature and will not include detailed information.

Orion Health | Primary Provider User Manual V0.1 | 17 October 2013
Orion Health | Copyright © 2013 Orion Health Inc. 44
Label Description
By Default descriptions:
Notify By Direct (default) Sends the detailed email to the secure Direct Secure Message Portal
Notify By Email Sends the summary notification (without patient information) to the email address identified
Notify in Daily Summary Email (default) Sends a daily summary email (without patient information) of the notifications as opposed to individual notifications
An example of a summary email that does not contain patient information is displayed below:
Figure 54: Summary Email - No Patient Information

Orion Health | Primary Provider User Manual V0.1 | 17 October 2013
Orion Health | Copyright © 2013 Orion Health Inc. 45
An example of a message that DOES contain patient information is displayed below:
Figure 55: Secure Detailed Notification
Each individual subscription may be manually changed if required. To change the Delivery Option of a specific notification check the box next to the Notification to be modified. To select an additional Delivery Option, check the box next to the option and click OK. To revert to NDHIN Clinical Portal defaults, click Use Defaults. Finally, click Save to save the modifications to the notification delivery.
Figure 56: Subscription Delivery Options
Tip: If the detailed notification message contains an attachment, select View the Attached Document link to place the patient in context and view the attached report. This feature is only available when viewing a Clinical Portal Received Message.

Orion Health | Primary Provider User Manual V0.1 | 17 October 2013
Orion Health | Copyright © 2013 Orion Health Inc. 46
Additionally, a user may change notifications based on the type of relationship the user has to the patient or group of patients. To change the notifications by type, click the Change to subscribe by Relationship Type link.
Figure 57: Change by Relationship type
This action allows a user to subscribe to notifications for Admitting MD, Attending MD, Ordering Provider, PCP, and/or Referring MD roles. Once displayed, the user may change the delivery options for each notification subscription based on the relationship type. Relationship types available are:
• Subscriptions for patients where I am the Attending MD • Subscriptions for patients where I am the Ordering Provider • Subscriptions for patients where I am the PCP • Subscriptions for patients where I am the REF MD
Figure 58: Example of Referring MD Notification Options

Orion Health | Primary Provider User Manual V0.1 | 17 October 2013
Orion Health | Copyright © 2013 Orion Health Inc. 47
Messaging
Secure Messaging Once a Direct mailbox has been established by the HIE Administrator, the user may access the Secure Mail feature within Clinical Portal. Secure Mail is used to send CCDs (or 'Patient Snapshots'), results and documents using Direct (an encrypted email delivery channel) manually to a trusted provider. The Send to Direct functionality is not automatically enabled and must be enabled and configured by the HIE Administrator. This must be an e-mail address that has been registered and granted permission to send secure messages via the Direct Secure Email system. This address will be used in the From and To fields of the outgoing e-mail message, but the user may elect to change the To field when sending the secure email. To access the Direct Mailbox click Secure Mail.
Secure Mailbox Icons
Figure 59: Secure Mailbox Navigation Links
Icon Description
Email Email section of the mailbox
Contacts Saved Email contacts
Settings Webmail, Anti-Spam, Email Filters and Mail Options settings
New Select Email or Contact from the dropdown
Get Mail Refreshes Inbox
Reply Reply to sender of active email
Reply All Reply to all email addresses on the email distribution (cc’s and bcc’s included)
Forward Forward active email to another recipient
Spam Move active (checked) email(s) to the Spam folder. Note: A user should never receive Spam emails, as DSM is a secure network. However, should something appear in this folder, please contact the network administrator.
Delete Delete active (checked) email(s) and move into Trash folder
More Select from dropdowns including • Select All: Allows user to Select All emails that have been received or sent. • Deselect: Allows user to Deselect items selected • Flag: Allows user to Flag emails to stand out • Remove Flag: Allows user to Remove Flags previously selected

Orion Health | Primary Provider User Manual V0.1 | 17 October 2013
Orion Health | Copyright © 2013 Orion Health Inc. 48
Icon Description
• Mark as Read: Allows user to mark emails received as Read • Mark as Unread: Allows user to mark emails as Unread
Compose Tab signifies a new message in the draft stage (without subject) and can be deleted by clicking the ‘X’ to the right of Compose
Working With Messages This section describes working with messages. Sending, receiving and forwarding messages and attachments will make up the bulk of user work with Secure Messaging.
Inbox
The Direct Secure Message Inbox houses user email messages that display when first received. Direct Secure Messaging is set up just like most email systems.
Figure 60: DSM Inbox
To access the Message Inbox, navigate to Inbox (default display). Messages in the Message Inbox are displayed as Unread messages in bold text and all messages are sorted in descending date order.
Click the Get Mail icon to refresh the mailbox.

Orion Health | Primary Provider User Manual V0.1 | 17 October 2013
Orion Health | Copyright © 2013 Orion Health Inc. 49
Read and reply to a message
• Navigate to the Message Inbox. • Select a message to open. The message displays in the right pane. • A message will be marked as read 3 seconds after selection. A User may mark the message as Unread
again by selecting the Mark as Unread dropdown of the More tab • To display message details such as who the message is from, the subject of the message and the date
the message was sent, select the Display Message Information icon. . Click again to collapse the message details
• Select the Reply button (in the top navigation bar or the icon above the message) to reply to the
sender of the message, or the Reply All button (or open the Reply dropdown) to reply to all recipients included in the original email.
• Enter the message. • Click the Send My Reply, Save As Draft, or Add Attachment button. The replied to message will
remain in the inbox and it will display a Replied icon next to the email. • Select Toggle Threads to reveal all emails in the thread, or Collapse Threads to stack messages in the
thread. To view an individual message within the thread, click on the bolded sender name to reveal the message. Select Quoted Text if available to reveal original email.
• Standard editing options are available in the message body such as, font changes, insert hyperlink, add image, bullet and numbering.
Figure 61: Compose New Email

Orion Health | Primary Provider User Manual V0.1 | 17 October 2013
Orion Health | Copyright © 2013 Orion Health Inc. 50
Send a new message
To compose a new message:
• Select the New>New Email button. The New Message screen displays in a new tab:
• Complete the required fields in the message such as To, Subject and the Message body. By clicking More Options, additional fields are revealed for entry such as CC and BCC.
• CC: Carbon Copy; to send an email to another per on besides the recipient • BCC: Blind Carbon Copy; to send an email to another person without any of the other recipients
being notified • Files: A list of the files attached to the message. The Files field will contain any attachments to the
Message with the ability to delete the file prior to sending if necessary. • Selecting the Read Receipt option notifies the sender when the recipient has opened the message. If
the sender asks to be notified, the subject line of the message will be preceded with the word Read: for example, Read: John Cardinal
• Add an attachment, if desired. To do so, select the Add Attachment button, and select the desired file from the library.
• Select the Send Email button to send the message, or the Save as Draft button.
At any point, a message can be saved as a draft by clicking Save As Draft button. The message will be stored in the Draft Messages folder. By default, a message is automatically saved as a draft every two minutes.
Once a message has been sent it cannot be recalled. A copy of the message will be stored in the Sent folder.
Send a Group Message
Rather than add email addresses to a message one by one, you may send a message to an entire group at once. To send a message to a contact group:
• Navigate to Contacts>[Contact List group] and click on the contact group to add to the email • Click the More button and Select All (all email addresses in the group are selected) • Click the Mail button and a new message screen displays with all selected contacts in the To field • Complete the email as usual, as described previously • Click the Send Email button
Forward A Message To forward a message:
• Navigate to the Message Inbox by selecting Direct Secure Messaging>Inbox. • Select a message to open it. The message displays in the right pane.

Orion Health | Primary Provider User Manual V0.1 | 17 October 2013
Orion Health | Copyright © 2013 Orion Health Inc. 51
• Select the Forward button. The Forward Message screen opens, containing all the information included in the original email.
• Enter a new recipient, or recipients, in the To field. • Write the email as described in Sending New Messages. All attachments in the original message will
be included in the forwarded message by default. The attachments may be removed or new ones added.
• Select the Send Email button to send the message, or the Save as Draft button • The forwarded message will remain in the inbox and will display a Forwarded icon
Downloading or Printing a Message To print or download a message:
• Navigate to Inbox and select the message to print or download • Open the Reply dropdown list by clicking on the Expand icon and select either Download or Print • A dialog box will display, prompting the user download or print the message.
Opening and Downloading an Attachment When a message is received with an attachment, the Attachment icon is displayed next to the message. To open the attachment:
• Navigate to Inbox and select the message containing the attachment. • Open the Reply dropdown list by clicking on the Expand icon and select Download • User will be prompted to open or save the attachment.
Draft Messages
Draft Messages are messages that have been composed, but not sent. To save a message as a draft, click the Save as Draft button. The message is then sent to your drafts folder. By default, a message is automatically saved as a draft every two minutes. To view a draft message:
• Navigate to Drafts folder, a list of messages will display • Select a message to read • A user may work with the message as described in Sending a New Message section or delete the
Draft. The user may also print of download the email by clicking the Reply icon.
Sent Messages Sent Messages are messages which have been composed, and sent by the user. To view a Sent message:
• Navigate to Sent folder, a list of messages will display • Select a message to read • A user may work with the message as described in Sending a New Message section or delete the
Draft. The user may also print of download the email by clicking the Reply icon.
Spam Messages
Spam Messages are messages the user does not wish to receive. Because DSM is a secure system, users should never receive an unwanted message. In the event a user does receive a ‘spam’ message, the user should contact the DSM Administrator. To mark a message as spam:
• Navigate to Inbox folder, a list of messages will display • Select a message mark as spam • Click on the Spam button on the top navigation bar • The message will be moved into the Spam folder.

Orion Health | Primary Provider User Manual V0.1 | 17 October 2013
Orion Health | Copyright © 2013 Orion Health Inc. 52
A user may work with the spam message as described in Sending a New Message section, delete the message or restore the message. To restore the spam message:
• Navigate to the Spam folder, a list of messages will display • Click on the message to restore • Drag the message into the Inbox
Emptying the Spam Folder
Messages will remain in the Spam folder until the user erases the messages or empties the Spam Folder. To empty the Spam folder:
• Navigate to the Spam folder • Select message(s) to delete and click the Erase button, OR • Click the Empty button to delete all messages in the Spam folder
Deleting a Message
Users may delete a message at any point by selecting the message, then the Delete button. The message is then moved into the Trash folder. Deleted messages are stored in the Trash folder and may be viewed or moved back to the Sent or Inbox folders. Individual messages can be Erased from the Trash folder or the entire Trash folder can be deleted permanently using the Empty link.
As Secure Mail messages may represent Personal Health Information or medical documents, all messages are archived. If a deleted message must be retrieved, contact the DSM Administrator.
Search Email Within the Direct mailbox, a user may search for mail by typing text in the search box, or selecting the Advanced Search dropdown. The Advanced Search options are Date, To, From, Subject, Body, Unread and Flagged. Select one or more of the search criteria and click Search to return results that meet the Advanced Search criteria.
Figure 62: Search DSM Email

Orion Health | Primary Provider User Manual V0.1 | 17 October 2013
Orion Health | Copyright © 2013 Orion Health Inc. 53
Adding and Deleting Folders
Folders allow a user to sort and manage email. Default folders display to the left of the Message Inbox. Default folders are:
• Inbox • Drafts • Sent • Spam • Trash
Using the mouse, users may drag and drop messages from one folder to another. Email filters may also be used to sort messages into folders automatically. To add or delete folders:
• Click the Add (or Delete) Folder button (+ or -) at the bottom of the folders pane. • Name the folder (required to Add folder) • If a sub-folder is required, select the Folder and click the (+) Add Subfolder button. • Name the sub-folder • To delete folder or subfolder, click the Delete (-) Folder button. Deleting a folder will also move all
messages within the folder to the Trash folder.
Contacts The Contacts tab houses and manages email addresses and contact information to be used within Direct Secure Messaging. Users may store individual contacts, create distribution lists and import or export existing contacts. Clicking the Sync button in the top navigation bar when the Contacts tab is active may access additional information regarding the use of the Contacts functions. Contacts allow the user to view Contacts (Email Addresses) that are in the system (local domain users). The DSM Contacts function has a number of pre-configured groups that the user can use, but cannot delete. At the same time, a user may create groups for individual use. In DSM, the user can access the Contact Lists by clicking in Secure Mail>Contacts. Contact lists are a means by which the user can group Email Addresses and find them easily. The list is not a distribution list or a group email list, but a user identified list that the user can categorize Email Addresses. By using the More button the user can select all Email Addresses in the group, then select the Mail button and the system will create a new Email with all the Email Addresses in the To: field. A Contact list can be used in this manner as a Distribution List if required. Below is a description of the preconfigured Contact Lists that the user will see when first viewing their Contacts page. They do not need to be used, but they cannot be permanently deleted.
• Personal: Preconfigured personal list that a user can add Email Addresses to for personal use. No other user has access to this list.
• Global: Preconfigured list that contains all the local Email Addresses in the system. This list is displayed to all users and cannot be copied from this list into other lists.
• Shared: Preconfigured list that a user can share with other users. To share with another user: • Navigate to Contacts and select the Shared list • Select a contact and click the Edit button. The Edit screen displays • Turn on Shared Contact and add at least on user email address (Permissions field) to share the
contact with. A smart list will display as the username is typed into this field. • Click the Save Contact button to share

Orion Health | Primary Provider User Manual V0.1 | 17 October 2013
Orion Health | Copyright © 2013 Orion Health Inc. 54
• Remembered: Preconfigured list that stores all Email Addresses that have been typed into an Email and subsequently sent the email. This list only remembers Email Addresses that are not already in other folders.
• Favorites: Preconfigured list that can be used by the user for any purpose, and is another example of a list.
• + - : These symbols allow the user to create more folders or delete folders they no longer require. When creating a folder, with the + symbol or the button, the user can give any name to the folder. Some special characters are not allowed in the name.
Figure 63: Contacts Menu
Add, Edit, and Delete contacts
A user may send a message to an email address which is not in the contact list by typing an address in the To, CC or BCC fields. Secure messaging will automatically save these email address as Contacts in the Remembered folder. To add a new contact, click the New Contact button and type the contact's information in the appropriate fields. Additional information may be added using the More Information menu, and choose whether to share the contact with other users with the Shared Permissions menu. Click the Save Contact button to save the contact to the selected address book.
To Edit the Contact, navigate to the Contacts screen and select a contact. Click the Edit button to make required changes to the contact and click Save Contact button.
To Delete the Contact, navigate to the Contacts screen and select a contact. Click the Delete button to remove the contact. No warning will be displayed and the contact is deleted without a prompt.
Adding more fields
A user can create fields for multiple email addresses, phone numbers, and other information using the green plus sign (+) buttons by each input field. Click the green plus sign (+) to create a new field, enter the appropriate information, and select options from the drop-down menus. Fields may be removed from a
TIP: New contacts may not be added directly into Shared Contacts folder. Users must add personal contact, then move to Shared Contact folder.
TIP: If the user deletes the Global, Shared, Remembered or favorites Contact Lists, the system will re-instate these folders the next time the user logs on.

Orion Health | Primary Provider User Manual V0.1 | 17 October 2013
Orion Health | Copyright © 2013 Orion Health Inc. 55
contact by clicking the red minus sign (-) next to the field. Click on Save Contact when finished to save the additional information.
Adding a new group
Click the New Group button to create a new Contact group and name the new Contact group folder. User may add contacts to groups by dragging their names from the contact list in the middle pane to the group's folder in the left pane.
To Delete a Contact List, select the list and click the Delete (-) button.
Deleting Remembered or Sticky Email Addresses As with all email systems, users send messages to many email address that are not in their contacts or address book and the system will ‘remember’ these email addresses. These Remembered email addresses are sometimes referred to as Sticky email addresses or Saved email addresses and are normally automatically displayed when the user starts typing in an email address in the To, CC or BCC lines in the email. Some systems store these addresses in the contacts / address book lists, and others place these addresses in a separate file on the system. Orion Health’s system stores these emails in the Contacts list under the Remembered folder. As a user may type in the wrong email address, or the email address may no longer exist, users may want to delete these Remembered or Sticky addresses at some stage. To delete these old Remembered or old Sticky email addresses in the Orion Health’s system the user must:
• Go into the Contacts list via the menu button on the top of the DIRECT Secure Messaging screen • Select the Remembered folder on the left hand menu • De-select the top Direct Email address that is selected by default • Select the Direct Email address(es) to delete • Select the Delete button from the menu bar (second from the top) • The entry is deleted with no prompt
When a new email is started this deleted Remembered Direct Email address will not be displayed. Be aware that any saved draft emails may still display the deleted address. Only newly started emails (after the delete process) that will not display the deleted email address.
Exporting and Importing Contacts
A user may import or export contacts in vcard.vcf format. A .vcf or vCard is an electronic business card. The standard format allows data to be shared between different mail programs.
DSM supports the vCard format for address book import and export. To save contacts to a vCard file, select the check boxes next to the contacts you'd like to export, then click the "Export" button. Select the name and location to save your .vcf (vCard) file and confirm (e.g. Outlook). To import contacts from a vCard file, click "Import" and choose the .vcf file from the file selection dialog. Click the More button and select Export All to export all users in a contact list.
Sync
The Sync link provides Email, Address Book and Settings help. Some features and options accessed from the Sync link may not be available to all users.

Orion Health | Primary Provider User Manual V0.1 | 17 October 2013
Orion Health | Copyright © 2013 Orion Health Inc. 56
Settings DSM allows the user to customize the look, feel and performance of DSM using the Settings screens. The following settings folders are available:
Webmail Settings Anti-Spam Settings Email Filters Mail Options
Webmail Settings To access Webmail Settings navigate to Settings tab>Webmail Settings folder.

Orion Health | Primary Provider User Manual V0.1 | 17 October 2013
Orion Health | Copyright © 2013 Orion Health Inc. 57
The following fields are available to view and/or edit:
Field Label Description
Account Name Displays email account name.
Real Name This will appear in the Sender field of sent emails before the email address.
Reply To Specify an email address for replies to be sent to, instead of the email address used to log in.
Thread Support Check this box to display email conversations as threads.
Thread Limit Select from dropdown age of email to be included or excluded from thread. Available options are 3 months, 6 months, 1 year, 2 years or infinite.
Display Email Images Select to display external images in email messages rather than as an attachment.
Automatic Draft Save Select to automatically save draft emails while composing, default is every 2 minutes.
Automatic Folder Reload Select to enable auto reload and/or sound notifications
Delete Trash on Logout Select to automatically delete all mail from Trash folder upon logout
Default View Select 2 pane or 3 pane view
Interface Language Select preferred language for the Webmail interface.
Date Display Select display format for date received on email headers (MM/DD/YY or DD/MM/YY)
Messages per page Select the number of simultaneous messages to display in the Webmail interface. Reduce the number if the user connection is slow.
Time zone Specify the time zone for user location.
Signature Specify a message that will be added to the end of every email sent from Webmail. Options include plain text or HTML for the signature.
After modification of settings, click the Save Settings button to preserve Webmail Settings.

Orion Health | Primary Provider User Manual V0.1 | 17 October 2013
Orion Health | Copyright © 2013 Orion Health Inc. 58
Anti-Spam Settings As the DIRECT system is a Trusted network of Email providers, a user should never get any spam emails in this folder unless a filter has been set up to move emails in this folder. Changing the standard settings is not recommended.
Figure 64: Anti-Spam Settings
The following options are available if the user opts to change the settings:
Field Label Description
Spam Filter Sensitivity Set the degree (1-20) to which the spam filter looks for spam within emails. A lower score indicates more aggressive spam marking.
Message Classification The default action to take on emails that are classified as spam. (Mark as Spam, Move to Spam Folder, Purge Message)
Spam Tag The wording to be added to the email header if an email is considered to be spam.
Whitelist senders Senders or sender domains that send emails but the spam filter picks up as spam. Placed in this field, all emails from these senders or sender domains are delivered regardless of their content.
Blacklist senders Senders or sender domains that are believed to be sending spam. Senders or sender domains placed in this field will be blocked.
After changing settings, click Save Settings button.

Orion Health | Primary Provider User Manual V0.1 | 17 October 2013
Orion Health | Copyright © 2013 Orion Health Inc. 59
Email Filters Email filters allow users to sort and manage emails into folders automatically.
Figure 65: Email Filters
Optional email filters and settings are: Add New Rule: Use this option to create email filters. Select from the drop down list 'From', 'To' or 'Subject'. Then select from second drop down list 'is', 'is not', 'contains' or 'does not contain'. In the text box enter criteria to be filtered, then specify which folder the rule will deliver to. For example, New Rule: 'From', 'is' and '[email protected]'. Move To: 'Trash'. This will move all emails received from [email protected] to the trash folder. To add a new rule:
• Navigate to Settings>Email Filters • Create a new rule using the dropdown lists • Click Add Filter to add the new rule
A user may also Delete or Modify a filter by selecting the rule and clicking on Delete/Modify button. Select the filter to delete (tick the box) and click Delete Selected.
Mail Options Mail options in DSM include features such as auto-reply and notifications. The auto-reply feature allows the automatic reply to any received email. This feature may be useful if the user is unavailable to answer emails for a period of time. The notifications feature allows a user to be notified of a DSM email to a separate nominated external email account, which will direct the user to the DSM system. The notification messages do not contain message details, only a link to DSM. Sign-on and validation must occur prior to viewing the DSM email.

Orion Health | Primary Provider User Manual V0.1 | 17 October 2013
Orion Health | Copyright © 2013 Orion Health Inc. 60
Field Label Description
Enable Notifications Check this box to enable notification of new email to a non-Direct email address. Only one email account may be designated to forward notifications. DSM Notifications are managed separately from Clinical Portal notifications.
Notifications Address Specify the email address to forward incoming notifications.
Enable Autoreply Check this box to enable automatic reply (Vacation or Out of Office) to incoming messages.
Autoreply message Enter the message to send to the senders of all incoming email.
After making changes to Notifications or Auto-Reply, click Save Settings button.

Orion Health | Primary Provider User Manual V0.1 | 17 October 2013
Orion Health | Copyright © 2013 Orion Health Inc. 61
Common
My Details My Details is located in the Common tab of the menu bar. It allows the user to change passwords, set the inactivity timeout period, and view or enter information in the My Attributes section.
Figure 66: My Details
The following fields are available for user editing on My Details page:
Change My Password Selecting the Change Password button allows a user to change his/her user password. This should be done regularly and in fact there may be an organizational policy requiring this.
Figure 67: Change Password Window
Password Policy The password policy for all users is as follows:
• Passwords must be at least 8 characters long • Password will expire every 90 days for all users • Passwords must be ‘strong’ (upper and lower case, number, special character) • Dictionary words within password are considered ‘weaker’ • Accounts will be locked out after 3 bad login attempts (counter and account reset after 15 minutes) • Username may not be used as a password • Inactive users may be disabled in 90 days

Orion Health | Primary Provider User Manual V0.1 | 17 October 2013
Orion Health | Copyright © 2013 Orion Health Inc. 62
Set Security Question The Forgot Your Password link allows a user who has forgotten their password to gain access to Clinical Portal by (correctly) answering the secret question they have configured on their My Details screen. This means Help Desk or other support staff do not need to be involved when a user requires password assistance by utilizing the Forgot My Password link on the sign-in screen. Select the Set Security question or Change Security question button allows a user to create or change his or her Security Question.
Figure 68: Secret Question
• Select a Secret question from the dropdown • Enter the answer to the secret question • Enter the current log-in password • Click OK
Start Screen (Homepage) The Start Screen is displayed following login to the portal or when the Home button at the top of the menu bar is selected. If this field is blank, the default Clinician Homepage will be displayed. Select one item from Start Screen dropdown the user would like to display following login. Selecting one option from the Start Screen dropdown will override the pre-configured Homepage windowlets.

Orion Health | Primary Provider User Manual V0.1 | 17 October 2013
Orion Health | Copyright © 2013 Orion Health Inc. 63
Figure 69: Start Screen (Homepage) Options
Inactivity Timeout In order to provide a secure environment, a default timeout of 30 minutes has been set by the HIE Administrator. On this screen, a user can set an inactivity timeout period for his/her account that is less than the 30-minute maximum timeout. This setting ensures that the user will be logged out of NDHIN Clinical Portal if the user does not register ‘clicks’ on the account for the number of minutes equal to the inactivity timeout value.
Roles I Perform There are 4 User Levels plus 4 Administrative Levels: Level 1 – 6b (See Functional Roles Matrix for more details). These roles are:
1. Level 1 View 2. Level 2 View 3. Level 3 View 4. Level 4 View 5a. NDHIN Administrator Level 5b. Participant Administrator Level 6a. NDHIN Privacy Officer Level 6b. Participant Privacy Officer Level 7. EMPI Admin/Opt Out Administrator Level
Groups I Belong To This section lists the user’s group membership that determines access to NDHIN Clinical Portal screens and functions.

Orion Health | Primary Provider User Manual V0.1 | 17 October 2013
Orion Health | Copyright © 2013 Orion Health Inc. 64
Additional User Attributes Group attributes may be added to allow an administrator to gather additional information about the user or to provide additional features to the user. The following attributes have been pre-configured for a user:
Figure 70: User Attributes
Users The Users field displays the user’s email address and can be edited by the user.
Clinician Homepage The user may set the content for the worklist windowlet appearing on the clinician homepage:
• Worklist to show on My Homepage: Allows the user to set the worklist (and the patients that will
appear on it) on the homepage. Select the Worklist to show on My Homepage icon to select the worklist. If a worklist is not selected on this screen, all six worklists will appear on the homepage.
HIE Users The HIE Users field displays the user’s primary facility. This field is set by the NDHIN HIE Administrator and is not editable by the user.
Notifications The Notifications field displays the attributes identified for user notifications. Notifications may not be available to all user levels. The following Notification options may be available:
• My EMR – Displays the EMR configured and associated with the user (not active) • DirectEmail - The Direct Secure Message address used to send CCDs, results and clinical documents.
Patient Search The My Preferred Patient ID Type field is used to set the preferred patient identifier to display on Patient Search. The Patient ID Type identifies the facility associated with the patient's medical number that will be used most often in Patient Search.

Orion Health | Primary Provider User Manual V0.1 | 17 October 2013
Orion Health | Copyright © 2013 Orion Health Inc. 65
Patient Privacy Policy
Patient Privacy Policies have been enabled to control access to patients. This access is based on the following:
• The user’s relationship with the patient • The patient’s HIE opt-in/out status
Access Descriptions Locked : The patient's name will be visible in a list of search results, but cannot be selected and unlocked. The patient has not opted out and user does not have ‘Break the Seal’ privileges. Privacy sealed : The patient's name will be visible and can be selected, but a reason for access will be required before the patient can be placed in context and their medical details viewed. Providing an access reason is referred to as 'Opening the privacy seal'. Once this has been done, the user will be able to access that patient's record for a limited period of time without having to re-apply the reason. This time is configurable (as a single global variable for the whole solution) and the default is 1 hour. If the clinical user ends his/her Portal session, all open privacy seal access is ended and he or she will need to re-supply the reason for viewing restricted information. Unlocked Patient Record : The Privacy Seal is opened for a patient and the patient’s medical record is accessible. Full Access (No Icon): Unrestricted access to clinical data/documents in the patient's medical record for users with appropriate privileges and patient relationship. No Access: The patient is visible in search results (demographics only) and cannot be selected.
State Descriptions There are two defined consent states a patient’s record can be in depending on whether the patient has opted-in to the HIE. These two states are: OptedIn (Patient has opted-in)
• Level 6a, 6b and 7 => Limited access to allow ability to opt=in/out • Provider has a valid relationship with patient => Full access • Provider does not have a valid relationship with patient => Privacy sealed access
OptedOut (Patient has opted-out)
• Level 6a, 6b and 7 => Limited access to allow ability to opt-in • Users => Locked

Orion Health | Primary Provider User Manual V0.1 | 17 October 2013
Orion Health | Copyright © 2013 Orion Health Inc. 66
Breaking the Privacy Seal The expiration for providers that break the privacy seal is 1 hour. List of reasons for when the user 'breaks the seal':
Access Request Reason
I Need to View Information About This Patient Because: This is an Emergency situation
Emergency Access
OR
Access Request Relationship
I Need to View Information About This Patient Because: I Have the Following Relationship With This Patient (select one):
Attending Clinician
PCP
Notes: Comments are not required
All instances of privacy override are recorded and documented.

Orion Health | Primary Provider User Manual V0.1 | 17 October 2013
Orion Health | Copyright © 2013 Orion Health Inc. 67
Appendix A
Functional Roles Matrix
Role Description
Clin
icia
n H
omep
age
Fron
t D
esk
Hom
epag
e
Adm
inis
trat
ive
Hom
epag
e
Patie
nt S
earc
h
Rec
ent
Patie
nts
Patie
nt W
orkl
ists
Patie
nt D
emog
raph
ics
Patie
nt E
ncou
nter
His
tory
Patie
nt A
llerg
ies
Patie
nt M
edic
atio
ns
Patie
nt P
robl
ems
Patie
nt L
ab a
nd P
atho
logy
Res
ults
Patie
nt R
adio
logy
Rep
orts
Patie
nt T
rans
crib
ed D
ocum
ents
Bre
ak t
he S
eal (
Patie
nt R
ecor
d)
Not
ifica
tions
Dir
ect
Sec
ure
Mes
sagi
ng
Level 1: Primary Provider x x x x x x x x x x x x x x x Level 2: Secondary Provider x x x x x x x x x x x x x x Level 3: Care Support x x x x x x x x x x x x x Level 4: Front Desk x x x x x x

Orion Health | Primary Provider User Manual V0.1 | 17 October 2013
Orion Health | Copyright © 2013 Orion Health Inc. 68
Appendix B
Browser Support
Full Support Limited Support
Firefox 3.5, 3.6, 4 on Windows Support for Safari is limited to Rhapsody Administrator & Conductor only
Firefox 3.5, 3.6, 4 on Mac OS X Support for Chrome is limited to Rhapsody Administrator & Conductor only
Internet Explorer (IE) 7, 8, 9 on Windows Internet Explorer (IE) 10 on Windows
iPad iOS4, iOS5, iOS6
Connectivity A dedicated Internet Connection (DSL, Cable Modem, etc.) with an Internet Service Provider (ISP) is required to access Clinical Portal.

Orion Health | Primary Provider User Manual V0.1 | 17 October 2013
Orion Health | Copyright © 2013 Orion Health Inc. 69
Any questions regarding this documentation can be directed to: Tami Jones Senior Change Management Specialist | Orion Health d 909.895.3131 m 310.625.4753 f 310.496.2835 e [email protected] s tami.jones0426 www.orionhealth.com